IDRO - ribind.it · idro operatore oleodinamico per cancelli a battente operateur hydraulique pour...
48
IDRO OPERATORE OLEODINAMICO PER CANCELLI A BATTENTE OPERATEUR HYDRAULIQUE POUR PORTAILS À BATTANT HYDRAULIC OPERATOR FOR LEAF GATES HYDRAULISCHER ANTRIEB FÜR FLUGELTORE OPERADOR OLEODINAMICO PARA PUERTAS BATIENTES IDRO 39 (90x90x1040) IDRODUE 27 IDRODUE 27 SUPER (90x90x1060) ITALIANO pag. 05 / FRANÇAIS pag. 12 / ENGLISH page 19 / DEUTSCH pag. 26 / ESPAÑOL pag. 33 Operatore Operateur Operator Torantrieb Operador Alimentazione Alimentation Power Supply Stromspannung Alimentacion Lunghezza max. anta Longueur maxi battant Max. leaf length Max. Torflügelweite Longitud máx. anta Peso max cancello Poids maxi portail Max gate weight Max Torgewicht Peso máx verja Forza max di spinta Force maxi de poussée Thrust force Max. Schubkraft Fuerza max de empuje Codice Code Code Kode Codigo IDRODUE 27/R IDRODUE 27/1B 230V 50/60Hz 3m 400 Kg / 880 lbs 2500 N AA10843 AA10844 IDRODUE 27 SUPER/R IDRODUE 27 SUPER/1B IDRODUE 27 SUPER/2B 6m 700 Kg / 1540 lbs 6400 N AA10809 AA10804 AA10847 IDRO 39/R IDRO 39/1B IDRO 39/2B 7m 1000 Kg / 2200 lbs AA10871 AA10876 AA10859 Il corretto funzionamento dell’operatore è garantito solo se viene gestito da un quadro di comando RIB Le bon fonctionnement de l’opérateur n’est garanti que s’il est géré par un panneau de contrôle RIB The correct operation of the operator is guaranteed only if it is managed by a RIB control panel Die korrekte Bedienung des Bedieners ist nur gewährleistet, wenn er von einem RIB-Bedienpanel verwaltet wird El funcionamiento correcto del operador solo está garantizado si está gestionado por un panel de control RIB
Transcript of IDRO - ribind.it · idro operatore oleodinamico per cancelli a battente operateur hydraulique pour...

IDROOPERATORE OLEODINAMICO PER CANCELLI A BATTENTE
OPERATEUR HYDRAULIQUE POUR PORTAILS À BATTANT
HYDRAULIC OPERATOR FOR LEAF GATES
HYDRAULISCHER ANTRIEB FÜR FLUGELTORE
OPERADOR OLEODINAMICO PARA PUERTAS BATIENTES
IDRO 39 (90x90x1040)
IDRODUE 27IDRODUE 27 SUPER (90x90x1060)
ITALIANO pag. 05 / FRANÇAIS pag. 12 / ENGLISH page 19 / DEUTSCH pag. 26 / ESPAÑOL pag. 33
OperatoreOperateurOperator
TorantriebOperador
AlimentazioneAlimentationPower Supply
StromspannungAlimentacion
Lunghezza max. antaLongueur maxi battant
Max. leaf lengthMax. TorflügelweiteLongitud máx. anta
Peso max cancelloPoids maxi portailMax gate weightMax TorgewichtPeso máx verja
Forza max di spintaForce maxi de poussée
Thrust forceMax. Schubkraft
Fuerza max de empuje
CodiceCodeCodeKode
Codigo
IDRODUE 27/RIDRODUE 27/1B
230V 50/60Hz
3m 400 Kg / 880 lbs 2500 NAA10843AA10844
IDRODUE 27 SUPER/RIDRODUE 27 SUPER/1BIDRODUE 27 SUPER/2B
6m 700 Kg / 1540 lbs
6400 N
AA10809AA10804AA10847
IDRO 39/RIDRO 39/1BIDRO 39/2B
7m 1000 Kg / 2200 lbsAA10871AA10876AA10859
Il corretto funzionamento dell’operatore è garantito solo se viene gestito da un quadro di comando RIBLe bon fonctionnement de l’opérateur n’est garanti que s’il est géré par un panneau de contrôle RIB
The correct operation of the operator is guaranteed only if it is managed by a RIB control panelDie korrekte Bedienung des Bedieners ist nur gewährleistet, wenn er von einem RIB-Bedienpanel verwaltet wird
El funcionamiento correcto del operador solo está garantizado si está gestionado por un panel de control RIB

2
ISTRUZIONI DI SICUREZZA IMPORTANTI PER L’INSTALLAZIONE
INSTRUCTIONS DE SECURITE IMPORTANTES POUR L’INSTALLATIONI F
ATTENZIONE - PER LA SICUREZZA DELLE PERSONE È IMPORTANTE CHE VENGANO SEGUITE TUTTE LE ISTRUZIONI
CONSERVARE CON CURA QUESTE ISTRUZIONI1° - Se non è previsto nel quadro elettronico, installare a monte del medesimo
un’interruttore di tipo magnetotermico (onnipolare con apertura minima dei contatti pari a 3 mm) che riporti un marchio di conformità alle normative internazionali. Tale dispositivo deve essere protetto contro la richiusura accidentale (ad esempio installandolo entro quadro chiuso a chiave).
2° - Per la sezione ed il tipo dei cavi la RIB consiglia di utilizzare un cavo di tipo H05RN-F con sezione minima di 1,5 mm2 e comunque di attenersi alla norma IEC 364 e alle norme di installazione vigenti nel proprio Paese.
3° - Posizionamento di un’eventuale coppia di fotocellule: il raggio delle fotocellule deve essere ad un’altezza non superiore a 70 cm dal suolo e ad una distanza dal piano di movimento della porta non superiore a 20 cm. Il loro corretto funzionamento deve essere verificato a fine installazione in accordo al punto D.3.2 della EN 12453.
4° - Per il soddisfacimento dei limiti imposti dalla EN 12453, se la forza di picco supera il limite normativo di 400 N è necessario ricorrere alla rilevazione di presenza attiva sull’intera altezza della porta (fino a 2,5 m max). Le fotocellule in questo caso sono da applicare come indicato nella norma EN 12453 punto D.4.1.
N.B.: È obbligatoria la messa a terra dell’impianto.I dati descritti nel presente manuale sono puramente indicativi.RIB si riserva di modificarli in qualsiasi momento.Realizzare l’impianto in ottemperanza alle norme ed alle leggi vigenti.
ISTRUZIONI IMPORTANTI DI SICUREZZA PER L’INSTALLAZIONEATTENZIONE - L’INSTALLAZIONE NON CORRETTA PUÒ CAUSARE GRAVI DANNI
SEGUIRE TUTTE LE ISTRUZIONI DI INSTALLAZIONE1° - Questo libretto d’istruzioni è rivolto esclusivamente a del personale specializzato
che sia a conoscenza dei criteri costruttivi e dei dispositivi di protezione contro gli infortuni per i cancelli, le porte e i portoni motorizzati (attenersi alle norme e alle leggi vigenti).
2° - L’installatore dovrà rilasciare all’utente finale un libretto di istruzioni in accordo alla norma EN 12635.
3° - L’installatore prima di procedere con l’installazione deve prevedere l’analisi dei rischi della chiusura automatizzata finale e la messa in sicurezza dei punti pericolosi identificati (seguendo le norme EN 12453).
4° - L’installatore prima di installare il motore di movimentazione deve verificare che il cancello sia in buone condizioni meccaniche e che si apra e chiuda adeguatamente.
5° - L’installatore dovrà installare l’organo per l’attuazione del rilascio manuale ad un’altezza inferiore a 1,8 m.
6° - L’installatore dovrà rimuovere eventuali impedimenti al movimento motorizzato del cancello (es. chiavistelli, catenacci, serrature ecc.)
7° - L’installatore dovrà applicare in modo permanente le etichette che mettono in guardia contro lo schiacciamento in un punto molto visibile o in prossimità di eventuali comandi fissi.
8° - Il cablaggio dei vari componenti elettrici esterni all’operatore (ad esempio fotocellule, lampeggianti, ecc.) deve essere effettuato secondo la EN 60204-1.
9° - L’eventuale montaggio di una pulsantiera per il comando manuale del movimento deve essere fatto posizionando la pulsantiera in modo che chi la aziona non si trovi in posizione pericolosa; inoltre si dovrà fare in modo che sia ridotto il rischio di azionamento accidentale dei pulsanti.
10° - Tenete i comandi dell’automatismo (pulsantiera, telecomando etc) fuori dalla portata dei bambini. L’organo di manovra (un interruttore tenuto chiuso manualmente) deve essere in una posizione che sia visibile dalla parte guidata ma lontana dalle parti in movimento. Deve essere installato a un’altezza minima di 1,5 m.
11° - Questo apparecchio può essere utilizzato da bambini di età compresa dagli 8 anni e al di sopra e le persone con ridotte capacità fisiche, sensoriali o mentali, o mancanza di esperienza e conoscenza se sono stati controllati o istruiti all’uso dell’apparecchio in modo sicuro e capire i rischi connessi.
12° - I bambini non devono giocare con l’apparecchio.13° - Pulizia e manutenzione utente non deve essere fatta da bambini senza supervisione.14° - Non permettere ai bambini di giocare con i comandi fissi. Tenere i telecomandi lontano
dai bambini.15° - I dispositivi di comando fissi devono essere installati in modo che siano visibili.16° - Prima di eseguire qualsiasi operazione di installazione, regolazione, manutenzione
dell’impianto, togliere la tensione agendo sull’apposito interruttore magnetotermico collegato a monte dello stesso.
17° - A fine installazione l’installatore dovrà assicurarsi che le parti della porta non ingombrino strade o marciapiedi pubblici.
LA DITTA RIB NON ACCETTA NESSUNA RESPONSABILITÀ per eventuali danni provocati dalla mancata osservanza nell’installazione delle norme di sicurezza e delle leggi attualmente in vigore.
ATTENTION - POUR LA SECURITE DES PERSONNES, IL EST IMPORTANT DE SUIVRE TOUTES LES INSTRUCTIONS
CONSERVER SOIGNEUSEMENT CES INSTRUCTIONS1° - Si ce n’est pas prévu dans la centrale, installer en amont de celle-ci un interrupteur
de type magnétothermique (omnipolaire avec ouverture minimum des contacts de 3 mm) qui porte une marque de conformité aux normes internationales. Ce dispositif doit être protégé contre la re-fermeture accidentelle (par exemple en l’installant dans un tableau fermé à clé).
2° - En ce qui concerne la section et le type des câbles, RIB conseille d’utiliser un câble de type H05RN-F ayant une section minumum de 1,5 mm2 et de toute façon, s’en tenir à la norme IEC 364 et aux normes d’installation en vigueur dans le propre pays.
3° - Positionnement d’un couple éventuel de photocellules: Le rayon des photocellules doit se situer à une hauteur qui ne doit pas être supérieure à 70 cm du sol et à une distance du plan de mouvement de la porte qui ne doit pas être supérieure à 20 cm. Leur bon fonctionnement doit être vérifié en fin d’installation selon le point D.3.2 de la EN 12453.
4° - Pour satisfaire aux limites imposées par la EN 12453, si la force de pointe dépasse la limite de la norme de 400 N, il est nécessaire de recourir au relevé de présence active sur la hauteur totale de la porte (jusqu’à 2,5 m max). - Les photocellules, dans ce cas, doivent être appliquées selon le point D.4.1 de la EN 12453.
N.B.: La prise de terre sur l’installation est obligatoire.Les données décrites dans ce manuel sont purement indicatives.RIB se réserve le droit de les modifier à tout moment. Réaliser l’installation en conformité aux normes et aux lois en vigueur.
INSTRUCTIONS IMPORTANTES DE SECURITE POUR L’INSTALLATIONATTENTION - UNE INSTALLATION NON CORRECTE PEUT CAUSER DE GRAVES
DOMMAGESSUIVRE TOUTES LES INSTRUCTIONS D’INSTALLATION
1° - Ce livret d’instructions est adressé exclusivement à un personnel spécialisé qui connaît les critères de construction et les dispositifs de protection contre les accidents concernant les portails, les portes et les portes cochères motorisés (s’en tenir aux normes et aux lois en vigueur).
2° - L’installateur devra délivrer à l’utilisateur final un livret d’instruction en accord à la EN 12635.
3° - L’installateur avant de procéder à l’installation, doit prévoir l’analyse des risques de la fermeture automatisée finale et la mise en sécurité des points identifiés dangereux (en suivant les normes EN 12453).
4° - L’installateur, avant d’installer le moteur de mouvement, doit vérifier que le portail de fer soit en bonnes conditions mécaniques et qu’il s’ouvre et se ferme correctement.
5° - L’installateur devra installer l’organe pour l’exécution de la relâche manuelle à une hauteur inférieure à 1,8 m.
6° - L’installateur devra retirer d’éventuels obstacles au mouvement motorisé du portail de fer (ex. verrous, serrures, etc).
7° - L’installateur devra appliquer, de façon permanente, les étiquettes qui mettent en garde contre l’écrasement, dans un endroit bien visible ou à proximité de commandes fixes éventuelles.
8° - Le câblage des divers composants électriques externes à l’opérateur (par exemple photocellules, clignotants, etc) doit être effectué selon la EN 60204-1.
9° - Le montage éventuel d’un tableau pour la commande manuelle du mouvement doit être fait en positionnant le tableau de façon à ce que la personne qui l’actionne ne se trouve pas en position de danger; de plus, il faudra faire en sorte que le risque d’actionnement accidentel des boutons soit réduit.
10° - Tenir les commandes de l’automatisme (tableau, télécommande, etc) hors de portée des enfants. L’organe de manoeuvre (un interrupteur tenu fermé manuellement) doit être dans une position qui soit visible de la partie guidée mais lointaine des parties en mouvement. Il doit être installé à une hauteur moindre de 1,5 m.
11° - Cet appareil peut être utilisé par des enfants âgés de 8 ans et plus et les personnes dont les capacités physiques, sensorielles ou mentales réduites, ou manquant d’expérience et de connaissances si elles sont sans surveillance ou instruction concernant l’utilisation de l’équipement en toute sécurité et de comprendre les risques encourus.
12° - Enfants ne doivent pas jouer avec l’appareil. 13° - Nettoyage et entretien utilisateur n’a pas à être effectué par des enfants sans
surveillance. 14° - Ne laissez pas les enfants jouer avec les commandes fixes. Gardez la télécommande
hors de portée des enfants.15° - Les dispositifs fixes de commande doivent être installés de sorte qu’ils soient visibles.16° - Avant l’exécution de toute opération d’installation, de réglage, d’entretien de
l’installation, couper le courant en agissant sur l’interrupteur magnétothermique à cet effet, branché en amont de l’installation.
17° - A la fin de l’installation, l’installateur devra s’assurer que les parties de la porte n’encombrent pas la rue ou le trottoir public.
LA SOCIETE RIB N’ACCEPTE AUCUNE RESPONSABILITE pour d’éventuels dommages provoqués par la non-observation dans l’installation, des normes de sécurité et des lois actuellement en vigueur.

3
IMPORTANT SAFETY INSTRUCTIONS FOR THE INSTALLATION
WICHTIGE SICHERHEITS ANLEITUNGEN FÜR DIE INSTALLATIONEN
GB D
ATTENTION - FOR THE SAFETY OF PEOPLE IT IS IMPORTANT TO FOLLOW ALL THE INSTRUCTIONS
KEEP THESE INSTRUCTIONS WITH CARE 1° - If it is not forecast in the electric gearcase, install a switch of magneto thermic type
upstream, (omni polar with minimum opening of the contacts of 3 mm) with a check of conformity to the international standards. Such device must be protected against the accidental lockup (for example by installing inside a locked board).
2° - For the section and the type of the cables RIB advices to use a cable of H05RN-F type with 1,5 sqmm minimum section and, however, to keep to the IEC 364 and installation standards in force in your country.
3° - Positioning of a possible couple of photoelectric cells: the radius of the photoelectric cells must be at a height of no more than 70 cm from the ground and at a distance not superior to 20 cm from the motion plane of the door. Their correct working must be verified at the end of the installation in accordance with the point D.3.2 of the EN 12453
4° - To fulfill the limits set by EN 12453, and in case the peak force exceeds the normative limit of 400 N it is necessary to have recourse to the active presence survey on the whole height of the door (up to max 2,5 m) - The photocells, in this case, must be applied in accordance with the point D.4.1 of the EN 12453.
N.B.: The earthing of the system is obligatory. The data described in this handbook are purely a guide. RIB reserves the right to change them in any moment. Carry out the system in the respect of the standards and laws in force.
IMPORTANT SAFETY INSTRUCTIONS FOR THE INSTALLATION ATTENTION - THE INCORRECT INSTALLATION CAN CAUSE SERIOUS DAMAGES
FOLLOW ALL INSTALLATION INSTRUCTIONS1° - This handbook is exclusively addressed to the specialized personnel who knows
the constructive criteria and the protection devices against accidents for motorized gates, doors and main doors (follow the standards and the laws in force).
2° - The installer will have to issue a handbook to the final user in accordance with the EN 12635.
3° - Before proceeding with the installation, the installer must forecast the risks analysis of the final automatized closing and the safety of the identified dangerous points (Following the standards EN 12453).
4° - Before installing the motion motor, the installer must verify that the gate is in good mechanical conditions and that it adequately opens and closes.
5° - The installer must install the member for the manual release at a height inferior to 1,8 m.
6° - The installer will have to remove possible impediments to the motorized motion of the gate (eg. door bolts, sliding bolts, door locks etc.)
7° - The installer will permanently have to put the tags warning against the deflection on a very visible point or near possible fixed controls.
8° - The wiring harness of the different electric components external to the operator (for example photoelectric cells, flashlights etc.) must be carried out according to the EN 60204-1.
9° - The possible assembly of a keyboard for the manual control of the movement must be done by positioning the keyboard so that the person operating it does not find himself in a dangerous position; moreover, the risk of accidental activation of the buttons must be reduced.
10° - Keep the automatism controls (push-button panel, remote control etc.) out of the children way. Command device for operating the motor (a switch manually closed) should be placed in area visible from the guided site and far from moving parts. It should be placed at least at 1,5 m height.
11° - this appliance can be used by children aged from 8 years and above and persons with reduced physical, sensory or mental capabilities or lack of experience and knowledge if they have been given supervision or instruction concerning use of the appliance in a safe way and understand the hazards involved
12° - children shall not play with the appliance13° - cleaning and user maintenance shall not be made by children without supervision14° - do not allow children to play with fixed controls. Keep remote controls away from
children15° - Fixed command devices should be installed in a well visible way.16° - Before carrying out any installation, regulation or maintenance operation of the
system, take off the voltage by operating on the special magneto thermic switch connected upstream.
17° - At the end of the installation, the installer will have to make sure that the parts of the door do not encumber streets or public sidewalks.
THE RIB COMPANY DOES NOT ACCEPT ANY RESPONSIBILITY for possible damages caused by the non observance during the installation of the safety standards and of the laws in force at present.
ACHTUNG - FÜR DIE SICHERHEIT DER PERSONEN IST ES WICHTIG, DASS ALLE ANWEISUNGEN GENAU AUSGEFÜHRT WERDEN
INSTALLATIONSVORSCHRIFTEN BEACHTET WERDEN1° - Wenn nicht bereits an der elektrischen Schaltzentrale vorgesehen, muss vor der
Schaltzentrale ein thermomagnetischer Schalter installiert werden (omnipolar, mit einer minimalen Kontaktöffnung von 3 mm), der ein von den internationalen Normen anerkanntes Konformitätszeichen besitzt. Solch ein Geraet muss vor Vandalismus geschuetzt werden (z.B.mit einen Schluesselkatsten in einem Panzergehaeuse).
2° - RIB empfiehlt den Kabeltyp H05RN-F mit einem minimalen Querschnitt von 1,5 mm2 generell sollten die Normative IEC 364 und alle anderen geltenden Montagenormen des Bestimmungslandes eingehalten werden.
3° - Position des ersten paar Fotozellen: Der sollten nicht hoeher als 70 cm vom Boden sein, und sollte nicht mehr als 20 cm entfernt von der Achse des Tores sitzen (das gilt fuer Schiebe und Drehtore). In Übereinstimmung mit dem Punkt D.3.2 der EN 12453 Norm, ihr korrektes Funktionieren muß einmal überprüft werden.
4° - In Einklang mit der Norm EN 12453, ist es bei Toren notwendig eine komplette Sicherheitslieiste zu installieren, bei denen mehr als 400 N Kraft aufgewand werden muessen, um das Tor zum anhalten zu bringen (Maximum von 2,5 m anwenden) - Die Fotozellen müssen in diesem Fall sein beantragen außen zwischen EN 12453 Punkt D.4.1.
ANMERKUNG: Die Erdung der Anlage ist obligatorischDie in diesem Handbuch aufgeführten Daten sind ausschließlich empfohlene Werte. RIB behält sich das Recht vor, das Produkt zu jedem Zeitpunkt zu modifizieren. Die Anlage muss in Übereinstimmung mit den gültigen Normen und Gesetzen montiert werden.
WICHTIGE SICHERHEITS ANLEITUNGEN FÜR DIE INSTALLATIONENWARNUNG - UNSACHGEMÄSSE INSTALLATION KANN ZU SCHWEREN VERLETZUNGEN
ALLE INSTALLATIONSANLEITUNGEN BEFOLGEN1° - Diese Betriebsanleitung dient ausschließlich dem Fachpersonal, welche die
Konstruktionskriterien und die Sicherheits-Vorschriften gegen Unfälle für Tore, Türen und automatische Tore kennt (geltende Normen und Gesetze beachten und befolgen).
2° - Der Monteur muss dem Endkunde eine Betriebsanleitung in Übereinkunft der EN12635 überreichen.
3° - Vor der Installierung muss für die automatische Schließung und zur Sicherheitsgewährung der identifizierten kritischen Punkte, eine Risiko Analyse vorgenommen werden mit der entsprechenden Behebung der identifizierten, gefährlichen Punkte (die Normen EN 12453 befolgend).
4° - Vor den Bewegungsmotor zu installieren, ist es nötig die mechanischen Zustande von der Gittertür (Öffnung, Schluss, u.s.w.) zu prüfen.
5° - Das Element für den manuellen Schiebebetrieb muss bei einer geringeren Höhe von 1,80 Metern installiert sein.
6° - Der Installateur muss mögliche Verhinderungen an der Gittertürbewegung (wie z.B. Riegeln, Schlossen u.s.w.) abnehmen.
7° - Der Installateur muss ständige Etiketten, gegen die Zerdrücken Gefahr, auf einen sehr sichtbaren Punkt oder in der nähe von stationären Steuerungen anbringen.
8° - Die Verkabelung der verschiedenen externen elektrischen Komponenten zum Operator (z.B. Fotozellen, Blinker etc.) muss nach EN 60204-1 ausgeführt werden.
9° - Die eventuelle Montage einer Schalttafel für den manuellen Bewegungsbefehl muss so angebracht werden, dass der Benutzer sich nicht in einer Gefahrenzone befindet, und dass, das Risiko einer zufälligen nicht gewollten Aktivierung von Schaltern gering ist.
10° - Alle Steuerungselemente (Schalttafel, Fernbedienung etc.) gehören nicht in Reichweite von Kindern. Das Schalten Element (einen Schalter dass manuell geschlossen ist) muss sichtbar aus dem angetriebenen Teil sein, und muss entfernt aus dem beweglichen Teil sein. Dies Element muss bei einer Höhe von wenigsten 1,50 Metern installiert sein.
11° - Die Nutzung von diesem Gerät ist erlaubt an Kinder ab 8 Jahre alte. Es ist nötig die Personen mit physischen und Intellekt Handikapen, auf die möglichen Gefahren zu warnen.
12° - Die Kinder muss mit diesem Gerät nicht spielen.13° - Die Kinder muss die Reinigung und die Wartung von diesem Gerät, ohne Aufsicht,
nicht machen.14° - Die Kinder muss mit den Steuerungen und mit den Fernsteuerungen nicht spielen.15° - Die fixe Steuerungen muss sichtbare nach der Installation sein.16° - Vor jeglichem Eingriff, sei es Installation, Regulation oder Wartung der Anlage, muss
vorher die Stromzufuhr unterbrochen werden, den dafür bestimmten Magnetthermo-Schalter drücken, der am Eingang der Anlage installiert ist.
17° - Nach der Installation ist es nötig zu prüfen dass Teile von der Gittertür keinen Hindernis auf Straße oder Bürgersteige verursachen.
DIE FIRMA RIB ÜBERNIMMT KEINE VERANTWORTUNG für eventuelle Schäden, die entstehen können, wenn die Installierungsvorschriften die den gültigen Sicherheitsnormen entsprechen, nicht eingehalten werden.

4
IMPORTANTES INSTRUCCIONES DE SEGURIDAD PARA LA INSTALACIÓN
ES
ATENCIÓN PARA LA SEGURIDAD DE LAS PERSONAS ES IMPORTANTE QUE SE OBSERVEN TODAS LAS INSTRUCCIONES
CONSERVAR CUIDADOSAMENTE ESTAS INSTRUCCIONES1° - En el caso de que no sea previsto en la central eléctrica, instalar antes de la misma,
un interruptor de tipo magnetotérmico (omnipolar con una apertura mínima de los contactos de 3 mm) que dé un sello de conformidad con las normas internacionales. Este dispositivo tiene que estar protegido contro cierres accidentales (por ejemplo instalándolo dentro de un panel cerrado a llave).
2° - Para la sección y el tipo de los cables, RIB aconseja utilizar cables de tipo H05RN-F con sección mínima de 1,5 mm2 e igualmente atenerse a la norma IEC 364 y a las normas de instalación del propio país.
3° - Posicionamiento eventual de un par de fotocélulas. El rayo de las fotocélulas no debe estar a más de 70 cm de altura desde el suelo y a una distancia de la superficie de movimiento de la puerta, no superior a 20 cm. El correcto funcionamiento tiene que ser controlado al final de la instalación de acuerdo con el punto D.3.2 de la EN 12453.
4° - Para lograr satisfascer los límites impuestos por la EN 12453, si la fuerza de punta supera el límite normativo de 400 N, es necesario recurrir al control de presencia activa en toda la altura de la puerta (hasta a 2,5m max). - Las fotocélulas en este caso se deben colocar como indicado en la EN 12453 punto D.4.1.
PS.: Es obligatorio la puesta a tierra del sistema.Los datos descritos en el presente manual son sólamente indicativos.RIB se reserva de modificarlos en cualquier momento.Realizar el sistema respetando las normas y las leyes vigentes.
IMPORTANTES INSTRUCCIONES DE SEGURIDAD PARA LA INSTALACIÓNCUIDADO: UNA INCORRECTA INSTALACIÓN PUEDE CAUSAR GRAVES DAÑOS
SEGUIR TODAS LAS INSTRUCCIONES DE INSTALACIÓN 1° - Este manual de instrucciones está exclusivamente dirigido a personal
especializado que conozca los criterios de construcción y de los dispositivos de protección contra accidentes con cancelas, puertas y portales motorizados (atenerse a las normas y a las leyes vigentes).
2° - El instalador tendrá que dar al utilizador final un manual de instrucciones de acuerdo con la EN 12635.
3° - El instalador antes de proceder con la instalación tiene que hacer un analisis de los riesgos del cierre automatizado final y la puesta en seguridad de los puntos identificados como peligrosos (siguiendo las normas EN 12453).
4° - El instalador antes de instalar el motor de desplazamiento tiene que controlar que la cancela esté en buenas condiciones mecánicas y que se abra y se cierre en forma adecuada.
5° - El instalador tendrá que instalar el órgano para el desenganche manual a una altura inferior a 1,8 m.
6° - El instalador tendrá que quitar eventuales impedimentos para el movimiento motorizado de la cancela (ej. pistillos, cerraduras, cerrojos, etc.).
7° - El instalador tendrá que colocar de modo permanente rótulos que adviertan de la posibildad de aplastamiento, en un punto bastante visible o en las cercanías de eventuales mandos fijos.
8° - El cablaje de los varios componentes eléctricos externos al operador (por ejemplo fotocélulas, los intermitentes, etc) tiene que ser efectuado según la EN 60204-1.
9° - El eventual montaje de un panel de mandos para la gestión del movimiento manual tiene que ser efectuado posicionando el panel en modo de que quien lo accione no se encuentre en una posición peligrosa; además se tiene que hacer en modo que sea mínimo el riesgo de accionamiento accidental de los pulsadores.
10° - Tener los mandos del automatismo (panel de mandos, mando a distancia, etc.) lejos del alcance de los niños. El òrgano de maniobra (un interruptor cerrado manualmente) tiene que estar en una posiciòn visible desde la parte de maniobra, pero lejana de las piezas en movimiento. Tiene que ser instalado en una altura mìn. de 1,5 metros.
11° - Esta unidad puede ser utilizado por niños de 8 años o más y las personas con capacidades físicas, sensoriales o mentales reducidas, o falta de experiencia y conocimientos que hayan recibido supervisión o instrucciones relativas al uso de ‘equipo de manera segura y comprender los riesgos que implica.
12° - Los niños no deben jugar con el aparato. 13° - Limpieza y mantenimiento de usuarios no tiene que ser hecho por los niños sin
supervisión. 14° - No permita que los niños jueguen con los controles fijos. Mantenga los controles
remotos alejados de los niños.15° - Los mecanismos de mando fijos tienen que ser instalados de manera visible.16° - Antes de ejecutar cualquier operación de instalación, ajuste o mantenimiento del
sistema, quitar la corriente accionando el respectivo interruptor magnetotérmico conectado antes del mismo.
17° - Al final de la instalación, el instalador tendrá que asegurarse de que las partes de la puerta no estorben calles o aceras públicas.
LA EMPRESA RIB NO SE RESPONSABILIZA por eventuales daños provocados por la falta de respeto de las normas de seguridad, durante la instalación y de las leyes actualmente vigentes.
ITALIANORAEE - Informazione agli utilizzatoriIl simbolo del cassonetto barrato riportato sull’apparecchiatura o sulla sua confezione indica che il prodotto alla fine della propria vita utile deve essere raccolto separatamente dagli altri rifiuti. L’utente dovrà, pertanto, conferire l’apparecchiatura giunta a fine vita
agli idonei centri comunali di raccolta differenziata dei rifiuti elettrotecnici ed elettronici. In alternativa alla gestione autonoma, è possibile consegnare gratuitamente l’apparecchiatura che si desidera smaltire al distributore, al momento dell’acquisto di una nuova apparecchiatura di tipo equivalente. Presso i distributori di prodotti elettronici con superficie di vendita di almeno 400 m2 è inoltre possibile consegnare gratuitamente, senza obbligo di acquisto, i prodotti elettronici da smaltire con dimensioni inferiori a 25 cm. L’adeguata raccolta differenziata per l’avvio successivo dell’apparecchiatura dismessa al riciclaggio, al trattamento e allo smaltimento ambientalmente compatibile contribuisce ad evitare possibili effetti negativi sull’ambiente e sulla salute e favorisce il reimpiego e/o riciclo dei materiali di cui è composta l’apparecchiatura.L’eliminazione dei materiali va fatta rispettando le norme vigenti. Non gettate il vostro apparecchio scartato, le pile o le batterie usate nei rifiuti domestici. Avete la responsabilità di restituire tutti i vostri rifiuti da apparecchiature elettriche o elettroniche lasciandoli in un punto di raccolta dedicato al loro riciclo.
FRANÇAISDEEE - Informations pour les utilisateursLe symbole du caisson barre, la ou il est reporte sur l’appareil ou l’emballage, indique que le produit en fin de vie doit etre collecte separement des autres dechets. Au terme de la duree de vie du produit, l’utilisateur devra se charger de le remettre a un centre de collecte separee ou bien au revendeur lors de l’achat d’un nouveau produit. Il est possible de remettre gratuitement, sans obligation d’achat, les produits a eliminer de dimensions inferieures a 25 cm aux revendeurs dont la surface de vente est d’au moins 400 m2. La collecte separee appropriee pour l’envoi successif de l’appareil en fin de vie au recyclage, au traitement et a l’elimination dans le respect de l’environnement contribue a eviter les effets negatifs sur l’environnement et sur la sante et favorise le reemploi et/ou le recyclage des materiaux dont l’appareil est compose.Eliminez les matériaux en respectant les normes en vigueur. Ne jetez ni les vieux appareils, ni les piles, ni les batteries usées avec les ordures domestiques. Vous devez confier tous vos déchets d’appareils électriques ou électroniques à un centre de collecte différenciée, préposé à leur recyclage.
ENGLISHWEEE - Information for usersIf the crossed-out bin symbol appears on the equipment or packaging, this means the product must not be included with other general waste at the end of its working life. The user must take the worn product to a sorted waste center, or return it to the retailer when purchasing a new one. Products for disposal can be consigned free of charge (without any new purchase obligation) to retailers with a sales area of at least 400 m2, if they measure less than 25 cm. An efficient sorted waste collection for the environmentally friendly disposal of the used device, or its subsequent recycling, helps avoid the potential negative effects on the environment and people’s health, and encourages the re-use and/or recycling of the construction materials.Materials must be disposed of in accordance with the regulations in force. Do not throw away your discarded equipment or used batteries with household waste. You are responsible for taking all your waste electrical and electronic equipment to a suitable recycling centre.
DEUTSCHElektro- und Elektronik-Altgeräte - Informationen für die NutzerDas Symbol der durchgestrichenen Mulltonne auf dem Gerat oder seiner Verpackung weist darauf hin, dass das Produkt am Ende seiner Nutzungsdauer getrennt von den anderen Abfallen zu entsorgen ist. Nach Ende der Nutzungsdauer obliegt es dem Nutzer, das Produkt in einer geeigneten Sammelstelle für getrennte Mullentsorgung zu deponieren oder es dem Handler bei Ankauf eines neuen Produkts zu ubergeben. Bei Handlern mit einer Verkaufsflache von mindestens 400 m2 konnen zu entsorgende Produkte mit Abmessungen unter 25 cm kostenlos und ohne Kaufzwang abgegeben werden. Die angemessene Mulltrennung fur das dem Recycling, der Behandlung und der umweltvertraglichen Entsorgung zugefuhrten Gerates tragt dazu bei, mogliche negative Auswirkungen auf die Umwelt und die Gesundheit zu vermeiden und begunstigt den Wiedereinsatz und/oder das Recyceln der Materialien, aus denen das Gerat besteht.Die Entsorgung der Materialien muss unter Beachtung der geltenden Normen erfolgen. Bitte werfen Sie Ihr Altgerät oder die leeren Batterien nicht in den Haushaltsabfall. Sie sind verantwortlich für die ordnungs-gemäße Entsorgung Ihrer elektrischen oder elektronischen Altgeräte durch eine offizielle Sammelstelle.
ESPAÑOLRAEE - Información para los usuariosEl simbolo del contenedor tachado, cuando se indica en el aparato o en el envase, indica que el producto, al final de su vida util, se debe recoger separado de los demas residuos. Al final del uso, el usuario debera encargarse de llevar el producto a un centro de recogida diferenciada adecuado o devolverselo al vendedor con ocasion de la compra de un nuevo producto. En las tiendas con una superficie de venta de al menos 400 m2, es posible entregar gratuitamente, sin obligacion de compra, los productos que se deben eliminar con unas dimensiones inferiores a 25 cm. La recogida diferenciada adecuada para proceder posteriormente al reciclaje, al tratamiento y a la eliminacion del aparato de manera compatible con el medio ambiente contribuye a evitar posibles efectos negativos en el medio ambiente y en la salud y favorece la reutilizacion y/o el reciclaje de los materiales de los que se compone el aparato.La eliminación de los materiales se debe realizar respetando las normas vigentes. No desechar su equipo descartado, las pilas o las baterías usadas con los residuos domésticos. Usted tiene la responsabilidad de desechar todos sus residuos de equipos eléctricos o electrónicos, entregándolos a un punto de recogida dedicado al reciclaje de los mismos.

5
* Oltre gli 1,6 m di lunghezza d’anta deve essere applicata una elettroserratura per assicurare un’efficace chiusura.
** Oltre gli 1,8 m di lunghezza d’anta deve essere applicata una elettroserratura per assicurare un’efficace chiusura.
*** IDRODUE 27 SUPER rallenta negli ultimi 2 cm di corsa dello stelo.
LAYOUT IMPIANTO
1 - Operatore IDRO2 - Antenna radio3 - Lampeggiatore4 - Selettore a chiave5 - Fotocellule esterne6 - Fotocellule interne
CONTROLLO PRE-INSTALLAZIONE
Le ante devono essere solidamente fissate ai cardini delle colonne, non devono flettere durante il movimento e devono muoversi senza attriti.Prima d’installare l’IDRO è meglio verificare tutti gli ingombri necessari per poterlo installare.Se il cancello si presenta come da Fig. 1 non occorrono modifiche.È obbligatorio uniformare le caratteristiche del cancello alle norme e leggi vigenti. La porta può essere automatizzata solo se in buono stato e se rispondente alla norma EN 12604. - L’anta non deve presentare porte pedonali. In caso contrario occorrerà
prendere opportune precauzioni in accordo al punto 6.5.1 della EN 12453 (ad esempio impedire il movimento del motore quando il portoncino è aperto, grazie ad un microinterruttore opportunamente collegato al quadro elettronico).
- Non bisogna generare punti di intrappolamento (ad esempio tra anta aperta del cancello e cancellata).
Non devono essere presenti fermi meccanici al di sopra del cancello perché non sono sufficientemente sicuri.
1
❻ ❻
❹
❶ ❶
❷❸
❺❻ ❻❺ ❹
CARATTERISTICHE TECNICHE 27/R 27/1B27
SUPER/R27
SUPER/1B39/R
39/1B39/2B
Lunghezza max. anta m 3 3* 6 6** 7 7**
Peso max cancello kg 400 700 1000
Corsa max di traino cm 27 27*** 39
Tempo medio di apertura s 16 40 50
Forza max di spinta N 2500 6400
Alimentazione e frequenza 230V~ 50/60Hz
Potenza motore W 180 220
Assorbimento A 1 1,1
Condensatore µF 6,3 12,5
Cicli normativi n° 300 - 15s/2s 500 - 23s/2s 800 - 45s/2s
Cicli consigliati al giorno n° 300 500 800
Servizio % 80 90
Cicli consecutivi garantiti n° 100 200 800
Lubrificazione a grasso OX SUPER
Peso motore kg 10 11,4 13,6
Rumorosità db <70
Volume m3 0,0086 0,0084
Temperatura di lavoro °C -20 ÷ +55
Grado di protezione IP 55
I

6
ac
d
b
Qualora il pilastro fosse molto largo e non fosse possibile installare l’operatore rispettando la misura a, è indispensabile creare una nicchia nel pilastro o spostare il cancello sullo spigolo.
FISSAGGIO ATTACCHI OPERATORE
In base alla scelta del tipo di apertura (interna o esterna) e in base alla scelta della rotazione massima dell’anta, la staffa deve essere prima tagliata rispettando la quota “a” e poi saldata come in Fig. 2. Il supporto deve essere posizionato in modo che l’operatore risulti perfettamente orizzontale.
Attenzione: non utilizzare il martello per l’inserimento del perno di ottone corto; l’inserimento del perno sulla forcella e staffa deve avvenire con la semplice pressione delle mani (Fig. 3).Attenzione: non inclinare l’operatore oleodinamico oltre l’angolazione permessa dalla forcella oscillante (1), pena la possibile rottura della stessa (Fig. 4).
a b c (max)Max angolo
aperturaCorsa stelo
maxCorsa stelo
per 90°100 115 50 110° 250 215100 150 50 90° 250105 110 55 110° 246 215105 145 55 90° 250120 105 70 105° 249 225120 130 70 90° 250125 125 75 90° 250140 95 90 100° 250 235140 110 90 90° 250145 95 95 100° 255 240145 105 95 90° 250150 100 100 90° 250155 85 105 95° 249 240160 90 110 90° 250170 75 120 90° 248180 65 130 90° 247
a b c (max)Max angolo
aperturaCorsa stelo
maxCorsa stelo
per 90°125 170 75 125° 368 295130 170 80 125° 372 300140 235 90 90° 370145 165 95 120° 372 310145 230 95 90° 370160 210 110 90° 370175 195 120 90° 370185 145 130 110° 370 330185 190 130 90° 370195 140 140 110° 371 355195 175 140 90° 370240 110 185 100° 370 355240 125 185 90° 370250 105 195 95° 370 360250 115 195 90° 370260 95 205 95° 369 365260 100 205 90° 370270 90 215 90° 370280 80 230 90° 370295 65 245 90° 369
(1)
58 mm 98 mm
2
(1)
58 mm 98 mm
4
(1)
58 mm 98 mm
3
5
Misure in mm
IDRODUE 27Corsa totale 270 mm - Corsa max suggerita 250 mm - d = 970 mm
IDRO 39Corsa totale 390 mm - corsa max suggerita 370 mm - d = 1210 mm
Componenti da installare secondo la norma EN 12453
TIPO DI COMANDO
USO DELLA CHIUSURA
Persone esperte(fuori da area pubblica*)
Persone esperte(area pubblica)
Persone non esperte
mantenuto A B non possibile
impulsivo - in vista(es. pulsante)
C o E C o E C e D, o E
impulsivo - non in vista (es. telecomando)
C o E C e D, o E C e D, o E
automatico C e D, o E C e D, o E C e D, o E
* esempio tipico sono le chiusure che non accedono alla pubblica via.A: Comando ad azione mantenuta, tramite Pulsantiera es: cod. ACG2013B: Comando ad azione mantenuta, tramite Selettore a chiave es: cod. ACG1010C: Regolazione della forza del motore o fotocellule per rispettare forze d’impatto come
indicato in Annex AD: Coste e/o altri dispositivi supplementari per ridurre la probabilità di contatto con la porta.E: Dispositivi installati in modo tale che una persona non possa essere toccata dalla porta.
I

7
IDRODUE 27
INSTALLAZIONE DELLA PROTEZIONE DELLO STELO CROMATOVerificare di aver inserito la cornice in plastica antivibrazione (A) prima d’inserire l’estruso copristelo (Fig. 8).
MONTAGGIO SBLOCCO IN PLASTICAATTENZIONE: Il montaggio dello sblocco in plastica deve avvenire nel modo indicato in fig. 9 solo e soltanto dopo aver terminato tutte le operazioni di installazione, montaggio del copristelo e di taratura delle valvole bypass.
SICUREZZE ELETTRICHEOltre alle sicurezze meccaniche già citate è obbligatorio, nel caso in cui il cancello abbia una lunghezza d’anta maggiore di 1,80 m, l’utilizzo di due coppie di fotocellule in grado di interromperne il moto. Una coppia di fotocellule deve essere collocata a un’altezza variabile da 40 a 60 cm tra le colonne del cancello in posizione esterna al fabbricato. L’altra coppia di fotocellule deve essere collocata, alla stessa altezza della prima, alle estremità delle ante del cancello quando questo è aperto. Il movimento del cancello deve essere sempre segnalato da un lampeggiatore collocato vicino al cancello. Si consiglia l’utilizzo del quadro elettronico di comando T2 (per 1 o 2 motori monofasi).Per i collegamenti ed i dati tecnici degli accessori attenersi ai relativi libretti.
46 mm70 mm
63,5 mm
70 mm
7
98
POSIZIONAMENTO DELL’ATTACCO ANTERIOREL’attacco anteriore in base alla natura del cancello (legno, ferro, alluminio) può essere sia saldato che avvitato (Fig. 6).L’attacco anteriore deve essere posizionato in maniera tale che l’operatore risulti perfettamente orizzontale (Fig. 7).
N.B.: Assicurarsi che ad anta tutta aperta e tutta chiusa, lo stelo non si trovi a fine corsa, ma si discosti dai limiti della sua corsa di almeno 15 mm per parte.
Installare IDRO provando più volte ad aprire e chiudere controllando che il profilo copristelo non sfreghi nel cancello in movimento, altrimenti riposizionare l’attacco.
In caso si abbia il muro parallelo al cancello quando questo è aperto, si rende necessario praticare una nicchia per dare una sede all’operatore.
46 mm70 mm
63,5 mm
70 mm
46 mm70 mm
63,5 mm
70 mm
10
6
COPRI-VALVOLE BY PASS
I

8
I
MANOVRA MANUALE CON CHIAVE - IDRODUE 27Per sbloccare operare come segue:- Inserire la chiavetta e ruotarla in senso antiorario di 180 gradi (Fig. 11).Per bloccare nuovamente l’Attuatore operare come segue:- Inserire la chiavetta e ruotarla in senso orario fino alla chiusura (Fig. 11).Attenzione: effettuare lo sblocco sempre in assenza di alimentazione.
MANOVRA MANUALE CON CHIAVE - IDRO 39Aprire il tappo RIB.Inserire la chiave nella serratura. Ruotare la chiave di 90° in senso antiorario. Eseguire la manovra manuale spingendo dolcemente l’anta del cancello.Per il ripristino in automatico, ruotarla nella posizione iniziale. Togliere la chiave e richiudere il tappo per evitare che entrino acqua e polvere nel dispositivo di sblocco. N.B.: Effettuare le operazioni per la manovra manuale con motore fermo.ATTENZIONE: Nei modelli IDRODUE 27/R, IDRODUE 27S/R e IDRO 39/R (reversibili) è
sempre presente lo sblocco. In questo caso lo sblocco serve ad aumentare o diminuire la reversibilità di movimento per evitare che l’anta si muova facilmente in presenza di vento.
Per poter eseguire in modo sicuro la movimentazione manuale dell’anta occorre verificare che: - sull’anta siano fornite maniglie idonee;- tali maniglie siano posizionate in modo da non creare punti di pericolo durante il loro
utilizzo;- lo sforzo manuale per muovere l’anta non superi i 225N per i cancelli posti su siti privati
ed i 390N per i cancelli posti su siti commerciali ed industriali (valori indicati nel punto 5.4.5 della norma EN 12453).
REGOLAZIONE DELLA FORZA (VALVOLE BY PASS)Per aumentare la forza, con l’ausilio di un cacciavite, ruotare in senso orario le valvole di apertura (grigia) e di chiusura (gialla) poste sotto il copri-valvole in plastica (da rimuovere) dell’operatore IDRODUE 27 (Fig. 13) o sotto il coperchio (una volta svitate le 4 viti) dell’operatore IDRO 39 (Fig. 14).Per diminuire la forza, ruotare le valvole di apertura e chiusura in senso antiorario.N.B.: Nell’eseguire l’operazione di regolazione della forza, ruotare le valvole per gradi
dolcemente senza svitarle o avvitarle completamente.Si consiglia di regolare le valvole in modo che le pressioni non siano molto differenti tra loro.Regolate la pressione di apertura leggermente superiore a quella di chiusura.
MANUTENZIONEDa effettuare solamente da parte di personale specializzato dopo aver tolto l’alimentazione elettrica al motore. Ogni anno ingrassare i cardini, controllare la forza di spinta esercitata dall’operatore sull’anta e verificare il livello dell’olio.
12
IDRO 39
14
IDRO 39
11
IDRODUE 27 - 27 SUPER
Blocca Sblocca
13
IDRODUE 27 - 27 SUPER
VALVOLEBY PASS
Rimuovere il copri-valvole in plastica

9
IPROCEDURA STRAPPO PROFILO ALLUMINIO
DA FARESOLO DURANTE
L’INSTALLAZIONE
SE GLI OPERATORI DEVONO ESSERE SPEDITI, NON APPLICARE QUESTA
PROCEDURA

10
RADIO RICEVITORI AD AUTOAPPRENDIMENTO
S433 1CH monocanale con innesto cod. ACG5081S433 1CH monocanale con morsettiera cod. ACG5082S433 2CH bicanale con innesto cod. ACG5083S433 2CH bicanale con morsettiera cod. ACG5084S433 4CH quadricanale con innesto cod. ACG5085S433 4CH quadricanale con morsettiera cod. ACG5086
PULSANTIERA FLAT
Con collegamento a motore cod. ACG2012Con collegamento a centralina cod. ACG2013
T2
cod. ABT2000 => CRX 230/50-60HZcod. ABT2001 => 230/50-60HZ cod. ABT2002 => CRX 120/60HZcod. ABT2003 => 120/60HZ
T2 Wi-Fi
Con scheda MASTER Wi-Fi.cod. ABT2001W
Autoapprendimento corsa e tempiApertura pedonaleChiusura automatica totale e pedonalePrelampeggioRallentamento regolabile in accostamentoRegolazione della forza Comando radio automatico o passo passo apertura totale Comando radio automatico o passo passo apertura pedonale Comando singolo automatico o passo passoColpo d’ariete serratura elettricaRadio ricevitore incorporatoGestione fotocelluleGestione chiusura immediata dopo il transito da fotocellule Gestione lampeggiatoreGestione coste Autotest coste di sicurezza come richiesto da norma EN 12453Selettore a chiaveBuzzerSerratura elettrica
SUN 2CH cod. ACG6052 SUN 4CH cod. ACG6054 SUN CLONE 2CH cod. ACG6056 SUN CLONE 4CH cod. ACG6058
TELECOMANDO SUN
SPARK
Per ottenere le migliori prestazioni degli apparati sopracitati, bisogna installare un’antenna accordata sulla frequenza del radio ricevitore installato .N.B. Fare molta attenzione che il filo centrale del cavo non vada a contatto
con la calza in rame esterna, ciò renderebbe nullo il funzionamento dell’antenna.
L’antenna va installata perpendicolarmente e deve essere in vista del telecomando.LAMPEGGIATORE SPARK con scheda intermittente incorporata cod. ACG7059SUPPORTO LATERALE cod. ACG7042ANTENNA SPARK 433 cod. ACG5452
CHIAVISTELLO MECCANICO
Chiavistello meccanico per cancelli a due ante cod. ACG5000
OPTIONALPer i collegamenti ed i dati tecnici degli accessori attenersi ai relativi libretti di istruzione.I

11
BLOCK
SELETTORE A CHIAVE DA PARETE cod. ACG1053SELETTORE A CHIAVE DA INCASSO cod. ACG1048
FIT SLIM
FOTOCELLULE DA PARETE cod. ACG8032COPPIA DI COLONNINE PER FIT SLIM cod. ACG8065Le fotocellule FIT SLIM hanno la funzione di sincronismo in corrente alternata e portata di 20 m.Sono applicabili più coppie di fotocellule ravvicinate grazie al circuito sincronizzatore.Aggiungere il TRASMETTITORE TX SLIM SYNCRO cod. ACG8029 per sincronizzare fino a 4 coppie di fotocellule.
DISPOSITIVI Wi-Fi
NOVA Wi-Fi
FOTOCELLULE SENZA FILI cod. ACG8037COPPIA COLONNINE NOVA cod. ACG8039
VERTIGO Wi-Fi
FOTOCELLULE SENZA FILI SOSTITUTIVE DELLA COSTAVERTIGO Wi-Fi 8 cod. ACG8042 - VERTIGO Wi-Fi 10 cod. ACG8043
BLOCK Wi-Fi
SELETTORE A CHIAVE SENZA FILI cod. ACG6098
MASTER Wi-Fi
SCHEDA DI GESTIONE SISTEMA SENZA FILIcon innesto - 12÷30V ac/dc cod. ACG6094con morsettiera - 12÷30V ac/dc cod. ACG6099
SPARK Wi-Fi
LAMPEGGIATORE SENZA FILI cod. ACG7064SUPPORTO LATERALE cod. ACG7042
I

12
F SCHÉMA DÉTAILLÉ DE L’INSTALLATION
* Les vantaux de plus de 1,6 m de langeur nécessitent l’installation d’une élettroserrure pour garantir une fermeture efficace.
** Les vantaux de plus de 1,8 m de langeur nécessitent l’installation d’une élettroserrure pour garantir une fermeture efficace.
*** IDRO 27 SUPER ralent dans les derniers 2 centimètres de course de la tige.
CONTROLE PRE-INSTALLATION
Le portail à battant doit être solidement fixé aux cardans des colonnes, ne doit pas flechir pendant le mouvement et doit pouvoir manoeuvrer sans effort.Avant d’installer le IDRO, il convient de verifier tous les encombrements necessairespour procéder à l’installation.Si le portail se presente comme indiqué Fig. 1, aucune modification n’est necessaire.Il est impératif d’uniformiser les caractéristiques du portail avec les normes et les lois en vigueur. La porte peut être automatisée seulement si elle est en bon état et qu’elle est conforme à la norme EN 12604.- Le vantail ne doit pas comporter de portillon intégré. Dans le cas contraire,
il sera opportun de prendre les précautions décrites au point 6.5.1 de la EN 12453 (interdire, par le biais d’un contact raccordé aux bornes adaptées de la platine électronique, la mise en marche de l’automatisme si le portillon est ouvert).
- Ne pas générer de zone d’écrasement (par exemple entre le vantail ouvert et la cloture).
Il ne devra y avoir aucun arrêt mécanique au-dessus du portail, étant donné que les arrêts mécaniques ne sont pas suffisamment sûrs.
1
❻ ❻
❹
❶ ❶
❷❸
❺❻ ❻❺ ❹
1 - Operateur IDRO2 - Antenne radio3 - Signal electrique4 - Selecteur5 - Photocellules p/protection externe6 - Photocellules p/protection interne
CARACTERISTIQUES TECHNIQUES
27/R 27/1B27
SUPER/R27
SUPER/1B39/R
39/1B39/2B
Longueur maxi du battant m 3 3* 6 6** 7 7**
Poids maxi du portail kg 400 700 1000
Course maxi d’entrainement
cm 27 27*** 39
Temps moyen d’ouverture s 16 40 50
Force maxi de poussée N 2500 6400
Alimentation et frequence 230V~ 50/60Hz
Puissance moteur W 180 220
Absorption A 1 1,1
Condensateur µF 6,3 12,5
Cycles normatifs n° 300 - 15s/2s 500 - 23s/2s 800 - 45s/2s
Cycles conseillés par jour n° 300 500 800
Service % 80 90
Cycles consécutifs garantis n° 100 200 800
Type d’huile OX SUPER
Poids maximun kg 10 11,4 13,6
Bruit db <70
Volume m3 0,0086 0,0084
Temperature de travail °C -20 ÷ +55
Indìce de protection IP 55

13
F
Si le pilier est très large et n’est pas possible d’installer le operateur en respectant la mesure a, il faut realiser une niche dans le pilier ou deplacer le portail sur l’arete.
FIXATION OPERATEUR
Selon le type d’ouverture (intérieure ou extérieure) et la rotation maxie du vantail choisie, il faut couper la bride en respectant le quota “a” et après souder comme dans Fig. 2.Le support doit être positionné de façon que l’opérateur est parfaitement horizontal.
Attention: ne pas utiliser le marteau pour insérer le pivot en laiton court; insérer le pivot dans la fourche et dans la bride avec la simple pression des mains (Fig. 3).
Attention: Ne pas incliner l’opérateur hydraulique outre l’angle permi par la fourche oscillante (1), risque de rupture de la même (Fig. 4).
a b c (max)Max. angle d’ouverture
Course tige max
Course tige pour 90°
100 115 50 110° 250 215100 150 50 90° 250105 110 55 110° 246 215105 145 55 90° 250120 105 70 105° 249 225120 130 70 90° 250125 125 75 90° 250140 95 90 100° 250 235140 110 90 90° 250145 95 95 100° 255 240145 105 95 90° 250150 100 100 90° 250155 85 105 95° 249 240160 90 110 90° 250170 75 120 90° 248180 65 130 90° 247
a b c (max)Max. angle d’ouverture
Course tige max
Course tige pour 90°
125 170 75 125° 368 295130 170 80 125° 372 300140 235 90 90° 370145 165 95 120° 372 310145 230 95 90° 370160 210 110 90° 370175 195 120 90° 370185 145 130 110° 370 330185 190 130 90° 370195 140 140 110° 371 355195 175 140 90° 370240 110 185 100° 370 355240 125 185 90° 370250 105 195 95° 370 360250 115 195 90° 370260 95 205 95° 369 365260 100 205 90° 370270 90 215 90° 370280 80 230 90° 370295 65 245 90° 369
Mesures en mm
IDRODUE 27Course totale 270 mm - Course max conseillé 250 mm - d = 970 mm
IDRO 39Course totale 390 mm - Course max conseillé 370 mm - d = 1210 mm
Parties à installer conformément à la norme EN 12453
TYPE DE COMMANDEUSAGE DE LA FERMETURE
Personne expertes(zone sans publique*)
Personne expertes(zone avec publique)
Personnes non expertes
homme presente A B Pas possible
impulsion en vue(ex. bouton)
C ou E C ou E C et D, ou E
impulsion hors de vue(ex. télécommande)
C ou E C et D, ou E C et D, ou E
automatique C et D, ou E C et D, ou E C et D, ou E
* example typique: fermetures qui n’ont pas d’accès à un chemin publicA: Touche de commande à homme present (à action maintenue), comme code ACG2013.B: Sélecteur à clef à homme present (à action maintenue), code ACG1010.C: Réglage de la puissance du moteur ou photocellules pour respecter les forces d’impact
indiquées à l’annexe AD: Barre palpeuse et/ou autres dispositifs supplémentaires pour réduire la probabilité de
contact avec la porte.E: Dispositifs installés de telle sorte qu’une personne ne puisse pas être touchée par la
porte.
ac
d
b
(1)
58 mm 98 mm
2
(1)
58 mm 98 mm
4
(1)
58 mm 98 mm
3
5

14
IDRODUE 27
INSTALLATION DE LA PROTECTION DE LA TIGE CHROMEES’assurer d’avoir inséré le quadre en plastique anti-vibration (A) avant d’insérer le couvre tige extrusé (Fig. 8).
MONTAGE DU DEVERROUILLAGE EN PLASTIQUEATTENTION: Le montage du déverrouillage en plastique doit être effecuté comme indiqué dans fig. 9 seul et uniquement après avoir terminés toutes les opérations d’installation, le montage du couvre tige et le tarage des valves by-pass.
SECURITES ELECTRIQUESEn plus des sécurités mécaniques précitées, lorsque les dimensions du vantail dépassent 1,80 m de largeur, il est obligatoire d’utiliser deux paires de cellules photo-électriques en mesure d’interrompre le mouvement. Placez une paire de cellules photo-électriques à une hauteur variant entre 40 et 60 cm entre les colonnes du portail àl’extérieur. Placez l’autre paire de cellules photo-électriques à la même hauteur que la première, aux extrémités des vantaux du portail quand celui-ci est ouvert. Le mouvement du portail doit toujours être signalé par un feu clignotant placé à proximité du portail.Nous vous conseillons d’utiliser des coffrets électroniques T2 (pour 1 ou 2 moteurs monophasés).Pour ce qui est des raccordements et des données techniques des accessoires, se référer à leur manuel.
46 mm70 mm
63,5 mm
70 mm
7
98
POSITIONNEMENT ATTAQUE ANTERIEURSelon la nature du portail (bois, fer, aluminium) l’attaque antérieur peut être soudé ou vissé (Fig. 6).L’attaque antérieur doit être positionné parfaitement horizontal (Fig. 7).
N.B.: S’assurer que lorsque le vantail est complètement ouvert ou complètement fermé, la tige n’est pas en fin de course, mais s’éloigne des limites de sa course d’au moins 15mm de chaque côté.
Installer IDRO en essayant plusieurs fois d’ouvrir et de fermer en controlant que le profile cache-vis ne frotte pas lorsque le portail est en mouvement, dans le cas contrarie, repositionner le agrafe.
En cas de mur parallèle au portail lorsque celui-ci est ouvert il est necessaire de pratiquer une niche pour loger le operateur.
46 mm70 mm
63,5 mm
70 mm
46 mm70 mm
63,5 mm
70 mm
10
6
COUVRE-VALVES BY PASS
F

15
MANOEUVRE MANUELLE AVEC CLE - IDRODUE 27Pour déverrouiller opérer comme suit:- Insérer la clef et la tourner de 180° en sens anti-horaire (Fig. 11).Pour bloquer de nouveau l’opérateur opérer comme suit:- Insérer la clef et la tourner en sens horaire jusqu’à son arrêt (Fig. 11).Attention: effecuter le déverrouillage toujours avec énergie électrique déclenchée.
MANOEUVRE MANUELLE AVEC CLE - IDRO 39Ouvrir le bouchon. Introduire la clé dans la serrure. Tourner la clé de 90° dans le sense anti-horarie. Effectuer la manoeuvre manuelle en poussant doucement le battant du portail. Pour revenir au fonctionnement automatique, tourner la clé dans la position initiale. Enlever la clé et fermer le bouchon pour éviter que de l’eau ou de la poussière entrent dans le dispositif de déblocage.ATTENTION: Effectuer les opérations relatives à la manoeuvre manuelle lorsque le moteur
est arrêté.ATTENTION: Dans les modèles IDRODUE 27/R, IDRODUE 27S/R et IDRO 39/R
(réversibles) le déblocage est toujours présent. Dans ce cas, le déblocage sert à augmenter ou diminuer la réversibilité de mouvement pour éviter que le volet batte trop facilement quand il y a du vent.
Afin de pouvoir manœuvre manuellement le vantail, il est important de vérifier que:- Il soit fourni des poignées adaptées sur le vantail.- Ces poignées doivent être positionnées de sorte à ne pas créer un danger durant leur
utilisation.- L’effort manuel pour mettre en mouvement le vantail ne doit pas excéder 225N pour les
portes et portails en usage privé, et 390N pour les portes et portails à usage industriel et commercial (valeurs indiquées au paragraphe 5.4.5 de la norme EN 12453).
REGLAGE DE LA FORCE (VALVES BY PASS)Pour augmenter la force, tourner, à l’aide d’un tournevis et dans le sens des aiguilles d’une montre, les soupapes d’ouverture (grise) et de fermeture (jaune) situées sous le couvre-valves de plastique (à retirer) de l’opérateur IDRODUE 27 (Fig. 13) ou sous le couvercle (une fois les 4 vis dévissées) de l’opérateur IDRO 39 (Fig. 14).Pour réduire la force, tourner les soupapes d’ouverture et de fermeture dans le sens contraire des aiguilles d’une montre.N.B.: Lors des opérations de réglage de la force, tourner les soupapes progressivement
et doucement, sans les dévisser ni les visser à fond. Il est conseillé de régler les soupapes de sorte que les pressions ne diffèrent pas trop entre elles.
Régler la pression d’ouverture légèrement supérieure à celle de fermeture.
ENTRETIENEffectuer soulement par personnel specialisé après avoir coupé l’alimentation. Tous les ans, graisser les gonds, contrôler la force de poussée exercée par le operateur sur le portail et vérifier le niveau d’huile.d
12
IDRO 39
14
IDRO 39
11
IDRODUE 27 - 27 SUPER
VerrouillerDéverrouiller
13
IDRODUE 27 - 27 SUPER
VALVESBY PASS
Enlever le couvre-valves de plastique
F

16
F PROCEDURE POUR ENLEVER LE PROFIL EN ALUMINIUM
PROCEDURE A FAIRESEULEMENT PENDANT
L’INSTALLATION
S’IL FAUT ENVOYER CES OPERATEURS, NE PAS APPLIQUER CETTE
PROCEDURE

17
RADIORÉCEPTEURS AUTO-APPRENDISSAGE
S433 1CH à un canal embrochable code ACG5081S433 1CH à un canal avec bornes à visser code ACG5082S433 2CH à deux canaux embrochable code ACG5083S433 2CH à deux canaux avec bornes à visser code ACG5084S433 4CH à quatre canaux embrochable code ACG5085S433 4CH à quatre canaux avec bornes à visser code ACG5086
POUSSOIR FLAT
Pour raccorder un moteur en direct code ACG2012Pour raccorder à une carte électronique code ACG2013
T2
code ABT2000 => CRX 230/50-60HZcode ABT2001 => 230/50-60HZ code ABT2002 => CRX 120/60HZcode ABT2003 => 120/60HZ
T2 Wi-Fi
Avec carte MASTER Wi-Fi.code ABT2001W
Auto-apprentissage course et tempsOuverture piétonneFermeture automatique totale et piétonnePré-clignotementRalentissement réglable en approche Réglage de la force Commande radio automatique ou pas à pas ouverture totale Commande radio automatique ou pas à pas ouverture piétonne Commande simple automatique ou pas à pasCoup de bélier serrure électriqueRécepteur radio incorporéGestion photocellules Gestion de la fermeture immédiate par les photocellules après le passageGestion clignotantGestion cordon de securitéAutotest cordons de sécurité comme requis par la norme EN 12453Sélecteur à clefBuzzerSerrure électrique
SPARK
Afin d’optimaliser les performances des appareils suscités, il est indispensable d’installer une antenne accordée sur la fréquence du radiorécepteur installé. N.B. Veiller à ce que le fil central du câble n’entre pas en contact avec
l’enveloppe extérieure en cuivre; dans le cas contraire, le fonctionnement de l’antenne serait nul.
L’antenne doit être installée de façon perpendiculaire et être en vue de la télécommande. FEU CLIGNOTANT SPARK avec carte intermittente incorporée code ACG7059SUPPORT LATERAL code ACG7042ANTENNE SPARK 433 code ACG5452
VERROU MECANIQUE
Pour le verrouillage au sol du premier vantail code ACG5000
SUN 2CH code ACG6052 SUN 4CH code ACG6054 SUN CLONE 2CH code ACG6056 SUN CLONE 4CH code ACG6058
EMETTEUR RADIO SUN
OPTIONS Pour les branchements et les données techniques des accessoires, se conformer aux livrets d’instruction correspondants. F

18
BLOCK
BLOCK - SÉLECTEUR À CLÉ MURAL code ACG1053BLOCK - SÉLECTEUR À CLÉ ENCASTRER code ACG1048
FIT SLIM
PHOTOCELLULES MURALES code ACG8032PAIRE DE POTEAUX POUR FIT SLIM code ACG8065Les photocellules FIT SLIM ont la fonction de synchronisme dans le courant à C.A. et les gammes de 20 m.Plusieurs paires sont appliqués, rapprochés les uns des autres grâce au circuit synchronisé. Ajouter le TRANSMETTEUR TX SLIM SYNCRO code ACG8029 s’il existe plus de deux paires de photocellules (jusqu’à 4).
DISPOSITIFS Wi-Fi
MASTER Wi-Fi
FICHE DE GESTION SYSTÈME SANS FILSembrochable - 12÷30V ac/dc code ACG6094avec bornes à visser - 12÷30V ac/dc code ACG6099
NOVA Wi-Fi
PHOTOCELLULES SANS FILS code ACG8037PAIRE DE POTEAUX NOVA code ACG8039
VERTIGO Wi-Fi
PHOTOCELLULES SANS FIL POUR REMPLACER LA BARRE PALPEUSEVERTIGO Wi-Fi 8 code ACG8042 - VERTIGO Wi-Fi 10 code ACG8043
BLOCK Wi-Fi
SÉLECTEUR À CLÉ SANS FILS code ACG6098
SPARK Wi-Fi
FEU CLIGNOTANT SANS FILS code ACG7064SUPPORT LATERAL code ACG7042
F

19
GB
* In the case of leaf longer than 1,6 m, an electric lock must be fitted to ensure efficient closing. ** In the case of leaf longer than 1,8 m, an electric lock must be fitted to ensure efficient closing.*** IDRO 27 SUPER slows down in the 2 cm of the stroke.
PRE-INSTALLATION CHECKS
The leaf must be fixed firmily on the hinges to the pillars, must not be flexible during the movement and must move without frictions.Before the installation of IDRO, verify all dimensions etc.There’s no need for any modification, if the gate is like that shown in Fig. 1.Gate features must be uniformed with the standards and laws in force. The door/gate can be automated only if it is in a good condition and its conditions comply with the EN 12604 norm.- The door/gate leaf does not have to have a pedestrian opening. In the
opposite case it is necessary to take the appropriate steps, in accordance with EN 12453 norm point 6.5.1 (for instance; by preventing the operation of the motor when the pedestrian opening is opened, by installing a safety microswitch connected with the control panel).
No mechanical stop shall be on top of the gate, since mechanical stops are not safe enough.
SYSTEM LAY-OUT
1
1 - IDRO operator2 - Tuned aerial3 - Flashing lamp4 - Key selector5 - Photoelectric cells (external)6 - Photoelectric cells (internal)
❻ ❻
❹
❶ ❶
❷❸
❺❻ ❻❺ ❹
TECHNICAL DATA 27/R 27/1B27
SUPER/R27
SUPER/1B39/R
39/1B39/2B
Max. leaf length m 3 3* 6 6** 7 7**
Max. leaf weight kg 400 700 1000
Max. travel cm 27 27*** 39
Average opening time s 16 40 50
Thrust force N 2500 6400
Power supply 230V~ 50/60Hz
Motor capacity W 180 220
Power absorbed A 1 1,1
Capacitor µF 6,3 12,5
Normative cycles n° 300 - 15s/2s 500 - 23s/2s 800 - 45s/2s
Daily operations suggested n° 300 500 800
Service % 80 90
Guaranteed consecutive n° 100 200 800
Lubrification OX SUPER
Weight kg 10 11,4 13,6
Noise db <70
Volume m3 0,0086 0,0084
Operating Temperature °C -20 ÷ +55
Protection IP 55

20
If the pillar is too large, and it is not possible to adjust the operator respecting the measure a, you must make a niche in the pillar or you have to move the gate to the edge of the pillar.
OPERATOR INSTALLATION
According to the chosen opening type (inside or outside) and according to the chosen max. rotation of the leaf, the bracket must be first cut respecting the mesurment “a” and than welded as in Fig. 2.The support must be positioned so that the operator is in perfect horizontal position.
Attention: do not use the hammer to insert the short brass pivot; the insertion of the pivot into the fork and bracket must be made simply by hand pressure (Fig. 3).
Attention: do not incline the hydraulic operator further then the allowed angle from the oscillating fork (1), could cause the braking of it (1) (Fig. 4).
a b c (max) Max. Opening Angle Max. Stroke Stroke for 90°100 115 50 110° 250 215100 150 50 90° 250105 110 55 110° 246 215105 145 55 90° 250120 105 70 105° 249 225120 130 70 90° 250125 125 75 90° 250140 95 90 100° 250 235140 110 90 90° 250145 95 95 100° 255 240145 105 95 90° 250150 100 100 90° 250155 85 105 95° 249 240160 90 110 90° 250170 75 120 90° 248180 65 130 90° 247
a b c (max) Max. Opening Angle Max. Stroke Stroke for 90°125 170 75 125° 368 295130 170 80 125° 372 300140 235 90 90° 370145 165 95 120° 372 310145 230 95 90° 370160 210 110 90° 370175 195 120 90° 370185 145 130 110° 370 330185 190 130 90° 370195 140 140 110° 371 355195 175 140 90° 370240 110 185 100° 370 355240 125 185 90° 370250 105 195 95° 370 360250 115 195 90° 370260 95 205 95° 369 365260 100 205 90° 370270 90 215 90° 370280 80 230 90° 370295 65 245 90° 369
Measurements in mm
IDRODUE 27Total stroke 270 mm - Max. recommended stroke 250 mm - d = 970 mm
IDRO 39Total stroke 390 mm - Max. recommended stroke 370 mm - d = 1210 mm
Parts to install according to EN 12453 standard
COMMAND TYPEUSE OF THE SHUTTER
Skilled persons(out of public area*)
Skilled persons(public area)
Not skilled persons
Hold-to-run operation A B Not possible
Impulsive - in sight (e.g. push-button)
C or E C or E C and D, or E
impulsive - out of sight (e.g. remote)
C or E C and D, or E C and D, or E
automatic C and D, or E C and D, or E C and D, or E
* a typical example are those doors which do not have access to any public wayA: Hold-to-run operation made by push-button ex: code ACG2013B: Hold-to-run operation made by key selector ex: code ACG1010C: Adjustable power of the motor or photocells to respect impact forces as indicated in
Annex AD: Safety strips and/or other additional devices to reduce the probability of contact with
the door.E: Devices installed in such a way that a person can not be touched by the door.
ac
d
b
(1)
58 mm 98 mm
2
(1)
58 mm 98 mm
4
(1)
58 mm 98 mm
3
5
GB

21
IDRODUE 27
INSTALLATION OF THE CHROMIUM-PLATED ROD PROTECTIONMake sure to have inserted the antivibration plastic frame (A) before inserting the rod cover extrusion (Fig. 8).
PLASTIC RELEASE MOUNTINGATTENTION: the mounting of the plastic release must be effectuated as shown in Fig. 9 only and exsclusively after havingfinished all the instalaltion operations, mounting of the rod cover and calibration of the by-pass valves.
ELECTRICAL SAFETY DEVICESIn addition to compliance to all mechanical safety regulations, gates with leaf length exceeding 1.8 m must be fitted with two pairs of photocells capable of interrupting gate movement.The photocells must be installed at a height of 40 - 60 cm between the gate posts on the outside of the structure.The other two photocells must be installed at the same height as the previous ones on the ends of the gate leafs to form a barrier between the leafs when open.Gate movement must be indicated by a flashing unit placed near the gate.Use the T2 (for one or two single-phase motors) electronic control unit.For connections and technical data of accessories refer to the appropriate booklets.
46 mm70 mm
63,5 mm
70 mm
7
98
POSITIONING OF THE FRONT FIXATIONDepending on the type of the gate (wood, iron, aluminium) the front fixation can be welded or screwed (Fig. 6).Mount the front fixation so that it guarantees the perfectly horizontal position of the operator (Fig. 7).
N.B.: Ensure that when the door is fully open and fully closed the rod is not at the end of its stroke, but is at least 15mm from the end of its stroke on each side.
Fix the IDRO and try several times to open and to close the gate, controlling that the cover does not touch the moving gate, otherwise you have to readjust the ancorage on the gate.
In the case you have a wall parallel with the open gate, you must provide a niche in which to place the operator.
46 mm70 mm
63,5 mm
70 mm
46 mm70 mm
63,5 mm
70 mm
10
6
BY-PASS VALVES COVER
GB

22
GB
MANUAL OPERATION WITH KEY - IDRODUE 27To release operate as follows:- Insert the key and turn it about 180° anti-clockwise (Fig. 11).To relock the operator do as follows:- Insert the key and turn it clockwise until it stops (Fig. 11).Attention: To release cut current supply.
MANUAL OPERATION WITH KEY - IDRO 39Open the RIB cap.Insert the key into the lock. Turn the key 90° in anti-clockwise sense, without forcing it. Then manually operate the gate by smoothly pushing the gate swing.To reset automatic operation, set it to the initial position, remove the key and close the cap to prevent water and powder from entering the unlocking device.WARNING: During manual operations be sure that the motor is off.CAUTION: Models IDRODUE 27R, IDRODUE 27S/R and IDRO 39/R (reverse type) always
feature the unlock mode. In this case the unlock mode allows the adjustment (increase/decrease) of stroke reversibility, to avoid undesired wing gate movement in presence of wind.
In order to carry out the manual operation of the gate leaf the followings must be checked:- That the gate is endowed with appropriate handles;- That these appropriate handles are placed so to avoid safety risks for the operator; - That the physical effort necessary to move the gate leaf should not be higher than 225
N, for doors/gates for private dwellings, and, 390N for doors/gates for commercial and industrial sites ( values indicated in 5.4.5 of the EN 12453 norm).
FORCE ADJUSTMENT (BY-PASS VALVES)Use a screwdriver to increase the force by rotating clockwise the opening valve (grey) and the closing valve (yellow) located below the plastic valves cover (to remove) of the IDRODUE 27 operator (Fig. 13) or below the cover (after You have unscrewed the 4 screws) of the IDRO 39 operator (Fig. 14).Decrease the force by rotating anti-clockwise the opening and closing valves.WARNING: When adjusting the force, smoothly and gradually rotate the valves without
screwing them or unscrewing them completely. We suggest to you to adjust the valves in a way that the pressions are not different between themselves.Adjust the opening pressure a little higher than the closing.
MAINTENANCETo be undertaken only by specialized staff after disconnecting power supply. Lubricate the hinges and check the oil level and thrust force generated by the operator on the gate once a year.
12
IDRO 39
14
IDRO 39
11
IDRODUE 27 - 27 SUPER
Lock Release
13
IDRODUE 27 - 27 SUPER
BY-PASSVALVES
Take off the plastic valves-cover

23
GBSTRIPPING PROCEDURE
TO DO ONLY DURINGINSTALLATION
IF OPERATORS MUST BE DELIVERED, DON’T
APPLY THIS PROCEDURE

24
CODE LEARNIG SYSTEM RADIORECEIVERS
S433 1CH 1-channel with connnector code ACG5081S433 1CH 1-channel with terminal Block code ACG5082S433 2CH 2-channels with connnector code ACG5083S433 2CH 2-channels with terminal Block code ACG5084S433 4CH 4-channels with connnector code ACG5085S433 4CH 4-channels with terminal Block code ACG5086
PUSH-BUTTON FLAT
Connection to motor code ACG2012 Connection to control panel code ACG2013
T2
code ABT2000 => CRX 230/50-60HZcode ABT2001 => 230/50-60HZ code ABT2002 => CRX 120/60HZcode ABT2003 => 120/60HZ
T2 Wi-Fi
With MASTER Wi-Fi card.code ABT2001W
Automatic travel and timing code learning systemPedestrian opening commandPedestrian and total automatic closurePre-blinking Adjustable slow speed in approachingElectronic adjustment of the forceRadio command - step by step or automatic total openingRadio command - step by step or automatic pedestrian openingSingle command - step by step or automaticElectric lock release operationBuilt-in radio receiver 433MHzManagement of the photocellsAutomatic closing after the transit through the photocellManagement of the blinker Management of the stripsSafety strip autotest as required by EN 12453Key selectorBuzzerElectric lock
SPARK
In order to make the systems mentioned above give the best performances, you need to install an antenna tuned on the frequency of the radio receiver installed.N.B. Pay attention to not let the central wire of the cable to came Into contact with the external copper sheath, since this would prevent the antenna from working.Install the antenna vertically and in such a way the remote control can reach it.SPARK BLINKER WITH IN-BUILT INTERMITTENT CARD code ACG7059LATERAL SUPPORT code ACG7042SPARK ANTENNA 433 code ACG5452
MECHANICAL BOLT
For 2-leaf gates to latch closed gate to the ground. code ACG5000
SUN 2CH code ACG6052 SUN 4CH code ACG6054 SUN CLONE 2CH code ACG6056 SUN CLONE 4CH code ACG6058
RADIO TRANSMITTER SUN
ACCESSORIES For the connections and the technical data of the optional equipments follow the relevant handbooks.
GB

25
BLOCK
KEY SELECTOR FOR WALL-INSTALLATION code ACG1053KEY SELECTOR TO BUILD-IN code ACG1048
FIT SLIM
PHOTOCELLS for the wall-installation code ACG8032PAIR OF COLUMNS FOR FIT SLIM code ACG8065FIT SLIM photocells have synchronism function in AC current and ranges of 20 m.You can fit many couples close together thanks to the synchronising circuit.Add the SYNCRO TRANSMITTER TX SLIM SYNCRO code ACG8029 for more than 2 photocells couples (up to 4).
Wi-Fi DEVICES
MASTER Wi-Fi
RECEIVER CARD TO MANAGE WIRELESS SYSTEMwith connector - 12÷30V ac/dc code ACG6094with terminal block - 12÷30V ac/dc code ACG6099
NOVA Wi-Fi
PHOTOCELLS WITHOUT WIRES code ACG8037PAIR OF COLUMS NOVA code ACG8039
VERTIGO Wi-Fi
WIRELESS PHOTOCELLS SUBSTITUTING THE SAFETY STRIPVERTIGO Wi-Fi 8 code ACG8042 - VERTIGO Wi-Fi 10 code ACG8043
BLOCK Wi-Fi
KEY SELECTOR WITHOUT WIRES code ACG6098
SPARK Wi-Fi
BLINKER WITHOUT WIRES code ACG7064LATERAL SUPPORT code ACG7042
GB

26
D
* Ab Flügelmaß von 1,6 m muß ein elektrisches Schloß zur Gewährleistung einer wirkungsvollen Schließung angebracht werden.
** Ab Flügelmaß von 1,8 m muß ein elektrisches Schloß zur Gewährleistung einer wirkungsvollen Schließung angebracht werden.
*** IDRO 27 SUPER verlangsamt in den letzten 2 cm Schaftlauf.
PRÜFUNG VON DER MONTAGE
Das Flugeltor muß fest an der Angelpunkten der Trager fixiert sein, darf sich wahrend der Bewegung nicht biegen und ohne reibung nicht bewegen.Bevor IDRO montiert wird ist es besser alle Hindernisse, die bei der Montage auftreten konnen festzustellen.Bei einem Tor wie in Abbildung 1 mussen keine Veranderungen vorgenommen werden.Es ist erforderlich, die Charakteristiken des Tors an die geltenden Normen und Gesetze anzupassen. Das Tor kann nur automatisch Angeschlossen werden, wenn es in einem einwandfreien Zustand ist und der EN12604 entspricht.- Das Tor welches keine Gehfluegelfunktion hat,in diesem Fall ist es
erforderlich das Tor mit der norm EN 12453 punkt 6.5.1 in Einklang zu bringen (z.B. das in Bewegung setzen des Motors per Handsender, wenn der Gehfluegel geoeffnet ist. Das zu vehindern koennen sie einen Endschalter anschliessen der beim oeffnen des Gehfluegel andere automatischen funktionen ausser Kraft setzt).
Es dürfen keine mechanischen Anschläge über dem Tor vorhanden sein, da diese nicht ausreichend sicher sind.
1
ANLAGEN LAY-OUT
1 - Antrieb IDRO2 - Antenne3 - Blinkleuchte4 - Schlusselschalter5 - Photozelle Toraussenseitig6 - Photozellen - innen
❻ ❻
❹
❶ ❶
❷❸
❺❻ ❻❺ ❹
TECHNISCHE EIGENSCHAFTEN 27/R 27/1B27
SUPER/R27
SUPER/1B39/R
39/1B39/2B
Max. Torflügelweite m 3 3* 6 6** 7 7**
Max. Torgewicht kg 400 700 1000
Max. Hub cm 27 27*** 39
Mittlere Öffnungszeit zirka s 16 40 50
Max. Schubkraft N 2500 6400
Stromspannung und freq. 230V~ 50/60Hz
Motorleistung W 180 220
Stromaufnahme A 1 1,1
Kondensator µF 6,3 12,5
Normative Zyklen n° 300 - 15s/2s 500 - 23s/2s 800 - 45s/2s
Zyklen rieten einem Tag n° 300 500 800
Service % 80 90
Garantierte nachfolgende Zyklen
n° 100 200 800
Ölsorte OX SUPER
Motorgewicht kg 10 11,4 13,6
Geräusch db <70
Volumen m3 0,0086 0,0084
Betriebstemperatur °C -20 ÷ +55
Schutzart IP 55

27
D
Falls der Antrieb nicht mit dem richtigen Maß (a) montiert werden kann, da der Tortrager zu breit ist, muß man in der Saule eine Wandvertiefung schaffen oder das Tor an den Rand versetzen.
BEFESTIGUNG DER ANTRIEB
Entsprechend dem ausgewählten Öffnungstyp (nach Aussen oder nach Innen) und je nach ausgewählter Rotation des Flügels, muss der Bügel zuerst entsprechend der Quote “a” geschnitten und danach, wie in Abb. 2 festgeschweisst werden.Die Stütze muss so positioniert werden, dass sich der Antrieb in horizontaler Position befindet.
Achtung: Den kurzen Messingstift nicht mit dem Hammer in die Gabel und den Bügel einführen, sondern einfach mit der Hand hineindrücken (Abb. 3).Achtung: Den hydraulischen Antrieb nicht über den erlaubten Winkel der Schwinggabel (1) beugen, sie könnte dabei brechen (Abb. 4).
a b c (max) Max. Öffnungs-Winkel Max. Kolbenlauf
Kolbenlauf für 90°
100 115 50 110° 250 215100 150 50 90° 250105 110 55 110° 246 215105 145 55 90° 250120 105 70 105° 249 225120 130 70 90° 250125 125 75 90° 250140 95 90 100° 250 235140 110 90 90° 250145 95 95 100° 255 240145 105 95 90° 250150 100 100 90° 250155 85 105 95° 249 240160 90 110 90° 250170 75 120 90° 248180 65 130 90° 247
a b c (max) Max. Öffnungs-Winkel Max. Kolbenlauf
Kolbenlauf für 90°
125 170 75 125° 368 295130 170 80 125° 372 300140 235 90 90° 370145 165 95 120° 372 310145 230 95 90° 370160 210 110 90° 370175 195 120 90° 370185 145 130 110° 370 330185 190 130 90° 370195 140 140 110° 371 355195 175 140 90° 370240 110 185 100° 370 355240 125 185 90° 370250 105 195 95° 370 360250 115 195 90° 370260 95 205 95° 369 365260 100 205 90° 370270 90 215 90° 370280 80 230 90° 370295 65 245 90° 369
Abmessungen in mm
IDRODUE 27Totale Laufl. 270 mm - Max. empfohlene Laufl. 250 mm - d = 970 mm
IDRO 39Totale Laufl. 390 mm - Max. empfohlene Laufl. 370 mm - d = 1210 mm
Komponenten zur Installation nach der Norm EN 12453
BEFEHLSTYP
ANWENDUNG DER SCHLIESSUNG
Erfahrene Personen(außerhalb des
öffentlichen Bereichs*)
Erfahrene Personen(öffentlicher Bereich)
Nicht fachkundige Personen
Gedrückt halten A B nicht möglich
Impulsiv - in Sicht(z.B. Wandtaster)
C oder E C oder E C und D, oder E
impulsiv - außer Sichtweite (z.B. Fernbedienung)
C oder E C und D, oder E C und D, oder E
automatisch C und D, oder E C und D, oder E C und D, oder E
* Ein typisches Beispiel sind jene Türen, die keinen öffentlichen Zugang habenA: Gedrückt halten Befehl, wie mit Wandtaster z.B: Kode ACG2013B: Gedrückt halten Befehl, wie mit Schlüsselschalter z.B: Kode ACG1010C: Einstellung der Motor- oder Fotozellenkraft zur Einhaltung der Aufprallkräfte, wie in Anhang
A angegeben.D: Kontaktleiste und /oder andere zusätzliche Geräte, um die Wahrscheinlichkeit eines Kontakts
mit der Tür zu verringernE: Geräte, die so installiert sind, dass eine Person nicht von der Tür berührt werden kann.
ac
d
b
(1)
58 mm 98 mm
2
(1)
58 mm 98 mm
4
(1)
58 mm 98 mm
3
5
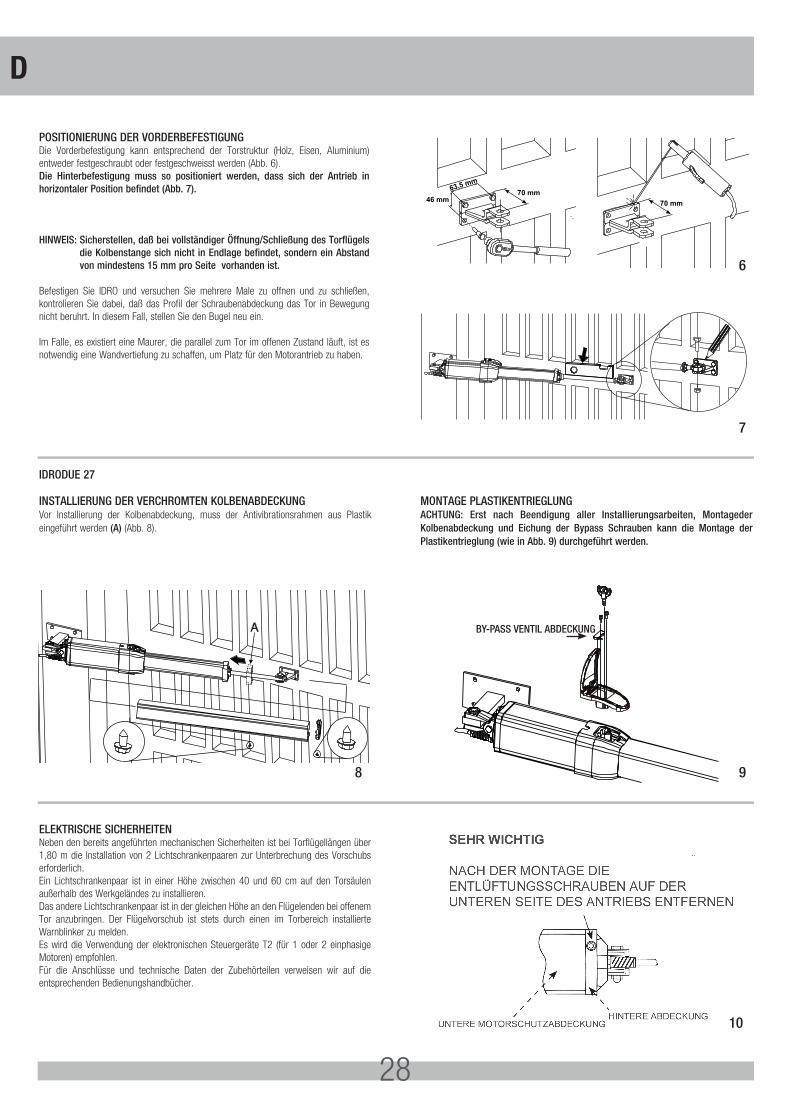
28
D
IDRODUE 27
INSTALLIERUNG DER VERCHROMTEN KOLBENABDECKUNGVor Installierung der Kolbenabdeckung, muss der Antivibrationsrahmen aus Plastik eingeführt werden (A) (Abb. 8).
MONTAGE PLASTIKENTRIEGLUNGACHTUNG: Erst nach Beendigung aller Installierungsarbeiten, Montageder Kolbenabdeckung und Eichung der Bypass Schrauben kann die Montage der Plastikentrieglung (wie in Abb. 9) durchgeführt werden.
ELEKTRISCHE SICHERHEITEN Neben den bereits angeführten mechanischen Sicherheiten ist bei Torflügellängen über 1,80 m die Installation von 2 Lichtschrankenpaaren zur Unterbrechung des Vorschubs erforderlich. Ein Lichtschrankenpaar ist in einer Höhe zwischen 40 und 60 cm auf den Torsäulen außerhalb des Werkgeländes zu installieren. Das andere Lichtschrankenpaar ist in der gleichen Höhe an den Flügelenden bei offenem Tor anzubringen. Der Flügelvorschub ist stets durch einen im Torbereich installierte Warnblinker zu melden.Es wird die Verwendung der elektronischen Steuergeräte T2 (für 1 oder 2 einphasige Motoren) empfohlen.Für die Anschlüsse und technische Daten der Zubehörteilen verweisen wir auf die entsprechenden Bedienungshandbücher.
46 mm70 mm
63,5 mm
70 mm
7
98
POSITIONIERUNG DER VORDERBEFESTIGUNGDie Vorderbefestigung kann entsprechend der Torstruktur (Holz, Eisen, Aluminium) entweder festgeschraubt oder festgeschweisst werden (Abb. 6).Die Hinterbefestigung muss so positioniert werden, dass sich der Antrieb in horizontaler Position befindet (Abb. 7).
HINWEIS: Sicherstellen, daß bei vollständiger Öffnung/Schließung des Torflügels die Kolbenstange sich nicht in Endlage befindet, sondern ein Abstand von mindestens 15 mm pro Seite vorhanden ist.
Befestigen Sie IDRO und versuchen Sie mehrere Male zu offnen und zu schließen, kontrolieren Sie dabei, daß das Profil der Schraubenabdeckung das Tor in Bewegung nicht beruhrt. In diesem Fall, stellen Sie den Bugel neu ein.
Im Falle, es existiert eine Maurer, die parallel zum Tor im offenen Zustand läuft, ist es notwendig eine Wandvertiefung zu schaffen, um Platz für den Motorantrieb zu haben.
46 mm70 mm
63,5 mm
70 mm
46 mm70 mm
63,5 mm
70 mm
10
6
BY-PASS VENTIL ABDECKUNG

29
D
MANUELLE BEWEGUNG MIT SCHLÜSSEL - IDRODUE 27Um den Antrieb zu entriegeln wie folgt vorgehen:- Den Schlüssel einführen und gegen den Uhrzeigersinn um 180° drehen (Abb. 11).Um den Antrieb erneut zu blockieren wie folgt vorgehen:- Den Schlüssel einführen und im Uhrzeigersinn bis zur Schliessung drehen (Abb. 11).Achtung: Vor der Entriegelung immer die Stromzufuhr unterbrechen
MANUELLE BEWEGUNG MIT SCHLÜSSEL - IDRO 39Den eingepreßten Stöpsel entfernen.Den Schlüssel in die Entriegelungsvorrichtung stecken. Den Schlüssel gegen Uhrzeigersinn von 90° drehen. Nun kann die manuelle Bewegung erfolgen; dazu den Torflügel vorsichtig mit der Hand schieben.Zur erneuten Einstellung auf automatischen Betrieb, auf die Anfangsposition drehen und abziehen. Danach den Stöpsel wieder einsetzen, damit kein Wasser und Staub in die Auslösevorrichtung eindringen können.ACHTUNG: Die Vorgange zur manuellen Bewegung bei stillstehendem Motor tätigen.ACHTUNG: Bei den Modellen IDRODUE 27/R, IDRODUE 27S/R und IDRO 39/R (reversibel),
ist die Freigabe immer gegeben. Die Freigabe benötigt man in diesem Fall für die Erhöhung oder Verminderung der reversiblen Bewegung. Damit verhütet man bei Wind unerwünschte Bewegungen.
Um das Tor manuell richtig zu pruefen muessen folgende Punkte beachtet werden:- Das Tor muss einen geeigneten Griff haben.- Dieser Griff muss so angebracht sein das er kein Risiko ist beim Test.- Daß die physische notwendige Kraft um das Tor-Blatt zu bewegen nicht höher als 225N
ist, für Tore bei privaten Wohnungen, und 390N für Tore für kommerzielle und industrielle Situationen (Werte nach 5.4.5 vom EN 12453 Norm).
DRUCKEINSTELLUNG (BY-PASS VENTIL)Um die Druckkraft zu steigern, mit einem Schraubenzieher das Öffnung-(grau) und Schließventil (gelb) im Uhrzeigersinn drehen (unter die Bypass Ventil Abdeckung -zu entfernen- auf dem Antrieb IDRODUE 27 (Fig. 13) bzw., nachdem die 4 Schrauben entfernt wurden, unter der Abdeckung bei IDRO 39 (Fig. 14).Um die Druckkraft zu reduzieren, die Öffnungs-/Schließventile gegen den Uhrzeigersinn drehen. Hinweis: Bei der Einstellung des Ventildrucks vorsichtig verfahren und darauf achten, die
Ventile nicht vollständig ein- oder auszuschrauben.Es empfiehlt sich, die Ventile nahezu auf gleichen Druck einzustellen. Der Öffnungsdruck muß etwas höher sein als der Schließdruck einstellen.
WARTUNGDie Wartungsarbeit nur durch spezialiesierten Fachleuten nach der Ausschliessung der Spannung auszuführen. Einmal jährlich sind die Angelzapfen zu schmieren, die vom Antrieb sowie der Ölstand zu überprüfen.
12
IDRO 39
14
IDRO 39
11
IDRODUE 27 - 27 SUPER
Blockiert Entriegelt
13
IDRODUE 27 - 27 SUPER
BY-PASSVENTIL
Entfernen Sie die Ventil Abdeckung

30
D PROZEDUR DEN ALUMINIUM-PROFIL AUSZUREISSEN
DURCHFÜHRUNGDER PROZEDURNUR WÄHREND
DER INSTALLATION
NICHT DURCHFÜHRUNG DER PROZEDUR WENN
DEN ANTRIEBE SOLLTEN GESENDET WERDEN

31
D
SELBSTLERNEND FUNKEMPFÄNGER
S433 1CH 1 Kanäl mit Steckverbindung Kode ACG5081S433 1CH 1 Kanäl mit Schraubklemmen Kode ACG5082S433 2CH 2 Kanäle mit Steckverbindung Kode ACG5083S433 2CH 2 Kanäle mit Schraubklemmen Kode ACG5084S433 4CH 4 Kanäle mit Steckverbindung Kode ACG5085S433 4CH 4 Kanäle mit Schraubklemmen Kode ACG5086
TASTER FLAT
Verbindung zum motor Kode ACG2012 Verbindung zum elektronik Kode ACG2013
T2
Kode ABT2000 => CRX 230/50-60HZKode ABT2001 => 230/50-60HZ Kode ABT2002 => CRX 120/60HZKode ABT2003 => 120/60HZ
T2 Wi-Fi
Mit Steuereinheit MASTER Wi-FiKode ABT2001W
Automatisches lernen des Weges-Hub und ZeitenFußgängeröffnungAutomatisches Fußgänger- und totalschliessenVorblinkenSie können den Sanft-Stop beim schließen regelnElektronische KupplungAutomatischer - oder Schrittfunkbefehl totalöffnungAutomatischer - oder Schrittfunkbefehl FußgängeröffnungAutomatischer - oder “step by step” EinzelimpulsElektrischer Verriegelung FreigabebetriebEingebautes Radiogerät 433MHzÜberwachung den Fotozellen Sofortige Schließung nach Durchfahrt von FotozellenÜberwachung der BlinklichtÜberwachung den KontaktleisteSelbstkontrolle der Sicherheitsrippen, gemäß Vorschrift der Norm EN 12453SchlüsselschalterBuzzerElektrische Verriegelung
SPARK
Um die bestmöglichen Leistungen mit den o. g. Apparaten zu erhalten, muss eine auf die Frequenz des Funkempfängers abgestimmte Antenne montiert werden.Anmerkung: Besonders muss darauf geachtet werden, dass das Zentralkabel
der Leitung nicht mit der externen Kupferumwicklung in Kontakt kommt, da dies die Funktion der Antenne außer Kraft setzt.
Die Antenne muss senkrecht, von dem Fernbetätigungsgerät aus sichtbar montiert werden. BLINKER SPARK mit eingebauter wechselsignalkarte Kode ACG7059SEITENLAGER Kode ACG7042ANTENNE SPARK 433 Kode ACG5452
MECHANISCHER RIEGEL
Fuer zwei Fluegel, zur Verrieglung am Boden. Kode ACG5000
SUN 2CH Kode ACG6052 SUN 4CH Kode ACG6054 SUN CLONE 2CH Kode ACG6056 SUN CLONE 4CH Kode ACG6058
FERNSENDER SUN
OPTIONENFür die Anschlüsse und die technischen Daten der Zubehöre verweisen wir auf die entsprechenden Betriebsanleitungen.

32
BLOCK
SCHLÜSSELWAHLSCHALTER FÜR DIE WAND Kode ACG1053SCHLÜSSELWAHLSCHALTER ZUM EINBAU Kode ACG1048
FIT SLIM
WANDFOTOZELLEN Kode ACG8032EIN PAAR FOTOZELLEN-STAENDER FÜR FIT SLIM Kode ACG8065FIT SLIM Fotozellen haben Synchronismusfunktion im Wechselstrom Strom und Strecken 20m.Dank einer Synchronisiereinrichtung sind mehrere sich gegenseitig annähernde Paare möglich.Bei mehr als 2 Fotozellenpaare (bis 4), den SENDER SYNCRO TX SLIM SYNCRO Kode ACG8029
Wi-Fi VORRICHTUNGEN
MASTER Wi-Fi
KARTE FÜR DEN BETRIEB DES SYSTEMS OHNE KABELmit Verbinder - 12÷30V ac/dc Kode ACG6094mit Endblockierung - 12÷30V ac/dc Kode ACG6099
NOVA Wi-Fi
FOTOZELLEN OHNE KABEL Kode ACG8037EIN PAAR FOTOZELLEN - STÄNDER NOVA Kode ACG8039
VERTIGO Wi-Fi
KABELLOSE FOTOZELLE ERSETZT DIE SCHALTLEISTENVERTIGO Wi-Fi 8 Kode ACG8042 - VERTIGO Wi-Fi 10 Kode ACG8043
BLOCK Wi-Fi
SCHLÜSSELSCHALTER OHNE KABEL Kode ACG6098
SPARK Wi-Fi
BLINKER OHNE KABEL Kode ACG7064SEITENLAGER Kode ACG7042
D

33
ES
* Sobre 1,6 m de largo de la hoja es necesario aplicar una electrocerradura para asegurar un bloqueo correcto.
** Sobre 1,8 m de largo de la hoja es necesario aplicar una electrocerradura para asegurar un bloqueo correcto.
*** IDRO 27 SUPER decelera en los ultimos 2 cm del recurrido.
CONTROLES ANTES DE LA INSTALACIÓN
La puerta de batiente debe fijarse sólidamente a las bisagras de las columnas y no debe doblarse durante el movimiento.Antes de proceder a la instalación de IDRO, es prudente verificar todos los espacios necesarios para emplazarlo. Si la cancela se presenta como en la Fig. 1, no hace falta efectuar ninguna modificación.N.B.: Es obligatorio adecuar las características de la cancela a las normas
y leyes vigentes.La puerta puede se automatizada sólo si se encuentra en buen estado y responde a la norma EN 12604. - La puerta no tiene que tener puertas peatonales. De lo contrario se
tendrán que tomar las oportunas precauciones de acuerdo con el punto 6.5.1 de la EN 12453 (por ejemplo impedir el movimiento del motor cuando la puertecilla está abierta, gracias a un microinterruptor debidamente conectado a la central).
- No hay que generar puntos en los que se pueda quedar atrapado (por ejemplo entre la puerta de la cancela y las paredes laterales).
No tiene que haber topes mecánicos por encima de la verja porque no son suficientemente seguros.
1
DISPOSICIÒN DE LA INSTALACIÒN
1 - Operador IDRO2 - Antena de radio3 - Luz intermitente4 - Selector con llave5 - Fotocélulas externas6 - Fotocélulas internas
❻ ❻
❹
❶ ❶
❷❸
❺❻ ❻❺ ❹
CARACTERÍSTICAS TÉCNICAS 27/R 27/1B27
SUPER/R27
SUPER/1B39/R
39/1B39/2B
Longitud máxima de la anta m 3 3* 6 6** 7 7**
Peso max kg 400 700 1000
Corsa max del cancello cm 27 27*** 39
Tiempo de apertura s 16 40 50
Par máx. N 2500 6400
Alimentación y frecuencia 230V~ 50/60Hz
Potencia del motor W 180 220
Absorción A 1 1,1
Condensador µF 6,3 12,5
Ciclos normativos n° 300 - 15s/2s 500 - 23s/2s 800 - 45s/2s
Ciclos diarios sugeridos n° 300 500 800
Servicio % 80 90
Ciclos garantizados n° 100 200 800
Lubricación OX SUPER
Peso máx. kg 10 11,4 13,6
Nivel de ruido db <70
Volume m3 0,0086 0,0084
Temperatura de trabajo °C -20 ÷ +55
Grado de protección IP 55
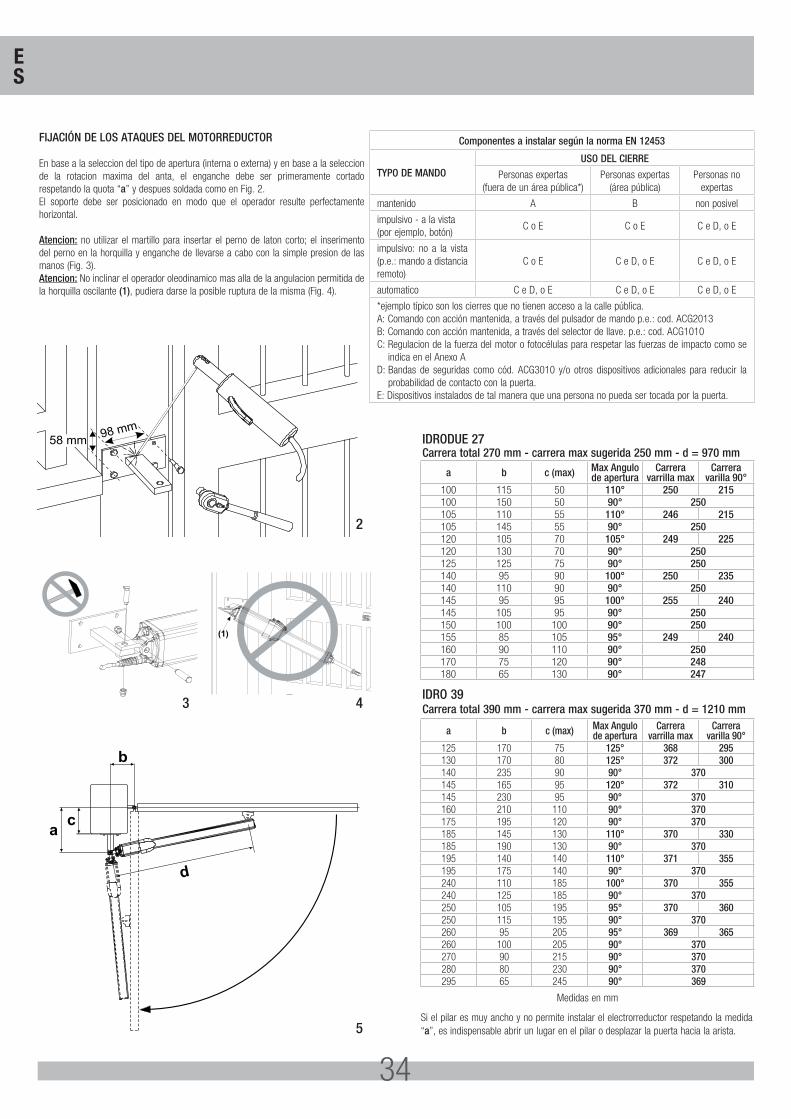
34
Si el pilar es muy ancho y no permite instalar el electrorreductor respetando la medida “a”, es indispensable abrir un lugar en el pilar o desplazar la puerta hacia la arista.
FIJACIÓN DE LOS ATAQUES DEL MOTORREDUCTOR
En base a la seleccion del tipo de apertura (interna o externa) y en base a la seleccion de la rotacion maxima del anta, el enganche debe ser primeramente cortado respetando la quota “a” y despues soldada como en Fig. 2.El soporte debe ser posicionado en modo que el operador resulte perfectamente horizontal.
Atencion: no utilizar el martillo para insertar el perno de laton corto; el inserimento del perno en la horquilla y enganche de llevarse a cabo con la simple presion de las manos (Fig. 3).Atencion: No inclinar el operador oleodinamico mas alla de la angulacion permitida de la horquilla oscilante (1), pudiera darse la posible ruptura de la misma (Fig. 4).
a b c (max) Max Angulo de apertura
Carrera varrilla max
Carrera varilla 90°
100 115 50 110° 250 215100 150 50 90° 250105 110 55 110° 246 215105 145 55 90° 250120 105 70 105° 249 225120 130 70 90° 250125 125 75 90° 250140 95 90 100° 250 235140 110 90 90° 250145 95 95 100° 255 240145 105 95 90° 250150 100 100 90° 250155 85 105 95° 249 240160 90 110 90° 250170 75 120 90° 248180 65 130 90° 247
a b c (max) Max Angulo de apertura
Carrera varrilla max
Carrera varilla 90°
125 170 75 125° 368 295130 170 80 125° 372 300140 235 90 90° 370145 165 95 120° 372 310145 230 95 90° 370160 210 110 90° 370175 195 120 90° 370185 145 130 110° 370 330185 190 130 90° 370195 140 140 110° 371 355195 175 140 90° 370240 110 185 100° 370 355240 125 185 90° 370250 105 195 95° 370 360250 115 195 90° 370260 95 205 95° 369 365260 100 205 90° 370270 90 215 90° 370280 80 230 90° 370295 65 245 90° 369
Medidas en mm
IDRODUE 27Carrera total 270 mm - carrera max sugerida 250 mm - d = 970 mm
IDRO 39Carrera total 390 mm - carrera max sugerida 370 mm - d = 1210 mm
Componentes a instalar según la norma EN 12453
TYPO DE MANDOUSO DEL CIERRE
Personas expertas(fuera de un área pública*)
Personas expertas(área pública)
Personas no expertas
mantenido A B non posivel
impulsivo - a la vista(por ejemplo, botón)
C o E C o E C e D, o E
impulsivo: no a la vista (p.e.: mando a distancia remoto)
C o E C e D, o E C e D, o E
automatico C e D, o E C e D, o E C e D, o E
*ejemplo típico son los cierres que no tienen acceso a la calle pública.A: Comando con acción mantenida, a través del pulsador de mando p.e.: cod. ACG2013B: Comando con acción mantenida, a través del selector de llave. p.e.: cod. ACG1010C: Regulacion de la fuerza del motor o fotocélulas para respetar las fuerzas de impacto como se
indica en el Anexo AD: Bandas de seguridas como cód. ACG3010 y/o otros dispositivos adicionales para reducir la
probabilidad de contacto con la puerta.E: Dispositivos instalados de tal manera que una persona no pueda ser tocada por la puerta.
ac
d
b
(1)
58 mm 98 mm
2
(1)
58 mm 98 mm
4
(1)
58 mm 98 mm
3
5
ES

35
CUIDADO!
DESPUÉS DE LA INSTALACIÓN RETIRAR EL TORNILLO DE RESPIRADERO COLOCADO NE LA PARTE BAJA DEL MOTOR.
TAPA POSTERIOR
COBERTURA INFERIOR DEL MOTOR
IDRODUE 27
INSTALACION DE LA PROTECCION DE LA VARILLA CROMADAVerificar de haber insertado el marco en plastica antivibracion (A) antes de insertar el estruso cubrevarilla (Fig. 8).
MONTAJE DE DESBLOQUEO EN PLASTICAATENCION: el montaje del desbloqueo en plastica debe ser efectuado en el modo indicado en la figura 9 solo y solo si despeus de haber terminado todas las operaciones de instalacion montaje del cubre varilla y de regulacion de las valvulas by pass.
PROTECCIONES ELÉCTRICASAdemás de los dispositivos de seguridad mecánicos ya citados, para cancelas con hojas de más de 1,80 m de largo es obligatorio utilizar dos pares de fotocélulas que puedan interrumpir el movimiento.Un par se coloca a una altura variable entre 40 y 60 cm, entre los pilares de la cancela, fuera de la finca.El otro par se instala a la misma altura del primero, en los extremos de las hojas de la cancela cuando ésta se halla abierta. El movimiento de la cancela tiene que ser acompañado del parpadeo de un indicador luminoso colocado cerca de la misma.Se aconseja utilizar centralitas electrónicas de mando T2, para uno o dos motores monofásicos).Para las conexiones y datos técnicos de los accesorios, consultar los manuales respectivos.
46 mm70 mm
63,5 mm
70 mm
7
98
POSICIONAMIENTO DEL ENGANCHE ANTERIOREl enganche anterior en base a la naturaleza de la cancela (madera, hierro, aluminio) puede ser soldado que atornillado (Fig. 6).El enganche anterior debe ser posicionado de manera talque el operador resulte perfectamente horizontal (Fig. 7).
NB.: Asegúrese de que cuando la puerta esté completamente abierta y completamente cerrada el perno no está en los extremos de su movimiento, sino se separe de por lo menos 15 mm de los extremos de su movimiento.
Instalar IDRO probando varias veces de abrir y cierrar controlando que la cobertura del perno no tocue la puerta en movimento, si no usted tiene que reajustar la fijaciòn a la puerta.
En caso de que usted tenga una pared paralela a la puerta abierta, usted debe proporcionar un lugar para dar espacio al operador.
46 mm70 mm
63,5 mm
70 mm
46 mm70 mm
63,5 mm
70 mm
10
6
CUBRE-VÁLVULAS BY PASS
ES

36
ES
DESBLOQUEO DE EMERGENCIA CON LLAVE - IDRODUE 27Para desbloquear operar como sigue:- Insertar la llave y rotarla en sentido antihorario de 180 grados (Fig. 11).Para bloquear nuevamente el actuador operar como sigue:- Insertar la llave y rotarla en sentido horario hasta el cierre (Fig. 11).Atencion: efectuar el desbloqueo siempre en ausencia de alimentacion.
DESBLOQUEO DE EMERGENCIA CON LLAVE - IDRO 39Abrir el tapòn RIB.Inserir la llave en la cerradura. Rotar la llave para una media vuelta a la izquierda, entonces mover cuidadosamente manualmente la puerta.Para el restablecimiento de la operación automática girar la llave en su posicion inicial. Quitar la llave y cierrar el tapòn para evitar que agua y polvo entren en el dispositivo de desbloqueo.NB: Desbloquear el motor como el motor se para.ATENCION: Ne los modelos IDRODUE 27/R, IDRODUE 27S/R y IDRO 39/R (reversibles)
está siempre presente el dispositivo del desbloqueo. En este caso el desbloqueo sirve para aumentar o diminuir la reversibilidad del movimiento para evitar que la hoja se mueva demasiado con facilidad en presencia de viento.Para poder realizar en modo seguro el desplazamiento manual de la puerta hay que controlar que: - Las manillas de la puerta que se han proporcionado sean idóneas;- Estas manillas no estén posicionadas en modo de crear puntos de peligro durante su
utilizo;- El esfuerzo manual para mover la puerta no debe superar los 225N para las cancelas
colocadas en lugares privados y los 390N para las cancelas colocadas en sitios comerciales e industriales (valores indiacados en el punto 5.4.5 de la norma EN 12453).
REGULACION DEL EMBRAGUE (VÁLVULAS BY PASS)Utilice un destornillador para aumentar la fuerza rotando a la derecha la válvula de apertura (gris) y la válvula de cierre (amarillo) situadas debajo el cubre-válvulas de plástico (quitar) del operador IDRODUE 27 (Fig. 13) o debajo del casquillo (después de que usted haya desatornillado los 4 tornillos) del operador IDRO 39 (Fig. 14).Para disminuir la fuerza, rotar a la izquierda las válvulas de apertura y de cierre.ATENCION: Cuando se ajusta la fuerza, rotar suavemente y gradualmente las válvulas sin
atornillarlas o desatornillar totalmente.Es recomendable regular las válvulas de una manera que las dos presiones no sean demaciado diferentes.Ajustar la presión de apertura un poco más arriba que la presión de cierre.
MANTENIMIENTO Estas operaciones deben ser efectuadas exclusivamente por personal especializado y con el motor desconectado de la alimentación eléctrica. Todos los años, engrasar las bisagras y controlar la fuerza de empuje ejercida por el motorreductor sobre la puerta y verificar el livel del aceite.
12
IDRO 39
14
IDRO 39
11
IDRODUE 27 - 27 SUPER
Bloquea Desbloquea
13
IDRODUE 27 - 27 SUPER
VÁLVULAS BY PASS
GIRAR A LA DERECHA
VÁLVULAS BY PASS
Sacar los 4 tornillos
Retire el cubre-válvulas

37
ESPROCEDIMIENTO PARA TEAR EL PERFIL DE ALUMINIO
SOLO SE PUEDEHACER DURANTE LA
INSTALACIÓN
SI LOS OPERADORES DEBEN EXPEDIRSE, NON APLICAR
ESTE PROCEDIMIENTO

38
RADIO RECEPTOR CON AUTO APRENDIZAJE
S433 1CH un canal enchufable cód. ACG5081S433 1CH un canal con regleta cód. ACG5082S433 2CH bi canal enchufable cód. ACG5083S433 2CH bi canal con regleta cód. ACG5084S433 4CH quadri canal enchufable cód. ACG5085S433 4CH quadri canal con regleta cód. ACG5086
BOTONERA FLAT
Conexión al motor cód. ACG2012Conexión al panel de control cód. ACG2013
T2
cód. ABT2000 => CRX 230/50-60HZcód. ABT2001 => 230/50-60HZ cód. ABT2002 => CRX 120/60HZcód. ABT2003 => 120/60HZ
T2 Wi-Fi
Con tarjeta MASTER Wi-Ficód. ABT2001W
Autoaprendizaje carrera y tiemposAbertura peatonalEncierro automático peatonal y totalPre-intermitenciaModeración de velocidad en acercamiento regulable Regulación de la fuerza Gestión telemando - paso a paso o automática abertura totalGestión telemando - paso a paso o automática abertura peatonalGestión Botón único - paso a paso o automática Golpe de desenganche de la cerradura eléctricaRadio receptor 433MHz incorporadoAdministracion fotocélulas Gestión de cierre inmediato después del tránsito por las fotocélulasAdministracion intermitenciaAdministracion costasAutotest costas de seguridad como requerido por la norma EN 12453Selector de llaveBuzzerCerradura eléctrica
SPARK
Para obtener las mejores prestaciones de los citados aparatos, es necesario instalar una antena sintonizada con la frecuencia del radioreceptor. Importante: Controlar con atención que el hilo central del cable no esté en contacto con la protección de cobre externa. Esto impediría el funcionamiento de la antena.Instale la antena verticalmente y de tal manera el mando a distancia puede alcanzarla.INTERMITENTE SPARK con tarjeta intermitente incorporada cód. ACG7059SOPORTE LATERAL cód. ACG7042ANTENA SPARK 433 cód. ACG5452
PESTILLO MECANICO
Pestillo mecanico para cancelas de 2 hojas. cód. ACG5000
SUN 2CH cód. ACG6052 SUN 4CH cód. ACG6054 SUN CLONE 2CH cód. ACG6056 SUN CLONE 4CH cód. ACG6058
TELEMANDO SUN
OPCIONALESPara las conexiones y datos técnicos de los accesorios, consultar los manuales respectivos.
ES

39
BLOCK
SELECTOR DE LLAVE DE PARED cód. ACG1053SELECTOR DE LLAVE DE ENCAJAR cód. ACG1048
FIT SLIM
FOTOCÉLULAS PARA PARED cód. ACG8032PAR DE COLUMNAS PARA FIT SLIM cód. ACG8065Las fotocélulas FIT SLIM tienen una funciòn de sincronizaciòn en corriente alterna y portada de 20 metros.Pueden ser aplicadas màs parejas de fotocélulas cercanas gracias al circùito de sincronizaciòn.Añadir el TRANSMISOR TX SLIM SYNCRO cód. ACG8029para sincronizar hasta 4 parejas de fotocélulas.
DISPOSITIVOS Wi-Fi
MASTER Wi-Fi
FICHA DE GESTIÓN SISTEMA SIN CABLEScon enchufe - 12÷30V ac/dc cód. ACG6094con regleta - 12÷30V ac/dc cód. ACG6099
NOVA Wi-Fi
FOTOCÉLULAS SIN CABLES cód. ACG8037PAR DE COLUMNAS NOVA cód. ACG8039
VERTIGO Wi-Fi
FOTOCÉLULAS SIN CABLES PARA REEMPLAZAR A LA COSTAVERTIGO Wi-Fi 8 cód. ACG8042 - VERTIGO Wi-Fi 10 cód. ACG8043
BLOCK Wi-Fi
SELECTOR DE LLAVE SIN CABLES cód. ACG6098
SPARK Wi-Fi
INTERMITENTE SIN CABLES cód. ACG7064SOPORTE LATERAL cód. ACG7042
ES

40
IDRO
DUE
27 R
/1B
46
42
47
1
49
56
65
11
58
38
36
37
5
2
26
50
34
61
62
45
14
60
57
10
18
17
4
15
3
33
43
7
21
40 6
44
63
41
35
48
39
64
16
24
51
9
54
52
32
31
29
27
25
24
8
30
28
22
19
20
23
59
53
55
12
13
25

41
Cod. Descrizione n°
IDR0027/1 COPERCHIO POSTERIORE CON CAVO
CAVO ELETTRICO DA 1 MT-NT 1 42
COPERCHIO POST.ELETTR. LAV.’08 8
GUARNIZ. ESTRUSO CARCAS.90X90 9
PRESSACAVO 3240 FLEX LTF9 PG9 43
RONDELLA RAME RICOTTO 4X8X1 1 41
TAPPO CHIUS. 1/4 GAS S.F. NERO 7
VITE TCEI M4 X8 ZINC.UNI5931 40
IDR0100 COPERCHIO CILINDRO F.16
CORNICE NERA 57
COPER.CIL.F.16 LAV. 55
GUARNIZIONE OR 3137 VITON NERO 24
GU.BALS.B 15,87X22,22X5,25X4,8 54
BOCCOLA SINTER.FE 22X16X16 FORO F7
53
IDR0065 GRUPPO POMPA LT 0,75 CON FORI
FILTRO ASPIRAZIONE METALLO 31
POMPA A LOBI H=4 C/FOR. P.0,75 34
SFERA D.7,14 (9/32”) AISI 420 33
TAPPO ASPIRAZIONE M12 X 1 32
IDR0052 GRUPPO POMPA LT 1 CON FORI SPECIALI
FILTRO ASPIRAZIONE METALLO 33
POMPA A LOBI H=4,8 C/FOR. P.1 36
SFERA D.7,14 (9/32”) AISI 420 35
TAPPO ASPIRAZIONE M12 X 1 34
IDR0101 GRUPPO POMPA LT 1,5 CON FORI SPECIALI
FILTRO ASPIRAZIONE METALLO 43
POMPA A LOBI H=5,6 C/FOR.P.1,5 12
SFERA D.7,14 (9/32”) AISI 420 42
TAPPO ASPIRAZIONE M12 X 1 41
IDR0102 DISTRIBUTORE COMPLETO IDRODUE 27/1B
PERNO SBLOCCO DIST. 2007 19
PISTONCINO PILOTAGGIO CON GOLA 26
SEDE DI TENUTA BLOC.IDR.’12ZAMA 27
SFERA D.4 AISI 420 29
TAPPO BLOCCO SEMP.CORTO ‘10
TAPPO AVSEAL DA MM. 4.0 21
TAPPO GUIDA ‘10 32
VITE DI TARATURA PLAST.ARGENTO 17
VITE DI TARATURA PLAST.GIALLA 18
IDR0103 DISTRIBUTORE COMPLETO IDRODUE 27/R
BY PASS ‘12 14
DISTRIBUTORE PRESS. 13
GUARN. OR 2037 (9.25X1.78) VITON 16
GUARN. OR 2062 (15.6X1.78) VITON 31
GUARN. OR 2031 (7,65X1,78) VITON 20
GUARN. OR 2043 (10,82X1,78) VITON 25
GUARN. OR 3137 VITON NERO 24
MOLLA BY PASS TIPO VERDE 15
PERNO SBLOCCO DIST. 2007 19
PISTONCINO PILOTAGGIO CON GOLA 26
TAPPO BLOCCO SEMP. CORTO’10
VITE DI TARATURA PLAST.ARGENTO 17
VITE DI TARATURA PLAST.GIALLA 18
IDR0003 ATTACCO POSTERIORE COMPLETO
ATTACCO POSTERIORE 40X15 1
BOCCOLA KU 12X14X15 3
IDR0062 ATTACCO ANTERIORE COMPLETO
VITE TORNITA ES.17 M10 ZN TR 61
ATTACCO ANT.PIEGATO F.10 ZN TR 62
DADO M10 H 7 ZINC.TR. UNI5588 63
IDR0009 PERNO FORCELLA LUNGO COMPLETO
DADO M 8 H 12 CIECO OTTONE 44
PERNO ATTACCO FORCELLA LUNGO 5
IDR0104 PERNO ATTACCO FORCELLA MEDIO COMPLETO
DADO M 8 H 12 CIECO OTTONE 44
PERNO ATT.POST.MEDIO FORC.PLAS 2
IDR0105 FORCELLA POSTERIORE ALLUMINIO + PERNO CORTO
DADO M 8 H 12 CIECO OTTONE 44
FORCELLA POSTERIORE OSCILLANTE (ALLUMINIO)
PERNO ATTACCO POSTERIORE CORTO
IDR0058 GRUPPO STELO/PISTONE
PISTONE D.40-11S 50
FASCIA PISTONE PTFE DIAM 40 51
GUARNIZIONE DE 156 52
STELO CROM.MM 16X385 56
IDR0106 GRUPPO STELO/PISTONE IDRODUE CON SNODO
PISTONE MINI T.ALL. D.40-11S 50
FASCIA PISTONE PTFE DIAM 40 51
GUARNIZIONE DE 156 52
STELO CROM.MM 16X342 X SNODO
IDR0107 KIT VITI COMPLETO
DADO M10 H 7 ZINC.TR. UNI5588 63
DADO M10 ZINC. UNI5589 61
DADO M8 H12 CIECO OTTONE 44
FILTRO ASPIRAZIONE METALLO 33
MOLLA BY PASS TIPO VERDE 15
MOLLA VALVOLA BLOCCO ‘10 30
ROND.P.10,5X21X2 UNI6592 ZINC 59
RONDELLA RAME RICOTTO 4X8X1 41
SFERA D.4 AISI 420 29
SFERA D.7.14 (9/32”) AISI 420 35
VITE AUT.TEC/BO4,2X9,5 INOX UNI6950 59
VITE TCEI M4X8 ZINC. UNI 5931 40
VITE TCEI M6X20 8.8 ZINCATA 6
VITE TORNITA ES.17 M10 ZN TR. 61
IDR0108 KIT GUARNIZIONI COMPLETO
BY PASS ‘12 14
FASCIA PISTONE PTFE DIAM 40 51
GU.BALS.B 15,87X22,22X5,25X4,8 54
GUARN. OR 2037 (9.25X1.78) VITON 16
GUARN. OR 2062 (15.6X1.78) VITON 31
GUARN. OR2018 (4.47X1.78) VITON 64
GUARN. OR 2015 3,68X1,78 VITON 80SH
28
GUARN. OR 2031 (7,65X1,78) VITON 20
GUARN. OR 2043 (10,82X1,78) VITON 25
GUARN. ESTRUSO CARCAS.90X90 9
GUARNIZ.OR 2025 (6.07X1.78) VITO 12
GUARNIZIONE DE 156 52
GUARNIZIONE OR 3137 VITON NERO 24
TASSELLO IN GOMMA MOTORE ELET 10
IDR0109 KIT ASPIRAZIONI POMPA
FILTRO ASPIRAZIONE METALLO 33
SFERA D.7,14 (9/32”) AISI 420 35
TAPPO ASPIRAZIONE M12 X 1 34
IDR0110 KIT BLOCCHI IDRODUE 27/1B
GUARN. OR 2062 (15.6X1.78) VITON 31
GUARN. OR 2015 (3,68X1,78) VITON 80SH
28
GUARN. OR 2043(10,82X1,78) VITON 25
MOLLA VALVOLA BLOCCO ‘10 30
PISTONCINO PILOTAGGIO CON GOLA 26
SEDE DI TENUTA BLOC.IDR.’12ZAMA 27
SFERA D.4 AISI 420 29
TAPPO GUIDA ‘10 32
IDR0111 SBLOCCO BASE
BASE SBLOCCO ECONOMICO
BLOCCA BY PASS
CHIAVE DI SBLOCCO
COPERCHIO SBLOCCO ECONOMICO
MOLLA SBLOCCO ECO
SPINA CIL.3H8X50-0+0,5 AISI303
VITE TCEI M4X10 ZINC.UNI5931
IDR0112 BATT.MECCANICA
IDR0080 CAVO ELETTRICO DA 1 MT-NT 42
IDR0054 CILINDRO IDR. MM315XD40 49
CEL1384 COND. 6,3 MF 450V 2C.15CM C.C. 46
IDR0113 COPERCHIO COPRISTELO 60
IDR0114 CORNICE NERA 57
IDR0115 ESTRUSO CARC. MM208 11
IDR0116 ESTRUSO COPRIST. 2010 58
IDR0117 FINEC. MEC/ELET. 2010
IDR0118 FORCELLA POST.OSCILL.PLAST”UL” 4
IDR0015 GIUNTINO POMPA - MOTORE 37
IDR0119 GIUNTO DISTRIB. SBLOCCO 23
IDR0120 GUARN.OR 2015 3,68X1,78 VITON 80SH 28
IDR0121 KIT FINEC. MICRO X ELETTR. 270
IDR0122 MOTORE EL.80X45X40 ING.220V MON.SIM
38
IDR0123 MOTORE EL.80X45X55 110V “UL”
IDR0051 OILH OLIO 0X29 VERDE (5LT) 47
IDR0124 PERNO SBLOCCO DIST. 2007 19
IDR0002 PIASTRA 150X80X6 ATTAC. POSTER. 45
IDR0125 PISTONCINO PILOTAGGIO CON GOLA 26
IDR0056 PISTONE D.40-11S 50
IDR0007 PRESSACAVO 3240 FLEX Pg9 43
IDR0126 SEDE DI TENUTA BLOC.IDR.’12ZAMA 27
IDR0127 SNODO SFERICO M 10 60
IDR0128 STELO CROM.MM 16X385 56
IDR0129 STELO CROM.MM 16X342 X SNODO 66
IDR0014/1 TAPPO ASPIRAZIONE M12X1 34
IDR0130 TAPPO GUIDA ‘10 32
IDR0131 TASSELLO IN GOMMA MOTORE ELET. 10
IDR0132 TIR. TE M6X342 FIL.15MM C40ZN 48
IDR0133 TIR. TCCR M4X120 ZN FIL.16MM C40 39
IDR0134 TIR.TCCR 6,5 M4X140 F.25MM C40-10PZ
IDR0040 TUBO COLLEG.MI/MA T. L.332,5 65
IDR0136 VITE AUT.TEC/BO4,2X9,5 INOX UNI6950 59
IDR0019 VITE DI TARATURA PLAST.ARGENTO 17
IDR0018 VITE DI TARATURA PLAST.GIALLA 18

42
IDRO
DUE
27 S
UPER
R/1
B
7
1
56
60
79
63
11
4
68
46
12
70
64
65
44
5
3
33
57
77
35
41
40
24
73
54
16
22 6
9
66
71
50
20
19
29
23
30
28
17
38
2
61
43
75
6
9
32
51
27
8
72
53
76
74
52
21
37
42
67
55
47
78
25
18
34
39
31
13
58
14
62
59
36
15
26
14
34
31
48
8
49
10
45

43
Cod. Descrizione n°
IDR0027/1 COPERCHIO POSTERIORE CON CAVO
CAVO ELETTRICO DA 1 MT-NT 7
COPERCHIO POST.ELETTR. LAV.’08 10
GUARNIZ.ESTRUSO CARCAS.90X90 14
PRESSACAVO 3240 FLEX LTF9 PG9 6
RONDELLA RAME RICOTTO 4X8X1 52
TAPPO CHIUS. 1/4 GAS S.F. NERO 9
VITE TCEI M4 X8 ZINC.UNI5931 51
IDR0091 COPERCHIO CILINDRO COMPLETO
BOCCOLA SINTER. FE 20X30X25 61
COPER.CIL.F.20 ELETT.LAV. 63
CORNICE COP.CILINDRO 66
GUARN. BALSELE 28X20X7 62
GUARN. OR 2162 (41X1,78) VITON 31
IDR0137 GRUPPO POMPA L.0,5 (HT 0,75)
FILTRO ASPIRAZIONE METALLO 43
POMPA A LOBI H=2,9 C/FOR.P.0,5 12
SFERA D.7,14 (9/32”) AISI 420 42
TAPPO ASPIRAZIONE M12 X 1 41
IDR0065 GRUPPO POMPA LT.0,75 CON FORI (LT.1)
FILTRO ASPIRAZIONE METALLO 43
POMPA A LOBI H=4 C/FOR. P.0,75 12
SFERA D.7,14 (9/32”) AISI 420 42
TAPPO ASPIRAZIONE M12 X 1 41
IDR0101 GRUPPO POMPA LT.1,5 CON FORI SPECIALI
FILTRO ASPIRAZIONE METALLO 43
POMPA A LOBI H=5,6 C/FOR.P.1,5 12
SFERA D.7,14 (9/32”) AISI 420 42
TAPPO ASPIRAZIONE M12 X 1 COPERCHIO CILINDRO
41
IDR0139 DISTRIBUTORE COMPLETO IDRODUE 27/SUPER 1B
BY PASS 16
DISTRIBUTORE PRESSOF. - LAV 15
GUARN. OR 2037 (9.25X1.78) VITON 18
GUARN. OR 2062 (15.6X1.78) VITON 39
GUARN. OR 2031 (7,65X1,78) VITON 25
GUARN. OR 2043 (10,82X1,78) VITON 34
GUARN. OR 2162 (41X1,78) VITON 31
GUARN. VALVOLA BLOCCO 36
MOLLA BY PASS TIPO VERDE 17
MOLLA VALVOLA BLOCCO 38
PERNO SBLOCCO 24
PISTONCINO PILOTAGGIO CON GOLA 33
SEDE DI TENUTA BLOCCO IDRAUL. 35
SFERA D.6,35 (1/4”) AISI 420 37
TAPPO AVSEAL DA MM. 4.0 32
TAPPO BLOCCO SEMPL.CORTO OTT.
TAPPO GUIDASFERA OTTONE CORTO 40
VITE DI TARATURA PLAST.ARGENTO 19
VITE DI TARATURA PLAST.GIALLA 20
IDR0140 DISTRIBUTORE COMPLETO IDRODUE 27/SUPER R
BY PASS 16
DISTRIBUTORE PRESSOF. - LAV 15
GUARN. OR 2037 (9.25X1.78) VITON 18
GUARN. OR 2062 (15.6X1.78) VITON 39
GUARN. OR 2031 (7,65X1,78) VITON 25
GUARN. OR 2043 (10,82X1,78) VITON 34
GUARN. OR 2162 (41X1,78) VITON 31
MOLLA BY PASS TIPO VERDE 17
PERNO SBLOCCO DIST. 24
PISTONCINO PILOTAGGIO CON GOLA 33
TAPPO AVSEAL DA MM. 4.0 32
TAPPO BLOCCO SEMPL.CORTO OTT.
VITE DI TARATURA PLAST.ARGENTO 19
VITE DI TARATURA PLAST.GIALLA 20
IDR0003 ATTACCO POSTERIORE COMPLETO
ATTACCO POSTERIORE 40X15 1
BOCCOLA KU 12X14X15 2
IDR0046 ATTACCO ANTERIORE COMPLETO
ATTACCO ANT.PIEGATO F.12 ZN TR 73
DADO M12 H 7 ZINC.TR. UNI5589 74
VITE TE M12X35 F.15 8.8 ZN TR. 72
IDR0009 PERNO FORCELLA LUNGO COMPLETO
DADO M 8 H 12 CIECO OTTONE 53
PERNO ATTACCO FORCELLA LUNGO 5
IDR0004 PERNO ATTACCO FORCELLA CORTO COMPLETO
DADO M 8 H 12 CIECO OTTONE 53
PERNO ATTACCO POSTERIORE CORTO 3
IDR0141 KIT VITI COMPLETO
DADO COPRISTELO 70
DADO DOPPIO M6/M4 64
DADO M6 OTTONE 65
DADO M12 H 7 ZINC.TR. UNI5589 74
MOLLA BY-PASS TIPO VERDE 17
MOLLA VALVOLA BLOCCO 38
RONDELLA RAME RICOTTO 4X8X1 52
VITE TCEI M4 X8 ZINC. UNI5931 51
VITE TCEI M4X10 ZINC. UNI5931 27
VITE TCEI M5X40 UNI5931 GREZZA 45
VITE TCEI M6X20 8.8 ZINCATA 8
VITE TE M12X35 F.15 8.8 ZN TR. 72
IDR0142 KIT VITI GUARNIZIONI
BY-PASS 16
FASCIA PISTONE PTFE DIAM 45 58
GUARNIZ. DE 175 59
GUARNIZ. ESTRUSO CARCAS.90X90 14
GUARNIZ. EUROSEAL MU/P 3022 4
GUARNIZ. OR 2062 (15,6X1,78) VITON 39
GUARNIZ. OR2018 (4.47X1.78) VITON 78
GUARNIZ. OR 2031 (7,65X1,78) VITON 25
GUARNIZ. OR 2025(6.07X1.78) VITON 13
GUARNIZ. OR 2037 (9.25X1.78) VITON 18
GUARNIZ. OR 2043(10,82X1,78) VITON 34
GUARNIZ. OR 2162 (41X1,78) VITON 31
GUARNIZ. VALVOLA BLOCCO 36
TASSELLO IN GOMMA MOTORE ELETTRICO
50
IDR0109 KIT ASPIRAZIONI POMPA
FILTRO ASPIRAZIONE METALLO 43
SFERA D.7,14 (9/32”) AISI 420 42
TAPPO ASPIRAZIONE M12 X 1 41
IDR0143 KIT BLOCCHI IDRODUE 27/SUPER 1B
GUARNIZ. OR 2043 (10,82X1,78) VITON 34
GUARNIZ. OR 2062 (15,6X1,78) VITON 39
GUARNIZ. VALVOLA BLOCCO 36
MOLLA VALVOLA BLOCCO 38
PISTONCINO PILOTAGGIO CON GOLA 33
SEDE DI TENUTA BLOCCO IDRAUL. 35
SFERA D.6,35 (1/4”) AISI 420 37
TAPPO GUIDASFERA OTTONE CORTO 40
IDR0111 SBLOCCO BASE
BASE SBLOCCO ECO 29
BLOCCA BY PASS 28
CHIAVE DI SBLOCCO 22
COPERCHIO SBLOCCO ECO 23
MOLLA SBLOCCO ECO 26
SPINA CIL. 3H8X50-0+0,5 AISI303 21
VITE TCEI M4X10 ZINC. UNI5931 27
IDR0080 CAVO ELETTRICO DA 1 MT 7
IDR0035 CILINDRO IDR. MM315XD45 56
CEL1380 COND. 12,5MF 450V C.25CM C/COD. 48
IDR0088 COPERCHIO COPRISTELO 69
IDR0144 CORNICE COP. CILINDRO 66
IDR0024 DADO COPRISTELO 70
IDR0115 ESTRUSO CARC. MM208 11
IDR0145 ESTRUSO COPRIST. MM.708 68
IDR0048 ESTRUSO COPRIST. MM 735 1
IDR0146 ESTRUSO COPRI. C/FRENO MM.759 1
IDR0005 FORCELLA POSTERIORE OSCILLANTE 4
IDR0015 GIUNTINO POMPA - MOTORE 44
IDR0020 GUARNIZIONE VALVOLA BLOCCO 36
IDR0085 MOTORE EL.80X45X55 INGR.220VNT 46
IDR0123 MOTORE EL.80X45X55 110V “UL” 46
IDR0051 OILH OLIO 0X29 VERDE (5LT) 49
IDR0124 PERNO SBLOCCO DIST. 24
IDR0002 PIASTRA 150X80X6 ATTAC. POSTER. 54
IDR0125 PISTONCINO PILOTAGGIO CON GOLA 33
IDR0037 PISTONE LIBRA ALLUM. D.45 - 11S 57
IDR0007 PRESSACAVO 3240 FLEX Pg9 6
IDR0147 SEDE DI TENUTA BLOCCO IDRAUL. 35
IDR0023 SNODO SFERICO CM12-M12 DIN648K 75
IDR0148 STELO CROM.100 MM345 60
IDR0014/1 TAPPO ASPIRAZIONE M12X1 41
IDR0087 TAPPO COPRIVITE COPRISTELO 71
IDR0149 TAPPO GUIDASFERA OTTONE CORTO 40
IDR0131 TASSELLO IN GOMMA MOTORE ELET. 50
IDR0047 TIR.PRI.M4X385 INOX 67
IDR0041 TIR.PRI.M6X346 2FIL.12MM C40ZN 55
IDR0150 TIR.PRI.M6X370 2FIL.12MM C40ZN 10
IDR0151 TIR.PRI.M6X394 2FIL.15MM C40ZN 10
IDR0134 TIR.TCCR 6,5 M4X140 F.25MM C40 47
IDR0040 TUBO COLLEG. L.332,5 79
IDR0152 TUBO COLLEG. L.356,5 9
IDR0138 TUBO COLLEG. L.380 2F 9
IDR0019 VITE DI TARATURA PLAST.ARGENTO 19
IDR0018 VITE DI TARATURA PLAST.GIALLA 20
IDR0134 TIR.TCCR 6,5 M4X140 F.25MM C40-10PZ
IDR0040 TUBO COLLEG.MI/MA T. L.332,5 65
IDR0136 VITE AUT.TEC/BO4,2X9,5 INOX UNI6950 59
IDR0019 VITE DI TARATURA PLAST.ARGENTO 17
IDR0018 VITE DI TARATURA PLAST.GIALLA 18

44
10
6
43
1
2
64
59 4
61
60
65
63
2562
52
57
11
5453 56
55
52
50
2118
19
23
2022
21
7024
2625
6917
16
129
8
715
13
14
15
51
27
28
29
30
31
30
3235
3637
35
49
4847
474645
44
58
3433
3839
4041
4243
5
IDRO
39/
R

45
Cod. Descrizione n°
IDR0079 COPERCHIO POSTERIORE COMPLETO
Cavo elettrico 60
Coperchio post. 59
Pressacavo 3240 Flex LTF9 PG9 62
Rondella Rame Ricotto 4x8x1 63
Vite TCEI M4 x8 Zinc. UNI5931 25
IDR0074 COPERCHIO CILINDRO COMPLETO
Boccola sinter. FE 20x30x25 34
Coperchio cilindro grande 38
Guarnizione Balsele 28x20x7 33
Rond. piana 20,3+0,2-0x30x2 Zn 39
Seeger interno D.30 Dacromet 1 40
IDR0003 ATTACCO POSTERIORE COMPLETO
Attacco posteriore 40x150 1
Boccola KU 12x14x15 2
IDR1004 ATTACCO ANTERIORE DRITTO
Attacco anteriore dritto F.12 Zn 45
Dado M12 H7 Zn UNI5589 44
Vite TE M12x35 46
IDR0066 DISTRIBUTORE COMPLETO
By-pass 21
Distributore alluminio 17
Filtro aspirazione metallo 15
Guarn. OR 2025 16
Guarn. OR 2031 (7.65x1.78)Viton 24
Guarn. OR 2037 (9.25x1.78)Viton 19
Guarn. OR 2162 (41x1,78) Viton 26
Inserto plastico tappo blocco
Molla by-pass tipo verde 20
Perno sblocco distr. 23
Rondella piana 4,3x12x1,5 69
Sfera D 7,14 AISI 420 14
Tappo aspirazione M12x1 13
Tappo AV MM. 4 70
Vite di taratura plastica argento 18
Vite di taratura plastica gialla 22
Vite TCEI M4x8 Zinc 25
IDR0078 ESTRUSO COMPLETO RIB
Estruso carcassa MM 628 57
Prigioniero per carcassa inox 55
IDR0043 KIT VITI COMPLETO
Dado cieco M5 ottone 54
Dado M5 zinc 28
Dado M12 basso UNI 5589 Zinc 42
Dado M12 H 7 Zinc. TR. UNI5589 44
Filtro aspirazione metallo 15
Molla by-pass tipo verde 20
Molla motore elettrico 10
Molla valvola blocco
Rondella piana 4,3x12x1,5 Zinc. 69
Rondella piana 13x27x3 Zinc. 41
Rondella piana 20,3+0,2 39
Rondella rame ricotto 63
Seeger interno D.30 Dacromet 40
Sfera D 6,35 AISI 420
Sfera D 7,14 AISI 420 14
Vite TCEI M4x8 Zinc. UNI5931 25
Vite TCEI M5x40 grezza
Vite TCEI M5x45 grezza 8
Vite TCEI M6x20 Inox 61
Vite TE M12x35 F.15 8.8 ZN TR 46
IDR0044 KIT GUARNIZIONI COMPLETO
By-pass 21
Fascia pistone PTFE diam.45 37
Guarnizione Balsele 28x20x7 33
Guarnizione DE 175 35
Guarnizione estruso carc. 90x90 52
Guarn. OR 2018 Viton 30
Guarn. OR 2025 Viton 16
Guarn. OR 2031 Viton 24
Guarn. OR 2037 Viton 19
Guarn. OR 2043 Viton
Guarn. OR 2062 Viton
Guarn. OR 2162 Viton 26
Guarn. OR 2175 Viton 32
Guarn. OR 3156 NBR 56
Guarnizione valvola blocco
Tassello in gomma motore elettrico 6
IDR0004 PERNO ATTACCO FORCELLA CORTO COMPLETO
Dado M 8 H 12 cieco ottone 4
Perno attacco posteriore corto 3
IDR0009 PERNO FORCELLA LUNGO COMPLETO
Dado M 8 H 12 cieco ottone 4
Perno attacco forcella lungo 65
IDR0080 Cavo elettrico 60
IDR0071 Cilindro idraulico MM430 27
IDR0088 Coperchio copristelo RIB 49
IDR0024 Dado copristelo 48
IDR0075 Estruso copristelo mm.521 RIB 51
IDR0005 Forcella posteriore oscillante 5
IDR0015 Giuntino pompa-motore 9
IDR0085 Motore elettrico ingresso 220V 7
Motore elettrico ingresso 110 V 7*
IDR0070 Perno sblocco distributore 23
IDR0002 Piastra 150x80x6 attacco posteriore 64
IDR0081 Piastrina trasporto 11
IDR0037 Pistone all. D.45-11S 36
IDR1065 Pompa a lobi s. fori 0,75 LT 12*
Pompa a lobi s. fori 1 LT 12*
Pompa a lobi s. fori 1,5 LT 12
Pompa a lobi s. fori 2 LT 12*
IDR0007 Pressacavo 3240 Flex 62
IDR0076 Sblocco completo RIB 53
IDR0023 Snodo sferico CM12-M12 Din 648K 43
IDR0099 Stelo crom. MM465 58
IDR0014 Tappo aspirazione M12x1 13
IDR0087 Tappo coprivite copristelo 47
IDR0090 Tir. Pri. M4x505 2Fil. 15 MM Inox 50
IDR0089 Tir. Pri. M5x463 2Fil. 12 MM 29
IDR0072 Tubo collegamento 31
IDR0019 Vite di taratura plastica argento 18
IDR0018 Vite di taratura plastica gialla 22

46
10
4
5
3
2
1
7233
7071
73
67 469
6
60
65
74
6261
63
64
60
58
2429
2322
2120
1978
26
2531
11
18
816
17
9
7
12
1513
2324
14
15
1819
2021
22
7832
3334
29
2830
2759
35
36
37
38
39
38
40
4344
4543
57
56
55
55
5453
52
66
4241
4647
484950
51
IDRO
39/
1B -
IDRO
39/
2B

47
Cod. Descrizione n°
IDR0079 COPERCHIO POSTERIORE COMPLETO
Cavo elettrico 68
Coperchio post. 67
Pressacavo 3240 Flex LTF9 PG9 70
Rondella Rame Ricotto 4x8x1 71
Vite TCEI M4 x8 Zinc. UNI5931 33
IDR0074 COPERCHIO CILINDRO COMPLETO
Boccola sinter. FE 20x30x25 42
Coperchio cilindro grande 46
Guarnizione Balsele 28x20x7 41
Rond. piana 20,3+0,2-0x30x2 Zn 47
Seeger interno D.30 Dacromet 1 48
IDR0003 ATTACCO POSTERIORE COMPLETO
Attacco posteriore 40x150 1
Boccola KU 12x14x15 2
IDR1004 ATTACCO ANTERIORE DRITTO
Attacco anteriore dritto F.12 Zn 53
Dado M12 H7 Zn UNI5589 52
Vite TE M12x35 54
IDR2004 per 39/1BIDR2002 per 39/2B
DISTRIBUTORE COMPLETO
By-pass 29
Distributore alluminio 17
Filtro aspirazione metallo 15
Guarn. OR 2025 16
Guarn. OR 2031 (7.65x1.78)Viton 11
Guarn. OR 2037 (9.25x1.78)Viton 27
Guarnizione OR 2043 Viton 18
Guarnizione OR 2062 Viton 23
Guarnizione OR 2162 Viton 34
Guarnizione valvola blocco 20
Inserto plastico tappo blocco
Molla by-pass tipo verde 28
Molla valvola blocco 22
Perno sblocco distr. 31
Pistoncino pilotaggio con gola 25
Rondella piana 4,3x12x1,5 32
Sede di tenuta blocco idraulico 19
Sfera D.6,35 AISI 420 21
Sfera D 7,14 AISI 420 14
Tappo aspirazione M12x1 13
Tappo AV MM. 4 78
Tappo guidasfera ottone corto 24
Vite di taratura plastica argento 26
Vite di taratura plastica gialla 30
Vite TCEI M4x8 Zinc 33
IDR0078 ESTRUSO COMPLETO RIB
Estruso carcassa MM 628 65
Prigioniero per carcassa inox 63
IDR0043 KIT VITI COMPLETO
Dado cieco M5 ottone 62
Dado M5 zinc 36
Dado M12 basso UNI 5589 Zinc 50
Dado M12 H 7 Zinc. TR. UNI5589 52
Filtro aspirazione metallo 15
Molla by-pass tipo verde 28
Molla motore elettrico 10
Molla valvola blocco 22
Rondella piana 4,3x12x1,5 Zinc. 32
Rondella piana 13x27x3 Zinc. 49
Rondella piana 20,3+0,2 47
Rondella rame ricotto 71
Seeger interno D.30 Dacromet 48
Sfera D 6,35 AISI 420 21
Sfera D 7,14 AISI 420 14
Vite TCEI M4x8 Zinc. UNI5931 33
Vite TCEI M5x40 grezza
Vite TCEI M5x45 grezza 8
Vite TCEI M6x20 Inox 69
Vite TE M12x35 F.15 8.8 ZN TR 54
IDR0044 KIT GUARNIZIONI COMPLETO
By-pass 29
Fascia pistone PTFE diam.45 45
Guarnizione Balsele 28x20x7 41
Guarnizione DE 175 43
Guarnizione estruso carc. 90x90 60
Guarn. OR 2018 Viton 38
Guarn. OR 2025 Viton 16
Guarn. OR 2031 Viton 11
Guarn. OR 2037 Viton 27
Guarn. OR 2043 Viton 18
Guarn. OR 2062 Viton 23
Guarn. OR 2162 Viton 34
Guarn. OR 2175 Viton 40
Guarn. OR 3156 NBR 64
Guarnizione valvola blocco 20
Tassello in gomma motore elettrico 6
IDR0004 PERNO ATTACCO FORCELLA CORTO COMPLETO
Dado M 8 H 12 cieco ottone 4
Perno attacco posteriore corto 3
IDR0009 PERNO FORCELLA LUNGO COMPLETO
Dado M 8 H 12 cieco ottone 4
Perno attacco forcella lungo 73
IDR0080 Cavo elettrico 68
IDR0071 Cilindro idraulico MM430 35
IDR0088 Coperchio copristelo RIB 57
IDR0024 Dado copristelo 56
IDR0075 Estruso copristelo mm.521 RIB 59
IDR0005 Forcella posteriore oscillante 5
IDR0015 Giuntino pompa-motore 9
IDR0020 Guarnizione valvola blocco 20
IDR0085 Motore elettrico ingresso 220V 7
Motore elettrico ingresso 110 V 7*
IDR0070 Perno sblocco distributore 31
IDR0002 Piastra 150x80x6 attacco posteriore 72
IDR0081 Piastrina trasporto 74
IDR0069 Pistoncino pilotaggio con gola 25
IDR0037 Pistone all. D.45-11S 44
IDR1065 Pompa a lobi s. fori 0,75 LT 12*
Pompa a lobi s. fori 1 LT 12*
Pompa a lobi s. fori 1,5 LT 12
Pompa a lobi s. fori 2 LT 12*
IDR0007 Pressacavo 3240 Flex 70
IDR0076 Sblocco completo RIB 61
IDR0067 Sede di tenuta blocco idraulico 19
IDR0023 Snodo sferico CM12-M12 Din 648K 51
IDR0099 Stelo crom. MM465 LAS390 66
IDR0014 Tappo aspirazione M12x1 13
IDR0087 Tappo coprivite copristelo 55
Tappo guidasfera ottone corto 24
IDR0090 Tir. Pri. M4x505 2Fil. 15 MM Inox 58
IDR0089 Tir. Pri. M5x463 2Fil. 12 MM 37
IDR0072 Tubo collegamento 39
IDR0019 Vite di taratura plastica argento 26
IDR0018 Vite di taratura plastica gialla 30

Cod.
CVA
1236
- 0
1032
018
- Re
v. 3
0
Dichiarazione di incorporazione per le quasi-macchine - Direttiva Macchine 2006/42/CE, Allegato II., BDéclaration d’incorporation pour les quasi-machines - Directive Machines 2006/42/CE, Annexe II, B
Declaration of incorporation for partly completed machinery - Machinery Directive 2006/42/EC, Annex II., BEinbauerklärung für unvollständige Maschinen - Maschinenrichtlinie 2006/42/EG, Anhang II, B
Declaración de incorporación de una cuasi máquina - Directiva de Máquinas 2006/42/CE, Anexo II, B
R.I.B. S.r.l. - Via Matteotti, 162 - 25014 Castenedolo - Brescia - ItalyTel. ++39.030.2135811 - www.ribind.it - [email protected]
Apparecchio modello :Modèle d'appareil :Apparatus model :Vorrichtung Modell :Modelo de aparato :
IDROOggetto della dichiarazione :Objet de la déclaration :Object of the declaration :Gegenstand der Erklärung :Objeto de la declaración :
I seguenti requisiti essenziali della Direttiva Macchine (2006/42/CE) sono applicati e rispettati:· La documentazione tecnica pertinente è stata compilata in
conformità alla parte B dell'allegato VII; tale documentazione, o parti di essa, sarà trasmessa per posta o per via elettronica, in risposta ad una richiesta motivata da parte delle autorità nazionali competenti.
· Questa quasi-macchina è conforme alle disposizioni delle seguenti altre direttive CE: Direttive 2014/30/UE e 2014/35/UE· Sono stati applicati e rispettati tutti i requisiti essenziali pertinenti di
cui all'allegato I della direttiva UE 2006/42/CE mediante il rispetto delle norme armonizzate applicate che conferiscono presunzione di conformità ai requisiti essenziali specifici delle Direttive applicabili da esse coperti.
AVVERTENZA: Altri requisiti e altre Direttive UE possono essere applicabili ai prodotti oggetto di questa dichiarazione.
Les exigences essentielles suivantes de la Directive Machines (2006/42/CE) sont appliquées et satisfaites:· La documentation technique pertinente est constituée conformément
à la partie B de l'annexe VII; ces documents, ou des parties de celui-ci, seront envoyés par la poste ou par voie électronique, en réponse à une demande motivée des autorités nationales compétentes.
· Cette quasi-machine est en conformité avec les dispositions des autres directives CE suivantes: Directives 2014/30/UE et 2014/35/UE· Les exigences essentielles pertinentes indiqueés dans l'annexe
I de la Directive UE 2006/42/CE ont été appliquées, au moyen du respect des normes harmonisées donnant présomption de conformité aux exigences essentielles pertinentes spécifiques des
Directives Européennes, couvertes par de telles normes ou parties de celles-ci.
ATTENTION: On peut appliquer d'autres exigences et d'autres Directives Européennes aux produits couverts par cette déclaration.
The following essential requirements of the Machinery Directive (2006/42/EC) are abided by and applied:· The relevant technical documentation is compiled in accordance
with Part B of Annex VII; such documentation, or parts of it, will be sent by post or by electronic means, in response to a motivated request received from the qualified national authorities.
· This almost complete-machinery is conformed with the provisions of these others EC directives: Directives 2014/30/EU and 2014/35/EU· All relevant essential requirements as given in Annex I of the EU
Directive 2006/42/EC have been applied to the product. Compliance with the cited harmonized standards provides presumption of conformity with the specified essential requirements of the Directive covered by those Standards or parts thereof.
WARNING: Other requirements and other EU Directives may be applicable to the products falling within the scope of this Declaration
Die folgenden grundlegenden Anforderungen der Maschinenrichtlinie (2006/42/CE) angewendet werden und erfüllt:· Die technischen Unterlagen gemäß Teil B des Anhangs VII
zusammengestellt; Unterlagen, oder Teile davon, werden per Post oder auf elektronischem Wege übermittelt werden, in Reaktion auf einen begründeten Antrag bei den zuständigen nationalen Behörden.
· Diese unvollständige Maschine in Übereinstimmung mit den Bestimmungen der folgenden anderen CE-Richtlinien: Richtlinien 2014/30/EU und 2014/35/EU· Alle grundlegenden Anforderungen, gemäß Anhang I der Richtlinie
UE 2006/42 /CE, angewendet wurden. Die Übereinstimmung mit den genannten harmonisierten Normen sieht die Vermutung der Übereinstimmung mit den festgelegten grundlegenden Anforderungen der Richtlinie vor, die unter diese Normen oder Teile davon fallen.
ACHTUNG: Weitere Anforderungen und andere EU-Richtlinien können für Produkte dieser Erklärung unterliegen angewendet werden.
Los siguientes requisitos esenciales de la Directiva de Máquinas (2006/42/CE) se cumplen y aplican:· La documentación técnica correspondiente se elaborará de acuerdo
con la Parte B del Anexo VII; dicha documentación, o partes de ésa, será enviada por correo o por medios electrónicos, en respuesta a una solicitud motivada de las autoridades nacionales competentes.
· Esta cuasi-máquina está conforme con las disposiciones de las siguientes otras directivas de la CE: Directivas 2014/30/UE y 2014/35/UE· Se han aplicado y se ha cumplido con todos los requisitos esenciales
pertinentes del Anexo I de la Directiva de la UE 2006/42/CE mediante el cumplimiento de las normas armonizadas aplicadas que dan presunción de conformidad con los requisitos esenciales específicos de las directivas aplicables cubiertos por ellas.
ADVERTENCIA: Otros requisitos y otras Directivas de la UE pueden ser aplicables a los productos cubiertos por esta norma.
L’oggetto della dichiarazione di cui sopra è conforme alla pertinente normativa di armonizzazione dell’Unione:L’objet de la déclaration décrit ci-dessus est en conformité avec la législation d’harmonisation de l’Union:
The object of the declaration described above is in conformity with the relevant Union harmonisation legislation: Die Aufgabe der Erklärung oben beschrieben, ist in Übereinstimmung mit den einschlägigen EU-Harmonisierungsvorschriften:
El objeto de la declaración descrita anteriormente es conforme con la legislación de armonización de la Unión pertinente:
EN 12453:2017EN 12635:2002+A1:2008EN 13241-1:2016 EN 55014-1:2017
EN 55014-2:2012+A1:2014EN 60335-1:2016EN 60335-2-103:2015EN 61000-3-2:2014
EN 61000-3-3:2013EN 61000-6-1:2007EN 61000-6-2:2005EN 61000-6-3:2007+A1:2011
EN 61000-6-4:2007+A1:2011
- Il presente prodotto non può funzionare in modo indipendente ed è destinato ad essere incorporato in un impianto costituito da ulteriori elementi. Rientra perciò nell’Art. 6 paragrafo 2 della Direttiva 2006/42/CE (Macchine) e successive modifiche, per cui segnaliamo il divieto di messa in servizio prima che l’impianto sia stato dichiarato conforme alle disposizioni della Direttiva.
- Le présent dispositif ne peut fonctionner de manière indépendante, étant prévu pour être intégré à une installation constituée d’autres éléments. Aussi rentre-t-il dans le champ d’application de l’art. 6, paragraphe 2 de la Directive machines 2006/42/CEE et de ses modifications successives. Sa mise en service est interdite avant que l’installation ait été déclarée conforme aux dispositions prévues par la Directive.
- This product can not work alone and was designed to be fitted into a system made up of various other elements. Hence, it falls within Article 6, Paragraph 2 of the EC-Directive 2006/42 (Machines) and following modifications, to which respect we point out the ban on its putting into service before being found compliant with what is provided by the Directive.
- Dieses Produkt kann nicht allein funktionieren und wurde konstruiert, um in einen von anderen Bestandteilen zusammengesetzten System eingebaut zu werden. Das Produkt fällt deswegen unter Artikel 6, Paragraph 2 der EWG-Richtlinie 2006/42 (Maschinen) und folgenden.
- Este producto no puede funcionar de manera independiente y se tiene que incorporar en una instalación compuesta por otros elementos. Está incluido por lo tanto en el Art. 6 párrafo 2 de la Disposición 2006/42/CEE (Maquinaria) y sus siguientes modificaciones, por lo cual destacamos que está prohibido poner la instalación en marcha antes de que esté declarada conforme a la citada Disposición.
(Bosio Stefano - Legal Representative)
Castenedolo, 01-03-2018
· Questo prodotto è stato completamente progettato e costruito in Italia · Ce produit a été complètement développé et fabriqué en Italie · This product has been completely developed and built in Italy · Dieses Produkt wurde komplett in Italien entwickelt und hergestellt · Artìculo totalmente proyectado y producido en Italia
AUTOMATISMI PER CANCELLIAUTOMATIC ENTRY SYSTEMS