
IDoc to File
21
IDOC TO FILE The document deals with outbound integration scenario from IDoc to File. The IDoc’s are pushed from SAP ISU system to XI. The content conversion is used at receiver side to convert IDoc data to CSV file. XSLT is used for mapping to retain the context of the segments. Prerequisites: 1. One Business System is required to be configured of type 3 rd party in SLD (System Landscape Directory). 2. Partner Profile should be configured for the outbound IDoc. 3. FTP configuration should be in place to transfer the output file to desired location. Note: 1. Business System configured in SLD is not covered in detail. 2. Partner Profile configuration is not covered in detail. Configuration steps in Integration Repository: 1. The basic IDoc structure is shown in figure 1. Create the data type for individual segments of the IDoc and create one final data type for output using the segment data type as shown in figure 2. Figure 1 IDoc structure used in scenario.
-
Upload
nelsondarla12 -
Category
Documents
-
view
183 -
download
7
description
IDoc to File
Transcript of IDoc to File

IDOC TO FILE
The document deals with outbound integration scenario from IDoc to File. The IDoc’s are pushed from SAP ISU system to XI. The content conversion is used at receiver side to convert IDoc data to CSV file. XSLT is used for mapping to retain the context of the segments. Prerequisites:
1. One Business System is required to be configured of type 3rd party in SLD (System
Landscape Directory).
2. Partner Profile should be configured for the outbound IDoc.
3. FTP configuration should be in place to transfer the output file to desired location.
Note:1. Business System configured in SLD is not covered in detail.
2. Partner Profile configuration is not covered in detail.
Configuration steps in Integration Repository:
1. The basic IDoc structure is shown in figure 1. Create the data type for individual segments
of the IDoc and create one final data type for output using the segment data type as
shown in figure 2.
Figure 1 IDoc structure used in scenario.
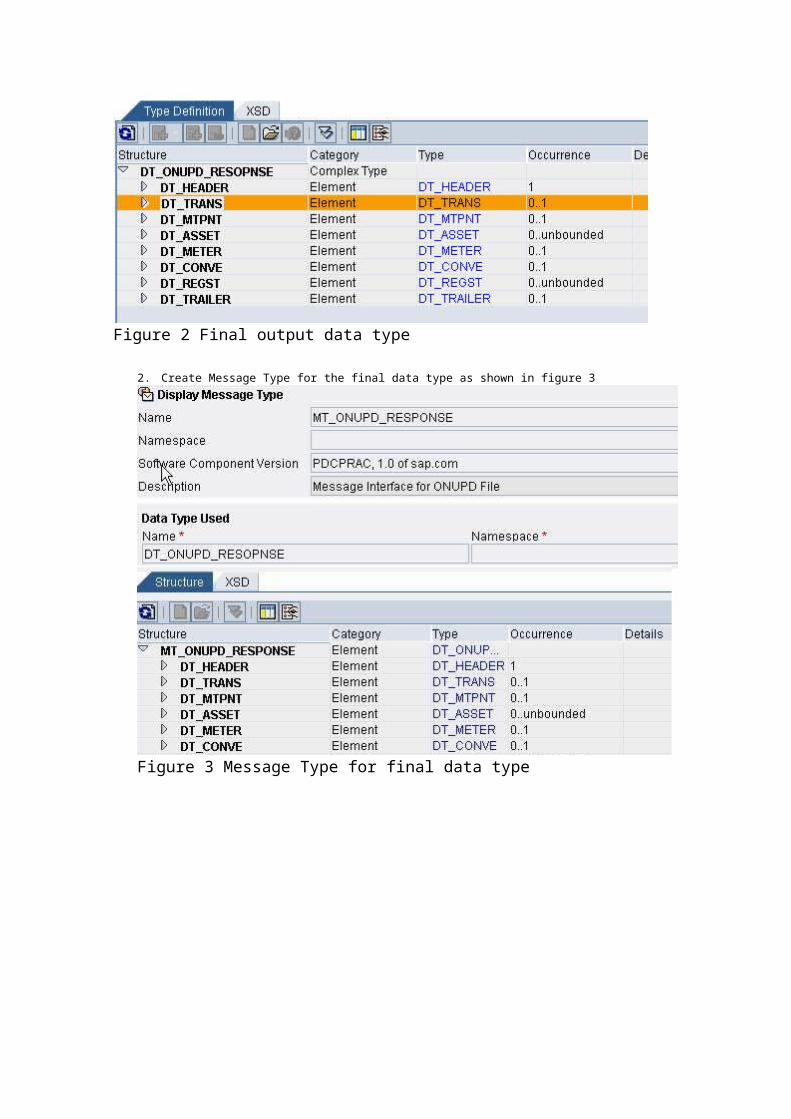
Figure 2 Final output data type
2. Create Message Type for the final data type as shown in figure 3
Figure 3 Message Type for final data type
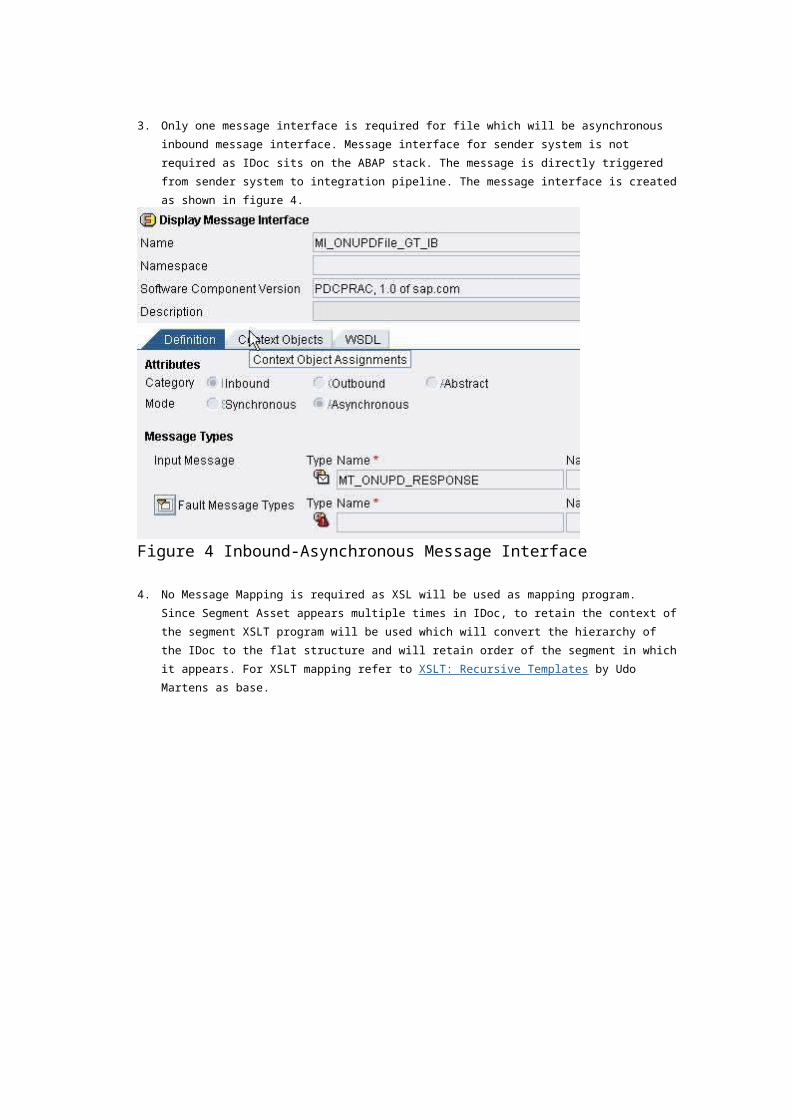
3. Only one message interface is required for file which will be asynchronous inbound
message interface. Message interface for sender system is not required as IDoc sits on the
ABAP stack. The message is directly triggered from sender system to integration pipeline.
The message interface is created as shown in figure 4.
Figure 4 Inbound-Asynchronous Message Interface 4. No Message Mapping is required as XSL will be used as mapping program. Since
Segment Asset appears multiple times in IDoc, to retain the context of the segment XSLT
program will be used which will convert the hierarchy of the IDoc to the flat structure and
will retain order of the segment in which it appears. For XSLT mapping refer to XSLT:
Recursive Templates by Udo Martens as base.

5. Create the Interface Mapping with source as IDoc and data type created as target. Use
XSL program as mapping program as shown in fig 5.
Fig 5 Interface Mapping using XSL Program
Configuration steps in Integration Directory:
1. a> Create one communication channel as shown in figure 6. Make sure that the service
selected is of 3rd party in System Landscape Directory.
b> Specify the FTP parameters and set the Connection Mode as permanently because we want to generate the CSV file as soon as IDoc is generated. Specify the directory in which you want to specify the file. c> Specify the content conversion on receiver side as shown in figure 7 for all the segments. Specify field names, field separator and end separator in the content conversion for the segments including header and trailer.
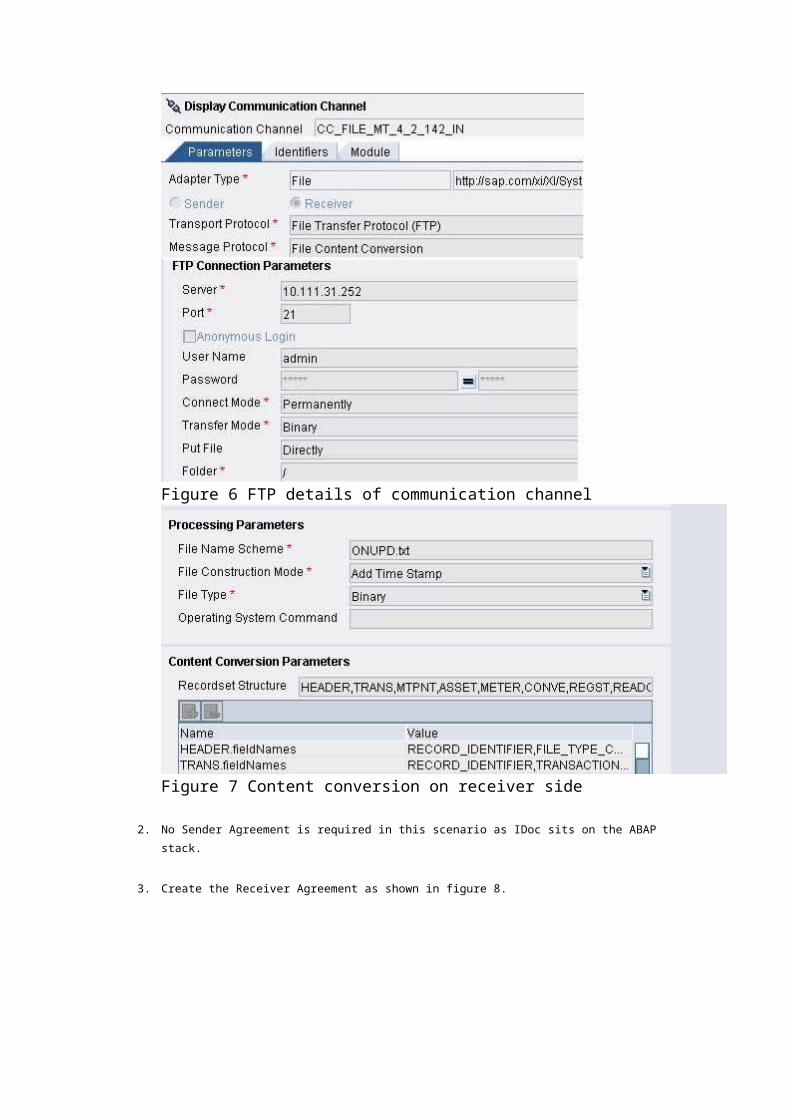
Figure 6 FTP details of communication channel
Figure 7 Content conversion on receiver side
2. No Sender Agreement is required in this scenario as IDoc sits on the ABAP stack.
3. Create the Receiver Agreement as shown in figure 8.
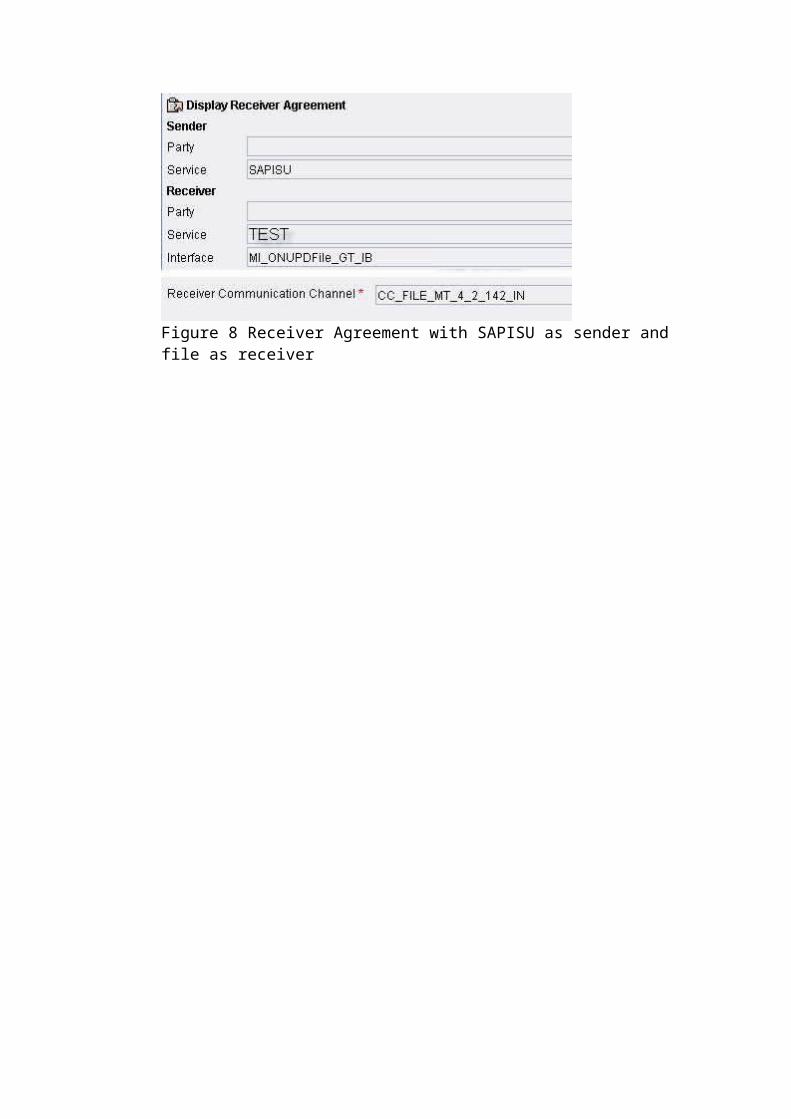
Figure 8 Receiver Agreement with SAPISU as sender and file as receiver
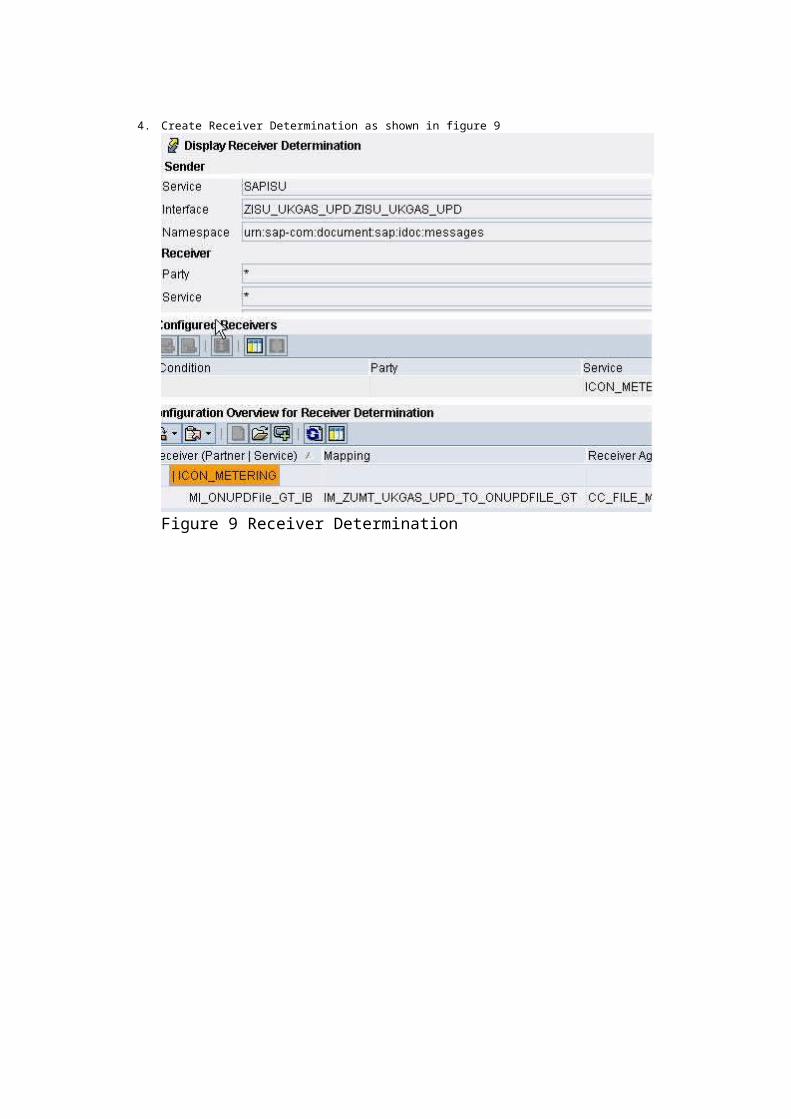
4. Create Receiver Determination as shown in figure 9
Figure 9 Receiver Determination
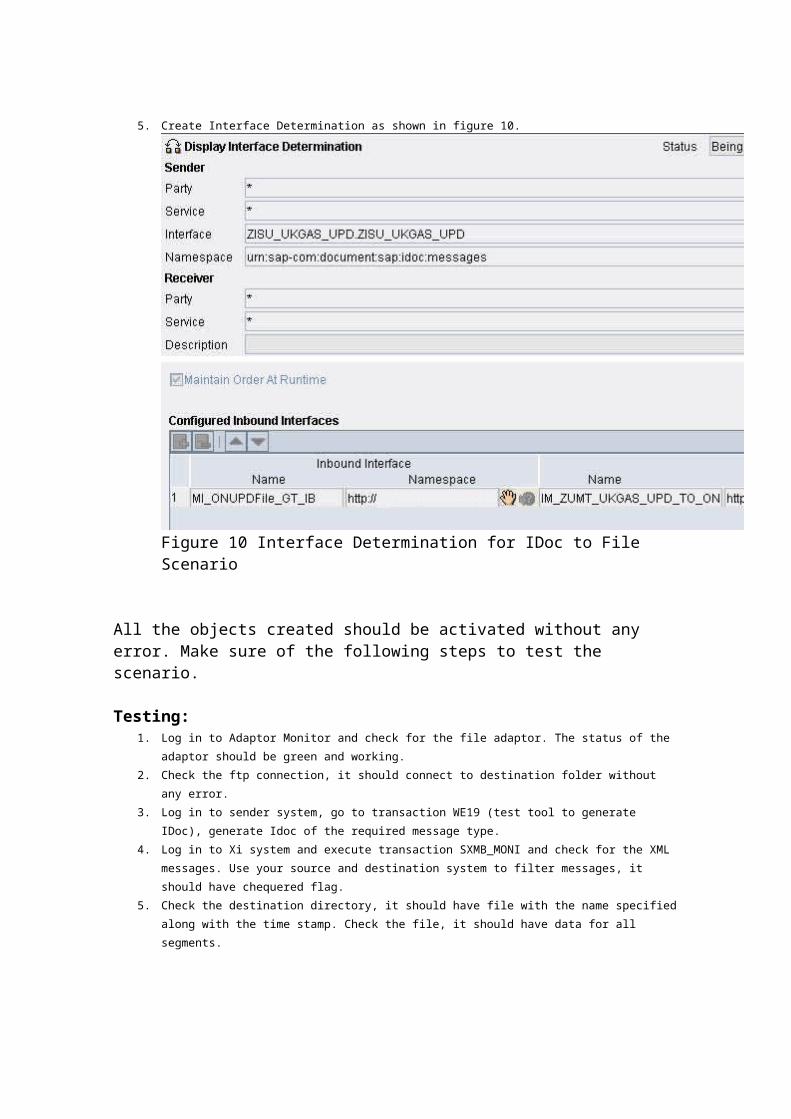
5. Create Interface Determination as shown in figure 10.
Figure 10 Interface Determination for IDoc to File Scenario
All the objects created should be activated without any error. Make sure of the following steps to test the scenario. Testing:
1. Log in to Adaptor Monitor and check for the file adaptor. The status of the adaptor should
be green and working.
2. Check the ftp connection, it should connect to destination folder without any error.
3. Log in to sender system, go to transaction WE19 (test tool to generate IDoc), generate
Idoc of the required message type.
4. Log in to Xi system and execute transaction SXMB_MONI and check for the XML messages.
Use your source and destination system to filter messages, it should have chequered flag.
5. Check the destination directory, it should have file with the name specified along with the
time stamp. Check the file, it should have data for all segments.
ABAP PROXY TO FILE
ABAP Proxies in XI(Client Proxy) The other way of interfacing XI is through proxies. From WAS 6.20, proxy generation feature enables application systems to communicate with XI using proxies. Proxy generation enables you to create proxies in application systems. Proxies encapsulate the creation or parsing of XML messages and the communication with the relevant runtime components required to send or receive the messages.
There are two types of Proxies.
1. Java Proxies. 2. ABAP Proxies.
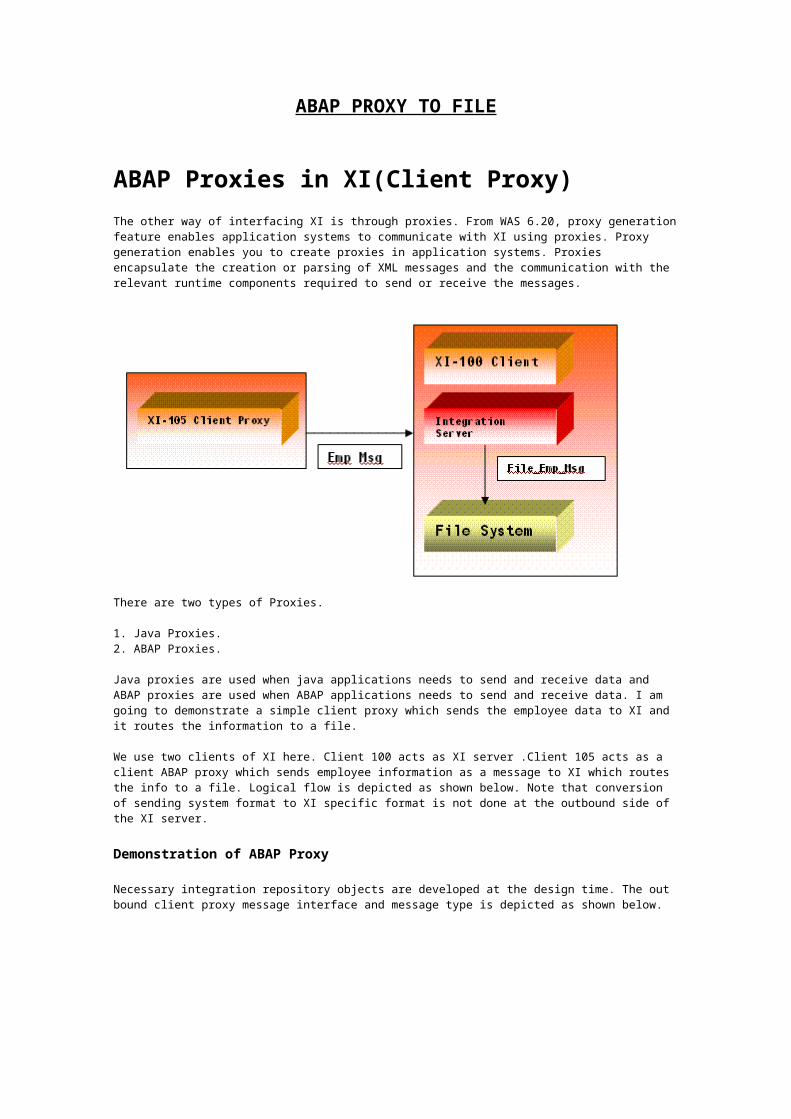
Java proxies are used when java applications needs to send and receive data and ABAP proxies are used when ABAP applications needs to send and receive data. I am going to demonstrate a simple client proxy which sends the employee data to XI and it routes the information to a file.
We use two clients of XI here. Client 100 acts as XI server .Client 105 acts as a client ABAP proxy which sends employee information as a message to XI which routes the info to a file. Logical flow is depicted as shown below. Note that conversion of sending system format to XI specific format is not done at the outbound side of the XI server.
Demonstration of ABAP Proxy
Necessary integration repository objects are developed at the design time. The out bound client proxy message interface and message type is depicted as shown below.
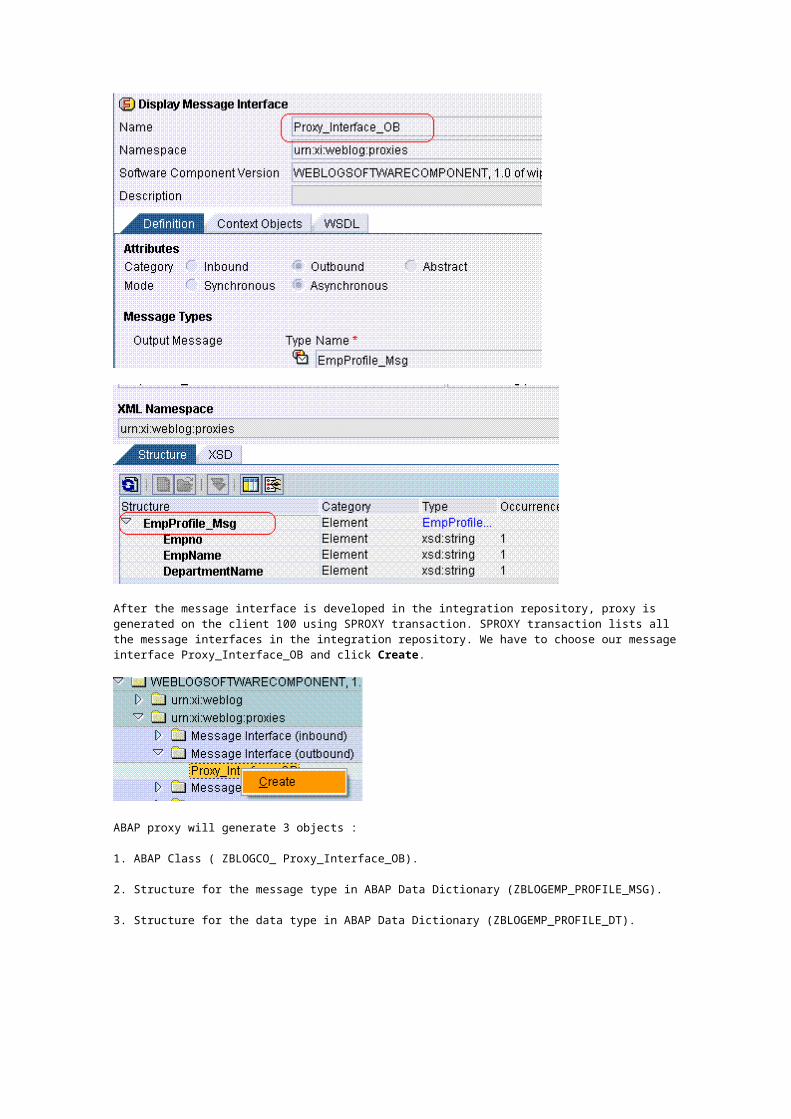
After the message interface is developed in the integration repository, proxy is generated on the client 100 using SPROXY transaction. SPROXY transaction lists all the message interfaces in the integration repository. We have to choose our message interface Proxy_Interface_OB and click Create.
ABAP proxy will generate 3 objects :
1. ABAP Class ( ZBLOGCO_ Proxy_Interface_OB).
2. Structure for the message type in ABAP Data Dictionary (ZBLOGEMP_PROFILE_MSG).
3. Structure for the data type in ABAP Data Dictionary (ZBLOGEMP_PROFILE_DT).
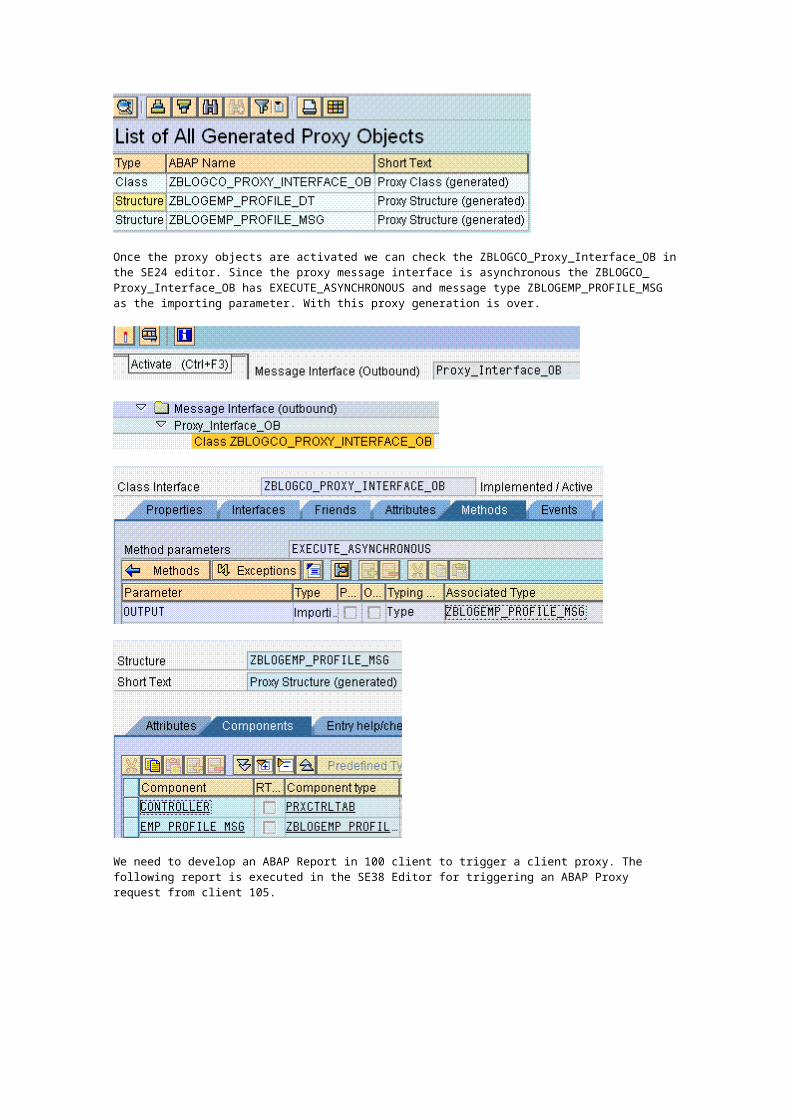
Once the proxy objects are activated we can check the ZBLOGCO_Proxy_Interface_OB in the SE24 editor. Since the proxy message interface is asynchronous the ZBLOGCO_ Proxy_Interface_OB has EXECUTE_ASYNCHRONOUS and message type ZBLOGEMP_PROFILE_MSG as the importing parameter. With this proxy generation is over.
We need to develop an ABAP Report in 100 client to trigger a client proxy. The following report is executed in the SE38 Editor for triggering an ABAP Proxy request from client 105.
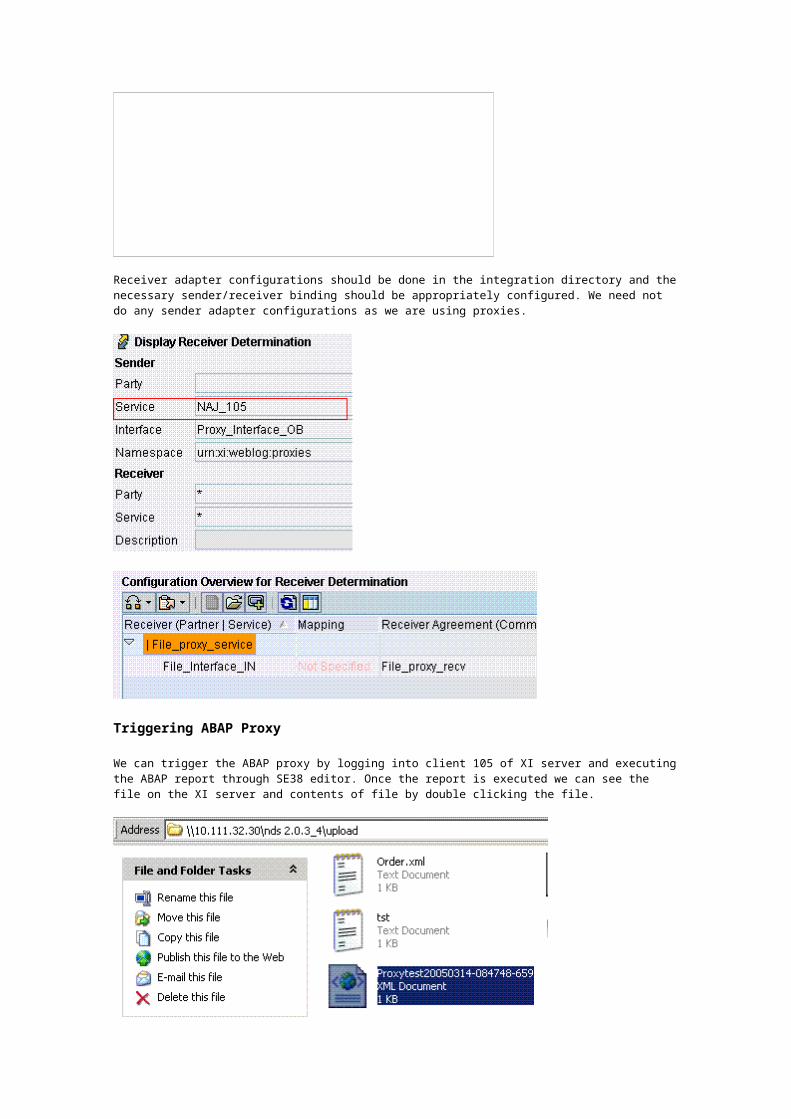
Receiver adapter configurations should be done in the integration directory and the necessary sender/receiver binding should be appropriately configured. We need not do any sender adapter configurations as we are using proxies.
Triggering ABAP Proxy
We can trigger the ABAP proxy by logging into client 105 of XI server and executing the ABAP report through SE38 editor. Once the report is executed we can see the file on the XI server and contents of file by double clicking the file.

I hope this blog will be useful for trying out real time applications on ABAP Proxies.
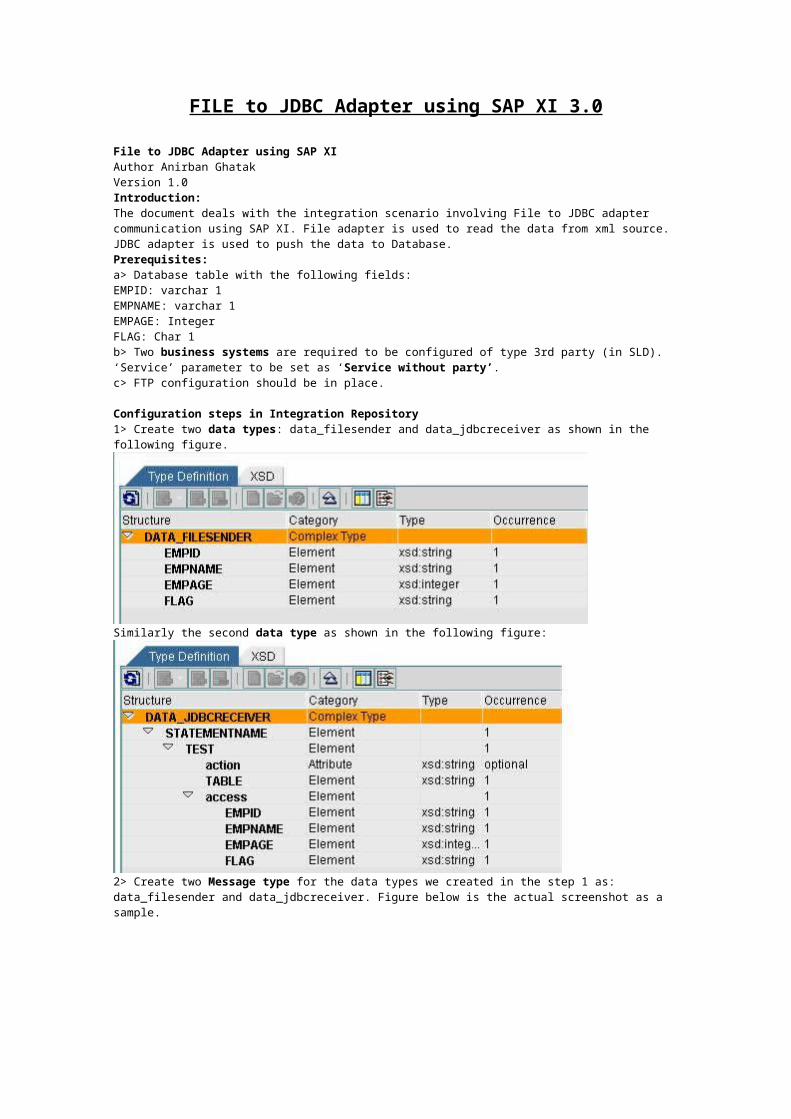
FILE to JDBC Adapter using SAP XI 3.0
File to JDBC Adapter using SAP XI Author Anirban Ghatak Version 1.0 Introduction: The document deals with the integration scenario involving File to JDBC adapter communication using SAP XI. File adapter is used to read the data from xml source. JDBC adapter is used to push the data to Database. Prerequisites: a> Database table with the following fields:EMPID: varchar 1EMPNAME: varchar 1 EMPAGE: Integer FLAG: Char 1 b> Two business systems are required to be configured of type 3rd party (in SLD). ‘Service’ parameter to be set as ‘Service without party’.c> FTP configuration should be in place.
Configuration steps in Integration Repository 1> Create two data types: data_filesender and data_jdbcreceiver as shown in the following figure.
Similarly the second data type as shown in the following figure:
2> Create two Message type for the data types we created in the step 1 as: data_filesender and data_jdbcreceiver. Figure below is the actual screenshot as a sample.
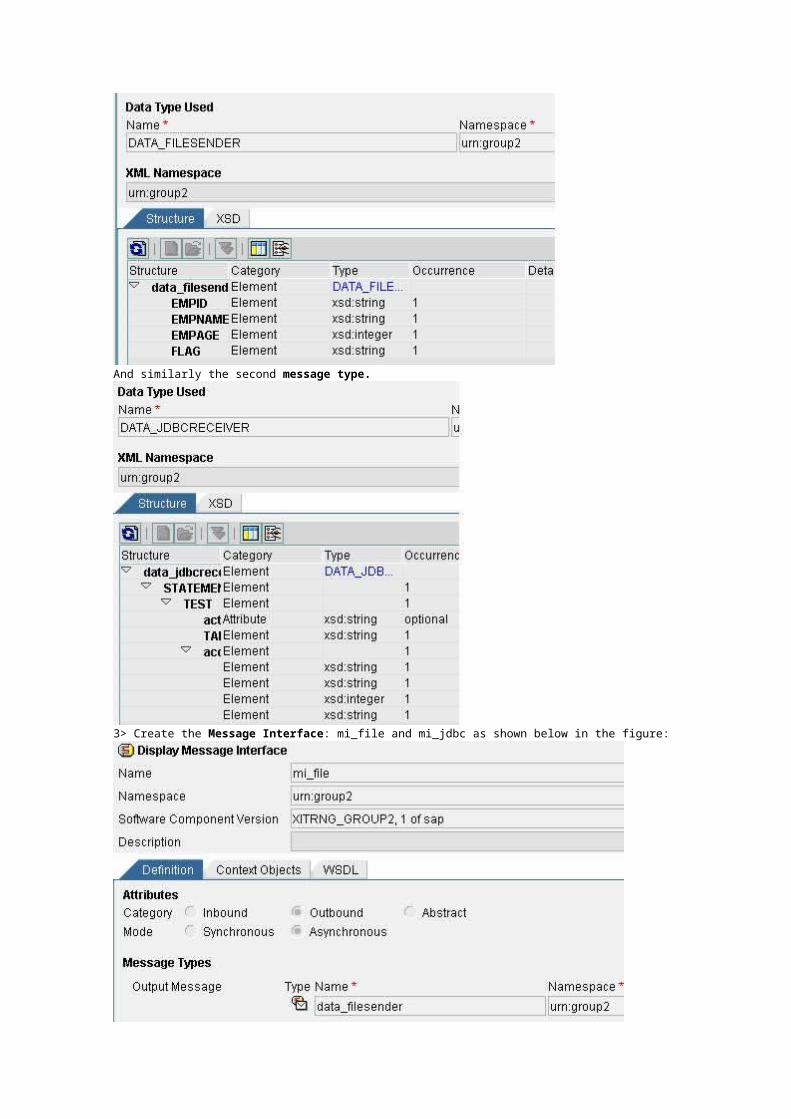
And similarly the second message type.
3> Create the Message Interface: mi_file and mi_jdbc as shown below in the figure:
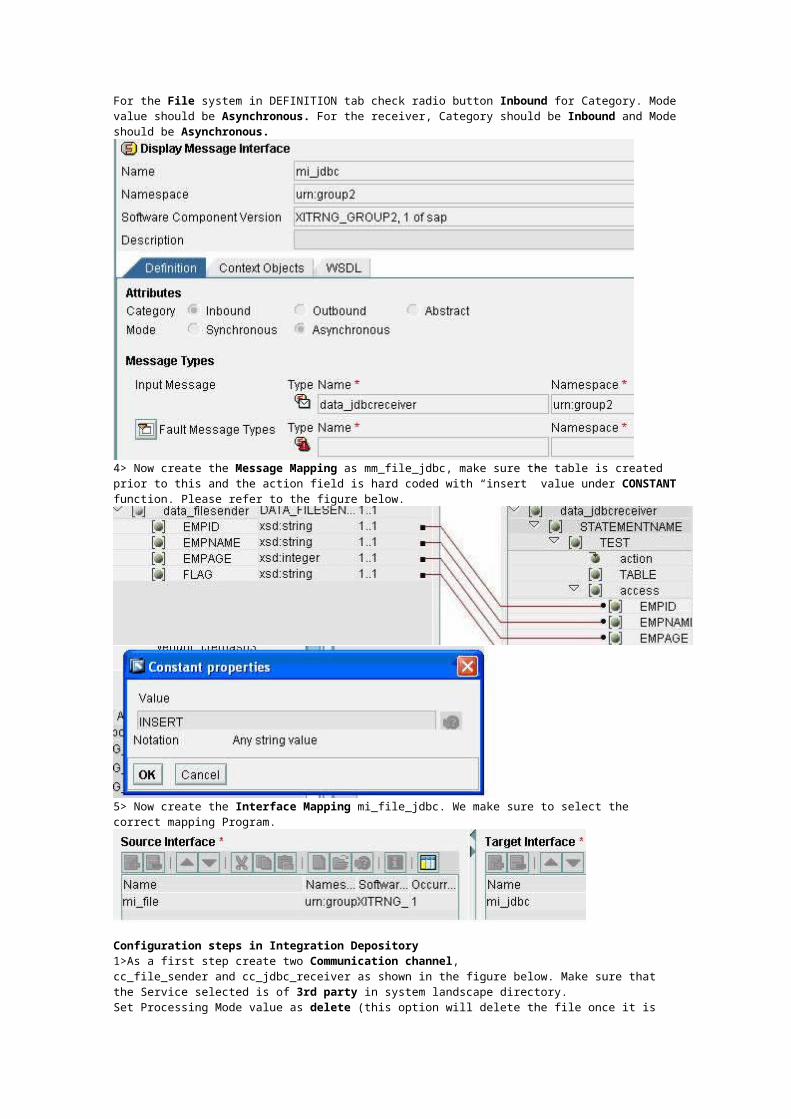
For the File system in DEFINITION tab check radio button Inbound for Category. Mode value should be Asynchronous. For the receiver, Category should be Inbound and Mode should be Asynchronous.
4> Now create the Message Mapping as mm_file_jdbc, make sure the table is created prior to this and the action field is hard coded with “insert” value under CONSTANT function. Please refer to the figure below.
5> Now create the Interface Mapping mi_file_jdbc. We make sure to select the correct mapping Program.
Configuration steps in Integration Depository 1>As a first step create two Communication channel,cc_file_sender and cc_jdbc_receiver as shown in the figure below. Make sure that the Service selected is of 3rd party in system landscape directory. Set Processing Mode value as delete (this option will delete the file once it is read by SAP XI adapter) and transfer mode as binary.
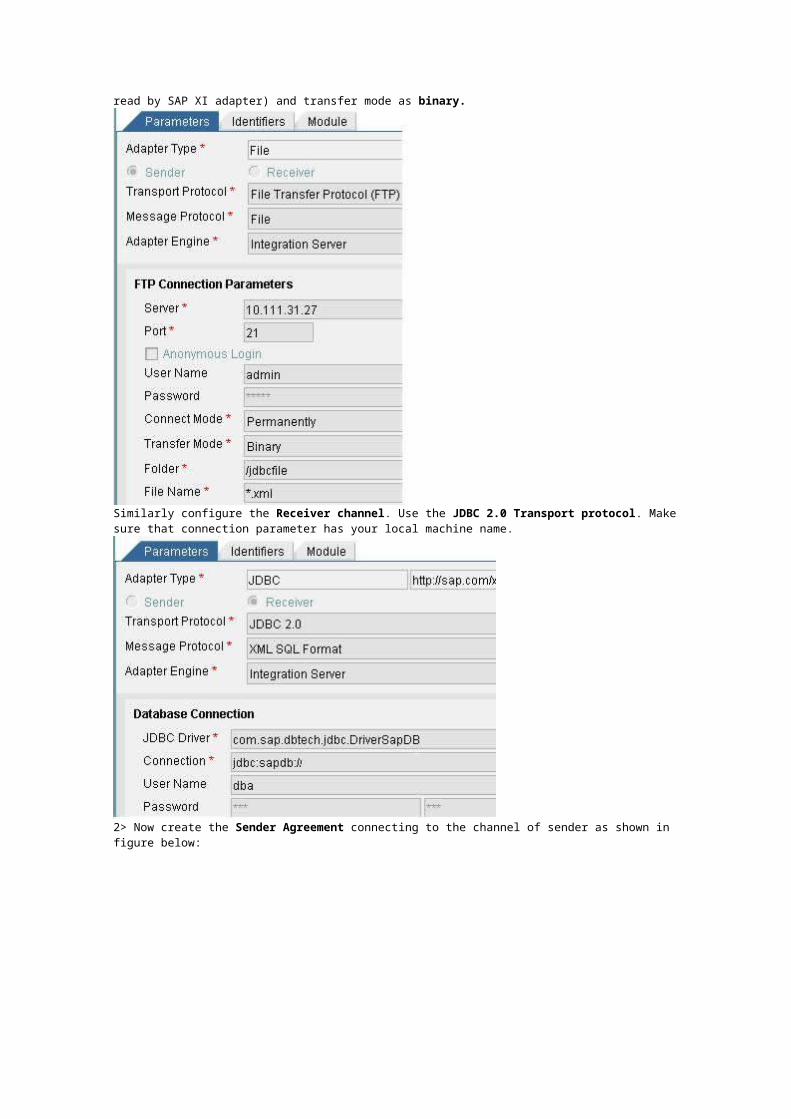
Similarly configure the Receiver channel. Use the JDBC 2.0 Transport protocol. Make sure that connection parameter has your local machine name.
2> Now create the Sender Agreement connecting to the channel of sender as shown in figure below:
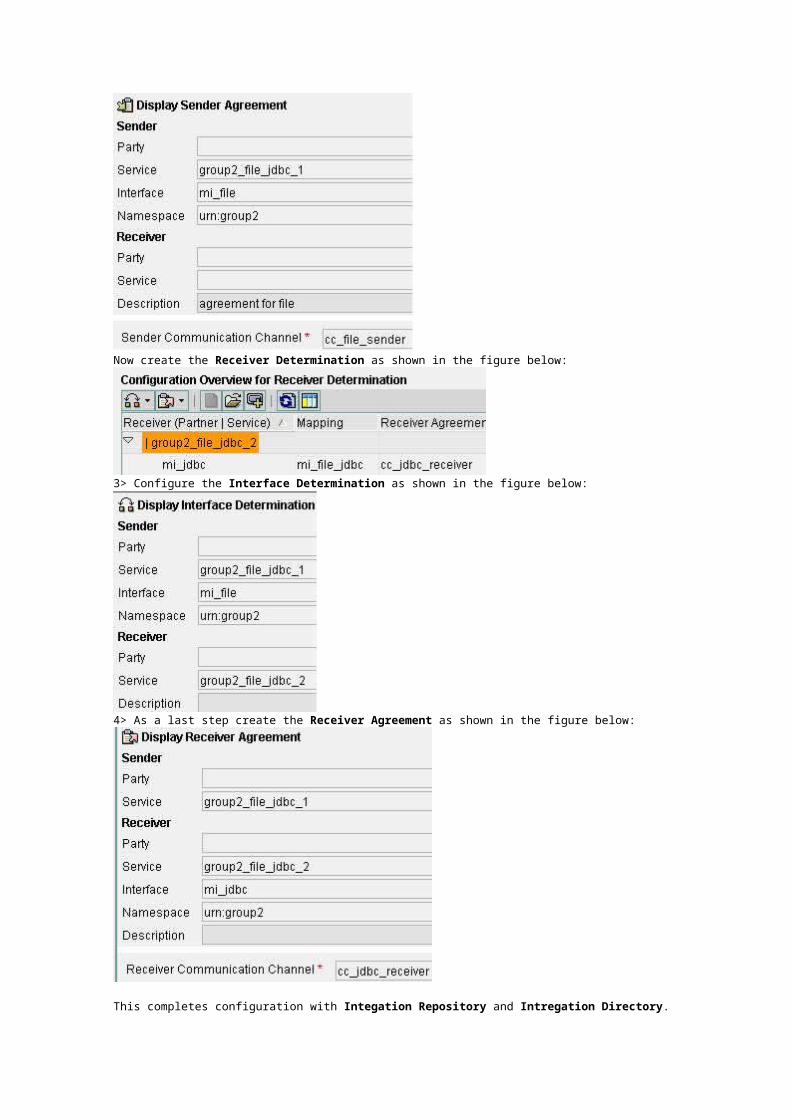
Now create the Receiver Determination as shown in the figure below:
3> Configure the Interface Determination as shown in the figure below:
4> As a last step create the Receiver Agreement as shown in the figure below:
This completes configuration with Integation Repository and Intregation Directory.
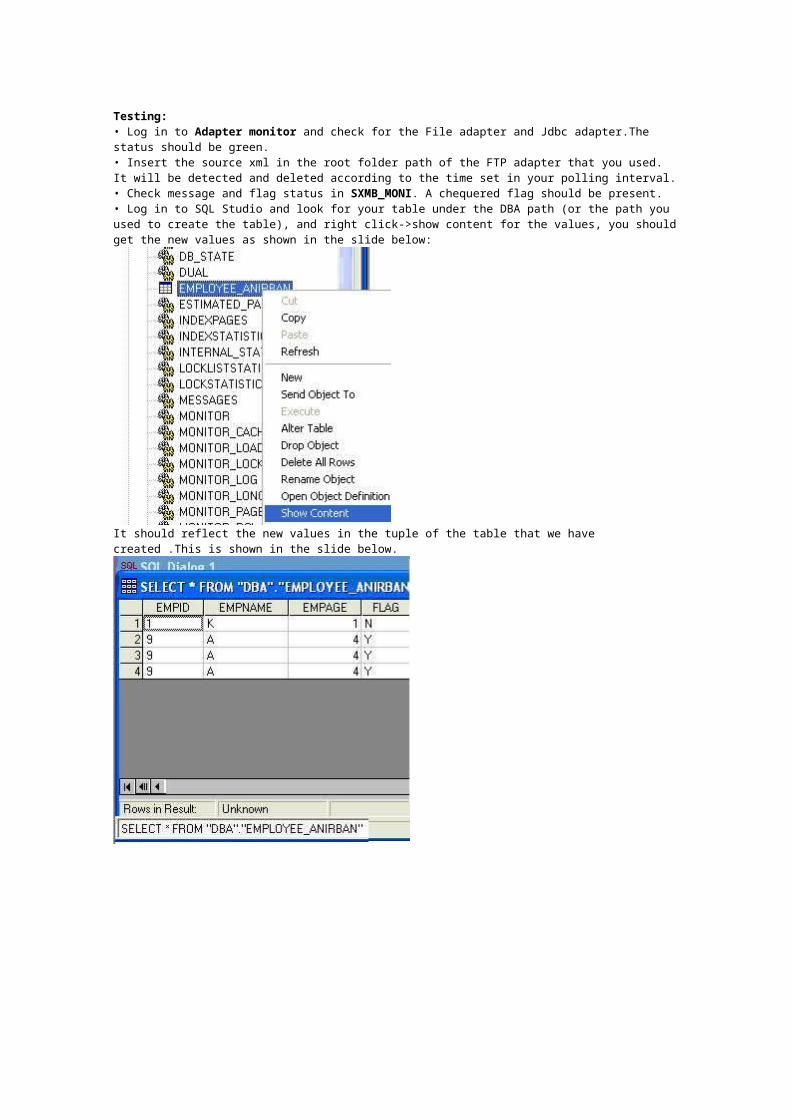
Testing: • Log in to Adapter monitor and check for the File adapter and Jdbc adapter.The status should be green.• Insert the source xml in the root folder path of the FTP adapter that you used. It will be detected and deleted according to the time set in your polling interval.• Check message and flag status in SXMB_MONI. A chequered flag should be present. • Log in to SQL Studio and look for your table under the DBA path (or the path you used to create the table), and right click->show content for the values, you should get the new values as shown in the slide below:
It should reflect the new values in the tuple of the table that we have created .This is shown in the slide below.
Overview of Transition from Dev to QA in XI
I have still not forgotten the initial days when we are trained on XI by SAP there were lot of questions on version management and transport mechanisms and things are not very clear at that stage .We have also seen lot of times the customers asking details about the reliability and complexity of version and transport mechanisms.
After really working in a project for integrating File server with SAP IS-U and involved in the transition of development objects to QA I strongly feel that transport and version mechanism in SAP XI is as good as ABAP transports if we orderly structure the components in the IR and ID and understand the interrelations between different objects of IR and ID.
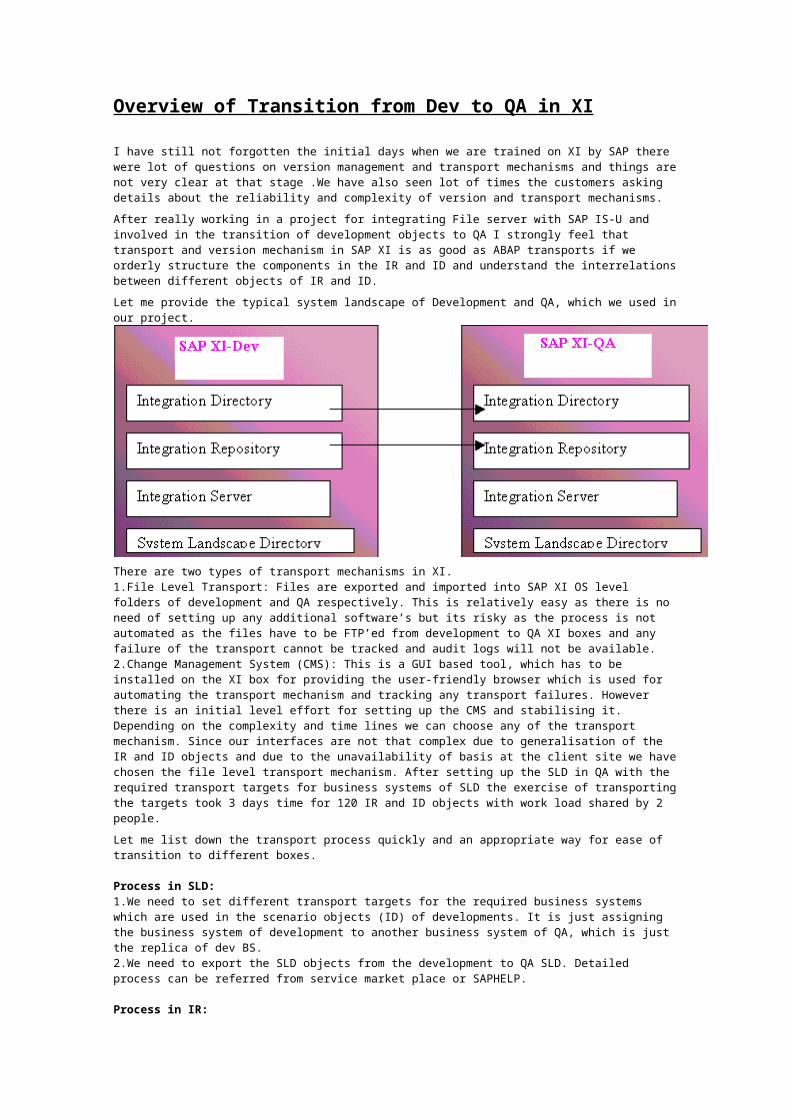
Let me provide the typical system landscape of Development and QA, which we used in our project.
There are two types of transport mechanisms in XI. 1.File Level Transport: Files are exported and imported into SAP XI OS level folders of development and QA respectively. This is relatively easy as there is no need of setting up any additional software’s but its risky as the process is not automated as the files have to be FTP’ed from development to QA XI boxes and any failure of the transport cannot be tracked and audit logs will not be available. 2.Change Management System (CMS): This is a GUI based tool, which has to be installed on the XI box for providing the user-friendly browser which is used for automating the transport mechanism and tracking any transport failures. However there is an initial level effort for setting up the CMS and stabilising it. Depending on the complexity and time lines we can choose any of the transport mechanism. Since our interfaces are not that complex due to generalisation of the IR and ID objects and due to the unavailability of basis at the client site we have chosen the file level transport mechanism. After setting up the SLD in QA with the required transport targets for business systems of SLD the exercise of transporting the targets took 3 days time for 120 IR and ID objects with work load shared by 2 people.
Let me list down the transport process quickly and an appropriate way for ease of transition to different boxes.
Process in SLD: 1.We need to set different transport targets for the required business systems which are used in the scenario objects (ID) of developments. It is just assigning the business system of development to another business system of QA, which is just the replica of dev BS. 2.We need to export the SLD objects from the development to QA SLD. Detailed process can be referred from service market place or SAPHELP.
Process in IR: 1.We need to organise the IR objects in the name spaces properly and ensure that all objects of the name space are correctly available. Ex: Message types, Data types are present in the appropriate name spaces. 2.We need to ensure all the usage dependency objects for the required if any are also available. 3.We can transport the objects at the name space level or SWCV level initially depending on the complexity. We can do it by using the Tools->Export Design Objects Wizard in the development IR. We can see that the file that is getting generated using the wizard has the name File: XI3_0_SWCV Description_Version number.tpz when exported at the SWC level and File: XI3_0_SWCV Description-nsps_Version number.tpz when exported at namespace level. We need to ensure that all the reference objects also are exported together to avoid run time failures in QA box. For Ex:
We have generic message types, data types, BPM’’s which are used by all namespaces in the corresponding SWCV. When we are importing the interface specific name spaces into QA IR it has imported successfully as we do not need activate the objects in QA IR. But when we tested it has given run time errors that required message type or data type cannot be found. We re-imported the generic name space objects and usage dependency objects into QA IR, tested the interface and it works fine after that. 4.We can transport each and every individual object of the IR like data type, message type,idoc type,rfc ..etc…by using the same wizard and the file name that is generated when exporting individual objects is File: XI3_0_SWCV Description -objs_VersionNumber.tpz 5.We have to make sure that if any custom RFC modules are developed for JCO calls that required connection parameters have to be changed to point to appropriate sand box. However this can be avoided by using gethostname and getclientname methods in JCO calls. 6.We also need to ensure that if any custom ABAP objects are developed in XI box those requests also have to be transported for avoiding run time failures in QA XI box.
Process in ID: 1.We can export configuration object either at the scenario or service or individual object level. 2.File Name conventions in the ID: File: XI3_0_directory-selection_VersionNumber.tpz- Export of Individual Objects File: XI3_0_ScenarioName_VersionNumber.tpz- Export of Scenario Objects File: XI3_0_ServiceName_VersionNumber.tpz- Export of Service Objects File: XI3_0_PartyName_VersionNumber.tpz- Export of Party Objects 3.However we can transport at the scenario level initially so that we can have a clear logical grouping of whether all the required individual objects like sender agreements, receiver determinations..etc are present for an interface to work. 4.Unlike IR when we import the scenarios in ID the configuration metadata will be lost and have to be manually entered in the QA ID. For Ex: Parameters like source directory, filename scheme, FTP server will vanish and have to be entered appropriately as required for QA sand box. After entering the metadata we need to activate all the scenario objects in the ID. After successful activation your interfaces are ready for testing.
Process in Runtime: 1.Check in the transaction SXMB_MONI of QA ABAP stack whether the interfaces are working as desired.
I just tried to put up my little experience in the blog thinking that it can be useful. As far as I understand from my little experience versioning and transporting mechanisms in XI is good if the objects are clearly understood.