
ibm INTELLIGENT SYNTHESIZER E-10)
54
i€Roland ibm INTELLIGENT SYNTHESIZER E-10) Owner’s Manual
Transcript of ibm INTELLIGENT SYNTHESIZER E-10)
i€Roland
ibm INTELLIGENT SYNTHESIZER
E-10) Owner’s Manual

CAUTION A PSS AUN REDUCE Tom SR OF LEC EME Sere
NO RR NACE COME RO Bal NO USEO SERIE ABE OASIS eS
REE E 6f eee 70 Qua HE SERENE BERS mM
Sy
The lightning flash with arrowhead symbo!, withinan equilaterat
Inangle. is intended to alert the user to the presence of un-
insulated “dangerous voltage” within the product's enclosure
that may be of sufficient magnitude to constitute a nsk of
electric shock to persons
The exclamation point within an equilateral tnangle ts intended
to alert the user to the presence of important operating and
maintenance (servicing) :nstructions in the literature accom- panying the product
[INSTRUCTIONS PERTAINING TO A RISK OF FIRE, ELECTRIC SHOCK OR INJURY TO PERSONS |
WARNING When using electnc products, basic precau- tions should always be followed, including the following:
near a bathtub, washbow, kitchen sink, in a wet basement, or near a swimming pool, or the like.
4. This product should be used only with a cart or stand that is recommended by the manufacture
5. This product, either alone or in combination with an amplifier and headphones or speakers, may be capable of producing sound levels that could cause
10
15
IMPORTANT SAFETY INSTRUCTIONS The power-supply cord of the product shouid be unplugged from the outlet when jeff unused for a long period of time
1. Read all the instructions before using the product 11. Do not tread on the power-supply cord
2. To reduce the risk of injury, close supervision is 12. Do not puil the cord but hoid the plug when necessary when a product is used near children unplugging.
3. Do not use this product near water- for exampie. 13. When setting up with any other instruments, the
procedure should be followed in accordance with instruction manual
Care should be taken so that objects do not fall and fiquids are not spilled into the enclosure through openings
The product should be serviced by qualified service personnel when
ADVARSEL!
Lithiumbatteri. Eksplosionstare.
Udskiftning ma kun foretages af en sagkyndig,
og som beskrevet i servicemanual.
VARNING !
Lithiumbatteri. Explosionsrisk.
Far endast bytas av behdrig servicetekniker.
Se instruktioner i servicemanualen.
ADVARSEL!
Lithiumbatteri. Fare for eksplotion.
Ma bare skittes av kvalifisert tekniker som
beskrevet i servicemanualen. permanent hearing loss
Do not operate for a long period of time at a high volume level or at level that is uncomfortable. If you experience any heanng loss or ringing in the ears. you should consult an audiologist.
A: The power-supply cord of the piug has been damaged; or
8 Objects have tallen. or hquid has been spilled into the product, or
C: The product has been exposed to rain: or D: The product does not appear to operate
cormalty or exhibits a marked change in perfor-
6. The product should be located so that its location or position does not interfere with its proper ventilation VAROITUS!
mance: or 7. The product should be located away trom heat igus > teas
sources such as radiators, heat registers or other E bases has been dropped. or the enclosure Lithiumparisto. Rajahdysvaara. products thal produce heat
Pariston saa vaihtaa ainoastaan
alan ammottimies.
16. Do not attempt to service the product beyond that
described in the user-maintenance instructions All other servicing shouid be referred to qualified service personnel
8. The product should avoid using in where it may be etected by dust
9. The product should be connected to a power supply only of the type described in the operating instruc- tions or aS marked on the product
SAVE THESE INSTRUCTIONS
——— a
NOTICE | WARNING \ |
This digital apparatus does not exceed the Class B li- THIS APPARATUS MUST BE EARTH GROUNDED. | mits for radio noise emission set out in the Radio In- The: three <conductors:oBthe“ wiping TANS =a terference Regulations of the Canadian Department lead attached to this apparatus are - i of Communications. identified with color as shown in the ; Conductor | Color | Mark on the matching terminat i
table below, together with the Live Brown | Red or letter L | | matching terminal on the UK type N fl | Bi lack or | N |
AVIS ; power plug. When connecting the Set am ~~ —— jcwrletiere _ ne 2 re m, lead to a plug, be sure t rounding reen- | Green, Green-Yellow, letter Cet appareil numérique ne dépasse pas les limites de |. coninset each: coneletob tate con | Yellow | or symbol i
la classe B au niveau des émissions de bruits radio- | rect terminal, as indicated | électriques fixés dans le Reglement des signaux para- | “This instruction applies to the sites par le Ministére canadien des Communications. J product for United Kingdom. |
Ng prs ai
r
Bescheinigung des Hersteliers /importeurs RADIO AND TELEVISION INTERFERENCE Warning his equipment has beer verted to compiy with the buts for a Class B computing arvice
P pursuart to Subpac J of Pac th of FCC rules Opershor with nor cemihed or nar vecher eaur Hiermit wird bescheinigt, da der/die/das ments haty tu senull an interference ta tadiy and TY reception
The equipment descebed ur costatieg and used properly tha! ence wih tadio ang television rece,
This equipment has beer tested
ROLAND SYNTHESIZER E-10
(Gear Typ Bezechoung:
anual generaies anc uses ‘ade treauency enatgy Hf it os Aut SINCE ACCONdaRCR wh Rut mstruLhons Hf enay cause verter
¢ found to comply with the brits tora Class B computing sons -n Subpart J ot Part 1 of FCC Rulas These rutes are
gainst SUCH a snterterence ir a fas dential instalipion 18 accordance with the spect
designed to provide reasonable protector
in Ubereinstimmung mit den Bestimmungen det Ine acoranion IPOCa ine Sisto oOuanee oe HE ATED ther I ioe eretea Fe © Oisconnect other devices and thet omput Oulpul cables Gee at a tie (ihe nterterence stops | Amtsbl. Vfg 1046 - 1984 wy housed by ewer tne ather deeee Orta 1 O cable
These devices usually equie Roland designated smeided ! 0 cabies for Rotand deeres yuu car
Hf your eaguiprment does cause interference to tad of lefediscon receptor you can ity to rottect she sploricrenee Drcang one of nate crine inline meee
et © Move the equipment tarther away trom the Ty or rar funk-entstrt ist 3° Plug the Guusenant sha an-Geuet that ero eiterers cieust than Yoo’ FV ie Auibig, <Thabct” iat Wits SOMolled By Meren certain the equipment and the ragic of telnwssor set ate orc:
breakers of fuses ¢ © Consider onsiatiing 3 tnottan televescon antenna wah cogil: ane Inert“
ty
Der Deutschen Bundespost wurde das Inverkehrbringen dieses Gerates
angezergt und die Berechtigung 2ur Uberpriitung de: Serie auf Einhaltung der Bestimmungen erngeraumt
between the x
necessary you shoul consult yout dealer oF an rapenenced radu tetewsue Techean tot saditional suggesans You May find Reiptul the following bookie prepared by (ye Fraps Con mumcetians Commision
pw 1 Identity and Resoive Rania TV intecterence Promerns This bookie! is available fom the US Government Pentng Ofie deastiratan fie 2aen?
Stock No 004 000 60345 & Roland Corporation Osaka -
Name oer Meriteliers:Importeurs
Japan
Please read the separate volume ‘‘MIDI’’, before reading this owner's manual.
Copyright © 1988 by ROLAND CORPORATION All rights reserved. No part of this publication may be reproduced in
any form without the written permission of ROLAND CORPORATION.
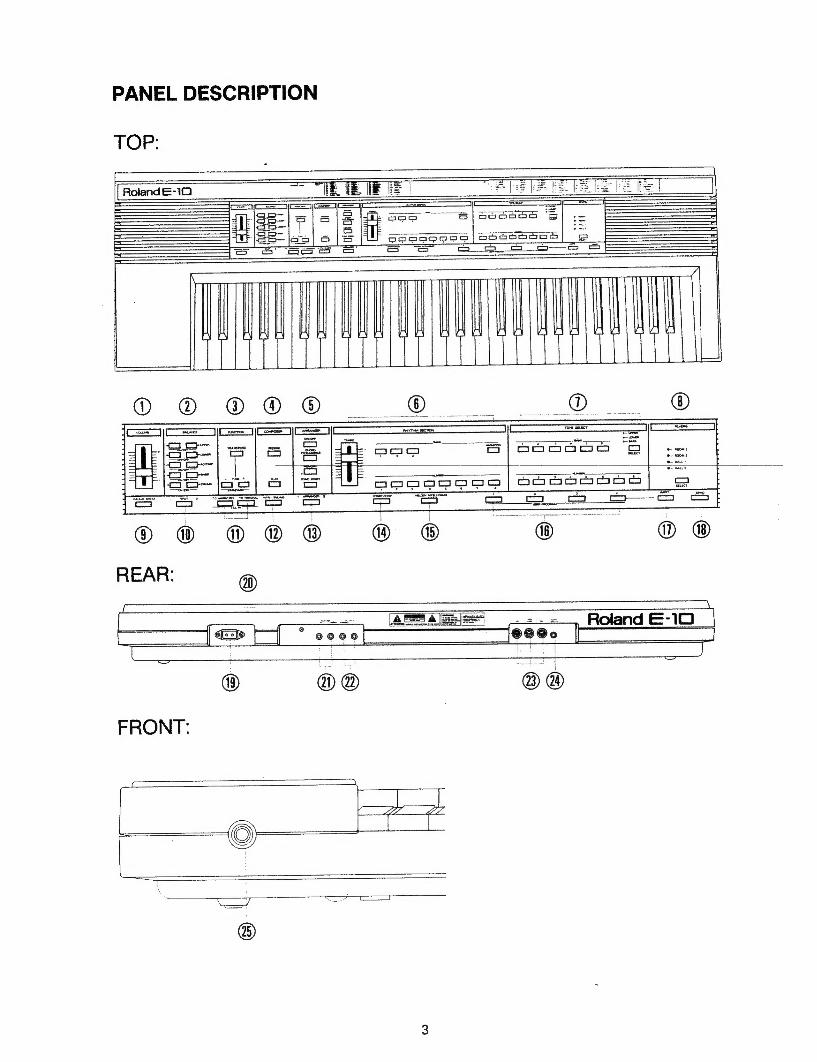
PANEL DESCRIPTION
TOP:
| RolandE-10 &. Le bee ket
=
rrr | =
SK ~ a on so
SS Se | = |e 1S aa S| 555555 S| :- E : | = 7=
Ss 88 [oe = | SSSHE — er |ee| ojo Seeqogegeg|eeesonas =
ee Ss Sos 5 SS ram ca = = Ss
(1) MASTER VOLUME slider (See page 13)
(2) TONE BALANCE SECTION (See page 20)
(@) FUNCTION CONTROL (See page 36)
@®) SONG COMPOSER SECTION
(See page 41)
() ARRANGER SECTION (See page 29 in ACCOMPANIMENT)
() RHYTHM SECTION (See page 21)
(TONE SELECT SECTION (See page 15)
REVERB EFFECT SECTION (See page 35)
@) MANUAL DRUM button (See page 26)
SPLIT button (See page 16 in TONE SELECT)
i) FILL-IN buttons (See page 30 in ACCOMPANIMENT)
(2) INTRO/ENDING button (See page 24 in RHYTHM Section)
(3) ARRANGER 1 & 2 button (See page 29 in ACCOMPANIMENT)
START/STOP button . (See page 24 in RHYTHM Section)
) MELODY INTELLIGENCE button
(See page 34 in ACCOMPANIMENT}
USER PROGRAMS buttons 1—4 (See page 38)
@) WRITE button (See page 40 in USER PROGRAMS)
DEMO button (See page 13 in DEMO SONG)
AC Socket
POWER SWITCH
@) Stereo AUX IN Sockets
@) Stereo AUX OUT Sockets
@) MIDI Sockets
SUSTAIN PEDAL Socket
(@) HEADPHONE Socket
Geib Rthieteds
FEATURES
M@ The E-10 is a 61-note, 32 partial, polyphonic synthesizer with dynamic keyboard.
i The E-10 uses Roland’s Linear Arithmetic Synthesis (LA sound)
@ LEDs provide information and directions to the player while programming the many features of the E-10 making operation quicker and easier.
M MIDI connectors are provided for connecting other MIDI devices.
@ The E-10 incorporates internal speakers and amplifier of maximum output of 2 x 5
watts.
Thank you for purchasing the Roland E-10 Intelligent Synthesizer. The E-10 is an easy-to-operate keyboard that anyone can play. It gives you the benefit of Roland’s superior digital technology. The E-10 uses the same Linear Arithmetic synthesis used by our D-series professional syn- thesizers. The 48 tones and 30 percussion sounds of the E-10 offer you an excellent natu- ral range of sound. The musical functions of the E-10 add the fantastic modern musical sounds of other in- struments to your keyboard playing. This Owner’s Manual is written to help you have many years of musical enjoyment with
your E-10.

CONTENTS
PANEL DESCRIPTION ...............-.-- 00 eee eeee 3 FEATURES. ooncis 5eil nto ed pee NEF eee eee wes 5 IMPORTANT NOTES ........... 0. e cece eee eens 8 THE CARE OF YOUR E-10 ..... 2.2... eee eee eee 9 CONNECTIONS: (e: oc6 cc che nie sey iws aie cease ee ess 10
OPERATION SETTING UP THE MUSIC STAND ................... 12 POWER: ON .ccc2eetagacieers teat ealw en enadeeand 12 MASTER VOLUME sii iiiuwe tie eoaaee va aeawamen ds 13 DEMO SONG 35 owes v eater ene te ey seedaty 13
‘PONE SELECT. 35 05: <vae caes ei Saas Sess ow weeereees 15 UPPER TONE SELECT on48iwe da pete etek ered 15 SPL atsat sina ee se tak ewe yaw esmiens weyltae mets 16 LOWER. TONE SELECY 2c ou cas oeeroe ca eweies 18 BASS TONE SELECD ics siesta vei etn iwearies 19
TONE BALANCE @:2.00 3 ctichs daewaatw eae eats 20 UPPER BALANCE: 3 :i24 4244659 eesaigweaeae cis 20 LOWER BALANGE®iicacwsi ees sedans awne sees 21 BASS BALANCE iii ccse esate esas aeenenen 21
RAY FHM SECTION it edvcey thie be reeetw eta ate kd 22 REYNE SEBO ht Suck chain etwas wiwiahatane nce uit 22 STARTING THE RHYTHM ................0.ceeee 24 TEMPO: CONTAGL socom us cee iec ees eette sass 24 STOPPING THE RHYTHM ..........6cccceeeeenns 25 MANUAL DRUMS ............. 0c ccc eee eee 26 DRUM BALANCE 2 coti vette ans Ses bos sale sews 26
ACCOMPANIMENT os cscaiieia vedas wen waa taaiveats 29 ARRANGER ON/OFF ..............- Siang ae Shy ania 29 ABRANGER VG? 602i catia a eteda ees ase 29 VARIATION sc oconanucg ee eee us Bags ha nin 29 FILLING 5 acho ston advtes atin edhe eeuet wane eee aae es 30 MEMORY sac fu totes ita dd cag een ye aleen’ 30 SYNC -OPART tesicraiored eas borate eda Sunes 30 CHORD INTELLIGENCE ......................044. 31 PLAY INTELLIGENT CHORDS .................... 32 MELODY INTELLIGENCE ....................000. 34 ACCOMPANIMENT BALANCE ................... 34
REVERS EREECI snc comet Wtha nesses aman van ewan 35 REVERB. TYPE cs cas icoee a sas Bie 4a ae 35

FUNCTION TRANSPOSE/TUNE ......... cece eect erence ee eens 36
TRANSPOSE ‘cis: ee ce viee es ak dee i etek 36
MASTER TUNE. cco 5 vis eee ees oS pee ae ore 37
SUSTAIN PEDAL (OPTIONAL) ...............---- 37
USER PROGRAMS .............. 0s cece e cece eee 38
WRITING A PANEL CONFIGURATION ..........-.- 40
SONG COMPOSER ..... Set tac ay itan Games Reng aia teh 41
RECORDING A SONG .............. 0 eee eee eee 42
PLAYING BACK A SONG .............-- eee ee eee 43
MIDI CONTROL ........... 02 cece teen eee e tenes 44
CONNECTIONS: 22. s42sneteeceraenne ete ies 44 128 TONES AVAILABLE BY EXTERNAL MIDI PROGRAM CHANGE ...........-. cee eee e erences 46
IF YOUR E-10 FAILS TO OPERATE ...............-- 47 MIDI IMPLEMENTATION CHART ............--.-- 48 SPECIFICATIONS ..........0.. ccc ccc cece te eeneee 49 PANEL SETTING MEMO ................------5- 50

IMPORTANT NOTES
@ The appropriate power supply for the keyboard unit is shown on its name plate. Please make sure that the line voltage in your country meets the requirements
@ Use only the AC cord provided.
e@ Please do not use the same socket used for any noise ge- nerating device (such as a motor, variable lighting system).
@ It is normal for this unit to become hot while being opera- ted.
@ If the unit is not to be used for a long period of time, un- plug the AC cord from the socket.
@ Disconnect the AC cord immediately in the event of an electrical storm.
@ Before setting up this keyboard with other MIDI devices, turn this keyboard off along with all other units.
@ Be sure to connect the MIDI! cables securely. If the MIDI cable is disconnected while the keyboard is being played, various troubles will occur (e.g. the note may continue to sound).
@ Static electricity may cause the built-in computer to mal- function. Should this occur, simply reset the keyboard by turning the power switch off and then after a few seconds, back on.
@ This keyboard might not operate correctly if turned on im- mediately after being turned off. If this happens, simply turn it off and after a few seconds later, turn it on again.
@ Operating the E-10 near a neon light, fluorescent lamp, TV or CRT display, may cause noise interference. If so, chan- ge the position of the keyboard.
@ To avoid risk of electric shock, do not perform any servi- cing. Refer all servicing to qualified service personnel.

THE CARE OF YOUR E-10
ROOM LOCATION
CABINET CARE
To ensure the best use and full enjoyment of your E-10, plea- se read this guide carefully and thoroughly.
Avoid using this keyboard in excessive heat or humidity con- ditions or where it may be affected by direct sunlight or dust and avoid places subject to high vibrations.
Use a soft dry cloth for dusting. To remove fingerprints or dulling film, use a soft cloth slightly dampened with water and a little mild detergent. Immediately wipe dry with a soft cloth. Do not use solvents such as paint thinners.

CONNECTIONS
From E-10
AUX-OUT
sockets
From FV-200 outputs To amplifier inputs
To E-10
AUX-IN To AC current sockets
From output To FV-200
sockets inputs
oman amc
OOOO NOOOOOooo
Another keyboard
or a rhythm machine
(8) FV-200
10
(1)
(2 —
(3 —
(4 —
(5 ~—
(6 —
(7 —
(8)
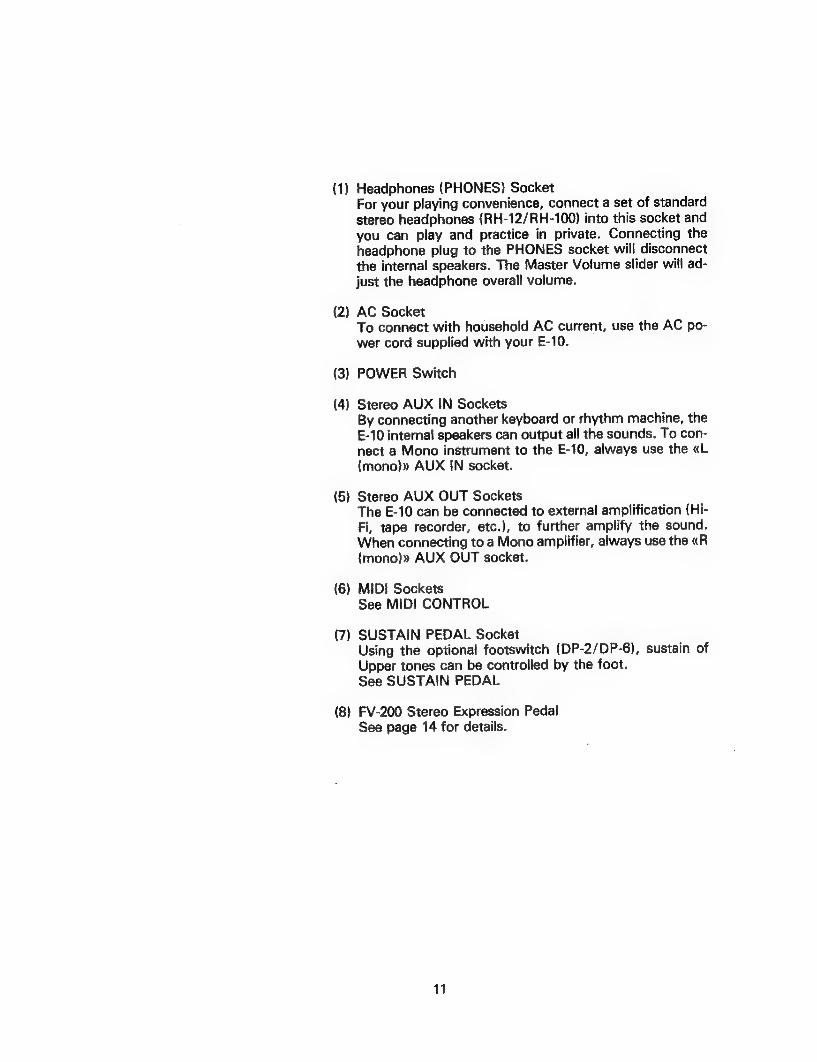
Headphones (PHONES) Socket For your playing convenience, connect a set of standard
stereo headphones (RH-12/RH-100) into this socket and
you can play and practice in private. Connecting the
headphone plug to the PHONES socket will disconnect
the internal speakers. The Master Volume slider will ad-
just the headphone overall volume.
AC Socket To connect with household AC current, use the AC po- wer cord supplied with your E-10.
POWER Switch
Stereo AUX IN Sockets By connecting another keyboard or rhythm machine, the
E-10 internal speakers can output all the sounds. To con-
nect a Mono instrument to the E-10, always use the «L
(mono)» AUX IN socket.
Stereo AUX OUT Sockets The E-10 can be connected to external amplification (Hi-
Fi, tape recorder, etc.), to further amplify the sound. When connecting to a Mono amplifier, always use the «R (mono)» AUX OUT socket.
MIDI Sockets See MIDI CONTROL
SUSTAIN PEDAL Socket Using the optional footswitch (DP-2/DP-6), sustain of
Upper tones can be controlled by the foot. See SUSTAIN PEDAL
FV-200 Stereo Expression Pedal See page 14 for details.
11
OPERATION
SETTING UP THE MUSIC STAND Supplied with your E-10 is a music stand. This will be found in the keyboard carton. To attach to keyboard, insert the two feet into the two holes located on the top panel.
POWER ON
Press the Power On/Off switch
The three SELECT and four REVERB LEDs will light for a few seconds. After the LEDs have been switched off, your E-10 is ready for use.
12
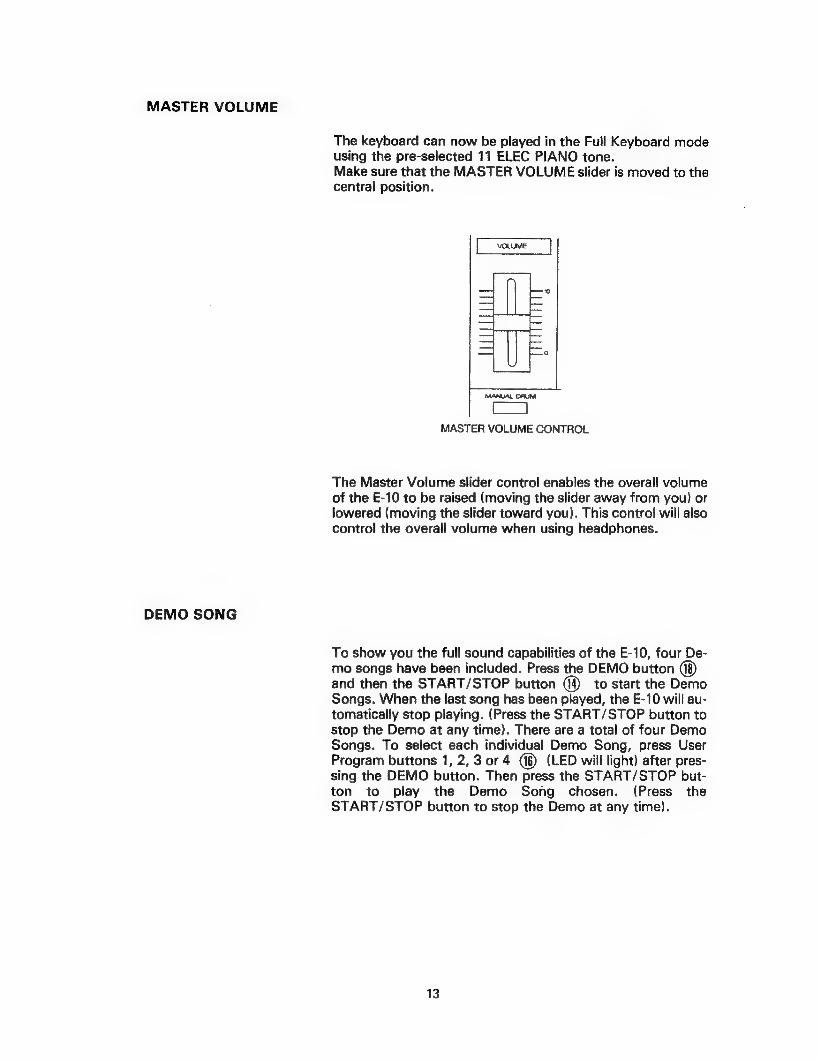
MASTER VOLUME
DEMO SONG
The keyboard can now be played in the Full Keyboard mode using the pre-selected 11 ELEC PIANO tone. Make sure that the MASTER VOLUME slider is moved to the central position.
MANUAL DRUM
MASTER VOLUME CONTROL
The Master Volume slider control enables the overall volume of the E-10 to be raised (moving the slider away from you) or lowered (moving the slider toward you). This control will also control the overall volume when using headphones.
To show you the full sound capabilities of the E-10, four De- mo songs have been included. Press the DEMO button and then the START/STOP button to start the Demo Songs. When the last song has been played, the E-10 will au- tomatically stop playing. (Press the START/STOP button to stop the Demo at any time). There are a total of four Demo Songs. To select each individual Demo Song, press User Program buttons 1, 2, 3 or 4 (LED will light) after pres- sing the DEMO button. Then press the START/STOP but- ton to play the Demo Song chosen. (Press the START/STOP button to stop the Demo at any time).
13

<Reference>
When connecting to external amplification, an optional ste- reo expression pedal (FV-200) can be used to control the ove- rall volume. See following illustration for connecting proce- dures.
AUX OUT
<Amplifiers>
1. Be sure to turn the E-10 and any other amplification sy- stem Off.
2. Connect the E-10 to the FV-200 by inserting a couple of shielded cords into the E-10 AUX OUT and the FV-200 IN- PUT sockets.
3. Connect the FV-200 to an amplification system with two additional shielded cords inserted into the FV-200 OUT- PUT sockets.
4. Turn the switches of all instruments ON and adjust the Master Volume control of the E-10.
5. Make sure that the overall volume is controlled by the foot pedal.
14
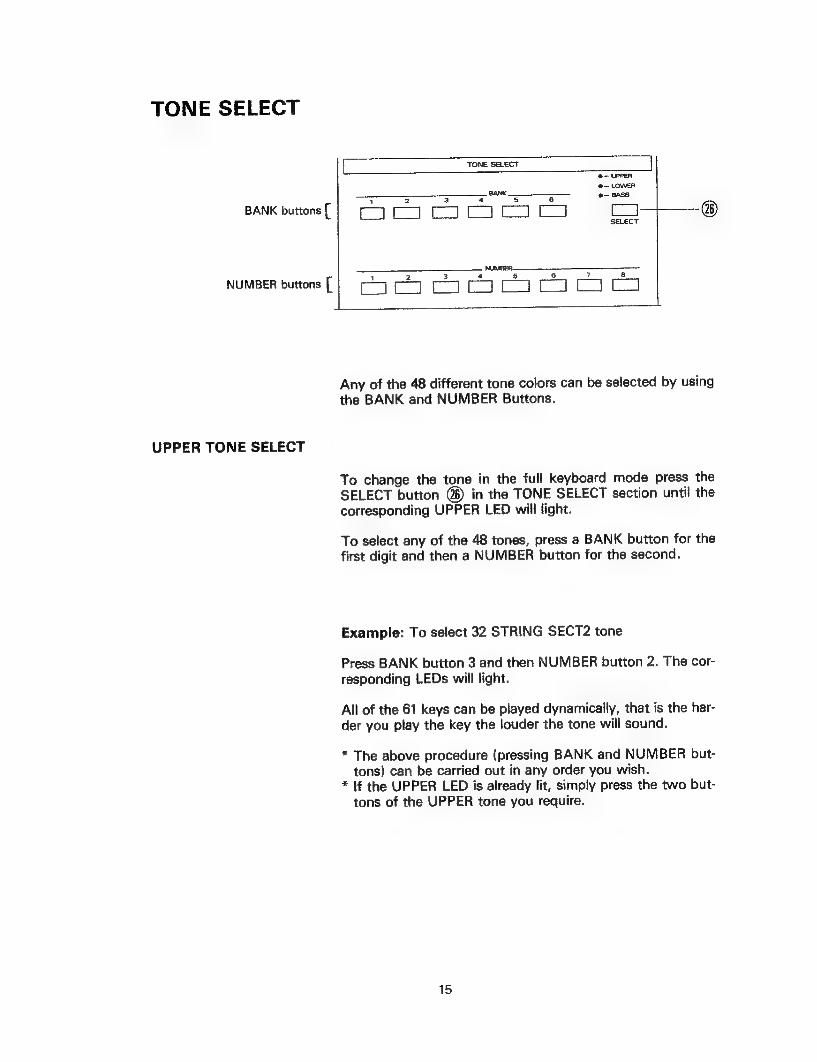
TONE SELECT
@— UPPER @— LOWER
BANK @- BASS
sank oun | E29 CS SELECT
NUMBER.
ea a see) NUMBER buttons [
Any of the 48 different tone colors can be selected by using
the BANK and NUMBER Buttons.
UPPER TONE SELECT
To change the tone in the full keyboard mode press the
SELECT button @) in the TONE SELECT section until the corresponding UPPER LED will light.
To select any of the 48 tones, press a BANK button for the
first digit and then a NUMBER button for the second.
Example: To select 32 STRING SECT2 tone
Press BANK button 3 and then NUMBER button 2. The cor-
responding LEDs will light.
All of the 61 keys can be played dynamically, that is the har-
der you play the key the louder the tone will sound.
* The above procedure (pressing BANK and NUMBER but-
tons) can be carried out in any order you wish. * If the UPPER LED is already lit, simply press the two but-
tons of the UPPER tone you require.
15
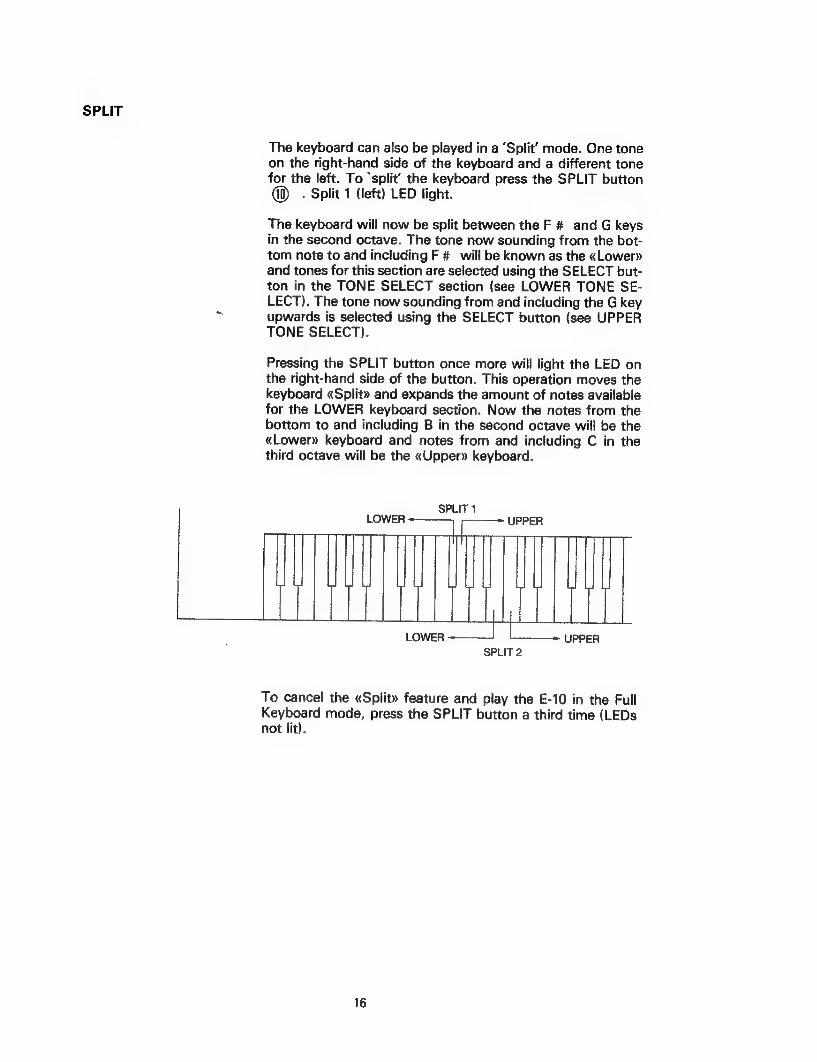
SPLIT
The keyboard can also be played in a ‘Split’ mode. One tone on the right-hand side of the keyboard and a different tone for the left. To ‘split’ the keyboard press the SPLIT button
. Split 1 (left) LED light.
The keyboard will now be split between the F # and G keys in the second octave. The tone now sounding from the bot- tom note to and including F # will be known as the «Lower» and tones for this section are selected using the SELECT but- ton in the TONE SELECT section (see LOWER TONE SE- LECT). The tone now sounding from and including the G key upwards is selected using the SELECT button (see UPPER TONE SELECT).
Pressing the SPLIT button once more will light the LED on the right-hand side of the button. This operation moves the keyboard «Split» and expands the amount of notes available for the LOWER keyboard section. Now the notes from the bottom to and including B in the second octave will be the «Lower» keyboard and notes from and including C in the third octave will be the «Upper» keyboard.
SPLIT 1
SPLIT 2
To cancel the «Split» feature and play the E-10 in the Full Keyboard mode, press the SPLIT button a third time (LEDs not lit).
16

The Split 2 function will also be automatically selected (if in Off position) when the following buttons are pressed:
@ ARRANGER 1 & 2 @ CHORD INTELLIGENCE @ MELODY INTELLIGENCE @ MEMORY @ COMPOSER RECORD @ COMPOSER PLAY @ USER PROGRAMS 1—4*
* If any of the following functions have been programmed in the On position: SPLIT 1 or 2 ARRANGER 1 or 2 CHORD INTELLIGENCE MELODY INTELLIGENCE MEMORY
When in SPLIT position (1 or 2), playing a chord in the Lower section will produce the chord sound plus a bass tone. The bass note heard, will be the root note of the chord played. To select a tone for the bass, press the SELECT button in the TONE SELECT section (see BASS TONE SELECT) until the corresponding BASS LED will light.
Chords can be played in two different ways - Easy chords (see CHORD INTELLIGENCE) and conventional chords.
17

LOWER TONE SELECT
To select a different tone for the left-side of the Split (Lower), press the SELECT button in the TONE SE- LECT section until the corresponding LOWER LED will light.
To select any of the 48 notes, press a BANK button for the first digit and then a NUMBER button for the second.
Example: To select 41 FANTASY tone
Press BANK button 4 and then NUMBER button 1. The cor-
responding LEDs will light.
* The above procedure (pressing BANK and NUMBER but- tons) can be carried out in any order you wish.
* If the LOWER LED is lit, there is no need to press the SE- LECT button before pressing BANK and NUMBER but- tons, simply press the two buttons of the LOWER tone you require.
18

BASS TONE SELECT
Bass Tone Select
To change the Bass tone, press the SELECT button in
the TONE SELECT section until the corresponding BASS
LED lights.
To select any of the 48 notes, press a BANK button for the
first digit and then a NUMBER button for the second.
Example: To select 62 SLAP BASS 1 tone
Press BANK button 6 and then NUMBER button 2. The cor-
responding LEDS will light.
* The above procedure (pressing BANK and NUMBER but-
tons) can be carried out in any order you wish.
* If BASS LED is already lit, there is no need to press the
SELECT button before pressing BANK and NUMBER but- tons, simply press the two buttons of the BASS tone you
require.
<Notes On Tone Selecting>
* On selecting either UPPER, LOWER or BASS tones, if the
BANK or the NUMBER is the same as the previous tone,
there is no need to press that button.
* The UPPER and BASS tone select procedures are the
same with or without the Rhythm playing.
* When the ARRANGER is playing, the LOWER tone will not
sound, and changing the LOWER tone or modifying the
LOWER volume (LOWER BALANCE: see TONE BALANCE) will not make any effect at all.
* Changing the BASS Tone will not affect the preset BASS
Tone played by the ARRANGER 1 & 2.
19
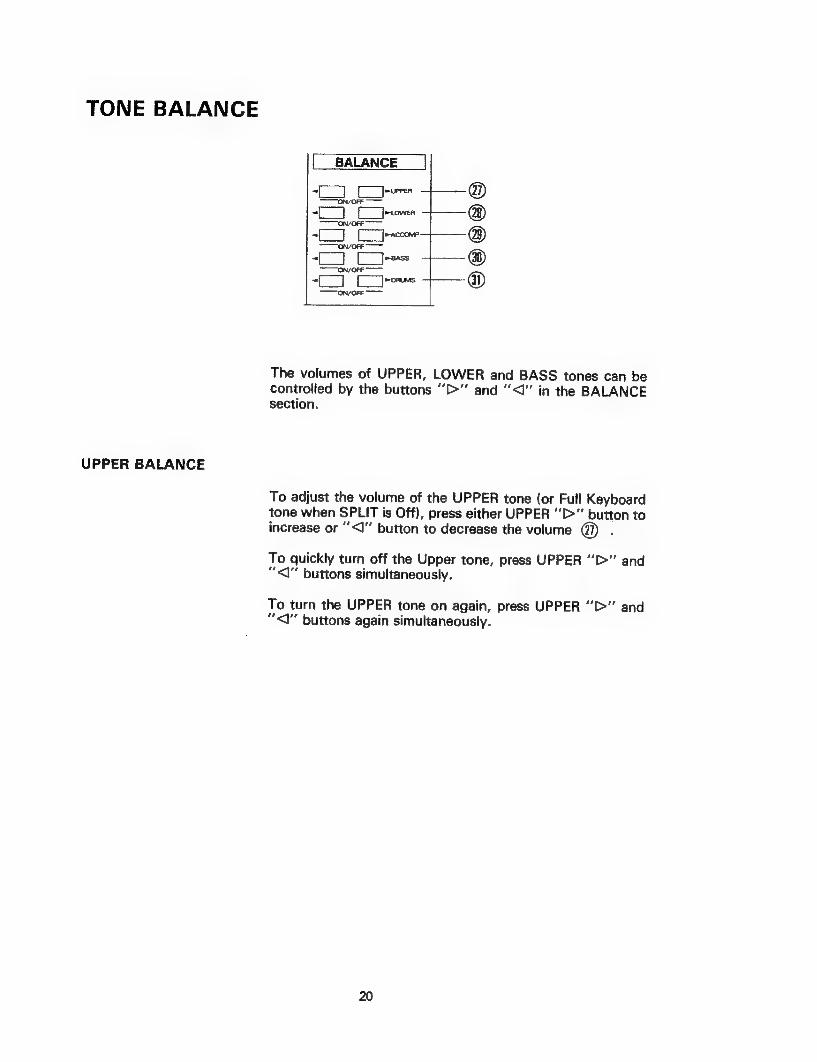
TONE BALANCE
UPPER BALANCE
BALANCE
©6ee88®
The volumes of UPPER, LOWER and BASS tones can be controlled by the buttons “>” and ‘‘<J” in the BALANCE section.
To adjust the volume of the UPPER tone (or Full Keyboard tone when SPLIT is Off), press either UPPER ‘‘>” button to increase or ‘‘<J'’ button to decrease the volume
To quickly turn off the Upper tone, press UPPER “>” and “<1” buttons simultaneously.
To turn the UPPER tone on again, press UPPER “f>” and <I" buttons again simultaneously.
20
LOWER BALANCE
BASS BALANCE
To adjust the volume of the LOWER tone, press either LO- WER “‘>”’ button to increase or ‘<1’ button to decrease the volume @§) .
To quickly turn off the Lower tone, press LOWER “I>” and “J” buttons simultaneously.
To turn on again the LOWER tone, press LOWER “I>” and “J” buttons again simultaneously.
To adjust the volume of the BASS tone, press either BASS “T>"' button to increase or ‘’<J’’ button to decrease the volu- me @)
To quickly turn off the BASS tone, press BASS “D>” and ‘<1 buttons simultaneously.
To turn on again the BASS tone, press BASS “>” and “<1” buttons again simultaneously.
21
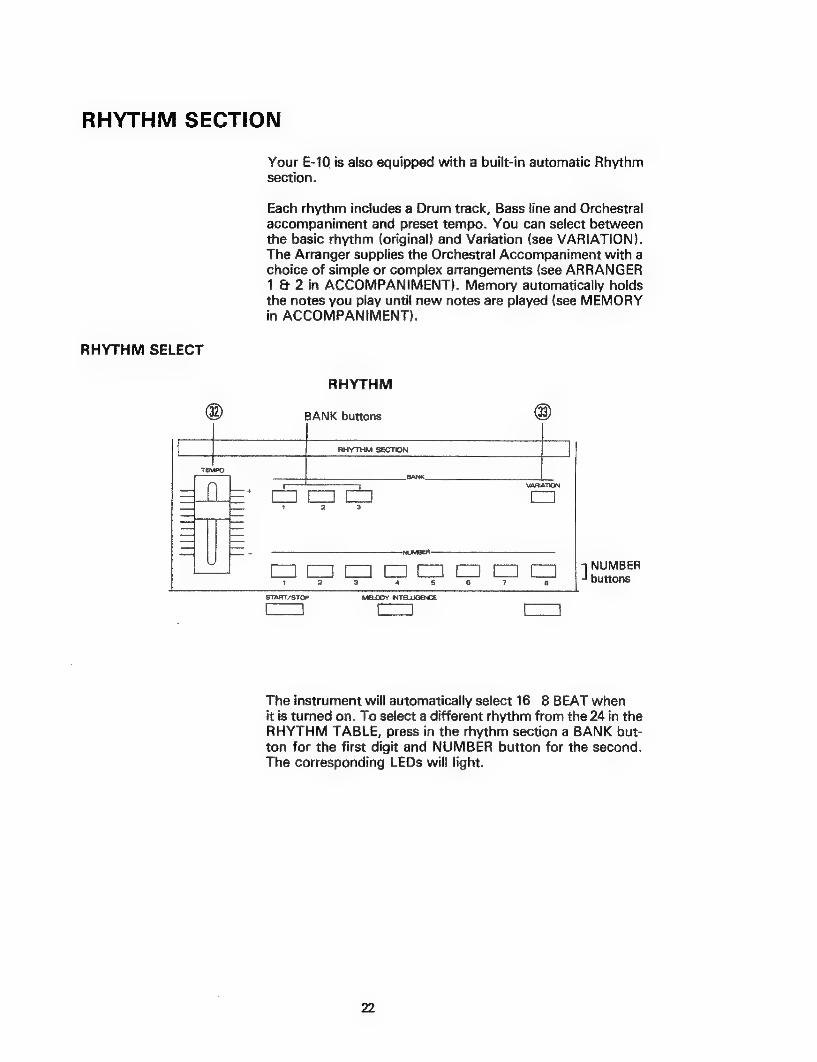
RHYTHM SECTION
Your E-10 is also equipped with a built-in automatic Rhythm section.
Each rhythm includes a Drum track, Bass line and Orchestral accompaniment and preset tempo. You can select between the basic rhythm (original) and Variation (see VARIATION). The Arranger supplies the Orchestral Accompaniment with a choice of simple or complex arrangements (see ARRANGER 1 & 2 in ACCOMPANIMENT). Memory automatically holds the notes you play until new notes are played (see MEMORY in ACCOMPANIMENT).
RHYTHM SELECT
RHYTHM
@ BANK buttons @
Salsas
eee ae Sie START/STOP MELODY INTELLIGENCE
Eee Co]
NUMBER buttons
The instrument will automatically select 16 8 BEAT when it is turned on. To select a different rhythm from the 24 in the RHYTHM TABLE, press in the rhythm section a BANK but- ton for the first digit and NUMBER button for the second. The corresponding LEDs will light.
VARIATION
Example: To select 38 CHA CHA rhythm
Press BANK button 3 and then NUMBER button 8. The new rhythm will be selected complete with preset tempo:
* The above procedure (pressing BANK and NUMBER but- tons) can be carried out in any order you wish.
* On selecting a new rhythm, if the BANK or the NUMBER is the same as the previous rhythm, there is no need to press
that button.
* A newrhythm can be selected while the Rhythm is playing. In this operation, the new rhythm will not take the preset tempo but the tempo of the previous rhythm.
Pressing the VARIATION button @3) (see RHYTHM SEC- TION) (LED lights), will give a variation to the rhythm.
To return to the basic (original) rhythm, press the VARIA- TION button once more (LED is turned off).
23
STARTING THE RHYTHM
TEMPO CONTROL
The rhythm can be started in three ways:
1. Press the START/STOP button and the rhythm will start immediately.
2. Press the SYNC START button @) (see ACCOMPANI- MENT) (LED lights). Then press a key in the accompani- ment section of the keyboard. The rhythm will automati- cally start (LED is turned off).
* The Sync Start function may only be selected when the rhythm is stopped.
3. Press the INTRO/ENDING button (12) . The rhythm will begin with a musical ‘introduction’, length of which de- pends on the rhythm selected.
While the rhythm is playing, the START/STOP LED will flash in time with the tempo set, the downbeat (first beat) of the measure will flash longer. When the rhythm is stopped, the LED will just flash the beat of the tempo set.
To change the tempo, move the TEMPO slider control @) located in the RHYTHM SECTION to the rhythm’s preset point and then away from you to increase or towards you to decrease the tempo.
The TEMPO range is from a minimum of 32 to a maximum of 250.
24
STOPPING THE RHYTHM
The rhythm can be stopped in two ways:
1. Press the START/STOP button and the rhythm will stop immediately.
2. Press the INTRO/ENDING button. At the next downbeat the rhythm will perform a musical “‘ending’’, the length of which depends on the rhythm selected.
You can change from one rhythm to another WITHOUT stopping the rhythm by simply pressing the appropriate BANK and NUMBER buttons in the RHYTHM section.
With this operation, the new rhythm will not be played in the rhythm’s preset tempo, but will follow the tempo set by the previous rhythm.
While stopped or while playing, the volumes of each section of the rhythm (DRUM, BASS, ACCOMP and UPPER) can be modified by using the appropriate “>” and ‘’<J”’ buttons in the BALANCE section.
25
MANUAL DRUMS
DRUM BALANCE
Pressing the MANUAL DRUM button @) (LED lights) ena- bles all the 30 drum instruments to be played manually from
the keyboard. All the drum instruments can be played dyna- mically, that is the harder you play any key the louder the drum will sound.
Underneath, at the front section of the keyboard, you will find the names of each instrument the key represents. Each of these instruments can be played without or in conjunction with the automatic rhythm. When the MANUAL DRUM but- ton is pressed without using automatic rhythm, the keyboard from the lowest note to D # in the 4th octave (MIDI note # 75) will not play any musical note. A manual rhythm can
then be played using these keys. When using automatic
rhythm and ARRANGER, pressing the switch will cancel any automatic chords and bass. The keys can then be used to manually add drum voices to the automatic rhythm playing. lf the MEMORY button was pressed (LED lit) prior to pres- sing the MANUAL DRUM button, the chord playing will re- main and cannot be changed until the MANUAL DRUM but- ton is pressed once more (LED off).
While the rhythm is stopped or playing, upper note tones can still be played from E in the 4th octave upwards when the MANUAL DRUM button is pressed.
To cancel the Manual Drums, just press the MANUAL DRUM button one more time (LED off).
To adjust the volume of the drums, press either DRUMS “t>"' button to increase or ‘’<J’’ button to decrease the volu- me Gl) (see TONE BALANCE).
To quickly turn off the Drums, press DRUMS “>” and “<0” buttons simultaneously.
To turn the Drums on again, press the DRUMS “T>”’ and "<1" buttons again simultaneously.
26
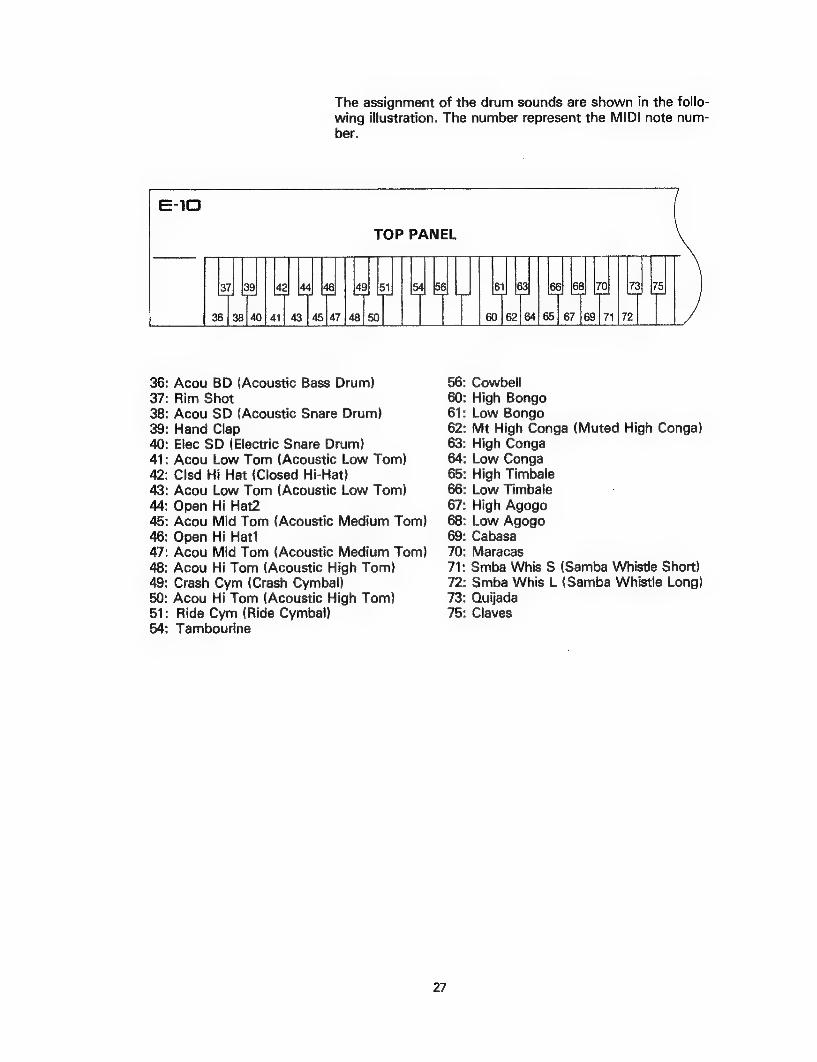
36: 37:
38:
39:
: Elec SD (Electric Snare Drum) 41: 42:
: Acou Low Tom (Acoustic Low Tom) : Open Hi Hat2
45:
: Open Hi Hatt 47:
: Acou Hi Tom (Acoustic High Tom) 49:
: Acou Hi Tom (Acoustic High Tom) 51:
: Tambourine
The assignment of the drum sounds are shown in the follo- wing illustration. The number represent the MIDI note num-
ber.
Acou BD (Acoustic Bass Drum) Rim Shot Acou SD (Acoustic Snare Drum) Hand Clap
Acou Low Tom (Acoustic Low Tom) Cisd Hi Hat (Closed Hi-Hat)
Acou Mid Tom (Acoustic Medium Tom)
Acou Mid Tom (Acoustic Medium Tom)
Crash Cym (Crash Cymbal)
Ride Cym (Ride Cymbal)
TOP PANEL
27
: Cowbell : High Bongo : Low Bongo : Mt High Conga (Muted High Conga) : High Conga : Low Conga : High Timbale : Low Timbale : High Agogo : Low Agogo : Cabasa : Maracas : Smba Whis S (Samba Whistle Short) : Smba Whis L (Samba Whistle Long) : Quijada : Claves

<Reference> Stereo Balance of the Drum sounds
(Stereo balance)
Acou BD |
Acou SD @ Rim Shot
Hand Clap @ @ Fec SD
Acou Low Tom @ i
@ Cis Hi Hat t @ Open Hi Har 2
Acou Mid Tom @ ! | @ Open Hi Hat 1
| | @ Acou Hi Tom
@ Crash Cym | i
i j Ride Cym@®
Tambourine : Cowbell
e
@ High Bongo @ Low Bongo
Mt High Conga @ High Conga @ t ;
Low Conga @ High Timbale
| e @ Low Timbale
@ High Agogo @ Low Agogo
Cabasa @ ! | @ Maracas
Smba Whis S @ Smba Whis L @
Quijada @
Claves @
|
7> 6>
LEFT
5> 4> 3> 2> 1> ><<I
CENTER
28
<2 <3 <4 <5 <6 <7
RIGHT

ACCOMPANIMENT
ARRANGER ON/OFF
NOTE:
ARRANGER 1 & 2
VARIATION
© © 6&6 ®
Pressing the ARRANGER ON/OFF button @® (LED lights)
automatically turns off the LOWER tone and introduces or-
chestral accompaniment from chords played on the lower
section of the keyboard. To switch off the ARRANGER,
press the same button again (LED is turned off, Lower Tone
is reactivated).
If you start the rhythm and stop then start again while pres-
sing some keys with ARRANGER on, at second start, only
the drums will play. Release the keys and play them again if
you wish to hear the accompaniment.
Each rhythm includes two types of arrangements - Simple
and Complex. Pressing the ARRANGER 1 & 2 button @®)
will select between the two arrangements (left or right LED
will light).
Pressing the VARIATION button @3) (see RHYTHM sec-
tion) (LED lights) will give a variation to each part of the
rhythm (Drum track, Bass line and accompaniment).
To return to the basic (original) rhythms, press the VARIA-
TION button once more (LED is turned Off).
29

FILL-IN
MEMORY
SYNC START
While playing the basic (original) rhythm, a Fill-in can be in- serted by pressing the TO ORIGINAL button. This will result in a one measure fill-in and on completion will return to the basic rhythm.
While playing in the Variation, pressing the TO VARIATION button will result in a one measure fill-in and then on comple- tion will return to the Variation.
If playing in the basic (original) rhythm and the TO VARIA- TION button is pressed, a one measure fill-in will occur and on completion will automatically proceed into the variation of the rhythm (VARIATION LED lights). Likewise if playing in the variation of a rhythm and the TO ORIGINAL button is pressed, a one measure fill-in will occur and on completion will automatically return to play the original rhythm (VARIA- TION LED is turned off). * If either of the FILL-IN buttons are pressed within the 1st and 3rd beats (1st and 2nd on Waltz rhythms), the fill-in will be perfomed for the remainder of that measure. If ei- ther of the FILL-IN buttons are pressed within the 4th beat (3rd on Waltz rhythms), this operation will be interpreted as a pre-selection of the fill-in to start at the downbeat of the next measure.
Pressing the MEMORY button (LED lights) will activate a memory circuit which will continue to play the notes played left of the SPLIT - LOWER tone (Accompaniment when AR- RANGER is turned on) and bass after you release the keys. It will memorize and hold the notes until the next note(s) is played. * Pressing the MEMORY button will automatically activate
the SPLIT 2 function if the latter was not previously selec- ted.
Pressing the SYNC START button @) will synchronize the start of the rhythm when a key is played on the lower section of the keyboard. The SYNC START button can be selected before pressing the INTRO/ENDING button (LED will begin to flash), pressing a key will now start the rhythm with an “introduction’’.
* The SYNC START button will not function while a rhythm is running.
30

CHORD INTELLIGENCE
Pressing the CHORD INTELLIGENCE button @) (LED
lights), enables you to play chords in the lower section of the
keyboard with but a finger or two. The CHORD INTELLI-
GENCE system let's you play major, minor, seventh, minor
seventh, major seventh, minor seventh b5th, diminished,
augmented, suspended fourth and suspended seventh
chords.
* Pressing the CHORD INTELLIGENCE button will automati-
cally select SPLIT 2 (if the latter was not selected previou-
sly).
The chords recognized on the E-10 are as follows:
Major (Ma) Minor (mi) Seventh (7) Minor seventh (mi7) Major seventh (Ma7) Minor seventh b5th (@) Diminished (Dim) Augmented (Aug) Suspended fourth (Su4) Suspended seventh (Su7)
31
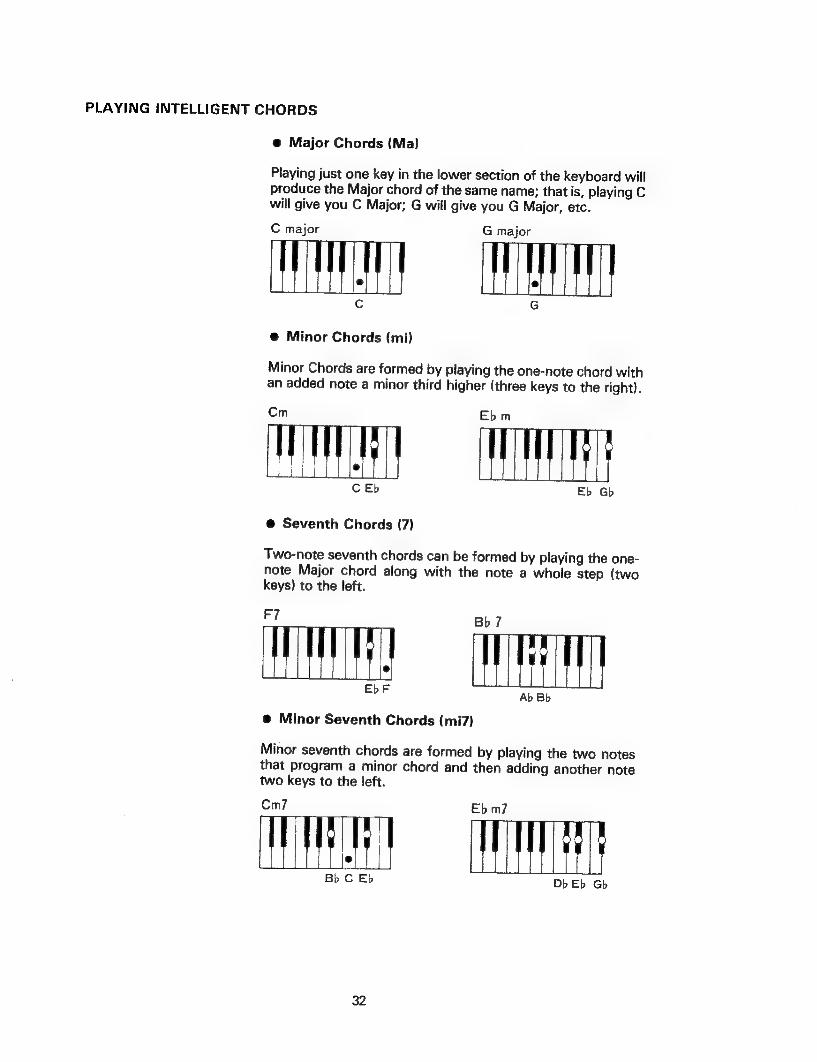
PLAYING INTELLIGENT CHORDS
@ Major Chords (Ma)
Playing just one key in the lower section of the keyboard will produce the Major chord of the same name; thatis, playing C will give you C Major; G will give you G Major, etc.
C major G major
ANAESTH TEL @ Minor Chords (mi)
Minor Chords are formed by playing the one-note chord with an added note a minor third higher (three keys to the right).
Cm Ebm
CEb Eb Gb
@ Seventh Chords (7)
Two-note seventh chords can be formed by playing the one- note Major chord along with the note a whole step (two keys) to the left.
Pl Bb7
EbF Wel Ab Bb
@ Minor Seventh Chords (mi7)
Minor seventh chords are formed by playing the two notes that program a minor chord and then adding another note two keys to the left.
Cm7 Eb m7
Bb C Eb DbEb Gb
32
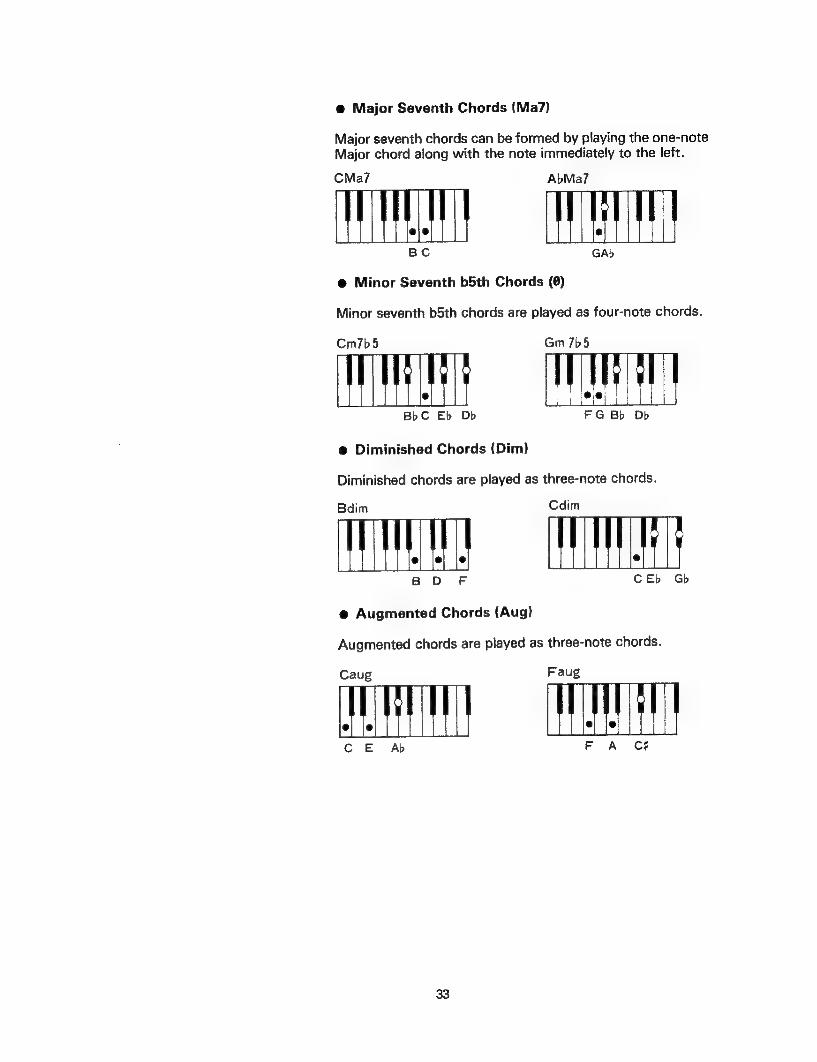
@ Major Seventh Chords (Ma7)
Major seventh chords can be formed by playing the one-note Major chord along with the note immediately to the left.
CMa? AbMa7
e@ Minor Seventh b5th Chords (0)
Minor seventh b5th chords are played as four-note chords.
Cm/7b5 Gm 7b5
AU Te BbC Eb Db FG Bb Db
@ Diminished Chords (Dim)
Diminished chords are played as three-note chords.
Bdim Cdim
BD F CEb Gb
@ Augmented Chords (Aug)
Augmented chords are played as three-note chords.
Caug Faug
C E Ab F A C#
33
MELODY INTELLIGENCE
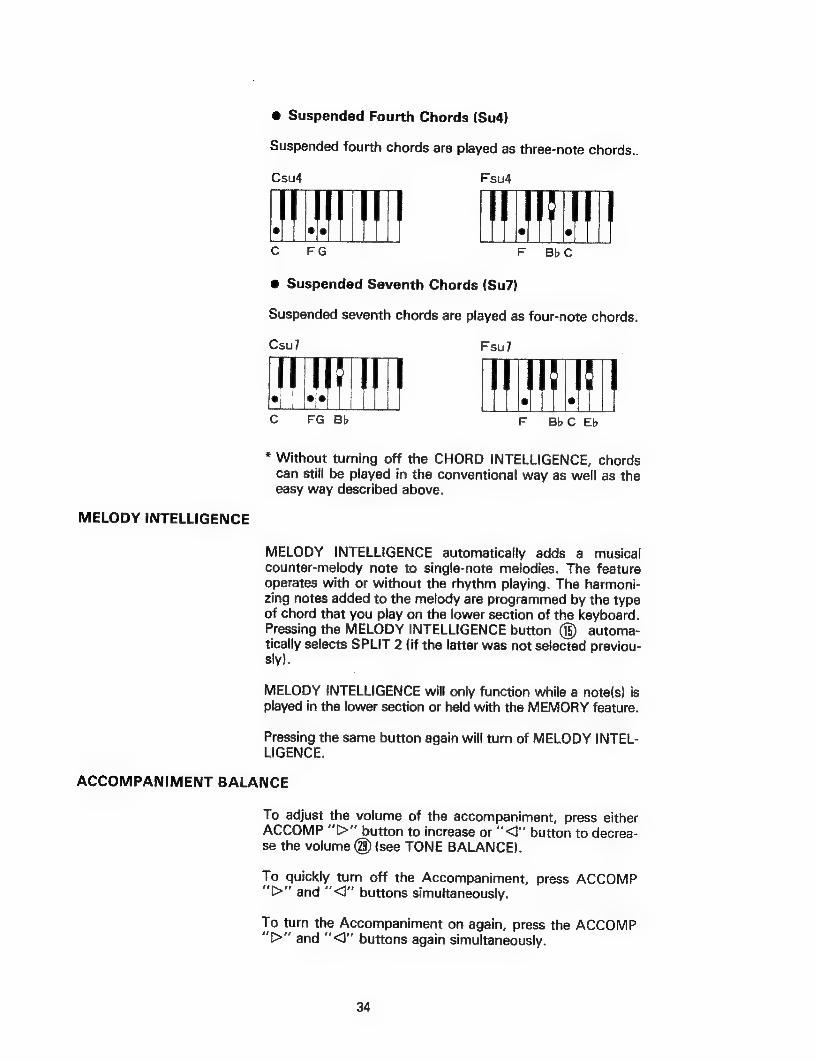
@ Suspended Fourth Chords (Su4)
Suspended fourth chords are played as three-note chords..
Csu4 Fsu4
JU TT Cc FG F BbC
@ Suspended Seventh Chords (Su7)
Suspended seventh chords are played as four-note chords.
Csul Fsul
Cc FG Bb F BbC Eb
* Without turning off the CHORD INTELLIGENCE, chords can still be played in the conventional way as well as the easy way described above.
MELODY INTELLIGENCE automatically adds a musical counter-melody note to single-note melodies. The feature operates with or without the rhythm playing. The harmoni- zing notes added to the melody are programmed by the type of chord that you play on the lower section of the keyboard. Pressing the MELODY INTELLIGENCE button ({§) automa- tically selects SPLIT 2 (if the latter was not selected previou- sly).
MELODY INTELLIGENCE will only function while a note(s) is played in the lower section or held with the MEMORY feature.
Pressing the same button again will turn of MELODY INTEL- LIGENCE.
ACCOMPANIMENT BALANCE
To adjust the volume of the accompaniment, press either ACCOMP “>” button to increase or ‘’<J’ button to decrea- se the volume (9) (see TONE BALANCE).
To quickly turn off the Accompaniment, press ACCOMP “TD” and “<1” buttons simultaneously.
To turn the Accompaniment on again, press the ACCOMP “D>” and “<1” buttons again simultaneously.
34
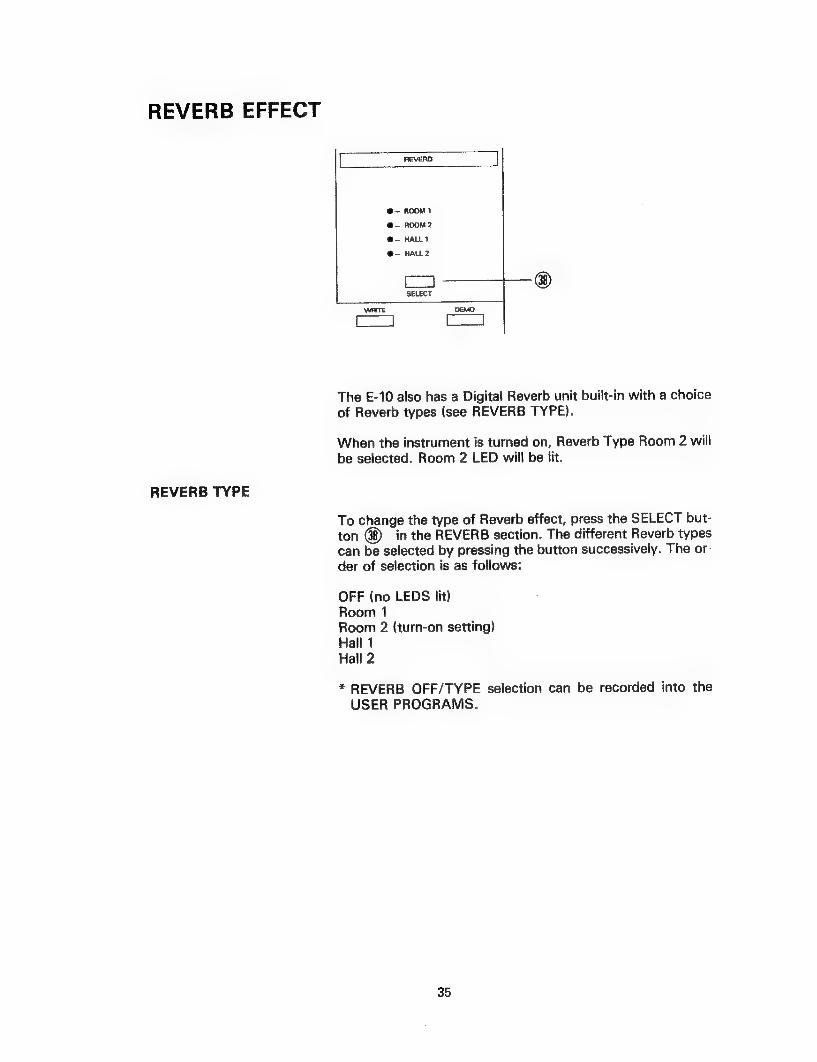
REVERB EFFECT
REVERB TYPE
REVERS
@-— ROOM!
@— ROOM 2
@— HALL1
@— HALLZ
SELECT
The E-10 also has a Digital Reverb unit built-in with a choice
of Reverb types (see REVERB TYPE).
When the instrument is turned on, Reverb Type Room 2 will
be selected. Room 2 LED will be lit.
To change the type of Reverb effect, press the SELECT but-
ton in the REVERB section. The different Reverb types
can be selected by pressing the button successively. The or-
der of selection is as follows:
OFF (no LEDS lit) Room 1 Room 2 (turn-on setting) Hall 1 Hall 2
* REVERB OFF/TYPE selection can be recorded into the
USER PROGRAMS.
35
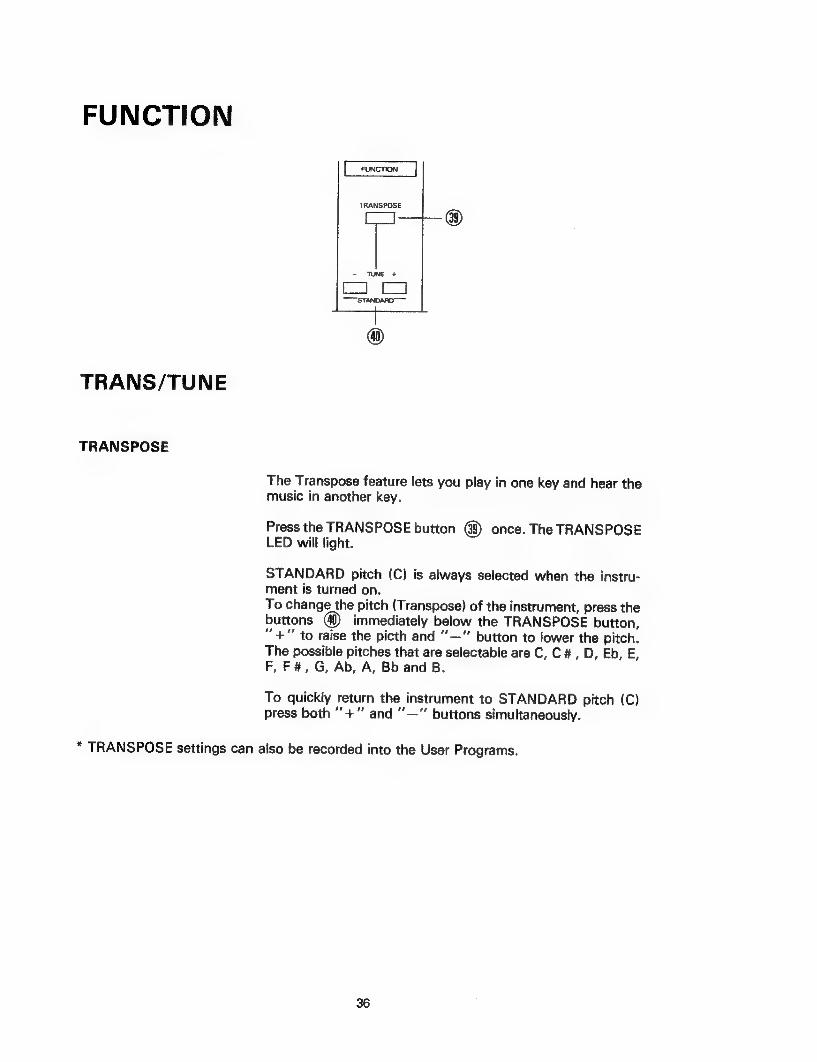
FUNCTION
TRANS/TUNE
TRANSPOSE
TRANSPOSE
The Transpose feature lets you play in one key and hear the music in another key.
Press the TRANSPOSE button once. The TRANSPOSE LED will light.
STANDARD pitch (C) is always selected when the instru- ment is turned on. To change the pitch (Transpose) of the instrument, press the buttons immediately below the TRANSPOSE button, ““+"' to raise the picth and “‘—" button to lower the pitch. The possible pitches that are selectable are C, C#, D, Eb, E, F, F#, G, Ab, A, Bb and B.
To quickly return the instrument to STANDARD pitch (C) press both ‘+ and '‘—"’ buttons simultaneously.
* TRANSPOSE settings can also be recorded into the User Programs.
36

MASTER TUNE
SUSTAIN PEDAL
The Master Tune feature enables you to slightly raise or lo- wer the pitch of your E-10. This feature is extremely useful when playing with other instruments that may not exactly match the pitch of the E-10.
Make sure that the TRANSPOSE LED is not lit. (If the LED is
lit, press the TRANSPOSE switch once).
To change the Master Tune of the instrument, press the but- tons immediately below the TRANSPOSE button, +" to raise the Master Tune and ‘’—” button to lower the Master Tune. The button can be pressed just once to change the Master Tune by one degree or if held will ‘scroll’ through the Master Tune range. The selectable range is from 427.5 Hz to 452.6 Hz.
* Any changes of Master Tune made will remembered even after the instrument is switched off.
To quickly return the instrument to STANDARD Tune (442.0 Hz), press both ““+’’ and ‘“’—” buttons simultaneously.
With the optional footswitch, sustain of the Upper tones can be controlled by the foot. The input socket for the SU- STAIN PEDAL is located on the rear panel.
37

USER PROGRAMS
One of the advantages of the E-10 is its ability to produce a wide variety of instrumental tones and effects. Normally changing from one tone or effect to another involves activa- ting several buttons. However, with Roland’s digital techno- logy, 4 User Programs provided on the instrument enable you to record 4 complete panel registrations of your choice which are recallable at the touch of a button.
a renee eee! | 1 2 3 4
The following functions can be recorded into the User Pro- grams:
@ Upper Tone @ Lower Tone @ Bass Tone @ Volume Balance of each section (Upper, Lower,
Accomp., Bass, Drum) @ Split On/Off, 1&2 @ Rhythm @ Tempo @ Variation @ Arranger On/Off, 1&2 @ Memory @ Sync Start @ Chord Intelligence @ Melody Intelligence @ Reverb Off/Type @ Manual Drum @ Transpose
38

The E-10 will arrive with 4 factory User Programs preset with the following configurations:
USER PROGRAM 1
Upper Tone — 23 SYN BRASS Lower Tone — 11 ELEC PIANO Bass Tone — 57 ACOU BASS
Volume Balances — as turn-on condition
Split — On, 2 Rhythm — 13 FUNK Tempo — 110 Variation — Off Arranger — On, 2 Memory — Off Sync Start — Off Chord Intelligence — Off Melody Intelligence — Off Reverb type — Hall 1 Manual Drum — Off Transpose — C
USER PROGRAM 3
Upper Tone — 25 TROMBONE Lower Tone — 11 ELEC PIANO Bass Tone — 57 ACOU BASS
Volume Balances — as turn-on condition
Split — On, 2 Rhythm — 24 SWING Tempo — 120 Variation — Off Arranger — On, 2 Memory — Off Sync Start — Off Chord Intelligence — Off Melody Intelligence — Off Reverb type — Hall 1 Manual Drum — Off Transpose — C
USER PROGRAM 2
Upper Tone — 52 ELEC GTR Lower Tone — 25 TROMBONE Bass Tone — 61 ELEC BASS
Volume Balances — as turn-on condition
Split — On, 2 Rhythm — 22 ROCK ‘N ROLL Tempo — 172 Variation — Off Arranger — On, 2 Memory — Off Sync Start — Off Chord Intelligence — Off Melody Intelligence — Off Reverb type — Room 2 Manual Drum — Off Transpose — C
USER PROGRAM 4
Upper Tone — 67 MARIMBA Lower Tone — 17 ELEC ORGAN Bass Tone — 57 ACOU BASS Volume Balances — as turn-on condition Split — On, 2 Rhythm — 38 CHA CHA Tempo — 140 Variation — Off Arranger — On, 2 Memory — Off Sync Start — Off Chord Intelligence — Off Melody Intelligence — Off Reverb type — Room 2 Manual Drum — Off Transpose — C

WRITING A PANEL CONFIGURATION
1. Select any of the recordable functions you wish to record into the User Program.
2. Press the WRITE button (7) and hold.
3. While pressing the WRITE button, press one of the USER PROGRAM buttons (1-4) LED lights . The panel has now been recorded into the User Program number pres- sed.
To change another User Program, follow the same procedu- re as above.
The User Program contents will be retained until they are fur- ther changed. Turning the instrument off will not erase a re- corded User Program.
To activate any of the User Programs, just press the number button you wish to use. The panel setting in that particular program will be recalled and the LED next to the button will light indicating which User Program is activated. To cancel a User Program, press the same User Program button a se- cond time (LED will be turned off). The program will now be canceled and the panel registration before selecting a User Program will return. This is called User Program O (not indi- cated on the panel).
If you wish to reset the factory preset User Programs (1-4):
1 .Turn the E-10 off if it is already on.
2. Press the WRITE button (7) and hold it.
3. Turn the E-10 back on.
The three Tone Select LEDs and four Reverb LEDs will light. Continue to hold the WRITE button until all four User Pro- gram LEDs light and then release. The factory User Program settings have now been loaded into the E-10.
NOTE: This procedure will erase any settings contained in the User Programs prior to loading the factory User Program settings.
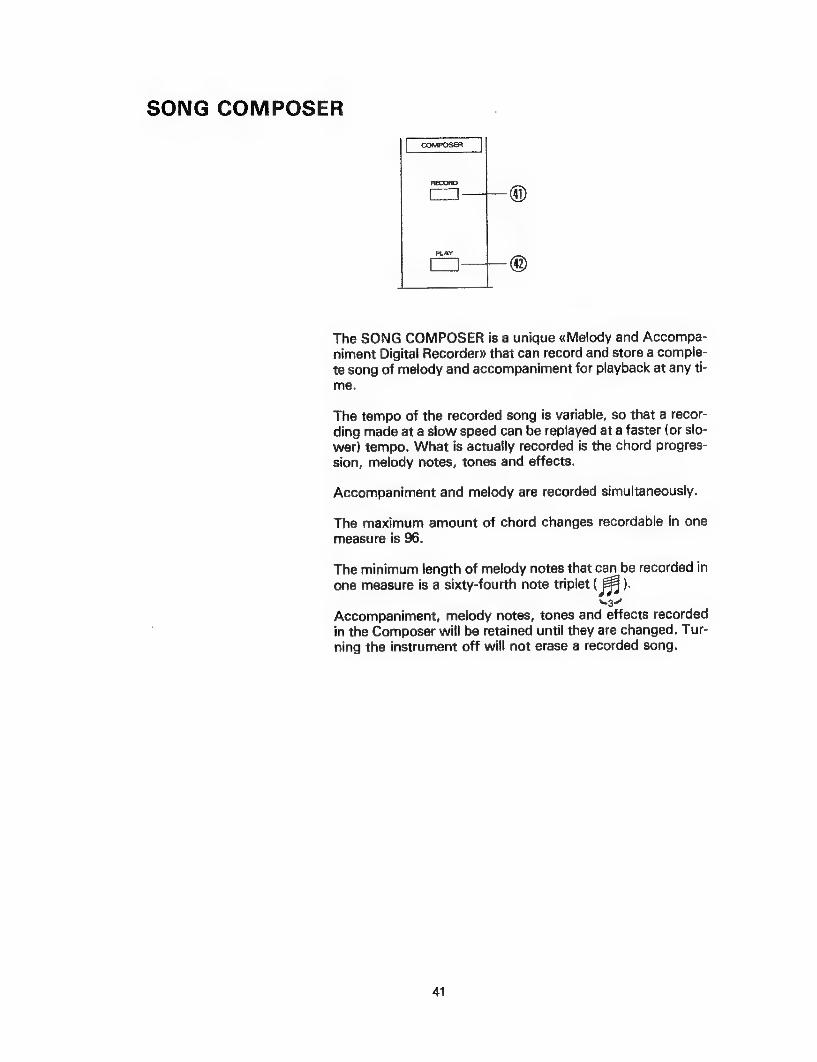
SONG COMPOSER
PLAY
The SONG COMPOSER is a unique «Melody and Accompa- niment Digital Recorder» that can record and store a comple- te song of melody and accompaniment for playback at any ti-
me.
The tempo of the recorded song is variable, so that a recor- ding made at a slow speed can be replayed at a faster (or slo- wer) tempo. What is actually recorded is the chord progres- sion, melody notes, tones and effects.
Accompaniment and melody are recorded simultaneously.
The maximum amount of chord changes recordable in one measure is 96.
The minimum length of melody notes that can be recorded in one measure is a sixty-fourth note triplet (A ).
37
Accompaniment, melody notes, tones and effects recorded
in the Composer will be retained until they are changed. Tur- ning the instrument off will not erase a recorded song.
41

RECORDING A SONG
1. Stop the rhythm if already playing.
2. Press the RECORD button in the Song Composer section (RECORD LED will light).
(Pressing RECORD button will automatically select SPLIT 2 position if it was switched off).
3. Select the rhythm you wish to use while recording, and select tones and effects.
The recording can be started in three ways:
a) Press the START/STOP button and the rhythm and re- cording starts immediately.
b) Press the SYNC START button (LED lights). Then press a chord in the accompaniment section of the keyboard. Rhythm and recording will begin automatically (LED off).
c) Press the INTRO/ENDING button and the recording will start with the “‘introduction” to the rhythm selected.
* The Intro can also be selected with the SYNC START function. Press the INTRO/ENDING button after pressing the SYNC START button (Sync Start LED begins to flash). Then play a chord in the accompaniment section and the recording will begin with the ‘introduction’.
In addition to recording chord and melody note information, the Composer can also record the following functions:
@ Tone change (UPPER, LOWER, BASS) @ Rhythm Change @ Variation @ Arranger On/Off, 1&2 @ Fill-in to Variation @ Fill-In to Original @ Intro ‘@ Ending @ User Program change @ Volume Balance change (UPPER, BASS, ACCOMP, DRUMS)
@ Sustain (using the optional footswitch)
42
PLAYING BACK A SONG
The Song Composer will inform you when you are approa-
ching the full memory capacity of the song you are recording
by flashing the RECORD LED. This occurs when only 10% of
the memory is remaining.
* When the total memory capacity is reached, recording will
be automatically switched off. The rhythm will automati-
cally be switched off and RECORD LED will be turned off.
1. To play back the song you have just recorded, press the
PLAY button (LED lights).
2. Press the START/STOP button and playback of the song
will begin.
-or-
Press the SYNC START button, then press a note in the
lower section of the keyboard.
The song will automatically stop after playing the final mea-
sure, or the song can be stopped at any time by pressing the
START/STOP button (PLAY LED is turned off).
If you wish the song to playback repeatedly, press the PLAY
button one more time (LED will start to flash). To cancel the
“loop” feature press the PLAY button again until the LED
lights constantly.
43
MIDI CONTROL
CONNECTIONS
M.1.D.1. is the acronym for Musical Instrument Digital Inter- face.
MIDI is a standardized interface by which all digital musical instruments also equipped with MIDI connections can ex- change data. This means that your E-10 can be used as a MI- DI control keyboard - to contro! other MIDI devices (key- board, sequencer, etc.) or as a MIDI sound source (to be controlled by other MIDI devices).
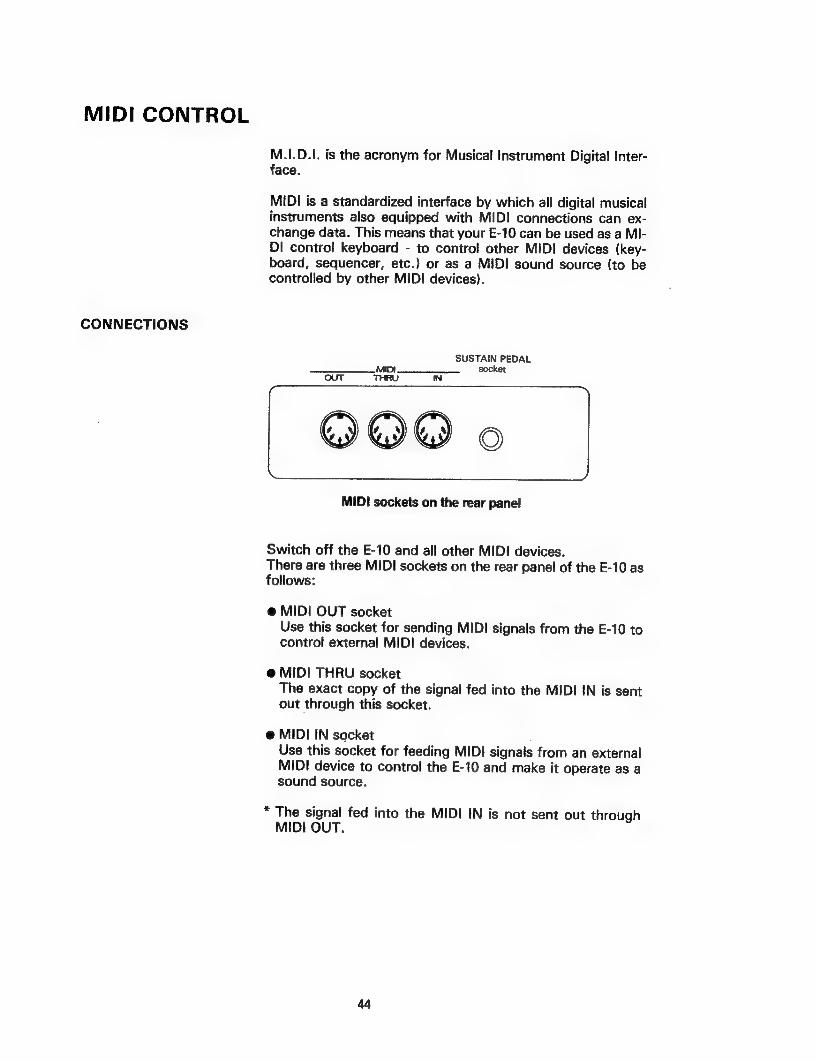
SUSTAIN PEDAL MIOt socket
OOD o
MIDI sockets on the rear pane!
Switch off the E-10 and all other MIDI devices. There are three MIDI sockets on the rear panel of the E-10 as follows:
@ MIDI OUT socket Use this socket for sending MIDI signals from the E-10 to control external MIDI devices.
@ MIDI THRU socket The exact copy of the signal fed into the MIDI IN is sent out through this socket.
@ MIDI IN socket Use this socket for feeding MIDI signals from an external MIDI device to control the E-10 and make it operate as a sound source.
* The signal fed into the MIDI IN is not sent out through MIDI OUT.

Example:
guesbone | seashore! a
MT-100, etc.
* When connecting, switch off the E-10 and all other MIDI devices.
* Do not connect more than 3 MIDI devices through the MI- Di THRU sockets. Use the optional MIDI THRU box (MM- 4) in this case.
As was explained above, the E-10 delivers a lot of musical ca- pability with ARRANGER, VARIATION, CHORD INTELLI- GENCE and MELODY INTELLIGENCE.
You can also get an additional 2 parts (1st and 2nd RX ONLY parts which cannot be played with the E-10 alone) with 128 tones available for selection when the E-10 is controlled by external MIDI devices such as the MC/PR series sequencers. Then the E-10 will perform most 9-part orchestrations.
See MIDI IMPLEMENTATION CHART for details on the MI- DI data which the E-10 can transmit and receive (recognize).
* For additional information on advanced MIDI Control, see your Roland dealer.
45
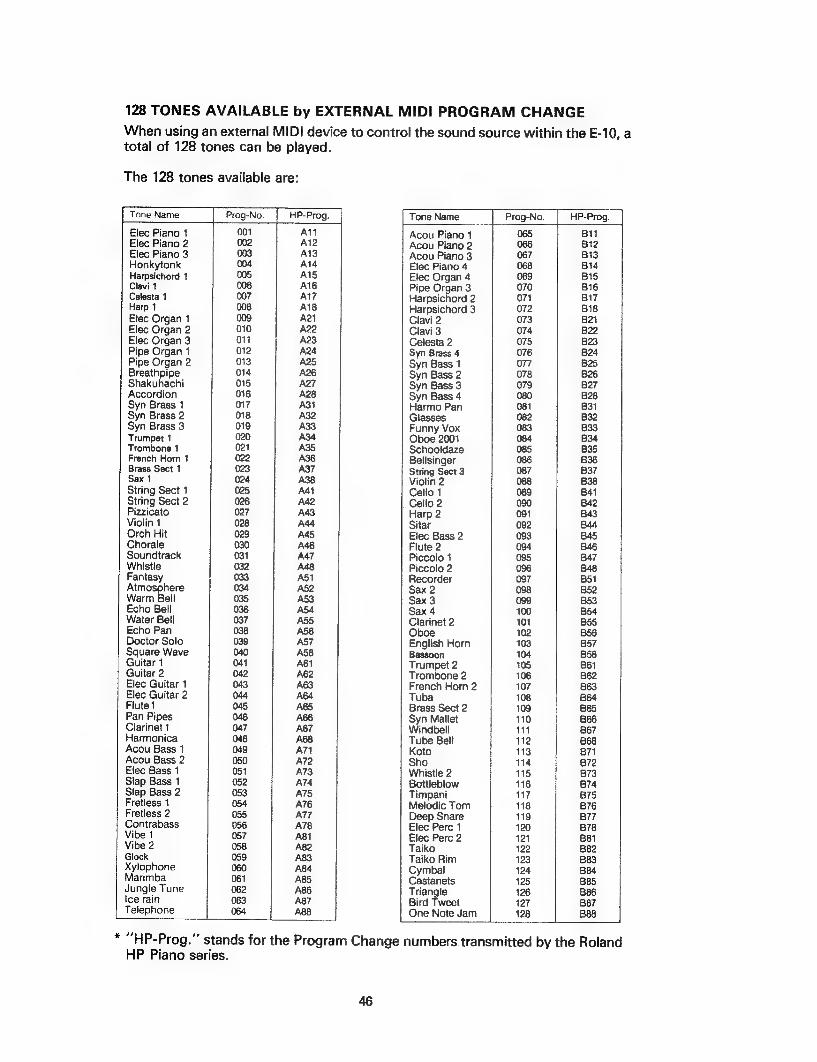
128 TONES AVAILABLE by EXTERNAL MIDI PROGRAM CHANGE
When using an external MIDI device to control the sound source within the E-10, a total of 128 tones can be played.
The 128 tones available are:
Tone Name HP-Prog.
Elec Piano 1 001 Alt Elec Piano 2 002 Al2 Elec Piano 3 003 A13 Honkytonk 004 Al4 Harpsichord 1 005 Ai5 Clavi 1 006 A16 Celesta 1 007 A17 Harp 1 008 A18
Elec Organ 1 009 A2i Elec Organ 2 010 A22 Elec Organ 3 011 A23 Pipe Organ 1 012 A24 Pipe Organ 2 013 A25 Breathpipe 014 A26 Shakuhachi 015 A27 Accordion 016 A28 Syn Brass 1 017 A31 Syn Brass 2 018 A32 Syn Brass 3 019 A33 Trumpet 1 020 A34 Trombone 1 021 A35 French Horn 1 022 A36 Brass Sect 1 023 A37 Sax 1 024 A388 String Sect 1 025 A4t String Sect 2 026 A42 Pizzicato 027 A43 Violin 1 028 A44 Orch Hit 029 A45 Chorale 030 A46 Soundtrack 031 A47 Whistle 032 A48 Fantasy 033 A51 Atmosphere 034 AS2 Warm Bell 035 A53 Echo Bell 036 A54 Water Bell 037 A55 Echo Pan 038 A56 Doctor Solo 039 A57 Square Wave 040 A58 Guitar 1 041 A61 Guitar 2 042 A62 Elec Guitar 1 043 A63 Elec Guitar 2 044 A64 Flute 1 045 A65 Pan Pipes 046 A66 Clarinet 1 047 A67 Harmonica 048 A68 Acou Bass 1 049 A71 Acou Bass 2 050 A72 Elec Bass 4 051 A73 Slap Bass 1 052 A74 Slap Bass 2 053 A75 Fretless 1 054 A76 Fretless 2 055 A77 Contrabass 056 A78 Vibe 1 057 ABi Vibe 2 058 A82 Glock 059 A83 Xylophone 060 A84 Marimba 061 A&5 Jungle Tune 062 A&6 Ice rain i 063 A87 Telephone 064 A88 |
* “HP-Prog.” stands for the Program Change numbers.transmitted by the Roland HP Piano series.
Tone Name Prog-No. HP-Prog.
Acou Piano 1 065 Bil Acou Piano 2 066 B12 Acou Piano 3 067 B13 Elec Piano 4 068 B14 Elec Organ 4 069 B15 Pipe Organ 3 070 B16 Harpsichord 2 071 B17 Harpsichord 3 072 Bi8 Clavi 2 073 B21
Clavi 3 074 B22 Celesta 2 075 B23 Syn Brass 4 076 B24
Syn Bass 1 077 B25 Syn Bass 2 078 B26 Syn Bass 3 079 B27 Syn Bass 4 080 B28 Harmo Pan 081 B31 Glasses 082 B32 Funny Vox 083 B33 Oboe 2001 084 B34 Schooldaze 085 B35 Bellsinger 086 B36 String Sect 3 087 B37 Violin 2 088 B38 Cello 1 089 Bai Cello 2 090 B42 Harp 2 091 B43 Sitar 092 B44 Elec Bass 2 093 B45 Flute 2 094 B46 Piccolo 1 095 B47 Piccolo 2 096 B48 Recorder 097 B51 Sax 2 098 B52 Sax 3 099 B53 Sax 4 100 B54 Clarinet 2 101 B55 Oboe 102 B56 English Horn 103 B57 Bassoon 104 B58 Trumpet 2 105 B61 Trombone 2 106 B62 French Horn 2 107 B63 Tuba 108 B64 Brass Sect 2 109 B65 Syn Mallet 110 B66 Windbell 111 B67 Tube Bell 112 B68 Koto 113 B71 Sho 114 B72 Whistle 2 115 B73 Bottleblow 116 B74 Timpani 117 B75 Melodic Tom 118 B76 Deep Snare 119 B77 Elec Perc 1 120 B78 Elec Perc 2 121 B81 Taiko 122 B82 Taiko Rim 123 B83
Cymbal 124 B84 Castanets 125 Bas Triangle 126 Bae Bird Tweet 127 B87 One Note Jam 128 B88
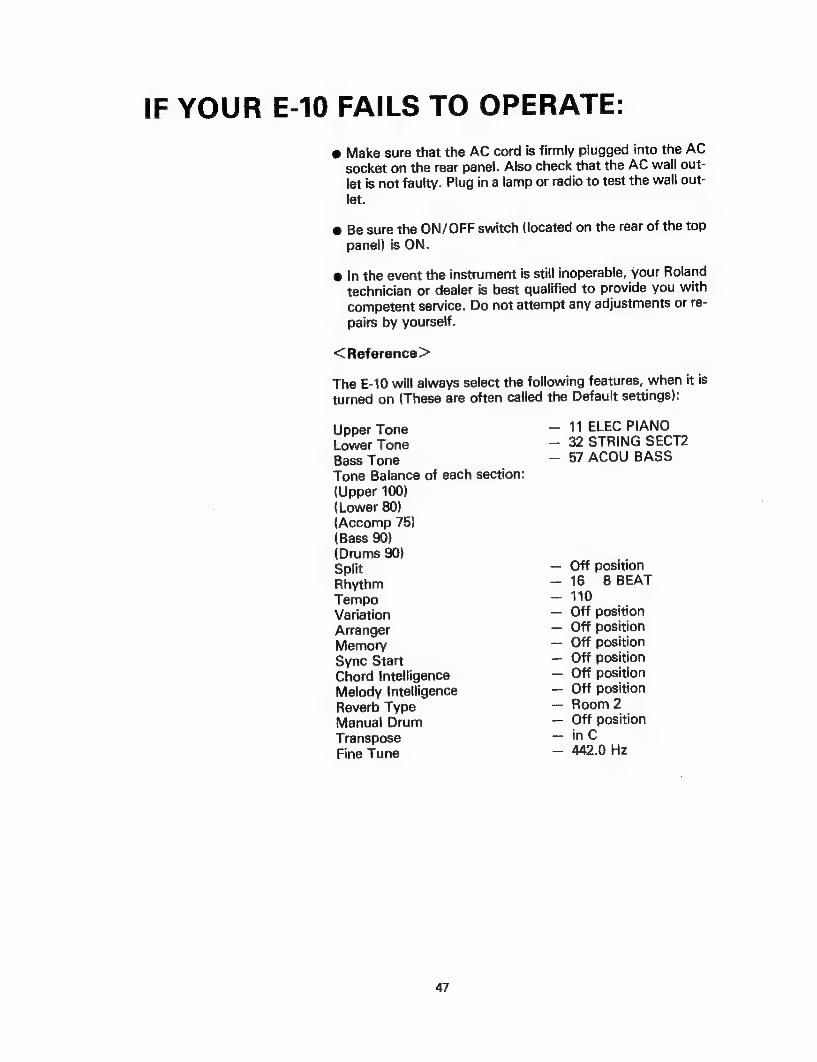
IF YOUR E-10 FAILS TO OPERATE:
e@ Make sure that the AC cord is firmly plugged into the AC
socket on the rear panel. Also check that the AC wall out-
let is not faulty. Plug in a lamp or radio to test the wall out-
let.
@ Be sure the ON/OFF switch (located on the rear of the top
panel) is ON.
@ In the event the instrument is still inoperable, your Roland
technician or dealer is best qualified to provide you with
competent service. Do not attempt any adjustments or re-
pairs by yourself.
<Reference>
The E-10 will always select the following features, when it is
turned on (These are often called the Default settings):
Upper Tone — 11 ELEC PIANO
Lower Tone — 32 STRING SECT2
Bass Tone — 57 ACOU BASS
Tone Balance of each section:
(Upper 100) (Lower 80) (Accomp 75) (Bass 90) (Drums 90) Split — Off position
Rhythm — 16 8 BEAT
Tempo — 110
Variation — Off position
Arranger — Off position
Memory — Off position
Sync Start — Off position
Chord Intelligence — Off position
Melody Intelligence — Off position
Reverb Type — Room 2
Manual Drum — Off position
Transpose — inc
Fine Tune — 442.0 Hz
47
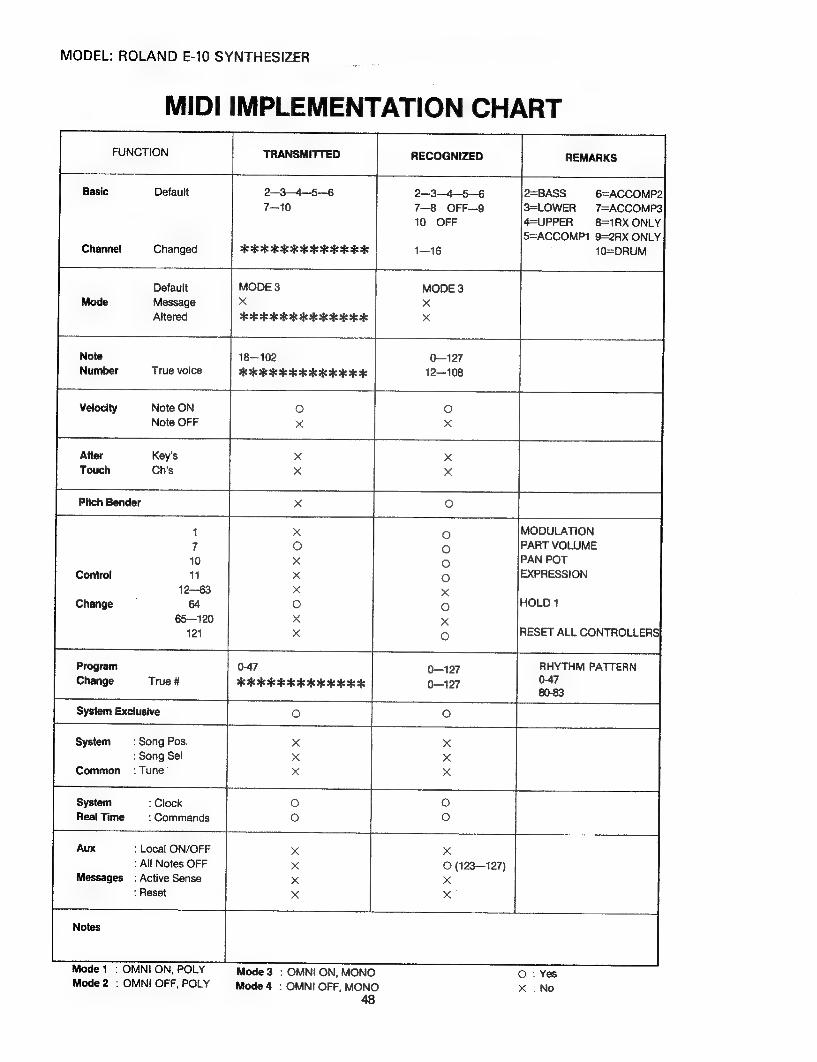
MODEL: ROLAND E-10 SYNTHESIZER
MIDI IMPLEMENTATION CHART
FUNCTION TRANSMITTED RECOGNIZED
2=BASS 6=ACCOMP2
3=LOWER 7=ACCOMP3
4=UPPER 8=1RX ONLY
5=ACCOMP1 9=2RX ONLY
10=DRUM
2—3—4—5 —6
7—10
2—3—4-5—6 7—8 OFF—9 10 OFF
Default
Channel Changed oh KK oe oe ok ok oe ok 1i—16
Default MODE 3
Mode Message x
Altered 3K 6 oe 2k ok ok ok RK OK
18—102
True voice oh 2 oh 2 of 6 ok ok ok ok ok ok ok 12—108
Note ON Oo Oo
Note OFF x x
|: |:
MODULATION
PART VOLUME
PAN POT
EXPRESSION Control 1
HOLD 1 Change
RESET ALL CONTROLLERS)
ben OXxOxO0000
RHYTHM PATTERN 0-47 0—127 22K oR kok ok sees ok kek ok 0-127 0-47
80-83
@) System Exclusive
System : Song Pos.
: Song Sel
: Tune Common
System : Clock
Real Time : Commands
: Local ON/OFF
: All Notes OFF
Messages: Active Sense
: Reset
Mode 1 : OMNI ON, POLY Mode 3 : OMNI ON, MONO © : Yes Mode 2 : OMNI OFF, POLY Mode 4 : OMNI OFF, MONO x . No
48
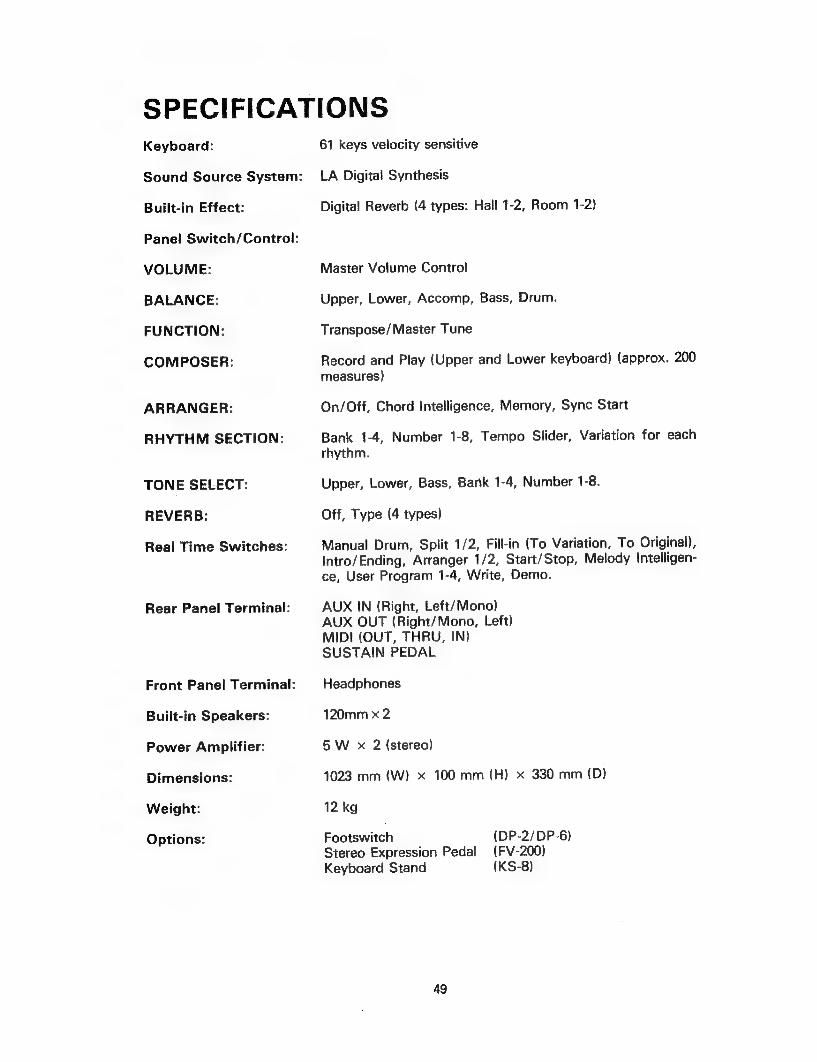
SPECIFICATIONS Keyboard:
Sound Source System:
Built-in Effect:
Panel Switch/Control:
VOLUME:
BALANCE:
FUNCTION:
COMPOSER:
ARRANGER:
RHYTHM SECTION:
TONE SELECT:
REVERB:
Real Time Switches:
Rear Panel Terminal:
Front Panel Terminal:
Built-in Speakers:
Power Amplifier:
Dimensions:
Weight:
Options:
61 keys velocity sensitive
LA Digital Synthesis
Digital Reverb (4 types: Hall 1-2, Room 1-2)
Master Volume Control
Upper, Lower, Accomp, Bass, Drum.
Transpose/Master Tune
Record and Play (Upper and Lower keyboard) (approx. 200
measures)
On/Off, Chord Intelligence, Memory, Sync Start
Bank 1-4, Number 1-8, Tempo Slider, Variation for each
rhythm.
Upper, Lower, Bass, Bank 1-4, Number 1-8.
Off, Type (4 types)
Manual Drum, Split 1/2, Fill-in (To Variation, To Original),
Intro/Ending, Arranger 1/2, Start/Stop, Melody Intelligen-
ce, User Program 1-4, Write, Demo.
AUX IN (Right, Left/Mono) AUX OUT (Right/Mono, Left) MIDI (OUT, THRU, IN) SUSTAIN PEDAL
Headphones
120mm x 2
5W x 2 (stereo)
1023 mm (W) x 100 mm (H) x 330 mm (D)
12 kg
Footswitch (DP-2/DP-6) Stereo Expression Pedal (FV-200) Keyboard Stand (KS-8)
49
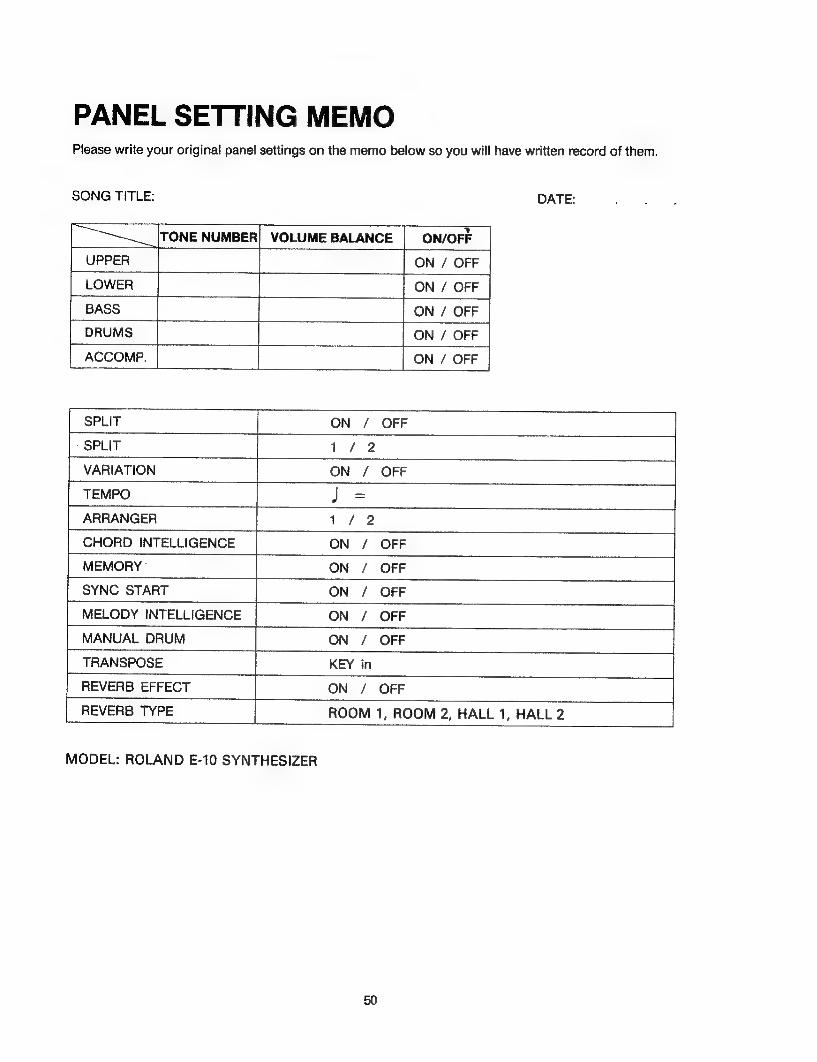
PANEL SETTING MEMO Please write your original panel settings on the memo below so you will have written record of them.
SONG TITLE:
Cee TONE NUMBER
DATE:
VOLUME BALANCE
UPPER
LOWER
BASS
DRUMS
ACCOMP.
VARIATION
ARRANGER
MEMORY
CHORD INTELLIGENCE ON / OFF
ON / OFF
ON / OFF
ON / OFF
ON / OFF
ON / OFF
ON / OFF
SYNC START
MELODY INTELLIGENCE
MANUAL DRUM
TRANSPOSE
REVERB EFFECT
REVERB TYPE
ON / OFF
ON / OFF
ON / OFF
ON / OFF
KEY in
ON / OFF
ROOM 1, ROOM 2, HALL 1, HALL 2
MODEL: ROLAND E-10 SYNTHESIZER

PANEL SETTING MEMO Please write your original panel settings on the memo below so you will have written record of them.
SONG TITLE: DATE:
ON/OFF
ON / OFF
ON / OFF
ON / OFF
TRANSPOSE
REVERB EFFECT
REVERB TYPE
MODEL: ROLAND E-10 SYNTHESIZER
51

PANEL SETTING MEMO Please write your original panel settings on the memo below so you will have written record of them.
SONG TITLE: DATE:
KEY in
REVERB EFFECT ON / OFF
REVERB TYPE ROOM 1, ROOM 2, HALL 1, HALL 2
MODEL: ROLAND E-10 SYNTHESIZER
52

(=Roland*
17049511
UPC 17049611
i=Roland
Ol-3