IBM BigFix: Web Reports Guide - IBM - United States€¦ · Computer Pr operties List ......
104
IBM BigFix Version 9.2 Web Reports Guide IBM
Transcript of IBM BigFix: Web Reports Guide - IBM - United States€¦ · Computer Pr operties List ......
IBM BigFixVersion 9.2
Web Reports Guide
IBM


IBM BigFixVersion 9.2
Web Reports Guide
IBM

NoteBefore using this information and the product it supports, read the information in “Notices” on page 93.
This edition applies to version 9, release 2, modification level 0 of IBM BigFix and to all subsequent releases andmodifications until otherwise indicated in new editions.
© Copyright IBM Corporation 2010, 2015.US Government Users Restricted Rights – Use, duplication or disclosure restricted by GSA ADP Schedule Contractwith IBM Corp.

Contents
Chapter 1. Introduction . . . . . . .. 1
Chapter 2. Configuring Web Reports .. 3Requirements . . . . . . . . . . . . .. 3Supported Browsers . . . . . . . . . . .. 4Deploying a stand-alone Web Report server . . .. 4Setting the session inactivity timeout . . . . .. 4Integrating LDAP with Web Reports . . . . .. 5
Integration with LDAP . . . . . . . . .. 5Integration with Active Directory . . . . .. 10Setting the Number of LDAP Entries to Display 12
Chapter 3. Using the Program . . . .. 13First Login. . . . . . . . . . . . . .. 13Starting Web Reports . . . . . . . . . .. 13Viewing the Data . . . . . . . . . . .. 15Filtering the Data . . . . . . . . . . .. 16Saving Reports . . . . . . . . . . . .. 17Viewing Reports . . . . . . . . . . . .. 17Creating Charts . . . . . . . . . . . .. 18Setting Up Email . . . . . . . . . . .. 19Scheduling Reports . . . . . . . . . . .. 21Adding a Datasource . . . . . . . . . .. 23Editing a Datasource . . . . . . . . . .. 24Setting Your Preferences . . . . . . . . .. 25Enabling FIPS cryptography on Web Reports . .. 25Setting the login lockout . . . . . . . . .. 26
Chapter 4. Exploring . . . . . . . .. 27Filters . . . . . . . . . . . . . . .. 27Charts . . . . . . . . . . . . . . .. 29
Collapsing the Table . . . . . . . . .. 32Columnar Report . . . . . . . . . . .. 34
Edit Columns. . . . . . . . . . . .. 34Changing Column Order . . . . . . . .. 36
Computers . . . . . . . . . . . . .. 37Content. . . . . . . . . . . . . . .. 38Actions . . . . . . . . . . . . . . .. 39Operators . . . . . . . . . . . . . .. 39Unmanaged Assets . . . . . . . . . . .. 40Custom. . . . . . . . . . . . . . .. 40
Chapter 5. Reporting. . . . . . . .. 43Report List Main Page . . . . . . . . . .. 43
Import Report . . . . . . . . . . .. 43Only Show Starred . . . . . . . . . .. 44Filter by Label . . . . . . . . . . .. 44Filter by Author . . . . . . . . . . .. 44Add, Create, and Delete Labels . . . . . .. 44Delete . . . . . . . . . . . . . .. 45Main List . . . . . . . . . . . . .. 45
Overview Report . . . . . . . . . . .. 46Total Issues . . . . . . . . . . . .. 46Total Number of Computers . . . . . . .. 47
Computer Vulnerability Status . . . . . .. 48Issues Remediated . . . . . . . . . .. 49Overall Statistics. . . . . . . . . . .. 50Top 10 Critical/Important Issues Detected . .. 51
Computer Properties List . . . . . . . . .. 51Open Vulnerabilities List . . . . . . . . .. 53Other Reports . . . . . . . . . . . .. 53Showing non-relevant results . . . . . . .. 54
Chapter 6. Administering the Program 55Scheduled Activities . . . . . . . . . .. 55
Creating Scheduled Activities . . . . . .. 56Filter Management . . . . . . . . . . .. 59Address Book . . . . . . . . . . . .. 59User Management . . . . . . . . . . .. 61
Create Users . . . . . . . . . . . .. 62Manage Roles . . . . . . . . . . .. 62Create Roles . . . . . . . . . . . .. 63Global User Options . . . . . . . . .. 64Edit User . . . . . . . . . . . . .. 66
Datasource Settings. . . . . . . . . . .. 66Add New Datasource . . . . . . . . .. 68Edit Datasource . . . . . . . . . . .. 68
Errors . . . . . . . . . . . . . . .. 69
Appendix A. Tasks for advanced users 71Understanding the Web Report File . . . . .. 71Creating a Custom Report . . . . . . . .. 71Web Reports XML . . . . . . . . . . .. 72Creating a Portable Report for Propagation . . .. 73Exporting activity reports to CSV files . . . .. 74Exporting activity reports to PDF documents . .. 74
On Windows Systems . . . . . . . . .. 74On Linux Systems . . . . . . . . . .. 76Exporting the report output to a PDF file . .. 78PDF Header and Footer . . . . . . . .. 78
Configuring HTTPS for Web Reports . . . . .. 79Creating a Certificate Signing Request (csr) . .. 80Generating a Self-Signed Certificate . . . .. 80Requesting a Certificate from a CertificateAuthority . . . . . . . . . . . . .. 81Web Reports HTTPS Settings . . . . . .. 82Configuring HTTPS manually on Windowssystems. . . . . . . . . . . . . .. 84Configuring HTTPS manually on Linux systems 85
Logging Web Reports . . . . . . . . . .. 85Querying Using HTTP GET . . . . . . . .. 86Querying Using SOAP. . . . . . . . . .. 87
PERL . . . . . . . . . . . . . .. 87Raw SOAP Request and Response Format . .. 88
Session Inspectors . . . . . . . . . . .. 88Displaying Web Reports from Content Sites . .. 89
External Reports . . . . . . . . . . .. 89Template Reports . . . . . . . . . .. 90
© Copyright IBM Corp. 2010, 2015 iii

Appendix B. Support. . . . . . . .. 91
Notices . . . . . . . . . . . . .. 93Trademarks . . . . . . . . . . . . .. 95
Terms and conditions for product documentation.. 96
iv IBM BigFix: Web Reports Guide

Chapter 1. Introduction
Web Reports is a high-level web application that complements and extends thepower of IBM BigFix. It connects to one or more IBM BigFix databases to aggregateand analyze your entire network. It allows you to visualize your data, with bothcharts and data listings, in any standard web browser. Web Reports provides youwith a convenient, compact, and timely overview of your IBM BigFix network, nomatter how broadly it extends.
Web Reports is prepackaged with dozens of critical reports ready to take the pulseof all your networked computers, including real-time visualization of patchrollouts, remediations, policy compliance, and much more. In addition, you caneasily customize your own reports using faceted navigation to reduce your data toits essentials for fast, targeted access.
Web Reports is organized around domains, which are content groupings withtheir own set of built-in reports to get you up and running quickly. Domains alsoact as primary filters that allow you to limit the scope of reports and drill downinto your network with finer granularity.
© Copyright IBM Corp. 2010, 2015 1

2 IBM BigFix: Web Reports Guide

Chapter 2. Configuring Web Reports
Web Reports is used whenever you want to view IBM BigFix data that is spreadover multiple databases in your deployment. Beyond aggregation, it is alsoinvaluable when you need real-time information quickly, but do not have directaccess to a IBM BigFix console. To use Web Reports, all you need is a browser.
You can generate listings and charts immediately with a large set of prepackagedreports. It is also easy to create custom reports to address questions or policiesspecific to your own network.
This guide describes all the unique features of the Web Reports Interface.Advanced topics in relevance and the low-level report language are beyond thescope of this guide. For more information about these topics, see the IBM BigFixRelevance Language Reference and the Session Inspector Guide.
Requirements
Web Reports can run on a stand-alone server or on the same machine that hoststhe IBM® BigFix database.
Starting from V9.2 Patch 3, only the 64-bit architecture is supported for installingthe BigFix Web Reports component on Windows systems.
Note: Ensure that the Web Reports component, like the BigFix console, has thesame version of the BigFix servers to which it connects.
The requirements for the Web Reports server vary depending on the number ofdatabases, computers, actions, and retrieved properties that you want to track.
The Web Reports primary resource requirements revolve around memory size forfast access and CPU speed for fast report processing. The disk stores a local cacheto make load times faster, but the disk speeds have less impact on the Web Reportsthan memory size and CPU speeds.
Note: The Web Reports server is not supported on Server Core for WindowsServer 2008 R2.
BigFix deployments with more than 30,000 agents can benefit by having a separateWeb Reports server so that the main IBM BigFix server does not need to share itsresources. You can set up multiple Web Reports servers with minimal performanceimpact on the main server.
Web Reports server requirements:
Number of Agents CPU Memory
< 10,000 2ghz 1 GB
10,001-30,000 2ghz (dual core) 2 GB
30,000-100,000 2ghz (dual core) 3 GB
100,000-200,000 2ghz (quad core) 4 GB
© Copyright IBM Corp. 2010, 2015 3

Supported Browsers
The approved client browsers include:v Internet Explorer 7 and later (Windows)v Firefox 3.5 and later (Windows)v Safari 4 and later (Mac)v Google Chrome (Windows, Mac)
JavaScript must be enabled on your browser to use Web Reports. To view sometypes of graphs, you also need to have Adobe Flash Player version 10 or higherinstalled.
Deploying a stand-alone Web Report serverHow to deploy a stand-alone Web Report server.
You can copy the BESInstallers\Server directory from your BigFix to the dedicatedsystem. These are the steps to take in deploying a stand-alone Web Report server:1. On the "Select Database" window, select Use Remote Database and click Next
2. On the "Database Server" window, select the desired authentication method. Ifyou choose Windows authentication, you need to change later the Web Reportsservice logon to use a Windows authenticated user logon
3. On the "Select Features" window, clear the BES Server and BES Server CoreComponents options. The only option that must selected is Web Reports. ClickNext
4. Choose the appropriate destination location and click Next
5. Choose where the Web Reports server must have its root directory and clickNext
6. Click Next to begin the installation7. Specify the database login and authentication method for the server
components and then click Next
8. Create this new key in the registry file of the stand-alone workstation:HKEY_LOCAL_MACHINE\SOFTWARE\BigFix\Enterprise Server\Installer:Hostname=<hostname>, where <hostname> is the Fully Qualified Domain Name(FQDN) of the stand-alone server
Note: For versions earlier than 8.2, after you started Web Reports, you must addthe bfenterprise database to be aggregated by clicking the Database link option. Youmust also create a Database Source Name pointing to the appropriate SQL serverand bfenterprise database. For version 8.2 and later, you do not need to create a newDatabase Source Name entry on the Web Reports servers. The data source addedon the Web Reports settings page must point to the root server workstation, thesame when opening the console, and it might be different than the database server.
Setting the session inactivity timeoutSetting a limit to the duration of a session for the user interface.
To put a limit to the length of an inactive user interface session, you must set theWeb Reports property InactivityTimeoutLength to the amount of inactivityminutes after which the user interface session expires. The default value ia 120minutes. To insert a different value, perform the following steps:
4 IBM BigFix: Web Reports Guide

On Windows operating systems:
1. Open a command prompt and run Regedit.2. In the Registry Editor window, under the HKEY_LOCAL_MACHINE\Software\
BigFix\Enterprise Server\BESReports key (on 32-bit Windows operatingsystems) or HKEY_LOCAL_MACHINE\Software\Wow6432Node\BigFix\EnterpriseServer\BESReports (on 64-bit Windows operating systems), create a REG_SZkeyword named InactivityTimeoutLength and set it to the maximum numberof minutes of inactivity after which the user interface session expires.
3. Close the Registry Editor window and restart the BES Web Report Serverservice to apply the new InactivityTimeoutLength value.
On Linux operating systems:1. Open the /var/opt/BESWebReportsServer/beswebreports.config configuration
file.2. Add the InactivityTimeoutLength property in the [Software\BigFix\
Enterprise Server\BESReports] section as follows:InactivityTimeoutLength = <max_timeout_minutes>
where <max_timeout_minutes> is the maximum number of minutes of inactivityafter which the user interface session expires.
Note: The new value for InactivityTimeoutLength is applied the next time youlaunch the Web Reports application.
Integrating LDAP with Web Reports
There are two solutions for integrating LDAP with the Web Reports server. Thetwo solutions are mutually exclusive on Windows:v The first solution supports the integration of LDAP (both Tivoli Directory Server
and Active Directory) with the Web Reports server running on both Windowsand Linux systems.
v The second solution supports the integration of Active Directory with the WebReports server running on Windows only. It works only if the computer wherethe Web Reports server runs is joined to an AD Domain.
When upgrading BigFix to V9.2, the Endpoint Manager 9.1 Active Directorysolution is kept for compatibility with the existing environment. To switch to theLDAP solution see “LDAP integration after Windows upgrade” on page 12.
Integration with LDAP
To integrate Web Reports with LDAP in a Windows or Linux environment, run thefollowing steps:v “Step 1: Add an LDAP directory to the BigFix Server”v “Step 2: Assign a Web Reports role to LDAP users or groups” on page 6v “Step 3: Log in with an LDAP user” on page 8
Step 1: Add an LDAP directory to the BigFix Server
To use the LDAP capabilities in Web Reports, you must define LDAP Directories inthe BigFix server. In this way Web Reports can see the same LDAP object detaillevel that can be seen using the BigFix console.
Chapter 2. Configuring Web Reports 5

To add an LDAP directory to your deployment use the BigFix console:
You do not need to add any LDAP console operators.
Step 2: Assign a Web Reports role to LDAP users or groups1. Log in to the Web Reports using a user with Administrator privileges, and
navigate to Administration > User Management:
2. Click the LDAP Group permissions to see the list of the available directoriesamong the known datasources:
6 IBM BigFix: Web Reports Guide

3. In the previous solution you see the list of AD containers. Click a directory tolist all its users and groups:
4. Select users or groups and assign them the Web Reports roles like that:
Chapter 2. Configuring Web Reports 7

The new LDAP user will be created in the Web Reports database when this userperforms the login for the first time.
Step 3: Log in with an LDAP user
You can now log in with one of the LDAP users belonging to the group associatedto the role Administrator. To enter the Web Reports login credentials, follow thesyntax used for entering Active Directory and Generic LDAP users from theConsole.
When performing the first log in, the Web Reports uses the BigFix server to sendthe login credentials to the LDAP server. If the credentials are accepted, the WebReports server creates the entry on the database and then logs in the LDAP user.
8 IBM BigFix: Web Reports Guide
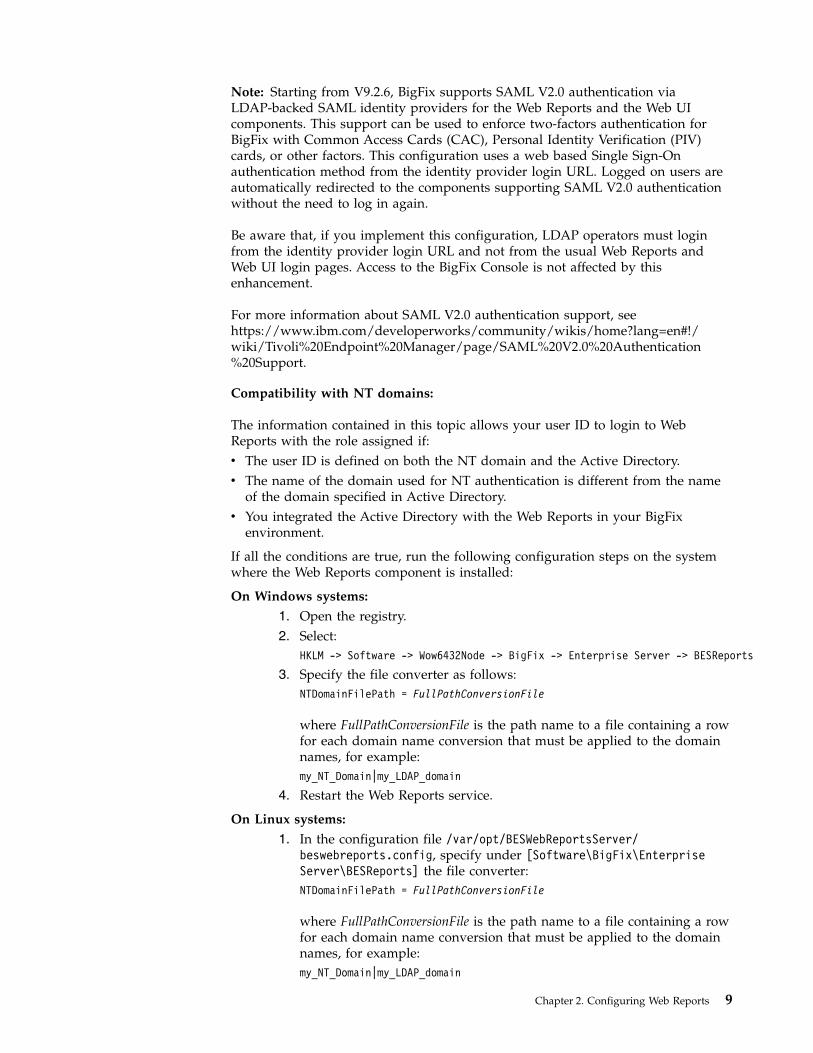
Note: Starting from V9.2.6, BigFix supports SAML V2.0 authentication viaLDAP-backed SAML identity providers for the Web Reports and the Web UIcomponents. This support can be used to enforce two-factors authentication forBigFix with Common Access Cards (CAC), Personal Identity Verification (PIV)cards, or other factors. This configuration uses a web based Single Sign-Onauthentication method from the identity provider login URL. Logged on users areautomatically redirected to the components supporting SAML V2.0 authenticationwithout the need to log in again.
Be aware that, if you implement this configuration, LDAP operators must loginfrom the identity provider login URL and not from the usual Web Reports andWeb UI login pages. Access to the BigFix Console is not affected by thisenhancement.
For more information about SAML V2.0 authentication support, seehttps://www.ibm.com/developerworks/community/wikis/home?lang=en#!/wiki/Tivoli%20Endpoint%20Manager/page/SAML%20V2.0%20Authentication%20Support.
Compatibility with NT domains:
The information contained in this topic allows your user ID to login to WebReports with the role assigned if:v The user ID is defined on both the NT domain and the Active Directory.v The name of the domain used for NT authentication is different from the name
of the domain specified in Active Directory.v You integrated the Active Directory with the Web Reports in your BigFix
environment.
If all the conditions are true, run the following configuration steps on the systemwhere the Web Reports component is installed:
On Windows systems:
1. Open the registry.2. Select:
HKLM -> Software -> Wow6432Node -> BigFix -> Enterprise Server -> BESReports
3. Specify the file converter as follows:NTDomainFilePath = FullPathConversionFile
where FullPathConversionFile is the path name to a file containing a rowfor each domain name conversion that must be applied to the domainnames, for example:my_NT_Domain|my_LDAP_domain
4. Restart the Web Reports service.
On Linux systems:
1. In the configuration file /var/opt/BESWebReportsServer/beswebreports.config, specify under [Software\BigFix\EnterpriseServer\BESReports] the file converter:NTDomainFilePath = FullPathConversionFile
where FullPathConversionFile is the path name to a file containing a rowfor each domain name conversion that must be applied to the domainnames, for example:my_NT_Domain|my_LDAP_domain
Chapter 2. Configuring Web Reports 9

2. Restart the Web Reports process.
After you complete these steps, the user can log in using the NT domaincredentials, for example my_user@my_NT_domain.com, and successfully access theWeb Reports.
Integration with Active Directory
You can enable Active Directory users to access the BigFix Web Reports server.
Note: This configuration is not supported on the BigFix Web Reports serverrunning on Linux.
To integrate Active Directory with the Web Reports server running on Windows,perform the following steps:1. Enable SSL support in Web Reports, to protect user Active Directory
credentials.2. If the permissions on Active Directory are set so that only some users are able
to read the Active Directory data or if the Web Reports server does not belongto the Active Directory domain, you must configure your Web Reports Serverservice to run as a domain user with permissions to query Active Directory.This user does not need to be a domain administrator or have any permissionsto make changes to Active Directory.
Note: Automatic Fixlet upgrades are enabled only if Web Reports service runswith the local system account.
3. Log in to Web Reports as a Web Reports administrator.4. Navigate to Administration > User Management.5. Click the Active directory permissions link.
Note: To display this link and start configuring Active Directory authenticationover LDAP for Web Reports, you must enable LDAP user authentication fromthe IBM BigFix console.
6. Enter your Active Directory user name and password. The format of user namemust be DOMAIN\username or username@DOMAIN as follows:
7. Select the domain name:
10 IBM BigFix: Web Reports Guide

8. Select the User container to list the available users in Active Directory forwhich to grant access:
9. Select domain groups or users, click Assign roles, and choose the roles orpermissions that you want to assign to them:
In this way you grant access to Web Reports according to the role definition.
Chapter 2. Configuring Web Reports 11

LDAP integration after Windows upgrade
If you upgrade Windows BigFix to V9.1, the BigFix V9.0 Active Directory solutionis kept for compatibility with the existing environment. To switch to the new WebReports and LDAP integration functionality, perform the following steps:1. Log in to Web Reports.2. From User Management remove all the Active Directory users.3. Change the BES Web Report Server service from Active Directory account to
Local System account.4. Set UseLegacyADLogin value in HKLM\Software\WOW6432Node\BigFix\Enterprise
Server\BESReports from 1 to 0.5. Restart the BES Web Report Server service.6. From the console, add Active Directory or LDAP by selecting Tool -> Add
LDAP Directory.7. Log in to Web Reports and from User Management assign Web Reports roles
to LDAP users and groups. For more information see Assigning a Web Reportsrole to LDAP users or groups.
Setting the Number of LDAP Entries to Display
The default number of LDAP entries displayed in Web Reports is 1000. If you wantto change the maximum number of LDAP entries to display within Web Reports,perform the following steps:
On Windows systems:
1. Stop the BES Web Report Server service.2. Run Regedit.3. Under the HKEY_LOCAL_MACHINE\Software\BigFix\Enterprise
Server\BESReports key (on 32-bit Windows systems) or HKEY_LOCAL_MACHINE\Software\Wow6432Node\BigFix\Enterprise Server\BESReports (on 64-bitWindows systems), create a REG_SZ keyword named LDAPSearchMaxResultsand set it to the number of LDAP entries to display in Web Reports.
4. Restart the BES Web Report Server service.
On Linux systems:1. Open the /var/opt/BESWebReportsServer/beswebreports.config configuration
file.2. Add the LDAPSearchMaxResults in the [Software\BigFix\Enterprise
Server\BESReports] section as follows:LDAPSearchMaxResults = <max_number_LDAP_entries>
where <max_number_LDAP_entries> is the maximum number of LDAP entries todisplay within Web Reports.
Note: The value assigned to the LDAPSearchMaxResults keyword applies to thequery for users and to the query for groups. For example, if you defined in yourLDAP 2000 users and 5000 groups and you set LDAPSearchMaxResults = 1000, thenyour queries about users and groups display up to 1000 users and 1000 groups.
12 IBM BigFix: Web Reports Guide

Chapter 3. Using the Program
The Web Reports interface is simple and straightforward. You can create aspecialized report and then print it or email it in only a few minutes, as thefollowing tutorials demonstrate. These are quick step-by-step explorations of someof the most popular features in Web Reports, which can help you appreciate thescope of the program. Although brief, they explore a large fraction of theprogram's functions.
First LoginDepending on the operating system where the IBM BigFix Server is running youcan have a different type of login to Web Reports.
To login to Web Reports running on Windows use the local browser to point tolocalhost as follows: http://localhost/webreports and define the first WebReports userid. After the userid definition, you can use a remote browser.
To login to Web Reports running on Linux use the userid and password of the IBMBigFix administrator, defined at installation time. With this userid you can specifythe Web Reports address in a remote browser such as: http://HostnameWebReportsServer/webreports
Starting Web Reports
Web Reports is a stand-alone program available from the Start Menu. You can alsostart it from within the console by selecting Tools > Launch Web Reports. Theinterface is divided into three main sections, which you access by clicking items inthe navigation bar at the top of the window.
When you first log in to the Web Reports program, you see a startup window withseveral options.
© Copyright IBM Corp. 2010, 2015 13

In the main window you can see at least two icons:v Starred: This option shows a list of the reports that you have starred as
important.v My Authored: This option shows a list of reports that you have personally
authored.
Other possible icons are:v Domain Icons: These icons can be selected to view the list of Web Reports
associated with the selected domain, such as Endpoint Protection or SecurityConfiguration.
At the top of the window you can see a search box and two user selections:v Search Computers: The search box, top right, allows you to select computers by
name, IP Address, OS, CPU, and Last Report Time.v Preferences: For your personal login, you can set preferences including your
opening splash page and the number of results you want to print on each page.For more information, see “Setting Your Preferences” on page 25.
v Logout: Click this to exit from the program.
Below this are the three main section headers in tab form:v Explore Data: This option lets you filter and view your data on your IBM BigFix
clients, Fixlet messages, tasks, actions, operators, and more. This option alsoallows you to create your own custom reports as well as graphical charts. Formore information, see Part Three, Exploring.
v Report List: This option shows all the reports, built-in and custom, that areavailable to you. You can filter the reports, modify their visibility, and set upschedules for printing them out. For more information, see Part Four, Reporting.
v Administration: This option lets you manage scheduled activities, databasesettings, and user databases. For more information, see Administering theProgram.
14 IBM BigFix: Web Reports Guide
The Explore and Report headers represent the primary functions of Web Reports.Explore Data lets you view your data with various filters. When you havenarrowed your focus to the ideal data set, you can save it as a report that you canreuse or customize with just a few mouse clicks.
The reports that you author are shown in the Report List for easy selection. Whenyou create and customize your favorite reports, this is where they are listed.
In the next sections of this guide, you can see how to use this program to createfocused reports customized to suit your particular corporate network and policies.
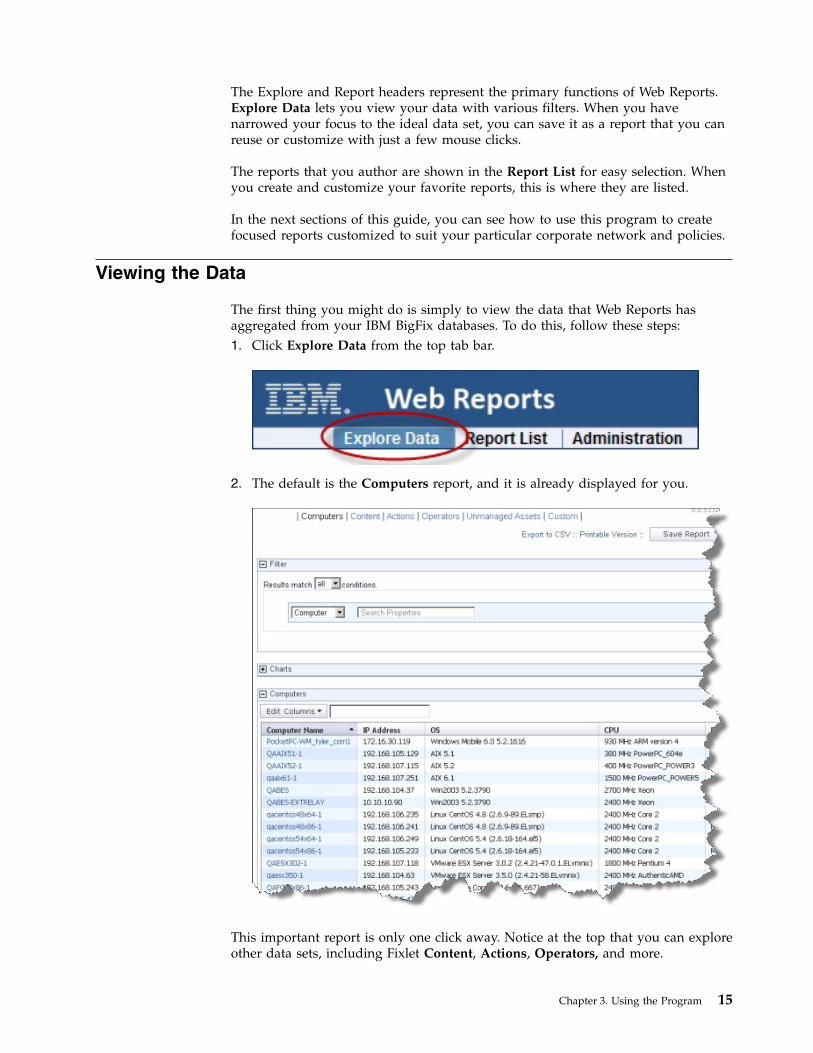
Viewing the Data
The first thing you might do is simply to view the data that Web Reports hasaggregated from your IBM BigFix databases. To do this, follow these steps:1. Click Explore Data from the top tab bar.
2. The default is the Computers report, and it is already displayed for you.
This important report is only one click away. Notice at the top that you can exploreother data sets, including Fixlet Content, Actions, Operators, and more.
Chapter 3. Using the Program 15

Also notice the Filter section above the report. The next tutorial shows you how touse the filter to narrow your focus.
Filtering the Data
The Filter section is a key component of both exploring data and creating reports.With effective filtering, you can highlight just that segment of the data that is mostimportant to you.
For example, to view just Windows computers, you might filter your computerslike this:1. Click Explore Data from the top tab bar.
2. The default Computers report is displayed as described in Viewing the Data. Itdisplays all the computers in the database.
3. Click in the box next to the pull-down menu that says Computer. A pull-downmenu opens, allowing you to select from the hundreds of computer propertiesdefined across your network.a. Select OS from the menu, or simply type it in and hit Enter.b. Another pull-down opens with a list of operators. Select contains.
c. A text box opens. Enter win to narrow the report down to Windowscomputers only.
4. Click the Apply Filter button to get an instant view of the impact of your filter.
Filters are essential to creating tight, relevant reports. For more information, see“Filtering the Data.”
16 IBM BigFix: Web Reports Guide

Saving Reports
When you have filtered a listing down to its essential core (as described in“Filtering the Data” on page 16), you can save your filter as a proper report.Simply click the Save Report button at the top of the window and provide a namefor your specialized report.
The name you provide is entered into the Report List, and labeled with you as theauthor.
Viewing Reports1. Click Report List from the top tab bar.
2. The list of reports is displayed.
Simply click one of the links to see the associated report.
Note: These is the list of reports that are available by default:v Action Listv Analysis Listv Computer Properties Listv Open Vulnerabilities List
Chapter 3. Using the Program 17

v Operating System Distributionv Operator Listv Overviewv Progress of 10 Fixlets from Recent Actionsv Progress of 10 Fixlets Recently Relevantv Vulnerability Trends Over Time
3. Note the boxes at the left of the window that allow you to filter the reports bylabel and author to help you keep your report list short and uncluttered.Simply click the check box in front of the filter. Multiple filters are ORedtogether.
There are several useful features in this section. For more information, see theReport List main page.
Creating Charts
Most data views and reports can display the data graphically. From Explore Dataor a Report listing, if a chart is possible, it is shown in a section just below thefilter section.
There are two basic chart types: ordinary and historical.1. Click the link to create a new chart. You can attach multiple charts to a report.2. Enter the title for a historical chart and click Create Chart.
3. Your chart is generated immediately.
18 IBM BigFix: Web Reports Guide
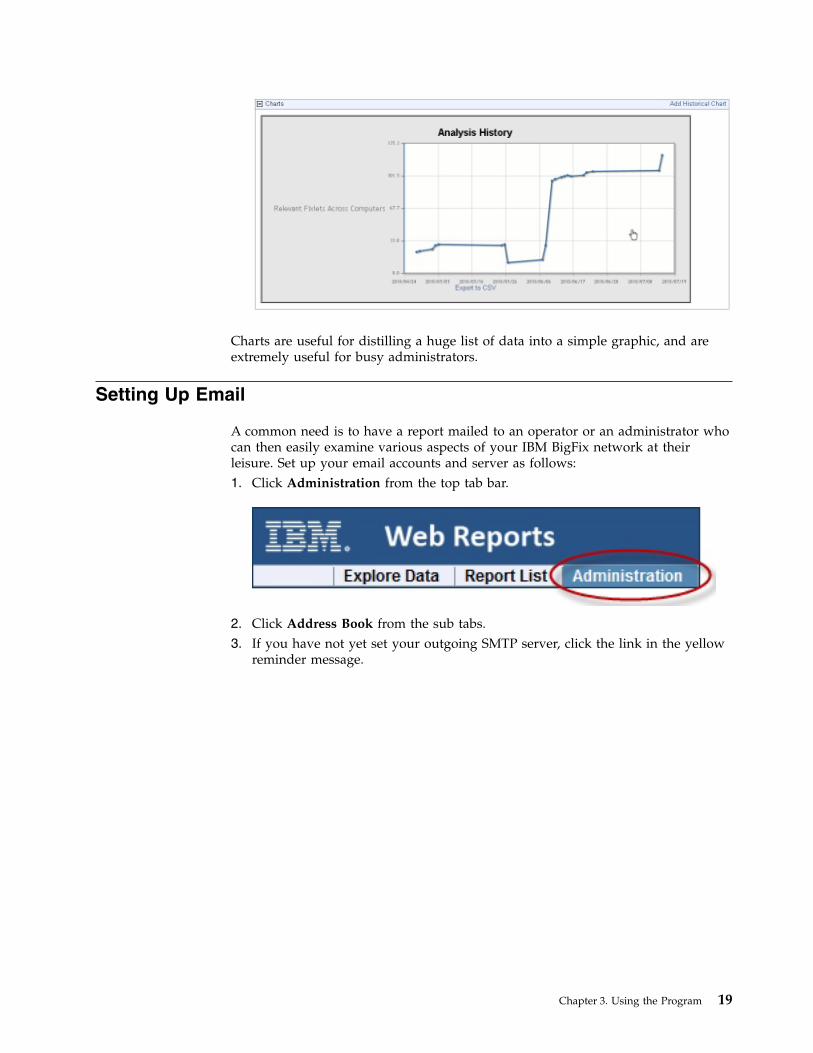
Charts are useful for distilling a huge list of data into a simple graphic, and areextremely useful for busy administrators.
Setting Up Email
A common need is to have a report mailed to an operator or an administrator whocan then easily examine various aspects of your IBM BigFix network at theirleisure. Set up your email accounts and server as follows:1. Click Administration from the top tab bar.
2. Click Address Book from the sub tabs.3. If you have not yet set your outgoing SMTP server, click the link in the yellow
reminder message.
Chapter 3. Using the Program 19

4. Enter your SMTP server and test it before saving it.
5. Click the link labeled Add contact to add name(s) to the Address Book.
20 IBM BigFix: Web Reports Guide

6. Continue to add contacts. If you need to delete a contact from the Addressbook, check the box in front of the name and click the Delete button.
You are now set up for emailing from Web Reports.
Scheduling Reports
When you have your email server set up and your Address book populated, youare ready to schedule a report and email it to yourself or another operator.1. Click Administration from the top tab bar.
2. Click Scheduled Activities and click the Create scheduled activity link tocreate your custom event.
3. In the linked page, you can create triggers for your events as well as theactions that you want to trigger.
Chapter 3. Using the Program 21

4. The Start time defaults to the current time, and is often what you want. Belowthis are three sections for you to complete.a. The Activity Report section is where you select the report you want to
schedule, as well as its format. From the pull-down menu, select the reportyou want.
b. The Activity Triggers section is where you specify how you want to triggeryour event. The most popular technique is to set a time period, such asevery day or week, to trigger the report (or other activity). However, thereare many other useful ways to trigger a report, as described later in thisguide.
c. The Activity Actions section is where you select the action you want totrigger.
22 IBM BigFix: Web Reports Guide

Typically that is just to email your report. To do this, click the Email checkbox, add contacts from your Address book, and set the subject line for theemailed report.
5. When you have finished, click Submit.
You can now set up reports and alerts to be sent or archived on your schedule.
Adding a Datasource
You can add other IBM BigFix datasources to your reports. This allows you tocreate aggregate reports covering hundreds of offices, each with thousands ofcomputers.
Note: Ensure that the schema versions of the aggregated datasources are the same.You can see the schema version of every BFENT database, by running the followingquery:select version from dbo.DBINFO
To add a datasource, credentials of a Master Operator must be provided. Thesecredentials are required only once per datasource, and are not saved.
To add a new datasource, follow these steps:1. Log in as an administrator.2. Select Administration > Datasource Settings > Add New Datasource.
3. The Add Datasource page is displayed.
Enter a descriptive Name for your datasource.
Chapter 3. Using the Program 23

4. Enter the URL of the root server you wish to connect to. The URL must alsoinclude the appropriate port number.
5. Enter Master Operator Credentials. These credentials are used only once, andare not saved.
Editing a Datasource
To edit a datasource, follow these steps:1. Log in as an administrator.2. Select Administration > Datasource Settings > Edit.
3. The Edit Datasource page is displayed.
Enter the URL of the root server to which to connect. The URL should alsoinclude the appropriate port number.
Note: You cannot change the name of your datasource.4. Enter the Master Operator Credentials if the URL is changed.5. When you have finished, click Submit.
24 IBM BigFix: Web Reports Guide

Setting Your Preferences
At the top right of the Web Reports interface is the Preferences link.
Click it to edit your personal user preferences.
1. Change your splash page by selecting a new page from the pull-down menu.As well as the default Domain List, you can select from a list of reports toappear in the starting splash page.
2. When you view a report, the number of rows is typically limited to 50 perpage. You can change that number here.
3. You can check the box to run in Developer mode, which disables the automaticloading of custom reports.
4. Click Save to set your preferences.
Enabling FIPS cryptography on Web Reports
After installed, you can set up your Web Reports server to encrypt using FIPScryptography.
To enable FIPS encryption, follow these steps:1. From the BigFix Management Domain, open the Computer Management
folder and click the Computers node.2. Select the computer where the Web Reports server is running.3. From the right-click context menu, select Edit Computer Settings.4. From the Edit Settings dialog, click Add.5. In the Add Custom Setting dialog, enter the setting name as
_BESClient_Cryptography_FipsMode
The values for this setting are:
Chapter 3. Using the Program 25

requiredCauses the client to encrypt using FIPS cryptography.
none FIPS cryptography is not used.6. Click OK to accept the value and OK again to complete the setting. You must
enter your private key password to deploy the setting action.
Setting the login lockout
You can set the number of invalid Web Reports login attempts that are allowedbefore an account is locked out.
If you are locked out, before attempting to log in again, wait for the lockoutduration to expire.
To set the lockout, complete the following steps:1. Click the Computers icon in the Domain Panel navigation tree to open the List
Panel of client computers.2. Select the computers on which to set the Web Reports login lockout.3. Right-click and select Edit Computer Settings from the pop-up menu, or select
Edit Computer Settings from the Edit menu. The Edit Settings dialog opens.
4. Change the lockout settings by editing the following keywords:
_WebReports_Authentication_LockoutThresholdThe number of invalid password attempts that are accepted before theuser is locked out. Default value: 5
_WebReports_Authentication_LockoutDurationSecondsThe number of seconds for which a user is locked out after reachingthe lockout threshold. Default value: 30
Note: Restart the Web Reports service to reset the lockout state for all users.
26 IBM BigFix: Web Reports Guide

Chapter 4. Exploring
The Explore Data section of the program allows you to look at data collected fromyour entire IBM BigFix network to filter it, and to create reports. Click the ExploreData tab, upper left.
Want a quick peek at your network? This section of the program lets you instantlyvisualize your data with both charts and reports. It also allows you to filter thatpotentially huge data set down to something concise and useful.
Want to record your custom view? At any time you can press the Save Reportbutton to save your filters, charts, and layouts, which are added to the Report List(available from the next tab to the right). Now you can reuse your custom templateto quickly provide you with unique portraits of your network at any givenmoment.
There are several options for exploring Data. They make up the secondary tabs onthis page:v Computers: This option allows you to examine properties of your networked
IBM BigFix clients and filter the list into a specialized report.v Content: This option allows you to examine and create specialized reports based
on Fixlet messages, baselines, tasks, and analyses.v Actions: This option allows you to list and report on actions taken on any of the
IBM BigFix clients in your network.v Operators: This option allows you to list subsets of your IBM BigFix operators.v Unmanaged Assets: This option allows you to examine the states of all your
unmanaged assets, such as printers, scanners, faxes, and more.v Custom: This option allows you to create free-form listings and reports.
These options are described later in this section. However, many of these optionshave commonalities that represent core utilities of Web Reports. These aredescribed in the following section.
Filters
Filters are a key part of most reports. They allow you to view just one facet of thedata at a time. Data fields can be filtered individually, limiting the data that isdisplayed. This technique is a form of Facet Navigation, and is a powerful way toreduce a huge data set to something easily tractable.
The Filter interface is nearly the same wherever you see it. This section highlightsthe essentials of designing powerful and effective filters, and is referred toelsewhere in this guide.
© Copyright IBM Corp. 2010, 2015 27

The default filter specifies nothing, allowing all data records to be listed.
To view a subgroup of the data, pull down the menu to filter by computer,content, site or a previously saved filter. The choice you make determines thesecondary fields of the filter. For example, you might want to view computers thathave specific operating systems. Click in the box labeled Search Properties andenter "OS". There might be a pause while the system collects the properties andverifies the existence of the OS property.
Click the link labeled add clause to add extra qualifiers to a filter. Click theassociated X to delete any of these clauses.
Click the plus sign to the right of the filter to add a new one.
These filters are ANDed together if you choose all conditions; they are ORedtogether if you choose any conditions. Click the minus sign next to a filter todelete it from the set.
Click the Apply Filter button to see how your custom filter affects the subsequentcomputer reports and charts.
28 IBM BigFix: Web Reports Guide

When defined, click the Save Filter link at the upper right if you want to saveyour work as a custom named filter. Later you can use this filter in othercircumstances by clicking the Load Filter link or by selecting it from the conditionspull-down menu.
Charts
Reports often include a chart to summarize the data. Charts and graphs help toclarify major trends hidden in a detailed list. Depending on the data, you canmake pie charts, columnar graphs, or historical trend sheets with just a few mouseclicks.
If a chart is available, the interface can be found immediately beneath the Filterinterface. Click the Add Chart link.
Depending on the data set you are looking at, the Chart Wizard has a defaultsetup that is appropriate. For a chart on computers, the wizard prompts you for acomputer property.
Chapter 4. Exploring 29

Here we have used the pull-down menu to chart CPUs on our network. The title isautomatically filled in to reflect our choice of computer property. You can change itif you want. Note that a typical chart includes a table below it. Use the checkboxes to specify whether you want a chart, a table, or both.
We have kept the default pie chart, but we could have chosen a bar chart instead.In the dotted box at the bottom of the wizard, you can choose to give some extraorder to the data by grouping records together.
When you are ready, click the Create Chart link.
30 IBM BigFix: Web Reports Guide

Note that we created this chart simply by selecting a single item (CPU) from apull-down menu.
When you mouse over a chart, a tool bar appears.
Chapter 4. Exploring 31

The top icon lets you delete the current chart, the wrench lets you edit the chart,and the grabber icon at the bottom lets you position the chart.
Collapsing the Table
When a chart is complete, you have another final option for editing. A smallhandle is available at the bottom of the list and you can drag it up or down totruncate the list.
32 IBM BigFix: Web Reports Guide

When you change the list, the truncated items get summed into an "Other"category and the chart is dynamically updated to reflect the change.
Chapter 4. Exploring 33

Here, Ken and May are collapsed into the Other category. You can continue to AddCharts by clicking on the link at the top of the UI.
Columnar Report
This section is directly below the Charts section and is named after the data setunder review, such as Computers, Content, or Actions.
Edit Columns
Click the Edit Columns button (at the top of columnar views and reports) tochange which columns you want to display in your report. It shows a menu ofcolumn headers that you can add and delete to create the most information in theleast number of columns.
34 IBM BigFix: Web Reports Guide

This example is from an Action report, so the headers all refer to fields in theAction database. When you check an item in the Available Columns box, it isadded to the Current Columns box. When you clear an item, it becomes cleared inboth boxes. The Current Columns box is generally smaller, letting you see thecolumn layout at a glance, without having to scroll through the lengthier list ofAvailable Columns.
The options for columns depend on what you are looking at. For computercolumns, there are more possibilities.
Chapter 4. Exploring 35

The Expand section lets you add Relevant or Remediated Fixlet messages to theComputer list. Note that there is a check box to Hide Individual Computers,which lists the computer count instead of individual computer names.
The Expand section for Content lets you add Applicable and RemediatedComputers to the list.
Changing Column Order
To change the order of any column in your report, simply click and drag thecolumn to where you want it. A red line indicates legitimate targets as you dragthe column.
36 IBM BigFix: Web Reports Guide

Both editing and moving columns are available when exploring data or viewing acolumnar report, allowing you to customize the output to your particular needs. Tokeep your changes, be sure to save your report when you are finished.
Computers
Click the Computers tab to see the default Computer report.
There are three sections on this page.v Filter: View just the subgroup of the database you want to view by specifying a
filter. Pull down the menu to filter by computer, content, site, or a previouslysaved filter. The choice you make determines the secondary fields of the filter.For example, you might want to view just those computers that have thespecified properties.
Chapter 4. Exploring 37

Click the link labeled add clause to add extra qualifiers to a filter. Click the X todelete any of these clauses. Click the plus sign to the right of the filter to add anew filter. These filters are ANDed together if you choose all conditions; theyare ORed together if you choose any conditions. Click the minus sign (-) todelete a filter from the set. Click the Apply Filter button to see how yourcustom filter affects the subsequent computer reports and charts.When defined, click the Save Filter link at the upper right if you want to saveyour work as a custom named filter. Later you can use this filter in othercircumstances by clicking the Load Filter link.
v Charts: The typical computer chart is a pie or a bar chart. As described in the“Charts” on page 29 section, you can select any computer property to graph.
v Computers: This section contains the data of the report. As described in the“Columnar Report” on page 34 section, you can edit and rearrange the columnsto suit your needs.
Content
Click the Content tab to view the default contents view.
IBM BigFix content consists of Fixlet messages, tasks, analyses and baselines. If youwant, you can create a filter to separate these categories, for example, ContentType is Fixlet.
As with all typical views and reports, you can click a column header to sort thedata (click again to change the direction of the sort). You can also edit the columnsto display, set filters, and create charts.
38 IBM BigFix: Web Reports Guide

Actions
Click the Actions tab to view the default Actions view.
Actions are the consequence of clicking an Action link in a Fixlet or task. Actionspropagate throughout your IBM BigFix network, during which time they aremarked as open. They can also be stopped and they can expire. A typical viewincludes the status, so you can watch the progress of your actions over time.
Operators
Click the Operators tab to view the default Operators view.
The Operator list is simple and straightforward. It contains a list of all theoperators of your IBM BigFix deployment, displaying the type and managementrights of each. This list cannot be edited, although you can filter it by the name ofthe operator.
Chapter 4. Exploring 39

Unmanaged Assets
Click the Unmanaged Assets tab to view the unmanaged assets in your network.
For the unmanaged assets in your network, you can click, shift-click or ctrl-clickthe properties that you want to display. Click Next to see the report.
The Unmanaged Assets report cannot be customized, except for your choices in theoriginal property list.
Custom
Click the Custom tab to create a new report from scratch.
For more information about custom reports, see the Resource section “Creating aCustom Report” on page 71. A complete description of how to write your own
40 IBM BigFix: Web Reports Guide

custom reports is beyond the scope of this guide, but you can find moreinformation in the Session Inspector Guide and the Web Reports and CustomReports.
Chapter 4. Exploring 41

42 IBM BigFix: Web Reports Guide

Chapter 5. Reporting
The Report List section of the program is accessed by clicking the appropriate tabfrom the top tab bar.
There are several parts to this page that allow you to customize your view of theavailable reports.
Report List Main Page
Import Report
The top link on the Report List page allows you to import a report. It opens a newpanel allowing you to browse for the report and specify the format and visibility.
v You can enter a filename in the text box, or use the file browser to find thereport.
© Copyright IBM Corp. 2010, 2015 43

v The input can be an XML or HTML file.v The imported file can be treated as a Private file that only you can view, or a
Public report that is available to everyone.v Click the Import button to load in the selected report.
Only Show Starred
Click this box to limit the report list to the starred reports. You set which reportsget a star by clicking the empty star next to their names in the list. The star is thenfilled with yellow. You can select any scheme you choose for starring a report.Most users star their favorite or most-used reports. Uncheck the box to display theentire list of reports.
Filter by Label
You can label any report by clicking the box in front of its link and then using theLabel pull-down menu to assign an existing label. To filter by a label, click the boxin front of the appropriate label in the Filter by Label section. You can selectmultiple labels. Labels are ORed so that reports containing any of the labelsselected are displayed.
Filter by Author
In the same way as you filter by label, you can filter the report list by author. Clickthe box in front of the authors that you want and all the reports that were createdby the chosen authors are listed.
Add, Create, and Delete Labels
When you click the box next to any report list, the Label button becomes available.From this pull-down menu, you can select a label to attach to the chosen reports.You can add multiple labels to a report to allow it to be selected in multiplegroups.
To create a new label, type in a name that does not already exist. The name isreprinted in the box below as a link.
44 IBM BigFix: Web Reports Guide

Click the link to create the new label, which is then applied to the reports.
To delete a label, use the X button to the right of the label.
Delete
When you click the box next to any report list, the Delete button becomesavailable. Click it to delete the specified report from your list.
Main List
There are several columns that describe reports in this list:v Select: This column consists of check boxes allowing you to apply a function to
several reports at a time. For example, if you want to delete a report, click theappropriate check boxes, then click the Delete button. This is also how you canattach a label to a report or group of reports.
v Stars: This column consists of unfilled stars directly to the left of the reportname. Click them to fill them with yellow and highlight them as starred reports.These reports can then be filtered by clicking the Only show starred check boxat the top left of the page.
v Name: This column contains the name or title of the stored report.v Labels: This column contains the labels that have been assigned to the particular
report. A report can have multiple labels, and the check boxes on the left allowyou to filter the report list by labels. Domain labels might also be attached toexternal reports delivered by a site. Because there are multiple labels in thiscolumn, it cannot be sorted.
v Author: This column lists the name of the Web Reports user who created thisreport.
Chapter 5. Reporting 45

v Visibility: This column shows whether the report is public or private. If you arethe author of a report, this column also lets you change the status of the reportfrom the pull-down menu.
v Scheduled: This column indicates which reports are on a schedule.v Last Modified: This column contains the dates when the report was last
modified by its author.
The next sections describe specific reports that are commonly used.
Overview Report
The Overview report contains graphs and tables that visually represent the generalstate of your network, as well as the effectiveness of your IBM BigFix deployment.Next to the title of each report, there is a bracketed question mark [?], which youcan click for additional information.
Note: Reports are disabled if a user is logged in without sufficient privileges toview them, or if the report is filtered. Users are not considered to have sufficientprivileges unless they have full rights to all the computers on the server.
The following sections describe each of the graphs, charts, and tables presented inthe Overview.
Total Issues
The Total Issues graph adds the number of relevant issues for each computer andthen groups them by their severity rating. An issue is a Fixlet message that isrelevant on any computer in your network. For example, if you have a computerwith five relevant Fixlet messages and a second computer with three relevantFixlet messages, the total number of issues is eight, even if some of those messagesare the same.
This graph can be set to different time granularities by selecting from thepull-down menu above the graph. The Auto-Fit Data option automatically groupsthe data in the graph for up to the last 12 months of your IBM BigFix installation.Last 7 Days groups the data by day and shows the last seven days. Last 30 Daysgroups the data by day and shows the last 30 days. Last 26 Weeks groups the databy week and shows the last six months. Last 52 Weeks also groups the data byweek and shows the last year.
46 IBM BigFix: Web Reports Guide

Different colored bars represent different issue severity. The height of each barrepresents the number of issues for a particular bar. For example, if a bar forimportant issues starts at 300 and ends at 500, the total number of important issuesis 200. Move your cursor over any point in the graph to see a pop-up containingmore detail.
Total Number of Computers
The Total Number of Computers graph displays the number of computers thathave been under BigFix management in a given period of time. This graph offers away to monitor additional deployments of the BigFix Client over time.
Chapter 5. Reporting 47

In the same way as the Total Issues graph, this graph is disabled if a user logs inwithout sufficient privileges. Select the time scale you want from the pop-up menuabove the chart. Move your cursor over specific data points for more information.
Computer Vulnerability Status
The Computer Vulnerability Status pie chart groups computers according to theirmost severe vulnerability.
48 IBM BigFix: Web Reports Guide

If a computer has a Critical vulnerability, it is considered to have critical status,regardless of other vulnerabilities it might have. If a computer has no criticalvulnerabilities, but has an Important vulnerability, it is considered to haveimportant status, providing you with a general sense of how your network isdoing. Initially, the vulnerability pie is mostly red (critical), and as you continue touse IBM BigFix, it becomes green (no vulnerabilities). Move your cursor over eachpie slice to see the actual number of computers with each vulnerability status, andthe percentage of network computers they represent.
Issues Remediated
The Issues Remediated graph shows a count of the number of computers thathave returned Fixed in response to an action. The time segment for an action isattached to its start time, not its completion time (which might occur in asubsequent time segment). This graph gives you a picture of remediation rolloutsacross your enterprise as IBM BigFix finds and fixes vulnerabilities.
Chapter 5. Reporting 49

This is a historical graph. Select a time scale from the pop-up menu above thechart. This graph displays colored bars representing the severity of remediatedissues, and lets you highlight data with your cursor.
Overall Statistics
The Overall statistics table displays important facts about your network:
v Total Number of Computers: The current number of BigFix Clients.v Relevant Fixlets per Computer: The average number of relevant Fixlet messages
per computer, or the total number of relevant issues divided by the total numberof computers.
v Total Number of Fixlets: The current number of Fixlet messages that exist onthe BigFix system. Note that if Web Reports is looking across multiple databasesin the network, the number of Fixlet messages corresponds to the union of allthe Fixlet messages in all the databases.
v Total Number of Fixlet Sites: The total number of sites to which the BigFixsystem is currently subscribed.
50 IBM BigFix: Web Reports Guide

v Total Number of Tasks: The current total of relevant tasks on your BigFixnetwork.
v Total Number of Analyses: The current total of analyses that exist on the BigFixsystem.
v Total Number of Actions: The current total of actions issued so far by the BigFixsystem.
v Mean Time to Remediate: The average time it took for every relevant issue tobecome non-relevant on all computers. Note that issues can become non-relevantby methods other than actions. For example, users can manually update theircomputers, making those relevant issues no longer relevant.
Top 10 Critical/Important Issues Detected
The Top 10 Critical/Important Issues Detected report displays Fixlet messages thatare currently affecting the largest number of computers in the network.
There are four columns in this list:v The Name column lists the name of the Fixlet message.v The Source Severity column lists the severity of each common Fixlet.v The Affected Computers column displays the number of computers that
currently have the Fixlet relevant. The Fixlet list is sorted by the AffectedComputers count.
v The Patch Completion column is the percentage of fixed computers out of thetotal number of computers that have ever been affected by the listed Fixlet.
Beneath the list of the top 10 most common issues, the Show Progress of Top 10Critical/Important Issues link opens a progress report that you can view inExplore Data.
Computer Properties List
This report provides you with a list of certain properties of your IBM BigFix Clientcomputers. Like many of the listed reports, this is derived from Explore Data, withspecific filters and charts. These exist for your convenience, but you can alsore-create them yourself with just a few mouse-clicks.
Chapter 5. Reporting 51

Select Computer Properties List from the Report List. You can select a filter toreduce the size of the list. The headers refer to important computer properties,such as the BIOS date, the CPU type, free hard disk drive space, the operatingsystem, memory, and user name. These properties are standard for out-of-the-boxIBM BigFix clients. However, from the console, you can create new computerproperties using relevance expressions, and they are also available here.
52 IBM BigFix: Web Reports Guide

Open Vulnerabilities List
This report displays Fixlet messages that are currently relevant. You can also filterthis report to view only Fixlet messages that have at least one applicable computer.
Select Open Vulnerabilities List from Report Lists. The first column provides aquick visual representation of the progress of each vulnerability. In addition, thereport shows the name, site applicable computer count, and deployed action countto complete the report. This report is useful to help you track those issues that canexpose your network to potential problems.
Other Reports
As well as the reports you create yourself, there a several other pre-installedreports included with Web Reports:v Action Listv Analysis Listv Operating System Distributionv Operator Listv OS Vulnerability Summary. (This report, along with a few other built-in reports
and some customer-created reports, is loaded in the 7.2 Computer PropertiesReport format. Reports in this format can be viewed, but new ones in thisformat cannot be created.)
v Progress of 10 Fixlet messages From Recent Actions. (This report is specialbecause it generates an ad-hoc filter to list only the 10 Fixlet messages with themost recent actions in the deployment.)
Chapter 5. Reporting 53

v Progress of 10 Fixlet messages Recently Relevant. (Similar to the above, thisreport generates an ad-hoc filter.)
v Vulnerabilities by Console Operators. (This report is in the 7.2 format.)v Vulnerabilities by OS. (This report is in the 7.2 format.)v Vulnerability Trends Over Time. (This is a special historical report, and cannot be
filtered.)v Average Vulnerability Trends Over Time. (This is a special historical report, and
cannot be filtered.)
These reports are easy to examine by clicking them from the Report List. Manyreports can be further customized by using filters, adding charts, and editing thecolumns.
Showing non-relevant results
By default the Web Reports mark as <not reported> a property that is not relevantor that is no longer relevant. The console, instead, always shows the property withits latest retrieved results. If you want that the Web Reports show the same type ofinformation as the console, configure them as follows:1. In the HKEY_LOCAL_MACHINE\SOFTWARE\Wow6432Node registry section under
HKLM\Software\WOW6432Node\BigFix\Enterprise Server\BESReports, create theShowNotRelevantResults registry key.
2. Set the ShowNotRelevantResults value to 1.3. Restart the Web Reports service after modifying the registry.
54 IBM BigFix: Web Reports Guide

Chapter 6. Administering the Program
The Administration section of the program lets you manage activities, filters,addresses, users, and databases. This part of the Guide describes these functions.Click the Administration tab, at the top of the window.
Scheduled Activities
The Schedule section allows you to run reports at a given time or when certainconditions are met. The report results can then be emailed to you or archived forlater viewing. This allows you, for example, to receive automatic updates of criticalFixlet messages via email, or to regularly back up audit reports.
When you open this page, a list of your currently scheduled reports is opened.Click Create Scheduled Activity to add to the list.
Below the create link are some buttons. These are grayed out until you select oneor more activities in the list below. The buttons include:v Edit: Allows you to edit the properties of the scheduled activity.v Enable: Allows the selected activity to perform on schedule. Used to reactivate
an activity that you previously disabled.v Disable: Prevents the activity from running until enabled again. This allows you
to preserve the functions of an activity without actually running it.v Delete: Deletes the selected (checked) activities.
You can select the items in the list by individually clicking them. You can also usethe links at the top of the list to Select All or None.
© Copyright IBM Corp. 2010, 2015 55
The list has several columns, including:v Name: The name of the activity, derived from the underlying report.v ID: An incremental number assigned to each activity when it is created.v Creator: The name of the activity author.v Type: The type, either report or alert.v Options: Describes the action, either email, archive, or custom.v Start Time:The starting time of the activity, which is typically when you created
it.v Expire Time: The ending time of the activity, if you set one. Otherwise, it is
open-ended and this column displays None.v Next Time: The time when the activity runs next, unless the activity has been
disabled.v Period: The time period between scheduled activities. This can be any time from
one minute to two years.
Creating Scheduled Activities
A scheduled activity creates a report or an alert on a specified schedule. Theinterface has four sections, specifying the time range, the activity report, theactivity trigger for the schedule, and the activity actions to be taken.
To schedule an activity, follow these steps:1. Click Administration > Scheduled Activities, and then click the Create
scheduled Activity link.2. From the requested Creation page, select a time range for the scheduled
activity.
This setting defines the window during which the schedule remains in effect. Itconsists of a Start time and an Expire time. The default start time is now. Ifyou do not select an expiration time, the activity stays open-ended.
3. In the Activity Report box:
a. Select a report type: Report or Alert. A report produces a detailedgraphic/tabular output and an alert typically sends a report as an email.
b. Select a stored report from the pull-down menu. The menu includes allpublic and private reports to which you have access.
c. Select either HTML or CSV format for your report. The PDF format is alsoavailable if PDF generation was enabled in Web Reports.
56 IBM BigFix: Web Reports Guide

4. In the Activity Triggers box:
a. Generate: Select how often to generate the report: during a specifiedinterval, after every data refresh, or once.
b. Match Relevance conditions: Enter any relevance conditions necessary forthe report to run.
c. Select whether to email or archive the report only when it has changed.d. Check the box labeled Include trigger information to embed the trigger
criteria in the report itself.5. In the Activity Actions box:
Chapter 6. Administering the Program 57

a. Select to whom you want to email the report. Write a subject line and someaccompanying text. Check the boxes to include the output of the report, alink to the report, or a link to the archive.
b. Select whether or not to Archive the report. You can limit the number ofarchives, and you can limit each archive by time, disk space, or number ofentries.
c. You can specify a customized executable that is triggered when the activityruns. Customized executables must be located in the correct directory. OnWindows Web Reports server the default path is: C:\Program Files\BigFixEnterprise\BES Server\BESReportsData\CustomExe. On Linux Web Reportsserver the default path is /var/opt/BESReportsServer/BESReportsData/BESExe.The executable runs as the Web Reports service's user through the shell. Itruns in the background, without a user interface. Select an executable fromthe pull-down menu. There are some reserved words that can pass variableinformation to the executable:
58 IBM BigFix: Web Reports Guide

<activityname>Passes the scheduled Activity name.
<reportfile>Passes the generated report file.
<activitycreator>Passes the name of the Activity creator.
6. Click Submit.
You have now scheduled an activity. It is shown in the Schedule Activity list,named after the report you chose to schedule.
Filter Management
Filters are used to customize reports, allowing you to highlight any particularsubset of the database. You can save your custom filters, allowing you to reusethem in other reports. You can then view, delete, and change the Private or Publicstatus of your custom filters from this interface.
Click the Filter Management option from the Administration tab. You can see alist of the existing filters, allowing you to modify any of them. All administrators,not just the creator of the filter, can edit, delete, or change the visibility of any filterin this list.
Click the check boxes in front of a filter to use the Delete, Make Public, or MakePrivate buttons. You can also specify a search string to narrow down the list offilters.
Note: If you delete a filter that is a part of an existing report, you might changethe interpretation of that report and generate a larger than expected listing.
Address Book
The Address Book section allows you to configure the email server settings, and toedit your list of email addresses.
Click the Address Book option from the Administration tab to manage youraddress book.
Chapter 6. Administering the Program 59

If you have not yet configured your email settings, a warning box opens, allowingyou to identify the outgoing email server.
At any time, you can return to the settings window by clicking the Email serversettings link above the address book. Only a Web Reports administrator can editemail settings. There are two buttons on this page:
v Save: Saves the email settings.v Test: Lets you verify the email server settings by sending a test message.
After you save the server address, you are returned to the Address Book.To add anew contact to the book:1. Click Add Contact. From the pop-up dialog, enter the name and email address.2. Click the Add button to store the contact information.3. This page also allows you to delete addresses: check the box next to the name
and click the Delete button.
60 IBM BigFix: Web Reports Guide

You have now set up your Address Book, which you can use to send scheduledactivities to anyone on your list.
User Management
The User Management page allows you to add, delete, and edit the properties ofyour web users. Each user can have more than one role. When you log in, yourroles are ORed together and your status is determined by the union of yourpermissions. If the sum of your roles does not grant you Administrator status, thenyou cannot see the User Management section. If you have Administrativeprivileges, click the User Management option from the Administration tab.
The User Management page lists users in a table, which contains a Login, Name,and Assigned roles.
There are other links on this page:v Create User: Opens the Create User page, which prompts you to provide a
name, login, password, and define any user roles. For more information, see“Create Users” on page 62.
v Manage Roles: Allows you to define and manage the roles that you want toassign to your users. For more information, see “Manage Roles” on page 62.
v Global User Options: Click the link for Global User Options. This allows youto set some management parameters that are shared by all users. For moreinformation, see “Global User Options” on page 64.
As you create new users, they are added to the list. In front of each entry is a boxthat you can check. When you do, the Assign Roles and Delete buttons becomeavailable. You can then assign a group of users a new role or delete them
You can also click the links in the Login column to edit a user. For moreinformation, see “Edit User” on page 66.
Chapter 6. Administering the Program 61

Create Users
This page is available from Administrator > User Management > Create User. Itprompts you to provide a name, login, password, and define the user roles.
The built-in Roles include:
Administrator: Grants top-level privileges, with the ability to create additionalusers, schedule activities, and set database configurations.
Normal user: Grants ordinary privileges allowing the user to view the data, butnot to create other users or set database configurations.
Read-only: Restricts a user from editing public filters and reports.
Enter the infomation required and click Create User.
Manage Roles
This page is available from Administration > User Management > Manage Roles.On this page you define and manage the roles that you want to assign to yourusers.
62 IBM BigFix: Web Reports Guide

Delete roles by clicking the box to the left of the role and then clicking Delete.
There are three built-in roles:
AdministratorGrants top-level privileges, which allow the user to create additional usersand set database configurations.
Normal userGrants ordinary privileges, which allow the user to view the data, but notto create other users, set database configurations, or schedule activities.
Read-onlyRestricts a user from creating or modifying public filters, reports, andlabels or anything belonging to or visible to any other user. A user with theRead-only role can create, save, and edit only private custom reports.
Click the Create Role link, to define your own custom role, allowing differentpermissions and scopes.
Create Roles
This page is available from Administration > User Management > Manage Roles> Create role. It allows you to create a new role with just the specific permissionsyou want to grant This role then becomes visible in the list of roles, available foryou to assign it to the appropriate users.
Chapter 6. Administering the Program 63

A role requires a name, and then there are some check boxes to define permissions:
Allow editing of public filters, reports, and labels. Check this box if you wantthis defined role to include editing permissions on these objects.
Allow creating and saving of custom content. Check this box if you want this roleto allow content creation.
Restrict view with a filter. Click this button to use a filter that constrains what thisrole can view. When you click this button, a filter panel opens allowing you tocreate a filter that is applied to computers or content to only allow subsets of thedata to be viewed by this role.
Restrict view by console user. Click the button to select a user from a list. Thisallows you to create a role just for a specific user. When you click this button, a listof console users opens from which you can choose a name.
The example above creates a Windows Administrator who is limited to accessingWindows computers. Click Create Role when you have finished your definition.
Global User Options
This page is available from Administrator > User Management > Global UserOptions. It allows you to set some management parameters that are shared by allusers.
64 IBM BigFix: Web Reports Guide

From this interface, you can refine user rights for non-administrative users andconsole operators. Check the appropriate boxes to add and delete the specificpermissions you want. The options include:
Allow non-admin users to:v Create and view scheduled activities. This is set to on by default. If it is turned
off, the non-administrator user cannot view the schedule of activities.v View custom reports created by other non-admin users. This is set to on by
default. Custom reports created by the administrator are always viewable.v View all filters. This is set to on by default. If turned off, non-administrative
users can only view filters they have created themselves.v View background error messages. This is set to off by default. Turn it on if you
want non-administrative users to view error messages.
Allow user restricted by Console operators to:v View all operators. This is set to on by default. If turned off, restricted Web
Reports users cannot view other operators.v View all local analyses. This is set to on by default. If turned off, restricted Web
Reports users cannot view analyses that were created by another non-masteroperator.
Password Complexity Rule:v You can also define the Password complexity, which specifies the minimum and
maximum length of acceptable passwords. The default is to allow passwordsbetween 6 and 256 characters. The password complexity rule is defined using aregular expression.
v Below the rule is the text that is printed when a password is out of thesebounds.
Chapter 6. Administering the Program 65

Click Save to record your global options.
Edit User
When editing user accounts, different options are presented depending on whetheryou are editing your own settings or those of someone else. If you are not loggedin as an administrator, you cannot edit other users’ accounts. To change theparameters of a user, select the Users tab, and then click the Login link for the useryou want.
Regardless of administrative privileges, if you are editing your own settings, youcan:v Change name. Click this link to enter a new user logon name.v Change password. Click this button to open the Change Password page. Enter
your old password, then enter your new password and confirm it.v Change preferences. You can only access your own personal defaults, not those
of other users. This opens the same dialog as when you click the Preferenceslink at the very top of the page.
If you are logged in as an administrator, and editing a user other than yourself,you can change everything except the preferences.
Datasource Settings
You can manage the datasources from which Web Reports aggregates information.The Datasource section is used for IBM BigFix datasource management. Thisincludes adding, deleting, and editing datasource connections and settings.
Click Administration > Datasource Settings.
66 IBM BigFix: Web Reports Guide

These are the links you can select on this page:v Disable (Enable): Allows you to remove a datasource from aggregation, without
deleting the datasource. In this way it can be re-enabled at a later time.v Edit: Allows you to edit the settings for a selected Datasource (to the left of the
row). For more information, see Edit Datasource.v Delete: Lets you delete the selected datasource from the Web Reports
aggregation. To ignore the datasource but keep the datasource connectioninformation available, you can disable the datasource by clicking Disable.
v Add New Datasource: Allows you to add a new datasource into the aggregationgroup. For more information, see Add New Datasource.
v Datasource Options: Allows you to set options for datasources. One optionexists on this page: Disable relevance evaluation.
It is cleared by default. If checked, all relevance evaluation in custom reportsand in any scheduled activities is disabled. Click Submit to set the option.
v Cache Settings: Displays information about the datasource cache in memory. Itdisplays the last time the cache was written to a file on disk for each datasource.It also allows you to change how often the cache is refreshed. Finally, it gives theoption of writing the cache to disk, and if so, how often to write it to disk.
v Refresh Cache: Starts a full refresh of the datasource cache. To delete thedatasource cache you can also restart the IBM BigFix BES Web Reports Serverservice.
Chapter 6. Administering the Program 67

v View Errors: Allows you to view all recent errors that have occurred in the WebReports system. These errors usually occur in the background and can affect theintegrity of the data. They are usually related to connection problems or otherproblems with the datasource. Only an administrator can clear these errors.
v Local Database Settings: Shows the local database DSN and the local IBMBigFix Reporting Server.
Add New DatasourceThis page allows you to add a new datasource for aggregation by Web Reports.
To reach this page, select Administration > Datasource Settings > Add NewDatasource.
Datasource Name: Enter a descriptive name for this new datasource.
URL: Enter the URL of the root server to which to connect. The URL must alsoinclude the appropriate port number.
Master Operator Credentials: Enter the Master Operator credentials. Thesecredentials are used only once, and are not saved.
Edit DatasourceThis page allows you to edit the settings for a selected datasource (to the left of therow).
68 IBM BigFix: Web Reports Guide

To reach this page, select Administration > Datasource Settings > Edit.
URL: Enter the URL of the root server to which to connect. The URL must alsoinclude the appropriate port number.
Note: You cannot change the name of your datasource.
Master Operator Credentials: Enter the Master Operator credentials if the URL ischanged.
Errors
This page is available by selecting Administration > Errors. It shows any currenterrors based on the last action taken.
Chapter 6. Administering the Program 69

70 IBM BigFix: Web Reports Guide

Appendix A. Tasks for advanced users
This section presents tasks unlikely to be needed by the typical user, but which canbe of use to advanced users with specific customization needs.
Understanding the Web Report File
Web Reports has a general report format using an XML wrapper. It can showreports from content sites and new reports can be added, edited, or removed.
The report file must either have the extension .beswrpt or .webreport, and iswritten in XML. It has the form:<BESWebReport><Name>Report Title</Name><Type>[TemplateReport] | [CustomReport] | [ExternalReport]</Type><URLParameters>param1=value1&param2=value2</URLParameters><Data>Custom data or external URL</Data><SourcePage>Source Page in Web Reports</SourcePage></BESWebReport>
The .beswrpt file can also contain multiple reports in one xml file:<BESWebReports><BESWebReport>
</BESWebReport><BESWebReport>
</BESWebReport></BESWebReports>
Most of the tags are self-explanatory. The Name tag provides the title of the report.URLParameters and Data depend on the Type tag. The Type tag can be one ofthree stringsv TemplateReportv CustomReportv ExternalReport
These strings are case-sensitive.
Creating a Custom Report
This page lets you create a custom report. A report like this is actually code thatgenerates a printable report. It typically consists of HTML with embeddedRelevance and JavaScript commands. You can choose to make this report public orprivate.
To create a custom report:1. Select Explore Data > Custom.
© Copyright IBM Corp. 2010, 2015 71

2. There is a Filter box. Set it to apply to just the subset of data you want yourcustom report to be based on.
3. Fill in the text box by specifying the full report request. For example you canspecify to list the names of your IBM BigFix computers as follows:<div>Computer Names</div>
<?Relevance names of bes computers?>
Note: In the corresponding XML file this information is displayed in thecharacter data (CDATA) block of the Data tag
4. When you like what you see, click the Save Report button to add your customreport to the list.
When in the list you can change its visibility, label it, and schedule it, as with anyother report. The following section describes in more detail how to create a customWeb Report using XML.
Web Reports XML
A custom report is made of HTML, Relevance, and JavaScript, embedded in anXML file.
In the Data tag specify the full report request using the character data (CDATA)block. The XML parser does interpret the CDATA block as markup, so you do nothave to escape your included HTML or JavaScript. You can also include anoptional parameter tag such as URLParameters tag for extra information to use.
For more information about the specific set of parameters available, see the BigFixsupport site.
The following is an example of custom web report:<BESWebReport>
<Name>Example Custom Report</Name><Type>CustomReport</Type><URLParameters>computerID=computerRecord</URLParameters><Data><
<?Relevance names of bes computers?>]]></Data> <SourcePage>ExploreComputers</SourcePage>
</BESWebReport>
This report lists the names of your IBM BigFix computers.
Creating a Portable Report for Propagation
As you explore data, you can save a report at any time. In general, if you want toshare the report with other users, you can set its visibility to Public in the ReportList.
However, there is an advanced technique that can be used if you are a site creator.You might notice that an abbreviated description of your report is shown as a partof the URL, as seen in the address bar of the browser. That, however, is acompressed version designed to stay within the 2048 character limit in InternetExplorer, and is not portable. To make a portable report, follow these steps:1. Click the Explore Data tab at the top of the Web Reports window.2. Configure the columns you want to display as well as any filters you want to
apply.3. Click the Save Report button.4. Open a JavaScript debugger, such as Firebug for Firefox.5. In the console area of the debugger, enter the command WR.PrintReportXML().
This example uses Firebug. WR.PrintReportXML is an embedded JavaScriptthat prints a portable XML version of the current report.It might look like this code sample:<?xml version="1.0" encoding="UTF-8"?><BESWebReport>
<Name>Example Report</Name><Type>TemplateReport</Type>
Appendix A. Tasks for advanced users 73

<Data></Data><URLParameters>#wr_computerTable=%22sort%3DR-Computer%2520Name%26dir%3Ddesc%26startIndex%3D0%26results%3D50%26c%3DR-Computer%2520Name%26c%3DR-IP%2520Address%26c%3DR-OS%26c%3DR-CPU%26c%3DR-Last%2520Report%2520Time%22</URLParameters>
<SourcePage>ExploreComputers</SourcePage></BESWebReport>
6. Copy this XML to a text editor and save it with the extension beswrpt.
You have now created a portable report that you can easily propagate in anycontent site or import into the Report List page. Note that the report is containedin the URLParameters tag. This listing shows line feeds for readability, but theactual XML has an uninterrupted line of text.
Exporting activity reports to CSV filesTo create a hardcopy of a report generated by BigFix, export the report to a CSVfile and print it.
To create the CSV report file schedule it as an activity in the Create scheduledActivity window opened from the Administration > Scheduled Activities menu.For additional information see “Creating Scheduled Activities” on page 56.
You can also use the CSV file to create charts and statistics based on theinformation in the report.
A Web Report exported to a CSV file has an Excel-compatible CSV format. Anystring containing characters that might be interpreted as a formula by MicrosoftExcel such as "+myfield", are transformed in literal strings as shown in thefollowing example:"=""+myfield"""
The following characters are handled in this way: + (plus), − (minus), / (slash), *(asterisk) and = (equal).
Exporting activity reports to PDF documents
Web Reports can generate PDF documents for printing or mailing. PDF reports canbe sent by setting the PDF format option when creating or editing a scheduledactivity, or by exporting the report as a PDF document.
On Windows Systems
Run the following steps, either automatically or manually, to add this capability toyour Web Reports installation on Windows platforms:
Automatic Installation
1. On the IBM BigFix console click Fixlets and Tasks.2. Search for the following task IDs:v Task ID: 602: BES Web Reports: Enable PDF Reports - Part 1 of 2v Task ID: 603: BES Web Reports: Enable PDF Reports - Part 2 of 2
3. Run the actions in these tasks to automatically install the PDFgenerator.
74 IBM BigFix: Web Reports Guide

Manual InstallationRun these steps on the server hosting the BESWebReportsServer service:1. Install Internet Explorer 7 or greater, if it is not already installed.2. Install Flash Player for Internet Explorer (install the 32-bit version,
also on an x64 system).3. Add your Web Reports host to Internet Explorer's trusted sites list for
the system account.4. Run the following steps in the registry:
a. Add a key with the fully qualified domain name of your WebReports host toHKEY_USERS\[User account running Web Reports service]\Software\Microsoft\Windows\CurrentVersion\Internet Settings\ZoneMap\Domains
For example, if you access Web Reports at http://bes.example.comand run Web Reports under the SYSTEM account, you add the keyHKEY_USERS\S-1-5-18\Software\Microsoft\Windows\CurrentVersion\Internet Settings\ZoneMap\Domains\bes.example.com
b. Add a REG_DWORD value (under the key you just added)named http and set it to 2.
c. Add a REG_DWORD value (under the key you just added)named https and set it to 2.
5. Add a PostScript file printer named BES Web Reports Printer thatprints to the port C:\Program Files\BigFix Enterprise\BESServer\BESReportsData\ArchiveData\__pdf\out.ps.
6. Install the 32-bit (x86) version of GhostScript (version 8.60) from thewebsite: http://pages.cs.wisc.edu/~ghost/doc/GPL/gpl860.htm.
7. Right-click the icon My Computer on the desktop.8. Select Properties > Advanced > Environment Variables.9. Append the following strings to the end of your PATH variable in the
System variables pane:C:\Program Files (x86)\gs\gs8.60\bin;C:\Program Files (x86)\gs\gs8.60\lib;
10. Create the following registry string values (REG_SZ) inHKLM\Software\WOW6432Node\BigFix\Enterprise Server\BESReports
v PDFEnable: 1
v PDFPrinterName: BES Web Reports Printer
v PDFPostScriptPath: C:\Program Files (x86)\BigFixEnterprise\BES Server\BESReportsData\ArchiveData\__pdf\out.ps
11. Restart Windows to ensure that the PATH variable is updated.
Registry Settings
All the following settings are under the key registry HKLM\Software\WOW6432Node\BigFix\Enterprise Server\BESReports, :
Setup
v PDFEnable (set to 1 to enable PDF generation)v PDFPostScriptPathv PDFPrinterName
Logging
v PDFLogPath
Appendix A. Tasks for advanced users 75

Default Header and Footer
v PDFDefaultHeaderv PDFDefaultFooter
Using an unprivileged user to render the report and generate the PDF
v PDFUseUnprivileged (set to 1 to use the account specified by the values below)– UnprivilegedUsername– UnprivilegedDomain– UnprivilegedPassword
Timeout Settings
v PDFReportTimeout (in minutes, default 60)v PDFPrintTimeout (in minutes, default 60)
Internet Explorer post-rendering pause
v PDFPause (in seconds, default 10, gives Flash components time to initializebefore printing)
Logging PDF generation on Windows systems
The keys to enable logging are stored in the HKEY_LOCAL_MACHINE\SOFTWARE\Wow6432Node section under HKLM\Software\WOW6432Node\BigFix\EnterpriseServer\BESReports.
Run the following steps to enable logging PDF generation:1. Set the PDFLogPath registry key to C:\webreportspdf.log.2. Ensure that the server machine was restarted after running the installation.3. Verify that the following registry keys have are correct values:v PDFEnable must be set to 1.v PDFPostScriptPath must be equal to the port of the printer added during the
installation.v PDFPrinterName must be equal to the name of the printer added during the
installation.
Troubleshooting PDF generation on Windows systems
If charts are not displayed in the generated PDF, ensure that Internet Explorer,running under the SYSTEM account on the Web Reports server box, has the correctsecurity settings to render Web Reports pages. Do the following to accomplish thistask:1. Open Internet Explorer using the at or the schtasks commands.2. Navigate to the Web Reports Overview page.3. Verify that the charts display. If they do not display, change the security
settings to allow ActiveX plugins and JavaScript.
On Linux Systems
If you installed Web Reports on a Linux system, you do not have to install extracomponents to export reports as PDF documents, but you must run someconfiguration steps if they apply to your environment.
76 IBM BigFix: Web Reports Guide

If BigFix server uses a proxy connection to communicate over the Internet andyou run Web Reports using Firefox on the Linux system where you installed theWeb Reports.
Ensure that the Firefox browser is not configured for the system's fullyqualified hostname. For example, if your network domain ismynetwork.com, configure the Firefox connection settings as highlighted inthe following picture:
If the DISPLAY variable is set to a value different from DISPLAY=:0:Manually change the export statement in the /etc/init.d/beswereportsfile as follows:1. Stop the Web Reports service by running:
/etc/init.d/beswereports stop
2. Edit the file /etc/init.d/beswereports.3. Set the DISPLAY variable to correctly point to your X server.4. Save the file.5. Restart the Web Reports service by running:
/etc/init.d/beswereports start
If the runlevel set on your Linux system is different from 5.Modify the runlevel and set it to 5, or use xvfb.
Run these steps if you decide to use xvfb:1. Set up the optional channel as follows:
rhn-channel --add --channel=rhel-x86_64-server-optional-6
2. Install the package:yum install xorg-x11-server-Xvfb.x86_64
3. Modify the script that manages the PDF exports as follows:a. Edit the script /var/opt/BESWebReportsServer/BESreportsData/
BESExe/wkhtmlpdf.sh
b. Add the following statement:xvfb-run -a -s "-screen 0 1024x768x16"
before the statement:/var/opt/BESWebReportsServer/BESReportsData/BESExe/wkhtmltopdf--enable-plugins --use-xserver --javascript-delay 5000--no-stop-slow-scripts $optionalparms $arg1 $arg2
c. Save the script file.
If you experience a slow flash rendering when the PDF is generated.If the generation of the PDF takes longer than 5 seconds to display theWeb Reports exports to the PDF only the data that were available beforethe 5 seconds elapsed. To bypass this limitation, increase the delay asfollows:1. Edit the script /var/opt/BESWebReportsServer/BESreportsData/BESExe/
wkhtmlpdf.sh
Appendix A. Tasks for advanced users 77

2. Increase the value that is assigned to --javascript-delay in thestatement:/var/opt/BESWebReportsServer/BESReportsData/BESExe/wkhtmltopdf--enable-plugins --use-xserver --javascript-delay 5000--no-stop-slow-scripts $optionalparms $arg1 $arg2
The value is expressed in milliseconds and 5000 ms is the default vale.3. Save the script file.
If you want to generate PDF containing graphs that require Adobe Flash Playerto be correctly displayed.
Ensure that Adobe Flash Player is available on the system where the WebReports component is installed. If Adobe Flash Player is not installed, onPDF creation, a message requesting to install Adobe Flash Player isdisplayed and the PDF is generated without graphs. After installing AdobeFlash Player, restart the Web Report server process to make Adobe FlashPlayer available for use.
Logging PDF generation on Linux systemsTo gather and review the output from the call to wkhtmltopdf, redirect the stdoutand stderr from wkhtmltopdf to a file. Before doing the redirection, ensure that youenabled logging for Web Reports as it is explained in “Logging Web Reports” onpage 85.
Run these steps to do the redirection:1. Make a backup copy of the script /var/opt/BESWebReportsServer/
BESReportsData/BESExe/wkhtmltopdf.sh
2. Update the script by changing the following line:/var/opt/BESWebReportsServer/BESReportsData/BESExe/wkhtmltopdf--enable-plugins --use-xserver --javascript-delay 5000--no-stop-slow-scripts $optionalparms $arg1 $arg2
as follows:/var/opt/BESWebReportsServer/BESReportsData/BESExe/wkhtmltopdf--enable-plugins --use-xserver --javascript-delay 5000--no-stop-slow-scripts $optionalparms $arg1 $arg21>/tmp/pdfout.txt 2>&1
By doing so you redirect the stdout and stderr from wkhtmltopdf to the/tmp/pdfout.txt file.
Exporting the report output to a PDF file
If you configured Web Reports to export reports as PDF, when you run a reportfrom the Reports List panel, the entry Export to PDF is displayed in the top rightcorner of the report output window. Click it to save the output of the report in aPDF file on the system where the Web Reports is installed.
PDF Header and Footer
From the Create Scheduled Activity dialog, after you select PDF as activity reportformat, you can open the following dialog to print a PDF file:
78 IBM BigFix: Web Reports Guide

Note: The Linux Web Reports server does not support non-ASCII characters in theheader and footer.
In PDF Header and PDF Footer you can specify information about the title, URL,date, and more by entering the following codes:
&w Window title
&u Page address (URL)
&d Date in short format specified by RegionalSettings in Control Panel
&D Date in long format specified by RegionalSettings in Control Panel
&t Time in the format specified by RegionalSettings in Control Panel
&T Time in 24-hour format
&p Current page number
&P Total number of pages
&& A single ampersand (&)
&b Separates preceding and succeeding text intodifferent sections. Example: left &bcenter &b right
text Custom text (can be used in combinationwith printing codes)
Important: The Linux Web Reports server does not support the header and footerprint codes because they are Internet Explorer-specific.
Configuring HTTPS for Web Reports
To configure Web Reports for working with HTTPS you can use a certificate filecontaining the private key or two separate files one for the certificate and anotherfor the private key.
You can configure Web Reports on Windows or Linux systems, by performing thefollowing steps:
Appendix A. Tasks for advanced users 79
1. Install or upgrade OpenSSL on your system to the latest available version.2. Ensure that an OpenSSL command-line tool is available.3. Create a Certificate Signing Request with your company and Web Reports
server information.4. EITHER: Generate a Self-Signed Certificate OR Request a Certificate from a
Certificate Authority.5. Update the Web Reports HTTPS Registry Settings to point either to the
combined certificate and private key file, or to the separate files, which are thecertificate and the private key files.You can also configure Web Reports to work with HTTPS manually withoutusing the console. For additional information see “Configuring HTTPSmanually on Windows systems” on page 84 and “Configuring HTTPS manuallyon Linux systems” on page 85.
Creating a Certificate Signing Request (csr)1. To register a certificate, you need a valid configuration file such as the
following one:[ req ]default_bits = 1024default_keyfile = keyfile.pemdistinguished_name = req_distinguished_nameattributes = req_attributesprompt = nooutput_password = bigfix
[ req_distinguished_name ]C = USST = CaliforniaL = EmeryvilleO = BigFixOU = DevelopmentCN = CommonemailAddress = [email protected]
[ req_attributes ]challengePassword = bigfix
2. Replace Common with the fully qualified domain name of the Web Reportsserver.
3. Create the certificate request cert.csr with the following command.openssl req -new -config "c:\mynewconfig.conf" > cert.csr
This also generates the private key called keyfile.pem.4. Remove the password from the private key file keyfile.pem and generate a
new private key (nopwdkey.pem) using the following command:openssl rsa -in keyfile.pem -out nopwdkey.pem
Generating a Self-Signed Certificate
To generate a self-signed certificate (cert.pem) from a certificate request file(cert.csr), perform the following steps:1. Create a Certificate Signing Request (cert.csr).2. Create a certificate file (cert.pem) from your private key (nopwdkey.pem) and
certificate request file (cert.csr) using the following command (valid for 365days):openssl x509 -in cert.csr -out cert.pem -req -signkey nopwdkey.pem -days 365
80 IBM BigFix: Web Reports Guide

Important: If you want to specify both the certificate and the private key filesin the Web Reports HTTPS configuration, skip the following steps and see“Web Reports HTTPS Settings” on page 82.
3. Open up your private key file nopwdkey.pem in WordPad.4. Copy the contents and paste them below the certificate in cert.pem, as in the
following example:-----BEGIN CERTIFICATE-----MIICYjCCAcugAwIBAgIJANiRLK2nbg9oMA0GCSqGSIb3DQEBBQUAMEoxCzAJBgNVBAYTAlVTMRMwEQYDVQQIDApDYWxpZm9ybmlhMRMwEQYDVQQHDApFbWVyeXZpbGxlMREwDwYDVQQDDAhIRUlNREFMTDAeFw0xMjAzMTUwMjA5MzdaFw0xMzAzMTUwMjA5MzdaMEoxCzAJBgNVBAYTAlVTMRMwEQYDVQQIDApDYWxpZm9ybmlhMRMwEQYDVQQHDApFbWVyeXZpbGxlMREwDwYDVQQDDAhIRUlNREFMTDCBnzANBgkqhkiG9w0BAQEFAAOBjQAwgYkCgYEA5h5aCcN5Up5rNYn7a88dKAehe7CbKDtPF6jdrn52yShJc97fmceJeIsnkVmBVRoIBevxFnNIKxMzzR52c0NKK2gU0ax2k6TWD8yVOHHFepBgcCyFJD9y9g5u444+7S5vsXRpmAx7z3HYHHh9Jjiv7zLoN46Mu+7KpnZnJgFX0QcCAwEAAaNQME4wHQYDVR0OBBYEFHJXtkgif6mZzQBcrp7U7yptf/WzMB8GA1UdIwQYMBaAFHJXtkgif6mZzQBcrp7U7yptf/WzMAwGA1UdEwQFMAMBAf8wDQYJKoZIhvcNAQEFBQADgYEARkkc8GmyFtuXsWmjvkUJvRkGJYiQ7LsO5Qg67ONcMr/beJDXsOR3w3lDcDqCglnQuswNySrcAGDPctDJwE2cZbcvpVdNlUd1UdXnbzHAjg/buh6Uy5OYYc0yNtbcKlPpgxvBp6cGua7K01bMeb379vXLNr1EcQG9KmlkHYqqJpU=-----END CERTIFICATE----------BEGIN PRIVATE KEY-----MIICeAIBADANBgkqhkiG9w0BAQEFAASCAmIwggJeAgEAAoGBAOYeWgnDeVKeazWJ+2vPHSgHoXuwmyg7Txeo3a5+dskoSXPe35nHiXiLJ5FZgVUaCAXr8RZzSCsTM80ednNDSitoFNGsdpOk1g/MlThxxXqQYHAshSQ/cvYObuOOPu0ub7F0aZgMe89x2Bx4fSY4r+8y6DeOjLvuyqZ2ZyYBV9EHAgMBAAECgYEAh2Jh/I6JaUcUsgn85l+SusNKiTfNAO1ryfKqgYeboRtXo5kDGjkfstDDtargAU5wW/OFAn1OfzEr78i1TXjQP/2h1ntvOobYeEsRFBlVdoC361GHKoSWMMbrymx75XIRmdW3cIHOSlpHfr2RA9WZfA2Rtn8gtITQNKed0uFyBskCQQD6IeYaxWegfoJwpcAmlTlYfyKXdSL9/DGsG+uhAIhUpUWPwsH/uHR8/61wQ9coH1NEy2bVRT0qha1s9CvHA0OFAkEA64RD4t5oQcA+Q/2oTtfYD3MB0NQJVL2KwJaW9hr4+osMQWJSSXTQuymMcd3tLJaS3eg0DVIsg0pO0GYxbVKKGwJANF9IqK5QhkA225M46lswSKFGAuRZ0UgutlSaP3m3EdIRAIrMx9g9O7bk/66UrCfy7WKRQ3Jd3jtjFn8Bc4fxaQJBALCVoRjPTThPXeA4piNHbvZWcrwS31QsMYao4lNwcdHYw72abLwq2/4Y7vbJQPU3iLLdUXnTbRCbfHCAzvp68pUCQQDX7iVRWjd9qVlgtR/6wxAQjSHSmlCyTfHA0ncVNzjEjZzA3FiCNq+gHFkBc6Kr4FxfNWCmaoyVGYxl1LT+VHJA-----END PRIVATE KEY-----
5. Refer to cert.pem on your Web Reports server in the certificate path registrysetting as described in “Web Reports HTTPS Settings” on page 82.
Requesting a Certificate from a Certificate Authority
To encrypt HTTPS Web Reports with a certificate that browsers implicitly trust,request a signed certificate from a trusted Certificate Authority (or CA) such asVerisign as follows:1. Create a Certificate Signing Request (csr)2. Forward the .csr file to a Certificate Authority (CA). They will issue you a
signed (browser-trusted) certificate for your server. Request the certificate beissued in PKCS12 format.
Important: If you want to specify both the certificate and the private key filesin the Web Reports HTTPS configuration, skip the following steps and see“Web Reports HTTPS Settings” on page 82.
3. After you have received the PKCS12 formatted file, DO NOT import it to anyMicrosoft default certificate handling facilities.
4. Via openssl, perform the following on each PKCS12 formatted file to export toa password stripped PEM file format:openssl pkcs12 -in PKCS12.p12 -out PEM_CERT_FILE_NAME.pem -nodes -clcerts
Appendix A. Tasks for advanced users 81

This exports the PKCS12 file to a PEM formatted file with both the public keyand private certificate without any passwords.
5. Open the PEM certificate file with WordPad.6. Leave only the public key and private certificate, keeping the BEGIN and END
block stanza headers. This is an example:-----BEGIN CERTIFICATE-----MIICYjCCAcugAwIBAgIJANiRLK2nbg9oMA0GCSqGSIb3DQEBBQUAMEoxCzAJBgNVBAYTAlVTMRMwEQYDVQQIDApDYWxpZm9ybmlhMRMwEQYDVQQHDApFbWVyeXZpbGxlMREwDwYDVQQDDAhIRUlNREFMTDAeFw0xMjAzMTUwMjA5MzdaFw0xMzAzMTUwMjA5MzdaMEoxCzAJBgNVBAYTAlVTMRMwEQYDVQQIDApDYWxpZm9ybmlhMRMwEQYDVQQHDApFbWVyeXZpbGxlMREwDwYDVQQDDAhIRUlNREFMTDCBnzANBgkqhkiG9w0BAQEFAAOBjQAwgYkCgYEA5h5aCcN5Up5rNYn7a88dKAehe7CbKDtPF6jdrn52yShJc97fmceJeIsnkVmBVRoIBevxFnNIKxMzzR52c0NKK2gU0ax2k6TWD8yVOHHFepBgcCyFJD9y9g5u444+7S5vsXRpmAx7z3HYHHh9Jjiv7zLoN46Mu+7KpnZnJgFX0QcCAwEAAaNQME4wHQYDVR0OBBYEFHJXtkgif6mZzQBcrp7U7yptf/WzMB8GA1UdIwQYMBaAFHJXtkgif6mZzQBcrp7U7yptf/WzMAwGA1UdEwQFMAMBAf8wDQYJKoZIhvcNAQEFBQADgYEARkkc8GmyFtuXsWmjvkUJvRkGJYiQ7LsO5Qg67ONcMr/beJDXsOR3w3lDcDqCglnQuswNySrcAGDPctDJwE2cZbcvpVdNlUd1UdXnbzHAjg/buh6Uy5OYYc0yNtbcKlPpgxvBp6cGua7K01bMeb379vXLNr1EcQG9KmlkHYqqJpU=-----END CERTIFICATE----------BEGIN PRIVATE KEY-----MIICeAIBADANBgkqhkiG9w0BAQEFAASCAmIwggJeAgEAAoGBAOYeWgnDeVKeazWJ+2vPHSgHoXuwmyg7Txeo3a5+dskoSXPe35nHiXiLJ5FZgVUaCAXr8RZzSCsTM80ednNDSitoFNGsdpOk1g/MlThxxXqQYHAshSQ/cvYObuOOPu0ub7F0aZgMe89x2Bx4fSY4r+8y6DeOjLvuyqZ2ZyYBV9EHAgMBAAECgYEAh2Jh/I6JaUcUsgn85l+SusNKiTfNAO1ryfKqgYeboRtXo5kDGjkfstDDtargAU5wW/OFAn1OfzEr78i1TXjQP/2h1ntvOobYeEsRFBlVdoC361GHKoSWMMbrymx75XIRmdW3cIHOSlpHfr2RA9WZfA2Rtn8gtITQNKed0uFyBskCQQD6IeYaxWegfoJwpcAmlTlYfyKXdSL9/DGsG+uhAIhUpUWPwsH/uHR8/61wQ9coH1NEy2bVRT0qha1s9CvHA0OFAkEA64RD4t5oQcA+Q/2oTtfYD3MB0NQJVL2KwJaW9hr4+osMQWJSSXTQuymMcd3tLJaS3eg0DVIsg0pO0GYxbVKKGwJANF9IqK5QhkA225M46lswSKFGAuRZ0UgutlSaP3m3EdIRAIrMx9g9O7bk/66UrCfy7WKRQ3Jd3jtjFn8Bc4fxaQJBALCVoRjPTThPXeA4piNHbvZWcrwS31QsMYao4lNwcdHYw72abLwq2/4Y7vbJQPU3iLLdUXnTbRCbfHCAzvp68pUCQQDX7iVRWjd9qVlgtR/6wxAQjSHSmlCyTfHA0ncVNzjEjZzA3FiCNq+gHFkBc6Kr4FxfNWCmaoyVGYxl1LT+VHJA-----END PRIVATE KEY-----
7. Save the modified PEM file containing only the public certificate and privatekey.
8. Store this file on your server and refer to it when setting up your Web Reports.
Web Reports HTTPS Settings
To enable HTTPS, configure the following client settings, such as the paths of thecertificate and private key files or the path of the combined certificate and privatekey file, the HTTPS port number, a listening for HTTP connections and forredirecting the client to HTTPS on the SSL port as follows:1. From the Endpoint Manager console select the Computers tab.2. Select the computer to configure and Edit Computer Settings from the Edit
menu.3. Look for _WebReports_HTTPServer_UseSSLFlag setting. If it exists, do not
create a second one, but edit its value to 1 to enable HTTPS. If it does not exist,add it:
82 IBM BigFix: Web Reports Guide
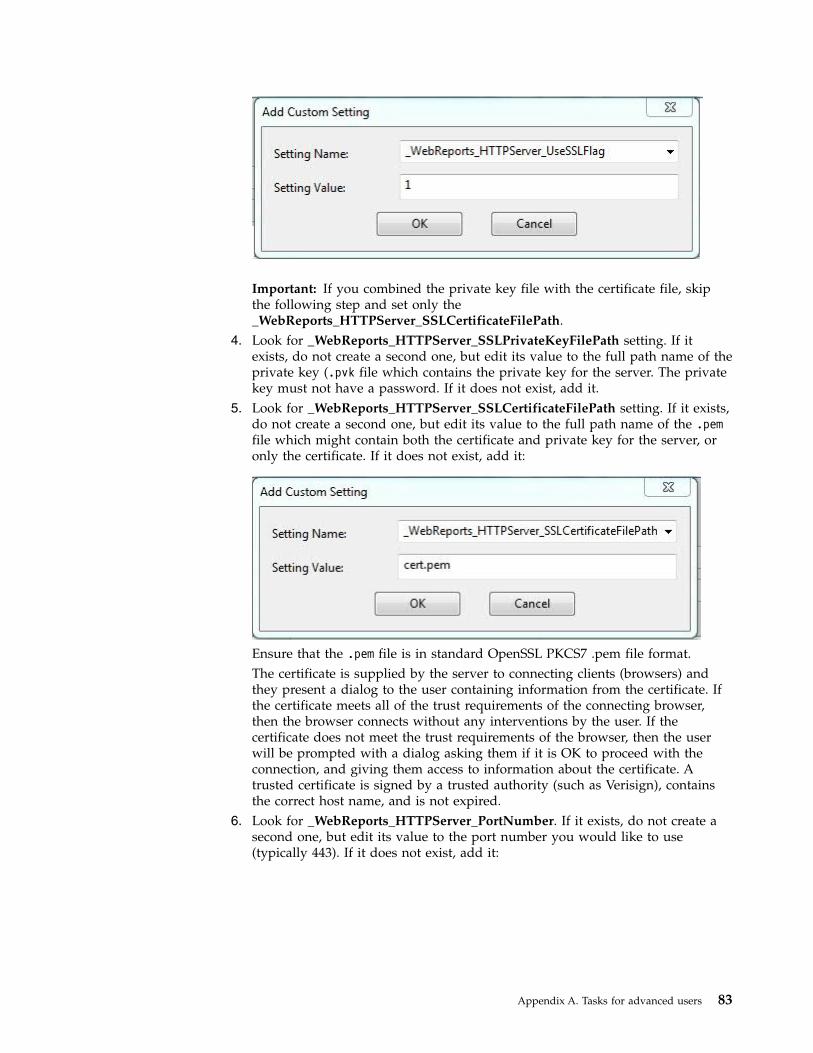
Important: If you combined the private key file with the certificate file, skipthe following step and set only the_WebReports_HTTPServer_SSLCertificateFilePath.
4. Look for _WebReports_HTTPServer_SSLPrivateKeyFilePath setting. If itexists, do not create a second one, but edit its value to the full path name of theprivate key (.pvk file which contains the private key for the server. The privatekey must not have a password. If it does not exist, add it.
5. Look for _WebReports_HTTPServer_SSLCertificateFilePath setting. If it exists,do not create a second one, but edit its value to the full path name of the .pemfile which might contain both the certificate and private key for the server, oronly the certificate. If it does not exist, add it:
Ensure that the .pem file is in standard OpenSSL PKCS7 .pem file format.The certificate is supplied by the server to connecting clients (browsers) andthey present a dialog to the user containing information from the certificate. Ifthe certificate meets all of the trust requirements of the connecting browser,then the browser connects without any interventions by the user. If thecertificate does not meet the trust requirements of the browser, then the userwill be prompted with a dialog asking them if it is OK to proceed with theconnection, and giving them access to information about the certificate. Atrusted certificate is signed by a trusted authority (such as Verisign), containsthe correct host name, and is not expired.
6. Look for _WebReports_HTTPServer_PortNumber. If it exists, do not create asecond one, but edit its value to the port number you would like to use(typically 443). If it does not exist, add it:
Appendix A. Tasks for advanced users 83

7. When SSL is enabled define the forwarding port by setting the following:_WebReports_HTTPRedirect_Enabled to 1 and_WebReports_HTTPRedirect_PortNumber to the port listening for HTTPconnection and redirecting the client to HTTPS.
8. To enable TLS12 for web browser requests, look for_WebReports_HTTPServer_RequireTLS12. If it exists, do not create a secondone, but edit its value to 1 .
Note: The Web Reports component always uses TLS 1.2 when communicatingwith the Endpoint Manager server, (regardless of local settings or settings ofthe masthead).
9. Restart the BESWebReports service:v On Windows, open Services, select BESWebReports and on the Action
menu, click Restart.v On Linux run from the prompt: service beswebreports restart or
/etc/init.d/beswebreports restart.
Note: These settings are stored in the registry under the key HKLM/Software/WoW6432Node/BigFix/EnterpriseClient/Settings/Client.
Configuring HTTPS manually on Windows systems
When you have an SSL certificate (a .pem file), place it on the computer runningWeb Reports (usually the server) and follow these steps:1. Run regedit and locate HKEY_LOCAL_MACHINE\Software\BigFix\
EnterpriseClient\Settings\Client for x32 systems and HKEY_LOCAL_MACHINE\Software\Wow6432Node\BigFix\EnterpriseClient\Settings\Client x64systems.You need to add or modify subkeys for the HTTPS flag, for the location of theSSL certificate, for the HTTPS port number, and for the redirection to HTTPS.
2. Create a subkey of Client called _WebReports_HTTPServer_UseSSLFlag (it mightalready exist).
3. Create a string value (reg_sz) for the key _WebReports_HTTPServer_UseSSLFlagcalled value and set it to 1 to enable HTTPS.
4. Create a subkey of Client called_WebReports_HTTPServer_SSLCertificateFilePath (it might already exist).
5. Create a string value (reg_sz) for the key_WebReports_HTTPServer_SSLCertificateFilePath called value and set it tothe full path name of the SSL certificate (cert.pem).
6. Create a subkey of Client called _WebReports_HTTPServer_PortNumber (it mightalready exist).
84 IBM BigFix: Web Reports Guide

7. Create a string value (reg_sz) for the key _WebReports_HTTPServer_PortNumbercalled value and set it to the port number you want to use (typically 443).
8. Create a subkey of Client called _WebReports_HTTPRedirect_Enabled (it mightalready exist).
9. Create a string value (reg_sz) for the key _WebReports_HTTPRedirect_Enabledcalled value and set it to 1 to enable the browser redirection to HTTPS.
10. Create a subkey of Client called _WebReports_HTTPRedirect_PortNumber (itmight already exist).
11. Create a string value (reg_sz) for the key_WebReports_HTTPRedirect_PortNumber called value and set it to the numberof the port listening for HTTP connection and redirecting the client to HTTPS.
12. Restart the BESWebReports service.
Configuring HTTPS manually on Linux systems
When you have an SSL certificate (a .pem file), place it on the computer runningWeb Reports and customize the keywords in the besclient.config file if a client isinstalled together with Web Reports or in the beswebreports.config file if onlyWeb Reports is installed.
To define the port number you want to use:[Software\BigFix\EnterpriseClient\Settings\Client\_WebReports_HTTPServer_PortNumber]
value = 443
To define the full path name of the SSL certificate (cert.pem):[Software\BigFix\EnterpriseClient\Settings\Client\_WebReports_HTTPServer_SSLCertificateFilePath]
value = /tmp/CERT/cert.pem
To enable HTTPS:[Software\BigFix\EnterpriseClient\Settings\Client\_WebReports_HTTPServer_UseSSLFlag]
value = 1
To enable client redirection from an HTTP connection to an HTTPS connection:[Software\BigFix\EnterpriseClient\Settings\Client\_WebReports_HTTPRedirect_Enabled]
value = 1
To define the number of the port listening for the HTTP connection and redirectingthe Client to HTTPS:[Software\BigFix\EnterpriseClient\Settings\Client\_WebReports_HTTPRedirect_PortNumber]
value = portnumber
Logging Web Reports
You can keep track of your Web Reports usage by setting up a log file.
On WindowsTo log Web Reports messages perform the following steps:1. Run regedit and find the HKEY_LOCAL_MACHINE\Software\BigFix\
Enterprise Server\BESReports key (on a 64-bit machine, you might
Appendix A. Tasks for advanced users 85

need to go down into the Wow6432Node: HKEY_LOCAL_MACHINE\Software\Wow6432Node\BigFix\Enterprise Server\BESReports).You see some variables and path names used by Web Reports.
2. Create a new DWORD value named LogOn and set it to 1 to turn onlogging.
3. Create a new string value named LogPath and set it to the full pathname of your log file, for example, C:\fullpath\file.txt.
4. Create a new DWORD value named LogFileSizeLimit and set it to thelog file size in byte. The minimum value is 1024000 (1MB). If you setthis value a maximum of 10 rotated log files is maintained in additionto the active log file. (for example, file.txt, file.txt_0, file.txt_1, ...,file.txt_9).
5. Create a new string named EnabledLogs to specify one of the followinglevels of log: debug|critical|memory|store_usage|all, where all is thedefault.
On LinuxTo log Web Reports messages perform the following steps:1. Open the following configuration file: /var/opt/BESWebReportsServer/
beswebreports.config
2. Add the full log file name in the [Software\BigFix\EnterpriseServer\BESReports] section as follows:LogPath = /var/log/WebReports.log
3. Enable the logging, define the log level and the log file size by settingthe following keywords:LogOn = 1EnabledLogs = allLogFileSizeLimit = file_size_in_bytes
where:
LogOnSet to 1 to enable logging. Set to 0 to disable the log.
EnabledLogsEnables or disables the logging of specific Web Reportsmessages. The values that you can specify are:debug|critical|memory|store_usage|all, where all is thedefault.
LogFileSizeLimitSet to the log file size in byte. The minimum value is 1024000(1MB). If you set this value a maximum of 10 rotated log files ismaintained in addition to the active log file. (for example,file.txt, file.txt_0, file.txt_1, ..., file.txt_9).
The next time you launch Web Reports, a log of the session is saved to thespecified file.
Querying Using HTTP GET
You can query and access Web Reports by using HTTP GET. Provide the URL andport for the Web Reports program, and then pass the command you want in yourbrowser address line. If you are already logged in to the program, you can accessthe main page with a URL:
86 IBM BigFix: Web Reports Guide

http://bigco.com:80/webreports?page=Main
If you have installed IBM BigFix 9.2.5, the URL to the main page is:http://bigco.com:80/webreports?page=Main
In this example, bigco.com is your domain, 80 is the default IBM BigFix port, andpage=Main describes the part of the program you want to access. If you have notyet logged in, you can pass your Username and Password on the same line:http://bigco.com:80/webreports?Username=myName&Password=myPassword&page=Main
If you have installed IBM BigFix 9.2.5, the URL is:http://bigco.com:8080/webreports?Username=myName&Password=myPassword&page=Main
Querying Using SOAP
You can also access Web Reports using SOAP. Most client libraries require thelocation of a Web Services Description Language (WSDL) file, a method name, andparameters to pass into the method. The WSDL file describes the networkendpoints required to query the IBM BigFix Database using Web Reports. TheWSDL can be accessed from the Web Reports server as in the following example:http://server/webreports?wsdl.
Alternatively, you can find a sample file, relevance.wsdl, in the IBM BigFixinstallation directory. This WSDL file defines relevanceExpr, which allows you toevaluate a relevance expression. If you installed IBM BigFix to a folder namedBigFix Enterprise, you can find the file in this directory:BigFix Enterprise\BES Server\BESReportsServer\wwwroot\soap
The registry location for your installation is HKLM\SOFTWARE\Wow6432Node\BigFix\Enterprise Server\BESReports\Paths.
This registry key has a string value named wsdl that contains the path name forthe WSDL file.
The request includes a tag labeled relevanceExpr, which contains the relevanceexpression number of IBM BigFix computers. This is one of the operations definedin the WSDL file.
Some of the available methods include:GetRelevanceResult( String relevanceExpression, String username, String password )StoreSharedVariable( dashID, variableName, variableValue, [success/failurecallback], [database id] )DeleteSharedVariable( dashID, variableName, [success/failure callback],[database id] )
To submit queries from SOA clients specify the following BigFix http path:http://web_report_server/soap
where web_report_server is the hostname or IP address of the Web Report server.
PERL
PERL code using the SOAP::Lite module that takes three arguments, Web Reportsusername, password, and relevance expression, and prints the results of the call.
Appendix A. Tasks for advanced users 87

use SOAP::Lite;#arguments: [hostname] [username] [password] [relevance expression]#hostname only, e.g. ’example.com’ rather than ’http://example.com/webreports’my $host = $ARGV[0];my $username = SOAP::Data->name(’username’ => $ARGV[1] );my $password = SOAP::Data->name(’password’ => $ARGV[2] );my $expr = SOAP::Data->name(’relevanceExpr’ => $ARGV[3] );my $service = SOAP::Lite -> uri( ’http://’ . $host . ’/webreports?wsdl’ )-> proxy(’http://’ . $host );my $result = $service -> GetRelevanceResult( $expr, $username, $password );if( $result->fault ) {print "faultcode: " . $result->faultcode . "\n";print "faultstring: " . $result->faultstring . "\n";}else {
foreach my $answer ( $result->valueof( "//GetRelevanceResultResponse/a" ) ) {print $answer . "\n";
}}
Raw SOAP Request and Response Format
A SOAP request looks like this:<?xml version="1.0" encoding="UTF-8"?><env:Envelope xmlns:env="http://schemas.xmlsoap.org/soap/envelope/" ><env:Body><GetRelevanceResult xmlns="http://[webreportshostname]:[webreportsport]
/webreports?wsdl"><relevanceExpr>names of bes computers</relevanceExpr><username>user</username><password>password</password></GetRelevanceResult>
</env:Body></env:Envelope>
A SOAP response looks like this:<?xml version="1.0" encoding="UTF-8"?><env:Envelope xmlns:env="http://schemas.xmlsoap.org/soap/envelope/"><env:Body><GetRelevanceResultResponse "xmlns=http://[webreportshostname]:[webreportsport]
/webreports?wsdl"><a>Computer 1</a><a>Computer 2</a><a>Computer 3</a></GetRelevanceResultResponse>
</env:Body></env:Envelope>
Sample relevance expressions are available at the IBM BigFix documentation website. You can also consult your IBM BigFix representative for more information.
Session Inspectors
IBM BigFix Console and Web Reports both depend on an in-memory session cacheto provide an efficient view of your database. Due to their distinct environments,these two programs have some significant differences:
IBM BigFix Console IBM BigFix Web Reports
Does not maintain Fixlet History inspectors. Maintains Fixlet History inspectors,however, to reduce the memory footprint,version 8.0 runs slower.
88 IBM BigFix: Web Reports Guide

Current inspectors are designed to work inthe IBM BigFix Console only.
Current inspectors do not work.
Inspectors dealing with globally visibleFixlet messages are consistent acrossapplications.
Locally visible Fixlet messages returnnothing.
Works with only one IBM BigFix server. Works across multiple IBM BigFix servers.
JavaScript Relevance calls are instantaneous. JavaScript Relevance calls generate an HTTPrequest, which incurs a round-trip penalty tothe server.
Links to Fixlet filters, computer groups,computers, Fixlet messages, tasks, andanalyses work.
Links to Fixlet filters and computer groupsdo not work. However, links to computers,Fixlet messages, tasks, and analyses do work.
For more information about these special Inspectors, see the IBM BigFix SessionInspector Guide.
Displaying Web Reports from Content Sites
Web Reports accepts a report format that can display reports from content sites,allowing new reports to be added, edited, or removed by Fixlet actions or tasks.There are three basic report types: External, Template, and Custom. The report filemust be a valid XML file with an extension of .beswrpt or .webreport.
The Name tag corresponds to the same-named columns in Report listings.
The contents and the existence of the URLParameters and Data tags depend on theType tag. The Type tag can be one of three case-sensitive strings: TemplateReport,CustomReport, or ExternalReport.
The .beswrpt file can also contain multiple reports in a single XML file:<BESWebReports>
<BESWebReport>...</BESWebReport><BESWebReport>...</BESWebReport>
</BESWebReports>
External Reports
An External Report contains a URL pointing to another page, service, or reportingengine. The report file is a simple wrapper containing the full URL of thedestination. When you import an External Report, it is shown in the Web Reportslist like any other report. When you click an External Report, it loads the targetpage into the browser.
In this example, an External Report loads the IBM BigFix home page:
<BESWebReport><Name>Example External Report</Name>
Appendix A. Tasks for advanced users 89

<Description>IBM BigFix Home Page</Description><Type>ExternalReport</Type><Category>External Report</Category><Source>IBM, Inc.</Source><Data>http://www.ibm.com/software/tivoli/solutions/endpoint/</Data>
</BESWebReport>
Note: An embedded URL is an absolute address and must start with http:// orhttps://
Template Reports
A Template Report is similar to an External Report, except that the base of the URLis assumed to be the Web Reports server. These reports are essentially the same asthe native Web Reports. The information in this section is included forcompleteness; in general you only need to use Custom or External reports.
The Data tag does not exist for this report. Instead, it passes all its information inthe URLParameters tag.
For example, you might create this Issue Assessment report:<BESWebReport><Name>Example Issue Assessment Report</Name><Description>An example report. Runs the Issue Assessment report with specific Fixlets,
BES Support/129 and BES Support/173.</Description><Type>TemplateReport</Type><Category>Issue Assessment</Category><Source>IBM, Inc.</Source><URLParameters>FixletParam=BES Support%2f129&FixletParam=BES
Support%2f173&page=VAReport</URLParameters>
</BESWebReport>
In XML as in HTML, you need to escape the URL Parameter.
90 IBM BigFix: Web Reports Guide

Appendix B. Support
For more information about this product, see the following resources:v IBM Knowledge Centerv IBM BigFix Support Centerv IBM BigFix Family supportv IBM BigFix wikiv Knowledge Basev IBM BigFix Forum
© Copyright IBM Corp. 2010, 2015 91

92 IBM BigFix: Web Reports Guide

Notices
This information was developed for products and services offered in the US. Thismaterial might be available from IBM in other languages. However, you may berequired to own a copy of the product or product version in that language in orderto access it.
IBM may not offer the products, services, or features discussed in this document inother countries. Consult your local IBM representative for information on theproducts and services currently available in your area. Any reference to an IBMproduct, program, or service is not intended to state or imply that only that IBMproduct, program, or service may be used. Any functionally equivalent product,program, or service that does not infringe any IBM intellectual property right maybe used instead. However, it is the user's responsibility to evaluate and verify theoperation of any non-IBM product, program, or service.
IBM may have patents or pending patent applications covering subject matterdescribed in this document. The furnishing of this document does not grant youany license to these patents. You can send license inquiries, in writing, to:
IBM Director of LicensingIBM CorporationNorth Castle Drive, MD-NC119Armonk, NY 10504-1785United States of America
For license inquiries regarding double-byte character set (DBCS) information,contact the IBM Intellectual Property Department in your country or sendinquiries, in writing, to:
Intellectual Property LicensingLegal and Intellectual Property LawIBM Japan Ltd.19-21, Nihonbashi-Hakozakicho, Chuo-kuTokyo 103-8510, Japan
The following paragraph does not apply to the United Kingdom or any othercountry where such provisions are inconsistent with local law:INTERNATIONAL BUSINESS MACHINES CORPORATION PROVIDES THISPUBLICATION "AS IS" WITHOUT WARRANTY OF ANY KIND, EITHEREXPRESS OR IMPLIED, INCLUDING, BUT NOT LIMITED TO, THE IMPLIEDWARRANTIES OF NON-INFRINGEMENT, MERCHANTABILITY OR FITNESSFOR A PARTICULAR PURPOSE. Some states do not allow disclaimer of express orimplied warranties in certain transactions, therefore, this statement may not applyto you.
This information could include technical inaccuracies or typographical errors.Changes are periodically made to the information herein; these changes will beincorporated in new editions of the publication. IBM may make improvementsand/or changes in the product(s) and/or the program(s) described in thispublication at any time without notice.
© Copyright IBM Corp. 2010, 2015 93

Any references in this information to non-IBM websites are provided forconvenience only and do not in any manner serve as an endorsement of thosewebsites. The materials at those websites are not part of the materials for this IBMproduct and use of those websites is at your own risk.
IBM may use or distribute any of the information you supply in any way itbelieves appropriate without incurring any obligation to you.
Licensees of this program who wish to have information about it for the purposeof enabling: (i) the exchange of information between independently createdprograms and other programs (including this one) and (ii) the mutual use of theinformation which has been exchanged, should contact:
IBM Director of LicensingIBM CorporationNorth Castle Drive, MD-NC119Armonk, NY 10504-1785US
Such information may be available, subject to appropriate terms and conditions,including in some cases, payment of a fee.
The licensed program described in this document and all licensed materialavailable for it are provided by IBM under terms of the IBM Customer Agreement,IBM International Program License Agreement or any equivalent agreementbetween us.
The performance data discussed herein is presented as derived under specificoperating conditions. Actual results may vary.
Information concerning non-IBM products was obtained from the suppliers ofthose products, their published announcements or other publicly available sources.IBM has not tested those products and cannot confirm the accuracy ofperformance, compatibility or any other claims related to non-IBM products.Questions on the capabilities of non-IBM products should be addressed to thesuppliers of those products.
Statements regarding IBM's future direction or intent are subject to change orwithdrawal without notice, and represent goals and objectives only.
All IBM prices shown are IBM's suggested retail prices, are current and are subjectto change without notice. Dealer prices may vary.
This information is for planning purposes only. The information herein is subject tochange before the products described become available.
This information contains examples of data and reports used in daily businessoperations. To illustrate them as completely as possible, the examples include thenames of individuals, companies, brands, and products. All of these names arefictitious and any similarity to actual people or business enterprises is entirelycoincidental.
COPYRIGHT LICENSE:
This information contains sample application programs in source language, whichillustrate programming techniques on various operating platforms. You may copy,
94 IBM BigFix: Web Reports Guide

modify, and distribute these sample programs in any form without payment toIBM, for the purposes of developing, using, marketing or distributing applicationprograms conforming to the application programming interface for the operatingplatform for which the sample programs are written. These examples have notbeen thoroughly tested under all conditions. IBM, therefore, cannot guarantee orimply reliability, serviceability, or function of these programs. The sampleprograms are provided "AS IS", without warranty of any kind. IBM shall not beliable for any damages arising out of your use of the sample programs.
© (your company name) (year).Portions of this code are derived from IBM Corp. Sample Programs.© Copyright IBM Corp. _enter the year or years_.
TrademarksIBM, the IBM logo, and ibm.com are trademarks or registered trademarks ofInternational Business Machines Corp., registered in many jurisdictions worldwide.Other product and service names might be trademarks of IBM or other companies.A current list of IBM trademarks is available on the web at www.ibm.com/legal/copytrade.shtml.
Adobe, Acrobat, PostScript and all Adobe-based trademarks are either registeredtrademarks or trademarks of Adobe Systems Incorporated in the United States,other countries, or both.
IT Infrastructure Library is a registered trademark of the Central Computer andTelecommunications Agency which is now part of the Office of GovernmentCommerce.
Intel, Intel logo, Intel Inside, Intel Inside logo, Intel Centrino, Intel Centrino logo,Celeron, Intel Xeon, Intel SpeedStep, Itanium, and Pentium are trademarks orregistered trademarks of Intel Corporation or its subsidiaries in the United Statesand other countries.
Linux is a trademark of Linus Torvalds in the United States, other countries, orboth.
Microsoft, Windows, Windows NT, and the Windows logo are trademarks ofMicrosoft Corporation in the United States, other countries, or both.
ITIL is a registered trademark, and a registered community trademark of TheMinister for the Cabinet Office, and is registered in the U.S. Patent and TrademarkOffice.
UNIX is a registered trademark of The Open Group in the United States and othercountries.
Java™ and all Java-based trademarks and logos are trademarks or registeredtrademarks of Oracle and/or its affiliates.
Cell Broadband Engine is a trademark of Sony Computer Entertainment, Inc. in theUnited States, other countries, or both and is used under license therefrom.
Linear Tape-Open, LTO, the LTO Logo, Ultrium, and the Ultrium logo aretrademarks of HP, IBM Corp. and Quantum in the U.S. and other countries.
Notices 95

Terms and conditions for product documentationPermissions for the use of these publications are granted subject to the followingterms and conditions.
Applicability
These terms and conditions are in addition to any terms of use for the IBMwebsite.
Personal use
You may reproduce these publications for your personal, noncommercial useprovided that all proprietary notices are preserved. You may not distribute, displayor make derivative work of these publications, or any portion thereof, without theexpress consent of IBM.
Commercial use
You may reproduce, distribute and display these publications solely within yourenterprise provided that all proprietary notices are preserved. You may not makederivative works of these publications, or reproduce, distribute or display thesepublications or any portion thereof outside your enterprise, without the expressconsent of IBM.
Rights
Except as expressly granted in this permission, no other permissions, licenses orrights are granted, either express or implied, to the publications or anyinformation, data, software or other intellectual property contained therein.
IBM reserves the right to withdraw the permissions granted herein whenever, in itsdiscretion, the use of the publications is detrimental to its interest or, asdetermined by IBM, the above instructions are not being properly followed.
You may not download, export or re-export this information except in fullcompliance with all applicable laws and regulations, including all United Statesexport laws and regulations.
IBM MAKES NO GUARANTEE ABOUT THE CONTENT OF THESEPUBLICATIONS. THE PUBLICATIONS ARE PROVIDED "AS-IS" AND WITHOUTWARRANTY OF ANY KIND, EITHER EXPRESSED OR IMPLIED, INCLUDINGBUT NOT LIMITED TO IMPLIED WARRANTIES OF MERCHANTABILITY,NON-INFRINGEMENT, AND FITNESS FOR A PARTICULAR PURPOSE.
96 IBM BigFix: Web Reports Guide

Notices 97

IBM®
Printed in USA