IBM API Management Installation and Configuration Guide
38
IBM API MANAGEMENT Installation Guide Julian Smiles [email protected] Version 3.0.4 This document provides the step-by-step install instructions for IBM API Management v3.0.4 for a development environment.
-
Upload
julian-smiles -
Category
Technology
-
view
396 -
download
4
Transcript of IBM API Management Installation and Configuration Guide

IBM API MANAGEMENT Installation Guide
Julian Smiles [email protected]
Version 3.0.4 This document provides the step-by-step install instructions for IBM API Management v3.0.4 for
a development environment.

IBM API Management Installation & Configuration Guide v3.0.4
IBM API MANAGEMENT JULIAN SMILES
www.ibmdeveloper.com [email protected]
1
Table of Contents Required Software .......................................................................................................................... 3
Installation of VMWare Tools ......................................................................................................... 3
Installation & Configuration of Datapower IDG VM ....................................................................... 8
Installation .............................................................................................................................. 8
IDG Virtual Appliance Configuration [Gateway Node] ......................................................... 11
Validate Web UI Access ........................................................................................................ 15
Configure NTP on the Gateway Node ................................................................................... 17
Enable the XML Management Interface Port ....................................................................... 19
Installation & Configuration of API Management VM .................................................................. 20
Installation ............................................................................................................................ 20
Configuring the Management Node ..................................................................................... 22
Configure Cloud Management Console ................................................................................ 25
Steps to Access API Manager ................................................................................................ 31

IBM API Management Installation & Configuration Guide v3.0.4
IBM API MANAGEMENT JULIAN SMILES
www.ibmdeveloper.com [email protected]
2
Overview The two main components of API Management are the Management Node and Gateway Node.
In version 3.0.4 API Manger provides the Analytics and Assembly function and they do not need
to be configured separately.
The Management node [API Management VM] manages the operations of the various nodes in
the IBM API Management environment and provides the tools to interface with the various
nodes. The Environment Console, API Manager and Developer portal user interfaces run on the
Management node.
The Gateway node [IBM Datapower IDG VM] process and manages security protocols and
stores relevant user and appliance authentication data.
To provide high availability in your environment you can deploy two or more of each node type.
In an environment with two Management nodes you need to define an external load balancer
to distribute requests across the Management nodes.
Consider whether you plan to use a combination of physical and virtual appliances, or, only
virtual images.
THIS DOCUMENT IS FOCUSED ON CREATING A DEVELOPMENT
ENVIRONMENT.

IBM API Management Installation & Configuration Guide v3.0.4
IBM API MANAGEMENT JULIAN SMILES
www.ibmdeveloper.com [email protected]
3
IBM API MANAGEMENT INSTALLATION
Required Software 1. VMWare Workstation or VMPlayer
2. VMWare ESXI 5.5x
3. VMWare vSphere Client 5.5
4. IBM Datapower XI52 or IDG VMWare Hypervisor Image
5. IBM API Management 3.0.4 VMWare Image
Installation of VMWare Tools
1. Install VMWare Player
Shown here is the version of VMWare Player i.e. Version 6.0.3

IBM API Management Installation & Configuration Guide v3.0.4
IBM API MANAGEMENT JULIAN SMILES
www.ibmdeveloper.com [email protected]
4
2. Install ESXI Image
a. Choose the ESXI ISO Image using the New Virtual Machine wizard
b. The VMWare Player Auto detects the Image Name

IBM API Management Installation & Configuration Guide v3.0.4
IBM API MANAGEMENT JULIAN SMILES
www.ibmdeveloper.com [email protected]
5
c. Specify the disk capacity
d. Finalize the Virtual Machine creation

IBM API Management Installation & Configuration Guide v3.0.4
IBM API MANAGEMENT JULIAN SMILES
www.ibmdeveloper.com [email protected]
6
e. Once the Virtual Machine boots up you will enter the below screen
f. The rest of the installation & configuration process is available in the below video
https://www.youtube.com/watch?v=UVv5K8RItYc
Specify the Static IP Address. You can specify the IP Address obtained automatically
from DHCP as the Static IP Address
Leave the hostname and domain name as localhost and localdomain
3. Install the vSphere Client
Once the vSphere Client is installed, log into the ESXI server using the static ip address
and the username and password you provided while installing.

IBM API Management Installation & Configuration Guide v3.0.4
IBM API MANAGEMENT JULIAN SMILES
www.ibmdeveloper.com [email protected]
7
The trial license is valid for only 60 days. If you have a permanent license enter the
license in the vSphere client by accessing the Inventory -> Configuration -> Licensed
Features -> Edit -> Assign new license key to host

IBM API Management Installation & Configuration Guide v3.0.4
IBM API MANAGEMENT JULIAN SMILES
www.ibmdeveloper.com [email protected]
8
Installation & Configuration of Datapower IDG VM
The Datapower IDG functions as the Gateway Node
Installation
1. In the vSphere Client, choose File -> Deploy OVA Template and Choose the IDG OVA
Image

IBM API Management Installation & Configuration Guide v3.0.4
IBM API MANAGEMENT JULIAN SMILES
www.ibmdeveloper.com [email protected]
9
2. Here we are installing version 7.1.0.1.
Click Next and Accept the License Agreements
In the Configuration, choose Standard or Enterprise Configuration, depending on
requirements
In the disk format screen, choose Thin Provision. This is my preference. But you can
learn more about it in the below blog
http://blogs.vmware.com/vsphere/2012/03/thin-provisioning-whats-the-scoop.html
NOTE: If you are planning to run many VMWare Images simultaneously, remember to
create a large datastore during ESXi Installation if you do not have access to create new
LUNs or access to SCSI hard disks. If you are installing in your laptop or desktop create 1
large datastore. In my case a created a 100GB datastore

IBM API Management Installation & Configuration Guide v3.0.4
IBM API MANAGEMENT JULIAN SMILES
www.ibmdeveloper.com [email protected]
10
In the next screen for Network Mapping just hit Next. All the NICs point to the same VM
Network
In the summary screen check if your settings are right and hit Finish
The deploy takes about 3 minutes. Once It is deployed successfully the inventory will be
updated with the entry for WebSphere Datapower IDG

IBM API Management Installation & Configuration Guide v3.0.4
IBM API MANAGEMENT JULIAN SMILES
www.ibmdeveloper.com [email protected]
11
IDG Virtual Appliance Configuration [Gateway Node]
Power on the Virtual Machine
Once the VM is powered on and booted, it will take you to the login Prompt.
Login: admin
Password: admin
Answer No to the below 2 questions
1. Enable Secure Backup Mode? N
2. Enable Common Criteria Compatibility Mode? N

IBM API Management Installation & Configuration Guide v3.0.4
IBM API MANAGEMENT JULIAN SMILES
www.ibmdeveloper.com [email protected]
12
It will prompt you to enter new password and confirm. Enter a password you can remember
twice.
Step 1: Configure Network Interfaces

IBM API Management Installation & Configuration Guide v3.0.4
IBM API MANAGEMENT JULIAN SMILES
www.ibmdeveloper.com [email protected]
13
Since the ESXi Host is configured with the Static IP address, it will serve as the DNS & Gateway
IP Address.
Here the ESXi IP address is 192.168.16.128. We can increment the last 3 digits by one and
assign the IP Address of 192.168.16.129 to Datapower IDG virtual appliance.
For Home Networks its preferable to have the CIDR notation as 192.168.16.129/24
Step 2: Configure Network Services
Here we say ‘Yes’ to both the questions and the IP address of the DNS Server will be the IP
address of ESXi
Step 3: Configure System Identifier
This is an optional parameter that is not required. You can specify a valid identifier.
Step 4: Configure Remote Management Access
Choose ‘Yes’ to configure remote management access, Web UI access and enable SSH.

IBM API Management Installation & Configuration Guide v3.0.4
IBM API MANAGEMENT JULIAN SMILES
www.ibmdeveloper.com [email protected]
14
The IP Address is the IP specified above for the Datapower IDG VM.
Step 5: Configure user account to reset passwords
Specify an account other than ‘admin’. If you specify admin you have to reset the admin
password to something new.
Step 6: Configure RAID Array
This is an optional step. If you would like to create a RAID array, follow the steps below
Step 7: Save the Configuration

IBM API Management Installation & Configuration Guide v3.0.4
IBM API MANAGEMENT JULIAN SMILES
www.ibmdeveloper.com [email protected]
15
Validate Web UI Access
Access the Web UI using the IP Address and port number you specified.
Here you specify https://192.168.16.129:9090/
Add the security exception and it will take you to the login page.
Enter the admin id and password you specified in the above steps.

IBM API Management Installation & Configuration Guide v3.0.4
IBM API MANAGEMENT JULIAN SMILES
www.ibmdeveloper.com [email protected]
16
Accept the Software License Agreement
This takes a few minute to complete processing

IBM API Management Installation & Configuration Guide v3.0.4
IBM API MANAGEMENT JULIAN SMILES
www.ibmdeveloper.com [email protected]
17
Configure NTP on the Gateway Node
Consider configuring NTP on every node to ensure that there is a consistent time view.
Any differences in the clocks across the nodes can cause problems.
Enable Windows NTP Server
Here I am performing the installation on a Windows 2008 Server.
Go to Local Group Policy Editor -> Computer Configuration -> Administrative Templates ->
System -> Windows Time Service -> Time Providers -> Enable Windows NTP Service
Enable Datapower NTP Service
Login to Datapower CLI using SSH

IBM API Management Installation & Configuration Guide v3.0.4
IBM API MANAGEMENT JULIAN SMILES
www.ibmdeveloper.com [email protected]
18
1. Log in to the CLI of the Datapower IDG Virtual Appliance
2. Enter co
3. Enter ntp-service
4. Enter admin-state enabled
5. Enter remote-server <IPaddress>
6. Enter exit
7. Enter write mem
TO VALIDATE:
Enter show time

IBM API Management Installation & Configuration Guide v3.0.4
IBM API MANAGEMENT JULIAN SMILES
www.ibmdeveloper.com [email protected]
19
Enable the XML Management Interface Port
The XML Management Interface port must be enabled for IBM API Management. For each
Gateway node complete the following steps to enable the port number that is used to monitor
incoming management requests.
Enable and Save Configuration.

IBM API Management Installation & Configuration Guide v3.0.4
IBM API MANAGEMENT JULIAN SMILES
www.ibmdeveloper.com [email protected]
20
Installation & Configuration of API Management VM
Installation
Deploy the API Management OVA Template

IBM API Management Installation & Configuration Guide v3.0.4
IBM API MANAGEMENT JULIAN SMILES
www.ibmdeveloper.com [email protected]
21

IBM API Management Installation & Configuration Guide v3.0.4
IBM API MANAGEMENT JULIAN SMILES
www.ibmdeveloper.com [email protected]
22
Configuring the Management Node

IBM API Management Installation & Configuration Guide v3.0.4
IBM API MANAGEMENT JULIAN SMILES
www.ibmdeveloper.com [email protected]
23
The Datapower IDG we configured above will serve as the Gateway Node
Login: admin
Password: !n0r1t5@C
IP Address is automatically assigned. In the below screenshot you can see the IP Address as
192.168.16.131
Run the below commands to verify

IBM API Management Installation & Configuration Guide v3.0.4
IBM API MANAGEMENT JULIAN SMILES
www.ibmdeveloper.com [email protected]
24
By default it is configured to use DHCP. If you want to change this to static, run the below
commands.
1. Set the host name for the management interface:
none/Standalone> net set hostname static appliancehostname
2. Set the DNS domain name:
none/Standalone> net set domain static domain-name
3. Set the DNS name server:
none/Standalone> net set nameserver static dns-ipaddress
4. Set the network address for the management interface:
none/Standalone> net set eth<n> address ipaddress mask netmask [bcast
broadcast]
5. Set the address of the default gateway for your TCP/IP network:
none/Standalone> net set gateway static ip-address {eth<n>|none}
We will configure the Gateway using the cloud management console.

IBM API Management Installation & Configuration Guide v3.0.4
IBM API MANAGEMENT JULIAN SMILES
www.ibmdeveloper.com [email protected]
25
Configure Cloud Management Console
https://192.168.16.131/cmc
The link will take you to the API Management Login page for Cloud Management Console.
Enter the admin Username and Password. admin, !n0r1t5@C

IBM API Management Installation & Configuration Guide v3.0.4
IBM API MANAGEMENT JULIAN SMILES
www.ibmdeveloper.com [email protected]
26
Accept the License Agreement

IBM API Management Installation & Configuration Guide v3.0.4
IBM API MANAGEMENT JULIAN SMILES
www.ibmdeveloper.com [email protected]
27
You will be prompted to change the password and add an email address.
IBM API Management Installation & Configuration Guide v3.0.4
IBM API MANAGEMENT JULIAN SMILES
www.ibmdeveloper.com [email protected]
28
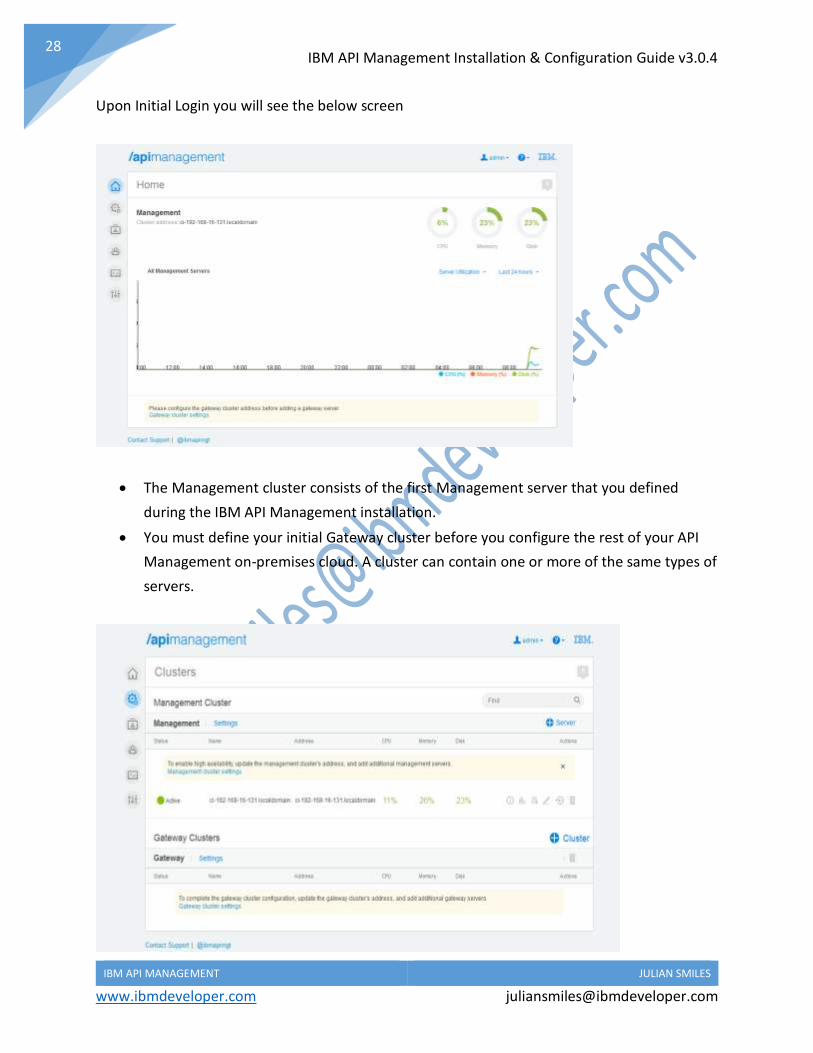
Upon Initial Login you will see the below screen
The Management cluster consists of the first Management server that you defined
during the IBM API Management installation.
You must define your initial Gateway cluster before you configure the rest of your API
Management on-premises cloud. A cluster can contain one or more of the same types of
servers.

IBM API Management Installation & Configuration Guide v3.0.4
IBM API MANAGEMENT JULIAN SMILES
www.ibmdeveloper.com [email protected]
29
To configure the Cloud Management Console settings for the initial Gateway cluster, complete
the following steps:
In the navigation section of the Cloud Management Console, click the Clusters icon (
). The Clusters page opens.
In the Gateway Clusters pane, click Settings.
Optional: To change the name of the name of the Gateway cluster, enter a new value in
the Name field.
In the Address field, enter the virtual IP address or host name that is to be used for
inbound API calls, or of an external load balancer if one is being used.

IBM API Management Installation & Configuration Guide v3.0.4
IBM API MANAGEMENT JULIAN SMILES
www.ibmdeveloper.com [email protected]
30
Add the Gateway Server. This is the Datapower IP Address and the XML Management Interface
port and the Login and Password.
This configuration completes the initial Management & Gateway cluster configuration

IBM API Management Installation & Configuration Guide v3.0.4
IBM API MANAGEMENT JULIAN SMILES
www.ibmdeveloper.com [email protected]
31
Steps to Access API Manager
Use the API Manager UI to define APIs and to securely manage your API environment. You can
also analyze your API usage by using the analytics that are provided and socialize your APIs in a
developer portal.
Before you can access the API Manager UI, you must activate the user account that your Cloud
Management Console administrator invited you to join. For you to be able to send the
invitation you need to first configure the SMTP Server settings in the Cloud Management
Console.
Choose Settings and scroll down to Email settings.
Set the Email SMTP Server Settings. Save and Test the configurations

IBM API Management Installation & Configuration Guide v3.0.4
IBM API MANAGEMENT JULIAN SMILES
www.ibmdeveloper.com [email protected]
32
Create an Organization and Add Owner. You will be prompted to enter an email id for a new
user. Once you save an invitation is sent for API Manager.
Add User
A Welcome email will be sent to the specified email address

IBM API Management Installation & Configuration Guide v3.0.4
IBM API MANAGEMENT JULIAN SMILES
www.ibmdeveloper.com [email protected]
33
Click on the link in the email and it will take you to the login page for API Manager.

IBM API Management Installation & Configuration Guide v3.0.4
IBM API MANAGEMENT JULIAN SMILES
www.ibmdeveloper.com [email protected]
34

IBM API Management Installation & Configuration Guide v3.0.4
IBM API MANAGEMENT JULIAN SMILES
www.ibmdeveloper.com [email protected]
35
Shown below is the Home Page for API Manager, for the organization you created.

IBM API Management Installation & Configuration Guide v3.0.4
IBM API MANAGEMENT JULIAN SMILES
www.ibmdeveloper.com [email protected]
36
Add Additional Users for different Roles in the Cloud Management Console. The admin id only
serves as the Cloud Owner. You require additional ids to perform the role of Cloud
Administrator and Organization Manager.
For all new users, an email invite is sent out. You need to click on the link for you to be added as
an active user.

IBM API Management Installation & Configuration Guide v3.0.4
IBM API MANAGEMENT JULIAN SMILES
www.ibmdeveloper.com [email protected]
37
This covers the basic install and configuration for IBM API Management.