i-trust PKI SERVICES IDRBT CERTIFYING AUTHORITY Manual.pdf · Certifying Authority by the...
114
i-trust PKI SERVICES IDRBT CERTIFYING AUTHORITY Registration Authority User Manual Copyright 2002, IDRBT, All rights reserved Institute for Development and Research in Banking Technology Castle Hills, Road #1, Masab Tank, Hyderabad (AP)- 500057, INDIA http://idrbtca.org.in/ , http://infinet.org.in/ http://www.idrbt.com/
-
Upload
nguyenphuc -
Category
Documents
-
view
253 -
download
0
Transcript of i-trust PKI SERVICES IDRBT CERTIFYING AUTHORITY Manual.pdf · Certifying Authority by the...

i-trust PKI SERVICES
IDRBT CERTIFYING AUTHORITY
Registration Authority User Manual
Copyright 2002, IDRBT, All rights reserved
Institute for Development and Research in Banking Technology Castle Hills, Road #1, Masab Tank,
Hyderabad (AP)- 500057, INDIA
http://idrbtca.org.in/, http://infinet.org.in/
http://www.idrbt.com/

© IDRBT, 2002
ii
Preface:
Certifying Authority (CA) is a body that fulfills the need for trusted third party services
in Electronic Commerce by issuing Digital Certificates that attests to some fact about
the subject of the certificate. A digital certificate is a digitally signed statement by a
CA that provides independent confirmation of an attribute claimed by a person
offering a Digital Signature.
For securing the transactions through INFINET, IDRBT provides high end Public Key
Infrastructure (PKI) based services and solutions to individuals, organizations as well
as governments that enable trust and security. IDRBT has set up a high-end, global
standards- based processing Center at its campus at Hyderabad, capable of issuing
thousands of Digital Certificates, an important component of PKI. As a licensed
Certifying Authority by the Controller of Certifying Authorities (CCA), Government of
India, IDRBT CA will issue, administer and revoke the digital certificates over
INFINET.
This manual will give you information about, the procedures for managing
Registration Authority services of IDRBT Certifying Authority.
About This Manual Typographic Conventions Convention Meaning
Select Use the arrow key or mouse to select an item on the menu, a
field in a window or an item in the interface.
Click Press the primary mouse button once. The primary mouse
button is typically the left button.
Italic
Bold Lettering Words in bold face type represent application’s functionalities
name, important notes, hints, paragraph headings.

© IDRBT, 2002
iii
What is in this Manual? This manual introduces the i-trust PKI Services by IDRBT Certifying Authority and
helps you by providing all the information to carry out the procedure for Certification
Services.
Chapter Description
Chapter 1 Introduction
Chapter 2 Getting Started
Chapter 3 Operational Guidelines for RA Administrator
Chapter 4 Operational Guidelines for RA Operator
Appendix 1 Getting Started in COVE
Appendix 2 Installation of Cyberflex Smart Card Reader Utility software
components
Getting Help:
If you have any questions that were not answered in this manual, please see the
following source for additional help.
Contacting IDRBT CA Technical Support:
i-trust PKI Customer Services team is committed to supporting the users. If you have
any questions, need additional assistance, or encounter a problem, please contact
the following:
IDRBT CA
i-trust PKI Services Support Team
INFINET http://idrbtca.org.in/ , http://infinet.org.in/
INTERNET http://www.idrbt.com/

© IDRBT, 2002
iv
E-mail [email protected]
Telephone +91-40-3534981/82
Fax +91-40-3535157
We Welcome Your Comments Our support is committed. Please include the following information, when you
contact us:
Your name, company/organization name, job title, phone number and e-mail
address
Send us e-mail at: [email protected] Or, you can write us at: The CA Administrator, IDRBT Castle Hills, Road #1, Masab Tank, Hyderabad – 500057, INDIA

© IDRBT, 2002
v
CONTENTS 1. Introduction ....................................................................................... 1
1.1. Introduction To Public Key Infrastructure ...........................................................1 1.1.1. Internet Security Issues .................................................................................1
1.2. PKI Model ................................................................................................................3 1.3. Encryption and Decryption....................................................................................4
1.3.1. Symmetric-Key Encryption ...........................................................................4 1.3.2. Public-Key Encryption ...................................................................................5 1.3.3. Key Length and Encryption Strength ..........................................................7
1.4. Digital Signatures ...................................................................................................7 1.5. Certificates and Authentication ..........................................................................10
1.5.1. A Certificate Identifies Someone or Something .......................................10 1.5.2. Authentication Confirms an Identity...........................................................11
1.6. Password-Based Authentication........................................................................12 1.7. Certificate-Based Authentication .......................................................................14 1.8. How Certificates Are Used..................................................................................16
1.8.1. Types of Certificates ....................................................................................16 1.9. SSL Protocol .........................................................................................................17 1.10. Signed and Encrypted Email ..........................................................................18 1.11. Object Signing...................................................................................................19 1.12. Contents of a Certificate ..................................................................................19 1.13. Distinguished Names.......................................................................................20 1.14. A Typical Certificate .........................................................................................20 1.15. How CA Certificates Are Used to Establish Trust.......................................23 1.16. Managing Certificates ......................................................................................24
1.16.1. Issuing Certificates ...................................................................................24 1.17. Certificates and the LDAP Directory .............................................................25 1.18. Key Management .............................................................................................25 1.19. Renewing and Revoking Certificates ............................................................26 1.20. IDRBT Certifying Authority..............................................................................27 1.21. Registration Authorities ...................................................................................28
2. Getting started................................................................................. 30 3. Operational Guidelines for RA Administrator ............................ 36
3.1. How to Login ? ......................................................................................................36 3.2. Creating a Subscriber ..........................................................................................42 3.3. Activate Subscriber ..............................................................................................44 3.4. Create RA Operator .............................................................................................45 3.5. Activate RA Operator ...........................................................................................47 3.6. Edit RA Operator’s Certificate Serial Number .................................................48 3.7. Assign requests to RA Operator ........................................................................49 3.8. Reassign pending request ..................................................................................52 3.9. Sign the request ...................................................................................................54 3.10. Release requests to CA Office.......................................................................57 3.11. View rejected request ......................................................................................59 3.12. View rejected request from CA ......................................................................59

© IDRBT, 2002
vi
3.13. Initiate revocation of the Certificate ...............................................................59 3.14. Initiate suspension of Certificate ....................................................................64 3.15. Report generation.............................................................................................64
4. Operational Guidelines for RA Operator..................................... 66 4.1. How to login? ........................................................................................................66 4.2. Create Subscriber ................................................................................................67 4.3. Verify and sign the request .................................................................................68 4.4. Rejection of request .............................................................................................69 4.5. Accept rejected request.......................................................................................70
5. Brief procedures for RA Office for the issuance of Digital Certificate ......................................................................................... 71
Appendix - 1............................................................................................ 72 Appendix - 2.......................................................................................... 102

© IDRBT, 2002
1
1. Introduction
1.1. Introduction To Public Key Infrastructure
1.1.1. Internet Security Issues
All communication over the Internet uses the Transmission Control Protocol/Internet
Protocol (TCP/IP). TCP/IP allows information to be sent from one computer to
another through a variety of intermediate computers and separate networks before it
reaches its destination.
The great flexibility of TCP/IP has led to its worldwide acceptance as the basic
Internet and intranet communications protocol. At the same time, the fact that
TCP/IP allows information to pass through intermediate computers makes it possible
for a third party to interfere with communications in the following ways:
• Eavesdropping. Information remains intact, but its privacy is compromised.
For example, someone could learn your credit card number, record a
sensitive conversation, or intercept classified information.
• Tampering. Information in transit is changed or replaced and then sent on to
the recipient. For example, someone could alter an order for goods or change
a person's resume.
• Impersonation. Information passes to a person who poses as the intended
recipient. Impersonation can take two forms:
o Spoofing. A person can pretend to be someone else. For example, a
person can pretend to have the email address [email protected], or a
computer can identify itself as a site called www.idrbt.com when it is not.
This type of impersonation is known as spoofing.
o Misrepresentation. A person or organization can misrepresent itself.
For example, suppose the site www.idrbt.com pretends to be a furniture

© IDRBT, 2002
2
store when it is really just a site that takes credit-card payments but
never sends any goods.
Normally, users of the many cooperating computers that make up the Internet or
other networks don't monitor or interfere with the network traffic that continuously
passes through their machines. However, many sensitive personal and business
communications over the Internet require precautions that address the threats listed
above. Fortunately, a set of well-established techniques and standards known as
public-key cryptography make it relatively easy to take such precautions.
Public-key cryptography facilitates the following tasks:
• Encryption and decryption allow two communicating parties to disguise
information they send to each other. The sender encrypts, or scrambles,
information before sending it. The receiver decrypts, or unscrambles, the
information after receiving it. While in transit, the encrypted information is
unintelligible to an intruder.
• Tamper detection allows the recipient of information to verify that it has not
been modified in transit. Any attempt to modify data or substitute a false
message for a legitimate one will be detected.
• Authentication allows the recipient of information to determine its origin —
that is, to confirm the sender's identity.
• Non-repudiation prevents the sender of information from claiming at a later
date that the information was never sent.
PKI is based on the use of digital certificates— the equivalent of a passport in the
physical world. Digital certificates allow users to verify the identity of the person or
institution that they're communicating with, and to digitally sign transactions.
A certificate-based system provides:
• Authentication- to verify the identity of the sender and the recipient of digital
information

© IDRBT, 2002
3
• Data integrity- to verify that information is received unaltered from the sender
• Data confidentiality- to ensure that sensitive information does not fall into the
wrong hands
• Non-repudiation- to ensure that transactions are legally binding, protecting
your business from fraud
1.2. PKI Model
The basic components of a PKI are the Registration Authority (RA) and the
Certificate Authority (CA).
• The RA verifies the certificate request of the applicant and forwards to the CA
• The CA generates certificates on the RA's request and posts the certificate to
a directory
• A PKI also includes policies, procedures, and contracts that govern how and
when digital certificates are issued, renewed, or revoked, among other issues.
Applications that are PKI-enabled can manage user certificates and generate digital
certificates on desktop PCs to secure communications and execute binding digital
transactions.

© IDRBT, 2002
4
1.3. Encryption and Decryption
Encryption is the process of transforming information so it is unintelligible to anyone
but the intended recipient. Decryption is the process of transforming encrypted
information so that it is intelligible again. A cryptographic algorithm, also called a
cipher, is a mathematical function used for encryption or decryption. In most cases,
two related functions are employed, one for encryption and the other for decryption.
With most modern cryptography, the ability to keep encrypted information secret is
based not on the cryptographic algorithm, which is widely known, but on a number
called a key that must be used with the algorithm to produce an encrypted result or
to decrypt previously encrypted information. Decryption with the correct key is
simple. Decryption without the correct key is very difficult, and in some cases
impossible for all practical purposes.
1.3.1. Symmetric-Key Encryption
With symmetric-key encryption, the encryption key can be calculated from the
decryption key and vice versa. With most symmetric algorithms, the same key is
used for both encryption and decryption, as shown in Figure 1.1.
Figure 1.1 Symmetric -key encryption
Implementations of symmetric-key encryption can be highly efficient, so that users
do not experience any significant time delay as a result of the encryption and
decryption. Symmetric-key encryption also provides a degree of authentication,
since information encrypted with one symmetric key cannot be decrypted with any
other symmetric key. Thus, as long as the symmetric key is kept secret by the two
parties using it to encrypt communications, each party can be sure that it is

© IDRBT, 2002
5
communicating with the other as long as the decrypted messages continue to make
sense.
Symmetric-key encryption is effective only if the symmetric key is kept secret by the
two parties involved. If anyone else discovers the key, it affects both confidentiality
and authentication. A person with an unauthorized symmetric key not only can
decrypt messages sent with that key, but can encrypt new messages and send them
as if they came from one of the two parties who were originally using the key.
Symmetric-key encryption plays an important role in the SSL protocol, which is
widely used for authentication, tamper detection, and encryption over TCP/IP
networks. SSL also uses techniques of public-key encryption, which is described in
the next section.
1.3.2. Public-Key Encryption
The most commonly used implementations of public-key encryption are based on
algorithms patented by RSA Data Security (http://www.rsa.com). Therefore, this
section describes the RSA approach to public-key encryption.
Public-key encryption (also called asymmetric encryption) involves a pair of keys
— a public key and a private key — associated with an entity that needs to
authenticate its identity electronically or to sign or encrypt data. Each public key is
published, and the corresponding private key is kept secret. Data encrypted with
your public key can be decrypted only with your private key. Figure 1.2 shows a
simplified view of the way public-key encryption works.

© IDRBT, 2002
6
Figure 1.2 Public-key encryption
The scheme shown in Figure 1.2 lets you freely distribute a public key, and only you
will be able to read data encrypted using this key. In general, to send encrypted data
to someone, you encrypt the data with that person's public key, and the person
receiving the encrypted data decrypts it with the corresponding private key.
Compared with symmetric-key encryption, public-key encryption requires more
computation and is therefore not always appropriate for large amounts of data.
However, it's possible to use public-key encryption to send a symmetric key, which
can then be used to encrypt additional data. This is the approach used by the SSL
protocol.
As it happens, the reverse of the scheme shown in Figure 1.2 also works: data
encrypted with your private key can be decrypted only with your public key. This
would not be a desirable way to encrypt sensitive data, however, because it means
that anyone with your public key, which is by definition published, could decrypt the
data. Nevertheless, private-key encryption is useful, because it means you can use
your private key to sign data with your digital signature — an important requirement
for electronic commerce and other commercial applications of cryptography. Client
software such as Internet Explorer or Netscape Communicator can then use your
public key to confirm that the message was signed with your private key and that it
hasn't been tampered with since being signed. Digital Signatures and subsequent
sections describe how this confirmation process works.

© IDRBT, 2002
7
1.3.3. Key Length and Encryption Strength
In general, the strength of encryption is related to the difficulty of discovering the
key, which in turn depends on both the cipher used and the length of the key. For
example, the difficulty of discovering the key for the RSA cipher most commonly
used for public-key encryption depends on the difficulty of factoring large numbers, a
well-known mathematical problem.
Encryption strength is often described in terms of the size of the keys used to
perform the encryption: in general, longer keys provide stronger encryption. Key
length is measured in bits. For example, 128-bit keys for use with the RC4
symmetric-key cipher supported by SSL provide significantly better cryptographic
protection than 40-bit keys for use with the same cipher. Roughly speaking, 128-bit
RC4 encryption is 3 x 1026 times stronger than 40-bit RC4 encryption.
Different ciphers may require different key lengths to achieve the same level of
encryption strength. The RSA cipher used for public-key encryption, for example,
can use only a subset of all possible values for a key of a given length, due to the
nature of the mathematical problem on which it is based. Other ciphers, such as
those used for symmetric key encryption, can use all possible values for a key of a
given length, rather than a subset of those values. Thus a 128-bit key for use with a
symmetric-key encryption cipher would provide stronger encryption than a 128-bit
key for use with the RSA public-key encryption cipher.
This difference explains why the RSA public-key encryption cipher must use a 512-
bit key (or longer) to be considered cryptographically strong, whereas symmetric key
ciphers can achieve approximately the same level of strength with a 64-bit key. Even
this level of strength may be vulnerable to attacks in the near future.
1.4. Digital Signatures
Encryption and decryption address the problem of eavesdropping, one of the three
Internet security issues mentioned at the beginning of this document. But encryption

© IDRBT, 2002
8
and decryption, by themselves, do not address the other two problems mentioned in
Internet Security Issues: tampering and impersonation.
This section describes how public-key cryptography addresses the problem of
tampering. The sections that follow describe how it addresses the problem of
impersonation.
Tamper detection and related authentication techniques rely on a mathematical
function called a one-way hash (also called a message digest). A one-way hash is
a number of fixed length with the following characteristics:
• The value of the hash is unique for the hashed data. Any change in the data,
even deleting or altering a single character, results in a different value.
• The content of the hashed data cannot, for all practical purposes, be deduced
from the hash — which is why it is called "one-way."
As mentioned in Public-Key Encryption, it's possible to use your private key for
encryption and your public key for decryption. Although this is not desirable when
you are encrypting sensitive information, it is a crucial part of digitally signing any
data. Instead of encrypting the data itself, the signing software creates a one-way
hash of the data, then uses your private key to encrypt the hash. The encrypted
hash, along with other information, such as the hashing algorithm, is known as a
digital signature. Figure 1.3 shows a simplified view of the way a digital signature
can be used to validate the integrity of signed data.

© IDRBT, 2002
9
Figure 1.3 Using a digital signature to validate data integrity
Figure 1.3 shows two items transferred to the recipient of some signed data: the
original data and the digital signature, which is basically a one-way hash (of the
original data) that has been encrypted with the signer's private key. To validate the
integrity of the data, the receiving software first uses the signer's public key to
decrypt the hash. It then uses the same hashing algorithm that generated the
original hash to generate a new one-way hash of the same data. (Information about
the hashing algorithm used is sent with the digital signature, although this isn't
shown in the figure.) Finally, the receiving software compares the new hash against
the original hash. If the two hashes match, the data has not changed since it was
signed. If they don't match, the data may have been tampered with since it was
signed, or the signature may have been created with a private key that doesn't
correspond to the public key presented by the signer.
If the two hashes match, the recipient can be certain that the public key used to
decrypt the digital signature corresponds to the private key used to create the digital
signature. Confirming the identity of the signer, however, also requires some way of
confirming that the public key really belongs to a particular person or other entity.
The significance of a digital signature is comparable to the significance of a
handwritten signature. Once you have signed some data, it is difficult to deny doing
so later — assuming that the private key has not been compromised or out of the

© IDRBT, 2002
10
owner's control. This quality of digital signatures provides a high degree of non-
repudiation — that is, digital signatures make it difficult for the signer to deny having
signed the data. In some situations, a digital signature may be as legally binding as
a handwritten signature.
1.5. Certificates and Authentication
1.5.1. A Certificate Identifies Someone or Something
A certificate is an electronic document used to identify an individual, a server, a
company, or some other entity and to associate that identity with a public key. Like a
driver's license, a passport, or other commonly used personal IDs, a certificate
provides generally recognized proof of a person's identity. Public-key cryptography
uses certificates to address the problem of impersonation.
To get a driver's license, you typically apply to a government agency, such as the
Department of Motor Vehicles, which verifies your identity, your ability to drive, your
address, and other information before issuing the license. To get a student ID, you
apply to a school or college, which performs different checks (such as whether you
have paid your tuition) before issuing the ID. To get a library card, you may need to
provide only your name and a utility bill with your address on it.
Certificates work much the same way as any of these familiar forms of identification.
Certificate authorities (CAs) are entities that validate identities and issue
certificates. They can be either independent third parties or organizations running
their own certificate-issuing server software. The methods used to validate an
identity vary depending on the policies of a given CA — just as the methods to
validate other forms of identification vary depending on who is issuing the ID and the
purpose for which it will be used. In general, before issuing a certificate, the CA must
use its published verification procedures for that type of certificate to ensure that an
entity requesting a certificate is in fact who it claims to be.
The certificate issued by the CA binds a particular public key to the name of the
entity the certificate identifies (such as the name of an employee or a server).

© IDRBT, 2002
11
Certificates help prevent the use of fake public keys for impersonation. Only the
public key certified by the certificate will work with the corresponding private key
possessed by the entity identified by the certificate.
In addition to a public key, a certificate always includes the name of the entity it
identifies, an expiration date, the name of the CA that issued the certificate, a serial
number, and other information. Most importantly, a certificate always includes the
digital signature of the issuing CA. The CA's digital signature allows the certificate to
function as a "letter of introduction" for users who know and trust the CA but don't
know the entity identified by the certificate.
1.5.2. Authentication Confirms an Identity
Authentication is the process of confirming an identity. In the context of network
interactions, authentication involves the confident identification of one party by
another party. Authentication over networks can take many forms. Certificates are
one way of supporting authentication.
Network interactions typically take place between a client, such as browser software
running on a personal computer, and a server, such as the software and hardware
used to host a Web site. Client authentication refers to the confident identification
of a client by a server (that is, identification of the person assumed to be using the
client software). Server authentication refers to the confident identification of a
server by a client (that is, identification of the organization assumed to be
responsible for the server at a particular network address).
Client and server authentication are not the only forms of authentication that
certificates support. For example, the digital signature on an email message,
combined with the certificate that identifies the sender, provide strong evidence that
the person identified by that certificate did indeed send that message. Similarly, a
digital signature on an HTML form, combined with a certificate that identifies the
signer, can provide evidence, after the fact, that the person identified by that
certificate did agree to the contents of the form. In addition to authentication, the

© IDRBT, 2002
12
digital signature in both cases ensures a degree of non-repudiation — that is, a
digital signature makes it difficult for the signer to claim later not to have sent the
email or the form.
Client authentication is an essential element of network security within most
intranets or extranets. The sections that follow contrast two forms of client
authentication:
• Password-Based Authentication. Almost all server software permits client
authentication by means of a name and password. For example, a server
might require a user to type a name and password before granting access to
the server. The server maintains a list of names and passwords; if a particular
name is on the list, and if the user types the correct password, the server
grants access.
• Certificate-Based Authentication. Client authentication based on certificates is
part of the SSL protocol. The client digitally signs a randomly generated piece
of data and sends both the certificate and the signed data across the network.
The server uses techniques of public-key cryptography to validate the
signature and confirm the validity of the certificate.
1.6. Password-Based Authentication
Figure 1.4 shows the basic steps involved in authenticating a client by means of a
name and password. Figure 1.4 assumes the following:
• The user has already decided to trust the server, either without authentication
or on the basis of server authentication via SSL.
• The user has requested a resource controlled by the server.
• The server requires client authentication before permitting access to the
requested resource.
Figure 1.4 Using a password to authenticate a client to a server

© IDRBT, 2002
13
These are the steps shown in Figure 1.4:
1. In response to an authentication request from the server, the client displays a
dialog box requesting the user's name and password for that server. The user
must supply a name and password separately for each new server the user
wishes to use during a work session.
2. The client sends the name and password across the network, either in the
clear or over an encrypted SSL connection.
3. The server looks up the name and password in its local password database
and, if they match, accepts them as evidence authenticating the user's
identity.
4. The server determines whether the identified user is permitted to access the
requested resource, and if so allows the client to access it.
With this arrangement, the user must supply a new password for each server, and
the administrator must keep track of the name and password for each user, typically
on separate servers.
As shown in the next section, one of the advantages of certificate-based
authentication is that it can be used to replace the first three steps in Figure 1.2 with
a mechanism that allows the user to supply just one password (which is not sent
across the network) and allows the administrator to control user authentication
centrally.

© IDRBT, 2002
14
1.7. Certificate-Based Authentication
Figure 1.5 shows how client authentication works using certificates and the SSL
Protocol. To authenticate a user to a server, a client digitally signs a randomly
generated piece of data and sends both the certificate and the signed data across
the network. For the purposes of this discussion, the digital signature associated
with some data can be thought of as evidence provided by the client to the server.
The server authenticates the user's identity on the strength of this evidence.
Like Figure 1.4, Figure 1.5 assumes that the user has already decided to trust the
server and has requested a resource, and that the server has requested client
authentication in the process of evaluating whether to grant access to the requested
resource.
Figure 1.5 Using a certificate to authenticate a client to a server
Unlike the process shown in Figure 1.4, the process shown in Figure 1.5 requires
the use of SSL. Figure 1.5 also assumes that the client has a valid certificate that
can be used to identify the client to the server. Certificate-based authentication is
generally considered preferable to password-based authentication because it is
based on what the user has (the private key) as well as what the user knows (the
password that protects the private key). However, it's important to note that these
two assumptions are true only if unauthorized personnel have not gained access to

© IDRBT, 2002
15
the user's machine or password, the password for the client software's private key
database has been set, and the software is set up to request the password at
reasonably frequent intervals.
Important Neither password-based authentication nor certificate-based
authentication address security issues related to physical access to individual
machines or passwords. Public- key cryptography can only verify that a private key
used to sign some data corresponds to the public key in a certificate. It is the user's
responsibility to protect a machine's physical security and to keep the private-key
password secret.
These are the steps shown in Figure 1.3:
1. The client software, such as Communicator, maintains a database of the
private keys that correspond to the public keys published in any certificates
issued for that client. The client asks for the password to this database the
first time the client needs to access it during a given session — for example,
the first time the user attempts to access an SSL-enabled server that requires
certificate-based client authentication. After entering this password once, the
user doesn't need to enter it again for the rest of the session, even when
accessing other SSL-enabled servers.
2. The client unlocks the private-key database, retrieves the private key for the
user's certificate, and uses that private key to digitally sign some data that has
been randomly generated for this purpose on the basis of input from both the
client and the server. This data and the digital signature constitute "evidence"
of the private key's validity. The digital signature can be created only with that
private key and can be validated with the corresponding public key against
the signed data, which is unique to the SSL session.
3. The client sends both the user's certificate and the evidence (the randomly
generated piece of data that has been digitally signed) across the network.
4. The server uses the certificate and the evidence to authenticate the user's
identity.

© IDRBT, 2002
16
5. At this point the server may optionally perform other authentication tasks,
such as checking that the certificate presented by the client is stored in the
user's entry in an LDAP directory. The server then continues to evaluate
whether the identified user is permitted to access the requested resource.
This evaluation process can employ a variety of standard authorization
mechanisms, potentially using additional information in an LDAP directory,
company databases, and so on. If the result of the evaluation is positive, the
server allows the client to access the requested resource.
As you can see by comparing Figure 1.5 to Figure 1.4, certificates replace the
authentication portion of the interaction between the client and the server. Instead of
requiring a user to send passwords across the network throughout the day, single
sign-on requires the user to enter the private-key database password just once,
without sending it across the network. For the rest of the session, the client presents
the user's certificate to authenticate the user to each new server it encounters.
Existing authorization mechanisms based on the authenticated user identity are not
affected.
1.8. How Certificates Are Used
1.8.1. Types of Certificates
• Server SSL certificates. Used to identify servers to clients via SSL (server
authentication). Server authentication may be used with or without client
authentication. Server authentication is a requirement for an encrypted SSL
session.
Example: Internet sites that engage in electronic commerce (commonly
known as e-commerce) usually support certificate-based server
authentication, at a minimum, to establish an encrypted SSL session and to
assure customers that they are dealing with a web site identified with a
particular company. The encrypted SSL session ensures that personal
information sent over the network, such as credit card numbers, cannot easily
be intercepted.

© IDRBT, 2002
17
• S/MIME certificates. Used for signed and encrypted email. As with client
SSL certificates, the identity of the client is typically assumed to be the same
as the identity of a human being, such as an employee in an enterprise.
Examples: A company deploys combined S/MIME and SSL certificates solely
for the purpose of authenticating employee identities, thus permitting signed
email and client SSL authentication but not encrypted email. Another
company issues S/MIME certificates solely for the purpose of both signing
and encrypting email that deals with sensitive financial or legal matters.
• Object-signing certificates. Used to identify signers of Java code,
JavaScript scripts, or other signed files.
Example: A software company signs software distributed over the Internet to
provide users with some assurance that the software is a legitimate product of
that company. Using certificates and digital signatures in this manner can also
make it possible for users to identify and control the kind of access
downloaded software has to their computers.
1.9. SSL Protocol
The Secure Sockets Layer (SSL) protocol, which was originally developed by
Netscape, is a set of rules governing server authentication, client authentication, and
encrypted communication between servers and clients. SSL is widely used on the
Internet, especially for interactions that involve exchanging confidential information
such as credit card numbers.
SSL requires a server SSL certificate, at a minimum. As part of the initial
"handshake" process, the server presents its certificate to the client to authenticate
the server's identity. The authentication process uses Public-Key Encryption and
Digital Signatures to confirm that the server is in fact the server it claims to be. Once
the server has been authenticated, the client and server use techniques of
Symmetric-Key Encryption, which is very fast, to encrypt all the information they

© IDRBT, 2002
18
exchange for the remainder of the session and to detect any tampering that may
have occurred.
Servers may optionally be configured to require client authentication as well as
server authentication. In this case, after server authentication is successfully
completed, the client must also present its certificate to the server to authenticate
the client's identity before the encrypted SSL session can be established.
1.10. Signed and Encrypted Email
Some email programs support digitally signed and encrypted email using a widely
accepted protocol known as Secure Multipurpose Internet Mail Extension (S/MIME).
Using S/MIME to sign or encrypt email messages requires the sender of the
message to have an S/MIME certificate.
An email message that includes a digital signature provides some assurance that it
was in fact sent by the person whose name appears in the message header, thus
providing authentication of the sender. If the digital signature cannot be validated by
the email software on the receiving end, the user will be alerted.
The digital signature is unique to the message it accompanies. If the message
received differs in any way from the message that was sent — even by the addition
or deletion of a comma — the digital signature cannot be validated. Therefore,
signed email also provides some assurance that the email has not been tampered
with. As discussed at the beginning of this document, this kind of assurance is
known as non-repudiation. In other words, signed email makes it very difficult for the
sender to deny having sent the message. This is important for many forms of
business communication.
S/MIME also makes it possible to encrypt email messages. This is also important for
some business users. However, using encryption for email requires careful planning.
If the recipient of encrypted email messages loses his or her private key and does

© IDRBT, 2002
19
not have access to a backup copy of the key, for example, the encrypted messages
can never be decrypted.
1.11. Object Signing
Object signing uses standard techniques of public-key cryptography to let users get
reliable information about code they download in much the same way they can get
reliable information about shrink-wrapped software.
Most importantly, object signing helps users and network administrators implement
decisions about software distributed over intranets or the Internet — for example,
whether to allow Java applets signed by a given entity to use specific computer
capabilities on specific users' machines.
The "objects" signed with object signing technology can be applets or other Java
code, JavaScript scripts, plug-ins, or any kind of file. The "signature" is a digital
signature. Signed objects and their signatures are typically stored in a special file
called a JAR file.
Software developers and others who wish to sign files using object-signing
technology must first obtain an object-signing certificate.
1.12. Contents of a Certificate
The contents of certificates are organized according to the X.509 v3 certificate
specification, which has been recommended by the International
Telecommunications Union (ITU), an international standards body, since 1988.
Users don't usually need to be concerned about the exact contents of a certificate.
However, system administrators working with certificates may need some familiarity
with the information provided here.

© IDRBT, 2002
20
1.13. Distinguished Names
An X.509 v3 certificate binds a distinguished name (DN) to a public key. A DN is a
series of name-value pairs, such as uid=biju, that uniquely identify an entity — that is,
the certificate subject.
For example, this might be a typical DN for an employee of IDRBT:
uid=bij, [email protected], cn=Biju, o=IDRBT CA, c=IN
The abbreviations before each equal sign in this example have these meanings:
• uid: user ID
• e: email address
• cn: the user's common name
• o: organization
• c: country
DNs may include a variety of other name-value pairs. They are used to identify both
certificate subjects and entries in directories that support the Lightweight Directory
Access Protocol (LDAP).
The rules governing the construction of DNs can be quite complex and are beyond
the scope of this document.
1.14. A Typical Certificate
Every X.509 certificate consists of two sections:
• The data section includes the following information:
o The version number of the X.509 standard supported by the certificate.
o The certificate's serial number. Every certificate issued by a CA has a
serial number that is unique among the certificates issued by that CA.
o Information
o Information about the user's public key, including the algorithm used
and a representation of the key itself.

© IDRBT, 2002
21
o The DN of the CA that issued the certificate.
o The period during which the certificate is valid (for example, between
1:00 p.m. on June 26, 2002 and 1:00 p.m. June 26,2003)
o The DN of the certificate subject (for example, in a client SSL
certificate this would be the user's DN), also called the subject name.
o Optional certificate extensions, which may provide additional data
used by the client or server. For example, the certificate type extension
indicates the type of certificate — that is, whether it is a client SSL
certificate, a server SSL certificate, a certificate for signing email, and
so on. Certificate extensions can also be used for a variety of other
purposes.
• The signature section includes the following information:
o The cryptographic algorithm, or cipher, used by the issuing CA to
create its own digital signature. For more information about ciphers.
o The CA's digital signature, obtained by hashing all of the data in the
certificate together and encrypting it with the CA's private key.
Here are the data and signature sections of a certificate in human-readable format:
Certificate:
Data:
Version: v3 (0x2)
Serial Number: 3 (0x3)
Signature Algorithm: PKCS #1 MD5 With RSA Encryption
Issuer: OU=IDRBT Certificate Authority, O=IDRBT, C=IN
Validity:
Not Before: Fri Oct 17 18:36:25 1997
Not After: Sun Oct 17 18:36:25 1999
Subject: C=US, O=IDRBT CA, OU=Class 1 Certificate, OU=Reserve Bank of
India, CN=Biju Varghese
Subject Public Key Info:

© IDRBT, 2002
22
Algorithm: PKCS #1 RSA Encryption
Public Key:
Modulus:
00:ca:fa:79:98:8f:19:f8:d7:de:e4:49:80:48:e6:2a:2a:86:
ed:27:40:4d:86:b3:05:c0:01:bb:50:15:c9:de:dc:85:19:22:
43:7d:45:6d:71:4e:17:3d:f0:36:4b:5b:7f:a8:51:a3:a1:00:
98:ce:7f:47:50:2c:93:36:7c:01:6e:cb:89:06:41:72:b5:e9:
73:49:38:76:ef:b6:8f:ac:49:bb:63:0f:9b:ff:16:2a:e3:0e:
9d:3b:af:ce:9a:3e:48:65:de:96:61:d5:0a:11:2a:a2:80:b0:
7d:d8:99:cb:0c:99:34:c9:ab:25:06:a8:31:ad:8c:4b:aa:54:
91:f4:15
Public Exponent: 65537 (0x10001)
Extensions:
Identifier: Certificate Type
Critical: no
Certified Usage:
SSL Client
Identifier: Authority Key Identifier
Critical: no
Key Identifier:
f2:f2:06:59:90:18:47:51:f5:89:33:5a:31:7a:e6:5c:fb:36:
26:c9
Signature:
Algorithm: PKCS #1 MD5 With RSA Encryption
Signature:
6d:23:af:f3:d3:b6:7a:df:90:df:cd:7e:18:6c:01:69:8e:54:65:fc:06:
30:43:34:d1:63:1f:06:7d:c3:40:a8:2a:82:c1:a4:83:2a:fb:2e:8f:fb:
f0:6d:ff:75:a3:78:f7:52:47:46:62:97:1d:d9:c6:11:0a:02:a2:e0:cc:
2a:75:6c:8b:b6:9b:87:00:7d:7c:84:76:79:ba:f8:b4:d2:62:58:c3:c5:
b6:c1:43:ac:63:44:42:fd:af:c8:0f:2f:38:85:6d:d6:59:e8:41:42:a5:

© IDRBT, 2002
23
4a:e5:26:38:ff:32:78:a1:38:f1:ed:dc:0d:31:d1:b0:6d:67:e9:46:a8:
dd:c4
Here is the same certificate displayed in the 64-byte-encoded form interpreted by
software:
-----BEGIN CERTIFICATE-----
MIICKzCCAZSgAwIBAgIBAzANBgkqhkiG9w0BAQQFADA3MQswCQYDVQQGEwJ
VUzERMA8GA1UEChMITmV0c2NhcGUxFTATBgNVBAsTDFN1cHJpeWEncyBDQ
TAeFw05NzEwMTgwMTM2MjVaFw05OTEwMTgwMTM2MjVaMEgxCzAJBgNVBAY
TAlVTMREwDwYDVQQKEwhOZXRzY2FwZTENMAsGA1UECxMEUHViczEXMBU
GA1UEAxMOU3Vwcml5YSBTaGV0dHkwgZ8wDQYJKoZIhvcNAQEFBQADgY0AMI
GJAoGBAMr6eZiPGfjX3uRJgEjmKiqG7SdATYazBcABu1AVyd7chRkiQ31FbXFOG
D3wNktbf6hRo6EAmM5/R1AskzZ8AW7LiQZBcrXpc0k4du+2Q6xJu2MPm/8WKuM
OnTuvzpo+SGXelmHVChEqooCwfdiZywyZNMmrJgaoMa2MS6pUkfQVAgMBAAGj
NjA0MBEGCWCGSAGG+EIBAQQEAwIAgDAfBgNVHSMEGDAWgBTy8gZZkBhHU
fWJM1oxeuZc+zYmyTANBgkqhkiG9w0BAQQFAAOBgQBtI6/z07Z635DfzX4XbAFpjl
Rl/AYwQzTSYx8GfcNAqCqCwaSDKvsuj/vwbf91o3j3UkdGYpcd2cYRCgKi4MwqdW
yLtpuHAH18hHZ5uvi00mJYw8W2wUOsY0RC/a/IDy84hW3WWehBUqVK5SY4/zJ4
oTjx7dwNMdGwbWfpRqjd1A==
-----END CERTIFICATE-----
1.15. How CA Certificates Are Used to Establish Trust
Certificate authorities (CAs) are entities that validate identities and issue certificates.
They can be either independent third parties or organizations running their own
certificate-issuing server software.
Any client or server software that supports certificates maintains a collection of
trusted CA certificates. These CA certificates determine which other certificates
the software can validate — in other words, which issuers of certificates the software
can trust. In the simplest case, the software can validate only certificates issued by
one of the CAs for which it has a certificate. It's also possible for a trusted CA

© IDRBT, 2002
24
certificate to be part of a chain of CA certificates, each issued by the CA above it in a
certificate hierarchy.
1.16. Managing Certificates
The set of standards and services that facilitate the use of public-key cryptography
and X.509 v3 certificates in a networked environment is called the public key
infrastructure (PKI). PKI management is complex topic beyond the scope of this
document.
1.16.1. Issuing Certificates
The process for issuing a certificate depends on the certificate authority that issues it
and the purpose for which it will be used. The process for issuing nondigital forms of
identification varies in similar ways. For example, if you want to get a generic ID card
(not a driver's license) from the Department of Motor Vehicles in California, the
requirements are straightforward: you need to present some evidence of your
identity, such as a utility bill with your address on it and a student identity card. If you
want to get a regular driving license, you also need to take a test — a driving test
when you first get the license, and a written test when you renew it. If you want to
get a commercial license for an eighteen-wheeler, the requirements are much more
stringent. If you live in some other state or country, the requirements for various
kinds of licenses will differ.
Similarly, different CAs have different procedures for issuing different kinds of
certificates. In some cases the only requirement may be your email address. In other
cases, your Unix or NT login and password may be sufficient. At the other end of the
scale, for certificates that identify people who can authorize large expenditures or
make other sensitive decisions, the issuing process may require notarized
documents, a background check, and a personal interview.
Depending on an organization's policies, the process of issuing certificates can
range from being completely transparent for the user to requiring significant user

© IDRBT, 2002
25
participation and complex procedures. In general, processes for issuing certificates
should be highly flexible, so organizations can tailor them to their changing needs.
Issuing certificates is one of several managements tasks that can be handled by
separate Registration Authorities.
1.17. Certificates and the LDAP Directory
The Lightweight Directory Access Protocol (LDAP) for accessing directory services
supports great flexibility in the management of certificates within an organization.
System administrators can store much of the information required to manage
certificates in an LDAP-compliant directory. For example, a CA can use information
in a directory to pre-populate a certificate with a new employee's legal name and
other information. The CA can leverage directory information in other ways to issue
certificates one at a time or in bulk, using a range of different identification
techniques depending on the security policies of a given organization. Other routine
management tasks, such as Key Management and Renewing and Revoking
Certificates, can be partially or fully automated with the aid of the directory.
Information stored in the directory can also be used with certificates to control
access to various network resources by different users or groups. Issuing certificates
and other certificate management tasks can thus be an integral part of user and
group management.
In general, high-performance directory services are an essential ingredient of any
certificate management strategy.
1.18. Key Management
Before a certificate can be issued, the public key it contains and the corresponding
private key must be generated. Sometimes it may be useful to issue a single person
one certificate and key pair for signing operations, and another certificate and key
pair for encryption operations. Separate signing and encryption certificates make it
possible to keep the private signing key on the local machine only, thus providing

© IDRBT, 2002
26
maximum non-repudiation, and to back up the private encryption key in some central
location where it can be retrieved in case the user loses the original key or leaves
the company.
Keys can be generated by client software or generated centrally by the CA and
distributed to users via an LDAP directory. There are trade-offs involved in choosing
between local and centralized key generation. For example, local key generation
provides maximum non-repudiation, but may involve more participation by the user
in the issuing process. Flexible key management capabilities are essential for most
organizations.
Key recovery, or the ability to retrieve backups of encryption keys under carefully
defined conditions, can be a crucial part of certificate management (depending on
how an organization uses certificates). Key recovery schemes usually involve an m
of n mechanism: for example, m of n managers within an organization might have to
agree, and each contribute a special code or key of their own, before a particular
person's encryption key can be recovered. This kind of mechanism ensures that
several authorized personnel must agree before an encryption key can be
recovered.
1.19. Renewing and Revoking Certificates
Like a driver's license, a certificate specifies a period of time during which it is valid.
Attempts to use a certificate for authentication before or after its validity period will
fail. Therefore, mechanisms for managing certificate renewal are essential for any
certificate management strategy. For example, an administrator may wish to be
notified automatically when a certificate is about to expire, so that an appropriate
renewal process can be completed in plenty of time without causing the certificate's
subject any inconvenience. The renewal process may involve reusing the same
public-private key pair or issuing a new one.
A driver's license can be suspended even if it has not expired — for example, as
punishment for a serious driving offense. Similarly, it's sometimes necessary to

© IDRBT, 2002
27
revoke a certificate before it has expired — for example, if an employee leaves a
company or moves to a new job within the company.
Certificate revocation can be handled in several different ways. For some
organizations, it may be sufficient to set up servers so that the authentication
process includes checking the directory for the presence of the certificate being
presented. When an administrator revokes a certificate, the certificate can be
automatically removed from the directory, and subsequent authentication attempts
with that certificate will fail even though the certificate remains valid in every other
respect. Another approach involves publishing a certificate revocation list (CRL)
— that is, a list of revoked certificates — to the directory at regular intervals and
checking the list as part of the authentication process. For some organizations, it
may be preferable to check directly with the issuing CA each time a certificate is
presented for authentication. This procedure is sometimes called real-time status
checking.
1.20. IDRBT Certifying Authority
IDRBT is an autonomous center for Development and Research in Banking
Technology set up by Reserve Bank of India in 1996. IDRBT owns the INFINET, the
communication backbone for the Indian Banking and Financial sector. Various inter-
bank and intra-bank applications ranging from Simple Messaging, MIS, EFT, ECS,
Electronic Debit, Online Processing and Trading in Government Securities,
Centralized Funds querying for Banks and Financial Institutions, Anywhere/Anytime
Banking and Inter-bank reconciliation are being implemented using the INFINET.
For securing the transactions through INFINET, IDRBT provides high end Public Key
Infrastructure (PKI) based services and solutions to individuals, organizations as well
as governments, which enable trust and security. IDRBT has set up a high-end,
global standards- based processing Center at its campus at Hyderabad, capable of
issuing thousands of Digital Certificates, an important component of PKI. As a
licensed Certifying Authority by the Controller of Certifying Authority (CCA), IDRBT
CA will issue, administer and revoke the digital certificates over INFINET.

© IDRBT, 2002
28
1.21. Registration Authorities
Interactions between entities identified by certificates (sometimes called end
entities) and CAs are an essential part of certificate management. These
interactions include operations such as registration for certification, certificate
retrieval, certificate renewal, certificate revocation, and key backup and recovery. In
general, a CA must be able to authenticate the identities of end entities before
responding to the requests. In addition, some requests need to be approved by
authorized administrators or managers before being services.
As previously discussed, the means used by different CAs to verify an identity before
issuing a certificate can vary widely, depending on the organization and the purpose
for which the certificate will be used. To provide maximum operational flexibility,
interactions with end entities can be separated from the other functions of a CA and
handled by a separate service called a Registration Authority (RA).
Registration Authority receives the applications for the Digital Certificate from the
Applicant/Subscriber and verifies the details contained in the Application. An RA will
also verify the documents accompanying the application form for different Classes of
Certificate as mentioned in the IDRBT CA CPS. In case of Class 3 Certificates, the
Applicant/Subscriber must present before the RA for personal verification. If the
verification is successful, then the request is forwarded to the IDRBT CA
recommending generation of a Digital Certificate for the verified
Applicant/Subscriber. If he finds anything wrong in the certificate application, the RA
has the right to reject it.
An RA shall be responsible for the following:
• Receiving the Certificate requests and Subscriber Agreement for the
Digital Certificates from the Applicants.
• Verifying the applications as per the terms and conditions of the IDRBT
CA CPS, and upon successful verification, requesting the IDRBT CA to

© IDRBT, 2002
29
generate a Digital Certificate for the respective applicant as per the terms
and conditions in the IDRBT CA CPS.
• Receiving and verifying the requests for Certificate suspension, activation
and revocation from the Subscribers and upon successful verification,
forwarding the request to the IDRBT CA.
• May notify the Subscribers when their Digital Certificate shall expire in
advance.
• Creating and maintaining an accurate audit trail of all RA operations.
• Rejection of Digital Certificate applications in the event the
Applicant/Subscriber does not indicate acceptance of obligations as per
IDRBT CA CPS or inaccurate information furnished by the
Applicant/Subscriber.
• Additional obligations as set forth in the RA agreement.
Others:
• The RA or IDRBT CA shall not be responsible if the Subscriber’s Private
Key is compromised and a request for Suspension, Revocation or
Activation is placed on Subscriber’s behalf.
• The RA or IDRBT CA shall not be responsible to inform users of
revocation of their Certificates in case of the request being initiated by the
Subscribers themselves. In case of request being initiated by RA or
IDRBT CA, the Subscriber shall be informed of the action being taken.
The procedure for becoming a Registration Authority are mentioned in the
document entitled “Rules and Guidelines for Registration Authorities”

© IDRBT, 2002
30
2. Getting started
A Certifying Authority (CA) is a body that fulfills the need for trusted third party
services in Electronic Commerce by issuing Digital Certificates that attests to some
fact about the subject of the certificate. A certificate is a digitally signed statement by
a CA that provides independent confirmation of an attribute claimed by a person
offering a Digital Signature.
For securing the transactions through INFINET, IDRBT provides high end Public Key
Infrastructure (PKI) based services and solutions to individuals, organizations as well
as governments that enable trust and security. IDRBT has set up a high-end, global
standards- based processing Center at its campus at Hyderabad, capable of issuing
thousands of Digital Certificates, an important component of PKI. As a licensed
Certifying Authority by the Controller of Certifying Authority (CCA), Government of
India, IDRBT CA will issue, administer and revoke the digital certificates over
INFINET.
IDRBT CA’s i-trust PKI Services are currently available only on INFINET.
Visit IDRBT CA’s official website on INFINET at http://idrbtca.org.in/ . This
website contains the information about the IDRBT CA Certification Practice
Statement, the classes of digital certificates offered by IDRBT CA, general
information about PKI, Registration Authorities, Information Technology Act,
Subscriber Agreement, Privacy Statement, Frequently Asked Questions, IDRBT
CA Help Desk, etc.
Figure 2.1 shows the home page of http://idrbtca.org.in/ .
Note: This website will only be accessed on INFINET. You are advised to
become a member of INFINET to utilize the certification services offered by
IDRBT CA.

© IDRBT, 2002
31
Figure 2.1 IDRBT CA home page
It is assumed that the applicant of the digital certificate of IDRBT CA must have
knowledge of Public Key Infrastructure, the general usage of certificates, the rights
and obligations as prescribed in IDRBT CA CPS. We suggest the applicants must
read and understand the rights, obligations, liabilities, warranties, documents
required at time of certificate request, certificate practices, etc. mentioned in the
IDRBT CA CPS. The information related to PKI and the IDRBT CA Certification
Services are available at http://idrbtca.org.in/ .

© IDRBT, 2002
32
Figure 2.2. CPS page.

© IDRBT, 2002
33
Figure 2.3. Repository Page.
If you want to get information for becoming Registration Authority under IDRBT CA,
click the appropriate link provided in the Registration Authority page.
If you are already a Registration Authority, you can proceed with the IDRBT CA
Registration Authority Services by clicking the link “Click here to visit Registration
Authority site”.

© IDRBT, 2002
34
Figure 2.4 Registration Authority page
This will guide you to IDRBT CA’s secured site https://10.0.65.60/RA/RA/

© IDRBT, 2002
35
Figure 2.5 IDRBT CA Registration Authority Services Home page.
Click the ‘lock’ icon in the Internet Explorer status bar to view the Secure Server
Certificate of IDRBT CA Website (Figure 2.6).
Figure 2.6 IDRBT CA Secured Server Certificate
© IDRBT, 2002
36
3. Operational Guidelines for RA Administrator
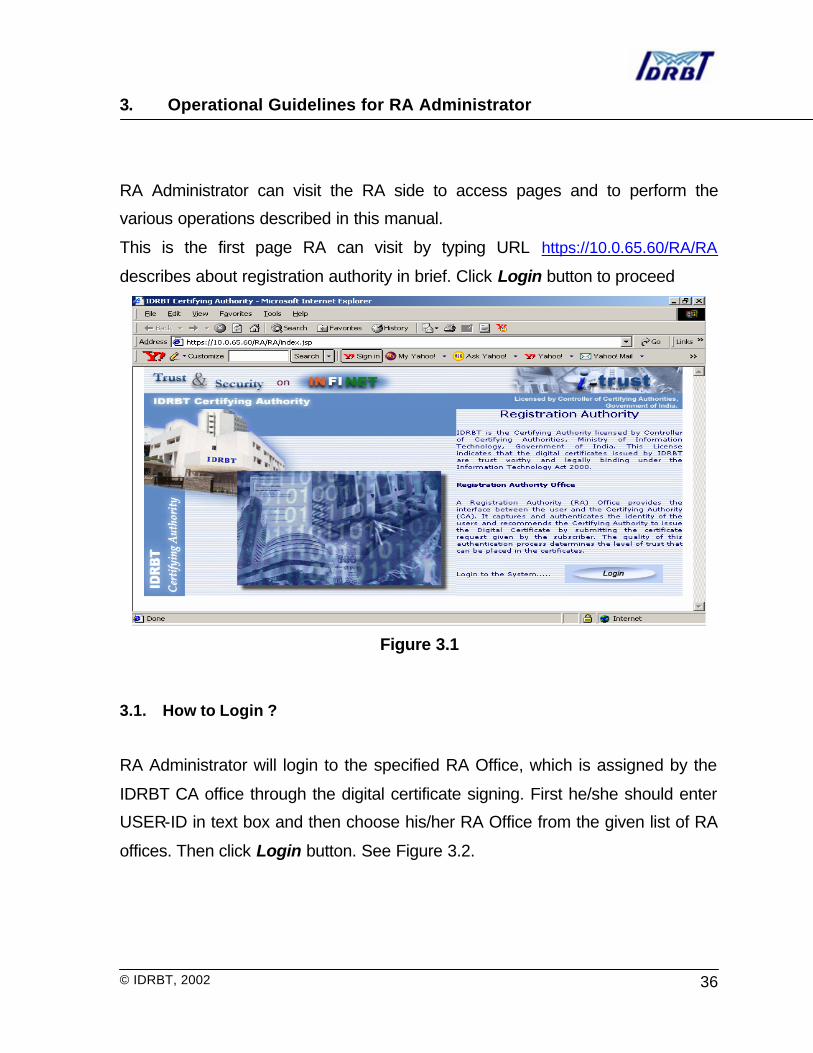
RA Administrator can visit the RA side to access pages and to perform the
various operations described in this manual.
This is the first page RA can visit by typing URL https://10.0.65.60/RA/RA
describes about registration authority in brief. Click Login button to proceed
Figure 3.1
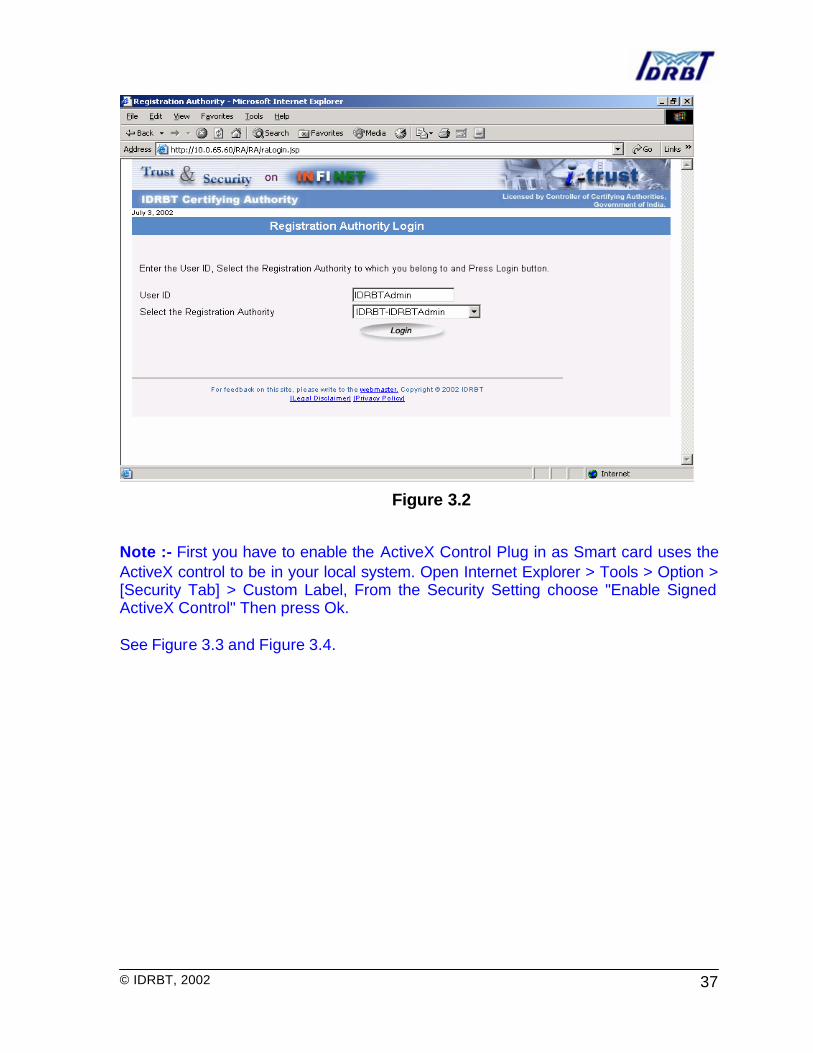
3.1. How to Login ?
RA Administrator will login to the specified RA Office, which is assigned by the
IDRBT CA office through the digital certificate signing. First he/she should enter
USER-ID in text box and then choose his/her RA Office from the given list of RA
offices. Then click Login button. See Figure 3.2.
© IDRBT, 2002
37
Figure 3.2
Note :- First you have to enable the ActiveX Control Plug in as Smart card uses the ActiveX control to be in your local system. Open Internet Explorer > Tools > Option > [Security Tab] > Custom Label, From the Security Setting choose "Enable Signed ActiveX Control" Then press Ok. See Figure 3.3 and Figure 3.4.

© IDRBT, 2002
38
Figure 3.3
Figure 3.4

© IDRBT, 2002
39
Following window (See Figure 3.5) will pop up. This window will contain the list of
certificate installed in your browser. You have to select the same certificate from list
for which key pair and certificates are installed in your smart card. After selecting
correct certificate some details will be displayed automatically on the rest of the
boxes. You can verify with these details that you have chosen the correct certificate.
Figure 3.5
If you try to proceed without selecting any certificate from the given list, following
error message will pop up
If you have selected correct certificate you can proceed with it by clicking OK
button. After clicking one pop up window will ask for your smart card PIN. (for
more information regarding smart card administration, please refer Appendix-1)

© IDRBT, 2002
40
Give the pin number and click OK.
If PIN number is typed incorrectly then following error message will pop up
You can retry with correct PIN by clicking Retry button. If PIN has given correctly
it will successfully login you to your page.
After signing in is successful the RA Administrator will get following Dash Board
on screen containing summary of information for his RA office. This information
includes (see Figure 3.6):
§ RA User Status
§ Aggregate Request Status
§ Subscriber Status
§ Assigned Request Status
§ Request Processing Time (in Hours)
RA Administrator can perform the following activities displayed on left pane of
screen.

© IDRBT, 2002
41
Figure 3.6
a. Create Subscriber
b. Activate/In activate Subscriber
c. Create RA Operator
d. Manage RA User
e. Edit RA Certificate Serial Number
f. Assign Request
g. Reassign Pending Request
h. Sign Request
i. View Rejected Requests
j. Release Request
k. Release Rejected Requests
l. View Request Rejected from CA
m. Revoke
n. Suspend
o. Activate
p. Report

© IDRBT, 2002
42
3.2. Creating a Subscriber
1. RA Administrator will assign a Username and password after getting an
application form duly filled accompanied with the subscriber agreement and
the DD for a particular class of certificate. The RA Office will acknowledge the
receipt of the application by email to the subscriber. The physical verification
procedure of the Subscriber will be solely depended on the registration
authority and it can be done according to the procedures followed by the RA
(Banks/Financial institutions).
2. The above process of creating the Subscriber’s user id and password is
carried out by clicking the “Create Subscriber” button as given in the figure
3.7.
Figure 3.7
RA Administrator has to give some information related to the off line application
form for creation of user id. Along with he has to give the email id and the type of
user should be selected as per the application form. The given input for the user

© IDRBT, 2002
43
id should be unique in nature. After clicking the submit button, the user id will
created and the password will be generated randomly. The following figure-8
shows the user id and concerned password for the subscriber, which has to be
printed with help of the printer attached to the system. When you scroll down the
page you will get Print button also for the said purpose. Out of two copies one
has to be sent to the Subscriber and one copy has to be essentially kept by the
RA Administrator in RA Office. In addition RA Administrator must write user-id
assigned to subscriber on the certificate request form.
Figure 3.8
RA Administrator will send the user name and password in a sealed envelope to
the subscriber. The user login will be kept inactive till the acknowledgment
receipt of the sealed envelope from the subscriber is received at the RA Office.

© IDRBT, 2002
44
3.3. Activate Subscriber
RA Administrator can activate the subscriber after receiving the subscriber‘s
acknowledgment receipt duly signed. Before that you have to select the type of
user form given list box. Click submit button. See figure 3.9.
Figure 3.9
To activate the Subscriber you should check the check box drawn before
corresponding user id and mail id of subscriber. You can inactivate the
subscriber by clicking again in the same check box. Press submit button. See
figure 3.10.

© IDRBT, 2002
45
Figure 3.10
3.4. Create RA Operator
RA Administrator can create the RA Operator for operational convenience by
clicking the “Create RA Operator” button specified. The figure 3.11 shows to fill
the field variables with the authentic value. All fields should be filled including a
certificate serial number, which is already obtained by the RA Operator or can be
obtained from IDRBT CA office.
Cell phone number is optional field but rest of the text boxes must be filled with
correct and valid information. It is RA administrator’s obligation to verify these
credentials while creating RA Operator.

© IDRBT, 2002
46
Figure 3.11
Press submit button will give following message
RA operator will be activated by clicking OK button. Clicking Cancel will create
RA Operator but he/she will not be activated.
After creation of RA operator following message will be displayed.

© IDRBT, 2002
47
Figure 3.12
3.5. Activate RA Operator
RA Administrator can Activate and Inactivate the RA Operators by clicking
“Manage RA Users” which is mentioned in the figure 3.13.

© IDRBT, 2002
48
Figure 3.13
3.6. Edit RA Operator’s Certificate Serial Number
RA Administrator can edit the RA Operators Certificate serial number. This facility is
to provide the administrator flexibility if he wants to retain the same operator with
other certificate. This facility will be useful in case of RA Operator lost his/her smart
card or smart card is spoiled. In case if smart card is lost, RA operator should
immediately intimate to RA Administrator or his higher authority. Registration
authority must request the CA office for revocation of that certificate. In case of
losing private key on the token RA operator should apply for new certificate and RA
administrator can replace certificate serial number of old certificate with certificate
serial number of new certificate. See figure 3.14.

© IDRBT, 2002
49
Figure 3.14
3.7. Assign requests to RA Operator
RA Administrator will assign the certificate generation / revocation / suspension /
activation request received from subscriber to activated RA Operator by clicking
“Assign Request” button.
See figure 3.15

© IDRBT, 2002
50
Figure 3.15
RA Operator can be selected from the list box named “RA Name” to whom RA
Administrator can assign. RA User ID will be automatically displayed on other
text box. Before clicking the check box and pressing submit button RA
Administrator should see the request. RA Administrator can view the request and
details of subscriber by clicking the Request Number (Blue Link).
See figure 3.16, 3.17.
After seeing request RA Administrator can assign it to selected RA Operator by
clicking on checkbox and clicking submit button. RA Administrator can assign
different requests to different RA Operators under same RA Office.

© IDRBT, 2002
51
Figure 3.16
Click the Certificate Serial Number
Figure 3.17
Once the RA Administrator has assigned the request to RA operator following
message will be displayed

© IDRBT, 2002
52
Figure 3.18
3.8. Reassign pending request
If RA Administrator has assigned some request to any operator who was later on
inactivated because of some reason (e.g. Certificate is revoked for RA Operator)
In that case requests assigned to him can be assigned to other activated RA
Operator under same RA Office. See figure 3.19.

© IDRBT, 2002
53
Figure 3.19
After clicking submit button in figure 3.19, list of activated and inactivated RA
Operator will be displayed see figure 3.20.
Figure 3.20
After assigning from inactivated user to activated user click submit button. It will
list the request those are pending with inactivated RA Operator. After selecting

© IDRBT, 2002
54
request click submit button. It will reassign pending request to selected and
activated RA Operator. See Figure 3.21.
Figure 3.21
3.9. Sign the request
Once the RA Administrator has released the request to RA Operator, RA
Operator will verify the credentials of subscriber, RA Operator signs it digitally
and send back to RA Administrator again. RA Administrator can view those
request by clicking Sign Request. RA Administrator needs to select the Request
Type and User Type from the List Boxes given.
See figure 3.22

© IDRBT, 2002
55
Figure 3.22
The RA Administrator will verify the signed requests by the RA Operator by
clicking button Verify. See figure 3.23.
Figure 3.23

© IDRBT, 2002
56
If RA Operator signature is verified successfully the following message will be
displayed.
Figure 3.24
After Clicking Sign&Send button the following window will pop up to select the RA
Administrator certificate to sign and send it for release to CA Office.
Figure 3.25

© IDRBT, 2002
57
3.10. Release requests to CA Office
To release the certificate request from the RA Office to CA Office click the
“Release Request” button. Select the Request Type and User Type Click Submit
button.
Figure 3.26
The requests, which are successfully signed by RA Administrator, will come for
Release to CA office. You can select the request to be released by clicking check
boxes. To release the request click on Release Button. See figure 3.27.

© IDRBT, 2002
58
Figure 3.27
After clicking Release button the following message will be displayed
Figure 3.28

© IDRBT, 2002
59
RA Operator will verify the subscriber information written in the application form
with the documents given by the applicant based on the Class of certificate he
has applied for. The RA will ask the applicant to be present before RA for
physical verification. In case of Class 3 certificates physical verification is
required and is to be conducted by the RA Operator.
3.11. View rejected request
In case of RA Operator signature verification is failed, RA administrator can view
those request by clicking “View Rejected Request” assigned to particular RA
operator.
3.12. View rejected request from CA
RA administrator can view the request reject from CA office by clicking View
Rejected Request from CA” in case signature is not verified. He can again send
the rejected request using correct signature using “Release Rejected Request”.
3.13. Initiate revocation of the Certificate
RA Administrator can initiate to revoke the Certificates issued to the Subscriber,
with some appropriate reason specified according to the IT Act 2000 by clicking
Revoke button from left pan menu. RA Administrator will select the type of user
and type of certificate for which he wants to initiate revocation. See Figure 3.29.

© IDRBT, 2002
60
Figure 3.29
After clicking Submit button the list of issued certificate will be displayed. RA
Administrator can select the certificate by clicking request number (Blue Link).
See Figure 3.30.

© IDRBT, 2002
61
Figure 3.30
After clicking request number following window will pop up which contains
certificate details. RA Administrator must specify the Reason for revocation. List
box contain the valid reasons for revocation according to IT Act 2000.
In comments text box he/she must specify the detailed reason and comments for
revocation. See figure 3.31.

© IDRBT, 2002
62
Figure 3.31
Click submit button, one message box will pop up asking for confirmation of
revocation. Click OK to confirm the revocation.
After confirmation RA Administrator need to sign the revocation request using his
digital certificate. See Figure 3.32.

© IDRBT, 2002
63
Figure 3.32
Once the RA administrator signed the revocation request following message will be
displayed on the screen.
Figure 3.33
© IDRBT, 2002
64
3.14. Initiate suspension of Certificate
RA Administrator can suspend the Certificates issued to the Subscriber, with
some appropriate reason specified according to the IT Act 2000.He will send the
suspension request to CA office. The rest of the operational procedure for
suspension is same as above-mentioned procedure for revocation.
Figure 3.34
If Revocation/Suspension request is imitated by the subscriber, RA Administrator
must get the Revocation / suspension paper form signed by subscriber before
forwarding request to CA office.
3.15. Report generation
RA Administrator can generate the following reports given below by clicking the
“Reports” button.

© IDRBT, 2002
65
Figure 3.35
RA Administrator should conduct investigation, in case a subscriber owns
multiple certificates for different purposes (The signature, Encryption, SSL etc)
and one of the certificates is suspended or revoked to ensure whether all other
certificates are to be revoked or not. In case it is required that any other or all the
certificates are to be revoked RA Administrator should initiate the revocation
process.

© IDRBT, 2002
66
4. Operational Guidelines for RA Operator
4.1. How to login?
RA Operator after being activated by the RA Administrator has to log in the RA
site using his certificate to perform the activities specified. He/She will login same
as RA Administrator using smart card as described in section 3.1.
Figure 4.1
Dash Board contains following information
• RA Pending Requests
• RA Aggregate Request Status
• RA Request Processing Time (In Hours)
After successful log in RA Operator can perform the following activities
• Create Subscriber
• Activate/Inactive Subscriber
• Sign Request
© IDRBT, 2002
67
• Accept Rejected Request
4.2. Create Subscriber
RA Operator will assign a Username and password after getting an application
form duly filled accompanied with the subscriber agreement and the DD/Cheque
for a particular class of certificate. The RA Office will acknowledge the receipt of
the application by email to the subscriber.
The physical verification procedure of the Subscriber will be solely depended on
the registration authority and it can be done according to the procedures followed
by the RA.. The process of creating the Subscriber’s user id and password is
carried out by clicking the “Create Subscriber” button as given in the figure 4.2.
The procedure is same as in RA Administration option.(See Figure 3.7,3.8 also)
Figure 4.2

© IDRBT, 2002
68
4.3. Verify and sign the request
After verification of the subscriber’s credentials, RA Operator will sign over the
subscriber’s request clicking “Sign Requests” and send back to RA Administrator.
If the credentials are found to be fictitious or mismatched with to the paper
application form then, RA Operator has authority to reject the request, which is
given in the following figure 4.3.
Figure 4.3
This window will pop up on Clicking Sign&Send Button So that RA Operator can
select his certificate and can sign the request. RA Operator can also view the
request and message to be signed in the given box .See Figure 4.4.
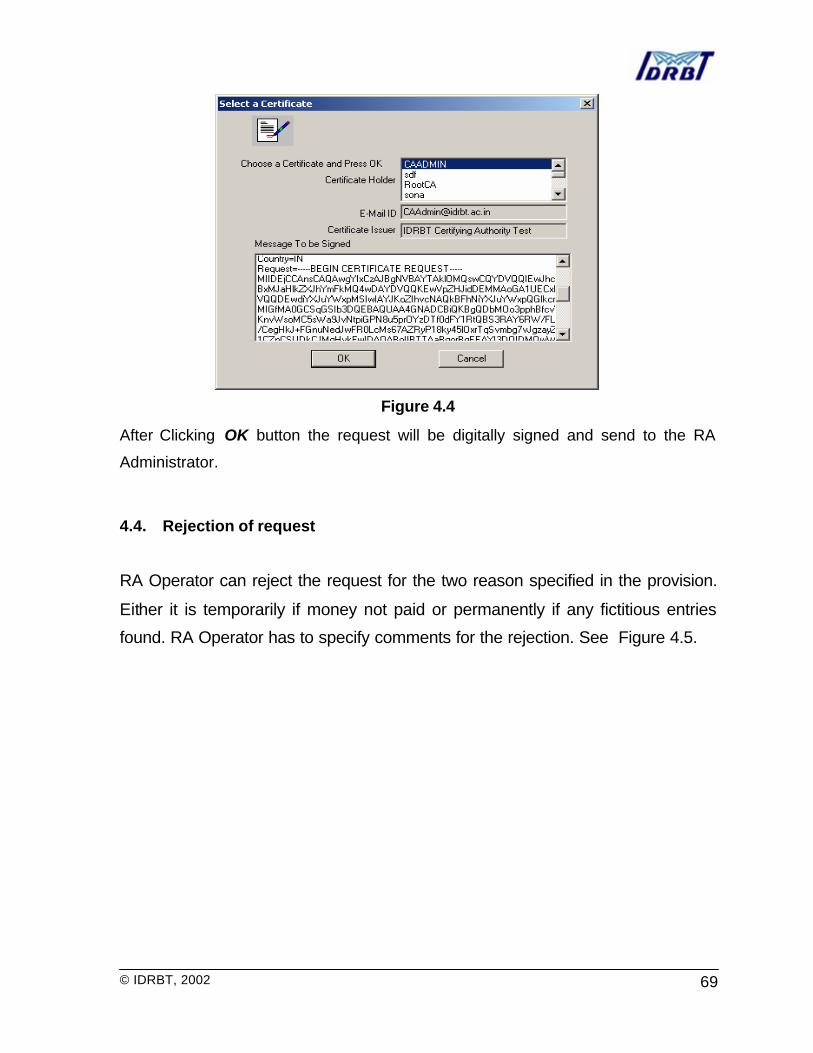
© IDRBT, 2002
69
Figure 4.4
After Clicking OK button the request will be digitally signed and send to the RA
Administrator.
4.4. Rejection of request
RA Operator can reject the request for the two reason specified in the provision.
Either it is temporarily if money not paid or permanently if any fictitious entries
found. RA Operator has to specify comments for the rejection. See Figure 4.5.

© IDRBT, 2002
70
Figure 4.5
RA Operator can activate the subscriber after receiving the subscriber’s
acknowledgment receipt duly signed.( Same as Figure 3.9, Figure 3.10).
4.5. Accept rejected request
RA Operator can again sign the subscriber’s rejected request by clicking “Accept
Rejected Request” after receiving the money if it is temporarily rejected.
NOTE: All paper based records, documentations and reports containing all
confidential information shall be kept in secure and locked container or filing
system, separately from all other records.

© IDRBT, 2002
71
5. Brief procedures for RA Office for the issuance of Digital Certificate
1. Get the duly filled Application Form, Subscriber Agreement and DD for the
corresponding Class of certificate from the subscriber. He also receives the
verification document as mentioned in IDRBT CA CPS (either Voter’s ID,
Passport, or PAN Card).
2. RA Administrator will login to RA Site through http://idrbtca.org.in on INFINET
and create User ID for the subscriber. The password will be automatically
generated by the system.
3. Take three print outs of the User ID and Password form.
4. Send two forms of the User ID and Password to Subscriber by register post
and insist the subscriber to acknowledge the receipt of the form in the other
form duly signed by him/her.
5. Get acknowledge the receipt of User ID and Password from the subscriber
duly signed in the receipt form.
6. Activate the Subscriber after getting acknowledgment receipt.
7. Send communication to subscriber by Email about the activation of the user
ID.
8. User logins to its Subscriber site and generate its key pair on Smart Card or
system.
9. RA Administrator assigns the request to RA Operator for verification.
10. RA Operator verifies the request of subscriber with the paper application
form. He can reject the request if the digital certificate request contains error
or incomplete.
11. RA Operator signs and sends the request to RA Administrator if the certificate
request is valid.
12. RA Administrator will verify the RA Operator’s signature.
13. RA Administrator signs and sends the request to CA Office.
14. Send the DD and the Xerox copies of the Subscriber Application Form and
the Subscriber Agreement to IDRBT.

© IDRBT, 2002
72
Appendix - 1

© IDRBT, 2002
73
Getting Started in COVE
The Cryptographic Object Viewer and Editor (COVE) is an application for formatting
a smart card to prepare it for the cryptographic operations required by the card’s
program. COVE has a graphical user interface to the card’s cryptographic
management tasks, which you can access through the Smart Card Toolkit or as a
standalone application.
Before you work with COVE, you should be familiar with the cryptographic
requirements and key types needed for the card programs you are planning. For
example, you might need to know the requirements for CryptoAPI, PKCS #11, or
Entrust software.
Starting the COVE Application
If you are viewing a standalone version of this help file and have not yet started the
COVE application, you can use any of the following methods to display the COVE
window.
Starting a COVE Application Installed with SDK 4.1 Software
To start COVE from the Schlumberger Smart Card Toolkit window, either:
• Click the COVE button, or
• Select Cryptographic Editor and Viewer (COVE) from the Tools menu.
To start COVE as a standalone application, click the Start button on the Windows
taskbar, then select Programs ? Schlumberger Smart Cards and Terminals ?
Cyberflex Access SDK 4.1 ? COVE Admin Tool (or, if you installed the software
in a custom location, find COVE Admin Tool in the custom path.)
The COVE Administration Personalization Tool window appears in either standalone
mode or pre-connected mode, depending on the method you used to display the
window.

© IDRBT, 2002
74
Starting a COVE Application Installed with SDK 4.1 Software
To start COVE as a standalone application, click the Start button on the Windows
taskbar, select Programs, and locate COVE under the SDK 4.1 installation folder.
The COVE Administration Personalization Tool window appears in standalone
mode.
Initial Appearance of the COVE Window
When you first display the COVE Administration Personalization Tool window, it
appears in either connected or pre-connected mode, depending on the method you
use to display it.
Connected Mode
If you display the COVE Administration Personalization Tool window from the Smart
Card Toolkit application (included with the Cyberflex Access SDK 4.1 software),
COVE is already connected to the card. The COVE Administration Personalization
Tool window is in connected mode, and connection controls (the Card Reader list
and Connect button) do not appear.
Pre-Connected Mode
If you display the COVE Administration Personalization Tool window as a
standalone application, COVE is not yet connected to the card. The COVE
Administration Personalization Tool window is in pre-connected mode, so
connection options appear in the window, as shown in the following illustration.

© IDRBT, 2002
75
Connecting to a Card
Until you personalize a card, you can connect COVE to it without presenting any
verification keys. If you have personalized the card with COVE in a previous card
session, you must verify your access rights before you can view the card’s contents.
Connecting to a New (Unpersonalized) Card
To connect to an unpersonalized card, click the Connect button in the COVE
Administration Personalization Tool window. (The Connect button appears only if the
window is currently in pre-connected mode. The status box at the bottom of the
window displays a message as COVE attempts to read the card’s contents. If COVE
recognizes the card’s type, it completes the connection, and these changes occur:
• The Connect button changes to read Disconnect.
• The name in the Card Reader box becomes dimmed, which indicates that the
reader type is no longer selectable.

© IDRBT, 2002
76
Connecting to a Personalized Card
Until you personalize a card, you do not have to have any key to connect to it in
COVE. If you have used COVE to create a cryptographic file structure on a card, you
must prove your access rights before you can communicate with the card in a later
session.
To connect to a personalized card, follow these steps:
1. If you are not already connect to the card, click the Connect button. (If the
COVE Administration Personalization Tool window displays a Disconnect
button instead of a Connect button, COVE has already established
connection with the card.
If COVE recognizes the card’s type, it completes the connection. A connection
dialog box appears, which you use to establish access rights.
2. Enter the correct key or keys in the connection dialog box and click OK.
COVE sends the verification command to the card. If you enter the key value(s)
correctly, the card grants you access rights to view and modify the card contents.
Personalizing a Card
Personalizing a card means creating the necessary cryptographic structure for
storing the digital certificates and keys you need to perform secure operations such
as signing and encrypting email.

© IDRBT, 2002
77
Personalization QuickStart
When you install the Cyberflex Access SDK 4.1 software, it adds several default
personalization profiles (files with .cpf extensions) to the host system. You can use
these profiles to quick-start personalization. Choose the profile that most closely
matches your needs, then make any adjustments that are necessary.
Follow these steps to quick-start personalization:
Step 1: Display the Personalization Tab
Step 2: Select a Personalization Template
Step 3: Set Advanced Personalization Options
Step 4: Adjust Personalization Settings
Step 5: Execute the Personalization Operation
Step 1: Display the Personalization Tab
To begin the personalization process, first display the Personalize tab by following
these steps:
1. Start the COVE application if it is not already running
The COVE Administration Personalization Tool window appears, with the Digital IDs
tab displayed in front.
2. Click the Personalize tab.
The Personalize tab appears at the front of the window.
Contents of the Personalize/Repersonalize Tab
If the currently connected card is not personalized, the COVE Administration
Personalization Tool window displays a Personalize tab. Once you personalize the
card, the tab name is Repersonalize.
The Personalize/Repersonalize tab contains the following elements:

© IDRBT, 2002
78
• A browsing pane and list of default personalization files (.cpf files) you can
select, modify, and load onto the card.
• Cryptoflex card or Cyberflex Access 16K card — A pie chart and statistics
that show how much EEPROM the current personalization settings will use
and how much EEPROM will remain available on the card.
• GINA-related personalization settings
• The PIN value and PIN unblocking value for the user PIN on a Cryptoflex card
or the PKI applet PIN on a Cyberflex Access Developer 32K card.
• A place to enter the key or keys needed to complete personalization, either:
o Cyberflex Access Developer 32K card — Fields to enter the AUTH,
MAC, and KEK key values.
o Cryptoflex or Cyberflex Access 16K cards — A field for entering the
transport key value.
If you fail to enter the correct value for the required key or keys within
the allowed number of attempts, the key becomes blocked and you
can no longer communicate with the card. Cryptoflex cards allow
three attempts to verify the transport key. Cyberflex Access 16K cards
allow eight verification attempts. Cyberflex Access Developer 32K
cards allow ten attempts to verify the AUTH, MAC, and KEK keys.
If you change value of a card key that corresponds to a key you use in
the Personalization File Settings dialog box, make sure you use the
new key value in the dialog box.
• Cyberflex Access Developer 32K card — A Settings button, which you use to
display the settings used for the PKI applet COVE incorporates during
personalization. Keep the default values unless you are performing advanced
debugging or correcting complex problems that require changes in these
values.

© IDRBT, 2002
79
Step 2: Select a Personalization Template
In this step, you select a personalization profile. Use the drive and subsidiary folder
lists to find and select the personalization file that best fits your needs. You can
select a custom profile you created in a previous personalization session, or select
one of the sample profiles the installation program added to your host system. The
sample personalization files contain configurations for the following situations:
• Cryptoflex Entrust interop MS.cpf - Windows 2000-compatible Cryptoflex or
Cyberflex Access 16K card that operates with Entrust and a Microsoft
browser and mail client (Internet Explorer and either Outlook or Outlook
Express).
• Cryptoflex Entrust.cpf - Cryptoflex or Cyberflex Access 16K card that
operates in the Entrust environment.
• Cryptoflex MS interop Netscape.cpf - Windows 2000-compatible card that
operates with either Netscape® or Microsoft browsers and mail clients.
• Cryptoflex Netscape.cpf - Cryptoflex or Cyberflex Access 16K card that
operates with a Netscape browser and mail client.
• Cyberflex Entrust interop MS.cpf - Windows 2000-compatible Cyberflex
Access Developer 32K card that operates with Entrust and a Microsoft
browser and mail client.
• Cyberflex Entrust plus Netscape.cpf - Cyberflex Access Developer 32K card
that operates with Entrust and a Netscape browser and mail client.
• Cyberflex Entrust.cpf - Cyberflex Access Developer 32K card that operates in
the Entrust environment.
• Cyberflex MS interop Netscape.cpf - Windows 2000-compatible Cyberflex
Access Developer 32K card that operates with either Microsoft or Netscape
browsers and mail clients.
• Cyberflex Netscape.cpf - Cyberflex Access Developer 32K card that operates
with a Netscape browser and mail client.
Each personality profile has specified settings for a file structure that reflects the
requirements for certain types of objects to be protected or remain unprotected. For

© IDRBT, 2002
80
example, PKCS #11 specifications require that public keys be stored in public areas,
and so remain unprotected. In this case, the public keys are publicly available.
CryptoAPI specifications, on the other hand, require that public keys be write-
protected, so that you typically must verify CHV1 to gain write access to public keys.
In this case, the public keys are stored in private space.
The choice you make affects the amount of EEPROM required for the
personalization. Different profiles may have different settings for such elements as
the number of private keys that can be stored on the card and the amount of
memory allocated to symbol tables.
Notes:
• Microsoft Profiles — Profiles whose file names include "Microsoft" can
accommodate full compliance with CryptoAPI standards, as long as you
enable protected mode.
• Netscape Profiles — Profiles whose file names include "Netscape" can
accommodate full compliance with the PKCS #11 specification, as long as
you do not enable protected mode.
• Netscape/Microsoft Profiles — Profiles whose file names include both
"Microsoft" and "Netscape" can accommodate full compliance with either
PKCS #11 or CryptoAPI specifications, depending on whether you enable
protected mode. The distribution of files in each case reflects the requirement
for certain types of files (such as public keys) to remain open (as in PKCS
#11) or to be protected by a security condition (as in CryptoAPI).
• Entrust Only Profiles — If you plan to use the card only with Entrust, choose
a profile whose file name includes "Entrust," but not "Microsoft" or "Netscape."
Step 3: Set Advanced Personalization Options
Optional Step: Once you select a personalization profile, you have the option of
setting advanced personalization options in the Personalization File Settings dialog
box.
To display the Personalization File Settings dialog box:
© IDRBT, 2002
81
1. Click the Advanced button.
The Personalization File Settings dialog box appears and displays the settings
specified by the personalization file you chose.
2. Review the settings and make any adjustments needed. You can revise any
of these attributes:
o Number of Private Keys — Number of private keys, or digital
identities.
o Private Space — Number of EEPROM bytes reserved for protected
digital ID data (data that is not publicly readable).
o Public Space — Number of EEPROM bytes reserved for unprotected
digital ID data (data that is publicly readable).
o CryptoAPI Enabled — Select this check box if you plan to implement
a card program that complies with Microsoft’s CryptoAPI architecture.
o PKCS #11 Enabled — Select this check box if you plan to implement
a card program that complies with RSA’s PKCS #11 specification.
o Generate Keys on Card— Cryptoflex Cards Only: Select this check
box if you plan to generate RSA keys on the card. (This option is not
available on Cyberflex Access Developer 32K cards.)
o Protected Mode Enabled — Select this check box to implement the
CryptoAPI requirement for write -protecting objects that are publicly
readable, such as public keys and public key certificates. Clear this
check box to implement the PKCS #11 requirement to grant write
access to objects that are publicly readable. The file structure can be
fully compliant with only one of these specifications.
3. Optional: To specify a new transport key value for a Cryptoflex card or a
Cyberflex Access 16K card, select the Set Transport Key check box, select
either the Ascii or HexString radio button and enter the transport key (an 8-
character ASCII or 16-digit hexadecimal value) in the text field. (The
HexString radio button is selected by default.)

© IDRBT, 2002
82
To cancel the transport key setting, clear the Set Transport Key check box.
If you change the transport key value, be sure to use the new transport key value
in the Personalize tab.
If you try to personalize the card with an invalid transport key, you may block the
transport key and permanently lose contact with the card.
4. When the Personalization File Settings dialog box settings are complete, click
OK.
You return to the Personalize tab of the COVE Administration Personalization Tool
window. If you are connected to a Cryptoflex or Cyberflex Access 16K card, the tab
displays an updated pie chart and corresponding statistics.
Step 4: Adjust Personalization Settings
Optional Step: Now that you have selected a personalization profile and set any
advanced options you like, you have the option to adjust the settings in the
Personalize / Repersonalize tab as follows:
• Card Label— The card label is used for PKCS #11 applications. The card
label typically appears in Netscape applications as the card identifier. If you
do not specify a card label, PKCS #11 supplies Netscape with the default
card label "Card in Slot #N," where N is an incremental value assigned to the
card reader slot. (Card labels do not appear in Internet Explorer, Outlook, or
Outlook Express.)
o To specify a card label, enter a text string in the Card Label text field.
You can enter any text string you like, with a maximum length of 32
characters.
o To delete the current label, clear the Card Label check box.
o To edit the card label, change the existing label name in the text field.
• User and Unblock Pins — To specify a new PIN value and unblock PIN
value for the Cryptoflex card user PIN or the PKI applet PIN on a Cyberflex
Access Developer 32K card, enter an 8-digit string in the User Pin box and

© IDRBT, 2002
83
the Unblock Pin box. If you specify a value in one of these boxes, you must
specify a value in both.
All the sample personalization profiles set these default PIN values:
User PIN — 00000000 (decimal)
o Unblock PIN — 11111111 (decimal)
o To cancel the PIN settings, clear the Set PINs check box.
o To require the user to change the PIN after login, select the Initial Pin
check box.
• GINA — To enable secure logins by using GINA, see .
Step 5: Execute the Personalization Operation
With all the personalization options set, you are ready to enter the appropriate key
value(s) and complete the personalization operation.
1. Enter the AUTH, MAC, and KEK key values (Cyberflex Access Developer
32K card) or the transport key value (Cryptoflex card):
o Select the ASCII or HexString radio button, and
o Click the Select Key button to choose the key value(s). For a
Cryptoflex card, you choose an 8-character ASCII or 16-digit
hexadecimal value to appear in the Transport Key box.
If you click the Select Keys button while you are personalizing a Cyberflex Access
Developer 32K card, the next step depends on whether you started COVE as a
standalone application or from the Smart Card Toolkit:
o Started as a standalone application — A window appears and asks
you for a key set file. You can select options through the window’s
Tools drop-down menu to create and edit keys, which COVE will store
in a key set file.

© IDRBT, 2002
84
o Started from the Smart Card Toolkit — The Key Manager Visa OP
window appears, which you can use to create and edit keysets. These
keysets are stored in the Key Manager database on the host system.
The personalization profiles you load from Cryptoflex .cpf files contain
the default transport key value. If you change the transport key on the
card, you must enter the new transport key value in the Transport Key
box.
If you fail to enter the correct key value within the allowed number of
attempts, the key becomes blocked and you can no longer
communicate with the card. Cryptoflex 16K cards allow three attempts
to verify the transport key. Cyberflex Access Developer 32K cards
allow ten attempts to verify the AUTH, MAC, and KEK keys.
2. When the settings are complete, click the Personalize button.
A message box appears and asks you to confirm the action. (If the card has already
been personalized or had certificate and key files added to it, personalization will
overwrite the old cryptographic files.)
3. Click OK.
COVE deletes old cryptographic files (if necessary), and creates the new file
structure. The status bar displays messages and a graphical display to indicate the
progress of the operation. When personalization is complete, a message appears
that confirms the card has been personalized. The Personalize tab name changes to
Repersonalize. When you start a new card session in COVE, you will be required to
enter the CHV1 key to gain access to the card. (The default CHV1 key value is
00000000.)
Example: Changing a Personalization Profile’s Settings
Most of the default profiles are set to accommodate one or two digital identities. As a
simple example, let’s say you choose a profile with these settings:

© IDRBT, 2002
85
• Private keys = 1
• Private space = 1000 bytes
• Public space = 2500 bytes
To modify the settings, you can enter new values in the boxes or click the spin
buttons to adjust the values incrementally. Following this example, you could add
space for another digital ID by entering these settings:
• Private keys = 2
• Private space = 2000 bytes
• Public space = 5000 bytes
To set the Personalize tab parameters correctly, you must have a good
understanding of the application that will be used with the card. Private keys typically
occupy private space on the card, and public keys occupy public space. Certificates
typically occupy a considerable amount of EEPROM memory and are stored in the
memory pool allocated to public objects. In some cases, however, certificates are
stored in private space.
When you calculate the space you need, use an appropriate personalization profile’s
settings as a basis.
Saving and Loading Custom Personalization Profiles
You can save custom options you have entered in the COVE Administration
Personalization Tool window’s Personalize tab and in the Personalization File
Settings dialog box. You can either save the settings as a new profile or overwrite an
existing profile. Once you save the personalization profile as a file, you can reload
the profile or distribute it for use on other systems.
For more information, see these topics:
• Saving a Profile
• Loading a Profile
© IDRBT, 2002
86
Saving a Profile
To save the current setting in the COVE Administration Personalization Tool
window’s Personalization tab and Personalization File Settings dialog box as a .cpf
file, follow these steps:
1. Click the Save button at the bottom of the Personalize tab.
A standard save file dialog box appears.
2. Navigate to the folder you want to use for storing the personalization file.
3. Enter a name for the file in the File Name box, or select an existing file (to
overwrite its contents).
4. Make sure Personalization File (*.cpf) appears in the Save as Type box.
5. Click Save to save the file, or Cancel to exit without saving changes.
Loading a Profile
You can load the personalization settings from an existing .cpf file into the
Personalization tab and the Personalization File Settings dialog box. To load profile,
use the navigation aids in the Select Personalization file area to find and select a
personalization profile. Be sure the file you want to use is highlighted in the right-
hand pane.
COVE loads the specifications from the specified profile into the Personalize tab. If
you like, you can make adjustments to the settings .
Using the Digital IDs Tab
The Digital IDs tab displays a list of all digital certificates in the host system’s
registry. If a card is connected to COVE, the Digital IDs tab also shows whether the

© IDRBT, 2002
87
card has been personalized and shows any certificates and associated
cryptographic keys stored on the card.
You can use the Digital IDs tab to examine the host system and card certificates,
and remove items that are not needed. If you are working with a CryptoAPI-enabled
card, you can add digital IDs on the card to the host system’s registry.
Displaying the Digital IDs Tab
When you first start the COVE application, the Digital IDs tab appears at the front of
the COVE Administration Personalization Tool window.
Examining Digital Certificate Data
When you first start the COVE application and view the Digital IDs tab, you can
examine information about certificates registered on the host system. Once you
connect to a personalized card, you can also view any digital ID data stored on the
card.
For more information, see these topics:
• View the registry tree
• Display a certificate’s properties
• Delete certificates and keys
• Export a certificate to the host registry
• Refresh the Digital ID tab display
Contents of the Registry Tree
The digital certificates registered on the host system appear in the Registry tree,
which contains these folders:
• Address Book — Certificates of email correspondents who have sent you
email from Outlook or Outlook Express
• CA — Certificates of certificate authorities, used to verify correspondents’
certificates
• My — Your personal certificates

© IDRBT, 2002
88
• REQUEST — Certificate requests that have not been processed
• Root — Self-signed certificates, used as the basis for trust trees
• TRUST — Certificates designated as trustworthy without proof from a
certificate authority
NOTE If you use a card that complies with Microsoft’s CryptoAPI card
standards, you must register digital certificates on the host
system. For a PKCS #11-compliant card, you do not need to
register certificates on the host system. This difference relates
to the different security models the two standards use.
The Card’s Digital ID Elements
If a personalized card is connected to COVE, the Digital IDs tab displays a
personalization container symbol (like the one shown at left). If you have added any
cryptographic objects to the card’s personalization files, they appear under this
symbol.
The following illustration shows a card that contains some digital certificates and
keys.

© IDRBT, 2002
89
Displaying a Certificate’s Properties
To display the properties of a certificate, double-click the item’s name or icon. The
Properties status box appears and displays information about the certificate in a
table format. The following illustration shows the Properties status box displaying
information about a sample card’s Entrust certificate.

© IDRBT, 2002
90
The Properties box displays whatever types of information are recorded in the
certificate. The information varies but typically includes a serial number, an inception
and expiration date, the type of algorithm used, the value of the public key modulus,
the issuer’s name, and information about the certificate holder.
Deleting Certificates and Keys
You can delete individual items or clear all digital information from a card in the
Digital IDs tab of the COVE Administration Personalization Tool window. You may
want to eliminate unneeded registration data, for example, or remove old digital IDs
from a card.
Deleting Digital ID Data from the Registry or the Card
To delete an individual item, follow these steps:

© IDRBT, 2002
91
1. Highlight the item you want to delete in the Digital IDs tab of the COVE
Administration Personalization Tool window. You can delete any of these
items:
o A certificate registration or request from the Registry tree (but not a
folder)
o A certificate or key from the personalization files on the card (but not
the personalization file container)
When you have selected an item you can delete, the Delete Object button is
activated. If you select an item that you cannot delete, the Delete Object button
appears dimmed.
2. Click the Delete Object button.
COVE removes the object.
Clearing All Certificates and Associated Data from the Card
To clear all the digital ID data that is currently on a card, follow these steps:
1. Highlight a personalization file container in the Digital IDs tab display area.
The Clear Card button is activated (and no longer appears dimmed).
2. Click the Clear Card button.
COVE removes all the digital IDs and associated keys from the card. The card’s
personalization files remain on the card, ready to receive new digital signatures and
keys.
Exporting a Certificate to the Host Registry
If your card program complies with Microsoft’s CryptoAPI card standards, you must
register digital certificates on the host system. (This is not necessary for PKCS #11
card programs.) When you download a certificate to a card, the certificate is
automatically registered on the host system. If you download the certificate on one
system, then use the card on another system, you must register the certificate on the

© IDRBT, 2002
92
new system. You cannot use the certificate until it is registered on the host system
you are currently using.
You can use the Digital IDs tab in the COVE Administration Personalization Tool
window to register certificates that were downloaded to a card on other host
systems:
1. Highlight a card certificate in the Digital IDs tab display.
The Export to Registry button is activated (no longer appears dimmed).
2. Click the Export to Registry button.
COVE automatically exports the certificate data to the host system’s registry.
3. Continue with this process until all the certificate data is registered. (You do
not register the certificates’ associated keys.)
Refreshing the Digital ID Tab Display
To refresh the display in the Digital ID tab, click the Refresh button.
COVE reloads the digital IDs in the host system registry, and the digital IDs on the
card.
Using the Card Tab
The Card tab shows the card’s current personalization settings and associated
cryptographic contents. You can use the Card tab to view and modify these settings.
You can also use the Card tab to add a label to the card or change the existing card
label.
The bottom part of the tab presents a graphical view of the amount of personalized
file space in current use, and shows the number of the card’s RSA public and private
keys, certificates, data objects, and containers.

© IDRBT, 2002
93
For more information, see these topics:
• Display the Card tab —
• Change Card tab data —
• Add or edit the card label —
Displaying the Card Tab
To display the Card tab, start the COVE application if it is not already running, then
click the Card tab. The Card tab appears at the front of the COVE Administration
Personalization Tool window.
Changing Card Tab Data
You can change the following types of information in the Card tab:
• Card Label — An editable field that displays the current label for the card, if a
label has been specified during personalization or in the Card tab. This is the
label used for PKCS #11, which typically appears in Netscape applications as
the card identifier.
• CryptoAPI Enabled — Check box to specify whether the file structure
defined during personalization is compatible with Microsoft’s CryptoAPI
standards.
• PKCS #11 Enabled — Check box to specify whether the file structure defined
during personalization is compatible with RSA’s PKCS #11 specification.
• Generate Keys on Card — Check box to choose to enable RSA key
generation for the card during personalization. (Applicable to Cryptoflex cards
only.)
• Protected Mode Enabled — Check box to specify whether certain types of
files will be placed in protected areas of the card (areas that require
authentication) or will be placed in unprotected areas.
Click Apply when you have finished making changes.

© IDRBT, 2002
94
Adding or Editing the Card Label
You can add a card label either in the Card tab or as part of the personalization
settings you specify in the Personalize/Repersonalize tab.
The card label you create appears as the list entry for the card to select in Netscape
clients. If you do not specify a card label, the Netscape list entry for the card reads
"Card in Slot #1" (or an incremented slot number). The card label does not appear in
Internet Explorer, Outlook, or Outlook Express.
To add or edit a card label, enter a text string in the Label box, then click the Apply
button. You can enter any text string you like.
To delete the current label, clear the Label box, enter a single space, then click the
Apply button.
Using the PIN Tab
You can use the PIN tab to perform any of these actions:
• Change the value of the PIN (the PKI applet PIN on a Cyberflex Access
Developer 32K card or the user PIN on a Cryptoflex card
• Unblock a blocked key
• Change the unblock key value
• Change the transport key on a Cryptoflex card
NOTE The PIN tab is enabled only for cards that contain a PIN—
either:
• A CHV1 PIN at the root level on a file-based card (which COVE will add to the
card during personalization if it finds no pre-existing PIN when personalization
is performed), or
• A PKI applet PIN on an Open Platform-compliant card (added to the card
during personalization).

© IDRBT, 2002
95
Displaying the PIN Tab
To display the PIN tab, start the COVE application, then click the PIN tab. The PIN
tab appears at the front of the COVE Administration Personalization Tool window.
The PIN tab appearance is card-specific. On a Cryptoflex card, you enter the
transport key to change or unblock the user PIN. On a Cyberflex Access Developer
32K card, you enter the AUTH, MAC, and KEK keys to unblock the PKI applet PIN.
Changing the PIN Value
If the card contains a PIN, you can change its value in the Change User PIN area of
the COVE PIN tab. (For a file -based card, this function applies to the CHV1 PIN
value at the root level. For an Open Platform-compliant card, this function applies to
the applet PIN added to the card during personalization.)
To change the PIN value, follow these steps in the Change User PIN area of the PIN
tab:
1. Enter the current PIN value in the Old PIN box. (The PIN is 8 decimal digits or
ASCII characters in length.)
For a Cryptoflex card or Cyberflex Access 16K card, enter the CHV1 PIN value. For
a Cyberflex Access Developer 32K card, enter the PIN value of the PKI applet
added to the card during the most recent personalization.
2. Enter the new PIN value in the New PIN box and in the Confirm PIN box.
(The replacement PIN must also be 8 decimal digits or ASCII characters in
length.)
The Change PIN button is activated as soon as you enter data in the Confirm PIN
box. (The button no longer appears dimmed.)
3. Click the Change PIN button.

© IDRBT, 2002
96
If you entered the correct PIN value and matching strings of the correct length for the
replacement PIN, COVE updates the PIN value. (COVE warns you if you enter a
new value that matches the original one.)
Unblocking the PIN and Changing Its Value
If the card contains a blocked PIN and you know the unblock PIN value, you can
unblock it and change the PIN’s unblock value in the Unblock User PIN dialog box.
NOTE For a file-based card, this function applies to the CHV1 PIN
value at the root level. For an Open Platform-compliant card,
this function applies to the applet PIN added to the card during
personalization.
To unblock the PIN and change its value, follow these steps:
1. Click the Unblock PIN button in the PIN tab of the COVE Administration
Personalization Tool window.
The Unblock User PIN dialog box appears, as shown in the following example. (The
example shows the dialog box after data has been entered.)
2. Enter the current unblock PIN value in the Unblock box.

© IDRBT, 2002
97
PINs are 8 decimal digits or ASCII characters in length. You can create a shorter
PIN by adding padding characters (with the value FFh) to the end of the PIN value
string.
If you are connected to a Cryptoflex card or Cyberflex Access 16K card, enter the
unblock key for the root CHV1 PIN value. For a Cyberflex Access Developer 32K
card, enter the unblock key value of the PKI applet PIN added to the card during the
most recent personalization.
3. Enter the new PIN in the New User PIN box and in the Confirm box. (The
replacement PIN must also be 8 decimal digits or ASCII characters in length.
To create a shorter PIN, add padding characters with the value FFh to the end
of the PIN value string.
The Unblock PIN button is activated as soon as you enter data in the Confirm box.
(The button no longer appears dimmed.)
4. Click the Unblock PIN button.
If you entered the correct value for the unblock PIN and entered matching strings of
the correct length for the replacement PIN, COVE unblocks the PIN and updates its
value. (COVE warns you if you entered a new value that matches the original one.)
Changing the Unblock PIN Value on a File-Based Card
If you know the transport key value of a file -based card, you can use the Change
Unblock area of the PIN tab to change the unblock PIN value.
NOTE For a file-based card, this function applies to the CHV1 PIN
value at the root level. If the card does not contain a PIN of this
type, this function is disabled.
To change the unblock PIN value in the Unblock User PIN dialog box, follow these
steps:

© IDRBT, 2002
98
1. Select the entry format for the transport key by clicking on one of the radio
button under the Key box in the PIN tab’s Change Unblock area:
o ASCII — Expressed as ASCII format, the transport key is 8 characters
or digits in length.
o HexString — Expressed in hexadecimal format, the transport key is an
8-byte (16-digit) value.
2. Enter the transport key in the Key box. Enter the value in the format you
selected in the previous step.
If you fail to enter the correct transport key value within the allowed
number of attempts, the key becomes blocked and you can no longer
communicate with the card. You have three chances to verify the
transport key on a Cryptoflex 16K card. You have ten chances to
verify the default keys on a Cyberflex Access Developer 32K card.
3. Enter the new unblock PIN in the New and Confirm boxes. (The replacement
PIN must also be 8 decimal digits or ASCII characters in length.)
The Change Unblock button is activated as soon as you enter data in the Confirm
box. (The button no longer appears dimmed.)
4. Click the Change Unblock button.
If you entered the correct value for the transport key and entered matching strings of
the correct length for the replacement PIN, COVE updates the unblock PIN value.
(COVE warn you if you entered new values that match the original one.)
Changing the Transport Key Value on a File-Based Card
If you know the current transport key value of a Cryptoflex or Cyberflex Access 16K
card, you can use the Change Transport Key dialog box to change the transport key
value.
To change the transport key value, follow these steps:

© IDRBT, 2002
99
1. Click the Change Transport Key button in the PIN tab of the COVE
Administration Personalization Tool window.
The Change Transport Key dialog box appears, as shown in the following example.
(The example shows the dialog box after the data has been entered.)
2. Select the entry format for the current transport key by clicking one of the
radio buttons located under the Old box:
o ASCII — Expressed as ASCII format, the transport key is 8 characters
or digits in length.
o HexString — Expressed in hexadecimal format, the transport key is an
8-byte (16-digit) value.
3. Enter the current transport key value in the Old box. Enter the value in the
format you specifed in the previous step.
As you enter the value, asterisks appear in the box.
If you fail to enter the correct transport key value within the allowed number of
attempts, the key becomes blocked and you can no longer communicate with the
card. Three attempts are allowed for Cryptoflex 16K cards and eight attempts for
Cyberflex Access 16K cards.
4. Select the HexString radio button to specify the entry format for the new
transport key.

© IDRBT, 2002
100
5. Enter the new transport key value in the New box. Enter a value in
hexadecimal fomat.(The Change Transport Key dialog box will respond only
to keystrokes for hexadecimal values.)
As you enter the value, it appears in plaintext in the New box.
Take note of the new number. If you forget it, you may permanently lock yourself
out of the card.
The Change Transport Key button is activated as soon as you enter the correct
number of digits or characters in the New box.
6. Click the Change Transport Key button.
If you entered the correct value for the transport key and your entry for the new
value is valid, COVE updates the card’s transport key value.
Using GINA
Winlogon is a component of the Microsoft Windows NT/Windows 2000 operating
system that provides interactive logon support by combining the Winlogon
executable program, a Graphical Identification and Authentication dynamic-link
library (DLL)—referred to as the GINA—and any number of network providers.
The GINA is a replaceable DLL component that is loaded by Winlogon. The GINA
implements the authentication policy of the interactive logon model, and is expected
to perform all identification and authentication user interactions. In this case, GINA
DLLs can implement smart-card authentication mechanisms in place of the standard
Windows NT/Windows 2000 user name and password authentication. Winlogon can
also load zero or more network providers to perform secondary authentication.
If you plan to use GINA for smart card login to Windows NT/2000, you must
personalize the smart card so that it is ready to accept GINA users.
NOTE Java Card specifications require a PKI applet to be loaded before GINA

© IDRBT, 2002
101
can be set up. This applet is loaded automatically by the software during
the card personalization process.

© IDRBT, 2002
102
Appendix - 2

© IDRBT, 2002
103
Installation of Cyberflex Smart Card Reader Utility software
components
• Installation must be under Administrator login. • Remove all other Smart card Reader Software if previously installed on the
computer. • Connect one of the Smart Card Reader ports to the serial port of the
machine and the other port to the mouse socket (connect the mouse to the Smart Card reader’s port).
• Use Add /Remove utility of START à Settings à Control Panel to remove the other Card Reader software.

© IDRBT, 2002
104
Prerequisites
• Netscape Navigator version should be 4.7 or above or
• Internet explorer version should be 5.5 or above. Installation
• Insert Software CD. This will automatically start the installation. If not run
setup.
• The program will be installed in the default C: drive. Choose the required software to be installed as given below
• Enable Microsoft Base Component,
• Enable Reflex 72 Reader driver Installation
• Enable Reflex tools • Enable Cyberflex Access SDK 4.1

© IDRBT, 2002
105
• Disable the other remaining options by right clicking on it and choosing
‘X’.
• Press The NEXT button to continue installation. • Complete the Installation. After Installation it will prompt for restarting the
machine. Choose the Restart option. Before Restarting connect Schlumberger Card Reader to the serial port and the mouse port.
After Restarting
• If using Netscape Navigator then after restarting open the file
“ C:\Program Files\Schlumberger\Smart Cards and Terminals\Cyberflex Access SDK
4.1\PKCS11 Enable\SlbNsInstall.html “
The Browser will inform if the installation was successful.
Exporting Certificate from smart Card to Registry for Internet Explorer
• Press Start Button.
• Go to Programs.
• Go to Schlumberger Smart cards and terminals.
• Select CyberFlex Acess SDK4.1.
• Select COVE User Tool 4.1.
• Check if the Schlumberger Reflex 72.0 is displayed in the Card Reader
Text Box. If not use reinstall or troubleshoot the Smart Card Hardware Device.
• Insert Smart card in to the Smart Card Reader.

© IDRBT, 2002
106
• COVE User Tool 4.1 will ask if you want to connect to the Smart Card Press YES.
• Else click the Connect button to connect to the Smart Card
• Enter your Smart Card PIN #. Default Pin number is 00000000.
• COVE User Tool 4.1 will now show Details of User Certificate on the
Smart Card • Select the Certificate Icon by pressing left mouse key only once. • Now Press “Export to Registry” Button on the Right side. • Press OK on completion of Export to Registry. • To View details of the User Certificate double click on the Certificate Icon.

© IDRBT, 2002
107
Changing the PIN number of the Smart card
• Press Start Button.
• Go to Programs.
• Go to Schlumberger Smart cards and terminals.
• Select Cyberflex Access SDK4.1.
• Select COVE User Tool 4.1.
• Check if the Schlumberger Reflex 72.0 is displayed in the Card Reader
Text Box. If not use reinstall or troubleshoot the Smart Card Hardware Device.
• Insert Smart card in to the Smart Card Reader.
• COVE User Tool 4.1 will ask if you want to connect to the Smart Card
Press YES.
• Else click the Connect button to connect to the Smart Card
• Enter your Smart Card PIN #.
• Once Validated, Click PIN tab, the change PIN dialog will appear.
• Enter the old PIN, new PIN and the confirm PIN.
• Click Change PIN to confirm. (See figure below)

© IDRBT, 2002
108