Hyperion Training Exercises - UBC Finance · PDF fileHyperion Training Exercises Page 3 b....
29
Hyperion Training Exercises Page 1 Exercises SmartView 1. Run the Operating Fund Planning Snapshot report in Hyperion a. Log in to the FMS Portal (www.msp.ubc.ca) b. Click Explore c. Reports – Management & Income Statement/Budget Reviews d. Right Click report “Planning_Snapshot– OPER_FUND Plan_Act_Fcst_NextPlan” e. Open in HTML preview f. For your user POV (Point of View) select the following. g. Click on Export In Query Ready Mode.
Transcript of Hyperion Training Exercises - UBC Finance · PDF fileHyperion Training Exercises Page 3 b....

Hyperion Training Exercises
Page 1
Exercises SmartView
1. Run the Operating Fund Planning Snapshot report in Hyperion
a. Log in to the FMS Portal (www.msp.ubc.ca)
b. Click Explore
c. Reports – Management & Income Statement/Budget Reviews
d. Right Click report “Planning_Snapshot– OPER_FUND Plan_Act_Fcst_NextPlan”
e. Open in HTML preview
f. For your user POV (Point of View) select the following.
g. Click on Export In Query Ready Mode.

Hyperion Training Exercises
Page 2
h. Save the file to your desktop
2. Navigate Smartview to view forms.
a. Click on the Smartview tab and then Panel:
Hyperion Training Exercises
Page 3
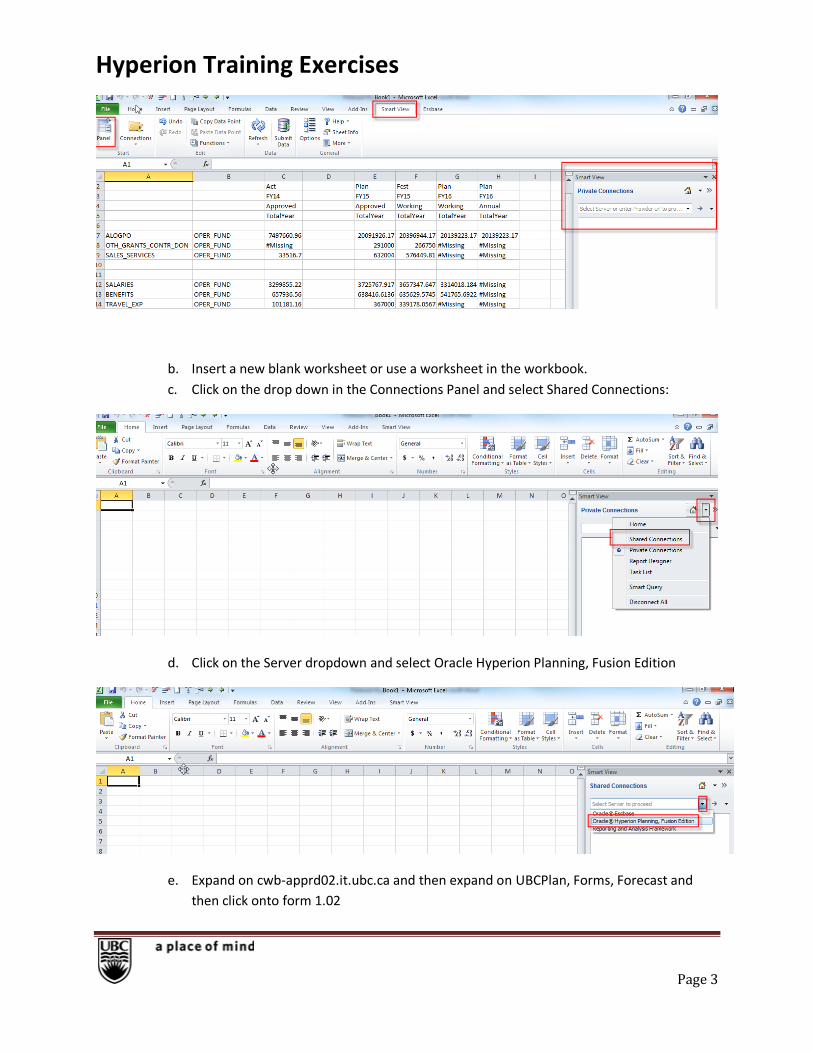
b. Insert a new blank worksheet or use a worksheet in the workbook.
c. Click on the drop down in the Connections Panel and select Shared Connections:
d. Click on the Server dropdown and select Oracle Hyperion Planning, Fusion Edition
e. Expand on cwb-apprd02.it.ubc.ca and then expand on UBCPlan, Forms, Forecast and
then click onto form 1.02

Hyperion Training Exercises
Page 4
f. Now click on Open Form:
g. Now the form is opened to the last Fund/Dept/PG that we were reviewing in Hyperion.

Hyperion Training Exercises
Page 5
Any changes/adjustments can be made by editing a yellow cell. If the account that you want to plan for
is not on this form, please try form 1.01.
3. Open the UBCPlan – ISPlan Grid
a. Go to this link on the Finance UBC website and open the “UBCPlan - ISPlan Grid”
http://www.finance.ubc.ca/budget/hyperion-campus-wide-budgeting/smartview-templates
b. Save the file to your desktop (File – Save As) or Copy/Paste the Grid into your current
sheet.
c. Now click on the SmartView tab – Panel - Shared Connections:

Hyperion Training Exercises
Page 6
d. Shared Connections will appear on the right side window, click on the server drop down
and select Oracle Essbase.
e. Expand on “EssbaseCluster-1” and then “UBCPlan” and then click on “ISPlan” and then
“Connect”
f. Then click on Ad Hoc analysis
g. Select “Reuse Sheet Contents Only”
4. In the same Grid, change PRESIDENT or All Departments to your six digit Department ID.
a. Type D and your 6 digit Dept ID number over PRESIDENT or All Departments. (users
please use a department that you would normally plan for)

Hyperion Training Exercises
Page 7
b. Change ALL_FUNDS or UBC Consolidated to G0000 and then click refresh.

Hyperion Training Exercises
Page 8
c. Now double click or Zoom In on STMT_REV_EXP (Net Income).
d. Keep only on EXPENSES

Hyperion Training Exercises
Page 9
e. Zoom in and keep only on Salaries

Hyperion Training Exercises
Page 10
f. Now rearrange the grid, so SALARIES is in column B,C and D and move ALL_PGS to
column A
Your grid should look like this:

Hyperion Training Exercises
Page 11
g. Supress #Missing data – click on Smart View/Options/Data Options and check off No
data/Missing in Suppress Rows:
h. Now zoom in or double click on ALL_PGS to get a listing of all your PGs with Salary
expenses. (keep double clicking until you get to the PG level)

Hyperion Training Exercises
Page 12

Hyperion Training Exercises
Page 13
i. Save your work and close the sheet.
5. Go to this link on the Finance UBC website and open the “FundPlan – Fiscal Recurring Funding
Grid”
http://www.finance.ubc.ca/budget/hyperion-campus-wide-budgeting/smartview-templates
a. Now save the grid to your desktop (File – Save As - Desktop) or copy and paste the grid into
your current Workbook.
b. Click on Smart View – Panel – Shared Connections:

Hyperion Training Exercises
Page 14
c. Click on the server drop down and select Oracle Essbase:
d. Expand on “EssbaseCluster-1” and then “FundPlan” and then click on “FundTxr” and then
“Connect”

Hyperion Training Exercises
Page 15
e. And then click on “Ad Hoc Analysis”
f. The sheet is now active and linked to the Hyperion database.

Hyperion Training Exercises
Page 16
g. Turn off Alias Table, Essbase/Change Alias/None
Here’s the grid after we have turned off the alias table:
h. Type your six digit department ID over PRESIDENT and then click on refresh.

Hyperion Training Exercises
Page 17
i. Now click on Smart View/Options/Data Options – check off suppress missing rows and OK
j. Drill down on Planning Pgs by either double clicking on the node, or click on Zoom In

Hyperion Training Exercises
Page 18
k. Keep double clicking until you get to the PG level

Hyperion Training Exercises
Page 19
l. Keep only a PG with funding
m. Insert two columns between column B and C
n. Move Tot_txr_dept and Line_item from column D to G to rows in B and C

Hyperion Training Exercises
Page 20
o. Click on SmartView/Options/Data Options and check off suppress missing rows
p. Zoom in on Tot_txr_dept and Line_item until you get to Department IDs (that start with
X_D) and Line Item numbers.

Hyperion Training Exercises
Page 21
q. Save and close the sheet
6. Go to this link on the Finance UBC website and open the “UBCPlan – Workforce Grid”
http://www.finance.ubc.ca/budget/hyperion-campus-wide-budgeting/smartview-templates
a. Save the file to your desktop (File – Save As) or Copy and Paste to an Excel Workbook.
b. Now click on “Panel” and then “Shared Connections”:
c. Shared Connections will appear on the right side window, click on the server drop down and
select Oracle Essbase.

Hyperion Training Exercises
Page 22
d. And then expand on EssbaseCluster – 1, UBCPlan and then click on Wrkforce and then Connect.
e. Now click on Ad Hoc analysis and “Reuse sheet contents only”

Hyperion Training Exercises
Page 23
f. Click on Essbase – Change Alias - None to remove the descriptions in Fund, Dept, Programs and
PGs.
g. Change ALL_FUNDS to G0000 and PRESIDENT to your six digit Dept ID.

Hyperion Training Exercises
Page 24
h. Zoom in or drill down on FMS Salary Accounts

Hyperion Training Exercises
Page 25
i. Keep only WF_SALARIES
j. Insert a row beneath TotalYear and move WF_SALARIES to column B and C beneath TotalYear

Hyperion Training Exercises
Page 26
k. Click on SmartView tab, Options, Data Options and check off #Missing in suppress rows
l. Now zoom in or double click on ALL_PGS until you see real PGs.

Hyperion Training Exercises
Page 27
a. Keep one of your PGs by clicking on the PG and selecting Keep Only
b. Insert a row under WF_SALARIES and move this PG to column B and C under WF_SALARIES and
insert a column between A and B

Hyperion Training Exercises
Page 28
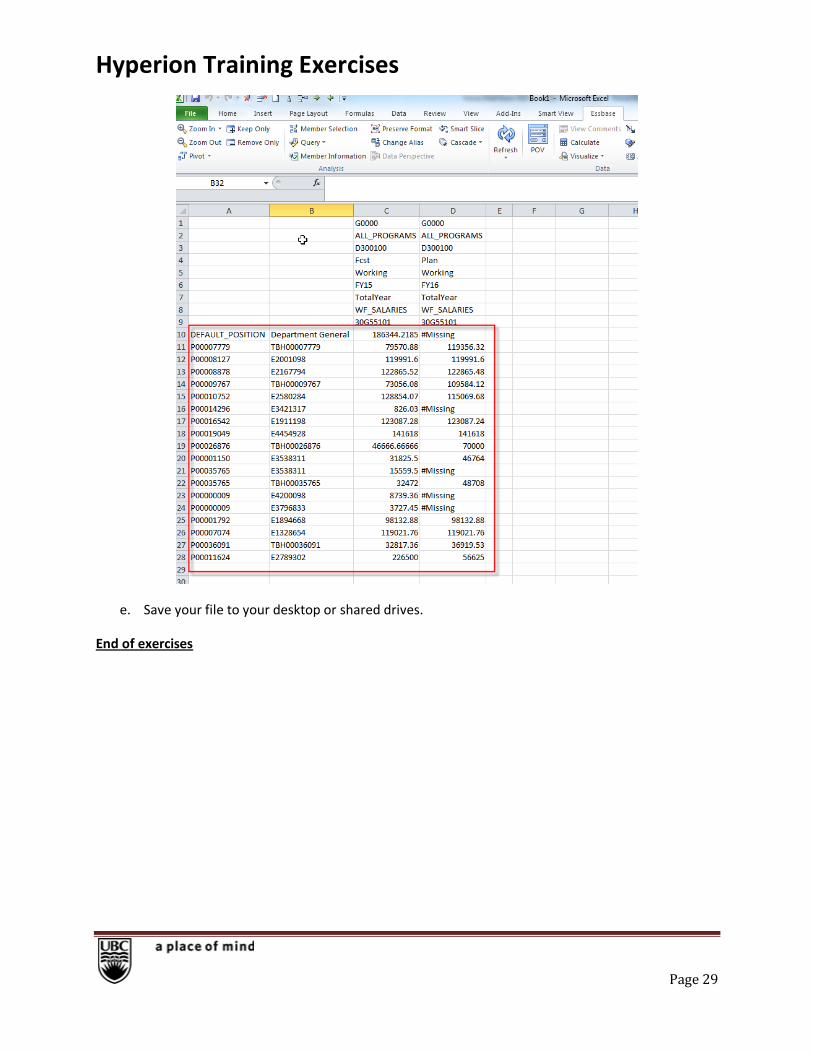
c. Move ALL_POSITIONS and Total Employees down to column A and B where PG was before
d. Zoom in on ALL_POSITIONS and Total Employees until you reach Position and Employee
numbers.
Hyperion Training Exercises
Page 29
e. Save your file to your desktop or shared drives.
End of exercises