
Hyperion Psb User
240
Oracle® Hyperion Public Sector Planning and Budgeting, Fusion Edition User's Guide RELEASE 11.1.2.1
-
Upload
azhar-awadz -
Category
Documents
-
view
217 -
download
9
Transcript of Hyperion Psb User

Oracle® Hyperion Public Sector Planning and Budgeting,Fusion Edition
User's Guide
RELEASE 11.1.2.1

Public Sector Planning and Budgeting User's Guide, 11.1.2.1
Copyright © 2011, Oracle and/or its affiliates. All rights reserved.
Authors: EPM Information Development Team
This software and related documentation are provided under a license agreement containing restrictions on use anddisclosure and are protected by intellectual property laws. Except as expressly permitted in your license agreement orallowed by law, you may not use, copy, reproduce, translate, broadcast, modify, license, transmit, distribute, exhibit,perform, publish, or display any part, in any form, or by any means. Reverse engineering, disassembly, or decompilationof this software, unless required by law for interoperability, is prohibited. The information contained herein is subject tochange without notice and is not warranted to be error-free. If you find any errors, please report them to us in writing.
If this software or related documentation is delivered to the U.S. Government or anyone licensing it on behalf of the U.S.Government, the following notice is applicable:
U.S. GOVERNMENT RIGHTS:Programs, software, databases, and related documentation and technical data delivered to U.S. Government customersare "commercial computer software" or "commercial technical data" pursuant to the applicable Federal AcquisitionRegulation and agency-specific supplemental regulations. As such, the use, duplication, disclosure, modification, andadaptation shall be subject to the restrictions and license terms set forth in the applicable Government contract, and, tothe extent applicable by the terms of the Government contract, the additional rights set forth in FAR 52.227-19, CommercialComputer Software License (December 2007). Oracle USA, Inc., 500 Oracle Parkway, Redwood City, CA 94065.
This software is developed for general use in a variety of information management applications. It is not developed orintended for use in any inherently dangerous applications, including applications which may create a risk of personalinjury. If you use this software in dangerous applications, then you shall be responsible to take all appropriate fail-safe,backup, redundancy, and other measures to ensure the safe use of this software. Oracle Corporation and its affiliatesdisclaim any liability for any damages caused by use of this software in dangerous applications.
Oracle is a registered trademark of Oracle Corporation and/or its affiliates. Other names may be trademarks of theirrespective owners.
This software and documentation may provide access to or information on content, products, and services from thirdparties. Oracle Corporation and its affiliates are not responsible for and expressly disclaim all warranties of any kind withrespect to third-party content, products, and services. Oracle Corporation and its affiliates will not be responsible for anyloss, costs, or damages incurred due to your access to or use of third-party content, products, or services.

Contents
Documentation Accessibility . . . . . . . . . . . . . . . . . . . . . . . . . . . . . . . . . . . . . . . . . . . . . . . . . . . . . . . . . . 13
Chapter 1. About Public Sector Planning and Budgeting . . . . . . . . . . . . . . . . . . . . . . . . . . . . . . . . . . . . . . . 15
About This Guide . . . . . . . . . . . . . . . . . . . . . . . . . . . . . . . . . . . . . . . . . . . . . . . . . . . . . 15
About Public Sector Planning and Budgeting . . . . . . . . . . . . . . . . . . . . . . . . . . . . . . . . . 15
General Ledger and HRMS Integration . . . . . . . . . . . . . . . . . . . . . . . . . . . . . . . . . . . 16
Budgeting Implementations and Approaches . . . . . . . . . . . . . . . . . . . . . . . . . . . . . . 17
The Budget Process . . . . . . . . . . . . . . . . . . . . . . . . . . . . . . . . . . . . . . . . . . . . . . . . 17
Plan Types . . . . . . . . . . . . . . . . . . . . . . . . . . . . . . . . . . . . . . . . . . . . . . . . . . . . . . . 18
Budget Detail Types . . . . . . . . . . . . . . . . . . . . . . . . . . . . . . . . . . . . . . . . . . . . . . . . 18
Position and Employee . . . . . . . . . . . . . . . . . . . . . . . . . . . . . . . . . . . . . . . . . . . 18
Employee . . . . . . . . . . . . . . . . . . . . . . . . . . . . . . . . . . . . . . . . . . . . . . . . . . . . 19
Position . . . . . . . . . . . . . . . . . . . . . . . . . . . . . . . . . . . . . . . . . . . . . . . . . . . . . . 19
Employee, Position, and Job Relationships . . . . . . . . . . . . . . . . . . . . . . . . . . . . . . . . 19
FTE, Headcount, Overtime, and Vacancy Calculations . . . . . . . . . . . . . . . . . . . . . . . 20
FTE . . . . . . . . . . . . . . . . . . . . . . . . . . . . . . . . . . . . . . . . . . . . . . . . . . . . . . . . . 20
Overtime . . . . . . . . . . . . . . . . . . . . . . . . . . . . . . . . . . . . . . . . . . . . . . . . . . . . . 20
Headcount . . . . . . . . . . . . . . . . . . . . . . . . . . . . . . . . . . . . . . . . . . . . . . . . . . . 20
Vacant Positions . . . . . . . . . . . . . . . . . . . . . . . . . . . . . . . . . . . . . . . . . . . . . . . . 21
Additional Earnings . . . . . . . . . . . . . . . . . . . . . . . . . . . . . . . . . . . . . . . . . . . . . 22
Compensation Funding From Different Departments . . . . . . . . . . . . . . . . . . . . . . . . 22
Provided Dimensions . . . . . . . . . . . . . . . . . . . . . . . . . . . . . . . . . . . . . . . . . . . . . . . 22
Scenario and Version . . . . . . . . . . . . . . . . . . . . . . . . . . . . . . . . . . . . . . . . . . . . 22
Element . . . . . . . . . . . . . . . . . . . . . . . . . . . . . . . . . . . . . . . . . . . . . . . . . . . . . . 23
Budget Item . . . . . . . . . . . . . . . . . . . . . . . . . . . . . . . . . . . . . . . . . . . . . . . . . . . 24
Entity . . . . . . . . . . . . . . . . . . . . . . . . . . . . . . . . . . . . . . . . . . . . . . . . . . . . . . . . 24
Account . . . . . . . . . . . . . . . . . . . . . . . . . . . . . . . . . . . . . . . . . . . . . . . . . . . . . . 25
Currency . . . . . . . . . . . . . . . . . . . . . . . . . . . . . . . . . . . . . . . . . . . . . . . . . . . . . 25
Additional Dimensions . . . . . . . . . . . . . . . . . . . . . . . . . . . . . . . . . . . . . . . . . . . 25
User Defined Dimensions . . . . . . . . . . . . . . . . . . . . . . . . . . . . . . . . . . . . . . . . . . . . 26
Smart Lists . . . . . . . . . . . . . . . . . . . . . . . . . . . . . . . . . . . . . . . . . . . . . . . . . . . . . . . 27
Predefined Accounts . . . . . . . . . . . . . . . . . . . . . . . . . . . . . . . . . . . . . . . . . . . . . . . . 27
Contents iii

Task Lists . . . . . . . . . . . . . . . . . . . . . . . . . . . . . . . . . . . . . . . . . . . . . . . . . . . . . . . . 28
Annotations, Comments, and Attachments . . . . . . . . . . . . . . . . . . . . . . . . . . . . . . . 28
Requirements . . . . . . . . . . . . . . . . . . . . . . . . . . . . . . . . . . . . . . . . . . . . . . . . . . . . . 29
Assumptions . . . . . . . . . . . . . . . . . . . . . . . . . . . . . . . . . . . . . . . . . . . . . . . . . . . . . . . . 29
Accessibility . . . . . . . . . . . . . . . . . . . . . . . . . . . . . . . . . . . . . . . . . . . . . . . . . . . . . . . . . 29
Chapter 2. Getting Started . . . . . . . . . . . . . . . . . . . . . . . . . . . . . . . . . . . . . . . . . . . . . . . . . . . . . . . . . . . 31
Initial Product Implementation Tasks . . . . . . . . . . . . . . . . . . . . . . . . . . . . . . . . . . . . . . 31
Maintenance Tasks . . . . . . . . . . . . . . . . . . . . . . . . . . . . . . . . . . . . . . . . . . . . . . . . . . . . 33
Planner Tasks . . . . . . . . . . . . . . . . . . . . . . . . . . . . . . . . . . . . . . . . . . . . . . . . . . . . . . . . 34
Part I. Creating, Preparing, and Managing Public Sector Planning and Budgeting Applications . . . . . . . . . . . . 35
Chapter 3. Creating Applications . . . . . . . . . . . . . . . . . . . . . . . . . . . . . . . . . . . . . . . . . . . . . . . . . . . . . . . 37
About Creating Applications . . . . . . . . . . . . . . . . . . . . . . . . . . . . . . . . . . . . . . . . . . . . . 37
Before Creating Applications . . . . . . . . . . . . . . . . . . . . . . . . . . . . . . . . . . . . . . . . . . . . . 37
Fiscal Year Impact on Calculations . . . . . . . . . . . . . . . . . . . . . . . . . . . . . . . . . . . . . . . . . 38
Creating Classic Planning Applications . . . . . . . . . . . . . . . . . . . . . . . . . . . . . . . . . . . . . . 38
Creating Performance Management Architect Applications . . . . . . . . . . . . . . . . . . . . . . . 39
Chapter 4. Preparing Applications . . . . . . . . . . . . . . . . . . . . . . . . . . . . . . . . . . . . . . . . . . . . . . . . . . . . . . 41
Requirements . . . . . . . . . . . . . . . . . . . . . . . . . . . . . . . . . . . . . . . . . . . . . . . . . . . . . . . . 41
Defining the Budget Process . . . . . . . . . . . . . . . . . . . . . . . . . . . . . . . . . . . . . . . . . . . . . 42
Verifying Your Application Setup . . . . . . . . . . . . . . . . . . . . . . . . . . . . . . . . . . . . . . . . . 43
Scenario and Version . . . . . . . . . . . . . . . . . . . . . . . . . . . . . . . . . . . . . . . . . . . . . . . 43
Exchange Rates . . . . . . . . . . . . . . . . . . . . . . . . . . . . . . . . . . . . . . . . . . . . . . . . . . . . 43
Task Lists . . . . . . . . . . . . . . . . . . . . . . . . . . . . . . . . . . . . . . . . . . . . . . . . . . . . . . . . 43
Substitution Variables . . . . . . . . . . . . . . . . . . . . . . . . . . . . . . . . . . . . . . . . . . . . . . . 44
Data Load Settings . . . . . . . . . . . . . . . . . . . . . . . . . . . . . . . . . . . . . . . . . . . . . . . . . 44
Setting Up Dimensions and Members . . . . . . . . . . . . . . . . . . . . . . . . . . . . . . . . . . . . . . 45
Defining Dimensions and Members . . . . . . . . . . . . . . . . . . . . . . . . . . . . . . . . . . . . . 45
Renaming Provided Members . . . . . . . . . . . . . . . . . . . . . . . . . . . . . . . . . . . . . . . . . 46
Creating Jobs, Positions, and Employees During the Budget Cycle . . . . . . . . . . . . . . . 46
Managing Dimensions in Performance Management Architect . . . . . . . . . . . . . . . . . 47
Setting Up Smart Lists . . . . . . . . . . . . . . . . . . . . . . . . . . . . . . . . . . . . . . . . . . . . . . . . . . 48
Defining Smart Lists . . . . . . . . . . . . . . . . . . . . . . . . . . . . . . . . . . . . . . . . . . . . . . . . 48
Required Smart Lists . . . . . . . . . . . . . . . . . . . . . . . . . . . . . . . . . . . . . . . . . . . . . . . 48
Additional Smart Lists . . . . . . . . . . . . . . . . . . . . . . . . . . . . . . . . . . . . . . . . . . . . . . . 49
Frequently Used Public Sector Planning and Budgeting Smart Lists . . . . . . . . . . . . . . 49
Salary Grade Details . . . . . . . . . . . . . . . . . . . . . . . . . . . . . . . . . . . . . . . . . . . . . 50
Salary Grade Steps and Sequences . . . . . . . . . . . . . . . . . . . . . . . . . . . . . . . . . . . 50
iv Contents

Compensation Element Information . . . . . . . . . . . . . . . . . . . . . . . . . . . . . . . . . 50
Employee Information . . . . . . . . . . . . . . . . . . . . . . . . . . . . . . . . . . . . . . . . . . . 51
Position Information . . . . . . . . . . . . . . . . . . . . . . . . . . . . . . . . . . . . . . . . . . . . 51
Employee Position Associations . . . . . . . . . . . . . . . . . . . . . . . . . . . . . . . . . . . . . 51
About Associating Smart Lists With Dimensions . . . . . . . . . . . . . . . . . . . . . . . . . . . . 52
Including New or Modified Smart List Entries in Essbase Reports . . . . . . . . . . . . . . . 52
Loading General Ledger and HRMS Metadata and Data . . . . . . . . . . . . . . . . . . . . . . . . . 53
Using ERP Integrator . . . . . . . . . . . . . . . . . . . . . . . . . . . . . . . . . . . . . . . . . . . . . . . 53
Using the Outline Load Utility for Classic Applications . . . . . . . . . . . . . . . . . . . . . . . 54
Using Enterprise Performance Management Architect . . . . . . . . . . . . . . . . . . . . . . . . 55
Data Load Guidelines . . . . . . . . . . . . . . . . . . . . . . . . . . . . . . . . . . . . . . . . . . . . . . . 55
Customizing Provided Components . . . . . . . . . . . . . . . . . . . . . . . . . . . . . . . . . . . . . . . . 56
Business Rules . . . . . . . . . . . . . . . . . . . . . . . . . . . . . . . . . . . . . . . . . . . . . . . . . . . . 56
Task Lists . . . . . . . . . . . . . . . . . . . . . . . . . . . . . . . . . . . . . . . . . . . . . . . . . . . . . . . . 57
Data Forms Using Formulas . . . . . . . . . . . . . . . . . . . . . . . . . . . . . . . . . . . . . . . . . . 57
Data Forms Using Validation Rules . . . . . . . . . . . . . . . . . . . . . . . . . . . . . . . . . . . . . 58
Menus . . . . . . . . . . . . . . . . . . . . . . . . . . . . . . . . . . . . . . . . . . . . . . . . . . . . . . . . . . 58
Text Fields for Increased Text Entry . . . . . . . . . . . . . . . . . . . . . . . . . . . . . . . . . . . . . 58
Securing Applications . . . . . . . . . . . . . . . . . . . . . . . . . . . . . . . . . . . . . . . . . . . . . . . . . . 58
Securing Dimensions and Members . . . . . . . . . . . . . . . . . . . . . . . . . . . . . . . . . . . . . 59
Entity . . . . . . . . . . . . . . . . . . . . . . . . . . . . . . . . . . . . . . . . . . . . . . . . . . . . . . . . 60
Account and Element . . . . . . . . . . . . . . . . . . . . . . . . . . . . . . . . . . . . . . . . . . . . 60
Position and Employee . . . . . . . . . . . . . . . . . . . . . . . . . . . . . . . . . . . . . . . . . . . 60
Scenario and Version . . . . . . . . . . . . . . . . . . . . . . . . . . . . . . . . . . . . . . . . . . . . 60
Budget Item and Job Code . . . . . . . . . . . . . . . . . . . . . . . . . . . . . . . . . . . . . . . . 61
Custom Dimensions . . . . . . . . . . . . . . . . . . . . . . . . . . . . . . . . . . . . . . . . . . . . . 61
Securing Data Forms . . . . . . . . . . . . . . . . . . . . . . . . . . . . . . . . . . . . . . . . . . . . . . . . 61
Securing Task Lists . . . . . . . . . . . . . . . . . . . . . . . . . . . . . . . . . . . . . . . . . . . . . . . . . 61
Securing Business Rules . . . . . . . . . . . . . . . . . . . . . . . . . . . . . . . . . . . . . . . . . . . . . . 61
Chapter 5. Configuring the Line Item Budget . . . . . . . . . . . . . . . . . . . . . . . . . . . . . . . . . . . . . . . . . . . . . . . 63
Preparing to Link Compensation Budget and Line Item Budgets . . . . . . . . . . . . . . . . . . . 63
Scenario 1: One-to-One Mapping Between Segments or Chart Fields and Public SectorPlanning and Budgeting Dimensions . . . . . . . . . . . . . . . . . . . . . . . . . . . . . . . . . . . . 64
Step 1: Defining Entity Dimensions and Members . . . . . . . . . . . . . . . . . . . . . . . . 64
Step 2: Defining User Defined Dimensions and Members . . . . . . . . . . . . . . . . . . 64
Step 3: Adding and Modifying Smart Lists . . . . . . . . . . . . . . . . . . . . . . . . . . . . . 65
Step 4: Adding Segment or Chart Field Members to the HCP Plan . . . . . . . . . . . . 65
Step 5: Configuring Business Rules . . . . . . . . . . . . . . . . . . . . . . . . . . . . . . . . . . . 66
Scenario 2: Combining General Ledger Segments or Chart Fields in a Dimension . . . . 70
Contents v

Scenario 3: Applications With Different Chart of Accounts and General LedgerSegments or Chart Fields . . . . . . . . . . . . . . . . . . . . . . . . . . . . . . . . . . . . . . . . . . . . . 70
Configuring Business Rules in Multiple Applications . . . . . . . . . . . . . . . . . . . . . . 71
About Associating Business Rules With Menu Items . . . . . . . . . . . . . . . . . . . . . . 71
Associating Business Rules With Menu Items . . . . . . . . . . . . . . . . . . . . . . . . . . . 71
Associating Business Rules With Data Forms . . . . . . . . . . . . . . . . . . . . . . . . . . . 72
Populating the Line Item Budget . . . . . . . . . . . . . . . . . . . . . . . . . . . . . . . . . . . . . . . . . . 73
Linking Compensation Data . . . . . . . . . . . . . . . . . . . . . . . . . . . . . . . . . . . . . . . . . . 73
Pushing Compensation And Operational Expense Data to Reporting Applications . . . 75
Overview . . . . . . . . . . . . . . . . . . . . . . . . . . . . . . . . . . . . . . . . . . . . . . . . . . . . . 75
Creating the HCP Dimension Mappings . . . . . . . . . . . . . . . . . . . . . . . . . . . . . . . 76
Pushing Data to Reporting Applications . . . . . . . . . . . . . . . . . . . . . . . . . . . . . . . 82
Chapter 6. Setting Up Compensation Budgets . . . . . . . . . . . . . . . . . . . . . . . . . . . . . . . . . . . . . . . . . . . . . . 83
Before You Begin . . . . . . . . . . . . . . . . . . . . . . . . . . . . . . . . . . . . . . . . . . . . . . . . . . . . . 84
Managing Salary Grades . . . . . . . . . . . . . . . . . . . . . . . . . . . . . . . . . . . . . . . . . . . . . . . . 84
About Salary Grades . . . . . . . . . . . . . . . . . . . . . . . . . . . . . . . . . . . . . . . . . . . . . . . . 84
Differentiating Between Salary Steps and Sequences . . . . . . . . . . . . . . . . . . . . . . . . . 85
Defining Salary Grades . . . . . . . . . . . . . . . . . . . . . . . . . . . . . . . . . . . . . . . . . . . . . . 85
Specifying Step-based Salary Grades . . . . . . . . . . . . . . . . . . . . . . . . . . . . . . . . . 86
Specifying Rate-based Grades . . . . . . . . . . . . . . . . . . . . . . . . . . . . . . . . . . . . . . 87
Specifying Value-based Salary Grades . . . . . . . . . . . . . . . . . . . . . . . . . . . . . . . . . 88
About Modifying Salary Grades . . . . . . . . . . . . . . . . . . . . . . . . . . . . . . . . . . . . . . . . 88
Simultaneously Adjusting Grade Steps or Sequences . . . . . . . . . . . . . . . . . . . . . . . . . 89
About Specifying Annual Salary Spreads . . . . . . . . . . . . . . . . . . . . . . . . . . . . . . . . . . 89
Using a 52-Week Fiscal Year . . . . . . . . . . . . . . . . . . . . . . . . . . . . . . . . . . . . . . . . . . 90
Managing Other Compensation Elements . . . . . . . . . . . . . . . . . . . . . . . . . . . . . . . . . . . 91
Defining Other Compensation Elements . . . . . . . . . . . . . . . . . . . . . . . . . . . . . . . . . 91
Adding Compensation Element Options . . . . . . . . . . . . . . . . . . . . . . . . . . . . . . 93
Defining Overtime . . . . . . . . . . . . . . . . . . . . . . . . . . . . . . . . . . . . . . . . . . . . . . 93
Modifying Compensation Elements and Options . . . . . . . . . . . . . . . . . . . . . . . . . . . 95
Updating Multiple Compensation Options . . . . . . . . . . . . . . . . . . . . . . . . . . . . . . . 96
Processing Loaded HRMS Data . . . . . . . . . . . . . . . . . . . . . . . . . . . . . . . . . . . . . . . . . . . 96
Reviewing Loaded Position, Job, and Employee Data . . . . . . . . . . . . . . . . . . . . . . . . . . . . 97
Reviewing Position and Employee Data . . . . . . . . . . . . . . . . . . . . . . . . . . . . . . . . . . 97
Reviewing Job and Employee Data . . . . . . . . . . . . . . . . . . . . . . . . . . . . . . . . . . . . . . 98
Reviewing Position-Only Data . . . . . . . . . . . . . . . . . . . . . . . . . . . . . . . . . . . . . . . . . 99
Performing Mass Updates . . . . . . . . . . . . . . . . . . . . . . . . . . . . . . . . . . . . . . . . . . . . . . . 99
When to Make Updates . . . . . . . . . . . . . . . . . . . . . . . . . . . . . . . . . . . . . . . . . . . . . . 99
How Mass Updates Work . . . . . . . . . . . . . . . . . . . . . . . . . . . . . . . . . . . . . . . . . . . 100
vi Contents

Making Mass Updates . . . . . . . . . . . . . . . . . . . . . . . . . . . . . . . . . . . . . . . . . . . . . . 100
Assigning or Overwriting Compensation Element and Allocation Defaults . . . . . 101
Sample Mass Update . . . . . . . . . . . . . . . . . . . . . . . . . . . . . . . . . . . . . . . . . . . . 101
Spreading Salary Expenses . . . . . . . . . . . . . . . . . . . . . . . . . . . . . . . . . . . . . . . . 102
Part II. Creating Compensation Budgets . . . . . . . . . . . . . . . . . . . . . . . . . . . . . . . . . . . . . . . . . . . . . . . . . 103
Chapter 7. Defining Salary, Compensation, and Allocation Defaults . . . . . . . . . . . . . . . . . . . . . . . . . . . . . . 105
Advantages of Using Defaults . . . . . . . . . . . . . . . . . . . . . . . . . . . . . . . . . . . . . . . . . . . 105
Before Specifying Defaults . . . . . . . . . . . . . . . . . . . . . . . . . . . . . . . . . . . . . . . . . . . . . . 106
Maintaining Position Defaults by Entity . . . . . . . . . . . . . . . . . . . . . . . . . . . . . . . . . . . . 106
Specifying Salary Grade Defaults . . . . . . . . . . . . . . . . . . . . . . . . . . . . . . . . . . . . . . . . . 107
Maintaining Compensation Elements Defaults By Entity . . . . . . . . . . . . . . . . . . . . . . . . 107
Maintaining Natural Account Defaults . . . . . . . . . . . . . . . . . . . . . . . . . . . . . . . . . . . . 109
About Default Natural Accounts . . . . . . . . . . . . . . . . . . . . . . . . . . . . . . . . . . . . . . 109
Specifying Natural Account Defaults . . . . . . . . . . . . . . . . . . . . . . . . . . . . . . . . . . . 109
About Benefit and Compensation Allocations . . . . . . . . . . . . . . . . . . . . . . . . . . . . . . . 110
Example 1 . . . . . . . . . . . . . . . . . . . . . . . . . . . . . . . . . . . . . . . . . . . . . . . . . . . . . . 111
Example 2 . . . . . . . . . . . . . . . . . . . . . . . . . . . . . . . . . . . . . . . . . . . . . . . . . . . . . . 111
Example 3 . . . . . . . . . . . . . . . . . . . . . . . . . . . . . . . . . . . . . . . . . . . . . . . . . . . . . . 112
Example 4 . . . . . . . . . . . . . . . . . . . . . . . . . . . . . . . . . . . . . . . . . . . . . . . . . . . . . . 112
Allocation Guidelines . . . . . . . . . . . . . . . . . . . . . . . . . . . . . . . . . . . . . . . . . . . . . . 113
Maintaining Salary Allocation Defaults . . . . . . . . . . . . . . . . . . . . . . . . . . . . . . . . . . . . . 113
Correcting Overlapping Allocations . . . . . . . . . . . . . . . . . . . . . . . . . . . . . . . . . . . . . . . 113
Mass Adjusting Compensation Expenses . . . . . . . . . . . . . . . . . . . . . . . . . . . . . . . . . . . 115
Defining Custom Numbers of Workdays and Paydays . . . . . . . . . . . . . . . . . . . . . . . . . . 115
Chapter 8. Working with Human Capital Compensation Budgets . . . . . . . . . . . . . . . . . . . . . . . . . . . . . . . . 117
Recommended Task Flow . . . . . . . . . . . . . . . . . . . . . . . . . . . . . . . . . . . . . . . . . . . . . . 117
Requirements . . . . . . . . . . . . . . . . . . . . . . . . . . . . . . . . . . . . . . . . . . . . . . . . . . . . . . . 118
Maintaining Jobs . . . . . . . . . . . . . . . . . . . . . . . . . . . . . . . . . . . . . . . . . . . . . . . . . . . . 119
Creating Jobs . . . . . . . . . . . . . . . . . . . . . . . . . . . . . . . . . . . . . . . . . . . . . . . . . . . . 119
Activating Jobs . . . . . . . . . . . . . . . . . . . . . . . . . . . . . . . . . . . . . . . . . . . . . . . . . . . 119
Viewing Job Details . . . . . . . . . . . . . . . . . . . . . . . . . . . . . . . . . . . . . . . . . . . . . . . . 120
Before Specifying Job Compensation . . . . . . . . . . . . . . . . . . . . . . . . . . . . . . . . . . . 120
Maintaining Job Compensation Details . . . . . . . . . . . . . . . . . . . . . . . . . . . . . . . . . 121
Maintaining General Job Information . . . . . . . . . . . . . . . . . . . . . . . . . . . . . . . 121
Viewing Job Status . . . . . . . . . . . . . . . . . . . . . . . . . . . . . . . . . . . . . . . . . . . . . 122
Viewing Employees Assigned to Jobs and Employee Details . . . . . . . . . . . . . . . . 122
Maintaining Job Salary Grades . . . . . . . . . . . . . . . . . . . . . . . . . . . . . . . . . . . . . 123
Contents vii

Maintaining Additional Earnings for Jobs . . . . . . . . . . . . . . . . . . . . . . . . . . . . . 123
Maintaining Job Benefits . . . . . . . . . . . . . . . . . . . . . . . . . . . . . . . . . . . . . . . . . 124
Maintaining Job Tax Details . . . . . . . . . . . . . . . . . . . . . . . . . . . . . . . . . . . . . . 125
Maintaining Job Allocations . . . . . . . . . . . . . . . . . . . . . . . . . . . . . . . . . . . . . . 125
Specifying Employee Assignments . . . . . . . . . . . . . . . . . . . . . . . . . . . . . . . . . . . . . 126
Terminating Jobs and Excluding Jobs From Calculations . . . . . . . . . . . . . . . . . . . . 127
Maintaining Employees . . . . . . . . . . . . . . . . . . . . . . . . . . . . . . . . . . . . . . . . . . . . . . . . 128
Maintaining Employee Compensation Details . . . . . . . . . . . . . . . . . . . . . . . . . . . . . 128
Managing and Specifying General Data . . . . . . . . . . . . . . . . . . . . . . . . . . . . . . 129
Managing and Specifying FTE . . . . . . . . . . . . . . . . . . . . . . . . . . . . . . . . . . . . . 129
Managing and Specifying Salary Grades . . . . . . . . . . . . . . . . . . . . . . . . . . . . . . 130
Managing and Specifying Allocations . . . . . . . . . . . . . . . . . . . . . . . . . . . . . . . . 131
Managing and Specifying Status . . . . . . . . . . . . . . . . . . . . . . . . . . . . . . . . . . . . 131
Managing and Specifying Additional Earnings . . . . . . . . . . . . . . . . . . . . . . . . . 132
Managing and Specifying Benefits . . . . . . . . . . . . . . . . . . . . . . . . . . . . . . . . . . 132
Managing and Specifying Tax Details . . . . . . . . . . . . . . . . . . . . . . . . . . . . . . . . 133
Changing Employee Status . . . . . . . . . . . . . . . . . . . . . . . . . . . . . . . . . . . . . . . . . . 133
Deleting Employees from Budgets . . . . . . . . . . . . . . . . . . . . . . . . . . . . . . . . . . . . . 134
Terminating Employees . . . . . . . . . . . . . . . . . . . . . . . . . . . . . . . . . . . . . . . . . . . . 134
Transferring Employees . . . . . . . . . . . . . . . . . . . . . . . . . . . . . . . . . . . . . . . . . . . . . 135
About Transfers . . . . . . . . . . . . . . . . . . . . . . . . . . . . . . . . . . . . . . . . . . . . . . . 135
Transferring Employees Out of Entities . . . . . . . . . . . . . . . . . . . . . . . . . . . . . . 136
Transferring Employees Into Positions . . . . . . . . . . . . . . . . . . . . . . . . . . . . . . . 136
Performing Single-Step Employee Transfers . . . . . . . . . . . . . . . . . . . . . . . . . . . 137
Assigning Employees to Positions . . . . . . . . . . . . . . . . . . . . . . . . . . . . . . . . . . . . . 137
Assigning Employees to Jobs . . . . . . . . . . . . . . . . . . . . . . . . . . . . . . . . . . . . . . . . . 138
Assigning Employees Outside HRMS to Positions . . . . . . . . . . . . . . . . . . . . . . . . . . 138
Deleting Employee Assignments . . . . . . . . . . . . . . . . . . . . . . . . . . . . . . . . . . . . . . 138
Maintaining Positions . . . . . . . . . . . . . . . . . . . . . . . . . . . . . . . . . . . . . . . . . . . . . . . . . 139
Creating Positions . . . . . . . . . . . . . . . . . . . . . . . . . . . . . . . . . . . . . . . . . . . . . . . . . 139
Maintaining Position Compensation Details . . . . . . . . . . . . . . . . . . . . . . . . . . . . . . 140
Maintaining General Position Data . . . . . . . . . . . . . . . . . . . . . . . . . . . . . . . . . 140
Maintaining Position FTE . . . . . . . . . . . . . . . . . . . . . . . . . . . . . . . . . . . . . . . . 141
Maintaining Position Salary Grades . . . . . . . . . . . . . . . . . . . . . . . . . . . . . . . . . 142
Maintaining Allocations . . . . . . . . . . . . . . . . . . . . . . . . . . . . . . . . . . . . . . . . . 142
Maintaining Position Status . . . . . . . . . . . . . . . . . . . . . . . . . . . . . . . . . . . . . . . 143
Maintaining Additional Earnings . . . . . . . . . . . . . . . . . . . . . . . . . . . . . . . . . . . 143
Maintaining Benefits . . . . . . . . . . . . . . . . . . . . . . . . . . . . . . . . . . . . . . . . . . . 143
Maintaining Assigned Employees . . . . . . . . . . . . . . . . . . . . . . . . . . . . . . . . . . . 144
viii Contents

Maintaining Tax Details . . . . . . . . . . . . . . . . . . . . . . . . . . . . . . . . . . . . . . . . . 144
Excluding Positions from Budget Calculations . . . . . . . . . . . . . . . . . . . . . . . . . . . . 145
Copying Position Data . . . . . . . . . . . . . . . . . . . . . . . . . . . . . . . . . . . . . . . . . . . . . 145
Performing Single Step Transfers . . . . . . . . . . . . . . . . . . . . . . . . . . . . . . . . . . . . . . 146
Reviewing Pending Transfers . . . . . . . . . . . . . . . . . . . . . . . . . . . . . . . . . . . . . . . . . 146
Deleting Positions . . . . . . . . . . . . . . . . . . . . . . . . . . . . . . . . . . . . . . . . . . . . . . . . . 146
About Terminating Positions . . . . . . . . . . . . . . . . . . . . . . . . . . . . . . . . . . . . . . . . . 147
Terminating Positions . . . . . . . . . . . . . . . . . . . . . . . . . . . . . . . . . . . . . . . . . . . . . . 147
Maintaining Employees by Job or Position . . . . . . . . . . . . . . . . . . . . . . . . . . . . . . . . . . 148
Viewing Employee Job Details . . . . . . . . . . . . . . . . . . . . . . . . . . . . . . . . . . . . . . . . 148
About Filling Vacant Positions or Jobs . . . . . . . . . . . . . . . . . . . . . . . . . . . . . . . . . . 148
Filling Vacant Positions or Jobs . . . . . . . . . . . . . . . . . . . . . . . . . . . . . . . . . . . . . . . 148
Reviewing and Accepting Pending Transfers . . . . . . . . . . . . . . . . . . . . . . . . . . . . . . 149
Calculating and Allocating Compensation Expenses . . . . . . . . . . . . . . . . . . . . . . . . . . . 150
Viewing the Budget Impact of Compensation Expenses . . . . . . . . . . . . . . . . . . . . . . . . . 151
Chapter 9. Calculating, Reviewing, and Allocating Compensation Expense Budgets . . . . . . . . . . . . . . . . . . . 153
Calculating Budgets . . . . . . . . . . . . . . . . . . . . . . . . . . . . . . . . . . . . . . . . . . . . . . . . . . 153
Reviewing Expenses . . . . . . . . . . . . . . . . . . . . . . . . . . . . . . . . . . . . . . . . . . . . . . . . . . 154
Reviewing Position and Job Budgets . . . . . . . . . . . . . . . . . . . . . . . . . . . . . . . . . . . . 154
Reviewing Employee Budgets . . . . . . . . . . . . . . . . . . . . . . . . . . . . . . . . . . . . . . . . . 155
Reviewing Compensation Element Budgets . . . . . . . . . . . . . . . . . . . . . . . . . . . . . . 155
Reviewing FTE Assignments . . . . . . . . . . . . . . . . . . . . . . . . . . . . . . . . . . . . . . . . . 156
About Allocating Compensation Expenses to General Ledger Accounts . . . . . . . . . . . . . 156
Allocating Compensation Expenses to General Ledger Accounts . . . . . . . . . . . . . . . . . . 157
Chapter 10. Reviewing and Approving Budgets . . . . . . . . . . . . . . . . . . . . . . . . . . . . . . . . . . . . . . . . . . . . . 159
About Approving Compensation . . . . . . . . . . . . . . . . . . . . . . . . . . . . . . . . . . . . . . . . . 159
About Submitting Budgets for Approval . . . . . . . . . . . . . . . . . . . . . . . . . . . . . . . . . . . . 159
Prerequisites . . . . . . . . . . . . . . . . . . . . . . . . . . . . . . . . . . . . . . . . . . . . . . . . . . . . . . . . 160
Approving Positions, Jobs, and Employee FTE and Compensation . . . . . . . . . . . . . . . . 160
Approval Options . . . . . . . . . . . . . . . . . . . . . . . . . . . . . . . . . . . . . . . . . . . . . . . . . 160
Approving Positions . . . . . . . . . . . . . . . . . . . . . . . . . . . . . . . . . . . . . . . . . . . . . . . 161
Approving Jobs . . . . . . . . . . . . . . . . . . . . . . . . . . . . . . . . . . . . . . . . . . . . . . . . . . 161
Approving Employee Assignments to Positions . . . . . . . . . . . . . . . . . . . . . . . . . . . . 162
Approving Period-Level FTEs . . . . . . . . . . . . . . . . . . . . . . . . . . . . . . . . . . . . . . . . 162
Submitting Budgets for Approval . . . . . . . . . . . . . . . . . . . . . . . . . . . . . . . . . . . . . . . . . 163
Chapter 11. Revising Budgets . . . . . . . . . . . . . . . . . . . . . . . . . . . . . . . . . . . . . . . . . . . . . . . . . . . . . . . . 165
Constraining Revisions . . . . . . . . . . . . . . . . . . . . . . . . . . . . . . . . . . . . . . . . . . . . . . . . 166
Contents ix

Requirements . . . . . . . . . . . . . . . . . . . . . . . . . . . . . . . . . . . . . . . . . . . . . . . . . . . . . . . 166
Creating Revision Requests . . . . . . . . . . . . . . . . . . . . . . . . . . . . . . . . . . . . . . . . . . . . . 167
Specifying Revision Data . . . . . . . . . . . . . . . . . . . . . . . . . . . . . . . . . . . . . . . . . . . . . . . 168
Recalculating Expenses and Submitting Revision Requests for Approval . . . . . . . . . . . . . 169
About Modifying Revisions . . . . . . . . . . . . . . . . . . . . . . . . . . . . . . . . . . . . . . . . . . . . . 169
Using Drafts . . . . . . . . . . . . . . . . . . . . . . . . . . . . . . . . . . . . . . . . . . . . . . . . . . . . . . . . 169
Chapter 12. Using Reports and Budget Books . . . . . . . . . . . . . . . . . . . . . . . . . . . . . . . . . . . . . . . . . . . . . 171
About Budget Books . . . . . . . . . . . . . . . . . . . . . . . . . . . . . . . . . . . . . . . . . . . . . . . . . . 171
Predefined Reports . . . . . . . . . . . . . . . . . . . . . . . . . . . . . . . . . . . . . . . . . . . . . . . . . . . 171
Using Budget Data in Financial Reporting . . . . . . . . . . . . . . . . . . . . . . . . . . . . . . . . . . 173
Part III. Appendixes . . . . . . . . . . . . . . . . . . . . . . . . . . . . . . . . . . . . . . . . . . . . . . . . . . . . . . . . . . . . . . . 175
Appendix A. Loading Metadata and Data Using the Outline Load Utility . . . . . . . . . . . . . . . . . . . . . . . . . . . 177
Requirements and Recommendations . . . . . . . . . . . . . . . . . . . . . . . . . . . . . . . . . . . . . 177
Reviewing the Dimensional Structure . . . . . . . . . . . . . . . . . . . . . . . . . . . . . . . . . . . 178
Identifying Smart List and Entry Names . . . . . . . . . . . . . . . . . . . . . . . . . . . . . . . . . 179
About Load Files . . . . . . . . . . . . . . . . . . . . . . . . . . . . . . . . . . . . . . . . . . . . . . . . . . . . . 180
Required Data Load File Run Order . . . . . . . . . . . . . . . . . . . . . . . . . . . . . . . . . . . . 181
About Creating Load Files and Verifying Loads . . . . . . . . . . . . . . . . . . . . . . . . . . . . 181
Loading Metadata and Data . . . . . . . . . . . . . . . . . . . . . . . . . . . . . . . . . . . . . . . . . . . . . 182
Loading Smart Lists and Smart List Values . . . . . . . . . . . . . . . . . . . . . . . . . . . . . . . 182
Loading Salary Grade Details . . . . . . . . . . . . . . . . . . . . . . . . . . . . . . . . . . . . . . . . 183
Loading Salary Grade Detail Lines . . . . . . . . . . . . . . . . . . . . . . . . . . . . . . . . . . . . . 184
Loading Compensation Elements . . . . . . . . . . . . . . . . . . . . . . . . . . . . . . . . . . . . . . 185
Loading Element Detail Lines . . . . . . . . . . . . . . . . . . . . . . . . . . . . . . . . . . . . . . . . 186
Loading Employee Information . . . . . . . . . . . . . . . . . . . . . . . . . . . . . . . . . . . . . . . 187
Loading Position Information . . . . . . . . . . . . . . . . . . . . . . . . . . . . . . . . . . . . . . . . 188
Loading Employee-Position Associations . . . . . . . . . . . . . . . . . . . . . . . . . . . . . . . . 189
Loading Position FTE Information . . . . . . . . . . . . . . . . . . . . . . . . . . . . . . . . . . . . . 190
Loading Employee FTE Information . . . . . . . . . . . . . . . . . . . . . . . . . . . . . . . . . . . 191
Loading Position Salary Grade Information . . . . . . . . . . . . . . . . . . . . . . . . . . . . . . 192
Loading Employee Salary Grade Information . . . . . . . . . . . . . . . . . . . . . . . . . . . . . 193
Loading Position Compensation Information . . . . . . . . . . . . . . . . . . . . . . . . . . . . . 194
Loading Employee Compensation Information . . . . . . . . . . . . . . . . . . . . . . . . . . . . 195
Loading Position Allocation Information . . . . . . . . . . . . . . . . . . . . . . . . . . . . . . . . 196
Loading Employee Allocation Information . . . . . . . . . . . . . . . . . . . . . . . . . . . . . . . 197
Loading Job Information . . . . . . . . . . . . . . . . . . . . . . . . . . . . . . . . . . . . . . . . . . . . 198
Loading Employee Job Assignments and Details . . . . . . . . . . . . . . . . . . . . . . . . . . . 199
x Contents

Testing Load Files . . . . . . . . . . . . . . . . . . . . . . . . . . . . . . . . . . . . . . . . . . . . . . . . . . . . 200
Verifying Data Loads . . . . . . . . . . . . . . . . . . . . . . . . . . . . . . . . . . . . . . . . . . . . . . . . . . 201
Running Load Files . . . . . . . . . . . . . . . . . . . . . . . . . . . . . . . . . . . . . . . . . . . . . . . . . . 203
Appendix B. Updating Public Sector Planning and Budgeting Applications From a Previous Release . . . . . . . . 205
Prerequisites . . . . . . . . . . . . . . . . . . . . . . . . . . . . . . . . . . . . . . . . . . . . . . . . . . . . . . . . 205
About Updating Data and Artifacts . . . . . . . . . . . . . . . . . . . . . . . . . . . . . . . . . . . . . . . 206
Options and Considerations . . . . . . . . . . . . . . . . . . . . . . . . . . . . . . . . . . . . . . . . . . . . 206
Updating Data Forms, Menus, Reports, and Task Lists . . . . . . . . . . . . . . . . . . . . . . . . . 207
Updating Applications That Use Calculation Manager . . . . . . . . . . . . . . . . . . . . . . . . . . 208
Updating Applications That Use Business Rules . . . . . . . . . . . . . . . . . . . . . . . . . . . . . . 209
Updating Dimensional Metadata . . . . . . . . . . . . . . . . . . . . . . . . . . . . . . . . . . . . . . . . . 209
Post Migration Tasks . . . . . . . . . . . . . . . . . . . . . . . . . . . . . . . . . . . . . . . . . . . . . . . . . . 211
Appendix C. Updating Business Rules After Changing Predefined Smart Lists . . . . . . . . . . . . . . . . . . . . . . . 213
Business Rule and Smart List Associations . . . . . . . . . . . . . . . . . . . . . . . . . . . . . . . . . . 213
Employee Budget Detail . . . . . . . . . . . . . . . . . . . . . . . . . . . . . . . . . . . . . . . . . . . . 213
Position and Employee Budget Detail . . . . . . . . . . . . . . . . . . . . . . . . . . . . . . . . . . . 218
Position Budget Detail . . . . . . . . . . . . . . . . . . . . . . . . . . . . . . . . . . . . . . . . . . . . . 223
Modifying Smart List Values . . . . . . . . . . . . . . . . . . . . . . . . . . . . . . . . . . . . . . . . . . . . 227
Glossary . . . . . . . . . . . . . . . . . . . . . . . . . . . . . . . . . . . . . . . . . . . . . . . . . . . . . . . . . . . . . . . . . . . . . . . 229
Index . . . . . . . . . . . . . . . . . . . . . . . . . . . . . . . . . . . . . . . . . . . . . . . . . . . . . . . . . . . . . . . . . . . . . . . . . 233
Contents xi

xii Contents

Documentation Accessibility
Our goal is to make Oracle products, services, and supporting documentation accessible, withgood usability, to the disabled community. To that end, our documentation includes featuresthat make information available to users of assistive technology. This documentation is availablein HTML format, and contains markup to facilitate access by the disabled community.Accessibility standards will continue to evolve over time, and Oracle is actively engaged withother market-leading technology vendors to address technical obstacles so that ourdocumentation can be accessible to all of our customers. For more information, visit the OracleAccessibility Program Web site at http://www.oracle.com/accessibility/.
Accessibility of Code Examples in DocumentationScreen readers may not always correctly read the code examples in this document. Theconventions for writing code require that closing braces should appear on an otherwise emptyline; however, some screen readers may not always read a line of text that consists solely of abracket or brace.
Accessibility of Links to External Web Sites inDocumentationThis documentation may contain links to Web sites of other companies or organizations thatOracle does not own or control. Oracle neither evaluates nor makes any representationsregarding the accessibility of these Web sites.
Access to Oracle Support for Hearing-ImpairedCustomersOracle customers have access to electronic support through My Oracle Support or by callingOracle Support at 1.800.223.1711. Hearing-impaired customers in the U.S. who wish to speakto an Oracle Support representative may use a telecommunications relay service (TRS).Information about the TRS is available at http://www.fcc.gov/cgb/consumerfacts/trs.html/, anda list of telephone numbers is available at http://www.fcc.gov/cgb/dro/trsphonebk.html.International hearing-impaired customers should use the TRS at +1.605.224.1837. An OracleSupport engineer will respond to technical issues according to the standard service requestprocess.
13

14 Documentation Accessibility

1About Public Sector Planning
and Budgeting
In This Chapter
About This Guide ... . . . . . . . . . . . . . . . . . . . . . . . . . . . . . . . . . . . . . . . . . . . . . . . . . . . . . . . . . . . . . . . . . . . . . . . . . . . . . . . . . . . . . . . .15
About Public Sector Planning and Budgeting ... . . . . . . . . . . . . . . . . . . . . . . . . . . . . . . . . . . . . . . . . . . . . . . . . . . . . . . . .15
Assumptions .. . . . . . . . . . . . . . . . . . . . . . . . . . . . . . . . . . . . . . . . . . . . . . . . . . . . . . . . . . . . . . . . . . . . . . . . . . . . . . . . . . . . . . . . . . . . . .29
Accessibility . . . . . . . . . . . . . . . . . . . . . . . . . . . . . . . . . . . . . . . . . . . . . . . . . . . . . . . . . . . . . . . . . . . . . . . . . . . . . . . . . . . . . . . . . . . . . . . .29
About This GuideThis guide has three parts:
l Part I provides the information that administrators need to create and prepare OracleHyperion Public Sector Planning and Budgeting, Fusion Edition applications forcompensation budget and line item budget integration.
l Part II provides the information that budget planners, finance office staff, and budget officestaff need to prepare, calculate, submit, revise, and report on compensation and line itembudgets.
l Part III, “Appendixes” provides supplemental information about loading HRMS data usingthe Outline Load Utility, updating existing applications after upgrading, and business ruleassociations with Smart Lists.
About Public Sector Planning and BudgetingPublic Sector Planning and Budgeting, is an integrated budgeting and planning solution in theOracle Hyperion Enterprise Performance Management System suite that enables public sectorand higher-education organizations to manage existing and projected budgets using current andprevious General Ledger and Human Resource Management (HRMS) data. Use Public SectorPlanning and Budgeting at the departmental or Human Resource organization level to manage,modify, and update employee and job data, identify the compensation budget impact, and defineGeneral Ledger allocations.
Public Sector Planning and Budgeting enables you to accomplish these tasks:
l Build budgets from prior years or versions
l Manage positions, and position data, and position-related compensation details
About This Guide 15

l Manage employee-related data such as salary grades, benefits, location, status, employer-paid taxes, and union information
l Project and evaluate the impact of employee compensation on overall budgets
l Forecast the impact of new positions, workforce reductions, contract proposals, andcompensation and benefit changes as they occur throughout the year
l Perform mass updates and globally or conditionally apply compensation default changes
l Allocate budget amounts to different programs, projects, or other chart-of-accountdimensions
l Integrate and aggregate position and employee budgets into operating expense line itembudgets
l Issue notifications when budget issues need attention or the budget is completed
l Distribute, consolidate, monitor, and manage budgets and revisions using Approvals
l Handle overrides with comprehensive audit trails to ensure accuracy
l Use Oracle Hyperion Smart View for Office, Fusion Edition, data forms
l Create detailed budget books and reports in Oracle Hyperion Financial Reporting, FusionEdition, enabling you to publish budget details internally or externally, and use reportqueries
General Ledger and HRMS IntegrationYou can budget using data and metadata in your General Ledger and HRMS systems by creatingand running integration in Oracle Hyperion Financial Data Quality Management ERPIntegration Adapter for Oracle Applications or by using the other supported tools and productssuch as the Oracle Data Integrator or the Outline Load utility. Doing so enables you to:
l Load previous budgets and actuals from the General Ledger.
l Load detailed information from HRMS to prepare detailed position budgets and updateexisting salary-related budgetary information.
l Allocate salary and position budgets into General Ledger accounts to enforce budgetarycontrol. Compensation data in the Human Capital Plan type integrates with the overall lineitem budget, enabling you to identify the impact of detailed salary plans on the overalloperating expense budget.
For information about using ERP Integrator to download and upload financial data, see theOracle Hyperion Financial Data Quality Management ERP Integration Adapter for OracleApplications Administrator's Guide.
For information about the supported General Ledger, HRMS, and EPM System, see the OracleEnterprise Performance Management Products Supported Platforms Matrices page:
http://www.oracle.com/technology/products/bi/hyperion-supported-platforms.html
16 About Public Sector Planning and Budgeting

Budgeting Implementations and ApproachesPublic Sector Planning and Budgeting supports these budgeting approaches:
l Bottom-up budgeting, in which expenses from low-level entities (cost centers, departments,business units, and so on) aggregate upward.
l Distributing or top-down budgeting, in which expenses are disseminated from the highestlevel entity downward. In this budget implementation, initial budgets are prepared by thetop level owners of the entity hierarchy, who pass the control to update and view budgetsto lower level entity owners such as cost center or business unit managers. These lower levelentity owners update compensation expenses, and then submit budgets back to the top levelowners.
l Target budgeting. Although this approach prevents you from using Approvals, it enablesyou to identify, enforce, and track the budget allocated to all offices, bureaus, cost centers,and business units by defining target versions. For example, a Public Sector organizationmay receive $800,000 from the federal or country government. Using target budgeting, theorganization allocates funds to different departments, preventing them from submittingbudget requests that exceed their departmental limits.
The Budget Process Building and maintaining budgets involves these steps:
1. At the beginning of the budget cycle, product implementors prepare applications bysatisfying the application preparation requirements, and loading General Ledger and HRMSactuals from the previous budget year or version. See “Initial Product ImplementationTasks” on page 31.
2. Under the guidance of finance staff, planners prepare compensation budgets by performingthese tasks:
l Prepare budgets for their cost centers to reflect position and employee changes such asfilled vacant positions, modified employee status, changes to benefits, and full-timeequivalent (FTE) assignments.
l Create positions.
l Perform mass adjustments to positions and employees.
l Calculate compensation expenses for their entity (cost center or department).
l Assign employees to jobs or positions.
l Transfer or terminate positions and employees.
l Allocate entity compensation expenses to General Ledger Accounts by specifying chartfields or segments.
l Review the budget impact of existing positions, employees, and compensation schedulechanges.
l Use Approvals to submit budgets to senior financial and division heads for review.
About Public Sector Planning and Budgeting 17

See Part II, “Creating Compensation Budgets”.
3. After compensation budgets are approved, administrators can perform these tasks:
l Write back next year's budget from an aggregate storage database to the General Ledgeras journal entries.
l Run journal imports in the General Ledger.
4. Finance and budget staff consolidate compensation budget plans and publish budgetreports, budget books, bills, and other statutory documents in HTML or PDF formats. SeeChapter 12, “Using Reports and Budget Books”.
5. Revise budgets.
Plan Types Plan types represent Oracle Essbase databases that Administrators create to contain dimensionaldata. Use Plan Type 1, 2, or 3 for line item operating expenses such as lease, utility expenses, andother driver-based budgets such as program or capital plans. One of these plan types can latercontain the line item budget.
Use the Human Capital Planning (HCP) plan type for compensation budget dimensions suchas effective-dated salary, benefit assignments, and General Ledger account allocationpercentages. Administrators populate the line item budget by mapping HCP dimensions andmembers to General Ledger accounts segments and chart fields.
Budget Detail Types
Subtopics
l Position and Employee
l Employee
l Position
When creating a Public Sector Planning and Budgeting application, select the budget type forthe level of driver-based compensation budgeting that you want to use to derive overallcompensation budget expenses.
Position and Employee Use this budget detail to budget employees by their assignments to positions, which drivecompensation expense calculations. This budget detail enables you to plan and track expensesby position and by employee in which each position represents a unique corporate role and ischaracterized by cost center and job title.
Where available, employee-specific salary, earnings, benefits, tax, and allocation information isused to ensure that position expenses are calculated and allocated as precisely as that of currentincumbent information. The Position and Employee dimensions are populated as mandatory
18 About Public Sector Planning and Budgeting

dimensions, and Job is a property of Position. Job is an Account member associated with a SmartList.
Employee Use this budget detail to track and budget solely by employees assigned to various jobs. If yourorganization does not use the position management module in your HRMS, select this budgetdetail. With the employee budget detail, Job Code is a dimension, is populated during applicationcreation, and drives personnel expense calculations.
Position Use this budget detail to track and budget solely by positions. Using this budget detail type,Position is populated as a mandatory dimension and has Job as a property. Job is an Accountmember associated with a Smart List. The position budget detail enables you to generate budgetsfor overall FTE, but not for headcount. The position budget detail enables you to load averageor maximum compensation information across all employees.
Employee, Position, and Job RelationshipsEvery position is unique to a department and is characterized by the associated jobs. For example,Mechanic is a job. Mechanic in the Parks department is one position, and Mechanic in theHighway department is a different position. Positions can be shared, pooled, or single-incumbent. The FTE for single incumbent positions cannot exceed one. Shared and pooledpositions can have multiple FTEs. Calculations are performed by position if you use the Positionbudget detail or the Position and Employee budget detail. With the Employee budget detail, Jobdrives compensation calculations.
Employees are assigned to positions. Until a position is filled by an employee, its vacant portionis tracked. If an employee terminates, the position remains vacant until another employee isassigned. Unless defined as single incumbent position, multiple employees can be assigned to aposition. Employees may also have multiple positions. For example, nurses may work day shiftsand night shifts but the nurse position is not differentiated by shift. The employee is assigned tothe same position twice so the pay for each shift can be calculated differently.
About Public Sector Planning and Budgeting 19

FTE, Headcount, Overtime, and Vacancy Calculations
Subtopics
l FTE
l Overtime
l Headcount
l Vacant Positions
l Additional Earnings
FTEHow FTE works:
l When employees are hired, assign the FTE of the position to the employees. This fills theFTE and reduces the vacancy portion of the position. If employees are terminated ortransferred, the position's vacancy portion of FTE is added to vacancy.
l The total FTE for the employees assigned to a position cannot exceed the total FTE for theposition.
l The difference between a position's FTE and the number of incumbent employee FTEs isthe vacant portion of the position.
To exclude the vacant portion of a position from calculations:
l Exclude or override the Total FTE assignment.
l Exclude positions from calculations.
OvertimeOvertime is calculated only for nonexempt and hourly employee. Overtime is budgetedseparately from salary, and paid at a higher rate (typically, 1.5 times or two times the hourlyrate). You can modify overtime calculation to scale it by the number of employees in a group,and by the overtime hours projected for each eligible employee. Create overtime as an additionalearnings element. See “Defining Overtime” on page 93.
Headcount l Existing headcount—In the Position budget detail, existing headcount is an input value. In
the Position and Employee budget detail, existing headcount is calculated based on thenumber of loaded employees assigned to a position. In the Employee budget detail, existingheadcount is a loaded, read-only value.
l Total headcount—The existing loaded headcount in addition to approved headcount.
l Approved headcount—Headcount is loaded from HRMS in addition to accepted employee-position assignments made during the budget year. Empty or vacant headcount loaded fromHRMS are approved, but further employee assignments in Public Sector Planning andBudgetingare unapproved. For example, if you load a position with a headcount of six to
20 About Public Sector Planning and Budgeting

which four employees are assigned, the remaining vacancy of two is approved. If you assigntwo employees to the position, their headcount is unapproved. Specify headcount topositions in HRMS to accommodate future employee assignments before loading positions.
l Proposed headcount—The number of newly assigned employees to approved orunapproved positions in the budget year.
l Unapproved headcount—Number of remaining unapproved employee assignments.
Vacant Positionsl With the Position and Employee budget detail, compensation is identified and calculated
using vacancies, FTE, and employee-position assignments.
l With the Position budget detail, FTE is one of several factors used to determinecompensation. Other factors such as start dates and salary changes are also used. Vacanciesare excluded from calculations.
l With the Employee budget detail, vacancy is calculated at the employee level and includesto be hired assignments.
Shared Positions
Several incumbents can be assigned to a shared position, up to the value of the FTE defined.With shared positions, Public Sector Planning and Budgeting ensures that the total number ofFTEs is the same as the number of assigned employees filling the position, plus the positionvacancies. For example, if a position has an FTE of six to which four employees (each with anFTE of one) are assigned, the remaining headcount of two is a vacant expense.
Assume that a Night Security Guard position has an FTE of two, a loaded headcount of four,and to which four part-time employees (each having an FTE of 0.5) will be assigned. If you assignone of the Night Security Guards an FTE of one (full time), three FTE or headcount remain. Ifa shared position is partially filled, average or default position-level salary, benefit, and allocationinformation derives the expense estimates of the filled and vacant portions of the position.
Pooled Positions
Because a potentially changing number of employees can be assigned to a pooled position, pooledpositions can have multiple employee assignments. If an FTE value is unspecified for a pooledposition, expenses are not calculated. Loaded pooled positions usually do not have FTEs. Forthese positions, budget expenses are calculated for assigned employees, and vacant expenses donot exist.
FTE is usually not defined for pooled positions. However, to budget for a new pooled positionwithout knowing how many employees will be assigned, assign a position FTE; budget expensesare computed based on this FTE. Typically, pooled positions are not used to calculate vacancycompensation, although you can define FTE without having first specified employeeassignments.
About Public Sector Planning and Budgeting 21

Additional EarningsModifying additional earnings can affect other calculations, such as those deriving effectivedating and percent of gross pay.
Compensation Funding From Different DepartmentsEach employee's salary, earnings, benefits, employer-paid tax, and allocation information is usedin calculations, ensuring that employee expenses are calculated and distributed correctly. Whena position is shared across departments, only one department owns the position and can modifyposition expenses. Define position or employee allocations to allocate compensation expensesto the owning department.
If an employee has two jobs, each in a different department, each department accounts for theirportion of employee expenses. For example, if an Administrative Assistant has an FTE of 1 andworks in two departments, each department pays 50% of the expense, and the FTE is calculatedas follows:
l Each department accounts for its portion of the employee FTE (0.5 per department in thiscase)
l The Administrative Assistant's two job records are grouped under the employee. The jobrecords are accessible only by the primary department.
You can also allocate a general expenses (hardware, furniture, and floor space, for example)across departments.
Provided Dimensions
Subtopics
l Scenario and Version
l Element
l Budget Item
l Entity
l Account
l Currency
l Additional Dimensions
By default, the Scenario, Version, Period, Year, and Currency (for multi-currency applications)dimensions are enabled for the HCP plan, and plan types 1, 2, and 3.
Scenario and VersionThe Scenario and Version dimensions represent the broadest categories of data in yourapplication. Scenario describes the type of data you are working with, such as actual, forecast,or budget.
22 About Public Sector Planning and Budgeting

Version contains the different budget stages or iterations that you use, providing snapshots ofdata during each phase of the budget preparation process. As such, the Version dimensiondescribes the possible stages or outcomes within the context of a scenario. For example, onestage represents the initial budget and another stage represents the final budget. Version alsocontains revision members. Administrators create members for budget revisions R(x) in theRevision parent member.
ElementThe Element dimension stores all the compensation components and salary grade structures.Each element represents a compensation type, such as a salary grade, benefit, additional earning,or employer-paid taxes. These predefined members are used:
l Total Compensation Expenses—Parent member that includes four compensationcategories (Salary Grades, Additional Earnings, Benefits, and Employer-paid Taxes). Thefour compensation categories do not contain members, because you are expected to createthe compensation components during implementation.
l Salary Grades—Parent member that stores all salary grades for the organization. Createsalary grades or load them from HRMS as children of Salary Grades. Examples of salarygrades include different nonunion wage scales.
l Additional Earnings—Parent member that stores additional earnings. Create additionalearnings or load them from HRMS as children of Additional Earnings. Generally, additionalearnings are taxable components of salary, but cannot be classified as base salaries. Examplesof additional earnings are overtime, shift differential, and hazard duty pay.
l Benefits—Parent member that tracks all benefits paid by the company to employees. Createbenefits or load them from HRMS as children of Benefits. Generally, benefits are nontaxable.Examples of benefits are medical insurance, dental plan, and short-term disability. Createbenefit elements such as "Fringe Benefits" to benefits using blended benefit rates that arepercentages of salary.
l Employer-paid Taxes—Parent member that tracks taxes paid to state and federalgovernments or other taxing authorities on behalf of employees. Create employer-paid taxesor load them from HRMS as children of Employer-paid Taxes. Examples of employer-paidtaxes are FICA (Federal Insurance Contributions Act) and SUTA (state unemploymentpayroll tax). You can add blended taxes to budget tax as an overall percentage of salary.
l Defaults—Four members (Salary Grade Defaults, Benefit Defaults, Additional EarningsDefaults, and Employer-paid Tax Defaults) are used to capture compensation defaults.
Set the Addition aggregation option for child members so that they roll up correctly to the parentmembers. For example, add all benefit members to calculate the total for the Benefits parentmember.
About Public Sector Planning and Budgeting 23

Budget ItemThe Budget Item dimension, enabled only for the HCP plan type, contains FTE assignments andchanges, status assignments and changes, compensation element changes, and allocationassignments. These predefined members are used:
l Unspecified Budget Item—Contains and tracks data that does not change by period or yearsuch as position name, employee name, and employee number.
l FTE and Status Assignments—Parent member that includes 25 placeholder child members(1st Assignment through 25th Assignment) that tracks changes to FTE, employees, andposition status. For example, track changes to employee status when employees aretransferred, terminated, or go on maternity leave.
l Element Changes—Parent member that includes 25 placeholder child members (1stElement Change through 25th Element Change) that tracks changes to the elements assignedto positions and employees, such as changes to benefits, salary grades, or additional earnings.Set the Addition aggregation option for all child members of Element Changes.
l Allocation Assignments—Parent member that includes 25 placeholder child members (1stAllocation through 25th Allocation) that tracks the allocation assignments for positions andemployees. Allocations link position and employee compensation expenses to thecorresponding General Ledger accounts through segments or chartfields. The details of thoseallocations are captured by these members.
l Rule Criteria—Preserves the search results for employees or positions that you adjust. Forexample, when you launch a business rule to search for positions to which to add benefits,the search results are stored in this member.
By default, applications include 25 effective-dated changes for a given scenario and versionduring a budget cycle. Determine the number of changes you will need in a budget cycle, andthen add or load members to the dimension hierarchy.
EntityThe Entity dimension contains members for HR organizations (departments, for example)enabled in the HCP plan, and for General Ledger organizations (cost centers) enabled in PlanType 1, 2, or 3. Set up the Entity dimension as follows:
l Add members to represent HR organizations under Total Entity.
l If you maintain separate HR and General Ledger organizations, in order to use GeneralLedger organizations in HR organization allocations, define a separate member hierarchyto represent General Ledger organizations. Then enable these members on Plan 1, 2, or 3,or the plan type for the line item budget .
l If HR and General Ledger organizations are the same, enable members in the HCP plantype, and Plan 1, 2, or 3, or the plan type for the line item budget.
For multi-currency applications, select the currency using the Base Currency property.
24 About Public Sector Planning and Budgeting

AccountThe Account dimension contains salary, job code, employee, and allocation properties enteredby planners. It also contains compensation expense accounts, personnel expenses, and loadedGeneral Ledger natural account segment or chart field values. Create account members for allbudgeted items.
CurrencyLocal Currency identifies the currency in which values are displayed. You can budget in multiplecurrencies. You can convert local currencies to different currencies (for use in reportingapplications and line item budgets) when you define mappings. For information about usingdifferent currencies, see Chapters 4 and 12 in the Oracle Hyperion Planning Administrator'sGuide.
Additional Dimensions
Subtopics
l Employee
l Job Code
l Position
l HSP_Rates
Employee
The Employee dimension contains employed workers in your organization. Employees aretypically paid compensation and benefits through the employer’s payroll application. Thisdimension is created if you use Employee budget detail or Position and Employee budget detail.The Employee dimension uses these members:
l Unspecified Employee—Tracks data for which this dimension does not apply, such asvacancy compensation details with respect to positions.
l Vacancy—Tracks position vacancy compensation details. When you specify position details,track the position vacancy in the Vacancy member from the Employee dimension.
l Existing Employees—Parent member for all existing employees. Loads all existingemployees from HR as children of Existing Employees.
l New Employees—Parent member that includes 100 placeholder child members (To beHired 1 through To be Hired 100) that are used to add new employees during a budget cycle.
Set the Addition aggregation option for child members so that they aggregate correctly to theparent members. For example, add all existing employee members to calculate the total for theExisting Employees parent member.
About Public Sector Planning and Budgeting 25

Job Code
The Job Code dimension contains generic employee roles or classifications that can beindependent of positions or organizations. For example, Secretary can be a job code in theFinance department and the Youth Services department. Job Code is used only with theEmployee budget detail, and uses these predefined members:
l Unspecified Job Code—Tracks data for which this dimension does not apply
l Total Job Code—Parent member for all job codes. Load job codes from HRMS as childrenof Total Job Code.
l Default Job Code—Captures job defaults
Administrators can add job codes during a budget cycle to reflect new proposed jobs.
Position
The Position dimension contains the occurrences of jobs in entities. For example, position 2655could hold a Firefighter job in the Fire Services department. These members are used:
l Unspecified Position—Tracks data for which this dimension does not apply
l Total Existing Positions—Parent member for all existing positions. Load all existingpositions from HR as children of Total Existing Positions.
l Total New Positions—Parent member that includes 100 placeholder child members (NewPosition 1 through New Position 100) that are used to add new positions during a budgetcycle.
l Default Position—Captures position defaults by entity
Set the Addition aggregation option for child members so that they aggregate correctly to theparent members. For example, add all new position members to calculate the total for the TotalNew Positions parent member.
HSP_Rates
Used only in multi-currency applications, the HSP_Rates dimension contains a member to storeexchange rate values for each currency. It also contains a member for input values and currencyoverrides.
User Defined DimensionsYou can create user-defined dimensions such as Fund, Program, Project, and Activity to suityour organization's budgeting needs. For example, define a Project dimension to budgetexpenses for projects such as community center swimming pool installation and communitycenter adult education computer upgrade. Although you need not enable user-defineddimensions on the HCP plan type, if you want to use them to track employee or positionexpenses, map and integrate the dimensions with the line item budget as described in Chapter 5,“Configuring the Line Item Budget”.
26 About Public Sector Planning and Budgeting

You cannot delete user-defined dimensions, but you can:
l Assign plan types at the dimension, not the member, level
l Rearrange the dimension hierarchy
l Share members
Note: Applications support up to 20 dimensions. However, for optimal performance, no morethan 12 dimensions should be assigned to each Plan Type.
Smart ListsSmart lists are linked to the dimensional members used to manage positions, jobs, andemployees, and to build compensation budgets using data forms. For example, theEmployee_Type Smart List includes Temporary, Permanent, and Contractor values. Smart Listsare also used by predefined business rules that perform calculations. Smart Lists are also usedto capture the allocation information for a given period of time. For information about creatingand using Smart Lists, see the Oracle Hyperion Planning Administrator's Guide, Oracle HyperionPlanning User Guide, and “Setting Up Smart Lists” on page 48.
Predefined AccountsPublic Sector Planning and Budgeting provides predefined accounts, such as:
l System Members—Parent member that includes members used for date calculations inpredefined business rules. You must keep the System Member parent and its members atthe top of the Account dimension hierarchy. Do not delete these members or modify theirproperties.
l Unspecified Account—Member used to track data for which this dimension does not apply.
l Human Capital Planning Accounts—Parent member that includes the accounts that captureinput in the predefined data forms. The parent includes three categories: Assumption Input,HCP Budgeting Assumptions, and Position-Expense.
l Revision Properties—Parent member that includes accounts which capture input for budgetrevisions. Accounts include Revision Approval Status, Posting Date, and Revision Amount.
l Segment Information—Parent member that includes a child which is a Smart List for eachGeneral Ledger segment or chart field that is part of your compensation allocation definition.If you want to specify allocation rules using segment or chart field values use these SmartLists.
l Segment Descriptions—Parent member that includes a child which is a Smart List for eachGeneral Ledger segment or chart field used in compensation allocations. Use these SmartLists to specify allocation rules using segment or chart field descriptions.
The child members in Segment Information and Segment Descriptions are a sample of segmentssuch as Account, Entity, Fund, Program, Project, and other user-defined dimensions that you
About Public Sector Planning and Budgeting 27

may have in your General Ledger chart of accounts. To set up the allocation detail for positionsor employees:
l Modify the list of child members to match your General Ledger chart of account.
l Modify Smart Lists associated with segment members. Smart Lists must include entries forall base members of the corresponding dimensions. For example, the Entity Segmentmember is associated with a Smart List that contains all base members of the Entity.
Add additional values here to allocate to an even lower level of granularity than codecombination or a chart field combination. For example, you can add “performanceobjective” as an extra allocation field.
Task ListsThe Budget Administration task list provides the tasks, such as the following, whichadministrators perform to review, modify, and prepare loaded data for use in Public SectorPlanning and Budgeting applications:
l Define step, value, or rate-based salary grade defaults
l Define position defaults
l Define default compensation elements, such as benefits, employer-paid taxes, and additionalearnings
l Review and adjust employee, job, and position details
l Perform mass updates to apply salary and compensation changes
The Budget Preparation task list guides budget center managers or planning unit staff throughthe budgeting process. It provides links to budget-specific tasks such as the following, used todefine and manage position, job, and employee compensation expenses:
l Create positions
l Define entity-specific allocation and compensation defaults for new positions
l Fill vacant positions
l Terminate positions
l Assign employees to positions
l Define General Ledger position allocations
l Modify employee details such as FTE and benefit options
l Transfer employees to other cost centers or departments
l Define employee General Ledger allocations or funding sources
Annotations, Comments, and Attachments Planners and cost center managers can explain and support their budget decisions andassumptions using the following:
28 About Public Sector Planning and Budgeting

l Annotations and comments
l Hyperlinks and URLs
l Microsoft Word documents or Microsoft Excel spreadsheets
RequirementsBefore planners can create budgets for their departments or business units, productimplementors and administrator must perform the tasks described in Chapter 2, “GettingStarted”, Chapter 4, “Preparing Applications” and Chapter 5, “Configuring the Line ItemBudget”.
AssumptionsOracle assumes that administrators managing Public Sector Planning and Budgetingapplications are familiar with the predefined content provided, Oracle Hyperion Planning,Fusion Edition, Hyperion Calculation Manager, and, if used, Financial Reporting and Oracle'sHyperion® Business Rules.
Accessibility For menu and navigation keyboard alternatives, see the Oracle Hyperion PlanningAdministrator's Guide, available on Oracle Technology Network (OTN) athttp://www.oracle.com/technetwork
Assumptions 29

30 About Public Sector Planning and Budgeting

2Getting Started
In This Chapter
Initial Product Implementation Tasks ... . . . . . . . . . . . . . . . . . . . . . . . . . . . . . . . . . . . . . . . . . . . . . . . . . . . . . . . . . . . . . . . . .31
Maintenance Tasks ... . . . . . . . . . . . . . . . . . . . . . . . . . . . . . . . . . . . . . . . . . . . . . . . . . . . . . . . . . . . . . . . . . . . . . . . . . . . . . . . . . . . . .33
Planner Tasks... . . . . . . . . . . . . . . . . . . . . . . . . . . . . . . . . . . . . . . . . . . . . . . . . . . . . . . . . . . . . . . . . . . . . . . . . . . . . . . . . . . . . . . . . . . . .34
For a high-level overview of the tasks and phases of the entire budgeting process, see “The BudgetProcess ” on page 17.
Initial Product Implementation TasksUsers who are responsible for setting up and initializing Public Sector Planning and Budgetingin your organization, define and prepare applications by performing these tasks:
l Install and configure Public Sector Planning and Budgeting. See the Oracle HyperionEnterprise Performance Management Installation and Configuration Guide.
l If upgrading from release 11.1.2, update existing data and artifacts. See Appendix B,“Updating Public Sector Planning and Budgeting Applications From a Previous Release”.
l Create Public Sector Planning and Budgeting applications using Calculation Manager as thecalculation engine. See Chapter 3, “Creating Applications”.
l If organization units in HRMS differ from those in the General Ledger, define two separatesets of members in the Entity dimension:
m Create one set of members to represent HR organizations (departments, for example)under Total Entity. Enable these members only on the HCP plan type.
m Create another set to represent General Ledger organizations (funding sources and costcenters) used in allocations to fund HR organizations. Enable these members on Plan1. 2, 3, or where they apply.
See “Setting Up Dimensions and Members” on page 45.
l Define additional dimensions and members required for budgeting. For example, to budgetby project, create a project dimension hierarchy for individual project data and expenses.See “Defining Dimensions and Members” on page 45.
Initial Product Implementation Tasks 31

l Define Smart Lists for the General Ledger segments or chart fields that you use in allocationsto fund positions and employees. For example, ensure that General Ledger organizationsused as funding sources are in Entity_List. See “Setting Up Smart Lists” on page 48.
Note: Ensure that Smart Lists for allocation segments or chart fields contain entries for allleaf level members. Also ensure that Smart List labels are the same as the name of thecorresponding dimension member name or alias.
l Ensure that all dimensions, Smart Lists, task lists, business rules, and validation rulesrequired for your business logic and budgeting needs are created.
l Specify application and system preferences. See Chapter 1 in the Oracle Hyperion PlanningAdministrator's Guide.
l Determine how to load General Ledger and HRMS source data (using the ERP Integratoror the Outline Load Utility, for example). See “Loading General Ledger and HRMS Metadataand Data” on page 53 or Appendix A, “Loading Metadata and Data Using the OutlineLoad Utility”.
l Define Budget Item as a data load dimension when verifying the data load settings. See “DataLoad Settings” on page 44.
l If using ERP Integrator, define and run integrations to load actual and budget metadata anddata from the HRMS and General Ledger. Load General Ledger data to Plan 1, 2, or 3. LoadHRMS data to the HCP plan type. See Oracle Hyperion Financial Data Quality ManagementERP Integration Adapter for Oracle Applications Administrator's Guide.
l Review the loaded data. See “Processing Loaded HRMS Data” on page 96 and “ReviewingLoaded Position, Job, and Employee Data” on page 97.
l Configure the line item budget to link compensation data and expenses on the HCP plantype to operation expenses on Plan 1, 2, or 3. See Chapter 5, “Configuring the Line ItemBudget”.
l Configure predefined artifacts, such as task lists, business rules, and validation rules to suityour business logic and budgeting needs. See “Customizing Provided Components” on page56, and the Oracle Hyperion Planning Administrator's Guide.
l In Essbase, set the current values for substitution variables to represent the current year,forecast year, and previous year. These are used in reporting. See “Substitution Variables”on page 44.
l Define other compensation elements, such as benefit schedules and additional earnings. See“Managing Other Compensation Elements” on page 91.
l Specify salary, compensation, and allocation defaults. See Chapter 7, “Defining Salary,Compensation, and Allocation Defaults”.
l Perform mass updates to apply updated compensation elements globally or to specificpositions and employees. See “Performing Mass Updates” on page 99.
l Restrict access to sensitive financial and personnel data by applying access permissions todimensions, members, data forms, task lists, and business rules. See “Securing Data Forms”on page 61, “Securing Task Lists” on page 61, and “Securing Business Rules” on page61.
32 Getting Started

l Calculate and review the initial budget to ensure aggregations and calculations are correct.See “Calculating Budgets” on page 153 and “Reviewing Expenses” on page 154.
l Allocate the initial budget to General Ledger accounts. See “About Allocating CompensationExpenses to General Ledger Accounts” on page 156.
Maintenance TasksPeriodically, administrators who are responsible for maintaining budgets may need to performthese tasks:
l Create a version member for each budget stage and assign users version access for data entry.See “Setting Up Dimensions and Members” on page 45 and “Securing Dimensions andMembers” on page 59.
l Update the new budget's calendar span by setting Start Year, End Year, Start Period, andEnd Period for the scenario. See Chapter 12 in the Oracle Hyperion Planning Administrator'sGuide.
l Define new positions, employees, and jobs mid budget cycle. See “Creating Jobs, Positions,and Employees During the Budget Cycle” on page 46.
l Assign new users access to artifacts such as scenarios. See “Securing Dimensions andMembers” on page 59.
l Completely or partially refresh data from the General Ledger and HRMS source systemsusing ERP Integrator. See Oracle Hyperion Financial Data Quality Management ERPIntegration Adapter for Oracle Applications Administrator's Guide.
l Incorporate changes to budget guidelines and assumptions and specify options for existingcompensation elements, and salary grades (grade steps, for example). See Chapter 6, “SettingUp Compensation Budgets” and Chapter 7, “Defining Salary, Compensation, andAllocation Defaults”.
l Distribute the budget for review by defining and starting planning units. See “AboutSubmitting Budgets for Approval” on page 159.
l Recalculate the compensation budget to reflect the impact of modified data. See “CalculatingBudgets” on page 153.
l Review the impact of updated budgets. See “Viewing the Budget Impact of CompensationExpenses” on page 151.
l After budget approval, upload data to the General Ledger using supported tools such as:
m ERP Integrator
m Oracle Data Integrator Knowledge Module for Essbase
l Revise approved budgets. See Chapter 11, “Revising Budgets”.
Maintenance Tasks 33

Planner TasksPlanners (department managers, budget office staff, and finance staff), review and maintain datafor their entities during the planning cycle by performing these tasks:
l Set up and activate new positions and jobs. See “Creating Jobs” on page 119 and “ActivatingJobs” on page 119.
l Specify job compensation details such as assigning salaries, employees, and additionalearnings. See “Maintaining Job Compensation Details” on page 121.
l Associate employees with jobs. See “Specifying Employee Assignments” on page 126.
l Terminate or exclude jobs from budget calculations. See “Terminating Jobs and ExcludingJobs From Calculations ” on page 127.
l Terminate employees or transfer them to other positions. See “Terminating Employees” onpage 134 and “Transferring Employees” on page 135.
l Specify employee compensation such as FTEs and benefits. See “Maintaining EmployeeCompensation Details” on page 128.
l Modify employee status to budget for changes such as maternity or disability leave. See“Changing Employee Status” on page 133.
l Exclude or delete employee expenses from budgets. See “Deleting Employees from Budgets”on page 134.
l Assign existing or prospective employees to jobs or positions. See “About Filling VacantPositions or Jobs ” on page 148.
l Manage position compensation such as employer paid taxes and salary. See “MaintainingPosition Compensation Details” on page 140.
l Identify and initiate position transfers. See “Reviewing Pending Transfers” on page 146.
l Set up and delete positions. See “Creating Positions” on page 139 and “Deleting Positions”on page 146.
l Calculate the compensation budget for their HR organizations, and allocate expenses toGeneral Ledger accounts. See “Calculating and Allocating Compensation Expenses” on page150.
l Review and approve compensation expenses. See “Reviewing Expenses” on page 154 and“Approving Positions, Jobs, and Employee FTE and Compensation ” on page 160.
l Submit their HR organization budgets for overall approval. See “Submitting Budgets forApproval” on page 163.
34 Getting Started

P a r t I
Creating, Preparing, and ManagingPublic Sector Planning and Budgeting
Applications
In Creating, Preparing, and Managing Public Sector Planning and Budgeting Applications:
l Creating Applicationsl Preparing Applicationsl Configuring the Line Item Budgetl Setting Up Compensation Budgets
Creating, Preparing, and Managing Public Sector Planning and Budgeting Applications 35

36 Creating, Preparing, and Managing Public Sector Planning and Budgeting Applications

3Creating Applications
In This Chapter
About Creating Applications ... . . . . . . . . . . . . . . . . . . . . . . . . . . . . . . . . . . . . . . . . . . . . . . . . . . . . . . . . . . . . . . . . . . . . . . . . . . .37
Before Creating Applications... . . . . . . . . . . . . . . . . . . . . . . . . . . . . . . . . . . . . . . . . . . . . . . . . . . . . . . . . . . . . . . . . . . . . . . . . . . .37
Fiscal Year Impact on Calculations... . . . . . . . . . . . . . . . . . . . . . . . . . . . . . . . . . . . . . . . . . . . . . . . . . . . . . . . . . . . . . . . . . . . .38
Creating Classic Planning Applications ... . . . . . . . . . . . . . . . . . . . . . . . . . . . . . . . . . . . . . . . . . . . . . . . . . . . . . . . . . . . . . . .38
Creating Performance Management Architect Applications... . . . . . . . . . . . . . . . . . . . . . . . . . . . . . . . . . . . . . . . . .39
About Creating ApplicationsYou can create Public Sector Planning and Budgeting applications as follows:
l Using the Classic Application Wizard. See “Creating Classic Planning Applications” on page38.
l Using the Enterprise Performance Management Architect application wizard. See “CreatingPerformance Management Architect Applications” on page 39. If you use Oracle HyperionEPM Architect, Fusion Edition, application administration and rename the predefineddimensions Employee, Position, Element, and Budget Item, you cannot validate or deploythe application.
Note: You can define a fiscal year that does not start in January for your budget applications,enabling you to, for example, create a budget application for 2012 in which July 2011 isthe fiscal year start. Oracle recommends that you make one previous year available in yourapplication.
Before Creating ApplicationsBefore creating Public Sector Planning and Budgeting applications, perform these tasks:
l Install the other product components such as Performance Management Architect,Financial Reporting; and Oracle Hyperion Financial Reporting Studio, Fusion Edition basedon calculation, integration, budgeting, and reporting needs. See the Hyperion EnterprisePerformance Management System Installation and Configuration Guide.
l In Oracle's Hyperion® Shared Services Console, provision Planning users and assign roles.See the Oracle Hyperion Enterprise Performance Management System Security Administration
About Creating Applications 37

Guide and the Oracle Hyperion Enterprise Performance Management System User and RoleSecurity Guide.
l Understand how fiscal year settings affect compensation budget calculations. See “FiscalYear Impact on Calculations” on page 38 and Chapter 12 of the Oracle Hyperion PlanningAdministrator's Guide.
Fiscal Year Impact on CalculationsAlthough Planning by default uses a fiscal year start date of January 1, you can budget usingfiscal years that do not start on January 1 and that start in the previous calendar year. For example,the 2011 fiscal year can start on July 1, 2010.
l If it starts on the same calendar year, the fiscal year is July 1, 2011, to June 30, 2012.
l If it starts on the previous calendar year, the fiscal year is July 1, 2010, to June 30, 2011.
Although position and employee compensation expenses are driven and calculated by effectivecalendar dates, quarterly and annual values are based on the fiscal year definition. For example:
l Monthly salary expenses in an entity in calendar year 2009 are $75,000 from January to May,and $60,000 from June to December.
l If the fiscal year 2010 starts April 1, 2009, and ends March 31, 2010, the annual salary expensefor the entity is $750,000.
l If the fiscal year 2010 starts January 1, 2010, and ends December 31, 2010, the annual salaryexpense for the entity is $720,000.
See “Setting Up The Calendar” in the Oracle Hyperion Planning Administrator's Guide.
Creating Classic Planning Applications
ä To create a Classic Public Sector Planning and Budgeting application, see Chapter 12 of theOracle Hyperion Planning Administrator's Guide, but make these selections:
1 On the Select tab, select:
l Shared Services Project—Default Application Group (project for which you definedsecurity and provisioning)
l Application Type—Public Sector Planning and Budgeting to add the HCP, Human CapitalPlanning plan.
l Calculation Module—Product to use for calculations.
Note: Oracle recommends that you use Calculation Manager.
2 On the Calendar tab, select:
l Base Time Period—12 Months
38 Creating Applications

l First Fiscal Year—First year for which to use actual data. Oracle recommends that youmake actuals from at least one prior budget available.
l Fiscal Year First Month—Month in the first fiscal year for which to have actuals available.
l Fiscal Year Start Date:
m Same Calendar Year—If the fiscal year begins in the same year
m Previous Calendar Year—If the fiscal year began in the previous year
For more information about fiscal year settings, see “Setting Up The Calendar” in theOracle Hyperion Planning Administrator's Guide.
3 On the Plan Type tab, select:
l Plan Type—Plan Type 1, 2, or 3 to budget for operational expenses such as programequipment or expenditures, to later include in the line item budget.
l Public Sector Planning and Budgeting Modules—HCP to create a Planning applicationthat includes the human capital expense budgeting features of Public Sector Planningand Budgeting.
l Budget Detail— See“Budget Detail Types” on page 18.
4 Click Finish.
5 If the application does not initialize, select Administration, then Initialization, and then Human CapitalPlanning.
Creating Performance Management ArchitectApplicationsTo create a Performance Management Architect Public Sector Planning and Budgetingapplication, follow the instructions in the Oracle Hyperion Enterprise Performance ManagementArchitect Administrator’s Guide, but make the selections described in “Creating Classic PlanningApplications” on page 38.
Applications are validated, deployed to Planning, and the HCP plan type configured with thepredefined compensation expenses model.
Creating Performance Management Architect Applications 39

40 Creating Applications

4Preparing Applications
In This Chapter
Requirements... . . . . . . . . . . . . . . . . . . . . . . . . . . . . . . . . . . . . . . . . . . . . . . . . . . . . . . . . . . . . . . . . . . . . . . . . . . . . . . . . . . . . . . . . . . . .41
Defining the Budget Process ... . . . . . . . . . . . . . . . . . . . . . . . . . . . . . . . . . . . . . . . . . . . . . . . . . . . . . . . . . . . . . . . . . . . . . . . . . . .42
Verifying Your Application Setup... . . . . . . . . . . . . . . . . . . . . . . . . . . . . . . . . . . . . . . . . . . . . . . . . . . . . . . . . . . . . . . . . . . . . . . .43
Setting Up Dimensions and Members ... . . . . . . . . . . . . . . . . . . . . . . . . . . . . . . . . . . . . . . . . . . . . . . . . . . . . . . . . . . . . . . . .45
Setting Up Smart Lists.. . . . . . . . . . . . . . . . . . . . . . . . . . . . . . . . . . . . . . . . . . . . . . . . . . . . . . . . . . . . . . . . . . . . . . . . . . . . . . . . . . . .48
Loading General Ledger and HRMS Metadata and Data... . . . . . . . . . . . . . . . . . . . . . . . . . . . . . . . . . . . . . . . . . . . .53
Customizing Provided Components ... . . . . . . . . . . . . . . . . . . . . . . . . . . . . . . . . . . . . . . . . . . . . . . . . . . . . . . . . . . . . . . . . . . .56
Securing Applications ... . . . . . . . . . . . . . . . . . . . . . . . . . . . . . . . . . . . . . . . . . . . . . . . . . . . . . . . . . . . . . . . . . . . . . . . . . . . . . . . . . .58
RequirementsBefore loading General Ledger and HRMS source data, perform these tasks:
l Create members for entities that represent HR organizations (business units, anddepartments, for example).Create these items under Total Entity in the Entity dimension,enable them only on the HCP plan, and load position, employee and compensation data tothese members.
l If necessary, create members in a second hierarchy to represent separate General Ledgerorganizations (cost centers, for example) to which HR organization expenses are allocated.Create these General Ledger members under Total Entity in the Entity dimension, and enablethem only on Plan 1, 2, 3, or the appropriate data source. Load General Ledger data againstthese members.
Note: Do not enable the HCP plan type for General Ledger entities that you also use tocapture operating expenses. Only enable the HCP plan for HR entities. In many cases,HR and General Ledger entities are the same. In this case, enable the HCP plan type,and the other plan types, for the entity.
For information about creating dimensions and members, see “Working With Dimensions”in the Oracle Hyperion Planning Administration Guide.
l Create dimensions or members for additional General Ledger segments or chart fields thatyou use in budgeting such as Program, Project, and Fund.
Requirements 41

l Create Smart Lists and entries to correspond to custom General Ledger dimensions andmembers that you create on Plan 1, 2, or 3 representing segments or chart fields for position,employee, and job allocations. Ensure that these Smart List entries have correspondingmembers under Segment Information in the Accounts dimension.
l Review the “Required Smart Lists ” on page 48.
l Create the Planning unit hierarchies and identify budget owners and reviewers who approvesubmitted budgets. See “About Submitting Budgets for Approval” on page 159 and Chapter10 of the Oracle Hyperion Planning Administrator's Guide.
l Ensure that all Planning artifacts, such as scenarios and versions that are required forbudgeting, exist . See “Verifying Your Application Setup” on page 43.
l Specify the Essbase substitution variables later used to report on compensation and linebudget data. See “Substitution Variables” on page 44.
l Ensure that data load settings, particularly those for Budget Item, are correct. See “DataLoad Settings” on page 44.
l Load General Ledger and HRMS metadata, and then load data using one of these tools:
m ERP Integrator. See “Using ERP Integrator” on page 53.
m The Outline Load Utility. See “Using the Outline Load Utility for Classic Applications”on page 54.
m Oracle Data Integrator Adapter for Planning
m Oracle Hyperion Financial Data Quality Management Adapter for Planning, FusionEdition
m Oracle Hyperion Enterprise Performance Management System Lifecycle Management
l Optional: Configure artifacts such as business rules, data forms, task lists, and validation rulesto suit your budgeting requirements. See “Customizing Provided Components” on page56.
l Optional: Increase the default length for inputs in text and comment cells. See “Text Fieldsfor Increased Text Entry” on page 58.
l Define access to task lists and data artifacts. See “Securing Applications” on page 58.
l Using Smart Lists, link salary and compensation budget dimensions in the HCP tooperational expense dimensions in Plan 1, 2, or 3 to populate the line item budget. SeeChapter 5, “Configuring the Line Item Budget”.
Defining the Budget ProcessPublic Sector Planning and Budgeting supports distributed, bottom-up, or free-form budgeting.Most public sector budgets are distributed based on the budget group hierarchy, modified bycost center or department managers, and then submitted for approval using the approvalhierarchy.
After source data is loaded, administrative or cost center managers usually specify common dataand settings such as cost of living adjustments and compensation defaults, and then distribute
42 Preparing Applications

the budget to planners. After all compensation expenses are ready and calculated, budgets aresubmitted as planning units for overall approval as planning units. See Chapter 10, “Reviewingand Approving Budgets”.
Note: Other budgeting methodologies may be supported by Planning, but these may requireconfiguration to achieve the desired processes and outcomes.
Verifying Your Application Setup
Subtopics
l Scenario and Version
l Exchange Rates
l Task Lists
l Substitution Variables
l Data Load Settings
Before releasing the budget, ensure that your Planning application has the scenarios, versions,substitution variables, task lists, and data load settings required for the budget process.
Scenario and Version l If you create scenario members specify a start year, specify an end year, and select Enabled
for Process Management to later submit budget scenarios for approval.
l To create versions for budget stages or outcomes (Best Case and Worst Case, for examples)add children in Versions
l To create members for revisions that can later be used to modify approved budgets, addchildren in Revisions.
Exchange RatesFor multicurrency applications, select Administration, then Manage, and then Exchange Rates tospecify how values are converted and viewed in different currencies.
Task ListsEnsure that the existing task lists cover all of the tasks that planners need to perform, the guidanceto perform these tasks, and values they need to enter to create compensation budgets. Ifnecessary, define tasks, and secure them by defining different task lists for different user groups.See “Managing Task Lists” in the Oracle Hyperion Planning Administrator's Guide.
Verifying Your Application Setup 43

Substitution VariablesTo ensure that users can use predefined reports, set values for these substitution variables inOracle Essbase Administration Services or using MaxL statements:
l CurrScenario
l CurrentStage
l CurrentYear
l PreviousStage
l PreviousYear
l PriorScenario
l ProposedYear
See the Essbase Database Administrator's Guide and Chapter 7 in the Oracle Hyperion PlanningAdministrator's Guide.
Data Load SettingsTo use loaded source system data such as effective-dated data at the period level, ensure that theBudget Item dimension is defined as a data load dimension.
ä To verify data load settings:
1 Log on to Planning as an administrator, select Administration, and then Data Load Settings.
2 From Data Load Dimension, select Budget Item.
3 From Driver Dimension, click and select Account.
4 Adjacent to Driver Dimension, click and select:
l Descendants (Human Capital Planning Accounts)
l Descendants (Segment Descriptions)
l Descendants (Segment Information)
5 Click Add Row three times so you can define driver identifiers for allocation assignments, elementchanges, and FTE and status assignments.
6 In Advanced Settings, click , and then select the following:
Table 1 Advanced Data load Settings for Budget Item
Data Load Dimension Parent Members Driver Dimension Unique Identifier
Allocation Assignmentsl Allocation Start Date
l Percentage Allocation
44 Preparing Applications

Data Load Dimension Parent Members Driver Dimension Unique Identifier
Element Changesl Grade Step
l Salary Grade Sequences
l Option Start Date
FTE and Status Assignments FTE Start Date
7 Click Save.
For more information about defining data load settings, see “Enabling Data Load of EssbaseData” in the Planning Administrator's Guide.
Setting Up Dimensions and Members
Subtopics
l Defining Dimensions and Members
l Renaming Provided Members
l Creating Jobs, Positions, and Employees During the Budget Cycle
l Managing Dimensions in Performance Management Architect
Note: The following sections assume that you create and manage dimensions in Planning.
Defining Dimensions and MembersBefore releasing the budget to planners:
l Familiarize yourself with the provided dimensions and how they are used. See “ProvidedDimensions” on page 22.
l Use the dimension editor in Planning to create any additional dimensions and membersthat you need for budgeting. For example:
m Create members for business units, departments, and cost centers under the Total Entitymember of the Entity dimension.
m Create child members for custom dimensions used in the General Ledger (on Plan 1, 2,or 3) in the Segment member of the Account dimension.
m Create dimensions and members in the Element dimension for salary, benefit,additional earning, and employer-paid tax details and options.
l Select HCP in Valid for Plan Types for all dimensions and members that you use to calculatehuman capital compensation expenses.
l Select a Plan 1, 2, or 3 in Valid for Plan Types for dimensions and members that you use tocalculate nonsalary operating expenses such as equipment and training.
Setting Up Dimensions and Members 45

Note: If you maintain separate HR and General Ledger entities, to use Genera Ledger entitiesin HR entity allocations, enable members representing each entity only the Plan 1, 2,or 3 type, or the plan type used for the line item budget. If your HR and GeneralLedger entities are the same, enable their members both in the HCP plan, and in Plan1, 2, or 3, or the plan type for the line item budget.
CAUTION: If you use Performance Management Architect, do not rename Employee, Position,Element, Budget Item, or Job Code. If you do, you cannot validate or deploy the application.
Tip: To enable planners to find and select data more quickly when prompted, specify descriptivealiases for dimension members. For example, the state of Delaware may have over 50 entitiesrepresenting departments, bureaus, and offices. In addition to specifying numeric namesfor the entity members (D100 and D200, for example), enter aliases such as Department
of Housing Services and Board of Library Commissioners. Click on Member Selectiondialogs to display by and search using these aliases.
Renaming Provided MembersInstead of renaming the names of provided dimensions and members, create an Alias table todefine and apply aliases, that more accurately describe data, to each members. SelectAdministration, then Manage, then Alias Tables, and then see the Oracle Hyperion PlanningAdministrator's Guide.
Creating Jobs, Positions, and Employees During the BudgetCycleAlthough you typically load jobs, positions, and employees from HRMS at the beginning of thebudget cycle, perform these tasks to add them during the cycle:
l Perform a task:
m For the Employee budget detail, create members in Total Job Code in the Job Codedimension.
m For the Position budget detail, create job code members in the Job_Class Smart List.
m In the Position dimension, create members for new positions in Total New Position.
m In the Employee dimension, create members for new employees in New Employees.
l Specify these settings:
m Data Storage— Store for Total Employees or Existing employees.
You can also select Store for members of New Employees and Never Share for childrenof To Be Hired.
m Plan Type–—HCP if you accepted the default plan type name when you created theapplication
46 Preparing Applications
m Aggregation— Addition
m Smart Lists— None
m Data Type—Unspecified
l Refresh the database.
l Activate the jobs or positions.
Managing Dimensions in Performance ManagementArchitect To use dimensions and members also used in Financial Reporting and Oracle HyperionPerformance Scorecard, Fusion Edition applications, create Public Sector Planning andBudgeting applications in Performance Management Architect, and define dimensions andmembers in the Performance Management Architect Shared Library. To manage commondimensions and members for applications created in Performance Management Architect,perform these steps:
l Create or import (from flat files or interface tables) dimensions and members in the SharedLibrary.
l Create Public Sector Planning and Budgeting applications in the Application Library.
l Verify that applications have these characteristics:
m Have the correct properties defined, such as plan type names, default currency, andfinancial year settings
m Contain an HCP plan type for compensation data and a Plan 1, 2, or 3 type for GeneralLedger and operation expense data.
l Share dimensions and members, making them available in your Public Sector Planning andBudgeting applications.
l Validate and deploy applications.
Setting Up Dimensions and Members 47

Setting Up Smart Lists
Subtopics
l Defining Smart Lists
l Required Smart Lists
l Additional Smart Lists
l Frequently Used Public Sector Planning and Budgeting Smart Lists
l About Associating Smart Lists With Dimensions
l Including New or Modified Smart List Entries in Essbase Reports
Defining Smart ListsSmart Lists are used in predefined business rules, which drive calculations in Public SectorPlanning and Budgeting applications. They also contain values for the members that users selectto build budgets. Consequently, perform these tasks:
l For the required Smart Lists and those used in General Ledger allocations, ensure that SmartList names and entries match the corresponding dimension member names
l Specify a label for each Smart List entry
Before changing or adding Smart List entries, or the dimension members with which they areassociated, identify the business rules that are affected. See Appendix C, “Updating BusinessRules After Changing Predefined Smart Lists”.
To define Smart Lists, see Chapter 12 in the Oracle Hyperion Planning Administrator's Guide.
Required Smart Lists You must populate the following Smart Lists.
Note: For Smart Lists used in General Ledger allocations, each Smart List label must match themember name or alias name of the corresponding dimension. For example, theSalary_Account_List label must have the same name as the corresponding Accountdimension member name or alias. In this case, the Alias of expense account members inthe Account dimension must correspond to the label in Salary_Account_List.
Table 2 Required Smart Lists
Smart List Contains
Grade_Steps Steps used to increment salary grades
Grade_Sequence Salary grade sequences for progression between salary grades
Job_Class Job codes
48 Preparing Applications

Smart List Contains
Benefit_Options Plans (Spouse and Dependants, for example) used to implement benefits
Salary_Account_List Compensation element members and General Ledger account entries used in allocations
Entity_List Members for General Ledger and/or department, business unit, or cost centers
Revision_Transactions Revision members containing changes to an approved budget
Smart Lists (Fund_List and Project_List, forexample) used in allocations
General Ledger account chart fields or segments
See also “Frequently Used Public Sector Planning and Budgeting Smart Lists” on page 49.
Additional Smart ListsIf required, load these additional Smart Lists or those used to link budget versions in Planningwith corresponding budget versions in the General Ledger or HRMS:
l Budget_Set
l GL_Budget_Set—Contains General Ledger budget names in ERP Integrator to which youcan write back data using revision request for HR data
l HR_Budget_Set—Contains HR budget names to which budgets are written back
l Union_Code—Contains all your organizational unions with which positions or employeesmay belong
l Location_Code—Contains all geographic locations with which employees or positions maybe associated
Frequently Used Public Sector Planning and Budgeting SmartLists
Subtopics
l Salary Grade Details
l Salary Grade Steps and Sequences
l Compensation Element Information
l Employee Information
l Position Information
l Employee Position Associations
For Smart Lists used in General Ledger allocations, each label must match the member or aliasname of the corresponding dimension. For example, the Salary_Account_List label must havethe same name as the corresponding dimension member name or alias.
Setting Up Smart Lists 49

Salary Grade Details
Table 3 Smart Lists for Salary Grade Data
Smart List Associated Member Names Entries
Salary_Type Salary Grade Type Input Grade_Step, Grade_Rate and so on
Salary_Basis Grade Salary Basis Input Annual, Monthly, and so on
Yes_No Allow Value Change Input Yes and No
HR_Budget_Set Sample Budget Set
Salary Grade Steps and Sequences
Table 4 Grade Step and Sequence Smart Lists
Smart List Associated Member Names Entries
Grade_Steps Grade Step Step1, Step2, and so on
Grade_Sequence Grade Sequence (for rate-based grades) Sequence1, Sequence2, and so on
Compensation Element Information
Table 5 Compensation Element Smart Lists
Smart List Associated Member Names
Yes_No Options Based
Payment_Terms Payment Terms Input
Element_Type Value Type Input
Yes_No Allow Value Change Input
Element_Type Maximum Value Type
Earning_Type Earning Type Input
Frequency Payment Frequency Input
Yes_No Taxable Component
Yes_No Follows Salary Allocation
HR_Budget_Set Budget Set (Optional)
50 Preparing Applications

Employee Information
Table 6 Employee Data Smart Lists
Smart List Associated Member Names
Full_Time_Status FT/PT
Employee_Type Employee Type
Pay_Type Pay Type
Union_Code Union Code
Location_Code Location Code
Position InformationDoes not apply to the Employee budget detail
Table 7 Position Data Smart Lists
Smart List Associated Member Names
Position_Type Position Type
Job_Class Job
Location_Code Location Code
Union_Code Union Code
Salary_Basis Salary Basis
Employee Position Associations
Table 8 Employee-Related Smart Lists
Smart List Associated Member Names
Position_Type Position Type
Job_Class Job
Location_Code Location Code
Union_Code Union Code
Salary_Basis Salary Basis
Full_Time_Status FT/PT
Employee_Type Employee Type
Setting Up Smart Lists 51

Smart List Associated Member Names
Pay_Type Pay Type
About Associating Smart Lists With DimensionsTo ensure that Smart Lists correctly display dimensional members that users can select, performthese tasks:
l If you created General Ledger segment members or chart field, create corresponding SmartList entries.
l If you modified General Ledger segment members or chart field, modify the correspondingSmart List entry names to ensure that they match.
l If dimensions were concatenated when loaded, ensure that the Smart List entries match theconcatenated dimension member names.
For more information, see “Working With Smart Lists” in the Oracle Hyperion PlanningAdministrators Guide.
l If you modify these items, update associated business rules:
m The names of the Employee, Position, Budget Item, Element, or Job Code dimensions
m Entry names in Smart List that are used in business rules. See Appendix C, “UpdatingBusiness Rules After Changing Predefined Smart Lists”.
Including New or Modified Smart List Entries in EssbaseReports
ä To include new or modified Smart List entry values in the reporting application mappingsused to generate reports:
1 Select Administration, then Manage, and then Dimensions.
2 From the first drop down list, select the dimension that corresponds to the updated Smart List.
3 When the page refreshes, select the parent member, and then click Edit.
4 From Data Type, select SmartList.
5 Click Save.
6 Select the parent member again, and then click Edit.
7 From Smart Lists, select the Smart List that contains new or modified entries, and then click Save
8 Select Administration, then Manage, and then Smart Lists.
9 Select the updated Smart List, and then click Synchronize.
52 Preparing Applications

Loading General Ledger and HRMS Metadata and DataYou can load source General Ledger and HRMS data to Public Sector Planning and Budgetingapplications using one or a combination of the following:
Table 9 Loading Tools
Tool For ClassicApplications
PerformanceManagementArchitectApplications
See
Outline Load Utility x Appendix A, “Loading Metadata and DataUsing the Outline Load Utility”
ERP Integrator x x “Using ERP Integrator” on page 53.
Note: You cannot load benefits from HRMSwith this tool. Use the Outline Load Utility toload benefits.
Lifecycle Management in which youdefine a migration to migrate globalartifacts and relational data to yourapplication.
x Lifecycle Management Users Guide
Oracle Data Integrator KnowledgeModule for Essbase
x The Hyperion Data Integration ManagementAdapter for Essbase User's Guide
Oracle Data Integrator Adapter forPlanning
x The Oracle Data Integrator Adapter forPlanning online help
Enterprise Performance Managementflat files or interface tables
x The Oracle Hyperion Enterprise PerformanceManagement Architect Administrator’s onlinehelp
Essbase flat files
Note: You cannot load textualcompensation HCP data, but onlynumeric line-item data using flat files.
x x The Oracle Hyperion Enterprise PerformanceManagement Architect Administrator’s Guide
Oracle Hyperion Financial Data QualityManagement Adapter for Planning,Fusion Edition
x x The Hyperion Financial Data QualityManagement Administrator's Guide
You can also use the Essbase database created for each plan type in your application. You canload data directly into the corresponding databases from external systems, such as loadingGeneral Ledger and HRMS data from other Oracle Hyperion Enterprise PerformanceManagement System products.
Using ERP IntegratorAlthough you can load data using a variety of products and tools, perform the following basicsteps to load data using ERP Integrator. See Chapters 2 and 3 in the Oracle Hyperion Financial
Loading General Ledger and HRMS Metadata and Data 53

Data Quality Management ERP Integration Adapter for Oracle Applications Administrator'sGuide for detailed instructions.
Note: When mapping members to the default natural account segment Smart List in ERPIntegrator, map only personnel expense-related accounts, and load only leaf-levelmembers into the Smart Lists to upload member data to General Ledger.
1. Register your General Ledger and HRMS source systems.
2. Register the target application.
3. Create metadata rules to extract metadata from your source systems to the target application.
4. Run metadata rules to load metadata into the target application.
5. Define calendar mappings to map General Ledger periods to the appropriate Year and Perioddimension members in the target application.
6. Create and run data rules.
Using the Outline Load Utility for Classic ApplicationsUse the Outline Load Utility to load General Ledger and HRMS metadata for the following:
l Account, Position, Element, Employee, Year, Scenario, Version, Currency, and Entitydimensions
l Job dimension if you use the Employee budget detail
l User-defined dimensions
l User-defined attributes
l Smart Lists
You load source metadata by loading to driver members in one of two ways:
l Specifying members in comma-separated (CSV) load files
l Using the Planning Data Load Administration page to load to driver members alreadyspecified in Planning
To load metadata, perform these tasks:
1. In a text editor or Microsoft Excel, create CSV files for each dimension or set of data to load.
2. Test the CSV files.
3. Run CSV files in the Outline Load Utility to load metadata records.
4. Refresh the database.
See Appendix A and Chapter 5 of the Oracle Hyperion Planning Administrator's Guide.
54 Preparing Applications
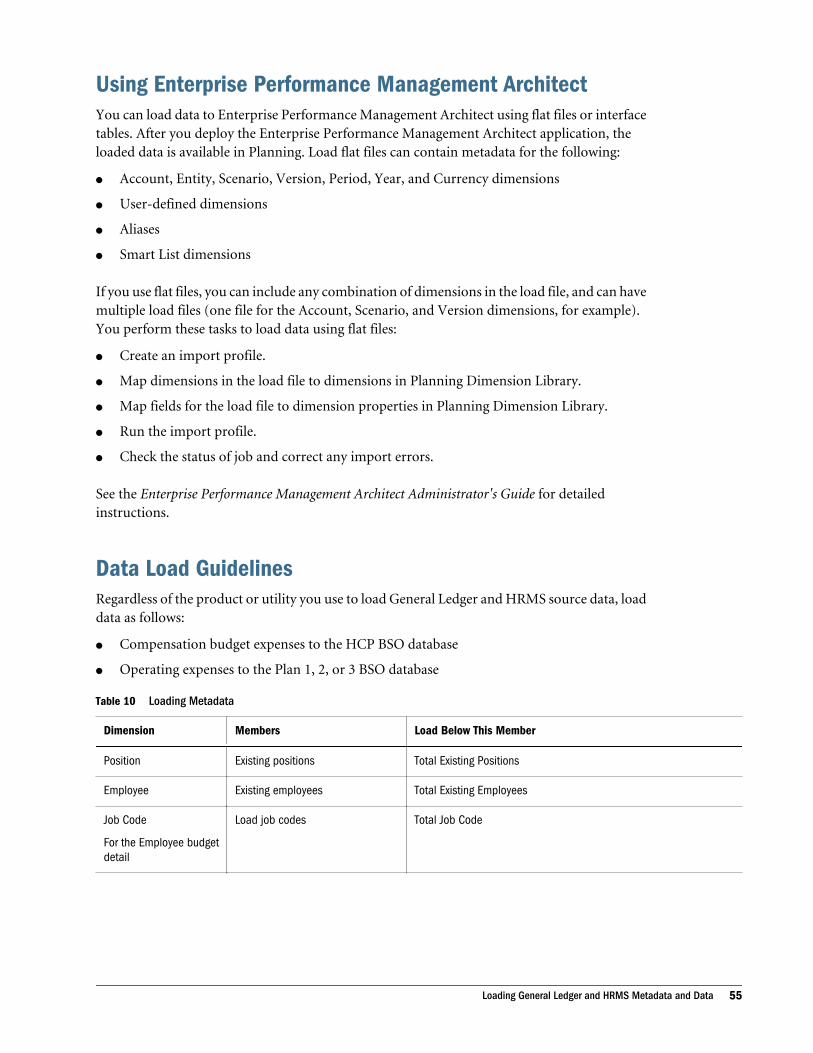
Using Enterprise Performance Management ArchitectYou can load data to Enterprise Performance Management Architect using flat files or interfacetables. After you deploy the Enterprise Performance Management Architect application, theloaded data is available in Planning. Load flat files can contain metadata for the following:
l Account, Entity, Scenario, Version, Period, Year, and Currency dimensions
l User-defined dimensions
l Aliases
l Smart List dimensions
If you use flat files, you can include any combination of dimensions in the load file, and can havemultiple load files (one file for the Account, Scenario, and Version dimensions, for example).You perform these tasks to load data using flat files:
l Create an import profile.
l Map dimensions in the load file to dimensions in Planning Dimension Library.
l Map fields for the load file to dimension properties in Planning Dimension Library.
l Run the import profile.
l Check the status of job and correct any import errors.
See the Enterprise Performance Management Architect Administrator's Guide for detailedinstructions.
Data Load GuidelinesRegardless of the product or utility you use to load General Ledger and HRMS source data, loaddata as follows:
l Compensation budget expenses to the HCP BSO database
l Operating expenses to the Plan 1, 2, or 3 BSO database
Table 10 Loading Metadata
Dimension Members Load Below This Member
Position Existing positions Total Existing Positions
Employee Existing employees Total Existing Employees
Job Code
For the Employee budgetdetail
Load job codes Total Job Code
Loading General Ledger and HRMS Metadata and Data 55

Dimension Members Load Below This Member
Element Salary Grades
Additional Earnings
Benefits
Employer-paid taxes
Salary Grades
Additional Earnings
Benefits
Employer-Paid Taxes
Budget Item Assignment placeholders
Element Changes placeholder
Allocation Assignment placeholders
FTE and Status Assignments
Element Changes
Allocation Assignments
Entity HR Entity Total Entity
Account Natural Account expenses
General Ledger dimensions
General Ledger dimension aliases
Personnel Expenses
Segment Information
Segment Description
For information about how the data in these members is used, see“About Allocating Compensation Expenses to General LedgerAccounts” on page 156.
Customizing Provided Components
Subtopics
l Business Rules
l Task Lists
l Data Forms Using Formulas
l Data Forms Using Validation Rules
l Menus
l Text Fields for Increased Text Entry
Business RulesIn Public Sector Planning and Budgeting data forms, many short cut menu options launchpredefined business rules, which display runtime prompt windows that you use to select data,apply changes, and calculate expenses:
l Performance Management Architect applications use Calculation Manager as thecalculation module.
l Classic applications use Business Rules or Calculation Manager as the calculation module.
Predefined business rules enable you to perform these tasks:
l Set or change defaults for compensation elements
l Add, transfer, change, or remove positions or employees
56 Preparing Applications

l Define allocations for position expenses
l Specify when employees move from one salary grade to another
l Recompute expenses for the entire budget or a subset of data, based on new input (forexample, for overall expenses, FTE, or status)
Create data forms and business rules to suit your organization's business logic and needs. Seethe Hyperion Calculation Manager documentation.
Tip: To more easily secure business rules, group them into sets or sequences and specify accesspermissions for the individual set or sequence.
Task ListsModify the predefined task lists to add your own tasks as reviewing instructions, entering datain specific data forms, and running business rules. When adding tasks, you can:
l Specify due dates to use alerts that notify the appropriate users of actions that they musttake specific actions
l Add instructions
See “Managing Task Lists” in the Oracle Hyperion Planning Administrator's Guide.
Data Forms Using FormulasDefine formulas to perform specific calculations on data forms. For example, you can create aformula for a column to calculate the variance between the multiple budget versions. Tocustomize data forms and refine the data displayed, create formulas to perform these tasks:
l Average values
l Total values
l Multiply values
l Identify maximum and minimum values
l Round values
l Truncate values
l Display the numeric or percent variance to compare values
l Rank values in a range that you specify
For information, see “Data Forms and Formula Functions” in the Oracle Hyperion PlanningAdministrator's Guide.
Customizing Provided Components 57

Data Forms Using Validation RulesTo implement and enforce budget or business policies and processes, create validation rules andassociate them with data forms. When you create validation rules, specify colors in which toindicate invalid data, and the error message generated.
For example, a company requires special approval for monthly expenses exceeding $70,000. Toimplement this policy, create a validation rule to flag criterion in blue and trigger notificationto management. In the same data form, include another rule that identifies variances below 0in yellow. When viewing the data form, planners can display the data validation messages thatyou defined in the rule. The validation messages contain links to the cells that violated the rule.
To ensure that budgets adhere to company policies, you can also enforce limits on submittedplanning unit data by using validation rules. For example, create a validation rule to ensure thatan employee’s salary is within a certain range for the grade and department. In addition to thevalidation rules that you create, predefined validation rules help ensure valid data entry, byensuring conditions:
l New option dates occur between the Element start and end dates.
l The Assigned FTE for a position does not exceed its Total FTE.
l Tax is computed on taxable salary, not just salary.
MenusPublic Sector Planning and Budgeting includes predefined short-cut menus that drivecalculations on predefined data forms. If you add or modify business rules and data forms, createnew menus or update the appropriate existing menus. For example, if you delete a business rulereferenced by a menu, remove it from the menu. You can delete predefined short cut menuswithout affecting predefined calculations.
See “Working With Menus” in Chapter 12 of the Oracle Hyperion Planning Administrator'sGuide.
Text Fields for Increased Text EntryBy default, 255 is the maximum number of single-byte characters that you can enter for textvalues, and 1500 is the maximum for comments. To increase the maximum length for text valuesand comments in cells, see “Setting the Maximum Length for Text Values and Comments ” inthe Oracle Hyperion Planning Administrator's Guide.
Securing ApplicationsSecurity is based on user privileges and system roles and access permissions that you assign tousers and to groups. Groups are sets of users who need similar access permissions. You assigntask security by assigning roles to a user. Each role is associated with a set of tasks. See the OracleHyperion Enterprise Performance Management System User and Role Security Guide.
58 Preparing Applications

By default, users can open only those artifacts, such as data forms and task lists, to which theyhave access. Assign access using the following guidelines, following the procedure in “SettingUp Access Permissions” and “Assigning Access to Members” in the Oracle Hyperion PlanningAdministrator's Guide.
l Dimensions and Members—Grant access so that planners can view and change informationonly for their own employees and positions. Do so by providing access to the Entitydimension and Element members. Do not restrict access to descendants of New Positionsand New Employees. See “Securing Dimensions and Members” on page 59.
l Data forms—Assign appropriate access to data forms based on their relevance to users. Forexample, assign planners access to all data forms in the Budget Preparation data form folder.If you grant access to the Human Capital Planning folder, planners can view all child foldersand forms. See “Securing Data Forms” on page 61.
l Task lists—Assign appropriate access to task lists based on their relevance to users. Forexample, allow planners access to the Budget Preparation task list, but not to the BudgetAdministration task list. Validation rules prevent users from entering invalid data. See“Securing Task Lists” on page 61.
l Business rules—Selectively assign access permissions to business rules at the HR entity levelto enable position mass updates. If you use Calculation Manager as the calculation module,assign access permissions to business rules in Planning. See “Securing Business Rules” onpage 61. If you use Business Rulesas the calculation module, set access permissions inAdministration Services.
l Planning unit hierarchies––Grant access only to cost center owners or reviewers.
l Reporting applications––Assign access to reporting applications in Shared Services, and setup security filters for the reporting applications in Administration Services.
l During the budget cycle, lock user sets to prevent users from modifying scenario-versiondata combinations.
Securing Dimensions and Members
Subtopics
l Entity
l Account and Element
l Position and Employee
l Scenario and Version
l Budget Item and Job Code
l Custom Dimensions
Generally, grant users access only to the employees and positions in their entity parent. Forexample, specify that planners can view and modify employee and position information onlyfor their department or cost center. Also, grant access to all unspecified members in eachdimension, such as Unspecified Position or Unspecified Element.
Securing Applications 59

EntityGrant users access only to their HR or departmental entities. This practice ensures that userscan view and modify only compensation, employee, job, or position data specific to theirdepartment or cost center. Similarly, grant only cost center or department managers andplanners access to the General Ledger entities in their cost centers or departments. For example,do not grant planners in the Transportation Department access to the Education Department’sbudget and associated General Ledger account entities.
Account and Elementl Grant all users access to predefined accounts, such as HCP accounts.
l Secure the General Ledger accounts as appropriate for your budget access.
l Grant all users access to the descendants of the Additional Earnings, Benefits, and Employer-paid Taxes elements.
l As needed, grant user access to salary-grade elements to limit access to the salary grades ofother departments. For example, in an education environment, you may not want themedical school to view the salary grades that apply to the business school. Rather than givinggroups access to all salary grades in the application, grant access only to the salary gradesthat apply to a group.
l Grant all users access to these Element members: Salary Grades Defaults, Benefit Defaults,Additional Earnings Defaults, and Employer-paid Taxes Defaults.
Note: Although you can secure members of the grade dimension, grade values are globally visiblein Smart Lists.
Position and EmployeeSecure the existing positions and employees loaded from HR based on their relevance toplanners.
l Grant users access to all new positions and employees in their entities, so that planners cancreate positions and add employees in their respective departments.
l Grant all users access to the Default Position member (in the Position dimension) and theVacancy member (in the Employee dimension).
Scenario and Versionl Grant users access to scenarios, such as providing access to actual budget data but restricting
access to forecast data.
l Grant users access to the Stages parent version and its children. For example, assign viewaccess to a final version of the budget, but restrict access to previous working versions.Permissions for versions are independent of scenarios, so view access to the final versionprevents write access to the final version data for all scenarios.
l Grant all users access to the Revisions parent version and its children.
60 Preparing Applications

Budget Item and Job CodeGrant all users access to the predefined Budget Item and Job Code members. You need not securethe Job Code dimension.
Custom DimensionsGrant users access to user-defined dimensions, such as Program, Project, and Fund.
Securing Data Formsl Grant administrators access to all data forms.
l Grant planners access to all Budget Preparation and Inquiry data forms.
l Do not grant planners access to the Budget Administration data forms.
Securing Task ListsProvide access to the predefined and custom task lists, based on their relevance to users.
l Grant administrators access to all task lists.
l Grant entity, cost center, or department managers access to the Budget Preparation task list.
l Grant planners access only to the Budget Preparation task list. To prevent these users fromapproving or rejecting sensitive budget data, remove access to the Review and ApprovePositions or Review and Approve Employee Budget Details tasks.
Securing Business Rulesl Grant administrators access to all business rules.
l Unless necessary, do not grant planners access to these common business rules:
m AddDefaultNonSalElement
m AddDefaultRateBasedOption
m AddDefaultStepBasedOption
m AddDefaultValueBasedOption
m CriteriaAnnualSalSpread
m CriteriaCreateMissingDistributions
m CriteriaCreateMissingNonSalElement
m CriteriaCreateMissingSalElement
m CriteriaOverwriteDistribution
m CriteriaOverwriteNonSalElement
m CriteriaOverwriteSalElement
Securing Applications 61

l Grant planners access to all remaining business rules, unless there is reason to limit access.
62 Preparing Applications

5Configuring the Line Item
Budget
In This Chapter
Preparing to Link Compensation Budget and Line Item Budgets.. . . . . . . . . . . . . . . . . . . . . . . . . . . . . . . . . . . . .63
Populating the Line Item Budget .. . . . . . . . . . . . . . . . . . . . . . . . . . . . . . . . . . . . . . . . . . . . . . . . . . . . . . . . . . . . . . . . . . . . . . . .73
Preparing to Link Compensation Budget and Line ItemBudgets
Subtopics
l Scenario 1: One-to-One Mapping Between Segments or Chart Fields and Public Sector Planning and Budgeting
Dimensions
l Scenario 2: Combining General Ledger Segments or Chart Fields in a Dimension
l Scenario 3: Applications With Different Chart of Accounts and General Ledger Segments or Chart Fields
Line item budgets are maintained in Plan 1, 2, or 3, because compensation budgets in the HCPplan type roll up to the corresponding Entity and Account member in Plan 1, 2, or 3. Thefollowing sections assume that you defined the dimensional model for General Ledger segmentsor chart fields in Plan 1.
Important: The dimensions used in position expense allocations must match those in the lineitem budget.
To link the compensation budget with the line item budget using reporting applications, mapdimensional data to General Ledger segments or chart field using the appropriate scenario:
l One-to-one mapping between General Ledger segments or chart fields and dimensions. See“Scenario 1: One-to-One Mapping Between Segments or Chart Fields and Public SectorPlanning and Budgeting Dimensions” on page 64.
l Two or more combined General Ledger segments or chart fields represent one dimension.See “Scenario 2: Combining General Ledger Segments or Chart Fields in a Dimension” onpage 70.
l Multiple applications with different Chart of Accounts. See “Scenario 3: Applications WithDifferent Chart of Accounts and General Ledger Segments or Chart Fields” on page 70.
After performing the required configuration tasks described in this section, see “Populating theLine Item Budget” on page 73.
Preparing to Link Compensation Budget and Line Item Budgets 63

Scenario 1: One-to-One Mapping Between Segments or ChartFields and Public Sector Planning and Budgeting Dimensions
Subtopics
l Step 1: Defining Entity Dimensions and Members
l Step 2: Defining User Defined Dimensions and Members
l Step 3: Adding and Modifying Smart Lists
l Step 4: Adding Segment or Chart Field Members to the HCP Plan
l Step 5: Configuring Business Rules
Perform these steps:
1. Perform a task based on any distinction between HR entities (departments and businessunits, for example) and General Ledger entities (cost centers) used in allocations:
l If you have separate General Ledger and HR entities, ensure that the Entity dimensioncontains:
m General Ledgers entities enabled only on Plan 1, 2, 3, or whatever plan type used inthe line item budget
m HR entities enabled only on the HCP plan
l If the General Ledger and HR entities are the same, enable them and their members onthe HCP plan, and on Plan 1, 2, or 3, or whatever plan type is used in the line itembudget.
2. Add corresponding Smart Lists.
3. Add segment members to the HCP Plan.
4. If necessary, configure business rules.
Step 1: Defining Entity Dimensions and Members
ä To set up the Entity dimension:
1 Create all HR entity members, such as departments and business units under the Total Entity parentmember.
2 Enable the HR entity members only for the HCP plan type.
3 Create General Ledger entity members under a separate parent.
Step 2: Defining User Defined Dimensions and Membersl Create dimensions for the General Ledger dimensions, such as Fund, Program, Project, and
Activity in one of the standard plan types.
l For each dimension that you add, add corresponding segment or chart field members belowthe Segment Information and Segment Description members.
l Associate each segment or chart field member with a Smart List.
64 Configuring the Line Item Budget

Step 3: Adding and Modifying Smart ListsAdd Smart Lists to contain all General Ledger account codes and their chart field or segmentdescriptions. Use ERP Integrator to map the General Ledger account codes and descriptions tocorresponding Smart Lists in the compensation budget.
Public Sector Planning and Budgeting provides predefined Smart Lists and descriptions, whichyou can change or delete to match the line item budget dimensions:
Note: Later map segments that represent default natural accounts to the Account dimension.
l Salary_Account_List and Salary_Account_Alias_List
These Smart Lists represent personnel expense default natural account members. Do notinclude summary level default natural account, expense, or statistical members.
l Entity_List and Entity_Alias_List
These Smart Lists represent General Ledger entity structures. Do not include summary levelentity members. Only include leaf-level members.
l Fund_List and Fund_Alias_List
l Program_List and Program_Alias_List
l Project_List and Project_Alias_List
Step 4: Adding Segment or Chart Field Members to the HCP Plan HCP plan type allocation details are captured against Account members that are associated withthe Smart Lists you create. Ensure that each dimension is a member under the SegmentInformation and Segment Description parents in the Account dimension. Segment Informationmembers capture the member codes for each segment in your General Ledger structure; SegmentDescription members capture the descriptions for each segment in your General Ledgerstructure. Each member must be associated with a Smart List to hold the corresponding membercodes and their descriptions.
Some predefined members exist in the Account dimension for General Ledger segments:
Preparing to Link Compensation Budget and Line Item Budgets 65

Modify the predefined Account members to reflect your actual segment structure.
ä To rename, delete, or add to the predefined General Ledger segments:
1 Select View, and then Advanced mode.
2 Select the Account dimension.
l For Classic applications, see the Oracle Hyperion Planning Administrator's Guide.
l For Performance Management Architect applications, see the Oracle Hyperion EnterprisePerformance Management Architect Administrator’s Guide.
3 Note the predefined segments under the Segment Information parent member.
4 Perform any tasks to manage placeholders in Smart Lists:
l To rename placeholder members, enter new Aliases for the member.
l To add placeholder member, add child member, and then specify member properties.
5 Refresh the database.
Step 5: Configuring Business RulesModify the following predefined business rules so that their allocation information reflectsGeneral Ledger segments or chart fields. If you modified predefined segment Account members,update the business rules that refer to the members. If you use Business Rules as the calculationmodule, copy the business rule in each application before making changes.
Caution! Because they reference General Ledger segments or chart fields be very careful whenmodifying business rules, and change only those sections pertaining to chart fieldsor segments.
l AddDistribution
66 Configuring the Line Item Budget

l AddNewPosition
l AddDefaultAccountSegment
l AllocDistCost
l AllocDistCost
l CriteriaCreateMissingDistributions
l CriteriaOverWriteDistribution
l CriteriaOverWriteNonSalElement
l CriteriaOverWriteSalElement
l DeleteDefaultAccountSegment
l DeleteDistribution
l EmployeeTransferOut
l EmployeeTransferIn
l EmployeeTransfer
l EmpToPosition
l FillPosition
l PositionTransferOut
l PositionTransferIn
l SyncSegWithSegDesc
l SyncSegWithSegs
l TerminatePos
l TerminateEmp
Change only the sections that pertain to General Ledger chart fields or segments. Use thefollowing for guidance:
l “Example 1: Replacing Segments” on page 67
l “Example 2: Delete Business Unit Segments” on page 68
l “Example 3: Adding Funding Source Segments” on page 69
Insert comments to identify the appropriate section:
l Starting comment: /* Configurable Allocation Segments Section - Start*/
l Ending comment: /* Configurable Allocation Segments Section - End*/
Example 1: Replacing Segments
In this example, the Business Unit allocation segment is removed, and Funding Source addedto AddDefaultDistribution. Make these changes by removing the italicized BusinessUnit Segment lines and adding the bolded Funding Source Segment lines.
Preparing to Link Compensation Budget and Line Item Budgets 67

/* Configurable Allocation Segments Section - Start */ "Object Segment" = [Acct_Dist]; "Object Segment Description"=[Acct_Dist]; "Business Unit Segment" = [BU_Dist]; "Business Unit Segment Description"=[BU_Dist]; "Funding Source Segment" = [FundSource_Dist]; "Funding Source Segment Description"=[ FundSource _Dist]; "Department Segment" = [Dept_Dist]; "Department Segment Description"=[Dept_Dist]; "Fund Segment" = [Fund_Dist]; "Fund Segment Description" = [Fund_Dist]; "Program Segment" = [Obj_Dist]; "Program Segment Description" = [Obj_Dist]; "Project Segment" = [Proj_Dist]; "Project Segment Description" = [Proj_Dist]; "Percentage Distribution" = [Dist_Percentage]; validAssign = 1;/* Configurable Allocation Segments Section - End*/
Example 2: Delete Business Unit Segments
In this example, the bolded Business Unit segment is deleted in the allocation sections ofAddDistribution. The example shows only one section; there are three others, identified withstarting and ending comments.
/* Configurable Allocation Segments Section - Start */
"Object Segment" = @MDSHIFT( "Object Segment", -1, LineItem, @DESCENDANTS("Distribution Assignments"), -1, period, @LIST("BegBalance", "Jan")); "Object Segment Description" = @MDSHIFT( "Object Segment Description", -1, LineItem, @DESCENDANTS("Distribution Assignments"), -1, period, @LIST("BegBalance", "Jan")); "Business Unit Segment" = @MDSHIFT( "Business Unit Segment", -1, LineItem, @DESCENDANTS("Distribution Assignments"), -1, period, @LIST("BegBalance", "Jan")); "Business Unit Segment Description" = @MDSHIFT( "Business Unit Segment Description", -1, LineItem, @DESCENDANTS("Distribution Assignments"), -1, period, @LIST("BegBalance", "Jan")); "Department Segment" = @MDSHIFT( "Department Segment", -1, LineItem, @DESCENDANTS("Distribution Assignments"), -1, period, @LIST("BegBalance", "Jan")); "Department Segment Description" = @MDSHIFT( "Department Segment Description", -1, LineItem, @DESCENDANTS("Distribution Assignments"), -1, period, @LIST("BegBalance", "Jan")); "Fund Segment" = @MDSHIFT( "Fund Segment", -1, LineItem, @DESCENDANTS("Distribution Assignments"), -1, period, @LIST("BegBalance", "Jan")); "Fund Segment Description" = @MDSHIFT( "Fund Segment Description", -1, LineItem, @DESCENDANTS("Distribution Assignments"), -1, period, @LIST("BegBalance", "Jan")); "Program Segment" = @MDSHIFT( "Program Segment", -1, LineItem, @DESCENDANTS("Distribution Assignments"), -1, period, @LIST("BegBalance", "Jan")); "Program Segment Description" = @MDSHIFT( "Program Segment Description", -1, LineItem, @DESCENDANTS("Distribution Assignments"), -1, period, @LIST("BegBalance", "Jan")); "Project Segment" = @MDSHIFT( "Project Segment", -1, LineItem, @DESCENDANTS("Distribution Assignments"), -1, period, @LIST("BegBalance", "Jan")); "Project Segment Description" = @MDSHIFT( "Project Segment Description", -1, LineItem, @DESCENDANTS("Distribution Assignments"), -1, period, @LIST("BegBalance",
68 Configuring the Line Item Budget

"Jan")); "Distribution Start Date" = @MDSHIFT( "Distribution Start Date", -1, "Budget Item", @DESCENDANTS("Distribution Assignments"), -1, period, @LIST("BegBalance", "Jan")); "Distribution End Date" = @MDSHIFT( "Distribution End Date", -1, "Budget Item", @DESCENDANTS("Distribution Assignments"), -1, period, @LIST("BegBalance", "Jan")); "Percentage Distribution" = @MDSHIFT( "Percentage Distribution", -1, "Budget Item", @DESCENDANTS("Distribution Assignments"), -1, period, @LIST("BegBalance", "Jan"));
/* Configurable Allocation Segments Section - End*/
To delete the Business Unit segment, delete these lines:
"Business Unit Segment" = @MDSHIFT( "Business Unit Segment", -1, LineItem, @DESCENDANTS("Distribution Assignments"), -1, period, @LIST("BegBalance", "Jan")); "Business Unit Segment Description" = @MDSHIFT( "Business Unit Segment Description", -1, LineItem, @DESCENDANTS("Distribution Assignments"), -1, period, @LIST("BegBalance", "Jan"));
Example 3: Adding Funding Source Segments
In this example, the Funding Source allocation segment is added to DeleteDistribution:
"Funding Source Segment" = @Next("Funding Source Segment", 1, @IRSIBLINGS([DistElem])); "Funding Source Segment Description" = @Next("Funding Source Segment Description", 1, @IRSIBLINGS([DistElem]));
This is DeleteDistribution after adding the bolded Funding Source segment:
/* Configurable Allocation Segments Section - Start*/"Object Segment" = @Next("Object Segment", 1, @IRSIBLINGS([DistElem])); "Object Segment Description" = @Next("Object Segment Description", 1, @IRSIBLINGS([DistElem])); "Business Unit Segment" = @Next("Business Unit Segment", 1, @IRSIBLINGS([DistElem])); "Business Unit Segment Description" = @Next("Business Unit Segment Description", 1, @IRSIBLINGS([DistElem])); "Department Segment" = @Next("Department Segment", 1, @IRSIBLINGS([DistElem])); "Department Segment Description" = @Next("Department Segment Description", 1, @IRSIBLINGS([DistElem])); "Fund Segment" = @Next("Fund Segment", 1, @IRSIBLINGS([DistElem])); "Fund Segment Description" = @Next("Fund Segment Description", 1, @IRSIBLINGS([DistElem])); "Program Segment" = @Next("Program Segment", 1, @IRSIBLINGS([DistElem])); "Program Segment Description" = @Next("Program Segment Description", 1, @IRSIBLINGS([DistElem])); "Project Segment" = @Next("Project Segment", 1, @IRSIBLINGS([DistElem])); "Project Segment Description" = @Next("Project Segment Description", 1, @IRSIBLINGS([DistElem])); "Funding Source Segment" = @Next("Funding Source Segment", 1, @IRSIBLINGS([DistElem])); "Funding Source Segment Description" = @Next("Funding Source Segment Description", 1, @IRSIBLINGS([DistElem]));
Preparing to Link Compensation Budget and Line Item Budgets 69

"Distribution Start Date" = @Next("Distribution Start Date", 1, @IRSIBLINGS([DistElem])); "Distribution End Date" = @Next("Distribution End Date", 1, @IRSIBLINGS([DistElem])); "Percentage Distribution" = @Next("Percentage Distribution", 1, @IRSIBLINGS([DistElem]));
/* Configurable Allocation Segments Section - End*/
Scenario 2: Combining General Ledger Segments or ChartFields in a DimensionFor information on combining source General Ledger segments and mapping them to one PublicSector Planning and Budgeting dimension, see the Oracle Hyperion Financial Data QualityManagement ERP Integration Adapter for Oracle Applications Administrator's Guide.
See also:
l “Step 1: Defining Entity Dimensions and Members” on page 64
l “Step 2: Defining User Defined Dimensions and Members” on page 64
l “Step 3: Adding and Modifying Smart Lists” on page 65
l “Step 4: Adding Segment or Chart Field Members to the HCP Plan ” on page 65
Scenario 3: Applications With Different Chart of Accountsand General Ledger Segments or Chart FieldsBusiness Rules users who have multiple applications that use different segments or chart fieldsmust ensure that each application is associated with its own set of uniquely named business rulesthat reflect the General Ledger segments or chart fields.
Perform these steps:
l “Step 1: Defining Entity Dimensions and Members” on page 64
l “Step 2: Defining User Defined Dimensions and Members” on page 64
l “Step 4: Adding Segment or Chart Field Members to the HCP Plan ” on page 65
l “Configuring Business Rules in Multiple Applications” on page 71
l If necessary, “Step 5: Configuring Business Rules” on page 66
If Business Rules is the calculation module, see:
l “About Associating Business Rules With Menu Items” on page 71
l “Associating Business Rules With Menu Items” on page 71
70 Configuring the Line Item Budget

Configuring Business Rules in Multiple ApplicationsPerform these tasks:
l Make a backup copy of the business rules in each application.
l Configure each set to reflect the different segments in each application (App1 and App2, forexample).
l In each application, prefix the business rule names with the application name. For example,in the first application rename AddDistribution as App1_AddDistribution. In thesecond application rename AddDistribution as App2_AddDistribution.
Tip: To simplify mapping configured business rules with their applications, prefix business rulenames with the application name. For example: App1_SyncSegDescWithSegs.
Note: If you modify business rules, you must also update the affected data forms and menus.
About Associating Business Rules With Menu ItemsIf you use Business Rules and have applications that use different General Ledger segments,associate each application's business rules with menu items as described below:
Table 11 Menu Items Impacted by General Ledger Segments
Menu Menu Item
Modify Default Segmentl Add Allocation
l Delete Allocation
Manage Allocationsl Add Default Account
l Delete Default Account
Mass Change Allocationsl Fill Missing Allocations
l Replace Allocations
Modify Default Costingl Add Default General Ledger Allocations
l Delete Default General Ledger Allocations
Apply Defaultsl Overwrite Allocations
l Fill Allocations
Calculate Compensation Cost Allocate the Expense to General Ledger Accounts
Associating Business Rules With Menu ItemsAssuming that you configured the business rules for each application and renamed them asrecommended in “About Associating Business Rules With Menu Items” on page 71, performthese tasks to link rules to the appropriate menu items.
Preparing to Link Compensation Budget and Line Item Budgets 71

ä To associate configured business rules with menu items:
1 Select View and then Advanced Mode.
2 Select Administration, then Manage, and then Menus.
3 Select a menus specified above (for example, Modify Default Natural Account), and then click Edit.
4 In Edit Menu, select Add Default Natural Account, and then click Edit.
5 From Business Rule, select a configured business rule for the application (for example,App2_AddDefaultAccountSegment) in the Edit Menu Item window.
Repeat for the other business rules that are configured for the current application.
6 Click Save and then Close.
7 Repeat for each menu item.
Associating Business Rules With Data FormsIf you configure business rules to apply different allocation segments in multiple applications,associate the business rules in each application to these data forms:
l Entity Default Salary Allocations (Segments)
l Entity Default Salary Allocations (Descriptions)
ä To associate configured business rules with affected data forms:
1 Select View and then Advanced Mode.
2 Select Administration, then Manage, and then Data Forms.
3 In Data Form Folders, expand Forms, Human Capital Planning and Budget Preparation, and then clickManage Compensation Defaults.
4 Select Department Default salary allocation (Descriptions), and click Edit.
5 Select Business Rules.
6 From Selected Business Rules, use the left arrow icon to remove theSyncSegWithSegDescbusiness rule.
7 From Business Rules, select the configured business rule for the current application (for example,App2_SyncSegWithSegDesc), and use the right arrow icon to select it for the data form.
8 Click Save.
9 Click Close.
10 Repeat Steps 6 and 7, removing the predefined affected business rules and selecting the business rulesthat are configured for the current application.
11 Repeat Steps 4 through 10 for the Department Default salary allocation (Segments) data form.
12 Repeat this procedure for each application.
72 Configuring the Line Item Budget

Populating the Line Item BudgetAdministrators perform these tasks to populate the line item budget:
l Populate the portion of the line item budget for personnel expenses by mapping line itemdimensions with corresponding HCP dimensions. This involves mapping chart fields orsegments in the Segment Allocation Information parent in the Account dimension tocorresponding compensation dimension members.
l Report and query all integrated compensation and line item budget data, by creating andpushing data to an aggregate storage (ASO) reporting application.
Linking Compensation Data To link compensation with operating expenses to create the line item budget, map Smart Liststo HCP dimensions and members, or HCP dimensions to operational expense dimensions onPlan Type 1, 2, or 3.
Note: The following mapping assumes that you use the Position and Employee budget detail.Use a similar approach for the other budget details.
ä To link compensation budget data to line item budgets:
1 In Planning, select View, and then Advanced Mode.
2 Select Administration, and then Map Reporting Applications.
3 Click New.
4 Under Details, enter a name and description, such as HCP Linked To Operating Expenses.
5 From Plan Type, select HCP.
Although you can specify another name, HCP is the default name for the Essbase applicationdatabase used with Public Sector Planning and Budgeting.
6 Expand Reporting Application, and select the server that hosts Plan Type 1, 2, or 3.
7 Click Next.
8 For each Public Sector Planning and Budgeting dimension or Smart List, select:
l Mapping type:
m Dimension to Dimension—Map shared dimensions such as scenario, period, andyear.
m Smart List to Dimension—Map segment or chart fields in Segment Information todimensions in Plan 1.
Note: If you expect that segments or chart fields will be blank in position oremployee allocations, update the #MISSING drop down label in thecorresponding Smart Lists. See “Adding or Changing Smart List Properties”in the Oracle Hyperion Planning Administrators Guide.
Populating the Line Item Budget 73

l A dimension and its members, or a Smart List
l The corresponding General Ledger dimension in Plan Type 1, 2, or 3.
Use this table to map HCP dimensions. Create rows to map Smart Lists for customdimensions such as Project_List or Program_List.
Table 12 HCP Mapping
Mapping Type Dimension/Smart List Member Reporting ApplicationDimension
Smart List toDimension
Salary_Account_List Account Segment default natural Account
Dimension toDimension
Period level 0 members
For example: ILvl0Descendants(Period)
Period
Include the entire dimension inthe reporting application.
Dimension toDimension
Year fiscal years
For example: FY09,FY10,FY11
Year
Include the entire dimension inthe reporting application.
Dimension toDimension
Version version to include
For example, Final
Version
Dimension toDimension
Currency Local Currency
Smart List toDimension
Entity_List Entity Segment General Ledger Dimension
For example, Cost_Center
Dimension toDimension
Scenario scenario
For example, Budget
Scenario
Include the entire dimension inthe reporting application.
Smart List toDimension
Smart List corresponding toGeneral Ledger dimension
Create row mappings forcustom Smart Lists such as:
l Activity_List
l Fund_List
General Ledger segment member
Examples:
l Activity Segment
l Fund Segment
General Ledger dimension
The HCP compensation dimensions in Public Sector Planning and Budgeting on the leftmap to the General Ledger or operational expense dimensions in Plan Type 1, 2, or 3 on theright.
9 Click Next and map these source POV dimensions:
l Account—Allocated Expense
l Budget Item—level 0 membersFor example: ILvl0Descendants(AllocationAssignments)
74 Configuring the Line Item Budget

l Entity—ILVl0Descendants(Total Entity)
l Employee—ILVl0Descendants(Total Employees)
l Position—ILVl0Descendants(Total Positions)
l Element—ILVl0Descendants(Total Compensation Expenses)
10 Click Save.
11 Select Administration, and then Map Reporting Applications.
12 Select the mapping that you defined, click Push Data, and then select an option:
l Push—Update existing data with new data.
l Clear and Push Data—Delete existing data and push new data.
Note: Select Push only if this is the first time mapping to Reporting applications.Otherwise, select Clear and Push Data.
Pushing Compensation And Operational Expense Data toReporting Applications
Subtopics
l Overview
l Creating the HCP Dimension Mappings
l Pushing Data to Reporting Applications
You can push all compensation budget and line item budget data to an ASO reporting applicationfor full reporting and querying.
OverviewBefore pushing compensation budget and line item budget data to an ASO reporting application,perform these tasks:
l In Essbase, create an ASO reporting application. See the Oracle Essbase DatabaseAdministrator's Guide.
l In the reporting application, create dimensions that correspond to each HCP and operatingexpense dimensions used in the Public Sector Planning and Budgeting application.
l Load members that map to the Public Sector Planning and Budgeting members on whichto report or aggregate into the reporting application dimensions. Oracle recommends usingERP Integrator.
After performing the initial tasks, perform these tasks:
l Define HCP dimension mappings to map salary expenses, headcount, FTE, and non-compensation operational expense dimensions (in Plan 1, 2, or 3) to the ASO application.See “Creating the HCP Dimension Mappings” on page 76.
Populating the Line Item Budget 75

l Ensure that you allocated expenses to General Ledger Accounts.
l Push the data. See “Pushing Data to Reporting Applications” on page 82.
Creating the HCP Dimension Mappings
ä To create the mappings:
1 In Planning, select View, and then Advanced Mode.
2 Select Administration, and then Map Reporting Applications.
3 Click New.
4 Under Details, enter a name such as Salary for the first mapping, and FTE and Headcount for the second.
5 Under Source Application, for Plan Type, select HCP.
6 Under Reporting Application, select the Essbase server that hosts the BSO database containing thePublic Sector Planning and Budgeting application, and then select the ASO reporting application.
7 Click Next.
8 See “Mapping Salary Dimensions” on page 76.
Mapping Salary Dimensions
On the Map Dimensions tab, map the Public Sector Planning and Budgeting dimensions andSmart Lists on the left to the ASO application members on the right.
ä To map the salary:
1 For each Public Sector Planning and Budgeting dimension or Smart List, select a Mapping Type, theDimension or Smart List, members, and then select the corresponding reporting application dimension.
About Mapping Type:
l Dimension to Dimension—Dimensions that are shared or identical in Public SectorPlanning and Budgeting and the reporting application map automatically. However,you must map any unmapped dimensions.
l Smart List to Dimension—Map dimensions and members to Smart List accountmembers.
For example:
76 Configuring the Line Item Budget

2 Use these salary mapping:
Table 13 Salary Mapping
MappingType
Dimension/Smart List Member Selection Reporting ApplicationDimension
Smart List toDimension
Salary_Account_List Account Segment natural Account
Dimension toDimension
Period level 0 members
For example: ILvl0Descendants(Period)
Period
Include the entiredimension in the reportingapplication.
Dimension toDimension
Year fiscal years
For example: FY09,FY10,FY11
Year
Include the entiredimension in the reportingapplication.
Dimension toDimension
Version version
For example, Final
Version
Dimension toDimension
Currency Local Currency
Smart List toDimension
Entity_List Entity Segment General Ledger dimension
For example, Cost_Center
Populating the Line Item Budget 77

MappingType
Dimension/Smart List Member Selection Reporting ApplicationDimension
Dimension toDimension
Scenario scenario
For example Budget
Scenario
Include the entiredimension in the reportingapplication.
Smart List toDimension
Smart Listcorresponding toGeneral Ledgerdimension
Create a separate rowmapping for each SmartList.
Examples:
l Activity_List
l Fund_List
l Program_List
l Project_List
General Ledger segment member
Examples:
l Activity Segment
l Fund Segment
l Program Segment
l Project Segment
General Ledger dimension
Dimension toDimension
Employee level 0 members. For example:ILvl0Descendants(Employee)
Note: Applies only to the Employee budget detail
Employee
Include the entiredimension
Dimension toDimension
Position level 0 members. For example:ILvl0Descendants(All Positions)
Note: Applies only to the Position budget detail
Position
Include the entiredimension
Dimension toDimension
Budget Item Unspecified Budget Item Budget Item
Include the entiredimension
Dimension toDimension
Element ILvl0Descendants(Total CompensationExpenses)
Dimension toDimension
Entity level 0 members.For example:ILvl0Descendants(Total Entity)
General Ledger dimension
For example, Cost_Center
3 Click Next.
4 On the Point of View tab, map these source dimensions:
POV dimensions must have only one member selected.
78 Configuring the Line Item Budget

Table 14 POV for Salary Mapping
Mapping Type Dimension/SmartList
Member Selection ReportingApplicationDimension
Dimension toDimension
Account Allocated Expense Account
Dimension toDimension
Entity level 0 members. For example:ILvl0Descendants(Total Entity)
General Ledger entitythat represents acost center ordepartment
5 See “Mapping Headcount and FTE” on page 79.
Mapping Headcount and FTE
ä To map headcount and FTE:
1 Map the Headcount and FTE dimensions or Smart Lists on the left to the corresponding dimensions tothe right in the ASO application. For example:
2 Use these mappings:
Table 15 Headcount and FTE Mapping
MappingType
Dimension/Smart List
Member Selection Reporting Application Dimension
DimensiontoDimension
Account level 0 members for Total FTE and Headcount For example:ILvl0Descendants(TotalFTE)ILvl0Descendants(Headcount)
Account dimension
Populating the Line Item Budget 79

MappingType
Dimension/Smart List
Member Selection Reporting Application Dimension
DimensiontoDimension
Period level 0 members
For example: ILvl0Descendants(Period)
Period
Include the entire dimension
DimensiontoDimension
Year fiscal years to include
For example: FY09,FY10,FY11
Year
Include the entire dimension
DimensiontoDimension
Budget Item Unspecified Budget Item Budget Item. Include the entiredimension
DimensiontoDimension
Version version
For example: Final
Version
DimensiontoDimension
Currency Local Currency
DimensiontoDimension
Element level 0 members
For example: ILvl0Descendants(Element)
Unspecified Element
Select only one member
DimensiontoDimension
Entity level 0 members. For example:ILvl0Descendants(Entity)
General Ledger dimension
For example,ILvl0Descendants(TotalEntity)
DimensiontoDimension
Position level 0 members. For example:ILvl0Descendants(All Positions)
Note: Applies only to the Position budget detail
Position
Include the entire dimension
DimensiontoDimension
Employee level 0 members. For example:ILvl0Descendants(Employee)
Note: Applies only to the Employee budget detail
Employee
Include the entire dimension
DimensiontoDimension
Scenario scenario
Typically, the scenario member is Budget
Scenario
Include the entire dimension
Not Linked Examples:
l Activity Segment
l Fund Segment
l Program Segment
l Project Segment
General Ledger dimensions
For example:
l Activity
l Fund
l Program
l Project
3 Click Next.
4 On the POV tab, select only one member for each General Ledger Smart Lists such as Activity, Fund,Program, and Project (Unspecified Activity and Unspecified Project, for example).
80 Configuring the Line Item Budget

5 Click Save.
6 See “Mapping Operational Dimensions on Plan Type 1, 2, or 3” on page 81.
Mapping Operational Dimensions on Plan Type 1, 2, or 3
ä To define the mapping:
1 In Planning, select View, and then Advanced Mode.
2 Select Administration, and then Map Reporting Applications.
3 Click New.
4 Under Details, enter a name, such as Operation Expenses.
5 Under Source Application, for Plan Type, select Plan 1, Plan 2, or Plan 3.
6 Under Reporting Application, select the ASO reporting application.
7 Click Next.
8 Use this table to map the operational expense dimensions:
Table 16 Operational Dimension Mapping
MappingType
Dimension/SmartList
Member Reporting Application Dimension
DimensiontoDimension
Account Members identifying operational expense and revenuesdata. Forexample:ILvl0Descendants(Revenues),ILvl0Descendants(Operational Expenses),Descendents(Depreciation Expense),520000
Account
DimensiontoDimension
Period Periods into which to load data. For example:ILvl0Descendants(Period)
Period
DimensiontoDimension
Year fiscal years
For example: FY09,FY10,FY11
Year
DimensiontoDimension
Entity Dimension members for which to load data. For example:1030,1031, ILvl0Descendants(2000)
General Ledger Entity dimensionthat represents Cost Centers orDepartments. For example:ILvl0Descendants(TotalGL Entity)
DimensiontoDimension
Version Version to include. For example:
Final
Version
DimensiontoDimension
Scenario Scenario, such as:
Forecast
Scenario
Populating the Line Item Budget 81

MappingType
Dimension/SmartList
Member Reporting Application Dimension
DimensiontoDimension
Currency Currency, such as Local Currency
DimensiontoDimension
User-definedGeneral Ledgerdimensions
ILvl0DescendantsdimensionFor example:ILvl0Descendants(Fund),ILvl0Descendants(Program),ILvl0Descendants(Project),ILvl0Descendants(Activity)
User-defined General Ledgerdimensions
9 Click Next and map these reporting application POV dimensions:
l Budget Item—Unspecified Budget Item
l Element—Unspecified Element
l Employee—Unspecified Employee
l Position—Unspecified Position
10 Click Save.
11 See “Pushing Data to Reporting Applications” on page 82.
Pushing Data to Reporting ApplicationsAfter defining application mappings, push data to the reporting application.
Note: If you modified the reporting application, refresh it. Also, ensure that you allocatedexpenses to General Ledger accounts.
ä To push data:
1 In Planning, select View, and then Advanced Mode.
2 Select Administration, and then Map Reporting Application.
3 Under Application Mapping Name, select the three application mappings that you defined.
4 Click Push Data and then select an option.
l Push—Update existing data with new data.
l Clear and push data—Delete existing data and push new data.
Note: Select Push the first time that you provide mapping data to Reportingapplications. Otherwise, select Clear and Push Data.
You can now aggregate and report on data in the reporting application.
82 Configuring the Line Item Budget

6Setting Up Compensation
Budgets
In This Chapter
Before You Begin .. . . . . . . . . . . . . . . . . . . . . . . . . . . . . . . . . . . . . . . . . . . . . . . . . . . . . . . . . . . . . . . . . . . . . . . . . . . . . . . . . . . . . . . . .84
Managing Salary Grades ... . . . . . . . . . . . . . . . . . . . . . . . . . . . . . . . . . . . . . . . . . . . . . . . . . . . . . . . . . . . . . . . . . . . . . . . . . . . . . . .84
Managing Other Compensation Elements ... . . . . . . . . . . . . . . . . . . . . . . . . . . . . . . . . . . . . . . . . . . . . . . . . . . . . . . . . . . . .91
Processing Loaded HRMS Data... . . . . . . . . . . . . . . . . . . . . . . . . . . . . . . . . . . . . . . . . . . . . . . . . . . . . . . . . . . . . . . . . . . . . . . . .96
Reviewing Loaded Position, Job, and Employee Data ... . . . . . . . . . . . . . . . . . . . . . . . . . . . . . . . . . . . . . . . . . . . . . . .97
Performing Mass Updates... . . . . . . . . . . . . . . . . . . . . . . . . . . . . . . . . . . . . . . . . . . . . . . . . . . . . . . . . . . . . . . . . . . . . . . . . . . . . . .99
After loading General Ledger or HRMS data or before starting a budget cycle, perform thesetasks:
l Review, modify, or create salary grades. See “Managing Salary Grades” on page 84.
l If you use ERP Integrator to load HRMS data, use another tool, such as the Outline LoadUtility, to load benefits. See “Loading General Ledger and HRMS Metadata and Data” onpage 53.
l Review, modify, or create other compensation elements such, as additional earnings andovertime, and compensation element options. See “Managing Other CompensationElements” on page 91.
l Process the effective-dated data loaded from HRMS to calculate the activation status andFTE for each period in Public Sector Planning and Budgeting. See “Processing LoadedHRMS Data” on page 96.
l Review and modify position and employee data. See “Reviewing Loaded Position, Job, andEmployee Data” on page 97.
l Globally or conditionally apply data missing in HRMS that you define to employees,positions, and jobs. See “When to Make Updates” on page 99 and “Performing MassUpdates” on page 99.
l Apply salary grades to vacant positions which could determine the total FTE or headcount.
l Calculate the budget impact.
l Allocate expenses to General Ledger accounts.
83

Before You Begin Perform these tasks before defining salary grades and compensation elements, and performingmass updates:
l Ensure an Administrator creates:
m Corresponding salary grade members under Salary Grades in Total CompensationExpenses in the Element dimension.
m Corresponding compensation element members (benefits, for example) in theappropriate folder in Total Compensation Expenses in the Element dimension.
l Ensure that you can select the correct budget year, scenario, and version in the Point of Viewbar on the upper portion of data forms, by performing these steps:
m Select File, then Preferences, and then Planning.
m Select User Variables.
m Select the year, scenario, and version members and click OK.
l Extend the business rule default timeout as described in Oracle Hyperion PlanningAdministrator's Guide. This is useful because some business rules you run may display errorsindicating that processing has exceeded the allowed limit. In addition to increasing thedefault timeout, select Administration and then Job Console to view the status of businessrules.
Managing Salary Grades
Subtopics
l About Salary Grades
l Differentiating Between Salary Steps and Sequences
l Defining Salary Grades
l About Modifying Salary Grades
l Simultaneously Adjusting Grade Steps or Sequences
l About Specifying Annual Salary Spreads
l Using a 52-Week Fiscal Year
Before making the budget accessible to planners and cost center managers, verify, create, modify,and delete salary grades so that planners can apply the correct salaries to positions and employees.
About Salary Grades You can create three kinds of salary grades:
l Rate-based, in which a range of minimum to maximum values are applied, for salaryprogression using grade sequences. Use rate-based salary grades to apply salaries fallingbetween a minimum or maximum value. For example, you could pay IT programmersbetween $74,000 and $78,000 depending on certification, seniority, and skill level.
84 Setting Up Compensation Budgets
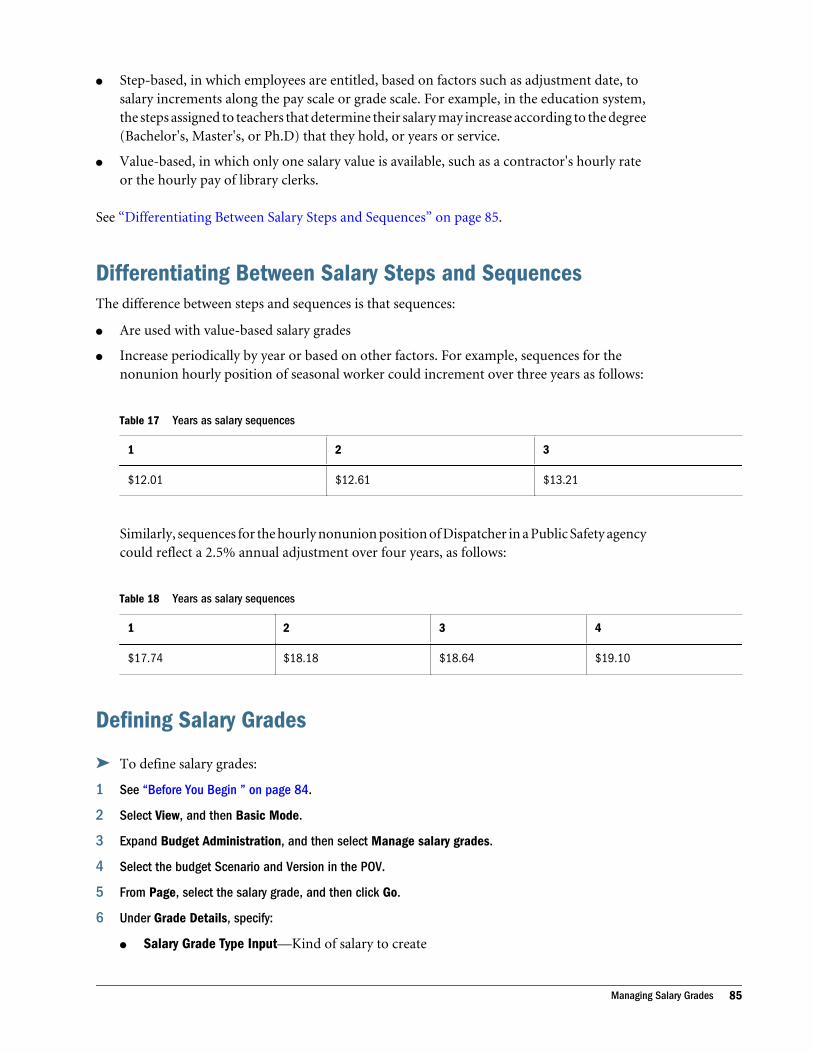
l Step-based, in which employees are entitled, based on factors such as adjustment date, tosalary increments along the pay scale or grade scale. For example, in the education system,the steps assigned to teachers that determine their salary may increase according to the degree(Bachelor's, Master's, or Ph.D) that they hold, or years or service.
l Value-based, in which only one salary value is available, such as a contractor's hourly rateor the hourly pay of library clerks.
See “Differentiating Between Salary Steps and Sequences” on page 85.
Differentiating Between Salary Steps and SequencesThe difference between steps and sequences is that sequences:
l Are used with value-based salary grades
l Increase periodically by year or based on other factors. For example, sequences for thenonunion hourly position of seasonal worker could increment over three years as follows:
Table 17 Years as salary sequences
1 2 3
$12.01 $12.61 $13.21
Similarly, sequences for the hourly nonunion position of Dispatcher in a Public Safety agencycould reflect a 2.5% annual adjustment over four years, as follows:
Table 18 Years as salary sequences
1 2 3 4
$17.74 $18.18 $18.64 $19.10
Defining Salary Grades
ä To define salary grades:
1 See “Before You Begin ” on page 84.
2 Select View, and then Basic Mode.
3 Expand Budget Administration, and then select Manage salary grades.
4 Select the budget Scenario and Version in the POV.
5 From Page, select the salary grade, and then click Go.
6 Under Grade Details, specify:
l Salary Grade Type Input—Kind of salary to create
Managing Salary Grades 85

l Grade Salary Basis Input—Period to which the Option Value applies. For example, ifGrade Salary Basis Input is Monthly and Option Value is 1,000, the salary is $1,000 permonth.
l Allow Value Change Input—To enable cost center managers or other users to modify thesalary grade at the position or employee level, select Yes.
l Element Start Date and Element End Date—When the salary grade is effective
l Budget Set—Version of the budget in the source system to which the budgets are writtenback
7 Save your work.
8 See:
l “Specifying Step-based Salary Grades ” on page 86
l “Specifying Rate-based Grades” on page 87
l “Specifying Value-based Salary Grades” on page 88
Specifying Step-based Salary Grades Use step-based salary grades for positions or employees whose salary corresponds to a point onthe grade-scale or pay-scale. Salary steps entitle these positions and employees to salary increasesby moving from one step to another. For example, the position of Captain in a municipal firedepartment could be paid based on a salary schedule with these step:
l step 1—$63, 500
l step 2 —$65,000
l step 3—$67,000
ä To specify grade steps:
1 Ensure that the salary grade is defined.
2 From Page, select the salary grade, and then click Go.
3 From Salary Grade Type Input, select Grade Step, and then click Save.
4 See “Defining Salary Grades” on page 85 for the information to specify in Grade Details.
5 Right-click 1st Element Change, select Add Salary Option, and then select Add Progression Steps.
6 Specify the following:
l Grade Step—Number for the step
l Enter Effective Date—When the step is effective
l Select Operator—Set to initially define the step
If you are editing the salary step, select the operation to perform. For example, to increasethe step by $100.00, select Add.
l Enter Value—Salary amount to budget
86 Setting Up Compensation Budgets

If you are editing the salary step, enter the value by which to change the step. For example,to increase the step by $100.00, enter 100.
7 Click Add.
8 Specify the remaining step details such as an end date.
9 Save.
Specifying Rate-based GradesDefine rate-based salary grades to associate a range of salary values with a specific grade sequence.This enables you for example, to pay security officers between $45,000 and $47,000 dependingon seniority and skill level. The sequence is the exact salary value in the range to apply. In thiscase, sequence 1 could have a value of $45,000 and apply to entry level security officers. Sequence2 could have a value of $46,000 for security officers with more than two years of experience.
ä To specify salary rates:
1 Ensure that the salary grade is defined.
2 From Page, select the salary grade, and then click Go.
3 From Salary Grade Type Input, select Grade Rate, and then click Save.
4 See “Defining Salary Grades” on page 85 for the information to specify in Grade Details.
5 Right-click 1st Element Change, select Add Salary Option, and then select Add Grade Rates.
6 Specify:
l Select Grade Sequence—Specific salary value, in a range of possible values, to use. Forexample:
Sequence 1 Sample Sequence To Select Sequence 2 Sample Sequence To Select
Values between $84,000 and$87,500
$85, 500 Values between $87,510 and$91,000
$89,000
l Effective Start Date—When the salary rate is effective
l Select Operator— Set to initially define the rate
If you are editing the salary rate, select the operation to perform. For example, to decreasethe rate by $130.00, select Subtraction.
l Enter Value—Salary amount to budget
If you are editing the salary rate, enter the value by which to change the rate. For example,to decrease the salary rate by $130.00 enter 130.
l Grade Minimum Value—Lowest salary amount
l Grade Mid Point Value—Average salary amount
l Grade Maximum Value—Highest salary amount
7 Click Add, and then Save.
Managing Salary Grades 87

Specifying Value-based Salary GradesUse value-based salary grades to pay employees a predefined single salary amount.
ä To add value-based salary grades:
1 Ensure that the salary grade is defined.
2 From Page, select the salary grade, and then click Go.
3 From Salary Grade Type Input, select Value, and then click Save.
4 Right-click 1st Element Change, select Add Salary Option, and then select Modify Values.
5 Specify information such as:
l Effective Start Date—When the salary value is effective
l Select Operator—Set to initially define the value
If you are editing the value, enter the calculation to perform. For example, to apply a2% change, select Percent Change.
l Enter Value—Amount to budget
If you are editing the salary value, enter the value in the operation to perform. Forexample, to apply a 2% change, enter 2.
6 Click Add, and then Save.
About Modifying Salary GradesAdministrators can change salary grade values by modifying:
l Step values
l Minimum, mid, and maximum values (for rate-based grades)
l Effective dates
l Payment periods
l Salary basis spread patterns. See “About Specifying Annual Salary Spreads” on page 89and “Spreading Salary Expenses” on page 102.
Note: Only administrators can modify salary values. For example, regular planners cannotmodify the minimum, mid, and maximum values of rate-based salary grades. If the valuesfor the salary grade rates, steps, or sequences that you use to budget need to be changed,contact an administrator.
You can also modify salary grades by applying missing data or date-specific changes, (a cost ofliving adjustment, for example) to all salary values associated with a step or grade sequence. See“Simultaneously Adjusting Grade Steps or Sequences” on page 89.
88 Setting Up Compensation Budgets

Simultaneously Adjusting Grade Steps or SequencesYou can simultaneously modify, by effective date, values for multiple grade steps or sequences.For example, assume that a salary grade has 12 steps. The first step was effective March 1, 2009,and you must accommodate a 2% inflation increase occurring on July 1, 2011. Instead ofmodifying each step to end-date them on June 30, 2011, perform this procedure to update allsteps or grade sequences simultaneously.
ä To adjust steps or sequences:
1 Select View, and then Basic Mode.
2 Select Budget Administration, and then Manage salary grades.
3 From Page, select the salary grade, and then click Go.
4 Under Grade Details, right-click, and then select Adjust Multiple Grade Steps or Sequences.
5 Specify:
l Enter Effective Start Date—When to make the adjustment
l Operator—Kind of change to make. In the example, a percentage.
l Enter Value—Value used to adjust the grade step or grade sequence. In this case, 2.
6 Click Adjust.
About Specifying Annual Salary SpreadsAlthough distributing salaries evenly across all periods is common (spreading an employee'sannual salary of $78,000 to $6,500 in each month of the annual budget), you can spread salaryexpenses across periods differently. Assuming monthly budgets, you can spread expenses acrosstime periods or entities using the options described below. See also “Using a 52-Week FiscalYear” on page 90.
Tip: If you use a nine or ten month spread, but the default start and end dates do not apply basedon your fiscal year settings, Administrators can edit the formula for the Mapping SpreadFactor member in the Accounts dimension to customize these spread options.Administrators can also define entries for the Custom_Salary_Spread Smart List.
l All and No Salary Spread–For internal use only
l Average–Expenses are equally spread across periods resulting in an average distribution.
l Workdays in a month—Expenses are spread across a certain number of days (manufacturingplant employees working six days a week, for example) that you or a planner define in eachmonth. See “Defining Custom Numbers of Workdays and Paydays” on page 115.
l Paydays in a month—Expenses are spread across the number of paydays and holidays, whichyou or a planner define each month, are excluded. See “Defining Custom Numbers ofWorkdays and Paydays” on page 115.
Managing Salary Grades 89

l Summer pay—Salary expenses are spread from mid-May to mid-September for positionsactive only in the summer, such as adjunct professorships and lifeguarding.
l Nine months—Expenses are spread across nine months for positions such as full-timeuniversity professors, active from September to May. By default the time period for thisspread option is January to September. To modify, change the formula of the MonthlySpread Factor member in the Accounts dimension.
For example, assume a Professor is paid $100,000 over a 12 month period for 9 months ofwork ($100,000/12 for each year). Use the Nine months option to identify that only 9 of the12 months are work months. The annual salary amount for the salary grade assigned to theprofessor position would be 9 months * the monthly salary. If the monthly salary amountsdiffer, modify the Monthly Spread Factor to redistribute the monthly amounts.
l Ten months—Expenses are spread across 10 months for positions such as public schoolteachers, that are active from September to June. By default the time period for this spreadoption is January to October. To modify, change the formula of the Monthly Spread Factormember in the Accounts dimension.
l Custom—Expenses are spread based on period-level FTE that you specify at the entity,position, or employee level.
Administrators or budget analysts can apply global changes across entities, effective on a certaindate, typically based on a common attribute. For example, assume that the Public EmploymentRetirement System (PERS) rate increases from 4.5% to 5% on August 1. You can retrieve allemployees or positions across all entities that have a PERS assignment and apply the 5% increase.You can make mass adjustments based on these attributes:
l An entity or an entity's parent member
l Job code
l Salary (plan, grade, or step)
l Union code
l Earning code (additional earnings)
l Tax class
You can apply spread patterns to positions, affecting positions and employees, or only toemployees if you do not use positions.
Note: When configuring spread patterns for multiple years, remember that the number of workdays in a year may vary.
Using a 52-Week Fiscal YearIn a 52-week year, weeks are distributed in repeating cycles of 4 and 5, resulting in 13 weeks perquarter. The cycle specifies the number of weeks in each of the three months used.
l 4-4-5 Calendar—The first month of the quarter has four weeks, the second, four weeks, andthe third, five weeks.
90 Setting Up Compensation Budgets

l 5-4-4 Calendar—The first month of the quarter has five weeks, the second, four weeks, andthe third, four weeks.
l 4-5-4 Calendar—The first month of the quarter has four weeks, the second, five weeks, andthe third, four weeks.
Managing Other Compensation Elements
Subtopics
l Defining Other Compensation Elements
l Modifying Compensation Elements and Options
l Updating Multiple Compensation Options
Other compensation elements are nonsalary expenses, such as additional earnings (bonuses, andso on), benefits, and employer-paid taxes. These elements have different rates and are usuallyallocated to different General Ledger segments or chart fields than basic salary. In some sourcesystems, individual benefits and employer-paid taxes are called attributes.
Before releasing the budget, review and update compensation elements and attributes,particularly employer-paid taxes for which you may need to define tax elements (attributes) formultiple countries or currencies. If tax rates change by year, modify the tax elements or attributesto reflect updated tax rate and base them on the fiscal or the calendar year.
To apply compensation element or attribute changes to multiple positions in a cost center, clickMass update position data.
See “Defining Other Compensation Elements” on page 91 and “Defining Overtime” on page93.
Defining Other Compensation ElementsYou can adjust existing options by end-dating and adding new ones.
ä To define compensation elements or attributes:
1 See “Before You Begin ” on page 84.
2 Select View, and then Basic Mode.
3 Expand Budget Administration, and then select Manage other compensation elements.
4 In the POV, select Version and Scenario members.
5 From Page, select the kind of compensation element (medical insurance, for example) to define, andthen click Go.
6 Under Element Definition, define the compensation element or attribute by specifying:
l Options Based—Yes if the element can be applied in different ways to multipleindividuals, such as an employee's medical insurance benefit covering their spouse anddependents.
Managing Other Compensation Elements 91

l Payment Terms Input—When the element is paid, such as monthly for health insuranceor annual for bonuses.
l Value Type Input—How the attribute or element is computed. For health insurance, thisvalue is Amount because coverage is not calculated and provided by factors such asovertime or percentage of salary.
l Allow Value Change Input—Whether planners and cost center managers can update theelement at the employee or position level.
l Maximum Value Type— Value type (amount or percentage) that the calculatedcompensation element cannot exceed. For example, to calculate employer paid tax suchas FICA (in which the Value type Input is percentage), select Amount for Maximum ValueType to assign a monetary amount that the tax cannot exceed.
Note: The Maximum Value in the lower Element Details area of the data form takesprecedence over that specified in the upper Element Definition area. If you donot specify a maximum value in Element Details, the value in Element Definitionsis used. If Maximum Value is specified in both areas, the value in Element Detailsis used.
l Maximum Value—Value or percentage (as specified as Maximum Value Type) thatcannot be exceeded and that caps the compensation element for the entire year basedon each month. For example, hazard pay could be capped at $5,000.
l Earnings Type Input—Applicable only for overtime.
l Payment Frequency Input-–How often the attribute or element is funded. For example,monthly health care insurance might be paid during the first period, whereas annualbonuses are onetime payments.
l Element start and end dates—Period during which the element applies.
l Required Element Input—Whether the element must be specified and assigned to allpositions, such as group life insurance.
l Taxable Component—Whether the compensation element is subject to tax. In the caseof medical and dental insurance, for example, this is No.
l Budget Set—Budget in the HRMS source system in which to apply the element orattribute.
l Follows Salary Allocation:
m Yes—Use allocations for salary unless you defined allocations at the compensationor employee level. Changes that you make to compensation element or employeelevel details are applied first, and salary allocations are applied to missing segmentsor chart fields. For example, if you apply this option to benefits for a ResearchScientist position, benefits are allocated using the same ratio of allocations definedfor the position salary, and allocations on the benefit's Allocations tab areoverridden.
m No—You must select all chart fields or segments on the compensation element'sAllocation tab.
92 Setting Up Compensation Budgets

7 To define a new compensation element, see “Adding Compensation Element Options ” on page 93.
8 To remove element options, right-click, and then select Delete Option.
9 To specify the General Ledger account from which funds are allocated, click Allocations, and then selectthe chart fields or segments.
10 Click Save.
Adding Compensation Element Options For an example of how to add overtime, see “Defining Overtime” on page 93.
ä To specify compensation elements options:
1 Perform steps 1 to 6 in “Defining Other Compensation Elements” on page 91.
2 In Element Details, select Options, right-click, and then select Add Option.
3 Specify information such as:
l Select Option—Plan or method available for the element, such as Survivor Spouse andChildren for health insurance coverage.
l Enter Effective Start Date—Period during which the option or attribute applies
l Enter Value—Corresponding to the specified value type, the dollar amount of the option($3,500 for survivor spouse and children health insurance coverage, for example) or thepercentage used to calculate the option value.
l Enter Maximum Value—The value or percentage that determines the maximum extent,that cannot be exceeded, of the option ($3,650 for survivor spouse and children healthinsurance, for example).
4 In Select Operator, select Set to initially define the option. To modify an option, select the kind ofcalculation to perform on the existing option value.
5 Click Add.
6 To specify the General Ledger account from which funds are allocated to compensation element, clickAllocations, select the chart fields or segments, and the allocation percentage.
7 Click Save.
Defining OvertimeOvertime is the number of times (typically 1.5 or 2.0) by which you multiply the regular hourlysalary rate, or calculated as a percentage of salary or gross earnings. Overtime is not a benefit.
ä To specify overtime:
1 Under Element Definition, provide this information to set up the overtime:
l Options Based—Whether overtime can be implemented and paid differently, such as anincreased value during statutory holidays. You later define these implementations.
Managing Other Compensation Elements 93

l Payment Terms Input—When overtime is paid, such as annually. If you budget by fiscalyear (may differ from the calendar year) and want the maximum overtime amount tobe paid based on the fiscal year, select Monthly (fiscal year). If your fiscal year is the sameas the calendar year, and you want the maximum overtime amount to be paid accordingto the calendar year, select Monthly (calendar year).
l Value Type Input—The amount depending on the maximum value type
l Maximum Value Type Input—A fixed amount, or percentage of salary, overall earnings,or taxable earnings.
l Allow Value Change Input—Whether planners or cost center managers can modifyovertime at the employee or position level.
l Maximum Value Input—Depending on the maximum value type:
m Number of times by which to multiply salary rate to calculate the overtime
m If overtime is calculated as a percentage of salary or taxable earnings, enter thegreatest percentage used to calculate overtime
m If overtime is paid as a single sum, enter the greatest possible amount
If maximum value type is a percentage of salary, the product annualizes the salary. Itthen uses the maximum value input value as a percentage to determine the maximumover time amount. For example, if salary is $1,000 Bimonthly(Calendar), (once every 2months), then the annual salary is $6,000. If maximum value is percentage of salary,and maximum value is 10, then maximum overtime amount for the calendar year is$600.
l Earnings Type Input—Whether overtime is included in employee gross pay.
l Payment Frequency Input—Whether an employee is eligible for payment annually, semi-annually, quarterly, monthly, and so on. For example, if Payment Terms Input isQuarter(Calendar) and Payment Frequency Input is Pay during last period, the paymentamount is in March, June, and so on. If Payment Frequency Input' is Pay during firstperiod, payment is in January, April, and so on.
l Element start and end dates—Period during which the overtime applies
l Required Input—If overtime must be assigned to all positions
l Taxable Component—If overtime is subject to tax
l Follows Salary Allocation—To enable users to specify allocation details for overtime,select No.
2 Specify if overtime is option-based, varying by time or other factor:
l In Element Details select Options, right-click, and then select Add Option.
l Provide information such as:
m Select Option—An available overtime plan
m Enter Effective Start Date—When the option applies, such as statutory holidays suchas Christmas and New Year
m Enter Value—Number of times to multiply pay to compute overtime
94 Setting Up Compensation Budgets

m Enter Maximum Value—Highest number by which to multiply pay to calculateovertime, or maximum percentage of salary, overall earnings, or taxable earningsused to calculate overtime.
For example, an overtime option for work during the Christmas season could be definedusing a start date of Dec. 25, 2011, a dollar value for overtime (1000) or using a portionof bimonthly salary or earnings (.20), and a value or percentage for overtime that cannotbe exceeded (1100 or .25, for example).
3 In Select Operator, select Set to initially define overtime. If you are modifying overtime, the operationthat you select modifies the existing value.
4 Click Add.
5 Specify missing overtime information, such as an end date.
6 Repeat steps 1-3 to define all overtime options.
7 To specify the General Ledger account from which funds are allocated to compensation element, clickAllocations, select the chart fields or segments, and the allocation percentage.
8 Click Save.
Modifying Compensation Elements and Options
Tip: To adjust options simultaneously, see “Updating Multiple Compensation Options ” onpage 96.
ä To edit compensation elements or options:
1 Select View, and then Basic Mode.
2 Expand Budget Administration, and then select Manage other compensation elements.
3 In the POV, select the Version and Scenario members.
4 From Page, select the compensation element of the option, and then click Go.
5 Perform any task:
l Modify compensation element or option definitions such as payment terms in put,maximum value, start date, and payment frequency at the top of the data form. See“Defining Other Compensation Elements” on page 91.
l Remove options
l Modify option details (changing values or payment frequencies, for example) by:
m Select the option from Page, and click Go.
m In Element Details, change settings such as start date, end date, option value, andmaximum value.
m In Element Details, remove options by right-clicking, and selecting Delete.
Managing Other Compensation Elements 95

6 To update numerous options at the same time, see “Updating Multiple Compensation Options ” on page96.
7 To specify the General Ledger account from which funds are allocated to compensation element, clickAllocations, select the chart fields or segments, and the allocation percentage.
8 Click Save.
Updating Multiple Compensation Options
ä To adjust multiple options simultaneously:
1 From Page, select the compensation element, and click Go.
2 In Element Definition, right-click the first column header, and then select Adjust multiple options.
3 Ensure that the correct compensation element is selected.
4 From Select Operator, select the operation to modify existing options values. For example, to increaseoptions by $1,150.00 select Add.
5 In Enter Value enter the amount by which to change option values. For example, to increase options by$1,150.00, enter 1150.
6 Click Adjust.
Processing Loaded HRMS DataUse the Process loaded human resources data task to process these effective dates loaded fromHRMS, in order to calculate period-level status and FTEs in applications:
l Position start and end dates
l Employee hire dates
l FTE start and end dates
Note: For the Employee budget detail, performing this procedure activates job codes to whichemployees are assigned. If the job codes are not associated with employees, activate thejobs later.
Running Process loaded human resources data ensures that the position or employee is activebetween these dates, and that the respective Planning period's status is updated accordingly.
ä To process loaded human resource data:
1 Select View, and then select Basic Mode.
2 Expand Budget Administration, and then Process loaded human resources data.
3 Accept the defaults, and then click Launch.
96 Setting Up Compensation Budgets

4 Specify the following to identify the budget in which to use loaded effective-dated data at the periodlevel:
l Entity—Department or cost center
l Version—Budget iteration or stage. For example, if the scenario is forecast, worst casecould be a version.
l Scenario—Budget type, such as baseline or forecast
5 Click Launch.
Reviewing Loaded Position, Job, and Employee DataWhenever you load job, position, and employee information from HRMS or a previous budgetversion, review the following to identify invalid or missing data:
l Positions and all related compensation elements, FTE assignments, and salary
l Employees and all related compensation elements, FTE assignments, and salary
Modify employees, jobs, and positions to resolve incorrect or missing data, and apply changesby performing a mass update.
l “Reviewing Position and Employee Data” on page 97
l “Reviewing Job and Employee Data” on page 98
l “Reviewing Position-Only Data” on page 99
Reviewing Position and Employee Data
ä To review loaded position and employee data:
1 Select View, and then Basic Mode.
2 Expand Budget Administration, and then select Review position and employee data.
3 Select the budget type (forecast, for example) and stage (forecast revision, for example), and then clickGo.
4 From Page, select the HR organization, and then click Go.
5 Perform any task:
l To display employees and compensation data by position, select Position’s EmployeeAssignments and perform a task.
m To view position details such as benefits and salary grades, right-click and then selectView position details.
Note: If you loaded data using Oracle Hyperion Financial Data QualityManagement ERP Integration Adapter for Oracle Applications, you can onlyreview salary information.
Reviewing Loaded Position, Job, and Employee Data 97

m To view employee details, right-click in the second column, and then select Viewemployee details.
l To view the budget impact, by period, of maintaining employees by position performthese tasks:
a. Calculate the compensation budget. See “Calculating Budgets” on page 153.
b. Right-click, and then select View employee expense by period.
l To display position or job, and compensation data by employee, select Employee'sPosition Assignments, select the employee from Page, click Go, and then:
m In Page, right-click the employee.
m Select View employee details.
l To access details about the position to which the employee is assigned, right-click theposition, and then select View Position Details.
Reviewing Job and Employee Data
ä To review loaded job and employee data:
1 Select View, and then Basic Mode.
2 Expand Budget Administration, and then select Review employee and job data.
3 Select the budget scenario (base, for example), applicable job code, HR organization, and version.
4 Click Go.
5 Perform a task:
l To display employees and compensation data by job, select Jobs Assigned toEmployees, right-click the employee in Page, and then click Go.
l To view job details such as taxes, right-click, and select View job details.
l To view employee details, right-click in the second column, and then select Viewemployee details.
l To display jobs and compensation data by employee, select Employees JobAssignments, select the employee from Page, and then click Go.
l To review employee details and compensation, right-click, and then select View employeedetails.
l To view the budget impact, by period, of maintaining employees by job, right-click,perform these tasks:
a. Calculate the compensation budget. See “Calculating Budgets” on page 153.
b. Right-click, and then select View employee expense by period.
98 Setting Up Compensation Budgets

Reviewing Position-Only Data
ä To review loaded position data:
1 Select View, and then Basic Mode.
2 Expand Budget Administration, and then select Review position data.
3 From Page, select the HR organization (your cost center, for example), the budget scenario (base, forexample), and the budget version.
4 To view details such as allocations and taxes, right-click, and then select View position details.
5 To view the expense, by period, of positions, perform these tasks:
l Calculate the compensation budget. See “Calculating Budgets” on page 153.
l Right-click, and then select View position expense by period.
Performing Mass Updates
Subtopics
l When to Make Updates
l How Mass Updates Work
l Making Mass Updates
When to Make UpdatesPerform mass updates on positions and employees in these situations throughout the budgetcycle:
l After loading data from the HRMS source system to implement global assumptions (a newbenefit option, for example)
l Before releasing the budget to planners or cost center managers
l When new or modified salary information and compensation details (apply a salaryadjustments for multiple positions, for example) must be incorporated
Perform mass updates to adjust:
l Salary grades and details
l Benefits
l Additional earnings
l Employer-paid taxes
You can also perform mass updates to apply updated defaults or replace existing defaults.
Performing Mass Updates 99

How Mass Updates WorkWhen performing mass updates on positions or employees, you can overwrite or fill data asfollows:
l Overwrite:
m Existing data and assignments are updated with new defaults. New assignment rows arenot created, but existing rows are updated.
m If salary or compensation details do not exist, the new defaults are not applied.
l Fill:
m Assignment rows for the new default data are added to position and employee details.
m If salary or compensation assignments do not exist, new assignment rows are added toemployee and position details.
See “Sample Mass Update” on page 101.
Making Mass Updates
ä To make mass updates to position, job, and employee data:
1 Select View, and then Basic Mode.
2 Expand Budget Administration, and then select Mass update position data or Mass update employeedata.
3 Select the correct budget scenario, stage, and year.
4 From Page, select the HR organization, and then click Go.
Note: If you select Total Entity to search all positions, jobs, and employees, check the resultsof the search by individual, lower-level entities.
5 Right-click, select Search, and then select Find Positions or Employees or Find Jobs or Employees.
6 Specify the criteria, such as pay type, approval status, union code, or position start date, to identify thepositions, jobs, or employees to update.
7 Click Find.
8 For each position or employee, select an option in the Apply Defaults column:
l No—Omit the position or employee from the update
l Yes—Include the position or employee in the update
9 See “Assigning or Overwriting Compensation Element and Allocation Defaults” on page 101.
10 To define how to spread position or employee expenses over the year, see “Spreading Salary Expenses”on page 102.
11 To view position or employee details, right-click, select View Position Details or View EmployeeDetails, and then select the kind of data to view.
100 Setting Up Compensation Budgets

Assigning or Overwriting Compensation Element and Allocation Defaults
ä To apply defaults or overwrite existing defaults:
1 Perform steps 1 to 8 in “Performing Mass Updates” on page 99 to identify the positions or employeesto update.
2 Right-click, and then select the default to apply or overwrite:
l Salary Grade Defaults—All salary information
l Allocation Defaults—Allocations to General Ledger or default natural accounts
l Other Compensation Defaults—Additional earnings, employer-paid taxes, and benefits
3 Select one:
l Overwrite—Existing data and assignments are updated with new defaults. Newassignment rows are not created, but existing rows are updated. If salary orcompensation details are undefined, the new defaults are not applied.
l Fill—Assignment rows for the new default data are added to position and employeedetails. If salary or compensation assignments do not exist, new assignment rows areadded to employee and position details.
4 Depending on the default or element that you are updating, specify information such as:
l Select Other Compensation Element—The new or updated compensation element toassign
l Select Option—The new or updated compensation element option to apply
l Salary Data—The salary grade, step, and grade sequence to apply
l Enter Effective Date—When to apply the option
l Enter Effective End Date—Date after which to withhold the new or modifiedcompensation element
5 Click Run.
See “Sample Mass Update” on page 101.
Sample Mass UpdateIn your department, you want to assign an overtime compensation default to only the new, andnot yet filled, positions of Office Clerk and Office Manager currently without this element. Theeffective date for these positions is January 1, 2012.
ä To apply the overtime default:
1 Select View, and then Basic Mode.
2 Expand Budget Administration, and then select Mass update position data.
3 Select the correct budget scenario, stage, and year.
4 From Page, select your HR organization, and then click Go.
Performing Mass Updates 101

5 Right-click, select Search, and then select Find Positions or Employees.
6 Specify January 1, 2012 as the Start Date to filter and find the positions.
7 Click Find.
8 For each position, ensure that Yes is selected in the Apply Defaults column.
9 Right-click, select Other Compensation Defaults, and then select Fill.
Spreading Salary Expenses
ä To perform spreads:
1 Perform steps 1 to 8 in “Performing Mass Updates” on page 99 to identify the positions or employeesto update.
2 Select Populate Annual Salary Spread Property.
3 Select your accounting period structure pattern. See “About Specifying Annual Salary Spreads” on page89.
4 Click Fill, and then Save.
102 Setting Up Compensation Budgets

P a r t I I
Creating Compensation Budgets
In Creating Compensation Budgets:
l Defining Salary, Compensation, and Allocation Defaultsl Working with Human Capital Compensation Budgetsl Calculating, Reviewing, and Allocating Compensation Expense Budgetsl Reviewing and Approving Budgetsl Revising Budgetsl Using Reports and Budget Books
Creating Compensation Budgets 103

104 Creating Compensation Budgets

7Defining Salary, Compensation,
and Allocation Defaults
In This Chapter
Advantages of Using Defaults.. . . . . . . . . . . . . . . . . . . . . . . . . . . . . . . . . . . . . . . . . . . . . . . . . . . . . . . . . . . . . . . . . . . . . . . . . . 105
Before Specifying Defaults .. . . . . . . . . . . . . . . . . . . . . . . . . . . . . . . . . . . . . . . . . . . . . . . . . . . . . . . . . . . . . . . . . . . . . . . . . . . . . 106
Maintaining Position Defaults by Entity .. . . . . . . . . . . . . . . . . . . . . . . . . . . . . . . . . . . . . . . . . . . . . . . . . . . . . . . . . . . . . . . 106
Specifying Salary Grade Defaults . . . . . . . . . . . . . . . . . . . . . . . . . . . . . . . . . . . . . . . . . . . . . . . . . . . . . . . . . . . . . . . . . . . . . . 107
Maintaining Compensation Elements Defaults By Entity .. . . . . . . . . . . . . . . . . . . . . . . . . . . . . . . . . . . . . . . . . . . . 107
Maintaining Natural Account Defaults . . . . . . . . . . . . . . . . . . . . . . . . . . . . . . . . . . . . . . . . . . . . . . . . . . . . . . . . . . . . . . . . . 109
About Benefit and Compensation Allocations .. . . . . . . . . . . . . . . . . . . . . . . . . . . . . . . . . . . . . . . . . . . . . . . . . . . . . . . 110
Maintaining Salary Allocation Defaults .. . . . . . . . . . . . . . . . . . . . . . . . . . . . . . . . . . . . . . . . . . . . . . . . . . . . . . . . . . . . . . . 113
Correcting Overlapping Allocations ... . . . . . . . . . . . . . . . . . . . . . . . . . . . . . . . . . . . . . . . . . . . . . . . . . . . . . . . . . . . . . . . . . . 113
Mass Adjusting Compensation Expenses ... . . . . . . . . . . . . . . . . . . . . . . . . . . . . . . . . . . . . . . . . . . . . . . . . . . . . . . . . . . . 115
Defining Custom Numbers of Workdays and Paydays... . . . . . . . . . . . . . . . . . . . . . . . . . . . . . . . . . . . . . . . . . . . . . 115
Advantages of Using DefaultsDefining salary, compensation element, and allocation defaults enables you to:
l Automatically apply specific salary, compensation element options, and salary allocationsto new positions or jobs. Existing or new employees that are not yet assigned to thesepositions or jobs inherit the defaults when assigned.
In the Position budget detail, and the Position and Employee budget detail, specify defaultsat the entity level; enabling you to apply default salary grades and compensation for positionsand associated employees in an HR organization (cost center, department, and so on). Inthe Employee budget detail, specify defaults at the job-level, and activate jobs.
l Have Public Sector Planning and Budgeting quickly match jobs and positions with salaryand compensation based on the default criteria that you define.
For example, to use the same salary grade steps to all positions in a union, regardless ofposition type or job, define a default for which you specify only the union code, and leaveapplicable job and applicable location blank or select All. This enables the product to applythe salary steps to union-specific employees regardless of their job or location.
Advantages of Using Defaults 105

Before Specifying DefaultsPerform these tasks before defining salary grades and compensation elements, and performingmass updates:
l Ensure that you can select the correct budget year, scenario, and version in the Point of View(POV) bar on the upper portion of data forms, by performing these steps:
m Select File, then Preferences, and then Planning.
m Select User Variables.
m Select the year, scenario, and version members and click OK.
l Extend the business rule default timeout because some of the business rules you run maydisplay errors indicating that processing has exceeded the allowed limit. In addition toincreasing the timeout, select Administration and then Job Console to monitor the status ofrunning business rules.
See the Oracle Hyperion Planning, Administrator's Guide.
Maintaining Position Defaults by EntityPerform the following procedure to create defaults that specify the basic position settings thatnew positions, in a particular entity, inherit. This enables you for example, to ensure that all newpositions created in your entity are shared, have the same salary grade step assigned, and havethe same adjustment date.
Note: If you do not specify the required settings in the default, you must specify them at theposition-level.
Applies to the Position budget detail and the Position and Employee budget detail
ä To define defaults for new positions:
1 Select View, and then Basic Mode.
2 Expand Budget Preparation, and then select Manage compensation defaults for each entity orManage compensation defaults.
3 From the POV, select the budget scenario and version.
4 From Page, select the HR organization.
The Details area displays any existing position defaults such as associated jobs, position startand end dates, and salary basis.
5 In Position Type:
l Select the type that, if not overwritten when you define positions, new positions inherit.For example, selecting Shared means that all new positions added to the cost center areautomatically shared positions unless you specify otherwise.
106 Defining Salary, Compensation, and Allocation Defaults

l Make no selection to enable users to specify a position type when they create positions.
6 Click Go.
7 Perform any task:
l Specify the following:
m Start Date—When positions start
m Adjustment Date—When changes to compensation elements that are assigned topositions are applied (annual bonuses or a new health benefit option, for example)
m Salary Basis—How often employees assigned to positions are paid (weekly or bi-monthly, for example)
m Default Weekly Hours—Number of hours per week
m Annual Salary Spread—How salary expenses for positions are spread across theaccounting periods in your organization. See “About Specifying Annual SalarySpreads” on page 89.
l Add or change salary grades, see “Specifying Salary Grade Defaults ” on page 107.
l Remove salary grade defaults by right-clicking, and then selecting Delete.
Specifying Salary Grade Defaults Define salary grade defaults to apply to the positions, employees, or jobs in your entity.
ä To define salary grade defaults:
1 Perform steps 1 to 5 in “Maintaining Position Defaults by Entity” on page 106.
2 Perform any task:
l Add step, value, or rate-based salary grades by right-clicking, selecting the grade type,and seeing “Defining Salary Grades” on page 85.
l Modify salary grade defaults.
l Remove salary grade defaults by right-clicking, and then selecting Delete.
Maintaining Compensation Elements Defaults ByEntityIf your departments or cost centers have positions to which certain compensation elements apply(hazard pay for police officers, for example), define these elements as entity-specificcompensation defaults. These compensation details are automatically applied to new positionsin your entity.
Specifying Salary Grade Defaults 107

ä To specify compensation defaults:
1 Ensure that a member exists for the element. For example, to add a Vision Care benefit, ensure that aVision Care benefit member exists in the Element dimension.
2 Perform steps 1 to 5 in “Maintaining Position Defaults by Entity” on page 106.
3 Select Other Compensation.
4 Define compensation defaults by specifying:
l Option—Plan or method available for the element, such as Survivor Spouse and Childrenfor health insurance coverage
l Applicable Jobs to which to assign the compensation default
l Enter Override Value — Amount by which the default element or attribute can change,if you enabled Allow Value Change Input.
l Applicable Location Code — Geographical or regional areas to which to apply the defaults
l Applicable Union Code—Union to whose positions you want to assign the compensationdefaults
Tip: Specify the lowest number of criteria to match and apply compensation defaults topositions, jobs, and the associated employees. For example, if all IT Support Staff,regardless of location or union, are eligible for an overtime compensation element,select IT Support Staff in Applicable Job, and leave Applicable Union Code, andApplicable Location Code blank or select All.
5 To add compensation defaults, right-click, select Add Other Compensation, and specify informationsuch as:
l Other Compensation Element—Compensation element (drug benefit, for example) toadd
l Select Option—Plan or implementation of the compensation element such as Memberand Spouse, or overtime as additional earnings
l Select Job—Jobs to which to add the element
l Enter Override Option Value—Value by which the planners can change the compensationelement value for individual positions (increasing a benefit default value by $200, forexample).
6 To delete compensation elements:
a. Select the compensation element, right-click, and then select Delete OtherCompensation.
Select All to delete the element from all positions in the entity.
b. Click Delete.
108 Defining Salary, Compensation, and Allocation Defaults

Maintaining Natural Account Defaults
Subtopics
l About Default Natural Accounts
l Specifying Natural Account Defaults
About Default Natural AccountsNatural accounts are the portion of general ledger account segments and chart fields that identifyfinancial activity, such as expenses, withholding tax, and other wages. The natural accountsegments or chart fields in the General Ledger are usually set up as members in the Accountdimension. Use the Natural Accounts tab to specify how basic expenses and compensationexpenses (for positions and employees in an entity) are allocated to General Ledger accountsegments or chart fields. For example, an administrator can specify that dental plan benefits areallocated to the 515600 account segment (natural account) for all entities.
Department or cost center managers can associate natural accounts with benefits, additionalearnings, and employer-paid taxes for selected entities. For example, the Department of PublicSafety manager can associate account 515500 (Medical Insurance Expense) with the BenefitExpense account, and account 512290 (FICA) with Employer-Paid Taxes.
When department managers associate natural accounts for other compensation categories(Benefit Defaults, Additional Earnings Defaults, and Employer-paid Tax Defaults) for selectedentities, elements in the categories are allocated to the associated account segment, unless theadministrator defined a natural account for an element. In this case, if Medical Insurance andVision Care benefits are not assigned a natural account, their expenses are allocated to theaccount segment (515500) associated with Benefit Defaults for the entity. However, Dental Planbenefits are allocated to the 515600 account segment that is specified for all entities.
Specifying Natural Account Defaults
Applies to the Position and Employee budget detail
ä To specify natural accounts for compensation elements:
1 Ensure that the Salary_Account_List Smart List includes entries for the natural account segments orchart fields.
2 Perform steps 1 to 5 in “Maintaining Position Defaults by Entity” on page 106.
3 Select Natural Account.
4 Review the default Account Segment and Account Segment Description information.
5 To add natural account default settings, perform these tasks in Default Setup:
a. Right-click , and then select Add Default Account.
b. In Provide Defaults, select or enter the account segment.
Maintaining Natural Account Defaults 109

c. Click Add.
d. Select the Account Segment Description and save.
6 To remove default natural accounts overwrites, reverting to the global default defined by Administratorsfor expense allocations, right-click the default row, and then select Delete Default Account.
About Benefit and Compensation Allocations Human capital expenses are charged against General Ledger accounts based on specifiedallocations stored in account segments or chart fields. Salary expenses are allocated based onsalary allocations that you specify for individual positions and employees. At the global level,default natural account allocations are associated by Administrators for entity-specificcompensation elements (associating benefit expenses to account segment 610000, for example).Administrators can provide missing allocation data and override allocation defaults by settingthe Follows Salary Allocation option as follows:
l “Yes”—Use the same allocations as those defined for salary expenses. In this case, you neednot specify all segments or chart fields on the Allocation tab. See “Example 2” on page 111and “Example 3” on page 112.
l “No”—Do not use the allocations defined for salary expenses. In this case, you must specifyall segments or chart fields on the Allocations tab. See “Example 1” on page 111.
Use the Salary Allocation Details tab to specify the General Ledger account segments or chartfields from which positions in your cost center are funded. For example, assume thatcompensation expenses for a Research Scientist position are allocated as follows using two defaultnatural accounts:
l 80% is allocated from the first account using Fund A, Program B, and Department D.
l 20% is allocated from the second account using Fund B, Program B, and Department D.
Assume that these compensation expenses, totaling $131,700, are added to the position:
l Base Salary—$100,000
l Additional earnings—$20,000
l Benefits—$5,500
l Employer-paid taxes—$6,200
The resulting base salary allocation for the position:
Table 19 Compensation Allocations
Natural Account Fund Program Department Percentage Amount
Nat Sal Fund A Program B Depart-D 80 $80,000
Nat Sal Fund B Program B Depart-D 20 $20,000
110 Defining Salary, Compensation, and Allocation Defaults

Note: Allocations that you define for individual compensation elements take precedence overallocation defaults. If, however, you do not specify allocations at the compensationelement level, any allocation defaults defined are applied.
Review how benefit expense allocations (such as those for employer-paid taxes and additionalearnings) for the Research Scientist position are made in these circumstances:
l “Example 1” on page 111 in which “Follows Salary Allocation” is “No”.
l “Example 2” on page 111 in which “Follows Salary Allocation” is “Yes”.
l “Example 3” on page 112 in which Follows Salary Allocation” is “Yes,” but the naturalaccount segment is not specified in the “Manage other compensation elements” task, and adepartment default is defined and applied using the “Manage compensation defaults” task.
l “Example 4” on page 112 in which effective dating is used.
Example 1If Follows Salary Allocation is No, benefit and compensation expenses are allocated as specifiedon the Allocations tab of the Manage other compensation elements data form. Assume that thisinformation is specified on that tab:
l Natural Account—Nat Ben
l Fund—C
l Program—P
l Department—Y
Using those settings, benefit expenses are allocated as follows:
Table 20 Research Scientist Compensation Allocations
Position Natural Account Fund Program Department Allocation Percentage Allocated Amount
Research Scientist Nat Ben Fund C Program P Depart-Y 100 $5,500
Example 2If Follows Salary Allocation is Yes, the allocations specified on the Manage other compensationelements are used, and blank chart fields and segments on Manage other compensationelements, use the salary allocations. If Follow Salary Allocation is No, you must specify each chartfield or segment allocation, even if they match the salary allocations.
For example, assume that the following is specified on the Allocations tab of the Manage othercompensation elements data form:
l Natural Account—Nat Ben
l Fund—C
About Benefit and Compensation Allocations 111

If Follows Salary Allocation is Yes , benefits expenses for the Research Scientist position areallocated as follows:
Table 21 Research Scientist Benefits Allocations
Natural Account Fund Program Department Allocation Percentage Allocated Amount
Nat Ben Fund C Program B Depart-D 80 $4,400
Nat Ben Fund C Program B Depart-D 20 $1,100
Example 3If Follows Salary Allocation is Yes, benefit expenses for Research Scientists are allocated in thesame way as the position's salary. Allocations defined for the compensation element areoverridden. In this case however, a natural account segment is not specified on the Manage othercompensation elements data form, and a department default is specified on the Managecompensation default data form. Assume that:
l No data other than Fund C is specified on the Allocations tab of the Manage othercompensation elements data form.
l No data other than Ben-D is specified on the Natural Account tab of the ManageCompensation Defaults data form.
Benefits expenses for the Research Scientist position are allocated as follows:
Table 22 Research Scientist Benefits Allocations
Natural Account Fund Program Department Allocation Percentage Allocated Amount
Ben-D Fund C Program B Depart-D 80 $4,400
Ben-D Fund C Program B Depart-D 20 $1,100
Example 4In this case, the allocations in Example 1 are effective from 01/01/10 to 6/30/10, and those inExample 2 are effective on 07/01/10 but have no end date. Benefits expenses for the ResearchScientist position are allocated as follows:
Table 23 Allocations Resulting from Effective Dating
Start Date End Date Natural Account Fund Program Department Allocation Percentage Allocated Amount
01/01/10 06/30/10 Nat Ben Fund C Program P Depart-Y 100 $5,500
07/01/10 Nat Ben Fund A Program B Depart-D 80 $4,400
07/01/10 Nat Ben Fund B Program B Depart-D 20 $1,100
112 Defining Salary, Compensation, and Allocation Defaults

Allocation GuidelinesTo ensure that your allocations do not overlap and can submitted for approval, perform thesetasks:
l End date allocations worth 100%.
l Ensure that allocations that use the same segments or chart fields during the same perioddo not exceed 100%.
l Ensure that allocations total to exactly 100%.
Maintaining Salary Allocation Defaults
Applies to the Position budget detail and the Position and Employee budget detail
ä To overwrite the default General Ledger accounts to which salary expenses are allocated byentity:
1 Review how benefit, salary, and General Ledger allocations work. See “About Benefit and CompensationAllocations ” on page 110.
2 Perform steps 1 to 5 in “Maintaining Position Defaults by Entity” on page 106.
3 Select Salary Allocation Details.
4 To change allocation defaults:
l Select different segments or chart fields in the Account, Entity, Program, and Projectsegments, in addition to custom segments you use in budgets (Fund or Initiative, forexample).
l Enter different allocation start dates and end dates
l Change the allocation percentages
5 To add allocations, right-click, select Add Allocation Information, and:
a. Specify start and end dates.
b. Click Add.
c. Select the segments or chart fields to use.
d. Specify the allocation percentage.
6 Ensure that salary expenses do not overlap by right-clicking and selecting View OverlappingAllocations. If they do, see “Correcting Overlapping Allocations” on page 113.
7 To delete allocations, right-click, and then select Delete Allocation Information.
Correcting Overlapping AllocationsPerform these steps to resolve overlapping salary expense allocations for employees andpositions. Overlapping allocations display in red.
Maintaining Salary Allocation Defaults 113

ä To resolve overlapping allocations:
1 On the Review Overlapping Allocations data form, or the current data form, review the invalid allocationsin red.
2 Perform a task:
l Right-click and select Return to Previous Data Form.
l Access the position or employee details data form:
m Expand Budget Preparation, and make the selection for the budget detail:
o Manage position and employee data, and then Maintain position data
o Manage employee data, and then Maintain employees by job
o Maintain position data
m From Page, select the HR organization, and then click Go.
m Right-click a position or employee, and then select Edit Position Details or EditEmployee Details
3 Select Allocations.
4 Modify start dates, end dates, and the percentages allocated, to ensure that allocations using the sameGeneral Ledgers segments or chart fields during the same period do not exceed 100.
5 End date allocations that are worth 100%.
For example, these assignments are made for an employee assigned to a position that has aninitial allocation of 100% to account, activity, entity, fund, program, and project segments, andthat starts 1/1/08:
l A second assignment starting 7/1/10 that uses the same segments except Activity Segment(00100) and has an 80% allocation
l A third assignment starting 7/1/10 that uses the same segments except Activity Segment(01400) and has a 20% allocation
If you end-date the first allocation on 9/1/10, the percentage overlaps in July and August andexceeds 100%, as displayed in red.
114 Defining Salary, Compensation, and Allocation Defaults

Mass Adjusting Compensation Expenses
Applies to the Position and Employee budget detail
You can make large-scale updates across a group of positions, employees, or (for the Employeebudget detail) jobs in your departments. For example:
l A benefits rate increases by 5% during the year, and it applies to all hourly employees
l Salaries for a certain salary grade increase by $2,000
ä To mass adjust compensation and benefits:
1 Select View and then Basic Mode.
2 Expand Budget Preparation, and then select Mass adjust compensation and benefits.
3 From Page, select the HR organization.
4 Select the scenario and version, and then click Go.
5 To find the positions or employees to adjust, right-click the grid, select Search, and then perform thesetasks:
l Select Find Positions or Employees.
l When prompted, select the criteria to locate the positions to update with modifiedcompensation data. For example, to find dates on or before June 30, 2012, select Lessthan or Equal to in Operation, and 06/30/12 in Enter Date.
l Click Find.
6 To omit employees or positions from the update, select No in Apply Defaults.
7 To update salaries or other compensation elements, right-click the position or employee, select UpdateSalaries, and then specify:
l Salary grade
l Grade sequence
l Operator (addition or division, for example) for the kind of change to make
l Amount by which to modify the salary grade
8 To view position details, right-click, and then select View Position Details.
9 To identify the budgetary impact of your changes, select Calculate compensation budgets.
Defining Custom Numbers of Workdays and Paydays
ä To specify the number of work and pay days in a month:
1 Select View and then Basic Mode.
2 Expand Budget Preparation, and then select Manage number of working days and pay days in amonth.
Mass Adjusting Compensation Expenses 115

3 In the POV, select the Scenario, Version, and Year.
4 From Page, select the HR organization, and then click Go.
Tip: To set the total number of work and paydays as a default that is applied to all newpositions, select Unspecified Entity.
5 In Pay Days, enter the number of paydays in each month.
6 In Working Days, enter the number of workdays in each month.
116 Defining Salary, Compensation, and Allocation Defaults

8Working with Human Capital
Compensation Budgets
In This Chapter
Recommended Task Flow ... . . . . . . . . . . . . . . . . . . . . . . . . . . . . . . . . . . . . . . . . . . . . . . . . . . . . . . . . . . . . . . . . . . . . . . . . . . . . 117
Requirements... . . . . . . . . . . . . . . . . . . . . . . . . . . . . . . . . . . . . . . . . . . . . . . . . . . . . . . . . . . . . . . . . . . . . . . . . . . . . . . . . . . . . . . . . . . 118
Maintaining Jobs .. . . . . . . . . . . . . . . . . . . . . . . . . . . . . . . . . . . . . . . . . . . . . . . . . . . . . . . . . . . . . . . . . . . . . . . . . . . . . . . . . . . . . . . 119
Maintaining Employees... . . . . . . . . . . . . . . . . . . . . . . . . . . . . . . . . . . . . . . . . . . . . . . . . . . . . . . . . . . . . . . . . . . . . . . . . . . . . . . . 128
Maintaining Positions... . . . . . . . . . . . . . . . . . . . . . . . . . . . . . . . . . . . . . . . . . . . . . . . . . . . . . . . . . . . . . . . . . . . . . . . . . . . . . . . . . 139
Maintaining Employees by Job or Position ... . . . . . . . . . . . . . . . . . . . . . . . . . . . . . . . . . . . . . . . . . . . . . . . . . . . . . . . . . 148
Calculating and Allocating Compensation Expenses ... . . . . . . . . . . . . . . . . . . . . . . . . . . . . . . . . . . . . . . . . . . . . . . 150
Viewing the Budget Impact of Compensation Expenses ... . . . . . . . . . . . . . . . . . . . . . . . . . . . . . . . . . . . . . . . . . . 151
Note:
l Administrators can perform all compensation budget set up tasks.
l Depending on the budget detail you use, you can create compensation budgets usingemployees, positions, or both.
Depending on the budget detail, human capital budgets include position expenses, employeeexpenses, or both.
Recommended Task FlowOracle recommends that you define or assign position and employee compensation details inthe this order:
l FTE
l Salary grades
l Allocations
Define these compensation details first because they drive the budget, and to ensure that youcan calculate, and then allocate, position and employee budget expenses.
After specifying FTE, salary grades, and allocations, assign the following optional data andassignments. These details are not required to calculate basic compensation (for example, vacantposition expenses can be calculated for positions without employee assignments).
l Benefits
Recommended Task Flow 117

l Additional earnings
l Employer-paid taxes
l Employee assignments
RequirementsBefore creating compensation budgets, perform these tasks:
l Ensure that an Administrator created the salary grades and other compensation expenses(benefits, additional earnings and so on) you use to specify employee and positioncompensation details. See Chapter 6.
l Perform these tasks to ensure that you can select the correct budget year, scenario, andversion in the Point of View (POV) bar:
m Select File, then Preferences, and then Planning.
m Select User Variables.
m Select the year, scenario, and version members and click OK.
l Review the order in which to specify compensation details. See “Recommended Task Flow”on page 117.
l Review the compensation expense data that you can define or change:
Table 24 Compensation Expense Modifications
Expense Modification Options or Information
Salarym Select and apply different grades or grade steps
m Specify when salary changes are effective (for example, on an employee's one year hire date anniversary)
Note: If an Administrator enabled Allow Value Change for the salary grade, you can also adjust salary values. Ifhowever, you cannot modify salary values because this option was not enabled, or if the salary grade steps,sequences, and rates that you must use are unavailable, have an administrator modify or define new salary grades.
HourlyEmployeesand Overtime
Overtime is calculated only for hourly, nonexempt employees, budgeted separately from salary, and paid at a higherrate (typically 1.5 times or two times the hourly rate). Create overtime as an additional earning element. See “DefiningOvertime” on page 93.
Working hours can vary across budget periods for hourly-paid employees, and their pay rate is effective-dated.Administrator can define spread patterns for hourly-paid workers (for example, to budget their wages based on thenumber of work hours per month).
AdditionalEarnings
Modifying additional earnings can affect other calculations such as those deriving effective dating and percent ofgross pay. For example, assume the following:
m You schedule a bonus of $10,000 for an employee in the second quarter
m Additional pay is added to gross pay
m 6.2% tax calculation must include the bonus and must apply only to the second quarter
The second quarter would show higher compensation expenses, due to both the bonus and additional taxes resultingfrom the gross pay increase.
118 Working with Human Capital Compensation Budgets

l Optional: Extend the business rule default timeout as described in Oracle Hyperion PlanningAdministrator's Guide. This is useful because some of the business rules you run may displayerrors indicating that processing has exceeded the allowed limit. In addition to increasingthe default timeout, select Administration and then Job Console to view the status of businessrules.
Maintaining Jobs
Subtopics
l Creating Jobs
l Activating Jobs
l Viewing Job Details
l Before Specifying Job Compensation
l Maintaining Job Compensation Details
l Specifying Employee Assignments
l Terminating Jobs and Excluding Jobs From Calculations
Applies only to the Employee budget detail
Creating JobsAt the beginning of the budget cycle, Administrators load jobs from the HRMS. To add jobsduring the budget cycle, Administrators must perform these tasks, after which you must activatethe jobs.
l In the Job Code dimension, create a member under Total Job Code.
Specify these settings:
m Data Storage— Never Share
m Plan Type–—HCP if you accepted the default plan type name when you created theapplication
m Aggregation— Addition
m Smart Lists— None
m Data Type—Unspecified
l Refresh the database.
Activating Jobs
ä To activate jobs:
1 Select View and then Basic Mode.
2 Expand Budget Preparation and then select Maintain job details.
Maintaining Jobs 119

3 Select Active Jobs.
4 Right-click jobs, and then select Activate.
5 When prompted, specify the following:
l Enter Effective Date—When to activate the job
l Select Entity—Specific department in which to activate the job
l Select Scenario—Budget scenario (Forecast, for example) in which to activate the job
l Select Version—Budget version (stage 1 or stage 2 for example) in which to activate thejob
l Select Job—Job to activate
6 Click Activate.
Viewing Job Details
ä To view job details:
1 Select View and then Basic Mode.
2 Expand Budget Preparation and then select Maintain job details.
3 Select All Jobs to view information such as FTE capacity, start date, and salary basis for all loaded jobs.
4 Select Active Jobs to view all jobs that were activated.
5 Right-click jobs, select View Job Details, and then select the kind of data to view, such as ViewBenefits.
Before Specifying Job CompensationBefore defining job details, ensure that:
l An Administrator created salary grades to assign to employees in various jobs.
l An Administrator created the other compensation element (benefit, additional earning andso on.) that you may want to assign.
l You know the version and year of the budget with which you are working.
120 Working with Human Capital Compensation Budgets

Maintaining Job Compensation Details
Subtopics
l Maintaining General Job Information
l Viewing Job Status
l Viewing Employees Assigned to Jobs and Employee Details
l Maintaining Job Salary Grades
l Maintaining Additional Earnings for Jobs
l Maintaining Job Benefits
l Maintaining Job Tax Details
l Maintaining Job Allocations
Maintaining General Job Information
ä To maintain basic job information:
1 See “Before Specifying Job Compensation” on page 120.
2 Expand Budget Preparation, and then select Maintain job details.
3 Select Active Jobs.
4 From Page, select the HR organization, and then click Go.
5 Right-click the job to modify, and then select Edit Job Details.
6 Under Job Details, click General.
7 Enter or select basic data such as:
l Job Code Level—Number identifying the job
l Job Code Start Date—When the job is effective
l Salary Basis—How often the assigned employees are paid (semimonthly or weekly, forexample)
l FTE Capacity—Number of full-time employees required to perform the job
l Headcount— Number of employees associated with the job, regardless of FTE. Forexample, if five full-time employees and two part-time employees are assigned to thejob, headcount is seven.
l Assigned FTE— Number of full time employees assigned to the job.
l Job Status:
m Vacant Vacant—No employees are assigned to the job
m Filled—The correct number of employees for the defined FTE and headcount areassigned to the job
m Active—Job expenses are included in budget calculations
m Inactive or Not Budgeted—Job expenses are omitted from budget calculations
8 Save.
Maintaining Jobs 121

See “Calculating and Allocating Compensation Expenses” on page 150 and “Viewing the BudgetImpact of Compensation Expenses” on page 151.
Viewing Job Status
ä To view recent status changes to jobs:
1 Perform steps 1-5 in “Maintaining General Job Information” on page 121.
2 Under Job Details, click Status Changes.
A list of all job changes (termination, exclusion from the budget, for example) are displayed.
Viewing Employees Assigned to Jobs and Employee Details
Applies only to the Employee budget detail
ä To view data for employees assigned to jobs:
1 Expand Budget Preparation, and then select Maintain job details.
2 Select Active Jobs.
3 From Page, select the HR organization, and then click Go.
4 Right-click jobs and then select Edit job details.
5 Under Job Details, select Employee.
6 To modify basic employee settings, specify data such as:
l Adjustment Date—When changes to compensation elements are effective and appliedto employees. For example, if employees assigned to a job get a raise on January 1, butthe budget year starts in July, specify the date that determines when the increasedemployee salaries are paid.
l Salary Basis—How often salary is paid. For example, the salary basis for a contractorcould be Hourly.
l Annual Salary Spread—How salary is distributed across periods. See “About SpecifyingAnnual Salary Spreads” on page 89.
7 To view proposed, existing, approved, and unapproved FTE, expand the Total FTE header.
8 To view benefit, additional earning, basic salary, and total tax expenses for each employee, expand theTotal Compensation header.
9 To view more employee data, right-click, and then select View Employee Details.
10 To modify employee data, right-click, and then select Edit Employee Details.
See “Maintaining Employee Compensation Details” on page 128.
11 Save.
12 See “Calculating and Allocating Compensation Expenses” on page 150.
122 Working with Human Capital Compensation Budgets

Maintaining Job Salary Grades
Applies only to the Employee budget detail
Use the Salary Grades tab to add, modify, or remove salary information. Ensure that anAdministrator created the salary grade. See “Defining Salary Grades” on page 85.
Note: If an Administrator enabled Allow Value Change for the salary grade, you can adjust salaryvalues. If however, you cannot modify salary values because this option is disabled, or ifthe salary grade steps, sequences, and rates that you must use are unavailable, have anadministrator modify or define new salary grades.
ä To maintain salary grades:
1 Perform steps 1-4 in “Maintaining General Job Information” on page 121.
2 Select Salary Grades.
3 Perform a task:
l To add salary grades, right-click, select Add Salary Information, and then select:
m Select Salary Grade—Grade to assign
m Select Grade Sequence—Sequence of the grade to assign
m Select Grade Step—Step of the salary grade to assign
m Enter Effective Start Date—When to apply the salary grade
l To remove salary grades, right-click, select Delete Salary Information, and then selectDelete.
4 Save.
5 See “Calculating and Allocating Compensation Expenses” on page 150 and “Viewing the Budget Impactof Compensation Expenses” on page 151.
Maintaining Additional Earnings for JobsModifying additional earnings affects other dependent calculations such as taxes.
Applies only to the Employee budget detail
ä To maintain additional earnings:
1 Perform steps 1-5 in “Maintaining General Job Information” on page 121.
2 Under Defaults Setup, select Additional Earnings.
3 Perform any task:
l To create additional earnings, such as bonuses, right-click, select Add AdditionalEarnings, and then specify the following before clicking Add:
m Employee—Employee to assign the additional earnings
Maintaining Jobs 123

m Additional Earnings Element—Member corresponding to the additional earnings
m Option—Plan or option for the additional earnings, such as Overtime_2 orBonus_2010
m Effective Start Date—When to create and assign the additional earnings
l To remove additional earnings, right-click, select Delete Additional Earnings, and thenclick Delete.
4 Save.
5 See “Calculating and Allocating Compensation Expenses” on page 150 and “Viewing the Budget Impactof Compensation Expenses” on page 151.
Maintaining Job Benefits
Applies only to the Employee budget detail
Use the Benefits tab to specify benefits for positions in your cost center or department. To addbenefits, an Administrator must create a corresponding member in the Benefits dimension.
ä To maintain benefits:
1 Perform steps 1- 5 in “Maintaining General Job Information” on page 121.
2 Under Defaults Setup, select Benefits.
3 Perform a task:
l To add benefits, right-click, select Add Benefit, and then specify the following beforeclicking Add:
m Select Benefit Element—Expand Benefits to select the member for the benefit
m Select Option—The plan or option associated with the benefit, such as SurvivorSpouse for health benefits
m Enter Effective Start Date—When to add and activate the benefit
l To modify benefits, enter or select new values on the data form such as:
m Option—Plan used to apply benefits (Member Only, for example)
m End Date—When the benefit no longer applies
m Maximum Value—Highest benefit value (an increased number of days permitted bymaternity leave, for example)
l To delete benefits, right-click, select Delete Benefit, ensure that you are removing thecorrect benefit, and then click Delete.
4 Save.
5 See “Calculating and Allocating Compensation Expenses” on page 150 and “Viewing the Budget Impactof Compensation Expenses” on page 151.
124 Working with Human Capital Compensation Budgets

Maintaining Job Tax DetailsModify tax details to identify the budget impact of new, changed, or obsolete employer-paidtaxes used in your country, and calculate the compensation budget. For example:
l Federal Insurance Compensation Act (FICA)
l State Unemployment Tax Act (SUTA)
l Federal Unemployment Tax Act (FUTA)
Applies only to the Employee budget detail
Use the Tax Details tab to remove from or add employer-paid taxes to jobs. To associate jobswith a new tax, ensure that an Administrator has defined a corresponding member.
ä To maintain employer-paid tax details:
1 Perform steps 1-5 in “Maintaining General Job Information” on page 121.
2 Under Defaults Setup, select Tax Details, and then perform any task:
l To add taxes, right-click, select Add Employer-paid tax, and then specify the followingbefore clicking Add:
m Select Employee—Employee to whose job to add the tax
m Select Tax Element—Element for the member representing the tax
m Select Option—The tax plan or option
m Enter Effective Start Date—When to apply the tax
l To remove taxes, right-click, select Delete Employer-paid Tax, confirm the job from whichto remove the tax, specify when to remove the tax, and then click Delete.
3 Save.
4 See “Calculating and Allocating Compensation Expenses” on page 150 and “Viewing the Budget Impactof Compensation Expenses” on page 151.
Maintaining Job AllocationsUse the Job Allocations tab to add, modify, and delete job allocations to General Ledger chartfields or segments, and to identify overlapping allocations.
Applies only to the Employee budget detail
ä To maintain job allocations:
1 Perform steps 1-5 in “Maintaining General Job Information” on page 121.
2 Under Defaults Setup, select Allocations, and then perform an action:
l To create allocations, right-click, select Add Allocation Information, and then performthese tasks before clicking Add:
m Specify when to apply the allocation
Maintaining Jobs 125

m Click Add.
m On the Allocations tab, select the General Account chart fields or segments to whichto allocate job expenses.
l To remove allocations, right-click, and then select Delete Allocation Information.
3 Important: Ensure that multiple allocations do not overlap by right-clicking, and then selecting ViewOverlapping Allocations.
See “Correcting Overlapping Allocations” on page 113.
4 Save.
See “Calculating and Allocating Compensation Expenses” on page 150
Specifying Employee Assignments
ä To specify employee job assignments:
1 Select View and then Basic Mode.
2 Expand Budget Preparation, and then select Maintain job details.
3 From Page, select the HR organization, and then click Go.
4 Right-click the job, and then select Edit Job Details
5 Under Job Details, click the General tab.
6 Right-click the Job Code Level, and then perform a task:
l To assign a current employee, select Assign Existing Employee, and then specify thefollowing before clicking Assign:
m Enter FTE—Value typically (although not necessarily) between 0-1 that indicates ifthe employee is full time or part time. Note that employee can have a full time FTE,but an FTE of 0.5 if they are assigned to 2 jobs. 1 normally indicates if the employeeis full time, and less than 1 indicates part time.
m Enter Effective Date— When the assignment occurs
l To assign a new hire, select Assign To-Be-Hired Employee, and then specify data such asthe following before clicking Assign:
m Select Employee Type—If the employee is a regular, contract, or temporary employee
m Select Pay Type—Non-exempt if the employee is paid hourly
m Select FT/PT:
o Full time—The employee works exclusively on the job
o Part time—The employee spends some time working on the job
m Enter FTE —Value typically between 0-1 that indicates if the employee is full timeor part time. Note that employee can have a full time FTE, but an FTE of 0.5 if they
126 Working with Human Capital Compensation Budgets

are assigned to 2 positions or jobs. 1 normally indicates if the employee is full time,and less than 1 indicates part time.
m Enter Overtime Hours—If employees might work more than the specified defaultweekly hours, define overtime as an additional earning. This enables you, ifnecessary, to allocate funds to cover overtime expenses using different GeneralLedger segments or chart fields. See “Defining Overtime” on page 93.
7 After the data form refreshes to display the employee, specify the remaining settings such as:
l Annual Salary Spread—How the salary expenses are distributed based on yourorganization's accounting period. See “About Specifying Annual Salary Spreads” onpage 89
l Adjustment Date—When changes such as salary increases are effective. For example, ifa budget year starts January 1, and the salaries of employees assigned to a specific jobincrease on April 1, specify when to apply the salary increase as the adjustment date.
l Salary Basis—How often the employee is paid, such as hourly or weekly.
8 Save.
See “Calculating and Allocating Compensation Expenses” on page 150.
Terminating Jobs and Excluding Jobs From Calculations
Applies only to the Employee budget detail
ä To terminate or exclude jobs:
1 Select View and then Basic Mode.
2 Expand Budget Preparation and then select Maintain job details.
3 Right-click jobs, and then select Terminate job or Exclude job from budget.
4 Perform a task:
l Specify when to terminate or exclude the job from calculations in Enter Effective Dateor Enter Effective Start Date.
l Specify when to include the job again in budget calculations in Enter Effective EndDate.
5 Click Terminate or Exclude.
Jobs excluded from budgets have a status of Inactive or Not Budgeted.
Maintaining Jobs 127

Maintaining Employees
Subtopics
l Maintaining Employee Compensation Details
l Changing Employee Status
l Deleting Employees from Budgets
l Terminating Employees
l Transferring Employees
l Assigning Employees to Positions
l Assigning Employees to Jobs
l Assigning Employees Outside HRMS to Positions
l Deleting Employee Assignments
Applies only to the Employee budget detail
Maintain employees to identify the budget impact of modified employee and job data, plan foremployee status changes such as transfers and terminations, assign employees to positions, andview expenses by period.
Maintaining Employee Compensation Details
Applies only to the Employee budget detail
If you must override some compensation element default settings for individual employees, see“Requirements” on page 118. Identify the order in which to specify employee details describedin “Recommended Task Flow” on page 117.
ä To manage employee compensation:
1 Review the order in which to define compensation details. See “Recommended Task Flow” on page117.
2 Select View and then Basic Mode.
3 Expand Budget Preparation and Manage employee data.
4 Select Maintain employees by job.
5 From Page, select the Human Resource organization, and then click Go.
6 You can specify basic information such as the following, for individual employees in the entity:
l Pay Type—If the employee is temporary or not on the payroll, select Non-exempt.
l Salary Basis—How often the employee is paid, such as weekly or bimonthly.
l Annual Salary Spread—–How the employee's salary expenses are distributed across theperiods defined for your corporate accounting period. See “About Specifying AnnualSalary Spreads” on page 89.
l Default Weekly Hours—Number of hours per week that the employee must work
128 Working with Human Capital Compensation Budgets

Tip: To view the total compensation expense for each employee by total salary, benefit,earning, and tax expenses, expand the Total Compensation Expenses header.
7 Right-click the employee for which to view or specify compensation, and then select Edit EmployeeDetails.
8 See:
l “Managing and Specifying General Data” on page 129
l “Managing and Specifying FTE ” on page 129
l “Managing and Specifying Salary Grades” on page 130
l “Maintaining Job Allocations” on page 125
l “Managing and Specifying Status” on page 131
l “Managing and Specifying Benefits” on page 132
l “Managing and Specifying Tax Details” on page 133
Managing and Specifying General DataUse the General tab of Employee Detail forms to enter or modify employee numbers, names,job codes, hire dates, salary basis, annual salary spread, and to recalculate the compensationbudget.
ä To manage general employee compensation data:
1 Perform steps 1-7 in “Maintaining Employee Compensation Details” on page 128.
2 On the General tab, specify data such as:
l Status—To exclude employee expenses from the budget, select Not Budgeted orInactive.
l Pay Type—If the employee is paid by the hour, select Non-exempt.
l FT/PT—If the employee must work full time or part time to satisfy the positionrequirements.
l Salary Basis—How often the employee is paid, such as weekly or bimonthly.
l Annual Salary Spread—How the employee's salary expenses are distributed across theperiods defined for your corporate accounting period. See “About Specifying AnnualSalary Spreads” on page 89.
3 Save, then see “Calculating and Allocating Compensation Expenses” on page 150.
Managing and Specifying FTE Use the FTE tab to specify the full-time equivalent assignments for an employee. For example,if an employee is full-time January to March and part-time the rest of the year, specify 1 forJanuary, February, and March, and 0.5 for the remaining months.
Maintaining Employees 129

ä To manage employee FTE data:
1 Perform steps 1-7 in “Maintaining Employee Compensation Details” on page 128.
2 Select FTE, and enter a value of 1 or greater in Proposed FTE if the employee is full time. Enter a valueof less than 1 if the employee is part time.
3 Enter the dates during which the FTE applies in FTE Start Date and FTE End Date.
4 Perform any task to specify FTE data:
l To add or change employee FTE assignments:
a. Right-click a column and then select Update FTE.
b. Indicate if the employee works full time or part time between a range of dates.
For example, if a full time employee must reduce hours and work part time betweenMarch 1 and June 15, specify the following:
m Enter FTE — Value typically, (although not necessarily) between 0-1 thatindicates if the employee is full time or part time. Normally, an FTE of oneindicates fulltime assignment. Note that employee can have a full time FTE,but an FTE of 0.5 if they are assigned to 2 positions.
m Enter Effective Start Date—March 1, 2011
m Enter Effective End Date—June 15, 2011
c. Click Add.
l To specify and budget for FTEs that change by month, quarter, or year, select AdjustPeriod-Level Details, and then perform these tasks:
a. In Overtime Hours, enter the number of additional hours for which the employee ispaid.
b. In Total FTE, right-click, and then select Calculate Compensation Expense to displaythe budget impact.
5 Save, and then see “Calculating and Allocating Compensation Expenses” on page 150.
Managing and Specifying Salary Grades
Note: If an Administrator enabled Allow Value Change for the salary grade, you can adjust salaryvalues. If however, you cannot modify salary values because this option is disabled, or ifthe salary grade steps, sequences, and rates that you must use are unavailable, have anadministrator modify or define new salary grades.
ä To manage employee salary grades:
1 Perform steps 1-7 in “Maintaining Employee Compensation Details” on page 128.
2 Select Salary Grades, and perform any task:
l To specify new salary data, right-click, select Add Salary Information, and specify thevalues described in “Defining Salary Grades” on page 85.
130 Working with Human Capital Compensation Budgets

l If permitted, modify the start date, end date, and override option values for existingsalary assignments.
l To remove salaries, right-click assignments, and then select Delete Salary Information.
3 Save, then see “Calculating and Allocating Compensation Expenses” on page 150 and“Viewing theBudget Impact of Compensation Expenses” on page 151.
Managing and Specifying AllocationsUse the Allocations tab to define employee compensation allocations to General Ledgeraccounts. You can view and modify allocation data by segments or chart fields such as project,fund, or program.
ä To manage allocations:
1 Perform steps 1-7 in “Maintaining Employee Compensation Details” on page 128.
2 Perform any task on the Allocations tab:
l To create allocations, right-click, select Add Allocation Information, and then performthese steps:
m Specify the following:
o Effective Start Date—When to apply the allocation
o Effective End Date—When to remove the allocation
m Click Add.
m Select segments or chart fields for Account and Entity.
m Specify segments or chart fields for all other General Ledger settings such as Programor Project that you use to budget.
m In Percentage Allocation enter a percentage for the allocation.
m Save.
l To remove allocations, right-click, and then select Delete Allocation Information.
l Important: Ensure that allocations do not overlap, causing the total allocationpercentage to exceed 100%, by right-clicking, and then selecting View OverlappingAllocations. See “Correcting Overlapping Allocations” on page 113.
3 Save.
See “Calculating and Allocating Compensation Expenses” on page 150.
Managing and Specifying StatusYou can use the Status Changes tab on Employee Detail data forms to specify the dates associatedwith changes to an employee's work status, such as short term disability leave. You can also usethis tab to identify the impact of the changes on the compensation budget.
To actually modify employee status, see “Changing Employee Status” on page 133.
Maintaining Employees 131

Note: Before modifying status ensure if necessary, that the salary grade for the new status exists.For example, ensure that the salary for disability leave is defined. See “Defining SalaryGrades” on page 85.
Managing and Specifying Additional EarningsModify additional earnings to budget for new employee earnings, to delete existing earnings,and to allocate the expenses to be budgeted for additional earnings to General Ledger accounts.
ä To view or specify additional earnings:
1 Perform steps 1-7 in “Maintaining Employee Compensation Details” on page 128.
2 Perform any task on the Additional Earnings tab:
l To budget for new additional earnings, right-click, select Add Additional Earnings, andthen specify the following:
m Additional earning element—The member corresponding to the additional earningssuch as annual bonus or hazard pay.
m Option—Select Set to initially define the additional earnings. You can later changethis to perform calculations.
m Effective start date—When the additional earnings are applied.
l To remove additional earnings, right-click assignments, and then select Delete AdditionalEarning.
3 Save, then see “Calculating and Allocating Compensation Expenses” on page 150 and“Viewing theBudget Impact of Compensation Expenses” on page 151.
Managing and Specifying BenefitsModify benefits to calculate the budget for new, modified, or deleted employee benefits, andallocate the compensation budget to General Ledger accounts for inclusion in the line itembudget.
ä To manage benefits:
1 Perform steps 1-7 in “Maintaining Employee Compensation Details” on page 128.
2 Perform any task on the Benefits tab:
l To identify and budget for new benefits, such as a dental plan, right-click, select AddBenefit, and then specify the following:
m Select Benefit Element—Expand Benefits to select the member for the benefit.
m Select Option—The plan or option associated with the benefit, such as Survivor andDependants for health benefits.
m Enter Effective Start Date—When to add and activate the benefit.
l To remove benefits, right-click the assignment, and then select Delete Benefit.
132 Working with Human Capital Compensation Budgets

3 Save.
See “Calculating and Allocating Compensation Expenses” on page 150 and“Viewing the BudgetImpact of Compensation Expenses” on page 151.
Managing and Specifying Tax DetailsModify tax details to identify the budget impact of new, modified, or obsolete employer-paidtaxes in your country or region, and calculate the compensation budget. Although theseAmerican taxes are used in examples, you define employer paid tax elements as required foryour budgeting needs:
l Federal Insurance Compensation Act (FICA)
l State Unemployment Tax Act (SUTA)
l Federal Unemployment Tax Act (FUTA)
ä To manage tax details:
1 Perform steps 1-7 in “Maintaining Employee Compensation Details” on page 128.
2 Perform any task on the Tax Details tab:
l To budget for new employer-paid taxes, right-click, select Add Employer-paid Tax, andspecify this information:
Data such as the payment frequency, payment terms, option value, and maximum valuedetermined by the tax are displayed on the employee details form.
m Select Tax Element—Member representing the tax
m Select Option—The tax plan or option
m Enter Effective Start Date—When to apply the tax
l To remove taxes, right-click, and then select Delete Employer-paid Tax.
3 Save, then see “Calculating and Allocating Compensation Expenses” on page 150 and“Viewing theBudget Impact of Compensation Expenses” on page 151.
Changing Employee StatusYou can plan and budget for employee status changes such as maternity or disability leave bymodifying employees or employee details.
Applies to the Employee budget detail, and the Position and Employee budget detail
ä To budget for status changes:
1 Select View and then Basic Mode.
2 Expand Budget Preparation and Manage position and employee data or Manage employee data.
3 Select Maintain employees by job or Maintain employees by position.
Maintaining Employees 133

4 From Page, select the Human Resources organization, and then click Go.
5 Right-click employees, and then select Change Status.
6 Assign a status:
l Disability—The employee is absent because of medical factors, is considered inactive,and their expenses are excluded from budget calculations.
l Maternity— The employee is absent and receives maternity leave pay.
l On Sabbatical—The employee is not paid.
l Leave of Absence—The employee is not paid.
l Terminated—A manager or supervisor request that the employee leaves the company.
l Inactive or Excluded–Employee expenses are excluded by date, from budget calculations.
7 Specify the start and end dates between which the status applies.
8 Click Change.
Deleting Employees from BudgetsApplies to the Employee budget detail and the Position and Employee budget detail
You can only delete proposed to be hired employees from budgets. To delete existing employeesyou must first terminate them, or reassign them.
ä To remove employees from budgets:
1 Select View and then Basic Mode.
2 Select Budget Preparation, and then Maintain employee information.
3 From Page, select the employee.
4 Right-click the employee in Page, and then an option:
l Delete employee for a specific version—Remove the employee from a budget versionthat you specify.
l Delete employee across all versions—Remove the employee from all budget versions.
Terminating Employees
Applies to the Employee budget detail, and the Position and Employee budget detail
When an employee is terminated, the assigned FTE at the employee level moves to the job orposition level.
ä To terminate employees:
1 Select View and then Basic Mode.
134 Working with Human Capital Compensation Budgets

2 Expand Budget Preparation, and then Manage employee data or Manage position and employeedata.
3 Select Maintain employee by job or Maintain employee by position.
4 From Page, select the HR organization in which the employee works, and then click Go.
5 Right-click the employee, and then select Terminate Employee.
6 Specify the following:
l Termination type:
m Departed—The employee is leaving
m Terminated—Human Resources initiated the termination
l Effective date—When to terminate the employee
7 Click Terminate.
8 Terminate the position to exclude its vacant expenses from the budget.
Transferring Employees
Subtopics
l About Transfers
l Transferring Employees Out of Entities
l Transferring Employees Into Positions
l Performing Single-Step Employee Transfers
Applies to all budget detail types
About TransfersYou can move employees between entities (HR organizations). Employees retain their employeenumbers, their assignments, and their assignment end-dates. Employee details are not availablein the original entity after the effective transfer date. The associated employee compensationbudget expenses are stored in the Generic entity until employees are transferred into the targetentity.
You can transfer employees to new or existing positions as follows:
l If the transfer is approved, you know the position to which to transfer the employee, andcan access the entities involved, see “Performing Single-Step Employee Transfers” on page137.
l If the transfer is unapproved, perform these steps:
m Transfer the employee out of your entity. See “Transferring Employees Out of Entities”on page 136.
m Have management accept the transfer. See “Reviewing and Accepting PendingTransfers” on page 149.
Maintaining Employees 135

m Have the manager overseeing the target position or entity transfer the employee in. See“Transferring Employees Into Positions” on page 136.
Note: Employees must be transferred into the target entity within the next business day.
Tip: If you use Approvals to submit budgets along a promotional approval path, have anadministrator define Generic Entity as a planning unit.
Transferring Employees Out of EntitiesTransfer employees out of entities to enable another manager to transfer them in to anotherposition in another HR organization.
ä To transfer employees out:
1 Select View and then Basic Mode.
2 Expand Budget Preparation and Manage position and employee data, and then select Maintainemployees by position.
3 From Page, select the HR organization, and then click Go.
4 Right-click the employee, select Transfer Employee, and then Transfer Out an Employee.
5 Specify the effective date on which to transfer the employee out of the current position.
6 Click Transfer.
Transferring Employees Into PositionsManagers and supervisors accept employees that are awaiting transfer into their target positionsby transferring them in.
ä To transfer employees into positions:
1 Select View and then Basic Mode.
2 Expand Budget Preparation, and then Manage position and employee data.
3 Select Review pending transfers.
4 Right-click Position Name, and then select Transfer In an Employee.
5 Specify values such as:
l Employee to transfer
l Department into which to transfer the employee
l Job or position to which to transfer the employee
l Date on which the transfer is effective
6 Click Transfer In.
136 Working with Human Capital Compensation Budgets

Performing Single-Step Employee TransfersPerform a single-step transfer to transfer existing employees from one department to another,and to identify the budget impact.
Tip: Oracle recommends that an Administrator who can access both the source and targetentities perform single-step transfers.
ä To perform a single-step transfer:
1 Ensure that you can access the source and target entities.
2 Select View and then Basic Mode.
3 Expand Budget Preparation, and then perform the task for the budget detail:
l Expand Manage employee data, and then select Maintain employees.
l Expand Manage position and employee data, and then select Maintain employees byposition.
4 From Page, select the HR organization in which the employee works, and then click Go.
5 Right-click the employee, select Transfer Employee, and then select Single Step Transfer.
6 Specify the following:
l Select Source Position—Employee's current position
l Select Source Entity—Department or cost center in which the employee is currentlyassociated
l Select Target Position—Position to which to transfer the employee
l Select Target Entity—Cost center or department into which the employee transfers
l Enter Effective Date—When the employee is transferred
7 Click Transfer.
Assigning Employees to Positions
Applies to the Position and Employee budget detail
ä To assign employees to positions:
1 Select View and then Basic Mode.
2 Select Budget Preparation, then Manage position and employee data, and then Maintain employeesby position.
3 From Page, select the HR organization, and then, click Go.
4 Right-click employees, select Assign Employee, and then select:
l Existing Employee: Assign a current employee by performing these steps:
Maintaining Employees 137

a. Select the employee to fill the position.
b. Enter the effective date when they are assigned to the position.
c. Enter the FTE.
d. Click Assign.
l To Be Hired Employee. An employee will be hired to fill the position. See “About FillingVacant Positions or Jobs ” on page 148.
To remove employees from positions, see “Deleting Employee Assignments” on page 138.
Assigning Employees to Jobs
Applies to the Employee budget detail
ä To assign employees to jobs:
1 Select View and then Basic Mode.
2 Select Budget Preparation, then Manage employee data, and then Maintain employees by job.
3 From Page, select the HR organization, and then click Go.
4 Right-click employees, select Assign Employee, and then:
l Existing Employee: Assign a current employee by performing these steps:
a. Select the employee.
b. Enter the effective date when they are assigned to the job.
c. Enter the FTE.
d. Click Assign.
l To Be Hired Employee. An employee will be hired for the job. See “About Filling VacantPositions or Jobs ” on page 148.
Assigning Employees Outside HRMS to PositionsTypically, you add employees by loading them from HRMS. However, see “Creating Jobs,Positions, and Employees During the Budget Cycle” on page 46 if:
l An employee was chosen for a vacant position but is not yet in the HRMS
l You must identify the budget impact of filling a vacant position
Deleting Employee AssignmentsWhen an employee no longer holds a position or job, remove the assignment, and identify thebudget impact. For example, if an employee performs two jobs but has completed work on one,delete the assignment.
138 Working with Human Capital Compensation Budgets

ä To delete employee assignments:
1 Select View and then Basic Mode.
2 Expand Budget Preparation, and perform the task for your budget detail:
l Employee—Select Manage employee data, and then Maintain employees by job.
l Position and Employee—Select Manage position and employee data, and then Maintainemployees by position.
3 From Page, select the HR organization, and then click Go.
4 Right-click employees, select Delete Employee Assignment, and then specify data such as:
l Job from which to remove an employee
l Budget scenario and version in which to remove an employee from a job
5 Click Launch.
Maintaining Positions
Subtopics
l Creating Positions
l Maintaining Position Compensation Details
l Excluding Positions from Budget Calculations
l Copying Position Data
l Performing Single Step Transfers
l Reviewing Pending Transfers
l Deleting Positions
l About Terminating Positions
l Terminating Positions
Applies to the Position budget detail and the Position and Employee budget detail
Positions that you create, and their associated expenses, must be reviewed and approved. See“Approving Positions, Jobs, and Employee FTE and Compensation ” on page 160.
Creating Positions
Note: Position settings that you do not specify are populated by position defaults, if defined.See “Maintaining Position Defaults by Entity” on page 106.
ä To create positions:
1 Select View and then Basic Mode.
2 Expand Budget Preparation, select Manage position and employee data, and then Maintain positiondata.
Maintaining Positions 139

3 In the POV, select the Scenario, Year, and Version.
4 From Page, select the HR organization with which the position is associated, and then click Go.
5 Right-click in Position Name, and select Add Position.
6 When prompted, define the position by specifying information such as:
l Entity—Department with which the position is associated
l Position Type:
m Pooled—Multiple headcount and FTE
m Shared—Multiple headcount with a specifically defined FTE limit
m Single Incumbent—Single FTE and headcount to support one employee
l FTE —Normally 1 if the position is full-time or less than 1 if it is part-time
l Position Start Date—When the position begins
l Annual Salary Spread—See “About Modifying Salary Grades” on page 88.
7 Click Add.
8 To define and budget for all other position settings, see “Maintaining Position Compensation Details”on page 140.
Maintaining Position Compensation Details
Subtopics
l Maintaining General Position Data
l Maintaining Position FTE
l Maintaining Position Salary Grades
l Maintaining Allocations
l Maintaining Position Status
l Maintaining Additional Earnings
l Maintaining Benefits
l Maintaining Assigned Employees
l Maintaining Tax Details
Applies to the Position budget detail, and the Position and Employee budget detail
Maintaining General Position DataIf you must override some compensation element default settings for individual positions, see“Requirements” on page 118.
Note: Before defining position compensation, review the order in which to specifycompensation details and satisfy the requirements. See “Recommended Task Flow” onpage 117 and “Requirements” on page 118.
140 Working with Human Capital Compensation Budgets

ä To maintain general data:
1 Select View, and then Basic Mode.
2 Expand Manage position and employee data, and then select Maintain positions or Maintain positiondata.
3 From Page, select the HR organization, and then click Go.
4 Right-click a position, and then select Edit Position Details.
5 On the General tab, specify basic position data such as:
l In Position Start Date, double-click to specify when the position is active.
l In Position End Date, double-click to specify when the position ends.
6 Save.
7 See “Calculating and Allocating Compensation Expenses” on page 150.
Maintaining Position FTE Specify position FTE to define or modify how many full time or part time employees are requiredfor a position. For example, a position that previously required only part-time employment maynow require full-time employee assignments.
ä To manage FTE data:
1 Perform steps 1-4 “Maintaining General Position Data” on page 140.
2 Perform any task on the FTE tab:
l To modify FTEs, right-click, select Update FTE, and specify this data:
m Enter FTE— Value typically between 0-1 that indicates if the employee is full timeor part time. Note that employee can have a full time FTE, but an FTE of 0.5 if theyare assigned to 2 positions.
m Enter Effective Start Date—When the FTE assignment begins
m Enter Effective End Date—When the FTE assignment ends
l To specify and budget for FTEs and the associated head count that change by month,quarter, or year, select Adjust Period Level Details.
a. In Overtime Hours, enter the number of additional hours for which an hourlyemployee is paid.
b. In Total FTE, right-click, and then select Calculate Compensation to display the finalbudget impact.
l Modify the monthly spread factor.
3 Save.
4 See “Calculating and Allocating Compensation Expenses” on page 150.
Maintaining Positions 141

Maintaining Position Salary GradesThe salary data you specify on the Salary Grades tab is automatically assigned to employeesassigned to the position, and to future employee who are assigned to the position. Use this SalaryGrades tab to define, modify, and remove salary for positions.
Note: If an Administrator enabled Allow Value Change for the salary grade, you can adjust salaryvalues. If however, you cannot modify salary values because this value was not enabled,or if the salary grade steps, sequences, and rates that you must use are unavailable, havean administrator modify or define new salary grades.
ä To manage position salary grades:
1 Perform steps 1-4 in “Maintaining General Position Data” on page 140.
2 Select Salary Grade.
3 To apply a new salary assignment, right-click, select Add Salary Information, and then see “DefiningSalary Grades” on page 85.
4 Click Add.
5 On the data form, specify the remaining salary information, such as start and end dates.
6 See “Calculating and Allocating Compensation Expenses” on page 150 and “Viewing the Budget Impactof Compensation Expenses” on page 151.
Maintaining Allocations
ä To maintain position allocations:
1 Perform steps 1-4 in“Maintaining General Position Data” on page 140.
2 Perform any task on the Allocations tab:
l To create allocations, right-click, select Add Allocation Information, and then performthese tasks:
a. When prompted, specify a start and end date.
b. On the Allocations form, click cells to specify recipient and allocation settings. Forexample:
m Object Segment Description— Allocation type, such as Overtime
m Fund Segment Description—Target fund pool, such as Teachers Retirement orEducational Services
m Program Segment Description—Target program such as Special Education
m Percentage Allocation—Portion to provide
l To remove allocations, right-click, and then select Delete Allocation.
142 Working with Human Capital Compensation Budgets

l Important: Ensure that multiple allocations do not overlap, causing the total allocationpercentage to exceed 100%, by right-clicking and then selecting View OverlappingAllocations.
See “Correcting Overlapping Allocations” on page 113.
3 See “Calculating and Allocating Compensation Expenses” on page 150.
Maintaining Position StatusUse the Status Changes tab to modify, and then budget for position status changes, such as whento exclude positions from budget calculations.
ä To manage position status:
1 Perform steps 1-4 in “Maintaining General Position Data” on page 140.
2 Select Status Changes.
3 To include positions that have been excluded from budgets, right-click them, and then select Active.
4 To omit positions from budget calculations, right-click them, and then select Inactive.
5 Save.
See “Calculating and Allocating Compensation Expenses” on page 150.
Maintaining Additional EarningsUse the Additional Earnings tab to add, remove, or modify any additional that are part of overallcompensation expenses such as hazard pay or relocation costs. Modifying additional earningscan impact other calculations such as those deriving effective dating and percent of gross pay.
ä To manage additional earnings:
1 Perform steps 1-4 in “Maintaining General Position Data” on page 140.
2 To specify a new earning, or to add another row to modify existing earnings, right-click, select AddAdditional Earning, and then select the corresponding earning element and an option.
3 To remove an earning, right-click, and then select Delete Additional Earning.
4 See “Calculating and Allocating Compensation Expenses” on page 150 and “Viewing the Budget Impactof Compensation Expenses” on page 151.
Maintaining Benefits Use the Benefits tab to remove, change, or add benefits assigned to positions. Before assigningbenefits, ensure that an Administrator has created a corresponding element.
ä To manage benefits:
1 Perform steps 1-4 in “Maintaining General Position Data” on page 140.
Maintaining Positions 143

2 Perform any task:
l To assign benefits, right-click, select Add Benefit, select the benefit, and then specify thestart and end dates after the benefit is added.
l To modify benefits, click in cells and use the cell drop-down lists to change settings suchas start dates, end dates, and value type.
l To remove benefits, right-click the assignment, and then select Delete Benefit.
3 Save.
4 See “Calculating and Allocating Compensation Expenses” on page 150 and “Viewing the Budget Impactof Compensation Expenses” on page 151.
Maintaining Assigned EmployeesUse the Employee tab to assign and remove employees from positions, in addition to changingdata such as salary spreads and basis.
ä To manage employees:
1 Perform steps 1-4 in “Maintaining General Position Data” on page 140.
2 In the Employee tab, change such data as:
l Salary Basis—How often assigned employees are paid, such as monthly
l Annual Salary Spread—See “About Modifying Salary Grades” on page 88.
3 To assign an employee to another position, right-click, select Modify, and then select a Transfer option.
4 To associate an employee who was transferred out of a position so that they could fill a position, selectTransfer Employee In.
5 To assign an employee to a position, right-click, and then select Assign Employee.
See “Assigning Employees to Positions” on page 137.
6 To remove an employee from the position, right-click, and then select Delete Employee Assignment.
7 Save.
See “Calculating and Allocating Compensation Expenses” on page 150.
Maintaining Tax Details Use the Tax Details tab to identify the budget impact of country-specific employer-paid taxes(SUTA or FICA for example in the U.S.) assigned to some positions.
ä To manage tax details:
1 Perform steps 1-4 in “Maintaining General Position Data” on page 140.
2 Perform any task on the Tax Details tab:
144 Working with Human Capital Compensation Budgets

l To budget for new employer-paid taxes, right-click, select Add Employee-Paid Tax, andthen specify data such as:
m Element—Tax element such as FUTA
m Option—Type or recipient of the tax, such as survivor spouse and children
m Payment frequency, payment terms, option value, and maximum value determinedby the tax
m Option End Date—When the tax obligation ends
l To remove taxes, right-click, and then select Delete Employer-Paid Tax.
l To identify the monthly, quarterly, and annual effect of taxes on the budget, right-click,and then select View Budget Impact of Taxes.
3 Save.
4 See “Calculating and Allocating Compensation Expenses” on page 150 and “Viewing the Budget Impactof Compensation Expenses” on page 151.
Excluding Positions from Budget Calculations
Applies to the Position budget detail, and to the Position and Employee budget detail
You may need to temporarily exclude positions from budget calculations to perform “what-if”analysis based on their inclusion and exclusion. Positions that you exclude become inactive untilyou change their status.
ä To exclude positions from budget calculations:
1 Select View and then Basic Mode.
2 Perform the task for your budget detail:
l Expand Budget Preparation, select Manage position and employee data, and then selectMaintain position data.
l Select Maintain position data.
3 From Page, select the cost center or department that contains the position, and then click Go.
4 Right-click the first column, and then select Exclude Position from Budget.
5 Specify the dates between which to omit position expenses, and then click Exclude.
To include expenses for a position that was previously excluded from calculations, see“Maintaining Position Status” on page 143.
Copying Position DataWhen budgeting for departments that have similar positions, create positions more quickly bycopying common elements such as FTE, salary grades, and benefits from an existing position.
Maintaining Positions 145

ä To create a position by copying existing position data:
1 Expand Budget Preparation and Manage position and employee data, and then select Maintainposition data.
2 From Page, select the cost center or department, and then click Go.
3 Right-click the position, and then select Copy Position Data.
4 When prompted, select Yes for the elements to copy, such as allocations and assignments.
Performing Single Step TransfersPerform a single step transfer to transfer a position and its associated expenses from onedepartment to another in a single step. Because you must have access to the source and targetentities, Oracle recommends that an Administrator performs the transfer.
ä To perform a single step position transfer:
1 Select View, and then Basic Mode.
2 Expand Budget Preparation, and then select Maintain position data.
3 In the POV, select the Scenario, Version, and Year.
4 From Page, select the HR organization in which the position exists, and then click Go.
5 Right-click the position and then select Single Step Position Transfer.
6 Ensure that the correct position is selected, and then select the target cost center or department.
7 Click Transfer.
Reviewing Pending TransfersTransfer requests for employees whose managers have transferred them out of their currentposition, need to be approved. Approve transfers by transferring employees in. See “TransferringEmployees Into Positions” on page 136.
Deleting PositionsYou can only delete new and initialized positions.
ä To delete positions:
1 Select View and then Basic Mode.
2 Perform the task for your budget detail:
l Expand Manage position and employee data, and then select Maintain position data.
l Select Maintain position data.
3 In the POV, select the Year, Scenario, and Version.
146 Working with Human Capital Compensation Budgets

4 From Page, select the HR organization in which the position exists, and then click Go.
5 Right-click the position, and then select one:
l Delete position for a specific version—Delete the position from a particular budget.
l Delete position across all versions—Delete the position in all budgets.
6 Specify when to delete the position.
About Terminating PositionsAlthough you typically terminate positions so that the budget does not reflect default vacancyexpenses, you can also terminate new and unapproved positions, or positions filled in the futureby to be hired employees. Terminated positions remain in the dimensional structure and theHRMS. Position expenses accrued prior to termination are included in the budget.
Before terminating positions, determine if there are assigned employees. If there are, performany task:
l Reassign them to another position
l Remove their assignment to the current position
l Terminate them
Terminating Positions
ä To terminate positions:
1 Select View, and then Basic Mode.
2 Expand Manage position and employee data, and then select Maintain position data.
3 Select the Year, Scenario, or Version in the POV.
4 From Page, select the HR organization in which the position exists and then click Go.
5 Right-click the position, and then select Terminate Position.
6 Specify when to terminate the position.
Maintaining Positions 147

Maintaining Employees by Job or Position
Subtopics
l Viewing Employee Job Details
l About Filling Vacant Positions or Jobs
l Filling Vacant Positions or Jobs
l Reviewing and Accepting Pending Transfers
Viewing Employee Job Details
Applies only to the Employee budget detail
ä To view job details:
1 Select View and then Basic Mode.
2 Expand Budget Preparation.
3 Expand Manage employee data, and then select Maintain employees by job.
4 Right-click a job, select View Job Details, and then select the kind of data to view, such as Salary Gradesor Taxes.
About Filling Vacant Positions or Jobs You can fill vacancies with new hires or existing employees. Although assigning employees tovacant positions or jobs creates new employee records, information about previously heldassignments is retained.
Note:
l Although planners do not typically add employees, you may need to create a budget for jobsor positions that are not filled.
l Vacant job and position expenses are not applied to those in HRMS. However, compensationexpenses are always associated with employee that you may assign.
Filling Vacant Positions or Jobs
Applies to the Employee budget detail, and the Position and Employee budget detail
Perform these tasks to identify the budget impact of filling vacancies with new hires not in theHRMS or with existing employees.
ä To fill vacant positions or jobs:
1 Select View, and then Basic Mode.
148 Working with Human Capital Compensation Budgets

2 Expand Budget Preparation, and then select Manage employee data or Manage position andemployee data.
3 Select Fill to-be-hired vacancies.
4 From Page, select the cost center or department, and then click Go.
5 Right-click the vacancy, and then perform a task:
l To assign an existing employee instead of a prospective new hire, select Replace to beHired With Existing Employee, and then select the employee.
l To assign an employee that was transferred out of their original position so that theycan fill the position
m Select Single Step Employee Transfer or Transfer In an Employee.
m Specify the employee, confirm the position for the transfer, confirm the associatedcost center or department, and specify when the transfer is effective.
l To assign a prospective employee, right click, select Assign Employee, select Assign to behired, and then specify data such as:
m Enter Employee Number—Number assigned or generated for the employee
m Select Employee Type—Is the employee is a regular, contract, or temporary employee
m Select Pay Type—Non-exempt if the employee is paid hourly
m Enter FTE — Value typically between 0-1 that indicates if the employee is full timeor part time. Note that employee can have a full time FTE, but an FTE of 0.5 if theyare assigned to 2 positions or jobs. 1 normally indicates if the employee is full time,and less than 1 indicates part time.
m Enter Overtime Hours— To define overtime as an additional earning, instead ofcovering overtime with regular salary pay, see “Defining Overtime” on page 93.
The details of the employee filling the vacancy are displayed and can be modified.
Reviewing and Accepting Pending Transfers
Applies to the Employee budget detail, and the Position and Employee budget detail
Use this budget preparation task to view and approve requested transfers. Employees withpending transfers, must first be transferred out of their entity or department.
ä To review and approve pending transfers:
1 Select View, and then Basic Mode.
2 Expand Budget Preparation and Manage position and employee data or Manage employee data.
3 Select Review pending transfers.
4 Right-click an employee and then select Transfer In an Employee.
5 Specify the following:
Maintaining Employees by Job or Position 149

l Position to which to transfer the employee
l Associated cost center or department
l When to transfer the employee
6 Click Transfer In.
Calculating and Allocating Compensation ExpensesAfter calculating the compensation expense for a position, use the Total Position tab in theExpense portion of the position details data form to view the total aggregated values of thefollowing for all assigned employees:
l Basic salary
l Taxable compensation
l Gross Earnings
Use the Vacancy tab to display the basic salary, taxable compensation, and gross earning expensesfor positions without assigned employees.
ä To calculate period-level compensation detail expenses, and allocate them to General Ledgeraccounts:
1 Access the position or the employee details data form.
2 Select the tab for the kind of compensation to calculate (Benefit, Additional Earnings, and so on) andallocate.
3 In Expense, perform any task:
l Calculate period-level expenses for compensation in terms of basic salary, grossearnings, and taxable compensation by performing these tasks:
m For the Position budget detail or the Position and Employee budget detail, selectTotal Position.
If compensation expenses are already calculated, expand Total CompensationExpense.
m Right-click in the first column, and then select Calculate Compensation Expense.
l Calculate compensation expenses for the vacant portion of the position, selectVacancy, right-click, and then select Calculate Compensation Expense.
l Allocate compensation expenses to General Ledger accounts, by performing these task:
m Ensure that allocations defaults are defined, or that the chart fields or segments forallocations are specified on the Allocations tab.
m Right-click, and then select Allocate Compensation Budget to General LedgerAccounts.
150 Working with Human Capital Compensation Budgets

Allocate the vacant portion of position or employee expenses by selecting Vacancy,right-clicking, and then selecting Allocate Compensation Budget to General LedgerAccounts.
l View position and employee expenses by period after performing allocations by right-clicking, and then selecting View Allocated Expenses.
l To identify the annual, quarterly, or monthly impact of all assigned compensation detailson the budget, see “Viewing the Budget Impact of Compensation Expenses” on page151.
Viewing the Budget Impact of Compensation ExpensesAfter calculating compensation expenses for positions and employees, view the annual,quarterly, or monthly impact of all assigned salary grades, benefits, employer-paid taxes, andadditional earnings on the budget.
ä To view the budget impact of compensation expenses:
1 Select View, then Basic, and then select Budget Preparation.
2 Select the task for your budget detail:
l Maintain employees by job
l Maintain position data
l Maintain employees by position
3 Right-click positions or employees, and then select Edit position details or Edit employee details.
4 Select the tab for the kind of compensation expense whose budget impact to identify.
5 Right-click in the salary grade, benefit, tax, or additional earning in the first column, and then selectView Budget Impact of <expense>.
For example, to view, by period, the budget impact of all benefits assigned to a position, selectBenefits, right-click each benefit, and then select View Budget Impact of Benefits.
Viewing the Budget Impact of Compensation Expenses 151

152 Working with Human Capital Compensation Budgets

9Calculating, Reviewing, and
Allocating CompensationExpense Budgets
In This Chapter
Calculating Budgets .. . . . . . . . . . . . . . . . . . . . . . . . . . . . . . . . . . . . . . . . . . . . . . . . . . . . . . . . . . . . . . . . . . . . . . . . . . . . . . . . . . . . 153
Reviewing Expenses ... . . . . . . . . . . . . . . . . . . . . . . . . . . . . . . . . . . . . . . . . . . . . . . . . . . . . . . . . . . . . . . . . . . . . . . . . . . . . . . . . . . 154
About Allocating Compensation Expenses to General Ledger Accounts .. . . . . . . . . . . . . . . . . . . . . . . . . . . 156
Allocating Compensation Expenses to General Ledger Accounts .. . . . . . . . . . . . . . . . . . . . . . . . . . . . . . . . . . 157
Calculating BudgetsUse this procedure to calculate all employee and position expenses, by HR organization, thatreflect expenses and calculations for compensation elements such as benefits, FTE assignments,allocations, and vacancy expenses.
Note:
l Effective dating applies to all compensation types. For example, if a salary change is effectiveJune 5, 2012, other expenses are automatically calculated using this date.
l If benefit expenses are based on a percentage of total pay (bonuses and commissions forexample), benefits increase if the salary changes.
ä To calculate the compensation budget:
1 Ensure that FTE, salary grade, and allocation details are defined for the positions or employees whoseexpenses you want to calculate. This data must exist in order to calculate the budget. See “MaintainingJob Compensation Details” on page 121, “Maintaining Employee Compensation Details” on page128, or “Maintaining Position Compensation Details” on page 140.
2 Select View and then Basic Mode.
3 Expand Budget Preparation, and then select Calculate compensation budgets.
4 Accept the default rule selected, and then click Launch.
5 Specify the following to identify the budget to calculate:
l Scenario—Type of budget such as baseline or forecast
l Version—Budget stage (for example, worst case if the scenario is forecast)
l Entity —Depending on your access permissions, select the HR organization(department, bureau, or cost center, for example) for which to calculate budget
Calculating Budgets 153

expenses. Selecting a parent level entity member calculates the budget for all children.Select Total Entity to calculate expenses for your entire organization.
Note: To recalculate the budget to reflect a version revision made on an approved budget,select the revision member.
6 Click Launch.
Review the budget calculated for positions and employees and make necessary changes. See“Reviewing Expenses” on page 154, “Reviewing Position and Job Budgets” on page 154, and“Reviewing Employee Budgets” on page 155. To allocate the entire calculated compensationbudget for the entity, see “Allocating Compensation Expenses to General Ledger Accounts” onpage 157.
Reviewing Expenses
Subtopics
l Reviewing Position and Job Budgets
l Reviewing Employee Budgets
l Reviewing Compensation Element Budgets
l Reviewing FTE Assignments
Reviewing Position and Job BudgetsAfter compensation budgets are entered and expenses calculated, you can review position, job,employee, and compensation element expenses by year, quarter, and month. You can also reviewFTE assignments.
ä To review position or job compensation expenses:
1 Select View and then Basic Mode.
2 Expand Budget Preparation, and then select Review entity compensation budgets.
3 Select Review position budgets or Review budgets for jobs.
4 On the POV, select the Version, Year, and Scenario.
5 From Page, select the entity for the HR organization, and then click Go.
6 Confirm that the position or job expenses are correct.
7 To calculate the compensation budget for the position or job, right-click, select Calculate CompensationExpenses, select the position or job, and then click Calculate.
The annual, quarterly, and monthly expense of the position or job is displayed.
154 Calculating, Reviewing, and Allocating Compensation Expense Budgets

Note: If you perform changes such as adding new positions to which you assign employees,and do not calculate expenses, these changes are not displayed on the Review Budgetdata form. Calculate compensation expenses to ensure that all changes are includedand updated. In this case, this would include expenses for the new positions, andpossible vacancy reductions due to employee assignments.
8 To allocate position or job expenses to General Ledger accounts, right-click, select AllocateCompensation Budget to GL Accounts, and then see “Allocating Compensation Expenses to GeneralLedger Accounts” on page 157.
Reviewing Employee Budgets
Does not apply to the Position budget detail
ä To review employee budgets:
1 Select View and then Basic Mode.
2 Expand Budget Preparation and Review entity compensation budgets.
3 Select Review employee budgets.
4 On the POV, select the correct Version, Year, and Scenario
5 From the Page, select the entity for the HR organization, and then click Go.
The annual compensation expense for each existing, new, and to be hired employee isdisplayed. The annual total compensation expense for all employees is also displayed.
6 If it is not already expanded, expand Year Total to list employee expenses by quarter. Expand theQuarter headers to list expenses by month.
Note: If you perform changes such as adding new positions to which you assign employees,and do not calculate expenses, these changes are not displayed on the Review Budgetdata form. Calculate compensation expenses to ensure that all changes are includedand updated. In this case, this would include expenses for the new positions, andpossible vacancy reductions due to employee assignments.
7 To calculate the compensation expenses associated with individual or types (existing and to be hired,for example) of employees, right-click, and then select Calculate Compensation Expense.
8 To allocate the entire entity compensation budget to General Ledger accounts, see “AllocatingCompensation Expenses to General Ledger Accounts” on page 157.
Reviewing Compensation Element Budgets
ä To review compensation element expenses:
1 Select View and then Basic Mode.
2 Expand Budget Preparation and Review entity compensation budgets.
Reviewing Expenses 155

3 Select Review element budgets.
4 On the POV, select the correct Version, Year, and Scenario.
5 From the Page, select the entity for the HR organization, and then click Go.
Compensation expenses are displayed by employee and their assigned job or position. Thetotal of each compensation element is displayed for Total Employees at the bottom of thedata form.
6 If it is not already expanded, expand Year Total to list expenses by quarter. Expand Quarter to listexpenses by month.
7 Confirm that the benefit, additional earning, tax, and salary expenses for each employee are correct.
Reviewing FTE Assignments
ä To review FTE assignments:
1 Select View and then Basic Mode.
2 Expand Budget Preparation and Review entity compensation budgets.
3 Select Review FTE assignments.
4 On the POV, select the correct Version, Year, and Scenario.
5 From the Page, select the entity for the HR organization, and then click Go.
The FTE capacity, proposed FTE, and assigned FTE is displayed for each job or position.
6 For the Employee budget detail, click the second tab to view:
l Proposed FTE
l Existing FTE
l Approved FTE
l Unapproved FTE
7 To change FTEs, see“Managing and Specifying FTE ” on page 129 and “Maintaining Position FTE ” onpage 141.
8 To approve FTEs, see “Approving Period-Level FTEs ” on page 162.
About Allocating Compensation Expenses to GeneralLedger AccountsAfter changing employee, position, jobs, FTE, and other compensation data, and recalculatingthe compensation budget, allocate compensation expenses to General Ledger account segmentsor chart fields:
l For all, or individual, entities. Allocating to Total Entity enables you to take one action toallocate all expenses in your cost center instead of taking multiple actions to allocate forpotentially hundreds of positions and employees.
156 Calculating, Reviewing, and Allocating Compensation Expense Budgets

l For all, or individual, jobs or positions in an entity
l For all, or individual, employees in an entity
For example, to allocate only for new positions in a department, select the following on theAllocate Expenses to GL Accounts data form:
l Select Entity—Department
l Select Positions—Total New Positions
To allocate for all existing employees in your entire organization, select:
l Select Entity—Total Entity
l Select Employees—Total Employees
Note: The entity you can select for which to allocate expenses, depends on your accesspermissions.
Allocating Compensation Expenses to General LedgerAccounts
ä To allocate compensation to General Ledger accounts:
1 Select View and then Basic Mode.
2 Expand Budget Preparation, and then select Allocate compensation to General Ledger accounts.
3 Accept the default business rule, and then click Launch.
4 Select members based on the allocations to make. For example, to allocate for all employees holdingthe job or position of Fire Chief in the New Haven municipal fire department, select:
l Scenario—Type of budget, such as baseline or forecast from which to make allocations
l Version—Budget stage, such as worst case or best case from which to make allocations
l Select Entity—New Haven Fire
l Select Employee—Total Existing Employees
l Select Position or Select Job Code–Fire Chief
5 Click Launch.
6 Push compensation expenses on the HCP plan to Plan 1, 2, or 3 to update the line item budget. See“Populating the Line Item Budget” on page 73.
Allocating Compensation Expenses to General Ledger Accounts 157

158 Calculating, Reviewing, and Allocating Compensation Expense Budgets

10Reviewing and Approving
Budgets
In This Chapter
About Approving Compensation ... . . . . . . . . . . . . . . . . . . . . . . . . . . . . . . . . . . . . . . . . . . . . . . . . . . . . . . . . . . . . . . . . . . . . . 159
About Submitting Budgets for Approval .. . . . . . . . . . . . . . . . . . . . . . . . . . . . . . . . . . . . . . . . . . . . . . . . . . . . . . . . . . . . . . 159
Prerequisites.. . . . . . . . . . . . . . . . . . . . . . . . . . . . . . . . . . . . . . . . . . . . . . . . . . . . . . . . . . . . . . . . . . . . . . . . . . . . . . . . . . . . . . . . . . . . . 160
Approving Positions, Jobs, and Employee FTE and Compensation .. . . . . . . . . . . . . . . . . . . . . . . . . . . . . . . . 160
Submitting Budgets for Approval .. . . . . . . . . . . . . . . . . . . . . . . . . . . . . . . . . . . . . . . . . . . . . . . . . . . . . . . . . . . . . . . . . . . . . . 163
About Approving CompensationCompensation budget approval is based on positions or position-employee assignments, andthe budget is calculated based on approved FTEs and compensation expenses. You need approveonly Employee FTE assignments; not individual employees, because approving an employee'sFTE automatically approves the employee. Similarly, rejecting an FTE rejects an employee'sassignment to a position. Before submitting budgets to the approval hierarchy for overallapproval, perform these tasks:
l Calculate budgets to aggregate positions, vacancy, and employee expenses
l Confirm and approve compensation expenses such as:
m FTEs for employees or positions
m Compensation elements such as additional earnings and benefits
Note: To prevent users from approving and submitting budgets, revoke access to the Approvaldata form and task list.
About Submitting Budgets for ApprovalSupervisors or managers can submit all or individual HR entity budgets as Planning units forapproval. Budgets in Planning units are reviewed and validated based the defined user hierarchy.When Planning units are submitted, data is validated and becomes read-only for users all exceptthe next owner or reviewer in the approval hierarchy.
See “Starting the Review Process ” in the Oracle Hyperion Planning User's Guide and “SubmittingBudgets for Approval” on page 163.
About Approving Compensation 159

PrerequisitesManagers and supervisors cannot submit budgets for overall approval in Planning until:
l All pending transfers are resolved. See “Reviewing Pending Transfers” on page 146.
l All positions, jobs, employees, and associated FTE assignments and compensation detailsare calculated and approved in Public Sector Planning and Budgeting.
l An administrator defines Planning units for budgets by specifying the scenario, version, andentity. For example, to submit the budget for the Department of State Police to the stateGovernor, create a planning unit that specifies:
m Version—Governor
m Entity—Department of State Police
m Scenario—Budget
Note: To include transfers, Generic Entity must be defined in Planning units.
l An administrator specifies the Planning unit owners and reviewers in the budgetpromotional and approval hierarchy.
Approving Positions, Jobs, and Employee FTE andCompensation
Subtopics
l Approval Options
l Approving Positions
l Approving Jobs
l Approving Employee Assignments to Positions
l Approving Period-Level FTEs
Approval OptionsUse these options to approve or reject FTE assignments and compensation for employees, jobsand positions:
l Approved—Accept the associated FTE and compensation
l Rejected— FTE and compensation settings must be modified
l Approve FTE, Reject Compensation—Accept the associated FTE, but indicate that thecompensation settings must be modified
l Reject FTE, Approve Compensation—Accept the compensation settings but indicate thatFTE assignments must be modified
l Approve for all employees:
m Yes—Accept the FTE and compensation details for all employees assigned to a position
160 Reviewing and Approving Budgets

m No—Approve employee expenses individually at the employee level
Approving Positions
ä To approve or reject positions:
1 Select View and then Basic Mode.
2 Expand Budget Preparation and then select Review and approve positions.
3 On the POV, select the correct Version, Time period, and Scenario
4 From Page, select the HR organization with which the position is associated, and then click Go.
5 To specify missing or invalid data displayed in red, select Maintain position data, right-click positions,and select Edit Position Details.
6 Right-click positions, select Approve, and then specify:
l Select Year—Fiscal year in which to approve positions. To approve positions in multiplebudget years, specify the year range as follows: Yx:Yx. For example FY09:FY11.
l Approval Status—See “Approval Options” on page 160.
7 To recalculate compensation expenses, right-click, and then select Calculate Compensation Expense.
8 To allocate expenses to the General Ledger accounts, right-click, and then select Allocate CompensationBudget to GL Accounts.
Approving Jobs
ä To approve or reject jobs:
1 Select View and then Basic Mode.
2 Expand Budget Preparation, and then select Review and approve employee budget details.
3 On the POV, select the correct Version, Time period, and Scenario.
4 From Page, select the HR entity, and then click Go.
5 Specify missing or invalid data displayed in red by selecting Maintain employees by job, right-clickingemployees, and then selecting Edit Employee Details.
6 After specifying missing data, save, and then select Review and approve employee budget details page.
7 Right-click jobs, select Approve, and then specify:
l Job Code
l Select Year—Fiscal year in which to approve positions. To approve positions in multiplebudget years, specify the year range as follows: Yx:Yx. For example FY10:FY12.
l Approval Status—See “Approval Options” on page 160.
8 To recalculate compensation expenses, right-click, and then select Calculate Compensation Expense.
Approving Positions, Jobs, and Employee FTE and Compensation 161
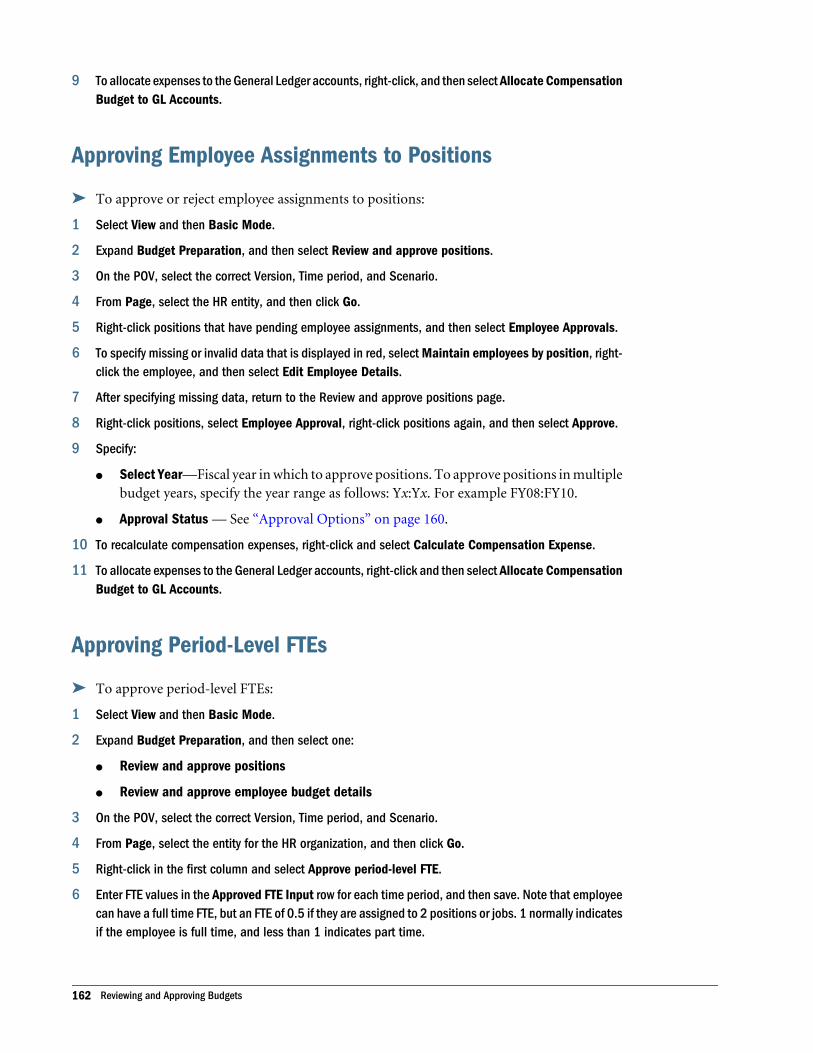
9 To allocate expenses to the General Ledger accounts, right-click, and then select Allocate CompensationBudget to GL Accounts.
Approving Employee Assignments to Positions
ä To approve or reject employee assignments to positions:
1 Select View and then Basic Mode.
2 Expand Budget Preparation, and then select Review and approve positions.
3 On the POV, select the correct Version, Time period, and Scenario.
4 From Page, select the HR entity, and then click Go.
5 Right-click positions that have pending employee assignments, and then select Employee Approvals.
6 To specify missing or invalid data that is displayed in red, select Maintain employees by position, right-click the employee, and then select Edit Employee Details.
7 After specifying missing data, return to the Review and approve positions page.
8 Right-click positions, select Employee Approval, right-click positions again, and then select Approve.
9 Specify:
l Select Year—Fiscal year in which to approve positions. To approve positions in multiplebudget years, specify the year range as follows: Yx:Yx. For example FY08:FY10.
l Approval Status — See “Approval Options” on page 160.
10 To recalculate compensation expenses, right-click and select Calculate Compensation Expense.
11 To allocate expenses to the General Ledger accounts, right-click and then select Allocate CompensationBudget to GL Accounts.
Approving Period-Level FTEs
ä To approve period-level FTEs:
1 Select View and then Basic Mode.
2 Expand Budget Preparation, and then select one:
l Review and approve positions
l Review and approve employee budget details
3 On the POV, select the correct Version, Time period, and Scenario.
4 From Page, select the entity for the HR organization, and then click Go.
5 Right-click in the first column and select Approve period-level FTE.
6 Enter FTE values in the Approved FTE Input row for each time period, and then save. Note that employeecan have a full time FTE, but an FTE of 0.5 if they are assigned to 2 positions or jobs. 1 normally indicatesif the employee is full time, and less than 1 indicates part time.
162 Reviewing and Approving Budgets

7 Right-click the Approved FTE Input row, and then select Approve.
8 Specify:
l Fiscal year in which to approve the FTE. To approve FTE in multiple budget years,specify the year range as follows: Yx:Yx. For example FY10:FY13.
l An approval status. See “Approval Options” on page 160.
9 To recalculate compensation expenses, right-click and select Calculate Compensation Expense.
10 To allocate expenses to the General Ledger accounts, right-click and then select Allocate CompensationBudget to GL Accounts.
Submitting Budgets for Approval
ä To submit budgets for Approval:
1 Satisfy the requirements in “About Submitting Budgets for Approval” on page 159.
2 Select View and then Advanced Mode.
3 Select Administration, then Approvals, and then Planning Unit Hierarchies.
4 See Chapter 10 of the Oracle Hyperion Planning User's Guide to continue with the submission.
Submitting Budgets for Approval 163

164 Reviewing and Approving Budgets

11Revising Budgets
In This Chapter
Constraining Revisions ... . . . . . . . . . . . . . . . . . . . . . . . . . . . . . . . . . . . . . . . . . . . . . . . . . . . . . . . . . . . . . . . . . . . . . . . . . . . . . . . 166
Requirements... . . . . . . . . . . . . . . . . . . . . . . . . . . . . . . . . . . . . . . . . . . . . . . . . . . . . . . . . . . . . . . . . . . . . . . . . . . . . . . . . . . . . . . . . . . 166
Creating Revision Requests .. . . . . . . . . . . . . . . . . . . . . . . . . . . . . . . . . . . . . . . . . . . . . . . . . . . . . . . . . . . . . . . . . . . . . . . . . . . . 167
Specifying Revision Data ... . . . . . . . . . . . . . . . . . . . . . . . . . . . . . . . . . . . . . . . . . . . . . . . . . . . . . . . . . . . . . . . . . . . . . . . . . . . . . 168
Recalculating Expenses and Submitting Revision Requests for Approval .. . . . . . . . . . . . . . . . . . . . . . . . . 169
About Modifying Revisions ... . . . . . . . . . . . . . . . . . . . . . . . . . . . . . . . . . . . . . . . . . . . . . . . . . . . . . . . . . . . . . . . . . . . . . . . . . . . 169
Using Drafts .. . . . . . . . . . . . . . . . . . . . . . . . . . . . . . . . . . . . . . . . . . . . . . . . . . . . . . . . . . . . . . . . . . . . . . . . . . . . . . . . . . . . . . . . . . . . . 169
After budgets for the current year are closed and posted to the HRMS, you can submit requeststo update data for approved budgets using revision requests. Revisions are performed usingR(x) members that Administrators create in the Revision parent of the Version dimension. Toensure that revisions comply with your fiscal policies, create and apply validation rules torevisions. See “Creating and Updating Data Validation Rules” in the Oracle Hyperion PlanningAdministrator's Guide.
Revisions are defined by transaction type (adjustment and transfer, for example) when used tomodify employee compensation. You can apply revisions as temporary or permanent changes,to:
l Individual or multiple budget years, positions, and employees
l Individual or multiple entity budgets
l Employee compensation expenses, including vacancies, updated assignments, and transfer
Sample revisions:
l Modifying tax information compensation elements assigned tor positions
l Updating salary elements such as the salary value or grade for a position
Note: After modifying position and employee data as part of a revision, recalculate the revisionbefore submitting it to the next Planning unit owner on the promotional path forapproval.
165

Constraining RevisionsAdministrators can create validation rules to ensure that budget revisions comply with fiscalpolicies. For example, apply validation rules only to permanent revisions, which are relevant tocurrent and future budgets. You can also use validation rules to:
l Restrict revisions by defining the maximum FTE at the overall position level or at the detaillevel
l Restrict salaries by a percentage or by a value
If revisions violate validation rules, correct the violations so planners can submit revisions.
RequirementsBefore performing revisions, or whenever the baseline budget changes, copy data from theapproved budget (the Budget scenario and the Final version, for example) to:
l The Baseline Budget (scenario)
l The Baseline Revision (version)
ä Before creating revisions:
1 Ensure that members for the revision exist in the Version dimension. Administrators can create as manyrevision members as required.
2 Important: If adjustments in the HRMS and General Ledger affect the approved budget, load the updateddata into your application using the following before copying data.
l Version—Current
l Scenario—Baseline Budget
3 Select View, and then Advanced Mode.
4 Select Administration, then Manage, and then Copy Data.
5 In Plan Type, select HCP, and then click Go.
6 In Static Dimensions, specify:
l Account—IDescendants(Account)
l Element—IDescendants(Element)
l Period—Descendants of period, including BegBalance
l Year—NoYear
l Budget Item— IDescendants(Budget Item)
l Entity—Descendants(Entity)
l Employee—Descendants(Employee)
l Position—Descendants(Position)
166 Revising Budgets

Tip: Click Add Dimension to specify members for all the dimensions that you use such asJob Code.
7 In Dimensions with Source and Destination, select:
l Source—Scenario and version of the existing and approved budget
l Destination—Baseline Budget (scenario) and Baseline Revision (version) members
8 Indicate whether you want to also copy supporting details, attachments, and so on, and then click CopyData.
9 In Public Sector Planning and Budgeting, expand Budget Preparation, and then select Calculatecompensation budget.
10 Accept the default business rule, click Launch, and then specify:
l Scenario—Baseline budget
l Version—Baseline revision
l Entity—Descendants(Total Entity)
11 Click Launch.
Creating Revision Requests
ä To create revision requests:
1 See “Requirements” on page 166.
2 Select View and then Basic Mode.
3 Expand Budget Preparation, and then select Manage revision requests.
4 In the POV, select the year.
5 From Page, select the HR entity, and then click Go. To enable revisions to child entities, select theirparent entity.
6 To create revisions, right-click, select Create Revision, and then specify the following:
l The entity (department or cost center) and scenario in which to make the revision
l Transaction Type:
m Transfer— Move compensation expenses to another account by changingallocations.
m Revision—Apply major changes, such as modifying position expenses by addingcompensation elements that began midyear, such as Group Insurance.
m Adjustment—Apply minor changes, such as increasing municipal compensationallowance by 5%.
l Justification—Reason for the revision
l Human resource budget—The HR budget referenced
l Revision source:
Creating Revision Requests 167

m Yes—Source data was loaded into Planning from a commitment control system thattracks encumbrances, such as purchase requests
m No—Source data was not loaded from a commitment control system
l Permanent Option—Yes to include revisions in the current and future budgets. No toinclude revisions only in the current budget.
7 Click Create.
8 Right-click the revision, select Populate Revision, and then make a selection for your budget type:
l By Position Properties—Make position changes
l By Job and Employee Properties—Make employee or job changes
l By Entity—Make changes to employees, jobs, positions, or compensation elements inan HR organization
l By Salary Grades—Make salary grade changes
9 Click Run.
10 See “Specifying Revision Data” on page 168.
Specifying Revision Data
ä To specify revision data:
1 On the Manage revision requests data form, right-click the revision, and then select Edit CompensationRevision.
2 Modify position, employee, job, salary, and compensation data by performing tasks such as:
l To modify position, job, or employee data, right-click the employee, position, or job onthe Manage Revision Requests data form, and then select the appropriate menu option.
For example, to use a revision request to adjust the salary for a Publication Managerposition, right-click the position, select Edit position details, select Salary Grades, andenter the new override option value. See “Maintaining Position Compensation Details”on page 140 or “Maintaining Employee Compensation Details” on page 128.
l To modify a salary grade, select Budget Administration, and then Manage Salary Grades.Change the salary grade, and then, if necessary, run a mass update. See “Managing SalaryGrades” on page 84 and “Performing Mass Updates” on page 99.
3 Recalculate the budget to reflect your changes by right-clicking in the Expense table and selectingCalculate Compensation Expense.
4 See “Recalculating Expenses and Submitting Revision Requests for Approval” on page 169.
168 Revising Budgets

Recalculating Expenses and Submitting RevisionRequests for ApprovalAfter making revisions, recalculate the overall budget to review updated data before submittingrevision requests for approval.
ä To calculate revisions:
1 Select Budget Preparation, and then Manage revision requests.
2 Right-click revisions, and then select Recalculate Revision.
3 Select a position or employee, and then click Calculate.
4 In Revision Amount, review the updated budget expense displayed.
5 See Chapter 10, “Reviewing and Approving Budgets” and Chapter 10 of the Oracle Hyperion PlanningUser's Guide to submit the revision.
About Modifying RevisionsUsing the scenario and version for the revision, you can perform all position and employeemanagement tasks such as the following while modifying revisions:
l Edit position details
l Edit employee details
l Terminate positions
l Exclude positions from the budget
l Add positions
l Perform mass adjustments to compensation data
Using DraftsYou can save an incomplete budget revision request and retrieve it later to make changes. If thebudget policy permits, approvers can modify revision requests. After you submit revisionshowever, requests are locked, and only administrators can modify them.
Recalculating Expenses and Submitting Revision Requests for Approval 169

170 Revising Budgets

12Using Reports and Budget Books
In This Chapter
About Budget Books... . . . . . . . . . . . . . . . . . . . . . . . . . . . . . . . . . . . . . . . . . . . . . . . . . . . . . . . . . . . . . . . . . . . . . . . . . . . . . . . . . . 171
Predefined Reports .. . . . . . . . . . . . . . . . . . . . . . . . . . . . . . . . . . . . . . . . . . . . . . . . . . . . . . . . . . . . . . . . . . . . . . . . . . . . . . . . . . . . . 171
Using Budget Data in Financial Reporting ... . . . . . . . . . . . . . . . . . . . . . . . . . . . . . . . . . . . . . . . . . . . . . . . . . . . . . . . . . . 173
About Budget BooksCreate budget books to present, in the structure, style, and sequence of your choice, yourorganization's budget data including all salary and compensation details and changes, strategicproposals, capital requirements, and other significant expenses. Budget books detail the revenueand capital budgets approved by the appropriate authority for the proposed fiscal year, andprovide all associated financial and operational data. After the budgeting process ends, publishbudget books as PDFs or as HTML on internal or public Web sites, enabling employees and thegeneral public to drill-down on links to access budget details and track expenditures.
Budget books enable you to:
l Insert and arrange Financial Reporting reports providing a variety of compensation budgetdata
l Insert and arrange Microsoft Word and Microsoft Excel files, and links to externaldocuments as attachments; providing supplemental information
l Insert and arrange Planning attachments
l Export the book to PDF or HTML format
Note: If you modified the application dimensions, update reports accordingly.
For more information, see the Oracle Hyperion Financial Reporting Workspace Administrator'sGuide, and the Oracle Hyperion Financial Reporting Workspace User's Guide.
Predefined ReportsYou can access these predefined Financial Reporting reports in this Oracle EnterprisePerformance Management Workspace, Fusion Edition folder:
application/Human Capital Planning
About Budget Books 171

Report Description In the Positionand EmployeeBudget Detail
In the PositionBudget Detail
In the EmployeeBudget Detail
Vacant Position Expense Displays all vacant positions, andtheir associated compensationexpenses for a given year byperiod. Positions withoutcompensation expenses are notdisplayed.
Yes No No
Employment Levels Totals the current and proposednumber of employees by entity, intabular and pie chart format.
Yes No Yes
Vacant Positions Displays all vacant positions,their numbers, and compensationdetails and expenses by year,quarter, and month. Positionswithout compensation expensesare not displayed.
Yes Yes No
Position Adjustments Lists changes in positionproperties, employeeassignments, assignment dates,FTE changes, salary details, taxes,benefits, and additional earnings.
Yes Yes No
FTE and Headcount by Position Summarizes, by entity, the FTE,headcount (if available), andassociated compensationexpenses by year.
Yes Yes No
FTE and Headcount by Job Summarizes, by entity, the FTE,headcount (if available), andassociated compensationexpenses by year.
No No Yes
New Position Costing Impact by Entity Summarizes the new positionsexpenses by entity for the currentand forecast year.
Yes Yes No
Position-Employee Associations Summarizes all employee-position assignments, includingthe job, position, and availableFTE.
Yes No No
Stage Variance for Positions Summarizes, for all positions inan entity, the requested and finalFTE and compensation expenses,including the amount and percentchange between the stages.
Yes Yes No
Stage Variance for Jobs For all employees in an entity,summarizes the requested andfinal FTE and compensationexpenses, including the amountand percent change between thestages.
No No Yes
172 Using Reports and Budget Books

Report Description In the Positionand EmployeeBudget Detail
In the PositionBudget Detail
In the EmployeeBudget Detail
Position Costing Summarizes, by entity, allcompensation expenses byposition for the current year
Yes Yes No
New Employee Impact Summarizes new employeecompensation expenses
No No Yes
Employee Expenses Summarizes employeecompensation expenses.
No No Yes
Employee Adjustments Summarizes adjusted employeeexpenses.
No No Yes
Employee-Job Association Summarizes the details of allemployee-job associations byentity.
No No Yes
Using Budget Data in Financial ReportingAdministrators can map dimensions between Public Sector Planning and Budgeting and ASOreporting applications. This enables you report on budget data using Financial Reporting. Forexample, administrators can aggregate and analyze dimensions and Smart Lists to:
l List all employees funded from Project 2221010 (Office of Infrastructure Development)
l Identify the total salary expense of Program 400 (Bureau of Debt Assistance)
l Identify the final salary expense for business unit 00300 (Department of Agriculture)
Report on different aspects and combinations of budget data by selecting members. Commonmember selections enable you to view reports such as:
l Pooled positions
l Vacant positions
l Headcount and FTE by position
l Submission status
l Budget revision summaries
Tip: To capture more budget data for use in reports, increase the default maximum length fortext values and comments in cells. See “Setting the Maximum Length for Text Values andComments ” in the Oracle Hyperion Planning Administrator's Guide.
For information about using Public Sector Planning and Budgeting data in ASO applicationsfor reporting, see Chapter 5, “Configuring the Line Item Budget.”
Using Budget Data in Financial Reporting 173

For information about Financial Reports, see the Oracle Hyperion Financial Reporting WorkspaceAdministrator's Guide or the Oracle Hyperion Financial Reporting Workspace User's Guide.
174 Using Reports and Budget Books

P a r t I I I
Appendixes
In Appendixes:
l Loading Metadata and Data Using the Outline Load Utilityl Updating Public Sector Planning and Budgeting Applications From a Previous Releasel Updating Business Rules After Changing Predefined Smart Lists
Appendixes 175

176 Appendixes

ALoading Metadata and Data
Using the Outline Load Utility
In This Appendix
Requirements and Recommendations ... . . . . . . . . . . . . . . . . . . . . . . . . . . . . . . . . . . . . . . . . . . . . . . . . . . . . . . . . . . . . . . 177
About Load Files .. . . . . . . . . . . . . . . . . . . . . . . . . . . . . . . . . . . . . . . . . . . . . . . . . . . . . . . . . . . . . . . . . . . . . . . . . . . . . . . . . . . . . . . . 180
Loading Metadata and Data ... . . . . . . . . . . . . . . . . . . . . . . . . . . . . . . . . . . . . . . . . . . . . . . . . . . . . . . . . . . . . . . . . . . . . . . . . . 182
Testing Load Files .. . . . . . . . . . . . . . . . . . . . . . . . . . . . . . . . . . . . . . . . . . . . . . . . . . . . . . . . . . . . . . . . . . . . . . . . . . . . . . . . . . . . . . . 200
Verifying Data Loads... . . . . . . . . . . . . . . . . . . . . . . . . . . . . . . . . . . . . . . . . . . . . . . . . . . . . . . . . . . . . . . . . . . . . . . . . . . . . . . . . . . 201
Running Load Files .. . . . . . . . . . . . . . . . . . . . . . . . . . . . . . . . . . . . . . . . . . . . . . . . . . . . . . . . . . . . . . . . . . . . . . . . . . . . . . . . . . . . . 203
Use the following procedures load metadata and data to classic Planning applications.
Requirements and Recommendations
Note: Oracle strongly recommends that you create and test CSV load files using a copy of thecurrent application in a development or test environment. After confirming that the loadfiles load data correctly, run them in your production environment.
Before using the Outline Load Utility, perform these tasks:
l Ensure that you maintain the line breaks in the sample code provided that you modify todefine load files. Although you can use a text editor, Oracle recommends that you use aspreadsheet program (such as Microsoft Excel) to customize the sample code, because sometext editors may remove the necessary line breaks.
l Back up the application and application databases. See the Oracle Hyperion EnterprisePerformance Management System Backup and Recovery Guide.
l Set DIRECT_DATA_LOAD and DATA_LOAD_FILE_PATH as described in Chapter 5 of theOracle Hyperion Planning Administrator's Guide.
l Identify the Smart Lists that you must load. See “Required Smart Lists ” on page 48.
l Ensure that the data load settings are correct. See “Data Load Settings” on page 44.
l If you modify dimensions and Smart List entries, refresh the database.
l Ensure that you defined child members for the required dimension parent members. See“Reviewing the Dimensional Structure” on page 178.
Requirements and Recommendations 177

l Identify the member names and entry names associated with Smart Lists. You specify thesenames in data load files. See “Identifying Smart List and Entry Names” on page 179.
Important: Load metadata first; and then data. Run load files in the order specified in “RequiredData Load File Run Order” on page 181.
Reviewing the Dimensional StructureBefore loading data, ensure that you defined child members for the following dimensions andparent members. If you modified the dimensional outline, synchronize Smart Lists withdimension members and refresh the database before using the Outline Load Utility.
Note: You need not define the child members displayed below. These members are used in thesample load files, and are not required.
Table 25 Required Dimensionality and Sample Children
Dimension Parent Member Sample Child Members and Smart List Entries
Scenario Forecast and Current.
Note: Select BegBalance
Version Stage 1Stage 2
Position Total Existing Positionsl Mrk_4
l Admin_12
l Fac_Mngr
l survey_2
l education_hs_snr
l prk_sec_pa
l Fire_1
l Instructor
Employee Existing Employeesl Fergusson, Deborah
l Day, John
l Daniels, Mark
l MacKay, Derek
l Wu, Jonathan
Entity Total Entityl tourism
l dept_tourism
l Parks and Recreation
l Department of Conservation
l Yorkville_Lib
178 Loading Metadata and Data Using the Outline Load Utility

Dimension Parent Member Sample Child Members and Smart List Entries
Element Compensation elements:
l Benefits
l Salary grades
l Employer-paid taxes
l Additional earnings
l Benefits:
m Benefit 5
m benefit_1
m Dental
l Salary Grades
m Grade 1
m Grade 2
l Employer-paid taxes:
m Medicare
m SUTA
Accountl Personnel Expenses
l General Ledger accounts
l Personnel Expenses
m A100
m A120
l General Ledger accounts
m 600
m 601
Job Total Job Classl entry Faclty_Cor
l job_56
Identifying Smart List and Entry NamesBefore loading Smart Lists and Smart List values, note the associated member names and entrynames. To load Smart Lists, you enter their names in the Smart List Name column of the dataload file. To load Smart List values, you enter the corresponding entry names in the Entry Namecolumn of the data load file.
ä To identify Smart List entry names:
1 Select View, then Administration, then Manage, and then Smart Lists.
2 Select the Smart List, click Edit, and then select Entries.
3 Note the associated names.
Requirements and Recommendations 179

About Load Files
Subtopics
l Required Data Load File Run Order
l About Creating Load Files and Verifying Loads
The first line in load file contains the header record columns that identifies the memberproperties and kinds of values to load. These are always budget item, data load cube name, Point-Of-View, and the kind of data to load. For example, this header record indicates that FTE datais being loaded:
Budget Item,Data Load Cube Name,Point-of-View,Proposed FTE,FTE Start Date,FTE End Date
The Point-of-View column contains information about the budget to which to load data (stageand version), and the artifacts to which you are loading data, or that are associated with the datayou load (entity, position, employee and so on). Remove the placeholders provided (Entity1,Stage 1 and so on) to identify your budget and artifacts.
LINEITEM determines whether the kind of data that you want to load already exists. If it doesnot, a new record is loaded. If it does exist, it is updated with the new data you load. Forinformation about using LINEITEM to run incremental loads, see “Command Line Parameters”in Chapter 5 of the Oracle Hyperion Planning Administrator's Guide. The remaining portion ofdata load files contain the metadata records . These are comma-separated lists of the data orvalues to load, and which represent Smart List selections in applications.
This is a sample portion of a data load file:
<LINEITEM("FTE and Status Assignments")>,HCP,"BegBalance,Local,Unspecified Element,Forecast,Stage 2,HR,No Year,Deborah Ferguson,Admin_Asst",1,01-01-2011,12-31-2012
You will replace the placeholders in the sample code (Budget, Stage 1, Entity1, Employee1 andso on) with the version and scenario of the budget to which you are loading data (Forecast Stage2, for example). You will also specify the appropriate entity (Human Resources, for example),and the applicable employees or positions. For example, this code loads the following FTEassignment data for employee1 in Entity1:
Budget Item,Data Load Cube Name,Point-of-View,Proposed FTE,FTE Start Date,FTE End Date<LINEITEM("FTE and Status Assignments")>,HCP,"BegBalance,Local,Unspecified Element,Forecast,Stage 2,HR,No Year,Deborah Ferguson,Admin_Asst",1,01-01-2011,12-31-2012
When run, this file loads the following to stage 2 of the forecast budget for Deborah Fergusson,an Administrative Assistant in Human Resources:
l A proposed FTE of 1
180 Loading Metadata and Data Using the Outline Load Utility

l The FTE start date as January 1, 2011
l The FTE end date as December 31, 2012
See “Loading Metadata and Data” on page 182.
Required Data Load File Run OrderTo ensure that your source data loads correctly, load artifacts in this order:
l Smart Lists
l Salary grades and salary grade details
l Compensation elements such as benefits and additional earnings
l Employees, positions, and jobs
l FTE and employee assignments
l Allocation details
See “Loading Metadata and Data” on page 182.
About Creating Load Files and Verifying Loads
Note: Before loading salary grades, compensation elements, positions, and employees, load therequired and optional Smart Lists.
ä Perform these tasks to create and verify data load files:
1 See “Requirements and Recommendations” on page 177.
2 Create a file in a tool such as Microsoft Excel. Note: Although you can use a text editor, it is best to usea spreadsheet program (such as Microsoft Excel) to customize the sample code, because some texteditors may not maintain the necessary line breaks.
3 Copy and paste the code provided for the data you want to load (see the appropriate topic in “LoadingMetadata and Data” on page 182) into the file
4 Modify the code to specify the data that you want to load and the budget in which to load it, and saveas a CSV file.
In addition to specifying the member values to load, and modify variable placeholders suchas Position1, Employee1, and Entity1, you can also customize the sample code by removing:
l Placeholders for inapplicable data or data that you do not want to load without deletingthe comma after the placeholder. For example, to load a start date of January 1, 2011but to not load an end date, delete the end date but not the comma. For example,01-01-2011,, is correct; 01-01-2011, is not.
l Budget scenario and version used in the sample code with your actual budget scenarioand version members
About Load Files 181

l Local if you are not using a mutlicurrency application
l Vacancy (for the Position budget detail, and the Employee budget detail)
5 Save the file in CSV format.
6 Perform a test run of the file, and then ensure that the correct metadata or data displays in theapplication. See “Testing Load Files” on page 200 and “Verifying Data Loads” on page 201.
7 After verifying files load data correctly, run them in your production environment. See “Running LoadFiles ” on page 203.
Loading Metadata and Data
Subtopics
l Loading Smart Lists and Smart List Values
l Loading Salary Grade Details
l Loading Salary Grade Detail Lines
l Loading Compensation Elements
l Loading Element Detail Lines
l Loading Employee Information
l Loading Position Information
l Loading Employee-Position Associations
l Loading Position FTE Information
l Loading Employee FTE Information
l Loading Position Salary Grade Information
l Loading Employee Salary Grade Information
l Loading Position Compensation Information
l Loading Employee Compensation Information
l Loading Position Allocation Information
l Loading Employee Allocation Information
l Loading Job Information
l Loading Employee Job Assignments and Details
Loading Smart Lists and Smart List ValuesBefore loading Smart Lists and Smart List values, identify the associated member and entrynames. To load Smart Lists, you specify their name in the Smart List Name column of the dataload file. To load Smart List values, you enter the corresponding entry name in the Entry Namecolumn in the data load file.
ä To load Smart Lists and entries:
1 Note the associated member and entry names. See “Identifying Smart List and Entry Names” on page179.
182 Loading Metadata and Data Using the Outline Load Utility

2 Create a file in a tool such as Microsoft Excel. Note: Although you can use a text editor, it is best to usea spreadsheet program to customize the sample code, because some text editors may not maintain thenecessary line breaks.
3 Copy and paste this code into the file:
SmartList Name, Operation, Entry Name, Entry LabelGrade_Steps,addEntry,Step_1,Step Description1Grade_Steps,addEntry,Step_2,Step Description2
4 For each Smart List to load, enter:
l The Smart List name (Salary_Type and Grade_Steps for example) in the SmartListName column.
l The name and label of all the entries to load (Step_1, Step_2, and Step_3 in this case)in the Entry Name and Entry Label columns.
l Enter addEntry as the operation.
5 Repeat steps 1-4 to load all required Smart Lists, custom Smart Lists, and their entries.
6 Save the file in CSV format.
7 Perform a test run of the file, and then ensure that the Smart Lists loaded correctly in the application.See “Testing Load Files” on page 200.
8 After verify the data load, run the CSV file in the production environment. See “Running Load Files ” onpage 203.
Loading Salary Grade Details
ä To load Smart Lists for salary grade details:
1 Review the member and entry names for these Smart Lists:
Table 26 Smart Lists for Salary Grade Data
Smart List Associated Member Names Entry Names
Salary_Type Salary Grade Type Input Grade_Step, Grade_Rate and so on
Salary_Basis Grade Salary Basis Input Annual, Monthly, and so on
Yes_No Allow Value Change Input Yes and No
HR_Budget_Set Sample Budget Set
2 Ensure that members for salary grades (Grade 1, Grade 2, Grade 3 etc.) exist under Salary Grades inthe Element dimension.
3 Create a file in a tool such as Microsoft Excel. Note: Although you can use a text editor, it is best to usea spreadsheet program to customize the sample code, because some text editors may not maintain thenecessary line breaks.
4 Copy and paste this code into the file:
Loading Metadata and Data 183

Budget Item,Data Load Cube Name,Point-of-View,Salary Grade Type Input,Grade Salary Basis Input,Allow Value Change Input,Element Start Date,Element End DateUnspecified Budget Item,HCP,"BegBalance,Local,Grade 1,Budget,Stage 1,Unspecified Entity,No Year,Vacancy,Default Position",Grade_Step,Annual,Yes,01-01-2010,12-31-2010
5 Replace Grade 1 with the name of the salary grade to load.
Example: You want to load a second monthly-based salary grade and an associated gradestep on September 30, 2012 for use in the Forecast budget for 2013. You want to preventPlanners from changing the grade value at the position level. To load the salary grade, specifythe following:
Budget Item,Data Load Cube Name,Point-of-View,Salary Grade Type Input,Grade Salary Basis Input,Allow Value Change Input,Element Start Date,Element End DateUnspecified Budget Item,HCP,"BegBalance,Local,Grade 1,Forecast,Stage 1,Unspecified Entity,Unspecified Element,No Year,Vacancy,Default Position",Grade_Step,Annual,Yes,09-30-2012,
6 Save the file in CSV format.
7 Perform a test run of the CSV file. See “Testing Load Files” on page 200.
8 In the application, confirm that the salary grade information loaded correctly. See “Verifying Data Loads”on page 201.
9 After ensuring that the file loads data correctly, run it in production. See “Running Load Files ” on page203.
Loading Salary Grade Detail Lines
ä To load salary grade details:
1 Review the member and entry names for these Smart Lists, and ensure that the salary steps or sequencesto load are defined:
Table 27 Grade Step and Sequence Smart Lists
Smart List Associated Member Names Entry Names
Grade_Steps Grade Step Step1, Step2, and so on
Grade_Sequence Grade Sequence (for rate-based grades) Sequence1, Sequence2, and so on
2 Create a file in a tool such as Microsoft Excel. Note: Although you can use a text editor, it is best to usea spreadsheet program to customize the sample code, because some text editors may not maintain thenecessary line breaks.
3 Copy and paste this code to the file:
Budget Item,Data Load Cube Name,Point-of-View,Salary Grade Type Input,Grade Salary Basis Input,Allow Value Change Input,Element Start Date,Element End Date<LINEITEM("Element Changes")>,HCP,"BegBalance,Local,Grade 1,Budget,Stage 1,Unspecified Entity,No Year,Vacancy,Default Position",S_2,3000,01-01-2012,12-31-2012
4 Replace S_2 with the name of the grade step to load.
184 Loading Metadata and Data Using the Outline Load Utility

5 Specify the value of the grade in the Option Value column, and specify the dates during which the gradeis effective.
Example: To load a fourth grade step (S4) with an option value of $65,000 to be effective onApril 1, 2011, specify:
<LINEITEM("Element Changes")>,HCP,"BegBalance,Local,Grade 4,Budget,Stage 1,Unspecified Entity,Unspecified Element,FY12,Default Position",S4,65000,04-01-2011,
6 Save the file in CSV format.
7 Perform a test run of the CSV file. See “Testing Load Files” on page 200.
8 In the application, ensure the correctly salary data displays. See “Verifying Data Loads” on page 201.
9 After confirming that the file loads data properly, run it in the production environment. See “RunningLoad Files ” on page 203.
Loading Compensation Elements
ä To load compensation elements:
1 Review the member and entry names associated with these Smart Lists:
Table 28 Compensation Element Smart Lists
Smart List Associated Member Names
Yes_No Options Based
Payment_Terms Payment Terms Input
Element_Type Value Type Input
Yes_No Allow Value Change Input
Element_Type Maximum Value Type
Earning_Type Earning Type Input
Frequency Payment Frequency Input
Yes_No Taxable Component
Yes_No Follows Salary Allocation
HR_Budget_Set Budget Set (Optional)
2 Create a file in a tool such as Microsoft Excel. Note: Although you can use a text editor, it is best to usea spreadsheet program to customize the sample code, because some text editors may not maintain thenecessary line breaks.
3 Copy and paste this code into the file:
Budget Item,Data Load Cube Name,Point-of-View,Options Based,Payment Terms Input,Value Type Input,Allow Value Change Input,Maximum Value Type,Maximum Value,Earning Type Input,Payment Frequency Input,Required Element Input,Taxable Component,Element Start Date,Element End Date,Follows Salary Allocation
Loading Metadata and Data 185

Unspecified Budget Item,HCP,"BegBalance,Local,Benefit 1,Budget,Stage 1,Unspecified Entity,No Year,Vacancy,Default Position", Yes,Semi_Annual,Amount,No,Percentage,Gross_Pay FirstPeriod,Yes,01-01-2010,01-01-2011,Yes
4 In the Point of View column, replace Benefit 1 with the compensation element to load (additional earning,employer-paid tax and so on), and replace Budget and Stage 1 with the scenario and version of thebudget to which to load data.
5 Replace data to identify the value of the compensation element to load, how it is paid, when it is paid,and the dates during which it is effective.
Example: You want to load a nontaxable mental health care benefit valued at $900, that doesnot change, does not have options, and is paid as part of salary once a year on January 1.You want the benefit to follow the default salary allocations and take effect on July 1, 2012.To load the benefit, specify:
Budget Item,Data Load Cube Name,Point-of-View,Options Based,Payment Terms Input,Value Type Input,Allow Value Change Input,Maximum Value Type,Maximum Value,Earning Type Input,Payment Frequency Input,Required Element Input,Taxable Component,Element Start Date,Element End Date,Follows Salary AllocationUnspecified Budget Item,HCP,"BegBalance,Local,Pharmacy,Budget,Stage 1,Unspecified Entity,No Year,Vacancy,Default Position",No,Annually,Amount,No,,,Gross_Pay,FirstPeriod,Yes,No,07-01-2012,,Yes
6 Save the file in CSV format.
7 Perform a test run of the CSV file. See “Testing Load Files” on page 200.
8 Open the application, and ensure that compensation elements and details load properly. See “VerifyingData Loads” on page 201.
9 After confirming that the file loads compensation data correctly, run it in the production environment.See “Running Load Files ” on page 203.
Loading Element Detail Lines
ä To load compensation element data:
1 Identify the member and entry names associated with compensation element Smart Lists. See“Frequently Used Public Sector Planning and Budgeting Smart Lists” on page 49.
2 Create a file in a tool such as Microsoft Excel. Note: Although you can use a text editor, it is best to usea spreadsheet program to customize the sample code, because some text editors may not maintain thenecessary line breaks.
3 Copy and paste this code into the file:
Budget Item,Data Load Cube Name,Point-of-View,Options,Option Value,Option Start Date,Option End Date,Maximum Value<LINEITEM("Element Changes")>,HCP,"BegBalance,Local,No Year,Pharmacy,Budget,Stage 1,Unspecified Entity,Vacancy,Default Position",Self,2000,04-01-2011,,3000
4 In the Point-of-View column, replace budget and stage 1 with the name of the budget stage andversion to which to load compensation details.
186 Loading Metadata and Data Using the Outline Load Utility

5 Specify the benefit that you are loading, and all benefit details such as option value, start date, andmaximum value.
6 In the appropriate columns, specify data such as the options for the compensation element, its maximumvalue, and when the compensation element settings are effective.
Example: To specify that benefit 5 has value of $2,000, a maximum value of $3,000 that cannotbe exceeded, applies to an employees spouse and children, and is effective on April 1, 2011,specify:
<LINEITEM("Element Changes")>,HCP,"BegBalance,Local,Benefit 5,Budget,Stage1, Unspecified Entity,Vacany,Default Position",Spouse and Children,2000,04-01-2011,,3000
7 Save the file in CSV format.
8 Perform a test run of the CSV file. See “Testing Load Files” on page 200.
9 In the application, ensure that the compensation elements loaded correctly. See “Testing Load Files”on page 200.
10 After confirming that the CSV file loads compensation data correctly, run the file in the productionenvironment. See “Running Load Files ” on page 203.
Loading Employee Information
Does not apply to the Position budget detail
ä To load employee data:
1 Review the names associated with these Smart Lists:
Table 29 Employee Data Smart Lists
Smart List Associated Member Names Entry Names
Full_Time_Status FT/PT
Employee_Type Employee Type Contract, temporary, regular, and so on
Pay_Type Pay Type
Union_Code Union Code union_1, union_2 and so on
Location_Code Location Code location_1, location_2 and so on
2 Create a file in a tool such as Microsoft Excel. Note: Although you can use a text editor, it is best to usea spreadsheet program to customize the sample code, because some text editors may not maintain thenecessary line breaks.
3 Copy and paste this code into the file:
Budget Item,Data Load Cube Name,Point-of-View,Employee Number,Employee Name,Hire Date,FT/PT,Employee Type,Pay Type,Union Code,Location Code,Annual Salary SpreadUnspecified Budget Item,HCP,"BegBalance,Local,""Wu, Jonathan"",Budget,Stage
Loading Metadata and Data 187

1,Unspecified Entity,No Year,Unspecified Element,Default Position",E1234,Jonathan Wu,01-01-1990,FullTime,Temporary,Exempt,Union_1,Location_1,Average
4 In the Point-of-View column, replace Employee1, Budget, and Stage 1 with the name of theemployee to load, and the budget stage and version to which to load them.
5 In the appropriate columns, specify employee data such as their job number, position name, salary type,hire data, and location.
Example: To load two full-time bimonthly salaried employees hired on February 1, 2013,and their details, specify:
Unspecified Budget Item,HCP,"BegBalance,Local,Employee 23,Budget,Stage 1,Unspecified Entity,No Year,Unspecified Element,Default Position",E23,""Cane_Geoff"",02-01-2013,Regular,FullTime,Nonexempt,,Salem,
Unspecified Budget Item, HCP,"BegBalance,Local,Employee 24,Budget,Stage 1,Unspecified Entity,No Year,Unspecified Element,Default Position",E24,""Bailey_Sue"",02-01-2013,Regular,FullTime,Nonexempt,,Philidelphia,
6 Save the file in CSV format.
7 Perform a test run of the CSV file. See “Testing Load Files” on page 200.
8 In the application, ensure that employees and their associated data loaded correctly. See “VerifyingData Loads” on page 201.
9 After confirming that the file loads data correctly, run it in the production environment. See “RunningLoad Files ” on page 203.
Loading Position Information
Does not apply to the Employee budget detail
ä To load position data:
1 Review the member and entry names associated with these Smart Lists:
Table 30 Position Data Smart Lists
Smart List Associated Member Names Entry Names
Position_Type Position Type Contract, temporary, and so on
Job_Class Job job_1, job_2 and so on
Location_Code Location Code location_1, location_2 and so on
Union_Code Union Code union_1, union_2, and so on
Salary_Basis Salary Basis Monthly, weekly, and so on
2 Create a file in a tool such as Microsoft Excel. Note: Although you can use a text editor, it is best to usea spreadsheet program to customize the sample code, because some text editors may not maintain thenecessary line breaks.
3 Copy and paste this code into the file:
188 Loading Metadata and Data Using the Outline Load Utility
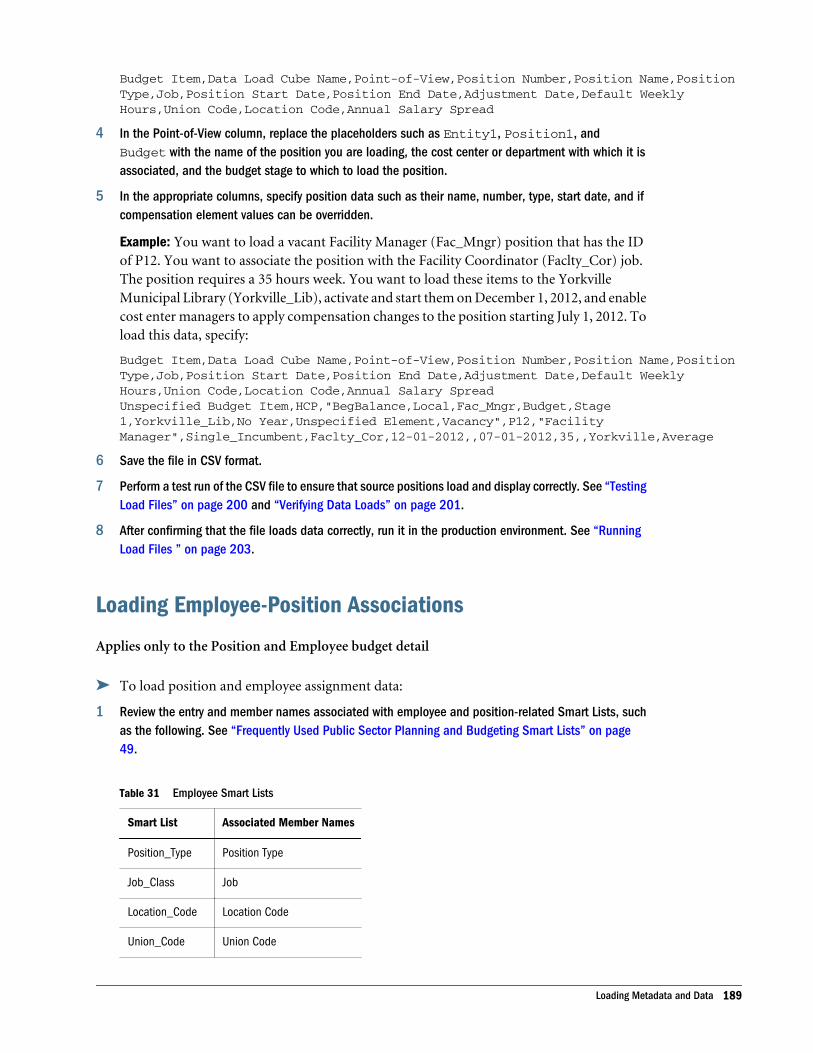
Budget Item,Data Load Cube Name,Point-of-View,Position Number,Position Name,Position Type,Job,Position Start Date,Position End Date,Adjustment Date,Default Weekly Hours,Union Code,Location Code,Annual Salary Spread
4 In the Point-of-View column, replace the placeholders such as Entity1, Position1, andBudget with the name of the position you are loading, the cost center or department with which it isassociated, and the budget stage to which to load the position.
5 In the appropriate columns, specify position data such as their name, number, type, start date, and ifcompensation element values can be overridden.
Example: You want to load a vacant Facility Manager (Fac_Mngr) position that has the IDof P12. You want to associate the position with the Facility Coordinator (Faclty_Cor) job.The position requires a 35 hours week. You want to load these items to the YorkvilleMunicipal Library (Yorkville_Lib), activate and start them on December 1, 2012, and enablecost enter managers to apply compensation changes to the position starting July 1, 2012. Toload this data, specify:
Budget Item,Data Load Cube Name,Point-of-View,Position Number,Position Name,Position Type,Job,Position Start Date,Position End Date,Adjustment Date,Default Weekly Hours,Union Code,Location Code,Annual Salary SpreadUnspecified Budget Item,HCP,"BegBalance,Local,Fac_Mngr,Budget,Stage 1,Yorkville_Lib,No Year,Unspecified Element,Vacancy",P12,"Facility Manager",Single_Incumbent,Faclty_Cor,12-01-2012,,07-01-2012,35,,Yorkville,Average
6 Save the file in CSV format.
7 Perform a test run of the CSV file to ensure that source positions load and display correctly. See “TestingLoad Files” on page 200 and “Verifying Data Loads” on page 201.
8 After confirming that the file loads data correctly, run it in the production environment. See “RunningLoad Files ” on page 203.
Loading Employee-Position Associations
Applies only to the Position and Employee budget detail
ä To load position and employee assignment data:
1 Review the entry and member names associated with employee and position-related Smart Lists, suchas the following. See “Frequently Used Public Sector Planning and Budgeting Smart Lists” on page49.
Table 31 Employee Smart Lists
Smart List Associated Member Names
Position_Type Position Type
Job_Class Job
Location_Code Location Code
Union_Code Union Code
Loading Metadata and Data 189

Smart List Associated Member Names
Salary_Basis Salary Basis
Full_Time_Status FT/PT
Employee_Type Employee Type
Pay_Type Pay Type
2 Create a file in a tool such as Microsoft Excel. Note: Although you can use a text editor, it is best to usea spreadsheet program to customize the sample code, because some text editors may not maintain thenecessary line breaks.
3 Copy and paste this code into the file:
Budget Item,Data Load Cube Name,Point-of-View,Position Number,Position Name,Position Type,Job,Position Start Date,Position End Date,Adjustment Date,Default Weekly Hours,Salary Basis,Union Code,Location Code,Annual Salary Spread,Employee Number,Employee Name,Hire Date,FT/PT,Employee Type,Pay Type
4 In the Point-of-View column, replace Entity1, Position1, Employee1, Budget, and Stage1 with the name of the positions and employees whose assignments to load, the associated cost centeror department, and the budget stage.
5 Specify assignment data such job name, job number, name of employee to assign to the job, andemployee type and salary basis.
Example: You want to associate a new Data Entry and Processing (job 56) job to theAdmissions Administration Position (P32), starting on June 1, 2012 . You also want to loadand assign the details of a permanent and full time employe hired on August 15, 2012. Toload this data, specify:
Budget Item,Data Load Cube Name,Point-of-View,Position Number,Position Name,Position Type,Job,Position Start Date,Position End Date,Adjustment Date,Default Weekly Hours,Salary Basis,Union Code,Location Code,Annual Salary Spread,Employee Number,Employee Name,Hire Date,FT/PT,Employee Type,Pay TypeUnspecified Budget Item,HCP,"BegBalance,Local,Admin_12,Budget,""Day, John"",Stage 1,Admission,No Year,Unspecified Element",P32,Budget Admissions position,Single_Incumbent,Job_56,01-06-2012,,,30,,,Bangor_1,Average,167,John Day,08-15-2012,FullTime,Regular,Nonexempt
6 Save the file in CSV format.
7 Perform a test run of the CSV file to ensure that the correct employee-position assignments load anddisplay correctly. See “Testing Load Files” on page 200 and “Verifying Data Loads” on page 201.
8 After confirming that data loads correctly, run the CSV file in the production environment. See “RunningLoad Files ” on page 203.
Loading Position FTE Information
ä To load position FTEs:
1 Identify the member and entry names associated with FTE-related Smart Lists. See “Frequently UsedPublic Sector Planning and Budgeting Smart Lists” on page 49.
190 Loading Metadata and Data Using the Outline Load Utility

2 Create a file in a tool such as Microsoft Excel. Note: Although you can use a text editor, it is best to usea spreadsheet program to customize the sample code, because some text editors may not maintain thenecessary line breaks.
3 Copy this code into the file:
Budget Item,Data Load Cube Name,Point-of-View,Proposed FTE,FTE Start Date,FTE End Date<LINEITEM("FTE and Status Assignments")>,HCP,"BegBalance,Local,Unspecified Element,Budget,Stage 1,Unspecified Entity,No Year,Vacancy,Mrk_3",1,01-01-2011,12-31-2012
4 In the Point-of-View column replace Entity1, Position1, Budget, and Stage 1 with the nameof the positions whose FTEs to load, and the budget stage and version to which to load the positionFTEs.
5 Specify the proposed FTE , dates during which it is effective, and applicable position.
Example: You want to load a proposed FTE of 7 to the Senior Marketer position (Mrk_3).The FTE is effective July 1, 2011 and does not have an end date. To load the FTE, specify:
Budget Item,Data Load Cube Name,Point-of-View,Proposed FTE,FTE Start Date,FTE End Date<LINEITEM("FTE and Status Assignments")>,HCP,"BegBalance,Local,Unspecified Element,Budget,Stage 1,Unspecified Entity,No Year,Vacancy,Mrk_3",7,01-07-2011,
6 Save the file in CSV format.
7 Perform a test run of the CSV file to confirm that the correct FTE data is loaded to the specified position.See “Verifying Data Loads” on page 201 and “Testing Load Files” on page 200.
8 After ensuring that the file loads data correctly, run it in the production environment. See “Running LoadFiles ” on page 203.
Loading Employee FTE Information
Does not apply to the Position budget detail
ä To load employee FTE:
1 Identify the member and entry names associated with FTE-related Smart Lists. See “Frequently UsedPublic Sector Planning and Budgeting Smart Lists” on page 49.
2 Create a file in a tool such as Microsoft Excel. Note: Although you can use a text editor, it is best to usea spreadsheet program to customize the sample code, because some text editors may not maintain thenecessary line breaks.
3 Copy and paste this code into the file:
Budget Item,Data Load Cube Name,Point-of-View,Proposed FTE,FTE Start Date,FTE End Date<LINEITEM("FTE and Status Assignments")>,HCP,"BegBalance,Local,Unspecified Element,Budget,Stage 1,Entity1,No Year,Employee1,Position1",1,01-01-2010,12-31-2010
4 In the Point-of-View column, replace Entity1, Employee1, Positon1, Budget, and Stage1 with the name of the employees for whom you are loading FTEs, their positions, their cost center ordepartment, and the budget stage and version.
Loading Metadata and Data 191

Note: For the Employee budget detail, replace Position with Job Code.
5 In the second line of code, specify data such as the FTE, the position to apply it, and the dates duringwhich to apply it.
Example: You want to load an FTE of 1, that is effective March 1, 2011 to March 2, 2012 forDerek MacKay holding the Survey Implementation position (survey_2) in the Office ofTourism (dept_tourism), specify:
Budget Item,Data Load Cube Name,Point-of-View,Proposed FTE,FTE Start Date,FTE End Date<LINEITEM("FTE and Status Assignments")>,HCP,"BegBalance,Local,Unspecified Element,Budget,Stage 1,dept_tourism,No Year,""MacKay, Derek"",survey_2",1,03-01-2011,03-01-2012,
6 Save the file in CSV format.
7 Perform a test run of the CSV file to ensure that it loads employee FTE is correctly. See “Verifying DataLoads” on page 201 and “Testing Load Files” on page 200.
8 After confirming that the file loads data correctly, run it in the production environment. See “RunningLoad Files ” on page 203.
Loading Position Salary Grade Information
Does not apply to the Employee budget detail
ä To load salary grades to positions:
1 Identify the member and entry names associated with position and salary-related Smart Lists. See“Frequently Used Public Sector Planning and Budgeting Smart Lists” on page 49.
2 Create a file in a tool such as Microsoft Excel. Note: Although you can use a text editor, it is best to usea spreadsheet program to customize the sample code, because some text editors may not maintain thenecessary line breaks.
3 Copy and paste this code into the file:
Budget Item,Data Load Cube Name,Point-of-View,Grade Step,Option Value,Override Option Value,Option Start Date,Option End Date,Grade Salary Basis Input,Allow Value Change Input,Salary Grade Type Input<LINEITEM("Element Changes")>,HCP,"BegBalance,Local,Grade 1,Budget,Stage 1,Entity1,No Year,Vacancy,Position1",Step1,2000,3000,01-01-2010,12-31-2010,Annual,Yes,Grade_Step
4 In the Point-of-View column, replace Position1, Budget, and Stage 1 with the positions to whichto load salary grades, and the budget stage and version. You can also replace Entity1 with thecost center or department associated with the position.
Note: For the Employee budget detail, replace Position with Job Code.
5 Customize the second line of code to specify salary grade data such as the grade step to load, the gradestep value, when to apply the grade step, and the position to which to apply the grade step.
Example: You want to load a third grade step (S3) to the 2013 forecast budget for the NewYork Public School System (ny_ss). The salary grade rate has a static option value of $59,000
192 Loading Metadata and Data Using the Outline Load Utility

a year, applies to all New York city high school teachers (educaton_hs_snr) with 25 yearsseniority, is paid out once bimonthly, and is effective on August 28, 2013. To load the gradestep, specify:
Budget Item,Data Load Cube Name,Point-of-View,Grade Step,Option Value,Override Option Value,Option Start Date,Option End Date,Grade Salary Basis Input,Allow Value Change Input,Salary Grade Type Input<LINEITEM("Element Changes")>,HCP,"BegBalance,Local,Grade 1,Budget,Stage 1,ny_ss,No Year,Vacancy,education_hs_snr",S3,59000,,09-28-2013,,Bi_Monthly,No,Grade_Step
6 Save the file in CSV format.
7 Perform a test run of the CSV file to ensure that it loads the correct salary information to positions. See“Verifying Data Loads” on page 201 and “Testing Load Files” on page 200.
8 After confirming that the file loads salary data correctly, run it in the production environment. See“Running Load Files ” on page 203.
Loading Employee Salary Grade Information
Does not apply to the Position budget detail
ä To load salary grades to employees:
1 Identify the member and entry names associated with employee and salary-related Smart Lists. See“Frequently Used Public Sector Planning and Budgeting Smart Lists” on page 49.
2 Create a file in a tool such as Microsoft Excel. Note: Although you can use a text editor, it is best to usea spreadsheet program to customize the sample code, because some text editors may not maintain thenecessary line breaks.
3 Copy and paste this code into the file:
Budget Item,Data Load Cube Name,Point-of-View,Grade Step,Option Value,Override Option Value,Option Start Date,Option End Date,Grade Salary Basis Input,Allow Value Change Input,Salary Grade Type InputLINEITEM("Element Changes")>,HCP,"BegBalance,Local,Grade 1,Budget,Stage 1,Entity1,No Year,Employee1,Position1",Step1,2000,3000,1-01-2010,12-31-2010,Annual,Yes,Grade_Step<LINEITEM("Element Changes")>,HCP,"BegBalance,Local,Grade 1,Budget,Stage 1,Entity1,No Year,Employee1,Position1",Step1,3000,3500,01-01-2011,12-31-2011,Annual,Yes,Grade_Step
4 In the Point-of-View column, make the required replacements. For example, replace Grade 1 with thesalary grade to load and Employee1 with employee to whom to load the grade.
Note: For the Employee budget type, replace Position with Job Code.
5 Specify salary grade data such as the grade step to load, the grade step value, whether the salary gradecan be modified at the employee level, and when to apply the salary grade.
Example: You want to load a new grade value (value_3) to an existing salary grade (grade_36)to apply to the budgets for James Williams, the State Park Security Patrol RecreationFacilitator (prk_sec_pat) in the department of Tourism (tourism). The salary is $46,000 a
Loading Metadata and Data 193

year, paid monthly, and can be increased by $4,000 on July 1, 2014. You want to apply thegrade on January 1, 2013. To do so, specify:
Budget Item,Data Load Cube Name,Point-of-View,Grade Step,Option Value,Override Option Value,Option Start Date,Option End Date,Grade Salary Basis Input,Allow Value Change Input,Salary Grade Type Input<LINEITEM("Element Changes")>,HCP,"BegBalance,Local,Grade 36,Budget,Stage 1,tourism,No Year,""James, William"",prk_sec_pa,",,46000,4000,01-01-2013,,Monthly,Yes,Value
6 Save the file in CSV format.
7 Perform a test run of the CSV file See “Testing Load Files” on page 200.
8 In the application, ensure that salaries loaded correctly to the employees specified.
9 After confirming that the data load file loads the correctly data, run it in the production environment.See “Running Load Files ” on page 203.
Loading Position Compensation Information
Does not apply to the Employee budget detail
ä To load compensation information to positions:
1 Identify the member and entry names associated with position and compensation-related Smart Lists.See “Frequently Used Public Sector Planning and Budgeting Smart Lists” on page 49.
2 Create a file in a tool such as Microsoft Excel. Note: Although you can use a text editor, it is best to usea spreadsheet program to customize the sample code, because some text editors may not maintain thenecessary line breaks.
3 Copy and paste this code into the file:
Budget Item,Data Load Cube Name,Point-of-View,Options,Option Value,Override Option Value,Option Start Date,Option End Date,Taxable Component,Allow Value Change Input,Payment Frequency Input,Payment Terms Input
4 Customize the data in the Point-of-View column. For example, replace Position1 with the positionto which to load compensation data, and Entity1 with the cost center or department associated withthe position. Replace Element 1 with the name of the compensation elements whose details you areloading to positions.
Note: For the Employee budget detail, replace Position with Job Code.
5 Specify position and compensation data such as option value, adjusted value, and if the element istaxed.
Example: Effective March ,1 2012, you want to add a static mental health option (option 4)for $1,100.00 that cannot increase, to an existing health care benefit (benefit_1) assigned toa Fire Fighter position (Fire_1) in the Baltimore Municipal Fire Department (FD_3). Thisposition is held by Mark Daniels. The benefit option is paid out in full on the first day orthe first period (January 1) of each year and not taxed. You want to add this option to thefirst stage of the forecast budget. To load this data, specify:
194 Loading Metadata and Data Using the Outline Load Utility

<LINEITEM("Element Changes")>,HCP,"BegBalance,Local,benefit_1,Forecast,Stage 1,FD_3,No Year,""Daniels, Mark"",Fire_1",Self,1100,,03-01-2012,,No,No,FirstPeriod,Annually
6 Save the file in CSV format.
7 Perform a test run of the file, and then ensure that it loaded compensation information to positionscorrectly in the application. See “Testing Load Files” on page 200 and “Verifying Data Loads” on page201.
8 After verifying the data file, run it in the production environment. See “Running Load Files ” on page203.
Loading Employee Compensation Information
Does not apply to the Position budget detail
ä To load compensation information to employees:
1 Identify the member and entry names associated with employee and compensation element-relatedSmart Lists. See “Frequently Used Public Sector Planning and Budgeting Smart Lists” on page 49.
2 Create a file in a tool such as Microsoft Excel. Note: Although you can use a text editor, it is best to usea spreadsheet program to customize the sample code, because some text editors may not maintain thenecessary line breaks.
3 Copy and paste this code into the file:
Budget Item,Data Load Cube Name,Point-of-View,Options,Option Value,Override Option Value,Option Start Date,Option End Date,Taxable Component,Allow Value Change Input,Payment Frequency Input,Payment Terms Input<LINEITEM("Element Changes")>,HCP,"BegBalance,Local,Pharmacy,Budget,Stage 1,FD_3,No Year,""Fisher, Claire"",Clerk_1",Spouse,2000,3000,01-01-2010, 12-31-2010,Yes,Yes,FirstPeriod,Semi_Annual<LINEITEM("Element Changes")>,HCP,"BegBalance,Local,Dental,Budget,Stage 1,FD_4,No Year,""Fisher, Claire"",Clerk_1",Spouse,1500,2000,01-01-2010, 12-31-2010,Yes,Yes,FirstPeriod,Semi_Annual
4 Customize the data in the Point-of-View column, and the compensation data to load. For example,replace Pharmacy, Fisher, Claire, and Clerk_1 to represent the appropriate benefits,employee, and position.
5 Specify the compensation data and values to load such as option value, start date, and if thecompensation is taxable.
6 Save the file in CSV format.
7 Perform a test run of the CSV file. See “Testing Load Files” on page 200.
8 In the application, review compensation element tabs (benefits, for example) to ensure that data loadedcorrectly See “Verifying Data Loads” on page 201.
9 Run it in the production environment. See “Running Load Files ” on page 203.
Loading Metadata and Data 195

Loading Position Allocation Information
Does not apply to the Employee budget detail
Before loading, ensure entries for all account segments or chart fields used in allocations existin the appropriate Smart Lists (Account_List, Entity_List, Fund_List, Program_List, andProject_List, for example).
ä To load allocations to positions:
1 Identify the member and entry names associated with position and allocation-related Smart Lists. See“Frequently Used Public Sector Planning and Budgeting Smart Lists” on page 49.
2 Create a file in a tool such as Microsoft Excel. Note: Although you can use a text editor, it is best to usea spreadsheet program to customize the sample code, because some text editors may not maintain thenecessary line breaks.
3 Copy and paste this code into the file:
Budget Item,Data Load Cube Name,Point-of-View,Account Segment,Entity Segment,Fund Segment, Program Segment, Project Segment,Percentage Allocation,Allocation Start Date,Allocation End Date
<LINEITEM("Allocation Assignments")>,HCP,"BegBalance,Local,Unspecified Element,Budget,Stage 1,y_arts,No Year,Vacancy,Instructor",A130,Bst_Pr_Rec,res10,class_8,Proj_10,35,06-01-2012,10-15-2012<LINEITEM("Allocation Assignments")>,HCP,"BegBalance,Local,Unspecified Element,Budget,Stage 1,y_arts,No Year,Vacancy,Instructor",A130,Bst_Pr_Rec,srp001,class_8,Proj_10,65,06-01-2012,10-15-2012
4 Customize the data in the Point-of-View column. For example, replace y_arts and Instructorwith your specific entity and position.
Note: For the Employee budget detail, replace Position with Job Code.
5 Replace all other sample data with your employee and allocation data.
6 Specify the different General Ledger account segments or chart fields used in the allocation, thepercentage for each allocation, and when the allocations apply.
Example: You want to load two allocations to finance the Instructor of a Summer/Fallpainting program (pnt_4) at the Youth Arts office (y_arts) in a Boston recreation center.The allocations use the same Entity segment for the municipal Boston Parks and RecreationDepartment (Bst_Pr_Rec), Account segment (11001), and program segment (class_8). Thefirst allocations is for 35% from the reserved fund (res10), begins on June 1, 2012, and endsOctober 15, 2012. The second allocation is for 65% from the surplus fund (srp001), beginsJune 1, 2012, and ends October 15, 2012
To load the allocations, modify the code as follows to identify the different General Ledgeraccount segments, allocation percentages, and dates:
<LINEITEM("Allocation Assignments")>,HCP,"BegBalance,Local,Unspecified Element,Budget,Stage 1,y_arts,No Year,Vacancy,Instructor",A130,Bst_Pr_Rec,res10,class_8,Proj_10,35,06-01-2012,
196 Loading Metadata and Data Using the Outline Load Utility

10-15-2012<LINEITEM("Allocation Assignments")>,HCP,"BegBalance,Local,Unspecified Element,Budget,Stage 1,y_arts,No Year,Vacancy,Instructor",A130,Bst_Pr_Rec,srp001,class_8,Proj_10,65,06-01-2012,10-15-2012
7 Save the file in CSV file.
8 Perform a test run of the file. See “Testing Load Files” on page 200.
9 In the application, ensure that the allocations loaded correctly. See “Verifying Data Loads” on page201.
10 After verifying the file, run it in production. See “Running Load Files ” on page 203.
Loading Employee Allocation InformationBefore loading, ensure entries for all account segments or chart fields for the employee allocationsexist in the appropriate Smart Lists (Account_List, Entity_List, Fund_List, Program_List, andProject_List, for example).
ä To load allocations to employees:
1 Identify the member and entry names associated with employee and allocation-related Smart Lists. See“Frequently Used Public Sector Planning and Budgeting Smart Lists” on page 49.
2 Create a file in a tool such as Microsoft Excel. Note: Although you can use a text editor, it is best to usea spreadsheet program to customize the sample code, because some text editors may not maintain thenecessary line breaks.
3 Copy and paste this code into the file:
Budget Item,Data Load Cube Name,Point-of-View,Account Segment,Entity Segment,Fund Segment, Program Segment, Project Segment,Percentage Allocation,Allocation Start Date,Allocation End Date<LINEITEM("Allocation Assignments")>,HCP,"BegBalance,Local,Unspecified Element,Budget,Stage 1,Entity1,No Year,Employee1,Position1",Account_1,Entity_1,Fund_1,Program_1,Project_1,100,01-01-2010,12-31-2010<LINEITEM("Allocation Assignments")>,HCP,"BegBalance,Local,Unspecified Element,Budget,Stage 1,Entity1,No Year,Employee1,Position1",Account_1,Entity_1,Fund_1,Program_1,Project_1,50,01-01-2011,
4 Customize the data in the Point-of-View column. For example, replace Employee1 with the employeeto which to load allocations, and Entity1 with the HR organization with which the employee isassociated.
Note: For the Employee budget detail, replace Position with Job Code.
5 In the appropriate columns, specify the different General Ledger account segments or chart fields usedin the allocation, the percentage for each allocation, and when the allocations apply.
Example: The Boston Parks and Recreation Department (Bst_Pr_Rec) needs to load threeallocations to budget for Marla Tate, who holds the single incumbent position ofCoordinator and Director. Marla will oversee a swimming pool installation project at a
Loading Metadata and Data 197

downtown recreation center. The allocations have the same start and end dates, Entitysegment (111), Account segment (011), and Facility Development program segment(fac_dev_1).
l The first allocation is for 25% from the reserved fund (res_10) segment and the swimproject (swm_01) segment, begins January 1, 2012, and ends June 1, 2012
l The second allocation is for 65% from the employee salary fund (e_1) and thedevelopment project (dev_12), begins January 1, 2012, and ends June 1, 2012
l The third allocation is for 10% from the employee salary fund (e_1) and the swim safetyproject (swm_saf_01), begins January 1, 2012, and ends June 1, 2012
To load the allocations, modify the code as follows to identify the entity, Marla Tate and herposition, and the different General Ledger account segments, allocation percentages, anddates:
LINEITEM("Allocation Assignments")>,HCP,"BegBalance,Local,Unspecified Element,Budget,Stage 1,No Year,Bst_Pr_Rec,""Tate, Marla"",coordinator_and_director",A011,E111,res10,fac_dev_1,swm_01,25,01-01-2012,06-01-2012<LINEITEM("Allocation Assignments")>,HCP,"BegBalance,Local,Unspecified Element,Budget,Stage 1,No Year,Bst_Pr_Rec,""Tate, Marla"",coordinator_and_director",A011,E111,res10,fac_dev_1,dev_12,65,01-01-2012,06-01-2012<LINEITEM("Allocation Assignments")>,HCP,"BegBalance,Local,Unspecified Element,Budget,Stage 1,No Year,Bst_Pr_Rec,""Tate, Marla"",coordinator_and_director",A011,E111,res10,fac_dev_1,swm_saf_01,10,01-01-2012,06-01-2012
6 Save the file in CSV format.
7 Perform a test run of the file. See “Testing Load Files” on page 200.
8 In the application, ensure that the correct allocations loaded. See “Verifying Data Loads” on page201.
9 After confirming that the file loads data correctly, run it in the production environment. See “RunningLoad Files ” on page 203.
Loading Job Information
Applies only to the Employee budget detail
ä To load jobs:
1 Identify the member and entry names associated with job-related Smart Lists. See “Frequently UsedPublic Sector Planning and Budgeting Smart Lists” on page 49.
2 Create a file in a tool such as Microsoft Excel. Note: Although you can use a text editor, it is best to usea spreadsheet program to customize the sample code, because some text editors may not maintain thenecessary line breaks.
3 Copy and paste this code into the file:
198 Loading Metadata and Data Using the Outline Load Utility

Budget Item,Data Load Cube Name,Point-of-View,Job Code Level,Job Description,FTE Capacity,Job Code Start Date,Job Code End Date,Salary Basis,Default Weekly Hours,Headcount Unspecified Budget Item,HCP,"BegBalance,Local,Unspecified Employee,Budget,Stage 1,Unspecified Entity,No Year,Unspecified Element,JobCode1",job,"Facilities Cordinator",40,01-01-2012,,Annual,40,40
4 Customize the data in the Point-of-View column. For example, replace Unspecified Employeewith the employee to which to assign a loaded job and JobCode1 with the number of the job to load.
5 Specify job data such as name, start date, FTE capacity, salary basis, and default weekly hours.
Example: You want to load two jobs: Facilities Coordinator with the job class J, and FacilitiesDirector with job class M2. Both jobs start on January 1, 2012, have annually-based salaries,require a forty hour week, and a headcount of 40. To load these jobs, specify:
Unspecified Budget Item,HCP,"BegBalance,Local,Unspecified Employee,Budget,Stage 1,Unspecified Entity,No Year,Unspecified Element,JobCode1",J1,"Facilities Cordinator",40,01-01-2012,,Annual,40,40
Unspecified Budget Item,HCP,"BegBalance,Local,Unspecified Employee,Budget,Stage 1,Unspecified Entity,No Year,Unspecified Element,JobCode2",M2,"FacilitiesDirector",40,01-01-2012,,Annual,40,40
6 Save the file in CSV format.
7 Perform a test run of the CSV file. See “Testing Load Files” on page 200.
8 In the application, access the All Jobs tab of the Manage job details data form, and ensure that thejobs and their details loaded correctly. See “Verifying Data Loads” on page 201.
9 After confirming that the file loads jobs correctly, run it in the production environment. See “RunningLoad Files ” on page 203.
10 Activate loaded jobs. See “Activating Jobs” on page 119.
Loading Employee Job Assignments and Details
Does not apply to the Position budget detail
ä To load jobs assignment details to employees:
1 Identify the member and entry names associated with employee and job-related Smart Lists. See“Frequently Used Public Sector Planning and Budgeting Smart Lists” on page 49.
2 Create a file in a tool such as Microsoft Excel. Note: Although you can use a text editor, it is best to usea spreadsheet program to customize the sample code, because some text editors may not maintain thenecessary line breaks.
3 Copy and paste this code into the file:
Budget Item,Data Load Cube Name,Point-of-View,Job Code Level,Job Description,Job Code Start Date,Job Code End Date,Adjustment Date,Default Weekly Hours,Union Code,Location Code,Salary Basis,Employee Number,Employee Name,Hire Date,FT/PT,Employee Type,Pay TypeUnspecified Budget Item,HCP,"BegBalance,Local,JobCode1,Budget,Stage 1,Entity1,No Year,Unspecified Element,Employee1",
Loading Metadata and Data 199

4 Customize the data in the Point-of-View column. For example, replace Employee1 with the employeeto whose job you are loading assignment details, and JobCode1 with the number of the job.
5 Specify job data such as name, type, start date, and location.
Example: You want to load a Facilities Coordinator job that starts January 1, 2011 and assignClaire Fisher (employee ID E133) as a temporary, exempt, and part-time employee hiredon January 1, 2011. The job is in Frankfurt Germany, has an annual based salary, and requiresa 30 hour week. To load this job and assignment data, specify:
Unspecified Budget Item,HCP,"BegBalance,Local,JobCode1,Budget,Stage 1,Entity1,No Year,Unspecified Element,Employee1",
J1,Facilities Coordinator, 01-01-2011,,,30,,,Annual,E133,Fisher_Claire,01-01-1999,FullTime,Regular,Exempt
6 Save the file in CSV format.
7 Perform a test run of the file. See “Testing Load Files” on page 200.
8 In the application, ensure that the correct job assignments loaded. See “Verifying Data Loads” on page201.
9 After confirming that the file loads data correctly, run it in production. See “Running Load Files ” onpage 203.
Testing Load FilesIn a test environment, run load files, and then open the appropriate data form in Public SectorPlanning and Budgeting to ensure that the files load the correct metadata and data (see “VerifyingData Loads” on page 201.)
Important: Run the load files for metadata first, and then those for data. See “Required DataLoad File Run Order” on page 181.
Test load files by running commands using this syntax
OutlineLoad /A:<application> /U:<user name>/I:<.csv file>/
D:<dimension> /L:<log file>/N [/S:<server>] [/M] /X:<exception file>
l /A:— Application name
l /U:— User name of administrative user who can access Essbase and Planning.
l /M:— Properties for each dimension to load
l /N:— If the file parses without loading data
l /I:— CSV load file that contains the header record and metadata records
l /D:— Dimension to load
l /C: —Refresh the database
l /L:— Name of the log file to report load status. Default is stdout.log
l /X:— Name of the file to report exceptions during the load. Default is stderr
l /S:— Server hosting the application
200 Loading Metadata and Data Using the Outline Load Utility

Omit components as necessary. For example, if you do not want to refresh the database,remove /C/.
For all command parameters, see Chapter 5 of the Oracle Hyperion Planning Administrator'sGuide.
For example: OutlineLoad /A:PO /U:jtadmin /I:<directory>\employee.csv/D:Employee /L:c:/employee_load.log /N/S:localhost /M/X:c:/
employee_load.exc:
l Loads data to the Position-Only (PO) application
l Logs on to the application usingjtadmin
l Loads data to the application on the localhost server
l Loads the Employee data specified in employee.csv
l Writes errors to employee_load.log
l Parses to ensure that the file is correctly defined
l Writes exception details to employee_load.exc
Verifying Data LoadsAfter performing test runs of the data load CSV files, log on to the Public Sector Planning andBudgeting application, and perform the appropriate steps below to ensure that the data loadedcorrectly.
Table 32 Verifying Data Loads
Data Loaded Steps to Verify Load
Salary Grades Select Budget Administration, and then Manage Salary Grades.
Salary gradedetails
Select Budget Administration, and then Manage Salary Grades.
Compensationelements anddetails
Select Budget Administration, and then Manage other compensation elements.
Employee datal Select Budget Administration, and then Review employee and job data or Review position and employee
data.
l Select Budget Preparation, and then Maintain employees information.
Position datal Select Budget Administration, and then Review position and employee data or Review position data.
l Select Budget Preparation, then Manage position data or Manage position and employee data, and thenMaintain position data.
Employee-positionassignments
l Select Budget Preparation, then Manage position and employee data, and then Maintain employees byposition.
l Select Budget Administration, and then Review position and employee data .
Verifying Data Loads 201

Data Loaded Steps to Verify Load
Position FTEl Position budget detail—Select Budget Preparation, then Maintain position data, then right-click positions, select
Edit position details, and then select FTE.
l Position and employee budget detail—Select Budget Preparation, then Manage position and employee data,then Maintain position data , right-click positions, select Edit position details, and then select FTE.
Employee FTEl Employee budget detail—Select Budget Preparation, then Manage employee data, then Maintain employees
by job, right-click employees, select Edit employees details, and then select FTE
l Position and employee budget detail—Select Budget Preparation, then Manage position and employee data,then Maintain employees by position, right-click employees, select Edit employees details, and then selectFTE.
Position salarygrades
l Position budget detail—Select Budget Preparation, then Maintain position data, then right-click positions, selectEdit position details, and then select Salary Grades.
l Position and employee budget detail—Select Budget Preparation, then Manage position and employee data,then Maintain position data , right-click positions, select Edit position details, and then select Salary Grades.
Employee salarygrades
l Employee budget detail—Select Budget Preparation, then Manage employee data, then Maintain employeesby job, right-click employees, select Edit employees details, and then select Salary Grades
l Position and employee budget detail—Select Budget Preparation, then Manage position and employee data,then Maintain employees by position, right-click employees, select Edit employees details, and then selectSalary Grades.
Positioncompensation
l Position budget detail—Select Budget Preparation, then Maintain position data, then right-click positions, selectEdit position details, and then select the compensation element tab (Tax Details, for example)
l Employee and position budget detail—Select Budget Preparation, then Manage position and employee data,then Maintain position data, right-click positions, select Edit position details, and then select the tab for thecompensation (Benefits for example).
Employeecompensation
l Employee budget detail—Select Budget Preparation, then Manage employee data, then Maintain employeesby job, right-click employees, select Edit employees details, and then select the compensation type tab (AdditionalEarnings, for example)
l Position and employee budget detail—Select Budget Preparation, then Manage position and employee data,then Maintain employees by position, right-click employees, select Edit employees details, and then select thecompensation type tab (Benefits for example)
Positionallocation
l Position budget detail—Select Budget Preparation, then Maintain position data, then right-click positions, selectEdit position details, and then select Allocations
l Employee and position budget detail—Select Budget Preparation, then Manage position and employee data,then Maintain position data, right-click positions, select Edit position details, and then select Allocations.
Employeeallocation
l Employee budget detail—Select Budget Preparation, then Manage employee data, then Maintain employeesby job, right-click employees, select Edit employees details, and then select Allocations
l Position and employee budget detail—Select Budget Preparation, then Manage position and employee data,then Maintain employees by position, right-click employees, select Edit employees details, and then selectAllocations
Jobs Select Budget Preparation, and then Maintain job details.
Employee-jobassignments
Select Budget Administration, and then Review employee and job data You can also select Budget Preparation,then Manage employee data , and then Maintain employees by job
202 Loading Metadata and Data Using the Outline Load Utility

Running Load Files After you ensure load files load the correct data, run the load files in the proper order (see“Required Data Load File Run Order” on page 181) in a production environment. Use this syntaxto run data load files:
OutlineLoad /A:<application> /U:<username> /I:<.csv file>/
D:<dimension> /L:<.log file> /N [/S:<server>] [/M] [/C]/X:<exception
file>
ä To run load files:
1 From a command prompt, enter CD x:\oracle\middleware\user_projects\epmsystem1\Planning\planning1 or {EPM_ORACLE_INSTANCE}/Planning/planning1/OutlineLoad.cmd.
2 Run a command:
l Windows:
m To load dimensional metadata:
OutlineLoad /A:PO /U:jtadmin /I:<directory>\employee.csv/
D:Employee /L:c:/employee_load.log /N/S:localhost /M/X:c:/
employee_load.exc
m To load Smart List data:/A:<application> /U:<user name> /I:<directory>/<.csv file> /DS:HSP_SMARTLISTS /L:/<directory>/
<.LOG file> /N [/S:<server>] [/M] /X:/<directory>/<.EXC file>
For example, C:\Oracle\Middleware\user_projects\epmsystem1\Planning\planning1>OutlineLoad /A:psbapp /U:admin /M /I:c:
\psb_salgradedetails.csv /D:"Budget Item"
l UNIX: {EPM_ORACLE_INSTANCE}/Planning/planning1/OutlineLoad.sh /A:<appName> /U:<adminUser> /M /I:<filename.csv> /
DS:HSP_SMARTLISTS /L:outlineload.log /X:outlineload.exc
3 Review the LOG file to confirm that the file ran correctly.
4 Open the application to ensure that the correct metadata loaded.
5 Select Administration, then Manage Applications, and then Refresh Database to write the metadatato the Plan 1, 2, or 3, and the HCP plan type.
Running Load Files 203

204 Loading Metadata and Data Using the Outline Load Utility

BUpdating Public SectorPlanning and Budgeting
Applications From a PreviousRelease
In This Appendix
Prerequisites.. . . . . . . . . . . . . . . . . . . . . . . . . . . . . . . . . . . . . . . . . . . . . . . . . . . . . . . . . . . . . . . . . . . . . . . . . . . . . . . . . . . . . . . . . . . . . 205
About Updating Data and Artifacts.. . . . . . . . . . . . . . . . . . . . . . . . . . . . . . . . . . . . . . . . . . . . . . . . . . . . . . . . . . . . . . . . . . . . 206
Options and Considerations .. . . . . . . . . . . . . . . . . . . . . . . . . . . . . . . . . . . . . . . . . . . . . . . . . . . . . . . . . . . . . . . . . . . . . . . . . . . 206
Updating Data Forms, Menus, Reports, and Task Lists .. . . . . . . . . . . . . . . . . . . . . . . . . . . . . . . . . . . . . . . . . . . . . 207
Updating Applications That Use Calculation Manager.. . . . . . . . . . . . . . . . . . . . . . . . . . . . . . . . . . . . . . . . . . . . . . . 208
Updating Applications That Use Business Rules ... . . . . . . . . . . . . . . . . . . . . . . . . . . . . . . . . . . . . . . . . . . . . . . . . . . . 209
Updating Dimensional Metadata ... . . . . . . . . . . . . . . . . . . . . . . . . . . . . . . . . . . . . . . . . . . . . . . . . . . . . . . . . . . . . . . . . . . . . 209
Post Migration Tasks... . . . . . . . . . . . . . . . . . . . . . . . . . . . . . . . . . . . . . . . . . . . . . . . . . . . . . . . . . . . . . . . . . . . . . . . . . . . . . . . . . . 211
This section describes how to update 11.1.2.0 Public Sector Planning and Budgeting applications,metadata, and data. Do not use the following procedures to update Planning applications.
PrerequisitesWarning: Review, understand, and satisfy the following requirements. If you do not meet therequirements, applications may malfunction, and you may experience service interruptions anddata loss.
1. Before running the upgrade wizard during installation, perform these tasks:
l Create a 11.1.2.0 test environment.
l Make a backup copy of the current 11.1.2.0 application in your productionenvironment. This copy will be the 11.1.2.0 test application.
If you use Business Rules as the calculation engine, copy the application to another serverthat has a different, and dedicated, Business Rules repository. See the Oracle HyperionEnterprise Performance Management System Backup and Recovery Guide.
l Ensure that you can log on to Shared Services Console using an account enabling OracleHyperion Enterprise Performance Management System Lifecycle Management tasks.
l Ensure that you can log on to EPM Workspace as a Financial Reporting administrator.
Prerequisites 205

2. Upgrade Planning as described in Chapter 5 of the Oracle Hyperion Enterprise PerformanceManagement System Installation and Configuration Guide and “Managing Upgrades” in theOracle Hyperion Planning Administrator's Guide. If you use Business Rules as the calculationengine, see the Oracle Hyperion Enterprise Performance Management System Installation andConfiguration Guide for specific instructions.
3. Update references to re-hosted data sources (relational databases and Oracle Essbaseservers). See "Managing Upgrades" in the Oracle Hyperion Planning Administrator's Guide.
4. Create a 11.1.2.1 test application that is identical, as follows, to the 11.1.2.0 test application:
l Uses the same budget detail. See “Budget Detail Types” on page 18.
l Uses the same calculation engine
l Uses the same currency options
l Has the same calendar definition (application start year, and number of years, forexample)
Note: If you use Business Rules as the calculation engine, create the application on anotherserver that has its own Oracle's Hyperion® Business Rules repository. Do not createthe application on a server hosting the production application.
5. Launch Planning11.1.2.1, open the 11.1.2.0 test application, and then click Upgrade.
About Updating Data and ArtifactsYou perform these tasks to update data and artifacts from the 11.1.2.1 test environment andmigrate them to the 11.1.2.0 test environment:
1. Review “Options and Considerations ” on page 206.
2. Select the artifacts to migrate in Shared Services Console.
3. Define the migration.
4. Execute the migration.
5. Validate the migrated data.
6. Refresh the database.
7. Verify the migrated data, and then use the same procedure to migrate data from the 11.1.2.0test environment to 11.1.2.0 production environment.
Options and Considerations Update 11.1.2.0 Public Sector Planning and Budgeting metadata and data based on yoursituation:
206 Updating Public Sector Planning and Budgeting Applications From a Previous Release

Table 33 Update Options
Situation Tasks
You do not want touse the newfeatures
1. “Updating Applications That Use Calculation Manager” on page 208 or “Updating Applications That Use BusinessRules” on page 209.
2. “Updating Dimensional Metadata” on page 209.
You want to usethe new featuresand did notmodify the 11.1.2.0dimensionality orartifacts
1. “Updating Data Forms, Menus, Reports, and Task Lists” on page 207.
2. Depending on the calculation module, “Updating Applications That Use Calculation Manager” on page 208 or“Updating Applications That Use Business Rules” on page 209.
3. “Updating Dimensional Metadata” on page 209.
You want to usethe new featuresand modified the11.1.2.0dimensionalityand artifacts forcustomimplementation
1. If you did not change artifact names in the pre-build application, copy each artifact using the Save As option.This ensures that you have a copy of all artifacts. If you changed artifacts that you copied, the artifacts are notoverwritten.
2. “Updating Data Forms, Menus, Reports, and Task Lists” on page 207.
3. Depending on your calculation module, “Updating Applications That Use Calculation Manager” on page 208 or“Updating Applications That Use Business Rules” on page 209.
4. “Updating Dimensional Metadata” on page 209.
5. Reinstate the artifacts that you copied in step 1 to restore your changes.
Updating Data Forms, Menus, Reports, and Task Lists
ä To update data forms, menus, reports, and task lists:
1 Satisfy the requirements. See “Prerequisites” on page 205.
2 Migrate composite forms, custom menus, task lists, data forms, data load settings, and user variablesfrom the 11.1.2.1 test application to the 11.2.1.0 application:
a. On the 11.1.2.1 test environment, log on to Oracle's Hyperion® Shared Services Consoleas an administrator.
b. Expand Application Groups, and select the new 11.1.2.1 application in the 11.1.2.1 testenvironment.
c. Expand Configuration, and then select Data Load Settings and User Variables.
d. Expand Application, expand Global Artifacts, and then select:
l Composite forms
l Custom menus
l Task lists
e. Expand Plan Type, expand HCP, and select Data Forms.
f. Click Define Migration.
g. Ensure that Application Group and Source Application reference the 11.1.2.1 application.
Updating Data Forms, Menus, Reports, and Task Lists 207

h. Click Next.
i. On Destination, select the 11.1.2.0 application, and then click Next.
j. Review the destination options and then click Next.
k. Click Execute Migration, and then click Migration Status Report to track the migrationprocess.
3 Export the reports from 11.1.2.1 test application:
a. Log on to EPM Workspace as a Financial Reporting administrator.
b. Click Explore.
c. Navigate to the 11.1.2.1 test application.
d. Select Human Capital Planning.
e. Select File, and then Export.
f. Individually export all existing reports in DES format to a temporary directory on thefile system.
4 Import the reports in to the 11.1.2.0 application:
a. Log on to EPM Workspace as a Oracle Hyperion Financial Reporting, Fusion Editionadministrator.
b. From the list of folders, select the 11.1.2.0 application.
c. To preserve reports you changed, rename the reports.
d. Select File, then Import, and then Financial Reporting Documents.
e. Import reports from the DES files in the temporary directory; overwriting the existingreports.
f. After importing all reports, select the reports, select Tools, and then select ChangeDatabase Connection to map the reports to 11.1.2.0 test application data source.
Depending on the calculation engine, see “Updating Applications That Use CalculationManager” on page 208 or “Updating Applications That Use Business Rules” on page 209.
Updating Applications That Use Calculation Manager
ä To update applications that use Calculation Manager:
1 Log on to Oracle Enterprise Performance Management Workspace, Fusion Edition.
2 Select Administer, and then Calculation Manager.
3 Expand Planning.
4 From Applications, identify the 11.1.2.0 application.
5 Make and maintain a copy of business rules that you may have modified, such as those used in GeneralLedger allocations.
6 Right-click the 11.1.2.0 application, and then select Load Predefined Rules.
208 Updating Public Sector Planning and Budgeting Applications From a Previous Release

7 Right-click the 11.1.2.0 application again, and select Deploy.
8 Perform the tasks in “Updating Dimensional Metadata” on page 209.
Updating Applications That Use Business Rules
ä To update applications that use Business Rules:
1 On the 11.1.2.0 test environment, log on to Oracle Essbase Administration Services.
2 Expand Business Rules, then Repository View, and then Rules.
3 Make a copy of any business rules that you modified, such as those used in General Ledger allocations.
4 On the 11.1.2.1 test environment, log on to Oracle's Hyperion® Shared Services as an administrator.
5 Expand Application Groups, and then select the 11.1.2.1 application as the source application.
6 Expand Applications, and then Global Artifacts.
7 Select Business Rules, and then click Define Migration.
8 Ensure that Source Application Group and Source Application reference the 11.1.2.1 test application.
9 Click Next.
10 On Destination, select Export to File System.
11 Review the destination options, and then click Next.
12 Click Execute Migration, and then click Migration Status Report to track the migration process.
13 Copy the rules from the 11.1.2.1 environment to the file system on the 11.1.2.0 environment:
a. On the 11.1.2.0 test environment, log on to Oracle's Hyperion® Shared Services.
b. Expand File System, select the folder that contains the copied rules, and ensure the folderis the Source Application.
c. From Target Application, select the 11.1.2.0 test application.
d. Click Execute Migration and track the migration process using the Migration Statusreport.
14 Reinstate your changes using he copies of the Business Rules you made.
15 Perform the steps in “Updating Dimensional Metadata” on page 209.
Updating Dimensional MetadataPerform these tasks to update dimensional metadata in Performance Management Architectand Planning applications. For Oracle Hyperion EPM Architect, Fusion Edition applications,perform these steps using the Enterprise Performance Management Architect, and then deployto Planning.
Updating Applications That Use Business Rules 209

ä To update dimensional metadata:
1 In the 11.1.2.1 test application, select View, and then Advanced Mode.
2 Select Administer, and then Dimensions.
3 If the 11.1.2 application is single currency, uses the Employee and Position budget detail, perform thesetasks:
a. Select the Position dimension, and then click Edit.
b. If the consolidation of Total New Positions and its children is Ignore, change it toAddition.
4 Select the Budget Item dimension, click Edit, and verify that Rule Criteria is before ElementChanges. If necessary, move members to ensure that Budget Item has this structure:
5 For the Employee budget detail: Select the Posting Date account, click Edit, and ensure it is enabledon the HCP plan type.
6 Select the Account dimension, and then click Edit.
7 Ensure that General Ledger natural account members that correspond to personnel expenses aredisabled in the HCP plan type, but enabled in Plan Type 1, 2, or 3.
8 Ensure that the Monthly spread factor formula is the same as that in 11.1.2.1 test application:
a. In the 11.1.2.1 test application, select View, and then Advanced Mode.
b. Select Administer, and then Dimensions.
c. Select the Account dimension, then Human Capital Planning Budgeting Assumptions, andthen Employee Properties.
d. Select Monthly spread factor formula, and then click Edit.
e. Select Member Formula , and then select the entire formula code.
f. Press Ctrl + C.
g. In the 11.1.2.0 test application:
l Perform steps 6 and 7 in this procedure.
l Perform steps 8 a - d.
h. In Member Formula, press Ctrl + V to paste the copied code, and save.
i. Select Administer, then Database, and then Refresh Database.
9 Perform the steps in “Post Migration Tasks” on page 211.
210 Updating Public Sector Planning and Budgeting Applications From a Previous Release

Post Migration TasksAfter migrating data, perform these tasks:
1. Log on to the Public Sector Planning and Budgeting 11.1.2.0 test application to confirm thatthe migrated task lists, data forms, and custom menus display.
2. Select Application, and then Refresh Database.
3. Select Update Custom Defined Functions, and then click Refresh.
4. To accommodate any data changes:
l Recalculate compensation budgets for Total Entity. See “Calculating Budgets” on page153.
l Allocate modified compensation expenses to General Ledger accounts. See “AboutAllocating Compensation Expenses to General Ledger Accounts” on page 156.
5. After validating the data in the 11.1.2.0 test application, repeat the procedures above tomigrate metadata and data from the 11.1.2.0 application in the test environment to theapplication in production.
Post Migration Tasks 211

212 Updating Public Sector Planning and Budgeting Applications From a Previous Release
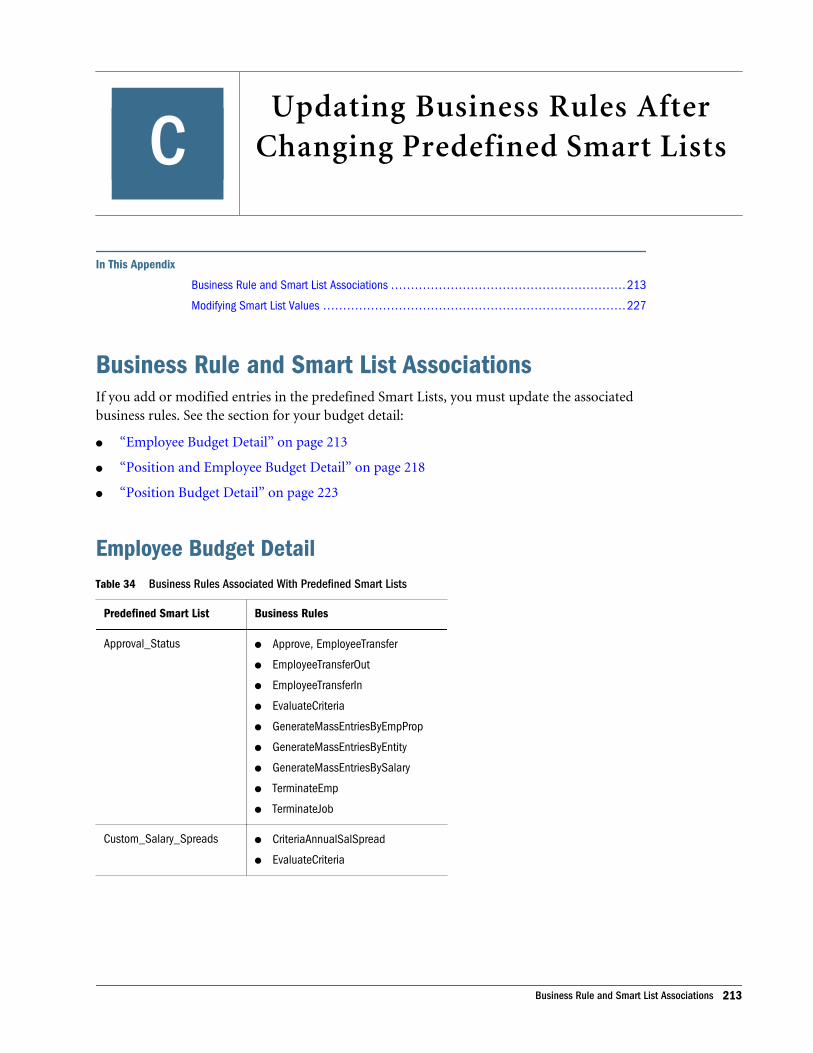
CUpdating Business Rules After
Changing Predefined Smart Lists
In This Appendix
Business Rule and Smart List Associations ... . . . . . . . . . . . . . . . . . . . . . . . . . . . . . . . . . . . . . . . . . . . . . . . . . . . . . . . . 213
Modifying Smart List Values ... . . . . . . . . . . . . . . . . . . . . . . . . . . . . . . . . . . . . . . . . . . . . . . . . . . . . . . . . . . . . . . . . . . . . . . . . . 227
Business Rule and Smart List AssociationsIf you add or modified entries in the predefined Smart Lists, you must update the associatedbusiness rules. See the section for your budget detail:
l “Employee Budget Detail” on page 213
l “Position and Employee Budget Detail” on page 218
l “Position Budget Detail” on page 223
Employee Budget DetailTable 34 Business Rules Associated With Predefined Smart Lists
Predefined Smart List Business Rules
Approval_Statusl Approve, EmployeeTransfer
l EmployeeTransferOut
l EmployeeTransferIn
l EvaluateCriteria
l GenerateMassEntriesByEmpProp
l GenerateMassEntriesByEntity
l GenerateMassEntriesBySalary
l TerminateEmp
l TerminateJob
Custom_Salary_Spreadsl CriteriaAnnualSalSpread
l EvaluateCriteria
Business Rule and Smart List Associations 213

Predefined Smart List Business Rules
Earning_Typel AddAdditionalEarning
l AllEmpDistElmCost
l AssignEmployee
l CriteriaCreateMissingNonSalElement
l CriteriaOverWriteNonSalElement
l DeleteNonSalElement
l TerminateEmp
l TerminateJob
l EmpDistElmCost
l EmployeeTransfer
l EmployeeTransferIn
l EmpToJobCode
Element_Typel AddBenefitElement
l AddAdditionalEarning
l AllEmpDistElmCost
l AddTaxElement
l AssignEmployee
l CriteriaCreateMissingNonSalElement
l CriteriaOverWriteNonSalElement
l DeleteNonSalElement
l TerminateEmp
l TerminateJob
l EmpDistElmCost
l EmployeeTransfer
l EmployeeTransferIn
l EmpToJobCode
Employee_Statusl ActivateJob
l AddEmpFTE
l ChangeEmpStatus
l AssignEmployee
l EmployeeTransfer
l EmployeeTransferIn
l EmployeeTransferOut
l TerminateEmp
l TerminateJob
l EmpToJobCode
l ExcludeJob
l SpreadByPeriod_ExistingFTE
l SpreadByPeriod
214 Updating Business Rules After Changing Predefined Smart Lists
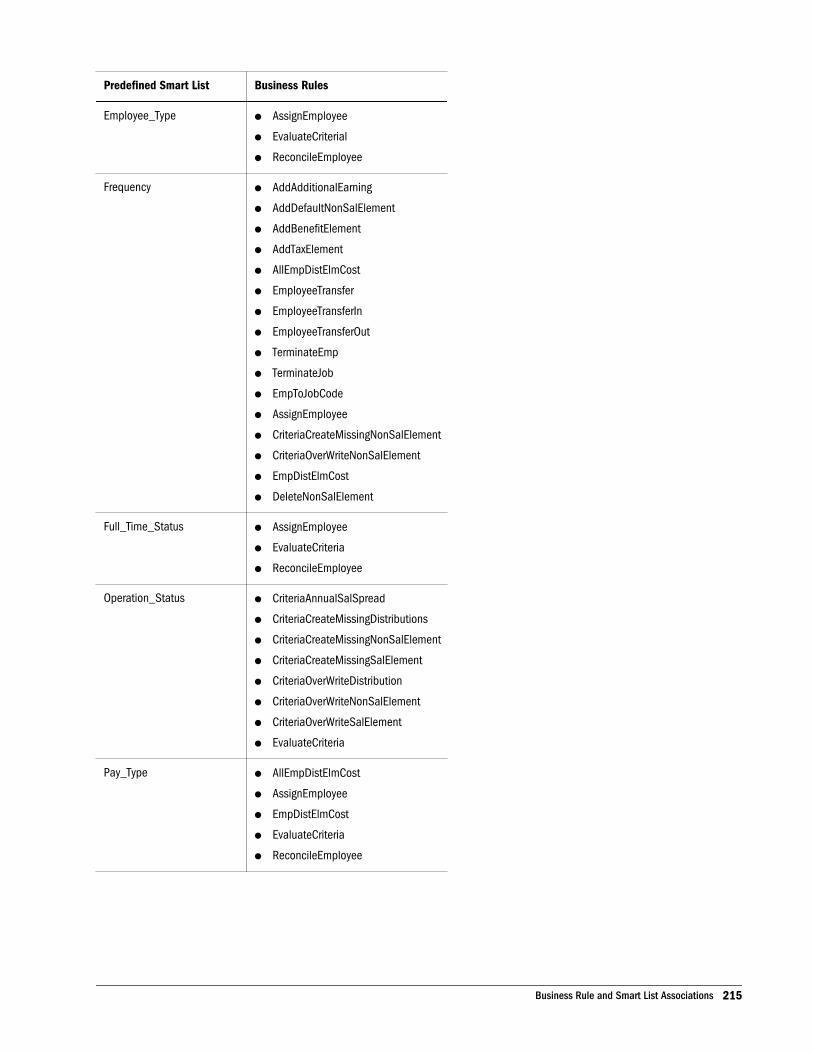
Predefined Smart List Business Rules
Employee_Typel AssignEmployee
l EvaluateCriterial
l ReconcileEmployee
Frequencyl AddAdditionalEarning
l AddDefaultNonSalElement
l AddBenefitElement
l AddTaxElement
l AllEmpDistElmCost
l EmployeeTransfer
l EmployeeTransferIn
l EmployeeTransferOut
l TerminateEmp
l TerminateJob
l EmpToJobCode
l AssignEmployee
l CriteriaCreateMissingNonSalElement
l CriteriaOverWriteNonSalElement
l EmpDistElmCost
l DeleteNonSalElement
Full_Time_Statusl AssignEmployee
l EvaluateCriteria
l ReconcileEmployee
Operation_Statusl CriteriaAnnualSalSpread
l CriteriaCreateMissingDistributions
l CriteriaCreateMissingNonSalElement
l CriteriaCreateMissingSalElement
l CriteriaOverWriteDistribution
l CriteriaOverWriteNonSalElement
l CriteriaOverWriteSalElement
l EvaluateCriteria
Pay_Typel AllEmpDistElmCost
l AssignEmployee
l EmpDistElmCost
l EvaluateCriteria
l ReconcileEmployee
Business Rule and Smart List Associations 215

Predefined Smart List Business Rules
Payment_Termsl AddAdditionalEarning
l AddBenefitElement
l AddDefaultNonSalElement
l AddTaxElement
l AllEmpDistElmCost
l AssignEmployee
l CriteriaCreateMissingNonSalElement
l CriteriaOverWriteNonSalElement
l DeleteNonSalElement
l EmpDistElmCost
l EmployeeTransfer
l EmployeeTransferIn
l EmpToJobCode
l TerminateEmp
l TerminateJob
Position_Statusl ActivateJob
l AllEmpDistElmCost
l AssignEmployee
l ChangeEmpStatus
l EmpDistElmCost
l EmployeeTransfer
l EmployeeTransferOut
l EmployeeTransferIn,
l EmpToJobCode
l EvaluateCriteria
l ExcludeJob
l GenerateMassEntriesByEmpProp
l GenerateMassEntriesBySalary
l SpreadByPeriod_ExistingFTE
l SpreadByPeriod
l TerminateEmp
l TerminateJob
Rule_Arithematic_Operatorsl AddDefaultNonSalElement
l AddDefaultRateBasedOption
l AddDefaultStepBasedOption
l AddDefaultValueBasedOption
l AddMultipleNonSalElemOptions
l AddMultipleSalElemOptions
l MassSalaryAdjustments
l MassValueUpdate
216 Updating Business Rules After Changing Predefined Smart Lists

Predefined Smart List Business Rules
Rule_Date_Criterial EvaluateCriteria
l GenerateMassEntriesByEmpProp
Rule_Comparision_Operatorsl EvaluateCriteria
l GenerateMassEntriesByEmpProp
Salary_Basisl AddDefaultRateBasedOption
l AddDefaultStepBasedOption,
l AddDefaultValueBasedOption
l AddSalElement
l AllEmpDistElmCost]
l AssignEmployee]
l CriteriaCreateMissingSalElement
l CriteriaOverWriteSalElement
l DeleteSalElement
l EmpDistElmCost
l EmployeeTransfer
l EmployeeTransferIn
l EmpToJobCode
l TerminateJob
l TerminateEmp
Salary_Typel AddDefaultRateBasedOption
l AddDefaultStepBasedOption
l AddDefaultValueBasedOption
l AddMultipleSalElemOptions
l AddSalElement
l AssignEmployee
l CriteriaCreateMissingSalElement
l CriteriaOverWriteSalElement
l DeleteSalElement
l EmployeeTransfer
l EmployeeTransferIn
l EmpToJobCode
l TerminateJob
l TerminateEmp
Business Rule and Smart List Associations 217

Position and Employee Budget DetailTable 35 Business Rules Associated With Predefined Smart Lists
Predefined Smart Lists Business Rules
Approval_Statusl AddNewPosition
l Approve
l EmployeeTransfer
l EmployeeTransferIn
l EmployeeTransferOut
l EvaluateCriteria
l GenerateMassEntriesByEntity
l GenerateMassEntriesByPosProp
l GenerateMassEntriesBySalary
l TerminatePos
l TerminateEmp
Custom_Salary_Spreadsl AddNewPosition
l CopyPosition
l CriteriaAnnualSalSpread
l EvaluateCriteria
Earning_Typel AddAdditionalEarning
l AddNewPosition
l CriteriaCreateMissingNonSalElement
l CriteriaOverWriteNonSalElement
l DeleteNonSalElement
l EmpDistElmCost
l EmpDistElmCost_All
l EmployeeTransfer
l EmployeeTransferIn,
l EmpToPosition
l TerminatePos
l TerminateEmp
218 Updating Business Rules After Changing Predefined Smart Lists

Predefined Smart Lists Business Rules
Element_Typel AddNewPosition
l Approve
l EmployeeTransfer
l EmployeeTransferIn
l EmployeeTransferOut
l EvaluateCriteria
l GenerateMassEntriesByEntity
l GenerateMassEntriesByPosProp
l GenerateMassEntriesBySalary
l TerminatePos
l TerminateEmp
Employee_Typel EvaluateCriteria
l FillPosition
l ReconcileEmployee
Employee_Statusl AddEmpFTE
l AddNewPosition
l ChangeEmpStatus
l EmployeeTransfer
l EmployeeTransferIn,
l EmployeeTransferOut
l EmpToPosition
l ExcludePos
l SpreadByPeriod_ExistingFTE
l SpreadByPeriod
l TerminateEmp
l TerminatePos
Business Rule and Smart List Associations 219

Predefined Smart Lists Business Rules
Frequencyl AddAdditionalEarning
l AddBenefitElement
l AddDefaultNonSalElement
l AddDefaultNonSalElemOption_Job
l AddNewPosition
l AddTaxElement
l CriteriaCreateMissingNonSalElement
l CriteriaOverWriteNonSalElement
l DeleteNonSalElement
l EmpDistElmCost
l EmpDistElmCost_All
l EmployeeTransfer
l TerminateEmp
l TerminatePos
l EmployeeTransferIn
l EmpToPosition
l FillPos
Full_Time_Statusl EvaluateCriteria
l FillPosition
l ReconcileEmployee
Operation_Statusl CriteriaAnnualSalSpread
l CriteriaCreateMissingDistributions
l CriteriaCreateMissingNonSalElement
l CriteriaCreateMissingSalElement
l CriteriaOverWriteDistribution
l CriteriaOverWriteNonSalElement
l CriteriaOverWriteSalElement
l EvaluateCriteria
Pay_Typel EmpDistElmCost
l EmpDistElmCost_All
l FillPosition
l EvaluateCriteria
l ReconcileEmployee
220 Updating Business Rules After Changing Predefined Smart Lists
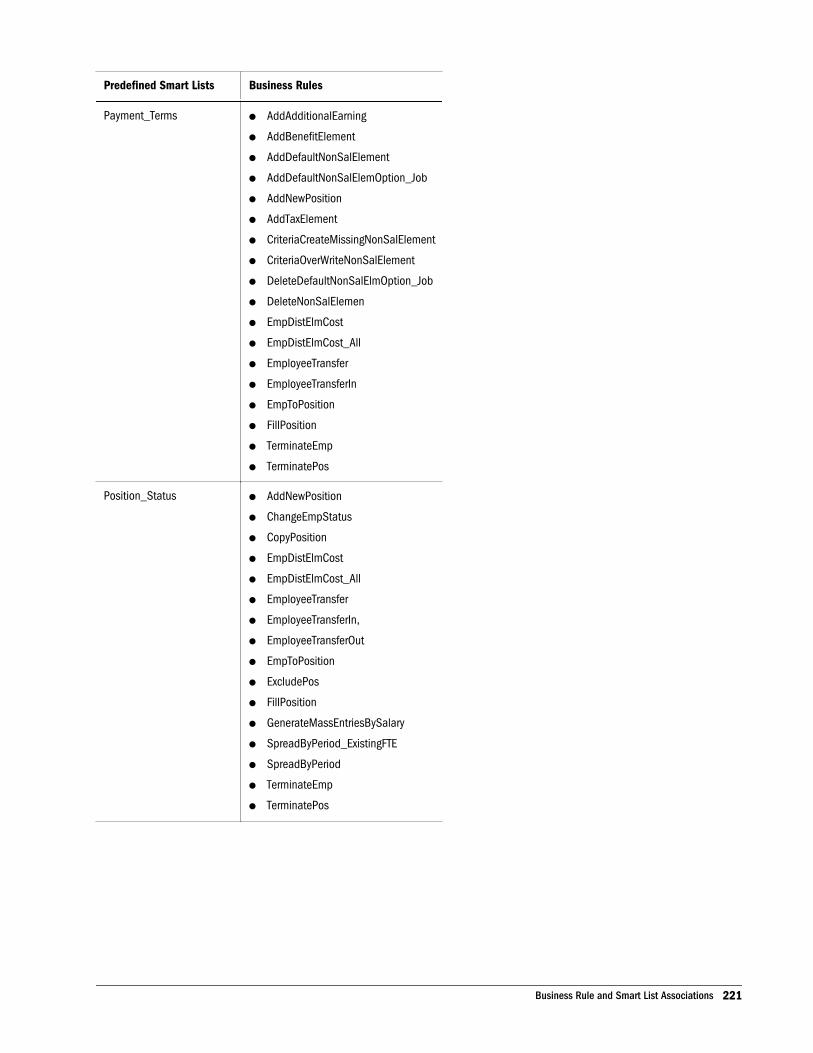
Predefined Smart Lists Business Rules
Payment_Termsl AddAdditionalEarning
l AddBenefitElement
l AddDefaultNonSalElement
l AddDefaultNonSalElemOption_Job
l AddNewPosition
l AddTaxElement
l CriteriaCreateMissingNonSalElement
l CriteriaOverWriteNonSalElement
l DeleteDefaultNonSalElmOption_Job
l DeleteNonSalElemen
l EmpDistElmCost
l EmpDistElmCost_All
l EmployeeTransfer
l EmployeeTransferIn
l EmpToPosition
l FillPosition
l TerminateEmp
l TerminatePos
Position_Statusl AddNewPosition
l ChangeEmpStatus
l CopyPosition
l EmpDistElmCost
l EmpDistElmCost_All
l EmployeeTransfer
l EmployeeTransferIn,
l EmployeeTransferOut
l EmpToPosition
l ExcludePos
l FillPosition
l GenerateMassEntriesBySalary
l SpreadByPeriod_ExistingFTE
l SpreadByPeriod
l TerminateEmp
l TerminatePos
Business Rule and Smart List Associations 221

Predefined Smart Lists Business Rules
Position_Typel AddNewPosition
l CopyPosition
l EmployeeTransfer
l EmployeeTransferIn
l EmpToPosition
l EvaluateCriteria
l FillPosition
Rule_Arithematic_Operatorsl AddDefaultNonSalElement
l AddDefaultRateBasedOption
l AddDefaultStepBasedOption
l AddDefaultValueBasedOption
l AddMultipleNonSalElemOptions
l AddMultipleSalElemOptions
l MassSalaryAdjustments
l MassValueUpdate
Rule_Date_Criterial EvaluateCriteria
l GenerateMassEntriesByPosProp
Salary_Basisl AddDefaultRateBasedOption
l AddDefaultRateBasedOption_Job
l AddDefaultStepBasedOption
l AddDefaultStepBasedOption_Job
l AddDefaultValueBasedOption
l AddDefaultValueBasedOption_Job
l AddNewPosition
l AddSalElement
l CopyPosition,
l CriteriaCreateMissingSalElement
l CriteriaOverWriteSalElement
l DeleteSalElement
l EmpDistElmCost
l EmpDistElmCost_All
l EmployeeTransfer
l EmployeeTransferIn
l EmpToPosition
l FillPosition
l TerminateEmp
l TerminatePos
222 Updating Business Rules After Changing Predefined Smart Lists

Predefined Smart Lists Business Rules
Salary_Typel AddDefaultRateBasedOption
l AddDefaultRateBasedOption_Job
l AddDefaultValueBasedOption
l AddDefaultValueBasedOption_Job
l AddMultipleSalElemOptions
l AddDefaultStepBasedOption
l AddDefaultStepBasedOption_Job
l AddNewPosition
l AddSalElement
l CriteriaCreateMissingSalElement
l CriteriaOverWriteSalElement
l DeleteDefaultSalElmOption_Job
l DeleteSalElement
l EmployeeTransfer
l EmployeeTransferIn
l EmpToPosition
l FillPosition
l TerminateEmp
l TerminatePos
Position Budget Detail
Table 36 Business Rules Associated With Predefined Smart Lists
Predefined Smart Lists Business Rules
Approval_Statusl AddNewPosition
l Approve
l EvaluateCriteria
l GenerateMassEntriesByEntity
l GenerateMassEntriesByPosProp
l GenerateMassEntriesBySalary
l PositionTransfer
l PositionTransferIn
l PositionTransferOut
l TerminatePos
Custom_Salary_Spreadsl AddNewPosition
l CopyPosition
l CriteriaAnnualSalSpread
l EvaluateCriteria
Business Rule and Smart List Associations 223

Predefined Smart Lists Business Rules
Earning_Typel AddAdditionalEarning
l AddNewPosition
l CriteriaCreateMissingNonSalElement
l CriteriaOverWriteNonSalElement]
l DeleteNonSalElement
l EmpDistElmCost
l EmpDistElmCost_All,
l PositionTransfer
l PositionTransferIn
l TerminatePos
Employee_Statusl AddFTE
l AddNewPosition
l ChangeStatus
l ExcludePos
l PositionTransfer
l PositionTransferIn
l PositionTransferOut
l SpreadByPeriod_ExistingFTE
l SpreadByPeriod
l TerminatePos
Element_Typel AddAdditionalEarning
l AddBenefitElement
l AddDefaultNonSalElement
l AddDefaultNonSalElemOption_Job
l AddNewPosition
l AddTaxElement
l CriteriaCreateMissingNonSalElement
l CriteriaOverWriteNonSalElement
l DeleteDefaultNonSalElmOption_Job
l DeleteNonSalElement
l EmpDistElmCost
l EmpDistElmCost_All
l PositionTransferIn
l PositionTransfer
l TerminatePos
224 Updating Business Rules After Changing Predefined Smart Lists

Predefined Smart Lists Business Rules
Employee_Statusl AddFTE
l AddNewPositions
l ChangeStatus
l ExcludePos
l PositionTransfer
l PositionTransferIn
l PositionTransferOut
l SpreadByPeriod_ExistingFTE
l SpreadByPeriod
l TerminatePos
Frequencyl AddAdditionalEarning
l AddBenefitElement
l AddDefaultNonSalElement
l AddDefaultNonSalElemOption_Job
l EmpDistElmCost
l EmpDistElmCost_All
l PositionTransfer
l PositionTransferIn
l TerminatePos
l AddTaxElement
l CriteriaCreateMissingNonSalElement
l CriteriaOverWriteNonSalElement
l DeleteNonSalElement
Operation_Statusl CriteriaAnnualSalSpread
l CriteriaCreateMissingDistributions
l CriteriaCreateMissingNonSalElement
l CriteriaCreateMissingSalElement
l CriteriaOverWriteDistribution
l CriteriaOverWriteNonSalElement
l CriteriaOverWriteSalElement
l EvaluateCriteria
Business Rule and Smart List Associations 225

Predefined Smart Lists Business Rules
Payment_Termsl AddAdditionalEarning
l AddBenefitElement
l AddDefaultNonSalElement
l AddDefaultNonSalElemOption_Job
l DeleteNonSalElement
l EmpDistElmCost
l EmpDistElmCost_All
l PositionTransfer
l PositionTransferIn
l TerminatePos
Position_Statusl AddNewPosition
l ChangeStatus
l CopyPosition
l EmpDistElmCost
l EmpDistElmCost_All
l ExcludePos,
l GenerateMassEntriesByEntity
l GenerateMassEntriesByPosProp
l GenerateMassEntriesBySalary
l PositionTransfer
l PositionTransferIn
l PositionTransferOut
l SpreadByPeriod_ExistingFTE
l SpreadByPeriod
l TerminatePos
Position_Typel AddNewPosition
l CopyPosition
l EvaluateCriteria
Rule_Arithematic_Operatorsl AddDefaultNonSalElement
l AddDefaultRateBasedOption
l AddDefaultStepBasedOption
l AddDefaultValueBasedOption
l AddMultipleNonSalElemOptions
l AddMultipleSalElemOptions
l MassSalaryAdjustments
l MassValueUpdate
Rule_Date_Criterial EvaluateCriteria
l GenerateMassEntriesByPosProp
226 Updating Business Rules After Changing Predefined Smart Lists

Predefined Smart Lists Business Rules
Salary_Basisl AddDefaultRateBasedOption
l AddDefaultRateBasedOption_Job
l AddDefaultStepBasedOption
l AddDefaultStepBasedOption_Job
l AddDefaultValueBasedOption
l AddDefaultValueBasedOption_Job
l AddNewPosition
l AddSalElement
l CopyPosition
l CriteriaCreateMissingSalElement
l CriteriaOverWriteSalElement
l DeleteSalElement
l EmpDistElmCost
l EmpDistElmCost_All
l PositionTransfer
l PositionTransferIn
l TerminatePos
Salary_Typel AddDefaultRateBasedOption
l AddDefaultRateBasedOption_Job
l AddDefaultStepBasedOption
l AddDefaultStepBasedOption_Job
l AddDefaultValueBasedOption
l AddDefaultValueBasedOption_Job
l AddNewPosition
l AddSalElement
l CopyPosition
l CriteriaCreateMissingSalElement
l CriteriaOverWriteSalElement
l DeleteDefaultSalElmOption_Job
l DeleteSalElement
l PositionTransfer
l PositionTransferIn
l TerminatePos
Modifying Smart List ValuesEdit HspCustomMsg_<language>.template to change the Smart List values displayed tousers. For information, see “Customizing Planning Web Client” in the Oracle Hyperion PlanningAdministrator's Guide.
Modifying Smart List Values 227

228 Updating Business Rules After Changing Predefined Smart Lists

Glossary
additional earning Compensation element for funds in
addition to salary associated with employees, jobs, and
positions. Hazard pay and overtime are additional earnings.
allocation A system for storing compensation expenses
using General Ledger segments, chart fields, or account code
IDs (dimensions).
Approval Oracle Hyperion Planning, Fusion Edition tool for
approving compensation budgets that are submitted as
planning units.
assignment The link between an employee to a job, position,
or FTE.
attribute In some General Ledger systems, settings for
individual benefits and employer paid taxes such as union
code or the location of positions and employees.
bimonthly Occurring every two months.
biweekly Occurring every two weeks.
budget book PDF or HTML document that details the
revenue and capital budgets approved for the proposed
fiscal year, and that includes associated financial and
operational information.
budget item Dimension that handles effective-dating logic
across compensation elements and General Ledger account
allocations. For example, a project or program can fund a
position, so expenses must be tracked for each.
budget sets Item that is part of loading General Ledger and
HRMS source data to Public Sector Planning and Budgeting
applications, and uploading data back from Oracle
Hyperion Public Sector Planning and Budgeting, Fusion
Edition applications.
compensation budget Budget for position or employee
expenses that includes salaries, benefits, additional
earnings, and employer-paid taxes. These expenses in the
compensation budget are linked and aggregated into the line
item budget.
default natural account Portion of a General Ledger account
number that identifies the financial activity in expense
accounts. A natural accounts is typically only one of the
segments or chart fields in a chart of account structure, and
maps to the Account dimension.
effective dating Dating method that enables predating to add
historical data, or postdating, before changes apply.
Effective dating does not delete values; it adds new values
with new effective dates.
element Dimension for storing the compensation
components and grade structures on which compensation
expenses are calculated. Each element represents a
compensation type, such as salary, benefits, and employer-
paid taxes.
employee Worker with a direct employment relationship
with an employer. Employees typically are paid
compensation and benefits through the employer's payroll
application.
encumbrance A firm obligation for future payment,
generated by purchase orders, for example. Included in the
total commitments.
entity Dimension that represents a cost center, department,
or business unit.
FICA Federal Insurance Contributions Act. Federal payroll
taxes that fund Social Security and Medicare.
Glossary 229

Full time equivalent (FTE) Measures the workforce in relation
to full-time employees. For example, an FTE of .5 means the
position is for a half-time employee. If a position is to be
filled with ten half-time employees, the FTE for that position
is 5.
FUTA Federal Unemployment Tax Act. Federal payroll taxes
that fund unemployment compensation.
General Ledger An organization's central accounting record,
which summarizes all financial transactions by offsetting
debit and credit accounts.
grade scale Range of possible salaries. See pay scale.
grade sequence Used to apply minimum, mid, and
maximum values to rate-based salaries. See rate-based.
grade step An salary increment corresponding to a point on
a grade scale or pay scale. Use grade steps enable to define
salary increases for a salary grade.
headcount Represents the number of employees, regardless
of their work full-time or part-time FTE. For example, the
headcount for an employee who works part-time is 1. The
headcount for ten part-time employees is 10.
Human Resource Management System (HRMS) A software
application that combines human resource functions,
typically including benefits administration, payroll,
recruiting, and training.
job A generic employee assignment or role that is
independent of a cost center or department. For example,
Director can be a job in the Finance department and the
Manufacturing department.
line item budget An organization's complete budget, which
includes all budgeted expenditures and employee expenses
derived from the compensation budget.
option Plan or implementation you can specify when
defining salary grades, benefits, and other compensation
elements. Options for dental or medical benefit could
include Member and Spouse, or Member and Dependents.
Options for salary grades could be grade steps and grade
sequences that define possible salary ranges and pay
increments.
option-based Setting indicating that different plans or
implementations exist for salary grades, benefits, and other
compensation elements. Options are applicable for
Benefits, Additional earnings and Taxes. For salary, steps or
rates defined for different dates.
pay scale Range of possible salaries.
period Specifies the fiscal year for the scenario or business
rule.
Point-of-View (POV) Area in the upper portion of Planning
that enables you to select a context for your budget data and
budgeting tasks by selecting members such as year, version,
and scenario.
pooled position A position—typically in the manufacturing
or transportation industry—in which a group of people
doing the same work and having the same reporting
relationship are assigned to a single position.
position A specific occurrence of a job in an entity (for
example, POS1234, a Security Guard in the Treasury
Office).
progression step Next increment on a salary grade scale or
pay scale.
rate-based salary grade Salary having a flexible range of
minimum, mid, and maximum values that you apply using
grade sequences. Use rate-based salary grades for jobs or
positions in which factors such as seniority and skill level
determine which salary to apply. For example, the position
of security officer may have an annual salary range of $45000
(sequence 1) at the entry level, $48000 (sequence 2) after
five years of experience, and $50000 (sequence 3) after ten
years of experience.
revision Member of the Version dimension that enables you
to modify individual budgets and then submit them for
approval.
salary grade Salary information associated with positions,
jobs, and employees. Salary grades can be rate, value, or
step-based.
scenario Dimension enables collecting data for different
time periods (for example, the current year's Budget,
Forecast1, Forecast2, and so on).
scenario hierarchy Establishes the relationship and period
aggregation of time within the budgets.
230 Glossary
semimonthly Occurring twice a month.
shared position planning Supports multiple employees
holding a single position (also called “job share”) and the
ability to assign employees to several part-time positions
(for example, an employee works 20 hours in one
department and 20 hours in another department).
single incumbent position A position that can be associated
with only one employee.
step-based salary grade Salary corresponding to a particular
point on a pay scale or grade scale. Define step-based salary
grades for positions or jobs whose salary can increase
incrementally, such as those government departments, in
which step 1 may be an annual salary of $76,000, and step 2
$80,000.
SUTA State Unemployment Tax Act. State payroll taxes that
fund unemployment insurance.
validation rule Imposed limits on planning data that
administrators define to ensure that values adhere to
company policies. For example, the salary for a new position
in the Operations department cannot be less than $40,000
or more than $100,000, or the total salary for the
Maintenance department cannot exceed $1,000,000.
value-based salary grade Salary having one, fixed value for a
given period of time. For example, a job or position of
municipal street repair crew member could have an annual,
unchanging, salary value of $42,000 in FY10. You can adjust
this salary value by 2% in FY11 to $42,420, by end dating
the existing value for FY10.
version Dimension for budget stages or outcomes given the
scenario. For example, if Forecast is a scenario, Best Case
and Worst Case can be versions.
Glossary 231

232 Glossary

Index
Aaccess permissions
about, 58business rules, 61data forms, 61dimensions and members, 59task lists, 61
accessibility, 29Account dimension, 25accounts
adding segment or chart field information, 65mapping to Smart Lists, 65natural, specifying defaults, 109predefined, 27
AddDefaultDistribution business rule, configuring,67
AddDistribution business rule, configuring, 68additional earnings
calculating budget impact, 132defining, 91Element dimension, 18specifying for employees, 132specifying for jobs, 123specifying for positions, 143specifying position defaults, 107
aggregate storage (ASO) databasesfor reporting, 173use to populate line item budgets, 73
allocation defaultsmass updates to positions and employees, 100overwriting, 101specifying, 101
allocationsand effective dating, 112configuring business rules, 66correcting overlapping, 113guidelines, 113identifying overlapping, 131
loading for employees, 197loading with CSV files, 196making to General Ledger accounts, 157specifying for employees, 131specifying for jobs, 125specifying for positions, 142
annotations, 28applications
creating Planning, 38creating Performance Management Architect, 39maintaining, 33mapping data to, 173migrating options, 206multiple, allocation segments, 70preparing to create line item budget, 63updating 11.1.2.0, 205
approved headcount, 20assignments
effect on headcount, 20overview, 19
Bbenefit allocations
overview , 110benefits
calculating budget impact, 132defining , 91Element dimension, 18mass adjusting, 115specifying for employees, 132specifying for jobs, 124specifying for positions, 143specifying position defaults, 107
budget booksdescribed, 171exporting, 171
budget calculations
A B C D E F G H J L M N O P R S T U V W
Index 233

excluding jobs, 127excluding positions, 143, 145FTE and vacancy calculations, 20including excluded positions, 143performing by entity, 153
budget detailsand predefined reports, 171employee, 19overview, 18position-based, 19
Budget Itemspecifying data load settings, 44
Budget Item dimensiondefined, 229overview, 24
budget processdefining, 42starting, 42task overview, 17
budget sets, defined, 229business rules, 66. See also Hyperion Business Rules
and Calculation ManagerAddDefaultDistribution, configuring, 67configured, updating data forms, 72configuring for different applications, 70configuring for General Ledger segments, 66DeleteDistribution, configuring, 69modifying after Smart List modification, 213overview, 56rulesAddDistribution, configuring, 68securing, 61
CCalculation Manager
assigning access permissions, 61using, 56
calendardefining , 38fiscal year and calculations, 38setting up in Performance Management Architect
applications, 39CCIDs. See General Ledger segmentscomments, 28compensation budge
preparing, 83compensation budget
allocating to General Ledger accounts, 157
approving, 159calculating, 153creating, 117defined, 229excluding jobs, 127excluding positions, 145integrating with line item expense budget, 73reviewing, 154revising, 165, 168submission, 159submission requirements, 160submitting, 163
compensation elementsdefaults, mass update positions and employees,
100defaults, specifying, 107for employees, loading using CSV files, 195for positions, loading using CSV files, 194loading using CSV files, 185managing, 91mass adjusting, 115modifying, 95modifying multiple simultaneously, 96modifying options, 95options, adding, 93overwriting defaults, 101review budget expenses, 155
compensation expensesannual salary spread methods, 89employees, approving, 162jobs, approving, 161positions, approving, 161sharing across departments, 22
CSV load filesabout, 180before defining, 177creating, 181running, 203syntax, 180testing, 200
Currency dimension, 18CurrentYear substitution variable, 32, 44
Ddata forms
about customizing, 57access permissions, 59
A B C D E F G H J L M N O P R S T U V W
234 Index

customizing using validation rules, 58menus, 58updating to reflect configured business rules, 72
data load settings, specifying, 44default natural accounts
defined, 229mapping to Account dimension, 65overview, 109
defaultscompensation elements, specifying, 107natural accounts, specifying, 109salary allocations, specifying, 113salary grades, specifying, 107
defining maximum values for Business Rulestext andcomment cells
, 58DeleteDistribution business rule, configuring, 69dimensions
access permissions, 59Account, 25associating with Smart Lists, 52Budget Item, 24Budget Item dimension, 229Currency, 18, 25Element, 18, 23Employee, 25Entity, 24HSP_Rates, 26Job Code, 26Position, 26predefined for Employee budget detail, 19predefined for the Position and Employee budget
detail, 18predefined for the Position budget detail, 19renaming, 45required, 45Scenario, 22sharing between products, 47user-defined, 26Version, 22
Eeffective dating
and allocations, 112defined, 229using loaded HRMS source data, 96
Element dimension, 18, 23
elementsdefined, 229
Employee Adjustments predefined report, 173Employee budget detail
selecting in Performance Management Architectapplications, 39
Employee budget detail, overview, 19employee details
loading using CSV files, 187Employee dimension, 25Employee Expenses predefined report, 173Employee Job Association predefined report, 173employees
adding, 46allocations, loading , 197approving compensation expenses, 162approving FTE , 162approving job assignments, 161approving position assignments, 160assigning to jobs, 126, 138assigning to positions, 137budgets, removing from, 134budgets, reviewing , 155compensation, specifying, 128defined, 229deleting job assignments, 138deleting position assignments, 138FTE, approving, 161loading compensation using CSV files, 195loading FTE, 191loading position or job associations, 189loading salary grades , 193modifying by position, 144modifying status, 133non exempt, Pay Type defaults, 128non exempt, setting Pay Type, 129not in HRMS, assigning to positions, 138relationship to positions, 19reviewing loaded, 97, 98sharing expenses across departments, 22single step transfer, 137specifying additional earnings, 132specifying allocations, 131specifying benefits, 132specifying FTE data, 129specifying general data, 129specifying salary grades, 130
A B C D E F G H J L M N O P R S T U V W
Index 235

status, changing, 131tax details, specifying, 133terminating, 134transfer out positions, 136transferring into positions, 136transfers, overview, 135using loaded effective-dated data at the period level,
96viewing by job, 148viewing those assigned to jobs, 122
employer paid taxesspecifying for jobs, 125specifying for positions, 144specifying position defaults , 107
Employment Levels predefined report, 172encumbrance, defined, 229entities
calculating compensation expenses, 153defined, 229mass adjustments, 115
entitycalculating compensation budget, 153position and job budget, reviewing, 154
Entity dimension, 24EPM Workspace, reports in, 171EPMA
creating applications, 39using to load data, 55
ERP Integratorabout using to load metadata and data, 53and source system integration, 16
Essbase substitution variables, 32, 44
FFICA
defined, 229specifying for employees, 133specifying for jobs, 125
Financial Reporting, 171fiscal year
and budget calculations, 38defining for applications, 38
FTEand Position-budget detail, 21and vacant positions, 20approving, 162approving for jobs, 161
approving for positions, 160defined, 230for positions, approving, 161Headcount report for jobs, 172Headcount report for positions, 172in reports, 173loading for employees, 190loading using CSV files, 191reviewing assignments, 156specifying for employees, 129specifying for positions, 141using effective-dated data at the period level, 96
FUTAspecifying for employees, 133specifying for jobs, 125specifying for positions, 144
FUTA, defined, 230
GGeneral Ledger
allocations, 156allocations, overview, 110chart fields, creating corresponding Smart Lists,
65data loading options, 53defined, 230integration , 16loading data using EPMA, 55loading data using ERP Integrator, 53loading data with the Outline Load Utility, 54performing allocations, 157segments, combining from source system, 70segments, creating corresponding Smart Lists, 65Smart Lists for, 48Smart Lists for allocations, 49uploading data, 33
General Ledger segmentsconfiguring business rules, 66
General Ledger segments or chart fieldsadding Account members, 65and Budget Item dimension, 24how used in line item budgets, 18
General Ledger segments or chartfieldsused to allocate benefit and compensation defaults,
110grade rates
about, 84
A B C D E F G H J L M N O P R S T U V W
236 Index

creating, 87grade steps
about, 84creating, 86
Hheadcount
approving, 20calculations, 20defined, 230in reporting, 173unapproved, 20
hourly-paid employeesand effective dates, 118budgeting overtime expenses, 20, 118
HRMSassigning external employees to jobs and positions,
138defined, 230integration, 16loading data using EPMA, 55loading data using ERPI, 53loading data with the Outline Load Utility, 54loading options, 53reviewing loaded data, 97using effective-dated data at the period level, 96
HRMS datareviewing loaded employees and jobs, 98reviewing loaded positions, 99
HSP_Rates dimension, 18Human Capital Plan
described , 18linking to General Ledger allocation details, 65mapping dimensions to create line item budget,
73Hyperion Business Rules
about using, 56configuring business rules for multiple
applications, 70naming, with multiple applications, 70
JJob Code dimension, 19, 26job share. See shared positionsjobs
activating, 119
adding, 46, 119approving, 161assigning employees, 126assigning existing employees, 138defined, 230excluding from budget, 127expenses, reviewing , 154filling, 138filling vacant, 148loading , 198loading assigned employees, 199loading details, 199loading employees assignments, 189loading using the Outline Load Utility, 182maintaining, 119relationship to positions and employees, 19reviewing loaded, 98specifying additional earnings, 123specifying allocations, 125specifying benefits, 124specifying general data, 121specifying salary grades, 123specifying tax details, 125terminating, 127viewing details, 120viewing status, 122
Lline item budget
defined, 230integrating with compensation budget, 73interaction of HCP and Plan 1, 2, or 3, 18populating, 73preparing , 63
loadsloading metadata, 54metadata with ERP Integrator, 53metadata with the Outline Load Utility, 54
Mmass updates
overview, 115performing, 100when to make, 99
membersaccess permissions, 59
A B C D E F G H J L M N O P R S T U V W
Index 237

creating, 45required , 45
menusadding or changing, 58and data forms, 58
metadatabefore loading with Outline Load Utility, 177executing loads with Outline Load Utility, 203loading options, 53loading Smart Lists, 182loading using CSV files, 181loading using ERP Integrator, 53loading with the Outline Load Utility, 54updating existing, 205
Microsoft Excel files, attaching, 28Microsoft Word documents
attaching, 28using in budget books, 171
migrationdata, after upgrading, 205options, 206
Nnatural accounts
overview, 109specifying position defaults, 109
New Employee Impact predefined report, 173New Position Impact by Entity predefined report,
172non-salary compensation elements, managing, 91
Oother compensation elements
about, 91defining and managing, 91
Outline Load Utilitybefore using, 177described, 54loading HRMS source data, 54running CSV load files, 203testing CSV load files, 200
overtimebudgeting expenses, 20, 118globally defining, 93
overview to Public Sector Planning and Budgeting,15
Ppaydays, specifying per month, 115PDF documents
exporting from budget books, 171inserting in budget books, 171
pending transfers, approving, 149Performance Management Architect
creating applications, 39loading data, 55
periods, 230. See also time periodsdefined, 230
Plan type 1, 2, or 3and line item budgeting, 63described, 18
planning unitsstarting, 42using to submit budgets, 163
pooled positionsdefined, 230expense calculation, 21reporting on, 173
Position Adjustments report, 172Position and Employee budget detail, overview, 18Position and Employee budgeting
selecting in Performance Management Architectapplications, 39
Position budget detailheadcount, 20overview, 19selecting in Performance Management Architect
applications, 39vacancies, 21
Position dimension, 26Position Expenses predefined report, 173position properties, copying, 145Position-Employee Associations predefined report,
172positions, 231. See also pooled positions and shared
positionsadding, 46allocations, loading , 196approving, 160assigning employees not in HRMS, 138assigning existing employees, 137copying properties, 145creating, 139defaults, specifying, 106
A B C D E F G H J L M N O P R S T U V W
238 Index

defined, 230deleting, 146excluding from budget calculation, 145expenses, reviewing, 154filling, 137filling vacant, 148general compensation, managing, 140including in budget, 143loading compensation using CSV files, 194loading employee assignments, 189loading FTE using CSV files, 190loading salary grades , 192loading salary grades for with CSV files, 192, 193loading with CSV files, 188maintaining, 139modifying taxes, 144relationship to jobs and employees, 19reviewing loaded, 97, 99salary grade defaults, 113salary grade defaults, specifying, 107sharing expenses across departments, 22single step transfer, 146single-incumbent, defined, 231specifying additional earnings, 143specifying allocations, 142specifying benefits, 143specifying compensation details, 140specifying FTE, 141specifying salary grades, 142specifying status, 143terminating, 147using loaded effective-dated data at the period level,
96PriorYear substitution variable, 32, 44ProposedYear substitution variable, 32, 44
Rrate-based salary grades
about, 84defined, 230defining, 87
Financial Reporting reports, 171budget books, 171FTE and headcount in, 173predefined, 171
requirements, 37creating dimensions and members, 45
defining budget stages, 42defining Essbase variables, 44defining Smart Lists, 48verifying data load settings, 44
revisionsbefore making, 166calculating, 169constraining with validation rules, 166creating, 167, 168creating members for, 165drafts, 169modifying, 169overview, 165
Ssalaries
annual spread methods, 89specifying for employees, 130specifying for positions, 142spreading, 102
salarybefore specifying, 84defining, 84expense, spreading, 102
salary allocationsguidelines, 113overview, 110specifying position defaults, 113
salary defaultsabout, 107mass updates to positions and employees, 100
salary gradesbefore defining, 84creating, 85defining, 84details, loading using CSV files, 184loading using the Outline Load Utility, 183multiple, simultaneously adjustments, 89rate-based, adding, 87specifying for jobs, 123specifying for positions, 142step-based, adding, 86value-based, adding, 88
Scenario dimension, 22scenarios
about, 43defined, 230
A B C D E F G H J L M N O P R S T U V W
Index 239

hierarchies, 230security, see access permissions, 58Segment Description members, 65Segment Information members, 65segments. See General Ledger segmentssemimonthly, defined, 231shared positions
defined, 231expense calculation, 21
single incumbent positionsdefined, 231expense calculation, 21
single step transferemployees, 137positions, 146
Smart Listsadditional, 49and General Ledger segment members, 65associated business rules, 213associating with dimensions, 52defining, 48for General Ledger allocations, 49loading using the Outline Load Utility, 182reporting on, 173required, 48
stagesdescribed, 43variance reports, 172
statusemployees, 131positions, 143
step-based salary gradesabout, 84creating, 86
substitution variables, 32, 44SUTA
changing the tax rate, 144defined, 231
Ttaxes
budget impact, 133employer-paid, defining , 91specifying for employees, 133specifying for jobs, 125specifying for positions, 144
time periods, specifying for budget scenarios, 43
transferringemployees into positions, 136employees out of entities, 136
transfersapproving, 149overview, 135review and accept pending, 146single step, 137
Uunion codes, loading with Outline Load Utility, 182updating existing applications, 205user provisioning, 38user-defined dimensions, 26users, specifying access permissions, 58
Vvacant jobs, filling, 148vacant positions
and FTEs, 20and pooled positions, 21and shared positions, 21expense calculation, 21filling, 148predefined report, 172
validation rulesabout, 58and revisions, 166creating, 58defined, 231
value-based salary gradesabout, 84creating, 88defined, 231
Version dimension, 22versions
about copying, 43defined, 231described, 43
Wworkdays, specifying per month, 115
A B C D E F G H J L M N O P R S T U V W
240 Index