hydrobotics industries - MATE Competition... · hydrobotics industries Specifications Safety...
18
Z3 hydrobotics industries Specifications Safety Features Special Features San Miguel Family Daniel Gonzalez CEO Harrison Mast CFO Miguel Rosales Programming Chris Delagarza R&D Meagan Hernandez Creative Solutions Primary Construction Materials: PVC, Lexan, Marine Sealant Approximate dimensions: 21.5x17x12 Total Weight: 16lbs. Total Cost: $713 25 amp fuse Waterproofed all components Protective Frame 1000 GPH Motors Adjustable buoyancy system Multiple Voltage Regulators First Time Participants 2014 Houston, TX to Alpena, Michigan: 2,455 KM
Transcript of hydrobotics industries - MATE Competition... · hydrobotics industries Specifications Safety...
Z3 hydrobotics industries
Specifications
Safety Features
Special Features
San Miguel Family
Daniel Gonzalez CEO
Harrison Mast CFO
Miguel Rosales Programming
Chris Delagarza R&D
Meagan Hernandez Creative Solutions
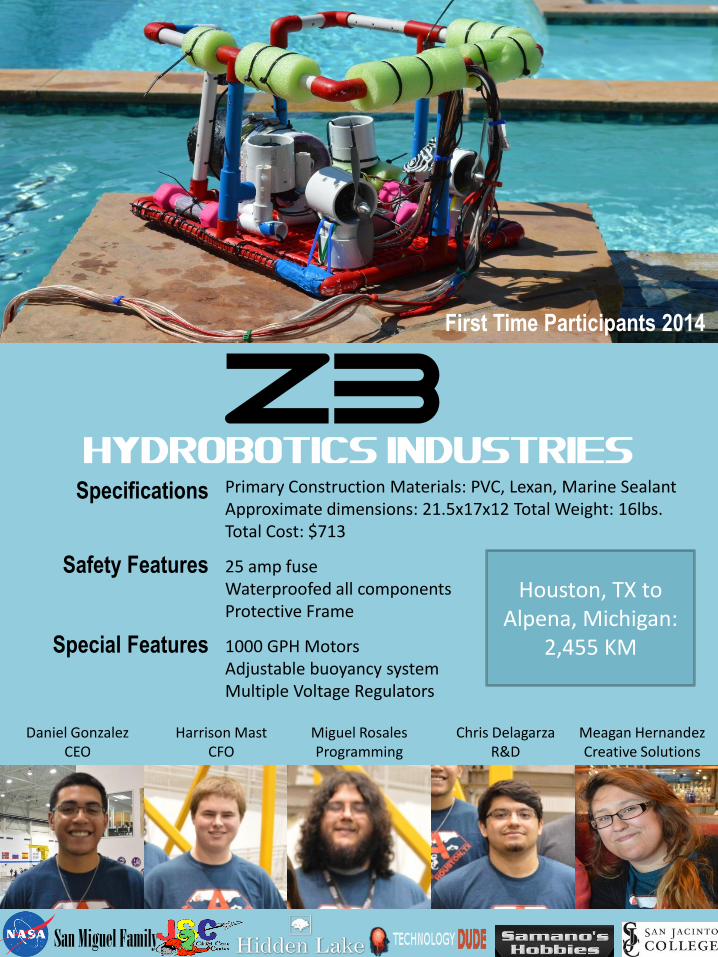
Primary Construction Materials: PVC, Lexan, Marine Sealant Approximate dimensions: 21.5x17x12 Total Weight: 16lbs. Total Cost: $713
25 amp fuse Waterproofed all components Protective Frame
1000 GPH Motors Adjustable buoyancy system Multiple Voltage Regulators
First Time Participants 2014
Houston, TX to Alpena, Michigan:
2,455 KM

Z3 Technical Report Hydrobotics Industries 2
Page | 2
Z3 hydrobotics industries
Table of Contents
Cover Page .................................................................................................................................................... 1
Abstract ......................................................................................................................................................... 4
Design Rationale ........................................................................................................................................... 4
Focus ......................................................................................................................................................... 4
Mechanical Design Process ....................................................................................................................... 4
Software .................................................................................................................................................... 5
Vehicle Systems ........................................................................................................................................ 6
Frame ........................................................................................................................................................ 6
Pictures of the Z3 ROV .................................................................................................................................. 7
Thrusters ................................................................................................................................................... 8
Buoyancy ................................................................................................................................................... 8
Housing ..................................................................................................................................................... 8
Electronics ................................................................................................................................................. 9
Safety .......................................................................................................................................................... 12
Company Safety Philosophy.................................................................................................................... 12
Training ................................................................................................................................................... 12
ROV Safety Features ............................................................................................................................... 12
Safety Checklist ....................................................................................................................................... 13
Pre-Power ........................................................................................................................................... 13
During Power ...................................................................................................................................... 13
Post Power .......................................................................................................................................... 13
Budget ......................................................................................................................................................... 14
Challenges ................................................................................................................................................... 14
Troubleshooting Techniques ...................................................................................................................... 15
Lessons Learned and Skills Gained .............................................................................................................. 15

Z3 Technical Report Hydrobotics Industries 3
Page | 3
Future Improvements ................................................................................................................................. 16
Reflections .................................................................................................................................................. 16
Teamwork ................................................................................................................................................... 16
References .................................................................................................................................................. 17
Acknowledgments ....................................................................................................................................... 17
Sponsors ...................................................................................................................................................... 18
Z3 Technical Report Hydrobotics Industries 4
Page | 4
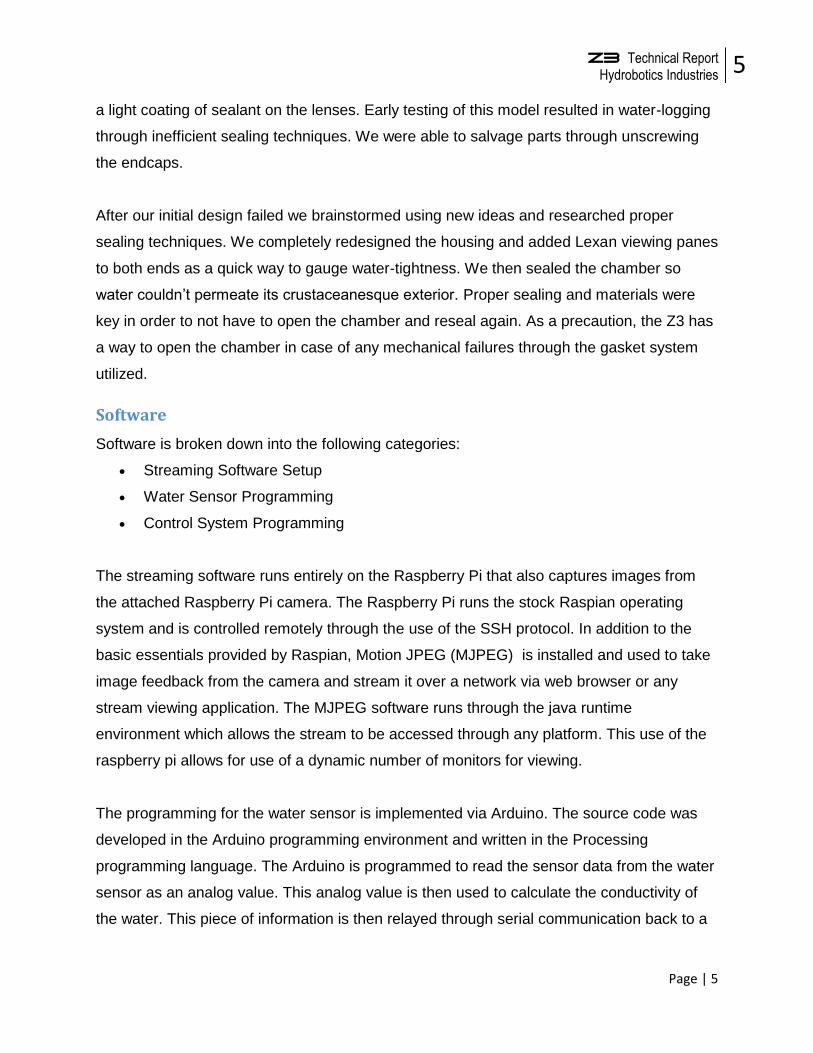
Abstract
SJC Aquanauts is a brilliant team of skilled engineering students from various backgrounds
with diverse skill sets. Our goal was to build an adroit and robust Remote Operated Vehicle
(ROV) for the economical consumer. During our first year alone, we have built many
prototypes to ensure we are providing a quality product for our clients. To create our latest
model, we brainstormed form and function, researched materials, sought parts, and,
through trial and error, created the Z3.
The ROV, Z3, was entirely designed and tested to perform exceptionally on underwater
tasks. Through long mornings that turned into late nights, our team worked cohesively,
devised creative solutions for any shortcomings in design, consistently sustained high
morale, supported and discussed any suggestions related to the ROV and exhausted all
available informational resources. Our frame is constructed from PVC with a waterproof
housing that has viewing panes on either side to gauge water-tightness, four bilge pump
motors, RC boat propellers, multiple voltage regulators and a control box consisting of an
Arduino, two axis joysticks, Sabertooth motor drivers, and a healthy length of deliberate
wiring. We have achieved neutral buoyancy through the utilization of closed cell
polyethylene foam and waterproof weights.
Design Rationale
Focus
The Z3 was designed to excel in Marine Archaeology tasks that humans are unable to
complete such as water conductivity testing at ground level, navigate through confined
spaces, and recover objects that have been displaced due to wreckage or cast off as
debris. We strove to exceed NOAA standards in safety, reliability, ease of use, and support
of coastal communities.
Mechanical Design Process
At the onset of our project, we initially designed a rectangular frame with a 3” Wye PVC
Fitting (shown in the housing section below) as the waterproof housing with see through
lenses for the Raspberry Pi Cameras. Initial sealing techniques included PVC Cement and
Z3 Technical Report Hydrobotics Industries 5
Page | 5
a light coating of sealant on the lenses. Early testing of this model resulted in water-logging
through inefficient sealing techniques. We were able to salvage parts through unscrewing
the endcaps.
After our initial design failed we brainstormed using new ideas and researched proper
sealing techniques. We completely redesigned the housing and added Lexan viewing panes
to both ends as a quick way to gauge water-tightness. We then sealed the chamber so
water couldn’t permeate its crustaceanesque exterior. Proper sealing and materials were
key in order to not have to open the chamber and reseal again. As a precaution, the Z3 has
a way to open the chamber in case of any mechanical failures through the gasket system
utilized.
Software
Software is broken down into the following categories:
Streaming Software Setup
Water Sensor Programming
Control System Programming
The streaming software runs entirely on the Raspberry Pi that also captures images from
the attached Raspberry Pi camera. The Raspberry Pi runs the stock Raspian operating
system and is controlled remotely through the use of the SSH protocol. In addition to the
basic essentials provided by Raspian, Motion JPEG (MJPEG) is installed and used to take
image feedback from the camera and stream it over a network via web browser or any
stream viewing application. The MJPEG software runs through the java runtime
environment which allows the stream to be accessed through any platform. This use of the
raspberry pi allows for use of a dynamic number of monitors for viewing.
The programming for the water sensor is implemented via Arduino. The source code was
developed in the Arduino programming environment and written in the Processing
programming language. The Arduino is programmed to read the sensor data from the water
sensor as an analog value. This analog value is then used to calculate the conductivity of
the water. This piece of information is then relayed through serial communication back to a

Z3 Technical Report Hydrobotics Industries 6
Page | 6
computer on the surface through a modified USB cable. The information is then displayed
on a monitor.
The control system is another Arduino based solution. The source code was developed in
the Arduino IDE and is written in the Processing programming language. The control
system is based around two 2-axis analog joysticks. The joysticks control the direction and
speed of the Z3 while it is powered in the water. By using the analog value from the
Sabertooth motor shields, the position of the joysticks causes the appropriate motors to run
at various speeds due to pulse-width modulation. In addition to motors, the onboard
manipulator is also being controlled the same system via input from a potentiometer. The
analog signal from the potentiometer is translated into a goal position for the motor that
releases and contracts the manipulator.
Vehicle Systems
The initial concept and the final design of the Z3 had a multitude of key differences such as
the housing materials, configuration of the motors and the sealing techniques implemented.
Through long days and frequent shopping trips, we were able to culminate and construct
our final design. Each team member worked diligently on their respective pieces of the ROV
as well as helped each other when initial designs fell through.
Frame
The Z3 is composed of plumbing grade polyvinyl chloride pipe. The PVC is arranged in a
rectangle-like structure. The main purpose behind the shape of the frame is to allow for
ease of access to components while leaving ample room for the attachment of weights and
closed cell polyethylene foam for buoyancy. The floor of the frame is composed of high
density polystyrene for the payload netting. This allows for a lightweight base to attach
components while leaving plenty of overhead for buoyancy adjustments.

Z3 Technical Report Hydrobotics Industries 7
Page | 7
Pictures of the Z3 ROV
Right view of ROV
Top view of ROV
Left view of ROV
Back view of ROV

Z3 Technical Report Hydrobotics Industries 8
Page | 8
Thrusters
The Z3 is equipped with four 1000 GPH thrusters. Two horizontally mounted on the rear
end of the ROV and two located vertically at the center for maximum propulsion. Each
thruster is securely fastened down to the frame within the perimeter for supreme safety.
With an operating voltage of 13.6 VDC and current draw of 3.6A, two thrusters can run at a
time within the power budget.
Buoyancy
When designing the frame, our water tests concluded the frame alone has neutral
buoyancy. When the latest waterproof housing was added, the neutral buoyancy was
disrupted. With no weights or flotation devices added in, the Z3 had a tendency for the front
to float up while the back tried to sink. To counteract this, we added closed cell polyethylene
foam on the rear of the vehicle with weights added to even the payload of the ROV. This
brought the Z3 back to neutral buoyancy.
Housing
The first idea used was nicknamed the aorta, due to its Y shaped PVC piece (a large 3”
Wye tee PVC pipe fitting) that resembled an artery. Inside the housing was a Raspberry Pi
and a camera which was mounted behind 2 layers of Lexan polycarbonate resin that acted
as our visibility panes. Various issues were raised in initial testing with this design such as
being too large for the components it housed, heavy, and lack of waterproofing. We
redesigned the housing completely and went with a shorter, lighter and wider piece of PVC
pipe with Lexan panels affixed on both sides after being sanded and primed. The new
housing is now 8.5 inches long, much shorter than its predecessor at 18 inches: securing
the same components more efficiently. The only difference in the two viewing panes is that
one circle is cut a centimeter from the bottom so that we may route all the cables through
the chamber while also being able to seal it in one central location. The new chamber is

Z3 Technical Report Hydrobotics Industries 9
Page | 9
housed at the front center of the ROV with the camera facing forward so that there are no
obstructions in view.
Wye Tee PVC Fitting
Electronics
All electronic components are included within the PVC chamber. These components are:
One Raspberry Pi with camera, voltage regulator (12v down to 5v), as well as the beginning
of our tether. The camera receives power through the Raspberry Pi which in turn
is powered by USB that runs through the voltage regulator.
The Z3 is equipped with the following electronic features:
Live stream visual feed
Independent water conductivity sensor
Two axis joysticks for easier maneuverability
The streaming system onboard the Z3 is comprised of a B model Raspberry Pi and
Raspberry Pi Camera. To keep the design simple and to save space within the chamber, a
waterproof DC-DC 12 volts to 5 volts regulator was implemented. This system makes use of
the Raspberry Pi as a computer by using it as a streaming server in addition to its function

Z3 Technical Report Hydrobotics Industries 10
Page | 10
as a camera. This allows for use of unlimited wireless displays without an increase in the
number wires on the ROV’s tether.
The water conductivity sensor is a simple Arduino sensor manufactured by KEYES. The
sensor functions by allowing water to complete a circuit by filling in grooves on the surface
of the sensor. The voltage from the circuit then gets measured by a potentiometer and is
returned as an analog signal voltage value ranging up to 5 volts. This voltage reading can
then be analyzed through an Arduino to compute the conductivity of the water across
various spectrums and in areas where conditions change in time. With this data, it is
possible to create a voltage gradient based on the conductivity of the water as the ROV
navigates through an ocean space. This process would be advantageous for diagnostic
testing.
The motor control system is entirely Arduino based. The Arduino platform allows for
modularity in the system such that parts can be integrated or removed entirely easily with
no impact on the function of the system as a whole. Two 2-axis analog joysticks are
implemented for user input and are connected directly to the Arduino making the Z3 user-
friendly and easy to maneuver. The motors are controlled through two Sabertooth 2x5
motor drivers. The Sabertooth motor drivers are capable delivering up to 5 amperes of
power to each of the 4 motors. The use of the entire control system as a whole allows for
the implementation of pulse-width modulation (PWM). PWM allows for variation on motor
speeds as opposed to a hard wired binary control system where the motors either run at full
speed or are off, and is very crucial for precise movement underwater.

Z3 Technical Report Hydrobotics Industries 11
Page | 11
SID

Z3 Technical Report Hydrobotics Industries 12
Page | 12
Safety
Company Safety Philosophy
The Z3 was designed and built with safety as a priority to protect the ROV and the team
members operating the vehicle. We followed strict protocols and guidelines during the
testing, design, and construction processes. Many safety features were implemented on the
Z3 such as built in handles, propeller guards, and the removal or covering of all sharp
objects on board. We made sure all wires were connected correctly before allowing power
through to the ROV and that all members were out of the water during all testing. With all
the safety features covered, consumers are free to focus on the diagnostic and
maneuvering capabilities of the Z3.
Training
Being that this is our first year as a company, we were faced with many new challenges and
obstacles. Each member of the company underwent rigorous amounts of time reading and
researching specifications on various parts in our initial design. This led to many hours of
constant communication and problem solving as we moved forward through our
development. We found working together through our journey was the most rewarding as it
made good ideas, great ideas! This not only prepares us for future upgrades on the ROV
but is a great experience for future team members who can easily apply these skills to
designing and troubleshooting any ROV.
ROV Safety Features
The Z3 utilizes many key safety features that not only protect the hardware on board but
protects the team handling the ROV as well. There are four handles all around for easy and
efficient transportation. This enables strength and durability for maximum safety for the
team and ROV. To ensure a fully waterproofed housing, we pressure tested the chamber
holding the electronics at a depth of thirteen feet.

Z3 Technical Report Hydrobotics Industries 13
Page | 13
Safety Checklist
Pre-Power
Here at Hydrobotics, safety is vitally important. There are a few key steps to take before
operating the Z3.
1. All personnel who are controlling and positioning the ROV should be well familiarized with
the equipment at hand.
2. Fuse should be securely fastened and connections from the tether to the power supply
are secure.
3. In order to conduct the ROV, 48 volts must be sent down the tether for maximum
operating power. How you wish to fulfill this requirement is up to you. A power inverter that
produces 48v and 20-40 amps would be ideal in this case.
5. Before connecting power, the working space should be clear of any safety hazards
(scattered objects, tools and electronics turned off when not in use). ALL POWER to the
ROV and power source should be in the OFF position during this connection process.
6. Once power is provided, the tether to the ROV should be unwound for full maneuvering
capabilities.
During Power
1. In the midst of maneuvering the Z3, be sure to keep a safe distance (3-5ft) from the edge
of the pool or deck you're navigating from.
2. It is strongly recommended that a secondary person is on hand to assist you with the
leveraging of the tether for maximum direction.
Post Power
1. To shut down the ROV, safely unplug the power cord from the outlet providing the power.
2. Allow five to ten seconds before removing tether from the power source.
3. Wind up the tether with the included cable organizer and place within the frame for easy
transport.

Z3 Technical Report Hydrobotics Industries 14
Page | 14
Budget
Hydrobotics Industries had a starting budget of $400.00 that was provided by the
Aerospace Academy. As the team developed the design of the Z3, a preliminary budget
was created for required materials. The cost of the Z3 was estimated to be more than what
was initially funded by the Aerospace Academy, so the team worked together to create a
donation solicitation package and video. The team members were able to fundraise an
additional $160.11 in donated components and $35 in services to help cover costs as well
as come out of pocket for any components the allotment did not cover. Our spending
worked out as follows:
Category Company Expenditure Donated Total
Frame and Buoyancy $42.87 $0.00 $42.87
Propulsion $185.39 $19.23 $204.62
Cameras & Sensors $48.55 $3.95 $52.50
Various Boards $102.65 $111.98 $214.63
Various Electronics and Wiring $138.29 $24.95 $163.24
Services Performed $0.00 $35.00 $35.00
Challenges
The initial design of the ROV utilized plane propellers on the thrusters due to the inability to
locate any boat propellers that would fit on the thruster props. We realized in early testing
stages that the airplane propellers spun too fast causing a negative effect on the propulsion
abilities (similar to spinning tires in the sand). This was remedied by replacing the airplane
propellers and adapters with RC boat propellers and master airscrew adapters we
located with extensive research and helpful insight from several experts. The team was
Donated Total: $195.11
Expenditure Total: $517.75
Grand Total: $712.86
Z3 Technical Report Hydrobotics Industries 15
Page | 15
also financially set back since our budget was not large enough and our fundraising
attempts fell short of our goal. At that point, we decided to purchase necessary parts out of
pocket since we didn't have any other means of acquiring these parts.
Troubleshooting Techniques
There were several issues that the team ran into while trying to perfect the Z3. Our initial
design was not water tight, so our initial water test with our first ROV design ended up
failing due to water seeping in the chamber. Once we replaced our aorta chamber with the
new housing, we began secondary water testing of the completed assembly including
motors, frame and the new housing. Our second issue was that the ROV would not move
underwater due to the use of propellers designed for RC aviation instead of RC marine.
Buoyancy was also an issue at the time of the propeller replacement, so we added weights
and closed cell polyethylene foam before putting the ROV back in the water for final testing.
Lessons Learned and Skills Gained
This competition has opened our eyes to a new world of ideas as well as taught us a few
new skills. During the process of building the ROV we have had to:
Use PVC pipe, which taught us how to cut using a PVC cutter.
Make a controller, which taught us how to fabricate materials as well as solder wires
together, utilize heat shrink, use a drill, arrange wires on a breadboard, and calculate
resistance and current using Ohm’s law
Create the housing, which taught us how to properly water seal a container using
marine seal.
The mistakes we’ve made throughout this learning process has further strengthened our
skills and changed the way we will conduct testing in the future such as:
Using marine grease to waterproof the servo without testing the component first,
causing us to scrap the part not knowing if it came faulty or was the result of
improper sealing technique.
Initial housing (Aorta) was bulky and wasted a massive amount of space
Motors were initially placed on the frame on the four corners for balance when they
should have been placed at the center of buoyancy

Z3 Technical Report Hydrobotics Industries 16
Page | 16
Future Improvements
In future models of the ROV, we would like to improve on the frame. Our frame used
currently was designed with cost effectiveness in mind, but we aim to improve by seeking a
similar material that is stronger and just as lightweight such as carbon fiber. By using
Carbon Fiber, we would be able to bolt the pieces into place and drill the same holes as the
PVC, but increase mobility and durability.
Reflections
We have an outstanding group of team members that have developed their engineering,
design and communications skills over the past few months. The team was excited to be
able to do so much hands-on work building the Z3 and sharpening their technical and
mechanical skills for future projects. In future projects, as we grow and mature together as a
team, we will be able to stay on task and delegate work so that we can complete projects
more efficiently. We were grateful for the experience.
Teamwork
The team has put countless hours these past few months working together to design, build,
test, and write up the specifications of the Z3. We accomplished this through frequent
meetings, both in person and online. Communication is key in group projects, so meetings
were made at least twice a week (or 5-6 times a week when a crucial test did not pass with
flying colors) for at least 6-12 hours per meeting. Taking into consideration that most
schedules were conflicting, it was a challenge for every single member to be present for all
meetings, but we did keep each other constantly updated. Each meeting consisted of
assigning sections of an assignment to each team member for them to review and complete
before the next meeting. For example, during the frame construction process, team
members were given the task of fabricating the frame, building the motor housing, painting
the frame, and wiring the electronics.

Z3 Technical Report Hydrobotics Industries 17
Page | 17
References
“2014 MATE ROV Competition Manual Scout Class.” Marine Advanced Technology
Education Center. MATE, 2014. January 21, 2014.
Arduino. Arduino, 2014. Web. April 1, 2014.
SeaPerch. SeaPerch Online, 2013. Web. May 17, 2014.
Acknowledgments
We are grateful to the San Jacinto Community College for providing facilities for us to use
weekly, and the blackboard system for internal team communications during the week.
The following people provided generous donations so that the team could procure supplies
for the Z3 and provided their technical expertise to help the team during the design process:
Mike Samano
Ike Coffman
Jose San Miguel
Nathanial Wiggins
Sara Malloy
Miguel Rosales
Cory Tharling
Victor Mejia
James Donlin
Meagan Hernandez
Thank you to Marine Advanced Technology Education (MATE) for allowing us to submit this
design and to our regional coordinator Ike for working our demonstration into his busy
schedule.

Z3 Technical Report Hydrobotics Industries 18
Page | 18
Sponsors
Hidden Lake for allowing us to use their facility for water testing
San Miguel Family for assistance with our viewing panes
SFEI for moral support during these last few months
Technologydude.com for guidance on buoyancy
Samanos hobbies for guidance on propulsion and donating their balancing
services for the propellers
San Jacinto College for moral support and allowing us to use their
facilities during the construction process