![Doctorul Ox [1.0].docx](https://static.fdocuments.net/doc/165x107/563dba82550346aa9aa63af4/doctorul-ox-10docx.jpg)
HydraPump Rev 1.0 Microsoft Word - HydraPump Rev 1.0.docx Created Date 4/24/2015 9:52:03 PM
9
©Copyright Watershed Innovations. All rights reserved. HydraPump Documentation Rev 1.0 HydraPump Pro™ Owner’s Guide
-
Upload
truongmien -
Category
Documents
-
view
227 -
download
0
Transcript of HydraPump Rev 1.0 Microsoft Word - HydraPump Rev 1.0.docx Created Date 4/24/2015 9:52:03 PM
©Copyright Watershed Innovations. All rights reserved. HydraPump Documentation Rev 1.0
HydraPump Pro™
Owner’s Guide
©Copyright Watershed Innovations. All rights reserved. HydraPump Documentation Rev 1.0
NOTE: This Water Pump has been designed to operate on 110-‐120 Volt, 60
Hz exclusively. Using any other voltage or Hz adversely affects performance.
IMPORTANT: Keep this guide for future reference. CAUTION: Be sure to review SAFETY INSTRUCTIONS FIRST PERTAINING TO A
RISK OF FIRE, ELECTRICAL SHOCK OR INJURY TO PERSONS before using the pump.
• Absorbent cloth or HydraTowel™ to for clean up and maintenance • Standard hoses for inlet and outlet • Small water container for priming the pump • PTFE tape, sometimes this is referred to as ‘plumber’s tape’
1 piece -‐ HydraPump 2 piece -‐ Brass hose Adapters 1 piece -‐ Repair and maintenance kit
USAGE GUIDE
TOOLS AND MATERIALS YOU MAY NEED
PACAKAGE CONTENTS
©Copyright Watershed Innovations. All rights reserved. HydraPump Documentation Rev 1.0
Make sure your work area where you intend to use the pump is clear of clutter and well lit. Also ensure that the pump is in a location that it will not be submerged or in contact with external water. The pump is designed to pump fresh water so please make sure that the water source does not contain large bits of debris.
INSTRUCTIONS PERTAINING TO A RISK OF FIRE, ELECTRIC SHOCK OR INJURY TO PERSONS. SAVE THESE INSTRUCTIONS. WARNING – When using electrical pumps, basic precautions should always be followed, including the following:
1. Read all instructions before using the pump. 2. To reduce the risk of injury, close supervision is recommended at all times
that the pump is in operation. 3. Do not put fingers or hands into a water pump inlet our outlet when
operating. 4. Unplug the power before attempting to move the pump. 5. For proper grounding instructions see the ELECTRICAL CONNECTION
portion of this manual.
SITE PREPARATION
IMPORTANT SAFETY INSTRUCTIONS
©Copyright Watershed Innovations. All rights reserved. HydraPump Documentation Rev 1.0
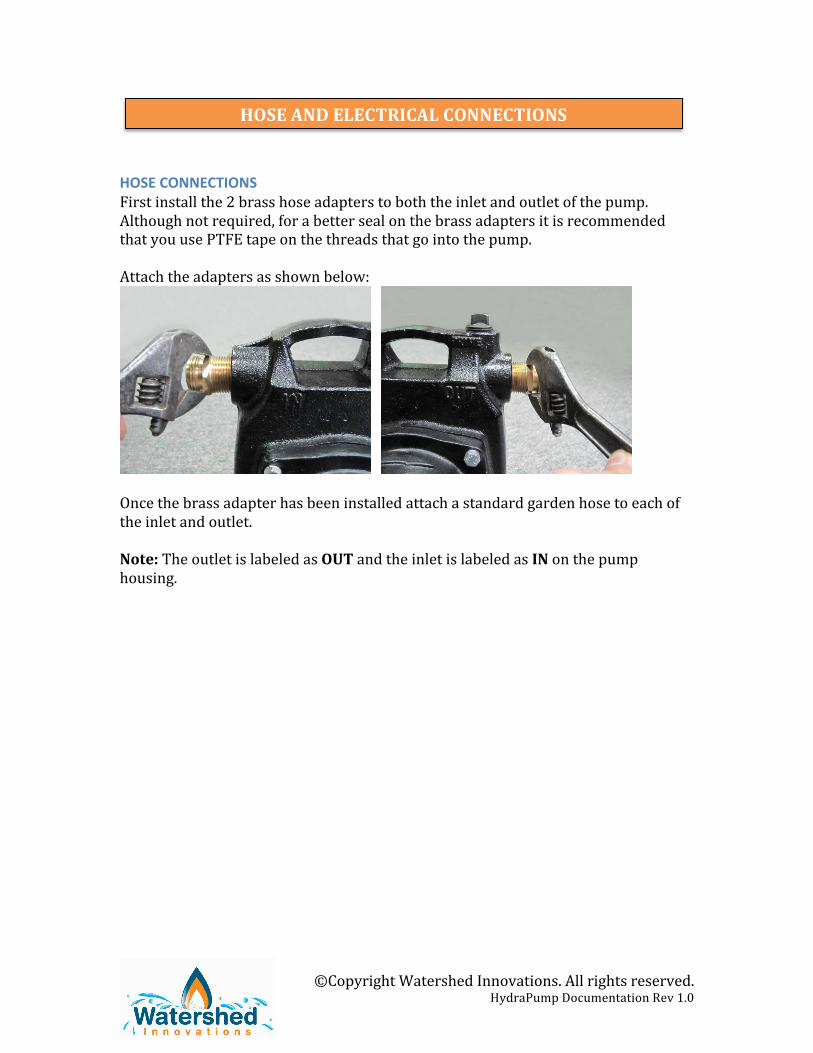
HOSE CONNECTIONS First install the 2 brass hose adapters to both the inlet and outlet of the pump. Although not required, for a better seal on the brass adapters it is recommended that you use PTFE tape on the threads that go into the pump. Attach the adapters as shown below:
Once the brass adapter has been installed attach a standard garden hose to each of the inlet and outlet. Note: The outlet is labeled as OUT and the inlet is labeled as IN on the pump housing.
HOSE AND ELECTRICAL CONNECTIONS
©Copyright Watershed Innovations. All rights reserved. HydraPump Documentation Rev 1.0
GROUNDING INSTRUCTIONS THE WATER PUMP IS EQUIPPED WITH A GROUNDED PLUG-‐IN POWER CORD. This pump must be grounded. In the event of a malfunction or breakdown. Grounding provides a path of least resistance for electric current to reduce the risk of electric shock. This pump is equipped with a cord having an equipment-‐grounding conductor and a grounding plug. The plug must be plugged into an appropriate outlet that is properly installed and grounded in accordance with all local codes and ordinances. ��
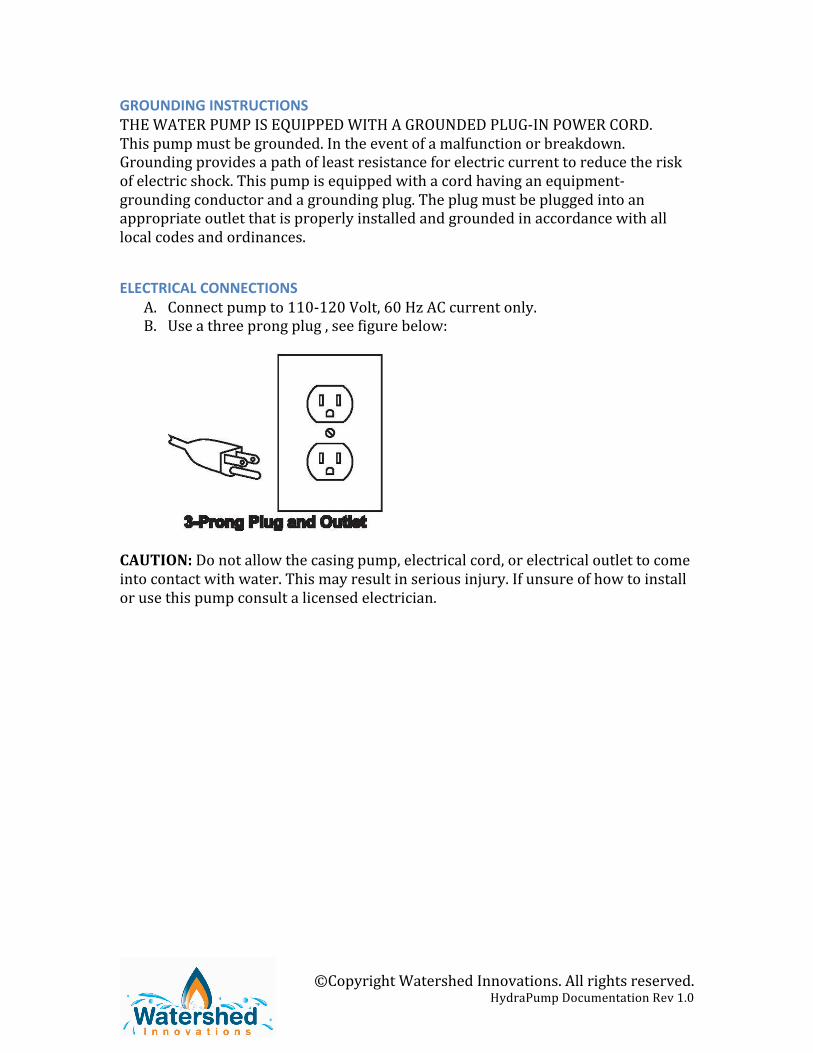
ELECTRICAL CONNECTIONS A. Connect pump to 110-‐120 Volt, 60 Hz AC current only. B. Use a three prong plug , see figure below:
CAUTION: Do not allow the casing pump, electrical cord, or electrical outlet to come into contact with water. This may result in serious injury. If unsure of how to install or use this pump consult a licensed electrician.
©Copyright Watershed Innovations. All rights reserved. HydraPump Documentation Rev 1.0
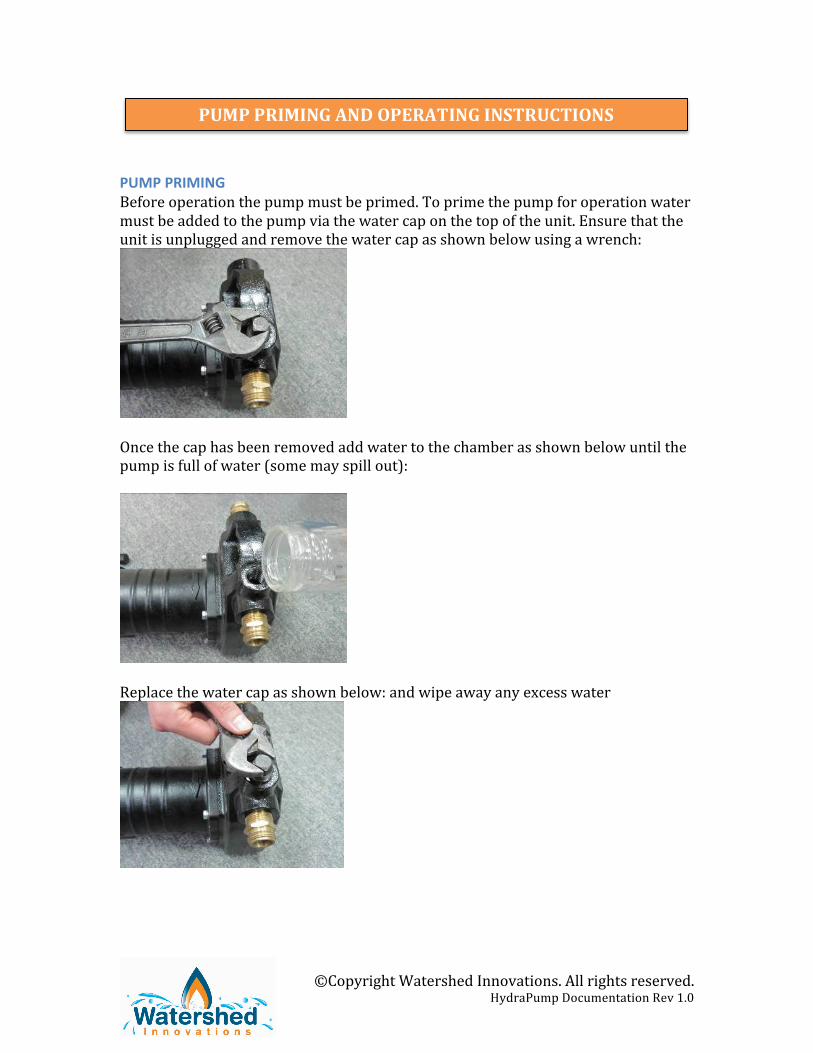
PUMP PRIMING Before operation the pump must be primed. To prime the pump for operation water must be added to the pump via the water cap on the top of the unit. Ensure that the unit is unplugged and remove the water cap as shown below using a wrench:
Once the cap has been removed add water to the chamber as shown below until the pump is full of water (some may spill out):
Replace the water cap as shown below: and wipe away any excess water
PUMP PRIMING AND OPERATING INSTRUCTIONS
©Copyright Watershed Innovations. All rights reserved. HydraPump Documentation Rev 1.0
OPERATING The following are the steps for pump operation
1. Connect standard garden hoses to the inlet and outlet of the pump. 2. Verify that the inlet hose is connected or submerged into a water source. 3. Make sure that the end of the outlet hose is connected correctly. 4. Prime the pump as described in the previous section. 5. Carefully plug the pump into a 3-‐wire, 120 Volt, 60 Hz, grounded A.C. Outlet
to begin operation. a. Water should being to flow in 30 seconds or less. b. If water does not flow, unplug the pump and recheck the connections
and setup. Re-‐prime the pump and try again. c. Note that operation the pump without water for an extended period
may dame the pump and cause it to fail. 6. Once pumping has completed, unplug the pump.
a. Be aware that the pump may become hot during operations. Be careful when working near or touching the pump.
CAUTION: Water and electricity do not mix. Make sure to continuously check that the power connections and cables are not in contact with water. Consult an electrician if you have any questions or concern about the electrical circuit or pump operations.
©Copyright Watershed Innovations. All rights reserved. HydraPump Documentation Rev 1.0
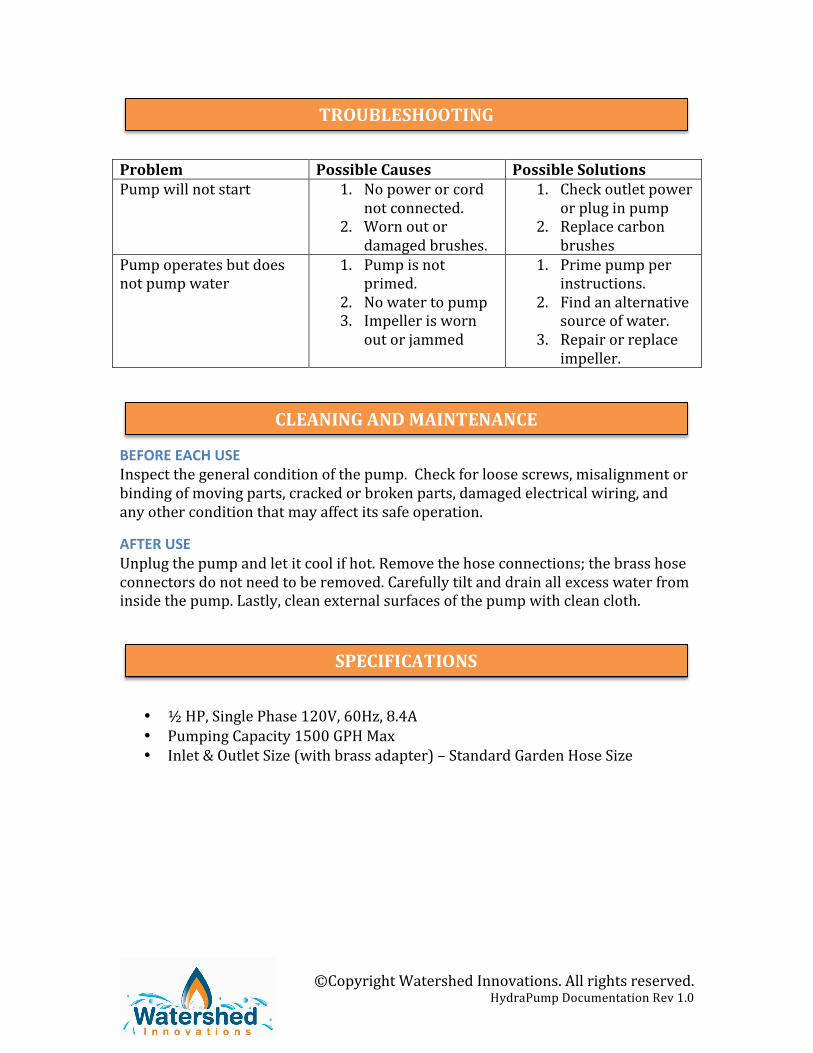
Problem Possible Causes Possible Solutions Pump will not start 1. No power or cord
not connected. 2. Worn out or
damaged brushes.
1. Check outlet power or plug in pump
2. Replace carbon brushes
Pump operates but does not pump water
1. Pump is not primed.
2. No water to pump 3. Impeller is worn
out or jammed
1. Prime pump per instructions.
2. Find an alternative source of water.
3. Repair or replace impeller.
BEFORE EACH USE Inspect the general condition of the pump. Check for loose screws, misalignment or binding of moving parts, cracked or broken parts, damaged electrical wiring, and any other condition that may affect its safe operation.
AFTER USE Unplug the pump and let it cool if hot. Remove the hose connections; the brass hose connectors do not need to be removed. Carefully tilt and drain all excess water from inside the pump. Lastly, clean external surfaces of the pump with clean cloth.
• ½ HP, Single Phase 120V, 60Hz, 8.4A • Pumping Capacity 1500 GPH Max • Inlet & Outlet Size (with brass adapter) – Standard Garden Hose Size
TROUBLESHOOTING
CLEANING AND MAINTENANCE
SPECIFICATIONS
©Copyright Watershed Innovations. All rights reserved. HydraPump Documentation Rev 1.0
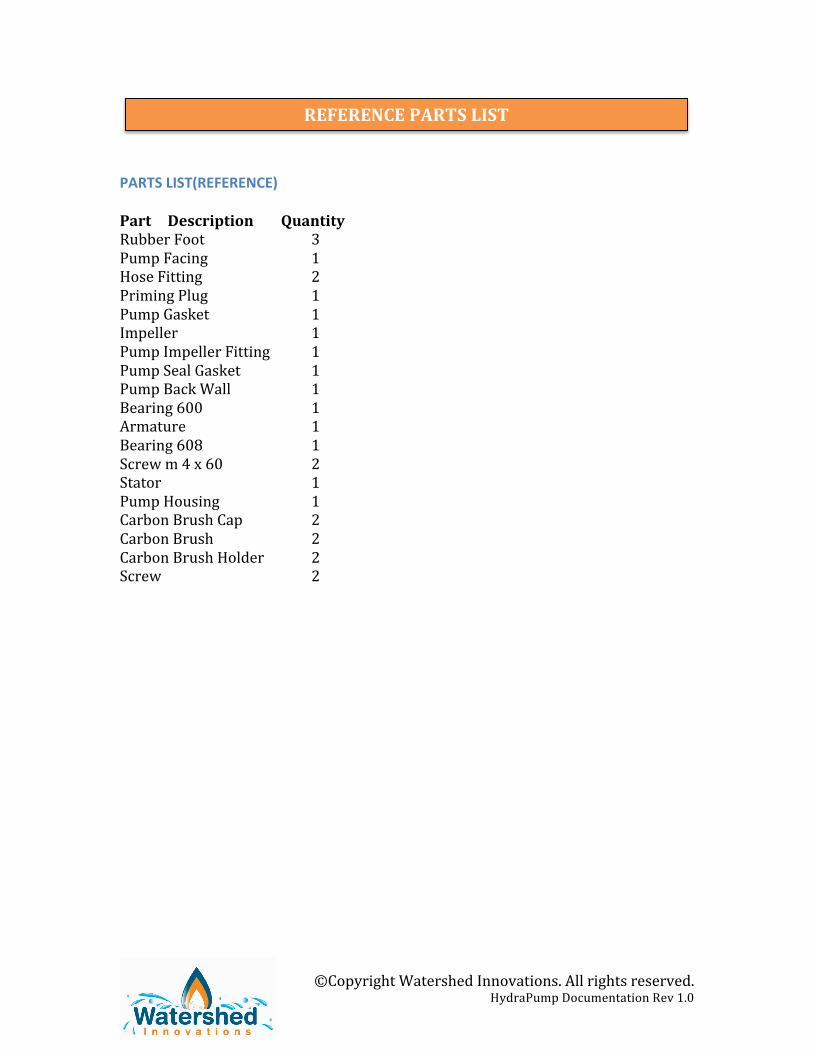
PARTS LIST(REFERENCE) Part Description Quantity Rubber Foot 3 Pump Facing 1 Hose Fitting 2 Priming Plug 1 Pump Gasket 1 Impeller 1 Pump Impeller Fitting 1 Pump Seal Gasket 1 Pump Back Wall 1 Bearing 600 1 Armature 1 Bearing 608 1 Screw m 4 x 60 2 Stator 1 Pump Housing 1 Carbon Brush Cap 2 Carbon Brush 2 Carbon Brush Holder 2 Screw 2
REFERENCE PARTS LIST


![20000 de leghe sub mari [1.0].docx](https://static.fdocuments.net/doc/165x107/563dba87550346aa9aa66c26/20000-de-leghe-sub-mari-10docx.jpg)


