Hurricane Compact Juicing Blender CPB-380 - cuisinart.com · blender jar cover on the blender jar...
21
INSTRUCTION AND RECIPE BOOKLET Hurricane ™ Compact Juicing Blender CPB-380 For your safety and continued enjoyment of this product, always read the instruction book carefully before using.
Transcript of Hurricane Compact Juicing Blender CPB-380 - cuisinart.com · blender jar cover on the blender jar...

INSTRUCTION ANDRECIPE BOOKLET
Hurricane™ Compact Juicing Blender CPB-380For your safety and continued enjoyment of this product, always read the instruction book carefully before using.

2
IMPORTANT SAFEGUARDSWhen using an electrical appliance, basic safety precautions should always be taken, including the following:1. READ ALL INSTRUCTIONS BEFORE USING.2. Unplug from outlet when not in use, before putting on or taking off parts, and
before cleaning or removing contents from blender jar or cup. Never put hands into the blender jar or cups, or handle the blades with appliance plugged in.
3. To protect against the risk of electrical shock, do not put motor base of blender in water or other liquids.
4. This appliance should not be used by or near children or individuals with certain disabilities.
5. Avoid contact with moving parts.6. Do not operate any appliance with a damaged cord or plug or after the appliance
malfunctions, or is dropped or damaged in any manner. Return appliance to nearest Cuisinart service facility for examination, repair, and/or mechanical or electrical adjustment.
7. The use of attachments, including canning or ordinary jars, not recommended or sold by Cuisinart, may cause fire, electric shock, or risk of injury to persons.
8. Do not use outdoors.9. Do not let cord hang over edge of counter or table or touch hot surfaces.10. Keep hands and utensils out of jar while blending to reduce the risk of
severe injury to persons or damage to blender itself. A rubber or plastic spatula may be used, but must be used only when the blender is turned off.
11. Do not touch cutting assembly, interfere with blade movement, or remove blender jar cover.
12. BLADES ARE SHARP. HANDLE CAREFULLY.13. To reduce the risk of injury, never place cutting assembly on base unless the blender
jar, chopper cup or travel cups are properly attached.14. Always operate blender jar with the cover in place.15. Never leave your blender unattended while running.16. Twist vessel on firmly. Injury can result if moving blades accidentally become
exposed.17. Do not use an extension cord with this unit. Doing so may result in fire, electric
shock, or personal injury. 18. Wash the blender jar, chopping cup, travel cups, cutting assemblies and lids/cover
before first use.
19. Do not blend hot liquids in the travel cups or chopping cup.20. CAUTION! NEVER USE carbonated beverages in the blending jar, chopping
cup, or travel cups. 21. Be certain cover is securely locked in place before operating appliance.22. Do not attempt to bypass the interlock system that powers the unit on.23. WARNING: TO REDUCE THE RISK OF ELECTRICAL SHOCK OR FIRE, DO
NOT REMOVE THE BASE PANEL. NO USER-SERVICEABLE PARTS ARE INSIDE. REPAIR SHOULD BE DONE ONLY BY AUTHORIZED PERSONNEL.
24. Do not operate your appliance in an appliance garage or under a wall cabinet. When storing in an appliance garage, always unplug the unit from the electrical outlet. Not doing so could create a risk of fire, especially if the appliance touches the walls of the garage or the door touches the unit as it closes.
SAVE THESE INSTRUCTIONS FOR HOUSEHOLD USE ONLYNOTICEThis appliance has a polarized plug (one prong is wider than the other). To reduce the risk of electric shock, this plug will fit into a polarized outlet only one way. If the plug does not fit fully into the outlet, reverse the plug. If it still does not fit, contact a qualified electrician. Do not modify the plug in any way.Rating of unit is 500 watts max. Recommended attachments and recipes may draw significantly less power.This appliance comes with a thermal resettable protection device to prevent damage to the motor in the case of extreme overload. Should the unit shut off unexpectedly, unplug it and let it cool for at least 15 minutes before continuing (see Operating and Safety Tips, on page 5).

3
UNPACKING INSTRUCTIONS1. Place the gift box containing your Cuisinart® Hurricane™ Compact Juicing
Blender on a flat, sturdy surface before unpacking. 2. Remove instruction booklet and other printed materials from top of box. Next,
remove top pulp tray.3. Carefully lift blender base from box and set aside. 4. Remove blender jar, chopping cup, travel cups, and straws and set aside. Before
using for the first time: Wash all parts according to the Cleaning and Maintenance section on page 6 of this booklet to remove any dust or residue.
To assemble the blender, follow the Assembly instructions on page 4 of this instruction booklet. Replace all packaging materials in the box and save the box for repackaging.
TABLE OF CONTENTSImportant Safeguards . . . . . . . . . . . . . . . . . . . . . . . . . . . . . . . . . . . . . . . . . .2
Unpacking Instructions . . . . . . . . . . . . . . . . . . . . . . . . . . . . . . . . . . . . . . . . .3
Features and Benefits . . . . . . . . . . . . . . . . . . . . . . . . . . . . . . . . . . . . . . . . . .3
Quick Reference Guide/Assembly . . . . . . . . . . . . . . . . . . . . . . . . . . . . . . . .4
Blender Jar Operation . . . . . . . . . . . . . . . . . . . . . . . . . . . . . . . . . . . . . . . . . .4
Travel Cup Operation . . . . . . . . . . . . . . . . . . . . . . . . . . . . . . . . . . . . . . . . . . .5
Chopping Cup Operation. . . . . . . . . . . . . . . . . . . . . . . . . . . . . . . . . . . . . . . .5
Operating and Safety Tips . . . . . . . . . . . . . . . . . . . . . . . . . . . . . . . . . . . . . . .5
Cleaning and Maintenance . . . . . . . . . . . . . . . . . . . . . . . . . . . . . . . . . . . . . .6
Troubleshooting . . . . . . . . . . . . . . . . . . . . . . . . . . . . . . . . . . . . . . . . . . . . . . .6
Warranty . . . . . . . . . . . . . . . . . . . . . . . . . . . . . . . . . . . . . . . . . . . . . . . . . . . .7
Food and Drink Quick Reference Guide . . . . . . . . . . . . . . . . . . . . . . . . . . . .8
Tips and Hints . . . . . . . . . . . . . . . . . . . . . . . . . . . . . . . . . . . . . . . . . . . . . . . .9
Recipes. . . . . . . . . . . . . . . . . . . . . . . . . . . . . . . . . . . . . . . . . . . . . . . . . . . . .10
FEATURES AND BENEFITS1. 32-oz., BPA-free, easy-grip blending jar
with cover and pour lid has a unique, sturdy design for all your blending needs. Cover fits on top with a 1-oz. measured pour lid.
2. 8-oz., BPA-free chopping cup with lid handles a variety of food preparation tasks including chopping, grinding and whipping.
3. Two 16-oz., BPA-free travel cups with no-spill lids with a straw allow you to blend and go. Make your favorite drinks: smoothies, protein shakes, health and diet drinks and more!
4. Two high-quality blade assemblies are strong enough for all blending, chopping and grinding tasks. They are self-aligning so that the cups easily fit on the base. Blade assemblies are interchangeable for desired tasks.
5. Heavy-duty motor base is sturdy and stable, housing a compact 500 watt motor with a safety interlock feature.
6. 3-function rotary dial is easy to use: Low, High, and Pulse.
7. Slip-proof feet (not shown) prevent movement during use and prevent damaging marks on countertops or tables.
3.
4.
5.
1.
6.
2.
NOTE: Blades are SHARP. Handle carefully.

4
ASSEMBLYAfter washing all parts, please see below for assembly. Place base on flat surface and plug in.
BLENDER JAR OPERATION1. With the base unit on the tabletop and unit plugged in, place the blender jar
assembled with the blade assembly onto the base and secure into place.
NOTE: Blade assemblies are interchangeable based on recipes and desired end results.
2. Add food ingredients, beginning with liquid and soft items and finishing with harder items like ice and frozen fruit. Replace the cover. You may add more ingredients by lifting the measured pour lid and dropping ingredients through the fill area. Replace the pour lid after adding ingredients. Do not put hands into blender jar while device is plugged in.
NOTE: To remove blender jar cover, lift edge of cover upward. Do not use measured pour lid to remove cover.
3. For continuous blending, turn dial to the desired speed. It is possible to switch between High and Low speeds by simply turning the rotary dial.
4. To pause the blending process, turn the rotary dial to the OFF position. The blending process will stop. To restart blending, rotate dial to desired speed.
5. To pulse, turn the dial to Pulse. Hold, then release after desired run time. Repeat as needed. The Pulse function can be used to break apart larger pieces of food. The Pulse function is also effective for starting the blending process when you do not want continuous power, or for processing items that do not require an extended amount of blending. Dial will automatically return to the OFF position upon release.
6. When you have finished blending, turn the dial to OFF. Then remove the blender jar from the base. Pour out ingredients. NEVER TOUCH THE BLADE ITSELF. Unplug the unit.
QUICK REFERENCE GUIDETo activate blender Place vessel fitted with blade
assembly onto base
To begin blending Turn dial to desired speed
To change speeds Turn dial to desired speed
To pulse Turn dial left to Pulse
To stop blending Turn dial to OFF
Blender Jar Assembly
Travel Cup Assembly
Chopping Cup Assembly
1. Turn blender jar upside down.
2. Place blade assembly on the round opening of the jar and turn counterclockwise until tightened.
3. Stand jar upright. Place on blender base and secure into place.
4. Add ingredients to be blended, place cover with pour lid in place on blender jar.
1. Place cup on flat surface upright. Add ingredients.
2. Attach blade assembly on round opening of the cup and turn counter-clockwise until tightened.
3. Place on blender base.
4. Turn clockwise to lock.
1. Place cup on flat surface upright. Add ingredients.
2. Attach blade assembly on round opening of the cup and turn counter-clockwise until tightened.
3. Place on blender base.
4. Turn clockwise to lock.
5
TRAVEL CUP OPERATION1. Put food ingredients into the travel cup, beginning with harder items like ice and
frozen fruit, and finishing with soft items and liquid. Attach blade assembly and turn to secure.
NOTE: Blade assemblies are interchangeable based on recipes and desired end results.
2. With the base unit on the tabletop and the unit plugged in, turn cup upside down, place the assembled travel cup onto the base. Turn clockwise to lock into place.
3. For continuous blending, turn dial to the desired speed. It is possible to switch between High and Low speeds by simply turning the dial.
4. To pause the blending process, turn the dial to OFF. The blending process will stop. To re-engage the unit, choose the desired speed.
5. When you have finished blending, turn dial to OFF. Remove the travel cup from the base. Unplug the unit.
6. Turn cup right side up, turn blade assembly clockwise to remove. Attach travel cup lid by twisting counterclockwise.
CHOPPING CUP OPERATION1. Put food ingredients into chopper cup, then attach blade assembly and turn
counterclockwise to secure.
NOTE: Blade assemblies are interchangeable based on recipes and desired end results.
2. With the base unit on the tabletop and the unit plugged in, turn the cup upside down, place the assembled chopper cup onto the base. Turn clockwise to lock into place.
3. To continuously chop, turn dial to High or Low speed.
4. To pulse, turn dial to Pulse, holding for desired time; 1 to 2 seconds is recommended per pulse. Repeat as needed.
5. When you have finished chopping, turn the dial to OFF. Remove the chopping cup from the base. Carefully remove food with a spatula. NEVER TOUCH THE BLADE ITSELF. Unplug the unit.
OPERATING AND SAFETY TIPS• Make sure the electrical outlet is rated at the same voltage as that stated on the
bottom of the blender motor base.
• Always use the blender on a clean, sturdy, and dry surface.
• Always operate the blender jar with the cover on. Place cover on firmly. Keep the blender jar cover on the blender jar while blending.
• Don’t put hands inside the blender jar when blender is plugged in.
• Don’t remove blender jar or cups while unit is running.
• Don’t place blade assembly onto motor base without the jar or cup attached.
• Make sure blade assembly is tightly attached to jar or cups.
• Always remove blade assembly before cleaning.
• Don’t twist blade assembly from blender jar or cups when removing from motor base. Simply lift jar or cups from motor base.
• Use a plastic spatula as needed, only when the blender is not plugged in. Do not use any utensil inside the blender while motor is on.
• Never use metal utensils, as damage may occur to the jar, cup or cutting assembly.
• Don’t store food or liquids in your blender jar.
• Don’t overload blender jar or cups. If the motor stalls, turn the blender off immediately, unplug the unit and let it cool for at least 15 minutes. Then, remove a portion of the food and continue.
• CAUTION: NEVER use carbonated beverages in the blending jar, chopping cup, and travel cups.
• Don’t blend hot liquids in chopper and travel cups.
• Don’t use any container or accessories not recommended by Cuisinart. Doing so may result in injury.
• To remove jar, lift straight up. Do not twist to remove.
• To remove travel and chopping cup, turn slightly counterclockwise before lifting.
• The blender jar, chopping cup, and travel cups are not recommended for microwave use.

6
CLEANING AND MAINTENANCEAlways unplug your Cuisinart® Hurricane™ Compact Juicing Blender from the electrical outlet before cleaning. The base and parts are made of corrosion-resistant materials that are easy to clean. Before first use and after every use, clean each part thoroughly. Periodically check all parts before reassembly. DO NOT USE if any part is damaged, or if the jar or cups are chipped or cracked.To remove blade assemblies, twist off by turning clockwise. NEVER TOUCH THE BLADE ITSELF.CAUTION: Handle the blade assemblies carefully. They are SHARP and may cause injury. DO NOT attempt to remove blades from cutting assembly.Wash all parts in warm, soapy water; rinse and dry thoroughly. All parts are top rack dishwasher safe. Tip: You may wish to clean your blending and chopper cutting assemblies as follows: Squirt a small amount of dishwashing liquid into blender jar or cups and fill halfway with warm (not hot) water. Attach blade assembly. Run on Low for 15 seconds. Repeat, using clean tap water. Carefully disassemble parts and empty blender jar or cups. Rinse and dry all parts thoroughly.Finally, wipe the motor base clean with a damp cloth to remove any residue, and dry thoroughly. Never submerge the motor base in water or other liquids, or place in a dishwasher.Any other servicing should be performed by an authorized service representative.
Problem: Solution:
My blender is not turning on.
Be sure the blade assembly is on the jar or cup correctly. Be sure it is pushed all the way onto the base (travel and chopping cups lock into place).1. Plug blender into an independent outlet.2. Make sure blender is securely plugged in.3. Check the outlet for power; try plugging into a different
outlet.4. Check your home's circuit breaker.
The blender stopped running.
The motor could have overheated. The resettable fuse, which protects the motor due to overloading, may have been tripped. When this happens, to reset the appliance unplug the unit and let it cool for a minimum of 15 minutes. Then, reduce the contents of the blender jar and/or clear any jams. Restart the unit as noted in the operating directions.
The rubber gasket won’t come out from the blade assembly for cleaning.
Run under water and tap on the edge of sink upside down to loosen the gasket.Avoid hitting the blades which could cause damage.
The blade assembly is hard to remove after blending.
The ingredients cause pressure, and with the airtight seal, pressure builds up creating a vacuum or a suction effect. This is normal.
Unit appears to be leaking.
1. Check rubber gasket. Make sure it's flush with blender assembly.
2. Make sure rubber gasket is properly in place.3. Make sure rubber gasket is not damaged.4. Make sure jar blade assembly is tight.
TROUBLESHOOTING

7
LIMITED THREE-YEAR WARRANTY(U.S. AND CANADA ONLY)This warranty is available to consumers only. You are a consumer if you own a Cuisinart® Hurricane™ Compact Juicing Blender that was purchased at retail for personal, family or household use. Except as otherwise required under applicable law, this warranty is not available to retailers or other commercial purchasers or owners.
We warrant that your Cuisinart® Hurricane™ Compact Juicing Blender will be free of defects in materials and workmanship under normal home use for 3 years from the date of original purchase.
We recommend that you visit our website, www.cuisinart.com for a fast, efficient way to complete your product registration. However, product registration does not eliminate the need for the consumer to maintain the original proof of purchase in order to obtain the warranty benefits. In the event that you do not have proof of purchase date, the purchase date for purposes of this warranty will be the date of manufacture.
If your Cuisinart® Hurricane™ Compact Juicing Blender should prove to be defective within the warranty period, we will repair it, or if we think necessary, replace it. To obtain warranty service, simply call our toll-free number 1-800-726-0190 for additional information from our Consumer Service Representatives, or send the defective product to Consumer Service at Cuisinart, 7475 North Glen Harbor Blvd., Glendale, AZ 85307.
To facilitate the speed and accuracy of your return, please enclose $10.00 for shipping and handling of the product.
Please pay by check or money order made payable to Cuisinart (California residents need only supply proof of purchase and should call 1-800-726-0190 for shipping instructions).
NOTE: For added protection and secure handling of any Cuisinart product that is being returned, we recommend you use a traceable, insured delivery service. Cuisinart cannot be held responsible for in-transit damage or for packages that are not delivered to us. Lost and/or damaged products are not covered under warranty. Please be sure to include your return address, daytime phone number, description of the product defect, product model number (located on bottom of product), original date of purchase, and any other information pertinent to the product’s return.
CALIFORNIA RESIDENTS ONLY California law provides that for In-Warranty Service, California residents have the option of returning a nonconforming product (A) to the store where it was purchased or (B) to another retail store which sells Cuisinart products of the same type.
The retail store shall then, at its discretion, either repair the product, refer the consumer to
an independent repair facility, replace the product, or refund the purchase price less the amount directly attributable to the consumer’s prior usage of the product. If the above two options do not result in the appropriate relief to the consumer, the consumer may then take the product to an independent repair facility if service or repair can be economically accomplished. Cuisinart and not the consumer will be responsible for the reasonable cost of such service, repair, replacement, or refund for nonconforming products under warranty.
California residents may also, according to their preference, return nonconforming products directly to Cuisinart for repair, or if necessary, replacement, by calling our Consumer Service Center toll-free at 1-800-726-0190.
Cuisinart will be responsible for the cost of the repair, replacement, and shipping and handling for such products under warranty.
BEFORE RETURNING YOUR CUISINART PRODUCT If you are experiencing problems with your Cuisinart product, we suggest that you call our Cuisinart Service Center at 1-800-726-0190 before returning the product for service. If servicing is needed, a Representative can confirm whether the product is under warranty and direct you to the nearest service location.
Your Cuisinart® Hurricane™ Compact Juicing Blender has been manufactured to the strictest specifications and has been designed for use only in 120-volt outlets and only with authorized accessories and replacement parts. This warranty expressly excludes any defects or damages caused by attempted use of this unit with a converter, as well as by use with accessories, replacement parts or repair service other than those authorized by Cuisinart. This warranty does not cover any damage caused by accident, misuse, shipment or other than ordinary household use. This warranty excludes all incidental or consequential damages. Some states do not allow the exclusion or limitation of these damages, so these exclusions may not apply to you. You may also have other rights, which vary from state to state.
Important: If the nonconforming product is to be serviced by someone other than Cuisinart’s Authorized Service Center, please remind the servicer to call our Consumer Service Center at 1-800-726-0190 to ensure that the problem is properly diagnosed, the product is serviced with the correct parts, and the product is still under warranty.
8
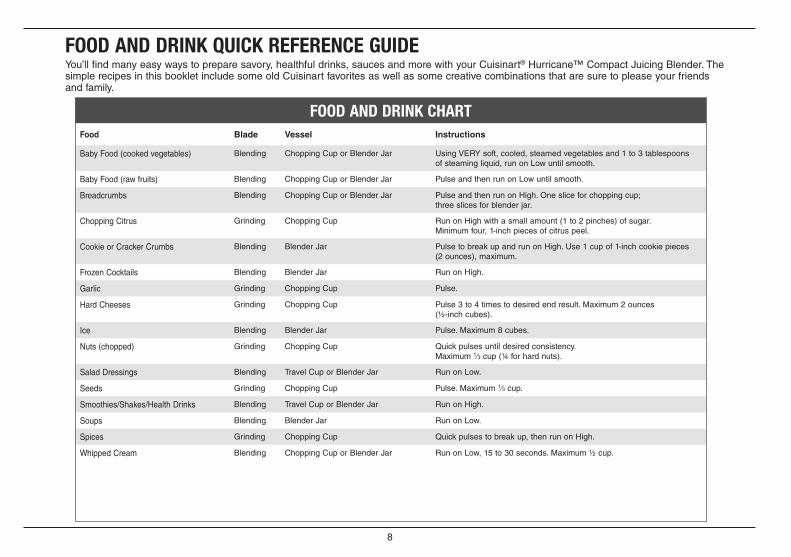
FOOD AND DRINK QUICK REFERENCE GUIDEYou’ll find many easy ways to prepare savory, healthful drinks, sauces and more with your Cuisinart® Hurricane™ Compact Juicing Blender. The simple recipes in this booklet include some old Cuisinart favorites as well as some creative combinations that are sure to please your friends and family.
FOOD AND DRINK CHARTFood Blade Vessel Instructions
Baby Food (cooked vegetables) Blending Chopping Cup or Blender Jar Using VERY soft, cooled, steamed vegetables and 1 to 3 tablespoons of steaming liquid, run on Low until smooth.
Baby Food (raw fruits) Blending Chopping Cup or Blender Jar Pulse and then run on Low until smooth.
Breadcrumbs Blending Chopping Cup or Blender Jar Pulse and then run on High. One slice for chopping cup; three slices for blender jar.
Chopping Citrus Grinding Chopping Cup Run on High with a small amount (1 to 2 pinches) of sugar. Minimum four, 1-inch pieces of citrus peel.
Cookie or Cracker Crumbs Blending Blender Jar Pulse to break up and run on High. Use 1 cup of 1-inch cookie pieces (2 ounces), maximum.
Frozen Cocktails Blending Blender Jar Run on High.
Garlic Grinding Chopping Cup Pulse.
Hard Cheeses Grinding Chopping Cup Pulse 3 to 4 times to desired end result. Maximum 2 ounces (½-inch cubes).
Ice Blending Blender Jar Pulse. Maximum 8 cubes.
Nuts (chopped) Grinding Chopping Cup Quick pulses until desired consistency. Maximum 1∕3 cup (1/4 for hard nuts).
Salad Dressings Blending Travel Cup or Blender Jar Run on Low.
Seeds Grinding Chopping Cup Pulse. Maximum 1∕3 cup.
Smoothies/Shakes/Health Drinks Blending Travel Cup or Blender Jar Run on High.
Soups Blending Blender Jar Run on Low.
Spices Grinding Chopping Cup Quick pulses to break up, then run on High.
Whipped Cream Blending Chopping Cup or Blender Jar Run on Low, 15 to 30 seconds. Maximum ½ cup.

9
BLENDER JAR – TIPS AND HINTS• Add liquid ingredients first, then follow with solid
ingredients with the softest items closest to the blade and the hardest items on top. This will provide more consistent blending and prevent unnecessary stress on the motor.
• It is recommended that most foods be cut into ½- to 1-inch pieces to achieve the most uniform result.
• For best results in the fastest time, pulse a few times before running continuously. Pulses should be short bursts with about 1 second in between each one to allow the blade to stop rotating between pulses.
• If you want to add ingredients during the blending process, remove the measured lid and drop or pour ingredients through the opening at the top.
• To crush ice, put no more than 8 standard ice cubes into the blender jar at one time. Pulse until uniformly crushed.
• When making hot soups, cool ingredients slightly before adding to the blender. Put a small amount of the warm soup liquid into the blender jar first, and then follow with some of the solids. Pulse ingredients and then run on Low. You can always thin it out more by carefully adding liquid through the opening at the top of the cover. Use only the blender jar when blending hot ingredients.
• If food sticks to the sides of the jar when blending, stop the blender, carefully scrape down the food, replace cover and pulse in short bursts to combine.
• When blending thicker mixtures, lightly hold down top of blender jar to prevent excessive movement.
• Do not attempt to mash white potatoes or knead bread dough in the blender.
TRAVEL CUPS – TIPS AND HINTS• When using the travel cup, ingredients are put in the reverse order of the
blender jar. Always put the hardest ingredients into the travel cup first (ice cubes, frozen fruit) and finish with the softer ingredients and liquids.
• It is recommended that most foods be cut into ½-inch to 1-inch pieces to achieve the most uniform result.
• For best results in the fastest time, pulse a few times before running continuously. Pulses should be short bursts with about 1 second in between each one to allow the blade to stop rotating between pulses.
• If food sticks to the sides of the cup when blending, stop the blender,
carefully scrape down the food, replace blade assembly and pulse in short bursts to combine.
• After blending, flip the travel cup over so that the blade assembly is on the top. Gently tap the cup on the counter a few times to prevent any spillage. Remove the blade assembly and replace with one of the provided lids.
• All beverage recipes in the booklet are portioned for the travel cup. If you wish to make more servings, simply double the recipe and prepare in the blender jar. Be sure to reverse the order of ingredients when doing so.
CHOPPING CUP – TIPS AND HINTS• It is recommended that most foods be cut into ½- to 1-inch pieces to
achieve a more uniform result. • Do not overload the cup; you will get inconsistent results and possibly harm
the motor or blade.• For best results in the fastest time, pulse a few times before running
continuously. Pulses should be short bursts with about 1 second in between each one to allow the blade to stop rotating between pulses.
• Results are usually achieved in seconds rather than minutes, so keep a close eye on the foods to prevent over-processing.
• The chopping cup with the grinding blade provides you with the perfect tool for grinding nuts and seeds for many different applications. Grind flax seeds or almonds and put them into the travel cup with your smoothie ingredients for added protein. See our recipes for some guidelines.
• When chopping nuts, use quick pulses.
BLENDING/JUICING TIPS AND HINTS• When blending, choose the ripest fruits for maximum flavor. • Add fresh herbs, like mint and parsley, to juices and smoothies for added
flavor and a boost of health benefits.• Add a squeeze of citrus to juices and smoothies to brighten flavors. • When blending vegetables for juice, steam hard vegetables, like carrots,
for a smoother consistency. Steam vegetables in bulk to have on hand. • Juices may be strained through a fine-mesh strainer for a thinner consis-
tency. Serving as is, however, is recommended to benefit from the fiber found in the pulp and skin of fruits and vegetables.
• Juices and smoothies will separate if not served right away. Re-blend before serving or strain to simply enjoy the juice.

©2016 Cuisinart150 Milford Road
East Windsor, NJ 08520Printed in China
16CE019319
IB-14229-ESP-A
Trademarks or service marks of third parties used herein are the trade-marks or service marks of their respective owners.

MANUAL DE INSTRUCCIONES Y LIBRO DE RECETAS
Licuadora juguera compacta Hurricane™ CPB-380
Para su seguridad y para disfrutar plenamente de este producto, siempre lea cuidadosamente las instrucciones antes de usarlo.

2
MEDIDAS DE SEGURIDAD IMPORTANTESAl usar aparatos eléctricos, siempre debe tomar precauciones básicas de seguridad, incluso las siguientes:1. LEA TODAS LAS INSTRUCCIONES ANTES DE USARLO.2. Desconecte el aparato cuando no está en uso, antes de instalar/sacar
piezas, antes de limpiarlo y antes de vaciar la jarra, el vaso picador o el vaso de viaje. Nunca introduzca las manos en la jarra/los vasos, ni toque las cuchillas mientras el aparato está enchufado.
3. Para reducir el riesgo de electrocución, no coloque el bloque-motor en agua ni en ningún otro líquido.
4. Supervise el uso de este aparato cuidadosamente cuando sea usado por o cerca de niños. Este aparato no debe ser usado por o cerca de niños o personas con ciertas discapacidades.
5. Evite el contacto con las piezas móviles.6. No utilice este aparato si el cable o la clavija estuviesen dañados, si no funcionase
debidamente, si estuviese dañado, o después de que se hubiese caído al piso o al agua; regréselo a un centro de servicio autorizado para su revisión, reparación o ajuste.
7. El uso de accesorios no recomendados o vendidos por Cuisinart, incluso frascos para conservas, presenta un riesgo de incendio, electrocución o heridas.
8. No lo utilice en exteriores.9. No permita que el cable cuelgue del borde de la encimera o de la mesa, ni que
haga contacto con superficies calientes.10. Para reducir el riesgo de herida seria o de daño al aparato, mantenga las
manos y los utensilios fuera de la jarra durante el funcionamiento. Se podrá usar una espátula de goma/plástico, siempre que el aparato esté apagado.
11. No toque ni interfiere con el movimiento de las cuchillas, y no retire la tapa de la jarra durante el funcionamiento.
12. LAS CUCHILLAS/HOJAS SON MUY FILOSAS. MANIPÚLELAS CON SUMO CUIDADO.
13. Para reducir el riesgo de heridas, nunca coloque las cuchillas sobre la base sin que la jarra, el vaso picador o los vasos de viaje estén debidamente ajustados.
14. No encienda el aparato a menos que la tapa esté debidamente puesta.15. Nunca descuide/deje el aparato sin vigilancia mientras está funcionando.16. Enrosque firmemente el anillo de bloqueo. Las cuchillas pueden provocar heridas
graves si quedan al descubierto por accidente.17. No utilice una extensión con este aparato; esto podría provocar un incendio, una
electrocución o heridas. 18. Lave la jarra, el vaso picador, los vasos de viaje, las cuchillas y las tapas antes del
primer uso.19. No licue líquidos calientes en los vasos de viaje o el vaso picador.
20. ¡PRECAUCIÓN! NUNCA procese líquidos carbonatados en la jarra, el vaso picador o los vasos de viaje.
21. Cuando licue líquidos calientes, quite el tapón medidor (la parte central de la tapa).
22. Asegúrese de que la tapa esté debidamente cerrada antes de encender el aparato.
23. No intente forzar el mecanismo de seguridad del aparato.24. ADVERTENCIA: PARA REDUCIR EL RIESGO DE INCENDIO O
ELECTROCUCIÓN, NO DESARME EL CUERPO DEL APARATO. ESTE APARATO NO CONTIENE NINGUNA PIEZA QUE PUEDA SER REPARADA/CAMBIADA POR EL USUARIO. LAS REPARACIONES DEBEN SER REALIZADAS POR UN TÉCNICO AUTORIZADO.
25. No haga funcionar el aparato debajo o dentro de un armario/gabinete. Siempre desconecte el aparato antes de guardarlo en un armario/gabinete. Dejar el aparato conectado presenta un riesgo de incendio, especialmente si este toca las paredes o la puerta del armario/gabinete cuando cierra.
26. Cuando prepare alimentos para bebés, tenga presente que este aparato ha sido diseñado para procesar pequeñas cantidades de alimentos, para consumo inmediato. No se aconseja preparar altas cantidades de alimentos a la vez.
GUARDE ESTAS INSTRUCCIONES PARA USO DOMÉSTICO SOLAMENTEAVISOEl cable de este aparato está dotado de una clavija polarizada (una pata es más ancha que otra). Como medida de seguridad, se podrá enchufar de una sola manera en la toma de corriente polarizada. Si no entrara en la toma de corriente, inviértala. Si aún no entrara completamente, comuníquese con un electricista. No intente modificarla.La potencia nominal del aparato es de 500 vatios; sin embargo, algunos accesorios/aditamentos pueden utilizar menos electricidad.Este aparato está equipado con un dispositivo de protección térmica que apagará el motor en caso de sobrecalentamiento. Si esto ocurriera, desenchufe el aparato y permita que se enfríe por 15 minutos o más antes de continuar (véase la sección “Consejos de operación y seguridad” en la página 5)
3
DESEMBALAJE1. Ponga la caja sobre una superficie espaciosa, plana y segura. 2. Retire el manual de instrucciones y otros folletos de la caja. Después, retire el
inserto de cartón.3. Alce cuidadosamente el bloque-motor y sáquelo de la caja. 4. Retire y aleje la jarra, el vaso picador, los vasos de viaje y las pajillas reutilizables.
Antes del primer uso: lave todas las piezas, según se describe en la sección “Limpieza y Mantenimiento”, a fin de eliminar el polvo y otros residuos.
Para ensamblar la licuadora, siga las instrucciones de ensamblaje que se encuentran en la página 4. Le aconsejamos que conserve el material de embalaje.
ÍNDICEMedidas de seguridad importantes . . . . . . . . . . . . . . . . . . . . . . . . . . . . . . . .2
Instrucciones de desembalaje . . . . . . . . . . . . . . . . . . . . . . . . . . . . . . . . . . . 3
Piezas y características . . . . . . . . . . . . . . . . . . . . . . . . . . . . . . . . . . . . . . . . 3
Guía de referencia rápida/Ensamblaje. . . . . . . . . . . . . . . . . . . . . . . . . . . . . 4
Operación – jarra licuadora . . . . . . . . . . . . . . . . . . . . . . . . . . . . . . . . . . . . . .4
Operación – vasos de viaje . . . . . . . . . . . . . . . . . . . . . . . . . . . . . . . . . . . . . .5
Operación – vaso picador . . . . . . . . . . . . . . . . . . . . . . . . . . . . . . . . . . . . . . .5
Consejos de operación y seguridad . . . . . . . . . . . . . . . . . . . . . . . . . . . . . . .5
Limpieza y mantenimiento . . . . . . . . . . . . . . . . . . . . . . . . . . . . . . . . . . . . . . 6
Resolución de problemas . . . . . . . . . . . . . . . . . . . . . . . . . . . . . . . . . . . . . . .6
Garantía . . . . . . . . . . . . . . . . . . . . . . . . . . . . . . . . . . . . . . . . . . . . . . . . . . . . .7
Guía de referencia rápida. . . . . . . . . . . . . . . . . . . . . . . . . . . . . . . . . . . . . . . .8
Consejos útiles. . . . . . . . . . . . . . . . . . . . . . . . . . . . . . . . . . . . . . . . . . . . . . . .9
Recetas . . . . . . . . . . . . . . . . . . . . . . . . . . . . . . . . . . . . . . . . . . . . . . . . . . . .10
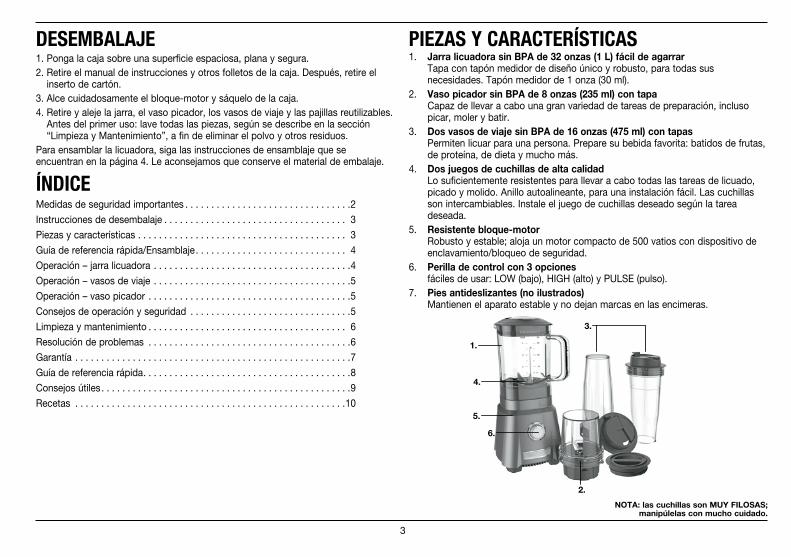
PIEZAS Y CARACTERÍSTICAS1. Jarra licuadora sin BPA de 32 onzas (1 L) fácil de agarrar
Tapa con tapón medidor de diseño único y robusto, para todas sus necesidades. Tapón medidor de 1 onza (30 ml).
2. Vaso picador sin BPA de 8 onzas (235 ml) con tapa Capaz de llevar a cabo una gran variedad de tareas de preparación, incluso picar, moler y batir.
3. Dos vasos de viaje sin BPA de 16 onzas (475 ml) con tapas Permiten licuar para una persona. Prepare su bebida favorita: batidos de frutas, de proteína, de dieta y mucho más.
4. Dos juegos de cuchillas de alta calidad Lo suficientemente resistentes para llevar a cabo todas las tareas de licuado, picado y molido. Anillo autoalineante, para una instalación fácil. Las cuchillas son intercambiables. Instale el juego de cuchillas deseado según la tarea deseada.
5. Resistente bloque-motor Robusto y estable; aloja un motor compacto de 500 vatios con dispositivo de enclavamiento/bloqueo de seguridad.
6. Perilla de control con 3 opciones fáciles de usar: LOW (bajo), HIGH (alto) y PULSE (pulso).
7. Pies antideslizantes (no ilustrados) Mantienen el aparato estable y no dejan marcas en las encimeras.
3.
4.
5.
1.
6.
2.
NOTA: las cuchillas son MUY FILOSAS; manipúlelas con mucho cuidado.

4
ENSAMBLAJEDespués de lavar todas las piezas, siga las instrucciones de ensamblaje a continuación. Coloque el aparato sobre una superficie plana y conéctelo a una toma de corriente.
OPERACIÓN – JARRA LICUADORA1. Coloque la jarra sobre la base.
NOTA: las cuchillas son intercambiables. Instale el juego de cuchillas deseado, según la tarea deseada.
2. Agregue los ingredientes deseados, empezando con los ingredientes líquidos, añadiendo después los ingredientes suaves y terminando con los ingredientes duros tales como el hielo o las frutas congeladas. Cierre la tapa. Si desea agregar ingredientes durante el licuado, retire el tapón medidor y añada los alimentos por la abertura en la tapa. Vuelva a cerrar el tapón después de haber añadido los ingredientes. Nunca introduzca las manos en la jarra mientras el aparato está conectado.
NOTA: para quitar la tapa, agárrela por el borde y álcela. No agarre la tapa por el tapón medidor para retirarla.
3. Para licuar, gire la perilla de control para elegir la velocidad deseada. Para cambiar de velocidad, simplemente gire la perilla.
4. Para interrumpir el licuado, ponga la perilla sobre “OFF”; el motor se apagará. Para empezar a licuar otra vez, ponga la perilla sobre la velocidad deseada.
5. Para pulsar, ponga la perilla sobre “PULSE”. Mantenga la perilla en esta posición por el tiempo deseado, y luego suéltela. Repita. La función de pulso puede usarse para romper pedazos grandes. También puede usarla para empezar a licuar o procesar alimentos que suelen licuarse rápidamente. La perilla regresará a la posición de apagado (“OFF”) automáticamente al soltar la perilla.
6. Después de terminar, ponga la perilla sobre “OFF”. Luego, retire la jarra de la base. Vacíe la jarra. NUNCA TOQUE LOS FILOS DE LA CUCHILLA. Desconecte el cable de la toma de corriente.
GUÍA DE REFERENCIA RÁPIDAPara poner el aparato bajo tensión
Coloque la jarra, con las cuchillas puestas, sobre la base.
Para empezar a licuar Ponga el control de velocidad sobre la velocidad deseada
Para cambiar la velocidad Ponga el control de velocidad sobre la velocidad deseada
Para pulsar Ponga el control de velocidad sobre “PULSE”.
Para interrumpir el licuado Ponga el control sobre “OFF”.
Ensamblaje de la jarra
Ensamblaje de los vasos de viaje
Ensamblaje del vaso picador
1. Voltee la jarra.
2. Introduzca el juego de cuchillas en la abertura de la jarra y gire en sentido antihorario para apretar.
3. Sostenga la jarra recta. Colóquela sobre la base, cerciorándose de que no se mueva.
4. Agregue los ingredientes deseados y cierre la tapa.
1. Coloque el vaso sobre una superficie llana. Agregue los ingredientes.
2. Introduzca el juego de cuchillas en la abertura y gire en sentido antihorario para apretar.
3. Colóquela sobre la base.
4. Gire en sentido horario para bloquear.
1. Coloque el vaso sobre una superficie llana. Agregue los ingredientes.
2. Introduzca el juego de cuchillas en la abertura y gire en sentido antihorario para apretar.
3. Colóquelo sobre la base.
4. Gire en sentido horario para bloquear.
5
OPERACIÓN – VASOS DE VIAJE1. Ponga los ingredientes en el vaso de viaje, agregando primero los ingredientes
duros tales como hielo y frutas congeladas, y terminando con los ingredientes suaves y líquidos. Instale las cuchillas y gire para sujetar.
NOTA: las cuchillas son intercambiables. Instale el juego de cuchillas deseado, según la tarea deseada.
2. Voltee el vaso de viaje y colóquelo sobre la base. Gire en sentido horario para sujetar.
3. Para licuar, gire la perilla de control para elegir la velocidad deseada. Para cambiar de velocidad, simplemente gire la perilla.
4. Para interrumpir el licuado, ponga la perilla sobre “OFF”; el motor se apagará. Para continuar, oprima el botón de velocidad deseado.
5. Después de terminar, ponga la perilla sobre “OFF”. Retire el vaso de viaje de la base. Desconecte el cable de la toma de corriente.
6. Voltee el vaso y gire el juego de cuchillas en sentido antihorario para retirarlo. Coloque una tapa sobre el vaso y gire en sentido horario para cerrar.
OPERACIÓN – VASO PICADOR1. Coloque los ingredientes en el vaso picador, y luego conecte las cuchillas, girando
en sentido antihorario para sujetar.
NOTA: las cuchillas son intercambiables. Instale el juego de cuchillas deseado, según la tarea deseada.
2. Voltee el vaso picador y colóquelo sobre la base. Gire en sentido horario para sujetar.
3. Para picar de manera continua, ponga la perilla sobre “HIGH” (alto) o “LOW” (bajo).
4. Para pulsar, ponga la perilla sobre “PULSE” por 1–2 segundos. Repita.
5. Después de terminar, ponga la perilla sobre “OFF”. Retire el vaso picador de la base. Retire cuidadosamente los alimentos del vaso con una espátula. NUNCA TOQUE LOS FILOS DE LA CUCHILLA. Desconecte el cable de la toma de corriente.
CONSEJOS DE OPERACIÓN Y SEGURIDAD• Asegúrese de que el voltaje de la toma de corriente corresponda al voltaje indicado
debajo de la base del aparato.
• Siempre coloque la licuadora sobre una superficie seca, limpia y segura.
• No encienda el aparato a menos que la tapa esté debidamente puesta. Cierre la tapa firmemente antes de poner la licuadora en marcha. Mantenga la tapa sobre la jarra durante el funcionamiento.
• No introduzca las manos en la jarra mientras el aparato está conectado.
• No retire la jarra o los vasos de la base durante el funcionamiento.
• Nunca instale las cuchillas por sí solas sobre la base. El juego de cuchillas siempre debe encontrarse adentro de la jarra o de los vasos.
• Asegúrese de que las cuchillas estén debidamente sujetadas a la jarra o al vaso.
• Siempre retire las cuchillas antes de limpiar la jarra.
• No gire las cuchillas para retirar la jarra o los vasos de la base. Simplemente alce la jarra o los vasos.
• Apague el aparato antes de raspar la jarra o desalojar alimentos trabados en las cuchillas. Utilice una espátula de plástico o de caucho únicamente. No introduzca ningún utensilio en la jarra durante el funcionamiento.
• Nunca utilice utensilios de metal, los cuales podrían dañar la jarra, los vasos o las cuchillas.
• No guarde alimentos/líquidos en la jarra de la licuadora.
• No sobrellene la jarra ni los vasos. Si nota que el motor está haciendo fuerza, apague y desconecte el aparato, y permita que se enfríe por 15 minutos o más. Después, retire una parte de los alimentos de la jarra.
• PRECAUCIÓN: NUNCA procese líquidos carbonatados en la jarra ni los vasos.
• No licue líquidos calientes en el vaso picador ni en los vasos de viaje.
• Nunca utilice piezas o accesorios no aprobados por Cuisinart; esto puede causar heridas.
• Para retirar la jarra, álcela de manera recta. No la gire.
• Para retirar los vasos de viaje o el vaso picador, gire ligeramente en sentido antihorario antes de levantar.
• La jarra, el vaso picador y los vasos de viaje no son aptos para microondas.
6
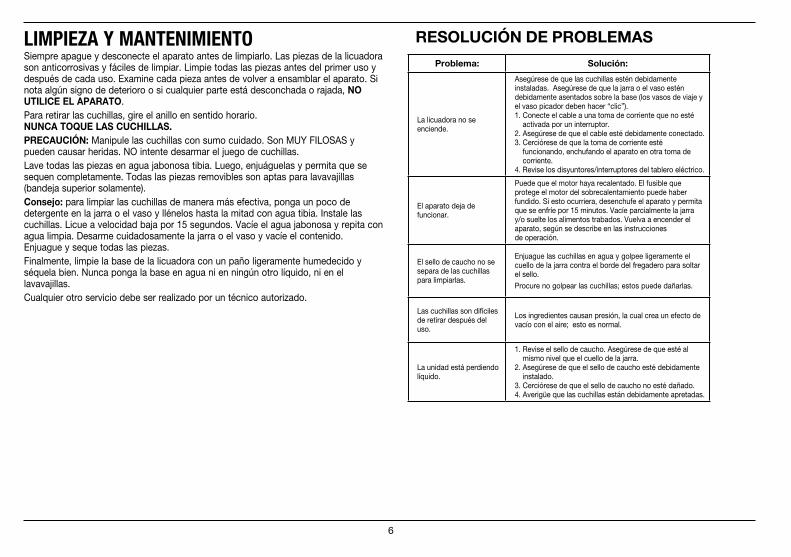
LIMPIEZA Y MANTENIMIENTOSiempre apague y desconecte el aparato antes de limpiarlo. Las piezas de la licuadora son anticorrosivas y fáciles de limpiar. Limpie todas las piezas antes del primer uso y después de cada uso. Examine cada pieza antes de volver a ensamblar el aparato. Si nota algún signo de deterioro o si cualquier parte está desconchada o rajada, NO UTILICE EL APARATO.Para retirar las cuchillas, gire el anillo en sentido horario. NUNCA TOQUE LAS CUCHILLAS.PRECAUCIÓN: Manipule las cuchillas con sumo cuidado. Son MUY FILOSAS y pueden causar heridas. NO intente desarmar el juego de cuchillas.Lave todas las piezas en agua jabonosa tibia. Luego, enjuáguelas y permita que se sequen completamente. Todas las piezas removibles son aptas para lavavajillas (bandeja superior solamente). Consejo: para limpiar las cuchillas de manera más efectiva, ponga un poco de detergente en la jarra o el vaso y llénelos hasta la mitad con agua tibia. Instale las cuchillas. Licue a velocidad baja por 15 segundos. Vacíe el agua jabonosa y repita con agua limpia. Desarme cuidadosamente la jarra o el vaso y vacíe el contenido. Enjuague y seque todas las piezas.Finalmente, limpie la base de la licuadora con un paño ligeramente humedecido y séquela bien. Nunca ponga la base en agua ni en ningún otro líquido, ni en el lavavajillas.Cualquier otro servicio debe ser realizado por un técnico autorizado.
Problema: Solución:
La licuadora no se enciende.
Asegúrese de que las cuchillas estén debidamente instaladas. Asegúrese de que la jarra o el vaso estén debidamente asentados sobre la base (los vasos de viaje y el vaso picador deben hacer “clic”).1. Conecte el cable a una toma de corriente que no esté
activada por un interruptor.2. Asegúrese de que el cable esté debidamente conectado.3. Cerciórese de que la toma de corriente esté
funcionando, enchufando el aparato en otra toma de corriente.
4. Revise los disyuntores/interruptores del tablero eléctrico.
El aparato deja de funcionar.
Puede que el motor haya recalentado. El fusible que protege el motor del sobrecalentamiento puede haber fundido. Si esto ocurriera, desenchufe el aparato y permita que se enfríe por 15 minutos. Vacíe parcialmente la jarra y/o suelte los alimentos trabados. Vuelva a encender el aparato, según se describe en las instrucciones de operación.
El sello de caucho no se separa de las cuchillas para limpiarlas.
Enjuague las cuchillas en agua y golpee ligeramente el cuello de la jarra contra el borde del fregadero para soltar el sello.Procure no golpear las cuchillas; estos puede dañarlas.
Las cuchillas son difíciles de retirar después del uso.
Los ingredientes causan presión, la cual crea un efecto de vacío con el aire; esto es normal.
La unidad está perdiendo líquido.
1. Revise el sello de caucho. Asegúrese de que esté al mismo nivel que el cuello de la jarra.
2. Asegúrese de que el sello de caucho esté debidamente instalado.
3. Cerciórese de que el sello de caucho no esté dañado.4. Averigüe que las cuchillas están debidamente apretadas.
RESOLUCIÓN DE PROBLEMAS

7
GARANTÍA LIMITADA DE TRES AÑOS(VÁLIDA EN LOS EE.UU. Y EN CANADÁ SOLAMENTE)Esta garantía es para los consumidores solamente. Usted es un consumidor si ha comprado su aparato Cuisinart® en una tienda, para uso personal o casero. A excepción de los estados donde la ley lo permita, esta garantía no es para los detallistas, los otros comerciantes ni los dueños.
Cuisinart garantiza este aparato contra todo defecto de materiales o fabricación durante 3 años después de la fecha de compra original, siempre que el aparato haya sido utilizado para uso doméstico y según las instrucciones.
Le aconsejamos que llene el formulario de registro disponible en www.cuisinart.com a fin de facilitar la verificación de la fecha de compra original. Sin embargo, no es necesario registrar el producto para recibir servicio bajo esta garantía. En ausencia del recibo de compra, el período de garantía será calculado a partir de la fecha de fabricación.
Si este aparato presentara algún defecto de materiales o fabricación durante el período de garantía, la reparemos o reemplazaremos (a nuestra opción). Para obtener servicio bajo esta garantía, llame a nuestra línea directa gratuita al 1-800-726-0190 o regrese el aparato defectuoso a: Cuisinart, Service Department, 7475 North Glen Harbor Blvd., Glendale, AZ 85307.
Regrese el aparato defectuoso, junto con su recibo de compra y un cheque o giro postal de US$10.00 para cubrir los gastos de manejo y envío.
Los residentes de California solo necesitan dar una prueba de compra y deben llamar al 1-800-726-0190 para recibir instrucciones de envío.
NOTA: para mayor seguridad, le aconsejamos que mande su paquete por un método de entrega con seguro y seguimiento. Cuisinart no será responsable por los daños ocurridos durante el transporte o por los paquetes mandados a una dirección equivocada. Los productos perdidos y/o dañados durante el envío no serán cubiertos bajo esta garantía. Recuerde incluir su nombre, dirección y teléfono, la descripción del problema, así como cualquier información pertinente.
RESIDENTES DE CALIFORNIA SOLAMENTE La ley del estado de California ofrece dos opciones bajo el período de garantía. Los residentes del estado de California pueden (A) regresar el producto defectuoso a la tienda donde lo compraron o (B) a otra tienda que venda productos Cuisinart® de este tipo.
La tienda, a su opción, reparará el producto, referirá al consumidor a un centro de servicio independiente, cambiará el producto o reembolsará al consumidor por el precio original del producto, menos la cantidad imputable al uso del producto por el consumidor hasta que este se dañe. Si estas dos opciones no satisfacen al consumidor, podrá llevar el producto a un centro de servicio independiente, siempre que se pueda ajustar o reparar el producto de manera económica. Cuisinart será responsable por los gastos de servicio, reparación, reemplazo o reembolso de los productos defectuosos durante el período de garantía.
Los residentes de California también pueden, si lo desean, mandar el aparato defectuoso directamente a Cuisinart para que lo reparen o lo cambien. Para esto, se debe llamar a nuestro servicio posventa al 1-800-800-726-0190.
Cuisinart será responsable por los gastos de reparación, reemplazo, manejo y envío de los productos defectuosos durante el período de garantía.
ANTES DE HACER REPARAR SU APARATO Si su aparato tiene algún problema, le recomendamos que llame a nuestro servicio posventa al 1-800-726-0190 antes de regresar el aparato a Cuisinart. Un representante le confirmará si su aparato sigue bajo garantía y le indicará la dirección del centro de servicio más cercano.
Este aparato satisface las más altas exigencias de fabricación y ha sido diseñado para uso sobre corriente de 120 V, usando accesorios y piezas de repuesto autorizados solamente. Esta garantía excluye expresamente los daños causados por accesorios, piezas o reparaciones no autorizados por Cuisinart, así como los daños causados por el uso de un convertidor de voltaje. Esta garantía no cubre el uso institucional o comercial del producto, y no es válida en caso de daños causados por mal uso, negligencia o accidente. Esta garantía excluye expresamente todos los daños incidentales o consecuentes. Algunos Estados no permiten la exclusión o limitación de daños incidentales o consecuentes, de modo que las limitaciones mencionadas pueden no regir para usted. Usted puede tener otros derechos que varían de un Estado a otro.
Importante: si debe llevar el aparato defectuoso a un centro de servicio no autorizado, por favor informe al personal del centro de servicio que deberían llamar al servicio posventa de Cuisinart al 1-800-726-0190 a fin de diagnosticar el problema correctamente, usar las piezas correctas para repararlo y asegurarse de que el producto esté bajo garantía.

8
GUÍA DE REFERENCIA RÁPIDASu licuadora juguera compacta Cuisinart® Hurricane™ le permitirá preparar una gran variedad de deliciosos y saludables batidos, salsas y mucho más. Las recetas a continuación incluyen algunas de nuestras recetas favoritas, así como algunas nuevas y creativas recetas que deleitarán a su familia y amigos.
GUÍA DE REFERENCIAAlimento Cuchillas Recipiente Instrucciones
Papilla (vegetales cocidos) Para licuar Vaso picador o jarra licuadora Usar vegetales cocidos al vapor MUY suaves. Agregar 1–3 cucharadas del líquido de cocción. Licuar velocidad baja hasta obtener una mezcla suave.
Papilla (frutas crudas) Para licuar Vaso picador o jarra licuadora Pulsar, y luego procesar a velocidad baja hasta obtener una mezcla suave.
Pan rallado Para licuar Vaso picador o jarra licuadora Pulsar, y luego procesar a velocidad alta. Una rebanada en el vaso picador; dos rebanadas en el vaso de viaje; tres rebanadas y la jarra licuadora.
Ralladura de cítrico Moler Vaso picador Procesar a velocidad alta con 1–2 pizcas de azúcar. Procesar por lo menos cuatro tiras de 1 pulgada (2.5 cm) de corteza a la vez.
Pan rallado o galletas molidas Para licuar Jarra licuadora Pulsar para romper, y luego procesar a velocidad alta. No procesar más de 1 taza (55 g) de galletas a la vez.
Cócteles helados Para licuar Jarra licuadora Licuar a velocidad alta.
Ajo Moler Vaso picador Pulsar.
Queso duro rallado Moler Vaso picador Pulsar 3 ó 4 veces, hasta obtener el resultado deseado. No procesar más de 2 onzas (55 g) de la vez.
Hielo picado Para licuar Jarra licuadora Pulsar. Máximo 8 cubitos.
Nueces (molidas) Moler Vaso picador Pulsar rápidamente hasta obtener la consistencia deseada. Máximo 1∕3 taza (¼ taza para nueces duras).
Aderezos para ensalada Para licuar Vaso de viaje o jarra licuadora Licuar a velocidad alta.
Semillas Moler Vaso picador Pulsar. Máximo 1∕3 taza.
Batidos y jugos naturales Para licuar Vaso de viaje o jarra licuadora Licuar a velocidad alta.
Sopas y cremas Para licuar Jarra licuadora Licuar a velocidad alta.
Especias Moler Vaso picador Pulsar rápidamente, y luego procesar a velocidad alta.
Crema batida Para licuar Vaso picador o jarra licuadora Procesar a velocidad baja por 15–30 segundos. Máximo ½ taza (120 ml).
9
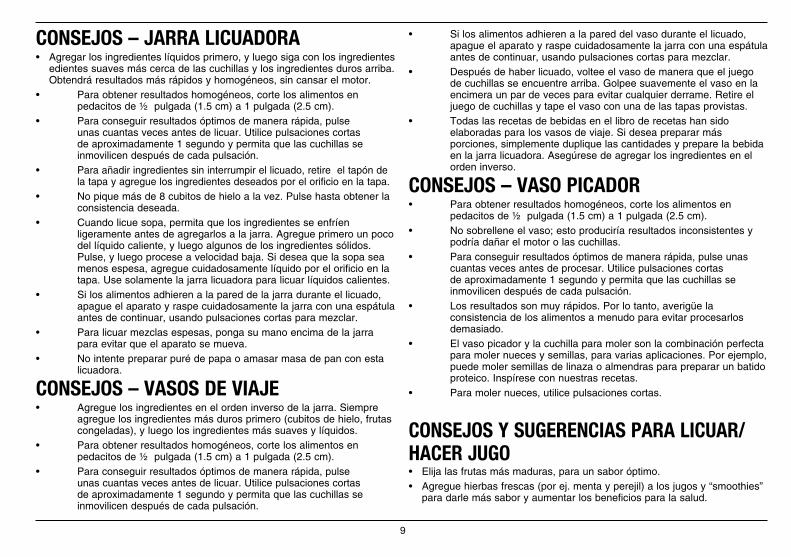
CONSEJOS – JARRA LICUADORA• Agregar los ingredientes líquidos primero, y luego siga con los ingredientes
edientes suaves más cerca de las cuchillas y los ingredientes duros arriba. Obtendrá resultados más rápidos y homogéneos, sin cansar el motor.
• Para obtener resultados homogéneos, corte los alimentos en pedacitos de ½ pulgada (1.5 cm) a 1 pulgada (2.5 cm).
• Para conseguir resultados óptimos de manera rápida, pulse unas cuantas veces antes de licuar. Utilice pulsaciones cortas de aproximadamente 1 segundo y permita que las cuchillas se inmovilicen después de cada pulsación.
• Para añadir ingredientes sin interrumpir el licuado, retire el tapón de la tapa y agregue los ingredientes deseados por el orificio en la tapa.
• No pique más de 8 cubitos de hielo a la vez. Pulse hasta obtener la consistencia deseada.
• Cuando licue sopa, permita que los ingredientes se enfríen ligeramente antes de agregarlos a la jarra. Agregue primero un poco del líquido caliente, y luego algunos de los ingredientes sólidos. Pulse, y luego procese a velocidad baja. Si desea que la sopa sea menos espesa, agregue cuidadosamente líquido por el orificio en la tapa. Use solamente la jarra licuadora para licuar líquidos calientes.
• Si los alimentos adhieren a la pared de la jarra durante el licuado, apague el aparato y raspe cuidadosamente la jarra con una espátula antes de continuar, usando pulsaciones cortas para mezclar.
• Para licuar mezclas espesas, ponga su mano encima de la jarra para evitar que el aparato se mueva.
• No intente preparar puré de papa o amasar masa de pan con esta licuadora.
CONSEJOS – VASOS DE VIAJE• Agregue los ingredientes en el orden inverso de la jarra. Siempre
agregue los ingredientes más duros primero (cubitos de hielo, frutas congeladas), y luego los ingredientes más suaves y líquidos.
• Para obtener resultados homogéneos, corte los alimentos en pedacitos de ½ pulgada (1.5 cm) a 1 pulgada (2.5 cm).
• Para conseguir resultados óptimos de manera rápida, pulse unas cuantas veces antes de licuar. Utilice pulsaciones cortas de aproximadamente 1 segundo y permita que las cuchillas se inmovilicen después de cada pulsación.
• Si los alimentos adhieren a la pared del vaso durante el licuado, apague el aparato y raspe cuidadosamente la jarra con una espátula antes de continuar, usando pulsaciones cortas para mezclar.
• Después de haber licuado, voltee el vaso de manera que el juego de cuchillas se encuentre arriba. Golpee suavemente el vaso en la encimera un par de veces para evitar cualquier derrame. Retire el juego de cuchillas y tape el vaso con una de las tapas provistas.
• Todas las recetas de bebidas en el libro de recetas han sido elaboradas para los vasos de viaje. Si desea preparar más porciones, simplemente duplique las cantidades y prepare la bebida en la jarra licuadora. Asegúrese de agregar los ingredientes en el orden inverso.
CONSEJOS – VASO PICADOR• Para obtener resultados homogéneos, corte los alimentos en
pedacitos de ½ pulgada (1.5 cm) a 1 pulgada (2.5 cm). • No sobrellene el vaso; esto produciría resultados inconsistentes y
podría dañar el motor o las cuchillas.• Para conseguir resultados óptimos de manera rápida, pulse unas
cuantas veces antes de procesar. Utilice pulsaciones cortas de aproximadamente 1 segundo y permita que las cuchillas se inmovilicen después de cada pulsación.
• Los resultados son muy rápidos. Por lo tanto, averigüe la consistencia de los alimentos a menudo para evitar procesarlos demasiado.
• El vaso picador y la cuchilla para moler son la combinación perfecta para moler nueces y semillas, para varias aplicaciones. Por ejemplo, puede moler semillas de linaza o almendras para preparar un batido proteico. Inspírese con nuestras recetas.
• Para moler nueces, utilice pulsaciones cortas.
CONSEJOS Y SUGERENCIAS PARA LICUAR/HACER JUGO• Elija las frutas más maduras, para un sabor óptimo. • Agregue hierbas frescas (por ej. menta y perejil) a los jugos y “smoothies”
para darle más sabor y aumentar los beneficios para la salud.

10
• Agregue un poco de jugo de cítricos a sus jugos y “smoothies” para realzar su sabor.
• Antes de preparar jugo de vegetales, cueza al vapor los vegetales duros, tales como las zanahorias, para obtener una consistencia más suave. Puede cocer los vegetales al vapor por antelación y en grandes cantidades, para siempre tenerlos listos.
• Si no le gusta la pulpa, puede colar sus jugos con un colador de malla fina. Sin embargo, es preferible no hacer esto ya que la pulpa y la piel de las frutas y de los vegetales son ricas en fibra.
• Los jugos y “smoothies” se separarán si no los sirve inmediatamente. Vuelva a licuarlos o simplemente cuélelos antes de servir.
• Para conseguir una consistencia más líquida, agregue ¼ taza (60 ml) de agua a la receta.
• Sirva los jugos con hielo. • Para endulzar naturalmente las recetas, utilice jugos de fruta.
RECETAS
BEBIDAS“Smoothie” de frutas tropicales rico en vitamina C . . . . . . . . . . . . . . . . 11
“Smoothie” verde ligero . . . . . . . . . . . . . . . . . . . . . . . . . . . . . . . . . . . . . . 11
“Smoothie” verde triple . . . . . . . . . . . . . . . . . . . . . . . . . . . . . . . . . . . . . . 11
“Smoothie” de avena para el desayuno . . . . . . . . . . . . . . . . . . . . . . . . . 12
“Latté” de té matcha helado . . . . . . . . . . . . . . . . . . . . . . . . . . . . . . . . . . 12
Batido energizante brasileño . . . . . . . . . . . . . . . . . . . . . . . . . . . . . . . . . . 12
“Smoothie” de coco-cardamomo-dátiles . . . . . . . . . . . . . . . . . . . . . . . . 12
Batido proteico de almendra y cacao . . . . . . . . . . . . . . . . . . . . . . . . . . . 13
Jugo de piña con menta . . . . . . . . . . . . . . . . . . . . . . . . . . . . . . . . . . . . . 13
Jugo de naranja e hinojo . . . . . . . . . . . . . . . . . . . . . . . . . . . . . . . . . . . . . 13
Leche de avena . . . . . . . . . . . . . . . . . . . . . . . . . . . . . . . . . . . . . . . . . . . . 14
BOLES DE “SMOOTHIE”Bol de “smoothie” de frutas tropicales rico en vitamina C . . . . . . . . . . . 14
Bol de “smoothie” de avena para el desayuno . . . . . . . . . . . . . . . . . . . . 15
SALSAS, ADEREZOS Y ALIÑOSVinagreta básica. . . . . . . . . . . . . . . . . . . . . . . . . . . . . . . . . . . . . . . . . . . . 15
Aderezo de miso 15
Mayonesa. . . . . . . . . . . . . . . . . . . . . . . . . . . . . . . . . . . . . . . . . . . . . . . . . 16
Salsa de tomate fresca . . . . . . . . . . . . . . . . . . . . . . . . . . . . . . . . . . . . . . 16
Aliño de limón y hierbas. . . . . . . . . . . . . . . . . . . . . . . . . . . . . . . . . . . . . . 16

©2016 Cuisinart150 Milford Road
East Windsor, NJ 08520Impreso en China
16CE019319
IB-14229-ESP-A
Todas las marcas registradas, comerciales o de servicio mencionadas en este documento pertenecen a sus titulares respectivos.