Huawei HG659 -...
7
Huawei HG659 Home Router for NBN ™ HFC Quick Setup Guide
Transcript of Huawei HG659 -...
Huawei HG659Home Router for NBN™ HFC
Quick Setup Guide
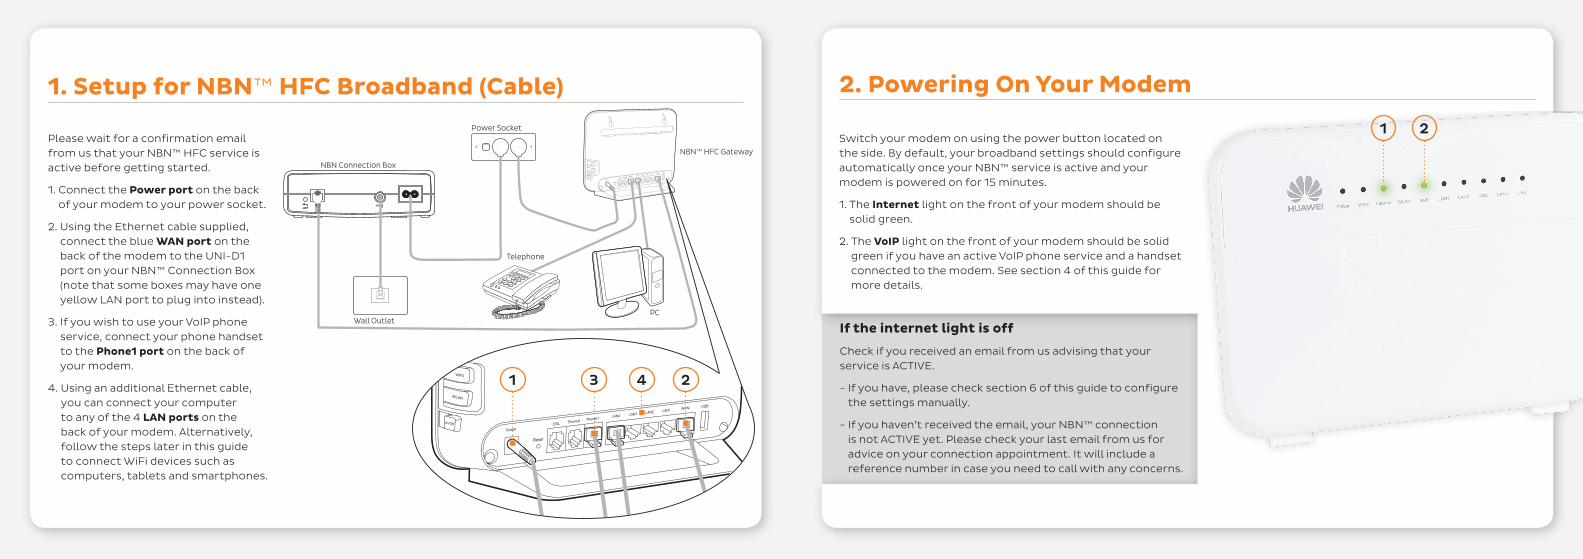
HeadlineHeadline1. Setup for NBN™ HFC Broadband (Cable) 2. Powering On Your Modem
Switch your modem on using the power button located on the side. By default, your broadband settings should configure automatically once your NBN™ service is active and your modem is powered on for 15 minutes.
1. The Internet light on the front of your modem should be solid green.
2. The VoIP light on the front of your modem should be solid green if you have an active VoIP phone service and a handset connected to the modem. See section 4 of this guide for more details.
Please wait for a confirmation email from us that your NBN™ HFC service is active before getting started.
1. Connect the Power port on the back of your modem to your power socket.
2. Using the Ethernet cable supplied, connect the blue WAN port on the back of the modem to the UNI-D1 port on your NBN™ Connection Box (note that some boxes may have one yellow LAN port to plug into instead).
3. If you wish to use your VoIP phone service, connect your phone handset to the Phone1 port on the back of your modem.
4. Using an additional Ethernet cable, you can connect your computer to any of the 4 LAN ports on the back of your modem. Alternatively, follow the steps later in this guide to connect WiFi devices such as computers, tablets and smartphones.
NBN Connection Box
Power Socket
NBN™ HFC Gateway
Telephone
Wall OutletPC
1 3 4 2
1 2
If the internet light is off
Check if you received an email from us advising that your service is ACTIVE.
- If you have, please check section 6 of this guide to configure the settings manually.
- If you haven’t received the email, your NBN™ connection is not ACTIVE yet. Please check your last email from us for advice on your connection appointment. It will include a reference number in case you need to call with any concerns.
Headline4. VoIP Phone Setup
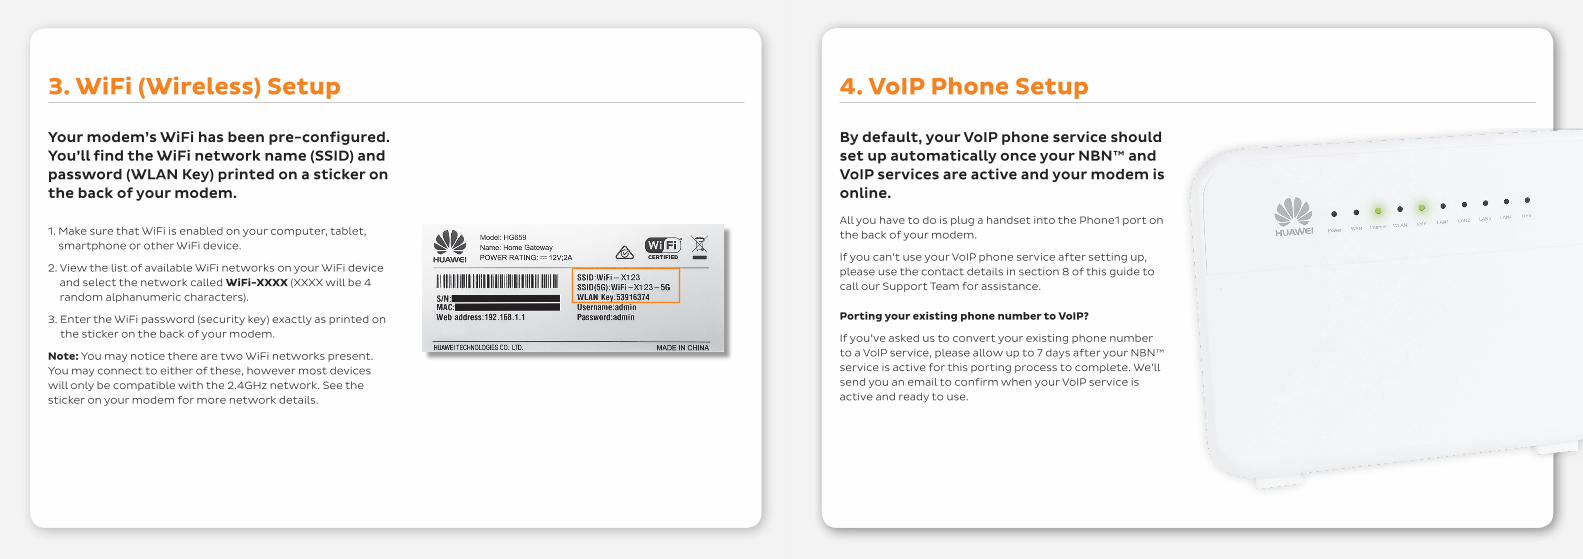
Your modem’s WiFi has been pre-configured. You’ll find the WiFi network name (SSID) and password (WLAN Key) printed on a sticker on the back of your modem.
1. Make sure that WiFi is enabled on your computer, tablet, smartphone or other WiFi device.
2. View the list of available WiFi networks on your WiFi device and select the network called WiFi-XXXX (XXXX will be 4 random alphanumeric characters).
3. Enter the WiFi password (security key) exactly as printed on the sticker on the back of your modem.
Note: You may notice there are two WiFi networks present. You may connect to either of these, however most devices will only be compatible with the 2.4GHz network. See the sticker on your modem for more network details.
3. WiFi (Wireless) Setup
By default, your VoIP phone service should set up automatically once your NBN™ and VoIP services are active and your modem is online.
All you have to do is plug a handset into the Phone1 port on the back of your modem.
If you can’t use your VoIP phone service after setting up, please use the contact details in section 8 of this guide to call our Support Team for assistance.
Porting your existing phone number to VoIP?
If you’ve asked us to convert your existing phone number to a VoIP service, please allow up to 7 days after your NBN™ service is active for this porting process to complete. We’ll send you an email to confirm when your VoIP service is active and ready to use.

Headline HeadlineSUPPORT INFORMATION
5. Modem Indicator Lights
The following table lists how the indicator lights on the front of your modem may appear and what they mean.
Indicator Light Description Light Description
Power Steady green Your modem is powered on
WANSteady green Your modem is connected to NBN™
Blinking green Your modem is connecting to NBN™
Internet
Off Your modem is not connected to the Internet
Steady green Your modem is connected to the Internet. No data is being transmitted
Blinking green Your modem is connected to the Internet. Data is being transmitted
WLANSteady green Your modem has wireless enabled
Blinking green Your modem has wireless enabled. Data is being transmitted wirelessly
VoIPSteady green Your VoIP phone service is ready
Blinking green Your VoIP phone service is in use
LAN1~LAN4 Steady green The LAN port has device plugged in and turned on
Power WAN Internet WLAN VoIP LAN1 LAN2 LAN3 LAN4 USB
6. Manual setup
1. On a computer or WiFi device that’s connected to your modem, open your web browser and go to http://192.168.1.1
2. Log in with the default username and password, which are both admin. The Start Wizard should open. If it doesn’t, select Home > Start Wizard.
3. Select Connect with user account and enter your credentials as provided in the email advising that your NBN™ HFC service is active.
iiNet Westnet Internode
Internet account e.g. “[email protected]” e.g. “[email protected]” e.g. “[email protected]”
Password recovery iinet.net.au/password westnet.com.au/password internode.on.net/getmypassword
4. Click Next. After connecting successfully, you may wish to customize your WiFi network by following the steps in the next section of this guide.
5. If following these manual setup instructions doesn’t get you online, please use the details in section 8 of this guide to call our Support Team for assistance.
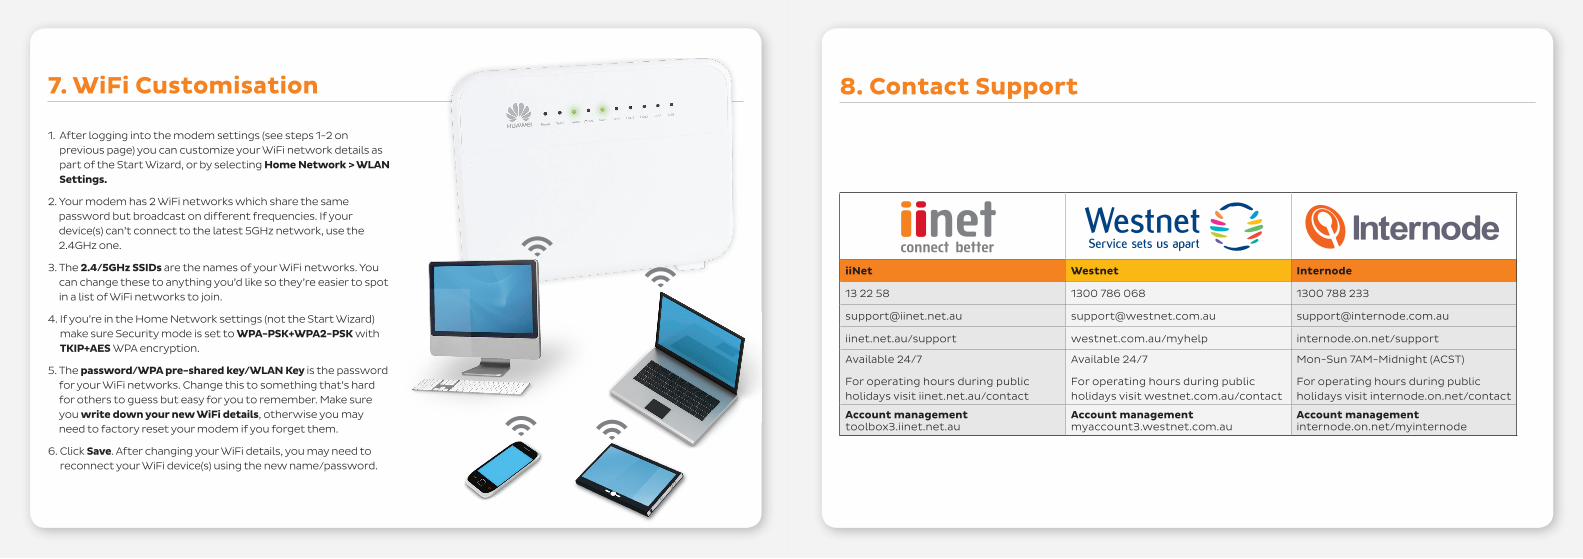
1. After logging into the modem settings (see steps 1-2 on previous page) you can customize your WiFi network details as part of the Start Wizard, or by selecting Home Network > WLAN Settings.
2. Your modem has 2 WiFi networks which share the same password but broadcast on different frequencies. If your device(s) can’t connect to the latest 5GHz network, use the 2.4GHz one.
3. The 2.4/5GHz SSIDs are the names of your WiFi networks. You can change these to anything you’d like so they’re easier to spot in a list of WiFi networks to join.
4. If you’re in the Home Network settings (not the Start Wizard) make sure Security mode is set to WPA-PSK+WPA2-PSK with TKIP+AES WPA encryption.
5. The password/WPA pre-shared key/WLAN Key is the password for your WiFi networks. Change this to something that’s hard for others to guess but easy for you to remember. Make sure you write down your new WiFi details, otherwise you may need to factory reset your modem if you forget them.
6. Click Save. After changing your WiFi details, you may need to reconnect your WiFi device(s) using the new name/password.
7. WiFi Customisation 8. Contact Support
iiNet Westnet Internode
13 22 58 1300 786 068 1300 788 233
[email protected] [email protected] [email protected]
iinet.net.au/support westnet.com.au/myhelp internode.on.net/support
Available 24/7
For operating hours during public holidays visit iinet.net.au/contact
Available 24/7
For operating hours during public holidays visit westnet.com.au/contact
Mon-Sun 7AM-Midnight (ACST)
For operating hours during public holidays visit internode.on.net/contact
Account managementtoolbox3.iinet.net.au
Account managementmyaccount3.westnet.com.au
Account managementinternode.on.net/myinternode
NotesNotes


![HUAWEI HUAWEI P smart Pure Smart HUAWEI FullView …€¦ · HUAWEI HUAWEI P smart Pure Smart HUAWEI FullView Display a In MAKE IT POSSIBLE [Single-SIM version] 32GB third of the](https://static.fdocuments.net/doc/165x107/5b6ebe037f8b9a46538b9dc7/huawei-huawei-p-smart-pure-smart-huawei-fullview-huawei-huawei-p-smart-pure.jpg)