HTTP REQUEST SMUGGLING - Root â€؛ Exploitation - Web â€؛ EN - HTTP... HTTP Request Smuggling enables
Upload
dawid-kampsCategory
view
213download
1description

4
Editorrsquos Note
032010 (11)
Greetings readersOur magazine has certainly come a long way since its creation as a traditional print publication and many factors have influenced the magazinersquos growth and development over the 3 years The dramatic transformation of the publishing industry has played a significant role as wersquove moved to a more interactive e-zine format Now we have another change for you ndash Now we are Monthly But without question loyal readers like you have been the biggest most influential and most consistent driving force behind the magazinersquos ongoing evolutionContent has always been the most important for FFD magazine But now wersquore taking that commitment to the next level This starts with even more in-depth hard-hitting
technical articles tutorials and other content designed specifically to help you do your job For example yoursquoll find a regular Special Report section ndash this issue ndash Hot topic of the latest ndash Apple vs Adobe great article written by Lee GrahamIt wouldnrsquot be much of a Flash and Flex Developerrsquos magazine if there werenrsquot any ActionScript Developement articles in it Also the Components section is full of the greatest articles available Louis Dicarro shows you how to create Custom Flash CS4 and AIR componentsRyan DrsquoAgostino in his article lsquoCreating an XML Photo Gallery with ASrsquo ndash shows up how to create an ActionScript application in Flex Builder 3 If you want to create flash games ndash do not miss our Creating an AS3 Game Framework series of articlesWersquore listening and we need your input Today more than ever your feedback directly guides the editorial direction of the magazine So please take the time to click the Feedback link send us your suggestions and help us make FFD Magazine an even more responsive reader-guided publication Thanks again for being dedicated to the growing community of readers who rely on FFD to help them stay abreast of changes in the technology as well as push the envelope of whatrsquos possible
Enjoy
Ewa Samulskaewasamulskaffdmagcom
Editor in Chief Ewa Samulska ewasamulskaffdmagcomProofreaders Patrick French Betsy Irvine
DTP Team Ireneusz Pogroszewski ireneuszpogroszewskisoftwarecomplArt Director Ireneusz Pogroszewski ireneuszpogroszewskisoftwarecompl
Senior ConsultantPublisher Paweł Marciniak
Publisher Software Press Sp z oo SKul Bokserska 1 02-682 Warszawa Poland Worldwide Publishing
Software Press Sp z oo SK is looking for partners from all over the WorldIf you are interested in cooperating with usplease contact us by e-mail cooperationsoftwarecompl
Whilst every effort has been made to ensure the high quality of the magazine the editors make no warranty express or implied concerning the results of content usage
All trade marks presented in the magazine were used only for informative purposesAll rights to trade marks presented in the magazine are reserved by the companies which own them
Thanks to the most active and helping beta testersRussell TangChoon Lee Graham Jassa Amir Lang Ed Werzyn Yann Smith-Kielland Justus Csomaacutek Gaacutebor Kevin Martin Charles Wong Ali Raza Almog Koren Izcoatl Armando Estanol Fuentes Lionel Low Michael J Iriarte Paula R Mould Rosarin Adulseranee Sidney de Koning
To create graphs and diagrams we used program by company
The editors use automatic DTP system Mathematical formulas created by Design Science MathTypetrade
ATTENTIONDistributing current or past issues of this magazine ndash without permission of the publisher ndash is harmful activity and will result in judicial liability
DISCLAIMERThe techniques described in our articles may only be used in private local net-works The editors hold no responsibility for misuse of the presented techniques or consequent data loss
6032010 (11)
CONTENTS
Influxis wwwinfluxiscom 2-3 Mediaparts Interactive SAwwwpage-flipcom 5 Digicraftswwwdigicraftscomhk 7
Kevin Ruse + Associatess Incwwwkevinrusecom 19
Kindisoftwwwkindisoftcom 31
Flexerwwwflexerinfo 33
Gamersafewwwgamersafecom 35
FITCwwwfitcca 43
Exsyswwwexsyscom 45
Infosoft Global (P) Ltdwwwinfosoftglobalcom 47
Flash and Mathwwwflashandmathcom 55
Creativenichewwwcreativenichecom 59
ActionScriptJobscomhttpactionscriptjobscom 65
Electricrainwwweraincom 66
The issue 32010 sponsored by Advertisers
Setting Individual Compression for Audio Files in FlashJoe Laurino ndash Game ProducerAudio Director Arkadium
Normally Flash tends to export all of a SWFrsquos sounds in MP3 format at 16kbps (and in mono no less) Yoursquoll get great compression this way ndash the delity though is not so great While you can up the quality globally yoursquoll get the best results by setting the compression and output format of each sound individually This will allow you to balance le size against sound quality with far more precision than you would get from blanket compression For example if there is a sound thatrsquos used frequently you can set it to use less compression so that it sounds cleaner If yoursquove got a sound that plays subtly in the background every now and then you can get away with compressing it a lot more To compress sounds individually open the Library by clicking WindowgtLibrary Select the sound you wish to tweak and navigate to lsquoPropertiesrsquo in the Options menu Yoursquoll see a drop down list there thatrsquos set to lsquoDefaultrsquo initially Earlier versions of Flash will have to stick with ADPCM but otherwise you should go with MP3 for best results Irsquove found that 80kbps or 112kbps tends to work best when compressing MP3 les but I suggest you try a few to see which best suits your project
Tip of the issue
Special Report
08 The Flash on iPhone War
BY LEE GRAHAM
InBrief
10 News
Tools
12 Storyfarm Switches to G-Technologytrade G-SPEEDtrade eS PRO to Cut Latest Doc Projects BY DEAN MERMELL
Beginners
14 Working with Display Objects 101
BY JUSTIN P JUNDA
ZEND and PHP
18 How a Software Flight Recorder was Built Using Adobe Flex and Zend PHP BY KEVIN SCHROEDER AND RYAN STEWART
ActionScript Development
20 Creating an AS3 Game Framework
BY JEFF FULTON STEVE FULTON
32 Creating an XML Photo Gallery with AS3
BY RYAN DrsquoAGOSTINO
Components
44 Custom Flash CS4 Components in Flash Builder 4 BY LOUIS DICARRO
52 AIR Components in Flash Builder
BY LOUIS DICARRO
TLF
56 Applying CSS to Text Layout Framework styles
BY MAXYM GOLOVANCHUK
Profile
60 Flashcreed ndash Business Gallery
Books Review
64 Essential Guide to Flash Games
BY ALI RAZA
032010 (11)8
SPECIAL REPORT The Flash on iPhone War
032010 (11) 9
The Preface Since the beginning of the year Irsquove been a part of Adobersquos Flash CS5 beta program using CS5 and AIR 2 to develop a simple eBook application TheProducer (Lite Edition httpitunesapplecomusapptheproducer-lite-editionid354580730mt=8) which was approved and accepted into the iTunes Store As of April 24th Apple hasnrsquot pulled the app yet
Bad Applehellip As many have heard Applersquos new iPhone OS 40 SDK Beta Agreement Section 331 states Applications may only use Documented APIs in the manner prescribed by Apple and must not use or call any private APIs Applications must be originally written in Objective-C C C++ or JavaScript as executed by the iPhone OS WebKit engine and only code written in C C++ and Objective-C may compile and directly link against the Documented APIs (eg Applications that link to Documented APIs through an intermediary translation or compatibility layer or tool are prohibited) You can read the full post on DaringFireballnet
The Issue Apple has created an uproar among developers using 3rd party tools such as Unity Appceleratorrsquos Titanium and yes the much anticipated Adobe Flash CS5 iPhone Packager The timing of Applersquos new agreement couldnrsquot have come at a worse time just days before the Adobe CS5 Launch
Adobersquos response thus farhellip
bull Kevin Lynch CTO at Adobe did a video interview (httpkaraallthingsdcom20100411exclusive-video-adobe-cto-lynch-smacks-back-at-apples-protectionist-strategy-calling-it-bad-for-consumers-but-hell-swing-chickens-if-forced) with All Things Digital
bull Mike Chambers a Product Manager for Adobe recently made a post on his personal blog (httpwwwmikechamberscomblog20100420on-adobe-flash-cs5-and-iphone-applications)
bull Lee Brimelow a well known Flash Evangelist for Adobe said Go screw yourself Apple (httptheflashblogcomp=1888) on his personal blog
Googlersquos responsehellip Andy Rubin VP of Engineering for Android weighed in on the situation fully backing Adobe (httpblogsadobecomconversations201004adobe_air_on_the_android_platfhtml) Google is happy to be partnering with Adobe to bring the full web great applications and developer choice to the Android platform Our engineering teams have been working closely to bring both AIR and Flash Player to Googlersquos mobile operating system and devices The Android platform is enjoying spectacular adoption and we expect our work with Adobe will help that growth continue
As a FlashFlex Developer There is so much potential with Flash CS5 Flash Builder 4 and AIR 2 Adobersquos Open Screen Project will put FlashAIR on as many devices including desktops mobiles tablets and HD television sets And there is a fast growing Facebook Group (over 10000 members) called Irsquom with Adobe (httpwwwfacebookcomgroupphpgid=113492765344092)
The Flash on iPhone War
032010 (11)8
SPECIAL REPORT The Flash on iPhone War
032010 (11) 9
Due to the flexibility of Android it is easy to install apps from a variety of methods download from URL USB connection MiniSD card or the Android Market (httpwwwandroidcommarket) No syncing needed
Timeframe of AIR for Android While Adobe has not yet stated a release date for this upcoming tool developers can stay informed by signup at the Adobe AIR for Android Beta Notification (httpswwwadobecomcfusionentitlementindexcfme=labs_air_android_signup)
Future of Android Platformhellip Over the next several months there will be a number of new Android mobiles and tablets hitting the market this summer Personally the tablet that has me most excited is Notion Inkrsquos ADAM (httpwwwnotioninkinadamoverviewphp) but there are others as well including the Marvell Moby WePad (httpwwwmarvellcomcompanynewspress_detailhtmlreleaseID=1397 custom version of Linux that supports Android Flash amp AIR apps) Dell Mini 5 (httpgizmodocom5443837first-hands+on-and-video-dell-mini-5-android-slate) to mention a few
Donrsquot Forgethellip While you can develop Flash Flex and AIR apps for desktops laptops netbooks and Android Adobe also plans to bring AIR 2 and Flash Player 101 to Palm webOS Windows Phone 7 and BlackBerry RIM devices In addition Adobersquos Slider (Flex 4 Mobile Framework httplabsadobecomtechnologiesflexmobile) targeted to run on high-end smartphones (phones with a processor speed of 400Mhz or more and 128MB of RAM) is also scheduled to be available in 2010
Bottom Line Itrsquos going to be a fabulous year for developers building Android apps using Adobe Flash CS5 and AIR 2
Click here to view a few videos AIR on mobile devices httpwwwadobecomdevnetdevicesdemosBREAKING NEWSClick here to read Steve Jobs CEO of Apple direct response on why Apple isnrsquot including Flash on the iPhone and iPad httpwwwapplecomhotnewsthoughts-on-flash
Here is Lee Graham response to Steve Jobsrsquo posthttpl33meapples-ceo-entered-an-insanity-plea-as-the-re
Current eventshellip In the past few weeks it appears that Apple is still approving apps built with 3rd party tools while not approving those developed with the Flash CS5 iPhone Packager As Mike Chambers stated in a recent blog post (httpwwwmikechamberscomblog20100420on-adobe-flash-cs5-and-iphone-applications) Developers should be prepared for Apple to remove existing content and applications (100+ on the store today) created with Flash CS5 from the iTunes store
Moving forwardhellip While the future of FlashAIR on the iPhone and iPad remains problematic the situation has given birth to a very exciting and new AIR 2 developer tool AIR for Android (httpblogsadobecomair201004adobe_air_applications_for_andhtml) There are many from the Flash CS5 beta (including myself) that have ported our Flash CS5 iPhone and iPad Apps successfully to the Android OS For me I simply tweaked a couple of graphics resized compiled and installed directly to my Nexus One
The excitement The Android App Market is growing faster than any other app market currently out there partly due I believe to the fact that Google has created the OS as an open source platform a truly creative environment for the developer community As analyst James Governor put it (httptwittercommonkchipsstatuses12511502233) [The] company doing [the] most to grow the Android app base is Apple The new terms of service are AWESOME for the Android team
My experience with AIR for Androidhellip It is quicker to develop and easier to deploy giving you more time for other things
Building an iPhone App (with or without Flash CS5)
1Go to the Applersquos Developer Portal 2Code your app 3Create a distribution certificate 4Then you need to create a mobile provisioning file
for the app 5Compile 6If all went well you drag and drop your mobile
provisioning file and iPhone app into iTunes 7Finally sync your iPhoneiPad with iTunes
With AIR for Android
1You simply code your app 2Compile 3Install the app Done
LEE GRAHAMLee Graham is co-founder of TRImagination (httptrimaginationcom) an educational app company based in the United States He has been involved in creating interactive eLearning programs for ve years and working with Adobe in beta testing Flash CS5 AIR 2 amp AIR for Android
10
IN BRIEF
032010 (11) 11
IN BRIEF
032010 (11)
Flash Builder Flex 4 and Cold-fusion Builder releasedOn the morning of march 22nd Adobe removed the beta versions from Ado-be Labs and added downloads for shipping versions If yoursquove wondered if yoursquoll want to upgrade your Flex Builder to Flash Builder - trust us - you real-ly should Flash Builder which is now part of Creative Suite 5 Web Premium and Master Collection is a joy to use and the new Flex SDK solves a lot of issues developers have had
The price of the software are Flash Builder 4 Standard $249 (upgrade $99) 4 Premium $699 (upgrade $299) Coldfusion Builder 1 $299 (upgrade na)
Some new features of FB4
bull Improving designerdeveloper workflowbull Enabling data-centric developmentbull Dataservice modeling and binding made easybull Advanced data management features
from flashmagazinecom
Adobe Online Developer Week May 10-14During Developer Week learn about the Adobe Flash Platform including Flex Flash Builder AIR and how it integrates with Cre-ative Suite 5 technologies This week-long event features free live webinars presented by Adobe technology experts See live demos and have your questions answered by the experts during interactive QampA sessions Register and attend whichever sessions suit your needs and you will be eligible to win a copy of Flash Builder 4 Professional or Creative Suite 5 Web Premium For more info and registration visit httpwwwadobecomcfusioneventindexc fmevent=detailampi-d=1489921amploc=en_us
from webkitchenbe
Adobe Flash Platform on androidIf you want to know when Flash Player 101 and AIR 20 becomes available for Android go to adobecom and sign up for the notication The promises say itrsquoll come in H1 of 2010
from corlanorg
Apple Slaps Developers In The FaceThe new iPhone 40 SDK modied the terms of use so now creating appli-cations in any non-Apple-approved languages is a violation of terms This does not just affect Adobe but also other technologies like Unity3D Apple announced this right before Flash CS5 came out with the -now useless- iPhone packager
ldquoNow let me put aside my role as an official representative of Adobe for a moment as I would look to make it clear what is going through my mind at the moment Go screw yourself Apple ldquo
ldquoI believe that we have witnessed a deliberate smear campaign aga-inst Flash to drive content providers towards improved web browsing support for iPhone OS devices A purely competitive measure driven to ensure that Apple devices can appear to compete with impending releases of Android that include Flash Player 101rdquo Mark Doherty
from theashblogcom ashmobile-blogcom
PDF Navigator developer con-test could get your FlexFlash resume in front of leading RIA amp brand agenciesAcrobatUserscom has launched the Acrobat PDF Portfolio Navigator con-test Flex developers create custom navigators using Flex and the Acrobat ActionScript API The top three entries win great prizes The top ten get their FlexFlash portfolios in front of some of the top brand RIA and user experience design firms in the world G2 Blitz Catalyst Resources Effecti-ve UI and Universal Mind
Its a win win situation The Adobe-sponsored Acrobat User Communi-ty gets examples of innovative PDF Navigators Flex developers get the chance to show off their create and technical work to the people who are looking for great and creative Flex developers Adobe will also feature the top ten entries on the Adobecom website
The contest runs now through June 7 2010 Full contest details are at httpwwwacrobatuserscomnavigator-contest
10
IN BRIEF
032010 (11) 11
IN BRIEF
032010 (11)
Flash is as open as HTML5Today the hottest topics in Flash news are in connection with Apple and HTML5 Serge Jespers wrote a same titled post on his blog about his opinion in this topics Here are some toughs from it This is not a fight HTML5 and Flash can live together just fine and can even complement each other On AppleInsi-der an Apple spokeswoman claimed that Mike Chambers got it all backwards when he blogged about Applersquos closed system Thatrsquos not the part that made me cringe though She said that ldquoit is HTML5 CSS JavaScript and H264 that are open and standard while Adobersquos Flash is closed and proprietaryldquo
H264is far from open It is owned by a private organization known as MPEG LA who said earlier this year that ldquoInternet Video that is free to end users would continue to be exempt from royalty fees until at least December 31 2015ldquo Nobody knows what is going to happen after 2015
So what about HTML5 CSS and JavaScripthellip Those are open right Well yeah The specs are open meaning that everyone can download tho-se specs and build an application around it to display that language Heyhellip Wait a minutehellip That sounds a lot like Flash The specs for FLV (Flash video) SWF (the file format for Flash Player) AMF (the binary format for exchanging data) and RTMP (the protocol used for transmission of audio video and data) are all published and can be downloaded by anyone
The specs for HTML5 are decided by the Web Hypertext Application Techno-logy Working Group (WHATWG) The WHATWG was founded by individuals of Apple the Mozilla Foundation and Opera Software in 2004 after a W3C work-shop Apple Mozilla and Opera were becoming increasingly concerned about the W3Crsquos direction with XHTML lack of interest in HTML and apparent disre-gard for the needs of real-world authors Anyone can participate as a Contribu-tor by joining the WHATWG mailing list The same goes for Flash The bugbase is open to anyone and anyone can view bugs and add feature requests But the Flash runtime is closed Okhellip Surehellip Flash Player is not open source although some parts are That saidhellip Ask yourself this Is your browser open source The only browser that is completely open source is Firefox Safari is only partly open source (only the WebKit engine) The same can be said about Chrome (in the Chromium project) However the biggest HTML runtime out there ndashInter-net Explorer (still used by over 50 of all internet users)ndash is as closed as Flash Player And so is Opera (even though they are part of the WHATWG)
And with that I come back to the title of this post Flash is as open as HTML5 = HTML5 is as open as Flash
from webkitchenbe
Adobe Creative Suite 5 AnnouncedOn April 12th Adobe released Creative Suite 5 the next evolution of Adobe products delivering a huge amount of new technology and innovation for de-sign and development on the web print video photography and extending the creative workflow with Omniture Analytics With the new suite of tools we have delivered Flash Player 101 for the creation of web content across platforms including mobile smartphones
Some new features of Flash CS5bull New text enginebull XML-based FLA filesbull Spring for Bonesbull Deco brushes
Flash Player and Googlersquos Chrome integrationFrom now on when users download Chrome they will also receive the latest version of Adobe Flash Player There will be no need to install Flash Player separately
Users will automatically receive updates related to Flash Player using Google Chromersquos auto-update mechanism This eliminates the need to manually download separate updates and reduces the security risk of using outdated versions
With Adobersquos help we plan to further protect users by extending Chromersquos ldquosandboxrdquo to web pages with Flash content
from corlanorg
Brand new FlexorgThose of you familiar with Flexorg will notice a substantial differenceBe sure to check out the new Flex showcase (click ldquoWhatrsquos Possibleldquo) Every time they add an application to the showcase they tweet it on httptwittercomexshowcase so follow them
Now when you want to show your boss friends and co-workers what Flex is about you have a good place to send them for a quick introduc-tion
from gregsramblingscom
Flasher Magazine Issue 3 by Lee BrimelowLee Brimelow Platform Evangelist at Adobe released the 3rd issue of Flasher Magazine and you can watch it on his blog httptheashblogcomp=1942
from theashblogcom
News selected by Gaacutebor Csomaacutek
bull Video improvementsbull Streamlined development environmentbull Integration with Adobe Flash Builderbull Omniture integration
032010 (11)12
TOOLS Storyfarm Switches to G-Technologytrade G-SPEEDtrade eS PRO to Cut Latest Doc Projects
032010 (11) 13
Video editors working in high definition (HD) face increasing technical challenges on a daily basis Their tools need to be sharp fast and function
well under deadline The sheer size of video files that have to get pushed through todayrsquos postproduction workflows can slow a system down to a level where the creative process just isnrsquot fun anymore For an editor working in HD the external storage solution that holds your video is now as important as your camera computer and editing software and the last thing any editor wants is to have issues because their workstation canrsquot deliver the goods
The Story Behind Storyfarm Storyfarm (httpwwwstoryfarmcom) is a post-production shop based in San Francisco Owner Dean Mermell cuts long-form documentaries corporate promos and TV commercials for a wide range of clients in the greater Bay Area Hersquos written for DV magazine and Macworld and taught Final Cut Proreg and digital filmmaking at Stanford University In his free time Dean writes produces directs and scores c o n t e m p o r a r y silent films His silent short Modern Life won the 2000 San Francisco International Film Festivals Golden Gate Award for best short film
The Solution G-Technology G-SPEED eS PRO
Benefits Speed and scalability Dean had reached a point at his company where he couldnrsquot afford to compromise on performance any longer While Dean doesnrsquot work much with uncompressed video he does use a lot of layers composites and effects at 720 and 1080 resolutions so he needed the same kind of throughput as editors working with uncompressed 2K files
The G-SPEED eS PRO was appealing to Dean because not only did it suit him for the work hersquos doing now but if he wanted to work on uncompressed or 2K projects in the future he liked the idea of simply adding another G-SPEED eS PRO to the system which is much cheaper than moving up to fibre channel
A single four-drive G-SPEED eS Pro unit in RAID 0 delivers a data transfer rate of up to 424MBsec read and 406MBsec write performance
When two units are connected together in fail-safe RAID 5 using the included PCIe RAID controller card the performance goes up to 678MBsec read and 730MBsec write
Capacity Knowing that the current 35-inch G-Technology product line utilized Hitachirsquos latest 2 terabyte (TB) Deskstar drives Dean decided the 8TB G-SPEED eS PRO would best meet his needs While eight terabytes seemed like a lot of space at first Dean sometimes has two or even three client projects going on at once as well as his own creative work and he quickly found that the hours of 1080 data he was working with added up fast
Great Tech Support You can have the best hardware at your disposal but if you canrsquot get the help you need when you crucially need it itrsquos not worth anything When configuring the G-SPEED eS PRO Dean quickly discovered the value of a responsive technical support staff
Storyfarm Switches to
San Francisco-based post house sold on productrsquos speed capacity scalability and responsive tech support
G-Technologytrade G-SPEEDtrade eS PRO to Cut Latest Doc Projects
032010 (11)12
TOOLS Storyfarm Switches to G-Technologytrade G-SPEEDtrade eS PRO to Cut Latest Doc Projects
032010 (11) 13
the Panasonic HVX 200 JVCrsquos HM100 and even an old Sony PD150
At the end of each production day David overnights Dean the P2 files on a small FireWire drive which Dean copies and unpacks onto his G-SPEED eS PRO before overnighting the drive back to the filmmakers Links to trailers and clips for both of these projects can be found on Storyfarmrsquos Projects webpage (httpwwwstoryfarmcommainfolderStoryfarmProjectshtml)
The external storage solution Dean used prior to his work with David and Susan worked fine for standard definition projects that didnrsquot come with punishing deadlines However when The Trouble With Normal landed in his lap he soon found that his current solution just wasnrsquot up to the task in terms of reliability and performance
The video bit rate for this project comes in at around 59MB per second which my previous RAID could handle without a problem said Dean But for this particular project and the way itrsquos being cut the amount of layers and filters not to mention the sheer volume of data brought my old system to its knees
Dean researched the G-Technology by Hitachi product line and decided the G-SPEED eS PRO configured in RAID 5 had the speed security and capacity to meet his workflow needs
Whatrsquos Next for Storyfarm Dean hopes to complete The Trouble with Normal in 2010 get attention through the usual festival channels and gain a greater audience through HBO or another such entity The Next US is already online with several moving episodes
Of course part of what has really made these projects fun for me is having a rockinrsquo system that doesnrsquot slow my creative process And in addition to my Mac I have the G-SPEED eS PRO to thank for that
The G-SPEED eS PRO is striped in RAID 0 right out of the box and it was wicked fast but like many editors do these days Dean really wanted to format it in RAID 5 He called tech support and immediately spoke to a person who was very knowledgeable about the G-SPEED eS PRO drive and how different RAID levels work overall
Additional features of the G-SPEED eS Pro include
bull RAID 0 1 3 5 and 6 ndash easily configurable and managed via a browser-based GUI
bull Single unit supports multi-stream compressed HD ProRes 422 and single stream uncompressed HD playback
bull Super quiet desktop unit with very small footprint bull Two units support dual-stream HD playback and
a single stream of 2K bull Professional locking mini SAS port with mini SAS
cable included bull Storage capacities available up to 8TB per unit
scalable to 16TB bull Compact and stylish aluminum enclosure with
thermo-regulated cooling fans bull Hot-swappable disk drive modules bull Formatted HFS+ mounts on a Mac Pro desktop
right out of the box
Going Beyond Normal Deanrsquos current documentary project The Trouble With Normal is about the peculiar state of the modern mental healthcare system and what it means to be crazy Filmmakers David Mackenzie and Susan Perkins of Everyday Wonder Productions (httpwwwwondereverydaycom) shot the project in cities all over North America using a Panasonic HVX 200 set up to capture in DVC PRO HD24720P
Deanrsquos editing takes a colorful non-linear approach that reflects the content of this non-traditional documentary
Irsquove been using a lot of layers speed changes and effects that really push the boundaries of long form editing to try and communicate the emotional content of the film It really maxed out my previous system but the G-SPEED eS PRO is handling it with ease
The Next US Project Dean is also working with Everyday Wonder on The Next US project an ongoing series of 5-minute Webisodes that profile small businesses in America that are thriving in this supposedly bleak economy
David and Susan are currently travelling across the country in an RV thatrsquos outfitted with a mobile production studio The project is being shot using a number of different cameras and formats including
DEAN MERMELLDigital lmmaker teacher composer and video editor
Martin Landau and Dean Mermell holding their awards for lifetime achievement and best editor respectively which they received at the California Independent Film Festival
032010 (11)14
BEGINNERS Working with Display Objects 101
032010 (11) 15
The DisplayObject class is the base class for all objects that can be placed on the display list The display list manages all objects displayed in Flash
Player or Adobe AIR Use the DisplayObjectContainer class to arrange the display objects in the display list DisplayObjectContainer objects can have child display objects while other display objects such as Shape and TextField objects are leaf nodes that have only parents and siblings no children (httplivedocsadobecomflash90ActionScriptLangRefV3flashdisplayDisplayObjecthtml)
The DisplayObject class supports basic functionality like the x and y position of an object as well as more advanced properties of the object such as its transformation matrix
DisplayObject is an abstract base class therefore you cannot call DisplayObject directly Invoking new DisplayObject() throws an ArgumentError exception
All display objects inherit from the DisplayObject classSo what does that really mean Well I like to refer to
display objects as any visual on the stage hence the name display So therefore I call them visual objects interchangeably throughout this article
A visual object can be a MovieClips Sprites Text Fields Shapes Buttons etchellip again all visual items that reside on the stage
So let get started and learn how to import the objects to the library we will be using the example files that accompany this lesson feel free to use any file that you want to follow along with
Note if you already understand this process please feel free to skip ahead if not we will go step by step for the first MovieClip then skip certain sets in the subsequent examples
Go to File =gt Import =gt Import to Library
Select the justinjpg This will bring the image into the library
Working with
No matter what you do in Flash you will encounter display objects at some point So what exactly are display object Adobe lists the following definition from their live docs
What you will learnhellipbull the basics of how to create and manipulate Display Objectsbull use the visual way by dragging from the librarybull add Display Objects to the stage using only AS3 code
What you should knowhellipbull doesnrsquot need and prerequisite knowledge when it comes to
tutorial
Display Objects 101
032010 (11)14
BEGINNERS Working with Display Objects 101
032010 (11) 15
(Note this name can be anything you want) I typically use _mc _btn etchellip behind the name for two reasons the first being it lets me know easily what type of object Irsquom using and the second it enables code hinting in Actionscript by using the underscore prefix (_mc) Also make sure you registration point is set to the upper left This is reference point for the MovieClip
Once you have done that select your newly created MovieClip instance on the stage and give it an instance name I called the instance the same thing I named the MovieClip justin_mc
Now we can then access its properties via Actionscript If you not familiar with instance names this simply is a way for you to tell Actionscript which item you are referring to
Create a new layer and label it actions and lock the layer
Select the first frame and open the actions panel Window=gtActions
The first properties we are going to manipulate in the Display Object aka MovieClip is the location parameters x and y These are going to be set in the upper left corner where you registration point was set up Enter the code into the actions panels
justin_mcx = 0
justin_mcy = 0
If you test the flash movie you will get something that should look like this
There are two way to access these objects the first way is to drag the justinjpg image out from the library to the stage
Now you will need to convert this image into a MovieClip which is a Display Object You do this by going to Modify=gtConvert to Symbol
This will pop up a dialog box These settings will be for your new MovieClip Give it a name of justin_mc
032010 (11)16
BEGINNERS Working with Display Objects 101
032010 (11) 17
Good now you can play around with the values and change them to see where other x and y values will place the MovieClip The images shown here are with the x and y set to 200
Lets try to access some different properties types enter the following code into your actions panel
justin_mcscaleX = 15
justin_mcscaleY = 15
If you test the movie you will now see that an output of the justin_mc MovieClip is 15 larger that before Your image might be pixilated since itrsquos stretching it to a larger dimension
Ok congratulations you have successfully added a displayvisual object to the stage and manipulated it Pretty Simple
Now lets delete the MovieClip from the stage and access it only through Actionscript
Once you have deleted the MovieClip off the stage go to the Library panel and right click the justin_mc and select properties
Select the Export for Actionscript option The name you see here will be the name that you create the object from in Actionscript This name can be anything but we will keep it the same as our instance name for no other reason but consistency
032010 (11)16
BEGINNERS Working with Display Objects 101
032010 (11) 17
Once you select the OK button you will get a window that looks like this Just select OK
So if we test our code now we will get and error because we have yet to create a MovieClip and add it to the stage
So delete all the code you have currently in the actions panel We will first create a variable that will hold the newly created instance of the MovieClip from the library instead of dragging it to the stage like we did before
Enter the following code
var anyNamejustin_mc = new justin_mc()
addChild(anyName)
the var keyword creates a variable anyName Note as the name states this can be called any name you want it to be eg Bob Billy Susan or whatever This is essentially its instance but in code instead of
selecting it and on the stage and then adding it via the properties panel like we did before justin _ mc references the library class name that you set earlier within the propertiesand the = new justin_mc() creates a new instance of a MovieClip name justin_mc() and assigns it to the variable
The addChild(anyName) just tells Flash to add the object to the stage using the variable (var) reference that you just created If you donrsquot use the addChild(name of variable) you will not see your visual object show up on the stage
So as you see itrsquos really not that difficult to access a display object and display it
Finally we will adjust some of the properties just as we did before Except this time we use the variable name that was called anyName Again this is just like your instance name see (Listing 1)
In next months issue we will continue this expedition of display objects and touch on things like drawing shapes using only code and working with text I hope you enjoyed this article please feel free to email me your comments or questions to jundajgmailcom
JUSTIN P JUNDAIs a New Media Engineer specializing in FlashAS2-3 Photo-shop After Effects PHP MySQL and a slue of other program-ming languages Justin also loves to travel and has a strong passion for teaching others how to use these technical pro-ducts He currently works with a top government-contracting rm implementing new media ideas into interactive course-ware that is then delivered to the military in order to effecti-vely train them Also check out shprotv to see the latest video from him and his partner Director Scott Hansen wavelenght-fxmaccom You can reach Justin at jundajgmailcom with any thoughts or concerns you have regarding this article
Listing 1
Creates Instance of the MovieClip named justin_mc
var anyNamejustin_mc = new justin_mc()
Set properties for the MovieClip properties
can be things like rotation
x y coordinates Scale sizes
etc
anyNamex = 100
anyNamey = 100
anyNamerotation = 45
anyNamescaleX = 15
anyNamescaleY = 15
Assigns the movie clip to the stage
addChild(anyName)
032010 (11)18
FLASH AND PHP
The webinar hosted by Ryan Stewart Platform Evangelist at Adobe and Kevin Schroeder Technology Evangelist at Zend hit the Web around
the same time that Zend announced Code Tracing had been added to its PHP web application server Who you might ask is this company called Zend And what is an article about flight recorders doing in Flash amp Flex Magazine After all yoursquore a Flex developer so why should you care
Who is ZendPHP runs a third of the worldrsquos Web sites and has now become the most popular language for building dynamic Web applications Zend Technologies Inc is the leading provider of products and services for developing deploying and managing business-critical PHP applications Zend contributes to Zend Framework (an open source objected-oriented Web application framework) and now Zend Framework is bundled with Adobe Flash Builder 4
What is a Software Flight RecorderWhen something goes wrong with an airplane in flight investigators obviously canrsquot reproduce the problem Instead they rely on data captured by the airplanersquos black box flight recorder in order to uncover the source of the problem Zend Server does the same for PHP web applications Rather than trying to recreate the environment and reproduce the steps leading up to a problem Zend Server captures in real-time the full
execution of an application ndash in production or in a test lab ndash and pinpoints root cause issues without trail and error This feature called Code Tracing is akin to a software flight recorder for PHP web applications
Code Tracing can be activated to automatically capture problems in real-time or used manually to trace specific scenarios Zend had strict requirements for the Code Tracing user interface
bull The performance chops to handle megabytes of databull A highly-interactive view for an exceptional user
experiencebull The ability to modify widget behaviorbull Established cross-browser supportbull Sufficient and accessible technical content and
expertise see (Figure 1)
Zend considered various alternatives and ultimately chose Adobe Flex for the following reasons
bull Performancebull Flexibilitybull Maturitybull Flash Builder 4 support for data-focused applications
Why Flex developers should care
bull Adobe Flash Builder now has built-in support for Zend Framework a PHP framework based on PHP 5
bull PHP provides easy integration with back-end logic using Flash remoting
bull Zend Server is a data-centric web application server and Code Tracing helps improve development and deployment in high performance production environments
EXCERPT FROM WEBINAR BY KEVIN SCHROEDER AND RYAN STEWART
How a Software Flight Recorder was You might have caught a recent webinar How Zend used Flex and PHP to build a Software Flight Recorder which sparked some interesting discussion
Built Using Adobe Flex and Zend PHP
Figure 1 Flash and PHP
How Zend Used Adobe Flex and PHP to Build a Software Flight Recorder
ldquoZend Framework with Support for Action Message For-mat (AMF) Now Bundled with Adobe Flash Builder 4rdquo
How to build Rich Internet Applications using Zend PHP and Adobe Flash Platform
032010 (11)20
ACTIONSCRIPT DEVELOPMENT Creating an AS3 Game Framework
032010 (11) 21
The game framework is the foundation for making the second game It is an expanded version of the first chapterrsquos framework with an emphasis
on organization and reuse Since this book is also not called Proper Object-Oriented Design Patterns and Principles for Games you will see little theory here and mostly practice Many of these techniques have been hard won and developed over many years of ActionScript programming We have fought the wars through AS1 AS2 and now AS3 so you donrsquot have to do it yourself
While our framework borrows from some design patterns we feel that games are a very expressive medium We want you the reader of this book to think outside that proverbial over-used box While design pattern ideas lend themselves to all manner of application development we donrsquot want you to feel hemmed in to using any one set of ideas for creating their games Our framework gives structure to the overall flow of a game but does not dictate how to code the actual game logic
Exploring the FrameworkThe game framework is housed in a reusable package structure A package structure at its very basic is an organized set of folders that will contain reusable classes All of the standard class files for using the framwork will be in this package structure We will update and extend this structure as we proceed through this book Letrsquos start by giving you an idea of what classes we will be creating for the framework
The GameFrameWorkas classThe GameFrameWorkas class is the foundation of the framework It contains a simple state machine and a basic game loop timer Our state machine is a simple
construct containing a set of state constants to switch the framework between states States are handled by state functions inside the GameFrameWorkas file We will employ a variable to reference the current state function The game timer will use this reference to call the current state function on each frame tick We will create states for such things as the title screen instructions screen game play game over and more
When we create a new game our document class will be an instance of GameFrameWork called Mainas This Mainas will have an init (short for initialization) function that will set up the framework for use This Mainas class will also act as a sort of message gateway between the game and the framework classes If you are confused donrsquot worry wersquoll be explaining this in greater detail soon
The FrameWorkStatesas classThis FrameWorkStatesas class will simply contain a set of constant integer values representing the state machine states When we first create the framework we will have 10 different state constants All will begin with the STATE_SYSTEM designation For example we will have a state that displays the title screen The state constant for this will be STATE_SYSTEM_TITLE More states will be added as we progress through the chapters in this book
The BasicScreen class and SimpleBlitButton helper class The BasicScreen class will be used to display very simple game state screens These screens can have a basic background color with transparency (if needed) as well as some text centered on the screen Each screen can also have a button that needs to be clicked to move to a new state in the state machine This class is so simple that it will probably never be used without major
Creating an AS3 Game Framework
Excerpted from the book The Essential Guide to Flash Games Building Interactive Entertainment with ActionScript by Jeff Fulton Steve Fulton (FriendsofEDApress 2010)
PART ONE
032010 (11)20
ACTIONSCRIPT DEVELOPMENT Creating an AS3 Game Framework
032010 (11) 21
We will also be creating three distinct custom event classes as part of the framework These will be used to send specific data from the Game class instance to the Mainas (GameFrameWorkas instance) class The Mainas will act on the data sent and if needed pass the data to other framework classes By doing this we are using Mainas as a sort of message gateway
The CustomEventButtonIdas classThis custom event will have the ability to pass an identification integer value to the listening function It is used for cases where multiple buttons share the same listener function It will be used in the framework (specifically in the GameFrameWork instance Mainas) to allow BasicScreen instances to each share the same listener functions if they employ a SimpleBlitButton You will see this when we examine the GameFrameWork class file It can also be used for any game or application that needs to send a basic integer id along with an Event instance
The CustomEventLevelScreenUpdateas classThis custom event will be used by the Gameas class instance to send data to a BasicScreen instance we will create called levelInScreen The levelInScreen will have the ability to display custom text between each level The event listnener for this event will change this text with a value passed when the event is fired off The Mainas (GameFrameWorkas sub-class) will listen for this event and pass the data to the levelInScreen
The CustomEventScoreBoardUpdateas classThis custom event will be used by the the Gameas class instance to update the values on the ScoreBoard class instance The Mainas class will listen to for this event and pass the data on to the ScoreBoardas class instance
The framework package structureWe will be organizing all of the code we will create into a package structure The reusable framework classes will be in one package and the games we will create will be in a separate package Letrsquos create these two package structures now
The source folderChoose a spot on your disk drive of choice and create a folder called source This will be the root or base level for all of the code and games we will create in this book
The classes packageThe reusable framework classes will be in a package called classes Create a folder called classes inside the source folder from the previous step You should now have a folder structure that looks a little like this
modification in your own commercial games We present it here in its very simple form for utility purposes
The SimpleBlitButton helper class is used to create a clickable button with rollover and off states The button is created completely in code with a simple color background for the over and off states to be sed in the BasicScreen class We do this for simplicity and to demonstrate some Sprite blitting techniques (much more on these later in the book) using a set of BitmapData instances for the background color change of the button on rollover
The ScoreBoard class and SideBySideScoreElement helper class The ScoreBoard class displays information for the user during game play Data such as the current game score time remaining and other useful information can be displayed to the user with a very basic look and feel by using this class It can be used as is but when you start to make your own commercial games you might find it useful to extend this class with more functionality This very basic class is used inside the framework to demonstrate how to use events from a Game instance to update a game score board
The SideBySideScoreElement helper class is used to display a text label and corresponding dynamic text field as a pair side by side on the screen For example it can be implemented by the ScoreBoard class to display the word Score followed by the userrsquos current score
The Game classThe Game class is a stub style class that all games in the framework will inherit from It contains the basic variables and functions needed to work with the GameFrameWork class
The Custom event classesThe framework makes use of events to communicate between classes The instances of the Game class will use events to communicate with the ScoreBoard and the Main classes We will create a custom Mainas class for each game This Main class will be a sub-class (or child) of the GameFrameWork class Some of the events we will use will be simple events These are instances of the standard Flash Event class used for basic communication By this we mean events that donrsquot need to send any data along with them For example instances of the Gameas framework class will have a constant variable called GAME_OVER This constant will be used as the name of a simple Event instance that is fired off with the standard dispatchEvent function call This example GAME_OVER event wil be used to tell the Mainas to move to the game over (STATE_SYSTEM_GAME_OVER) state in the main state loop when the current game has completed
032010 (11)22
ACTIONSCRIPT DEVELOPMENT Creating an AS3 Game Framework
032010 (11) 23
[source]
[classes]
Next we will create the actual package that will contain all of the source code for the reusable framework classes We will name this package comefgframework To create this you must first create a folder inside the classes folder called com then a folder called efg inside the com folder and finally a framework folder inside the efg folder By the way the efg is an abbreviation for the book title Essential Flash Games You should now have a folder structure that looks like this
[source]
[classes]
[com]
[efg]
[framework]
When we start to create all of the class files necessary for the framework they will all go into the framework folder You will see that when we create these classes the package name will look like this
package comefgframework
The projects packageThe second package we will create is called the projects package You can start this right away by creating a folder inside the root source folder called projects The projects folder is not going to be a straight package structure like the classes folder It is organized in a manner to allow individual custom game development using the framework
Inside this projects folder we are going to create a unique folder for each game in the book The first game we are going to create is called stubgame A stub is usually a function or class that contains very little (if any) usable code but is instead a simple placeholder Our game will be slightly more than a placeholder but not much more It will be used to demonstrate the basic functionality of the framework Go ahead and create a folder called stubgame in the projects folder You should have a projects set of folders that look like this
[source]
[classes]
[projects]
[stubgame]
Next we are going to create two folders each to hold a different version of our game Why are we going to do this This book is meant to support Flash game development with a variety of tools There are many popular methods to create Flash games
with an assortment of tools and code integrated development environments (IDEs) We are going to focus on two such tools in this book the Flash IDE (the one with the library timelines drawing tools and so on all combined into a single tool) and Flash Develop (a very popular free IDE made specifically for ActionScript development) You can use any tool with this book but you will need to follow the documentation specific to your own tool when setting up projects
You will need to pay careful attention to linking the reusable code package structure to your games because linking may vary depending on the Flash code editor environment you are using Linking the package to a game is actually a very simple process but it differs between the various code IDE versions Jeff does most of his Flash game development Flash Develop using the free Flex SDK that Adobe provides Steve on the other-hand uses the Flash IDE almost exclusively We have combined our efforts on all of the chapter games to bring you code that will work with both a Flex SDK project and a Flash IDE project
On that note the next two folders you will create inside the stubgame folder are called flashIDE and flexSDK You donrsquot have to create both for any project You just need to create the one that works with the tools you are going to use to create Flash games Each is set up differently so pay attention to the specifics of the one you will be using the most
You should now have a projects folder that looks like this
[projects]
[stubgame]
[flashIDE]
[flexSDK]
The Flash IDE package structureThe Flash IDE package structure begins right inside the flashIDE folder The package name is very similar to the classes package you saw in the last section The package structure will be comefggames[game
name] For instance with the stub game we are going to create in this chapter the package name will be comefggamesstubgame Go ahead and create those folders now You should have this package structure when you are complete
[projects]
[stubgame]
[flashIDE]
[com]
[efg]
[games]
[stubgame]
[flexSDK]
032010 (11)22
ACTIONSCRIPT DEVELOPMENT Creating an AS3 Game Framework
032010 (11) 23
The Flex SDK package structureThe Flex SDK package structure is very similar to the Flash IDE package structure with one small difference Flash Develop and other Flex tools use a specific set of folders for organizing their own project structures To accommodate these and still have a common package structure for our games we must add the Flash Develop created src folder to the flexSDK folder You will not have to create the src folder or the package structure by hand as Flash Develop will create it automatically for you when you start a new project In the section called Setting up the game in Flash Develop we will go into the details For now here is the way the structure will be laid out (including the Flash Develop specific folders such as bin obj and lib If you have used Flash Develop to create a Flex SDK project you will recognize the following structure
[projects]
[stubgame]
[flexSDK]
[bin]
[obj]
[lib]
[src]
[com]
[efg]
[games]
[stubgame]
Notice that we have created the exact same package structure inside the src folder as we will use with the Flash IDE The package name for our game will be comefggamesstubgame
The package name in the code for classes in both the Flash IDE and Flex SDK will be the same
package comefggamesstubgame
The Mainas and StubGameas filesWhen we start to add files to the subgame package we will be creating two subclasses (or children) of framework classes that will be unique to our game The Mainas will be created as a subclass (or child) of GameFrameWorkas framework class The StubGameas class will be a subclass (or child) of the Gameas framework class
Starting a project using the framework packagesYou have just seen the basic package structure for both the framework reusable classes and the projects we are going to create Letrsquos make use of this right away by creating a project for the stub game The stub game will be very similar to the Chapter 1 game where the player is tasked with clicking the mouse ten times
Creating the stub game project in the Flash IDEFollow these steps to set up stub game using the Flash IDE
1 Start up your version of Flash I am using CS3 but this will work exactly the same in CS4 and CS5
2 Create a fla file in the sourceprojectsstubgame
flashIDE folder called stubgame3 In the sourceprojectsstubgameflashIDE folder
create the following package structure for your game comefggamesstubgame
4 Set the frame rate of the Flash movie to 30 FPS Set the width and height both to 400
5 Set the document class to comefggamesstubgameMain6 We have not yet created the Mainas class so you
will see a warning We are going to create this later in this chapter
7 Add the framework reusable class package to the class path for the fla filebull In the publish settings select [Flash]gt
[ActionScript 3 Setting]bull Click the Browse to Path button and find the
source folder we created earlier for the package structure Select the classes folder and click the choose button Now the comefgframework package will be available for use when we begin to create our game We have not created the framework class files yet but we will be doing this very shortly
Creating the stub game project in Flash DevelopAnd these are the steps to create the same project using Flash Develop
1 Create a folder inside the [source][projects][stubgame] folder called [flexSDK] (if you have not already done so)
2 Start Flash Develop and create a new projectbull Select Flex 3 Projectbull Give the project the name stubgamebull The location should be the sourceprojects
stubgameflexSDK folderbull The package should be comefggamesstubgamebull Do not have Flash Develop create a project
folder automatically Make sure the Create Folder For Project box is unchecked
bull Click the OK button to create the project3 Add the class path to the framework to the project
bull Go to the [project]gt[properties]gt[classpaths] menu item
bull Click the add class path buttonbull Find the source folder we created earlier and
select the classes subfolderbull Click the ok button and then the apply button
032010 (11)24
ACTIONSCRIPT DEVELOPMENT Creating an AS3 Game Framework
032010 (11) 25
You now have the basic structure to start creating projects inside the framework We are now going to discuss a few topics concerning the structure of the framework classes and then move into building the reusable framework code
Here are a couple of things to noteFor Flex Builder Flash Builder or other IDEs please refer to the documentation provided for that product to create a new project and set the default compile class
A common method of Flash development is to use the Flash IDE for assets and organization and Flash Develop for code editing If this is your workflow of choice you will want to follow the Flash IDE folder and package structure rather than the Flex SDK folder structure
Creating game timersThere are two basic methods that most Flash developers implement when creating a frame-based game timer By frame-based we mean a timer that uses the idea of a segment of time broken up into logical slices (or frames) to manage game logic There are other types of methods for timing game updates but we will make extensive use of time-slice or frame-based timers in this book The basic game timer we will use most of the games will attempt to squeeze all processing and screen updates into each segment or frame We will also explore a time-step timer and a sleep-based timer in chapter 11
The first timer method is the EventENTER_FRAME event timer The standard EventENTER_FRAME event handler will attempt to run the game loop at the swf filersquos set frame rate This very handy game loop timer has been in use for a number of years The second standard game loop timer method makes use of the Timer class The Timer class is used to call the game loop at millisecond intervals specified by a delay interval For example if the millisecond delay interval is set to 100 the Timer instance would run ten times a second (there are 1000 milliseconds in a single second) Our framework will begin by using this Timer instance game loop timer We will do this so we can make use of the TimerEventTIMER updateAfterEvent function As you will see this function will help smooth out screen updates
Defining frame timer tick You will see the phrases frame timer tick timer tick and frame tick used in this book When we refer to a tick or a frame tick we simply mean one framersquos worth of processing When we run a game at 30 frames per second we have 30 ticks or 30 frame ticks This also means that we only have 3333 milliseconds (or 100030) inside each tick to do all of our processing
State MachinesA traditional state machine at its very basic is a mechanism that controls the state or current actions a system can perform Sometimes this is called a finite state machine Finite state machines have traditionally been used to model complex mathematical computations and more recently artificial intelligence The finite in the name refers to the fact that the system can only be in a single state at any one time Our game framework is built on a simple state machine pattern that employs a separate code function or method for each state There are many other styles of state machines some use entire classes for each individual state (sometimes called an object-oriented state machine) and some use a simple switchcase statement block called on each frame tick to control state We will use a third type that borrows from these two
We call our state machine pattern a function reference pattern Unlike the object-oriented state machine our machine will contain a separate method or function for each state inside a single framework class Each of these state functions will control elements in the framework such as instances of the BasicScreen and Game classes We will use a switchcase statement to move between states Unlike the afore mentioned very simple switchcase state machine structures that call this switchstate control structure on each frame tick we only need to call it when we are switching states The switchcase we call will simply change the function reference we call on each frame tick The GameFrameWorkas will contain the state machine that controls overall game flow This will move our game system between states defined in the FrameWorkStatesas file
Each individual game package we create will contain a Mainas (in the gamersquos own package structure) that will extend GameFrameWorkas We will also create a unique Gameas child class for each game The Game class children that we create can also employ their own internal state machines based on the function reference pattern when needed
Richard (Squize) Myles of wwwgamingyourwaycom was one of the first to offer the idea of a function reference state machine for ActionScript 3 on his well-respected blog
The FrameWorkStatesas class fileThis class file is a simple collection of constants that will define the states for the game framework They will be consumed by the GameFrameWorkas class file The following code listing shows the entire code for this file you will want to create this file according to the package structure in the previous section see (Listing 1)
The first thing you should notice about this class is the package name in the first line It conforms to the file system structure we created earlier No matter if
032010 (11)24
ACTIONSCRIPT DEVELOPMENT Creating an AS3 Game Framework
032010 (11) 25
you are using a version of Flash Flex Builder Flash Builder Flash Develop TextMate or even plain old Notepad this package name will be the same The package name is not depended on the code development environment but the chosen file structure for organizing the code Save this file in the location we created previously
sourceclassescomefgframeworkFrameWorkStatesas
The state variablesThe state variables are constants that the game loop state machine will use to move between game states We have set up the most common basic states in this sample file but you will be able to create as many as you need As we progress through the chapters more will be added as necessary
bull STATE _ SYSTEM _ TITLE This state is used to display a basic title screen with an OK button for the user to click to move on Once the instructions are on the screen the state will change to the next state
bull STATE _ SYSTEM _ WAIT _ FOR _ CLOSE This one waits until the OK button is clicked for any instance of the BasicScreen class
bull STATE _ SYSTEM _ INSTRUCTIONS This state is used to display basic instructions with the same OK button as in the SYSTEM _ TITLE state It also changes to the STATE _ SYSTEM _ WAIT _ FOR _ CLOSE state until the OK button is clicked
bull STATE _ SYSTEM _ NEW _ GAME This state will call the game logic class and fire off its gamenewGame() function It does not wait but moves on to the NEW _
LEVEL state right awaybull STATE _ SYSTEM _ NEW _ LEVEL With this state we can
call the gamenewLevel() function to set up a new level for the given game
bull STATE _ SYSTEM _ LEVEL _ IN This state is used to display some basic information if needed for the beginning of a level In this basic game we simply display the level screen and wait a few seconds before moving on The wait is accomplished by changing state to the STATE _ SYSTEM _ WAIT state for the specified number of frame ticks
bull STATE _ SYSTEM _ GAME _ PLAY This one simply calls the game logic classrsquos runGame function repeatedly and lets the game take care of its own logic and states
bull STATE _ SYSTEM _ GAME _ OVER The game over state displays the basic game over screen and waits for the OK button to be clicked before moving back to the instructions screen It quickly changes state to the STATE _ SYSTEM _ WAIT _ FOR _ CLOSE until the OK button is clicked
bull STATE _ SYSTEM _ WAIT This state waits for a specified number of frames and then fires off a simple custom event constant called WAIT _ COMPLETE
The GameFrameWorkas class fileThe GameFrameWorkas will be that parent of our gamersquos document class Mainas (the gamersquos document class)
for our games will extend this class and call functions to modify the framework for each unique game The entire code listing is provided at the end of this section We will explore it in detail once your have had a chance to type in the code The location for this file in the package structure is
sourceclassescomefgframeworkGameFrameWorkas
The GameFrameWorkas will be the parent class to the Mainas class we will use for our games and itrsquos shown in the following listing In later chapters we will add some functions to this file and even create one that uses a completely different timer The Mainas will subclass this class with the extends syntax and override the blank stub init function we are about to create This class will also contain all of the state functions that coincide with the state variables in the FrameWorkStates class All of the functions in the GameFrameWorkas are public so all can be overridden by the Mainas if needed In this way we can customize the behavior of the state functions if we need to
For example in later chapters we will want to play music on the title screen The function call to play
Listing 1
package comefgframework
author Jeff and Steve Fulton
public class FrameWorkStates
public static const STATE_SYSTEM_WAIT_FOR_CLOSEint = 0
public static const STATE_SYSTEM_TITLEint = 1
public static const STATE_SYSTEM_INSTRUCTIONSint = 2
public static const STATE_SYSTEM_NEW_GAMEint = 3
public static const STATE_SYSTEM_GAME_OVERint = 4
public static const STATE_SYSTEM_NEW_LEVELint = 5
public static const STATE_SYSTEM_LEVEL_INint = 6
public static const STATE_SYSTEM_GAME_PLAYint = 7
public static const STATE_SYSTEM_LEVEL_OUTint = 8
public static const STATE_SYSTEM_WAITint = 9
032010 (11)26
ACTIONSCRIPT DEVELOPMENT Creating an AS3 Game Framework
032010 (11) 27
the music will need to be added to the systemTitle state function Not all games will need this though so we will not add it to the GameFrameWorkas filersquos systemTitleFunction Instead we will create a new version of the function in Mainas to override the one in GameFrameWorkas The new one will play the sound needed and then call the systemTitle function inside GameFrameWorkas with the supersystemTitle() function call see (Listing 2)
The class imports The class import section contains the necessary Flash core classes needed for the Main class Notice the package name coincides with the package structure we created earlier in the chapter for the framework
package comefgframework
Listing 2
package comefgframework
import flashdisplayBitmap
import flashdisplayBitmapData
import flashdisplayMovieClip
import flasheventsEvent
import flashgeomPoint
import flashtextTextFormat
import flashutilsTimer
import flasheventsTimerEvent
public class GameFrameWork extends MovieClip
public static const EVENT_WAIT_COMPLETEString =
wait complete
public var systemFunctionFunction
public var currentSystemStateint
public var nextSystemStateint
public var lastSystemStateint
public var appBackBitmapDataBitmapData
public var appBackBitmapBitmap
public var frameRateint
public var timerPeriodNumber
public var gameTimerTimer
public var titleScreenBasicScreen
public var gameOverScreenBasicScreen
public var instructionsScreenBasicScreen
public var levelInScreenBasicScreen
public var screenTextFormatTextFormat
public var screenButtonFormatTextFormat
public var levelInTextString
public var scoreBoardScoreBoard
public var scoreBoardTextFormatTextFormat
Game is our custom class to hold all logic for
the game
public var gameGame
waitTime is used in conjunction with the
STATE_SYSTEM_WAIT state
it suspends the game and allows animation or
other
processing to finish
public var waitTimeint
public var waitCountint=0
public function GameFrameWork()
public function init()void
stub to override
public function setApplicationBackGround(width
Number
heightNumberisTransparentBoolean = false
coloruint = 0x000000)void
appBackBitmapData = new BitmapData(width
height
isTransparent color)
appBackBitmap = new Bitmap(appBackBitmapData)
addChild(appBackBitmap)
public function startTimer()void
timerPeriod = 1000 frameRate
gameTimer=new Timer(timerPeriod)
gameTimeraddEventListener(TimerEventTIMER
runGame)
gameTimerstart()
public function runGame(eTimerEvent)void
systemFunction()
eupdateAfterEvent()
switchSystem state is called only when the
032010 (11)26
ACTIONSCRIPT DEVELOPMENT Creating an AS3 Game Framework
032010 (11) 27
Listing 2
state is to be changed
(not every frame like in some switchcase
based simple state machines
public function switchSystemState(statevalint)
void
lastSystemState = currentSystemState
currentSystemState = stateval
switch(stateval)
case FrameWorkStatesSTATE_SYSTEM_WAIT
systemFunction = systemWait
break
case FrameWorkStatesSTATE_SYSTEM_WAIT_FOR_
CLOSE
systemFunction = systemWaitForClose
break
case FrameWorkStatesSTATE_SYSTEM_TITLE
systemFunction = systemTitle
break
case FrameWorkStatesSTATE_SYSTEM_
INSTRUCTIONS
systemFunction = systemInstructions
break
case FrameWorkStatesSTATE_SYSTEM_NEW_GAME
systemFunction = systemNewGame
break
case FrameWorkStatesSTATE_SYSTEM_NEW_LEVEL
systemFunction = systemNewLevel
break
case FrameWorkStatesSTATE_SYSTEM_LEVEL_IN
systemFunction = systemLevelIn
break
case FrameWorkStatesSTATE_SYSTEM_GAME_PLAY
systemFunction = systemGamePlay
break
case FrameWorkStatesSTATE_SYSTEM_GAME_OVER
systemFunction = systemGameOver
break
public function systemTitle()void
addChild(titleScreen)
titleScreenaddEventListener(CustomEventButton
IdBUTTON_ID
okButtonClickListener false 0 true)
switchSystemState(FrameWorkStates
STATE_SYSTEM_WAIT_FOR_CLOSE)
nextSystemState = FrameWorkStatesSTATE_
SYSTEM_INSTRUCTIONS
public function systemInstructions()void
addChild(instructionsScreen)
instructionsScreenaddEventListener(CustomEven
tButtonId
BUTTON_IDokButtonClickListener false 0
true)
switchSystemState(FrameWorkStates
STATE_SYSTEM_WAIT_FOR_CLOSE)
nextSystemState = FrameWorkStatesSTATE_
SYSTEM_NEW_GAME
public function systemNewGame()void
addChild(game)
gameaddEventListener(CustomEventScoreBoardUp
date
UPDATE_TEXTscoreBoardUpdateListenerfalse 0
true)
gameaddEventListener(CustomEventLevelScreenU
pdate
UPDATE_TEXTlevelScreenUpdateListenerfalse
0 true)
gameaddEventListener(GameGAME_OVER
gameOverListener
false 0 true)
gameaddEventListener(GameNEW_LEVEL
newLevelListener
false 0 true)
gamenewGame()
switchSystemState(FrameWorkStatesSTATE_
SYSTEM_NEW_LEVEL)
public function systemNewLevel()void
032010 (11)28
ACTIONSCRIPT DEVELOPMENT Creating an AS3 Game Framework
032010 (11) 29
Listing 2
gamenewLevel()
switchSystemState(FrameWorkStatesSTATE_
SYSTEM_LEVEL_IN)
public function systemLevelIn()void
addChild(levelInScreen)
waitTime = 30
switchSystemState(FrameWorkStatesSTATE_
SYSTEM_WAIT)
nextSystemState = FrameWorkStatesSTATE_
SYSTEM_GAME_PLAY
addEventListener(EVENT_WAIT_COMPLETE
waitCompleteListener false 0 true)
public function systemGameOver()void
removeChild(game)
addChild(gameOverScreen)
gameOverScreenaddEventListener(CustomEventBu
ttonId
BUTTON_IDokButtonClickListener false 0
true)
switchSystemState(FrameWorkStates
STATE_SYSTEM_WAIT_FOR_CLOSE)
nextSystemState = FrameWorkStatesSTATE_
SYSTEM_TITLE
public function systemGamePlay()void
gamerunGame()
public function systemWaitForClose()void
do nothing
public function systemWait()void
waitCount++
if (waitCount gt waitTime)
waitCount = 0
dispatchEvent(new Event(EVENT_WAIT_COMPLETE))
public function okButtonClickListener(e
CustomEventButtonId)void
switch(eid)
case FrameWorkStatesSTATE_SYSTEM_TITLE
removeChild(titleScreen)
titleScreenremoveEventListener(CustomEv
entButtonId
BUTTON_IDokButtonClickListener)
break
case FrameWorkStatesSTATE_SYSTEM_
INSTRUCTIONS
removeChild(instructionsScreen)
instructionsScreenremoveEventListener(
CustomEventButtonIdBUTTON_IDokButtonC
lickListener)
break
case FrameWorkStatesSTATE_SYSTEM_GAME_OVER
removeChild(gameOverScreen)
gameOverScreenremoveEventListener(
CustomEventButtonIdBUTTON_IDokButtonC
lickListener)
break
switchSystemState(nextSystemState)
public function scoreBoardUpdateListener(e
CustomEventScoreBoardUpdate)void
scoreBoardupdate(eelement evalue)
public function levelScreenUpdateListener(e
CustomEventLevelScreenUpdate)void
levelInScreensetDisplayText(levelInText +
etext)
gameOverListener listens for GameGAMEOVER
simple
custom events calls and changes state
accordingly
public function gameOverListener(eEvent)void
switchSystemState(FrameWorkStatesSTATE_
SYSTEM_GAME_OVER)
gameremoveEventListener(CustomEventScoreBoard
Update
UPDATE_TEXTscoreBoardUpdateListener)
gameremoveEventListener(CustomEventLevelScree
nUpdate
032010 (11)28
ACTIONSCRIPT DEVELOPMENT Creating an AS3 Game Framework
032010 (11) 29
We also must import all of the classes needed for the framework to run You will see this put to use shortly
The variable definitions The variable definition section defines all of the global scope variables for the class These include all of the variables needed for the state machine screens and the game timer
We will make use of constants to define the current state and a set of variables to hold the state information These have been be defined on the FrameWorkStatesas file we created in the last section More states can be added to the basic ones but these will be sufficient for many games that we will create in this book There are two special states that are used for the system and wait for button clicks or things like animations to complete These are the STATE_SYSTEM_WAIT_FOR_CLOSE and STATE_SYSTEM_WAIT respectively We will also make use of a generic function called systemFunction that will hold the current state function to call in our game loop Combined with this we use a set of
integer variables to hold the value of the current state (currentSystemState) the last state (lastSystemState) and the next state (nextSystemState) for processing purposes These states should not be confused with an actual game pause function This will be handled in a different manner and added to the framework in Chapter 11
If you are using the Flash IDE and have any assets in the library that need to be exported in the first frame you must extend MovieClip and not Sprite even if you donrsquot plan to use the main time line for anything else We have extended MovieClip for the GameFrameWork so it will work with both Flex SDK and Flash IDE projects
The state control variablesThe control variables keep the system functioning within the context of the current state The main control variable is an instance of the Function class called systemFunction This function holds a reference to the current function that will be repeatedly called on each frame tick This saves us from having to evaluate a switchcase statement on each frame to decide which function to call The function is changed to a new reference by called the switchSystemState() function and passing a new constant that represents the new state
Optimization switchSystemState() is the first of many optimizations we will make to the game framework All of these optimizations will make the Flash games run much more efficiently These efficiencies in the game framework will allow the actual game code to perform more complex operations and still run with a reasonable frame rate
The currentSystemState integer variable holds a number representing the constant of the current state the system is running The nextSystemState contains the constant integer value for the state to transition to after this state is complete The lastSystemState variable holds the integer constant of the previous system state This is used in the rare occurrence that the game loop needs to return to the previous system state
The lastSystemState variable will become useful when we use a shared state such as STATE_SYSTEM_WAIT The STATE_SYSTEM_LEVEL_IN state will implement a 30-millisecond delay before moving on to the STATE_SYSTEM_GAME_PLAY state The nextSystemState will be STATE_SYSTEM_WAIT and the lastSystemState will be STATE_SYSTEM_LEVEL_IN When the 30-millisecond wait time has expired the waitCompleteListener function will be called It will use the lastSystemState to determine where the processing was before the wait was started Yoursquoll see this in detail later in this chapter when we examine the waitCompleteListener function
Listing 2
UPDATE_TEXT levelScreenUpdateListener)
gameremoveEventListener(GameGAME_OVER
gameOverListener)
gameremoveEventListener(GameNEW_LEVEL
newLevelListener)
newLevelListener listens for GameNEWLEVEL
simple custom events calls and changes
state accordingly
public function newLevelListener(eEvent)void
switchSystemState(FrameWorkStatesSTATE_
SYSTEM_NEW_LEVEL)
public function waitCompleteListener(eEvent)
void
switch(lastSystemState)
case FrameWorkStatesSTATE_SYSTEM_LEVEL_
IN
removeChild(levelInScreen)
break
removeEventListener(EVENT_WAIT_COMPLETEwai
tCompleteListener)
switchSystemState(nextSystemState)
032010 (11)30
ACTIONSCRIPT DEVELOPMENT
The background fill variablesAll Flash applications have a background color of some type No matter what game we are going to be creating the framework can control this background color You should never rely on the background color setting in HTML for your Flash applicationrsquos background color This leaves the HTML embed code with control over major aspect of your application If you are creating a viral game to be placed on game portals you will lose control of your gamersquos background color and it will default to what ever the game portal operators have selected as the standard background color in their embed code The framework allows you to override the HTML settings here by placing a simple colored Bitmap behind the entire application We will simply define a BitmapData object called appBackBitmapData and a Bitmap object called appBackBitmap that will be used to place the BitmapData onto the displayList
We will not define the background in the GameFrameWorkas file but rather the Mainas subclass of the GameFrameWork will set the background if needed in its init function override
The timer variablesThe timer will control the frame rate of the game and help smooth out the display by employing the TimerEventupdateAfterEvent method The frameRate variable will be defined in Mainas as the number of frame ticks per second we want our game timer to run
The most important thing to note is that we are making use of the built-in Timer class (gameTimer) We are not using the standard EnterFrame event This allows us to create our own frame rate for the game and specify it in the frameRate variable By doing this we can control game timer tick rate independent of the swf filersquos frame rate (FPS) The swf file can have a frame rate setting of 25 (for example) but the game can run at a 30 frame ticks a second To do this we first set the frameRate to the desired number of frame update ticks we want per second (30) When Mainas calls the startTimer function (described in detail when we get to the section on the init function) the gameTimer is put into action First we will calculate the timerPeriod value as 1000frameRate With the updateAfterEvent function call (in the runGame function) we help to smooth out the render of the screen by asking the Flash display engine to update at the rate of the Timer not the frame rate set in the swf So going back to our example if the game SWF is set to run at 25 FPS and the frameRate is set to 30 ticks the updateAfterEvent will help to smooth out the rendering of the screen by asking the Flash display engine to update at the timer tick rate (30) not the swf filersquos FPS setting (25)
The timerPeriod will be passed into the Timer instance and the game will attempt to run at this rate We say
attempt because if the game includes too many on screen moving objects or more logic than can be computed inside the timerPeriod number of milliseconds (or a combination of both) then there will be a noticable slowdown in the game screen updates In later chapters we will add functionality to the runGame function to mitigate some of these issues
The screen definition variablesThe screen definition variables create instances of our BasicScreen class This is a rather simple class that allows a single positional text box and an OK button on the screen We will use this simple screen for the title instructions level and game over screens We will customize each screen when we create the init function override in our gamersquos Mainas class Note that the levelInText is a special variable Setting this string to a default value will allow the leveInScreen to display some default text along on each new level This text can be combined with dynamic text to create a screen that says something like Level 1 with the word Level being the default text and the number 1 being the dynamic text
public var titleScreenBasicScreen
public var gameOverScreenBasicScreen
public var instructionsScreenBasicScreen
public var levelInScreenBasicScreen
public var levelInTextString
public var screenTextFormatTextFormat
public var screenButtonFormatTextFormat
We also create two TextFormat objects that will be used for defining the format of the text on the screens and the format of the button text
The ScoreBoard variablesThe scoreBoard instance of the ScoreBoard class will handle a simple heads up display (HUD) for the user with information such as the current score It is a simple framework class that will be customized in the init function override in each gamersquos Mainas class The changes will depend on the game that is to be created We also define a TextFormatObject for the basic look of the text for our scoreboard text scoreBoardTextFormat
JEFF FULTON
STEVE FULTON
The next part of the article in the June issue of FFD Magazine
032010 (11)32
ACTIONSCRIPT DEVELOPMENT
032010 (11) 33
On my quest of learning Flash I often became frustrated of how difficult it was to update the contents of my application Meaning if I wanted
to change out an image or piece of copy I had to open up Flash go to my library find the Movie Clip that had my asset in it and republish I thought to myself this is no way to work this is so inefficient Enter XML in all its glory Constructing an application with enabled me to quickly and easily update my project at a moments
notice Without having to open up Flash Now what could be better than that
In this article yoursquore going to learn how to create a new ActionScript project in Flex Builder 3 and write ActionScript 30 code that will load in an XML file display the images on screen and add some interactivity to the scene
Setting up FlexOpen up Flex and go to Filegt NewgtActionScript Project A dialog window will open In the project name field type in PhotoGallery Leave the use default location box checked and click finish (see Figure 1)
Creating an XML Photo Gallery
Searching the Internet yoursquoll find dozens if not hundreds of examples of photo galleries created with Flash
What you will learnhellipbull How to create an ActionScript application in Flex Builder 3bull How to use ActionScript to parse an XML le
What you should knowhellipbull Familiar with general programming concepts such as data ty-
pes variables loops and functionsbull Familiar with class creation and constructionbull Some understanding of XML
with AS3
Figure 1 New ActionScript window dialog Figure 2 ActionScript Compiler dialog
032010 (11)32
ACTIONSCRIPT DEVELOPMENT
032010 (11) 33
Once you click finish your project should open and you should see PhotoGalleryas on screen There are a few steps that I like to take next that I do for every project
First right click PhotoGallery folder in the Flex Navigator window click properties at the bottom and then click on the ActionScript Compiler link on the left hand side At the bottom yoursquoll see a check box that is already selected to generate a HTML wrapper file Uncheck that and click ok A warning message will appear saying that the html-template folder will be deleted Donrsquot worry about that because we havenrsquot put anything in that folder Click ok I personally donrsquot like to have a browser window open every time I run my application (see Figure 2)
Secondly wersquoll be using a tweening library called Tweener In order to use Tweener we have to first download it (httpcodegooglecomptweener) Be sure to download the ActionScript 30 version and create a folder on your desktop or any other place and name it code Place the contents of that download into that folder Next go back to Flex and again right click the PhotoGallery folder and click properties again and this time yoursquoll click the ActionScript Build Path link This window gives us the ability to add assets to our project so we can use them in our project Click the Add Folder button browser to the code folder you just created click ok and click ok again to close the window Now that folder and all its contents will be included in our project (see Figure 3)
Next right click the src folder in your project scroll over to new and add a new folder Name this folder classes This folder will contain two classes that wersquoll be using Then repeat the same steps but this time name the folder images This folder will contain all the images
Figure 3 ActionScript Build Path dialog
032010 (11)34
ACTIONSCRIPT DEVELOPMENT
Listing 1 galleryxml
ltxml version=10 encoding=UTF-8gt
ltgallery image_height=150 image_width=150 image_
gap=5 rows=3gt
ltphotogt
ltdescriptiongtThis is a description for the first
imageltdescriptiongt
ltthumb_pathgtimagesthumbjpgltthumb_pathgt
ltfull_pathgtimagesfullgifltfull_pathgt
ltphotogt
ltphotogt
ltdescriptiongtThis is a description for the second
imageltdescriptiongt
ltthumb_pathgtimagesthumbjpgltthumb_pathgt
ltfull_pathgtimagesfullgifltfull_pathgt
ltphotogt
ltphotogt
ltdescriptiongtThis is a description for the third
imageltdescriptiongt
ltthumb_pathgtimagesthumbjpgltthumb_pathgt
ltfull_pathgtimagesfullgifltfull_pathgt
ltphotogt
ltphotogt
ltdescriptiongtThis is a description for the fourth
imageltdescriptiongt
ltthumb_pathgtimagesthumbjpgltthumb_pathgt
ltfull_pathgtimagesfullgifltfull_pathgt
ltphotogt
ltphotogt
ltdescriptiongtThis is a description for the fifth
imageltdescriptiongt
ltthumb_pathgtimagesthumbjpgltthumb_pathgt
ltfull_pathgtimagesfullgifltfull_pathgt
ltphotogt
ltphotogt
ltdescriptiongtThis is a description for the sixth
imageltdescriptiongt
ltthumb_pathgtimagesthumbjpgltthumb_pathgt
ltfull_pathgtimagesfullgifltfull_pathgt
ltphotogt
ltphotogt
ltdescriptiongtThis is a description for the seventh
imageltdescriptiongt
ltthumb_pathgtimagesthumbjpgltthumb_pathgt
ltfull_pathgtimagesfullgifltfull_pathgt
ltphotogt
ltphotogt
ltdescriptiongtThis is a description for the eighth
imageltdescriptiongt
ltthumb_pathgtimagesthumbjpgltthumb_pathgt
ltfull_pathgtimagesfullgifltfull_pathgt
ltphotogt
ltphotogt
ltdescriptiongtThis is a description for the ninth
imageltdescriptiongt
ltthumb_pathgtimagesthumbjpgltthumb_pathgt
ltfull_pathgtimagesfullgifltfull_pathgt
ltphotogt
ltphotogt
ltdescriptiongtThis is a description for the tenth
imageltdescriptiongt
ltthumb_pathgtimagesthumbjpgltthumb_pathgt
ltfull_pathgtimagesfullgifltfull_pathgt
ltphotogt
ltphotogt
ltdescriptiongtThis is a description for the
eleventh imageltdescriptiongt
ltthumb_pathgtimagesthumbjpgltthumb_pathgt
ltfull_pathgtimagesfullgifltfull_pathgt
ltphotogt
ltphotogt
ltdescriptiongtThis is a description for the twelfth
imageltdescriptiongt
ltthumb_pathgtimagesthumbjpgltthumb_pathgt
ltfull_pathgtimagesfullgifltfull_pathgt
ltphotogt
ltphotogt
ltdescriptiongtThis is a description for the
thirteenth imageltdescriptiongt
ltthumb_pathgtimagesthumbjpgltthumb_pathgt
ltfull_pathgtimagesfullgifltfull_pathgt
ltphotogt
ltphotogt
ltdescriptiongtThis is a description for the
fourteenth imageltdescriptiongt
ltthumb_pathgtimagesthumbjpgltthumb_pathgt
ltfull_pathgtimagesfullgifltfull_pathgt
ltphotogt
ltphotogt
ltdescriptiongtThis is a description for the
fifteenth imageltdescriptiongt
ltthumb_pathgtimagesthumbjpgltthumb_pathgt
ltfull_pathgtimagesfullgifltfull_pathgt
ltphotogt
ltgallerygt
032010 (11)36
ACTIONSCRIPT DEVELOPMENT
Listing 2 PhotoGalleryas
package
Imports
import caurinatransitionsTweener
import classesBigPhoto
import classesThumbNail
import flashdisplayBitmap
import flashdisplaySprite
import flasheventsEvent
import flasheventsMouseEvent
import flashnetURLLoader
import flashnetURLRequest
[SWF(width=466 height=515 backgroundColor=00
0000 frameRate=30)]
public class PhotoGallery extends Sprite
Containers
private var _thumbContainerSprite Stores
the thumbnails
private var _nextButtonSprite Stores
the next arrow
private var _backButtonSprite Stores
the back arrow
private var _bigPhotoBigPhoto
Container for the big image
XML
private var _xmlLoaderURLLoader
Loads the XML file
private var _xmlXML
Stores the XML data
Image Assets
[Embed(source=assetsnext-arrowpng)]
private var _nextArrowClass
Embedded asset for the next
arrow
[Embed(source=assetsback-arrowpng)]
private var _backArrowClass
Embedded asset for the back
arrow
Constructor
public function PhotoGallery()
init ()
Initializing method
private function init ()void
_xmlLoader = new URLLoader ()
_xmlLoaderaddEventListener (EventCOMPLETE
xmlComplete false 0 true)
_xmlLoaderload (new URLRequest
(galleryxml))
XML Complete
private function xmlComplete (eEvent)void
Store the XML data
_xml = new XML (etargetdata)
loadImages ()
Clean up
_xmlLoaderremoveEventListener
(EventCOMPLETE xmlComplete)
_xmlLoader = null
Load in the thumbs
private function loadImages ()void
Temporary variables
var imageHeightuint = _xmlimage_height
var imageWidthuint = _xmlimage_width
var imageGapuint = _xmlimage_gap
var rowsuint = _xmlrows
var rowCounteruint = 0
var columnCounteruint = 0
Instantiate the container and position it
on screen
_thumbContainer = new Sprite ()
_thumbContainerx = 78
_thumbContainery = 78
_thumbContainerbuttonMode = true
_thumbContaineraddEventListener
(MouseEventCLICK thumbClick
false 0 true)
thisaddChild (_thumbContainer)
Loop through the images and create the
visual grid
for (var iuint = 0 i lt _xmlphotolength ()
i++)
var pathString = _xmlphoto[i]thumb_path
var descriptionString = _xmlphoto[i]desc
Creating an XML Photo Gallery with AS3
032010 (11) 37
Listing 2 PhotoGalleryas
ription
Create the thumbnail
var pThumbNail = new ThumbNail ()
pnewID = i
ploadImage (path)
pdescription = description
px = (imageWidth + imageGap)
columnCounter
py = (imageHeight + imageGap)
rowCounter
_thumbContaineraddChild (p)
Create the grid
if ((rowCounter + 1) lt rows)
rowCounter++
else
rowCounter = 0
columnCounter++
Setup the navigation
createNavigation ()
This method handles the click event for the
next arrow
private function nextClick (eMouseEvent)void
155 is the width + spacing
if (-_thumbContainerx lt (_thumbContainerwidth
ndash stagestageWidth ndash 155))
disableNavigation ()
TweeneraddTween (_thumbContainer x
_thumbContainerx ndash 155 time
075 transitioneaseOutExpo
onCompleteenableNavigation)
This method handles the click event for the
back arrow
private function previousClick (eMouseEvent)void
if (-_thumbContainerx gt 0)
disableNavigation ()
TweeneraddTween (_thumbContainer x
_thumbContainerx + 155 time
075 transitioneaseOutExpo
onCompleteenableNavigation)
This method handles the click event for the
thumbnails
private function thumbClick (eMouseEvent)void
disableNavigation ()
Disable the container that stores the
thumbnails
_thumbContainerbuttonMode = false
_thumbContainermouseChildren = false
_thumbContainerremoveEventListener
(MouseEventCLICK thumbClick)
Get the full image path
var imagePathString = _xmlphoto[etargetnewI
D]full_path
Instantiate the big photo
_bigPhoto = new BigPhoto ()
_bigPhotobuttonMode = true
_bigPhotox = 108
_bigPhotoy = 1075
_bigPhotoalpha = 0
_bigPhotoloadImage (imagePath)
_bigPhotoaddEventListener (MouseEventCLICK
closePhoto false 0 true)
thisaddChild (_bigPhoto)
Fade up the photo
TweeneraddTween (_bigPhoto alpha1 time
1)
Fade out the photo
When the image finishes fading delete the
photo and enable the navigation
items
private function closePhoto (eMouseEvent)void
TweeneraddTween (_bigPhoto alpha0 time1
onCompletedeletePhoto)
private function deletePhoto ()void
032010 (11)38
ACTIONSCRIPT DEVELOPMENT
Listing 2 PhotoGalleryas
_bigPhotobuttonMode = false
_bigPhotoremoveEventListener
(MouseEventCLICK closePhoto)
_bigPhotodestroy ()
thisremoveChild (_bigPhoto)
_bigPhoto = null
_thumbContainerbuttonMode = true
_thumbContainermouseChildren = true
_thumbContaineraddEventListener
(MouseEventCLICK thumbClick
false 0 true)
enableNavigation ()
private function createNavigation ()void
Instantiate the next arrow
var nBitmap = new _nextArrow ()
Instantiate the nextButton container
Add the next button as a child of the
nextButton container
_nextButton = new Sprite ()
thisaddChild (_nextButton)
_nextButtonaddChild (n)
_nextButtonx = stagestageWidth ndash _
nextButtonwidth
_nextButtony = 475
Instantiate the back arrow
var bBitmap = new _backArrow ()
Instantiate the backButton container
Add the next button as a child of the
backButton container
_backButton = new Sprite ()
thisaddChild (_backButton)
_backButtonaddChild (b)
_backButtonx = _nextButtonx ndash _
nextButtonwidth ndash 5
_backButtony = 475
enableNavigation ()
private function enableNavigation ()void
_nextButtonbuttonMode = true
_nextButtonaddEventListener
(MouseEventCLICK nextClick false
0 true)
_backButtonbuttonMode = true
_backButtonaddEventListener
(MouseEventCLICK previousClick
false 0 true)
private function disableNavigation ()void
_nextButtonbuttonMode = false
_nextButtonremoveEventListener
(MouseEventCLICK nextClick)
_backButtonbuttonMode = false
_backButtonremoveEventListener
(MouseEventCLICK previousClick)
Figure 4 New ActionScript class dialog
Creating an XML Photo Gallery with AS3
032010 (11) 39
Listing 3 ThumbNailas
package classes
import caurinatransitionsTweener
import flashdisplayLoader
import flashdisplayShape
import flashdisplaySprite
import flasheventsEvent
import flasheventsMouseEvent
import flashnetURLRequest
import flashtextTextField
import flashtextTextFieldAutoSize
import flashtextTextFormat
public class ThumbNail extends Sprite
Containers
private var _imageLoaderLoader Loads in
the thumbnail
private var _imageContainerSprite
Container for the thumbnail
private var _maskShape Container for the
mask
private var _descriptionContainerSprite
Container for the description
TextFields
private var _descriptionTextField
TextField for the container
Logic
private var _newIDuint The ID of the
object
[Embed(systemFont=Arial fontName=arial
fontWeight=bold
mimeType=applicationx-font-
truetype)]
private var _arialClass Embedded asset
for the font
Constructor
public function ThumbNail ()
super ()
init ()
Initializing method
private function init ()void
Instantiate the container
_imageContainer = new Sprite ()
_imageContaineralpha = 0
thisaddChild (_imageContainer)
createDescription ()
thismouseChildren = false
thisaddEventListener (MouseEventMOUSE_OVER
onMouseOver false 0 true)
thisaddEventListener (MouseEventMOUSE_OUT
onMouseOut false 0 true)
Public Methods
public function loadImage (pathString)void
_imageLoader = new Loader ()
_imageLoadercontentLoaderInfoaddEventListen
er (EventCOMPLETE imageComplete
false 0 true)
_imageLoaderload (new URLRequest (path))
GetterSetter Methods
public function get newID ()uint
return this_newID
public function set newID (valueuint)void
this_newID = value
public function get description ()String
return this_descriptiontext
public function set description (valueString)void
this_descriptiontext = value
Private Methods
032010 (11)40
ACTIONSCRIPT DEVELOPMENT
Listing 3 ThumbNailas
private function onMouseOver (eMouseEvent)void
TweeneraddTween (_descriptionContainer
y75 time05 transition
easeOutExpo)
private function onMouseOut (eMouseEvent)void
TweeneraddTween (_descriptionContainer
y150 time05 transition
easeOutExpo)
private function imageComplete (eEvent)void
Reposition the loaded content to the center
_imageLoaderx = -(_imageLoaderwidth 2)
_imageLoadery = -(_imageLoaderheight 2)
_imageContaineraddChildAt (_imageLoader 0)
Apply background after the image has
completely loaded
drawBackground ()
Draw the mask around the description
drawMask ()
Fade in the container
TweeneraddTween (_imageContainer alpha1
time05)
Clean up
_imageLoadercontentLoaderInforemoveEv
entListener (EventCOMPLETE
imageComplete)
Draws a background behind _imageContainer
private function drawBackground ()void
_imageContainergraphicsbeginFill (0xFFFFFF)
_imageContainergraphicsdrawRect (_
imageLoaderx ndash 1 _imageLoadery
ndash 1 _imageLoaderwidth + 2
_imageLoaderheight + 2)
_imageContainergraphicsendFill ()
Creates everything for the description
private function createDescription ()void
Instantiate the container
_descriptionContainer = new Sprite ()
_descriptionContainery = 150
_descriptionContainergraphicsbeginFill
(0x000000 075)
_descriptionContainergraphicsdrawRect (-75
-75 150 75)
_descriptionContainergraphicsendFill ()
_imageContaineraddChild (_
descriptionContainer)
Specify text formatting for the description
Text Field
var tfTextFormat = new TextFormat ()
tfcolor = 0xFFFFFF
tfalign = center
tffont = arial
tfbold = true
tfsize = 12
Instantiate the TextF ield
_description = new TextField ()
_descriptionx = -75
_descriptiony = -70
_descriptionwidth = 150
_descriptionwordWrap = true
_descriptionembedFonts = true
_descriptiondefaultTextFormat = tf
_descriptionautoSize = TextFieldAutoSizeLEFT
_descriptionContaineraddChild (_description)
Draws a mask our _descriptionContainer
private function drawMask ()void
Draw the mask shape
_mask = new Shape ()
_maskgraphicsbeginFill (0xFF0000)
_maskgraphicsdrawRect (_imageLoaderx
_imageLoadery _imageLoaderwidth
_imageLoaderheight)
_maskgraphicsendFill ()
addChild (_mask)
Apply the mask to the container
_descriptionContainermask = _mask
Creating an XML Photo Gallery with AS3
032010 (11) 41
that will be loaded into the application from XML Finally create another folder and this time name it assets This folder will contain the buttons that wersquoll embed into our project
The AssetsBefore we start coding we need to create some visual assets Open up Photoshop or any other program you have for creating graphics and create an image that is 150x150 pixels Fill it with a flat color and save the image as thumbjpg in the images folder you just created Next create another image thatrsquos 250x300 pixels Fill it with another color and save that image as fulljpg into the same folder These images will be used for testing purposes only
Listing 4 BigPhotoas
package classes
import flashdisplayLoader
import flashdisplaySprite
import flasheventsEvent
import flashnetURLRequest
public class BigPhoto extends Sprite
Containers
private var _imageLoaderLoader Loads in the
thumbnail
private var _imageContainerSprite Container
for the thumbnail
Constructor
public function BigPhoto ()
super()
Public Methods
public function loadImage (pathString)void
_imageLoader = new Loader ()
_imageLoadercontentLoaderInfoaddEventListen
er (EventCOMPLETE imageComplete
false 0 true)
_imageLoaderload (new URLRequest (path))
Clean up method
public function destroy ()void
_imageContainerremoveChild (_imageLoader)
_imageLoaderunload ()
_imageLoader = null
thisremoveChild (_imageContainer)
_imageContainer = null
Private Methods
private function imageComplete (eEvent)void
Instantiate the container
_imageContainer = new Sprite ()
thisaddChild (_imageContainer)
Add the loader
_imageContaineraddChild (_imageLoader)
Clean up
_imageLoadercontentLoaderInforemoveEv
entListener (EventCOMPLETE
imageComplete)
Figure 5 Time to test
032010 (11)42
ACTIONSCRIPT DEVELOPMENT
We still have to create our navigation buttons that wersquoll use to scroll through our gallery Create two buttons that are 40x40 pixels and design them how you like They should resemble forward and back buttons Save the forward arrow as next-arrowpng and the other as back-arrowpng into the assets folder Now that our assets our created itrsquos time to code
The XML fileRight click the src folder in the project scroll over to new and click file A dialog window will open and in the file name input box type galleryxml (see Figure 4) Write the code that you see from Listing 1 into galleryxml
Line 1 is the XML declaration This is needed to have a well-formed XML document
Line 2 declares the gallery root node Notice in this node Irsquove added attributes Also to have a well-formed XML document you must have one root node and all attribute values must be in quotes
Lines 3-7 declares a photo node with three children description thumb_path and full_path description is exactly as it sounds It will contain a description for our thumbnail thumb_path contains the path to our thumbnail image Same goes for full_path it contains the path to our full image
I then just copy and pasted that and pasted it 14 times just changing out the description Remember wersquore just using dummy data When you finish go back and add photos of your choice
The ClassesWersquoll be using two additional classes for this project One will be for the thumbnails and another for the full image Right click the classes folder go to new and click ActionScript class In the name field type ThumbNail For the Superclass type in flashdisplaySprite Wersquoll need to extend from that class so we can use the functionality of that object but add our own (see Figure 4)
Add another class this time name it BigPhoto It should also inherit from flashdisplaySprite
CodingTime to start writing the ActionScript for this project Open up PhotoGalleryas from the Flex Navigator and type in the code from Listing 2 Open up ThumbNailas and type in the code from Listing 3 Open up BigPhotoas and type in the code from Listing 4 Now that you have all the code in itrsquos time to test In the menu bar click RungtRun PhotoGallery (see Figure 5) If you get an error make sure you typed everything correctly If all went well you should see the gallery open up Click the buttons and watch the gallery scroll left and right Roll over the thumbnails to see the description scroll up Click on a thumbnail to see the full image fade in You might be wondering about whatrsquos going on Irsquoll try to break that down for you next
The ExplanationOur main focus is going to be whatrsquos going on in PhotoGalleryas This file contains the ActionScript that makes almost everything happen We first start off by declaring our properties that will be used in the project Yoursquoll notice a couple of embeded lines These lines are MetaData tags that actually embed assets into the project The two embeded lines you see add the next-arrowpng file and the back-arrowpng file In the constructor there is one call to a method called init() This method gets the application going by requesting and loading in the XML File When the file finishes loading we store the XML data into our _xml property Next we call the loadImages() method This method is responsible for a big part of the application We first gather some information from the XML file and store it in temporary variables
bull imageWidth stores the image _ height attributes valuebull imageWidth stores the image _ width attributes valuebull imageGap stores the image _ gap attributes valuebull rows stores the row attributes valuebull rowCounter increments ever pass of the for loop Is
compared against the rows variablebull columnCounter increments once for every column
created
The for loop cycles the XML file creating a new ThumbNail object with every iteration During each iteration we create variables that store the path to the thumb nail (path) and the description of the thumbnail (description) We pass the variables into the methods of the ThumbNail class Remember the ThumbNail class defines methods and properties that are specific to it The class code is commented if you wish to explore it Again our main focus is PhotoGalleryas To create the grid we write ifelse logic that compares the rowCounter variable to the row variable For every iteration of the loop we increment that variable if that variable becomes greater than rows we set it back to 0 rowCounter is then multiplied to the y-axis of each ThumbNail object The rest of the code is commented for you to explore
ConclusionYoursquoll notice I actually hard coded a lot of values directly in the ActionScript Not too ideal In the next part of this tutorial wersquore going to come back to this code and modify it to be a little more flexible and visually appealing If you have any questions feel free to contact me through my site (wwwcodedbyryancom)
RYAN DrsquoAGOSTINORyan DrsquoAgostino is an Interactive Developer at NAS Recruitment Communications in Cleveland OH part-time instructor at Virginia Marti College of Art and Design in Lakewood Ohio and freelance designer and ActionScript developer For more information about Ryan please visit httpwwwcodedbyryancom
032010 (11)44
COMPONENTS
Components are the controls and containers that are the elements of the application that create the interface They cover controls such
as buttons and check boxes containers that can hold other containers and controls navigation elements and charts Components can be added to your application in variety of ways They can be added through the design view writing then in MXML or through ActionScript
Flash Builder now has two major sets of components the Halo set which has been available in previous versions of Flex and the new Spark set The components from the Spark set have a direct correlation to a component in the Halo set but not all Halo components have been upgraded to the Spark framework yet The namespaces for these components are added automatically when a MXML document is created and you will notice there are now multiple namespace in the main MXML document already
Creating custom components takes two paths The first is to create a skin for an existing Halo component in Flash Illustrator Photoshop or Fireworks or create a custom skin for a Spark component using MXML The second path is to create a completely custom component using Flash Professional and importing it into the Flash Builder project We are going to focus on the second path and create a custom component with Flash Professional
The first step in creating a custom component is to instal the Flex Component Kit mxp into Flash Professional This is an extension that will expose some
Custom Flash CS4
Flash Builder comes with a lot of components to cover almost all of an apps needs But what if you want a custom look or functionality to a component With Flash Professional you can create custom components and import them into Flash Builder for use in your application
What you will learnhellipbull How to create custom components in Flash Professional to im-
port into Flash Builder
What you should knowhellipbull Flash Professional CS4bull Flash Builder 4bull Actionscript 3
Components in Flash Builder 4
Figure 1 The component artwork Figure 2 Converting the movie clip
032010 (11)46
COMPONENTS
Listing 1 The component class
package comtest
import mxflashUIMovieClip
import flasheventsEvent
import flasheventsEventDispatcher
import flasheventsMouseEvent
import flashfiltersGlowFilter
public class SliderButton extends UIMovieClip
public static const BUTTON_CLICKString = button click
private var glowGlowFilter = new GlowFilter(0x0000cc54421falsefalse)
public function SliderButton()
plusButtonbuttonMode = true
minusButtonbuttonMode = true
plusButtonaddEventListener(MouseEventMOUSE_OVER handleMouseOver)
plusButtonaddEventListener(MouseEventMOUSE_OUT handleMouseOut)
plusButtonaddEventListener(MouseEventCLICK handleMousePress)
minusButtonaddEventListener(MouseEventMOUSE_OVER handleMouseOver)
minusButtonaddEventListener(MouseEventMOUSE_OUT handleMouseOut)
minusButtonaddEventListener(MouseEventCLICK handleMousePress)
private function handleMouseOver(eMouseEvent)void
ecurrentTargetfilters = [glow]
private function handleMouseOut(eMouseEvent)void
ecurrentTargetfilters = []
private function handleMousePress(eMouseEvent)void
if(ecurrentTargetname == plusButton ampamp trackThumbx lt 134)
trackThumbx++
else if(ecurrentTargetname == minusButton ampamp trackThumbx gt 37)
trackThumbx--
dispatchEvent(new Event(SliderButtonBUTTON_CLICK))
032010 (11)48
COMPONENTS
of the Flex classes to Flash allowing the component to communicate with the application Download the extension from the Adobe site at httpwwwadobecomcfusionexchangeindexcfmevent=extensionDetailampextid=1273018 and install using the Adobe Extension Manager The extension should work with Flash
versions as far back as Flash 8 but I highly recommend using at least Flash 9 (CS 3)
Once the extension is installed launch Flash Professional and create a new ActionScript 3 project We are going to create a simple slider button that has a plus and minus button on each end of the button and a track between them When the plus and minus buttons are clicked the the track thumb will move one pixel in either direction There will also be a roll over behavior on the buttons to change their look as the mouse rolls over and off the buttons Finally Flash Builder will receive the event of the button being pushed and update a text input on the stage
It is common to encapsulate the behaviors of the component within itself and have events broadcast to the containing application If you think about some of standard components in both Flash Builder and Flash Professional and deconstruct them in your mind you will see that the same methods are used on them The NumericStepper is a lot like our component It has two buttons with a text field that displays a value that is incremented or decremented with each push of the button The component itself does nothing to effect the application until the code calls it to either send or receive a value
With our new document we are going to create the artwork for the component in the fla file Create four movie clips one each for the scroll track the plus button the minus button and the track thumb (Figure 1) The naming and look of these movie clips are not important
Once the movie clips are created and on the stage give each one an instance name The names in the
Figure 3 Setting the class of the movie clip
Figure 4 Setting to export as SWC
Figure 5 Creating the Flash Builder project
Custom Flash CS4 Components in Flash Builder 4
032010 (11) 49
example files are plusButton minusButton and trackThumb The actual names do not matter and we dont need an instance name for the track since we are not going to reference it in Flash Builder Flash Builder will reference the instance names of the movie clips in the components we will use these later
Now that the artwork has been created it must be collected into its own movie clip Select all of the artwork on the stage and choose ModifygtgtConvert to Symbolhellip In the Library panel there is a new symbol that is called in the sample files SliderButton The name is important here because this is how the Convert to Flex Component mxp will name the class that Flash Builder will refer to later
An external class will give the component the internal behaviors that were mentioned earlier as well as an event to broadcast to the Flash Builder application (Listing 1) All the code in the class should be familiar but there are a few points to go over First the package name is given the qualifier of comtest to identify that the component belongs to our namespace This is not necessary but helpful when there are multiple components or components from different publishers in the application
The most important change is instead of having the class extend the Sprite class this class is going to
extend the UIMovieClip class This class like the Flex Component in the library exposes the behaviors and methods we set up in the class to the Flash Builder application In the import statements use import
mxflashUIMovieClip The mxflash class includes both the UIMovieClip and ContainerMovieClip classes
When the variables are declared we set up a glow filter that will be attached to the buttons when the mouse rolls over them and a string constant for the event we create later In the constructor of the class the buttons receive the event listeners for the mouse interactions and the handlers are added later in the code In the handleClick event handler we use the event dispatcher class to dispatch the event Here we are just dispatching a standard event with the constant that was created earlier You can just as easily dispatc a custom event that has extra information attached to it
Select the movie clip in the Library panel then select CommandsgtgtConvert Symbol to Flex Component (Figure 2) The extension will do several operations such as making the symbol available to ActionScript giving the symbol a class name adding the Flex Component to the library and others
Save the file as SliderButtonas in the folder path comtest When you declare the package name as we have here you must have the same hierarchy as listed in the package name Back in the fla select the
Figure 6 The Package Explorer
Listing 2 The main MXML le
ltxml version=10 encoding=utf-8gt
ltsApplication xmlnsfx=httpnsadobecommxml
2009
xmlnss=librarynsadobecomflex
spark
xmlnsmx=librarynsadobecomflex
mx
width=200 height=110gt
ltfxDeclarationsgt
lt-- Place non-visual elements (eg
services value objects) here
--gt
ltfxDeclarationsgt
ltsApplicationgt
Listing 3 The new component and name space
xmlnstest=comtest
lttestSliderButton x=14 y=10 id=sliderButton
gt
032010 (11)50
COMPONENTS
SliderButton movie clip and select Propertieshellip from the contextual menu Expand the advanced area if it is not already and enter comtestSliderButton in the Class text field Leave the Base Class text field blank and click OK (Figure 3)
Select Publish Settingshellip from the file menu and click on the Flash tab (Figure4) Under the SWF Settings area of the window be sure that the Export SWC check box is checked The swc is the part that Flash Builder will use in the application SWC are archives that contain the classes and media assets of the component and make it easy to distribute the movie clip
Publish the SWF and SWC and we are ready to move to Flash Builder
Flash BuilderIn Flash Builder create a new project This example we only need a basic Flash Builder project without any
server technologies You can name the project anything you would like in this case I have name FB_Components and saved it in my default workspace
If you have not worked on a Flash Builder project yet it is a lot like working on the Flex projects in the past with some new MXML tags You will also notice that the Flex Navigator pane has now been replaced with the Package Explorer (Figure 6)
The Package Explorer pane has a different organization than the Flex Navigator but the main MXML file can still be found under src then under the default package
Looking at the main MXML (Listing 2) you will see that the three name spaces are added automatically and the application begins with sApplication instead of mxApplication These are the minor differences to be on the look out for when working on a Flash Builder project
Listing 4 The nal MXML le
ltxml version=10 encoding=utf-8gt
ltsApplication xmlnsfx=httpnsadobecommxml2009
xmlnss=librarynsadobecomflexspark
xmlnsmx=librarynsadobecomflexmx minWidth=200 minHeight=110
width=200 height=110
initialize=init()
xmlnstest=comtestgt
ltfxDeclarationsgt
lt-- Place non-visual elements (eg services value objects) here --gt
ltfxDeclarationsgt
ltfxScriptgt
lt[CDATA[
private function init()void
sliderButtonaddEventListener(SliderButtonBUTTON_CLICK updateText)
private function updateText(eEvent)void
pixelTexttext = String(sliderButtontrackThumbx)
]]gt
ltfxScriptgt
lttestSliderButton x=14 y=10 id=sliderButton gt
ltsLabel x=39 y=41 text=The position of the track thumb is textAlign=center width=122gt
ltsTextInput x=76 y=76 width=49 id=pixelTextgt
ltsApplicationgt
Custom Flash CS4 Components in Flash Builder 4
032010 (11) 51
To get our component into the Flash Builder project we need to put the swc some where the project can see it On your desktop navigate to where the swc was published to and copy the file Then navigate to where Flash Builder project is and put the swc into libs folder I have found it is easier to keep the fla and swf files out of the project then copy the swc over to the Flash Builder project as needed
Back in Flash Builder open the libs folder under the project in the Package Explorer pane In that directory you should see your swc if you do not try right clicking on the libs folder and selecting Refresh
In the MXML editor switch to Design view When the Design view becomes active the Component pane should become available in the lower left of the workspace The first folder in the pane is the Custom folder and our custom component should be displayed in the list Drag an instance of this component onto the stage
To show that we can have two way communication with the component drag a label and a text input onto the stage Set the labels text to be The position of the track thumb is and move the text input near the label Set the id of the text input to pixelText (Figure 7) Switch back to the Source view after saving
Notice that several lines have been added to the source of the MXML document In addition to the MXML for the component including our custom component a name space value has been added to the sApplication tag designated as xmlnstest=comtest (Listing 3) If we add more components using the same comtest package declaration they will all fall under this name space If we were to add more components using a different package additional name spaces would be added You will also notice that the component starts with testSliderButton as opposed to s fx or mx
In the application tag add an initialize property calling a function called init() After the fxDeclarations tags add fxScript tags to hold the Actionscript As you type fx the code completion should pop up and allow you to select the fxScript tags
Add an id property to the SliderButton tag and give it a value of sliderButton In between the CDATA tags add the init function This function simply adds an event listener to our component calling the updateText
function every time the BUTTON_CLICK event is broadcast from the SliderButton class (Listing 4)
Once the application receives the BUTTON_CLICK event it calls the updateText function This function looks into the component and gets the x position of the track thumb then puts that value into the text input we set up earlier
So now we have communication coming out of the component using the dispatchEvent call in the class We are also looking into the component where the application is getting the x position of the thumb track inside the component Communication can get much more complicated than this but this is a simple example to give a starting point to create more complex components
Click debug to run the application and if no errors occurred the application should launch in a browser window If you have a browser window open before running the app you should close it There is a bug in the Flash Player at the time of this writing that may cause the app to not run if there are browser windows already open
Once the application is running click on the buttons and watch as the value in the text input increase and decrease The custom component is now complete and ready to have more behaviors and methods added to it
ConclusionWhile the components that come with Flash Builder can cover most situations there will be times where only a custom component will fit the applications needs Creating a custom component takes a little work but can make the developers job a lot easier With this new level of control over the look and behavior of the component can make the application more rich and engaging to the end user
Figure 7 Components on the stage
On the Netbull httpwwwadobecombull httpwwwadobecomcfusionexchangeindexcfmeven-
t=extensionDetailampextid=1273018
LOUIS DICARROLouis DiCarro is a consultant based in NYC and has been working with Flash since the rst version He has taught web development at the college level and has worked for numerous large clients He can be reached at louisdicarroffdgmailcom
032010 (11)52
COMPONENTS AIR Components in Flash Builder
032010 (11) 53
We already know that building an AIR application affords us a lot more capabilities than working with a web based project
Digging through the Actionscript documentation shows that there are a lot of classes that are only available to AIR applications These mostly have to do with classes and methods that interact with the file system or windowing of the application
Flash Builder as with Flex Builder before it contains several components that are only available to use with AIR applications These components deal with
visual interfaces for interacting with the file system and a HTML component for displaying web content
You may wonder why these components are only available for AIR applications Mostly it is for security reasons Up to Flash Player 101 a swf does not have the permission to interact with files on the file system except in very limited circumstances
Swfs in the web browser are able to interact only with files on the server in which the swf is hosted This allows them to load images xml and other file types at run time but only if the files come from within its
AIR Components
Adding file and html rendering can result in a lot of code But with the AIR components in Flash Builder 4 this functionality can be added easily with only a few lines of code
What you will learnhellipbull What components are available for AIR applications in Flash
Builder 4
What you should knowhellipbull Flash Builder 4bull Actionscript 3
in Flash Builder
Figure 1 AIR Actionscript 3 special classes for the HTML component Figure 2 Layout of the HTML application
032010 (11)52
COMPONENTS AIR Components in Flash Builder
032010 (11) 53
Were going to take a look at couple of simple examples for each component to get a feel how use them It is also important to note that the documentation for these components are in the AS 3 documentation When looking at the documentation you will see a symbol next to some of the classes and also next to some methods within the classes (Figure 1)
HTML ComponentThe HTML component is very easy to work with It can pull in many types of media and render them as you would expect them to be rendered in a web browser
Start up Flash Builder and create a new Flex project Name the project and select Desktop under project type Click finish and let Flash Builder set up the project
Once the project is started click on the Design tab In the lower left a component tab should be open If it is not open it using the Window menu and selecting Components Scroll down to the Adobe AIR folder You will not see this folder if you set your project to run in a web browser
We are going to create a simple web browser using only three components and one line of code First drag a HTML component a text field and a button to the stage Arrange them how you would like and switch over to design view
Give each component an id as in Listing 1 Also give the button a click handler Type click and let the program auto complete another code hint will pop up to create the handler automatically
Flash Builder will generate the handler as well as the fxScript block in the code In the click handler that is generated add a line that will set the location of the HTML component to the text in the text field See Listing 2 for the full code
Run the application and fill in a valid web address in the application Remember to include http in front of
own sandbox There are exceptions and ways around it but for the majority the swf cannot interact with the file system
If the development of applications using Flash Builder and AIR were to succeed they would need to act like real desktop applications This means that the applications would have to load and save files just as any other application that a user would use on the computer
Security is still maintained in this model by having the developer digitally sign their application using certificates If the certificate is obtained though a trusted source the application would be traceable back to the original developer if something bad should happen
Having a HTML component gives the application greater rendering power by tapping into the Web Kit which can run better than the HTML renderers in the Flash Player This allows developers to repurpose content from their web site to the application
Figure 3 The application running Figure 4 Layout of the image viewer application
Listing 1 MXML of components
ltsTextInput id=addressBar x=10 y=10
width=518gt
ltsButton id=goButton x=555 y=13
label=Go click=goButton_
clickHandler(event) gt
ltmxHTML id=htmlPane x=10 y=40 width=620
height=430gt
Listing 2 goButton handler
protected function goButton_clickHandler(event
MouseEvent)void
htmlPanelocation = addressBartext
032010 (11)54
COMPONENTS
the address Click the Go button and the page should load after a few seconds Take a look at Figure 3 for the results
There are a lot of methods and commands associated with the HTML component This will allow you to make a more customized display and give more control over the HTML content that you show
File system componentsUsing the file system components is just as easy To test the components we are going to create a simple image viewer that allows the user to select the images from the file system
Create a new Flex Project as we did before and be sure to make it a desktop application Once the project has loaded switch to design view and drag a File System Tree and an Image component to the stage See Figure 4 for the layout
Once the application is laid out switch over to the Source mode and give all the components ids as we did before (Listing 3) Also add a change handler instead of a click handler Flash Builder will autocomplete and generate the handler for you as it did when we added the click action to the button
In the generated handler add the code that will load the image into the image component To keep everything simple we only are going to load jpg and png files (Listing 4) in this function we are first checking to make sure the file is a file and not a directory by checking for a file extension If the file passes the first test we check to see if the file is a jpg or png Lastly if the file passes all of these test it gets loaded into the image component
Save the file and run the application to see the results Clicking on the file system tree items will either open or close the directory or try to load the file When the user clicks on a jpg or png it will load into the image component (Figure 5) Note that as the tree expands a scroll bar is attached to the component automatically
ConclusionJust as with the HTML component there is more methods and properties available to you with the file system components In this demo application we have seen how easy it is to get access to the file system using the component without writing a lot of code
There is a lot more involved in making a full application using these components but we have witnessed how easy to get started with them Having more control over the elements as well as error checking would be added in real applications
Having these components available gives the application a large amount of functionality very quickly and allows the developer to concentrate on the logic of the application Using these components in your application will help make it more full-featured and feel more like a real desktop application
LOUIS DICARROLouis DiCarro is a consultant based in NYC and has been working with Flash since the rst version He has taught web development at the college level and has worked for numerous large clients He can be reached at louisdicarroffdgmailcom
Listing 3 MXML of components
ltmxFileSystemTree id=fsList x=10 y=10
height=460 change=fsList_
changeHandler(event)gt
ltmxImage id=imgPane x=193 y=10 width=437
height=460gt
Listing 4 Handler for change event
protected function fsList_changeHandler(event
ListEvent)void
var fileFile = eventcurrentTargetselectedItem
as File
if(fileextension)
if(fileextensiontoLowerCase() == jpg ||
fileextensiontoLowerCase() ==
png)
imgPanesource = fileurl
Figure 5 The image viewer application running
032010 (11)56
TLF Applying CSS to Text Layout Framework styles
032010 (11) 57
TLF is introducing the new way of applying styles to the text Prior to TLF flash used simple approach you had to prepare and attach
StyleSheet object to the style property of the TextFieldTLF provides more flexible and customizable but
more complex techniqueDuring this tutorial we are going to create a small
application in Flex 4 This application contains a text displayed with TLF component TextArea and 2 different CSS that can be applied to the text simply by pressing the button Figure 1 show the screenshot of the application
TextFlow and itrsquos IFormatResolverTLF provides a callback mechanism to for with text styles TextFlow objectrsquos got a property formatResolver that should implement IFormatResolver interface Actually it is a set of callback functions that are called by parent TextFlow when it processes itrsquos elements
To have a closer look at formatResolver we will implement itrsquos version to work with out simple CSS So start create a new project in Flex and name it for example TextCSS In the default package create a new ActionScript class named CSSFormatResolver that implements IFormatResolver interface
Listing 1 shows the complete implementation of the class and will we look closer into it later For now pay attention on the following functions
bull invalidateAll
bull invalidate
bull resolveFormat
bull resolveUserFormat
bull getResolverForNewFlow
These function are created automatically by Flex Builder as they are required for implementation of the interface All functions are callbacks that are called when the certain action is performed by TextFlow and it needs to know how to treat with different elements
Applying CSS
This article is a reply to our readerrsquos question about the possibility to apply CSS to Text Layout Framework (TLF) We will show how to implement the necessary class and switch text styles on the fly
What you will learnhellipbull how can custom styles be applied to TLF elementsbull how to implement IFormatResolver to work with CSS
What you should knowhellipbull the basics of Flex and FlexFlash Builderbull the basics of TLF
to Text Layout Framework styles
Figure 1 Style changing application
032010 (11)56
TLF Applying CSS to Text Layout Framework styles
032010 (11) 57
Main ApplicationListing 2 contains a full code for main application
The application consists of
bull TextArea with some text The text is formed using XML Some elements of the TextFlow have
For our case we are interested in resolveFormat function that is called for every element of the TextFlow when itrsquos style needs to be changed This function return an object that should implement ITextLayoutFormat
Before we continue lets have a fast look at main application and how we build our example
Listing 1 CSSFormatResolveras
package
import flashtextStyleSheet
import flashxtextLayoutelementsFlowElement
import flashxtextLayoutelementsFlowValueHolder
import flashxtextLayoutelementsIFormatResolver
import flashxtextLayoutelementsTextFlow
import flashxtextLayoutformatsITextLayoutFormat
public class CSSFormatResolver implements
IFormatResolver
private var _styleSheetStyleSheet
public function CSSFormatResolver()
_styleSheet = new StyleSheet()
public function invalidateAll(textFlow
TextFlow)void
public function invalidate(targetObject)void
public function resolveFormat(targetObject)
ITextLayoutFormat
var formatFlowValueHolder = null
if (target is FlowElement)
var elementFlowElement = target as
FlowElement
if (element = null)
format = elementformat as
FlowValueHolder
if (elementstyleName = null)
var styleObject = styleSheetgetSt
yle(elementstyleName)
formatcolor = style[color]
formatfontSize =
style[fontSize]
formatfontWeight =
style[fontWeight]
formatfontStyle =
style[fontStyle]
return format
public function resolveUserFormat(targetObject
userFormatString)
return null
public function getResolverForNewFlow(oldFlow
TextFlow newFlowTextFlow)
IFormatResolver
return null
public function get styleSheet()StyleSheet
return _styleSheet
public function set styleSheet(valueStyleSheet)
void
_styleSheet = value
032010 (11)58
TLF
032010 (11) 59
Listing 2 TextCSSmxml
ltxml version=10 encoding=utf-8gt
ltsApplication xmlnsfx=httpnsadobecommxml2009
xmlnss=librarynsadobecomflexspark
xmlnsmx=librarynsadobecomflexhalo
xmlnslocal=
width=640 height=300gt
ltfxScriptgt
lt[CDATA[
import mxeventsFlexEvent
protected function applyCSS1Button_
clickHandler(eventMouseEvent)void
var formatResolverCSSFormatResolver =
new CSSFormatResolver()
formatResolverstyleSheetparseCSS(css1
text)
textAreatextFlowformatResolver =
formatResolver
protected function applyCSS2Button_
clickHandler(eventMouseEvent)void
var formatResolverCSSFormatResolver =
new CSSFormatResolver()
formatResolverstyleSheetparseCSS(css2
text)
textAreatextFlowformatResolver =
formatResolver
]]gt
ltfxScriptgt
ltsTextArea id=textArea width=620 height=134
x=9 y=156gt
ltsTextFlowgt
ltsp styleName=h1gt
Title of the Text
ltspgt
ltsp styleName=h2gt
Section of the Text
ltspgt
ltspgt
This is a body text Lorem ipsum
ltspgt
ltsTextFlowgt
ltsTextAreagt
ltsTextArea x=10 y=10 width=285 height=86
id=css1 gt
lt[CDATA[
h1
colorFF0000
fontSize20
fontWeightbold
fontStylenormal
h2
colorFF00FF
fontSize16
fontWeightbold
fontStyleitalic
]]gt
ltsTextAreagt
ltsTextArea x=345 y=10 width=285 height=86
id=css2 gt
lt[CDATA[
h1
color00FF00
fontSize32
fontWeightnormal
fontStyleitalic
h2
color0000FF
fontSize24
fontWeightbold
fontStylenormal
]]gt
ltsTextAreagt
ltsButton x=108 y=105 label=Apply CSS
1 id=applyCSS1Button
click=applyCSS1Button_
clickHandler(event)gt
ltsButton x=443 y=105 label=Apply CSS
2 id=applyCSS2Button
click=applyCSS2Button_
clickHandler(event)gt
ltsApplicationgt
032010 (11)58
TLF
032010 (11) 59
got styleName attribute so you could apply the corresponding CSS style to them later
bull 2 TextAreas with simple different CSSbull 2 Buttons to apply CSS from TextAreas to example
text
When the button is clicked the new instance of CSSFormatResolver class is created Then the corresponding CSS string from the TextArea is parsed and set into resolverrsquos property of SlyleSheet class type And finally prepared formatResolver instance is assigned to the TextFlow
Applying CSS to TextFlowNow lets have more detailed look at resolveFormat callback function First it should return a value that implements ITextLayoutFormat if it returns null then no new styling should be applied to an element being processed by the function So we create format variable of FlowValueHolder (it implements ITextLayoutFormat) and set itrsquos value to null (we do that because resolveFormat works with all elements including TextFlow itself as probably we donrsquot want to apply one style to the whole text)
After we do all the necessary casts and null checks and if we are sure that current elementrsquos got styleName attribute we assign styles from CSS to a current format StyleSheet object is used to contain CSS data as it is convenient object to parse and retrieve CSS data
Conclusion and a WarningThere was a brief tutorial on how to apply simple CSS to TLF TextFlow Please note that CSSFormatResolver class is not fully functional and only can be applied to our sample CSSs Writing reusable and versatile class requires more detailed coding and approach
Check the TLF Blog on this issue There is fully functional CSSFormatResolver with example there httpblogsadobecomtlf200902iformatresolver_and_using_css_1html
MAXYM GOLOVANCHUK Maxym Golovanchuk is a Photoshop Certied Expert and TV producer and he is using Adobersquos software for implementing entertainment solutions including video delivery with Flash Media Server mexxikgmailcom
MondayTuesdayWednesdayThursday Friday
DIVISIONS OF CREATIVE NICHE INC
032010 (11)60
PROFILE Flashcreed ndash Business Gallery
032010 (11) 61
The Business Gallery (httpwwwflashcreedcombusiness_video_image_gallery) is a Flash component meant to do one thing to enhance the visual experience a website portfolio or presentation site gives to its users Mainly itrsquos all about the image you present yourself or
your product to the world wide web Letrsquos face it without the looks you canrsquot sell your product or image no matter how interesting it might be
Whatrsquos so great about this gallery you might wonder Well the answer is simple everything Advanced AS3 programming dynamic XML implementation unlimited number of media items on stage PNG JPG and video FLA SWF MP4 F4V supported media tween and image effects just to name a few of the over 150 settings this gallery brings you Bottom line you can customize it in any way you see fit in order to make it resemble your website layout Not to mention the code optimization that allows the gallery to run so smoothly even on low resources
We brought 45 background wallpapers in case just a color doesnrsquot do the job also a set of custom arrows and close buttons
Flashcreed ndash Business GalleryHello itrsquos good to be back here among Flash amp Flex Magazine readers Today we are going to tell you a bit about our products mainly our Business Gallery but since all our products are built on the same framework most of the properties apply to all When we first realized what we could do with this framework we decided to name it ldquoPandorardquo in order to point out the unlimited number of possibilities it revealed regarding customization and user friendliness
032010 (11)60
PROFILE Flashcreed ndash Business Gallery
032010 (11) 61
The size of the entire gallery and any element in it is subject to any kind of resize big stage and small thumbs or the other way around for any template you or your client desire
Column_scroll and the properties for the stage mask helps you configure the exact number of visible columns you want to set in order to browse through the media items your gallery has Beside this useful feature we added blur and a couple of tween effects for the leftright navigation that gives an impressive look
032010 (11)62
PROFILE Flashcreed ndash Business Gallery
032010 (11) 63
Either as tooltip or plain text you can show any information you want regarding a certain media thumb in the gallery You can change font type size spacing color position and many other properties
The color gradient system for roll overout mouse gesture is unique in every way if we are to compare it with other galleries on the market at this point You can customize up to 5 sets of color with different alpha values The gradient type either linear or radial can be modified with rotation and ratio values
032010 (11)62
PROFILE Flashcreed ndash Business Gallery
032010 (11) 63
When clicking on a thumb if preview_type is selected as internal a resizable preview window will reveal itself and depending on the media type (image or video) an image viewer or video player will be contained inside it If preview_type is selected as external you have the possibility to set certain URL addresses this allowing you to redirect the user to a specific area of the website like a product page from a virtual store for example
The video player has a dozen of controllers that allow you to create a skin to better suit the template you want to create for your gallery Buttonrsquos color thickness handler color or scrub bar size just to name a few of the properties you can play with
At an amazing price of 999 $ this has to be one of the best choices when it comes to media galleries flash components Donrsquot hesitate to take a look at it on wwwflashcreedcom and also consider other products that might better suit your specifications or desires We would definitely appreciate any kind of feedback regarding current or possible features
Thank you
032010 (11)65
BOOK REVIEW
Are you an actionscript 3 game developer who is not able to write a complete commercial game because you cannot manage dozens
of classes Or you are an experienced actionscript 3 applications developer who wants to program game but donrsquot like reading any available beginner book as it doesnrsquot suit your style Even if you already have a good grasp over java or c++ and interested in creating not only fun games but commercial ones also then this is what you really require
There are several actionscript 3 game development books for beginners out there but Essential Guide to Game Dev is one of those few books that talk about the advanced gaming concepts However its first chapter begins with an easy to understand game example (good for any beginner) and ends up creating 3 games Did I tell you 3 games in just first chapter
Teaching about an Actionscript 3 Game framework is one of the many reasons that make this book a kick-ass addition to actionscript 3 gaming library Authors teach you how to create 10 unique games ranging from arcade to driving tile based to puzzle game and shooters to dice games Another specialty of this book is to use Flex and Flash Develop IDEs along with the primary Flash tool that creates space for not only flex
developers but also Flash Develop users In addition to this you will also learn to create game assets with GIMP Mappy and a sound effect creation tool You will get information about copyright laws which are necessary for any would-be commercial game creation and a complete game example integrated with MochiAds
This book also discusses and further more implements various advanced topics such as bitmap rendering pixel-level collision detection sound management AI xml-based level designing scrolling screen optimization techniques particles etc
In short this book will surely blow your minds with the wealth of knowledge it includes and you will pray for authors to keep writing such informative and useful books
If you are really serious about gaming then donrsquot miss the opportunity of reading this book Highly recommended
by Ali RAZA ACI ACE SCJP
Essential Guide to Flash Games
Authors Jeff Fulton Steve FultonPublisher friends of EDISBN 978-1-4302-2614-7Language EnglishPages 664 PagesWebsite httpfriendsofedcombookhtmlisbn=1430226145

032010 (11)8
SPECIAL REPORT The Flash on iPhone War
032010 (11) 9
Due to the flexibility of Android it is easy to install apps from a variety of methods download from URL USB connection MiniSD card or the Android Market (httpwwwandroidcommarket) No syncing needed
Timeframe of AIR for Android While Adobe has not yet stated a release date for this upcoming tool developers can stay informed by signup at the Adobe AIR for Android Beta Notification (httpswwwadobecomcfusionentitlementindexcfme=labs_air_android_signup)
Future of Android Platformhellip Over the next several months there will be a number of new Android mobiles and tablets hitting the market this summer Personally the tablet that has me most excited is Notion Inkrsquos ADAM (httpwwwnotioninkinadamoverviewphp) but there are others as well including the Marvell Moby WePad (httpwwwmarvellcomcompanynewspress_detailhtmlreleaseID=1397 custom version of Linux that supports Android Flash amp AIR apps) Dell Mini 5 (httpgizmodocom5443837first-hands+on-and-video-dell-mini-5-android-slate) to mention a few
Donrsquot Forgethellip While you can develop Flash Flex and AIR apps for desktops laptops netbooks and Android Adobe also plans to bring AIR 2 and Flash Player 101 to Palm webOS Windows Phone 7 and BlackBerry RIM devices In addition Adobersquos Slider (Flex 4 Mobile Framework httplabsadobecomtechnologiesflexmobile) targeted to run on high-end smartphones (phones with a processor speed of 400Mhz or more and 128MB of RAM) is also scheduled to be available in 2010
Bottom Line Itrsquos going to be a fabulous year for developers building Android apps using Adobe Flash CS5 and AIR 2
Click here to view a few videos AIR on mobile devices httpwwwadobecomdevnetdevicesdemosBREAKING NEWSClick here to read Steve Jobs CEO of Apple direct response on why Apple isnrsquot including Flash on the iPhone and iPad httpwwwapplecomhotnewsthoughts-on-flash
Here is Lee Graham response to Steve Jobsrsquo posthttpl33meapples-ceo-entered-an-insanity-plea-as-the-re
Current eventshellip In the past few weeks it appears that Apple is still approving apps built with 3rd party tools while not approving those developed with the Flash CS5 iPhone Packager As Mike Chambers stated in a recent blog post (httpwwwmikechamberscomblog20100420on-adobe-flash-cs5-and-iphone-applications) Developers should be prepared for Apple to remove existing content and applications (100+ on the store today) created with Flash CS5 from the iTunes store
Moving forwardhellip While the future of FlashAIR on the iPhone and iPad remains problematic the situation has given birth to a very exciting and new AIR 2 developer tool AIR for Android (httpblogsadobecomair201004adobe_air_applications_for_andhtml) There are many from the Flash CS5 beta (including myself) that have ported our Flash CS5 iPhone and iPad Apps successfully to the Android OS For me I simply tweaked a couple of graphics resized compiled and installed directly to my Nexus One
The excitement The Android App Market is growing faster than any other app market currently out there partly due I believe to the fact that Google has created the OS as an open source platform a truly creative environment for the developer community As analyst James Governor put it (httptwittercommonkchipsstatuses12511502233) [The] company doing [the] most to grow the Android app base is Apple The new terms of service are AWESOME for the Android team
My experience with AIR for Androidhellip It is quicker to develop and easier to deploy giving you more time for other things
Building an iPhone App (with or without Flash CS5)
1Go to the Applersquos Developer Portal 2Code your app 3Create a distribution certificate 4Then you need to create a mobile provisioning file
for the app 5Compile 6If all went well you drag and drop your mobile
provisioning file and iPhone app into iTunes 7Finally sync your iPhoneiPad with iTunes
With AIR for Android
1You simply code your app 2Compile 3Install the app Done
LEE GRAHAMLee Graham is co-founder of TRImagination (httptrimaginationcom) an educational app company based in the United States He has been involved in creating interactive eLearning programs for ve years and working with Adobe in beta testing Flash CS5 AIR 2 amp AIR for Android
10
IN BRIEF
032010 (11) 11
IN BRIEF
032010 (11)
Flash Builder Flex 4 and Cold-fusion Builder releasedOn the morning of march 22nd Adobe removed the beta versions from Ado-be Labs and added downloads for shipping versions If yoursquove wondered if yoursquoll want to upgrade your Flex Builder to Flash Builder - trust us - you real-ly should Flash Builder which is now part of Creative Suite 5 Web Premium and Master Collection is a joy to use and the new Flex SDK solves a lot of issues developers have had
The price of the software are Flash Builder 4 Standard $249 (upgrade $99) 4 Premium $699 (upgrade $299) Coldfusion Builder 1 $299 (upgrade na)
Some new features of FB4
bull Improving designerdeveloper workflowbull Enabling data-centric developmentbull Dataservice modeling and binding made easybull Advanced data management features
from flashmagazinecom
Adobe Online Developer Week May 10-14During Developer Week learn about the Adobe Flash Platform including Flex Flash Builder AIR and how it integrates with Cre-ative Suite 5 technologies This week-long event features free live webinars presented by Adobe technology experts See live demos and have your questions answered by the experts during interactive QampA sessions Register and attend whichever sessions suit your needs and you will be eligible to win a copy of Flash Builder 4 Professional or Creative Suite 5 Web Premium For more info and registration visit httpwwwadobecomcfusioneventindexc fmevent=detailampi-d=1489921amploc=en_us
from webkitchenbe
Adobe Flash Platform on androidIf you want to know when Flash Player 101 and AIR 20 becomes available for Android go to adobecom and sign up for the notication The promises say itrsquoll come in H1 of 2010
from corlanorg
Apple Slaps Developers In The FaceThe new iPhone 40 SDK modied the terms of use so now creating appli-cations in any non-Apple-approved languages is a violation of terms This does not just affect Adobe but also other technologies like Unity3D Apple announced this right before Flash CS5 came out with the -now useless- iPhone packager
ldquoNow let me put aside my role as an official representative of Adobe for a moment as I would look to make it clear what is going through my mind at the moment Go screw yourself Apple ldquo
ldquoI believe that we have witnessed a deliberate smear campaign aga-inst Flash to drive content providers towards improved web browsing support for iPhone OS devices A purely competitive measure driven to ensure that Apple devices can appear to compete with impending releases of Android that include Flash Player 101rdquo Mark Doherty
from theashblogcom ashmobile-blogcom
PDF Navigator developer con-test could get your FlexFlash resume in front of leading RIA amp brand agenciesAcrobatUserscom has launched the Acrobat PDF Portfolio Navigator con-test Flex developers create custom navigators using Flex and the Acrobat ActionScript API The top three entries win great prizes The top ten get their FlexFlash portfolios in front of some of the top brand RIA and user experience design firms in the world G2 Blitz Catalyst Resources Effecti-ve UI and Universal Mind
Its a win win situation The Adobe-sponsored Acrobat User Communi-ty gets examples of innovative PDF Navigators Flex developers get the chance to show off their create and technical work to the people who are looking for great and creative Flex developers Adobe will also feature the top ten entries on the Adobecom website
The contest runs now through June 7 2010 Full contest details are at httpwwwacrobatuserscomnavigator-contest
10
IN BRIEF
032010 (11) 11
IN BRIEF
032010 (11)
Flash is as open as HTML5Today the hottest topics in Flash news are in connection with Apple and HTML5 Serge Jespers wrote a same titled post on his blog about his opinion in this topics Here are some toughs from it This is not a fight HTML5 and Flash can live together just fine and can even complement each other On AppleInsi-der an Apple spokeswoman claimed that Mike Chambers got it all backwards when he blogged about Applersquos closed system Thatrsquos not the part that made me cringe though She said that ldquoit is HTML5 CSS JavaScript and H264 that are open and standard while Adobersquos Flash is closed and proprietaryldquo
H264is far from open It is owned by a private organization known as MPEG LA who said earlier this year that ldquoInternet Video that is free to end users would continue to be exempt from royalty fees until at least December 31 2015ldquo Nobody knows what is going to happen after 2015
So what about HTML5 CSS and JavaScripthellip Those are open right Well yeah The specs are open meaning that everyone can download tho-se specs and build an application around it to display that language Heyhellip Wait a minutehellip That sounds a lot like Flash The specs for FLV (Flash video) SWF (the file format for Flash Player) AMF (the binary format for exchanging data) and RTMP (the protocol used for transmission of audio video and data) are all published and can be downloaded by anyone
The specs for HTML5 are decided by the Web Hypertext Application Techno-logy Working Group (WHATWG) The WHATWG was founded by individuals of Apple the Mozilla Foundation and Opera Software in 2004 after a W3C work-shop Apple Mozilla and Opera were becoming increasingly concerned about the W3Crsquos direction with XHTML lack of interest in HTML and apparent disre-gard for the needs of real-world authors Anyone can participate as a Contribu-tor by joining the WHATWG mailing list The same goes for Flash The bugbase is open to anyone and anyone can view bugs and add feature requests But the Flash runtime is closed Okhellip Surehellip Flash Player is not open source although some parts are That saidhellip Ask yourself this Is your browser open source The only browser that is completely open source is Firefox Safari is only partly open source (only the WebKit engine) The same can be said about Chrome (in the Chromium project) However the biggest HTML runtime out there ndashInter-net Explorer (still used by over 50 of all internet users)ndash is as closed as Flash Player And so is Opera (even though they are part of the WHATWG)
And with that I come back to the title of this post Flash is as open as HTML5 = HTML5 is as open as Flash
from webkitchenbe
Adobe Creative Suite 5 AnnouncedOn April 12th Adobe released Creative Suite 5 the next evolution of Adobe products delivering a huge amount of new technology and innovation for de-sign and development on the web print video photography and extending the creative workflow with Omniture Analytics With the new suite of tools we have delivered Flash Player 101 for the creation of web content across platforms including mobile smartphones
Some new features of Flash CS5bull New text enginebull XML-based FLA filesbull Spring for Bonesbull Deco brushes
Flash Player and Googlersquos Chrome integrationFrom now on when users download Chrome they will also receive the latest version of Adobe Flash Player There will be no need to install Flash Player separately
Users will automatically receive updates related to Flash Player using Google Chromersquos auto-update mechanism This eliminates the need to manually download separate updates and reduces the security risk of using outdated versions
With Adobersquos help we plan to further protect users by extending Chromersquos ldquosandboxrdquo to web pages with Flash content
from corlanorg
Brand new FlexorgThose of you familiar with Flexorg will notice a substantial differenceBe sure to check out the new Flex showcase (click ldquoWhatrsquos Possibleldquo) Every time they add an application to the showcase they tweet it on httptwittercomexshowcase so follow them
Now when you want to show your boss friends and co-workers what Flex is about you have a good place to send them for a quick introduc-tion
from gregsramblingscom
Flasher Magazine Issue 3 by Lee BrimelowLee Brimelow Platform Evangelist at Adobe released the 3rd issue of Flasher Magazine and you can watch it on his blog httptheashblogcomp=1942
from theashblogcom
News selected by Gaacutebor Csomaacutek
bull Video improvementsbull Streamlined development environmentbull Integration with Adobe Flash Builderbull Omniture integration
032010 (11)12
TOOLS Storyfarm Switches to G-Technologytrade G-SPEEDtrade eS PRO to Cut Latest Doc Projects
032010 (11) 13
Video editors working in high definition (HD) face increasing technical challenges on a daily basis Their tools need to be sharp fast and function
well under deadline The sheer size of video files that have to get pushed through todayrsquos postproduction workflows can slow a system down to a level where the creative process just isnrsquot fun anymore For an editor working in HD the external storage solution that holds your video is now as important as your camera computer and editing software and the last thing any editor wants is to have issues because their workstation canrsquot deliver the goods
The Story Behind Storyfarm Storyfarm (httpwwwstoryfarmcom) is a post-production shop based in San Francisco Owner Dean Mermell cuts long-form documentaries corporate promos and TV commercials for a wide range of clients in the greater Bay Area Hersquos written for DV magazine and Macworld and taught Final Cut Proreg and digital filmmaking at Stanford University In his free time Dean writes produces directs and scores c o n t e m p o r a r y silent films His silent short Modern Life won the 2000 San Francisco International Film Festivals Golden Gate Award for best short film
The Solution G-Technology G-SPEED eS PRO
Benefits Speed and scalability Dean had reached a point at his company where he couldnrsquot afford to compromise on performance any longer While Dean doesnrsquot work much with uncompressed video he does use a lot of layers composites and effects at 720 and 1080 resolutions so he needed the same kind of throughput as editors working with uncompressed 2K files
The G-SPEED eS PRO was appealing to Dean because not only did it suit him for the work hersquos doing now but if he wanted to work on uncompressed or 2K projects in the future he liked the idea of simply adding another G-SPEED eS PRO to the system which is much cheaper than moving up to fibre channel
A single four-drive G-SPEED eS Pro unit in RAID 0 delivers a data transfer rate of up to 424MBsec read and 406MBsec write performance
When two units are connected together in fail-safe RAID 5 using the included PCIe RAID controller card the performance goes up to 678MBsec read and 730MBsec write
Capacity Knowing that the current 35-inch G-Technology product line utilized Hitachirsquos latest 2 terabyte (TB) Deskstar drives Dean decided the 8TB G-SPEED eS PRO would best meet his needs While eight terabytes seemed like a lot of space at first Dean sometimes has two or even three client projects going on at once as well as his own creative work and he quickly found that the hours of 1080 data he was working with added up fast
Great Tech Support You can have the best hardware at your disposal but if you canrsquot get the help you need when you crucially need it itrsquos not worth anything When configuring the G-SPEED eS PRO Dean quickly discovered the value of a responsive technical support staff
Storyfarm Switches to
San Francisco-based post house sold on productrsquos speed capacity scalability and responsive tech support
G-Technologytrade G-SPEEDtrade eS PRO to Cut Latest Doc Projects
032010 (11)12
TOOLS Storyfarm Switches to G-Technologytrade G-SPEEDtrade eS PRO to Cut Latest Doc Projects
032010 (11) 13
the Panasonic HVX 200 JVCrsquos HM100 and even an old Sony PD150
At the end of each production day David overnights Dean the P2 files on a small FireWire drive which Dean copies and unpacks onto his G-SPEED eS PRO before overnighting the drive back to the filmmakers Links to trailers and clips for both of these projects can be found on Storyfarmrsquos Projects webpage (httpwwwstoryfarmcommainfolderStoryfarmProjectshtml)
The external storage solution Dean used prior to his work with David and Susan worked fine for standard definition projects that didnrsquot come with punishing deadlines However when The Trouble With Normal landed in his lap he soon found that his current solution just wasnrsquot up to the task in terms of reliability and performance
The video bit rate for this project comes in at around 59MB per second which my previous RAID could handle without a problem said Dean But for this particular project and the way itrsquos being cut the amount of layers and filters not to mention the sheer volume of data brought my old system to its knees
Dean researched the G-Technology by Hitachi product line and decided the G-SPEED eS PRO configured in RAID 5 had the speed security and capacity to meet his workflow needs
Whatrsquos Next for Storyfarm Dean hopes to complete The Trouble with Normal in 2010 get attention through the usual festival channels and gain a greater audience through HBO or another such entity The Next US is already online with several moving episodes
Of course part of what has really made these projects fun for me is having a rockinrsquo system that doesnrsquot slow my creative process And in addition to my Mac I have the G-SPEED eS PRO to thank for that
The G-SPEED eS PRO is striped in RAID 0 right out of the box and it was wicked fast but like many editors do these days Dean really wanted to format it in RAID 5 He called tech support and immediately spoke to a person who was very knowledgeable about the G-SPEED eS PRO drive and how different RAID levels work overall
Additional features of the G-SPEED eS Pro include
bull RAID 0 1 3 5 and 6 ndash easily configurable and managed via a browser-based GUI
bull Single unit supports multi-stream compressed HD ProRes 422 and single stream uncompressed HD playback
bull Super quiet desktop unit with very small footprint bull Two units support dual-stream HD playback and
a single stream of 2K bull Professional locking mini SAS port with mini SAS
cable included bull Storage capacities available up to 8TB per unit
scalable to 16TB bull Compact and stylish aluminum enclosure with
thermo-regulated cooling fans bull Hot-swappable disk drive modules bull Formatted HFS+ mounts on a Mac Pro desktop
right out of the box
Going Beyond Normal Deanrsquos current documentary project The Trouble With Normal is about the peculiar state of the modern mental healthcare system and what it means to be crazy Filmmakers David Mackenzie and Susan Perkins of Everyday Wonder Productions (httpwwwwondereverydaycom) shot the project in cities all over North America using a Panasonic HVX 200 set up to capture in DVC PRO HD24720P
Deanrsquos editing takes a colorful non-linear approach that reflects the content of this non-traditional documentary
Irsquove been using a lot of layers speed changes and effects that really push the boundaries of long form editing to try and communicate the emotional content of the film It really maxed out my previous system but the G-SPEED eS PRO is handling it with ease
The Next US Project Dean is also working with Everyday Wonder on The Next US project an ongoing series of 5-minute Webisodes that profile small businesses in America that are thriving in this supposedly bleak economy
David and Susan are currently travelling across the country in an RV thatrsquos outfitted with a mobile production studio The project is being shot using a number of different cameras and formats including
DEAN MERMELLDigital lmmaker teacher composer and video editor
Martin Landau and Dean Mermell holding their awards for lifetime achievement and best editor respectively which they received at the California Independent Film Festival
032010 (11)14
BEGINNERS Working with Display Objects 101
032010 (11) 15
The DisplayObject class is the base class for all objects that can be placed on the display list The display list manages all objects displayed in Flash
Player or Adobe AIR Use the DisplayObjectContainer class to arrange the display objects in the display list DisplayObjectContainer objects can have child display objects while other display objects such as Shape and TextField objects are leaf nodes that have only parents and siblings no children (httplivedocsadobecomflash90ActionScriptLangRefV3flashdisplayDisplayObjecthtml)
The DisplayObject class supports basic functionality like the x and y position of an object as well as more advanced properties of the object such as its transformation matrix
DisplayObject is an abstract base class therefore you cannot call DisplayObject directly Invoking new DisplayObject() throws an ArgumentError exception
All display objects inherit from the DisplayObject classSo what does that really mean Well I like to refer to
display objects as any visual on the stage hence the name display So therefore I call them visual objects interchangeably throughout this article
A visual object can be a MovieClips Sprites Text Fields Shapes Buttons etchellip again all visual items that reside on the stage
So let get started and learn how to import the objects to the library we will be using the example files that accompany this lesson feel free to use any file that you want to follow along with
Note if you already understand this process please feel free to skip ahead if not we will go step by step for the first MovieClip then skip certain sets in the subsequent examples
Go to File =gt Import =gt Import to Library
Select the justinjpg This will bring the image into the library
Working with
No matter what you do in Flash you will encounter display objects at some point So what exactly are display object Adobe lists the following definition from their live docs
What you will learnhellipbull the basics of how to create and manipulate Display Objectsbull use the visual way by dragging from the librarybull add Display Objects to the stage using only AS3 code
What you should knowhellipbull doesnrsquot need and prerequisite knowledge when it comes to
tutorial
Display Objects 101
032010 (11)14
BEGINNERS Working with Display Objects 101
032010 (11) 15
(Note this name can be anything you want) I typically use _mc _btn etchellip behind the name for two reasons the first being it lets me know easily what type of object Irsquom using and the second it enables code hinting in Actionscript by using the underscore prefix (_mc) Also make sure you registration point is set to the upper left This is reference point for the MovieClip
Once you have done that select your newly created MovieClip instance on the stage and give it an instance name I called the instance the same thing I named the MovieClip justin_mc
Now we can then access its properties via Actionscript If you not familiar with instance names this simply is a way for you to tell Actionscript which item you are referring to
Create a new layer and label it actions and lock the layer
Select the first frame and open the actions panel Window=gtActions
The first properties we are going to manipulate in the Display Object aka MovieClip is the location parameters x and y These are going to be set in the upper left corner where you registration point was set up Enter the code into the actions panels
justin_mcx = 0
justin_mcy = 0
If you test the flash movie you will get something that should look like this
There are two way to access these objects the first way is to drag the justinjpg image out from the library to the stage
Now you will need to convert this image into a MovieClip which is a Display Object You do this by going to Modify=gtConvert to Symbol
This will pop up a dialog box These settings will be for your new MovieClip Give it a name of justin_mc
032010 (11)16
BEGINNERS Working with Display Objects 101
032010 (11) 17
Good now you can play around with the values and change them to see where other x and y values will place the MovieClip The images shown here are with the x and y set to 200
Lets try to access some different properties types enter the following code into your actions panel
justin_mcscaleX = 15
justin_mcscaleY = 15
If you test the movie you will now see that an output of the justin_mc MovieClip is 15 larger that before Your image might be pixilated since itrsquos stretching it to a larger dimension
Ok congratulations you have successfully added a displayvisual object to the stage and manipulated it Pretty Simple
Now lets delete the MovieClip from the stage and access it only through Actionscript
Once you have deleted the MovieClip off the stage go to the Library panel and right click the justin_mc and select properties
Select the Export for Actionscript option The name you see here will be the name that you create the object from in Actionscript This name can be anything but we will keep it the same as our instance name for no other reason but consistency
032010 (11)16
BEGINNERS Working with Display Objects 101
032010 (11) 17
Once you select the OK button you will get a window that looks like this Just select OK
So if we test our code now we will get and error because we have yet to create a MovieClip and add it to the stage
So delete all the code you have currently in the actions panel We will first create a variable that will hold the newly created instance of the MovieClip from the library instead of dragging it to the stage like we did before
Enter the following code
var anyNamejustin_mc = new justin_mc()
addChild(anyName)
the var keyword creates a variable anyName Note as the name states this can be called any name you want it to be eg Bob Billy Susan or whatever This is essentially its instance but in code instead of
selecting it and on the stage and then adding it via the properties panel like we did before justin _ mc references the library class name that you set earlier within the propertiesand the = new justin_mc() creates a new instance of a MovieClip name justin_mc() and assigns it to the variable
The addChild(anyName) just tells Flash to add the object to the stage using the variable (var) reference that you just created If you donrsquot use the addChild(name of variable) you will not see your visual object show up on the stage
So as you see itrsquos really not that difficult to access a display object and display it
Finally we will adjust some of the properties just as we did before Except this time we use the variable name that was called anyName Again this is just like your instance name see (Listing 1)
In next months issue we will continue this expedition of display objects and touch on things like drawing shapes using only code and working with text I hope you enjoyed this article please feel free to email me your comments or questions to jundajgmailcom
JUSTIN P JUNDAIs a New Media Engineer specializing in FlashAS2-3 Photo-shop After Effects PHP MySQL and a slue of other program-ming languages Justin also loves to travel and has a strong passion for teaching others how to use these technical pro-ducts He currently works with a top government-contracting rm implementing new media ideas into interactive course-ware that is then delivered to the military in order to effecti-vely train them Also check out shprotv to see the latest video from him and his partner Director Scott Hansen wavelenght-fxmaccom You can reach Justin at jundajgmailcom with any thoughts or concerns you have regarding this article
Listing 1
Creates Instance of the MovieClip named justin_mc
var anyNamejustin_mc = new justin_mc()
Set properties for the MovieClip properties
can be things like rotation
x y coordinates Scale sizes
etc
anyNamex = 100
anyNamey = 100
anyNamerotation = 45
anyNamescaleX = 15
anyNamescaleY = 15
Assigns the movie clip to the stage
addChild(anyName)
032010 (11)18
FLASH AND PHP
The webinar hosted by Ryan Stewart Platform Evangelist at Adobe and Kevin Schroeder Technology Evangelist at Zend hit the Web around
the same time that Zend announced Code Tracing had been added to its PHP web application server Who you might ask is this company called Zend And what is an article about flight recorders doing in Flash amp Flex Magazine After all yoursquore a Flex developer so why should you care
Who is ZendPHP runs a third of the worldrsquos Web sites and has now become the most popular language for building dynamic Web applications Zend Technologies Inc is the leading provider of products and services for developing deploying and managing business-critical PHP applications Zend contributes to Zend Framework (an open source objected-oriented Web application framework) and now Zend Framework is bundled with Adobe Flash Builder 4
What is a Software Flight RecorderWhen something goes wrong with an airplane in flight investigators obviously canrsquot reproduce the problem Instead they rely on data captured by the airplanersquos black box flight recorder in order to uncover the source of the problem Zend Server does the same for PHP web applications Rather than trying to recreate the environment and reproduce the steps leading up to a problem Zend Server captures in real-time the full
execution of an application ndash in production or in a test lab ndash and pinpoints root cause issues without trail and error This feature called Code Tracing is akin to a software flight recorder for PHP web applications
Code Tracing can be activated to automatically capture problems in real-time or used manually to trace specific scenarios Zend had strict requirements for the Code Tracing user interface
bull The performance chops to handle megabytes of databull A highly-interactive view for an exceptional user
experiencebull The ability to modify widget behaviorbull Established cross-browser supportbull Sufficient and accessible technical content and
expertise see (Figure 1)
Zend considered various alternatives and ultimately chose Adobe Flex for the following reasons
bull Performancebull Flexibilitybull Maturitybull Flash Builder 4 support for data-focused applications
Why Flex developers should care
bull Adobe Flash Builder now has built-in support for Zend Framework a PHP framework based on PHP 5
bull PHP provides easy integration with back-end logic using Flash remoting
bull Zend Server is a data-centric web application server and Code Tracing helps improve development and deployment in high performance production environments
EXCERPT FROM WEBINAR BY KEVIN SCHROEDER AND RYAN STEWART
How a Software Flight Recorder was You might have caught a recent webinar How Zend used Flex and PHP to build a Software Flight Recorder which sparked some interesting discussion
Built Using Adobe Flex and Zend PHP
Figure 1 Flash and PHP
How Zend Used Adobe Flex and PHP to Build a Software Flight Recorder
ldquoZend Framework with Support for Action Message For-mat (AMF) Now Bundled with Adobe Flash Builder 4rdquo
How to build Rich Internet Applications using Zend PHP and Adobe Flash Platform
032010 (11)20
ACTIONSCRIPT DEVELOPMENT Creating an AS3 Game Framework
032010 (11) 21
The game framework is the foundation for making the second game It is an expanded version of the first chapterrsquos framework with an emphasis
on organization and reuse Since this book is also not called Proper Object-Oriented Design Patterns and Principles for Games you will see little theory here and mostly practice Many of these techniques have been hard won and developed over many years of ActionScript programming We have fought the wars through AS1 AS2 and now AS3 so you donrsquot have to do it yourself
While our framework borrows from some design patterns we feel that games are a very expressive medium We want you the reader of this book to think outside that proverbial over-used box While design pattern ideas lend themselves to all manner of application development we donrsquot want you to feel hemmed in to using any one set of ideas for creating their games Our framework gives structure to the overall flow of a game but does not dictate how to code the actual game logic
Exploring the FrameworkThe game framework is housed in a reusable package structure A package structure at its very basic is an organized set of folders that will contain reusable classes All of the standard class files for using the framwork will be in this package structure We will update and extend this structure as we proceed through this book Letrsquos start by giving you an idea of what classes we will be creating for the framework
The GameFrameWorkas classThe GameFrameWorkas class is the foundation of the framework It contains a simple state machine and a basic game loop timer Our state machine is a simple
construct containing a set of state constants to switch the framework between states States are handled by state functions inside the GameFrameWorkas file We will employ a variable to reference the current state function The game timer will use this reference to call the current state function on each frame tick We will create states for such things as the title screen instructions screen game play game over and more
When we create a new game our document class will be an instance of GameFrameWork called Mainas This Mainas will have an init (short for initialization) function that will set up the framework for use This Mainas class will also act as a sort of message gateway between the game and the framework classes If you are confused donrsquot worry wersquoll be explaining this in greater detail soon
The FrameWorkStatesas classThis FrameWorkStatesas class will simply contain a set of constant integer values representing the state machine states When we first create the framework we will have 10 different state constants All will begin with the STATE_SYSTEM designation For example we will have a state that displays the title screen The state constant for this will be STATE_SYSTEM_TITLE More states will be added as we progress through the chapters in this book
The BasicScreen class and SimpleBlitButton helper class The BasicScreen class will be used to display very simple game state screens These screens can have a basic background color with transparency (if needed) as well as some text centered on the screen Each screen can also have a button that needs to be clicked to move to a new state in the state machine This class is so simple that it will probably never be used without major
Creating an AS3 Game Framework
Excerpted from the book The Essential Guide to Flash Games Building Interactive Entertainment with ActionScript by Jeff Fulton Steve Fulton (FriendsofEDApress 2010)
PART ONE
032010 (11)20
ACTIONSCRIPT DEVELOPMENT Creating an AS3 Game Framework
032010 (11) 21
We will also be creating three distinct custom event classes as part of the framework These will be used to send specific data from the Game class instance to the Mainas (GameFrameWorkas instance) class The Mainas will act on the data sent and if needed pass the data to other framework classes By doing this we are using Mainas as a sort of message gateway
The CustomEventButtonIdas classThis custom event will have the ability to pass an identification integer value to the listening function It is used for cases where multiple buttons share the same listener function It will be used in the framework (specifically in the GameFrameWork instance Mainas) to allow BasicScreen instances to each share the same listener functions if they employ a SimpleBlitButton You will see this when we examine the GameFrameWork class file It can also be used for any game or application that needs to send a basic integer id along with an Event instance
The CustomEventLevelScreenUpdateas classThis custom event will be used by the Gameas class instance to send data to a BasicScreen instance we will create called levelInScreen The levelInScreen will have the ability to display custom text between each level The event listnener for this event will change this text with a value passed when the event is fired off The Mainas (GameFrameWorkas sub-class) will listen for this event and pass the data to the levelInScreen
The CustomEventScoreBoardUpdateas classThis custom event will be used by the the Gameas class instance to update the values on the ScoreBoard class instance The Mainas class will listen to for this event and pass the data on to the ScoreBoardas class instance
The framework package structureWe will be organizing all of the code we will create into a package structure The reusable framework classes will be in one package and the games we will create will be in a separate package Letrsquos create these two package structures now
The source folderChoose a spot on your disk drive of choice and create a folder called source This will be the root or base level for all of the code and games we will create in this book
The classes packageThe reusable framework classes will be in a package called classes Create a folder called classes inside the source folder from the previous step You should now have a folder structure that looks a little like this
modification in your own commercial games We present it here in its very simple form for utility purposes
The SimpleBlitButton helper class is used to create a clickable button with rollover and off states The button is created completely in code with a simple color background for the over and off states to be sed in the BasicScreen class We do this for simplicity and to demonstrate some Sprite blitting techniques (much more on these later in the book) using a set of BitmapData instances for the background color change of the button on rollover
The ScoreBoard class and SideBySideScoreElement helper class The ScoreBoard class displays information for the user during game play Data such as the current game score time remaining and other useful information can be displayed to the user with a very basic look and feel by using this class It can be used as is but when you start to make your own commercial games you might find it useful to extend this class with more functionality This very basic class is used inside the framework to demonstrate how to use events from a Game instance to update a game score board
The SideBySideScoreElement helper class is used to display a text label and corresponding dynamic text field as a pair side by side on the screen For example it can be implemented by the ScoreBoard class to display the word Score followed by the userrsquos current score
The Game classThe Game class is a stub style class that all games in the framework will inherit from It contains the basic variables and functions needed to work with the GameFrameWork class
The Custom event classesThe framework makes use of events to communicate between classes The instances of the Game class will use events to communicate with the ScoreBoard and the Main classes We will create a custom Mainas class for each game This Main class will be a sub-class (or child) of the GameFrameWork class Some of the events we will use will be simple events These are instances of the standard Flash Event class used for basic communication By this we mean events that donrsquot need to send any data along with them For example instances of the Gameas framework class will have a constant variable called GAME_OVER This constant will be used as the name of a simple Event instance that is fired off with the standard dispatchEvent function call This example GAME_OVER event wil be used to tell the Mainas to move to the game over (STATE_SYSTEM_GAME_OVER) state in the main state loop when the current game has completed
032010 (11)22
ACTIONSCRIPT DEVELOPMENT Creating an AS3 Game Framework
032010 (11) 23
[source]
[classes]
Next we will create the actual package that will contain all of the source code for the reusable framework classes We will name this package comefgframework To create this you must first create a folder inside the classes folder called com then a folder called efg inside the com folder and finally a framework folder inside the efg folder By the way the efg is an abbreviation for the book title Essential Flash Games You should now have a folder structure that looks like this
[source]
[classes]
[com]
[efg]
[framework]
When we start to create all of the class files necessary for the framework they will all go into the framework folder You will see that when we create these classes the package name will look like this
package comefgframework
The projects packageThe second package we will create is called the projects package You can start this right away by creating a folder inside the root source folder called projects The projects folder is not going to be a straight package structure like the classes folder It is organized in a manner to allow individual custom game development using the framework
Inside this projects folder we are going to create a unique folder for each game in the book The first game we are going to create is called stubgame A stub is usually a function or class that contains very little (if any) usable code but is instead a simple placeholder Our game will be slightly more than a placeholder but not much more It will be used to demonstrate the basic functionality of the framework Go ahead and create a folder called stubgame in the projects folder You should have a projects set of folders that look like this
[source]
[classes]
[projects]
[stubgame]
Next we are going to create two folders each to hold a different version of our game Why are we going to do this This book is meant to support Flash game development with a variety of tools There are many popular methods to create Flash games
with an assortment of tools and code integrated development environments (IDEs) We are going to focus on two such tools in this book the Flash IDE (the one with the library timelines drawing tools and so on all combined into a single tool) and Flash Develop (a very popular free IDE made specifically for ActionScript development) You can use any tool with this book but you will need to follow the documentation specific to your own tool when setting up projects
You will need to pay careful attention to linking the reusable code package structure to your games because linking may vary depending on the Flash code editor environment you are using Linking the package to a game is actually a very simple process but it differs between the various code IDE versions Jeff does most of his Flash game development Flash Develop using the free Flex SDK that Adobe provides Steve on the other-hand uses the Flash IDE almost exclusively We have combined our efforts on all of the chapter games to bring you code that will work with both a Flex SDK project and a Flash IDE project
On that note the next two folders you will create inside the stubgame folder are called flashIDE and flexSDK You donrsquot have to create both for any project You just need to create the one that works with the tools you are going to use to create Flash games Each is set up differently so pay attention to the specifics of the one you will be using the most
You should now have a projects folder that looks like this
[projects]
[stubgame]
[flashIDE]
[flexSDK]
The Flash IDE package structureThe Flash IDE package structure begins right inside the flashIDE folder The package name is very similar to the classes package you saw in the last section The package structure will be comefggames[game
name] For instance with the stub game we are going to create in this chapter the package name will be comefggamesstubgame Go ahead and create those folders now You should have this package structure when you are complete
[projects]
[stubgame]
[flashIDE]
[com]
[efg]
[games]
[stubgame]
[flexSDK]
032010 (11)22
ACTIONSCRIPT DEVELOPMENT Creating an AS3 Game Framework
032010 (11) 23
The Flex SDK package structureThe Flex SDK package structure is very similar to the Flash IDE package structure with one small difference Flash Develop and other Flex tools use a specific set of folders for organizing their own project structures To accommodate these and still have a common package structure for our games we must add the Flash Develop created src folder to the flexSDK folder You will not have to create the src folder or the package structure by hand as Flash Develop will create it automatically for you when you start a new project In the section called Setting up the game in Flash Develop we will go into the details For now here is the way the structure will be laid out (including the Flash Develop specific folders such as bin obj and lib If you have used Flash Develop to create a Flex SDK project you will recognize the following structure
[projects]
[stubgame]
[flexSDK]
[bin]
[obj]
[lib]
[src]
[com]
[efg]
[games]
[stubgame]
Notice that we have created the exact same package structure inside the src folder as we will use with the Flash IDE The package name for our game will be comefggamesstubgame
The package name in the code for classes in both the Flash IDE and Flex SDK will be the same
package comefggamesstubgame
The Mainas and StubGameas filesWhen we start to add files to the subgame package we will be creating two subclasses (or children) of framework classes that will be unique to our game The Mainas will be created as a subclass (or child) of GameFrameWorkas framework class The StubGameas class will be a subclass (or child) of the Gameas framework class
Starting a project using the framework packagesYou have just seen the basic package structure for both the framework reusable classes and the projects we are going to create Letrsquos make use of this right away by creating a project for the stub game The stub game will be very similar to the Chapter 1 game where the player is tasked with clicking the mouse ten times
Creating the stub game project in the Flash IDEFollow these steps to set up stub game using the Flash IDE
1 Start up your version of Flash I am using CS3 but this will work exactly the same in CS4 and CS5
2 Create a fla file in the sourceprojectsstubgame
flashIDE folder called stubgame3 In the sourceprojectsstubgameflashIDE folder
create the following package structure for your game comefggamesstubgame
4 Set the frame rate of the Flash movie to 30 FPS Set the width and height both to 400
5 Set the document class to comefggamesstubgameMain6 We have not yet created the Mainas class so you
will see a warning We are going to create this later in this chapter
7 Add the framework reusable class package to the class path for the fla filebull In the publish settings select [Flash]gt
[ActionScript 3 Setting]bull Click the Browse to Path button and find the
source folder we created earlier for the package structure Select the classes folder and click the choose button Now the comefgframework package will be available for use when we begin to create our game We have not created the framework class files yet but we will be doing this very shortly
Creating the stub game project in Flash DevelopAnd these are the steps to create the same project using Flash Develop
1 Create a folder inside the [source][projects][stubgame] folder called [flexSDK] (if you have not already done so)
2 Start Flash Develop and create a new projectbull Select Flex 3 Projectbull Give the project the name stubgamebull The location should be the sourceprojects
stubgameflexSDK folderbull The package should be comefggamesstubgamebull Do not have Flash Develop create a project
folder automatically Make sure the Create Folder For Project box is unchecked
bull Click the OK button to create the project3 Add the class path to the framework to the project
bull Go to the [project]gt[properties]gt[classpaths] menu item
bull Click the add class path buttonbull Find the source folder we created earlier and
select the classes subfolderbull Click the ok button and then the apply button
032010 (11)24
ACTIONSCRIPT DEVELOPMENT Creating an AS3 Game Framework
032010 (11) 25
You now have the basic structure to start creating projects inside the framework We are now going to discuss a few topics concerning the structure of the framework classes and then move into building the reusable framework code
Here are a couple of things to noteFor Flex Builder Flash Builder or other IDEs please refer to the documentation provided for that product to create a new project and set the default compile class
A common method of Flash development is to use the Flash IDE for assets and organization and Flash Develop for code editing If this is your workflow of choice you will want to follow the Flash IDE folder and package structure rather than the Flex SDK folder structure
Creating game timersThere are two basic methods that most Flash developers implement when creating a frame-based game timer By frame-based we mean a timer that uses the idea of a segment of time broken up into logical slices (or frames) to manage game logic There are other types of methods for timing game updates but we will make extensive use of time-slice or frame-based timers in this book The basic game timer we will use most of the games will attempt to squeeze all processing and screen updates into each segment or frame We will also explore a time-step timer and a sleep-based timer in chapter 11
The first timer method is the EventENTER_FRAME event timer The standard EventENTER_FRAME event handler will attempt to run the game loop at the swf filersquos set frame rate This very handy game loop timer has been in use for a number of years The second standard game loop timer method makes use of the Timer class The Timer class is used to call the game loop at millisecond intervals specified by a delay interval For example if the millisecond delay interval is set to 100 the Timer instance would run ten times a second (there are 1000 milliseconds in a single second) Our framework will begin by using this Timer instance game loop timer We will do this so we can make use of the TimerEventTIMER updateAfterEvent function As you will see this function will help smooth out screen updates
Defining frame timer tick You will see the phrases frame timer tick timer tick and frame tick used in this book When we refer to a tick or a frame tick we simply mean one framersquos worth of processing When we run a game at 30 frames per second we have 30 ticks or 30 frame ticks This also means that we only have 3333 milliseconds (or 100030) inside each tick to do all of our processing
State MachinesA traditional state machine at its very basic is a mechanism that controls the state or current actions a system can perform Sometimes this is called a finite state machine Finite state machines have traditionally been used to model complex mathematical computations and more recently artificial intelligence The finite in the name refers to the fact that the system can only be in a single state at any one time Our game framework is built on a simple state machine pattern that employs a separate code function or method for each state There are many other styles of state machines some use entire classes for each individual state (sometimes called an object-oriented state machine) and some use a simple switchcase statement block called on each frame tick to control state We will use a third type that borrows from these two
We call our state machine pattern a function reference pattern Unlike the object-oriented state machine our machine will contain a separate method or function for each state inside a single framework class Each of these state functions will control elements in the framework such as instances of the BasicScreen and Game classes We will use a switchcase statement to move between states Unlike the afore mentioned very simple switchcase state machine structures that call this switchstate control structure on each frame tick we only need to call it when we are switching states The switchcase we call will simply change the function reference we call on each frame tick The GameFrameWorkas will contain the state machine that controls overall game flow This will move our game system between states defined in the FrameWorkStatesas file
Each individual game package we create will contain a Mainas (in the gamersquos own package structure) that will extend GameFrameWorkas We will also create a unique Gameas child class for each game The Game class children that we create can also employ their own internal state machines based on the function reference pattern when needed
Richard (Squize) Myles of wwwgamingyourwaycom was one of the first to offer the idea of a function reference state machine for ActionScript 3 on his well-respected blog
The FrameWorkStatesas class fileThis class file is a simple collection of constants that will define the states for the game framework They will be consumed by the GameFrameWorkas class file The following code listing shows the entire code for this file you will want to create this file according to the package structure in the previous section see (Listing 1)
The first thing you should notice about this class is the package name in the first line It conforms to the file system structure we created earlier No matter if
032010 (11)24
ACTIONSCRIPT DEVELOPMENT Creating an AS3 Game Framework
032010 (11) 25
you are using a version of Flash Flex Builder Flash Builder Flash Develop TextMate or even plain old Notepad this package name will be the same The package name is not depended on the code development environment but the chosen file structure for organizing the code Save this file in the location we created previously
sourceclassescomefgframeworkFrameWorkStatesas
The state variablesThe state variables are constants that the game loop state machine will use to move between game states We have set up the most common basic states in this sample file but you will be able to create as many as you need As we progress through the chapters more will be added as necessary
bull STATE _ SYSTEM _ TITLE This state is used to display a basic title screen with an OK button for the user to click to move on Once the instructions are on the screen the state will change to the next state
bull STATE _ SYSTEM _ WAIT _ FOR _ CLOSE This one waits until the OK button is clicked for any instance of the BasicScreen class
bull STATE _ SYSTEM _ INSTRUCTIONS This state is used to display basic instructions with the same OK button as in the SYSTEM _ TITLE state It also changes to the STATE _ SYSTEM _ WAIT _ FOR _ CLOSE state until the OK button is clicked
bull STATE _ SYSTEM _ NEW _ GAME This state will call the game logic class and fire off its gamenewGame() function It does not wait but moves on to the NEW _
LEVEL state right awaybull STATE _ SYSTEM _ NEW _ LEVEL With this state we can
call the gamenewLevel() function to set up a new level for the given game
bull STATE _ SYSTEM _ LEVEL _ IN This state is used to display some basic information if needed for the beginning of a level In this basic game we simply display the level screen and wait a few seconds before moving on The wait is accomplished by changing state to the STATE _ SYSTEM _ WAIT state for the specified number of frame ticks
bull STATE _ SYSTEM _ GAME _ PLAY This one simply calls the game logic classrsquos runGame function repeatedly and lets the game take care of its own logic and states
bull STATE _ SYSTEM _ GAME _ OVER The game over state displays the basic game over screen and waits for the OK button to be clicked before moving back to the instructions screen It quickly changes state to the STATE _ SYSTEM _ WAIT _ FOR _ CLOSE until the OK button is clicked
bull STATE _ SYSTEM _ WAIT This state waits for a specified number of frames and then fires off a simple custom event constant called WAIT _ COMPLETE
The GameFrameWorkas class fileThe GameFrameWorkas will be that parent of our gamersquos document class Mainas (the gamersquos document class)
for our games will extend this class and call functions to modify the framework for each unique game The entire code listing is provided at the end of this section We will explore it in detail once your have had a chance to type in the code The location for this file in the package structure is
sourceclassescomefgframeworkGameFrameWorkas
The GameFrameWorkas will be the parent class to the Mainas class we will use for our games and itrsquos shown in the following listing In later chapters we will add some functions to this file and even create one that uses a completely different timer The Mainas will subclass this class with the extends syntax and override the blank stub init function we are about to create This class will also contain all of the state functions that coincide with the state variables in the FrameWorkStates class All of the functions in the GameFrameWorkas are public so all can be overridden by the Mainas if needed In this way we can customize the behavior of the state functions if we need to
For example in later chapters we will want to play music on the title screen The function call to play
Listing 1
package comefgframework
author Jeff and Steve Fulton
public class FrameWorkStates
public static const STATE_SYSTEM_WAIT_FOR_CLOSEint = 0
public static const STATE_SYSTEM_TITLEint = 1
public static const STATE_SYSTEM_INSTRUCTIONSint = 2
public static const STATE_SYSTEM_NEW_GAMEint = 3
public static const STATE_SYSTEM_GAME_OVERint = 4
public static const STATE_SYSTEM_NEW_LEVELint = 5
public static const STATE_SYSTEM_LEVEL_INint = 6
public static const STATE_SYSTEM_GAME_PLAYint = 7
public static const STATE_SYSTEM_LEVEL_OUTint = 8
public static const STATE_SYSTEM_WAITint = 9
032010 (11)26
ACTIONSCRIPT DEVELOPMENT Creating an AS3 Game Framework
032010 (11) 27
the music will need to be added to the systemTitle state function Not all games will need this though so we will not add it to the GameFrameWorkas filersquos systemTitleFunction Instead we will create a new version of the function in Mainas to override the one in GameFrameWorkas The new one will play the sound needed and then call the systemTitle function inside GameFrameWorkas with the supersystemTitle() function call see (Listing 2)
The class imports The class import section contains the necessary Flash core classes needed for the Main class Notice the package name coincides with the package structure we created earlier in the chapter for the framework
package comefgframework
Listing 2
package comefgframework
import flashdisplayBitmap
import flashdisplayBitmapData
import flashdisplayMovieClip
import flasheventsEvent
import flashgeomPoint
import flashtextTextFormat
import flashutilsTimer
import flasheventsTimerEvent
public class GameFrameWork extends MovieClip
public static const EVENT_WAIT_COMPLETEString =
wait complete
public var systemFunctionFunction
public var currentSystemStateint
public var nextSystemStateint
public var lastSystemStateint
public var appBackBitmapDataBitmapData
public var appBackBitmapBitmap
public var frameRateint
public var timerPeriodNumber
public var gameTimerTimer
public var titleScreenBasicScreen
public var gameOverScreenBasicScreen
public var instructionsScreenBasicScreen
public var levelInScreenBasicScreen
public var screenTextFormatTextFormat
public var screenButtonFormatTextFormat
public var levelInTextString
public var scoreBoardScoreBoard
public var scoreBoardTextFormatTextFormat
Game is our custom class to hold all logic for
the game
public var gameGame
waitTime is used in conjunction with the
STATE_SYSTEM_WAIT state
it suspends the game and allows animation or
other
processing to finish
public var waitTimeint
public var waitCountint=0
public function GameFrameWork()
public function init()void
stub to override
public function setApplicationBackGround(width
Number
heightNumberisTransparentBoolean = false
coloruint = 0x000000)void
appBackBitmapData = new BitmapData(width
height
isTransparent color)
appBackBitmap = new Bitmap(appBackBitmapData)
addChild(appBackBitmap)
public function startTimer()void
timerPeriod = 1000 frameRate
gameTimer=new Timer(timerPeriod)
gameTimeraddEventListener(TimerEventTIMER
runGame)
gameTimerstart()
public function runGame(eTimerEvent)void
systemFunction()
eupdateAfterEvent()
switchSystem state is called only when the
032010 (11)26
ACTIONSCRIPT DEVELOPMENT Creating an AS3 Game Framework
032010 (11) 27
Listing 2
state is to be changed
(not every frame like in some switchcase
based simple state machines
public function switchSystemState(statevalint)
void
lastSystemState = currentSystemState
currentSystemState = stateval
switch(stateval)
case FrameWorkStatesSTATE_SYSTEM_WAIT
systemFunction = systemWait
break
case FrameWorkStatesSTATE_SYSTEM_WAIT_FOR_
CLOSE
systemFunction = systemWaitForClose
break
case FrameWorkStatesSTATE_SYSTEM_TITLE
systemFunction = systemTitle
break
case FrameWorkStatesSTATE_SYSTEM_
INSTRUCTIONS
systemFunction = systemInstructions
break
case FrameWorkStatesSTATE_SYSTEM_NEW_GAME
systemFunction = systemNewGame
break
case FrameWorkStatesSTATE_SYSTEM_NEW_LEVEL
systemFunction = systemNewLevel
break
case FrameWorkStatesSTATE_SYSTEM_LEVEL_IN
systemFunction = systemLevelIn
break
case FrameWorkStatesSTATE_SYSTEM_GAME_PLAY
systemFunction = systemGamePlay
break
case FrameWorkStatesSTATE_SYSTEM_GAME_OVER
systemFunction = systemGameOver
break
public function systemTitle()void
addChild(titleScreen)
titleScreenaddEventListener(CustomEventButton
IdBUTTON_ID
okButtonClickListener false 0 true)
switchSystemState(FrameWorkStates
STATE_SYSTEM_WAIT_FOR_CLOSE)
nextSystemState = FrameWorkStatesSTATE_
SYSTEM_INSTRUCTIONS
public function systemInstructions()void
addChild(instructionsScreen)
instructionsScreenaddEventListener(CustomEven
tButtonId
BUTTON_IDokButtonClickListener false 0
true)
switchSystemState(FrameWorkStates
STATE_SYSTEM_WAIT_FOR_CLOSE)
nextSystemState = FrameWorkStatesSTATE_
SYSTEM_NEW_GAME
public function systemNewGame()void
addChild(game)
gameaddEventListener(CustomEventScoreBoardUp
date
UPDATE_TEXTscoreBoardUpdateListenerfalse 0
true)
gameaddEventListener(CustomEventLevelScreenU
pdate
UPDATE_TEXTlevelScreenUpdateListenerfalse
0 true)
gameaddEventListener(GameGAME_OVER
gameOverListener
false 0 true)
gameaddEventListener(GameNEW_LEVEL
newLevelListener
false 0 true)
gamenewGame()
switchSystemState(FrameWorkStatesSTATE_
SYSTEM_NEW_LEVEL)
public function systemNewLevel()void
032010 (11)28
ACTIONSCRIPT DEVELOPMENT Creating an AS3 Game Framework
032010 (11) 29
Listing 2
gamenewLevel()
switchSystemState(FrameWorkStatesSTATE_
SYSTEM_LEVEL_IN)
public function systemLevelIn()void
addChild(levelInScreen)
waitTime = 30
switchSystemState(FrameWorkStatesSTATE_
SYSTEM_WAIT)
nextSystemState = FrameWorkStatesSTATE_
SYSTEM_GAME_PLAY
addEventListener(EVENT_WAIT_COMPLETE
waitCompleteListener false 0 true)
public function systemGameOver()void
removeChild(game)
addChild(gameOverScreen)
gameOverScreenaddEventListener(CustomEventBu
ttonId
BUTTON_IDokButtonClickListener false 0
true)
switchSystemState(FrameWorkStates
STATE_SYSTEM_WAIT_FOR_CLOSE)
nextSystemState = FrameWorkStatesSTATE_
SYSTEM_TITLE
public function systemGamePlay()void
gamerunGame()
public function systemWaitForClose()void
do nothing
public function systemWait()void
waitCount++
if (waitCount gt waitTime)
waitCount = 0
dispatchEvent(new Event(EVENT_WAIT_COMPLETE))
public function okButtonClickListener(e
CustomEventButtonId)void
switch(eid)
case FrameWorkStatesSTATE_SYSTEM_TITLE
removeChild(titleScreen)
titleScreenremoveEventListener(CustomEv
entButtonId
BUTTON_IDokButtonClickListener)
break
case FrameWorkStatesSTATE_SYSTEM_
INSTRUCTIONS
removeChild(instructionsScreen)
instructionsScreenremoveEventListener(
CustomEventButtonIdBUTTON_IDokButtonC
lickListener)
break
case FrameWorkStatesSTATE_SYSTEM_GAME_OVER
removeChild(gameOverScreen)
gameOverScreenremoveEventListener(
CustomEventButtonIdBUTTON_IDokButtonC
lickListener)
break
switchSystemState(nextSystemState)
public function scoreBoardUpdateListener(e
CustomEventScoreBoardUpdate)void
scoreBoardupdate(eelement evalue)
public function levelScreenUpdateListener(e
CustomEventLevelScreenUpdate)void
levelInScreensetDisplayText(levelInText +
etext)
gameOverListener listens for GameGAMEOVER
simple
custom events calls and changes state
accordingly
public function gameOverListener(eEvent)void
switchSystemState(FrameWorkStatesSTATE_
SYSTEM_GAME_OVER)
gameremoveEventListener(CustomEventScoreBoard
Update
UPDATE_TEXTscoreBoardUpdateListener)
gameremoveEventListener(CustomEventLevelScree
nUpdate
032010 (11)28
ACTIONSCRIPT DEVELOPMENT Creating an AS3 Game Framework
032010 (11) 29
We also must import all of the classes needed for the framework to run You will see this put to use shortly
The variable definitions The variable definition section defines all of the global scope variables for the class These include all of the variables needed for the state machine screens and the game timer
We will make use of constants to define the current state and a set of variables to hold the state information These have been be defined on the FrameWorkStatesas file we created in the last section More states can be added to the basic ones but these will be sufficient for many games that we will create in this book There are two special states that are used for the system and wait for button clicks or things like animations to complete These are the STATE_SYSTEM_WAIT_FOR_CLOSE and STATE_SYSTEM_WAIT respectively We will also make use of a generic function called systemFunction that will hold the current state function to call in our game loop Combined with this we use a set of
integer variables to hold the value of the current state (currentSystemState) the last state (lastSystemState) and the next state (nextSystemState) for processing purposes These states should not be confused with an actual game pause function This will be handled in a different manner and added to the framework in Chapter 11
If you are using the Flash IDE and have any assets in the library that need to be exported in the first frame you must extend MovieClip and not Sprite even if you donrsquot plan to use the main time line for anything else We have extended MovieClip for the GameFrameWork so it will work with both Flex SDK and Flash IDE projects
The state control variablesThe control variables keep the system functioning within the context of the current state The main control variable is an instance of the Function class called systemFunction This function holds a reference to the current function that will be repeatedly called on each frame tick This saves us from having to evaluate a switchcase statement on each frame to decide which function to call The function is changed to a new reference by called the switchSystemState() function and passing a new constant that represents the new state
Optimization switchSystemState() is the first of many optimizations we will make to the game framework All of these optimizations will make the Flash games run much more efficiently These efficiencies in the game framework will allow the actual game code to perform more complex operations and still run with a reasonable frame rate
The currentSystemState integer variable holds a number representing the constant of the current state the system is running The nextSystemState contains the constant integer value for the state to transition to after this state is complete The lastSystemState variable holds the integer constant of the previous system state This is used in the rare occurrence that the game loop needs to return to the previous system state
The lastSystemState variable will become useful when we use a shared state such as STATE_SYSTEM_WAIT The STATE_SYSTEM_LEVEL_IN state will implement a 30-millisecond delay before moving on to the STATE_SYSTEM_GAME_PLAY state The nextSystemState will be STATE_SYSTEM_WAIT and the lastSystemState will be STATE_SYSTEM_LEVEL_IN When the 30-millisecond wait time has expired the waitCompleteListener function will be called It will use the lastSystemState to determine where the processing was before the wait was started Yoursquoll see this in detail later in this chapter when we examine the waitCompleteListener function
Listing 2
UPDATE_TEXT levelScreenUpdateListener)
gameremoveEventListener(GameGAME_OVER
gameOverListener)
gameremoveEventListener(GameNEW_LEVEL
newLevelListener)
newLevelListener listens for GameNEWLEVEL
simple custom events calls and changes
state accordingly
public function newLevelListener(eEvent)void
switchSystemState(FrameWorkStatesSTATE_
SYSTEM_NEW_LEVEL)
public function waitCompleteListener(eEvent)
void
switch(lastSystemState)
case FrameWorkStatesSTATE_SYSTEM_LEVEL_
IN
removeChild(levelInScreen)
break
removeEventListener(EVENT_WAIT_COMPLETEwai
tCompleteListener)
switchSystemState(nextSystemState)
032010 (11)30
ACTIONSCRIPT DEVELOPMENT
The background fill variablesAll Flash applications have a background color of some type No matter what game we are going to be creating the framework can control this background color You should never rely on the background color setting in HTML for your Flash applicationrsquos background color This leaves the HTML embed code with control over major aspect of your application If you are creating a viral game to be placed on game portals you will lose control of your gamersquos background color and it will default to what ever the game portal operators have selected as the standard background color in their embed code The framework allows you to override the HTML settings here by placing a simple colored Bitmap behind the entire application We will simply define a BitmapData object called appBackBitmapData and a Bitmap object called appBackBitmap that will be used to place the BitmapData onto the displayList
We will not define the background in the GameFrameWorkas file but rather the Mainas subclass of the GameFrameWork will set the background if needed in its init function override
The timer variablesThe timer will control the frame rate of the game and help smooth out the display by employing the TimerEventupdateAfterEvent method The frameRate variable will be defined in Mainas as the number of frame ticks per second we want our game timer to run
The most important thing to note is that we are making use of the built-in Timer class (gameTimer) We are not using the standard EnterFrame event This allows us to create our own frame rate for the game and specify it in the frameRate variable By doing this we can control game timer tick rate independent of the swf filersquos frame rate (FPS) The swf file can have a frame rate setting of 25 (for example) but the game can run at a 30 frame ticks a second To do this we first set the frameRate to the desired number of frame update ticks we want per second (30) When Mainas calls the startTimer function (described in detail when we get to the section on the init function) the gameTimer is put into action First we will calculate the timerPeriod value as 1000frameRate With the updateAfterEvent function call (in the runGame function) we help to smooth out the render of the screen by asking the Flash display engine to update at the rate of the Timer not the frame rate set in the swf So going back to our example if the game SWF is set to run at 25 FPS and the frameRate is set to 30 ticks the updateAfterEvent will help to smooth out the rendering of the screen by asking the Flash display engine to update at the timer tick rate (30) not the swf filersquos FPS setting (25)
The timerPeriod will be passed into the Timer instance and the game will attempt to run at this rate We say
attempt because if the game includes too many on screen moving objects or more logic than can be computed inside the timerPeriod number of milliseconds (or a combination of both) then there will be a noticable slowdown in the game screen updates In later chapters we will add functionality to the runGame function to mitigate some of these issues
The screen definition variablesThe screen definition variables create instances of our BasicScreen class This is a rather simple class that allows a single positional text box and an OK button on the screen We will use this simple screen for the title instructions level and game over screens We will customize each screen when we create the init function override in our gamersquos Mainas class Note that the levelInText is a special variable Setting this string to a default value will allow the leveInScreen to display some default text along on each new level This text can be combined with dynamic text to create a screen that says something like Level 1 with the word Level being the default text and the number 1 being the dynamic text
public var titleScreenBasicScreen
public var gameOverScreenBasicScreen
public var instructionsScreenBasicScreen
public var levelInScreenBasicScreen
public var levelInTextString
public var screenTextFormatTextFormat
public var screenButtonFormatTextFormat
We also create two TextFormat objects that will be used for defining the format of the text on the screens and the format of the button text
The ScoreBoard variablesThe scoreBoard instance of the ScoreBoard class will handle a simple heads up display (HUD) for the user with information such as the current score It is a simple framework class that will be customized in the init function override in each gamersquos Mainas class The changes will depend on the game that is to be created We also define a TextFormatObject for the basic look of the text for our scoreboard text scoreBoardTextFormat
JEFF FULTON
STEVE FULTON
The next part of the article in the June issue of FFD Magazine
032010 (11)32
ACTIONSCRIPT DEVELOPMENT
032010 (11) 33
On my quest of learning Flash I often became frustrated of how difficult it was to update the contents of my application Meaning if I wanted
to change out an image or piece of copy I had to open up Flash go to my library find the Movie Clip that had my asset in it and republish I thought to myself this is no way to work this is so inefficient Enter XML in all its glory Constructing an application with enabled me to quickly and easily update my project at a moments
notice Without having to open up Flash Now what could be better than that
In this article yoursquore going to learn how to create a new ActionScript project in Flex Builder 3 and write ActionScript 30 code that will load in an XML file display the images on screen and add some interactivity to the scene
Setting up FlexOpen up Flex and go to Filegt NewgtActionScript Project A dialog window will open In the project name field type in PhotoGallery Leave the use default location box checked and click finish (see Figure 1)
Creating an XML Photo Gallery
Searching the Internet yoursquoll find dozens if not hundreds of examples of photo galleries created with Flash
What you will learnhellipbull How to create an ActionScript application in Flex Builder 3bull How to use ActionScript to parse an XML le
What you should knowhellipbull Familiar with general programming concepts such as data ty-
pes variables loops and functionsbull Familiar with class creation and constructionbull Some understanding of XML
with AS3
Figure 1 New ActionScript window dialog Figure 2 ActionScript Compiler dialog
032010 (11)32
ACTIONSCRIPT DEVELOPMENT
032010 (11) 33
Once you click finish your project should open and you should see PhotoGalleryas on screen There are a few steps that I like to take next that I do for every project
First right click PhotoGallery folder in the Flex Navigator window click properties at the bottom and then click on the ActionScript Compiler link on the left hand side At the bottom yoursquoll see a check box that is already selected to generate a HTML wrapper file Uncheck that and click ok A warning message will appear saying that the html-template folder will be deleted Donrsquot worry about that because we havenrsquot put anything in that folder Click ok I personally donrsquot like to have a browser window open every time I run my application (see Figure 2)
Secondly wersquoll be using a tweening library called Tweener In order to use Tweener we have to first download it (httpcodegooglecomptweener) Be sure to download the ActionScript 30 version and create a folder on your desktop or any other place and name it code Place the contents of that download into that folder Next go back to Flex and again right click the PhotoGallery folder and click properties again and this time yoursquoll click the ActionScript Build Path link This window gives us the ability to add assets to our project so we can use them in our project Click the Add Folder button browser to the code folder you just created click ok and click ok again to close the window Now that folder and all its contents will be included in our project (see Figure 3)
Next right click the src folder in your project scroll over to new and add a new folder Name this folder classes This folder will contain two classes that wersquoll be using Then repeat the same steps but this time name the folder images This folder will contain all the images
Figure 3 ActionScript Build Path dialog
032010 (11)34
ACTIONSCRIPT DEVELOPMENT
Listing 1 galleryxml
ltxml version=10 encoding=UTF-8gt
ltgallery image_height=150 image_width=150 image_
gap=5 rows=3gt
ltphotogt
ltdescriptiongtThis is a description for the first
imageltdescriptiongt
ltthumb_pathgtimagesthumbjpgltthumb_pathgt
ltfull_pathgtimagesfullgifltfull_pathgt
ltphotogt
ltphotogt
ltdescriptiongtThis is a description for the second
imageltdescriptiongt
ltthumb_pathgtimagesthumbjpgltthumb_pathgt
ltfull_pathgtimagesfullgifltfull_pathgt
ltphotogt
ltphotogt
ltdescriptiongtThis is a description for the third
imageltdescriptiongt
ltthumb_pathgtimagesthumbjpgltthumb_pathgt
ltfull_pathgtimagesfullgifltfull_pathgt
ltphotogt
ltphotogt
ltdescriptiongtThis is a description for the fourth
imageltdescriptiongt
ltthumb_pathgtimagesthumbjpgltthumb_pathgt
ltfull_pathgtimagesfullgifltfull_pathgt
ltphotogt
ltphotogt
ltdescriptiongtThis is a description for the fifth
imageltdescriptiongt
ltthumb_pathgtimagesthumbjpgltthumb_pathgt
ltfull_pathgtimagesfullgifltfull_pathgt
ltphotogt
ltphotogt
ltdescriptiongtThis is a description for the sixth
imageltdescriptiongt
ltthumb_pathgtimagesthumbjpgltthumb_pathgt
ltfull_pathgtimagesfullgifltfull_pathgt
ltphotogt
ltphotogt
ltdescriptiongtThis is a description for the seventh
imageltdescriptiongt
ltthumb_pathgtimagesthumbjpgltthumb_pathgt
ltfull_pathgtimagesfullgifltfull_pathgt
ltphotogt
ltphotogt
ltdescriptiongtThis is a description for the eighth
imageltdescriptiongt
ltthumb_pathgtimagesthumbjpgltthumb_pathgt
ltfull_pathgtimagesfullgifltfull_pathgt
ltphotogt
ltphotogt
ltdescriptiongtThis is a description for the ninth
imageltdescriptiongt
ltthumb_pathgtimagesthumbjpgltthumb_pathgt
ltfull_pathgtimagesfullgifltfull_pathgt
ltphotogt
ltphotogt
ltdescriptiongtThis is a description for the tenth
imageltdescriptiongt
ltthumb_pathgtimagesthumbjpgltthumb_pathgt
ltfull_pathgtimagesfullgifltfull_pathgt
ltphotogt
ltphotogt
ltdescriptiongtThis is a description for the
eleventh imageltdescriptiongt
ltthumb_pathgtimagesthumbjpgltthumb_pathgt
ltfull_pathgtimagesfullgifltfull_pathgt
ltphotogt
ltphotogt
ltdescriptiongtThis is a description for the twelfth
imageltdescriptiongt
ltthumb_pathgtimagesthumbjpgltthumb_pathgt
ltfull_pathgtimagesfullgifltfull_pathgt
ltphotogt
ltphotogt
ltdescriptiongtThis is a description for the
thirteenth imageltdescriptiongt
ltthumb_pathgtimagesthumbjpgltthumb_pathgt
ltfull_pathgtimagesfullgifltfull_pathgt
ltphotogt
ltphotogt
ltdescriptiongtThis is a description for the
fourteenth imageltdescriptiongt
ltthumb_pathgtimagesthumbjpgltthumb_pathgt
ltfull_pathgtimagesfullgifltfull_pathgt
ltphotogt
ltphotogt
ltdescriptiongtThis is a description for the
fifteenth imageltdescriptiongt
ltthumb_pathgtimagesthumbjpgltthumb_pathgt
ltfull_pathgtimagesfullgifltfull_pathgt
ltphotogt
ltgallerygt
032010 (11)36
ACTIONSCRIPT DEVELOPMENT
Listing 2 PhotoGalleryas
package
Imports
import caurinatransitionsTweener
import classesBigPhoto
import classesThumbNail
import flashdisplayBitmap
import flashdisplaySprite
import flasheventsEvent
import flasheventsMouseEvent
import flashnetURLLoader
import flashnetURLRequest
[SWF(width=466 height=515 backgroundColor=00
0000 frameRate=30)]
public class PhotoGallery extends Sprite
Containers
private var _thumbContainerSprite Stores
the thumbnails
private var _nextButtonSprite Stores
the next arrow
private var _backButtonSprite Stores
the back arrow
private var _bigPhotoBigPhoto
Container for the big image
XML
private var _xmlLoaderURLLoader
Loads the XML file
private var _xmlXML
Stores the XML data
Image Assets
[Embed(source=assetsnext-arrowpng)]
private var _nextArrowClass
Embedded asset for the next
arrow
[Embed(source=assetsback-arrowpng)]
private var _backArrowClass
Embedded asset for the back
arrow
Constructor
public function PhotoGallery()
init ()
Initializing method
private function init ()void
_xmlLoader = new URLLoader ()
_xmlLoaderaddEventListener (EventCOMPLETE
xmlComplete false 0 true)
_xmlLoaderload (new URLRequest
(galleryxml))
XML Complete
private function xmlComplete (eEvent)void
Store the XML data
_xml = new XML (etargetdata)
loadImages ()
Clean up
_xmlLoaderremoveEventListener
(EventCOMPLETE xmlComplete)
_xmlLoader = null
Load in the thumbs
private function loadImages ()void
Temporary variables
var imageHeightuint = _xmlimage_height
var imageWidthuint = _xmlimage_width
var imageGapuint = _xmlimage_gap
var rowsuint = _xmlrows
var rowCounteruint = 0
var columnCounteruint = 0
Instantiate the container and position it
on screen
_thumbContainer = new Sprite ()
_thumbContainerx = 78
_thumbContainery = 78
_thumbContainerbuttonMode = true
_thumbContaineraddEventListener
(MouseEventCLICK thumbClick
false 0 true)
thisaddChild (_thumbContainer)
Loop through the images and create the
visual grid
for (var iuint = 0 i lt _xmlphotolength ()
i++)
var pathString = _xmlphoto[i]thumb_path
var descriptionString = _xmlphoto[i]desc
Creating an XML Photo Gallery with AS3
032010 (11) 37
Listing 2 PhotoGalleryas
ription
Create the thumbnail
var pThumbNail = new ThumbNail ()
pnewID = i
ploadImage (path)
pdescription = description
px = (imageWidth + imageGap)
columnCounter
py = (imageHeight + imageGap)
rowCounter
_thumbContaineraddChild (p)
Create the grid
if ((rowCounter + 1) lt rows)
rowCounter++
else
rowCounter = 0
columnCounter++
Setup the navigation
createNavigation ()
This method handles the click event for the
next arrow
private function nextClick (eMouseEvent)void
155 is the width + spacing
if (-_thumbContainerx lt (_thumbContainerwidth
ndash stagestageWidth ndash 155))
disableNavigation ()
TweeneraddTween (_thumbContainer x
_thumbContainerx ndash 155 time
075 transitioneaseOutExpo
onCompleteenableNavigation)
This method handles the click event for the
back arrow
private function previousClick (eMouseEvent)void
if (-_thumbContainerx gt 0)
disableNavigation ()
TweeneraddTween (_thumbContainer x
_thumbContainerx + 155 time
075 transitioneaseOutExpo
onCompleteenableNavigation)
This method handles the click event for the
thumbnails
private function thumbClick (eMouseEvent)void
disableNavigation ()
Disable the container that stores the
thumbnails
_thumbContainerbuttonMode = false
_thumbContainermouseChildren = false
_thumbContainerremoveEventListener
(MouseEventCLICK thumbClick)
Get the full image path
var imagePathString = _xmlphoto[etargetnewI
D]full_path
Instantiate the big photo
_bigPhoto = new BigPhoto ()
_bigPhotobuttonMode = true
_bigPhotox = 108
_bigPhotoy = 1075
_bigPhotoalpha = 0
_bigPhotoloadImage (imagePath)
_bigPhotoaddEventListener (MouseEventCLICK
closePhoto false 0 true)
thisaddChild (_bigPhoto)
Fade up the photo
TweeneraddTween (_bigPhoto alpha1 time
1)
Fade out the photo
When the image finishes fading delete the
photo and enable the navigation
items
private function closePhoto (eMouseEvent)void
TweeneraddTween (_bigPhoto alpha0 time1
onCompletedeletePhoto)
private function deletePhoto ()void
032010 (11)38
ACTIONSCRIPT DEVELOPMENT
Listing 2 PhotoGalleryas
_bigPhotobuttonMode = false
_bigPhotoremoveEventListener
(MouseEventCLICK closePhoto)
_bigPhotodestroy ()
thisremoveChild (_bigPhoto)
_bigPhoto = null
_thumbContainerbuttonMode = true
_thumbContainermouseChildren = true
_thumbContaineraddEventListener
(MouseEventCLICK thumbClick
false 0 true)
enableNavigation ()
private function createNavigation ()void
Instantiate the next arrow
var nBitmap = new _nextArrow ()
Instantiate the nextButton container
Add the next button as a child of the
nextButton container
_nextButton = new Sprite ()
thisaddChild (_nextButton)
_nextButtonaddChild (n)
_nextButtonx = stagestageWidth ndash _
nextButtonwidth
_nextButtony = 475
Instantiate the back arrow
var bBitmap = new _backArrow ()
Instantiate the backButton container
Add the next button as a child of the
backButton container
_backButton = new Sprite ()
thisaddChild (_backButton)
_backButtonaddChild (b)
_backButtonx = _nextButtonx ndash _
nextButtonwidth ndash 5
_backButtony = 475
enableNavigation ()
private function enableNavigation ()void
_nextButtonbuttonMode = true
_nextButtonaddEventListener
(MouseEventCLICK nextClick false
0 true)
_backButtonbuttonMode = true
_backButtonaddEventListener
(MouseEventCLICK previousClick
false 0 true)
private function disableNavigation ()void
_nextButtonbuttonMode = false
_nextButtonremoveEventListener
(MouseEventCLICK nextClick)
_backButtonbuttonMode = false
_backButtonremoveEventListener
(MouseEventCLICK previousClick)
Figure 4 New ActionScript class dialog
Creating an XML Photo Gallery with AS3
032010 (11) 39
Listing 3 ThumbNailas
package classes
import caurinatransitionsTweener
import flashdisplayLoader
import flashdisplayShape
import flashdisplaySprite
import flasheventsEvent
import flasheventsMouseEvent
import flashnetURLRequest
import flashtextTextField
import flashtextTextFieldAutoSize
import flashtextTextFormat
public class ThumbNail extends Sprite
Containers
private var _imageLoaderLoader Loads in
the thumbnail
private var _imageContainerSprite
Container for the thumbnail
private var _maskShape Container for the
mask
private var _descriptionContainerSprite
Container for the description
TextFields
private var _descriptionTextField
TextField for the container
Logic
private var _newIDuint The ID of the
object
[Embed(systemFont=Arial fontName=arial
fontWeight=bold
mimeType=applicationx-font-
truetype)]
private var _arialClass Embedded asset
for the font
Constructor
public function ThumbNail ()
super ()
init ()
Initializing method
private function init ()void
Instantiate the container
_imageContainer = new Sprite ()
_imageContaineralpha = 0
thisaddChild (_imageContainer)
createDescription ()
thismouseChildren = false
thisaddEventListener (MouseEventMOUSE_OVER
onMouseOver false 0 true)
thisaddEventListener (MouseEventMOUSE_OUT
onMouseOut false 0 true)
Public Methods
public function loadImage (pathString)void
_imageLoader = new Loader ()
_imageLoadercontentLoaderInfoaddEventListen
er (EventCOMPLETE imageComplete
false 0 true)
_imageLoaderload (new URLRequest (path))
GetterSetter Methods
public function get newID ()uint
return this_newID
public function set newID (valueuint)void
this_newID = value
public function get description ()String
return this_descriptiontext
public function set description (valueString)void
this_descriptiontext = value
Private Methods
032010 (11)40
ACTIONSCRIPT DEVELOPMENT
Listing 3 ThumbNailas
private function onMouseOver (eMouseEvent)void
TweeneraddTween (_descriptionContainer
y75 time05 transition
easeOutExpo)
private function onMouseOut (eMouseEvent)void
TweeneraddTween (_descriptionContainer
y150 time05 transition
easeOutExpo)
private function imageComplete (eEvent)void
Reposition the loaded content to the center
_imageLoaderx = -(_imageLoaderwidth 2)
_imageLoadery = -(_imageLoaderheight 2)
_imageContaineraddChildAt (_imageLoader 0)
Apply background after the image has
completely loaded
drawBackground ()
Draw the mask around the description
drawMask ()
Fade in the container
TweeneraddTween (_imageContainer alpha1
time05)
Clean up
_imageLoadercontentLoaderInforemoveEv
entListener (EventCOMPLETE
imageComplete)
Draws a background behind _imageContainer
private function drawBackground ()void
_imageContainergraphicsbeginFill (0xFFFFFF)
_imageContainergraphicsdrawRect (_
imageLoaderx ndash 1 _imageLoadery
ndash 1 _imageLoaderwidth + 2
_imageLoaderheight + 2)
_imageContainergraphicsendFill ()
Creates everything for the description
private function createDescription ()void
Instantiate the container
_descriptionContainer = new Sprite ()
_descriptionContainery = 150
_descriptionContainergraphicsbeginFill
(0x000000 075)
_descriptionContainergraphicsdrawRect (-75
-75 150 75)
_descriptionContainergraphicsendFill ()
_imageContaineraddChild (_
descriptionContainer)
Specify text formatting for the description
Text Field
var tfTextFormat = new TextFormat ()
tfcolor = 0xFFFFFF
tfalign = center
tffont = arial
tfbold = true
tfsize = 12
Instantiate the TextF ield
_description = new TextField ()
_descriptionx = -75
_descriptiony = -70
_descriptionwidth = 150
_descriptionwordWrap = true
_descriptionembedFonts = true
_descriptiondefaultTextFormat = tf
_descriptionautoSize = TextFieldAutoSizeLEFT
_descriptionContaineraddChild (_description)
Draws a mask our _descriptionContainer
private function drawMask ()void
Draw the mask shape
_mask = new Shape ()
_maskgraphicsbeginFill (0xFF0000)
_maskgraphicsdrawRect (_imageLoaderx
_imageLoadery _imageLoaderwidth
_imageLoaderheight)
_maskgraphicsendFill ()
addChild (_mask)
Apply the mask to the container
_descriptionContainermask = _mask
Creating an XML Photo Gallery with AS3
032010 (11) 41
that will be loaded into the application from XML Finally create another folder and this time name it assets This folder will contain the buttons that wersquoll embed into our project
The AssetsBefore we start coding we need to create some visual assets Open up Photoshop or any other program you have for creating graphics and create an image that is 150x150 pixels Fill it with a flat color and save the image as thumbjpg in the images folder you just created Next create another image thatrsquos 250x300 pixels Fill it with another color and save that image as fulljpg into the same folder These images will be used for testing purposes only
Listing 4 BigPhotoas
package classes
import flashdisplayLoader
import flashdisplaySprite
import flasheventsEvent
import flashnetURLRequest
public class BigPhoto extends Sprite
Containers
private var _imageLoaderLoader Loads in the
thumbnail
private var _imageContainerSprite Container
for the thumbnail
Constructor
public function BigPhoto ()
super()
Public Methods
public function loadImage (pathString)void
_imageLoader = new Loader ()
_imageLoadercontentLoaderInfoaddEventListen
er (EventCOMPLETE imageComplete
false 0 true)
_imageLoaderload (new URLRequest (path))
Clean up method
public function destroy ()void
_imageContainerremoveChild (_imageLoader)
_imageLoaderunload ()
_imageLoader = null
thisremoveChild (_imageContainer)
_imageContainer = null
Private Methods
private function imageComplete (eEvent)void
Instantiate the container
_imageContainer = new Sprite ()
thisaddChild (_imageContainer)
Add the loader
_imageContaineraddChild (_imageLoader)
Clean up
_imageLoadercontentLoaderInforemoveEv
entListener (EventCOMPLETE
imageComplete)
Figure 5 Time to test
032010 (11)42
ACTIONSCRIPT DEVELOPMENT
We still have to create our navigation buttons that wersquoll use to scroll through our gallery Create two buttons that are 40x40 pixels and design them how you like They should resemble forward and back buttons Save the forward arrow as next-arrowpng and the other as back-arrowpng into the assets folder Now that our assets our created itrsquos time to code
The XML fileRight click the src folder in the project scroll over to new and click file A dialog window will open and in the file name input box type galleryxml (see Figure 4) Write the code that you see from Listing 1 into galleryxml
Line 1 is the XML declaration This is needed to have a well-formed XML document
Line 2 declares the gallery root node Notice in this node Irsquove added attributes Also to have a well-formed XML document you must have one root node and all attribute values must be in quotes
Lines 3-7 declares a photo node with three children description thumb_path and full_path description is exactly as it sounds It will contain a description for our thumbnail thumb_path contains the path to our thumbnail image Same goes for full_path it contains the path to our full image
I then just copy and pasted that and pasted it 14 times just changing out the description Remember wersquore just using dummy data When you finish go back and add photos of your choice
The ClassesWersquoll be using two additional classes for this project One will be for the thumbnails and another for the full image Right click the classes folder go to new and click ActionScript class In the name field type ThumbNail For the Superclass type in flashdisplaySprite Wersquoll need to extend from that class so we can use the functionality of that object but add our own (see Figure 4)
Add another class this time name it BigPhoto It should also inherit from flashdisplaySprite
CodingTime to start writing the ActionScript for this project Open up PhotoGalleryas from the Flex Navigator and type in the code from Listing 2 Open up ThumbNailas and type in the code from Listing 3 Open up BigPhotoas and type in the code from Listing 4 Now that you have all the code in itrsquos time to test In the menu bar click RungtRun PhotoGallery (see Figure 5) If you get an error make sure you typed everything correctly If all went well you should see the gallery open up Click the buttons and watch the gallery scroll left and right Roll over the thumbnails to see the description scroll up Click on a thumbnail to see the full image fade in You might be wondering about whatrsquos going on Irsquoll try to break that down for you next
The ExplanationOur main focus is going to be whatrsquos going on in PhotoGalleryas This file contains the ActionScript that makes almost everything happen We first start off by declaring our properties that will be used in the project Yoursquoll notice a couple of embeded lines These lines are MetaData tags that actually embed assets into the project The two embeded lines you see add the next-arrowpng file and the back-arrowpng file In the constructor there is one call to a method called init() This method gets the application going by requesting and loading in the XML File When the file finishes loading we store the XML data into our _xml property Next we call the loadImages() method This method is responsible for a big part of the application We first gather some information from the XML file and store it in temporary variables
bull imageWidth stores the image _ height attributes valuebull imageWidth stores the image _ width attributes valuebull imageGap stores the image _ gap attributes valuebull rows stores the row attributes valuebull rowCounter increments ever pass of the for loop Is
compared against the rows variablebull columnCounter increments once for every column
created
The for loop cycles the XML file creating a new ThumbNail object with every iteration During each iteration we create variables that store the path to the thumb nail (path) and the description of the thumbnail (description) We pass the variables into the methods of the ThumbNail class Remember the ThumbNail class defines methods and properties that are specific to it The class code is commented if you wish to explore it Again our main focus is PhotoGalleryas To create the grid we write ifelse logic that compares the rowCounter variable to the row variable For every iteration of the loop we increment that variable if that variable becomes greater than rows we set it back to 0 rowCounter is then multiplied to the y-axis of each ThumbNail object The rest of the code is commented for you to explore
ConclusionYoursquoll notice I actually hard coded a lot of values directly in the ActionScript Not too ideal In the next part of this tutorial wersquore going to come back to this code and modify it to be a little more flexible and visually appealing If you have any questions feel free to contact me through my site (wwwcodedbyryancom)
RYAN DrsquoAGOSTINORyan DrsquoAgostino is an Interactive Developer at NAS Recruitment Communications in Cleveland OH part-time instructor at Virginia Marti College of Art and Design in Lakewood Ohio and freelance designer and ActionScript developer For more information about Ryan please visit httpwwwcodedbyryancom
032010 (11)44
COMPONENTS
Components are the controls and containers that are the elements of the application that create the interface They cover controls such
as buttons and check boxes containers that can hold other containers and controls navigation elements and charts Components can be added to your application in variety of ways They can be added through the design view writing then in MXML or through ActionScript
Flash Builder now has two major sets of components the Halo set which has been available in previous versions of Flex and the new Spark set The components from the Spark set have a direct correlation to a component in the Halo set but not all Halo components have been upgraded to the Spark framework yet The namespaces for these components are added automatically when a MXML document is created and you will notice there are now multiple namespace in the main MXML document already
Creating custom components takes two paths The first is to create a skin for an existing Halo component in Flash Illustrator Photoshop or Fireworks or create a custom skin for a Spark component using MXML The second path is to create a completely custom component using Flash Professional and importing it into the Flash Builder project We are going to focus on the second path and create a custom component with Flash Professional
The first step in creating a custom component is to instal the Flex Component Kit mxp into Flash Professional This is an extension that will expose some
Custom Flash CS4
Flash Builder comes with a lot of components to cover almost all of an apps needs But what if you want a custom look or functionality to a component With Flash Professional you can create custom components and import them into Flash Builder for use in your application
What you will learnhellipbull How to create custom components in Flash Professional to im-
port into Flash Builder
What you should knowhellipbull Flash Professional CS4bull Flash Builder 4bull Actionscript 3
Components in Flash Builder 4
Figure 1 The component artwork Figure 2 Converting the movie clip
032010 (11)46
COMPONENTS
Listing 1 The component class
package comtest
import mxflashUIMovieClip
import flasheventsEvent
import flasheventsEventDispatcher
import flasheventsMouseEvent
import flashfiltersGlowFilter
public class SliderButton extends UIMovieClip
public static const BUTTON_CLICKString = button click
private var glowGlowFilter = new GlowFilter(0x0000cc54421falsefalse)
public function SliderButton()
plusButtonbuttonMode = true
minusButtonbuttonMode = true
plusButtonaddEventListener(MouseEventMOUSE_OVER handleMouseOver)
plusButtonaddEventListener(MouseEventMOUSE_OUT handleMouseOut)
plusButtonaddEventListener(MouseEventCLICK handleMousePress)
minusButtonaddEventListener(MouseEventMOUSE_OVER handleMouseOver)
minusButtonaddEventListener(MouseEventMOUSE_OUT handleMouseOut)
minusButtonaddEventListener(MouseEventCLICK handleMousePress)
private function handleMouseOver(eMouseEvent)void
ecurrentTargetfilters = [glow]
private function handleMouseOut(eMouseEvent)void
ecurrentTargetfilters = []
private function handleMousePress(eMouseEvent)void
if(ecurrentTargetname == plusButton ampamp trackThumbx lt 134)
trackThumbx++
else if(ecurrentTargetname == minusButton ampamp trackThumbx gt 37)
trackThumbx--
dispatchEvent(new Event(SliderButtonBUTTON_CLICK))
032010 (11)48
COMPONENTS
of the Flex classes to Flash allowing the component to communicate with the application Download the extension from the Adobe site at httpwwwadobecomcfusionexchangeindexcfmevent=extensionDetailampextid=1273018 and install using the Adobe Extension Manager The extension should work with Flash
versions as far back as Flash 8 but I highly recommend using at least Flash 9 (CS 3)
Once the extension is installed launch Flash Professional and create a new ActionScript 3 project We are going to create a simple slider button that has a plus and minus button on each end of the button and a track between them When the plus and minus buttons are clicked the the track thumb will move one pixel in either direction There will also be a roll over behavior on the buttons to change their look as the mouse rolls over and off the buttons Finally Flash Builder will receive the event of the button being pushed and update a text input on the stage
It is common to encapsulate the behaviors of the component within itself and have events broadcast to the containing application If you think about some of standard components in both Flash Builder and Flash Professional and deconstruct them in your mind you will see that the same methods are used on them The NumericStepper is a lot like our component It has two buttons with a text field that displays a value that is incremented or decremented with each push of the button The component itself does nothing to effect the application until the code calls it to either send or receive a value
With our new document we are going to create the artwork for the component in the fla file Create four movie clips one each for the scroll track the plus button the minus button and the track thumb (Figure 1) The naming and look of these movie clips are not important
Once the movie clips are created and on the stage give each one an instance name The names in the
Figure 3 Setting the class of the movie clip
Figure 4 Setting to export as SWC
Figure 5 Creating the Flash Builder project
Custom Flash CS4 Components in Flash Builder 4
032010 (11) 49
example files are plusButton minusButton and trackThumb The actual names do not matter and we dont need an instance name for the track since we are not going to reference it in Flash Builder Flash Builder will reference the instance names of the movie clips in the components we will use these later
Now that the artwork has been created it must be collected into its own movie clip Select all of the artwork on the stage and choose ModifygtgtConvert to Symbolhellip In the Library panel there is a new symbol that is called in the sample files SliderButton The name is important here because this is how the Convert to Flex Component mxp will name the class that Flash Builder will refer to later
An external class will give the component the internal behaviors that were mentioned earlier as well as an event to broadcast to the Flash Builder application (Listing 1) All the code in the class should be familiar but there are a few points to go over First the package name is given the qualifier of comtest to identify that the component belongs to our namespace This is not necessary but helpful when there are multiple components or components from different publishers in the application
The most important change is instead of having the class extend the Sprite class this class is going to
extend the UIMovieClip class This class like the Flex Component in the library exposes the behaviors and methods we set up in the class to the Flash Builder application In the import statements use import
mxflashUIMovieClip The mxflash class includes both the UIMovieClip and ContainerMovieClip classes
When the variables are declared we set up a glow filter that will be attached to the buttons when the mouse rolls over them and a string constant for the event we create later In the constructor of the class the buttons receive the event listeners for the mouse interactions and the handlers are added later in the code In the handleClick event handler we use the event dispatcher class to dispatch the event Here we are just dispatching a standard event with the constant that was created earlier You can just as easily dispatc a custom event that has extra information attached to it
Select the movie clip in the Library panel then select CommandsgtgtConvert Symbol to Flex Component (Figure 2) The extension will do several operations such as making the symbol available to ActionScript giving the symbol a class name adding the Flex Component to the library and others
Save the file as SliderButtonas in the folder path comtest When you declare the package name as we have here you must have the same hierarchy as listed in the package name Back in the fla select the
Figure 6 The Package Explorer
Listing 2 The main MXML le
ltxml version=10 encoding=utf-8gt
ltsApplication xmlnsfx=httpnsadobecommxml
2009
xmlnss=librarynsadobecomflex
spark
xmlnsmx=librarynsadobecomflex
mx
width=200 height=110gt
ltfxDeclarationsgt
lt-- Place non-visual elements (eg
services value objects) here
--gt
ltfxDeclarationsgt
ltsApplicationgt
Listing 3 The new component and name space
xmlnstest=comtest
lttestSliderButton x=14 y=10 id=sliderButton
gt
032010 (11)50
COMPONENTS
SliderButton movie clip and select Propertieshellip from the contextual menu Expand the advanced area if it is not already and enter comtestSliderButton in the Class text field Leave the Base Class text field blank and click OK (Figure 3)
Select Publish Settingshellip from the file menu and click on the Flash tab (Figure4) Under the SWF Settings area of the window be sure that the Export SWC check box is checked The swc is the part that Flash Builder will use in the application SWC are archives that contain the classes and media assets of the component and make it easy to distribute the movie clip
Publish the SWF and SWC and we are ready to move to Flash Builder
Flash BuilderIn Flash Builder create a new project This example we only need a basic Flash Builder project without any
server technologies You can name the project anything you would like in this case I have name FB_Components and saved it in my default workspace
If you have not worked on a Flash Builder project yet it is a lot like working on the Flex projects in the past with some new MXML tags You will also notice that the Flex Navigator pane has now been replaced with the Package Explorer (Figure 6)
The Package Explorer pane has a different organization than the Flex Navigator but the main MXML file can still be found under src then under the default package
Looking at the main MXML (Listing 2) you will see that the three name spaces are added automatically and the application begins with sApplication instead of mxApplication These are the minor differences to be on the look out for when working on a Flash Builder project
Listing 4 The nal MXML le
ltxml version=10 encoding=utf-8gt
ltsApplication xmlnsfx=httpnsadobecommxml2009
xmlnss=librarynsadobecomflexspark
xmlnsmx=librarynsadobecomflexmx minWidth=200 minHeight=110
width=200 height=110
initialize=init()
xmlnstest=comtestgt
ltfxDeclarationsgt
lt-- Place non-visual elements (eg services value objects) here --gt
ltfxDeclarationsgt
ltfxScriptgt
lt[CDATA[
private function init()void
sliderButtonaddEventListener(SliderButtonBUTTON_CLICK updateText)
private function updateText(eEvent)void
pixelTexttext = String(sliderButtontrackThumbx)
]]gt
ltfxScriptgt
lttestSliderButton x=14 y=10 id=sliderButton gt
ltsLabel x=39 y=41 text=The position of the track thumb is textAlign=center width=122gt
ltsTextInput x=76 y=76 width=49 id=pixelTextgt
ltsApplicationgt
Custom Flash CS4 Components in Flash Builder 4
032010 (11) 51
To get our component into the Flash Builder project we need to put the swc some where the project can see it On your desktop navigate to where the swc was published to and copy the file Then navigate to where Flash Builder project is and put the swc into libs folder I have found it is easier to keep the fla and swf files out of the project then copy the swc over to the Flash Builder project as needed
Back in Flash Builder open the libs folder under the project in the Package Explorer pane In that directory you should see your swc if you do not try right clicking on the libs folder and selecting Refresh
In the MXML editor switch to Design view When the Design view becomes active the Component pane should become available in the lower left of the workspace The first folder in the pane is the Custom folder and our custom component should be displayed in the list Drag an instance of this component onto the stage
To show that we can have two way communication with the component drag a label and a text input onto the stage Set the labels text to be The position of the track thumb is and move the text input near the label Set the id of the text input to pixelText (Figure 7) Switch back to the Source view after saving
Notice that several lines have been added to the source of the MXML document In addition to the MXML for the component including our custom component a name space value has been added to the sApplication tag designated as xmlnstest=comtest (Listing 3) If we add more components using the same comtest package declaration they will all fall under this name space If we were to add more components using a different package additional name spaces would be added You will also notice that the component starts with testSliderButton as opposed to s fx or mx
In the application tag add an initialize property calling a function called init() After the fxDeclarations tags add fxScript tags to hold the Actionscript As you type fx the code completion should pop up and allow you to select the fxScript tags
Add an id property to the SliderButton tag and give it a value of sliderButton In between the CDATA tags add the init function This function simply adds an event listener to our component calling the updateText
function every time the BUTTON_CLICK event is broadcast from the SliderButton class (Listing 4)
Once the application receives the BUTTON_CLICK event it calls the updateText function This function looks into the component and gets the x position of the track thumb then puts that value into the text input we set up earlier
So now we have communication coming out of the component using the dispatchEvent call in the class We are also looking into the component where the application is getting the x position of the thumb track inside the component Communication can get much more complicated than this but this is a simple example to give a starting point to create more complex components
Click debug to run the application and if no errors occurred the application should launch in a browser window If you have a browser window open before running the app you should close it There is a bug in the Flash Player at the time of this writing that may cause the app to not run if there are browser windows already open
Once the application is running click on the buttons and watch as the value in the text input increase and decrease The custom component is now complete and ready to have more behaviors and methods added to it
ConclusionWhile the components that come with Flash Builder can cover most situations there will be times where only a custom component will fit the applications needs Creating a custom component takes a little work but can make the developers job a lot easier With this new level of control over the look and behavior of the component can make the application more rich and engaging to the end user
Figure 7 Components on the stage
On the Netbull httpwwwadobecombull httpwwwadobecomcfusionexchangeindexcfmeven-
t=extensionDetailampextid=1273018
LOUIS DICARROLouis DiCarro is a consultant based in NYC and has been working with Flash since the rst version He has taught web development at the college level and has worked for numerous large clients He can be reached at louisdicarroffdgmailcom
032010 (11)52
COMPONENTS AIR Components in Flash Builder
032010 (11) 53
We already know that building an AIR application affords us a lot more capabilities than working with a web based project
Digging through the Actionscript documentation shows that there are a lot of classes that are only available to AIR applications These mostly have to do with classes and methods that interact with the file system or windowing of the application
Flash Builder as with Flex Builder before it contains several components that are only available to use with AIR applications These components deal with
visual interfaces for interacting with the file system and a HTML component for displaying web content
You may wonder why these components are only available for AIR applications Mostly it is for security reasons Up to Flash Player 101 a swf does not have the permission to interact with files on the file system except in very limited circumstances
Swfs in the web browser are able to interact only with files on the server in which the swf is hosted This allows them to load images xml and other file types at run time but only if the files come from within its
AIR Components
Adding file and html rendering can result in a lot of code But with the AIR components in Flash Builder 4 this functionality can be added easily with only a few lines of code
What you will learnhellipbull What components are available for AIR applications in Flash
Builder 4
What you should knowhellipbull Flash Builder 4bull Actionscript 3
in Flash Builder
Figure 1 AIR Actionscript 3 special classes for the HTML component Figure 2 Layout of the HTML application
032010 (11)52
COMPONENTS AIR Components in Flash Builder
032010 (11) 53
Were going to take a look at couple of simple examples for each component to get a feel how use them It is also important to note that the documentation for these components are in the AS 3 documentation When looking at the documentation you will see a symbol next to some of the classes and also next to some methods within the classes (Figure 1)
HTML ComponentThe HTML component is very easy to work with It can pull in many types of media and render them as you would expect them to be rendered in a web browser
Start up Flash Builder and create a new Flex project Name the project and select Desktop under project type Click finish and let Flash Builder set up the project
Once the project is started click on the Design tab In the lower left a component tab should be open If it is not open it using the Window menu and selecting Components Scroll down to the Adobe AIR folder You will not see this folder if you set your project to run in a web browser
We are going to create a simple web browser using only three components and one line of code First drag a HTML component a text field and a button to the stage Arrange them how you would like and switch over to design view
Give each component an id as in Listing 1 Also give the button a click handler Type click and let the program auto complete another code hint will pop up to create the handler automatically
Flash Builder will generate the handler as well as the fxScript block in the code In the click handler that is generated add a line that will set the location of the HTML component to the text in the text field See Listing 2 for the full code
Run the application and fill in a valid web address in the application Remember to include http in front of
own sandbox There are exceptions and ways around it but for the majority the swf cannot interact with the file system
If the development of applications using Flash Builder and AIR were to succeed they would need to act like real desktop applications This means that the applications would have to load and save files just as any other application that a user would use on the computer
Security is still maintained in this model by having the developer digitally sign their application using certificates If the certificate is obtained though a trusted source the application would be traceable back to the original developer if something bad should happen
Having a HTML component gives the application greater rendering power by tapping into the Web Kit which can run better than the HTML renderers in the Flash Player This allows developers to repurpose content from their web site to the application
Figure 3 The application running Figure 4 Layout of the image viewer application
Listing 1 MXML of components
ltsTextInput id=addressBar x=10 y=10
width=518gt
ltsButton id=goButton x=555 y=13
label=Go click=goButton_
clickHandler(event) gt
ltmxHTML id=htmlPane x=10 y=40 width=620
height=430gt
Listing 2 goButton handler
protected function goButton_clickHandler(event
MouseEvent)void
htmlPanelocation = addressBartext
032010 (11)54
COMPONENTS
the address Click the Go button and the page should load after a few seconds Take a look at Figure 3 for the results
There are a lot of methods and commands associated with the HTML component This will allow you to make a more customized display and give more control over the HTML content that you show
File system componentsUsing the file system components is just as easy To test the components we are going to create a simple image viewer that allows the user to select the images from the file system
Create a new Flex Project as we did before and be sure to make it a desktop application Once the project has loaded switch to design view and drag a File System Tree and an Image component to the stage See Figure 4 for the layout
Once the application is laid out switch over to the Source mode and give all the components ids as we did before (Listing 3) Also add a change handler instead of a click handler Flash Builder will autocomplete and generate the handler for you as it did when we added the click action to the button
In the generated handler add the code that will load the image into the image component To keep everything simple we only are going to load jpg and png files (Listing 4) in this function we are first checking to make sure the file is a file and not a directory by checking for a file extension If the file passes the first test we check to see if the file is a jpg or png Lastly if the file passes all of these test it gets loaded into the image component
Save the file and run the application to see the results Clicking on the file system tree items will either open or close the directory or try to load the file When the user clicks on a jpg or png it will load into the image component (Figure 5) Note that as the tree expands a scroll bar is attached to the component automatically
ConclusionJust as with the HTML component there is more methods and properties available to you with the file system components In this demo application we have seen how easy it is to get access to the file system using the component without writing a lot of code
There is a lot more involved in making a full application using these components but we have witnessed how easy to get started with them Having more control over the elements as well as error checking would be added in real applications
Having these components available gives the application a large amount of functionality very quickly and allows the developer to concentrate on the logic of the application Using these components in your application will help make it more full-featured and feel more like a real desktop application
LOUIS DICARROLouis DiCarro is a consultant based in NYC and has been working with Flash since the rst version He has taught web development at the college level and has worked for numerous large clients He can be reached at louisdicarroffdgmailcom
Listing 3 MXML of components
ltmxFileSystemTree id=fsList x=10 y=10
height=460 change=fsList_
changeHandler(event)gt
ltmxImage id=imgPane x=193 y=10 width=437
height=460gt
Listing 4 Handler for change event
protected function fsList_changeHandler(event
ListEvent)void
var fileFile = eventcurrentTargetselectedItem
as File
if(fileextension)
if(fileextensiontoLowerCase() == jpg ||
fileextensiontoLowerCase() ==
png)
imgPanesource = fileurl
Figure 5 The image viewer application running
032010 (11)56
TLF Applying CSS to Text Layout Framework styles
032010 (11) 57
TLF is introducing the new way of applying styles to the text Prior to TLF flash used simple approach you had to prepare and attach
StyleSheet object to the style property of the TextFieldTLF provides more flexible and customizable but
more complex techniqueDuring this tutorial we are going to create a small
application in Flex 4 This application contains a text displayed with TLF component TextArea and 2 different CSS that can be applied to the text simply by pressing the button Figure 1 show the screenshot of the application
TextFlow and itrsquos IFormatResolverTLF provides a callback mechanism to for with text styles TextFlow objectrsquos got a property formatResolver that should implement IFormatResolver interface Actually it is a set of callback functions that are called by parent TextFlow when it processes itrsquos elements
To have a closer look at formatResolver we will implement itrsquos version to work with out simple CSS So start create a new project in Flex and name it for example TextCSS In the default package create a new ActionScript class named CSSFormatResolver that implements IFormatResolver interface
Listing 1 shows the complete implementation of the class and will we look closer into it later For now pay attention on the following functions
bull invalidateAll
bull invalidate
bull resolveFormat
bull resolveUserFormat
bull getResolverForNewFlow
These function are created automatically by Flex Builder as they are required for implementation of the interface All functions are callbacks that are called when the certain action is performed by TextFlow and it needs to know how to treat with different elements
Applying CSS
This article is a reply to our readerrsquos question about the possibility to apply CSS to Text Layout Framework (TLF) We will show how to implement the necessary class and switch text styles on the fly
What you will learnhellipbull how can custom styles be applied to TLF elementsbull how to implement IFormatResolver to work with CSS
What you should knowhellipbull the basics of Flex and FlexFlash Builderbull the basics of TLF
to Text Layout Framework styles
Figure 1 Style changing application
032010 (11)56
TLF Applying CSS to Text Layout Framework styles
032010 (11) 57
Main ApplicationListing 2 contains a full code for main application
The application consists of
bull TextArea with some text The text is formed using XML Some elements of the TextFlow have
For our case we are interested in resolveFormat function that is called for every element of the TextFlow when itrsquos style needs to be changed This function return an object that should implement ITextLayoutFormat
Before we continue lets have a fast look at main application and how we build our example
Listing 1 CSSFormatResolveras
package
import flashtextStyleSheet
import flashxtextLayoutelementsFlowElement
import flashxtextLayoutelementsFlowValueHolder
import flashxtextLayoutelementsIFormatResolver
import flashxtextLayoutelementsTextFlow
import flashxtextLayoutformatsITextLayoutFormat
public class CSSFormatResolver implements
IFormatResolver
private var _styleSheetStyleSheet
public function CSSFormatResolver()
_styleSheet = new StyleSheet()
public function invalidateAll(textFlow
TextFlow)void
public function invalidate(targetObject)void
public function resolveFormat(targetObject)
ITextLayoutFormat
var formatFlowValueHolder = null
if (target is FlowElement)
var elementFlowElement = target as
FlowElement
if (element = null)
format = elementformat as
FlowValueHolder
if (elementstyleName = null)
var styleObject = styleSheetgetSt
yle(elementstyleName)
formatcolor = style[color]
formatfontSize =
style[fontSize]
formatfontWeight =
style[fontWeight]
formatfontStyle =
style[fontStyle]
return format
public function resolveUserFormat(targetObject
userFormatString)
return null
public function getResolverForNewFlow(oldFlow
TextFlow newFlowTextFlow)
IFormatResolver
return null
public function get styleSheet()StyleSheet
return _styleSheet
public function set styleSheet(valueStyleSheet)
void
_styleSheet = value
032010 (11)58
TLF
032010 (11) 59
Listing 2 TextCSSmxml
ltxml version=10 encoding=utf-8gt
ltsApplication xmlnsfx=httpnsadobecommxml2009
xmlnss=librarynsadobecomflexspark
xmlnsmx=librarynsadobecomflexhalo
xmlnslocal=
width=640 height=300gt
ltfxScriptgt
lt[CDATA[
import mxeventsFlexEvent
protected function applyCSS1Button_
clickHandler(eventMouseEvent)void
var formatResolverCSSFormatResolver =
new CSSFormatResolver()
formatResolverstyleSheetparseCSS(css1
text)
textAreatextFlowformatResolver =
formatResolver
protected function applyCSS2Button_
clickHandler(eventMouseEvent)void
var formatResolverCSSFormatResolver =
new CSSFormatResolver()
formatResolverstyleSheetparseCSS(css2
text)
textAreatextFlowformatResolver =
formatResolver
]]gt
ltfxScriptgt
ltsTextArea id=textArea width=620 height=134
x=9 y=156gt
ltsTextFlowgt
ltsp styleName=h1gt
Title of the Text
ltspgt
ltsp styleName=h2gt
Section of the Text
ltspgt
ltspgt
This is a body text Lorem ipsum
ltspgt
ltsTextFlowgt
ltsTextAreagt
ltsTextArea x=10 y=10 width=285 height=86
id=css1 gt
lt[CDATA[
h1
colorFF0000
fontSize20
fontWeightbold
fontStylenormal
h2
colorFF00FF
fontSize16
fontWeightbold
fontStyleitalic
]]gt
ltsTextAreagt
ltsTextArea x=345 y=10 width=285 height=86
id=css2 gt
lt[CDATA[
h1
color00FF00
fontSize32
fontWeightnormal
fontStyleitalic
h2
color0000FF
fontSize24
fontWeightbold
fontStylenormal
]]gt
ltsTextAreagt
ltsButton x=108 y=105 label=Apply CSS
1 id=applyCSS1Button
click=applyCSS1Button_
clickHandler(event)gt
ltsButton x=443 y=105 label=Apply CSS
2 id=applyCSS2Button
click=applyCSS2Button_
clickHandler(event)gt
ltsApplicationgt
032010 (11)58
TLF
032010 (11) 59
got styleName attribute so you could apply the corresponding CSS style to them later
bull 2 TextAreas with simple different CSSbull 2 Buttons to apply CSS from TextAreas to example
text
When the button is clicked the new instance of CSSFormatResolver class is created Then the corresponding CSS string from the TextArea is parsed and set into resolverrsquos property of SlyleSheet class type And finally prepared formatResolver instance is assigned to the TextFlow
Applying CSS to TextFlowNow lets have more detailed look at resolveFormat callback function First it should return a value that implements ITextLayoutFormat if it returns null then no new styling should be applied to an element being processed by the function So we create format variable of FlowValueHolder (it implements ITextLayoutFormat) and set itrsquos value to null (we do that because resolveFormat works with all elements including TextFlow itself as probably we donrsquot want to apply one style to the whole text)
After we do all the necessary casts and null checks and if we are sure that current elementrsquos got styleName attribute we assign styles from CSS to a current format StyleSheet object is used to contain CSS data as it is convenient object to parse and retrieve CSS data
Conclusion and a WarningThere was a brief tutorial on how to apply simple CSS to TLF TextFlow Please note that CSSFormatResolver class is not fully functional and only can be applied to our sample CSSs Writing reusable and versatile class requires more detailed coding and approach
Check the TLF Blog on this issue There is fully functional CSSFormatResolver with example there httpblogsadobecomtlf200902iformatresolver_and_using_css_1html
MAXYM GOLOVANCHUK Maxym Golovanchuk is a Photoshop Certied Expert and TV producer and he is using Adobersquos software for implementing entertainment solutions including video delivery with Flash Media Server mexxikgmailcom
MondayTuesdayWednesdayThursday Friday
DIVISIONS OF CREATIVE NICHE INC
032010 (11)60
PROFILE Flashcreed ndash Business Gallery
032010 (11) 61
The Business Gallery (httpwwwflashcreedcombusiness_video_image_gallery) is a Flash component meant to do one thing to enhance the visual experience a website portfolio or presentation site gives to its users Mainly itrsquos all about the image you present yourself or
your product to the world wide web Letrsquos face it without the looks you canrsquot sell your product or image no matter how interesting it might be
Whatrsquos so great about this gallery you might wonder Well the answer is simple everything Advanced AS3 programming dynamic XML implementation unlimited number of media items on stage PNG JPG and video FLA SWF MP4 F4V supported media tween and image effects just to name a few of the over 150 settings this gallery brings you Bottom line you can customize it in any way you see fit in order to make it resemble your website layout Not to mention the code optimization that allows the gallery to run so smoothly even on low resources
We brought 45 background wallpapers in case just a color doesnrsquot do the job also a set of custom arrows and close buttons
Flashcreed ndash Business GalleryHello itrsquos good to be back here among Flash amp Flex Magazine readers Today we are going to tell you a bit about our products mainly our Business Gallery but since all our products are built on the same framework most of the properties apply to all When we first realized what we could do with this framework we decided to name it ldquoPandorardquo in order to point out the unlimited number of possibilities it revealed regarding customization and user friendliness
032010 (11)60
PROFILE Flashcreed ndash Business Gallery
032010 (11) 61
The size of the entire gallery and any element in it is subject to any kind of resize big stage and small thumbs or the other way around for any template you or your client desire
Column_scroll and the properties for the stage mask helps you configure the exact number of visible columns you want to set in order to browse through the media items your gallery has Beside this useful feature we added blur and a couple of tween effects for the leftright navigation that gives an impressive look
032010 (11)62
PROFILE Flashcreed ndash Business Gallery
032010 (11) 63
Either as tooltip or plain text you can show any information you want regarding a certain media thumb in the gallery You can change font type size spacing color position and many other properties
The color gradient system for roll overout mouse gesture is unique in every way if we are to compare it with other galleries on the market at this point You can customize up to 5 sets of color with different alpha values The gradient type either linear or radial can be modified with rotation and ratio values
032010 (11)62
PROFILE Flashcreed ndash Business Gallery
032010 (11) 63
When clicking on a thumb if preview_type is selected as internal a resizable preview window will reveal itself and depending on the media type (image or video) an image viewer or video player will be contained inside it If preview_type is selected as external you have the possibility to set certain URL addresses this allowing you to redirect the user to a specific area of the website like a product page from a virtual store for example
The video player has a dozen of controllers that allow you to create a skin to better suit the template you want to create for your gallery Buttonrsquos color thickness handler color or scrub bar size just to name a few of the properties you can play with
At an amazing price of 999 $ this has to be one of the best choices when it comes to media galleries flash components Donrsquot hesitate to take a look at it on wwwflashcreedcom and also consider other products that might better suit your specifications or desires We would definitely appreciate any kind of feedback regarding current or possible features
Thank you
032010 (11)65
BOOK REVIEW
Are you an actionscript 3 game developer who is not able to write a complete commercial game because you cannot manage dozens
of classes Or you are an experienced actionscript 3 applications developer who wants to program game but donrsquot like reading any available beginner book as it doesnrsquot suit your style Even if you already have a good grasp over java or c++ and interested in creating not only fun games but commercial ones also then this is what you really require
There are several actionscript 3 game development books for beginners out there but Essential Guide to Game Dev is one of those few books that talk about the advanced gaming concepts However its first chapter begins with an easy to understand game example (good for any beginner) and ends up creating 3 games Did I tell you 3 games in just first chapter
Teaching about an Actionscript 3 Game framework is one of the many reasons that make this book a kick-ass addition to actionscript 3 gaming library Authors teach you how to create 10 unique games ranging from arcade to driving tile based to puzzle game and shooters to dice games Another specialty of this book is to use Flex and Flash Develop IDEs along with the primary Flash tool that creates space for not only flex
developers but also Flash Develop users In addition to this you will also learn to create game assets with GIMP Mappy and a sound effect creation tool You will get information about copyright laws which are necessary for any would-be commercial game creation and a complete game example integrated with MochiAds
This book also discusses and further more implements various advanced topics such as bitmap rendering pixel-level collision detection sound management AI xml-based level designing scrolling screen optimization techniques particles etc
In short this book will surely blow your minds with the wealth of knowledge it includes and you will pray for authors to keep writing such informative and useful books
If you are really serious about gaming then donrsquot miss the opportunity of reading this book Highly recommended
by Ali RAZA ACI ACE SCJP
Essential Guide to Flash Games
Authors Jeff Fulton Steve FultonPublisher friends of EDISBN 978-1-4302-2614-7Language EnglishPages 664 PagesWebsite httpfriendsofedcombookhtmlisbn=1430226145

10
IN BRIEF
032010 (11) 11
IN BRIEF
032010 (11)
Flash Builder Flex 4 and Cold-fusion Builder releasedOn the morning of march 22nd Adobe removed the beta versions from Ado-be Labs and added downloads for shipping versions If yoursquove wondered if yoursquoll want to upgrade your Flex Builder to Flash Builder - trust us - you real-ly should Flash Builder which is now part of Creative Suite 5 Web Premium and Master Collection is a joy to use and the new Flex SDK solves a lot of issues developers have had
The price of the software are Flash Builder 4 Standard $249 (upgrade $99) 4 Premium $699 (upgrade $299) Coldfusion Builder 1 $299 (upgrade na)
Some new features of FB4
bull Improving designerdeveloper workflowbull Enabling data-centric developmentbull Dataservice modeling and binding made easybull Advanced data management features
from flashmagazinecom
Adobe Online Developer Week May 10-14During Developer Week learn about the Adobe Flash Platform including Flex Flash Builder AIR and how it integrates with Cre-ative Suite 5 technologies This week-long event features free live webinars presented by Adobe technology experts See live demos and have your questions answered by the experts during interactive QampA sessions Register and attend whichever sessions suit your needs and you will be eligible to win a copy of Flash Builder 4 Professional or Creative Suite 5 Web Premium For more info and registration visit httpwwwadobecomcfusioneventindexc fmevent=detailampi-d=1489921amploc=en_us
from webkitchenbe
Adobe Flash Platform on androidIf you want to know when Flash Player 101 and AIR 20 becomes available for Android go to adobecom and sign up for the notication The promises say itrsquoll come in H1 of 2010
from corlanorg
Apple Slaps Developers In The FaceThe new iPhone 40 SDK modied the terms of use so now creating appli-cations in any non-Apple-approved languages is a violation of terms This does not just affect Adobe but also other technologies like Unity3D Apple announced this right before Flash CS5 came out with the -now useless- iPhone packager
ldquoNow let me put aside my role as an official representative of Adobe for a moment as I would look to make it clear what is going through my mind at the moment Go screw yourself Apple ldquo
ldquoI believe that we have witnessed a deliberate smear campaign aga-inst Flash to drive content providers towards improved web browsing support for iPhone OS devices A purely competitive measure driven to ensure that Apple devices can appear to compete with impending releases of Android that include Flash Player 101rdquo Mark Doherty
from theashblogcom ashmobile-blogcom
PDF Navigator developer con-test could get your FlexFlash resume in front of leading RIA amp brand agenciesAcrobatUserscom has launched the Acrobat PDF Portfolio Navigator con-test Flex developers create custom navigators using Flex and the Acrobat ActionScript API The top three entries win great prizes The top ten get their FlexFlash portfolios in front of some of the top brand RIA and user experience design firms in the world G2 Blitz Catalyst Resources Effecti-ve UI and Universal Mind
Its a win win situation The Adobe-sponsored Acrobat User Communi-ty gets examples of innovative PDF Navigators Flex developers get the chance to show off their create and technical work to the people who are looking for great and creative Flex developers Adobe will also feature the top ten entries on the Adobecom website
The contest runs now through June 7 2010 Full contest details are at httpwwwacrobatuserscomnavigator-contest
10
IN BRIEF
032010 (11) 11
IN BRIEF
032010 (11)
Flash is as open as HTML5Today the hottest topics in Flash news are in connection with Apple and HTML5 Serge Jespers wrote a same titled post on his blog about his opinion in this topics Here are some toughs from it This is not a fight HTML5 and Flash can live together just fine and can even complement each other On AppleInsi-der an Apple spokeswoman claimed that Mike Chambers got it all backwards when he blogged about Applersquos closed system Thatrsquos not the part that made me cringe though She said that ldquoit is HTML5 CSS JavaScript and H264 that are open and standard while Adobersquos Flash is closed and proprietaryldquo
H264is far from open It is owned by a private organization known as MPEG LA who said earlier this year that ldquoInternet Video that is free to end users would continue to be exempt from royalty fees until at least December 31 2015ldquo Nobody knows what is going to happen after 2015
So what about HTML5 CSS and JavaScripthellip Those are open right Well yeah The specs are open meaning that everyone can download tho-se specs and build an application around it to display that language Heyhellip Wait a minutehellip That sounds a lot like Flash The specs for FLV (Flash video) SWF (the file format for Flash Player) AMF (the binary format for exchanging data) and RTMP (the protocol used for transmission of audio video and data) are all published and can be downloaded by anyone
The specs for HTML5 are decided by the Web Hypertext Application Techno-logy Working Group (WHATWG) The WHATWG was founded by individuals of Apple the Mozilla Foundation and Opera Software in 2004 after a W3C work-shop Apple Mozilla and Opera were becoming increasingly concerned about the W3Crsquos direction with XHTML lack of interest in HTML and apparent disre-gard for the needs of real-world authors Anyone can participate as a Contribu-tor by joining the WHATWG mailing list The same goes for Flash The bugbase is open to anyone and anyone can view bugs and add feature requests But the Flash runtime is closed Okhellip Surehellip Flash Player is not open source although some parts are That saidhellip Ask yourself this Is your browser open source The only browser that is completely open source is Firefox Safari is only partly open source (only the WebKit engine) The same can be said about Chrome (in the Chromium project) However the biggest HTML runtime out there ndashInter-net Explorer (still used by over 50 of all internet users)ndash is as closed as Flash Player And so is Opera (even though they are part of the WHATWG)
And with that I come back to the title of this post Flash is as open as HTML5 = HTML5 is as open as Flash
from webkitchenbe
Adobe Creative Suite 5 AnnouncedOn April 12th Adobe released Creative Suite 5 the next evolution of Adobe products delivering a huge amount of new technology and innovation for de-sign and development on the web print video photography and extending the creative workflow with Omniture Analytics With the new suite of tools we have delivered Flash Player 101 for the creation of web content across platforms including mobile smartphones
Some new features of Flash CS5bull New text enginebull XML-based FLA filesbull Spring for Bonesbull Deco brushes
Flash Player and Googlersquos Chrome integrationFrom now on when users download Chrome they will also receive the latest version of Adobe Flash Player There will be no need to install Flash Player separately
Users will automatically receive updates related to Flash Player using Google Chromersquos auto-update mechanism This eliminates the need to manually download separate updates and reduces the security risk of using outdated versions
With Adobersquos help we plan to further protect users by extending Chromersquos ldquosandboxrdquo to web pages with Flash content
from corlanorg
Brand new FlexorgThose of you familiar with Flexorg will notice a substantial differenceBe sure to check out the new Flex showcase (click ldquoWhatrsquos Possibleldquo) Every time they add an application to the showcase they tweet it on httptwittercomexshowcase so follow them
Now when you want to show your boss friends and co-workers what Flex is about you have a good place to send them for a quick introduc-tion
from gregsramblingscom
Flasher Magazine Issue 3 by Lee BrimelowLee Brimelow Platform Evangelist at Adobe released the 3rd issue of Flasher Magazine and you can watch it on his blog httptheashblogcomp=1942
from theashblogcom
News selected by Gaacutebor Csomaacutek
bull Video improvementsbull Streamlined development environmentbull Integration with Adobe Flash Builderbull Omniture integration
032010 (11)12
TOOLS Storyfarm Switches to G-Technologytrade G-SPEEDtrade eS PRO to Cut Latest Doc Projects
032010 (11) 13
Video editors working in high definition (HD) face increasing technical challenges on a daily basis Their tools need to be sharp fast and function
well under deadline The sheer size of video files that have to get pushed through todayrsquos postproduction workflows can slow a system down to a level where the creative process just isnrsquot fun anymore For an editor working in HD the external storage solution that holds your video is now as important as your camera computer and editing software and the last thing any editor wants is to have issues because their workstation canrsquot deliver the goods
The Story Behind Storyfarm Storyfarm (httpwwwstoryfarmcom) is a post-production shop based in San Francisco Owner Dean Mermell cuts long-form documentaries corporate promos and TV commercials for a wide range of clients in the greater Bay Area Hersquos written for DV magazine and Macworld and taught Final Cut Proreg and digital filmmaking at Stanford University In his free time Dean writes produces directs and scores c o n t e m p o r a r y silent films His silent short Modern Life won the 2000 San Francisco International Film Festivals Golden Gate Award for best short film
The Solution G-Technology G-SPEED eS PRO
Benefits Speed and scalability Dean had reached a point at his company where he couldnrsquot afford to compromise on performance any longer While Dean doesnrsquot work much with uncompressed video he does use a lot of layers composites and effects at 720 and 1080 resolutions so he needed the same kind of throughput as editors working with uncompressed 2K files
The G-SPEED eS PRO was appealing to Dean because not only did it suit him for the work hersquos doing now but if he wanted to work on uncompressed or 2K projects in the future he liked the idea of simply adding another G-SPEED eS PRO to the system which is much cheaper than moving up to fibre channel
A single four-drive G-SPEED eS Pro unit in RAID 0 delivers a data transfer rate of up to 424MBsec read and 406MBsec write performance
When two units are connected together in fail-safe RAID 5 using the included PCIe RAID controller card the performance goes up to 678MBsec read and 730MBsec write
Capacity Knowing that the current 35-inch G-Technology product line utilized Hitachirsquos latest 2 terabyte (TB) Deskstar drives Dean decided the 8TB G-SPEED eS PRO would best meet his needs While eight terabytes seemed like a lot of space at first Dean sometimes has two or even three client projects going on at once as well as his own creative work and he quickly found that the hours of 1080 data he was working with added up fast
Great Tech Support You can have the best hardware at your disposal but if you canrsquot get the help you need when you crucially need it itrsquos not worth anything When configuring the G-SPEED eS PRO Dean quickly discovered the value of a responsive technical support staff
Storyfarm Switches to
San Francisco-based post house sold on productrsquos speed capacity scalability and responsive tech support
G-Technologytrade G-SPEEDtrade eS PRO to Cut Latest Doc Projects
032010 (11)12
TOOLS Storyfarm Switches to G-Technologytrade G-SPEEDtrade eS PRO to Cut Latest Doc Projects
032010 (11) 13
the Panasonic HVX 200 JVCrsquos HM100 and even an old Sony PD150
At the end of each production day David overnights Dean the P2 files on a small FireWire drive which Dean copies and unpacks onto his G-SPEED eS PRO before overnighting the drive back to the filmmakers Links to trailers and clips for both of these projects can be found on Storyfarmrsquos Projects webpage (httpwwwstoryfarmcommainfolderStoryfarmProjectshtml)
The external storage solution Dean used prior to his work with David and Susan worked fine for standard definition projects that didnrsquot come with punishing deadlines However when The Trouble With Normal landed in his lap he soon found that his current solution just wasnrsquot up to the task in terms of reliability and performance
The video bit rate for this project comes in at around 59MB per second which my previous RAID could handle without a problem said Dean But for this particular project and the way itrsquos being cut the amount of layers and filters not to mention the sheer volume of data brought my old system to its knees
Dean researched the G-Technology by Hitachi product line and decided the G-SPEED eS PRO configured in RAID 5 had the speed security and capacity to meet his workflow needs
Whatrsquos Next for Storyfarm Dean hopes to complete The Trouble with Normal in 2010 get attention through the usual festival channels and gain a greater audience through HBO or another such entity The Next US is already online with several moving episodes
Of course part of what has really made these projects fun for me is having a rockinrsquo system that doesnrsquot slow my creative process And in addition to my Mac I have the G-SPEED eS PRO to thank for that
The G-SPEED eS PRO is striped in RAID 0 right out of the box and it was wicked fast but like many editors do these days Dean really wanted to format it in RAID 5 He called tech support and immediately spoke to a person who was very knowledgeable about the G-SPEED eS PRO drive and how different RAID levels work overall
Additional features of the G-SPEED eS Pro include
bull RAID 0 1 3 5 and 6 ndash easily configurable and managed via a browser-based GUI
bull Single unit supports multi-stream compressed HD ProRes 422 and single stream uncompressed HD playback
bull Super quiet desktop unit with very small footprint bull Two units support dual-stream HD playback and
a single stream of 2K bull Professional locking mini SAS port with mini SAS
cable included bull Storage capacities available up to 8TB per unit
scalable to 16TB bull Compact and stylish aluminum enclosure with
thermo-regulated cooling fans bull Hot-swappable disk drive modules bull Formatted HFS+ mounts on a Mac Pro desktop
right out of the box
Going Beyond Normal Deanrsquos current documentary project The Trouble With Normal is about the peculiar state of the modern mental healthcare system and what it means to be crazy Filmmakers David Mackenzie and Susan Perkins of Everyday Wonder Productions (httpwwwwondereverydaycom) shot the project in cities all over North America using a Panasonic HVX 200 set up to capture in DVC PRO HD24720P
Deanrsquos editing takes a colorful non-linear approach that reflects the content of this non-traditional documentary
Irsquove been using a lot of layers speed changes and effects that really push the boundaries of long form editing to try and communicate the emotional content of the film It really maxed out my previous system but the G-SPEED eS PRO is handling it with ease
The Next US Project Dean is also working with Everyday Wonder on The Next US project an ongoing series of 5-minute Webisodes that profile small businesses in America that are thriving in this supposedly bleak economy
David and Susan are currently travelling across the country in an RV thatrsquos outfitted with a mobile production studio The project is being shot using a number of different cameras and formats including
DEAN MERMELLDigital lmmaker teacher composer and video editor
Martin Landau and Dean Mermell holding their awards for lifetime achievement and best editor respectively which they received at the California Independent Film Festival
032010 (11)14
BEGINNERS Working with Display Objects 101
032010 (11) 15
The DisplayObject class is the base class for all objects that can be placed on the display list The display list manages all objects displayed in Flash
Player or Adobe AIR Use the DisplayObjectContainer class to arrange the display objects in the display list DisplayObjectContainer objects can have child display objects while other display objects such as Shape and TextField objects are leaf nodes that have only parents and siblings no children (httplivedocsadobecomflash90ActionScriptLangRefV3flashdisplayDisplayObjecthtml)
The DisplayObject class supports basic functionality like the x and y position of an object as well as more advanced properties of the object such as its transformation matrix
DisplayObject is an abstract base class therefore you cannot call DisplayObject directly Invoking new DisplayObject() throws an ArgumentError exception
All display objects inherit from the DisplayObject classSo what does that really mean Well I like to refer to
display objects as any visual on the stage hence the name display So therefore I call them visual objects interchangeably throughout this article
A visual object can be a MovieClips Sprites Text Fields Shapes Buttons etchellip again all visual items that reside on the stage
So let get started and learn how to import the objects to the library we will be using the example files that accompany this lesson feel free to use any file that you want to follow along with
Note if you already understand this process please feel free to skip ahead if not we will go step by step for the first MovieClip then skip certain sets in the subsequent examples
Go to File =gt Import =gt Import to Library
Select the justinjpg This will bring the image into the library
Working with
No matter what you do in Flash you will encounter display objects at some point So what exactly are display object Adobe lists the following definition from their live docs
What you will learnhellipbull the basics of how to create and manipulate Display Objectsbull use the visual way by dragging from the librarybull add Display Objects to the stage using only AS3 code
What you should knowhellipbull doesnrsquot need and prerequisite knowledge when it comes to
tutorial
Display Objects 101
032010 (11)14
BEGINNERS Working with Display Objects 101
032010 (11) 15
(Note this name can be anything you want) I typically use _mc _btn etchellip behind the name for two reasons the first being it lets me know easily what type of object Irsquom using and the second it enables code hinting in Actionscript by using the underscore prefix (_mc) Also make sure you registration point is set to the upper left This is reference point for the MovieClip
Once you have done that select your newly created MovieClip instance on the stage and give it an instance name I called the instance the same thing I named the MovieClip justin_mc
Now we can then access its properties via Actionscript If you not familiar with instance names this simply is a way for you to tell Actionscript which item you are referring to
Create a new layer and label it actions and lock the layer
Select the first frame and open the actions panel Window=gtActions
The first properties we are going to manipulate in the Display Object aka MovieClip is the location parameters x and y These are going to be set in the upper left corner where you registration point was set up Enter the code into the actions panels
justin_mcx = 0
justin_mcy = 0
If you test the flash movie you will get something that should look like this
There are two way to access these objects the first way is to drag the justinjpg image out from the library to the stage
Now you will need to convert this image into a MovieClip which is a Display Object You do this by going to Modify=gtConvert to Symbol
This will pop up a dialog box These settings will be for your new MovieClip Give it a name of justin_mc
032010 (11)16
BEGINNERS Working with Display Objects 101
032010 (11) 17
Good now you can play around with the values and change them to see where other x and y values will place the MovieClip The images shown here are with the x and y set to 200
Lets try to access some different properties types enter the following code into your actions panel
justin_mcscaleX = 15
justin_mcscaleY = 15
If you test the movie you will now see that an output of the justin_mc MovieClip is 15 larger that before Your image might be pixilated since itrsquos stretching it to a larger dimension
Ok congratulations you have successfully added a displayvisual object to the stage and manipulated it Pretty Simple
Now lets delete the MovieClip from the stage and access it only through Actionscript
Once you have deleted the MovieClip off the stage go to the Library panel and right click the justin_mc and select properties
Select the Export for Actionscript option The name you see here will be the name that you create the object from in Actionscript This name can be anything but we will keep it the same as our instance name for no other reason but consistency
032010 (11)16
BEGINNERS Working with Display Objects 101
032010 (11) 17
Once you select the OK button you will get a window that looks like this Just select OK
So if we test our code now we will get and error because we have yet to create a MovieClip and add it to the stage
So delete all the code you have currently in the actions panel We will first create a variable that will hold the newly created instance of the MovieClip from the library instead of dragging it to the stage like we did before
Enter the following code
var anyNamejustin_mc = new justin_mc()
addChild(anyName)
the var keyword creates a variable anyName Note as the name states this can be called any name you want it to be eg Bob Billy Susan or whatever This is essentially its instance but in code instead of
selecting it and on the stage and then adding it via the properties panel like we did before justin _ mc references the library class name that you set earlier within the propertiesand the = new justin_mc() creates a new instance of a MovieClip name justin_mc() and assigns it to the variable
The addChild(anyName) just tells Flash to add the object to the stage using the variable (var) reference that you just created If you donrsquot use the addChild(name of variable) you will not see your visual object show up on the stage
So as you see itrsquos really not that difficult to access a display object and display it
Finally we will adjust some of the properties just as we did before Except this time we use the variable name that was called anyName Again this is just like your instance name see (Listing 1)
In next months issue we will continue this expedition of display objects and touch on things like drawing shapes using only code and working with text I hope you enjoyed this article please feel free to email me your comments or questions to jundajgmailcom
JUSTIN P JUNDAIs a New Media Engineer specializing in FlashAS2-3 Photo-shop After Effects PHP MySQL and a slue of other program-ming languages Justin also loves to travel and has a strong passion for teaching others how to use these technical pro-ducts He currently works with a top government-contracting rm implementing new media ideas into interactive course-ware that is then delivered to the military in order to effecti-vely train them Also check out shprotv to see the latest video from him and his partner Director Scott Hansen wavelenght-fxmaccom You can reach Justin at jundajgmailcom with any thoughts or concerns you have regarding this article
Listing 1
Creates Instance of the MovieClip named justin_mc
var anyNamejustin_mc = new justin_mc()
Set properties for the MovieClip properties
can be things like rotation
x y coordinates Scale sizes
etc
anyNamex = 100
anyNamey = 100
anyNamerotation = 45
anyNamescaleX = 15
anyNamescaleY = 15
Assigns the movie clip to the stage
addChild(anyName)
032010 (11)18
FLASH AND PHP
The webinar hosted by Ryan Stewart Platform Evangelist at Adobe and Kevin Schroeder Technology Evangelist at Zend hit the Web around
the same time that Zend announced Code Tracing had been added to its PHP web application server Who you might ask is this company called Zend And what is an article about flight recorders doing in Flash amp Flex Magazine After all yoursquore a Flex developer so why should you care
Who is ZendPHP runs a third of the worldrsquos Web sites and has now become the most popular language for building dynamic Web applications Zend Technologies Inc is the leading provider of products and services for developing deploying and managing business-critical PHP applications Zend contributes to Zend Framework (an open source objected-oriented Web application framework) and now Zend Framework is bundled with Adobe Flash Builder 4
What is a Software Flight RecorderWhen something goes wrong with an airplane in flight investigators obviously canrsquot reproduce the problem Instead they rely on data captured by the airplanersquos black box flight recorder in order to uncover the source of the problem Zend Server does the same for PHP web applications Rather than trying to recreate the environment and reproduce the steps leading up to a problem Zend Server captures in real-time the full
execution of an application ndash in production or in a test lab ndash and pinpoints root cause issues without trail and error This feature called Code Tracing is akin to a software flight recorder for PHP web applications
Code Tracing can be activated to automatically capture problems in real-time or used manually to trace specific scenarios Zend had strict requirements for the Code Tracing user interface
bull The performance chops to handle megabytes of databull A highly-interactive view for an exceptional user
experiencebull The ability to modify widget behaviorbull Established cross-browser supportbull Sufficient and accessible technical content and
expertise see (Figure 1)
Zend considered various alternatives and ultimately chose Adobe Flex for the following reasons
bull Performancebull Flexibilitybull Maturitybull Flash Builder 4 support for data-focused applications
Why Flex developers should care
bull Adobe Flash Builder now has built-in support for Zend Framework a PHP framework based on PHP 5
bull PHP provides easy integration with back-end logic using Flash remoting
bull Zend Server is a data-centric web application server and Code Tracing helps improve development and deployment in high performance production environments
EXCERPT FROM WEBINAR BY KEVIN SCHROEDER AND RYAN STEWART
How a Software Flight Recorder was You might have caught a recent webinar How Zend used Flex and PHP to build a Software Flight Recorder which sparked some interesting discussion
Built Using Adobe Flex and Zend PHP
Figure 1 Flash and PHP
How Zend Used Adobe Flex and PHP to Build a Software Flight Recorder
ldquoZend Framework with Support for Action Message For-mat (AMF) Now Bundled with Adobe Flash Builder 4rdquo
How to build Rich Internet Applications using Zend PHP and Adobe Flash Platform
032010 (11)20
ACTIONSCRIPT DEVELOPMENT Creating an AS3 Game Framework
032010 (11) 21
The game framework is the foundation for making the second game It is an expanded version of the first chapterrsquos framework with an emphasis
on organization and reuse Since this book is also not called Proper Object-Oriented Design Patterns and Principles for Games you will see little theory here and mostly practice Many of these techniques have been hard won and developed over many years of ActionScript programming We have fought the wars through AS1 AS2 and now AS3 so you donrsquot have to do it yourself
While our framework borrows from some design patterns we feel that games are a very expressive medium We want you the reader of this book to think outside that proverbial over-used box While design pattern ideas lend themselves to all manner of application development we donrsquot want you to feel hemmed in to using any one set of ideas for creating their games Our framework gives structure to the overall flow of a game but does not dictate how to code the actual game logic
Exploring the FrameworkThe game framework is housed in a reusable package structure A package structure at its very basic is an organized set of folders that will contain reusable classes All of the standard class files for using the framwork will be in this package structure We will update and extend this structure as we proceed through this book Letrsquos start by giving you an idea of what classes we will be creating for the framework
The GameFrameWorkas classThe GameFrameWorkas class is the foundation of the framework It contains a simple state machine and a basic game loop timer Our state machine is a simple
construct containing a set of state constants to switch the framework between states States are handled by state functions inside the GameFrameWorkas file We will employ a variable to reference the current state function The game timer will use this reference to call the current state function on each frame tick We will create states for such things as the title screen instructions screen game play game over and more
When we create a new game our document class will be an instance of GameFrameWork called Mainas This Mainas will have an init (short for initialization) function that will set up the framework for use This Mainas class will also act as a sort of message gateway between the game and the framework classes If you are confused donrsquot worry wersquoll be explaining this in greater detail soon
The FrameWorkStatesas classThis FrameWorkStatesas class will simply contain a set of constant integer values representing the state machine states When we first create the framework we will have 10 different state constants All will begin with the STATE_SYSTEM designation For example we will have a state that displays the title screen The state constant for this will be STATE_SYSTEM_TITLE More states will be added as we progress through the chapters in this book
The BasicScreen class and SimpleBlitButton helper class The BasicScreen class will be used to display very simple game state screens These screens can have a basic background color with transparency (if needed) as well as some text centered on the screen Each screen can also have a button that needs to be clicked to move to a new state in the state machine This class is so simple that it will probably never be used without major
Creating an AS3 Game Framework
Excerpted from the book The Essential Guide to Flash Games Building Interactive Entertainment with ActionScript by Jeff Fulton Steve Fulton (FriendsofEDApress 2010)
PART ONE
032010 (11)20
ACTIONSCRIPT DEVELOPMENT Creating an AS3 Game Framework
032010 (11) 21
We will also be creating three distinct custom event classes as part of the framework These will be used to send specific data from the Game class instance to the Mainas (GameFrameWorkas instance) class The Mainas will act on the data sent and if needed pass the data to other framework classes By doing this we are using Mainas as a sort of message gateway
The CustomEventButtonIdas classThis custom event will have the ability to pass an identification integer value to the listening function It is used for cases where multiple buttons share the same listener function It will be used in the framework (specifically in the GameFrameWork instance Mainas) to allow BasicScreen instances to each share the same listener functions if they employ a SimpleBlitButton You will see this when we examine the GameFrameWork class file It can also be used for any game or application that needs to send a basic integer id along with an Event instance
The CustomEventLevelScreenUpdateas classThis custom event will be used by the Gameas class instance to send data to a BasicScreen instance we will create called levelInScreen The levelInScreen will have the ability to display custom text between each level The event listnener for this event will change this text with a value passed when the event is fired off The Mainas (GameFrameWorkas sub-class) will listen for this event and pass the data to the levelInScreen
The CustomEventScoreBoardUpdateas classThis custom event will be used by the the Gameas class instance to update the values on the ScoreBoard class instance The Mainas class will listen to for this event and pass the data on to the ScoreBoardas class instance
The framework package structureWe will be organizing all of the code we will create into a package structure The reusable framework classes will be in one package and the games we will create will be in a separate package Letrsquos create these two package structures now
The source folderChoose a spot on your disk drive of choice and create a folder called source This will be the root or base level for all of the code and games we will create in this book
The classes packageThe reusable framework classes will be in a package called classes Create a folder called classes inside the source folder from the previous step You should now have a folder structure that looks a little like this
modification in your own commercial games We present it here in its very simple form for utility purposes
The SimpleBlitButton helper class is used to create a clickable button with rollover and off states The button is created completely in code with a simple color background for the over and off states to be sed in the BasicScreen class We do this for simplicity and to demonstrate some Sprite blitting techniques (much more on these later in the book) using a set of BitmapData instances for the background color change of the button on rollover
The ScoreBoard class and SideBySideScoreElement helper class The ScoreBoard class displays information for the user during game play Data such as the current game score time remaining and other useful information can be displayed to the user with a very basic look and feel by using this class It can be used as is but when you start to make your own commercial games you might find it useful to extend this class with more functionality This very basic class is used inside the framework to demonstrate how to use events from a Game instance to update a game score board
The SideBySideScoreElement helper class is used to display a text label and corresponding dynamic text field as a pair side by side on the screen For example it can be implemented by the ScoreBoard class to display the word Score followed by the userrsquos current score
The Game classThe Game class is a stub style class that all games in the framework will inherit from It contains the basic variables and functions needed to work with the GameFrameWork class
The Custom event classesThe framework makes use of events to communicate between classes The instances of the Game class will use events to communicate with the ScoreBoard and the Main classes We will create a custom Mainas class for each game This Main class will be a sub-class (or child) of the GameFrameWork class Some of the events we will use will be simple events These are instances of the standard Flash Event class used for basic communication By this we mean events that donrsquot need to send any data along with them For example instances of the Gameas framework class will have a constant variable called GAME_OVER This constant will be used as the name of a simple Event instance that is fired off with the standard dispatchEvent function call This example GAME_OVER event wil be used to tell the Mainas to move to the game over (STATE_SYSTEM_GAME_OVER) state in the main state loop when the current game has completed
032010 (11)22
ACTIONSCRIPT DEVELOPMENT Creating an AS3 Game Framework
032010 (11) 23
[source]
[classes]
Next we will create the actual package that will contain all of the source code for the reusable framework classes We will name this package comefgframework To create this you must first create a folder inside the classes folder called com then a folder called efg inside the com folder and finally a framework folder inside the efg folder By the way the efg is an abbreviation for the book title Essential Flash Games You should now have a folder structure that looks like this
[source]
[classes]
[com]
[efg]
[framework]
When we start to create all of the class files necessary for the framework they will all go into the framework folder You will see that when we create these classes the package name will look like this
package comefgframework
The projects packageThe second package we will create is called the projects package You can start this right away by creating a folder inside the root source folder called projects The projects folder is not going to be a straight package structure like the classes folder It is organized in a manner to allow individual custom game development using the framework
Inside this projects folder we are going to create a unique folder for each game in the book The first game we are going to create is called stubgame A stub is usually a function or class that contains very little (if any) usable code but is instead a simple placeholder Our game will be slightly more than a placeholder but not much more It will be used to demonstrate the basic functionality of the framework Go ahead and create a folder called stubgame in the projects folder You should have a projects set of folders that look like this
[source]
[classes]
[projects]
[stubgame]
Next we are going to create two folders each to hold a different version of our game Why are we going to do this This book is meant to support Flash game development with a variety of tools There are many popular methods to create Flash games
with an assortment of tools and code integrated development environments (IDEs) We are going to focus on two such tools in this book the Flash IDE (the one with the library timelines drawing tools and so on all combined into a single tool) and Flash Develop (a very popular free IDE made specifically for ActionScript development) You can use any tool with this book but you will need to follow the documentation specific to your own tool when setting up projects
You will need to pay careful attention to linking the reusable code package structure to your games because linking may vary depending on the Flash code editor environment you are using Linking the package to a game is actually a very simple process but it differs between the various code IDE versions Jeff does most of his Flash game development Flash Develop using the free Flex SDK that Adobe provides Steve on the other-hand uses the Flash IDE almost exclusively We have combined our efforts on all of the chapter games to bring you code that will work with both a Flex SDK project and a Flash IDE project
On that note the next two folders you will create inside the stubgame folder are called flashIDE and flexSDK You donrsquot have to create both for any project You just need to create the one that works with the tools you are going to use to create Flash games Each is set up differently so pay attention to the specifics of the one you will be using the most
You should now have a projects folder that looks like this
[projects]
[stubgame]
[flashIDE]
[flexSDK]
The Flash IDE package structureThe Flash IDE package structure begins right inside the flashIDE folder The package name is very similar to the classes package you saw in the last section The package structure will be comefggames[game
name] For instance with the stub game we are going to create in this chapter the package name will be comefggamesstubgame Go ahead and create those folders now You should have this package structure when you are complete
[projects]
[stubgame]
[flashIDE]
[com]
[efg]
[games]
[stubgame]
[flexSDK]
032010 (11)22
ACTIONSCRIPT DEVELOPMENT Creating an AS3 Game Framework
032010 (11) 23
The Flex SDK package structureThe Flex SDK package structure is very similar to the Flash IDE package structure with one small difference Flash Develop and other Flex tools use a specific set of folders for organizing their own project structures To accommodate these and still have a common package structure for our games we must add the Flash Develop created src folder to the flexSDK folder You will not have to create the src folder or the package structure by hand as Flash Develop will create it automatically for you when you start a new project In the section called Setting up the game in Flash Develop we will go into the details For now here is the way the structure will be laid out (including the Flash Develop specific folders such as bin obj and lib If you have used Flash Develop to create a Flex SDK project you will recognize the following structure
[projects]
[stubgame]
[flexSDK]
[bin]
[obj]
[lib]
[src]
[com]
[efg]
[games]
[stubgame]
Notice that we have created the exact same package structure inside the src folder as we will use with the Flash IDE The package name for our game will be comefggamesstubgame
The package name in the code for classes in both the Flash IDE and Flex SDK will be the same
package comefggamesstubgame
The Mainas and StubGameas filesWhen we start to add files to the subgame package we will be creating two subclasses (or children) of framework classes that will be unique to our game The Mainas will be created as a subclass (or child) of GameFrameWorkas framework class The StubGameas class will be a subclass (or child) of the Gameas framework class
Starting a project using the framework packagesYou have just seen the basic package structure for both the framework reusable classes and the projects we are going to create Letrsquos make use of this right away by creating a project for the stub game The stub game will be very similar to the Chapter 1 game where the player is tasked with clicking the mouse ten times
Creating the stub game project in the Flash IDEFollow these steps to set up stub game using the Flash IDE
1 Start up your version of Flash I am using CS3 but this will work exactly the same in CS4 and CS5
2 Create a fla file in the sourceprojectsstubgame
flashIDE folder called stubgame3 In the sourceprojectsstubgameflashIDE folder
create the following package structure for your game comefggamesstubgame
4 Set the frame rate of the Flash movie to 30 FPS Set the width and height both to 400
5 Set the document class to comefggamesstubgameMain6 We have not yet created the Mainas class so you
will see a warning We are going to create this later in this chapter
7 Add the framework reusable class package to the class path for the fla filebull In the publish settings select [Flash]gt
[ActionScript 3 Setting]bull Click the Browse to Path button and find the
source folder we created earlier for the package structure Select the classes folder and click the choose button Now the comefgframework package will be available for use when we begin to create our game We have not created the framework class files yet but we will be doing this very shortly
Creating the stub game project in Flash DevelopAnd these are the steps to create the same project using Flash Develop
1 Create a folder inside the [source][projects][stubgame] folder called [flexSDK] (if you have not already done so)
2 Start Flash Develop and create a new projectbull Select Flex 3 Projectbull Give the project the name stubgamebull The location should be the sourceprojects
stubgameflexSDK folderbull The package should be comefggamesstubgamebull Do not have Flash Develop create a project
folder automatically Make sure the Create Folder For Project box is unchecked
bull Click the OK button to create the project3 Add the class path to the framework to the project
bull Go to the [project]gt[properties]gt[classpaths] menu item
bull Click the add class path buttonbull Find the source folder we created earlier and
select the classes subfolderbull Click the ok button and then the apply button
032010 (11)24
ACTIONSCRIPT DEVELOPMENT Creating an AS3 Game Framework
032010 (11) 25
You now have the basic structure to start creating projects inside the framework We are now going to discuss a few topics concerning the structure of the framework classes and then move into building the reusable framework code
Here are a couple of things to noteFor Flex Builder Flash Builder or other IDEs please refer to the documentation provided for that product to create a new project and set the default compile class
A common method of Flash development is to use the Flash IDE for assets and organization and Flash Develop for code editing If this is your workflow of choice you will want to follow the Flash IDE folder and package structure rather than the Flex SDK folder structure
Creating game timersThere are two basic methods that most Flash developers implement when creating a frame-based game timer By frame-based we mean a timer that uses the idea of a segment of time broken up into logical slices (or frames) to manage game logic There are other types of methods for timing game updates but we will make extensive use of time-slice or frame-based timers in this book The basic game timer we will use most of the games will attempt to squeeze all processing and screen updates into each segment or frame We will also explore a time-step timer and a sleep-based timer in chapter 11
The first timer method is the EventENTER_FRAME event timer The standard EventENTER_FRAME event handler will attempt to run the game loop at the swf filersquos set frame rate This very handy game loop timer has been in use for a number of years The second standard game loop timer method makes use of the Timer class The Timer class is used to call the game loop at millisecond intervals specified by a delay interval For example if the millisecond delay interval is set to 100 the Timer instance would run ten times a second (there are 1000 milliseconds in a single second) Our framework will begin by using this Timer instance game loop timer We will do this so we can make use of the TimerEventTIMER updateAfterEvent function As you will see this function will help smooth out screen updates
Defining frame timer tick You will see the phrases frame timer tick timer tick and frame tick used in this book When we refer to a tick or a frame tick we simply mean one framersquos worth of processing When we run a game at 30 frames per second we have 30 ticks or 30 frame ticks This also means that we only have 3333 milliseconds (or 100030) inside each tick to do all of our processing
State MachinesA traditional state machine at its very basic is a mechanism that controls the state or current actions a system can perform Sometimes this is called a finite state machine Finite state machines have traditionally been used to model complex mathematical computations and more recently artificial intelligence The finite in the name refers to the fact that the system can only be in a single state at any one time Our game framework is built on a simple state machine pattern that employs a separate code function or method for each state There are many other styles of state machines some use entire classes for each individual state (sometimes called an object-oriented state machine) and some use a simple switchcase statement block called on each frame tick to control state We will use a third type that borrows from these two
We call our state machine pattern a function reference pattern Unlike the object-oriented state machine our machine will contain a separate method or function for each state inside a single framework class Each of these state functions will control elements in the framework such as instances of the BasicScreen and Game classes We will use a switchcase statement to move between states Unlike the afore mentioned very simple switchcase state machine structures that call this switchstate control structure on each frame tick we only need to call it when we are switching states The switchcase we call will simply change the function reference we call on each frame tick The GameFrameWorkas will contain the state machine that controls overall game flow This will move our game system between states defined in the FrameWorkStatesas file
Each individual game package we create will contain a Mainas (in the gamersquos own package structure) that will extend GameFrameWorkas We will also create a unique Gameas child class for each game The Game class children that we create can also employ their own internal state machines based on the function reference pattern when needed
Richard (Squize) Myles of wwwgamingyourwaycom was one of the first to offer the idea of a function reference state machine for ActionScript 3 on his well-respected blog
The FrameWorkStatesas class fileThis class file is a simple collection of constants that will define the states for the game framework They will be consumed by the GameFrameWorkas class file The following code listing shows the entire code for this file you will want to create this file according to the package structure in the previous section see (Listing 1)
The first thing you should notice about this class is the package name in the first line It conforms to the file system structure we created earlier No matter if
032010 (11)24
ACTIONSCRIPT DEVELOPMENT Creating an AS3 Game Framework
032010 (11) 25
you are using a version of Flash Flex Builder Flash Builder Flash Develop TextMate or even plain old Notepad this package name will be the same The package name is not depended on the code development environment but the chosen file structure for organizing the code Save this file in the location we created previously
sourceclassescomefgframeworkFrameWorkStatesas
The state variablesThe state variables are constants that the game loop state machine will use to move between game states We have set up the most common basic states in this sample file but you will be able to create as many as you need As we progress through the chapters more will be added as necessary
bull STATE _ SYSTEM _ TITLE This state is used to display a basic title screen with an OK button for the user to click to move on Once the instructions are on the screen the state will change to the next state
bull STATE _ SYSTEM _ WAIT _ FOR _ CLOSE This one waits until the OK button is clicked for any instance of the BasicScreen class
bull STATE _ SYSTEM _ INSTRUCTIONS This state is used to display basic instructions with the same OK button as in the SYSTEM _ TITLE state It also changes to the STATE _ SYSTEM _ WAIT _ FOR _ CLOSE state until the OK button is clicked
bull STATE _ SYSTEM _ NEW _ GAME This state will call the game logic class and fire off its gamenewGame() function It does not wait but moves on to the NEW _
LEVEL state right awaybull STATE _ SYSTEM _ NEW _ LEVEL With this state we can
call the gamenewLevel() function to set up a new level for the given game
bull STATE _ SYSTEM _ LEVEL _ IN This state is used to display some basic information if needed for the beginning of a level In this basic game we simply display the level screen and wait a few seconds before moving on The wait is accomplished by changing state to the STATE _ SYSTEM _ WAIT state for the specified number of frame ticks
bull STATE _ SYSTEM _ GAME _ PLAY This one simply calls the game logic classrsquos runGame function repeatedly and lets the game take care of its own logic and states
bull STATE _ SYSTEM _ GAME _ OVER The game over state displays the basic game over screen and waits for the OK button to be clicked before moving back to the instructions screen It quickly changes state to the STATE _ SYSTEM _ WAIT _ FOR _ CLOSE until the OK button is clicked
bull STATE _ SYSTEM _ WAIT This state waits for a specified number of frames and then fires off a simple custom event constant called WAIT _ COMPLETE
The GameFrameWorkas class fileThe GameFrameWorkas will be that parent of our gamersquos document class Mainas (the gamersquos document class)
for our games will extend this class and call functions to modify the framework for each unique game The entire code listing is provided at the end of this section We will explore it in detail once your have had a chance to type in the code The location for this file in the package structure is
sourceclassescomefgframeworkGameFrameWorkas
The GameFrameWorkas will be the parent class to the Mainas class we will use for our games and itrsquos shown in the following listing In later chapters we will add some functions to this file and even create one that uses a completely different timer The Mainas will subclass this class with the extends syntax and override the blank stub init function we are about to create This class will also contain all of the state functions that coincide with the state variables in the FrameWorkStates class All of the functions in the GameFrameWorkas are public so all can be overridden by the Mainas if needed In this way we can customize the behavior of the state functions if we need to
For example in later chapters we will want to play music on the title screen The function call to play
Listing 1
package comefgframework
author Jeff and Steve Fulton
public class FrameWorkStates
public static const STATE_SYSTEM_WAIT_FOR_CLOSEint = 0
public static const STATE_SYSTEM_TITLEint = 1
public static const STATE_SYSTEM_INSTRUCTIONSint = 2
public static const STATE_SYSTEM_NEW_GAMEint = 3
public static const STATE_SYSTEM_GAME_OVERint = 4
public static const STATE_SYSTEM_NEW_LEVELint = 5
public static const STATE_SYSTEM_LEVEL_INint = 6
public static const STATE_SYSTEM_GAME_PLAYint = 7
public static const STATE_SYSTEM_LEVEL_OUTint = 8
public static const STATE_SYSTEM_WAITint = 9
032010 (11)26
ACTIONSCRIPT DEVELOPMENT Creating an AS3 Game Framework
032010 (11) 27
the music will need to be added to the systemTitle state function Not all games will need this though so we will not add it to the GameFrameWorkas filersquos systemTitleFunction Instead we will create a new version of the function in Mainas to override the one in GameFrameWorkas The new one will play the sound needed and then call the systemTitle function inside GameFrameWorkas with the supersystemTitle() function call see (Listing 2)
The class imports The class import section contains the necessary Flash core classes needed for the Main class Notice the package name coincides with the package structure we created earlier in the chapter for the framework
package comefgframework
Listing 2
package comefgframework
import flashdisplayBitmap
import flashdisplayBitmapData
import flashdisplayMovieClip
import flasheventsEvent
import flashgeomPoint
import flashtextTextFormat
import flashutilsTimer
import flasheventsTimerEvent
public class GameFrameWork extends MovieClip
public static const EVENT_WAIT_COMPLETEString =
wait complete
public var systemFunctionFunction
public var currentSystemStateint
public var nextSystemStateint
public var lastSystemStateint
public var appBackBitmapDataBitmapData
public var appBackBitmapBitmap
public var frameRateint
public var timerPeriodNumber
public var gameTimerTimer
public var titleScreenBasicScreen
public var gameOverScreenBasicScreen
public var instructionsScreenBasicScreen
public var levelInScreenBasicScreen
public var screenTextFormatTextFormat
public var screenButtonFormatTextFormat
public var levelInTextString
public var scoreBoardScoreBoard
public var scoreBoardTextFormatTextFormat
Game is our custom class to hold all logic for
the game
public var gameGame
waitTime is used in conjunction with the
STATE_SYSTEM_WAIT state
it suspends the game and allows animation or
other
processing to finish
public var waitTimeint
public var waitCountint=0
public function GameFrameWork()
public function init()void
stub to override
public function setApplicationBackGround(width
Number
heightNumberisTransparentBoolean = false
coloruint = 0x000000)void
appBackBitmapData = new BitmapData(width
height
isTransparent color)
appBackBitmap = new Bitmap(appBackBitmapData)
addChild(appBackBitmap)
public function startTimer()void
timerPeriod = 1000 frameRate
gameTimer=new Timer(timerPeriod)
gameTimeraddEventListener(TimerEventTIMER
runGame)
gameTimerstart()
public function runGame(eTimerEvent)void
systemFunction()
eupdateAfterEvent()
switchSystem state is called only when the
032010 (11)26
ACTIONSCRIPT DEVELOPMENT Creating an AS3 Game Framework
032010 (11) 27
Listing 2
state is to be changed
(not every frame like in some switchcase
based simple state machines
public function switchSystemState(statevalint)
void
lastSystemState = currentSystemState
currentSystemState = stateval
switch(stateval)
case FrameWorkStatesSTATE_SYSTEM_WAIT
systemFunction = systemWait
break
case FrameWorkStatesSTATE_SYSTEM_WAIT_FOR_
CLOSE
systemFunction = systemWaitForClose
break
case FrameWorkStatesSTATE_SYSTEM_TITLE
systemFunction = systemTitle
break
case FrameWorkStatesSTATE_SYSTEM_
INSTRUCTIONS
systemFunction = systemInstructions
break
case FrameWorkStatesSTATE_SYSTEM_NEW_GAME
systemFunction = systemNewGame
break
case FrameWorkStatesSTATE_SYSTEM_NEW_LEVEL
systemFunction = systemNewLevel
break
case FrameWorkStatesSTATE_SYSTEM_LEVEL_IN
systemFunction = systemLevelIn
break
case FrameWorkStatesSTATE_SYSTEM_GAME_PLAY
systemFunction = systemGamePlay
break
case FrameWorkStatesSTATE_SYSTEM_GAME_OVER
systemFunction = systemGameOver
break
public function systemTitle()void
addChild(titleScreen)
titleScreenaddEventListener(CustomEventButton
IdBUTTON_ID
okButtonClickListener false 0 true)
switchSystemState(FrameWorkStates
STATE_SYSTEM_WAIT_FOR_CLOSE)
nextSystemState = FrameWorkStatesSTATE_
SYSTEM_INSTRUCTIONS
public function systemInstructions()void
addChild(instructionsScreen)
instructionsScreenaddEventListener(CustomEven
tButtonId
BUTTON_IDokButtonClickListener false 0
true)
switchSystemState(FrameWorkStates
STATE_SYSTEM_WAIT_FOR_CLOSE)
nextSystemState = FrameWorkStatesSTATE_
SYSTEM_NEW_GAME
public function systemNewGame()void
addChild(game)
gameaddEventListener(CustomEventScoreBoardUp
date
UPDATE_TEXTscoreBoardUpdateListenerfalse 0
true)
gameaddEventListener(CustomEventLevelScreenU
pdate
UPDATE_TEXTlevelScreenUpdateListenerfalse
0 true)
gameaddEventListener(GameGAME_OVER
gameOverListener
false 0 true)
gameaddEventListener(GameNEW_LEVEL
newLevelListener
false 0 true)
gamenewGame()
switchSystemState(FrameWorkStatesSTATE_
SYSTEM_NEW_LEVEL)
public function systemNewLevel()void
032010 (11)28
ACTIONSCRIPT DEVELOPMENT Creating an AS3 Game Framework
032010 (11) 29
Listing 2
gamenewLevel()
switchSystemState(FrameWorkStatesSTATE_
SYSTEM_LEVEL_IN)
public function systemLevelIn()void
addChild(levelInScreen)
waitTime = 30
switchSystemState(FrameWorkStatesSTATE_
SYSTEM_WAIT)
nextSystemState = FrameWorkStatesSTATE_
SYSTEM_GAME_PLAY
addEventListener(EVENT_WAIT_COMPLETE
waitCompleteListener false 0 true)
public function systemGameOver()void
removeChild(game)
addChild(gameOverScreen)
gameOverScreenaddEventListener(CustomEventBu
ttonId
BUTTON_IDokButtonClickListener false 0
true)
switchSystemState(FrameWorkStates
STATE_SYSTEM_WAIT_FOR_CLOSE)
nextSystemState = FrameWorkStatesSTATE_
SYSTEM_TITLE
public function systemGamePlay()void
gamerunGame()
public function systemWaitForClose()void
do nothing
public function systemWait()void
waitCount++
if (waitCount gt waitTime)
waitCount = 0
dispatchEvent(new Event(EVENT_WAIT_COMPLETE))
public function okButtonClickListener(e
CustomEventButtonId)void
switch(eid)
case FrameWorkStatesSTATE_SYSTEM_TITLE
removeChild(titleScreen)
titleScreenremoveEventListener(CustomEv
entButtonId
BUTTON_IDokButtonClickListener)
break
case FrameWorkStatesSTATE_SYSTEM_
INSTRUCTIONS
removeChild(instructionsScreen)
instructionsScreenremoveEventListener(
CustomEventButtonIdBUTTON_IDokButtonC
lickListener)
break
case FrameWorkStatesSTATE_SYSTEM_GAME_OVER
removeChild(gameOverScreen)
gameOverScreenremoveEventListener(
CustomEventButtonIdBUTTON_IDokButtonC
lickListener)
break
switchSystemState(nextSystemState)
public function scoreBoardUpdateListener(e
CustomEventScoreBoardUpdate)void
scoreBoardupdate(eelement evalue)
public function levelScreenUpdateListener(e
CustomEventLevelScreenUpdate)void
levelInScreensetDisplayText(levelInText +
etext)
gameOverListener listens for GameGAMEOVER
simple
custom events calls and changes state
accordingly
public function gameOverListener(eEvent)void
switchSystemState(FrameWorkStatesSTATE_
SYSTEM_GAME_OVER)
gameremoveEventListener(CustomEventScoreBoard
Update
UPDATE_TEXTscoreBoardUpdateListener)
gameremoveEventListener(CustomEventLevelScree
nUpdate
032010 (11)28
ACTIONSCRIPT DEVELOPMENT Creating an AS3 Game Framework
032010 (11) 29
We also must import all of the classes needed for the framework to run You will see this put to use shortly
The variable definitions The variable definition section defines all of the global scope variables for the class These include all of the variables needed for the state machine screens and the game timer
We will make use of constants to define the current state and a set of variables to hold the state information These have been be defined on the FrameWorkStatesas file we created in the last section More states can be added to the basic ones but these will be sufficient for many games that we will create in this book There are two special states that are used for the system and wait for button clicks or things like animations to complete These are the STATE_SYSTEM_WAIT_FOR_CLOSE and STATE_SYSTEM_WAIT respectively We will also make use of a generic function called systemFunction that will hold the current state function to call in our game loop Combined with this we use a set of
integer variables to hold the value of the current state (currentSystemState) the last state (lastSystemState) and the next state (nextSystemState) for processing purposes These states should not be confused with an actual game pause function This will be handled in a different manner and added to the framework in Chapter 11
If you are using the Flash IDE and have any assets in the library that need to be exported in the first frame you must extend MovieClip and not Sprite even if you donrsquot plan to use the main time line for anything else We have extended MovieClip for the GameFrameWork so it will work with both Flex SDK and Flash IDE projects
The state control variablesThe control variables keep the system functioning within the context of the current state The main control variable is an instance of the Function class called systemFunction This function holds a reference to the current function that will be repeatedly called on each frame tick This saves us from having to evaluate a switchcase statement on each frame to decide which function to call The function is changed to a new reference by called the switchSystemState() function and passing a new constant that represents the new state
Optimization switchSystemState() is the first of many optimizations we will make to the game framework All of these optimizations will make the Flash games run much more efficiently These efficiencies in the game framework will allow the actual game code to perform more complex operations and still run with a reasonable frame rate
The currentSystemState integer variable holds a number representing the constant of the current state the system is running The nextSystemState contains the constant integer value for the state to transition to after this state is complete The lastSystemState variable holds the integer constant of the previous system state This is used in the rare occurrence that the game loop needs to return to the previous system state
The lastSystemState variable will become useful when we use a shared state such as STATE_SYSTEM_WAIT The STATE_SYSTEM_LEVEL_IN state will implement a 30-millisecond delay before moving on to the STATE_SYSTEM_GAME_PLAY state The nextSystemState will be STATE_SYSTEM_WAIT and the lastSystemState will be STATE_SYSTEM_LEVEL_IN When the 30-millisecond wait time has expired the waitCompleteListener function will be called It will use the lastSystemState to determine where the processing was before the wait was started Yoursquoll see this in detail later in this chapter when we examine the waitCompleteListener function
Listing 2
UPDATE_TEXT levelScreenUpdateListener)
gameremoveEventListener(GameGAME_OVER
gameOverListener)
gameremoveEventListener(GameNEW_LEVEL
newLevelListener)
newLevelListener listens for GameNEWLEVEL
simple custom events calls and changes
state accordingly
public function newLevelListener(eEvent)void
switchSystemState(FrameWorkStatesSTATE_
SYSTEM_NEW_LEVEL)
public function waitCompleteListener(eEvent)
void
switch(lastSystemState)
case FrameWorkStatesSTATE_SYSTEM_LEVEL_
IN
removeChild(levelInScreen)
break
removeEventListener(EVENT_WAIT_COMPLETEwai
tCompleteListener)
switchSystemState(nextSystemState)
032010 (11)30
ACTIONSCRIPT DEVELOPMENT
The background fill variablesAll Flash applications have a background color of some type No matter what game we are going to be creating the framework can control this background color You should never rely on the background color setting in HTML for your Flash applicationrsquos background color This leaves the HTML embed code with control over major aspect of your application If you are creating a viral game to be placed on game portals you will lose control of your gamersquos background color and it will default to what ever the game portal operators have selected as the standard background color in their embed code The framework allows you to override the HTML settings here by placing a simple colored Bitmap behind the entire application We will simply define a BitmapData object called appBackBitmapData and a Bitmap object called appBackBitmap that will be used to place the BitmapData onto the displayList
We will not define the background in the GameFrameWorkas file but rather the Mainas subclass of the GameFrameWork will set the background if needed in its init function override
The timer variablesThe timer will control the frame rate of the game and help smooth out the display by employing the TimerEventupdateAfterEvent method The frameRate variable will be defined in Mainas as the number of frame ticks per second we want our game timer to run
The most important thing to note is that we are making use of the built-in Timer class (gameTimer) We are not using the standard EnterFrame event This allows us to create our own frame rate for the game and specify it in the frameRate variable By doing this we can control game timer tick rate independent of the swf filersquos frame rate (FPS) The swf file can have a frame rate setting of 25 (for example) but the game can run at a 30 frame ticks a second To do this we first set the frameRate to the desired number of frame update ticks we want per second (30) When Mainas calls the startTimer function (described in detail when we get to the section on the init function) the gameTimer is put into action First we will calculate the timerPeriod value as 1000frameRate With the updateAfterEvent function call (in the runGame function) we help to smooth out the render of the screen by asking the Flash display engine to update at the rate of the Timer not the frame rate set in the swf So going back to our example if the game SWF is set to run at 25 FPS and the frameRate is set to 30 ticks the updateAfterEvent will help to smooth out the rendering of the screen by asking the Flash display engine to update at the timer tick rate (30) not the swf filersquos FPS setting (25)
The timerPeriod will be passed into the Timer instance and the game will attempt to run at this rate We say
attempt because if the game includes too many on screen moving objects or more logic than can be computed inside the timerPeriod number of milliseconds (or a combination of both) then there will be a noticable slowdown in the game screen updates In later chapters we will add functionality to the runGame function to mitigate some of these issues
The screen definition variablesThe screen definition variables create instances of our BasicScreen class This is a rather simple class that allows a single positional text box and an OK button on the screen We will use this simple screen for the title instructions level and game over screens We will customize each screen when we create the init function override in our gamersquos Mainas class Note that the levelInText is a special variable Setting this string to a default value will allow the leveInScreen to display some default text along on each new level This text can be combined with dynamic text to create a screen that says something like Level 1 with the word Level being the default text and the number 1 being the dynamic text
public var titleScreenBasicScreen
public var gameOverScreenBasicScreen
public var instructionsScreenBasicScreen
public var levelInScreenBasicScreen
public var levelInTextString
public var screenTextFormatTextFormat
public var screenButtonFormatTextFormat
We also create two TextFormat objects that will be used for defining the format of the text on the screens and the format of the button text
The ScoreBoard variablesThe scoreBoard instance of the ScoreBoard class will handle a simple heads up display (HUD) for the user with information such as the current score It is a simple framework class that will be customized in the init function override in each gamersquos Mainas class The changes will depend on the game that is to be created We also define a TextFormatObject for the basic look of the text for our scoreboard text scoreBoardTextFormat
JEFF FULTON
STEVE FULTON
The next part of the article in the June issue of FFD Magazine
032010 (11)32
ACTIONSCRIPT DEVELOPMENT
032010 (11) 33
On my quest of learning Flash I often became frustrated of how difficult it was to update the contents of my application Meaning if I wanted
to change out an image or piece of copy I had to open up Flash go to my library find the Movie Clip that had my asset in it and republish I thought to myself this is no way to work this is so inefficient Enter XML in all its glory Constructing an application with enabled me to quickly and easily update my project at a moments
notice Without having to open up Flash Now what could be better than that
In this article yoursquore going to learn how to create a new ActionScript project in Flex Builder 3 and write ActionScript 30 code that will load in an XML file display the images on screen and add some interactivity to the scene
Setting up FlexOpen up Flex and go to Filegt NewgtActionScript Project A dialog window will open In the project name field type in PhotoGallery Leave the use default location box checked and click finish (see Figure 1)
Creating an XML Photo Gallery
Searching the Internet yoursquoll find dozens if not hundreds of examples of photo galleries created with Flash
What you will learnhellipbull How to create an ActionScript application in Flex Builder 3bull How to use ActionScript to parse an XML le
What you should knowhellipbull Familiar with general programming concepts such as data ty-
pes variables loops and functionsbull Familiar with class creation and constructionbull Some understanding of XML
with AS3
Figure 1 New ActionScript window dialog Figure 2 ActionScript Compiler dialog
032010 (11)32
ACTIONSCRIPT DEVELOPMENT
032010 (11) 33
Once you click finish your project should open and you should see PhotoGalleryas on screen There are a few steps that I like to take next that I do for every project
First right click PhotoGallery folder in the Flex Navigator window click properties at the bottom and then click on the ActionScript Compiler link on the left hand side At the bottom yoursquoll see a check box that is already selected to generate a HTML wrapper file Uncheck that and click ok A warning message will appear saying that the html-template folder will be deleted Donrsquot worry about that because we havenrsquot put anything in that folder Click ok I personally donrsquot like to have a browser window open every time I run my application (see Figure 2)
Secondly wersquoll be using a tweening library called Tweener In order to use Tweener we have to first download it (httpcodegooglecomptweener) Be sure to download the ActionScript 30 version and create a folder on your desktop or any other place and name it code Place the contents of that download into that folder Next go back to Flex and again right click the PhotoGallery folder and click properties again and this time yoursquoll click the ActionScript Build Path link This window gives us the ability to add assets to our project so we can use them in our project Click the Add Folder button browser to the code folder you just created click ok and click ok again to close the window Now that folder and all its contents will be included in our project (see Figure 3)
Next right click the src folder in your project scroll over to new and add a new folder Name this folder classes This folder will contain two classes that wersquoll be using Then repeat the same steps but this time name the folder images This folder will contain all the images
Figure 3 ActionScript Build Path dialog
032010 (11)34
ACTIONSCRIPT DEVELOPMENT
Listing 1 galleryxml
ltxml version=10 encoding=UTF-8gt
ltgallery image_height=150 image_width=150 image_
gap=5 rows=3gt
ltphotogt
ltdescriptiongtThis is a description for the first
imageltdescriptiongt
ltthumb_pathgtimagesthumbjpgltthumb_pathgt
ltfull_pathgtimagesfullgifltfull_pathgt
ltphotogt
ltphotogt
ltdescriptiongtThis is a description for the second
imageltdescriptiongt
ltthumb_pathgtimagesthumbjpgltthumb_pathgt
ltfull_pathgtimagesfullgifltfull_pathgt
ltphotogt
ltphotogt
ltdescriptiongtThis is a description for the third
imageltdescriptiongt
ltthumb_pathgtimagesthumbjpgltthumb_pathgt
ltfull_pathgtimagesfullgifltfull_pathgt
ltphotogt
ltphotogt
ltdescriptiongtThis is a description for the fourth
imageltdescriptiongt
ltthumb_pathgtimagesthumbjpgltthumb_pathgt
ltfull_pathgtimagesfullgifltfull_pathgt
ltphotogt
ltphotogt
ltdescriptiongtThis is a description for the fifth
imageltdescriptiongt
ltthumb_pathgtimagesthumbjpgltthumb_pathgt
ltfull_pathgtimagesfullgifltfull_pathgt
ltphotogt
ltphotogt
ltdescriptiongtThis is a description for the sixth
imageltdescriptiongt
ltthumb_pathgtimagesthumbjpgltthumb_pathgt
ltfull_pathgtimagesfullgifltfull_pathgt
ltphotogt
ltphotogt
ltdescriptiongtThis is a description for the seventh
imageltdescriptiongt
ltthumb_pathgtimagesthumbjpgltthumb_pathgt
ltfull_pathgtimagesfullgifltfull_pathgt
ltphotogt
ltphotogt
ltdescriptiongtThis is a description for the eighth
imageltdescriptiongt
ltthumb_pathgtimagesthumbjpgltthumb_pathgt
ltfull_pathgtimagesfullgifltfull_pathgt
ltphotogt
ltphotogt
ltdescriptiongtThis is a description for the ninth
imageltdescriptiongt
ltthumb_pathgtimagesthumbjpgltthumb_pathgt
ltfull_pathgtimagesfullgifltfull_pathgt
ltphotogt
ltphotogt
ltdescriptiongtThis is a description for the tenth
imageltdescriptiongt
ltthumb_pathgtimagesthumbjpgltthumb_pathgt
ltfull_pathgtimagesfullgifltfull_pathgt
ltphotogt
ltphotogt
ltdescriptiongtThis is a description for the
eleventh imageltdescriptiongt
ltthumb_pathgtimagesthumbjpgltthumb_pathgt
ltfull_pathgtimagesfullgifltfull_pathgt
ltphotogt
ltphotogt
ltdescriptiongtThis is a description for the twelfth
imageltdescriptiongt
ltthumb_pathgtimagesthumbjpgltthumb_pathgt
ltfull_pathgtimagesfullgifltfull_pathgt
ltphotogt
ltphotogt
ltdescriptiongtThis is a description for the
thirteenth imageltdescriptiongt
ltthumb_pathgtimagesthumbjpgltthumb_pathgt
ltfull_pathgtimagesfullgifltfull_pathgt
ltphotogt
ltphotogt
ltdescriptiongtThis is a description for the
fourteenth imageltdescriptiongt
ltthumb_pathgtimagesthumbjpgltthumb_pathgt
ltfull_pathgtimagesfullgifltfull_pathgt
ltphotogt
ltphotogt
ltdescriptiongtThis is a description for the
fifteenth imageltdescriptiongt
ltthumb_pathgtimagesthumbjpgltthumb_pathgt
ltfull_pathgtimagesfullgifltfull_pathgt
ltphotogt
ltgallerygt
032010 (11)36
ACTIONSCRIPT DEVELOPMENT
Listing 2 PhotoGalleryas
package
Imports
import caurinatransitionsTweener
import classesBigPhoto
import classesThumbNail
import flashdisplayBitmap
import flashdisplaySprite
import flasheventsEvent
import flasheventsMouseEvent
import flashnetURLLoader
import flashnetURLRequest
[SWF(width=466 height=515 backgroundColor=00
0000 frameRate=30)]
public class PhotoGallery extends Sprite
Containers
private var _thumbContainerSprite Stores
the thumbnails
private var _nextButtonSprite Stores
the next arrow
private var _backButtonSprite Stores
the back arrow
private var _bigPhotoBigPhoto
Container for the big image
XML
private var _xmlLoaderURLLoader
Loads the XML file
private var _xmlXML
Stores the XML data
Image Assets
[Embed(source=assetsnext-arrowpng)]
private var _nextArrowClass
Embedded asset for the next
arrow
[Embed(source=assetsback-arrowpng)]
private var _backArrowClass
Embedded asset for the back
arrow
Constructor
public function PhotoGallery()
init ()
Initializing method
private function init ()void
_xmlLoader = new URLLoader ()
_xmlLoaderaddEventListener (EventCOMPLETE
xmlComplete false 0 true)
_xmlLoaderload (new URLRequest
(galleryxml))
XML Complete
private function xmlComplete (eEvent)void
Store the XML data
_xml = new XML (etargetdata)
loadImages ()
Clean up
_xmlLoaderremoveEventListener
(EventCOMPLETE xmlComplete)
_xmlLoader = null
Load in the thumbs
private function loadImages ()void
Temporary variables
var imageHeightuint = _xmlimage_height
var imageWidthuint = _xmlimage_width
var imageGapuint = _xmlimage_gap
var rowsuint = _xmlrows
var rowCounteruint = 0
var columnCounteruint = 0
Instantiate the container and position it
on screen
_thumbContainer = new Sprite ()
_thumbContainerx = 78
_thumbContainery = 78
_thumbContainerbuttonMode = true
_thumbContaineraddEventListener
(MouseEventCLICK thumbClick
false 0 true)
thisaddChild (_thumbContainer)
Loop through the images and create the
visual grid
for (var iuint = 0 i lt _xmlphotolength ()
i++)
var pathString = _xmlphoto[i]thumb_path
var descriptionString = _xmlphoto[i]desc
Creating an XML Photo Gallery with AS3
032010 (11) 37
Listing 2 PhotoGalleryas
ription
Create the thumbnail
var pThumbNail = new ThumbNail ()
pnewID = i
ploadImage (path)
pdescription = description
px = (imageWidth + imageGap)
columnCounter
py = (imageHeight + imageGap)
rowCounter
_thumbContaineraddChild (p)
Create the grid
if ((rowCounter + 1) lt rows)
rowCounter++
else
rowCounter = 0
columnCounter++
Setup the navigation
createNavigation ()
This method handles the click event for the
next arrow
private function nextClick (eMouseEvent)void
155 is the width + spacing
if (-_thumbContainerx lt (_thumbContainerwidth
ndash stagestageWidth ndash 155))
disableNavigation ()
TweeneraddTween (_thumbContainer x
_thumbContainerx ndash 155 time
075 transitioneaseOutExpo
onCompleteenableNavigation)
This method handles the click event for the
back arrow
private function previousClick (eMouseEvent)void
if (-_thumbContainerx gt 0)
disableNavigation ()
TweeneraddTween (_thumbContainer x
_thumbContainerx + 155 time
075 transitioneaseOutExpo
onCompleteenableNavigation)
This method handles the click event for the
thumbnails
private function thumbClick (eMouseEvent)void
disableNavigation ()
Disable the container that stores the
thumbnails
_thumbContainerbuttonMode = false
_thumbContainermouseChildren = false
_thumbContainerremoveEventListener
(MouseEventCLICK thumbClick)
Get the full image path
var imagePathString = _xmlphoto[etargetnewI
D]full_path
Instantiate the big photo
_bigPhoto = new BigPhoto ()
_bigPhotobuttonMode = true
_bigPhotox = 108
_bigPhotoy = 1075
_bigPhotoalpha = 0
_bigPhotoloadImage (imagePath)
_bigPhotoaddEventListener (MouseEventCLICK
closePhoto false 0 true)
thisaddChild (_bigPhoto)
Fade up the photo
TweeneraddTween (_bigPhoto alpha1 time
1)
Fade out the photo
When the image finishes fading delete the
photo and enable the navigation
items
private function closePhoto (eMouseEvent)void
TweeneraddTween (_bigPhoto alpha0 time1
onCompletedeletePhoto)
private function deletePhoto ()void
032010 (11)38
ACTIONSCRIPT DEVELOPMENT
Listing 2 PhotoGalleryas
_bigPhotobuttonMode = false
_bigPhotoremoveEventListener
(MouseEventCLICK closePhoto)
_bigPhotodestroy ()
thisremoveChild (_bigPhoto)
_bigPhoto = null
_thumbContainerbuttonMode = true
_thumbContainermouseChildren = true
_thumbContaineraddEventListener
(MouseEventCLICK thumbClick
false 0 true)
enableNavigation ()
private function createNavigation ()void
Instantiate the next arrow
var nBitmap = new _nextArrow ()
Instantiate the nextButton container
Add the next button as a child of the
nextButton container
_nextButton = new Sprite ()
thisaddChild (_nextButton)
_nextButtonaddChild (n)
_nextButtonx = stagestageWidth ndash _
nextButtonwidth
_nextButtony = 475
Instantiate the back arrow
var bBitmap = new _backArrow ()
Instantiate the backButton container
Add the next button as a child of the
backButton container
_backButton = new Sprite ()
thisaddChild (_backButton)
_backButtonaddChild (b)
_backButtonx = _nextButtonx ndash _
nextButtonwidth ndash 5
_backButtony = 475
enableNavigation ()
private function enableNavigation ()void
_nextButtonbuttonMode = true
_nextButtonaddEventListener
(MouseEventCLICK nextClick false
0 true)
_backButtonbuttonMode = true
_backButtonaddEventListener
(MouseEventCLICK previousClick
false 0 true)
private function disableNavigation ()void
_nextButtonbuttonMode = false
_nextButtonremoveEventListener
(MouseEventCLICK nextClick)
_backButtonbuttonMode = false
_backButtonremoveEventListener
(MouseEventCLICK previousClick)
Figure 4 New ActionScript class dialog
Creating an XML Photo Gallery with AS3
032010 (11) 39
Listing 3 ThumbNailas
package classes
import caurinatransitionsTweener
import flashdisplayLoader
import flashdisplayShape
import flashdisplaySprite
import flasheventsEvent
import flasheventsMouseEvent
import flashnetURLRequest
import flashtextTextField
import flashtextTextFieldAutoSize
import flashtextTextFormat
public class ThumbNail extends Sprite
Containers
private var _imageLoaderLoader Loads in
the thumbnail
private var _imageContainerSprite
Container for the thumbnail
private var _maskShape Container for the
mask
private var _descriptionContainerSprite
Container for the description
TextFields
private var _descriptionTextField
TextField for the container
Logic
private var _newIDuint The ID of the
object
[Embed(systemFont=Arial fontName=arial
fontWeight=bold
mimeType=applicationx-font-
truetype)]
private var _arialClass Embedded asset
for the font
Constructor
public function ThumbNail ()
super ()
init ()
Initializing method
private function init ()void
Instantiate the container
_imageContainer = new Sprite ()
_imageContaineralpha = 0
thisaddChild (_imageContainer)
createDescription ()
thismouseChildren = false
thisaddEventListener (MouseEventMOUSE_OVER
onMouseOver false 0 true)
thisaddEventListener (MouseEventMOUSE_OUT
onMouseOut false 0 true)
Public Methods
public function loadImage (pathString)void
_imageLoader = new Loader ()
_imageLoadercontentLoaderInfoaddEventListen
er (EventCOMPLETE imageComplete
false 0 true)
_imageLoaderload (new URLRequest (path))
GetterSetter Methods
public function get newID ()uint
return this_newID
public function set newID (valueuint)void
this_newID = value
public function get description ()String
return this_descriptiontext
public function set description (valueString)void
this_descriptiontext = value
Private Methods
032010 (11)40
ACTIONSCRIPT DEVELOPMENT
Listing 3 ThumbNailas
private function onMouseOver (eMouseEvent)void
TweeneraddTween (_descriptionContainer
y75 time05 transition
easeOutExpo)
private function onMouseOut (eMouseEvent)void
TweeneraddTween (_descriptionContainer
y150 time05 transition
easeOutExpo)
private function imageComplete (eEvent)void
Reposition the loaded content to the center
_imageLoaderx = -(_imageLoaderwidth 2)
_imageLoadery = -(_imageLoaderheight 2)
_imageContaineraddChildAt (_imageLoader 0)
Apply background after the image has
completely loaded
drawBackground ()
Draw the mask around the description
drawMask ()
Fade in the container
TweeneraddTween (_imageContainer alpha1
time05)
Clean up
_imageLoadercontentLoaderInforemoveEv
entListener (EventCOMPLETE
imageComplete)
Draws a background behind _imageContainer
private function drawBackground ()void
_imageContainergraphicsbeginFill (0xFFFFFF)
_imageContainergraphicsdrawRect (_
imageLoaderx ndash 1 _imageLoadery
ndash 1 _imageLoaderwidth + 2
_imageLoaderheight + 2)
_imageContainergraphicsendFill ()
Creates everything for the description
private function createDescription ()void
Instantiate the container
_descriptionContainer = new Sprite ()
_descriptionContainery = 150
_descriptionContainergraphicsbeginFill
(0x000000 075)
_descriptionContainergraphicsdrawRect (-75
-75 150 75)
_descriptionContainergraphicsendFill ()
_imageContaineraddChild (_
descriptionContainer)
Specify text formatting for the description
Text Field
var tfTextFormat = new TextFormat ()
tfcolor = 0xFFFFFF
tfalign = center
tffont = arial
tfbold = true
tfsize = 12
Instantiate the TextF ield
_description = new TextField ()
_descriptionx = -75
_descriptiony = -70
_descriptionwidth = 150
_descriptionwordWrap = true
_descriptionembedFonts = true
_descriptiondefaultTextFormat = tf
_descriptionautoSize = TextFieldAutoSizeLEFT
_descriptionContaineraddChild (_description)
Draws a mask our _descriptionContainer
private function drawMask ()void
Draw the mask shape
_mask = new Shape ()
_maskgraphicsbeginFill (0xFF0000)
_maskgraphicsdrawRect (_imageLoaderx
_imageLoadery _imageLoaderwidth
_imageLoaderheight)
_maskgraphicsendFill ()
addChild (_mask)
Apply the mask to the container
_descriptionContainermask = _mask
Creating an XML Photo Gallery with AS3
032010 (11) 41
that will be loaded into the application from XML Finally create another folder and this time name it assets This folder will contain the buttons that wersquoll embed into our project
The AssetsBefore we start coding we need to create some visual assets Open up Photoshop or any other program you have for creating graphics and create an image that is 150x150 pixels Fill it with a flat color and save the image as thumbjpg in the images folder you just created Next create another image thatrsquos 250x300 pixels Fill it with another color and save that image as fulljpg into the same folder These images will be used for testing purposes only
Listing 4 BigPhotoas
package classes
import flashdisplayLoader
import flashdisplaySprite
import flasheventsEvent
import flashnetURLRequest
public class BigPhoto extends Sprite
Containers
private var _imageLoaderLoader Loads in the
thumbnail
private var _imageContainerSprite Container
for the thumbnail
Constructor
public function BigPhoto ()
super()
Public Methods
public function loadImage (pathString)void
_imageLoader = new Loader ()
_imageLoadercontentLoaderInfoaddEventListen
er (EventCOMPLETE imageComplete
false 0 true)
_imageLoaderload (new URLRequest (path))
Clean up method
public function destroy ()void
_imageContainerremoveChild (_imageLoader)
_imageLoaderunload ()
_imageLoader = null
thisremoveChild (_imageContainer)
_imageContainer = null
Private Methods
private function imageComplete (eEvent)void
Instantiate the container
_imageContainer = new Sprite ()
thisaddChild (_imageContainer)
Add the loader
_imageContaineraddChild (_imageLoader)
Clean up
_imageLoadercontentLoaderInforemoveEv
entListener (EventCOMPLETE
imageComplete)
Figure 5 Time to test
032010 (11)42
ACTIONSCRIPT DEVELOPMENT
We still have to create our navigation buttons that wersquoll use to scroll through our gallery Create two buttons that are 40x40 pixels and design them how you like They should resemble forward and back buttons Save the forward arrow as next-arrowpng and the other as back-arrowpng into the assets folder Now that our assets our created itrsquos time to code
The XML fileRight click the src folder in the project scroll over to new and click file A dialog window will open and in the file name input box type galleryxml (see Figure 4) Write the code that you see from Listing 1 into galleryxml
Line 1 is the XML declaration This is needed to have a well-formed XML document
Line 2 declares the gallery root node Notice in this node Irsquove added attributes Also to have a well-formed XML document you must have one root node and all attribute values must be in quotes
Lines 3-7 declares a photo node with three children description thumb_path and full_path description is exactly as it sounds It will contain a description for our thumbnail thumb_path contains the path to our thumbnail image Same goes for full_path it contains the path to our full image
I then just copy and pasted that and pasted it 14 times just changing out the description Remember wersquore just using dummy data When you finish go back and add photos of your choice
The ClassesWersquoll be using two additional classes for this project One will be for the thumbnails and another for the full image Right click the classes folder go to new and click ActionScript class In the name field type ThumbNail For the Superclass type in flashdisplaySprite Wersquoll need to extend from that class so we can use the functionality of that object but add our own (see Figure 4)
Add another class this time name it BigPhoto It should also inherit from flashdisplaySprite
CodingTime to start writing the ActionScript for this project Open up PhotoGalleryas from the Flex Navigator and type in the code from Listing 2 Open up ThumbNailas and type in the code from Listing 3 Open up BigPhotoas and type in the code from Listing 4 Now that you have all the code in itrsquos time to test In the menu bar click RungtRun PhotoGallery (see Figure 5) If you get an error make sure you typed everything correctly If all went well you should see the gallery open up Click the buttons and watch the gallery scroll left and right Roll over the thumbnails to see the description scroll up Click on a thumbnail to see the full image fade in You might be wondering about whatrsquos going on Irsquoll try to break that down for you next
The ExplanationOur main focus is going to be whatrsquos going on in PhotoGalleryas This file contains the ActionScript that makes almost everything happen We first start off by declaring our properties that will be used in the project Yoursquoll notice a couple of embeded lines These lines are MetaData tags that actually embed assets into the project The two embeded lines you see add the next-arrowpng file and the back-arrowpng file In the constructor there is one call to a method called init() This method gets the application going by requesting and loading in the XML File When the file finishes loading we store the XML data into our _xml property Next we call the loadImages() method This method is responsible for a big part of the application We first gather some information from the XML file and store it in temporary variables
bull imageWidth stores the image _ height attributes valuebull imageWidth stores the image _ width attributes valuebull imageGap stores the image _ gap attributes valuebull rows stores the row attributes valuebull rowCounter increments ever pass of the for loop Is
compared against the rows variablebull columnCounter increments once for every column
created
The for loop cycles the XML file creating a new ThumbNail object with every iteration During each iteration we create variables that store the path to the thumb nail (path) and the description of the thumbnail (description) We pass the variables into the methods of the ThumbNail class Remember the ThumbNail class defines methods and properties that are specific to it The class code is commented if you wish to explore it Again our main focus is PhotoGalleryas To create the grid we write ifelse logic that compares the rowCounter variable to the row variable For every iteration of the loop we increment that variable if that variable becomes greater than rows we set it back to 0 rowCounter is then multiplied to the y-axis of each ThumbNail object The rest of the code is commented for you to explore
ConclusionYoursquoll notice I actually hard coded a lot of values directly in the ActionScript Not too ideal In the next part of this tutorial wersquore going to come back to this code and modify it to be a little more flexible and visually appealing If you have any questions feel free to contact me through my site (wwwcodedbyryancom)
RYAN DrsquoAGOSTINORyan DrsquoAgostino is an Interactive Developer at NAS Recruitment Communications in Cleveland OH part-time instructor at Virginia Marti College of Art and Design in Lakewood Ohio and freelance designer and ActionScript developer For more information about Ryan please visit httpwwwcodedbyryancom
032010 (11)44
COMPONENTS
Components are the controls and containers that are the elements of the application that create the interface They cover controls such
as buttons and check boxes containers that can hold other containers and controls navigation elements and charts Components can be added to your application in variety of ways They can be added through the design view writing then in MXML or through ActionScript
Flash Builder now has two major sets of components the Halo set which has been available in previous versions of Flex and the new Spark set The components from the Spark set have a direct correlation to a component in the Halo set but not all Halo components have been upgraded to the Spark framework yet The namespaces for these components are added automatically when a MXML document is created and you will notice there are now multiple namespace in the main MXML document already
Creating custom components takes two paths The first is to create a skin for an existing Halo component in Flash Illustrator Photoshop or Fireworks or create a custom skin for a Spark component using MXML The second path is to create a completely custom component using Flash Professional and importing it into the Flash Builder project We are going to focus on the second path and create a custom component with Flash Professional
The first step in creating a custom component is to instal the Flex Component Kit mxp into Flash Professional This is an extension that will expose some
Custom Flash CS4
Flash Builder comes with a lot of components to cover almost all of an apps needs But what if you want a custom look or functionality to a component With Flash Professional you can create custom components and import them into Flash Builder for use in your application
What you will learnhellipbull How to create custom components in Flash Professional to im-
port into Flash Builder
What you should knowhellipbull Flash Professional CS4bull Flash Builder 4bull Actionscript 3
Components in Flash Builder 4
Figure 1 The component artwork Figure 2 Converting the movie clip
032010 (11)46
COMPONENTS
Listing 1 The component class
package comtest
import mxflashUIMovieClip
import flasheventsEvent
import flasheventsEventDispatcher
import flasheventsMouseEvent
import flashfiltersGlowFilter
public class SliderButton extends UIMovieClip
public static const BUTTON_CLICKString = button click
private var glowGlowFilter = new GlowFilter(0x0000cc54421falsefalse)
public function SliderButton()
plusButtonbuttonMode = true
minusButtonbuttonMode = true
plusButtonaddEventListener(MouseEventMOUSE_OVER handleMouseOver)
plusButtonaddEventListener(MouseEventMOUSE_OUT handleMouseOut)
plusButtonaddEventListener(MouseEventCLICK handleMousePress)
minusButtonaddEventListener(MouseEventMOUSE_OVER handleMouseOver)
minusButtonaddEventListener(MouseEventMOUSE_OUT handleMouseOut)
minusButtonaddEventListener(MouseEventCLICK handleMousePress)
private function handleMouseOver(eMouseEvent)void
ecurrentTargetfilters = [glow]
private function handleMouseOut(eMouseEvent)void
ecurrentTargetfilters = []
private function handleMousePress(eMouseEvent)void
if(ecurrentTargetname == plusButton ampamp trackThumbx lt 134)
trackThumbx++
else if(ecurrentTargetname == minusButton ampamp trackThumbx gt 37)
trackThumbx--
dispatchEvent(new Event(SliderButtonBUTTON_CLICK))
032010 (11)48
COMPONENTS
of the Flex classes to Flash allowing the component to communicate with the application Download the extension from the Adobe site at httpwwwadobecomcfusionexchangeindexcfmevent=extensionDetailampextid=1273018 and install using the Adobe Extension Manager The extension should work with Flash
versions as far back as Flash 8 but I highly recommend using at least Flash 9 (CS 3)
Once the extension is installed launch Flash Professional and create a new ActionScript 3 project We are going to create a simple slider button that has a plus and minus button on each end of the button and a track between them When the plus and minus buttons are clicked the the track thumb will move one pixel in either direction There will also be a roll over behavior on the buttons to change their look as the mouse rolls over and off the buttons Finally Flash Builder will receive the event of the button being pushed and update a text input on the stage
It is common to encapsulate the behaviors of the component within itself and have events broadcast to the containing application If you think about some of standard components in both Flash Builder and Flash Professional and deconstruct them in your mind you will see that the same methods are used on them The NumericStepper is a lot like our component It has two buttons with a text field that displays a value that is incremented or decremented with each push of the button The component itself does nothing to effect the application until the code calls it to either send or receive a value
With our new document we are going to create the artwork for the component in the fla file Create four movie clips one each for the scroll track the plus button the minus button and the track thumb (Figure 1) The naming and look of these movie clips are not important
Once the movie clips are created and on the stage give each one an instance name The names in the
Figure 3 Setting the class of the movie clip
Figure 4 Setting to export as SWC
Figure 5 Creating the Flash Builder project
Custom Flash CS4 Components in Flash Builder 4
032010 (11) 49
example files are plusButton minusButton and trackThumb The actual names do not matter and we dont need an instance name for the track since we are not going to reference it in Flash Builder Flash Builder will reference the instance names of the movie clips in the components we will use these later
Now that the artwork has been created it must be collected into its own movie clip Select all of the artwork on the stage and choose ModifygtgtConvert to Symbolhellip In the Library panel there is a new symbol that is called in the sample files SliderButton The name is important here because this is how the Convert to Flex Component mxp will name the class that Flash Builder will refer to later
An external class will give the component the internal behaviors that were mentioned earlier as well as an event to broadcast to the Flash Builder application (Listing 1) All the code in the class should be familiar but there are a few points to go over First the package name is given the qualifier of comtest to identify that the component belongs to our namespace This is not necessary but helpful when there are multiple components or components from different publishers in the application
The most important change is instead of having the class extend the Sprite class this class is going to
extend the UIMovieClip class This class like the Flex Component in the library exposes the behaviors and methods we set up in the class to the Flash Builder application In the import statements use import
mxflashUIMovieClip The mxflash class includes both the UIMovieClip and ContainerMovieClip classes
When the variables are declared we set up a glow filter that will be attached to the buttons when the mouse rolls over them and a string constant for the event we create later In the constructor of the class the buttons receive the event listeners for the mouse interactions and the handlers are added later in the code In the handleClick event handler we use the event dispatcher class to dispatch the event Here we are just dispatching a standard event with the constant that was created earlier You can just as easily dispatc a custom event that has extra information attached to it
Select the movie clip in the Library panel then select CommandsgtgtConvert Symbol to Flex Component (Figure 2) The extension will do several operations such as making the symbol available to ActionScript giving the symbol a class name adding the Flex Component to the library and others
Save the file as SliderButtonas in the folder path comtest When you declare the package name as we have here you must have the same hierarchy as listed in the package name Back in the fla select the
Figure 6 The Package Explorer
Listing 2 The main MXML le
ltxml version=10 encoding=utf-8gt
ltsApplication xmlnsfx=httpnsadobecommxml
2009
xmlnss=librarynsadobecomflex
spark
xmlnsmx=librarynsadobecomflex
mx
width=200 height=110gt
ltfxDeclarationsgt
lt-- Place non-visual elements (eg
services value objects) here
--gt
ltfxDeclarationsgt
ltsApplicationgt
Listing 3 The new component and name space
xmlnstest=comtest
lttestSliderButton x=14 y=10 id=sliderButton
gt
032010 (11)50
COMPONENTS
SliderButton movie clip and select Propertieshellip from the contextual menu Expand the advanced area if it is not already and enter comtestSliderButton in the Class text field Leave the Base Class text field blank and click OK (Figure 3)
Select Publish Settingshellip from the file menu and click on the Flash tab (Figure4) Under the SWF Settings area of the window be sure that the Export SWC check box is checked The swc is the part that Flash Builder will use in the application SWC are archives that contain the classes and media assets of the component and make it easy to distribute the movie clip
Publish the SWF and SWC and we are ready to move to Flash Builder
Flash BuilderIn Flash Builder create a new project This example we only need a basic Flash Builder project without any
server technologies You can name the project anything you would like in this case I have name FB_Components and saved it in my default workspace
If you have not worked on a Flash Builder project yet it is a lot like working on the Flex projects in the past with some new MXML tags You will also notice that the Flex Navigator pane has now been replaced with the Package Explorer (Figure 6)
The Package Explorer pane has a different organization than the Flex Navigator but the main MXML file can still be found under src then under the default package
Looking at the main MXML (Listing 2) you will see that the three name spaces are added automatically and the application begins with sApplication instead of mxApplication These are the minor differences to be on the look out for when working on a Flash Builder project
Listing 4 The nal MXML le
ltxml version=10 encoding=utf-8gt
ltsApplication xmlnsfx=httpnsadobecommxml2009
xmlnss=librarynsadobecomflexspark
xmlnsmx=librarynsadobecomflexmx minWidth=200 minHeight=110
width=200 height=110
initialize=init()
xmlnstest=comtestgt
ltfxDeclarationsgt
lt-- Place non-visual elements (eg services value objects) here --gt
ltfxDeclarationsgt
ltfxScriptgt
lt[CDATA[
private function init()void
sliderButtonaddEventListener(SliderButtonBUTTON_CLICK updateText)
private function updateText(eEvent)void
pixelTexttext = String(sliderButtontrackThumbx)
]]gt
ltfxScriptgt
lttestSliderButton x=14 y=10 id=sliderButton gt
ltsLabel x=39 y=41 text=The position of the track thumb is textAlign=center width=122gt
ltsTextInput x=76 y=76 width=49 id=pixelTextgt
ltsApplicationgt
Custom Flash CS4 Components in Flash Builder 4
032010 (11) 51
To get our component into the Flash Builder project we need to put the swc some where the project can see it On your desktop navigate to where the swc was published to and copy the file Then navigate to where Flash Builder project is and put the swc into libs folder I have found it is easier to keep the fla and swf files out of the project then copy the swc over to the Flash Builder project as needed
Back in Flash Builder open the libs folder under the project in the Package Explorer pane In that directory you should see your swc if you do not try right clicking on the libs folder and selecting Refresh
In the MXML editor switch to Design view When the Design view becomes active the Component pane should become available in the lower left of the workspace The first folder in the pane is the Custom folder and our custom component should be displayed in the list Drag an instance of this component onto the stage
To show that we can have two way communication with the component drag a label and a text input onto the stage Set the labels text to be The position of the track thumb is and move the text input near the label Set the id of the text input to pixelText (Figure 7) Switch back to the Source view after saving
Notice that several lines have been added to the source of the MXML document In addition to the MXML for the component including our custom component a name space value has been added to the sApplication tag designated as xmlnstest=comtest (Listing 3) If we add more components using the same comtest package declaration they will all fall under this name space If we were to add more components using a different package additional name spaces would be added You will also notice that the component starts with testSliderButton as opposed to s fx or mx
In the application tag add an initialize property calling a function called init() After the fxDeclarations tags add fxScript tags to hold the Actionscript As you type fx the code completion should pop up and allow you to select the fxScript tags
Add an id property to the SliderButton tag and give it a value of sliderButton In between the CDATA tags add the init function This function simply adds an event listener to our component calling the updateText
function every time the BUTTON_CLICK event is broadcast from the SliderButton class (Listing 4)
Once the application receives the BUTTON_CLICK event it calls the updateText function This function looks into the component and gets the x position of the track thumb then puts that value into the text input we set up earlier
So now we have communication coming out of the component using the dispatchEvent call in the class We are also looking into the component where the application is getting the x position of the thumb track inside the component Communication can get much more complicated than this but this is a simple example to give a starting point to create more complex components
Click debug to run the application and if no errors occurred the application should launch in a browser window If you have a browser window open before running the app you should close it There is a bug in the Flash Player at the time of this writing that may cause the app to not run if there are browser windows already open
Once the application is running click on the buttons and watch as the value in the text input increase and decrease The custom component is now complete and ready to have more behaviors and methods added to it
ConclusionWhile the components that come with Flash Builder can cover most situations there will be times where only a custom component will fit the applications needs Creating a custom component takes a little work but can make the developers job a lot easier With this new level of control over the look and behavior of the component can make the application more rich and engaging to the end user
Figure 7 Components on the stage
On the Netbull httpwwwadobecombull httpwwwadobecomcfusionexchangeindexcfmeven-
t=extensionDetailampextid=1273018
LOUIS DICARROLouis DiCarro is a consultant based in NYC and has been working with Flash since the rst version He has taught web development at the college level and has worked for numerous large clients He can be reached at louisdicarroffdgmailcom
032010 (11)52
COMPONENTS AIR Components in Flash Builder
032010 (11) 53
We already know that building an AIR application affords us a lot more capabilities than working with a web based project
Digging through the Actionscript documentation shows that there are a lot of classes that are only available to AIR applications These mostly have to do with classes and methods that interact with the file system or windowing of the application
Flash Builder as with Flex Builder before it contains several components that are only available to use with AIR applications These components deal with
visual interfaces for interacting with the file system and a HTML component for displaying web content
You may wonder why these components are only available for AIR applications Mostly it is for security reasons Up to Flash Player 101 a swf does not have the permission to interact with files on the file system except in very limited circumstances
Swfs in the web browser are able to interact only with files on the server in which the swf is hosted This allows them to load images xml and other file types at run time but only if the files come from within its
AIR Components
Adding file and html rendering can result in a lot of code But with the AIR components in Flash Builder 4 this functionality can be added easily with only a few lines of code
What you will learnhellipbull What components are available for AIR applications in Flash
Builder 4
What you should knowhellipbull Flash Builder 4bull Actionscript 3
in Flash Builder
Figure 1 AIR Actionscript 3 special classes for the HTML component Figure 2 Layout of the HTML application
032010 (11)52
COMPONENTS AIR Components in Flash Builder
032010 (11) 53
Were going to take a look at couple of simple examples for each component to get a feel how use them It is also important to note that the documentation for these components are in the AS 3 documentation When looking at the documentation you will see a symbol next to some of the classes and also next to some methods within the classes (Figure 1)
HTML ComponentThe HTML component is very easy to work with It can pull in many types of media and render them as you would expect them to be rendered in a web browser
Start up Flash Builder and create a new Flex project Name the project and select Desktop under project type Click finish and let Flash Builder set up the project
Once the project is started click on the Design tab In the lower left a component tab should be open If it is not open it using the Window menu and selecting Components Scroll down to the Adobe AIR folder You will not see this folder if you set your project to run in a web browser
We are going to create a simple web browser using only three components and one line of code First drag a HTML component a text field and a button to the stage Arrange them how you would like and switch over to design view
Give each component an id as in Listing 1 Also give the button a click handler Type click and let the program auto complete another code hint will pop up to create the handler automatically
Flash Builder will generate the handler as well as the fxScript block in the code In the click handler that is generated add a line that will set the location of the HTML component to the text in the text field See Listing 2 for the full code
Run the application and fill in a valid web address in the application Remember to include http in front of
own sandbox There are exceptions and ways around it but for the majority the swf cannot interact with the file system
If the development of applications using Flash Builder and AIR were to succeed they would need to act like real desktop applications This means that the applications would have to load and save files just as any other application that a user would use on the computer
Security is still maintained in this model by having the developer digitally sign their application using certificates If the certificate is obtained though a trusted source the application would be traceable back to the original developer if something bad should happen
Having a HTML component gives the application greater rendering power by tapping into the Web Kit which can run better than the HTML renderers in the Flash Player This allows developers to repurpose content from their web site to the application
Figure 3 The application running Figure 4 Layout of the image viewer application
Listing 1 MXML of components
ltsTextInput id=addressBar x=10 y=10
width=518gt
ltsButton id=goButton x=555 y=13
label=Go click=goButton_
clickHandler(event) gt
ltmxHTML id=htmlPane x=10 y=40 width=620
height=430gt
Listing 2 goButton handler
protected function goButton_clickHandler(event
MouseEvent)void
htmlPanelocation = addressBartext
032010 (11)54
COMPONENTS
the address Click the Go button and the page should load after a few seconds Take a look at Figure 3 for the results
There are a lot of methods and commands associated with the HTML component This will allow you to make a more customized display and give more control over the HTML content that you show
File system componentsUsing the file system components is just as easy To test the components we are going to create a simple image viewer that allows the user to select the images from the file system
Create a new Flex Project as we did before and be sure to make it a desktop application Once the project has loaded switch to design view and drag a File System Tree and an Image component to the stage See Figure 4 for the layout
Once the application is laid out switch over to the Source mode and give all the components ids as we did before (Listing 3) Also add a change handler instead of a click handler Flash Builder will autocomplete and generate the handler for you as it did when we added the click action to the button
In the generated handler add the code that will load the image into the image component To keep everything simple we only are going to load jpg and png files (Listing 4) in this function we are first checking to make sure the file is a file and not a directory by checking for a file extension If the file passes the first test we check to see if the file is a jpg or png Lastly if the file passes all of these test it gets loaded into the image component
Save the file and run the application to see the results Clicking on the file system tree items will either open or close the directory or try to load the file When the user clicks on a jpg or png it will load into the image component (Figure 5) Note that as the tree expands a scroll bar is attached to the component automatically
ConclusionJust as with the HTML component there is more methods and properties available to you with the file system components In this demo application we have seen how easy it is to get access to the file system using the component without writing a lot of code
There is a lot more involved in making a full application using these components but we have witnessed how easy to get started with them Having more control over the elements as well as error checking would be added in real applications
Having these components available gives the application a large amount of functionality very quickly and allows the developer to concentrate on the logic of the application Using these components in your application will help make it more full-featured and feel more like a real desktop application
LOUIS DICARROLouis DiCarro is a consultant based in NYC and has been working with Flash since the rst version He has taught web development at the college level and has worked for numerous large clients He can be reached at louisdicarroffdgmailcom
Listing 3 MXML of components
ltmxFileSystemTree id=fsList x=10 y=10
height=460 change=fsList_
changeHandler(event)gt
ltmxImage id=imgPane x=193 y=10 width=437
height=460gt
Listing 4 Handler for change event
protected function fsList_changeHandler(event
ListEvent)void
var fileFile = eventcurrentTargetselectedItem
as File
if(fileextension)
if(fileextensiontoLowerCase() == jpg ||
fileextensiontoLowerCase() ==
png)
imgPanesource = fileurl
Figure 5 The image viewer application running
032010 (11)56
TLF Applying CSS to Text Layout Framework styles
032010 (11) 57
TLF is introducing the new way of applying styles to the text Prior to TLF flash used simple approach you had to prepare and attach
StyleSheet object to the style property of the TextFieldTLF provides more flexible and customizable but
more complex techniqueDuring this tutorial we are going to create a small
application in Flex 4 This application contains a text displayed with TLF component TextArea and 2 different CSS that can be applied to the text simply by pressing the button Figure 1 show the screenshot of the application
TextFlow and itrsquos IFormatResolverTLF provides a callback mechanism to for with text styles TextFlow objectrsquos got a property formatResolver that should implement IFormatResolver interface Actually it is a set of callback functions that are called by parent TextFlow when it processes itrsquos elements
To have a closer look at formatResolver we will implement itrsquos version to work with out simple CSS So start create a new project in Flex and name it for example TextCSS In the default package create a new ActionScript class named CSSFormatResolver that implements IFormatResolver interface
Listing 1 shows the complete implementation of the class and will we look closer into it later For now pay attention on the following functions
bull invalidateAll
bull invalidate
bull resolveFormat
bull resolveUserFormat
bull getResolverForNewFlow
These function are created automatically by Flex Builder as they are required for implementation of the interface All functions are callbacks that are called when the certain action is performed by TextFlow and it needs to know how to treat with different elements
Applying CSS
This article is a reply to our readerrsquos question about the possibility to apply CSS to Text Layout Framework (TLF) We will show how to implement the necessary class and switch text styles on the fly
What you will learnhellipbull how can custom styles be applied to TLF elementsbull how to implement IFormatResolver to work with CSS
What you should knowhellipbull the basics of Flex and FlexFlash Builderbull the basics of TLF
to Text Layout Framework styles
Figure 1 Style changing application
032010 (11)56
TLF Applying CSS to Text Layout Framework styles
032010 (11) 57
Main ApplicationListing 2 contains a full code for main application
The application consists of
bull TextArea with some text The text is formed using XML Some elements of the TextFlow have
For our case we are interested in resolveFormat function that is called for every element of the TextFlow when itrsquos style needs to be changed This function return an object that should implement ITextLayoutFormat
Before we continue lets have a fast look at main application and how we build our example
Listing 1 CSSFormatResolveras
package
import flashtextStyleSheet
import flashxtextLayoutelementsFlowElement
import flashxtextLayoutelementsFlowValueHolder
import flashxtextLayoutelementsIFormatResolver
import flashxtextLayoutelementsTextFlow
import flashxtextLayoutformatsITextLayoutFormat
public class CSSFormatResolver implements
IFormatResolver
private var _styleSheetStyleSheet
public function CSSFormatResolver()
_styleSheet = new StyleSheet()
public function invalidateAll(textFlow
TextFlow)void
public function invalidate(targetObject)void
public function resolveFormat(targetObject)
ITextLayoutFormat
var formatFlowValueHolder = null
if (target is FlowElement)
var elementFlowElement = target as
FlowElement
if (element = null)
format = elementformat as
FlowValueHolder
if (elementstyleName = null)
var styleObject = styleSheetgetSt
yle(elementstyleName)
formatcolor = style[color]
formatfontSize =
style[fontSize]
formatfontWeight =
style[fontWeight]
formatfontStyle =
style[fontStyle]
return format
public function resolveUserFormat(targetObject
userFormatString)
return null
public function getResolverForNewFlow(oldFlow
TextFlow newFlowTextFlow)
IFormatResolver
return null
public function get styleSheet()StyleSheet
return _styleSheet
public function set styleSheet(valueStyleSheet)
void
_styleSheet = value
032010 (11)58
TLF
032010 (11) 59
Listing 2 TextCSSmxml
ltxml version=10 encoding=utf-8gt
ltsApplication xmlnsfx=httpnsadobecommxml2009
xmlnss=librarynsadobecomflexspark
xmlnsmx=librarynsadobecomflexhalo
xmlnslocal=
width=640 height=300gt
ltfxScriptgt
lt[CDATA[
import mxeventsFlexEvent
protected function applyCSS1Button_
clickHandler(eventMouseEvent)void
var formatResolverCSSFormatResolver =
new CSSFormatResolver()
formatResolverstyleSheetparseCSS(css1
text)
textAreatextFlowformatResolver =
formatResolver
protected function applyCSS2Button_
clickHandler(eventMouseEvent)void
var formatResolverCSSFormatResolver =
new CSSFormatResolver()
formatResolverstyleSheetparseCSS(css2
text)
textAreatextFlowformatResolver =
formatResolver
]]gt
ltfxScriptgt
ltsTextArea id=textArea width=620 height=134
x=9 y=156gt
ltsTextFlowgt
ltsp styleName=h1gt
Title of the Text
ltspgt
ltsp styleName=h2gt
Section of the Text
ltspgt
ltspgt
This is a body text Lorem ipsum
ltspgt
ltsTextFlowgt
ltsTextAreagt
ltsTextArea x=10 y=10 width=285 height=86
id=css1 gt
lt[CDATA[
h1
colorFF0000
fontSize20
fontWeightbold
fontStylenormal
h2
colorFF00FF
fontSize16
fontWeightbold
fontStyleitalic
]]gt
ltsTextAreagt
ltsTextArea x=345 y=10 width=285 height=86
id=css2 gt
lt[CDATA[
h1
color00FF00
fontSize32
fontWeightnormal
fontStyleitalic
h2
color0000FF
fontSize24
fontWeightbold
fontStylenormal
]]gt
ltsTextAreagt
ltsButton x=108 y=105 label=Apply CSS
1 id=applyCSS1Button
click=applyCSS1Button_
clickHandler(event)gt
ltsButton x=443 y=105 label=Apply CSS
2 id=applyCSS2Button
click=applyCSS2Button_
clickHandler(event)gt
ltsApplicationgt
032010 (11)58
TLF
032010 (11) 59
got styleName attribute so you could apply the corresponding CSS style to them later
bull 2 TextAreas with simple different CSSbull 2 Buttons to apply CSS from TextAreas to example
text
When the button is clicked the new instance of CSSFormatResolver class is created Then the corresponding CSS string from the TextArea is parsed and set into resolverrsquos property of SlyleSheet class type And finally prepared formatResolver instance is assigned to the TextFlow
Applying CSS to TextFlowNow lets have more detailed look at resolveFormat callback function First it should return a value that implements ITextLayoutFormat if it returns null then no new styling should be applied to an element being processed by the function So we create format variable of FlowValueHolder (it implements ITextLayoutFormat) and set itrsquos value to null (we do that because resolveFormat works with all elements including TextFlow itself as probably we donrsquot want to apply one style to the whole text)
After we do all the necessary casts and null checks and if we are sure that current elementrsquos got styleName attribute we assign styles from CSS to a current format StyleSheet object is used to contain CSS data as it is convenient object to parse and retrieve CSS data
Conclusion and a WarningThere was a brief tutorial on how to apply simple CSS to TLF TextFlow Please note that CSSFormatResolver class is not fully functional and only can be applied to our sample CSSs Writing reusable and versatile class requires more detailed coding and approach
Check the TLF Blog on this issue There is fully functional CSSFormatResolver with example there httpblogsadobecomtlf200902iformatresolver_and_using_css_1html
MAXYM GOLOVANCHUK Maxym Golovanchuk is a Photoshop Certied Expert and TV producer and he is using Adobersquos software for implementing entertainment solutions including video delivery with Flash Media Server mexxikgmailcom
MondayTuesdayWednesdayThursday Friday
DIVISIONS OF CREATIVE NICHE INC
032010 (11)60
PROFILE Flashcreed ndash Business Gallery
032010 (11) 61
The Business Gallery (httpwwwflashcreedcombusiness_video_image_gallery) is a Flash component meant to do one thing to enhance the visual experience a website portfolio or presentation site gives to its users Mainly itrsquos all about the image you present yourself or
your product to the world wide web Letrsquos face it without the looks you canrsquot sell your product or image no matter how interesting it might be
Whatrsquos so great about this gallery you might wonder Well the answer is simple everything Advanced AS3 programming dynamic XML implementation unlimited number of media items on stage PNG JPG and video FLA SWF MP4 F4V supported media tween and image effects just to name a few of the over 150 settings this gallery brings you Bottom line you can customize it in any way you see fit in order to make it resemble your website layout Not to mention the code optimization that allows the gallery to run so smoothly even on low resources
We brought 45 background wallpapers in case just a color doesnrsquot do the job also a set of custom arrows and close buttons
Flashcreed ndash Business GalleryHello itrsquos good to be back here among Flash amp Flex Magazine readers Today we are going to tell you a bit about our products mainly our Business Gallery but since all our products are built on the same framework most of the properties apply to all When we first realized what we could do with this framework we decided to name it ldquoPandorardquo in order to point out the unlimited number of possibilities it revealed regarding customization and user friendliness
032010 (11)60
PROFILE Flashcreed ndash Business Gallery
032010 (11) 61
The size of the entire gallery and any element in it is subject to any kind of resize big stage and small thumbs or the other way around for any template you or your client desire
Column_scroll and the properties for the stage mask helps you configure the exact number of visible columns you want to set in order to browse through the media items your gallery has Beside this useful feature we added blur and a couple of tween effects for the leftright navigation that gives an impressive look
032010 (11)62
PROFILE Flashcreed ndash Business Gallery
032010 (11) 63
Either as tooltip or plain text you can show any information you want regarding a certain media thumb in the gallery You can change font type size spacing color position and many other properties
The color gradient system for roll overout mouse gesture is unique in every way if we are to compare it with other galleries on the market at this point You can customize up to 5 sets of color with different alpha values The gradient type either linear or radial can be modified with rotation and ratio values
032010 (11)62
PROFILE Flashcreed ndash Business Gallery
032010 (11) 63
When clicking on a thumb if preview_type is selected as internal a resizable preview window will reveal itself and depending on the media type (image or video) an image viewer or video player will be contained inside it If preview_type is selected as external you have the possibility to set certain URL addresses this allowing you to redirect the user to a specific area of the website like a product page from a virtual store for example
The video player has a dozen of controllers that allow you to create a skin to better suit the template you want to create for your gallery Buttonrsquos color thickness handler color or scrub bar size just to name a few of the properties you can play with
At an amazing price of 999 $ this has to be one of the best choices when it comes to media galleries flash components Donrsquot hesitate to take a look at it on wwwflashcreedcom and also consider other products that might better suit your specifications or desires We would definitely appreciate any kind of feedback regarding current or possible features
Thank you
032010 (11)65
BOOK REVIEW
Are you an actionscript 3 game developer who is not able to write a complete commercial game because you cannot manage dozens
of classes Or you are an experienced actionscript 3 applications developer who wants to program game but donrsquot like reading any available beginner book as it doesnrsquot suit your style Even if you already have a good grasp over java or c++ and interested in creating not only fun games but commercial ones also then this is what you really require
There are several actionscript 3 game development books for beginners out there but Essential Guide to Game Dev is one of those few books that talk about the advanced gaming concepts However its first chapter begins with an easy to understand game example (good for any beginner) and ends up creating 3 games Did I tell you 3 games in just first chapter
Teaching about an Actionscript 3 Game framework is one of the many reasons that make this book a kick-ass addition to actionscript 3 gaming library Authors teach you how to create 10 unique games ranging from arcade to driving tile based to puzzle game and shooters to dice games Another specialty of this book is to use Flex and Flash Develop IDEs along with the primary Flash tool that creates space for not only flex
developers but also Flash Develop users In addition to this you will also learn to create game assets with GIMP Mappy and a sound effect creation tool You will get information about copyright laws which are necessary for any would-be commercial game creation and a complete game example integrated with MochiAds
This book also discusses and further more implements various advanced topics such as bitmap rendering pixel-level collision detection sound management AI xml-based level designing scrolling screen optimization techniques particles etc
In short this book will surely blow your minds with the wealth of knowledge it includes and you will pray for authors to keep writing such informative and useful books
If you are really serious about gaming then donrsquot miss the opportunity of reading this book Highly recommended
by Ali RAZA ACI ACE SCJP
Essential Guide to Flash Games
Authors Jeff Fulton Steve FultonPublisher friends of EDISBN 978-1-4302-2614-7Language EnglishPages 664 PagesWebsite httpfriendsofedcombookhtmlisbn=1430226145

032010 (11)12
TOOLS Storyfarm Switches to G-Technologytrade G-SPEEDtrade eS PRO to Cut Latest Doc Projects
032010 (11) 13
the Panasonic HVX 200 JVCrsquos HM100 and even an old Sony PD150
At the end of each production day David overnights Dean the P2 files on a small FireWire drive which Dean copies and unpacks onto his G-SPEED eS PRO before overnighting the drive back to the filmmakers Links to trailers and clips for both of these projects can be found on Storyfarmrsquos Projects webpage (httpwwwstoryfarmcommainfolderStoryfarmProjectshtml)
The external storage solution Dean used prior to his work with David and Susan worked fine for standard definition projects that didnrsquot come with punishing deadlines However when The Trouble With Normal landed in his lap he soon found that his current solution just wasnrsquot up to the task in terms of reliability and performance
The video bit rate for this project comes in at around 59MB per second which my previous RAID could handle without a problem said Dean But for this particular project and the way itrsquos being cut the amount of layers and filters not to mention the sheer volume of data brought my old system to its knees
Dean researched the G-Technology by Hitachi product line and decided the G-SPEED eS PRO configured in RAID 5 had the speed security and capacity to meet his workflow needs
Whatrsquos Next for Storyfarm Dean hopes to complete The Trouble with Normal in 2010 get attention through the usual festival channels and gain a greater audience through HBO or another such entity The Next US is already online with several moving episodes
Of course part of what has really made these projects fun for me is having a rockinrsquo system that doesnrsquot slow my creative process And in addition to my Mac I have the G-SPEED eS PRO to thank for that
The G-SPEED eS PRO is striped in RAID 0 right out of the box and it was wicked fast but like many editors do these days Dean really wanted to format it in RAID 5 He called tech support and immediately spoke to a person who was very knowledgeable about the G-SPEED eS PRO drive and how different RAID levels work overall
Additional features of the G-SPEED eS Pro include
bull RAID 0 1 3 5 and 6 ndash easily configurable and managed via a browser-based GUI
bull Single unit supports multi-stream compressed HD ProRes 422 and single stream uncompressed HD playback
bull Super quiet desktop unit with very small footprint bull Two units support dual-stream HD playback and
a single stream of 2K bull Professional locking mini SAS port with mini SAS
cable included bull Storage capacities available up to 8TB per unit
scalable to 16TB bull Compact and stylish aluminum enclosure with
thermo-regulated cooling fans bull Hot-swappable disk drive modules bull Formatted HFS+ mounts on a Mac Pro desktop
right out of the box
Going Beyond Normal Deanrsquos current documentary project The Trouble With Normal is about the peculiar state of the modern mental healthcare system and what it means to be crazy Filmmakers David Mackenzie and Susan Perkins of Everyday Wonder Productions (httpwwwwondereverydaycom) shot the project in cities all over North America using a Panasonic HVX 200 set up to capture in DVC PRO HD24720P
Deanrsquos editing takes a colorful non-linear approach that reflects the content of this non-traditional documentary
Irsquove been using a lot of layers speed changes and effects that really push the boundaries of long form editing to try and communicate the emotional content of the film It really maxed out my previous system but the G-SPEED eS PRO is handling it with ease
The Next US Project Dean is also working with Everyday Wonder on The Next US project an ongoing series of 5-minute Webisodes that profile small businesses in America that are thriving in this supposedly bleak economy
David and Susan are currently travelling across the country in an RV thatrsquos outfitted with a mobile production studio The project is being shot using a number of different cameras and formats including
DEAN MERMELLDigital lmmaker teacher composer and video editor
Martin Landau and Dean Mermell holding their awards for lifetime achievement and best editor respectively which they received at the California Independent Film Festival
032010 (11)14
BEGINNERS Working with Display Objects 101
032010 (11) 15
The DisplayObject class is the base class for all objects that can be placed on the display list The display list manages all objects displayed in Flash
Player or Adobe AIR Use the DisplayObjectContainer class to arrange the display objects in the display list DisplayObjectContainer objects can have child display objects while other display objects such as Shape and TextField objects are leaf nodes that have only parents and siblings no children (httplivedocsadobecomflash90ActionScriptLangRefV3flashdisplayDisplayObjecthtml)
The DisplayObject class supports basic functionality like the x and y position of an object as well as more advanced properties of the object such as its transformation matrix
DisplayObject is an abstract base class therefore you cannot call DisplayObject directly Invoking new DisplayObject() throws an ArgumentError exception
All display objects inherit from the DisplayObject classSo what does that really mean Well I like to refer to
display objects as any visual on the stage hence the name display So therefore I call them visual objects interchangeably throughout this article
A visual object can be a MovieClips Sprites Text Fields Shapes Buttons etchellip again all visual items that reside on the stage
So let get started and learn how to import the objects to the library we will be using the example files that accompany this lesson feel free to use any file that you want to follow along with
Note if you already understand this process please feel free to skip ahead if not we will go step by step for the first MovieClip then skip certain sets in the subsequent examples
Go to File =gt Import =gt Import to Library
Select the justinjpg This will bring the image into the library
Working with
No matter what you do in Flash you will encounter display objects at some point So what exactly are display object Adobe lists the following definition from their live docs
What you will learnhellipbull the basics of how to create and manipulate Display Objectsbull use the visual way by dragging from the librarybull add Display Objects to the stage using only AS3 code
What you should knowhellipbull doesnrsquot need and prerequisite knowledge when it comes to
tutorial
Display Objects 101
032010 (11)14
BEGINNERS Working with Display Objects 101
032010 (11) 15
(Note this name can be anything you want) I typically use _mc _btn etchellip behind the name for two reasons the first being it lets me know easily what type of object Irsquom using and the second it enables code hinting in Actionscript by using the underscore prefix (_mc) Also make sure you registration point is set to the upper left This is reference point for the MovieClip
Once you have done that select your newly created MovieClip instance on the stage and give it an instance name I called the instance the same thing I named the MovieClip justin_mc
Now we can then access its properties via Actionscript If you not familiar with instance names this simply is a way for you to tell Actionscript which item you are referring to
Create a new layer and label it actions and lock the layer
Select the first frame and open the actions panel Window=gtActions
The first properties we are going to manipulate in the Display Object aka MovieClip is the location parameters x and y These are going to be set in the upper left corner where you registration point was set up Enter the code into the actions panels
justin_mcx = 0
justin_mcy = 0
If you test the flash movie you will get something that should look like this
There are two way to access these objects the first way is to drag the justinjpg image out from the library to the stage
Now you will need to convert this image into a MovieClip which is a Display Object You do this by going to Modify=gtConvert to Symbol
This will pop up a dialog box These settings will be for your new MovieClip Give it a name of justin_mc
032010 (11)16
BEGINNERS Working with Display Objects 101
032010 (11) 17
Good now you can play around with the values and change them to see where other x and y values will place the MovieClip The images shown here are with the x and y set to 200
Lets try to access some different properties types enter the following code into your actions panel
justin_mcscaleX = 15
justin_mcscaleY = 15
If you test the movie you will now see that an output of the justin_mc MovieClip is 15 larger that before Your image might be pixilated since itrsquos stretching it to a larger dimension
Ok congratulations you have successfully added a displayvisual object to the stage and manipulated it Pretty Simple
Now lets delete the MovieClip from the stage and access it only through Actionscript
Once you have deleted the MovieClip off the stage go to the Library panel and right click the justin_mc and select properties
Select the Export for Actionscript option The name you see here will be the name that you create the object from in Actionscript This name can be anything but we will keep it the same as our instance name for no other reason but consistency
032010 (11)16
BEGINNERS Working with Display Objects 101
032010 (11) 17
Once you select the OK button you will get a window that looks like this Just select OK
So if we test our code now we will get and error because we have yet to create a MovieClip and add it to the stage
So delete all the code you have currently in the actions panel We will first create a variable that will hold the newly created instance of the MovieClip from the library instead of dragging it to the stage like we did before
Enter the following code
var anyNamejustin_mc = new justin_mc()
addChild(anyName)
the var keyword creates a variable anyName Note as the name states this can be called any name you want it to be eg Bob Billy Susan or whatever This is essentially its instance but in code instead of
selecting it and on the stage and then adding it via the properties panel like we did before justin _ mc references the library class name that you set earlier within the propertiesand the = new justin_mc() creates a new instance of a MovieClip name justin_mc() and assigns it to the variable
The addChild(anyName) just tells Flash to add the object to the stage using the variable (var) reference that you just created If you donrsquot use the addChild(name of variable) you will not see your visual object show up on the stage
So as you see itrsquos really not that difficult to access a display object and display it
Finally we will adjust some of the properties just as we did before Except this time we use the variable name that was called anyName Again this is just like your instance name see (Listing 1)
In next months issue we will continue this expedition of display objects and touch on things like drawing shapes using only code and working with text I hope you enjoyed this article please feel free to email me your comments or questions to jundajgmailcom
JUSTIN P JUNDAIs a New Media Engineer specializing in FlashAS2-3 Photo-shop After Effects PHP MySQL and a slue of other program-ming languages Justin also loves to travel and has a strong passion for teaching others how to use these technical pro-ducts He currently works with a top government-contracting rm implementing new media ideas into interactive course-ware that is then delivered to the military in order to effecti-vely train them Also check out shprotv to see the latest video from him and his partner Director Scott Hansen wavelenght-fxmaccom You can reach Justin at jundajgmailcom with any thoughts or concerns you have regarding this article
Listing 1
Creates Instance of the MovieClip named justin_mc
var anyNamejustin_mc = new justin_mc()
Set properties for the MovieClip properties
can be things like rotation
x y coordinates Scale sizes
etc
anyNamex = 100
anyNamey = 100
anyNamerotation = 45
anyNamescaleX = 15
anyNamescaleY = 15
Assigns the movie clip to the stage
addChild(anyName)
032010 (11)18
FLASH AND PHP
The webinar hosted by Ryan Stewart Platform Evangelist at Adobe and Kevin Schroeder Technology Evangelist at Zend hit the Web around
the same time that Zend announced Code Tracing had been added to its PHP web application server Who you might ask is this company called Zend And what is an article about flight recorders doing in Flash amp Flex Magazine After all yoursquore a Flex developer so why should you care
Who is ZendPHP runs a third of the worldrsquos Web sites and has now become the most popular language for building dynamic Web applications Zend Technologies Inc is the leading provider of products and services for developing deploying and managing business-critical PHP applications Zend contributes to Zend Framework (an open source objected-oriented Web application framework) and now Zend Framework is bundled with Adobe Flash Builder 4
What is a Software Flight RecorderWhen something goes wrong with an airplane in flight investigators obviously canrsquot reproduce the problem Instead they rely on data captured by the airplanersquos black box flight recorder in order to uncover the source of the problem Zend Server does the same for PHP web applications Rather than trying to recreate the environment and reproduce the steps leading up to a problem Zend Server captures in real-time the full
execution of an application ndash in production or in a test lab ndash and pinpoints root cause issues without trail and error This feature called Code Tracing is akin to a software flight recorder for PHP web applications
Code Tracing can be activated to automatically capture problems in real-time or used manually to trace specific scenarios Zend had strict requirements for the Code Tracing user interface
bull The performance chops to handle megabytes of databull A highly-interactive view for an exceptional user
experiencebull The ability to modify widget behaviorbull Established cross-browser supportbull Sufficient and accessible technical content and
expertise see (Figure 1)
Zend considered various alternatives and ultimately chose Adobe Flex for the following reasons
bull Performancebull Flexibilitybull Maturitybull Flash Builder 4 support for data-focused applications
Why Flex developers should care
bull Adobe Flash Builder now has built-in support for Zend Framework a PHP framework based on PHP 5
bull PHP provides easy integration with back-end logic using Flash remoting
bull Zend Server is a data-centric web application server and Code Tracing helps improve development and deployment in high performance production environments
EXCERPT FROM WEBINAR BY KEVIN SCHROEDER AND RYAN STEWART
How a Software Flight Recorder was You might have caught a recent webinar How Zend used Flex and PHP to build a Software Flight Recorder which sparked some interesting discussion
Built Using Adobe Flex and Zend PHP
Figure 1 Flash and PHP
How Zend Used Adobe Flex and PHP to Build a Software Flight Recorder
ldquoZend Framework with Support for Action Message For-mat (AMF) Now Bundled with Adobe Flash Builder 4rdquo
How to build Rich Internet Applications using Zend PHP and Adobe Flash Platform
032010 (11)20
ACTIONSCRIPT DEVELOPMENT Creating an AS3 Game Framework
032010 (11) 21
The game framework is the foundation for making the second game It is an expanded version of the first chapterrsquos framework with an emphasis
on organization and reuse Since this book is also not called Proper Object-Oriented Design Patterns and Principles for Games you will see little theory here and mostly practice Many of these techniques have been hard won and developed over many years of ActionScript programming We have fought the wars through AS1 AS2 and now AS3 so you donrsquot have to do it yourself
While our framework borrows from some design patterns we feel that games are a very expressive medium We want you the reader of this book to think outside that proverbial over-used box While design pattern ideas lend themselves to all manner of application development we donrsquot want you to feel hemmed in to using any one set of ideas for creating their games Our framework gives structure to the overall flow of a game but does not dictate how to code the actual game logic
Exploring the FrameworkThe game framework is housed in a reusable package structure A package structure at its very basic is an organized set of folders that will contain reusable classes All of the standard class files for using the framwork will be in this package structure We will update and extend this structure as we proceed through this book Letrsquos start by giving you an idea of what classes we will be creating for the framework
The GameFrameWorkas classThe GameFrameWorkas class is the foundation of the framework It contains a simple state machine and a basic game loop timer Our state machine is a simple
construct containing a set of state constants to switch the framework between states States are handled by state functions inside the GameFrameWorkas file We will employ a variable to reference the current state function The game timer will use this reference to call the current state function on each frame tick We will create states for such things as the title screen instructions screen game play game over and more
When we create a new game our document class will be an instance of GameFrameWork called Mainas This Mainas will have an init (short for initialization) function that will set up the framework for use This Mainas class will also act as a sort of message gateway between the game and the framework classes If you are confused donrsquot worry wersquoll be explaining this in greater detail soon
The FrameWorkStatesas classThis FrameWorkStatesas class will simply contain a set of constant integer values representing the state machine states When we first create the framework we will have 10 different state constants All will begin with the STATE_SYSTEM designation For example we will have a state that displays the title screen The state constant for this will be STATE_SYSTEM_TITLE More states will be added as we progress through the chapters in this book
The BasicScreen class and SimpleBlitButton helper class The BasicScreen class will be used to display very simple game state screens These screens can have a basic background color with transparency (if needed) as well as some text centered on the screen Each screen can also have a button that needs to be clicked to move to a new state in the state machine This class is so simple that it will probably never be used without major
Creating an AS3 Game Framework
Excerpted from the book The Essential Guide to Flash Games Building Interactive Entertainment with ActionScript by Jeff Fulton Steve Fulton (FriendsofEDApress 2010)
PART ONE
032010 (11)20
ACTIONSCRIPT DEVELOPMENT Creating an AS3 Game Framework
032010 (11) 21
We will also be creating three distinct custom event classes as part of the framework These will be used to send specific data from the Game class instance to the Mainas (GameFrameWorkas instance) class The Mainas will act on the data sent and if needed pass the data to other framework classes By doing this we are using Mainas as a sort of message gateway
The CustomEventButtonIdas classThis custom event will have the ability to pass an identification integer value to the listening function It is used for cases where multiple buttons share the same listener function It will be used in the framework (specifically in the GameFrameWork instance Mainas) to allow BasicScreen instances to each share the same listener functions if they employ a SimpleBlitButton You will see this when we examine the GameFrameWork class file It can also be used for any game or application that needs to send a basic integer id along with an Event instance
The CustomEventLevelScreenUpdateas classThis custom event will be used by the Gameas class instance to send data to a BasicScreen instance we will create called levelInScreen The levelInScreen will have the ability to display custom text between each level The event listnener for this event will change this text with a value passed when the event is fired off The Mainas (GameFrameWorkas sub-class) will listen for this event and pass the data to the levelInScreen
The CustomEventScoreBoardUpdateas classThis custom event will be used by the the Gameas class instance to update the values on the ScoreBoard class instance The Mainas class will listen to for this event and pass the data on to the ScoreBoardas class instance
The framework package structureWe will be organizing all of the code we will create into a package structure The reusable framework classes will be in one package and the games we will create will be in a separate package Letrsquos create these two package structures now
The source folderChoose a spot on your disk drive of choice and create a folder called source This will be the root or base level for all of the code and games we will create in this book
The classes packageThe reusable framework classes will be in a package called classes Create a folder called classes inside the source folder from the previous step You should now have a folder structure that looks a little like this
modification in your own commercial games We present it here in its very simple form for utility purposes
The SimpleBlitButton helper class is used to create a clickable button with rollover and off states The button is created completely in code with a simple color background for the over and off states to be sed in the BasicScreen class We do this for simplicity and to demonstrate some Sprite blitting techniques (much more on these later in the book) using a set of BitmapData instances for the background color change of the button on rollover
The ScoreBoard class and SideBySideScoreElement helper class The ScoreBoard class displays information for the user during game play Data such as the current game score time remaining and other useful information can be displayed to the user with a very basic look and feel by using this class It can be used as is but when you start to make your own commercial games you might find it useful to extend this class with more functionality This very basic class is used inside the framework to demonstrate how to use events from a Game instance to update a game score board
The SideBySideScoreElement helper class is used to display a text label and corresponding dynamic text field as a pair side by side on the screen For example it can be implemented by the ScoreBoard class to display the word Score followed by the userrsquos current score
The Game classThe Game class is a stub style class that all games in the framework will inherit from It contains the basic variables and functions needed to work with the GameFrameWork class
The Custom event classesThe framework makes use of events to communicate between classes The instances of the Game class will use events to communicate with the ScoreBoard and the Main classes We will create a custom Mainas class for each game This Main class will be a sub-class (or child) of the GameFrameWork class Some of the events we will use will be simple events These are instances of the standard Flash Event class used for basic communication By this we mean events that donrsquot need to send any data along with them For example instances of the Gameas framework class will have a constant variable called GAME_OVER This constant will be used as the name of a simple Event instance that is fired off with the standard dispatchEvent function call This example GAME_OVER event wil be used to tell the Mainas to move to the game over (STATE_SYSTEM_GAME_OVER) state in the main state loop when the current game has completed
032010 (11)22
ACTIONSCRIPT DEVELOPMENT Creating an AS3 Game Framework
032010 (11) 23
[source]
[classes]
Next we will create the actual package that will contain all of the source code for the reusable framework classes We will name this package comefgframework To create this you must first create a folder inside the classes folder called com then a folder called efg inside the com folder and finally a framework folder inside the efg folder By the way the efg is an abbreviation for the book title Essential Flash Games You should now have a folder structure that looks like this
[source]
[classes]
[com]
[efg]
[framework]
When we start to create all of the class files necessary for the framework they will all go into the framework folder You will see that when we create these classes the package name will look like this
package comefgframework
The projects packageThe second package we will create is called the projects package You can start this right away by creating a folder inside the root source folder called projects The projects folder is not going to be a straight package structure like the classes folder It is organized in a manner to allow individual custom game development using the framework
Inside this projects folder we are going to create a unique folder for each game in the book The first game we are going to create is called stubgame A stub is usually a function or class that contains very little (if any) usable code but is instead a simple placeholder Our game will be slightly more than a placeholder but not much more It will be used to demonstrate the basic functionality of the framework Go ahead and create a folder called stubgame in the projects folder You should have a projects set of folders that look like this
[source]
[classes]
[projects]
[stubgame]
Next we are going to create two folders each to hold a different version of our game Why are we going to do this This book is meant to support Flash game development with a variety of tools There are many popular methods to create Flash games
with an assortment of tools and code integrated development environments (IDEs) We are going to focus on two such tools in this book the Flash IDE (the one with the library timelines drawing tools and so on all combined into a single tool) and Flash Develop (a very popular free IDE made specifically for ActionScript development) You can use any tool with this book but you will need to follow the documentation specific to your own tool when setting up projects
You will need to pay careful attention to linking the reusable code package structure to your games because linking may vary depending on the Flash code editor environment you are using Linking the package to a game is actually a very simple process but it differs between the various code IDE versions Jeff does most of his Flash game development Flash Develop using the free Flex SDK that Adobe provides Steve on the other-hand uses the Flash IDE almost exclusively We have combined our efforts on all of the chapter games to bring you code that will work with both a Flex SDK project and a Flash IDE project
On that note the next two folders you will create inside the stubgame folder are called flashIDE and flexSDK You donrsquot have to create both for any project You just need to create the one that works with the tools you are going to use to create Flash games Each is set up differently so pay attention to the specifics of the one you will be using the most
You should now have a projects folder that looks like this
[projects]
[stubgame]
[flashIDE]
[flexSDK]
The Flash IDE package structureThe Flash IDE package structure begins right inside the flashIDE folder The package name is very similar to the classes package you saw in the last section The package structure will be comefggames[game
name] For instance with the stub game we are going to create in this chapter the package name will be comefggamesstubgame Go ahead and create those folders now You should have this package structure when you are complete
[projects]
[stubgame]
[flashIDE]
[com]
[efg]
[games]
[stubgame]
[flexSDK]
032010 (11)22
ACTIONSCRIPT DEVELOPMENT Creating an AS3 Game Framework
032010 (11) 23
The Flex SDK package structureThe Flex SDK package structure is very similar to the Flash IDE package structure with one small difference Flash Develop and other Flex tools use a specific set of folders for organizing their own project structures To accommodate these and still have a common package structure for our games we must add the Flash Develop created src folder to the flexSDK folder You will not have to create the src folder or the package structure by hand as Flash Develop will create it automatically for you when you start a new project In the section called Setting up the game in Flash Develop we will go into the details For now here is the way the structure will be laid out (including the Flash Develop specific folders such as bin obj and lib If you have used Flash Develop to create a Flex SDK project you will recognize the following structure
[projects]
[stubgame]
[flexSDK]
[bin]
[obj]
[lib]
[src]
[com]
[efg]
[games]
[stubgame]
Notice that we have created the exact same package structure inside the src folder as we will use with the Flash IDE The package name for our game will be comefggamesstubgame
The package name in the code for classes in both the Flash IDE and Flex SDK will be the same
package comefggamesstubgame
The Mainas and StubGameas filesWhen we start to add files to the subgame package we will be creating two subclasses (or children) of framework classes that will be unique to our game The Mainas will be created as a subclass (or child) of GameFrameWorkas framework class The StubGameas class will be a subclass (or child) of the Gameas framework class
Starting a project using the framework packagesYou have just seen the basic package structure for both the framework reusable classes and the projects we are going to create Letrsquos make use of this right away by creating a project for the stub game The stub game will be very similar to the Chapter 1 game where the player is tasked with clicking the mouse ten times
Creating the stub game project in the Flash IDEFollow these steps to set up stub game using the Flash IDE
1 Start up your version of Flash I am using CS3 but this will work exactly the same in CS4 and CS5
2 Create a fla file in the sourceprojectsstubgame
flashIDE folder called stubgame3 In the sourceprojectsstubgameflashIDE folder
create the following package structure for your game comefggamesstubgame
4 Set the frame rate of the Flash movie to 30 FPS Set the width and height both to 400
5 Set the document class to comefggamesstubgameMain6 We have not yet created the Mainas class so you
will see a warning We are going to create this later in this chapter
7 Add the framework reusable class package to the class path for the fla filebull In the publish settings select [Flash]gt
[ActionScript 3 Setting]bull Click the Browse to Path button and find the
source folder we created earlier for the package structure Select the classes folder and click the choose button Now the comefgframework package will be available for use when we begin to create our game We have not created the framework class files yet but we will be doing this very shortly
Creating the stub game project in Flash DevelopAnd these are the steps to create the same project using Flash Develop
1 Create a folder inside the [source][projects][stubgame] folder called [flexSDK] (if you have not already done so)
2 Start Flash Develop and create a new projectbull Select Flex 3 Projectbull Give the project the name stubgamebull The location should be the sourceprojects
stubgameflexSDK folderbull The package should be comefggamesstubgamebull Do not have Flash Develop create a project
folder automatically Make sure the Create Folder For Project box is unchecked
bull Click the OK button to create the project3 Add the class path to the framework to the project
bull Go to the [project]gt[properties]gt[classpaths] menu item
bull Click the add class path buttonbull Find the source folder we created earlier and
select the classes subfolderbull Click the ok button and then the apply button
032010 (11)24
ACTIONSCRIPT DEVELOPMENT Creating an AS3 Game Framework
032010 (11) 25
You now have the basic structure to start creating projects inside the framework We are now going to discuss a few topics concerning the structure of the framework classes and then move into building the reusable framework code
Here are a couple of things to noteFor Flex Builder Flash Builder or other IDEs please refer to the documentation provided for that product to create a new project and set the default compile class
A common method of Flash development is to use the Flash IDE for assets and organization and Flash Develop for code editing If this is your workflow of choice you will want to follow the Flash IDE folder and package structure rather than the Flex SDK folder structure
Creating game timersThere are two basic methods that most Flash developers implement when creating a frame-based game timer By frame-based we mean a timer that uses the idea of a segment of time broken up into logical slices (or frames) to manage game logic There are other types of methods for timing game updates but we will make extensive use of time-slice or frame-based timers in this book The basic game timer we will use most of the games will attempt to squeeze all processing and screen updates into each segment or frame We will also explore a time-step timer and a sleep-based timer in chapter 11
The first timer method is the EventENTER_FRAME event timer The standard EventENTER_FRAME event handler will attempt to run the game loop at the swf filersquos set frame rate This very handy game loop timer has been in use for a number of years The second standard game loop timer method makes use of the Timer class The Timer class is used to call the game loop at millisecond intervals specified by a delay interval For example if the millisecond delay interval is set to 100 the Timer instance would run ten times a second (there are 1000 milliseconds in a single second) Our framework will begin by using this Timer instance game loop timer We will do this so we can make use of the TimerEventTIMER updateAfterEvent function As you will see this function will help smooth out screen updates
Defining frame timer tick You will see the phrases frame timer tick timer tick and frame tick used in this book When we refer to a tick or a frame tick we simply mean one framersquos worth of processing When we run a game at 30 frames per second we have 30 ticks or 30 frame ticks This also means that we only have 3333 milliseconds (or 100030) inside each tick to do all of our processing
State MachinesA traditional state machine at its very basic is a mechanism that controls the state or current actions a system can perform Sometimes this is called a finite state machine Finite state machines have traditionally been used to model complex mathematical computations and more recently artificial intelligence The finite in the name refers to the fact that the system can only be in a single state at any one time Our game framework is built on a simple state machine pattern that employs a separate code function or method for each state There are many other styles of state machines some use entire classes for each individual state (sometimes called an object-oriented state machine) and some use a simple switchcase statement block called on each frame tick to control state We will use a third type that borrows from these two
We call our state machine pattern a function reference pattern Unlike the object-oriented state machine our machine will contain a separate method or function for each state inside a single framework class Each of these state functions will control elements in the framework such as instances of the BasicScreen and Game classes We will use a switchcase statement to move between states Unlike the afore mentioned very simple switchcase state machine structures that call this switchstate control structure on each frame tick we only need to call it when we are switching states The switchcase we call will simply change the function reference we call on each frame tick The GameFrameWorkas will contain the state machine that controls overall game flow This will move our game system between states defined in the FrameWorkStatesas file
Each individual game package we create will contain a Mainas (in the gamersquos own package structure) that will extend GameFrameWorkas We will also create a unique Gameas child class for each game The Game class children that we create can also employ their own internal state machines based on the function reference pattern when needed
Richard (Squize) Myles of wwwgamingyourwaycom was one of the first to offer the idea of a function reference state machine for ActionScript 3 on his well-respected blog
The FrameWorkStatesas class fileThis class file is a simple collection of constants that will define the states for the game framework They will be consumed by the GameFrameWorkas class file The following code listing shows the entire code for this file you will want to create this file according to the package structure in the previous section see (Listing 1)
The first thing you should notice about this class is the package name in the first line It conforms to the file system structure we created earlier No matter if
032010 (11)24
ACTIONSCRIPT DEVELOPMENT Creating an AS3 Game Framework
032010 (11) 25
you are using a version of Flash Flex Builder Flash Builder Flash Develop TextMate or even plain old Notepad this package name will be the same The package name is not depended on the code development environment but the chosen file structure for organizing the code Save this file in the location we created previously
sourceclassescomefgframeworkFrameWorkStatesas
The state variablesThe state variables are constants that the game loop state machine will use to move between game states We have set up the most common basic states in this sample file but you will be able to create as many as you need As we progress through the chapters more will be added as necessary
bull STATE _ SYSTEM _ TITLE This state is used to display a basic title screen with an OK button for the user to click to move on Once the instructions are on the screen the state will change to the next state
bull STATE _ SYSTEM _ WAIT _ FOR _ CLOSE This one waits until the OK button is clicked for any instance of the BasicScreen class
bull STATE _ SYSTEM _ INSTRUCTIONS This state is used to display basic instructions with the same OK button as in the SYSTEM _ TITLE state It also changes to the STATE _ SYSTEM _ WAIT _ FOR _ CLOSE state until the OK button is clicked
bull STATE _ SYSTEM _ NEW _ GAME This state will call the game logic class and fire off its gamenewGame() function It does not wait but moves on to the NEW _
LEVEL state right awaybull STATE _ SYSTEM _ NEW _ LEVEL With this state we can
call the gamenewLevel() function to set up a new level for the given game
bull STATE _ SYSTEM _ LEVEL _ IN This state is used to display some basic information if needed for the beginning of a level In this basic game we simply display the level screen and wait a few seconds before moving on The wait is accomplished by changing state to the STATE _ SYSTEM _ WAIT state for the specified number of frame ticks
bull STATE _ SYSTEM _ GAME _ PLAY This one simply calls the game logic classrsquos runGame function repeatedly and lets the game take care of its own logic and states
bull STATE _ SYSTEM _ GAME _ OVER The game over state displays the basic game over screen and waits for the OK button to be clicked before moving back to the instructions screen It quickly changes state to the STATE _ SYSTEM _ WAIT _ FOR _ CLOSE until the OK button is clicked
bull STATE _ SYSTEM _ WAIT This state waits for a specified number of frames and then fires off a simple custom event constant called WAIT _ COMPLETE
The GameFrameWorkas class fileThe GameFrameWorkas will be that parent of our gamersquos document class Mainas (the gamersquos document class)
for our games will extend this class and call functions to modify the framework for each unique game The entire code listing is provided at the end of this section We will explore it in detail once your have had a chance to type in the code The location for this file in the package structure is
sourceclassescomefgframeworkGameFrameWorkas
The GameFrameWorkas will be the parent class to the Mainas class we will use for our games and itrsquos shown in the following listing In later chapters we will add some functions to this file and even create one that uses a completely different timer The Mainas will subclass this class with the extends syntax and override the blank stub init function we are about to create This class will also contain all of the state functions that coincide with the state variables in the FrameWorkStates class All of the functions in the GameFrameWorkas are public so all can be overridden by the Mainas if needed In this way we can customize the behavior of the state functions if we need to
For example in later chapters we will want to play music on the title screen The function call to play
Listing 1
package comefgframework
author Jeff and Steve Fulton
public class FrameWorkStates
public static const STATE_SYSTEM_WAIT_FOR_CLOSEint = 0
public static const STATE_SYSTEM_TITLEint = 1
public static const STATE_SYSTEM_INSTRUCTIONSint = 2
public static const STATE_SYSTEM_NEW_GAMEint = 3
public static const STATE_SYSTEM_GAME_OVERint = 4
public static const STATE_SYSTEM_NEW_LEVELint = 5
public static const STATE_SYSTEM_LEVEL_INint = 6
public static const STATE_SYSTEM_GAME_PLAYint = 7
public static const STATE_SYSTEM_LEVEL_OUTint = 8
public static const STATE_SYSTEM_WAITint = 9
032010 (11)26
ACTIONSCRIPT DEVELOPMENT Creating an AS3 Game Framework
032010 (11) 27
the music will need to be added to the systemTitle state function Not all games will need this though so we will not add it to the GameFrameWorkas filersquos systemTitleFunction Instead we will create a new version of the function in Mainas to override the one in GameFrameWorkas The new one will play the sound needed and then call the systemTitle function inside GameFrameWorkas with the supersystemTitle() function call see (Listing 2)
The class imports The class import section contains the necessary Flash core classes needed for the Main class Notice the package name coincides with the package structure we created earlier in the chapter for the framework
package comefgframework
Listing 2
package comefgframework
import flashdisplayBitmap
import flashdisplayBitmapData
import flashdisplayMovieClip
import flasheventsEvent
import flashgeomPoint
import flashtextTextFormat
import flashutilsTimer
import flasheventsTimerEvent
public class GameFrameWork extends MovieClip
public static const EVENT_WAIT_COMPLETEString =
wait complete
public var systemFunctionFunction
public var currentSystemStateint
public var nextSystemStateint
public var lastSystemStateint
public var appBackBitmapDataBitmapData
public var appBackBitmapBitmap
public var frameRateint
public var timerPeriodNumber
public var gameTimerTimer
public var titleScreenBasicScreen
public var gameOverScreenBasicScreen
public var instructionsScreenBasicScreen
public var levelInScreenBasicScreen
public var screenTextFormatTextFormat
public var screenButtonFormatTextFormat
public var levelInTextString
public var scoreBoardScoreBoard
public var scoreBoardTextFormatTextFormat
Game is our custom class to hold all logic for
the game
public var gameGame
waitTime is used in conjunction with the
STATE_SYSTEM_WAIT state
it suspends the game and allows animation or
other
processing to finish
public var waitTimeint
public var waitCountint=0
public function GameFrameWork()
public function init()void
stub to override
public function setApplicationBackGround(width
Number
heightNumberisTransparentBoolean = false
coloruint = 0x000000)void
appBackBitmapData = new BitmapData(width
height
isTransparent color)
appBackBitmap = new Bitmap(appBackBitmapData)
addChild(appBackBitmap)
public function startTimer()void
timerPeriod = 1000 frameRate
gameTimer=new Timer(timerPeriod)
gameTimeraddEventListener(TimerEventTIMER
runGame)
gameTimerstart()
public function runGame(eTimerEvent)void
systemFunction()
eupdateAfterEvent()
switchSystem state is called only when the
032010 (11)26
ACTIONSCRIPT DEVELOPMENT Creating an AS3 Game Framework
032010 (11) 27
Listing 2
state is to be changed
(not every frame like in some switchcase
based simple state machines
public function switchSystemState(statevalint)
void
lastSystemState = currentSystemState
currentSystemState = stateval
switch(stateval)
case FrameWorkStatesSTATE_SYSTEM_WAIT
systemFunction = systemWait
break
case FrameWorkStatesSTATE_SYSTEM_WAIT_FOR_
CLOSE
systemFunction = systemWaitForClose
break
case FrameWorkStatesSTATE_SYSTEM_TITLE
systemFunction = systemTitle
break
case FrameWorkStatesSTATE_SYSTEM_
INSTRUCTIONS
systemFunction = systemInstructions
break
case FrameWorkStatesSTATE_SYSTEM_NEW_GAME
systemFunction = systemNewGame
break
case FrameWorkStatesSTATE_SYSTEM_NEW_LEVEL
systemFunction = systemNewLevel
break
case FrameWorkStatesSTATE_SYSTEM_LEVEL_IN
systemFunction = systemLevelIn
break
case FrameWorkStatesSTATE_SYSTEM_GAME_PLAY
systemFunction = systemGamePlay
break
case FrameWorkStatesSTATE_SYSTEM_GAME_OVER
systemFunction = systemGameOver
break
public function systemTitle()void
addChild(titleScreen)
titleScreenaddEventListener(CustomEventButton
IdBUTTON_ID
okButtonClickListener false 0 true)
switchSystemState(FrameWorkStates
STATE_SYSTEM_WAIT_FOR_CLOSE)
nextSystemState = FrameWorkStatesSTATE_
SYSTEM_INSTRUCTIONS
public function systemInstructions()void
addChild(instructionsScreen)
instructionsScreenaddEventListener(CustomEven
tButtonId
BUTTON_IDokButtonClickListener false 0
true)
switchSystemState(FrameWorkStates
STATE_SYSTEM_WAIT_FOR_CLOSE)
nextSystemState = FrameWorkStatesSTATE_
SYSTEM_NEW_GAME
public function systemNewGame()void
addChild(game)
gameaddEventListener(CustomEventScoreBoardUp
date
UPDATE_TEXTscoreBoardUpdateListenerfalse 0
true)
gameaddEventListener(CustomEventLevelScreenU
pdate
UPDATE_TEXTlevelScreenUpdateListenerfalse
0 true)
gameaddEventListener(GameGAME_OVER
gameOverListener
false 0 true)
gameaddEventListener(GameNEW_LEVEL
newLevelListener
false 0 true)
gamenewGame()
switchSystemState(FrameWorkStatesSTATE_
SYSTEM_NEW_LEVEL)
public function systemNewLevel()void
032010 (11)28
ACTIONSCRIPT DEVELOPMENT Creating an AS3 Game Framework
032010 (11) 29
Listing 2
gamenewLevel()
switchSystemState(FrameWorkStatesSTATE_
SYSTEM_LEVEL_IN)
public function systemLevelIn()void
addChild(levelInScreen)
waitTime = 30
switchSystemState(FrameWorkStatesSTATE_
SYSTEM_WAIT)
nextSystemState = FrameWorkStatesSTATE_
SYSTEM_GAME_PLAY
addEventListener(EVENT_WAIT_COMPLETE
waitCompleteListener false 0 true)
public function systemGameOver()void
removeChild(game)
addChild(gameOverScreen)
gameOverScreenaddEventListener(CustomEventBu
ttonId
BUTTON_IDokButtonClickListener false 0
true)
switchSystemState(FrameWorkStates
STATE_SYSTEM_WAIT_FOR_CLOSE)
nextSystemState = FrameWorkStatesSTATE_
SYSTEM_TITLE
public function systemGamePlay()void
gamerunGame()
public function systemWaitForClose()void
do nothing
public function systemWait()void
waitCount++
if (waitCount gt waitTime)
waitCount = 0
dispatchEvent(new Event(EVENT_WAIT_COMPLETE))
public function okButtonClickListener(e
CustomEventButtonId)void
switch(eid)
case FrameWorkStatesSTATE_SYSTEM_TITLE
removeChild(titleScreen)
titleScreenremoveEventListener(CustomEv
entButtonId
BUTTON_IDokButtonClickListener)
break
case FrameWorkStatesSTATE_SYSTEM_
INSTRUCTIONS
removeChild(instructionsScreen)
instructionsScreenremoveEventListener(
CustomEventButtonIdBUTTON_IDokButtonC
lickListener)
break
case FrameWorkStatesSTATE_SYSTEM_GAME_OVER
removeChild(gameOverScreen)
gameOverScreenremoveEventListener(
CustomEventButtonIdBUTTON_IDokButtonC
lickListener)
break
switchSystemState(nextSystemState)
public function scoreBoardUpdateListener(e
CustomEventScoreBoardUpdate)void
scoreBoardupdate(eelement evalue)
public function levelScreenUpdateListener(e
CustomEventLevelScreenUpdate)void
levelInScreensetDisplayText(levelInText +
etext)
gameOverListener listens for GameGAMEOVER
simple
custom events calls and changes state
accordingly
public function gameOverListener(eEvent)void
switchSystemState(FrameWorkStatesSTATE_
SYSTEM_GAME_OVER)
gameremoveEventListener(CustomEventScoreBoard
Update
UPDATE_TEXTscoreBoardUpdateListener)
gameremoveEventListener(CustomEventLevelScree
nUpdate
032010 (11)28
ACTIONSCRIPT DEVELOPMENT Creating an AS3 Game Framework
032010 (11) 29
We also must import all of the classes needed for the framework to run You will see this put to use shortly
The variable definitions The variable definition section defines all of the global scope variables for the class These include all of the variables needed for the state machine screens and the game timer
We will make use of constants to define the current state and a set of variables to hold the state information These have been be defined on the FrameWorkStatesas file we created in the last section More states can be added to the basic ones but these will be sufficient for many games that we will create in this book There are two special states that are used for the system and wait for button clicks or things like animations to complete These are the STATE_SYSTEM_WAIT_FOR_CLOSE and STATE_SYSTEM_WAIT respectively We will also make use of a generic function called systemFunction that will hold the current state function to call in our game loop Combined with this we use a set of
integer variables to hold the value of the current state (currentSystemState) the last state (lastSystemState) and the next state (nextSystemState) for processing purposes These states should not be confused with an actual game pause function This will be handled in a different manner and added to the framework in Chapter 11
If you are using the Flash IDE and have any assets in the library that need to be exported in the first frame you must extend MovieClip and not Sprite even if you donrsquot plan to use the main time line for anything else We have extended MovieClip for the GameFrameWork so it will work with both Flex SDK and Flash IDE projects
The state control variablesThe control variables keep the system functioning within the context of the current state The main control variable is an instance of the Function class called systemFunction This function holds a reference to the current function that will be repeatedly called on each frame tick This saves us from having to evaluate a switchcase statement on each frame to decide which function to call The function is changed to a new reference by called the switchSystemState() function and passing a new constant that represents the new state
Optimization switchSystemState() is the first of many optimizations we will make to the game framework All of these optimizations will make the Flash games run much more efficiently These efficiencies in the game framework will allow the actual game code to perform more complex operations and still run with a reasonable frame rate
The currentSystemState integer variable holds a number representing the constant of the current state the system is running The nextSystemState contains the constant integer value for the state to transition to after this state is complete The lastSystemState variable holds the integer constant of the previous system state This is used in the rare occurrence that the game loop needs to return to the previous system state
The lastSystemState variable will become useful when we use a shared state such as STATE_SYSTEM_WAIT The STATE_SYSTEM_LEVEL_IN state will implement a 30-millisecond delay before moving on to the STATE_SYSTEM_GAME_PLAY state The nextSystemState will be STATE_SYSTEM_WAIT and the lastSystemState will be STATE_SYSTEM_LEVEL_IN When the 30-millisecond wait time has expired the waitCompleteListener function will be called It will use the lastSystemState to determine where the processing was before the wait was started Yoursquoll see this in detail later in this chapter when we examine the waitCompleteListener function
Listing 2
UPDATE_TEXT levelScreenUpdateListener)
gameremoveEventListener(GameGAME_OVER
gameOverListener)
gameremoveEventListener(GameNEW_LEVEL
newLevelListener)
newLevelListener listens for GameNEWLEVEL
simple custom events calls and changes
state accordingly
public function newLevelListener(eEvent)void
switchSystemState(FrameWorkStatesSTATE_
SYSTEM_NEW_LEVEL)
public function waitCompleteListener(eEvent)
void
switch(lastSystemState)
case FrameWorkStatesSTATE_SYSTEM_LEVEL_
IN
removeChild(levelInScreen)
break
removeEventListener(EVENT_WAIT_COMPLETEwai
tCompleteListener)
switchSystemState(nextSystemState)
032010 (11)30
ACTIONSCRIPT DEVELOPMENT
The background fill variablesAll Flash applications have a background color of some type No matter what game we are going to be creating the framework can control this background color You should never rely on the background color setting in HTML for your Flash applicationrsquos background color This leaves the HTML embed code with control over major aspect of your application If you are creating a viral game to be placed on game portals you will lose control of your gamersquos background color and it will default to what ever the game portal operators have selected as the standard background color in their embed code The framework allows you to override the HTML settings here by placing a simple colored Bitmap behind the entire application We will simply define a BitmapData object called appBackBitmapData and a Bitmap object called appBackBitmap that will be used to place the BitmapData onto the displayList
We will not define the background in the GameFrameWorkas file but rather the Mainas subclass of the GameFrameWork will set the background if needed in its init function override
The timer variablesThe timer will control the frame rate of the game and help smooth out the display by employing the TimerEventupdateAfterEvent method The frameRate variable will be defined in Mainas as the number of frame ticks per second we want our game timer to run
The most important thing to note is that we are making use of the built-in Timer class (gameTimer) We are not using the standard EnterFrame event This allows us to create our own frame rate for the game and specify it in the frameRate variable By doing this we can control game timer tick rate independent of the swf filersquos frame rate (FPS) The swf file can have a frame rate setting of 25 (for example) but the game can run at a 30 frame ticks a second To do this we first set the frameRate to the desired number of frame update ticks we want per second (30) When Mainas calls the startTimer function (described in detail when we get to the section on the init function) the gameTimer is put into action First we will calculate the timerPeriod value as 1000frameRate With the updateAfterEvent function call (in the runGame function) we help to smooth out the render of the screen by asking the Flash display engine to update at the rate of the Timer not the frame rate set in the swf So going back to our example if the game SWF is set to run at 25 FPS and the frameRate is set to 30 ticks the updateAfterEvent will help to smooth out the rendering of the screen by asking the Flash display engine to update at the timer tick rate (30) not the swf filersquos FPS setting (25)
The timerPeriod will be passed into the Timer instance and the game will attempt to run at this rate We say
attempt because if the game includes too many on screen moving objects or more logic than can be computed inside the timerPeriod number of milliseconds (or a combination of both) then there will be a noticable slowdown in the game screen updates In later chapters we will add functionality to the runGame function to mitigate some of these issues
The screen definition variablesThe screen definition variables create instances of our BasicScreen class This is a rather simple class that allows a single positional text box and an OK button on the screen We will use this simple screen for the title instructions level and game over screens We will customize each screen when we create the init function override in our gamersquos Mainas class Note that the levelInText is a special variable Setting this string to a default value will allow the leveInScreen to display some default text along on each new level This text can be combined with dynamic text to create a screen that says something like Level 1 with the word Level being the default text and the number 1 being the dynamic text
public var titleScreenBasicScreen
public var gameOverScreenBasicScreen
public var instructionsScreenBasicScreen
public var levelInScreenBasicScreen
public var levelInTextString
public var screenTextFormatTextFormat
public var screenButtonFormatTextFormat
We also create two TextFormat objects that will be used for defining the format of the text on the screens and the format of the button text
The ScoreBoard variablesThe scoreBoard instance of the ScoreBoard class will handle a simple heads up display (HUD) for the user with information such as the current score It is a simple framework class that will be customized in the init function override in each gamersquos Mainas class The changes will depend on the game that is to be created We also define a TextFormatObject for the basic look of the text for our scoreboard text scoreBoardTextFormat
JEFF FULTON
STEVE FULTON
The next part of the article in the June issue of FFD Magazine
032010 (11)32
ACTIONSCRIPT DEVELOPMENT
032010 (11) 33
On my quest of learning Flash I often became frustrated of how difficult it was to update the contents of my application Meaning if I wanted
to change out an image or piece of copy I had to open up Flash go to my library find the Movie Clip that had my asset in it and republish I thought to myself this is no way to work this is so inefficient Enter XML in all its glory Constructing an application with enabled me to quickly and easily update my project at a moments
notice Without having to open up Flash Now what could be better than that
In this article yoursquore going to learn how to create a new ActionScript project in Flex Builder 3 and write ActionScript 30 code that will load in an XML file display the images on screen and add some interactivity to the scene
Setting up FlexOpen up Flex and go to Filegt NewgtActionScript Project A dialog window will open In the project name field type in PhotoGallery Leave the use default location box checked and click finish (see Figure 1)
Creating an XML Photo Gallery
Searching the Internet yoursquoll find dozens if not hundreds of examples of photo galleries created with Flash
What you will learnhellipbull How to create an ActionScript application in Flex Builder 3bull How to use ActionScript to parse an XML le
What you should knowhellipbull Familiar with general programming concepts such as data ty-
pes variables loops and functionsbull Familiar with class creation and constructionbull Some understanding of XML
with AS3
Figure 1 New ActionScript window dialog Figure 2 ActionScript Compiler dialog
032010 (11)32
ACTIONSCRIPT DEVELOPMENT
032010 (11) 33
Once you click finish your project should open and you should see PhotoGalleryas on screen There are a few steps that I like to take next that I do for every project
First right click PhotoGallery folder in the Flex Navigator window click properties at the bottom and then click on the ActionScript Compiler link on the left hand side At the bottom yoursquoll see a check box that is already selected to generate a HTML wrapper file Uncheck that and click ok A warning message will appear saying that the html-template folder will be deleted Donrsquot worry about that because we havenrsquot put anything in that folder Click ok I personally donrsquot like to have a browser window open every time I run my application (see Figure 2)
Secondly wersquoll be using a tweening library called Tweener In order to use Tweener we have to first download it (httpcodegooglecomptweener) Be sure to download the ActionScript 30 version and create a folder on your desktop or any other place and name it code Place the contents of that download into that folder Next go back to Flex and again right click the PhotoGallery folder and click properties again and this time yoursquoll click the ActionScript Build Path link This window gives us the ability to add assets to our project so we can use them in our project Click the Add Folder button browser to the code folder you just created click ok and click ok again to close the window Now that folder and all its contents will be included in our project (see Figure 3)
Next right click the src folder in your project scroll over to new and add a new folder Name this folder classes This folder will contain two classes that wersquoll be using Then repeat the same steps but this time name the folder images This folder will contain all the images
Figure 3 ActionScript Build Path dialog
032010 (11)34
ACTIONSCRIPT DEVELOPMENT
Listing 1 galleryxml
ltxml version=10 encoding=UTF-8gt
ltgallery image_height=150 image_width=150 image_
gap=5 rows=3gt
ltphotogt
ltdescriptiongtThis is a description for the first
imageltdescriptiongt
ltthumb_pathgtimagesthumbjpgltthumb_pathgt
ltfull_pathgtimagesfullgifltfull_pathgt
ltphotogt
ltphotogt
ltdescriptiongtThis is a description for the second
imageltdescriptiongt
ltthumb_pathgtimagesthumbjpgltthumb_pathgt
ltfull_pathgtimagesfullgifltfull_pathgt
ltphotogt
ltphotogt
ltdescriptiongtThis is a description for the third
imageltdescriptiongt
ltthumb_pathgtimagesthumbjpgltthumb_pathgt
ltfull_pathgtimagesfullgifltfull_pathgt
ltphotogt
ltphotogt
ltdescriptiongtThis is a description for the fourth
imageltdescriptiongt
ltthumb_pathgtimagesthumbjpgltthumb_pathgt
ltfull_pathgtimagesfullgifltfull_pathgt
ltphotogt
ltphotogt
ltdescriptiongtThis is a description for the fifth
imageltdescriptiongt
ltthumb_pathgtimagesthumbjpgltthumb_pathgt
ltfull_pathgtimagesfullgifltfull_pathgt
ltphotogt
ltphotogt
ltdescriptiongtThis is a description for the sixth
imageltdescriptiongt
ltthumb_pathgtimagesthumbjpgltthumb_pathgt
ltfull_pathgtimagesfullgifltfull_pathgt
ltphotogt
ltphotogt
ltdescriptiongtThis is a description for the seventh
imageltdescriptiongt
ltthumb_pathgtimagesthumbjpgltthumb_pathgt
ltfull_pathgtimagesfullgifltfull_pathgt
ltphotogt
ltphotogt
ltdescriptiongtThis is a description for the eighth
imageltdescriptiongt
ltthumb_pathgtimagesthumbjpgltthumb_pathgt
ltfull_pathgtimagesfullgifltfull_pathgt
ltphotogt
ltphotogt
ltdescriptiongtThis is a description for the ninth
imageltdescriptiongt
ltthumb_pathgtimagesthumbjpgltthumb_pathgt
ltfull_pathgtimagesfullgifltfull_pathgt
ltphotogt
ltphotogt
ltdescriptiongtThis is a description for the tenth
imageltdescriptiongt
ltthumb_pathgtimagesthumbjpgltthumb_pathgt
ltfull_pathgtimagesfullgifltfull_pathgt
ltphotogt
ltphotogt
ltdescriptiongtThis is a description for the
eleventh imageltdescriptiongt
ltthumb_pathgtimagesthumbjpgltthumb_pathgt
ltfull_pathgtimagesfullgifltfull_pathgt
ltphotogt
ltphotogt
ltdescriptiongtThis is a description for the twelfth
imageltdescriptiongt
ltthumb_pathgtimagesthumbjpgltthumb_pathgt
ltfull_pathgtimagesfullgifltfull_pathgt
ltphotogt
ltphotogt
ltdescriptiongtThis is a description for the
thirteenth imageltdescriptiongt
ltthumb_pathgtimagesthumbjpgltthumb_pathgt
ltfull_pathgtimagesfullgifltfull_pathgt
ltphotogt
ltphotogt
ltdescriptiongtThis is a description for the
fourteenth imageltdescriptiongt
ltthumb_pathgtimagesthumbjpgltthumb_pathgt
ltfull_pathgtimagesfullgifltfull_pathgt
ltphotogt
ltphotogt
ltdescriptiongtThis is a description for the
fifteenth imageltdescriptiongt
ltthumb_pathgtimagesthumbjpgltthumb_pathgt
ltfull_pathgtimagesfullgifltfull_pathgt
ltphotogt
ltgallerygt
032010 (11)36
ACTIONSCRIPT DEVELOPMENT
Listing 2 PhotoGalleryas
package
Imports
import caurinatransitionsTweener
import classesBigPhoto
import classesThumbNail
import flashdisplayBitmap
import flashdisplaySprite
import flasheventsEvent
import flasheventsMouseEvent
import flashnetURLLoader
import flashnetURLRequest
[SWF(width=466 height=515 backgroundColor=00
0000 frameRate=30)]
public class PhotoGallery extends Sprite
Containers
private var _thumbContainerSprite Stores
the thumbnails
private var _nextButtonSprite Stores
the next arrow
private var _backButtonSprite Stores
the back arrow
private var _bigPhotoBigPhoto
Container for the big image
XML
private var _xmlLoaderURLLoader
Loads the XML file
private var _xmlXML
Stores the XML data
Image Assets
[Embed(source=assetsnext-arrowpng)]
private var _nextArrowClass
Embedded asset for the next
arrow
[Embed(source=assetsback-arrowpng)]
private var _backArrowClass
Embedded asset for the back
arrow
Constructor
public function PhotoGallery()
init ()
Initializing method
private function init ()void
_xmlLoader = new URLLoader ()
_xmlLoaderaddEventListener (EventCOMPLETE
xmlComplete false 0 true)
_xmlLoaderload (new URLRequest
(galleryxml))
XML Complete
private function xmlComplete (eEvent)void
Store the XML data
_xml = new XML (etargetdata)
loadImages ()
Clean up
_xmlLoaderremoveEventListener
(EventCOMPLETE xmlComplete)
_xmlLoader = null
Load in the thumbs
private function loadImages ()void
Temporary variables
var imageHeightuint = _xmlimage_height
var imageWidthuint = _xmlimage_width
var imageGapuint = _xmlimage_gap
var rowsuint = _xmlrows
var rowCounteruint = 0
var columnCounteruint = 0
Instantiate the container and position it
on screen
_thumbContainer = new Sprite ()
_thumbContainerx = 78
_thumbContainery = 78
_thumbContainerbuttonMode = true
_thumbContaineraddEventListener
(MouseEventCLICK thumbClick
false 0 true)
thisaddChild (_thumbContainer)
Loop through the images and create the
visual grid
for (var iuint = 0 i lt _xmlphotolength ()
i++)
var pathString = _xmlphoto[i]thumb_path
var descriptionString = _xmlphoto[i]desc
Creating an XML Photo Gallery with AS3
032010 (11) 37
Listing 2 PhotoGalleryas
ription
Create the thumbnail
var pThumbNail = new ThumbNail ()
pnewID = i
ploadImage (path)
pdescription = description
px = (imageWidth + imageGap)
columnCounter
py = (imageHeight + imageGap)
rowCounter
_thumbContaineraddChild (p)
Create the grid
if ((rowCounter + 1) lt rows)
rowCounter++
else
rowCounter = 0
columnCounter++
Setup the navigation
createNavigation ()
This method handles the click event for the
next arrow
private function nextClick (eMouseEvent)void
155 is the width + spacing
if (-_thumbContainerx lt (_thumbContainerwidth
ndash stagestageWidth ndash 155))
disableNavigation ()
TweeneraddTween (_thumbContainer x
_thumbContainerx ndash 155 time
075 transitioneaseOutExpo
onCompleteenableNavigation)
This method handles the click event for the
back arrow
private function previousClick (eMouseEvent)void
if (-_thumbContainerx gt 0)
disableNavigation ()
TweeneraddTween (_thumbContainer x
_thumbContainerx + 155 time
075 transitioneaseOutExpo
onCompleteenableNavigation)
This method handles the click event for the
thumbnails
private function thumbClick (eMouseEvent)void
disableNavigation ()
Disable the container that stores the
thumbnails
_thumbContainerbuttonMode = false
_thumbContainermouseChildren = false
_thumbContainerremoveEventListener
(MouseEventCLICK thumbClick)
Get the full image path
var imagePathString = _xmlphoto[etargetnewI
D]full_path
Instantiate the big photo
_bigPhoto = new BigPhoto ()
_bigPhotobuttonMode = true
_bigPhotox = 108
_bigPhotoy = 1075
_bigPhotoalpha = 0
_bigPhotoloadImage (imagePath)
_bigPhotoaddEventListener (MouseEventCLICK
closePhoto false 0 true)
thisaddChild (_bigPhoto)
Fade up the photo
TweeneraddTween (_bigPhoto alpha1 time
1)
Fade out the photo
When the image finishes fading delete the
photo and enable the navigation
items
private function closePhoto (eMouseEvent)void
TweeneraddTween (_bigPhoto alpha0 time1
onCompletedeletePhoto)
private function deletePhoto ()void
032010 (11)38
ACTIONSCRIPT DEVELOPMENT
Listing 2 PhotoGalleryas
_bigPhotobuttonMode = false
_bigPhotoremoveEventListener
(MouseEventCLICK closePhoto)
_bigPhotodestroy ()
thisremoveChild (_bigPhoto)
_bigPhoto = null
_thumbContainerbuttonMode = true
_thumbContainermouseChildren = true
_thumbContaineraddEventListener
(MouseEventCLICK thumbClick
false 0 true)
enableNavigation ()
private function createNavigation ()void
Instantiate the next arrow
var nBitmap = new _nextArrow ()
Instantiate the nextButton container
Add the next button as a child of the
nextButton container
_nextButton = new Sprite ()
thisaddChild (_nextButton)
_nextButtonaddChild (n)
_nextButtonx = stagestageWidth ndash _
nextButtonwidth
_nextButtony = 475
Instantiate the back arrow
var bBitmap = new _backArrow ()
Instantiate the backButton container
Add the next button as a child of the
backButton container
_backButton = new Sprite ()
thisaddChild (_backButton)
_backButtonaddChild (b)
_backButtonx = _nextButtonx ndash _
nextButtonwidth ndash 5
_backButtony = 475
enableNavigation ()
private function enableNavigation ()void
_nextButtonbuttonMode = true
_nextButtonaddEventListener
(MouseEventCLICK nextClick false
0 true)
_backButtonbuttonMode = true
_backButtonaddEventListener
(MouseEventCLICK previousClick
false 0 true)
private function disableNavigation ()void
_nextButtonbuttonMode = false
_nextButtonremoveEventListener
(MouseEventCLICK nextClick)
_backButtonbuttonMode = false
_backButtonremoveEventListener
(MouseEventCLICK previousClick)
Figure 4 New ActionScript class dialog
Creating an XML Photo Gallery with AS3
032010 (11) 39
Listing 3 ThumbNailas
package classes
import caurinatransitionsTweener
import flashdisplayLoader
import flashdisplayShape
import flashdisplaySprite
import flasheventsEvent
import flasheventsMouseEvent
import flashnetURLRequest
import flashtextTextField
import flashtextTextFieldAutoSize
import flashtextTextFormat
public class ThumbNail extends Sprite
Containers
private var _imageLoaderLoader Loads in
the thumbnail
private var _imageContainerSprite
Container for the thumbnail
private var _maskShape Container for the
mask
private var _descriptionContainerSprite
Container for the description
TextFields
private var _descriptionTextField
TextField for the container
Logic
private var _newIDuint The ID of the
object
[Embed(systemFont=Arial fontName=arial
fontWeight=bold
mimeType=applicationx-font-
truetype)]
private var _arialClass Embedded asset
for the font
Constructor
public function ThumbNail ()
super ()
init ()
Initializing method
private function init ()void
Instantiate the container
_imageContainer = new Sprite ()
_imageContaineralpha = 0
thisaddChild (_imageContainer)
createDescription ()
thismouseChildren = false
thisaddEventListener (MouseEventMOUSE_OVER
onMouseOver false 0 true)
thisaddEventListener (MouseEventMOUSE_OUT
onMouseOut false 0 true)
Public Methods
public function loadImage (pathString)void
_imageLoader = new Loader ()
_imageLoadercontentLoaderInfoaddEventListen
er (EventCOMPLETE imageComplete
false 0 true)
_imageLoaderload (new URLRequest (path))
GetterSetter Methods
public function get newID ()uint
return this_newID
public function set newID (valueuint)void
this_newID = value
public function get description ()String
return this_descriptiontext
public function set description (valueString)void
this_descriptiontext = value
Private Methods
032010 (11)40
ACTIONSCRIPT DEVELOPMENT
Listing 3 ThumbNailas
private function onMouseOver (eMouseEvent)void
TweeneraddTween (_descriptionContainer
y75 time05 transition
easeOutExpo)
private function onMouseOut (eMouseEvent)void
TweeneraddTween (_descriptionContainer
y150 time05 transition
easeOutExpo)
private function imageComplete (eEvent)void
Reposition the loaded content to the center
_imageLoaderx = -(_imageLoaderwidth 2)
_imageLoadery = -(_imageLoaderheight 2)
_imageContaineraddChildAt (_imageLoader 0)
Apply background after the image has
completely loaded
drawBackground ()
Draw the mask around the description
drawMask ()
Fade in the container
TweeneraddTween (_imageContainer alpha1
time05)
Clean up
_imageLoadercontentLoaderInforemoveEv
entListener (EventCOMPLETE
imageComplete)
Draws a background behind _imageContainer
private function drawBackground ()void
_imageContainergraphicsbeginFill (0xFFFFFF)
_imageContainergraphicsdrawRect (_
imageLoaderx ndash 1 _imageLoadery
ndash 1 _imageLoaderwidth + 2
_imageLoaderheight + 2)
_imageContainergraphicsendFill ()
Creates everything for the description
private function createDescription ()void
Instantiate the container
_descriptionContainer = new Sprite ()
_descriptionContainery = 150
_descriptionContainergraphicsbeginFill
(0x000000 075)
_descriptionContainergraphicsdrawRect (-75
-75 150 75)
_descriptionContainergraphicsendFill ()
_imageContaineraddChild (_
descriptionContainer)
Specify text formatting for the description
Text Field
var tfTextFormat = new TextFormat ()
tfcolor = 0xFFFFFF
tfalign = center
tffont = arial
tfbold = true
tfsize = 12
Instantiate the TextF ield
_description = new TextField ()
_descriptionx = -75
_descriptiony = -70
_descriptionwidth = 150
_descriptionwordWrap = true
_descriptionembedFonts = true
_descriptiondefaultTextFormat = tf
_descriptionautoSize = TextFieldAutoSizeLEFT
_descriptionContaineraddChild (_description)
Draws a mask our _descriptionContainer
private function drawMask ()void
Draw the mask shape
_mask = new Shape ()
_maskgraphicsbeginFill (0xFF0000)
_maskgraphicsdrawRect (_imageLoaderx
_imageLoadery _imageLoaderwidth
_imageLoaderheight)
_maskgraphicsendFill ()
addChild (_mask)
Apply the mask to the container
_descriptionContainermask = _mask
Creating an XML Photo Gallery with AS3
032010 (11) 41
that will be loaded into the application from XML Finally create another folder and this time name it assets This folder will contain the buttons that wersquoll embed into our project
The AssetsBefore we start coding we need to create some visual assets Open up Photoshop or any other program you have for creating graphics and create an image that is 150x150 pixels Fill it with a flat color and save the image as thumbjpg in the images folder you just created Next create another image thatrsquos 250x300 pixels Fill it with another color and save that image as fulljpg into the same folder These images will be used for testing purposes only
Listing 4 BigPhotoas
package classes
import flashdisplayLoader
import flashdisplaySprite
import flasheventsEvent
import flashnetURLRequest
public class BigPhoto extends Sprite
Containers
private var _imageLoaderLoader Loads in the
thumbnail
private var _imageContainerSprite Container
for the thumbnail
Constructor
public function BigPhoto ()
super()
Public Methods
public function loadImage (pathString)void
_imageLoader = new Loader ()
_imageLoadercontentLoaderInfoaddEventListen
er (EventCOMPLETE imageComplete
false 0 true)
_imageLoaderload (new URLRequest (path))
Clean up method
public function destroy ()void
_imageContainerremoveChild (_imageLoader)
_imageLoaderunload ()
_imageLoader = null
thisremoveChild (_imageContainer)
_imageContainer = null
Private Methods
private function imageComplete (eEvent)void
Instantiate the container
_imageContainer = new Sprite ()
thisaddChild (_imageContainer)
Add the loader
_imageContaineraddChild (_imageLoader)
Clean up
_imageLoadercontentLoaderInforemoveEv
entListener (EventCOMPLETE
imageComplete)
Figure 5 Time to test
032010 (11)42
ACTIONSCRIPT DEVELOPMENT
We still have to create our navigation buttons that wersquoll use to scroll through our gallery Create two buttons that are 40x40 pixels and design them how you like They should resemble forward and back buttons Save the forward arrow as next-arrowpng and the other as back-arrowpng into the assets folder Now that our assets our created itrsquos time to code
The XML fileRight click the src folder in the project scroll over to new and click file A dialog window will open and in the file name input box type galleryxml (see Figure 4) Write the code that you see from Listing 1 into galleryxml
Line 1 is the XML declaration This is needed to have a well-formed XML document
Line 2 declares the gallery root node Notice in this node Irsquove added attributes Also to have a well-formed XML document you must have one root node and all attribute values must be in quotes
Lines 3-7 declares a photo node with three children description thumb_path and full_path description is exactly as it sounds It will contain a description for our thumbnail thumb_path contains the path to our thumbnail image Same goes for full_path it contains the path to our full image
I then just copy and pasted that and pasted it 14 times just changing out the description Remember wersquore just using dummy data When you finish go back and add photos of your choice
The ClassesWersquoll be using two additional classes for this project One will be for the thumbnails and another for the full image Right click the classes folder go to new and click ActionScript class In the name field type ThumbNail For the Superclass type in flashdisplaySprite Wersquoll need to extend from that class so we can use the functionality of that object but add our own (see Figure 4)
Add another class this time name it BigPhoto It should also inherit from flashdisplaySprite
CodingTime to start writing the ActionScript for this project Open up PhotoGalleryas from the Flex Navigator and type in the code from Listing 2 Open up ThumbNailas and type in the code from Listing 3 Open up BigPhotoas and type in the code from Listing 4 Now that you have all the code in itrsquos time to test In the menu bar click RungtRun PhotoGallery (see Figure 5) If you get an error make sure you typed everything correctly If all went well you should see the gallery open up Click the buttons and watch the gallery scroll left and right Roll over the thumbnails to see the description scroll up Click on a thumbnail to see the full image fade in You might be wondering about whatrsquos going on Irsquoll try to break that down for you next
The ExplanationOur main focus is going to be whatrsquos going on in PhotoGalleryas This file contains the ActionScript that makes almost everything happen We first start off by declaring our properties that will be used in the project Yoursquoll notice a couple of embeded lines These lines are MetaData tags that actually embed assets into the project The two embeded lines you see add the next-arrowpng file and the back-arrowpng file In the constructor there is one call to a method called init() This method gets the application going by requesting and loading in the XML File When the file finishes loading we store the XML data into our _xml property Next we call the loadImages() method This method is responsible for a big part of the application We first gather some information from the XML file and store it in temporary variables
bull imageWidth stores the image _ height attributes valuebull imageWidth stores the image _ width attributes valuebull imageGap stores the image _ gap attributes valuebull rows stores the row attributes valuebull rowCounter increments ever pass of the for loop Is
compared against the rows variablebull columnCounter increments once for every column
created
The for loop cycles the XML file creating a new ThumbNail object with every iteration During each iteration we create variables that store the path to the thumb nail (path) and the description of the thumbnail (description) We pass the variables into the methods of the ThumbNail class Remember the ThumbNail class defines methods and properties that are specific to it The class code is commented if you wish to explore it Again our main focus is PhotoGalleryas To create the grid we write ifelse logic that compares the rowCounter variable to the row variable For every iteration of the loop we increment that variable if that variable becomes greater than rows we set it back to 0 rowCounter is then multiplied to the y-axis of each ThumbNail object The rest of the code is commented for you to explore
ConclusionYoursquoll notice I actually hard coded a lot of values directly in the ActionScript Not too ideal In the next part of this tutorial wersquore going to come back to this code and modify it to be a little more flexible and visually appealing If you have any questions feel free to contact me through my site (wwwcodedbyryancom)
RYAN DrsquoAGOSTINORyan DrsquoAgostino is an Interactive Developer at NAS Recruitment Communications in Cleveland OH part-time instructor at Virginia Marti College of Art and Design in Lakewood Ohio and freelance designer and ActionScript developer For more information about Ryan please visit httpwwwcodedbyryancom
032010 (11)44
COMPONENTS
Components are the controls and containers that are the elements of the application that create the interface They cover controls such
as buttons and check boxes containers that can hold other containers and controls navigation elements and charts Components can be added to your application in variety of ways They can be added through the design view writing then in MXML or through ActionScript
Flash Builder now has two major sets of components the Halo set which has been available in previous versions of Flex and the new Spark set The components from the Spark set have a direct correlation to a component in the Halo set but not all Halo components have been upgraded to the Spark framework yet The namespaces for these components are added automatically when a MXML document is created and you will notice there are now multiple namespace in the main MXML document already
Creating custom components takes two paths The first is to create a skin for an existing Halo component in Flash Illustrator Photoshop or Fireworks or create a custom skin for a Spark component using MXML The second path is to create a completely custom component using Flash Professional and importing it into the Flash Builder project We are going to focus on the second path and create a custom component with Flash Professional
The first step in creating a custom component is to instal the Flex Component Kit mxp into Flash Professional This is an extension that will expose some
Custom Flash CS4
Flash Builder comes with a lot of components to cover almost all of an apps needs But what if you want a custom look or functionality to a component With Flash Professional you can create custom components and import them into Flash Builder for use in your application
What you will learnhellipbull How to create custom components in Flash Professional to im-
port into Flash Builder
What you should knowhellipbull Flash Professional CS4bull Flash Builder 4bull Actionscript 3
Components in Flash Builder 4
Figure 1 The component artwork Figure 2 Converting the movie clip
032010 (11)46
COMPONENTS
Listing 1 The component class
package comtest
import mxflashUIMovieClip
import flasheventsEvent
import flasheventsEventDispatcher
import flasheventsMouseEvent
import flashfiltersGlowFilter
public class SliderButton extends UIMovieClip
public static const BUTTON_CLICKString = button click
private var glowGlowFilter = new GlowFilter(0x0000cc54421falsefalse)
public function SliderButton()
plusButtonbuttonMode = true
minusButtonbuttonMode = true
plusButtonaddEventListener(MouseEventMOUSE_OVER handleMouseOver)
plusButtonaddEventListener(MouseEventMOUSE_OUT handleMouseOut)
plusButtonaddEventListener(MouseEventCLICK handleMousePress)
minusButtonaddEventListener(MouseEventMOUSE_OVER handleMouseOver)
minusButtonaddEventListener(MouseEventMOUSE_OUT handleMouseOut)
minusButtonaddEventListener(MouseEventCLICK handleMousePress)
private function handleMouseOver(eMouseEvent)void
ecurrentTargetfilters = [glow]
private function handleMouseOut(eMouseEvent)void
ecurrentTargetfilters = []
private function handleMousePress(eMouseEvent)void
if(ecurrentTargetname == plusButton ampamp trackThumbx lt 134)
trackThumbx++
else if(ecurrentTargetname == minusButton ampamp trackThumbx gt 37)
trackThumbx--
dispatchEvent(new Event(SliderButtonBUTTON_CLICK))
032010 (11)48
COMPONENTS
of the Flex classes to Flash allowing the component to communicate with the application Download the extension from the Adobe site at httpwwwadobecomcfusionexchangeindexcfmevent=extensionDetailampextid=1273018 and install using the Adobe Extension Manager The extension should work with Flash
versions as far back as Flash 8 but I highly recommend using at least Flash 9 (CS 3)
Once the extension is installed launch Flash Professional and create a new ActionScript 3 project We are going to create a simple slider button that has a plus and minus button on each end of the button and a track between them When the plus and minus buttons are clicked the the track thumb will move one pixel in either direction There will also be a roll over behavior on the buttons to change their look as the mouse rolls over and off the buttons Finally Flash Builder will receive the event of the button being pushed and update a text input on the stage
It is common to encapsulate the behaviors of the component within itself and have events broadcast to the containing application If you think about some of standard components in both Flash Builder and Flash Professional and deconstruct them in your mind you will see that the same methods are used on them The NumericStepper is a lot like our component It has two buttons with a text field that displays a value that is incremented or decremented with each push of the button The component itself does nothing to effect the application until the code calls it to either send or receive a value
With our new document we are going to create the artwork for the component in the fla file Create four movie clips one each for the scroll track the plus button the minus button and the track thumb (Figure 1) The naming and look of these movie clips are not important
Once the movie clips are created and on the stage give each one an instance name The names in the
Figure 3 Setting the class of the movie clip
Figure 4 Setting to export as SWC
Figure 5 Creating the Flash Builder project
Custom Flash CS4 Components in Flash Builder 4
032010 (11) 49
example files are plusButton minusButton and trackThumb The actual names do not matter and we dont need an instance name for the track since we are not going to reference it in Flash Builder Flash Builder will reference the instance names of the movie clips in the components we will use these later
Now that the artwork has been created it must be collected into its own movie clip Select all of the artwork on the stage and choose ModifygtgtConvert to Symbolhellip In the Library panel there is a new symbol that is called in the sample files SliderButton The name is important here because this is how the Convert to Flex Component mxp will name the class that Flash Builder will refer to later
An external class will give the component the internal behaviors that were mentioned earlier as well as an event to broadcast to the Flash Builder application (Listing 1) All the code in the class should be familiar but there are a few points to go over First the package name is given the qualifier of comtest to identify that the component belongs to our namespace This is not necessary but helpful when there are multiple components or components from different publishers in the application
The most important change is instead of having the class extend the Sprite class this class is going to
extend the UIMovieClip class This class like the Flex Component in the library exposes the behaviors and methods we set up in the class to the Flash Builder application In the import statements use import
mxflashUIMovieClip The mxflash class includes both the UIMovieClip and ContainerMovieClip classes
When the variables are declared we set up a glow filter that will be attached to the buttons when the mouse rolls over them and a string constant for the event we create later In the constructor of the class the buttons receive the event listeners for the mouse interactions and the handlers are added later in the code In the handleClick event handler we use the event dispatcher class to dispatch the event Here we are just dispatching a standard event with the constant that was created earlier You can just as easily dispatc a custom event that has extra information attached to it
Select the movie clip in the Library panel then select CommandsgtgtConvert Symbol to Flex Component (Figure 2) The extension will do several operations such as making the symbol available to ActionScript giving the symbol a class name adding the Flex Component to the library and others
Save the file as SliderButtonas in the folder path comtest When you declare the package name as we have here you must have the same hierarchy as listed in the package name Back in the fla select the
Figure 6 The Package Explorer
Listing 2 The main MXML le
ltxml version=10 encoding=utf-8gt
ltsApplication xmlnsfx=httpnsadobecommxml
2009
xmlnss=librarynsadobecomflex
spark
xmlnsmx=librarynsadobecomflex
mx
width=200 height=110gt
ltfxDeclarationsgt
lt-- Place non-visual elements (eg
services value objects) here
--gt
ltfxDeclarationsgt
ltsApplicationgt
Listing 3 The new component and name space
xmlnstest=comtest
lttestSliderButton x=14 y=10 id=sliderButton
gt
032010 (11)50
COMPONENTS
SliderButton movie clip and select Propertieshellip from the contextual menu Expand the advanced area if it is not already and enter comtestSliderButton in the Class text field Leave the Base Class text field blank and click OK (Figure 3)
Select Publish Settingshellip from the file menu and click on the Flash tab (Figure4) Under the SWF Settings area of the window be sure that the Export SWC check box is checked The swc is the part that Flash Builder will use in the application SWC are archives that contain the classes and media assets of the component and make it easy to distribute the movie clip
Publish the SWF and SWC and we are ready to move to Flash Builder
Flash BuilderIn Flash Builder create a new project This example we only need a basic Flash Builder project without any
server technologies You can name the project anything you would like in this case I have name FB_Components and saved it in my default workspace
If you have not worked on a Flash Builder project yet it is a lot like working on the Flex projects in the past with some new MXML tags You will also notice that the Flex Navigator pane has now been replaced with the Package Explorer (Figure 6)
The Package Explorer pane has a different organization than the Flex Navigator but the main MXML file can still be found under src then under the default package
Looking at the main MXML (Listing 2) you will see that the three name spaces are added automatically and the application begins with sApplication instead of mxApplication These are the minor differences to be on the look out for when working on a Flash Builder project
Listing 4 The nal MXML le
ltxml version=10 encoding=utf-8gt
ltsApplication xmlnsfx=httpnsadobecommxml2009
xmlnss=librarynsadobecomflexspark
xmlnsmx=librarynsadobecomflexmx minWidth=200 minHeight=110
width=200 height=110
initialize=init()
xmlnstest=comtestgt
ltfxDeclarationsgt
lt-- Place non-visual elements (eg services value objects) here --gt
ltfxDeclarationsgt
ltfxScriptgt
lt[CDATA[
private function init()void
sliderButtonaddEventListener(SliderButtonBUTTON_CLICK updateText)
private function updateText(eEvent)void
pixelTexttext = String(sliderButtontrackThumbx)
]]gt
ltfxScriptgt
lttestSliderButton x=14 y=10 id=sliderButton gt
ltsLabel x=39 y=41 text=The position of the track thumb is textAlign=center width=122gt
ltsTextInput x=76 y=76 width=49 id=pixelTextgt
ltsApplicationgt
Custom Flash CS4 Components in Flash Builder 4
032010 (11) 51
To get our component into the Flash Builder project we need to put the swc some where the project can see it On your desktop navigate to where the swc was published to and copy the file Then navigate to where Flash Builder project is and put the swc into libs folder I have found it is easier to keep the fla and swf files out of the project then copy the swc over to the Flash Builder project as needed
Back in Flash Builder open the libs folder under the project in the Package Explorer pane In that directory you should see your swc if you do not try right clicking on the libs folder and selecting Refresh
In the MXML editor switch to Design view When the Design view becomes active the Component pane should become available in the lower left of the workspace The first folder in the pane is the Custom folder and our custom component should be displayed in the list Drag an instance of this component onto the stage
To show that we can have two way communication with the component drag a label and a text input onto the stage Set the labels text to be The position of the track thumb is and move the text input near the label Set the id of the text input to pixelText (Figure 7) Switch back to the Source view after saving
Notice that several lines have been added to the source of the MXML document In addition to the MXML for the component including our custom component a name space value has been added to the sApplication tag designated as xmlnstest=comtest (Listing 3) If we add more components using the same comtest package declaration they will all fall under this name space If we were to add more components using a different package additional name spaces would be added You will also notice that the component starts with testSliderButton as opposed to s fx or mx
In the application tag add an initialize property calling a function called init() After the fxDeclarations tags add fxScript tags to hold the Actionscript As you type fx the code completion should pop up and allow you to select the fxScript tags
Add an id property to the SliderButton tag and give it a value of sliderButton In between the CDATA tags add the init function This function simply adds an event listener to our component calling the updateText
function every time the BUTTON_CLICK event is broadcast from the SliderButton class (Listing 4)
Once the application receives the BUTTON_CLICK event it calls the updateText function This function looks into the component and gets the x position of the track thumb then puts that value into the text input we set up earlier
So now we have communication coming out of the component using the dispatchEvent call in the class We are also looking into the component where the application is getting the x position of the thumb track inside the component Communication can get much more complicated than this but this is a simple example to give a starting point to create more complex components
Click debug to run the application and if no errors occurred the application should launch in a browser window If you have a browser window open before running the app you should close it There is a bug in the Flash Player at the time of this writing that may cause the app to not run if there are browser windows already open
Once the application is running click on the buttons and watch as the value in the text input increase and decrease The custom component is now complete and ready to have more behaviors and methods added to it
ConclusionWhile the components that come with Flash Builder can cover most situations there will be times where only a custom component will fit the applications needs Creating a custom component takes a little work but can make the developers job a lot easier With this new level of control over the look and behavior of the component can make the application more rich and engaging to the end user
Figure 7 Components on the stage
On the Netbull httpwwwadobecombull httpwwwadobecomcfusionexchangeindexcfmeven-
t=extensionDetailampextid=1273018
LOUIS DICARROLouis DiCarro is a consultant based in NYC and has been working with Flash since the rst version He has taught web development at the college level and has worked for numerous large clients He can be reached at louisdicarroffdgmailcom
032010 (11)52
COMPONENTS AIR Components in Flash Builder
032010 (11) 53
We already know that building an AIR application affords us a lot more capabilities than working with a web based project
Digging through the Actionscript documentation shows that there are a lot of classes that are only available to AIR applications These mostly have to do with classes and methods that interact with the file system or windowing of the application
Flash Builder as with Flex Builder before it contains several components that are only available to use with AIR applications These components deal with
visual interfaces for interacting with the file system and a HTML component for displaying web content
You may wonder why these components are only available for AIR applications Mostly it is for security reasons Up to Flash Player 101 a swf does not have the permission to interact with files on the file system except in very limited circumstances
Swfs in the web browser are able to interact only with files on the server in which the swf is hosted This allows them to load images xml and other file types at run time but only if the files come from within its
AIR Components
Adding file and html rendering can result in a lot of code But with the AIR components in Flash Builder 4 this functionality can be added easily with only a few lines of code
What you will learnhellipbull What components are available for AIR applications in Flash
Builder 4
What you should knowhellipbull Flash Builder 4bull Actionscript 3
in Flash Builder
Figure 1 AIR Actionscript 3 special classes for the HTML component Figure 2 Layout of the HTML application
032010 (11)52
COMPONENTS AIR Components in Flash Builder
032010 (11) 53
Were going to take a look at couple of simple examples for each component to get a feel how use them It is also important to note that the documentation for these components are in the AS 3 documentation When looking at the documentation you will see a symbol next to some of the classes and also next to some methods within the classes (Figure 1)
HTML ComponentThe HTML component is very easy to work with It can pull in many types of media and render them as you would expect them to be rendered in a web browser
Start up Flash Builder and create a new Flex project Name the project and select Desktop under project type Click finish and let Flash Builder set up the project
Once the project is started click on the Design tab In the lower left a component tab should be open If it is not open it using the Window menu and selecting Components Scroll down to the Adobe AIR folder You will not see this folder if you set your project to run in a web browser
We are going to create a simple web browser using only three components and one line of code First drag a HTML component a text field and a button to the stage Arrange them how you would like and switch over to design view
Give each component an id as in Listing 1 Also give the button a click handler Type click and let the program auto complete another code hint will pop up to create the handler automatically
Flash Builder will generate the handler as well as the fxScript block in the code In the click handler that is generated add a line that will set the location of the HTML component to the text in the text field See Listing 2 for the full code
Run the application and fill in a valid web address in the application Remember to include http in front of
own sandbox There are exceptions and ways around it but for the majority the swf cannot interact with the file system
If the development of applications using Flash Builder and AIR were to succeed they would need to act like real desktop applications This means that the applications would have to load and save files just as any other application that a user would use on the computer
Security is still maintained in this model by having the developer digitally sign their application using certificates If the certificate is obtained though a trusted source the application would be traceable back to the original developer if something bad should happen
Having a HTML component gives the application greater rendering power by tapping into the Web Kit which can run better than the HTML renderers in the Flash Player This allows developers to repurpose content from their web site to the application
Figure 3 The application running Figure 4 Layout of the image viewer application
Listing 1 MXML of components
ltsTextInput id=addressBar x=10 y=10
width=518gt
ltsButton id=goButton x=555 y=13
label=Go click=goButton_
clickHandler(event) gt
ltmxHTML id=htmlPane x=10 y=40 width=620
height=430gt
Listing 2 goButton handler
protected function goButton_clickHandler(event
MouseEvent)void
htmlPanelocation = addressBartext
032010 (11)54
COMPONENTS
the address Click the Go button and the page should load after a few seconds Take a look at Figure 3 for the results
There are a lot of methods and commands associated with the HTML component This will allow you to make a more customized display and give more control over the HTML content that you show
File system componentsUsing the file system components is just as easy To test the components we are going to create a simple image viewer that allows the user to select the images from the file system
Create a new Flex Project as we did before and be sure to make it a desktop application Once the project has loaded switch to design view and drag a File System Tree and an Image component to the stage See Figure 4 for the layout
Once the application is laid out switch over to the Source mode and give all the components ids as we did before (Listing 3) Also add a change handler instead of a click handler Flash Builder will autocomplete and generate the handler for you as it did when we added the click action to the button
In the generated handler add the code that will load the image into the image component To keep everything simple we only are going to load jpg and png files (Listing 4) in this function we are first checking to make sure the file is a file and not a directory by checking for a file extension If the file passes the first test we check to see if the file is a jpg or png Lastly if the file passes all of these test it gets loaded into the image component
Save the file and run the application to see the results Clicking on the file system tree items will either open or close the directory or try to load the file When the user clicks on a jpg or png it will load into the image component (Figure 5) Note that as the tree expands a scroll bar is attached to the component automatically
ConclusionJust as with the HTML component there is more methods and properties available to you with the file system components In this demo application we have seen how easy it is to get access to the file system using the component without writing a lot of code
There is a lot more involved in making a full application using these components but we have witnessed how easy to get started with them Having more control over the elements as well as error checking would be added in real applications
Having these components available gives the application a large amount of functionality very quickly and allows the developer to concentrate on the logic of the application Using these components in your application will help make it more full-featured and feel more like a real desktop application
LOUIS DICARROLouis DiCarro is a consultant based in NYC and has been working with Flash since the rst version He has taught web development at the college level and has worked for numerous large clients He can be reached at louisdicarroffdgmailcom
Listing 3 MXML of components
ltmxFileSystemTree id=fsList x=10 y=10
height=460 change=fsList_
changeHandler(event)gt
ltmxImage id=imgPane x=193 y=10 width=437
height=460gt
Listing 4 Handler for change event
protected function fsList_changeHandler(event
ListEvent)void
var fileFile = eventcurrentTargetselectedItem
as File
if(fileextension)
if(fileextensiontoLowerCase() == jpg ||
fileextensiontoLowerCase() ==
png)
imgPanesource = fileurl
Figure 5 The image viewer application running
032010 (11)56
TLF Applying CSS to Text Layout Framework styles
032010 (11) 57
TLF is introducing the new way of applying styles to the text Prior to TLF flash used simple approach you had to prepare and attach
StyleSheet object to the style property of the TextFieldTLF provides more flexible and customizable but
more complex techniqueDuring this tutorial we are going to create a small
application in Flex 4 This application contains a text displayed with TLF component TextArea and 2 different CSS that can be applied to the text simply by pressing the button Figure 1 show the screenshot of the application
TextFlow and itrsquos IFormatResolverTLF provides a callback mechanism to for with text styles TextFlow objectrsquos got a property formatResolver that should implement IFormatResolver interface Actually it is a set of callback functions that are called by parent TextFlow when it processes itrsquos elements
To have a closer look at formatResolver we will implement itrsquos version to work with out simple CSS So start create a new project in Flex and name it for example TextCSS In the default package create a new ActionScript class named CSSFormatResolver that implements IFormatResolver interface
Listing 1 shows the complete implementation of the class and will we look closer into it later For now pay attention on the following functions
bull invalidateAll
bull invalidate
bull resolveFormat
bull resolveUserFormat
bull getResolverForNewFlow
These function are created automatically by Flex Builder as they are required for implementation of the interface All functions are callbacks that are called when the certain action is performed by TextFlow and it needs to know how to treat with different elements
Applying CSS
This article is a reply to our readerrsquos question about the possibility to apply CSS to Text Layout Framework (TLF) We will show how to implement the necessary class and switch text styles on the fly
What you will learnhellipbull how can custom styles be applied to TLF elementsbull how to implement IFormatResolver to work with CSS
What you should knowhellipbull the basics of Flex and FlexFlash Builderbull the basics of TLF
to Text Layout Framework styles
Figure 1 Style changing application
032010 (11)56
TLF Applying CSS to Text Layout Framework styles
032010 (11) 57
Main ApplicationListing 2 contains a full code for main application
The application consists of
bull TextArea with some text The text is formed using XML Some elements of the TextFlow have
For our case we are interested in resolveFormat function that is called for every element of the TextFlow when itrsquos style needs to be changed This function return an object that should implement ITextLayoutFormat
Before we continue lets have a fast look at main application and how we build our example
Listing 1 CSSFormatResolveras
package
import flashtextStyleSheet
import flashxtextLayoutelementsFlowElement
import flashxtextLayoutelementsFlowValueHolder
import flashxtextLayoutelementsIFormatResolver
import flashxtextLayoutelementsTextFlow
import flashxtextLayoutformatsITextLayoutFormat
public class CSSFormatResolver implements
IFormatResolver
private var _styleSheetStyleSheet
public function CSSFormatResolver()
_styleSheet = new StyleSheet()
public function invalidateAll(textFlow
TextFlow)void
public function invalidate(targetObject)void
public function resolveFormat(targetObject)
ITextLayoutFormat
var formatFlowValueHolder = null
if (target is FlowElement)
var elementFlowElement = target as
FlowElement
if (element = null)
format = elementformat as
FlowValueHolder
if (elementstyleName = null)
var styleObject = styleSheetgetSt
yle(elementstyleName)
formatcolor = style[color]
formatfontSize =
style[fontSize]
formatfontWeight =
style[fontWeight]
formatfontStyle =
style[fontStyle]
return format
public function resolveUserFormat(targetObject
userFormatString)
return null
public function getResolverForNewFlow(oldFlow
TextFlow newFlowTextFlow)
IFormatResolver
return null
public function get styleSheet()StyleSheet
return _styleSheet
public function set styleSheet(valueStyleSheet)
void
_styleSheet = value
032010 (11)58
TLF
032010 (11) 59
Listing 2 TextCSSmxml
ltxml version=10 encoding=utf-8gt
ltsApplication xmlnsfx=httpnsadobecommxml2009
xmlnss=librarynsadobecomflexspark
xmlnsmx=librarynsadobecomflexhalo
xmlnslocal=
width=640 height=300gt
ltfxScriptgt
lt[CDATA[
import mxeventsFlexEvent
protected function applyCSS1Button_
clickHandler(eventMouseEvent)void
var formatResolverCSSFormatResolver =
new CSSFormatResolver()
formatResolverstyleSheetparseCSS(css1
text)
textAreatextFlowformatResolver =
formatResolver
protected function applyCSS2Button_
clickHandler(eventMouseEvent)void
var formatResolverCSSFormatResolver =
new CSSFormatResolver()
formatResolverstyleSheetparseCSS(css2
text)
textAreatextFlowformatResolver =
formatResolver
]]gt
ltfxScriptgt
ltsTextArea id=textArea width=620 height=134
x=9 y=156gt
ltsTextFlowgt
ltsp styleName=h1gt
Title of the Text
ltspgt
ltsp styleName=h2gt
Section of the Text
ltspgt
ltspgt
This is a body text Lorem ipsum
ltspgt
ltsTextFlowgt
ltsTextAreagt
ltsTextArea x=10 y=10 width=285 height=86
id=css1 gt
lt[CDATA[
h1
colorFF0000
fontSize20
fontWeightbold
fontStylenormal
h2
colorFF00FF
fontSize16
fontWeightbold
fontStyleitalic
]]gt
ltsTextAreagt
ltsTextArea x=345 y=10 width=285 height=86
id=css2 gt
lt[CDATA[
h1
color00FF00
fontSize32
fontWeightnormal
fontStyleitalic
h2
color0000FF
fontSize24
fontWeightbold
fontStylenormal
]]gt
ltsTextAreagt
ltsButton x=108 y=105 label=Apply CSS
1 id=applyCSS1Button
click=applyCSS1Button_
clickHandler(event)gt
ltsButton x=443 y=105 label=Apply CSS
2 id=applyCSS2Button
click=applyCSS2Button_
clickHandler(event)gt
ltsApplicationgt
032010 (11)58
TLF
032010 (11) 59
got styleName attribute so you could apply the corresponding CSS style to them later
bull 2 TextAreas with simple different CSSbull 2 Buttons to apply CSS from TextAreas to example
text
When the button is clicked the new instance of CSSFormatResolver class is created Then the corresponding CSS string from the TextArea is parsed and set into resolverrsquos property of SlyleSheet class type And finally prepared formatResolver instance is assigned to the TextFlow
Applying CSS to TextFlowNow lets have more detailed look at resolveFormat callback function First it should return a value that implements ITextLayoutFormat if it returns null then no new styling should be applied to an element being processed by the function So we create format variable of FlowValueHolder (it implements ITextLayoutFormat) and set itrsquos value to null (we do that because resolveFormat works with all elements including TextFlow itself as probably we donrsquot want to apply one style to the whole text)
After we do all the necessary casts and null checks and if we are sure that current elementrsquos got styleName attribute we assign styles from CSS to a current format StyleSheet object is used to contain CSS data as it is convenient object to parse and retrieve CSS data
Conclusion and a WarningThere was a brief tutorial on how to apply simple CSS to TLF TextFlow Please note that CSSFormatResolver class is not fully functional and only can be applied to our sample CSSs Writing reusable and versatile class requires more detailed coding and approach
Check the TLF Blog on this issue There is fully functional CSSFormatResolver with example there httpblogsadobecomtlf200902iformatresolver_and_using_css_1html
MAXYM GOLOVANCHUK Maxym Golovanchuk is a Photoshop Certied Expert and TV producer and he is using Adobersquos software for implementing entertainment solutions including video delivery with Flash Media Server mexxikgmailcom
MondayTuesdayWednesdayThursday Friday
DIVISIONS OF CREATIVE NICHE INC
032010 (11)60
PROFILE Flashcreed ndash Business Gallery
032010 (11) 61
The Business Gallery (httpwwwflashcreedcombusiness_video_image_gallery) is a Flash component meant to do one thing to enhance the visual experience a website portfolio or presentation site gives to its users Mainly itrsquos all about the image you present yourself or
your product to the world wide web Letrsquos face it without the looks you canrsquot sell your product or image no matter how interesting it might be
Whatrsquos so great about this gallery you might wonder Well the answer is simple everything Advanced AS3 programming dynamic XML implementation unlimited number of media items on stage PNG JPG and video FLA SWF MP4 F4V supported media tween and image effects just to name a few of the over 150 settings this gallery brings you Bottom line you can customize it in any way you see fit in order to make it resemble your website layout Not to mention the code optimization that allows the gallery to run so smoothly even on low resources
We brought 45 background wallpapers in case just a color doesnrsquot do the job also a set of custom arrows and close buttons
Flashcreed ndash Business GalleryHello itrsquos good to be back here among Flash amp Flex Magazine readers Today we are going to tell you a bit about our products mainly our Business Gallery but since all our products are built on the same framework most of the properties apply to all When we first realized what we could do with this framework we decided to name it ldquoPandorardquo in order to point out the unlimited number of possibilities it revealed regarding customization and user friendliness
032010 (11)60
PROFILE Flashcreed ndash Business Gallery
032010 (11) 61
The size of the entire gallery and any element in it is subject to any kind of resize big stage and small thumbs or the other way around for any template you or your client desire
Column_scroll and the properties for the stage mask helps you configure the exact number of visible columns you want to set in order to browse through the media items your gallery has Beside this useful feature we added blur and a couple of tween effects for the leftright navigation that gives an impressive look
032010 (11)62
PROFILE Flashcreed ndash Business Gallery
032010 (11) 63
Either as tooltip or plain text you can show any information you want regarding a certain media thumb in the gallery You can change font type size spacing color position and many other properties
The color gradient system for roll overout mouse gesture is unique in every way if we are to compare it with other galleries on the market at this point You can customize up to 5 sets of color with different alpha values The gradient type either linear or radial can be modified with rotation and ratio values
032010 (11)62
PROFILE Flashcreed ndash Business Gallery
032010 (11) 63
When clicking on a thumb if preview_type is selected as internal a resizable preview window will reveal itself and depending on the media type (image or video) an image viewer or video player will be contained inside it If preview_type is selected as external you have the possibility to set certain URL addresses this allowing you to redirect the user to a specific area of the website like a product page from a virtual store for example
The video player has a dozen of controllers that allow you to create a skin to better suit the template you want to create for your gallery Buttonrsquos color thickness handler color or scrub bar size just to name a few of the properties you can play with
At an amazing price of 999 $ this has to be one of the best choices when it comes to media galleries flash components Donrsquot hesitate to take a look at it on wwwflashcreedcom and also consider other products that might better suit your specifications or desires We would definitely appreciate any kind of feedback regarding current or possible features
Thank you
032010 (11)65
BOOK REVIEW
Are you an actionscript 3 game developer who is not able to write a complete commercial game because you cannot manage dozens
of classes Or you are an experienced actionscript 3 applications developer who wants to program game but donrsquot like reading any available beginner book as it doesnrsquot suit your style Even if you already have a good grasp over java or c++ and interested in creating not only fun games but commercial ones also then this is what you really require
There are several actionscript 3 game development books for beginners out there but Essential Guide to Game Dev is one of those few books that talk about the advanced gaming concepts However its first chapter begins with an easy to understand game example (good for any beginner) and ends up creating 3 games Did I tell you 3 games in just first chapter
Teaching about an Actionscript 3 Game framework is one of the many reasons that make this book a kick-ass addition to actionscript 3 gaming library Authors teach you how to create 10 unique games ranging from arcade to driving tile based to puzzle game and shooters to dice games Another specialty of this book is to use Flex and Flash Develop IDEs along with the primary Flash tool that creates space for not only flex
developers but also Flash Develop users In addition to this you will also learn to create game assets with GIMP Mappy and a sound effect creation tool You will get information about copyright laws which are necessary for any would-be commercial game creation and a complete game example integrated with MochiAds
This book also discusses and further more implements various advanced topics such as bitmap rendering pixel-level collision detection sound management AI xml-based level designing scrolling screen optimization techniques particles etc
In short this book will surely blow your minds with the wealth of knowledge it includes and you will pray for authors to keep writing such informative and useful books
If you are really serious about gaming then donrsquot miss the opportunity of reading this book Highly recommended
by Ali RAZA ACI ACE SCJP
Essential Guide to Flash Games
Authors Jeff Fulton Steve FultonPublisher friends of EDISBN 978-1-4302-2614-7Language EnglishPages 664 PagesWebsite httpfriendsofedcombookhtmlisbn=1430226145
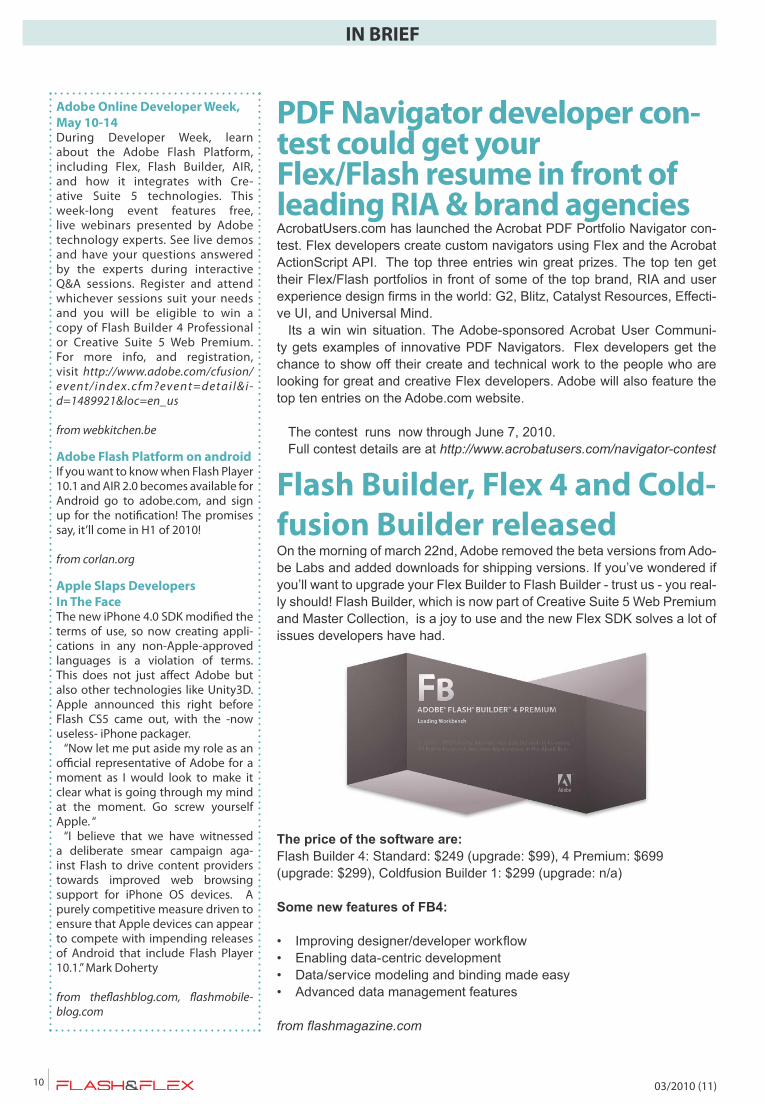
032010 (11)14
BEGINNERS Working with Display Objects 101
032010 (11) 15
The DisplayObject class is the base class for all objects that can be placed on the display list The display list manages all objects displayed in Flash
Player or Adobe AIR Use the DisplayObjectContainer class to arrange the display objects in the display list DisplayObjectContainer objects can have child display objects while other display objects such as Shape and TextField objects are leaf nodes that have only parents and siblings no children (httplivedocsadobecomflash90ActionScriptLangRefV3flashdisplayDisplayObjecthtml)
The DisplayObject class supports basic functionality like the x and y position of an object as well as more advanced properties of the object such as its transformation matrix
DisplayObject is an abstract base class therefore you cannot call DisplayObject directly Invoking new DisplayObject() throws an ArgumentError exception
All display objects inherit from the DisplayObject classSo what does that really mean Well I like to refer to
display objects as any visual on the stage hence the name display So therefore I call them visual objects interchangeably throughout this article
A visual object can be a MovieClips Sprites Text Fields Shapes Buttons etchellip again all visual items that reside on the stage
So let get started and learn how to import the objects to the library we will be using the example files that accompany this lesson feel free to use any file that you want to follow along with
Note if you already understand this process please feel free to skip ahead if not we will go step by step for the first MovieClip then skip certain sets in the subsequent examples
Go to File =gt Import =gt Import to Library
Select the justinjpg This will bring the image into the library
Working with
No matter what you do in Flash you will encounter display objects at some point So what exactly are display object Adobe lists the following definition from their live docs
What you will learnhellipbull the basics of how to create and manipulate Display Objectsbull use the visual way by dragging from the librarybull add Display Objects to the stage using only AS3 code
What you should knowhellipbull doesnrsquot need and prerequisite knowledge when it comes to
tutorial
Display Objects 101
032010 (11)14
BEGINNERS Working with Display Objects 101
032010 (11) 15
(Note this name can be anything you want) I typically use _mc _btn etchellip behind the name for two reasons the first being it lets me know easily what type of object Irsquom using and the second it enables code hinting in Actionscript by using the underscore prefix (_mc) Also make sure you registration point is set to the upper left This is reference point for the MovieClip
Once you have done that select your newly created MovieClip instance on the stage and give it an instance name I called the instance the same thing I named the MovieClip justin_mc
Now we can then access its properties via Actionscript If you not familiar with instance names this simply is a way for you to tell Actionscript which item you are referring to
Create a new layer and label it actions and lock the layer
Select the first frame and open the actions panel Window=gtActions
The first properties we are going to manipulate in the Display Object aka MovieClip is the location parameters x and y These are going to be set in the upper left corner where you registration point was set up Enter the code into the actions panels
justin_mcx = 0
justin_mcy = 0
If you test the flash movie you will get something that should look like this
There are two way to access these objects the first way is to drag the justinjpg image out from the library to the stage
Now you will need to convert this image into a MovieClip which is a Display Object You do this by going to Modify=gtConvert to Symbol
This will pop up a dialog box These settings will be for your new MovieClip Give it a name of justin_mc
032010 (11)16
BEGINNERS Working with Display Objects 101
032010 (11) 17
Good now you can play around with the values and change them to see where other x and y values will place the MovieClip The images shown here are with the x and y set to 200
Lets try to access some different properties types enter the following code into your actions panel
justin_mcscaleX = 15
justin_mcscaleY = 15
If you test the movie you will now see that an output of the justin_mc MovieClip is 15 larger that before Your image might be pixilated since itrsquos stretching it to a larger dimension
Ok congratulations you have successfully added a displayvisual object to the stage and manipulated it Pretty Simple
Now lets delete the MovieClip from the stage and access it only through Actionscript
Once you have deleted the MovieClip off the stage go to the Library panel and right click the justin_mc and select properties
Select the Export for Actionscript option The name you see here will be the name that you create the object from in Actionscript This name can be anything but we will keep it the same as our instance name for no other reason but consistency
032010 (11)16
BEGINNERS Working with Display Objects 101
032010 (11) 17
Once you select the OK button you will get a window that looks like this Just select OK
So if we test our code now we will get and error because we have yet to create a MovieClip and add it to the stage
So delete all the code you have currently in the actions panel We will first create a variable that will hold the newly created instance of the MovieClip from the library instead of dragging it to the stage like we did before
Enter the following code
var anyNamejustin_mc = new justin_mc()
addChild(anyName)
the var keyword creates a variable anyName Note as the name states this can be called any name you want it to be eg Bob Billy Susan or whatever This is essentially its instance but in code instead of
selecting it and on the stage and then adding it via the properties panel like we did before justin _ mc references the library class name that you set earlier within the propertiesand the = new justin_mc() creates a new instance of a MovieClip name justin_mc() and assigns it to the variable
The addChild(anyName) just tells Flash to add the object to the stage using the variable (var) reference that you just created If you donrsquot use the addChild(name of variable) you will not see your visual object show up on the stage
So as you see itrsquos really not that difficult to access a display object and display it
Finally we will adjust some of the properties just as we did before Except this time we use the variable name that was called anyName Again this is just like your instance name see (Listing 1)
In next months issue we will continue this expedition of display objects and touch on things like drawing shapes using only code and working with text I hope you enjoyed this article please feel free to email me your comments or questions to jundajgmailcom
JUSTIN P JUNDAIs a New Media Engineer specializing in FlashAS2-3 Photo-shop After Effects PHP MySQL and a slue of other program-ming languages Justin also loves to travel and has a strong passion for teaching others how to use these technical pro-ducts He currently works with a top government-contracting rm implementing new media ideas into interactive course-ware that is then delivered to the military in order to effecti-vely train them Also check out shprotv to see the latest video from him and his partner Director Scott Hansen wavelenght-fxmaccom You can reach Justin at jundajgmailcom with any thoughts or concerns you have regarding this article
Listing 1
Creates Instance of the MovieClip named justin_mc
var anyNamejustin_mc = new justin_mc()
Set properties for the MovieClip properties
can be things like rotation
x y coordinates Scale sizes
etc
anyNamex = 100
anyNamey = 100
anyNamerotation = 45
anyNamescaleX = 15
anyNamescaleY = 15
Assigns the movie clip to the stage
addChild(anyName)
032010 (11)18
FLASH AND PHP
The webinar hosted by Ryan Stewart Platform Evangelist at Adobe and Kevin Schroeder Technology Evangelist at Zend hit the Web around
the same time that Zend announced Code Tracing had been added to its PHP web application server Who you might ask is this company called Zend And what is an article about flight recorders doing in Flash amp Flex Magazine After all yoursquore a Flex developer so why should you care
Who is ZendPHP runs a third of the worldrsquos Web sites and has now become the most popular language for building dynamic Web applications Zend Technologies Inc is the leading provider of products and services for developing deploying and managing business-critical PHP applications Zend contributes to Zend Framework (an open source objected-oriented Web application framework) and now Zend Framework is bundled with Adobe Flash Builder 4
What is a Software Flight RecorderWhen something goes wrong with an airplane in flight investigators obviously canrsquot reproduce the problem Instead they rely on data captured by the airplanersquos black box flight recorder in order to uncover the source of the problem Zend Server does the same for PHP web applications Rather than trying to recreate the environment and reproduce the steps leading up to a problem Zend Server captures in real-time the full
execution of an application ndash in production or in a test lab ndash and pinpoints root cause issues without trail and error This feature called Code Tracing is akin to a software flight recorder for PHP web applications
Code Tracing can be activated to automatically capture problems in real-time or used manually to trace specific scenarios Zend had strict requirements for the Code Tracing user interface
bull The performance chops to handle megabytes of databull A highly-interactive view for an exceptional user
experiencebull The ability to modify widget behaviorbull Established cross-browser supportbull Sufficient and accessible technical content and
expertise see (Figure 1)
Zend considered various alternatives and ultimately chose Adobe Flex for the following reasons
bull Performancebull Flexibilitybull Maturitybull Flash Builder 4 support for data-focused applications
Why Flex developers should care
bull Adobe Flash Builder now has built-in support for Zend Framework a PHP framework based on PHP 5
bull PHP provides easy integration with back-end logic using Flash remoting
bull Zend Server is a data-centric web application server and Code Tracing helps improve development and deployment in high performance production environments
EXCERPT FROM WEBINAR BY KEVIN SCHROEDER AND RYAN STEWART
How a Software Flight Recorder was You might have caught a recent webinar How Zend used Flex and PHP to build a Software Flight Recorder which sparked some interesting discussion
Built Using Adobe Flex and Zend PHP
Figure 1 Flash and PHP
How Zend Used Adobe Flex and PHP to Build a Software Flight Recorder
ldquoZend Framework with Support for Action Message For-mat (AMF) Now Bundled with Adobe Flash Builder 4rdquo
How to build Rich Internet Applications using Zend PHP and Adobe Flash Platform
032010 (11)20
ACTIONSCRIPT DEVELOPMENT Creating an AS3 Game Framework
032010 (11) 21
The game framework is the foundation for making the second game It is an expanded version of the first chapterrsquos framework with an emphasis
on organization and reuse Since this book is also not called Proper Object-Oriented Design Patterns and Principles for Games you will see little theory here and mostly practice Many of these techniques have been hard won and developed over many years of ActionScript programming We have fought the wars through AS1 AS2 and now AS3 so you donrsquot have to do it yourself
While our framework borrows from some design patterns we feel that games are a very expressive medium We want you the reader of this book to think outside that proverbial over-used box While design pattern ideas lend themselves to all manner of application development we donrsquot want you to feel hemmed in to using any one set of ideas for creating their games Our framework gives structure to the overall flow of a game but does not dictate how to code the actual game logic
Exploring the FrameworkThe game framework is housed in a reusable package structure A package structure at its very basic is an organized set of folders that will contain reusable classes All of the standard class files for using the framwork will be in this package structure We will update and extend this structure as we proceed through this book Letrsquos start by giving you an idea of what classes we will be creating for the framework
The GameFrameWorkas classThe GameFrameWorkas class is the foundation of the framework It contains a simple state machine and a basic game loop timer Our state machine is a simple
construct containing a set of state constants to switch the framework between states States are handled by state functions inside the GameFrameWorkas file We will employ a variable to reference the current state function The game timer will use this reference to call the current state function on each frame tick We will create states for such things as the title screen instructions screen game play game over and more
When we create a new game our document class will be an instance of GameFrameWork called Mainas This Mainas will have an init (short for initialization) function that will set up the framework for use This Mainas class will also act as a sort of message gateway between the game and the framework classes If you are confused donrsquot worry wersquoll be explaining this in greater detail soon
The FrameWorkStatesas classThis FrameWorkStatesas class will simply contain a set of constant integer values representing the state machine states When we first create the framework we will have 10 different state constants All will begin with the STATE_SYSTEM designation For example we will have a state that displays the title screen The state constant for this will be STATE_SYSTEM_TITLE More states will be added as we progress through the chapters in this book
The BasicScreen class and SimpleBlitButton helper class The BasicScreen class will be used to display very simple game state screens These screens can have a basic background color with transparency (if needed) as well as some text centered on the screen Each screen can also have a button that needs to be clicked to move to a new state in the state machine This class is so simple that it will probably never be used without major
Creating an AS3 Game Framework
Excerpted from the book The Essential Guide to Flash Games Building Interactive Entertainment with ActionScript by Jeff Fulton Steve Fulton (FriendsofEDApress 2010)
PART ONE
032010 (11)20
ACTIONSCRIPT DEVELOPMENT Creating an AS3 Game Framework
032010 (11) 21
We will also be creating three distinct custom event classes as part of the framework These will be used to send specific data from the Game class instance to the Mainas (GameFrameWorkas instance) class The Mainas will act on the data sent and if needed pass the data to other framework classes By doing this we are using Mainas as a sort of message gateway
The CustomEventButtonIdas classThis custom event will have the ability to pass an identification integer value to the listening function It is used for cases where multiple buttons share the same listener function It will be used in the framework (specifically in the GameFrameWork instance Mainas) to allow BasicScreen instances to each share the same listener functions if they employ a SimpleBlitButton You will see this when we examine the GameFrameWork class file It can also be used for any game or application that needs to send a basic integer id along with an Event instance
The CustomEventLevelScreenUpdateas classThis custom event will be used by the Gameas class instance to send data to a BasicScreen instance we will create called levelInScreen The levelInScreen will have the ability to display custom text between each level The event listnener for this event will change this text with a value passed when the event is fired off The Mainas (GameFrameWorkas sub-class) will listen for this event and pass the data to the levelInScreen
The CustomEventScoreBoardUpdateas classThis custom event will be used by the the Gameas class instance to update the values on the ScoreBoard class instance The Mainas class will listen to for this event and pass the data on to the ScoreBoardas class instance
The framework package structureWe will be organizing all of the code we will create into a package structure The reusable framework classes will be in one package and the games we will create will be in a separate package Letrsquos create these two package structures now
The source folderChoose a spot on your disk drive of choice and create a folder called source This will be the root or base level for all of the code and games we will create in this book
The classes packageThe reusable framework classes will be in a package called classes Create a folder called classes inside the source folder from the previous step You should now have a folder structure that looks a little like this
modification in your own commercial games We present it here in its very simple form for utility purposes
The SimpleBlitButton helper class is used to create a clickable button with rollover and off states The button is created completely in code with a simple color background for the over and off states to be sed in the BasicScreen class We do this for simplicity and to demonstrate some Sprite blitting techniques (much more on these later in the book) using a set of BitmapData instances for the background color change of the button on rollover
The ScoreBoard class and SideBySideScoreElement helper class The ScoreBoard class displays information for the user during game play Data such as the current game score time remaining and other useful information can be displayed to the user with a very basic look and feel by using this class It can be used as is but when you start to make your own commercial games you might find it useful to extend this class with more functionality This very basic class is used inside the framework to demonstrate how to use events from a Game instance to update a game score board
The SideBySideScoreElement helper class is used to display a text label and corresponding dynamic text field as a pair side by side on the screen For example it can be implemented by the ScoreBoard class to display the word Score followed by the userrsquos current score
The Game classThe Game class is a stub style class that all games in the framework will inherit from It contains the basic variables and functions needed to work with the GameFrameWork class
The Custom event classesThe framework makes use of events to communicate between classes The instances of the Game class will use events to communicate with the ScoreBoard and the Main classes We will create a custom Mainas class for each game This Main class will be a sub-class (or child) of the GameFrameWork class Some of the events we will use will be simple events These are instances of the standard Flash Event class used for basic communication By this we mean events that donrsquot need to send any data along with them For example instances of the Gameas framework class will have a constant variable called GAME_OVER This constant will be used as the name of a simple Event instance that is fired off with the standard dispatchEvent function call This example GAME_OVER event wil be used to tell the Mainas to move to the game over (STATE_SYSTEM_GAME_OVER) state in the main state loop when the current game has completed
032010 (11)22
ACTIONSCRIPT DEVELOPMENT Creating an AS3 Game Framework
032010 (11) 23
[source]
[classes]
Next we will create the actual package that will contain all of the source code for the reusable framework classes We will name this package comefgframework To create this you must first create a folder inside the classes folder called com then a folder called efg inside the com folder and finally a framework folder inside the efg folder By the way the efg is an abbreviation for the book title Essential Flash Games You should now have a folder structure that looks like this
[source]
[classes]
[com]
[efg]
[framework]
When we start to create all of the class files necessary for the framework they will all go into the framework folder You will see that when we create these classes the package name will look like this
package comefgframework
The projects packageThe second package we will create is called the projects package You can start this right away by creating a folder inside the root source folder called projects The projects folder is not going to be a straight package structure like the classes folder It is organized in a manner to allow individual custom game development using the framework
Inside this projects folder we are going to create a unique folder for each game in the book The first game we are going to create is called stubgame A stub is usually a function or class that contains very little (if any) usable code but is instead a simple placeholder Our game will be slightly more than a placeholder but not much more It will be used to demonstrate the basic functionality of the framework Go ahead and create a folder called stubgame in the projects folder You should have a projects set of folders that look like this
[source]
[classes]
[projects]
[stubgame]
Next we are going to create two folders each to hold a different version of our game Why are we going to do this This book is meant to support Flash game development with a variety of tools There are many popular methods to create Flash games
with an assortment of tools and code integrated development environments (IDEs) We are going to focus on two such tools in this book the Flash IDE (the one with the library timelines drawing tools and so on all combined into a single tool) and Flash Develop (a very popular free IDE made specifically for ActionScript development) You can use any tool with this book but you will need to follow the documentation specific to your own tool when setting up projects
You will need to pay careful attention to linking the reusable code package structure to your games because linking may vary depending on the Flash code editor environment you are using Linking the package to a game is actually a very simple process but it differs between the various code IDE versions Jeff does most of his Flash game development Flash Develop using the free Flex SDK that Adobe provides Steve on the other-hand uses the Flash IDE almost exclusively We have combined our efforts on all of the chapter games to bring you code that will work with both a Flex SDK project and a Flash IDE project
On that note the next two folders you will create inside the stubgame folder are called flashIDE and flexSDK You donrsquot have to create both for any project You just need to create the one that works with the tools you are going to use to create Flash games Each is set up differently so pay attention to the specifics of the one you will be using the most
You should now have a projects folder that looks like this
[projects]
[stubgame]
[flashIDE]
[flexSDK]
The Flash IDE package structureThe Flash IDE package structure begins right inside the flashIDE folder The package name is very similar to the classes package you saw in the last section The package structure will be comefggames[game
name] For instance with the stub game we are going to create in this chapter the package name will be comefggamesstubgame Go ahead and create those folders now You should have this package structure when you are complete
[projects]
[stubgame]
[flashIDE]
[com]
[efg]
[games]
[stubgame]
[flexSDK]
032010 (11)22
ACTIONSCRIPT DEVELOPMENT Creating an AS3 Game Framework
032010 (11) 23
The Flex SDK package structureThe Flex SDK package structure is very similar to the Flash IDE package structure with one small difference Flash Develop and other Flex tools use a specific set of folders for organizing their own project structures To accommodate these and still have a common package structure for our games we must add the Flash Develop created src folder to the flexSDK folder You will not have to create the src folder or the package structure by hand as Flash Develop will create it automatically for you when you start a new project In the section called Setting up the game in Flash Develop we will go into the details For now here is the way the structure will be laid out (including the Flash Develop specific folders such as bin obj and lib If you have used Flash Develop to create a Flex SDK project you will recognize the following structure
[projects]
[stubgame]
[flexSDK]
[bin]
[obj]
[lib]
[src]
[com]
[efg]
[games]
[stubgame]
Notice that we have created the exact same package structure inside the src folder as we will use with the Flash IDE The package name for our game will be comefggamesstubgame
The package name in the code for classes in both the Flash IDE and Flex SDK will be the same
package comefggamesstubgame
The Mainas and StubGameas filesWhen we start to add files to the subgame package we will be creating two subclasses (or children) of framework classes that will be unique to our game The Mainas will be created as a subclass (or child) of GameFrameWorkas framework class The StubGameas class will be a subclass (or child) of the Gameas framework class
Starting a project using the framework packagesYou have just seen the basic package structure for both the framework reusable classes and the projects we are going to create Letrsquos make use of this right away by creating a project for the stub game The stub game will be very similar to the Chapter 1 game where the player is tasked with clicking the mouse ten times
Creating the stub game project in the Flash IDEFollow these steps to set up stub game using the Flash IDE
1 Start up your version of Flash I am using CS3 but this will work exactly the same in CS4 and CS5
2 Create a fla file in the sourceprojectsstubgame
flashIDE folder called stubgame3 In the sourceprojectsstubgameflashIDE folder
create the following package structure for your game comefggamesstubgame
4 Set the frame rate of the Flash movie to 30 FPS Set the width and height both to 400
5 Set the document class to comefggamesstubgameMain6 We have not yet created the Mainas class so you
will see a warning We are going to create this later in this chapter
7 Add the framework reusable class package to the class path for the fla filebull In the publish settings select [Flash]gt
[ActionScript 3 Setting]bull Click the Browse to Path button and find the
source folder we created earlier for the package structure Select the classes folder and click the choose button Now the comefgframework package will be available for use when we begin to create our game We have not created the framework class files yet but we will be doing this very shortly
Creating the stub game project in Flash DevelopAnd these are the steps to create the same project using Flash Develop
1 Create a folder inside the [source][projects][stubgame] folder called [flexSDK] (if you have not already done so)
2 Start Flash Develop and create a new projectbull Select Flex 3 Projectbull Give the project the name stubgamebull The location should be the sourceprojects
stubgameflexSDK folderbull The package should be comefggamesstubgamebull Do not have Flash Develop create a project
folder automatically Make sure the Create Folder For Project box is unchecked
bull Click the OK button to create the project3 Add the class path to the framework to the project
bull Go to the [project]gt[properties]gt[classpaths] menu item
bull Click the add class path buttonbull Find the source folder we created earlier and
select the classes subfolderbull Click the ok button and then the apply button
032010 (11)24
ACTIONSCRIPT DEVELOPMENT Creating an AS3 Game Framework
032010 (11) 25
You now have the basic structure to start creating projects inside the framework We are now going to discuss a few topics concerning the structure of the framework classes and then move into building the reusable framework code
Here are a couple of things to noteFor Flex Builder Flash Builder or other IDEs please refer to the documentation provided for that product to create a new project and set the default compile class
A common method of Flash development is to use the Flash IDE for assets and organization and Flash Develop for code editing If this is your workflow of choice you will want to follow the Flash IDE folder and package structure rather than the Flex SDK folder structure
Creating game timersThere are two basic methods that most Flash developers implement when creating a frame-based game timer By frame-based we mean a timer that uses the idea of a segment of time broken up into logical slices (or frames) to manage game logic There are other types of methods for timing game updates but we will make extensive use of time-slice or frame-based timers in this book The basic game timer we will use most of the games will attempt to squeeze all processing and screen updates into each segment or frame We will also explore a time-step timer and a sleep-based timer in chapter 11
The first timer method is the EventENTER_FRAME event timer The standard EventENTER_FRAME event handler will attempt to run the game loop at the swf filersquos set frame rate This very handy game loop timer has been in use for a number of years The second standard game loop timer method makes use of the Timer class The Timer class is used to call the game loop at millisecond intervals specified by a delay interval For example if the millisecond delay interval is set to 100 the Timer instance would run ten times a second (there are 1000 milliseconds in a single second) Our framework will begin by using this Timer instance game loop timer We will do this so we can make use of the TimerEventTIMER updateAfterEvent function As you will see this function will help smooth out screen updates
Defining frame timer tick You will see the phrases frame timer tick timer tick and frame tick used in this book When we refer to a tick or a frame tick we simply mean one framersquos worth of processing When we run a game at 30 frames per second we have 30 ticks or 30 frame ticks This also means that we only have 3333 milliseconds (or 100030) inside each tick to do all of our processing
State MachinesA traditional state machine at its very basic is a mechanism that controls the state or current actions a system can perform Sometimes this is called a finite state machine Finite state machines have traditionally been used to model complex mathematical computations and more recently artificial intelligence The finite in the name refers to the fact that the system can only be in a single state at any one time Our game framework is built on a simple state machine pattern that employs a separate code function or method for each state There are many other styles of state machines some use entire classes for each individual state (sometimes called an object-oriented state machine) and some use a simple switchcase statement block called on each frame tick to control state We will use a third type that borrows from these two
We call our state machine pattern a function reference pattern Unlike the object-oriented state machine our machine will contain a separate method or function for each state inside a single framework class Each of these state functions will control elements in the framework such as instances of the BasicScreen and Game classes We will use a switchcase statement to move between states Unlike the afore mentioned very simple switchcase state machine structures that call this switchstate control structure on each frame tick we only need to call it when we are switching states The switchcase we call will simply change the function reference we call on each frame tick The GameFrameWorkas will contain the state machine that controls overall game flow This will move our game system between states defined in the FrameWorkStatesas file
Each individual game package we create will contain a Mainas (in the gamersquos own package structure) that will extend GameFrameWorkas We will also create a unique Gameas child class for each game The Game class children that we create can also employ their own internal state machines based on the function reference pattern when needed
Richard (Squize) Myles of wwwgamingyourwaycom was one of the first to offer the idea of a function reference state machine for ActionScript 3 on his well-respected blog
The FrameWorkStatesas class fileThis class file is a simple collection of constants that will define the states for the game framework They will be consumed by the GameFrameWorkas class file The following code listing shows the entire code for this file you will want to create this file according to the package structure in the previous section see (Listing 1)
The first thing you should notice about this class is the package name in the first line It conforms to the file system structure we created earlier No matter if
032010 (11)24
ACTIONSCRIPT DEVELOPMENT Creating an AS3 Game Framework
032010 (11) 25
you are using a version of Flash Flex Builder Flash Builder Flash Develop TextMate or even plain old Notepad this package name will be the same The package name is not depended on the code development environment but the chosen file structure for organizing the code Save this file in the location we created previously
sourceclassescomefgframeworkFrameWorkStatesas
The state variablesThe state variables are constants that the game loop state machine will use to move between game states We have set up the most common basic states in this sample file but you will be able to create as many as you need As we progress through the chapters more will be added as necessary
bull STATE _ SYSTEM _ TITLE This state is used to display a basic title screen with an OK button for the user to click to move on Once the instructions are on the screen the state will change to the next state
bull STATE _ SYSTEM _ WAIT _ FOR _ CLOSE This one waits until the OK button is clicked for any instance of the BasicScreen class
bull STATE _ SYSTEM _ INSTRUCTIONS This state is used to display basic instructions with the same OK button as in the SYSTEM _ TITLE state It also changes to the STATE _ SYSTEM _ WAIT _ FOR _ CLOSE state until the OK button is clicked
bull STATE _ SYSTEM _ NEW _ GAME This state will call the game logic class and fire off its gamenewGame() function It does not wait but moves on to the NEW _
LEVEL state right awaybull STATE _ SYSTEM _ NEW _ LEVEL With this state we can
call the gamenewLevel() function to set up a new level for the given game
bull STATE _ SYSTEM _ LEVEL _ IN This state is used to display some basic information if needed for the beginning of a level In this basic game we simply display the level screen and wait a few seconds before moving on The wait is accomplished by changing state to the STATE _ SYSTEM _ WAIT state for the specified number of frame ticks
bull STATE _ SYSTEM _ GAME _ PLAY This one simply calls the game logic classrsquos runGame function repeatedly and lets the game take care of its own logic and states
bull STATE _ SYSTEM _ GAME _ OVER The game over state displays the basic game over screen and waits for the OK button to be clicked before moving back to the instructions screen It quickly changes state to the STATE _ SYSTEM _ WAIT _ FOR _ CLOSE until the OK button is clicked
bull STATE _ SYSTEM _ WAIT This state waits for a specified number of frames and then fires off a simple custom event constant called WAIT _ COMPLETE
The GameFrameWorkas class fileThe GameFrameWorkas will be that parent of our gamersquos document class Mainas (the gamersquos document class)
for our games will extend this class and call functions to modify the framework for each unique game The entire code listing is provided at the end of this section We will explore it in detail once your have had a chance to type in the code The location for this file in the package structure is
sourceclassescomefgframeworkGameFrameWorkas
The GameFrameWorkas will be the parent class to the Mainas class we will use for our games and itrsquos shown in the following listing In later chapters we will add some functions to this file and even create one that uses a completely different timer The Mainas will subclass this class with the extends syntax and override the blank stub init function we are about to create This class will also contain all of the state functions that coincide with the state variables in the FrameWorkStates class All of the functions in the GameFrameWorkas are public so all can be overridden by the Mainas if needed In this way we can customize the behavior of the state functions if we need to
For example in later chapters we will want to play music on the title screen The function call to play
Listing 1
package comefgframework
author Jeff and Steve Fulton
public class FrameWorkStates
public static const STATE_SYSTEM_WAIT_FOR_CLOSEint = 0
public static const STATE_SYSTEM_TITLEint = 1
public static const STATE_SYSTEM_INSTRUCTIONSint = 2
public static const STATE_SYSTEM_NEW_GAMEint = 3
public static const STATE_SYSTEM_GAME_OVERint = 4
public static const STATE_SYSTEM_NEW_LEVELint = 5
public static const STATE_SYSTEM_LEVEL_INint = 6
public static const STATE_SYSTEM_GAME_PLAYint = 7
public static const STATE_SYSTEM_LEVEL_OUTint = 8
public static const STATE_SYSTEM_WAITint = 9
032010 (11)26
ACTIONSCRIPT DEVELOPMENT Creating an AS3 Game Framework
032010 (11) 27
the music will need to be added to the systemTitle state function Not all games will need this though so we will not add it to the GameFrameWorkas filersquos systemTitleFunction Instead we will create a new version of the function in Mainas to override the one in GameFrameWorkas The new one will play the sound needed and then call the systemTitle function inside GameFrameWorkas with the supersystemTitle() function call see (Listing 2)
The class imports The class import section contains the necessary Flash core classes needed for the Main class Notice the package name coincides with the package structure we created earlier in the chapter for the framework
package comefgframework
Listing 2
package comefgframework
import flashdisplayBitmap
import flashdisplayBitmapData
import flashdisplayMovieClip
import flasheventsEvent
import flashgeomPoint
import flashtextTextFormat
import flashutilsTimer
import flasheventsTimerEvent
public class GameFrameWork extends MovieClip
public static const EVENT_WAIT_COMPLETEString =
wait complete
public var systemFunctionFunction
public var currentSystemStateint
public var nextSystemStateint
public var lastSystemStateint
public var appBackBitmapDataBitmapData
public var appBackBitmapBitmap
public var frameRateint
public var timerPeriodNumber
public var gameTimerTimer
public var titleScreenBasicScreen
public var gameOverScreenBasicScreen
public var instructionsScreenBasicScreen
public var levelInScreenBasicScreen
public var screenTextFormatTextFormat
public var screenButtonFormatTextFormat
public var levelInTextString
public var scoreBoardScoreBoard
public var scoreBoardTextFormatTextFormat
Game is our custom class to hold all logic for
the game
public var gameGame
waitTime is used in conjunction with the
STATE_SYSTEM_WAIT state
it suspends the game and allows animation or
other
processing to finish
public var waitTimeint
public var waitCountint=0
public function GameFrameWork()
public function init()void
stub to override
public function setApplicationBackGround(width
Number
heightNumberisTransparentBoolean = false
coloruint = 0x000000)void
appBackBitmapData = new BitmapData(width
height
isTransparent color)
appBackBitmap = new Bitmap(appBackBitmapData)
addChild(appBackBitmap)
public function startTimer()void
timerPeriod = 1000 frameRate
gameTimer=new Timer(timerPeriod)
gameTimeraddEventListener(TimerEventTIMER
runGame)
gameTimerstart()
public function runGame(eTimerEvent)void
systemFunction()
eupdateAfterEvent()
switchSystem state is called only when the
032010 (11)26
ACTIONSCRIPT DEVELOPMENT Creating an AS3 Game Framework
032010 (11) 27
Listing 2
state is to be changed
(not every frame like in some switchcase
based simple state machines
public function switchSystemState(statevalint)
void
lastSystemState = currentSystemState
currentSystemState = stateval
switch(stateval)
case FrameWorkStatesSTATE_SYSTEM_WAIT
systemFunction = systemWait
break
case FrameWorkStatesSTATE_SYSTEM_WAIT_FOR_
CLOSE
systemFunction = systemWaitForClose
break
case FrameWorkStatesSTATE_SYSTEM_TITLE
systemFunction = systemTitle
break
case FrameWorkStatesSTATE_SYSTEM_
INSTRUCTIONS
systemFunction = systemInstructions
break
case FrameWorkStatesSTATE_SYSTEM_NEW_GAME
systemFunction = systemNewGame
break
case FrameWorkStatesSTATE_SYSTEM_NEW_LEVEL
systemFunction = systemNewLevel
break
case FrameWorkStatesSTATE_SYSTEM_LEVEL_IN
systemFunction = systemLevelIn
break
case FrameWorkStatesSTATE_SYSTEM_GAME_PLAY
systemFunction = systemGamePlay
break
case FrameWorkStatesSTATE_SYSTEM_GAME_OVER
systemFunction = systemGameOver
break
public function systemTitle()void
addChild(titleScreen)
titleScreenaddEventListener(CustomEventButton
IdBUTTON_ID
okButtonClickListener false 0 true)
switchSystemState(FrameWorkStates
STATE_SYSTEM_WAIT_FOR_CLOSE)
nextSystemState = FrameWorkStatesSTATE_
SYSTEM_INSTRUCTIONS
public function systemInstructions()void
addChild(instructionsScreen)
instructionsScreenaddEventListener(CustomEven
tButtonId
BUTTON_IDokButtonClickListener false 0
true)
switchSystemState(FrameWorkStates
STATE_SYSTEM_WAIT_FOR_CLOSE)
nextSystemState = FrameWorkStatesSTATE_
SYSTEM_NEW_GAME
public function systemNewGame()void
addChild(game)
gameaddEventListener(CustomEventScoreBoardUp
date
UPDATE_TEXTscoreBoardUpdateListenerfalse 0
true)
gameaddEventListener(CustomEventLevelScreenU
pdate
UPDATE_TEXTlevelScreenUpdateListenerfalse
0 true)
gameaddEventListener(GameGAME_OVER
gameOverListener
false 0 true)
gameaddEventListener(GameNEW_LEVEL
newLevelListener
false 0 true)
gamenewGame()
switchSystemState(FrameWorkStatesSTATE_
SYSTEM_NEW_LEVEL)
public function systemNewLevel()void
032010 (11)28
ACTIONSCRIPT DEVELOPMENT Creating an AS3 Game Framework
032010 (11) 29
Listing 2
gamenewLevel()
switchSystemState(FrameWorkStatesSTATE_
SYSTEM_LEVEL_IN)
public function systemLevelIn()void
addChild(levelInScreen)
waitTime = 30
switchSystemState(FrameWorkStatesSTATE_
SYSTEM_WAIT)
nextSystemState = FrameWorkStatesSTATE_
SYSTEM_GAME_PLAY
addEventListener(EVENT_WAIT_COMPLETE
waitCompleteListener false 0 true)
public function systemGameOver()void
removeChild(game)
addChild(gameOverScreen)
gameOverScreenaddEventListener(CustomEventBu
ttonId
BUTTON_IDokButtonClickListener false 0
true)
switchSystemState(FrameWorkStates
STATE_SYSTEM_WAIT_FOR_CLOSE)
nextSystemState = FrameWorkStatesSTATE_
SYSTEM_TITLE
public function systemGamePlay()void
gamerunGame()
public function systemWaitForClose()void
do nothing
public function systemWait()void
waitCount++
if (waitCount gt waitTime)
waitCount = 0
dispatchEvent(new Event(EVENT_WAIT_COMPLETE))
public function okButtonClickListener(e
CustomEventButtonId)void
switch(eid)
case FrameWorkStatesSTATE_SYSTEM_TITLE
removeChild(titleScreen)
titleScreenremoveEventListener(CustomEv
entButtonId
BUTTON_IDokButtonClickListener)
break
case FrameWorkStatesSTATE_SYSTEM_
INSTRUCTIONS
removeChild(instructionsScreen)
instructionsScreenremoveEventListener(
CustomEventButtonIdBUTTON_IDokButtonC
lickListener)
break
case FrameWorkStatesSTATE_SYSTEM_GAME_OVER
removeChild(gameOverScreen)
gameOverScreenremoveEventListener(
CustomEventButtonIdBUTTON_IDokButtonC
lickListener)
break
switchSystemState(nextSystemState)
public function scoreBoardUpdateListener(e
CustomEventScoreBoardUpdate)void
scoreBoardupdate(eelement evalue)
public function levelScreenUpdateListener(e
CustomEventLevelScreenUpdate)void
levelInScreensetDisplayText(levelInText +
etext)
gameOverListener listens for GameGAMEOVER
simple
custom events calls and changes state
accordingly
public function gameOverListener(eEvent)void
switchSystemState(FrameWorkStatesSTATE_
SYSTEM_GAME_OVER)
gameremoveEventListener(CustomEventScoreBoard
Update
UPDATE_TEXTscoreBoardUpdateListener)
gameremoveEventListener(CustomEventLevelScree
nUpdate
032010 (11)28
ACTIONSCRIPT DEVELOPMENT Creating an AS3 Game Framework
032010 (11) 29
We also must import all of the classes needed for the framework to run You will see this put to use shortly
The variable definitions The variable definition section defines all of the global scope variables for the class These include all of the variables needed for the state machine screens and the game timer
We will make use of constants to define the current state and a set of variables to hold the state information These have been be defined on the FrameWorkStatesas file we created in the last section More states can be added to the basic ones but these will be sufficient for many games that we will create in this book There are two special states that are used for the system and wait for button clicks or things like animations to complete These are the STATE_SYSTEM_WAIT_FOR_CLOSE and STATE_SYSTEM_WAIT respectively We will also make use of a generic function called systemFunction that will hold the current state function to call in our game loop Combined with this we use a set of
integer variables to hold the value of the current state (currentSystemState) the last state (lastSystemState) and the next state (nextSystemState) for processing purposes These states should not be confused with an actual game pause function This will be handled in a different manner and added to the framework in Chapter 11
If you are using the Flash IDE and have any assets in the library that need to be exported in the first frame you must extend MovieClip and not Sprite even if you donrsquot plan to use the main time line for anything else We have extended MovieClip for the GameFrameWork so it will work with both Flex SDK and Flash IDE projects
The state control variablesThe control variables keep the system functioning within the context of the current state The main control variable is an instance of the Function class called systemFunction This function holds a reference to the current function that will be repeatedly called on each frame tick This saves us from having to evaluate a switchcase statement on each frame to decide which function to call The function is changed to a new reference by called the switchSystemState() function and passing a new constant that represents the new state
Optimization switchSystemState() is the first of many optimizations we will make to the game framework All of these optimizations will make the Flash games run much more efficiently These efficiencies in the game framework will allow the actual game code to perform more complex operations and still run with a reasonable frame rate
The currentSystemState integer variable holds a number representing the constant of the current state the system is running The nextSystemState contains the constant integer value for the state to transition to after this state is complete The lastSystemState variable holds the integer constant of the previous system state This is used in the rare occurrence that the game loop needs to return to the previous system state
The lastSystemState variable will become useful when we use a shared state such as STATE_SYSTEM_WAIT The STATE_SYSTEM_LEVEL_IN state will implement a 30-millisecond delay before moving on to the STATE_SYSTEM_GAME_PLAY state The nextSystemState will be STATE_SYSTEM_WAIT and the lastSystemState will be STATE_SYSTEM_LEVEL_IN When the 30-millisecond wait time has expired the waitCompleteListener function will be called It will use the lastSystemState to determine where the processing was before the wait was started Yoursquoll see this in detail later in this chapter when we examine the waitCompleteListener function
Listing 2
UPDATE_TEXT levelScreenUpdateListener)
gameremoveEventListener(GameGAME_OVER
gameOverListener)
gameremoveEventListener(GameNEW_LEVEL
newLevelListener)
newLevelListener listens for GameNEWLEVEL
simple custom events calls and changes
state accordingly
public function newLevelListener(eEvent)void
switchSystemState(FrameWorkStatesSTATE_
SYSTEM_NEW_LEVEL)
public function waitCompleteListener(eEvent)
void
switch(lastSystemState)
case FrameWorkStatesSTATE_SYSTEM_LEVEL_
IN
removeChild(levelInScreen)
break
removeEventListener(EVENT_WAIT_COMPLETEwai
tCompleteListener)
switchSystemState(nextSystemState)
032010 (11)30
ACTIONSCRIPT DEVELOPMENT
The background fill variablesAll Flash applications have a background color of some type No matter what game we are going to be creating the framework can control this background color You should never rely on the background color setting in HTML for your Flash applicationrsquos background color This leaves the HTML embed code with control over major aspect of your application If you are creating a viral game to be placed on game portals you will lose control of your gamersquos background color and it will default to what ever the game portal operators have selected as the standard background color in their embed code The framework allows you to override the HTML settings here by placing a simple colored Bitmap behind the entire application We will simply define a BitmapData object called appBackBitmapData and a Bitmap object called appBackBitmap that will be used to place the BitmapData onto the displayList
We will not define the background in the GameFrameWorkas file but rather the Mainas subclass of the GameFrameWork will set the background if needed in its init function override
The timer variablesThe timer will control the frame rate of the game and help smooth out the display by employing the TimerEventupdateAfterEvent method The frameRate variable will be defined in Mainas as the number of frame ticks per second we want our game timer to run
The most important thing to note is that we are making use of the built-in Timer class (gameTimer) We are not using the standard EnterFrame event This allows us to create our own frame rate for the game and specify it in the frameRate variable By doing this we can control game timer tick rate independent of the swf filersquos frame rate (FPS) The swf file can have a frame rate setting of 25 (for example) but the game can run at a 30 frame ticks a second To do this we first set the frameRate to the desired number of frame update ticks we want per second (30) When Mainas calls the startTimer function (described in detail when we get to the section on the init function) the gameTimer is put into action First we will calculate the timerPeriod value as 1000frameRate With the updateAfterEvent function call (in the runGame function) we help to smooth out the render of the screen by asking the Flash display engine to update at the rate of the Timer not the frame rate set in the swf So going back to our example if the game SWF is set to run at 25 FPS and the frameRate is set to 30 ticks the updateAfterEvent will help to smooth out the rendering of the screen by asking the Flash display engine to update at the timer tick rate (30) not the swf filersquos FPS setting (25)
The timerPeriod will be passed into the Timer instance and the game will attempt to run at this rate We say
attempt because if the game includes too many on screen moving objects or more logic than can be computed inside the timerPeriod number of milliseconds (or a combination of both) then there will be a noticable slowdown in the game screen updates In later chapters we will add functionality to the runGame function to mitigate some of these issues
The screen definition variablesThe screen definition variables create instances of our BasicScreen class This is a rather simple class that allows a single positional text box and an OK button on the screen We will use this simple screen for the title instructions level and game over screens We will customize each screen when we create the init function override in our gamersquos Mainas class Note that the levelInText is a special variable Setting this string to a default value will allow the leveInScreen to display some default text along on each new level This text can be combined with dynamic text to create a screen that says something like Level 1 with the word Level being the default text and the number 1 being the dynamic text
public var titleScreenBasicScreen
public var gameOverScreenBasicScreen
public var instructionsScreenBasicScreen
public var levelInScreenBasicScreen
public var levelInTextString
public var screenTextFormatTextFormat
public var screenButtonFormatTextFormat
We also create two TextFormat objects that will be used for defining the format of the text on the screens and the format of the button text
The ScoreBoard variablesThe scoreBoard instance of the ScoreBoard class will handle a simple heads up display (HUD) for the user with information such as the current score It is a simple framework class that will be customized in the init function override in each gamersquos Mainas class The changes will depend on the game that is to be created We also define a TextFormatObject for the basic look of the text for our scoreboard text scoreBoardTextFormat
JEFF FULTON
STEVE FULTON
The next part of the article in the June issue of FFD Magazine
032010 (11)32
ACTIONSCRIPT DEVELOPMENT
032010 (11) 33
On my quest of learning Flash I often became frustrated of how difficult it was to update the contents of my application Meaning if I wanted
to change out an image or piece of copy I had to open up Flash go to my library find the Movie Clip that had my asset in it and republish I thought to myself this is no way to work this is so inefficient Enter XML in all its glory Constructing an application with enabled me to quickly and easily update my project at a moments
notice Without having to open up Flash Now what could be better than that
In this article yoursquore going to learn how to create a new ActionScript project in Flex Builder 3 and write ActionScript 30 code that will load in an XML file display the images on screen and add some interactivity to the scene
Setting up FlexOpen up Flex and go to Filegt NewgtActionScript Project A dialog window will open In the project name field type in PhotoGallery Leave the use default location box checked and click finish (see Figure 1)
Creating an XML Photo Gallery
Searching the Internet yoursquoll find dozens if not hundreds of examples of photo galleries created with Flash
What you will learnhellipbull How to create an ActionScript application in Flex Builder 3bull How to use ActionScript to parse an XML le
What you should knowhellipbull Familiar with general programming concepts such as data ty-
pes variables loops and functionsbull Familiar with class creation and constructionbull Some understanding of XML
with AS3
Figure 1 New ActionScript window dialog Figure 2 ActionScript Compiler dialog
032010 (11)32
ACTIONSCRIPT DEVELOPMENT
032010 (11) 33
Once you click finish your project should open and you should see PhotoGalleryas on screen There are a few steps that I like to take next that I do for every project
First right click PhotoGallery folder in the Flex Navigator window click properties at the bottom and then click on the ActionScript Compiler link on the left hand side At the bottom yoursquoll see a check box that is already selected to generate a HTML wrapper file Uncheck that and click ok A warning message will appear saying that the html-template folder will be deleted Donrsquot worry about that because we havenrsquot put anything in that folder Click ok I personally donrsquot like to have a browser window open every time I run my application (see Figure 2)
Secondly wersquoll be using a tweening library called Tweener In order to use Tweener we have to first download it (httpcodegooglecomptweener) Be sure to download the ActionScript 30 version and create a folder on your desktop or any other place and name it code Place the contents of that download into that folder Next go back to Flex and again right click the PhotoGallery folder and click properties again and this time yoursquoll click the ActionScript Build Path link This window gives us the ability to add assets to our project so we can use them in our project Click the Add Folder button browser to the code folder you just created click ok and click ok again to close the window Now that folder and all its contents will be included in our project (see Figure 3)
Next right click the src folder in your project scroll over to new and add a new folder Name this folder classes This folder will contain two classes that wersquoll be using Then repeat the same steps but this time name the folder images This folder will contain all the images
Figure 3 ActionScript Build Path dialog
032010 (11)34
ACTIONSCRIPT DEVELOPMENT
Listing 1 galleryxml
ltxml version=10 encoding=UTF-8gt
ltgallery image_height=150 image_width=150 image_
gap=5 rows=3gt
ltphotogt
ltdescriptiongtThis is a description for the first
imageltdescriptiongt
ltthumb_pathgtimagesthumbjpgltthumb_pathgt
ltfull_pathgtimagesfullgifltfull_pathgt
ltphotogt
ltphotogt
ltdescriptiongtThis is a description for the second
imageltdescriptiongt
ltthumb_pathgtimagesthumbjpgltthumb_pathgt
ltfull_pathgtimagesfullgifltfull_pathgt
ltphotogt
ltphotogt
ltdescriptiongtThis is a description for the third
imageltdescriptiongt
ltthumb_pathgtimagesthumbjpgltthumb_pathgt
ltfull_pathgtimagesfullgifltfull_pathgt
ltphotogt
ltphotogt
ltdescriptiongtThis is a description for the fourth
imageltdescriptiongt
ltthumb_pathgtimagesthumbjpgltthumb_pathgt
ltfull_pathgtimagesfullgifltfull_pathgt
ltphotogt
ltphotogt
ltdescriptiongtThis is a description for the fifth
imageltdescriptiongt
ltthumb_pathgtimagesthumbjpgltthumb_pathgt
ltfull_pathgtimagesfullgifltfull_pathgt
ltphotogt
ltphotogt
ltdescriptiongtThis is a description for the sixth
imageltdescriptiongt
ltthumb_pathgtimagesthumbjpgltthumb_pathgt
ltfull_pathgtimagesfullgifltfull_pathgt
ltphotogt
ltphotogt
ltdescriptiongtThis is a description for the seventh
imageltdescriptiongt
ltthumb_pathgtimagesthumbjpgltthumb_pathgt
ltfull_pathgtimagesfullgifltfull_pathgt
ltphotogt
ltphotogt
ltdescriptiongtThis is a description for the eighth
imageltdescriptiongt
ltthumb_pathgtimagesthumbjpgltthumb_pathgt
ltfull_pathgtimagesfullgifltfull_pathgt
ltphotogt
ltphotogt
ltdescriptiongtThis is a description for the ninth
imageltdescriptiongt
ltthumb_pathgtimagesthumbjpgltthumb_pathgt
ltfull_pathgtimagesfullgifltfull_pathgt
ltphotogt
ltphotogt
ltdescriptiongtThis is a description for the tenth
imageltdescriptiongt
ltthumb_pathgtimagesthumbjpgltthumb_pathgt
ltfull_pathgtimagesfullgifltfull_pathgt
ltphotogt
ltphotogt
ltdescriptiongtThis is a description for the
eleventh imageltdescriptiongt
ltthumb_pathgtimagesthumbjpgltthumb_pathgt
ltfull_pathgtimagesfullgifltfull_pathgt
ltphotogt
ltphotogt
ltdescriptiongtThis is a description for the twelfth
imageltdescriptiongt
ltthumb_pathgtimagesthumbjpgltthumb_pathgt
ltfull_pathgtimagesfullgifltfull_pathgt
ltphotogt
ltphotogt
ltdescriptiongtThis is a description for the
thirteenth imageltdescriptiongt
ltthumb_pathgtimagesthumbjpgltthumb_pathgt
ltfull_pathgtimagesfullgifltfull_pathgt
ltphotogt
ltphotogt
ltdescriptiongtThis is a description for the
fourteenth imageltdescriptiongt
ltthumb_pathgtimagesthumbjpgltthumb_pathgt
ltfull_pathgtimagesfullgifltfull_pathgt
ltphotogt
ltphotogt
ltdescriptiongtThis is a description for the
fifteenth imageltdescriptiongt
ltthumb_pathgtimagesthumbjpgltthumb_pathgt
ltfull_pathgtimagesfullgifltfull_pathgt
ltphotogt
ltgallerygt
032010 (11)36
ACTIONSCRIPT DEVELOPMENT
Listing 2 PhotoGalleryas
package
Imports
import caurinatransitionsTweener
import classesBigPhoto
import classesThumbNail
import flashdisplayBitmap
import flashdisplaySprite
import flasheventsEvent
import flasheventsMouseEvent
import flashnetURLLoader
import flashnetURLRequest
[SWF(width=466 height=515 backgroundColor=00
0000 frameRate=30)]
public class PhotoGallery extends Sprite
Containers
private var _thumbContainerSprite Stores
the thumbnails
private var _nextButtonSprite Stores
the next arrow
private var _backButtonSprite Stores
the back arrow
private var _bigPhotoBigPhoto
Container for the big image
XML
private var _xmlLoaderURLLoader
Loads the XML file
private var _xmlXML
Stores the XML data
Image Assets
[Embed(source=assetsnext-arrowpng)]
private var _nextArrowClass
Embedded asset for the next
arrow
[Embed(source=assetsback-arrowpng)]
private var _backArrowClass
Embedded asset for the back
arrow
Constructor
public function PhotoGallery()
init ()
Initializing method
private function init ()void
_xmlLoader = new URLLoader ()
_xmlLoaderaddEventListener (EventCOMPLETE
xmlComplete false 0 true)
_xmlLoaderload (new URLRequest
(galleryxml))
XML Complete
private function xmlComplete (eEvent)void
Store the XML data
_xml = new XML (etargetdata)
loadImages ()
Clean up
_xmlLoaderremoveEventListener
(EventCOMPLETE xmlComplete)
_xmlLoader = null
Load in the thumbs
private function loadImages ()void
Temporary variables
var imageHeightuint = _xmlimage_height
var imageWidthuint = _xmlimage_width
var imageGapuint = _xmlimage_gap
var rowsuint = _xmlrows
var rowCounteruint = 0
var columnCounteruint = 0
Instantiate the container and position it
on screen
_thumbContainer = new Sprite ()
_thumbContainerx = 78
_thumbContainery = 78
_thumbContainerbuttonMode = true
_thumbContaineraddEventListener
(MouseEventCLICK thumbClick
false 0 true)
thisaddChild (_thumbContainer)
Loop through the images and create the
visual grid
for (var iuint = 0 i lt _xmlphotolength ()
i++)
var pathString = _xmlphoto[i]thumb_path
var descriptionString = _xmlphoto[i]desc
Creating an XML Photo Gallery with AS3
032010 (11) 37
Listing 2 PhotoGalleryas
ription
Create the thumbnail
var pThumbNail = new ThumbNail ()
pnewID = i
ploadImage (path)
pdescription = description
px = (imageWidth + imageGap)
columnCounter
py = (imageHeight + imageGap)
rowCounter
_thumbContaineraddChild (p)
Create the grid
if ((rowCounter + 1) lt rows)
rowCounter++
else
rowCounter = 0
columnCounter++
Setup the navigation
createNavigation ()
This method handles the click event for the
next arrow
private function nextClick (eMouseEvent)void
155 is the width + spacing
if (-_thumbContainerx lt (_thumbContainerwidth
ndash stagestageWidth ndash 155))
disableNavigation ()
TweeneraddTween (_thumbContainer x
_thumbContainerx ndash 155 time
075 transitioneaseOutExpo
onCompleteenableNavigation)
This method handles the click event for the
back arrow
private function previousClick (eMouseEvent)void
if (-_thumbContainerx gt 0)
disableNavigation ()
TweeneraddTween (_thumbContainer x
_thumbContainerx + 155 time
075 transitioneaseOutExpo
onCompleteenableNavigation)
This method handles the click event for the
thumbnails
private function thumbClick (eMouseEvent)void
disableNavigation ()
Disable the container that stores the
thumbnails
_thumbContainerbuttonMode = false
_thumbContainermouseChildren = false
_thumbContainerremoveEventListener
(MouseEventCLICK thumbClick)
Get the full image path
var imagePathString = _xmlphoto[etargetnewI
D]full_path
Instantiate the big photo
_bigPhoto = new BigPhoto ()
_bigPhotobuttonMode = true
_bigPhotox = 108
_bigPhotoy = 1075
_bigPhotoalpha = 0
_bigPhotoloadImage (imagePath)
_bigPhotoaddEventListener (MouseEventCLICK
closePhoto false 0 true)
thisaddChild (_bigPhoto)
Fade up the photo
TweeneraddTween (_bigPhoto alpha1 time
1)
Fade out the photo
When the image finishes fading delete the
photo and enable the navigation
items
private function closePhoto (eMouseEvent)void
TweeneraddTween (_bigPhoto alpha0 time1
onCompletedeletePhoto)
private function deletePhoto ()void
032010 (11)38
ACTIONSCRIPT DEVELOPMENT
Listing 2 PhotoGalleryas
_bigPhotobuttonMode = false
_bigPhotoremoveEventListener
(MouseEventCLICK closePhoto)
_bigPhotodestroy ()
thisremoveChild (_bigPhoto)
_bigPhoto = null
_thumbContainerbuttonMode = true
_thumbContainermouseChildren = true
_thumbContaineraddEventListener
(MouseEventCLICK thumbClick
false 0 true)
enableNavigation ()
private function createNavigation ()void
Instantiate the next arrow
var nBitmap = new _nextArrow ()
Instantiate the nextButton container
Add the next button as a child of the
nextButton container
_nextButton = new Sprite ()
thisaddChild (_nextButton)
_nextButtonaddChild (n)
_nextButtonx = stagestageWidth ndash _
nextButtonwidth
_nextButtony = 475
Instantiate the back arrow
var bBitmap = new _backArrow ()
Instantiate the backButton container
Add the next button as a child of the
backButton container
_backButton = new Sprite ()
thisaddChild (_backButton)
_backButtonaddChild (b)
_backButtonx = _nextButtonx ndash _
nextButtonwidth ndash 5
_backButtony = 475
enableNavigation ()
private function enableNavigation ()void
_nextButtonbuttonMode = true
_nextButtonaddEventListener
(MouseEventCLICK nextClick false
0 true)
_backButtonbuttonMode = true
_backButtonaddEventListener
(MouseEventCLICK previousClick
false 0 true)
private function disableNavigation ()void
_nextButtonbuttonMode = false
_nextButtonremoveEventListener
(MouseEventCLICK nextClick)
_backButtonbuttonMode = false
_backButtonremoveEventListener
(MouseEventCLICK previousClick)
Figure 4 New ActionScript class dialog
Creating an XML Photo Gallery with AS3
032010 (11) 39
Listing 3 ThumbNailas
package classes
import caurinatransitionsTweener
import flashdisplayLoader
import flashdisplayShape
import flashdisplaySprite
import flasheventsEvent
import flasheventsMouseEvent
import flashnetURLRequest
import flashtextTextField
import flashtextTextFieldAutoSize
import flashtextTextFormat
public class ThumbNail extends Sprite
Containers
private var _imageLoaderLoader Loads in
the thumbnail
private var _imageContainerSprite
Container for the thumbnail
private var _maskShape Container for the
mask
private var _descriptionContainerSprite
Container for the description
TextFields
private var _descriptionTextField
TextField for the container
Logic
private var _newIDuint The ID of the
object
[Embed(systemFont=Arial fontName=arial
fontWeight=bold
mimeType=applicationx-font-
truetype)]
private var _arialClass Embedded asset
for the font
Constructor
public function ThumbNail ()
super ()
init ()
Initializing method
private function init ()void
Instantiate the container
_imageContainer = new Sprite ()
_imageContaineralpha = 0
thisaddChild (_imageContainer)
createDescription ()
thismouseChildren = false
thisaddEventListener (MouseEventMOUSE_OVER
onMouseOver false 0 true)
thisaddEventListener (MouseEventMOUSE_OUT
onMouseOut false 0 true)
Public Methods
public function loadImage (pathString)void
_imageLoader = new Loader ()
_imageLoadercontentLoaderInfoaddEventListen
er (EventCOMPLETE imageComplete
false 0 true)
_imageLoaderload (new URLRequest (path))
GetterSetter Methods
public function get newID ()uint
return this_newID
public function set newID (valueuint)void
this_newID = value
public function get description ()String
return this_descriptiontext
public function set description (valueString)void
this_descriptiontext = value
Private Methods
032010 (11)40
ACTIONSCRIPT DEVELOPMENT
Listing 3 ThumbNailas
private function onMouseOver (eMouseEvent)void
TweeneraddTween (_descriptionContainer
y75 time05 transition
easeOutExpo)
private function onMouseOut (eMouseEvent)void
TweeneraddTween (_descriptionContainer
y150 time05 transition
easeOutExpo)
private function imageComplete (eEvent)void
Reposition the loaded content to the center
_imageLoaderx = -(_imageLoaderwidth 2)
_imageLoadery = -(_imageLoaderheight 2)
_imageContaineraddChildAt (_imageLoader 0)
Apply background after the image has
completely loaded
drawBackground ()
Draw the mask around the description
drawMask ()
Fade in the container
TweeneraddTween (_imageContainer alpha1
time05)
Clean up
_imageLoadercontentLoaderInforemoveEv
entListener (EventCOMPLETE
imageComplete)
Draws a background behind _imageContainer
private function drawBackground ()void
_imageContainergraphicsbeginFill (0xFFFFFF)
_imageContainergraphicsdrawRect (_
imageLoaderx ndash 1 _imageLoadery
ndash 1 _imageLoaderwidth + 2
_imageLoaderheight + 2)
_imageContainergraphicsendFill ()
Creates everything for the description
private function createDescription ()void
Instantiate the container
_descriptionContainer = new Sprite ()
_descriptionContainery = 150
_descriptionContainergraphicsbeginFill
(0x000000 075)
_descriptionContainergraphicsdrawRect (-75
-75 150 75)
_descriptionContainergraphicsendFill ()
_imageContaineraddChild (_
descriptionContainer)
Specify text formatting for the description
Text Field
var tfTextFormat = new TextFormat ()
tfcolor = 0xFFFFFF
tfalign = center
tffont = arial
tfbold = true
tfsize = 12
Instantiate the TextF ield
_description = new TextField ()
_descriptionx = -75
_descriptiony = -70
_descriptionwidth = 150
_descriptionwordWrap = true
_descriptionembedFonts = true
_descriptiondefaultTextFormat = tf
_descriptionautoSize = TextFieldAutoSizeLEFT
_descriptionContaineraddChild (_description)
Draws a mask our _descriptionContainer
private function drawMask ()void
Draw the mask shape
_mask = new Shape ()
_maskgraphicsbeginFill (0xFF0000)
_maskgraphicsdrawRect (_imageLoaderx
_imageLoadery _imageLoaderwidth
_imageLoaderheight)
_maskgraphicsendFill ()
addChild (_mask)
Apply the mask to the container
_descriptionContainermask = _mask
Creating an XML Photo Gallery with AS3
032010 (11) 41
that will be loaded into the application from XML Finally create another folder and this time name it assets This folder will contain the buttons that wersquoll embed into our project
The AssetsBefore we start coding we need to create some visual assets Open up Photoshop or any other program you have for creating graphics and create an image that is 150x150 pixels Fill it with a flat color and save the image as thumbjpg in the images folder you just created Next create another image thatrsquos 250x300 pixels Fill it with another color and save that image as fulljpg into the same folder These images will be used for testing purposes only
Listing 4 BigPhotoas
package classes
import flashdisplayLoader
import flashdisplaySprite
import flasheventsEvent
import flashnetURLRequest
public class BigPhoto extends Sprite
Containers
private var _imageLoaderLoader Loads in the
thumbnail
private var _imageContainerSprite Container
for the thumbnail
Constructor
public function BigPhoto ()
super()
Public Methods
public function loadImage (pathString)void
_imageLoader = new Loader ()
_imageLoadercontentLoaderInfoaddEventListen
er (EventCOMPLETE imageComplete
false 0 true)
_imageLoaderload (new URLRequest (path))
Clean up method
public function destroy ()void
_imageContainerremoveChild (_imageLoader)
_imageLoaderunload ()
_imageLoader = null
thisremoveChild (_imageContainer)
_imageContainer = null
Private Methods
private function imageComplete (eEvent)void
Instantiate the container
_imageContainer = new Sprite ()
thisaddChild (_imageContainer)
Add the loader
_imageContaineraddChild (_imageLoader)
Clean up
_imageLoadercontentLoaderInforemoveEv
entListener (EventCOMPLETE
imageComplete)
Figure 5 Time to test
032010 (11)42
ACTIONSCRIPT DEVELOPMENT
We still have to create our navigation buttons that wersquoll use to scroll through our gallery Create two buttons that are 40x40 pixels and design them how you like They should resemble forward and back buttons Save the forward arrow as next-arrowpng and the other as back-arrowpng into the assets folder Now that our assets our created itrsquos time to code
The XML fileRight click the src folder in the project scroll over to new and click file A dialog window will open and in the file name input box type galleryxml (see Figure 4) Write the code that you see from Listing 1 into galleryxml
Line 1 is the XML declaration This is needed to have a well-formed XML document
Line 2 declares the gallery root node Notice in this node Irsquove added attributes Also to have a well-formed XML document you must have one root node and all attribute values must be in quotes
Lines 3-7 declares a photo node with three children description thumb_path and full_path description is exactly as it sounds It will contain a description for our thumbnail thumb_path contains the path to our thumbnail image Same goes for full_path it contains the path to our full image
I then just copy and pasted that and pasted it 14 times just changing out the description Remember wersquore just using dummy data When you finish go back and add photos of your choice
The ClassesWersquoll be using two additional classes for this project One will be for the thumbnails and another for the full image Right click the classes folder go to new and click ActionScript class In the name field type ThumbNail For the Superclass type in flashdisplaySprite Wersquoll need to extend from that class so we can use the functionality of that object but add our own (see Figure 4)
Add another class this time name it BigPhoto It should also inherit from flashdisplaySprite
CodingTime to start writing the ActionScript for this project Open up PhotoGalleryas from the Flex Navigator and type in the code from Listing 2 Open up ThumbNailas and type in the code from Listing 3 Open up BigPhotoas and type in the code from Listing 4 Now that you have all the code in itrsquos time to test In the menu bar click RungtRun PhotoGallery (see Figure 5) If you get an error make sure you typed everything correctly If all went well you should see the gallery open up Click the buttons and watch the gallery scroll left and right Roll over the thumbnails to see the description scroll up Click on a thumbnail to see the full image fade in You might be wondering about whatrsquos going on Irsquoll try to break that down for you next
The ExplanationOur main focus is going to be whatrsquos going on in PhotoGalleryas This file contains the ActionScript that makes almost everything happen We first start off by declaring our properties that will be used in the project Yoursquoll notice a couple of embeded lines These lines are MetaData tags that actually embed assets into the project The two embeded lines you see add the next-arrowpng file and the back-arrowpng file In the constructor there is one call to a method called init() This method gets the application going by requesting and loading in the XML File When the file finishes loading we store the XML data into our _xml property Next we call the loadImages() method This method is responsible for a big part of the application We first gather some information from the XML file and store it in temporary variables
bull imageWidth stores the image _ height attributes valuebull imageWidth stores the image _ width attributes valuebull imageGap stores the image _ gap attributes valuebull rows stores the row attributes valuebull rowCounter increments ever pass of the for loop Is
compared against the rows variablebull columnCounter increments once for every column
created
The for loop cycles the XML file creating a new ThumbNail object with every iteration During each iteration we create variables that store the path to the thumb nail (path) and the description of the thumbnail (description) We pass the variables into the methods of the ThumbNail class Remember the ThumbNail class defines methods and properties that are specific to it The class code is commented if you wish to explore it Again our main focus is PhotoGalleryas To create the grid we write ifelse logic that compares the rowCounter variable to the row variable For every iteration of the loop we increment that variable if that variable becomes greater than rows we set it back to 0 rowCounter is then multiplied to the y-axis of each ThumbNail object The rest of the code is commented for you to explore
ConclusionYoursquoll notice I actually hard coded a lot of values directly in the ActionScript Not too ideal In the next part of this tutorial wersquore going to come back to this code and modify it to be a little more flexible and visually appealing If you have any questions feel free to contact me through my site (wwwcodedbyryancom)
RYAN DrsquoAGOSTINORyan DrsquoAgostino is an Interactive Developer at NAS Recruitment Communications in Cleveland OH part-time instructor at Virginia Marti College of Art and Design in Lakewood Ohio and freelance designer and ActionScript developer For more information about Ryan please visit httpwwwcodedbyryancom
032010 (11)44
COMPONENTS
Components are the controls and containers that are the elements of the application that create the interface They cover controls such
as buttons and check boxes containers that can hold other containers and controls navigation elements and charts Components can be added to your application in variety of ways They can be added through the design view writing then in MXML or through ActionScript
Flash Builder now has two major sets of components the Halo set which has been available in previous versions of Flex and the new Spark set The components from the Spark set have a direct correlation to a component in the Halo set but not all Halo components have been upgraded to the Spark framework yet The namespaces for these components are added automatically when a MXML document is created and you will notice there are now multiple namespace in the main MXML document already
Creating custom components takes two paths The first is to create a skin for an existing Halo component in Flash Illustrator Photoshop or Fireworks or create a custom skin for a Spark component using MXML The second path is to create a completely custom component using Flash Professional and importing it into the Flash Builder project We are going to focus on the second path and create a custom component with Flash Professional
The first step in creating a custom component is to instal the Flex Component Kit mxp into Flash Professional This is an extension that will expose some
Custom Flash CS4
Flash Builder comes with a lot of components to cover almost all of an apps needs But what if you want a custom look or functionality to a component With Flash Professional you can create custom components and import them into Flash Builder for use in your application
What you will learnhellipbull How to create custom components in Flash Professional to im-
port into Flash Builder
What you should knowhellipbull Flash Professional CS4bull Flash Builder 4bull Actionscript 3
Components in Flash Builder 4
Figure 1 The component artwork Figure 2 Converting the movie clip
032010 (11)46
COMPONENTS
Listing 1 The component class
package comtest
import mxflashUIMovieClip
import flasheventsEvent
import flasheventsEventDispatcher
import flasheventsMouseEvent
import flashfiltersGlowFilter
public class SliderButton extends UIMovieClip
public static const BUTTON_CLICKString = button click
private var glowGlowFilter = new GlowFilter(0x0000cc54421falsefalse)
public function SliderButton()
plusButtonbuttonMode = true
minusButtonbuttonMode = true
plusButtonaddEventListener(MouseEventMOUSE_OVER handleMouseOver)
plusButtonaddEventListener(MouseEventMOUSE_OUT handleMouseOut)
plusButtonaddEventListener(MouseEventCLICK handleMousePress)
minusButtonaddEventListener(MouseEventMOUSE_OVER handleMouseOver)
minusButtonaddEventListener(MouseEventMOUSE_OUT handleMouseOut)
minusButtonaddEventListener(MouseEventCLICK handleMousePress)
private function handleMouseOver(eMouseEvent)void
ecurrentTargetfilters = [glow]
private function handleMouseOut(eMouseEvent)void
ecurrentTargetfilters = []
private function handleMousePress(eMouseEvent)void
if(ecurrentTargetname == plusButton ampamp trackThumbx lt 134)
trackThumbx++
else if(ecurrentTargetname == minusButton ampamp trackThumbx gt 37)
trackThumbx--
dispatchEvent(new Event(SliderButtonBUTTON_CLICK))
032010 (11)48
COMPONENTS
of the Flex classes to Flash allowing the component to communicate with the application Download the extension from the Adobe site at httpwwwadobecomcfusionexchangeindexcfmevent=extensionDetailampextid=1273018 and install using the Adobe Extension Manager The extension should work with Flash
versions as far back as Flash 8 but I highly recommend using at least Flash 9 (CS 3)
Once the extension is installed launch Flash Professional and create a new ActionScript 3 project We are going to create a simple slider button that has a plus and minus button on each end of the button and a track between them When the plus and minus buttons are clicked the the track thumb will move one pixel in either direction There will also be a roll over behavior on the buttons to change their look as the mouse rolls over and off the buttons Finally Flash Builder will receive the event of the button being pushed and update a text input on the stage
It is common to encapsulate the behaviors of the component within itself and have events broadcast to the containing application If you think about some of standard components in both Flash Builder and Flash Professional and deconstruct them in your mind you will see that the same methods are used on them The NumericStepper is a lot like our component It has two buttons with a text field that displays a value that is incremented or decremented with each push of the button The component itself does nothing to effect the application until the code calls it to either send or receive a value
With our new document we are going to create the artwork for the component in the fla file Create four movie clips one each for the scroll track the plus button the minus button and the track thumb (Figure 1) The naming and look of these movie clips are not important
Once the movie clips are created and on the stage give each one an instance name The names in the
Figure 3 Setting the class of the movie clip
Figure 4 Setting to export as SWC
Figure 5 Creating the Flash Builder project
Custom Flash CS4 Components in Flash Builder 4
032010 (11) 49
example files are plusButton minusButton and trackThumb The actual names do not matter and we dont need an instance name for the track since we are not going to reference it in Flash Builder Flash Builder will reference the instance names of the movie clips in the components we will use these later
Now that the artwork has been created it must be collected into its own movie clip Select all of the artwork on the stage and choose ModifygtgtConvert to Symbolhellip In the Library panel there is a new symbol that is called in the sample files SliderButton The name is important here because this is how the Convert to Flex Component mxp will name the class that Flash Builder will refer to later
An external class will give the component the internal behaviors that were mentioned earlier as well as an event to broadcast to the Flash Builder application (Listing 1) All the code in the class should be familiar but there are a few points to go over First the package name is given the qualifier of comtest to identify that the component belongs to our namespace This is not necessary but helpful when there are multiple components or components from different publishers in the application
The most important change is instead of having the class extend the Sprite class this class is going to
extend the UIMovieClip class This class like the Flex Component in the library exposes the behaviors and methods we set up in the class to the Flash Builder application In the import statements use import
mxflashUIMovieClip The mxflash class includes both the UIMovieClip and ContainerMovieClip classes
When the variables are declared we set up a glow filter that will be attached to the buttons when the mouse rolls over them and a string constant for the event we create later In the constructor of the class the buttons receive the event listeners for the mouse interactions and the handlers are added later in the code In the handleClick event handler we use the event dispatcher class to dispatch the event Here we are just dispatching a standard event with the constant that was created earlier You can just as easily dispatc a custom event that has extra information attached to it
Select the movie clip in the Library panel then select CommandsgtgtConvert Symbol to Flex Component (Figure 2) The extension will do several operations such as making the symbol available to ActionScript giving the symbol a class name adding the Flex Component to the library and others
Save the file as SliderButtonas in the folder path comtest When you declare the package name as we have here you must have the same hierarchy as listed in the package name Back in the fla select the
Figure 6 The Package Explorer
Listing 2 The main MXML le
ltxml version=10 encoding=utf-8gt
ltsApplication xmlnsfx=httpnsadobecommxml
2009
xmlnss=librarynsadobecomflex
spark
xmlnsmx=librarynsadobecomflex
mx
width=200 height=110gt
ltfxDeclarationsgt
lt-- Place non-visual elements (eg
services value objects) here
--gt
ltfxDeclarationsgt
ltsApplicationgt
Listing 3 The new component and name space
xmlnstest=comtest
lttestSliderButton x=14 y=10 id=sliderButton
gt
032010 (11)50
COMPONENTS
SliderButton movie clip and select Propertieshellip from the contextual menu Expand the advanced area if it is not already and enter comtestSliderButton in the Class text field Leave the Base Class text field blank and click OK (Figure 3)
Select Publish Settingshellip from the file menu and click on the Flash tab (Figure4) Under the SWF Settings area of the window be sure that the Export SWC check box is checked The swc is the part that Flash Builder will use in the application SWC are archives that contain the classes and media assets of the component and make it easy to distribute the movie clip
Publish the SWF and SWC and we are ready to move to Flash Builder
Flash BuilderIn Flash Builder create a new project This example we only need a basic Flash Builder project without any
server technologies You can name the project anything you would like in this case I have name FB_Components and saved it in my default workspace
If you have not worked on a Flash Builder project yet it is a lot like working on the Flex projects in the past with some new MXML tags You will also notice that the Flex Navigator pane has now been replaced with the Package Explorer (Figure 6)
The Package Explorer pane has a different organization than the Flex Navigator but the main MXML file can still be found under src then under the default package
Looking at the main MXML (Listing 2) you will see that the three name spaces are added automatically and the application begins with sApplication instead of mxApplication These are the minor differences to be on the look out for when working on a Flash Builder project
Listing 4 The nal MXML le
ltxml version=10 encoding=utf-8gt
ltsApplication xmlnsfx=httpnsadobecommxml2009
xmlnss=librarynsadobecomflexspark
xmlnsmx=librarynsadobecomflexmx minWidth=200 minHeight=110
width=200 height=110
initialize=init()
xmlnstest=comtestgt
ltfxDeclarationsgt
lt-- Place non-visual elements (eg services value objects) here --gt
ltfxDeclarationsgt
ltfxScriptgt
lt[CDATA[
private function init()void
sliderButtonaddEventListener(SliderButtonBUTTON_CLICK updateText)
private function updateText(eEvent)void
pixelTexttext = String(sliderButtontrackThumbx)
]]gt
ltfxScriptgt
lttestSliderButton x=14 y=10 id=sliderButton gt
ltsLabel x=39 y=41 text=The position of the track thumb is textAlign=center width=122gt
ltsTextInput x=76 y=76 width=49 id=pixelTextgt
ltsApplicationgt
Custom Flash CS4 Components in Flash Builder 4
032010 (11) 51
To get our component into the Flash Builder project we need to put the swc some where the project can see it On your desktop navigate to where the swc was published to and copy the file Then navigate to where Flash Builder project is and put the swc into libs folder I have found it is easier to keep the fla and swf files out of the project then copy the swc over to the Flash Builder project as needed
Back in Flash Builder open the libs folder under the project in the Package Explorer pane In that directory you should see your swc if you do not try right clicking on the libs folder and selecting Refresh
In the MXML editor switch to Design view When the Design view becomes active the Component pane should become available in the lower left of the workspace The first folder in the pane is the Custom folder and our custom component should be displayed in the list Drag an instance of this component onto the stage
To show that we can have two way communication with the component drag a label and a text input onto the stage Set the labels text to be The position of the track thumb is and move the text input near the label Set the id of the text input to pixelText (Figure 7) Switch back to the Source view after saving
Notice that several lines have been added to the source of the MXML document In addition to the MXML for the component including our custom component a name space value has been added to the sApplication tag designated as xmlnstest=comtest (Listing 3) If we add more components using the same comtest package declaration they will all fall under this name space If we were to add more components using a different package additional name spaces would be added You will also notice that the component starts with testSliderButton as opposed to s fx or mx
In the application tag add an initialize property calling a function called init() After the fxDeclarations tags add fxScript tags to hold the Actionscript As you type fx the code completion should pop up and allow you to select the fxScript tags
Add an id property to the SliderButton tag and give it a value of sliderButton In between the CDATA tags add the init function This function simply adds an event listener to our component calling the updateText
function every time the BUTTON_CLICK event is broadcast from the SliderButton class (Listing 4)
Once the application receives the BUTTON_CLICK event it calls the updateText function This function looks into the component and gets the x position of the track thumb then puts that value into the text input we set up earlier
So now we have communication coming out of the component using the dispatchEvent call in the class We are also looking into the component where the application is getting the x position of the thumb track inside the component Communication can get much more complicated than this but this is a simple example to give a starting point to create more complex components
Click debug to run the application and if no errors occurred the application should launch in a browser window If you have a browser window open before running the app you should close it There is a bug in the Flash Player at the time of this writing that may cause the app to not run if there are browser windows already open
Once the application is running click on the buttons and watch as the value in the text input increase and decrease The custom component is now complete and ready to have more behaviors and methods added to it
ConclusionWhile the components that come with Flash Builder can cover most situations there will be times where only a custom component will fit the applications needs Creating a custom component takes a little work but can make the developers job a lot easier With this new level of control over the look and behavior of the component can make the application more rich and engaging to the end user
Figure 7 Components on the stage
On the Netbull httpwwwadobecombull httpwwwadobecomcfusionexchangeindexcfmeven-
t=extensionDetailampextid=1273018
LOUIS DICARROLouis DiCarro is a consultant based in NYC and has been working with Flash since the rst version He has taught web development at the college level and has worked for numerous large clients He can be reached at louisdicarroffdgmailcom
032010 (11)52
COMPONENTS AIR Components in Flash Builder
032010 (11) 53
We already know that building an AIR application affords us a lot more capabilities than working with a web based project
Digging through the Actionscript documentation shows that there are a lot of classes that are only available to AIR applications These mostly have to do with classes and methods that interact with the file system or windowing of the application
Flash Builder as with Flex Builder before it contains several components that are only available to use with AIR applications These components deal with
visual interfaces for interacting with the file system and a HTML component for displaying web content
You may wonder why these components are only available for AIR applications Mostly it is for security reasons Up to Flash Player 101 a swf does not have the permission to interact with files on the file system except in very limited circumstances
Swfs in the web browser are able to interact only with files on the server in which the swf is hosted This allows them to load images xml and other file types at run time but only if the files come from within its
AIR Components
Adding file and html rendering can result in a lot of code But with the AIR components in Flash Builder 4 this functionality can be added easily with only a few lines of code
What you will learnhellipbull What components are available for AIR applications in Flash
Builder 4
What you should knowhellipbull Flash Builder 4bull Actionscript 3
in Flash Builder
Figure 1 AIR Actionscript 3 special classes for the HTML component Figure 2 Layout of the HTML application
032010 (11)52
COMPONENTS AIR Components in Flash Builder
032010 (11) 53
Were going to take a look at couple of simple examples for each component to get a feel how use them It is also important to note that the documentation for these components are in the AS 3 documentation When looking at the documentation you will see a symbol next to some of the classes and also next to some methods within the classes (Figure 1)
HTML ComponentThe HTML component is very easy to work with It can pull in many types of media and render them as you would expect them to be rendered in a web browser
Start up Flash Builder and create a new Flex project Name the project and select Desktop under project type Click finish and let Flash Builder set up the project
Once the project is started click on the Design tab In the lower left a component tab should be open If it is not open it using the Window menu and selecting Components Scroll down to the Adobe AIR folder You will not see this folder if you set your project to run in a web browser
We are going to create a simple web browser using only three components and one line of code First drag a HTML component a text field and a button to the stage Arrange them how you would like and switch over to design view
Give each component an id as in Listing 1 Also give the button a click handler Type click and let the program auto complete another code hint will pop up to create the handler automatically
Flash Builder will generate the handler as well as the fxScript block in the code In the click handler that is generated add a line that will set the location of the HTML component to the text in the text field See Listing 2 for the full code
Run the application and fill in a valid web address in the application Remember to include http in front of
own sandbox There are exceptions and ways around it but for the majority the swf cannot interact with the file system
If the development of applications using Flash Builder and AIR were to succeed they would need to act like real desktop applications This means that the applications would have to load and save files just as any other application that a user would use on the computer
Security is still maintained in this model by having the developer digitally sign their application using certificates If the certificate is obtained though a trusted source the application would be traceable back to the original developer if something bad should happen
Having a HTML component gives the application greater rendering power by tapping into the Web Kit which can run better than the HTML renderers in the Flash Player This allows developers to repurpose content from their web site to the application
Figure 3 The application running Figure 4 Layout of the image viewer application
Listing 1 MXML of components
ltsTextInput id=addressBar x=10 y=10
width=518gt
ltsButton id=goButton x=555 y=13
label=Go click=goButton_
clickHandler(event) gt
ltmxHTML id=htmlPane x=10 y=40 width=620
height=430gt
Listing 2 goButton handler
protected function goButton_clickHandler(event
MouseEvent)void
htmlPanelocation = addressBartext
032010 (11)54
COMPONENTS
the address Click the Go button and the page should load after a few seconds Take a look at Figure 3 for the results
There are a lot of methods and commands associated with the HTML component This will allow you to make a more customized display and give more control over the HTML content that you show
File system componentsUsing the file system components is just as easy To test the components we are going to create a simple image viewer that allows the user to select the images from the file system
Create a new Flex Project as we did before and be sure to make it a desktop application Once the project has loaded switch to design view and drag a File System Tree and an Image component to the stage See Figure 4 for the layout
Once the application is laid out switch over to the Source mode and give all the components ids as we did before (Listing 3) Also add a change handler instead of a click handler Flash Builder will autocomplete and generate the handler for you as it did when we added the click action to the button
In the generated handler add the code that will load the image into the image component To keep everything simple we only are going to load jpg and png files (Listing 4) in this function we are first checking to make sure the file is a file and not a directory by checking for a file extension If the file passes the first test we check to see if the file is a jpg or png Lastly if the file passes all of these test it gets loaded into the image component
Save the file and run the application to see the results Clicking on the file system tree items will either open or close the directory or try to load the file When the user clicks on a jpg or png it will load into the image component (Figure 5) Note that as the tree expands a scroll bar is attached to the component automatically
ConclusionJust as with the HTML component there is more methods and properties available to you with the file system components In this demo application we have seen how easy it is to get access to the file system using the component without writing a lot of code
There is a lot more involved in making a full application using these components but we have witnessed how easy to get started with them Having more control over the elements as well as error checking would be added in real applications
Having these components available gives the application a large amount of functionality very quickly and allows the developer to concentrate on the logic of the application Using these components in your application will help make it more full-featured and feel more like a real desktop application
LOUIS DICARROLouis DiCarro is a consultant based in NYC and has been working with Flash since the rst version He has taught web development at the college level and has worked for numerous large clients He can be reached at louisdicarroffdgmailcom
Listing 3 MXML of components
ltmxFileSystemTree id=fsList x=10 y=10
height=460 change=fsList_
changeHandler(event)gt
ltmxImage id=imgPane x=193 y=10 width=437
height=460gt
Listing 4 Handler for change event
protected function fsList_changeHandler(event
ListEvent)void
var fileFile = eventcurrentTargetselectedItem
as File
if(fileextension)
if(fileextensiontoLowerCase() == jpg ||
fileextensiontoLowerCase() ==
png)
imgPanesource = fileurl
Figure 5 The image viewer application running
032010 (11)56
TLF Applying CSS to Text Layout Framework styles
032010 (11) 57
TLF is introducing the new way of applying styles to the text Prior to TLF flash used simple approach you had to prepare and attach
StyleSheet object to the style property of the TextFieldTLF provides more flexible and customizable but
more complex techniqueDuring this tutorial we are going to create a small
application in Flex 4 This application contains a text displayed with TLF component TextArea and 2 different CSS that can be applied to the text simply by pressing the button Figure 1 show the screenshot of the application
TextFlow and itrsquos IFormatResolverTLF provides a callback mechanism to for with text styles TextFlow objectrsquos got a property formatResolver that should implement IFormatResolver interface Actually it is a set of callback functions that are called by parent TextFlow when it processes itrsquos elements
To have a closer look at formatResolver we will implement itrsquos version to work with out simple CSS So start create a new project in Flex and name it for example TextCSS In the default package create a new ActionScript class named CSSFormatResolver that implements IFormatResolver interface
Listing 1 shows the complete implementation of the class and will we look closer into it later For now pay attention on the following functions
bull invalidateAll
bull invalidate
bull resolveFormat
bull resolveUserFormat
bull getResolverForNewFlow
These function are created automatically by Flex Builder as they are required for implementation of the interface All functions are callbacks that are called when the certain action is performed by TextFlow and it needs to know how to treat with different elements
Applying CSS
This article is a reply to our readerrsquos question about the possibility to apply CSS to Text Layout Framework (TLF) We will show how to implement the necessary class and switch text styles on the fly
What you will learnhellipbull how can custom styles be applied to TLF elementsbull how to implement IFormatResolver to work with CSS
What you should knowhellipbull the basics of Flex and FlexFlash Builderbull the basics of TLF
to Text Layout Framework styles
Figure 1 Style changing application
032010 (11)56
TLF Applying CSS to Text Layout Framework styles
032010 (11) 57
Main ApplicationListing 2 contains a full code for main application
The application consists of
bull TextArea with some text The text is formed using XML Some elements of the TextFlow have
For our case we are interested in resolveFormat function that is called for every element of the TextFlow when itrsquos style needs to be changed This function return an object that should implement ITextLayoutFormat
Before we continue lets have a fast look at main application and how we build our example
Listing 1 CSSFormatResolveras
package
import flashtextStyleSheet
import flashxtextLayoutelementsFlowElement
import flashxtextLayoutelementsFlowValueHolder
import flashxtextLayoutelementsIFormatResolver
import flashxtextLayoutelementsTextFlow
import flashxtextLayoutformatsITextLayoutFormat
public class CSSFormatResolver implements
IFormatResolver
private var _styleSheetStyleSheet
public function CSSFormatResolver()
_styleSheet = new StyleSheet()
public function invalidateAll(textFlow
TextFlow)void
public function invalidate(targetObject)void
public function resolveFormat(targetObject)
ITextLayoutFormat
var formatFlowValueHolder = null
if (target is FlowElement)
var elementFlowElement = target as
FlowElement
if (element = null)
format = elementformat as
FlowValueHolder
if (elementstyleName = null)
var styleObject = styleSheetgetSt
yle(elementstyleName)
formatcolor = style[color]
formatfontSize =
style[fontSize]
formatfontWeight =
style[fontWeight]
formatfontStyle =
style[fontStyle]
return format
public function resolveUserFormat(targetObject
userFormatString)
return null
public function getResolverForNewFlow(oldFlow
TextFlow newFlowTextFlow)
IFormatResolver
return null
public function get styleSheet()StyleSheet
return _styleSheet
public function set styleSheet(valueStyleSheet)
void
_styleSheet = value
032010 (11)58
TLF
032010 (11) 59
Listing 2 TextCSSmxml
ltxml version=10 encoding=utf-8gt
ltsApplication xmlnsfx=httpnsadobecommxml2009
xmlnss=librarynsadobecomflexspark
xmlnsmx=librarynsadobecomflexhalo
xmlnslocal=
width=640 height=300gt
ltfxScriptgt
lt[CDATA[
import mxeventsFlexEvent
protected function applyCSS1Button_
clickHandler(eventMouseEvent)void
var formatResolverCSSFormatResolver =
new CSSFormatResolver()
formatResolverstyleSheetparseCSS(css1
text)
textAreatextFlowformatResolver =
formatResolver
protected function applyCSS2Button_
clickHandler(eventMouseEvent)void
var formatResolverCSSFormatResolver =
new CSSFormatResolver()
formatResolverstyleSheetparseCSS(css2
text)
textAreatextFlowformatResolver =
formatResolver
]]gt
ltfxScriptgt
ltsTextArea id=textArea width=620 height=134
x=9 y=156gt
ltsTextFlowgt
ltsp styleName=h1gt
Title of the Text
ltspgt
ltsp styleName=h2gt
Section of the Text
ltspgt
ltspgt
This is a body text Lorem ipsum
ltspgt
ltsTextFlowgt
ltsTextAreagt
ltsTextArea x=10 y=10 width=285 height=86
id=css1 gt
lt[CDATA[
h1
colorFF0000
fontSize20
fontWeightbold
fontStylenormal
h2
colorFF00FF
fontSize16
fontWeightbold
fontStyleitalic
]]gt
ltsTextAreagt
ltsTextArea x=345 y=10 width=285 height=86
id=css2 gt
lt[CDATA[
h1
color00FF00
fontSize32
fontWeightnormal
fontStyleitalic
h2
color0000FF
fontSize24
fontWeightbold
fontStylenormal
]]gt
ltsTextAreagt
ltsButton x=108 y=105 label=Apply CSS
1 id=applyCSS1Button
click=applyCSS1Button_
clickHandler(event)gt
ltsButton x=443 y=105 label=Apply CSS
2 id=applyCSS2Button
click=applyCSS2Button_
clickHandler(event)gt
ltsApplicationgt
032010 (11)58
TLF
032010 (11) 59
got styleName attribute so you could apply the corresponding CSS style to them later
bull 2 TextAreas with simple different CSSbull 2 Buttons to apply CSS from TextAreas to example
text
When the button is clicked the new instance of CSSFormatResolver class is created Then the corresponding CSS string from the TextArea is parsed and set into resolverrsquos property of SlyleSheet class type And finally prepared formatResolver instance is assigned to the TextFlow
Applying CSS to TextFlowNow lets have more detailed look at resolveFormat callback function First it should return a value that implements ITextLayoutFormat if it returns null then no new styling should be applied to an element being processed by the function So we create format variable of FlowValueHolder (it implements ITextLayoutFormat) and set itrsquos value to null (we do that because resolveFormat works with all elements including TextFlow itself as probably we donrsquot want to apply one style to the whole text)
After we do all the necessary casts and null checks and if we are sure that current elementrsquos got styleName attribute we assign styles from CSS to a current format StyleSheet object is used to contain CSS data as it is convenient object to parse and retrieve CSS data
Conclusion and a WarningThere was a brief tutorial on how to apply simple CSS to TLF TextFlow Please note that CSSFormatResolver class is not fully functional and only can be applied to our sample CSSs Writing reusable and versatile class requires more detailed coding and approach
Check the TLF Blog on this issue There is fully functional CSSFormatResolver with example there httpblogsadobecomtlf200902iformatresolver_and_using_css_1html
MAXYM GOLOVANCHUK Maxym Golovanchuk is a Photoshop Certied Expert and TV producer and he is using Adobersquos software for implementing entertainment solutions including video delivery with Flash Media Server mexxikgmailcom
MondayTuesdayWednesdayThursday Friday
DIVISIONS OF CREATIVE NICHE INC
032010 (11)60
PROFILE Flashcreed ndash Business Gallery
032010 (11) 61
The Business Gallery (httpwwwflashcreedcombusiness_video_image_gallery) is a Flash component meant to do one thing to enhance the visual experience a website portfolio or presentation site gives to its users Mainly itrsquos all about the image you present yourself or
your product to the world wide web Letrsquos face it without the looks you canrsquot sell your product or image no matter how interesting it might be
Whatrsquos so great about this gallery you might wonder Well the answer is simple everything Advanced AS3 programming dynamic XML implementation unlimited number of media items on stage PNG JPG and video FLA SWF MP4 F4V supported media tween and image effects just to name a few of the over 150 settings this gallery brings you Bottom line you can customize it in any way you see fit in order to make it resemble your website layout Not to mention the code optimization that allows the gallery to run so smoothly even on low resources
We brought 45 background wallpapers in case just a color doesnrsquot do the job also a set of custom arrows and close buttons
Flashcreed ndash Business GalleryHello itrsquos good to be back here among Flash amp Flex Magazine readers Today we are going to tell you a bit about our products mainly our Business Gallery but since all our products are built on the same framework most of the properties apply to all When we first realized what we could do with this framework we decided to name it ldquoPandorardquo in order to point out the unlimited number of possibilities it revealed regarding customization and user friendliness
032010 (11)60
PROFILE Flashcreed ndash Business Gallery
032010 (11) 61
The size of the entire gallery and any element in it is subject to any kind of resize big stage and small thumbs or the other way around for any template you or your client desire
Column_scroll and the properties for the stage mask helps you configure the exact number of visible columns you want to set in order to browse through the media items your gallery has Beside this useful feature we added blur and a couple of tween effects for the leftright navigation that gives an impressive look
032010 (11)62
PROFILE Flashcreed ndash Business Gallery
032010 (11) 63
Either as tooltip or plain text you can show any information you want regarding a certain media thumb in the gallery You can change font type size spacing color position and many other properties
The color gradient system for roll overout mouse gesture is unique in every way if we are to compare it with other galleries on the market at this point You can customize up to 5 sets of color with different alpha values The gradient type either linear or radial can be modified with rotation and ratio values
032010 (11)62
PROFILE Flashcreed ndash Business Gallery
032010 (11) 63
When clicking on a thumb if preview_type is selected as internal a resizable preview window will reveal itself and depending on the media type (image or video) an image viewer or video player will be contained inside it If preview_type is selected as external you have the possibility to set certain URL addresses this allowing you to redirect the user to a specific area of the website like a product page from a virtual store for example
The video player has a dozen of controllers that allow you to create a skin to better suit the template you want to create for your gallery Buttonrsquos color thickness handler color or scrub bar size just to name a few of the properties you can play with
At an amazing price of 999 $ this has to be one of the best choices when it comes to media galleries flash components Donrsquot hesitate to take a look at it on wwwflashcreedcom and also consider other products that might better suit your specifications or desires We would definitely appreciate any kind of feedback regarding current or possible features
Thank you
032010 (11)65
BOOK REVIEW
Are you an actionscript 3 game developer who is not able to write a complete commercial game because you cannot manage dozens
of classes Or you are an experienced actionscript 3 applications developer who wants to program game but donrsquot like reading any available beginner book as it doesnrsquot suit your style Even if you already have a good grasp over java or c++ and interested in creating not only fun games but commercial ones also then this is what you really require
There are several actionscript 3 game development books for beginners out there but Essential Guide to Game Dev is one of those few books that talk about the advanced gaming concepts However its first chapter begins with an easy to understand game example (good for any beginner) and ends up creating 3 games Did I tell you 3 games in just first chapter
Teaching about an Actionscript 3 Game framework is one of the many reasons that make this book a kick-ass addition to actionscript 3 gaming library Authors teach you how to create 10 unique games ranging from arcade to driving tile based to puzzle game and shooters to dice games Another specialty of this book is to use Flex and Flash Develop IDEs along with the primary Flash tool that creates space for not only flex
developers but also Flash Develop users In addition to this you will also learn to create game assets with GIMP Mappy and a sound effect creation tool You will get information about copyright laws which are necessary for any would-be commercial game creation and a complete game example integrated with MochiAds
This book also discusses and further more implements various advanced topics such as bitmap rendering pixel-level collision detection sound management AI xml-based level designing scrolling screen optimization techniques particles etc
In short this book will surely blow your minds with the wealth of knowledge it includes and you will pray for authors to keep writing such informative and useful books
If you are really serious about gaming then donrsquot miss the opportunity of reading this book Highly recommended
by Ali RAZA ACI ACE SCJP
Essential Guide to Flash Games
Authors Jeff Fulton Steve FultonPublisher friends of EDISBN 978-1-4302-2614-7Language EnglishPages 664 PagesWebsite httpfriendsofedcombookhtmlisbn=1430226145

032010 (11)16
BEGINNERS Working with Display Objects 101
032010 (11) 17
Good now you can play around with the values and change them to see where other x and y values will place the MovieClip The images shown here are with the x and y set to 200
Lets try to access some different properties types enter the following code into your actions panel
justin_mcscaleX = 15
justin_mcscaleY = 15
If you test the movie you will now see that an output of the justin_mc MovieClip is 15 larger that before Your image might be pixilated since itrsquos stretching it to a larger dimension
Ok congratulations you have successfully added a displayvisual object to the stage and manipulated it Pretty Simple
Now lets delete the MovieClip from the stage and access it only through Actionscript
Once you have deleted the MovieClip off the stage go to the Library panel and right click the justin_mc and select properties
Select the Export for Actionscript option The name you see here will be the name that you create the object from in Actionscript This name can be anything but we will keep it the same as our instance name for no other reason but consistency
032010 (11)16
BEGINNERS Working with Display Objects 101
032010 (11) 17
Once you select the OK button you will get a window that looks like this Just select OK
So if we test our code now we will get and error because we have yet to create a MovieClip and add it to the stage
So delete all the code you have currently in the actions panel We will first create a variable that will hold the newly created instance of the MovieClip from the library instead of dragging it to the stage like we did before
Enter the following code
var anyNamejustin_mc = new justin_mc()
addChild(anyName)
the var keyword creates a variable anyName Note as the name states this can be called any name you want it to be eg Bob Billy Susan or whatever This is essentially its instance but in code instead of
selecting it and on the stage and then adding it via the properties panel like we did before justin _ mc references the library class name that you set earlier within the propertiesand the = new justin_mc() creates a new instance of a MovieClip name justin_mc() and assigns it to the variable
The addChild(anyName) just tells Flash to add the object to the stage using the variable (var) reference that you just created If you donrsquot use the addChild(name of variable) you will not see your visual object show up on the stage
So as you see itrsquos really not that difficult to access a display object and display it
Finally we will adjust some of the properties just as we did before Except this time we use the variable name that was called anyName Again this is just like your instance name see (Listing 1)
In next months issue we will continue this expedition of display objects and touch on things like drawing shapes using only code and working with text I hope you enjoyed this article please feel free to email me your comments or questions to jundajgmailcom
JUSTIN P JUNDAIs a New Media Engineer specializing in FlashAS2-3 Photo-shop After Effects PHP MySQL and a slue of other program-ming languages Justin also loves to travel and has a strong passion for teaching others how to use these technical pro-ducts He currently works with a top government-contracting rm implementing new media ideas into interactive course-ware that is then delivered to the military in order to effecti-vely train them Also check out shprotv to see the latest video from him and his partner Director Scott Hansen wavelenght-fxmaccom You can reach Justin at jundajgmailcom with any thoughts or concerns you have regarding this article
Listing 1
Creates Instance of the MovieClip named justin_mc
var anyNamejustin_mc = new justin_mc()
Set properties for the MovieClip properties
can be things like rotation
x y coordinates Scale sizes
etc
anyNamex = 100
anyNamey = 100
anyNamerotation = 45
anyNamescaleX = 15
anyNamescaleY = 15
Assigns the movie clip to the stage
addChild(anyName)
032010 (11)18
FLASH AND PHP
The webinar hosted by Ryan Stewart Platform Evangelist at Adobe and Kevin Schroeder Technology Evangelist at Zend hit the Web around
the same time that Zend announced Code Tracing had been added to its PHP web application server Who you might ask is this company called Zend And what is an article about flight recorders doing in Flash amp Flex Magazine After all yoursquore a Flex developer so why should you care
Who is ZendPHP runs a third of the worldrsquos Web sites and has now become the most popular language for building dynamic Web applications Zend Technologies Inc is the leading provider of products and services for developing deploying and managing business-critical PHP applications Zend contributes to Zend Framework (an open source objected-oriented Web application framework) and now Zend Framework is bundled with Adobe Flash Builder 4
What is a Software Flight RecorderWhen something goes wrong with an airplane in flight investigators obviously canrsquot reproduce the problem Instead they rely on data captured by the airplanersquos black box flight recorder in order to uncover the source of the problem Zend Server does the same for PHP web applications Rather than trying to recreate the environment and reproduce the steps leading up to a problem Zend Server captures in real-time the full
execution of an application ndash in production or in a test lab ndash and pinpoints root cause issues without trail and error This feature called Code Tracing is akin to a software flight recorder for PHP web applications
Code Tracing can be activated to automatically capture problems in real-time or used manually to trace specific scenarios Zend had strict requirements for the Code Tracing user interface
bull The performance chops to handle megabytes of databull A highly-interactive view for an exceptional user
experiencebull The ability to modify widget behaviorbull Established cross-browser supportbull Sufficient and accessible technical content and
expertise see (Figure 1)
Zend considered various alternatives and ultimately chose Adobe Flex for the following reasons
bull Performancebull Flexibilitybull Maturitybull Flash Builder 4 support for data-focused applications
Why Flex developers should care
bull Adobe Flash Builder now has built-in support for Zend Framework a PHP framework based on PHP 5
bull PHP provides easy integration with back-end logic using Flash remoting
bull Zend Server is a data-centric web application server and Code Tracing helps improve development and deployment in high performance production environments
EXCERPT FROM WEBINAR BY KEVIN SCHROEDER AND RYAN STEWART
How a Software Flight Recorder was You might have caught a recent webinar How Zend used Flex and PHP to build a Software Flight Recorder which sparked some interesting discussion
Built Using Adobe Flex and Zend PHP
Figure 1 Flash and PHP
How Zend Used Adobe Flex and PHP to Build a Software Flight Recorder
ldquoZend Framework with Support for Action Message For-mat (AMF) Now Bundled with Adobe Flash Builder 4rdquo
How to build Rich Internet Applications using Zend PHP and Adobe Flash Platform
032010 (11)20
ACTIONSCRIPT DEVELOPMENT Creating an AS3 Game Framework
032010 (11) 21
The game framework is the foundation for making the second game It is an expanded version of the first chapterrsquos framework with an emphasis
on organization and reuse Since this book is also not called Proper Object-Oriented Design Patterns and Principles for Games you will see little theory here and mostly practice Many of these techniques have been hard won and developed over many years of ActionScript programming We have fought the wars through AS1 AS2 and now AS3 so you donrsquot have to do it yourself
While our framework borrows from some design patterns we feel that games are a very expressive medium We want you the reader of this book to think outside that proverbial over-used box While design pattern ideas lend themselves to all manner of application development we donrsquot want you to feel hemmed in to using any one set of ideas for creating their games Our framework gives structure to the overall flow of a game but does not dictate how to code the actual game logic
Exploring the FrameworkThe game framework is housed in a reusable package structure A package structure at its very basic is an organized set of folders that will contain reusable classes All of the standard class files for using the framwork will be in this package structure We will update and extend this structure as we proceed through this book Letrsquos start by giving you an idea of what classes we will be creating for the framework
The GameFrameWorkas classThe GameFrameWorkas class is the foundation of the framework It contains a simple state machine and a basic game loop timer Our state machine is a simple
construct containing a set of state constants to switch the framework between states States are handled by state functions inside the GameFrameWorkas file We will employ a variable to reference the current state function The game timer will use this reference to call the current state function on each frame tick We will create states for such things as the title screen instructions screen game play game over and more
When we create a new game our document class will be an instance of GameFrameWork called Mainas This Mainas will have an init (short for initialization) function that will set up the framework for use This Mainas class will also act as a sort of message gateway between the game and the framework classes If you are confused donrsquot worry wersquoll be explaining this in greater detail soon
The FrameWorkStatesas classThis FrameWorkStatesas class will simply contain a set of constant integer values representing the state machine states When we first create the framework we will have 10 different state constants All will begin with the STATE_SYSTEM designation For example we will have a state that displays the title screen The state constant for this will be STATE_SYSTEM_TITLE More states will be added as we progress through the chapters in this book
The BasicScreen class and SimpleBlitButton helper class The BasicScreen class will be used to display very simple game state screens These screens can have a basic background color with transparency (if needed) as well as some text centered on the screen Each screen can also have a button that needs to be clicked to move to a new state in the state machine This class is so simple that it will probably never be used without major
Creating an AS3 Game Framework
Excerpted from the book The Essential Guide to Flash Games Building Interactive Entertainment with ActionScript by Jeff Fulton Steve Fulton (FriendsofEDApress 2010)
PART ONE
032010 (11)20
ACTIONSCRIPT DEVELOPMENT Creating an AS3 Game Framework
032010 (11) 21
We will also be creating three distinct custom event classes as part of the framework These will be used to send specific data from the Game class instance to the Mainas (GameFrameWorkas instance) class The Mainas will act on the data sent and if needed pass the data to other framework classes By doing this we are using Mainas as a sort of message gateway
The CustomEventButtonIdas classThis custom event will have the ability to pass an identification integer value to the listening function It is used for cases where multiple buttons share the same listener function It will be used in the framework (specifically in the GameFrameWork instance Mainas) to allow BasicScreen instances to each share the same listener functions if they employ a SimpleBlitButton You will see this when we examine the GameFrameWork class file It can also be used for any game or application that needs to send a basic integer id along with an Event instance
The CustomEventLevelScreenUpdateas classThis custom event will be used by the Gameas class instance to send data to a BasicScreen instance we will create called levelInScreen The levelInScreen will have the ability to display custom text between each level The event listnener for this event will change this text with a value passed when the event is fired off The Mainas (GameFrameWorkas sub-class) will listen for this event and pass the data to the levelInScreen
The CustomEventScoreBoardUpdateas classThis custom event will be used by the the Gameas class instance to update the values on the ScoreBoard class instance The Mainas class will listen to for this event and pass the data on to the ScoreBoardas class instance
The framework package structureWe will be organizing all of the code we will create into a package structure The reusable framework classes will be in one package and the games we will create will be in a separate package Letrsquos create these two package structures now
The source folderChoose a spot on your disk drive of choice and create a folder called source This will be the root or base level for all of the code and games we will create in this book
The classes packageThe reusable framework classes will be in a package called classes Create a folder called classes inside the source folder from the previous step You should now have a folder structure that looks a little like this
modification in your own commercial games We present it here in its very simple form for utility purposes
The SimpleBlitButton helper class is used to create a clickable button with rollover and off states The button is created completely in code with a simple color background for the over and off states to be sed in the BasicScreen class We do this for simplicity and to demonstrate some Sprite blitting techniques (much more on these later in the book) using a set of BitmapData instances for the background color change of the button on rollover
The ScoreBoard class and SideBySideScoreElement helper class The ScoreBoard class displays information for the user during game play Data such as the current game score time remaining and other useful information can be displayed to the user with a very basic look and feel by using this class It can be used as is but when you start to make your own commercial games you might find it useful to extend this class with more functionality This very basic class is used inside the framework to demonstrate how to use events from a Game instance to update a game score board
The SideBySideScoreElement helper class is used to display a text label and corresponding dynamic text field as a pair side by side on the screen For example it can be implemented by the ScoreBoard class to display the word Score followed by the userrsquos current score
The Game classThe Game class is a stub style class that all games in the framework will inherit from It contains the basic variables and functions needed to work with the GameFrameWork class
The Custom event classesThe framework makes use of events to communicate between classes The instances of the Game class will use events to communicate with the ScoreBoard and the Main classes We will create a custom Mainas class for each game This Main class will be a sub-class (or child) of the GameFrameWork class Some of the events we will use will be simple events These are instances of the standard Flash Event class used for basic communication By this we mean events that donrsquot need to send any data along with them For example instances of the Gameas framework class will have a constant variable called GAME_OVER This constant will be used as the name of a simple Event instance that is fired off with the standard dispatchEvent function call This example GAME_OVER event wil be used to tell the Mainas to move to the game over (STATE_SYSTEM_GAME_OVER) state in the main state loop when the current game has completed
032010 (11)22
ACTIONSCRIPT DEVELOPMENT Creating an AS3 Game Framework
032010 (11) 23
[source]
[classes]
Next we will create the actual package that will contain all of the source code for the reusable framework classes We will name this package comefgframework To create this you must first create a folder inside the classes folder called com then a folder called efg inside the com folder and finally a framework folder inside the efg folder By the way the efg is an abbreviation for the book title Essential Flash Games You should now have a folder structure that looks like this
[source]
[classes]
[com]
[efg]
[framework]
When we start to create all of the class files necessary for the framework they will all go into the framework folder You will see that when we create these classes the package name will look like this
package comefgframework
The projects packageThe second package we will create is called the projects package You can start this right away by creating a folder inside the root source folder called projects The projects folder is not going to be a straight package structure like the classes folder It is organized in a manner to allow individual custom game development using the framework
Inside this projects folder we are going to create a unique folder for each game in the book The first game we are going to create is called stubgame A stub is usually a function or class that contains very little (if any) usable code but is instead a simple placeholder Our game will be slightly more than a placeholder but not much more It will be used to demonstrate the basic functionality of the framework Go ahead and create a folder called stubgame in the projects folder You should have a projects set of folders that look like this
[source]
[classes]
[projects]
[stubgame]
Next we are going to create two folders each to hold a different version of our game Why are we going to do this This book is meant to support Flash game development with a variety of tools There are many popular methods to create Flash games
with an assortment of tools and code integrated development environments (IDEs) We are going to focus on two such tools in this book the Flash IDE (the one with the library timelines drawing tools and so on all combined into a single tool) and Flash Develop (a very popular free IDE made specifically for ActionScript development) You can use any tool with this book but you will need to follow the documentation specific to your own tool when setting up projects
You will need to pay careful attention to linking the reusable code package structure to your games because linking may vary depending on the Flash code editor environment you are using Linking the package to a game is actually a very simple process but it differs between the various code IDE versions Jeff does most of his Flash game development Flash Develop using the free Flex SDK that Adobe provides Steve on the other-hand uses the Flash IDE almost exclusively We have combined our efforts on all of the chapter games to bring you code that will work with both a Flex SDK project and a Flash IDE project
On that note the next two folders you will create inside the stubgame folder are called flashIDE and flexSDK You donrsquot have to create both for any project You just need to create the one that works with the tools you are going to use to create Flash games Each is set up differently so pay attention to the specifics of the one you will be using the most
You should now have a projects folder that looks like this
[projects]
[stubgame]
[flashIDE]
[flexSDK]
The Flash IDE package structureThe Flash IDE package structure begins right inside the flashIDE folder The package name is very similar to the classes package you saw in the last section The package structure will be comefggames[game
name] For instance with the stub game we are going to create in this chapter the package name will be comefggamesstubgame Go ahead and create those folders now You should have this package structure when you are complete
[projects]
[stubgame]
[flashIDE]
[com]
[efg]
[games]
[stubgame]
[flexSDK]
032010 (11)22
ACTIONSCRIPT DEVELOPMENT Creating an AS3 Game Framework
032010 (11) 23
The Flex SDK package structureThe Flex SDK package structure is very similar to the Flash IDE package structure with one small difference Flash Develop and other Flex tools use a specific set of folders for organizing their own project structures To accommodate these and still have a common package structure for our games we must add the Flash Develop created src folder to the flexSDK folder You will not have to create the src folder or the package structure by hand as Flash Develop will create it automatically for you when you start a new project In the section called Setting up the game in Flash Develop we will go into the details For now here is the way the structure will be laid out (including the Flash Develop specific folders such as bin obj and lib If you have used Flash Develop to create a Flex SDK project you will recognize the following structure
[projects]
[stubgame]
[flexSDK]
[bin]
[obj]
[lib]
[src]
[com]
[efg]
[games]
[stubgame]
Notice that we have created the exact same package structure inside the src folder as we will use with the Flash IDE The package name for our game will be comefggamesstubgame
The package name in the code for classes in both the Flash IDE and Flex SDK will be the same
package comefggamesstubgame
The Mainas and StubGameas filesWhen we start to add files to the subgame package we will be creating two subclasses (or children) of framework classes that will be unique to our game The Mainas will be created as a subclass (or child) of GameFrameWorkas framework class The StubGameas class will be a subclass (or child) of the Gameas framework class
Starting a project using the framework packagesYou have just seen the basic package structure for both the framework reusable classes and the projects we are going to create Letrsquos make use of this right away by creating a project for the stub game The stub game will be very similar to the Chapter 1 game where the player is tasked with clicking the mouse ten times
Creating the stub game project in the Flash IDEFollow these steps to set up stub game using the Flash IDE
1 Start up your version of Flash I am using CS3 but this will work exactly the same in CS4 and CS5
2 Create a fla file in the sourceprojectsstubgame
flashIDE folder called stubgame3 In the sourceprojectsstubgameflashIDE folder
create the following package structure for your game comefggamesstubgame
4 Set the frame rate of the Flash movie to 30 FPS Set the width and height both to 400
5 Set the document class to comefggamesstubgameMain6 We have not yet created the Mainas class so you
will see a warning We are going to create this later in this chapter
7 Add the framework reusable class package to the class path for the fla filebull In the publish settings select [Flash]gt
[ActionScript 3 Setting]bull Click the Browse to Path button and find the
source folder we created earlier for the package structure Select the classes folder and click the choose button Now the comefgframework package will be available for use when we begin to create our game We have not created the framework class files yet but we will be doing this very shortly
Creating the stub game project in Flash DevelopAnd these are the steps to create the same project using Flash Develop
1 Create a folder inside the [source][projects][stubgame] folder called [flexSDK] (if you have not already done so)
2 Start Flash Develop and create a new projectbull Select Flex 3 Projectbull Give the project the name stubgamebull The location should be the sourceprojects
stubgameflexSDK folderbull The package should be comefggamesstubgamebull Do not have Flash Develop create a project
folder automatically Make sure the Create Folder For Project box is unchecked
bull Click the OK button to create the project3 Add the class path to the framework to the project
bull Go to the [project]gt[properties]gt[classpaths] menu item
bull Click the add class path buttonbull Find the source folder we created earlier and
select the classes subfolderbull Click the ok button and then the apply button
032010 (11)24
ACTIONSCRIPT DEVELOPMENT Creating an AS3 Game Framework
032010 (11) 25
You now have the basic structure to start creating projects inside the framework We are now going to discuss a few topics concerning the structure of the framework classes and then move into building the reusable framework code
Here are a couple of things to noteFor Flex Builder Flash Builder or other IDEs please refer to the documentation provided for that product to create a new project and set the default compile class
A common method of Flash development is to use the Flash IDE for assets and organization and Flash Develop for code editing If this is your workflow of choice you will want to follow the Flash IDE folder and package structure rather than the Flex SDK folder structure
Creating game timersThere are two basic methods that most Flash developers implement when creating a frame-based game timer By frame-based we mean a timer that uses the idea of a segment of time broken up into logical slices (or frames) to manage game logic There are other types of methods for timing game updates but we will make extensive use of time-slice or frame-based timers in this book The basic game timer we will use most of the games will attempt to squeeze all processing and screen updates into each segment or frame We will also explore a time-step timer and a sleep-based timer in chapter 11
The first timer method is the EventENTER_FRAME event timer The standard EventENTER_FRAME event handler will attempt to run the game loop at the swf filersquos set frame rate This very handy game loop timer has been in use for a number of years The second standard game loop timer method makes use of the Timer class The Timer class is used to call the game loop at millisecond intervals specified by a delay interval For example if the millisecond delay interval is set to 100 the Timer instance would run ten times a second (there are 1000 milliseconds in a single second) Our framework will begin by using this Timer instance game loop timer We will do this so we can make use of the TimerEventTIMER updateAfterEvent function As you will see this function will help smooth out screen updates
Defining frame timer tick You will see the phrases frame timer tick timer tick and frame tick used in this book When we refer to a tick or a frame tick we simply mean one framersquos worth of processing When we run a game at 30 frames per second we have 30 ticks or 30 frame ticks This also means that we only have 3333 milliseconds (or 100030) inside each tick to do all of our processing
State MachinesA traditional state machine at its very basic is a mechanism that controls the state or current actions a system can perform Sometimes this is called a finite state machine Finite state machines have traditionally been used to model complex mathematical computations and more recently artificial intelligence The finite in the name refers to the fact that the system can only be in a single state at any one time Our game framework is built on a simple state machine pattern that employs a separate code function or method for each state There are many other styles of state machines some use entire classes for each individual state (sometimes called an object-oriented state machine) and some use a simple switchcase statement block called on each frame tick to control state We will use a third type that borrows from these two
We call our state machine pattern a function reference pattern Unlike the object-oriented state machine our machine will contain a separate method or function for each state inside a single framework class Each of these state functions will control elements in the framework such as instances of the BasicScreen and Game classes We will use a switchcase statement to move between states Unlike the afore mentioned very simple switchcase state machine structures that call this switchstate control structure on each frame tick we only need to call it when we are switching states The switchcase we call will simply change the function reference we call on each frame tick The GameFrameWorkas will contain the state machine that controls overall game flow This will move our game system between states defined in the FrameWorkStatesas file
Each individual game package we create will contain a Mainas (in the gamersquos own package structure) that will extend GameFrameWorkas We will also create a unique Gameas child class for each game The Game class children that we create can also employ their own internal state machines based on the function reference pattern when needed
Richard (Squize) Myles of wwwgamingyourwaycom was one of the first to offer the idea of a function reference state machine for ActionScript 3 on his well-respected blog
The FrameWorkStatesas class fileThis class file is a simple collection of constants that will define the states for the game framework They will be consumed by the GameFrameWorkas class file The following code listing shows the entire code for this file you will want to create this file according to the package structure in the previous section see (Listing 1)
The first thing you should notice about this class is the package name in the first line It conforms to the file system structure we created earlier No matter if
032010 (11)24
ACTIONSCRIPT DEVELOPMENT Creating an AS3 Game Framework
032010 (11) 25
you are using a version of Flash Flex Builder Flash Builder Flash Develop TextMate or even plain old Notepad this package name will be the same The package name is not depended on the code development environment but the chosen file structure for organizing the code Save this file in the location we created previously
sourceclassescomefgframeworkFrameWorkStatesas
The state variablesThe state variables are constants that the game loop state machine will use to move between game states We have set up the most common basic states in this sample file but you will be able to create as many as you need As we progress through the chapters more will be added as necessary
bull STATE _ SYSTEM _ TITLE This state is used to display a basic title screen with an OK button for the user to click to move on Once the instructions are on the screen the state will change to the next state
bull STATE _ SYSTEM _ WAIT _ FOR _ CLOSE This one waits until the OK button is clicked for any instance of the BasicScreen class
bull STATE _ SYSTEM _ INSTRUCTIONS This state is used to display basic instructions with the same OK button as in the SYSTEM _ TITLE state It also changes to the STATE _ SYSTEM _ WAIT _ FOR _ CLOSE state until the OK button is clicked
bull STATE _ SYSTEM _ NEW _ GAME This state will call the game logic class and fire off its gamenewGame() function It does not wait but moves on to the NEW _
LEVEL state right awaybull STATE _ SYSTEM _ NEW _ LEVEL With this state we can
call the gamenewLevel() function to set up a new level for the given game
bull STATE _ SYSTEM _ LEVEL _ IN This state is used to display some basic information if needed for the beginning of a level In this basic game we simply display the level screen and wait a few seconds before moving on The wait is accomplished by changing state to the STATE _ SYSTEM _ WAIT state for the specified number of frame ticks
bull STATE _ SYSTEM _ GAME _ PLAY This one simply calls the game logic classrsquos runGame function repeatedly and lets the game take care of its own logic and states
bull STATE _ SYSTEM _ GAME _ OVER The game over state displays the basic game over screen and waits for the OK button to be clicked before moving back to the instructions screen It quickly changes state to the STATE _ SYSTEM _ WAIT _ FOR _ CLOSE until the OK button is clicked
bull STATE _ SYSTEM _ WAIT This state waits for a specified number of frames and then fires off a simple custom event constant called WAIT _ COMPLETE
The GameFrameWorkas class fileThe GameFrameWorkas will be that parent of our gamersquos document class Mainas (the gamersquos document class)
for our games will extend this class and call functions to modify the framework for each unique game The entire code listing is provided at the end of this section We will explore it in detail once your have had a chance to type in the code The location for this file in the package structure is
sourceclassescomefgframeworkGameFrameWorkas
The GameFrameWorkas will be the parent class to the Mainas class we will use for our games and itrsquos shown in the following listing In later chapters we will add some functions to this file and even create one that uses a completely different timer The Mainas will subclass this class with the extends syntax and override the blank stub init function we are about to create This class will also contain all of the state functions that coincide with the state variables in the FrameWorkStates class All of the functions in the GameFrameWorkas are public so all can be overridden by the Mainas if needed In this way we can customize the behavior of the state functions if we need to
For example in later chapters we will want to play music on the title screen The function call to play
Listing 1
package comefgframework
author Jeff and Steve Fulton
public class FrameWorkStates
public static const STATE_SYSTEM_WAIT_FOR_CLOSEint = 0
public static const STATE_SYSTEM_TITLEint = 1
public static const STATE_SYSTEM_INSTRUCTIONSint = 2
public static const STATE_SYSTEM_NEW_GAMEint = 3
public static const STATE_SYSTEM_GAME_OVERint = 4
public static const STATE_SYSTEM_NEW_LEVELint = 5
public static const STATE_SYSTEM_LEVEL_INint = 6
public static const STATE_SYSTEM_GAME_PLAYint = 7
public static const STATE_SYSTEM_LEVEL_OUTint = 8
public static const STATE_SYSTEM_WAITint = 9
032010 (11)26
ACTIONSCRIPT DEVELOPMENT Creating an AS3 Game Framework
032010 (11) 27
the music will need to be added to the systemTitle state function Not all games will need this though so we will not add it to the GameFrameWorkas filersquos systemTitleFunction Instead we will create a new version of the function in Mainas to override the one in GameFrameWorkas The new one will play the sound needed and then call the systemTitle function inside GameFrameWorkas with the supersystemTitle() function call see (Listing 2)
The class imports The class import section contains the necessary Flash core classes needed for the Main class Notice the package name coincides with the package structure we created earlier in the chapter for the framework
package comefgframework
Listing 2
package comefgframework
import flashdisplayBitmap
import flashdisplayBitmapData
import flashdisplayMovieClip
import flasheventsEvent
import flashgeomPoint
import flashtextTextFormat
import flashutilsTimer
import flasheventsTimerEvent
public class GameFrameWork extends MovieClip
public static const EVENT_WAIT_COMPLETEString =
wait complete
public var systemFunctionFunction
public var currentSystemStateint
public var nextSystemStateint
public var lastSystemStateint
public var appBackBitmapDataBitmapData
public var appBackBitmapBitmap
public var frameRateint
public var timerPeriodNumber
public var gameTimerTimer
public var titleScreenBasicScreen
public var gameOverScreenBasicScreen
public var instructionsScreenBasicScreen
public var levelInScreenBasicScreen
public var screenTextFormatTextFormat
public var screenButtonFormatTextFormat
public var levelInTextString
public var scoreBoardScoreBoard
public var scoreBoardTextFormatTextFormat
Game is our custom class to hold all logic for
the game
public var gameGame
waitTime is used in conjunction with the
STATE_SYSTEM_WAIT state
it suspends the game and allows animation or
other
processing to finish
public var waitTimeint
public var waitCountint=0
public function GameFrameWork()
public function init()void
stub to override
public function setApplicationBackGround(width
Number
heightNumberisTransparentBoolean = false
coloruint = 0x000000)void
appBackBitmapData = new BitmapData(width
height
isTransparent color)
appBackBitmap = new Bitmap(appBackBitmapData)
addChild(appBackBitmap)
public function startTimer()void
timerPeriod = 1000 frameRate
gameTimer=new Timer(timerPeriod)
gameTimeraddEventListener(TimerEventTIMER
runGame)
gameTimerstart()
public function runGame(eTimerEvent)void
systemFunction()
eupdateAfterEvent()
switchSystem state is called only when the
032010 (11)26
ACTIONSCRIPT DEVELOPMENT Creating an AS3 Game Framework
032010 (11) 27
Listing 2
state is to be changed
(not every frame like in some switchcase
based simple state machines
public function switchSystemState(statevalint)
void
lastSystemState = currentSystemState
currentSystemState = stateval
switch(stateval)
case FrameWorkStatesSTATE_SYSTEM_WAIT
systemFunction = systemWait
break
case FrameWorkStatesSTATE_SYSTEM_WAIT_FOR_
CLOSE
systemFunction = systemWaitForClose
break
case FrameWorkStatesSTATE_SYSTEM_TITLE
systemFunction = systemTitle
break
case FrameWorkStatesSTATE_SYSTEM_
INSTRUCTIONS
systemFunction = systemInstructions
break
case FrameWorkStatesSTATE_SYSTEM_NEW_GAME
systemFunction = systemNewGame
break
case FrameWorkStatesSTATE_SYSTEM_NEW_LEVEL
systemFunction = systemNewLevel
break
case FrameWorkStatesSTATE_SYSTEM_LEVEL_IN
systemFunction = systemLevelIn
break
case FrameWorkStatesSTATE_SYSTEM_GAME_PLAY
systemFunction = systemGamePlay
break
case FrameWorkStatesSTATE_SYSTEM_GAME_OVER
systemFunction = systemGameOver
break
public function systemTitle()void
addChild(titleScreen)
titleScreenaddEventListener(CustomEventButton
IdBUTTON_ID
okButtonClickListener false 0 true)
switchSystemState(FrameWorkStates
STATE_SYSTEM_WAIT_FOR_CLOSE)
nextSystemState = FrameWorkStatesSTATE_
SYSTEM_INSTRUCTIONS
public function systemInstructions()void
addChild(instructionsScreen)
instructionsScreenaddEventListener(CustomEven
tButtonId
BUTTON_IDokButtonClickListener false 0
true)
switchSystemState(FrameWorkStates
STATE_SYSTEM_WAIT_FOR_CLOSE)
nextSystemState = FrameWorkStatesSTATE_
SYSTEM_NEW_GAME
public function systemNewGame()void
addChild(game)
gameaddEventListener(CustomEventScoreBoardUp
date
UPDATE_TEXTscoreBoardUpdateListenerfalse 0
true)
gameaddEventListener(CustomEventLevelScreenU
pdate
UPDATE_TEXTlevelScreenUpdateListenerfalse
0 true)
gameaddEventListener(GameGAME_OVER
gameOverListener
false 0 true)
gameaddEventListener(GameNEW_LEVEL
newLevelListener
false 0 true)
gamenewGame()
switchSystemState(FrameWorkStatesSTATE_
SYSTEM_NEW_LEVEL)
public function systemNewLevel()void
032010 (11)28
ACTIONSCRIPT DEVELOPMENT Creating an AS3 Game Framework
032010 (11) 29
Listing 2
gamenewLevel()
switchSystemState(FrameWorkStatesSTATE_
SYSTEM_LEVEL_IN)
public function systemLevelIn()void
addChild(levelInScreen)
waitTime = 30
switchSystemState(FrameWorkStatesSTATE_
SYSTEM_WAIT)
nextSystemState = FrameWorkStatesSTATE_
SYSTEM_GAME_PLAY
addEventListener(EVENT_WAIT_COMPLETE
waitCompleteListener false 0 true)
public function systemGameOver()void
removeChild(game)
addChild(gameOverScreen)
gameOverScreenaddEventListener(CustomEventBu
ttonId
BUTTON_IDokButtonClickListener false 0
true)
switchSystemState(FrameWorkStates
STATE_SYSTEM_WAIT_FOR_CLOSE)
nextSystemState = FrameWorkStatesSTATE_
SYSTEM_TITLE
public function systemGamePlay()void
gamerunGame()
public function systemWaitForClose()void
do nothing
public function systemWait()void
waitCount++
if (waitCount gt waitTime)
waitCount = 0
dispatchEvent(new Event(EVENT_WAIT_COMPLETE))
public function okButtonClickListener(e
CustomEventButtonId)void
switch(eid)
case FrameWorkStatesSTATE_SYSTEM_TITLE
removeChild(titleScreen)
titleScreenremoveEventListener(CustomEv
entButtonId
BUTTON_IDokButtonClickListener)
break
case FrameWorkStatesSTATE_SYSTEM_
INSTRUCTIONS
removeChild(instructionsScreen)
instructionsScreenremoveEventListener(
CustomEventButtonIdBUTTON_IDokButtonC
lickListener)
break
case FrameWorkStatesSTATE_SYSTEM_GAME_OVER
removeChild(gameOverScreen)
gameOverScreenremoveEventListener(
CustomEventButtonIdBUTTON_IDokButtonC
lickListener)
break
switchSystemState(nextSystemState)
public function scoreBoardUpdateListener(e
CustomEventScoreBoardUpdate)void
scoreBoardupdate(eelement evalue)
public function levelScreenUpdateListener(e
CustomEventLevelScreenUpdate)void
levelInScreensetDisplayText(levelInText +
etext)
gameOverListener listens for GameGAMEOVER
simple
custom events calls and changes state
accordingly
public function gameOverListener(eEvent)void
switchSystemState(FrameWorkStatesSTATE_
SYSTEM_GAME_OVER)
gameremoveEventListener(CustomEventScoreBoard
Update
UPDATE_TEXTscoreBoardUpdateListener)
gameremoveEventListener(CustomEventLevelScree
nUpdate
032010 (11)28
ACTIONSCRIPT DEVELOPMENT Creating an AS3 Game Framework
032010 (11) 29
We also must import all of the classes needed for the framework to run You will see this put to use shortly
The variable definitions The variable definition section defines all of the global scope variables for the class These include all of the variables needed for the state machine screens and the game timer
We will make use of constants to define the current state and a set of variables to hold the state information These have been be defined on the FrameWorkStatesas file we created in the last section More states can be added to the basic ones but these will be sufficient for many games that we will create in this book There are two special states that are used for the system and wait for button clicks or things like animations to complete These are the STATE_SYSTEM_WAIT_FOR_CLOSE and STATE_SYSTEM_WAIT respectively We will also make use of a generic function called systemFunction that will hold the current state function to call in our game loop Combined with this we use a set of
integer variables to hold the value of the current state (currentSystemState) the last state (lastSystemState) and the next state (nextSystemState) for processing purposes These states should not be confused with an actual game pause function This will be handled in a different manner and added to the framework in Chapter 11
If you are using the Flash IDE and have any assets in the library that need to be exported in the first frame you must extend MovieClip and not Sprite even if you donrsquot plan to use the main time line for anything else We have extended MovieClip for the GameFrameWork so it will work with both Flex SDK and Flash IDE projects
The state control variablesThe control variables keep the system functioning within the context of the current state The main control variable is an instance of the Function class called systemFunction This function holds a reference to the current function that will be repeatedly called on each frame tick This saves us from having to evaluate a switchcase statement on each frame to decide which function to call The function is changed to a new reference by called the switchSystemState() function and passing a new constant that represents the new state
Optimization switchSystemState() is the first of many optimizations we will make to the game framework All of these optimizations will make the Flash games run much more efficiently These efficiencies in the game framework will allow the actual game code to perform more complex operations and still run with a reasonable frame rate
The currentSystemState integer variable holds a number representing the constant of the current state the system is running The nextSystemState contains the constant integer value for the state to transition to after this state is complete The lastSystemState variable holds the integer constant of the previous system state This is used in the rare occurrence that the game loop needs to return to the previous system state
The lastSystemState variable will become useful when we use a shared state such as STATE_SYSTEM_WAIT The STATE_SYSTEM_LEVEL_IN state will implement a 30-millisecond delay before moving on to the STATE_SYSTEM_GAME_PLAY state The nextSystemState will be STATE_SYSTEM_WAIT and the lastSystemState will be STATE_SYSTEM_LEVEL_IN When the 30-millisecond wait time has expired the waitCompleteListener function will be called It will use the lastSystemState to determine where the processing was before the wait was started Yoursquoll see this in detail later in this chapter when we examine the waitCompleteListener function
Listing 2
UPDATE_TEXT levelScreenUpdateListener)
gameremoveEventListener(GameGAME_OVER
gameOverListener)
gameremoveEventListener(GameNEW_LEVEL
newLevelListener)
newLevelListener listens for GameNEWLEVEL
simple custom events calls and changes
state accordingly
public function newLevelListener(eEvent)void
switchSystemState(FrameWorkStatesSTATE_
SYSTEM_NEW_LEVEL)
public function waitCompleteListener(eEvent)
void
switch(lastSystemState)
case FrameWorkStatesSTATE_SYSTEM_LEVEL_
IN
removeChild(levelInScreen)
break
removeEventListener(EVENT_WAIT_COMPLETEwai
tCompleteListener)
switchSystemState(nextSystemState)
032010 (11)30
ACTIONSCRIPT DEVELOPMENT
The background fill variablesAll Flash applications have a background color of some type No matter what game we are going to be creating the framework can control this background color You should never rely on the background color setting in HTML for your Flash applicationrsquos background color This leaves the HTML embed code with control over major aspect of your application If you are creating a viral game to be placed on game portals you will lose control of your gamersquos background color and it will default to what ever the game portal operators have selected as the standard background color in their embed code The framework allows you to override the HTML settings here by placing a simple colored Bitmap behind the entire application We will simply define a BitmapData object called appBackBitmapData and a Bitmap object called appBackBitmap that will be used to place the BitmapData onto the displayList
We will not define the background in the GameFrameWorkas file but rather the Mainas subclass of the GameFrameWork will set the background if needed in its init function override
The timer variablesThe timer will control the frame rate of the game and help smooth out the display by employing the TimerEventupdateAfterEvent method The frameRate variable will be defined in Mainas as the number of frame ticks per second we want our game timer to run
The most important thing to note is that we are making use of the built-in Timer class (gameTimer) We are not using the standard EnterFrame event This allows us to create our own frame rate for the game and specify it in the frameRate variable By doing this we can control game timer tick rate independent of the swf filersquos frame rate (FPS) The swf file can have a frame rate setting of 25 (for example) but the game can run at a 30 frame ticks a second To do this we first set the frameRate to the desired number of frame update ticks we want per second (30) When Mainas calls the startTimer function (described in detail when we get to the section on the init function) the gameTimer is put into action First we will calculate the timerPeriod value as 1000frameRate With the updateAfterEvent function call (in the runGame function) we help to smooth out the render of the screen by asking the Flash display engine to update at the rate of the Timer not the frame rate set in the swf So going back to our example if the game SWF is set to run at 25 FPS and the frameRate is set to 30 ticks the updateAfterEvent will help to smooth out the rendering of the screen by asking the Flash display engine to update at the timer tick rate (30) not the swf filersquos FPS setting (25)
The timerPeriod will be passed into the Timer instance and the game will attempt to run at this rate We say
attempt because if the game includes too many on screen moving objects or more logic than can be computed inside the timerPeriod number of milliseconds (or a combination of both) then there will be a noticable slowdown in the game screen updates In later chapters we will add functionality to the runGame function to mitigate some of these issues
The screen definition variablesThe screen definition variables create instances of our BasicScreen class This is a rather simple class that allows a single positional text box and an OK button on the screen We will use this simple screen for the title instructions level and game over screens We will customize each screen when we create the init function override in our gamersquos Mainas class Note that the levelInText is a special variable Setting this string to a default value will allow the leveInScreen to display some default text along on each new level This text can be combined with dynamic text to create a screen that says something like Level 1 with the word Level being the default text and the number 1 being the dynamic text
public var titleScreenBasicScreen
public var gameOverScreenBasicScreen
public var instructionsScreenBasicScreen
public var levelInScreenBasicScreen
public var levelInTextString
public var screenTextFormatTextFormat
public var screenButtonFormatTextFormat
We also create two TextFormat objects that will be used for defining the format of the text on the screens and the format of the button text
The ScoreBoard variablesThe scoreBoard instance of the ScoreBoard class will handle a simple heads up display (HUD) for the user with information such as the current score It is a simple framework class that will be customized in the init function override in each gamersquos Mainas class The changes will depend on the game that is to be created We also define a TextFormatObject for the basic look of the text for our scoreboard text scoreBoardTextFormat
JEFF FULTON
STEVE FULTON
The next part of the article in the June issue of FFD Magazine
032010 (11)32
ACTIONSCRIPT DEVELOPMENT
032010 (11) 33
On my quest of learning Flash I often became frustrated of how difficult it was to update the contents of my application Meaning if I wanted
to change out an image or piece of copy I had to open up Flash go to my library find the Movie Clip that had my asset in it and republish I thought to myself this is no way to work this is so inefficient Enter XML in all its glory Constructing an application with enabled me to quickly and easily update my project at a moments
notice Without having to open up Flash Now what could be better than that
In this article yoursquore going to learn how to create a new ActionScript project in Flex Builder 3 and write ActionScript 30 code that will load in an XML file display the images on screen and add some interactivity to the scene
Setting up FlexOpen up Flex and go to Filegt NewgtActionScript Project A dialog window will open In the project name field type in PhotoGallery Leave the use default location box checked and click finish (see Figure 1)
Creating an XML Photo Gallery
Searching the Internet yoursquoll find dozens if not hundreds of examples of photo galleries created with Flash
What you will learnhellipbull How to create an ActionScript application in Flex Builder 3bull How to use ActionScript to parse an XML le
What you should knowhellipbull Familiar with general programming concepts such as data ty-
pes variables loops and functionsbull Familiar with class creation and constructionbull Some understanding of XML
with AS3
Figure 1 New ActionScript window dialog Figure 2 ActionScript Compiler dialog
032010 (11)32
ACTIONSCRIPT DEVELOPMENT
032010 (11) 33
Once you click finish your project should open and you should see PhotoGalleryas on screen There are a few steps that I like to take next that I do for every project
First right click PhotoGallery folder in the Flex Navigator window click properties at the bottom and then click on the ActionScript Compiler link on the left hand side At the bottom yoursquoll see a check box that is already selected to generate a HTML wrapper file Uncheck that and click ok A warning message will appear saying that the html-template folder will be deleted Donrsquot worry about that because we havenrsquot put anything in that folder Click ok I personally donrsquot like to have a browser window open every time I run my application (see Figure 2)
Secondly wersquoll be using a tweening library called Tweener In order to use Tweener we have to first download it (httpcodegooglecomptweener) Be sure to download the ActionScript 30 version and create a folder on your desktop or any other place and name it code Place the contents of that download into that folder Next go back to Flex and again right click the PhotoGallery folder and click properties again and this time yoursquoll click the ActionScript Build Path link This window gives us the ability to add assets to our project so we can use them in our project Click the Add Folder button browser to the code folder you just created click ok and click ok again to close the window Now that folder and all its contents will be included in our project (see Figure 3)
Next right click the src folder in your project scroll over to new and add a new folder Name this folder classes This folder will contain two classes that wersquoll be using Then repeat the same steps but this time name the folder images This folder will contain all the images
Figure 3 ActionScript Build Path dialog
032010 (11)34
ACTIONSCRIPT DEVELOPMENT
Listing 1 galleryxml
ltxml version=10 encoding=UTF-8gt
ltgallery image_height=150 image_width=150 image_
gap=5 rows=3gt
ltphotogt
ltdescriptiongtThis is a description for the first
imageltdescriptiongt
ltthumb_pathgtimagesthumbjpgltthumb_pathgt
ltfull_pathgtimagesfullgifltfull_pathgt
ltphotogt
ltphotogt
ltdescriptiongtThis is a description for the second
imageltdescriptiongt
ltthumb_pathgtimagesthumbjpgltthumb_pathgt
ltfull_pathgtimagesfullgifltfull_pathgt
ltphotogt
ltphotogt
ltdescriptiongtThis is a description for the third
imageltdescriptiongt
ltthumb_pathgtimagesthumbjpgltthumb_pathgt
ltfull_pathgtimagesfullgifltfull_pathgt
ltphotogt
ltphotogt
ltdescriptiongtThis is a description for the fourth
imageltdescriptiongt
ltthumb_pathgtimagesthumbjpgltthumb_pathgt
ltfull_pathgtimagesfullgifltfull_pathgt
ltphotogt
ltphotogt
ltdescriptiongtThis is a description for the fifth
imageltdescriptiongt
ltthumb_pathgtimagesthumbjpgltthumb_pathgt
ltfull_pathgtimagesfullgifltfull_pathgt
ltphotogt
ltphotogt
ltdescriptiongtThis is a description for the sixth
imageltdescriptiongt
ltthumb_pathgtimagesthumbjpgltthumb_pathgt
ltfull_pathgtimagesfullgifltfull_pathgt
ltphotogt
ltphotogt
ltdescriptiongtThis is a description for the seventh
imageltdescriptiongt
ltthumb_pathgtimagesthumbjpgltthumb_pathgt
ltfull_pathgtimagesfullgifltfull_pathgt
ltphotogt
ltphotogt
ltdescriptiongtThis is a description for the eighth
imageltdescriptiongt
ltthumb_pathgtimagesthumbjpgltthumb_pathgt
ltfull_pathgtimagesfullgifltfull_pathgt
ltphotogt
ltphotogt
ltdescriptiongtThis is a description for the ninth
imageltdescriptiongt
ltthumb_pathgtimagesthumbjpgltthumb_pathgt
ltfull_pathgtimagesfullgifltfull_pathgt
ltphotogt
ltphotogt
ltdescriptiongtThis is a description for the tenth
imageltdescriptiongt
ltthumb_pathgtimagesthumbjpgltthumb_pathgt
ltfull_pathgtimagesfullgifltfull_pathgt
ltphotogt
ltphotogt
ltdescriptiongtThis is a description for the
eleventh imageltdescriptiongt
ltthumb_pathgtimagesthumbjpgltthumb_pathgt
ltfull_pathgtimagesfullgifltfull_pathgt
ltphotogt
ltphotogt
ltdescriptiongtThis is a description for the twelfth
imageltdescriptiongt
ltthumb_pathgtimagesthumbjpgltthumb_pathgt
ltfull_pathgtimagesfullgifltfull_pathgt
ltphotogt
ltphotogt
ltdescriptiongtThis is a description for the
thirteenth imageltdescriptiongt
ltthumb_pathgtimagesthumbjpgltthumb_pathgt
ltfull_pathgtimagesfullgifltfull_pathgt
ltphotogt
ltphotogt
ltdescriptiongtThis is a description for the
fourteenth imageltdescriptiongt
ltthumb_pathgtimagesthumbjpgltthumb_pathgt
ltfull_pathgtimagesfullgifltfull_pathgt
ltphotogt
ltphotogt
ltdescriptiongtThis is a description for the
fifteenth imageltdescriptiongt
ltthumb_pathgtimagesthumbjpgltthumb_pathgt
ltfull_pathgtimagesfullgifltfull_pathgt
ltphotogt
ltgallerygt
032010 (11)36
ACTIONSCRIPT DEVELOPMENT
Listing 2 PhotoGalleryas
package
Imports
import caurinatransitionsTweener
import classesBigPhoto
import classesThumbNail
import flashdisplayBitmap
import flashdisplaySprite
import flasheventsEvent
import flasheventsMouseEvent
import flashnetURLLoader
import flashnetURLRequest
[SWF(width=466 height=515 backgroundColor=00
0000 frameRate=30)]
public class PhotoGallery extends Sprite
Containers
private var _thumbContainerSprite Stores
the thumbnails
private var _nextButtonSprite Stores
the next arrow
private var _backButtonSprite Stores
the back arrow
private var _bigPhotoBigPhoto
Container for the big image
XML
private var _xmlLoaderURLLoader
Loads the XML file
private var _xmlXML
Stores the XML data
Image Assets
[Embed(source=assetsnext-arrowpng)]
private var _nextArrowClass
Embedded asset for the next
arrow
[Embed(source=assetsback-arrowpng)]
private var _backArrowClass
Embedded asset for the back
arrow
Constructor
public function PhotoGallery()
init ()
Initializing method
private function init ()void
_xmlLoader = new URLLoader ()
_xmlLoaderaddEventListener (EventCOMPLETE
xmlComplete false 0 true)
_xmlLoaderload (new URLRequest
(galleryxml))
XML Complete
private function xmlComplete (eEvent)void
Store the XML data
_xml = new XML (etargetdata)
loadImages ()
Clean up
_xmlLoaderremoveEventListener
(EventCOMPLETE xmlComplete)
_xmlLoader = null
Load in the thumbs
private function loadImages ()void
Temporary variables
var imageHeightuint = _xmlimage_height
var imageWidthuint = _xmlimage_width
var imageGapuint = _xmlimage_gap
var rowsuint = _xmlrows
var rowCounteruint = 0
var columnCounteruint = 0
Instantiate the container and position it
on screen
_thumbContainer = new Sprite ()
_thumbContainerx = 78
_thumbContainery = 78
_thumbContainerbuttonMode = true
_thumbContaineraddEventListener
(MouseEventCLICK thumbClick
false 0 true)
thisaddChild (_thumbContainer)
Loop through the images and create the
visual grid
for (var iuint = 0 i lt _xmlphotolength ()
i++)
var pathString = _xmlphoto[i]thumb_path
var descriptionString = _xmlphoto[i]desc
Creating an XML Photo Gallery with AS3
032010 (11) 37
Listing 2 PhotoGalleryas
ription
Create the thumbnail
var pThumbNail = new ThumbNail ()
pnewID = i
ploadImage (path)
pdescription = description
px = (imageWidth + imageGap)
columnCounter
py = (imageHeight + imageGap)
rowCounter
_thumbContaineraddChild (p)
Create the grid
if ((rowCounter + 1) lt rows)
rowCounter++
else
rowCounter = 0
columnCounter++
Setup the navigation
createNavigation ()
This method handles the click event for the
next arrow
private function nextClick (eMouseEvent)void
155 is the width + spacing
if (-_thumbContainerx lt (_thumbContainerwidth
ndash stagestageWidth ndash 155))
disableNavigation ()
TweeneraddTween (_thumbContainer x
_thumbContainerx ndash 155 time
075 transitioneaseOutExpo
onCompleteenableNavigation)
This method handles the click event for the
back arrow
private function previousClick (eMouseEvent)void
if (-_thumbContainerx gt 0)
disableNavigation ()
TweeneraddTween (_thumbContainer x
_thumbContainerx + 155 time
075 transitioneaseOutExpo
onCompleteenableNavigation)
This method handles the click event for the
thumbnails
private function thumbClick (eMouseEvent)void
disableNavigation ()
Disable the container that stores the
thumbnails
_thumbContainerbuttonMode = false
_thumbContainermouseChildren = false
_thumbContainerremoveEventListener
(MouseEventCLICK thumbClick)
Get the full image path
var imagePathString = _xmlphoto[etargetnewI
D]full_path
Instantiate the big photo
_bigPhoto = new BigPhoto ()
_bigPhotobuttonMode = true
_bigPhotox = 108
_bigPhotoy = 1075
_bigPhotoalpha = 0
_bigPhotoloadImage (imagePath)
_bigPhotoaddEventListener (MouseEventCLICK
closePhoto false 0 true)
thisaddChild (_bigPhoto)
Fade up the photo
TweeneraddTween (_bigPhoto alpha1 time
1)
Fade out the photo
When the image finishes fading delete the
photo and enable the navigation
items
private function closePhoto (eMouseEvent)void
TweeneraddTween (_bigPhoto alpha0 time1
onCompletedeletePhoto)
private function deletePhoto ()void
032010 (11)38
ACTIONSCRIPT DEVELOPMENT
Listing 2 PhotoGalleryas
_bigPhotobuttonMode = false
_bigPhotoremoveEventListener
(MouseEventCLICK closePhoto)
_bigPhotodestroy ()
thisremoveChild (_bigPhoto)
_bigPhoto = null
_thumbContainerbuttonMode = true
_thumbContainermouseChildren = true
_thumbContaineraddEventListener
(MouseEventCLICK thumbClick
false 0 true)
enableNavigation ()
private function createNavigation ()void
Instantiate the next arrow
var nBitmap = new _nextArrow ()
Instantiate the nextButton container
Add the next button as a child of the
nextButton container
_nextButton = new Sprite ()
thisaddChild (_nextButton)
_nextButtonaddChild (n)
_nextButtonx = stagestageWidth ndash _
nextButtonwidth
_nextButtony = 475
Instantiate the back arrow
var bBitmap = new _backArrow ()
Instantiate the backButton container
Add the next button as a child of the
backButton container
_backButton = new Sprite ()
thisaddChild (_backButton)
_backButtonaddChild (b)
_backButtonx = _nextButtonx ndash _
nextButtonwidth ndash 5
_backButtony = 475
enableNavigation ()
private function enableNavigation ()void
_nextButtonbuttonMode = true
_nextButtonaddEventListener
(MouseEventCLICK nextClick false
0 true)
_backButtonbuttonMode = true
_backButtonaddEventListener
(MouseEventCLICK previousClick
false 0 true)
private function disableNavigation ()void
_nextButtonbuttonMode = false
_nextButtonremoveEventListener
(MouseEventCLICK nextClick)
_backButtonbuttonMode = false
_backButtonremoveEventListener
(MouseEventCLICK previousClick)
Figure 4 New ActionScript class dialog
Creating an XML Photo Gallery with AS3
032010 (11) 39
Listing 3 ThumbNailas
package classes
import caurinatransitionsTweener
import flashdisplayLoader
import flashdisplayShape
import flashdisplaySprite
import flasheventsEvent
import flasheventsMouseEvent
import flashnetURLRequest
import flashtextTextField
import flashtextTextFieldAutoSize
import flashtextTextFormat
public class ThumbNail extends Sprite
Containers
private var _imageLoaderLoader Loads in
the thumbnail
private var _imageContainerSprite
Container for the thumbnail
private var _maskShape Container for the
mask
private var _descriptionContainerSprite
Container for the description
TextFields
private var _descriptionTextField
TextField for the container
Logic
private var _newIDuint The ID of the
object
[Embed(systemFont=Arial fontName=arial
fontWeight=bold
mimeType=applicationx-font-
truetype)]
private var _arialClass Embedded asset
for the font
Constructor
public function ThumbNail ()
super ()
init ()
Initializing method
private function init ()void
Instantiate the container
_imageContainer = new Sprite ()
_imageContaineralpha = 0
thisaddChild (_imageContainer)
createDescription ()
thismouseChildren = false
thisaddEventListener (MouseEventMOUSE_OVER
onMouseOver false 0 true)
thisaddEventListener (MouseEventMOUSE_OUT
onMouseOut false 0 true)
Public Methods
public function loadImage (pathString)void
_imageLoader = new Loader ()
_imageLoadercontentLoaderInfoaddEventListen
er (EventCOMPLETE imageComplete
false 0 true)
_imageLoaderload (new URLRequest (path))
GetterSetter Methods
public function get newID ()uint
return this_newID
public function set newID (valueuint)void
this_newID = value
public function get description ()String
return this_descriptiontext
public function set description (valueString)void
this_descriptiontext = value
Private Methods
032010 (11)40
ACTIONSCRIPT DEVELOPMENT
Listing 3 ThumbNailas
private function onMouseOver (eMouseEvent)void
TweeneraddTween (_descriptionContainer
y75 time05 transition
easeOutExpo)
private function onMouseOut (eMouseEvent)void
TweeneraddTween (_descriptionContainer
y150 time05 transition
easeOutExpo)
private function imageComplete (eEvent)void
Reposition the loaded content to the center
_imageLoaderx = -(_imageLoaderwidth 2)
_imageLoadery = -(_imageLoaderheight 2)
_imageContaineraddChildAt (_imageLoader 0)
Apply background after the image has
completely loaded
drawBackground ()
Draw the mask around the description
drawMask ()
Fade in the container
TweeneraddTween (_imageContainer alpha1
time05)
Clean up
_imageLoadercontentLoaderInforemoveEv
entListener (EventCOMPLETE
imageComplete)
Draws a background behind _imageContainer
private function drawBackground ()void
_imageContainergraphicsbeginFill (0xFFFFFF)
_imageContainergraphicsdrawRect (_
imageLoaderx ndash 1 _imageLoadery
ndash 1 _imageLoaderwidth + 2
_imageLoaderheight + 2)
_imageContainergraphicsendFill ()
Creates everything for the description
private function createDescription ()void
Instantiate the container
_descriptionContainer = new Sprite ()
_descriptionContainery = 150
_descriptionContainergraphicsbeginFill
(0x000000 075)
_descriptionContainergraphicsdrawRect (-75
-75 150 75)
_descriptionContainergraphicsendFill ()
_imageContaineraddChild (_
descriptionContainer)
Specify text formatting for the description
Text Field
var tfTextFormat = new TextFormat ()
tfcolor = 0xFFFFFF
tfalign = center
tffont = arial
tfbold = true
tfsize = 12
Instantiate the TextF ield
_description = new TextField ()
_descriptionx = -75
_descriptiony = -70
_descriptionwidth = 150
_descriptionwordWrap = true
_descriptionembedFonts = true
_descriptiondefaultTextFormat = tf
_descriptionautoSize = TextFieldAutoSizeLEFT
_descriptionContaineraddChild (_description)
Draws a mask our _descriptionContainer
private function drawMask ()void
Draw the mask shape
_mask = new Shape ()
_maskgraphicsbeginFill (0xFF0000)
_maskgraphicsdrawRect (_imageLoaderx
_imageLoadery _imageLoaderwidth
_imageLoaderheight)
_maskgraphicsendFill ()
addChild (_mask)
Apply the mask to the container
_descriptionContainermask = _mask
Creating an XML Photo Gallery with AS3
032010 (11) 41
that will be loaded into the application from XML Finally create another folder and this time name it assets This folder will contain the buttons that wersquoll embed into our project
The AssetsBefore we start coding we need to create some visual assets Open up Photoshop or any other program you have for creating graphics and create an image that is 150x150 pixels Fill it with a flat color and save the image as thumbjpg in the images folder you just created Next create another image thatrsquos 250x300 pixels Fill it with another color and save that image as fulljpg into the same folder These images will be used for testing purposes only
Listing 4 BigPhotoas
package classes
import flashdisplayLoader
import flashdisplaySprite
import flasheventsEvent
import flashnetURLRequest
public class BigPhoto extends Sprite
Containers
private var _imageLoaderLoader Loads in the
thumbnail
private var _imageContainerSprite Container
for the thumbnail
Constructor
public function BigPhoto ()
super()
Public Methods
public function loadImage (pathString)void
_imageLoader = new Loader ()
_imageLoadercontentLoaderInfoaddEventListen
er (EventCOMPLETE imageComplete
false 0 true)
_imageLoaderload (new URLRequest (path))
Clean up method
public function destroy ()void
_imageContainerremoveChild (_imageLoader)
_imageLoaderunload ()
_imageLoader = null
thisremoveChild (_imageContainer)
_imageContainer = null
Private Methods
private function imageComplete (eEvent)void
Instantiate the container
_imageContainer = new Sprite ()
thisaddChild (_imageContainer)
Add the loader
_imageContaineraddChild (_imageLoader)
Clean up
_imageLoadercontentLoaderInforemoveEv
entListener (EventCOMPLETE
imageComplete)
Figure 5 Time to test
032010 (11)42
ACTIONSCRIPT DEVELOPMENT
We still have to create our navigation buttons that wersquoll use to scroll through our gallery Create two buttons that are 40x40 pixels and design them how you like They should resemble forward and back buttons Save the forward arrow as next-arrowpng and the other as back-arrowpng into the assets folder Now that our assets our created itrsquos time to code
The XML fileRight click the src folder in the project scroll over to new and click file A dialog window will open and in the file name input box type galleryxml (see Figure 4) Write the code that you see from Listing 1 into galleryxml
Line 1 is the XML declaration This is needed to have a well-formed XML document
Line 2 declares the gallery root node Notice in this node Irsquove added attributes Also to have a well-formed XML document you must have one root node and all attribute values must be in quotes
Lines 3-7 declares a photo node with three children description thumb_path and full_path description is exactly as it sounds It will contain a description for our thumbnail thumb_path contains the path to our thumbnail image Same goes for full_path it contains the path to our full image
I then just copy and pasted that and pasted it 14 times just changing out the description Remember wersquore just using dummy data When you finish go back and add photos of your choice
The ClassesWersquoll be using two additional classes for this project One will be for the thumbnails and another for the full image Right click the classes folder go to new and click ActionScript class In the name field type ThumbNail For the Superclass type in flashdisplaySprite Wersquoll need to extend from that class so we can use the functionality of that object but add our own (see Figure 4)
Add another class this time name it BigPhoto It should also inherit from flashdisplaySprite
CodingTime to start writing the ActionScript for this project Open up PhotoGalleryas from the Flex Navigator and type in the code from Listing 2 Open up ThumbNailas and type in the code from Listing 3 Open up BigPhotoas and type in the code from Listing 4 Now that you have all the code in itrsquos time to test In the menu bar click RungtRun PhotoGallery (see Figure 5) If you get an error make sure you typed everything correctly If all went well you should see the gallery open up Click the buttons and watch the gallery scroll left and right Roll over the thumbnails to see the description scroll up Click on a thumbnail to see the full image fade in You might be wondering about whatrsquos going on Irsquoll try to break that down for you next
The ExplanationOur main focus is going to be whatrsquos going on in PhotoGalleryas This file contains the ActionScript that makes almost everything happen We first start off by declaring our properties that will be used in the project Yoursquoll notice a couple of embeded lines These lines are MetaData tags that actually embed assets into the project The two embeded lines you see add the next-arrowpng file and the back-arrowpng file In the constructor there is one call to a method called init() This method gets the application going by requesting and loading in the XML File When the file finishes loading we store the XML data into our _xml property Next we call the loadImages() method This method is responsible for a big part of the application We first gather some information from the XML file and store it in temporary variables
bull imageWidth stores the image _ height attributes valuebull imageWidth stores the image _ width attributes valuebull imageGap stores the image _ gap attributes valuebull rows stores the row attributes valuebull rowCounter increments ever pass of the for loop Is
compared against the rows variablebull columnCounter increments once for every column
created
The for loop cycles the XML file creating a new ThumbNail object with every iteration During each iteration we create variables that store the path to the thumb nail (path) and the description of the thumbnail (description) We pass the variables into the methods of the ThumbNail class Remember the ThumbNail class defines methods and properties that are specific to it The class code is commented if you wish to explore it Again our main focus is PhotoGalleryas To create the grid we write ifelse logic that compares the rowCounter variable to the row variable For every iteration of the loop we increment that variable if that variable becomes greater than rows we set it back to 0 rowCounter is then multiplied to the y-axis of each ThumbNail object The rest of the code is commented for you to explore
ConclusionYoursquoll notice I actually hard coded a lot of values directly in the ActionScript Not too ideal In the next part of this tutorial wersquore going to come back to this code and modify it to be a little more flexible and visually appealing If you have any questions feel free to contact me through my site (wwwcodedbyryancom)
RYAN DrsquoAGOSTINORyan DrsquoAgostino is an Interactive Developer at NAS Recruitment Communications in Cleveland OH part-time instructor at Virginia Marti College of Art and Design in Lakewood Ohio and freelance designer and ActionScript developer For more information about Ryan please visit httpwwwcodedbyryancom
032010 (11)44
COMPONENTS
Components are the controls and containers that are the elements of the application that create the interface They cover controls such
as buttons and check boxes containers that can hold other containers and controls navigation elements and charts Components can be added to your application in variety of ways They can be added through the design view writing then in MXML or through ActionScript
Flash Builder now has two major sets of components the Halo set which has been available in previous versions of Flex and the new Spark set The components from the Spark set have a direct correlation to a component in the Halo set but not all Halo components have been upgraded to the Spark framework yet The namespaces for these components are added automatically when a MXML document is created and you will notice there are now multiple namespace in the main MXML document already
Creating custom components takes two paths The first is to create a skin for an existing Halo component in Flash Illustrator Photoshop or Fireworks or create a custom skin for a Spark component using MXML The second path is to create a completely custom component using Flash Professional and importing it into the Flash Builder project We are going to focus on the second path and create a custom component with Flash Professional
The first step in creating a custom component is to instal the Flex Component Kit mxp into Flash Professional This is an extension that will expose some
Custom Flash CS4
Flash Builder comes with a lot of components to cover almost all of an apps needs But what if you want a custom look or functionality to a component With Flash Professional you can create custom components and import them into Flash Builder for use in your application
What you will learnhellipbull How to create custom components in Flash Professional to im-
port into Flash Builder
What you should knowhellipbull Flash Professional CS4bull Flash Builder 4bull Actionscript 3
Components in Flash Builder 4
Figure 1 The component artwork Figure 2 Converting the movie clip
032010 (11)46
COMPONENTS
Listing 1 The component class
package comtest
import mxflashUIMovieClip
import flasheventsEvent
import flasheventsEventDispatcher
import flasheventsMouseEvent
import flashfiltersGlowFilter
public class SliderButton extends UIMovieClip
public static const BUTTON_CLICKString = button click
private var glowGlowFilter = new GlowFilter(0x0000cc54421falsefalse)
public function SliderButton()
plusButtonbuttonMode = true
minusButtonbuttonMode = true
plusButtonaddEventListener(MouseEventMOUSE_OVER handleMouseOver)
plusButtonaddEventListener(MouseEventMOUSE_OUT handleMouseOut)
plusButtonaddEventListener(MouseEventCLICK handleMousePress)
minusButtonaddEventListener(MouseEventMOUSE_OVER handleMouseOver)
minusButtonaddEventListener(MouseEventMOUSE_OUT handleMouseOut)
minusButtonaddEventListener(MouseEventCLICK handleMousePress)
private function handleMouseOver(eMouseEvent)void
ecurrentTargetfilters = [glow]
private function handleMouseOut(eMouseEvent)void
ecurrentTargetfilters = []
private function handleMousePress(eMouseEvent)void
if(ecurrentTargetname == plusButton ampamp trackThumbx lt 134)
trackThumbx++
else if(ecurrentTargetname == minusButton ampamp trackThumbx gt 37)
trackThumbx--
dispatchEvent(new Event(SliderButtonBUTTON_CLICK))
032010 (11)48
COMPONENTS
of the Flex classes to Flash allowing the component to communicate with the application Download the extension from the Adobe site at httpwwwadobecomcfusionexchangeindexcfmevent=extensionDetailampextid=1273018 and install using the Adobe Extension Manager The extension should work with Flash
versions as far back as Flash 8 but I highly recommend using at least Flash 9 (CS 3)
Once the extension is installed launch Flash Professional and create a new ActionScript 3 project We are going to create a simple slider button that has a plus and minus button on each end of the button and a track between them When the plus and minus buttons are clicked the the track thumb will move one pixel in either direction There will also be a roll over behavior on the buttons to change their look as the mouse rolls over and off the buttons Finally Flash Builder will receive the event of the button being pushed and update a text input on the stage
It is common to encapsulate the behaviors of the component within itself and have events broadcast to the containing application If you think about some of standard components in both Flash Builder and Flash Professional and deconstruct them in your mind you will see that the same methods are used on them The NumericStepper is a lot like our component It has two buttons with a text field that displays a value that is incremented or decremented with each push of the button The component itself does nothing to effect the application until the code calls it to either send or receive a value
With our new document we are going to create the artwork for the component in the fla file Create four movie clips one each for the scroll track the plus button the minus button and the track thumb (Figure 1) The naming and look of these movie clips are not important
Once the movie clips are created and on the stage give each one an instance name The names in the
Figure 3 Setting the class of the movie clip
Figure 4 Setting to export as SWC
Figure 5 Creating the Flash Builder project
Custom Flash CS4 Components in Flash Builder 4
032010 (11) 49
example files are plusButton minusButton and trackThumb The actual names do not matter and we dont need an instance name for the track since we are not going to reference it in Flash Builder Flash Builder will reference the instance names of the movie clips in the components we will use these later
Now that the artwork has been created it must be collected into its own movie clip Select all of the artwork on the stage and choose ModifygtgtConvert to Symbolhellip In the Library panel there is a new symbol that is called in the sample files SliderButton The name is important here because this is how the Convert to Flex Component mxp will name the class that Flash Builder will refer to later
An external class will give the component the internal behaviors that were mentioned earlier as well as an event to broadcast to the Flash Builder application (Listing 1) All the code in the class should be familiar but there are a few points to go over First the package name is given the qualifier of comtest to identify that the component belongs to our namespace This is not necessary but helpful when there are multiple components or components from different publishers in the application
The most important change is instead of having the class extend the Sprite class this class is going to
extend the UIMovieClip class This class like the Flex Component in the library exposes the behaviors and methods we set up in the class to the Flash Builder application In the import statements use import
mxflashUIMovieClip The mxflash class includes both the UIMovieClip and ContainerMovieClip classes
When the variables are declared we set up a glow filter that will be attached to the buttons when the mouse rolls over them and a string constant for the event we create later In the constructor of the class the buttons receive the event listeners for the mouse interactions and the handlers are added later in the code In the handleClick event handler we use the event dispatcher class to dispatch the event Here we are just dispatching a standard event with the constant that was created earlier You can just as easily dispatc a custom event that has extra information attached to it
Select the movie clip in the Library panel then select CommandsgtgtConvert Symbol to Flex Component (Figure 2) The extension will do several operations such as making the symbol available to ActionScript giving the symbol a class name adding the Flex Component to the library and others
Save the file as SliderButtonas in the folder path comtest When you declare the package name as we have here you must have the same hierarchy as listed in the package name Back in the fla select the
Figure 6 The Package Explorer
Listing 2 The main MXML le
ltxml version=10 encoding=utf-8gt
ltsApplication xmlnsfx=httpnsadobecommxml
2009
xmlnss=librarynsadobecomflex
spark
xmlnsmx=librarynsadobecomflex
mx
width=200 height=110gt
ltfxDeclarationsgt
lt-- Place non-visual elements (eg
services value objects) here
--gt
ltfxDeclarationsgt
ltsApplicationgt
Listing 3 The new component and name space
xmlnstest=comtest
lttestSliderButton x=14 y=10 id=sliderButton
gt
032010 (11)50
COMPONENTS
SliderButton movie clip and select Propertieshellip from the contextual menu Expand the advanced area if it is not already and enter comtestSliderButton in the Class text field Leave the Base Class text field blank and click OK (Figure 3)
Select Publish Settingshellip from the file menu and click on the Flash tab (Figure4) Under the SWF Settings area of the window be sure that the Export SWC check box is checked The swc is the part that Flash Builder will use in the application SWC are archives that contain the classes and media assets of the component and make it easy to distribute the movie clip
Publish the SWF and SWC and we are ready to move to Flash Builder
Flash BuilderIn Flash Builder create a new project This example we only need a basic Flash Builder project without any
server technologies You can name the project anything you would like in this case I have name FB_Components and saved it in my default workspace
If you have not worked on a Flash Builder project yet it is a lot like working on the Flex projects in the past with some new MXML tags You will also notice that the Flex Navigator pane has now been replaced with the Package Explorer (Figure 6)
The Package Explorer pane has a different organization than the Flex Navigator but the main MXML file can still be found under src then under the default package
Looking at the main MXML (Listing 2) you will see that the three name spaces are added automatically and the application begins with sApplication instead of mxApplication These are the minor differences to be on the look out for when working on a Flash Builder project
Listing 4 The nal MXML le
ltxml version=10 encoding=utf-8gt
ltsApplication xmlnsfx=httpnsadobecommxml2009
xmlnss=librarynsadobecomflexspark
xmlnsmx=librarynsadobecomflexmx minWidth=200 minHeight=110
width=200 height=110
initialize=init()
xmlnstest=comtestgt
ltfxDeclarationsgt
lt-- Place non-visual elements (eg services value objects) here --gt
ltfxDeclarationsgt
ltfxScriptgt
lt[CDATA[
private function init()void
sliderButtonaddEventListener(SliderButtonBUTTON_CLICK updateText)
private function updateText(eEvent)void
pixelTexttext = String(sliderButtontrackThumbx)
]]gt
ltfxScriptgt
lttestSliderButton x=14 y=10 id=sliderButton gt
ltsLabel x=39 y=41 text=The position of the track thumb is textAlign=center width=122gt
ltsTextInput x=76 y=76 width=49 id=pixelTextgt
ltsApplicationgt
Custom Flash CS4 Components in Flash Builder 4
032010 (11) 51
To get our component into the Flash Builder project we need to put the swc some where the project can see it On your desktop navigate to where the swc was published to and copy the file Then navigate to where Flash Builder project is and put the swc into libs folder I have found it is easier to keep the fla and swf files out of the project then copy the swc over to the Flash Builder project as needed
Back in Flash Builder open the libs folder under the project in the Package Explorer pane In that directory you should see your swc if you do not try right clicking on the libs folder and selecting Refresh
In the MXML editor switch to Design view When the Design view becomes active the Component pane should become available in the lower left of the workspace The first folder in the pane is the Custom folder and our custom component should be displayed in the list Drag an instance of this component onto the stage
To show that we can have two way communication with the component drag a label and a text input onto the stage Set the labels text to be The position of the track thumb is and move the text input near the label Set the id of the text input to pixelText (Figure 7) Switch back to the Source view after saving
Notice that several lines have been added to the source of the MXML document In addition to the MXML for the component including our custom component a name space value has been added to the sApplication tag designated as xmlnstest=comtest (Listing 3) If we add more components using the same comtest package declaration they will all fall under this name space If we were to add more components using a different package additional name spaces would be added You will also notice that the component starts with testSliderButton as opposed to s fx or mx
In the application tag add an initialize property calling a function called init() After the fxDeclarations tags add fxScript tags to hold the Actionscript As you type fx the code completion should pop up and allow you to select the fxScript tags
Add an id property to the SliderButton tag and give it a value of sliderButton In between the CDATA tags add the init function This function simply adds an event listener to our component calling the updateText
function every time the BUTTON_CLICK event is broadcast from the SliderButton class (Listing 4)
Once the application receives the BUTTON_CLICK event it calls the updateText function This function looks into the component and gets the x position of the track thumb then puts that value into the text input we set up earlier
So now we have communication coming out of the component using the dispatchEvent call in the class We are also looking into the component where the application is getting the x position of the thumb track inside the component Communication can get much more complicated than this but this is a simple example to give a starting point to create more complex components
Click debug to run the application and if no errors occurred the application should launch in a browser window If you have a browser window open before running the app you should close it There is a bug in the Flash Player at the time of this writing that may cause the app to not run if there are browser windows already open
Once the application is running click on the buttons and watch as the value in the text input increase and decrease The custom component is now complete and ready to have more behaviors and methods added to it
ConclusionWhile the components that come with Flash Builder can cover most situations there will be times where only a custom component will fit the applications needs Creating a custom component takes a little work but can make the developers job a lot easier With this new level of control over the look and behavior of the component can make the application more rich and engaging to the end user
Figure 7 Components on the stage
On the Netbull httpwwwadobecombull httpwwwadobecomcfusionexchangeindexcfmeven-
t=extensionDetailampextid=1273018
LOUIS DICARROLouis DiCarro is a consultant based in NYC and has been working with Flash since the rst version He has taught web development at the college level and has worked for numerous large clients He can be reached at louisdicarroffdgmailcom
032010 (11)52
COMPONENTS AIR Components in Flash Builder
032010 (11) 53
We already know that building an AIR application affords us a lot more capabilities than working with a web based project
Digging through the Actionscript documentation shows that there are a lot of classes that are only available to AIR applications These mostly have to do with classes and methods that interact with the file system or windowing of the application
Flash Builder as with Flex Builder before it contains several components that are only available to use with AIR applications These components deal with
visual interfaces for interacting with the file system and a HTML component for displaying web content
You may wonder why these components are only available for AIR applications Mostly it is for security reasons Up to Flash Player 101 a swf does not have the permission to interact with files on the file system except in very limited circumstances
Swfs in the web browser are able to interact only with files on the server in which the swf is hosted This allows them to load images xml and other file types at run time but only if the files come from within its
AIR Components
Adding file and html rendering can result in a lot of code But with the AIR components in Flash Builder 4 this functionality can be added easily with only a few lines of code
What you will learnhellipbull What components are available for AIR applications in Flash
Builder 4
What you should knowhellipbull Flash Builder 4bull Actionscript 3
in Flash Builder
Figure 1 AIR Actionscript 3 special classes for the HTML component Figure 2 Layout of the HTML application
032010 (11)52
COMPONENTS AIR Components in Flash Builder
032010 (11) 53
Were going to take a look at couple of simple examples for each component to get a feel how use them It is also important to note that the documentation for these components are in the AS 3 documentation When looking at the documentation you will see a symbol next to some of the classes and also next to some methods within the classes (Figure 1)
HTML ComponentThe HTML component is very easy to work with It can pull in many types of media and render them as you would expect them to be rendered in a web browser
Start up Flash Builder and create a new Flex project Name the project and select Desktop under project type Click finish and let Flash Builder set up the project
Once the project is started click on the Design tab In the lower left a component tab should be open If it is not open it using the Window menu and selecting Components Scroll down to the Adobe AIR folder You will not see this folder if you set your project to run in a web browser
We are going to create a simple web browser using only three components and one line of code First drag a HTML component a text field and a button to the stage Arrange them how you would like and switch over to design view
Give each component an id as in Listing 1 Also give the button a click handler Type click and let the program auto complete another code hint will pop up to create the handler automatically
Flash Builder will generate the handler as well as the fxScript block in the code In the click handler that is generated add a line that will set the location of the HTML component to the text in the text field See Listing 2 for the full code
Run the application and fill in a valid web address in the application Remember to include http in front of
own sandbox There are exceptions and ways around it but for the majority the swf cannot interact with the file system
If the development of applications using Flash Builder and AIR were to succeed they would need to act like real desktop applications This means that the applications would have to load and save files just as any other application that a user would use on the computer
Security is still maintained in this model by having the developer digitally sign their application using certificates If the certificate is obtained though a trusted source the application would be traceable back to the original developer if something bad should happen
Having a HTML component gives the application greater rendering power by tapping into the Web Kit which can run better than the HTML renderers in the Flash Player This allows developers to repurpose content from their web site to the application
Figure 3 The application running Figure 4 Layout of the image viewer application
Listing 1 MXML of components
ltsTextInput id=addressBar x=10 y=10
width=518gt
ltsButton id=goButton x=555 y=13
label=Go click=goButton_
clickHandler(event) gt
ltmxHTML id=htmlPane x=10 y=40 width=620
height=430gt
Listing 2 goButton handler
protected function goButton_clickHandler(event
MouseEvent)void
htmlPanelocation = addressBartext
032010 (11)54
COMPONENTS
the address Click the Go button and the page should load after a few seconds Take a look at Figure 3 for the results
There are a lot of methods and commands associated with the HTML component This will allow you to make a more customized display and give more control over the HTML content that you show
File system componentsUsing the file system components is just as easy To test the components we are going to create a simple image viewer that allows the user to select the images from the file system
Create a new Flex Project as we did before and be sure to make it a desktop application Once the project has loaded switch to design view and drag a File System Tree and an Image component to the stage See Figure 4 for the layout
Once the application is laid out switch over to the Source mode and give all the components ids as we did before (Listing 3) Also add a change handler instead of a click handler Flash Builder will autocomplete and generate the handler for you as it did when we added the click action to the button
In the generated handler add the code that will load the image into the image component To keep everything simple we only are going to load jpg and png files (Listing 4) in this function we are first checking to make sure the file is a file and not a directory by checking for a file extension If the file passes the first test we check to see if the file is a jpg or png Lastly if the file passes all of these test it gets loaded into the image component
Save the file and run the application to see the results Clicking on the file system tree items will either open or close the directory or try to load the file When the user clicks on a jpg or png it will load into the image component (Figure 5) Note that as the tree expands a scroll bar is attached to the component automatically
ConclusionJust as with the HTML component there is more methods and properties available to you with the file system components In this demo application we have seen how easy it is to get access to the file system using the component without writing a lot of code
There is a lot more involved in making a full application using these components but we have witnessed how easy to get started with them Having more control over the elements as well as error checking would be added in real applications
Having these components available gives the application a large amount of functionality very quickly and allows the developer to concentrate on the logic of the application Using these components in your application will help make it more full-featured and feel more like a real desktop application
LOUIS DICARROLouis DiCarro is a consultant based in NYC and has been working with Flash since the rst version He has taught web development at the college level and has worked for numerous large clients He can be reached at louisdicarroffdgmailcom
Listing 3 MXML of components
ltmxFileSystemTree id=fsList x=10 y=10
height=460 change=fsList_
changeHandler(event)gt
ltmxImage id=imgPane x=193 y=10 width=437
height=460gt
Listing 4 Handler for change event
protected function fsList_changeHandler(event
ListEvent)void
var fileFile = eventcurrentTargetselectedItem
as File
if(fileextension)
if(fileextensiontoLowerCase() == jpg ||
fileextensiontoLowerCase() ==
png)
imgPanesource = fileurl
Figure 5 The image viewer application running
032010 (11)56
TLF Applying CSS to Text Layout Framework styles
032010 (11) 57
TLF is introducing the new way of applying styles to the text Prior to TLF flash used simple approach you had to prepare and attach
StyleSheet object to the style property of the TextFieldTLF provides more flexible and customizable but
more complex techniqueDuring this tutorial we are going to create a small
application in Flex 4 This application contains a text displayed with TLF component TextArea and 2 different CSS that can be applied to the text simply by pressing the button Figure 1 show the screenshot of the application
TextFlow and itrsquos IFormatResolverTLF provides a callback mechanism to for with text styles TextFlow objectrsquos got a property formatResolver that should implement IFormatResolver interface Actually it is a set of callback functions that are called by parent TextFlow when it processes itrsquos elements
To have a closer look at formatResolver we will implement itrsquos version to work with out simple CSS So start create a new project in Flex and name it for example TextCSS In the default package create a new ActionScript class named CSSFormatResolver that implements IFormatResolver interface
Listing 1 shows the complete implementation of the class and will we look closer into it later For now pay attention on the following functions
bull invalidateAll
bull invalidate
bull resolveFormat
bull resolveUserFormat
bull getResolverForNewFlow
These function are created automatically by Flex Builder as they are required for implementation of the interface All functions are callbacks that are called when the certain action is performed by TextFlow and it needs to know how to treat with different elements
Applying CSS
This article is a reply to our readerrsquos question about the possibility to apply CSS to Text Layout Framework (TLF) We will show how to implement the necessary class and switch text styles on the fly
What you will learnhellipbull how can custom styles be applied to TLF elementsbull how to implement IFormatResolver to work with CSS
What you should knowhellipbull the basics of Flex and FlexFlash Builderbull the basics of TLF
to Text Layout Framework styles
Figure 1 Style changing application
032010 (11)56
TLF Applying CSS to Text Layout Framework styles
032010 (11) 57
Main ApplicationListing 2 contains a full code for main application
The application consists of
bull TextArea with some text The text is formed using XML Some elements of the TextFlow have
For our case we are interested in resolveFormat function that is called for every element of the TextFlow when itrsquos style needs to be changed This function return an object that should implement ITextLayoutFormat
Before we continue lets have a fast look at main application and how we build our example
Listing 1 CSSFormatResolveras
package
import flashtextStyleSheet
import flashxtextLayoutelementsFlowElement
import flashxtextLayoutelementsFlowValueHolder
import flashxtextLayoutelementsIFormatResolver
import flashxtextLayoutelementsTextFlow
import flashxtextLayoutformatsITextLayoutFormat
public class CSSFormatResolver implements
IFormatResolver
private var _styleSheetStyleSheet
public function CSSFormatResolver()
_styleSheet = new StyleSheet()
public function invalidateAll(textFlow
TextFlow)void
public function invalidate(targetObject)void
public function resolveFormat(targetObject)
ITextLayoutFormat
var formatFlowValueHolder = null
if (target is FlowElement)
var elementFlowElement = target as
FlowElement
if (element = null)
format = elementformat as
FlowValueHolder
if (elementstyleName = null)
var styleObject = styleSheetgetSt
yle(elementstyleName)
formatcolor = style[color]
formatfontSize =
style[fontSize]
formatfontWeight =
style[fontWeight]
formatfontStyle =
style[fontStyle]
return format
public function resolveUserFormat(targetObject
userFormatString)
return null
public function getResolverForNewFlow(oldFlow
TextFlow newFlowTextFlow)
IFormatResolver
return null
public function get styleSheet()StyleSheet
return _styleSheet
public function set styleSheet(valueStyleSheet)
void
_styleSheet = value
032010 (11)58
TLF
032010 (11) 59
Listing 2 TextCSSmxml
ltxml version=10 encoding=utf-8gt
ltsApplication xmlnsfx=httpnsadobecommxml2009
xmlnss=librarynsadobecomflexspark
xmlnsmx=librarynsadobecomflexhalo
xmlnslocal=
width=640 height=300gt
ltfxScriptgt
lt[CDATA[
import mxeventsFlexEvent
protected function applyCSS1Button_
clickHandler(eventMouseEvent)void
var formatResolverCSSFormatResolver =
new CSSFormatResolver()
formatResolverstyleSheetparseCSS(css1
text)
textAreatextFlowformatResolver =
formatResolver
protected function applyCSS2Button_
clickHandler(eventMouseEvent)void
var formatResolverCSSFormatResolver =
new CSSFormatResolver()
formatResolverstyleSheetparseCSS(css2
text)
textAreatextFlowformatResolver =
formatResolver
]]gt
ltfxScriptgt
ltsTextArea id=textArea width=620 height=134
x=9 y=156gt
ltsTextFlowgt
ltsp styleName=h1gt
Title of the Text
ltspgt
ltsp styleName=h2gt
Section of the Text
ltspgt
ltspgt
This is a body text Lorem ipsum
ltspgt
ltsTextFlowgt
ltsTextAreagt
ltsTextArea x=10 y=10 width=285 height=86
id=css1 gt
lt[CDATA[
h1
colorFF0000
fontSize20
fontWeightbold
fontStylenormal
h2
colorFF00FF
fontSize16
fontWeightbold
fontStyleitalic
]]gt
ltsTextAreagt
ltsTextArea x=345 y=10 width=285 height=86
id=css2 gt
lt[CDATA[
h1
color00FF00
fontSize32
fontWeightnormal
fontStyleitalic
h2
color0000FF
fontSize24
fontWeightbold
fontStylenormal
]]gt
ltsTextAreagt
ltsButton x=108 y=105 label=Apply CSS
1 id=applyCSS1Button
click=applyCSS1Button_
clickHandler(event)gt
ltsButton x=443 y=105 label=Apply CSS
2 id=applyCSS2Button
click=applyCSS2Button_
clickHandler(event)gt
ltsApplicationgt
032010 (11)58
TLF
032010 (11) 59
got styleName attribute so you could apply the corresponding CSS style to them later
bull 2 TextAreas with simple different CSSbull 2 Buttons to apply CSS from TextAreas to example
text
When the button is clicked the new instance of CSSFormatResolver class is created Then the corresponding CSS string from the TextArea is parsed and set into resolverrsquos property of SlyleSheet class type And finally prepared formatResolver instance is assigned to the TextFlow
Applying CSS to TextFlowNow lets have more detailed look at resolveFormat callback function First it should return a value that implements ITextLayoutFormat if it returns null then no new styling should be applied to an element being processed by the function So we create format variable of FlowValueHolder (it implements ITextLayoutFormat) and set itrsquos value to null (we do that because resolveFormat works with all elements including TextFlow itself as probably we donrsquot want to apply one style to the whole text)
After we do all the necessary casts and null checks and if we are sure that current elementrsquos got styleName attribute we assign styles from CSS to a current format StyleSheet object is used to contain CSS data as it is convenient object to parse and retrieve CSS data
Conclusion and a WarningThere was a brief tutorial on how to apply simple CSS to TLF TextFlow Please note that CSSFormatResolver class is not fully functional and only can be applied to our sample CSSs Writing reusable and versatile class requires more detailed coding and approach
Check the TLF Blog on this issue There is fully functional CSSFormatResolver with example there httpblogsadobecomtlf200902iformatresolver_and_using_css_1html
MAXYM GOLOVANCHUK Maxym Golovanchuk is a Photoshop Certied Expert and TV producer and he is using Adobersquos software for implementing entertainment solutions including video delivery with Flash Media Server mexxikgmailcom
MondayTuesdayWednesdayThursday Friday
DIVISIONS OF CREATIVE NICHE INC
032010 (11)60
PROFILE Flashcreed ndash Business Gallery
032010 (11) 61
The Business Gallery (httpwwwflashcreedcombusiness_video_image_gallery) is a Flash component meant to do one thing to enhance the visual experience a website portfolio or presentation site gives to its users Mainly itrsquos all about the image you present yourself or
your product to the world wide web Letrsquos face it without the looks you canrsquot sell your product or image no matter how interesting it might be
Whatrsquos so great about this gallery you might wonder Well the answer is simple everything Advanced AS3 programming dynamic XML implementation unlimited number of media items on stage PNG JPG and video FLA SWF MP4 F4V supported media tween and image effects just to name a few of the over 150 settings this gallery brings you Bottom line you can customize it in any way you see fit in order to make it resemble your website layout Not to mention the code optimization that allows the gallery to run so smoothly even on low resources
We brought 45 background wallpapers in case just a color doesnrsquot do the job also a set of custom arrows and close buttons
Flashcreed ndash Business GalleryHello itrsquos good to be back here among Flash amp Flex Magazine readers Today we are going to tell you a bit about our products mainly our Business Gallery but since all our products are built on the same framework most of the properties apply to all When we first realized what we could do with this framework we decided to name it ldquoPandorardquo in order to point out the unlimited number of possibilities it revealed regarding customization and user friendliness
032010 (11)60
PROFILE Flashcreed ndash Business Gallery
032010 (11) 61
The size of the entire gallery and any element in it is subject to any kind of resize big stage and small thumbs or the other way around for any template you or your client desire
Column_scroll and the properties for the stage mask helps you configure the exact number of visible columns you want to set in order to browse through the media items your gallery has Beside this useful feature we added blur and a couple of tween effects for the leftright navigation that gives an impressive look
032010 (11)62
PROFILE Flashcreed ndash Business Gallery
032010 (11) 63
Either as tooltip or plain text you can show any information you want regarding a certain media thumb in the gallery You can change font type size spacing color position and many other properties
The color gradient system for roll overout mouse gesture is unique in every way if we are to compare it with other galleries on the market at this point You can customize up to 5 sets of color with different alpha values The gradient type either linear or radial can be modified with rotation and ratio values
032010 (11)62
PROFILE Flashcreed ndash Business Gallery
032010 (11) 63
When clicking on a thumb if preview_type is selected as internal a resizable preview window will reveal itself and depending on the media type (image or video) an image viewer or video player will be contained inside it If preview_type is selected as external you have the possibility to set certain URL addresses this allowing you to redirect the user to a specific area of the website like a product page from a virtual store for example
The video player has a dozen of controllers that allow you to create a skin to better suit the template you want to create for your gallery Buttonrsquos color thickness handler color or scrub bar size just to name a few of the properties you can play with
At an amazing price of 999 $ this has to be one of the best choices when it comes to media galleries flash components Donrsquot hesitate to take a look at it on wwwflashcreedcom and also consider other products that might better suit your specifications or desires We would definitely appreciate any kind of feedback regarding current or possible features
Thank you
032010 (11)65
BOOK REVIEW
Are you an actionscript 3 game developer who is not able to write a complete commercial game because you cannot manage dozens
of classes Or you are an experienced actionscript 3 applications developer who wants to program game but donrsquot like reading any available beginner book as it doesnrsquot suit your style Even if you already have a good grasp over java or c++ and interested in creating not only fun games but commercial ones also then this is what you really require
There are several actionscript 3 game development books for beginners out there but Essential Guide to Game Dev is one of those few books that talk about the advanced gaming concepts However its first chapter begins with an easy to understand game example (good for any beginner) and ends up creating 3 games Did I tell you 3 games in just first chapter
Teaching about an Actionscript 3 Game framework is one of the many reasons that make this book a kick-ass addition to actionscript 3 gaming library Authors teach you how to create 10 unique games ranging from arcade to driving tile based to puzzle game and shooters to dice games Another specialty of this book is to use Flex and Flash Develop IDEs along with the primary Flash tool that creates space for not only flex
developers but also Flash Develop users In addition to this you will also learn to create game assets with GIMP Mappy and a sound effect creation tool You will get information about copyright laws which are necessary for any would-be commercial game creation and a complete game example integrated with MochiAds
This book also discusses and further more implements various advanced topics such as bitmap rendering pixel-level collision detection sound management AI xml-based level designing scrolling screen optimization techniques particles etc
In short this book will surely blow your minds with the wealth of knowledge it includes and you will pray for authors to keep writing such informative and useful books
If you are really serious about gaming then donrsquot miss the opportunity of reading this book Highly recommended
by Ali RAZA ACI ACE SCJP
Essential Guide to Flash Games
Authors Jeff Fulton Steve FultonPublisher friends of EDISBN 978-1-4302-2614-7Language EnglishPages 664 PagesWebsite httpfriendsofedcombookhtmlisbn=1430226145
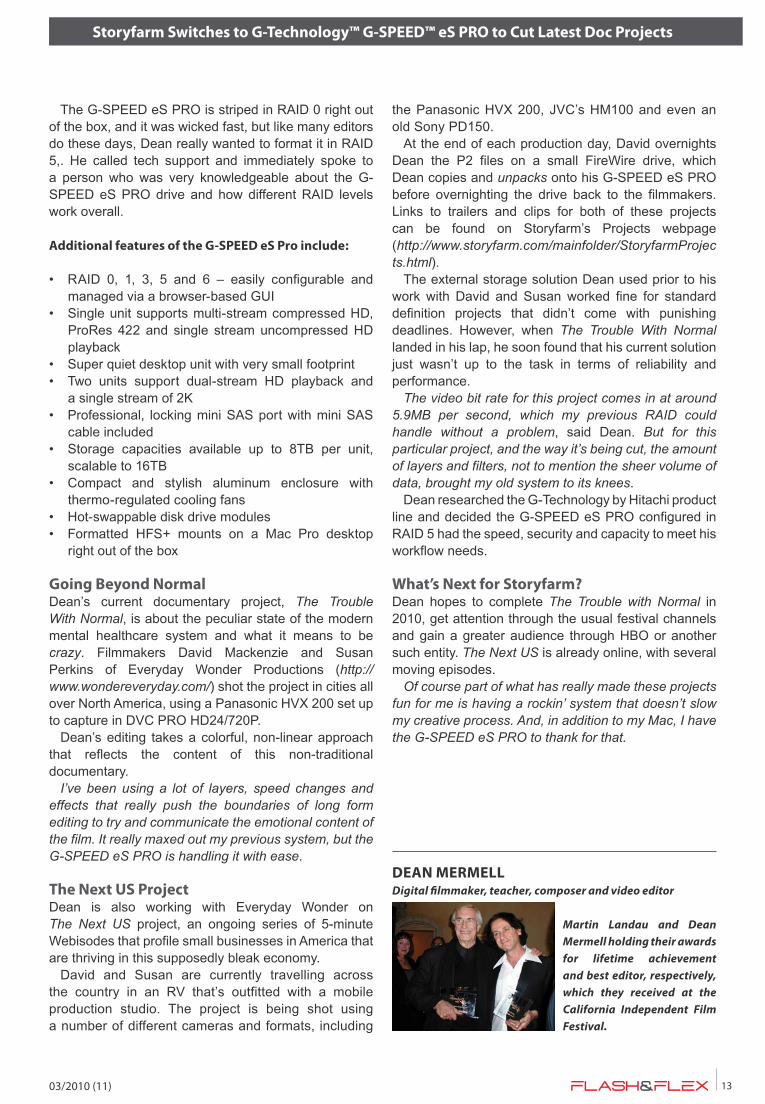
032010 (11)16
BEGINNERS Working with Display Objects 101
032010 (11) 17
Once you select the OK button you will get a window that looks like this Just select OK
So if we test our code now we will get and error because we have yet to create a MovieClip and add it to the stage
So delete all the code you have currently in the actions panel We will first create a variable that will hold the newly created instance of the MovieClip from the library instead of dragging it to the stage like we did before
Enter the following code
var anyNamejustin_mc = new justin_mc()
addChild(anyName)
the var keyword creates a variable anyName Note as the name states this can be called any name you want it to be eg Bob Billy Susan or whatever This is essentially its instance but in code instead of
selecting it and on the stage and then adding it via the properties panel like we did before justin _ mc references the library class name that you set earlier within the propertiesand the = new justin_mc() creates a new instance of a MovieClip name justin_mc() and assigns it to the variable
The addChild(anyName) just tells Flash to add the object to the stage using the variable (var) reference that you just created If you donrsquot use the addChild(name of variable) you will not see your visual object show up on the stage
So as you see itrsquos really not that difficult to access a display object and display it
Finally we will adjust some of the properties just as we did before Except this time we use the variable name that was called anyName Again this is just like your instance name see (Listing 1)
In next months issue we will continue this expedition of display objects and touch on things like drawing shapes using only code and working with text I hope you enjoyed this article please feel free to email me your comments or questions to jundajgmailcom
JUSTIN P JUNDAIs a New Media Engineer specializing in FlashAS2-3 Photo-shop After Effects PHP MySQL and a slue of other program-ming languages Justin also loves to travel and has a strong passion for teaching others how to use these technical pro-ducts He currently works with a top government-contracting rm implementing new media ideas into interactive course-ware that is then delivered to the military in order to effecti-vely train them Also check out shprotv to see the latest video from him and his partner Director Scott Hansen wavelenght-fxmaccom You can reach Justin at jundajgmailcom with any thoughts or concerns you have regarding this article
Listing 1
Creates Instance of the MovieClip named justin_mc
var anyNamejustin_mc = new justin_mc()
Set properties for the MovieClip properties
can be things like rotation
x y coordinates Scale sizes
etc
anyNamex = 100
anyNamey = 100
anyNamerotation = 45
anyNamescaleX = 15
anyNamescaleY = 15
Assigns the movie clip to the stage
addChild(anyName)
032010 (11)18
FLASH AND PHP
The webinar hosted by Ryan Stewart Platform Evangelist at Adobe and Kevin Schroeder Technology Evangelist at Zend hit the Web around
the same time that Zend announced Code Tracing had been added to its PHP web application server Who you might ask is this company called Zend And what is an article about flight recorders doing in Flash amp Flex Magazine After all yoursquore a Flex developer so why should you care
Who is ZendPHP runs a third of the worldrsquos Web sites and has now become the most popular language for building dynamic Web applications Zend Technologies Inc is the leading provider of products and services for developing deploying and managing business-critical PHP applications Zend contributes to Zend Framework (an open source objected-oriented Web application framework) and now Zend Framework is bundled with Adobe Flash Builder 4
What is a Software Flight RecorderWhen something goes wrong with an airplane in flight investigators obviously canrsquot reproduce the problem Instead they rely on data captured by the airplanersquos black box flight recorder in order to uncover the source of the problem Zend Server does the same for PHP web applications Rather than trying to recreate the environment and reproduce the steps leading up to a problem Zend Server captures in real-time the full
execution of an application ndash in production or in a test lab ndash and pinpoints root cause issues without trail and error This feature called Code Tracing is akin to a software flight recorder for PHP web applications
Code Tracing can be activated to automatically capture problems in real-time or used manually to trace specific scenarios Zend had strict requirements for the Code Tracing user interface
bull The performance chops to handle megabytes of databull A highly-interactive view for an exceptional user
experiencebull The ability to modify widget behaviorbull Established cross-browser supportbull Sufficient and accessible technical content and
expertise see (Figure 1)
Zend considered various alternatives and ultimately chose Adobe Flex for the following reasons
bull Performancebull Flexibilitybull Maturitybull Flash Builder 4 support for data-focused applications
Why Flex developers should care
bull Adobe Flash Builder now has built-in support for Zend Framework a PHP framework based on PHP 5
bull PHP provides easy integration with back-end logic using Flash remoting
bull Zend Server is a data-centric web application server and Code Tracing helps improve development and deployment in high performance production environments
EXCERPT FROM WEBINAR BY KEVIN SCHROEDER AND RYAN STEWART
How a Software Flight Recorder was You might have caught a recent webinar How Zend used Flex and PHP to build a Software Flight Recorder which sparked some interesting discussion
Built Using Adobe Flex and Zend PHP
Figure 1 Flash and PHP
How Zend Used Adobe Flex and PHP to Build a Software Flight Recorder
ldquoZend Framework with Support for Action Message For-mat (AMF) Now Bundled with Adobe Flash Builder 4rdquo
How to build Rich Internet Applications using Zend PHP and Adobe Flash Platform
032010 (11)20
ACTIONSCRIPT DEVELOPMENT Creating an AS3 Game Framework
032010 (11) 21
The game framework is the foundation for making the second game It is an expanded version of the first chapterrsquos framework with an emphasis
on organization and reuse Since this book is also not called Proper Object-Oriented Design Patterns and Principles for Games you will see little theory here and mostly practice Many of these techniques have been hard won and developed over many years of ActionScript programming We have fought the wars through AS1 AS2 and now AS3 so you donrsquot have to do it yourself
While our framework borrows from some design patterns we feel that games are a very expressive medium We want you the reader of this book to think outside that proverbial over-used box While design pattern ideas lend themselves to all manner of application development we donrsquot want you to feel hemmed in to using any one set of ideas for creating their games Our framework gives structure to the overall flow of a game but does not dictate how to code the actual game logic
Exploring the FrameworkThe game framework is housed in a reusable package structure A package structure at its very basic is an organized set of folders that will contain reusable classes All of the standard class files for using the framwork will be in this package structure We will update and extend this structure as we proceed through this book Letrsquos start by giving you an idea of what classes we will be creating for the framework
The GameFrameWorkas classThe GameFrameWorkas class is the foundation of the framework It contains a simple state machine and a basic game loop timer Our state machine is a simple
construct containing a set of state constants to switch the framework between states States are handled by state functions inside the GameFrameWorkas file We will employ a variable to reference the current state function The game timer will use this reference to call the current state function on each frame tick We will create states for such things as the title screen instructions screen game play game over and more
When we create a new game our document class will be an instance of GameFrameWork called Mainas This Mainas will have an init (short for initialization) function that will set up the framework for use This Mainas class will also act as a sort of message gateway between the game and the framework classes If you are confused donrsquot worry wersquoll be explaining this in greater detail soon
The FrameWorkStatesas classThis FrameWorkStatesas class will simply contain a set of constant integer values representing the state machine states When we first create the framework we will have 10 different state constants All will begin with the STATE_SYSTEM designation For example we will have a state that displays the title screen The state constant for this will be STATE_SYSTEM_TITLE More states will be added as we progress through the chapters in this book
The BasicScreen class and SimpleBlitButton helper class The BasicScreen class will be used to display very simple game state screens These screens can have a basic background color with transparency (if needed) as well as some text centered on the screen Each screen can also have a button that needs to be clicked to move to a new state in the state machine This class is so simple that it will probably never be used without major
Creating an AS3 Game Framework
Excerpted from the book The Essential Guide to Flash Games Building Interactive Entertainment with ActionScript by Jeff Fulton Steve Fulton (FriendsofEDApress 2010)
PART ONE
032010 (11)20
ACTIONSCRIPT DEVELOPMENT Creating an AS3 Game Framework
032010 (11) 21
We will also be creating three distinct custom event classes as part of the framework These will be used to send specific data from the Game class instance to the Mainas (GameFrameWorkas instance) class The Mainas will act on the data sent and if needed pass the data to other framework classes By doing this we are using Mainas as a sort of message gateway
The CustomEventButtonIdas classThis custom event will have the ability to pass an identification integer value to the listening function It is used for cases where multiple buttons share the same listener function It will be used in the framework (specifically in the GameFrameWork instance Mainas) to allow BasicScreen instances to each share the same listener functions if they employ a SimpleBlitButton You will see this when we examine the GameFrameWork class file It can also be used for any game or application that needs to send a basic integer id along with an Event instance
The CustomEventLevelScreenUpdateas classThis custom event will be used by the Gameas class instance to send data to a BasicScreen instance we will create called levelInScreen The levelInScreen will have the ability to display custom text between each level The event listnener for this event will change this text with a value passed when the event is fired off The Mainas (GameFrameWorkas sub-class) will listen for this event and pass the data to the levelInScreen
The CustomEventScoreBoardUpdateas classThis custom event will be used by the the Gameas class instance to update the values on the ScoreBoard class instance The Mainas class will listen to for this event and pass the data on to the ScoreBoardas class instance
The framework package structureWe will be organizing all of the code we will create into a package structure The reusable framework classes will be in one package and the games we will create will be in a separate package Letrsquos create these two package structures now
The source folderChoose a spot on your disk drive of choice and create a folder called source This will be the root or base level for all of the code and games we will create in this book
The classes packageThe reusable framework classes will be in a package called classes Create a folder called classes inside the source folder from the previous step You should now have a folder structure that looks a little like this
modification in your own commercial games We present it here in its very simple form for utility purposes
The SimpleBlitButton helper class is used to create a clickable button with rollover and off states The button is created completely in code with a simple color background for the over and off states to be sed in the BasicScreen class We do this for simplicity and to demonstrate some Sprite blitting techniques (much more on these later in the book) using a set of BitmapData instances for the background color change of the button on rollover
The ScoreBoard class and SideBySideScoreElement helper class The ScoreBoard class displays information for the user during game play Data such as the current game score time remaining and other useful information can be displayed to the user with a very basic look and feel by using this class It can be used as is but when you start to make your own commercial games you might find it useful to extend this class with more functionality This very basic class is used inside the framework to demonstrate how to use events from a Game instance to update a game score board
The SideBySideScoreElement helper class is used to display a text label and corresponding dynamic text field as a pair side by side on the screen For example it can be implemented by the ScoreBoard class to display the word Score followed by the userrsquos current score
The Game classThe Game class is a stub style class that all games in the framework will inherit from It contains the basic variables and functions needed to work with the GameFrameWork class
The Custom event classesThe framework makes use of events to communicate between classes The instances of the Game class will use events to communicate with the ScoreBoard and the Main classes We will create a custom Mainas class for each game This Main class will be a sub-class (or child) of the GameFrameWork class Some of the events we will use will be simple events These are instances of the standard Flash Event class used for basic communication By this we mean events that donrsquot need to send any data along with them For example instances of the Gameas framework class will have a constant variable called GAME_OVER This constant will be used as the name of a simple Event instance that is fired off with the standard dispatchEvent function call This example GAME_OVER event wil be used to tell the Mainas to move to the game over (STATE_SYSTEM_GAME_OVER) state in the main state loop when the current game has completed
032010 (11)22
ACTIONSCRIPT DEVELOPMENT Creating an AS3 Game Framework
032010 (11) 23
[source]
[classes]
Next we will create the actual package that will contain all of the source code for the reusable framework classes We will name this package comefgframework To create this you must first create a folder inside the classes folder called com then a folder called efg inside the com folder and finally a framework folder inside the efg folder By the way the efg is an abbreviation for the book title Essential Flash Games You should now have a folder structure that looks like this
[source]
[classes]
[com]
[efg]
[framework]
When we start to create all of the class files necessary for the framework they will all go into the framework folder You will see that when we create these classes the package name will look like this
package comefgframework
The projects packageThe second package we will create is called the projects package You can start this right away by creating a folder inside the root source folder called projects The projects folder is not going to be a straight package structure like the classes folder It is organized in a manner to allow individual custom game development using the framework
Inside this projects folder we are going to create a unique folder for each game in the book The first game we are going to create is called stubgame A stub is usually a function or class that contains very little (if any) usable code but is instead a simple placeholder Our game will be slightly more than a placeholder but not much more It will be used to demonstrate the basic functionality of the framework Go ahead and create a folder called stubgame in the projects folder You should have a projects set of folders that look like this
[source]
[classes]
[projects]
[stubgame]
Next we are going to create two folders each to hold a different version of our game Why are we going to do this This book is meant to support Flash game development with a variety of tools There are many popular methods to create Flash games
with an assortment of tools and code integrated development environments (IDEs) We are going to focus on two such tools in this book the Flash IDE (the one with the library timelines drawing tools and so on all combined into a single tool) and Flash Develop (a very popular free IDE made specifically for ActionScript development) You can use any tool with this book but you will need to follow the documentation specific to your own tool when setting up projects
You will need to pay careful attention to linking the reusable code package structure to your games because linking may vary depending on the Flash code editor environment you are using Linking the package to a game is actually a very simple process but it differs between the various code IDE versions Jeff does most of his Flash game development Flash Develop using the free Flex SDK that Adobe provides Steve on the other-hand uses the Flash IDE almost exclusively We have combined our efforts on all of the chapter games to bring you code that will work with both a Flex SDK project and a Flash IDE project
On that note the next two folders you will create inside the stubgame folder are called flashIDE and flexSDK You donrsquot have to create both for any project You just need to create the one that works with the tools you are going to use to create Flash games Each is set up differently so pay attention to the specifics of the one you will be using the most
You should now have a projects folder that looks like this
[projects]
[stubgame]
[flashIDE]
[flexSDK]
The Flash IDE package structureThe Flash IDE package structure begins right inside the flashIDE folder The package name is very similar to the classes package you saw in the last section The package structure will be comefggames[game
name] For instance with the stub game we are going to create in this chapter the package name will be comefggamesstubgame Go ahead and create those folders now You should have this package structure when you are complete
[projects]
[stubgame]
[flashIDE]
[com]
[efg]
[games]
[stubgame]
[flexSDK]
032010 (11)22
ACTIONSCRIPT DEVELOPMENT Creating an AS3 Game Framework
032010 (11) 23
The Flex SDK package structureThe Flex SDK package structure is very similar to the Flash IDE package structure with one small difference Flash Develop and other Flex tools use a specific set of folders for organizing their own project structures To accommodate these and still have a common package structure for our games we must add the Flash Develop created src folder to the flexSDK folder You will not have to create the src folder or the package structure by hand as Flash Develop will create it automatically for you when you start a new project In the section called Setting up the game in Flash Develop we will go into the details For now here is the way the structure will be laid out (including the Flash Develop specific folders such as bin obj and lib If you have used Flash Develop to create a Flex SDK project you will recognize the following structure
[projects]
[stubgame]
[flexSDK]
[bin]
[obj]
[lib]
[src]
[com]
[efg]
[games]
[stubgame]
Notice that we have created the exact same package structure inside the src folder as we will use with the Flash IDE The package name for our game will be comefggamesstubgame
The package name in the code for classes in both the Flash IDE and Flex SDK will be the same
package comefggamesstubgame
The Mainas and StubGameas filesWhen we start to add files to the subgame package we will be creating two subclasses (or children) of framework classes that will be unique to our game The Mainas will be created as a subclass (or child) of GameFrameWorkas framework class The StubGameas class will be a subclass (or child) of the Gameas framework class
Starting a project using the framework packagesYou have just seen the basic package structure for both the framework reusable classes and the projects we are going to create Letrsquos make use of this right away by creating a project for the stub game The stub game will be very similar to the Chapter 1 game where the player is tasked with clicking the mouse ten times
Creating the stub game project in the Flash IDEFollow these steps to set up stub game using the Flash IDE
1 Start up your version of Flash I am using CS3 but this will work exactly the same in CS4 and CS5
2 Create a fla file in the sourceprojectsstubgame
flashIDE folder called stubgame3 In the sourceprojectsstubgameflashIDE folder
create the following package structure for your game comefggamesstubgame
4 Set the frame rate of the Flash movie to 30 FPS Set the width and height both to 400
5 Set the document class to comefggamesstubgameMain6 We have not yet created the Mainas class so you
will see a warning We are going to create this later in this chapter
7 Add the framework reusable class package to the class path for the fla filebull In the publish settings select [Flash]gt
[ActionScript 3 Setting]bull Click the Browse to Path button and find the
source folder we created earlier for the package structure Select the classes folder and click the choose button Now the comefgframework package will be available for use when we begin to create our game We have not created the framework class files yet but we will be doing this very shortly
Creating the stub game project in Flash DevelopAnd these are the steps to create the same project using Flash Develop
1 Create a folder inside the [source][projects][stubgame] folder called [flexSDK] (if you have not already done so)
2 Start Flash Develop and create a new projectbull Select Flex 3 Projectbull Give the project the name stubgamebull The location should be the sourceprojects
stubgameflexSDK folderbull The package should be comefggamesstubgamebull Do not have Flash Develop create a project
folder automatically Make sure the Create Folder For Project box is unchecked
bull Click the OK button to create the project3 Add the class path to the framework to the project
bull Go to the [project]gt[properties]gt[classpaths] menu item
bull Click the add class path buttonbull Find the source folder we created earlier and
select the classes subfolderbull Click the ok button and then the apply button
032010 (11)24
ACTIONSCRIPT DEVELOPMENT Creating an AS3 Game Framework
032010 (11) 25
You now have the basic structure to start creating projects inside the framework We are now going to discuss a few topics concerning the structure of the framework classes and then move into building the reusable framework code
Here are a couple of things to noteFor Flex Builder Flash Builder or other IDEs please refer to the documentation provided for that product to create a new project and set the default compile class
A common method of Flash development is to use the Flash IDE for assets and organization and Flash Develop for code editing If this is your workflow of choice you will want to follow the Flash IDE folder and package structure rather than the Flex SDK folder structure
Creating game timersThere are two basic methods that most Flash developers implement when creating a frame-based game timer By frame-based we mean a timer that uses the idea of a segment of time broken up into logical slices (or frames) to manage game logic There are other types of methods for timing game updates but we will make extensive use of time-slice or frame-based timers in this book The basic game timer we will use most of the games will attempt to squeeze all processing and screen updates into each segment or frame We will also explore a time-step timer and a sleep-based timer in chapter 11
The first timer method is the EventENTER_FRAME event timer The standard EventENTER_FRAME event handler will attempt to run the game loop at the swf filersquos set frame rate This very handy game loop timer has been in use for a number of years The second standard game loop timer method makes use of the Timer class The Timer class is used to call the game loop at millisecond intervals specified by a delay interval For example if the millisecond delay interval is set to 100 the Timer instance would run ten times a second (there are 1000 milliseconds in a single second) Our framework will begin by using this Timer instance game loop timer We will do this so we can make use of the TimerEventTIMER updateAfterEvent function As you will see this function will help smooth out screen updates
Defining frame timer tick You will see the phrases frame timer tick timer tick and frame tick used in this book When we refer to a tick or a frame tick we simply mean one framersquos worth of processing When we run a game at 30 frames per second we have 30 ticks or 30 frame ticks This also means that we only have 3333 milliseconds (or 100030) inside each tick to do all of our processing
State MachinesA traditional state machine at its very basic is a mechanism that controls the state or current actions a system can perform Sometimes this is called a finite state machine Finite state machines have traditionally been used to model complex mathematical computations and more recently artificial intelligence The finite in the name refers to the fact that the system can only be in a single state at any one time Our game framework is built on a simple state machine pattern that employs a separate code function or method for each state There are many other styles of state machines some use entire classes for each individual state (sometimes called an object-oriented state machine) and some use a simple switchcase statement block called on each frame tick to control state We will use a third type that borrows from these two
We call our state machine pattern a function reference pattern Unlike the object-oriented state machine our machine will contain a separate method or function for each state inside a single framework class Each of these state functions will control elements in the framework such as instances of the BasicScreen and Game classes We will use a switchcase statement to move between states Unlike the afore mentioned very simple switchcase state machine structures that call this switchstate control structure on each frame tick we only need to call it when we are switching states The switchcase we call will simply change the function reference we call on each frame tick The GameFrameWorkas will contain the state machine that controls overall game flow This will move our game system between states defined in the FrameWorkStatesas file
Each individual game package we create will contain a Mainas (in the gamersquos own package structure) that will extend GameFrameWorkas We will also create a unique Gameas child class for each game The Game class children that we create can also employ their own internal state machines based on the function reference pattern when needed
Richard (Squize) Myles of wwwgamingyourwaycom was one of the first to offer the idea of a function reference state machine for ActionScript 3 on his well-respected blog
The FrameWorkStatesas class fileThis class file is a simple collection of constants that will define the states for the game framework They will be consumed by the GameFrameWorkas class file The following code listing shows the entire code for this file you will want to create this file according to the package structure in the previous section see (Listing 1)
The first thing you should notice about this class is the package name in the first line It conforms to the file system structure we created earlier No matter if
032010 (11)24
ACTIONSCRIPT DEVELOPMENT Creating an AS3 Game Framework
032010 (11) 25
you are using a version of Flash Flex Builder Flash Builder Flash Develop TextMate or even plain old Notepad this package name will be the same The package name is not depended on the code development environment but the chosen file structure for organizing the code Save this file in the location we created previously
sourceclassescomefgframeworkFrameWorkStatesas
The state variablesThe state variables are constants that the game loop state machine will use to move between game states We have set up the most common basic states in this sample file but you will be able to create as many as you need As we progress through the chapters more will be added as necessary
bull STATE _ SYSTEM _ TITLE This state is used to display a basic title screen with an OK button for the user to click to move on Once the instructions are on the screen the state will change to the next state
bull STATE _ SYSTEM _ WAIT _ FOR _ CLOSE This one waits until the OK button is clicked for any instance of the BasicScreen class
bull STATE _ SYSTEM _ INSTRUCTIONS This state is used to display basic instructions with the same OK button as in the SYSTEM _ TITLE state It also changes to the STATE _ SYSTEM _ WAIT _ FOR _ CLOSE state until the OK button is clicked
bull STATE _ SYSTEM _ NEW _ GAME This state will call the game logic class and fire off its gamenewGame() function It does not wait but moves on to the NEW _
LEVEL state right awaybull STATE _ SYSTEM _ NEW _ LEVEL With this state we can
call the gamenewLevel() function to set up a new level for the given game
bull STATE _ SYSTEM _ LEVEL _ IN This state is used to display some basic information if needed for the beginning of a level In this basic game we simply display the level screen and wait a few seconds before moving on The wait is accomplished by changing state to the STATE _ SYSTEM _ WAIT state for the specified number of frame ticks
bull STATE _ SYSTEM _ GAME _ PLAY This one simply calls the game logic classrsquos runGame function repeatedly and lets the game take care of its own logic and states
bull STATE _ SYSTEM _ GAME _ OVER The game over state displays the basic game over screen and waits for the OK button to be clicked before moving back to the instructions screen It quickly changes state to the STATE _ SYSTEM _ WAIT _ FOR _ CLOSE until the OK button is clicked
bull STATE _ SYSTEM _ WAIT This state waits for a specified number of frames and then fires off a simple custom event constant called WAIT _ COMPLETE
The GameFrameWorkas class fileThe GameFrameWorkas will be that parent of our gamersquos document class Mainas (the gamersquos document class)
for our games will extend this class and call functions to modify the framework for each unique game The entire code listing is provided at the end of this section We will explore it in detail once your have had a chance to type in the code The location for this file in the package structure is
sourceclassescomefgframeworkGameFrameWorkas
The GameFrameWorkas will be the parent class to the Mainas class we will use for our games and itrsquos shown in the following listing In later chapters we will add some functions to this file and even create one that uses a completely different timer The Mainas will subclass this class with the extends syntax and override the blank stub init function we are about to create This class will also contain all of the state functions that coincide with the state variables in the FrameWorkStates class All of the functions in the GameFrameWorkas are public so all can be overridden by the Mainas if needed In this way we can customize the behavior of the state functions if we need to
For example in later chapters we will want to play music on the title screen The function call to play
Listing 1
package comefgframework
author Jeff and Steve Fulton
public class FrameWorkStates
public static const STATE_SYSTEM_WAIT_FOR_CLOSEint = 0
public static const STATE_SYSTEM_TITLEint = 1
public static const STATE_SYSTEM_INSTRUCTIONSint = 2
public static const STATE_SYSTEM_NEW_GAMEint = 3
public static const STATE_SYSTEM_GAME_OVERint = 4
public static const STATE_SYSTEM_NEW_LEVELint = 5
public static const STATE_SYSTEM_LEVEL_INint = 6
public static const STATE_SYSTEM_GAME_PLAYint = 7
public static const STATE_SYSTEM_LEVEL_OUTint = 8
public static const STATE_SYSTEM_WAITint = 9
032010 (11)26
ACTIONSCRIPT DEVELOPMENT Creating an AS3 Game Framework
032010 (11) 27
the music will need to be added to the systemTitle state function Not all games will need this though so we will not add it to the GameFrameWorkas filersquos systemTitleFunction Instead we will create a new version of the function in Mainas to override the one in GameFrameWorkas The new one will play the sound needed and then call the systemTitle function inside GameFrameWorkas with the supersystemTitle() function call see (Listing 2)
The class imports The class import section contains the necessary Flash core classes needed for the Main class Notice the package name coincides with the package structure we created earlier in the chapter for the framework
package comefgframework
Listing 2
package comefgframework
import flashdisplayBitmap
import flashdisplayBitmapData
import flashdisplayMovieClip
import flasheventsEvent
import flashgeomPoint
import flashtextTextFormat
import flashutilsTimer
import flasheventsTimerEvent
public class GameFrameWork extends MovieClip
public static const EVENT_WAIT_COMPLETEString =
wait complete
public var systemFunctionFunction
public var currentSystemStateint
public var nextSystemStateint
public var lastSystemStateint
public var appBackBitmapDataBitmapData
public var appBackBitmapBitmap
public var frameRateint
public var timerPeriodNumber
public var gameTimerTimer
public var titleScreenBasicScreen
public var gameOverScreenBasicScreen
public var instructionsScreenBasicScreen
public var levelInScreenBasicScreen
public var screenTextFormatTextFormat
public var screenButtonFormatTextFormat
public var levelInTextString
public var scoreBoardScoreBoard
public var scoreBoardTextFormatTextFormat
Game is our custom class to hold all logic for
the game
public var gameGame
waitTime is used in conjunction with the
STATE_SYSTEM_WAIT state
it suspends the game and allows animation or
other
processing to finish
public var waitTimeint
public var waitCountint=0
public function GameFrameWork()
public function init()void
stub to override
public function setApplicationBackGround(width
Number
heightNumberisTransparentBoolean = false
coloruint = 0x000000)void
appBackBitmapData = new BitmapData(width
height
isTransparent color)
appBackBitmap = new Bitmap(appBackBitmapData)
addChild(appBackBitmap)
public function startTimer()void
timerPeriod = 1000 frameRate
gameTimer=new Timer(timerPeriod)
gameTimeraddEventListener(TimerEventTIMER
runGame)
gameTimerstart()
public function runGame(eTimerEvent)void
systemFunction()
eupdateAfterEvent()
switchSystem state is called only when the
032010 (11)26
ACTIONSCRIPT DEVELOPMENT Creating an AS3 Game Framework
032010 (11) 27
Listing 2
state is to be changed
(not every frame like in some switchcase
based simple state machines
public function switchSystemState(statevalint)
void
lastSystemState = currentSystemState
currentSystemState = stateval
switch(stateval)
case FrameWorkStatesSTATE_SYSTEM_WAIT
systemFunction = systemWait
break
case FrameWorkStatesSTATE_SYSTEM_WAIT_FOR_
CLOSE
systemFunction = systemWaitForClose
break
case FrameWorkStatesSTATE_SYSTEM_TITLE
systemFunction = systemTitle
break
case FrameWorkStatesSTATE_SYSTEM_
INSTRUCTIONS
systemFunction = systemInstructions
break
case FrameWorkStatesSTATE_SYSTEM_NEW_GAME
systemFunction = systemNewGame
break
case FrameWorkStatesSTATE_SYSTEM_NEW_LEVEL
systemFunction = systemNewLevel
break
case FrameWorkStatesSTATE_SYSTEM_LEVEL_IN
systemFunction = systemLevelIn
break
case FrameWorkStatesSTATE_SYSTEM_GAME_PLAY
systemFunction = systemGamePlay
break
case FrameWorkStatesSTATE_SYSTEM_GAME_OVER
systemFunction = systemGameOver
break
public function systemTitle()void
addChild(titleScreen)
titleScreenaddEventListener(CustomEventButton
IdBUTTON_ID
okButtonClickListener false 0 true)
switchSystemState(FrameWorkStates
STATE_SYSTEM_WAIT_FOR_CLOSE)
nextSystemState = FrameWorkStatesSTATE_
SYSTEM_INSTRUCTIONS
public function systemInstructions()void
addChild(instructionsScreen)
instructionsScreenaddEventListener(CustomEven
tButtonId
BUTTON_IDokButtonClickListener false 0
true)
switchSystemState(FrameWorkStates
STATE_SYSTEM_WAIT_FOR_CLOSE)
nextSystemState = FrameWorkStatesSTATE_
SYSTEM_NEW_GAME
public function systemNewGame()void
addChild(game)
gameaddEventListener(CustomEventScoreBoardUp
date
UPDATE_TEXTscoreBoardUpdateListenerfalse 0
true)
gameaddEventListener(CustomEventLevelScreenU
pdate
UPDATE_TEXTlevelScreenUpdateListenerfalse
0 true)
gameaddEventListener(GameGAME_OVER
gameOverListener
false 0 true)
gameaddEventListener(GameNEW_LEVEL
newLevelListener
false 0 true)
gamenewGame()
switchSystemState(FrameWorkStatesSTATE_
SYSTEM_NEW_LEVEL)
public function systemNewLevel()void
032010 (11)28
ACTIONSCRIPT DEVELOPMENT Creating an AS3 Game Framework
032010 (11) 29
Listing 2
gamenewLevel()
switchSystemState(FrameWorkStatesSTATE_
SYSTEM_LEVEL_IN)
public function systemLevelIn()void
addChild(levelInScreen)
waitTime = 30
switchSystemState(FrameWorkStatesSTATE_
SYSTEM_WAIT)
nextSystemState = FrameWorkStatesSTATE_
SYSTEM_GAME_PLAY
addEventListener(EVENT_WAIT_COMPLETE
waitCompleteListener false 0 true)
public function systemGameOver()void
removeChild(game)
addChild(gameOverScreen)
gameOverScreenaddEventListener(CustomEventBu
ttonId
BUTTON_IDokButtonClickListener false 0
true)
switchSystemState(FrameWorkStates
STATE_SYSTEM_WAIT_FOR_CLOSE)
nextSystemState = FrameWorkStatesSTATE_
SYSTEM_TITLE
public function systemGamePlay()void
gamerunGame()
public function systemWaitForClose()void
do nothing
public function systemWait()void
waitCount++
if (waitCount gt waitTime)
waitCount = 0
dispatchEvent(new Event(EVENT_WAIT_COMPLETE))
public function okButtonClickListener(e
CustomEventButtonId)void
switch(eid)
case FrameWorkStatesSTATE_SYSTEM_TITLE
removeChild(titleScreen)
titleScreenremoveEventListener(CustomEv
entButtonId
BUTTON_IDokButtonClickListener)
break
case FrameWorkStatesSTATE_SYSTEM_
INSTRUCTIONS
removeChild(instructionsScreen)
instructionsScreenremoveEventListener(
CustomEventButtonIdBUTTON_IDokButtonC
lickListener)
break
case FrameWorkStatesSTATE_SYSTEM_GAME_OVER
removeChild(gameOverScreen)
gameOverScreenremoveEventListener(
CustomEventButtonIdBUTTON_IDokButtonC
lickListener)
break
switchSystemState(nextSystemState)
public function scoreBoardUpdateListener(e
CustomEventScoreBoardUpdate)void
scoreBoardupdate(eelement evalue)
public function levelScreenUpdateListener(e
CustomEventLevelScreenUpdate)void
levelInScreensetDisplayText(levelInText +
etext)
gameOverListener listens for GameGAMEOVER
simple
custom events calls and changes state
accordingly
public function gameOverListener(eEvent)void
switchSystemState(FrameWorkStatesSTATE_
SYSTEM_GAME_OVER)
gameremoveEventListener(CustomEventScoreBoard
Update
UPDATE_TEXTscoreBoardUpdateListener)
gameremoveEventListener(CustomEventLevelScree
nUpdate
032010 (11)28
ACTIONSCRIPT DEVELOPMENT Creating an AS3 Game Framework
032010 (11) 29
We also must import all of the classes needed for the framework to run You will see this put to use shortly
The variable definitions The variable definition section defines all of the global scope variables for the class These include all of the variables needed for the state machine screens and the game timer
We will make use of constants to define the current state and a set of variables to hold the state information These have been be defined on the FrameWorkStatesas file we created in the last section More states can be added to the basic ones but these will be sufficient for many games that we will create in this book There are two special states that are used for the system and wait for button clicks or things like animations to complete These are the STATE_SYSTEM_WAIT_FOR_CLOSE and STATE_SYSTEM_WAIT respectively We will also make use of a generic function called systemFunction that will hold the current state function to call in our game loop Combined with this we use a set of
integer variables to hold the value of the current state (currentSystemState) the last state (lastSystemState) and the next state (nextSystemState) for processing purposes These states should not be confused with an actual game pause function This will be handled in a different manner and added to the framework in Chapter 11
If you are using the Flash IDE and have any assets in the library that need to be exported in the first frame you must extend MovieClip and not Sprite even if you donrsquot plan to use the main time line for anything else We have extended MovieClip for the GameFrameWork so it will work with both Flex SDK and Flash IDE projects
The state control variablesThe control variables keep the system functioning within the context of the current state The main control variable is an instance of the Function class called systemFunction This function holds a reference to the current function that will be repeatedly called on each frame tick This saves us from having to evaluate a switchcase statement on each frame to decide which function to call The function is changed to a new reference by called the switchSystemState() function and passing a new constant that represents the new state
Optimization switchSystemState() is the first of many optimizations we will make to the game framework All of these optimizations will make the Flash games run much more efficiently These efficiencies in the game framework will allow the actual game code to perform more complex operations and still run with a reasonable frame rate
The currentSystemState integer variable holds a number representing the constant of the current state the system is running The nextSystemState contains the constant integer value for the state to transition to after this state is complete The lastSystemState variable holds the integer constant of the previous system state This is used in the rare occurrence that the game loop needs to return to the previous system state
The lastSystemState variable will become useful when we use a shared state such as STATE_SYSTEM_WAIT The STATE_SYSTEM_LEVEL_IN state will implement a 30-millisecond delay before moving on to the STATE_SYSTEM_GAME_PLAY state The nextSystemState will be STATE_SYSTEM_WAIT and the lastSystemState will be STATE_SYSTEM_LEVEL_IN When the 30-millisecond wait time has expired the waitCompleteListener function will be called It will use the lastSystemState to determine where the processing was before the wait was started Yoursquoll see this in detail later in this chapter when we examine the waitCompleteListener function
Listing 2
UPDATE_TEXT levelScreenUpdateListener)
gameremoveEventListener(GameGAME_OVER
gameOverListener)
gameremoveEventListener(GameNEW_LEVEL
newLevelListener)
newLevelListener listens for GameNEWLEVEL
simple custom events calls and changes
state accordingly
public function newLevelListener(eEvent)void
switchSystemState(FrameWorkStatesSTATE_
SYSTEM_NEW_LEVEL)
public function waitCompleteListener(eEvent)
void
switch(lastSystemState)
case FrameWorkStatesSTATE_SYSTEM_LEVEL_
IN
removeChild(levelInScreen)
break
removeEventListener(EVENT_WAIT_COMPLETEwai
tCompleteListener)
switchSystemState(nextSystemState)
032010 (11)30
ACTIONSCRIPT DEVELOPMENT
The background fill variablesAll Flash applications have a background color of some type No matter what game we are going to be creating the framework can control this background color You should never rely on the background color setting in HTML for your Flash applicationrsquos background color This leaves the HTML embed code with control over major aspect of your application If you are creating a viral game to be placed on game portals you will lose control of your gamersquos background color and it will default to what ever the game portal operators have selected as the standard background color in their embed code The framework allows you to override the HTML settings here by placing a simple colored Bitmap behind the entire application We will simply define a BitmapData object called appBackBitmapData and a Bitmap object called appBackBitmap that will be used to place the BitmapData onto the displayList
We will not define the background in the GameFrameWorkas file but rather the Mainas subclass of the GameFrameWork will set the background if needed in its init function override
The timer variablesThe timer will control the frame rate of the game and help smooth out the display by employing the TimerEventupdateAfterEvent method The frameRate variable will be defined in Mainas as the number of frame ticks per second we want our game timer to run
The most important thing to note is that we are making use of the built-in Timer class (gameTimer) We are not using the standard EnterFrame event This allows us to create our own frame rate for the game and specify it in the frameRate variable By doing this we can control game timer tick rate independent of the swf filersquos frame rate (FPS) The swf file can have a frame rate setting of 25 (for example) but the game can run at a 30 frame ticks a second To do this we first set the frameRate to the desired number of frame update ticks we want per second (30) When Mainas calls the startTimer function (described in detail when we get to the section on the init function) the gameTimer is put into action First we will calculate the timerPeriod value as 1000frameRate With the updateAfterEvent function call (in the runGame function) we help to smooth out the render of the screen by asking the Flash display engine to update at the rate of the Timer not the frame rate set in the swf So going back to our example if the game SWF is set to run at 25 FPS and the frameRate is set to 30 ticks the updateAfterEvent will help to smooth out the rendering of the screen by asking the Flash display engine to update at the timer tick rate (30) not the swf filersquos FPS setting (25)
The timerPeriod will be passed into the Timer instance and the game will attempt to run at this rate We say
attempt because if the game includes too many on screen moving objects or more logic than can be computed inside the timerPeriod number of milliseconds (or a combination of both) then there will be a noticable slowdown in the game screen updates In later chapters we will add functionality to the runGame function to mitigate some of these issues
The screen definition variablesThe screen definition variables create instances of our BasicScreen class This is a rather simple class that allows a single positional text box and an OK button on the screen We will use this simple screen for the title instructions level and game over screens We will customize each screen when we create the init function override in our gamersquos Mainas class Note that the levelInText is a special variable Setting this string to a default value will allow the leveInScreen to display some default text along on each new level This text can be combined with dynamic text to create a screen that says something like Level 1 with the word Level being the default text and the number 1 being the dynamic text
public var titleScreenBasicScreen
public var gameOverScreenBasicScreen
public var instructionsScreenBasicScreen
public var levelInScreenBasicScreen
public var levelInTextString
public var screenTextFormatTextFormat
public var screenButtonFormatTextFormat
We also create two TextFormat objects that will be used for defining the format of the text on the screens and the format of the button text
The ScoreBoard variablesThe scoreBoard instance of the ScoreBoard class will handle a simple heads up display (HUD) for the user with information such as the current score It is a simple framework class that will be customized in the init function override in each gamersquos Mainas class The changes will depend on the game that is to be created We also define a TextFormatObject for the basic look of the text for our scoreboard text scoreBoardTextFormat
JEFF FULTON
STEVE FULTON
The next part of the article in the June issue of FFD Magazine
032010 (11)32
ACTIONSCRIPT DEVELOPMENT
032010 (11) 33
On my quest of learning Flash I often became frustrated of how difficult it was to update the contents of my application Meaning if I wanted
to change out an image or piece of copy I had to open up Flash go to my library find the Movie Clip that had my asset in it and republish I thought to myself this is no way to work this is so inefficient Enter XML in all its glory Constructing an application with enabled me to quickly and easily update my project at a moments
notice Without having to open up Flash Now what could be better than that
In this article yoursquore going to learn how to create a new ActionScript project in Flex Builder 3 and write ActionScript 30 code that will load in an XML file display the images on screen and add some interactivity to the scene
Setting up FlexOpen up Flex and go to Filegt NewgtActionScript Project A dialog window will open In the project name field type in PhotoGallery Leave the use default location box checked and click finish (see Figure 1)
Creating an XML Photo Gallery
Searching the Internet yoursquoll find dozens if not hundreds of examples of photo galleries created with Flash
What you will learnhellipbull How to create an ActionScript application in Flex Builder 3bull How to use ActionScript to parse an XML le
What you should knowhellipbull Familiar with general programming concepts such as data ty-
pes variables loops and functionsbull Familiar with class creation and constructionbull Some understanding of XML
with AS3
Figure 1 New ActionScript window dialog Figure 2 ActionScript Compiler dialog
032010 (11)32
ACTIONSCRIPT DEVELOPMENT
032010 (11) 33
Once you click finish your project should open and you should see PhotoGalleryas on screen There are a few steps that I like to take next that I do for every project
First right click PhotoGallery folder in the Flex Navigator window click properties at the bottom and then click on the ActionScript Compiler link on the left hand side At the bottom yoursquoll see a check box that is already selected to generate a HTML wrapper file Uncheck that and click ok A warning message will appear saying that the html-template folder will be deleted Donrsquot worry about that because we havenrsquot put anything in that folder Click ok I personally donrsquot like to have a browser window open every time I run my application (see Figure 2)
Secondly wersquoll be using a tweening library called Tweener In order to use Tweener we have to first download it (httpcodegooglecomptweener) Be sure to download the ActionScript 30 version and create a folder on your desktop or any other place and name it code Place the contents of that download into that folder Next go back to Flex and again right click the PhotoGallery folder and click properties again and this time yoursquoll click the ActionScript Build Path link This window gives us the ability to add assets to our project so we can use them in our project Click the Add Folder button browser to the code folder you just created click ok and click ok again to close the window Now that folder and all its contents will be included in our project (see Figure 3)
Next right click the src folder in your project scroll over to new and add a new folder Name this folder classes This folder will contain two classes that wersquoll be using Then repeat the same steps but this time name the folder images This folder will contain all the images
Figure 3 ActionScript Build Path dialog
032010 (11)34
ACTIONSCRIPT DEVELOPMENT
Listing 1 galleryxml
ltxml version=10 encoding=UTF-8gt
ltgallery image_height=150 image_width=150 image_
gap=5 rows=3gt
ltphotogt
ltdescriptiongtThis is a description for the first
imageltdescriptiongt
ltthumb_pathgtimagesthumbjpgltthumb_pathgt
ltfull_pathgtimagesfullgifltfull_pathgt
ltphotogt
ltphotogt
ltdescriptiongtThis is a description for the second
imageltdescriptiongt
ltthumb_pathgtimagesthumbjpgltthumb_pathgt
ltfull_pathgtimagesfullgifltfull_pathgt
ltphotogt
ltphotogt
ltdescriptiongtThis is a description for the third
imageltdescriptiongt
ltthumb_pathgtimagesthumbjpgltthumb_pathgt
ltfull_pathgtimagesfullgifltfull_pathgt
ltphotogt
ltphotogt
ltdescriptiongtThis is a description for the fourth
imageltdescriptiongt
ltthumb_pathgtimagesthumbjpgltthumb_pathgt
ltfull_pathgtimagesfullgifltfull_pathgt
ltphotogt
ltphotogt
ltdescriptiongtThis is a description for the fifth
imageltdescriptiongt
ltthumb_pathgtimagesthumbjpgltthumb_pathgt
ltfull_pathgtimagesfullgifltfull_pathgt
ltphotogt
ltphotogt
ltdescriptiongtThis is a description for the sixth
imageltdescriptiongt
ltthumb_pathgtimagesthumbjpgltthumb_pathgt
ltfull_pathgtimagesfullgifltfull_pathgt
ltphotogt
ltphotogt
ltdescriptiongtThis is a description for the seventh
imageltdescriptiongt
ltthumb_pathgtimagesthumbjpgltthumb_pathgt
ltfull_pathgtimagesfullgifltfull_pathgt
ltphotogt
ltphotogt
ltdescriptiongtThis is a description for the eighth
imageltdescriptiongt
ltthumb_pathgtimagesthumbjpgltthumb_pathgt
ltfull_pathgtimagesfullgifltfull_pathgt
ltphotogt
ltphotogt
ltdescriptiongtThis is a description for the ninth
imageltdescriptiongt
ltthumb_pathgtimagesthumbjpgltthumb_pathgt
ltfull_pathgtimagesfullgifltfull_pathgt
ltphotogt
ltphotogt
ltdescriptiongtThis is a description for the tenth
imageltdescriptiongt
ltthumb_pathgtimagesthumbjpgltthumb_pathgt
ltfull_pathgtimagesfullgifltfull_pathgt
ltphotogt
ltphotogt
ltdescriptiongtThis is a description for the
eleventh imageltdescriptiongt
ltthumb_pathgtimagesthumbjpgltthumb_pathgt
ltfull_pathgtimagesfullgifltfull_pathgt
ltphotogt
ltphotogt
ltdescriptiongtThis is a description for the twelfth
imageltdescriptiongt
ltthumb_pathgtimagesthumbjpgltthumb_pathgt
ltfull_pathgtimagesfullgifltfull_pathgt
ltphotogt
ltphotogt
ltdescriptiongtThis is a description for the
thirteenth imageltdescriptiongt
ltthumb_pathgtimagesthumbjpgltthumb_pathgt
ltfull_pathgtimagesfullgifltfull_pathgt
ltphotogt
ltphotogt
ltdescriptiongtThis is a description for the
fourteenth imageltdescriptiongt
ltthumb_pathgtimagesthumbjpgltthumb_pathgt
ltfull_pathgtimagesfullgifltfull_pathgt
ltphotogt
ltphotogt
ltdescriptiongtThis is a description for the
fifteenth imageltdescriptiongt
ltthumb_pathgtimagesthumbjpgltthumb_pathgt
ltfull_pathgtimagesfullgifltfull_pathgt
ltphotogt
ltgallerygt
032010 (11)36
ACTIONSCRIPT DEVELOPMENT
Listing 2 PhotoGalleryas
package
Imports
import caurinatransitionsTweener
import classesBigPhoto
import classesThumbNail
import flashdisplayBitmap
import flashdisplaySprite
import flasheventsEvent
import flasheventsMouseEvent
import flashnetURLLoader
import flashnetURLRequest
[SWF(width=466 height=515 backgroundColor=00
0000 frameRate=30)]
public class PhotoGallery extends Sprite
Containers
private var _thumbContainerSprite Stores
the thumbnails
private var _nextButtonSprite Stores
the next arrow
private var _backButtonSprite Stores
the back arrow
private var _bigPhotoBigPhoto
Container for the big image
XML
private var _xmlLoaderURLLoader
Loads the XML file
private var _xmlXML
Stores the XML data
Image Assets
[Embed(source=assetsnext-arrowpng)]
private var _nextArrowClass
Embedded asset for the next
arrow
[Embed(source=assetsback-arrowpng)]
private var _backArrowClass
Embedded asset for the back
arrow
Constructor
public function PhotoGallery()
init ()
Initializing method
private function init ()void
_xmlLoader = new URLLoader ()
_xmlLoaderaddEventListener (EventCOMPLETE
xmlComplete false 0 true)
_xmlLoaderload (new URLRequest
(galleryxml))
XML Complete
private function xmlComplete (eEvent)void
Store the XML data
_xml = new XML (etargetdata)
loadImages ()
Clean up
_xmlLoaderremoveEventListener
(EventCOMPLETE xmlComplete)
_xmlLoader = null
Load in the thumbs
private function loadImages ()void
Temporary variables
var imageHeightuint = _xmlimage_height
var imageWidthuint = _xmlimage_width
var imageGapuint = _xmlimage_gap
var rowsuint = _xmlrows
var rowCounteruint = 0
var columnCounteruint = 0
Instantiate the container and position it
on screen
_thumbContainer = new Sprite ()
_thumbContainerx = 78
_thumbContainery = 78
_thumbContainerbuttonMode = true
_thumbContaineraddEventListener
(MouseEventCLICK thumbClick
false 0 true)
thisaddChild (_thumbContainer)
Loop through the images and create the
visual grid
for (var iuint = 0 i lt _xmlphotolength ()
i++)
var pathString = _xmlphoto[i]thumb_path
var descriptionString = _xmlphoto[i]desc
Creating an XML Photo Gallery with AS3
032010 (11) 37
Listing 2 PhotoGalleryas
ription
Create the thumbnail
var pThumbNail = new ThumbNail ()
pnewID = i
ploadImage (path)
pdescription = description
px = (imageWidth + imageGap)
columnCounter
py = (imageHeight + imageGap)
rowCounter
_thumbContaineraddChild (p)
Create the grid
if ((rowCounter + 1) lt rows)
rowCounter++
else
rowCounter = 0
columnCounter++
Setup the navigation
createNavigation ()
This method handles the click event for the
next arrow
private function nextClick (eMouseEvent)void
155 is the width + spacing
if (-_thumbContainerx lt (_thumbContainerwidth
ndash stagestageWidth ndash 155))
disableNavigation ()
TweeneraddTween (_thumbContainer x
_thumbContainerx ndash 155 time
075 transitioneaseOutExpo
onCompleteenableNavigation)
This method handles the click event for the
back arrow
private function previousClick (eMouseEvent)void
if (-_thumbContainerx gt 0)
disableNavigation ()
TweeneraddTween (_thumbContainer x
_thumbContainerx + 155 time
075 transitioneaseOutExpo
onCompleteenableNavigation)
This method handles the click event for the
thumbnails
private function thumbClick (eMouseEvent)void
disableNavigation ()
Disable the container that stores the
thumbnails
_thumbContainerbuttonMode = false
_thumbContainermouseChildren = false
_thumbContainerremoveEventListener
(MouseEventCLICK thumbClick)
Get the full image path
var imagePathString = _xmlphoto[etargetnewI
D]full_path
Instantiate the big photo
_bigPhoto = new BigPhoto ()
_bigPhotobuttonMode = true
_bigPhotox = 108
_bigPhotoy = 1075
_bigPhotoalpha = 0
_bigPhotoloadImage (imagePath)
_bigPhotoaddEventListener (MouseEventCLICK
closePhoto false 0 true)
thisaddChild (_bigPhoto)
Fade up the photo
TweeneraddTween (_bigPhoto alpha1 time
1)
Fade out the photo
When the image finishes fading delete the
photo and enable the navigation
items
private function closePhoto (eMouseEvent)void
TweeneraddTween (_bigPhoto alpha0 time1
onCompletedeletePhoto)
private function deletePhoto ()void
032010 (11)38
ACTIONSCRIPT DEVELOPMENT
Listing 2 PhotoGalleryas
_bigPhotobuttonMode = false
_bigPhotoremoveEventListener
(MouseEventCLICK closePhoto)
_bigPhotodestroy ()
thisremoveChild (_bigPhoto)
_bigPhoto = null
_thumbContainerbuttonMode = true
_thumbContainermouseChildren = true
_thumbContaineraddEventListener
(MouseEventCLICK thumbClick
false 0 true)
enableNavigation ()
private function createNavigation ()void
Instantiate the next arrow
var nBitmap = new _nextArrow ()
Instantiate the nextButton container
Add the next button as a child of the
nextButton container
_nextButton = new Sprite ()
thisaddChild (_nextButton)
_nextButtonaddChild (n)
_nextButtonx = stagestageWidth ndash _
nextButtonwidth
_nextButtony = 475
Instantiate the back arrow
var bBitmap = new _backArrow ()
Instantiate the backButton container
Add the next button as a child of the
backButton container
_backButton = new Sprite ()
thisaddChild (_backButton)
_backButtonaddChild (b)
_backButtonx = _nextButtonx ndash _
nextButtonwidth ndash 5
_backButtony = 475
enableNavigation ()
private function enableNavigation ()void
_nextButtonbuttonMode = true
_nextButtonaddEventListener
(MouseEventCLICK nextClick false
0 true)
_backButtonbuttonMode = true
_backButtonaddEventListener
(MouseEventCLICK previousClick
false 0 true)
private function disableNavigation ()void
_nextButtonbuttonMode = false
_nextButtonremoveEventListener
(MouseEventCLICK nextClick)
_backButtonbuttonMode = false
_backButtonremoveEventListener
(MouseEventCLICK previousClick)
Figure 4 New ActionScript class dialog
Creating an XML Photo Gallery with AS3
032010 (11) 39
Listing 3 ThumbNailas
package classes
import caurinatransitionsTweener
import flashdisplayLoader
import flashdisplayShape
import flashdisplaySprite
import flasheventsEvent
import flasheventsMouseEvent
import flashnetURLRequest
import flashtextTextField
import flashtextTextFieldAutoSize
import flashtextTextFormat
public class ThumbNail extends Sprite
Containers
private var _imageLoaderLoader Loads in
the thumbnail
private var _imageContainerSprite
Container for the thumbnail
private var _maskShape Container for the
mask
private var _descriptionContainerSprite
Container for the description
TextFields
private var _descriptionTextField
TextField for the container
Logic
private var _newIDuint The ID of the
object
[Embed(systemFont=Arial fontName=arial
fontWeight=bold
mimeType=applicationx-font-
truetype)]
private var _arialClass Embedded asset
for the font
Constructor
public function ThumbNail ()
super ()
init ()
Initializing method
private function init ()void
Instantiate the container
_imageContainer = new Sprite ()
_imageContaineralpha = 0
thisaddChild (_imageContainer)
createDescription ()
thismouseChildren = false
thisaddEventListener (MouseEventMOUSE_OVER
onMouseOver false 0 true)
thisaddEventListener (MouseEventMOUSE_OUT
onMouseOut false 0 true)
Public Methods
public function loadImage (pathString)void
_imageLoader = new Loader ()
_imageLoadercontentLoaderInfoaddEventListen
er (EventCOMPLETE imageComplete
false 0 true)
_imageLoaderload (new URLRequest (path))
GetterSetter Methods
public function get newID ()uint
return this_newID
public function set newID (valueuint)void
this_newID = value
public function get description ()String
return this_descriptiontext
public function set description (valueString)void
this_descriptiontext = value
Private Methods
032010 (11)40
ACTIONSCRIPT DEVELOPMENT
Listing 3 ThumbNailas
private function onMouseOver (eMouseEvent)void
TweeneraddTween (_descriptionContainer
y75 time05 transition
easeOutExpo)
private function onMouseOut (eMouseEvent)void
TweeneraddTween (_descriptionContainer
y150 time05 transition
easeOutExpo)
private function imageComplete (eEvent)void
Reposition the loaded content to the center
_imageLoaderx = -(_imageLoaderwidth 2)
_imageLoadery = -(_imageLoaderheight 2)
_imageContaineraddChildAt (_imageLoader 0)
Apply background after the image has
completely loaded
drawBackground ()
Draw the mask around the description
drawMask ()
Fade in the container
TweeneraddTween (_imageContainer alpha1
time05)
Clean up
_imageLoadercontentLoaderInforemoveEv
entListener (EventCOMPLETE
imageComplete)
Draws a background behind _imageContainer
private function drawBackground ()void
_imageContainergraphicsbeginFill (0xFFFFFF)
_imageContainergraphicsdrawRect (_
imageLoaderx ndash 1 _imageLoadery
ndash 1 _imageLoaderwidth + 2
_imageLoaderheight + 2)
_imageContainergraphicsendFill ()
Creates everything for the description
private function createDescription ()void
Instantiate the container
_descriptionContainer = new Sprite ()
_descriptionContainery = 150
_descriptionContainergraphicsbeginFill
(0x000000 075)
_descriptionContainergraphicsdrawRect (-75
-75 150 75)
_descriptionContainergraphicsendFill ()
_imageContaineraddChild (_
descriptionContainer)
Specify text formatting for the description
Text Field
var tfTextFormat = new TextFormat ()
tfcolor = 0xFFFFFF
tfalign = center
tffont = arial
tfbold = true
tfsize = 12
Instantiate the TextF ield
_description = new TextField ()
_descriptionx = -75
_descriptiony = -70
_descriptionwidth = 150
_descriptionwordWrap = true
_descriptionembedFonts = true
_descriptiondefaultTextFormat = tf
_descriptionautoSize = TextFieldAutoSizeLEFT
_descriptionContaineraddChild (_description)
Draws a mask our _descriptionContainer
private function drawMask ()void
Draw the mask shape
_mask = new Shape ()
_maskgraphicsbeginFill (0xFF0000)
_maskgraphicsdrawRect (_imageLoaderx
_imageLoadery _imageLoaderwidth
_imageLoaderheight)
_maskgraphicsendFill ()
addChild (_mask)
Apply the mask to the container
_descriptionContainermask = _mask
Creating an XML Photo Gallery with AS3
032010 (11) 41
that will be loaded into the application from XML Finally create another folder and this time name it assets This folder will contain the buttons that wersquoll embed into our project
The AssetsBefore we start coding we need to create some visual assets Open up Photoshop or any other program you have for creating graphics and create an image that is 150x150 pixels Fill it with a flat color and save the image as thumbjpg in the images folder you just created Next create another image thatrsquos 250x300 pixels Fill it with another color and save that image as fulljpg into the same folder These images will be used for testing purposes only
Listing 4 BigPhotoas
package classes
import flashdisplayLoader
import flashdisplaySprite
import flasheventsEvent
import flashnetURLRequest
public class BigPhoto extends Sprite
Containers
private var _imageLoaderLoader Loads in the
thumbnail
private var _imageContainerSprite Container
for the thumbnail
Constructor
public function BigPhoto ()
super()
Public Methods
public function loadImage (pathString)void
_imageLoader = new Loader ()
_imageLoadercontentLoaderInfoaddEventListen
er (EventCOMPLETE imageComplete
false 0 true)
_imageLoaderload (new URLRequest (path))
Clean up method
public function destroy ()void
_imageContainerremoveChild (_imageLoader)
_imageLoaderunload ()
_imageLoader = null
thisremoveChild (_imageContainer)
_imageContainer = null
Private Methods
private function imageComplete (eEvent)void
Instantiate the container
_imageContainer = new Sprite ()
thisaddChild (_imageContainer)
Add the loader
_imageContaineraddChild (_imageLoader)
Clean up
_imageLoadercontentLoaderInforemoveEv
entListener (EventCOMPLETE
imageComplete)
Figure 5 Time to test
032010 (11)42
ACTIONSCRIPT DEVELOPMENT
We still have to create our navigation buttons that wersquoll use to scroll through our gallery Create two buttons that are 40x40 pixels and design them how you like They should resemble forward and back buttons Save the forward arrow as next-arrowpng and the other as back-arrowpng into the assets folder Now that our assets our created itrsquos time to code
The XML fileRight click the src folder in the project scroll over to new and click file A dialog window will open and in the file name input box type galleryxml (see Figure 4) Write the code that you see from Listing 1 into galleryxml
Line 1 is the XML declaration This is needed to have a well-formed XML document
Line 2 declares the gallery root node Notice in this node Irsquove added attributes Also to have a well-formed XML document you must have one root node and all attribute values must be in quotes
Lines 3-7 declares a photo node with three children description thumb_path and full_path description is exactly as it sounds It will contain a description for our thumbnail thumb_path contains the path to our thumbnail image Same goes for full_path it contains the path to our full image
I then just copy and pasted that and pasted it 14 times just changing out the description Remember wersquore just using dummy data When you finish go back and add photos of your choice
The ClassesWersquoll be using two additional classes for this project One will be for the thumbnails and another for the full image Right click the classes folder go to new and click ActionScript class In the name field type ThumbNail For the Superclass type in flashdisplaySprite Wersquoll need to extend from that class so we can use the functionality of that object but add our own (see Figure 4)
Add another class this time name it BigPhoto It should also inherit from flashdisplaySprite
CodingTime to start writing the ActionScript for this project Open up PhotoGalleryas from the Flex Navigator and type in the code from Listing 2 Open up ThumbNailas and type in the code from Listing 3 Open up BigPhotoas and type in the code from Listing 4 Now that you have all the code in itrsquos time to test In the menu bar click RungtRun PhotoGallery (see Figure 5) If you get an error make sure you typed everything correctly If all went well you should see the gallery open up Click the buttons and watch the gallery scroll left and right Roll over the thumbnails to see the description scroll up Click on a thumbnail to see the full image fade in You might be wondering about whatrsquos going on Irsquoll try to break that down for you next
The ExplanationOur main focus is going to be whatrsquos going on in PhotoGalleryas This file contains the ActionScript that makes almost everything happen We first start off by declaring our properties that will be used in the project Yoursquoll notice a couple of embeded lines These lines are MetaData tags that actually embed assets into the project The two embeded lines you see add the next-arrowpng file and the back-arrowpng file In the constructor there is one call to a method called init() This method gets the application going by requesting and loading in the XML File When the file finishes loading we store the XML data into our _xml property Next we call the loadImages() method This method is responsible for a big part of the application We first gather some information from the XML file and store it in temporary variables
bull imageWidth stores the image _ height attributes valuebull imageWidth stores the image _ width attributes valuebull imageGap stores the image _ gap attributes valuebull rows stores the row attributes valuebull rowCounter increments ever pass of the for loop Is
compared against the rows variablebull columnCounter increments once for every column
created
The for loop cycles the XML file creating a new ThumbNail object with every iteration During each iteration we create variables that store the path to the thumb nail (path) and the description of the thumbnail (description) We pass the variables into the methods of the ThumbNail class Remember the ThumbNail class defines methods and properties that are specific to it The class code is commented if you wish to explore it Again our main focus is PhotoGalleryas To create the grid we write ifelse logic that compares the rowCounter variable to the row variable For every iteration of the loop we increment that variable if that variable becomes greater than rows we set it back to 0 rowCounter is then multiplied to the y-axis of each ThumbNail object The rest of the code is commented for you to explore
ConclusionYoursquoll notice I actually hard coded a lot of values directly in the ActionScript Not too ideal In the next part of this tutorial wersquore going to come back to this code and modify it to be a little more flexible and visually appealing If you have any questions feel free to contact me through my site (wwwcodedbyryancom)
RYAN DrsquoAGOSTINORyan DrsquoAgostino is an Interactive Developer at NAS Recruitment Communications in Cleveland OH part-time instructor at Virginia Marti College of Art and Design in Lakewood Ohio and freelance designer and ActionScript developer For more information about Ryan please visit httpwwwcodedbyryancom
032010 (11)44
COMPONENTS
Components are the controls and containers that are the elements of the application that create the interface They cover controls such
as buttons and check boxes containers that can hold other containers and controls navigation elements and charts Components can be added to your application in variety of ways They can be added through the design view writing then in MXML or through ActionScript
Flash Builder now has two major sets of components the Halo set which has been available in previous versions of Flex and the new Spark set The components from the Spark set have a direct correlation to a component in the Halo set but not all Halo components have been upgraded to the Spark framework yet The namespaces for these components are added automatically when a MXML document is created and you will notice there are now multiple namespace in the main MXML document already
Creating custom components takes two paths The first is to create a skin for an existing Halo component in Flash Illustrator Photoshop or Fireworks or create a custom skin for a Spark component using MXML The second path is to create a completely custom component using Flash Professional and importing it into the Flash Builder project We are going to focus on the second path and create a custom component with Flash Professional
The first step in creating a custom component is to instal the Flex Component Kit mxp into Flash Professional This is an extension that will expose some
Custom Flash CS4
Flash Builder comes with a lot of components to cover almost all of an apps needs But what if you want a custom look or functionality to a component With Flash Professional you can create custom components and import them into Flash Builder for use in your application
What you will learnhellipbull How to create custom components in Flash Professional to im-
port into Flash Builder
What you should knowhellipbull Flash Professional CS4bull Flash Builder 4bull Actionscript 3
Components in Flash Builder 4
Figure 1 The component artwork Figure 2 Converting the movie clip
032010 (11)46
COMPONENTS
Listing 1 The component class
package comtest
import mxflashUIMovieClip
import flasheventsEvent
import flasheventsEventDispatcher
import flasheventsMouseEvent
import flashfiltersGlowFilter
public class SliderButton extends UIMovieClip
public static const BUTTON_CLICKString = button click
private var glowGlowFilter = new GlowFilter(0x0000cc54421falsefalse)
public function SliderButton()
plusButtonbuttonMode = true
minusButtonbuttonMode = true
plusButtonaddEventListener(MouseEventMOUSE_OVER handleMouseOver)
plusButtonaddEventListener(MouseEventMOUSE_OUT handleMouseOut)
plusButtonaddEventListener(MouseEventCLICK handleMousePress)
minusButtonaddEventListener(MouseEventMOUSE_OVER handleMouseOver)
minusButtonaddEventListener(MouseEventMOUSE_OUT handleMouseOut)
minusButtonaddEventListener(MouseEventCLICK handleMousePress)
private function handleMouseOver(eMouseEvent)void
ecurrentTargetfilters = [glow]
private function handleMouseOut(eMouseEvent)void
ecurrentTargetfilters = []
private function handleMousePress(eMouseEvent)void
if(ecurrentTargetname == plusButton ampamp trackThumbx lt 134)
trackThumbx++
else if(ecurrentTargetname == minusButton ampamp trackThumbx gt 37)
trackThumbx--
dispatchEvent(new Event(SliderButtonBUTTON_CLICK))
032010 (11)48
COMPONENTS
of the Flex classes to Flash allowing the component to communicate with the application Download the extension from the Adobe site at httpwwwadobecomcfusionexchangeindexcfmevent=extensionDetailampextid=1273018 and install using the Adobe Extension Manager The extension should work with Flash
versions as far back as Flash 8 but I highly recommend using at least Flash 9 (CS 3)
Once the extension is installed launch Flash Professional and create a new ActionScript 3 project We are going to create a simple slider button that has a plus and minus button on each end of the button and a track between them When the plus and minus buttons are clicked the the track thumb will move one pixel in either direction There will also be a roll over behavior on the buttons to change their look as the mouse rolls over and off the buttons Finally Flash Builder will receive the event of the button being pushed and update a text input on the stage
It is common to encapsulate the behaviors of the component within itself and have events broadcast to the containing application If you think about some of standard components in both Flash Builder and Flash Professional and deconstruct them in your mind you will see that the same methods are used on them The NumericStepper is a lot like our component It has two buttons with a text field that displays a value that is incremented or decremented with each push of the button The component itself does nothing to effect the application until the code calls it to either send or receive a value
With our new document we are going to create the artwork for the component in the fla file Create four movie clips one each for the scroll track the plus button the minus button and the track thumb (Figure 1) The naming and look of these movie clips are not important
Once the movie clips are created and on the stage give each one an instance name The names in the
Figure 3 Setting the class of the movie clip
Figure 4 Setting to export as SWC
Figure 5 Creating the Flash Builder project
Custom Flash CS4 Components in Flash Builder 4
032010 (11) 49
example files are plusButton minusButton and trackThumb The actual names do not matter and we dont need an instance name for the track since we are not going to reference it in Flash Builder Flash Builder will reference the instance names of the movie clips in the components we will use these later
Now that the artwork has been created it must be collected into its own movie clip Select all of the artwork on the stage and choose ModifygtgtConvert to Symbolhellip In the Library panel there is a new symbol that is called in the sample files SliderButton The name is important here because this is how the Convert to Flex Component mxp will name the class that Flash Builder will refer to later
An external class will give the component the internal behaviors that were mentioned earlier as well as an event to broadcast to the Flash Builder application (Listing 1) All the code in the class should be familiar but there are a few points to go over First the package name is given the qualifier of comtest to identify that the component belongs to our namespace This is not necessary but helpful when there are multiple components or components from different publishers in the application
The most important change is instead of having the class extend the Sprite class this class is going to
extend the UIMovieClip class This class like the Flex Component in the library exposes the behaviors and methods we set up in the class to the Flash Builder application In the import statements use import
mxflashUIMovieClip The mxflash class includes both the UIMovieClip and ContainerMovieClip classes
When the variables are declared we set up a glow filter that will be attached to the buttons when the mouse rolls over them and a string constant for the event we create later In the constructor of the class the buttons receive the event listeners for the mouse interactions and the handlers are added later in the code In the handleClick event handler we use the event dispatcher class to dispatch the event Here we are just dispatching a standard event with the constant that was created earlier You can just as easily dispatc a custom event that has extra information attached to it
Select the movie clip in the Library panel then select CommandsgtgtConvert Symbol to Flex Component (Figure 2) The extension will do several operations such as making the symbol available to ActionScript giving the symbol a class name adding the Flex Component to the library and others
Save the file as SliderButtonas in the folder path comtest When you declare the package name as we have here you must have the same hierarchy as listed in the package name Back in the fla select the
Figure 6 The Package Explorer
Listing 2 The main MXML le
ltxml version=10 encoding=utf-8gt
ltsApplication xmlnsfx=httpnsadobecommxml
2009
xmlnss=librarynsadobecomflex
spark
xmlnsmx=librarynsadobecomflex
mx
width=200 height=110gt
ltfxDeclarationsgt
lt-- Place non-visual elements (eg
services value objects) here
--gt
ltfxDeclarationsgt
ltsApplicationgt
Listing 3 The new component and name space
xmlnstest=comtest
lttestSliderButton x=14 y=10 id=sliderButton
gt
032010 (11)50
COMPONENTS
SliderButton movie clip and select Propertieshellip from the contextual menu Expand the advanced area if it is not already and enter comtestSliderButton in the Class text field Leave the Base Class text field blank and click OK (Figure 3)
Select Publish Settingshellip from the file menu and click on the Flash tab (Figure4) Under the SWF Settings area of the window be sure that the Export SWC check box is checked The swc is the part that Flash Builder will use in the application SWC are archives that contain the classes and media assets of the component and make it easy to distribute the movie clip
Publish the SWF and SWC and we are ready to move to Flash Builder
Flash BuilderIn Flash Builder create a new project This example we only need a basic Flash Builder project without any
server technologies You can name the project anything you would like in this case I have name FB_Components and saved it in my default workspace
If you have not worked on a Flash Builder project yet it is a lot like working on the Flex projects in the past with some new MXML tags You will also notice that the Flex Navigator pane has now been replaced with the Package Explorer (Figure 6)
The Package Explorer pane has a different organization than the Flex Navigator but the main MXML file can still be found under src then under the default package
Looking at the main MXML (Listing 2) you will see that the three name spaces are added automatically and the application begins with sApplication instead of mxApplication These are the minor differences to be on the look out for when working on a Flash Builder project
Listing 4 The nal MXML le
ltxml version=10 encoding=utf-8gt
ltsApplication xmlnsfx=httpnsadobecommxml2009
xmlnss=librarynsadobecomflexspark
xmlnsmx=librarynsadobecomflexmx minWidth=200 minHeight=110
width=200 height=110
initialize=init()
xmlnstest=comtestgt
ltfxDeclarationsgt
lt-- Place non-visual elements (eg services value objects) here --gt
ltfxDeclarationsgt
ltfxScriptgt
lt[CDATA[
private function init()void
sliderButtonaddEventListener(SliderButtonBUTTON_CLICK updateText)
private function updateText(eEvent)void
pixelTexttext = String(sliderButtontrackThumbx)
]]gt
ltfxScriptgt
lttestSliderButton x=14 y=10 id=sliderButton gt
ltsLabel x=39 y=41 text=The position of the track thumb is textAlign=center width=122gt
ltsTextInput x=76 y=76 width=49 id=pixelTextgt
ltsApplicationgt
Custom Flash CS4 Components in Flash Builder 4
032010 (11) 51
To get our component into the Flash Builder project we need to put the swc some where the project can see it On your desktop navigate to where the swc was published to and copy the file Then navigate to where Flash Builder project is and put the swc into libs folder I have found it is easier to keep the fla and swf files out of the project then copy the swc over to the Flash Builder project as needed
Back in Flash Builder open the libs folder under the project in the Package Explorer pane In that directory you should see your swc if you do not try right clicking on the libs folder and selecting Refresh
In the MXML editor switch to Design view When the Design view becomes active the Component pane should become available in the lower left of the workspace The first folder in the pane is the Custom folder and our custom component should be displayed in the list Drag an instance of this component onto the stage
To show that we can have two way communication with the component drag a label and a text input onto the stage Set the labels text to be The position of the track thumb is and move the text input near the label Set the id of the text input to pixelText (Figure 7) Switch back to the Source view after saving
Notice that several lines have been added to the source of the MXML document In addition to the MXML for the component including our custom component a name space value has been added to the sApplication tag designated as xmlnstest=comtest (Listing 3) If we add more components using the same comtest package declaration they will all fall under this name space If we were to add more components using a different package additional name spaces would be added You will also notice that the component starts with testSliderButton as opposed to s fx or mx
In the application tag add an initialize property calling a function called init() After the fxDeclarations tags add fxScript tags to hold the Actionscript As you type fx the code completion should pop up and allow you to select the fxScript tags
Add an id property to the SliderButton tag and give it a value of sliderButton In between the CDATA tags add the init function This function simply adds an event listener to our component calling the updateText
function every time the BUTTON_CLICK event is broadcast from the SliderButton class (Listing 4)
Once the application receives the BUTTON_CLICK event it calls the updateText function This function looks into the component and gets the x position of the track thumb then puts that value into the text input we set up earlier
So now we have communication coming out of the component using the dispatchEvent call in the class We are also looking into the component where the application is getting the x position of the thumb track inside the component Communication can get much more complicated than this but this is a simple example to give a starting point to create more complex components
Click debug to run the application and if no errors occurred the application should launch in a browser window If you have a browser window open before running the app you should close it There is a bug in the Flash Player at the time of this writing that may cause the app to not run if there are browser windows already open
Once the application is running click on the buttons and watch as the value in the text input increase and decrease The custom component is now complete and ready to have more behaviors and methods added to it
ConclusionWhile the components that come with Flash Builder can cover most situations there will be times where only a custom component will fit the applications needs Creating a custom component takes a little work but can make the developers job a lot easier With this new level of control over the look and behavior of the component can make the application more rich and engaging to the end user
Figure 7 Components on the stage
On the Netbull httpwwwadobecombull httpwwwadobecomcfusionexchangeindexcfmeven-
t=extensionDetailampextid=1273018
LOUIS DICARROLouis DiCarro is a consultant based in NYC and has been working with Flash since the rst version He has taught web development at the college level and has worked for numerous large clients He can be reached at louisdicarroffdgmailcom
032010 (11)52
COMPONENTS AIR Components in Flash Builder
032010 (11) 53
We already know that building an AIR application affords us a lot more capabilities than working with a web based project
Digging through the Actionscript documentation shows that there are a lot of classes that are only available to AIR applications These mostly have to do with classes and methods that interact with the file system or windowing of the application
Flash Builder as with Flex Builder before it contains several components that are only available to use with AIR applications These components deal with
visual interfaces for interacting with the file system and a HTML component for displaying web content
You may wonder why these components are only available for AIR applications Mostly it is for security reasons Up to Flash Player 101 a swf does not have the permission to interact with files on the file system except in very limited circumstances
Swfs in the web browser are able to interact only with files on the server in which the swf is hosted This allows them to load images xml and other file types at run time but only if the files come from within its
AIR Components
Adding file and html rendering can result in a lot of code But with the AIR components in Flash Builder 4 this functionality can be added easily with only a few lines of code
What you will learnhellipbull What components are available for AIR applications in Flash
Builder 4
What you should knowhellipbull Flash Builder 4bull Actionscript 3
in Flash Builder
Figure 1 AIR Actionscript 3 special classes for the HTML component Figure 2 Layout of the HTML application
032010 (11)52
COMPONENTS AIR Components in Flash Builder
032010 (11) 53
Were going to take a look at couple of simple examples for each component to get a feel how use them It is also important to note that the documentation for these components are in the AS 3 documentation When looking at the documentation you will see a symbol next to some of the classes and also next to some methods within the classes (Figure 1)
HTML ComponentThe HTML component is very easy to work with It can pull in many types of media and render them as you would expect them to be rendered in a web browser
Start up Flash Builder and create a new Flex project Name the project and select Desktop under project type Click finish and let Flash Builder set up the project
Once the project is started click on the Design tab In the lower left a component tab should be open If it is not open it using the Window menu and selecting Components Scroll down to the Adobe AIR folder You will not see this folder if you set your project to run in a web browser
We are going to create a simple web browser using only three components and one line of code First drag a HTML component a text field and a button to the stage Arrange them how you would like and switch over to design view
Give each component an id as in Listing 1 Also give the button a click handler Type click and let the program auto complete another code hint will pop up to create the handler automatically
Flash Builder will generate the handler as well as the fxScript block in the code In the click handler that is generated add a line that will set the location of the HTML component to the text in the text field See Listing 2 for the full code
Run the application and fill in a valid web address in the application Remember to include http in front of
own sandbox There are exceptions and ways around it but for the majority the swf cannot interact with the file system
If the development of applications using Flash Builder and AIR were to succeed they would need to act like real desktop applications This means that the applications would have to load and save files just as any other application that a user would use on the computer
Security is still maintained in this model by having the developer digitally sign their application using certificates If the certificate is obtained though a trusted source the application would be traceable back to the original developer if something bad should happen
Having a HTML component gives the application greater rendering power by tapping into the Web Kit which can run better than the HTML renderers in the Flash Player This allows developers to repurpose content from their web site to the application
Figure 3 The application running Figure 4 Layout of the image viewer application
Listing 1 MXML of components
ltsTextInput id=addressBar x=10 y=10
width=518gt
ltsButton id=goButton x=555 y=13
label=Go click=goButton_
clickHandler(event) gt
ltmxHTML id=htmlPane x=10 y=40 width=620
height=430gt
Listing 2 goButton handler
protected function goButton_clickHandler(event
MouseEvent)void
htmlPanelocation = addressBartext
032010 (11)54
COMPONENTS
the address Click the Go button and the page should load after a few seconds Take a look at Figure 3 for the results
There are a lot of methods and commands associated with the HTML component This will allow you to make a more customized display and give more control over the HTML content that you show
File system componentsUsing the file system components is just as easy To test the components we are going to create a simple image viewer that allows the user to select the images from the file system
Create a new Flex Project as we did before and be sure to make it a desktop application Once the project has loaded switch to design view and drag a File System Tree and an Image component to the stage See Figure 4 for the layout
Once the application is laid out switch over to the Source mode and give all the components ids as we did before (Listing 3) Also add a change handler instead of a click handler Flash Builder will autocomplete and generate the handler for you as it did when we added the click action to the button
In the generated handler add the code that will load the image into the image component To keep everything simple we only are going to load jpg and png files (Listing 4) in this function we are first checking to make sure the file is a file and not a directory by checking for a file extension If the file passes the first test we check to see if the file is a jpg or png Lastly if the file passes all of these test it gets loaded into the image component
Save the file and run the application to see the results Clicking on the file system tree items will either open or close the directory or try to load the file When the user clicks on a jpg or png it will load into the image component (Figure 5) Note that as the tree expands a scroll bar is attached to the component automatically
ConclusionJust as with the HTML component there is more methods and properties available to you with the file system components In this demo application we have seen how easy it is to get access to the file system using the component without writing a lot of code
There is a lot more involved in making a full application using these components but we have witnessed how easy to get started with them Having more control over the elements as well as error checking would be added in real applications
Having these components available gives the application a large amount of functionality very quickly and allows the developer to concentrate on the logic of the application Using these components in your application will help make it more full-featured and feel more like a real desktop application
LOUIS DICARROLouis DiCarro is a consultant based in NYC and has been working with Flash since the rst version He has taught web development at the college level and has worked for numerous large clients He can be reached at louisdicarroffdgmailcom
Listing 3 MXML of components
ltmxFileSystemTree id=fsList x=10 y=10
height=460 change=fsList_
changeHandler(event)gt
ltmxImage id=imgPane x=193 y=10 width=437
height=460gt
Listing 4 Handler for change event
protected function fsList_changeHandler(event
ListEvent)void
var fileFile = eventcurrentTargetselectedItem
as File
if(fileextension)
if(fileextensiontoLowerCase() == jpg ||
fileextensiontoLowerCase() ==
png)
imgPanesource = fileurl
Figure 5 The image viewer application running
032010 (11)56
TLF Applying CSS to Text Layout Framework styles
032010 (11) 57
TLF is introducing the new way of applying styles to the text Prior to TLF flash used simple approach you had to prepare and attach
StyleSheet object to the style property of the TextFieldTLF provides more flexible and customizable but
more complex techniqueDuring this tutorial we are going to create a small
application in Flex 4 This application contains a text displayed with TLF component TextArea and 2 different CSS that can be applied to the text simply by pressing the button Figure 1 show the screenshot of the application
TextFlow and itrsquos IFormatResolverTLF provides a callback mechanism to for with text styles TextFlow objectrsquos got a property formatResolver that should implement IFormatResolver interface Actually it is a set of callback functions that are called by parent TextFlow when it processes itrsquos elements
To have a closer look at formatResolver we will implement itrsquos version to work with out simple CSS So start create a new project in Flex and name it for example TextCSS In the default package create a new ActionScript class named CSSFormatResolver that implements IFormatResolver interface
Listing 1 shows the complete implementation of the class and will we look closer into it later For now pay attention on the following functions
bull invalidateAll
bull invalidate
bull resolveFormat
bull resolveUserFormat
bull getResolverForNewFlow
These function are created automatically by Flex Builder as they are required for implementation of the interface All functions are callbacks that are called when the certain action is performed by TextFlow and it needs to know how to treat with different elements
Applying CSS
This article is a reply to our readerrsquos question about the possibility to apply CSS to Text Layout Framework (TLF) We will show how to implement the necessary class and switch text styles on the fly
What you will learnhellipbull how can custom styles be applied to TLF elementsbull how to implement IFormatResolver to work with CSS
What you should knowhellipbull the basics of Flex and FlexFlash Builderbull the basics of TLF
to Text Layout Framework styles
Figure 1 Style changing application
032010 (11)56
TLF Applying CSS to Text Layout Framework styles
032010 (11) 57
Main ApplicationListing 2 contains a full code for main application
The application consists of
bull TextArea with some text The text is formed using XML Some elements of the TextFlow have
For our case we are interested in resolveFormat function that is called for every element of the TextFlow when itrsquos style needs to be changed This function return an object that should implement ITextLayoutFormat
Before we continue lets have a fast look at main application and how we build our example
Listing 1 CSSFormatResolveras
package
import flashtextStyleSheet
import flashxtextLayoutelementsFlowElement
import flashxtextLayoutelementsFlowValueHolder
import flashxtextLayoutelementsIFormatResolver
import flashxtextLayoutelementsTextFlow
import flashxtextLayoutformatsITextLayoutFormat
public class CSSFormatResolver implements
IFormatResolver
private var _styleSheetStyleSheet
public function CSSFormatResolver()
_styleSheet = new StyleSheet()
public function invalidateAll(textFlow
TextFlow)void
public function invalidate(targetObject)void
public function resolveFormat(targetObject)
ITextLayoutFormat
var formatFlowValueHolder = null
if (target is FlowElement)
var elementFlowElement = target as
FlowElement
if (element = null)
format = elementformat as
FlowValueHolder
if (elementstyleName = null)
var styleObject = styleSheetgetSt
yle(elementstyleName)
formatcolor = style[color]
formatfontSize =
style[fontSize]
formatfontWeight =
style[fontWeight]
formatfontStyle =
style[fontStyle]
return format
public function resolveUserFormat(targetObject
userFormatString)
return null
public function getResolverForNewFlow(oldFlow
TextFlow newFlowTextFlow)
IFormatResolver
return null
public function get styleSheet()StyleSheet
return _styleSheet
public function set styleSheet(valueStyleSheet)
void
_styleSheet = value
032010 (11)58
TLF
032010 (11) 59
Listing 2 TextCSSmxml
ltxml version=10 encoding=utf-8gt
ltsApplication xmlnsfx=httpnsadobecommxml2009
xmlnss=librarynsadobecomflexspark
xmlnsmx=librarynsadobecomflexhalo
xmlnslocal=
width=640 height=300gt
ltfxScriptgt
lt[CDATA[
import mxeventsFlexEvent
protected function applyCSS1Button_
clickHandler(eventMouseEvent)void
var formatResolverCSSFormatResolver =
new CSSFormatResolver()
formatResolverstyleSheetparseCSS(css1
text)
textAreatextFlowformatResolver =
formatResolver
protected function applyCSS2Button_
clickHandler(eventMouseEvent)void
var formatResolverCSSFormatResolver =
new CSSFormatResolver()
formatResolverstyleSheetparseCSS(css2
text)
textAreatextFlowformatResolver =
formatResolver
]]gt
ltfxScriptgt
ltsTextArea id=textArea width=620 height=134
x=9 y=156gt
ltsTextFlowgt
ltsp styleName=h1gt
Title of the Text
ltspgt
ltsp styleName=h2gt
Section of the Text
ltspgt
ltspgt
This is a body text Lorem ipsum
ltspgt
ltsTextFlowgt
ltsTextAreagt
ltsTextArea x=10 y=10 width=285 height=86
id=css1 gt
lt[CDATA[
h1
colorFF0000
fontSize20
fontWeightbold
fontStylenormal
h2
colorFF00FF
fontSize16
fontWeightbold
fontStyleitalic
]]gt
ltsTextAreagt
ltsTextArea x=345 y=10 width=285 height=86
id=css2 gt
lt[CDATA[
h1
color00FF00
fontSize32
fontWeightnormal
fontStyleitalic
h2
color0000FF
fontSize24
fontWeightbold
fontStylenormal
]]gt
ltsTextAreagt
ltsButton x=108 y=105 label=Apply CSS
1 id=applyCSS1Button
click=applyCSS1Button_
clickHandler(event)gt
ltsButton x=443 y=105 label=Apply CSS
2 id=applyCSS2Button
click=applyCSS2Button_
clickHandler(event)gt
ltsApplicationgt
032010 (11)58
TLF
032010 (11) 59
got styleName attribute so you could apply the corresponding CSS style to them later
bull 2 TextAreas with simple different CSSbull 2 Buttons to apply CSS from TextAreas to example
text
When the button is clicked the new instance of CSSFormatResolver class is created Then the corresponding CSS string from the TextArea is parsed and set into resolverrsquos property of SlyleSheet class type And finally prepared formatResolver instance is assigned to the TextFlow
Applying CSS to TextFlowNow lets have more detailed look at resolveFormat callback function First it should return a value that implements ITextLayoutFormat if it returns null then no new styling should be applied to an element being processed by the function So we create format variable of FlowValueHolder (it implements ITextLayoutFormat) and set itrsquos value to null (we do that because resolveFormat works with all elements including TextFlow itself as probably we donrsquot want to apply one style to the whole text)
After we do all the necessary casts and null checks and if we are sure that current elementrsquos got styleName attribute we assign styles from CSS to a current format StyleSheet object is used to contain CSS data as it is convenient object to parse and retrieve CSS data
Conclusion and a WarningThere was a brief tutorial on how to apply simple CSS to TLF TextFlow Please note that CSSFormatResolver class is not fully functional and only can be applied to our sample CSSs Writing reusable and versatile class requires more detailed coding and approach
Check the TLF Blog on this issue There is fully functional CSSFormatResolver with example there httpblogsadobecomtlf200902iformatresolver_and_using_css_1html
MAXYM GOLOVANCHUK Maxym Golovanchuk is a Photoshop Certied Expert and TV producer and he is using Adobersquos software for implementing entertainment solutions including video delivery with Flash Media Server mexxikgmailcom
MondayTuesdayWednesdayThursday Friday
DIVISIONS OF CREATIVE NICHE INC
032010 (11)60
PROFILE Flashcreed ndash Business Gallery
032010 (11) 61
The Business Gallery (httpwwwflashcreedcombusiness_video_image_gallery) is a Flash component meant to do one thing to enhance the visual experience a website portfolio or presentation site gives to its users Mainly itrsquos all about the image you present yourself or
your product to the world wide web Letrsquos face it without the looks you canrsquot sell your product or image no matter how interesting it might be
Whatrsquos so great about this gallery you might wonder Well the answer is simple everything Advanced AS3 programming dynamic XML implementation unlimited number of media items on stage PNG JPG and video FLA SWF MP4 F4V supported media tween and image effects just to name a few of the over 150 settings this gallery brings you Bottom line you can customize it in any way you see fit in order to make it resemble your website layout Not to mention the code optimization that allows the gallery to run so smoothly even on low resources
We brought 45 background wallpapers in case just a color doesnrsquot do the job also a set of custom arrows and close buttons
Flashcreed ndash Business GalleryHello itrsquos good to be back here among Flash amp Flex Magazine readers Today we are going to tell you a bit about our products mainly our Business Gallery but since all our products are built on the same framework most of the properties apply to all When we first realized what we could do with this framework we decided to name it ldquoPandorardquo in order to point out the unlimited number of possibilities it revealed regarding customization and user friendliness
032010 (11)60
PROFILE Flashcreed ndash Business Gallery
032010 (11) 61
The size of the entire gallery and any element in it is subject to any kind of resize big stage and small thumbs or the other way around for any template you or your client desire
Column_scroll and the properties for the stage mask helps you configure the exact number of visible columns you want to set in order to browse through the media items your gallery has Beside this useful feature we added blur and a couple of tween effects for the leftright navigation that gives an impressive look
032010 (11)62
PROFILE Flashcreed ndash Business Gallery
032010 (11) 63
Either as tooltip or plain text you can show any information you want regarding a certain media thumb in the gallery You can change font type size spacing color position and many other properties
The color gradient system for roll overout mouse gesture is unique in every way if we are to compare it with other galleries on the market at this point You can customize up to 5 sets of color with different alpha values The gradient type either linear or radial can be modified with rotation and ratio values
032010 (11)62
PROFILE Flashcreed ndash Business Gallery
032010 (11) 63
When clicking on a thumb if preview_type is selected as internal a resizable preview window will reveal itself and depending on the media type (image or video) an image viewer or video player will be contained inside it If preview_type is selected as external you have the possibility to set certain URL addresses this allowing you to redirect the user to a specific area of the website like a product page from a virtual store for example
The video player has a dozen of controllers that allow you to create a skin to better suit the template you want to create for your gallery Buttonrsquos color thickness handler color or scrub bar size just to name a few of the properties you can play with
At an amazing price of 999 $ this has to be one of the best choices when it comes to media galleries flash components Donrsquot hesitate to take a look at it on wwwflashcreedcom and also consider other products that might better suit your specifications or desires We would definitely appreciate any kind of feedback regarding current or possible features
Thank you
032010 (11)65
BOOK REVIEW
Are you an actionscript 3 game developer who is not able to write a complete commercial game because you cannot manage dozens
of classes Or you are an experienced actionscript 3 applications developer who wants to program game but donrsquot like reading any available beginner book as it doesnrsquot suit your style Even if you already have a good grasp over java or c++ and interested in creating not only fun games but commercial ones also then this is what you really require
There are several actionscript 3 game development books for beginners out there but Essential Guide to Game Dev is one of those few books that talk about the advanced gaming concepts However its first chapter begins with an easy to understand game example (good for any beginner) and ends up creating 3 games Did I tell you 3 games in just first chapter
Teaching about an Actionscript 3 Game framework is one of the many reasons that make this book a kick-ass addition to actionscript 3 gaming library Authors teach you how to create 10 unique games ranging from arcade to driving tile based to puzzle game and shooters to dice games Another specialty of this book is to use Flex and Flash Develop IDEs along with the primary Flash tool that creates space for not only flex
developers but also Flash Develop users In addition to this you will also learn to create game assets with GIMP Mappy and a sound effect creation tool You will get information about copyright laws which are necessary for any would-be commercial game creation and a complete game example integrated with MochiAds
This book also discusses and further more implements various advanced topics such as bitmap rendering pixel-level collision detection sound management AI xml-based level designing scrolling screen optimization techniques particles etc
In short this book will surely blow your minds with the wealth of knowledge it includes and you will pray for authors to keep writing such informative and useful books
If you are really serious about gaming then donrsquot miss the opportunity of reading this book Highly recommended
by Ali RAZA ACI ACE SCJP
Essential Guide to Flash Games
Authors Jeff Fulton Steve FultonPublisher friends of EDISBN 978-1-4302-2614-7Language EnglishPages 664 PagesWebsite httpfriendsofedcombookhtmlisbn=1430226145

032010 (11)20
ACTIONSCRIPT DEVELOPMENT Creating an AS3 Game Framework
032010 (11) 21
We will also be creating three distinct custom event classes as part of the framework These will be used to send specific data from the Game class instance to the Mainas (GameFrameWorkas instance) class The Mainas will act on the data sent and if needed pass the data to other framework classes By doing this we are using Mainas as a sort of message gateway
The CustomEventButtonIdas classThis custom event will have the ability to pass an identification integer value to the listening function It is used for cases where multiple buttons share the same listener function It will be used in the framework (specifically in the GameFrameWork instance Mainas) to allow BasicScreen instances to each share the same listener functions if they employ a SimpleBlitButton You will see this when we examine the GameFrameWork class file It can also be used for any game or application that needs to send a basic integer id along with an Event instance
The CustomEventLevelScreenUpdateas classThis custom event will be used by the Gameas class instance to send data to a BasicScreen instance we will create called levelInScreen The levelInScreen will have the ability to display custom text between each level The event listnener for this event will change this text with a value passed when the event is fired off The Mainas (GameFrameWorkas sub-class) will listen for this event and pass the data to the levelInScreen
The CustomEventScoreBoardUpdateas classThis custom event will be used by the the Gameas class instance to update the values on the ScoreBoard class instance The Mainas class will listen to for this event and pass the data on to the ScoreBoardas class instance
The framework package structureWe will be organizing all of the code we will create into a package structure The reusable framework classes will be in one package and the games we will create will be in a separate package Letrsquos create these two package structures now
The source folderChoose a spot on your disk drive of choice and create a folder called source This will be the root or base level for all of the code and games we will create in this book
The classes packageThe reusable framework classes will be in a package called classes Create a folder called classes inside the source folder from the previous step You should now have a folder structure that looks a little like this
modification in your own commercial games We present it here in its very simple form for utility purposes
The SimpleBlitButton helper class is used to create a clickable button with rollover and off states The button is created completely in code with a simple color background for the over and off states to be sed in the BasicScreen class We do this for simplicity and to demonstrate some Sprite blitting techniques (much more on these later in the book) using a set of BitmapData instances for the background color change of the button on rollover
The ScoreBoard class and SideBySideScoreElement helper class The ScoreBoard class displays information for the user during game play Data such as the current game score time remaining and other useful information can be displayed to the user with a very basic look and feel by using this class It can be used as is but when you start to make your own commercial games you might find it useful to extend this class with more functionality This very basic class is used inside the framework to demonstrate how to use events from a Game instance to update a game score board
The SideBySideScoreElement helper class is used to display a text label and corresponding dynamic text field as a pair side by side on the screen For example it can be implemented by the ScoreBoard class to display the word Score followed by the userrsquos current score
The Game classThe Game class is a stub style class that all games in the framework will inherit from It contains the basic variables and functions needed to work with the GameFrameWork class
The Custom event classesThe framework makes use of events to communicate between classes The instances of the Game class will use events to communicate with the ScoreBoard and the Main classes We will create a custom Mainas class for each game This Main class will be a sub-class (or child) of the GameFrameWork class Some of the events we will use will be simple events These are instances of the standard Flash Event class used for basic communication By this we mean events that donrsquot need to send any data along with them For example instances of the Gameas framework class will have a constant variable called GAME_OVER This constant will be used as the name of a simple Event instance that is fired off with the standard dispatchEvent function call This example GAME_OVER event wil be used to tell the Mainas to move to the game over (STATE_SYSTEM_GAME_OVER) state in the main state loop when the current game has completed
032010 (11)22
ACTIONSCRIPT DEVELOPMENT Creating an AS3 Game Framework
032010 (11) 23
[source]
[classes]
Next we will create the actual package that will contain all of the source code for the reusable framework classes We will name this package comefgframework To create this you must first create a folder inside the classes folder called com then a folder called efg inside the com folder and finally a framework folder inside the efg folder By the way the efg is an abbreviation for the book title Essential Flash Games You should now have a folder structure that looks like this
[source]
[classes]
[com]
[efg]
[framework]
When we start to create all of the class files necessary for the framework they will all go into the framework folder You will see that when we create these classes the package name will look like this
package comefgframework
The projects packageThe second package we will create is called the projects package You can start this right away by creating a folder inside the root source folder called projects The projects folder is not going to be a straight package structure like the classes folder It is organized in a manner to allow individual custom game development using the framework
Inside this projects folder we are going to create a unique folder for each game in the book The first game we are going to create is called stubgame A stub is usually a function or class that contains very little (if any) usable code but is instead a simple placeholder Our game will be slightly more than a placeholder but not much more It will be used to demonstrate the basic functionality of the framework Go ahead and create a folder called stubgame in the projects folder You should have a projects set of folders that look like this
[source]
[classes]
[projects]
[stubgame]
Next we are going to create two folders each to hold a different version of our game Why are we going to do this This book is meant to support Flash game development with a variety of tools There are many popular methods to create Flash games
with an assortment of tools and code integrated development environments (IDEs) We are going to focus on two such tools in this book the Flash IDE (the one with the library timelines drawing tools and so on all combined into a single tool) and Flash Develop (a very popular free IDE made specifically for ActionScript development) You can use any tool with this book but you will need to follow the documentation specific to your own tool when setting up projects
You will need to pay careful attention to linking the reusable code package structure to your games because linking may vary depending on the Flash code editor environment you are using Linking the package to a game is actually a very simple process but it differs between the various code IDE versions Jeff does most of his Flash game development Flash Develop using the free Flex SDK that Adobe provides Steve on the other-hand uses the Flash IDE almost exclusively We have combined our efforts on all of the chapter games to bring you code that will work with both a Flex SDK project and a Flash IDE project
On that note the next two folders you will create inside the stubgame folder are called flashIDE and flexSDK You donrsquot have to create both for any project You just need to create the one that works with the tools you are going to use to create Flash games Each is set up differently so pay attention to the specifics of the one you will be using the most
You should now have a projects folder that looks like this
[projects]
[stubgame]
[flashIDE]
[flexSDK]
The Flash IDE package structureThe Flash IDE package structure begins right inside the flashIDE folder The package name is very similar to the classes package you saw in the last section The package structure will be comefggames[game
name] For instance with the stub game we are going to create in this chapter the package name will be comefggamesstubgame Go ahead and create those folders now You should have this package structure when you are complete
[projects]
[stubgame]
[flashIDE]
[com]
[efg]
[games]
[stubgame]
[flexSDK]
032010 (11)22
ACTIONSCRIPT DEVELOPMENT Creating an AS3 Game Framework
032010 (11) 23
The Flex SDK package structureThe Flex SDK package structure is very similar to the Flash IDE package structure with one small difference Flash Develop and other Flex tools use a specific set of folders for organizing their own project structures To accommodate these and still have a common package structure for our games we must add the Flash Develop created src folder to the flexSDK folder You will not have to create the src folder or the package structure by hand as Flash Develop will create it automatically for you when you start a new project In the section called Setting up the game in Flash Develop we will go into the details For now here is the way the structure will be laid out (including the Flash Develop specific folders such as bin obj and lib If you have used Flash Develop to create a Flex SDK project you will recognize the following structure
[projects]
[stubgame]
[flexSDK]
[bin]
[obj]
[lib]
[src]
[com]
[efg]
[games]
[stubgame]
Notice that we have created the exact same package structure inside the src folder as we will use with the Flash IDE The package name for our game will be comefggamesstubgame
The package name in the code for classes in both the Flash IDE and Flex SDK will be the same
package comefggamesstubgame
The Mainas and StubGameas filesWhen we start to add files to the subgame package we will be creating two subclasses (or children) of framework classes that will be unique to our game The Mainas will be created as a subclass (or child) of GameFrameWorkas framework class The StubGameas class will be a subclass (or child) of the Gameas framework class
Starting a project using the framework packagesYou have just seen the basic package structure for both the framework reusable classes and the projects we are going to create Letrsquos make use of this right away by creating a project for the stub game The stub game will be very similar to the Chapter 1 game where the player is tasked with clicking the mouse ten times
Creating the stub game project in the Flash IDEFollow these steps to set up stub game using the Flash IDE
1 Start up your version of Flash I am using CS3 but this will work exactly the same in CS4 and CS5
2 Create a fla file in the sourceprojectsstubgame
flashIDE folder called stubgame3 In the sourceprojectsstubgameflashIDE folder
create the following package structure for your game comefggamesstubgame
4 Set the frame rate of the Flash movie to 30 FPS Set the width and height both to 400
5 Set the document class to comefggamesstubgameMain6 We have not yet created the Mainas class so you
will see a warning We are going to create this later in this chapter
7 Add the framework reusable class package to the class path for the fla filebull In the publish settings select [Flash]gt
[ActionScript 3 Setting]bull Click the Browse to Path button and find the
source folder we created earlier for the package structure Select the classes folder and click the choose button Now the comefgframework package will be available for use when we begin to create our game We have not created the framework class files yet but we will be doing this very shortly
Creating the stub game project in Flash DevelopAnd these are the steps to create the same project using Flash Develop
1 Create a folder inside the [source][projects][stubgame] folder called [flexSDK] (if you have not already done so)
2 Start Flash Develop and create a new projectbull Select Flex 3 Projectbull Give the project the name stubgamebull The location should be the sourceprojects
stubgameflexSDK folderbull The package should be comefggamesstubgamebull Do not have Flash Develop create a project
folder automatically Make sure the Create Folder For Project box is unchecked
bull Click the OK button to create the project3 Add the class path to the framework to the project
bull Go to the [project]gt[properties]gt[classpaths] menu item
bull Click the add class path buttonbull Find the source folder we created earlier and
select the classes subfolderbull Click the ok button and then the apply button
032010 (11)24
ACTIONSCRIPT DEVELOPMENT Creating an AS3 Game Framework
032010 (11) 25
You now have the basic structure to start creating projects inside the framework We are now going to discuss a few topics concerning the structure of the framework classes and then move into building the reusable framework code
Here are a couple of things to noteFor Flex Builder Flash Builder or other IDEs please refer to the documentation provided for that product to create a new project and set the default compile class
A common method of Flash development is to use the Flash IDE for assets and organization and Flash Develop for code editing If this is your workflow of choice you will want to follow the Flash IDE folder and package structure rather than the Flex SDK folder structure
Creating game timersThere are two basic methods that most Flash developers implement when creating a frame-based game timer By frame-based we mean a timer that uses the idea of a segment of time broken up into logical slices (or frames) to manage game logic There are other types of methods for timing game updates but we will make extensive use of time-slice or frame-based timers in this book The basic game timer we will use most of the games will attempt to squeeze all processing and screen updates into each segment or frame We will also explore a time-step timer and a sleep-based timer in chapter 11
The first timer method is the EventENTER_FRAME event timer The standard EventENTER_FRAME event handler will attempt to run the game loop at the swf filersquos set frame rate This very handy game loop timer has been in use for a number of years The second standard game loop timer method makes use of the Timer class The Timer class is used to call the game loop at millisecond intervals specified by a delay interval For example if the millisecond delay interval is set to 100 the Timer instance would run ten times a second (there are 1000 milliseconds in a single second) Our framework will begin by using this Timer instance game loop timer We will do this so we can make use of the TimerEventTIMER updateAfterEvent function As you will see this function will help smooth out screen updates
Defining frame timer tick You will see the phrases frame timer tick timer tick and frame tick used in this book When we refer to a tick or a frame tick we simply mean one framersquos worth of processing When we run a game at 30 frames per second we have 30 ticks or 30 frame ticks This also means that we only have 3333 milliseconds (or 100030) inside each tick to do all of our processing
State MachinesA traditional state machine at its very basic is a mechanism that controls the state or current actions a system can perform Sometimes this is called a finite state machine Finite state machines have traditionally been used to model complex mathematical computations and more recently artificial intelligence The finite in the name refers to the fact that the system can only be in a single state at any one time Our game framework is built on a simple state machine pattern that employs a separate code function or method for each state There are many other styles of state machines some use entire classes for each individual state (sometimes called an object-oriented state machine) and some use a simple switchcase statement block called on each frame tick to control state We will use a third type that borrows from these two
We call our state machine pattern a function reference pattern Unlike the object-oriented state machine our machine will contain a separate method or function for each state inside a single framework class Each of these state functions will control elements in the framework such as instances of the BasicScreen and Game classes We will use a switchcase statement to move between states Unlike the afore mentioned very simple switchcase state machine structures that call this switchstate control structure on each frame tick we only need to call it when we are switching states The switchcase we call will simply change the function reference we call on each frame tick The GameFrameWorkas will contain the state machine that controls overall game flow This will move our game system between states defined in the FrameWorkStatesas file
Each individual game package we create will contain a Mainas (in the gamersquos own package structure) that will extend GameFrameWorkas We will also create a unique Gameas child class for each game The Game class children that we create can also employ their own internal state machines based on the function reference pattern when needed
Richard (Squize) Myles of wwwgamingyourwaycom was one of the first to offer the idea of a function reference state machine for ActionScript 3 on his well-respected blog
The FrameWorkStatesas class fileThis class file is a simple collection of constants that will define the states for the game framework They will be consumed by the GameFrameWorkas class file The following code listing shows the entire code for this file you will want to create this file according to the package structure in the previous section see (Listing 1)
The first thing you should notice about this class is the package name in the first line It conforms to the file system structure we created earlier No matter if
032010 (11)24
ACTIONSCRIPT DEVELOPMENT Creating an AS3 Game Framework
032010 (11) 25
you are using a version of Flash Flex Builder Flash Builder Flash Develop TextMate or even plain old Notepad this package name will be the same The package name is not depended on the code development environment but the chosen file structure for organizing the code Save this file in the location we created previously
sourceclassescomefgframeworkFrameWorkStatesas
The state variablesThe state variables are constants that the game loop state machine will use to move between game states We have set up the most common basic states in this sample file but you will be able to create as many as you need As we progress through the chapters more will be added as necessary
bull STATE _ SYSTEM _ TITLE This state is used to display a basic title screen with an OK button for the user to click to move on Once the instructions are on the screen the state will change to the next state
bull STATE _ SYSTEM _ WAIT _ FOR _ CLOSE This one waits until the OK button is clicked for any instance of the BasicScreen class
bull STATE _ SYSTEM _ INSTRUCTIONS This state is used to display basic instructions with the same OK button as in the SYSTEM _ TITLE state It also changes to the STATE _ SYSTEM _ WAIT _ FOR _ CLOSE state until the OK button is clicked
bull STATE _ SYSTEM _ NEW _ GAME This state will call the game logic class and fire off its gamenewGame() function It does not wait but moves on to the NEW _
LEVEL state right awaybull STATE _ SYSTEM _ NEW _ LEVEL With this state we can
call the gamenewLevel() function to set up a new level for the given game
bull STATE _ SYSTEM _ LEVEL _ IN This state is used to display some basic information if needed for the beginning of a level In this basic game we simply display the level screen and wait a few seconds before moving on The wait is accomplished by changing state to the STATE _ SYSTEM _ WAIT state for the specified number of frame ticks
bull STATE _ SYSTEM _ GAME _ PLAY This one simply calls the game logic classrsquos runGame function repeatedly and lets the game take care of its own logic and states
bull STATE _ SYSTEM _ GAME _ OVER The game over state displays the basic game over screen and waits for the OK button to be clicked before moving back to the instructions screen It quickly changes state to the STATE _ SYSTEM _ WAIT _ FOR _ CLOSE until the OK button is clicked
bull STATE _ SYSTEM _ WAIT This state waits for a specified number of frames and then fires off a simple custom event constant called WAIT _ COMPLETE
The GameFrameWorkas class fileThe GameFrameWorkas will be that parent of our gamersquos document class Mainas (the gamersquos document class)
for our games will extend this class and call functions to modify the framework for each unique game The entire code listing is provided at the end of this section We will explore it in detail once your have had a chance to type in the code The location for this file in the package structure is
sourceclassescomefgframeworkGameFrameWorkas
The GameFrameWorkas will be the parent class to the Mainas class we will use for our games and itrsquos shown in the following listing In later chapters we will add some functions to this file and even create one that uses a completely different timer The Mainas will subclass this class with the extends syntax and override the blank stub init function we are about to create This class will also contain all of the state functions that coincide with the state variables in the FrameWorkStates class All of the functions in the GameFrameWorkas are public so all can be overridden by the Mainas if needed In this way we can customize the behavior of the state functions if we need to
For example in later chapters we will want to play music on the title screen The function call to play
Listing 1
package comefgframework
author Jeff and Steve Fulton
public class FrameWorkStates
public static const STATE_SYSTEM_WAIT_FOR_CLOSEint = 0
public static const STATE_SYSTEM_TITLEint = 1
public static const STATE_SYSTEM_INSTRUCTIONSint = 2
public static const STATE_SYSTEM_NEW_GAMEint = 3
public static const STATE_SYSTEM_GAME_OVERint = 4
public static const STATE_SYSTEM_NEW_LEVELint = 5
public static const STATE_SYSTEM_LEVEL_INint = 6
public static const STATE_SYSTEM_GAME_PLAYint = 7
public static const STATE_SYSTEM_LEVEL_OUTint = 8
public static const STATE_SYSTEM_WAITint = 9
032010 (11)26
ACTIONSCRIPT DEVELOPMENT Creating an AS3 Game Framework
032010 (11) 27
the music will need to be added to the systemTitle state function Not all games will need this though so we will not add it to the GameFrameWorkas filersquos systemTitleFunction Instead we will create a new version of the function in Mainas to override the one in GameFrameWorkas The new one will play the sound needed and then call the systemTitle function inside GameFrameWorkas with the supersystemTitle() function call see (Listing 2)
The class imports The class import section contains the necessary Flash core classes needed for the Main class Notice the package name coincides with the package structure we created earlier in the chapter for the framework
package comefgframework
Listing 2
package comefgframework
import flashdisplayBitmap
import flashdisplayBitmapData
import flashdisplayMovieClip
import flasheventsEvent
import flashgeomPoint
import flashtextTextFormat
import flashutilsTimer
import flasheventsTimerEvent
public class GameFrameWork extends MovieClip
public static const EVENT_WAIT_COMPLETEString =
wait complete
public var systemFunctionFunction
public var currentSystemStateint
public var nextSystemStateint
public var lastSystemStateint
public var appBackBitmapDataBitmapData
public var appBackBitmapBitmap
public var frameRateint
public var timerPeriodNumber
public var gameTimerTimer
public var titleScreenBasicScreen
public var gameOverScreenBasicScreen
public var instructionsScreenBasicScreen
public var levelInScreenBasicScreen
public var screenTextFormatTextFormat
public var screenButtonFormatTextFormat
public var levelInTextString
public var scoreBoardScoreBoard
public var scoreBoardTextFormatTextFormat
Game is our custom class to hold all logic for
the game
public var gameGame
waitTime is used in conjunction with the
STATE_SYSTEM_WAIT state
it suspends the game and allows animation or
other
processing to finish
public var waitTimeint
public var waitCountint=0
public function GameFrameWork()
public function init()void
stub to override
public function setApplicationBackGround(width
Number
heightNumberisTransparentBoolean = false
coloruint = 0x000000)void
appBackBitmapData = new BitmapData(width
height
isTransparent color)
appBackBitmap = new Bitmap(appBackBitmapData)
addChild(appBackBitmap)
public function startTimer()void
timerPeriod = 1000 frameRate
gameTimer=new Timer(timerPeriod)
gameTimeraddEventListener(TimerEventTIMER
runGame)
gameTimerstart()
public function runGame(eTimerEvent)void
systemFunction()
eupdateAfterEvent()
switchSystem state is called only when the
032010 (11)26
ACTIONSCRIPT DEVELOPMENT Creating an AS3 Game Framework
032010 (11) 27
Listing 2
state is to be changed
(not every frame like in some switchcase
based simple state machines
public function switchSystemState(statevalint)
void
lastSystemState = currentSystemState
currentSystemState = stateval
switch(stateval)
case FrameWorkStatesSTATE_SYSTEM_WAIT
systemFunction = systemWait
break
case FrameWorkStatesSTATE_SYSTEM_WAIT_FOR_
CLOSE
systemFunction = systemWaitForClose
break
case FrameWorkStatesSTATE_SYSTEM_TITLE
systemFunction = systemTitle
break
case FrameWorkStatesSTATE_SYSTEM_
INSTRUCTIONS
systemFunction = systemInstructions
break
case FrameWorkStatesSTATE_SYSTEM_NEW_GAME
systemFunction = systemNewGame
break
case FrameWorkStatesSTATE_SYSTEM_NEW_LEVEL
systemFunction = systemNewLevel
break
case FrameWorkStatesSTATE_SYSTEM_LEVEL_IN
systemFunction = systemLevelIn
break
case FrameWorkStatesSTATE_SYSTEM_GAME_PLAY
systemFunction = systemGamePlay
break
case FrameWorkStatesSTATE_SYSTEM_GAME_OVER
systemFunction = systemGameOver
break
public function systemTitle()void
addChild(titleScreen)
titleScreenaddEventListener(CustomEventButton
IdBUTTON_ID
okButtonClickListener false 0 true)
switchSystemState(FrameWorkStates
STATE_SYSTEM_WAIT_FOR_CLOSE)
nextSystemState = FrameWorkStatesSTATE_
SYSTEM_INSTRUCTIONS
public function systemInstructions()void
addChild(instructionsScreen)
instructionsScreenaddEventListener(CustomEven
tButtonId
BUTTON_IDokButtonClickListener false 0
true)
switchSystemState(FrameWorkStates
STATE_SYSTEM_WAIT_FOR_CLOSE)
nextSystemState = FrameWorkStatesSTATE_
SYSTEM_NEW_GAME
public function systemNewGame()void
addChild(game)
gameaddEventListener(CustomEventScoreBoardUp
date
UPDATE_TEXTscoreBoardUpdateListenerfalse 0
true)
gameaddEventListener(CustomEventLevelScreenU
pdate
UPDATE_TEXTlevelScreenUpdateListenerfalse
0 true)
gameaddEventListener(GameGAME_OVER
gameOverListener
false 0 true)
gameaddEventListener(GameNEW_LEVEL
newLevelListener
false 0 true)
gamenewGame()
switchSystemState(FrameWorkStatesSTATE_
SYSTEM_NEW_LEVEL)
public function systemNewLevel()void
032010 (11)28
ACTIONSCRIPT DEVELOPMENT Creating an AS3 Game Framework
032010 (11) 29
Listing 2
gamenewLevel()
switchSystemState(FrameWorkStatesSTATE_
SYSTEM_LEVEL_IN)
public function systemLevelIn()void
addChild(levelInScreen)
waitTime = 30
switchSystemState(FrameWorkStatesSTATE_
SYSTEM_WAIT)
nextSystemState = FrameWorkStatesSTATE_
SYSTEM_GAME_PLAY
addEventListener(EVENT_WAIT_COMPLETE
waitCompleteListener false 0 true)
public function systemGameOver()void
removeChild(game)
addChild(gameOverScreen)
gameOverScreenaddEventListener(CustomEventBu
ttonId
BUTTON_IDokButtonClickListener false 0
true)
switchSystemState(FrameWorkStates
STATE_SYSTEM_WAIT_FOR_CLOSE)
nextSystemState = FrameWorkStatesSTATE_
SYSTEM_TITLE
public function systemGamePlay()void
gamerunGame()
public function systemWaitForClose()void
do nothing
public function systemWait()void
waitCount++
if (waitCount gt waitTime)
waitCount = 0
dispatchEvent(new Event(EVENT_WAIT_COMPLETE))
public function okButtonClickListener(e
CustomEventButtonId)void
switch(eid)
case FrameWorkStatesSTATE_SYSTEM_TITLE
removeChild(titleScreen)
titleScreenremoveEventListener(CustomEv
entButtonId
BUTTON_IDokButtonClickListener)
break
case FrameWorkStatesSTATE_SYSTEM_
INSTRUCTIONS
removeChild(instructionsScreen)
instructionsScreenremoveEventListener(
CustomEventButtonIdBUTTON_IDokButtonC
lickListener)
break
case FrameWorkStatesSTATE_SYSTEM_GAME_OVER
removeChild(gameOverScreen)
gameOverScreenremoveEventListener(
CustomEventButtonIdBUTTON_IDokButtonC
lickListener)
break
switchSystemState(nextSystemState)
public function scoreBoardUpdateListener(e
CustomEventScoreBoardUpdate)void
scoreBoardupdate(eelement evalue)
public function levelScreenUpdateListener(e
CustomEventLevelScreenUpdate)void
levelInScreensetDisplayText(levelInText +
etext)
gameOverListener listens for GameGAMEOVER
simple
custom events calls and changes state
accordingly
public function gameOverListener(eEvent)void
switchSystemState(FrameWorkStatesSTATE_
SYSTEM_GAME_OVER)
gameremoveEventListener(CustomEventScoreBoard
Update
UPDATE_TEXTscoreBoardUpdateListener)
gameremoveEventListener(CustomEventLevelScree
nUpdate
032010 (11)28
ACTIONSCRIPT DEVELOPMENT Creating an AS3 Game Framework
032010 (11) 29
We also must import all of the classes needed for the framework to run You will see this put to use shortly
The variable definitions The variable definition section defines all of the global scope variables for the class These include all of the variables needed for the state machine screens and the game timer
We will make use of constants to define the current state and a set of variables to hold the state information These have been be defined on the FrameWorkStatesas file we created in the last section More states can be added to the basic ones but these will be sufficient for many games that we will create in this book There are two special states that are used for the system and wait for button clicks or things like animations to complete These are the STATE_SYSTEM_WAIT_FOR_CLOSE and STATE_SYSTEM_WAIT respectively We will also make use of a generic function called systemFunction that will hold the current state function to call in our game loop Combined with this we use a set of
integer variables to hold the value of the current state (currentSystemState) the last state (lastSystemState) and the next state (nextSystemState) for processing purposes These states should not be confused with an actual game pause function This will be handled in a different manner and added to the framework in Chapter 11
If you are using the Flash IDE and have any assets in the library that need to be exported in the first frame you must extend MovieClip and not Sprite even if you donrsquot plan to use the main time line for anything else We have extended MovieClip for the GameFrameWork so it will work with both Flex SDK and Flash IDE projects
The state control variablesThe control variables keep the system functioning within the context of the current state The main control variable is an instance of the Function class called systemFunction This function holds a reference to the current function that will be repeatedly called on each frame tick This saves us from having to evaluate a switchcase statement on each frame to decide which function to call The function is changed to a new reference by called the switchSystemState() function and passing a new constant that represents the new state
Optimization switchSystemState() is the first of many optimizations we will make to the game framework All of these optimizations will make the Flash games run much more efficiently These efficiencies in the game framework will allow the actual game code to perform more complex operations and still run with a reasonable frame rate
The currentSystemState integer variable holds a number representing the constant of the current state the system is running The nextSystemState contains the constant integer value for the state to transition to after this state is complete The lastSystemState variable holds the integer constant of the previous system state This is used in the rare occurrence that the game loop needs to return to the previous system state
The lastSystemState variable will become useful when we use a shared state such as STATE_SYSTEM_WAIT The STATE_SYSTEM_LEVEL_IN state will implement a 30-millisecond delay before moving on to the STATE_SYSTEM_GAME_PLAY state The nextSystemState will be STATE_SYSTEM_WAIT and the lastSystemState will be STATE_SYSTEM_LEVEL_IN When the 30-millisecond wait time has expired the waitCompleteListener function will be called It will use the lastSystemState to determine where the processing was before the wait was started Yoursquoll see this in detail later in this chapter when we examine the waitCompleteListener function
Listing 2
UPDATE_TEXT levelScreenUpdateListener)
gameremoveEventListener(GameGAME_OVER
gameOverListener)
gameremoveEventListener(GameNEW_LEVEL
newLevelListener)
newLevelListener listens for GameNEWLEVEL
simple custom events calls and changes
state accordingly
public function newLevelListener(eEvent)void
switchSystemState(FrameWorkStatesSTATE_
SYSTEM_NEW_LEVEL)
public function waitCompleteListener(eEvent)
void
switch(lastSystemState)
case FrameWorkStatesSTATE_SYSTEM_LEVEL_
IN
removeChild(levelInScreen)
break
removeEventListener(EVENT_WAIT_COMPLETEwai
tCompleteListener)
switchSystemState(nextSystemState)
032010 (11)30
ACTIONSCRIPT DEVELOPMENT
The background fill variablesAll Flash applications have a background color of some type No matter what game we are going to be creating the framework can control this background color You should never rely on the background color setting in HTML for your Flash applicationrsquos background color This leaves the HTML embed code with control over major aspect of your application If you are creating a viral game to be placed on game portals you will lose control of your gamersquos background color and it will default to what ever the game portal operators have selected as the standard background color in their embed code The framework allows you to override the HTML settings here by placing a simple colored Bitmap behind the entire application We will simply define a BitmapData object called appBackBitmapData and a Bitmap object called appBackBitmap that will be used to place the BitmapData onto the displayList
We will not define the background in the GameFrameWorkas file but rather the Mainas subclass of the GameFrameWork will set the background if needed in its init function override
The timer variablesThe timer will control the frame rate of the game and help smooth out the display by employing the TimerEventupdateAfterEvent method The frameRate variable will be defined in Mainas as the number of frame ticks per second we want our game timer to run
The most important thing to note is that we are making use of the built-in Timer class (gameTimer) We are not using the standard EnterFrame event This allows us to create our own frame rate for the game and specify it in the frameRate variable By doing this we can control game timer tick rate independent of the swf filersquos frame rate (FPS) The swf file can have a frame rate setting of 25 (for example) but the game can run at a 30 frame ticks a second To do this we first set the frameRate to the desired number of frame update ticks we want per second (30) When Mainas calls the startTimer function (described in detail when we get to the section on the init function) the gameTimer is put into action First we will calculate the timerPeriod value as 1000frameRate With the updateAfterEvent function call (in the runGame function) we help to smooth out the render of the screen by asking the Flash display engine to update at the rate of the Timer not the frame rate set in the swf So going back to our example if the game SWF is set to run at 25 FPS and the frameRate is set to 30 ticks the updateAfterEvent will help to smooth out the rendering of the screen by asking the Flash display engine to update at the timer tick rate (30) not the swf filersquos FPS setting (25)
The timerPeriod will be passed into the Timer instance and the game will attempt to run at this rate We say
attempt because if the game includes too many on screen moving objects or more logic than can be computed inside the timerPeriod number of milliseconds (or a combination of both) then there will be a noticable slowdown in the game screen updates In later chapters we will add functionality to the runGame function to mitigate some of these issues
The screen definition variablesThe screen definition variables create instances of our BasicScreen class This is a rather simple class that allows a single positional text box and an OK button on the screen We will use this simple screen for the title instructions level and game over screens We will customize each screen when we create the init function override in our gamersquos Mainas class Note that the levelInText is a special variable Setting this string to a default value will allow the leveInScreen to display some default text along on each new level This text can be combined with dynamic text to create a screen that says something like Level 1 with the word Level being the default text and the number 1 being the dynamic text
public var titleScreenBasicScreen
public var gameOverScreenBasicScreen
public var instructionsScreenBasicScreen
public var levelInScreenBasicScreen
public var levelInTextString
public var screenTextFormatTextFormat
public var screenButtonFormatTextFormat
We also create two TextFormat objects that will be used for defining the format of the text on the screens and the format of the button text
The ScoreBoard variablesThe scoreBoard instance of the ScoreBoard class will handle a simple heads up display (HUD) for the user with information such as the current score It is a simple framework class that will be customized in the init function override in each gamersquos Mainas class The changes will depend on the game that is to be created We also define a TextFormatObject for the basic look of the text for our scoreboard text scoreBoardTextFormat
JEFF FULTON
STEVE FULTON
The next part of the article in the June issue of FFD Magazine
032010 (11)32
ACTIONSCRIPT DEVELOPMENT
032010 (11) 33
On my quest of learning Flash I often became frustrated of how difficult it was to update the contents of my application Meaning if I wanted
to change out an image or piece of copy I had to open up Flash go to my library find the Movie Clip that had my asset in it and republish I thought to myself this is no way to work this is so inefficient Enter XML in all its glory Constructing an application with enabled me to quickly and easily update my project at a moments
notice Without having to open up Flash Now what could be better than that
In this article yoursquore going to learn how to create a new ActionScript project in Flex Builder 3 and write ActionScript 30 code that will load in an XML file display the images on screen and add some interactivity to the scene
Setting up FlexOpen up Flex and go to Filegt NewgtActionScript Project A dialog window will open In the project name field type in PhotoGallery Leave the use default location box checked and click finish (see Figure 1)
Creating an XML Photo Gallery
Searching the Internet yoursquoll find dozens if not hundreds of examples of photo galleries created with Flash
What you will learnhellipbull How to create an ActionScript application in Flex Builder 3bull How to use ActionScript to parse an XML le
What you should knowhellipbull Familiar with general programming concepts such as data ty-
pes variables loops and functionsbull Familiar with class creation and constructionbull Some understanding of XML
with AS3
Figure 1 New ActionScript window dialog Figure 2 ActionScript Compiler dialog
032010 (11)32
ACTIONSCRIPT DEVELOPMENT
032010 (11) 33
Once you click finish your project should open and you should see PhotoGalleryas on screen There are a few steps that I like to take next that I do for every project
First right click PhotoGallery folder in the Flex Navigator window click properties at the bottom and then click on the ActionScript Compiler link on the left hand side At the bottom yoursquoll see a check box that is already selected to generate a HTML wrapper file Uncheck that and click ok A warning message will appear saying that the html-template folder will be deleted Donrsquot worry about that because we havenrsquot put anything in that folder Click ok I personally donrsquot like to have a browser window open every time I run my application (see Figure 2)
Secondly wersquoll be using a tweening library called Tweener In order to use Tweener we have to first download it (httpcodegooglecomptweener) Be sure to download the ActionScript 30 version and create a folder on your desktop or any other place and name it code Place the contents of that download into that folder Next go back to Flex and again right click the PhotoGallery folder and click properties again and this time yoursquoll click the ActionScript Build Path link This window gives us the ability to add assets to our project so we can use them in our project Click the Add Folder button browser to the code folder you just created click ok and click ok again to close the window Now that folder and all its contents will be included in our project (see Figure 3)
Next right click the src folder in your project scroll over to new and add a new folder Name this folder classes This folder will contain two classes that wersquoll be using Then repeat the same steps but this time name the folder images This folder will contain all the images
Figure 3 ActionScript Build Path dialog
032010 (11)34
ACTIONSCRIPT DEVELOPMENT
Listing 1 galleryxml
ltxml version=10 encoding=UTF-8gt
ltgallery image_height=150 image_width=150 image_
gap=5 rows=3gt
ltphotogt
ltdescriptiongtThis is a description for the first
imageltdescriptiongt
ltthumb_pathgtimagesthumbjpgltthumb_pathgt
ltfull_pathgtimagesfullgifltfull_pathgt
ltphotogt
ltphotogt
ltdescriptiongtThis is a description for the second
imageltdescriptiongt
ltthumb_pathgtimagesthumbjpgltthumb_pathgt
ltfull_pathgtimagesfullgifltfull_pathgt
ltphotogt
ltphotogt
ltdescriptiongtThis is a description for the third
imageltdescriptiongt
ltthumb_pathgtimagesthumbjpgltthumb_pathgt
ltfull_pathgtimagesfullgifltfull_pathgt
ltphotogt
ltphotogt
ltdescriptiongtThis is a description for the fourth
imageltdescriptiongt
ltthumb_pathgtimagesthumbjpgltthumb_pathgt
ltfull_pathgtimagesfullgifltfull_pathgt
ltphotogt
ltphotogt
ltdescriptiongtThis is a description for the fifth
imageltdescriptiongt
ltthumb_pathgtimagesthumbjpgltthumb_pathgt
ltfull_pathgtimagesfullgifltfull_pathgt
ltphotogt
ltphotogt
ltdescriptiongtThis is a description for the sixth
imageltdescriptiongt
ltthumb_pathgtimagesthumbjpgltthumb_pathgt
ltfull_pathgtimagesfullgifltfull_pathgt
ltphotogt
ltphotogt
ltdescriptiongtThis is a description for the seventh
imageltdescriptiongt
ltthumb_pathgtimagesthumbjpgltthumb_pathgt
ltfull_pathgtimagesfullgifltfull_pathgt
ltphotogt
ltphotogt
ltdescriptiongtThis is a description for the eighth
imageltdescriptiongt
ltthumb_pathgtimagesthumbjpgltthumb_pathgt
ltfull_pathgtimagesfullgifltfull_pathgt
ltphotogt
ltphotogt
ltdescriptiongtThis is a description for the ninth
imageltdescriptiongt
ltthumb_pathgtimagesthumbjpgltthumb_pathgt
ltfull_pathgtimagesfullgifltfull_pathgt
ltphotogt
ltphotogt
ltdescriptiongtThis is a description for the tenth
imageltdescriptiongt
ltthumb_pathgtimagesthumbjpgltthumb_pathgt
ltfull_pathgtimagesfullgifltfull_pathgt
ltphotogt
ltphotogt
ltdescriptiongtThis is a description for the
eleventh imageltdescriptiongt
ltthumb_pathgtimagesthumbjpgltthumb_pathgt
ltfull_pathgtimagesfullgifltfull_pathgt
ltphotogt
ltphotogt
ltdescriptiongtThis is a description for the twelfth
imageltdescriptiongt
ltthumb_pathgtimagesthumbjpgltthumb_pathgt
ltfull_pathgtimagesfullgifltfull_pathgt
ltphotogt
ltphotogt
ltdescriptiongtThis is a description for the
thirteenth imageltdescriptiongt
ltthumb_pathgtimagesthumbjpgltthumb_pathgt
ltfull_pathgtimagesfullgifltfull_pathgt
ltphotogt
ltphotogt
ltdescriptiongtThis is a description for the
fourteenth imageltdescriptiongt
ltthumb_pathgtimagesthumbjpgltthumb_pathgt
ltfull_pathgtimagesfullgifltfull_pathgt
ltphotogt
ltphotogt
ltdescriptiongtThis is a description for the
fifteenth imageltdescriptiongt
ltthumb_pathgtimagesthumbjpgltthumb_pathgt
ltfull_pathgtimagesfullgifltfull_pathgt
ltphotogt
ltgallerygt
032010 (11)36
ACTIONSCRIPT DEVELOPMENT
Listing 2 PhotoGalleryas
package
Imports
import caurinatransitionsTweener
import classesBigPhoto
import classesThumbNail
import flashdisplayBitmap
import flashdisplaySprite
import flasheventsEvent
import flasheventsMouseEvent
import flashnetURLLoader
import flashnetURLRequest
[SWF(width=466 height=515 backgroundColor=00
0000 frameRate=30)]
public class PhotoGallery extends Sprite
Containers
private var _thumbContainerSprite Stores
the thumbnails
private var _nextButtonSprite Stores
the next arrow
private var _backButtonSprite Stores
the back arrow
private var _bigPhotoBigPhoto
Container for the big image
XML
private var _xmlLoaderURLLoader
Loads the XML file
private var _xmlXML
Stores the XML data
Image Assets
[Embed(source=assetsnext-arrowpng)]
private var _nextArrowClass
Embedded asset for the next
arrow
[Embed(source=assetsback-arrowpng)]
private var _backArrowClass
Embedded asset for the back
arrow
Constructor
public function PhotoGallery()
init ()
Initializing method
private function init ()void
_xmlLoader = new URLLoader ()
_xmlLoaderaddEventListener (EventCOMPLETE
xmlComplete false 0 true)
_xmlLoaderload (new URLRequest
(galleryxml))
XML Complete
private function xmlComplete (eEvent)void
Store the XML data
_xml = new XML (etargetdata)
loadImages ()
Clean up
_xmlLoaderremoveEventListener
(EventCOMPLETE xmlComplete)
_xmlLoader = null
Load in the thumbs
private function loadImages ()void
Temporary variables
var imageHeightuint = _xmlimage_height
var imageWidthuint = _xmlimage_width
var imageGapuint = _xmlimage_gap
var rowsuint = _xmlrows
var rowCounteruint = 0
var columnCounteruint = 0
Instantiate the container and position it
on screen
_thumbContainer = new Sprite ()
_thumbContainerx = 78
_thumbContainery = 78
_thumbContainerbuttonMode = true
_thumbContaineraddEventListener
(MouseEventCLICK thumbClick
false 0 true)
thisaddChild (_thumbContainer)
Loop through the images and create the
visual grid
for (var iuint = 0 i lt _xmlphotolength ()
i++)
var pathString = _xmlphoto[i]thumb_path
var descriptionString = _xmlphoto[i]desc
Creating an XML Photo Gallery with AS3
032010 (11) 37
Listing 2 PhotoGalleryas
ription
Create the thumbnail
var pThumbNail = new ThumbNail ()
pnewID = i
ploadImage (path)
pdescription = description
px = (imageWidth + imageGap)
columnCounter
py = (imageHeight + imageGap)
rowCounter
_thumbContaineraddChild (p)
Create the grid
if ((rowCounter + 1) lt rows)
rowCounter++
else
rowCounter = 0
columnCounter++
Setup the navigation
createNavigation ()
This method handles the click event for the
next arrow
private function nextClick (eMouseEvent)void
155 is the width + spacing
if (-_thumbContainerx lt (_thumbContainerwidth
ndash stagestageWidth ndash 155))
disableNavigation ()
TweeneraddTween (_thumbContainer x
_thumbContainerx ndash 155 time
075 transitioneaseOutExpo
onCompleteenableNavigation)
This method handles the click event for the
back arrow
private function previousClick (eMouseEvent)void
if (-_thumbContainerx gt 0)
disableNavigation ()
TweeneraddTween (_thumbContainer x
_thumbContainerx + 155 time
075 transitioneaseOutExpo
onCompleteenableNavigation)
This method handles the click event for the
thumbnails
private function thumbClick (eMouseEvent)void
disableNavigation ()
Disable the container that stores the
thumbnails
_thumbContainerbuttonMode = false
_thumbContainermouseChildren = false
_thumbContainerremoveEventListener
(MouseEventCLICK thumbClick)
Get the full image path
var imagePathString = _xmlphoto[etargetnewI
D]full_path
Instantiate the big photo
_bigPhoto = new BigPhoto ()
_bigPhotobuttonMode = true
_bigPhotox = 108
_bigPhotoy = 1075
_bigPhotoalpha = 0
_bigPhotoloadImage (imagePath)
_bigPhotoaddEventListener (MouseEventCLICK
closePhoto false 0 true)
thisaddChild (_bigPhoto)
Fade up the photo
TweeneraddTween (_bigPhoto alpha1 time
1)
Fade out the photo
When the image finishes fading delete the
photo and enable the navigation
items
private function closePhoto (eMouseEvent)void
TweeneraddTween (_bigPhoto alpha0 time1
onCompletedeletePhoto)
private function deletePhoto ()void
032010 (11)38
ACTIONSCRIPT DEVELOPMENT
Listing 2 PhotoGalleryas
_bigPhotobuttonMode = false
_bigPhotoremoveEventListener
(MouseEventCLICK closePhoto)
_bigPhotodestroy ()
thisremoveChild (_bigPhoto)
_bigPhoto = null
_thumbContainerbuttonMode = true
_thumbContainermouseChildren = true
_thumbContaineraddEventListener
(MouseEventCLICK thumbClick
false 0 true)
enableNavigation ()
private function createNavigation ()void
Instantiate the next arrow
var nBitmap = new _nextArrow ()
Instantiate the nextButton container
Add the next button as a child of the
nextButton container
_nextButton = new Sprite ()
thisaddChild (_nextButton)
_nextButtonaddChild (n)
_nextButtonx = stagestageWidth ndash _
nextButtonwidth
_nextButtony = 475
Instantiate the back arrow
var bBitmap = new _backArrow ()
Instantiate the backButton container
Add the next button as a child of the
backButton container
_backButton = new Sprite ()
thisaddChild (_backButton)
_backButtonaddChild (b)
_backButtonx = _nextButtonx ndash _
nextButtonwidth ndash 5
_backButtony = 475
enableNavigation ()
private function enableNavigation ()void
_nextButtonbuttonMode = true
_nextButtonaddEventListener
(MouseEventCLICK nextClick false
0 true)
_backButtonbuttonMode = true
_backButtonaddEventListener
(MouseEventCLICK previousClick
false 0 true)
private function disableNavigation ()void
_nextButtonbuttonMode = false
_nextButtonremoveEventListener
(MouseEventCLICK nextClick)
_backButtonbuttonMode = false
_backButtonremoveEventListener
(MouseEventCLICK previousClick)
Figure 4 New ActionScript class dialog
Creating an XML Photo Gallery with AS3
032010 (11) 39
Listing 3 ThumbNailas
package classes
import caurinatransitionsTweener
import flashdisplayLoader
import flashdisplayShape
import flashdisplaySprite
import flasheventsEvent
import flasheventsMouseEvent
import flashnetURLRequest
import flashtextTextField
import flashtextTextFieldAutoSize
import flashtextTextFormat
public class ThumbNail extends Sprite
Containers
private var _imageLoaderLoader Loads in
the thumbnail
private var _imageContainerSprite
Container for the thumbnail
private var _maskShape Container for the
mask
private var _descriptionContainerSprite
Container for the description
TextFields
private var _descriptionTextField
TextField for the container
Logic
private var _newIDuint The ID of the
object
[Embed(systemFont=Arial fontName=arial
fontWeight=bold
mimeType=applicationx-font-
truetype)]
private var _arialClass Embedded asset
for the font
Constructor
public function ThumbNail ()
super ()
init ()
Initializing method
private function init ()void
Instantiate the container
_imageContainer = new Sprite ()
_imageContaineralpha = 0
thisaddChild (_imageContainer)
createDescription ()
thismouseChildren = false
thisaddEventListener (MouseEventMOUSE_OVER
onMouseOver false 0 true)
thisaddEventListener (MouseEventMOUSE_OUT
onMouseOut false 0 true)
Public Methods
public function loadImage (pathString)void
_imageLoader = new Loader ()
_imageLoadercontentLoaderInfoaddEventListen
er (EventCOMPLETE imageComplete
false 0 true)
_imageLoaderload (new URLRequest (path))
GetterSetter Methods
public function get newID ()uint
return this_newID
public function set newID (valueuint)void
this_newID = value
public function get description ()String
return this_descriptiontext
public function set description (valueString)void
this_descriptiontext = value
Private Methods
032010 (11)40
ACTIONSCRIPT DEVELOPMENT
Listing 3 ThumbNailas
private function onMouseOver (eMouseEvent)void
TweeneraddTween (_descriptionContainer
y75 time05 transition
easeOutExpo)
private function onMouseOut (eMouseEvent)void
TweeneraddTween (_descriptionContainer
y150 time05 transition
easeOutExpo)
private function imageComplete (eEvent)void
Reposition the loaded content to the center
_imageLoaderx = -(_imageLoaderwidth 2)
_imageLoadery = -(_imageLoaderheight 2)
_imageContaineraddChildAt (_imageLoader 0)
Apply background after the image has
completely loaded
drawBackground ()
Draw the mask around the description
drawMask ()
Fade in the container
TweeneraddTween (_imageContainer alpha1
time05)
Clean up
_imageLoadercontentLoaderInforemoveEv
entListener (EventCOMPLETE
imageComplete)
Draws a background behind _imageContainer
private function drawBackground ()void
_imageContainergraphicsbeginFill (0xFFFFFF)
_imageContainergraphicsdrawRect (_
imageLoaderx ndash 1 _imageLoadery
ndash 1 _imageLoaderwidth + 2
_imageLoaderheight + 2)
_imageContainergraphicsendFill ()
Creates everything for the description
private function createDescription ()void
Instantiate the container
_descriptionContainer = new Sprite ()
_descriptionContainery = 150
_descriptionContainergraphicsbeginFill
(0x000000 075)
_descriptionContainergraphicsdrawRect (-75
-75 150 75)
_descriptionContainergraphicsendFill ()
_imageContaineraddChild (_
descriptionContainer)
Specify text formatting for the description
Text Field
var tfTextFormat = new TextFormat ()
tfcolor = 0xFFFFFF
tfalign = center
tffont = arial
tfbold = true
tfsize = 12
Instantiate the TextF ield
_description = new TextField ()
_descriptionx = -75
_descriptiony = -70
_descriptionwidth = 150
_descriptionwordWrap = true
_descriptionembedFonts = true
_descriptiondefaultTextFormat = tf
_descriptionautoSize = TextFieldAutoSizeLEFT
_descriptionContaineraddChild (_description)
Draws a mask our _descriptionContainer
private function drawMask ()void
Draw the mask shape
_mask = new Shape ()
_maskgraphicsbeginFill (0xFF0000)
_maskgraphicsdrawRect (_imageLoaderx
_imageLoadery _imageLoaderwidth
_imageLoaderheight)
_maskgraphicsendFill ()
addChild (_mask)
Apply the mask to the container
_descriptionContainermask = _mask
Creating an XML Photo Gallery with AS3
032010 (11) 41
that will be loaded into the application from XML Finally create another folder and this time name it assets This folder will contain the buttons that wersquoll embed into our project
The AssetsBefore we start coding we need to create some visual assets Open up Photoshop or any other program you have for creating graphics and create an image that is 150x150 pixels Fill it with a flat color and save the image as thumbjpg in the images folder you just created Next create another image thatrsquos 250x300 pixels Fill it with another color and save that image as fulljpg into the same folder These images will be used for testing purposes only
Listing 4 BigPhotoas
package classes
import flashdisplayLoader
import flashdisplaySprite
import flasheventsEvent
import flashnetURLRequest
public class BigPhoto extends Sprite
Containers
private var _imageLoaderLoader Loads in the
thumbnail
private var _imageContainerSprite Container
for the thumbnail
Constructor
public function BigPhoto ()
super()
Public Methods
public function loadImage (pathString)void
_imageLoader = new Loader ()
_imageLoadercontentLoaderInfoaddEventListen
er (EventCOMPLETE imageComplete
false 0 true)
_imageLoaderload (new URLRequest (path))
Clean up method
public function destroy ()void
_imageContainerremoveChild (_imageLoader)
_imageLoaderunload ()
_imageLoader = null
thisremoveChild (_imageContainer)
_imageContainer = null
Private Methods
private function imageComplete (eEvent)void
Instantiate the container
_imageContainer = new Sprite ()
thisaddChild (_imageContainer)
Add the loader
_imageContaineraddChild (_imageLoader)
Clean up
_imageLoadercontentLoaderInforemoveEv
entListener (EventCOMPLETE
imageComplete)
Figure 5 Time to test
032010 (11)42
ACTIONSCRIPT DEVELOPMENT
We still have to create our navigation buttons that wersquoll use to scroll through our gallery Create two buttons that are 40x40 pixels and design them how you like They should resemble forward and back buttons Save the forward arrow as next-arrowpng and the other as back-arrowpng into the assets folder Now that our assets our created itrsquos time to code
The XML fileRight click the src folder in the project scroll over to new and click file A dialog window will open and in the file name input box type galleryxml (see Figure 4) Write the code that you see from Listing 1 into galleryxml
Line 1 is the XML declaration This is needed to have a well-formed XML document
Line 2 declares the gallery root node Notice in this node Irsquove added attributes Also to have a well-formed XML document you must have one root node and all attribute values must be in quotes
Lines 3-7 declares a photo node with three children description thumb_path and full_path description is exactly as it sounds It will contain a description for our thumbnail thumb_path contains the path to our thumbnail image Same goes for full_path it contains the path to our full image
I then just copy and pasted that and pasted it 14 times just changing out the description Remember wersquore just using dummy data When you finish go back and add photos of your choice
The ClassesWersquoll be using two additional classes for this project One will be for the thumbnails and another for the full image Right click the classes folder go to new and click ActionScript class In the name field type ThumbNail For the Superclass type in flashdisplaySprite Wersquoll need to extend from that class so we can use the functionality of that object but add our own (see Figure 4)
Add another class this time name it BigPhoto It should also inherit from flashdisplaySprite
CodingTime to start writing the ActionScript for this project Open up PhotoGalleryas from the Flex Navigator and type in the code from Listing 2 Open up ThumbNailas and type in the code from Listing 3 Open up BigPhotoas and type in the code from Listing 4 Now that you have all the code in itrsquos time to test In the menu bar click RungtRun PhotoGallery (see Figure 5) If you get an error make sure you typed everything correctly If all went well you should see the gallery open up Click the buttons and watch the gallery scroll left and right Roll over the thumbnails to see the description scroll up Click on a thumbnail to see the full image fade in You might be wondering about whatrsquos going on Irsquoll try to break that down for you next
The ExplanationOur main focus is going to be whatrsquos going on in PhotoGalleryas This file contains the ActionScript that makes almost everything happen We first start off by declaring our properties that will be used in the project Yoursquoll notice a couple of embeded lines These lines are MetaData tags that actually embed assets into the project The two embeded lines you see add the next-arrowpng file and the back-arrowpng file In the constructor there is one call to a method called init() This method gets the application going by requesting and loading in the XML File When the file finishes loading we store the XML data into our _xml property Next we call the loadImages() method This method is responsible for a big part of the application We first gather some information from the XML file and store it in temporary variables
bull imageWidth stores the image _ height attributes valuebull imageWidth stores the image _ width attributes valuebull imageGap stores the image _ gap attributes valuebull rows stores the row attributes valuebull rowCounter increments ever pass of the for loop Is
compared against the rows variablebull columnCounter increments once for every column
created
The for loop cycles the XML file creating a new ThumbNail object with every iteration During each iteration we create variables that store the path to the thumb nail (path) and the description of the thumbnail (description) We pass the variables into the methods of the ThumbNail class Remember the ThumbNail class defines methods and properties that are specific to it The class code is commented if you wish to explore it Again our main focus is PhotoGalleryas To create the grid we write ifelse logic that compares the rowCounter variable to the row variable For every iteration of the loop we increment that variable if that variable becomes greater than rows we set it back to 0 rowCounter is then multiplied to the y-axis of each ThumbNail object The rest of the code is commented for you to explore
ConclusionYoursquoll notice I actually hard coded a lot of values directly in the ActionScript Not too ideal In the next part of this tutorial wersquore going to come back to this code and modify it to be a little more flexible and visually appealing If you have any questions feel free to contact me through my site (wwwcodedbyryancom)
RYAN DrsquoAGOSTINORyan DrsquoAgostino is an Interactive Developer at NAS Recruitment Communications in Cleveland OH part-time instructor at Virginia Marti College of Art and Design in Lakewood Ohio and freelance designer and ActionScript developer For more information about Ryan please visit httpwwwcodedbyryancom
032010 (11)44
COMPONENTS
Components are the controls and containers that are the elements of the application that create the interface They cover controls such
as buttons and check boxes containers that can hold other containers and controls navigation elements and charts Components can be added to your application in variety of ways They can be added through the design view writing then in MXML or through ActionScript
Flash Builder now has two major sets of components the Halo set which has been available in previous versions of Flex and the new Spark set The components from the Spark set have a direct correlation to a component in the Halo set but not all Halo components have been upgraded to the Spark framework yet The namespaces for these components are added automatically when a MXML document is created and you will notice there are now multiple namespace in the main MXML document already
Creating custom components takes two paths The first is to create a skin for an existing Halo component in Flash Illustrator Photoshop or Fireworks or create a custom skin for a Spark component using MXML The second path is to create a completely custom component using Flash Professional and importing it into the Flash Builder project We are going to focus on the second path and create a custom component with Flash Professional
The first step in creating a custom component is to instal the Flex Component Kit mxp into Flash Professional This is an extension that will expose some
Custom Flash CS4
Flash Builder comes with a lot of components to cover almost all of an apps needs But what if you want a custom look or functionality to a component With Flash Professional you can create custom components and import them into Flash Builder for use in your application
What you will learnhellipbull How to create custom components in Flash Professional to im-
port into Flash Builder
What you should knowhellipbull Flash Professional CS4bull Flash Builder 4bull Actionscript 3
Components in Flash Builder 4
Figure 1 The component artwork Figure 2 Converting the movie clip
032010 (11)46
COMPONENTS
Listing 1 The component class
package comtest
import mxflashUIMovieClip
import flasheventsEvent
import flasheventsEventDispatcher
import flasheventsMouseEvent
import flashfiltersGlowFilter
public class SliderButton extends UIMovieClip
public static const BUTTON_CLICKString = button click
private var glowGlowFilter = new GlowFilter(0x0000cc54421falsefalse)
public function SliderButton()
plusButtonbuttonMode = true
minusButtonbuttonMode = true
plusButtonaddEventListener(MouseEventMOUSE_OVER handleMouseOver)
plusButtonaddEventListener(MouseEventMOUSE_OUT handleMouseOut)
plusButtonaddEventListener(MouseEventCLICK handleMousePress)
minusButtonaddEventListener(MouseEventMOUSE_OVER handleMouseOver)
minusButtonaddEventListener(MouseEventMOUSE_OUT handleMouseOut)
minusButtonaddEventListener(MouseEventCLICK handleMousePress)
private function handleMouseOver(eMouseEvent)void
ecurrentTargetfilters = [glow]
private function handleMouseOut(eMouseEvent)void
ecurrentTargetfilters = []
private function handleMousePress(eMouseEvent)void
if(ecurrentTargetname == plusButton ampamp trackThumbx lt 134)
trackThumbx++
else if(ecurrentTargetname == minusButton ampamp trackThumbx gt 37)
trackThumbx--
dispatchEvent(new Event(SliderButtonBUTTON_CLICK))
032010 (11)48
COMPONENTS
of the Flex classes to Flash allowing the component to communicate with the application Download the extension from the Adobe site at httpwwwadobecomcfusionexchangeindexcfmevent=extensionDetailampextid=1273018 and install using the Adobe Extension Manager The extension should work with Flash
versions as far back as Flash 8 but I highly recommend using at least Flash 9 (CS 3)
Once the extension is installed launch Flash Professional and create a new ActionScript 3 project We are going to create a simple slider button that has a plus and minus button on each end of the button and a track between them When the plus and minus buttons are clicked the the track thumb will move one pixel in either direction There will also be a roll over behavior on the buttons to change their look as the mouse rolls over and off the buttons Finally Flash Builder will receive the event of the button being pushed and update a text input on the stage
It is common to encapsulate the behaviors of the component within itself and have events broadcast to the containing application If you think about some of standard components in both Flash Builder and Flash Professional and deconstruct them in your mind you will see that the same methods are used on them The NumericStepper is a lot like our component It has two buttons with a text field that displays a value that is incremented or decremented with each push of the button The component itself does nothing to effect the application until the code calls it to either send or receive a value
With our new document we are going to create the artwork for the component in the fla file Create four movie clips one each for the scroll track the plus button the minus button and the track thumb (Figure 1) The naming and look of these movie clips are not important
Once the movie clips are created and on the stage give each one an instance name The names in the
Figure 3 Setting the class of the movie clip
Figure 4 Setting to export as SWC
Figure 5 Creating the Flash Builder project
Custom Flash CS4 Components in Flash Builder 4
032010 (11) 49
example files are plusButton minusButton and trackThumb The actual names do not matter and we dont need an instance name for the track since we are not going to reference it in Flash Builder Flash Builder will reference the instance names of the movie clips in the components we will use these later
Now that the artwork has been created it must be collected into its own movie clip Select all of the artwork on the stage and choose ModifygtgtConvert to Symbolhellip In the Library panel there is a new symbol that is called in the sample files SliderButton The name is important here because this is how the Convert to Flex Component mxp will name the class that Flash Builder will refer to later
An external class will give the component the internal behaviors that were mentioned earlier as well as an event to broadcast to the Flash Builder application (Listing 1) All the code in the class should be familiar but there are a few points to go over First the package name is given the qualifier of comtest to identify that the component belongs to our namespace This is not necessary but helpful when there are multiple components or components from different publishers in the application
The most important change is instead of having the class extend the Sprite class this class is going to
extend the UIMovieClip class This class like the Flex Component in the library exposes the behaviors and methods we set up in the class to the Flash Builder application In the import statements use import
mxflashUIMovieClip The mxflash class includes both the UIMovieClip and ContainerMovieClip classes
When the variables are declared we set up a glow filter that will be attached to the buttons when the mouse rolls over them and a string constant for the event we create later In the constructor of the class the buttons receive the event listeners for the mouse interactions and the handlers are added later in the code In the handleClick event handler we use the event dispatcher class to dispatch the event Here we are just dispatching a standard event with the constant that was created earlier You can just as easily dispatc a custom event that has extra information attached to it
Select the movie clip in the Library panel then select CommandsgtgtConvert Symbol to Flex Component (Figure 2) The extension will do several operations such as making the symbol available to ActionScript giving the symbol a class name adding the Flex Component to the library and others
Save the file as SliderButtonas in the folder path comtest When you declare the package name as we have here you must have the same hierarchy as listed in the package name Back in the fla select the
Figure 6 The Package Explorer
Listing 2 The main MXML le
ltxml version=10 encoding=utf-8gt
ltsApplication xmlnsfx=httpnsadobecommxml
2009
xmlnss=librarynsadobecomflex
spark
xmlnsmx=librarynsadobecomflex
mx
width=200 height=110gt
ltfxDeclarationsgt
lt-- Place non-visual elements (eg
services value objects) here
--gt
ltfxDeclarationsgt
ltsApplicationgt
Listing 3 The new component and name space
xmlnstest=comtest
lttestSliderButton x=14 y=10 id=sliderButton
gt
032010 (11)50
COMPONENTS
SliderButton movie clip and select Propertieshellip from the contextual menu Expand the advanced area if it is not already and enter comtestSliderButton in the Class text field Leave the Base Class text field blank and click OK (Figure 3)
Select Publish Settingshellip from the file menu and click on the Flash tab (Figure4) Under the SWF Settings area of the window be sure that the Export SWC check box is checked The swc is the part that Flash Builder will use in the application SWC are archives that contain the classes and media assets of the component and make it easy to distribute the movie clip
Publish the SWF and SWC and we are ready to move to Flash Builder
Flash BuilderIn Flash Builder create a new project This example we only need a basic Flash Builder project without any
server technologies You can name the project anything you would like in this case I have name FB_Components and saved it in my default workspace
If you have not worked on a Flash Builder project yet it is a lot like working on the Flex projects in the past with some new MXML tags You will also notice that the Flex Navigator pane has now been replaced with the Package Explorer (Figure 6)
The Package Explorer pane has a different organization than the Flex Navigator but the main MXML file can still be found under src then under the default package
Looking at the main MXML (Listing 2) you will see that the three name spaces are added automatically and the application begins with sApplication instead of mxApplication These are the minor differences to be on the look out for when working on a Flash Builder project
Listing 4 The nal MXML le
ltxml version=10 encoding=utf-8gt
ltsApplication xmlnsfx=httpnsadobecommxml2009
xmlnss=librarynsadobecomflexspark
xmlnsmx=librarynsadobecomflexmx minWidth=200 minHeight=110
width=200 height=110
initialize=init()
xmlnstest=comtestgt
ltfxDeclarationsgt
lt-- Place non-visual elements (eg services value objects) here --gt
ltfxDeclarationsgt
ltfxScriptgt
lt[CDATA[
private function init()void
sliderButtonaddEventListener(SliderButtonBUTTON_CLICK updateText)
private function updateText(eEvent)void
pixelTexttext = String(sliderButtontrackThumbx)
]]gt
ltfxScriptgt
lttestSliderButton x=14 y=10 id=sliderButton gt
ltsLabel x=39 y=41 text=The position of the track thumb is textAlign=center width=122gt
ltsTextInput x=76 y=76 width=49 id=pixelTextgt
ltsApplicationgt
Custom Flash CS4 Components in Flash Builder 4
032010 (11) 51
To get our component into the Flash Builder project we need to put the swc some where the project can see it On your desktop navigate to where the swc was published to and copy the file Then navigate to where Flash Builder project is and put the swc into libs folder I have found it is easier to keep the fla and swf files out of the project then copy the swc over to the Flash Builder project as needed
Back in Flash Builder open the libs folder under the project in the Package Explorer pane In that directory you should see your swc if you do not try right clicking on the libs folder and selecting Refresh
In the MXML editor switch to Design view When the Design view becomes active the Component pane should become available in the lower left of the workspace The first folder in the pane is the Custom folder and our custom component should be displayed in the list Drag an instance of this component onto the stage
To show that we can have two way communication with the component drag a label and a text input onto the stage Set the labels text to be The position of the track thumb is and move the text input near the label Set the id of the text input to pixelText (Figure 7) Switch back to the Source view after saving
Notice that several lines have been added to the source of the MXML document In addition to the MXML for the component including our custom component a name space value has been added to the sApplication tag designated as xmlnstest=comtest (Listing 3) If we add more components using the same comtest package declaration they will all fall under this name space If we were to add more components using a different package additional name spaces would be added You will also notice that the component starts with testSliderButton as opposed to s fx or mx
In the application tag add an initialize property calling a function called init() After the fxDeclarations tags add fxScript tags to hold the Actionscript As you type fx the code completion should pop up and allow you to select the fxScript tags
Add an id property to the SliderButton tag and give it a value of sliderButton In between the CDATA tags add the init function This function simply adds an event listener to our component calling the updateText
function every time the BUTTON_CLICK event is broadcast from the SliderButton class (Listing 4)
Once the application receives the BUTTON_CLICK event it calls the updateText function This function looks into the component and gets the x position of the track thumb then puts that value into the text input we set up earlier
So now we have communication coming out of the component using the dispatchEvent call in the class We are also looking into the component where the application is getting the x position of the thumb track inside the component Communication can get much more complicated than this but this is a simple example to give a starting point to create more complex components
Click debug to run the application and if no errors occurred the application should launch in a browser window If you have a browser window open before running the app you should close it There is a bug in the Flash Player at the time of this writing that may cause the app to not run if there are browser windows already open
Once the application is running click on the buttons and watch as the value in the text input increase and decrease The custom component is now complete and ready to have more behaviors and methods added to it
ConclusionWhile the components that come with Flash Builder can cover most situations there will be times where only a custom component will fit the applications needs Creating a custom component takes a little work but can make the developers job a lot easier With this new level of control over the look and behavior of the component can make the application more rich and engaging to the end user
Figure 7 Components on the stage
On the Netbull httpwwwadobecombull httpwwwadobecomcfusionexchangeindexcfmeven-
t=extensionDetailampextid=1273018
LOUIS DICARROLouis DiCarro is a consultant based in NYC and has been working with Flash since the rst version He has taught web development at the college level and has worked for numerous large clients He can be reached at louisdicarroffdgmailcom
032010 (11)52
COMPONENTS AIR Components in Flash Builder
032010 (11) 53
We already know that building an AIR application affords us a lot more capabilities than working with a web based project
Digging through the Actionscript documentation shows that there are a lot of classes that are only available to AIR applications These mostly have to do with classes and methods that interact with the file system or windowing of the application
Flash Builder as with Flex Builder before it contains several components that are only available to use with AIR applications These components deal with
visual interfaces for interacting with the file system and a HTML component for displaying web content
You may wonder why these components are only available for AIR applications Mostly it is for security reasons Up to Flash Player 101 a swf does not have the permission to interact with files on the file system except in very limited circumstances
Swfs in the web browser are able to interact only with files on the server in which the swf is hosted This allows them to load images xml and other file types at run time but only if the files come from within its
AIR Components
Adding file and html rendering can result in a lot of code But with the AIR components in Flash Builder 4 this functionality can be added easily with only a few lines of code
What you will learnhellipbull What components are available for AIR applications in Flash
Builder 4
What you should knowhellipbull Flash Builder 4bull Actionscript 3
in Flash Builder
Figure 1 AIR Actionscript 3 special classes for the HTML component Figure 2 Layout of the HTML application
032010 (11)52
COMPONENTS AIR Components in Flash Builder
032010 (11) 53
Were going to take a look at couple of simple examples for each component to get a feel how use them It is also important to note that the documentation for these components are in the AS 3 documentation When looking at the documentation you will see a symbol next to some of the classes and also next to some methods within the classes (Figure 1)
HTML ComponentThe HTML component is very easy to work with It can pull in many types of media and render them as you would expect them to be rendered in a web browser
Start up Flash Builder and create a new Flex project Name the project and select Desktop under project type Click finish and let Flash Builder set up the project
Once the project is started click on the Design tab In the lower left a component tab should be open If it is not open it using the Window menu and selecting Components Scroll down to the Adobe AIR folder You will not see this folder if you set your project to run in a web browser
We are going to create a simple web browser using only three components and one line of code First drag a HTML component a text field and a button to the stage Arrange them how you would like and switch over to design view
Give each component an id as in Listing 1 Also give the button a click handler Type click and let the program auto complete another code hint will pop up to create the handler automatically
Flash Builder will generate the handler as well as the fxScript block in the code In the click handler that is generated add a line that will set the location of the HTML component to the text in the text field See Listing 2 for the full code
Run the application and fill in a valid web address in the application Remember to include http in front of
own sandbox There are exceptions and ways around it but for the majority the swf cannot interact with the file system
If the development of applications using Flash Builder and AIR were to succeed they would need to act like real desktop applications This means that the applications would have to load and save files just as any other application that a user would use on the computer
Security is still maintained in this model by having the developer digitally sign their application using certificates If the certificate is obtained though a trusted source the application would be traceable back to the original developer if something bad should happen
Having a HTML component gives the application greater rendering power by tapping into the Web Kit which can run better than the HTML renderers in the Flash Player This allows developers to repurpose content from their web site to the application
Figure 3 The application running Figure 4 Layout of the image viewer application
Listing 1 MXML of components
ltsTextInput id=addressBar x=10 y=10
width=518gt
ltsButton id=goButton x=555 y=13
label=Go click=goButton_
clickHandler(event) gt
ltmxHTML id=htmlPane x=10 y=40 width=620
height=430gt
Listing 2 goButton handler
protected function goButton_clickHandler(event
MouseEvent)void
htmlPanelocation = addressBartext
032010 (11)54
COMPONENTS
the address Click the Go button and the page should load after a few seconds Take a look at Figure 3 for the results
There are a lot of methods and commands associated with the HTML component This will allow you to make a more customized display and give more control over the HTML content that you show
File system componentsUsing the file system components is just as easy To test the components we are going to create a simple image viewer that allows the user to select the images from the file system
Create a new Flex Project as we did before and be sure to make it a desktop application Once the project has loaded switch to design view and drag a File System Tree and an Image component to the stage See Figure 4 for the layout
Once the application is laid out switch over to the Source mode and give all the components ids as we did before (Listing 3) Also add a change handler instead of a click handler Flash Builder will autocomplete and generate the handler for you as it did when we added the click action to the button
In the generated handler add the code that will load the image into the image component To keep everything simple we only are going to load jpg and png files (Listing 4) in this function we are first checking to make sure the file is a file and not a directory by checking for a file extension If the file passes the first test we check to see if the file is a jpg or png Lastly if the file passes all of these test it gets loaded into the image component
Save the file and run the application to see the results Clicking on the file system tree items will either open or close the directory or try to load the file When the user clicks on a jpg or png it will load into the image component (Figure 5) Note that as the tree expands a scroll bar is attached to the component automatically
ConclusionJust as with the HTML component there is more methods and properties available to you with the file system components In this demo application we have seen how easy it is to get access to the file system using the component without writing a lot of code
There is a lot more involved in making a full application using these components but we have witnessed how easy to get started with them Having more control over the elements as well as error checking would be added in real applications
Having these components available gives the application a large amount of functionality very quickly and allows the developer to concentrate on the logic of the application Using these components in your application will help make it more full-featured and feel more like a real desktop application
LOUIS DICARROLouis DiCarro is a consultant based in NYC and has been working with Flash since the rst version He has taught web development at the college level and has worked for numerous large clients He can be reached at louisdicarroffdgmailcom
Listing 3 MXML of components
ltmxFileSystemTree id=fsList x=10 y=10
height=460 change=fsList_
changeHandler(event)gt
ltmxImage id=imgPane x=193 y=10 width=437
height=460gt
Listing 4 Handler for change event
protected function fsList_changeHandler(event
ListEvent)void
var fileFile = eventcurrentTargetselectedItem
as File
if(fileextension)
if(fileextensiontoLowerCase() == jpg ||
fileextensiontoLowerCase() ==
png)
imgPanesource = fileurl
Figure 5 The image viewer application running
032010 (11)56
TLF Applying CSS to Text Layout Framework styles
032010 (11) 57
TLF is introducing the new way of applying styles to the text Prior to TLF flash used simple approach you had to prepare and attach
StyleSheet object to the style property of the TextFieldTLF provides more flexible and customizable but
more complex techniqueDuring this tutorial we are going to create a small
application in Flex 4 This application contains a text displayed with TLF component TextArea and 2 different CSS that can be applied to the text simply by pressing the button Figure 1 show the screenshot of the application
TextFlow and itrsquos IFormatResolverTLF provides a callback mechanism to for with text styles TextFlow objectrsquos got a property formatResolver that should implement IFormatResolver interface Actually it is a set of callback functions that are called by parent TextFlow when it processes itrsquos elements
To have a closer look at formatResolver we will implement itrsquos version to work with out simple CSS So start create a new project in Flex and name it for example TextCSS In the default package create a new ActionScript class named CSSFormatResolver that implements IFormatResolver interface
Listing 1 shows the complete implementation of the class and will we look closer into it later For now pay attention on the following functions
bull invalidateAll
bull invalidate
bull resolveFormat
bull resolveUserFormat
bull getResolverForNewFlow
These function are created automatically by Flex Builder as they are required for implementation of the interface All functions are callbacks that are called when the certain action is performed by TextFlow and it needs to know how to treat with different elements
Applying CSS
This article is a reply to our readerrsquos question about the possibility to apply CSS to Text Layout Framework (TLF) We will show how to implement the necessary class and switch text styles on the fly
What you will learnhellipbull how can custom styles be applied to TLF elementsbull how to implement IFormatResolver to work with CSS
What you should knowhellipbull the basics of Flex and FlexFlash Builderbull the basics of TLF
to Text Layout Framework styles
Figure 1 Style changing application
032010 (11)56
TLF Applying CSS to Text Layout Framework styles
032010 (11) 57
Main ApplicationListing 2 contains a full code for main application
The application consists of
bull TextArea with some text The text is formed using XML Some elements of the TextFlow have
For our case we are interested in resolveFormat function that is called for every element of the TextFlow when itrsquos style needs to be changed This function return an object that should implement ITextLayoutFormat
Before we continue lets have a fast look at main application and how we build our example
Listing 1 CSSFormatResolveras
package
import flashtextStyleSheet
import flashxtextLayoutelementsFlowElement
import flashxtextLayoutelementsFlowValueHolder
import flashxtextLayoutelementsIFormatResolver
import flashxtextLayoutelementsTextFlow
import flashxtextLayoutformatsITextLayoutFormat
public class CSSFormatResolver implements
IFormatResolver
private var _styleSheetStyleSheet
public function CSSFormatResolver()
_styleSheet = new StyleSheet()
public function invalidateAll(textFlow
TextFlow)void
public function invalidate(targetObject)void
public function resolveFormat(targetObject)
ITextLayoutFormat
var formatFlowValueHolder = null
if (target is FlowElement)
var elementFlowElement = target as
FlowElement
if (element = null)
format = elementformat as
FlowValueHolder
if (elementstyleName = null)
var styleObject = styleSheetgetSt
yle(elementstyleName)
formatcolor = style[color]
formatfontSize =
style[fontSize]
formatfontWeight =
style[fontWeight]
formatfontStyle =
style[fontStyle]
return format
public function resolveUserFormat(targetObject
userFormatString)
return null
public function getResolverForNewFlow(oldFlow
TextFlow newFlowTextFlow)
IFormatResolver
return null
public function get styleSheet()StyleSheet
return _styleSheet
public function set styleSheet(valueStyleSheet)
void
_styleSheet = value
032010 (11)58
TLF
032010 (11) 59
Listing 2 TextCSSmxml
ltxml version=10 encoding=utf-8gt
ltsApplication xmlnsfx=httpnsadobecommxml2009
xmlnss=librarynsadobecomflexspark
xmlnsmx=librarynsadobecomflexhalo
xmlnslocal=
width=640 height=300gt
ltfxScriptgt
lt[CDATA[
import mxeventsFlexEvent
protected function applyCSS1Button_
clickHandler(eventMouseEvent)void
var formatResolverCSSFormatResolver =
new CSSFormatResolver()
formatResolverstyleSheetparseCSS(css1
text)
textAreatextFlowformatResolver =
formatResolver
protected function applyCSS2Button_
clickHandler(eventMouseEvent)void
var formatResolverCSSFormatResolver =
new CSSFormatResolver()
formatResolverstyleSheetparseCSS(css2
text)
textAreatextFlowformatResolver =
formatResolver
]]gt
ltfxScriptgt
ltsTextArea id=textArea width=620 height=134
x=9 y=156gt
ltsTextFlowgt
ltsp styleName=h1gt
Title of the Text
ltspgt
ltsp styleName=h2gt
Section of the Text
ltspgt
ltspgt
This is a body text Lorem ipsum
ltspgt
ltsTextFlowgt
ltsTextAreagt
ltsTextArea x=10 y=10 width=285 height=86
id=css1 gt
lt[CDATA[
h1
colorFF0000
fontSize20
fontWeightbold
fontStylenormal
h2
colorFF00FF
fontSize16
fontWeightbold
fontStyleitalic
]]gt
ltsTextAreagt
ltsTextArea x=345 y=10 width=285 height=86
id=css2 gt
lt[CDATA[
h1
color00FF00
fontSize32
fontWeightnormal
fontStyleitalic
h2
color0000FF
fontSize24
fontWeightbold
fontStylenormal
]]gt
ltsTextAreagt
ltsButton x=108 y=105 label=Apply CSS
1 id=applyCSS1Button
click=applyCSS1Button_
clickHandler(event)gt
ltsButton x=443 y=105 label=Apply CSS
2 id=applyCSS2Button
click=applyCSS2Button_
clickHandler(event)gt
ltsApplicationgt
032010 (11)58
TLF
032010 (11) 59
got styleName attribute so you could apply the corresponding CSS style to them later
bull 2 TextAreas with simple different CSSbull 2 Buttons to apply CSS from TextAreas to example
text
When the button is clicked the new instance of CSSFormatResolver class is created Then the corresponding CSS string from the TextArea is parsed and set into resolverrsquos property of SlyleSheet class type And finally prepared formatResolver instance is assigned to the TextFlow
Applying CSS to TextFlowNow lets have more detailed look at resolveFormat callback function First it should return a value that implements ITextLayoutFormat if it returns null then no new styling should be applied to an element being processed by the function So we create format variable of FlowValueHolder (it implements ITextLayoutFormat) and set itrsquos value to null (we do that because resolveFormat works with all elements including TextFlow itself as probably we donrsquot want to apply one style to the whole text)
After we do all the necessary casts and null checks and if we are sure that current elementrsquos got styleName attribute we assign styles from CSS to a current format StyleSheet object is used to contain CSS data as it is convenient object to parse and retrieve CSS data
Conclusion and a WarningThere was a brief tutorial on how to apply simple CSS to TLF TextFlow Please note that CSSFormatResolver class is not fully functional and only can be applied to our sample CSSs Writing reusable and versatile class requires more detailed coding and approach
Check the TLF Blog on this issue There is fully functional CSSFormatResolver with example there httpblogsadobecomtlf200902iformatresolver_and_using_css_1html
MAXYM GOLOVANCHUK Maxym Golovanchuk is a Photoshop Certied Expert and TV producer and he is using Adobersquos software for implementing entertainment solutions including video delivery with Flash Media Server mexxikgmailcom
MondayTuesdayWednesdayThursday Friday
DIVISIONS OF CREATIVE NICHE INC
032010 (11)60
PROFILE Flashcreed ndash Business Gallery
032010 (11) 61
The Business Gallery (httpwwwflashcreedcombusiness_video_image_gallery) is a Flash component meant to do one thing to enhance the visual experience a website portfolio or presentation site gives to its users Mainly itrsquos all about the image you present yourself or
your product to the world wide web Letrsquos face it without the looks you canrsquot sell your product or image no matter how interesting it might be
Whatrsquos so great about this gallery you might wonder Well the answer is simple everything Advanced AS3 programming dynamic XML implementation unlimited number of media items on stage PNG JPG and video FLA SWF MP4 F4V supported media tween and image effects just to name a few of the over 150 settings this gallery brings you Bottom line you can customize it in any way you see fit in order to make it resemble your website layout Not to mention the code optimization that allows the gallery to run so smoothly even on low resources
We brought 45 background wallpapers in case just a color doesnrsquot do the job also a set of custom arrows and close buttons
Flashcreed ndash Business GalleryHello itrsquos good to be back here among Flash amp Flex Magazine readers Today we are going to tell you a bit about our products mainly our Business Gallery but since all our products are built on the same framework most of the properties apply to all When we first realized what we could do with this framework we decided to name it ldquoPandorardquo in order to point out the unlimited number of possibilities it revealed regarding customization and user friendliness
032010 (11)60
PROFILE Flashcreed ndash Business Gallery
032010 (11) 61
The size of the entire gallery and any element in it is subject to any kind of resize big stage and small thumbs or the other way around for any template you or your client desire
Column_scroll and the properties for the stage mask helps you configure the exact number of visible columns you want to set in order to browse through the media items your gallery has Beside this useful feature we added blur and a couple of tween effects for the leftright navigation that gives an impressive look
032010 (11)62
PROFILE Flashcreed ndash Business Gallery
032010 (11) 63
Either as tooltip or plain text you can show any information you want regarding a certain media thumb in the gallery You can change font type size spacing color position and many other properties
The color gradient system for roll overout mouse gesture is unique in every way if we are to compare it with other galleries on the market at this point You can customize up to 5 sets of color with different alpha values The gradient type either linear or radial can be modified with rotation and ratio values
032010 (11)62
PROFILE Flashcreed ndash Business Gallery
032010 (11) 63
When clicking on a thumb if preview_type is selected as internal a resizable preview window will reveal itself and depending on the media type (image or video) an image viewer or video player will be contained inside it If preview_type is selected as external you have the possibility to set certain URL addresses this allowing you to redirect the user to a specific area of the website like a product page from a virtual store for example
The video player has a dozen of controllers that allow you to create a skin to better suit the template you want to create for your gallery Buttonrsquos color thickness handler color or scrub bar size just to name a few of the properties you can play with
At an amazing price of 999 $ this has to be one of the best choices when it comes to media galleries flash components Donrsquot hesitate to take a look at it on wwwflashcreedcom and also consider other products that might better suit your specifications or desires We would definitely appreciate any kind of feedback regarding current or possible features
Thank you
032010 (11)65
BOOK REVIEW
Are you an actionscript 3 game developer who is not able to write a complete commercial game because you cannot manage dozens
of classes Or you are an experienced actionscript 3 applications developer who wants to program game but donrsquot like reading any available beginner book as it doesnrsquot suit your style Even if you already have a good grasp over java or c++ and interested in creating not only fun games but commercial ones also then this is what you really require
There are several actionscript 3 game development books for beginners out there but Essential Guide to Game Dev is one of those few books that talk about the advanced gaming concepts However its first chapter begins with an easy to understand game example (good for any beginner) and ends up creating 3 games Did I tell you 3 games in just first chapter
Teaching about an Actionscript 3 Game framework is one of the many reasons that make this book a kick-ass addition to actionscript 3 gaming library Authors teach you how to create 10 unique games ranging from arcade to driving tile based to puzzle game and shooters to dice games Another specialty of this book is to use Flex and Flash Develop IDEs along with the primary Flash tool that creates space for not only flex
developers but also Flash Develop users In addition to this you will also learn to create game assets with GIMP Mappy and a sound effect creation tool You will get information about copyright laws which are necessary for any would-be commercial game creation and a complete game example integrated with MochiAds
This book also discusses and further more implements various advanced topics such as bitmap rendering pixel-level collision detection sound management AI xml-based level designing scrolling screen optimization techniques particles etc
In short this book will surely blow your minds with the wealth of knowledge it includes and you will pray for authors to keep writing such informative and useful books
If you are really serious about gaming then donrsquot miss the opportunity of reading this book Highly recommended
by Ali RAZA ACI ACE SCJP
Essential Guide to Flash Games
Authors Jeff Fulton Steve FultonPublisher friends of EDISBN 978-1-4302-2614-7Language EnglishPages 664 PagesWebsite httpfriendsofedcombookhtmlisbn=1430226145

032010 (11)22
ACTIONSCRIPT DEVELOPMENT Creating an AS3 Game Framework
032010 (11) 23
[source]
[classes]
Next we will create the actual package that will contain all of the source code for the reusable framework classes We will name this package comefgframework To create this you must first create a folder inside the classes folder called com then a folder called efg inside the com folder and finally a framework folder inside the efg folder By the way the efg is an abbreviation for the book title Essential Flash Games You should now have a folder structure that looks like this
[source]
[classes]
[com]
[efg]
[framework]
When we start to create all of the class files necessary for the framework they will all go into the framework folder You will see that when we create these classes the package name will look like this
package comefgframework
The projects packageThe second package we will create is called the projects package You can start this right away by creating a folder inside the root source folder called projects The projects folder is not going to be a straight package structure like the classes folder It is organized in a manner to allow individual custom game development using the framework
Inside this projects folder we are going to create a unique folder for each game in the book The first game we are going to create is called stubgame A stub is usually a function or class that contains very little (if any) usable code but is instead a simple placeholder Our game will be slightly more than a placeholder but not much more It will be used to demonstrate the basic functionality of the framework Go ahead and create a folder called stubgame in the projects folder You should have a projects set of folders that look like this
[source]
[classes]
[projects]
[stubgame]
Next we are going to create two folders each to hold a different version of our game Why are we going to do this This book is meant to support Flash game development with a variety of tools There are many popular methods to create Flash games
with an assortment of tools and code integrated development environments (IDEs) We are going to focus on two such tools in this book the Flash IDE (the one with the library timelines drawing tools and so on all combined into a single tool) and Flash Develop (a very popular free IDE made specifically for ActionScript development) You can use any tool with this book but you will need to follow the documentation specific to your own tool when setting up projects
You will need to pay careful attention to linking the reusable code package structure to your games because linking may vary depending on the Flash code editor environment you are using Linking the package to a game is actually a very simple process but it differs between the various code IDE versions Jeff does most of his Flash game development Flash Develop using the free Flex SDK that Adobe provides Steve on the other-hand uses the Flash IDE almost exclusively We have combined our efforts on all of the chapter games to bring you code that will work with both a Flex SDK project and a Flash IDE project
On that note the next two folders you will create inside the stubgame folder are called flashIDE and flexSDK You donrsquot have to create both for any project You just need to create the one that works with the tools you are going to use to create Flash games Each is set up differently so pay attention to the specifics of the one you will be using the most
You should now have a projects folder that looks like this
[projects]
[stubgame]
[flashIDE]
[flexSDK]
The Flash IDE package structureThe Flash IDE package structure begins right inside the flashIDE folder The package name is very similar to the classes package you saw in the last section The package structure will be comefggames[game
name] For instance with the stub game we are going to create in this chapter the package name will be comefggamesstubgame Go ahead and create those folders now You should have this package structure when you are complete
[projects]
[stubgame]
[flashIDE]
[com]
[efg]
[games]
[stubgame]
[flexSDK]
032010 (11)22
ACTIONSCRIPT DEVELOPMENT Creating an AS3 Game Framework
032010 (11) 23
The Flex SDK package structureThe Flex SDK package structure is very similar to the Flash IDE package structure with one small difference Flash Develop and other Flex tools use a specific set of folders for organizing their own project structures To accommodate these and still have a common package structure for our games we must add the Flash Develop created src folder to the flexSDK folder You will not have to create the src folder or the package structure by hand as Flash Develop will create it automatically for you when you start a new project In the section called Setting up the game in Flash Develop we will go into the details For now here is the way the structure will be laid out (including the Flash Develop specific folders such as bin obj and lib If you have used Flash Develop to create a Flex SDK project you will recognize the following structure
[projects]
[stubgame]
[flexSDK]
[bin]
[obj]
[lib]
[src]
[com]
[efg]
[games]
[stubgame]
Notice that we have created the exact same package structure inside the src folder as we will use with the Flash IDE The package name for our game will be comefggamesstubgame
The package name in the code for classes in both the Flash IDE and Flex SDK will be the same
package comefggamesstubgame
The Mainas and StubGameas filesWhen we start to add files to the subgame package we will be creating two subclasses (or children) of framework classes that will be unique to our game The Mainas will be created as a subclass (or child) of GameFrameWorkas framework class The StubGameas class will be a subclass (or child) of the Gameas framework class
Starting a project using the framework packagesYou have just seen the basic package structure for both the framework reusable classes and the projects we are going to create Letrsquos make use of this right away by creating a project for the stub game The stub game will be very similar to the Chapter 1 game where the player is tasked with clicking the mouse ten times
Creating the stub game project in the Flash IDEFollow these steps to set up stub game using the Flash IDE
1 Start up your version of Flash I am using CS3 but this will work exactly the same in CS4 and CS5
2 Create a fla file in the sourceprojectsstubgame
flashIDE folder called stubgame3 In the sourceprojectsstubgameflashIDE folder
create the following package structure for your game comefggamesstubgame
4 Set the frame rate of the Flash movie to 30 FPS Set the width and height both to 400
5 Set the document class to comefggamesstubgameMain6 We have not yet created the Mainas class so you
will see a warning We are going to create this later in this chapter
7 Add the framework reusable class package to the class path for the fla filebull In the publish settings select [Flash]gt
[ActionScript 3 Setting]bull Click the Browse to Path button and find the
source folder we created earlier for the package structure Select the classes folder and click the choose button Now the comefgframework package will be available for use when we begin to create our game We have not created the framework class files yet but we will be doing this very shortly
Creating the stub game project in Flash DevelopAnd these are the steps to create the same project using Flash Develop
1 Create a folder inside the [source][projects][stubgame] folder called [flexSDK] (if you have not already done so)
2 Start Flash Develop and create a new projectbull Select Flex 3 Projectbull Give the project the name stubgamebull The location should be the sourceprojects
stubgameflexSDK folderbull The package should be comefggamesstubgamebull Do not have Flash Develop create a project
folder automatically Make sure the Create Folder For Project box is unchecked
bull Click the OK button to create the project3 Add the class path to the framework to the project
bull Go to the [project]gt[properties]gt[classpaths] menu item
bull Click the add class path buttonbull Find the source folder we created earlier and
select the classes subfolderbull Click the ok button and then the apply button
032010 (11)24
ACTIONSCRIPT DEVELOPMENT Creating an AS3 Game Framework
032010 (11) 25
You now have the basic structure to start creating projects inside the framework We are now going to discuss a few topics concerning the structure of the framework classes and then move into building the reusable framework code
Here are a couple of things to noteFor Flex Builder Flash Builder or other IDEs please refer to the documentation provided for that product to create a new project and set the default compile class
A common method of Flash development is to use the Flash IDE for assets and organization and Flash Develop for code editing If this is your workflow of choice you will want to follow the Flash IDE folder and package structure rather than the Flex SDK folder structure
Creating game timersThere are two basic methods that most Flash developers implement when creating a frame-based game timer By frame-based we mean a timer that uses the idea of a segment of time broken up into logical slices (or frames) to manage game logic There are other types of methods for timing game updates but we will make extensive use of time-slice or frame-based timers in this book The basic game timer we will use most of the games will attempt to squeeze all processing and screen updates into each segment or frame We will also explore a time-step timer and a sleep-based timer in chapter 11
The first timer method is the EventENTER_FRAME event timer The standard EventENTER_FRAME event handler will attempt to run the game loop at the swf filersquos set frame rate This very handy game loop timer has been in use for a number of years The second standard game loop timer method makes use of the Timer class The Timer class is used to call the game loop at millisecond intervals specified by a delay interval For example if the millisecond delay interval is set to 100 the Timer instance would run ten times a second (there are 1000 milliseconds in a single second) Our framework will begin by using this Timer instance game loop timer We will do this so we can make use of the TimerEventTIMER updateAfterEvent function As you will see this function will help smooth out screen updates
Defining frame timer tick You will see the phrases frame timer tick timer tick and frame tick used in this book When we refer to a tick or a frame tick we simply mean one framersquos worth of processing When we run a game at 30 frames per second we have 30 ticks or 30 frame ticks This also means that we only have 3333 milliseconds (or 100030) inside each tick to do all of our processing
State MachinesA traditional state machine at its very basic is a mechanism that controls the state or current actions a system can perform Sometimes this is called a finite state machine Finite state machines have traditionally been used to model complex mathematical computations and more recently artificial intelligence The finite in the name refers to the fact that the system can only be in a single state at any one time Our game framework is built on a simple state machine pattern that employs a separate code function or method for each state There are many other styles of state machines some use entire classes for each individual state (sometimes called an object-oriented state machine) and some use a simple switchcase statement block called on each frame tick to control state We will use a third type that borrows from these two
We call our state machine pattern a function reference pattern Unlike the object-oriented state machine our machine will contain a separate method or function for each state inside a single framework class Each of these state functions will control elements in the framework such as instances of the BasicScreen and Game classes We will use a switchcase statement to move between states Unlike the afore mentioned very simple switchcase state machine structures that call this switchstate control structure on each frame tick we only need to call it when we are switching states The switchcase we call will simply change the function reference we call on each frame tick The GameFrameWorkas will contain the state machine that controls overall game flow This will move our game system between states defined in the FrameWorkStatesas file
Each individual game package we create will contain a Mainas (in the gamersquos own package structure) that will extend GameFrameWorkas We will also create a unique Gameas child class for each game The Game class children that we create can also employ their own internal state machines based on the function reference pattern when needed
Richard (Squize) Myles of wwwgamingyourwaycom was one of the first to offer the idea of a function reference state machine for ActionScript 3 on his well-respected blog
The FrameWorkStatesas class fileThis class file is a simple collection of constants that will define the states for the game framework They will be consumed by the GameFrameWorkas class file The following code listing shows the entire code for this file you will want to create this file according to the package structure in the previous section see (Listing 1)
The first thing you should notice about this class is the package name in the first line It conforms to the file system structure we created earlier No matter if
032010 (11)24
ACTIONSCRIPT DEVELOPMENT Creating an AS3 Game Framework
032010 (11) 25
you are using a version of Flash Flex Builder Flash Builder Flash Develop TextMate or even plain old Notepad this package name will be the same The package name is not depended on the code development environment but the chosen file structure for organizing the code Save this file in the location we created previously
sourceclassescomefgframeworkFrameWorkStatesas
The state variablesThe state variables are constants that the game loop state machine will use to move between game states We have set up the most common basic states in this sample file but you will be able to create as many as you need As we progress through the chapters more will be added as necessary
bull STATE _ SYSTEM _ TITLE This state is used to display a basic title screen with an OK button for the user to click to move on Once the instructions are on the screen the state will change to the next state
bull STATE _ SYSTEM _ WAIT _ FOR _ CLOSE This one waits until the OK button is clicked for any instance of the BasicScreen class
bull STATE _ SYSTEM _ INSTRUCTIONS This state is used to display basic instructions with the same OK button as in the SYSTEM _ TITLE state It also changes to the STATE _ SYSTEM _ WAIT _ FOR _ CLOSE state until the OK button is clicked
bull STATE _ SYSTEM _ NEW _ GAME This state will call the game logic class and fire off its gamenewGame() function It does not wait but moves on to the NEW _
LEVEL state right awaybull STATE _ SYSTEM _ NEW _ LEVEL With this state we can
call the gamenewLevel() function to set up a new level for the given game
bull STATE _ SYSTEM _ LEVEL _ IN This state is used to display some basic information if needed for the beginning of a level In this basic game we simply display the level screen and wait a few seconds before moving on The wait is accomplished by changing state to the STATE _ SYSTEM _ WAIT state for the specified number of frame ticks
bull STATE _ SYSTEM _ GAME _ PLAY This one simply calls the game logic classrsquos runGame function repeatedly and lets the game take care of its own logic and states
bull STATE _ SYSTEM _ GAME _ OVER The game over state displays the basic game over screen and waits for the OK button to be clicked before moving back to the instructions screen It quickly changes state to the STATE _ SYSTEM _ WAIT _ FOR _ CLOSE until the OK button is clicked
bull STATE _ SYSTEM _ WAIT This state waits for a specified number of frames and then fires off a simple custom event constant called WAIT _ COMPLETE
The GameFrameWorkas class fileThe GameFrameWorkas will be that parent of our gamersquos document class Mainas (the gamersquos document class)
for our games will extend this class and call functions to modify the framework for each unique game The entire code listing is provided at the end of this section We will explore it in detail once your have had a chance to type in the code The location for this file in the package structure is
sourceclassescomefgframeworkGameFrameWorkas
The GameFrameWorkas will be the parent class to the Mainas class we will use for our games and itrsquos shown in the following listing In later chapters we will add some functions to this file and even create one that uses a completely different timer The Mainas will subclass this class with the extends syntax and override the blank stub init function we are about to create This class will also contain all of the state functions that coincide with the state variables in the FrameWorkStates class All of the functions in the GameFrameWorkas are public so all can be overridden by the Mainas if needed In this way we can customize the behavior of the state functions if we need to
For example in later chapters we will want to play music on the title screen The function call to play
Listing 1
package comefgframework
author Jeff and Steve Fulton
public class FrameWorkStates
public static const STATE_SYSTEM_WAIT_FOR_CLOSEint = 0
public static const STATE_SYSTEM_TITLEint = 1
public static const STATE_SYSTEM_INSTRUCTIONSint = 2
public static const STATE_SYSTEM_NEW_GAMEint = 3
public static const STATE_SYSTEM_GAME_OVERint = 4
public static const STATE_SYSTEM_NEW_LEVELint = 5
public static const STATE_SYSTEM_LEVEL_INint = 6
public static const STATE_SYSTEM_GAME_PLAYint = 7
public static const STATE_SYSTEM_LEVEL_OUTint = 8
public static const STATE_SYSTEM_WAITint = 9
032010 (11)26
ACTIONSCRIPT DEVELOPMENT Creating an AS3 Game Framework
032010 (11) 27
the music will need to be added to the systemTitle state function Not all games will need this though so we will not add it to the GameFrameWorkas filersquos systemTitleFunction Instead we will create a new version of the function in Mainas to override the one in GameFrameWorkas The new one will play the sound needed and then call the systemTitle function inside GameFrameWorkas with the supersystemTitle() function call see (Listing 2)
The class imports The class import section contains the necessary Flash core classes needed for the Main class Notice the package name coincides with the package structure we created earlier in the chapter for the framework
package comefgframework
Listing 2
package comefgframework
import flashdisplayBitmap
import flashdisplayBitmapData
import flashdisplayMovieClip
import flasheventsEvent
import flashgeomPoint
import flashtextTextFormat
import flashutilsTimer
import flasheventsTimerEvent
public class GameFrameWork extends MovieClip
public static const EVENT_WAIT_COMPLETEString =
wait complete
public var systemFunctionFunction
public var currentSystemStateint
public var nextSystemStateint
public var lastSystemStateint
public var appBackBitmapDataBitmapData
public var appBackBitmapBitmap
public var frameRateint
public var timerPeriodNumber
public var gameTimerTimer
public var titleScreenBasicScreen
public var gameOverScreenBasicScreen
public var instructionsScreenBasicScreen
public var levelInScreenBasicScreen
public var screenTextFormatTextFormat
public var screenButtonFormatTextFormat
public var levelInTextString
public var scoreBoardScoreBoard
public var scoreBoardTextFormatTextFormat
Game is our custom class to hold all logic for
the game
public var gameGame
waitTime is used in conjunction with the
STATE_SYSTEM_WAIT state
it suspends the game and allows animation or
other
processing to finish
public var waitTimeint
public var waitCountint=0
public function GameFrameWork()
public function init()void
stub to override
public function setApplicationBackGround(width
Number
heightNumberisTransparentBoolean = false
coloruint = 0x000000)void
appBackBitmapData = new BitmapData(width
height
isTransparent color)
appBackBitmap = new Bitmap(appBackBitmapData)
addChild(appBackBitmap)
public function startTimer()void
timerPeriod = 1000 frameRate
gameTimer=new Timer(timerPeriod)
gameTimeraddEventListener(TimerEventTIMER
runGame)
gameTimerstart()
public function runGame(eTimerEvent)void
systemFunction()
eupdateAfterEvent()
switchSystem state is called only when the
032010 (11)26
ACTIONSCRIPT DEVELOPMENT Creating an AS3 Game Framework
032010 (11) 27
Listing 2
state is to be changed
(not every frame like in some switchcase
based simple state machines
public function switchSystemState(statevalint)
void
lastSystemState = currentSystemState
currentSystemState = stateval
switch(stateval)
case FrameWorkStatesSTATE_SYSTEM_WAIT
systemFunction = systemWait
break
case FrameWorkStatesSTATE_SYSTEM_WAIT_FOR_
CLOSE
systemFunction = systemWaitForClose
break
case FrameWorkStatesSTATE_SYSTEM_TITLE
systemFunction = systemTitle
break
case FrameWorkStatesSTATE_SYSTEM_
INSTRUCTIONS
systemFunction = systemInstructions
break
case FrameWorkStatesSTATE_SYSTEM_NEW_GAME
systemFunction = systemNewGame
break
case FrameWorkStatesSTATE_SYSTEM_NEW_LEVEL
systemFunction = systemNewLevel
break
case FrameWorkStatesSTATE_SYSTEM_LEVEL_IN
systemFunction = systemLevelIn
break
case FrameWorkStatesSTATE_SYSTEM_GAME_PLAY
systemFunction = systemGamePlay
break
case FrameWorkStatesSTATE_SYSTEM_GAME_OVER
systemFunction = systemGameOver
break
public function systemTitle()void
addChild(titleScreen)
titleScreenaddEventListener(CustomEventButton
IdBUTTON_ID
okButtonClickListener false 0 true)
switchSystemState(FrameWorkStates
STATE_SYSTEM_WAIT_FOR_CLOSE)
nextSystemState = FrameWorkStatesSTATE_
SYSTEM_INSTRUCTIONS
public function systemInstructions()void
addChild(instructionsScreen)
instructionsScreenaddEventListener(CustomEven
tButtonId
BUTTON_IDokButtonClickListener false 0
true)
switchSystemState(FrameWorkStates
STATE_SYSTEM_WAIT_FOR_CLOSE)
nextSystemState = FrameWorkStatesSTATE_
SYSTEM_NEW_GAME
public function systemNewGame()void
addChild(game)
gameaddEventListener(CustomEventScoreBoardUp
date
UPDATE_TEXTscoreBoardUpdateListenerfalse 0
true)
gameaddEventListener(CustomEventLevelScreenU
pdate
UPDATE_TEXTlevelScreenUpdateListenerfalse
0 true)
gameaddEventListener(GameGAME_OVER
gameOverListener
false 0 true)
gameaddEventListener(GameNEW_LEVEL
newLevelListener
false 0 true)
gamenewGame()
switchSystemState(FrameWorkStatesSTATE_
SYSTEM_NEW_LEVEL)
public function systemNewLevel()void
032010 (11)28
ACTIONSCRIPT DEVELOPMENT Creating an AS3 Game Framework
032010 (11) 29
Listing 2
gamenewLevel()
switchSystemState(FrameWorkStatesSTATE_
SYSTEM_LEVEL_IN)
public function systemLevelIn()void
addChild(levelInScreen)
waitTime = 30
switchSystemState(FrameWorkStatesSTATE_
SYSTEM_WAIT)
nextSystemState = FrameWorkStatesSTATE_
SYSTEM_GAME_PLAY
addEventListener(EVENT_WAIT_COMPLETE
waitCompleteListener false 0 true)
public function systemGameOver()void
removeChild(game)
addChild(gameOverScreen)
gameOverScreenaddEventListener(CustomEventBu
ttonId
BUTTON_IDokButtonClickListener false 0
true)
switchSystemState(FrameWorkStates
STATE_SYSTEM_WAIT_FOR_CLOSE)
nextSystemState = FrameWorkStatesSTATE_
SYSTEM_TITLE
public function systemGamePlay()void
gamerunGame()
public function systemWaitForClose()void
do nothing
public function systemWait()void
waitCount++
if (waitCount gt waitTime)
waitCount = 0
dispatchEvent(new Event(EVENT_WAIT_COMPLETE))
public function okButtonClickListener(e
CustomEventButtonId)void
switch(eid)
case FrameWorkStatesSTATE_SYSTEM_TITLE
removeChild(titleScreen)
titleScreenremoveEventListener(CustomEv
entButtonId
BUTTON_IDokButtonClickListener)
break
case FrameWorkStatesSTATE_SYSTEM_
INSTRUCTIONS
removeChild(instructionsScreen)
instructionsScreenremoveEventListener(
CustomEventButtonIdBUTTON_IDokButtonC
lickListener)
break
case FrameWorkStatesSTATE_SYSTEM_GAME_OVER
removeChild(gameOverScreen)
gameOverScreenremoveEventListener(
CustomEventButtonIdBUTTON_IDokButtonC
lickListener)
break
switchSystemState(nextSystemState)
public function scoreBoardUpdateListener(e
CustomEventScoreBoardUpdate)void
scoreBoardupdate(eelement evalue)
public function levelScreenUpdateListener(e
CustomEventLevelScreenUpdate)void
levelInScreensetDisplayText(levelInText +
etext)
gameOverListener listens for GameGAMEOVER
simple
custom events calls and changes state
accordingly
public function gameOverListener(eEvent)void
switchSystemState(FrameWorkStatesSTATE_
SYSTEM_GAME_OVER)
gameremoveEventListener(CustomEventScoreBoard
Update
UPDATE_TEXTscoreBoardUpdateListener)
gameremoveEventListener(CustomEventLevelScree
nUpdate
032010 (11)28
ACTIONSCRIPT DEVELOPMENT Creating an AS3 Game Framework
032010 (11) 29
We also must import all of the classes needed for the framework to run You will see this put to use shortly
The variable definitions The variable definition section defines all of the global scope variables for the class These include all of the variables needed for the state machine screens and the game timer
We will make use of constants to define the current state and a set of variables to hold the state information These have been be defined on the FrameWorkStatesas file we created in the last section More states can be added to the basic ones but these will be sufficient for many games that we will create in this book There are two special states that are used for the system and wait for button clicks or things like animations to complete These are the STATE_SYSTEM_WAIT_FOR_CLOSE and STATE_SYSTEM_WAIT respectively We will also make use of a generic function called systemFunction that will hold the current state function to call in our game loop Combined with this we use a set of
integer variables to hold the value of the current state (currentSystemState) the last state (lastSystemState) and the next state (nextSystemState) for processing purposes These states should not be confused with an actual game pause function This will be handled in a different manner and added to the framework in Chapter 11
If you are using the Flash IDE and have any assets in the library that need to be exported in the first frame you must extend MovieClip and not Sprite even if you donrsquot plan to use the main time line for anything else We have extended MovieClip for the GameFrameWork so it will work with both Flex SDK and Flash IDE projects
The state control variablesThe control variables keep the system functioning within the context of the current state The main control variable is an instance of the Function class called systemFunction This function holds a reference to the current function that will be repeatedly called on each frame tick This saves us from having to evaluate a switchcase statement on each frame to decide which function to call The function is changed to a new reference by called the switchSystemState() function and passing a new constant that represents the new state
Optimization switchSystemState() is the first of many optimizations we will make to the game framework All of these optimizations will make the Flash games run much more efficiently These efficiencies in the game framework will allow the actual game code to perform more complex operations and still run with a reasonable frame rate
The currentSystemState integer variable holds a number representing the constant of the current state the system is running The nextSystemState contains the constant integer value for the state to transition to after this state is complete The lastSystemState variable holds the integer constant of the previous system state This is used in the rare occurrence that the game loop needs to return to the previous system state
The lastSystemState variable will become useful when we use a shared state such as STATE_SYSTEM_WAIT The STATE_SYSTEM_LEVEL_IN state will implement a 30-millisecond delay before moving on to the STATE_SYSTEM_GAME_PLAY state The nextSystemState will be STATE_SYSTEM_WAIT and the lastSystemState will be STATE_SYSTEM_LEVEL_IN When the 30-millisecond wait time has expired the waitCompleteListener function will be called It will use the lastSystemState to determine where the processing was before the wait was started Yoursquoll see this in detail later in this chapter when we examine the waitCompleteListener function
Listing 2
UPDATE_TEXT levelScreenUpdateListener)
gameremoveEventListener(GameGAME_OVER
gameOverListener)
gameremoveEventListener(GameNEW_LEVEL
newLevelListener)
newLevelListener listens for GameNEWLEVEL
simple custom events calls and changes
state accordingly
public function newLevelListener(eEvent)void
switchSystemState(FrameWorkStatesSTATE_
SYSTEM_NEW_LEVEL)
public function waitCompleteListener(eEvent)
void
switch(lastSystemState)
case FrameWorkStatesSTATE_SYSTEM_LEVEL_
IN
removeChild(levelInScreen)
break
removeEventListener(EVENT_WAIT_COMPLETEwai
tCompleteListener)
switchSystemState(nextSystemState)
032010 (11)30
ACTIONSCRIPT DEVELOPMENT
The background fill variablesAll Flash applications have a background color of some type No matter what game we are going to be creating the framework can control this background color You should never rely on the background color setting in HTML for your Flash applicationrsquos background color This leaves the HTML embed code with control over major aspect of your application If you are creating a viral game to be placed on game portals you will lose control of your gamersquos background color and it will default to what ever the game portal operators have selected as the standard background color in their embed code The framework allows you to override the HTML settings here by placing a simple colored Bitmap behind the entire application We will simply define a BitmapData object called appBackBitmapData and a Bitmap object called appBackBitmap that will be used to place the BitmapData onto the displayList
We will not define the background in the GameFrameWorkas file but rather the Mainas subclass of the GameFrameWork will set the background if needed in its init function override
The timer variablesThe timer will control the frame rate of the game and help smooth out the display by employing the TimerEventupdateAfterEvent method The frameRate variable will be defined in Mainas as the number of frame ticks per second we want our game timer to run
The most important thing to note is that we are making use of the built-in Timer class (gameTimer) We are not using the standard EnterFrame event This allows us to create our own frame rate for the game and specify it in the frameRate variable By doing this we can control game timer tick rate independent of the swf filersquos frame rate (FPS) The swf file can have a frame rate setting of 25 (for example) but the game can run at a 30 frame ticks a second To do this we first set the frameRate to the desired number of frame update ticks we want per second (30) When Mainas calls the startTimer function (described in detail when we get to the section on the init function) the gameTimer is put into action First we will calculate the timerPeriod value as 1000frameRate With the updateAfterEvent function call (in the runGame function) we help to smooth out the render of the screen by asking the Flash display engine to update at the rate of the Timer not the frame rate set in the swf So going back to our example if the game SWF is set to run at 25 FPS and the frameRate is set to 30 ticks the updateAfterEvent will help to smooth out the rendering of the screen by asking the Flash display engine to update at the timer tick rate (30) not the swf filersquos FPS setting (25)
The timerPeriod will be passed into the Timer instance and the game will attempt to run at this rate We say
attempt because if the game includes too many on screen moving objects or more logic than can be computed inside the timerPeriod number of milliseconds (or a combination of both) then there will be a noticable slowdown in the game screen updates In later chapters we will add functionality to the runGame function to mitigate some of these issues
The screen definition variablesThe screen definition variables create instances of our BasicScreen class This is a rather simple class that allows a single positional text box and an OK button on the screen We will use this simple screen for the title instructions level and game over screens We will customize each screen when we create the init function override in our gamersquos Mainas class Note that the levelInText is a special variable Setting this string to a default value will allow the leveInScreen to display some default text along on each new level This text can be combined with dynamic text to create a screen that says something like Level 1 with the word Level being the default text and the number 1 being the dynamic text
public var titleScreenBasicScreen
public var gameOverScreenBasicScreen
public var instructionsScreenBasicScreen
public var levelInScreenBasicScreen
public var levelInTextString
public var screenTextFormatTextFormat
public var screenButtonFormatTextFormat
We also create two TextFormat objects that will be used for defining the format of the text on the screens and the format of the button text
The ScoreBoard variablesThe scoreBoard instance of the ScoreBoard class will handle a simple heads up display (HUD) for the user with information such as the current score It is a simple framework class that will be customized in the init function override in each gamersquos Mainas class The changes will depend on the game that is to be created We also define a TextFormatObject for the basic look of the text for our scoreboard text scoreBoardTextFormat
JEFF FULTON
STEVE FULTON
The next part of the article in the June issue of FFD Magazine
032010 (11)32
ACTIONSCRIPT DEVELOPMENT
032010 (11) 33
On my quest of learning Flash I often became frustrated of how difficult it was to update the contents of my application Meaning if I wanted
to change out an image or piece of copy I had to open up Flash go to my library find the Movie Clip that had my asset in it and republish I thought to myself this is no way to work this is so inefficient Enter XML in all its glory Constructing an application with enabled me to quickly and easily update my project at a moments
notice Without having to open up Flash Now what could be better than that
In this article yoursquore going to learn how to create a new ActionScript project in Flex Builder 3 and write ActionScript 30 code that will load in an XML file display the images on screen and add some interactivity to the scene
Setting up FlexOpen up Flex and go to Filegt NewgtActionScript Project A dialog window will open In the project name field type in PhotoGallery Leave the use default location box checked and click finish (see Figure 1)
Creating an XML Photo Gallery
Searching the Internet yoursquoll find dozens if not hundreds of examples of photo galleries created with Flash
What you will learnhellipbull How to create an ActionScript application in Flex Builder 3bull How to use ActionScript to parse an XML le
What you should knowhellipbull Familiar with general programming concepts such as data ty-
pes variables loops and functionsbull Familiar with class creation and constructionbull Some understanding of XML
with AS3
Figure 1 New ActionScript window dialog Figure 2 ActionScript Compiler dialog
032010 (11)32
ACTIONSCRIPT DEVELOPMENT
032010 (11) 33
Once you click finish your project should open and you should see PhotoGalleryas on screen There are a few steps that I like to take next that I do for every project
First right click PhotoGallery folder in the Flex Navigator window click properties at the bottom and then click on the ActionScript Compiler link on the left hand side At the bottom yoursquoll see a check box that is already selected to generate a HTML wrapper file Uncheck that and click ok A warning message will appear saying that the html-template folder will be deleted Donrsquot worry about that because we havenrsquot put anything in that folder Click ok I personally donrsquot like to have a browser window open every time I run my application (see Figure 2)
Secondly wersquoll be using a tweening library called Tweener In order to use Tweener we have to first download it (httpcodegooglecomptweener) Be sure to download the ActionScript 30 version and create a folder on your desktop or any other place and name it code Place the contents of that download into that folder Next go back to Flex and again right click the PhotoGallery folder and click properties again and this time yoursquoll click the ActionScript Build Path link This window gives us the ability to add assets to our project so we can use them in our project Click the Add Folder button browser to the code folder you just created click ok and click ok again to close the window Now that folder and all its contents will be included in our project (see Figure 3)
Next right click the src folder in your project scroll over to new and add a new folder Name this folder classes This folder will contain two classes that wersquoll be using Then repeat the same steps but this time name the folder images This folder will contain all the images
Figure 3 ActionScript Build Path dialog
032010 (11)34
ACTIONSCRIPT DEVELOPMENT
Listing 1 galleryxml
ltxml version=10 encoding=UTF-8gt
ltgallery image_height=150 image_width=150 image_
gap=5 rows=3gt
ltphotogt
ltdescriptiongtThis is a description for the first
imageltdescriptiongt
ltthumb_pathgtimagesthumbjpgltthumb_pathgt
ltfull_pathgtimagesfullgifltfull_pathgt
ltphotogt
ltphotogt
ltdescriptiongtThis is a description for the second
imageltdescriptiongt
ltthumb_pathgtimagesthumbjpgltthumb_pathgt
ltfull_pathgtimagesfullgifltfull_pathgt
ltphotogt
ltphotogt
ltdescriptiongtThis is a description for the third
imageltdescriptiongt
ltthumb_pathgtimagesthumbjpgltthumb_pathgt
ltfull_pathgtimagesfullgifltfull_pathgt
ltphotogt
ltphotogt
ltdescriptiongtThis is a description for the fourth
imageltdescriptiongt
ltthumb_pathgtimagesthumbjpgltthumb_pathgt
ltfull_pathgtimagesfullgifltfull_pathgt
ltphotogt
ltphotogt
ltdescriptiongtThis is a description for the fifth
imageltdescriptiongt
ltthumb_pathgtimagesthumbjpgltthumb_pathgt
ltfull_pathgtimagesfullgifltfull_pathgt
ltphotogt
ltphotogt
ltdescriptiongtThis is a description for the sixth
imageltdescriptiongt
ltthumb_pathgtimagesthumbjpgltthumb_pathgt
ltfull_pathgtimagesfullgifltfull_pathgt
ltphotogt
ltphotogt
ltdescriptiongtThis is a description for the seventh
imageltdescriptiongt
ltthumb_pathgtimagesthumbjpgltthumb_pathgt
ltfull_pathgtimagesfullgifltfull_pathgt
ltphotogt
ltphotogt
ltdescriptiongtThis is a description for the eighth
imageltdescriptiongt
ltthumb_pathgtimagesthumbjpgltthumb_pathgt
ltfull_pathgtimagesfullgifltfull_pathgt
ltphotogt
ltphotogt
ltdescriptiongtThis is a description for the ninth
imageltdescriptiongt
ltthumb_pathgtimagesthumbjpgltthumb_pathgt
ltfull_pathgtimagesfullgifltfull_pathgt
ltphotogt
ltphotogt
ltdescriptiongtThis is a description for the tenth
imageltdescriptiongt
ltthumb_pathgtimagesthumbjpgltthumb_pathgt
ltfull_pathgtimagesfullgifltfull_pathgt
ltphotogt
ltphotogt
ltdescriptiongtThis is a description for the
eleventh imageltdescriptiongt
ltthumb_pathgtimagesthumbjpgltthumb_pathgt
ltfull_pathgtimagesfullgifltfull_pathgt
ltphotogt
ltphotogt
ltdescriptiongtThis is a description for the twelfth
imageltdescriptiongt
ltthumb_pathgtimagesthumbjpgltthumb_pathgt
ltfull_pathgtimagesfullgifltfull_pathgt
ltphotogt
ltphotogt
ltdescriptiongtThis is a description for the
thirteenth imageltdescriptiongt
ltthumb_pathgtimagesthumbjpgltthumb_pathgt
ltfull_pathgtimagesfullgifltfull_pathgt
ltphotogt
ltphotogt
ltdescriptiongtThis is a description for the
fourteenth imageltdescriptiongt
ltthumb_pathgtimagesthumbjpgltthumb_pathgt
ltfull_pathgtimagesfullgifltfull_pathgt
ltphotogt
ltphotogt
ltdescriptiongtThis is a description for the
fifteenth imageltdescriptiongt
ltthumb_pathgtimagesthumbjpgltthumb_pathgt
ltfull_pathgtimagesfullgifltfull_pathgt
ltphotogt
ltgallerygt
032010 (11)36
ACTIONSCRIPT DEVELOPMENT
Listing 2 PhotoGalleryas
package
Imports
import caurinatransitionsTweener
import classesBigPhoto
import classesThumbNail
import flashdisplayBitmap
import flashdisplaySprite
import flasheventsEvent
import flasheventsMouseEvent
import flashnetURLLoader
import flashnetURLRequest
[SWF(width=466 height=515 backgroundColor=00
0000 frameRate=30)]
public class PhotoGallery extends Sprite
Containers
private var _thumbContainerSprite Stores
the thumbnails
private var _nextButtonSprite Stores
the next arrow
private var _backButtonSprite Stores
the back arrow
private var _bigPhotoBigPhoto
Container for the big image
XML
private var _xmlLoaderURLLoader
Loads the XML file
private var _xmlXML
Stores the XML data
Image Assets
[Embed(source=assetsnext-arrowpng)]
private var _nextArrowClass
Embedded asset for the next
arrow
[Embed(source=assetsback-arrowpng)]
private var _backArrowClass
Embedded asset for the back
arrow
Constructor
public function PhotoGallery()
init ()
Initializing method
private function init ()void
_xmlLoader = new URLLoader ()
_xmlLoaderaddEventListener (EventCOMPLETE
xmlComplete false 0 true)
_xmlLoaderload (new URLRequest
(galleryxml))
XML Complete
private function xmlComplete (eEvent)void
Store the XML data
_xml = new XML (etargetdata)
loadImages ()
Clean up
_xmlLoaderremoveEventListener
(EventCOMPLETE xmlComplete)
_xmlLoader = null
Load in the thumbs
private function loadImages ()void
Temporary variables
var imageHeightuint = _xmlimage_height
var imageWidthuint = _xmlimage_width
var imageGapuint = _xmlimage_gap
var rowsuint = _xmlrows
var rowCounteruint = 0
var columnCounteruint = 0
Instantiate the container and position it
on screen
_thumbContainer = new Sprite ()
_thumbContainerx = 78
_thumbContainery = 78
_thumbContainerbuttonMode = true
_thumbContaineraddEventListener
(MouseEventCLICK thumbClick
false 0 true)
thisaddChild (_thumbContainer)
Loop through the images and create the
visual grid
for (var iuint = 0 i lt _xmlphotolength ()
i++)
var pathString = _xmlphoto[i]thumb_path
var descriptionString = _xmlphoto[i]desc
Creating an XML Photo Gallery with AS3
032010 (11) 37
Listing 2 PhotoGalleryas
ription
Create the thumbnail
var pThumbNail = new ThumbNail ()
pnewID = i
ploadImage (path)
pdescription = description
px = (imageWidth + imageGap)
columnCounter
py = (imageHeight + imageGap)
rowCounter
_thumbContaineraddChild (p)
Create the grid
if ((rowCounter + 1) lt rows)
rowCounter++
else
rowCounter = 0
columnCounter++
Setup the navigation
createNavigation ()
This method handles the click event for the
next arrow
private function nextClick (eMouseEvent)void
155 is the width + spacing
if (-_thumbContainerx lt (_thumbContainerwidth
ndash stagestageWidth ndash 155))
disableNavigation ()
TweeneraddTween (_thumbContainer x
_thumbContainerx ndash 155 time
075 transitioneaseOutExpo
onCompleteenableNavigation)
This method handles the click event for the
back arrow
private function previousClick (eMouseEvent)void
if (-_thumbContainerx gt 0)
disableNavigation ()
TweeneraddTween (_thumbContainer x
_thumbContainerx + 155 time
075 transitioneaseOutExpo
onCompleteenableNavigation)
This method handles the click event for the
thumbnails
private function thumbClick (eMouseEvent)void
disableNavigation ()
Disable the container that stores the
thumbnails
_thumbContainerbuttonMode = false
_thumbContainermouseChildren = false
_thumbContainerremoveEventListener
(MouseEventCLICK thumbClick)
Get the full image path
var imagePathString = _xmlphoto[etargetnewI
D]full_path
Instantiate the big photo
_bigPhoto = new BigPhoto ()
_bigPhotobuttonMode = true
_bigPhotox = 108
_bigPhotoy = 1075
_bigPhotoalpha = 0
_bigPhotoloadImage (imagePath)
_bigPhotoaddEventListener (MouseEventCLICK
closePhoto false 0 true)
thisaddChild (_bigPhoto)
Fade up the photo
TweeneraddTween (_bigPhoto alpha1 time
1)
Fade out the photo
When the image finishes fading delete the
photo and enable the navigation
items
private function closePhoto (eMouseEvent)void
TweeneraddTween (_bigPhoto alpha0 time1
onCompletedeletePhoto)
private function deletePhoto ()void
032010 (11)38
ACTIONSCRIPT DEVELOPMENT
Listing 2 PhotoGalleryas
_bigPhotobuttonMode = false
_bigPhotoremoveEventListener
(MouseEventCLICK closePhoto)
_bigPhotodestroy ()
thisremoveChild (_bigPhoto)
_bigPhoto = null
_thumbContainerbuttonMode = true
_thumbContainermouseChildren = true
_thumbContaineraddEventListener
(MouseEventCLICK thumbClick
false 0 true)
enableNavigation ()
private function createNavigation ()void
Instantiate the next arrow
var nBitmap = new _nextArrow ()
Instantiate the nextButton container
Add the next button as a child of the
nextButton container
_nextButton = new Sprite ()
thisaddChild (_nextButton)
_nextButtonaddChild (n)
_nextButtonx = stagestageWidth ndash _
nextButtonwidth
_nextButtony = 475
Instantiate the back arrow
var bBitmap = new _backArrow ()
Instantiate the backButton container
Add the next button as a child of the
backButton container
_backButton = new Sprite ()
thisaddChild (_backButton)
_backButtonaddChild (b)
_backButtonx = _nextButtonx ndash _
nextButtonwidth ndash 5
_backButtony = 475
enableNavigation ()
private function enableNavigation ()void
_nextButtonbuttonMode = true
_nextButtonaddEventListener
(MouseEventCLICK nextClick false
0 true)
_backButtonbuttonMode = true
_backButtonaddEventListener
(MouseEventCLICK previousClick
false 0 true)
private function disableNavigation ()void
_nextButtonbuttonMode = false
_nextButtonremoveEventListener
(MouseEventCLICK nextClick)
_backButtonbuttonMode = false
_backButtonremoveEventListener
(MouseEventCLICK previousClick)
Figure 4 New ActionScript class dialog
Creating an XML Photo Gallery with AS3
032010 (11) 39
Listing 3 ThumbNailas
package classes
import caurinatransitionsTweener
import flashdisplayLoader
import flashdisplayShape
import flashdisplaySprite
import flasheventsEvent
import flasheventsMouseEvent
import flashnetURLRequest
import flashtextTextField
import flashtextTextFieldAutoSize
import flashtextTextFormat
public class ThumbNail extends Sprite
Containers
private var _imageLoaderLoader Loads in
the thumbnail
private var _imageContainerSprite
Container for the thumbnail
private var _maskShape Container for the
mask
private var _descriptionContainerSprite
Container for the description
TextFields
private var _descriptionTextField
TextField for the container
Logic
private var _newIDuint The ID of the
object
[Embed(systemFont=Arial fontName=arial
fontWeight=bold
mimeType=applicationx-font-
truetype)]
private var _arialClass Embedded asset
for the font
Constructor
public function ThumbNail ()
super ()
init ()
Initializing method
private function init ()void
Instantiate the container
_imageContainer = new Sprite ()
_imageContaineralpha = 0
thisaddChild (_imageContainer)
createDescription ()
thismouseChildren = false
thisaddEventListener (MouseEventMOUSE_OVER
onMouseOver false 0 true)
thisaddEventListener (MouseEventMOUSE_OUT
onMouseOut false 0 true)
Public Methods
public function loadImage (pathString)void
_imageLoader = new Loader ()
_imageLoadercontentLoaderInfoaddEventListen
er (EventCOMPLETE imageComplete
false 0 true)
_imageLoaderload (new URLRequest (path))
GetterSetter Methods
public function get newID ()uint
return this_newID
public function set newID (valueuint)void
this_newID = value
public function get description ()String
return this_descriptiontext
public function set description (valueString)void
this_descriptiontext = value
Private Methods
032010 (11)40
ACTIONSCRIPT DEVELOPMENT
Listing 3 ThumbNailas
private function onMouseOver (eMouseEvent)void
TweeneraddTween (_descriptionContainer
y75 time05 transition
easeOutExpo)
private function onMouseOut (eMouseEvent)void
TweeneraddTween (_descriptionContainer
y150 time05 transition
easeOutExpo)
private function imageComplete (eEvent)void
Reposition the loaded content to the center
_imageLoaderx = -(_imageLoaderwidth 2)
_imageLoadery = -(_imageLoaderheight 2)
_imageContaineraddChildAt (_imageLoader 0)
Apply background after the image has
completely loaded
drawBackground ()
Draw the mask around the description
drawMask ()
Fade in the container
TweeneraddTween (_imageContainer alpha1
time05)
Clean up
_imageLoadercontentLoaderInforemoveEv
entListener (EventCOMPLETE
imageComplete)
Draws a background behind _imageContainer
private function drawBackground ()void
_imageContainergraphicsbeginFill (0xFFFFFF)
_imageContainergraphicsdrawRect (_
imageLoaderx ndash 1 _imageLoadery
ndash 1 _imageLoaderwidth + 2
_imageLoaderheight + 2)
_imageContainergraphicsendFill ()
Creates everything for the description
private function createDescription ()void
Instantiate the container
_descriptionContainer = new Sprite ()
_descriptionContainery = 150
_descriptionContainergraphicsbeginFill
(0x000000 075)
_descriptionContainergraphicsdrawRect (-75
-75 150 75)
_descriptionContainergraphicsendFill ()
_imageContaineraddChild (_
descriptionContainer)
Specify text formatting for the description
Text Field
var tfTextFormat = new TextFormat ()
tfcolor = 0xFFFFFF
tfalign = center
tffont = arial
tfbold = true
tfsize = 12
Instantiate the TextF ield
_description = new TextField ()
_descriptionx = -75
_descriptiony = -70
_descriptionwidth = 150
_descriptionwordWrap = true
_descriptionembedFonts = true
_descriptiondefaultTextFormat = tf
_descriptionautoSize = TextFieldAutoSizeLEFT
_descriptionContaineraddChild (_description)
Draws a mask our _descriptionContainer
private function drawMask ()void
Draw the mask shape
_mask = new Shape ()
_maskgraphicsbeginFill (0xFF0000)
_maskgraphicsdrawRect (_imageLoaderx
_imageLoadery _imageLoaderwidth
_imageLoaderheight)
_maskgraphicsendFill ()
addChild (_mask)
Apply the mask to the container
_descriptionContainermask = _mask
Creating an XML Photo Gallery with AS3
032010 (11) 41
that will be loaded into the application from XML Finally create another folder and this time name it assets This folder will contain the buttons that wersquoll embed into our project
The AssetsBefore we start coding we need to create some visual assets Open up Photoshop or any other program you have for creating graphics and create an image that is 150x150 pixels Fill it with a flat color and save the image as thumbjpg in the images folder you just created Next create another image thatrsquos 250x300 pixels Fill it with another color and save that image as fulljpg into the same folder These images will be used for testing purposes only
Listing 4 BigPhotoas
package classes
import flashdisplayLoader
import flashdisplaySprite
import flasheventsEvent
import flashnetURLRequest
public class BigPhoto extends Sprite
Containers
private var _imageLoaderLoader Loads in the
thumbnail
private var _imageContainerSprite Container
for the thumbnail
Constructor
public function BigPhoto ()
super()
Public Methods
public function loadImage (pathString)void
_imageLoader = new Loader ()
_imageLoadercontentLoaderInfoaddEventListen
er (EventCOMPLETE imageComplete
false 0 true)
_imageLoaderload (new URLRequest (path))
Clean up method
public function destroy ()void
_imageContainerremoveChild (_imageLoader)
_imageLoaderunload ()
_imageLoader = null
thisremoveChild (_imageContainer)
_imageContainer = null
Private Methods
private function imageComplete (eEvent)void
Instantiate the container
_imageContainer = new Sprite ()
thisaddChild (_imageContainer)
Add the loader
_imageContaineraddChild (_imageLoader)
Clean up
_imageLoadercontentLoaderInforemoveEv
entListener (EventCOMPLETE
imageComplete)
Figure 5 Time to test
032010 (11)42
ACTIONSCRIPT DEVELOPMENT
We still have to create our navigation buttons that wersquoll use to scroll through our gallery Create two buttons that are 40x40 pixels and design them how you like They should resemble forward and back buttons Save the forward arrow as next-arrowpng and the other as back-arrowpng into the assets folder Now that our assets our created itrsquos time to code
The XML fileRight click the src folder in the project scroll over to new and click file A dialog window will open and in the file name input box type galleryxml (see Figure 4) Write the code that you see from Listing 1 into galleryxml
Line 1 is the XML declaration This is needed to have a well-formed XML document
Line 2 declares the gallery root node Notice in this node Irsquove added attributes Also to have a well-formed XML document you must have one root node and all attribute values must be in quotes
Lines 3-7 declares a photo node with three children description thumb_path and full_path description is exactly as it sounds It will contain a description for our thumbnail thumb_path contains the path to our thumbnail image Same goes for full_path it contains the path to our full image
I then just copy and pasted that and pasted it 14 times just changing out the description Remember wersquore just using dummy data When you finish go back and add photos of your choice
The ClassesWersquoll be using two additional classes for this project One will be for the thumbnails and another for the full image Right click the classes folder go to new and click ActionScript class In the name field type ThumbNail For the Superclass type in flashdisplaySprite Wersquoll need to extend from that class so we can use the functionality of that object but add our own (see Figure 4)
Add another class this time name it BigPhoto It should also inherit from flashdisplaySprite
CodingTime to start writing the ActionScript for this project Open up PhotoGalleryas from the Flex Navigator and type in the code from Listing 2 Open up ThumbNailas and type in the code from Listing 3 Open up BigPhotoas and type in the code from Listing 4 Now that you have all the code in itrsquos time to test In the menu bar click RungtRun PhotoGallery (see Figure 5) If you get an error make sure you typed everything correctly If all went well you should see the gallery open up Click the buttons and watch the gallery scroll left and right Roll over the thumbnails to see the description scroll up Click on a thumbnail to see the full image fade in You might be wondering about whatrsquos going on Irsquoll try to break that down for you next
The ExplanationOur main focus is going to be whatrsquos going on in PhotoGalleryas This file contains the ActionScript that makes almost everything happen We first start off by declaring our properties that will be used in the project Yoursquoll notice a couple of embeded lines These lines are MetaData tags that actually embed assets into the project The two embeded lines you see add the next-arrowpng file and the back-arrowpng file In the constructor there is one call to a method called init() This method gets the application going by requesting and loading in the XML File When the file finishes loading we store the XML data into our _xml property Next we call the loadImages() method This method is responsible for a big part of the application We first gather some information from the XML file and store it in temporary variables
bull imageWidth stores the image _ height attributes valuebull imageWidth stores the image _ width attributes valuebull imageGap stores the image _ gap attributes valuebull rows stores the row attributes valuebull rowCounter increments ever pass of the for loop Is
compared against the rows variablebull columnCounter increments once for every column
created
The for loop cycles the XML file creating a new ThumbNail object with every iteration During each iteration we create variables that store the path to the thumb nail (path) and the description of the thumbnail (description) We pass the variables into the methods of the ThumbNail class Remember the ThumbNail class defines methods and properties that are specific to it The class code is commented if you wish to explore it Again our main focus is PhotoGalleryas To create the grid we write ifelse logic that compares the rowCounter variable to the row variable For every iteration of the loop we increment that variable if that variable becomes greater than rows we set it back to 0 rowCounter is then multiplied to the y-axis of each ThumbNail object The rest of the code is commented for you to explore
ConclusionYoursquoll notice I actually hard coded a lot of values directly in the ActionScript Not too ideal In the next part of this tutorial wersquore going to come back to this code and modify it to be a little more flexible and visually appealing If you have any questions feel free to contact me through my site (wwwcodedbyryancom)
RYAN DrsquoAGOSTINORyan DrsquoAgostino is an Interactive Developer at NAS Recruitment Communications in Cleveland OH part-time instructor at Virginia Marti College of Art and Design in Lakewood Ohio and freelance designer and ActionScript developer For more information about Ryan please visit httpwwwcodedbyryancom
032010 (11)44
COMPONENTS
Components are the controls and containers that are the elements of the application that create the interface They cover controls such
as buttons and check boxes containers that can hold other containers and controls navigation elements and charts Components can be added to your application in variety of ways They can be added through the design view writing then in MXML or through ActionScript
Flash Builder now has two major sets of components the Halo set which has been available in previous versions of Flex and the new Spark set The components from the Spark set have a direct correlation to a component in the Halo set but not all Halo components have been upgraded to the Spark framework yet The namespaces for these components are added automatically when a MXML document is created and you will notice there are now multiple namespace in the main MXML document already
Creating custom components takes two paths The first is to create a skin for an existing Halo component in Flash Illustrator Photoshop or Fireworks or create a custom skin for a Spark component using MXML The second path is to create a completely custom component using Flash Professional and importing it into the Flash Builder project We are going to focus on the second path and create a custom component with Flash Professional
The first step in creating a custom component is to instal the Flex Component Kit mxp into Flash Professional This is an extension that will expose some
Custom Flash CS4
Flash Builder comes with a lot of components to cover almost all of an apps needs But what if you want a custom look or functionality to a component With Flash Professional you can create custom components and import them into Flash Builder for use in your application
What you will learnhellipbull How to create custom components in Flash Professional to im-
port into Flash Builder
What you should knowhellipbull Flash Professional CS4bull Flash Builder 4bull Actionscript 3
Components in Flash Builder 4
Figure 1 The component artwork Figure 2 Converting the movie clip
032010 (11)46
COMPONENTS
Listing 1 The component class
package comtest
import mxflashUIMovieClip
import flasheventsEvent
import flasheventsEventDispatcher
import flasheventsMouseEvent
import flashfiltersGlowFilter
public class SliderButton extends UIMovieClip
public static const BUTTON_CLICKString = button click
private var glowGlowFilter = new GlowFilter(0x0000cc54421falsefalse)
public function SliderButton()
plusButtonbuttonMode = true
minusButtonbuttonMode = true
plusButtonaddEventListener(MouseEventMOUSE_OVER handleMouseOver)
plusButtonaddEventListener(MouseEventMOUSE_OUT handleMouseOut)
plusButtonaddEventListener(MouseEventCLICK handleMousePress)
minusButtonaddEventListener(MouseEventMOUSE_OVER handleMouseOver)
minusButtonaddEventListener(MouseEventMOUSE_OUT handleMouseOut)
minusButtonaddEventListener(MouseEventCLICK handleMousePress)
private function handleMouseOver(eMouseEvent)void
ecurrentTargetfilters = [glow]
private function handleMouseOut(eMouseEvent)void
ecurrentTargetfilters = []
private function handleMousePress(eMouseEvent)void
if(ecurrentTargetname == plusButton ampamp trackThumbx lt 134)
trackThumbx++
else if(ecurrentTargetname == minusButton ampamp trackThumbx gt 37)
trackThumbx--
dispatchEvent(new Event(SliderButtonBUTTON_CLICK))
032010 (11)48
COMPONENTS
of the Flex classes to Flash allowing the component to communicate with the application Download the extension from the Adobe site at httpwwwadobecomcfusionexchangeindexcfmevent=extensionDetailampextid=1273018 and install using the Adobe Extension Manager The extension should work with Flash
versions as far back as Flash 8 but I highly recommend using at least Flash 9 (CS 3)
Once the extension is installed launch Flash Professional and create a new ActionScript 3 project We are going to create a simple slider button that has a plus and minus button on each end of the button and a track between them When the plus and minus buttons are clicked the the track thumb will move one pixel in either direction There will also be a roll over behavior on the buttons to change their look as the mouse rolls over and off the buttons Finally Flash Builder will receive the event of the button being pushed and update a text input on the stage
It is common to encapsulate the behaviors of the component within itself and have events broadcast to the containing application If you think about some of standard components in both Flash Builder and Flash Professional and deconstruct them in your mind you will see that the same methods are used on them The NumericStepper is a lot like our component It has two buttons with a text field that displays a value that is incremented or decremented with each push of the button The component itself does nothing to effect the application until the code calls it to either send or receive a value
With our new document we are going to create the artwork for the component in the fla file Create four movie clips one each for the scroll track the plus button the minus button and the track thumb (Figure 1) The naming and look of these movie clips are not important
Once the movie clips are created and on the stage give each one an instance name The names in the
Figure 3 Setting the class of the movie clip
Figure 4 Setting to export as SWC
Figure 5 Creating the Flash Builder project
Custom Flash CS4 Components in Flash Builder 4
032010 (11) 49
example files are plusButton minusButton and trackThumb The actual names do not matter and we dont need an instance name for the track since we are not going to reference it in Flash Builder Flash Builder will reference the instance names of the movie clips in the components we will use these later
Now that the artwork has been created it must be collected into its own movie clip Select all of the artwork on the stage and choose ModifygtgtConvert to Symbolhellip In the Library panel there is a new symbol that is called in the sample files SliderButton The name is important here because this is how the Convert to Flex Component mxp will name the class that Flash Builder will refer to later
An external class will give the component the internal behaviors that were mentioned earlier as well as an event to broadcast to the Flash Builder application (Listing 1) All the code in the class should be familiar but there are a few points to go over First the package name is given the qualifier of comtest to identify that the component belongs to our namespace This is not necessary but helpful when there are multiple components or components from different publishers in the application
The most important change is instead of having the class extend the Sprite class this class is going to
extend the UIMovieClip class This class like the Flex Component in the library exposes the behaviors and methods we set up in the class to the Flash Builder application In the import statements use import
mxflashUIMovieClip The mxflash class includes both the UIMovieClip and ContainerMovieClip classes
When the variables are declared we set up a glow filter that will be attached to the buttons when the mouse rolls over them and a string constant for the event we create later In the constructor of the class the buttons receive the event listeners for the mouse interactions and the handlers are added later in the code In the handleClick event handler we use the event dispatcher class to dispatch the event Here we are just dispatching a standard event with the constant that was created earlier You can just as easily dispatc a custom event that has extra information attached to it
Select the movie clip in the Library panel then select CommandsgtgtConvert Symbol to Flex Component (Figure 2) The extension will do several operations such as making the symbol available to ActionScript giving the symbol a class name adding the Flex Component to the library and others
Save the file as SliderButtonas in the folder path comtest When you declare the package name as we have here you must have the same hierarchy as listed in the package name Back in the fla select the
Figure 6 The Package Explorer
Listing 2 The main MXML le
ltxml version=10 encoding=utf-8gt
ltsApplication xmlnsfx=httpnsadobecommxml
2009
xmlnss=librarynsadobecomflex
spark
xmlnsmx=librarynsadobecomflex
mx
width=200 height=110gt
ltfxDeclarationsgt
lt-- Place non-visual elements (eg
services value objects) here
--gt
ltfxDeclarationsgt
ltsApplicationgt
Listing 3 The new component and name space
xmlnstest=comtest
lttestSliderButton x=14 y=10 id=sliderButton
gt
032010 (11)50
COMPONENTS
SliderButton movie clip and select Propertieshellip from the contextual menu Expand the advanced area if it is not already and enter comtestSliderButton in the Class text field Leave the Base Class text field blank and click OK (Figure 3)
Select Publish Settingshellip from the file menu and click on the Flash tab (Figure4) Under the SWF Settings area of the window be sure that the Export SWC check box is checked The swc is the part that Flash Builder will use in the application SWC are archives that contain the classes and media assets of the component and make it easy to distribute the movie clip
Publish the SWF and SWC and we are ready to move to Flash Builder
Flash BuilderIn Flash Builder create a new project This example we only need a basic Flash Builder project without any
server technologies You can name the project anything you would like in this case I have name FB_Components and saved it in my default workspace
If you have not worked on a Flash Builder project yet it is a lot like working on the Flex projects in the past with some new MXML tags You will also notice that the Flex Navigator pane has now been replaced with the Package Explorer (Figure 6)
The Package Explorer pane has a different organization than the Flex Navigator but the main MXML file can still be found under src then under the default package
Looking at the main MXML (Listing 2) you will see that the three name spaces are added automatically and the application begins with sApplication instead of mxApplication These are the minor differences to be on the look out for when working on a Flash Builder project
Listing 4 The nal MXML le
ltxml version=10 encoding=utf-8gt
ltsApplication xmlnsfx=httpnsadobecommxml2009
xmlnss=librarynsadobecomflexspark
xmlnsmx=librarynsadobecomflexmx minWidth=200 minHeight=110
width=200 height=110
initialize=init()
xmlnstest=comtestgt
ltfxDeclarationsgt
lt-- Place non-visual elements (eg services value objects) here --gt
ltfxDeclarationsgt
ltfxScriptgt
lt[CDATA[
private function init()void
sliderButtonaddEventListener(SliderButtonBUTTON_CLICK updateText)
private function updateText(eEvent)void
pixelTexttext = String(sliderButtontrackThumbx)
]]gt
ltfxScriptgt
lttestSliderButton x=14 y=10 id=sliderButton gt
ltsLabel x=39 y=41 text=The position of the track thumb is textAlign=center width=122gt
ltsTextInput x=76 y=76 width=49 id=pixelTextgt
ltsApplicationgt
Custom Flash CS4 Components in Flash Builder 4
032010 (11) 51
To get our component into the Flash Builder project we need to put the swc some where the project can see it On your desktop navigate to where the swc was published to and copy the file Then navigate to where Flash Builder project is and put the swc into libs folder I have found it is easier to keep the fla and swf files out of the project then copy the swc over to the Flash Builder project as needed
Back in Flash Builder open the libs folder under the project in the Package Explorer pane In that directory you should see your swc if you do not try right clicking on the libs folder and selecting Refresh
In the MXML editor switch to Design view When the Design view becomes active the Component pane should become available in the lower left of the workspace The first folder in the pane is the Custom folder and our custom component should be displayed in the list Drag an instance of this component onto the stage
To show that we can have two way communication with the component drag a label and a text input onto the stage Set the labels text to be The position of the track thumb is and move the text input near the label Set the id of the text input to pixelText (Figure 7) Switch back to the Source view after saving
Notice that several lines have been added to the source of the MXML document In addition to the MXML for the component including our custom component a name space value has been added to the sApplication tag designated as xmlnstest=comtest (Listing 3) If we add more components using the same comtest package declaration they will all fall under this name space If we were to add more components using a different package additional name spaces would be added You will also notice that the component starts with testSliderButton as opposed to s fx or mx
In the application tag add an initialize property calling a function called init() After the fxDeclarations tags add fxScript tags to hold the Actionscript As you type fx the code completion should pop up and allow you to select the fxScript tags
Add an id property to the SliderButton tag and give it a value of sliderButton In between the CDATA tags add the init function This function simply adds an event listener to our component calling the updateText
function every time the BUTTON_CLICK event is broadcast from the SliderButton class (Listing 4)
Once the application receives the BUTTON_CLICK event it calls the updateText function This function looks into the component and gets the x position of the track thumb then puts that value into the text input we set up earlier
So now we have communication coming out of the component using the dispatchEvent call in the class We are also looking into the component where the application is getting the x position of the thumb track inside the component Communication can get much more complicated than this but this is a simple example to give a starting point to create more complex components
Click debug to run the application and if no errors occurred the application should launch in a browser window If you have a browser window open before running the app you should close it There is a bug in the Flash Player at the time of this writing that may cause the app to not run if there are browser windows already open
Once the application is running click on the buttons and watch as the value in the text input increase and decrease The custom component is now complete and ready to have more behaviors and methods added to it
ConclusionWhile the components that come with Flash Builder can cover most situations there will be times where only a custom component will fit the applications needs Creating a custom component takes a little work but can make the developers job a lot easier With this new level of control over the look and behavior of the component can make the application more rich and engaging to the end user
Figure 7 Components on the stage
On the Netbull httpwwwadobecombull httpwwwadobecomcfusionexchangeindexcfmeven-
t=extensionDetailampextid=1273018
LOUIS DICARROLouis DiCarro is a consultant based in NYC and has been working with Flash since the rst version He has taught web development at the college level and has worked for numerous large clients He can be reached at louisdicarroffdgmailcom
032010 (11)52
COMPONENTS AIR Components in Flash Builder
032010 (11) 53
We already know that building an AIR application affords us a lot more capabilities than working with a web based project
Digging through the Actionscript documentation shows that there are a lot of classes that are only available to AIR applications These mostly have to do with classes and methods that interact with the file system or windowing of the application
Flash Builder as with Flex Builder before it contains several components that are only available to use with AIR applications These components deal with
visual interfaces for interacting with the file system and a HTML component for displaying web content
You may wonder why these components are only available for AIR applications Mostly it is for security reasons Up to Flash Player 101 a swf does not have the permission to interact with files on the file system except in very limited circumstances
Swfs in the web browser are able to interact only with files on the server in which the swf is hosted This allows them to load images xml and other file types at run time but only if the files come from within its
AIR Components
Adding file and html rendering can result in a lot of code But with the AIR components in Flash Builder 4 this functionality can be added easily with only a few lines of code
What you will learnhellipbull What components are available for AIR applications in Flash
Builder 4
What you should knowhellipbull Flash Builder 4bull Actionscript 3
in Flash Builder
Figure 1 AIR Actionscript 3 special classes for the HTML component Figure 2 Layout of the HTML application
032010 (11)52
COMPONENTS AIR Components in Flash Builder
032010 (11) 53
Were going to take a look at couple of simple examples for each component to get a feel how use them It is also important to note that the documentation for these components are in the AS 3 documentation When looking at the documentation you will see a symbol next to some of the classes and also next to some methods within the classes (Figure 1)
HTML ComponentThe HTML component is very easy to work with It can pull in many types of media and render them as you would expect them to be rendered in a web browser
Start up Flash Builder and create a new Flex project Name the project and select Desktop under project type Click finish and let Flash Builder set up the project
Once the project is started click on the Design tab In the lower left a component tab should be open If it is not open it using the Window menu and selecting Components Scroll down to the Adobe AIR folder You will not see this folder if you set your project to run in a web browser
We are going to create a simple web browser using only three components and one line of code First drag a HTML component a text field and a button to the stage Arrange them how you would like and switch over to design view
Give each component an id as in Listing 1 Also give the button a click handler Type click and let the program auto complete another code hint will pop up to create the handler automatically
Flash Builder will generate the handler as well as the fxScript block in the code In the click handler that is generated add a line that will set the location of the HTML component to the text in the text field See Listing 2 for the full code
Run the application and fill in a valid web address in the application Remember to include http in front of
own sandbox There are exceptions and ways around it but for the majority the swf cannot interact with the file system
If the development of applications using Flash Builder and AIR were to succeed they would need to act like real desktop applications This means that the applications would have to load and save files just as any other application that a user would use on the computer
Security is still maintained in this model by having the developer digitally sign their application using certificates If the certificate is obtained though a trusted source the application would be traceable back to the original developer if something bad should happen
Having a HTML component gives the application greater rendering power by tapping into the Web Kit which can run better than the HTML renderers in the Flash Player This allows developers to repurpose content from their web site to the application
Figure 3 The application running Figure 4 Layout of the image viewer application
Listing 1 MXML of components
ltsTextInput id=addressBar x=10 y=10
width=518gt
ltsButton id=goButton x=555 y=13
label=Go click=goButton_
clickHandler(event) gt
ltmxHTML id=htmlPane x=10 y=40 width=620
height=430gt
Listing 2 goButton handler
protected function goButton_clickHandler(event
MouseEvent)void
htmlPanelocation = addressBartext
032010 (11)54
COMPONENTS
the address Click the Go button and the page should load after a few seconds Take a look at Figure 3 for the results
There are a lot of methods and commands associated with the HTML component This will allow you to make a more customized display and give more control over the HTML content that you show
File system componentsUsing the file system components is just as easy To test the components we are going to create a simple image viewer that allows the user to select the images from the file system
Create a new Flex Project as we did before and be sure to make it a desktop application Once the project has loaded switch to design view and drag a File System Tree and an Image component to the stage See Figure 4 for the layout
Once the application is laid out switch over to the Source mode and give all the components ids as we did before (Listing 3) Also add a change handler instead of a click handler Flash Builder will autocomplete and generate the handler for you as it did when we added the click action to the button
In the generated handler add the code that will load the image into the image component To keep everything simple we only are going to load jpg and png files (Listing 4) in this function we are first checking to make sure the file is a file and not a directory by checking for a file extension If the file passes the first test we check to see if the file is a jpg or png Lastly if the file passes all of these test it gets loaded into the image component
Save the file and run the application to see the results Clicking on the file system tree items will either open or close the directory or try to load the file When the user clicks on a jpg or png it will load into the image component (Figure 5) Note that as the tree expands a scroll bar is attached to the component automatically
ConclusionJust as with the HTML component there is more methods and properties available to you with the file system components In this demo application we have seen how easy it is to get access to the file system using the component without writing a lot of code
There is a lot more involved in making a full application using these components but we have witnessed how easy to get started with them Having more control over the elements as well as error checking would be added in real applications
Having these components available gives the application a large amount of functionality very quickly and allows the developer to concentrate on the logic of the application Using these components in your application will help make it more full-featured and feel more like a real desktop application
LOUIS DICARROLouis DiCarro is a consultant based in NYC and has been working with Flash since the rst version He has taught web development at the college level and has worked for numerous large clients He can be reached at louisdicarroffdgmailcom
Listing 3 MXML of components
ltmxFileSystemTree id=fsList x=10 y=10
height=460 change=fsList_
changeHandler(event)gt
ltmxImage id=imgPane x=193 y=10 width=437
height=460gt
Listing 4 Handler for change event
protected function fsList_changeHandler(event
ListEvent)void
var fileFile = eventcurrentTargetselectedItem
as File
if(fileextension)
if(fileextensiontoLowerCase() == jpg ||
fileextensiontoLowerCase() ==
png)
imgPanesource = fileurl
Figure 5 The image viewer application running
032010 (11)56
TLF Applying CSS to Text Layout Framework styles
032010 (11) 57
TLF is introducing the new way of applying styles to the text Prior to TLF flash used simple approach you had to prepare and attach
StyleSheet object to the style property of the TextFieldTLF provides more flexible and customizable but
more complex techniqueDuring this tutorial we are going to create a small
application in Flex 4 This application contains a text displayed with TLF component TextArea and 2 different CSS that can be applied to the text simply by pressing the button Figure 1 show the screenshot of the application
TextFlow and itrsquos IFormatResolverTLF provides a callback mechanism to for with text styles TextFlow objectrsquos got a property formatResolver that should implement IFormatResolver interface Actually it is a set of callback functions that are called by parent TextFlow when it processes itrsquos elements
To have a closer look at formatResolver we will implement itrsquos version to work with out simple CSS So start create a new project in Flex and name it for example TextCSS In the default package create a new ActionScript class named CSSFormatResolver that implements IFormatResolver interface
Listing 1 shows the complete implementation of the class and will we look closer into it later For now pay attention on the following functions
bull invalidateAll
bull invalidate
bull resolveFormat
bull resolveUserFormat
bull getResolverForNewFlow
These function are created automatically by Flex Builder as they are required for implementation of the interface All functions are callbacks that are called when the certain action is performed by TextFlow and it needs to know how to treat with different elements
Applying CSS
This article is a reply to our readerrsquos question about the possibility to apply CSS to Text Layout Framework (TLF) We will show how to implement the necessary class and switch text styles on the fly
What you will learnhellipbull how can custom styles be applied to TLF elementsbull how to implement IFormatResolver to work with CSS
What you should knowhellipbull the basics of Flex and FlexFlash Builderbull the basics of TLF
to Text Layout Framework styles
Figure 1 Style changing application
032010 (11)56
TLF Applying CSS to Text Layout Framework styles
032010 (11) 57
Main ApplicationListing 2 contains a full code for main application
The application consists of
bull TextArea with some text The text is formed using XML Some elements of the TextFlow have
For our case we are interested in resolveFormat function that is called for every element of the TextFlow when itrsquos style needs to be changed This function return an object that should implement ITextLayoutFormat
Before we continue lets have a fast look at main application and how we build our example
Listing 1 CSSFormatResolveras
package
import flashtextStyleSheet
import flashxtextLayoutelementsFlowElement
import flashxtextLayoutelementsFlowValueHolder
import flashxtextLayoutelementsIFormatResolver
import flashxtextLayoutelementsTextFlow
import flashxtextLayoutformatsITextLayoutFormat
public class CSSFormatResolver implements
IFormatResolver
private var _styleSheetStyleSheet
public function CSSFormatResolver()
_styleSheet = new StyleSheet()
public function invalidateAll(textFlow
TextFlow)void
public function invalidate(targetObject)void
public function resolveFormat(targetObject)
ITextLayoutFormat
var formatFlowValueHolder = null
if (target is FlowElement)
var elementFlowElement = target as
FlowElement
if (element = null)
format = elementformat as
FlowValueHolder
if (elementstyleName = null)
var styleObject = styleSheetgetSt
yle(elementstyleName)
formatcolor = style[color]
formatfontSize =
style[fontSize]
formatfontWeight =
style[fontWeight]
formatfontStyle =
style[fontStyle]
return format
public function resolveUserFormat(targetObject
userFormatString)
return null
public function getResolverForNewFlow(oldFlow
TextFlow newFlowTextFlow)
IFormatResolver
return null
public function get styleSheet()StyleSheet
return _styleSheet
public function set styleSheet(valueStyleSheet)
void
_styleSheet = value
032010 (11)58
TLF
032010 (11) 59
Listing 2 TextCSSmxml
ltxml version=10 encoding=utf-8gt
ltsApplication xmlnsfx=httpnsadobecommxml2009
xmlnss=librarynsadobecomflexspark
xmlnsmx=librarynsadobecomflexhalo
xmlnslocal=
width=640 height=300gt
ltfxScriptgt
lt[CDATA[
import mxeventsFlexEvent
protected function applyCSS1Button_
clickHandler(eventMouseEvent)void
var formatResolverCSSFormatResolver =
new CSSFormatResolver()
formatResolverstyleSheetparseCSS(css1
text)
textAreatextFlowformatResolver =
formatResolver
protected function applyCSS2Button_
clickHandler(eventMouseEvent)void
var formatResolverCSSFormatResolver =
new CSSFormatResolver()
formatResolverstyleSheetparseCSS(css2
text)
textAreatextFlowformatResolver =
formatResolver
]]gt
ltfxScriptgt
ltsTextArea id=textArea width=620 height=134
x=9 y=156gt
ltsTextFlowgt
ltsp styleName=h1gt
Title of the Text
ltspgt
ltsp styleName=h2gt
Section of the Text
ltspgt
ltspgt
This is a body text Lorem ipsum
ltspgt
ltsTextFlowgt
ltsTextAreagt
ltsTextArea x=10 y=10 width=285 height=86
id=css1 gt
lt[CDATA[
h1
colorFF0000
fontSize20
fontWeightbold
fontStylenormal
h2
colorFF00FF
fontSize16
fontWeightbold
fontStyleitalic
]]gt
ltsTextAreagt
ltsTextArea x=345 y=10 width=285 height=86
id=css2 gt
lt[CDATA[
h1
color00FF00
fontSize32
fontWeightnormal
fontStyleitalic
h2
color0000FF
fontSize24
fontWeightbold
fontStylenormal
]]gt
ltsTextAreagt
ltsButton x=108 y=105 label=Apply CSS
1 id=applyCSS1Button
click=applyCSS1Button_
clickHandler(event)gt
ltsButton x=443 y=105 label=Apply CSS
2 id=applyCSS2Button
click=applyCSS2Button_
clickHandler(event)gt
ltsApplicationgt
032010 (11)58
TLF
032010 (11) 59
got styleName attribute so you could apply the corresponding CSS style to them later
bull 2 TextAreas with simple different CSSbull 2 Buttons to apply CSS from TextAreas to example
text
When the button is clicked the new instance of CSSFormatResolver class is created Then the corresponding CSS string from the TextArea is parsed and set into resolverrsquos property of SlyleSheet class type And finally prepared formatResolver instance is assigned to the TextFlow
Applying CSS to TextFlowNow lets have more detailed look at resolveFormat callback function First it should return a value that implements ITextLayoutFormat if it returns null then no new styling should be applied to an element being processed by the function So we create format variable of FlowValueHolder (it implements ITextLayoutFormat) and set itrsquos value to null (we do that because resolveFormat works with all elements including TextFlow itself as probably we donrsquot want to apply one style to the whole text)
After we do all the necessary casts and null checks and if we are sure that current elementrsquos got styleName attribute we assign styles from CSS to a current format StyleSheet object is used to contain CSS data as it is convenient object to parse and retrieve CSS data
Conclusion and a WarningThere was a brief tutorial on how to apply simple CSS to TLF TextFlow Please note that CSSFormatResolver class is not fully functional and only can be applied to our sample CSSs Writing reusable and versatile class requires more detailed coding and approach
Check the TLF Blog on this issue There is fully functional CSSFormatResolver with example there httpblogsadobecomtlf200902iformatresolver_and_using_css_1html
MAXYM GOLOVANCHUK Maxym Golovanchuk is a Photoshop Certied Expert and TV producer and he is using Adobersquos software for implementing entertainment solutions including video delivery with Flash Media Server mexxikgmailcom
MondayTuesdayWednesdayThursday Friday
DIVISIONS OF CREATIVE NICHE INC
032010 (11)60
PROFILE Flashcreed ndash Business Gallery
032010 (11) 61
The Business Gallery (httpwwwflashcreedcombusiness_video_image_gallery) is a Flash component meant to do one thing to enhance the visual experience a website portfolio or presentation site gives to its users Mainly itrsquos all about the image you present yourself or
your product to the world wide web Letrsquos face it without the looks you canrsquot sell your product or image no matter how interesting it might be
Whatrsquos so great about this gallery you might wonder Well the answer is simple everything Advanced AS3 programming dynamic XML implementation unlimited number of media items on stage PNG JPG and video FLA SWF MP4 F4V supported media tween and image effects just to name a few of the over 150 settings this gallery brings you Bottom line you can customize it in any way you see fit in order to make it resemble your website layout Not to mention the code optimization that allows the gallery to run so smoothly even on low resources
We brought 45 background wallpapers in case just a color doesnrsquot do the job also a set of custom arrows and close buttons
Flashcreed ndash Business GalleryHello itrsquos good to be back here among Flash amp Flex Magazine readers Today we are going to tell you a bit about our products mainly our Business Gallery but since all our products are built on the same framework most of the properties apply to all When we first realized what we could do with this framework we decided to name it ldquoPandorardquo in order to point out the unlimited number of possibilities it revealed regarding customization and user friendliness
032010 (11)60
PROFILE Flashcreed ndash Business Gallery
032010 (11) 61
The size of the entire gallery and any element in it is subject to any kind of resize big stage and small thumbs or the other way around for any template you or your client desire
Column_scroll and the properties for the stage mask helps you configure the exact number of visible columns you want to set in order to browse through the media items your gallery has Beside this useful feature we added blur and a couple of tween effects for the leftright navigation that gives an impressive look
032010 (11)62
PROFILE Flashcreed ndash Business Gallery
032010 (11) 63
Either as tooltip or plain text you can show any information you want regarding a certain media thumb in the gallery You can change font type size spacing color position and many other properties
The color gradient system for roll overout mouse gesture is unique in every way if we are to compare it with other galleries on the market at this point You can customize up to 5 sets of color with different alpha values The gradient type either linear or radial can be modified with rotation and ratio values
032010 (11)62
PROFILE Flashcreed ndash Business Gallery
032010 (11) 63
When clicking on a thumb if preview_type is selected as internal a resizable preview window will reveal itself and depending on the media type (image or video) an image viewer or video player will be contained inside it If preview_type is selected as external you have the possibility to set certain URL addresses this allowing you to redirect the user to a specific area of the website like a product page from a virtual store for example
The video player has a dozen of controllers that allow you to create a skin to better suit the template you want to create for your gallery Buttonrsquos color thickness handler color or scrub bar size just to name a few of the properties you can play with
At an amazing price of 999 $ this has to be one of the best choices when it comes to media galleries flash components Donrsquot hesitate to take a look at it on wwwflashcreedcom and also consider other products that might better suit your specifications or desires We would definitely appreciate any kind of feedback regarding current or possible features
Thank you
032010 (11)65
BOOK REVIEW
Are you an actionscript 3 game developer who is not able to write a complete commercial game because you cannot manage dozens
of classes Or you are an experienced actionscript 3 applications developer who wants to program game but donrsquot like reading any available beginner book as it doesnrsquot suit your style Even if you already have a good grasp over java or c++ and interested in creating not only fun games but commercial ones also then this is what you really require
There are several actionscript 3 game development books for beginners out there but Essential Guide to Game Dev is one of those few books that talk about the advanced gaming concepts However its first chapter begins with an easy to understand game example (good for any beginner) and ends up creating 3 games Did I tell you 3 games in just first chapter
Teaching about an Actionscript 3 Game framework is one of the many reasons that make this book a kick-ass addition to actionscript 3 gaming library Authors teach you how to create 10 unique games ranging from arcade to driving tile based to puzzle game and shooters to dice games Another specialty of this book is to use Flex and Flash Develop IDEs along with the primary Flash tool that creates space for not only flex
developers but also Flash Develop users In addition to this you will also learn to create game assets with GIMP Mappy and a sound effect creation tool You will get information about copyright laws which are necessary for any would-be commercial game creation and a complete game example integrated with MochiAds
This book also discusses and further more implements various advanced topics such as bitmap rendering pixel-level collision detection sound management AI xml-based level designing scrolling screen optimization techniques particles etc
In short this book will surely blow your minds with the wealth of knowledge it includes and you will pray for authors to keep writing such informative and useful books
If you are really serious about gaming then donrsquot miss the opportunity of reading this book Highly recommended
by Ali RAZA ACI ACE SCJP
Essential Guide to Flash Games
Authors Jeff Fulton Steve FultonPublisher friends of EDISBN 978-1-4302-2614-7Language EnglishPages 664 PagesWebsite httpfriendsofedcombookhtmlisbn=1430226145

032010 (11)24
ACTIONSCRIPT DEVELOPMENT Creating an AS3 Game Framework
032010 (11) 25
You now have the basic structure to start creating projects inside the framework We are now going to discuss a few topics concerning the structure of the framework classes and then move into building the reusable framework code
Here are a couple of things to noteFor Flex Builder Flash Builder or other IDEs please refer to the documentation provided for that product to create a new project and set the default compile class
A common method of Flash development is to use the Flash IDE for assets and organization and Flash Develop for code editing If this is your workflow of choice you will want to follow the Flash IDE folder and package structure rather than the Flex SDK folder structure
Creating game timersThere are two basic methods that most Flash developers implement when creating a frame-based game timer By frame-based we mean a timer that uses the idea of a segment of time broken up into logical slices (or frames) to manage game logic There are other types of methods for timing game updates but we will make extensive use of time-slice or frame-based timers in this book The basic game timer we will use most of the games will attempt to squeeze all processing and screen updates into each segment or frame We will also explore a time-step timer and a sleep-based timer in chapter 11
The first timer method is the EventENTER_FRAME event timer The standard EventENTER_FRAME event handler will attempt to run the game loop at the swf filersquos set frame rate This very handy game loop timer has been in use for a number of years The second standard game loop timer method makes use of the Timer class The Timer class is used to call the game loop at millisecond intervals specified by a delay interval For example if the millisecond delay interval is set to 100 the Timer instance would run ten times a second (there are 1000 milliseconds in a single second) Our framework will begin by using this Timer instance game loop timer We will do this so we can make use of the TimerEventTIMER updateAfterEvent function As you will see this function will help smooth out screen updates
Defining frame timer tick You will see the phrases frame timer tick timer tick and frame tick used in this book When we refer to a tick or a frame tick we simply mean one framersquos worth of processing When we run a game at 30 frames per second we have 30 ticks or 30 frame ticks This also means that we only have 3333 milliseconds (or 100030) inside each tick to do all of our processing
State MachinesA traditional state machine at its very basic is a mechanism that controls the state or current actions a system can perform Sometimes this is called a finite state machine Finite state machines have traditionally been used to model complex mathematical computations and more recently artificial intelligence The finite in the name refers to the fact that the system can only be in a single state at any one time Our game framework is built on a simple state machine pattern that employs a separate code function or method for each state There are many other styles of state machines some use entire classes for each individual state (sometimes called an object-oriented state machine) and some use a simple switchcase statement block called on each frame tick to control state We will use a third type that borrows from these two
We call our state machine pattern a function reference pattern Unlike the object-oriented state machine our machine will contain a separate method or function for each state inside a single framework class Each of these state functions will control elements in the framework such as instances of the BasicScreen and Game classes We will use a switchcase statement to move between states Unlike the afore mentioned very simple switchcase state machine structures that call this switchstate control structure on each frame tick we only need to call it when we are switching states The switchcase we call will simply change the function reference we call on each frame tick The GameFrameWorkas will contain the state machine that controls overall game flow This will move our game system between states defined in the FrameWorkStatesas file
Each individual game package we create will contain a Mainas (in the gamersquos own package structure) that will extend GameFrameWorkas We will also create a unique Gameas child class for each game The Game class children that we create can also employ their own internal state machines based on the function reference pattern when needed
Richard (Squize) Myles of wwwgamingyourwaycom was one of the first to offer the idea of a function reference state machine for ActionScript 3 on his well-respected blog
The FrameWorkStatesas class fileThis class file is a simple collection of constants that will define the states for the game framework They will be consumed by the GameFrameWorkas class file The following code listing shows the entire code for this file you will want to create this file according to the package structure in the previous section see (Listing 1)
The first thing you should notice about this class is the package name in the first line It conforms to the file system structure we created earlier No matter if
032010 (11)24
ACTIONSCRIPT DEVELOPMENT Creating an AS3 Game Framework
032010 (11) 25
you are using a version of Flash Flex Builder Flash Builder Flash Develop TextMate or even plain old Notepad this package name will be the same The package name is not depended on the code development environment but the chosen file structure for organizing the code Save this file in the location we created previously
sourceclassescomefgframeworkFrameWorkStatesas
The state variablesThe state variables are constants that the game loop state machine will use to move between game states We have set up the most common basic states in this sample file but you will be able to create as many as you need As we progress through the chapters more will be added as necessary
bull STATE _ SYSTEM _ TITLE This state is used to display a basic title screen with an OK button for the user to click to move on Once the instructions are on the screen the state will change to the next state
bull STATE _ SYSTEM _ WAIT _ FOR _ CLOSE This one waits until the OK button is clicked for any instance of the BasicScreen class
bull STATE _ SYSTEM _ INSTRUCTIONS This state is used to display basic instructions with the same OK button as in the SYSTEM _ TITLE state It also changes to the STATE _ SYSTEM _ WAIT _ FOR _ CLOSE state until the OK button is clicked
bull STATE _ SYSTEM _ NEW _ GAME This state will call the game logic class and fire off its gamenewGame() function It does not wait but moves on to the NEW _
LEVEL state right awaybull STATE _ SYSTEM _ NEW _ LEVEL With this state we can
call the gamenewLevel() function to set up a new level for the given game
bull STATE _ SYSTEM _ LEVEL _ IN This state is used to display some basic information if needed for the beginning of a level In this basic game we simply display the level screen and wait a few seconds before moving on The wait is accomplished by changing state to the STATE _ SYSTEM _ WAIT state for the specified number of frame ticks
bull STATE _ SYSTEM _ GAME _ PLAY This one simply calls the game logic classrsquos runGame function repeatedly and lets the game take care of its own logic and states
bull STATE _ SYSTEM _ GAME _ OVER The game over state displays the basic game over screen and waits for the OK button to be clicked before moving back to the instructions screen It quickly changes state to the STATE _ SYSTEM _ WAIT _ FOR _ CLOSE until the OK button is clicked
bull STATE _ SYSTEM _ WAIT This state waits for a specified number of frames and then fires off a simple custom event constant called WAIT _ COMPLETE
The GameFrameWorkas class fileThe GameFrameWorkas will be that parent of our gamersquos document class Mainas (the gamersquos document class)
for our games will extend this class and call functions to modify the framework for each unique game The entire code listing is provided at the end of this section We will explore it in detail once your have had a chance to type in the code The location for this file in the package structure is
sourceclassescomefgframeworkGameFrameWorkas
The GameFrameWorkas will be the parent class to the Mainas class we will use for our games and itrsquos shown in the following listing In later chapters we will add some functions to this file and even create one that uses a completely different timer The Mainas will subclass this class with the extends syntax and override the blank stub init function we are about to create This class will also contain all of the state functions that coincide with the state variables in the FrameWorkStates class All of the functions in the GameFrameWorkas are public so all can be overridden by the Mainas if needed In this way we can customize the behavior of the state functions if we need to
For example in later chapters we will want to play music on the title screen The function call to play
Listing 1
package comefgframework
author Jeff and Steve Fulton
public class FrameWorkStates
public static const STATE_SYSTEM_WAIT_FOR_CLOSEint = 0
public static const STATE_SYSTEM_TITLEint = 1
public static const STATE_SYSTEM_INSTRUCTIONSint = 2
public static const STATE_SYSTEM_NEW_GAMEint = 3
public static const STATE_SYSTEM_GAME_OVERint = 4
public static const STATE_SYSTEM_NEW_LEVELint = 5
public static const STATE_SYSTEM_LEVEL_INint = 6
public static const STATE_SYSTEM_GAME_PLAYint = 7
public static const STATE_SYSTEM_LEVEL_OUTint = 8
public static const STATE_SYSTEM_WAITint = 9
032010 (11)26
ACTIONSCRIPT DEVELOPMENT Creating an AS3 Game Framework
032010 (11) 27
the music will need to be added to the systemTitle state function Not all games will need this though so we will not add it to the GameFrameWorkas filersquos systemTitleFunction Instead we will create a new version of the function in Mainas to override the one in GameFrameWorkas The new one will play the sound needed and then call the systemTitle function inside GameFrameWorkas with the supersystemTitle() function call see (Listing 2)
The class imports The class import section contains the necessary Flash core classes needed for the Main class Notice the package name coincides with the package structure we created earlier in the chapter for the framework
package comefgframework
Listing 2
package comefgframework
import flashdisplayBitmap
import flashdisplayBitmapData
import flashdisplayMovieClip
import flasheventsEvent
import flashgeomPoint
import flashtextTextFormat
import flashutilsTimer
import flasheventsTimerEvent
public class GameFrameWork extends MovieClip
public static const EVENT_WAIT_COMPLETEString =
wait complete
public var systemFunctionFunction
public var currentSystemStateint
public var nextSystemStateint
public var lastSystemStateint
public var appBackBitmapDataBitmapData
public var appBackBitmapBitmap
public var frameRateint
public var timerPeriodNumber
public var gameTimerTimer
public var titleScreenBasicScreen
public var gameOverScreenBasicScreen
public var instructionsScreenBasicScreen
public var levelInScreenBasicScreen
public var screenTextFormatTextFormat
public var screenButtonFormatTextFormat
public var levelInTextString
public var scoreBoardScoreBoard
public var scoreBoardTextFormatTextFormat
Game is our custom class to hold all logic for
the game
public var gameGame
waitTime is used in conjunction with the
STATE_SYSTEM_WAIT state
it suspends the game and allows animation or
other
processing to finish
public var waitTimeint
public var waitCountint=0
public function GameFrameWork()
public function init()void
stub to override
public function setApplicationBackGround(width
Number
heightNumberisTransparentBoolean = false
coloruint = 0x000000)void
appBackBitmapData = new BitmapData(width
height
isTransparent color)
appBackBitmap = new Bitmap(appBackBitmapData)
addChild(appBackBitmap)
public function startTimer()void
timerPeriod = 1000 frameRate
gameTimer=new Timer(timerPeriod)
gameTimeraddEventListener(TimerEventTIMER
runGame)
gameTimerstart()
public function runGame(eTimerEvent)void
systemFunction()
eupdateAfterEvent()
switchSystem state is called only when the
032010 (11)26
ACTIONSCRIPT DEVELOPMENT Creating an AS3 Game Framework
032010 (11) 27
Listing 2
state is to be changed
(not every frame like in some switchcase
based simple state machines
public function switchSystemState(statevalint)
void
lastSystemState = currentSystemState
currentSystemState = stateval
switch(stateval)
case FrameWorkStatesSTATE_SYSTEM_WAIT
systemFunction = systemWait
break
case FrameWorkStatesSTATE_SYSTEM_WAIT_FOR_
CLOSE
systemFunction = systemWaitForClose
break
case FrameWorkStatesSTATE_SYSTEM_TITLE
systemFunction = systemTitle
break
case FrameWorkStatesSTATE_SYSTEM_
INSTRUCTIONS
systemFunction = systemInstructions
break
case FrameWorkStatesSTATE_SYSTEM_NEW_GAME
systemFunction = systemNewGame
break
case FrameWorkStatesSTATE_SYSTEM_NEW_LEVEL
systemFunction = systemNewLevel
break
case FrameWorkStatesSTATE_SYSTEM_LEVEL_IN
systemFunction = systemLevelIn
break
case FrameWorkStatesSTATE_SYSTEM_GAME_PLAY
systemFunction = systemGamePlay
break
case FrameWorkStatesSTATE_SYSTEM_GAME_OVER
systemFunction = systemGameOver
break
public function systemTitle()void
addChild(titleScreen)
titleScreenaddEventListener(CustomEventButton
IdBUTTON_ID
okButtonClickListener false 0 true)
switchSystemState(FrameWorkStates
STATE_SYSTEM_WAIT_FOR_CLOSE)
nextSystemState = FrameWorkStatesSTATE_
SYSTEM_INSTRUCTIONS
public function systemInstructions()void
addChild(instructionsScreen)
instructionsScreenaddEventListener(CustomEven
tButtonId
BUTTON_IDokButtonClickListener false 0
true)
switchSystemState(FrameWorkStates
STATE_SYSTEM_WAIT_FOR_CLOSE)
nextSystemState = FrameWorkStatesSTATE_
SYSTEM_NEW_GAME
public function systemNewGame()void
addChild(game)
gameaddEventListener(CustomEventScoreBoardUp
date
UPDATE_TEXTscoreBoardUpdateListenerfalse 0
true)
gameaddEventListener(CustomEventLevelScreenU
pdate
UPDATE_TEXTlevelScreenUpdateListenerfalse
0 true)
gameaddEventListener(GameGAME_OVER
gameOverListener
false 0 true)
gameaddEventListener(GameNEW_LEVEL
newLevelListener
false 0 true)
gamenewGame()
switchSystemState(FrameWorkStatesSTATE_
SYSTEM_NEW_LEVEL)
public function systemNewLevel()void
032010 (11)28
ACTIONSCRIPT DEVELOPMENT Creating an AS3 Game Framework
032010 (11) 29
Listing 2
gamenewLevel()
switchSystemState(FrameWorkStatesSTATE_
SYSTEM_LEVEL_IN)
public function systemLevelIn()void
addChild(levelInScreen)
waitTime = 30
switchSystemState(FrameWorkStatesSTATE_
SYSTEM_WAIT)
nextSystemState = FrameWorkStatesSTATE_
SYSTEM_GAME_PLAY
addEventListener(EVENT_WAIT_COMPLETE
waitCompleteListener false 0 true)
public function systemGameOver()void
removeChild(game)
addChild(gameOverScreen)
gameOverScreenaddEventListener(CustomEventBu
ttonId
BUTTON_IDokButtonClickListener false 0
true)
switchSystemState(FrameWorkStates
STATE_SYSTEM_WAIT_FOR_CLOSE)
nextSystemState = FrameWorkStatesSTATE_
SYSTEM_TITLE
public function systemGamePlay()void
gamerunGame()
public function systemWaitForClose()void
do nothing
public function systemWait()void
waitCount++
if (waitCount gt waitTime)
waitCount = 0
dispatchEvent(new Event(EVENT_WAIT_COMPLETE))
public function okButtonClickListener(e
CustomEventButtonId)void
switch(eid)
case FrameWorkStatesSTATE_SYSTEM_TITLE
removeChild(titleScreen)
titleScreenremoveEventListener(CustomEv
entButtonId
BUTTON_IDokButtonClickListener)
break
case FrameWorkStatesSTATE_SYSTEM_
INSTRUCTIONS
removeChild(instructionsScreen)
instructionsScreenremoveEventListener(
CustomEventButtonIdBUTTON_IDokButtonC
lickListener)
break
case FrameWorkStatesSTATE_SYSTEM_GAME_OVER
removeChild(gameOverScreen)
gameOverScreenremoveEventListener(
CustomEventButtonIdBUTTON_IDokButtonC
lickListener)
break
switchSystemState(nextSystemState)
public function scoreBoardUpdateListener(e
CustomEventScoreBoardUpdate)void
scoreBoardupdate(eelement evalue)
public function levelScreenUpdateListener(e
CustomEventLevelScreenUpdate)void
levelInScreensetDisplayText(levelInText +
etext)
gameOverListener listens for GameGAMEOVER
simple
custom events calls and changes state
accordingly
public function gameOverListener(eEvent)void
switchSystemState(FrameWorkStatesSTATE_
SYSTEM_GAME_OVER)
gameremoveEventListener(CustomEventScoreBoard
Update
UPDATE_TEXTscoreBoardUpdateListener)
gameremoveEventListener(CustomEventLevelScree
nUpdate
032010 (11)28
ACTIONSCRIPT DEVELOPMENT Creating an AS3 Game Framework
032010 (11) 29
We also must import all of the classes needed for the framework to run You will see this put to use shortly
The variable definitions The variable definition section defines all of the global scope variables for the class These include all of the variables needed for the state machine screens and the game timer
We will make use of constants to define the current state and a set of variables to hold the state information These have been be defined on the FrameWorkStatesas file we created in the last section More states can be added to the basic ones but these will be sufficient for many games that we will create in this book There are two special states that are used for the system and wait for button clicks or things like animations to complete These are the STATE_SYSTEM_WAIT_FOR_CLOSE and STATE_SYSTEM_WAIT respectively We will also make use of a generic function called systemFunction that will hold the current state function to call in our game loop Combined with this we use a set of
integer variables to hold the value of the current state (currentSystemState) the last state (lastSystemState) and the next state (nextSystemState) for processing purposes These states should not be confused with an actual game pause function This will be handled in a different manner and added to the framework in Chapter 11
If you are using the Flash IDE and have any assets in the library that need to be exported in the first frame you must extend MovieClip and not Sprite even if you donrsquot plan to use the main time line for anything else We have extended MovieClip for the GameFrameWork so it will work with both Flex SDK and Flash IDE projects
The state control variablesThe control variables keep the system functioning within the context of the current state The main control variable is an instance of the Function class called systemFunction This function holds a reference to the current function that will be repeatedly called on each frame tick This saves us from having to evaluate a switchcase statement on each frame to decide which function to call The function is changed to a new reference by called the switchSystemState() function and passing a new constant that represents the new state
Optimization switchSystemState() is the first of many optimizations we will make to the game framework All of these optimizations will make the Flash games run much more efficiently These efficiencies in the game framework will allow the actual game code to perform more complex operations and still run with a reasonable frame rate
The currentSystemState integer variable holds a number representing the constant of the current state the system is running The nextSystemState contains the constant integer value for the state to transition to after this state is complete The lastSystemState variable holds the integer constant of the previous system state This is used in the rare occurrence that the game loop needs to return to the previous system state
The lastSystemState variable will become useful when we use a shared state such as STATE_SYSTEM_WAIT The STATE_SYSTEM_LEVEL_IN state will implement a 30-millisecond delay before moving on to the STATE_SYSTEM_GAME_PLAY state The nextSystemState will be STATE_SYSTEM_WAIT and the lastSystemState will be STATE_SYSTEM_LEVEL_IN When the 30-millisecond wait time has expired the waitCompleteListener function will be called It will use the lastSystemState to determine where the processing was before the wait was started Yoursquoll see this in detail later in this chapter when we examine the waitCompleteListener function
Listing 2
UPDATE_TEXT levelScreenUpdateListener)
gameremoveEventListener(GameGAME_OVER
gameOverListener)
gameremoveEventListener(GameNEW_LEVEL
newLevelListener)
newLevelListener listens for GameNEWLEVEL
simple custom events calls and changes
state accordingly
public function newLevelListener(eEvent)void
switchSystemState(FrameWorkStatesSTATE_
SYSTEM_NEW_LEVEL)
public function waitCompleteListener(eEvent)
void
switch(lastSystemState)
case FrameWorkStatesSTATE_SYSTEM_LEVEL_
IN
removeChild(levelInScreen)
break
removeEventListener(EVENT_WAIT_COMPLETEwai
tCompleteListener)
switchSystemState(nextSystemState)
032010 (11)30
ACTIONSCRIPT DEVELOPMENT
The background fill variablesAll Flash applications have a background color of some type No matter what game we are going to be creating the framework can control this background color You should never rely on the background color setting in HTML for your Flash applicationrsquos background color This leaves the HTML embed code with control over major aspect of your application If you are creating a viral game to be placed on game portals you will lose control of your gamersquos background color and it will default to what ever the game portal operators have selected as the standard background color in their embed code The framework allows you to override the HTML settings here by placing a simple colored Bitmap behind the entire application We will simply define a BitmapData object called appBackBitmapData and a Bitmap object called appBackBitmap that will be used to place the BitmapData onto the displayList
We will not define the background in the GameFrameWorkas file but rather the Mainas subclass of the GameFrameWork will set the background if needed in its init function override
The timer variablesThe timer will control the frame rate of the game and help smooth out the display by employing the TimerEventupdateAfterEvent method The frameRate variable will be defined in Mainas as the number of frame ticks per second we want our game timer to run
The most important thing to note is that we are making use of the built-in Timer class (gameTimer) We are not using the standard EnterFrame event This allows us to create our own frame rate for the game and specify it in the frameRate variable By doing this we can control game timer tick rate independent of the swf filersquos frame rate (FPS) The swf file can have a frame rate setting of 25 (for example) but the game can run at a 30 frame ticks a second To do this we first set the frameRate to the desired number of frame update ticks we want per second (30) When Mainas calls the startTimer function (described in detail when we get to the section on the init function) the gameTimer is put into action First we will calculate the timerPeriod value as 1000frameRate With the updateAfterEvent function call (in the runGame function) we help to smooth out the render of the screen by asking the Flash display engine to update at the rate of the Timer not the frame rate set in the swf So going back to our example if the game SWF is set to run at 25 FPS and the frameRate is set to 30 ticks the updateAfterEvent will help to smooth out the rendering of the screen by asking the Flash display engine to update at the timer tick rate (30) not the swf filersquos FPS setting (25)
The timerPeriod will be passed into the Timer instance and the game will attempt to run at this rate We say
attempt because if the game includes too many on screen moving objects or more logic than can be computed inside the timerPeriod number of milliseconds (or a combination of both) then there will be a noticable slowdown in the game screen updates In later chapters we will add functionality to the runGame function to mitigate some of these issues
The screen definition variablesThe screen definition variables create instances of our BasicScreen class This is a rather simple class that allows a single positional text box and an OK button on the screen We will use this simple screen for the title instructions level and game over screens We will customize each screen when we create the init function override in our gamersquos Mainas class Note that the levelInText is a special variable Setting this string to a default value will allow the leveInScreen to display some default text along on each new level This text can be combined with dynamic text to create a screen that says something like Level 1 with the word Level being the default text and the number 1 being the dynamic text
public var titleScreenBasicScreen
public var gameOverScreenBasicScreen
public var instructionsScreenBasicScreen
public var levelInScreenBasicScreen
public var levelInTextString
public var screenTextFormatTextFormat
public var screenButtonFormatTextFormat
We also create two TextFormat objects that will be used for defining the format of the text on the screens and the format of the button text
The ScoreBoard variablesThe scoreBoard instance of the ScoreBoard class will handle a simple heads up display (HUD) for the user with information such as the current score It is a simple framework class that will be customized in the init function override in each gamersquos Mainas class The changes will depend on the game that is to be created We also define a TextFormatObject for the basic look of the text for our scoreboard text scoreBoardTextFormat
JEFF FULTON
STEVE FULTON
The next part of the article in the June issue of FFD Magazine
032010 (11)32
ACTIONSCRIPT DEVELOPMENT
032010 (11) 33
On my quest of learning Flash I often became frustrated of how difficult it was to update the contents of my application Meaning if I wanted
to change out an image or piece of copy I had to open up Flash go to my library find the Movie Clip that had my asset in it and republish I thought to myself this is no way to work this is so inefficient Enter XML in all its glory Constructing an application with enabled me to quickly and easily update my project at a moments
notice Without having to open up Flash Now what could be better than that
In this article yoursquore going to learn how to create a new ActionScript project in Flex Builder 3 and write ActionScript 30 code that will load in an XML file display the images on screen and add some interactivity to the scene
Setting up FlexOpen up Flex and go to Filegt NewgtActionScript Project A dialog window will open In the project name field type in PhotoGallery Leave the use default location box checked and click finish (see Figure 1)
Creating an XML Photo Gallery
Searching the Internet yoursquoll find dozens if not hundreds of examples of photo galleries created with Flash
What you will learnhellipbull How to create an ActionScript application in Flex Builder 3bull How to use ActionScript to parse an XML le
What you should knowhellipbull Familiar with general programming concepts such as data ty-
pes variables loops and functionsbull Familiar with class creation and constructionbull Some understanding of XML
with AS3
Figure 1 New ActionScript window dialog Figure 2 ActionScript Compiler dialog
032010 (11)32
ACTIONSCRIPT DEVELOPMENT
032010 (11) 33
Once you click finish your project should open and you should see PhotoGalleryas on screen There are a few steps that I like to take next that I do for every project
First right click PhotoGallery folder in the Flex Navigator window click properties at the bottom and then click on the ActionScript Compiler link on the left hand side At the bottom yoursquoll see a check box that is already selected to generate a HTML wrapper file Uncheck that and click ok A warning message will appear saying that the html-template folder will be deleted Donrsquot worry about that because we havenrsquot put anything in that folder Click ok I personally donrsquot like to have a browser window open every time I run my application (see Figure 2)
Secondly wersquoll be using a tweening library called Tweener In order to use Tweener we have to first download it (httpcodegooglecomptweener) Be sure to download the ActionScript 30 version and create a folder on your desktop or any other place and name it code Place the contents of that download into that folder Next go back to Flex and again right click the PhotoGallery folder and click properties again and this time yoursquoll click the ActionScript Build Path link This window gives us the ability to add assets to our project so we can use them in our project Click the Add Folder button browser to the code folder you just created click ok and click ok again to close the window Now that folder and all its contents will be included in our project (see Figure 3)
Next right click the src folder in your project scroll over to new and add a new folder Name this folder classes This folder will contain two classes that wersquoll be using Then repeat the same steps but this time name the folder images This folder will contain all the images
Figure 3 ActionScript Build Path dialog
032010 (11)34
ACTIONSCRIPT DEVELOPMENT
Listing 1 galleryxml
ltxml version=10 encoding=UTF-8gt
ltgallery image_height=150 image_width=150 image_
gap=5 rows=3gt
ltphotogt
ltdescriptiongtThis is a description for the first
imageltdescriptiongt
ltthumb_pathgtimagesthumbjpgltthumb_pathgt
ltfull_pathgtimagesfullgifltfull_pathgt
ltphotogt
ltphotogt
ltdescriptiongtThis is a description for the second
imageltdescriptiongt
ltthumb_pathgtimagesthumbjpgltthumb_pathgt
ltfull_pathgtimagesfullgifltfull_pathgt
ltphotogt
ltphotogt
ltdescriptiongtThis is a description for the third
imageltdescriptiongt
ltthumb_pathgtimagesthumbjpgltthumb_pathgt
ltfull_pathgtimagesfullgifltfull_pathgt
ltphotogt
ltphotogt
ltdescriptiongtThis is a description for the fourth
imageltdescriptiongt
ltthumb_pathgtimagesthumbjpgltthumb_pathgt
ltfull_pathgtimagesfullgifltfull_pathgt
ltphotogt
ltphotogt
ltdescriptiongtThis is a description for the fifth
imageltdescriptiongt
ltthumb_pathgtimagesthumbjpgltthumb_pathgt
ltfull_pathgtimagesfullgifltfull_pathgt
ltphotogt
ltphotogt
ltdescriptiongtThis is a description for the sixth
imageltdescriptiongt
ltthumb_pathgtimagesthumbjpgltthumb_pathgt
ltfull_pathgtimagesfullgifltfull_pathgt
ltphotogt
ltphotogt
ltdescriptiongtThis is a description for the seventh
imageltdescriptiongt
ltthumb_pathgtimagesthumbjpgltthumb_pathgt
ltfull_pathgtimagesfullgifltfull_pathgt
ltphotogt
ltphotogt
ltdescriptiongtThis is a description for the eighth
imageltdescriptiongt
ltthumb_pathgtimagesthumbjpgltthumb_pathgt
ltfull_pathgtimagesfullgifltfull_pathgt
ltphotogt
ltphotogt
ltdescriptiongtThis is a description for the ninth
imageltdescriptiongt
ltthumb_pathgtimagesthumbjpgltthumb_pathgt
ltfull_pathgtimagesfullgifltfull_pathgt
ltphotogt
ltphotogt
ltdescriptiongtThis is a description for the tenth
imageltdescriptiongt
ltthumb_pathgtimagesthumbjpgltthumb_pathgt
ltfull_pathgtimagesfullgifltfull_pathgt
ltphotogt
ltphotogt
ltdescriptiongtThis is a description for the
eleventh imageltdescriptiongt
ltthumb_pathgtimagesthumbjpgltthumb_pathgt
ltfull_pathgtimagesfullgifltfull_pathgt
ltphotogt
ltphotogt
ltdescriptiongtThis is a description for the twelfth
imageltdescriptiongt
ltthumb_pathgtimagesthumbjpgltthumb_pathgt
ltfull_pathgtimagesfullgifltfull_pathgt
ltphotogt
ltphotogt
ltdescriptiongtThis is a description for the
thirteenth imageltdescriptiongt
ltthumb_pathgtimagesthumbjpgltthumb_pathgt
ltfull_pathgtimagesfullgifltfull_pathgt
ltphotogt
ltphotogt
ltdescriptiongtThis is a description for the
fourteenth imageltdescriptiongt
ltthumb_pathgtimagesthumbjpgltthumb_pathgt
ltfull_pathgtimagesfullgifltfull_pathgt
ltphotogt
ltphotogt
ltdescriptiongtThis is a description for the
fifteenth imageltdescriptiongt
ltthumb_pathgtimagesthumbjpgltthumb_pathgt
ltfull_pathgtimagesfullgifltfull_pathgt
ltphotogt
ltgallerygt
032010 (11)36
ACTIONSCRIPT DEVELOPMENT
Listing 2 PhotoGalleryas
package
Imports
import caurinatransitionsTweener
import classesBigPhoto
import classesThumbNail
import flashdisplayBitmap
import flashdisplaySprite
import flasheventsEvent
import flasheventsMouseEvent
import flashnetURLLoader
import flashnetURLRequest
[SWF(width=466 height=515 backgroundColor=00
0000 frameRate=30)]
public class PhotoGallery extends Sprite
Containers
private var _thumbContainerSprite Stores
the thumbnails
private var _nextButtonSprite Stores
the next arrow
private var _backButtonSprite Stores
the back arrow
private var _bigPhotoBigPhoto
Container for the big image
XML
private var _xmlLoaderURLLoader
Loads the XML file
private var _xmlXML
Stores the XML data
Image Assets
[Embed(source=assetsnext-arrowpng)]
private var _nextArrowClass
Embedded asset for the next
arrow
[Embed(source=assetsback-arrowpng)]
private var _backArrowClass
Embedded asset for the back
arrow
Constructor
public function PhotoGallery()
init ()
Initializing method
private function init ()void
_xmlLoader = new URLLoader ()
_xmlLoaderaddEventListener (EventCOMPLETE
xmlComplete false 0 true)
_xmlLoaderload (new URLRequest
(galleryxml))
XML Complete
private function xmlComplete (eEvent)void
Store the XML data
_xml = new XML (etargetdata)
loadImages ()
Clean up
_xmlLoaderremoveEventListener
(EventCOMPLETE xmlComplete)
_xmlLoader = null
Load in the thumbs
private function loadImages ()void
Temporary variables
var imageHeightuint = _xmlimage_height
var imageWidthuint = _xmlimage_width
var imageGapuint = _xmlimage_gap
var rowsuint = _xmlrows
var rowCounteruint = 0
var columnCounteruint = 0
Instantiate the container and position it
on screen
_thumbContainer = new Sprite ()
_thumbContainerx = 78
_thumbContainery = 78
_thumbContainerbuttonMode = true
_thumbContaineraddEventListener
(MouseEventCLICK thumbClick
false 0 true)
thisaddChild (_thumbContainer)
Loop through the images and create the
visual grid
for (var iuint = 0 i lt _xmlphotolength ()
i++)
var pathString = _xmlphoto[i]thumb_path
var descriptionString = _xmlphoto[i]desc
Creating an XML Photo Gallery with AS3
032010 (11) 37
Listing 2 PhotoGalleryas
ription
Create the thumbnail
var pThumbNail = new ThumbNail ()
pnewID = i
ploadImage (path)
pdescription = description
px = (imageWidth + imageGap)
columnCounter
py = (imageHeight + imageGap)
rowCounter
_thumbContaineraddChild (p)
Create the grid
if ((rowCounter + 1) lt rows)
rowCounter++
else
rowCounter = 0
columnCounter++
Setup the navigation
createNavigation ()
This method handles the click event for the
next arrow
private function nextClick (eMouseEvent)void
155 is the width + spacing
if (-_thumbContainerx lt (_thumbContainerwidth
ndash stagestageWidth ndash 155))
disableNavigation ()
TweeneraddTween (_thumbContainer x
_thumbContainerx ndash 155 time
075 transitioneaseOutExpo
onCompleteenableNavigation)
This method handles the click event for the
back arrow
private function previousClick (eMouseEvent)void
if (-_thumbContainerx gt 0)
disableNavigation ()
TweeneraddTween (_thumbContainer x
_thumbContainerx + 155 time
075 transitioneaseOutExpo
onCompleteenableNavigation)
This method handles the click event for the
thumbnails
private function thumbClick (eMouseEvent)void
disableNavigation ()
Disable the container that stores the
thumbnails
_thumbContainerbuttonMode = false
_thumbContainermouseChildren = false
_thumbContainerremoveEventListener
(MouseEventCLICK thumbClick)
Get the full image path
var imagePathString = _xmlphoto[etargetnewI
D]full_path
Instantiate the big photo
_bigPhoto = new BigPhoto ()
_bigPhotobuttonMode = true
_bigPhotox = 108
_bigPhotoy = 1075
_bigPhotoalpha = 0
_bigPhotoloadImage (imagePath)
_bigPhotoaddEventListener (MouseEventCLICK
closePhoto false 0 true)
thisaddChild (_bigPhoto)
Fade up the photo
TweeneraddTween (_bigPhoto alpha1 time
1)
Fade out the photo
When the image finishes fading delete the
photo and enable the navigation
items
private function closePhoto (eMouseEvent)void
TweeneraddTween (_bigPhoto alpha0 time1
onCompletedeletePhoto)
private function deletePhoto ()void
032010 (11)38
ACTIONSCRIPT DEVELOPMENT
Listing 2 PhotoGalleryas
_bigPhotobuttonMode = false
_bigPhotoremoveEventListener
(MouseEventCLICK closePhoto)
_bigPhotodestroy ()
thisremoveChild (_bigPhoto)
_bigPhoto = null
_thumbContainerbuttonMode = true
_thumbContainermouseChildren = true
_thumbContaineraddEventListener
(MouseEventCLICK thumbClick
false 0 true)
enableNavigation ()
private function createNavigation ()void
Instantiate the next arrow
var nBitmap = new _nextArrow ()
Instantiate the nextButton container
Add the next button as a child of the
nextButton container
_nextButton = new Sprite ()
thisaddChild (_nextButton)
_nextButtonaddChild (n)
_nextButtonx = stagestageWidth ndash _
nextButtonwidth
_nextButtony = 475
Instantiate the back arrow
var bBitmap = new _backArrow ()
Instantiate the backButton container
Add the next button as a child of the
backButton container
_backButton = new Sprite ()
thisaddChild (_backButton)
_backButtonaddChild (b)
_backButtonx = _nextButtonx ndash _
nextButtonwidth ndash 5
_backButtony = 475
enableNavigation ()
private function enableNavigation ()void
_nextButtonbuttonMode = true
_nextButtonaddEventListener
(MouseEventCLICK nextClick false
0 true)
_backButtonbuttonMode = true
_backButtonaddEventListener
(MouseEventCLICK previousClick
false 0 true)
private function disableNavigation ()void
_nextButtonbuttonMode = false
_nextButtonremoveEventListener
(MouseEventCLICK nextClick)
_backButtonbuttonMode = false
_backButtonremoveEventListener
(MouseEventCLICK previousClick)
Figure 4 New ActionScript class dialog
Creating an XML Photo Gallery with AS3
032010 (11) 39
Listing 3 ThumbNailas
package classes
import caurinatransitionsTweener
import flashdisplayLoader
import flashdisplayShape
import flashdisplaySprite
import flasheventsEvent
import flasheventsMouseEvent
import flashnetURLRequest
import flashtextTextField
import flashtextTextFieldAutoSize
import flashtextTextFormat
public class ThumbNail extends Sprite
Containers
private var _imageLoaderLoader Loads in
the thumbnail
private var _imageContainerSprite
Container for the thumbnail
private var _maskShape Container for the
mask
private var _descriptionContainerSprite
Container for the description
TextFields
private var _descriptionTextField
TextField for the container
Logic
private var _newIDuint The ID of the
object
[Embed(systemFont=Arial fontName=arial
fontWeight=bold
mimeType=applicationx-font-
truetype)]
private var _arialClass Embedded asset
for the font
Constructor
public function ThumbNail ()
super ()
init ()
Initializing method
private function init ()void
Instantiate the container
_imageContainer = new Sprite ()
_imageContaineralpha = 0
thisaddChild (_imageContainer)
createDescription ()
thismouseChildren = false
thisaddEventListener (MouseEventMOUSE_OVER
onMouseOver false 0 true)
thisaddEventListener (MouseEventMOUSE_OUT
onMouseOut false 0 true)
Public Methods
public function loadImage (pathString)void
_imageLoader = new Loader ()
_imageLoadercontentLoaderInfoaddEventListen
er (EventCOMPLETE imageComplete
false 0 true)
_imageLoaderload (new URLRequest (path))
GetterSetter Methods
public function get newID ()uint
return this_newID
public function set newID (valueuint)void
this_newID = value
public function get description ()String
return this_descriptiontext
public function set description (valueString)void
this_descriptiontext = value
Private Methods
032010 (11)40
ACTIONSCRIPT DEVELOPMENT
Listing 3 ThumbNailas
private function onMouseOver (eMouseEvent)void
TweeneraddTween (_descriptionContainer
y75 time05 transition
easeOutExpo)
private function onMouseOut (eMouseEvent)void
TweeneraddTween (_descriptionContainer
y150 time05 transition
easeOutExpo)
private function imageComplete (eEvent)void
Reposition the loaded content to the center
_imageLoaderx = -(_imageLoaderwidth 2)
_imageLoadery = -(_imageLoaderheight 2)
_imageContaineraddChildAt (_imageLoader 0)
Apply background after the image has
completely loaded
drawBackground ()
Draw the mask around the description
drawMask ()
Fade in the container
TweeneraddTween (_imageContainer alpha1
time05)
Clean up
_imageLoadercontentLoaderInforemoveEv
entListener (EventCOMPLETE
imageComplete)
Draws a background behind _imageContainer
private function drawBackground ()void
_imageContainergraphicsbeginFill (0xFFFFFF)
_imageContainergraphicsdrawRect (_
imageLoaderx ndash 1 _imageLoadery
ndash 1 _imageLoaderwidth + 2
_imageLoaderheight + 2)
_imageContainergraphicsendFill ()
Creates everything for the description
private function createDescription ()void
Instantiate the container
_descriptionContainer = new Sprite ()
_descriptionContainery = 150
_descriptionContainergraphicsbeginFill
(0x000000 075)
_descriptionContainergraphicsdrawRect (-75
-75 150 75)
_descriptionContainergraphicsendFill ()
_imageContaineraddChild (_
descriptionContainer)
Specify text formatting for the description
Text Field
var tfTextFormat = new TextFormat ()
tfcolor = 0xFFFFFF
tfalign = center
tffont = arial
tfbold = true
tfsize = 12
Instantiate the TextF ield
_description = new TextField ()
_descriptionx = -75
_descriptiony = -70
_descriptionwidth = 150
_descriptionwordWrap = true
_descriptionembedFonts = true
_descriptiondefaultTextFormat = tf
_descriptionautoSize = TextFieldAutoSizeLEFT
_descriptionContaineraddChild (_description)
Draws a mask our _descriptionContainer
private function drawMask ()void
Draw the mask shape
_mask = new Shape ()
_maskgraphicsbeginFill (0xFF0000)
_maskgraphicsdrawRect (_imageLoaderx
_imageLoadery _imageLoaderwidth
_imageLoaderheight)
_maskgraphicsendFill ()
addChild (_mask)
Apply the mask to the container
_descriptionContainermask = _mask
Creating an XML Photo Gallery with AS3
032010 (11) 41
that will be loaded into the application from XML Finally create another folder and this time name it assets This folder will contain the buttons that wersquoll embed into our project
The AssetsBefore we start coding we need to create some visual assets Open up Photoshop or any other program you have for creating graphics and create an image that is 150x150 pixels Fill it with a flat color and save the image as thumbjpg in the images folder you just created Next create another image thatrsquos 250x300 pixels Fill it with another color and save that image as fulljpg into the same folder These images will be used for testing purposes only
Listing 4 BigPhotoas
package classes
import flashdisplayLoader
import flashdisplaySprite
import flasheventsEvent
import flashnetURLRequest
public class BigPhoto extends Sprite
Containers
private var _imageLoaderLoader Loads in the
thumbnail
private var _imageContainerSprite Container
for the thumbnail
Constructor
public function BigPhoto ()
super()
Public Methods
public function loadImage (pathString)void
_imageLoader = new Loader ()
_imageLoadercontentLoaderInfoaddEventListen
er (EventCOMPLETE imageComplete
false 0 true)
_imageLoaderload (new URLRequest (path))
Clean up method
public function destroy ()void
_imageContainerremoveChild (_imageLoader)
_imageLoaderunload ()
_imageLoader = null
thisremoveChild (_imageContainer)
_imageContainer = null
Private Methods
private function imageComplete (eEvent)void
Instantiate the container
_imageContainer = new Sprite ()
thisaddChild (_imageContainer)
Add the loader
_imageContaineraddChild (_imageLoader)
Clean up
_imageLoadercontentLoaderInforemoveEv
entListener (EventCOMPLETE
imageComplete)
Figure 5 Time to test
032010 (11)42
ACTIONSCRIPT DEVELOPMENT
We still have to create our navigation buttons that wersquoll use to scroll through our gallery Create two buttons that are 40x40 pixels and design them how you like They should resemble forward and back buttons Save the forward arrow as next-arrowpng and the other as back-arrowpng into the assets folder Now that our assets our created itrsquos time to code
The XML fileRight click the src folder in the project scroll over to new and click file A dialog window will open and in the file name input box type galleryxml (see Figure 4) Write the code that you see from Listing 1 into galleryxml
Line 1 is the XML declaration This is needed to have a well-formed XML document
Line 2 declares the gallery root node Notice in this node Irsquove added attributes Also to have a well-formed XML document you must have one root node and all attribute values must be in quotes
Lines 3-7 declares a photo node with three children description thumb_path and full_path description is exactly as it sounds It will contain a description for our thumbnail thumb_path contains the path to our thumbnail image Same goes for full_path it contains the path to our full image
I then just copy and pasted that and pasted it 14 times just changing out the description Remember wersquore just using dummy data When you finish go back and add photos of your choice
The ClassesWersquoll be using two additional classes for this project One will be for the thumbnails and another for the full image Right click the classes folder go to new and click ActionScript class In the name field type ThumbNail For the Superclass type in flashdisplaySprite Wersquoll need to extend from that class so we can use the functionality of that object but add our own (see Figure 4)
Add another class this time name it BigPhoto It should also inherit from flashdisplaySprite
CodingTime to start writing the ActionScript for this project Open up PhotoGalleryas from the Flex Navigator and type in the code from Listing 2 Open up ThumbNailas and type in the code from Listing 3 Open up BigPhotoas and type in the code from Listing 4 Now that you have all the code in itrsquos time to test In the menu bar click RungtRun PhotoGallery (see Figure 5) If you get an error make sure you typed everything correctly If all went well you should see the gallery open up Click the buttons and watch the gallery scroll left and right Roll over the thumbnails to see the description scroll up Click on a thumbnail to see the full image fade in You might be wondering about whatrsquos going on Irsquoll try to break that down for you next
The ExplanationOur main focus is going to be whatrsquos going on in PhotoGalleryas This file contains the ActionScript that makes almost everything happen We first start off by declaring our properties that will be used in the project Yoursquoll notice a couple of embeded lines These lines are MetaData tags that actually embed assets into the project The two embeded lines you see add the next-arrowpng file and the back-arrowpng file In the constructor there is one call to a method called init() This method gets the application going by requesting and loading in the XML File When the file finishes loading we store the XML data into our _xml property Next we call the loadImages() method This method is responsible for a big part of the application We first gather some information from the XML file and store it in temporary variables
bull imageWidth stores the image _ height attributes valuebull imageWidth stores the image _ width attributes valuebull imageGap stores the image _ gap attributes valuebull rows stores the row attributes valuebull rowCounter increments ever pass of the for loop Is
compared against the rows variablebull columnCounter increments once for every column
created
The for loop cycles the XML file creating a new ThumbNail object with every iteration During each iteration we create variables that store the path to the thumb nail (path) and the description of the thumbnail (description) We pass the variables into the methods of the ThumbNail class Remember the ThumbNail class defines methods and properties that are specific to it The class code is commented if you wish to explore it Again our main focus is PhotoGalleryas To create the grid we write ifelse logic that compares the rowCounter variable to the row variable For every iteration of the loop we increment that variable if that variable becomes greater than rows we set it back to 0 rowCounter is then multiplied to the y-axis of each ThumbNail object The rest of the code is commented for you to explore
ConclusionYoursquoll notice I actually hard coded a lot of values directly in the ActionScript Not too ideal In the next part of this tutorial wersquore going to come back to this code and modify it to be a little more flexible and visually appealing If you have any questions feel free to contact me through my site (wwwcodedbyryancom)
RYAN DrsquoAGOSTINORyan DrsquoAgostino is an Interactive Developer at NAS Recruitment Communications in Cleveland OH part-time instructor at Virginia Marti College of Art and Design in Lakewood Ohio and freelance designer and ActionScript developer For more information about Ryan please visit httpwwwcodedbyryancom
032010 (11)44
COMPONENTS
Components are the controls and containers that are the elements of the application that create the interface They cover controls such
as buttons and check boxes containers that can hold other containers and controls navigation elements and charts Components can be added to your application in variety of ways They can be added through the design view writing then in MXML or through ActionScript
Flash Builder now has two major sets of components the Halo set which has been available in previous versions of Flex and the new Spark set The components from the Spark set have a direct correlation to a component in the Halo set but not all Halo components have been upgraded to the Spark framework yet The namespaces for these components are added automatically when a MXML document is created and you will notice there are now multiple namespace in the main MXML document already
Creating custom components takes two paths The first is to create a skin for an existing Halo component in Flash Illustrator Photoshop or Fireworks or create a custom skin for a Spark component using MXML The second path is to create a completely custom component using Flash Professional and importing it into the Flash Builder project We are going to focus on the second path and create a custom component with Flash Professional
The first step in creating a custom component is to instal the Flex Component Kit mxp into Flash Professional This is an extension that will expose some
Custom Flash CS4
Flash Builder comes with a lot of components to cover almost all of an apps needs But what if you want a custom look or functionality to a component With Flash Professional you can create custom components and import them into Flash Builder for use in your application
What you will learnhellipbull How to create custom components in Flash Professional to im-
port into Flash Builder
What you should knowhellipbull Flash Professional CS4bull Flash Builder 4bull Actionscript 3
Components in Flash Builder 4
Figure 1 The component artwork Figure 2 Converting the movie clip
032010 (11)46
COMPONENTS
Listing 1 The component class
package comtest
import mxflashUIMovieClip
import flasheventsEvent
import flasheventsEventDispatcher
import flasheventsMouseEvent
import flashfiltersGlowFilter
public class SliderButton extends UIMovieClip
public static const BUTTON_CLICKString = button click
private var glowGlowFilter = new GlowFilter(0x0000cc54421falsefalse)
public function SliderButton()
plusButtonbuttonMode = true
minusButtonbuttonMode = true
plusButtonaddEventListener(MouseEventMOUSE_OVER handleMouseOver)
plusButtonaddEventListener(MouseEventMOUSE_OUT handleMouseOut)
plusButtonaddEventListener(MouseEventCLICK handleMousePress)
minusButtonaddEventListener(MouseEventMOUSE_OVER handleMouseOver)
minusButtonaddEventListener(MouseEventMOUSE_OUT handleMouseOut)
minusButtonaddEventListener(MouseEventCLICK handleMousePress)
private function handleMouseOver(eMouseEvent)void
ecurrentTargetfilters = [glow]
private function handleMouseOut(eMouseEvent)void
ecurrentTargetfilters = []
private function handleMousePress(eMouseEvent)void
if(ecurrentTargetname == plusButton ampamp trackThumbx lt 134)
trackThumbx++
else if(ecurrentTargetname == minusButton ampamp trackThumbx gt 37)
trackThumbx--
dispatchEvent(new Event(SliderButtonBUTTON_CLICK))
032010 (11)48
COMPONENTS
of the Flex classes to Flash allowing the component to communicate with the application Download the extension from the Adobe site at httpwwwadobecomcfusionexchangeindexcfmevent=extensionDetailampextid=1273018 and install using the Adobe Extension Manager The extension should work with Flash
versions as far back as Flash 8 but I highly recommend using at least Flash 9 (CS 3)
Once the extension is installed launch Flash Professional and create a new ActionScript 3 project We are going to create a simple slider button that has a plus and minus button on each end of the button and a track between them When the plus and minus buttons are clicked the the track thumb will move one pixel in either direction There will also be a roll over behavior on the buttons to change their look as the mouse rolls over and off the buttons Finally Flash Builder will receive the event of the button being pushed and update a text input on the stage
It is common to encapsulate the behaviors of the component within itself and have events broadcast to the containing application If you think about some of standard components in both Flash Builder and Flash Professional and deconstruct them in your mind you will see that the same methods are used on them The NumericStepper is a lot like our component It has two buttons with a text field that displays a value that is incremented or decremented with each push of the button The component itself does nothing to effect the application until the code calls it to either send or receive a value
With our new document we are going to create the artwork for the component in the fla file Create four movie clips one each for the scroll track the plus button the minus button and the track thumb (Figure 1) The naming and look of these movie clips are not important
Once the movie clips are created and on the stage give each one an instance name The names in the
Figure 3 Setting the class of the movie clip
Figure 4 Setting to export as SWC
Figure 5 Creating the Flash Builder project
Custom Flash CS4 Components in Flash Builder 4
032010 (11) 49
example files are plusButton minusButton and trackThumb The actual names do not matter and we dont need an instance name for the track since we are not going to reference it in Flash Builder Flash Builder will reference the instance names of the movie clips in the components we will use these later
Now that the artwork has been created it must be collected into its own movie clip Select all of the artwork on the stage and choose ModifygtgtConvert to Symbolhellip In the Library panel there is a new symbol that is called in the sample files SliderButton The name is important here because this is how the Convert to Flex Component mxp will name the class that Flash Builder will refer to later
An external class will give the component the internal behaviors that were mentioned earlier as well as an event to broadcast to the Flash Builder application (Listing 1) All the code in the class should be familiar but there are a few points to go over First the package name is given the qualifier of comtest to identify that the component belongs to our namespace This is not necessary but helpful when there are multiple components or components from different publishers in the application
The most important change is instead of having the class extend the Sprite class this class is going to
extend the UIMovieClip class This class like the Flex Component in the library exposes the behaviors and methods we set up in the class to the Flash Builder application In the import statements use import
mxflashUIMovieClip The mxflash class includes both the UIMovieClip and ContainerMovieClip classes
When the variables are declared we set up a glow filter that will be attached to the buttons when the mouse rolls over them and a string constant for the event we create later In the constructor of the class the buttons receive the event listeners for the mouse interactions and the handlers are added later in the code In the handleClick event handler we use the event dispatcher class to dispatch the event Here we are just dispatching a standard event with the constant that was created earlier You can just as easily dispatc a custom event that has extra information attached to it
Select the movie clip in the Library panel then select CommandsgtgtConvert Symbol to Flex Component (Figure 2) The extension will do several operations such as making the symbol available to ActionScript giving the symbol a class name adding the Flex Component to the library and others
Save the file as SliderButtonas in the folder path comtest When you declare the package name as we have here you must have the same hierarchy as listed in the package name Back in the fla select the
Figure 6 The Package Explorer
Listing 2 The main MXML le
ltxml version=10 encoding=utf-8gt
ltsApplication xmlnsfx=httpnsadobecommxml
2009
xmlnss=librarynsadobecomflex
spark
xmlnsmx=librarynsadobecomflex
mx
width=200 height=110gt
ltfxDeclarationsgt
lt-- Place non-visual elements (eg
services value objects) here
--gt
ltfxDeclarationsgt
ltsApplicationgt
Listing 3 The new component and name space
xmlnstest=comtest
lttestSliderButton x=14 y=10 id=sliderButton
gt
032010 (11)50
COMPONENTS
SliderButton movie clip and select Propertieshellip from the contextual menu Expand the advanced area if it is not already and enter comtestSliderButton in the Class text field Leave the Base Class text field blank and click OK (Figure 3)
Select Publish Settingshellip from the file menu and click on the Flash tab (Figure4) Under the SWF Settings area of the window be sure that the Export SWC check box is checked The swc is the part that Flash Builder will use in the application SWC are archives that contain the classes and media assets of the component and make it easy to distribute the movie clip
Publish the SWF and SWC and we are ready to move to Flash Builder
Flash BuilderIn Flash Builder create a new project This example we only need a basic Flash Builder project without any
server technologies You can name the project anything you would like in this case I have name FB_Components and saved it in my default workspace
If you have not worked on a Flash Builder project yet it is a lot like working on the Flex projects in the past with some new MXML tags You will also notice that the Flex Navigator pane has now been replaced with the Package Explorer (Figure 6)
The Package Explorer pane has a different organization than the Flex Navigator but the main MXML file can still be found under src then under the default package
Looking at the main MXML (Listing 2) you will see that the three name spaces are added automatically and the application begins with sApplication instead of mxApplication These are the minor differences to be on the look out for when working on a Flash Builder project
Listing 4 The nal MXML le
ltxml version=10 encoding=utf-8gt
ltsApplication xmlnsfx=httpnsadobecommxml2009
xmlnss=librarynsadobecomflexspark
xmlnsmx=librarynsadobecomflexmx minWidth=200 minHeight=110
width=200 height=110
initialize=init()
xmlnstest=comtestgt
ltfxDeclarationsgt
lt-- Place non-visual elements (eg services value objects) here --gt
ltfxDeclarationsgt
ltfxScriptgt
lt[CDATA[
private function init()void
sliderButtonaddEventListener(SliderButtonBUTTON_CLICK updateText)
private function updateText(eEvent)void
pixelTexttext = String(sliderButtontrackThumbx)
]]gt
ltfxScriptgt
lttestSliderButton x=14 y=10 id=sliderButton gt
ltsLabel x=39 y=41 text=The position of the track thumb is textAlign=center width=122gt
ltsTextInput x=76 y=76 width=49 id=pixelTextgt
ltsApplicationgt
Custom Flash CS4 Components in Flash Builder 4
032010 (11) 51
To get our component into the Flash Builder project we need to put the swc some where the project can see it On your desktop navigate to where the swc was published to and copy the file Then navigate to where Flash Builder project is and put the swc into libs folder I have found it is easier to keep the fla and swf files out of the project then copy the swc over to the Flash Builder project as needed
Back in Flash Builder open the libs folder under the project in the Package Explorer pane In that directory you should see your swc if you do not try right clicking on the libs folder and selecting Refresh
In the MXML editor switch to Design view When the Design view becomes active the Component pane should become available in the lower left of the workspace The first folder in the pane is the Custom folder and our custom component should be displayed in the list Drag an instance of this component onto the stage
To show that we can have two way communication with the component drag a label and a text input onto the stage Set the labels text to be The position of the track thumb is and move the text input near the label Set the id of the text input to pixelText (Figure 7) Switch back to the Source view after saving
Notice that several lines have been added to the source of the MXML document In addition to the MXML for the component including our custom component a name space value has been added to the sApplication tag designated as xmlnstest=comtest (Listing 3) If we add more components using the same comtest package declaration they will all fall under this name space If we were to add more components using a different package additional name spaces would be added You will also notice that the component starts with testSliderButton as opposed to s fx or mx
In the application tag add an initialize property calling a function called init() After the fxDeclarations tags add fxScript tags to hold the Actionscript As you type fx the code completion should pop up and allow you to select the fxScript tags
Add an id property to the SliderButton tag and give it a value of sliderButton In between the CDATA tags add the init function This function simply adds an event listener to our component calling the updateText
function every time the BUTTON_CLICK event is broadcast from the SliderButton class (Listing 4)
Once the application receives the BUTTON_CLICK event it calls the updateText function This function looks into the component and gets the x position of the track thumb then puts that value into the text input we set up earlier
So now we have communication coming out of the component using the dispatchEvent call in the class We are also looking into the component where the application is getting the x position of the thumb track inside the component Communication can get much more complicated than this but this is a simple example to give a starting point to create more complex components
Click debug to run the application and if no errors occurred the application should launch in a browser window If you have a browser window open before running the app you should close it There is a bug in the Flash Player at the time of this writing that may cause the app to not run if there are browser windows already open
Once the application is running click on the buttons and watch as the value in the text input increase and decrease The custom component is now complete and ready to have more behaviors and methods added to it
ConclusionWhile the components that come with Flash Builder can cover most situations there will be times where only a custom component will fit the applications needs Creating a custom component takes a little work but can make the developers job a lot easier With this new level of control over the look and behavior of the component can make the application more rich and engaging to the end user
Figure 7 Components on the stage
On the Netbull httpwwwadobecombull httpwwwadobecomcfusionexchangeindexcfmeven-
t=extensionDetailampextid=1273018
LOUIS DICARROLouis DiCarro is a consultant based in NYC and has been working with Flash since the rst version He has taught web development at the college level and has worked for numerous large clients He can be reached at louisdicarroffdgmailcom
032010 (11)52
COMPONENTS AIR Components in Flash Builder
032010 (11) 53
We already know that building an AIR application affords us a lot more capabilities than working with a web based project
Digging through the Actionscript documentation shows that there are a lot of classes that are only available to AIR applications These mostly have to do with classes and methods that interact with the file system or windowing of the application
Flash Builder as with Flex Builder before it contains several components that are only available to use with AIR applications These components deal with
visual interfaces for interacting with the file system and a HTML component for displaying web content
You may wonder why these components are only available for AIR applications Mostly it is for security reasons Up to Flash Player 101 a swf does not have the permission to interact with files on the file system except in very limited circumstances
Swfs in the web browser are able to interact only with files on the server in which the swf is hosted This allows them to load images xml and other file types at run time but only if the files come from within its
AIR Components
Adding file and html rendering can result in a lot of code But with the AIR components in Flash Builder 4 this functionality can be added easily with only a few lines of code
What you will learnhellipbull What components are available for AIR applications in Flash
Builder 4
What you should knowhellipbull Flash Builder 4bull Actionscript 3
in Flash Builder
Figure 1 AIR Actionscript 3 special classes for the HTML component Figure 2 Layout of the HTML application
032010 (11)52
COMPONENTS AIR Components in Flash Builder
032010 (11) 53
Were going to take a look at couple of simple examples for each component to get a feel how use them It is also important to note that the documentation for these components are in the AS 3 documentation When looking at the documentation you will see a symbol next to some of the classes and also next to some methods within the classes (Figure 1)
HTML ComponentThe HTML component is very easy to work with It can pull in many types of media and render them as you would expect them to be rendered in a web browser
Start up Flash Builder and create a new Flex project Name the project and select Desktop under project type Click finish and let Flash Builder set up the project
Once the project is started click on the Design tab In the lower left a component tab should be open If it is not open it using the Window menu and selecting Components Scroll down to the Adobe AIR folder You will not see this folder if you set your project to run in a web browser
We are going to create a simple web browser using only three components and one line of code First drag a HTML component a text field and a button to the stage Arrange them how you would like and switch over to design view
Give each component an id as in Listing 1 Also give the button a click handler Type click and let the program auto complete another code hint will pop up to create the handler automatically
Flash Builder will generate the handler as well as the fxScript block in the code In the click handler that is generated add a line that will set the location of the HTML component to the text in the text field See Listing 2 for the full code
Run the application and fill in a valid web address in the application Remember to include http in front of
own sandbox There are exceptions and ways around it but for the majority the swf cannot interact with the file system
If the development of applications using Flash Builder and AIR were to succeed they would need to act like real desktop applications This means that the applications would have to load and save files just as any other application that a user would use on the computer
Security is still maintained in this model by having the developer digitally sign their application using certificates If the certificate is obtained though a trusted source the application would be traceable back to the original developer if something bad should happen
Having a HTML component gives the application greater rendering power by tapping into the Web Kit which can run better than the HTML renderers in the Flash Player This allows developers to repurpose content from their web site to the application
Figure 3 The application running Figure 4 Layout of the image viewer application
Listing 1 MXML of components
ltsTextInput id=addressBar x=10 y=10
width=518gt
ltsButton id=goButton x=555 y=13
label=Go click=goButton_
clickHandler(event) gt
ltmxHTML id=htmlPane x=10 y=40 width=620
height=430gt
Listing 2 goButton handler
protected function goButton_clickHandler(event
MouseEvent)void
htmlPanelocation = addressBartext
032010 (11)54
COMPONENTS
the address Click the Go button and the page should load after a few seconds Take a look at Figure 3 for the results
There are a lot of methods and commands associated with the HTML component This will allow you to make a more customized display and give more control over the HTML content that you show
File system componentsUsing the file system components is just as easy To test the components we are going to create a simple image viewer that allows the user to select the images from the file system
Create a new Flex Project as we did before and be sure to make it a desktop application Once the project has loaded switch to design view and drag a File System Tree and an Image component to the stage See Figure 4 for the layout
Once the application is laid out switch over to the Source mode and give all the components ids as we did before (Listing 3) Also add a change handler instead of a click handler Flash Builder will autocomplete and generate the handler for you as it did when we added the click action to the button
In the generated handler add the code that will load the image into the image component To keep everything simple we only are going to load jpg and png files (Listing 4) in this function we are first checking to make sure the file is a file and not a directory by checking for a file extension If the file passes the first test we check to see if the file is a jpg or png Lastly if the file passes all of these test it gets loaded into the image component
Save the file and run the application to see the results Clicking on the file system tree items will either open or close the directory or try to load the file When the user clicks on a jpg or png it will load into the image component (Figure 5) Note that as the tree expands a scroll bar is attached to the component automatically
ConclusionJust as with the HTML component there is more methods and properties available to you with the file system components In this demo application we have seen how easy it is to get access to the file system using the component without writing a lot of code
There is a lot more involved in making a full application using these components but we have witnessed how easy to get started with them Having more control over the elements as well as error checking would be added in real applications
Having these components available gives the application a large amount of functionality very quickly and allows the developer to concentrate on the logic of the application Using these components in your application will help make it more full-featured and feel more like a real desktop application
LOUIS DICARROLouis DiCarro is a consultant based in NYC and has been working with Flash since the rst version He has taught web development at the college level and has worked for numerous large clients He can be reached at louisdicarroffdgmailcom
Listing 3 MXML of components
ltmxFileSystemTree id=fsList x=10 y=10
height=460 change=fsList_
changeHandler(event)gt
ltmxImage id=imgPane x=193 y=10 width=437
height=460gt
Listing 4 Handler for change event
protected function fsList_changeHandler(event
ListEvent)void
var fileFile = eventcurrentTargetselectedItem
as File
if(fileextension)
if(fileextensiontoLowerCase() == jpg ||
fileextensiontoLowerCase() ==
png)
imgPanesource = fileurl
Figure 5 The image viewer application running
032010 (11)56
TLF Applying CSS to Text Layout Framework styles
032010 (11) 57
TLF is introducing the new way of applying styles to the text Prior to TLF flash used simple approach you had to prepare and attach
StyleSheet object to the style property of the TextFieldTLF provides more flexible and customizable but
more complex techniqueDuring this tutorial we are going to create a small
application in Flex 4 This application contains a text displayed with TLF component TextArea and 2 different CSS that can be applied to the text simply by pressing the button Figure 1 show the screenshot of the application
TextFlow and itrsquos IFormatResolverTLF provides a callback mechanism to for with text styles TextFlow objectrsquos got a property formatResolver that should implement IFormatResolver interface Actually it is a set of callback functions that are called by parent TextFlow when it processes itrsquos elements
To have a closer look at formatResolver we will implement itrsquos version to work with out simple CSS So start create a new project in Flex and name it for example TextCSS In the default package create a new ActionScript class named CSSFormatResolver that implements IFormatResolver interface
Listing 1 shows the complete implementation of the class and will we look closer into it later For now pay attention on the following functions
bull invalidateAll
bull invalidate
bull resolveFormat
bull resolveUserFormat
bull getResolverForNewFlow
These function are created automatically by Flex Builder as they are required for implementation of the interface All functions are callbacks that are called when the certain action is performed by TextFlow and it needs to know how to treat with different elements
Applying CSS
This article is a reply to our readerrsquos question about the possibility to apply CSS to Text Layout Framework (TLF) We will show how to implement the necessary class and switch text styles on the fly
What you will learnhellipbull how can custom styles be applied to TLF elementsbull how to implement IFormatResolver to work with CSS
What you should knowhellipbull the basics of Flex and FlexFlash Builderbull the basics of TLF
to Text Layout Framework styles
Figure 1 Style changing application
032010 (11)56
TLF Applying CSS to Text Layout Framework styles
032010 (11) 57
Main ApplicationListing 2 contains a full code for main application
The application consists of
bull TextArea with some text The text is formed using XML Some elements of the TextFlow have
For our case we are interested in resolveFormat function that is called for every element of the TextFlow when itrsquos style needs to be changed This function return an object that should implement ITextLayoutFormat
Before we continue lets have a fast look at main application and how we build our example
Listing 1 CSSFormatResolveras
package
import flashtextStyleSheet
import flashxtextLayoutelementsFlowElement
import flashxtextLayoutelementsFlowValueHolder
import flashxtextLayoutelementsIFormatResolver
import flashxtextLayoutelementsTextFlow
import flashxtextLayoutformatsITextLayoutFormat
public class CSSFormatResolver implements
IFormatResolver
private var _styleSheetStyleSheet
public function CSSFormatResolver()
_styleSheet = new StyleSheet()
public function invalidateAll(textFlow
TextFlow)void
public function invalidate(targetObject)void
public function resolveFormat(targetObject)
ITextLayoutFormat
var formatFlowValueHolder = null
if (target is FlowElement)
var elementFlowElement = target as
FlowElement
if (element = null)
format = elementformat as
FlowValueHolder
if (elementstyleName = null)
var styleObject = styleSheetgetSt
yle(elementstyleName)
formatcolor = style[color]
formatfontSize =
style[fontSize]
formatfontWeight =
style[fontWeight]
formatfontStyle =
style[fontStyle]
return format
public function resolveUserFormat(targetObject
userFormatString)
return null
public function getResolverForNewFlow(oldFlow
TextFlow newFlowTextFlow)
IFormatResolver
return null
public function get styleSheet()StyleSheet
return _styleSheet
public function set styleSheet(valueStyleSheet)
void
_styleSheet = value
032010 (11)58
TLF
032010 (11) 59
Listing 2 TextCSSmxml
ltxml version=10 encoding=utf-8gt
ltsApplication xmlnsfx=httpnsadobecommxml2009
xmlnss=librarynsadobecomflexspark
xmlnsmx=librarynsadobecomflexhalo
xmlnslocal=
width=640 height=300gt
ltfxScriptgt
lt[CDATA[
import mxeventsFlexEvent
protected function applyCSS1Button_
clickHandler(eventMouseEvent)void
var formatResolverCSSFormatResolver =
new CSSFormatResolver()
formatResolverstyleSheetparseCSS(css1
text)
textAreatextFlowformatResolver =
formatResolver
protected function applyCSS2Button_
clickHandler(eventMouseEvent)void
var formatResolverCSSFormatResolver =
new CSSFormatResolver()
formatResolverstyleSheetparseCSS(css2
text)
textAreatextFlowformatResolver =
formatResolver
]]gt
ltfxScriptgt
ltsTextArea id=textArea width=620 height=134
x=9 y=156gt
ltsTextFlowgt
ltsp styleName=h1gt
Title of the Text
ltspgt
ltsp styleName=h2gt
Section of the Text
ltspgt
ltspgt
This is a body text Lorem ipsum
ltspgt
ltsTextFlowgt
ltsTextAreagt
ltsTextArea x=10 y=10 width=285 height=86
id=css1 gt
lt[CDATA[
h1
colorFF0000
fontSize20
fontWeightbold
fontStylenormal
h2
colorFF00FF
fontSize16
fontWeightbold
fontStyleitalic
]]gt
ltsTextAreagt
ltsTextArea x=345 y=10 width=285 height=86
id=css2 gt
lt[CDATA[
h1
color00FF00
fontSize32
fontWeightnormal
fontStyleitalic
h2
color0000FF
fontSize24
fontWeightbold
fontStylenormal
]]gt
ltsTextAreagt
ltsButton x=108 y=105 label=Apply CSS
1 id=applyCSS1Button
click=applyCSS1Button_
clickHandler(event)gt
ltsButton x=443 y=105 label=Apply CSS
2 id=applyCSS2Button
click=applyCSS2Button_
clickHandler(event)gt
ltsApplicationgt
032010 (11)58
TLF
032010 (11) 59
got styleName attribute so you could apply the corresponding CSS style to them later
bull 2 TextAreas with simple different CSSbull 2 Buttons to apply CSS from TextAreas to example
text
When the button is clicked the new instance of CSSFormatResolver class is created Then the corresponding CSS string from the TextArea is parsed and set into resolverrsquos property of SlyleSheet class type And finally prepared formatResolver instance is assigned to the TextFlow
Applying CSS to TextFlowNow lets have more detailed look at resolveFormat callback function First it should return a value that implements ITextLayoutFormat if it returns null then no new styling should be applied to an element being processed by the function So we create format variable of FlowValueHolder (it implements ITextLayoutFormat) and set itrsquos value to null (we do that because resolveFormat works with all elements including TextFlow itself as probably we donrsquot want to apply one style to the whole text)
After we do all the necessary casts and null checks and if we are sure that current elementrsquos got styleName attribute we assign styles from CSS to a current format StyleSheet object is used to contain CSS data as it is convenient object to parse and retrieve CSS data
Conclusion and a WarningThere was a brief tutorial on how to apply simple CSS to TLF TextFlow Please note that CSSFormatResolver class is not fully functional and only can be applied to our sample CSSs Writing reusable and versatile class requires more detailed coding and approach
Check the TLF Blog on this issue There is fully functional CSSFormatResolver with example there httpblogsadobecomtlf200902iformatresolver_and_using_css_1html
MAXYM GOLOVANCHUK Maxym Golovanchuk is a Photoshop Certied Expert and TV producer and he is using Adobersquos software for implementing entertainment solutions including video delivery with Flash Media Server mexxikgmailcom
MondayTuesdayWednesdayThursday Friday
DIVISIONS OF CREATIVE NICHE INC
032010 (11)60
PROFILE Flashcreed ndash Business Gallery
032010 (11) 61
The Business Gallery (httpwwwflashcreedcombusiness_video_image_gallery) is a Flash component meant to do one thing to enhance the visual experience a website portfolio or presentation site gives to its users Mainly itrsquos all about the image you present yourself or
your product to the world wide web Letrsquos face it without the looks you canrsquot sell your product or image no matter how interesting it might be
Whatrsquos so great about this gallery you might wonder Well the answer is simple everything Advanced AS3 programming dynamic XML implementation unlimited number of media items on stage PNG JPG and video FLA SWF MP4 F4V supported media tween and image effects just to name a few of the over 150 settings this gallery brings you Bottom line you can customize it in any way you see fit in order to make it resemble your website layout Not to mention the code optimization that allows the gallery to run so smoothly even on low resources
We brought 45 background wallpapers in case just a color doesnrsquot do the job also a set of custom arrows and close buttons
Flashcreed ndash Business GalleryHello itrsquos good to be back here among Flash amp Flex Magazine readers Today we are going to tell you a bit about our products mainly our Business Gallery but since all our products are built on the same framework most of the properties apply to all When we first realized what we could do with this framework we decided to name it ldquoPandorardquo in order to point out the unlimited number of possibilities it revealed regarding customization and user friendliness
032010 (11)60
PROFILE Flashcreed ndash Business Gallery
032010 (11) 61
The size of the entire gallery and any element in it is subject to any kind of resize big stage and small thumbs or the other way around for any template you or your client desire
Column_scroll and the properties for the stage mask helps you configure the exact number of visible columns you want to set in order to browse through the media items your gallery has Beside this useful feature we added blur and a couple of tween effects for the leftright navigation that gives an impressive look
032010 (11)62
PROFILE Flashcreed ndash Business Gallery
032010 (11) 63
Either as tooltip or plain text you can show any information you want regarding a certain media thumb in the gallery You can change font type size spacing color position and many other properties
The color gradient system for roll overout mouse gesture is unique in every way if we are to compare it with other galleries on the market at this point You can customize up to 5 sets of color with different alpha values The gradient type either linear or radial can be modified with rotation and ratio values
032010 (11)62
PROFILE Flashcreed ndash Business Gallery
032010 (11) 63
When clicking on a thumb if preview_type is selected as internal a resizable preview window will reveal itself and depending on the media type (image or video) an image viewer or video player will be contained inside it If preview_type is selected as external you have the possibility to set certain URL addresses this allowing you to redirect the user to a specific area of the website like a product page from a virtual store for example
The video player has a dozen of controllers that allow you to create a skin to better suit the template you want to create for your gallery Buttonrsquos color thickness handler color or scrub bar size just to name a few of the properties you can play with
At an amazing price of 999 $ this has to be one of the best choices when it comes to media galleries flash components Donrsquot hesitate to take a look at it on wwwflashcreedcom and also consider other products that might better suit your specifications or desires We would definitely appreciate any kind of feedback regarding current or possible features
Thank you
032010 (11)65
BOOK REVIEW
Are you an actionscript 3 game developer who is not able to write a complete commercial game because you cannot manage dozens
of classes Or you are an experienced actionscript 3 applications developer who wants to program game but donrsquot like reading any available beginner book as it doesnrsquot suit your style Even if you already have a good grasp over java or c++ and interested in creating not only fun games but commercial ones also then this is what you really require
There are several actionscript 3 game development books for beginners out there but Essential Guide to Game Dev is one of those few books that talk about the advanced gaming concepts However its first chapter begins with an easy to understand game example (good for any beginner) and ends up creating 3 games Did I tell you 3 games in just first chapter
Teaching about an Actionscript 3 Game framework is one of the many reasons that make this book a kick-ass addition to actionscript 3 gaming library Authors teach you how to create 10 unique games ranging from arcade to driving tile based to puzzle game and shooters to dice games Another specialty of this book is to use Flex and Flash Develop IDEs along with the primary Flash tool that creates space for not only flex
developers but also Flash Develop users In addition to this you will also learn to create game assets with GIMP Mappy and a sound effect creation tool You will get information about copyright laws which are necessary for any would-be commercial game creation and a complete game example integrated with MochiAds
This book also discusses and further more implements various advanced topics such as bitmap rendering pixel-level collision detection sound management AI xml-based level designing scrolling screen optimization techniques particles etc
In short this book will surely blow your minds with the wealth of knowledge it includes and you will pray for authors to keep writing such informative and useful books
If you are really serious about gaming then donrsquot miss the opportunity of reading this book Highly recommended
by Ali RAZA ACI ACE SCJP
Essential Guide to Flash Games
Authors Jeff Fulton Steve FultonPublisher friends of EDISBN 978-1-4302-2614-7Language EnglishPages 664 PagesWebsite httpfriendsofedcombookhtmlisbn=1430226145

032010 (11)26
ACTIONSCRIPT DEVELOPMENT Creating an AS3 Game Framework
032010 (11) 27
the music will need to be added to the systemTitle state function Not all games will need this though so we will not add it to the GameFrameWorkas filersquos systemTitleFunction Instead we will create a new version of the function in Mainas to override the one in GameFrameWorkas The new one will play the sound needed and then call the systemTitle function inside GameFrameWorkas with the supersystemTitle() function call see (Listing 2)
The class imports The class import section contains the necessary Flash core classes needed for the Main class Notice the package name coincides with the package structure we created earlier in the chapter for the framework
package comefgframework
Listing 2
package comefgframework
import flashdisplayBitmap
import flashdisplayBitmapData
import flashdisplayMovieClip
import flasheventsEvent
import flashgeomPoint
import flashtextTextFormat
import flashutilsTimer
import flasheventsTimerEvent
public class GameFrameWork extends MovieClip
public static const EVENT_WAIT_COMPLETEString =
wait complete
public var systemFunctionFunction
public var currentSystemStateint
public var nextSystemStateint
public var lastSystemStateint
public var appBackBitmapDataBitmapData
public var appBackBitmapBitmap
public var frameRateint
public var timerPeriodNumber
public var gameTimerTimer
public var titleScreenBasicScreen
public var gameOverScreenBasicScreen
public var instructionsScreenBasicScreen
public var levelInScreenBasicScreen
public var screenTextFormatTextFormat
public var screenButtonFormatTextFormat
public var levelInTextString
public var scoreBoardScoreBoard
public var scoreBoardTextFormatTextFormat
Game is our custom class to hold all logic for
the game
public var gameGame
waitTime is used in conjunction with the
STATE_SYSTEM_WAIT state
it suspends the game and allows animation or
other
processing to finish
public var waitTimeint
public var waitCountint=0
public function GameFrameWork()
public function init()void
stub to override
public function setApplicationBackGround(width
Number
heightNumberisTransparentBoolean = false
coloruint = 0x000000)void
appBackBitmapData = new BitmapData(width
height
isTransparent color)
appBackBitmap = new Bitmap(appBackBitmapData)
addChild(appBackBitmap)
public function startTimer()void
timerPeriod = 1000 frameRate
gameTimer=new Timer(timerPeriod)
gameTimeraddEventListener(TimerEventTIMER
runGame)
gameTimerstart()
public function runGame(eTimerEvent)void
systemFunction()
eupdateAfterEvent()
switchSystem state is called only when the
032010 (11)26
ACTIONSCRIPT DEVELOPMENT Creating an AS3 Game Framework
032010 (11) 27
Listing 2
state is to be changed
(not every frame like in some switchcase
based simple state machines
public function switchSystemState(statevalint)
void
lastSystemState = currentSystemState
currentSystemState = stateval
switch(stateval)
case FrameWorkStatesSTATE_SYSTEM_WAIT
systemFunction = systemWait
break
case FrameWorkStatesSTATE_SYSTEM_WAIT_FOR_
CLOSE
systemFunction = systemWaitForClose
break
case FrameWorkStatesSTATE_SYSTEM_TITLE
systemFunction = systemTitle
break
case FrameWorkStatesSTATE_SYSTEM_
INSTRUCTIONS
systemFunction = systemInstructions
break
case FrameWorkStatesSTATE_SYSTEM_NEW_GAME
systemFunction = systemNewGame
break
case FrameWorkStatesSTATE_SYSTEM_NEW_LEVEL
systemFunction = systemNewLevel
break
case FrameWorkStatesSTATE_SYSTEM_LEVEL_IN
systemFunction = systemLevelIn
break
case FrameWorkStatesSTATE_SYSTEM_GAME_PLAY
systemFunction = systemGamePlay
break
case FrameWorkStatesSTATE_SYSTEM_GAME_OVER
systemFunction = systemGameOver
break
public function systemTitle()void
addChild(titleScreen)
titleScreenaddEventListener(CustomEventButton
IdBUTTON_ID
okButtonClickListener false 0 true)
switchSystemState(FrameWorkStates
STATE_SYSTEM_WAIT_FOR_CLOSE)
nextSystemState = FrameWorkStatesSTATE_
SYSTEM_INSTRUCTIONS
public function systemInstructions()void
addChild(instructionsScreen)
instructionsScreenaddEventListener(CustomEven
tButtonId
BUTTON_IDokButtonClickListener false 0
true)
switchSystemState(FrameWorkStates
STATE_SYSTEM_WAIT_FOR_CLOSE)
nextSystemState = FrameWorkStatesSTATE_
SYSTEM_NEW_GAME
public function systemNewGame()void
addChild(game)
gameaddEventListener(CustomEventScoreBoardUp
date
UPDATE_TEXTscoreBoardUpdateListenerfalse 0
true)
gameaddEventListener(CustomEventLevelScreenU
pdate
UPDATE_TEXTlevelScreenUpdateListenerfalse
0 true)
gameaddEventListener(GameGAME_OVER
gameOverListener
false 0 true)
gameaddEventListener(GameNEW_LEVEL
newLevelListener
false 0 true)
gamenewGame()
switchSystemState(FrameWorkStatesSTATE_
SYSTEM_NEW_LEVEL)
public function systemNewLevel()void
032010 (11)28
ACTIONSCRIPT DEVELOPMENT Creating an AS3 Game Framework
032010 (11) 29
Listing 2
gamenewLevel()
switchSystemState(FrameWorkStatesSTATE_
SYSTEM_LEVEL_IN)
public function systemLevelIn()void
addChild(levelInScreen)
waitTime = 30
switchSystemState(FrameWorkStatesSTATE_
SYSTEM_WAIT)
nextSystemState = FrameWorkStatesSTATE_
SYSTEM_GAME_PLAY
addEventListener(EVENT_WAIT_COMPLETE
waitCompleteListener false 0 true)
public function systemGameOver()void
removeChild(game)
addChild(gameOverScreen)
gameOverScreenaddEventListener(CustomEventBu
ttonId
BUTTON_IDokButtonClickListener false 0
true)
switchSystemState(FrameWorkStates
STATE_SYSTEM_WAIT_FOR_CLOSE)
nextSystemState = FrameWorkStatesSTATE_
SYSTEM_TITLE
public function systemGamePlay()void
gamerunGame()
public function systemWaitForClose()void
do nothing
public function systemWait()void
waitCount++
if (waitCount gt waitTime)
waitCount = 0
dispatchEvent(new Event(EVENT_WAIT_COMPLETE))
public function okButtonClickListener(e
CustomEventButtonId)void
switch(eid)
case FrameWorkStatesSTATE_SYSTEM_TITLE
removeChild(titleScreen)
titleScreenremoveEventListener(CustomEv
entButtonId
BUTTON_IDokButtonClickListener)
break
case FrameWorkStatesSTATE_SYSTEM_
INSTRUCTIONS
removeChild(instructionsScreen)
instructionsScreenremoveEventListener(
CustomEventButtonIdBUTTON_IDokButtonC
lickListener)
break
case FrameWorkStatesSTATE_SYSTEM_GAME_OVER
removeChild(gameOverScreen)
gameOverScreenremoveEventListener(
CustomEventButtonIdBUTTON_IDokButtonC
lickListener)
break
switchSystemState(nextSystemState)
public function scoreBoardUpdateListener(e
CustomEventScoreBoardUpdate)void
scoreBoardupdate(eelement evalue)
public function levelScreenUpdateListener(e
CustomEventLevelScreenUpdate)void
levelInScreensetDisplayText(levelInText +
etext)
gameOverListener listens for GameGAMEOVER
simple
custom events calls and changes state
accordingly
public function gameOverListener(eEvent)void
switchSystemState(FrameWorkStatesSTATE_
SYSTEM_GAME_OVER)
gameremoveEventListener(CustomEventScoreBoard
Update
UPDATE_TEXTscoreBoardUpdateListener)
gameremoveEventListener(CustomEventLevelScree
nUpdate
032010 (11)28
ACTIONSCRIPT DEVELOPMENT Creating an AS3 Game Framework
032010 (11) 29
We also must import all of the classes needed for the framework to run You will see this put to use shortly
The variable definitions The variable definition section defines all of the global scope variables for the class These include all of the variables needed for the state machine screens and the game timer
We will make use of constants to define the current state and a set of variables to hold the state information These have been be defined on the FrameWorkStatesas file we created in the last section More states can be added to the basic ones but these will be sufficient for many games that we will create in this book There are two special states that are used for the system and wait for button clicks or things like animations to complete These are the STATE_SYSTEM_WAIT_FOR_CLOSE and STATE_SYSTEM_WAIT respectively We will also make use of a generic function called systemFunction that will hold the current state function to call in our game loop Combined with this we use a set of
integer variables to hold the value of the current state (currentSystemState) the last state (lastSystemState) and the next state (nextSystemState) for processing purposes These states should not be confused with an actual game pause function This will be handled in a different manner and added to the framework in Chapter 11
If you are using the Flash IDE and have any assets in the library that need to be exported in the first frame you must extend MovieClip and not Sprite even if you donrsquot plan to use the main time line for anything else We have extended MovieClip for the GameFrameWork so it will work with both Flex SDK and Flash IDE projects
The state control variablesThe control variables keep the system functioning within the context of the current state The main control variable is an instance of the Function class called systemFunction This function holds a reference to the current function that will be repeatedly called on each frame tick This saves us from having to evaluate a switchcase statement on each frame to decide which function to call The function is changed to a new reference by called the switchSystemState() function and passing a new constant that represents the new state
Optimization switchSystemState() is the first of many optimizations we will make to the game framework All of these optimizations will make the Flash games run much more efficiently These efficiencies in the game framework will allow the actual game code to perform more complex operations and still run with a reasonable frame rate
The currentSystemState integer variable holds a number representing the constant of the current state the system is running The nextSystemState contains the constant integer value for the state to transition to after this state is complete The lastSystemState variable holds the integer constant of the previous system state This is used in the rare occurrence that the game loop needs to return to the previous system state
The lastSystemState variable will become useful when we use a shared state such as STATE_SYSTEM_WAIT The STATE_SYSTEM_LEVEL_IN state will implement a 30-millisecond delay before moving on to the STATE_SYSTEM_GAME_PLAY state The nextSystemState will be STATE_SYSTEM_WAIT and the lastSystemState will be STATE_SYSTEM_LEVEL_IN When the 30-millisecond wait time has expired the waitCompleteListener function will be called It will use the lastSystemState to determine where the processing was before the wait was started Yoursquoll see this in detail later in this chapter when we examine the waitCompleteListener function
Listing 2
UPDATE_TEXT levelScreenUpdateListener)
gameremoveEventListener(GameGAME_OVER
gameOverListener)
gameremoveEventListener(GameNEW_LEVEL
newLevelListener)
newLevelListener listens for GameNEWLEVEL
simple custom events calls and changes
state accordingly
public function newLevelListener(eEvent)void
switchSystemState(FrameWorkStatesSTATE_
SYSTEM_NEW_LEVEL)
public function waitCompleteListener(eEvent)
void
switch(lastSystemState)
case FrameWorkStatesSTATE_SYSTEM_LEVEL_
IN
removeChild(levelInScreen)
break
removeEventListener(EVENT_WAIT_COMPLETEwai
tCompleteListener)
switchSystemState(nextSystemState)
032010 (11)30
ACTIONSCRIPT DEVELOPMENT
The background fill variablesAll Flash applications have a background color of some type No matter what game we are going to be creating the framework can control this background color You should never rely on the background color setting in HTML for your Flash applicationrsquos background color This leaves the HTML embed code with control over major aspect of your application If you are creating a viral game to be placed on game portals you will lose control of your gamersquos background color and it will default to what ever the game portal operators have selected as the standard background color in their embed code The framework allows you to override the HTML settings here by placing a simple colored Bitmap behind the entire application We will simply define a BitmapData object called appBackBitmapData and a Bitmap object called appBackBitmap that will be used to place the BitmapData onto the displayList
We will not define the background in the GameFrameWorkas file but rather the Mainas subclass of the GameFrameWork will set the background if needed in its init function override
The timer variablesThe timer will control the frame rate of the game and help smooth out the display by employing the TimerEventupdateAfterEvent method The frameRate variable will be defined in Mainas as the number of frame ticks per second we want our game timer to run
The most important thing to note is that we are making use of the built-in Timer class (gameTimer) We are not using the standard EnterFrame event This allows us to create our own frame rate for the game and specify it in the frameRate variable By doing this we can control game timer tick rate independent of the swf filersquos frame rate (FPS) The swf file can have a frame rate setting of 25 (for example) but the game can run at a 30 frame ticks a second To do this we first set the frameRate to the desired number of frame update ticks we want per second (30) When Mainas calls the startTimer function (described in detail when we get to the section on the init function) the gameTimer is put into action First we will calculate the timerPeriod value as 1000frameRate With the updateAfterEvent function call (in the runGame function) we help to smooth out the render of the screen by asking the Flash display engine to update at the rate of the Timer not the frame rate set in the swf So going back to our example if the game SWF is set to run at 25 FPS and the frameRate is set to 30 ticks the updateAfterEvent will help to smooth out the rendering of the screen by asking the Flash display engine to update at the timer tick rate (30) not the swf filersquos FPS setting (25)
The timerPeriod will be passed into the Timer instance and the game will attempt to run at this rate We say
attempt because if the game includes too many on screen moving objects or more logic than can be computed inside the timerPeriod number of milliseconds (or a combination of both) then there will be a noticable slowdown in the game screen updates In later chapters we will add functionality to the runGame function to mitigate some of these issues
The screen definition variablesThe screen definition variables create instances of our BasicScreen class This is a rather simple class that allows a single positional text box and an OK button on the screen We will use this simple screen for the title instructions level and game over screens We will customize each screen when we create the init function override in our gamersquos Mainas class Note that the levelInText is a special variable Setting this string to a default value will allow the leveInScreen to display some default text along on each new level This text can be combined with dynamic text to create a screen that says something like Level 1 with the word Level being the default text and the number 1 being the dynamic text
public var titleScreenBasicScreen
public var gameOverScreenBasicScreen
public var instructionsScreenBasicScreen
public var levelInScreenBasicScreen
public var levelInTextString
public var screenTextFormatTextFormat
public var screenButtonFormatTextFormat
We also create two TextFormat objects that will be used for defining the format of the text on the screens and the format of the button text
The ScoreBoard variablesThe scoreBoard instance of the ScoreBoard class will handle a simple heads up display (HUD) for the user with information such as the current score It is a simple framework class that will be customized in the init function override in each gamersquos Mainas class The changes will depend on the game that is to be created We also define a TextFormatObject for the basic look of the text for our scoreboard text scoreBoardTextFormat
JEFF FULTON
STEVE FULTON
The next part of the article in the June issue of FFD Magazine
032010 (11)32
ACTIONSCRIPT DEVELOPMENT
032010 (11) 33
On my quest of learning Flash I often became frustrated of how difficult it was to update the contents of my application Meaning if I wanted
to change out an image or piece of copy I had to open up Flash go to my library find the Movie Clip that had my asset in it and republish I thought to myself this is no way to work this is so inefficient Enter XML in all its glory Constructing an application with enabled me to quickly and easily update my project at a moments
notice Without having to open up Flash Now what could be better than that
In this article yoursquore going to learn how to create a new ActionScript project in Flex Builder 3 and write ActionScript 30 code that will load in an XML file display the images on screen and add some interactivity to the scene
Setting up FlexOpen up Flex and go to Filegt NewgtActionScript Project A dialog window will open In the project name field type in PhotoGallery Leave the use default location box checked and click finish (see Figure 1)
Creating an XML Photo Gallery
Searching the Internet yoursquoll find dozens if not hundreds of examples of photo galleries created with Flash
What you will learnhellipbull How to create an ActionScript application in Flex Builder 3bull How to use ActionScript to parse an XML le
What you should knowhellipbull Familiar with general programming concepts such as data ty-
pes variables loops and functionsbull Familiar with class creation and constructionbull Some understanding of XML
with AS3
Figure 1 New ActionScript window dialog Figure 2 ActionScript Compiler dialog
032010 (11)32
ACTIONSCRIPT DEVELOPMENT
032010 (11) 33
Once you click finish your project should open and you should see PhotoGalleryas on screen There are a few steps that I like to take next that I do for every project
First right click PhotoGallery folder in the Flex Navigator window click properties at the bottom and then click on the ActionScript Compiler link on the left hand side At the bottom yoursquoll see a check box that is already selected to generate a HTML wrapper file Uncheck that and click ok A warning message will appear saying that the html-template folder will be deleted Donrsquot worry about that because we havenrsquot put anything in that folder Click ok I personally donrsquot like to have a browser window open every time I run my application (see Figure 2)
Secondly wersquoll be using a tweening library called Tweener In order to use Tweener we have to first download it (httpcodegooglecomptweener) Be sure to download the ActionScript 30 version and create a folder on your desktop or any other place and name it code Place the contents of that download into that folder Next go back to Flex and again right click the PhotoGallery folder and click properties again and this time yoursquoll click the ActionScript Build Path link This window gives us the ability to add assets to our project so we can use them in our project Click the Add Folder button browser to the code folder you just created click ok and click ok again to close the window Now that folder and all its contents will be included in our project (see Figure 3)
Next right click the src folder in your project scroll over to new and add a new folder Name this folder classes This folder will contain two classes that wersquoll be using Then repeat the same steps but this time name the folder images This folder will contain all the images
Figure 3 ActionScript Build Path dialog
032010 (11)34
ACTIONSCRIPT DEVELOPMENT
Listing 1 galleryxml
ltxml version=10 encoding=UTF-8gt
ltgallery image_height=150 image_width=150 image_
gap=5 rows=3gt
ltphotogt
ltdescriptiongtThis is a description for the first
imageltdescriptiongt
ltthumb_pathgtimagesthumbjpgltthumb_pathgt
ltfull_pathgtimagesfullgifltfull_pathgt
ltphotogt
ltphotogt
ltdescriptiongtThis is a description for the second
imageltdescriptiongt
ltthumb_pathgtimagesthumbjpgltthumb_pathgt
ltfull_pathgtimagesfullgifltfull_pathgt
ltphotogt
ltphotogt
ltdescriptiongtThis is a description for the third
imageltdescriptiongt
ltthumb_pathgtimagesthumbjpgltthumb_pathgt
ltfull_pathgtimagesfullgifltfull_pathgt
ltphotogt
ltphotogt
ltdescriptiongtThis is a description for the fourth
imageltdescriptiongt
ltthumb_pathgtimagesthumbjpgltthumb_pathgt
ltfull_pathgtimagesfullgifltfull_pathgt
ltphotogt
ltphotogt
ltdescriptiongtThis is a description for the fifth
imageltdescriptiongt
ltthumb_pathgtimagesthumbjpgltthumb_pathgt
ltfull_pathgtimagesfullgifltfull_pathgt
ltphotogt
ltphotogt
ltdescriptiongtThis is a description for the sixth
imageltdescriptiongt
ltthumb_pathgtimagesthumbjpgltthumb_pathgt
ltfull_pathgtimagesfullgifltfull_pathgt
ltphotogt
ltphotogt
ltdescriptiongtThis is a description for the seventh
imageltdescriptiongt
ltthumb_pathgtimagesthumbjpgltthumb_pathgt
ltfull_pathgtimagesfullgifltfull_pathgt
ltphotogt
ltphotogt
ltdescriptiongtThis is a description for the eighth
imageltdescriptiongt
ltthumb_pathgtimagesthumbjpgltthumb_pathgt
ltfull_pathgtimagesfullgifltfull_pathgt
ltphotogt
ltphotogt
ltdescriptiongtThis is a description for the ninth
imageltdescriptiongt
ltthumb_pathgtimagesthumbjpgltthumb_pathgt
ltfull_pathgtimagesfullgifltfull_pathgt
ltphotogt
ltphotogt
ltdescriptiongtThis is a description for the tenth
imageltdescriptiongt
ltthumb_pathgtimagesthumbjpgltthumb_pathgt
ltfull_pathgtimagesfullgifltfull_pathgt
ltphotogt
ltphotogt
ltdescriptiongtThis is a description for the
eleventh imageltdescriptiongt
ltthumb_pathgtimagesthumbjpgltthumb_pathgt
ltfull_pathgtimagesfullgifltfull_pathgt
ltphotogt
ltphotogt
ltdescriptiongtThis is a description for the twelfth
imageltdescriptiongt
ltthumb_pathgtimagesthumbjpgltthumb_pathgt
ltfull_pathgtimagesfullgifltfull_pathgt
ltphotogt
ltphotogt
ltdescriptiongtThis is a description for the
thirteenth imageltdescriptiongt
ltthumb_pathgtimagesthumbjpgltthumb_pathgt
ltfull_pathgtimagesfullgifltfull_pathgt
ltphotogt
ltphotogt
ltdescriptiongtThis is a description for the
fourteenth imageltdescriptiongt
ltthumb_pathgtimagesthumbjpgltthumb_pathgt
ltfull_pathgtimagesfullgifltfull_pathgt
ltphotogt
ltphotogt
ltdescriptiongtThis is a description for the
fifteenth imageltdescriptiongt
ltthumb_pathgtimagesthumbjpgltthumb_pathgt
ltfull_pathgtimagesfullgifltfull_pathgt
ltphotogt
ltgallerygt
032010 (11)36
ACTIONSCRIPT DEVELOPMENT
Listing 2 PhotoGalleryas
package
Imports
import caurinatransitionsTweener
import classesBigPhoto
import classesThumbNail
import flashdisplayBitmap
import flashdisplaySprite
import flasheventsEvent
import flasheventsMouseEvent
import flashnetURLLoader
import flashnetURLRequest
[SWF(width=466 height=515 backgroundColor=00
0000 frameRate=30)]
public class PhotoGallery extends Sprite
Containers
private var _thumbContainerSprite Stores
the thumbnails
private var _nextButtonSprite Stores
the next arrow
private var _backButtonSprite Stores
the back arrow
private var _bigPhotoBigPhoto
Container for the big image
XML
private var _xmlLoaderURLLoader
Loads the XML file
private var _xmlXML
Stores the XML data
Image Assets
[Embed(source=assetsnext-arrowpng)]
private var _nextArrowClass
Embedded asset for the next
arrow
[Embed(source=assetsback-arrowpng)]
private var _backArrowClass
Embedded asset for the back
arrow
Constructor
public function PhotoGallery()
init ()
Initializing method
private function init ()void
_xmlLoader = new URLLoader ()
_xmlLoaderaddEventListener (EventCOMPLETE
xmlComplete false 0 true)
_xmlLoaderload (new URLRequest
(galleryxml))
XML Complete
private function xmlComplete (eEvent)void
Store the XML data
_xml = new XML (etargetdata)
loadImages ()
Clean up
_xmlLoaderremoveEventListener
(EventCOMPLETE xmlComplete)
_xmlLoader = null
Load in the thumbs
private function loadImages ()void
Temporary variables
var imageHeightuint = _xmlimage_height
var imageWidthuint = _xmlimage_width
var imageGapuint = _xmlimage_gap
var rowsuint = _xmlrows
var rowCounteruint = 0
var columnCounteruint = 0
Instantiate the container and position it
on screen
_thumbContainer = new Sprite ()
_thumbContainerx = 78
_thumbContainery = 78
_thumbContainerbuttonMode = true
_thumbContaineraddEventListener
(MouseEventCLICK thumbClick
false 0 true)
thisaddChild (_thumbContainer)
Loop through the images and create the
visual grid
for (var iuint = 0 i lt _xmlphotolength ()
i++)
var pathString = _xmlphoto[i]thumb_path
var descriptionString = _xmlphoto[i]desc
Creating an XML Photo Gallery with AS3
032010 (11) 37
Listing 2 PhotoGalleryas
ription
Create the thumbnail
var pThumbNail = new ThumbNail ()
pnewID = i
ploadImage (path)
pdescription = description
px = (imageWidth + imageGap)
columnCounter
py = (imageHeight + imageGap)
rowCounter
_thumbContaineraddChild (p)
Create the grid
if ((rowCounter + 1) lt rows)
rowCounter++
else
rowCounter = 0
columnCounter++
Setup the navigation
createNavigation ()
This method handles the click event for the
next arrow
private function nextClick (eMouseEvent)void
155 is the width + spacing
if (-_thumbContainerx lt (_thumbContainerwidth
ndash stagestageWidth ndash 155))
disableNavigation ()
TweeneraddTween (_thumbContainer x
_thumbContainerx ndash 155 time
075 transitioneaseOutExpo
onCompleteenableNavigation)
This method handles the click event for the
back arrow
private function previousClick (eMouseEvent)void
if (-_thumbContainerx gt 0)
disableNavigation ()
TweeneraddTween (_thumbContainer x
_thumbContainerx + 155 time
075 transitioneaseOutExpo
onCompleteenableNavigation)
This method handles the click event for the
thumbnails
private function thumbClick (eMouseEvent)void
disableNavigation ()
Disable the container that stores the
thumbnails
_thumbContainerbuttonMode = false
_thumbContainermouseChildren = false
_thumbContainerremoveEventListener
(MouseEventCLICK thumbClick)
Get the full image path
var imagePathString = _xmlphoto[etargetnewI
D]full_path
Instantiate the big photo
_bigPhoto = new BigPhoto ()
_bigPhotobuttonMode = true
_bigPhotox = 108
_bigPhotoy = 1075
_bigPhotoalpha = 0
_bigPhotoloadImage (imagePath)
_bigPhotoaddEventListener (MouseEventCLICK
closePhoto false 0 true)
thisaddChild (_bigPhoto)
Fade up the photo
TweeneraddTween (_bigPhoto alpha1 time
1)
Fade out the photo
When the image finishes fading delete the
photo and enable the navigation
items
private function closePhoto (eMouseEvent)void
TweeneraddTween (_bigPhoto alpha0 time1
onCompletedeletePhoto)
private function deletePhoto ()void
032010 (11)38
ACTIONSCRIPT DEVELOPMENT
Listing 2 PhotoGalleryas
_bigPhotobuttonMode = false
_bigPhotoremoveEventListener
(MouseEventCLICK closePhoto)
_bigPhotodestroy ()
thisremoveChild (_bigPhoto)
_bigPhoto = null
_thumbContainerbuttonMode = true
_thumbContainermouseChildren = true
_thumbContaineraddEventListener
(MouseEventCLICK thumbClick
false 0 true)
enableNavigation ()
private function createNavigation ()void
Instantiate the next arrow
var nBitmap = new _nextArrow ()
Instantiate the nextButton container
Add the next button as a child of the
nextButton container
_nextButton = new Sprite ()
thisaddChild (_nextButton)
_nextButtonaddChild (n)
_nextButtonx = stagestageWidth ndash _
nextButtonwidth
_nextButtony = 475
Instantiate the back arrow
var bBitmap = new _backArrow ()
Instantiate the backButton container
Add the next button as a child of the
backButton container
_backButton = new Sprite ()
thisaddChild (_backButton)
_backButtonaddChild (b)
_backButtonx = _nextButtonx ndash _
nextButtonwidth ndash 5
_backButtony = 475
enableNavigation ()
private function enableNavigation ()void
_nextButtonbuttonMode = true
_nextButtonaddEventListener
(MouseEventCLICK nextClick false
0 true)
_backButtonbuttonMode = true
_backButtonaddEventListener
(MouseEventCLICK previousClick
false 0 true)
private function disableNavigation ()void
_nextButtonbuttonMode = false
_nextButtonremoveEventListener
(MouseEventCLICK nextClick)
_backButtonbuttonMode = false
_backButtonremoveEventListener
(MouseEventCLICK previousClick)
Figure 4 New ActionScript class dialog
Creating an XML Photo Gallery with AS3
032010 (11) 39
Listing 3 ThumbNailas
package classes
import caurinatransitionsTweener
import flashdisplayLoader
import flashdisplayShape
import flashdisplaySprite
import flasheventsEvent
import flasheventsMouseEvent
import flashnetURLRequest
import flashtextTextField
import flashtextTextFieldAutoSize
import flashtextTextFormat
public class ThumbNail extends Sprite
Containers
private var _imageLoaderLoader Loads in
the thumbnail
private var _imageContainerSprite
Container for the thumbnail
private var _maskShape Container for the
mask
private var _descriptionContainerSprite
Container for the description
TextFields
private var _descriptionTextField
TextField for the container
Logic
private var _newIDuint The ID of the
object
[Embed(systemFont=Arial fontName=arial
fontWeight=bold
mimeType=applicationx-font-
truetype)]
private var _arialClass Embedded asset
for the font
Constructor
public function ThumbNail ()
super ()
init ()
Initializing method
private function init ()void
Instantiate the container
_imageContainer = new Sprite ()
_imageContaineralpha = 0
thisaddChild (_imageContainer)
createDescription ()
thismouseChildren = false
thisaddEventListener (MouseEventMOUSE_OVER
onMouseOver false 0 true)
thisaddEventListener (MouseEventMOUSE_OUT
onMouseOut false 0 true)
Public Methods
public function loadImage (pathString)void
_imageLoader = new Loader ()
_imageLoadercontentLoaderInfoaddEventListen
er (EventCOMPLETE imageComplete
false 0 true)
_imageLoaderload (new URLRequest (path))
GetterSetter Methods
public function get newID ()uint
return this_newID
public function set newID (valueuint)void
this_newID = value
public function get description ()String
return this_descriptiontext
public function set description (valueString)void
this_descriptiontext = value
Private Methods
032010 (11)40
ACTIONSCRIPT DEVELOPMENT
Listing 3 ThumbNailas
private function onMouseOver (eMouseEvent)void
TweeneraddTween (_descriptionContainer
y75 time05 transition
easeOutExpo)
private function onMouseOut (eMouseEvent)void
TweeneraddTween (_descriptionContainer
y150 time05 transition
easeOutExpo)
private function imageComplete (eEvent)void
Reposition the loaded content to the center
_imageLoaderx = -(_imageLoaderwidth 2)
_imageLoadery = -(_imageLoaderheight 2)
_imageContaineraddChildAt (_imageLoader 0)
Apply background after the image has
completely loaded
drawBackground ()
Draw the mask around the description
drawMask ()
Fade in the container
TweeneraddTween (_imageContainer alpha1
time05)
Clean up
_imageLoadercontentLoaderInforemoveEv
entListener (EventCOMPLETE
imageComplete)
Draws a background behind _imageContainer
private function drawBackground ()void
_imageContainergraphicsbeginFill (0xFFFFFF)
_imageContainergraphicsdrawRect (_
imageLoaderx ndash 1 _imageLoadery
ndash 1 _imageLoaderwidth + 2
_imageLoaderheight + 2)
_imageContainergraphicsendFill ()
Creates everything for the description
private function createDescription ()void
Instantiate the container
_descriptionContainer = new Sprite ()
_descriptionContainery = 150
_descriptionContainergraphicsbeginFill
(0x000000 075)
_descriptionContainergraphicsdrawRect (-75
-75 150 75)
_descriptionContainergraphicsendFill ()
_imageContaineraddChild (_
descriptionContainer)
Specify text formatting for the description
Text Field
var tfTextFormat = new TextFormat ()
tfcolor = 0xFFFFFF
tfalign = center
tffont = arial
tfbold = true
tfsize = 12
Instantiate the TextF ield
_description = new TextField ()
_descriptionx = -75
_descriptiony = -70
_descriptionwidth = 150
_descriptionwordWrap = true
_descriptionembedFonts = true
_descriptiondefaultTextFormat = tf
_descriptionautoSize = TextFieldAutoSizeLEFT
_descriptionContaineraddChild (_description)
Draws a mask our _descriptionContainer
private function drawMask ()void
Draw the mask shape
_mask = new Shape ()
_maskgraphicsbeginFill (0xFF0000)
_maskgraphicsdrawRect (_imageLoaderx
_imageLoadery _imageLoaderwidth
_imageLoaderheight)
_maskgraphicsendFill ()
addChild (_mask)
Apply the mask to the container
_descriptionContainermask = _mask
Creating an XML Photo Gallery with AS3
032010 (11) 41
that will be loaded into the application from XML Finally create another folder and this time name it assets This folder will contain the buttons that wersquoll embed into our project
The AssetsBefore we start coding we need to create some visual assets Open up Photoshop or any other program you have for creating graphics and create an image that is 150x150 pixels Fill it with a flat color and save the image as thumbjpg in the images folder you just created Next create another image thatrsquos 250x300 pixels Fill it with another color and save that image as fulljpg into the same folder These images will be used for testing purposes only
Listing 4 BigPhotoas
package classes
import flashdisplayLoader
import flashdisplaySprite
import flasheventsEvent
import flashnetURLRequest
public class BigPhoto extends Sprite
Containers
private var _imageLoaderLoader Loads in the
thumbnail
private var _imageContainerSprite Container
for the thumbnail
Constructor
public function BigPhoto ()
super()
Public Methods
public function loadImage (pathString)void
_imageLoader = new Loader ()
_imageLoadercontentLoaderInfoaddEventListen
er (EventCOMPLETE imageComplete
false 0 true)
_imageLoaderload (new URLRequest (path))
Clean up method
public function destroy ()void
_imageContainerremoveChild (_imageLoader)
_imageLoaderunload ()
_imageLoader = null
thisremoveChild (_imageContainer)
_imageContainer = null
Private Methods
private function imageComplete (eEvent)void
Instantiate the container
_imageContainer = new Sprite ()
thisaddChild (_imageContainer)
Add the loader
_imageContaineraddChild (_imageLoader)
Clean up
_imageLoadercontentLoaderInforemoveEv
entListener (EventCOMPLETE
imageComplete)
Figure 5 Time to test
032010 (11)42
ACTIONSCRIPT DEVELOPMENT
We still have to create our navigation buttons that wersquoll use to scroll through our gallery Create two buttons that are 40x40 pixels and design them how you like They should resemble forward and back buttons Save the forward arrow as next-arrowpng and the other as back-arrowpng into the assets folder Now that our assets our created itrsquos time to code
The XML fileRight click the src folder in the project scroll over to new and click file A dialog window will open and in the file name input box type galleryxml (see Figure 4) Write the code that you see from Listing 1 into galleryxml
Line 1 is the XML declaration This is needed to have a well-formed XML document
Line 2 declares the gallery root node Notice in this node Irsquove added attributes Also to have a well-formed XML document you must have one root node and all attribute values must be in quotes
Lines 3-7 declares a photo node with three children description thumb_path and full_path description is exactly as it sounds It will contain a description for our thumbnail thumb_path contains the path to our thumbnail image Same goes for full_path it contains the path to our full image
I then just copy and pasted that and pasted it 14 times just changing out the description Remember wersquore just using dummy data When you finish go back and add photos of your choice
The ClassesWersquoll be using two additional classes for this project One will be for the thumbnails and another for the full image Right click the classes folder go to new and click ActionScript class In the name field type ThumbNail For the Superclass type in flashdisplaySprite Wersquoll need to extend from that class so we can use the functionality of that object but add our own (see Figure 4)
Add another class this time name it BigPhoto It should also inherit from flashdisplaySprite
CodingTime to start writing the ActionScript for this project Open up PhotoGalleryas from the Flex Navigator and type in the code from Listing 2 Open up ThumbNailas and type in the code from Listing 3 Open up BigPhotoas and type in the code from Listing 4 Now that you have all the code in itrsquos time to test In the menu bar click RungtRun PhotoGallery (see Figure 5) If you get an error make sure you typed everything correctly If all went well you should see the gallery open up Click the buttons and watch the gallery scroll left and right Roll over the thumbnails to see the description scroll up Click on a thumbnail to see the full image fade in You might be wondering about whatrsquos going on Irsquoll try to break that down for you next
The ExplanationOur main focus is going to be whatrsquos going on in PhotoGalleryas This file contains the ActionScript that makes almost everything happen We first start off by declaring our properties that will be used in the project Yoursquoll notice a couple of embeded lines These lines are MetaData tags that actually embed assets into the project The two embeded lines you see add the next-arrowpng file and the back-arrowpng file In the constructor there is one call to a method called init() This method gets the application going by requesting and loading in the XML File When the file finishes loading we store the XML data into our _xml property Next we call the loadImages() method This method is responsible for a big part of the application We first gather some information from the XML file and store it in temporary variables
bull imageWidth stores the image _ height attributes valuebull imageWidth stores the image _ width attributes valuebull imageGap stores the image _ gap attributes valuebull rows stores the row attributes valuebull rowCounter increments ever pass of the for loop Is
compared against the rows variablebull columnCounter increments once for every column
created
The for loop cycles the XML file creating a new ThumbNail object with every iteration During each iteration we create variables that store the path to the thumb nail (path) and the description of the thumbnail (description) We pass the variables into the methods of the ThumbNail class Remember the ThumbNail class defines methods and properties that are specific to it The class code is commented if you wish to explore it Again our main focus is PhotoGalleryas To create the grid we write ifelse logic that compares the rowCounter variable to the row variable For every iteration of the loop we increment that variable if that variable becomes greater than rows we set it back to 0 rowCounter is then multiplied to the y-axis of each ThumbNail object The rest of the code is commented for you to explore
ConclusionYoursquoll notice I actually hard coded a lot of values directly in the ActionScript Not too ideal In the next part of this tutorial wersquore going to come back to this code and modify it to be a little more flexible and visually appealing If you have any questions feel free to contact me through my site (wwwcodedbyryancom)
RYAN DrsquoAGOSTINORyan DrsquoAgostino is an Interactive Developer at NAS Recruitment Communications in Cleveland OH part-time instructor at Virginia Marti College of Art and Design in Lakewood Ohio and freelance designer and ActionScript developer For more information about Ryan please visit httpwwwcodedbyryancom
032010 (11)44
COMPONENTS
Components are the controls and containers that are the elements of the application that create the interface They cover controls such
as buttons and check boxes containers that can hold other containers and controls navigation elements and charts Components can be added to your application in variety of ways They can be added through the design view writing then in MXML or through ActionScript
Flash Builder now has two major sets of components the Halo set which has been available in previous versions of Flex and the new Spark set The components from the Spark set have a direct correlation to a component in the Halo set but not all Halo components have been upgraded to the Spark framework yet The namespaces for these components are added automatically when a MXML document is created and you will notice there are now multiple namespace in the main MXML document already
Creating custom components takes two paths The first is to create a skin for an existing Halo component in Flash Illustrator Photoshop or Fireworks or create a custom skin for a Spark component using MXML The second path is to create a completely custom component using Flash Professional and importing it into the Flash Builder project We are going to focus on the second path and create a custom component with Flash Professional
The first step in creating a custom component is to instal the Flex Component Kit mxp into Flash Professional This is an extension that will expose some
Custom Flash CS4
Flash Builder comes with a lot of components to cover almost all of an apps needs But what if you want a custom look or functionality to a component With Flash Professional you can create custom components and import them into Flash Builder for use in your application
What you will learnhellipbull How to create custom components in Flash Professional to im-
port into Flash Builder
What you should knowhellipbull Flash Professional CS4bull Flash Builder 4bull Actionscript 3
Components in Flash Builder 4
Figure 1 The component artwork Figure 2 Converting the movie clip
032010 (11)46
COMPONENTS
Listing 1 The component class
package comtest
import mxflashUIMovieClip
import flasheventsEvent
import flasheventsEventDispatcher
import flasheventsMouseEvent
import flashfiltersGlowFilter
public class SliderButton extends UIMovieClip
public static const BUTTON_CLICKString = button click
private var glowGlowFilter = new GlowFilter(0x0000cc54421falsefalse)
public function SliderButton()
plusButtonbuttonMode = true
minusButtonbuttonMode = true
plusButtonaddEventListener(MouseEventMOUSE_OVER handleMouseOver)
plusButtonaddEventListener(MouseEventMOUSE_OUT handleMouseOut)
plusButtonaddEventListener(MouseEventCLICK handleMousePress)
minusButtonaddEventListener(MouseEventMOUSE_OVER handleMouseOver)
minusButtonaddEventListener(MouseEventMOUSE_OUT handleMouseOut)
minusButtonaddEventListener(MouseEventCLICK handleMousePress)
private function handleMouseOver(eMouseEvent)void
ecurrentTargetfilters = [glow]
private function handleMouseOut(eMouseEvent)void
ecurrentTargetfilters = []
private function handleMousePress(eMouseEvent)void
if(ecurrentTargetname == plusButton ampamp trackThumbx lt 134)
trackThumbx++
else if(ecurrentTargetname == minusButton ampamp trackThumbx gt 37)
trackThumbx--
dispatchEvent(new Event(SliderButtonBUTTON_CLICK))
032010 (11)48
COMPONENTS
of the Flex classes to Flash allowing the component to communicate with the application Download the extension from the Adobe site at httpwwwadobecomcfusionexchangeindexcfmevent=extensionDetailampextid=1273018 and install using the Adobe Extension Manager The extension should work with Flash
versions as far back as Flash 8 but I highly recommend using at least Flash 9 (CS 3)
Once the extension is installed launch Flash Professional and create a new ActionScript 3 project We are going to create a simple slider button that has a plus and minus button on each end of the button and a track between them When the plus and minus buttons are clicked the the track thumb will move one pixel in either direction There will also be a roll over behavior on the buttons to change their look as the mouse rolls over and off the buttons Finally Flash Builder will receive the event of the button being pushed and update a text input on the stage
It is common to encapsulate the behaviors of the component within itself and have events broadcast to the containing application If you think about some of standard components in both Flash Builder and Flash Professional and deconstruct them in your mind you will see that the same methods are used on them The NumericStepper is a lot like our component It has two buttons with a text field that displays a value that is incremented or decremented with each push of the button The component itself does nothing to effect the application until the code calls it to either send or receive a value
With our new document we are going to create the artwork for the component in the fla file Create four movie clips one each for the scroll track the plus button the minus button and the track thumb (Figure 1) The naming and look of these movie clips are not important
Once the movie clips are created and on the stage give each one an instance name The names in the
Figure 3 Setting the class of the movie clip
Figure 4 Setting to export as SWC
Figure 5 Creating the Flash Builder project
Custom Flash CS4 Components in Flash Builder 4
032010 (11) 49
example files are plusButton minusButton and trackThumb The actual names do not matter and we dont need an instance name for the track since we are not going to reference it in Flash Builder Flash Builder will reference the instance names of the movie clips in the components we will use these later
Now that the artwork has been created it must be collected into its own movie clip Select all of the artwork on the stage and choose ModifygtgtConvert to Symbolhellip In the Library panel there is a new symbol that is called in the sample files SliderButton The name is important here because this is how the Convert to Flex Component mxp will name the class that Flash Builder will refer to later
An external class will give the component the internal behaviors that were mentioned earlier as well as an event to broadcast to the Flash Builder application (Listing 1) All the code in the class should be familiar but there are a few points to go over First the package name is given the qualifier of comtest to identify that the component belongs to our namespace This is not necessary but helpful when there are multiple components or components from different publishers in the application
The most important change is instead of having the class extend the Sprite class this class is going to
extend the UIMovieClip class This class like the Flex Component in the library exposes the behaviors and methods we set up in the class to the Flash Builder application In the import statements use import
mxflashUIMovieClip The mxflash class includes both the UIMovieClip and ContainerMovieClip classes
When the variables are declared we set up a glow filter that will be attached to the buttons when the mouse rolls over them and a string constant for the event we create later In the constructor of the class the buttons receive the event listeners for the mouse interactions and the handlers are added later in the code In the handleClick event handler we use the event dispatcher class to dispatch the event Here we are just dispatching a standard event with the constant that was created earlier You can just as easily dispatc a custom event that has extra information attached to it
Select the movie clip in the Library panel then select CommandsgtgtConvert Symbol to Flex Component (Figure 2) The extension will do several operations such as making the symbol available to ActionScript giving the symbol a class name adding the Flex Component to the library and others
Save the file as SliderButtonas in the folder path comtest When you declare the package name as we have here you must have the same hierarchy as listed in the package name Back in the fla select the
Figure 6 The Package Explorer
Listing 2 The main MXML le
ltxml version=10 encoding=utf-8gt
ltsApplication xmlnsfx=httpnsadobecommxml
2009
xmlnss=librarynsadobecomflex
spark
xmlnsmx=librarynsadobecomflex
mx
width=200 height=110gt
ltfxDeclarationsgt
lt-- Place non-visual elements (eg
services value objects) here
--gt
ltfxDeclarationsgt
ltsApplicationgt
Listing 3 The new component and name space
xmlnstest=comtest
lttestSliderButton x=14 y=10 id=sliderButton
gt
032010 (11)50
COMPONENTS
SliderButton movie clip and select Propertieshellip from the contextual menu Expand the advanced area if it is not already and enter comtestSliderButton in the Class text field Leave the Base Class text field blank and click OK (Figure 3)
Select Publish Settingshellip from the file menu and click on the Flash tab (Figure4) Under the SWF Settings area of the window be sure that the Export SWC check box is checked The swc is the part that Flash Builder will use in the application SWC are archives that contain the classes and media assets of the component and make it easy to distribute the movie clip
Publish the SWF and SWC and we are ready to move to Flash Builder
Flash BuilderIn Flash Builder create a new project This example we only need a basic Flash Builder project without any
server technologies You can name the project anything you would like in this case I have name FB_Components and saved it in my default workspace
If you have not worked on a Flash Builder project yet it is a lot like working on the Flex projects in the past with some new MXML tags You will also notice that the Flex Navigator pane has now been replaced with the Package Explorer (Figure 6)
The Package Explorer pane has a different organization than the Flex Navigator but the main MXML file can still be found under src then under the default package
Looking at the main MXML (Listing 2) you will see that the three name spaces are added automatically and the application begins with sApplication instead of mxApplication These are the minor differences to be on the look out for when working on a Flash Builder project
Listing 4 The nal MXML le
ltxml version=10 encoding=utf-8gt
ltsApplication xmlnsfx=httpnsadobecommxml2009
xmlnss=librarynsadobecomflexspark
xmlnsmx=librarynsadobecomflexmx minWidth=200 minHeight=110
width=200 height=110
initialize=init()
xmlnstest=comtestgt
ltfxDeclarationsgt
lt-- Place non-visual elements (eg services value objects) here --gt
ltfxDeclarationsgt
ltfxScriptgt
lt[CDATA[
private function init()void
sliderButtonaddEventListener(SliderButtonBUTTON_CLICK updateText)
private function updateText(eEvent)void
pixelTexttext = String(sliderButtontrackThumbx)
]]gt
ltfxScriptgt
lttestSliderButton x=14 y=10 id=sliderButton gt
ltsLabel x=39 y=41 text=The position of the track thumb is textAlign=center width=122gt
ltsTextInput x=76 y=76 width=49 id=pixelTextgt
ltsApplicationgt
Custom Flash CS4 Components in Flash Builder 4
032010 (11) 51
To get our component into the Flash Builder project we need to put the swc some where the project can see it On your desktop navigate to where the swc was published to and copy the file Then navigate to where Flash Builder project is and put the swc into libs folder I have found it is easier to keep the fla and swf files out of the project then copy the swc over to the Flash Builder project as needed
Back in Flash Builder open the libs folder under the project in the Package Explorer pane In that directory you should see your swc if you do not try right clicking on the libs folder and selecting Refresh
In the MXML editor switch to Design view When the Design view becomes active the Component pane should become available in the lower left of the workspace The first folder in the pane is the Custom folder and our custom component should be displayed in the list Drag an instance of this component onto the stage
To show that we can have two way communication with the component drag a label and a text input onto the stage Set the labels text to be The position of the track thumb is and move the text input near the label Set the id of the text input to pixelText (Figure 7) Switch back to the Source view after saving
Notice that several lines have been added to the source of the MXML document In addition to the MXML for the component including our custom component a name space value has been added to the sApplication tag designated as xmlnstest=comtest (Listing 3) If we add more components using the same comtest package declaration they will all fall under this name space If we were to add more components using a different package additional name spaces would be added You will also notice that the component starts with testSliderButton as opposed to s fx or mx
In the application tag add an initialize property calling a function called init() After the fxDeclarations tags add fxScript tags to hold the Actionscript As you type fx the code completion should pop up and allow you to select the fxScript tags
Add an id property to the SliderButton tag and give it a value of sliderButton In between the CDATA tags add the init function This function simply adds an event listener to our component calling the updateText
function every time the BUTTON_CLICK event is broadcast from the SliderButton class (Listing 4)
Once the application receives the BUTTON_CLICK event it calls the updateText function This function looks into the component and gets the x position of the track thumb then puts that value into the text input we set up earlier
So now we have communication coming out of the component using the dispatchEvent call in the class We are also looking into the component where the application is getting the x position of the thumb track inside the component Communication can get much more complicated than this but this is a simple example to give a starting point to create more complex components
Click debug to run the application and if no errors occurred the application should launch in a browser window If you have a browser window open before running the app you should close it There is a bug in the Flash Player at the time of this writing that may cause the app to not run if there are browser windows already open
Once the application is running click on the buttons and watch as the value in the text input increase and decrease The custom component is now complete and ready to have more behaviors and methods added to it
ConclusionWhile the components that come with Flash Builder can cover most situations there will be times where only a custom component will fit the applications needs Creating a custom component takes a little work but can make the developers job a lot easier With this new level of control over the look and behavior of the component can make the application more rich and engaging to the end user
Figure 7 Components on the stage
On the Netbull httpwwwadobecombull httpwwwadobecomcfusionexchangeindexcfmeven-
t=extensionDetailampextid=1273018
LOUIS DICARROLouis DiCarro is a consultant based in NYC and has been working with Flash since the rst version He has taught web development at the college level and has worked for numerous large clients He can be reached at louisdicarroffdgmailcom
032010 (11)52
COMPONENTS AIR Components in Flash Builder
032010 (11) 53
We already know that building an AIR application affords us a lot more capabilities than working with a web based project
Digging through the Actionscript documentation shows that there are a lot of classes that are only available to AIR applications These mostly have to do with classes and methods that interact with the file system or windowing of the application
Flash Builder as with Flex Builder before it contains several components that are only available to use with AIR applications These components deal with
visual interfaces for interacting with the file system and a HTML component for displaying web content
You may wonder why these components are only available for AIR applications Mostly it is for security reasons Up to Flash Player 101 a swf does not have the permission to interact with files on the file system except in very limited circumstances
Swfs in the web browser are able to interact only with files on the server in which the swf is hosted This allows them to load images xml and other file types at run time but only if the files come from within its
AIR Components
Adding file and html rendering can result in a lot of code But with the AIR components in Flash Builder 4 this functionality can be added easily with only a few lines of code
What you will learnhellipbull What components are available for AIR applications in Flash
Builder 4
What you should knowhellipbull Flash Builder 4bull Actionscript 3
in Flash Builder
Figure 1 AIR Actionscript 3 special classes for the HTML component Figure 2 Layout of the HTML application
032010 (11)52
COMPONENTS AIR Components in Flash Builder
032010 (11) 53
Were going to take a look at couple of simple examples for each component to get a feel how use them It is also important to note that the documentation for these components are in the AS 3 documentation When looking at the documentation you will see a symbol next to some of the classes and also next to some methods within the classes (Figure 1)
HTML ComponentThe HTML component is very easy to work with It can pull in many types of media and render them as you would expect them to be rendered in a web browser
Start up Flash Builder and create a new Flex project Name the project and select Desktop under project type Click finish and let Flash Builder set up the project
Once the project is started click on the Design tab In the lower left a component tab should be open If it is not open it using the Window menu and selecting Components Scroll down to the Adobe AIR folder You will not see this folder if you set your project to run in a web browser
We are going to create a simple web browser using only three components and one line of code First drag a HTML component a text field and a button to the stage Arrange them how you would like and switch over to design view
Give each component an id as in Listing 1 Also give the button a click handler Type click and let the program auto complete another code hint will pop up to create the handler automatically
Flash Builder will generate the handler as well as the fxScript block in the code In the click handler that is generated add a line that will set the location of the HTML component to the text in the text field See Listing 2 for the full code
Run the application and fill in a valid web address in the application Remember to include http in front of
own sandbox There are exceptions and ways around it but for the majority the swf cannot interact with the file system
If the development of applications using Flash Builder and AIR were to succeed they would need to act like real desktop applications This means that the applications would have to load and save files just as any other application that a user would use on the computer
Security is still maintained in this model by having the developer digitally sign their application using certificates If the certificate is obtained though a trusted source the application would be traceable back to the original developer if something bad should happen
Having a HTML component gives the application greater rendering power by tapping into the Web Kit which can run better than the HTML renderers in the Flash Player This allows developers to repurpose content from their web site to the application
Figure 3 The application running Figure 4 Layout of the image viewer application
Listing 1 MXML of components
ltsTextInput id=addressBar x=10 y=10
width=518gt
ltsButton id=goButton x=555 y=13
label=Go click=goButton_
clickHandler(event) gt
ltmxHTML id=htmlPane x=10 y=40 width=620
height=430gt
Listing 2 goButton handler
protected function goButton_clickHandler(event
MouseEvent)void
htmlPanelocation = addressBartext
032010 (11)54
COMPONENTS
the address Click the Go button and the page should load after a few seconds Take a look at Figure 3 for the results
There are a lot of methods and commands associated with the HTML component This will allow you to make a more customized display and give more control over the HTML content that you show
File system componentsUsing the file system components is just as easy To test the components we are going to create a simple image viewer that allows the user to select the images from the file system
Create a new Flex Project as we did before and be sure to make it a desktop application Once the project has loaded switch to design view and drag a File System Tree and an Image component to the stage See Figure 4 for the layout
Once the application is laid out switch over to the Source mode and give all the components ids as we did before (Listing 3) Also add a change handler instead of a click handler Flash Builder will autocomplete and generate the handler for you as it did when we added the click action to the button
In the generated handler add the code that will load the image into the image component To keep everything simple we only are going to load jpg and png files (Listing 4) in this function we are first checking to make sure the file is a file and not a directory by checking for a file extension If the file passes the first test we check to see if the file is a jpg or png Lastly if the file passes all of these test it gets loaded into the image component
Save the file and run the application to see the results Clicking on the file system tree items will either open or close the directory or try to load the file When the user clicks on a jpg or png it will load into the image component (Figure 5) Note that as the tree expands a scroll bar is attached to the component automatically
ConclusionJust as with the HTML component there is more methods and properties available to you with the file system components In this demo application we have seen how easy it is to get access to the file system using the component without writing a lot of code
There is a lot more involved in making a full application using these components but we have witnessed how easy to get started with them Having more control over the elements as well as error checking would be added in real applications
Having these components available gives the application a large amount of functionality very quickly and allows the developer to concentrate on the logic of the application Using these components in your application will help make it more full-featured and feel more like a real desktop application
LOUIS DICARROLouis DiCarro is a consultant based in NYC and has been working with Flash since the rst version He has taught web development at the college level and has worked for numerous large clients He can be reached at louisdicarroffdgmailcom
Listing 3 MXML of components
ltmxFileSystemTree id=fsList x=10 y=10
height=460 change=fsList_
changeHandler(event)gt
ltmxImage id=imgPane x=193 y=10 width=437
height=460gt
Listing 4 Handler for change event
protected function fsList_changeHandler(event
ListEvent)void
var fileFile = eventcurrentTargetselectedItem
as File
if(fileextension)
if(fileextensiontoLowerCase() == jpg ||
fileextensiontoLowerCase() ==
png)
imgPanesource = fileurl
Figure 5 The image viewer application running
032010 (11)56
TLF Applying CSS to Text Layout Framework styles
032010 (11) 57
TLF is introducing the new way of applying styles to the text Prior to TLF flash used simple approach you had to prepare and attach
StyleSheet object to the style property of the TextFieldTLF provides more flexible and customizable but
more complex techniqueDuring this tutorial we are going to create a small
application in Flex 4 This application contains a text displayed with TLF component TextArea and 2 different CSS that can be applied to the text simply by pressing the button Figure 1 show the screenshot of the application
TextFlow and itrsquos IFormatResolverTLF provides a callback mechanism to for with text styles TextFlow objectrsquos got a property formatResolver that should implement IFormatResolver interface Actually it is a set of callback functions that are called by parent TextFlow when it processes itrsquos elements
To have a closer look at formatResolver we will implement itrsquos version to work with out simple CSS So start create a new project in Flex and name it for example TextCSS In the default package create a new ActionScript class named CSSFormatResolver that implements IFormatResolver interface
Listing 1 shows the complete implementation of the class and will we look closer into it later For now pay attention on the following functions
bull invalidateAll
bull invalidate
bull resolveFormat
bull resolveUserFormat
bull getResolverForNewFlow
These function are created automatically by Flex Builder as they are required for implementation of the interface All functions are callbacks that are called when the certain action is performed by TextFlow and it needs to know how to treat with different elements
Applying CSS
This article is a reply to our readerrsquos question about the possibility to apply CSS to Text Layout Framework (TLF) We will show how to implement the necessary class and switch text styles on the fly
What you will learnhellipbull how can custom styles be applied to TLF elementsbull how to implement IFormatResolver to work with CSS
What you should knowhellipbull the basics of Flex and FlexFlash Builderbull the basics of TLF
to Text Layout Framework styles
Figure 1 Style changing application
032010 (11)56
TLF Applying CSS to Text Layout Framework styles
032010 (11) 57
Main ApplicationListing 2 contains a full code for main application
The application consists of
bull TextArea with some text The text is formed using XML Some elements of the TextFlow have
For our case we are interested in resolveFormat function that is called for every element of the TextFlow when itrsquos style needs to be changed This function return an object that should implement ITextLayoutFormat
Before we continue lets have a fast look at main application and how we build our example
Listing 1 CSSFormatResolveras
package
import flashtextStyleSheet
import flashxtextLayoutelementsFlowElement
import flashxtextLayoutelementsFlowValueHolder
import flashxtextLayoutelementsIFormatResolver
import flashxtextLayoutelementsTextFlow
import flashxtextLayoutformatsITextLayoutFormat
public class CSSFormatResolver implements
IFormatResolver
private var _styleSheetStyleSheet
public function CSSFormatResolver()
_styleSheet = new StyleSheet()
public function invalidateAll(textFlow
TextFlow)void
public function invalidate(targetObject)void
public function resolveFormat(targetObject)
ITextLayoutFormat
var formatFlowValueHolder = null
if (target is FlowElement)
var elementFlowElement = target as
FlowElement
if (element = null)
format = elementformat as
FlowValueHolder
if (elementstyleName = null)
var styleObject = styleSheetgetSt
yle(elementstyleName)
formatcolor = style[color]
formatfontSize =
style[fontSize]
formatfontWeight =
style[fontWeight]
formatfontStyle =
style[fontStyle]
return format
public function resolveUserFormat(targetObject
userFormatString)
return null
public function getResolverForNewFlow(oldFlow
TextFlow newFlowTextFlow)
IFormatResolver
return null
public function get styleSheet()StyleSheet
return _styleSheet
public function set styleSheet(valueStyleSheet)
void
_styleSheet = value
032010 (11)58
TLF
032010 (11) 59
Listing 2 TextCSSmxml
ltxml version=10 encoding=utf-8gt
ltsApplication xmlnsfx=httpnsadobecommxml2009
xmlnss=librarynsadobecomflexspark
xmlnsmx=librarynsadobecomflexhalo
xmlnslocal=
width=640 height=300gt
ltfxScriptgt
lt[CDATA[
import mxeventsFlexEvent
protected function applyCSS1Button_
clickHandler(eventMouseEvent)void
var formatResolverCSSFormatResolver =
new CSSFormatResolver()
formatResolverstyleSheetparseCSS(css1
text)
textAreatextFlowformatResolver =
formatResolver
protected function applyCSS2Button_
clickHandler(eventMouseEvent)void
var formatResolverCSSFormatResolver =
new CSSFormatResolver()
formatResolverstyleSheetparseCSS(css2
text)
textAreatextFlowformatResolver =
formatResolver
]]gt
ltfxScriptgt
ltsTextArea id=textArea width=620 height=134
x=9 y=156gt
ltsTextFlowgt
ltsp styleName=h1gt
Title of the Text
ltspgt
ltsp styleName=h2gt
Section of the Text
ltspgt
ltspgt
This is a body text Lorem ipsum
ltspgt
ltsTextFlowgt
ltsTextAreagt
ltsTextArea x=10 y=10 width=285 height=86
id=css1 gt
lt[CDATA[
h1
colorFF0000
fontSize20
fontWeightbold
fontStylenormal
h2
colorFF00FF
fontSize16
fontWeightbold
fontStyleitalic
]]gt
ltsTextAreagt
ltsTextArea x=345 y=10 width=285 height=86
id=css2 gt
lt[CDATA[
h1
color00FF00
fontSize32
fontWeightnormal
fontStyleitalic
h2
color0000FF
fontSize24
fontWeightbold
fontStylenormal
]]gt
ltsTextAreagt
ltsButton x=108 y=105 label=Apply CSS
1 id=applyCSS1Button
click=applyCSS1Button_
clickHandler(event)gt
ltsButton x=443 y=105 label=Apply CSS
2 id=applyCSS2Button
click=applyCSS2Button_
clickHandler(event)gt
ltsApplicationgt
032010 (11)58
TLF
032010 (11) 59
got styleName attribute so you could apply the corresponding CSS style to them later
bull 2 TextAreas with simple different CSSbull 2 Buttons to apply CSS from TextAreas to example
text
When the button is clicked the new instance of CSSFormatResolver class is created Then the corresponding CSS string from the TextArea is parsed and set into resolverrsquos property of SlyleSheet class type And finally prepared formatResolver instance is assigned to the TextFlow
Applying CSS to TextFlowNow lets have more detailed look at resolveFormat callback function First it should return a value that implements ITextLayoutFormat if it returns null then no new styling should be applied to an element being processed by the function So we create format variable of FlowValueHolder (it implements ITextLayoutFormat) and set itrsquos value to null (we do that because resolveFormat works with all elements including TextFlow itself as probably we donrsquot want to apply one style to the whole text)
After we do all the necessary casts and null checks and if we are sure that current elementrsquos got styleName attribute we assign styles from CSS to a current format StyleSheet object is used to contain CSS data as it is convenient object to parse and retrieve CSS data
Conclusion and a WarningThere was a brief tutorial on how to apply simple CSS to TLF TextFlow Please note that CSSFormatResolver class is not fully functional and only can be applied to our sample CSSs Writing reusable and versatile class requires more detailed coding and approach
Check the TLF Blog on this issue There is fully functional CSSFormatResolver with example there httpblogsadobecomtlf200902iformatresolver_and_using_css_1html
MAXYM GOLOVANCHUK Maxym Golovanchuk is a Photoshop Certied Expert and TV producer and he is using Adobersquos software for implementing entertainment solutions including video delivery with Flash Media Server mexxikgmailcom
MondayTuesdayWednesdayThursday Friday
DIVISIONS OF CREATIVE NICHE INC
032010 (11)60
PROFILE Flashcreed ndash Business Gallery
032010 (11) 61
The Business Gallery (httpwwwflashcreedcombusiness_video_image_gallery) is a Flash component meant to do one thing to enhance the visual experience a website portfolio or presentation site gives to its users Mainly itrsquos all about the image you present yourself or
your product to the world wide web Letrsquos face it without the looks you canrsquot sell your product or image no matter how interesting it might be
Whatrsquos so great about this gallery you might wonder Well the answer is simple everything Advanced AS3 programming dynamic XML implementation unlimited number of media items on stage PNG JPG and video FLA SWF MP4 F4V supported media tween and image effects just to name a few of the over 150 settings this gallery brings you Bottom line you can customize it in any way you see fit in order to make it resemble your website layout Not to mention the code optimization that allows the gallery to run so smoothly even on low resources
We brought 45 background wallpapers in case just a color doesnrsquot do the job also a set of custom arrows and close buttons
Flashcreed ndash Business GalleryHello itrsquos good to be back here among Flash amp Flex Magazine readers Today we are going to tell you a bit about our products mainly our Business Gallery but since all our products are built on the same framework most of the properties apply to all When we first realized what we could do with this framework we decided to name it ldquoPandorardquo in order to point out the unlimited number of possibilities it revealed regarding customization and user friendliness
032010 (11)60
PROFILE Flashcreed ndash Business Gallery
032010 (11) 61
The size of the entire gallery and any element in it is subject to any kind of resize big stage and small thumbs or the other way around for any template you or your client desire
Column_scroll and the properties for the stage mask helps you configure the exact number of visible columns you want to set in order to browse through the media items your gallery has Beside this useful feature we added blur and a couple of tween effects for the leftright navigation that gives an impressive look
032010 (11)62
PROFILE Flashcreed ndash Business Gallery
032010 (11) 63
Either as tooltip or plain text you can show any information you want regarding a certain media thumb in the gallery You can change font type size spacing color position and many other properties
The color gradient system for roll overout mouse gesture is unique in every way if we are to compare it with other galleries on the market at this point You can customize up to 5 sets of color with different alpha values The gradient type either linear or radial can be modified with rotation and ratio values
032010 (11)62
PROFILE Flashcreed ndash Business Gallery
032010 (11) 63
When clicking on a thumb if preview_type is selected as internal a resizable preview window will reveal itself and depending on the media type (image or video) an image viewer or video player will be contained inside it If preview_type is selected as external you have the possibility to set certain URL addresses this allowing you to redirect the user to a specific area of the website like a product page from a virtual store for example
The video player has a dozen of controllers that allow you to create a skin to better suit the template you want to create for your gallery Buttonrsquos color thickness handler color or scrub bar size just to name a few of the properties you can play with
At an amazing price of 999 $ this has to be one of the best choices when it comes to media galleries flash components Donrsquot hesitate to take a look at it on wwwflashcreedcom and also consider other products that might better suit your specifications or desires We would definitely appreciate any kind of feedback regarding current or possible features
Thank you
032010 (11)65
BOOK REVIEW
Are you an actionscript 3 game developer who is not able to write a complete commercial game because you cannot manage dozens
of classes Or you are an experienced actionscript 3 applications developer who wants to program game but donrsquot like reading any available beginner book as it doesnrsquot suit your style Even if you already have a good grasp over java or c++ and interested in creating not only fun games but commercial ones also then this is what you really require
There are several actionscript 3 game development books for beginners out there but Essential Guide to Game Dev is one of those few books that talk about the advanced gaming concepts However its first chapter begins with an easy to understand game example (good for any beginner) and ends up creating 3 games Did I tell you 3 games in just first chapter
Teaching about an Actionscript 3 Game framework is one of the many reasons that make this book a kick-ass addition to actionscript 3 gaming library Authors teach you how to create 10 unique games ranging from arcade to driving tile based to puzzle game and shooters to dice games Another specialty of this book is to use Flex and Flash Develop IDEs along with the primary Flash tool that creates space for not only flex
developers but also Flash Develop users In addition to this you will also learn to create game assets with GIMP Mappy and a sound effect creation tool You will get information about copyright laws which are necessary for any would-be commercial game creation and a complete game example integrated with MochiAds
This book also discusses and further more implements various advanced topics such as bitmap rendering pixel-level collision detection sound management AI xml-based level designing scrolling screen optimization techniques particles etc
In short this book will surely blow your minds with the wealth of knowledge it includes and you will pray for authors to keep writing such informative and useful books
If you are really serious about gaming then donrsquot miss the opportunity of reading this book Highly recommended
by Ali RAZA ACI ACE SCJP
Essential Guide to Flash Games
Authors Jeff Fulton Steve FultonPublisher friends of EDISBN 978-1-4302-2614-7Language EnglishPages 664 PagesWebsite httpfriendsofedcombookhtmlisbn=1430226145

032010 (11)28
ACTIONSCRIPT DEVELOPMENT Creating an AS3 Game Framework
032010 (11) 29
Listing 2
gamenewLevel()
switchSystemState(FrameWorkStatesSTATE_
SYSTEM_LEVEL_IN)
public function systemLevelIn()void
addChild(levelInScreen)
waitTime = 30
switchSystemState(FrameWorkStatesSTATE_
SYSTEM_WAIT)
nextSystemState = FrameWorkStatesSTATE_
SYSTEM_GAME_PLAY
addEventListener(EVENT_WAIT_COMPLETE
waitCompleteListener false 0 true)
public function systemGameOver()void
removeChild(game)
addChild(gameOverScreen)
gameOverScreenaddEventListener(CustomEventBu
ttonId
BUTTON_IDokButtonClickListener false 0
true)
switchSystemState(FrameWorkStates
STATE_SYSTEM_WAIT_FOR_CLOSE)
nextSystemState = FrameWorkStatesSTATE_
SYSTEM_TITLE
public function systemGamePlay()void
gamerunGame()
public function systemWaitForClose()void
do nothing
public function systemWait()void
waitCount++
if (waitCount gt waitTime)
waitCount = 0
dispatchEvent(new Event(EVENT_WAIT_COMPLETE))
public function okButtonClickListener(e
CustomEventButtonId)void
switch(eid)
case FrameWorkStatesSTATE_SYSTEM_TITLE
removeChild(titleScreen)
titleScreenremoveEventListener(CustomEv
entButtonId
BUTTON_IDokButtonClickListener)
break
case FrameWorkStatesSTATE_SYSTEM_
INSTRUCTIONS
removeChild(instructionsScreen)
instructionsScreenremoveEventListener(
CustomEventButtonIdBUTTON_IDokButtonC
lickListener)
break
case FrameWorkStatesSTATE_SYSTEM_GAME_OVER
removeChild(gameOverScreen)
gameOverScreenremoveEventListener(
CustomEventButtonIdBUTTON_IDokButtonC
lickListener)
break
switchSystemState(nextSystemState)
public function scoreBoardUpdateListener(e
CustomEventScoreBoardUpdate)void
scoreBoardupdate(eelement evalue)
public function levelScreenUpdateListener(e
CustomEventLevelScreenUpdate)void
levelInScreensetDisplayText(levelInText +
etext)
gameOverListener listens for GameGAMEOVER
simple
custom events calls and changes state
accordingly
public function gameOverListener(eEvent)void
switchSystemState(FrameWorkStatesSTATE_
SYSTEM_GAME_OVER)
gameremoveEventListener(CustomEventScoreBoard
Update
UPDATE_TEXTscoreBoardUpdateListener)
gameremoveEventListener(CustomEventLevelScree
nUpdate
032010 (11)28
ACTIONSCRIPT DEVELOPMENT Creating an AS3 Game Framework
032010 (11) 29
We also must import all of the classes needed for the framework to run You will see this put to use shortly
The variable definitions The variable definition section defines all of the global scope variables for the class These include all of the variables needed for the state machine screens and the game timer
We will make use of constants to define the current state and a set of variables to hold the state information These have been be defined on the FrameWorkStatesas file we created in the last section More states can be added to the basic ones but these will be sufficient for many games that we will create in this book There are two special states that are used for the system and wait for button clicks or things like animations to complete These are the STATE_SYSTEM_WAIT_FOR_CLOSE and STATE_SYSTEM_WAIT respectively We will also make use of a generic function called systemFunction that will hold the current state function to call in our game loop Combined with this we use a set of
integer variables to hold the value of the current state (currentSystemState) the last state (lastSystemState) and the next state (nextSystemState) for processing purposes These states should not be confused with an actual game pause function This will be handled in a different manner and added to the framework in Chapter 11
If you are using the Flash IDE and have any assets in the library that need to be exported in the first frame you must extend MovieClip and not Sprite even if you donrsquot plan to use the main time line for anything else We have extended MovieClip for the GameFrameWork so it will work with both Flex SDK and Flash IDE projects
The state control variablesThe control variables keep the system functioning within the context of the current state The main control variable is an instance of the Function class called systemFunction This function holds a reference to the current function that will be repeatedly called on each frame tick This saves us from having to evaluate a switchcase statement on each frame to decide which function to call The function is changed to a new reference by called the switchSystemState() function and passing a new constant that represents the new state
Optimization switchSystemState() is the first of many optimizations we will make to the game framework All of these optimizations will make the Flash games run much more efficiently These efficiencies in the game framework will allow the actual game code to perform more complex operations and still run with a reasonable frame rate
The currentSystemState integer variable holds a number representing the constant of the current state the system is running The nextSystemState contains the constant integer value for the state to transition to after this state is complete The lastSystemState variable holds the integer constant of the previous system state This is used in the rare occurrence that the game loop needs to return to the previous system state
The lastSystemState variable will become useful when we use a shared state such as STATE_SYSTEM_WAIT The STATE_SYSTEM_LEVEL_IN state will implement a 30-millisecond delay before moving on to the STATE_SYSTEM_GAME_PLAY state The nextSystemState will be STATE_SYSTEM_WAIT and the lastSystemState will be STATE_SYSTEM_LEVEL_IN When the 30-millisecond wait time has expired the waitCompleteListener function will be called It will use the lastSystemState to determine where the processing was before the wait was started Yoursquoll see this in detail later in this chapter when we examine the waitCompleteListener function
Listing 2
UPDATE_TEXT levelScreenUpdateListener)
gameremoveEventListener(GameGAME_OVER
gameOverListener)
gameremoveEventListener(GameNEW_LEVEL
newLevelListener)
newLevelListener listens for GameNEWLEVEL
simple custom events calls and changes
state accordingly
public function newLevelListener(eEvent)void
switchSystemState(FrameWorkStatesSTATE_
SYSTEM_NEW_LEVEL)
public function waitCompleteListener(eEvent)
void
switch(lastSystemState)
case FrameWorkStatesSTATE_SYSTEM_LEVEL_
IN
removeChild(levelInScreen)
break
removeEventListener(EVENT_WAIT_COMPLETEwai
tCompleteListener)
switchSystemState(nextSystemState)
032010 (11)30
ACTIONSCRIPT DEVELOPMENT
The background fill variablesAll Flash applications have a background color of some type No matter what game we are going to be creating the framework can control this background color You should never rely on the background color setting in HTML for your Flash applicationrsquos background color This leaves the HTML embed code with control over major aspect of your application If you are creating a viral game to be placed on game portals you will lose control of your gamersquos background color and it will default to what ever the game portal operators have selected as the standard background color in their embed code The framework allows you to override the HTML settings here by placing a simple colored Bitmap behind the entire application We will simply define a BitmapData object called appBackBitmapData and a Bitmap object called appBackBitmap that will be used to place the BitmapData onto the displayList
We will not define the background in the GameFrameWorkas file but rather the Mainas subclass of the GameFrameWork will set the background if needed in its init function override
The timer variablesThe timer will control the frame rate of the game and help smooth out the display by employing the TimerEventupdateAfterEvent method The frameRate variable will be defined in Mainas as the number of frame ticks per second we want our game timer to run
The most important thing to note is that we are making use of the built-in Timer class (gameTimer) We are not using the standard EnterFrame event This allows us to create our own frame rate for the game and specify it in the frameRate variable By doing this we can control game timer tick rate independent of the swf filersquos frame rate (FPS) The swf file can have a frame rate setting of 25 (for example) but the game can run at a 30 frame ticks a second To do this we first set the frameRate to the desired number of frame update ticks we want per second (30) When Mainas calls the startTimer function (described in detail when we get to the section on the init function) the gameTimer is put into action First we will calculate the timerPeriod value as 1000frameRate With the updateAfterEvent function call (in the runGame function) we help to smooth out the render of the screen by asking the Flash display engine to update at the rate of the Timer not the frame rate set in the swf So going back to our example if the game SWF is set to run at 25 FPS and the frameRate is set to 30 ticks the updateAfterEvent will help to smooth out the rendering of the screen by asking the Flash display engine to update at the timer tick rate (30) not the swf filersquos FPS setting (25)
The timerPeriod will be passed into the Timer instance and the game will attempt to run at this rate We say
attempt because if the game includes too many on screen moving objects or more logic than can be computed inside the timerPeriod number of milliseconds (or a combination of both) then there will be a noticable slowdown in the game screen updates In later chapters we will add functionality to the runGame function to mitigate some of these issues
The screen definition variablesThe screen definition variables create instances of our BasicScreen class This is a rather simple class that allows a single positional text box and an OK button on the screen We will use this simple screen for the title instructions level and game over screens We will customize each screen when we create the init function override in our gamersquos Mainas class Note that the levelInText is a special variable Setting this string to a default value will allow the leveInScreen to display some default text along on each new level This text can be combined with dynamic text to create a screen that says something like Level 1 with the word Level being the default text and the number 1 being the dynamic text
public var titleScreenBasicScreen
public var gameOverScreenBasicScreen
public var instructionsScreenBasicScreen
public var levelInScreenBasicScreen
public var levelInTextString
public var screenTextFormatTextFormat
public var screenButtonFormatTextFormat
We also create two TextFormat objects that will be used for defining the format of the text on the screens and the format of the button text
The ScoreBoard variablesThe scoreBoard instance of the ScoreBoard class will handle a simple heads up display (HUD) for the user with information such as the current score It is a simple framework class that will be customized in the init function override in each gamersquos Mainas class The changes will depend on the game that is to be created We also define a TextFormatObject for the basic look of the text for our scoreboard text scoreBoardTextFormat
JEFF FULTON
STEVE FULTON
The next part of the article in the June issue of FFD Magazine
032010 (11)32
ACTIONSCRIPT DEVELOPMENT
032010 (11) 33
On my quest of learning Flash I often became frustrated of how difficult it was to update the contents of my application Meaning if I wanted
to change out an image or piece of copy I had to open up Flash go to my library find the Movie Clip that had my asset in it and republish I thought to myself this is no way to work this is so inefficient Enter XML in all its glory Constructing an application with enabled me to quickly and easily update my project at a moments
notice Without having to open up Flash Now what could be better than that
In this article yoursquore going to learn how to create a new ActionScript project in Flex Builder 3 and write ActionScript 30 code that will load in an XML file display the images on screen and add some interactivity to the scene
Setting up FlexOpen up Flex and go to Filegt NewgtActionScript Project A dialog window will open In the project name field type in PhotoGallery Leave the use default location box checked and click finish (see Figure 1)
Creating an XML Photo Gallery
Searching the Internet yoursquoll find dozens if not hundreds of examples of photo galleries created with Flash
What you will learnhellipbull How to create an ActionScript application in Flex Builder 3bull How to use ActionScript to parse an XML le
What you should knowhellipbull Familiar with general programming concepts such as data ty-
pes variables loops and functionsbull Familiar with class creation and constructionbull Some understanding of XML
with AS3
Figure 1 New ActionScript window dialog Figure 2 ActionScript Compiler dialog
032010 (11)32
ACTIONSCRIPT DEVELOPMENT
032010 (11) 33
Once you click finish your project should open and you should see PhotoGalleryas on screen There are a few steps that I like to take next that I do for every project
First right click PhotoGallery folder in the Flex Navigator window click properties at the bottom and then click on the ActionScript Compiler link on the left hand side At the bottom yoursquoll see a check box that is already selected to generate a HTML wrapper file Uncheck that and click ok A warning message will appear saying that the html-template folder will be deleted Donrsquot worry about that because we havenrsquot put anything in that folder Click ok I personally donrsquot like to have a browser window open every time I run my application (see Figure 2)
Secondly wersquoll be using a tweening library called Tweener In order to use Tweener we have to first download it (httpcodegooglecomptweener) Be sure to download the ActionScript 30 version and create a folder on your desktop or any other place and name it code Place the contents of that download into that folder Next go back to Flex and again right click the PhotoGallery folder and click properties again and this time yoursquoll click the ActionScript Build Path link This window gives us the ability to add assets to our project so we can use them in our project Click the Add Folder button browser to the code folder you just created click ok and click ok again to close the window Now that folder and all its contents will be included in our project (see Figure 3)
Next right click the src folder in your project scroll over to new and add a new folder Name this folder classes This folder will contain two classes that wersquoll be using Then repeat the same steps but this time name the folder images This folder will contain all the images
Figure 3 ActionScript Build Path dialog
032010 (11)34
ACTIONSCRIPT DEVELOPMENT
Listing 1 galleryxml
ltxml version=10 encoding=UTF-8gt
ltgallery image_height=150 image_width=150 image_
gap=5 rows=3gt
ltphotogt
ltdescriptiongtThis is a description for the first
imageltdescriptiongt
ltthumb_pathgtimagesthumbjpgltthumb_pathgt
ltfull_pathgtimagesfullgifltfull_pathgt
ltphotogt
ltphotogt
ltdescriptiongtThis is a description for the second
imageltdescriptiongt
ltthumb_pathgtimagesthumbjpgltthumb_pathgt
ltfull_pathgtimagesfullgifltfull_pathgt
ltphotogt
ltphotogt
ltdescriptiongtThis is a description for the third
imageltdescriptiongt
ltthumb_pathgtimagesthumbjpgltthumb_pathgt
ltfull_pathgtimagesfullgifltfull_pathgt
ltphotogt
ltphotogt
ltdescriptiongtThis is a description for the fourth
imageltdescriptiongt
ltthumb_pathgtimagesthumbjpgltthumb_pathgt
ltfull_pathgtimagesfullgifltfull_pathgt
ltphotogt
ltphotogt
ltdescriptiongtThis is a description for the fifth
imageltdescriptiongt
ltthumb_pathgtimagesthumbjpgltthumb_pathgt
ltfull_pathgtimagesfullgifltfull_pathgt
ltphotogt
ltphotogt
ltdescriptiongtThis is a description for the sixth
imageltdescriptiongt
ltthumb_pathgtimagesthumbjpgltthumb_pathgt
ltfull_pathgtimagesfullgifltfull_pathgt
ltphotogt
ltphotogt
ltdescriptiongtThis is a description for the seventh
imageltdescriptiongt
ltthumb_pathgtimagesthumbjpgltthumb_pathgt
ltfull_pathgtimagesfullgifltfull_pathgt
ltphotogt
ltphotogt
ltdescriptiongtThis is a description for the eighth
imageltdescriptiongt
ltthumb_pathgtimagesthumbjpgltthumb_pathgt
ltfull_pathgtimagesfullgifltfull_pathgt
ltphotogt
ltphotogt
ltdescriptiongtThis is a description for the ninth
imageltdescriptiongt
ltthumb_pathgtimagesthumbjpgltthumb_pathgt
ltfull_pathgtimagesfullgifltfull_pathgt
ltphotogt
ltphotogt
ltdescriptiongtThis is a description for the tenth
imageltdescriptiongt
ltthumb_pathgtimagesthumbjpgltthumb_pathgt
ltfull_pathgtimagesfullgifltfull_pathgt
ltphotogt
ltphotogt
ltdescriptiongtThis is a description for the
eleventh imageltdescriptiongt
ltthumb_pathgtimagesthumbjpgltthumb_pathgt
ltfull_pathgtimagesfullgifltfull_pathgt
ltphotogt
ltphotogt
ltdescriptiongtThis is a description for the twelfth
imageltdescriptiongt
ltthumb_pathgtimagesthumbjpgltthumb_pathgt
ltfull_pathgtimagesfullgifltfull_pathgt
ltphotogt
ltphotogt
ltdescriptiongtThis is a description for the
thirteenth imageltdescriptiongt
ltthumb_pathgtimagesthumbjpgltthumb_pathgt
ltfull_pathgtimagesfullgifltfull_pathgt
ltphotogt
ltphotogt
ltdescriptiongtThis is a description for the
fourteenth imageltdescriptiongt
ltthumb_pathgtimagesthumbjpgltthumb_pathgt
ltfull_pathgtimagesfullgifltfull_pathgt
ltphotogt
ltphotogt
ltdescriptiongtThis is a description for the
fifteenth imageltdescriptiongt
ltthumb_pathgtimagesthumbjpgltthumb_pathgt
ltfull_pathgtimagesfullgifltfull_pathgt
ltphotogt
ltgallerygt
032010 (11)36
ACTIONSCRIPT DEVELOPMENT
Listing 2 PhotoGalleryas
package
Imports
import caurinatransitionsTweener
import classesBigPhoto
import classesThumbNail
import flashdisplayBitmap
import flashdisplaySprite
import flasheventsEvent
import flasheventsMouseEvent
import flashnetURLLoader
import flashnetURLRequest
[SWF(width=466 height=515 backgroundColor=00
0000 frameRate=30)]
public class PhotoGallery extends Sprite
Containers
private var _thumbContainerSprite Stores
the thumbnails
private var _nextButtonSprite Stores
the next arrow
private var _backButtonSprite Stores
the back arrow
private var _bigPhotoBigPhoto
Container for the big image
XML
private var _xmlLoaderURLLoader
Loads the XML file
private var _xmlXML
Stores the XML data
Image Assets
[Embed(source=assetsnext-arrowpng)]
private var _nextArrowClass
Embedded asset for the next
arrow
[Embed(source=assetsback-arrowpng)]
private var _backArrowClass
Embedded asset for the back
arrow
Constructor
public function PhotoGallery()
init ()
Initializing method
private function init ()void
_xmlLoader = new URLLoader ()
_xmlLoaderaddEventListener (EventCOMPLETE
xmlComplete false 0 true)
_xmlLoaderload (new URLRequest
(galleryxml))
XML Complete
private function xmlComplete (eEvent)void
Store the XML data
_xml = new XML (etargetdata)
loadImages ()
Clean up
_xmlLoaderremoveEventListener
(EventCOMPLETE xmlComplete)
_xmlLoader = null
Load in the thumbs
private function loadImages ()void
Temporary variables
var imageHeightuint = _xmlimage_height
var imageWidthuint = _xmlimage_width
var imageGapuint = _xmlimage_gap
var rowsuint = _xmlrows
var rowCounteruint = 0
var columnCounteruint = 0
Instantiate the container and position it
on screen
_thumbContainer = new Sprite ()
_thumbContainerx = 78
_thumbContainery = 78
_thumbContainerbuttonMode = true
_thumbContaineraddEventListener
(MouseEventCLICK thumbClick
false 0 true)
thisaddChild (_thumbContainer)
Loop through the images and create the
visual grid
for (var iuint = 0 i lt _xmlphotolength ()
i++)
var pathString = _xmlphoto[i]thumb_path
var descriptionString = _xmlphoto[i]desc
Creating an XML Photo Gallery with AS3
032010 (11) 37
Listing 2 PhotoGalleryas
ription
Create the thumbnail
var pThumbNail = new ThumbNail ()
pnewID = i
ploadImage (path)
pdescription = description
px = (imageWidth + imageGap)
columnCounter
py = (imageHeight + imageGap)
rowCounter
_thumbContaineraddChild (p)
Create the grid
if ((rowCounter + 1) lt rows)
rowCounter++
else
rowCounter = 0
columnCounter++
Setup the navigation
createNavigation ()
This method handles the click event for the
next arrow
private function nextClick (eMouseEvent)void
155 is the width + spacing
if (-_thumbContainerx lt (_thumbContainerwidth
ndash stagestageWidth ndash 155))
disableNavigation ()
TweeneraddTween (_thumbContainer x
_thumbContainerx ndash 155 time
075 transitioneaseOutExpo
onCompleteenableNavigation)
This method handles the click event for the
back arrow
private function previousClick (eMouseEvent)void
if (-_thumbContainerx gt 0)
disableNavigation ()
TweeneraddTween (_thumbContainer x
_thumbContainerx + 155 time
075 transitioneaseOutExpo
onCompleteenableNavigation)
This method handles the click event for the
thumbnails
private function thumbClick (eMouseEvent)void
disableNavigation ()
Disable the container that stores the
thumbnails
_thumbContainerbuttonMode = false
_thumbContainermouseChildren = false
_thumbContainerremoveEventListener
(MouseEventCLICK thumbClick)
Get the full image path
var imagePathString = _xmlphoto[etargetnewI
D]full_path
Instantiate the big photo
_bigPhoto = new BigPhoto ()
_bigPhotobuttonMode = true
_bigPhotox = 108
_bigPhotoy = 1075
_bigPhotoalpha = 0
_bigPhotoloadImage (imagePath)
_bigPhotoaddEventListener (MouseEventCLICK
closePhoto false 0 true)
thisaddChild (_bigPhoto)
Fade up the photo
TweeneraddTween (_bigPhoto alpha1 time
1)
Fade out the photo
When the image finishes fading delete the
photo and enable the navigation
items
private function closePhoto (eMouseEvent)void
TweeneraddTween (_bigPhoto alpha0 time1
onCompletedeletePhoto)
private function deletePhoto ()void
032010 (11)38
ACTIONSCRIPT DEVELOPMENT
Listing 2 PhotoGalleryas
_bigPhotobuttonMode = false
_bigPhotoremoveEventListener
(MouseEventCLICK closePhoto)
_bigPhotodestroy ()
thisremoveChild (_bigPhoto)
_bigPhoto = null
_thumbContainerbuttonMode = true
_thumbContainermouseChildren = true
_thumbContaineraddEventListener
(MouseEventCLICK thumbClick
false 0 true)
enableNavigation ()
private function createNavigation ()void
Instantiate the next arrow
var nBitmap = new _nextArrow ()
Instantiate the nextButton container
Add the next button as a child of the
nextButton container
_nextButton = new Sprite ()
thisaddChild (_nextButton)
_nextButtonaddChild (n)
_nextButtonx = stagestageWidth ndash _
nextButtonwidth
_nextButtony = 475
Instantiate the back arrow
var bBitmap = new _backArrow ()
Instantiate the backButton container
Add the next button as a child of the
backButton container
_backButton = new Sprite ()
thisaddChild (_backButton)
_backButtonaddChild (b)
_backButtonx = _nextButtonx ndash _
nextButtonwidth ndash 5
_backButtony = 475
enableNavigation ()
private function enableNavigation ()void
_nextButtonbuttonMode = true
_nextButtonaddEventListener
(MouseEventCLICK nextClick false
0 true)
_backButtonbuttonMode = true
_backButtonaddEventListener
(MouseEventCLICK previousClick
false 0 true)
private function disableNavigation ()void
_nextButtonbuttonMode = false
_nextButtonremoveEventListener
(MouseEventCLICK nextClick)
_backButtonbuttonMode = false
_backButtonremoveEventListener
(MouseEventCLICK previousClick)
Figure 4 New ActionScript class dialog
Creating an XML Photo Gallery with AS3
032010 (11) 39
Listing 3 ThumbNailas
package classes
import caurinatransitionsTweener
import flashdisplayLoader
import flashdisplayShape
import flashdisplaySprite
import flasheventsEvent
import flasheventsMouseEvent
import flashnetURLRequest
import flashtextTextField
import flashtextTextFieldAutoSize
import flashtextTextFormat
public class ThumbNail extends Sprite
Containers
private var _imageLoaderLoader Loads in
the thumbnail
private var _imageContainerSprite
Container for the thumbnail
private var _maskShape Container for the
mask
private var _descriptionContainerSprite
Container for the description
TextFields
private var _descriptionTextField
TextField for the container
Logic
private var _newIDuint The ID of the
object
[Embed(systemFont=Arial fontName=arial
fontWeight=bold
mimeType=applicationx-font-
truetype)]
private var _arialClass Embedded asset
for the font
Constructor
public function ThumbNail ()
super ()
init ()
Initializing method
private function init ()void
Instantiate the container
_imageContainer = new Sprite ()
_imageContaineralpha = 0
thisaddChild (_imageContainer)
createDescription ()
thismouseChildren = false
thisaddEventListener (MouseEventMOUSE_OVER
onMouseOver false 0 true)
thisaddEventListener (MouseEventMOUSE_OUT
onMouseOut false 0 true)
Public Methods
public function loadImage (pathString)void
_imageLoader = new Loader ()
_imageLoadercontentLoaderInfoaddEventListen
er (EventCOMPLETE imageComplete
false 0 true)
_imageLoaderload (new URLRequest (path))
GetterSetter Methods
public function get newID ()uint
return this_newID
public function set newID (valueuint)void
this_newID = value
public function get description ()String
return this_descriptiontext
public function set description (valueString)void
this_descriptiontext = value
Private Methods
032010 (11)40
ACTIONSCRIPT DEVELOPMENT
Listing 3 ThumbNailas
private function onMouseOver (eMouseEvent)void
TweeneraddTween (_descriptionContainer
y75 time05 transition
easeOutExpo)
private function onMouseOut (eMouseEvent)void
TweeneraddTween (_descriptionContainer
y150 time05 transition
easeOutExpo)
private function imageComplete (eEvent)void
Reposition the loaded content to the center
_imageLoaderx = -(_imageLoaderwidth 2)
_imageLoadery = -(_imageLoaderheight 2)
_imageContaineraddChildAt (_imageLoader 0)
Apply background after the image has
completely loaded
drawBackground ()
Draw the mask around the description
drawMask ()
Fade in the container
TweeneraddTween (_imageContainer alpha1
time05)
Clean up
_imageLoadercontentLoaderInforemoveEv
entListener (EventCOMPLETE
imageComplete)
Draws a background behind _imageContainer
private function drawBackground ()void
_imageContainergraphicsbeginFill (0xFFFFFF)
_imageContainergraphicsdrawRect (_
imageLoaderx ndash 1 _imageLoadery
ndash 1 _imageLoaderwidth + 2
_imageLoaderheight + 2)
_imageContainergraphicsendFill ()
Creates everything for the description
private function createDescription ()void
Instantiate the container
_descriptionContainer = new Sprite ()
_descriptionContainery = 150
_descriptionContainergraphicsbeginFill
(0x000000 075)
_descriptionContainergraphicsdrawRect (-75
-75 150 75)
_descriptionContainergraphicsendFill ()
_imageContaineraddChild (_
descriptionContainer)
Specify text formatting for the description
Text Field
var tfTextFormat = new TextFormat ()
tfcolor = 0xFFFFFF
tfalign = center
tffont = arial
tfbold = true
tfsize = 12
Instantiate the TextF ield
_description = new TextField ()
_descriptionx = -75
_descriptiony = -70
_descriptionwidth = 150
_descriptionwordWrap = true
_descriptionembedFonts = true
_descriptiondefaultTextFormat = tf
_descriptionautoSize = TextFieldAutoSizeLEFT
_descriptionContaineraddChild (_description)
Draws a mask our _descriptionContainer
private function drawMask ()void
Draw the mask shape
_mask = new Shape ()
_maskgraphicsbeginFill (0xFF0000)
_maskgraphicsdrawRect (_imageLoaderx
_imageLoadery _imageLoaderwidth
_imageLoaderheight)
_maskgraphicsendFill ()
addChild (_mask)
Apply the mask to the container
_descriptionContainermask = _mask
Creating an XML Photo Gallery with AS3
032010 (11) 41
that will be loaded into the application from XML Finally create another folder and this time name it assets This folder will contain the buttons that wersquoll embed into our project
The AssetsBefore we start coding we need to create some visual assets Open up Photoshop or any other program you have for creating graphics and create an image that is 150x150 pixels Fill it with a flat color and save the image as thumbjpg in the images folder you just created Next create another image thatrsquos 250x300 pixels Fill it with another color and save that image as fulljpg into the same folder These images will be used for testing purposes only
Listing 4 BigPhotoas
package classes
import flashdisplayLoader
import flashdisplaySprite
import flasheventsEvent
import flashnetURLRequest
public class BigPhoto extends Sprite
Containers
private var _imageLoaderLoader Loads in the
thumbnail
private var _imageContainerSprite Container
for the thumbnail
Constructor
public function BigPhoto ()
super()
Public Methods
public function loadImage (pathString)void
_imageLoader = new Loader ()
_imageLoadercontentLoaderInfoaddEventListen
er (EventCOMPLETE imageComplete
false 0 true)
_imageLoaderload (new URLRequest (path))
Clean up method
public function destroy ()void
_imageContainerremoveChild (_imageLoader)
_imageLoaderunload ()
_imageLoader = null
thisremoveChild (_imageContainer)
_imageContainer = null
Private Methods
private function imageComplete (eEvent)void
Instantiate the container
_imageContainer = new Sprite ()
thisaddChild (_imageContainer)
Add the loader
_imageContaineraddChild (_imageLoader)
Clean up
_imageLoadercontentLoaderInforemoveEv
entListener (EventCOMPLETE
imageComplete)
Figure 5 Time to test
032010 (11)42
ACTIONSCRIPT DEVELOPMENT
We still have to create our navigation buttons that wersquoll use to scroll through our gallery Create two buttons that are 40x40 pixels and design them how you like They should resemble forward and back buttons Save the forward arrow as next-arrowpng and the other as back-arrowpng into the assets folder Now that our assets our created itrsquos time to code
The XML fileRight click the src folder in the project scroll over to new and click file A dialog window will open and in the file name input box type galleryxml (see Figure 4) Write the code that you see from Listing 1 into galleryxml
Line 1 is the XML declaration This is needed to have a well-formed XML document
Line 2 declares the gallery root node Notice in this node Irsquove added attributes Also to have a well-formed XML document you must have one root node and all attribute values must be in quotes
Lines 3-7 declares a photo node with three children description thumb_path and full_path description is exactly as it sounds It will contain a description for our thumbnail thumb_path contains the path to our thumbnail image Same goes for full_path it contains the path to our full image
I then just copy and pasted that and pasted it 14 times just changing out the description Remember wersquore just using dummy data When you finish go back and add photos of your choice
The ClassesWersquoll be using two additional classes for this project One will be for the thumbnails and another for the full image Right click the classes folder go to new and click ActionScript class In the name field type ThumbNail For the Superclass type in flashdisplaySprite Wersquoll need to extend from that class so we can use the functionality of that object but add our own (see Figure 4)
Add another class this time name it BigPhoto It should also inherit from flashdisplaySprite
CodingTime to start writing the ActionScript for this project Open up PhotoGalleryas from the Flex Navigator and type in the code from Listing 2 Open up ThumbNailas and type in the code from Listing 3 Open up BigPhotoas and type in the code from Listing 4 Now that you have all the code in itrsquos time to test In the menu bar click RungtRun PhotoGallery (see Figure 5) If you get an error make sure you typed everything correctly If all went well you should see the gallery open up Click the buttons and watch the gallery scroll left and right Roll over the thumbnails to see the description scroll up Click on a thumbnail to see the full image fade in You might be wondering about whatrsquos going on Irsquoll try to break that down for you next
The ExplanationOur main focus is going to be whatrsquos going on in PhotoGalleryas This file contains the ActionScript that makes almost everything happen We first start off by declaring our properties that will be used in the project Yoursquoll notice a couple of embeded lines These lines are MetaData tags that actually embed assets into the project The two embeded lines you see add the next-arrowpng file and the back-arrowpng file In the constructor there is one call to a method called init() This method gets the application going by requesting and loading in the XML File When the file finishes loading we store the XML data into our _xml property Next we call the loadImages() method This method is responsible for a big part of the application We first gather some information from the XML file and store it in temporary variables
bull imageWidth stores the image _ height attributes valuebull imageWidth stores the image _ width attributes valuebull imageGap stores the image _ gap attributes valuebull rows stores the row attributes valuebull rowCounter increments ever pass of the for loop Is
compared against the rows variablebull columnCounter increments once for every column
created
The for loop cycles the XML file creating a new ThumbNail object with every iteration During each iteration we create variables that store the path to the thumb nail (path) and the description of the thumbnail (description) We pass the variables into the methods of the ThumbNail class Remember the ThumbNail class defines methods and properties that are specific to it The class code is commented if you wish to explore it Again our main focus is PhotoGalleryas To create the grid we write ifelse logic that compares the rowCounter variable to the row variable For every iteration of the loop we increment that variable if that variable becomes greater than rows we set it back to 0 rowCounter is then multiplied to the y-axis of each ThumbNail object The rest of the code is commented for you to explore
ConclusionYoursquoll notice I actually hard coded a lot of values directly in the ActionScript Not too ideal In the next part of this tutorial wersquore going to come back to this code and modify it to be a little more flexible and visually appealing If you have any questions feel free to contact me through my site (wwwcodedbyryancom)
RYAN DrsquoAGOSTINORyan DrsquoAgostino is an Interactive Developer at NAS Recruitment Communications in Cleveland OH part-time instructor at Virginia Marti College of Art and Design in Lakewood Ohio and freelance designer and ActionScript developer For more information about Ryan please visit httpwwwcodedbyryancom
032010 (11)44
COMPONENTS
Components are the controls and containers that are the elements of the application that create the interface They cover controls such
as buttons and check boxes containers that can hold other containers and controls navigation elements and charts Components can be added to your application in variety of ways They can be added through the design view writing then in MXML or through ActionScript
Flash Builder now has two major sets of components the Halo set which has been available in previous versions of Flex and the new Spark set The components from the Spark set have a direct correlation to a component in the Halo set but not all Halo components have been upgraded to the Spark framework yet The namespaces for these components are added automatically when a MXML document is created and you will notice there are now multiple namespace in the main MXML document already
Creating custom components takes two paths The first is to create a skin for an existing Halo component in Flash Illustrator Photoshop or Fireworks or create a custom skin for a Spark component using MXML The second path is to create a completely custom component using Flash Professional and importing it into the Flash Builder project We are going to focus on the second path and create a custom component with Flash Professional
The first step in creating a custom component is to instal the Flex Component Kit mxp into Flash Professional This is an extension that will expose some
Custom Flash CS4
Flash Builder comes with a lot of components to cover almost all of an apps needs But what if you want a custom look or functionality to a component With Flash Professional you can create custom components and import them into Flash Builder for use in your application
What you will learnhellipbull How to create custom components in Flash Professional to im-
port into Flash Builder
What you should knowhellipbull Flash Professional CS4bull Flash Builder 4bull Actionscript 3
Components in Flash Builder 4
Figure 1 The component artwork Figure 2 Converting the movie clip
032010 (11)46
COMPONENTS
Listing 1 The component class
package comtest
import mxflashUIMovieClip
import flasheventsEvent
import flasheventsEventDispatcher
import flasheventsMouseEvent
import flashfiltersGlowFilter
public class SliderButton extends UIMovieClip
public static const BUTTON_CLICKString = button click
private var glowGlowFilter = new GlowFilter(0x0000cc54421falsefalse)
public function SliderButton()
plusButtonbuttonMode = true
minusButtonbuttonMode = true
plusButtonaddEventListener(MouseEventMOUSE_OVER handleMouseOver)
plusButtonaddEventListener(MouseEventMOUSE_OUT handleMouseOut)
plusButtonaddEventListener(MouseEventCLICK handleMousePress)
minusButtonaddEventListener(MouseEventMOUSE_OVER handleMouseOver)
minusButtonaddEventListener(MouseEventMOUSE_OUT handleMouseOut)
minusButtonaddEventListener(MouseEventCLICK handleMousePress)
private function handleMouseOver(eMouseEvent)void
ecurrentTargetfilters = [glow]
private function handleMouseOut(eMouseEvent)void
ecurrentTargetfilters = []
private function handleMousePress(eMouseEvent)void
if(ecurrentTargetname == plusButton ampamp trackThumbx lt 134)
trackThumbx++
else if(ecurrentTargetname == minusButton ampamp trackThumbx gt 37)
trackThumbx--
dispatchEvent(new Event(SliderButtonBUTTON_CLICK))
032010 (11)48
COMPONENTS
of the Flex classes to Flash allowing the component to communicate with the application Download the extension from the Adobe site at httpwwwadobecomcfusionexchangeindexcfmevent=extensionDetailampextid=1273018 and install using the Adobe Extension Manager The extension should work with Flash
versions as far back as Flash 8 but I highly recommend using at least Flash 9 (CS 3)
Once the extension is installed launch Flash Professional and create a new ActionScript 3 project We are going to create a simple slider button that has a plus and minus button on each end of the button and a track between them When the plus and minus buttons are clicked the the track thumb will move one pixel in either direction There will also be a roll over behavior on the buttons to change their look as the mouse rolls over and off the buttons Finally Flash Builder will receive the event of the button being pushed and update a text input on the stage
It is common to encapsulate the behaviors of the component within itself and have events broadcast to the containing application If you think about some of standard components in both Flash Builder and Flash Professional and deconstruct them in your mind you will see that the same methods are used on them The NumericStepper is a lot like our component It has two buttons with a text field that displays a value that is incremented or decremented with each push of the button The component itself does nothing to effect the application until the code calls it to either send or receive a value
With our new document we are going to create the artwork for the component in the fla file Create four movie clips one each for the scroll track the plus button the minus button and the track thumb (Figure 1) The naming and look of these movie clips are not important
Once the movie clips are created and on the stage give each one an instance name The names in the
Figure 3 Setting the class of the movie clip
Figure 4 Setting to export as SWC
Figure 5 Creating the Flash Builder project
Custom Flash CS4 Components in Flash Builder 4
032010 (11) 49
example files are plusButton minusButton and trackThumb The actual names do not matter and we dont need an instance name for the track since we are not going to reference it in Flash Builder Flash Builder will reference the instance names of the movie clips in the components we will use these later
Now that the artwork has been created it must be collected into its own movie clip Select all of the artwork on the stage and choose ModifygtgtConvert to Symbolhellip In the Library panel there is a new symbol that is called in the sample files SliderButton The name is important here because this is how the Convert to Flex Component mxp will name the class that Flash Builder will refer to later
An external class will give the component the internal behaviors that were mentioned earlier as well as an event to broadcast to the Flash Builder application (Listing 1) All the code in the class should be familiar but there are a few points to go over First the package name is given the qualifier of comtest to identify that the component belongs to our namespace This is not necessary but helpful when there are multiple components or components from different publishers in the application
The most important change is instead of having the class extend the Sprite class this class is going to
extend the UIMovieClip class This class like the Flex Component in the library exposes the behaviors and methods we set up in the class to the Flash Builder application In the import statements use import
mxflashUIMovieClip The mxflash class includes both the UIMovieClip and ContainerMovieClip classes
When the variables are declared we set up a glow filter that will be attached to the buttons when the mouse rolls over them and a string constant for the event we create later In the constructor of the class the buttons receive the event listeners for the mouse interactions and the handlers are added later in the code In the handleClick event handler we use the event dispatcher class to dispatch the event Here we are just dispatching a standard event with the constant that was created earlier You can just as easily dispatc a custom event that has extra information attached to it
Select the movie clip in the Library panel then select CommandsgtgtConvert Symbol to Flex Component (Figure 2) The extension will do several operations such as making the symbol available to ActionScript giving the symbol a class name adding the Flex Component to the library and others
Save the file as SliderButtonas in the folder path comtest When you declare the package name as we have here you must have the same hierarchy as listed in the package name Back in the fla select the
Figure 6 The Package Explorer
Listing 2 The main MXML le
ltxml version=10 encoding=utf-8gt
ltsApplication xmlnsfx=httpnsadobecommxml
2009
xmlnss=librarynsadobecomflex
spark
xmlnsmx=librarynsadobecomflex
mx
width=200 height=110gt
ltfxDeclarationsgt
lt-- Place non-visual elements (eg
services value objects) here
--gt
ltfxDeclarationsgt
ltsApplicationgt
Listing 3 The new component and name space
xmlnstest=comtest
lttestSliderButton x=14 y=10 id=sliderButton
gt
032010 (11)50
COMPONENTS
SliderButton movie clip and select Propertieshellip from the contextual menu Expand the advanced area if it is not already and enter comtestSliderButton in the Class text field Leave the Base Class text field blank and click OK (Figure 3)
Select Publish Settingshellip from the file menu and click on the Flash tab (Figure4) Under the SWF Settings area of the window be sure that the Export SWC check box is checked The swc is the part that Flash Builder will use in the application SWC are archives that contain the classes and media assets of the component and make it easy to distribute the movie clip
Publish the SWF and SWC and we are ready to move to Flash Builder
Flash BuilderIn Flash Builder create a new project This example we only need a basic Flash Builder project without any
server technologies You can name the project anything you would like in this case I have name FB_Components and saved it in my default workspace
If you have not worked on a Flash Builder project yet it is a lot like working on the Flex projects in the past with some new MXML tags You will also notice that the Flex Navigator pane has now been replaced with the Package Explorer (Figure 6)
The Package Explorer pane has a different organization than the Flex Navigator but the main MXML file can still be found under src then under the default package
Looking at the main MXML (Listing 2) you will see that the three name spaces are added automatically and the application begins with sApplication instead of mxApplication These are the minor differences to be on the look out for when working on a Flash Builder project
Listing 4 The nal MXML le
ltxml version=10 encoding=utf-8gt
ltsApplication xmlnsfx=httpnsadobecommxml2009
xmlnss=librarynsadobecomflexspark
xmlnsmx=librarynsadobecomflexmx minWidth=200 minHeight=110
width=200 height=110
initialize=init()
xmlnstest=comtestgt
ltfxDeclarationsgt
lt-- Place non-visual elements (eg services value objects) here --gt
ltfxDeclarationsgt
ltfxScriptgt
lt[CDATA[
private function init()void
sliderButtonaddEventListener(SliderButtonBUTTON_CLICK updateText)
private function updateText(eEvent)void
pixelTexttext = String(sliderButtontrackThumbx)
]]gt
ltfxScriptgt
lttestSliderButton x=14 y=10 id=sliderButton gt
ltsLabel x=39 y=41 text=The position of the track thumb is textAlign=center width=122gt
ltsTextInput x=76 y=76 width=49 id=pixelTextgt
ltsApplicationgt
Custom Flash CS4 Components in Flash Builder 4
032010 (11) 51
To get our component into the Flash Builder project we need to put the swc some where the project can see it On your desktop navigate to where the swc was published to and copy the file Then navigate to where Flash Builder project is and put the swc into libs folder I have found it is easier to keep the fla and swf files out of the project then copy the swc over to the Flash Builder project as needed
Back in Flash Builder open the libs folder under the project in the Package Explorer pane In that directory you should see your swc if you do not try right clicking on the libs folder and selecting Refresh
In the MXML editor switch to Design view When the Design view becomes active the Component pane should become available in the lower left of the workspace The first folder in the pane is the Custom folder and our custom component should be displayed in the list Drag an instance of this component onto the stage
To show that we can have two way communication with the component drag a label and a text input onto the stage Set the labels text to be The position of the track thumb is and move the text input near the label Set the id of the text input to pixelText (Figure 7) Switch back to the Source view after saving
Notice that several lines have been added to the source of the MXML document In addition to the MXML for the component including our custom component a name space value has been added to the sApplication tag designated as xmlnstest=comtest (Listing 3) If we add more components using the same comtest package declaration they will all fall under this name space If we were to add more components using a different package additional name spaces would be added You will also notice that the component starts with testSliderButton as opposed to s fx or mx
In the application tag add an initialize property calling a function called init() After the fxDeclarations tags add fxScript tags to hold the Actionscript As you type fx the code completion should pop up and allow you to select the fxScript tags
Add an id property to the SliderButton tag and give it a value of sliderButton In between the CDATA tags add the init function This function simply adds an event listener to our component calling the updateText
function every time the BUTTON_CLICK event is broadcast from the SliderButton class (Listing 4)
Once the application receives the BUTTON_CLICK event it calls the updateText function This function looks into the component and gets the x position of the track thumb then puts that value into the text input we set up earlier
So now we have communication coming out of the component using the dispatchEvent call in the class We are also looking into the component where the application is getting the x position of the thumb track inside the component Communication can get much more complicated than this but this is a simple example to give a starting point to create more complex components
Click debug to run the application and if no errors occurred the application should launch in a browser window If you have a browser window open before running the app you should close it There is a bug in the Flash Player at the time of this writing that may cause the app to not run if there are browser windows already open
Once the application is running click on the buttons and watch as the value in the text input increase and decrease The custom component is now complete and ready to have more behaviors and methods added to it
ConclusionWhile the components that come with Flash Builder can cover most situations there will be times where only a custom component will fit the applications needs Creating a custom component takes a little work but can make the developers job a lot easier With this new level of control over the look and behavior of the component can make the application more rich and engaging to the end user
Figure 7 Components on the stage
On the Netbull httpwwwadobecombull httpwwwadobecomcfusionexchangeindexcfmeven-
t=extensionDetailampextid=1273018
LOUIS DICARROLouis DiCarro is a consultant based in NYC and has been working with Flash since the rst version He has taught web development at the college level and has worked for numerous large clients He can be reached at louisdicarroffdgmailcom
032010 (11)52
COMPONENTS AIR Components in Flash Builder
032010 (11) 53
We already know that building an AIR application affords us a lot more capabilities than working with a web based project
Digging through the Actionscript documentation shows that there are a lot of classes that are only available to AIR applications These mostly have to do with classes and methods that interact with the file system or windowing of the application
Flash Builder as with Flex Builder before it contains several components that are only available to use with AIR applications These components deal with
visual interfaces for interacting with the file system and a HTML component for displaying web content
You may wonder why these components are only available for AIR applications Mostly it is for security reasons Up to Flash Player 101 a swf does not have the permission to interact with files on the file system except in very limited circumstances
Swfs in the web browser are able to interact only with files on the server in which the swf is hosted This allows them to load images xml and other file types at run time but only if the files come from within its
AIR Components
Adding file and html rendering can result in a lot of code But with the AIR components in Flash Builder 4 this functionality can be added easily with only a few lines of code
What you will learnhellipbull What components are available for AIR applications in Flash
Builder 4
What you should knowhellipbull Flash Builder 4bull Actionscript 3
in Flash Builder
Figure 1 AIR Actionscript 3 special classes for the HTML component Figure 2 Layout of the HTML application
032010 (11)52
COMPONENTS AIR Components in Flash Builder
032010 (11) 53
Were going to take a look at couple of simple examples for each component to get a feel how use them It is also important to note that the documentation for these components are in the AS 3 documentation When looking at the documentation you will see a symbol next to some of the classes and also next to some methods within the classes (Figure 1)
HTML ComponentThe HTML component is very easy to work with It can pull in many types of media and render them as you would expect them to be rendered in a web browser
Start up Flash Builder and create a new Flex project Name the project and select Desktop under project type Click finish and let Flash Builder set up the project
Once the project is started click on the Design tab In the lower left a component tab should be open If it is not open it using the Window menu and selecting Components Scroll down to the Adobe AIR folder You will not see this folder if you set your project to run in a web browser
We are going to create a simple web browser using only three components and one line of code First drag a HTML component a text field and a button to the stage Arrange them how you would like and switch over to design view
Give each component an id as in Listing 1 Also give the button a click handler Type click and let the program auto complete another code hint will pop up to create the handler automatically
Flash Builder will generate the handler as well as the fxScript block in the code In the click handler that is generated add a line that will set the location of the HTML component to the text in the text field See Listing 2 for the full code
Run the application and fill in a valid web address in the application Remember to include http in front of
own sandbox There are exceptions and ways around it but for the majority the swf cannot interact with the file system
If the development of applications using Flash Builder and AIR were to succeed they would need to act like real desktop applications This means that the applications would have to load and save files just as any other application that a user would use on the computer
Security is still maintained in this model by having the developer digitally sign their application using certificates If the certificate is obtained though a trusted source the application would be traceable back to the original developer if something bad should happen
Having a HTML component gives the application greater rendering power by tapping into the Web Kit which can run better than the HTML renderers in the Flash Player This allows developers to repurpose content from their web site to the application
Figure 3 The application running Figure 4 Layout of the image viewer application
Listing 1 MXML of components
ltsTextInput id=addressBar x=10 y=10
width=518gt
ltsButton id=goButton x=555 y=13
label=Go click=goButton_
clickHandler(event) gt
ltmxHTML id=htmlPane x=10 y=40 width=620
height=430gt
Listing 2 goButton handler
protected function goButton_clickHandler(event
MouseEvent)void
htmlPanelocation = addressBartext
032010 (11)54
COMPONENTS
the address Click the Go button and the page should load after a few seconds Take a look at Figure 3 for the results
There are a lot of methods and commands associated with the HTML component This will allow you to make a more customized display and give more control over the HTML content that you show
File system componentsUsing the file system components is just as easy To test the components we are going to create a simple image viewer that allows the user to select the images from the file system
Create a new Flex Project as we did before and be sure to make it a desktop application Once the project has loaded switch to design view and drag a File System Tree and an Image component to the stage See Figure 4 for the layout
Once the application is laid out switch over to the Source mode and give all the components ids as we did before (Listing 3) Also add a change handler instead of a click handler Flash Builder will autocomplete and generate the handler for you as it did when we added the click action to the button
In the generated handler add the code that will load the image into the image component To keep everything simple we only are going to load jpg and png files (Listing 4) in this function we are first checking to make sure the file is a file and not a directory by checking for a file extension If the file passes the first test we check to see if the file is a jpg or png Lastly if the file passes all of these test it gets loaded into the image component
Save the file and run the application to see the results Clicking on the file system tree items will either open or close the directory or try to load the file When the user clicks on a jpg or png it will load into the image component (Figure 5) Note that as the tree expands a scroll bar is attached to the component automatically
ConclusionJust as with the HTML component there is more methods and properties available to you with the file system components In this demo application we have seen how easy it is to get access to the file system using the component without writing a lot of code
There is a lot more involved in making a full application using these components but we have witnessed how easy to get started with them Having more control over the elements as well as error checking would be added in real applications
Having these components available gives the application a large amount of functionality very quickly and allows the developer to concentrate on the logic of the application Using these components in your application will help make it more full-featured and feel more like a real desktop application
LOUIS DICARROLouis DiCarro is a consultant based in NYC and has been working with Flash since the rst version He has taught web development at the college level and has worked for numerous large clients He can be reached at louisdicarroffdgmailcom
Listing 3 MXML of components
ltmxFileSystemTree id=fsList x=10 y=10
height=460 change=fsList_
changeHandler(event)gt
ltmxImage id=imgPane x=193 y=10 width=437
height=460gt
Listing 4 Handler for change event
protected function fsList_changeHandler(event
ListEvent)void
var fileFile = eventcurrentTargetselectedItem
as File
if(fileextension)
if(fileextensiontoLowerCase() == jpg ||
fileextensiontoLowerCase() ==
png)
imgPanesource = fileurl
Figure 5 The image viewer application running
032010 (11)56
TLF Applying CSS to Text Layout Framework styles
032010 (11) 57
TLF is introducing the new way of applying styles to the text Prior to TLF flash used simple approach you had to prepare and attach
StyleSheet object to the style property of the TextFieldTLF provides more flexible and customizable but
more complex techniqueDuring this tutorial we are going to create a small
application in Flex 4 This application contains a text displayed with TLF component TextArea and 2 different CSS that can be applied to the text simply by pressing the button Figure 1 show the screenshot of the application
TextFlow and itrsquos IFormatResolverTLF provides a callback mechanism to for with text styles TextFlow objectrsquos got a property formatResolver that should implement IFormatResolver interface Actually it is a set of callback functions that are called by parent TextFlow when it processes itrsquos elements
To have a closer look at formatResolver we will implement itrsquos version to work with out simple CSS So start create a new project in Flex and name it for example TextCSS In the default package create a new ActionScript class named CSSFormatResolver that implements IFormatResolver interface
Listing 1 shows the complete implementation of the class and will we look closer into it later For now pay attention on the following functions
bull invalidateAll
bull invalidate
bull resolveFormat
bull resolveUserFormat
bull getResolverForNewFlow
These function are created automatically by Flex Builder as they are required for implementation of the interface All functions are callbacks that are called when the certain action is performed by TextFlow and it needs to know how to treat with different elements
Applying CSS
This article is a reply to our readerrsquos question about the possibility to apply CSS to Text Layout Framework (TLF) We will show how to implement the necessary class and switch text styles on the fly
What you will learnhellipbull how can custom styles be applied to TLF elementsbull how to implement IFormatResolver to work with CSS
What you should knowhellipbull the basics of Flex and FlexFlash Builderbull the basics of TLF
to Text Layout Framework styles
Figure 1 Style changing application
032010 (11)56
TLF Applying CSS to Text Layout Framework styles
032010 (11) 57
Main ApplicationListing 2 contains a full code for main application
The application consists of
bull TextArea with some text The text is formed using XML Some elements of the TextFlow have
For our case we are interested in resolveFormat function that is called for every element of the TextFlow when itrsquos style needs to be changed This function return an object that should implement ITextLayoutFormat
Before we continue lets have a fast look at main application and how we build our example
Listing 1 CSSFormatResolveras
package
import flashtextStyleSheet
import flashxtextLayoutelementsFlowElement
import flashxtextLayoutelementsFlowValueHolder
import flashxtextLayoutelementsIFormatResolver
import flashxtextLayoutelementsTextFlow
import flashxtextLayoutformatsITextLayoutFormat
public class CSSFormatResolver implements
IFormatResolver
private var _styleSheetStyleSheet
public function CSSFormatResolver()
_styleSheet = new StyleSheet()
public function invalidateAll(textFlow
TextFlow)void
public function invalidate(targetObject)void
public function resolveFormat(targetObject)
ITextLayoutFormat
var formatFlowValueHolder = null
if (target is FlowElement)
var elementFlowElement = target as
FlowElement
if (element = null)
format = elementformat as
FlowValueHolder
if (elementstyleName = null)
var styleObject = styleSheetgetSt
yle(elementstyleName)
formatcolor = style[color]
formatfontSize =
style[fontSize]
formatfontWeight =
style[fontWeight]
formatfontStyle =
style[fontStyle]
return format
public function resolveUserFormat(targetObject
userFormatString)
return null
public function getResolverForNewFlow(oldFlow
TextFlow newFlowTextFlow)
IFormatResolver
return null
public function get styleSheet()StyleSheet
return _styleSheet
public function set styleSheet(valueStyleSheet)
void
_styleSheet = value
032010 (11)58
TLF
032010 (11) 59
Listing 2 TextCSSmxml
ltxml version=10 encoding=utf-8gt
ltsApplication xmlnsfx=httpnsadobecommxml2009
xmlnss=librarynsadobecomflexspark
xmlnsmx=librarynsadobecomflexhalo
xmlnslocal=
width=640 height=300gt
ltfxScriptgt
lt[CDATA[
import mxeventsFlexEvent
protected function applyCSS1Button_
clickHandler(eventMouseEvent)void
var formatResolverCSSFormatResolver =
new CSSFormatResolver()
formatResolverstyleSheetparseCSS(css1
text)
textAreatextFlowformatResolver =
formatResolver
protected function applyCSS2Button_
clickHandler(eventMouseEvent)void
var formatResolverCSSFormatResolver =
new CSSFormatResolver()
formatResolverstyleSheetparseCSS(css2
text)
textAreatextFlowformatResolver =
formatResolver
]]gt
ltfxScriptgt
ltsTextArea id=textArea width=620 height=134
x=9 y=156gt
ltsTextFlowgt
ltsp styleName=h1gt
Title of the Text
ltspgt
ltsp styleName=h2gt
Section of the Text
ltspgt
ltspgt
This is a body text Lorem ipsum
ltspgt
ltsTextFlowgt
ltsTextAreagt
ltsTextArea x=10 y=10 width=285 height=86
id=css1 gt
lt[CDATA[
h1
colorFF0000
fontSize20
fontWeightbold
fontStylenormal
h2
colorFF00FF
fontSize16
fontWeightbold
fontStyleitalic
]]gt
ltsTextAreagt
ltsTextArea x=345 y=10 width=285 height=86
id=css2 gt
lt[CDATA[
h1
color00FF00
fontSize32
fontWeightnormal
fontStyleitalic
h2
color0000FF
fontSize24
fontWeightbold
fontStylenormal
]]gt
ltsTextAreagt
ltsButton x=108 y=105 label=Apply CSS
1 id=applyCSS1Button
click=applyCSS1Button_
clickHandler(event)gt
ltsButton x=443 y=105 label=Apply CSS
2 id=applyCSS2Button
click=applyCSS2Button_
clickHandler(event)gt
ltsApplicationgt
032010 (11)58
TLF
032010 (11) 59
got styleName attribute so you could apply the corresponding CSS style to them later
bull 2 TextAreas with simple different CSSbull 2 Buttons to apply CSS from TextAreas to example
text
When the button is clicked the new instance of CSSFormatResolver class is created Then the corresponding CSS string from the TextArea is parsed and set into resolverrsquos property of SlyleSheet class type And finally prepared formatResolver instance is assigned to the TextFlow
Applying CSS to TextFlowNow lets have more detailed look at resolveFormat callback function First it should return a value that implements ITextLayoutFormat if it returns null then no new styling should be applied to an element being processed by the function So we create format variable of FlowValueHolder (it implements ITextLayoutFormat) and set itrsquos value to null (we do that because resolveFormat works with all elements including TextFlow itself as probably we donrsquot want to apply one style to the whole text)
After we do all the necessary casts and null checks and if we are sure that current elementrsquos got styleName attribute we assign styles from CSS to a current format StyleSheet object is used to contain CSS data as it is convenient object to parse and retrieve CSS data
Conclusion and a WarningThere was a brief tutorial on how to apply simple CSS to TLF TextFlow Please note that CSSFormatResolver class is not fully functional and only can be applied to our sample CSSs Writing reusable and versatile class requires more detailed coding and approach
Check the TLF Blog on this issue There is fully functional CSSFormatResolver with example there httpblogsadobecomtlf200902iformatresolver_and_using_css_1html
MAXYM GOLOVANCHUK Maxym Golovanchuk is a Photoshop Certied Expert and TV producer and he is using Adobersquos software for implementing entertainment solutions including video delivery with Flash Media Server mexxikgmailcom
MondayTuesdayWednesdayThursday Friday
DIVISIONS OF CREATIVE NICHE INC
032010 (11)60
PROFILE Flashcreed ndash Business Gallery
032010 (11) 61
The Business Gallery (httpwwwflashcreedcombusiness_video_image_gallery) is a Flash component meant to do one thing to enhance the visual experience a website portfolio or presentation site gives to its users Mainly itrsquos all about the image you present yourself or
your product to the world wide web Letrsquos face it without the looks you canrsquot sell your product or image no matter how interesting it might be
Whatrsquos so great about this gallery you might wonder Well the answer is simple everything Advanced AS3 programming dynamic XML implementation unlimited number of media items on stage PNG JPG and video FLA SWF MP4 F4V supported media tween and image effects just to name a few of the over 150 settings this gallery brings you Bottom line you can customize it in any way you see fit in order to make it resemble your website layout Not to mention the code optimization that allows the gallery to run so smoothly even on low resources
We brought 45 background wallpapers in case just a color doesnrsquot do the job also a set of custom arrows and close buttons
Flashcreed ndash Business GalleryHello itrsquos good to be back here among Flash amp Flex Magazine readers Today we are going to tell you a bit about our products mainly our Business Gallery but since all our products are built on the same framework most of the properties apply to all When we first realized what we could do with this framework we decided to name it ldquoPandorardquo in order to point out the unlimited number of possibilities it revealed regarding customization and user friendliness
032010 (11)60
PROFILE Flashcreed ndash Business Gallery
032010 (11) 61
The size of the entire gallery and any element in it is subject to any kind of resize big stage and small thumbs or the other way around for any template you or your client desire
Column_scroll and the properties for the stage mask helps you configure the exact number of visible columns you want to set in order to browse through the media items your gallery has Beside this useful feature we added blur and a couple of tween effects for the leftright navigation that gives an impressive look
032010 (11)62
PROFILE Flashcreed ndash Business Gallery
032010 (11) 63
Either as tooltip or plain text you can show any information you want regarding a certain media thumb in the gallery You can change font type size spacing color position and many other properties
The color gradient system for roll overout mouse gesture is unique in every way if we are to compare it with other galleries on the market at this point You can customize up to 5 sets of color with different alpha values The gradient type either linear or radial can be modified with rotation and ratio values
032010 (11)62
PROFILE Flashcreed ndash Business Gallery
032010 (11) 63
When clicking on a thumb if preview_type is selected as internal a resizable preview window will reveal itself and depending on the media type (image or video) an image viewer or video player will be contained inside it If preview_type is selected as external you have the possibility to set certain URL addresses this allowing you to redirect the user to a specific area of the website like a product page from a virtual store for example
The video player has a dozen of controllers that allow you to create a skin to better suit the template you want to create for your gallery Buttonrsquos color thickness handler color or scrub bar size just to name a few of the properties you can play with
At an amazing price of 999 $ this has to be one of the best choices when it comes to media galleries flash components Donrsquot hesitate to take a look at it on wwwflashcreedcom and also consider other products that might better suit your specifications or desires We would definitely appreciate any kind of feedback regarding current or possible features
Thank you
032010 (11)65
BOOK REVIEW
Are you an actionscript 3 game developer who is not able to write a complete commercial game because you cannot manage dozens
of classes Or you are an experienced actionscript 3 applications developer who wants to program game but donrsquot like reading any available beginner book as it doesnrsquot suit your style Even if you already have a good grasp over java or c++ and interested in creating not only fun games but commercial ones also then this is what you really require
There are several actionscript 3 game development books for beginners out there but Essential Guide to Game Dev is one of those few books that talk about the advanced gaming concepts However its first chapter begins with an easy to understand game example (good for any beginner) and ends up creating 3 games Did I tell you 3 games in just first chapter
Teaching about an Actionscript 3 Game framework is one of the many reasons that make this book a kick-ass addition to actionscript 3 gaming library Authors teach you how to create 10 unique games ranging from arcade to driving tile based to puzzle game and shooters to dice games Another specialty of this book is to use Flex and Flash Develop IDEs along with the primary Flash tool that creates space for not only flex
developers but also Flash Develop users In addition to this you will also learn to create game assets with GIMP Mappy and a sound effect creation tool You will get information about copyright laws which are necessary for any would-be commercial game creation and a complete game example integrated with MochiAds
This book also discusses and further more implements various advanced topics such as bitmap rendering pixel-level collision detection sound management AI xml-based level designing scrolling screen optimization techniques particles etc
In short this book will surely blow your minds with the wealth of knowledge it includes and you will pray for authors to keep writing such informative and useful books
If you are really serious about gaming then donrsquot miss the opportunity of reading this book Highly recommended
by Ali RAZA ACI ACE SCJP
Essential Guide to Flash Games
Authors Jeff Fulton Steve FultonPublisher friends of EDISBN 978-1-4302-2614-7Language EnglishPages 664 PagesWebsite httpfriendsofedcombookhtmlisbn=1430226145

032010 (11)32
ACTIONSCRIPT DEVELOPMENT
032010 (11) 33
Once you click finish your project should open and you should see PhotoGalleryas on screen There are a few steps that I like to take next that I do for every project
First right click PhotoGallery folder in the Flex Navigator window click properties at the bottom and then click on the ActionScript Compiler link on the left hand side At the bottom yoursquoll see a check box that is already selected to generate a HTML wrapper file Uncheck that and click ok A warning message will appear saying that the html-template folder will be deleted Donrsquot worry about that because we havenrsquot put anything in that folder Click ok I personally donrsquot like to have a browser window open every time I run my application (see Figure 2)
Secondly wersquoll be using a tweening library called Tweener In order to use Tweener we have to first download it (httpcodegooglecomptweener) Be sure to download the ActionScript 30 version and create a folder on your desktop or any other place and name it code Place the contents of that download into that folder Next go back to Flex and again right click the PhotoGallery folder and click properties again and this time yoursquoll click the ActionScript Build Path link This window gives us the ability to add assets to our project so we can use them in our project Click the Add Folder button browser to the code folder you just created click ok and click ok again to close the window Now that folder and all its contents will be included in our project (see Figure 3)
Next right click the src folder in your project scroll over to new and add a new folder Name this folder classes This folder will contain two classes that wersquoll be using Then repeat the same steps but this time name the folder images This folder will contain all the images
Figure 3 ActionScript Build Path dialog
032010 (11)34
ACTIONSCRIPT DEVELOPMENT
Listing 1 galleryxml
ltxml version=10 encoding=UTF-8gt
ltgallery image_height=150 image_width=150 image_
gap=5 rows=3gt
ltphotogt
ltdescriptiongtThis is a description for the first
imageltdescriptiongt
ltthumb_pathgtimagesthumbjpgltthumb_pathgt
ltfull_pathgtimagesfullgifltfull_pathgt
ltphotogt
ltphotogt
ltdescriptiongtThis is a description for the second
imageltdescriptiongt
ltthumb_pathgtimagesthumbjpgltthumb_pathgt
ltfull_pathgtimagesfullgifltfull_pathgt
ltphotogt
ltphotogt
ltdescriptiongtThis is a description for the third
imageltdescriptiongt
ltthumb_pathgtimagesthumbjpgltthumb_pathgt
ltfull_pathgtimagesfullgifltfull_pathgt
ltphotogt
ltphotogt
ltdescriptiongtThis is a description for the fourth
imageltdescriptiongt
ltthumb_pathgtimagesthumbjpgltthumb_pathgt
ltfull_pathgtimagesfullgifltfull_pathgt
ltphotogt
ltphotogt
ltdescriptiongtThis is a description for the fifth
imageltdescriptiongt
ltthumb_pathgtimagesthumbjpgltthumb_pathgt
ltfull_pathgtimagesfullgifltfull_pathgt
ltphotogt
ltphotogt
ltdescriptiongtThis is a description for the sixth
imageltdescriptiongt
ltthumb_pathgtimagesthumbjpgltthumb_pathgt
ltfull_pathgtimagesfullgifltfull_pathgt
ltphotogt
ltphotogt
ltdescriptiongtThis is a description for the seventh
imageltdescriptiongt
ltthumb_pathgtimagesthumbjpgltthumb_pathgt
ltfull_pathgtimagesfullgifltfull_pathgt
ltphotogt
ltphotogt
ltdescriptiongtThis is a description for the eighth
imageltdescriptiongt
ltthumb_pathgtimagesthumbjpgltthumb_pathgt
ltfull_pathgtimagesfullgifltfull_pathgt
ltphotogt
ltphotogt
ltdescriptiongtThis is a description for the ninth
imageltdescriptiongt
ltthumb_pathgtimagesthumbjpgltthumb_pathgt
ltfull_pathgtimagesfullgifltfull_pathgt
ltphotogt
ltphotogt
ltdescriptiongtThis is a description for the tenth
imageltdescriptiongt
ltthumb_pathgtimagesthumbjpgltthumb_pathgt
ltfull_pathgtimagesfullgifltfull_pathgt
ltphotogt
ltphotogt
ltdescriptiongtThis is a description for the
eleventh imageltdescriptiongt
ltthumb_pathgtimagesthumbjpgltthumb_pathgt
ltfull_pathgtimagesfullgifltfull_pathgt
ltphotogt
ltphotogt
ltdescriptiongtThis is a description for the twelfth
imageltdescriptiongt
ltthumb_pathgtimagesthumbjpgltthumb_pathgt
ltfull_pathgtimagesfullgifltfull_pathgt
ltphotogt
ltphotogt
ltdescriptiongtThis is a description for the
thirteenth imageltdescriptiongt
ltthumb_pathgtimagesthumbjpgltthumb_pathgt
ltfull_pathgtimagesfullgifltfull_pathgt
ltphotogt
ltphotogt
ltdescriptiongtThis is a description for the
fourteenth imageltdescriptiongt
ltthumb_pathgtimagesthumbjpgltthumb_pathgt
ltfull_pathgtimagesfullgifltfull_pathgt
ltphotogt
ltphotogt
ltdescriptiongtThis is a description for the
fifteenth imageltdescriptiongt
ltthumb_pathgtimagesthumbjpgltthumb_pathgt
ltfull_pathgtimagesfullgifltfull_pathgt
ltphotogt
ltgallerygt
032010 (11)36
ACTIONSCRIPT DEVELOPMENT
Listing 2 PhotoGalleryas
package
Imports
import caurinatransitionsTweener
import classesBigPhoto
import classesThumbNail
import flashdisplayBitmap
import flashdisplaySprite
import flasheventsEvent
import flasheventsMouseEvent
import flashnetURLLoader
import flashnetURLRequest
[SWF(width=466 height=515 backgroundColor=00
0000 frameRate=30)]
public class PhotoGallery extends Sprite
Containers
private var _thumbContainerSprite Stores
the thumbnails
private var _nextButtonSprite Stores
the next arrow
private var _backButtonSprite Stores
the back arrow
private var _bigPhotoBigPhoto
Container for the big image
XML
private var _xmlLoaderURLLoader
Loads the XML file
private var _xmlXML
Stores the XML data
Image Assets
[Embed(source=assetsnext-arrowpng)]
private var _nextArrowClass
Embedded asset for the next
arrow
[Embed(source=assetsback-arrowpng)]
private var _backArrowClass
Embedded asset for the back
arrow
Constructor
public function PhotoGallery()
init ()
Initializing method
private function init ()void
_xmlLoader = new URLLoader ()
_xmlLoaderaddEventListener (EventCOMPLETE
xmlComplete false 0 true)
_xmlLoaderload (new URLRequest
(galleryxml))
XML Complete
private function xmlComplete (eEvent)void
Store the XML data
_xml = new XML (etargetdata)
loadImages ()
Clean up
_xmlLoaderremoveEventListener
(EventCOMPLETE xmlComplete)
_xmlLoader = null
Load in the thumbs
private function loadImages ()void
Temporary variables
var imageHeightuint = _xmlimage_height
var imageWidthuint = _xmlimage_width
var imageGapuint = _xmlimage_gap
var rowsuint = _xmlrows
var rowCounteruint = 0
var columnCounteruint = 0
Instantiate the container and position it
on screen
_thumbContainer = new Sprite ()
_thumbContainerx = 78
_thumbContainery = 78
_thumbContainerbuttonMode = true
_thumbContaineraddEventListener
(MouseEventCLICK thumbClick
false 0 true)
thisaddChild (_thumbContainer)
Loop through the images and create the
visual grid
for (var iuint = 0 i lt _xmlphotolength ()
i++)
var pathString = _xmlphoto[i]thumb_path
var descriptionString = _xmlphoto[i]desc
Creating an XML Photo Gallery with AS3
032010 (11) 37
Listing 2 PhotoGalleryas
ription
Create the thumbnail
var pThumbNail = new ThumbNail ()
pnewID = i
ploadImage (path)
pdescription = description
px = (imageWidth + imageGap)
columnCounter
py = (imageHeight + imageGap)
rowCounter
_thumbContaineraddChild (p)
Create the grid
if ((rowCounter + 1) lt rows)
rowCounter++
else
rowCounter = 0
columnCounter++
Setup the navigation
createNavigation ()
This method handles the click event for the
next arrow
private function nextClick (eMouseEvent)void
155 is the width + spacing
if (-_thumbContainerx lt (_thumbContainerwidth
ndash stagestageWidth ndash 155))
disableNavigation ()
TweeneraddTween (_thumbContainer x
_thumbContainerx ndash 155 time
075 transitioneaseOutExpo
onCompleteenableNavigation)
This method handles the click event for the
back arrow
private function previousClick (eMouseEvent)void
if (-_thumbContainerx gt 0)
disableNavigation ()
TweeneraddTween (_thumbContainer x
_thumbContainerx + 155 time
075 transitioneaseOutExpo
onCompleteenableNavigation)
This method handles the click event for the
thumbnails
private function thumbClick (eMouseEvent)void
disableNavigation ()
Disable the container that stores the
thumbnails
_thumbContainerbuttonMode = false
_thumbContainermouseChildren = false
_thumbContainerremoveEventListener
(MouseEventCLICK thumbClick)
Get the full image path
var imagePathString = _xmlphoto[etargetnewI
D]full_path
Instantiate the big photo
_bigPhoto = new BigPhoto ()
_bigPhotobuttonMode = true
_bigPhotox = 108
_bigPhotoy = 1075
_bigPhotoalpha = 0
_bigPhotoloadImage (imagePath)
_bigPhotoaddEventListener (MouseEventCLICK
closePhoto false 0 true)
thisaddChild (_bigPhoto)
Fade up the photo
TweeneraddTween (_bigPhoto alpha1 time
1)
Fade out the photo
When the image finishes fading delete the
photo and enable the navigation
items
private function closePhoto (eMouseEvent)void
TweeneraddTween (_bigPhoto alpha0 time1
onCompletedeletePhoto)
private function deletePhoto ()void
032010 (11)38
ACTIONSCRIPT DEVELOPMENT
Listing 2 PhotoGalleryas
_bigPhotobuttonMode = false
_bigPhotoremoveEventListener
(MouseEventCLICK closePhoto)
_bigPhotodestroy ()
thisremoveChild (_bigPhoto)
_bigPhoto = null
_thumbContainerbuttonMode = true
_thumbContainermouseChildren = true
_thumbContaineraddEventListener
(MouseEventCLICK thumbClick
false 0 true)
enableNavigation ()
private function createNavigation ()void
Instantiate the next arrow
var nBitmap = new _nextArrow ()
Instantiate the nextButton container
Add the next button as a child of the
nextButton container
_nextButton = new Sprite ()
thisaddChild (_nextButton)
_nextButtonaddChild (n)
_nextButtonx = stagestageWidth ndash _
nextButtonwidth
_nextButtony = 475
Instantiate the back arrow
var bBitmap = new _backArrow ()
Instantiate the backButton container
Add the next button as a child of the
backButton container
_backButton = new Sprite ()
thisaddChild (_backButton)
_backButtonaddChild (b)
_backButtonx = _nextButtonx ndash _
nextButtonwidth ndash 5
_backButtony = 475
enableNavigation ()
private function enableNavigation ()void
_nextButtonbuttonMode = true
_nextButtonaddEventListener
(MouseEventCLICK nextClick false
0 true)
_backButtonbuttonMode = true
_backButtonaddEventListener
(MouseEventCLICK previousClick
false 0 true)
private function disableNavigation ()void
_nextButtonbuttonMode = false
_nextButtonremoveEventListener
(MouseEventCLICK nextClick)
_backButtonbuttonMode = false
_backButtonremoveEventListener
(MouseEventCLICK previousClick)
Figure 4 New ActionScript class dialog
Creating an XML Photo Gallery with AS3
032010 (11) 39
Listing 3 ThumbNailas
package classes
import caurinatransitionsTweener
import flashdisplayLoader
import flashdisplayShape
import flashdisplaySprite
import flasheventsEvent
import flasheventsMouseEvent
import flashnetURLRequest
import flashtextTextField
import flashtextTextFieldAutoSize
import flashtextTextFormat
public class ThumbNail extends Sprite
Containers
private var _imageLoaderLoader Loads in
the thumbnail
private var _imageContainerSprite
Container for the thumbnail
private var _maskShape Container for the
mask
private var _descriptionContainerSprite
Container for the description
TextFields
private var _descriptionTextField
TextField for the container
Logic
private var _newIDuint The ID of the
object
[Embed(systemFont=Arial fontName=arial
fontWeight=bold
mimeType=applicationx-font-
truetype)]
private var _arialClass Embedded asset
for the font
Constructor
public function ThumbNail ()
super ()
init ()
Initializing method
private function init ()void
Instantiate the container
_imageContainer = new Sprite ()
_imageContaineralpha = 0
thisaddChild (_imageContainer)
createDescription ()
thismouseChildren = false
thisaddEventListener (MouseEventMOUSE_OVER
onMouseOver false 0 true)
thisaddEventListener (MouseEventMOUSE_OUT
onMouseOut false 0 true)
Public Methods
public function loadImage (pathString)void
_imageLoader = new Loader ()
_imageLoadercontentLoaderInfoaddEventListen
er (EventCOMPLETE imageComplete
false 0 true)
_imageLoaderload (new URLRequest (path))
GetterSetter Methods
public function get newID ()uint
return this_newID
public function set newID (valueuint)void
this_newID = value
public function get description ()String
return this_descriptiontext
public function set description (valueString)void
this_descriptiontext = value
Private Methods
032010 (11)40
ACTIONSCRIPT DEVELOPMENT
Listing 3 ThumbNailas
private function onMouseOver (eMouseEvent)void
TweeneraddTween (_descriptionContainer
y75 time05 transition
easeOutExpo)
private function onMouseOut (eMouseEvent)void
TweeneraddTween (_descriptionContainer
y150 time05 transition
easeOutExpo)
private function imageComplete (eEvent)void
Reposition the loaded content to the center
_imageLoaderx = -(_imageLoaderwidth 2)
_imageLoadery = -(_imageLoaderheight 2)
_imageContaineraddChildAt (_imageLoader 0)
Apply background after the image has
completely loaded
drawBackground ()
Draw the mask around the description
drawMask ()
Fade in the container
TweeneraddTween (_imageContainer alpha1
time05)
Clean up
_imageLoadercontentLoaderInforemoveEv
entListener (EventCOMPLETE
imageComplete)
Draws a background behind _imageContainer
private function drawBackground ()void
_imageContainergraphicsbeginFill (0xFFFFFF)
_imageContainergraphicsdrawRect (_
imageLoaderx ndash 1 _imageLoadery
ndash 1 _imageLoaderwidth + 2
_imageLoaderheight + 2)
_imageContainergraphicsendFill ()
Creates everything for the description
private function createDescription ()void
Instantiate the container
_descriptionContainer = new Sprite ()
_descriptionContainery = 150
_descriptionContainergraphicsbeginFill
(0x000000 075)
_descriptionContainergraphicsdrawRect (-75
-75 150 75)
_descriptionContainergraphicsendFill ()
_imageContaineraddChild (_
descriptionContainer)
Specify text formatting for the description
Text Field
var tfTextFormat = new TextFormat ()
tfcolor = 0xFFFFFF
tfalign = center
tffont = arial
tfbold = true
tfsize = 12
Instantiate the TextF ield
_description = new TextField ()
_descriptionx = -75
_descriptiony = -70
_descriptionwidth = 150
_descriptionwordWrap = true
_descriptionembedFonts = true
_descriptiondefaultTextFormat = tf
_descriptionautoSize = TextFieldAutoSizeLEFT
_descriptionContaineraddChild (_description)
Draws a mask our _descriptionContainer
private function drawMask ()void
Draw the mask shape
_mask = new Shape ()
_maskgraphicsbeginFill (0xFF0000)
_maskgraphicsdrawRect (_imageLoaderx
_imageLoadery _imageLoaderwidth
_imageLoaderheight)
_maskgraphicsendFill ()
addChild (_mask)
Apply the mask to the container
_descriptionContainermask = _mask
Creating an XML Photo Gallery with AS3
032010 (11) 41
that will be loaded into the application from XML Finally create another folder and this time name it assets This folder will contain the buttons that wersquoll embed into our project
The AssetsBefore we start coding we need to create some visual assets Open up Photoshop or any other program you have for creating graphics and create an image that is 150x150 pixels Fill it with a flat color and save the image as thumbjpg in the images folder you just created Next create another image thatrsquos 250x300 pixels Fill it with another color and save that image as fulljpg into the same folder These images will be used for testing purposes only
Listing 4 BigPhotoas
package classes
import flashdisplayLoader
import flashdisplaySprite
import flasheventsEvent
import flashnetURLRequest
public class BigPhoto extends Sprite
Containers
private var _imageLoaderLoader Loads in the
thumbnail
private var _imageContainerSprite Container
for the thumbnail
Constructor
public function BigPhoto ()
super()
Public Methods
public function loadImage (pathString)void
_imageLoader = new Loader ()
_imageLoadercontentLoaderInfoaddEventListen
er (EventCOMPLETE imageComplete
false 0 true)
_imageLoaderload (new URLRequest (path))
Clean up method
public function destroy ()void
_imageContainerremoveChild (_imageLoader)
_imageLoaderunload ()
_imageLoader = null
thisremoveChild (_imageContainer)
_imageContainer = null
Private Methods
private function imageComplete (eEvent)void
Instantiate the container
_imageContainer = new Sprite ()
thisaddChild (_imageContainer)
Add the loader
_imageContaineraddChild (_imageLoader)
Clean up
_imageLoadercontentLoaderInforemoveEv
entListener (EventCOMPLETE
imageComplete)
Figure 5 Time to test
032010 (11)42
ACTIONSCRIPT DEVELOPMENT
We still have to create our navigation buttons that wersquoll use to scroll through our gallery Create two buttons that are 40x40 pixels and design them how you like They should resemble forward and back buttons Save the forward arrow as next-arrowpng and the other as back-arrowpng into the assets folder Now that our assets our created itrsquos time to code
The XML fileRight click the src folder in the project scroll over to new and click file A dialog window will open and in the file name input box type galleryxml (see Figure 4) Write the code that you see from Listing 1 into galleryxml
Line 1 is the XML declaration This is needed to have a well-formed XML document
Line 2 declares the gallery root node Notice in this node Irsquove added attributes Also to have a well-formed XML document you must have one root node and all attribute values must be in quotes
Lines 3-7 declares a photo node with three children description thumb_path and full_path description is exactly as it sounds It will contain a description for our thumbnail thumb_path contains the path to our thumbnail image Same goes for full_path it contains the path to our full image
I then just copy and pasted that and pasted it 14 times just changing out the description Remember wersquore just using dummy data When you finish go back and add photos of your choice
The ClassesWersquoll be using two additional classes for this project One will be for the thumbnails and another for the full image Right click the classes folder go to new and click ActionScript class In the name field type ThumbNail For the Superclass type in flashdisplaySprite Wersquoll need to extend from that class so we can use the functionality of that object but add our own (see Figure 4)
Add another class this time name it BigPhoto It should also inherit from flashdisplaySprite
CodingTime to start writing the ActionScript for this project Open up PhotoGalleryas from the Flex Navigator and type in the code from Listing 2 Open up ThumbNailas and type in the code from Listing 3 Open up BigPhotoas and type in the code from Listing 4 Now that you have all the code in itrsquos time to test In the menu bar click RungtRun PhotoGallery (see Figure 5) If you get an error make sure you typed everything correctly If all went well you should see the gallery open up Click the buttons and watch the gallery scroll left and right Roll over the thumbnails to see the description scroll up Click on a thumbnail to see the full image fade in You might be wondering about whatrsquos going on Irsquoll try to break that down for you next
The ExplanationOur main focus is going to be whatrsquos going on in PhotoGalleryas This file contains the ActionScript that makes almost everything happen We first start off by declaring our properties that will be used in the project Yoursquoll notice a couple of embeded lines These lines are MetaData tags that actually embed assets into the project The two embeded lines you see add the next-arrowpng file and the back-arrowpng file In the constructor there is one call to a method called init() This method gets the application going by requesting and loading in the XML File When the file finishes loading we store the XML data into our _xml property Next we call the loadImages() method This method is responsible for a big part of the application We first gather some information from the XML file and store it in temporary variables
bull imageWidth stores the image _ height attributes valuebull imageWidth stores the image _ width attributes valuebull imageGap stores the image _ gap attributes valuebull rows stores the row attributes valuebull rowCounter increments ever pass of the for loop Is
compared against the rows variablebull columnCounter increments once for every column
created
The for loop cycles the XML file creating a new ThumbNail object with every iteration During each iteration we create variables that store the path to the thumb nail (path) and the description of the thumbnail (description) We pass the variables into the methods of the ThumbNail class Remember the ThumbNail class defines methods and properties that are specific to it The class code is commented if you wish to explore it Again our main focus is PhotoGalleryas To create the grid we write ifelse logic that compares the rowCounter variable to the row variable For every iteration of the loop we increment that variable if that variable becomes greater than rows we set it back to 0 rowCounter is then multiplied to the y-axis of each ThumbNail object The rest of the code is commented for you to explore
ConclusionYoursquoll notice I actually hard coded a lot of values directly in the ActionScript Not too ideal In the next part of this tutorial wersquore going to come back to this code and modify it to be a little more flexible and visually appealing If you have any questions feel free to contact me through my site (wwwcodedbyryancom)
RYAN DrsquoAGOSTINORyan DrsquoAgostino is an Interactive Developer at NAS Recruitment Communications in Cleveland OH part-time instructor at Virginia Marti College of Art and Design in Lakewood Ohio and freelance designer and ActionScript developer For more information about Ryan please visit httpwwwcodedbyryancom
032010 (11)44
COMPONENTS
Components are the controls and containers that are the elements of the application that create the interface They cover controls such
as buttons and check boxes containers that can hold other containers and controls navigation elements and charts Components can be added to your application in variety of ways They can be added through the design view writing then in MXML or through ActionScript
Flash Builder now has two major sets of components the Halo set which has been available in previous versions of Flex and the new Spark set The components from the Spark set have a direct correlation to a component in the Halo set but not all Halo components have been upgraded to the Spark framework yet The namespaces for these components are added automatically when a MXML document is created and you will notice there are now multiple namespace in the main MXML document already
Creating custom components takes two paths The first is to create a skin for an existing Halo component in Flash Illustrator Photoshop or Fireworks or create a custom skin for a Spark component using MXML The second path is to create a completely custom component using Flash Professional and importing it into the Flash Builder project We are going to focus on the second path and create a custom component with Flash Professional
The first step in creating a custom component is to instal the Flex Component Kit mxp into Flash Professional This is an extension that will expose some
Custom Flash CS4
Flash Builder comes with a lot of components to cover almost all of an apps needs But what if you want a custom look or functionality to a component With Flash Professional you can create custom components and import them into Flash Builder for use in your application
What you will learnhellipbull How to create custom components in Flash Professional to im-
port into Flash Builder
What you should knowhellipbull Flash Professional CS4bull Flash Builder 4bull Actionscript 3
Components in Flash Builder 4
Figure 1 The component artwork Figure 2 Converting the movie clip
032010 (11)46
COMPONENTS
Listing 1 The component class
package comtest
import mxflashUIMovieClip
import flasheventsEvent
import flasheventsEventDispatcher
import flasheventsMouseEvent
import flashfiltersGlowFilter
public class SliderButton extends UIMovieClip
public static const BUTTON_CLICKString = button click
private var glowGlowFilter = new GlowFilter(0x0000cc54421falsefalse)
public function SliderButton()
plusButtonbuttonMode = true
minusButtonbuttonMode = true
plusButtonaddEventListener(MouseEventMOUSE_OVER handleMouseOver)
plusButtonaddEventListener(MouseEventMOUSE_OUT handleMouseOut)
plusButtonaddEventListener(MouseEventCLICK handleMousePress)
minusButtonaddEventListener(MouseEventMOUSE_OVER handleMouseOver)
minusButtonaddEventListener(MouseEventMOUSE_OUT handleMouseOut)
minusButtonaddEventListener(MouseEventCLICK handleMousePress)
private function handleMouseOver(eMouseEvent)void
ecurrentTargetfilters = [glow]
private function handleMouseOut(eMouseEvent)void
ecurrentTargetfilters = []
private function handleMousePress(eMouseEvent)void
if(ecurrentTargetname == plusButton ampamp trackThumbx lt 134)
trackThumbx++
else if(ecurrentTargetname == minusButton ampamp trackThumbx gt 37)
trackThumbx--
dispatchEvent(new Event(SliderButtonBUTTON_CLICK))
032010 (11)48
COMPONENTS
of the Flex classes to Flash allowing the component to communicate with the application Download the extension from the Adobe site at httpwwwadobecomcfusionexchangeindexcfmevent=extensionDetailampextid=1273018 and install using the Adobe Extension Manager The extension should work with Flash
versions as far back as Flash 8 but I highly recommend using at least Flash 9 (CS 3)
Once the extension is installed launch Flash Professional and create a new ActionScript 3 project We are going to create a simple slider button that has a plus and minus button on each end of the button and a track between them When the plus and minus buttons are clicked the the track thumb will move one pixel in either direction There will also be a roll over behavior on the buttons to change their look as the mouse rolls over and off the buttons Finally Flash Builder will receive the event of the button being pushed and update a text input on the stage
It is common to encapsulate the behaviors of the component within itself and have events broadcast to the containing application If you think about some of standard components in both Flash Builder and Flash Professional and deconstruct them in your mind you will see that the same methods are used on them The NumericStepper is a lot like our component It has two buttons with a text field that displays a value that is incremented or decremented with each push of the button The component itself does nothing to effect the application until the code calls it to either send or receive a value
With our new document we are going to create the artwork for the component in the fla file Create four movie clips one each for the scroll track the plus button the minus button and the track thumb (Figure 1) The naming and look of these movie clips are not important
Once the movie clips are created and on the stage give each one an instance name The names in the
Figure 3 Setting the class of the movie clip
Figure 4 Setting to export as SWC
Figure 5 Creating the Flash Builder project
Custom Flash CS4 Components in Flash Builder 4
032010 (11) 49
example files are plusButton minusButton and trackThumb The actual names do not matter and we dont need an instance name for the track since we are not going to reference it in Flash Builder Flash Builder will reference the instance names of the movie clips in the components we will use these later
Now that the artwork has been created it must be collected into its own movie clip Select all of the artwork on the stage and choose ModifygtgtConvert to Symbolhellip In the Library panel there is a new symbol that is called in the sample files SliderButton The name is important here because this is how the Convert to Flex Component mxp will name the class that Flash Builder will refer to later
An external class will give the component the internal behaviors that were mentioned earlier as well as an event to broadcast to the Flash Builder application (Listing 1) All the code in the class should be familiar but there are a few points to go over First the package name is given the qualifier of comtest to identify that the component belongs to our namespace This is not necessary but helpful when there are multiple components or components from different publishers in the application
The most important change is instead of having the class extend the Sprite class this class is going to
extend the UIMovieClip class This class like the Flex Component in the library exposes the behaviors and methods we set up in the class to the Flash Builder application In the import statements use import
mxflashUIMovieClip The mxflash class includes both the UIMovieClip and ContainerMovieClip classes
When the variables are declared we set up a glow filter that will be attached to the buttons when the mouse rolls over them and a string constant for the event we create later In the constructor of the class the buttons receive the event listeners for the mouse interactions and the handlers are added later in the code In the handleClick event handler we use the event dispatcher class to dispatch the event Here we are just dispatching a standard event with the constant that was created earlier You can just as easily dispatc a custom event that has extra information attached to it
Select the movie clip in the Library panel then select CommandsgtgtConvert Symbol to Flex Component (Figure 2) The extension will do several operations such as making the symbol available to ActionScript giving the symbol a class name adding the Flex Component to the library and others
Save the file as SliderButtonas in the folder path comtest When you declare the package name as we have here you must have the same hierarchy as listed in the package name Back in the fla select the
Figure 6 The Package Explorer
Listing 2 The main MXML le
ltxml version=10 encoding=utf-8gt
ltsApplication xmlnsfx=httpnsadobecommxml
2009
xmlnss=librarynsadobecomflex
spark
xmlnsmx=librarynsadobecomflex
mx
width=200 height=110gt
ltfxDeclarationsgt
lt-- Place non-visual elements (eg
services value objects) here
--gt
ltfxDeclarationsgt
ltsApplicationgt
Listing 3 The new component and name space
xmlnstest=comtest
lttestSliderButton x=14 y=10 id=sliderButton
gt
032010 (11)50
COMPONENTS
SliderButton movie clip and select Propertieshellip from the contextual menu Expand the advanced area if it is not already and enter comtestSliderButton in the Class text field Leave the Base Class text field blank and click OK (Figure 3)
Select Publish Settingshellip from the file menu and click on the Flash tab (Figure4) Under the SWF Settings area of the window be sure that the Export SWC check box is checked The swc is the part that Flash Builder will use in the application SWC are archives that contain the classes and media assets of the component and make it easy to distribute the movie clip
Publish the SWF and SWC and we are ready to move to Flash Builder
Flash BuilderIn Flash Builder create a new project This example we only need a basic Flash Builder project without any
server technologies You can name the project anything you would like in this case I have name FB_Components and saved it in my default workspace
If you have not worked on a Flash Builder project yet it is a lot like working on the Flex projects in the past with some new MXML tags You will also notice that the Flex Navigator pane has now been replaced with the Package Explorer (Figure 6)
The Package Explorer pane has a different organization than the Flex Navigator but the main MXML file can still be found under src then under the default package
Looking at the main MXML (Listing 2) you will see that the three name spaces are added automatically and the application begins with sApplication instead of mxApplication These are the minor differences to be on the look out for when working on a Flash Builder project
Listing 4 The nal MXML le
ltxml version=10 encoding=utf-8gt
ltsApplication xmlnsfx=httpnsadobecommxml2009
xmlnss=librarynsadobecomflexspark
xmlnsmx=librarynsadobecomflexmx minWidth=200 minHeight=110
width=200 height=110
initialize=init()
xmlnstest=comtestgt
ltfxDeclarationsgt
lt-- Place non-visual elements (eg services value objects) here --gt
ltfxDeclarationsgt
ltfxScriptgt
lt[CDATA[
private function init()void
sliderButtonaddEventListener(SliderButtonBUTTON_CLICK updateText)
private function updateText(eEvent)void
pixelTexttext = String(sliderButtontrackThumbx)
]]gt
ltfxScriptgt
lttestSliderButton x=14 y=10 id=sliderButton gt
ltsLabel x=39 y=41 text=The position of the track thumb is textAlign=center width=122gt
ltsTextInput x=76 y=76 width=49 id=pixelTextgt
ltsApplicationgt
Custom Flash CS4 Components in Flash Builder 4
032010 (11) 51
To get our component into the Flash Builder project we need to put the swc some where the project can see it On your desktop navigate to where the swc was published to and copy the file Then navigate to where Flash Builder project is and put the swc into libs folder I have found it is easier to keep the fla and swf files out of the project then copy the swc over to the Flash Builder project as needed
Back in Flash Builder open the libs folder under the project in the Package Explorer pane In that directory you should see your swc if you do not try right clicking on the libs folder and selecting Refresh
In the MXML editor switch to Design view When the Design view becomes active the Component pane should become available in the lower left of the workspace The first folder in the pane is the Custom folder and our custom component should be displayed in the list Drag an instance of this component onto the stage
To show that we can have two way communication with the component drag a label and a text input onto the stage Set the labels text to be The position of the track thumb is and move the text input near the label Set the id of the text input to pixelText (Figure 7) Switch back to the Source view after saving
Notice that several lines have been added to the source of the MXML document In addition to the MXML for the component including our custom component a name space value has been added to the sApplication tag designated as xmlnstest=comtest (Listing 3) If we add more components using the same comtest package declaration they will all fall under this name space If we were to add more components using a different package additional name spaces would be added You will also notice that the component starts with testSliderButton as opposed to s fx or mx
In the application tag add an initialize property calling a function called init() After the fxDeclarations tags add fxScript tags to hold the Actionscript As you type fx the code completion should pop up and allow you to select the fxScript tags
Add an id property to the SliderButton tag and give it a value of sliderButton In between the CDATA tags add the init function This function simply adds an event listener to our component calling the updateText
function every time the BUTTON_CLICK event is broadcast from the SliderButton class (Listing 4)
Once the application receives the BUTTON_CLICK event it calls the updateText function This function looks into the component and gets the x position of the track thumb then puts that value into the text input we set up earlier
So now we have communication coming out of the component using the dispatchEvent call in the class We are also looking into the component where the application is getting the x position of the thumb track inside the component Communication can get much more complicated than this but this is a simple example to give a starting point to create more complex components
Click debug to run the application and if no errors occurred the application should launch in a browser window If you have a browser window open before running the app you should close it There is a bug in the Flash Player at the time of this writing that may cause the app to not run if there are browser windows already open
Once the application is running click on the buttons and watch as the value in the text input increase and decrease The custom component is now complete and ready to have more behaviors and methods added to it
ConclusionWhile the components that come with Flash Builder can cover most situations there will be times where only a custom component will fit the applications needs Creating a custom component takes a little work but can make the developers job a lot easier With this new level of control over the look and behavior of the component can make the application more rich and engaging to the end user
Figure 7 Components on the stage
On the Netbull httpwwwadobecombull httpwwwadobecomcfusionexchangeindexcfmeven-
t=extensionDetailampextid=1273018
LOUIS DICARROLouis DiCarro is a consultant based in NYC and has been working with Flash since the rst version He has taught web development at the college level and has worked for numerous large clients He can be reached at louisdicarroffdgmailcom
032010 (11)52
COMPONENTS AIR Components in Flash Builder
032010 (11) 53
We already know that building an AIR application affords us a lot more capabilities than working with a web based project
Digging through the Actionscript documentation shows that there are a lot of classes that are only available to AIR applications These mostly have to do with classes and methods that interact with the file system or windowing of the application
Flash Builder as with Flex Builder before it contains several components that are only available to use with AIR applications These components deal with
visual interfaces for interacting with the file system and a HTML component for displaying web content
You may wonder why these components are only available for AIR applications Mostly it is for security reasons Up to Flash Player 101 a swf does not have the permission to interact with files on the file system except in very limited circumstances
Swfs in the web browser are able to interact only with files on the server in which the swf is hosted This allows them to load images xml and other file types at run time but only if the files come from within its
AIR Components
Adding file and html rendering can result in a lot of code But with the AIR components in Flash Builder 4 this functionality can be added easily with only a few lines of code
What you will learnhellipbull What components are available for AIR applications in Flash
Builder 4
What you should knowhellipbull Flash Builder 4bull Actionscript 3
in Flash Builder
Figure 1 AIR Actionscript 3 special classes for the HTML component Figure 2 Layout of the HTML application
032010 (11)52
COMPONENTS AIR Components in Flash Builder
032010 (11) 53
Were going to take a look at couple of simple examples for each component to get a feel how use them It is also important to note that the documentation for these components are in the AS 3 documentation When looking at the documentation you will see a symbol next to some of the classes and also next to some methods within the classes (Figure 1)
HTML ComponentThe HTML component is very easy to work with It can pull in many types of media and render them as you would expect them to be rendered in a web browser
Start up Flash Builder and create a new Flex project Name the project and select Desktop under project type Click finish and let Flash Builder set up the project
Once the project is started click on the Design tab In the lower left a component tab should be open If it is not open it using the Window menu and selecting Components Scroll down to the Adobe AIR folder You will not see this folder if you set your project to run in a web browser
We are going to create a simple web browser using only three components and one line of code First drag a HTML component a text field and a button to the stage Arrange them how you would like and switch over to design view
Give each component an id as in Listing 1 Also give the button a click handler Type click and let the program auto complete another code hint will pop up to create the handler automatically
Flash Builder will generate the handler as well as the fxScript block in the code In the click handler that is generated add a line that will set the location of the HTML component to the text in the text field See Listing 2 for the full code
Run the application and fill in a valid web address in the application Remember to include http in front of
own sandbox There are exceptions and ways around it but for the majority the swf cannot interact with the file system
If the development of applications using Flash Builder and AIR were to succeed they would need to act like real desktop applications This means that the applications would have to load and save files just as any other application that a user would use on the computer
Security is still maintained in this model by having the developer digitally sign their application using certificates If the certificate is obtained though a trusted source the application would be traceable back to the original developer if something bad should happen
Having a HTML component gives the application greater rendering power by tapping into the Web Kit which can run better than the HTML renderers in the Flash Player This allows developers to repurpose content from their web site to the application
Figure 3 The application running Figure 4 Layout of the image viewer application
Listing 1 MXML of components
ltsTextInput id=addressBar x=10 y=10
width=518gt
ltsButton id=goButton x=555 y=13
label=Go click=goButton_
clickHandler(event) gt
ltmxHTML id=htmlPane x=10 y=40 width=620
height=430gt
Listing 2 goButton handler
protected function goButton_clickHandler(event
MouseEvent)void
htmlPanelocation = addressBartext
032010 (11)54
COMPONENTS
the address Click the Go button and the page should load after a few seconds Take a look at Figure 3 for the results
There are a lot of methods and commands associated with the HTML component This will allow you to make a more customized display and give more control over the HTML content that you show
File system componentsUsing the file system components is just as easy To test the components we are going to create a simple image viewer that allows the user to select the images from the file system
Create a new Flex Project as we did before and be sure to make it a desktop application Once the project has loaded switch to design view and drag a File System Tree and an Image component to the stage See Figure 4 for the layout
Once the application is laid out switch over to the Source mode and give all the components ids as we did before (Listing 3) Also add a change handler instead of a click handler Flash Builder will autocomplete and generate the handler for you as it did when we added the click action to the button
In the generated handler add the code that will load the image into the image component To keep everything simple we only are going to load jpg and png files (Listing 4) in this function we are first checking to make sure the file is a file and not a directory by checking for a file extension If the file passes the first test we check to see if the file is a jpg or png Lastly if the file passes all of these test it gets loaded into the image component
Save the file and run the application to see the results Clicking on the file system tree items will either open or close the directory or try to load the file When the user clicks on a jpg or png it will load into the image component (Figure 5) Note that as the tree expands a scroll bar is attached to the component automatically
ConclusionJust as with the HTML component there is more methods and properties available to you with the file system components In this demo application we have seen how easy it is to get access to the file system using the component without writing a lot of code
There is a lot more involved in making a full application using these components but we have witnessed how easy to get started with them Having more control over the elements as well as error checking would be added in real applications
Having these components available gives the application a large amount of functionality very quickly and allows the developer to concentrate on the logic of the application Using these components in your application will help make it more full-featured and feel more like a real desktop application
LOUIS DICARROLouis DiCarro is a consultant based in NYC and has been working with Flash since the rst version He has taught web development at the college level and has worked for numerous large clients He can be reached at louisdicarroffdgmailcom
Listing 3 MXML of components
ltmxFileSystemTree id=fsList x=10 y=10
height=460 change=fsList_
changeHandler(event)gt
ltmxImage id=imgPane x=193 y=10 width=437
height=460gt
Listing 4 Handler for change event
protected function fsList_changeHandler(event
ListEvent)void
var fileFile = eventcurrentTargetselectedItem
as File
if(fileextension)
if(fileextensiontoLowerCase() == jpg ||
fileextensiontoLowerCase() ==
png)
imgPanesource = fileurl
Figure 5 The image viewer application running
032010 (11)56
TLF Applying CSS to Text Layout Framework styles
032010 (11) 57
TLF is introducing the new way of applying styles to the text Prior to TLF flash used simple approach you had to prepare and attach
StyleSheet object to the style property of the TextFieldTLF provides more flexible and customizable but
more complex techniqueDuring this tutorial we are going to create a small
application in Flex 4 This application contains a text displayed with TLF component TextArea and 2 different CSS that can be applied to the text simply by pressing the button Figure 1 show the screenshot of the application
TextFlow and itrsquos IFormatResolverTLF provides a callback mechanism to for with text styles TextFlow objectrsquos got a property formatResolver that should implement IFormatResolver interface Actually it is a set of callback functions that are called by parent TextFlow when it processes itrsquos elements
To have a closer look at formatResolver we will implement itrsquos version to work with out simple CSS So start create a new project in Flex and name it for example TextCSS In the default package create a new ActionScript class named CSSFormatResolver that implements IFormatResolver interface
Listing 1 shows the complete implementation of the class and will we look closer into it later For now pay attention on the following functions
bull invalidateAll
bull invalidate
bull resolveFormat
bull resolveUserFormat
bull getResolverForNewFlow
These function are created automatically by Flex Builder as they are required for implementation of the interface All functions are callbacks that are called when the certain action is performed by TextFlow and it needs to know how to treat with different elements
Applying CSS
This article is a reply to our readerrsquos question about the possibility to apply CSS to Text Layout Framework (TLF) We will show how to implement the necessary class and switch text styles on the fly
What you will learnhellipbull how can custom styles be applied to TLF elementsbull how to implement IFormatResolver to work with CSS
What you should knowhellipbull the basics of Flex and FlexFlash Builderbull the basics of TLF
to Text Layout Framework styles
Figure 1 Style changing application
032010 (11)56
TLF Applying CSS to Text Layout Framework styles
032010 (11) 57
Main ApplicationListing 2 contains a full code for main application
The application consists of
bull TextArea with some text The text is formed using XML Some elements of the TextFlow have
For our case we are interested in resolveFormat function that is called for every element of the TextFlow when itrsquos style needs to be changed This function return an object that should implement ITextLayoutFormat
Before we continue lets have a fast look at main application and how we build our example
Listing 1 CSSFormatResolveras
package
import flashtextStyleSheet
import flashxtextLayoutelementsFlowElement
import flashxtextLayoutelementsFlowValueHolder
import flashxtextLayoutelementsIFormatResolver
import flashxtextLayoutelementsTextFlow
import flashxtextLayoutformatsITextLayoutFormat
public class CSSFormatResolver implements
IFormatResolver
private var _styleSheetStyleSheet
public function CSSFormatResolver()
_styleSheet = new StyleSheet()
public function invalidateAll(textFlow
TextFlow)void
public function invalidate(targetObject)void
public function resolveFormat(targetObject)
ITextLayoutFormat
var formatFlowValueHolder = null
if (target is FlowElement)
var elementFlowElement = target as
FlowElement
if (element = null)
format = elementformat as
FlowValueHolder
if (elementstyleName = null)
var styleObject = styleSheetgetSt
yle(elementstyleName)
formatcolor = style[color]
formatfontSize =
style[fontSize]
formatfontWeight =
style[fontWeight]
formatfontStyle =
style[fontStyle]
return format
public function resolveUserFormat(targetObject
userFormatString)
return null
public function getResolverForNewFlow(oldFlow
TextFlow newFlowTextFlow)
IFormatResolver
return null
public function get styleSheet()StyleSheet
return _styleSheet
public function set styleSheet(valueStyleSheet)
void
_styleSheet = value
032010 (11)58
TLF
032010 (11) 59
Listing 2 TextCSSmxml
ltxml version=10 encoding=utf-8gt
ltsApplication xmlnsfx=httpnsadobecommxml2009
xmlnss=librarynsadobecomflexspark
xmlnsmx=librarynsadobecomflexhalo
xmlnslocal=
width=640 height=300gt
ltfxScriptgt
lt[CDATA[
import mxeventsFlexEvent
protected function applyCSS1Button_
clickHandler(eventMouseEvent)void
var formatResolverCSSFormatResolver =
new CSSFormatResolver()
formatResolverstyleSheetparseCSS(css1
text)
textAreatextFlowformatResolver =
formatResolver
protected function applyCSS2Button_
clickHandler(eventMouseEvent)void
var formatResolverCSSFormatResolver =
new CSSFormatResolver()
formatResolverstyleSheetparseCSS(css2
text)
textAreatextFlowformatResolver =
formatResolver
]]gt
ltfxScriptgt
ltsTextArea id=textArea width=620 height=134
x=9 y=156gt
ltsTextFlowgt
ltsp styleName=h1gt
Title of the Text
ltspgt
ltsp styleName=h2gt
Section of the Text
ltspgt
ltspgt
This is a body text Lorem ipsum
ltspgt
ltsTextFlowgt
ltsTextAreagt
ltsTextArea x=10 y=10 width=285 height=86
id=css1 gt
lt[CDATA[
h1
colorFF0000
fontSize20
fontWeightbold
fontStylenormal
h2
colorFF00FF
fontSize16
fontWeightbold
fontStyleitalic
]]gt
ltsTextAreagt
ltsTextArea x=345 y=10 width=285 height=86
id=css2 gt
lt[CDATA[
h1
color00FF00
fontSize32
fontWeightnormal
fontStyleitalic
h2
color0000FF
fontSize24
fontWeightbold
fontStylenormal
]]gt
ltsTextAreagt
ltsButton x=108 y=105 label=Apply CSS
1 id=applyCSS1Button
click=applyCSS1Button_
clickHandler(event)gt
ltsButton x=443 y=105 label=Apply CSS
2 id=applyCSS2Button
click=applyCSS2Button_
clickHandler(event)gt
ltsApplicationgt
032010 (11)58
TLF
032010 (11) 59
got styleName attribute so you could apply the corresponding CSS style to them later
bull 2 TextAreas with simple different CSSbull 2 Buttons to apply CSS from TextAreas to example
text
When the button is clicked the new instance of CSSFormatResolver class is created Then the corresponding CSS string from the TextArea is parsed and set into resolverrsquos property of SlyleSheet class type And finally prepared formatResolver instance is assigned to the TextFlow
Applying CSS to TextFlowNow lets have more detailed look at resolveFormat callback function First it should return a value that implements ITextLayoutFormat if it returns null then no new styling should be applied to an element being processed by the function So we create format variable of FlowValueHolder (it implements ITextLayoutFormat) and set itrsquos value to null (we do that because resolveFormat works with all elements including TextFlow itself as probably we donrsquot want to apply one style to the whole text)
After we do all the necessary casts and null checks and if we are sure that current elementrsquos got styleName attribute we assign styles from CSS to a current format StyleSheet object is used to contain CSS data as it is convenient object to parse and retrieve CSS data
Conclusion and a WarningThere was a brief tutorial on how to apply simple CSS to TLF TextFlow Please note that CSSFormatResolver class is not fully functional and only can be applied to our sample CSSs Writing reusable and versatile class requires more detailed coding and approach
Check the TLF Blog on this issue There is fully functional CSSFormatResolver with example there httpblogsadobecomtlf200902iformatresolver_and_using_css_1html
MAXYM GOLOVANCHUK Maxym Golovanchuk is a Photoshop Certied Expert and TV producer and he is using Adobersquos software for implementing entertainment solutions including video delivery with Flash Media Server mexxikgmailcom
MondayTuesdayWednesdayThursday Friday
DIVISIONS OF CREATIVE NICHE INC
032010 (11)60
PROFILE Flashcreed ndash Business Gallery
032010 (11) 61
The Business Gallery (httpwwwflashcreedcombusiness_video_image_gallery) is a Flash component meant to do one thing to enhance the visual experience a website portfolio or presentation site gives to its users Mainly itrsquos all about the image you present yourself or
your product to the world wide web Letrsquos face it without the looks you canrsquot sell your product or image no matter how interesting it might be
Whatrsquos so great about this gallery you might wonder Well the answer is simple everything Advanced AS3 programming dynamic XML implementation unlimited number of media items on stage PNG JPG and video FLA SWF MP4 F4V supported media tween and image effects just to name a few of the over 150 settings this gallery brings you Bottom line you can customize it in any way you see fit in order to make it resemble your website layout Not to mention the code optimization that allows the gallery to run so smoothly even on low resources
We brought 45 background wallpapers in case just a color doesnrsquot do the job also a set of custom arrows and close buttons
Flashcreed ndash Business GalleryHello itrsquos good to be back here among Flash amp Flex Magazine readers Today we are going to tell you a bit about our products mainly our Business Gallery but since all our products are built on the same framework most of the properties apply to all When we first realized what we could do with this framework we decided to name it ldquoPandorardquo in order to point out the unlimited number of possibilities it revealed regarding customization and user friendliness
032010 (11)60
PROFILE Flashcreed ndash Business Gallery
032010 (11) 61
The size of the entire gallery and any element in it is subject to any kind of resize big stage and small thumbs or the other way around for any template you or your client desire
Column_scroll and the properties for the stage mask helps you configure the exact number of visible columns you want to set in order to browse through the media items your gallery has Beside this useful feature we added blur and a couple of tween effects for the leftright navigation that gives an impressive look
032010 (11)62
PROFILE Flashcreed ndash Business Gallery
032010 (11) 63
Either as tooltip or plain text you can show any information you want regarding a certain media thumb in the gallery You can change font type size spacing color position and many other properties
The color gradient system for roll overout mouse gesture is unique in every way if we are to compare it with other galleries on the market at this point You can customize up to 5 sets of color with different alpha values The gradient type either linear or radial can be modified with rotation and ratio values
032010 (11)62
PROFILE Flashcreed ndash Business Gallery
032010 (11) 63
When clicking on a thumb if preview_type is selected as internal a resizable preview window will reveal itself and depending on the media type (image or video) an image viewer or video player will be contained inside it If preview_type is selected as external you have the possibility to set certain URL addresses this allowing you to redirect the user to a specific area of the website like a product page from a virtual store for example
The video player has a dozen of controllers that allow you to create a skin to better suit the template you want to create for your gallery Buttonrsquos color thickness handler color or scrub bar size just to name a few of the properties you can play with
At an amazing price of 999 $ this has to be one of the best choices when it comes to media galleries flash components Donrsquot hesitate to take a look at it on wwwflashcreedcom and also consider other products that might better suit your specifications or desires We would definitely appreciate any kind of feedback regarding current or possible features
Thank you
032010 (11)65
BOOK REVIEW
Are you an actionscript 3 game developer who is not able to write a complete commercial game because you cannot manage dozens
of classes Or you are an experienced actionscript 3 applications developer who wants to program game but donrsquot like reading any available beginner book as it doesnrsquot suit your style Even if you already have a good grasp over java or c++ and interested in creating not only fun games but commercial ones also then this is what you really require
There are several actionscript 3 game development books for beginners out there but Essential Guide to Game Dev is one of those few books that talk about the advanced gaming concepts However its first chapter begins with an easy to understand game example (good for any beginner) and ends up creating 3 games Did I tell you 3 games in just first chapter
Teaching about an Actionscript 3 Game framework is one of the many reasons that make this book a kick-ass addition to actionscript 3 gaming library Authors teach you how to create 10 unique games ranging from arcade to driving tile based to puzzle game and shooters to dice games Another specialty of this book is to use Flex and Flash Develop IDEs along with the primary Flash tool that creates space for not only flex
developers but also Flash Develop users In addition to this you will also learn to create game assets with GIMP Mappy and a sound effect creation tool You will get information about copyright laws which are necessary for any would-be commercial game creation and a complete game example integrated with MochiAds
This book also discusses and further more implements various advanced topics such as bitmap rendering pixel-level collision detection sound management AI xml-based level designing scrolling screen optimization techniques particles etc
In short this book will surely blow your minds with the wealth of knowledge it includes and you will pray for authors to keep writing such informative and useful books
If you are really serious about gaming then donrsquot miss the opportunity of reading this book Highly recommended
by Ali RAZA ACI ACE SCJP
Essential Guide to Flash Games
Authors Jeff Fulton Steve FultonPublisher friends of EDISBN 978-1-4302-2614-7Language EnglishPages 664 PagesWebsite httpfriendsofedcombookhtmlisbn=1430226145

Creating an XML Photo Gallery with AS3
032010 (11) 37
Listing 2 PhotoGalleryas
ription
Create the thumbnail
var pThumbNail = new ThumbNail ()
pnewID = i
ploadImage (path)
pdescription = description
px = (imageWidth + imageGap)
columnCounter
py = (imageHeight + imageGap)
rowCounter
_thumbContaineraddChild (p)
Create the grid
if ((rowCounter + 1) lt rows)
rowCounter++
else
rowCounter = 0
columnCounter++
Setup the navigation
createNavigation ()
This method handles the click event for the
next arrow
private function nextClick (eMouseEvent)void
155 is the width + spacing
if (-_thumbContainerx lt (_thumbContainerwidth
ndash stagestageWidth ndash 155))
disableNavigation ()
TweeneraddTween (_thumbContainer x
_thumbContainerx ndash 155 time
075 transitioneaseOutExpo
onCompleteenableNavigation)
This method handles the click event for the
back arrow
private function previousClick (eMouseEvent)void
if (-_thumbContainerx gt 0)
disableNavigation ()
TweeneraddTween (_thumbContainer x
_thumbContainerx + 155 time
075 transitioneaseOutExpo
onCompleteenableNavigation)
This method handles the click event for the
thumbnails
private function thumbClick (eMouseEvent)void
disableNavigation ()
Disable the container that stores the
thumbnails
_thumbContainerbuttonMode = false
_thumbContainermouseChildren = false
_thumbContainerremoveEventListener
(MouseEventCLICK thumbClick)
Get the full image path
var imagePathString = _xmlphoto[etargetnewI
D]full_path
Instantiate the big photo
_bigPhoto = new BigPhoto ()
_bigPhotobuttonMode = true
_bigPhotox = 108
_bigPhotoy = 1075
_bigPhotoalpha = 0
_bigPhotoloadImage (imagePath)
_bigPhotoaddEventListener (MouseEventCLICK
closePhoto false 0 true)
thisaddChild (_bigPhoto)
Fade up the photo
TweeneraddTween (_bigPhoto alpha1 time
1)
Fade out the photo
When the image finishes fading delete the
photo and enable the navigation
items
private function closePhoto (eMouseEvent)void
TweeneraddTween (_bigPhoto alpha0 time1
onCompletedeletePhoto)
private function deletePhoto ()void
032010 (11)38
ACTIONSCRIPT DEVELOPMENT
Listing 2 PhotoGalleryas
_bigPhotobuttonMode = false
_bigPhotoremoveEventListener
(MouseEventCLICK closePhoto)
_bigPhotodestroy ()
thisremoveChild (_bigPhoto)
_bigPhoto = null
_thumbContainerbuttonMode = true
_thumbContainermouseChildren = true
_thumbContaineraddEventListener
(MouseEventCLICK thumbClick
false 0 true)
enableNavigation ()
private function createNavigation ()void
Instantiate the next arrow
var nBitmap = new _nextArrow ()
Instantiate the nextButton container
Add the next button as a child of the
nextButton container
_nextButton = new Sprite ()
thisaddChild (_nextButton)
_nextButtonaddChild (n)
_nextButtonx = stagestageWidth ndash _
nextButtonwidth
_nextButtony = 475
Instantiate the back arrow
var bBitmap = new _backArrow ()
Instantiate the backButton container
Add the next button as a child of the
backButton container
_backButton = new Sprite ()
thisaddChild (_backButton)
_backButtonaddChild (b)
_backButtonx = _nextButtonx ndash _
nextButtonwidth ndash 5
_backButtony = 475
enableNavigation ()
private function enableNavigation ()void
_nextButtonbuttonMode = true
_nextButtonaddEventListener
(MouseEventCLICK nextClick false
0 true)
_backButtonbuttonMode = true
_backButtonaddEventListener
(MouseEventCLICK previousClick
false 0 true)
private function disableNavigation ()void
_nextButtonbuttonMode = false
_nextButtonremoveEventListener
(MouseEventCLICK nextClick)
_backButtonbuttonMode = false
_backButtonremoveEventListener
(MouseEventCLICK previousClick)
Figure 4 New ActionScript class dialog
Creating an XML Photo Gallery with AS3
032010 (11) 39
Listing 3 ThumbNailas
package classes
import caurinatransitionsTweener
import flashdisplayLoader
import flashdisplayShape
import flashdisplaySprite
import flasheventsEvent
import flasheventsMouseEvent
import flashnetURLRequest
import flashtextTextField
import flashtextTextFieldAutoSize
import flashtextTextFormat
public class ThumbNail extends Sprite
Containers
private var _imageLoaderLoader Loads in
the thumbnail
private var _imageContainerSprite
Container for the thumbnail
private var _maskShape Container for the
mask
private var _descriptionContainerSprite
Container for the description
TextFields
private var _descriptionTextField
TextField for the container
Logic
private var _newIDuint The ID of the
object
[Embed(systemFont=Arial fontName=arial
fontWeight=bold
mimeType=applicationx-font-
truetype)]
private var _arialClass Embedded asset
for the font
Constructor
public function ThumbNail ()
super ()
init ()
Initializing method
private function init ()void
Instantiate the container
_imageContainer = new Sprite ()
_imageContaineralpha = 0
thisaddChild (_imageContainer)
createDescription ()
thismouseChildren = false
thisaddEventListener (MouseEventMOUSE_OVER
onMouseOver false 0 true)
thisaddEventListener (MouseEventMOUSE_OUT
onMouseOut false 0 true)
Public Methods
public function loadImage (pathString)void
_imageLoader = new Loader ()
_imageLoadercontentLoaderInfoaddEventListen
er (EventCOMPLETE imageComplete
false 0 true)
_imageLoaderload (new URLRequest (path))
GetterSetter Methods
public function get newID ()uint
return this_newID
public function set newID (valueuint)void
this_newID = value
public function get description ()String
return this_descriptiontext
public function set description (valueString)void
this_descriptiontext = value
Private Methods
032010 (11)40
ACTIONSCRIPT DEVELOPMENT
Listing 3 ThumbNailas
private function onMouseOver (eMouseEvent)void
TweeneraddTween (_descriptionContainer
y75 time05 transition
easeOutExpo)
private function onMouseOut (eMouseEvent)void
TweeneraddTween (_descriptionContainer
y150 time05 transition
easeOutExpo)
private function imageComplete (eEvent)void
Reposition the loaded content to the center
_imageLoaderx = -(_imageLoaderwidth 2)
_imageLoadery = -(_imageLoaderheight 2)
_imageContaineraddChildAt (_imageLoader 0)
Apply background after the image has
completely loaded
drawBackground ()
Draw the mask around the description
drawMask ()
Fade in the container
TweeneraddTween (_imageContainer alpha1
time05)
Clean up
_imageLoadercontentLoaderInforemoveEv
entListener (EventCOMPLETE
imageComplete)
Draws a background behind _imageContainer
private function drawBackground ()void
_imageContainergraphicsbeginFill (0xFFFFFF)
_imageContainergraphicsdrawRect (_
imageLoaderx ndash 1 _imageLoadery
ndash 1 _imageLoaderwidth + 2
_imageLoaderheight + 2)
_imageContainergraphicsendFill ()
Creates everything for the description
private function createDescription ()void
Instantiate the container
_descriptionContainer = new Sprite ()
_descriptionContainery = 150
_descriptionContainergraphicsbeginFill
(0x000000 075)
_descriptionContainergraphicsdrawRect (-75
-75 150 75)
_descriptionContainergraphicsendFill ()
_imageContaineraddChild (_
descriptionContainer)
Specify text formatting for the description
Text Field
var tfTextFormat = new TextFormat ()
tfcolor = 0xFFFFFF
tfalign = center
tffont = arial
tfbold = true
tfsize = 12
Instantiate the TextF ield
_description = new TextField ()
_descriptionx = -75
_descriptiony = -70
_descriptionwidth = 150
_descriptionwordWrap = true
_descriptionembedFonts = true
_descriptiondefaultTextFormat = tf
_descriptionautoSize = TextFieldAutoSizeLEFT
_descriptionContaineraddChild (_description)
Draws a mask our _descriptionContainer
private function drawMask ()void
Draw the mask shape
_mask = new Shape ()
_maskgraphicsbeginFill (0xFF0000)
_maskgraphicsdrawRect (_imageLoaderx
_imageLoadery _imageLoaderwidth
_imageLoaderheight)
_maskgraphicsendFill ()
addChild (_mask)
Apply the mask to the container
_descriptionContainermask = _mask
Creating an XML Photo Gallery with AS3
032010 (11) 41
that will be loaded into the application from XML Finally create another folder and this time name it assets This folder will contain the buttons that wersquoll embed into our project
The AssetsBefore we start coding we need to create some visual assets Open up Photoshop or any other program you have for creating graphics and create an image that is 150x150 pixels Fill it with a flat color and save the image as thumbjpg in the images folder you just created Next create another image thatrsquos 250x300 pixels Fill it with another color and save that image as fulljpg into the same folder These images will be used for testing purposes only
Listing 4 BigPhotoas
package classes
import flashdisplayLoader
import flashdisplaySprite
import flasheventsEvent
import flashnetURLRequest
public class BigPhoto extends Sprite
Containers
private var _imageLoaderLoader Loads in the
thumbnail
private var _imageContainerSprite Container
for the thumbnail
Constructor
public function BigPhoto ()
super()
Public Methods
public function loadImage (pathString)void
_imageLoader = new Loader ()
_imageLoadercontentLoaderInfoaddEventListen
er (EventCOMPLETE imageComplete
false 0 true)
_imageLoaderload (new URLRequest (path))
Clean up method
public function destroy ()void
_imageContainerremoveChild (_imageLoader)
_imageLoaderunload ()
_imageLoader = null
thisremoveChild (_imageContainer)
_imageContainer = null
Private Methods
private function imageComplete (eEvent)void
Instantiate the container
_imageContainer = new Sprite ()
thisaddChild (_imageContainer)
Add the loader
_imageContaineraddChild (_imageLoader)
Clean up
_imageLoadercontentLoaderInforemoveEv
entListener (EventCOMPLETE
imageComplete)
Figure 5 Time to test
032010 (11)42
ACTIONSCRIPT DEVELOPMENT
We still have to create our navigation buttons that wersquoll use to scroll through our gallery Create two buttons that are 40x40 pixels and design them how you like They should resemble forward and back buttons Save the forward arrow as next-arrowpng and the other as back-arrowpng into the assets folder Now that our assets our created itrsquos time to code
The XML fileRight click the src folder in the project scroll over to new and click file A dialog window will open and in the file name input box type galleryxml (see Figure 4) Write the code that you see from Listing 1 into galleryxml
Line 1 is the XML declaration This is needed to have a well-formed XML document
Line 2 declares the gallery root node Notice in this node Irsquove added attributes Also to have a well-formed XML document you must have one root node and all attribute values must be in quotes
Lines 3-7 declares a photo node with three children description thumb_path and full_path description is exactly as it sounds It will contain a description for our thumbnail thumb_path contains the path to our thumbnail image Same goes for full_path it contains the path to our full image
I then just copy and pasted that and pasted it 14 times just changing out the description Remember wersquore just using dummy data When you finish go back and add photos of your choice
The ClassesWersquoll be using two additional classes for this project One will be for the thumbnails and another for the full image Right click the classes folder go to new and click ActionScript class In the name field type ThumbNail For the Superclass type in flashdisplaySprite Wersquoll need to extend from that class so we can use the functionality of that object but add our own (see Figure 4)
Add another class this time name it BigPhoto It should also inherit from flashdisplaySprite
CodingTime to start writing the ActionScript for this project Open up PhotoGalleryas from the Flex Navigator and type in the code from Listing 2 Open up ThumbNailas and type in the code from Listing 3 Open up BigPhotoas and type in the code from Listing 4 Now that you have all the code in itrsquos time to test In the menu bar click RungtRun PhotoGallery (see Figure 5) If you get an error make sure you typed everything correctly If all went well you should see the gallery open up Click the buttons and watch the gallery scroll left and right Roll over the thumbnails to see the description scroll up Click on a thumbnail to see the full image fade in You might be wondering about whatrsquos going on Irsquoll try to break that down for you next
The ExplanationOur main focus is going to be whatrsquos going on in PhotoGalleryas This file contains the ActionScript that makes almost everything happen We first start off by declaring our properties that will be used in the project Yoursquoll notice a couple of embeded lines These lines are MetaData tags that actually embed assets into the project The two embeded lines you see add the next-arrowpng file and the back-arrowpng file In the constructor there is one call to a method called init() This method gets the application going by requesting and loading in the XML File When the file finishes loading we store the XML data into our _xml property Next we call the loadImages() method This method is responsible for a big part of the application We first gather some information from the XML file and store it in temporary variables
bull imageWidth stores the image _ height attributes valuebull imageWidth stores the image _ width attributes valuebull imageGap stores the image _ gap attributes valuebull rows stores the row attributes valuebull rowCounter increments ever pass of the for loop Is
compared against the rows variablebull columnCounter increments once for every column
created
The for loop cycles the XML file creating a new ThumbNail object with every iteration During each iteration we create variables that store the path to the thumb nail (path) and the description of the thumbnail (description) We pass the variables into the methods of the ThumbNail class Remember the ThumbNail class defines methods and properties that are specific to it The class code is commented if you wish to explore it Again our main focus is PhotoGalleryas To create the grid we write ifelse logic that compares the rowCounter variable to the row variable For every iteration of the loop we increment that variable if that variable becomes greater than rows we set it back to 0 rowCounter is then multiplied to the y-axis of each ThumbNail object The rest of the code is commented for you to explore
ConclusionYoursquoll notice I actually hard coded a lot of values directly in the ActionScript Not too ideal In the next part of this tutorial wersquore going to come back to this code and modify it to be a little more flexible and visually appealing If you have any questions feel free to contact me through my site (wwwcodedbyryancom)
RYAN DrsquoAGOSTINORyan DrsquoAgostino is an Interactive Developer at NAS Recruitment Communications in Cleveland OH part-time instructor at Virginia Marti College of Art and Design in Lakewood Ohio and freelance designer and ActionScript developer For more information about Ryan please visit httpwwwcodedbyryancom
032010 (11)44
COMPONENTS
Components are the controls and containers that are the elements of the application that create the interface They cover controls such
as buttons and check boxes containers that can hold other containers and controls navigation elements and charts Components can be added to your application in variety of ways They can be added through the design view writing then in MXML or through ActionScript
Flash Builder now has two major sets of components the Halo set which has been available in previous versions of Flex and the new Spark set The components from the Spark set have a direct correlation to a component in the Halo set but not all Halo components have been upgraded to the Spark framework yet The namespaces for these components are added automatically when a MXML document is created and you will notice there are now multiple namespace in the main MXML document already
Creating custom components takes two paths The first is to create a skin for an existing Halo component in Flash Illustrator Photoshop or Fireworks or create a custom skin for a Spark component using MXML The second path is to create a completely custom component using Flash Professional and importing it into the Flash Builder project We are going to focus on the second path and create a custom component with Flash Professional
The first step in creating a custom component is to instal the Flex Component Kit mxp into Flash Professional This is an extension that will expose some
Custom Flash CS4
Flash Builder comes with a lot of components to cover almost all of an apps needs But what if you want a custom look or functionality to a component With Flash Professional you can create custom components and import them into Flash Builder for use in your application
What you will learnhellipbull How to create custom components in Flash Professional to im-
port into Flash Builder
What you should knowhellipbull Flash Professional CS4bull Flash Builder 4bull Actionscript 3
Components in Flash Builder 4
Figure 1 The component artwork Figure 2 Converting the movie clip
032010 (11)46
COMPONENTS
Listing 1 The component class
package comtest
import mxflashUIMovieClip
import flasheventsEvent
import flasheventsEventDispatcher
import flasheventsMouseEvent
import flashfiltersGlowFilter
public class SliderButton extends UIMovieClip
public static const BUTTON_CLICKString = button click
private var glowGlowFilter = new GlowFilter(0x0000cc54421falsefalse)
public function SliderButton()
plusButtonbuttonMode = true
minusButtonbuttonMode = true
plusButtonaddEventListener(MouseEventMOUSE_OVER handleMouseOver)
plusButtonaddEventListener(MouseEventMOUSE_OUT handleMouseOut)
plusButtonaddEventListener(MouseEventCLICK handleMousePress)
minusButtonaddEventListener(MouseEventMOUSE_OVER handleMouseOver)
minusButtonaddEventListener(MouseEventMOUSE_OUT handleMouseOut)
minusButtonaddEventListener(MouseEventCLICK handleMousePress)
private function handleMouseOver(eMouseEvent)void
ecurrentTargetfilters = [glow]
private function handleMouseOut(eMouseEvent)void
ecurrentTargetfilters = []
private function handleMousePress(eMouseEvent)void
if(ecurrentTargetname == plusButton ampamp trackThumbx lt 134)
trackThumbx++
else if(ecurrentTargetname == minusButton ampamp trackThumbx gt 37)
trackThumbx--
dispatchEvent(new Event(SliderButtonBUTTON_CLICK))
032010 (11)48
COMPONENTS
of the Flex classes to Flash allowing the component to communicate with the application Download the extension from the Adobe site at httpwwwadobecomcfusionexchangeindexcfmevent=extensionDetailampextid=1273018 and install using the Adobe Extension Manager The extension should work with Flash
versions as far back as Flash 8 but I highly recommend using at least Flash 9 (CS 3)
Once the extension is installed launch Flash Professional and create a new ActionScript 3 project We are going to create a simple slider button that has a plus and minus button on each end of the button and a track between them When the plus and minus buttons are clicked the the track thumb will move one pixel in either direction There will also be a roll over behavior on the buttons to change their look as the mouse rolls over and off the buttons Finally Flash Builder will receive the event of the button being pushed and update a text input on the stage
It is common to encapsulate the behaviors of the component within itself and have events broadcast to the containing application If you think about some of standard components in both Flash Builder and Flash Professional and deconstruct them in your mind you will see that the same methods are used on them The NumericStepper is a lot like our component It has two buttons with a text field that displays a value that is incremented or decremented with each push of the button The component itself does nothing to effect the application until the code calls it to either send or receive a value
With our new document we are going to create the artwork for the component in the fla file Create four movie clips one each for the scroll track the plus button the minus button and the track thumb (Figure 1) The naming and look of these movie clips are not important
Once the movie clips are created and on the stage give each one an instance name The names in the
Figure 3 Setting the class of the movie clip
Figure 4 Setting to export as SWC
Figure 5 Creating the Flash Builder project
Custom Flash CS4 Components in Flash Builder 4
032010 (11) 49
example files are plusButton minusButton and trackThumb The actual names do not matter and we dont need an instance name for the track since we are not going to reference it in Flash Builder Flash Builder will reference the instance names of the movie clips in the components we will use these later
Now that the artwork has been created it must be collected into its own movie clip Select all of the artwork on the stage and choose ModifygtgtConvert to Symbolhellip In the Library panel there is a new symbol that is called in the sample files SliderButton The name is important here because this is how the Convert to Flex Component mxp will name the class that Flash Builder will refer to later
An external class will give the component the internal behaviors that were mentioned earlier as well as an event to broadcast to the Flash Builder application (Listing 1) All the code in the class should be familiar but there are a few points to go over First the package name is given the qualifier of comtest to identify that the component belongs to our namespace This is not necessary but helpful when there are multiple components or components from different publishers in the application
The most important change is instead of having the class extend the Sprite class this class is going to
extend the UIMovieClip class This class like the Flex Component in the library exposes the behaviors and methods we set up in the class to the Flash Builder application In the import statements use import
mxflashUIMovieClip The mxflash class includes both the UIMovieClip and ContainerMovieClip classes
When the variables are declared we set up a glow filter that will be attached to the buttons when the mouse rolls over them and a string constant for the event we create later In the constructor of the class the buttons receive the event listeners for the mouse interactions and the handlers are added later in the code In the handleClick event handler we use the event dispatcher class to dispatch the event Here we are just dispatching a standard event with the constant that was created earlier You can just as easily dispatc a custom event that has extra information attached to it
Select the movie clip in the Library panel then select CommandsgtgtConvert Symbol to Flex Component (Figure 2) The extension will do several operations such as making the symbol available to ActionScript giving the symbol a class name adding the Flex Component to the library and others
Save the file as SliderButtonas in the folder path comtest When you declare the package name as we have here you must have the same hierarchy as listed in the package name Back in the fla select the
Figure 6 The Package Explorer
Listing 2 The main MXML le
ltxml version=10 encoding=utf-8gt
ltsApplication xmlnsfx=httpnsadobecommxml
2009
xmlnss=librarynsadobecomflex
spark
xmlnsmx=librarynsadobecomflex
mx
width=200 height=110gt
ltfxDeclarationsgt
lt-- Place non-visual elements (eg
services value objects) here
--gt
ltfxDeclarationsgt
ltsApplicationgt
Listing 3 The new component and name space
xmlnstest=comtest
lttestSliderButton x=14 y=10 id=sliderButton
gt
032010 (11)50
COMPONENTS
SliderButton movie clip and select Propertieshellip from the contextual menu Expand the advanced area if it is not already and enter comtestSliderButton in the Class text field Leave the Base Class text field blank and click OK (Figure 3)
Select Publish Settingshellip from the file menu and click on the Flash tab (Figure4) Under the SWF Settings area of the window be sure that the Export SWC check box is checked The swc is the part that Flash Builder will use in the application SWC are archives that contain the classes and media assets of the component and make it easy to distribute the movie clip
Publish the SWF and SWC and we are ready to move to Flash Builder
Flash BuilderIn Flash Builder create a new project This example we only need a basic Flash Builder project without any
server technologies You can name the project anything you would like in this case I have name FB_Components and saved it in my default workspace
If you have not worked on a Flash Builder project yet it is a lot like working on the Flex projects in the past with some new MXML tags You will also notice that the Flex Navigator pane has now been replaced with the Package Explorer (Figure 6)
The Package Explorer pane has a different organization than the Flex Navigator but the main MXML file can still be found under src then under the default package
Looking at the main MXML (Listing 2) you will see that the three name spaces are added automatically and the application begins with sApplication instead of mxApplication These are the minor differences to be on the look out for when working on a Flash Builder project
Listing 4 The nal MXML le
ltxml version=10 encoding=utf-8gt
ltsApplication xmlnsfx=httpnsadobecommxml2009
xmlnss=librarynsadobecomflexspark
xmlnsmx=librarynsadobecomflexmx minWidth=200 minHeight=110
width=200 height=110
initialize=init()
xmlnstest=comtestgt
ltfxDeclarationsgt
lt-- Place non-visual elements (eg services value objects) here --gt
ltfxDeclarationsgt
ltfxScriptgt
lt[CDATA[
private function init()void
sliderButtonaddEventListener(SliderButtonBUTTON_CLICK updateText)
private function updateText(eEvent)void
pixelTexttext = String(sliderButtontrackThumbx)
]]gt
ltfxScriptgt
lttestSliderButton x=14 y=10 id=sliderButton gt
ltsLabel x=39 y=41 text=The position of the track thumb is textAlign=center width=122gt
ltsTextInput x=76 y=76 width=49 id=pixelTextgt
ltsApplicationgt
Custom Flash CS4 Components in Flash Builder 4
032010 (11) 51
To get our component into the Flash Builder project we need to put the swc some where the project can see it On your desktop navigate to where the swc was published to and copy the file Then navigate to where Flash Builder project is and put the swc into libs folder I have found it is easier to keep the fla and swf files out of the project then copy the swc over to the Flash Builder project as needed
Back in Flash Builder open the libs folder under the project in the Package Explorer pane In that directory you should see your swc if you do not try right clicking on the libs folder and selecting Refresh
In the MXML editor switch to Design view When the Design view becomes active the Component pane should become available in the lower left of the workspace The first folder in the pane is the Custom folder and our custom component should be displayed in the list Drag an instance of this component onto the stage
To show that we can have two way communication with the component drag a label and a text input onto the stage Set the labels text to be The position of the track thumb is and move the text input near the label Set the id of the text input to pixelText (Figure 7) Switch back to the Source view after saving
Notice that several lines have been added to the source of the MXML document In addition to the MXML for the component including our custom component a name space value has been added to the sApplication tag designated as xmlnstest=comtest (Listing 3) If we add more components using the same comtest package declaration they will all fall under this name space If we were to add more components using a different package additional name spaces would be added You will also notice that the component starts with testSliderButton as opposed to s fx or mx
In the application tag add an initialize property calling a function called init() After the fxDeclarations tags add fxScript tags to hold the Actionscript As you type fx the code completion should pop up and allow you to select the fxScript tags
Add an id property to the SliderButton tag and give it a value of sliderButton In between the CDATA tags add the init function This function simply adds an event listener to our component calling the updateText
function every time the BUTTON_CLICK event is broadcast from the SliderButton class (Listing 4)
Once the application receives the BUTTON_CLICK event it calls the updateText function This function looks into the component and gets the x position of the track thumb then puts that value into the text input we set up earlier
So now we have communication coming out of the component using the dispatchEvent call in the class We are also looking into the component where the application is getting the x position of the thumb track inside the component Communication can get much more complicated than this but this is a simple example to give a starting point to create more complex components
Click debug to run the application and if no errors occurred the application should launch in a browser window If you have a browser window open before running the app you should close it There is a bug in the Flash Player at the time of this writing that may cause the app to not run if there are browser windows already open
Once the application is running click on the buttons and watch as the value in the text input increase and decrease The custom component is now complete and ready to have more behaviors and methods added to it
ConclusionWhile the components that come with Flash Builder can cover most situations there will be times where only a custom component will fit the applications needs Creating a custom component takes a little work but can make the developers job a lot easier With this new level of control over the look and behavior of the component can make the application more rich and engaging to the end user
Figure 7 Components on the stage
On the Netbull httpwwwadobecombull httpwwwadobecomcfusionexchangeindexcfmeven-
t=extensionDetailampextid=1273018
LOUIS DICARROLouis DiCarro is a consultant based in NYC and has been working with Flash since the rst version He has taught web development at the college level and has worked for numerous large clients He can be reached at louisdicarroffdgmailcom
032010 (11)52
COMPONENTS AIR Components in Flash Builder
032010 (11) 53
We already know that building an AIR application affords us a lot more capabilities than working with a web based project
Digging through the Actionscript documentation shows that there are a lot of classes that are only available to AIR applications These mostly have to do with classes and methods that interact with the file system or windowing of the application
Flash Builder as with Flex Builder before it contains several components that are only available to use with AIR applications These components deal with
visual interfaces for interacting with the file system and a HTML component for displaying web content
You may wonder why these components are only available for AIR applications Mostly it is for security reasons Up to Flash Player 101 a swf does not have the permission to interact with files on the file system except in very limited circumstances
Swfs in the web browser are able to interact only with files on the server in which the swf is hosted This allows them to load images xml and other file types at run time but only if the files come from within its
AIR Components
Adding file and html rendering can result in a lot of code But with the AIR components in Flash Builder 4 this functionality can be added easily with only a few lines of code
What you will learnhellipbull What components are available for AIR applications in Flash
Builder 4
What you should knowhellipbull Flash Builder 4bull Actionscript 3
in Flash Builder
Figure 1 AIR Actionscript 3 special classes for the HTML component Figure 2 Layout of the HTML application
032010 (11)52
COMPONENTS AIR Components in Flash Builder
032010 (11) 53
Were going to take a look at couple of simple examples for each component to get a feel how use them It is also important to note that the documentation for these components are in the AS 3 documentation When looking at the documentation you will see a symbol next to some of the classes and also next to some methods within the classes (Figure 1)
HTML ComponentThe HTML component is very easy to work with It can pull in many types of media and render them as you would expect them to be rendered in a web browser
Start up Flash Builder and create a new Flex project Name the project and select Desktop under project type Click finish and let Flash Builder set up the project
Once the project is started click on the Design tab In the lower left a component tab should be open If it is not open it using the Window menu and selecting Components Scroll down to the Adobe AIR folder You will not see this folder if you set your project to run in a web browser
We are going to create a simple web browser using only three components and one line of code First drag a HTML component a text field and a button to the stage Arrange them how you would like and switch over to design view
Give each component an id as in Listing 1 Also give the button a click handler Type click and let the program auto complete another code hint will pop up to create the handler automatically
Flash Builder will generate the handler as well as the fxScript block in the code In the click handler that is generated add a line that will set the location of the HTML component to the text in the text field See Listing 2 for the full code
Run the application and fill in a valid web address in the application Remember to include http in front of
own sandbox There are exceptions and ways around it but for the majority the swf cannot interact with the file system
If the development of applications using Flash Builder and AIR were to succeed they would need to act like real desktop applications This means that the applications would have to load and save files just as any other application that a user would use on the computer
Security is still maintained in this model by having the developer digitally sign their application using certificates If the certificate is obtained though a trusted source the application would be traceable back to the original developer if something bad should happen
Having a HTML component gives the application greater rendering power by tapping into the Web Kit which can run better than the HTML renderers in the Flash Player This allows developers to repurpose content from their web site to the application
Figure 3 The application running Figure 4 Layout of the image viewer application
Listing 1 MXML of components
ltsTextInput id=addressBar x=10 y=10
width=518gt
ltsButton id=goButton x=555 y=13
label=Go click=goButton_
clickHandler(event) gt
ltmxHTML id=htmlPane x=10 y=40 width=620
height=430gt
Listing 2 goButton handler
protected function goButton_clickHandler(event
MouseEvent)void
htmlPanelocation = addressBartext
032010 (11)54
COMPONENTS
the address Click the Go button and the page should load after a few seconds Take a look at Figure 3 for the results
There are a lot of methods and commands associated with the HTML component This will allow you to make a more customized display and give more control over the HTML content that you show
File system componentsUsing the file system components is just as easy To test the components we are going to create a simple image viewer that allows the user to select the images from the file system
Create a new Flex Project as we did before and be sure to make it a desktop application Once the project has loaded switch to design view and drag a File System Tree and an Image component to the stage See Figure 4 for the layout
Once the application is laid out switch over to the Source mode and give all the components ids as we did before (Listing 3) Also add a change handler instead of a click handler Flash Builder will autocomplete and generate the handler for you as it did when we added the click action to the button
In the generated handler add the code that will load the image into the image component To keep everything simple we only are going to load jpg and png files (Listing 4) in this function we are first checking to make sure the file is a file and not a directory by checking for a file extension If the file passes the first test we check to see if the file is a jpg or png Lastly if the file passes all of these test it gets loaded into the image component
Save the file and run the application to see the results Clicking on the file system tree items will either open or close the directory or try to load the file When the user clicks on a jpg or png it will load into the image component (Figure 5) Note that as the tree expands a scroll bar is attached to the component automatically
ConclusionJust as with the HTML component there is more methods and properties available to you with the file system components In this demo application we have seen how easy it is to get access to the file system using the component without writing a lot of code
There is a lot more involved in making a full application using these components but we have witnessed how easy to get started with them Having more control over the elements as well as error checking would be added in real applications
Having these components available gives the application a large amount of functionality very quickly and allows the developer to concentrate on the logic of the application Using these components in your application will help make it more full-featured and feel more like a real desktop application
LOUIS DICARROLouis DiCarro is a consultant based in NYC and has been working with Flash since the rst version He has taught web development at the college level and has worked for numerous large clients He can be reached at louisdicarroffdgmailcom
Listing 3 MXML of components
ltmxFileSystemTree id=fsList x=10 y=10
height=460 change=fsList_
changeHandler(event)gt
ltmxImage id=imgPane x=193 y=10 width=437
height=460gt
Listing 4 Handler for change event
protected function fsList_changeHandler(event
ListEvent)void
var fileFile = eventcurrentTargetselectedItem
as File
if(fileextension)
if(fileextensiontoLowerCase() == jpg ||
fileextensiontoLowerCase() ==
png)
imgPanesource = fileurl
Figure 5 The image viewer application running
032010 (11)56
TLF Applying CSS to Text Layout Framework styles
032010 (11) 57
TLF is introducing the new way of applying styles to the text Prior to TLF flash used simple approach you had to prepare and attach
StyleSheet object to the style property of the TextFieldTLF provides more flexible and customizable but
more complex techniqueDuring this tutorial we are going to create a small
application in Flex 4 This application contains a text displayed with TLF component TextArea and 2 different CSS that can be applied to the text simply by pressing the button Figure 1 show the screenshot of the application
TextFlow and itrsquos IFormatResolverTLF provides a callback mechanism to for with text styles TextFlow objectrsquos got a property formatResolver that should implement IFormatResolver interface Actually it is a set of callback functions that are called by parent TextFlow when it processes itrsquos elements
To have a closer look at formatResolver we will implement itrsquos version to work with out simple CSS So start create a new project in Flex and name it for example TextCSS In the default package create a new ActionScript class named CSSFormatResolver that implements IFormatResolver interface
Listing 1 shows the complete implementation of the class and will we look closer into it later For now pay attention on the following functions
bull invalidateAll
bull invalidate
bull resolveFormat
bull resolveUserFormat
bull getResolverForNewFlow
These function are created automatically by Flex Builder as they are required for implementation of the interface All functions are callbacks that are called when the certain action is performed by TextFlow and it needs to know how to treat with different elements
Applying CSS
This article is a reply to our readerrsquos question about the possibility to apply CSS to Text Layout Framework (TLF) We will show how to implement the necessary class and switch text styles on the fly
What you will learnhellipbull how can custom styles be applied to TLF elementsbull how to implement IFormatResolver to work with CSS
What you should knowhellipbull the basics of Flex and FlexFlash Builderbull the basics of TLF
to Text Layout Framework styles
Figure 1 Style changing application
032010 (11)56
TLF Applying CSS to Text Layout Framework styles
032010 (11) 57
Main ApplicationListing 2 contains a full code for main application
The application consists of
bull TextArea with some text The text is formed using XML Some elements of the TextFlow have
For our case we are interested in resolveFormat function that is called for every element of the TextFlow when itrsquos style needs to be changed This function return an object that should implement ITextLayoutFormat
Before we continue lets have a fast look at main application and how we build our example
Listing 1 CSSFormatResolveras
package
import flashtextStyleSheet
import flashxtextLayoutelementsFlowElement
import flashxtextLayoutelementsFlowValueHolder
import flashxtextLayoutelementsIFormatResolver
import flashxtextLayoutelementsTextFlow
import flashxtextLayoutformatsITextLayoutFormat
public class CSSFormatResolver implements
IFormatResolver
private var _styleSheetStyleSheet
public function CSSFormatResolver()
_styleSheet = new StyleSheet()
public function invalidateAll(textFlow
TextFlow)void
public function invalidate(targetObject)void
public function resolveFormat(targetObject)
ITextLayoutFormat
var formatFlowValueHolder = null
if (target is FlowElement)
var elementFlowElement = target as
FlowElement
if (element = null)
format = elementformat as
FlowValueHolder
if (elementstyleName = null)
var styleObject = styleSheetgetSt
yle(elementstyleName)
formatcolor = style[color]
formatfontSize =
style[fontSize]
formatfontWeight =
style[fontWeight]
formatfontStyle =
style[fontStyle]
return format
public function resolveUserFormat(targetObject
userFormatString)
return null
public function getResolverForNewFlow(oldFlow
TextFlow newFlowTextFlow)
IFormatResolver
return null
public function get styleSheet()StyleSheet
return _styleSheet
public function set styleSheet(valueStyleSheet)
void
_styleSheet = value
032010 (11)58
TLF
032010 (11) 59
Listing 2 TextCSSmxml
ltxml version=10 encoding=utf-8gt
ltsApplication xmlnsfx=httpnsadobecommxml2009
xmlnss=librarynsadobecomflexspark
xmlnsmx=librarynsadobecomflexhalo
xmlnslocal=
width=640 height=300gt
ltfxScriptgt
lt[CDATA[
import mxeventsFlexEvent
protected function applyCSS1Button_
clickHandler(eventMouseEvent)void
var formatResolverCSSFormatResolver =
new CSSFormatResolver()
formatResolverstyleSheetparseCSS(css1
text)
textAreatextFlowformatResolver =
formatResolver
protected function applyCSS2Button_
clickHandler(eventMouseEvent)void
var formatResolverCSSFormatResolver =
new CSSFormatResolver()
formatResolverstyleSheetparseCSS(css2
text)
textAreatextFlowformatResolver =
formatResolver
]]gt
ltfxScriptgt
ltsTextArea id=textArea width=620 height=134
x=9 y=156gt
ltsTextFlowgt
ltsp styleName=h1gt
Title of the Text
ltspgt
ltsp styleName=h2gt
Section of the Text
ltspgt
ltspgt
This is a body text Lorem ipsum
ltspgt
ltsTextFlowgt
ltsTextAreagt
ltsTextArea x=10 y=10 width=285 height=86
id=css1 gt
lt[CDATA[
h1
colorFF0000
fontSize20
fontWeightbold
fontStylenormal
h2
colorFF00FF
fontSize16
fontWeightbold
fontStyleitalic
]]gt
ltsTextAreagt
ltsTextArea x=345 y=10 width=285 height=86
id=css2 gt
lt[CDATA[
h1
color00FF00
fontSize32
fontWeightnormal
fontStyleitalic
h2
color0000FF
fontSize24
fontWeightbold
fontStylenormal
]]gt
ltsTextAreagt
ltsButton x=108 y=105 label=Apply CSS
1 id=applyCSS1Button
click=applyCSS1Button_
clickHandler(event)gt
ltsButton x=443 y=105 label=Apply CSS
2 id=applyCSS2Button
click=applyCSS2Button_
clickHandler(event)gt
ltsApplicationgt
032010 (11)58
TLF
032010 (11) 59
got styleName attribute so you could apply the corresponding CSS style to them later
bull 2 TextAreas with simple different CSSbull 2 Buttons to apply CSS from TextAreas to example
text
When the button is clicked the new instance of CSSFormatResolver class is created Then the corresponding CSS string from the TextArea is parsed and set into resolverrsquos property of SlyleSheet class type And finally prepared formatResolver instance is assigned to the TextFlow
Applying CSS to TextFlowNow lets have more detailed look at resolveFormat callback function First it should return a value that implements ITextLayoutFormat if it returns null then no new styling should be applied to an element being processed by the function So we create format variable of FlowValueHolder (it implements ITextLayoutFormat) and set itrsquos value to null (we do that because resolveFormat works with all elements including TextFlow itself as probably we donrsquot want to apply one style to the whole text)
After we do all the necessary casts and null checks and if we are sure that current elementrsquos got styleName attribute we assign styles from CSS to a current format StyleSheet object is used to contain CSS data as it is convenient object to parse and retrieve CSS data
Conclusion and a WarningThere was a brief tutorial on how to apply simple CSS to TLF TextFlow Please note that CSSFormatResolver class is not fully functional and only can be applied to our sample CSSs Writing reusable and versatile class requires more detailed coding and approach
Check the TLF Blog on this issue There is fully functional CSSFormatResolver with example there httpblogsadobecomtlf200902iformatresolver_and_using_css_1html
MAXYM GOLOVANCHUK Maxym Golovanchuk is a Photoshop Certied Expert and TV producer and he is using Adobersquos software for implementing entertainment solutions including video delivery with Flash Media Server mexxikgmailcom
MondayTuesdayWednesdayThursday Friday
DIVISIONS OF CREATIVE NICHE INC
032010 (11)60
PROFILE Flashcreed ndash Business Gallery
032010 (11) 61
The Business Gallery (httpwwwflashcreedcombusiness_video_image_gallery) is a Flash component meant to do one thing to enhance the visual experience a website portfolio or presentation site gives to its users Mainly itrsquos all about the image you present yourself or
your product to the world wide web Letrsquos face it without the looks you canrsquot sell your product or image no matter how interesting it might be
Whatrsquos so great about this gallery you might wonder Well the answer is simple everything Advanced AS3 programming dynamic XML implementation unlimited number of media items on stage PNG JPG and video FLA SWF MP4 F4V supported media tween and image effects just to name a few of the over 150 settings this gallery brings you Bottom line you can customize it in any way you see fit in order to make it resemble your website layout Not to mention the code optimization that allows the gallery to run so smoothly even on low resources
We brought 45 background wallpapers in case just a color doesnrsquot do the job also a set of custom arrows and close buttons
Flashcreed ndash Business GalleryHello itrsquos good to be back here among Flash amp Flex Magazine readers Today we are going to tell you a bit about our products mainly our Business Gallery but since all our products are built on the same framework most of the properties apply to all When we first realized what we could do with this framework we decided to name it ldquoPandorardquo in order to point out the unlimited number of possibilities it revealed regarding customization and user friendliness
032010 (11)60
PROFILE Flashcreed ndash Business Gallery
032010 (11) 61
The size of the entire gallery and any element in it is subject to any kind of resize big stage and small thumbs or the other way around for any template you or your client desire
Column_scroll and the properties for the stage mask helps you configure the exact number of visible columns you want to set in order to browse through the media items your gallery has Beside this useful feature we added blur and a couple of tween effects for the leftright navigation that gives an impressive look
032010 (11)62
PROFILE Flashcreed ndash Business Gallery
032010 (11) 63
Either as tooltip or plain text you can show any information you want regarding a certain media thumb in the gallery You can change font type size spacing color position and many other properties
The color gradient system for roll overout mouse gesture is unique in every way if we are to compare it with other galleries on the market at this point You can customize up to 5 sets of color with different alpha values The gradient type either linear or radial can be modified with rotation and ratio values
032010 (11)62
PROFILE Flashcreed ndash Business Gallery
032010 (11) 63
When clicking on a thumb if preview_type is selected as internal a resizable preview window will reveal itself and depending on the media type (image or video) an image viewer or video player will be contained inside it If preview_type is selected as external you have the possibility to set certain URL addresses this allowing you to redirect the user to a specific area of the website like a product page from a virtual store for example
The video player has a dozen of controllers that allow you to create a skin to better suit the template you want to create for your gallery Buttonrsquos color thickness handler color or scrub bar size just to name a few of the properties you can play with
At an amazing price of 999 $ this has to be one of the best choices when it comes to media galleries flash components Donrsquot hesitate to take a look at it on wwwflashcreedcom and also consider other products that might better suit your specifications or desires We would definitely appreciate any kind of feedback regarding current or possible features
Thank you
032010 (11)65
BOOK REVIEW
Are you an actionscript 3 game developer who is not able to write a complete commercial game because you cannot manage dozens
of classes Or you are an experienced actionscript 3 applications developer who wants to program game but donrsquot like reading any available beginner book as it doesnrsquot suit your style Even if you already have a good grasp over java or c++ and interested in creating not only fun games but commercial ones also then this is what you really require
There are several actionscript 3 game development books for beginners out there but Essential Guide to Game Dev is one of those few books that talk about the advanced gaming concepts However its first chapter begins with an easy to understand game example (good for any beginner) and ends up creating 3 games Did I tell you 3 games in just first chapter
Teaching about an Actionscript 3 Game framework is one of the many reasons that make this book a kick-ass addition to actionscript 3 gaming library Authors teach you how to create 10 unique games ranging from arcade to driving tile based to puzzle game and shooters to dice games Another specialty of this book is to use Flex and Flash Develop IDEs along with the primary Flash tool that creates space for not only flex
developers but also Flash Develop users In addition to this you will also learn to create game assets with GIMP Mappy and a sound effect creation tool You will get information about copyright laws which are necessary for any would-be commercial game creation and a complete game example integrated with MochiAds
This book also discusses and further more implements various advanced topics such as bitmap rendering pixel-level collision detection sound management AI xml-based level designing scrolling screen optimization techniques particles etc
In short this book will surely blow your minds with the wealth of knowledge it includes and you will pray for authors to keep writing such informative and useful books
If you are really serious about gaming then donrsquot miss the opportunity of reading this book Highly recommended
by Ali RAZA ACI ACE SCJP
Essential Guide to Flash Games
Authors Jeff Fulton Steve FultonPublisher friends of EDISBN 978-1-4302-2614-7Language EnglishPages 664 PagesWebsite httpfriendsofedcombookhtmlisbn=1430226145
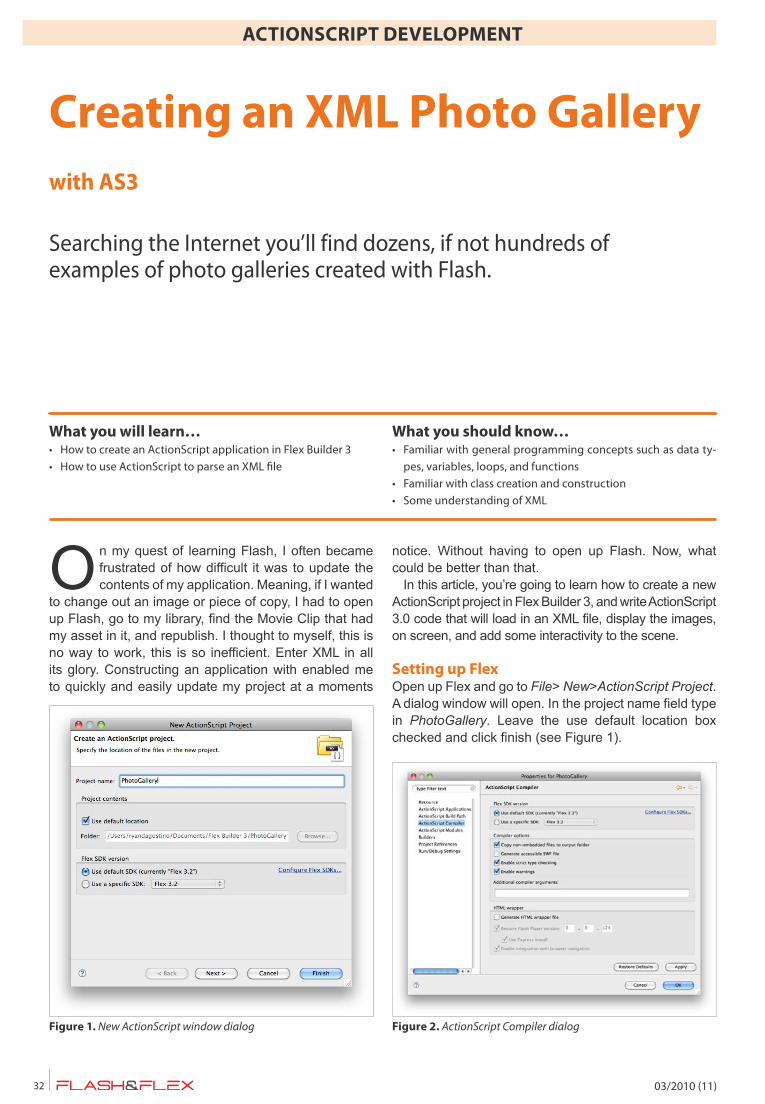
Creating an XML Photo Gallery with AS3
032010 (11) 39
Listing 3 ThumbNailas
package classes
import caurinatransitionsTweener
import flashdisplayLoader
import flashdisplayShape
import flashdisplaySprite
import flasheventsEvent
import flasheventsMouseEvent
import flashnetURLRequest
import flashtextTextField
import flashtextTextFieldAutoSize
import flashtextTextFormat
public class ThumbNail extends Sprite
Containers
private var _imageLoaderLoader Loads in
the thumbnail
private var _imageContainerSprite
Container for the thumbnail
private var _maskShape Container for the
mask
private var _descriptionContainerSprite
Container for the description
TextFields
private var _descriptionTextField
TextField for the container
Logic
private var _newIDuint The ID of the
object
[Embed(systemFont=Arial fontName=arial
fontWeight=bold
mimeType=applicationx-font-
truetype)]
private var _arialClass Embedded asset
for the font
Constructor
public function ThumbNail ()
super ()
init ()
Initializing method
private function init ()void
Instantiate the container
_imageContainer = new Sprite ()
_imageContaineralpha = 0
thisaddChild (_imageContainer)
createDescription ()
thismouseChildren = false
thisaddEventListener (MouseEventMOUSE_OVER
onMouseOver false 0 true)
thisaddEventListener (MouseEventMOUSE_OUT
onMouseOut false 0 true)
Public Methods
public function loadImage (pathString)void
_imageLoader = new Loader ()
_imageLoadercontentLoaderInfoaddEventListen
er (EventCOMPLETE imageComplete
false 0 true)
_imageLoaderload (new URLRequest (path))
GetterSetter Methods
public function get newID ()uint
return this_newID
public function set newID (valueuint)void
this_newID = value
public function get description ()String
return this_descriptiontext
public function set description (valueString)void
this_descriptiontext = value
Private Methods
032010 (11)40
ACTIONSCRIPT DEVELOPMENT
Listing 3 ThumbNailas
private function onMouseOver (eMouseEvent)void
TweeneraddTween (_descriptionContainer
y75 time05 transition
easeOutExpo)
private function onMouseOut (eMouseEvent)void
TweeneraddTween (_descriptionContainer
y150 time05 transition
easeOutExpo)
private function imageComplete (eEvent)void
Reposition the loaded content to the center
_imageLoaderx = -(_imageLoaderwidth 2)
_imageLoadery = -(_imageLoaderheight 2)
_imageContaineraddChildAt (_imageLoader 0)
Apply background after the image has
completely loaded
drawBackground ()
Draw the mask around the description
drawMask ()
Fade in the container
TweeneraddTween (_imageContainer alpha1
time05)
Clean up
_imageLoadercontentLoaderInforemoveEv
entListener (EventCOMPLETE
imageComplete)
Draws a background behind _imageContainer
private function drawBackground ()void
_imageContainergraphicsbeginFill (0xFFFFFF)
_imageContainergraphicsdrawRect (_
imageLoaderx ndash 1 _imageLoadery
ndash 1 _imageLoaderwidth + 2
_imageLoaderheight + 2)
_imageContainergraphicsendFill ()
Creates everything for the description
private function createDescription ()void
Instantiate the container
_descriptionContainer = new Sprite ()
_descriptionContainery = 150
_descriptionContainergraphicsbeginFill
(0x000000 075)
_descriptionContainergraphicsdrawRect (-75
-75 150 75)
_descriptionContainergraphicsendFill ()
_imageContaineraddChild (_
descriptionContainer)
Specify text formatting for the description
Text Field
var tfTextFormat = new TextFormat ()
tfcolor = 0xFFFFFF
tfalign = center
tffont = arial
tfbold = true
tfsize = 12
Instantiate the TextF ield
_description = new TextField ()
_descriptionx = -75
_descriptiony = -70
_descriptionwidth = 150
_descriptionwordWrap = true
_descriptionembedFonts = true
_descriptiondefaultTextFormat = tf
_descriptionautoSize = TextFieldAutoSizeLEFT
_descriptionContaineraddChild (_description)
Draws a mask our _descriptionContainer
private function drawMask ()void
Draw the mask shape
_mask = new Shape ()
_maskgraphicsbeginFill (0xFF0000)
_maskgraphicsdrawRect (_imageLoaderx
_imageLoadery _imageLoaderwidth
_imageLoaderheight)
_maskgraphicsendFill ()
addChild (_mask)
Apply the mask to the container
_descriptionContainermask = _mask
Creating an XML Photo Gallery with AS3
032010 (11) 41
that will be loaded into the application from XML Finally create another folder and this time name it assets This folder will contain the buttons that wersquoll embed into our project
The AssetsBefore we start coding we need to create some visual assets Open up Photoshop or any other program you have for creating graphics and create an image that is 150x150 pixels Fill it with a flat color and save the image as thumbjpg in the images folder you just created Next create another image thatrsquos 250x300 pixels Fill it with another color and save that image as fulljpg into the same folder These images will be used for testing purposes only
Listing 4 BigPhotoas
package classes
import flashdisplayLoader
import flashdisplaySprite
import flasheventsEvent
import flashnetURLRequest
public class BigPhoto extends Sprite
Containers
private var _imageLoaderLoader Loads in the
thumbnail
private var _imageContainerSprite Container
for the thumbnail
Constructor
public function BigPhoto ()
super()
Public Methods
public function loadImage (pathString)void
_imageLoader = new Loader ()
_imageLoadercontentLoaderInfoaddEventListen
er (EventCOMPLETE imageComplete
false 0 true)
_imageLoaderload (new URLRequest (path))
Clean up method
public function destroy ()void
_imageContainerremoveChild (_imageLoader)
_imageLoaderunload ()
_imageLoader = null
thisremoveChild (_imageContainer)
_imageContainer = null
Private Methods
private function imageComplete (eEvent)void
Instantiate the container
_imageContainer = new Sprite ()
thisaddChild (_imageContainer)
Add the loader
_imageContaineraddChild (_imageLoader)
Clean up
_imageLoadercontentLoaderInforemoveEv
entListener (EventCOMPLETE
imageComplete)
Figure 5 Time to test
032010 (11)42
ACTIONSCRIPT DEVELOPMENT
We still have to create our navigation buttons that wersquoll use to scroll through our gallery Create two buttons that are 40x40 pixels and design them how you like They should resemble forward and back buttons Save the forward arrow as next-arrowpng and the other as back-arrowpng into the assets folder Now that our assets our created itrsquos time to code
The XML fileRight click the src folder in the project scroll over to new and click file A dialog window will open and in the file name input box type galleryxml (see Figure 4) Write the code that you see from Listing 1 into galleryxml
Line 1 is the XML declaration This is needed to have a well-formed XML document
Line 2 declares the gallery root node Notice in this node Irsquove added attributes Also to have a well-formed XML document you must have one root node and all attribute values must be in quotes
Lines 3-7 declares a photo node with three children description thumb_path and full_path description is exactly as it sounds It will contain a description for our thumbnail thumb_path contains the path to our thumbnail image Same goes for full_path it contains the path to our full image
I then just copy and pasted that and pasted it 14 times just changing out the description Remember wersquore just using dummy data When you finish go back and add photos of your choice
The ClassesWersquoll be using two additional classes for this project One will be for the thumbnails and another for the full image Right click the classes folder go to new and click ActionScript class In the name field type ThumbNail For the Superclass type in flashdisplaySprite Wersquoll need to extend from that class so we can use the functionality of that object but add our own (see Figure 4)
Add another class this time name it BigPhoto It should also inherit from flashdisplaySprite
CodingTime to start writing the ActionScript for this project Open up PhotoGalleryas from the Flex Navigator and type in the code from Listing 2 Open up ThumbNailas and type in the code from Listing 3 Open up BigPhotoas and type in the code from Listing 4 Now that you have all the code in itrsquos time to test In the menu bar click RungtRun PhotoGallery (see Figure 5) If you get an error make sure you typed everything correctly If all went well you should see the gallery open up Click the buttons and watch the gallery scroll left and right Roll over the thumbnails to see the description scroll up Click on a thumbnail to see the full image fade in You might be wondering about whatrsquos going on Irsquoll try to break that down for you next
The ExplanationOur main focus is going to be whatrsquos going on in PhotoGalleryas This file contains the ActionScript that makes almost everything happen We first start off by declaring our properties that will be used in the project Yoursquoll notice a couple of embeded lines These lines are MetaData tags that actually embed assets into the project The two embeded lines you see add the next-arrowpng file and the back-arrowpng file In the constructor there is one call to a method called init() This method gets the application going by requesting and loading in the XML File When the file finishes loading we store the XML data into our _xml property Next we call the loadImages() method This method is responsible for a big part of the application We first gather some information from the XML file and store it in temporary variables
bull imageWidth stores the image _ height attributes valuebull imageWidth stores the image _ width attributes valuebull imageGap stores the image _ gap attributes valuebull rows stores the row attributes valuebull rowCounter increments ever pass of the for loop Is
compared against the rows variablebull columnCounter increments once for every column
created
The for loop cycles the XML file creating a new ThumbNail object with every iteration During each iteration we create variables that store the path to the thumb nail (path) and the description of the thumbnail (description) We pass the variables into the methods of the ThumbNail class Remember the ThumbNail class defines methods and properties that are specific to it The class code is commented if you wish to explore it Again our main focus is PhotoGalleryas To create the grid we write ifelse logic that compares the rowCounter variable to the row variable For every iteration of the loop we increment that variable if that variable becomes greater than rows we set it back to 0 rowCounter is then multiplied to the y-axis of each ThumbNail object The rest of the code is commented for you to explore
ConclusionYoursquoll notice I actually hard coded a lot of values directly in the ActionScript Not too ideal In the next part of this tutorial wersquore going to come back to this code and modify it to be a little more flexible and visually appealing If you have any questions feel free to contact me through my site (wwwcodedbyryancom)
RYAN DrsquoAGOSTINORyan DrsquoAgostino is an Interactive Developer at NAS Recruitment Communications in Cleveland OH part-time instructor at Virginia Marti College of Art and Design in Lakewood Ohio and freelance designer and ActionScript developer For more information about Ryan please visit httpwwwcodedbyryancom
032010 (11)44
COMPONENTS
Components are the controls and containers that are the elements of the application that create the interface They cover controls such
as buttons and check boxes containers that can hold other containers and controls navigation elements and charts Components can be added to your application in variety of ways They can be added through the design view writing then in MXML or through ActionScript
Flash Builder now has two major sets of components the Halo set which has been available in previous versions of Flex and the new Spark set The components from the Spark set have a direct correlation to a component in the Halo set but not all Halo components have been upgraded to the Spark framework yet The namespaces for these components are added automatically when a MXML document is created and you will notice there are now multiple namespace in the main MXML document already
Creating custom components takes two paths The first is to create a skin for an existing Halo component in Flash Illustrator Photoshop or Fireworks or create a custom skin for a Spark component using MXML The second path is to create a completely custom component using Flash Professional and importing it into the Flash Builder project We are going to focus on the second path and create a custom component with Flash Professional
The first step in creating a custom component is to instal the Flex Component Kit mxp into Flash Professional This is an extension that will expose some
Custom Flash CS4
Flash Builder comes with a lot of components to cover almost all of an apps needs But what if you want a custom look or functionality to a component With Flash Professional you can create custom components and import them into Flash Builder for use in your application
What you will learnhellipbull How to create custom components in Flash Professional to im-
port into Flash Builder
What you should knowhellipbull Flash Professional CS4bull Flash Builder 4bull Actionscript 3
Components in Flash Builder 4
Figure 1 The component artwork Figure 2 Converting the movie clip
032010 (11)46
COMPONENTS
Listing 1 The component class
package comtest
import mxflashUIMovieClip
import flasheventsEvent
import flasheventsEventDispatcher
import flasheventsMouseEvent
import flashfiltersGlowFilter
public class SliderButton extends UIMovieClip
public static const BUTTON_CLICKString = button click
private var glowGlowFilter = new GlowFilter(0x0000cc54421falsefalse)
public function SliderButton()
plusButtonbuttonMode = true
minusButtonbuttonMode = true
plusButtonaddEventListener(MouseEventMOUSE_OVER handleMouseOver)
plusButtonaddEventListener(MouseEventMOUSE_OUT handleMouseOut)
plusButtonaddEventListener(MouseEventCLICK handleMousePress)
minusButtonaddEventListener(MouseEventMOUSE_OVER handleMouseOver)
minusButtonaddEventListener(MouseEventMOUSE_OUT handleMouseOut)
minusButtonaddEventListener(MouseEventCLICK handleMousePress)
private function handleMouseOver(eMouseEvent)void
ecurrentTargetfilters = [glow]
private function handleMouseOut(eMouseEvent)void
ecurrentTargetfilters = []
private function handleMousePress(eMouseEvent)void
if(ecurrentTargetname == plusButton ampamp trackThumbx lt 134)
trackThumbx++
else if(ecurrentTargetname == minusButton ampamp trackThumbx gt 37)
trackThumbx--
dispatchEvent(new Event(SliderButtonBUTTON_CLICK))
032010 (11)48
COMPONENTS
of the Flex classes to Flash allowing the component to communicate with the application Download the extension from the Adobe site at httpwwwadobecomcfusionexchangeindexcfmevent=extensionDetailampextid=1273018 and install using the Adobe Extension Manager The extension should work with Flash
versions as far back as Flash 8 but I highly recommend using at least Flash 9 (CS 3)
Once the extension is installed launch Flash Professional and create a new ActionScript 3 project We are going to create a simple slider button that has a plus and minus button on each end of the button and a track between them When the plus and minus buttons are clicked the the track thumb will move one pixel in either direction There will also be a roll over behavior on the buttons to change their look as the mouse rolls over and off the buttons Finally Flash Builder will receive the event of the button being pushed and update a text input on the stage
It is common to encapsulate the behaviors of the component within itself and have events broadcast to the containing application If you think about some of standard components in both Flash Builder and Flash Professional and deconstruct them in your mind you will see that the same methods are used on them The NumericStepper is a lot like our component It has two buttons with a text field that displays a value that is incremented or decremented with each push of the button The component itself does nothing to effect the application until the code calls it to either send or receive a value
With our new document we are going to create the artwork for the component in the fla file Create four movie clips one each for the scroll track the plus button the minus button and the track thumb (Figure 1) The naming and look of these movie clips are not important
Once the movie clips are created and on the stage give each one an instance name The names in the
Figure 3 Setting the class of the movie clip
Figure 4 Setting to export as SWC
Figure 5 Creating the Flash Builder project
Custom Flash CS4 Components in Flash Builder 4
032010 (11) 49
example files are plusButton minusButton and trackThumb The actual names do not matter and we dont need an instance name for the track since we are not going to reference it in Flash Builder Flash Builder will reference the instance names of the movie clips in the components we will use these later
Now that the artwork has been created it must be collected into its own movie clip Select all of the artwork on the stage and choose ModifygtgtConvert to Symbolhellip In the Library panel there is a new symbol that is called in the sample files SliderButton The name is important here because this is how the Convert to Flex Component mxp will name the class that Flash Builder will refer to later
An external class will give the component the internal behaviors that were mentioned earlier as well as an event to broadcast to the Flash Builder application (Listing 1) All the code in the class should be familiar but there are a few points to go over First the package name is given the qualifier of comtest to identify that the component belongs to our namespace This is not necessary but helpful when there are multiple components or components from different publishers in the application
The most important change is instead of having the class extend the Sprite class this class is going to
extend the UIMovieClip class This class like the Flex Component in the library exposes the behaviors and methods we set up in the class to the Flash Builder application In the import statements use import
mxflashUIMovieClip The mxflash class includes both the UIMovieClip and ContainerMovieClip classes
When the variables are declared we set up a glow filter that will be attached to the buttons when the mouse rolls over them and a string constant for the event we create later In the constructor of the class the buttons receive the event listeners for the mouse interactions and the handlers are added later in the code In the handleClick event handler we use the event dispatcher class to dispatch the event Here we are just dispatching a standard event with the constant that was created earlier You can just as easily dispatc a custom event that has extra information attached to it
Select the movie clip in the Library panel then select CommandsgtgtConvert Symbol to Flex Component (Figure 2) The extension will do several operations such as making the symbol available to ActionScript giving the symbol a class name adding the Flex Component to the library and others
Save the file as SliderButtonas in the folder path comtest When you declare the package name as we have here you must have the same hierarchy as listed in the package name Back in the fla select the
Figure 6 The Package Explorer
Listing 2 The main MXML le
ltxml version=10 encoding=utf-8gt
ltsApplication xmlnsfx=httpnsadobecommxml
2009
xmlnss=librarynsadobecomflex
spark
xmlnsmx=librarynsadobecomflex
mx
width=200 height=110gt
ltfxDeclarationsgt
lt-- Place non-visual elements (eg
services value objects) here
--gt
ltfxDeclarationsgt
ltsApplicationgt
Listing 3 The new component and name space
xmlnstest=comtest
lttestSliderButton x=14 y=10 id=sliderButton
gt
032010 (11)50
COMPONENTS
SliderButton movie clip and select Propertieshellip from the contextual menu Expand the advanced area if it is not already and enter comtestSliderButton in the Class text field Leave the Base Class text field blank and click OK (Figure 3)
Select Publish Settingshellip from the file menu and click on the Flash tab (Figure4) Under the SWF Settings area of the window be sure that the Export SWC check box is checked The swc is the part that Flash Builder will use in the application SWC are archives that contain the classes and media assets of the component and make it easy to distribute the movie clip
Publish the SWF and SWC and we are ready to move to Flash Builder
Flash BuilderIn Flash Builder create a new project This example we only need a basic Flash Builder project without any
server technologies You can name the project anything you would like in this case I have name FB_Components and saved it in my default workspace
If you have not worked on a Flash Builder project yet it is a lot like working on the Flex projects in the past with some new MXML tags You will also notice that the Flex Navigator pane has now been replaced with the Package Explorer (Figure 6)
The Package Explorer pane has a different organization than the Flex Navigator but the main MXML file can still be found under src then under the default package
Looking at the main MXML (Listing 2) you will see that the three name spaces are added automatically and the application begins with sApplication instead of mxApplication These are the minor differences to be on the look out for when working on a Flash Builder project
Listing 4 The nal MXML le
ltxml version=10 encoding=utf-8gt
ltsApplication xmlnsfx=httpnsadobecommxml2009
xmlnss=librarynsadobecomflexspark
xmlnsmx=librarynsadobecomflexmx minWidth=200 minHeight=110
width=200 height=110
initialize=init()
xmlnstest=comtestgt
ltfxDeclarationsgt
lt-- Place non-visual elements (eg services value objects) here --gt
ltfxDeclarationsgt
ltfxScriptgt
lt[CDATA[
private function init()void
sliderButtonaddEventListener(SliderButtonBUTTON_CLICK updateText)
private function updateText(eEvent)void
pixelTexttext = String(sliderButtontrackThumbx)
]]gt
ltfxScriptgt
lttestSliderButton x=14 y=10 id=sliderButton gt
ltsLabel x=39 y=41 text=The position of the track thumb is textAlign=center width=122gt
ltsTextInput x=76 y=76 width=49 id=pixelTextgt
ltsApplicationgt
Custom Flash CS4 Components in Flash Builder 4
032010 (11) 51
To get our component into the Flash Builder project we need to put the swc some where the project can see it On your desktop navigate to where the swc was published to and copy the file Then navigate to where Flash Builder project is and put the swc into libs folder I have found it is easier to keep the fla and swf files out of the project then copy the swc over to the Flash Builder project as needed
Back in Flash Builder open the libs folder under the project in the Package Explorer pane In that directory you should see your swc if you do not try right clicking on the libs folder and selecting Refresh
In the MXML editor switch to Design view When the Design view becomes active the Component pane should become available in the lower left of the workspace The first folder in the pane is the Custom folder and our custom component should be displayed in the list Drag an instance of this component onto the stage
To show that we can have two way communication with the component drag a label and a text input onto the stage Set the labels text to be The position of the track thumb is and move the text input near the label Set the id of the text input to pixelText (Figure 7) Switch back to the Source view after saving
Notice that several lines have been added to the source of the MXML document In addition to the MXML for the component including our custom component a name space value has been added to the sApplication tag designated as xmlnstest=comtest (Listing 3) If we add more components using the same comtest package declaration they will all fall under this name space If we were to add more components using a different package additional name spaces would be added You will also notice that the component starts with testSliderButton as opposed to s fx or mx
In the application tag add an initialize property calling a function called init() After the fxDeclarations tags add fxScript tags to hold the Actionscript As you type fx the code completion should pop up and allow you to select the fxScript tags
Add an id property to the SliderButton tag and give it a value of sliderButton In between the CDATA tags add the init function This function simply adds an event listener to our component calling the updateText
function every time the BUTTON_CLICK event is broadcast from the SliderButton class (Listing 4)
Once the application receives the BUTTON_CLICK event it calls the updateText function This function looks into the component and gets the x position of the track thumb then puts that value into the text input we set up earlier
So now we have communication coming out of the component using the dispatchEvent call in the class We are also looking into the component where the application is getting the x position of the thumb track inside the component Communication can get much more complicated than this but this is a simple example to give a starting point to create more complex components
Click debug to run the application and if no errors occurred the application should launch in a browser window If you have a browser window open before running the app you should close it There is a bug in the Flash Player at the time of this writing that may cause the app to not run if there are browser windows already open
Once the application is running click on the buttons and watch as the value in the text input increase and decrease The custom component is now complete and ready to have more behaviors and methods added to it
ConclusionWhile the components that come with Flash Builder can cover most situations there will be times where only a custom component will fit the applications needs Creating a custom component takes a little work but can make the developers job a lot easier With this new level of control over the look and behavior of the component can make the application more rich and engaging to the end user
Figure 7 Components on the stage
On the Netbull httpwwwadobecombull httpwwwadobecomcfusionexchangeindexcfmeven-
t=extensionDetailampextid=1273018
LOUIS DICARROLouis DiCarro is a consultant based in NYC and has been working with Flash since the rst version He has taught web development at the college level and has worked for numerous large clients He can be reached at louisdicarroffdgmailcom
032010 (11)52
COMPONENTS AIR Components in Flash Builder
032010 (11) 53
We already know that building an AIR application affords us a lot more capabilities than working with a web based project
Digging through the Actionscript documentation shows that there are a lot of classes that are only available to AIR applications These mostly have to do with classes and methods that interact with the file system or windowing of the application
Flash Builder as with Flex Builder before it contains several components that are only available to use with AIR applications These components deal with
visual interfaces for interacting with the file system and a HTML component for displaying web content
You may wonder why these components are only available for AIR applications Mostly it is for security reasons Up to Flash Player 101 a swf does not have the permission to interact with files on the file system except in very limited circumstances
Swfs in the web browser are able to interact only with files on the server in which the swf is hosted This allows them to load images xml and other file types at run time but only if the files come from within its
AIR Components
Adding file and html rendering can result in a lot of code But with the AIR components in Flash Builder 4 this functionality can be added easily with only a few lines of code
What you will learnhellipbull What components are available for AIR applications in Flash
Builder 4
What you should knowhellipbull Flash Builder 4bull Actionscript 3
in Flash Builder
Figure 1 AIR Actionscript 3 special classes for the HTML component Figure 2 Layout of the HTML application
032010 (11)52
COMPONENTS AIR Components in Flash Builder
032010 (11) 53
Were going to take a look at couple of simple examples for each component to get a feel how use them It is also important to note that the documentation for these components are in the AS 3 documentation When looking at the documentation you will see a symbol next to some of the classes and also next to some methods within the classes (Figure 1)
HTML ComponentThe HTML component is very easy to work with It can pull in many types of media and render them as you would expect them to be rendered in a web browser
Start up Flash Builder and create a new Flex project Name the project and select Desktop under project type Click finish and let Flash Builder set up the project
Once the project is started click on the Design tab In the lower left a component tab should be open If it is not open it using the Window menu and selecting Components Scroll down to the Adobe AIR folder You will not see this folder if you set your project to run in a web browser
We are going to create a simple web browser using only three components and one line of code First drag a HTML component a text field and a button to the stage Arrange them how you would like and switch over to design view
Give each component an id as in Listing 1 Also give the button a click handler Type click and let the program auto complete another code hint will pop up to create the handler automatically
Flash Builder will generate the handler as well as the fxScript block in the code In the click handler that is generated add a line that will set the location of the HTML component to the text in the text field See Listing 2 for the full code
Run the application and fill in a valid web address in the application Remember to include http in front of
own sandbox There are exceptions and ways around it but for the majority the swf cannot interact with the file system
If the development of applications using Flash Builder and AIR were to succeed they would need to act like real desktop applications This means that the applications would have to load and save files just as any other application that a user would use on the computer
Security is still maintained in this model by having the developer digitally sign their application using certificates If the certificate is obtained though a trusted source the application would be traceable back to the original developer if something bad should happen
Having a HTML component gives the application greater rendering power by tapping into the Web Kit which can run better than the HTML renderers in the Flash Player This allows developers to repurpose content from their web site to the application
Figure 3 The application running Figure 4 Layout of the image viewer application
Listing 1 MXML of components
ltsTextInput id=addressBar x=10 y=10
width=518gt
ltsButton id=goButton x=555 y=13
label=Go click=goButton_
clickHandler(event) gt
ltmxHTML id=htmlPane x=10 y=40 width=620
height=430gt
Listing 2 goButton handler
protected function goButton_clickHandler(event
MouseEvent)void
htmlPanelocation = addressBartext
032010 (11)54
COMPONENTS
the address Click the Go button and the page should load after a few seconds Take a look at Figure 3 for the results
There are a lot of methods and commands associated with the HTML component This will allow you to make a more customized display and give more control over the HTML content that you show
File system componentsUsing the file system components is just as easy To test the components we are going to create a simple image viewer that allows the user to select the images from the file system
Create a new Flex Project as we did before and be sure to make it a desktop application Once the project has loaded switch to design view and drag a File System Tree and an Image component to the stage See Figure 4 for the layout
Once the application is laid out switch over to the Source mode and give all the components ids as we did before (Listing 3) Also add a change handler instead of a click handler Flash Builder will autocomplete and generate the handler for you as it did when we added the click action to the button
In the generated handler add the code that will load the image into the image component To keep everything simple we only are going to load jpg and png files (Listing 4) in this function we are first checking to make sure the file is a file and not a directory by checking for a file extension If the file passes the first test we check to see if the file is a jpg or png Lastly if the file passes all of these test it gets loaded into the image component
Save the file and run the application to see the results Clicking on the file system tree items will either open or close the directory or try to load the file When the user clicks on a jpg or png it will load into the image component (Figure 5) Note that as the tree expands a scroll bar is attached to the component automatically
ConclusionJust as with the HTML component there is more methods and properties available to you with the file system components In this demo application we have seen how easy it is to get access to the file system using the component without writing a lot of code
There is a lot more involved in making a full application using these components but we have witnessed how easy to get started with them Having more control over the elements as well as error checking would be added in real applications
Having these components available gives the application a large amount of functionality very quickly and allows the developer to concentrate on the logic of the application Using these components in your application will help make it more full-featured and feel more like a real desktop application
LOUIS DICARROLouis DiCarro is a consultant based in NYC and has been working with Flash since the rst version He has taught web development at the college level and has worked for numerous large clients He can be reached at louisdicarroffdgmailcom
Listing 3 MXML of components
ltmxFileSystemTree id=fsList x=10 y=10
height=460 change=fsList_
changeHandler(event)gt
ltmxImage id=imgPane x=193 y=10 width=437
height=460gt
Listing 4 Handler for change event
protected function fsList_changeHandler(event
ListEvent)void
var fileFile = eventcurrentTargetselectedItem
as File
if(fileextension)
if(fileextensiontoLowerCase() == jpg ||
fileextensiontoLowerCase() ==
png)
imgPanesource = fileurl
Figure 5 The image viewer application running
032010 (11)56
TLF Applying CSS to Text Layout Framework styles
032010 (11) 57
TLF is introducing the new way of applying styles to the text Prior to TLF flash used simple approach you had to prepare and attach
StyleSheet object to the style property of the TextFieldTLF provides more flexible and customizable but
more complex techniqueDuring this tutorial we are going to create a small
application in Flex 4 This application contains a text displayed with TLF component TextArea and 2 different CSS that can be applied to the text simply by pressing the button Figure 1 show the screenshot of the application
TextFlow and itrsquos IFormatResolverTLF provides a callback mechanism to for with text styles TextFlow objectrsquos got a property formatResolver that should implement IFormatResolver interface Actually it is a set of callback functions that are called by parent TextFlow when it processes itrsquos elements
To have a closer look at formatResolver we will implement itrsquos version to work with out simple CSS So start create a new project in Flex and name it for example TextCSS In the default package create a new ActionScript class named CSSFormatResolver that implements IFormatResolver interface
Listing 1 shows the complete implementation of the class and will we look closer into it later For now pay attention on the following functions
bull invalidateAll
bull invalidate
bull resolveFormat
bull resolveUserFormat
bull getResolverForNewFlow
These function are created automatically by Flex Builder as they are required for implementation of the interface All functions are callbacks that are called when the certain action is performed by TextFlow and it needs to know how to treat with different elements
Applying CSS
This article is a reply to our readerrsquos question about the possibility to apply CSS to Text Layout Framework (TLF) We will show how to implement the necessary class and switch text styles on the fly
What you will learnhellipbull how can custom styles be applied to TLF elementsbull how to implement IFormatResolver to work with CSS
What you should knowhellipbull the basics of Flex and FlexFlash Builderbull the basics of TLF
to Text Layout Framework styles
Figure 1 Style changing application
032010 (11)56
TLF Applying CSS to Text Layout Framework styles
032010 (11) 57
Main ApplicationListing 2 contains a full code for main application
The application consists of
bull TextArea with some text The text is formed using XML Some elements of the TextFlow have
For our case we are interested in resolveFormat function that is called for every element of the TextFlow when itrsquos style needs to be changed This function return an object that should implement ITextLayoutFormat
Before we continue lets have a fast look at main application and how we build our example
Listing 1 CSSFormatResolveras
package
import flashtextStyleSheet
import flashxtextLayoutelementsFlowElement
import flashxtextLayoutelementsFlowValueHolder
import flashxtextLayoutelementsIFormatResolver
import flashxtextLayoutelementsTextFlow
import flashxtextLayoutformatsITextLayoutFormat
public class CSSFormatResolver implements
IFormatResolver
private var _styleSheetStyleSheet
public function CSSFormatResolver()
_styleSheet = new StyleSheet()
public function invalidateAll(textFlow
TextFlow)void
public function invalidate(targetObject)void
public function resolveFormat(targetObject)
ITextLayoutFormat
var formatFlowValueHolder = null
if (target is FlowElement)
var elementFlowElement = target as
FlowElement
if (element = null)
format = elementformat as
FlowValueHolder
if (elementstyleName = null)
var styleObject = styleSheetgetSt
yle(elementstyleName)
formatcolor = style[color]
formatfontSize =
style[fontSize]
formatfontWeight =
style[fontWeight]
formatfontStyle =
style[fontStyle]
return format
public function resolveUserFormat(targetObject
userFormatString)
return null
public function getResolverForNewFlow(oldFlow
TextFlow newFlowTextFlow)
IFormatResolver
return null
public function get styleSheet()StyleSheet
return _styleSheet
public function set styleSheet(valueStyleSheet)
void
_styleSheet = value
032010 (11)58
TLF
032010 (11) 59
Listing 2 TextCSSmxml
ltxml version=10 encoding=utf-8gt
ltsApplication xmlnsfx=httpnsadobecommxml2009
xmlnss=librarynsadobecomflexspark
xmlnsmx=librarynsadobecomflexhalo
xmlnslocal=
width=640 height=300gt
ltfxScriptgt
lt[CDATA[
import mxeventsFlexEvent
protected function applyCSS1Button_
clickHandler(eventMouseEvent)void
var formatResolverCSSFormatResolver =
new CSSFormatResolver()
formatResolverstyleSheetparseCSS(css1
text)
textAreatextFlowformatResolver =
formatResolver
protected function applyCSS2Button_
clickHandler(eventMouseEvent)void
var formatResolverCSSFormatResolver =
new CSSFormatResolver()
formatResolverstyleSheetparseCSS(css2
text)
textAreatextFlowformatResolver =
formatResolver
]]gt
ltfxScriptgt
ltsTextArea id=textArea width=620 height=134
x=9 y=156gt
ltsTextFlowgt
ltsp styleName=h1gt
Title of the Text
ltspgt
ltsp styleName=h2gt
Section of the Text
ltspgt
ltspgt
This is a body text Lorem ipsum
ltspgt
ltsTextFlowgt
ltsTextAreagt
ltsTextArea x=10 y=10 width=285 height=86
id=css1 gt
lt[CDATA[
h1
colorFF0000
fontSize20
fontWeightbold
fontStylenormal
h2
colorFF00FF
fontSize16
fontWeightbold
fontStyleitalic
]]gt
ltsTextAreagt
ltsTextArea x=345 y=10 width=285 height=86
id=css2 gt
lt[CDATA[
h1
color00FF00
fontSize32
fontWeightnormal
fontStyleitalic
h2
color0000FF
fontSize24
fontWeightbold
fontStylenormal
]]gt
ltsTextAreagt
ltsButton x=108 y=105 label=Apply CSS
1 id=applyCSS1Button
click=applyCSS1Button_
clickHandler(event)gt
ltsButton x=443 y=105 label=Apply CSS
2 id=applyCSS2Button
click=applyCSS2Button_
clickHandler(event)gt
ltsApplicationgt
032010 (11)58
TLF
032010 (11) 59
got styleName attribute so you could apply the corresponding CSS style to them later
bull 2 TextAreas with simple different CSSbull 2 Buttons to apply CSS from TextAreas to example
text
When the button is clicked the new instance of CSSFormatResolver class is created Then the corresponding CSS string from the TextArea is parsed and set into resolverrsquos property of SlyleSheet class type And finally prepared formatResolver instance is assigned to the TextFlow
Applying CSS to TextFlowNow lets have more detailed look at resolveFormat callback function First it should return a value that implements ITextLayoutFormat if it returns null then no new styling should be applied to an element being processed by the function So we create format variable of FlowValueHolder (it implements ITextLayoutFormat) and set itrsquos value to null (we do that because resolveFormat works with all elements including TextFlow itself as probably we donrsquot want to apply one style to the whole text)
After we do all the necessary casts and null checks and if we are sure that current elementrsquos got styleName attribute we assign styles from CSS to a current format StyleSheet object is used to contain CSS data as it is convenient object to parse and retrieve CSS data
Conclusion and a WarningThere was a brief tutorial on how to apply simple CSS to TLF TextFlow Please note that CSSFormatResolver class is not fully functional and only can be applied to our sample CSSs Writing reusable and versatile class requires more detailed coding and approach
Check the TLF Blog on this issue There is fully functional CSSFormatResolver with example there httpblogsadobecomtlf200902iformatresolver_and_using_css_1html
MAXYM GOLOVANCHUK Maxym Golovanchuk is a Photoshop Certied Expert and TV producer and he is using Adobersquos software for implementing entertainment solutions including video delivery with Flash Media Server mexxikgmailcom
MondayTuesdayWednesdayThursday Friday
DIVISIONS OF CREATIVE NICHE INC
032010 (11)60
PROFILE Flashcreed ndash Business Gallery
032010 (11) 61
The Business Gallery (httpwwwflashcreedcombusiness_video_image_gallery) is a Flash component meant to do one thing to enhance the visual experience a website portfolio or presentation site gives to its users Mainly itrsquos all about the image you present yourself or
your product to the world wide web Letrsquos face it without the looks you canrsquot sell your product or image no matter how interesting it might be
Whatrsquos so great about this gallery you might wonder Well the answer is simple everything Advanced AS3 programming dynamic XML implementation unlimited number of media items on stage PNG JPG and video FLA SWF MP4 F4V supported media tween and image effects just to name a few of the over 150 settings this gallery brings you Bottom line you can customize it in any way you see fit in order to make it resemble your website layout Not to mention the code optimization that allows the gallery to run so smoothly even on low resources
We brought 45 background wallpapers in case just a color doesnrsquot do the job also a set of custom arrows and close buttons
Flashcreed ndash Business GalleryHello itrsquos good to be back here among Flash amp Flex Magazine readers Today we are going to tell you a bit about our products mainly our Business Gallery but since all our products are built on the same framework most of the properties apply to all When we first realized what we could do with this framework we decided to name it ldquoPandorardquo in order to point out the unlimited number of possibilities it revealed regarding customization and user friendliness
032010 (11)60
PROFILE Flashcreed ndash Business Gallery
032010 (11) 61
The size of the entire gallery and any element in it is subject to any kind of resize big stage and small thumbs or the other way around for any template you or your client desire
Column_scroll and the properties for the stage mask helps you configure the exact number of visible columns you want to set in order to browse through the media items your gallery has Beside this useful feature we added blur and a couple of tween effects for the leftright navigation that gives an impressive look
032010 (11)62
PROFILE Flashcreed ndash Business Gallery
032010 (11) 63
Either as tooltip or plain text you can show any information you want regarding a certain media thumb in the gallery You can change font type size spacing color position and many other properties
The color gradient system for roll overout mouse gesture is unique in every way if we are to compare it with other galleries on the market at this point You can customize up to 5 sets of color with different alpha values The gradient type either linear or radial can be modified with rotation and ratio values
032010 (11)62
PROFILE Flashcreed ndash Business Gallery
032010 (11) 63
When clicking on a thumb if preview_type is selected as internal a resizable preview window will reveal itself and depending on the media type (image or video) an image viewer or video player will be contained inside it If preview_type is selected as external you have the possibility to set certain URL addresses this allowing you to redirect the user to a specific area of the website like a product page from a virtual store for example
The video player has a dozen of controllers that allow you to create a skin to better suit the template you want to create for your gallery Buttonrsquos color thickness handler color or scrub bar size just to name a few of the properties you can play with
At an amazing price of 999 $ this has to be one of the best choices when it comes to media galleries flash components Donrsquot hesitate to take a look at it on wwwflashcreedcom and also consider other products that might better suit your specifications or desires We would definitely appreciate any kind of feedback regarding current or possible features
Thank you
032010 (11)65
BOOK REVIEW
Are you an actionscript 3 game developer who is not able to write a complete commercial game because you cannot manage dozens
of classes Or you are an experienced actionscript 3 applications developer who wants to program game but donrsquot like reading any available beginner book as it doesnrsquot suit your style Even if you already have a good grasp over java or c++ and interested in creating not only fun games but commercial ones also then this is what you really require
There are several actionscript 3 game development books for beginners out there but Essential Guide to Game Dev is one of those few books that talk about the advanced gaming concepts However its first chapter begins with an easy to understand game example (good for any beginner) and ends up creating 3 games Did I tell you 3 games in just first chapter
Teaching about an Actionscript 3 Game framework is one of the many reasons that make this book a kick-ass addition to actionscript 3 gaming library Authors teach you how to create 10 unique games ranging from arcade to driving tile based to puzzle game and shooters to dice games Another specialty of this book is to use Flex and Flash Develop IDEs along with the primary Flash tool that creates space for not only flex
developers but also Flash Develop users In addition to this you will also learn to create game assets with GIMP Mappy and a sound effect creation tool You will get information about copyright laws which are necessary for any would-be commercial game creation and a complete game example integrated with MochiAds
This book also discusses and further more implements various advanced topics such as bitmap rendering pixel-level collision detection sound management AI xml-based level designing scrolling screen optimization techniques particles etc
In short this book will surely blow your minds with the wealth of knowledge it includes and you will pray for authors to keep writing such informative and useful books
If you are really serious about gaming then donrsquot miss the opportunity of reading this book Highly recommended
by Ali RAZA ACI ACE SCJP
Essential Guide to Flash Games
Authors Jeff Fulton Steve FultonPublisher friends of EDISBN 978-1-4302-2614-7Language EnglishPages 664 PagesWebsite httpfriendsofedcombookhtmlisbn=1430226145
Custom Flash CS4 Components in Flash Builder 4
032010 (11) 49
example files are plusButton minusButton and trackThumb The actual names do not matter and we dont need an instance name for the track since we are not going to reference it in Flash Builder Flash Builder will reference the instance names of the movie clips in the components we will use these later
Now that the artwork has been created it must be collected into its own movie clip Select all of the artwork on the stage and choose ModifygtgtConvert to Symbolhellip In the Library panel there is a new symbol that is called in the sample files SliderButton The name is important here because this is how the Convert to Flex Component mxp will name the class that Flash Builder will refer to later
An external class will give the component the internal behaviors that were mentioned earlier as well as an event to broadcast to the Flash Builder application (Listing 1) All the code in the class should be familiar but there are a few points to go over First the package name is given the qualifier of comtest to identify that the component belongs to our namespace This is not necessary but helpful when there are multiple components or components from different publishers in the application
The most important change is instead of having the class extend the Sprite class this class is going to
extend the UIMovieClip class This class like the Flex Component in the library exposes the behaviors and methods we set up in the class to the Flash Builder application In the import statements use import
mxflashUIMovieClip The mxflash class includes both the UIMovieClip and ContainerMovieClip classes
When the variables are declared we set up a glow filter that will be attached to the buttons when the mouse rolls over them and a string constant for the event we create later In the constructor of the class the buttons receive the event listeners for the mouse interactions and the handlers are added later in the code In the handleClick event handler we use the event dispatcher class to dispatch the event Here we are just dispatching a standard event with the constant that was created earlier You can just as easily dispatc a custom event that has extra information attached to it
Select the movie clip in the Library panel then select CommandsgtgtConvert Symbol to Flex Component (Figure 2) The extension will do several operations such as making the symbol available to ActionScript giving the symbol a class name adding the Flex Component to the library and others
Save the file as SliderButtonas in the folder path comtest When you declare the package name as we have here you must have the same hierarchy as listed in the package name Back in the fla select the
Figure 6 The Package Explorer
Listing 2 The main MXML le
ltxml version=10 encoding=utf-8gt
ltsApplication xmlnsfx=httpnsadobecommxml
2009
xmlnss=librarynsadobecomflex
spark
xmlnsmx=librarynsadobecomflex
mx
width=200 height=110gt
ltfxDeclarationsgt
lt-- Place non-visual elements (eg
services value objects) here
--gt
ltfxDeclarationsgt
ltsApplicationgt
Listing 3 The new component and name space
xmlnstest=comtest
lttestSliderButton x=14 y=10 id=sliderButton
gt
032010 (11)50
COMPONENTS
SliderButton movie clip and select Propertieshellip from the contextual menu Expand the advanced area if it is not already and enter comtestSliderButton in the Class text field Leave the Base Class text field blank and click OK (Figure 3)
Select Publish Settingshellip from the file menu and click on the Flash tab (Figure4) Under the SWF Settings area of the window be sure that the Export SWC check box is checked The swc is the part that Flash Builder will use in the application SWC are archives that contain the classes and media assets of the component and make it easy to distribute the movie clip
Publish the SWF and SWC and we are ready to move to Flash Builder
Flash BuilderIn Flash Builder create a new project This example we only need a basic Flash Builder project without any
server technologies You can name the project anything you would like in this case I have name FB_Components and saved it in my default workspace
If you have not worked on a Flash Builder project yet it is a lot like working on the Flex projects in the past with some new MXML tags You will also notice that the Flex Navigator pane has now been replaced with the Package Explorer (Figure 6)
The Package Explorer pane has a different organization than the Flex Navigator but the main MXML file can still be found under src then under the default package
Looking at the main MXML (Listing 2) you will see that the three name spaces are added automatically and the application begins with sApplication instead of mxApplication These are the minor differences to be on the look out for when working on a Flash Builder project
Listing 4 The nal MXML le
ltxml version=10 encoding=utf-8gt
ltsApplication xmlnsfx=httpnsadobecommxml2009
xmlnss=librarynsadobecomflexspark
xmlnsmx=librarynsadobecomflexmx minWidth=200 minHeight=110
width=200 height=110
initialize=init()
xmlnstest=comtestgt
ltfxDeclarationsgt
lt-- Place non-visual elements (eg services value objects) here --gt
ltfxDeclarationsgt
ltfxScriptgt
lt[CDATA[
private function init()void
sliderButtonaddEventListener(SliderButtonBUTTON_CLICK updateText)
private function updateText(eEvent)void
pixelTexttext = String(sliderButtontrackThumbx)
]]gt
ltfxScriptgt
lttestSliderButton x=14 y=10 id=sliderButton gt
ltsLabel x=39 y=41 text=The position of the track thumb is textAlign=center width=122gt
ltsTextInput x=76 y=76 width=49 id=pixelTextgt
ltsApplicationgt
Custom Flash CS4 Components in Flash Builder 4
032010 (11) 51
To get our component into the Flash Builder project we need to put the swc some where the project can see it On your desktop navigate to where the swc was published to and copy the file Then navigate to where Flash Builder project is and put the swc into libs folder I have found it is easier to keep the fla and swf files out of the project then copy the swc over to the Flash Builder project as needed
Back in Flash Builder open the libs folder under the project in the Package Explorer pane In that directory you should see your swc if you do not try right clicking on the libs folder and selecting Refresh
In the MXML editor switch to Design view When the Design view becomes active the Component pane should become available in the lower left of the workspace The first folder in the pane is the Custom folder and our custom component should be displayed in the list Drag an instance of this component onto the stage
To show that we can have two way communication with the component drag a label and a text input onto the stage Set the labels text to be The position of the track thumb is and move the text input near the label Set the id of the text input to pixelText (Figure 7) Switch back to the Source view after saving
Notice that several lines have been added to the source of the MXML document In addition to the MXML for the component including our custom component a name space value has been added to the sApplication tag designated as xmlnstest=comtest (Listing 3) If we add more components using the same comtest package declaration they will all fall under this name space If we were to add more components using a different package additional name spaces would be added You will also notice that the component starts with testSliderButton as opposed to s fx or mx
In the application tag add an initialize property calling a function called init() After the fxDeclarations tags add fxScript tags to hold the Actionscript As you type fx the code completion should pop up and allow you to select the fxScript tags
Add an id property to the SliderButton tag and give it a value of sliderButton In between the CDATA tags add the init function This function simply adds an event listener to our component calling the updateText
function every time the BUTTON_CLICK event is broadcast from the SliderButton class (Listing 4)
Once the application receives the BUTTON_CLICK event it calls the updateText function This function looks into the component and gets the x position of the track thumb then puts that value into the text input we set up earlier
So now we have communication coming out of the component using the dispatchEvent call in the class We are also looking into the component where the application is getting the x position of the thumb track inside the component Communication can get much more complicated than this but this is a simple example to give a starting point to create more complex components
Click debug to run the application and if no errors occurred the application should launch in a browser window If you have a browser window open before running the app you should close it There is a bug in the Flash Player at the time of this writing that may cause the app to not run if there are browser windows already open
Once the application is running click on the buttons and watch as the value in the text input increase and decrease The custom component is now complete and ready to have more behaviors and methods added to it
ConclusionWhile the components that come with Flash Builder can cover most situations there will be times where only a custom component will fit the applications needs Creating a custom component takes a little work but can make the developers job a lot easier With this new level of control over the look and behavior of the component can make the application more rich and engaging to the end user
Figure 7 Components on the stage
On the Netbull httpwwwadobecombull httpwwwadobecomcfusionexchangeindexcfmeven-
t=extensionDetailampextid=1273018
LOUIS DICARROLouis DiCarro is a consultant based in NYC and has been working with Flash since the rst version He has taught web development at the college level and has worked for numerous large clients He can be reached at louisdicarroffdgmailcom
032010 (11)52
COMPONENTS AIR Components in Flash Builder
032010 (11) 53
We already know that building an AIR application affords us a lot more capabilities than working with a web based project
Digging through the Actionscript documentation shows that there are a lot of classes that are only available to AIR applications These mostly have to do with classes and methods that interact with the file system or windowing of the application
Flash Builder as with Flex Builder before it contains several components that are only available to use with AIR applications These components deal with
visual interfaces for interacting with the file system and a HTML component for displaying web content
You may wonder why these components are only available for AIR applications Mostly it is for security reasons Up to Flash Player 101 a swf does not have the permission to interact with files on the file system except in very limited circumstances
Swfs in the web browser are able to interact only with files on the server in which the swf is hosted This allows them to load images xml and other file types at run time but only if the files come from within its
AIR Components
Adding file and html rendering can result in a lot of code But with the AIR components in Flash Builder 4 this functionality can be added easily with only a few lines of code
What you will learnhellipbull What components are available for AIR applications in Flash
Builder 4
What you should knowhellipbull Flash Builder 4bull Actionscript 3
in Flash Builder
Figure 1 AIR Actionscript 3 special classes for the HTML component Figure 2 Layout of the HTML application
032010 (11)52
COMPONENTS AIR Components in Flash Builder
032010 (11) 53
Were going to take a look at couple of simple examples for each component to get a feel how use them It is also important to note that the documentation for these components are in the AS 3 documentation When looking at the documentation you will see a symbol next to some of the classes and also next to some methods within the classes (Figure 1)
HTML ComponentThe HTML component is very easy to work with It can pull in many types of media and render them as you would expect them to be rendered in a web browser
Start up Flash Builder and create a new Flex project Name the project and select Desktop under project type Click finish and let Flash Builder set up the project
Once the project is started click on the Design tab In the lower left a component tab should be open If it is not open it using the Window menu and selecting Components Scroll down to the Adobe AIR folder You will not see this folder if you set your project to run in a web browser
We are going to create a simple web browser using only three components and one line of code First drag a HTML component a text field and a button to the stage Arrange them how you would like and switch over to design view
Give each component an id as in Listing 1 Also give the button a click handler Type click and let the program auto complete another code hint will pop up to create the handler automatically
Flash Builder will generate the handler as well as the fxScript block in the code In the click handler that is generated add a line that will set the location of the HTML component to the text in the text field See Listing 2 for the full code
Run the application and fill in a valid web address in the application Remember to include http in front of
own sandbox There are exceptions and ways around it but for the majority the swf cannot interact with the file system
If the development of applications using Flash Builder and AIR were to succeed they would need to act like real desktop applications This means that the applications would have to load and save files just as any other application that a user would use on the computer
Security is still maintained in this model by having the developer digitally sign their application using certificates If the certificate is obtained though a trusted source the application would be traceable back to the original developer if something bad should happen
Having a HTML component gives the application greater rendering power by tapping into the Web Kit which can run better than the HTML renderers in the Flash Player This allows developers to repurpose content from their web site to the application
Figure 3 The application running Figure 4 Layout of the image viewer application
Listing 1 MXML of components
ltsTextInput id=addressBar x=10 y=10
width=518gt
ltsButton id=goButton x=555 y=13
label=Go click=goButton_
clickHandler(event) gt
ltmxHTML id=htmlPane x=10 y=40 width=620
height=430gt
Listing 2 goButton handler
protected function goButton_clickHandler(event
MouseEvent)void
htmlPanelocation = addressBartext
032010 (11)54
COMPONENTS
the address Click the Go button and the page should load after a few seconds Take a look at Figure 3 for the results
There are a lot of methods and commands associated with the HTML component This will allow you to make a more customized display and give more control over the HTML content that you show
File system componentsUsing the file system components is just as easy To test the components we are going to create a simple image viewer that allows the user to select the images from the file system
Create a new Flex Project as we did before and be sure to make it a desktop application Once the project has loaded switch to design view and drag a File System Tree and an Image component to the stage See Figure 4 for the layout
Once the application is laid out switch over to the Source mode and give all the components ids as we did before (Listing 3) Also add a change handler instead of a click handler Flash Builder will autocomplete and generate the handler for you as it did when we added the click action to the button
In the generated handler add the code that will load the image into the image component To keep everything simple we only are going to load jpg and png files (Listing 4) in this function we are first checking to make sure the file is a file and not a directory by checking for a file extension If the file passes the first test we check to see if the file is a jpg or png Lastly if the file passes all of these test it gets loaded into the image component
Save the file and run the application to see the results Clicking on the file system tree items will either open or close the directory or try to load the file When the user clicks on a jpg or png it will load into the image component (Figure 5) Note that as the tree expands a scroll bar is attached to the component automatically
ConclusionJust as with the HTML component there is more methods and properties available to you with the file system components In this demo application we have seen how easy it is to get access to the file system using the component without writing a lot of code
There is a lot more involved in making a full application using these components but we have witnessed how easy to get started with them Having more control over the elements as well as error checking would be added in real applications
Having these components available gives the application a large amount of functionality very quickly and allows the developer to concentrate on the logic of the application Using these components in your application will help make it more full-featured and feel more like a real desktop application
LOUIS DICARROLouis DiCarro is a consultant based in NYC and has been working with Flash since the rst version He has taught web development at the college level and has worked for numerous large clients He can be reached at louisdicarroffdgmailcom
Listing 3 MXML of components
ltmxFileSystemTree id=fsList x=10 y=10
height=460 change=fsList_
changeHandler(event)gt
ltmxImage id=imgPane x=193 y=10 width=437
height=460gt
Listing 4 Handler for change event
protected function fsList_changeHandler(event
ListEvent)void
var fileFile = eventcurrentTargetselectedItem
as File
if(fileextension)
if(fileextensiontoLowerCase() == jpg ||
fileextensiontoLowerCase() ==
png)
imgPanesource = fileurl
Figure 5 The image viewer application running
032010 (11)56
TLF Applying CSS to Text Layout Framework styles
032010 (11) 57
TLF is introducing the new way of applying styles to the text Prior to TLF flash used simple approach you had to prepare and attach
StyleSheet object to the style property of the TextFieldTLF provides more flexible and customizable but
more complex techniqueDuring this tutorial we are going to create a small
application in Flex 4 This application contains a text displayed with TLF component TextArea and 2 different CSS that can be applied to the text simply by pressing the button Figure 1 show the screenshot of the application
TextFlow and itrsquos IFormatResolverTLF provides a callback mechanism to for with text styles TextFlow objectrsquos got a property formatResolver that should implement IFormatResolver interface Actually it is a set of callback functions that are called by parent TextFlow when it processes itrsquos elements
To have a closer look at formatResolver we will implement itrsquos version to work with out simple CSS So start create a new project in Flex and name it for example TextCSS In the default package create a new ActionScript class named CSSFormatResolver that implements IFormatResolver interface
Listing 1 shows the complete implementation of the class and will we look closer into it later For now pay attention on the following functions
bull invalidateAll
bull invalidate
bull resolveFormat
bull resolveUserFormat
bull getResolverForNewFlow
These function are created automatically by Flex Builder as they are required for implementation of the interface All functions are callbacks that are called when the certain action is performed by TextFlow and it needs to know how to treat with different elements
Applying CSS
This article is a reply to our readerrsquos question about the possibility to apply CSS to Text Layout Framework (TLF) We will show how to implement the necessary class and switch text styles on the fly
What you will learnhellipbull how can custom styles be applied to TLF elementsbull how to implement IFormatResolver to work with CSS
What you should knowhellipbull the basics of Flex and FlexFlash Builderbull the basics of TLF
to Text Layout Framework styles
Figure 1 Style changing application
032010 (11)56
TLF Applying CSS to Text Layout Framework styles
032010 (11) 57
Main ApplicationListing 2 contains a full code for main application
The application consists of
bull TextArea with some text The text is formed using XML Some elements of the TextFlow have
For our case we are interested in resolveFormat function that is called for every element of the TextFlow when itrsquos style needs to be changed This function return an object that should implement ITextLayoutFormat
Before we continue lets have a fast look at main application and how we build our example
Listing 1 CSSFormatResolveras
package
import flashtextStyleSheet
import flashxtextLayoutelementsFlowElement
import flashxtextLayoutelementsFlowValueHolder
import flashxtextLayoutelementsIFormatResolver
import flashxtextLayoutelementsTextFlow
import flashxtextLayoutformatsITextLayoutFormat
public class CSSFormatResolver implements
IFormatResolver
private var _styleSheetStyleSheet
public function CSSFormatResolver()
_styleSheet = new StyleSheet()
public function invalidateAll(textFlow
TextFlow)void
public function invalidate(targetObject)void
public function resolveFormat(targetObject)
ITextLayoutFormat
var formatFlowValueHolder = null
if (target is FlowElement)
var elementFlowElement = target as
FlowElement
if (element = null)
format = elementformat as
FlowValueHolder
if (elementstyleName = null)
var styleObject = styleSheetgetSt
yle(elementstyleName)
formatcolor = style[color]
formatfontSize =
style[fontSize]
formatfontWeight =
style[fontWeight]
formatfontStyle =
style[fontStyle]
return format
public function resolveUserFormat(targetObject
userFormatString)
return null
public function getResolverForNewFlow(oldFlow
TextFlow newFlowTextFlow)
IFormatResolver
return null
public function get styleSheet()StyleSheet
return _styleSheet
public function set styleSheet(valueStyleSheet)
void
_styleSheet = value
032010 (11)58
TLF
032010 (11) 59
Listing 2 TextCSSmxml
ltxml version=10 encoding=utf-8gt
ltsApplication xmlnsfx=httpnsadobecommxml2009
xmlnss=librarynsadobecomflexspark
xmlnsmx=librarynsadobecomflexhalo
xmlnslocal=
width=640 height=300gt
ltfxScriptgt
lt[CDATA[
import mxeventsFlexEvent
protected function applyCSS1Button_
clickHandler(eventMouseEvent)void
var formatResolverCSSFormatResolver =
new CSSFormatResolver()
formatResolverstyleSheetparseCSS(css1
text)
textAreatextFlowformatResolver =
formatResolver
protected function applyCSS2Button_
clickHandler(eventMouseEvent)void
var formatResolverCSSFormatResolver =
new CSSFormatResolver()
formatResolverstyleSheetparseCSS(css2
text)
textAreatextFlowformatResolver =
formatResolver
]]gt
ltfxScriptgt
ltsTextArea id=textArea width=620 height=134
x=9 y=156gt
ltsTextFlowgt
ltsp styleName=h1gt
Title of the Text
ltspgt
ltsp styleName=h2gt
Section of the Text
ltspgt
ltspgt
This is a body text Lorem ipsum
ltspgt
ltsTextFlowgt
ltsTextAreagt
ltsTextArea x=10 y=10 width=285 height=86
id=css1 gt
lt[CDATA[
h1
colorFF0000
fontSize20
fontWeightbold
fontStylenormal
h2
colorFF00FF
fontSize16
fontWeightbold
fontStyleitalic
]]gt
ltsTextAreagt
ltsTextArea x=345 y=10 width=285 height=86
id=css2 gt
lt[CDATA[
h1
color00FF00
fontSize32
fontWeightnormal
fontStyleitalic
h2
color0000FF
fontSize24
fontWeightbold
fontStylenormal
]]gt
ltsTextAreagt
ltsButton x=108 y=105 label=Apply CSS
1 id=applyCSS1Button
click=applyCSS1Button_
clickHandler(event)gt
ltsButton x=443 y=105 label=Apply CSS
2 id=applyCSS2Button
click=applyCSS2Button_
clickHandler(event)gt
ltsApplicationgt
032010 (11)58
TLF
032010 (11) 59
got styleName attribute so you could apply the corresponding CSS style to them later
bull 2 TextAreas with simple different CSSbull 2 Buttons to apply CSS from TextAreas to example
text
When the button is clicked the new instance of CSSFormatResolver class is created Then the corresponding CSS string from the TextArea is parsed and set into resolverrsquos property of SlyleSheet class type And finally prepared formatResolver instance is assigned to the TextFlow
Applying CSS to TextFlowNow lets have more detailed look at resolveFormat callback function First it should return a value that implements ITextLayoutFormat if it returns null then no new styling should be applied to an element being processed by the function So we create format variable of FlowValueHolder (it implements ITextLayoutFormat) and set itrsquos value to null (we do that because resolveFormat works with all elements including TextFlow itself as probably we donrsquot want to apply one style to the whole text)
After we do all the necessary casts and null checks and if we are sure that current elementrsquos got styleName attribute we assign styles from CSS to a current format StyleSheet object is used to contain CSS data as it is convenient object to parse and retrieve CSS data
Conclusion and a WarningThere was a brief tutorial on how to apply simple CSS to TLF TextFlow Please note that CSSFormatResolver class is not fully functional and only can be applied to our sample CSSs Writing reusable and versatile class requires more detailed coding and approach
Check the TLF Blog on this issue There is fully functional CSSFormatResolver with example there httpblogsadobecomtlf200902iformatresolver_and_using_css_1html
MAXYM GOLOVANCHUK Maxym Golovanchuk is a Photoshop Certied Expert and TV producer and he is using Adobersquos software for implementing entertainment solutions including video delivery with Flash Media Server mexxikgmailcom
MondayTuesdayWednesdayThursday Friday
DIVISIONS OF CREATIVE NICHE INC
032010 (11)60
PROFILE Flashcreed ndash Business Gallery
032010 (11) 61
The Business Gallery (httpwwwflashcreedcombusiness_video_image_gallery) is a Flash component meant to do one thing to enhance the visual experience a website portfolio or presentation site gives to its users Mainly itrsquos all about the image you present yourself or
your product to the world wide web Letrsquos face it without the looks you canrsquot sell your product or image no matter how interesting it might be
Whatrsquos so great about this gallery you might wonder Well the answer is simple everything Advanced AS3 programming dynamic XML implementation unlimited number of media items on stage PNG JPG and video FLA SWF MP4 F4V supported media tween and image effects just to name a few of the over 150 settings this gallery brings you Bottom line you can customize it in any way you see fit in order to make it resemble your website layout Not to mention the code optimization that allows the gallery to run so smoothly even on low resources
We brought 45 background wallpapers in case just a color doesnrsquot do the job also a set of custom arrows and close buttons
Flashcreed ndash Business GalleryHello itrsquos good to be back here among Flash amp Flex Magazine readers Today we are going to tell you a bit about our products mainly our Business Gallery but since all our products are built on the same framework most of the properties apply to all When we first realized what we could do with this framework we decided to name it ldquoPandorardquo in order to point out the unlimited number of possibilities it revealed regarding customization and user friendliness
032010 (11)60
PROFILE Flashcreed ndash Business Gallery
032010 (11) 61
The size of the entire gallery and any element in it is subject to any kind of resize big stage and small thumbs or the other way around for any template you or your client desire
Column_scroll and the properties for the stage mask helps you configure the exact number of visible columns you want to set in order to browse through the media items your gallery has Beside this useful feature we added blur and a couple of tween effects for the leftright navigation that gives an impressive look
032010 (11)62
PROFILE Flashcreed ndash Business Gallery
032010 (11) 63
Either as tooltip or plain text you can show any information you want regarding a certain media thumb in the gallery You can change font type size spacing color position and many other properties
The color gradient system for roll overout mouse gesture is unique in every way if we are to compare it with other galleries on the market at this point You can customize up to 5 sets of color with different alpha values The gradient type either linear or radial can be modified with rotation and ratio values
032010 (11)62
PROFILE Flashcreed ndash Business Gallery
032010 (11) 63
When clicking on a thumb if preview_type is selected as internal a resizable preview window will reveal itself and depending on the media type (image or video) an image viewer or video player will be contained inside it If preview_type is selected as external you have the possibility to set certain URL addresses this allowing you to redirect the user to a specific area of the website like a product page from a virtual store for example
The video player has a dozen of controllers that allow you to create a skin to better suit the template you want to create for your gallery Buttonrsquos color thickness handler color or scrub bar size just to name a few of the properties you can play with
At an amazing price of 999 $ this has to be one of the best choices when it comes to media galleries flash components Donrsquot hesitate to take a look at it on wwwflashcreedcom and also consider other products that might better suit your specifications or desires We would definitely appreciate any kind of feedback regarding current or possible features
Thank you
032010 (11)65
BOOK REVIEW
Are you an actionscript 3 game developer who is not able to write a complete commercial game because you cannot manage dozens
of classes Or you are an experienced actionscript 3 applications developer who wants to program game but donrsquot like reading any available beginner book as it doesnrsquot suit your style Even if you already have a good grasp over java or c++ and interested in creating not only fun games but commercial ones also then this is what you really require
There are several actionscript 3 game development books for beginners out there but Essential Guide to Game Dev is one of those few books that talk about the advanced gaming concepts However its first chapter begins with an easy to understand game example (good for any beginner) and ends up creating 3 games Did I tell you 3 games in just first chapter
Teaching about an Actionscript 3 Game framework is one of the many reasons that make this book a kick-ass addition to actionscript 3 gaming library Authors teach you how to create 10 unique games ranging from arcade to driving tile based to puzzle game and shooters to dice games Another specialty of this book is to use Flex and Flash Develop IDEs along with the primary Flash tool that creates space for not only flex
developers but also Flash Develop users In addition to this you will also learn to create game assets with GIMP Mappy and a sound effect creation tool You will get information about copyright laws which are necessary for any would-be commercial game creation and a complete game example integrated with MochiAds
This book also discusses and further more implements various advanced topics such as bitmap rendering pixel-level collision detection sound management AI xml-based level designing scrolling screen optimization techniques particles etc
In short this book will surely blow your minds with the wealth of knowledge it includes and you will pray for authors to keep writing such informative and useful books
If you are really serious about gaming then donrsquot miss the opportunity of reading this book Highly recommended
by Ali RAZA ACI ACE SCJP
Essential Guide to Flash Games
Authors Jeff Fulton Steve FultonPublisher friends of EDISBN 978-1-4302-2614-7Language EnglishPages 664 PagesWebsite httpfriendsofedcombookhtmlisbn=1430226145
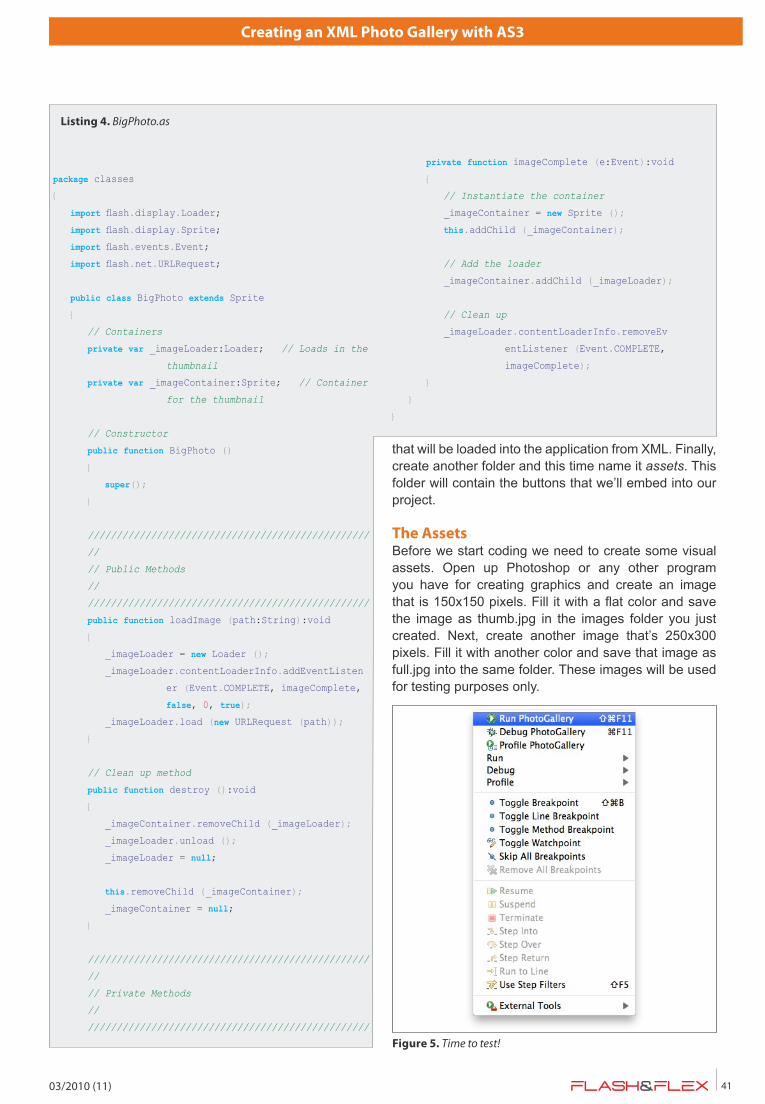
032010 (11)52
COMPONENTS AIR Components in Flash Builder
032010 (11) 53
We already know that building an AIR application affords us a lot more capabilities than working with a web based project
Digging through the Actionscript documentation shows that there are a lot of classes that are only available to AIR applications These mostly have to do with classes and methods that interact with the file system or windowing of the application
Flash Builder as with Flex Builder before it contains several components that are only available to use with AIR applications These components deal with
visual interfaces for interacting with the file system and a HTML component for displaying web content
You may wonder why these components are only available for AIR applications Mostly it is for security reasons Up to Flash Player 101 a swf does not have the permission to interact with files on the file system except in very limited circumstances
Swfs in the web browser are able to interact only with files on the server in which the swf is hosted This allows them to load images xml and other file types at run time but only if the files come from within its
AIR Components
Adding file and html rendering can result in a lot of code But with the AIR components in Flash Builder 4 this functionality can be added easily with only a few lines of code
What you will learnhellipbull What components are available for AIR applications in Flash
Builder 4
What you should knowhellipbull Flash Builder 4bull Actionscript 3
in Flash Builder
Figure 1 AIR Actionscript 3 special classes for the HTML component Figure 2 Layout of the HTML application
032010 (11)52
COMPONENTS AIR Components in Flash Builder
032010 (11) 53
Were going to take a look at couple of simple examples for each component to get a feel how use them It is also important to note that the documentation for these components are in the AS 3 documentation When looking at the documentation you will see a symbol next to some of the classes and also next to some methods within the classes (Figure 1)
HTML ComponentThe HTML component is very easy to work with It can pull in many types of media and render them as you would expect them to be rendered in a web browser
Start up Flash Builder and create a new Flex project Name the project and select Desktop under project type Click finish and let Flash Builder set up the project
Once the project is started click on the Design tab In the lower left a component tab should be open If it is not open it using the Window menu and selecting Components Scroll down to the Adobe AIR folder You will not see this folder if you set your project to run in a web browser
We are going to create a simple web browser using only three components and one line of code First drag a HTML component a text field and a button to the stage Arrange them how you would like and switch over to design view
Give each component an id as in Listing 1 Also give the button a click handler Type click and let the program auto complete another code hint will pop up to create the handler automatically
Flash Builder will generate the handler as well as the fxScript block in the code In the click handler that is generated add a line that will set the location of the HTML component to the text in the text field See Listing 2 for the full code
Run the application and fill in a valid web address in the application Remember to include http in front of
own sandbox There are exceptions and ways around it but for the majority the swf cannot interact with the file system
If the development of applications using Flash Builder and AIR were to succeed they would need to act like real desktop applications This means that the applications would have to load and save files just as any other application that a user would use on the computer
Security is still maintained in this model by having the developer digitally sign their application using certificates If the certificate is obtained though a trusted source the application would be traceable back to the original developer if something bad should happen
Having a HTML component gives the application greater rendering power by tapping into the Web Kit which can run better than the HTML renderers in the Flash Player This allows developers to repurpose content from their web site to the application
Figure 3 The application running Figure 4 Layout of the image viewer application
Listing 1 MXML of components
ltsTextInput id=addressBar x=10 y=10
width=518gt
ltsButton id=goButton x=555 y=13
label=Go click=goButton_
clickHandler(event) gt
ltmxHTML id=htmlPane x=10 y=40 width=620
height=430gt
Listing 2 goButton handler
protected function goButton_clickHandler(event
MouseEvent)void
htmlPanelocation = addressBartext
032010 (11)54
COMPONENTS
the address Click the Go button and the page should load after a few seconds Take a look at Figure 3 for the results
There are a lot of methods and commands associated with the HTML component This will allow you to make a more customized display and give more control over the HTML content that you show
File system componentsUsing the file system components is just as easy To test the components we are going to create a simple image viewer that allows the user to select the images from the file system
Create a new Flex Project as we did before and be sure to make it a desktop application Once the project has loaded switch to design view and drag a File System Tree and an Image component to the stage See Figure 4 for the layout
Once the application is laid out switch over to the Source mode and give all the components ids as we did before (Listing 3) Also add a change handler instead of a click handler Flash Builder will autocomplete and generate the handler for you as it did when we added the click action to the button
In the generated handler add the code that will load the image into the image component To keep everything simple we only are going to load jpg and png files (Listing 4) in this function we are first checking to make sure the file is a file and not a directory by checking for a file extension If the file passes the first test we check to see if the file is a jpg or png Lastly if the file passes all of these test it gets loaded into the image component
Save the file and run the application to see the results Clicking on the file system tree items will either open or close the directory or try to load the file When the user clicks on a jpg or png it will load into the image component (Figure 5) Note that as the tree expands a scroll bar is attached to the component automatically
ConclusionJust as with the HTML component there is more methods and properties available to you with the file system components In this demo application we have seen how easy it is to get access to the file system using the component without writing a lot of code
There is a lot more involved in making a full application using these components but we have witnessed how easy to get started with them Having more control over the elements as well as error checking would be added in real applications
Having these components available gives the application a large amount of functionality very quickly and allows the developer to concentrate on the logic of the application Using these components in your application will help make it more full-featured and feel more like a real desktop application
LOUIS DICARROLouis DiCarro is a consultant based in NYC and has been working with Flash since the rst version He has taught web development at the college level and has worked for numerous large clients He can be reached at louisdicarroffdgmailcom
Listing 3 MXML of components
ltmxFileSystemTree id=fsList x=10 y=10
height=460 change=fsList_
changeHandler(event)gt
ltmxImage id=imgPane x=193 y=10 width=437
height=460gt
Listing 4 Handler for change event
protected function fsList_changeHandler(event
ListEvent)void
var fileFile = eventcurrentTargetselectedItem
as File
if(fileextension)
if(fileextensiontoLowerCase() == jpg ||
fileextensiontoLowerCase() ==
png)
imgPanesource = fileurl
Figure 5 The image viewer application running
032010 (11)56
TLF Applying CSS to Text Layout Framework styles
032010 (11) 57
TLF is introducing the new way of applying styles to the text Prior to TLF flash used simple approach you had to prepare and attach
StyleSheet object to the style property of the TextFieldTLF provides more flexible and customizable but
more complex techniqueDuring this tutorial we are going to create a small
application in Flex 4 This application contains a text displayed with TLF component TextArea and 2 different CSS that can be applied to the text simply by pressing the button Figure 1 show the screenshot of the application
TextFlow and itrsquos IFormatResolverTLF provides a callback mechanism to for with text styles TextFlow objectrsquos got a property formatResolver that should implement IFormatResolver interface Actually it is a set of callback functions that are called by parent TextFlow when it processes itrsquos elements
To have a closer look at formatResolver we will implement itrsquos version to work with out simple CSS So start create a new project in Flex and name it for example TextCSS In the default package create a new ActionScript class named CSSFormatResolver that implements IFormatResolver interface
Listing 1 shows the complete implementation of the class and will we look closer into it later For now pay attention on the following functions
bull invalidateAll
bull invalidate
bull resolveFormat
bull resolveUserFormat
bull getResolverForNewFlow
These function are created automatically by Flex Builder as they are required for implementation of the interface All functions are callbacks that are called when the certain action is performed by TextFlow and it needs to know how to treat with different elements
Applying CSS
This article is a reply to our readerrsquos question about the possibility to apply CSS to Text Layout Framework (TLF) We will show how to implement the necessary class and switch text styles on the fly
What you will learnhellipbull how can custom styles be applied to TLF elementsbull how to implement IFormatResolver to work with CSS
What you should knowhellipbull the basics of Flex and FlexFlash Builderbull the basics of TLF
to Text Layout Framework styles
Figure 1 Style changing application
032010 (11)56
TLF Applying CSS to Text Layout Framework styles
032010 (11) 57
Main ApplicationListing 2 contains a full code for main application
The application consists of
bull TextArea with some text The text is formed using XML Some elements of the TextFlow have
For our case we are interested in resolveFormat function that is called for every element of the TextFlow when itrsquos style needs to be changed This function return an object that should implement ITextLayoutFormat
Before we continue lets have a fast look at main application and how we build our example
Listing 1 CSSFormatResolveras
package
import flashtextStyleSheet
import flashxtextLayoutelementsFlowElement
import flashxtextLayoutelementsFlowValueHolder
import flashxtextLayoutelementsIFormatResolver
import flashxtextLayoutelementsTextFlow
import flashxtextLayoutformatsITextLayoutFormat
public class CSSFormatResolver implements
IFormatResolver
private var _styleSheetStyleSheet
public function CSSFormatResolver()
_styleSheet = new StyleSheet()
public function invalidateAll(textFlow
TextFlow)void
public function invalidate(targetObject)void
public function resolveFormat(targetObject)
ITextLayoutFormat
var formatFlowValueHolder = null
if (target is FlowElement)
var elementFlowElement = target as
FlowElement
if (element = null)
format = elementformat as
FlowValueHolder
if (elementstyleName = null)
var styleObject = styleSheetgetSt
yle(elementstyleName)
formatcolor = style[color]
formatfontSize =
style[fontSize]
formatfontWeight =
style[fontWeight]
formatfontStyle =
style[fontStyle]
return format
public function resolveUserFormat(targetObject
userFormatString)
return null
public function getResolverForNewFlow(oldFlow
TextFlow newFlowTextFlow)
IFormatResolver
return null
public function get styleSheet()StyleSheet
return _styleSheet
public function set styleSheet(valueStyleSheet)
void
_styleSheet = value
032010 (11)58
TLF
032010 (11) 59
Listing 2 TextCSSmxml
ltxml version=10 encoding=utf-8gt
ltsApplication xmlnsfx=httpnsadobecommxml2009
xmlnss=librarynsadobecomflexspark
xmlnsmx=librarynsadobecomflexhalo
xmlnslocal=
width=640 height=300gt
ltfxScriptgt
lt[CDATA[
import mxeventsFlexEvent
protected function applyCSS1Button_
clickHandler(eventMouseEvent)void
var formatResolverCSSFormatResolver =
new CSSFormatResolver()
formatResolverstyleSheetparseCSS(css1
text)
textAreatextFlowformatResolver =
formatResolver
protected function applyCSS2Button_
clickHandler(eventMouseEvent)void
var formatResolverCSSFormatResolver =
new CSSFormatResolver()
formatResolverstyleSheetparseCSS(css2
text)
textAreatextFlowformatResolver =
formatResolver
]]gt
ltfxScriptgt
ltsTextArea id=textArea width=620 height=134
x=9 y=156gt
ltsTextFlowgt
ltsp styleName=h1gt
Title of the Text
ltspgt
ltsp styleName=h2gt
Section of the Text
ltspgt
ltspgt
This is a body text Lorem ipsum
ltspgt
ltsTextFlowgt
ltsTextAreagt
ltsTextArea x=10 y=10 width=285 height=86
id=css1 gt
lt[CDATA[
h1
colorFF0000
fontSize20
fontWeightbold
fontStylenormal
h2
colorFF00FF
fontSize16
fontWeightbold
fontStyleitalic
]]gt
ltsTextAreagt
ltsTextArea x=345 y=10 width=285 height=86
id=css2 gt
lt[CDATA[
h1
color00FF00
fontSize32
fontWeightnormal
fontStyleitalic
h2
color0000FF
fontSize24
fontWeightbold
fontStylenormal
]]gt
ltsTextAreagt
ltsButton x=108 y=105 label=Apply CSS
1 id=applyCSS1Button
click=applyCSS1Button_
clickHandler(event)gt
ltsButton x=443 y=105 label=Apply CSS
2 id=applyCSS2Button
click=applyCSS2Button_
clickHandler(event)gt
ltsApplicationgt
032010 (11)58
TLF
032010 (11) 59
got styleName attribute so you could apply the corresponding CSS style to them later
bull 2 TextAreas with simple different CSSbull 2 Buttons to apply CSS from TextAreas to example
text
When the button is clicked the new instance of CSSFormatResolver class is created Then the corresponding CSS string from the TextArea is parsed and set into resolverrsquos property of SlyleSheet class type And finally prepared formatResolver instance is assigned to the TextFlow
Applying CSS to TextFlowNow lets have more detailed look at resolveFormat callback function First it should return a value that implements ITextLayoutFormat if it returns null then no new styling should be applied to an element being processed by the function So we create format variable of FlowValueHolder (it implements ITextLayoutFormat) and set itrsquos value to null (we do that because resolveFormat works with all elements including TextFlow itself as probably we donrsquot want to apply one style to the whole text)
After we do all the necessary casts and null checks and if we are sure that current elementrsquos got styleName attribute we assign styles from CSS to a current format StyleSheet object is used to contain CSS data as it is convenient object to parse and retrieve CSS data
Conclusion and a WarningThere was a brief tutorial on how to apply simple CSS to TLF TextFlow Please note that CSSFormatResolver class is not fully functional and only can be applied to our sample CSSs Writing reusable and versatile class requires more detailed coding and approach
Check the TLF Blog on this issue There is fully functional CSSFormatResolver with example there httpblogsadobecomtlf200902iformatresolver_and_using_css_1html
MAXYM GOLOVANCHUK Maxym Golovanchuk is a Photoshop Certied Expert and TV producer and he is using Adobersquos software for implementing entertainment solutions including video delivery with Flash Media Server mexxikgmailcom
MondayTuesdayWednesdayThursday Friday
DIVISIONS OF CREATIVE NICHE INC
032010 (11)60
PROFILE Flashcreed ndash Business Gallery
032010 (11) 61
The Business Gallery (httpwwwflashcreedcombusiness_video_image_gallery) is a Flash component meant to do one thing to enhance the visual experience a website portfolio or presentation site gives to its users Mainly itrsquos all about the image you present yourself or
your product to the world wide web Letrsquos face it without the looks you canrsquot sell your product or image no matter how interesting it might be
Whatrsquos so great about this gallery you might wonder Well the answer is simple everything Advanced AS3 programming dynamic XML implementation unlimited number of media items on stage PNG JPG and video FLA SWF MP4 F4V supported media tween and image effects just to name a few of the over 150 settings this gallery brings you Bottom line you can customize it in any way you see fit in order to make it resemble your website layout Not to mention the code optimization that allows the gallery to run so smoothly even on low resources
We brought 45 background wallpapers in case just a color doesnrsquot do the job also a set of custom arrows and close buttons
Flashcreed ndash Business GalleryHello itrsquos good to be back here among Flash amp Flex Magazine readers Today we are going to tell you a bit about our products mainly our Business Gallery but since all our products are built on the same framework most of the properties apply to all When we first realized what we could do with this framework we decided to name it ldquoPandorardquo in order to point out the unlimited number of possibilities it revealed regarding customization and user friendliness
032010 (11)60
PROFILE Flashcreed ndash Business Gallery
032010 (11) 61
The size of the entire gallery and any element in it is subject to any kind of resize big stage and small thumbs or the other way around for any template you or your client desire
Column_scroll and the properties for the stage mask helps you configure the exact number of visible columns you want to set in order to browse through the media items your gallery has Beside this useful feature we added blur and a couple of tween effects for the leftright navigation that gives an impressive look
032010 (11)62
PROFILE Flashcreed ndash Business Gallery
032010 (11) 63
Either as tooltip or plain text you can show any information you want regarding a certain media thumb in the gallery You can change font type size spacing color position and many other properties
The color gradient system for roll overout mouse gesture is unique in every way if we are to compare it with other galleries on the market at this point You can customize up to 5 sets of color with different alpha values The gradient type either linear or radial can be modified with rotation and ratio values
032010 (11)62
PROFILE Flashcreed ndash Business Gallery
032010 (11) 63
When clicking on a thumb if preview_type is selected as internal a resizable preview window will reveal itself and depending on the media type (image or video) an image viewer or video player will be contained inside it If preview_type is selected as external you have the possibility to set certain URL addresses this allowing you to redirect the user to a specific area of the website like a product page from a virtual store for example
The video player has a dozen of controllers that allow you to create a skin to better suit the template you want to create for your gallery Buttonrsquos color thickness handler color or scrub bar size just to name a few of the properties you can play with
At an amazing price of 999 $ this has to be one of the best choices when it comes to media galleries flash components Donrsquot hesitate to take a look at it on wwwflashcreedcom and also consider other products that might better suit your specifications or desires We would definitely appreciate any kind of feedback regarding current or possible features
Thank you
032010 (11)65
BOOK REVIEW
Are you an actionscript 3 game developer who is not able to write a complete commercial game because you cannot manage dozens
of classes Or you are an experienced actionscript 3 applications developer who wants to program game but donrsquot like reading any available beginner book as it doesnrsquot suit your style Even if you already have a good grasp over java or c++ and interested in creating not only fun games but commercial ones also then this is what you really require
There are several actionscript 3 game development books for beginners out there but Essential Guide to Game Dev is one of those few books that talk about the advanced gaming concepts However its first chapter begins with an easy to understand game example (good for any beginner) and ends up creating 3 games Did I tell you 3 games in just first chapter
Teaching about an Actionscript 3 Game framework is one of the many reasons that make this book a kick-ass addition to actionscript 3 gaming library Authors teach you how to create 10 unique games ranging from arcade to driving tile based to puzzle game and shooters to dice games Another specialty of this book is to use Flex and Flash Develop IDEs along with the primary Flash tool that creates space for not only flex
developers but also Flash Develop users In addition to this you will also learn to create game assets with GIMP Mappy and a sound effect creation tool You will get information about copyright laws which are necessary for any would-be commercial game creation and a complete game example integrated with MochiAds
This book also discusses and further more implements various advanced topics such as bitmap rendering pixel-level collision detection sound management AI xml-based level designing scrolling screen optimization techniques particles etc
In short this book will surely blow your minds with the wealth of knowledge it includes and you will pray for authors to keep writing such informative and useful books
If you are really serious about gaming then donrsquot miss the opportunity of reading this book Highly recommended
by Ali RAZA ACI ACE SCJP
Essential Guide to Flash Games
Authors Jeff Fulton Steve FultonPublisher friends of EDISBN 978-1-4302-2614-7Language EnglishPages 664 PagesWebsite httpfriendsofedcombookhtmlisbn=1430226145

032010 (11)56
TLF Applying CSS to Text Layout Framework styles
032010 (11) 57
TLF is introducing the new way of applying styles to the text Prior to TLF flash used simple approach you had to prepare and attach
StyleSheet object to the style property of the TextFieldTLF provides more flexible and customizable but
more complex techniqueDuring this tutorial we are going to create a small
application in Flex 4 This application contains a text displayed with TLF component TextArea and 2 different CSS that can be applied to the text simply by pressing the button Figure 1 show the screenshot of the application
TextFlow and itrsquos IFormatResolverTLF provides a callback mechanism to for with text styles TextFlow objectrsquos got a property formatResolver that should implement IFormatResolver interface Actually it is a set of callback functions that are called by parent TextFlow when it processes itrsquos elements
To have a closer look at formatResolver we will implement itrsquos version to work with out simple CSS So start create a new project in Flex and name it for example TextCSS In the default package create a new ActionScript class named CSSFormatResolver that implements IFormatResolver interface
Listing 1 shows the complete implementation of the class and will we look closer into it later For now pay attention on the following functions
bull invalidateAll
bull invalidate
bull resolveFormat
bull resolveUserFormat
bull getResolverForNewFlow
These function are created automatically by Flex Builder as they are required for implementation of the interface All functions are callbacks that are called when the certain action is performed by TextFlow and it needs to know how to treat with different elements
Applying CSS
This article is a reply to our readerrsquos question about the possibility to apply CSS to Text Layout Framework (TLF) We will show how to implement the necessary class and switch text styles on the fly
What you will learnhellipbull how can custom styles be applied to TLF elementsbull how to implement IFormatResolver to work with CSS
What you should knowhellipbull the basics of Flex and FlexFlash Builderbull the basics of TLF
to Text Layout Framework styles
Figure 1 Style changing application
032010 (11)56
TLF Applying CSS to Text Layout Framework styles
032010 (11) 57
Main ApplicationListing 2 contains a full code for main application
The application consists of
bull TextArea with some text The text is formed using XML Some elements of the TextFlow have
For our case we are interested in resolveFormat function that is called for every element of the TextFlow when itrsquos style needs to be changed This function return an object that should implement ITextLayoutFormat
Before we continue lets have a fast look at main application and how we build our example
Listing 1 CSSFormatResolveras
package
import flashtextStyleSheet
import flashxtextLayoutelementsFlowElement
import flashxtextLayoutelementsFlowValueHolder
import flashxtextLayoutelementsIFormatResolver
import flashxtextLayoutelementsTextFlow
import flashxtextLayoutformatsITextLayoutFormat
public class CSSFormatResolver implements
IFormatResolver
private var _styleSheetStyleSheet
public function CSSFormatResolver()
_styleSheet = new StyleSheet()
public function invalidateAll(textFlow
TextFlow)void
public function invalidate(targetObject)void
public function resolveFormat(targetObject)
ITextLayoutFormat
var formatFlowValueHolder = null
if (target is FlowElement)
var elementFlowElement = target as
FlowElement
if (element = null)
format = elementformat as
FlowValueHolder
if (elementstyleName = null)
var styleObject = styleSheetgetSt
yle(elementstyleName)
formatcolor = style[color]
formatfontSize =
style[fontSize]
formatfontWeight =
style[fontWeight]
formatfontStyle =
style[fontStyle]
return format
public function resolveUserFormat(targetObject
userFormatString)
return null
public function getResolverForNewFlow(oldFlow
TextFlow newFlowTextFlow)
IFormatResolver
return null
public function get styleSheet()StyleSheet
return _styleSheet
public function set styleSheet(valueStyleSheet)
void
_styleSheet = value
032010 (11)58
TLF
032010 (11) 59
Listing 2 TextCSSmxml
ltxml version=10 encoding=utf-8gt
ltsApplication xmlnsfx=httpnsadobecommxml2009
xmlnss=librarynsadobecomflexspark
xmlnsmx=librarynsadobecomflexhalo
xmlnslocal=
width=640 height=300gt
ltfxScriptgt
lt[CDATA[
import mxeventsFlexEvent
protected function applyCSS1Button_
clickHandler(eventMouseEvent)void
var formatResolverCSSFormatResolver =
new CSSFormatResolver()
formatResolverstyleSheetparseCSS(css1
text)
textAreatextFlowformatResolver =
formatResolver
protected function applyCSS2Button_
clickHandler(eventMouseEvent)void
var formatResolverCSSFormatResolver =
new CSSFormatResolver()
formatResolverstyleSheetparseCSS(css2
text)
textAreatextFlowformatResolver =
formatResolver
]]gt
ltfxScriptgt
ltsTextArea id=textArea width=620 height=134
x=9 y=156gt
ltsTextFlowgt
ltsp styleName=h1gt
Title of the Text
ltspgt
ltsp styleName=h2gt
Section of the Text
ltspgt
ltspgt
This is a body text Lorem ipsum
ltspgt
ltsTextFlowgt
ltsTextAreagt
ltsTextArea x=10 y=10 width=285 height=86
id=css1 gt
lt[CDATA[
h1
colorFF0000
fontSize20
fontWeightbold
fontStylenormal
h2
colorFF00FF
fontSize16
fontWeightbold
fontStyleitalic
]]gt
ltsTextAreagt
ltsTextArea x=345 y=10 width=285 height=86
id=css2 gt
lt[CDATA[
h1
color00FF00
fontSize32
fontWeightnormal
fontStyleitalic
h2
color0000FF
fontSize24
fontWeightbold
fontStylenormal
]]gt
ltsTextAreagt
ltsButton x=108 y=105 label=Apply CSS
1 id=applyCSS1Button
click=applyCSS1Button_
clickHandler(event)gt
ltsButton x=443 y=105 label=Apply CSS
2 id=applyCSS2Button
click=applyCSS2Button_
clickHandler(event)gt
ltsApplicationgt
032010 (11)58
TLF
032010 (11) 59
got styleName attribute so you could apply the corresponding CSS style to them later
bull 2 TextAreas with simple different CSSbull 2 Buttons to apply CSS from TextAreas to example
text
When the button is clicked the new instance of CSSFormatResolver class is created Then the corresponding CSS string from the TextArea is parsed and set into resolverrsquos property of SlyleSheet class type And finally prepared formatResolver instance is assigned to the TextFlow
Applying CSS to TextFlowNow lets have more detailed look at resolveFormat callback function First it should return a value that implements ITextLayoutFormat if it returns null then no new styling should be applied to an element being processed by the function So we create format variable of FlowValueHolder (it implements ITextLayoutFormat) and set itrsquos value to null (we do that because resolveFormat works with all elements including TextFlow itself as probably we donrsquot want to apply one style to the whole text)
After we do all the necessary casts and null checks and if we are sure that current elementrsquos got styleName attribute we assign styles from CSS to a current format StyleSheet object is used to contain CSS data as it is convenient object to parse and retrieve CSS data
Conclusion and a WarningThere was a brief tutorial on how to apply simple CSS to TLF TextFlow Please note that CSSFormatResolver class is not fully functional and only can be applied to our sample CSSs Writing reusable and versatile class requires more detailed coding and approach
Check the TLF Blog on this issue There is fully functional CSSFormatResolver with example there httpblogsadobecomtlf200902iformatresolver_and_using_css_1html
MAXYM GOLOVANCHUK Maxym Golovanchuk is a Photoshop Certied Expert and TV producer and he is using Adobersquos software for implementing entertainment solutions including video delivery with Flash Media Server mexxikgmailcom
MondayTuesdayWednesdayThursday Friday
DIVISIONS OF CREATIVE NICHE INC
032010 (11)60
PROFILE Flashcreed ndash Business Gallery
032010 (11) 61
The Business Gallery (httpwwwflashcreedcombusiness_video_image_gallery) is a Flash component meant to do one thing to enhance the visual experience a website portfolio or presentation site gives to its users Mainly itrsquos all about the image you present yourself or
your product to the world wide web Letrsquos face it without the looks you canrsquot sell your product or image no matter how interesting it might be
Whatrsquos so great about this gallery you might wonder Well the answer is simple everything Advanced AS3 programming dynamic XML implementation unlimited number of media items on stage PNG JPG and video FLA SWF MP4 F4V supported media tween and image effects just to name a few of the over 150 settings this gallery brings you Bottom line you can customize it in any way you see fit in order to make it resemble your website layout Not to mention the code optimization that allows the gallery to run so smoothly even on low resources
We brought 45 background wallpapers in case just a color doesnrsquot do the job also a set of custom arrows and close buttons
Flashcreed ndash Business GalleryHello itrsquos good to be back here among Flash amp Flex Magazine readers Today we are going to tell you a bit about our products mainly our Business Gallery but since all our products are built on the same framework most of the properties apply to all When we first realized what we could do with this framework we decided to name it ldquoPandorardquo in order to point out the unlimited number of possibilities it revealed regarding customization and user friendliness
032010 (11)60
PROFILE Flashcreed ndash Business Gallery
032010 (11) 61
The size of the entire gallery and any element in it is subject to any kind of resize big stage and small thumbs or the other way around for any template you or your client desire
Column_scroll and the properties for the stage mask helps you configure the exact number of visible columns you want to set in order to browse through the media items your gallery has Beside this useful feature we added blur and a couple of tween effects for the leftright navigation that gives an impressive look
032010 (11)62
PROFILE Flashcreed ndash Business Gallery
032010 (11) 63
Either as tooltip or plain text you can show any information you want regarding a certain media thumb in the gallery You can change font type size spacing color position and many other properties
The color gradient system for roll overout mouse gesture is unique in every way if we are to compare it with other galleries on the market at this point You can customize up to 5 sets of color with different alpha values The gradient type either linear or radial can be modified with rotation and ratio values
032010 (11)62
PROFILE Flashcreed ndash Business Gallery
032010 (11) 63
When clicking on a thumb if preview_type is selected as internal a resizable preview window will reveal itself and depending on the media type (image or video) an image viewer or video player will be contained inside it If preview_type is selected as external you have the possibility to set certain URL addresses this allowing you to redirect the user to a specific area of the website like a product page from a virtual store for example
The video player has a dozen of controllers that allow you to create a skin to better suit the template you want to create for your gallery Buttonrsquos color thickness handler color or scrub bar size just to name a few of the properties you can play with
At an amazing price of 999 $ this has to be one of the best choices when it comes to media galleries flash components Donrsquot hesitate to take a look at it on wwwflashcreedcom and also consider other products that might better suit your specifications or desires We would definitely appreciate any kind of feedback regarding current or possible features
Thank you
032010 (11)65
BOOK REVIEW
Are you an actionscript 3 game developer who is not able to write a complete commercial game because you cannot manage dozens
of classes Or you are an experienced actionscript 3 applications developer who wants to program game but donrsquot like reading any available beginner book as it doesnrsquot suit your style Even if you already have a good grasp over java or c++ and interested in creating not only fun games but commercial ones also then this is what you really require
There are several actionscript 3 game development books for beginners out there but Essential Guide to Game Dev is one of those few books that talk about the advanced gaming concepts However its first chapter begins with an easy to understand game example (good for any beginner) and ends up creating 3 games Did I tell you 3 games in just first chapter
Teaching about an Actionscript 3 Game framework is one of the many reasons that make this book a kick-ass addition to actionscript 3 gaming library Authors teach you how to create 10 unique games ranging from arcade to driving tile based to puzzle game and shooters to dice games Another specialty of this book is to use Flex and Flash Develop IDEs along with the primary Flash tool that creates space for not only flex
developers but also Flash Develop users In addition to this you will also learn to create game assets with GIMP Mappy and a sound effect creation tool You will get information about copyright laws which are necessary for any would-be commercial game creation and a complete game example integrated with MochiAds
This book also discusses and further more implements various advanced topics such as bitmap rendering pixel-level collision detection sound management AI xml-based level designing scrolling screen optimization techniques particles etc
In short this book will surely blow your minds with the wealth of knowledge it includes and you will pray for authors to keep writing such informative and useful books
If you are really serious about gaming then donrsquot miss the opportunity of reading this book Highly recommended
by Ali RAZA ACI ACE SCJP
Essential Guide to Flash Games
Authors Jeff Fulton Steve FultonPublisher friends of EDISBN 978-1-4302-2614-7Language EnglishPages 664 PagesWebsite httpfriendsofedcombookhtmlisbn=1430226145
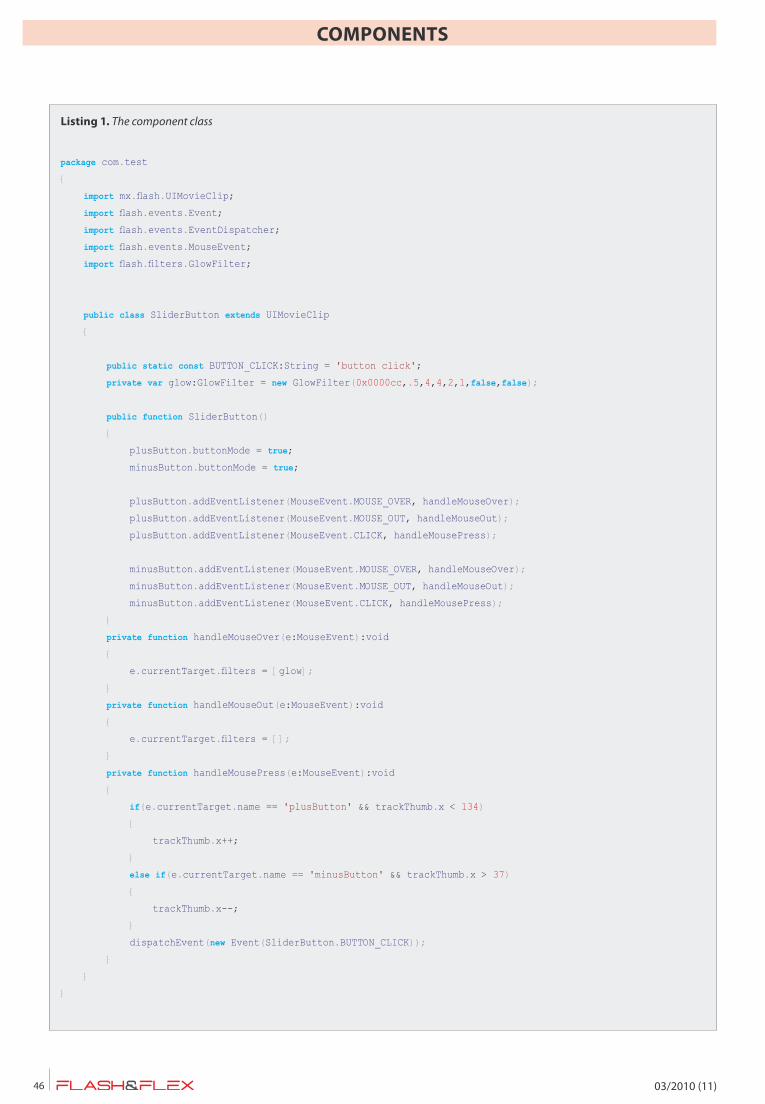
032010 (11)56
TLF Applying CSS to Text Layout Framework styles
032010 (11) 57
Main ApplicationListing 2 contains a full code for main application
The application consists of
bull TextArea with some text The text is formed using XML Some elements of the TextFlow have
For our case we are interested in resolveFormat function that is called for every element of the TextFlow when itrsquos style needs to be changed This function return an object that should implement ITextLayoutFormat
Before we continue lets have a fast look at main application and how we build our example
Listing 1 CSSFormatResolveras
package
import flashtextStyleSheet
import flashxtextLayoutelementsFlowElement
import flashxtextLayoutelementsFlowValueHolder
import flashxtextLayoutelementsIFormatResolver
import flashxtextLayoutelementsTextFlow
import flashxtextLayoutformatsITextLayoutFormat
public class CSSFormatResolver implements
IFormatResolver
private var _styleSheetStyleSheet
public function CSSFormatResolver()
_styleSheet = new StyleSheet()
public function invalidateAll(textFlow
TextFlow)void
public function invalidate(targetObject)void
public function resolveFormat(targetObject)
ITextLayoutFormat
var formatFlowValueHolder = null
if (target is FlowElement)
var elementFlowElement = target as
FlowElement
if (element = null)
format = elementformat as
FlowValueHolder
if (elementstyleName = null)
var styleObject = styleSheetgetSt
yle(elementstyleName)
formatcolor = style[color]
formatfontSize =
style[fontSize]
formatfontWeight =
style[fontWeight]
formatfontStyle =
style[fontStyle]
return format
public function resolveUserFormat(targetObject
userFormatString)
return null
public function getResolverForNewFlow(oldFlow
TextFlow newFlowTextFlow)
IFormatResolver
return null
public function get styleSheet()StyleSheet
return _styleSheet
public function set styleSheet(valueStyleSheet)
void
_styleSheet = value
032010 (11)58
TLF
032010 (11) 59
Listing 2 TextCSSmxml
ltxml version=10 encoding=utf-8gt
ltsApplication xmlnsfx=httpnsadobecommxml2009
xmlnss=librarynsadobecomflexspark
xmlnsmx=librarynsadobecomflexhalo
xmlnslocal=
width=640 height=300gt
ltfxScriptgt
lt[CDATA[
import mxeventsFlexEvent
protected function applyCSS1Button_
clickHandler(eventMouseEvent)void
var formatResolverCSSFormatResolver =
new CSSFormatResolver()
formatResolverstyleSheetparseCSS(css1
text)
textAreatextFlowformatResolver =
formatResolver
protected function applyCSS2Button_
clickHandler(eventMouseEvent)void
var formatResolverCSSFormatResolver =
new CSSFormatResolver()
formatResolverstyleSheetparseCSS(css2
text)
textAreatextFlowformatResolver =
formatResolver
]]gt
ltfxScriptgt
ltsTextArea id=textArea width=620 height=134
x=9 y=156gt
ltsTextFlowgt
ltsp styleName=h1gt
Title of the Text
ltspgt
ltsp styleName=h2gt
Section of the Text
ltspgt
ltspgt
This is a body text Lorem ipsum
ltspgt
ltsTextFlowgt
ltsTextAreagt
ltsTextArea x=10 y=10 width=285 height=86
id=css1 gt
lt[CDATA[
h1
colorFF0000
fontSize20
fontWeightbold
fontStylenormal
h2
colorFF00FF
fontSize16
fontWeightbold
fontStyleitalic
]]gt
ltsTextAreagt
ltsTextArea x=345 y=10 width=285 height=86
id=css2 gt
lt[CDATA[
h1
color00FF00
fontSize32
fontWeightnormal
fontStyleitalic
h2
color0000FF
fontSize24
fontWeightbold
fontStylenormal
]]gt
ltsTextAreagt
ltsButton x=108 y=105 label=Apply CSS
1 id=applyCSS1Button
click=applyCSS1Button_
clickHandler(event)gt
ltsButton x=443 y=105 label=Apply CSS
2 id=applyCSS2Button
click=applyCSS2Button_
clickHandler(event)gt
ltsApplicationgt
032010 (11)58
TLF
032010 (11) 59
got styleName attribute so you could apply the corresponding CSS style to them later
bull 2 TextAreas with simple different CSSbull 2 Buttons to apply CSS from TextAreas to example
text
When the button is clicked the new instance of CSSFormatResolver class is created Then the corresponding CSS string from the TextArea is parsed and set into resolverrsquos property of SlyleSheet class type And finally prepared formatResolver instance is assigned to the TextFlow
Applying CSS to TextFlowNow lets have more detailed look at resolveFormat callback function First it should return a value that implements ITextLayoutFormat if it returns null then no new styling should be applied to an element being processed by the function So we create format variable of FlowValueHolder (it implements ITextLayoutFormat) and set itrsquos value to null (we do that because resolveFormat works with all elements including TextFlow itself as probably we donrsquot want to apply one style to the whole text)
After we do all the necessary casts and null checks and if we are sure that current elementrsquos got styleName attribute we assign styles from CSS to a current format StyleSheet object is used to contain CSS data as it is convenient object to parse and retrieve CSS data
Conclusion and a WarningThere was a brief tutorial on how to apply simple CSS to TLF TextFlow Please note that CSSFormatResolver class is not fully functional and only can be applied to our sample CSSs Writing reusable and versatile class requires more detailed coding and approach
Check the TLF Blog on this issue There is fully functional CSSFormatResolver with example there httpblogsadobecomtlf200902iformatresolver_and_using_css_1html
MAXYM GOLOVANCHUK Maxym Golovanchuk is a Photoshop Certied Expert and TV producer and he is using Adobersquos software for implementing entertainment solutions including video delivery with Flash Media Server mexxikgmailcom
MondayTuesdayWednesdayThursday Friday
DIVISIONS OF CREATIVE NICHE INC
032010 (11)60
PROFILE Flashcreed ndash Business Gallery
032010 (11) 61
The Business Gallery (httpwwwflashcreedcombusiness_video_image_gallery) is a Flash component meant to do one thing to enhance the visual experience a website portfolio or presentation site gives to its users Mainly itrsquos all about the image you present yourself or
your product to the world wide web Letrsquos face it without the looks you canrsquot sell your product or image no matter how interesting it might be
Whatrsquos so great about this gallery you might wonder Well the answer is simple everything Advanced AS3 programming dynamic XML implementation unlimited number of media items on stage PNG JPG and video FLA SWF MP4 F4V supported media tween and image effects just to name a few of the over 150 settings this gallery brings you Bottom line you can customize it in any way you see fit in order to make it resemble your website layout Not to mention the code optimization that allows the gallery to run so smoothly even on low resources
We brought 45 background wallpapers in case just a color doesnrsquot do the job also a set of custom arrows and close buttons
Flashcreed ndash Business GalleryHello itrsquos good to be back here among Flash amp Flex Magazine readers Today we are going to tell you a bit about our products mainly our Business Gallery but since all our products are built on the same framework most of the properties apply to all When we first realized what we could do with this framework we decided to name it ldquoPandorardquo in order to point out the unlimited number of possibilities it revealed regarding customization and user friendliness
032010 (11)60
PROFILE Flashcreed ndash Business Gallery
032010 (11) 61
The size of the entire gallery and any element in it is subject to any kind of resize big stage and small thumbs or the other way around for any template you or your client desire
Column_scroll and the properties for the stage mask helps you configure the exact number of visible columns you want to set in order to browse through the media items your gallery has Beside this useful feature we added blur and a couple of tween effects for the leftright navigation that gives an impressive look
032010 (11)62
PROFILE Flashcreed ndash Business Gallery
032010 (11) 63
Either as tooltip or plain text you can show any information you want regarding a certain media thumb in the gallery You can change font type size spacing color position and many other properties
The color gradient system for roll overout mouse gesture is unique in every way if we are to compare it with other galleries on the market at this point You can customize up to 5 sets of color with different alpha values The gradient type either linear or radial can be modified with rotation and ratio values
032010 (11)62
PROFILE Flashcreed ndash Business Gallery
032010 (11) 63
When clicking on a thumb if preview_type is selected as internal a resizable preview window will reveal itself and depending on the media type (image or video) an image viewer or video player will be contained inside it If preview_type is selected as external you have the possibility to set certain URL addresses this allowing you to redirect the user to a specific area of the website like a product page from a virtual store for example
The video player has a dozen of controllers that allow you to create a skin to better suit the template you want to create for your gallery Buttonrsquos color thickness handler color or scrub bar size just to name a few of the properties you can play with
At an amazing price of 999 $ this has to be one of the best choices when it comes to media galleries flash components Donrsquot hesitate to take a look at it on wwwflashcreedcom and also consider other products that might better suit your specifications or desires We would definitely appreciate any kind of feedback regarding current or possible features
Thank you
032010 (11)65
BOOK REVIEW
Are you an actionscript 3 game developer who is not able to write a complete commercial game because you cannot manage dozens
of classes Or you are an experienced actionscript 3 applications developer who wants to program game but donrsquot like reading any available beginner book as it doesnrsquot suit your style Even if you already have a good grasp over java or c++ and interested in creating not only fun games but commercial ones also then this is what you really require
There are several actionscript 3 game development books for beginners out there but Essential Guide to Game Dev is one of those few books that talk about the advanced gaming concepts However its first chapter begins with an easy to understand game example (good for any beginner) and ends up creating 3 games Did I tell you 3 games in just first chapter
Teaching about an Actionscript 3 Game framework is one of the many reasons that make this book a kick-ass addition to actionscript 3 gaming library Authors teach you how to create 10 unique games ranging from arcade to driving tile based to puzzle game and shooters to dice games Another specialty of this book is to use Flex and Flash Develop IDEs along with the primary Flash tool that creates space for not only flex
developers but also Flash Develop users In addition to this you will also learn to create game assets with GIMP Mappy and a sound effect creation tool You will get information about copyright laws which are necessary for any would-be commercial game creation and a complete game example integrated with MochiAds
This book also discusses and further more implements various advanced topics such as bitmap rendering pixel-level collision detection sound management AI xml-based level designing scrolling screen optimization techniques particles etc
In short this book will surely blow your minds with the wealth of knowledge it includes and you will pray for authors to keep writing such informative and useful books
If you are really serious about gaming then donrsquot miss the opportunity of reading this book Highly recommended
by Ali RAZA ACI ACE SCJP
Essential Guide to Flash Games
Authors Jeff Fulton Steve FultonPublisher friends of EDISBN 978-1-4302-2614-7Language EnglishPages 664 PagesWebsite httpfriendsofedcombookhtmlisbn=1430226145

032010 (11)58
TLF
032010 (11) 59
got styleName attribute so you could apply the corresponding CSS style to them later
bull 2 TextAreas with simple different CSSbull 2 Buttons to apply CSS from TextAreas to example
text
When the button is clicked the new instance of CSSFormatResolver class is created Then the corresponding CSS string from the TextArea is parsed and set into resolverrsquos property of SlyleSheet class type And finally prepared formatResolver instance is assigned to the TextFlow
Applying CSS to TextFlowNow lets have more detailed look at resolveFormat callback function First it should return a value that implements ITextLayoutFormat if it returns null then no new styling should be applied to an element being processed by the function So we create format variable of FlowValueHolder (it implements ITextLayoutFormat) and set itrsquos value to null (we do that because resolveFormat works with all elements including TextFlow itself as probably we donrsquot want to apply one style to the whole text)
After we do all the necessary casts and null checks and if we are sure that current elementrsquos got styleName attribute we assign styles from CSS to a current format StyleSheet object is used to contain CSS data as it is convenient object to parse and retrieve CSS data
Conclusion and a WarningThere was a brief tutorial on how to apply simple CSS to TLF TextFlow Please note that CSSFormatResolver class is not fully functional and only can be applied to our sample CSSs Writing reusable and versatile class requires more detailed coding and approach
Check the TLF Blog on this issue There is fully functional CSSFormatResolver with example there httpblogsadobecomtlf200902iformatresolver_and_using_css_1html
MAXYM GOLOVANCHUK Maxym Golovanchuk is a Photoshop Certied Expert and TV producer and he is using Adobersquos software for implementing entertainment solutions including video delivery with Flash Media Server mexxikgmailcom
MondayTuesdayWednesdayThursday Friday
DIVISIONS OF CREATIVE NICHE INC
032010 (11)60
PROFILE Flashcreed ndash Business Gallery
032010 (11) 61
The Business Gallery (httpwwwflashcreedcombusiness_video_image_gallery) is a Flash component meant to do one thing to enhance the visual experience a website portfolio or presentation site gives to its users Mainly itrsquos all about the image you present yourself or
your product to the world wide web Letrsquos face it without the looks you canrsquot sell your product or image no matter how interesting it might be
Whatrsquos so great about this gallery you might wonder Well the answer is simple everything Advanced AS3 programming dynamic XML implementation unlimited number of media items on stage PNG JPG and video FLA SWF MP4 F4V supported media tween and image effects just to name a few of the over 150 settings this gallery brings you Bottom line you can customize it in any way you see fit in order to make it resemble your website layout Not to mention the code optimization that allows the gallery to run so smoothly even on low resources
We brought 45 background wallpapers in case just a color doesnrsquot do the job also a set of custom arrows and close buttons
Flashcreed ndash Business GalleryHello itrsquos good to be back here among Flash amp Flex Magazine readers Today we are going to tell you a bit about our products mainly our Business Gallery but since all our products are built on the same framework most of the properties apply to all When we first realized what we could do with this framework we decided to name it ldquoPandorardquo in order to point out the unlimited number of possibilities it revealed regarding customization and user friendliness
032010 (11)60
PROFILE Flashcreed ndash Business Gallery
032010 (11) 61
The size of the entire gallery and any element in it is subject to any kind of resize big stage and small thumbs or the other way around for any template you or your client desire
Column_scroll and the properties for the stage mask helps you configure the exact number of visible columns you want to set in order to browse through the media items your gallery has Beside this useful feature we added blur and a couple of tween effects for the leftright navigation that gives an impressive look
032010 (11)62
PROFILE Flashcreed ndash Business Gallery
032010 (11) 63
Either as tooltip or plain text you can show any information you want regarding a certain media thumb in the gallery You can change font type size spacing color position and many other properties
The color gradient system for roll overout mouse gesture is unique in every way if we are to compare it with other galleries on the market at this point You can customize up to 5 sets of color with different alpha values The gradient type either linear or radial can be modified with rotation and ratio values
032010 (11)62
PROFILE Flashcreed ndash Business Gallery
032010 (11) 63
When clicking on a thumb if preview_type is selected as internal a resizable preview window will reveal itself and depending on the media type (image or video) an image viewer or video player will be contained inside it If preview_type is selected as external you have the possibility to set certain URL addresses this allowing you to redirect the user to a specific area of the website like a product page from a virtual store for example
The video player has a dozen of controllers that allow you to create a skin to better suit the template you want to create for your gallery Buttonrsquos color thickness handler color or scrub bar size just to name a few of the properties you can play with
At an amazing price of 999 $ this has to be one of the best choices when it comes to media galleries flash components Donrsquot hesitate to take a look at it on wwwflashcreedcom and also consider other products that might better suit your specifications or desires We would definitely appreciate any kind of feedback regarding current or possible features
Thank you
032010 (11)65
BOOK REVIEW
Are you an actionscript 3 game developer who is not able to write a complete commercial game because you cannot manage dozens
of classes Or you are an experienced actionscript 3 applications developer who wants to program game but donrsquot like reading any available beginner book as it doesnrsquot suit your style Even if you already have a good grasp over java or c++ and interested in creating not only fun games but commercial ones also then this is what you really require
There are several actionscript 3 game development books for beginners out there but Essential Guide to Game Dev is one of those few books that talk about the advanced gaming concepts However its first chapter begins with an easy to understand game example (good for any beginner) and ends up creating 3 games Did I tell you 3 games in just first chapter
Teaching about an Actionscript 3 Game framework is one of the many reasons that make this book a kick-ass addition to actionscript 3 gaming library Authors teach you how to create 10 unique games ranging from arcade to driving tile based to puzzle game and shooters to dice games Another specialty of this book is to use Flex and Flash Develop IDEs along with the primary Flash tool that creates space for not only flex
developers but also Flash Develop users In addition to this you will also learn to create game assets with GIMP Mappy and a sound effect creation tool You will get information about copyright laws which are necessary for any would-be commercial game creation and a complete game example integrated with MochiAds
This book also discusses and further more implements various advanced topics such as bitmap rendering pixel-level collision detection sound management AI xml-based level designing scrolling screen optimization techniques particles etc
In short this book will surely blow your minds with the wealth of knowledge it includes and you will pray for authors to keep writing such informative and useful books
If you are really serious about gaming then donrsquot miss the opportunity of reading this book Highly recommended
by Ali RAZA ACI ACE SCJP
Essential Guide to Flash Games
Authors Jeff Fulton Steve FultonPublisher friends of EDISBN 978-1-4302-2614-7Language EnglishPages 664 PagesWebsite httpfriendsofedcombookhtmlisbn=1430226145

032010 (11)60
PROFILE Flashcreed ndash Business Gallery
032010 (11) 61
The Business Gallery (httpwwwflashcreedcombusiness_video_image_gallery) is a Flash component meant to do one thing to enhance the visual experience a website portfolio or presentation site gives to its users Mainly itrsquos all about the image you present yourself or
your product to the world wide web Letrsquos face it without the looks you canrsquot sell your product or image no matter how interesting it might be
Whatrsquos so great about this gallery you might wonder Well the answer is simple everything Advanced AS3 programming dynamic XML implementation unlimited number of media items on stage PNG JPG and video FLA SWF MP4 F4V supported media tween and image effects just to name a few of the over 150 settings this gallery brings you Bottom line you can customize it in any way you see fit in order to make it resemble your website layout Not to mention the code optimization that allows the gallery to run so smoothly even on low resources
We brought 45 background wallpapers in case just a color doesnrsquot do the job also a set of custom arrows and close buttons
Flashcreed ndash Business GalleryHello itrsquos good to be back here among Flash amp Flex Magazine readers Today we are going to tell you a bit about our products mainly our Business Gallery but since all our products are built on the same framework most of the properties apply to all When we first realized what we could do with this framework we decided to name it ldquoPandorardquo in order to point out the unlimited number of possibilities it revealed regarding customization and user friendliness
032010 (11)60
PROFILE Flashcreed ndash Business Gallery
032010 (11) 61
The size of the entire gallery and any element in it is subject to any kind of resize big stage and small thumbs or the other way around for any template you or your client desire
Column_scroll and the properties for the stage mask helps you configure the exact number of visible columns you want to set in order to browse through the media items your gallery has Beside this useful feature we added blur and a couple of tween effects for the leftright navigation that gives an impressive look
032010 (11)62
PROFILE Flashcreed ndash Business Gallery
032010 (11) 63
Either as tooltip or plain text you can show any information you want regarding a certain media thumb in the gallery You can change font type size spacing color position and many other properties
The color gradient system for roll overout mouse gesture is unique in every way if we are to compare it with other galleries on the market at this point You can customize up to 5 sets of color with different alpha values The gradient type either linear or radial can be modified with rotation and ratio values
032010 (11)62
PROFILE Flashcreed ndash Business Gallery
032010 (11) 63
When clicking on a thumb if preview_type is selected as internal a resizable preview window will reveal itself and depending on the media type (image or video) an image viewer or video player will be contained inside it If preview_type is selected as external you have the possibility to set certain URL addresses this allowing you to redirect the user to a specific area of the website like a product page from a virtual store for example
The video player has a dozen of controllers that allow you to create a skin to better suit the template you want to create for your gallery Buttonrsquos color thickness handler color or scrub bar size just to name a few of the properties you can play with
At an amazing price of 999 $ this has to be one of the best choices when it comes to media galleries flash components Donrsquot hesitate to take a look at it on wwwflashcreedcom and also consider other products that might better suit your specifications or desires We would definitely appreciate any kind of feedback regarding current or possible features
Thank you
032010 (11)65
BOOK REVIEW
Are you an actionscript 3 game developer who is not able to write a complete commercial game because you cannot manage dozens
of classes Or you are an experienced actionscript 3 applications developer who wants to program game but donrsquot like reading any available beginner book as it doesnrsquot suit your style Even if you already have a good grasp over java or c++ and interested in creating not only fun games but commercial ones also then this is what you really require
There are several actionscript 3 game development books for beginners out there but Essential Guide to Game Dev is one of those few books that talk about the advanced gaming concepts However its first chapter begins with an easy to understand game example (good for any beginner) and ends up creating 3 games Did I tell you 3 games in just first chapter
Teaching about an Actionscript 3 Game framework is one of the many reasons that make this book a kick-ass addition to actionscript 3 gaming library Authors teach you how to create 10 unique games ranging from arcade to driving tile based to puzzle game and shooters to dice games Another specialty of this book is to use Flex and Flash Develop IDEs along with the primary Flash tool that creates space for not only flex
developers but also Flash Develop users In addition to this you will also learn to create game assets with GIMP Mappy and a sound effect creation tool You will get information about copyright laws which are necessary for any would-be commercial game creation and a complete game example integrated with MochiAds
This book also discusses and further more implements various advanced topics such as bitmap rendering pixel-level collision detection sound management AI xml-based level designing scrolling screen optimization techniques particles etc
In short this book will surely blow your minds with the wealth of knowledge it includes and you will pray for authors to keep writing such informative and useful books
If you are really serious about gaming then donrsquot miss the opportunity of reading this book Highly recommended
by Ali RAZA ACI ACE SCJP
Essential Guide to Flash Games
Authors Jeff Fulton Steve FultonPublisher friends of EDISBN 978-1-4302-2614-7Language EnglishPages 664 PagesWebsite httpfriendsofedcombookhtmlisbn=1430226145
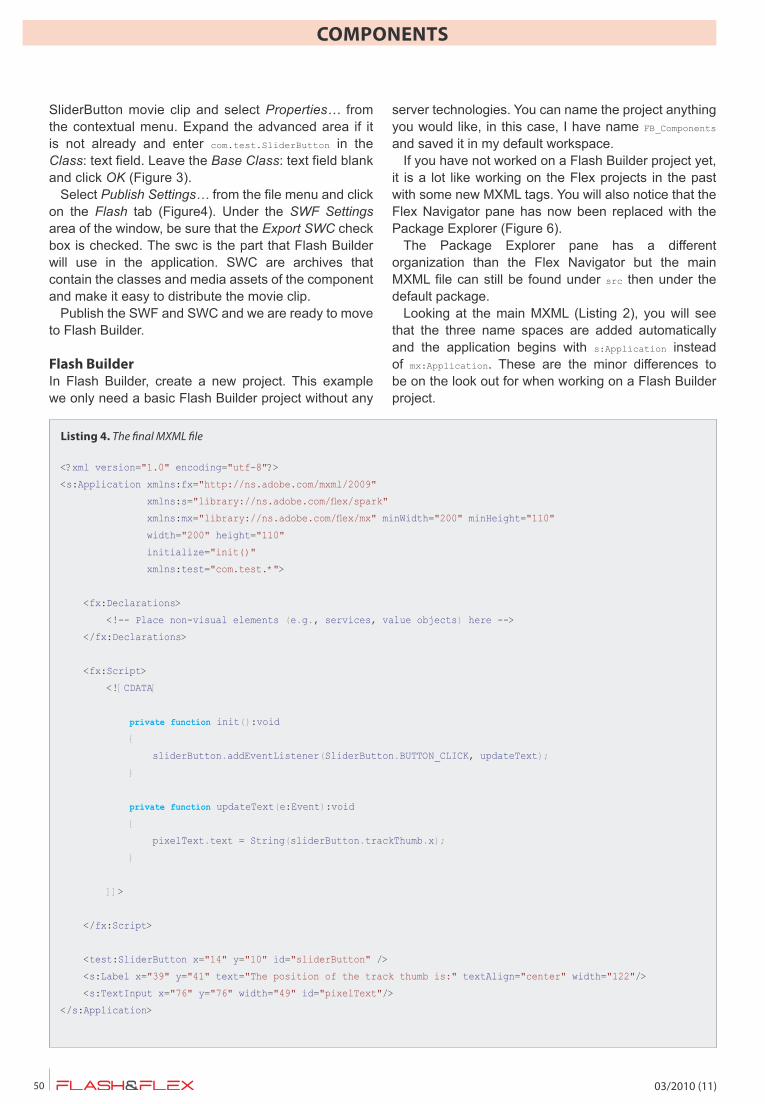
032010 (11)60
PROFILE Flashcreed ndash Business Gallery
032010 (11) 61
The size of the entire gallery and any element in it is subject to any kind of resize big stage and small thumbs or the other way around for any template you or your client desire
Column_scroll and the properties for the stage mask helps you configure the exact number of visible columns you want to set in order to browse through the media items your gallery has Beside this useful feature we added blur and a couple of tween effects for the leftright navigation that gives an impressive look
032010 (11)62
PROFILE Flashcreed ndash Business Gallery
032010 (11) 63
Either as tooltip or plain text you can show any information you want regarding a certain media thumb in the gallery You can change font type size spacing color position and many other properties
The color gradient system for roll overout mouse gesture is unique in every way if we are to compare it with other galleries on the market at this point You can customize up to 5 sets of color with different alpha values The gradient type either linear or radial can be modified with rotation and ratio values
032010 (11)62
PROFILE Flashcreed ndash Business Gallery
032010 (11) 63
When clicking on a thumb if preview_type is selected as internal a resizable preview window will reveal itself and depending on the media type (image or video) an image viewer or video player will be contained inside it If preview_type is selected as external you have the possibility to set certain URL addresses this allowing you to redirect the user to a specific area of the website like a product page from a virtual store for example
The video player has a dozen of controllers that allow you to create a skin to better suit the template you want to create for your gallery Buttonrsquos color thickness handler color or scrub bar size just to name a few of the properties you can play with
At an amazing price of 999 $ this has to be one of the best choices when it comes to media galleries flash components Donrsquot hesitate to take a look at it on wwwflashcreedcom and also consider other products that might better suit your specifications or desires We would definitely appreciate any kind of feedback regarding current or possible features
Thank you
032010 (11)65
BOOK REVIEW
Are you an actionscript 3 game developer who is not able to write a complete commercial game because you cannot manage dozens
of classes Or you are an experienced actionscript 3 applications developer who wants to program game but donrsquot like reading any available beginner book as it doesnrsquot suit your style Even if you already have a good grasp over java or c++ and interested in creating not only fun games but commercial ones also then this is what you really require
There are several actionscript 3 game development books for beginners out there but Essential Guide to Game Dev is one of those few books that talk about the advanced gaming concepts However its first chapter begins with an easy to understand game example (good for any beginner) and ends up creating 3 games Did I tell you 3 games in just first chapter
Teaching about an Actionscript 3 Game framework is one of the many reasons that make this book a kick-ass addition to actionscript 3 gaming library Authors teach you how to create 10 unique games ranging from arcade to driving tile based to puzzle game and shooters to dice games Another specialty of this book is to use Flex and Flash Develop IDEs along with the primary Flash tool that creates space for not only flex
developers but also Flash Develop users In addition to this you will also learn to create game assets with GIMP Mappy and a sound effect creation tool You will get information about copyright laws which are necessary for any would-be commercial game creation and a complete game example integrated with MochiAds
This book also discusses and further more implements various advanced topics such as bitmap rendering pixel-level collision detection sound management AI xml-based level designing scrolling screen optimization techniques particles etc
In short this book will surely blow your minds with the wealth of knowledge it includes and you will pray for authors to keep writing such informative and useful books
If you are really serious about gaming then donrsquot miss the opportunity of reading this book Highly recommended
by Ali RAZA ACI ACE SCJP
Essential Guide to Flash Games
Authors Jeff Fulton Steve FultonPublisher friends of EDISBN 978-1-4302-2614-7Language EnglishPages 664 PagesWebsite httpfriendsofedcombookhtmlisbn=1430226145

032010 (11)62
PROFILE Flashcreed ndash Business Gallery
032010 (11) 63
When clicking on a thumb if preview_type is selected as internal a resizable preview window will reveal itself and depending on the media type (image or video) an image viewer or video player will be contained inside it If preview_type is selected as external you have the possibility to set certain URL addresses this allowing you to redirect the user to a specific area of the website like a product page from a virtual store for example
The video player has a dozen of controllers that allow you to create a skin to better suit the template you want to create for your gallery Buttonrsquos color thickness handler color or scrub bar size just to name a few of the properties you can play with
At an amazing price of 999 $ this has to be one of the best choices when it comes to media galleries flash components Donrsquot hesitate to take a look at it on wwwflashcreedcom and also consider other products that might better suit your specifications or desires We would definitely appreciate any kind of feedback regarding current or possible features
Thank you
032010 (11)65
BOOK REVIEW
Are you an actionscript 3 game developer who is not able to write a complete commercial game because you cannot manage dozens
of classes Or you are an experienced actionscript 3 applications developer who wants to program game but donrsquot like reading any available beginner book as it doesnrsquot suit your style Even if you already have a good grasp over java or c++ and interested in creating not only fun games but commercial ones also then this is what you really require
There are several actionscript 3 game development books for beginners out there but Essential Guide to Game Dev is one of those few books that talk about the advanced gaming concepts However its first chapter begins with an easy to understand game example (good for any beginner) and ends up creating 3 games Did I tell you 3 games in just first chapter
Teaching about an Actionscript 3 Game framework is one of the many reasons that make this book a kick-ass addition to actionscript 3 gaming library Authors teach you how to create 10 unique games ranging from arcade to driving tile based to puzzle game and shooters to dice games Another specialty of this book is to use Flex and Flash Develop IDEs along with the primary Flash tool that creates space for not only flex
developers but also Flash Develop users In addition to this you will also learn to create game assets with GIMP Mappy and a sound effect creation tool You will get information about copyright laws which are necessary for any would-be commercial game creation and a complete game example integrated with MochiAds
This book also discusses and further more implements various advanced topics such as bitmap rendering pixel-level collision detection sound management AI xml-based level designing scrolling screen optimization techniques particles etc
In short this book will surely blow your minds with the wealth of knowledge it includes and you will pray for authors to keep writing such informative and useful books
If you are really serious about gaming then donrsquot miss the opportunity of reading this book Highly recommended
by Ali RAZA ACI ACE SCJP
Essential Guide to Flash Games
Authors Jeff Fulton Steve FultonPublisher friends of EDISBN 978-1-4302-2614-7Language EnglishPages 664 PagesWebsite httpfriendsofedcombookhtmlisbn=1430226145