
HSPA+ WIFI ROUTER WITH VOICE -...
61
HSPA+ WIFI ROUTER WITH VOICE NETCOMM LIBERTY SERIES
-
Upload
vuongxuyen -
Category
Documents
-
view
238 -
download
10
Transcript of HSPA+ WIFI ROUTER WITH VOICE -...

HSPA+ WIFI ROUTER WITH VOICE
NETCOMM LIBERTY SERIES

HSPA+ WIFI ROUTER WITH VOICE User Guide YML10WVR22 www.netcommlimited.com
PrefaceThe purpose of this manual is to provide you with detailed information on the installation, operation and application of your HSPA WiFi Router with Voice.
Important Notice and Safety Precaution
• Before servicing or disassembling this equipment, always disconnect all power or telephone lines from the device.
• Use an appropriate power supply, preferably the supplied power adapter, with an output of DC 12V 1.5A
• Do not operate the device near flammable gas or fumes. Turn off the device when you are near a petrol station, fuel depot or chemical plant/depot. Operation of such equipment in potentially explosive atmospheres can represent a safety hazard.
• The device and antenna shall be used only with a minimum of 20cm from human body.
• The operation of this device may affect medical electronic devices, such as hearing aids and pacemakers
• The antennas must be connected to this product prior to connecting the telephone cord.
• The telephone cord must be disconnected prior to disconnecting the antennas.

YML10WVR2 HSPA+ WIFI ROUTER WITH VOICE User Guidewww.netcommlimited.com 3
HSPA+ WIFI ROUTER WITH VOICENETCOMM LIBERTY SERIES
TABLE OF CONTENTSIntroduction�������������������������������������������������������������������������������������������������������������������������������������������������������������������������������������������� 5
1.1 Features .................................................................................................................................................................................................................51.2 Package Contents..................................................................................................................................................................................................51.3 LED Indicators........................................................................................................................................................................................................61.4 Rear Panel .............................................................................................................................................................................................................7
Quick�Setup�������������������������������������������������������������������������������������������������������������������������������������������������������������������������������������������� 92.1 Setup Procedure ....................................................................................................................................................................................................9
Web�User�Interface������������������������������������������������������������������������������������������������������������������������������������������������������������������������������� 113.1 Default Settings ...................................................................................................................................................................................................113.2 TCP/IP Settings....................................................................................................................................................................................................113.3 Login Procedure ..................................................................................................................................................................................................143.4 Web User Interface Homepage ............................................................................................................................................................................14
3G�Settings������������������������������������������������������������������������������������������������������������������������������������������������������������������������������������������� 164.1 3G Service Setup .................................................................................................................................................................................................164.2 PIN Configuration .................................................................................................................................................................................................17
Wireless������������������������������������������������������������������������������������������������������������������������������������������������������������������������������������������������ 205.1 Setup ...................................................................................................................................................................................................................205.2 Security ...............................................................................................................................................................................................................215.3 Configuration........................................................................................................................................................................................................225.4 MAC Filter ............................................................................................................................................................................................................245.5 Wireless Bridge ....................................................................................................................................................................................................255.6 Station Info ...........................................................................................................................................................................................................25
Management����������������������������������������������������������������������������������������������������������������������������������������������������������������������������������������� 276.1 Device Settings ....................................................................................................................................................................................................276.2 Configure SNMP agent on 3G10WVR2 ...............................................................................................................................................................296.3 Simple Network Time Protocol (SNTP) .................................................................................................................................................................306.4 Access Control .....................................................................................................................................................................................................31
Advanced�Setup����������������������������������������������������������������������������������������������������������������������������������������������������������������������������������� 347.1 Local Area Network (LAN) ....................................................................................................................................................................................347.2 Network Address Translation (NAT).......................................................................................................................................................................367.3 Security ................................................................................................................................................................................................................387.4 Routing ................................................................................................................................................................................................................40
Voice������������������������������������������������������������������������������������������������������������������������������������������������������������������������������������������������������ 43
Status���������������������������������������������������������������������������������������������������������������������������������������������������������������������������������������������������� 458.1 Diagnostics ..........................................................................................................................................................................................................458.2 System Log ..........................................................................................................................................................................................................468.3 3G Network .........................................................................................................................................................................................................488.4 Statistics ..............................................................................................................................................................................................................508.5 Route ...................................................................................................................................................................................................................518.6 ARP .....................................................................................................................................................................................................................518.7 Dynamic Host Configuration Protocol (DHCP) ......................................................................................................................................................528.8 PING....................................................................................................................................................................................................................52
Appendix�A:�Print�Server���������������������������������������������������������������������������������������������������������������������������������������������������������������������� 54For Windows Vista/7 ..................................................................................................................................................................................................54For MAC OSX ............................................................................................................................................................................................................56
Appendix�B:�USB�Storage�������������������������������������������������������������������������������������������������������������������������������������������������������������������� 58For Windows Vista/7 ..................................................................................................................................................................................................58For MAC OSX ............................................................................................................................................................................................................58
Legal�&�Regulatory�Information����������������������������������������������������������������������������������������������������������������������������������������������������������� 59

INTRODUCTION

YML10WVR2 HSPA+ WIFI ROUTER WITH VOICE User Guidewww.netcommlimited.com 5
HSPA+ WIFI ROUTER WITH VOICENETCOMM LIBERTY SERIES
IntroductionWith the increasing popularity of the 3G standard worldwide, this HSPA WiFi Router with Voice provides you with triple-band coverage through expanding cellular networks throughout the world.
By following these simple step-by-step instructions, you can share your connection with multiple wireless and wired devices using the 3G network.
Integrating a Sierra Wireless HSPA module, this Router downloads at turbo speeds of up to 7.2Mbps.
This Router also provides state-of-the-art security features such as WiFi Protected Access (WPA) data encryption, Firewall and Virtual Private Networks (VPN) pass through.
1.1 Features• This HSPA WiFi Router with Voice allows you to share your 3G connection with multiple wireless or wired devices
• Provides you with worldwide coverage through triple-band HSUPA/HSDPA/UMTS (850 / 1900 / 2100MHz), quad-band EDGE/GSM (850 / 900 / 1800 / 1900 MHz)
• Embedded multi-mode HSUPA/HSDPA/UMTS/EDGE/GPRS/GSM module
• 1 x RJ11 port for voice calling over the 3G network via a connected standard Analogue Telephone (not included).
• Integrated 802.11g/54Mbps AP (backward compatible with 802.11b)
• WiFi Protected Access (WPA)/ WiFi Protected Access 2 (WPA2) and 802.1x wireless encryption
• Static route/ Routing Information Protocol (RIP)/RIP v2 routing functions
• Media Access Control (MAC) address and IP filtering
• Network Address Translation (NAT)/ Port Address Translation (PAT)
• Supports Universal Plug and Play (UPnP) and Internet Group Management Protocol (IGMP) snooping
• Supports Virtual Private Network (VPN) Pass-Through
• Dynamic Host Configuration Protocol (DHCP) Server/Relay/Client
• Domain Name System (DNS) Proxy and Dynamic Domain Name System (DDNS)
• Web-based Management
• Command Line Interface (CLI) command interface via Telnet
• Configuration backup and restoration
• Remote configuration
• Router and 3G module firmware upgrade
• Supports half-bridging mode
• Supports Simple Network Management Protocol (SNMP)
1.2 Package ContentsYour package contains the following:
• 3G10WVR2 – HSPA WiFi Router with Voice
• Printed Quick Start Guide
• Ethernet Cable
• Wireless Security Card
• 1 x 3G Antenna
• Power Supply
• Support CD

HSPA+ WIFI ROUTER WITH VOICE User Guide YML10WVR26 www.netcommlimited.com
1.3 LED IndicatorsThe front panel LED indicators are shown in this illustration and followed by detailed explanations in the table below.
LED COLOR MODE DESCRIPTIONPOWER Red On Power on
O ff Power of f
Phone Red On Phone l ine ac t ive
O ff Phone l ine inac t ive or not connec ted
Flashing New Voice mai l
LAN 1~2 Red On Powered device connec ted to the associated por t ( inc ludes devices with wake - on- LAN capabi l i t y where a s l ight voltage is suppl ied to an Ethernet connec t ion)
O ff No ac t iv i t y, modem powered of f, no cable or no powered device connec ted to the associated por t
Bl ink LAN ac t iv i t y present ( t raf f ic in e i ther di rec t ion)
WiFi Red On The wire less module is ready.
O ff The wire less module is not insta l led.
Bl ink Data being transmitted or received over WiFi .
I nternet Red Bl ink Data is t ransmitted through I nternet connec t ion
O ff No connec t ion to the internet or router powered of f
On I nternet connec t ion establ ished
3G Red On I nternet connec t ion establ ished.
Bl ink Connec t ing with UMTS cel lu lar stat ion
O ff No connec t ion with UMTS cel lu lar stat ion, no ac t iv i t y or router powered of f.
2G Red On I nternet connec t ion establ ished.
Bl ink Connec t ing to an EDGE, GPRS or GSM cel lu lar stat ion
O ff No connec t ion with EDGE, GPRS or GSM cel lu lar stat ion, no ac t iv i t y or router powered of f.
Low Red On Low s ignal st rength
O ff No ac t iv i t y, router powered of f or on other s ignal st rength
Med Red On Medium s ignal st rength
O ff No ac t iv i t y, router powered of f or on other s ignal st rength
H igh Red On H igh s ignal st rength
O ff No ac t iv i t y, router powered of f or on other s ignal st rength
NOTE: The six LEDs on the right side of the front panel display (Internet, 3G, 2G, Low, Med, High) will cycle on and off if PIN code protection is activated. In this case, you should consult section 4.2.1 PIN Code Protection for
further instructions.

YML10WVR2 HSPA+ WIFI ROUTER WITH VOICE User Guidewww.netcommlimited.com 7
HSPA+ WIFI ROUTER WITH VOICENETCOMM LIBERTY SERIES
1.4 Rear PanelThe rear panel contains the ports for data and power connections.
2 RJ-45 Ethernet Ports
Main 3G Antenna (removable, SMA connection)
Power jack for DC power input (12VDC / 1.5A)
Power button
USIM card slot
Aux 3G Antenna (internal)
USB Port (For connecting a USB Printer or USB Storage Device)
Reset button
Phone Port (for Circuit-Switched Voice Call)

QUICK SETUP

YML10WVR2 HSPA+ WIFI ROUTER WITH VOICE User Guidewww.netcommlimited.com 9
HSPA+ WIFI ROUTER WITH VOICENETCOMM LIBERTY SERIES
Quick Setup2.1 Setup ProcedureThese steps explain how to quickly setup your 3G Router:
1. Attach the 3G antenna provided to the port marked Main on the back of the router. The antenna should be screwed in a clockwise direction.
2. Insert your SIM card (until you hear a click) into the USIM slot at the back of the Router.
3. Connect the yellow networking cable to one of the yellow ports found at the back of the Router.
4. Connect the other end of the yellow networking cable to the port on your computer.
5. If required, connect a standard Analogue Telephone to the port labeled “Phone” using an RJ-11 Cable (not included)
6. Connect the power adapter to the Power socket on the back of the Router.
7. Plug the power adapter into the wall socket and press the power button into the ON position (in).
8. Configure the router through the Web User Interface (WUI).NOTE: Chapters 3 through 8 explain how to setup and use the WUI
9. Save the router configuration and reboot (see section 6.4).
Telephone
Laptop
Computer
Computer
3G TowerSmart Phone
Printer USB Storage
OR

WEB USER INTERFACE

YML10WVR2 HSPA+ WIFI ROUTER WITH VOICE User Guidewww.netcommlimited.com 11
HSPA+ WIFI ROUTER WITH VOICENETCOMM LIBERTY SERIES
Web User InterfaceThis section describes how to access the device via the web user interface using a web browser such as Microsoft Internet Explorer (version 6.0 or later).
3.1 Default SettingsThe following are the default settings for the device.
• Local (LAN) access (username: admin, password: admin)
• Remote (WAN) access (username: support, password: support)
• User access (username: user, password: user)
• LAN IP address: 192.168.1.1
• Remote WAN access: disabled
• NAT and firewall: enabled
• Dynamic Host Configuration Protocol (DHCP) server on LAN interface: enabledTechnical Note:
During power on, the device initializes all settings to default values. It will then read the configuration profile from the permanent storage section of flash memory. The default attributes are overwritten when identical attributes with different values are configured. The configuration profile in permanent storage can be created via the web user interface or telnet user interface, or other management protocols. The factory default configuration can be restored either by pushing the reset button for more than five seconds until the power indicates LED blinking or by clicking the Restore Default Configuration option in the Restore Default Settings screen.
3.2 TCP/IP SettingsIt is likely that your computer will automatically obtain an IP Address and join the network. This is because the Dynamic Host Configuration Protocol (DHCP) server (on the device) will start automatically when your Router powers up.
This automatic assignment requires that DHCP is configured on your computers. It is likely that this is already the case, but should you be required to configure this, please see the instructions below.
Windows XP/Vista/7
DHCP ModeTo set your PC for DHCP mode, check the Internet Protocol properties of your Local Area Connection. You can set your PC to DHCP mode by selecting Obtain an IP address automatically in the dialog box shown below.

HSPA+ WIFI ROUTER WITH VOICE User Guide YML10WVR212 www.netcommlimited.com
STATIC IP ModeTo configure your Router manually, your PC must have a static IP address within the Router’s subnet. The following steps show how to configure your PC IP address using subnet 192.168.1.x. The following assumes you are running Windows XP .
1. From the Network Connections window, open Local Area Connection (You may also access this screen by double-clicking the Local Area Connection icon on your taskbar). Click the Properties button.
2. Select Internet Protocol (TCP/IP) and click the Properties button. The screen should now display as below. Change the IP address to the domain of 192.168.1.x (1<x<254) with subnet mask of 255.255.255.0. Set the default router and DNS server to the router’s IP address.
NOTE: The IP address of the router is 192.168.1.1 (default), so the PC must be set with a different IP. In the case below, the PC’s IP address is set as 192.168.1.2
3. Click OK to submit the settings.

YML10WVR2 HSPA+ WIFI ROUTER WITH VOICE User Guidewww.netcommlimited.com 13
HSPA+ WIFI ROUTER WITH VOICENETCOMM LIBERTY SERIES
MAC OSX 10.4
DHCP Mode
To set your Apple Mac for DHCP mode, browse to the Apple menu and select System Preferences. In the System Preferences menu, click on the Network icon and select Ethernet. Next select Using DHCP from the Configure drop down list. After clicking Apply, your Mac’s IP Address will now be automatically assigned from the Gateway.
STATIC ModeIf you do not wish to use automatic assignment of IP Addresses and wish to configure your Router manually, your computer must have a static IP address within the Router’s subnet. The following steps show how to configure your computer’s IP address within the subnet 192.168.1.x
1. Browse to the Apple menu and select System Preferences. From the System Preferences, click the Network icon and select the Ethernet connection.
2. From the Configure drop down list, you can set your computer to Static IP mode by selecting the “Manually” option.
3. Choose an IP address between 192.168.1.2 – 192.168.1.254 (Do not choose the Router IP of 192.168.1.1). Enter this IP address into the field marked IP Address, and enter a Subnet Mask of 255.255.255.0
4. Set the Router and DNS server field to 192.168.1.1 (The Router’s IP address).NOTE: The IP address of the router is 192.168.1.1 (default), so the computer must be set with a different IP to the router. In the case below, the PC’s IP address is set as 192.168.1.2
5. Click Apply to submit the settings.

HSPA+ WIFI ROUTER WITH VOICE User Guide YML10WVR214 www.netcommlimited.com
3.3 Login ProcedureTo login to the web interface, follow the steps below:NOTE: The default settings can be found in 3.1 Default Settings.
1. Open a web browser and enter the default IP address for the Router in the Web address field. In this case http://192.168.1.1 .NOTE: For local administration (i.e. LAN access), the PC running the browser must be attached to the Ethernet, and not necessarily to the device. For remote access, use the WAN IP
address shown on the WUI Homepage screen and login with remote username and password.
2. Enter the default username and password, as defined in section 3.1 Default Settings.Click OK to continue. NOTE: The login password can be changed later (see 6.4.2 Passwords)
3. After successfully logging in for the first time, you will reach this screen.
3.4 Web User Interface HomepageThe web user interface (WUI) is divided into two window panels, the main menu (on the top) and the display screen (on the bottom). The main menu has the following options: Basic, 3G Settings, Wireless, Management, Advanced, and Status.
Selecting one of these options will open a submenu with more options. Basic is discussed below while subsequent chapters introduce the other main menu selections.
NOTE: The menu options available within the web user interface are based upon the device configuration and user privileges (i.e. local or remote).
BASIC / HOMEThe Basic / Home screen is the WUI homepage and the first selection on the main menu. It provides information regarding the firmware, 3G, and IP configuration.
The following table provides further details
FIELDS DESCRIPTIONSof t ware vers ion The sof t ware vers ion of the device.
Hardware vers ion The Hardware vers ion of the device
Bootloader vers ion The boot loader vers ion of the device.
Wireless dr iver vers ion The wire less dr iver vers ion of the wire less module.
Net work The name of or other reference to the mobi le net work operator.
L ink Shows the connec t ion status of the current 3G connec t ion.
Mode The radio access technique current ly used to enable internet access. I t can be HSUPA, HSDPA, UMTS, EDGE, GPRS or Disconnec ted.
S ignal st rength The mobi le net work (UMTS or GSM) s ignal qual i t y avai lable at the device locat ion. This s ignal qual i t y af fec ts the per formance of the unit . I f t wo or more bars are green, the connec t ion is usual ly acceptable.
S IM info Shows the S IM card status on the device.
LAN IP Address Shows the IP address for LAN inter face.
WAN IP Address Shows the IP address for WAN inter face.
Default G ateway Shows the IP address of the default gateway for the WAN inter face.
Pr imar y DNS Ser ver Shows the IP address of the pr imar y DNS ser ver.
Secondar y DNS Ser ver Shows the IP address of the secondar y DNS ser ver.
Date/Time The t ime according to the device’s internal c lock
Onl ine Help Cl ick this Icon for Onl ine User Guide

3G SETTINGS

HSPA+ WIFI ROUTER WITH VOICE User Guide YML10WVR216 www.netcommlimited.com
3G Settings4.1 3G Service SetupSelect your 3G service settings according to predefined or custom profiles. Setup instructions are provided in the following sections for your assistance.
4.1.1 3G SettingsThis menu includes 3G service Setup and PIN Configuration.
NOTE: Sections 8.3 and 8.4.2 also provide information about the 3G service.
4.1.2 Profile SetupYour Service Provider will provide the information required to complete the first time setup instructions below. This includes profile, username and password. Only complete those steps for which you have information and skip the others.
1. If your SIM card is not inserted into the Router, then do so now.
2. Type the APN in the APN field. Authentication Method should be provided by your Internet service provider; or just leave it to AUTO if not acquired. If you have not received the username and password., leave these fields empty.
3. Select IP compression and Data compression to be ON or Off. By default they are set to off.
4. Click the Save button to save the new settings.
5. Press the Connect button to reboot the router and to connect to Internet. After reboot, the Device Info for 3G network box in the WUI Basic screen should indicate an active connection, as shown below. The 3G and Internet LEDs on the front panel of the Router should also be blinking. If the LEDs are off, then either your profile settings are incorrect, the SIM card is not working or the service network is unavailable. In either case, contact Technical Support for further instructions.
NOTE: If the LEDs light in an on/off pattern moving from left to right this indicates that your SIM is PIN Locked, please lee PIN Lock Off on page 17 for instruction on how to fix this

YML10WVR2 HSPA+ WIFI ROUTER WITH VOICE User Guidewww.netcommlimited.com 17
HSPA+ WIFI ROUTER WITH VOICENETCOMM LIBERTY SERIES
4.2 PIN ConfigurationThis screen allows for changes to the 3G SIM card PIN code protection settings.NOTE: If you have entered the incorrect PIN 3 times, your SIM card will be locked for your security. Please call your 3G Provider for assistance.
4.2.1 PIN Code ProtectionPIN code protection prevents the use of a SIM card by unauthorized persons. To use the 3G internet service with this router however, the PIN code protection must be disabled. If the SIM card inserted into the Router is locked with a PIN code, the web user interface will display the following screen after login.
PIN Lock Off
If you wish to connect to the Internet using a PIN locked SIM card, you must first turn PIN code protection Off. Select PIN lock Off, enter the PIN Code twice. Please keep in mind you only have 3 attempts before your SIM card is locked. The remaining attempts’ number shows how many attempts left. Contact Your 3G Carrieryour 3G Carrier if you require assistance. You can select Remember PIN Code to ON so you don’t need to input the PIN code every time when the router turns on. Afterwards, click Apply. The following dialog box should now appear.
PIN Lock OnAfter you are finished using your SIM card for Internet service, you may wish to lock it again. In this case, first go to the 3G Settings - PIN Configuration screen, as shown below. Select PIN lock ON, enter the PIN code twice. You can select Remember PIN code to Yes so you don’t need to input the PIN code every time when the router turns on.
After you do so, the following dialog box should appear.
You can now return your SIM card to your cellular phone or other mobile device.

HSPA+ WIFI ROUTER WITH VOICE User Guide YML10WVR218 www.netcommlimited.com
4.2.2 PIN Code ChangeIf you wish to change your PIN code for greater security, enable the PIN Code protection. Go to the previous section and follow the procedure listed under PIN Lock On.
After locking the SIM card, select PIN Code Change and enter your Old and New PIN codes in the fields provided. Keep in mind you only have 3 attempts before your SIM card is locked. The remaining attempts’ number shows how many attempts left. Contact Your 3G Carrier if you require assistance. Afterwards, click Apply to activate the change.
NOTE: If you forget to change the PIN Code without first turning on PIN lock protection, you will see this dialog box as a helpful reminder.
NOTE: If your PIN Code change request was successful the following dialog box will display.

WIRELESS

HSPA+ WIFI ROUTER WITH VOICE User Guide YML10WVR220 www.netcommlimited.com
WirelessThe Wireless submenu provides access to Wireless Local Area Network (WLAN) configuration settings including:
• Wireless network name
• Channel restrictions (based on country)
• Security
• Access point or bridging behaviour
• Station information
5.1 SetupThis screen allows you to configure basic features of the wireless LAN interface. You can enable or disable the wireless LAN interface, hide the network from active scans, set the wireless network name (also known as SSID) and restrict the channel set based on country requirements. The Wireless Guest Network function adds extra networking security when connecting to remote hosts.
OPTION DESCRIPTIONEnable Wireless A check box that enables (default ) or d isables the wire less LAN inter face. When
selec ted, the Web UI d isplays H ide Access point , SSID, BSSID and Countr y sett ings.
H ide Access Point Selec t H ide Access Point to protec t the access point f rom detec t ion by wire less ac t ive scans. To check AP status in Windows XP, open Net work Connec t ions f rom the star t Menu and selec t View Avai lable Net work Connec t ions. I f the access point i s h idden, i t wi l l not be l i s ted there. To connec t a c l ient to a h idden access point , the stat ion must add the access point manual ly to i ts wire less conf igurat ion.
SSID [1-32 charac ters] Sets the wire less net work name. SSID stands for Ser vice Set Ident i f ier. Al l s tat ions must be conf igured with the correc t SSID to access the WLAN. I f the SSID does not match, that user wi l l not be granted access.
BSSID The BSSID is a 48bit ident i t y used to ident i fy a par t icular BSS (Bas ic Ser vice Set) within an area . I n I nfrastruc ture BSS net works, the BSSID is the MAC (Media Access Control ) address of the AP (Access Point) and in I ndependent BSS or ad hoc net works, the BSSID is generated randomly.
Countr y A drop - down menu that permits wor ldwide and speci f ic nat ional sett ings.
Wireless Guest The Guest SSID ( Vi r tual Access Point) can be enabled by selec t ing the Enable Wireless Guest
Net work check box Rename the Wireless Guest Net work as you wish.
Cl ients Isolat ion Prevent wire less c l ients f rom communicat ing with each other
NOTE: wireless hosts cannot scan Guest SSIDs.

YML10WVR2 HSPA+ WIFI ROUTER WITH VOICE User Guidewww.netcommlimited.com 21
HSPA+ WIFI ROUTER WITH VOICENETCOMM LIBERTY SERIES
5.2 SecurityThis Router includes a number of security options that provides you with a secure connection to your wireless network. State-of-the art security includes:
• WEP / WPA / WPA2 data encryption
• SPI Firewall
• VPN Pass-Through
• MAC address IP filtering
• Authentication protocols – PAP / CHAP
You can authenticate or encrypt your service on the Wired Equivalent Privacy (WEP) algorithm, which provides protection against unauthorized access such as eavesdropping.
The following screen appears when Security is selected. The Security page allows you to configure security features of your Router’s wireless LAN interface. You can set the network authentication method, select data encryption, specify whether a network key is required to authenticate to this wireless network and specify the encryption strength.
Click Save/Apply to configure the wireless security options.
OPTION DESCRIPTIONSelec t SSID Your Ser vice Set Ident i f ier (SSID) , sets your Wireless Net work Name. You can
connec t mult iple devices including Laptops, Desktop PCs and PDAs to your Wireless Router. To get addit ional devices connec ted, scan for a net work , and locate the SSID shown on your Wireless Secur i t y Card. I f the SSID does not match, access is denied.
Net work Authent icat ion This opt ion is used for authent icat ion to the wire less net work . Each authent icat ion t ype has i ts own sett ings as i l lustrated below. For example, se lec t ing 802.1X authent icat ion wi l l reveal the RADIUS Ser ver IP address, Por t and Key f ie lds. WEP Encr ypt ion wi l l a lso be enabled.

HSPA+ WIFI ROUTER WITH VOICE User Guide YML10WVR222 www.netcommlimited.com
The settings for WPA authentication are shown below.
OPTION DESCRIPTIONWEP Encr ypt ion This opt ion indicates whether data sent over the net work is encr ypted. The same
net work key is used for data encr ypt ion and net work authent icat ion. Whi lst four net work keys can be def ined, only one can be used at any one t ime. Use the net work key found in the drop down l ist .
Encr ypt ion Strength This drop - down l ist box wi l l d isplay when WEP Encr ypt ion is enabled. The key strength is propor t ional to the number of b inar y bits compris ing the key. This means that keys with a greater number of b i ts have a greater degree encr ypted data . of secur i t y and are considerably more di f f icult to crack . Encr ypt ion strength can be set to e i ther 64-bit or 128-bit . A 64-bit key is equivalent to 5 ASCI I charac ters or 10 hexadecimal numbers. A 128-bitkey contains 13 ASCI I charac ters or 26 hexadecimal numbers. FYI : Each key contains a 24-bit header (an in i t iat ion vec tor) which enables paral le l decoding of mult iple streams of encr ypted data .
5.3 ConfigurationThe amount of time between beacon transmissions is in milliseconds.
• Select the channel which you wish to operate from
• Force the transmission rate to a particular speed
• Set the fragmentation threshold
• Set the RTS threshold
• Set the wake-up interval for clients in power-save mode
• Set the beacon interval for the access point
• Set Xpress mode
• Program short or long preambles
Click Save/Apply to set the advanced wireless configuration.

YML10WVR2 HSPA+ WIFI ROUTER WITH VOICE User Guidewww.netcommlimited.com 23
HSPA+ WIFI ROUTER WITH VOICENETCOMM LIBERTY SERIES
OPTION DESCRIPTIONBand The new amendment a l lows IEEE 802.11g units to fa l l back to speeds of 11 Mbps, so IEEE 802.11b and IEEE 802.11g
devices can coexist in the same net work .
Channel Al lows selec t ion of a speci f ic channel (1-11) or Auto mode.
Auto Channel Timer (min) The Auto Channel t imes the length i t takes to scan in minutes.
54g R ate I n Auto (default ) mode, your Router uses the maximum data rate and lowers the data rate dependent on the s ignal st rength. The appropr iate sett ing is dependent on s ignal st rength. O ther rates are discrete values bet ween 1 to 54Mbps.
Mult icast R ate Sett ing for mult icast packet t ransmiss ion rate. (1-54 Mbps)
Basic R ate Sets bas ic t ransmiss ion rate.
Fragmentat ion Threshold A threshold ( in bytes) determines whether packets wi l l be f ragmented and at what s ize. Packets that exceed the f ragmentat ion threshold of an 802.11 WLAN wi l l be spl i t into smal ler units suitable for the c i rcuit s ize. Packets smal ler than the speci f ied f ragmentat ion threshold value however are not f ragmented. Values bet ween 256 and 2346 can be entered but should remain at a default sett ing of 2346. Sett ing the Fragmentat ion Threshold too low may result in poor per formance.
R TS Threshold Request To Send (R TS) speci f ies the packet s ize that exceeds the speci f ied R TS threshold, which then tr iggers the R TS/C TS mechanism. Smal ler packets are sent without us ing R TS/C TS. The default sett ing of 2347 (max length) wi l l d isables the R TS Threshold.
DTIM I nter val Del iver y Traf f ic I ndicat ion Message (DTIM) is a lso k nown as Beacon R ate. The entr y range is a value bet ween 1 and 65535. A DTIM is a countdown var iable that informs c l ients of the nex t window for l i s tening to broadcast and mult icast messages. When the AP has buffered broadcast or mult icast messages for associated c l ients, i t sends the nex t DTIM with a DTIM I nter val value. AP Cl ients hear the beacons and awaken to receive the broadcast and mult icast messages. The default i s 1 .
Beacon I nter val The amount of t ime bet ween beacon transmiss ions in is mi l l i seconds. The default i s 100 ms and the acceptable range is 1 – 65535. The beacon transmiss ions ident i fy the presence of an access point . By default , net work devices pass ively scan a l l RF channels l i s tening for beacons coming f rom access points. Before a stat ion enters power save mode, the stat ion needs the beacon inter val to k now when to wake up to receive the beacon.
Xpress™ Technology Broadcom’s Xpress™ Technology is compl iant with draf t speci f icat ions of t wo planned wireless industr y standards. I t has been designed to improve wire less net work ef f ic ienc y. Disabled by default .
54g Mode Selec t Auto mode for greatest compatibi l i t y. Selec t Per formance mode for the fastest per formance among 54g cer t i f ied equipment. Selec t LRS mode i f you are exper iencing di f f icult y with legac y 802.11b equipment. I f th is does not work , you may a lso t r y 802.11b only mode.
54g Protec t ion I n Auto mode, the router wi l l use R TS/C TS to improve 802.11g per formance in mixed 802.11g/802.11b net works. Turning protec t ion O ff wi l l maximize 802.11g throughput under most condit ions.
Preamble Type Shor t preamble is intended for appl icat ions where maximum throughput is des i red but i t does not work with legac y equipment. Long preamble works with the current 1 and 2 Mbit/s DSSS speci f icat ion as descr ibed in IEEE Std 802.11-1999
Transmit Power Set the power output (by percentage) as des i red.

HSPA+ WIFI ROUTER WITH VOICE User Guide YML10WVR224 www.netcommlimited.com
5.4 MAC FilterThis screen appears when Media Access Control (MAC) Filter is selected. This option allows access to be restricted based upon the unique 48-bit MAC address.
To add a MAC Address filter, click the Add button shown below.
To delete a filter, select it from the table below and click the Remove button.
OPTION DESCRIPTIONMAC Restr ic t Mode Disabled – Disables MAC f i l ter ing
Al low – Permits access for the speci f ied MAC addresses.
NOTE: Add a wireless device’s MAC address before clicking the Allow radio button or else you will need to connect to the Router’s web user interface using the supplied yellow Ethernet cable and add the wireless device’s MAC address.
Deny – Rejec ts access for the speci f ied MAC addresses
MAC Address Lists the MAC addresses subjec t to the MAC Restr ic t Mode. The Add button prompts an entr y f ie ld that requires you t ype in a MAC address in a t wo - charac ter, 6-byte convent ion: xx :xx :xx :xx :xx :xx where xx are hexadecimal numbers. A maximum of 60 MAC addresses can be added.
Enter the MAC address on the screen below and click Save/Apply.

YML10WVR2 HSPA+ WIFI ROUTER WITH VOICE User Guidewww.netcommlimited.com 25
HSPA+ WIFI ROUTER WITH VOICENETCOMM LIBERTY SERIES
5.5 Wireless BridgeThe following screen appears when selecting Wireless Bridge, and goes into a detailed explanation of how to configure wireless bridge features of the wireless LAN interface.
Click Save/Apply to implement new configuration settings.
FEATURE DESCRIPTIONAP Mode Selec t ing Wireless Br idge ( Wireless Distr ibut ion System) disables Access Point (AP func t ional i t y
whi le se lec t ing Access Point enables AP func t ional i t y. I n Access Point mode, wire less br idge func t ional i t y wi l l s t i l l be avai lable and wire less stat ions wi l l be able to associate to the AP.
Br idge Restr ic t Selec t ing Disabled in Br idge Restr ic t d isables Wireless Br idge restr ic t ion, which means that any wire less br idge wi l l be granted access. Selec t ing Enabled or Enabled (Scan) a l lows wire less br idge restr ic t ion. Only those br idges selec ted in Remote Br idges wi l l be granted access. C l ick Refresh to update the stat ion l i s t when Br idge Restr ic t i s enabled.
5.6 Station InfoThe following screen appears when you select Station Info, and shows authenticated wireless stations and their status.
Click the Refresh button to update the list of stations in the WLAN.
OPTION DESCRIPTIONAssociated Lists a l l the stat ions that are associated with the Access Point , a long with the
amount of t ime s ince packets were t ransferred to and f rom each stat ion. I f a stat ion is id le for too long, i t i s removed f rom this l i s t .
Author ized Lists those devices with author ized access.

MANAGEMENT

YML10WVR2 HSPA+ WIFI ROUTER WITH VOICE User Guidewww.netcommlimited.com 27
HSPA+ WIFI ROUTER WITH VOICENETCOMM LIBERTY SERIES
ManagementThe Management menu has the following maintenance functions and processes:
• Device Settings
• Simple Network Management Protocol (SNMP)
• Simple Network Time Protocol (SNTP)
• Access Control
• Save and Reboot
6.1 Device SettingsThe Device Settings screens allow you to backup, retrieve and restore the default settings of your Router. It also provides a function for you to update your Routers firmware.
6.1.1 Backup Settings
The following screen appears when Backup is selected. Click the Backup Settings button to save the current configuration settings. You will be prompted to define the location of a backup file to save to your PC.
6.1.2 Update Settings
The following screen appears when selecting Update from the submenu. By clicking on the Browse button, you can locate a previously saved filename as the configuration backup file. Click on the Update settings to load it.

HSPA+ WIFI ROUTER WITH VOICE User Guide YML10WVR228 www.netcommlimited.com
6.1.3 Restore Default
The following screen appears when selecting Restore Default. By clicking on the Restore Default Settings button, you can restore your Routers default firmware settings. To restore system settings, reboot your Router.
NOTE: The default settings can be found in section 3.1 Default Settings.
Once you have selected the Restore Default Settings button, the following screen will appear. Close the window and wait 2 minutes before reopening your browser. If required, reconfigure your PCs IP address to match your new configuration(see section 3.2 TCP/IP Settings for details).
After a successful reboot, the browser will return to the Device Info screen. If the browser does not refresh to the default screen, close and restart the browser.NOTE: The Restore Default function has the same effect as the reset button. The device board hardware and the boot loader support the reset to default button. If the reset
button is continuously pushed for more than 5 seconds (and not more than 12 seconds), the boot loader will erase the configuration settings saved on flash memory.
6.1.4 Update FirmwareThe following screen appears when selecting Update Firmware. By following this screens steps, you can update your Routers firmware. Manual device upgrades from a locally stored file can also be performed using the following screen.
1. Obtain an updated software image file
2. Enter the path and filename of the firmware image file in the Software File Name field or click the Browse button to locate the image file.
3. Click the Update Software button once to upload and install the file.NOTE: The update process will take about 2 minutes to complete. The Router will reboot and the browser window will refresh to the default screen upon successful installation.
It is recommended that you compare the Software Version at the top of the Basic screen (WUI homepage) with the firmware version installed, to confirm the installation was successful.

YML10WVR2 HSPA+ WIFI ROUTER WITH VOICE User Guidewww.netcommlimited.com 29
HSPA+ WIFI ROUTER WITH VOICENETCOMM LIBERTY SERIES
6.2 Configure SNMP agent on 3G10WVR2The Simple Network Management Protocol (SNMP) allows a network administrator to monitor a network by retrieving settings on remote network devices. To do this, the administrator typically runs an SNMP management station program such as MIB browser on a local host to obtain information from the SNMP agent, in this case the 3G10WVR2 (if SNMP enabled). An SNMP ‘community’ performs the function of authenticating SNMP traffic. A ‘community name’ acts as a password that is typically shared among SNMP agents and managers.
By default, SNMP agent is enabled on the router.
Setting up SNMP agent1. Open a web browser (IE/firefox/Safari), type in LAN address of the router (http://192.168.1.1 by default)
to log into the web interface.
2. The login username and password by default is admin/admin.
3. Go to Management> SNMP
4. Enable SNMP agent and set up all options according to the description form below.
5. Press Save/Apply to activate setting.

HSPA+ WIFI ROUTER WITH VOICE User Guide YML10WVR230 www.netcommlimited.com
6.3 Simple Network Time Protocol (SNTP)This screen allows you to configure the time settings of your Router. To automatically synchronize with Internet timeservers, tick the box as illustrated below.
The following options should now appear (see screenshot below):
First NTP timeserver: Select the required server.
Second NTP timeserver: Select second timeserver, if required.
Time zone offset: Select the local time zone.
Configure these options and then click Save/Apply to activate.
NOTE: SNTP must be activated to use Parental Control (section 7.3.2).

YML10WVR2 HSPA+ WIFI ROUTER WITH VOICE User Guidewww.netcommlimited.com 31
HSPA+ WIFI ROUTER WITH VOICENETCOMM LIBERTY SERIES
6.4 Access ControlThe Access Control option found in the Management drop down menu, configures access related parameters in the following areas:
• Services
• Passwords
Access Control is used to control remote management settings for your Router.
6.4.1 Services
The Service Control List (SCL) allows you to enable or disable your Wide Area Network (WAN) services by ticking the checkbox as illustrated below. These access services are available: FTP, HTTP, ICMP, SNMP, SSH, TELNET, and TFTP. Click Save/Apply to continue.

HSPA+ WIFI ROUTER WITH VOICE User Guide YML10WVR232 www.netcommlimited.com
6.4.2 PasswordsThe Passwords option configures your account access password for your Router. Access to the device is limited to the following three user accounts:
• admin is to be used for local unrestricted access control
• support is to be used for remote maintenance of the device
• user is to be used to view information and update device firmware
Use the fields illustrated in the screen below to change or create your password. Passwords must be 16 characters or less with no spaces. Click Save/Apply to continue.
6.5 Save and RebootThis function saves the current configuration settings and reboots your Router.
NOTE1: It may be necessary to reconfigure your TCP/IP settings to adjust for the new configuration. For example, if you disable the Dynamic Host Configuration Protocol (DHCP) server you will need to apply Static IP settings.
NOTE2: If you lose all access to your web user interface, simply press the reset button on the rear panel for 5-7 seconds to restore default settings.

ADVANCED SETUP

HSPA+ WIFI ROUTER WITH VOICE User Guide YML10WVR234 www.netcommlimited.com
Advanced SetupThis chapter explains advanced setup for your Router:
7.1 Local Area Network (LAN)This screen allows you to configure the Local Area Network (LAN) interface on your Router.

YML10WVR2 HSPA+ WIFI ROUTER WITH VOICE User Guidewww.netcommlimited.com 35
HSPA+ WIFI ROUTER WITH VOICENETCOMM LIBERTY SERIES
See the field descriptions below for more details.
OPTION DESCRIPTIONIP Address Enter the IP address for the LAN inter face
Subnet Mask Enter the subnet mask for the LAN inter face
Enable UPnP Tick the box to enable Universal Plug and Play
Enable Hal f -Br idge The Router can be set up as a hal f - t ransparent br idge to cope with some specia l appl icat ions such as VPN pass-through. By default hal f - br idge is of f.
Enable I nternet Group Management Protocol ( IGMP) Snooping Enable by t ick ing the box
Standard Mode: I n standard mode, mult icast t raf f ic wi l l f lood to a l l br idge por ts when no c l ient subscr ibes to a mult icast group.
Block ing Mode: I n block ing mode, the mult icast data t raf f ic wi l l be blocked. When there are no c l ient subscr ipt ions to a mult icast group, i t wi l l not f lood to the br idge por ts .
D ynamic Host Conf igurat ion Protocol (DHCP) Ser ver Selec t Enable DHCP ser ver and enter your star t ing and ending IP addresses and the lease t ime. This sett ing conf igures the router to automatical ly ass ign IP, default gateway and DNS ser ver addresses to ever y DHCP c l ient on your LAN
Enable NAT To enable/disable Net work Address Translat ion (NAT, p lease refer to 7 .2 for NAT sett ing) . By default NAT is enabled.
Option 42, 66 ,150,160 These opt ions are used for specia l DHCP set up.
Stat ic IP Lease L ist To speci fy the IP address ass igned through DHCP according to the MAC address of the hosts connec ted to HSPA WiFi Router.
Configure a second IP address by ticking the checkbox shown below and enter the following information:
IP Address : Enter the secondar y IP address for the LAN inter face.
Subnet Mask : Enter the secondar y subnet mask for the LAN inter face.
NOTE: The Save button saves new settings to allow continued configuration, while the Save/Reboot button not only saves new settings but also reboots the device to apply the new configuration (i.e. all new settings).

HSPA+ WIFI ROUTER WITH VOICE User Guide YML10WVR236 www.netcommlimited.com
7.2 Network Address Translation (NAT)7.2.1 Port ForwardingPort Forwarding allows you to direct incoming traffic from the Internet side (identified by Protocol and External port) to the internal server with a private IP address on the LAN side. The Internal port is required only if the external port needs to be converted to a different port number used by the server on the LAN side. A maximum of 32 entries can be configured.
To add a Virtual Server, click the Add button. The following screen will display.
OPTION DESCRIPTIONSelec t a Ser vice
Or
Custom Ser ver
User should selec t the ser v ice f rom the l i s t .
Or
Create a custom ser ver and enter a name for the custom ser ver
Ser ver IP Address Enter the IP address for the ser ver.
Ex ternal Por t Star t Enter the star t ing ex ternal por t number (when you selec t Custom Ser ver) . When a ser v ice is se lec ted the por t ranges are automatical ly conf igured.
Ex ternal Por t End Enter the ending ex ternal por t number (when you selec t Custom Ser ver) . When a ser v ice is se lec ted the por t ranges are automatical ly conf igured.
Protocol User can selec t f rom: TCP, TCP/UDP or UDP.
I nternal Por t Star t Enter the internal por t star t ing number (when you selec t Custom Ser ver) . When a ser v ice is se lec ted the por t ranges are automatical ly conf igured
I nternal Por t End Enter the internal por t ending number (when you selec t Custom Ser ver) . When a ser v ice is se lec ted the por t ranges are automatical ly conf igured.

YML10WVR2 HSPA+ WIFI ROUTER WITH VOICE User Guidewww.netcommlimited.com 37
HSPA+ WIFI ROUTER WITH VOICENETCOMM LIBERTY SERIES
7.2.2 Port TriggeringSome applications require specific ports in the Router’s firewall to be open for access by remote parties. Port Triggering opens up the ‘Open Ports’ in the firewall when an application on the LAN initiates a TCP/UDP connection to a remote party using the ‘Triggering Ports’. The Router allows the remote party from the WAN side to establish new connections back to the application on the LAN side using the ‘Open Ports’. A maximum 32 entries can be configured.
To add a Trigger Port, simply click the Add button. The following will be displayed.
OPTION DESCRIPTIONSelec t an Appl icat ion
Or
Custom Appl icat ion
User should selec t the appl icat ion f rom the l i s t .
Or
User can enter the name of their choice.
Tr igger Por t Star t Enter the star t ing tr igger por t number (when you selec t custom appl icat ion) . When an appl icat ion is se lec ted, the por t ranges are automatical ly conf igured.
Tr igger Por t End Enter the ending tr igger por t number (when you selec t custom appl icat ion) . When an appl icat ion is se lec ted, the por t ranges are automatical ly conf igured.
Tr igger Protocol TCP, TCP/UDP or UDP.
Open Por t Star t Enter the star t ing open por t number (when you selec t custom appl icat ion) . When an appl icat ion is se lec ted, the por t ranges are automatical ly conf igured.
Open Por t End Enter the ending open por t number (when you selec t custom appl icat ion) . When an appl icat ion is se lec ted, the por t ranges are automatical ly conf igured.
Open Protocol TCP, TCP/UDP or UDP
7.2.3 Demilitarized (DMZ) HostYour Router will forward IP packets from the Wireless Area Network (WAN) that do not belong to any of the applications configured in the Virtual Servers table to the DMZ host computer.
Enter the computer’s IP address and click Apply to activate the DMZ host. Clear the IP address field and click Apply to deactivate the DMZ host.

HSPA+ WIFI ROUTER WITH VOICE User Guide YML10WVR238 www.netcommlimited.com
7.3 SecurityYour Router can be secured with IP Filtering or Parental Control functions.
7.3.1 IP FilteringThe IP Filtering screen sets filter rules that limit incoming and outgoing IP traffic. Multiple filter rules can be set with at least one limiting condition. All conditions must be fulfilled when individual IP packets pass filter.
Outgoing IP FilterThe default setting for Outgoing traffic is ACCEPTED. Under this condition, all outgoing IP packets that match the filter rules will be BLOCKED.
To add a filtering rule, click the Add button. The following screen will display.
FILTER NAME THE FILTER RULE LABELProtocol TCP, TCP/UDP, UDP or ICMP Source IP address
Source IP address Enter source IP address Source Subnet Mask
Dest inat ion IP address Enter source subnet mask
Source Por t (por t or por t :por t ) Enter source por t number or por t range
Dest inat ion IP address Enter dest inat ion IP address
Dest inat ion Subnet Mask Enter dest inat ion subnet mask
Dest inat ion por t (por t or por t :por t ) Enter dest inat ion por t number or range
Incoming IP FilterThe default setting for all Incoming traffic is BLOCKED. Under this condition only those incoming IP packets that match the filter rules will be ACCEPTED.

YML10WVR2 HSPA+ WIFI ROUTER WITH VOICE User Guidewww.netcommlimited.com 39
HSPA+ WIFI ROUTER WITH VOICENETCOMM LIBERTY SERIES
To add a filtering rule, click the Add button. The following screen will display.
Please refer to the Outgoing IP Filter table for field descriptions.
Click Save/Apply to save and activate the filter.
7.3.2 Parental ControlThis Parental Control allows you to restrict access from a Local Area Network (LAN) to an outside network through the Router on selected days at certain times. Make sure to activate the Internet Time server synchronization as described in section 6.3 SNTP, so that the scheduled times match your local time.
Click Add to display the following screen.
See instructions below and click Save/Apply to apply the settings.
OPTION DESCRIPTIONUser Name A user- def ined label for this restr ic t ion
Browser ’s MAC Address MAC address of the PC running the browser
O ther MAC Address MAC address of another LAN device
Days of the Week The days the restr ic t ions apply.
Star t B lock ing Time The t ime the restr ic t ions star t
End Block ing Time The t ime the restr ic t ions end.

HSPA+ WIFI ROUTER WITH VOICE User Guide YML10WVR240 www.netcommlimited.com
7.4 RoutingStatic Route and Dynamic Route settings can be found in the Routing link as illustrated below.
7.4.1 Static RouteThe Static Route screen displays the configured static routes. Click the Add or Remove buttons to change settings.
Click the Add button to display the following screen.
Enter Destination Network Address, Subnet Mask, Gateway IP Address and/or WAN Interface. Then click Save/Apply to add the entry to the routing table.
7.4.2 Dynamic RouteTo activate this option, select the Enabled radio button for Global RIP Mode.
To configure an individual interface, select the desired RIP version and operation, followed by placing a check in the Enabled checkbox for that interface. Click Save/Apply to save the configuration and to start or stop dynamic routing.

YML10WVR2 HSPA+ WIFI ROUTER WITH VOICE User Guidewww.netcommlimited.com 41
HSPA+ WIFI ROUTER WITH VOICENETCOMM LIBERTY SERIES
7.5 Domain Name Servers (DNS)7.5.1 DNS Server ConfigurationIf the Enable Automatic Assigned DNS checkbox is selected, this device will accept the first received DNS assignment from the Wide Area Network (WAN) interface during the connection process. If the checkbox is not selected, a field will appear allowing you to enter the primary and optional secondary DNS server IP addresses. Click on Save to apply.
NOTE: Click the Save button to save the new configuration. To make the new configuration effective, reboot your Router.
7.5.2 Dynamic DNSThe Dynamic DNS service allows a dynamic IP address to be aliased to a static hostname in any of a selection of domains, allowing the router to be more easily accessed from various locations on the internet.
Note: The Add/Remove buttons will be displayed only if the router has been assigned an IP address from the remote server.
To add a dynamic DNS service, click the Add button and this screen will display.
OPTION DESCRIPTION
D-DNS provider Select a dynamic DNS provider from the list.
Hostname Enter the name for the dynamic DNS server.
Interface Select the interface from the list.
Username Enter the username for the dynamic DNS server.
Password Enter the password for the dynamic DNS server.

VOICE

YML10WVR2 HSPA+ WIFI ROUTER WITH VOICE User Guidewww.netcommlimited.com 43
HSPA+ WIFI ROUTER WITH VOICENETCOMM LIBERTY SERIES
VoiceThe 3G10WVR2 Router with Voice allows you to make telephone calls over the 3G Mobile/Cellular Telephone network using a standard Analogue Telephone via the built in RJ-11 Phone port.
Please refer to the documentation provided by the manufacturer for operating your Analogue Telephone.Note: That your SIM card and Mobile service needs to be provisioned for Voice Calling. Please consult with your Network Provider for verification.
Note: That any telephone calls placed using the 3G10WVR2 may incur call usage charges determined by your Network Provider. Please consult with your Network Provider for verification.
Configuring your 3G10WVR2 for placing Voice CallsOnce your 3G10WVR2 has been correctly configured to access the mobile network as outlined in Section 2.1 – Quick Setup, you can make and receive telephone calls after connecting your Analogue Telephone to the socket labeled Voice on the back of your Router.
Calling FeaturesThe 3G10WVR2 router allows you to experience the calling features provided by your service provider. Please refer to the table below for more details.
CALLING FEATURE USAGE ACT CODE DE-ACT CODEAccess Voice Mai l Access Voice Mai l Standard wire less *98
Cal l Display - B lock ing per ca l l #31#
Cal l For warding Al l Cal ls *21* #21#
Cal l Wait ing *43# #43#
Answer ing Cal l wait ing Hook Flash”
To switch bet ween cal ls Hook Flash”
Direc tor y Ass istance Dia l 411
Emergenc y Cal l Dia l 911
Col lec t Cal ls Col lec t ca l ls cannot be received on your wire less phone. However you can make an outgoing col lec t ca l l .
Roaming The Rocket Hub wi l l func t ional only in Canada, and only on the Rogers Wireless Net work

STATUS

YML10WVR2 HSPA+ WIFI ROUTER WITH VOICE User Guidewww.netcommlimited.com 45
HSPA+ WIFI ROUTER WITH VOICENETCOMM LIBERTY SERIES
StatusThe Status menu has the following submenus:
• Diagnostics
• System Log
• 3G network
• Statistics
• Route
• ARP
• DHCP
• PING
8.1 DiagnosticsThe Diagnostics menu provides feedback on the connection status of the device. The individual tests are listed below. If a test displays a fail status:
1. Click on the Help link
2. Now click Re-run Diagnostic Tests at the bottom of the screen to re-test and confirm the error
3. If the test continues to fail, follow the troubleshooting procedures in the Help screen.
OPTION DESCRIPTIONLAN Connec t ion Pass : I ndicates that the Ethernet inter face f rom your computer is connec ted to the
LAN por t of th is Router.
Fai l : I ndicates that the Router does not detec t the Ethernet inter face on your computer.
Wireless connec t ion Pass : I ndicates that the wire less card is ON.
Down: I ndicates that the wire less card is OFF.
DATA APN ass igned IP Address Pass : I ndicates that the Router can communicate with the f i rst entr y point to the net work . I t i s usual ly the IP address of the ISP ’s local G ateway.
Fai l : I ndicates that the Router was unable to communicate with the f i rst entr y point on the net work , and i t may not have an ef fec t on your I nternet connec t iv i t y. I f th is test fa i ls and you can access the I nternet , there is no need to t roubleshoot this i ssue.
Ping Pr imar y Domain Name Ser ver Pass : I ndicates that the Router can communicate with the pr imar y Domain Name Ser ver (DNS) .
Fai l : I ndicates that the Router was unable to communicate with the pr imar y Domain Name Ser ver (DNS) . I t may not have an ef fec t on your I nternet connec t iv i t y. Therefore i f th is test fa i ls but you are st i l l able to access the I nternet , there is no need to t roubleshoot this i ssue.

HSPA+ WIFI ROUTER WITH VOICE User Guide YML10WVR246 www.netcommlimited.com
8.2 System LogThis function allows you to view system events and configure related options. Follow the steps below to enable and view the System Log.
1. Click Configure System Log to continue.
2. Select the system log options (see table below) and click Save/Apply.
OPTION DESCRIPTIONLog I ndicates whether the system is current ly recording events. You can enable or d isable
event logging. By default , i t i s d isabled.
Log level Al lows you to conf igure the event level and f i l ter out unwanted events below this level . The events ranging f rom the highest cr i t ica l level “Emergenc y ” down to this conf igured level wi l l be recorded to the log buffer on the Router ’s SDRAM. When the log buffer i s fu l l , the newest event wi l l wrap up to the top of the log buffer and over wr ite the oldest event . By default , the log level i s “Debugging”, which is the lowest cr i t ica l level . The log levels are def ined as fo l lows: Emergenc y is the most ser ious event level , whereas Debugging is the least impor tant . For instance, i f the log level i s set to Debugging, a l l the events f rom the lowest Debugging level to the most cr i t ica l level Emergenc y level wi l l be recorded. I f the log level i s set to Error, only Er ror and the level above wi l l be logged.
Display Level Al lows you to selec t the logged events and displays on the View System Log window for events of th is level and above to the highest Emergenc y level .
Mode Al lows you to speci fy whether events should be stored in the local memor y, be sent to a remote sys log ser ver, or to both s imultaneously. I f remote mode is se lec ted, the v iew system log wi l l not be able to display events saved in the remote sys log ser ver. When either Remote mode or Both mode is conf igured, the WEB UI wi l l prompt the you to enter the Ser ver IP address and Ser ver UDP por t .

YML10WVR2 HSPA+ WIFI ROUTER WITH VOICE User Guidewww.netcommlimited.com 47
HSPA+ WIFI ROUTER WITH VOICENETCOMM LIBERTY SERIES
3. Click View System Log. The results are displayed as follows.

HSPA+ WIFI ROUTER WITH VOICE User Guide YML10WVR248 www.netcommlimited.com
8.3 3G NetworkSelect this option for detailed status information on your Routers 3G connection.

YML10WVR2 HSPA+ WIFI ROUTER WITH VOICE User Guidewww.netcommlimited.com 49
HSPA+ WIFI ROUTER WITH VOICENETCOMM LIBERTY SERIES
Consult the table on the next page for detailed field descriptions.
STATUS DESCRIPTIONManufac turer The manufac turer of the embedded 3G module.
Model The model name of the embedded 3G module
FW Rev The f i rmware vers ion of the 3G module.
IMEI The IMEI ( I nternat ional Mobi le Equipment Ident i t y) i s a 15 digit number that i s used to ident i fy a mobi le device on a net work .
FSN Fac tor y Ser ia l Number of the 3G module.
IMSI The IMSI ( I nternat ional Mobi le Subscr iber Ident i t y) i s a unique 15- digit number used to ident i fy an indiv idual user on a GSM or UMTS net work .
HW Rev. The hardware vers ion of the 3G module.
System Mode WCDMA/Europe CDMA 2000 / Amer ica
HSPA band The 3G radio f requenc y band which suppor ts t r i -band UTMS/HSDPA/HSUPA frequencies (850/1900/2100 MH z) , IMT2000 is 2100 MH z, WCDMA800 is 850 MH z, WCDMA1900 is 1900 MH z.
GSM band The 2G radio f requenc y band which suppor ts Quad-band GSM/GRPS f requencies, inc luding GSM850, GSM900, DCS1800, PCS1900 with each number represent ing the respec t ive f requenc y in MH z.
HSPA channel The 3G channel .
GSM (PS) state Packet Switching state
MM (CS) state Circuit Switching state
Signal Strength The 3G/2G ser vice s ignal st rength in dBm.
OPTION DESCRIPTIONSignal Level (RSSI ) 3G R adio S ignal Strength I ndex
Qual i t y (Ec/ Io) The total energy per chip per power densit y (Ec/ Io) value of the ac t ive set ’s three strongest cel ls .
Net work Registrat ion Status Should display as registered with a val id unlocked SIM card.
Net work Name The 3G internet Ser vice Provider.
Countr y & Net work Codes Each countr y and net work has a unique code.
Cel l ID The net work information for the “ser v ing” cel l ID.
Pr imar y Scrambl ing Code (PSC ) The PSC of the reference WCDMA cel l
Data Sess ion Status Connec ted or Disconnec ted
HSUPA/HSDPA Categor ies The HSUPA/HSDPA categor ies correspond to di f ferent data t ransmiss ion rates with higher numbers general ly indicat ing faster rates
Received S ignal Code Power (RSCP) The RSCP of the ac t ive set ’s three strongest cel ls

HSPA+ WIFI ROUTER WITH VOICE User Guide YML10WVR250 www.netcommlimited.com
8.4 StatisticsThese screens provide detailed information for:
• Local Area Network (LAN) and Wireless Local Area Network (WLAN)
• 3G InterfacesNOTE: These statistics page refresh every 15 seconds.
8.4.1 LAN StatisticsThis screen displays statistics for the Ethernet and Wireless LAN interfaces.
INTERFACE SHOWS CONNECTION INTERFACESReceived / Transmitted Bytes Rx/T X ( receive/transmit) packet in bytes
Pkts Rx/T X ( receive/transmit) packets
Errs Rx/T X ( receive/transmit) packets with errors
Drops Rx/T X ( receive/transmit) packets dropped
8.4.2 3G StatisticsClick 3G network in the Statistics submenu to display the screen below.
I nbound Oc tets Number of received oc tets over the inter face.
Packets Number of received packets over the inter face.
Drops Received packets which are dropped.
Error Received packets which are errors.
Outbound Oc tets Number of Transmitted oc tets over the inter face.
Packets Number of Transmitted packets over the inter face.
Drops Transmitted packets which are dropped
Error Transmitted packets which are errors.

YML10WVR2 HSPA+ WIFI ROUTER WITH VOICE User Guidewww.netcommlimited.com 51
HSPA+ WIFI ROUTER WITH VOICENETCOMM LIBERTY SERIES
8.5 RouteSelect Route to display the paths the Router has found.
DESTINATION DESTINATION NETWORK OR DESTINATION HOSTG ateway Nex t hop IP address
Subnet Mask Subnet Mask of Dest inat ion
Flag U: route is up
! : re jec t route
G: use gateway
H: target is a host
R: re instate route for dynamic rout ing
D: dynamical ly insta l led by daemon or redirec t
M: modif ied f rom rout ing daemon or redirec t
Metr ic The ‘d istance’ to the target (usual ly counted in hops) . I t i s not used by recent kernels , but may be needed by rout ing daemons.
Ser vice Shows the name for WAN connec t ion
I nter face Shows connec t ion inter faces
8.6 ARPClick ARP to display the ARP information.
FIELD DESCRIPTIONIP address Shows IP address of host pc
Flags Complete
I ncomplete
Permanent
Publ ish
HW Address Shows the MAC address of host pc
Device Shows the connec t ion inter face

HSPA+ WIFI ROUTER WITH VOICE User Guide YML10WVR252 www.netcommlimited.com
8.7 Dynamic Host Configuration Protocol (DHCP)Click DHCP to display the DHCP information.
FIELD DESCRIPTION
Hostname Shows the device/host/PC net work name
MAC Address Shows the Ethernet MAC address of the device/host/PC
IP address Shows IP address of device/host/PC
Expires In Shows how much t ime is lef t for each DHCP Lease
8.8 PING The PING menu provides feedback of connection test to an IP address or a host name.
Input an IP address or a host name, e.g www.google.com and press Submit.

APPENDICES
HSPA+ WIFI ROUTER WITH VOICE User Guide YML10WVR254 www.netcommlimited.com
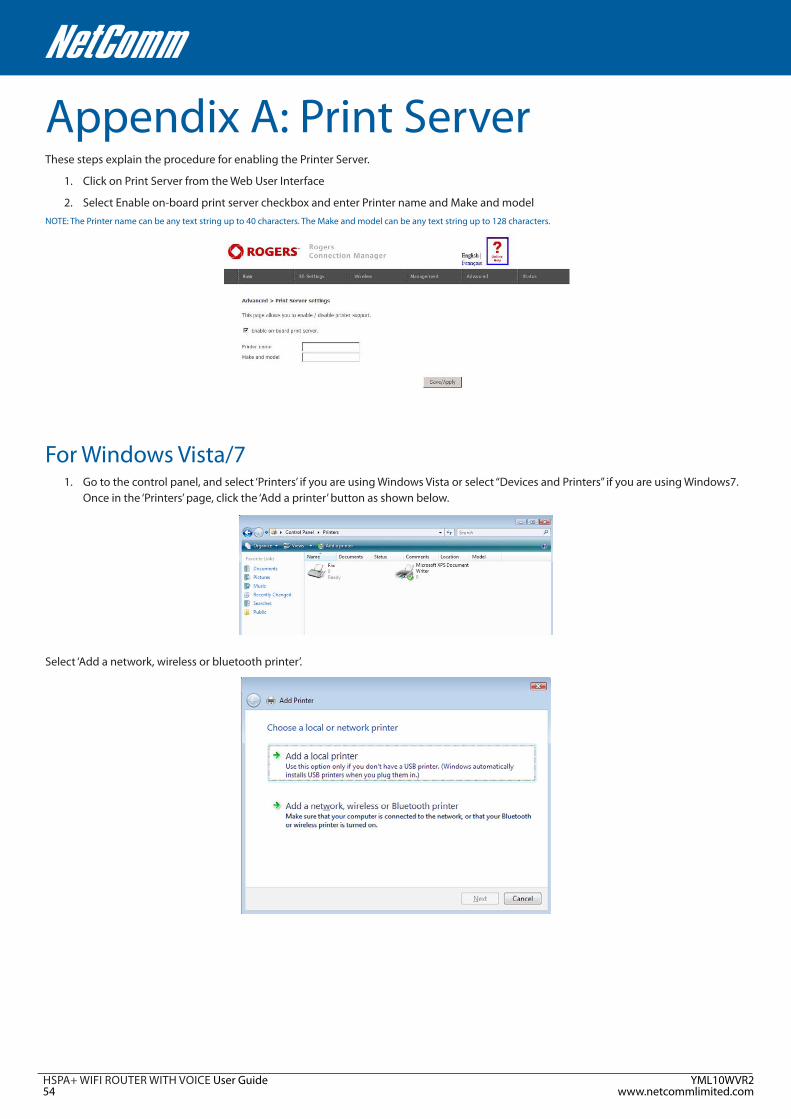
Appendix A: Print ServerThese steps explain the procedure for enabling the Printer Server.
1. Click on Print Server from the Web User Interface
2. Select Enable on-board print server checkbox and enter Printer name and Make and modelNOTE: The Printer name can be any text string up to 40 characters. The Make and model can be any text string up to 128 characters.
For Windows Vista/71. Go to the control panel, and select ‘Printers’ if you are using Windows Vista or select “Devices and Printers” if you are using Windows7.
Once in the ‘Printers’ page, click the ‘Add a printer’ button as shown below.
Select ‘Add a network, wireless or bluetooth printer’.

YML10WVR2 HSPA+ WIFI ROUTER WITH VOICE User Guidewww.netcommlimited.com 55
HSPA+ WIFI ROUTER WITH VOICENETCOMM LIBERTY SERIES
2. Click on the radio-button labelled ‘Select a shared printer by name’, and type “http://192.168.1.1:631/printers/samsung” in the box below. Click ‘Next’.
NOTE: The PrinterName must be the same as the printer name entered into the Printer section of 3G10WVR2.
3. Next, select the driver that came with your printer. Browse through the list to select your printer driver, or click ‘Have Disk’ if you have your printer driver installation media.
Choose whether you want this printer to be the default printer, and then click ‘Next’.
4. Click ‘Finish’. Your device is now configured and ready for use.

HSPA+ WIFI ROUTER WITH VOICE User Guide YML10WVR256 www.netcommlimited.com
For MAC OSXTo set up your printer, check the Apple menu, select System Preferences. In the System Preference menu click on the Print & Fax.
With your Printer driver installed, please add your printer from the Print &Fax menu.
Mouseover to the Protocol drop down list and select Internet Printing Protocol – IPP.
Input the Address field with “192.168.1.1:631” and the Queue with “/printers/PrinterName”
NOTE: The PrinterName must be the same as the printer name entered into the Printer section of 3G10WVR2.

YML10WVR2 HSPA+ WIFI ROUTER WITH VOICE User Guidewww.netcommlimited.com 57
HSPA+ WIFI ROUTER WITH VOICENETCOMM LIBERTY SERIES
From Print Using drop down list and select your corresponding printer driver.
Click Add and check the printer status.

HSPA+ WIFI ROUTER WITH VOICE User Guide YML10WVR258 www.netcommlimited.com
Appendix B: USB StorageClick on USB Storage from the Web User Interface
1. Select the Enable USB Storage checkbox.
For Windows Vista/7Open a web-browser (such as internet Explorer, Firefox or Safari)
Type in the address \\“NetbiosName”\“DirectoryName”\ (eg \\Rocket Hub\USB-Storage)
Note: There are no username and password required to access the USB drive, the user will be able to read/write the folder/files in the USB drive.
For MAC OSXClick the finder icon in the Dock.
Choose Connect to Server from the Go menu.
In the address field of the Connect to Server dialog, type in the URL Smb://“NetbiosName”/“DirectoryName” (eg smb://Rocket Hub/ USB-Storage)
Select Connect to connect your USB storage.

YML10WVR2 HSPA+ WIFI ROUTER WITH VOICE User Guidewww.netcommlimited.com 59
HSPA+ WIFI ROUTER WITH VOICENETCOMM LIBERTY SERIES
Legal & Regulatory InformationThis manual is copyright. Apart from any fair dealing for the purposes of private study, research, criticism or review, as permitted under the Copyright Act, no part may be reproduced, stored in a retrieval system or transmitted in any form, by any means, be it electronic, mechanical, recording or otherwise, without the prior written permission of NetComm Limited. NetComm Limited accepts no liability or responsibility, for consequences arising from the use of this product.
NetComm Limited reserves the right to change the specifications and operating details of this product without notice.
NetComm is a registered trademark of NetComm Limited.
All other trademarks are acknowledged the property of their respective owners.
Federal Communication Commission Interference StatementThis device complies with part 15 of the FCC Rules. Operation is subject to the following two conditions: (1) This device may not cause harmful interference, and (2) this device must accept any interference received, including interference that may cause undesired operation.
This device has been tested and found to comply with the limits for a Class B digital device, pursuant to Part 15 of the FCC Rules. These limits are designed to provide reasonable protection against harmful interference in a residential installation. This equipment generates uses and can radiate radio frequency energy and, if not installed and used in accordance with the instructions, may cause harmful interference to radio communications. However, there is no guarantee that interference will not occur in a particular installation If this equipment does cause harmful interference to radio or television reception, which can be determined by turning the equipment off and on, the user is encouraged to try to correct the interference by one or more of the following measures:
• Reorient or relocate the receiving antenna.
• Increase the separation between the equipment and receiver.
• Connect the equipment into an outlet on a circuit different from that to which the receiver is connected.
• Consult the dealer or an experienced radio/TV technician for help.
Changes or modifications not expressly approved by the party responsible for compliance could void the user‘s authority to operate the equipment.
The antenna(s) used for this transmitter must not be co-located or operating in conjunction with any other antenna or transmitter.
This device complies with FCC radiation exposure limits set forth for an uncontrolled environment. In order to avoid the possibility of exceeding the FCC radio frequency exposure limits, human proximity to the antenna shall not be less than 20cm (8 inches) during normal operation.
Operation is subject to the following two conditions: (1) this device may not cause interference, and (2) this device must accept any interference, including interference that may cause undesired operation of the device.

HSPA+ WIFI ROUTER WITH VOICE User Guide YML10WVR260 www.netcommlimited.com
IC Important Note IC Radiation Exposure Statement:
This equipment complies with IC RSS-102 radiation exposure limits set forth for an uncontrolled environment. This equipment should be installed and operated with minimum distance 20cm between the radiator & your body.
This device and its antenna(s) must not be co-located or operating in conjunction with any other antenna or transmitter.
The County Code Selection feature is disabled for products marketed in the US/Canada.
Operation is subject to the following two conditions: (1) this device may not cause interference, and (2) this device must accept any interference, including interference that may cause undesired operation of the device.
This Class B digital apparatus complies with Canadian ICES-003.
Cet appareil numérique de la classe B est conforme à la norme NMB-003 du Canada.
To reduce potential radio interference to other users, the antenna type and its gain should be so chosen that the equivalent isotropically radiated power (EIRP) is not more than that required for successful communication
This device has been designed to operate with an antenna having a maximum gain of 4 dBi. Antenna having a higher gain is strictly prohibited per regulations of Industry Canada. The required antenna impedance is 50 ohms.
To reduce potential radio interference to other users, the antenna type and its gain should be so chosen that the equivalent isotropically radiated power (e.i.r.p.) is not more than that permitted for successful communication.
Operation is subject to the following two conditions:
(1) this device may not cause interference, and
(2) this device must accept any interference, including interference that may cause undesired operation of the device.

YML10WVR2 HSPA+ WIFI ROUTER WITH VOICE User Guidewww.netcommlimited.com 61
HSPA+ WIFI ROUTER WITH VOICENETCOMM LIBERTY SERIES
Trademarks and registered trademarks are the property of NetComm Limited or their respective owners. Specifications are subject to change without notice. Images shown may vary slightly from the actual product.
NETCOMM LIMITED Head Office PO Box 1200, Lane Cove NSW 2066 Australia W: www.netcommlimited.com
TM Rogers,RocketandMobiusdesignaretrademarksoforusedunderlicensefromRogersCommunicationsInc.oranaffiliate.NetCommandtheNetCommlogoaretrademarksofNetcommLimited.


