HP ProCurve Network Management 3 - h20628. · A-24 B Transferring a PCM Plus 3.20 License to...
114
HP ProCurve Network Management 3.20 Migration Guide
Transcript of HP ProCurve Network Management 3 - h20628. · A-24 B Transferring a PCM Plus 3.20 License to...
HP ProCurve Network Management 3.20 Migration Guide
Hewlett-Packard Company
8000 Foothills Boulevard, m/s 5551
Roseville, California 95747-5551
http://www.hp.com/go/procurve
© Copyright 2010 Hewlett-Packard Development Company, L.P.All Rights Reserved.
Publication Number
5998-0911
October 2010
Trademark Credits
Microsoft, Windows, Windows XP, and Windows Vista are registered trademarks of Microsoft Corporation.
Adobe is a trademark of Adobe Systems Incorporated.
Java is a US trademark of Sun Microsystems, Inc.
UNIX is a registered trademark of The Open Group.
Disclaimer
The information contained in this document is subject to change without notice.
The only warranties for HP products and services are set forth in the express warranty statement accompanying such products and services. Nothing herein should be construed as constituting an additional warranty. HP shall not be liable for technical or editorial errors or omissions contained herein.
Warranty
See the Customer Support/Warranty booklet included with the product.
A copy of the specific warranty terms applicable to your Hewlett-Packard products and replacement parts can be obtained from your HP Sales and Service Office or autho-rized dealer.
iii
Contents
1 Moving to ProCurve Manager 3.20
Introduction . . . . . . . . . . . . . . . . . . . . . . . . . . . . . . . . . . . . . . . . . . . . . . . . . . . 1-2Terminology . . . . . . . . . . . . . . . . . . . . . . . . . . . . . . . . . . . . . . . . . . . . . . . . 1-2Audience . . . . . . . . . . . . . . . . . . . . . . . . . . . . . . . . . . . . . . . . . . . . . . . . . . . 1-3Related Publications . . . . . . . . . . . . . . . . . . . . . . . . . . . . . . . . . . . . . . . . . 1-4
PCM 3.20 Overview . . . . . . . . . . . . . . . . . . . . . . . . . . . . . . . . . . . . . . . . . . . . . 1-5Agent-Based Architecture . . . . . . . . . . . . . . . . . . . . . . . . . . . . . . . . . . . . 1-5What’s New in PCM 3.20? . . . . . . . . . . . . . . . . . . . . . . . . . . . . . . . . . . . . 1-12PCM Plus 3.20 Optional Plug-in Modules . . . . . . . . . . . . . . . . . . . . . . . 1-12
Can Your System Be Migrated? . . . . . . . . . . . . . . . . . . . . . . . . . . . . . . . . . . 1-16
2 Before You Migrate to PCM 3.20
Review Your Network Configuration . . . . . . . . . . . . . . . . . . . . . . . . . . . . . . . 2-2Network Structure . . . . . . . . . . . . . . . . . . . . . . . . . . . . . . . . . . . . . . . . . . 2-2Network Management Requirements . . . . . . . . . . . . . . . . . . . . . . . . . . . 2-4
Understand PCM Licensing . . . . . . . . . . . . . . . . . . . . . . . . . . . . . . . . . . . . . . . 2-8Overview . . . . . . . . . . . . . . . . . . . . . . . . . . . . . . . . . . . . . . . . . . . . . . . . . . . 2-8Registering a PCM 3.20 License . . . . . . . . . . . . . . . . . . . . . . . . . . . . . . . . 2-9PCM 3.20 Base Licenses . . . . . . . . . . . . . . . . . . . . . . . . . . . . . . . . . . . . . 2-10Upgrade Licenses for PCM 2.30 and Earlier . . . . . . . . . . . . . . . . . . . . 2-11Migrating to PCM 2.30 from an Earlier PCM Version . . . . . . . . . . . . . 2-12Maintenance Licenses for PCM 3.xx . . . . . . . . . . . . . . . . . . . . . . . . . . . 2-13PCM 3.20 Plug-in Licenses . . . . . . . . . . . . . . . . . . . . . . . . . . . . . . . . . . . 2-15
3 Migrating Your Current Configuration
PCM 2.10 or Earlier Migration . . . . . . . . . . . . . . . . . . . . . . . . . . . . . . . . . . . . 3-2PCM 2.30 or Later Migration . . . . . . . . . . . . . . . . . . . . . . . . . . . . . . . . . . . . . . 3-3
What’s New in the PCM 3.20 Installer? . . . . . . . . . . . . . . . . . . . . . . . . . . 3-3Global Preferences . . . . . . . . . . . . . . . . . . . . . . . . . . . . . . . . . . . . . . . . . . 3-7Traffic Policies . . . . . . . . . . . . . . . . . . . . . . . . . . . . . . . . . . . . . . . . . . . . . . 3-9User Defined Devices, CIP Files . . . . . . . . . . . . . . . . . . . . . . . . . . . . . . . 3-9Custom Groups . . . . . . . . . . . . . . . . . . . . . . . . . . . . . . . . . . . . . . . . . . . . 3-10User Profiles . . . . . . . . . . . . . . . . . . . . . . . . . . . . . . . . . . . . . . . . . . . . . . 3-10PCM Plug-In Modules . . . . . . . . . . . . . . . . . . . . . . . . . . . . . . . . . . . . . . . 3-10
Create a Backup . . . . . . . . . . . . . . . . . . . . . . . . . . . . . . . . . . . . . . . . . . . . . . . 3-13Backup . . . . . . . . . . . . . . . . . . . . . . . . . . . . . . . . . . . . . . . . . . . . . . . . . . . 3-13Restore to the Same Server . . . . . . . . . . . . . . . . . . . . . . . . . . . . . . . . . . 3-13

iv
Contents
Moving to a New Server . . . . . . . . . . . . . . . . . . . . . . . . . . . . . . . . . . . . . 3-14
4 Migration Example
Overview . . . . . . . . . . . . . . . . . . . . . . . . . . . . . . . . . . . . . . . . . . . . . . . . . . . . . . 4-2Planning for Agents and Agent Groups . . . . . . . . . . . . . . . . . . . . . . . . . . . . . 4-3
Agent Groups . . . . . . . . . . . . . . . . . . . . . . . . . . . . . . . . . . . . . . . . . . . . . . . 4-3Local Agent . . . . . . . . . . . . . . . . . . . . . . . . . . . . . . . . . . . . . . . . . . . . . . . . 4-4
Hardware Requirements . . . . . . . . . . . . . . . . . . . . . . . . . . . . . . . . . . . . . . . . . 4-4PCM 3.20 Server . . . . . . . . . . . . . . . . . . . . . . . . . . . . . . . . . . . . . . . . . . . . 4-4Four Remote Agents . . . . . . . . . . . . . . . . . . . . . . . . . . . . . . . . . . . . . . . . . 4-4
PCM License Requirements . . . . . . . . . . . . . . . . . . . . . . . . . . . . . . . . . . . . . . 4-5Installing PCM 3.20 Server Software . . . . . . . . . . . . . . . . . . . . . . . . . . . . . . . 4-6
Local Agent’s Seed Device . . . . . . . . . . . . . . . . . . . . . . . . . . . . . . . . . . . . 4-6Agent Configuration . . . . . . . . . . . . . . . . . . . . . . . . . . . . . . . . . . . . . . . . . 4-7Define Agent Groups . . . . . . . . . . . . . . . . . . . . . . . . . . . . . . . . . . . . . . . . . 4-8User Profiles and User Accounts . . . . . . . . . . . . . . . . . . . . . . . . . . . . . 4-12
Installing PCM 3.20 Remote Clients . . . . . . . . . . . . . . . . . . . . . . . . . . . . . . . 4-16
5 Troubleshooting Your PCM 3.20 Migration
PCM 3.20 Remote Client Fails . . . . . . . . . . . . . . . . . . . . . . . . . . . . . . . . . . . . . 5-2Only 10 Agents Available, not 25, in Agent Manager . . . . . . . . . . . . . . . . . . 5-3Additional Troubleshooting Information . . . . . . . . . . . . . . . . . . . . . . . . . . . 5-4
A Migrating From PCM 2.30 or Later
PCM 2.30 to PCM 3.20: Example Migration . . . . . . . . . . . . . . . . . . . . . . . . . A-2Step 1: Introduction . . . . . . . . . . . . . . . . . . . . . . . . . . . . . . . . . . . . . . . . A-2Step 2: License Agreement . . . . . . . . . . . . . . . . . . . . . . . . . . . . . . . . . . . A-3Step 3: Readme . . . . . . . . . . . . . . . . . . . . . . . . . . . . . . . . . . . . . . . . . . . . A-4Step 4: Configuration Detection . . . . . . . . . . . . . . . . . . . . . . . . . . . . . . A-5Step 5: License Key . . . . . . . . . . . . . . . . . . . . . . . . . . . . . . . . . . . . . . . . . A-7Step 6: Selecting Plug-In Modules . . . . . . . . . . . . . . . . . . . . . . . . . . . . . A-8Step 7: Installing IDM (Optional) . . . . . . . . . . . . . . . . . . . . . . . . . . . . . A-9Step 8: Upgrade Information . . . . . . . . . . . . . . . . . . . . . . . . . . . . . . . . A-10Step 9: Pre-Installation Summary . . . . . . . . . . . . . . . . . . . . . . . . . . . . A-11Step 10: Installing PCM 3.20 . . . . . . . . . . . . . . . . . . . . . . . . . . . . . . . . . A-13Step 11: Data Migration . . . . . . . . . . . . . . . . . . . . . . . . . . . . . . . . . . . . A-15Step 12: NNMi Integration (Optional) . . . . . . . . . . . . . . . . . . . . . . . . . A-16Step 13: SSL Certificate Credentials . . . . . . . . . . . . . . . . . . . . . . . . . . A-19Step 14: PCM Server and Remote Agent Connections . . . . . . . . . . . A-20Step 15: Install Complete . . . . . . . . . . . . . . . . . . . . . . . . . . . . . . . . . . . A-22
v
Contents
Next Steps Following Migration . . . . . . . . . . . . . . . . . . . . . . . . . . . . . . . . . A-23Install Auto Updates . . . . . . . . . . . . . . . . . . . . . . . . . . . . . . . . . . . . . . . A-23Upgrade and Install Licenses . . . . . . . . . . . . . . . . . . . . . . . . . . . . . . . . A-23Install Remote Agents . . . . . . . . . . . . . . . . . . . . . . . . . . . . . . . . . . . . . . A-24Configure User Profiles and User Accounts . . . . . . . . . . . . . . . . . . . A-24Install Remote Clients . . . . . . . . . . . . . . . . . . . . . . . . . . . . . . . . . . . . . . A-24
B Transferring a PCM Plus 3.20 License to Another Server
Overview . . . . . . . . . . . . . . . . . . . . . . . . . . . . . . . . . . . . . . . . . . . . . . . . . . . . . B-2Step1: Deactivate the Current License . . . . . . . . . . . . . . . . . . . . . . . . . . . . . B-2Step 2: Record the Uninstall Key . . . . . . . . . . . . . . . . . . . . . . . . . . . . . . . . . B-4Step 3: Uninstall PCM 3.20 on the Existing PCM Server . . . . . . . . . . . . . . B-5Step 4: Install PCM 3.20 on the New PCM Server . . . . . . . . . . . . . . . . . . . . B-5Step 5: Record the Install ID on the New PCM Server . . . . . . . . . . . . . . . . B-6Step 6: Transfer License from Existing PCM Server to New PCM Server B-7Step 7: Add the Transferred License to the New PCM Server . . . . . . . . B-11

vi
Contents
1-1
1
Moving to ProCurve Manager 3.20
Introduction . . . . . . . . . . . . . . . . . . . . . . . . . . . . . . . . . . . . . . . . . . . . . . . . . . . 1-2Terminology . . . . . . . . . . . . . . . . . . . . . . . . . . . . . . . . . . . . . . . . . . . . . . . . 1-2Audience . . . . . . . . . . . . . . . . . . . . . . . . . . . . . . . . . . . . . . . . . . . . . . . . . . . 1-3Related Publications . . . . . . . . . . . . . . . . . . . . . . . . . . . . . . . . . . . . . . . . . 1-4
PCM 3.20 Overview . . . . . . . . . . . . . . . . . . . . . . . . . . . . . . . . . . . . . . . . . . . . . 1-5Agent-Based Architecture . . . . . . . . . . . . . . . . . . . . . . . . . . . . . . . . . . . . 1-5What’s New in PCM 3.20? . . . . . . . . . . . . . . . . . . . . . . . . . . . . . . . . . . . . 1-12PCM Plus 3.20 Optional Plug-in Modules . . . . . . . . . . . . . . . . . . . . . . . 1-12
Can Your System Be Migrated? . . . . . . . . . . . . . . . . . . . . . . . . . . . . . . . . . . 1-16
1-2
Moving to ProCurve Manager 3.20Introduction
Introduction
This guide is intended to help you plan and migrate (upgrade) an existing version of HP ProCurve Manager (PCM) software to ProCurve Manager Plus 3.20 in order to maintain an advanced set network management features to manage your network.
■ Customers managing fewer than 50 devices may find that the basic network management tools available in ProCurve Manager 3.20 meet their needs.
■ Customers with more than 50 devices in their network need to use ProCurve Manager Plus 3.20 and its extended feature set to manage their network.
For more information on the differences between ProCurve Manager 3.20 and ProCurve Manager Plus 3.20, refer to the HP ProCurve Network Management web site.
Important If you are installing ProCurve Manager Plus 3.20 for the first time — as a new installation — on a network management station on which no previous version of PCM software is running, follow the installation procedure in the HP
ProCurve Network Management: Installation and Getting Started Guide.
The information in this guide is intended for an installation running PCM 2.30, 3.0, or 3.10 that you want to upgrade to PCM 3.20.
Terminology
In this document the term ‘PCM 3.20’ refers to both ProCurve Manager 3.20 and ProCurve Manager Plus 3.20. When discussing the management of more than 50 devices, the use of more than 1 Agent, or the use of plug-in modules, the text refers to ProCurve Manager Plus 3.20. When a feature applies to a specific version (and later) of PCM software, the version number is used. For example, PCM 3.10 refers to software release 3.10.
The term ‘migrate’ refers to upgrading existing PCM software to PCM 3.20. When you install PCM 3.20, the currently installed software for PCM plug-in modules (Identity Driven Manager, Network Immunity Manager, and Pro-Curve Mobility Manager) is automatically upgraded to a new version.
1-3
Moving to ProCurve Manager 3.20Introduction
Audience
If you are a new user of PCM, this guide presents the essential features of PCM 3.20 that you need to understand when planning your implementation. HP recommends that you read the feature descriptions, and the resource planning discussion, and then read through the example to see how this comes together in an actual implementation.
If you are migrating an existing PCM or PCM Plus 2.30 installation to PCM 3.20, be sure to read the “PCM 3.20 Overview” on page 1-5 to acquaint yourself with its expanded capabilities.
You can migrate an existing PCM version to PCM 3.20 as follows:
■ PCM 2.30, 3.0, and 3.10 can be automatically migrated to PCM 3.20. Information on the features and data that are migrated is presented in Chapter 2.
■ To migrate PCM versions earlier than 2.30, you must do one of the following:
• Uninstall the earlier version of PCM software and install PCM 3.20.
• Upgrade the earlier version of PCM software to PCM 2.30 and then upgrade PCM 2.30 to PCM 3.20.
If you already have planned your implementation and would like to see an example of how to install PCM 3.20 on your existing PCM 2.30, 3.0, or 3.10 Server, see Appendix A for a step-by-step migration.
Caution Once you migrate to PCM 3.20, you cannot revert to the previously installed version. If you are uncertain that you want to upgrade to PCM 3.20, it is best to install the PCM 3.20 trial version on a system that does not have an earlier PCM version installed.
Lastly, it is recommend that you read “Migration Example” on page 4-1 to see how an example implementation is planned and installed.
1-4
Moving to ProCurve Manager 3.20Introduction
Related Publications
Before migrating your existing PCM version, HP recommends that you famil-iarize yourself with the capabilities of PCM 3.20 and its features. The following sources offer more information on PCM 3.20:
■ The HP ProCurve Manager Plus web site provides an overview of PCM 3.20 features and licenses, as well as links to the PCM 3.20 datasheet and product documentation.
■ The HP ProCurve Network Management: License and Upgrade Selec-tion Guide provides information on licensing and upgrades according to the number of managed devices in your network, and includes frequently asked questions (FAQs).
■ The following PCM 3.20 documentation is available on the PCM Manuals web page:
• Release Notes: ProCurve Manager Version 3.20
• HP ProCurve Network Management: Installation and Getting
Started Guide
• HP ProCurve Manager 3.20: Network Administrator's Guide
1-5
Moving to ProCurve Manager 3.20PCM 3.20 Overview
PCM 3.20 Overview
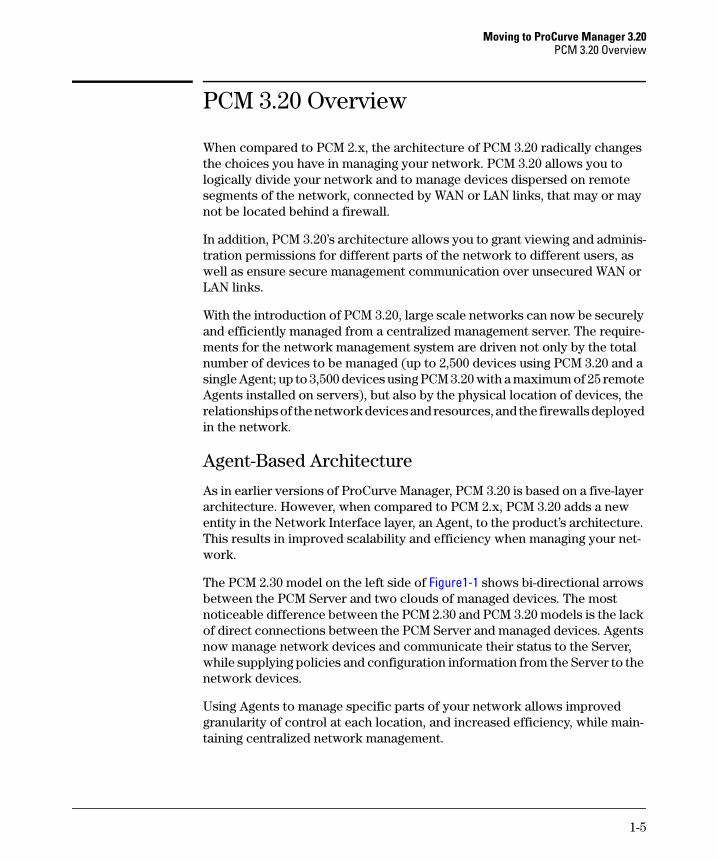
When compared to PCM 2.x, the architecture of PCM 3.20 radically changes the choices you have in managing your network. PCM 3.20 allows you to logically divide your network and to manage devices dispersed on remote segments of the network, connected by WAN or LAN links, that may or may not be located behind a firewall.
In addition, PCM 3.20’s architecture allows you to grant viewing and adminis-tration permissions for different parts of the network to different users, as well as ensure secure management communication over unsecured WAN or LAN links.
With the introduction of PCM 3.20, large scale networks can now be securely and efficiently managed from a centralized management server. The require-ments for the network management system are driven not only by the total number of devices to be managed (up to 2,500 devices using PCM 3.20 and a single Agent; up to 3,500 devices using PCM 3.20 with a maximum of 25 remote Agents installed on servers), but also by the physical location of devices, the relationships of the network devices and resources, and the firewalls deployed in the network.
Agent-Based Architecture
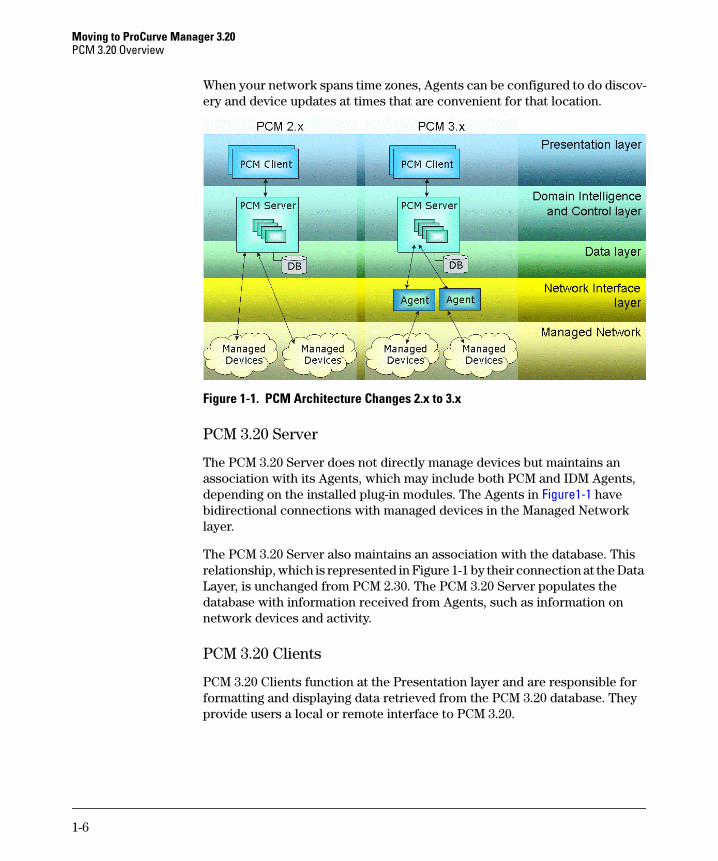
As in earlier versions of ProCurve Manager, PCM 3.20 is based on a five-layer architecture. However, when compared to PCM 2.x, PCM 3.20 adds a new entity in the Network Interface layer, an Agent, to the product’s architecture. This results in improved scalability and efficiency when managing your net-work.
The PCM 2.30 model on the left side of Figure1-1 shows bi-directional arrows between the PCM Server and two clouds of managed devices. The most noticeable difference between the PCM 2.30 and PCM 3.20 models is the lack of direct connections between the PCM Server and managed devices. Agents now manage network devices and communicate their status to the Server, while supplying policies and configuration information from the Server to the network devices.
Using Agents to manage specific parts of your network allows improved granularity of control at each location, and increased efficiency, while main-taining centralized network management.
1-6
Moving to ProCurve Manager 3.20PCM 3.20 Overview
When your network spans time zones, Agents can be configured to do discov-ery and device updates at times that are convenient for that location.
Figure 1-1. PCM Architecture Changes 2.x to 3.x
PCM 3.20 Server
The PCM 3.20 Server does not directly manage devices but maintains an association with its Agents, which may include both PCM and IDM Agents, depending on the installed plug-in modules. The Agents in Figure1-1 have bidirectional connections with managed devices in the Managed Network layer.
The PCM 3.20 Server also maintains an association with the database. This relationship, which is represented in Figure 1-1 by their connection at the Data Layer, is unchanged from PCM 2.30. The PCM 3.20 Server populates the database with information received from Agents, such as information on network devices and activity.
PCM 3.20 Clients
PCM 3.20 Clients function at the Presentation layer and are responsible for formatting and displaying data retrieved from the PCM 3.20 database. They provide users a local or remote interface to PCM 3.20.
1-7
Moving to ProCurve Manager 3.20PCM 3.20 Overview
Just as in PCM 2.30, when you first install PCM 3.20, both the Server and the Client are installed on the server hardware. You can also install the Client on other computers that have network access to the PCM Server. PCM 3.20 supports a total of ten Clients (including a local and all remote Clients).
When installing a remote Client, you first configure access permissions on the PCM Server. You then install the remote Client software on a computer in the desired location. The term ‘remote Client’ simply refers to a Client that is not installed on the PCM Server; the ‘local Client’ is the Client installed automat-ically with the PCM 3.20 Server.
PCM 3.20 provides secure network management through user accounts and associated user profiles. User accounts define a user name and password used to log into PCM through a Client. User profiles determine the functions that can be performed and the devices shown in the navigation tree and network maps when a user logs on to a Client. PCM 3.20 has expanded the granularity of the actions a user may take and the devices that they have access to when logged in to PCM (see “Customized User Profiles” on page 1-11).
For more information on installing remote Clients and configuring user accounts and profiles, refer to the HP ProCurve Manager 3.20: Network
Administrator’s Guide.
PCM 3.20 Agents
The PCM 3.20 architecture relies on Agents deployed across a network to perform management operations on behalf of the PCM 3.20 Server. A local Agent is configured automatically with the PCM 3.20 Server during installa-tion.
■ A managed Agent supports a maximum of 1,500 devices.
■ A PCM 3.20 Server supports a total of 25 Agents. (The 25 Agent total includes the local Agent.)
■ A PCM 3.20 Server supports a maximum of 3,500 devices managed by all Agents.
If more than 4 remote Agents are required, HP recommends deactivating the local Agent and running only remote Agents to make best use of the PCM Server’s resources. Refer to the HP ProCurve Network Management: Instal-
lation and Getting Started Guide for the hardware platform requirements for PCM Servers and Agents required to manage your network.
For the latest updates on how to best deploy PCM 3.20 Agents, please visit the HP ProCurve Manager Plus web site.
1-8
Moving to ProCurve Manager 3.20PCM 3.20 Overview
PCM+ Agent on ONE Services zl Module: You can also add a remote Agent to your network by using an HP ProCurve ONE Services zl Module (J9289A) in either of the following ways:
■ The HP ProCurve PCM+ Agent with ONE Services zl Module (J9496A) ships with a PCM+ Agent application pre-installed on a ProCurve ONE Services zl Module.
■ If you have already installed a ProCurve ONE Services zl Module, you can install a PCM+ Agent application to run on it.
Before you can use a PCM+ Agent application installed on a ProCurve ONE Services zl Module, you must first activate and configure the Agent applica-tion. For more information, refer to the HP ProCurve PCM+ Agent with ONE
zl Module: Installation and Getting Started Guide.
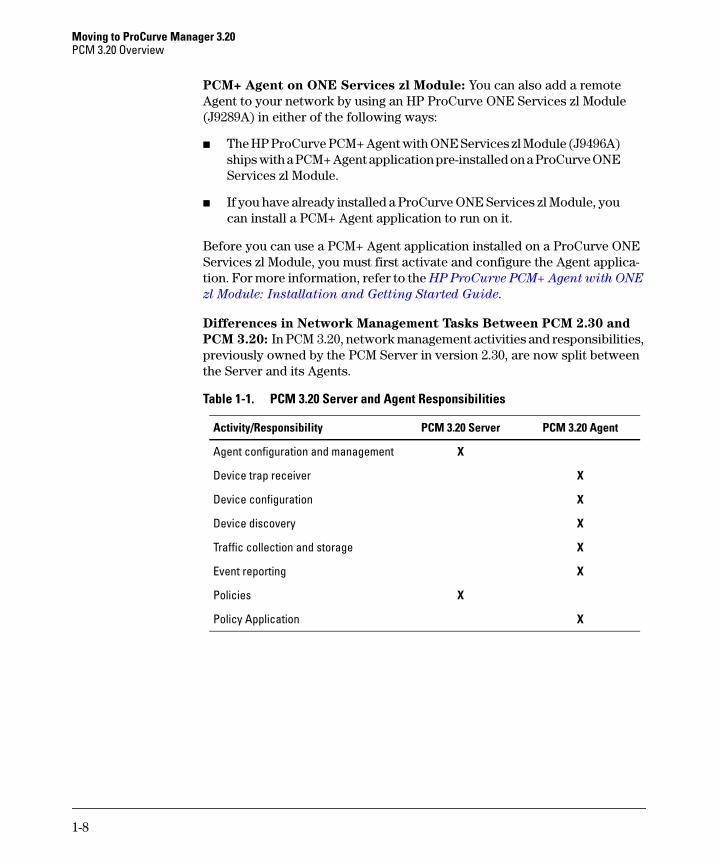
Differences in Network Management Tasks Between PCM 2.30 and
PCM 3.20: In PCM 3.20, network management activities and responsibilities, previously owned by the PCM Server in version 2.30, are now split between the Server and its Agents.
Table 1-1. PCM 3.20 Server and Agent Responsibilities
Activity/Responsibility PCM 3.20 Server PCM 3.20 Agent
Agent configuration and management X
Device trap receiver X
Device configuration X
Device discovery X
Traffic collection and storage X
Event reporting X
Policies X
Policy Application X
1-9
Moving to ProCurve Manager 3.20PCM 3.20 Overview
Device Access and Agent Management Traffic: With Agents, the use of low-level network protocols for device management, such as SNMP, SSH, and Telnet, may be restricted to a local subnet or some portion of the network. In large enterprise networks, which may be geographically distributed, this keeps such network traffic and activity off the enterprise backbone or the long-haul WAN links. This localization of low-level network protocols helps deliver scalability to the management platform and has security benefits as well.
Communication between the PCM 3.20 Server and an Agent may be done using plain text or SSL. By default, the local Agent uses plain text for communicating with the Server; by default, remote Agents use SSL. Communication between a remote Agent and the Server is thus secured over the network.
Note All agents that initiate a connection to the PCM server must use the same encryption type and port number as configured on the Agent Manager Server Setup tab. The default encryption type for agent-initiated connections is SSL and the default port number is 51111.
When the PCM Server initiates the connection to an agent, you can use the encryption mode or port number that you choose for each agent. However, the configuration on both the Agent and the PCM Server must match.

1-10
Moving to ProCurve Manager 3.20PCM 3.20 Overview
Agent Groups and Network Devices
In PCM 3.20, the Interconnect Devices and Network Map folders do not appear at the level immediately under Network Management Home. The first time that PCM 3.20 is opened, all managed devices appear in the same network map and device list because all are managed by the local Agent (see Figure1-2).
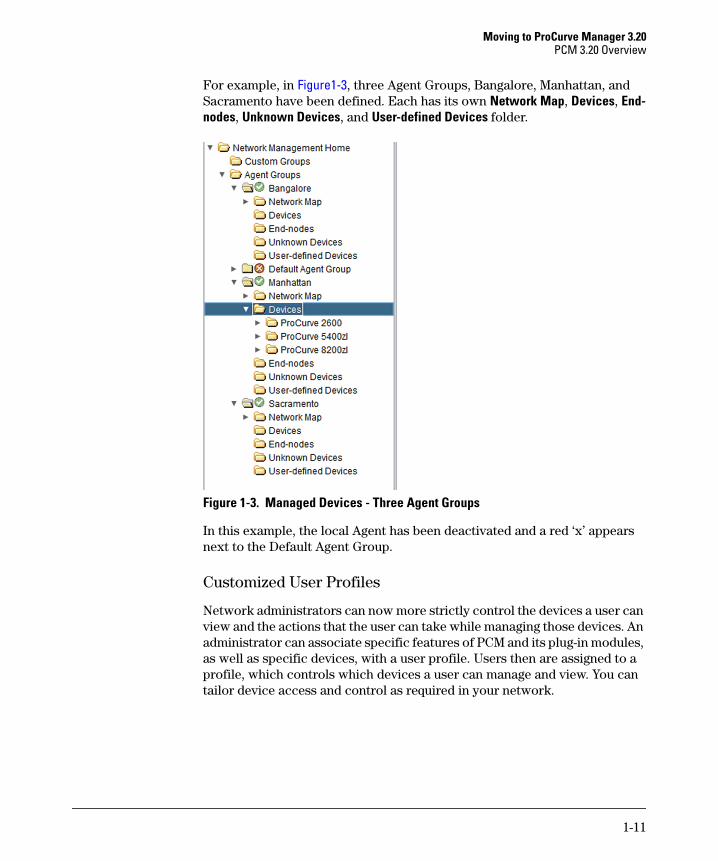
However, if the environment requires the definition of additional Agent Groups, PCM 3.20 creates a separate folder for Network Map, Devices, End-nodes, Unknown Devices, and User-defined Devices under each user-defined Agent Group (see Figure1-3).
Each network map or device list contains devices managed by Agents belong-ing to the same Agent Group. Similarly, each Agent Group’s subnet and VLAN lists contain only subnets or VLANs managed by Agents in that group.
Figure 1-2. Managed Devices - PCM 3.20 Compared to PCM 2.30 and Earlier Releases
PCM Managed Devices (PCM 2.x) PCM 3.20 Managed Devices
1-11
Moving to ProCurve Manager 3.20PCM 3.20 Overview
For example, in Figure1-3, three Agent Groups, Bangalore, Manhattan, and Sacramento have been defined. Each has its own Network Map, Devices, End-nodes, Unknown Devices, and User-defined Devices folder.
Figure 1-3. Managed Devices - Three Agent Groups
In this example, the local Agent has been deactivated and a red ‘x’ appears next to the Default Agent Group.
Customized User Profiles
Network administrators can now more strictly control the devices a user can view and the actions that the user can take while managing those devices. An administrator can associate specific features of PCM and its plug-in modules, as well as specific devices, with a user profile. Users then are assigned to a profile, which controls which devices a user can manage and view. You can tailor device access and control as required in your network.
1-12
Moving to ProCurve Manager 3.20PCM 3.20 Overview
What’s New in PCM 3.20?
The following new and enhanced network management features are sup-ported in PCM 3.20:
■ Improved device monitoring: Detailed network device availability and network event information can be used to document network avail-ability or troubleshoot network downtime.
■ Rich media endpoint aware: Real-time display, location, and inventory reporting of rich media endpoints in your network, such as VoIP phones and IP cameras.
■ HP ONE Services zl Module Management: Simplified deployment of network services with the discovery, monitoring, licensing, and configuration of HP ONE Services Modules.
■ Custom Script Wizard: Enables secure, user-defined extensibility to the HP PCM Plus management platform.
PCM Plus 3.20 Optional Plug-in Modules
The upgraded plug-in modules, IDM 3.20, NIM 2.20, and PMM 3.10 have new features, as described below. For the latest information on these products, refer to the HP ProCurve Network Management web site.
IDM 3.20
The latest release of Identity Driven Management (IDM) delivers increased integration with HP Networking management and security products, including Network Immunity Manager 2.20, the new HP ProCurve Threat Management Services zl (TMS zl) module, and MSM controllers.
By integrating with other ProCurve management and security components, actions taken by one module can be reflected and enforced by another, increasing the overall manageability and security of the network.
This new release also simplifies the process of deploying and managing a secure network access solution with Secure Access Wizard enhancements and Agent Auto-update.
IDM 2.3 or later versions are upgraded to IDM 3.20 when PCM 3.20 is installed on an existing PCM 2.30, 3.0, or 3.10 Server with a valid PCM 3.20 license. For more information, see “Understand PCM Licensing” on page 2-8.
1-13
Moving to ProCurve Manager 3.20PCM 3.20 Overview
NIM 2.20
The Network Immunity Manager (NIM) 2.20 provides multi-function security management capabilities that integrate into the PCM 3.20 platform.
NIM 2.20 provides the following benefits:
■ Network protection against internal threats, such as viruses
■ Visibility of network threats with the intelligence to mitigate a threat at the edge of the network where the threat occurred
■ Threat detection without entirely disabling the attacker, enabling an administrator to take corrective action without alerting an intentional attacker
NIM uses enhanced Network Behavior Anomaly Detection (NBAD) to detect threats based on behavior, providing broad coverage with an efficient and flexible architecture that minimizes false positives. While integrating with other PCM applications, such as IDM, NIM also supports an expanded set of third-party IDS/IPS devices for detecting signature-based attacks.
NIM 2.20 adds centralized VPN configuration for Threat Management Services zl Modules, including:
■ IPSec VPN configuration
■ GRE over IPSec configuration
■ L2TP over IPSec configuration
NIM 2.20 also adds support for the centralized configuration of up to 256 VLANs on Threat Management Services zl Modules.
NIM 1.0 and later versions are upgraded to NIM 2.20 when PCM 3.20 is installed on an existing PCM 2.30, 3.0, or 3.10 Server with a valid PCM 3.20 license. For more information, see “Understand PCM Licensing” on page 2-8.
1-14
Moving to ProCurve Manager 3.20PCM 3.20 Overview
PMM 3.10
ProCurve Mobility Manager (PMM) 3.10 integrates with PCM’s Agent-based architecture and provides the following features:
■ Monitors client and device connectivity, and device performance.
■ Helps you to locate APs with an easy-to-use Site View tool and visualize RF coverage with a built-in heat map.
■ Checks for threats, such as rogue devices and “open” unsecured devices.
■ Provides reports and graphs on current and past performance (up to five years).
■ Provides reports for audits and business tracking purposes.
Imported floor plans in the Site Map tool can also be used to envision RF coverage for currently managed APs or new APs. These “heat maps” are based on the manually supplied data, such as the location of obstacles and the scale/dimension of the real area represented in the floor plan.
When integrated with PCM, PMM allows you to use single-pane views for the monitoring and management of wired devices without having to move to a separate tool to manage your wireless devices.
PIM 3.10 provides the following new and enhanced features:
■ Access point associations
■ Real-time monitoring of controlled MSM APs
■ Customizing of the PMM dashboard from PCM by selecting Tools > Preferences > Mobility Manager
■ Wireless Status tab to display the status of:
• Access points • Neighborhoods
• Bridges • RADIUS servers
• DHCP servers • Sensors
• IP connections • System uptime
• IPSec • Wireless clients
• Local mesh neighborhood • Wireless devices
• Local mesh links • Wireless ports
• Mobility (client roaming status) • Wireless rates
1-15
Moving to ProCurve Manager 3.20PCM 3.20 Overview
■ Improved graphs and tables, including:
• Associated Wireless Clients history
• Device Status history
• Device Usage table
• Top Mobility Manager Events table (with alarms)
• Wireless Client Connection history
• Wireless Errors history
• Wireless Monitor table
• Wired Throughput history
• Wireless Throughput history
PMM 2.0 or later versions are upgraded to PMM 3.10 when PCM 3.20 is installed on an existing PCM 2.30, 3.0, or 3.10 Server with a valid PCM 3.20 license. For more information, see “Understand PCM Licensing” on page 2-8.
1-16
Moving to ProCurve Manager 3.20Can Your System Be Migrated?
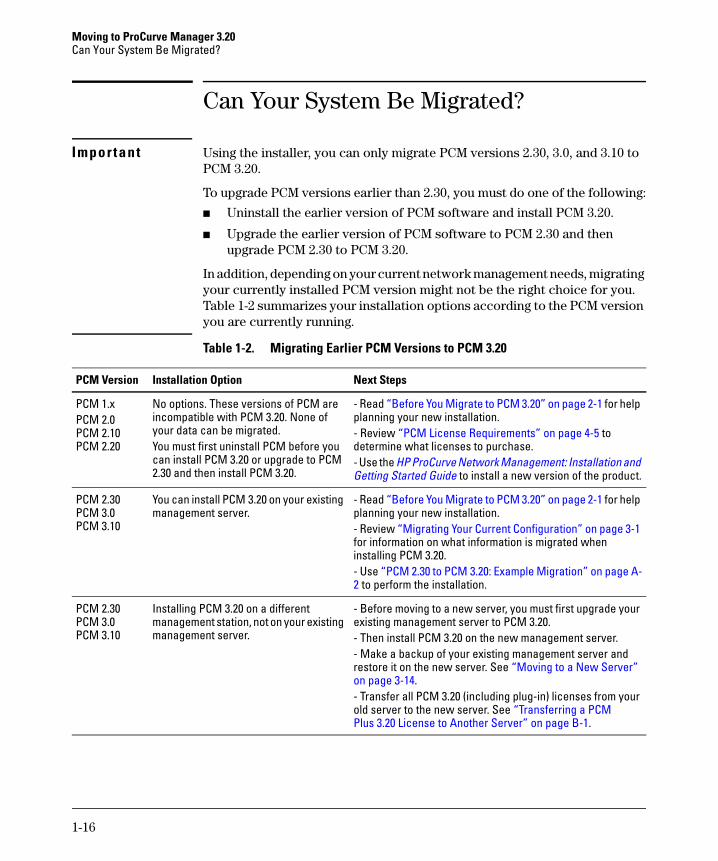
Can Your System Be Migrated?
Important Using the installer, you can only migrate PCM versions 2.30, 3.0, and 3.10 to PCM 3.20.
To upgrade PCM versions earlier than 2.30, you must do one of the following:
■ Uninstall the earlier version of PCM software and install PCM 3.20.
■ Upgrade the earlier version of PCM software to PCM 2.30 and then upgrade PCM 2.30 to PCM 3.20.
In addition, depending on your current network management needs, migrating your currently installed PCM version might not be the right choice for you. Table 1-2 summarizes your installation options according to the PCM version you are currently running.
Table 1-2. Migrating Earlier PCM Versions to PCM 3.20
PCM Version Installation Option Next Steps
PCM 1.xPCM 2.0PCM 2.10PCM 2.20
No options. These versions of PCM are incompatible with PCM 3.20. None of your data can be migrated.You must first uninstall PCM before you can install PCM 3.20 or upgrade to PCM 2.30 and then install PCM 3.20.
- Read “Before You Migrate to PCM 3.20” on page 2-1 for help planning your new installation.- Review “PCM License Requirements” on page 4-5 to determine what licenses to purchase.- Use the HP ProCurve Network Management: Installation and Getting Started Guide to install a new version of the product.
PCM 2.30PCM 3.0PCM 3.10
You can install PCM 3.20 on your existing management server.
- Read “Before You Migrate to PCM 3.20” on page 2-1 for help planning your new installation.- Review “Migrating Your Current Configuration” on page 3-1 for information on what information is migrated when installing PCM 3.20.- Use “PCM 2.30 to PCM 3.20: Example Migration” on page A-2 to perform the installation.
PCM 2.30PCM 3.0PCM 3.10
Installing PCM 3.20 on a different management station, not on your existing management server.
- Before moving to a new server, you must first upgrade your existing management server to PCM 3.20. - Then install PCM 3.20 on the new management server.- Make a backup of your existing management server and restore it on the new server. See “Moving to a New Server” on page 3-14.- Transfer all PCM 3.20 (including plug-in) licenses from your old server to the new server. See “Transferring a PCM Plus 3.20 License to Another Server” on page B-1.
1-17
Moving to ProCurve Manager 3.20Can Your System Be Migrated?
Caution Before you install PCM 3.20, be sure to make a backup of your current system (see “Create a Backup” on page 3-13).
PCM 2.10 (or later) cannot be restored once it is migrated to PCM 3.20. If you are uncertain about moving to PCM 3.20, ProCurve recommends that you install PCM 3.20 on a system other than your current management server for evaluation.

1-18
Moving to ProCurve Manager 3.20Can Your System Be Migrated?
2-1
2
Before You Migrate to PCM 3.20
Review Your Network Configuration . . . . . . . . . . . . . . . . . . . . . . . . . . . . . . . 2-2Network Structure . . . . . . . . . . . . . . . . . . . . . . . . . . . . . . . . . . . . . . . . . . 2-2Network Management Requirements . . . . . . . . . . . . . . . . . . . . . . . . . . . 2-4
Understand PCM Licensing . . . . . . . . . . . . . . . . . . . . . . . . . . . . . . . . . . . . . . . 2-8Overview . . . . . . . . . . . . . . . . . . . . . . . . . . . . . . . . . . . . . . . . . . . . . . . . . . . 2-8Registering a PCM 3.20 License . . . . . . . . . . . . . . . . . . . . . . . . . . . . . . . . 2-9PCM 3.20 Base Licenses . . . . . . . . . . . . . . . . . . . . . . . . . . . . . . . . . . . . . 2-10Upgrade Licenses for PCM 2.30 and Earlier . . . . . . . . . . . . . . . . . . . . 2-11Migrating to PCM 2.30 from an Earlier PCM Version . . . . . . . . . . . . . 2-12Maintenance Licenses for PCM 3.xx . . . . . . . . . . . . . . . . . . . . . . . . . . . 2-13PCM 3.20 Plug-in Licenses . . . . . . . . . . . . . . . . . . . . . . . . . . . . . . . . . . . 2-15
2-2
Before You Migrate to PCM 3.20Review Your Network Configuration
Review Your Network Configuration
Planning the implementation of PCM 3.20 starts with the network structure, and the management and administration requirements of your current net-work. This section explains how you can use PCM 3.20 to achieve superior results in managing your network.
Network Structure
Does your network span multiple time zones? Are some network segments protected by firewalls? Is your network management traffic secure in all segments of your network? PCM 3.20 uses Agents to distribute across a network some of the responsibilities formerly handled by the PCM Server (see Table 1-1 on page 1-8). Reviewing the physical and logical structure of your network is an important first step in planning the number of Agents you need in your network to meet your requirements.
You most likely already have available the information you need. The discus-sion below explains how your network’s structure helps determine the num-ber of Agents you may require when migrating to PCM 3.20.
Physical Layout
Remote sites connected over an enterprise backbone or long-haul WAN link, such as a branch office or a campus extension, are likely locations to place a remote PCM Agent. This is especially true when your network covers multiple time zones. A remote Agent allows network management tasks, such as discovery operations, software maintenance, or policy updates, typically done at a time outside of peak network load, to be scheduled for a time that works best at that location.
The number of devices to be managed at each remote site, is another important factor in determining the number of Agents you need. Each Agent can support up to 1,500 devices. Additional Agents are required when a remote site has more than 1,500 devices to be managed.
A third factor in determining the number of Agents that you require is the location of firewalls in your network. Today, firewalls are often used to protect networks or segments of networks. Often, a firewall tightly limits or blocks protocols such as SNMP, TFTP, and HTTP, used by PCM to directly manage network devices. As a result, a local management solution often is employed to manage devices behind a firewall, thus making a centralized management solution for all network devices virtually impossible.
2-3
Before You Migrate to PCM 3.20Review Your Network Configuration
PCM 3.20 solves this problem by allowing an Agent to be placed behind a firewall to manage the network devices located there. This remote Agent communicates with a PCM Server through the firewall using an encrypted (SSL over TCP) or plain text connection. Now, previously unreachable net-work devices behind the firewall may be securely and centrally managed by PCM 3.20.
Logical Layout
Beyond the physical layout of a network, there may be other groupings or logical organizations of network devices to consider when determining when and where an Agent may be needed. For example, VLANs are often used in a network to group users by logical function, to manage network traffic, and to control access to network resources. You may wish to restrict management access to VLANs, devices, and network status information. Using an Agent to manage a VLAN may be useful, particularly when the VLAN is large or contains sensitive network resources that you want managed only by specific users.
Some departments within an organization, such as Finance or Personnel, maintain records that contain sensitive information. Network access to such resources is tightly controlled. Using an Agent can allow network manage-ment also to be carefully controlled while maintaining centralized network management. In the same way, an Agent can help maintain tight control over specific network resources such as servers, where only a limited number of network staff are allowed access and control.
When PCM 3.20 uses Agents to manage specific network devices, VLANs, or subnets, Agent Groups help the centralized network management operation. Agents are logically grouped to provide a hierarchical organization for PCM 3.20’s navigation tree. Device lists, subnets and VLAN lists, and topology maps are displayed per Agent Group, rather than all devices appearing in the same map. Using an Agent enables all devices in a particular location to be viewed as a single unit, while limiting Agent access to only the devices they are assigned to manage.
Remote Network Management Using Clients
As in previous versions, PCM provides remote Clients that are authorized to log on to a PCM Server. However, in PCM 3.20, a user’s ability to view or manage devices can be limited to a given location or logical grouping, depend-ing on their user profile (see “Customized User Profiles” on page 1-11). Policies are configured from a local or remote PCM Client session and are stored on the PCM Server. Agents carry out the policy actions.
2-4
Before You Migrate to PCM 3.20Review Your Network Configuration
Integrating Third-Party Devices
The Configurable Integration Platform (CIP) capabilities for support ofmulti-vendor environments have been enhanced in PCM 3.20 by the addition of a CIP Wizard.
PCM 3.20 discovers any device that supports MIB 2 and SNMP. The CIP Wizard can then be used to customize the appearance and basic behavior of these third-party switches by allowing device configurations (including templates) to be collected (scanned) and deployed to them.
Also, CIP can be used to launch the user interface for other Web-based applications from PCM Plus. For more information see “Using the Configu-rable Integration Platform” in the HP ProCurve Manager 3.20: Network
Administrator’s Guide.
Network Management Requirements
Use the information in this section to determine the hardware and agents you need to install PCM 3.20 to mange your network. Note that Clients, Agents, and the PCM Server are now supported on VMware and Microsoft Hyper-V virtual platforms. You may already have the capacity to support the network management resources required.
Number of Agents Required
In PCM 3.20, a single PCM 3.20 Server, with 4 GB of RAM, 4 CPU cores, and a 100 GB hard drive, can manage 2,000 devices using the local Agent. A less powerful Server can be used to support fewer devices. Refer to the HP
ProCurve Network Management: Installation and Getting Started Guide for specific PCM Server requirements.
Note A fully provisioned PCM 3.20 Server can support a maximum of 3,500 devices. While up to 25 Agents are supported and each Agent may support up to 1,500 devices, the total number of devices that can be managed by up to 25 Agents is 3,500.
2-5
Before You Migrate to PCM 3.20Review Your Network Configuration
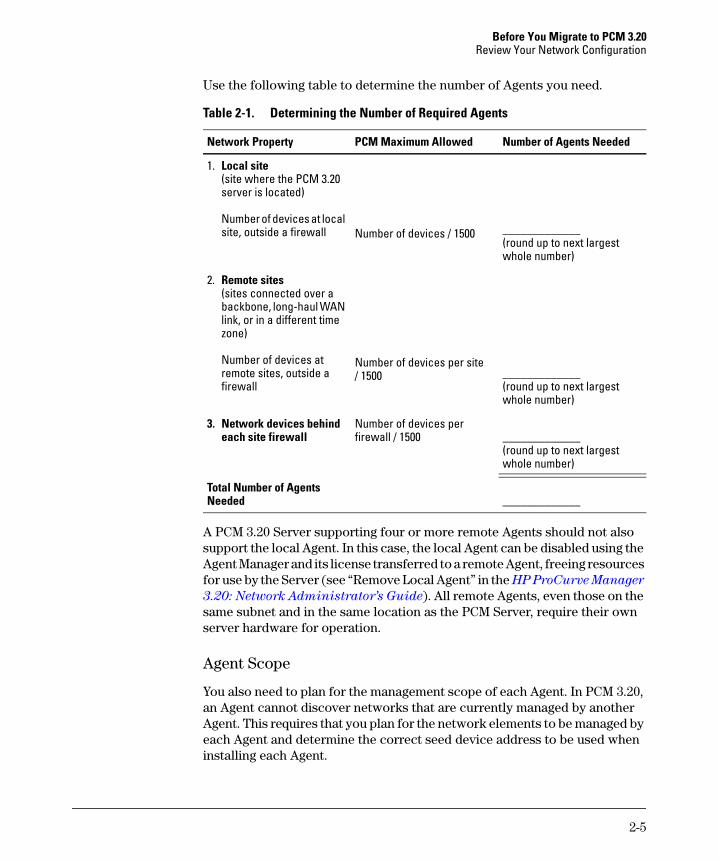
Use the following table to determine the number of Agents you need.
Table 2-1. Determining the Number of Required Agents
A PCM 3.20 Server supporting four or more remote Agents should not also support the local Agent. In this case, the local Agent can be disabled using the Agent Manager and its license transferred to a remote Agent, freeing resources for use by the Server (see “Remove Local Agent” in the HP ProCurve Manager
3.20: Network Administrator’s Guide). All remote Agents, even those on the same subnet and in the same location as the PCM Server, require their own server hardware for operation.
Agent Scope
You also need to plan for the management scope of each Agent. In PCM 3.20, an Agent cannot discover networks that are currently managed by another Agent. This requires that you plan for the network elements to be managed by each Agent and determine the correct seed device address to be used when installing each Agent.
Network Property PCM Maximum Allowed Number of Agents Needed
1. Local site(site where the PCM 3.20 server is located)
Number of devices at local site, outside a firewall Number of devices / 1500 _____________
(round up to next largest whole number)
2. Remote sites(sites connected over a backbone, long-haul WAN link, or in a different time zone)
Number of devices at remote sites, outside a firewall
Number of devices per site/ 1500 _____________
(round up to next largest whole number)
3. Network devices behind each site firewall
Number of devices per firewall / 1500 _____________
(round up to next largest whole number)
Total Number of Agents Needed _____________
2-6
Before You Migrate to PCM 3.20Review Your Network Configuration
When PCM 3.20 is first installed, the local Agent is installed and activated automatically. Once Discovery is completed, all networks and devices are assigned to the default Agent. If your network has fewer than 350 devices, your local Agent may be all that you require. However, if you have more than 350 devices to manage, or if you have devices behind a firewall (local or remote), or if your network has remote sites that are most efficiently managed using a remote Agent, you may require additional Agents.
If additional agents are required, you may need to configure the seed device address for Discovery for these Agents and transfer devices and subnets from the local Agent to a remote Agent, as required. See “Local Agent’s Seed Device” on page 4-6 for more information.
PCM 3.20 has a tool to help you in this task. The Agent Manager’s Move subnets wizard assists you in moving discovered subnets from one Agent to another. Refer to the HP ProCurve Manager 3.20: Network Administrator’s Guide for more information.
Agent Groups
In addition to planning for the number of Agents needed, you must decide whether you want PCM to display one map for each Agent or to integrate devices from multiple Agents into the same network map. Agents can be logically grouped to provide a hierarchical organization for PCM 3.20’s navi-gation tree. Device lists, subnet and VLAN lists, and topology maps are displayed per Agent Group, rather than all devices appearing in the same map. For each desired network map and device list, you should create an Agent Group.
Typically, one Agent Group per location is used, so that all devices at a location appear in the same network map and device list. However, you have the flexibility using PCM 3.20 to organize and manage network maps and device lists in a way that best fits your needs.
Number of Clients Supported
PCM 3.20 supports a total of 10 Clients (one local and up to nine remote). Customizable user profiles give an administrator the power to associate specific features of PCM and its plug-ins with specific devices. Users are associated with the user profile. This can result in more strict limits on which devices a user can manage or even view.
When logged in to a Client, these granular user profiles can limit the scope of management capabilities for each user, as well as limit visibility and omit details about other network devices or locations for local or remote users.
2-7
Before You Migrate to PCM 3.20Review Your Network Configuration
PCM Server Hardware Provisioning
After you determine the number of devices to be supported by the PCM 3.20 Server along with the number of required Agents and Clients, you need to provision computers for their use.
The best PCM Server performance is provided on 64-bit Microsoft Windows Server 2008 R2, followed by Microsoft Windows Server 2003, and then Micro-soft Windows XP Pro.
Also, you can run PCM 3.20 on the following virtual platforms:
■ VMware ESX Server V3.5 and V4.0
■ MS Windows Server 2008 R2 Hyper-V
For detailed information on the hardware and software requirements for PCM 3.20 components, refer to the HP ProCurve Network Management: Installa-
tion and Getting Started Guide.
2-8
Before You Migrate to PCM 3.20Understand PCM Licensing
Understand PCM Licensing
Overview
The following licensing guidelines apply when upgrading to PCM 3.20:
■ Both new PCM users with no currently installed PCM version and existing PCM users running a PCM version earlier than 2.30 are required to buy a base PCM 3.20 software license.
■ Upgrades from a PCM version earlier than 2.30 to PCM 3.20 are not supported. You must do one of the following:
• Uninstall your current PCM version and then install PCM 3.20. A base software license is required.
• Upgrade to PCM 2.30 and then upgrade from PCM 2.30 to PCM 3.20. An upgrade license is required.
■ Customers currently running PCM version 2.30 are required to purchase an upgrade license with 12-month maintenance to upgrade to PCM 3.20.
■ Customers currently running PCM version 3.0 or 3.10, which was registered more than 12 months ago, are required to purchase a 12-month maintenance license for an upgrade to PCM 3.20 and continued use of PCM software.
■ Customers currently running PCM version 2.30, 3.0, or 3.10, which was registered less than 12 months ago, may upgrade to PCM 3.20 by using the license key received when the PCM 2.30, 3.0, or 3.10 software was purchased.
The different types of PCM licenses are shown in Table 2-2 and described in:
■ “PCM 3.20 Base Licenses” on page 2-10
■ “Upgrade Licenses for PCM 2.30 and Earlier” on page 2-11
■ “Maintenance Licenses for PCM 3.xx” on page 2-13
2-9
Before You Migrate to PCM 3.20Understand PCM Licensing
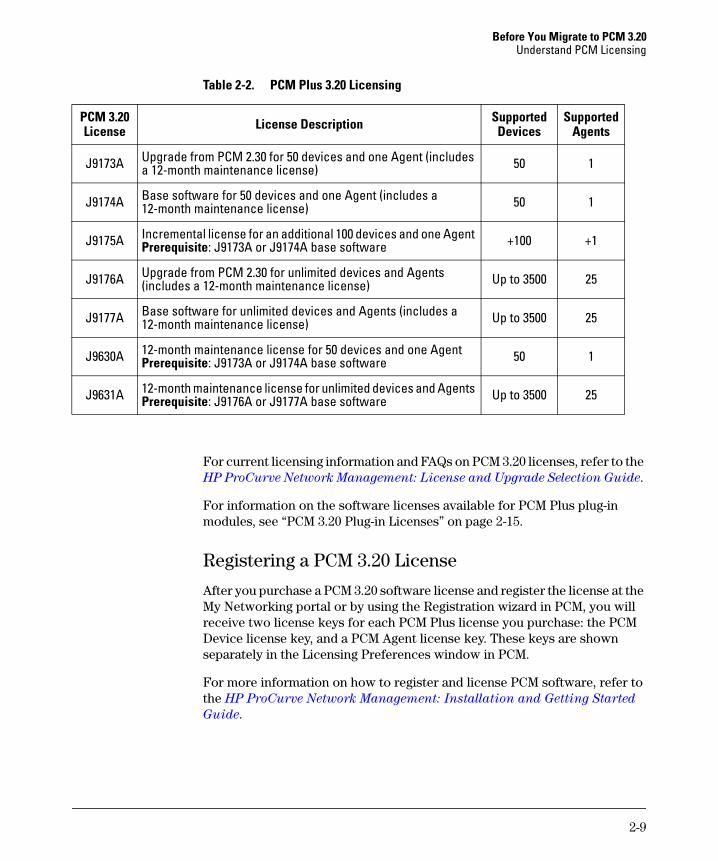
Table 2-2. PCM Plus 3.20 Licensing
For current licensing information and FAQs on PCM 3.20 licenses, refer to the HP ProCurve Network Management: License and Upgrade Selection Guide.
For information on the software licenses available for PCM Plus plug-in modules, see “PCM 3.20 Plug-in Licenses” on page 2-15.
Registering a PCM 3.20 License
After you purchase a PCM 3.20 software license and register the license at the My Networking portal or by using the Registration wizard in PCM, you will receive two license keys for each PCM Plus license you purchase: the PCM Device license key, and a PCM Agent license key. These keys are shown separately in the Licensing Preferences window in PCM.
For more information on how to register and license PCM software, refer to the HP ProCurve Network Management: Installation and Getting Started
Guide.
PCM 3.20 License License Description Supported
DevicesSupported
Agents
J9173A Upgrade from PCM 2.30 for 50 devices and one Agent (includes a 12-month maintenance license) 50 1
J9174A Base software for 50 devices and one Agent (includes a12-month maintenance license) 50 1
J9175A Incremental license for an additional 100 devices and one Agent Prerequisite: J9173A or J9174A base software +100 +1
J9176A Upgrade from PCM 2.30 for unlimited devices and Agents (includes a 12-month maintenance license) Up to 3500 25
J9177A Base software for unlimited devices and Agents (includes a 12-month maintenance license) Up to 3500 25
J9630A 12-month maintenance license for 50 devices and one Agent Prerequisite: J9173A or J9174A base software 50 1
J9631A 12-month maintenance license for unlimited devices and Agents Prerequisite: J9176A or J9177A base software Up to 3500 25
2-10
Before You Migrate to PCM 3.20Understand PCM Licensing
PCM 3.20 Base Licenses
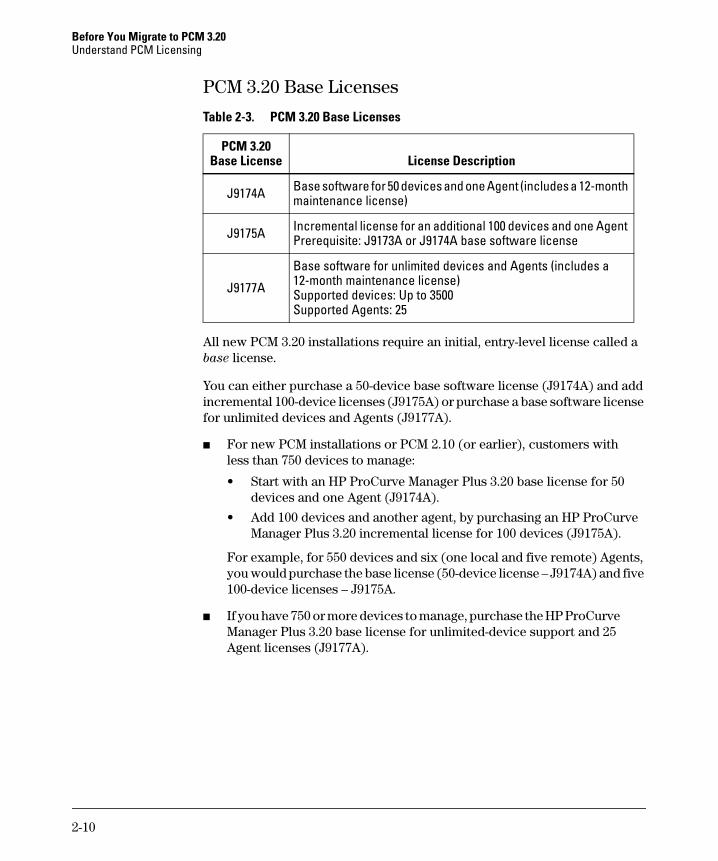
Table 2-3. PCM 3.20 Base Licenses
All new PCM 3.20 installations require an initial, entry-level license called a base license.
You can either purchase a 50-device base software license (J9174A) and add incremental 100-device licenses (J9175A) or purchase a base software license for unlimited devices and Agents (J9177A).
■ For new PCM installations or PCM 2.10 (or earlier), customers with less than 750 devices to manage:
• Start with an HP ProCurve Manager Plus 3.20 base license for 50 devices and one Agent (J9174A).
• Add 100 devices and another agent, by purchasing an HP ProCurve Manager Plus 3.20 incremental license for 100 devices (J9175A).
For example, for 550 devices and six (one local and five remote) Agents, you would purchase the base license (50-device license – J9174A) and five 100-device licenses – J9175A.
■ If you have 750 or more devices to manage, purchase the HP ProCurve Manager Plus 3.20 base license for unlimited-device support and 25 Agent licenses (J9177A).
PCM 3.20Base License License Description
J9174A Base software for 50 devices and one Agent (includes a 12-month maintenance license)
J9175A Incremental license for an additional 100 devices and one Agent Prerequisite: J9173A or J9174A base software license
J9177A
Base software for unlimited devices and Agents (includes a 12-month maintenance license) Supported devices: Up to 3500Supported Agents: 25
2-11
Before You Migrate to PCM 3.20Understand PCM Licensing
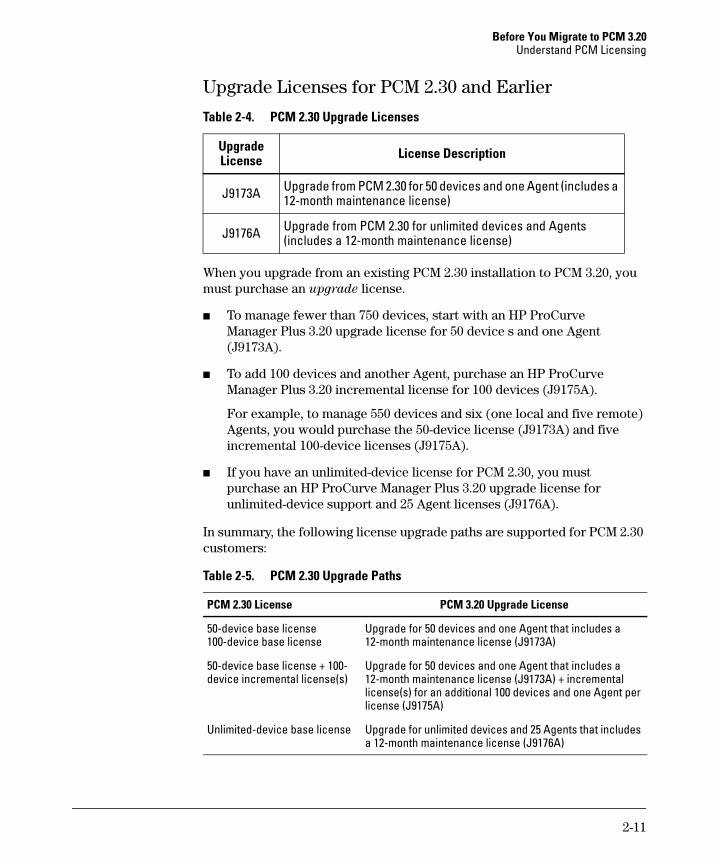
Upgrade Licenses for PCM 2.30 and Earlier
Table 2-4. PCM 2.30 Upgrade Licenses
When you upgrade from an existing PCM 2.30 installation to PCM 3.20, you must purchase an upgrade license.
■ To manage fewer than 750 devices, start with an HP ProCurve Manager Plus 3.20 upgrade license for 50 device s and one Agent (J9173A).
■ To add 100 devices and another Agent, purchase an HP ProCurve Manager Plus 3.20 incremental license for 100 devices (J9175A).
For example, to manage 550 devices and six (one local and five remote) Agents, you would purchase the 50-device license (J9173A) and five incremental 100-device licenses (J9175A).
■ If you have an unlimited-device license for PCM 2.30, you must purchase an HP ProCurve Manager Plus 3.20 upgrade license for unlimited-device support and 25 Agent licenses (J9176A).
In summary, the following license upgrade paths are supported for PCM 2.30 customers:
Table 2-5. PCM 2.30 Upgrade Paths
Upgrade License License Description
J9173A Upgrade from PCM 2.30 for 50 devices and one Agent (includes a 12-month maintenance license)
J9176A Upgrade from PCM 2.30 for unlimited devices and Agents (includes a 12-month maintenance license)
PCM 2.30 License PCM 3.20 Upgrade License
50-device base license100-device base license
Upgrade for 50 devices and one Agent that includes a 12-month maintenance license (J9173A)
50-device base license + 100-device incremental license(s)
Upgrade for 50 devices and one Agent that includes a 12-month maintenance license (J9173A) + incremental license(s) for an additional 100 devices and one Agent per license (J9175A)
Unlimited-device base license Upgrade for unlimited devices and 25 Agents that includes a 12-month maintenance license (J9176A)
2-12
Before You Migrate to PCM 3.20Understand PCM Licensing
The following PCM 3.20 upgrade paths are not supported:
■ PCM 1.x to PCM 3.20
■ PCM 2.30 base 50-device or PCM 2.30 incremental 100-device license to a PCM 3.20 unlimited-device license upgrade (J9176A)
■ PCM 2.30 unlimited-device license to a PCM 3.20 base 50-device license (J9173A) + incremental 100-device license (J9175A)
Migrating to PCM 2.30 from an Earlier PCM Version
If you are upgrading from PCM 2.10 or earlier, you must do one of the following:
■ Migrate to PCM 2.30 and then upgrade to PCM 3.20. An upgrade license is required.
■ Uninstall PCM 2.10 or earlier and then install PCM 3.20. A base software license for a new installation is required. See “PCM 3.20 Base Licenses” on page 2-10 for more information.
To install PCM 3.20, follow the instructions in the HP ProCurve Network
Management: Installation and Getting Started Guide. You start by download-ing the 60-day trial version from the HP ProCurve Manager Plus web site.
2-13
Before You Migrate to PCM 3.20Understand PCM Licensing
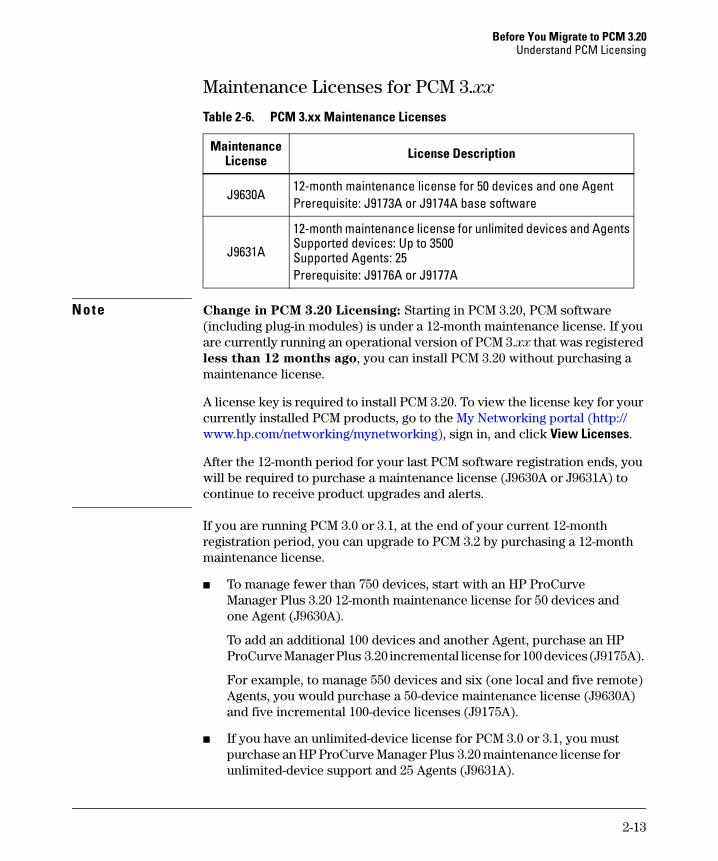
Maintenance Licenses for PCM 3.xx
Table 2-6. PCM 3.xx Maintenance Licenses
Note Change in PCM 3.20 Licensing: Starting in PCM 3.20, PCM software (including plug-in modules) is under a 12-month maintenance license. If you are currently running an operational version of PCM 3.xx that was registered less than 12 months ago, you can install PCM 3.20 without purchasing a maintenance license.
A license key is required to install PCM 3.20. To view the license key for your currently installed PCM products, go to the My Networking portal (http://www.hp.com/networking/mynetworking), sign in, and click View Licenses.
After the 12-month period for your last PCM software registration ends, you will be required to purchase a maintenance license (J9630A or J9631A) to continue to receive product upgrades and alerts.
If you are running PCM 3.0 or 3.1, at the end of your current 12-month registration period, you can upgrade to PCM 3.2 by purchasing a 12-month maintenance license.
■ To manage fewer than 750 devices, start with an HP ProCurve Manager Plus 3.20 12-month maintenance license for 50 devices and one Agent (J9630A).
To add an additional 100 devices and another Agent, purchase an HP ProCurve Manager Plus 3.20 incremental license for 100 devices (J9175A).
For example, to manage 550 devices and six (one local and five remote) Agents, you would purchase a 50-device maintenance license (J9630A) and five incremental 100-device licenses (J9175A).
■ If you have an unlimited-device license for PCM 3.0 or 3.1, you must purchase an HP ProCurve Manager Plus 3.20 maintenance license for unlimited-device support and 25 Agents (J9631A).
Maintenance License License Description
J9630A12-month maintenance license for 50 devices and one Agent Prerequisite: J9173A or J9174A base software
J9631A
12-month maintenance license for unlimited devices and AgentsSupported devices: Up to 3500Supported Agents: 25Prerequisite: J9176A or J9177A
2-14
Before You Migrate to PCM 3.20Understand PCM Licensing
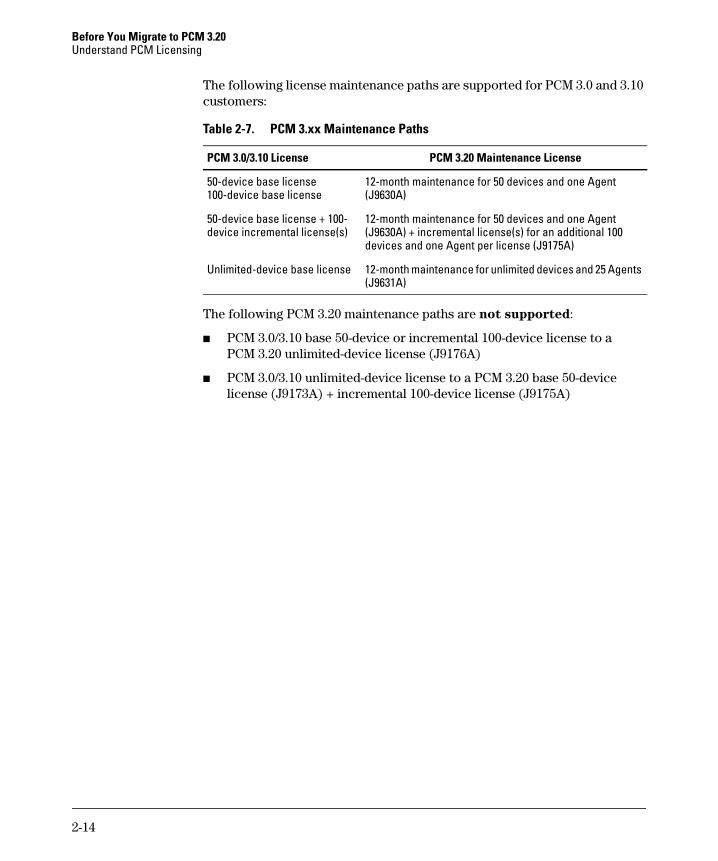
The following license maintenance paths are supported for PCM 3.0 and 3.10 customers:
Table 2-7. PCM 3.xx Maintenance Paths
The following PCM 3.20 maintenance paths are not supported:
■ PCM 3.0/3.10 base 50-device or incremental 100-device license to a PCM 3.20 unlimited-device license (J9176A)
■ PCM 3.0/3.10 unlimited-device license to a PCM 3.20 base 50-device license (J9173A) + incremental 100-device license (J9175A)
PCM 3.0/3.10 License PCM 3.20 Maintenance License
50-device base license100-device base license
12-month maintenance for 50 devices and one Agent (J9630A)
50-device base license + 100-device incremental license(s)
12-month maintenance for 50 devices and one Agent (J9630A) + incremental license(s) for an additional 100 devices and one Agent per license (J9175A)
Unlimited-device base license 12-month maintenance for unlimited devices and 25 Agents (J9631A)
2-15
Before You Migrate to PCM 3.20Understand PCM Licensing
PCM 3.20 Plug-in Licenses
This section describes the license requirements for new PCM 3.20 plug-in modules and supported upgrades to earlier PCM plug-in versions.
License upgrades for PCM plug-in modules are automatically included with a ProCurve Manager Plus 3.20 upgrade or maintenance license. See “Upgrade Licenses for PCM 2.30 and Earlier” on page 2-11 and “Maintenance Licenses for PCM 3.xx” on page 2-13 for details on PCM 3.20 licensing.
License upgrades are provided for the following PCM plug-in versions:
■ IDM 3.01 or earlier
■ NIM 2.10 or earlier
■ PMM 3.10 or earlier
When you migrate to PCM 3.20, upgrades from the following versions of PCM plug-in modules are not supported:
■ IDM 1.x
■ PMM 1.x
Contact your HP sales representative for information on how to purchase the latest version of a PCM plug-in module.
A migrated PCM plug-in module maintains the same type of license as the previous plug-in version; for example, an IDM 2.x 500-user license becomes an IDM 3.20 500-user license. The upgraded license has a new license key on the Management Software License tab under My Licenses in your My ProCurve account.
A PCM plug-in module is automatically upgraded when you install PCM 3.20 on an existing PCM 2.30, 3.0, or 3.10 Server in the following cases:
■ You migrate PCM 2.30 to PCM 3.20 and purchase an upgrade license for PCM 3.20 and the PCM plug-in modules you have installed.
■ You migrate PCM 3.0 or 3.10 software that was registered more
than 12 months ago to PCM 3.20 using a 12-month maintenance license.
■ You migrate PCM 3.0 or 3.10 software that was registered less than
12 months ago to PCM 3.20 using the maintenance license key for your currently installed PCM software products.
2-16
Before You Migrate to PCM 3.20Understand PCM Licensing
After the upgrade completes, you can move PCM 3.20 licenses and PCM plug-in module licenses to a new PCM Server (see “Transferring a PCM Plus 3.20 License to Another Server” on page B-1 for details).
Selecting an IDM 3.20 License
Note that HP ProCurve Identity Driven Manager 3.20 requires the purchase and installation of a PCM Plus 3.20 base license.
New licenses: If your managed network has 500 or fewer users, and if you are a new PCM user or an IDM 1.x customer, purchase the starter 500-user IDM license (J9438A).
If your managed network has 500 or fewer devices, purchase the starter 500-user license (J9438A) and then add a +1,000-user IDM license (J9440A). You must purchase the 500-user license before adding a +1,000-user license.
For a large number of users, you may determine that purchasing an unlimited-user license (J9439A) is the best choice.
Upgrade licenses: For current users of IDM 3.01 or earlier (except for IDM 1.x), your previous device license type is maintained for IDM 3.20 when you purchase and install a PCM Plus 3.20 license upgrade. For example, an IDM 3.01 500-user license becomes an IDM 3.20 500-user license. To add more devices, purchase the +1,000-user license (J9440A).
An upgrade to IDM 3.20 requires the purchase and installation of a PCM Plus 3.20 upgrade license on your current PCM 2.30, 3.0, or 3.10 Server.
Selecting a NIM 2.20 License
Note that HP ProCurve Network Immunity Manager 2.20 requires the pur-chase and installation of a PCM Plus 3.20 base license.
New licenses: If your network has up to 450 managed devices and if you are a new PCM user of NIM 2.20, purchase the base 50-device NIM license (J9161A). To add more devices, purchase additional +100-device NIM licenses (J9162A) for a total of 450 devices.
For networks with more than 450 managed devices, purchase the unlimited-device NIM license (J9163A).
2-17
Before You Migrate to PCM 3.20Understand PCM Licensing
Upgrade licenses: For users of NIM 2.10 or earlier, your device license type is maintained for NIM 2.20 when you purchase and install a PCM Plus 3.20 license upgrade. For example, a NIM 2.10 50-user license becomes a NIM 2.20 50-user license. To add more devices, purchase the +100-device NIM license (J9162A).
An upgrade from NIM 2.10 or earlier requires the purchase and installation of a PCM Plus 3.20 upgrade license on your current PCM 2.30, 3.0, or 3.10 Server.
Selecting a PMM 3.10 License
Note that HP ProCurve Mobility Manager 3.10 requires the purchase and installation of an HP ProCurve Manager Plus 3.20 base license.
Counting Managed Devices: When you count the number of access points in your network to be managed by PMM, take into account that PMM counts devices in a different way than PCM. PMM counts all devices that it handles, such as MSM controllers, controlled MSM APs and Radio Ports attached to the WESM controllers, and standalone APs. PCM does not count controlled MSM APs and Radio Ports attached to the WESM controllers as devices.
New licenses: If your network has less than 500 access points, purchase the base 50-device PMM license (J9291A) and add incremental +100-device PMM licenses (J9292A) as needed.
If your network has more than 500 access points, consider the purchase of an unlimited-device PMM license (J9293A). The unlimited-device license includes the base PMM software.
For more information, refer to the HP ProCurve Network Management:
License and Upgrade Selection Guide.
Upgrade licenses: For current users of PMM 3.01 or earlier (except for PMM 1.x), your previous device license type is maintained for PMM 3.10 when you purchase and install a PCM Plus 3.20 license upgrade. For example, a PMM 3.01 50-device license becomes a PMM 3.10 50-device license. To add more devices, purchase the +100-device PMM license (J9292A).
An upgrade to PMM 3.10 requires the purchase and installation of a PCM Plus 3.20 license on your current PCM 2.30, 3.0, or 3.10 Server.

2-18
Before You Migrate to PCM 3.20Understand PCM Licensing
3-1
3
Migrating Your Current Configuration
PCM 2.10 or Earlier Migration . . . . . . . . . . . . . . . . . . . . . . . . . . . . . . . . . . . . 3-2PCM 2.30 or Later Migration . . . . . . . . . . . . . . . . . . . . . . . . . . . . . . . . . . . . . . 3-3
What’s New in the PCM 3.20 Installer? . . . . . . . . . . . . . . . . . . . . . . . . . . 3-3Global Preferences . . . . . . . . . . . . . . . . . . . . . . . . . . . . . . . . . . . . . . . . . . 3-7Traffic Policies . . . . . . . . . . . . . . . . . . . . . . . . . . . . . . . . . . . . . . . . . . . . . . 3-9User Defined Devices, CIP Files . . . . . . . . . . . . . . . . . . . . . . . . . . . . . . . 3-9Custom Groups . . . . . . . . . . . . . . . . . . . . . . . . . . . . . . . . . . . . . . . . . . . . 3-10User Profiles . . . . . . . . . . . . . . . . . . . . . . . . . . . . . . . . . . . . . . . . . . . . . . 3-10PCM Plug-In Modules . . . . . . . . . . . . . . . . . . . . . . . . . . . . . . . . . . . . . . . 3-10
Create a Backup . . . . . . . . . . . . . . . . . . . . . . . . . . . . . . . . . . . . . . . . . . . . . . . 3-13Backup . . . . . . . . . . . . . . . . . . . . . . . . . . . . . . . . . . . . . . . . . . . . . . . . . . . 3-13Restore to the Same Server . . . . . . . . . . . . . . . . . . . . . . . . . . . . . . . . . . 3-13Moving to a New Server . . . . . . . . . . . . . . . . . . . . . . . . . . . . . . . . . . . . . 3-14
3-2
Migrating Your Current ConfigurationPCM 2.10 or Earlier Migration
PCM 2.10 or Earlier Migration
PCM versions 2.10 or earlier cannot be directly migrated to PCM 3.20.
There is no automatic migration of PCM 2.10 (or earlier) application data when installing PCM 3.20. As a result of improvements to PCM 3.20, PCM 2.10 (or earlier) data is incompatible and cannot be migrated.
If you have PCM 2.10 (or earlier) policies and alerts that you want to use in PCM 3.20, HP recommends installing PCM 3.20 on new server hardware and disabling your PCM 2.10 (or earlier) system. You may then review the PCM 2.10 (or earlier) policies and settings while configuring the required settings in PCM 3.20.
Note If you must install PCM 3.20 on the same server hardware running PCM 2.10 (or earlier), check the server hardware requirements for PCM 3.20 to make sure your existing server meets them. For hardware and software prerequi-sites, refer to the HP ProCurve Network Management: Installation and
Getting Started Guide.
To install PCM 3.20 on the same server that is running PCM 2.10 (or earlier), HP recommends that you follow one of these procedures:
■ Uninstall the PCM 2.10 (or earlier) application and restart the server. Then install PCM 3.20 by following the instructions in the HP
ProCurve Network Management: Installation and Getting Started
Guide.
■ Migrate the PCM 2.10 (or earlier) application to PCM 2.30 or 3.0. Then follow the instructions in this chapter to upgrade to PCM 3.20.
3-3
Migrating Your Current ConfigurationPCM 2.30 or Later Migration
PCM 2.30 or Later Migration
Only PCM versions 2.30, 3.0, and 3.10 can be migrated to PCM 3.20.
To migrate a PCM 2.30 (or later) Server, you must install the trial version of PCM 3.20 on the server currently running PCM 2.30 or later. The installer recognizes the existing PCM 2.30 or later application and plug-ins and migrates the PCM 2.30 or later data to PCM 3.20, as described in this chapter.
After installing the trial version of PCM 3.20, you must then register your PCM 3.20 upgrade licenses. Refer to the “Licensing PCM Plus Software” chapter in the HP ProCurve Network Management: Installation and Getting
Started Guide for more information.
To review the screen-by-screen migration procedure, see “PCM 2.30 to PCM 3.20: Example Migration” on page A-2.
What’s New in the PCM 3.20 Installer?
■ Operating system support: PCM 3.20 is supported on 32-bit and 64-bit operating systems.
■ Licensing changes: The migration of PCM 2.30 or later systems, which were registered more 12 months ago, require a new software license to upgrade to PCM 3.20.
32-bit/64-bit Operating System Support
Starting in PCM 3.20, you can install PCM software on either a 32-bit or 64-bit operating system. The 32-bit and 64-bit executable files are delivered on the PCM 3.20 DVD:
■ pcm-C.03.20-Win32.exe (32-bit)
■ pcm-C.03.20-x64.exe (64-bit)
Refer to figure for information about the operating systems that are supported for a PCM 3.20 Server, remote Agent, and remote Client installation.
32-bit/64-bit Installation Notes:
■ If you try to run the 32-bit executable file on a 64-bit operating system, or the 64-bit executable file on a 32-bit operating system, an error message is displayed and the installation stops.
3-4
Migrating Your Current ConfigurationPCM 2.30 or Later Migration
■ Only the PCM 3.20 Server, local Agent, and local Client are supported on a 64-bit operating system. An upgrade to a PCM 3.20 remote Agent and remote Client:
• Are supported only on a 32-bit operating system.
• Can be downloaded from a PCM 3.20 Server running on either a 32-bit or 64-bit system.
• Can connect to a PCM 3.20 Server running on either a 32-bit or 64-bit system.
■ A PCM 3.10 installation running on a 64-bit system can be upgraded to PCM 3.20 on the same 64-bit operating system.
For more information on the hardware and software prerequisites for PCM 3.20, refer to the HP ProCurve Network Management: Installation and
Getting Started Guide.
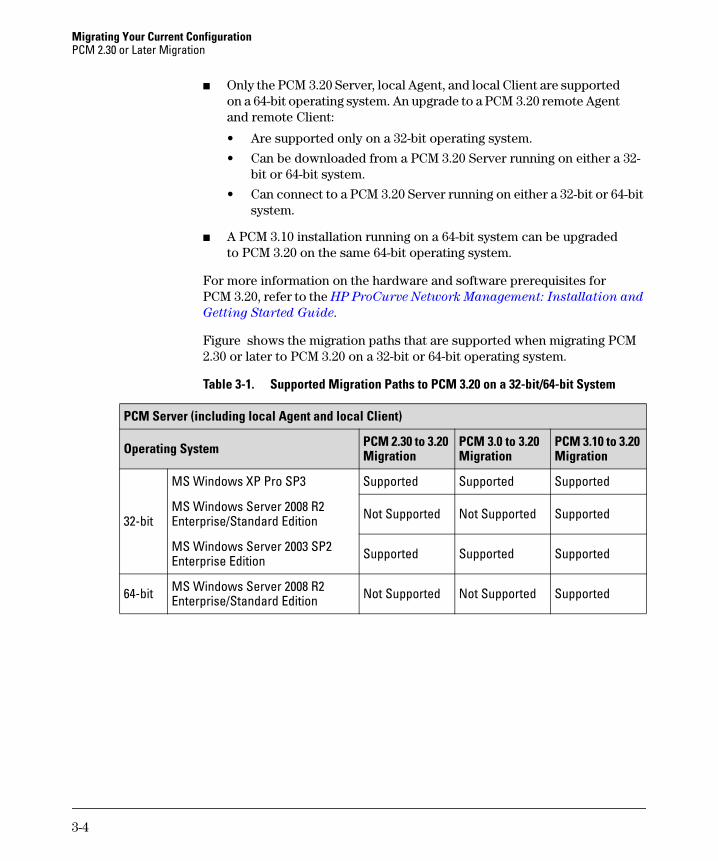
Figure shows the migration paths that are supported when migrating PCM 2.30 or later to PCM 3.20 on a 32-bit or 64-bit operating system.
Table 3-1. Supported Migration Paths to PCM 3.20 on a 32-bit/64-bit System
PCM Server (including local Agent and local Client)
Operating System PCM 2.30 to 3.20 Migration
PCM 3.0 to 3.20 Migration
PCM 3.10 to 3.20 Migration
32-bit
MS Windows XP Pro SP3 Supported Supported Supported
MS Windows Server 2008 R2 Enterprise/Standard Edition Not Supported Not Supported Supported
MS Windows Server 2003 SP2 Enterprise Edition Supported Supported Supported
64-bit MS Windows Server 2008 R2 Enterprise/Standard Edition Not Supported Not Supported Supported
3-5
Migrating Your Current ConfigurationPCM 2.30 or Later Migration
PCM Remote Agent
Operating System PCM 2.30 to 3.20 Migration
PCM 3.0 to 3.20 Migration
PCM 3.10 to 3.20 Migration
32-bit
MS Windows XP Pro SP3 Not Supported Supported Supported
MS Windows Server 2008 R2 Enterprise/Standard Edition Not Supported Not Supported Supported
MS Windows Server 2003 SP2 Enterprise Edition Not Supported Supported Supported
64-bit MS Windows Server 2008 R2 Enterprise/Standard Edition Not Supported Not Supported Supported
ONE zl Module Not Supported Not Supported Supported
PCM Remote Client
Operating System PCM 2.30 to 3.20 Migration
PCM 3.0 to 3.20 Migration
PCM 3.10 to 3.20 Migration
32-bit
MS Windows 7 Professional Not Supported Not Supported Supported
MS Windows Vista SP1Business/Ultimate Not Supported Supported Supported
MS Windows XP Pro SP3 Supported Supported Supported
MS Windows Server 2008 R2 Enterprise/Standard Edition Not Supported Not Supported Supported
MS Windows Server 2003 SP2 Enterprise Edition, Supported Supported Supported
64-bit
MS Windows 7 Professional Not Supported Not Supported Supported
MS Windows Vista SP1Business/Ultimate Not Supported Not Supported Supported
MS Windows Server 2008 R2 Enterprise/Standard Edition Not Supported Not Supported Supported
3-6
Migrating Your Current ConfigurationPCM 2.30 or Later Migration
Licensing Changes
Starting in PCM 3.20, a 12-month maintenance license is required to continue to receive PCM updates and alerts.
When you upgrade PCM 2.30 (or later) to PCM 3.20, a new software license may be required. Review the following cases before you migrate to PCM 3.20:
■ If you are migrating PCM 2.30 to PCM 3.20, you must purchase an upgrade license for PCM 3.20 and the PCM plug-in modules you have installed.
For more information, see:
• “Upgrade Licenses for PCM 2.30 and Earlier” on page 2-11
• “PCM 3.20 Plug-in Licenses” on page 2-15
■ If you are migrating PCM 3.0 or 3.10 to PCM 3.20 and your current PCM software was registered more than 12 months ago, you must purchase a 12-month maintenance license for PCM 3.20 and the PCM plug-in modules you have installed.
For more information, see:
• “Maintenance Licenses for PCM 3.xx” on page 2-13
• “PCM 3.20 Plug-in Licenses” on page 2-15
■ If you are migrating PCM 3.0 or 3.10 to PCM 3.20 and your PCM software was registered less than 12 months ago, you are able to use the maintenance license key for your currently installed PCM software products: PCM Server, remote Agents, and PCM plug-in modules.
To view the license keys for your installed PCM products, contact your HP sales representative or go to the My Networking portal, sign in, and click View Licenses.
Note that when your current 12-month registration period ends, you will be required to purchase a 12-month maintenance license in order to continue to receive PCM updates and alerts.
For more information on maintenance licensing, see “Maintenance Licenses for PCM 3.xx” on page 2-13.
For information on how to register a license for your PCM products, refer to “Using the Registration Wizard” and “Using the My Networking Web Site” in the HP ProCurve Network Management: Installation and Getting
Started Guide.
3-7
Migrating Your Current ConfigurationPCM 2.30 or Later Migration
Global Preferences
PCM 3.20 migrates policies, alerts, data, and configurations from PCM 2.30 or later. The exceptions are described in the following sections.
Discovery Settings
Starting in PCM 3.0, all discovery preferences are moved from Tools > Prefer-ences to Agent Manager, which is accessed by clicking the Agent Manager icon on the global toolbar. The Discovery screen is now a sub-tab on an Agent screen.
In PCM 3.20, discovery preferences are configured per Agent. You enter your preferences when you create an Agent. Agent Manager allows you to perform the following tasks for each Agent:
■ Assign an Agent to the appropriate Agent Group.
■ Specify a seed device address.
■ Set device access parameters as required.
■ Activate an Agent.
■ Move discovered networks to managed subnets as required.
If you are migrating PCM 2.30 discovery settings to PCM 3.20, you will need to specify a seed device address or default device access parameters. If none are entered, PCM 2.30 global values are migrated to the local Agent’s settings.
If you are migrating PCM 3.0 or 3.10 to PCM 3.20, you do not need to specify a seed device address or default device access parameters for the local Agent. Your currently configured settings are migrated.

3-8
Migrating Your Current ConfigurationPCM 2.30 or Later Migration
Discovery schedules are not migrated. You must configure the schedule for each Agent on the Discovery > Status tab.
Figure 3-1. Discovery Schedules
Network Maps
Network maps from PCM 2.30 are not migrated to PCM 3.20; network maps from PCM 3.0 and 3.10 are migrated.
PCM 3.20 creates network maps by Agent and Agent Group. As a part of planning the Agents and Agent Groups you need, keep in mind the network maps that you require. See “Planning for Agents and Agent Groups” on page 4-3 for more information.
Background images used in PCM 2.30 are not migrated to PCM 3.20.
3-9
Migrating Your Current ConfigurationPCM 2.30 or Later Migration
Policy Manager and Alerts
Scheduled CLI policies created using the Configuration Manager CLI wizard are not migrated.
Policy Manager and Alert policies created in PCM 2.30, 3.0, and 3.10 are migrated to PCM 3.20. Policy Manager and Alert policies created prior to PCM 2.20 are not migrated.
Note PCM 2.30 Text Files: The installation of PCM 3.20 on an existing PCM 2.30 Server may generate text files related to items that are not migrated. This information has no use in PCM 3.20. The text files may be deleted. The text files are stored on an existing PCM 2.30 Server at: <install directory>\server\pre-<productname>_<major version#>_<minor ver-sion#>_<object name>_summary.txt
When using the default PCM 3.20 installation choices, the text files are stored at: Program Files\Hewlett-Packard\PNM\server\<pre-PCM_3_0_traffic_policies_summary.txt
Also, if you were using NIM 1.0 when you installed PCM 3.20 on a server, the text files are stored at: Program Files\Hewlett-Packard\PNM\server\pre-NIM_2_0_security_policies_summary.txt
Traffic Policies
In PCM 3.20, individual Agents (instead of the PCM Server) collect traffic samples. This is true even if the PCM Server supports only the local Agent.
Therefore, when you migrate PCM 2.30 to PCM 3.20, traffic policies are not migrated. When you migrate PCM 3.0 or 3.10 to PCM 3.20, traffic policies are migrated.
User Defined Devices, CIP Files
Configurable Integration Platform (CIP) files with scripts do not appear in the PCM 3.20 CIP Wizard.
3-10
Migrating Your Current ConfigurationPCM 2.30 or Later Migration
Custom Groups
Existing PCM 2.30, 3.0, and 3.10 Custom Groups are migrated to PCM 3.20. In the navigation tree, Custom Groups appear at the top of the tree in a folder separate from the hierarchy of Agent Groups and Agents. Custom Groups can contain devices from more than one Agent Group or Agent.
If you move devices in a migrated Custom Groups folder to a different Agent Group, the device membership in the Custom Group is maintained because PCM 3.20 Custom Groups can span Agent Groups.
User Profiles
PCM 2.30, 3.0, and 3.10 system-defined Administrator, Operator, and View-only user profiles are migrated.
A PCM 2.30 “No Access” user profile is not migrated since PCM 3.20 has no equivalent profile.
PCM Plug-In Modules
Not all previous versions of PCM plug-in modules are compatible with PCM 3.20. Only the following PCM plug-in versions are automatically migrated when you install PCM 3.20 on a PCM Server that is running PCM 2.30 or later:
■ IDM 2.3 and later
■ NIM 1.0 and later
■ PMM 2.0 and later
When you install PCM 3.20 on a new system, you must select the plug-in modules to be installed.
When upgrading PCM 2.30 or later to PCM 3.20, the installer reviews the current installation and automatically selects the plug-in modules that are running before migrating them to the latest version: IDM 3.20, NIM 2.20, and PMM 3.10.
The following sections describe the migration of each PCM plug-in module.
3-11
Migrating Your Current ConfigurationPCM 2.30 or Later Migration
Migrating IDM 2.3 (and later) to IDM 3.20
Migrated: All policies, alerts, device data, and user data are migrated to IDM 3.20.
Caution After you upgrade the IDM server, you must uninstall any IDM Agents that are running before you install the new IDM 3.20 Agent. Earlier versions of the IDM Agent are not compatible with IDM 3.20 and PCM 3.20.
For information on how to install an IDM Agent, refer to “Before You Begin” in the HP ProCurve Identity Driven Manager User’s Guide.
Not migrated: None.
Migrating NIM 1.0 (and later) to NIM 2.20
Migrated: All data and configurations are migrated.
The following NIM 1.0 policies are moved to new locations:
■ ProCurve alerts are migrated to the NIM 2.20 ProCurve NBAD cate-gory.
■ ProCurve virus throttle alerts are migrated to the NIM 2.20 ProCurve Wired category.
■ TCP/UDP fan-out alerts are migrated to the NIM 2.20 ProCurve NBAD TCP sweep type.
Not migrated: The following NIM 1.0 information is not migrated to NIM 2.20:
■ All external alerts
■ Average packet deviation (NIM 2.20 does not support this threat)
■ Default alerts (NIM 2.20 uses a new set of default policies)
■ Security default policy (NIM 2.20 uses a new set of default policies)
3-12
Migrating Your Current ConfigurationPCM 2.30 or Later Migration
Migrating PMM 2.0 (and later) to PMM 3.10
Migrated: When migrating from PMM 2.0 (and later) to PMM 3.10, all PMM policies, data, and configuration settings, such as RF Planner parameters and PMM preferences, are migrated.
Not migrated: The following PMM 2.0 (and later) information is not migrated to PMM 3.10:
■ Statistics reports
• Wireless Associated Station List
• Wireless Bandwidth Table
• Wireless Rx/Tx Errors
• Wireless Station Connection History
■ Information displayed in charts
■ Configuration settings of managed wireless devices (all configured settings are read from discovered devices)
■ Operational status of managed wireless devices
■ PMM alarms
3-13
Migrating Your Current ConfigurationCreate a Backup
Create a Backup
Caution After you upgrade from PCM 2.30 or later to PCM 3.20, you cannot revert back to your previous PCM 2.30 or later application. Creating a backup for your PCM 2.30 or later application is the only way you can restore it to operation. The backup and restore processes are described below
Backup
Follow these steps to create a complete backup of your PCM 2.30 or later installation:
1. Stop all PCM services by using the Administrative Tools function in the Windows Control Panel:
• HP ProCurve Datastore
• HP ProCurve Network Manager Agent
• HP ProCurve Network Manager Server
2. Create a Zip file or copy the entire <install_dir>/pnm folder.
ProCurve recommends that you note the approximate time on the server that the backup was created, should you need to restore the system. Restoring to the server with a time earlier than when the backup was done is detected as tampering and invalidates the licenses.
3. Start services.
Restore to the Same Server
Restoring to the same server where the backup was made avoids possible issues with PCM licensing. The IP address must be the same as the IP address in use when the backup was made.
1. Stop all PCM services:
• HP ProCurve Datastore
• HP ProCurve Network Manager Agent
• HP ProCurve Network Manager Server
2. Replace the entire <install_dir>/pnm folder with the folder from the backup.
3. Start all PCM services.
4. Reinstall all Agents and Clients.
3-14
Migrating Your Current ConfigurationCreate a Backup
Moving to a New Server
The first two steps in the process below must be done before installing the backup. If these are not completed before the installation of the backup the restored system will not operate.
In addition, you must install on the new server the exact version and options of PCM and plug-ins as used on the old server when the backup was made. For example, if you backup a system that contains PCM 2.30 with Auto Update 3 and IDM 2.25 Auto Update 1, you need to restore the backup on a system which also contains PCM 2.30 with Auto Update 3 and IDM 2.25 Auto Update 1.
Lastly, be sure the install folder on the new server matches that of the old server.
1. Set the IP address of the new server to that of old server. If you cannot decommission the old server, stop the PCM services and change it's IP address.
2. Make sure that the time on the new server matches or is later than the time on the old server when the backup was made. If the time on the new server is earlier than the time on the old server, the licensing engine detects this as tampering and invalidates the licenses.
Install on the new server the exact version and options of PCM and plug-ins as used on the old server.
3. Stop all PCM services by using the Administrative Tools function in the Windows Control Panel:
• HP ProCurve Datastore
• HP ProCurve Network Manager Agent
• HP ProCurve Network Manager Server
4. Replace the entire <install_dir>/pnm folder with the folder from the backup.
5. Start all PCM services.
4-1
4
Migration Example
Overview . . . . . . . . . . . . . . . . . . . . . . . . . . . . . . . . . . . . . . . . . . . . . . . . . . . . . . 4-2Planning for Agents and Agent Groups . . . . . . . . . . . . . . . . . . . . . . . . . . . . . 4-3
Agent Groups . . . . . . . . . . . . . . . . . . . . . . . . . . . . . . . . . . . . . . . . . . . . . . . 4-3Local Agent . . . . . . . . . . . . . . . . . . . . . . . . . . . . . . . . . . . . . . . . . . . . . . . . 4-4
Hardware Requirements . . . . . . . . . . . . . . . . . . . . . . . . . . . . . . . . . . . . . . . . . 4-4PCM 3.20 Server . . . . . . . . . . . . . . . . . . . . . . . . . . . . . . . . . . . . . . . . . . . . 4-4Four Remote Agents . . . . . . . . . . . . . . . . . . . . . . . . . . . . . . . . . . . . . . . . . 4-4
PCM License Requirements . . . . . . . . . . . . . . . . . . . . . . . . . . . . . . . . . . . . . . 4-5Installing PCM 3.20 Server Software . . . . . . . . . . . . . . . . . . . . . . . . . . . . . . . 4-6
Local Agent’s Seed Device . . . . . . . . . . . . . . . . . . . . . . . . . . . . . . . . . . . . 4-6Agent Configuration . . . . . . . . . . . . . . . . . . . . . . . . . . . . . . . . . . . . . . . . . 4-7Define Agent Groups . . . . . . . . . . . . . . . . . . . . . . . . . . . . . . . . . . . . . . . . . 4-8User Profiles and User Accounts . . . . . . . . . . . . . . . . . . . . . . . . . . . . . 4-12
Installing PCM 3.20 Remote Clients . . . . . . . . . . . . . . . . . . . . . . . . . . . . . . . 4-16

4-2
Migration ExampleOverview
Overview
In this chapter, a fictitious network is migrated to PCM 3.20 from another network management product. The information and recommendations pre-sented in the previous two chapters are applied to deliver an efficient, cen-trally-managed network management solution for a global network.
This example features a deployment that includes three customer locations spread across the globe, connected by WAN links. The network set up at each site is illustrated below.
Figure 4-1. Customer Networks Connected by WAN Links
Earlier versions of PCM may have been inadequate to address some of the customer’s needs. PCM 3.20’s distributed architecture supports this environ-ment. Some planning is required to consider deployment options and recom-mend the best solutions to several challenges.
For example, the server and remote Agent computers will need to be ade-quately provisioned. It will be important to place Agents in locations where they will have free access to the devices they must manage, and to group the Agents appropriately, so that each group’s network map and device list will contain the elements that belong together logically. Also discussed is a strat-egy for adding user roles for regional administration while continuing to support central administration over the entire intranet.
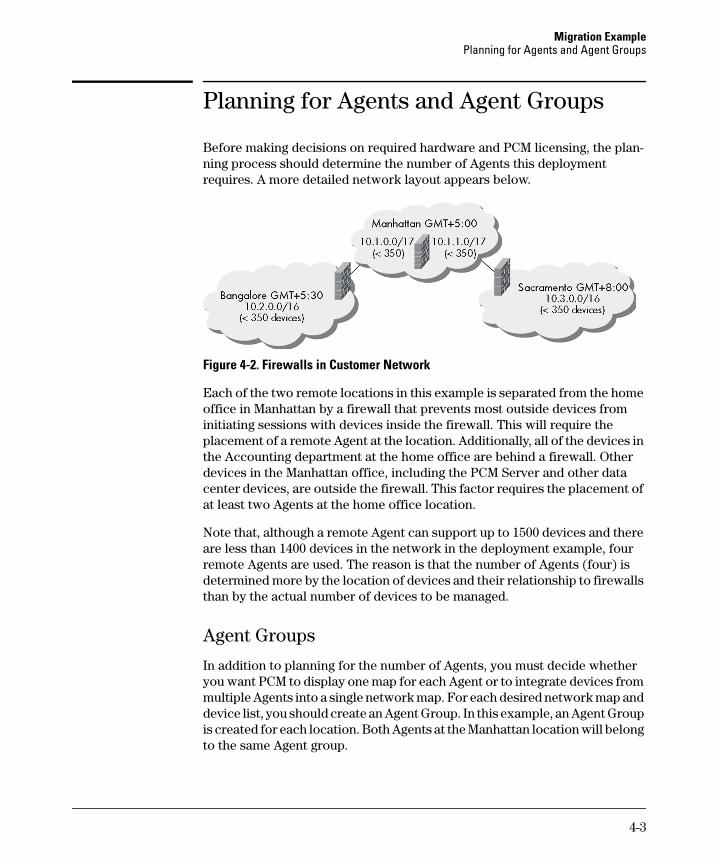
4-3
Migration ExamplePlanning for Agents and Agent Groups
Planning for Agents and Agent Groups
Before making decisions on required hardware and PCM licensing, the plan-ning process should determine the number of Agents this deployment requires. A more detailed network layout appears below.
Figure 4-2. Firewalls in Customer Network
Each of the two remote locations in this example is separated from the home office in Manhattan by a firewall that prevents most outside devices from initiating sessions with devices inside the firewall. This will require the placement of a remote Agent at the location. Additionally, all of the devices in the Accounting department at the home office are behind a firewall. Other devices in the Manhattan office, including the PCM Server and other data center devices, are outside the firewall. This factor requires the placement of at least two Agents at the home office location.
Note that, although a remote Agent can support up to 1500 devices and there are less than 1400 devices in the network in the deployment example, four remote Agents are used. The reason is that the number of Agents (four) is determined more by the location of devices and their relationship to firewalls than by the actual number of devices to be managed.
Agent Groups
In addition to planning for the number of Agents, you must decide whether you want PCM to display one map for each Agent or to integrate devices from multiple Agents into a single network map. For each desired network map and device list, you should create an Agent Group. In this example, an Agent Group is created for each location. Both Agents at the Manhattan location will belong to the same Agent group.
4-4
Migration ExampleHardware Requirements
Local Agent
The PCM Server in this scenario will be located at the home office in Manhat-tan, outside the firewall that separates the Accounting department from other devices at this location. As a general rule, if a PCM 3.20 Server accepts data from four or more remote Agents, you should deactivate the local Agent. The devices in the data center and other areas outside the Accounting department firewall could be managed either by the local Agent or a remote Agent. In this example, all of the Agents are deployed as remote Agents, so the local Agent would need to be deactivated.
Hardware Requirements
The PCM 3.20 Server in this environment will need to support four remote Agents. This will require a system with at least 6 GB memory and four CPU cores. The server should have a gigabit NIC to enable it to keep up with data coming in from the remote Agents, and enough disk space to store the database, at least 120 GB in size.
Each of the remote Agents should be sized appropriately as well. The amount of disk space, CPU cores, and memory shown below are based on recom-mended values for the PCM 3.20 Server and its Agents, rather than minimum values. Refer to the HP ProCurve Network Management: Installation and
Getting Started Guide for more information on hardware requirements.
PCM 3.20 Server ■ Windows Server 2003 SP2, Enterprise Edition (64-bit)
■ 1 Gbps network adapter
■ 4 CPU cores and 6 GB memory
■ 120 GB available disk space
Four Remote Agents■ Windows Server 2003 SP2, Enterprise Edition (32-bit)
■ 100 Mbps network adapter
■ 2 CPU cores and 3 GB memory
■ 80 GB available disk space
4-5
Migration ExamplePCM License Requirements
PCM License Requirements
PCM 3.20 licensing includes two components: the device count and the Agent count. A PCM 3.20 installation includes a 60-day trial license that includes support for a single Agent, which by default, is the local Agent.
However, in the example, it was determined that because the of the distributed nature of the customer’s network, four remote Agents are required. The customer must, therefore, purchase and install the licenses before he can begin configuring the Agents. Unlicensed Agents cannot discover networks or manage devices. (A PCM Agent can manage up to 1500 devices.)
If the actual number of managed devices is significantly lower than the maximum number of devices that can be managed by four remote Agents (4 x 1500 = 6000 devices), the customer might benefit from purchasing a 50-device base license (including one Agent) at US list price and add up to seven +100-device and one-Agent incremental licenses before it equals the cost of an unlimited license.
The customer must purchase and then register the licenses by following the same procedure as in earlier PCM versions:
■ Enter the Registration ID and Installation ID at the My Networking portal.
■ Add the licenses in the Preferences > Registration and Licensing > License screen in PCM 3.20.
To access the My Networking portal, go to http://www.hp.com/networking/mynetworking.
4-6
Migration ExampleInstalling PCM 3.20 Server Software
Installing PCM 3.20 Server Software
Local Agent’s Seed Device
A deployment in which the local Agent will be deactivated requires some consideration of the local Agent’s seed device. If you plan to deactivate the local Agent, you should take steps to prevent it from discovering networks that you intend to assign to remote Agents. However, the PCM installation process requires that you provide a seed device IP address or DNS Name for the local Agent, even if you plan to deactivate it after installation.
If you provide the IP address of a seed device that you intend to later associate with one of the remote Agents, the local Agent will begin discovering networks immediately after installation completes (the local Agent is automatically installed and activated). The Agent Manager allows you to provide the same seed device IP address to more than one Agent; however, any networks that have been discovered by one Agent may not also be discovered by another Agent.
Take into account that, if the networks you intend to manage using a remote Agent are already discovered by the local Agent, the remote Agent cannot discover them. You would need to change the IP address (or DNS name) of the seed device used by the local Agent and move the managed subnets to the remote Agent using the Agent Manager.
To avoid the steps required to transfer discovered devices from the local Agent, you can provide an unreachable IP address during PCM 3.20 installa-tion as the local Agent’s seed device. When the local Agent service starts it will not discover any networks and consequently, no devices. This allows the administrator to move directly to remote Agent installation, configuration, and activation.
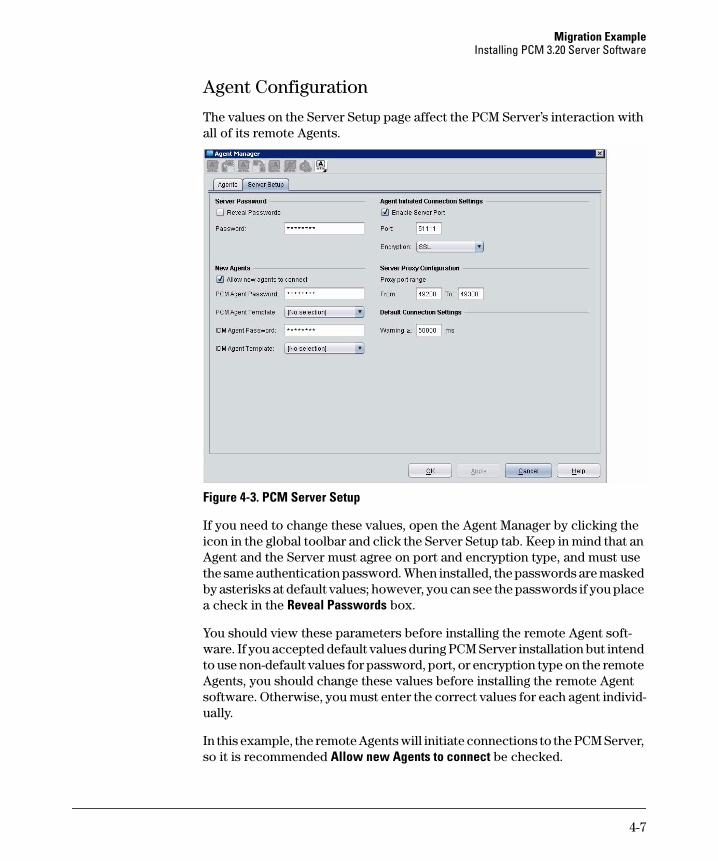
4-7
Migration ExampleInstalling PCM 3.20 Server Software
Agent Configuration
The values on the Server Setup page affect the PCM Server’s interaction with all of its remote Agents.
Figure 4-3. PCM Server Setup
If you need to change these values, open the Agent Manager by clicking the icon in the global toolbar and click the Server Setup tab. Keep in mind that an Agent and the Server must agree on port and encryption type, and must use the same authentication password. When installed, the passwords are masked by asterisks at default values; however, you can see the passwords if you place a check in the Reveal Passwords box.
You should view these parameters before installing the remote Agent soft-ware. If you accepted default values during PCM Server installation but intend to use non-default values for password, port, or encryption type on the remote Agents, you should change these values before installing the remote Agent software. Otherwise, you must enter the correct values for each agent individ-ually.
In this example, the remote Agents will initiate connections to the PCM Server, so it is recommended Allow new Agents to connect be checked.
4-8
Migration ExampleInstalling PCM 3.20 Server Software
There are several steps involved in adding a remote Agent. Some of these steps are the same whether the Agent will initiate a connection to the PCM Server (a requirement for Agents in this example due to the existence of firewalls) or whether the Server will initiate a connection with the Agent.
Other steps involved in preparing the PCM server for remote Agent support are different between Server-initiated and Agent-initiated communication. See the HP ProCurve Manager 3.20: Network Administrator’s Guide for more information on installing a remote Agent.
After installing the ProCurve Management Agent software on the computers you have chosen to act as the remote Agents, return to the ProCurve Manager Client interface to define Agent groups and activate the remote Agents (see “Define Agent Groups” on page 4-8). You may also need to modify parameters that will govern each Agent’s discovery activities, and provide the SNMP and CLI credentials it will use for communication with its managed devices.
Define Agent Groups
Before the remote Agents can be activated and begin collecting network and device information, you must create one or more groups for them. The number of Agent Groups should be decided in the planning phase. In this example, one Agent Group per location is created so that all devices at that location appear in the same network map and device list.
4-9
Migration ExampleInstalling PCM 3.20 Server Software
To create an Agent Group, select the Agent Groups folder in the PCM naviga-tion tree. Click the Agent Groups tab, click the Add an Agent group icon, enter a group name, and click OK.
Figure 4-4. Creating an Agent Group
Additional description for the Agent Group is optional. The Agent Group’s name and description can be modified at any time after it has been created.
After you have created the groups, the icon that represents the Default Agent Group is red. When remote Agents initiate a connection with the PCM Server, they are temporarily associated with the Default Agent Group. None of the remote Agents have been activated. Consequently, the icon that represents the Default Agent Group shows red to indicate that there is a problem with that Agent group.
After Agent software has been installed on the remote Agent platforms, they immediately begin to initiate connections with the PCM Server. Each Agent is displayed in the list of Agents. Select the Agent Groups folder in the navigation tree and click the Agents tab. The yellow triangle exclamation point icon, combined with the contents of the “Status” column indicate that these Agents need to be activated. Because the Agents have not been activated, this screen does not show values for latency or CPU utilization. Note the Agents’ associ-ation with the Default Agent Group.
4-10
Migration ExampleInstalling PCM 3.20 Server Software
Figure 4-5. List of Agents
The Agents in this example have already begun to initiate connections with the PCM Server; however, several tasks must be performed before they are ready to begin discovering networks (subnets) and devices.
The sequence of the listed tasks is significant. For example, if you have not specified a seed device, Agent activation will not be successful and you will receive an error message.
Caution The Agent Manager will allow you to activate an Agent before you assign it to an Agent Group. Note that the Agent’s group membership cannot be modified
after it has been activated. An improper Agent Group assignment would require deactivation and deletion of the Agent before it can be reconnected to the Server and assigned to the correct Agent Group.
PCM 3.20 default device access settings are described in the section “Rules for Configuring Device Access with PCM” in the “Managing Network Devices” chapter of the HP ProCurve Manager 3.20: Network Administrator’s Guide. The default device access settings can be changed for each Agent using the Agent Manager (Agents tab > PCM tab > Device Access). Modifications may be made before or after activation. Activation is a prerequisite to defining man-aged subnets.
Note On a PCM Server that manages four or more remote Agents, the local Agent should be deactivated. Although the PCM Server could support three remote Agents along with the local Agent, only remote Agents are used in this example.
If the local Agent is not being used, it should be deactivated to return system resources to the PCM Server.
4-11
Migration ExampleInstalling PCM 3.20 Server Software
All four of the remote Agents need to be activated. As mentioned earlier, you cannot activate an Agent until you have set a seed device. Also, activation will not be successful if there are unapplied changes on any of the Agent’s pages. You need to apply or cancel any changes before the Agent Manager will process your activation request.
After the Agents have been activated, verify that:
■ All Agents have successfully established a connection with the PCM Server.
■ Each Agent has responsibility for the correct set of managed subnets.
■ The maps for each Agent and Agent Group include the complete set of devices for the Agent location.
In this example, the Bangalore Agent Group contains four devices. Because this Agent Group has a single Agent, the Bangalore Agent Group network map is the same as the Bangalore Agent map.
Figure 4-6. Agent Map
If devices are missing, you can run a manual discovery to include them.
If subnets are missing, use the Agent Manager (Agents tab > PCM tab > Discovery tab > Managed Subnet) to configure them.
4-12
Migration ExampleInstalling PCM 3.20 Server Software
User Profiles and User Accounts
In PCM 2.30, user profiles and the association of user accounts with user profiles are supported. PCM 3.0 and later supports granular modifications to user profiles on two levels. At the first level, a check box enables or disables nearly every operation possible within PCM and its plug-ins. User profiles can be assigned any subset of PCM, IDM, NIM, or MM tasks. Secondly, profiles also can be associated with all devices managed by a given Agent, the devices managed by all of the Agents in a given Agent group, Custom groups, or individual devices.
To enable regional administrators, start with the operator profile, which is different from the administrator profile only with regard to user management. Specifically, the administrator profile can manage users and operators cannot. In this example, the cloned operator profiles are further modified to remove capabilities that have a global effect. For example, the regional operators will not have control over platform licensing or backup.
When you make changes to a profile, any users associated with the profile are affected immediately.
One profile for each region is created because a user’s association with an Agent or Agent Group is based on their user profile.
In this example, the profiles are named after the address range that will be assigned to each profile (e.g. 10.1.0.0/16). Later, a profile will be associated with devices in an Agent Group, to limit users’ network visibility.
In addition, platform capabilities have been removed from the regional oper-ator accounts. This is primarily to prevent regional users from making changes that could affect devices in other groups, such as platform licensing and modifying global preferences.
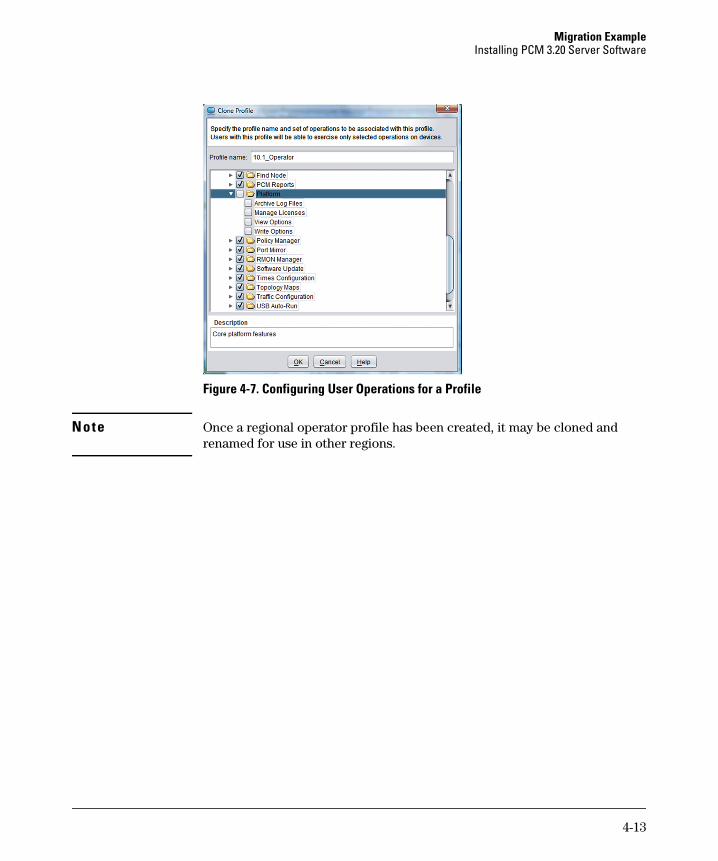
4-13
Migration ExampleInstalling PCM 3.20 Server Software
Figure 4-7. Configuring User Operations for a Profile
Note Once a regional operator profile has been created, it may be cloned and renamed for use in other regions.
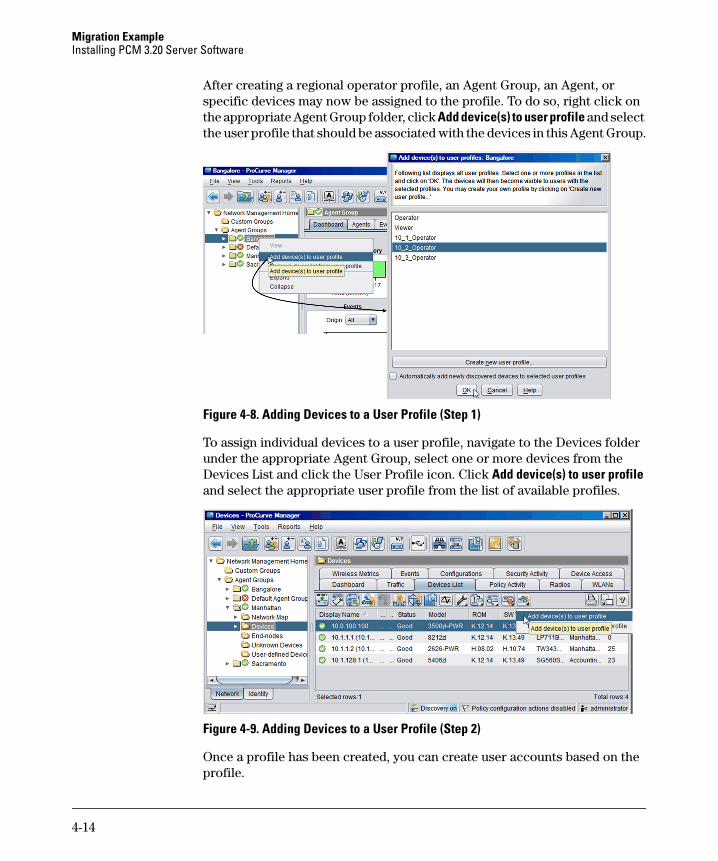
4-14
Migration ExampleInstalling PCM 3.20 Server Software
After creating a regional operator profile, an Agent Group, an Agent, or specific devices may now be assigned to the profile. To do so, right click on the appropriate Agent Group folder, click Add device(s) to user profile and select the user profile that should be associated with the devices in this Agent Group.
Figure 4-8. Adding Devices to a User Profile (Step 1)
To assign individual devices to a user profile, navigate to the Devices folder under the appropriate Agent Group, select one or more devices from the Devices List and click the User Profile icon. Click Add device(s) to user profile and select the appropriate user profile from the list of available profiles.
Figure 4-9. Adding Devices to a User Profile (Step 2)
Once a profile has been created, you can create user accounts based on the profile.
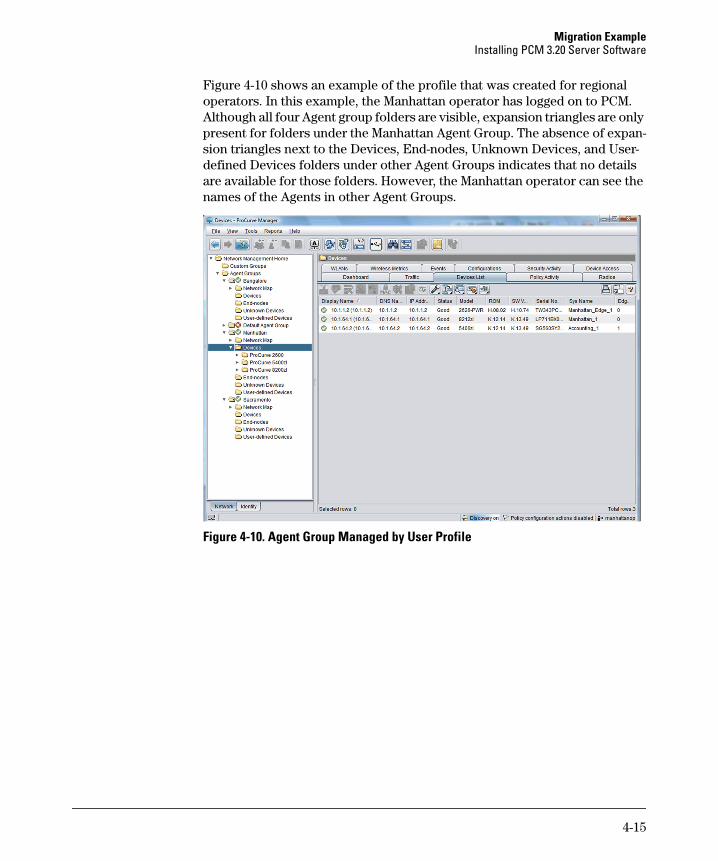
4-15
Migration ExampleInstalling PCM 3.20 Server Software
Figure 4-10 shows an example of the profile that was created for regional operators. In this example, the Manhattan operator has logged on to PCM. Although all four Agent group folders are visible, expansion triangles are only present for folders under the Manhattan Agent Group. The absence of expan-sion triangles next to the Devices, End-nodes, Unknown Devices, and User-defined Devices folders under other Agent Groups indicates that no details are available for those folders. However, the Manhattan operator can see the names of the Agents in other Agent Groups.
Figure 4-10. Agent Group Managed by User Profile
4-16
Migration ExampleInstalling PCM 3.20 Remote Clients
Installing PCM 3.20 Remote Clients
When you install ProCurve Manager 3.xx, both the Server and Client functions are installed on the Server. As in previous PCM versions, you can also install a Client on any number of other computers in your network that have network access to the PCM 3.20 Server. Refer to the HP ProCurve Manager 3.20:
Network Administrator’s Guide for instructions on installing PCM 3.20 Cli-ents.
If you are installing the PCM 3.20 Client on a PC that previously hosted a PCM 2.30, 3.0, or 3.10 Client, follow these steps:
1. Uninstall the PCM 2.30, 3.0, or 3.10 Client software from the PC.
2. Delete the PNM folder at Program Files > Hewlett-Packard > PNM.
3. Restart the PC.
4. Install the PCM 3.20 Client.
5-1
5
Troubleshooting Your PCM 3.20 Migration
PCM 3.20 Remote Client Fails . . . . . . . . . . . . . . . . . . . . . . . . . . . . . . . . . . . . . 5-2Only 10 Agents Available, not 25, in Agent Manager . . . . . . . . . . . . . . . . . . 5-3Additional Troubleshooting Information . . . . . . . . . . . . . . . . . . . . . . . . . . . 5-4
5-2
Troubleshooting Your PCM 3.20 MigrationPCM 3.20 Remote Client Fails
PCM 3.20 Remote Client Fails
If you are installing the PCM 3.20 Client on a PC that previously hosted a PCM 2.30 Client, follow these steps:
1. Uninstall the PCM 2.30 Client software from the PC.
2. Delete the PNM folder at Program Files > Hewlett-Packard > PNM.
3. Restart the PC.
4. Install the PCM 3.20 Client.
If the problem persists, review “Adding PCM Remote Client Stations” in the HP ProCurve Manager 3.20: Network Administrator’s Guide.
5-3
Troubleshooting Your PCM 3.20 MigrationOnly 10 Agents Available, not 25, in Agent Manager
Only 10 Agents Available, not 25, in Agent Manager
After you install PCM 3.20, your MyUnlimited Device license shows only 10 agents available, not 25, in Agent Manager.
If you install the PCM 3.20 software on a server that previously hosted a PCM 3.0 Server with an unlimited device license, you must uninstall the unlimited device license and receive an Uninstall Key from the My Networking portal (My ProCurve > My Licenses > Uninstall Licenses in left Navigation pane). Then, on the My Networking portal, use the Uninstall Key to generate a new Registration ID and install it on your PCM 3.20 Server. Agent Manager now shows 100 Agents available (the unlimited Agent value).
Note PCM 3.20 supports a maximum of 25 Agents (including local and remote Agents). While the unlimited device license results in 100 Agents being dis-played as available, only 25 Agents may be used.
Additional Troubleshooting Information
The HP ProCurve Manager 3.20: Network Administrator’s Guide provides a wealth of troubleshooting information for problems you may encounter when installing and using PCM 3.20 and its plug-in modules. Troubleshooting infor-mation includes the following:
■ Agents
■ Discovery
■ LLDP
■ Device communication problems
■ Device logs
■ Traffic monitor
■ CIP
A-1
Migrating From PCM 2.30 or Later
A
Migrating From PCM 2.30 or Later
PCM 2.30 to PCM 3.20: Example Migration . . . . . . . . . . . . . . . . . . . . . . . . . . A-2Step 1: Introduction . . . . . . . . . . . . . . . . . . . . . . . . . . . . . . . . . . . . . . . . A-2Step 2: License Agreement . . . . . . . . . . . . . . . . . . . . . . . . . . . . . . . . . . . A-3Step 3: Readme . . . . . . . . . . . . . . . . . . . . . . . . . . . . . . . . . . . . . . . . . . . . A-4Step 4: Configuration Detection . . . . . . . . . . . . . . . . . . . . . . . . . . . . . . A-5Step 5: License Key . . . . . . . . . . . . . . . . . . . . . . . . . . . . . . . . . . . . . . . . . A-7Step 6: Selecting Plug-In Modules . . . . . . . . . . . . . . . . . . . . . . . . . . . . . A-8Step 7: Installing IDM (Optional) . . . . . . . . . . . . . . . . . . . . . . . . . . . . . A-9Step 8: Upgrade Information . . . . . . . . . . . . . . . . . . . . . . . . . . . . . . . . A-10Step 9: Pre-Installation Summary . . . . . . . . . . . . . . . . . . . . . . . . . . . . A-11Step 10: Installing PCM 3.20 . . . . . . . . . . . . . . . . . . . . . . . . . . . . . . . . . A-13Step 11: Data Migration . . . . . . . . . . . . . . . . . . . . . . . . . . . . . . . . . . . . A-15Step 12: NNMi Integration (Optional) . . . . . . . . . . . . . . . . . . . . . . . . . A-16Step 13: SSL Certificate Credentials . . . . . . . . . . . . . . . . . . . . . . . . . . A-19Step 14: PCM Server and Remote Agent Connections . . . . . . . . . . . A-20Step 15: Install Complete . . . . . . . . . . . . . . . . . . . . . . . . . . . . . . . . . . . A-22
Next Steps Following Migration . . . . . . . . . . . . . . . . . . . . . . . . . . . . . . . . . . A-23Install Auto Updates . . . . . . . . . . . . . . . . . . . . . . . . . . . . . . . . . . . . . . . A-23Upgrade and Install Licenses . . . . . . . . . . . . . . . . . . . . . . . . . . . . . . . . A-23Install Remote Agents . . . . . . . . . . . . . . . . . . . . . . . . . . . . . . . . . . . . . . A-24Configure User Profiles and User Accounts . . . . . . . . . . . . . . . . . . . A-24Install Remote Clients . . . . . . . . . . . . . . . . . . . . . . . . . . . . . . . . . . . . . . A-24
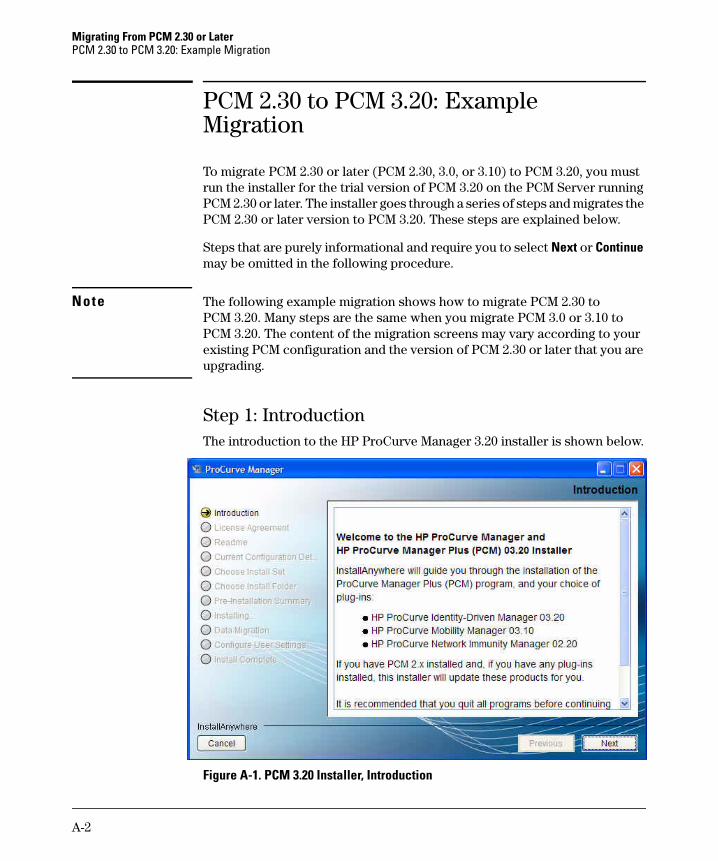
A-2
Migrating From PCM 2.30 or LaterPCM 2.30 to PCM 3.20: Example Migration
PCM 2.30 to PCM 3.20: Example Migration
To migrate PCM 2.30 or later (PCM 2.30, 3.0, or 3.10) to PCM 3.20, you must run the installer for the trial version of PCM 3.20 on the PCM Server running PCM 2.30 or later. The installer goes through a series of steps and migrates the PCM 2.30 or later version to PCM 3.20. These steps are explained below.
Steps that are purely informational and require you to select Next or Continue may be omitted in the following procedure.
Note The following example migration shows how to migrate PCM 2.30 to PCM 3.20. Many steps are the same when you migrate PCM 3.0 or 3.10 to PCM 3.20. The content of the migration screens may vary according to your existing PCM configuration and the version of PCM 2.30 or later that you are upgrading.
Step 1: IntroductionThe introduction to the HP ProCurve Manager 3.20 installer is shown below.
Figure A-1. PCM 3.20 Installer, Introduction
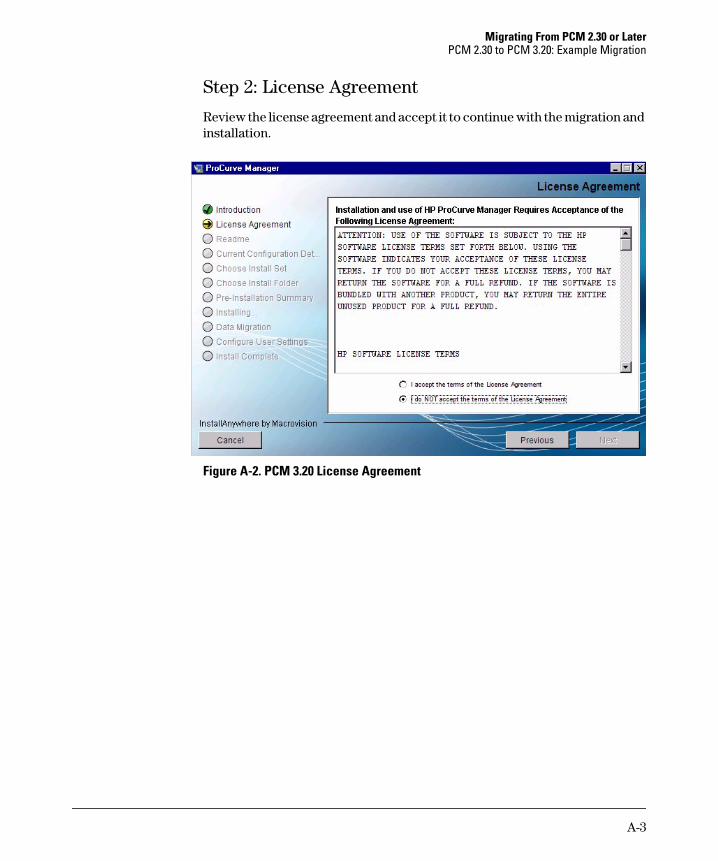
A-3
Migrating From PCM 2.30 or LaterPCM 2.30 to PCM 3.20: Example Migration
Step 2: License Agreement
Review the license agreement and accept it to continue with the migration and installation.
Figure A-2. PCM 3.20 License Agreement
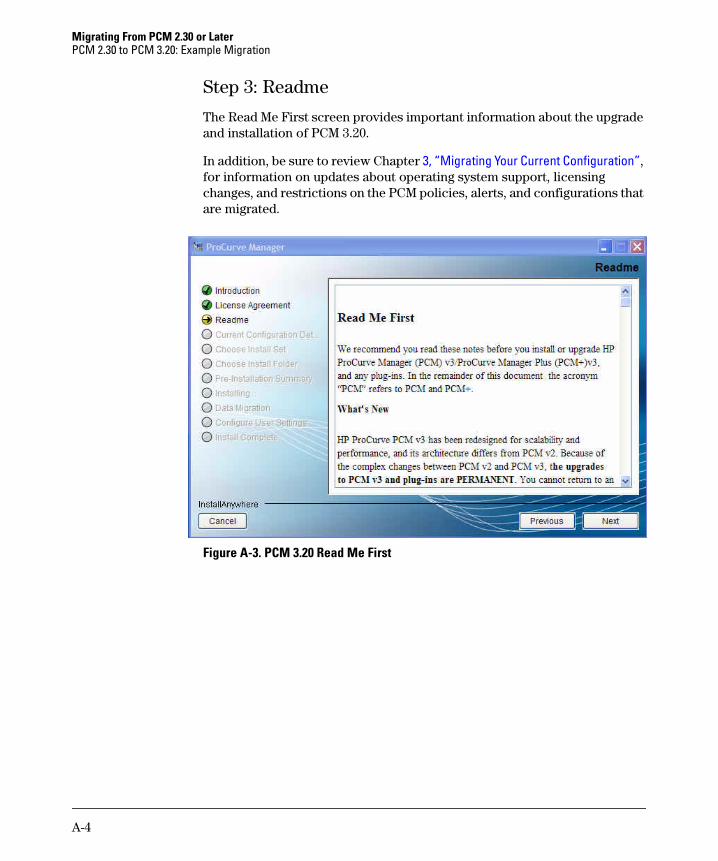
A-4
Migrating From PCM 2.30 or LaterPCM 2.30 to PCM 3.20: Example Migration
Step 3: Readme
The Read Me First screen provides important information about the upgrade and installation of PCM 3.20.
In addition, be sure to review Chapter 3, “Migrating Your Current Configuration”, for information on updates about operating system support, licensing changes, and restrictions on the PCM policies, alerts, and configurations that are migrated.
Figure A-3. PCM 3.20 Read Me First
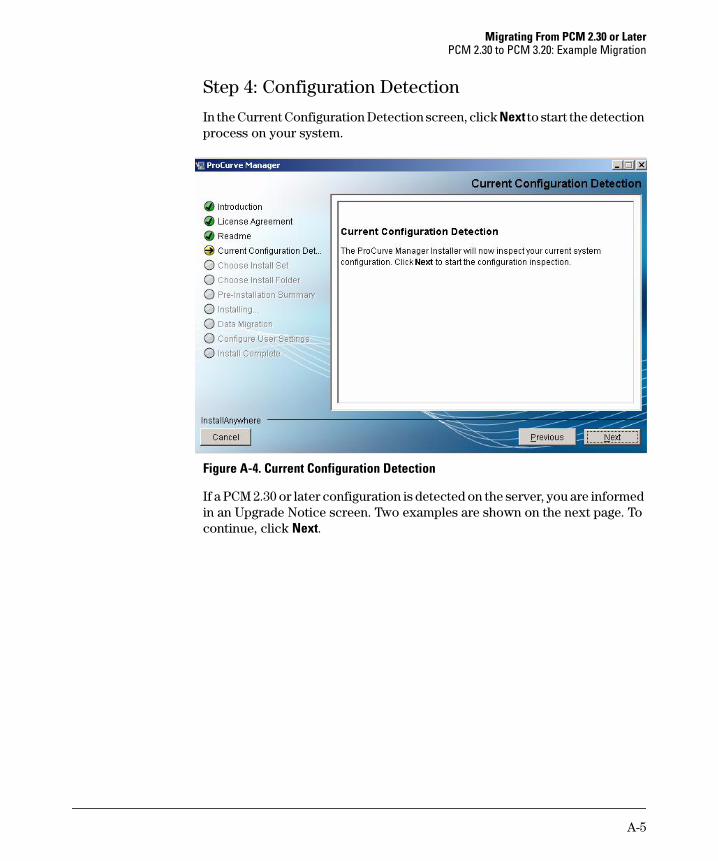
A-5
Migrating From PCM 2.30 or LaterPCM 2.30 to PCM 3.20: Example Migration
Step 4: Configuration Detection
In the Current Configuration Detection screen, click Next to start the detection process on your system.
Figure A-4. Current Configuration Detection
If a PCM 2.30 or later configuration is detected on the server, you are informed in an Upgrade Notice screen. Two examples are shown on the next page. To continue, click Next.
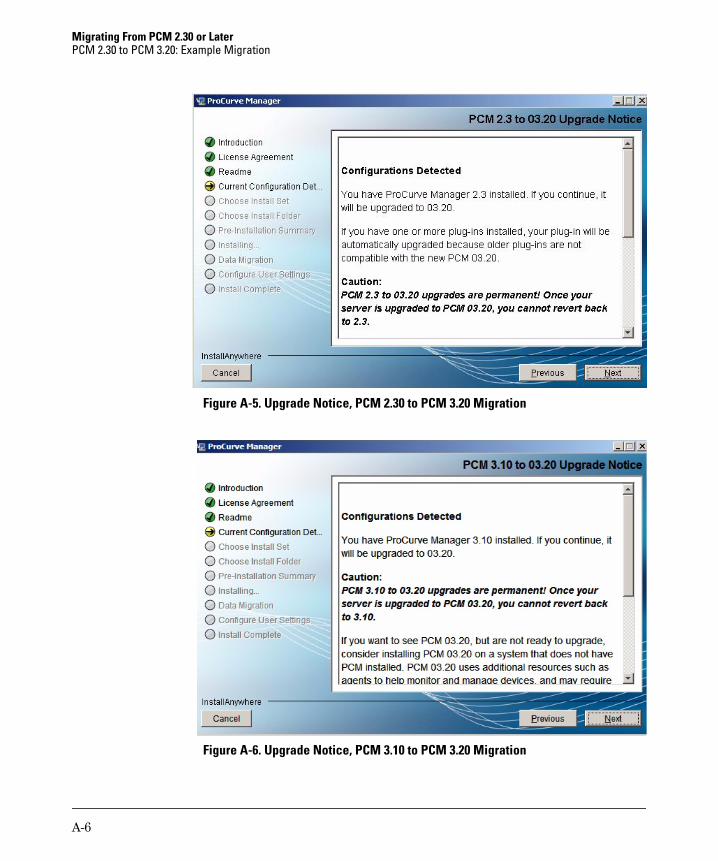
A-6
Migrating From PCM 2.30 or LaterPCM 2.30 to PCM 3.20: Example Migration
Figure A-5. Upgrade Notice, PCM 2.30 to PCM 3.20 Migration
Figure A-6. Upgrade Notice, PCM 3.10 to PCM 3.20 Migration
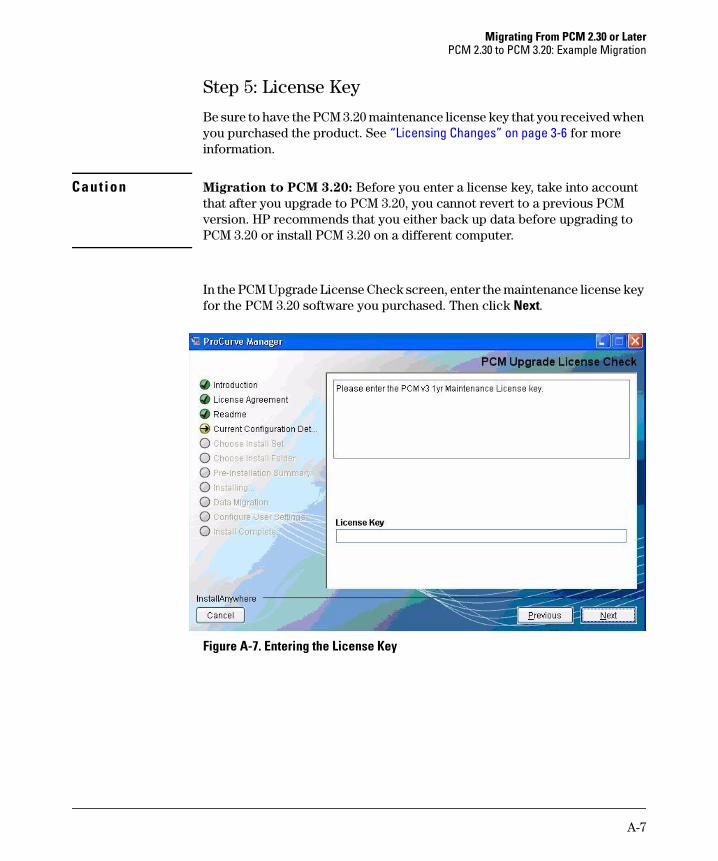
A-7
Migrating From PCM 2.30 or LaterPCM 2.30 to PCM 3.20: Example Migration
Step 5: License Key
Be sure to have the PCM 3.20 maintenance license key that you received when you purchased the product. See “Licensing Changes” on page 3-6 for more information.
Caution Migration to PCM 3.20: Before you enter a license key, take into account that after you upgrade to PCM 3.20, you cannot revert to a previous PCM version. HP recommends that you either back up data before upgrading to PCM 3.20 or install PCM 3.20 on a different computer.
In the PCM Upgrade License Check screen, enter the maintenance license key for the PCM 3.20 software you purchased. Then click Next.
Figure A-7. Entering the License Key
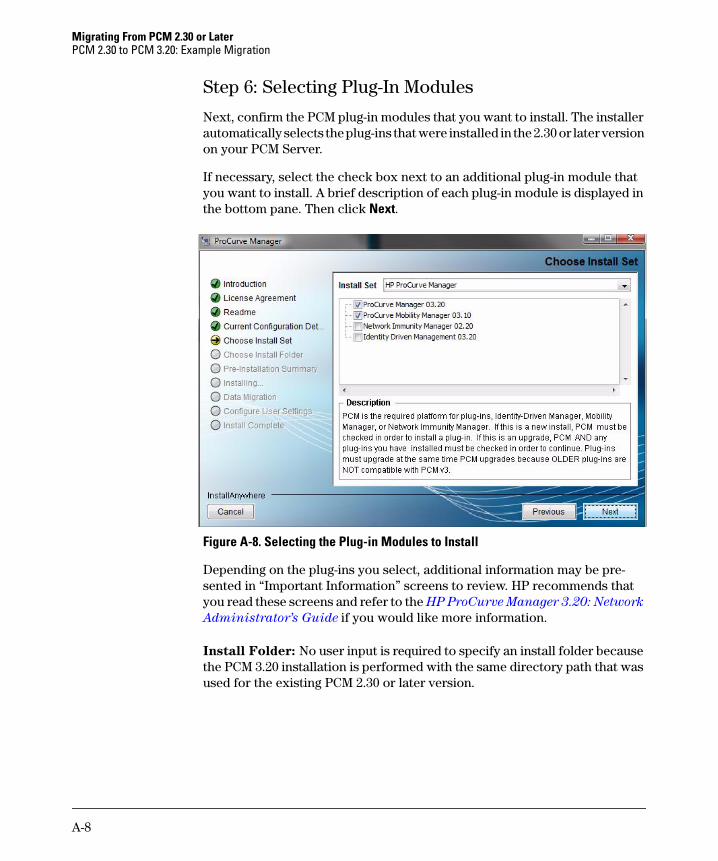
A-8
Migrating From PCM 2.30 or LaterPCM 2.30 to PCM 3.20: Example Migration
Step 6: Selecting Plug-In Modules
Next, confirm the PCM plug-in modules that you want to install. The installer automatically selects the plug-ins that were installed in the 2.30 or later version on your PCM Server.
If necessary, select the check box next to an additional plug-in module that you want to install. A brief description of each plug-in module is displayed in the bottom pane. Then click Next.
Figure A-8. Selecting the Plug-in Modules to Install
Depending on the plug-ins you select, additional information may be pre-sented in “Important Information” screens to review. HP recommends that you read these screens and refer to the HP ProCurve Manager 3.20: Network
Administrator’s Guide if you would like more information.
Install Folder: No user input is required to specify an install folder because the PCM 3.20 installation is performed with the same directory path that was used for the existing PCM 2.30 or later version.
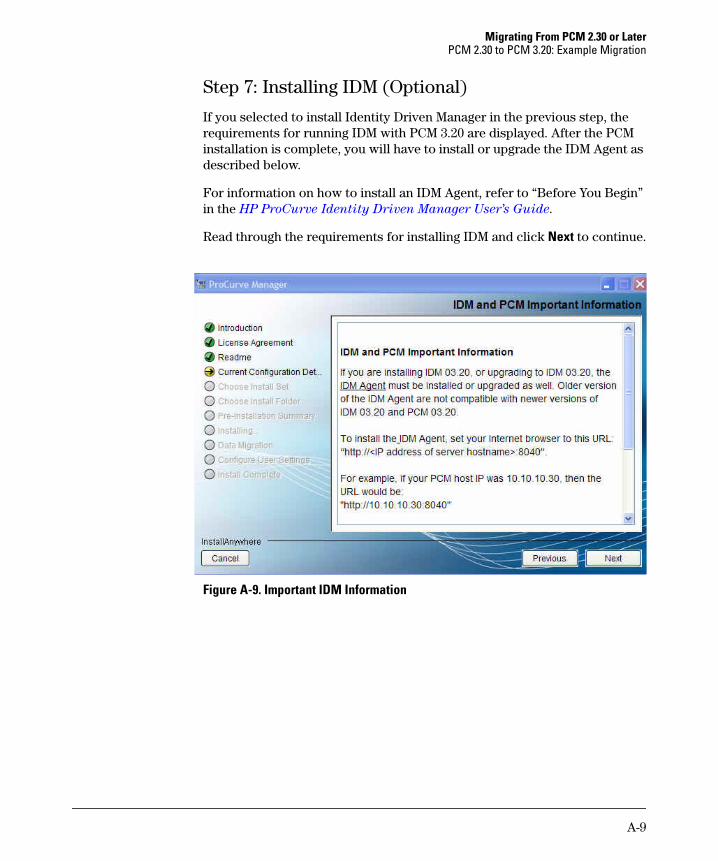
A-9
Migrating From PCM 2.30 or LaterPCM 2.30 to PCM 3.20: Example Migration
Step 7: Installing IDM (Optional)
If you selected to install Identity Driven Manager in the previous step, the requirements for running IDM with PCM 3.20 are displayed. After the PCM installation is complete, you will have to install or upgrade the IDM Agent as described below.
For information on how to install an IDM Agent, refer to “Before You Begin” in the HP ProCurve Identity Driven Manager User’s Guide.
Read through the requirements for installing IDM and click Next to continue.
Figure A-9. Important IDM Information
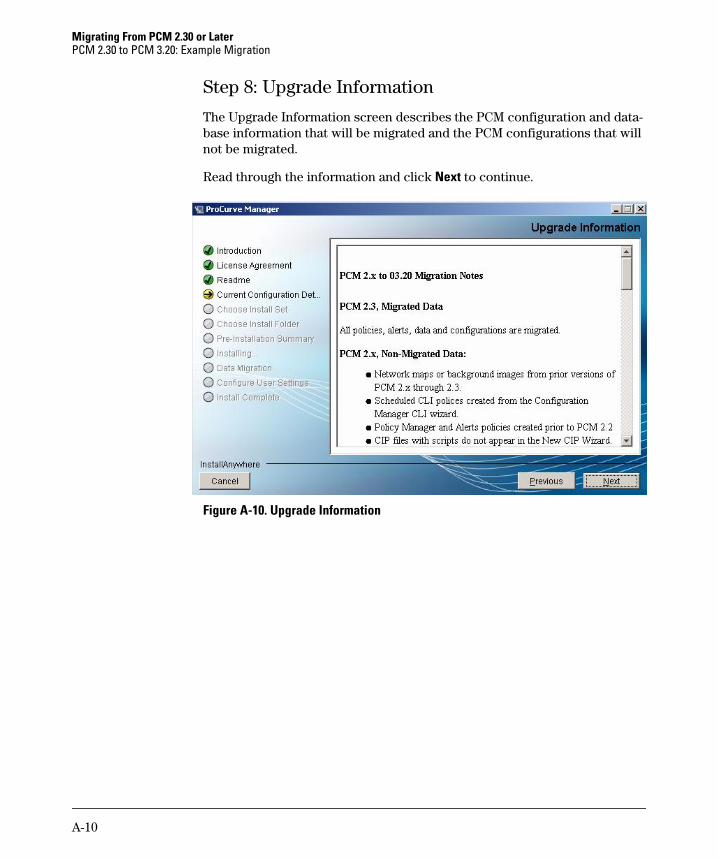
A-10
Migrating From PCM 2.30 or LaterPCM 2.30 to PCM 3.20: Example Migration
Step 8: Upgrade Information
The Upgrade Information screen describes the PCM configuration and data-base information that will be migrated and the PCM configurations that will not be migrated.
Read through the information and click Next to continue.
Figure A-10. Upgrade Information
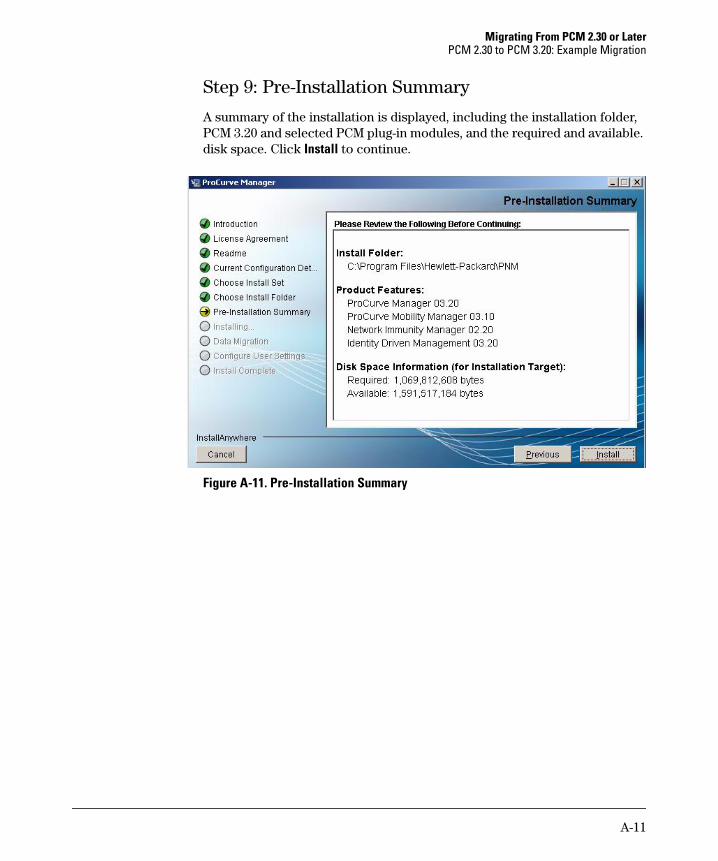
A-11
Migrating From PCM 2.30 or LaterPCM 2.30 to PCM 3.20: Example Migration
Step 9: Pre-Installation Summary
A summary of the installation is displayed, including the installation folder, PCM 3.20 and selected PCM plug-in modules, and the required and available. disk space. Click Install to continue.
Figure A-11. Pre-Installation Summary
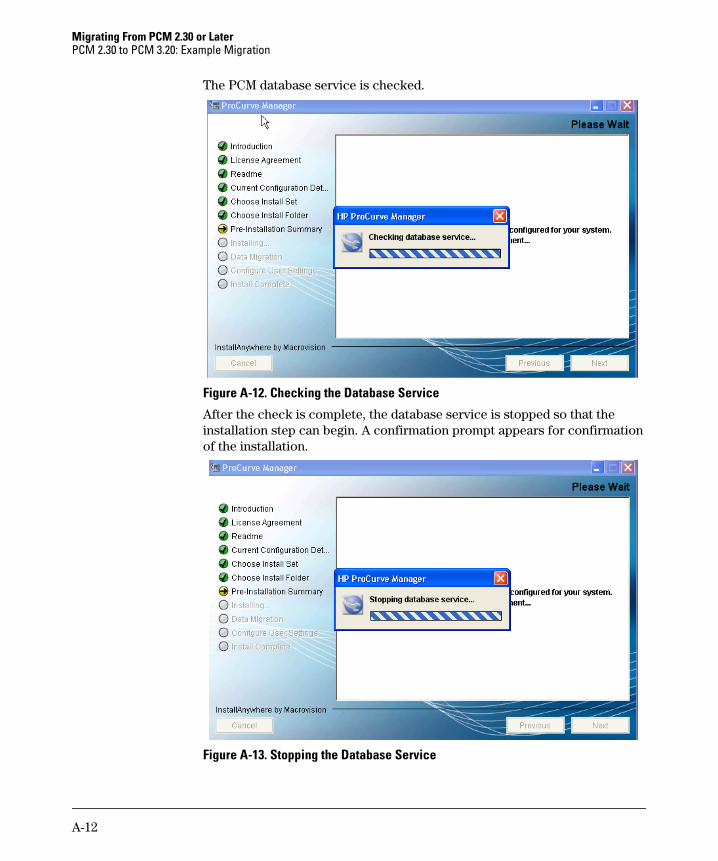
A-12
Migrating From PCM 2.30 or LaterPCM 2.30 to PCM 3.20: Example Migration
The PCM database service is checked.
Figure A-12. Checking the Database Service
After the check is complete, the database service is stopped so that the installation step can begin. A confirmation prompt appears for confirmation of the installation.
Figure A-13. Stopping the Database Service
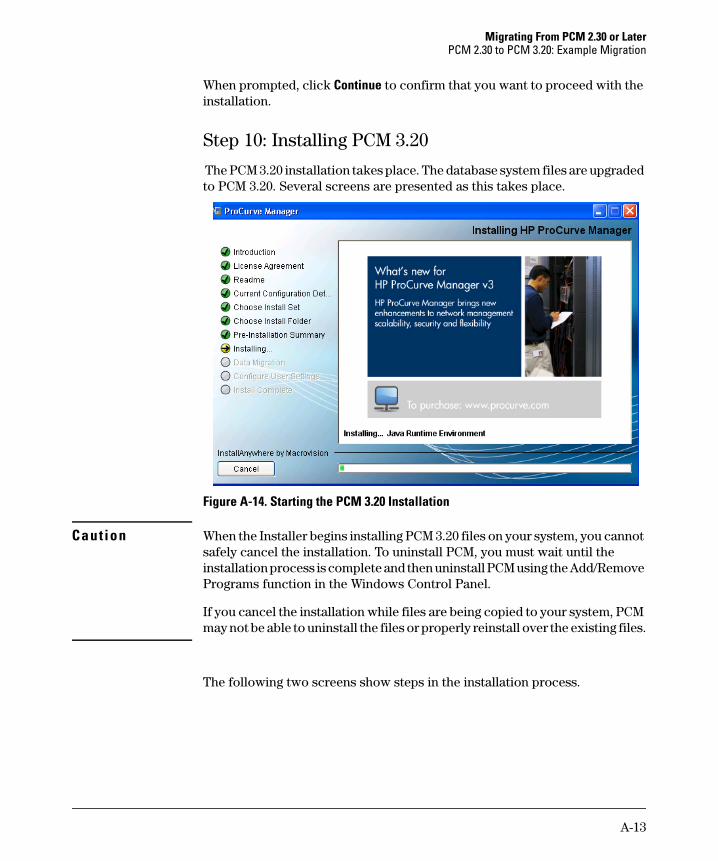
A-13
Migrating From PCM 2.30 or LaterPCM 2.30 to PCM 3.20: Example Migration
When prompted, click Continue to confirm that you want to proceed with the installation.
Step 10: Installing PCM 3.20
The PCM 3.20 installation takes place. The database system files are upgraded to PCM 3.20. Several screens are presented as this takes place.
Figure A-14. Starting the PCM 3.20 Installation
Caut ion When the Installer begins installing PCM 3.20 files on your system, you cannot safely cancel the installation. To uninstall PCM, you must wait until the installation process is complete and then uninstall PCM using the Add/Remove Programs function in the Windows Control Panel.
If you cancel the installation while files are being copied to your system, PCM may not be able to uninstall the files or properly reinstall over the existing files.
The following two screens show steps in the installation process.
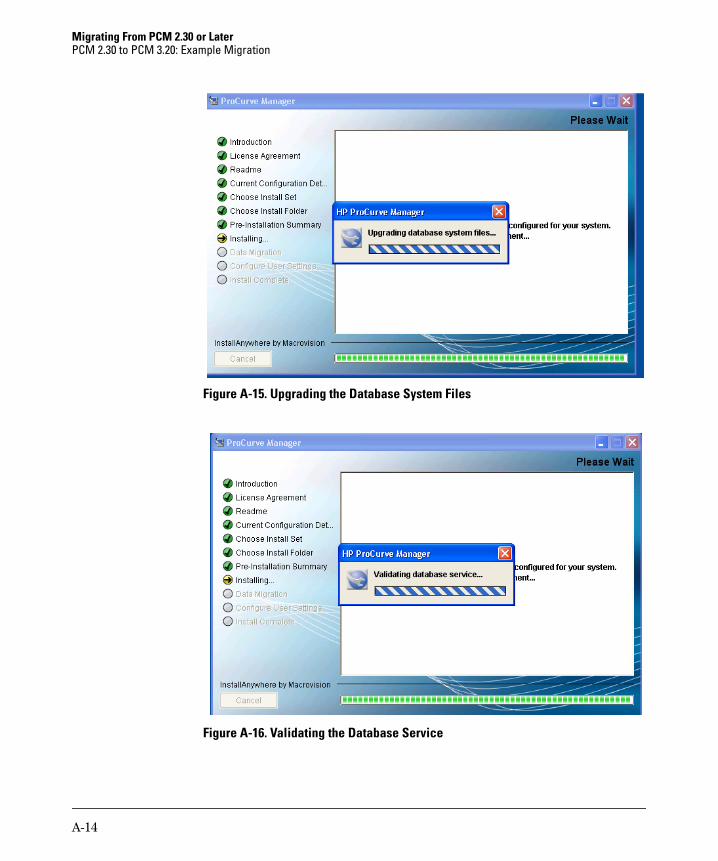
A-14
Migrating From PCM 2.30 or LaterPCM 2.30 to PCM 3.20: Example Migration
Figure A-15. Upgrading the Database System Files
Figure A-16. Validating the Database Service
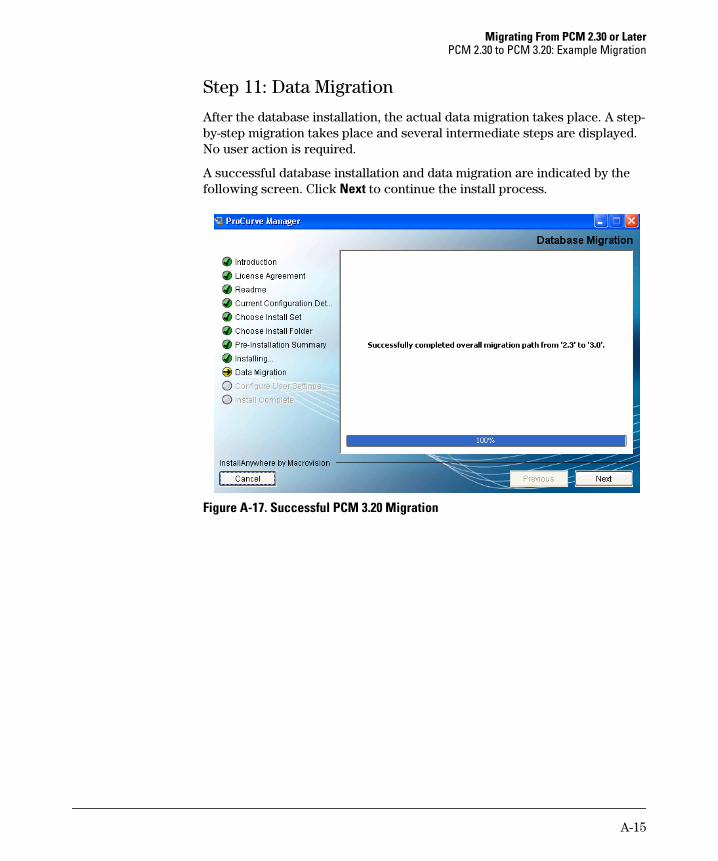
A-15
Migrating From PCM 2.30 or LaterPCM 2.30 to PCM 3.20: Example Migration
Step 11: Data Migration
After the database installation, the actual data migration takes place. A step-by-step migration takes place and several intermediate steps are displayed. No user action is required.
A successful database installation and data migration are indicated by the following screen. Click Next to continue the install process.
Figure A-17. Successful PCM 3.20 Migration

A-16
Migrating From PCM 2.30 or LaterPCM 2.30 to PCM 3.20: Example Migration
Step 12: NNMi Integration (Optional)
To integrate PCM with NNMi, select the Integrate PCM with NNMi check box and click Next.
You will need the IP address, port number, user name, and password used to communicate with the NNMi Server to complete integration. When enabled, NNMi will provide device discovery and events to PCM.
Figure A-18. Enabling NNMi Integration
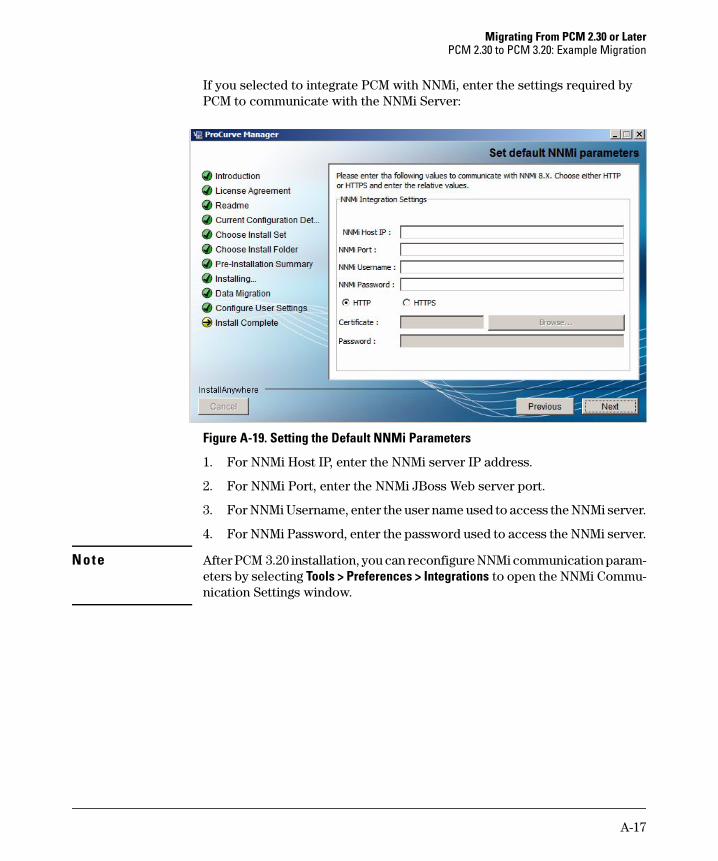
A-17
Migrating From PCM 2.30 or LaterPCM 2.30 to PCM 3.20: Example Migration
If you selected to integrate PCM with NNMi, enter the settings required by PCM to communicate with the NNMi Server:
Figure A-19. Setting the Default NNMi Parameters
1. For NNMi Host IP, enter the NNMi server IP address.
2. For NNMi Port, enter the NNMi JBoss Web server port.
3. For NNMi Username, enter the user name used to access the NNMi server.
4. For NNMi Password, enter the password used to access the NNMi server.
Note After PCM 3.20 installation, you can reconfigure NNMi communication param-eters by selecting Tools > Preferences > Integrations to open the NNMi Commu-nication Settings window.

A-18
Migrating From PCM 2.30 or LaterPCM 2.30 to PCM 3.20: Example Migration
5. Select the protocol used to communicate with the NNMi WSDL URLs by selecting HTTP or HTTPS. (You can change the protocol only if you have user permission and the PCM Plus license is in compliance.)
If you use HTTPS as the communication protocol, you must enable HTTPS on the NNMi Server (HTTP is enabled by default in NNMi) and copy the nnm.keystore certificate from the NNMi directory to the PCM Server. Detailed HTTPS configuration instructions for NNMi are provided at http://tomcat.apache.org/tomcat-6.0-doc/ssl-howto.html.
The nnm.keystore certificate is stored on the NNMi Server atDocuments and Settings\All Users\Application Data\HP\HP BTO Soft-ware\shared\nnm\certificates.
• If you select HTTPS:– Use the Certificate Browse button to browse and enter the direc-
tory path of nnm.keystore certificate on the PCM Server. – Enter the password of the certificate in the Password field.
• If you select HTTP, the Certificate and Password fields are greyed out.
6. Click Next.
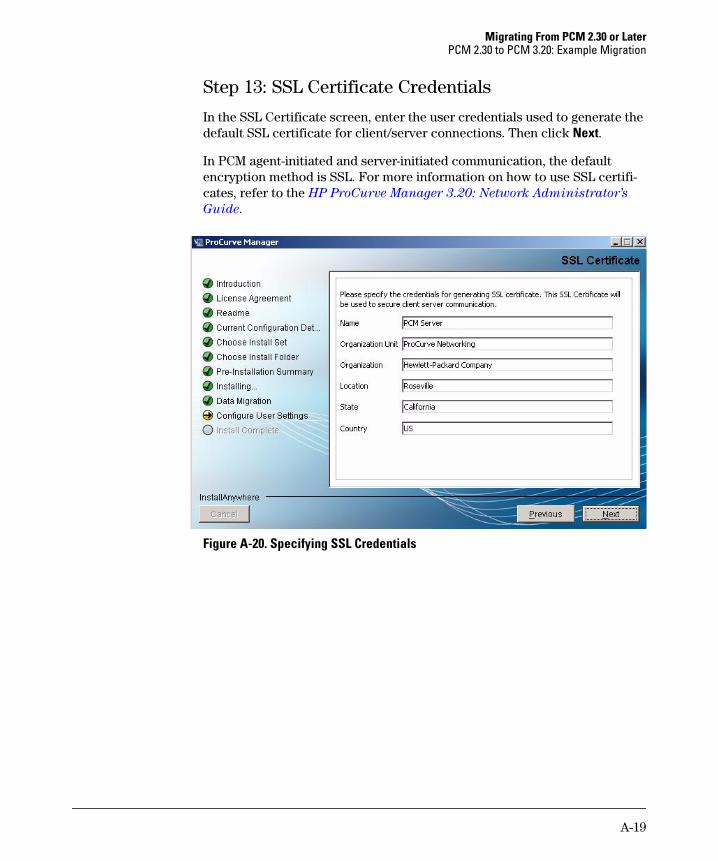
A-19
Migrating From PCM 2.30 or LaterPCM 2.30 to PCM 3.20: Example Migration
Step 13: SSL Certificate Credentials
In the SSL Certificate screen, enter the user credentials used to generate the default SSL certificate for client/server connections. Then click Next.
In PCM agent-initiated and server-initiated communication, the default encryption method is SSL. For more information on how to use SSL certifi-cates, refer to the HP ProCurve Manager 3.20: Network Administrator’s
Guide.
Figure A-20. Specifying SSL Credentials
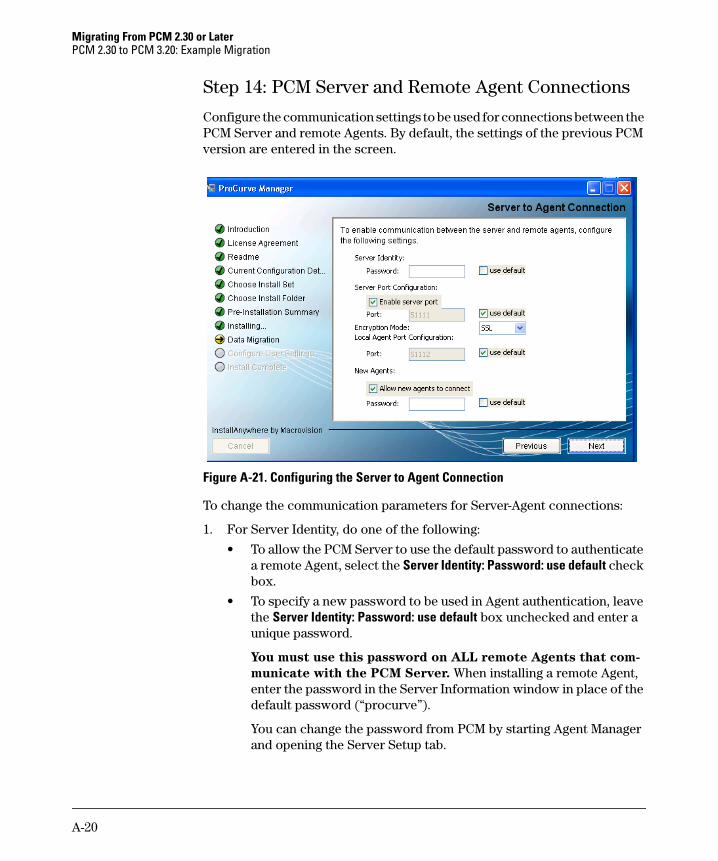
A-20
Migrating From PCM 2.30 or LaterPCM 2.30 to PCM 3.20: Example Migration
Step 14: PCM Server and Remote Agent Connections
Configure the communication settings to be used for connections between the PCM Server and remote Agents. By default, the settings of the previous PCM version are entered in the screen.
Figure A-21. Configuring the Server to Agent Connection
To change the communication parameters for Server-Agent connections:
1. For Server Identity, do one of the following:
• To allow the PCM Server to use the default password to authenticate a remote Agent, select the Server Identity: Password: use default check box.
• To specify a new password to be used in Agent authentication, leave the Server Identity: Password: use default box unchecked and enter a unique password.
You must use this password on ALL remote Agents that com-
municate with the PCM Server. When installing a remote Agent, enter the password in the Server Information window in place of the default password (“procurve”).
You can change the password from PCM by starting Agent Manager and opening the Server Setup tab.
A-21
Migrating From PCM 2.30 or LaterPCM 2.30 to PCM 3.20: Example Migration
2. For Server Port Configuration, do one of the following:
• To allow remote Agents to initiate a connection with the PCM Server, enable the Server port by selecting the Enable server port check box.
To use the default Server port (51111) to communicate with remote Agents, select the use default check box. HP recommends that you use the default port unless it conflicts with an existing application.
If you change the Server port number, all remote Agents that are configured to initiate a connection to the PCM Server must use the new port number.
• To require all connections with remote Agents to be initiated by the PCM Server, disable the Server port by unchecking the Enable server port check box. The Port field is greyed out.
3. For Encryption Mode: PCM uses SSL by default (encrypts all messages in both directions) in communication between the Server and remote Agents. To disable SSL encryption, select Plain Text.
4. For Local Agent Port Configuration:
• To allow the local Agent to connect with the PCM Server using the default Server port (51112), select the use default check box. HP recommends that you use the default port unless it conflicts with an existing application.
• To change the Server port number, enter a new port number in the Port field.
5. To allow new remote Agents to connect to the PCM Server, select the New Agents: Allow new Agents to connect check box and do one of the following:
• To enable the default password to be used to connect to the PCM Server, select the New Agents: Password: use default check box. New Agents that initiate a connection with the PCM Server automatically appear in the Agent Manager.
• To change the password, enter a new password in the Password field. New remote Agents that initiate a connection with the PCM Server must use this password to appear in the Agent Manager in PCM.
6. Click Next.
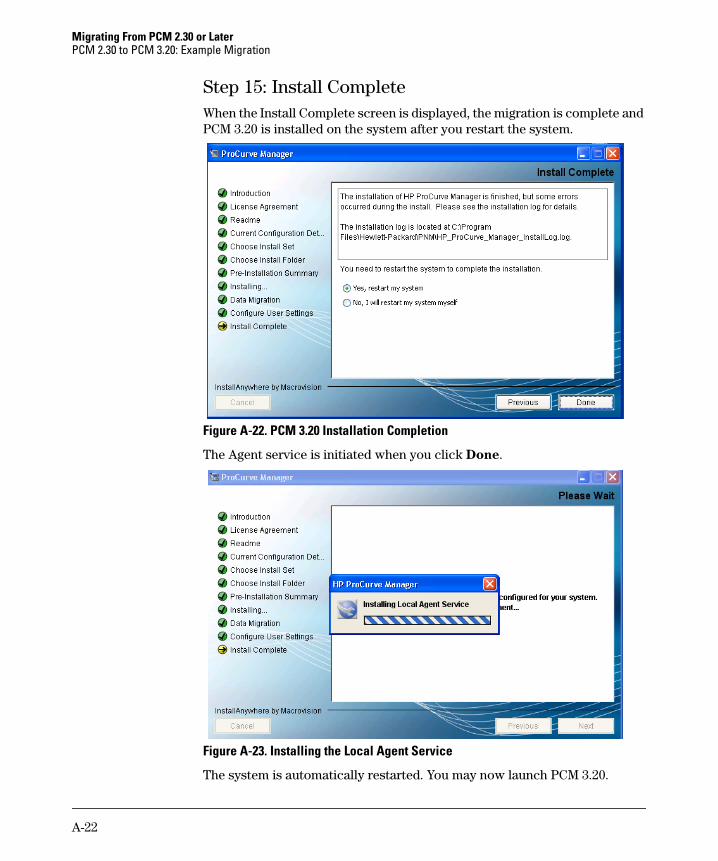
A-22
Migrating From PCM 2.30 or LaterPCM 2.30 to PCM 3.20: Example Migration
Step 15: Install CompleteWhen the Install Complete screen is displayed, the migration is complete and PCM 3.20 is installed on the system after you restart the system.
Figure A-22. PCM 3.20 Installation Completion
The Agent service is initiated when you click Done.
Figure A-23. Installing the Local Agent Service
The system is automatically restarted. You may now launch PCM 3.20.
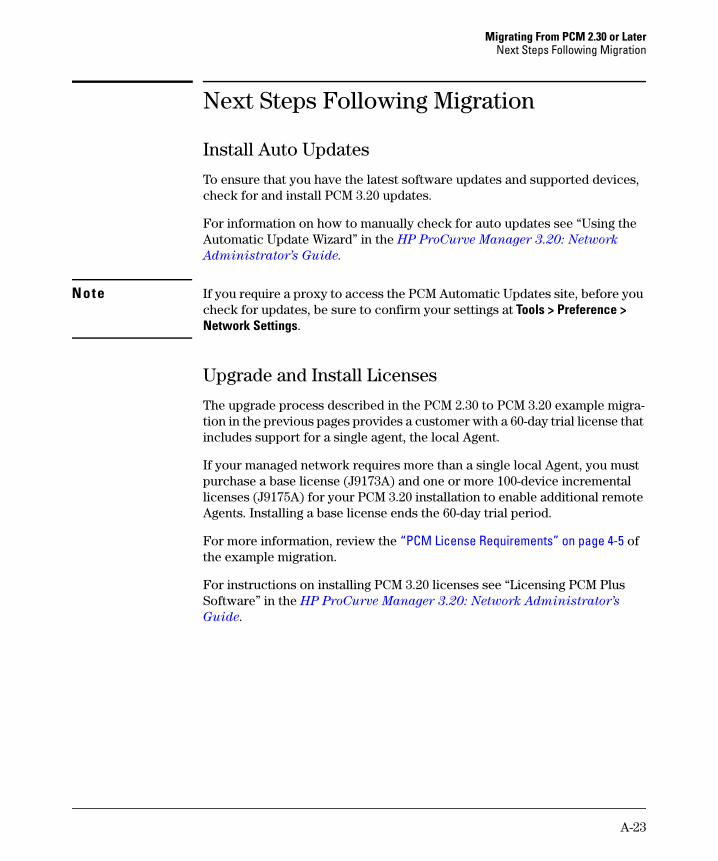
A-23
Migrating From PCM 2.30 or LaterNext Steps Following Migration
Next Steps Following Migration
Install Auto Updates
To ensure that you have the latest software updates and supported devices, check for and install PCM 3.20 updates.
For information on how to manually check for auto updates see “Using the Automatic Update Wizard” in the HP ProCurve Manager 3.20: Network
Administrator’s Guide.
Note If you require a proxy to access the PCM Automatic Updates site, before you check for updates, be sure to confirm your settings at Tools > Preference > Network Settings.
Upgrade and Install Licenses
The upgrade process described in the PCM 2.30 to PCM 3.20 example migra-tion in the previous pages provides a customer with a 60-day trial license that includes support for a single agent, the local Agent.
If your managed network requires more than a single local Agent, you must purchase a base license (J9173A) and one or more 100-device incremental licenses (J9175A) for your PCM 3.20 installation to enable additional remote Agents. Installing a base license ends the 60-day trial period.
For more information, review the “PCM License Requirements” on page 4-5 of the example migration.
For instructions on installing PCM 3.20 licenses see “Licensing PCM Plus Software” in the HP ProCurve Manager 3.20: Network Administrator’s
Guide.
A-24
Migrating From PCM 2.30 or LaterNext Steps Following Migration
Install Remote Agents
(Optional) You may need to download remote Agent software from the PCM 3.20 Server to the computer you have chosen to act as the remote Agent, install the Agent software on the computer, and then return to the PCM Agent Manager interface to finish configuring the PCM Server to interact with the remote Agent.
Refer to the HP ProCurve Manager 3.20: Network Administrator’s Guide for instructions on how to install and configure a remote Agent. When configuring a remote Agent be sure to modify its settings to meet your requirements, such as:
■ Reassign subnets to the new Agent.
■ Update the Agent’s discovery schedule.
■ Override global SNMP and CLI credentials for devices this Agent will manage, if required.
When a remote Agent is configured and connected with the PCM Server, use the Agent Manager to activate the Agent.
Configure User Profiles and User Accounts
(Optional) If you need to configure user profiles and user accounts for your PCM 3.20 installation, see “User Profiles and User Accounts” on page 4-12. Compared to PCM 2.30 and earlier versions, PCM 3.20 provides additional granularity in what a user is allowed to view and manage.
Install Remote Clients
PCM 3.20 supports up to 10 Clients, including one local Client.
For information on how to install remote Clients, see “Installing PCM 3.20 Remote Clients” on page 4-15. For more information, refer to the HP ProCurve
Manager 3.20: Network Administrator’s Guide.
B-1
Transferring a PCM Plus 3.20 License to Another Server
B
Transferring a PCM Plus 3.20 License to Another Server
Overview . . . . . . . . . . . . . . . . . . . . . . . . . . . . . . . . . . . . . . . . . . . . . . . . . . . . . B-2Step1: Deactivate the Current License . . . . . . . . . . . . . . . . . . . . . . . . . . . . . B-2Step 2: Record the Uninstall Key . . . . . . . . . . . . . . . . . . . . . . . . . . . . . . . . . B-4Step 3: Uninstall PCM 3.20 on the Existing PCM Server . . . . . . . . . . . . . . B-5Step 4: Install PCM 3.20 on the New PCM Server . . . . . . . . . . . . . . . . . . . . B-5Step 5: Record the Install ID on the New PCM Server . . . . . . . . . . . . . . . . B-6Step 6: Transfer License from Existing PCM Server to New PCM Server B-7Step 7: Add the Transferred License to the New PCM Server . . . . . . . . B-11
B-2
Transferring a PCM Plus 3.20 License to Another ServerOverview
Overview
This appendix describes how to transfer one or more PCM Plus 3.20 licenses from an existing PCM Server computer to a different PCM Server computer. Both devices must be operational.
The license transfer procedure consists of these general steps:
1. Deactivate the current license.
2. Record the Uninstall key.
3. Uninstall PCM 3.20 from the existing PCM Server.
4. Install PCM 3.20 on the new PCM Server.
5. Record the Install ID on the new PCM Server.
6. Transfer the license from the existing PCM Server to the new PCM Server.
7. Add the transferred license to the new PCM Server.
Step1: Deactivate the Current License
1. On the existing PCM Server which contains the current license to be transferred, go to Tools > Preferences > Licensing.
2. In the Licensing Preferences pane, click the Active Licenses tab, select the ProCurve Manager Plus 3.20 license that you want to transfer, and record the serial number assigned to the license. (The serial number will be required on the My Networking portal when you transfer the license.)
Then click the Deactivate button.
3. In the Warning window, click Yes to confirm the deactivation and removal of the license.
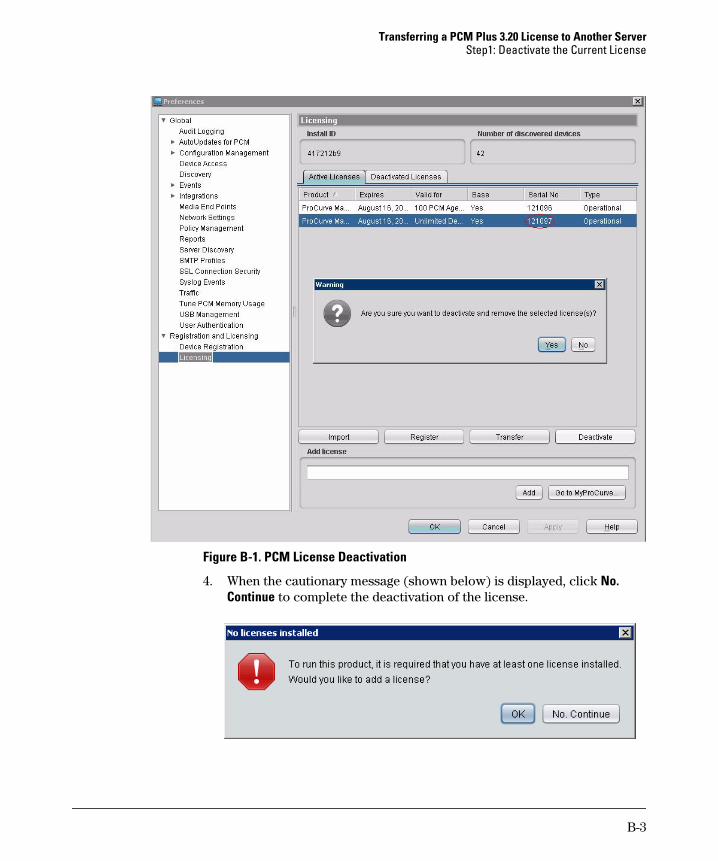
B-3
Transferring a PCM Plus 3.20 License to Another ServerStep1: Deactivate the Current License
Figure B-1. PCM License Deactivation
4. When the cautionary message (shown below) is displayed, click No. Continue to complete the deactivation of the license.
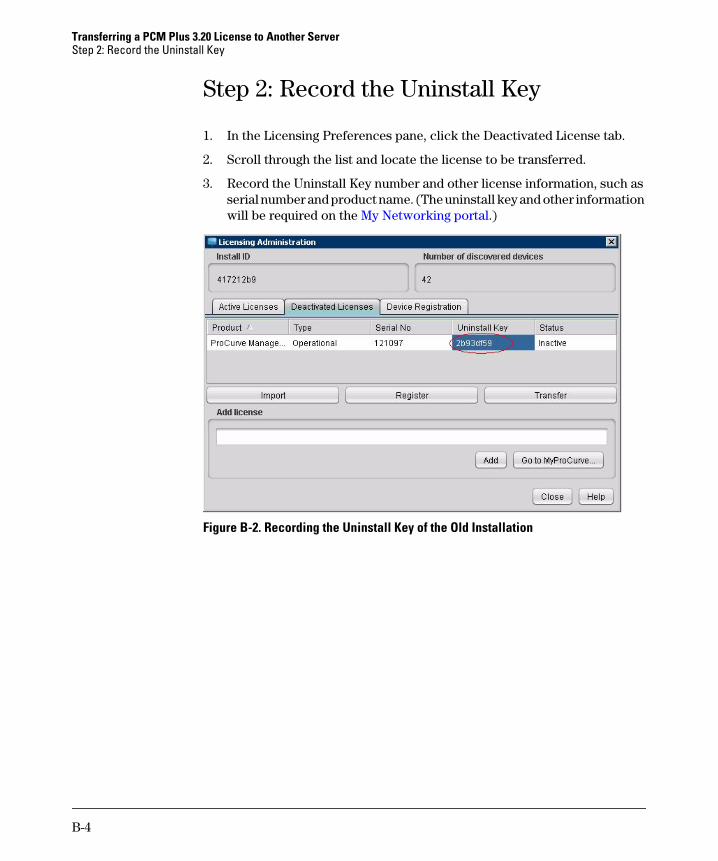
B-4
Transferring a PCM Plus 3.20 License to Another ServerStep 2: Record the Uninstall Key
Step 2: Record the Uninstall Key
1. In the Licensing Preferences pane, click the Deactivated License tab.
2. Scroll through the list and locate the license to be transferred.
3. Record the Uninstall Key number and other license information, such as serial number and product name. (The uninstall key and other information will be required on the My Networking portal.)
Figure B-2. Recording the Uninstall Key of the Old Installation
B-5
Transferring a PCM Plus 3.20 License to Another ServerStep 3: Uninstall PCM 3.20 on the Existing PCM Server
Step 3: Uninstall PCM 3.20 on the Existing PCM Server
1. On the computer where the existing PCM Plus 3.20 Server is installed, click the Start button and select Control Panel > Add Remove Programs.
2. Locate and uninstall HP ProCurve Manager Plus 3.20.
3. Reboot the computer after the software is uninstalled.
4. Remove all remaining PCM Plus 3.20 components:
• Delete the PNM folder at C:\Program Files\Hewlett-Packard\PNM.
• Delete any icons for PCM Plus 3.20 from the desktop.
Step 4: Install PCM 3.20 on the New PCM Server
If necessary, download and install PCM Plus 3.20 from the Software for Network Management web page on the new PCM Server computer to which you want to transfer the PCM license.
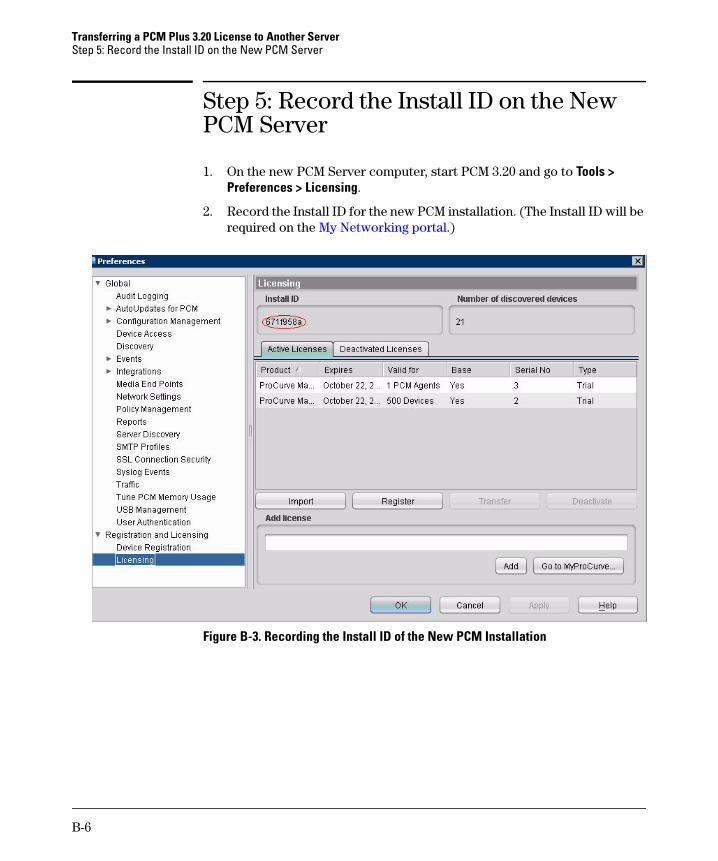
B-6
Transferring a PCM Plus 3.20 License to Another ServerStep 5: Record the Install ID on the New PCM Server
Step 5: Record the Install ID on the New PCM Server
1. On the new PCM Server computer, start PCM 3.20 and go to Tools > Preferences > Licensing.
2. Record the Install ID for the new PCM installation. (The Install ID will be required on the My Networking portal.)
Figure B-3. Recording the Install ID of the New PCM Installation
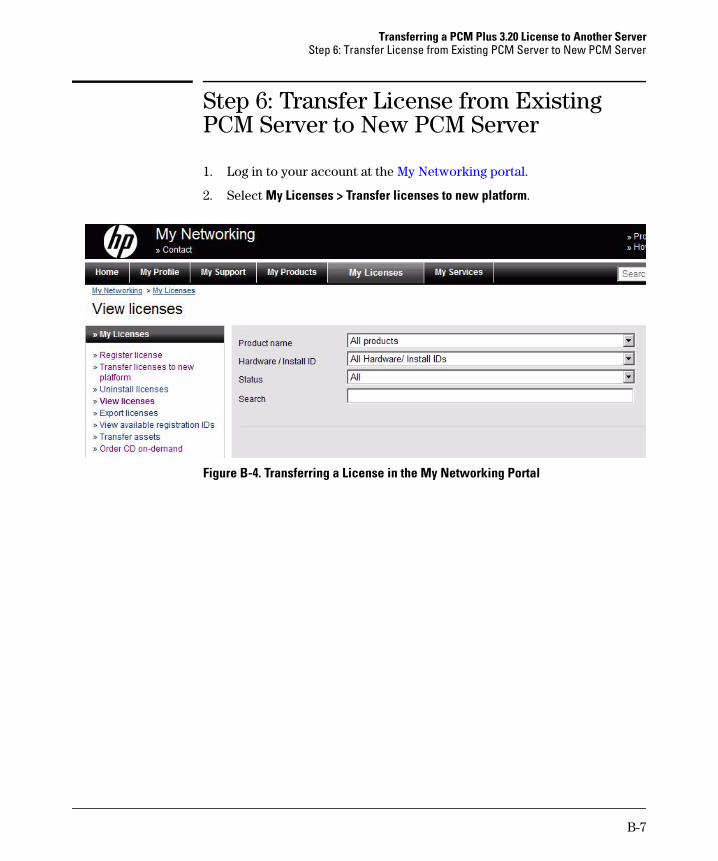
B-7
Transferring a PCM Plus 3.20 License to Another ServerStep 6: Transfer License from Existing PCM Server to New PCM Server
Step 6: Transfer License from Existing PCM Server to New PCM Server
1. Log in to your account at the My Networking portal.
2. Select My Licenses > Transfer licenses to new platform.
Figure B-4. Transferring a License in the My Networking Portal
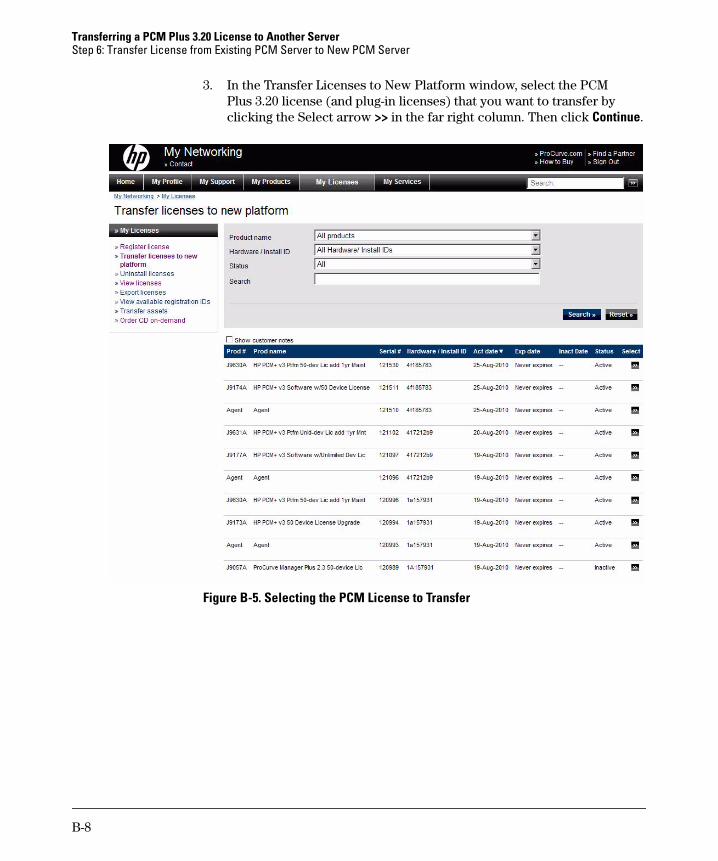
B-8
Transferring a PCM Plus 3.20 License to Another ServerStep 6: Transfer License from Existing PCM Server to New PCM Server
3. In the Transfer Licenses to New Platform window, select the PCM Plus 3.20 license (and plug-in licenses) that you want to transfer by clicking the Select arrow >> in the far right column. Then click Continue.
Figure B-5. Selecting the PCM License to Transfer
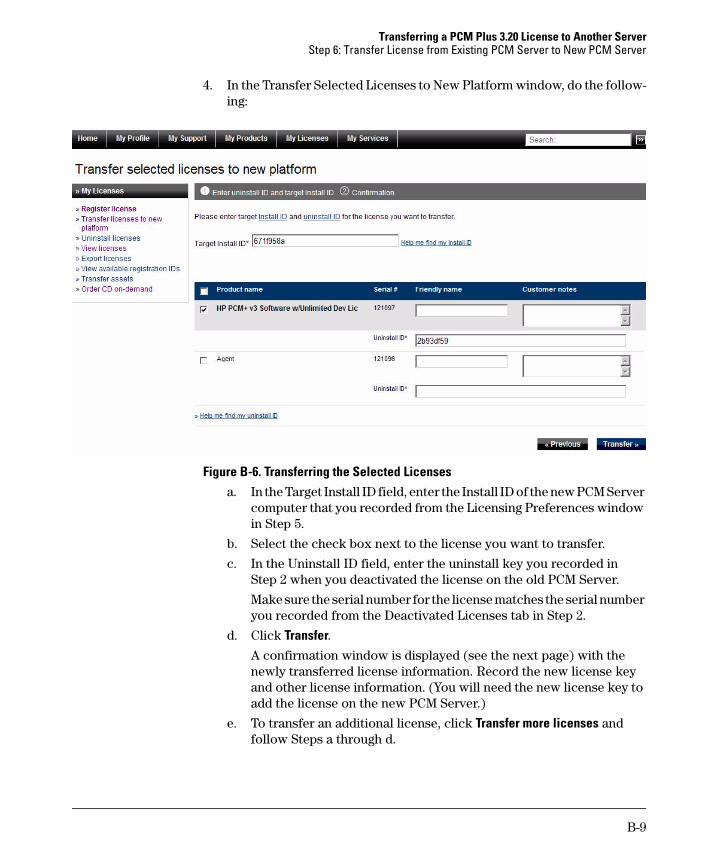
B-9
Transferring a PCM Plus 3.20 License to Another ServerStep 6: Transfer License from Existing PCM Server to New PCM Server
4. In the Transfer Selected Licenses to New Platform window, do the follow-ing:
Figure B-6. Transferring the Selected Licensesa. In the Target Install ID field, enter the Install ID of the new PCM Server
computer that you recorded from the Licensing Preferences window in Step 5.
b. Select the check box next to the license you want to transfer.
c. In the Uninstall ID field, enter the uninstall key you recorded inStep 2 when you deactivated the license on the old PCM Server.
Make sure the serial number for the license matches the serial number you recorded from the Deactivated Licenses tab in Step 2.
d. Click Transfer.A confirmation window is displayed (see the next page) with the newly transferred license information. Record the new license key and other license information. (You will need the new license key to add the license on the new PCM Server.)
e. To transfer an additional license, click Transfer more licenses and follow Steps a through d.
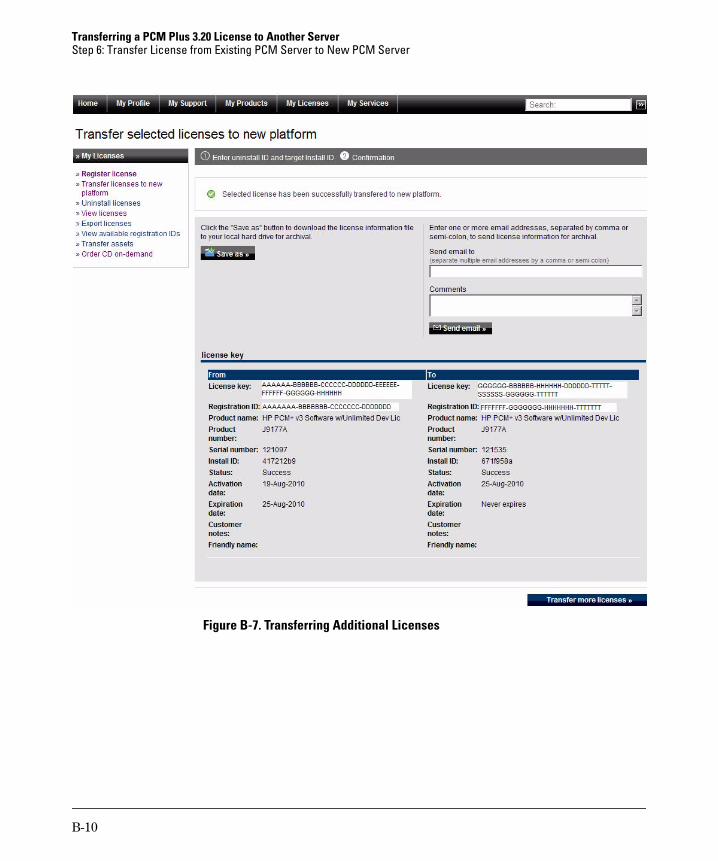
B-10
Transferring a PCM Plus 3.20 License to Another ServerStep 6: Transfer License from Existing PCM Server to New PCM Server
Figure B-7. Transferring Additional Licenses
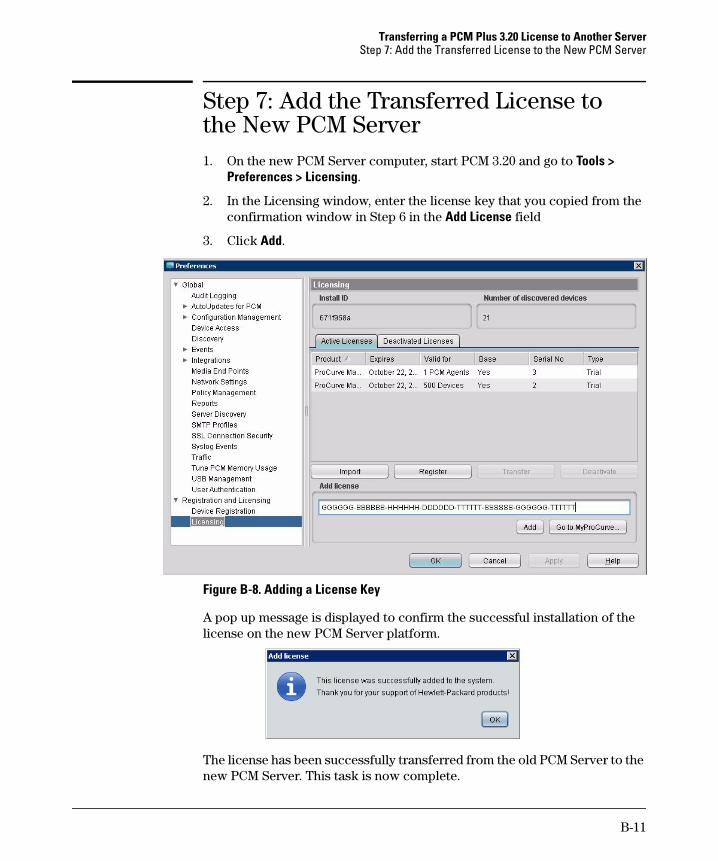
B-11
Transferring a PCM Plus 3.20 License to Another ServerStep 7: Add the Transferred License to the New PCM Server
Step 7: Add the Transferred License to the New PCM Server1. On the new PCM Server computer, start PCM 3.20 and go to Tools >
Preferences > Licensing.
2. In the Licensing window, enter the license key that you copied from the confirmation window in Step 6 in the Add License field
3. Click Add.
Figure B-8. Adding a License Key
A pop up message is displayed to confirm the successful installation of the license on the new PCM Server platform.
The license has been successfully transferred from the old PCM Server to the new PCM Server. This task is now complete.

B-12
Transferring a PCM Plus 3.20 License to Another ServerStep 7: Add the Transferred License to the New PCM Server


ProCurve 5witches Installation an
Technology for better business outcomes
To learn more, visit www.hp.com/go/procurve/
© Copyright 2010 Hewlett-Packard Development Company, L.P. The information contained herein is subject to change without notice. The only warranties for HP products and services are set forth in the express warranty statements accompanying such products and services. Nothing herein should be construed as constituting an additional warranty. HP will not be liable for technical or editorial errors or omissions contained herein.
October 2010
Manual Part Number5998-0911
*5998-0911*