HP Pavilion M40, M50, and M70 Multimedia Displaysh10032. · The HP Pavilion M40, M50, and M70...
59
English HP Pavilion M40, M50, and M70 Multimedia Displays User’s Guide
Transcript of HP Pavilion M40, M50, and M70 Multimedia Displaysh10032. · The HP Pavilion M40, M50, and M70...

Engl
ish
HP PavilionM40, M50, and M70MultimediaDisplays
User’s Guide

HP Pavilion M50 and M70 MultimediaDisplays
ii
Notice
The information contained in thisdocument is subject to change withoutnotice.
Hewlett-Packard ® Company makes nowarranty of any kind with regard tothis material, including, but notlimited to, the implied warranties ofmerchantability and fitness for aparticular purpose.
HP shall not be liable for errorscontained herein or for incidental orconsequential damages in connectionwith the furnishing, performance, oruse of this material.
HP assumes no responsibility for theuse or reliability of its software onequipment that is not furnished by HP.
This document contains proprietaryinformation that is protected bycopyright. All rights are reserved. Nopart of this document may bephotocopied, reproduced, or translatedto another language without the priorwritten consent of HP.
Hewlett-Packard CompanyHome Products DivisionP.O. Box 4010Cupertino, CA 95015-4010
©1998 Hewlett-Packard Company. Allrights reserved.

1 IntroductionHP Pavilion Multimedia Displays
iii
Engl
ishHewlett-Packard is a registered
trademark of Hewlett-Packard Companyin the United States of America andother countries.
Other brand or product names aretrademarks of their respectiveholders.

v
Engl
ishTable of Contents
1 Introduction 1
For Your Safety 2
2 Installation 5
Unpacking the Display 5
Locating the Display 5
Connecting the Power and VideoCables 6
Connecting the Speakers 8
3 Using the Display 11
Turning the Display On and Off 11
Degaussing the Display 12
Setting the Screen Resolution 13
Minimizing Eyestrain 13
Minimizing Energy Use 14
Care and Cleaning 15Cleaning the Screen 15
Adjusting the Viewing Angle 17
4 Changing Display Settings 19
Using the Front Panel 19
Setting the Custom Preset Modes 20Changing Mode Settings 22
Adjusting the Brightness andContrast 24
Using the OSD Main Window 25Choosing the Color Temperature29Setting Red, Green, and BlueValues 31

1 IntroductionHP Pavilion Multimedia Displays
vi
5 Technical Information 35
M40 Display Information 35M40 Video Modes 37M40 Pin Assignments 38
M50 Display Information 40M50 Video Modes 41M50 Pin Assignments 43
M70 Display Information 44M70 Video Modes 45M70 Pin Assignments 47
DPMS Power-Management Features 48
6 Regulatory Information 51
FCC Statement 51
X-Ray Radiation Notice 52
General Notice 53

1
Engl
ish1 Introduction
The HP Pavilion M40, M50, and M70Multimedia Displays (Models D5269A,D5258A, and D5259A) are high-resolution, multi-scan color monitorsdesigned for use with HP Pavilion andother computers. Each display includesa built-in microphone and mounts forthe speakers supplied with HP Pavilioncomputers. The displays comply withEPA ENERGY STAR standards and includeautomatic power-management features.
Other features include
� Non-glare picture tube to reducethe reflection of ambient light(except U.S. M40 models).
� On-screen adjustment of displaysettings.
� Compliance with Swedish MPR IIguidelines for reducedelectromagnetic emissions (exceptU.S. M40 models).
� Support for high refresh rates toreduce screen flicker andeyestrain.
� Built-in tilt and swivel base.

1 IntroductionHP Pavilion Multimedia Displays
2
For Your Safety
For your safety and the protection ofyour display, follow theseprecautions:
� Always connect the display to agrounded, three-prong power outlet.Use only the factory-supplied powercord.
WARNING To completely disconnect power fromthe display, you must remove the powercable from the power socket.
� To prevent electrical shock, do notremove the back cover of thedisplay. The cover should beremoved only by qualified servicepersonnel.
� Position the display so the powercord is accessible.
� Do not place objects on top of thedisplay that could fall into thevents or block airflow.
Microphone
Power buttonControlpanel

1 IntroductionHP Pavilion Multimedia Displays
3
Engl
ish� To avoid the risk of damage to the
display and electrical shock toyourself, do not expose the displayto rain or moisture.
� Adjust only those controls whoseoperations are covered in thismanual. Improperly adjusting othercontrols may result in damage andcould require repair by a servicetechnician.
If any of the following conditionsoccur, unplug the display and contacta qualified service technician:
� The power cord or plug is frayed ordamaged.
� You have spilled liquid into thedisplay.
� The display has been exposed torain or water.
� The display does not operatecorrectly when the operatinginstructions are followed.
� The display has been dropped or thecabinet has been damaged.
� The performance of the displaychanges abruptly.

5
Engl
ish2 Installation
Follow the instructions in thischapter to install yourHP Pavilion M40, M50, or M70Multimedia Display.
NOTE Before installing the display, referto your computer and video adapterdocumentation. You may need to makechanges to accommodate the display.
Unpacking the Display
When you unpack the display, make surethat you have the following items:
� The display with its attached videocable and pedestal mount
� A power cord
Locating the Display
Place the display on a flat, sturdysurface. If you plan to use thedisplay with a desktop PC, you canplace it on top of the computer. (Ifyou’re not using an HP Pavilioncomputer, check the documentation forthe maximum weight the computer’s casecan hold.)
Choose an area that is free fromexcessive heat, moisture, andsunlight. Avoid possible sources ofelectromagnetic interference, such astransformers, motors, fluorescentlighting, and other computer displays.

2 InstallationHP Pavilion Multimedia Displays
6
Connecting the Power andVideo Cables
Before connecting any cables, makesure to read the safety instructionsat the beginning of the manual. Thecomputer and display must be turnedoff.
2 InstallationHP Pavilion Multimedia Displays
7
Engl
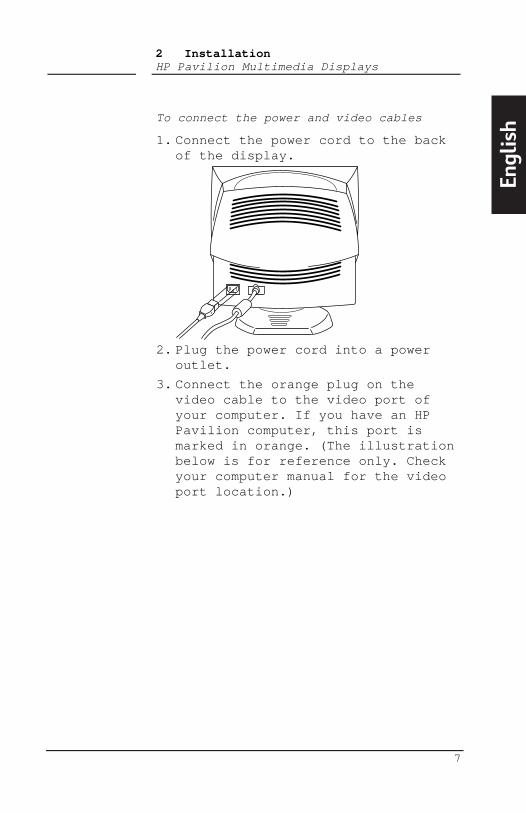
ishTo connect the power and video cables
1. Connect the power cord to the backof the display.
2. Plug the power cord into a poweroutlet.
3. Connect the orange plug on thevideo cable to the video port ofyour computer. If you have an HPPavilion computer, this port ismarked in orange. (The illustrationbelow is for reference only. Checkyour computer manual for the videoport location.)
2 InstallationHP Pavilion Multimedia Displays
8
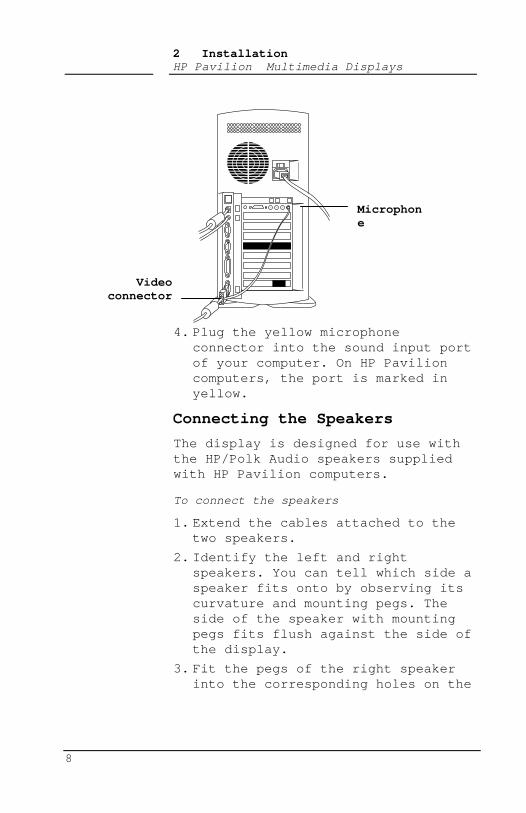
4. Plug the yellow microphoneconnector into the sound input portof your computer. On HP Pavilioncomputers, the port is marked inyellow.
Connecting the Speakers
The display is designed for use withthe HP/Polk Audio speakers suppliedwith HP Pavilion computers.
To connect the speakers
1. Extend the cables attached to thetwo speakers.
2. Identify the left and rightspeakers. You can tell which side aspeaker fits onto by observing itscurvature and mounting pegs. Theside of the speaker with mountingpegs fits flush against the side ofthe display.
3. Fit the pegs of the right speakerinto the corresponding holes on the
Videoconnector
Microphone

2 InstallationHP Pavilion Multimedia Displays
9
Engl
ishright side of the display, then
push down until the speaker issecure.

2 InstallationHP Pavilion Multimedia Displays
10
4. Clip the speaker wires to theunderside of the monitor as shownin the illustration.
5. Plug the two speaker wireconnectors into the Y-connector.
6. Plug the single connector on theend of the Y-connector’s cable tothe sound-out port on yourcomputer. (Check in the computer’sdocumentation for the location ofthe port.)
Y-

11
Engl
ish3 Using the Display
This chapter contains informationabout using your HP Pavilion M40, M50,or M70 Multimedia Display.
Turning the Display Onand Off
You use the power button on the frontpanel to turn the display on and off.When the display is on, the light nearthe power button is illuminated. Thelight is green when the display andcomputer are active and amber when thedisplay is in one of its reduced powermodes.
The display’s power managementfeatures reduce power consumption tolow levels when your computer has beeninactive for a specified period oftime. See “Minimizing Energy Use”later in this chapter for moreinformation.
Because of the display’s powermanagement features, you don’tnormally need to turn off the displaywhen it’s not in use. When turned off,the display uses the same amount ofpower that it uses in sleep mode (lessthan eight watts).
If your computer doesn’t support DPMSpower management, you can reduce powerconsumption by turning off the monitorwhen it won’t be used for an extended

3 Using the DisplayHP Pavilion Multimedia Displays
12
period. You can turn the display offeven if you leave the computerrunning.
WARNING To completely disconnect power fromthe display, you must remove the powercable from the power socket.
To turn the display on or off
� Press the power button on the frontof the display.
Degaussing the Display
Each time you turn on the display, itis automatically degaussed . Degaussingremoves magnetism that causes unwantedcolor variations. Degauss the displayany time you notice unusual colorvariations. If you leave the displaycontinuously turned on or frequentlychange its position, you shoulddegauss about once a week.
To degauss the M40 or M50 display,turn it off for about 30 minutes. Whenyou turn the display on again, therewill be a short humming sound and amomentary instability in the image.
There are two degaussing options forthe M70 display. You can either turnoff the display as described for theM40 and M50, or use the degauss optionin the OSD main window. See “Using theOSD Main Window” in Chapter 4 forinstructions.

3 Using the DisplayHP Pavilion Multimedia Displays
13
Engl
ishSetting the Screen
Resolution
The screen resolution determines theamount of information shown in thedisplay. Screen resolution refers tothe number of the dots or pixels usedto make up an image. A low screenresolution means that the display usesa relatively small number ofrelatively large dots. A higherresolution means that more dots of asmaller size make up the image. Withhigher screen resolutions, icons,windows, and text are smaller on thescreen, but more information can bedisplayed.
The screen resolution is set on thecomputer. The display supports manycommon screen resolutions, as shown in“M40 Video Modes,” “M50 Video Modes,”and “M70 Video Modes” in Chapter 5.Check the documentation supplied withyour computer and video adapter tofind out which resolutions theysupport.
Minimizing Eyestrain
To minimize eyestrain and avoid screenflicker, use the highest possibleimage refresh rate or verticalfrequency supported by your computerat the current screen resolution. (Theimage refresh rate is the number oftimes per second that the image isrefreshed.) The tables in “M40 VideoModes,” “M50 Video Modes,” and “M70

3 Using the DisplayHP Pavilion Multimedia Displays
14
Video Modes” in Chapter 5 show theimage refresh rates supported by thedisplays at different screenresolutions.
Minimizing Energy Use
All HP Pavilion computers and manyother computers support VESA displaypower management . Power-managementfeatures reduce the display’s powerconsumption after a period of keyboardinactivity.
The display supports three differentpower-saving modes—standby, suspend,and sleep—which reduce consumption toless than eight watts. See “DPMSPower-Management Features” in Chapter5 for a description of thecharacteristics of each mode.
When the display is in one of itspower saving modes, the screen isblanked out and the front panel powerindicator is amber. Pressing a key onthe keyboard or moving the mouserestores the image. Consult yourcomputer’s documentation forinformation about setting the power-saving modes.
3 Using the DisplayHP Pavilion Multimedia Displays
15
Engl
ishCare and Cleaning
To maximize screen life and preventdamage to the picture tube, HPrecommends that you
� Use the display power-managementsystem (if available on yourcomputer) or a screen saverprogram.
� Turn off the display or reduce itsbrightness and contrast to minimumlevels when you won’t be using thedisplay for an extended period.This is particularly important ifyou don’t use a power-managementsystem or screen saver.
� Avoid setting contrast andbrightness to maximum levels orusing the Gaming preset mode forprolonged periods.
Cleaning the Screen
The screen of the display has a high-quality optical coating that reducesglare and static buildup. To preventdamage to this coating, use onlyregular household glass cleaner toclean the screen.
CAUTION Don’t use cleaning solutionscontaining fluoride, acids, oralkalis. Never use hard or abrasivecleaning products to clean the screen.
To clean the screen
1. Turn off and unplug the display.
3 Using the DisplayHP Pavilion Multimedia Displays
16
2. Spray a soft cotton cloth withglass cleaner and gently wipe thescreen.
3. Dry the screen with a soft cottoncloth.
4. Plug in the display and turn it on.

3 Using the DisplayHP Pavilion Multimedia Displays
17
Engl
ishAdjusting the Viewing
Angle
The display’s pedestal mountingenables you to adjust the viewingangle. You can tilt and turn thedisplay to find the most comfortableviewing position.

3 Using the DisplayHP Pavilion Multimedia Displays
18
19
Engl
ish4 Changing Display
Settings
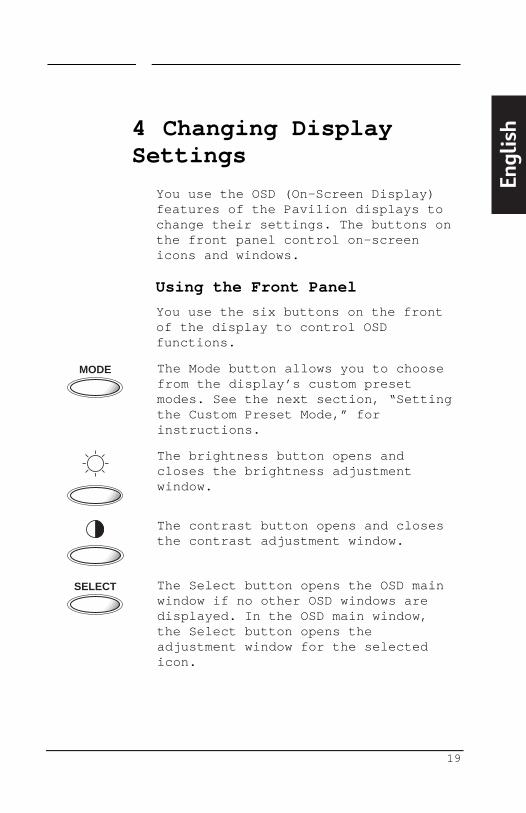
You use the OSD (On-Screen Display)features of the Pavilion displays tochange their settings. The buttons onthe front panel control on-screenicons and windows.
Using the Front Panel
You use the six buttons on the frontof the display to control OSDfunctions.
MODE The Mode button allows you to choosefrom the display’s custom presetmodes. See the next section, “Settingthe Custom Preset Mode,” forinstructions.
The brightness button opens andcloses the brightness adjustmentwindow.
The contrast button opens and closesthe contrast adjustment window.
SELECT The Select button opens the OSD mainwindow if no other OSD windows aredisplayed. In the OSD main window,the Select button opens theadjustment window for the selectedicon.

4 Changing Display SettingsHP Pavilion Multimedia Displays
20
The minus button decreases a settingif an adjustment window is open. Inthe OSD main window, the button movesbackward through the icons.
The plus button increases a settingif an adjustment window is open. Inthe OSD main window, the button movesforward through the icons.
Setting the CustomPreset Modes
Your display is configured forexcellent performance right out of thebox. If you want to optimize thedisplay’s settings for a particularactivity, however, you can use custompreset modes.
Custom preset modes enable you toquickly change contrast and colorsettings to match those commonly usedfor various activities and viewingconditions. The three preset modes areProductivity, Photos/Graphics, andGaming.
The display also includes a PersonalSetup mode, whose contrast,brightness, and color settings you candefine. (See the next section,“Changing Mode Settings,” forinformation about defining thePersonal Setup mode and temporarilychanging settings for the othermodes.)

4 Changing Display SettingsHP Pavilion Multimedia Displays
21
Engl
ishYou choose the mode in the Mode
window, which displays the followingicons:
Productivity mode is designed forbest results in office environmentsand with applications like wordprocessors and spreadsheets.
Photos/Graphics mode has the samesettings used by graphicsprofessionals in photographic andpre-press applications andenvironments.
Gaming mode offers higher contrastand the same color settings found inTV and arcade games. It is alsoappropriate for viewing full-motionvideo. HP recommends that Gamingmode not be used for productivityapplications.
Personal Setup mode enables you todefine and save colors and settingsfor your own purposes.

4 Changing Display SettingsHP Pavilion Multimedia Displays
22
To set the display mode
1. Press the Mode button to displaythe Mode window.
2. To immediately change to the nextmode, press the Mode button again.(Alternatively, press the + or –button to move through the icons.)
3. When the display mode you want ishighlighted, press the Selectbutton to close the Mode window.(Alternatively, wait five secondsfor the window to closeautomatically.)
Changing Mode Settings
The custom preset modes were designedfor quick access to common settings.You can’t permanently change thesesettings, but you can make temporaryadjustments to the contrast, and colorto meet a particular need. Thesechanges are lost if you change toanother mode or turn off the display.
For example, if you change thecontrast level while working in Gamingmode, switch to Productivity mode,then return to Gaming mode, theoriginal factory default contrastlevel will be in effect.

4 Changing Display SettingsHP Pavilion Multimedia Displays
23
Engl
ishIf you turn off the display, it will
be in Personal Setup mode when youturn it back on. Any changespreviously made to Productivity,Photos/Graphics, or Gaming modes arelost.
The display’s power-saving featuresdon’t affect temporary changes tocustom preset modes. If you leave thecomputer inactive long enough totrigger its power-management system,or if you turn off the computer, thetemporary changes will still be ineffect when the display returns fromits power-saving state.
If you want to define and savesettings, use Personal Setup mode.Personal Setup initially has the samesettings as Productivity mode. Whenyou’re working in Personal Setup mode,however, adjustments to brightness,contrast, and color are automaticallysaved and remain in effect until youchange them.
In addition, Personal Setup enablesyou to individually control the red,green, and blue video content in theimage. See “Setting Red, Green, andBlue Values,” later in this chapter,for instructions.

4 Changing Display SettingsHP Pavilion Multimedia Displays
24
Adjusting theBrightnessand Contrast
You can change the display’sbrightness or contrast quickly bypressing the brightness or contrastbutton on the front panel. (You canalso adjust the brightness andcontrast through the OSD main windowas described in the next section,“Using the OSD Main Window.”)Brightness adjusts the black level,while contrast adjusts the differencebetween the dark and light parts ofthe image.
Adjust the brightness level so thatblack items on the screen appearblack. Then adjust the contrast forthe most comfortable viewing.
To adjust the brightness or contrast
1. Press the brightness or contrastbutton on the front panel to openthe brightness or contrastadjustment window.
50
2. Press the + or – button to increaseor decrease the setting from itscurrent position.
3. When the brightness or contrast isat the desired level, press thebrightness or contrast button againto close the adjustment window.

4 Changing Display SettingsHP Pavilion Multimedia Displays
25
Engl
ish(Alternatively, wait five seconds
for the window to closeautomatically.)
Using the OSD MainWindow
The OSD main window enables you tomake changes to a variety of displaysettings. You open the window bypressing the Select button when noother OSD windows are displayed on thescreen.
In the OSD main window, you selecticons for the settings you want tochange:
Select the brightness icon to adjustthe black level in the image.
Select the contrast icon to adjustthe level of difference between lightand dark areas of the image.
Select the horizontal size icon toadjust the horizontal size of theimage.
Select the horizontal position iconto adjust the horizontal position ofthe image.
Select the vertical size icon toadjust the vertical size of theimage.
Select the vertical position icon toadjust the vertical position of theimage.

4 Changing Display SettingsHP Pavilion Multimedia Displays
26
Select the pincushion icon to adjustany tapering or bowing of the sidesof the image.
Select the trapezoid icon to adjustdistortion where the top of the imageis larger or smaller than the bottomof the image.
Select the color temperature icon toadjust the color temperature or whitebalance of the image. See the nextsection, “Choosing the ColorTemperature,” for instructions.
(M70 display only) Select the degaussicon to degauss the display andrestore image quality.
(M70 display only) Select therotation icon to adjust the angle ofthe image.
(M70 display only) Select the pinbalance icon to balance any bowing inthe sides of the image.
(M70 display only) Select theparallelogram icon to square theimage.
Select the factory reset icon toreturn size and position settings totheir original factory values. (Ifyou’re using a nonstandard screenresolution, this feature returns thedisplay to the geometric settings ineffect when the resolution was firstapplied. See Chapter 5 for lists ofstandard resolutions for eachdisplay.)

4 Changing Display SettingsHP Pavilion Multimedia Displays
27
Engl
ishSelect the exit icon to close the OSD
main window and save any changes youhave made.
In most cases, when you select anicon, an adjustment window appearsbelow the OSD main window. Theadjustment window contains a controlbar that you shorten or lengthen withthe + or – key. A number next to thecontrol bar shows the percentage ofthe current setting relative to itsmaximum value.

4 Changing Display SettingsHP Pavilion Multimedia Displays
28
There are some exceptions to thispattern, however:
� Selecting the color temperatureicon opens a window where you canmake additional choices. See thenext section, “Choosing the ColorTemperature,” for instructions.
� The degauss, factory reset, andexit options don’t have adjustmentwindows. They take effectimmediately after you select them.
To use the OSD main window
1. When no other OSD windows aredisplayed on the screen, press theSelect button on the front of thedisplay to open the OSD mainwindow.
1024x768 / 75HZ
2. Press the + or – button to moveamong the icons in the window.
3. When the icon for the function youwant is highlighted, press theSelect button.
If you selected the degauss,factory reset, or exit option, ittakes effect immediately.

4 Changing Display SettingsHP Pavilion Multimedia Displays
29
Engl
ishIf you selected another option, an
adjustment window appears for theoption you selected.
1024x768 / 75HZ
50
4. Press the + or – button to changethe current setting.
5. Press the Select button to saveyour changes and close theadjustment window.
6. To close the OSD mainwindow, select the Exiticon or wait five secondsfor the window to closeautomatically.
Choosing the Color Temperature
The default color settings inProductivity, Photos/Graphics, andGaming modes are optimized for bestresults in those environments, but youcan change the color temperaturetemporarily when necessary. (If youneed to save color settings for aparticular application, use PersonalSetup mode.)

4 Changing Display SettingsHP Pavilion Multimedia Displays
30
In Productivity and Gaming Modes, youcan choose between two settings: 9300Kand 6500K. In Photos/Graphics mode,you can also choose a thirdsetting—5000K. This settingis represented by the camera icon.
In Personal Setup mode, you can choosecolors to suit the color of theambient lighting in your environment.9300K is often used for officeenvironments or fluorescent lighting.6500K is often used for incandescentlighting.
You can also choose to individuallyadjust the red, green, and blue (RGB)values that make up the screen image.See the next section, “Setting Red,Green, and Blue Values,” forinstructions.
To choose the color temperature
1. In the OSD main window, pressthe + or – button to move tothe color temperature icon.
2. Press the Select button to open thecolor adjustment window.

4 Changing Display SettingsHP Pavilion Multimedia Displays
31
Engl
ish1024x768 / 75HZ
9300 6500
3. Press the + or – button to move tothe color temperature option youwant.
4. Press the Select button to selectthe color temperature and close theadjustment window.
Setting Red, Green, and BlueValues
You may need to make very preciseadjustments to the screen color. Forexample, under unique ambient lightingconditions, you may need to adjust thescreen color so that it more closelymatches the output of your printer.You can make these adjustments inPersonal Setup mode by individuallysetting red, green, and blue (RGB)values.
Make sure to let the display warm upfully before trying to match colorsprecisely. It takes the display about30 minutes to warm up completely afterbeing turned on or recovering from apower-saving state.
4 Changing Display SettingsHP Pavilion Multimedia Displays
32
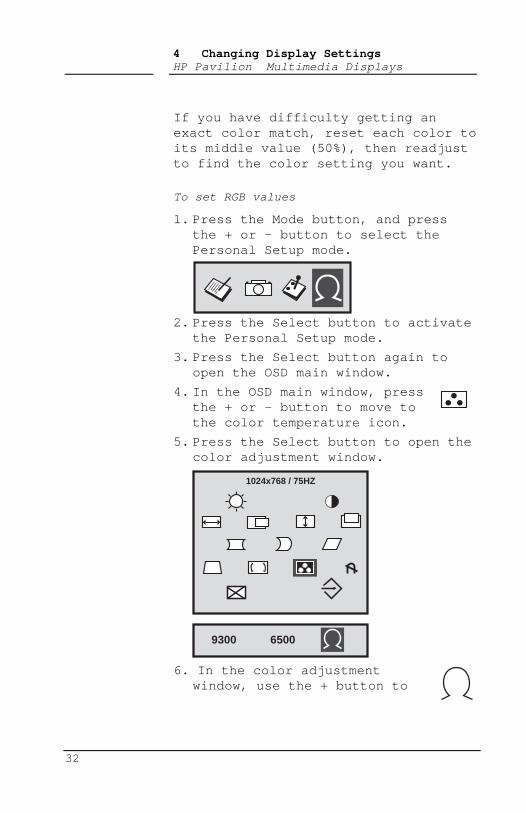
If you have difficulty getting anexact color match, reset each color toits middle value (50%), then readjustto find the color setting you want.
To set RGB values
1. Press the Mode button, and pressthe + or – button to select thePersonal Setup mode.
2. Press the Select button to activatethe Personal Setup mode.
3. Press the Select button again toopen the OSD main window.
4. In the OSD main window, pressthe + or – button to move tothe color temperature icon.
5. Press the Select button to open thecolor adjustment window.
1024x768 / 75HZ
9300 6500
6. In the color adjustmentwindow, use the + button to

4 Changing Display SettingsHP Pavilion Multimedia Displays
33
Engl
ishmove to the Personal Setup icon.
7. Press the Select button to open theRGB adjustment window. The Exiticon is highlighted by default.
R 50
50
50
G
B
8. If you want to accept the currentRGB values, press the + or - buttonto close the window.
9. To make changes to color values,press the Select button to move tothe red adjustment bar, then pressthe + or - button to adjust thevalue.
10. Press the Select button to move tothe green adjustment bar, thenpress the + or – button toadjust†it.
11. Press the Select button to move tothe blue adjustment bar, then pressthe + or – button to adjust it.
12. Press the Select button tomove to the exit icon, thenpress the + or – button to closethe adjustment window.(Alternatively, wait five secondsfor the window to closeautomatically.)
35
Engl
ish5 Technical
Information
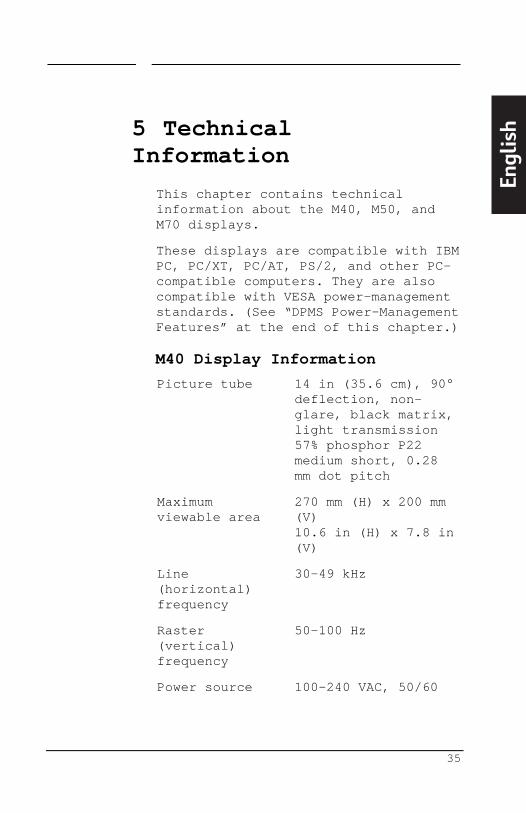
This chapter contains technicalinformation about the M40, M50, andM70 displays.
These displays are compatible with IBMPC, PC/XT, PC/AT, PS/2, and other PC-compatible computers. They are alsocompatible with VESA power-managementstandards. (See “DPMS Power-ManagementFeatures” at the end of this chapter.)
M40 Display Information
Picture tube 14 in (35.6 cm), 90°deflection, non-glare, black matrix,light transmission57% phosphor P22medium short, 0.28mm dot pitch
Maximumviewable area
270 mm (H) x 200 mm(V)10.6 in (H) x 7.8 in(V)
Line(horizontal)frequency
30–49 kHz
Raster(vertical)frequency
50–100 Hz
Power source 100–240 VAC, 50/60

5 Technical InformationHP Pavilion Multimedia Displays
36
Hz
Maximum powerconsumption
74 W
Dot rate 65 MHz
Pedestal Tilt: -5° forward,12° backward
Swivel: 90° left orright

5 Technical InformationHP Pavilion Multimedia Displays
37
Engl
ishDimensions
(W x H x D)372 x 401 x 395 mm14.9 x 16.0 x 15.8in
Net weight 11 kg (24.3 lb)
OperatingConditions
Temperature
Humidity
5° to 35°C (41° to95°F )
20% to 80%
StorageConditions
Temperature
Humidity
-25° to 55°C (-13°to 131°F )
20% to 80%, non-condensing
M40 Video Modes
The display supports the followingindustry-standard combinations ofscreen resolution and refresh rates.Other combinations are possible, butmay require adjustments to the imagesize and position. (See “Using the OSDMain Window” in Chapter 4 forinformation about making theseadjustments.)
Resolution(dots xlines)
VerticalFrequency
640 x 480 60 Hz
640 x 480 75 Hz
640 x 480 85 Hz
720 x 400 70 Hz
800 x 600 60 Hz
800 x 600 75 Hz

5 Technical InformationHP Pavilion Multimedia Displays
38
1024 x 768 60 Hz
CAUTION Setting the screen resolution/refreshrate combination higher than 1024 x768 at 60 Hz can damage the display.
M40 Pin Assignments
The following figure illustrates the15-pin D-sub male video connector usedby the M40 monitor. The table showsthe pin assignments.
Pin 1Pin 6Pin 11
Pin 5Pin 10Pin 15
PinNumber
Assignment
1 Red video input
2 Green video input
3 Blue video input
4 Ground
5 DDC return
6 Red video return
7 Green video return
8 Blue video return
9 No connect
10 Sync return
11 Ground
12 DDC data (SDA)
13 Horizontal sync
14 Vertical sync
15 DDC data clock (SCL)
NOTE Because of a policy of continuousproduct improvement, pin assignments

5 Technical InformationHP Pavilion Multimedia Displays
39
Engl
ishare subject to change without notice.

5 Technical InformationHP Pavilion Multimedia Displays
40
M50 Display Information
Picture tube 15 in (38.1 cm), 90°deflection, non-glare, black matrix,light transmission57% phosphor P22medium short, 0.28mm dot pitch
Maximumviewable area
280 mm (H) x 210 mm(V)11 in (H) x 8.25 in(V)
Line(horizontal)frequency
30–54 kHz
Raster(vertical)frequency
50–100 Hz
Power source 100–240 VAC, 50/60Hz
Maximum powerconsumption
90 W
Dot rate 65 MHz
Pedestal Tilt: -5° forward,12° backward
Swivel: 90° left orright
Dimensions(W x H x D)
372 x 401 x 395 mm14.9 x 16.0 x 15.8in
5 Technical InformationHP Pavilion Multimedia Displays
41
Engl
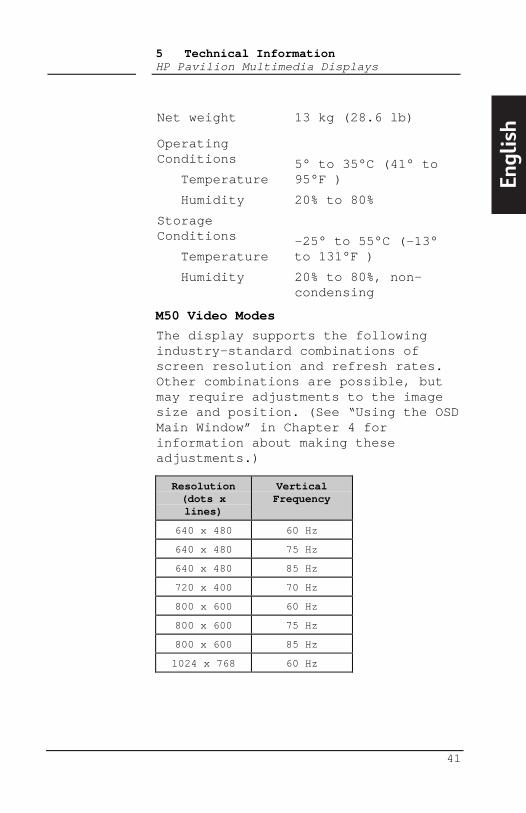
ishNet weight 13 kg (28.6 lb)
OperatingConditions
Temperature
Humidity
5° to 35°C (41° to95°F )
20% to 80%
StorageConditions
Temperature
Humidity
-25° to 55°C (-13°to 131°F )
20% to 80%, non-condensing
M50 Video Modes
The display supports the followingindustry-standard combinations ofscreen resolution and refresh rates.Other combinations are possible, butmay require adjustments to the imagesize and position. (See “Using the OSDMain Window” in Chapter 4 forinformation about making theseadjustments.)
Resolution(dots xlines)
VerticalFrequency
640 x 480 60 Hz
640 x 480 75 Hz
640 x 480 85 Hz
720 x 400 70 Hz
800 x 600 60 Hz
800 x 600 75 Hz
800 x 600 85 Hz
1024 x 768 60 Hz

5 Technical InformationHP Pavilion Multimedia Displays
42
CAUTION Setting the screen resolution/refreshrate combination higher than 1024 x768 at 60 Hz can damage the display.

5 Technical InformationHP Pavilion Multimedia Displays
43
Engl
ishM50 Pin Assignments
The following figure illustrates the15-pin D-sub male video connector usedby the M50 monitor. The table showsthe pin assignments.
Pin 1Pin 6Pin 11
Pin 5Pin 10Pin 15
PinNumber
Assignment
1 Red video input
2 Green video input
3 Blue video input
4 Ground
5 DDC return
6 Red video return
7 Green video return
8 Blue video return
9 No connect
10 Sync return
11 Ground
12 DDC data (SDA)
13 Horizontal sync
14 Vertical sync
15 DDC data clock (SCL)
NOTE Because of a policy of continuousproduct improvement, pin assignmentsare subject to change without notice.

5 Technical InformationHP Pavilion Multimedia Displays
44
M70 Display Information
Picture tube 17 in (43.1 cm), 90°deflection, non-glare, lighttransmission 52%phosphor P22 mediumshort, 0.28 mm dotpitch
Maximumviewable area
320 mm (H) x 240 mm(V)12.8 in (H) x 9.6 in(V)
Line(horizontal)frequency
30–70 kHz
Raster(vertical)frequency
50–120 Hz
Power source 100–240 VAC, 50–60Hz
Maximum powerconsumption
130 W (maximum)
Dot rate 110 MHz
Pedestal Tilt: -5° forward,17° backward
Swivel: -45° left orright
Dimensions(W x H x D)
408 x 416 x 450 mm16.3 x 16.6 x 18.0in

5 Technical InformationHP Pavilion Multimedia Displays
45
Engl
ishNet weight 19 kg (41.9 lb)
OperatingConditions
Temperature
Humidity
5° to 35°C (41° to95°F )
20% to 80%, non-condensing
StorageConditions
Temperature
Humidity
-25° to 60°C (-13°to 140°F )
20% to 80%, non-condensing
M70 Video Modes
The M70 display supports the followingindustry-standard combinations ofscreen resolution and refresh rates.Other combinations are possible, butmay require adjustments to the imagesize and position. (See “Using the OSDMain Window” in Chapter 4 forinformation about making theseadjustments.)
Resolution(dots xlines)
VerticalFrequency
640 x 480 60 Hz
720 x 400 70 Hz
800 x 600 75 Hz
800 x 600 85 Hz
1024 x 768 60 Hz
1024 x 768 75 Hz
1024 x 768 85 Hz
1280 x 1024 60 Hz

5 Technical InformationHP Pavilion Multimedia Displays
46
CAUTION Setting the screen resolution/refreshrate combination higher than 1280 x1024 at 60 Hz can damage the display.

5 Technical InformationHP Pavilion Multimedia Displays
47
Engl
ishM70 Pin Assignments
The following figure illustrates the15-pin D-sub male video connector usedby the M70 display. The table showsthe pin assignments.
Pin 1Pin 6Pin 11
Pin 5Pin 10Pin 15
PinNumber
Assignment
1 Red video input
2 Green video input
3 Blue video input
4 Ground
5 No connect
6 Red video return
7 Green video return
8 Blue video return
9 No connect
10 Ground
11 Ground
12 SDA data
13 Horizontal sync
14 Vertical sync
15 DDC data clock (SCL)
NOTE Because of a policy of continuousproduct improvement, pin assignmentsare subject to change without notice.

5 Technical InformationHP Pavilion Multimedia Displays
48
DPMS Power-ManagementFeatures
The HP Pavilion M40, M50, and M70displays can recognize power-management signals from VESA DPMSvideo adapters, such as those in HPPavilion and many other computers.When the display receives anappropriate signal, it reduces itspower but remains ready for quick use.The power light on the front panelturns amber when the display is in apower-saving mode.
VESA DPMS video adapters reducedisplay power consumption by settingthe horizontal and/or verticalsynchronization signals to inactive.The display will recover quickly whenthe synchronization signals arereapplied.
Standby and Suspend modes offer lowpower consumption with rapid recovery,while Sleep mode offers the lowestpower consumption and a somewhatslower recovery.
The following table shows thecharacteristics of the normaloperating mode and the three power-saving modes.
VESA DPMS Power Management
POWER USED
Mode VideoHor.sync.
Vert.sync
M40 M50 M70

5 Technical InformationHP Pavilion Multimedia Displays
49
Engl
ish.
On Active
Yes Yes 74W 90W 130W
Standby
Blank No Yes <15W <15W <30W
Suspend
Blank Yes No <15W <15W <30W
Sleep Blank No No <8W <8W <8W

51
Engl
ish6 Regulatory
Information
FCC Statement
This equipment has been tested andfound to comply with the limits for aClass B digital device pursuant toPart 15 of the FCC Rules. These limitsare designed to provide reasonableprotection against harmfulinterference in a residentialinstallation. This equipmentgenerates, uses, and can radiate radiofrequency energy. If not installed andused in accordance with theinstructions, it may cause harmfulinterference to radio communications.However, there is no guarantee thatinterference will not occur in aparticular installation. If thisequipment does cause harmfulinterference to radio or televisionreception, which can be determined byturning the equipment off and on, theuser is encouraged to try to correctthe interference by one or more of thefollowing measures:
� Reorient or relocate the receivingantenna.
� Move the computer away from theradio or television.
� Plug the computer into a differentelectrical outlet, so that thecomputer and the radio or

6 Regulatory InformationHP Pavilion Multimedia Displays
52
television are on separateelectrical circuits.
� Make sure that all your peripheraldevices are also FCC Class Bcertified.
� Consult your computer dealer,Hewlett-Packard, or an experiencedradio/TV technician for help.
WARNING Hewlett Packard’s system verificationtests were conducted with HP-supportedperipheral devices and HP shieldedcables, such as those you received withyour system. Cables used with thisdisplay must be properly shielded tocomply with FCC requirements.
Changes or modifications not expresslyapproved by Hewlett-Packard could voidthe user’s authority to operate theequipment.
X-Ray Radiation Notice
When operating, this product emits X-rays; however, it is well shielded andmeets the safety and healthrequirements of various countries,such as the Radiation Act of Germanyand the Radiation Control for Healthand Safety Act of the United States.
Radiation emitted by this product isless than 0.1 mR/hr (1µSv/hr) at adistance of 10 centimeters from thesurface of the cathode-ray tube. Thex-ray radiation primarily depends onthe characteristics of the cathode raytube and its associated low-voltageand high-voltage circuitry. Internal

6 Regulatory InformationHP Pavilion Multimedia Displays
53
Engl
ishcontrols have been adjusted to ensure
safe operation. Only qualifiedpersonnel should perform any internaladjustments, as specified in theservice manual for this product.
Replace the cathode-ray tube with anidentical CRT only.
General Notice
The HP Pavilion M40 (except NorthAmerican models), M50, and M70Multimedia Displays have been testedaccording to MPR 1990:8 for emissionproperties and meet the guidelines asgiven by MPR 1990:10 (2.01 – 2.04).
NOTE This display is a Class 1 LED product.
NOTE As an ENERGY STAR Partner, Hewlett-Packard has determined that thisproduct meets the ENERGY STARguidelines for energy efficiency.The ENERGY STAR name is a U.S.Registered Mark of the U.S.Environmental Protection Agency.

55
Engl
ish
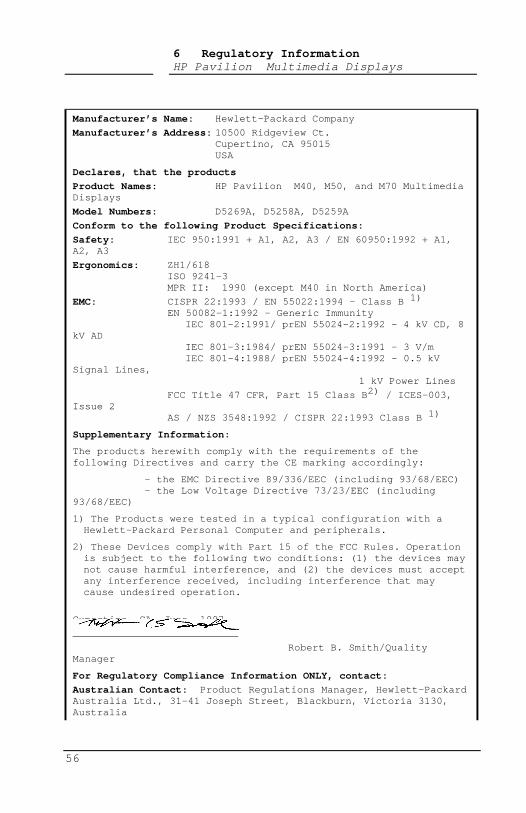
DECLARATION OF CONFORMITYaccording to ISO/IEC Guide 22 and EN 45014
6 Regulatory InformationHP Pavilion Multimedia Displays
56
Manufacturer’s Name: Hewlett-Packard Company
Manufacturer’s Address: 10500 Ridgeview Ct.Cupertino, CA 95015USA
Declares, that the products
Product Names: HP Pavilion M40, M50, and M70 MultimediaDisplays
Model Numbers: D5269A, D5258A, D5259A
Conform to the following Product Specifications:
Safety: IEC 950:1991 + A1, A2, A3 / EN 60950:1992 + A1,A2, A3
Ergonomics: ZH1/618ISO 9241-3MPR II: 1990 (except M40 in North America)
EMC: CISPR 22:1993 / EN 55022:1994 - Class B 1)
EN 50082-1:1992 - Generic ImmunityIEC 801-2:1991/ prEN 55024-2:1992 - 4 kV CD, 8
kV ADIEC 801-3:1984/ prEN 55024-3:1991 - 3 V/mIEC 801-4:1988/ prEN 55024-4:1992 - 0.5 kV
Signal Lines, 1 kV Power Lines
FCC Title 47 CFR, Part 15 Class B 2) / ICES-003,Issue 2
AS / NZS 3548:1992 / CISPR 22:1993 Class B 1)
Supplementary Information :
The products herewith comply with the requirements of thefollowing Directives and carry the CE marking accordingly:
- the EMC Directive 89/336/EEC (including 93/68/EEC)- the Low Voltage Directive 73/23/EEC (including
93/68/EEC)
1) The Products were tested in a typical configuration with aHewlett-Packard Personal Computer and peripherals.
2) These Devices comply with Part 15 of the FCC Rules. Operationis subject to the following two conditions: (1) the devices maynot cause harmful interference, and (2) the devices must acceptany interference received, including interference that maycause undesired operation.
Cupertino, CA June, 1997
Robert B. Smith/QualityManager
For Regulatory Compliance Information ONLY, contact:
Australian Contact: Product Regulations Manager, Hewlett-PackardAustralia Ltd., 31-41 Joseph Street, Blackburn, Victoria 3130,Australia

6 Regulatory InformationHP Pavilion Multimedia Displays
57
Engl
ish
European Contact : Your local Hewlett-Packard Sales and ServiceOffice or Hewlett-Packard GmbH, Department HQ-TRE StandardsEurope, Herrenberger Straße 130, D-71034 Böblingen(FAX: + 49-7031-14-3143)
USA Contact: Product Regulations Manager, Hewlett-Packard, HPD,10500 Ridgeview Ct.,Cupertino, CA 95015-4010 (Phone: 408-343-5000)

6 Regulatory InformationHP Pavilion Multimedia Displays
58