
HP OmniBook 900 - HP® Official Site | Laptop …h10032. · Reference Guide 3 HP Software Product...
145
HP OmniBook 900 Reference Guide
Transcript of HP OmniBook 900 - HP® Official Site | Laptop …h10032. · Reference Guide 3 HP Software Product...

HP OmniBook 900
Reference Guide

2 Reference Guide
Notice
This manual and any examples contained herein are provided “as is” and are subject tochange without notice. Hewlett-Packard Company makes no warranty of any kind withregard to this manual, including, but not limited to, the implied warranties ofmerchantability and fitness for a particular purpose. Hewlett-Packard Co. shall not beliable for any errors or for incidental or consequential damages in connection with thefurnishing, performance, or use of this manual or the examples herein.
Consumer transactions in Australia and the United Kingdom: The above disclaimers andlimitations shall not apply to Consumer transactions in Australia and the United Kingdomand shall not affect the statutory rights of Consumers.
© Copyright Hewlett-Packard Company 1999. All rights reserved. Reproduction,adaptation, or translation of this manual is prohibited without prior written permission ofHewlett-Packard Company, except as allowed under the copyright laws.
The programs that control this product are copyrighted and all rights are reserved.Reproduction, adaptation, or translation of those programs without prior writtenpermission of Hewlett-Packard Co. is also prohibited.
Portions of the programs that control this product may also be copyrighted by MicrosoftCorporation, SystemSoft Corp., Phoenix Technologies, Ltd., ATI Technologies Inc.,NeoMagic Corporation, and Adobe Systems Incorporated. See the individual programsfor additional copyright notices.
Microsoft, MS, MS-DOS, Windows, and Windows NT are registered trademarks ofMicrosoft Corporation. Pentium and the Intel Inside logo are U.S. registered trademarksof Intel Corporation. TrackPoint is a U.S. registered trademark of International BusinessMachines, Adobe and Acrobat are trademarks of Adobe Systems Incorporated.
Hewlett-Packard CompanyMobile Computing Division19310 Pruneridge Ave.Cupertino, CA 95014

Reference Guide 3
HP Software Product License Agreement
Your HP OmniBook PC contains factory-installed software programs. Please read theSoftware License Agreement before proceeding.
Carefully read this License Agreement before proceeding to operate this equipment.Rights in the software are offered only on the condition that the customer agrees toall terms and conditions of the License Agreement. Proceeding to operate theequipment indicates your acceptance of these terms and conditions. If you do notagree with the terms of the License Agreement, you must now either remove thesoftware from your hard disk drive and destroy the Recovery CD, or return thecomplete computer and software for a full refund.
Proceeding with configuration signifies your acceptance of the License Terms.
Unless otherwise stated below, this HP Software Product License Agreement shallgovern the use of all software that is provided to you, the customer, as part of theHP computer product. It shall supersede any non-HP software license terms thatmay be found online, or in any documentation or other materials contained in thecomputer product packaging.
Note: Operating System Software by Microsoft is licensed to you under the MicrosoftEnd User License Agreement (EULA).
The following License Terms govern the use of the software:
Use. Customer may use the software on any one computer. Customer may not networkthe software or otherwise use it on more than one computer. Customer may not reverseassemble or decompile the software unless authorized by law.
Copies and Adaptations. Customer may make copies or adaptations of the software (a)for archival purposes or (b) when copying or adaptation is an essential step in the use ofthe software with a computer so long as the copies and adaptations are used in no othermanner.
Ownership. Customer agrees that he/she does not have any title or ownership of thesoftware, other than ownership of the physical media. Customer acknowledges andagrees that the software is copyrighted and protected under the copyright laws. Customeracknowledges and agrees that the software may have been developed by a third partysoftware supplier named in the copyright notices included with the software, who shall beauthorized to hold the Customer responsible for any copyright infringement or violationof this Agreement.
Product Recovery CD-ROM. If your computer was shipped with a product RecoveryCD-ROM: (i) The product Recovery CD-ROM and/or support utility software may onlybe used for restoring the hard disk of the HP computer with which the product RecoveryCD-ROM was originally provided. (ii) The use of any operating system software byMicrosoft contained in any such product Recovery CD-ROM shall be governed by theMicrosoft End User License Agreement (EULA).

4 Reference Guide
Transfer of Rights in Software. Customer may transfer rights in the software to a thirdparty only as part of the transfer of all rights and only if Customer obtains the prioragreement of the third party to be bound by the terms of this License Agreement. Uponsuch a transfer, Customer agrees that his/her rights in the software are terminated and thathe/she will either destroy his/her copies and adaptations or deliver them to the third party.
Sublicensing and Distribution. Customer may not lease, sublicense the software ordistribute copies or adaptations of the software to the public in physical media or bytelecommunication without the prior written consent of Hewlett-Packard.
Termination. Hewlett-Packard may terminate this software license for failure to complywith any of these terms provided Hewlett-Packard has requested Customer to cure thefailure and Customer has failed to do so within thirty (30) days of such notice.
Updates And Upgrades. Customer agrees that the software does not include updates andupgrades which may be available from Hewlett-Packard under a separate supportagreement.
Export Clause. Customer agrees not to export or re-export the software or any copy oradaptation in violation of the U.S. Export Administration regulations or other applicableregulation.
U.S. Government Restricted Rights. Use, duplication, or disclosure by the U.S.Government is subject to restrictions as set forth in subparagraph (c)(1)(ii) of the Rightsin Technical Data and Computer Software clause in DFARS 252.227-7013. Hewlett-Packard Company, 3000 Hanover Street, Palo Alto, CA 94304 U.S.A. Rights for non-DOD U.S. Government Departments and Agencies are as set forth in FAR 52.227-19(c)(1,2).
Edition History
Edition 1 ..........................................September 1999
Edition 2 .......................................... December 1999
This manual is printed on recycled paper.

Reference Guide 5
Contents
Introducing the OmniBook ............................................................................................... 9Getting More Information ............................................................................................ 10Taking Inventory .......................................................................................................... 11
Included in the OmniBook box .............................................................................. 11To buy OmniBook accessories............................................................................... 12
OmniBook Features...................................................................................................... 13OmniBook—Front View ........................................................................................ 13OmniBook—Side View.......................................................................................... 14OmniBook—Back View......................................................................................... 15OmniBook—External Module Bay........................................................................ 15
Setting Up for the First Time ....................................................................................... 16To set up the OmniBook and Windows ................................................................. 16To connect the floppy disk drive............................................................................ 18
Operating the OmniBook ................................................................................................ 19Starting and Stopping the OmniBook .......................................................................... 20
To start and stop the OmniBook............................................................................. 20To reset the OmniBook........................................................................................... 21
Checking the Status of the OmniBook......................................................................... 22To check power status and drive activity ............................................................... 22To check the keyboard status ................................................................................. 23
Using the OmniBook Pointing Devices ....................................................................... 24To use the built-in pointing devices ....................................................................... 25To activate full touch pad capabilities.................................................................... 26To activate full pointing stick capabilities ............................................................. 27To configure pointing devices ................................................................................ 27To disable the touch pad or pointing stick ............................................................. 28
Using the OmniBook Display ...................................................................................... 29To adjust the display brightness ............................................................................. 29To extend the life of the display ............................................................................. 29To suspend the OmniBook when closing the display ............................................ 30
Adjusting the Audio System ........................................................................................ 31To adjust the volume .............................................................................................. 31
Using the OmniBook Keyboard................................................................................... 32To use the Fn hot keys............................................................................................ 32To use the Windows keys....................................................................................... 33To use the embedded keypad ................................................................................. 33To use the ALT GR key ......................................................................................... 34
Working in Comfort ..................................................................................................... 35About Repetitive Strain Injury ............................................................................... 35Preparing Your Work Environment ....................................................................... 37Setting Up Your HP Computing Equipment.......................................................... 39

6 Reference Guide
Comfort and Safety Checklist ................................................................................ 44Your HP OmniBook Computer .............................................................................. 46
Taking Care of Your OmniBook.................................................................................. 48
Managing Battery Power................................................................................................. 49How Power is Managed ............................................................................................... 50Monitoring Battery Power............................................................................................ 51
To install APM for Windows NT 4.0..................................................................... 51To check the battery status ..................................................................................... 52To respond to a low-battery warning ..................................................................... 53To recharge a battery .............................................................................................. 53To replace the battery ............................................................................................. 55
Conserving Battery Power............................................................................................ 57To save battery power............................................................................................. 57To set power time-outs ........................................................................................... 58To get the most from your battery.......................................................................... 59
Expanding the OmniBook ............................................................................................... 61Using the External Module Bay ................................................................................... 62
To install hot-swap support .................................................................................... 62To remove or install the bay or module ................................................................. 63To connect the floppy disk drive to the parallel port ............................................. 65
Connecting External Devices ....................................................................................... 66To identify connectors for external devices ........................................................... 66To connect an external monitor.............................................................................. 67To enable the built-in and external displays........................................................... 67To change display settings in the BIOS Setup utility ............................................ 67To use an external monitor ..................................................................................... 68To connect an external keyboard or PS/2 mouse ................................................... 69To connect a printer ................................................................................................ 69To connect a serial device ...................................................................................... 70To connect a serial mouse ...................................................................................... 70To connect USB devices......................................................................................... 70To connect audio devices ....................................................................................... 71To make an infrared connection ............................................................................. 72
Using PC Cards ............................................................................................................ 74To insert and remove a PC Card............................................................................. 74To find tested PC Cards.......................................................................................... 75To install Card Executive for Windows NT 4.0..................................................... 75
Using Docking Products............................................................................................... 76To install a docking tray ......................................................................................... 76To dock the OmniBook .......................................................................................... 77To undock the OmniBook ...................................................................................... 78
Installing a Hard Disk Drive ........................................................................................ 79To replace the hard disk drive ................................................................................ 79To replace the hard disk drive holder ..................................................................... 80

Reference Guide 7
Installing a RAM Expansion Module .......................................................................... 81To install a RAM expansion module...................................................................... 81To remove a RAM expansion module ................................................................... 83
Configuring the OmniBook............................................................................................. 85Using BIOS Setup ........................................................................................................ 86
To run the BIOS Setup utility................................................................................. 86Using TopTools ............................................................................................................ 92
To install TopTools ................................................................................................ 92To run TopTools ..................................................................................................... 92To get more information about TopTools .............................................................. 92
Configuring Security Options ...................................................................................... 93To set or change an OmniBook password.............................................................. 93To delete an OmniBook password ......................................................................... 94To install the VirusScan utility............................................................................... 94To attach a security cable ....................................................................................... 95To set PC identification .......................................................................................... 95To enable hard disk drive lock ............................................................................... 96
Troubleshooting................................................................................................................97Solving Problems.......................................................................................................... 98
Accessory Problems ............................................................................................... 98Audio Problems .................................................................................................... 100Display Problems.................................................................................................. 101Hard Disk Drive Problems ................................................................................... 102Infrared Problems ................................................................................................. 103Keyboard and Pointing Device Problems ............................................................ 104Memory Problems ................................................................................................ 106PC Card (PCMCIA) Problems ............................................................................. 107Performance Problems.......................................................................................... 108Power and Battery Problems ................................................................................ 109Printing Problems ................................................................................................. 111Serial, Parallel, and USB Problems...................................................................... 112Startup Problems................................................................................................... 113
Testing the Operation ................................................................................................. 115To run the diagnostic test ..................................................................................... 115To create a diagnostic floppy disk........................................................................ 116
Recovering Software .................................................................................................. 117To recover the factory installation of Windows................................................... 118To create a Support Utility Disk........................................................................... 119To update the OmniBook BIOS ........................................................................... 120To replace a damaged Recovery CD .................................................................... 120
Support and Service....................................................................................................... 121Getting HP OmniBook Assistance............................................................................. 122

8 Reference Guide
Support Assistance ............................................................................................... 122Electronic Support Services ................................................................................. 122Repair Assistance ................................................................................................. 123Customer Support Centers.................................................................................... 123
Hewlett-Packard Limited Warranty Statement .......................................................... 125
Specifications and Regulatory Information................................................................. 127Hardware Specifications............................................................................................. 128Software System Resources ....................................................................................... 131Safety Information...................................................................................................... 134
Power Cords.......................................................................................................... 134Ergonomics ........................................................................................................... 135Battery Safety ....................................................................................................... 135LED Safety ........................................................................................................... 136
Regulatory Information .............................................................................................. 137U.S.A. ................................................................................................................... 137Canada .................................................................................................................. 138Japan ..................................................................................................................... 138International.......................................................................................................... 139
Index ................................................................................................................................ 141

Reference Guide 9
Introducing the OmniBook

Introducing the OmniBookGetting More Information
10 Reference Guide
Getting More Information
Congratulations! Your OmniBook sets a new standard in personal computing. Althoughit’s compact and easy to carry, the OmniBook is infused with the quality and attention todetail that are the hallmark of Hewlett-Packard.
The OmniBook Quick Start sheet shows how to get your OmniBook up and runningquickly. This manual shows how to set up and operate the OmniBook, and it also showswhat to do if you run into trouble.
This table lists other sources of supplementary information about OmniBook products.
Source Description and Location
User’s Handbook This printed manual introduces the OmniBook and shows you the OmniBook basics.It also contains setup instructions, basic operation, troubleshooting, and warrantyinformation.
Online ReferenceGuide
The full Reference Guide is shipped on the OmniBook hard drive. This manualprovides a complete source for operating and maintaining the OmniBook. Look inthe OmniBook Library group.
Online OmniBookNotes
For late-breaking information available after the manuals were completed, seeOmniBook Notes in the online OmniBook Library.
Microsoft Windowsmanual
This is shipped with your OmniBook and contains information about using thestandard features of the version of Microsoft Windows shipped with your computer.
OmniBook website http://www.hp.com/omnibook.http://www.europe.hp.com/omnibook (European mirror).
HP Customer Carewebsite
http://www.hp.com/cposupport/eschome.html.
CorporateEvaluator’s Guide
This provides information about installing alternate operating systems, as well ashow to configure the OmniBook in a corporate, networked environment. Located atthe OmniBook website.

Introducing the OmniBookTaking Inventory
Reference Guide 11
Taking Inventory
The HP OmniBook 900 represents a category of HP notebook computers for highlymobile professionals who want a notebook PC with the performance and expansion foreveryday use, as well as the portability to take it everywhere.
Included in the OmniBook box
• HP OmniBook 900.
• External module bay.
• Floppy disk drive.
• AC adapter and power cord.
• Lithium-ion battery.
• The OmniBook User’s Handbook.
• Quick Start sheet.
• OmniBook Recovery CD. Includes Windows recovery and operating system drivers.
• Microsoft Windows manual.

Introducing the OmniBookTaking Inventory
12 Reference Guide
To buy OmniBook accessories
Buy OmniBook accessories online! For the latest accessories and options, visit us athttp://www.hp.com/omnibook. As new accessories become available, you’ll find themlisted here.
At the time of this printing, HP offers a variety of docking solutions, plug-in modules,and other accessories, including the following:
• Docking system and monitor stand.
• Mini dock.
• Port replicator.
• External module bay.
• Floppy disk drive.
• External floppy disk drive cable.
• CD-ROM drive.
• LS-120 drive.
• DVD drive.
• Replacement hard disk drive.
• Second hard disk drive.
• Lithium-ion battery.
• External battery charger.
• PC Cards.
• Smart Card security system.
• Auto / airline adapter.
• AC adapter.
Introducing the OmniBookOmniBook Features
Reference Guide 13
OmniBook Features
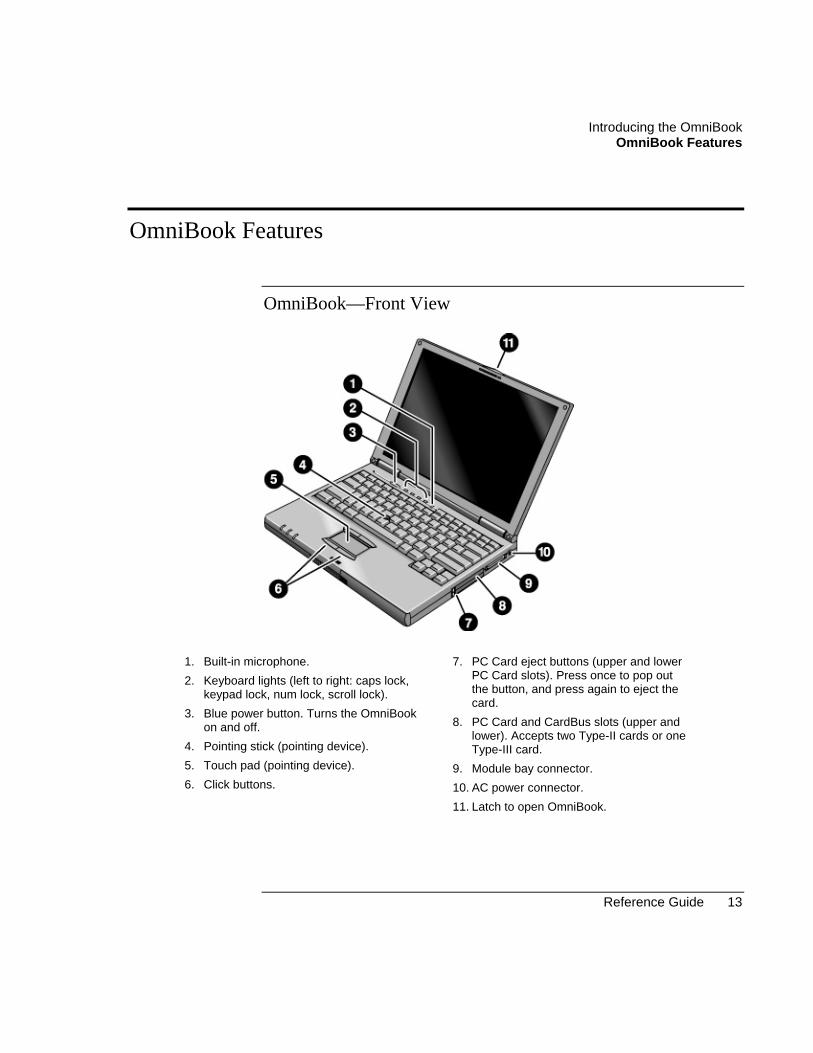
OmniBook—Front View
1. Built-in microphone.
2. Keyboard lights (left to right: caps lock,keypad lock, num lock, scroll lock).
3. Blue power button. Turns the OmniBookon and off.
4. Pointing stick (pointing device).
5. Touch pad (pointing device).
6. Click buttons.
7. PC Card eject buttons (upper and lowerPC Card slots). Press once to pop outthe button, and press again to eject thecard.
8. PC Card and CardBus slots (upper andlower). Accepts two Type-II cards or oneType-III card.
9. Module bay connector.
10. AC power connector.
11. Latch to open OmniBook.
Introducing the OmniBookOmniBook Features
14 Reference Guide
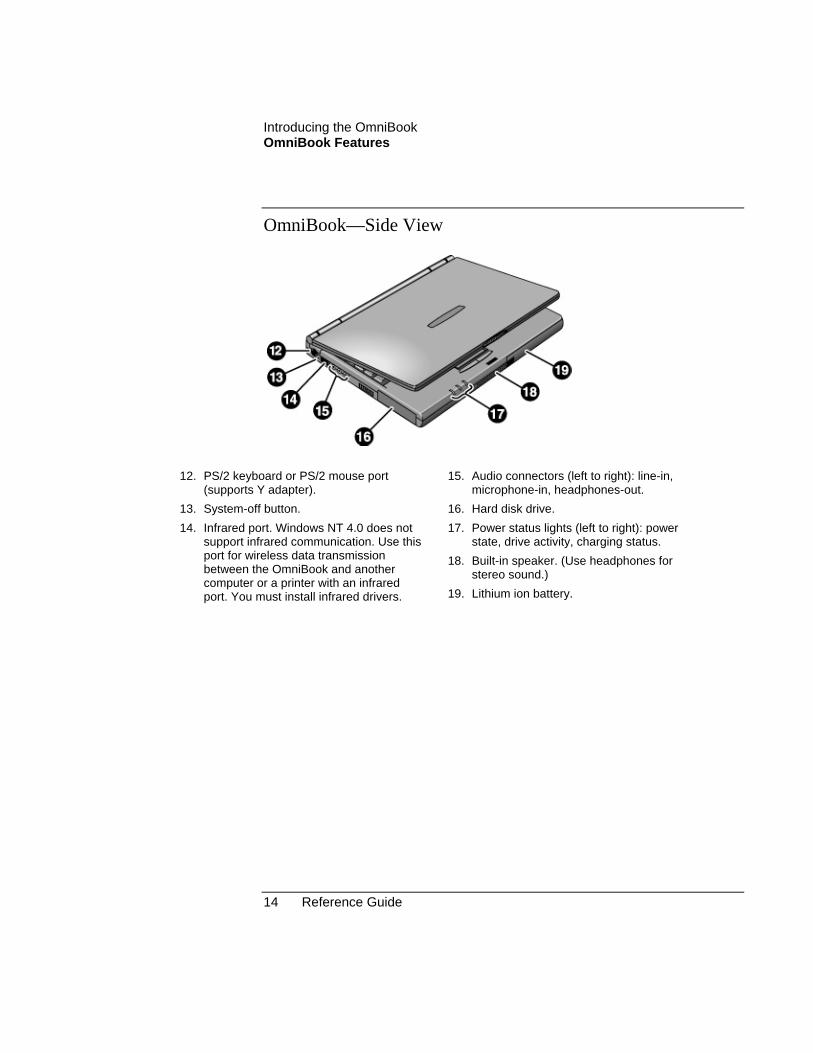
OmniBook—Side View
12. PS/2 keyboard or PS/2 mouse port(supports Y adapter).
13. System-off button.
14. Infrared port. Windows NT 4.0 does notsupport infrared communication. Use thisport for wireless data transmissionbetween the OmniBook and anothercomputer or a printer with an infraredport. You must install infrared drivers.
15. Audio connectors (left to right): line-in,microphone-in, headphones-out.
16. Hard disk drive.
17. Power status lights (left to right): powerstate, drive activity, charging status.
18. Built-in speaker. (Use headphones forstereo sound.)
19. Lithium ion battery.

Introducing the OmniBookOmniBook Features
Reference Guide 15
OmniBook—Back View
20. Kensington lock slot (security connector).
21. Serial port (COM1).
22. Parallel port (LPT1).
23. External monitor port.
24. Universal Serial Bus (USB) port.
25. Docking port (for the port replicator ordocking system).
OmniBook—External Module Bay
26. External module bay. 27. Floppy disk drive plug-in module.

Introducing the OmniBookSetting Up for the First Time
16 Reference Guide
Setting Up for the First Time
When you set up the OmniBook for the first time, you’ll need to install and charge thebattery, connect the ac adapter, turn on the OmniBook, and go through the Windowssetup program.
To set up the OmniBook and Windows
CAUTION Use only the HP adapter shipped with the OmniBook (or other approved adapter).Using any other ac adapter could damage the OmniBook and may void yourwarranty. Refer to the warranty statement for your product.
1. Install the OmniBook battery (see the Quick Start sheet or “To replace the battery” onpage 55).
2. Plug in the ac adapter.
3. Connect the ac adapter to the OmniBook’s right side, as shown. The OmniBookbattery starts charging.
Let the battery charge a full 24 hours to completely charge the internal clock battery.Otherwise, the OmniBook may not keep the correct date and time.

Introducing the OmniBookSetting Up for the First Time
Reference Guide 17
4. Press the blue power button.
5. The Windows Setup program starts automatically. Follow the instructions as theyappear on the screen.
6. During setup, you may be prompted to enter the Product Key or Product ID (printedon the Certificate of Authenticity on the Microsoft Windows manual or attached tothe bottom of the computer).
7. If you are prompted to set up a user account and password, you can either set up theaccount or press ESC to skip this step.
Windows NT 4.0 For Windows NT, Card Executive provides support for PC Cards, and Advanced PowerManagement provides power management. If a PC Card icon and a Power icon aredisplayed in the taskbar, these utilities are already installed. If these icons are notpresent, see “To install Card Executive for Windows NT 4.0” on page 75 and “To installAPM for Windows NT 4.0” on page 51. You should install Card Executive before youinstall networking support.
For Windows NT, the NT administrator password is initially blank. For system security,you should change the NT administrator password in the Windows NT User Manager.
For Windows NT, the keyboard locale is initially set to match the Windows NTlanguage. For example, French Windows NT uses a French keyboard. If yourOmniBook has a different keyboard, such as French-Canadian, you should useKeyboard Control Panel to change the locale and layout under Input Locales.
Year 2000 Hewlett-Packard makes no representation or warranty about the Year 2000 readiness ofnon-HP products including pre-installed operating systems or application software.Customer should contact the software manufacturer directly to determine if anyadditional actions by Customer are necessary to ensure compliance.
ATTENTION: MICROSOFT HAS INDICATED MANY OF ITS OPERATINGSYSTEM SOFTWARE PRODUCTS AND APPLICATIONS REQUIRE CUSTOMERINSTALLATION OF SOFTWARE PATCHES FOR YEAR 2000 COMPLIANCEAND MAY REQUIRE ADDITIONAL PATCHES IN THE FUTURE. THE NEEDFOR SUCH PATCHES MOST LIKELY APPLIES TO THE OPERATING SYSTEMSOFTWARE AND ANY MICROSOFT APPLICATIONS SHIPPED WITH THISPRODUCT. CUSTOMER IS URGED TO CONTACT MICROSOFT AThttp://www.microsoft.com/y2k, AT 1-888-MSFTY2K (U.S. AND CANADA ONLY),OR AT THEIR LOCAL MICROSOFT OFFICE.

Introducing the OmniBookSetting Up for the First Time
18 Reference Guide
To connect the floppy disk drive
1. Insert the floppy disk drive into the external module bay. If this is your only plug-inmodule, you can leave it in the module bay.
2. On the right side of the OmniBook, open the flap covering the module bay connectorand plug in the module bay cable. The computer can be on or off.
To remove the floppy drive, you must shut down or notify Windows before you unplugthe module or the module bay. See “To remove or install the bay or module” on page 63.
CAUTION Do not touch the metallic pins in OmniBook connectors, module connectors, orcable connectors. Static electricity can damage internal components.

Reference Guide 19
Operating the OmniBook

Operating the OmniBookStarting and Stopping the OmniBook
20 Reference Guide
Starting and Stopping the OmniBook
You can easily start and stop your OmniBook using the blue power button. However, atcertain times, you may want to use other methods for starting and stopping yourOmniBook—depending on power considerations, types of active connections, and start-up time.
To start and stop the OmniBook
When you The OmniBook enters To turn on again
Press Fn+S.*–or–allow time-out.
Standby ModeSaves minimal power.Turns off the display only.Restarts quickly.Maintains network connections.
Press any key or move apointing device to displayyour current session(“Instant-On”).
Press blue powerbutton–or–click Start,Suspend.**–or–allow time-out.
Suspend ModeSaves significant power.Turns off the display.Saves current session to RAM.Restarts quickly.May restore network connections.***
Press the blue powerbutton to display yourcurrent session (“Instant-On”).
Press Fn+F12–or–allow time-out.
Hibernate ModeSaves maximum power.Saves current session to disk, shuts down.May restore network connections.***
Press the blue powerbutton to restart andrestore your previoussession.
Click Start,Shut Down(recommended)–or–Press and hold theblue power buttonuntil the displayshuts down.
Off ModeSaves maximum power.Turns off without saving current session.At startup, resets everything, starts a new session, andrestores network connections.
Press the blue powerbutton to restart with anew session.
* Windows NT and Windows 95 only. In Windows 98, press Fn+S to suspend. Not supported in Windows 2000.
** Windows 95 only. In Windows 98 and Windows 2000, click Start, Shutdown, Standby to suspend.
*** A plug-and-play operating system, such as Windows 95, Windows 98, or Windows 2000, can restore networkconnections when you turn on the OmniBook. For Windows NT 4.0 or a different operating system, you mayhave to reset the OmniBook or restart the operating system to restore them.

Operating the OmniBookStarting and Stopping the OmniBook
Reference Guide 21
To reset the OmniBook
If Windows or the OmniBook stops responding, you can reset the OmniBook and restartWindows.
1. If possible, shut down Windows.
2. Press and hold the blue power button until the display shuts down.
–or, if this fails–
Insert a pen or straightened paper clip into the recess on the left side of theOmniBook, as shown.
3. After the computer shuts down, press the blue power button to turn it on.
Hint To boot from a CD-ROM or DVD drive in the external module bay, press ESC twotimes during reboot when you see the HP logo. Then select the CD-ROM/DVD drive asthe temporary boot device.

Operating the OmniBookChecking the Status of the OmniBook
22 Reference Guide
Checking the Status of the OmniBook
To check power status and drive activity
The OmniBook has status lights that report power status and drive activity. When thefloppy disk drive is installed in the external module bay, the following lights are presenton the front of the OmniBook and the external module bay.
1. Power status light.
• Green light. OmniBook is on.
• Amber light. OmniBook is in Standby or Suspend mode.
• No light. OmniBook is in Off or Hibernate mode.
• Green and amber light. OmniBook failed when resuming. Reset the OmniBook.
2. Drive activity light.
• Green light. OmniBook is accessing the hard disk drive or a drive in the externalmodule bay.
3. Charging status light.
• Green light. The ac adapter is connected and battery is full or has stoppedcharging.
• Blinking green light. The ac adapter is connected and battery is charging.
• No light. The ac adapter is not connected or the battery is not installed.
4. Floppy disk drive light.
• Green light. The OmniBook is accessing the floppy disk drive.

Operating the OmniBookChecking the Status of the OmniBook
Reference Guide 23
To check the keyboard status
The keyboard status lights, located above the keyboard, indicate the states of thekeyboard locks.
1. Caps Lock. Caps Lock is active.
2. Keypad Lock. The embedded keypad is active (Fn+F8). Num Lock must also be onfor the numeric keys—otherwise, cursor control is active.
3. Num Lock. Num Lock is active. (The Keypad Lock must also be on to use theembedded keypad.)
4. Scroll Lock. Scroll Lock is active.

Operating the OmniBookUsing the OmniBook Pointing Devices
24 Reference Guide
Using the OmniBook Pointing Devices
Two pointing devices (pointing stick and touch pad) are built into your OmniBook.
1. Pointing stick (pressure-sensitive pointing device).
2. Touch pad (touch-sensitive pointing device).
3. Click buttons (two above and two below the touch pad).
Both pointing devices use these click buttons, which work like the right and leftbuttons on a standard mouse. What the buttons do depends on the software beingused.

Operating the OmniBookUsing the OmniBook Pointing Devices
Reference Guide 25
To use the built-in pointing devices
1. Place your hands in the typing position.
2. Pointing stick. With your index finger, press the pointing stick in the direction youwant the pointer to move. Pressing away from you moves the pointer up the screen;pressing toward you moves the pointer down the screen.
Touch pad. Move a thumb or finger across the touch pad in the direction you wantthe pointer to move.
3. Use the left and right click buttons, which function like the left and right buttons on amouse, to make your selection.
• To open an application, move the pointer over the icon, then press the left buttontwice rapidly.
• To make menu selections, move the pointer to the item and press the left buttononce.
• To open the shortcut menu for an item, move the pointer over the item and clickthe right button.
• To drag an item, move the pointer over the item. Press and hold the left buttonwhile you move the pointer to the new location. Release the button.
The default pointing device driver (PS/2 TrackPoint) supports the enhanced features ofthe pointing stick and basic features the touch pad.
You can customize the OmniBook to support enhanced touch pad features (see the nexttopic). If you do this, keep in mind that you are selecting enhanced features for the touchpad only. You cannot activate enhanced features for both simultaneously.
Windows 2000 Under Windows 2000, enhanced features for the pointing stick and touch pad are notavailable at this time. Check the Customer Care website(http://www.hp.com/cposupport/eschome.html) for PS/2 TrackPoint and touch paddevice drivers for Windows 2000. The default pointing device driver is the standardPS/2 Compatible Mouse driver.

Operating the OmniBookUsing the OmniBook Pointing Devices
26 Reference Guide
To activate full touch pad capabilities
Windows 2000 Under Windows 2000, full touch pad capabilities are not available at this time.
The built-in pointing stick driver supports only basic touch pad features. To activate fulltouch pad capabilities, you have to
Remove the pointing stick driver and select a new mouse driver
1. From the Start menu, click Settings, Control Panel.
2. Double-click Add/Remove Programs and remove IBM TrackPoint Support.
3. From Control Panel, open Mouse, General and click Change.
–or–
In Windows 98, from Control Panel, open System, Device Manager, Mouse, IBMPS/2 TrackPoint, Driver, click Update Driver, and select the option to display a list ofdrivers.
4. Select Show All to see a complete list of devices.
5. Under Manufacturers, click Standard Mouse Types.
6. Under Models, change the mouse type to Standard PS/2 Port Mouse, then continue.
7. Click Yes to any questions.
Disable the pointing stick
1. From the Start menu, shut down, then restart the OmniBook.
2. When you see the HP logo, press F2 to enter the BIOS Setup utility.
3. Select the System Devices menu.
4. Highlight Internal Pointing Devices and select Touch Pad.
5. Press F10 to save and exit.
Install touch pad support
• Run C:\Omnibook\Drivers\Touchpad\Setup.exe.

Operating the OmniBookUsing the OmniBook Pointing Devices
Reference Guide 27
To activate full pointing stick capabilities
Windows 2000 Under Windows 2000, full pointing stick capabilities are not available at this time.
If you have activated full touch pad capabilities, you can use this procedure to switchback to full pointing stick capabilities.
Enable the pointing stick
1. From the Start menu, shut down, then restart the OmniBook.
2. When you see the HP logo, press F2 to enter the BIOS Setup utility.
3. Select the System Devices menu.
4. Highlight Internal Pointing Devices and select Pointing Stick. (Choose Both if youwant basic touch pad features available.)
5. Press F10 to save and exit.
Install pointing stick support
• From Control Panel, open Mouse, General and click Change. Click Have Disk, pointto the directory listed below, and select IBM PS/2 TrackPoint.
–or–
In Windows 98, from Control Panel, open System, Device Manager, Mouse, StandardPS/2 Port Mouse, Driver, click Update Driver, and select the option to display a list ofdrivers. Click Have Disk, point to the directory listed below, and select IBM PS/2TrackPoint.
c:\Omnibook\Drivers\Trackpnt
To configure pointing devices
• To customize the operation of all pointing devices (pointing stick, touch pad, andexternal PS/2 or serial mouse), in Control Panel open Mouse. You can change left andright button actions, double-click speed, pointer speed and tail, and more.
• To customize special pointing stick features, click the pointing stick icon on thetaskbar or open TrackPoint in Control Panel. This is not yet available underWindows 2000.

Operating the OmniBookUsing the OmniBook Pointing Devices
28 Reference Guide
To disable the touch pad or pointing stick
You can disable the touch pad or pointing stick if it interferes with your normal operationof the computer.
1. From the Start menu, shut down, then restart the OmniBook.
2. When you see the HP logo, press F2 to enter the BIOS Setup utility.
3. Select the System Devices menu.
4. Highlight Internal Pointing Devices and select only the pointing device you want touse. Choose Both if you want both devices available.
5. Press F10 to save and exit.

Operating the OmniBookUsing the OmniBook Display
Reference Guide 29
Using the OmniBook Display
To adjust the display brightness
The OmniBook uses special key combinations, called hot keys, to control brightness.
• Press Fn+F1 to decrease the brightness.
• Press Fn+F2 to increase the brightness.
Hint To maximize your battery operating time, set the brightness to the lowest comfortablesetting, so that the internal light uses less power.
To extend the life of the display
Observe the following guidelines to maximize the life of the backlight in the OmniBookdisplay.
• Set the brightness to the lowest comfortable setting (Fn+F1). If you are using anexternal keyboard, Fn = left CTRL + left ALT.
• When working at your desk, connect an external monitor and turn off the internaldisplay (Fn+F5).
• Avoid using a screen saver or other software that prevents the OmniBook fromchanging to Suspend or Standby mode after a time-out period. If you use a screensaver in Windows 95, 98, or 2000, enable the option to shut off the display after atime delay.
• Do not disable Suspend or Standby time-outs.
• If you are using ac power and have no external monitor attached, change to suspendor standby when the OmniBook is not in use.

Operating the OmniBookUsing the OmniBook Display
30 Reference Guide
To suspend the OmniBook when closing the display
Windows 2000 Under Windows 2000, to set the action for closing the display, open Control Panel, openPower Options, and on the Advanced tab, select an option for closing the lid. Nonemeans that the display will turn off when you close the lid.
By default, the OmniBook display turns off when you close the display lid. You canchange this setting to suspend the OmniBook when you close the display lid.
1. Close all applications, then shut down Windows and restart the OmniBook.
2. When you see the HP logo, press F2 to enter the BIOS Setup utility.
3. From the Power menu, choose Lid Switch Mode.
4. Choose one of the following options:
Turn off LCD. Closing the lid turns off the display (default). Open the lid to turn onthe display again.
Suspend. Closing the lid suspends the OmniBook. Press the blue power button toresume again.
5. Press F10 to save and exit the BIOS Setup utility.

Operating the OmniBookAdjusting the Audio System
Reference Guide 31
Adjusting the Audio System
The OmniBook supports Sound Blaster Pro-compatible sound and the MicrosoftWindows Sound System.
To adjust the volume
On the Keyboard
• To increase the volume, press Fn+UP-ARROW.
• To decrease the volume, press Fn+DOWN-ARROW.
• To temporarily silence the speaker without changing the volume setting, press Fn+F7.Press Fn+F7 again to restore the audio.
In Windows
• Click the speaker symbol in the taskbar.
• Drag the volume control bar up or down to adjust the volume.
• To temporarily silence the speaker without changing the volume setting, click Mute.

Operating the OmniBookUsing the OmniBook Keyboard
32 Reference Guide
Using the OmniBook Keyboard
WARNING Improper use of keyboards and other input devices has been associated withergonomic injury. For information about reducing your risk, see Working inComfort in the online OmniBook Library, or visit our ergonomics website,http://www.hp.com/ergo.
If you are using your portable computer as your primary computer, or using it forextended periods, you should use it with a full-size keyboard, monitor, and mouse.This can reduce the risk of ergonomic injury. See Working in Comfort in the onlineOmniBook Library.
To use the Fn hot keys
The combination of the Fn key plus another key creates a hot key—a shortcut keysequence—for various system controls. The OmniBook keyboard shows the Fn hot keyslabeled in gray. If you are using an external keyboard, the Fn key = left CTRL +left ALT.
These keys Do this
Fn + F1 Decreases the display’s brightness.
Fn + F2 Increases the display’s brightness.
Fn + F5 Switches among the built-in display, an external display, and simultaneous displays.
Fn + F7 Toggles audio mute on and off.
Fn + F8 Toggles the built-in keypad on and off. Does not affect an external keyboard. If NumLock is on, then the numeric functions are active; otherwise, cursor control is active.
Fn + F12 Enters Hibernate mode.
Fn + S Enters Standby mode in Windows 95 and Windows NT. Enters Suspend mode inWindows 98. Not supported in Windows 2000.
Fn + R Enters Suspend mode. Not supported in Windows 2000.
Fn + ScrLk Toggles Scroll Lock on and off.
Fn + UP ARROW Increases the volume.
Fn + DOWNARROW
Decrease the volume.

Operating the OmniBookUsing the OmniBook Keyboard
Reference Guide 33
To use the Windows keys
There are two Windows keys on the keyboard.
The one next to the Fn key brings up the Windows Start menu.
The one at the top center of the keyboard brings up the shortcut menu for thecurrent application. This is the same menu that appears when you click the rightmouse button while pointing at the application.
To use the embedded keypad
When the embedded keypad on the OmniBook’s built-in keyboard is active, two optionsare possible.
Num Lock on Keys change to the numeric or arithmetic designations printed in light gray on thekeyboard.
Num Lock off Keys change to cursor control keys.
1. Press NmLk to turn Num Lock on or off.
2. Press Fn+F8 to turn on the embedded keypad.–or–To temporarily turn on the embedded keypad, hold Fn while typing a key.

Operating the OmniBookUsing the OmniBook Keyboard
34 Reference Guide
To use the ALT GR key
Non-U.S. keyboards have an ALT GR key to the right of the spacebar. This is a shift keyproviding access to certain keyboard characters.
• For a character in the lower-right corner of a key, press and hold ALT GR to type thecharacter.
1. Shift.
2. Unshifted.
3. ALT GR.
For example, to type the euro currency symbol, hold ALT GR and press the markedkey—or you can turn on Num Lock and the embedded keypad, then hold ALT and type0128 on the embedded keypad.

Operating the OmniBookWorking in Comfort
Reference Guide 35
Working in Comfort
WARNING Improper use of keyboards and other input devices has been associated withergonomic injury. For more information about reducing your risk, visit ourergonomics website at www.hp.com/ergo.
Thank you for selecting HP computing equipment. To optimize your comfort andproductivity, it is important that you set up your work area correctly and use your HPequipment properly. With that in mind, we have developed some set-up and userecommendations for you to follow based on established ergonomic principles.
Improper and prolonged use of keyboards and input devices are among those tasks thathave been associated with repetitive strain injury (RSI) to soft tissues in the hands andarms. If you experience discomfort or pain while using any computing equipment,discontinue use immediately and consult your physician as soon as possible.
In addition to the information on RSI given in this chapter, you may also consult theonline version of Working in Comfort preloaded on the hard disk of the your HPOmniBook, or visit HP’s Working in Comfort website.
About Repetitive Strain Injury
Because your comfort and safety are our primary concern, we strongly recommend thatyou use HP computing equipment in accordance with established ergonomic principlesand recommendations.
Scientific literature suggests that there may be a relationship between injury to softtissues—especially in the hands and arms—and prolonged, improper use of keyboards orother equipment requiring repeated motions of the hands and forearms.
This literature also suggests that there are many other risk factors that may increase thechance of such injury, commonly called Repetitive Strain Injury.
What is RSI?
Repetitive Strain Injury (RSI—also known as cumulative trauma disorder or repetitivemotion injury) is a type of injury where soft tissues in the body, such as muscles, nerves,or tendons, become irritated or inflamed.

Operating the OmniBookWorking in Comfort
36 Reference Guide
RSI has been a reported problem for those who perform repetitive tasks such as assemblyline work, meatpacking, sewing, playing musical instruments, and computer work.
RSI also has been observed in those who frequently engage in activities such ascarpentry, knitting, housework, gardening, tennis, windsurfing and lifting children.
What causes RSI?
The specific causes of RSI have not been established. Nevertheless, the incidence of RSIhas been associated with a variety of risk factors, including:
• Too many uninterrupted repetitions of an activity or motion.
• Performing an activity in an awkward or unnatural posture.
• Maintaining static posture for prolonged periods.
• Failing to take frequent short breaks.
• Other environmental and psychosocial factors.
In addition, there have been reports associating the occurrence of RSI with the use ofcomputer keyboards, mice, and other input devices. Also, certain medical conditions,such as rheumatoid arthritis, obesity and diabetes, may predispose some people to thistype of injury.
What can I do to avoid RSI?
Some people who use computers may experience physical discomfort during their use.This discomfort may be a symptom of a repetitive strain injury.
Properly setting up and using computing equipment can help to minimize your chances ofexperiencing this discomfort. Well-designed and properly adjusted equipment alone maynot be sufficient to eliminate all potential problems.
Maintaining good posture and positioning when working on computers also has asignificant bearing on your comfort.
What if I experience discomfort?
If you are experiencing any discomfort, seek professional medical advice immediately.Typically, the earlier a problem is diagnosed and treated, the easier it is to resolve.

Operating the OmniBookWorking in Comfort
Reference Guide 37
Preparing Your Work Environment
When using HP computing equipment, it is important that your work environmentcontribute to your comfort and productivity.
Your Chair
It’s very important that your chair provides a comfortable sitting position and offers thefollowing features:
• A stable base, such as five legs with casters. Make sure the casters are designed forthe type of floor you have in your workspace, whether it is bare or carpeted.
• A height- and tilt-adjustment feature. It should be easy to adjust your chair heightfrom 40 cm to 52 cm (15.5 inches to 20.5 inches) as measured from the top of the seatpan to the floor. If you are much taller or shorter than average, you may need a chairthat can be adjusted beyond this range. Adjust your chair so that the work surface orkeyboard tray is at elbow height and your feet are flat on the floor with your kneesslightly bent below your hips. Ideally, the seat pan should be able to tilt both forward(minimum of 5 degrees) and backward (minimum of 10 degrees). If the chair has anadjustable seat pan, inclining the seat slightly forward will transfer some of thepressure from the spine to the thighs and feet. This will relieve pressure on your back.

Operating the OmniBookWorking in Comfort
38 Reference Guide
• A curved seat edge. The front of the seat should be curved and finished in a“waterfall” edge.
• An adjustable back support in both height and forward and backward tilt. It isimportant that the backrest correctly supports the lower part, or lumbar curve, of theback.
• A freely rotating swivel so you can move easily from side-to-side.
• Fully adjustable and padded armrests. The chair arms should not interfere withadjusting the chair or moving it close to your work surface.
Your Work Surface
Ideally, you should be able to adjust the height of your work surface.
A simple way to ensure your work surface is at the correct height is to first adjust theheight of the seat-pan of your chair. With your chair properly adjusted and your feetfirmly on the floor, adjust the work surface height until your forearms are parallel to thefloor when you have your fingers on the keyboard or other input device.
Your Work Posture
Sitting in one position for long periods can be uncomfortable. To minimize the potentialfor physical discomfort or injury, it's important that you maintain proper posture.
• Back: While sitting at your work surface, make sure your back is supported by thechair's backrest in an erect position or angled slightly backwards.
• Arms: Your arms should be relaxed and loose, elbows close to your sides, withforearms and hands approximately parallel to the floor.

Operating the OmniBookWorking in Comfort
Reference Guide 39
• Wrists: Your wrists should be as straight as possible while using the keyboard,mouse or trackball. They should not be bent sideways, or more than 10 degrees up ordown.
• Legs: Your thighs should be horizontal or angled slightly downward. Your lower legsshould be near a right angle to your thighs. Your feet should rest flat on the floor. Ifnecessary, use a footrest, but double check that you have your seat height adjustedcorrectly before getting a footrest.
• Head: Your head should be upright or tilted slightly forward. Avoid working withyour head or trunk twisted.
• Overall: Change your position frequently and take regular breaks to avoid fatigue.
Setting Up Your HP Computing Equipment
Make sure that all the elements of your HP computer system—monitor, document holder,keyboard, mice and other input devices, and headphones and speakers—are optimallyarranged and adjusted to meet your personal requirements. The recommendations thatfollow will help you achieve this.
Your HP Monitor
It is important that your monitor screen be clean and positioned correctly to improvereadability and help you work comfortably. Glare, high contrast, reflections, dirt and dustwill interfere with what you see on the screen. The recommendations that follow can helpyou achieve a comfortable arrangement.

Operating the OmniBookWorking in Comfort
40 Reference Guide
• The top of your monitor screen should be at or slightly below eye level. Most HPmonitors come with a tilt-and-swivel feature that makes it easy to adjust the screenposition.
• To avoid obscuring your view, the screen should be positioned perpendicular to yourline of sight; that is, straight on.
• To avoid glare or reflection, try to position the monitor so the screen is at a right angleto your window rather than in front of it. If reflection or glare persists, tilting thescreen forward may help.
• Maintain a comfortable viewing distance to the screen. Most people prefer a viewingdistance of approximately 46 to 76 cm (18 to 30 inches), depending on monitor size.Character size and the amount of space available on the work surface can affect thisdistance.
• Text should be easy to read. To help ease eyestrain, adjust text attributes such ascharacter size, spacing, and color. In addition, you will need to use the controlsprovided with your monitor to adjust the visual settings so that contrast and brightnesslevels are comfortable for you. High contrast and low brightness is usually thepreferable combination.
• The monitor should be free from flicker. If the image on your screen is not stable, themonitor may require repair or adjustment.
• When possible, use a program that has a simple user interface, such as easilyidentifiable icons and pull-down menus. Also, screen information should be displayedin a structured and well-organized way.

Operating the OmniBookWorking in Comfort
Reference Guide 41
Monitor Use Specifications
• When viewing your monitor, your head should not be tilted more than 15 degreesforward.
• You should not have to look up more than 5 degrees above horizontal or down morethan 30 degrees below horizontal for normal work tasks, such as typing or reading.
Document Holders
When keying in data from a hard-copy document, placing it in a document holder ratherthan on a flat surface will make it easier to read. The following recommendations shouldbe observed when using a document holder:
• The document holder should be at approximately the same height and distance fromyour eyes as the screen, and as close to the monitor as possible to prevent necktwisting. Some users prefer a document holder mounted to the monitor while othersprefer the document holder positioned between the screen and keyboard.
• If the primary task is to view documents rather than using the monitor, the documentholder may be placed directly in front of the keyboard with the monitor slightly to theside.
• To help reduce stress on your neck and prevent eye fatigue, try to minimize themovement of your head and eyes while using a document holder.
Your HP Keyboard
The proper positioning and use of your HP keyboard is important when using HPcomputing equipment. Be sure to observe the following recommendations to optimizeyour comfort and safety:

Operating the OmniBookWorking in Comfort
42 Reference Guide
• We recommend you place your keyboard in front of the screen or document holder,whichever is viewed the most. Your HP keyboard has long cables so you can place itin the position that is most comfortable for you while you are using your system.
• Because HP keyboards vary in depth, you’ll want to be sure that your work surface orkeyboard tray has sufficient room to accommodate your model. The keyboard trayshould be wide enough to hold both the keyboard and mouse or trackball: 66 to 71 cm(26 to 28 inches).
• Your HP keyboard may have a kickstand that can be opened or closed to raise orlower the keyboard angle. If you are in the correct sitting position with your elbows atabout the same level as the work surface, you may not need to use it. However, ifyour elbows are below the work surface, you may wish to use the kickstand to raisethe back of the keyboard.
• An adjustable keyboard tray may be useful if you cannot adjust your chair or worksurface to the proper height for typing. It should adjust in height from 64 to 76 cm (25to 30 inches) above the floor and tilt forward and backward to help you find the mostcomfortable position. Note that research has shown that there may be less muscletension in shoulders and forearms with the keyboard tilted away from you.
• When using your HP keyboard, remember it takes very little pressure or force fromyour fingers to activate the keys. Improper typing style—the use of too much force—can place unnecessary stress on the tendons and muscles in your hands, wrists, andforearms.
• Make sure that your hands are in a neutral position when you use your keyboard. Thismeans that your forearms, wrists, and hands should be in a straight line.
• The keyboard has a low profile to help prevent excessive bending of your wrists whiletyping. Literature suggests that you should not bend your wrists sideways or morethan 10 degrees up or down. Keep your wrists straight by moving your entire handand forearm over to use the function keys or numeric keypad.
• You may use a palm rest to help keep your hands and wrists in a comfortable andneutral position when you are not typing. Some HP keyboards come with anintegrated palm rest. If you use a palm rest, see that it is rounded and padded, andflush in height with the front edge of the keyboard. Note that your palms—not yourwrists—should rest on the palm rest. If you don't have a palm rest, try not to rest yourwrists on a sharp edge, such as a work surface edge.
Mice and Other Input Devices
Various aspects of using mice and other input devices may increase your risk ofdiscomfort or injury. If you connect an external mouse to your OmniBook, observing thefollowing recommendations may reduce that risk.

Operating the OmniBookWorking in Comfort
Reference Guide 43
• As with the keyboard, try to keep your hand, wrist, and forearm in a neutral positionwhile using your mouse or other input device.
• When using a stylus or light pen with a graphics tablet, don’t grip the stylus tightly.Keep your hand and fingers relaxed and try to maintain a neutral posture in yourhand, wrist and forearm.
• If you use your thumb to rotate the ball on a trackball or spaceball, keep it in arelaxed, natural shape, and maintain a neutral posture in your hand, wrist, andforearm.
• Hold the mouse gently by draping your fingers over it. Keep your hand relaxed andfingers loose. Do not grip the mouse tightly.
• It takes very little pressure or force from your fingers to activate the buttons or scrollwheel on your mouse, scrolling mouse, trackball, or other input device. Using toomuch force can place unnecessary stress on the tendons and muscles in your hands,wrists, and forearms.
• If you are using a scrolling mouse, be sure to keep your fingers and hand in a relaxed,neutral position when activating the scroll wheel. Also, this type of mouse featuressoftware that can minimize the number of mouse movements or button clicks.
• When using a mouse, trackball, stylus and graphics tablet, or other input device,position it as close to the keyboard as possible, and keep it at the same level so you donot have to stretch while using it.
• Use a good quality mouse pad to enable the mouse to work most effectively andreduce unnecessary hand and wrist movements.
• Be sure to keep your mouse and trackball clean. Regular removal of accumulated dustand dirt helps ensure proper tracking and reduces unnecessary hand and wristmotions.

Operating the OmniBookWorking in Comfort
44 Reference Guide
Headphones and Speakers
Listening to loud sounds for prolonged periods may permanently damage your hearing.To avoid discomfort from unexpected noise, always turn down the volume beforeconnecting headphones or speakers to your HP equipment.
When you put on the headphones, slowly increase the volume until you find acomfortable listening level, then leave the volume control in that position.
Comfort and Safety Checklist
These recommendations are drawn from the latest available international ergonomicstandards and recommendations, including ISO 9241 and ANSI/HFS 100-1988.
General
• Work Surface Height: Adjust either your seat height, work surface, or both, toposition the work surface at approximately elbow height.
• Work Surface Arrangement: Make sure frequently used equipment is within easyreach. For example, if you are primarily using the keyboard, place it directly in frontof you, not to the side. If you are primarily using the mouse, place it in front of yourhand or arm. If you are using both a mouse and keyboard, place them both at the samework surface height and close together. If a palm rest is used, the height should beflush with the front edge of the keyboard. Other items, such as your telephone ornotepad, also should be considered.
• Monitor: Place your monitor so that the top of the screen is at, or slightly below, eyelevel (up to 15 degrees).

Operating the OmniBookWorking in Comfort
Reference Guide 45
• Head: Do not tilt your head forward by more than 15 degrees, and try not to turn yourhead toward the side.
• Back: While sitting at your work surface, make sure your back is supported by thechair’s backrest in an erect position or angled slightly backwards.
• Arms: Make sure your arms and elbows are relaxed and loose, with your upper armperpendicular to the floor or slightly forward. Keep your forearms and handsapproximately parallel with the floor with elbows bent between 70 and 115 degrees.Keep your elbows close to your sides (less than 20 degrees away from your body).
• Legs: Your thighs should be horizontal or angled slightly downward. Your lower legsshould be near a right angle to your thighs. Make sure there is sufficient room underthe work surface for your legs.
• Feet: If after adjusting your chair you cannot rest your feet comfortably on the floor,use a footrest, preferably one that can be adjusted in height and angle.
Overall
• Look away from the screen from time-to-time to help reduce eyestrain. Focus ondistant objects briefly, and blink periodically to lubricate your eyes. You also shouldhave your eyes checked on a regular basis and ensure your eyeglass prescription issuitable for working on a monitor screen.
• Remember to occasionally shift position and move your body. Keeping your body inone position for long periods is unnatural and stressful. When prolonged work isrequired, take frequent short breaks. As a rule of thumb, a five- or ten-minute breakevery hour is a good idea. Short, frequent breaks are more beneficial than longer lessfrequent breaks. Data show that people who work for long periods of time without abreak may be more prone to injury.
• Changing tasks frequently will help prevent muscle stiffness. Examples: alternatingbetween keyboarding, reading, writing, filing, and moving around in your workenvironment, helps you maintain a relaxed posture. Occasionally stretch the musclesin your hands, arms, shoulders, neck, and back. You should stretch at least as often asyou take brief task breaks—at least once every hour.
• Discomfort may be alleviated by using alternative ergonomic designs and accessoriessuch as ergonomically personalized chairs, palm rests, keyboard trays, alternativeinput devices, prescription eyeglasses, anti-glare screens, and more. Seek additionalinformation from the sources available to you, including your employer, doctor, localoffice supply store, and the information sources listed in the online version ofWorking in Comfort, which is preloaded on the hard disk of your HP computingequipment.

Operating the OmniBookWorking in Comfort
46 Reference Guide
Your HP OmniBook Computer
You can use your HP OmniBook computer virtually anywhere, anytime. The followingrecommendations should help you work more comfortably.
Note that if you are using your portable computer as your primary computer, or using itfor extended periods, you should use it with a full-size keyboard, monitor and mouse.This will give your portable computer the adjustability and comfort features of a desktopunit. HP port replicators offer quick, easy connections to these devices. More informationon how to prepare your workspace environment and set up your HP equipment isavailable in other sections of Working in Comfort, which is preloaded on the hard disk ofyour HP computing equipment.
Preparing Your Mobile Work Environment
• Use a chair that provides good support for your lower back. If an adjustable chair isnot available, you can use a pillow or rolled-up towel to provide lower back support.
• Try to keep your thighs parallel to the floor and your feet flat on the floor. In a mobileenvironment, you can do this by using a phone book or briefcase to support your feet.
• Adjust the height of either your work surface or chair to keep your arms in a neutralposition. Your arms should be relaxed and loose, elbows at your sides, with theforearms and hands parallel with the floor.
• Position your notebook computer display to minimize glare and reflection. Forexample, on an airplane, lower the window shade, or in a hotel room, draw thecurtains. You also should maintain a comfortable viewing distance, approximately 40to 60 cm (16 to 24 inches). Adjust the angle of your display to help keep your headangled slightly downward in a comfortable position.
Using Your Mobile Computer
• Position the computer so your wrists and hands are in a neutral position. Your wristsshould be as straight as possible and should not have to bend sideways or more than10 degrees up or down. If your notebook computer does not have a built-in palm rest,you can use a rolled-up towel.
• Try to type as lightly as possible. The notebook keyboard requires little force toactivate.
• Take frequent, short rest breaks. This is especially important in a mobile computingenvironment.

Operating the OmniBookWorking in Comfort
Reference Guide 47
• Portable computers weigh between approximately 1.4 and 3.7 kilos (3 and 8 pounds).When traveling, be sure to carry your computer properly to minimize strain on yourbody. Shift the bag containing your notebook equipment frequently between your leftand right hands and shoulders.

Operating the OmniBookTaking Care of Your OmniBook
48 Reference Guide
Taking Care of Your OmniBook
Protect your OmniBook from damage
• Observe the temperature limits and other specifications listed in “HardwareSpecifications” on page 128. Do not use the OmniBook outside in the rain or snow(inclement weather).
• Make sure there is adequate ventilation around the OmniBook. Suspend or shut downthe OmniBook before putting it in a carrying case or other enclosed space.
• Do not pick up or carry the OmniBook by the display.
• You can clean the OmniBook with a soft cloth dampened either in clean water or inwater containing a mild detergent. Do not use an excessively wet cloth nor allowwater inside the case. Do not use any abrasive cleaners, especially on the display. Donot apply any cleaner directly to the display. Instead, apply the cleaner to a soft clothand then gently wipe the display. You can clean the keyboard with a vacuum cleanerto remove accumulated dust.
Protect your hard disk drive from damage
• Avoid bumps or jolts.
• Suspend or shut down the OmniBook before transporting it. This turns off the harddrive. A drop of a few inches onto a rigid surface while the hard drive is operatingcould cause loss of data or damage to the drive.
• Carry the OmniBook in a padded case to protect against bumps and jolts.
• Set down the OmniBook gently. Take precautions against accidental bumps.
• Do not operate the OmniBook while traveling over bumpy terrain.
Protect your work
• Back up your work regularly. Copy files to floppy, tape, or network drives.
• Use a virus scanning program, preferably one that will run automatically, to check theintegrity of your files and operating system on a periodic basis. See “To install theVirusScan utility” on page 94.
• Periodically check your hard disk using standard Windows disk-maintenance utilities.

Reference Guide 49
Managing Battery Power

Managing Battery PowerHow Power is Managed
50 Reference Guide
How Power is Managed
The OmniBook conserves power by using software that controls battery charging andpower drain.
If you’re using Windows 95 or Windows 98, Advanced Power Management (APM) ispreinstalled on the OmniBook.
If you’re using Windows NT 4.0, look for a Power icon in the taskbar. If the icon ispresent, APM is installed. If not, see “To install APM for Windows NT 4.0” on page 51.
If you’re using Windows 2000, power management is built into Windows.
The OmniBook provides several safeguards so you won’t be surprised by a dead-batterycondition, including the following:
• The status lights on the battery show the remaining battery charge.
• Built-in warnings are displayed for low-battery conditions.
• The OmniBook automatically turns off when the battery charge gets too low—yoursession continues when you start recharging the battery or insert a fresh battery.
Data on any of the drives is not affected by a low battery—unless the battery runs downcompletely while writing data to the drive, or if the battery in a PC RAM card is also low.
Managing Battery PowerMonitoring Battery Power
Reference Guide 51
Monitoring Battery Power
The primary source of power for the OmniBook is its rechargeable battery pack. You canuse the ac adapter to recharge the battery—or to run on ac power to preserve the battery.
Important Running external connections is a power-intensive operation that significantly shortensthe length of a battery session. Whenever possible, connect the ac adapter when usingexternal connections.
In addition to the replaceable battery, there is a permanent, internal backup battery, whichrecharges whenever the OmniBook is on or connected to ac. It maintains certain internalsettings, such as the clock.
To install APM for Windows NT 4.0
If a Power icon (battery or power plug) is present in the taskbar, APM is installed. If theicon is not present, you can install APM using the steps below.
The Advanced Power Management (APM) driver for Windows NT 4.0 is located on theOmniBook’s hard disk drive. You set up APM from the Windows Start menu. (The APMdriver is also located on the Recovery CD in \OmniBook\Drivers\NT4 or Apm.)
Phoenix APM adds the following capabilities to the OmniBook:
• Improved battery life under Windows NT 4.0.
• PC Card power management.
• Convenient user control and monitoring of power settings and status.
1. To install APM, click Start, Programs, OmniBook, Phoenix Advanced PowerManagement, Setup.
2. Follow the setup instructions on the screen.
You can download the Phoenix APM documentation from the following website:http://www.phoenix.com.

Managing Battery PowerMonitoring Battery Power
52 Reference Guide
To check the battery status
From the Windows Taskbar
• Move the pointer onto the power icon at the right end of the taskbar. If you are usingWindows NT 4.0, you’ll need to install Advanced Power Management to display thepower icon (see “To install APM for Windows NT 4.0” on page 51). The approximatebattery charge is displayed as a percentage or in hours.
• Double-click the power icon on the taskbar to open the Battery Meter window.
From Windows Control Panel
• Click My Computer, Control Panel, Power. This provides access to all optionsassociated with reporting of power information by Windows.
On the Battery
1. Plug in the ac adapter or shut down the OmniBook.
2. Press the pad on the back of the battery.
The number of lights that turn on indicates the charge—each light represents 20% of afull charge.

Managing Battery PowerMonitoring Battery Power
Reference Guide 53
To respond to a low-battery warning
When battery power is critically low, you are alerted by one or more of the following:
• The computer emits a warning beep. This reminds you to save your work.
• If the OmniBook has been off, you will not be able to turn it on.
As an emergency measure, the OmniBook automatically hibernates to preserve yourcurrent session. However, unsaved data could be affected if the battery runs downcompletely while writing data to the drive. You won’t be able to restart until you restorepower by one of the following actions:
• Plug in the ac adapter.
–or–
Replace the main battery with one that is charged.
To recharge a battery
CAUTION The ac adapter is normally warm to the touch whenever it’s plugged into an acoutlet. The OmniBook is normally warm while it’s charging. Don’t charge it in abriefcase or other confined space as this may cause the battery to overheat.
1. Connect the power cord to the ac adapter, then plug the cord into an ac outlet. Theindicator light on the ac adapter shines when the adapter is on. If the ac adapter doesnot light, make sure that cord is not damaged.
2. Connect the ac adapter to the OmniBook’s right side, as shown.

Managing Battery PowerMonitoring Battery Power
54 Reference Guide
Charging time
Charging the battery takes about 1.5-2 hours to fully charge.
Battery life
When the computer is in use, typical battery life can last up to 3-4 hours or more,depending on your level of use, your power management settings, and your computermodel.
Optimum Charging
To get the longest battery operating time, wait to recharge until the battery is below 50%charged, then continue charging until the battery is fully charged. The battery charginglight stops blinking only when the battery is actually full. You can continue workingwhile the battery is charging.

Managing Battery PowerMonitoring Battery Power
Reference Guide 55
To replace the battery
CAUTION If you have any unsaved data, it (and your current work session) will be lost whenyou remove the battery unless the computer is connected to ac power. Also, youshould wait at least 3 seconds after inserting the battery before you unplug the acadapter.
1. Important. Save your work.
2. Plug in the ac adapter.
–or–
From the Start menu, shut down the OmniBook.
3. Slide the battery’s front panel to the right, as shown.
4. Pull the battery out of the bay.
5. With the front panel in the open position, slide the charged battery into the OmniBookuntil it is flush with the unit.

Managing Battery PowerMonitoring Battery Power
56 Reference Guide
6. Slide the battery’s front panel to the left.
WARNING Do not mutilate, puncture, or dispose of batteries in fire. A battery can burst orexplode, releasing hazardous chemicals. A rechargeable battery must be recycledor disposed of properly. For more information about battery safety, see “BatterySafety” on page 135.

Managing Battery PowerConserving Battery Power
Reference Guide 57
Conserving Battery Power
The OmniBook uses software to conserve battery power. You can manage this softwareto optimize your battery operating time. If you’re using Windows 95 or Windows 98,Advanced Power Management (APM) is preinstalled on the OmniBook. If you’re usingWindows NT 4.0, make sure APM is installed (see “To install APM for Windows NT4.0” on page 51). If you’re using Windows 2000, power management is built intoWindows.
To save battery power
Follow these suggestions to conserve battery power.
• Plug in the ac adapter, especially while using the floppy disk drive, the CD-ROMdrive, or any external connections.
• Put the OmniBook in Suspend mode whenever you are not using it for a short while:press the blue power button for approximately 1 second or click Start, Suspend(Windows 95) or Start, Shut Down, Standby (Windows 98 and 2000).
• Put the OmniBook in Hibernate mode whenever you want to save your currentsession, but will not be using the computer for several hours or more (Fn+F12).
• Shut down the OmniBook whenever you will not be using it for several hours ormore. Click Start, Shut Down. The current session is not saved.
• Press Fn+F1 to turn the brightness of the display down to the lowest comfortablelevel. This reduces the backlight power and extends the life of your OmniBookdisplay.
• Set the automatic time-out settings to emphasize saving power (see “To set powertime-outs” on page 58). For a model with “900 B” after the serial number, use SmartCPU mode. The default settings conserve battery power.
• If you work with an application that uses the serial port or a PC Card, exit theapplication when you are done using it.
• If you have an I/O PC Card—that is, a PC Card having an external connection, suchas a modem or network card—remove it when you are not using it. Some I/O cardsuse significant power, even while they’re inactive.

Managing Battery PowerConserving Battery Power
58 Reference Guide
To set power time-outs
Windows 95, 98, or NT
The BIOS Setup utility includes settings for automatic time-outs at specified periods ofinactivity. There are four different time-outs for different levels of power andconservation.
Note For Windows 98, power options you set in Power Management Control Panel overridecorresponding settings in BIOS Setup.
1. From the Start menu, shut down then restart the OmniBook.
2. When you see the HP logo, press F2 to enter the BIOS Setup utility. Active keys aredescribed along the bottom of the screen. (The pointing devices are not active in theBIOS Setup utility.) Help information for the highlighted item appears in the right-hand sidebar in the display.
3. Select the Power menu.
4. Select Power Management Mode. (Press the spacebar, F5, or F6 to pick an optionother than Disabled.)
Maximum Power Savings: The time-out settings are defined for best power savings(relatively short time-outs).
Maximum Performance: The time-out settings are set for fast performance withsome power conservation (relatively long time-outs).
Customized: You determine each setting for Smart CPU Mode, Standby Time-out,Suspend Time-out, Hibernate Time-out, and Hard Disk Time-out. For definitions ofthe main power modes, see “To start and stop the OmniBook” on page 20.
5. Optional. Choose a setting for Time-Out On AC. If you want the time-outs to occureven when the OmniBook is connected to ac power, choose Enabled. To preventtime-outs while the OmniBook is plugged in, choose Disabled (default setting).
6. Press F10 to save and exit the BIOS Setup utility.
Windows 2000
Power Options Properties includes settings for automatic time-outs at specified periods ofinactivity. Time-outs set in BIOS setup are ignored.
1. From the Control Panel, open Power Options.
2. Follow the instructions on the Power Schemes tab. We recommend that you avoidsetting the Hibernate time-outs to Never.

Managing Battery PowerConserving Battery Power
Reference Guide 59
To get the most from your battery
The following are some further suggestions for the best management of your OmniBookbatteries.
• Do not leave batteries unused for long periods of time. If you have more than one,rotate them.
• If you normally use ac power, make a practice of at least once a week using thebattery as your power source.
• Unplug the ac adapter when the computer is not in use.
• To preserve the life of your battery, be sure to charge the battery regularly.
• For long-term storage, the battery must be charged at 20-50% to prevent capacity lossand to avoid deterioration of battery performance. Storage in a 100% chargedcondition can cause increased deterioration of discharge capacity—even afterrecharging—compared to storage in a 20-50% charged condition.


Reference Guide 61
Expanding the OmniBook

Expanding the OmniBookUsing the External Module Bay
62 Reference Guide
Using the External Module Bay
You can use any compatible plug-in module with the OmniBook external module bay,such as those listed below. The module bay does not support a battery module.
• DVD drive module.
• LS-120 SuperDisk drive module.
• Floppy drive module.
You can also attach the floppy disk drive to the parallel port with the optional floppydrive cable. You can then use the module bay for a different plug-in module.
• 24X CD-ROM drive module.
CAUTION Do not unplug the external module bay or remove a plug-in module without firstnotifying Windows—unless the module bay is empty. If you do not take properaction, you could lose data.
To install hot-swap support
For Windows 95 or Windows 98, if a plug-in module icon is present in the taskbar, AgatéTioman “hot-swap” software is installed. If the icon is not present, you can install it usingthe steps below.
The Agaté Tioman hot-swap software lets you disconnect most modules in the plug-inbay without shutting down the computer and rebooting. (This software does not supportWindows NT.)
• Click Start, Programs, Agaté Tioman for HP, Setup, then follow the onscreeninstructions.
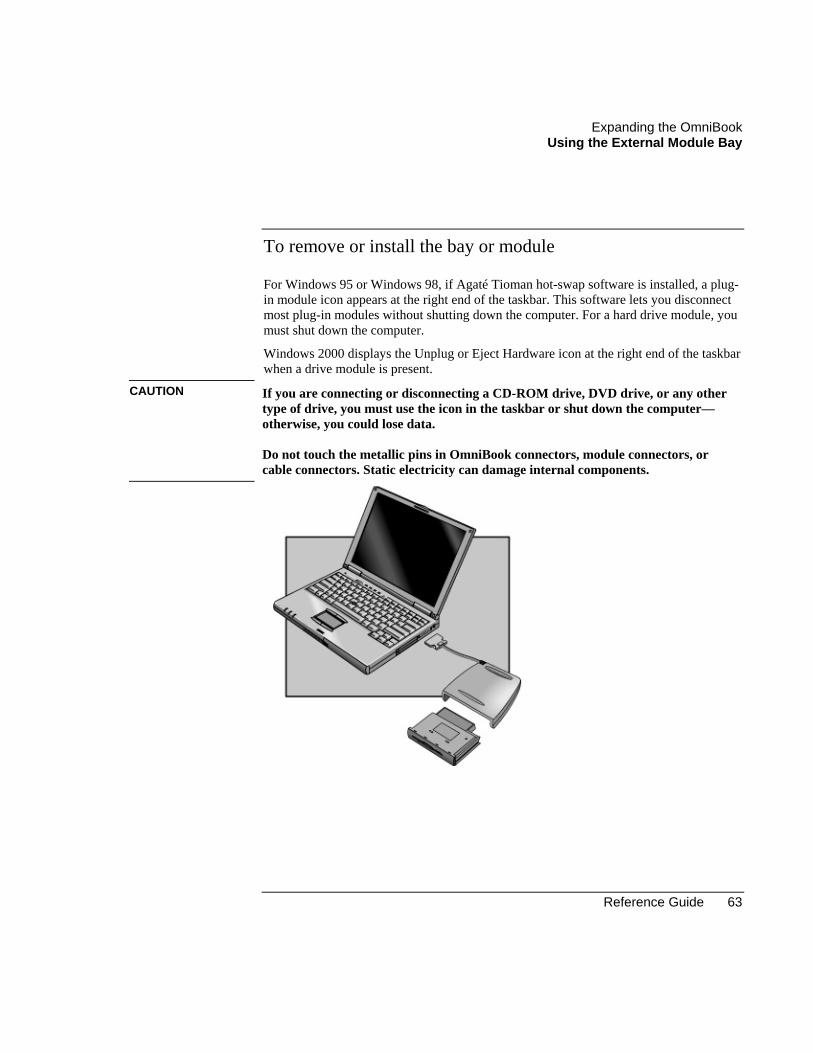
Expanding the OmniBookUsing the External Module Bay
Reference Guide 63
To remove or install the bay or module
For Windows 95 or Windows 98, if Agaté Tioman hot-swap software is installed, a plug-in module icon appears at the right end of the taskbar. This software lets you disconnectmost plug-in modules without shutting down the computer. For a hard drive module, youmust shut down the computer.
Windows 2000 displays the Unplug or Eject Hardware icon at the right end of the taskbarwhen a drive module is present.
CAUTION If you are connecting or disconnecting a CD-ROM drive, DVD drive, or any othertype of drive, you must use the icon in the taskbar or shut down the computer—otherwise, you could lose data.
Do not touch the metallic pins in OmniBook connectors, module connectors, orcable connectors. Static electricity can damage internal components.

Expanding the OmniBookUsing the External Module Bay
64 Reference Guide
Windows 95 or 98with “hot-swap”
Windows 95, 98, or NT(no “hot-swap”)
Windows 2000
RemovingBefore you remove thecable or plug-in module.(The order doesn’tmatter.)
1. Close files on themodule drive.
2. Right-click the plug-in module icon in thetaskbar, then clickRemove Device.When prompted toremove the module,click OK.–or–For a hard drivemodule, click Start,Shut Down to shutdown the computer.
1. Close all files.
2. Click Start, ShutDown to shut downthe computer.
1. Close files on themodule drive.
2. Left-click the Unplugor Eject Hardwareicon on the taskbar,and select themodule you want toremove. Whenprompted to removethe module, click OK.
InstallingAfter you insert thecable and plug-inmodule. (The orderdoesn’t matter.)
• Nothing required.–or–For a hard drivemodule, restart thecomputer.
• Restart thecomputer.
• Nothing required.
You can plug in or unplug an empty module bay at any time.

Expanding the OmniBookUsing the External Module Bay
Reference Guide 65
To connect the floppy disk drive to the parallel port
If you have a CD-ROM drive or other module in the external module bay, you canconnect the floppy disk drive to the parallel port.
1. Buy a floppy drive cable, HP accessory F1473A.
2. Connect the cable directly to the floppy drive and to the OmniBook parallel port.
Before disconnecting the floppy disk drive, use the icon in the taskbar to stop the drive,or shutdown the computer—see “To remove or install the bay or module” on page 63.

Expanding the OmniBookConnecting External Devices
66 Reference Guide
Connecting External Devices
You can expand the OmniBook’s capabilities by connecting other devices.
Note Before you connect any device, check the documentation that came with the equipmentto see if you need to make any settings or adjustments to the equipment before using it.This might include setting switches to configure the equipment so that it will operateproperly with the OmniBook and the software you plan to use.
To identify connectors for external devices
The following picture describes the available connectors for external devices. Refer to it,if necessary, when following the procedures in this section.
1. Kensington lock slot (security connector).
2. Serial port (COM1). Use this port for a serial mouse, a modem, a serial printer, orother serial device.
3. Parallel port (LPT1). Use this port for a parallel printer, other parallel device, or toconnect the floppy disk drive externally.
4. External monitor port.
5. Universal Serial Bus (USB) port.
6. Docking port (for the port replicator or docking system).
7. PS/2 port. Use this to connect a keyboard or an external PS/2 mouse.
8. Infrared port. Use this port for wireless data transmission between the OmniBook andanother computer or a printer with an infrared port. In Windows 95, you must installinfrared drivers.

Expanding the OmniBookConnecting External Devices
Reference Guide 67
To connect an external monitor
You can connect a VGA, SVGA, XGA, or SXGA monitor to your OmniBook—orUXGA for a computer with “900 B” after the serial number. A 12-inch internal displaysupports standard SVGA mode (800 by 600 pixels), and a 13-inch display supports XGAmode (1024 by 768 pixels).
1. Press the blue power button for one second to suspend the OmniBook.
2. Connect the monitor cable to the monitor, then to the monitor port on the back of theOmniBook.
3. Connect the monitor to a power source and turn it on.
4. Press the blue power button to turn on the OmniBook.
5. If the external monitor has a different resolution from the internal display, adjust thedisplay properties (My Computer, Control Panel, Display, Settings).
Hint Turn on the monitor before turning on the computer. This makes plug-and-play featureson the monitor available to the computer.
To enable the built-in and external displays
• For a temporary change, press Fn+F5 to cycle through the display options (Internal,External, Both).
• For a permanent change in which display is active, change the Video Display Devicesetting in the BIOS Setup utility (see below).
• For a display connected to a video adapter in a docking system, the docking display isautomatically selected when it is detected. To change this behavior, change thePrimary Video Adapter setting in the BIOS Setup utility (see below).
To change BIOS display settings, see the next topic.
To change display settings in the BIOS Setup utility
1. From the Start menu, shut down, then restart the OmniBook.
2. When you see the HP logo, press F2 to enter the BIOS Setup utility.
3. From the Main menu, use the down arrow to highlight Video Display Device.

Expanding the OmniBookConnecting External Devices
68 Reference Guide
4. Press ENTER to view choices.
5. Select Auto (to automatically detect and select the external display) or Both (to selectboth displays).
6. Similarly, highlight Primary Video Adapter. Select Auto (to automatically switch toan external video adapter in a docking system) or Internal (to reserve the externaldisplay for special use, such as multiple displays in Windows 98).
7. Press F10 to save settings and exit Setup.
To use an external monitor
• If you attach an external monitor to the OmniBook, you can press Fn+F5 to switchbetween the internal OmniBook display and the external monitor. An internal 12-inchdisplay supports settings up to 800 × 600 resolution and 16M colors (24- or 32-bit),and a 13-inch display supports 1024 × 768 resolution. You can change displaysettings using Control Panel Display or right-clicking the desktop and clickingProperties.
• If you need to use both displays at the same time, you can press Fn+F5 again to showthe same image on both displays. However, by default, the image is limited by theinternal display to 800 × 600 or 1024 × 768 pixels, so at a higher resolution you seeonly part of the desktop on both displays. This doesn’t happen if you use only theexternal monitor. If you need to increase the refresh rate on the external monitor, youcan switch to only the external monitor or you can make the internal or externaldisplay a “secondary” display—you make this setting on the Display tab (in Windows98 or 2000, you have to click Advanced on the Settings tab first).
• In Windows 98, you can enable the Extended Desktop (dual displays), which spreadsthe desktop across two displays. To do this, right-click display 2 on the Settings taband select Enable. You can set different resolutions and numbers of colors for eachdisplay. However, using the Extended Desktop requires video memory to be shared.For this reason, higher resolutions and higher numbers of colors may causeunexpected behavior on the displays. We recommend starting with 1024 × 768resolution on the external display and 64K colors (16-bit) on both displays. You cantry higher settings to see whether they work for your applications. In addition, certainoperations such as playing DVDs and running 3D graphics require extra videomemory, so you may have to use lower display settings.
See OmniBook Notes in the online OmniBook Library for any last-minute informationabout display operation.

Expanding the OmniBookConnecting External Devices
Reference Guide 69
To connect an external keyboard or PS/2 mouse
The 6-pin PS/2 port allows you to attach an external keyboard or a PS/2-compatiblemouse to the OmniBook. While an external PS/2 mouse is connected, the built-inpointing devices are normally disabled.
1. Turn off the computer by pressing the blue power button (suspend) or clicking Start,Shut Down.
2. Plug the mouse or keyboard PS/2 cable into the PS/2 port on the OmniBook.
To connect both a mouse and keyboard, use the HP F1469A Y adapter.
To connect a device that has a PC-type jack, first connect its cable to an adapter cablewith a PS/2 jack.
Hint To use hot keys from an external keyboard, substitute left CTRL + left ALT for theOmniBook Fn key. For example, to access Fn+F2, press left CTRL + left ALT+F2. Ifthis does not work, check that the setting for External Fn Key is enabled in the SystemDevices menu of the BIOS Setup utility. See “To run the BIOS Setup utility” on page86.
The built-in pointing device must be disabled for special mouse features to work. In theBIOS Setup utility, check that the PS/2 Pointing Devices option is set to Auto in theSystem Devices menu.
To connect a printer
The parallel port uses a standard 25-pin connector, most commonly used for connecting aprinter. These include dot-matrix, ink-jet, and laser printers. The parallel port supportsboth EPP and ECP capabilities (if selected in BIOS Setup).
The OmniBook has one parallel port. Its address and properties can be set in the BIOSSetup utility.
• Connect the parallel printer cable or other parallel cable to the parallel port.

Expanding the OmniBookConnecting External Devices
70 Reference Guide
To connect a serial device
The OmniBook’s serial port uses a standard 9-pin serial port. Serial connections typicallyare to external modems and fax modems. The OmniBook has one serial port. Its addresscan be set in the BIOS Setup utility.
• Connect the serial cable to the serial port.
To connect a serial mouse
For Windows 95, 98, or NT
1. Connect the serial cable to the serial port.
2. From the Start menu, click Settings, Control Panel.
3. Double-click Mouse, then click General.
4. Click Change and then select Show All Devices.
5. Under Manufacturers, click Standard Mouse Types.
6. Under Models, change the mouse type to Standard Serial Mouse, then click OK.
For Windows 2000
1. Connect the serial cable to the serial port.
2. Press the blue power button to suspend the OmniBook, then press it again to turn theOmniBook back on. Wait several seconds for Windows to find the new device.
To connect USB devices
Note Windows NT 4.0 does not support universal serial bus (USB) devices.
Universal serial bus (USB) provides a bidirectional serial interface for adding peripheraldevices such as game controllers, serial and parallel ports, and scanners on a single bus.The OmniBook provides one USB port; the OmniBook docking products provide twoUSB ports.
• Attach the USB cable to the USB port. Windows 95, Windows 98, and Windows2000 automatically recognize the USB device. Some USB devices can be connected

Expanding the OmniBookConnecting External Devices
Reference Guide 71
to the OmniBook in series with other USB devices—this is called a “daisy-chain”connection.
Note If you have problems making this connection, contact the vendor of the peripheraldevice, as well as the OmniBook website, for the latest versions of the USB drivers. TheUSB technology is dynamic and continues to develop.
If the device is not recognized, you may need to install a driver. Contact your devicevendor.
To connect audio devices
There is a built-in microphone located at the bottom of the OmniBook display. You canuse it to record voice, sound, and music. You can also plug in a stereo input source, (suchas a CD player), an external microphone, and external speakers or headphones.
CAUTION The audio jacks are three-terminal stereo jacks. They are not compatible with two-terminal mono plugs. Connecting a mono plug into the speaker-out jack maydamage the OmniBook.
• Attach the audio cable to the corresponding audio port.
• When you plug a device into the microphone-in port, the built-in microphoneautomatically turns off.
• When you plug a device into the speaker-out port, the built-in speaker automaticallyturns off.
WARNING Do not leave your headphones plugged in when rebooting the OmniBook as the PCspeaker can be loud.

Expanding the OmniBookConnecting External Devices
72 Reference Guide
To make an infrared connection
Note Windows NT 4.0 does not support infrared communication.
By default, the infrared port is not enabled.
For Windows 95. Enable the infrared port in the BIOS Setup utility and then install theinfrared driver. When you enable the infrared port in BIOS setup, disable ECP for theparallel port because they use the same resources. For more information, refer to theReadme file located in \OmniBook\Drivers\Irda.
For Windows 98 and Windows 2000. Enable the infrared port in the BIOS Setup utility.When you enable the infrared port in BIOS setup, disable ECP for the parallel portbecause they use the same resources. Reboot the OmniBook. The infrared drivers installautomatically on Windows 98 and 2000 during reboot. For more information, refer to theReadme file located in \OmniBook\Drivers.
The OmniBook has an infrared port—located on the left side of the OmniBook—whichprovides wireless, serial communication between the OmniBook and other infrareddevices such as printers or other OmniBooks.
• Line up the OmniBook’s infrared port and the other infrared port in as straight a lineas possible. The two ports should be no more than 1 meter apart, with no obstructionsin between. Noise from nearby equipment can cause transmission errors.
• To check the status of communications, go to Start, Settings, Control Panel, InfraredMonitor (or Wireless Link in Windows 2000).
• Disable infrared communications when you aren’t using it, especially beforesuspending or docking. To do this, close applications that are using infrared, closefolders on an infrared link, then disable infrared in Infrared Monitor (or Wireless Linkin Windows 2000).
Printing to an Infrared Printer
• Install your printer and assign it to the OmniBook’s infrared port. You can then printfrom your applications as you would to any other printer. Be sure the OmniBook andprinter infrared ports are properly aligned.

Expanding the OmniBookConnecting External Devices
Reference Guide 73
Transferring Files with an Infrared Connection
To transfer files in Windows 95 or Windows 98, use the built-in Direct Cable Connectionsoftware. You need to install it first.
1. From Control Panel, click Add/Remove Programs.
2. Click Windows Setup, Communications, and select Direct Cable Connection.
See the Windows online help for instructions about how to use Direct Cable Connection(Windows 95 or 98) or Wireless Link (Windows 2000).

Expanding the OmniBookUsing PC Cards
74 Reference Guide
Using PC Cards
To insert and remove a PC Card
Note If you are using Windows NT 4.0, make sure Card Executive is installed (see “Toinstall Card Executive for Windows NT” on page 75). Windows NT 4.0 does notsupport zoomed video.
The OmniBook PC Card slots are available for storing data and expanding thecommunication capabilities of the OmniBook. The OmniBook supports standard Type I,II, and III PC Cards (PCMCIA and CardBus). You can use two Type I or II cards or oneType III card. The lower slot supports Zoomed Video, which allows high-qualitymultimedia presentations.
1. Hold the card with its face up and its connector holes toward the card slot.
2. Slide the PC Card into the slot until it is flush with the OmniBook.
3. Before removing the card, click the PC Card or Eject Hardware icon in the taskbar,then click Stop (for Windows 95, Windows 98, and 2000 only). This protects yourdata and avoids unexpected problems. You can restart the card by removing it, thenreinserting.
4. Press the eject button once to pop out the button, then again to pop the card out.
Expanding the OmniBookUsing PC Cards
Reference Guide 75
To find tested PC Cards
For the latest information about compatible cards, visit our website athttp://www.hp.com/omnibook and check the Accessories section. Or contact Hewlett-Packard as described in “Support Assistance” on page 122.
To install Card Executive for Windows NT 4.0
If a PC Card icon is present in the taskbar, Card Executive is installed. If the icon is notpresent, you can install Card Executive using the steps below.
To take advantage of Card Executive’s plug-and-play for PC network cards, you mustinstall Card Executive before installing Windows NT networking. Card Executive islocated on the OmniBook’s hard disk drive.
You set up Card Executive from the Windows Start menu. (The driver is also located onthe Recovery CD in \OmniBook\Drivers\NT4 or Pccard.)
Card Executive adds the following capabilities to your OmniBook:
• Plug and Play for PC Cards using standard Windows NT drivers.
• Plug and Play for supported network PC Cards.
• Automatic configuration of PC Cards using advanced “Wizard” technology toallocate system resources.
• Suspend/Resume functions and simplified administration of PC Cards whenintegrated with Phoenix Card Executive.
1. Click Start, Programs, OmniBook, Phoenix Card Executive, Setup.
2. Follow the setup instructions on the screen.
You can download the Phoenix Card Executive documentation from the followingwebsite: http://www.phoenix.com.

Expanding the OmniBookUsing Docking Products
76 Reference Guide
Using Docking Products
A docking product provides external connections for the OmniBook that you can leave inplace whenever you remove the OmniBook from your desk. Instead of disconnecting andreconnecting peripheral devices, simply undock and dock the OmniBook.
For more information about using docking products, see the User’s Guide that shippedwith your dock.
To install a docking tray
Your dock requires a tray that accommodates your specific OmniBook model. Install thistray prior to connecting the OmniBook to the dock.
1. Select the tray labeled for the OmniBook 900. If you do not have a tray for theOmniBook 900, call the number listed in “Support Assistance” on page 122 to orderone.
2. Slide the rear of the tray into the dock as shown on the dock label.
3. Push down firmly on both sides of the tray until it snaps into place.
To remove a tray from the dock, pull the latch (at the center front of the dock) towardsyou until the tray pops free.

Expanding the OmniBookUsing Docking Products
Reference Guide 77
To dock the OmniBook
1. From the Start menu, shut down the OmniBook.
If you have a plug-and-play operating system, such as Windows 95, Windows 98, orWindows 2000, you do not need to turn off the OmniBook before inserting into thedock.
2. Connect power to the dock—the type of connection depends on the dock. See themanual that came with the dock.
3. Place the OmniBook on the dock platform, with the rear of the computer facing thedock’s docking connector. Make sure the OmniBook’s lower PC Card eject button isin.

Expanding the OmniBookUsing Docking Products
78 Reference Guide
4. Position your fingers on the platform grips as shown below. Use your thumbs to pushthe computer into the dock until the computer slides into place.
To undock the OmniBook
1. If you’re using Windows NT, click Start, Shut Down.
2. Press the undock button on the front of the dock and wait for the undock light toblink. Then position your thumb as shown and pull the release lever forward.
3. Remove the OmniBook from the dock.

Expanding the OmniBookInstalling a Hard Disk Drive
Reference Guide 79
Installing a Hard Disk Drive
To replace the hard disk drive
You’ll need a small Phillips screwdriver for this procedure.
1. Unplug the ac adapter, if present, and remove the battery.
2. Turn the unit bottom side up and remove the hard drive screw.
3. Open the hard disk drive door and pull out the hard drive by its plastic tab.

Expanding the OmniBookInstalling a Hard Disk Drive
80 Reference Guide
Important If you are installing a new hard disk drive, you should create a Hibernate partition on thedrive before loading any software. See “To recover the factory installation of Windows”on page 118.
To replace the hard disk drive holder
If you are installing a new hard drive that does not have a cover, you can remove thecover parts from the old hard drive. You’ll need a small Phillips screwdriver for thisprocedure.
1. Carefully pry the connector off the end of the hard disk drive. Work alternately ateach end so that the connector slides off evenly.
2. Remove the two screws from the case, as shown.
3. Lift the plastic tab and remove the plastic cover and metal sheet from the hard diskdrive. The metal sheet may not be present on some drives.
When you reinstall the connector, make sure the small tabs on the side of the connectorhold the metal sheet.

Expanding the OmniBookInstalling a RAM Expansion Module
Reference Guide 81
Installing a RAM Expansion Module
The OmniBook has 32 MB of memory (RAM) built in (64 MB for a model with “900 B”after the serial number), and it has one slot for installing additional RAM. You have toremove the computer keyboard to add or remove a RAM module.
To install a RAM expansion module
You’ll need a small Phillips screwdriver for these steps.
CAUTION Your OmniBook’s computer chips are extremely static-sensitive. Static electricitycan permanently damage computer chips. Handle the RAM module only by itsedges. Before installing the memory module, discharge your body’s staticelectricity by touching the metal shielding around the connectors on the rear of theOmniBook.
For a model with “900 B” after the serial number, you must use only PC-100 typeRAM modules—other RAM modules will not function. Other OmniBook modelscan use PC-100 or earlier RAM modules.
1. From the Start menu, shut down the OmniBook.
2. Important. Unplug the ac adapter, if present, and remove the battery.
3. Find the plastic panel above the keyboard—it contains the power button and keyboardstatus lights. Put your finger above the F8 key and slide the panel to the left about3 mm (1/8 inch)—then lift off the panel.
4. Remove the two screws above the F1 and HOME keys.

Expanding the OmniBookInstalling a RAM Expansion Module
82 Reference Guide
5. Lift up the keyboard tab above the F1 key about 10 mm (1/2 inch), then free the snapat the center of the back edge.
6. Slide the keyboard toward the display about 5 mm (1/4 inch), then fold the keyboardforward onto the front of the case.
WARNING Do not touch the metal surfaces inside the computer until they have cooled off.They could be very hot if you were using the computer just before you started thesesteps.
Do not touch the electronic components inside the computer. Static electricity canpermanently damage them.
7. Insert the RAM board into the connector at about a 30° angle until it’s fully seated.Then press down at both sides until it latches.
8. Fold the keyboard back into place. Slip the front tabs into the slots, then snap the backedge into place.
9. Insert the two screws at the top of the keyboard.

Expanding the OmniBookInstalling a RAM Expansion Module
Reference Guide 83
10. Lower the plastic panel about 3 mm (1/8 inch) from its normal position. Hold downboth ends and slide it closed to the right.
11. Insert the battery and slide its front panel to the left.
To remove a RAM expansion module
You may want to remove a RAM module so you can install a larger one. You’ll need asmall Phillips screwdriver for these steps.
CAUTION Your OmniBook’s computer chips are extremely static-sensitive. Static electricitycan permanently damage computer chips. Handle the RAM module only by itsedges. Before installing the memory module, discharge your body’s staticelectricity by touching the metal shielding around the connectors on the rear of theOmniBook.
1. From the Start menu, shut down the OmniBook.
2. Important. Unplug the ac adapter, if present, and remove the battery.
3. Open the RAM compartment by removing the keyboard (described in the previoustopic).
4. Release the two latches at the sides of the RAM board. Push them outward and awayfrom the sides of the board. When you release both latches, the free edge of the boardpops up.
5. Pull the board out of the connector. You can install a new board if you want.
6. Close the RAM compartment as described in the previous topic.
7. Insert the battery and slide its front panel to the left.


Reference Guide 85
Configuring the OmniBook

Configuring the OmniBookUsing BIOS Setup
86 Reference Guide
Using BIOS Setup
The BIOS (Basic Input and Output System) Setup utility is a menu-driven utility thatenables you to make changes to the system configuration and tailor the operation of yourOmniBook to your individual work needs.
The settings made in the BIOS Setup utility generally control the hardware andconsequently have a fundamental effect on how the OmniBook operates.
This section describes the BIOS Setup utility menus and options in detail.
To run the BIOS Setup utility
1. Close all applications, then shut down Windows and restart the OmniBook.
2. When you see the HP logo, press F2 to enter the BIOS Setup utility.
3. The pointing devices are not active in the BIOS Setup utility. Press the RIGHT andLEFT arrow keys to move among menus. Press the DOWN and UP arrow keys tomove among parameters in a menu. Press F5 or F6 to move through values for thecurrent parameter or press ENTER to change a setting. See the tables below for moreinformation.
4. After you select the options you want, press F10 or use the Exit menu to exit theBIOS Setup utility.
5. If the settings cause a conflict between devices during reboot, the system prompts youto run BIOS Setup, and the conflicting settings are marked.
The following tables describe BIOS settings for BIOS version 3.05. If your BIOS is adifferent version, some settings may differ from those shown.

Configuring the OmniBookUsing BIOS Setup
Reference Guide 87
Main Menu
Setting Description Default
Language Sets the language for this utility and for BIOS messages. English
BIOS Revision Shows the current BIOS version. Detectedautomatically.
System Time Sets the time using 24-hour format. Values set take effectimmediately.
System Date Sets the date using dd/mm/yy format (except English, whichis mm/dd/yy format).
Floppy Drive Sets the floppy drive type. Floppy diskdrive typedetected andsetautomatically.
Internal Hard Disk Sets the hard disk drive type and various parameters. Hard disk drivedetected andsetautomatically.
Quiet Boot When enabled, hides summary of power-on self-test andmessages during boot.
Enabled
Video Display Device Sets whether the built-in display automatically switches to anexternal display, if one is detected.
Auto
Video Expansion When enabled, the video image covers the entire display inlower resolution modes (VGA). When disabled, the videoimage is centered in the display.
Disabled
Primary Video Adapter Sets whether the internal (built-in) video adapterautomatically switches to an external video adapterconnected to the docking system, if one is detected.
Auto
System Memory Shows the system memory size. 640KB
Extended Memory Shows the extended memory size. Detectedautomatically.
CPU Serial Number For a processor with a serial number, makes the processorserial number available to software.
Disabled

Configuring the OmniBookUsing BIOS Setup
88 Reference Guide
System Devices Menu
Setting Description Default
PS/2 Pointing Devices Disables the internal pointing devices when an external PS/2mouse is connected. This is required for the scroll wheel on aPS/2 mouse to function.
Auto
Internal PointingDevices
Enables one or both built-in PS/2 devices. Both
External Fn Key Sets whether left CTRL + left ALT on an external keyboard isinterpreted as the Fn key.
Enabled
IDE Controller Enables the primary (hard drive) and secondary (optionalCD-ROM drive) controllers.
Both
FDD Controller Enables the floppy drive. Enabled
Serial Port Sets how the serial port is configured by the BIOS (specifiedor automatic).
Enabled
Base I/O address Sets the I/O address and interrupt. 3F8h, IRQ4
Infrared Port Sets how the infrared port is configured by the BIOS(specified or automatic).
Disabled
Mode Sets the hardware to support SIR (Standard IR), ASK IR(amplitude shift keyed IR), or FIR (Fast IR) infraredcommunications. (Driver installation required forWindows 95.)
SIR
Base I/O address Sets the I/O address and interrupt. 2F8h, IRQ3
DMA channel For Fast Ir mode, sets the DMA channel. DMA3
Parallel Port Sets how parallel port is configured by the BIOS (specified orautomatic).
Enabled
Mode Sets the port to normal, bidirectional, EPP, or ECP. ECP
Base I/O address Sets the I/O address. 378h
Interrupt Sets the interrupt. IRQ7
DMA channel For ECP mode, sets the DMA channel. DMA3

Configuring the OmniBookUsing BIOS Setup
Reference Guide 89
Security Menu
Setting Description Default
User Password Is Shows if a user password is set. Clear
Administrator PasswordIs
Shows if an administrator password is set. Clear
Set User Password Press ENTER to set, change, or clear user password.Password length can be no longer than 8 characters, 0-9, A-Z, and cannot include special or accented characters.
Set AdministratorPassword
Press ENTER to set, change, or clear administratorpassword. This password protects BIOS Setup settings.Password length can be no longer than 8 characters, 0-9, A-Z, and cannot include special or accented characters.
Smart Card Security Available only if a smart card accessory is installed. Setswhether the password is read from a smart card instead ofentered from the keyboard.
Disabled
Boot Sets whether a user password is required when thecomputer boots.
Enabled
Resume* Sets whether a user password is required when resumingfrom a suspended state. This setting is ignored whenWindows 2000 is running.
Enabled
Undock* Sets whether a user password is required when undockingthe OmniBook. This setting is ignored when Windows 2000is running.
Disabled
Internal Hard Disk DriveLock*
Encodes the current user password (or administratorpassword if that is the only password set) on the hard diskdrive.
Disabled
Removable Device Boot Sets whether the floppy drive or other removable device is aboot device.
Enabled
* Resume, Undock, and Internal Hard Disk Drive Lock options are available only if Boot option is enabled.

Configuring the OmniBookUsing BIOS Setup
90 Reference Guide
Power Menu
If you’re using Windows 98 in its standard power mode, power options you set in PowerManagement Control Panel override corresponding settings in the Power menu.
If you’re using Windows 2000, only the settings marked with * are used, and othersettings in the Power menu are ignored.
Setting Description Default
Power ManagementMode
Disables time-outs, selects a combination of time-outs, orallows customized time-outs.
Max PowerSavings
Smart CPU Mode Enables automatic CPU power savings when running onbattery power. Absence of keyboard, mouse, and hard diskactivity could cause slower CPU response. For a modelwithout “900 B” after the serial number, this should normallybe Off to avoid interfering with time sensitive operations—and this setting applies on both battery and ac power.
On (“900 B”)Off (non“900 B”)
Standby Time-out Sets the period of inactivity after which the computer goesfrom On to Standby power mode.
2 minutes
Suspend Time-out Sets the period of inactivity after which the computer goesfrom Standby to Suspend power mode. (Skips Standbymode if that time-out is disabled.)
4 minutes
Hibernate Time-out Sets whether the computer goes from Suspend to Hibernatepower mode after the indicated period of inactivity. (SkipsSuspend mode if that time-out is disabled.)
4 hours
Hard Disk Time-out Sets the period of hard disk inactivity after which the harddisk stops spinning. Also affects a hard disk drive in theplug-in module bay.
2 minutes
Time-out on AC Sets whether power management time-outs occur while theac adapter is connected.
Disabled
Power Button Mode Sets the action of the blue power button when pressed forless than 4 seconds.
Suspend
Lid Switch Mode Sets the action when the OmniBook lid closes. Turn off LCD
Resume on Serial Ring Sets whether the system resumes from Suspend if a ringsignal is received.
Enabled
Resume on Time of Day Sets whether the system resumes from Suspend at adefined time of day.
Disabled
Resume Time Sets the 24-hour time when the system resumes fromSuspend if enabled.
Auto Suspend onUndock*
Sets whether the OmniBook suspends after undocking. When LidClosed
Auto Turn-on on Dock* Sets whether the OmniBook turns on after docking. Enabled
* For Windows 2000, only these settings are used. All other settings in this menu are ignored.

Configuring the OmniBookUsing BIOS Setup
Reference Guide 91
Boot Menu
Setting Description Default
+Removable Device+Hard DiskCD-ROM/DVD Drive
Shows the order of boot devices. Move theentries to change the order. If the computer hasmore than one device in one of the “+”categories,you can select the one that’s scanned.
1. RemovableDevice2. Hard Disk3. CD-ROM/DVDdrive
Exit Menu
Setting Description Default
Save Changes and Exit Saves Setup changes, exits, and reboots.
Discard Changes and Exit Discards Setup changes since last save, exits,and reboots. Does not affect Security, date, ortime changes.
Get Default Values Restores default settings, stays in Setup. Doesnot affect Security, date, or time changes.
Load Previous Values Discards Setup changes since last save, stays inSetup. Does not affect Security, date, or timechanges.
Save Changes Saves Setup changes, and stays in Setup.Security settings are saved when changed.

Configuring the OmniBookUsing TopTools
92 Reference Guide
Using TopTools
HP TopTools is for network managers and administrators with responsibilities forcomputer system management. It offers configuration and security options that allow youto check what hardware and software components are installed on your computer andhow well they are working.
Windows 2000 TopTools is not available at this time under Windows 2000. Check the Customer Carewebsite (http://www.hp.com/cposupport/eschome.html) for HP TopTools for Windows2000.
To install TopTools
The TopTools package is included with the OmniBook, but you must install it before youcan use it. On Windows NT systems, you will need administrator privileges to installTopTools software. TopTools is not available at this time for Windows 2000.
1. Start Windows, if it is not already running.
2. Click Start, Programs, HP TopTools for Notebooks, Setup.
To run TopTools
TopTools may be run locally on a PC or remotely by a network administrator. TopToolsis not available at this time for Windows 2000.
• To run TopTools locally, click Start, Programs, HP TopTools for Notebooks, HPTopTools.
To get more information about TopTools
For information on HP TopTools, compatible HP computers, and how they lower PCoperating costs, see the HP website at http://www.hp.com/toptools.

Configuring the OmniBookConfiguring Security Options
Reference Guide 93
Configuring Security Options
To set or change an OmniBook password
The OmniBook provides two levels of password protection—user password protectionand administrator password protection. You cannot set the user password until you set anadministrator password.
If password protection is set, then you will be prompted to enter a password wheneveryou reset or turn on the computer (depending on your setting). You cannot use thecomputer until you enter the correct password.
To set, change, or delete password protection for this OmniBook, use the BIOS Setuputility. You can also use HP TopTools to set the password—see below for passwordrestrictions.
1. From the Start menu, shut down, then restart the OmniBook.
2. When you see the HP logo, press F2 to enter the BIOS Setup utility.
3. Select the Security menu.
4. Select Set Administrator Password, then press ENTER.
5. Type the new password, then press ENTER. Password length can be no longer than 8characters, 0-9, A-Z, and cannot include special or accented characters. Passwords arenot case-sensitive.
6. Type the password again to confirm, then press ENTER.
7. Under Password Required To, choose when the password will be required.
Boot. Requires a password when booting the OmniBook. This option enables the nexttwo options.
Resume. Requires a password when resuming from Suspend.
Undock. Requires a password when undocking the OmniBook.
Windows 2000 Windows 2000 controls resume and undock security, so both the Resume and Undockoptions are normally ignored. These options are used, though, whenever Windows isn’trunning.

Configuring the OmniBookConfiguring Security Options
94 Reference Guide
8. If desired, repeat this procedure for Set User Password.
9. Press F10 to Save and Exit the BIOS Setup utility.
Note If you forget a password, call Customer Support at the number listed in “SupportAssistance” on page 122 to determine the proper removal procedure.
To delete an OmniBook password
If you delete an administrator password, the OmniBook automatically deletes the userpassword as well.
1. From the Start menu, shut down, then restart the OmniBook.
2. When you see the HP logo, press F2 to enter the BIOS Setup utility.
3. Select the Security menu.
4. Select Set Administrator Password, then press ENTER.
5. Type the current password, then press ENTER.
6. Press ENTER at the Enter New Password prompt.
7. Press ENTER at the Confirm New Password prompt.
8. Press Continue.
9. Press F10 to Save and Exit the BIOS Setup utility.
To install the VirusScan utility
The OmniBook comes equipped with VirusScan. Before you can use VirusScan, youneed to install it.
1. From the Start menu, click Programs, VirusScan, Setup.
2. Follow the instructions as they appear on the screen.
Once installed, you can get detailed online instructions under VirusScan Help. (ClickStart, VirusScan, VirusScan Help.)

Configuring the OmniBookConfiguring Security Options
Reference Guide 95
To attach a security cable
Your OmniBook has two built-in connectors that allows you to secure the OmniBookwith a cable. The Kensington MicroSaver lock system works with this connector and isavailable at many computer stores.
1. Wrap the cable around a stationary object, such as a table leg.
2. Loop the cable to create a slip knot around the stationary object—make sure it can’tslip off
3. Insert the lock into one of the OmniBook security connectors and release the key.Store the key in a safe place away from the OmniBook.
To set PC identification
Windows 2000 You cannot set PC identification under Windows 2000 because TopTools is notavailable at this time.
You must have administrator password authority to set a PC identification number.
1. If you have not already installed HP TopTools, do so now (see “To install TopTools”on page 92).
2. Click Start, Programs, HP TopTools for Notebooks, HP TopTools.
3. Click Security.

Configuring the OmniBookConfiguring Security Options
96 Reference Guide
4. Type your administrator password, then press ENTER.
5. Click Settings and Actions.
6. In the “Tattooing String” box, type the unique set of characters which will identifyyour PC. You can type up to 80 characters including spaces and special characters.Do not press ENTER when typing. The string wraps automatically.
To enable hard disk drive lock
Hard disk drive lock helps you keep your information secure. Hard disk drive lock doesnot protect a second hard disk drive installed in the module bay.
CAUTION When you enable hard disk drive lock, the current user password (oradministrator password if that is the only password set) is encoded on the harddisk drive.
If you move the hard disk drive to another OmniBook, you can’t access the drive untilyou set the user (or administrator) password to match the drive’s password. After youmatch the drive’s password, you can change the OmniBook (and drive) password.If you forget the password, your data cannot be recovered by you or by Hewlett-Packard.
1. From the Start menu, shut down, then restart the OmniBook.
2. When you see the HP logo, press F2 to enter the BIOS Setup utility.
3. From the Security menu, enable Password Required To Boot.
4. From the Security menu, enable Hard Disk Drive Lock.
5. Press F10 to save and exit the BIOS Setup utility.

Reference Guide 97
Troubleshooting

TroubleshootingSolving Problems
98 Reference Guide
Solving Problems
If your OmniBook has a problem, find the symptom below that matches your situation.Try the suggestions one at a time.
Here are some other sources of information:
• Click Start, Help and use the Windows Troubleshooters.
• See the Microsoft Windows manual shipped with the OmniBook.
• For information about system addresses, interrupts, or memory, see “Software SystemResources” on page 131.
• Find technical tips and software updates for the OmniBook at the HP Customer Carewebsite (http://www.hp.com/cposupport/eschome.html).
• Test your OmniBook by running the DiagTools test program. See “To run thediagnostic test” on page 115.
• Contact your dealer or Hewlett-Packard—see “Support Assistance” on page 122.Please have your OmniBook with you.
Note For Windows NT, if you install new services, hardware devices, or applications, youmust reinstall the Service Pack from the Recovery CD—see OmniBook Notes in theonline OmniBook Library. This ensures that the Service Pack components workproperly. It will not write over any applications, settings, or drivers you have installed.
Accessory Problems
If a port on a dock isn’t working
• Check that ac power is connected to the dock.
• Try using the corresponding OmniBook port, while undocked.
• Make sure the OmniBook is fully inserted in the dock.
• See the manual for the dock.
If you can’t boot from a CD in a CD-ROM drive
• Make sure the CD is a bootable CD, such as the OmniBook Recovery CD.

TroubleshootingSolving Problems
Reference Guide 99
• Make sure you are using a plug-in OmniBook CD-ROM module in the externalmodule bay. You cannot boot from an external CD-ROM or DVD drive, which youcan connect to the OmniBook via a PC Card SCSI connection.
• Press ESC twice during bootup to see if the CD-ROM drive is the first boot device.
• Make sure the CD-ROM drive is seated correctly—remove and reinsert.
• If you always want to boot from a CD, check the boot order in BIOS Setup.
1. From the Start menu, shut down, then restart the OmniBook.
2. When you see the HP logo, press F2 to enter the BIOS Setup utility.
3. Open the Boot menu. The default boot order is
Removable Device
Hard Drive
CD-ROM/DVD Disk
4. If CD-ROM/DVD drive is not option 1, use the arrow keys to select it.
5. Press F6 to move up (or F5 to move down) in the list.
6. Press F10 to Save and Exit the BIOS Setup utility.
• Make sure the external module bay is connected properly.
If the OmniBook redocks after undocking
• If you press the Undock button to undock, but do not remove the OmniBook, theOmniBook automatically redocks. In certain situations, this may cause some systemdevices to stop working. If this occurs, undock the OmniBook, remove it from thedock and check the operation, then dock again.
If a DVD drive locks up the computer in Windows 98
If you’re using Windows 98, you may not be able to use a DVD drive with the AgatéTioman hot-swap software.
• Check the HP Customer Care website (http://www.hp.com/cposupport/eschome.html)for updated hot-swap software for Windows 98.
• Try uninstalling the Agaté Tioman software. You’ll have to shut down the computerevery time you swap modules or the module bay.

TroubleshootingSolving Problems
100 Reference Guide
Audio Problems
If sound is not audible
• Double-click the speaker icon on the taskbar to ensure that Mute is not checked, orpress Fn+F7 to mute or un-mute sound.
• Press Fn+UP-ARROW to increase the volume.
• For a model without “900” after the serial number, check settings in BIOS Setup.
1. From the Start menu, shut down, then restart the OmniBook.
2. When you see the HP logo, press F2 to enter the BIOS Setup utility.
3. From the System Devices menu, check that Audio is enabled.
If you hear a loud high-pitched whine (feedback) from the speakers
• Try reducing the Master volume (Start, Programs, Accessories, Multimedia orEntertainment, Volume Control).
• Avoid using both the built-in microphone and the built-in speaker at the same time.For example, use an external microphone or external headphones.
If sound doesn’t record
• For a model without “900” after the serial number, check settings in BIOS Setup.
1. From the Start menu, shut down, then restart the OmniBook.
2. When you see the HP logo, press F2 to enter the BIOS Setup utility.
3. From the System Devices menu, check that Audio is enabled.
• Check software controls for recording sound (Start, Programs, Accessories,Multimedia or Entertainment, Sound Recorder).
If sound doesn’t play from a CD-ROM drive in a docking system
• Enable the Aux B channel in Volume Control. To do this, double-click the speakericon in the taskbar, then click Options, Properties. Display the controls for Aux B,then clear the Mute setting.

TroubleshootingSolving Problems
Reference Guide 101
Display Problems
If the OmniBook is on, but the screen is blank
• Press the space bar or move the pointer to see if the computer is in Standby mode.
• Press Fn+F1 or Fn+F2 to adjust the display brightness. If you are using an externalkeyboard, Fn=left CTRL + left ALT.
• Press Fn+F5 in case the internal display was disabled. (Do this three times to return tothe state you started from.)
• If the OmniBook is cold, allow it to warm up.
If the screen is difficult to read
• Check whether the display resolution is set to its default setting, such as 800 × 600(SVGA) for a 12-inch display. Check this in Start, Settings, Control Panel, Display,Settings.
• Check brightness (press Fn+F2 to increase brightness).
• For Windows 98 or 2000, if the text looks blurred, check whether font smoothing isactive. Check this in Start, Settings, Control Panel, Display, Effects.
If an external monitor doesn’t work
• Check the connections.
• Press Fn+F5 in case the external monitor was disabled. (Do this three times to returnto the state you started from.)
• The external monitor may not be detected. In the BIOS Setup utility, try setting VideoDisplay Device to Both in the Main menu. See “To run the BIOS Setup utility” onpage 86.
• If the monitor is connected to a video adapter in a docking system, in BIOS Setupmake sure the Primary Video Adapter is set to Auto in the Main menu.
If the image on an external monitor or projector is unstable
• Press Fn+F5 to turn off the built-in display. (Do this three times to return to the stateyou started from.)
• Change the display properties of the OmniBook display to match the resolution of themonitor or projector. In Control Panel, open Display, Settings and change theDesktop Area or Screen Area setting.

TroubleshootingSolving Problems
102 Reference Guide
• Use a monitor or projector that matches the resolution of the OmniBook display.
If multiple display support doesn’t work in Windows 98
In Windows 98, the computer supports multiple independent displays using the built-indisplay and an external monitor connected to the monitor port. You can also add anindependent display using a video adapter in a docking system.
• Check the monitor connections.
• If the monitor is connected to the OmniBook monitor port, you might have to reducethe resolution and number of colors for the built-in display to make more memoryavailable for the external monitor. See “To use an external monitor” on page 68.
• If the monitor is connected to a video adapter in a docking system, in BIOS Setupmake sure the Primary Video Adapter is set to Internal in the Main menu. See “To runthe BIOS Setup utility” on page 86.
• See Windows 98 Help for information about setting up and using multiple displays.
If a DVD image doesn’t appear on an external monitor
• If you’re using both the internal screen and an external monitor while playing a DVD,the DVD image will not appear on a “secondary” display. If you’re using Windows98 Extended Desktop (dual displays), it won’t be shown on display 2. For anyoperating system, if you’re not using Extended Desktop and both displays are active,the DVD image won’t be shown on a display if it’s set up as “secondary”—you canpress Fn+F5 to switch to one display. You can change display settings in ControlPanel Display on the Display tab (in Windows 98, you have to click Advanced on theSettings tab first).
If DVD images don’t play smoothly
• Try connecting the ac adapter. If this fixes the problem, Smart CPU mode may beaffecting performance on battery power. You can turn off Smart CPU mode usingBIOS Setup (press F2 during boot), but this will decrease battery operating timesomewhat.
Hard Disk Drive Problems
If the OmniBook’s hard drive doesn’t spin
• Check the power source.
• Remove and reinsert the hard drive. See “To replace the hard disk drive” on page 79.

TroubleshootingSolving Problems
Reference Guide 103
If the hard disk makes buzzing or whining noise
• Back up the drive immediately.
• Check for alternate noise sources, such as the fan or a PC Card drive.
If files are corrupted
• Run the VirusScan program. See “To install the VirusScan utility” on page 94.
• For Windows 95 or Windows 98, you can run the Scandisk surface scan to check theplatter. (This is not available in Windows NT 4.0). From the Start menu, clickPrograms, Accessories, System Tools, Scandisk.
• For Windows 2000, open My Computer, select the disk you want to scan, click File,Properties, and use the Tools tab.
• For Windows NT 4.0, right click on the drive, then click Properties, Tools, ErrorChecking.
• If necessary, you can format the hard disk and reinstall the original factory software.See “To recover the factory installation of Windows” on page 118.
Infrared Problems
Hint Windows NT 4.0 does not support infrared communication.
If you have problems with infrared communications
• Windows NT 4.0 does not support infrared devices.
• Make sure the infrared light path is not blocked. The infrared port is located on theleft side next to the audio jacks.
• Line up the OmniBook’s infrared port and the other infrared port in as straight a lineas possible. The two ports should be no more than 1 meter apart, with no obstructionsin between. Noise from nearby equipment can cause transmission errors.
• Disable infrared communications when you aren’t using it, especially beforesuspending or docking. To do this, close applications that are using infrared, closefolders on an infrared link, then disable infrared in Infrared Monitor.
• Check settings in BIOS Setup utility.
1. From the Start menu, shut down, then restart the OmniBook.
2. When you see the HP logo, press F2 to enter the BIOS Setup utility.

TroubleshootingSolving Problems
104 Reference Guide
3. From the System Devices menu, check that Infrared Port is enabled and thedesired mode is selected.
4. Press F10 to Save and Exit the BIOS Setup utility.
• For infrared communications under Windows 95, you must install an infrared driverthat matches the mode selected in BIOS Setup. For details, refer to the driver’sReadme file located in \OmniBook\Drivers.
• Check that only one application is using the infrared port.
• Standard IrDA and fast-IrDA are incompatible (they use different drivers).
• For fast-IrDA, check for DMA conflict with ECP parallel port.
• Remove any PC Cards. An infrared IRQ conflict is possible if two PC Cards arepresent at the same time.
Keyboard and Pointing Device Problems
If the pointer is difficult to control
• To customize all pointing devices, use the Mouse icon in Control Panel.
• To customize the operation of the pointing stick, use the pointing stick icon availableon the taskbar (or in the Windows Control panel) to access TrackPoint Properties.This is not yet available in Windows 2000.
If the touch pad or pointing stick doesn’t work
• Do not move the pointer while the OmniBook is resuming from Suspend or rebooting.If you moved the pointer, try pressing a key on the keyboard. You may have tosuspend and resume using the power button, or you may have to shut down and restartWindows.
• Make sure the touch pad or pointing stick is enabled in the BIOS Setup utility.
1. From the Start menu, shut down, then restart the OmniBook.
2. When you see the HP logo, press F2 to enter the BIOS Setup utility.
3. From the System Devices menu, check Internal Pointing Devices.
4. Select the desired pointing device or both devices.
5. Press F10 to Save and Exit the BIOS Setup utility.

TroubleshootingSolving Problems
Reference Guide 105
• Reset the OmniBook. See “To reset the OmniBook” on page 21.
If the embedded numeric keypad doesn’t work
• Make sure the embedded Keypad Lock (Fn+F8) is on—or that you press and hold theFn key to temporarily access the embedded keypad.
• To type numbers, make sure Num Lock is on.
If an external mouse doesn’t work
• Suspend the computer before connecting or unplugging an external PS/2 mouse. If themouse or computer don’t work properly, try suspending and resuming (Windows95/98) or shutting down and restarting (Windows NT).
If a special feature on the PS/2 mouse doesn’t work
• The built-in pointing devices must be disabled for special mouse features to work. Inthe BIOS Setup utility, check that the PS/2 Pointing Devices option is set to Auto inthe System Devices menu. See “To run the BIOS Setup utility” on page 86.
• Press the blue power button to suspend the OmniBook, then press it again to resume.
• Make sure you installed any drivers shipped with the mouse.
• For Windows 95, the mouse driver may not support Suspend mode. Try using MouseControl Panel to reselect the scrolling function, if available. If necessary, reboot thecomputer to restore operation.
If left CTRL + left ALT doesn’t work on an external keyboard
• Left CTRL + left ALT should work like the Fn key on an external keyboard. In BIOSSetup, check that External Fn Key is enabled in the System Devices menu. See “Torun the BIOS Setup utility” on page 86.
If you can’t type the euro symbol
• Hold ALT GR when you press the marked key.
• The euro symbol is not on the U.S. English keyboard. Make sure the embeddedkeypad is active (Fn+F8) and Num Lock is on, then hold ALT while typing 0128 onthe numeric keypad.
• For Windows NT, if you select a different keyboard layout in Control Panel, you mustreinstall the euro software. In Explorer, double-click\Omnibook\Drivers\Euro\Nt4_euro.exe on drive C or on the Recovery CD.

TroubleshootingSolving Problems
106 Reference Guide
• Support for the euro symbol requires software available from Microsoft. Thissoftware is installed in the factory software, but may not be included with retailWindows.
Special pointing stick features stop working after docking
• For Windows 95/98, if you set PS/2 Pointing Devices to Auto in BIOS Setup andenable special features of the pointing stick such as “press-to-select” or “scrolling”,and then dock and undock with the OmniBook powered on, the special pointing-stickfeatures may stop working. Note that this problem does not happen when docking andundocking in Suspend mode. Try one of the following:
In BIOS Setup, set PS/2 Pointing Devices to Both. (This preserves special pointing-stick features after hot docking and undocking, but you can’t enable special featuressuch as a scrolling button for a PS/2 mouse connected to the dock.)
Suspend the OmniBook before undocking, or suspend and resume after undocking.(This preserves special pointing-stick features and lets you enable special features fora dock PS/2 mouse.)
Open TrackPoint Control Panel and click on a setting (it can be one already selected)so that the Apply button is not grayed out. Then select OK or Apply. (This restoresspecial pointing-stick features after hot undocking.)
If an external keyboard and mouse connected to a dock don’t work after docking
• Try swapping the keyboard and mouse connections on the dock. These PS/2 devicesshould work correctly even if their connections are swapped.
Memory Problems
If a message says you are out of memory
• If you’re using Windows 95, Windows 98, or Windows NT, click Start, Help and usethe Memory Troubleshooter.
• If you are having memory problems running MS-DOS programs, in Windows clickStart, Help and use the MS-DOS Troubleshooter.
• Not all 3rd party memory cards have been tested with the OmniBook. Please checkthe OmniBook website (http://www.hp.com/omnibook) for a list of approved andtested memory cards.

TroubleshootingSolving Problems
Reference Guide 107
If memory doesn’t increase after adding RAM
• Use the correct type of memory (RAM) modules for your computer. For a model with“900 B” after the serial number, use only PC-100 modules.
PC Card (PCMCIA) Problems
If the OmniBook doesn’t recognize a PC Card
• For Windows NT, make sure Card Executive is installed. See “To install CardExecutive for Windows NT” on page 75.
• Remove and reinsert the PC Card.
• Insert the PC Card in a different slot.
• Press the blue power button to suspend the OmniBook, then press it again to resume.
• If the card requires an IRQ, check that there is one available. If necessary, set the IRQto an unused value manually.
If you’re using Windows 95 or Windows 98, look in Device Manager underProperties, Interrupt Request (IRQ).
If you’re using Windows NT, click Start, Programs, Administrative Tools, WindowsNT Diagnostics.
• Check the HP Customer Care website (http://www.hp.com/cposupport/eschome.html)for information about installing certain PC Cards.
• Reboot the OmniBook.
• Zoomed Video is supported in the lower card slot only.
• Windows NT does not support Zoomed Video.
• Try the card in another computer.
• Not all 3rd party PC cards have been tested with the OmniBook. Please check theOmniBook website (http://www.hp.com/omnibook) for a list of approved and testedPC Cards.
• Certain Xircom CE2 (IIps) LAN cards conflict with the game port device in Windows2000. Contact Xircom to see if your card is one of these.
• When using a PC card in a docking system, insert or remove the card while thesystem is turned on or shut down, but not while the computer is suspended.

TroubleshootingSolving Problems
108 Reference Guide
If an I/O card stops communicating properly
• It may have been reset if the OmniBook suspended or turned off. Exit and restart theapplication.
• Check settings in Control Panel (and in Windows NT Diagnostics).
Performance Problems
If the OmniBook gets hot
• It is normal for the computer to get warm, especially while the battery is charging.
• Make sure the air vents are clear. For example, don’t put the computer on a softsurface that blocks the vent holes on the bottom at the back-right corner.
• DOS games and other programs that drive CPU usage toward 100% can contribute toa temperature increase.
If the OmniBook pauses or runs sluggishly
• Press CTRL+ALT+DEL to see if an application is not responding.
• Reboot the OmniBook.
• Delete temporary and unneeded files.
• This may be normal Windows behavior. Background processing can affect responsetime.
• Certain background operations (such as VirusScan) can affect performance whilethey’re running.
• Some file browsers may be unresponsive while they’re processing a graphic image orwaiting for broken network connections to time out.
• Install additional memory if Windows is spending a lot of time swapping to disk.
• Check amount of available free disk space.
• Check the BIOS Setup settings.
1. From the Start menu, shut down, then restart the OmniBook.
2. When you see the HP logo, press F2 to enter the BIOS Setup utility.
3. From the Power menu, set the Power Management Mode to Max. Performance.

TroubleshootingSolving Problems
Reference Guide 109
4. Press F10 to Save and Exit the BIOS Setup utility.
If the OmniBook shuts down slowly
• Make sure you do not enable the VirusScan option for checking the floppy drive atshutdown. Otherwise, if you shut down the computer without a floppy drive present,the computer may take several minutes to shut down and may beep loudly. To disablethis option, double-click the VirusScan icon in the taskbar, then click Properties andview the Detection tab. In Windows 95/98, clear Shutdown under Scan Floppies. InWindows NT, clear Floppy During Shutdown under Scan.
Power and Battery Problems
If the OmniBook turns off immediately after it turns on
• Battery power is probably extremely low. Plug in the ac adapter or insert a chargedbattery.
If the OmniBook keeps beeping
• The OmniBook beeps for 15 seconds when the battery is low. Save your work, quitimmediately, and insert a charged battery or plug in the ac adapter.
If the OmniBook has a short operating time
• Try conserving power using any of the suggestions listed under “To save batterypower” on page 57.
• If you are running any applications with an automatic save feature, such as MS Wordfor Windows, disable this feature.
• If the operating time has gotten shorter and the battery is more than a year or two old,you may need to replace the battery.
• Turn down the display brightness (Fn+F1).
• Heavy modem use can affect battery operating time.
• For Windows 95, 98, or NT, check the Power Management settings in BIOS Setup.
1. From the Start menu, shut down, then restart the OmniBook.
2. When you see the HP logo, press F2 to enter the BIOS Setup utility.
3. From the Power menu, make sure the Power Management Mode is set toMaximum Power Savings.

TroubleshootingSolving Problems
110 Reference Guide
4. Press F10 to Save and Exit the BIOS Setup utility.
• For Windows 2000, check the settings in Control Panel, Power Options, on the PowerSchemes tab.
If the battery doesn’t charge
• Make sure the ac adapter is plugged into the power source.
• If you’re using a power strip, remove the ac adapter from the power strip and plug itdirectly into a wall outlet.
• Check that the light on the ac adapter is on.
• Check that the battery is fully installed and locked in place.
• Turn off the OmniBook, then remove the battery and check that the battery contactsare clean.
• Check that the ac adapter cables are fully plugged in.
• Move the OmniBook away from any nearby heat source. Unplug the ac adapter andallow the battery to cool down. An elevated battery temperature prevents charging.
• If available, try another battery and ac adapter.
If the OmniBook stops responding
• Press CTRL+ALT+DEL and end an application that is not responding.
• Press the blue power button to suspend the OmniBook. Then press the blue buttonagain to turn the OmniBook back on.
• If nothing happens, insert a straightened paper clip into the system-off button on theleft side of the OmniBook. Then press the blue power button to turn on theOmniBook.
If the OmniBook doesn’t suspend as expected
• If you have a connection to another computer, the OmniBook doesn’t suspend if theconnection is actively in use.
• If the OmniBook is performing an operation, it normally waits for the operation tofinish.
• For Windows 95, 98, or NT, if a CD-ROM drive is present, make sure auto insertnotification is disabled. This is the default factory setting. (This is not required forWindows 2000.)

TroubleshootingSolving Problems
Reference Guide 111
In Windows 95 or Windows 98, view the CD-ROM drive properties in DeviceManager.
If retail Windows NT 4.0 is installed, you must edit the Registry to change thissetting:CAUTION: Incorrect editing of the Registry can make the system unbootable.
1. Log in as administrator.
2. Click Start, Run, type REGEDIT, and click OK.
3. Select HKEY_LOCAL_Machine\System\CurrentControlSet\Services\Cdrom.
4. Double-click AutoRun, change the value from 1 to 0, and click OK.
5. Exit the Registry Editor, then shut down and restart Windows.
If the OmniBook doesn’t automatically hibernate as expected
• For Windows NT, certain point-enabled PC Cards and possibly other cards mayprevent automatic hibernation when battery power is low. This may cause a drainedbattery and data loss. When leaving the computer unattended, either connect the acadapter or shut down the computer.
• For Windows 2000, check to see that hibernate support is enabled. From ControlPanel, open Power Options, and then click the Hibernate tab.
Also, check the Power Schemes tab. Make sure the Hibernate time-outs for both acpower and battery power are not set to Never.
Printing Problems
Hint For most printing problems, click Start, Help and use the Print Troubleshooter. If you’reusing Windows 2000, click Start, Help, Troubleshooting, and Print.
If a serial or parallel printer doesn’t print
• Check that you are using a proper cable or cable adapter, and that the printer is turnedon.
• Check for paper in the printer or other printer errors.
• Make sure the printer cable is secure at both ends.
If an infrared printer doesn’t print
• Windows NT 4.0 does not support infrared devices.

TroubleshootingSolving Problems
112 Reference Guide
• Make sure the infrared light path is not blocked.
• Check for paper in the printer or other printer errors.
• Make sure Windows is running—infrared printing is supported only while Windowsis running.
• In BIOS Setup the infrared port must be enabled and the mode selected. The modemust match the driver. In Windows 95, an infrared driver must be installed. Fordetails, refer to the driver’s Readme file located in \Omnibook\Drivers.
• Click Start, Help and use the Print Troubleshooter. If you’re using Windows 2000,click Start, Help, Troubleshooting, and Print.
• See “Infrared Problems” on page 103.
If the left edge of printed output is missing
• If the printer you are using is a 600-dpi (dots per inch) printer, try selecting acompatible printer driver for a 300-dpi printer. For example, for a 600-dpiHP LaserJet printer, try using the HP LaserJet IIIsi driver (300-dpi). Certainapplications may not work properly with 600-dpi printers.
Serial, Parallel, and USB Problems
If the serial mouse doesn’t work
• First, make certain you followed the manufacturer’s installation instructionscompletely and have installed the mouse properly.
• Check that the cable is properly connected.
• Check settings in Control Panel (and in Windows NT Diagnostics).
• Make sure the serial port is working—see the next heading.
• If you have problems with a serial mouse that you can’t resolve using the suggestionsin the OmniBook manuals, you should consider using a PS/2 mouse instead. The PS/2bus provides better support for pointing devices than the serial bus does, especiallywhen docking and undocking under power management.
If the serial or parallel port is not working
• Check that the cable is properly connected.
• Check settings in Control Panel (and in Windows NT Diagnostics).

TroubleshootingSolving Problems
Reference Guide 113
• Check settings in BIOS Setup.
1. From the Start menu, shut down, then restart the OmniBook.
2. When you see the HP logo, press F2 to enter the BIOS Setup utility.
3. From the System Devices menu, check that Parallel and Serial are enabled.
If a serial modem doesn’t work properly
• Click Start, Help and use the Modem Troubleshooter. If you’re using Windows 2000,click Start, Help, Troubleshooting, and Modem.
• Check that the cables are properly connected.
• Check settings in Control Panel (and in Windows NT Diagnostics).
• Make sure the serial port is working—see the previous heading.
If the USB port is not working
• Windows NT 4.0 does not support USB devices.
• Check settings in Control Panel.
• Contact the vendor of the peripheral device, as well as the OmniBook website, for thelatest versions of the USB drivers.
Startup Problems
If the OmniBook doesn’t respond at turn-on
• Connect the ac adapter.
• Press blue power button to try turning on the unit.
• Reset the OmniBook. See “To reset the OmniBook” on page 21.
• If you get no response, remove the battery and ac adapter—then plug in the ac adapterand try resetting. If you still get no response, the unit requires service.
If the OmniBook doesn’t boot from battery power
• Make sure the battery is properly inserted.
• Remove the battery and check its charge level by pressing the pad on the back of thebattery. The lights show the charge level.

TroubleshootingSolving Problems
114 Reference Guide
• Check battery contacts. If available, try another battery.
If the OmniBook doesn’t boot from the floppy disk drive
After checking all connections, check the boot order and setup in BIOS Setup utility.
1. From the Start menu, shut down, then restart the OmniBook.
2. When you see the HP logo, press F2 to enter the BIOS Setup utility.
3. Open the Boot menu. The default boot order is
Removable Device
Hard Disk
CD-ROM/DVD Drive
4. If Removable Device is not option 1, use the arrow keys to select Removable Device.
5. Press F6 to move up (or F5 to move down) in the list.
6. If an LS-120 drive is also installed, expand the Removable Device category and movethe floppy drive to the first position.
7. In the Security menu, make sure the Floppy Boot setting is Enabled.
8. Press F10 to Save and Exit the BIOS Setup utility.

TroubleshootingTesting the Operation
Reference Guide 115
Testing the Operation
The DiagTools hardware diagnostic program provides two levels of testing:
• Automated testing using the basic hardware test.
• Advanced testing using the individual hardware tests.
The tests are designed to run after the system reboots. This ensures that the computer willbe in a predictable state, so the diagnostic program can properly test the hardwarecomponents. The tests are non-destructive and are intended to preserve the state of thecomputer. The OmniBook reboots when you exit the program so drivers can be loaded.
To run the diagnostic test
Note If the computer does not display the F10 diagnostics prompt while rebooting, you mustrun the diagnostics from a diagnostic floppy disk. See “To create a diagnostic floppydisk” on page 116.
1. Reboot the OmniBook. When you see the HP logo and the F10 prompt, press F10 tostart the diagnostic test.
2. Go through the first several screens.
3. When the hardware detection finishes, check the list of detected hardware.
Hint If a device is not detected or fails its test below, it may be configured incorrectly in theBIOS Setup utility. You can confirm the problem by running BIOS Setup and checkingthe settings. See “To run the BIOS Setup utility” on page 86.
4. Run the basic test. Press F2 to start the basic hardware test.
5. If you intend to exit without running the advanced tests, press F4 to save system andtest information in the Support Ticket log file, HPSUPPT.TXT. Then press F3 to exit.
6. Optional: Run the advanced tests. Press F2 to open the advanced test screen.

TroubleshootingTesting the Operation
116 Reference Guide
7. Select and run the appropriate tests. Tests are not listed if no such hardware isdetected. Press the following keys to run tests:
ENTER Runs the highlighted test.
F5 orSPACE
Marks or unmarks the highlighted test.
F6 Marks or unmarks all tests in the currentmenu.
F7 Marks or unmarks all tests in all menus.
F10 Runs all marked tests.
8. When you are finished running tests, press ESC to exit the advanced tests.
9. Optional: Save the Support Ticket. Press F4 to save system and test information inthe Support Ticket log file, HPSUPPT.TXT.
10. Exit. Press F3 to exit and reboot.
11. Optional: Check the log. The log file contains a list of all test results and errors. RunC:\Dmi\Hpdiags\Hpsuppt.exe to retrieve the log file to this directory and open it inNotepad. (If Hpsuppt.exe is not on your hard disk, you can download it from theOmniBook website.)
To create a diagnostic floppy disk
If your computer doesn’t support running the diagnostics by pressing F10 during reboot,you can run the diagnostics by booting from a diagnostic floppy disk.
After inserting a formatted floppy disk in the floppy drive, do one of the following tocreate a diagnostic floppy disk:
• Check the C:\Dmi\Hpdiags directory. If diaginst is in this directory, double-click it.–or–If HP TopTools is installed, check the DiagTools page to see if it can create the disk.
• On any computer with World Wide Web access, download the diagnostic softwarepackage from the HP Customer Care website(http://www.hp.com/cposupport/eschome.html), and follow the instructions.
To run the diagnostics from the floppy disk, insert the disk in the floppy drive and rebootthe OmniBook. If you create a Support Ticket, it is saved on the diagnostic floppy disk.Remove the floppy disk just before you exit the diagnostics program.

TroubleshootingRecovering Software
Reference Guide 117
Recovering Software
You can use the OmniBook Recovery CD to reinstall the original factory software onyour hard disk drive.
If you need to configure a custom system, you can get OmniBook-specific drivers fromthese locations:
• On the Recovery CD ROM, under \Omnibook\Drivers.
• On the OmniBook hard drive under C:\Omnibook\Drivers.
• On the HP Customer Care website at http://www.hp.com/cposupport/eschome.html.This website contains the latest updates of software drivers.
Detailed instructions for installing the drivers are contained in the Drivers\Readme file.
Note You’ll find drivers for the operating system that was shipped with your OmniBook onthe hard drive and on the Recovery CD. If you want drivers for a different operatingsystem, see the HP Customer Care website.

TroubleshootingRecovering Software
118 Reference Guide
To recover the factory installation of Windows
Use the Recovery CD to reinstall the original factory software on the hard disk. You usethe same process to create a larger Hibernate/diagnostics partition on your hard disk or tocreate a Hibernate partition on a new hard disk.
CAUTION This procedure will format the hard disk drive. After the hard disk drive isformatted, you’ll need to reinstall any applications. Reformatting the hard diskdrive will erase all data on the disk.
Do not interrupt the following process or unplug the ac adapter until the process iscomplete.
1. Important. Back up all data from your hard disk. The following steps delete all datafrom the disk.
2. Plug in the ac adapter.
3. Insert the Recovery CD in the CD-ROM drive in the module bay.–or–If you have a PC Card or parallel port CD-ROM drive, connect it and insert theRecovery CD. Also connect the floppy drive and insert the Support Utility disk (see“To create a Support Utility Disk” on page 119).
4. Shut down and restart the computer.
If you’re using a CD-ROM drive in the module bay, press ESC two times when yousee the HP logo. Select the CD-ROM drive as the boot device.
5. When the Recovery CD dialog box appears, follow the displayed instructions. Ifprompted, accept the recommended partition size. If you install the factory software,the recovery process can take up to 10 minutes.
If you want to create the Hibernate/diagnostics partition without installing the factorysoftware, click Advanced and select the option to not install the operating system. Ifyou intend to install Windows NT, you should choose the FAT16 option or theHibernate-only option.
Note If, instead, you see an MS-DOS menu of options, select “Recover...” to create theHibernate partition and install the factory software, which can take up to 60 minutes. Orselect “Create Hibernate Partition” to not install the software. Accept the recommendedpartition size.
6. When prompted to reboot the computer, press CTRL+ALT+DEL and follow anydisplayed instructions.

TroubleshootingRecovering Software
Reference Guide 119
To create a Support Utility Disk
If you want to use the Recovery CD in a PC Card CD-ROM drive or parallel port CD-ROM drive, you’ll need a Support Utility disk for certain operations.
1. Insert a formatted floppy disk in the floppy drive.
2. Run makesupp.bat from the \Omnibook\Drivers\Hputils directory on the OmniBookRecovery CD.
3. Copy the device drivers from the installation software provided with the CD-ROMdrive to the Support Utility disk into the A:\Tools directory.
4. In the CONFIG.SYS file on the Support Utility disk, enable or disable the appropriatedrivers for your CD-ROM drive:
For a PC card drive. REM the OmniBook driver (OAKCDROM) and insert thecommand to run the point enabler for the card.
For a parallel drive. REM the OmniBook driver (OAKCDROM).
5. Add the device=driver statements to the CONFIG.SYS file on the Support Utilitydisk. The device statements should immediately follow the [USERCD] label.

TroubleshootingRecovering Software
120 Reference Guide
To update the OmniBook BIOS
OmniBook BIOS updates are available from the HP Customer Care website athttp://www.hp.com/cposupport/eschome.html. You may receive a BIOS update on afloppy disk or on a CD.
CAUTION Because a BIOS update replaces the previous version, it is very important youfollow these instructions exactly. Otherwise, the OmniBook may be damaged. TheBIOS update process resets the configuration settings in the BIOS Setup utilityexcept for the PC Identification and Password.
1. From the Start menu, shut down the OmniBook.
2. Connect the ac adapter to the OmniBook.
3. Remove any PC Cards and, if docked, undock the OmniBook.
4. Insert the BIOS Update disk or CD in the appropriate drive.
5. Press the blue power button.
If you’re using a CD-ROM drive in the module bay, press ESC two times when yousee the HP logo. Select the CD-ROM drive as the boot device.
6. When prompted, choose the correct language.
7. Follow the onscreen instructions. This starts a process that takes approximately1 minute. Once it begins, do not interrupt the update process.
To replace a damaged Recovery CD
If you lose or damage the Recovery CD, take your OmniBook and Certificate ofAuthenticity to an HP Service Center to be replaced. If you mail your OmniBook for thisservice, you must provide a photocopy of the Certificate of Authenticity along withpayment.

Reference Guide 121
Support and Service

Support and ServiceGetting HP OmniBook Assistance
122 Reference Guide
Getting HP OmniBook Assistance
Support Assistance
If you need assistance with your HP OmniBook or accessory, use any of the followingsupport services:
Provider Type Type of Assistance
1. Electronic Support Services(see below)
HP self-help tools, information and software.Approved and Tested Solutions.
2. Customer Support Centers(see below)
Email and telephone support assistance.In and out of warranty repair processes.
3. HP-authorized resellers Local support assistance.Referral to Customer Support Center or HP-approved support provider.
Electronic Support Services
• HP OmniBook World Wide Web: Download technical information, drivers andsoftware from the web at http://www.hp.com/omnibook.
• HP PC & Peripheral Self-Help and Direct-Help Tools: Visit the web athttp://www.hp.com/cpso-support/guide/home.html.
Choose Self-Help Tools to use a number of services that offer information andsoftware that will help you make the most of your HP products:
- Bulletin Boards.- Commercial Online Services.- CD-ROM Subscriptions.- Service Parts Information.

Support and ServiceGetting HP OmniBook Assistance
Reference Guide 123
Repair Assistance
Warranty. You must contact one of the participating support providers listed in item 3 in“Support Assistance” above, or an HP Service Center to receive warranty service. Thesupport provider will help qualify your unit for warranty repair based on the warrantyapplicable to your unit and original purchase date, and will provide you with repairprocesses in your area. Warranty service includes the cost of shipping, handling, duties,taxes, freight or fees to or from the service location.
Out of Warranty. Contact one of the support providers listed in items 2 or 3 in “SupportAssistance” above, or an HP Service Center. The support provider will provide you withrepair charges and processes in your area.
Customer Support Centers
HP Customer Support Centers will assist you by email or telephone for free (you areresponsible for the telephone charges) during the term of the warranty.
During the free assistance period, HP will assistwith questions about:
HP will not be able to help with questions about:
• Included applications and operating systems.
• HP-described operation environments andconditions.
• HP accessories, HP upgrades, and basic operationand troubleshooting.
• Non-HP hardware, software, operating systems, orusage not intended for or included (by HP) with theproduct.
• How to repair the product yourself.
• Product development, custom installations.
• Consulting.

Support and ServiceGetting HP OmniBook Assistance
124 Reference Guide
To contact the Customer Support Center by email, visit the HP Customer Care website athttp://www.hp.com/cposupport/eschome.html.
For the latest list of phone numbers, see the OmniBook website under Support,http://www.hp.com/omnibook.
North AmericaUnited States: (970) 635-1000Canada (English): (970) 635-1000Canada (French): (800) 387-3867Mexico: 326 4600, Guadalejara 669 9500,Monterrey 378 4240
Central/South AmericaArgentina: 541781 4061 69Brazil: 5511 709 1444Venezuela: 58 2 239 5664
EuropeAustria (German): 0660.6386Belgium (Dutch): 02.626.8806Belgium (French): 02.626.8807Czech Republic: 42 2 471 7321Denmark (Danish/Swedish): 3929.4099Finland (Swedish/English): 0203.47.288France (French): 01.43.62.34.34Germany (German): 0180.52.58.143Greece: 301 689 6411Hungary: 36(1) 252 4505Netherlands (Dutch): 020.606.8751Ireland (English): 01.662.5525Italy (Italian): 02.264.10350Norway (Norwegian/Swedish): 22.11.6299Poland 4822 37 50 65Portugal: 01.441.7199
Russia 7095 797 3500Spain (Spanish): 902.321.123Sweden (Swedish): 08.619.2170Switzerland (German/French): 0848.80.11.11Turkey: 90 212 224 59 25UK (English): 0171.512.52.02English (non-UK): 44 171 512 52 02
Asia and AustraliaAustralia: 03.9272.8000China: 010 6505 3888Hong Kong: 800 967-729India: 011 682 6035Indonesia: 021 350 3408Japan: 03 3235 8333Korea: Seoul 02.3270.0700, outside Seoul080 999-0700Malaysia: Penang 1300 88 0028, outside Penang03 295 2566New Zealand: 0800 445 543Philippines: 02 867 3551Singapore: 65 272 5300Taiwan: 02 717 0055Thailand: 02 661 4011Vietnam: 08823 4530
Africa/Middle East41 22 780 71 11

Support and ServiceHewlett-Packard Limited Warranty Statement
Reference Guide 125
Hewlett-Packard Limited Warranty Statement
1. HP warrants to you, the end-user customer, that HP hardware, accessories andsupplies will be free from defects in materials and workmanship after the date ofpurchase, for the period specified in the Warranty Duration sheet included with yourOmniBook. If HP receives notice of such defects during the warranty period, HP will,at its option, either repair or replace products which prove to be defective.Replacement products may be either new or equivalent in performance to new.
2. HP warrants to you that HP software will not fail to execute its programminginstructions after the date of purchase, for the period specified in the WarrantyDuration sheet included with your OmniBook, due to defects in material andworkmanship when properly installed and used. If HP receives notice of such defectsduring the warranty period, HP will replace software which does not execute itsprogramming instructions due to such defects.
3. HP does not warrant that the operation of HP products will be uninterrupted or errorfree. If HP is unable, within a reasonable time, to repair or replace any product to acondition as warranted, you will be entitled to a refund of the purchase price uponprompt return of the product.
4. HP products may contain remanufactured parts equivalent to new in performance ormay have been subject to incidental use.
5. Warranty does not apply to defects resulting from (a) improper or inadequatemaintenance or calibration, (b) software, interfacing, parts or supplies not supplied byHP, (c) unauthorized modification or misuse, (d) operation outside of the publishedenvironmental specifications for the product, or (e) improper site preparation ormaintenance.
6. TO THE EXTENT ALLOWED BY LOCAL LAW, THE ABOVE WARRANTIESARE EXCLUSIVE AND NO OTHER WARRANTY OR CONDITION, WHETHERWRITTEN OR ORAL, IS EXPRESSED OR IMPLIED AND HP SPECIFICALLYDISCLAIMS ANY IMPLIED WARRANTIES OR CONDITIONS OFMERCHANTABILITY, SATISFACTORY QUALITY, AND FITNESS FOR APARTICULAR PURPOSE. Some countries, states or provinces do not allowlimitations on the duration of an implied warranty, so the above limitation orexclusion might not apply to you. This warranty gives you specific legal rights andyou might also have other rights that vary from country to country, state to state, orprovince to province.
7. TO THE EXTENT ALLOWED BY LOCAL LAW, THE REMEDIES IN THISWARRANTY STATEMENT ARE YOUR SOLE AND EXCLUSIVE REMEDIES.

Support and ServiceHewlett-Packard Limited Warranty Statement
126 Reference Guide
EXCEPT AS INDICATED ABOVE, IN NO EVENT WILL HP OR ITS SUPPLIERSBE LIABLE FOR LOSS OF DATA OR FOR DIRECT, SPECIAL, INCIDENTAL,CONSEQUENTIAL (INCLUDING LOST PROFIT OR DATA), OR OTHERDAMAGE, WHETHER BASED IN CONTRACT, TORT, OR OTHERWISE. Somecountries, states or provinces do not allow the exclusion or limitation of incidental orconsequential damages, so the above limitation or exclusion may not apply to you.
THE WARRANTY TERMS CONTAINED IN THIS STATEMENT, EXCEPT TOTHE EXTENT LAWFULLY PERMITTED, DO NOT EXCLUDE, RESTRICT ORMODIFY AND ARE IN ADDITION TO THE MANDATORY STATUTORYRIGHTS APPLICABLE TO THE SALE OF THIS PRODUCT TO YOU.

Reference Guide 127
Specifications and Regulatory Information

Specifications and Regulatory InformationHardware Specifications
128 Reference Guide
Hardware Specifications
In a continuing effort to improve our products, the specifications shown below are subjectto change. For the latest specifications, see the OmniBook website,http://www.hp.com/omnibook.
Physical Attributes Models with 12-inch display:Size: 11.8 × 8.8 × 1.26 in (30.0 × 22.5 × 3.2 cm).Weight: 4 lb (1.8 kg) for notebook.Models with 13-inch display:Size: 11.9 × 9.3 × 1.4 in (30.4 × 23.7 × 3.5 cm)Weight: 4.3 lb (1.9 kg) for notebook.
Processor andBus Architecture
500- or 450-MHz Intel Mobile Pentium III processor.–or–400-, 366-, or 300-MHz Intel Mobile Pentium II Performance Enhanced (PE)processor.1.6-V core, 2.5-V external, low-power processor.32-KB (16-KB instruction, 16-KB data) L1 cache.256-KB four-way set-associative L2 cache.32-bit PCI bus.
Graphics 12.1-inch SVGA TFT display (800 × 600 × 16M colors) or 13.3-inch XGA TFT display(1024 × 768 x16M colors).Zoomed Video support for lower PC Card slot.Models without “900” after serial number256-bit NeoMagic MagicGraph graphics accelerator with 2.5-MB video RAM, 1x AGPgraphics capability.Models with “900 B” after serial numberATI Mobility-M graphics accelerator with 4-MB video RAM, 2x AGP graphicscapability.
Power Rechargeable 6-cell lithium ion battery with LED charge-level gauge (11.1 Vdc).Battery life: up to 3-4 hours typical (varies with type of usage and model).Fast battery recharge: 80% in 1 hour, 100% in 1.5-2 hours.Low-battery warning.Suspend/resume capability.60-watt ac adapter: 100 to 240 Vac (50 to 60 Hz) input, 19 Vdc, 3.16 A output.
Mass Storage 12-GB, 6-GB, or 4-GB removable hard drive.1.44-MB floppy drive module for use in external module bay. External module bay(standard) also accommodates any of the following optional modules:Optional CD-ROM drive module. LS-120 SuperDisk drive module. DVD drive module.

Specifications and Regulatory InformationHardware Specifications
Reference Guide 129
RAM Models without “900” after serial number32-MB RAM built-in, one slot for RAM expansion up to 160 MB (using 128-MBmodules).66-MHz RAM bus.Models with “900 B” after serial number64-MB RAM built-in, one slot for RAM expansion up to 192 MB (using 128-MBmodules).100-MHz RAM bus.
Audio System 16-bit Sound Blaster Pro−compatible stereo sound.Built-in speaker.3D-enhanced PCI bus audio with Zoomed Video support.Built-in microphone.Line-in, headphone-out, and microphone-in.
Keyboard andPointing Device
87/88-key touch-type QWERTY keyboard with 101/102 key emulation.Embedded numeric keypad.12 function (Fn) keys.Two pointing devices: pointing stick (TrackPoint technology licensed from IBM) andtouch pad.
Input/Output FDD/IDE interface for external module bay.Universal serial bus (USB).9-pin, 115,200-bps serial (16550 UART).25-pin bi-directional ECP/EPP parallel.Video-out. (Resolution up to 1280×1024×256 colors, or up to 1600×1200×64K colorsfor models with “900 B” after serial number. Refresh rate 60 to 85 Hz.)PS/2 keyboard/mouse.4-Mbps IrDA-compatible infrared port.
Expandability One Type III or two Type II 16-/32-bit PC Card slots (3.3- and 5-V support).CardBus enabled.External plug-in module bay for accessory modules.Optional port replicator, mini dock, and docking system.
Software Microsoft Windows 95/98, Windows 2000, or Windows NT 4.0.Windows 95/98/2000-compatible Plug-and-Play.Windows NT 4.0 and PC Card Plug-and-Play.Advanced Power Management (APM).DMI with HP TopTools.Adobe Acrobat Reader.Agaté Tioman for HP (Hot Swap).DiagTools.VirusScan.Online Reference Guide.OmniBook Recovery CD included.Centralized worldwide BIOS and driver update service

Specifications and Regulatory InformationHardware Specifications
130 Reference Guide
Security Features User and administrator passwords.System, hard drive, and docking passwords.PC identification displayed at boot.DMI-accessible electronic serial number.Kensington MicroSaver lock slot.
EnvironmentalLimits
Operating temperature: 5 to 35 °C (41 to 95 °F).Operating humidity: 20 to 90 percent RH (5 to 35 °C).Storage temperature: –20 to 50 °C (–4 to 122 °F).
Major ICs Models without “900” after serial numberCPU: Intel Mobile Pentium II Performance Enhanced (PE) processor.South Bridge: PIIX4E.Video: NeoMagic MagicGraph NM2200 (NMG5).Audio: NeoMagic MagicGraph NM2200 (NMG5) and NeoMagic Audio NMA2.CardBus: TI PCI 1225.Keyboard controller: National PC87570.Super I/O: SMC 769.Models with “900 B” after serial numberCPU: Intel Mobile Pentium III processor.South Bridge: PIIX4M.Video: ATI Mobility-M.Audio: ESS ES1978 Maestro-2E and ESS ES1921.CardBus: TI PCI 1225.Keyboard controller: National PC87570.Super I/O: SMC 869.

Specifications and Regulatory InformationSoftware System Resources
Reference Guide 131
Software System Resources
The tables in this section show typical default resource usage as set up by the OmniBookBIOS. Plug-and-play operating systems, drivers, and BIOS Setup settings may changesome of the entries.
To see other, non-default possibilities, refer to the BIOS Setup utility, which lists portand audio device configurations in the Input/Output menu.
System Interrupts
0 System timer
1 Keyboard
2 Cascade IRQ 9
3 Free (or COM2 infrared port, if enabled)
4 COM1 (serial port)
5 Audio
6 Floppy drive
7 LPT1 (ECP parallel port)
8 Real-time clock
9 Video Controller (unmarked models*)Free (“900 B” models*)
10 USB and CardBus - assigned by Windows driverVideo Controller (“900 B” models*)
11 Free
12 Pointing device
13 Numeric data processor
14 Internal hard disk (primary IDE controller)
15 Internal CD-ROM drive (secondary IDE controller)
* Unmarked models have no “900” after the serial number, “900 B” models have“900 B” after the serial number.

Specifications and Regulatory InformationSoftware System Resources
132 Reference Guide
System Memory
00000 - 9FFFF System memory
A0000 - BFFFF Video
C0000 - CBFFFC0000 - CFFFF
Video BIOS (unmarked models***)Video BIOS (“900 B” models***)
CC000 – DBFFF*D0000 – DBFFF*
Free** (unmarked models***)Free** (“900 B” models***)
DC000*- FFFFF System BIOS
* Approximate boundary.
** Valid uses for memory addresses CC000-DBFFF or D0000-DBFFF: Upper memory blocks (UMBs). PC card memory windows.
*** Unmarked models have no “900” after the serial number, “900 B” models have “900 B”after the serial number.
System Input/Output Addresses (100-3FF)
120-127 Audio (only models without “900” after serialnumber)
170-177 Internal CD-ROM drive (secondary IDEcontroller)
1F0-1F7 Internal hard disk (primary IDE controller)
220-22F Audio
376 Internal CD-ROM drive (secondary IDEcontroller)
378-37F LPT1 (printer port)
388-38B Audio
3B0-3BB Video adapter
3C0-3DF Video adapter
3E0-3E1 PCMCIA controller
3F0-3F5 Floppy controller
3F6 Internal hard disk (primary IDE controller)
3F7 Floppy controller
3F8-3FF COM1 (serial port)

Specifications and Regulatory InformationSoftware System Resources
Reference Guide 133
DMA Channels
0 Sound Record* (unmarked models*)Free (“900 B” models)
1 Sound playback
2 Floppy drive
3 LPT1 (ECP parallel port)
4 Cascade
5 Free
6 Free
7 Free
* Unmarked models have no “900” after the serial number, “900 B” models have“900 B” after the serial number.

Specifications and Regulatory InformationSafety Information
134 Reference Guide
Safety Information
Power Cords
The power cord supplied with the OmniBook ac adapter should match the plug andvoltage requirements for your local area. Regulatory approval for the ac adapter has beenobtained using the power cord for the local area. However, if you travel to a different areaand need to connect to a different outlet or voltage, you should use one of the powercords listed below. To purchase a power cord (including one for a country not listedbelow) or a replacement ac adapter, contact your local Hewlett-Packard dealer or Salesand Service office.
Country Rated Voltage and Current HP Part Number
CanadaMexicoPhilippinesTaiwanUnited States
125 Vac (3 A) 8120-6313
East and West EuropeEgyptSaudi Arabia
250 Vac (2.5 A) 8120-6314
Hong KongSingaporeUnited Kingdom
250 Vac (2.5 A) 8120-8699
AustraliaNew Zealand
250 Vac (2.5 A) 8120-6312
Japan 125 Vac (3 A) 8120-6316
IndiaSouth Africa
250 Vac (2.5 A) 8120-6317
Argentina 250 Vac (2.5 A) 8120-8367
Chile 250 Vac (2.5 A) 8120-8452
People’s Republic of China 250 Vac (2.5 A) 8120-8373

Specifications and Regulatory InformationSafety Information
Reference Guide 135
Ergonomics
WARNING Improper use of keyboards and other input devices has been associated withergonomic injury. For information about reducing your risk, see Working inComfort in the online OmniBook Library, or visit our ergonomics website,http://www.hp.com/ergo.
Battery Safety
• To avoid risk of fire, burns, or damage to your battery pack, do not allow a metalobject to touch the battery contacts.
• The battery pack is suitable for use only with compatible OmniBook models. Check“Support Assistance” on page 122 for your local HP contact.
• Do not disassemble the battery. There are no serviceable parts inside. Do not disposeof the battery pack in fire or water.
• Handle a damaged or leaking battery with extreme care. If you come in contact withthe electrolyte, wash the exposed area with soap and water. If it contacts the eye, flushthe eye with water for 15 minutes and seek medical attention.
• Do not expose the battery pack to high storage temperatures (above 60 °C, 140 °F).
• When the battery is not in use, store it in the battery pouch provided.
• When discarding a battery pack, contact your local waste disposal provider regardinglocal restrictions on the disposal or recycling of batteries.
• To obtain a replacement battery, contact your local dealer or HP sales office.
• Do not charge the battery pack if the ambient temperature exceeds 45 °C (113 °F).

Specifications and Regulatory InformationSafety Information
136 Reference Guide
LED Safety
The infrared port located on the left side of the OmniBook is classified as a Class 1 LED(light-emitting diode) device according to International Standard IEC 825-1 (EN60825-1). This device is not considered harmful, but the following precautions arerecommended:
• If the unit requires service, contact an authorized HP service center—see “SupportAssistance” on page 122.
• Do not attempt to make any adjustment of the unit.
• Avoid direct eye exposure to the infrared LED beam. Be aware that the beam isinvisible light and cannot be seen.
• Do not attempt to view the infrared LED beam with any type of optical device.
CLASS 1 LED PRODUCT
LEDSCHÜTZKLASSE 1 PRODUKT

Specifications and Regulatory InformationRegulatory Information
Reference Guide 137
Regulatory Information
This section presents information that shows how the OmniBook complies withregulations in certain regions. Any modifications to the OmniBook not expresslyapproved by Hewlett-Packard could void the authority to operate the OmniBook in theseregions.
U.S.A.
The OmniBook generates and uses radio frequency energy and may interfere with radioand television reception. The OmniBook complies with the limits for a Class Bcomputing device as specified in Part 15 of FCC Rules, which provide reasonableprotection against such interference in a residential installation. In the unlikely event thatthere is interference to radio or television reception (which can be determined byremoving the unit’s batteries and ac adapter), try the following:
• Reorienting or relocating the receiving antenna.
• Relocating the OmniBook with respect to the receiver.
• Connecting the OmniBook ac adapter to another power outlet.
Connections to Peripheral Devices
To maintain compliance with FCC Rules and Regulations, use properly shielded cableswith this device.
For more information, consult your dealer, an experienced radio/television technician, orthe following booklet, prepared by the Federal Communications Commission: How toIdentify and Resolve Radio-TV Interference Problems. This booklet is available from theU.S. Government Printing Office, Washington, DC 20402, Stock Number 004-000-00345-4. At the first printing of this manual, the telephone number was (202) 512-1800.

Specifications and Regulatory InformationRegulatory Information
138 Reference Guide
Declaration of Conformity
Responsible Party: Hewlett-Packard CompanyManager of Corporate Product Regulations3000 Hanover StreetPalo Alto, CA 94304(415) 857-1501declares that the product(s)
Trade name: Hewlett-Packard Company
Product name: HP OmniBook 900
Complies with Part 15 of the FCC Rules. Operation is subject to the following two conditions:1. This device may not cause harmful interference, and2. This device must accept any interference received, including interference that may cause undesiredoperation.
Canada
This digital apparatus does not exceed the Class B limits for radio noise emissions fromdigital apparatus as set out in the radio interference regulations of the CanadianDepartment of Communications.
Le présent appareil numérique n’émet pas de bruits radioélectriques dépassant les limitesapplicables aux appareils numériques de Classe B prescrites dans le règlement sur lebrouillage radioélectrique édicté par le Ministère des Communications du Canada.
Japan

Specifications and Regulatory InformationRegulatory Information
Reference Guide 139
International
Products sold internationally by Hewlett-Packard and its authorized dealers meet thespecifications listed below.
Declaration of Conformity (according to ISO/IEC Guide 22 and EN 45014)
Address: Hewlett-Packard CompanyMobile Computing Division19310 Pruneridge Ave.Cupertino, CA 95014declares that the following product
Product name: HP OmniBook 900
Options: All
conforms to the following product specifications
Safety: IEC 950:1991+A1,A2,A3,A4 / EN 60950 (1992)+A1,A2,A3,A4,A11GB4943-1995IEC 825-1:1993 / EN 60825-1:1994, Class 1
EMC: CISPR 22:1993+A1,A2 / EN 55022 (1994)+A1,A2: Class B [1 ]GB9254-1988EN 50082-1:1992 IEC 801-2:1991 / prEN 55024-2 (1992): 4kV CD, 8kV AD IEC 801-3:1984 / prEN 55024-3 (1991): 3V/m IEC 801-4:1988 / prEN 55024-4 (1992): 0.5 kV signal lines, 1.0kV power linesFCC Title 47 CFR, Part 15 Class B Ansi C63.4:1992AS/NZS 3548:1995 Rules and Regulations of Class B
SupplementaryInformation:
The product herewith complies with the requirements of the Low Voltage Directive 73/23/EEC and EMC Directive89/336/EEC and carries the CE mark accordingly.
This device complies with Part 15 of FCC Rules. Operation is subject to the following two conditions: (1) this devicemay not cause harmful interference, and (2) this device must accept any interference received, includinginterference that may cause undesired operation.
The ac adapter shipped with this product is designed to operate on all power systems, other than IT powersystems.
[1] The product was tested in a typical configuration with Hewlett-Packard personal computer peripherals.
Quality Department,Hewlett-Packard CompanyMobile Computing Division


Reference Guide 141
Index
Aac (time-out), 58, 90ac adapter
charging battery, 53connecting, 16, 53jack, 13part number, 16
accessoriesdocking products, 76plug-in modules, 63troubleshooting, 98
adding RAM, 81addresses (I/O), 132adjusting
brightness, 29volume, 31
administrator password, 93Advanced Power Management
(APM)preinstalled for Windows 95/98,
50Windows NT 4, 51
Agaté Tioman hot-swapinstalling, 62troubleshooting, 99using, 63
airline adapter, 12Alt Gr key, 34antistatic precautions, 81, 83audio
adjusting volume, 31, 100connecting devices, 71muting, 31troubleshooting, 100
audio jacksconnecting, 71location, 14
auto/airline adapter, 12
Bbattery
charging, 53checking level, 52for clock, 51installing, 55location, 14low-power warnings, 50, 53operating time, 57, 109
prolonging life, 59removing, 55safety, 56, 135saving power, 57storing, 59troubleshooting, 109
bay (module), 18, 63BIOS Setup utility
Boot menu, 91deleting passwords, 94Exit menu, 91external display settings, 67, 87Main menu, 87Power menu, 90Security menu, 89setting passwords, 93setting time-outs, 58System Devices menu, 88using, 86
BIOS updates, 120boot device order, 21, 91, 99Boot menu (BIOS), 91brightness
adjusting, 29affects battery time, 57affects display life, 29
CCaps Lock, 13, 23Card Executive, 75Cardbus cards, 74cards (PCMCIA), 74CD-ROM drive
installing, 63parallel port, 119PC Card, 119troubleshooting, 98
channels (DMA), 133charging battery, 53cleaning the OmniBook, 48clicking items, 25COM1 port, 15, 66configuring
BIOS settings, 86pointing stick, 27touch pad, 26, 27
connectingac adapter, 53audio devices, 71
external display, 67floppy drive, 18floppy to parallel port, 65infrared device, 72parallel device, 69plug-in modules, 63serial device, 70serial mouse, 70USB devices, 70
Corporate Evaluator's Guide, 10corrupted files, 103creating
diagnostic disk, 116Support Utility disk, 119
cursor (pointer), 25, 27Customer Care website, 10
Ddefault BIOS settings, 87default system resources, 131deleting password, 94desktop management, 92devices
boot order, 91, 99docks, 76drivers, 117external display, 32, 33, 67infrared, 72parallel, 69ports for, 66printers, 69PS/2, 69, 88serial, 70temporary boot order, 21USB, 70
diagnosticsfloppy disk, 116running, 115
DiagTools, 115Direct Cable Connection, 73disks
diagnostic, 116Support Utility, 119
displayBIOS settings, 67, 87brightness, 29brightness affects battery, 57closing, 30connected to dock, 67, 68

142 Reference Guide
connecting external, 67extending life, 29multiple (Windows 98), 68, 102port, 15, 66switching to external, 32, 33, 67troubleshooting, 101turning off, 30using external, 68
DMA channels, 133docking, 77docking port, 15, 66docking system
BIOS display settings, 68display, 67docking, 77installing tray, 76multiple displays, 68, 102purpose, 76troubleshooting, 98undocking, 78
docking tray, 76dot matrix printer, 69dragging items, 25drive lock, 96drivers
APM (Windows NT), 51Card Executive (Windows NT),
75on Recovery CD, 117on web, 117
drivescreating Hibernate partition, 118hard drive holder, 80hard drive lock, 96plug-in modules, 63replacing hard disk, 79time-out, 58, 90
DVD driveinstalling, 63troubleshooting, 99
EECP, 69enabling
external display, 32, 67EPP, 69ergonomics, 32, 35euro symbol, 34, 105Exit menu (BIOS), 91Extended Desktop (Windows 98),
68extended memory, 87external
display, 32, 67
keyboard, 69module bay, 18, 63
external display, 68
FF1 through F12, 32F10 (diagnostics), 115files
corrupted, 103infrared transfer, 73protecting, 96recovering, 118
FIR port, 66floppy drive
connecting, 18, 63parallel connection, 65
Fn key+ F1 (decrease brightness), 29+ F12 (Hibernate), 32+ F2 (increase brightness), 29+ F5 (display options), 67+ F8 (keypad), 33+ R (Suspend), 32+ S (Standby), 32external keyboard, 69, 88temporary keypad, 33
function keys, 32
Hhard disk drive
caring for, 48creating Hibernate partition, 118holder, 80locking, 96replacing, 79time-out, 58, 90troubleshooting, 102
hardware specifications, 128headphones, 71Hewlett-Packard support, 98hibernate
at low battery, 53creating partition, 118mode, 20, 32saves power, 57status lights, 22time-out, 58, 90
holder (HDD), 80hot computer, 108hot keys, 32hot swapping
installing software, 62swapping modules, 63troubleshooting, 99
HP Customer Care website, 10
II/O addresses, 132infrared port
location, 14, 66making connections, 72mode, 88printing, 72safety, 136troubleshooting, 103
InkJet printer, 69installing
battery, 55docking tray, 76hard disk drive, 79hard drive holder, 80hot-swap software, 62plug-in modules, 63RAM, 81TopTools, 92VirusScan, 94
installing original software, 118instant-on, 20interrupts (system), 131
KKensington lock, 95keyboard
Alt Gr key, 34connecing external, 69embedded keypad, 33ergonomic precautions, 32euro symbol, 34, 105external Fn key, 69, 88Fn hot keys, 32NT language, 17num lock, 33opening, 81status lights, 13, 23troubleshooting, 104Windows keys, 33
keypad (embedded), 33Keypad Lock, 13, 23
Llaser printer, 69Library (OmniBook), 10license agreement, 3lid switch, 30lights (status), 13, 22, 23locking (cable), 95low battery
charging, 53

Reference Guide 143
warning, 53LPT1 port, 15, 66
MMain menu (BIOS), 87memory
adding, 81extended, 87PC-100, 81, 107removing, 83system, 132troubleshooting, 106
microphoneexternal, 71location, 13
mini dock, 76, 98modes
power, 20Smart CPU, 58, 90
module bay, 18, 63modules (plug-in), 63monitor
BIOS settings, 67, 87connecting, 67multiple (Windows 98), 68, 102port, 15, 66switching to, 32, 33, 67troubleshooting, 101using external, 68
mono plugs, 71mouse
connecting, 69PS/2 port, 14serial, 70
multiple displays (Windows 98),68, 102
mute, 31
NNum Lock, 13, 23, 33
Ooff
button location, 13status lights, 22turning off, 20
OmniBookcaring for, 48changing BIOS settings, 86cleaning, 48locking, 95reinstalling Windows, 118resetting, 21starting and stopping, 20
testing, 115websites, 10
OmniBook Library, 10OmniBook Notes, 10on
button location, 13status lights, 22turning on, 20
overheating, 108
Pparallel port
CD-ROM drive, 119connecting, 69floppy connection, 65location, 15, 66troubleshooting, 112
passwordsdeleting, 94forgotten, 94NT administrator, 17setting, 93
PC CardsCD-ROM drive, 119installing, 74plug and play, 75saving power, 57slots for, 13stopping, 74tested, 75troubleshooting, 107use power, 57Windows NT support, 75
PC identification, 95PC-100 RAM, 81, 107PCMCIA cards, 74plug requirements, 134plug-in modules, 63pointing stick
advanced features, 27BIOS setting, 88disabling, 26, 28location, 13troubleshooting, 104using, 25
port locations, 15, 66port replicator, 76, 98power
checking battery, 52connecting ac, 16, 53conserving, 58low-battery warnings, 50, 53modes, 20saving, 57
troubleshooting, 109power button
location, 13resetting with, 21turning on and off, 20
power cords, 134Power menu (BIOS), 90printers
connecting, 69infrared, 72troubleshooting, 111
protectionfiles, 96hard drive lock, 96Kensington lock, 95passwords, 93, 94PC identification, 95VirusScan, 94
PS/2 devicesconnecting, 69selecting, 88
PS/2 port, 14
RRAM
adding, 81PC-100, 81, 107removing, 83troubleshooting, 106
rebootingafter shutdown, 20boot device, 91, 99temporary boot device, 21troubleshooting, 113
recharging battery, 53recovering original software, 118Recovery CD
contents, 117replacing, 120
regulatory information, 137removing
battery, 55hard disk drive, 79hard drive holder, 80PC Card, 74RAM, 83
repair service, 98resetting, 21
Ssafety
battery use, 135infrared port, 136power cords, 134

144 Reference Guide
saving battery power, 57Scandisk, 103Scroll Lock, 13, 23security
hard drive lock, 96Kensington lock, 95passwords, 93, 94PC identification, 95VirusScan, 94
Security menu (BIOS), 89selecting items, 25serial mouse, 70serial port
connecting, 70location, 15, 66troubleshooting, 112uses power, 57
service (repair), 98Service Pack (Windows NT), 98shortcut keys, 32Smart Card accessory, 12Smart CPU, 58, 90software
license, 3speaker
location, 14speakers
external, 71specifications
hardware, 128system resources, 131
standbyand display life, 29mode, 20status lights, 22time-out, 58, 90
starting OmniBook, 20static electricity, 81, 83status lights
keyboard, 13, 23location, 13, 14meanings, 22
stopping OmniBook, 20Support Ticket, 115Support Utility disk, 119suspend
and display life, 29mode, 20saves power, 57status lights, 22time-out, 58, 90when closing lid, 30
swapping modules, 63, 99
System Devices menu (BIOS), 88system memory, 132system resources
BIOS settings, 88DMA channels, 133I/O addresses, 132interrupts, 131system memory, 132
system-off buttonlocation, 14resetting, 21
Ttaskbar
battery, 52PC Card, 74volume, 31
tattooing, 95temperature
limits, 130overheating, 108
testing the OmniBook, 115time-outs, 58, 90TopTools, 92touch pad
advanced features, 26BIOS setting, 88configuring, 27disabling, 28location, 13troubleshooting, 104using, 25
track point, See pointing sticktray (docking), 76troubleshooting
audio, 100battery, 109CD-ROM drive, 98display, 101dock, 98DVD drive, 99hard disk drive, 102infrared port, 103keyboard, 104memory, 106parallel devices, 112PC Cards, 107performance, 108pointing stick, 104power, 109printing, 111serial devices, 112startup, 113touch pad, 104
USB devices, 112turning off
display, 30OmniBook, 20
typing special characters, 34
Uundocking, 78Universal Serial Bus, 70URLs, 10USB
connecting, 70port location, 15, 66troubleshooting, 112
user password, 93
VVGA output, See displayVirusScan, 94voltage requirements, 134volume
adjusting, 31troubleshooting, 100
Wwarning (low battery), 53websites, 10Windows
documentation, 10installing drivers, 117reinstalling, 118Y2K, 17
Windows 2000closing the display, 30TopTools, 92undock security, 93
Windows keys, 33Windows NT 4
adding APM, 51adding Card Executive, 75administrator password, 17euro symbol, 105infrared not supported, 72keyboard language, 17Service Pack, 98USB not supported, 70zoomed video not supported, 74

Reference Guide 145
wireless communication, 72working in comfort, 35
YY2K, 17Y-adapter (PS/2), 69
Zzoomed video, 74


