HP Beats All-In-One - 23-n200np (ENERGY STAR) Guideusermanual Com
33
User Guide
description
user manual rare for hp envy n200np
Transcript of HP Beats All-In-One - 23-n200np (ENERGY STAR) Guideusermanual Com

User Guide

© Copyright 2014 Hewlett-PackardDevelopment Company, L.P.
Microsoft and Windows are U.S. registeredtrademarks of the Microsoft group ofcompanies.
The information contained herein is subjectto change without notice. The onlywarranties for HP products and services areset forth in the express warranty statementsaccompanying such products and services.Nothing herein should be construed asconstituting an additional warranty. HP shallnot be liable for technical or editorial errorsor omissions contained herein.
Second Edition: February 2014
First Edition: November 2013
Document Part Number: 742532-002
Product notice
This guide describes features that arecommon to most models. Some featuresmay not be available on your computer.
Not all features are available in all editionsof Windows. This computer may requireupgraded and/or separately purchasedhardware, drivers and/or software to takefull advantage of Windows functionality. Goto http://www.microsoft.com for details.
To access the latest user guide, go tohttp://www.hp.com/support, and select yourcountry. Select Drivers & Downloads, andthen follow the on-screen instructions.
Software terms
By installing, copying, downloading, orotherwise using any software productpreinstalled on this computer, you agree tobe bound by the terms of the HP End UserLicense Agreement (EULA). If you do notaccept these license terms, your soleremedy is to return the entire unusedproduct (hardware and software) within 14days for a full refund subject to the refundpolicy of your seller.
For any further information or to request afull refund of the price of the computer,please contact your seller.

Safety warning noticeWARNING! To reduce the possibility of heat-related injuries or of overheating the computer, do notplace the computer directly on your lap or obstruct the computer air vents. Use the computer only ona hard, flat surface. Do not allow another hard surface, such as an adjoining optional printer, or a softsurface, such as pillows or rugs or clothing, to block airflow. Also, do not allow the AC adapter tocome into contact with the skin or a soft surface, such as pillows or rugs or clothing, during operation.The computer and the AC adapter comply with the user-accessible surface temperature limits definedby the International Standard for Safety of Information Technology Equipment (IEC 60950).
iii

iv Safety warning notice

Table of contents
1 Getting information ............................................................................................................................................ 1
2 Setting up your computer .................................................................................................................................. 3Connecting to the Internet (select models only) ................................................................................... 4
3 Navigating the screen ....................................................................................................................................... 5Using touch gestures ............................................................................................................................ 5Using the keyboard and mouse ............................................................................................................ 5
4 Protecting your computer .................................................................................................................................. 8Computer security features .................................................................................................................. 8
5 Troubleshooting ................................................................................................................................................ 9Computer does not start ....................................................................................................................... 9Power ................................................................................................................................................. 10Display (monitor) ................................................................................................................................ 10Keyboard and mouse (with cable) ...................................................................................................... 10Keyboard and mouse (wireless) ......................................................................................................... 12Speakers and sound .......................................................................................................................... 13Internet access ................................................................................................................................... 13Software troubleshooting .................................................................................................................... 14
6 System Recovery ............................................................................................................................................ 16Choosing a system recovery method ................................................................................................. 16System recovery options .................................................................................................................... 16Recovery media ................................................................................................................................. 18
7 Maintenance ................................................................................................................................................... 20Schedules and tasks .......................................................................................................................... 20Cleaning your computer ..................................................................................................................... 21
8 Using HP PC Hardware Diagnostics (UEFI) ................................................................................................... 23Downloading HP PC Hardware Diagnostics (UEFI) to a USB device ................................................ 23
v

9 Specifications .................................................................................................................................................. 24Operating specifications ..................................................................................................................... 24
10 Support information ....................................................................................................................................... 25How to get help .................................................................................................................................. 25Where to get help ............................................................................................................................... 25Customer support for repairs .............................................................................................................. 26Before upgrading your hardware ........................................................................................................ 26
Index ................................................................................................................................................................... 27
vi
1 Getting information
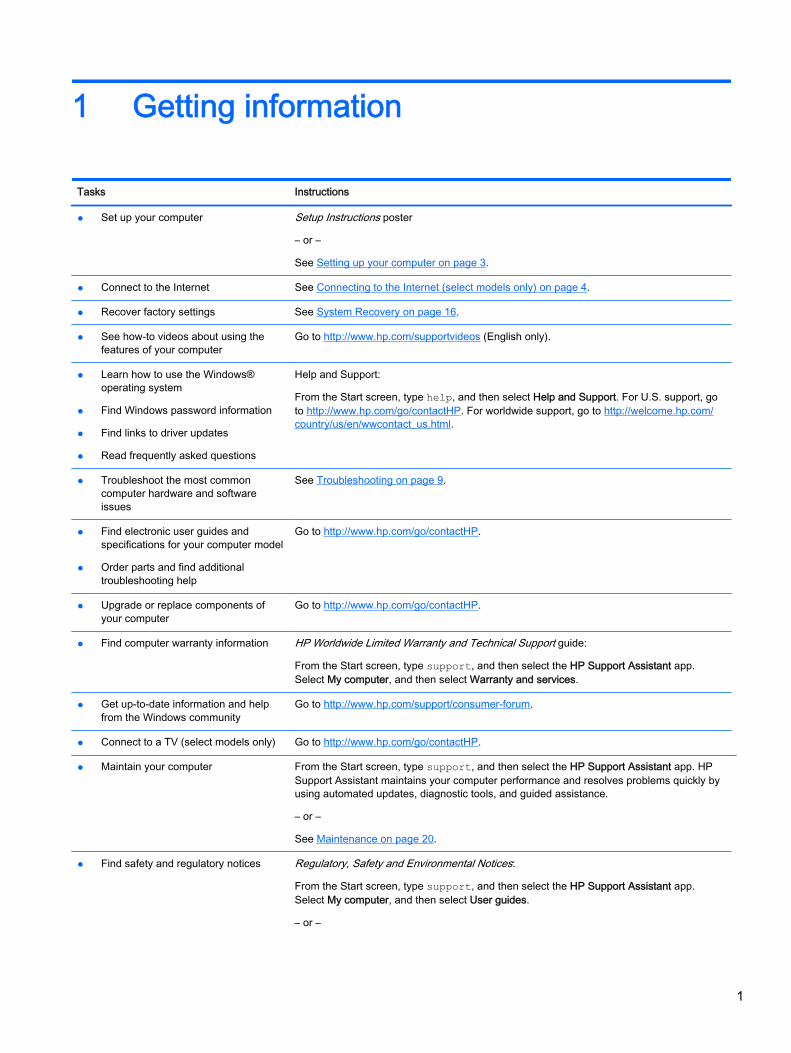
Tasks Instructions
● Set up your computer Setup Instructions poster
– or –
See Setting up your computer on page 3.
● Connect to the Internet See Connecting to the Internet (select models only) on page 4.
● Recover factory settings See System Recovery on page 16.
● See how-to videos about using thefeatures of your computer
Go to http://www.hp.com/supportvideos (English only).
● Learn how to use the Windows®operating system
● Find Windows password information
● Find links to driver updates
● Read frequently asked questions
Help and Support:
From the Start screen, type help, and then select Help and Support. For U.S. support, goto http://www.hp.com/go/contactHP. For worldwide support, go to http://welcome.hp.com/country/us/en/wwcontact_us.html.
● Troubleshoot the most commoncomputer hardware and softwareissues
See Troubleshooting on page 9.
● Find electronic user guides andspecifications for your computer model
● Order parts and find additionaltroubleshooting help
Go to http://www.hp.com/go/contactHP.
● Upgrade or replace components ofyour computer
Go to http://www.hp.com/go/contactHP.
● Find computer warranty information HP Worldwide Limited Warranty and Technical Support guide:
From the Start screen, type support, and then select the HP Support Assistant app.Select My computer, and then select Warranty and services.
● Get up-to-date information and helpfrom the Windows community
Go to http://www.hp.com/support/consumer-forum.
● Connect to a TV (select models only) Go to http://www.hp.com/go/contactHP.
● Maintain your computer From the Start screen, type support, and then select the HP Support Assistant app. HPSupport Assistant maintains your computer performance and resolves problems quickly byusing automated updates, diagnostic tools, and guided assistance.
– or –
See Maintenance on page 20.
● Find safety and regulatory notices Regulatory, Safety and Environmental Notices:
From the Start screen, type support, and then select the HP Support Assistant app.Select My computer, and then select User guides.
– or –
1

Tasks Instructions
Go to http://www.hp.com/go/contactHP.
● Find ergonomic information Safety & Comfort Guide:
From the Start screen, type support, and then select the HP Support Assistant app.Select My computer, and then select User guides.
– or –
Go to http://www.hp.com/ergo.
2 Chapter 1 Getting information

2 Setting up your computer
WARNING! To reduce the risk of electrical shock or damage to your equipment:
● Place the computer in a location away from water, dust, moisture, and soot. Theseenvironmental factors can increase the temperature inside your computer or cause fire orelectrocution.
● Do not disable the power cord grounding pin. The grounding pin is an important safety feature.
● Plug the power cord into an AC outlet that is easily accessible at all times.
● Disconnect power from the equipment by unplugging the power cord from the AC outlet. Toprevent direct exposure to the laser beam, do not try to open the enclosure of the CD or DVDdrive.
● The power supply is preset for the country or region in which you purchased your computer. Ifyou move, check the voltage requirements for your new location before plugging the computerinto an AC outlet.
To reduce the risk of serious injury read the Safety & Comfort Guide. To access this guide, go tohttp://www.hp.com/ergo.
1. Place the computer so that all ventilation openings are unobstructed and cabling is not in awalkway or where it can be stepped on or damaged by placing furniture on it.
2. When connecting all power cords from the monitor, computer, and accessories to anuninterruptible power supply (UPS), it is recommended that you use a power surge protectiondetection device. If the computer has a television tuner, or a modem or telephone connection,protect the computer by using surge protection with these signal inputs as well. Connect thetelevision cable or the telephone line cord to the surge protection device, and then connect thedevice to the computer.
3. Download and install operating system updates.
a. Find out what operating system and version your computer is currently running.
From the Start screen, type control panel, select Control Panel, select System andSecurity, and then select System.
b. Open your internet browser, and then go to http://www.hp.com/go/contactHP.
c. If necessary, click your country and language, click Support, and then click Downloaddrivers.
d. Enter your computer model name and number in the Find by product field, and then clickGo.
e. If necessary, select your computer model from Product search results.
f. Select your computer operating system.
g. Click Download next to each update you wish to download.
h. Follow the on-screen instructions to install each downloaded update.
4. Look in the computer box for additional printed details or updates.
3

5. Read the Regulatory, Safety and Environmental Notices. From the Start screen, type support,and then select the HP Support Assistant app. Select My computer, and then select Userguides.
6. Read the Safety & Comfort Guide provided with your user guides. It describes properworkstation setup, and proper posture, health, and work habits for computer users. The Safety &Comfort Guide also provides important electrical and mechanical safety information. To accessthe guide, from the Start screen, type support, and then select the HP Support Assistant app.Select My computer, and then select User guides, or go to http://www.hp.com/ergo.
After you complete the initial computer setup, you might want to install additional hardware devices orsoftware. Check the operating system, memory, and other requirements listed for these items beforepurchasing them for your computer. Follow the software manufacturer's directions to install the newsoftware.
NOTE: Use only licensed original software. Installing copied software could result in an unstableinstallation, infect the computer with a virus, or be illegal.
NOTE: A security solution is designed as a deterrent, but it might not be able to prevent theft,mishandling, or software attacks.
Connecting to the Internet (select models only)To connect to a wireless network:
▲ From the Start screen, type wireless, and then select Connect to a network.
NOTE: To set up a wireless local area network (WLAN) and connect to the Internet, you need abroadband modem (either DSL or cable) (purchased separately), high-speed Internet servicepurchased from an Internet service provider, and a wireless router (purchased separately).
For more information about wireless technology, see the information and Website links provided inHelp and Support. From the Start screen, type help, and then select Help and Support.
To connect to a wired network:
1. Plug an 8-pin, RJ-45 (network) cable into the network jack on the computer.
2. Plug the other end of the network cable into a network wall jack or router.
NOTE: If the network cable contains noise suppression circuitry, which prevents interferencefrom TV and radio reception, orient the circuitry end of the cable toward the computer.
If you have issues connecting to the Internet, see Internet access on page 13.
4 Chapter 2 Setting up your computer
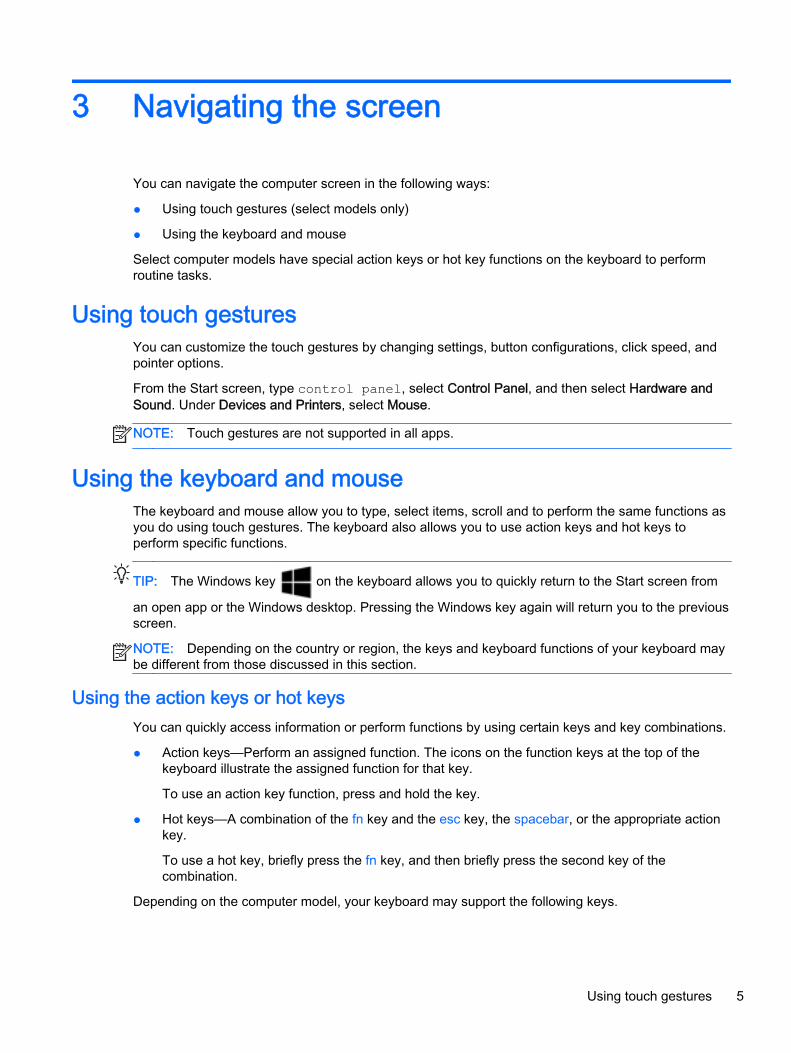
3 Navigating the screen
You can navigate the computer screen in the following ways:
● Using touch gestures (select models only)
● Using the keyboard and mouse
Select computer models have special action keys or hot key functions on the keyboard to performroutine tasks.
Using touch gesturesYou can customize the touch gestures by changing settings, button configurations, click speed, andpointer options.
From the Start screen, type control panel, select Control Panel, and then select Hardware andSound. Under Devices and Printers, select Mouse.
NOTE: Touch gestures are not supported in all apps.
Using the keyboard and mouseThe keyboard and mouse allow you to type, select items, scroll and to perform the same functions asyou do using touch gestures. The keyboard also allows you to use action keys and hot keys toperform specific functions.
TIP: The Windows key on the keyboard allows you to quickly return to the Start screen from
an open app or the Windows desktop. Pressing the Windows key again will return you to the previousscreen.
NOTE: Depending on the country or region, the keys and keyboard functions of your keyboard maybe different from those discussed in this section.
Using the action keys or hot keysYou can quickly access information or perform functions by using certain keys and key combinations.
● Action keys—Perform an assigned function. The icons on the function keys at the top of thekeyboard illustrate the assigned function for that key.
To use an action key function, press and hold the key.
● Hot keys—A combination of the fn key and the esc key, the spacebar, or the appropriate actionkey.
To use a hot key, briefly press the fn key, and then briefly press the second key of thecombination.
Depending on the computer model, your keyboard may support the following keys.
Using touch gestures 5
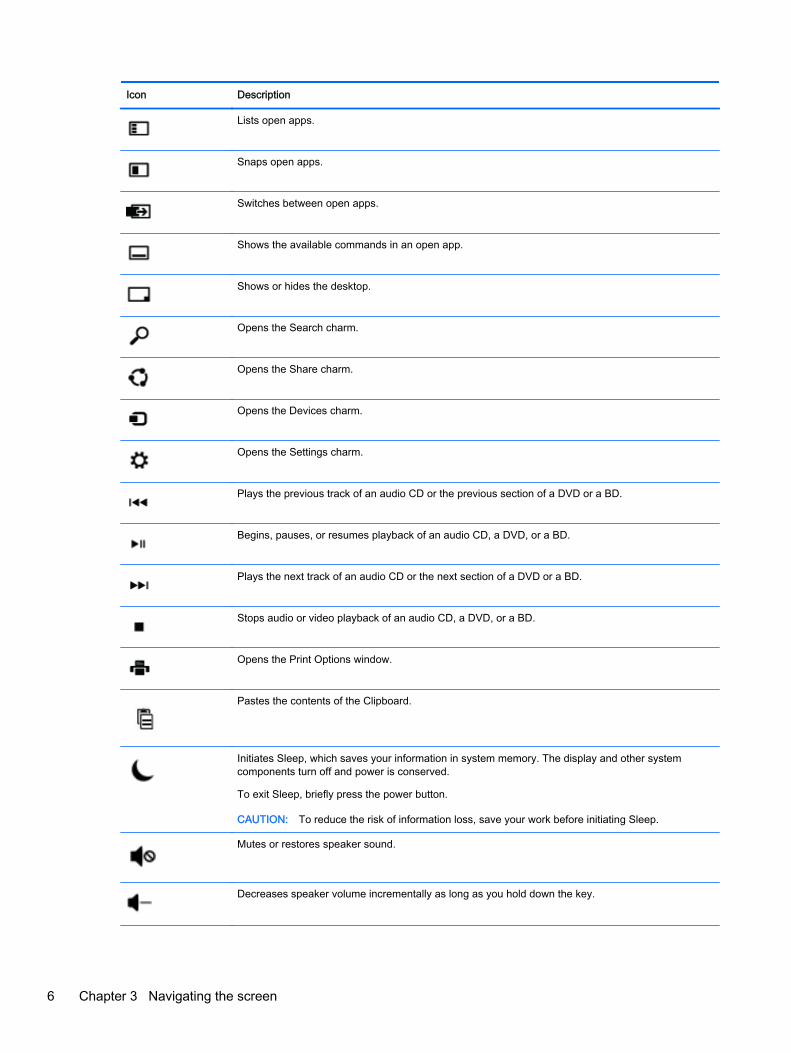
Icon Description
Lists open apps.
Snaps open apps.
Switches between open apps.
Shows the available commands in an open app.
Shows or hides the desktop.
Opens the Search charm.
Opens the Share charm.
Opens the Devices charm.
Opens the Settings charm.
Plays the previous track of an audio CD or the previous section of a DVD or a BD.
Begins, pauses, or resumes playback of an audio CD, a DVD, or a BD.
Plays the next track of an audio CD or the next section of a DVD or a BD.
Stops audio or video playback of an audio CD, a DVD, or a BD.
Opens the Print Options window.
Pastes the contents of the Clipboard.
Initiates Sleep, which saves your information in system memory. The display and other systemcomponents turn off and power is conserved.
To exit Sleep, briefly press the power button.
CAUTION: To reduce the risk of information loss, save your work before initiating Sleep.
Mutes or restores speaker sound.
Decreases speaker volume incrementally as long as you hold down the key.
6 Chapter 3 Navigating the screen
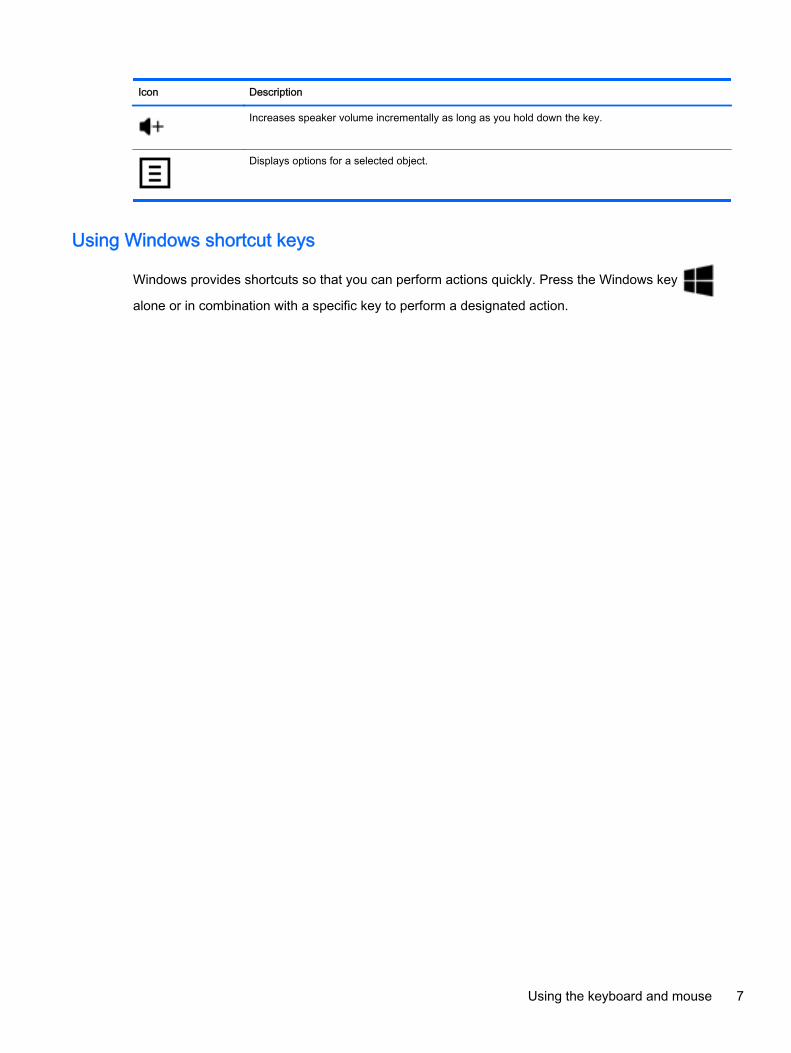
Icon Description
Increases speaker volume incrementally as long as you hold down the key.
Displays options for a selected object.
Using Windows shortcut keys
Windows provides shortcuts so that you can perform actions quickly. Press the Windows key
alone or in combination with a specific key to perform a designated action.
Using the keyboard and mouse 7
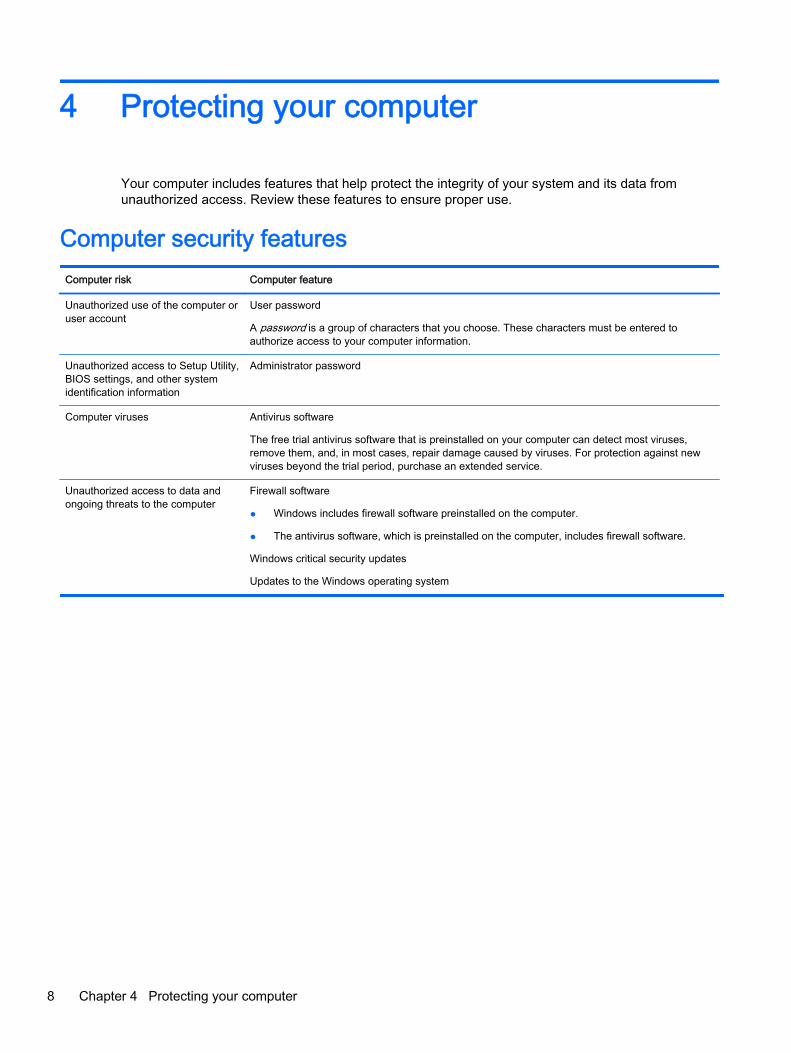
4 Protecting your computer
Your computer includes features that help protect the integrity of your system and its data fromunauthorized access. Review these features to ensure proper use.
Computer security featuresComputer risk Computer feature
Unauthorized use of the computer oruser account
User password
A password is a group of characters that you choose. These characters must be entered toauthorize access to your computer information.
Unauthorized access to Setup Utility,BIOS settings, and other systemidentification information
Administrator password
Computer viruses Antivirus software
The free trial antivirus software that is preinstalled on your computer can detect most viruses,remove them, and, in most cases, repair damage caused by viruses. For protection against newviruses beyond the trial period, purchase an extended service.
Unauthorized access to data andongoing threats to the computer
Firewall software
● Windows includes firewall software preinstalled on the computer.
● The antivirus software, which is preinstalled on the computer, includes firewall software.
Windows critical security updates
Updates to the Windows operating system
8 Chapter 4 Protecting your computer

5 Troubleshooting
If you have problems using any peripheral devices such as a monitor, or a printer, with yourcomputer, for more extensive troubleshooting refer to the documentation provided by the productmanufacturer. The following tables present some issues you might encounter while installing, startingup, or using your computer and suggest possible solutions.
For more information or for additional troubleshooting options, go to http://www.hp.com/go/contactHP,and then search for your computer model.
Computer does not startSymptom Possible solution
Error message: harddrive error
1. Restart the computer.
a. Press ctrl+alt+delete.
b. Select the Power icon in the lower-right corner of the screen, and then select Restart.
– or –
Press and hold the power button on the computer for 5 or more seconds to turn off the computer, and thenpress the button to turn on the computer.
2. If Windows opens, immediately back up all important data to a backup hard drive.
3. Contact support (regardless of whether Windows started or not).
Computer will notturn on or start
Be sure that the cables connecting the computer to the AC outlet are plugged in properly. The green power supplylight on the computer should be on. If it is not, try a different AC outlet. If you are still having trouble, contactsupport.
If the display (monitor) is blank, the monitor might not be properly connected. Connect the monitor to thecomputer, plug the power cord into an AC outlet, and then turn the monitor on. See Display (monitor)on page 10.
Test the AC outlet by plugging a different electrical device into it.
Computer is notresponding
1. Press ctrl+alt+delete.
2. Select Task Manager.
3. Select any programs that are not responding, and then click End task.
If closing programs does not resolve the problem, restart the computer.
1. Press ctrl+alt+delete.
2. Select the Power icon in the lower-right corner of the screen, and then select Restart.
– or –
Press and hold the power button on the computer for 5 or more seconds to turn off the computer, and then pressthe power button to turn on the computer.
Error message:Invalid system diskor Non-System diskor Disk error
When drive activity stops, remove the optical disc inside the optical drive, and then press the spacebar on thekeyboard.
Computer does not start 9

PowerSymptom Possible solution
Computer does notturn off when thepower button ispressed
Press and hold the power button until the computer turns off. Then turn the computer on again.
Computer shutsdown automatically
● The computer might be in an exceedingly hot environment. Let it cool down.
● Be sure that computer air vents are not blocked. See Cleaning your computer on page 21.
NOTE: If your computer has an internal fan, be sure that the internal fan is running.
Display (monitor)Symptom Possible solution
Screen is blank, andmonitor power light is notlit
Reconnect the power cable to the back of the monitor and to the AC outlet.
Press the power button on the monitor.
Screen is blank Press the space bar on the keyboard or move the mouse to redisplay the screen image.
Press the Sleep button (select models only), or esc, to resume from Sleep mode.
Press the power button to turn on the computer.
Inspect the monitor cable for bent pins.
● If any of the pins are bent, replace the monitor cable.
● If no pins are bent, reconnect the monitor cable to the computer.
Images on the screen aretoo large or too small, orthe images are fuzzy
Adjust the monitor resolution setting in Windows.
1. Right-click an empty area of the desktop, and then click Screen resolution.
2. Select a different resolution from the drop-down menu.
3. Click Apply, and then click Keep changes.
NOTE: In addition to the information listed here, also refer to the documentation that came with your monitor.
Keyboard and mouse (with cable)Symptom Possible solution
Keyboard commandsand typing are notrecognized by thecomputer
Use the mouse to turn off the computer. Disconnect and reconnect the keyboard to the back of yourcomputer, and then restart your computer.
Mouse (with cable) doesnot work or is notdetected
Disconnect and reconnect the mouse cable to your computer.
If the mouse is still not detected, turn off the computer, disconnect and reconnect the mouse cable, and thenrestart the computer.
10 Chapter 5 Troubleshooting
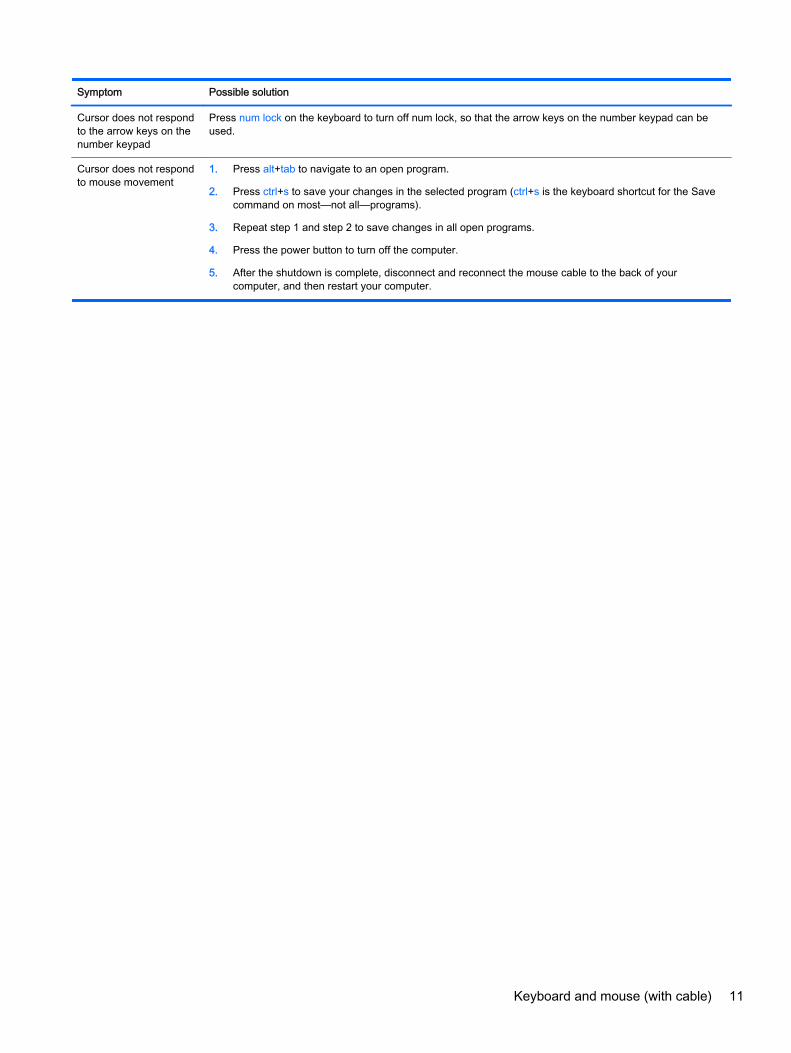
Symptom Possible solution
Cursor does not respondto the arrow keys on thenumber keypad
Press num lock on the keyboard to turn off num lock, so that the arrow keys on the number keypad can beused.
Cursor does not respondto mouse movement
1. Press alt+tab to navigate to an open program.
2. Press ctrl+s to save your changes in the selected program (ctrl+s is the keyboard shortcut for the Savecommand on most—not all—programs).
3. Repeat step 1 and step 2 to save changes in all open programs.
4. Press the power button to turn off the computer.
5. After the shutdown is complete, disconnect and reconnect the mouse cable to the back of yourcomputer, and then restart your computer.
Keyboard and mouse (with cable) 11
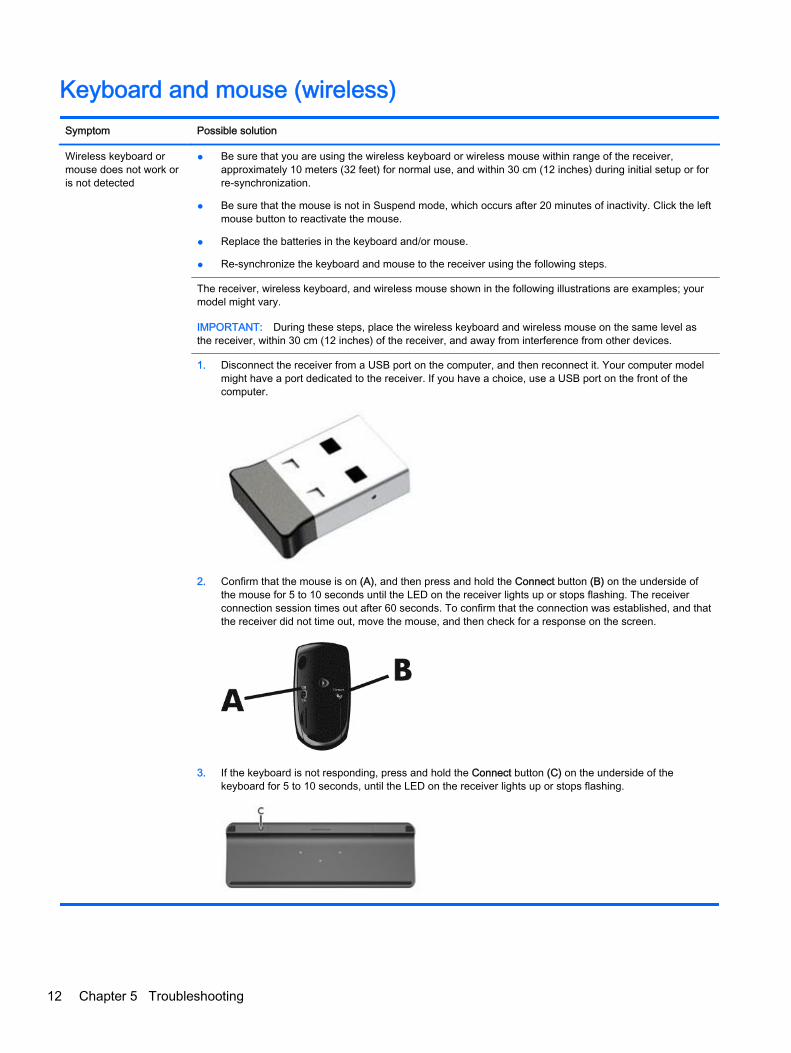
Keyboard and mouse (wireless)Symptom Possible solution
Wireless keyboard ormouse does not work oris not detected
● Be sure that you are using the wireless keyboard or wireless mouse within range of the receiver,approximately 10 meters (32 feet) for normal use, and within 30 cm (12 inches) during initial setup or forre-synchronization.
● Be sure that the mouse is not in Suspend mode, which occurs after 20 minutes of inactivity. Click the leftmouse button to reactivate the mouse.
● Replace the batteries in the keyboard and/or mouse.
● Re-synchronize the keyboard and mouse to the receiver using the following steps.
The receiver, wireless keyboard, and wireless mouse shown in the following illustrations are examples; yourmodel might vary.
IMPORTANT: During these steps, place the wireless keyboard and wireless mouse on the same level asthe receiver, within 30 cm (12 inches) of the receiver, and away from interference from other devices.
1. Disconnect the receiver from a USB port on the computer, and then reconnect it. Your computer modelmight have a port dedicated to the receiver. If you have a choice, use a USB port on the front of thecomputer.
2. Confirm that the mouse is on (A), and then press and hold the Connect button (B) on the underside ofthe mouse for 5 to 10 seconds until the LED on the receiver lights up or stops flashing. The receiverconnection session times out after 60 seconds. To confirm that the connection was established, and thatthe receiver did not time out, move the mouse, and then check for a response on the screen.
3. If the keyboard is not responding, press and hold the Connect button (C) on the underside of thekeyboard for 5 to 10 seconds, until the LED on the receiver lights up or stops flashing.
12 Chapter 5 Troubleshooting

Speakers and soundSymptom Possible solution
Volume is very low orunsatisfactory
Be sure that you connected the speakers to the audio-out (black) jack on the back of the computer.(Additional audio jacks are used for multiple-channel speakers.) Detached non-powered speakers (speakerswithout a separate power source, such as batteries or a power cord) do not produce satisfactory sound.Replace the non-powered speakers with powered speakers.
No sound is produced 1. From the Start screen, type control panel, select Control Panel, and then select System andSecurity.
2. Under Action Center, select Troubleshoot common computer problems, and then select Troubleshootaudio playback.
Be sure that you connected powered speakers and that they are turned on.
Turn off your computer, and then disconnect and reconnect the speakers. Be sure that the speakers areconnected to an audio jack, not a microphone or headphone jack.
To resume from Sleep mode, press the Sleep button (select models only), or press esc.
Unplug headphones if they are connected to your computer (or speaker system).
Internet accessSymptom Possible solution
Cannot connect to theInternet
1. From the Start screen, type control panel, and then select Control Panel.
2. Under Network and Internet, select Connect to the Internet.
Verify that you are using the proper cables for your Internet connection type. Your computer might have adial-up modem and an Ethernet network adapter (also called a network interface card, or NIC). A modemuses a standard telephone cable, whereas the network adapter uses a network cable, to connect to a localarea network (LAN). Do not connect a telephone cable to the network adapter, and do not connect a networkcable to a telephone line; doing so might damage the network adapter.
Run the wireless setup wizard.
1. From the Start screen, type control panel, select Control Panel, select Network and Internet, andthen select Network and Sharing Center.
2. In the Network and Sharing Center window, select Set up a new connection or network to open thewizard, and then follow the on-screen instructions.
If your system has an external antenna, try moving the antenna to a better position. If the antenna is internal,try moving the computer.
Try to connect again later, or contact your ISP for assistance.
Speakers and sound 13
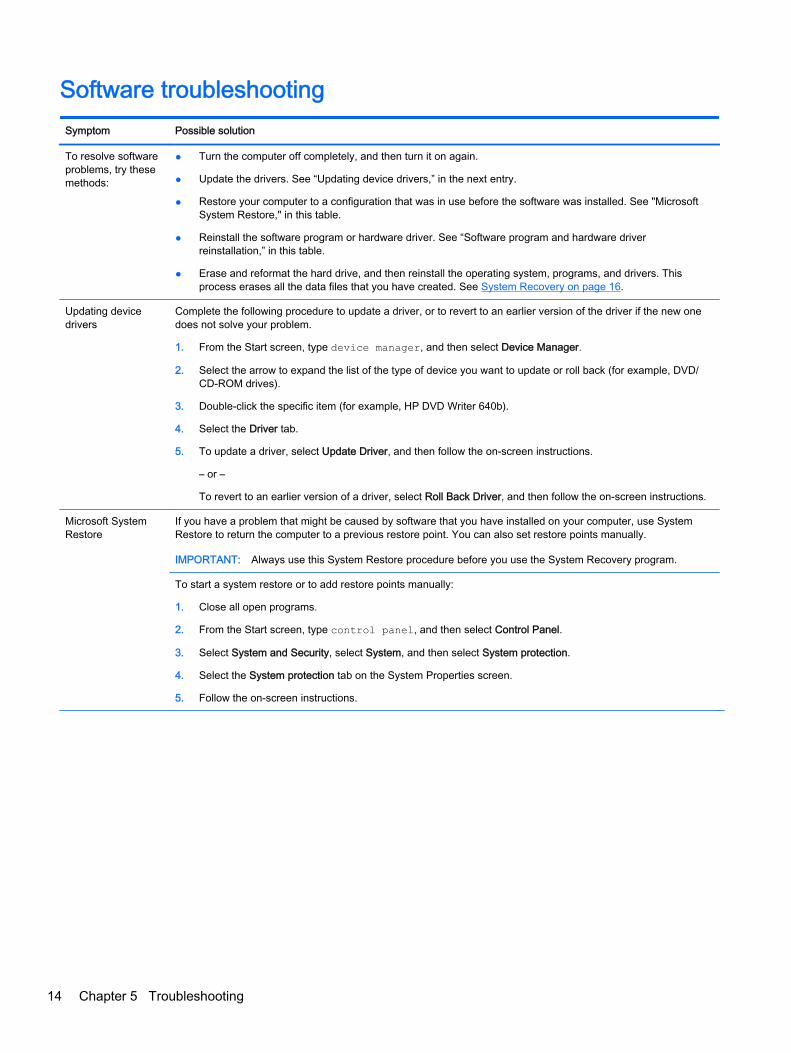
Software troubleshootingSymptom Possible solution
To resolve softwareproblems, try thesemethods:
● Turn the computer off completely, and then turn it on again.
● Update the drivers. See “Updating device drivers,” in the next entry.
● Restore your computer to a configuration that was in use before the software was installed. See "MicrosoftSystem Restore," in this table.
● Reinstall the software program or hardware driver. See “Software program and hardware driverreinstallation,” in this table.
● Erase and reformat the hard drive, and then reinstall the operating system, programs, and drivers. Thisprocess erases all the data files that you have created. See System Recovery on page 16.
Updating devicedrivers
Complete the following procedure to update a driver, or to revert to an earlier version of the driver if the new onedoes not solve your problem.
1. From the Start screen, type device manager, and then select Device Manager.
2. Select the arrow to expand the list of the type of device you want to update or roll back (for example, DVD/CD-ROM drives).
3. Double-click the specific item (for example, HP DVD Writer 640b).
4. Select the Driver tab.
5. To update a driver, select Update Driver, and then follow the on-screen instructions.
– or –
To revert to an earlier version of a driver, select Roll Back Driver, and then follow the on-screen instructions.
Microsoft SystemRestore
If you have a problem that might be caused by software that you have installed on your computer, use SystemRestore to return the computer to a previous restore point. You can also set restore points manually.
IMPORTANT: Always use this System Restore procedure before you use the System Recovery program.
To start a system restore or to add restore points manually:
1. Close all open programs.
2. From the Start screen, type control panel, and then select Control Panel.
3. Select System and Security, select System, and then select System protection.
4. Select the System protection tab on the System Properties screen.
5. Follow the on-screen instructions.
14 Chapter 5 Troubleshooting

Symptom Possible solution
Software programand hardware driverreinstallation
If any of your factory-installed software programs or hardware drivers are damaged, you can reinstall them byusing HP Recovery Manager (select models only).
NOTE: Do not use HP Recovery Manager to reinstall software programs provided on CDs or DVDs included inthe computer box. Reinstall these programs directly from the CDs or DVDs.
Before you uninstall a program, be sure that you have a way to reinstall it. Confirm that it is still available from theoriginal source (for example, discs or the Internet). Or, confirm that the program is in the list of programs you canreinstall from HP Recovery Manager (see the steps directly below).
NOTE: Some features might not be available on systems that are shipped without a version of MicrosoftWindows.
To check the list of installable programs or to reinstall a program in HP Recovery Manager:
1. From the Start screen, type recovery, and then select HP Recovery Manager. If prompted, click Yes toallow the program to continue.
2. Select Drivers and Applications Reinstall. A list of programs opens. Check to see if the program you want toreinstall is listed.
To uninstall a program:
1. Close all software programs and folders.
2. From the Start screen, type control panel, and then select Control Panel.
3. Under Programs, select Uninstall a program.
4. Select the program you want to remove, and then select Uninstall.
Software troubleshooting 15
6 System Recovery
System Recovery completely erases and reformats the hard drive, deleting all data files you havecreated, and then reinstalls the operating system, programs, and drivers that were installed at thefactory. Therefore, you must manually reinstall any software that was installed after the computer leftthe factory.
NOTE: Always use the System Restore procedure before you use the System Recovery program.See “Microsoft System Restore,” under Software troubleshooting on page 14.
Some features might not be available on systems that are shipped without a version of MicrosoftWindows.
Choosing a system recovery methodYou must choose one of the following methods to perform a system recovery:
● Recovery Image—Run System Recovery from a recovery image stored on your hard drive. Therecovery image is a file that contains a copy of the original factory-shipped software. To performa System Recovery from a recovery image, see System recovery from the Windows Start screenon page 16
NOTE: The recovery image uses a portion of the hard drive that cannot be used for datastorage.
● Recovery Media—Run System Recovery from recovery media that you create from files storedon your hard drive or purchased separately. To create recovery media, see Creating recoverymedia on page 18.
System recovery optionsYou should attempt a system recovery in the following order:
1. Through the hard drive, from the Windows Start screen.
2. Through the hard drive, by pressing f11 system startup.
3. Through recovery media that you create.
4. Through recovery discs purchased from HP. To purchase recovery discs, go tohttp://www.hp.com/go/contactHP.
System recovery from the Windows Start screenCAUTION: System Recovery deletes all data and programs you have created or installed. Back upany important data to a removable disc or USB flash drive.
If the computer is working and Windows is responding, use these steps to perform a system recovery:
1. Turn off the computer.
2. Disconnect all peripheral devices from the computer except the monitor, keyboard, and mouse.
3. Turn on the computer.
16 Chapter 6 System Recovery

4. From the Start screen, type recovery, and then select HP Recovery Manager. If prompted,click Yes to allow the program to continue.
5. Select Windows Recovery Environment.
6. Follow the on-screen instructions.
NOTE: If your system does not detect a recovery partition, it prompts you to insert recoverymedia. Insert the disc or USB flash drive, select Yes, and then click Next to restart the computerand run HP Recovery Manager from the recovery disc or USB flash drive. If using discs, insertthe next system recovery disc when prompted.
7. When the recovery is complete, turn off the computer, reconnect all peripheral devices, and turnthe computer back on.
System recovery at system startupCAUTION: System Recovery deletes all data and programs you have created or installed. Back upany important data to a removable disc or USB flash drive.
If Windows is not responding, but the computer is working, follow these steps to perform a systemrecovery:
1. Turn off the computer. If necessary, press and hold the power button until the computer turns off.
2. Disconnect all peripheral devices from the computer except the monitor, keyboard, and mouse.
3. Press the power button to turn on the computer.
4. As soon as you see the initial company logo screen appear, repeatedly press f11 until theWindows is Loading Files message appears on the screen.
5. Select Windows Recovery Environment.
6. Follow the on-screen instructions.
7. When the recovery is complete, turn off the computer, reconnect all peripheral devices, and thenturn the computer back on.
System recovery from recovery mediaCAUTION: System Recovery deletes all data and programs you have created or installed. Back upany important data to a removable disc or USB flash drive.
To create recovery media, see Creating recovery media on page 18.
To perform a system recovery using recovery media:
1. If the computer is working, create a backup DVD or backup USB flash drive containing all thedata files you want to save, and then remove the backup media from the computer.
2. If using recovery DVDs, insert recovery disc #1 into the DVD drive tray, and then close the tray.If you are using a recovery USB flash drive, insert the flash drive into a USB port.
3. If the computer works, from the Start screen, move your cursor to the lower-right corner of thescreen to display the charms toolbar, select Settings, select the Power icon, and then selectShut down. Or, if the computer is not responding, press and hold the power button forapproximately 5 seconds, or until the computer turns off.
4. Disconnect all peripheral devices from the computer except the monitor, keyboard, and mouse.
System recovery options 17
5. Press the power button to turn on the computer. If you are using a recovery DVD, the computerautomatically runs HP Recovery Manager from the disc. Skip to step 7.
6. If you are running System Recovery from a USB flash drive, press esc as the computer ispowering on to bring up the boot menu. Use the arrow keys to select the USB device, and thenpress enter to start from that device.
7. If you are prompted to choose between running System Recovery from media or from the harddrive, select media, and then click Next.
8. Select Factory Reset.
9. Follow the on-screen instructions.
Recovery mediaRecovery media can be created on either blank DVDs or a USB flash drive (one or the other, but notboth). Create recovery media from the recovery image stored on your hard drive. This image containsthe operating system and software program files that were originally installed on your computer at thefactory. You can create only one set of recovery media for your computer, and the media can be usedonly with this computer. Store the recovery media in a safe place.
NOTE: Some features might not be available on systems that are shipped without a version ofMicrosoft Windows.
Choosing recovery media● To create recovery discs, your computer must have a DVD writer, and you must use only high-
quality blank DVD+R or DVD-R discs.
NOTE: You cannot use CDs or DVD+RW, DVD-RW, DVD+RW DL, DVD-RW DL, DVD+R DL,or DVD-R DL discs to create recovery discs.
● If you are creating recovery discs, be sure to use high-quality discs to create your set of recoverydiscs. It is normal for discs to be rejected if they are not defect-free. You will be prompted toinsert a new blank disc to try again.
● The number of discs in the recovery-disc set depends on your computer model (typically one tothree DVDs). The Recovery Disc Creator program will tell you the specific number of blank discsneeded to make the set.
● You may choose to create a recovery USB flash drive instead, using a high-quality blank USBflash drive. If you are using a USB flash drive, the program will tell you the size of the driverequired to store all the data (minimum of 8 GB).
NOTE: The process of creating recovery media takes some time to verify that the informationwritten on the media is correct. You can quit the process at any time. The next time you run theprogram, it will resume where it left off.
Creating recovery mediaTo create recovery discs:
1. Close all open programs.
2. From the Start screen, type recovery, and then select HP Recovery Manager. If prompted,click Yes to allow the program to continue.
18 Chapter 6 System Recovery
3. Select Recovery Media Creation, select Create recovery media using blank DVD(s), and thenselect Next.
4. Follow the on-screen instructions. Label each disc as you make it (for example, Recovery 1,Recovery 2).
To create a recovery USB flash drive:
1. Close all open programs.
2. Connect the USB flash drive to a USB port on the computer.
3. From the Start screen, type recovery, and then select HP Recovery Manager. If prompted,click Yes to allow the program to continue.
4. Select Recovery Media Creation, select Create recovery media with a USB flash drive, and thenselect Next.
5. Select the USB flash drive from the list of media. The program lets you know how much storageis required to create the recovery drive. If the USB flash drive does not have enough storagecapacity (8 GB is the minimum), it is grayed out on the screen and you cannot continue. ClickNext.
NOTE: Recovery Media Creation formats the flash drive and deletes all files on it.
6. Follow the on-screen instructions. Be sure to label the USB flash drive and store it in a secureplace.
NOTE: Do not use media cards for creating recovery media. The system may not be able tostart from a media card and you may not be able to run System Recovery.
Recovery media 19
7 Maintenance
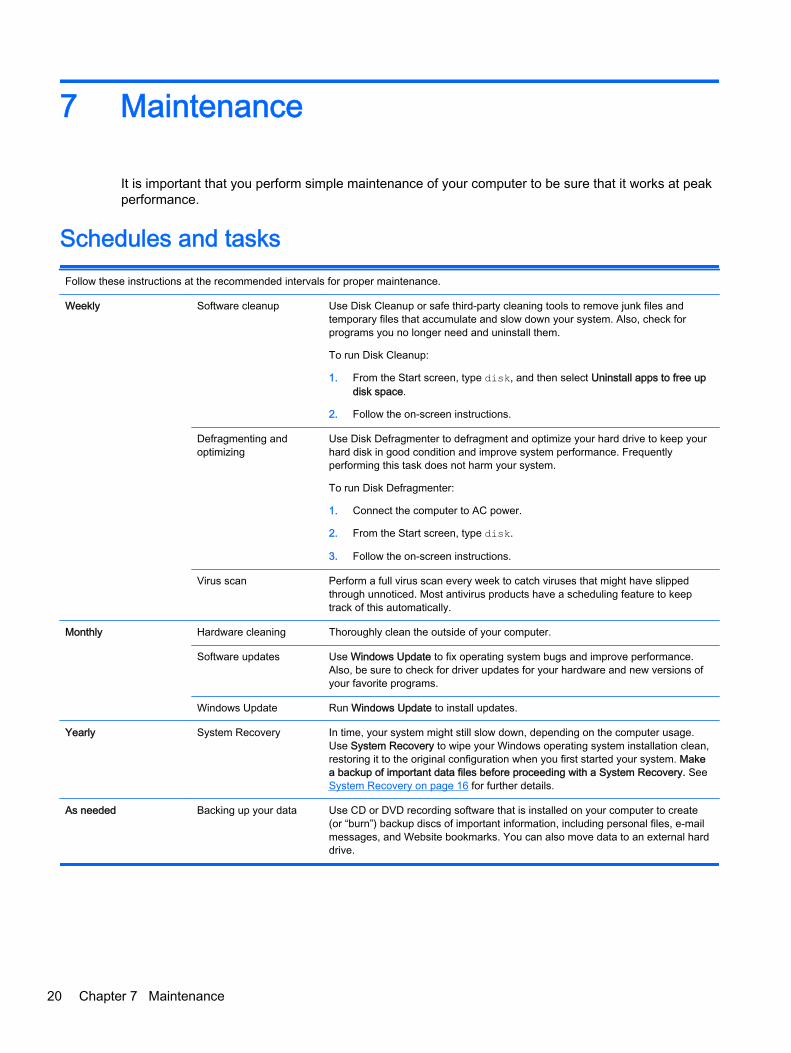
It is important that you perform simple maintenance of your computer to be sure that it works at peakperformance.
Schedules and tasksFollow these instructions at the recommended intervals for proper maintenance.
Weekly Software cleanup Use Disk Cleanup or safe third-party cleaning tools to remove junk files andtemporary files that accumulate and slow down your system. Also, check forprograms you no longer need and uninstall them.
To run Disk Cleanup:
1. From the Start screen, type disk, and then select Uninstall apps to free updisk space.
2. Follow the on-screen instructions.
Defragmenting andoptimizing
Use Disk Defragmenter to defragment and optimize your hard drive to keep yourhard disk in good condition and improve system performance. Frequentlyperforming this task does not harm your system.
To run Disk Defragmenter:
1. Connect the computer to AC power.
2. From the Start screen, type disk.
3. Follow the on-screen instructions.
Virus scan Perform a full virus scan every week to catch viruses that might have slippedthrough unnoticed. Most antivirus products have a scheduling feature to keeptrack of this automatically.
Monthly Hardware cleaning Thoroughly clean the outside of your computer.
Software updates Use Windows Update to fix operating system bugs and improve performance.Also, be sure to check for driver updates for your hardware and new versions ofyour favorite programs.
Windows Update Run Windows Update to install updates.
Yearly System Recovery In time, your system might still slow down, depending on the computer usage.Use System Recovery to wipe your Windows operating system installation clean,restoring it to the original configuration when you first started your system. Makea backup of important data files before proceeding with a System Recovery. SeeSystem Recovery on page 16 for further details.
As needed Backing up your data Use CD or DVD recording software that is installed on your computer to create(or “burn”) backup discs of important information, including personal files, e-mailmessages, and Website bookmarks. You can also move data to an external harddrive.
20 Chapter 7 Maintenance

Cleaning your computerUse the following products to safely clean your computer:
● Dimethyl benzyl ammonium chloride 0.3 percent maximum concentration (for example,disposable wipes, which come in a variety of brands)
● Alcohol-free glass-cleaning fluid
● Water with mild soap solution
● Dry microfiber cleaning cloth or a chamois (static-free cloth without oil)
● Static-free cloth wipes
CAUTION: Avoid strong cleaning solvents that can permanently damage your computer. If you arenot sure that a cleaning product is safe for your computer, check the product contents to make surethat ingredients such as alcohol, acetone, ammonium chloride, methylene chloride, and hydrocarbonsare not included in the product.
Fibrous materials, such as paper towels, can scratch the computer. Over time, dirt particles andcleaning agents can get trapped in the scratches.
Cleaning proceduresFollow the procedures in this section to safely clean your computer.
WARNING! To prevent electric shock or damage to components, do not attempt to clean yourcomputer while it is turned on.
● Turn off the computer.
● Disconnect AC power.
● Disconnect all powered external devices.
CAUTION: To prevent damage to internal components, do not spray cleaning agents or liquidsdirectly on any computer surface. Liquids dripped on the surface can permanently damage internalcomponents.
Cleaning the display
CAUTION: Do not spray or place the cleaner directly on the screen.
Gently wipe the sides and the surface of the display using a soft, lint-free cloth moistened with analcohol-free glass cleaner.
Cleaning the computer ventsAir vents keep the computer cool. Keep these vents clean by using a small, battery-powered vacuumcleaner. (A battery-powered vacuum cleaner eliminates the risk of electric shock.)
1. Vacuum the vents on the computer case.
2. Remove any debris that has accumulated in and around the computer connectors (for example,the Ethernet and USB connectors).
Cleaning your computer 21

Cleaning the keyboard or mouse
WARNING! To reduce the risk of electric shock or damage to internal components, do not use avacuum cleaner attachment to clean the keyboard. A vacuum cleaner can deposit household debrison the keyboard surface.
CAUTION: To prevent damage to internal components, do not allow liquids to drip between thekeys.
● To clean the keyboard or mouse, use a soft microfiber cloth or a chamois moistened with one ofthe cleaning solutions listed previously or use an acceptable disposable wipe.
● To prevent keys from sticking and to remove dust, lint, and particles from the keyboard, use acan of compressed air with a straw extension.
If you have a roller-ball mouse, clean the ball and rollers inside.
1. Turn the mouse upside down, and rotate the ball-cover ring counterclockwise to remove the ringand release the roller ball.
2. Rinse the roller ball with soap and warm water.
3. Clean the rollers inside the mouse with a cotton swab dampened with isopropyl (rubbing)alcohol.
4. After the roller ball and rollers are completely dry, replace the ball and ball-cover ring.
22 Chapter 7 Maintenance

8 Using HP PC Hardware Diagnostics(UEFI)
HP PC Hardware Diagnostics is a Unified Extensible Firmware Interface (UEFI) that allows you to rundiagnostic tests to determine whether the computer hardware is functioning properly. The tool runsoutside the operating system so that it can isolate hardware failures from issues that are caused bythe operating system or other software components.
To start HP PC Hardware Diagnostics UEFI:
1. Turn on or restart the computer, quickly press esc, and then press f2.
The BIOS searches three places for the diagnostic tools, in the following order:
a. Connected USB drive
NOTE: To download the HP PC Hardware Diagnostics (UEFI) tool to a USB drive, seeDownloading HP PC Hardware Diagnostics (UEFI) to a USB device on page 23.
b. Hard drive
c. BIOS
2. When the diagnostic tool opens, use the keyboard arrow keys to select the type of diagnostictest you want to run, and then follow the on-screen instructions.
NOTE: If you need to stop a diagnostic test, press esc.
Downloading HP PC Hardware Diagnostics (UEFI) to a USBdevice
NOTE: Instructions for downloading HP PC Hardware Diagnostics (UEFI) are provided in Englishonly.
1. Go to http://www.hp.com.
2. Point to Support, located at the top of the page, and then click Download Drivers.
3. In the text box, enter the product name, and then click Go.
– or –
Click Find Now to let HP automatically detect your product.
4. Select your computer model, and then select your operating system.
5. In the Diagnostic section, click HP UEFI Support Environment.
– or –
Click Download, and then select Run.
Downloading HP PC Hardware Diagnostics (UEFI) to a USB device 23

9 Specifications
Operating specificationsNOTE: To determine the exact electrical ratings of your computer, refer to the computer ratingslabel, located on the outside of the computer.
Factor Metric U.S.
Operating temperature 5°C to 35°C 41°F to 95°F
Storage temperature -20°C to 60°C –22°F to 149°F
Operating humidity 15% to 80% @ 26°C 15% to 80% @ 78°F
Operating altitude 0 m to 2000 m 0 ft to 6561 ft
Storage altitude 0 m to 4572 m 0 ft to 15,000 ft
24 Chapter 9 Specifications
10 Support information
How to get helpHP support can help you get the most from your computer. You will find what you need with toolslocated on your computer and with information available on the Web, by phone, or through your localretailer.
Before contacting HP support, it’s important to have the following information handy:
● Model number
● Product number
● Serial number
● Software build number
● Operating system
● Purchase date
Please take a moment to write down your product information for future reference.
The first four items on the list (model number, product number, serial number, and software buildnumber) can be viewed by using HP Support Information. From the Start screen, type support, andthen select HP Support Information.
Don’t forget to register at http://www.hp.com/apac/register.
Where to get help● Use Windows Help and Support for help with hardware and software questions. From the Start
screen, type help, and then select Help and Support.
● Use HP Support Assistant. From the Start screen, type support, and then select HP SupportAssistant. HP Support Assistant provides useful troubleshooting and diagnostics information andincludes the following:
◦ Online chat with an HP technician
◦ Support telephone numbers
◦ HP service center locations
● For help online, go to http://www.hp.com/go/contactHP.
Telephone assistance to get you up and running is covered for thirty (30) days from the time youpurchase your computer. After thirty (30) days, there may be a charge, but the helpful support is stillavailable.
How to get help 25
Customer support for repairsIf your computer needs to be repaired, or to have parts replaced, you have two choices:
● You can easily replace many of your computer parts that are considered consumer replaceable.This is the fastest method of repair, because many times we can send the part directly to yourhome or business in a few days. (This option may not be available in all countries or regions.)
● If a repair is necessary, HP support will make arrangements to repair your computer.
These services are covered during the warranty period.
There are some limitations and exclusions to the warranty (as well as some important details), whichare described in the HP Worldwide Limited Warranty and Technical Support guide.
Before upgrading your hardwareIf you intend to upgrade any of your hardware, do it only after you set up your new computer. Forinstructions on setting up your computer, see the Setup Instructions poster or Setting up yourcomputer on page 3. If you have any problems setting up your system and turning it on, immediatelycontact HP support using the procedures given earlier in this chapter. This must be done first beforeattempting to upgrade your system.
By breaking the security seal on the back of the computer, you confirm that the computer wasworking properly before you attempted to upgrade your system. After the security seal has beenbroken, your computer is then, to the extent allowed by local law, covered under the terms andconditions listed in the HP Worldwide Limited Warranty and Technical Support guide.
26 Chapter 10 Support information

Index
Aaction keys 5
Ccaring for your computer 21cleaning your computer 21computer
security features 8troubleshooting 9
Ffn key 5
HHelp and Support 1, 25hot keys 5HP PC Hardware Diagnostics
(UEFI)downloading 23using 23
Iinternet, connecting 4
Mmaintenance, schedules and
tasks 20
Ooperating specifications 24
Rrecovery media
choosing 18creating 18
Ssecurity features 8support 25system recovery
methods 16options 16
Ttroubleshooting
computer does not start 9display (monitor) 10Internet access 13keyboard and mouse
(wireless) 12keyboard and mouse (with
cable) 10power 10software 14speakers and sound 13
Index 27