How to Use This Chapter - Virginia Department of ... · How to Use This Chapter ... lives or...
107
How to Use This Chapter The first three chapters of the Toolbox focus on how to begin organizing and planning for your trail. Now that you’ve decided upon the general location for your trail, gathered public consensus, and have studies and plans in progress, it is time to move forward with implementation. This chapter discusses how to take your trail from a concept on paper to a built product. The topics in this chapter will familiarize you with common trail implementation practices, including land acquisition, liability issues, hiring design professionals, and trail types and construction methods. This chapter is not a construction manual but serves as a clearinghouse for information that you may refer to as your project moves forward. The overarching goal is to provide you and your organization with the basic knowledge to converse with regulatory officials, design and construction consultants, property owners, public stakeholders, volunteers, and other entities in order to encourage a smooth and efficient trail-building experience. Secondary to this goal is understanding, and helping others understand, that trail and path projects should be approached differently than standard road or parking lot projects. Trails and paths require a certain flexibility regarding design, permiing, and construction given their general intent to bring people closer to nature. Creative methods of applying standard procedures for issues such as erosion and sediment control and stormwater management should be reviewed and promoted in order to incorporate construction practices that limit land disturbance and protect the natural and cultural environment. As you will learn, trail building encompasses a wide variety of processes, terms, and information. While the term “trail” generally encompasses all routes used primarily for recreation, there are many subtypes that require further explanation. We will refer to “trails” as those routes that utilize a natural surface or hardened natural surface. “Paths” will be considered routes that are built with imported hard surfaces such as asphalt and crushed stone. An overview discussion of bike lanes and motorized trails is also provided for reference and comparison. Of course, there will be cross-over with any type of terminology applied to trails, paths, and other methods of travel. For example, equestrians use both backcountry earthen trails and paths that are surfaced with crushed stone. However, in order to facilitate discussion of overarching trail design topics, we will use the terms as described above and denote exceptions wherever possible. Refer to Appendix 4-A for a matrix containing definitions for trails, paths, and other related travelways. Given the broad range of topics within this chapter and the inherent nature of the clearinghouse format, the reader should note that the information provided serves as guidelines for trail building, not strict standards. The Toolbox is meant to be a user- guide, not a rule book. This is due to the wide array of people who will be using this document; the fact that regulatory and review practices vary by locality and agency; and the knowledge that there are Virginia Department of Conservation & Recreation Greenways and Trails Toolbox • Introduction Land Acquisition & Trail Development • Chapter 4 - Path at Lord Fairfax Community College. Courtesy of LPDA, Inc. Equestrian trail in Virginia. Courtesy of Virginia Horse Council.
Transcript of How to Use This Chapter - Virginia Department of ... · How to Use This Chapter ... lives or...

How to Use This ChapterThe first three chapters of the Toolbox focus on how to begin organizing and planning for your trail. Now that you’ve decided upon the general location for your trail, gathered public consensus, and have studies and plans in progress, it is time to move forward with implementation. This chapter discusses how to take your trail from a concept on paper to a built product. The topics in this chapter will familiarize you with common trail implementation practices, including land acquisition, liability issues, hiring design professionals, and trail types and construction methods. This chapter is not a construction manual but serves as a clearinghouse for information that you may refer to as your project moves forward. The overarching goal is to provide you and your organization with the basic knowledge to converse with regulatory officials, design and construction consultants, property owners, public stakeholders, volunteers, and other entities in order to encourage a smooth and efficient trail-building experience.
Secondary to this goal is understanding, and helping others understand, that trail and path projects should be approached differently than standard road or parking lot projects. Trails and paths require a certain flexibility regarding design, permitting, and construction given their general intent to bring people closer to nature. Creative methods of applying standard procedures for issues such as erosion and sediment control and stormwater management should be reviewed and promoted
in order to incorporate construction practices that limit land disturbance and protect the natural and cultural environment.
As you will learn, trail building encompasses a wide variety of processes, terms, and information. While the term “trail” generally encompasses all routes used primarily for recreation, there are many subtypes that require further explanation. We will refer to “trails” as those routes that utilize a natural surface or hardened natural surface. “Paths” will be considered routes that are built with imported hard surfaces such as asphalt and crushed stone. An overview discussion of bike lanes and motorized trails is also provided for reference and comparison. Of course, there will be cross-over with any type of terminology applied to trails, paths, and other methods of travel. For example, equestrians use both backcountry earthen trails and paths that are surfaced with crushed stone. However, in order to facilitate discussion of overarching trail design topics, we will use the terms as described above and denote exceptions wherever possible. Refer to Appendix 4-A for a matrix containing definitions for trails, paths, and other related travelways.Given the broad range of topics within this chapter and the inherent nature of the clearinghouse format, the reader should note that the information provided serves as guidelines for trail building, not strict standards. The Toolbox is meant to be a user-guide, not a rule book. This is due to the wide array of people who will be using this document; the fact that regulatory and review practices vary by locality and agency; and the knowledge that there are
Virginia Department of Conservation & RecreationGreenways and Trails Toolbox • Introduction
Land Acquisition & Trail Development • Chapter 4 -�
Path at Lord Fairfax Community College. Courtesy of LPDA, Inc.
Equestrian trail in Virginia. Courtesy of Virginia Horse Council.

multiple ways to achieve a successful trail project. The guidance offered within this chapter is based on research, professional experience, and practical applications yet the reader must be able to conform the information to their specific needs.
Land AcquisitionOne of the most challenging phases of a trail project is the acquisition of rights-of-way required for building the trail. Your master plan or feasibility study provided you with a desired route for your trail or path but the best route likely includes property that you do not own. Trail projects can engender strong reactions from opponents who cite increased crime, reduced privacy, and violation of private property rights as reasons to deter projects. These reactions pose bigger issues when the opponent owns land upon which the trail is proposed to be built. Trail supporters should prepare themselves for landowners who will not provide deeds or easements
due to concerns for their safety or property rights. A greater rate of success, however, is achieved when landowners are involved in the trail development process from its inception rather than approached after all studies and plans are completed.
The goal of land acquisition is to obtain the legal right to build your trail across property that you do not own outright. All acquisition methods require patience, good negotiation skills, a positive attitude, and the ability to work with landowners, localities, legal professionals, and regulatory agencies. Flexibility is also key to the process since the desired method of acquisition may need to be reworked depending on the willingness of the individual property owner. For example, your original goal of outright purchase may be revised into easement acquisition if the property owner desires to retain ownership of their parcel.This section of the Toolbox includes discussions about acquisition methods, how to negotiate with landowners, and regulatory requirements.
Acquisition of Rights-of-WayThere are three general methods of acquiring land for trails: donation, purchase, and user agreements. Lengthier trail projects may require a combination of these methods in order to secure legal rights to the entire trail right-of-way. Each method requires legal documentation in the form of written documents and surveyed plats even if no money changes hands. Legal documentation will protect the trail right-of-way for future users even if the property changes hands or the initial trail-building entity is dissolved; it is also often required by various funding agencies.
Virginia Department of Conservation & RecreationGreenways and Trails Toolbox • Land Acquisition
Land Acquisition & Trail Development • Chapter 4 -�
TOOLBOX TIP:Below are websites and books most often used by trail and path managers and referenced throughout the Toolbox. Use these resources as a baseline of information as you begin researching trail and path topics.American Trails
http://www.americantrails.org/Flink, Charles A., Kristine Olka, and Robert M. Searns. Trails for the Twenty-First Century: Planning, Design, and Management Manual for Multi-Use Trails. 2nd ed. Washington: Island Press, 2001.Available for purchase at any major retailer International Mountain Biking Association
www.imba.comNational Off-Highway Vehicle Conservancy Council
http://www.nohvcc.org/Rails-To-Trails Conservancy
http://www.railstotrails.org/index.htmlU.S. Federal Highway Administration Recreational Trails Program Publications
http://www.fhwa.dot.gov/environment/rectrails/publications.htm
•
•
•
•
•
Community meeting for trail project. Courtesy of LPDA, Inc.

Consider contacting organizations such as the Trust for Public Land who specialize in assisting local governments and non-profits with acquiring land for recreation purposes.
DonationLand donation comes in many forms. Some landowners may simply agree to give their piece of property to your organization because they want to promote trails, because they will see a reduction in property taxes, or they have a large enough parcel where donating a piece will not impact their daily lives or financial situation. Land donation is the best-case scenario for trail builders because it is the least expensive method of acquiring right-of-way. Costs for donation typically involve legal fees for preparing the documentation and surveying fees for verifying the parcel boundaries and preparing a plat map. It is always a good practice to investigate the possibility of donations before offering to purchase or obtain an easement.
PurchasePurchasing land for trail projects involves offering a landowner money for clear title to the property in question. However, the timing and method of delivery can vary depending on the type of sale.
Fee-Simple PurchaseFee-simple purchases involve paying a set fee to a landowner in exchange for the title and full rights of ownership for a piece of land. Unless property restrictions—such as conservation easements or covenants—convey with the sale, your organization is free to do what they choose with the property within standard legal confines.
Bargain SaleBargain sales take place when a landowner sells their property at a below-market rate. Bargain sales save money for trail builders but may also provide sellers with charitable deductions.
Right of First RefusalRight of First Refusal is a long-term sale method where the trail builder pays a nominal fee to the property owner in exchange for the first chance to buy the land should it come up for sale in the future. The trail builder is essentially paying for the chance to buy the property before someone else can purchase it. This is typically done if the trail builder doesn’t have all the funding in place at present to build the entire length of planned trail or feels that they may build a trail or path in a specific location in the future.
Lease PurchaseThrough lease purchases, or land leases, land is acquired through a long-term lease that conveys ownership to the trail builder at the end of the lease term. Lease terms range from 5 to 99 years although perpetual leases are preferred. The owner may also choose to donate the land at the end of the lease term. Leases are beneficial to both parties because they allow the owner to continue receiving income from the property while the trail builder is able to use the right-of-way without having to provide the full purchase price up front. Leases are useful where the property owner wishes to allow access to their land yet also desires a monetary benefit from that access. Leases can be a negotiating tool when full purchase and easements are not valid options.
EasementsAn easement is a legally-binding agreement between the property owner and trail builder where the property owner grants the right to build a trail and allow public access but still retains ownership of the land. The easement may have a time limitation or may be granted in perpetuity. Easements may be donated, sold, or traded but, because full ownership and title are not purchased, the easement price is less than the full property value.
Virginia Department of Conservation & RecreationGreenways and Trails Toolbox • Land Acquisition
Land Acquisition & Trail Development • Chapter 4 -�
TOOLBOX TIP:If you are using donated or bargain-sale land (see below) as match for a grant, do not conduct any land transfer prior to the grant’s official start date. If you are completing a grant application, a letter of commitment signed by the landowner should be sufficient. Check with the grant agency about specific requirements.

Easements are useful where private landowners want to allow access to their land but do not want to give up full ownership. Easements are common where trail builders want to cross land owned by public entities, private corporations, and individuals who do not actively use the land along the proposed trail route. Refer to Appendix 4-B for sample easements.
Working With RailroadsIn some cases, your trail might be routed over abandoned railroad right-of-way or even within an active rail corridor. While common acquisition procedures still apply, an added layer of negotiation and administration is required when dealing with railroads due to legal and liability concerns. While acquiring right-of-way through railroads can go smoothly, it may take longer and therefore discussions should begin as soon as possible. The first step in acquiring abandoned rail right-of-way is determining the correct person with whom to begin discussions. It may take a number of phone calls to find the person who deals with your particular concern and can take appropriate action on behalf of their company.
A caveat to remember about acquiring or working with railroad property is that some parcels may require environmental remediation due to the presence of diesel or oil spills, underground storage tanks, or other contaminants. Environmental assessments, discussed later in this section, should be performed in order to determine whether mitigation activities are necessary. In addition, the railroad company may require some form of assessment and clean-up as part of Virginia’s Voluntary Remediation Program in order to receive liability waivers issued upon completion of mitigation efforts.
RailbankingThe Rails-to-Trails Conservancy defines railbanking as a method by which corridors that would otherwise be abandoned can be preserved for future rail use through interim conversion to a trail. Established in 1983 as an amendment to Section 8(d) of the National Trails System Act, the railbanking statute allows a railroad to remove all of its equipment, with the exception of bridges, tunnels and culverts, from a corridor, and to turn the corridor over to any qualified private organization or public agency that has agreed to maintain it for future rail use. In essence, a railroad may legally transfer all forms of its ownership, including easements, to a trail group. The railroad may, however, choose to reclaim the property if it chooses to use the corridor again for rail service.
Rails with TrailsIf you are working toward obtaining easements within active rail corridors, the State of Virginia offers
Virginia Department of Conservation & RecreationGreenways and Trails Toolbox • Land Acquisition
Land Acquisition & Trail Development • Chapter 4 -4
Resources:
Acquiring Rail Corridors: A How-To Manualhttp://www.railstotrails.org/
resources/documents/resource_docs/acquiringrailcorridors.pdfFlink, Charles A., Kristine Olka, and Robert M. Searns. Trails for the Twenty-First Century: Planning, Design, and Management Manual for Multi-Use Trails. 2nd ed. Washington: Island Press, 2001. Land Trust Alliance
http://www.landtrustalliance.org/National Trails Training Partnership, Planning Trails & Greenways: Legal Agreements For Trails
http://www.americantrails.org/resources/land/easements.htmlRails-to-Trails Conservancy Acquisition Overview
http://www.railstotrails.org/ourWork/trailBuilding/toolbox/informationSummaries/acquisition_overview.html
•
•
•
•
TOOLBOX TIP:Norfolk Southern and CSX are two major railroad companies within Virginia who own abandoned rail corridor. Contact them at:Norfolk Southern Real Estate Division: Property Sales (540) 981-5992
http://realestate.nscorp.com/nscrealestate/RealEstate/Real_Estate_Services/Property_Sales/CSX Property and Projects Division - Highway Projects Specialist at (904) 633-4597
http://www.csx.com/index.cfm/community/property-and-projects/
•
•

a publication entitled “Rails with Trails/Pedestrian Crossing Project Initiation, Coordination, and Review” which outlines the process citizens should follow to begin discussions about rails-with-trails. In order to streamline the process, Class 1 (including CSX and Norfolk-Southern) and Shortline (including the Buckingham Branch and Commonwealth Railway) railroads operating in Virginia request that proposals for rails-with-trails be coordinated and submitted for review through the Virginia Department of Conservation and Recreation (DCR). DCR is also the agency responsible for initial review of public requests for rail-with-trail projects. The process for submitting a trail proposal is outlined in Appendix 4-C and the full report with design guidance is available on-line.
Acquisition ProceduresAcquiring legal rights to the land along your trail route is necessary for a number of reasons. Many funding sources require trail builders to prove that they have clear and legal access to a right-of-way in order to avoid lawsuits or authorizing funds for trail projects that may never come to fruition due to ownership complications. Acquiring legal rights is also necessary to protect the future of the trail. Without a legal document stating the terms of agreement and use between landowner and trail builder, operation of the trail may be jeopardized should the property be sold or the property owner decide that they no longer want the trail on their land.
While land acquisition can be achieved through two parties—the property owner and the trail builder—it is common to involve a legal professional to ensure a fair and objective transaction. Many trail building entities choose to engage an attorney who is familiar with real estate transactions.
Procedures for Acquiring LandBelow are four common procedures for acquiring land. While the actual steps and their order may vary based on the location of your trail or path, your relationship with the landowner, political climate, and other complexities, the procedures offered here provide a general basis for moving forward with acquiring property. Before proceeding with any acquisition efforts, take a moment to assess the current political climate, the general attitude toward landownership and trails in the region in which your trail is proposed, and other trends that may affect the manner in which you proceed. Understanding the challenges and opportunities in advance of proceeding will help define a fair and efficient approach to acquiring the parcels necessary to implement your trail or path.
Identification of ParcelsYour trail master plan identified the desired route of your trail and, better yet, even the type of ownership (public, private, or otherwise). Now is the time to refine the master plan by identifying actual landowner names and thinking about the feasibility and method of acquiring each parcel necessary to connect your trail from beginning to end. There are two methods of identifying which parcels you need to acquire: visiting your local public records repository and using an on-line GIS-based real estate assessment website. Your local public records repository is most likely your town or city
Virginia Department of Conservation & RecreationGreenways and Trails Toolbox • Land Acquisition
Land Acquisition & Trail Development • Chapter 4 -�
Resources:
Acquiring Rail Corridors: A How-To Manualhttp://www.railstotrails.org/
resources/documents/resource_docs/acquiringrailcorridors.pdf
Rails-to-Trails Conservancy Acquisition Overviewhttp://www.railstotrails.org/ourWork/
trailBuilding/toolbox/informationSummaries/acquisition_overview.html
“Rails with Trails/Pedestrian Crossing Project Initiation, Coordination, and Review”
http://leg2.state.va.us/dls/h&sdocs.nsf/By+Year/RD4042009/$file/RD404.pdf
•
•
•
TOOLBOX TIP:The Trust for Public Land is a non-profit agency that specializes in land conservation and acquisition procedures. Contact them with questions about acquisition, negotiation, financing, and research.
http://www.tpl.org/•

Assessor’s Office. Public tax assessors are generally charged with maintaining tax map and parcel information in order to properly levy taxes. In larger towns and cities, the tax assessor may also offer an on-line website that allows you to identify parcels and bring up ownership information without having to visit the assessor’s office. It is a good practice to use the on-line GIS website as a planning tool and verify all information in the tax assessor’s office since GIS maps are not as accurate as official tax maps.
Using either method, your goal is to collect the tax map and parcel numbers for each property upon which your trail is proposed to be built. Your research must include not only the actual trail route, but any property where construction equipment must enter or exit, land where parking lots, trailheads, and other facilities will be constructed, and property that is otherwise impacted by construction of your trail. For trails built on abandoned rail corridors, you should also collect the names of adjacent landowners in addition to information about the railroad company. Once you have the tax map and parcel numbers, your next step is to locate the latest recorded deed for each property; this may be at the assessor’s office or a court clerk’s office. Deeds contain the landowner names, a legal description of the property boundary, and easements or other restrictions that may already be in place. Some deeds may contain a plat or map of the property. If there is no plat, the boundary can be approximated by comparing the tax map and the property description.
Now that you have copies of the plat maps for each parcel, you can overlay them onto your master plan in order to get an idea of where the trail will impact each parcel and how much land is actually needed from each property owner. This task can be done by hand with a copy machine that can scale the plat maps to match the master plan (or vice versa) or in the computer. If you, your consultants, or your volunteers are computer savvy, they may be able to scan in each plat map and overlay them onto a digital image of your master plan. Regardless of how the drawing is prepared, it should include boundary lines, bearings and distances, measurements, tax map and parcel information, and landowner names. Shade the area of future acquisition to make it highly visible. You now have a complete picture of how many acres and linear feet of land you need to acquire, who owns that land, and how many people you’ll need to contact.
Discussions With LandownersThis is the point where having a good idea of local attitudes toward landownership and political climates is helpful. As mentioned earlier, discussions with landowners often go smoothly if they have been involved in the process since the first notion of the trail or path was introduced. If the first contact you make with a landowner is with a purchase offer, you may catch come people off-guard and even create animosity and suspicion. The benefits of talking to landowners in advance of making an offer include:
An increased likelihood of gaining acceptance and a fair deal
An increased likelihood of creating a proponent and promoter
The opportunity to limit suspicion and gossip when project staff, appraisers, and officials are seen walking the proposed route
An early determination of which parcels of land could be more difficult to obtainYou may need to set up meetings with individual landowners as well as group meetings in order to address potential concerns and issues. For any
•
•
•
•
Virginia Department of Conservation & RecreationGreenways and Trails Toolbox • Land Acquisition
Land Acquisition & Trail Development • Chapter 4 -�
TOOLBOX TIP:If you are a municipality within the State of Virginia, contact your local Planning District Commission (PDC) for assistance obtaining parcel information, as well as for help with mapping, grant-writing, proposal writing, and project management. PDCs are State-sanctioned planning entities whose mission is to facilitate local government and state cooperation for regional planning. While some services require fees, the PDC may be a lower-cost alternative to private consultants or hiring in-house staff.
Find your local PDC at: http://www.vapdc.org/•
conversation, approach landowners with respect; a strong knowledge of your proposed trail route, mission, and goals; and an open mind to acquisition alternatives and options.
Phase I /II Environmental AssessmentsBefore finalizing acquisition deals for any piece of land, it is good practice to undergo an environmental assessment to make sure that there are no pollutants—or pollutants that cannot be mitigated—within your trail corridor. Environmental assessments are a form of due diligence that protect the trail user from hazardous situations and protect your trail organization from lawsuits. These research and inventory reports are typically prepared by an environmental consultant who is familiar with contaminants, brownfields, and hazardous wastes. Only individuals trained in ASTM Standard E1527-05 and 40 CFR part 312 should perform this work. Finding pollutants within your trail corridor will not necessarily stop your project, but additional steps may need to be taken to mitigate the problem. In cases where pollutants cannot be mitigated, your organization must decide whether or not to proceed with acquisition or re-route the trail or path.
The Rails-to-Trails Conservancy offers the following steps for assessing environmental pollutants:1. Conduct due diligence and inventory potential hazards along the corridor. This could include a Phase I and Phase II environmental assessment.2. Analyze the potential adverse health effects caused by found substances.3. Determine what, if any, mitigation steps need to be taken and examine the risks and benefits of remedial alternatives.
4. Provide information needed by regulators and the public.5. Design and route the trail to avoid dangers. 6. Follow state and federal laws.7. Create a comprehensive management plan that includes risk management for the open trail.8. A qualified person should regularly inspect the trail to identify potential hazards and maintenance problems.9. When needed, use signage and fencing to protect trail users.
Land AppraisalsBased on your best judgement of the attitudes and public opinion in and near your proposed corridor, your next step may be to begin the appraisal process in order to understand the current real estate value of each area of land you need to acquire. In many cases, having a verbal or written agreement with the landowner is highly recommended before beginning the appraisal process. Having an agreement in place will prevent you from paying for an appraisal on a piece of land that you will ultimately be unable to acquire. Many trail managers use current land assessment values in order to begin discussions
Virginia Department of Conservation & RecreationGreenways and Trails Toolbox • Land Acquisition
Land Acquisition & Trail Development • Chapter 4 -�
Resources:
Flink, Charles A., Kristine Olka, and Robert M. Searns. Trails for the Twenty-First Century: Planning, Design, and Management Manual for Multi-Use Trails. 2nd ed. Washington: Island Press, 2001. Rails-to-Trails Conservancy, Corridor Research: Environmental Contaminants
http://www.railstotrails.org/ourWork/trailBuilding/toolbox/informationSummaries/environmental_contaminants.htmlRails-to-Trails Conservancy. “Understanding Environmental Contaminants: Lessons Learned and Guidance to Keep Your Rail-Trail Project On Track.” Washington, D.C.: Rails-to-Trails Conservancy, 2004.
http://www.railstotrails.org/resources/documents/resource_docs/EPAReport.pdf
•
•
TOOLBOX TIP:Refer to an environmental screening checklist or form to ensure all issues have been considered. These lists and forms provide valuable self-checks even if they are not required by your funding source. Appendix 4-D contains example checklists and forms from common granting and funding agencies.

rather than pay for an appraisal up-front. Contact your funding agency to determine appraisal requirements for your project. Most often, appraisals must be completed before acquisition discussions with landowners can be concluded. In other words, you must understand the fair market value of the land you want to buy before you finalize a deal. Assessment value of the land will help you initiate discussions, but assessment and appraisal values may differ. Determining the value of trail corridors is a difficult undertaking due to their nonstandard shapes and characteristics. Hiring a licensed, professional appraiser skilled in corridor appraisals to undertake research and provide you with an estimate of value is highly recommended and even required for some funding sources such as federal transportation enhancement grants.If the land proposed for acquisition is entirely visible from a public right-of-way such as a road or park, an appraiser may be able to perform their task without contacting a landowner for access to their property. If the land is not visible, you will need to speak with the landowner to obtain permission to access their property. In this case, it is helpful if the trail project has been made public knowledge. If the trail project has not achieved a level of acceptance or a minimum of public exposure, the risk of landowners denying permission for access to their property is greater. In addition, you and your team will need to explain the project in detail to each landowner. Because it is likely that very few of the parcels you would like to acquire are completely visible from a public right-of-way, your project will benefit from a group landowners’ meeting in advance of beginning the appraisal process. In order to save time and money, appraisals can be contracted as a group. If you hire a professional appraiser, you should solicit for bids in order to receive the highest quality services for a fair value. Your solicitation package, or Request for Proposal, should specify the project purpose; general location; number of properties; timeframe; need to follow local, state, and federal requirements; and any other pertinent information. Refer to your funding source—particularly for federal, state, and local government funding—for any procurement requirements. Some
granting agencies require that appraisals follow Uniform Appraisal Standards for Federal Land Acquisitions (UASFLA) and/or Uniform Standards of Professional Appraisal Practice (USPAP). The appraiser will determine the fair market value of each parcel you wish to acquire and you will include this information in the financial package you use to approach each landowner.
Acquisition Offers to LandownersWhen the appraisal process is complete and you have a good understanding of the value of each piece of property you wish to acquire, you can approach individual landowners with offers. At this point, most landowners should be familiar with your project and have formulated ideas on how it might affect them. Presenting and negotiating offers will be expedited if done by someone who is very familiar with the process and can answer questions authoritatively. Ideally, negotiators will frame discussions as win-win scenarios where both the landowner and your trail organization benefit from the land deal. Even with experienced negotiators offering fair deals, the process may involve more than one visit with each property owner before they agree to a deal and sign paperwork.
Survey RequirementsSome funding sources—particularly state and federal agencies such as the Virginia Department of Transportation (VDOT)—require professionally-surveyed plats for each individual area of land to be acquired, regardless of the acquisition method.
Virginia Department of Conservation & RecreationGreenways and Trails Toolbox • Land Acquisition
Land Acquisition & Trail Development • Chapter 4 -�
Survey crew in the field. Courtesy of Hurt & Proffitt, Inc.

This is part of their Right-of-Way Certification Phase that enables the funding entity to be certain that your organization has legally obtained clear rights to build a trail or path upon a certain parcel. Check with your funding agency to determine if specific survey requirements must be met. For example, when public money is involved, you must follow UASFLA appraisal standards and produce a plat and deed that delineate the portion of property purchased with government funds. Some local governments who have survey capabilities may be willing to contribute surveying services at low or no cost, particularly if the same government entity will eventually be managing the trail or path.
Liability & Insurance IssuesLiability and insurance concerns are some of the primary roadblocks to building trails. Both landowners and trail builders are wary of potential lawsuits, legal difficulties, and financial burdens involved with public trail use. Landowners may feel that allowing access to their land for a trail will leave them susceptible to personal injury lawsuits, increased insurance fees, or the possibility of property damage. Similarly, trail builders and managers may be unable to move past the planning stages due to concerns about injuries and insurance costs. Historical precedent and case studies, however, show that liability or insurance claims are rare. In addition, most states have laws that limit public and private landowner liability.The goal of this section is to illustrate that, while insurance and liability issues should certainly be addressed, they should not prevent trail construction from taking place. By implementing risk management strategies, incorporating careful planning and design techniques, and working with the public and landowners, liability and insurance concerns can be minimized. Refer to Appendix 4-E for applicable laws and statutes addressing liability. Refer to Chapter 5 for information on incorporating risk management into your project.
What is Liability and Who is Liable?When discussing trails, liability is synonymous with responsibility. When describing liability, the Rails-To-Trails Conservancy states that “if the actions or duties of an individual, agency, or corporation lead
to a loss, that party can be held responsible for the loss.” For example, if someone falls on a trail and is injured, the question may arise about who was liable or responsible for the fall. In general, the three categories of people who are concerned about liability are trail managers, private landowners who have granted access to their land for trails, and private landowners whose land abuts trail corridors or easements.In Virginia, laws are in place to protect all three categories of people; these laws include the Virginia Tort Claims Act and Recreational Use Statute and are discussed in more detail below. If your organization is private and has not yet been incorporated as a 501(c)(3) not-for-profit entity, you should consider doing so before planning and building a trail or path. Members of incorporated not-for-profit organizations are protected from personal liability in the operation of a trail and these organizations also have the ability to obtain liability insurance. Governmental agencies and their employees are typically already covered by state laws and statutes.
Mitigating Liability and Liability ConcernsThere are a number of ways to mitigate exposure to liability and therefore reduce fears about being held liable for injuries and property damage. The five methods below were adapted from the Rails-to-Trails Conservancy’s “Rail-Trails and Liability” brochure yet apply to all types of trails and paths. While the Toolbox provides overview information
Virginia Department of Conservation & RecreationGreenways and Trails Toolbox • Liability & Insurance
Land Acquisition & Trail Development • Chapter 4 -�
TOOLBOX TIP:You or your consultants may need to access property that you do not own before land acquisition is complete. Check with your insurance provider to determine what steps to take before you visit the site to make sure your organization, volunteers, and consultants are protected from liability claims. Consider developing a letter of agreement that property owners will sign to make sure both parties understand the legal issues and agree to necessary remedies.

about addressing liability, you should consult a legal professional who is familiar with recreational use laws prior to undertaking your project to assess your potential for risk and determine ways to limit your exposure prior to designing and constructing your trail.
Risk ManagementRisk management is a method of addressing and dealing with potential issues before they occur. Proper design and construction, management plans, signage, and maintenance plans are all ways of managing risks associated with managing a trail. Designing a trail to avoid potential hazards, placing signage, and ensuring that periodic and corrective maintenance is performed limit exposure to lawsuits and issues of negligence. Additional discussions about addressing risk management through design and management are found in Chapter 5 under “Risk Management Considerations.”
Duty of Care & the Virginia Tort Claims ActDuty of care is one of the concepts involved in tort law, or laws that deal with finding fault for an incident that occurs in a particular location. In legal terms, duty of care is defined as whether or not an agency or individual has a responsibility to provide for a trail user in some way. For example, it may be the duty of a trail manager to provide fencing around a sinkhole within the trail corridor in order to prevent users from falling in. Tort law divides the general public into four classes (trespasser, licensee, invitee, and child) and affords different standards of duty of care for each class. For example, a trail manager has a lower level of duty of care for a trespasser because the trespasser entered the landowner’s property illegally. Therefore the liability risk is lower for the trail manager. Conversely, the duty of care and liability risk for a trail manager is greater when dealing with an invitee such as a paying customer. Because the trail manager knew the user was entering and using their property, the trail manager was responsible for ensuring that hidden hazards are removed and facilities are properly maintained. Beyond understanding the general concept of different classes, it should be noted that requiring payment for using property
such as a trail typically requires a greater duty of care on the part of the trail manager. Therefore, trail managers and agencies should consider other methods of fundraising before choosing to charge for use of a trail. The Virginia Tort Claims Act (§8.01-195.1 and §8.01-222 Code of Virginia) defines the scope of governmental liability and limits liability for local and state governments. Because the Tort Claims Act limits the liability and caps the dollar amounts awarded in cases of negligence, the Act offers a degree of protection to municipalities such as towns or cities who choose to build trails.
Recreational Use StatutesWhile the Virginia Tort Claims Act is primarily used to protect governmental agencies from liability, the Virginia Recreational Use Statute (RUS) is intended to protect private landowners who provide access to their land for recreational purposes and do not charge a fee to do so. These statutes were introduced in the 1960s as a way to encourage private landowners to open their land for public recreational use. The language in the RUS does not differentiate between a private landowner and a public entity that holds a title or easement. Therefore, the RUS may be applied to both private individuals and public entities in Virginia. Virginia’s RUS limits the liability of private landowners except in cases of “gross negligence or willful or malicious failure to guard or warn against a dangerous condition, use, structure, or activity.” It should be noted that these statutes do not prevent someone from suing a trail manager or landowner, but that the suit should not advance in court if the conditions listed in the RUS are met. In addition, Virginia’s statute specifies that if a private landowner grants an easement to a governmental agency or non-profit, that agency or non-profit becomes responsible for legal services resulting in a claim or lawsuit.
InsuranceThe Virginia Tort Claims Act and Recreational Use Statute may prevent court cases from moving forward, but they do not prevent someone from filing a suit against a trail manager or landowner.
Virginia Department of Conservation & RecreationGreenways and Trails Toolbox • Liability & Insurance
Land Acquisition & Trail Development • Chapter 4 -�0

Most public agencies such as towns, cities, and counties already have liability insurance in place in the form of an umbrella policy. This policy likely covers injuries or damages resulting from trail use.
Independent organizations, such as “friends-of” groups or land trusts, should consider purchasing a comprehensive liability insurance policy. If your organization is fairly complex and supports employees, facilities, and owns equipment and property, you might consider obtaining worker’s compensation insurance and property insurance to protect from vandalism, theft, and fire. Another form of insurance to consider is volunteer accident insurance. This insurance covers the organization in case a volunteer is injured while performing work for the organization.The U.S. Forest Service (USFS) and the National Park Service (NPS) have specific agreement authorities (Volunteers in Forests and Volunteers in Parks, respectively) which apply to volunteers on the lands that the USFS and NPS manage. These agreements include specific protections for volunteers. Trail managers and proponents should engage with these federal agencies early on to learn about and, if appropriate, enter into these agreements.
Working with Design Professionals and Skilled Trail PractitionersA trail is a facility that should be designed correctly in order to avoid long-term maintenance costs. Trails can be quite complicated and often benefit from the advice of skilled practitioners and professional consultants.
In many instances, your organization will not be designing the trail but will be hiring professional design and engineering consultants. Consultants have the expertise to make decisions that result in a creative and cost effective design which takes into account the health, safety, and welfare of the trail user. Consultants who submit plans for formal agency reviews often must also be licensed by the Virginia Department of Professional and Occupational Regulation (VDPOR). The majority of plan reviewing agencies—including VDOT, local erosion and sediment control reviewers, and planning commissions—will not accept trail plans unless they bear the signed seal of a professional landscape architect, civil engineer, or other qualified consultant.
Virginia Department of Conservation & RecreationGreenways and Trails Toolbox • Working With Professionals
Land Acquisition & Trail Development • Chapter 4 -��
TOOLBOX TIP:Visit VDPOR’s website to see if your consultant is licensed in the State of Virginia. http://www.dpor.virginia.gov/regulantlookup/selection_input.cfm?CFID=3930367&CFTOKEN=32017877
TOOLBOX TIP:Some insurance companies have special programs specifically for non-profits involved in land conservation and recreation. Check with your insurance provider to see if they offer special coverage, such as Directors and Officers Insurance. The Land Trust Alliance endorses Alliant Insurance’s Conserv-A-Nation program that provides insurance to non-profits for workers’ compensation, liability, special events, and volunteer accident coverage.
Resources:
Virginia Recreational Use Statute within the Code of Virginia Title 29.1-509
http://leg1.state.va.us/cgi-bin/legp504.exe?000+cod+29.1-509•
Virginia Tort Claims Act within the Code of Virginia Title 8.01
http://leg1.state.va.us/cgi-bin/legp504.exe?000+cod+TOC0800100Morris, Hugh. “Rail-Trails and Liability: A Primer on Trail-Related Liability Issues & Risk Management Techniques.” Washington D.C.: Rails-to-Trails Conservancy, 2000.
http://www.railstotrails.org/resources/documents/resource_docs/tgc_liability.pdfUSFS Volunteers in Forests Program
http://www.fs.usda.gov/wps/portal/fsinternet/!ut/p/c4/04_
•
•
•

It is important to note that not all trail plans must be signed and sealed. Plans that do not require reviews and approvals by local or state governments and do not use public funding most likely do not require the designer to be licensed. In these cases, skilled trail practitioners who are not licensed but are very familiar with trail design produce plans that result in creative, buildable, and long-lasting trails. This section discusses what type of design professionals are most appropriate for trail design and overview of typical hiring practices. Refer to Chapter 3 of the Toolbox for guidance regarding writing Requests for Proposals and interviewing consultants.
When Do You Need Professional Assistance and What Type Do You Need?The early stages of trail planning may be done without hiring professional consultants. Determining the desired route; initial discussions with landowners, railroad companies, and public agencies; preliminary environmental research; and other organizational tasks that do not require licensed or skilled trail professionals can be done in advance. In fact, having a solid foundation of information prior to hiring a consultant will enable you to hold more meaningful and productive discussions when seeking out and working with trail professionals. If many of the following conditions are met, consider planning and designing the trail or path within your own organization:
your desired trail or path route is simple,the project does not require permits or sealed
drawings,
••
the project has no funding agency restrictions on who prepares the plans,
your organization owns or has permission to construct trails or paths on the property, and
you have staff or volunteers familiar with trail and path design and construction
Mountain bike trails, hiking trails, and backcountry equestrian trails are the most common trail types that are designed and built using skilled volunteers. You must first check with your local planning and review agencies and land manager to ensure that you have permission to build the trail and determine what approvals, permits, reviews, or professional drawings are required.
Professional design consultants are primarily hired to prepare master plans and construction documents, assist with or manage bid negotiation,
•
•
•
Virginia Department of Conservation & RecreationGreenways and Trails Toolbox • Working With Professionals
Land Acquisition & Trail Development • Chapter 4 -��
TOOLBOX TIP:When interviewing professional consultants or skilled practitioners, ask about their trail and path building experience. How many trails have they designed? How many of their trail designs have been constructed? Have they designed and built projects similar to yours? Do they have experience working with State and federal funding and permitting agencies? Asking questions like these will help determine which consultant can best meet your specific needs.
Landscape architects reviewing trail plans. Courtesy of LPDA, Inc.
Skilled trail practitioners developing trail plans. Courtesy of IMBA/Rich Edwards.

and perform construction administration. Most often, trail managers or organizations have a good idea of where they would like to locate a trail. Design consultants help refine that idea and apply it to real-world situations. Consultants will be well-versed in environmental regulations; locating and designing the trail in a cost-effective manner that takes into account risk management issues; applicable local, state, and federal regulations; and construction-phase activities.Landscape architects and civil engineers are the two primary types of consultants who design trails. Both consultant types are experienced with standard trail design and regulatory practices. More often than not, landscape architects and civil engineers team on a single project to ensure that all aspects of a project are taken into account. Either consultant can be the primary consultant who manages the team.
Getting It Built: Construction Documents, Permitting, and BiddingOnce you have completed some type of master plan, held discussions with landowners and public entities, secured funding, and hired your design consultants, you can begin to work out the details of construction. The goal of this section is to provide you with a basic understanding of what comprises a construction package, what types of permits are required before and during construction, and the essentials of the public bid process necessary to hire a general contractor.
Determining Who Builds Your TrailWhen your trail master plan is complete or you have a solid idea of where your trail will be routed, start to think about who will build your trail. Will you rely mostly on volunteers to construct the trail or will you hire a general contractor with trail experience? In order to answer this question, you must consider how much and the source of the funding you’ve secured, whether your trail project is long and complex or short and simple, how many volunteers are available, and what site constraints must be dealt with. Refer to the section on bidding later in this chapter for discussions about how to hire a contractor through the bid process.
Use the chart in Appendix 4-F to help determine whether it is better to rely on volunteers or to hire a contractor for your project. Refer to Chapter 5 for similar discussions regarding maintenance responsibilities.
Construction PackagesWhen you hire a design consultant, whether it be a landscape architect, civil engineer, or other professional, they will ultimately produce a construction package for you. A construction package consists of a project manual and construction drawings. These two items will guide the physical implementation of the trail. A project manual is a bound booklet that contains all of the administrative forms, legal documents, and written specifications required to build the project. The project manual contains a table of contents; a copy of the invitation to bid; all bid forms and requirements; any required local, state, and federal government forms; general project requirements including how and when the contractor will be paid, how many bad weather days can be claimed by the contractor, and insurance requirements; and specifications that describe what materials and methods may be used to build the trail. In essence, a project manual is the rule book for construction. Consider including in your Project Manual clauses requiring references and demonstrated ability to successfully complete trail and path projects. Although most procurement laws require that a contractor be selected solely on
Virginia Department of Conservation & RecreationGreenways and Trails Toolbox • Getting It Built
Land Acquisition & Trail Development • Chapter 4 -��
TOOLBOX TIP:The Professional Trailbuilders Association (PTBA) is a network of professional contractors who have a wealth of experience building trails and paths. Visit their website for information, resources, lists of contractors, and case studies.
http://www.trailbuilders.org/IMBA offers day-and-a-half-long Trail Building Schools throughout the country that instruct participants on proper trail building techniques for mountain biking trails.
http://www.imba.com/tcc/imba-trailbuilding-schools
•
•

the basis of the lowest bid, privately-funded projects have much more freedom to select a contractor on the basis of qualifications as well as price. When using public monies, check with your funding agency to determine what types of qualifications and references clauses are allowable for your project. Construction drawings are the actual plans that the contractor or volunteers will use to construct the trail. These drawings provide a graphic illustration of the proposed trail layout and alignment, where soil needs to be moved to change the grade, where plants and site furnishings will be installed, and where erosion and sediment controls must be placed. Construction drawings also contain written notes to aid the contractor and construction details that show the contractor how certain things, such as fences, signs, and the actual trail surface, should be built. Together, the project manual and construction drawings become a legally-binding construction package that will be used for bidding and constructing your trail or path.
Overview of Permitting and Regulatory AgenciesPermits and approvals are required for just about any type of construction project, be it privately or publicly funded. Various regulatory agencies often get involved to ensure no laws are being broken and important resources are protected. The following text provides an overview of permits that may be required and agencies that may need to be contacted in order to build your trail in a lawful manner. Refer to Appendix G for agency contact information. It is important to note that the text below might not encompass every permit and agency and
you should contact your funding agency and applicable governmental entities to ensure you’ve met all requirements. Refer to Appendix 4-E for a compilation of federal and state laws that apply to permitting and regulation of trail projects. It is helpful to have an idea of what environmental and cultural resources exist on your site before you begin trail planning and design in earnest. This section contains specific information concerning where and how to research items such as threatened plant species and historic sites. You may, however, find it useful to refer to the environmental screening forms or checklists so that all potential regulatory and permitting items are addressed. Refer to Appendix 4-D for example screening forms from commonly-used grant sources. Note that your funding source may have specific and/or required forms and checklists that must be filled out prior to or during design and planning phases. Before discussing permits in detail, an important item to remember is that developing trails on federal or state lands may require additional time due to stricter regulations, additional permits, and the potential need for public meetings. Develop a schedule that includes additional time for reviews and meetings if you will be working in these situations.
Environmental and Cultural Permits and Agencies
Wetlands and WaterwaysWetlands and waterways offer beautiful scenery and top-notch wildlife viewing. Yet these features are also sensitive resources that are protected by local, state, and federal laws. Planning a trail through a wetland or over a stream is possible but the design and construction must be done sensitively and according to applicable regulations. In order to impact wetlands and waterways in any manner, you must check to see if a permit is required. Impacts include, but are not limited to, building a boardwalk over a wetland, constructing bridge abutments on stream banks, placing temporary fill next to a river bank to support construction equipment, and installing culverts to direct an active stream under a trail. Depending on the location and type of construction, permits are
Virginia Department of Conservation & RecreationGreenways and Trails Toolbox • Getting It Built
Land Acquisition & Trail Development • Chapter 4 -�4
TOOLBOX TIP:Almost every construction package requires multiple reviews at various stages before final approval by your municipality and/or funding source. Local planners, erosion and sediment control reviewers, VDOT, and other agencies may require reviews of the construction package. Make sure to allow enough time in your project schedule for reviews and revisions.
issued by local wetland or environmental boards, the State of Virginia Department of Environmental Quality, Army Corps of Engineers (ACOE), and/or the Virginia Marine Resources Commission.
Because permitting can often be a complicated process that requires wetlands, perennial streams, and other water resources to be delineated by a qualified professional, most trail managers elect to work with a company who has wetland delineators and permitting specialists on staff or as part of a consultant team. Obtaining permits to work in or near wetlands and waterways may take anywhere between 45 days and 3 months depending on the complexity of the project. Below are the three primary agencies you will have to work with in Virginia if you plan on routing your trail or path near or through waterways or wetlands.
Virginia Marine Resources Commission (VMRC): Contact VMRC first if you plan on building anything in or near waterways (subaqueous or bottomlands), tidal wetlands, and coastal primary sand dunes. If a permit is required, VMRC may allow you to prepare a Joint Permit Application which is a single permit application used for local wetland boards, the VMRC, ACOE, and DEQ. Although each agency has a separate review and response process, only one application will be required.
Army Corps of Engineers (ACOE): Contact ACOE if you are plan on building trails or trail amenities in or near any wetland, navigable waterway, or body of water.
•
•
Virginia Department of Environmental Quality (DEQ): Contact DEQ if you plan on building trails or trail amenities in or near any wetland, navigable waterway, or body of water within the State of Virginia.
Rare, Threatened, and Endangered SpeciesTrail building may also impact the habitat of plant and animal species that are threatened, rare, or endangered according to state and federal laws. If state or federal funds are used to build a trail, or if a trail is built on state and federal land, the proposed trail alignment and corridor must be reviewed to ensure that it does not adversely impact important habitats. You should also check with your local planning or environmental review department to see if local regulations apply. To initiate the environmental review process, you or your consultant must submit a project description, USGS topographic map with project boundaries clearly delineated, and a completed Information Services Order form to the Project Review Coordinator with DCR’s Division of Natural Heritage. Another option—available only to agencies, companies, non-profits, and other organizations—is to submit your project on-line using the Natural Heritage Data Explorer website. You must first register your organization via the website registration process in order to utilize this service. Reviews will take approximately 30 days, although more complex projects may take longer.
•
Virginia Department of Conservation & RecreationGreenways and Trails Toolbox • Getting It Built
Land Acquisition & Trail Development • Chapter 4 -��
Resources:
Army Corps of Engineershttp://www.usace.army.mil/Pages/default.aspx
Army Corps of Engineers Norfolk District Joint Permit Application
http://www.nao.usace.army.mil/technical%20services/Regulatory%20branch/JPA.aspVirginia Department of Environmental Quality Office of Wetlands and Water Protection
http://www.deq.state.va.us/wetlands/Virginia Marine Resources Commission
http://www.mrc.virginia.gov/index.shtm
•
•
•
•
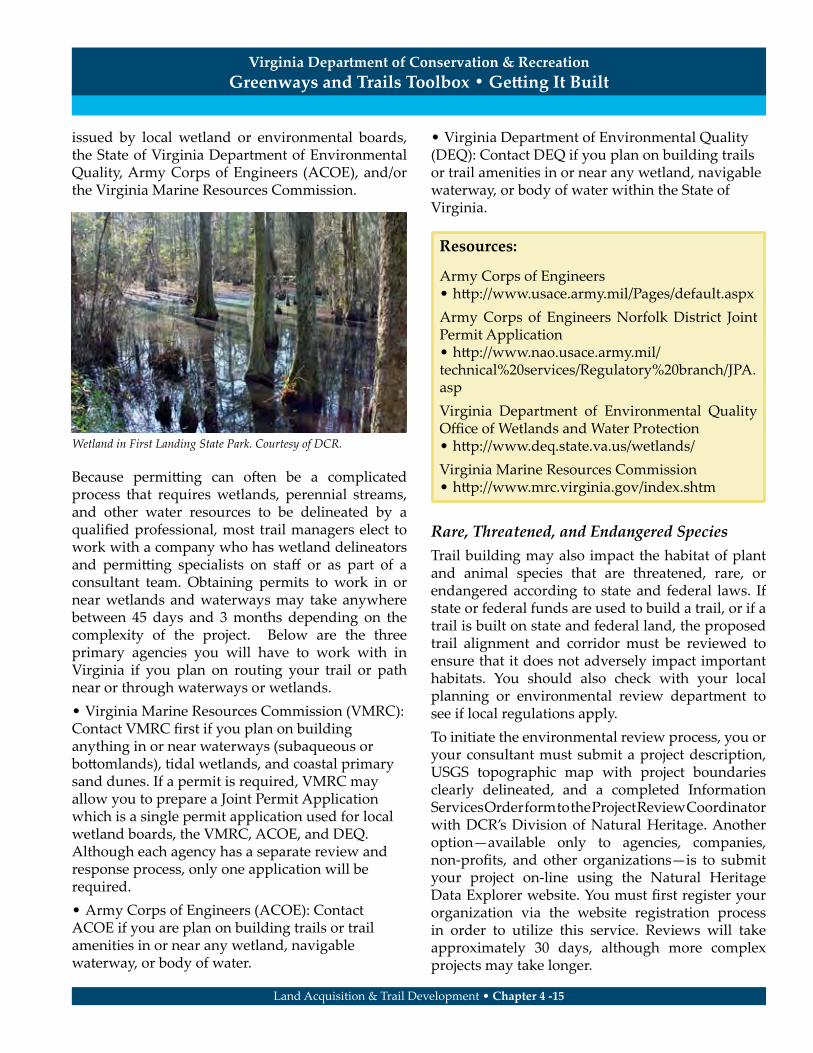
Wetland in First Landing State Park. Courtesy of DCR.

In addition, to get an idea of what State-listed rare, threatened, and endangered animal species may be in or near your project area, you can use the Virginia Department of Game and Inland Fisheries’ Fish and Wildlife Information Service web tool. This on-line database will give you a general idea of what species may be within or near your site. You must still submit to DCR for an environmental review if state or federal funding or lands are involved in your project.
Another agency to contact for rare, threatened, and endangered species information is the U.S. Fish and Wildlife Service. This agency has a self-certification website that allows the user to determine if there are any potential conflicts with federally-listed species within the trail project area. You must still contact Virginia DGIF and DCR to complete project reviews for State-listed plant and animal species.
Cultural ResourcesAs with environmental resources, trails must be planned and designed in a way that minimizes impacts to cultural resources. Cultural resources are generally considered pre-historic or historic features created by humans that provide important information about the history and development of our world. Cultural resources include historic buildings; Civil War battlefields; Native American burial grounds; arrowheads, pottery sherds, and designed gardens. Most often, trails are planned to avoid buried archaeological resources or to take advantage of visible cultural resources such as bridges.When trails are constructed using state or federal funds or on state or federal land, they must take into account potential impacts on both recorded and unrecorded cultural resources. For state projects, this effort is required under various laws such as the Virginia Appropriations Act, Virginia Antiquities Act, and the Virginia Environmental Impacts Reports Act. For projects using federal funds, this is required under Section 106 of the National Historic Preservation Act of 1966. These laws do not preclude trail construction, but do require that the sponsoring agencies (such as VDOT) or their designated representative for the trail or path project (such as a town or city) conscientiously evaluate the proposed
Virginia Department of Conservation & RecreationGreenways and Trails Toolbox • Getting It Built
Land Acquisition & Trail Development • Chapter 4 -��
Resources:
United States Fish and Wildlife Service: Project Reviews (Project Review Services)
http://www.fws.gov/northeast/virginiafield/endspecies/Project_Reviews.htmlVirginia Department of Conservation and Recreation Natural Heritage Environmental Review Section (Project Review Services)
http://www.dcr.virginia.gov/natural_heritage/ereview.shtml
•
•
Virginia Department of Conservation and Recreation Natural Heritage Information Services Overview (Public Site: Plants and Animals)
http://www.dcr.virginia.gov/natural_heritage/infoservices.shtmlVirginia Natural Heritage Data Explorer (Registered Organizations Only: Plants, Animals, & Significant Communities)
http://www.dcr.virginia.gov/natural_heritage/nhdeinfo.shtmlVirginia Department of Game and Inland Fisheries: Wildlife (Animals)
http://www.dgif.virginia.gov/wildlife/Virginia Department of Game and Inland Fisheries: Fish and Wildlife Information Service (Animals)
http://vafwis.org/fwis/?Menu=Home
•
•
•
•
Three-toothed Cinquefoil, listed in Virginia as “Imperiled.” Courtesy of DCR.
trail route for impacts to cultural resources. The Virginia Department of Historic Resources (DHR) serves as Virginia’s State Historic Preservation Office. Within DHR, the Office of Review and Compliance serves to advise and assist federal and state agencies and their designated representatives in determining if their projects will impact significant cultural resources and, if so, how to address and resolve those impacts.
For trail projects using state or federal funds or requiring a state or federal permit, DHR requires a Project Review Application to initiate a cultural resources review. At a minimum, the application requires a description of the project, information on
recorded cultural resources within the vicinity of the project, detailed photographs, a USGS topographic map showing the Area of Potential Effects (APE), and construction drawings that illustrate how the trail will be designed and constructed. For additional guidance, refer to the Environmental Review page of DHR’s website where you can find links to the Project Review Application, frequently asked questions, and other assistance. In certain instances where Transportation Enhancement funds are used to design and build trails and paths, VDOT will manage the cultural resources process and provide archaeological services. After an initial review of the project application, DHR may recommend that an archaeological and/or architectural survey be completed within the Area of Potential Effect. Known as a Phase 1 archaeological survey, this must be completed by a qualified archaeologist and/or architectural historian who meets the federally-promulgated Secretary of the Interior’s Professional Qualification Standards; they must also follow DHR’s guidelines for cultural resource surveys. The survey will determine whether there are any unrecorded cultural resources within the vicinity of your trail project that may be impacted by construction. Therefore, the trail route must be fairly solidified by the time the survey is conducted. Once DHR has completed their review of all submitted materials, they will make one of the following recommendations: no historic properties affected; no adverse effect; or adverse effect. If the project is found to have an adverse effect, a Memorandum of Agreement (federal) or Memorandum of Understanding (state) must be prepared in order to resolve the identified adverse effects. Mitigation of adverse effects, usually in the form of a preservation-related action or measure, is required. A cultural resource review under state or federal law cannot stop a project, but it can cause delays and added expense. DHR advises applicants to submit project review applications as soon as trail routes are finalized to allow enough time for review and any potential mitigation measures.
Virginia Department of Conservation & RecreationGreenways and Trails Toolbox • Getting It Built
Land Acquisition & Trail Development • Chapter 4 -��
TOOLBOX TIP:Visit DHR’s website to get an idea of what cultural resources may be within or near your trail or path corridor. DHR’s “State and National Historic Registers” web page provides downloadable National Register of Historic Places nominations that are sorted by municipality. Information on all recorded cultural resources within or near your project area can be obtained at DHR’s archives in Richmond, VA. Visit DHR’s “Archival Research” page on their website for more information.DHR’s Historic Registers web page
http://www.dhr.virginia.gov/registers/register_counties_cities.htmDHR’s Archival Research web page
http://www.dhr.virginia.gov/archives/archiv_info.htm
•
•
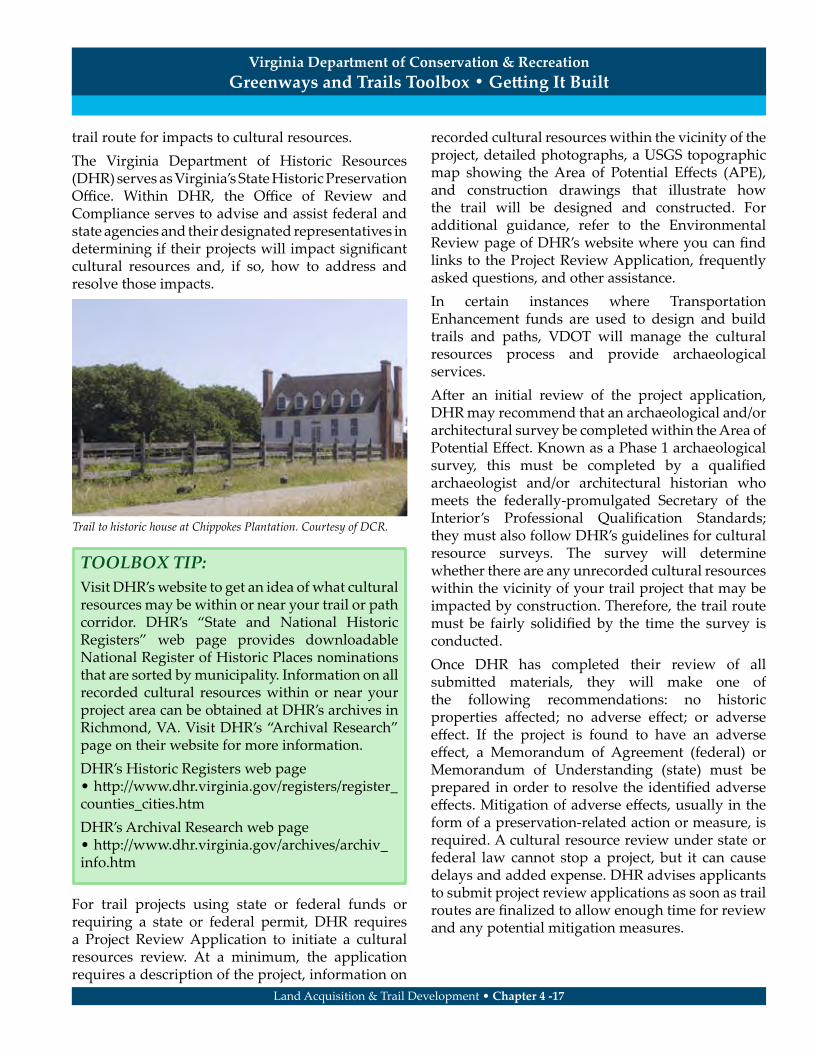
Trail to historic house at Chippokes Plantation. Courtesy of DCR.

Construction Permits and Reviewing AgenciesYour construction package will likely need to be reviewed by local municipalities for compliance with state, county, city, or town codes and ordinances. These reviews are separate from funding agency reviews and different from environmental and cultural resource reviews. In addition, your organization or contractor may need to obtain specific construction-related permits to legally build your trail or path. Below are common review and permit types.
Site Plan ReviewSome municipalities will require you to submit your construction package to their planning department for site plan review. A planner is assigned to your project and he or she goes through a checklist to ensure that the design of your trail, trailhead, and other elements complies with local codes and ordinances. Planners look for items such as amount of tree canopy, number of accessible parking spaces, setback distances from adjacent properties, and visual screening requirements. Site plan reviews typically take 30-45 days. The planner will provide you with a letter stating whether your plans have met all requirements or if changes need to be made to satisfy certain codes.
Erosion and Sediment ControlMost projects that disturb more than 10,000 square feet of land (or 2,500 square feet of land that is subject
to Chesapeake Bay Preservation Area Designation and Management Regulations; generally east of Interstate 95 or the Tidewater region) must be submitted for erosion and sediment control review and approval. This law, however, varies in some municipalities and you should therefore check your local ordinance before proceeding. Erosion and sediment control is a term for ensuring that any earth-disturbing construction activity is done in a manner that limits erosion and the amount of sediment allowed to enter waterways. Referred to as “E&S control,” these measures help prevent damage to rivers, streams, and wetlands caused by siltation, bank erosion, pollutants, and other soil disturbances.E&S reviews may be done by a local government reviewer, a regional Soil and Water Conservation District, or by the State E&S program. Specific E&S drawings must be included as part of your overall construction drawings, as well as a narrative that describes what control methods will be used to limit erosion and sedimentation. E&S standards and laws are collected in the Virginia Erosion and Sediment Control Handbook (VESCH). Reviewers look for infractions such as unstabilized steep slopes, disturbed earth that is not seeded, and lack of control methods such as silt fences and inlet protection. Reviewer must respond to applicants within 45 days or the submitted plan is considered to be in compliance with local and state laws. The reviewer will provide you with a letter stating that all requirements have been met or requesting changes and re-submittal. In the case of trails and paths, standard E&S controls may sometimes be perceived as heavy-handed since the practices were originally developed to control erosion and silt from large, denuded, and mass-graded sites such as subdivisions and road projects. There is a call for flexibility and creative alternatives to standard E&S measures for smaller projects such as trails and paths where the installation of traditional measures may do more damage than the trail-building itself and/or be a burden to limited budgets. While the intent of erosion and sediment control laws is to protect water quality, certain alternatives can be just as efficient and more cost-effective. In addition, the current State of Virginia E&S law allows for variances when alternative
Virginia Department of Conservation & RecreationGreenways and Trails Toolbox • Getting It Built
Land Acquisition & Trail Development • Chapter 4 -��
Resources:
Advisory Council on Historic Preservationhttp://www.achp.gov/index.html
National Register of Historic Placeshttp://www.nps.gov/nr/
Virginia Department of Historic Resources/State Historic Preservation Office
http://www.dhr.virginia.gov/Virginia DHR National Register of Historic Places and Virginia Landmarks Register
http://www.dhr.virginia.gov/registers/register.htm
•
•
•
•

measures are proposed. Contact your local or State E&S reviewer or trail professional to discuss alternatives prior to submitting plans for review.
Land Disturbing PermitYour municipality may require you to apply for and receive a permit for disturbing more than 10,000 square feet of land or 2,500 square feet of land where Chesapeake Bay Preservation Area Designation and Management Regulations apply. The permit provides assurances to the municipality that you or your contractor are aware of all regulations and ordinances and accept responsibility for installing and maintaining appropriate E&S controls. Although certain exemptions may apply, most municipalities require an approved E&S plan before they will issue a Land Disturbing Permit. Permits may cost between $100 and $200 depending on the municipality and extent of work being done. If you are using a contractor, it is his or her responsibility to obtain and manage this permit.
Virginia Stormwater Management PermitIf your trail or path project disturbs more than one acre of land, or more than 2,500 square feet of land where Chesapeake Bay Preservation Area Designation and Management Regulations apply, you or your contractor may need to apply for this permit. Referred to as a VSMP permit, it requires the applicant to be responsible for any amount and quality of stormwater that discharges into existing waterways due to construction activities. The VSMP permit also requires preparation of a Stormwater Pollution Prevention Plan (SWPPP) that details how any potentially harmful pollutants, such as
diesel fuel and soil sediment, will be dealt with during construction. Permit fees range from $300 to $500. If you are using a contractor, it is his or her responsibility to obtain and manage this permit.
Building PermitsAlthough rare on trail and path projects, you may need to apply for a building permit if your plans include structures such as bathroom facilities,
Virginia Department of Conservation & RecreationGreenways and Trails Toolbox • Getting It Built
Land Acquisition & Trail Development • Chapter 4 -��
Resources:
Erosion and Sediment Control Program within the Virginia Dept. of Conservation and Recreation’s Soil and Water Conservation Division
http://www.dcr.virginia.gov/stormwater_management/e_and_s.shtmlVirginia Erosion and Sediment Control Handbook (VESCH)
http://www.dcr.virginia.gov/stormwater_management/e_and_s-ftp.shtml
•
•
TOOLBOX TIP:Low-Impact Development (LID) approaches are becoming more common in trail and path projects. LID promotes a comprehensive land planning, design, and engineering approach whose goal is to maintain and/or enhance pre-development hydrologic site conditions. In other words, LID aims to manage stormwater in the most un-intrusive manner possible by minimizing installation of pipes, preserving existing vegetation, maximizing water infiltration into the ground rather than creating run-off, and other methodologies. Visit the websites below, talk with your Town or City Engineer, and/or your consultants to investigate ways of incorporating LID approaches into your trail or path project. Environmental Protection Agency LID Web Page
http://www.epa.gov/owow/NPS/lid/Low Impact Development Center, Inc
http://www.lowimpactdevelopment.org/index.htmlGuidelines for the Use of Innovative BMPs
http://www.fairfaxcounty.gov/dpwes/publications/bmp_guide.pdfFriends of the Rappahannock LID Examples
http://www.riverfriends.org/Publications/LowImpactDevelopment/tabid/86/Default.aspx
•
•
•
•
Resources:
Virginia Stormwater Management Program Permits within the Virginia Dept. of Conservation and Recreation’s Soil and Water Conservation Division
http://www.dcr.virginia.gov/stormwater_management/vsmp.shtml•

shelters, trellises or pergolas, or any other habitable structure. Check with your municipality’s Building Inspector to determine what building permits and inspections may be required.
Sending Your Project Out To BidAfter your construction package is prepared and approved, you are ready to send the project out to bid. The bid process applies only to projects that will use public funds and paid contractors to construct the trail or path.A bid is a proposal from a contractor that states a price for doing the work described in the construction package. The bid is signed by the contractor and becomes a legal document once submitted. If the bid is accepted, the contractor’s price stated in the bid becomes the highest amount the owner will have to pay. Exceptions such as change orders may increase or decrease the project price due to additional work required or unforeseen circumstances. If you are a private entity using private funds to design and construct your trail, you may select any contractor you would like for the construction phase. In many cases, however, trail managers are either public entities or use public funds to implement trails. In these cases, standard hiring and bidding practices—called procurement laws—apply and must be followed. Refer to Chapter 3 for additional information about procurement laws. Procurement laws are in place to ensure that all people attempting to enter into contracts using public money are treated fairly and equally. Procurement laws come into play for any state- or federally-funded project, any project funded or sponsored by a Virginia town, city, or other municipality, and most other projects using public funding. Check with your funding agency or municipality for specific procurement requirements. When your construction drawings are complete, all pre-construction permits obtained, all plan reviews complete, and relevant public agencies have signed off on the plans, you may post your bid in the local newspapers and websites. This is called advertising your invitation to bid. An invitation to bid includes the scope of work to be constructed including trail or path length, width, surface type, and any
amenities; any special requirements based on state or federal funding regulations; where plans can be viewed and/or purchased; how much plans cost and how many will be sold to an individual; calendar dates for pre-bid meetings and returning the bids; the location to which bids should be returned; and contact information for questions. Refer to Appendix 4-H for a sample invitation to bid.Most bids are run in newspapers, websites, or other media for a minimum of 21 days to allow time for contractors to see the invitation to bid and prepare their bid. Check with your funding agency and/or municipality for advertisement requirements.Once the bids are received by the date specified, they are opened and the lowest price is determined. The lowest price bid is called the low bidder. Most public bids require that the lowest bid be accepted regardless of the reputation and quality of the contractor. There are exceptions in egregious cases, but in general, the low bidder is the person who will become your trail contractor. Some agencies, such as VDOT, do not allow for negotiation with the low bidder meaning that the price listed in the bid is the set cost for the contract and no discussion is allowed to adjust the price.
Once the low bidder is identified, most public entities and funding sources require time to review the bidder’s paperwork and make sure all documents and legal forms are in order. This may take between
Virginia Department of Conservation & RecreationGreenways and Trails Toolbox • Getting It Built
Land Acquisition & Trail Development • Chapter 4 -�0
TOOLBOX TIP:Be prepared to answer contractor questions during the bid phase and issue addenda. Even the most thorough plans and specifications are sure to generate some questions as contractors review the designs to develop accurate costs.
Only accept contractor questions in written format such as a letter, fax, or e-mail in order to document the correspondence.
Addenda are clarifications provided by you or your consultant to the contractor that address errors and omissions from the design or answer questions.
Make sure that all bid planholders receive the response to any questions posed during the bid.
•
•
•

2 weeks to 30 days. The point to understand is that even though the low bidder has been identified, construction on your trail may not start immediately after bids are opened. This review period, however, gives both you and the contractor time to prepare for the start of construction activities.
Do’s and Don’ts During the Bid PhaseDO:
Make sure that the Invitation to Bid is written clearly, concisely, and contains all the information required for the bidder to understand what type of project you have.
Have your funding agency review the Invitation to Bid prior to releasing it to media outlets. Some funding agencies have certain requirements or suggestions to make certain contractors understand all project requirements.
List in your Invitation to Bid if your project is state or federally-funded as well as if there are requirements for disadvantaged businesses entities (DBEs).
Determine who will be selling plans and how much they cost before preparing the Invitation to Bid. Plans should be ready for sale as soon as the bid advertisement is listed in the media.
Check with your local newspapers or websites for classifieds deadlines. Some media outlets require classifieds (including bid advertisements) to be submitted several days before they are run.
When determining the length of time to run the invitation to bid, consider upcoming events such as holidays. Contractors need time to review the drawings in order to come up with accurate bids that truly reflect the time and cost it will take to build your trail or path.
Make sure all required forms are inserted into the Project Manual.
Hold a pre-bid meeting if your trail or path project is complex. Pre-bid meetings allow you to explain project goals and issues in person, answer questions, and get an idea of who might submit bids.
Keep lists of people who purchased plans and attended any pre-bid meetings. These people must
•
•
•
•
•
•
•
•
•
receive any updates to the drawings and Project Manual as well as answers to any questions asked during the bid period. DON’T:
Provide any contractor, even if they request it, with the estimated cost of the project. This practice avoids price-fixing and collusion by contractors.
Open any bids until after the date and time specified in the invitation to bid.
Allow any bids to be received after the time specified in the invitation to bid. Any bids received at 3:02 pm when the invitation to bid specified 3:00 pm must be thrown out.
Expect to start construction the day after bids are received. Most bids must be reviewed by funding agencies and legal departments before construction can begin.
Provide information about the project to one contractor and not the others. You must share information equally among all potential bidders to avoid the appearance of collusion. All questions you answer via phone, e-mail, fax, or otherwise must be supplied to anyone who attended a pre-bid meeting, purchased plans, or that you know is interested in submitting a bid.
•
•
•
•
•
Virginia Department of Conservation & RecreationGreenways and Trails Toolbox • Getting It Built
Land Acquisition & Trail Development • Chapter 4 -��
Resources:
e-VA Virginia’s Total e-Procurement Solution (for local and state governments)
http://www.eva.state.va.us/National Trails Training Partnership, Planning Trails and Greenways: Maximizing Trail Budgets through Competitive Bidding
http://www.americantrails.org/resources/planning/BooneBidding.html Professional Trailbuilders’ Association (PTBA) Contractor Solicitation Website
http://www.trailbuilders.org/contractors/solicit_projects.htmlVirginia Department of Transportation Enhancement Program Procedure Manual
http://www.virginiadot.org/business/resources/local_assistance/2010_Enhancement_Manual.pdf
•
•
•
•

Trail DesignMoving from planning into actual design is one of the most exciting phases of a trail project. Plan drawings, sketches, and technical details allow you to envision how your trail will actually appear when it is constructed.Taking the trail or path from a line on paper to a buildable design requires a holistic approach. The designer must consider current site conditions, access to the trail, universal accessibility within the trail corridor, adjacent landowners, environmental and cultural resources, stormwater management, aesthetics, and an entire host of factors in order to ensure a successful trail project. Your trail or path is not simply a slice through the woods or a ribbon of pavement along the road; it is a project that will have physical and psychological influences upon multiple resources and stakeholders both within and adjacent to the project corridor. For this reason, care and forethought must be put into developing a project that takes into account all the facets of design. This section discusses incorporating universal design to ensure that the widest range of trail enthusiasts can enjoy their recreational pursuits while limiting changes to the character and experience of the trail. Additional topics include reviewing environmental considerations; overview guidance for typical trail design and construction standards and amenities; and methods of managing user conflicts on your trail.Because of the wide array of information provided in this section and the highly variable site conditions that exist within Virginia’s landscape, take note that the discussions and descriptions offered on the following pages are intended only as guidance. Use the information to double-check your own ideas and as a way to begin conversations within your organization and with landowners and consultants.
Universally-Designed TrailsUniversal design is the practice of designing and promoting the use of facilities to accommodate the widest range of potential users possible. Universal design has been defined as “simply an approach to creating environments and products that are usable by all people to the greatest extent possible.” In this
context, the term universal means not only people with disabilities but people who push strollers, seniors, and young children. Universal design is intended to truly address all types of users. In relation to trails and paths, universal design means designing facilities that have the potential to accommodate all users. This may mean ensuring that slopes accommodate people in wheelchairs and trail surfaces are firm enough to support baby strollers and the wear and tear of all users between maintenance cycles. It also means designing signage that is easily legible for all people and selecting picnic tables, drinking fountains, and other amenities that can utilized by all visitors. While universal design is the ultimate goal for trail design, it is important to note that rarely are all the needs of every user met. The overarching strategy behind universal design is to take into consideration the widest range of potential users during the design phase yet ensure that the character and experience of the setting are not compromised.
Laws, Standards, and GuidelinesIn the United States, many outdoor facilities such as trails and paths are regulated by certain laws that deal with accessibility. An overview of these laws, and where to find more information, is provided below. The 1990 Americans with Disabilities Act (ADA) and the 1968 Architectural Barriers Act (ABA) are the two primary laws that deal with accessibility in the built environment in the United States. ADA establishes accessibility requirements for state and local government facilities, places of public accommodation—business and other private entities that are open to the public—and commercial facilities. The ABA requires access to facilities designed, built, altered, or leased with federal funds or on federally managed lands. In Virginia, the majority of grants available for trail design and construction are funded with federal monies. Within the ADA law are standards and guidelines for designing different types of facilities, including trails, paths, and trailheads. The 2010 ADA Standards For Accessible Design and companion document Guidance on the 2010 ADA Standards For Accessible
Virginia Department of Conservation & RecreationGreenways and Trails Toolbox • Trail Design
Land Acquisition & Trail Development • Chapter 4 -��

Design provide technical information on design requirements for elements such as handrails, slope limitations, accessible routes, and stairs within the built environment. These standards are enforceable by law. For entities responsible for complying with the ADA, the 2010 ADA Standards replaced all previous ADA accessibility guidelines.The 2009 DRAFT Final Accessibility Guidelines for Outdoor Developed Areas (AGODA) by the U.S. Access Board offers technical guidance for outdoor and recreational facilities—including trails and paths—that are newly-constructed or altered on federal lands or using federal funds. Based on standards set forth in the ABA, these guidelines have yet to be formally approved but are generally considered the current rule-of-thumb for accessible outdoor design. These guidelines apply to trails which are designed and constructed for pedestrian use; they do not apply to trails primarily designed and constructed for use by equestrians, mountain bicyclists, snowmobilers, or off-highway vehicles even if pedestrians occasionally use the same trails. Trail managers and planners should follow the progress of the AGODA as a final, approved version is forthcoming; follow the final version as best practice guidance.The 2005 DRAFT Public Rights-of-Way Advisory Committee Public Rights-of-way Accessibility Guidelines (PROWAG) offers guidance on pedestrian access to sidewalks and streets, including crosswalks, curb ramps, street furnishings, pedestrian signals, parking, and other components of public rights-of-way.The U.S. Access Board is currently drafting accessibility guidelines for Shared-Use Pathways. These guidelines will serve as another method for incorporating universal design best practices into your trail or path plan. The U.S. Forest Service has accessibility guidelines that are legally enforceable within the National Forest System. The Forest Service Outdoor Recreation Accessibility Guidelines (FSORAG) applies to campground, picnic areas, scenic overviews and the routes that connect facilities within those outdoor recreation areas. The Forest Service Trail Accessibility Guidelines (FSTAG) addresses routes that are solely for the purpose of recreational hiking.
Routes that connect facilities within a campground or other recreation area are not considered trails but are considered outdoor recreation access routes and are addressed in the FSORAG. Any trails or other facilities on National Forest System lands must adhere to Forest Service accessibility guidelines.
Allowing Power-Driven Devices on Trails The ADA law was amended in 2010 so that trails located on state and local government lands must allow “power-driven mobility devices” when those devices are used to aid people with disabilities unless one of the designated assessment factors precludes such use. The Department of Justice reflects the ADA requirement which states “A public entity shall make reasonable modifications in its policies, practices, or procedures to permit the use of other power-driven mobility devices by individuals with mobility disabilities, unless the public entity can demonstrate that the class of other power-driven mobility devices cannot be operated in accordance
Virginia Department of Conservation & RecreationGreenways and Trails Toolbox • Trail Design
Land Acquisition & Trail Development • Chapter 4 -��
Resources:
ADA Standards Homepagehttp://www.access-board.gov/ada/
ABA Standards Homepagehttp://www.access-board.gov/aba/index.htm
Draft Final Accessibility Guidelines for Outdoor Developed Areas (AGODA)
http://www.access-board.gov/outdoor/draft-final.htmPublic Rights-of-Way Accessibility Guidelines (PROWAG)
http://www.access-board.gov/prowac/draft.htmU.S. Forest Service Trails Accessibility Guidelines (FSTAG)
http://www.fs.fed.us/recreation/programs/accessibility/U.S. Forest Service Outdoor Recreation Accessibility Guidelines (FSORAG)
http://www.fs.fed.us/recreation/programs/accessibility/htmlpubs/htm06232801/toc.htm
•
•
•
•
•
•

with legitimate safety requirements that the public entity has adopted pursuant to § 35.130(h).”A person who uses a wheelchair or other mobility device that meets the following definition is allowed to take that device anywhere foot travel is allowed. ADA defines a wheelchair as “a manually-operated or power-driven device designed primarily for use by an individual with a mobility disability for the main purpose of indoor or of both indoor and outdoor locomotion. This definition does not apply to federal wilderness areas; wheelchairs in such areas are defined in section 508(c)(2) of the ADA, 42 U.S.C. 12207(c)(2).” An “other power-driven mobility device” (OPDMD) is considered“ to be any mobility device powered by batteries, fuel, or other engines—whether or not designed primarily for use by individuals with mobility disabilities—that is used by individuals with mobility disabilities for the purpose of locomotion, including golf cars, electronic personal assistance mobility devices (EPAMDs), such as the Segway® PT, or any mobility device designed to operate in areas without defined pedestrian routes…”
For state or local government or private entities owning and/or operating trails that are open to the public, this means that power-driven and/or motorized devices cannot be automatically excluded from trails. Segways, ATVs, golf carts, and other devices as defined above must be allowed on the trail if they are to be used by persons with mobility issues, unless there has been a prior assessment of that area which has determined that one or more of
the assessment factors precludes the use of a specific other power driven mobility device. The DOJ rule offers guidance for determining if specific classes of OPDMD are appropriate in specific locations. These assessment factors require that the area be assessed for the appropriateness of use before a person comes to the area seeking to use that OPDMD. The assessment factors include whether a specific class of OPDMDs would cause harm to other trail users based on documentable safety risks, the size and dimensions of the device, the volume of pedestrian traffic, and the potential risk to environmental or cultural resources. Although a public trail manager cannot directly ask about the nature of a person’s disability, the manager can ask to see a valid, State-issued, disability parking placard or card, or other State-issued proof of disability, as a credible assurance that the use of the OPDMD is for the individual´s mobility disability. In lieu of these items, a public entity must accept as a credible assurance a verbal representation, not contradicted by observable fact, that the OPDMD is being used for a mobility disability.Refer to the links below for the official ruling language and websites that assist with understanding and applying the ruling.
Exemptions and FlexibilityIn all cases, trails and paths should attempt to comply with accessibility guidelines and standards wherever possible. Both the FSTAG and the Access
Virginia Department of Conservation & RecreationGreenways and Trails Toolbox • Trail Design
Land Acquisition & Trail Development • Chapter 4 -�4
Resources:
Federal Register, Part II Department of Justice. 28 CFR Parts 35 and 36 Nondiscrimination on the Basis of Disability in State and Local Government Services; Final Rules; September 15, 2010.
http://edocket.access.gpo.gov/2010/pdf/2010-21821.pdf“Questions and Answers to Help Trail Managers Respond to Recent Department of Justice Rule on Wheelchairs and Other Power-Driven Mobility Devices”
http://www.americantrails.org/resources/accessible/power-mobility-questions-answers.html
•
•
Power-driven mobility device on Huckleberry Trail in Blacksburg, VA. Courtesy of DCR.

Board guidelines provide a wide range of exceptions to ensure the character and experience of the trail or path setting will be maintained while accessibility is integrated to the maximum extent possible. Those exceptions ensure the design of trails blends into the existing topography and the features to be highlighted or protected, such as scenic vistas and waterways. The AGODA offers exceptions for situations where complying with the guidelines would be impractical for the entirety of a trail or path. The Accessibility Guidelines for Outdoor Developed Areas offer the following exemptions for the following existing conditions:
The combination of running slope and cross slope exceeds 40 percent for over 20 feet.
A trail obstacle 30 inches or more in height extends across the full tread width of the trail.
The surface is neither firm nor stable for a distance of 45 feet or more.
The clear tread width is less than 12 inches for a distance of 20 feet or more.
The conditional exceptions result in over 15 percent of the length of the trail departing from the technical provisions.If one or more of those reasons exist and thereby your entire trail or path will not be comply with the accessibility guidelines, a statement explaining those reasons must be prepared, dated and signed by the project manager and placed in the project file for future reference.
Trail & Path Design Guidance for Universal AccessibilityThe documents and websites offered above provide the most current and thorough standards and guidelines and should be consulted when technical assistance is required. This section highlights the most frequently referenced guidance from the 2009 Draft Final Accessibility Guidelines for Outdoor Developed Areas (AGODA); the 2005 ADA/ABA Accessibility Guidelines for Buildings and Facilities (ADAAG); and the 2010 Draft AASHTO Guide for the Planning, Design, and Operation of Bicycle Facilities (AASHTO Guide). Many trail funding agencies, such
•
•
•
•
•
as VDOT, have requirements that may vary from or exceed those found below because of the need to accommodate bicycles or other use types on shared-use trails and paths. Refer to your funding and/or reviewing agencies to determine which accessibility standards apply to your project.
General Layout and SitingAs much as possible, choose a route that is relatively level, can be easily modified to allow two trail users to pass, and that does not have excessively steep slopes, drop-offs, or tight turns. Avoid selecting a route that might require steps or ramps.
Vertical Clearance80 inches of clear space for the width of the route is required, although an exception exists for any naturally-occurring intrusions into that space such as tree limbs and rocks. Human-constructed objects such as signs must not protrude into an 80-inch-high by 36-inch-wide clear space. Refer to Chapters 4 and 10 of ADAAG.
Horizontal ClearanceAn accessible route must be at least 36 inches wide for a single user and a minimum of 60 inches wide to allow for passing. However, exceptions for passing widths exist when certain conditions are present. Refer to Chapters 4 and 10 of ADAAG.
Virginia Department of Conservation & RecreationGreenways and Trails Toolbox • Trail Design
Land Acquisition & Trail Development • Chapter 4 -��
ADA/ABA Accessibility Guidelines for vertical clearance. Courtesy of U.S. Access Board.
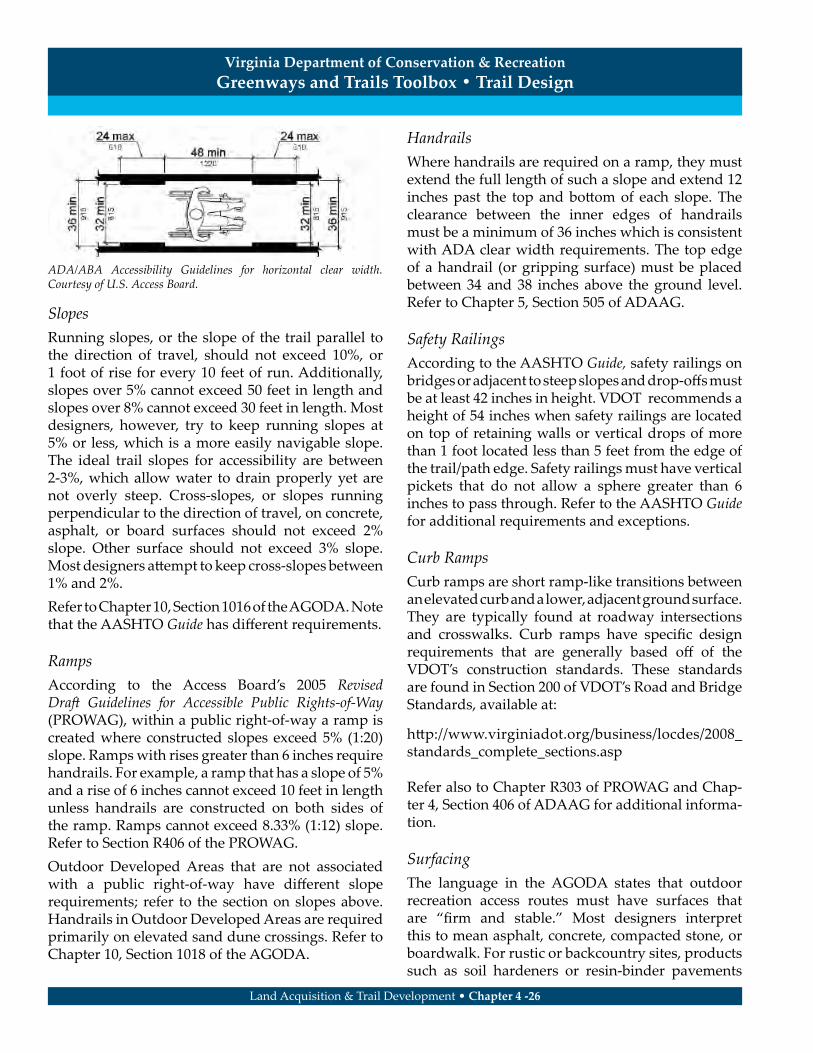
SlopesRunning slopes, or the slope of the trail parallel to the direction of travel, should not exceed 10%, or 1 foot of rise for every 10 feet of run. Additionally, slopes over 5% cannot exceed 50 feet in length and slopes over 8% cannot exceed 30 feet in length. Most designers, however, try to keep running slopes at 5% or less, which is a more easily navigable slope. The ideal trail slopes for accessibility are between 2-3%, which allow water to drain properly yet are not overly steep. Cross-slopes, or slopes running perpendicular to the direction of travel, on concrete, asphalt, or board surfaces should not exceed 2% slope. Other surface should not exceed 3% slope. Most designers attempt to keep cross-slopes between 1% and 2%.Refer to Chapter 10, Section 1016 of the AGODA. Note that the AASHTO Guide has different requirements.
RampsAccording to the Access Board’s 2005 Revised Draft Guidelines for Accessible Public Rights-of-Way (PROWAG), within a public right-of-way a ramp is created where constructed slopes exceed 5% (1:20) slope. Ramps with rises greater than 6 inches require handrails. For example, a ramp that has a slope of 5% and a rise of 6 inches cannot exceed 10 feet in length unless handrails are constructed on both sides of the ramp. Ramps cannot exceed 8.33% (1:12) slope. Refer to Section R406 of the PROWAG.Outdoor Developed Areas that are not associated with a public right-of-way have different slope requirements; refer to the section on slopes above. Handrails in Outdoor Developed Areas are required primarily on elevated sand dune crossings. Refer to Chapter 10, Section 1018 of the AGODA.
HandrailsWhere handrails are required on a ramp, they must extend the full length of such a slope and extend 12 inches past the top and bottom of each slope. The clearance between the inner edges of handrails must be a minimum of 36 inches which is consistent with ADA clear width requirements. The top edge of a handrail (or gripping surface) must be placed between 34 and 38 inches above the ground level. Refer to Chapter 5, Section 505 of ADAAG.
Safety RailingsAccording to the AASHTO Guide, safety railings on bridges or adjacent to steep slopes and drop-offs must be at least 42 inches in height. VDOT recommends a height of 54 inches when safety railings are located on top of retaining walls or vertical drops of more than 1 foot located less than 5 feet from the edge of the trail/path edge. Safety railings must have vertical pickets that do not allow a sphere greater than 6 inches to pass through. Refer to the AASHTO Guide for additional requirements and exceptions.
Curb RampsCurb ramps are short ramp-like transitions between an elevated curb and a lower, adjacent ground surface. They are typically found at roadway intersections and crosswalks. Curb ramps have specific design requirements that are generally based off of the VDOT’s construction standards. These standards are found in Section 200 of VDOT’s Road and Bridge Standards, available at:
http://www.virginiadot.org/business/locdes/2008_standards_complete_sections.asp
Refer also to Chapter R303 of PROWAG and Chap-ter 4, Section 406 of ADAAG for additional informa-tion.
SurfacingThe language in the AGODA states that outdoor recreation access routes must have surfaces that are “firm and stable.” Most designers interpret this to mean asphalt, concrete, compacted stone, or boardwalk. For rustic or backcountry sites, products such as soil hardeners or resin-binder pavements
Virginia Department of Conservation & RecreationGreenways and Trails Toolbox • Trail Design
Land Acquisition & Trail Development • Chapter 4 -��
ADA/ABA Accessibility Guidelines for horizontal clear width. Courtesy of U.S. Access Board.

may be specified if the native soil cannot be suitably compacted to become firm and stable. Refer to Chapter 10, Section 1016 of the AGODA.
Parking FacilitiesParking facilities, whether new or adapted for recreation purposes, may serve as trailheads. In order to make the universally-accessible experience as inclusive as possible, parking facilities should accommodate people of varying capabilities. The slopes of parking lots and spaces should not exceed 2% (1:48). A specific number of accessible and van-accessible spaces should be provided and appropriately signed and marked; the number varies according to total number of spaces provided. Refer to Chapter 5 of ADAAG for in-depth guidance and to your local zoning code and/or design ordinances.
Universally-Designed Trail and Path AmenitiesIn order to enhance the trail experience for all users, trail managers and designers should consider making amenities such as fishing platforms, wildlife viewing areas, and boardwalks universally accessible. In some cases, these facilities must comply with accessibility guidelines particularly if they are owned and/or operated by public entities. The following examples represent only a few ways to integrate universally-accessible design into your trail. Excellent handbooks and websites that provide more specific information are available for organizations and designers interested in this topic. While the Toolbox provides the following examples for your reference and inspiration, the text and graphics are not intended to be used for construction
purposes. Work with your design and engineering consultants or volunteers to properly select, locate, and design any amenity.
Water Access & BoardwalksWater access—in the form of platforms, boardwalks, and piers—is one of the most desirable accessibility amenities. People of all ages and abilities enjoy being near water. In order to be designed in a universally-accessible manner, platforms, boardwalks, and piers require additional edge protection, varying railing heights to accommodate wheelchair users, clear space, and other minor adjustments.
Wildlife Viewing AreasAccording to the book, Everyone’s Nature by Carol Hunt, “wildlife viewing is a very important part of outdoor recreation for many. It is an experience that can be greatly enjoyed no matter what a person’s age or abilities.” Viewing areas may consist of
Virginia Department of Conservation & RecreationGreenways and Trails Toolbox • Trail Design
Land Acquisition & Trail Development • Chapter 4 -��
Resources:
AGODA, Section 1017 “Trails”http://www.access-board.gov/outdoor/draft-
final.htm#5
U.S. Forest Service Trails Accessibility Guidelines (FSTAG)
http://www.fs.fed.us/recreation/programs/accessibility
•
•
Resources:
ADA/ADAAG Chapter 10 Section 1005http://www.access-board.gov/ada-aba/final.
cfm#a1005Summaries of Accessibility Guidelines for Recreation Facilities: Accessible Fishing Piers and Platforms
http://www.access-board.gov/recreation/guides/fishing.htm
•
•
TOOLBOX TIP:Many books and reports are available that provide in-depth information for planning, designing, and constructing universally-accessible outdoor facilities.Hunter, Carol. Everyone’s Nature: Accessible Outdoor Facilities and Programs Using Universal Design. Cambridge, MN: Adventure Publications, Inc., 2002.U.S. Forest Service “Accessiblity Guidebook for Outdoor Recreation and Trails.” Available on-line:http://www.fs.fed.us/recreation/programs/accessibility/htmlpubs/htm06232801/index.htm

boardwalks, decks, blinds, or other facilities that provide visual connections with wildlife and can be both accessible routes and destinations. Viewing areas share many of the same standards as the accessible routes described earlier. Clear ground space must be at least 36 inches by 48 inches to allow for maneuverability. Surfaces must be firm and stable. One addition, however, is guidance for viewing. The AGODA state that an unobstructed view shall be provided between 32 inches and 51 inches above the clear ground space at each distinct viewing location that extends the entire side of the clear ground space facing the landscape or point of interest.
SignageFew people consider signage when they think about accessible amenities, yet signs are the main way of communicating with trail and path users. Signage must clearly communicate rules, hazards, directions, educational notes, and other information in a way that most people can understand. Accessible signs design should consider people who have no or limited vision, color-blindness, comprehension problems, or other visual and mental difficulties. Signs should be designed with sharp color and contrast with upper and lower case and so the center line of the information is 48 to 52 inches above the ground. Sign information should clearly identify the specifications of the trail so that users can decide which trail best meets their needs. Below is a list of trail sign information required by the Access Board’s Guidelines for Outdoor Developed Areas:
Length of the trail or trail segment; •
Surface type; Typical and minimum tread width; Typical and maximum running slope; and Typical and maximum cross slope.
Universally-Designed Equestrian AmenitiesMore and more people with disabilities are finding enjoyment, freedom, and therapy through equestrian events. Equestrian trails provide people who have mobility issues, visual impairments, and other difficulties with a way to participate in nature and enjoy the company of animals. Therefore, every effort should be made to make equestrian facilities universally accessible. Trailheads, signage, water pumps, and road crossings can all be designed or adjusted to achieve comfortable levels of use by riders with disabilities. Refer to the Site Amenities guides at the end of this chapter for more information. The U.S. Forest Service recommends that you begin by identifying your intended users, understanding your funding sources, and then separating trailhead/campground design from trail design. This process helps determine which accessibility standards are required by law and which you may use as guidelines. Most standards and guidelines that address equestrian amenities refer to the need to get the rider successfully out of their own vehicle and to an area where they can mount stock. The greatest needs include accessible parking areas and accessible routes to trailheads and mounting areas. Overnight
••••
Virginia Department of Conservation & RecreationGreenways and Trails Toolbox • Trail Design
Land Acquisition & Trail Development • Chapter 4 -��
Resources:
AGODA, Section 1015 “Viewing Areas”http://www.access-board.gov/outdoor/draft-
final.htm#5U.S. Forest Service “Accessibility Guidebook for Outdoor Recreation and Trails: Other Constructed Features”
http://www.fs.fed.us/recreation/programs/accessibility/htmlpubs/htm06232801/page18.htm
•
•
Universally-accessible signage. Courtesy of AmericanTrails.org/Stuart Macdonald.

and day-use facilities, including camp sites, restrooms, stock wash areas, and corrals, should also be designed for universal accessibility. All general standards and guidelines noted earlier apply.
Managing User ConflictsSingle-use trails are rare given that most trail organizations are limited in funding, property ownership, and labor to build or oversee trails. In most cases, one trail will be built and designed to be shared by multiple user types. Because walkers, bicyclists, equestrians, and other users have different needs and goals when they are on trails or paths, conflicts may arise when diverse users encounter each other. Most conflicts are born out of safety concerns, although some develop from concerns over impacts to the trail itself or the surrounding environment. This section will focus on resolving safety-related concerns.
Typically, conflicts occur on trails or paths that are heavily-used. This is particularly true of trails whose users travel at different speeds. For example, a trail that hosts pedestrians, mountain bicyclists, and equestrians will likely have user conflicts at some point. Conflicts become an even greater concern when motorized vehicles, such as ATVs, are introduced. The primary issue that causes distress is the potential for injury to the slower-moving and smaller user.
Solutions become more difficult when emerging trends in recreational vehicles and devices are factored in. New technologies for motorized vehicles are responding to the desire for trail and path users to incorporate both environmental sustainability and travel efficiency into recreational pursuits and commuting. Gasoline- and electric-powered bicycles, scooters, golf carts, and other devices are becoming more prevalent. More specifically, devices such as Segways®, electric bicycles and electric dirt bikes, and mopeds and Go-Peds® are seen more frequently on both motorized and non-motorized trails. Many of these devices are hybrids between traditional human-powered equipment that are allowed on most trails and paths today—such as bicycles and kick scooters—and motorized equipment that are frequently not allowed due to the speeds they can attain—such as motorcycles and mopeds. The question trail managers must answer is two-fold: what types of motorized vehicles must I allow and what types are desirable to allow. The question is very case-specific and must factor in intended trail users, ADA laws requiring access using personal mobility devices (refer to Accessibility discussion earlier in this chapter), user demand, and maintenance considerations. While the question is a
Virginia Department of Conservation & RecreationGreenways and Trails Toolbox • Trail Design
Land Acquisition & Trail Development • Chapter 4 -��
Resources:
Hancock, Jan, Kim Jones Vander Hoek, Sunni Bradshaw, James D. Coffman, and Jeffrey Engelmann. “Equestrian Design Guidebook for Trails, Trailheads, and Campgrounds.” Missoula, MT: USDA Forest Service Technology and Development Program, 2007.
TOOLBOX TIP:Refer to the report titled “Conflicts on Multiple Use Trails: Synthesis of the Literature and State of the Practice” developed by FHWA and the National Recreational Trails Advisory Committee. This report contains 12 principles for minimizing user conflict on shared-use trails and paths. It is available on-line at:
http://atfiles.org/files/pdf/Conflicts.pdf•Hand-crank water pumps allow mobility-impaired equestrians to fill water containers for horses. Courtesy of Simple Pump.

difficult one, working with all stakeholders through meetings, joint discussions, and compromise is the first step in finding a resolution that works for the majority of trail users. A good deal of research and information exists on managing user conflicts on trails and paths. IMBA, FHWA, the U.S. Forest Service, and the book Trails for the Twenty-first Century offer techniques and ideas for managing conflict. In general, they focus on the need to educate trail users, design the trail to minimize conflicts, regulate trail use, and encourage discussions among diverse user types.
EducationFewer conflicts may arise if trail users understand the trail they are on and the other user types they may encounter. Signage that explains and identifies trail routes, who is allowed to use which portions of trail, and other pertinent information will go a long way toward making users aware of the rules of the trail and less likely to be surprised and upset.Paid and volunteer trail patrols can also canvass the trail routes and keep an eye out for potential conflicts as well as help resolve those in progress. Clinics, brochures, trail “open houses,” and information sessions help make new and existing users—as well as nearby residents—aware of trail characteristics and etiquette. This is a form of prevention that is worth the extra time and cost.
Trail DesignConflicts should be addressed before the trail is constructed through proper design. After identifying your users, develop a trail system that minimizes potential problems.The keys to managing conflict through design are:
Providing adequate trail mileageProviding diverse trail experiencesDesigning proper trail widthsControlling speeds
Adequate trail mileage means constructing, if possible, enough trail to prevent overcrowding. This may mean a single length of trail or multiple trails
••••
within the same system. Providing diverse trail experiences with a variety of trail styles helps divide user groups who may otherwise experience conflicts. For example, a section of your trail or trail system may be designated for pedestrian-use only while another section is limited only to equestrians. The division can be made clear through signage or changes in materials. Signs are useful to indicate which sections are off-limits to which users. Changes in surface material physically prevent some users from continuing on. An example would be switching a path surface from asphalt to aggregate to limit how far in-line skaters and skateboarders can go. Proper trail widths allow for comfortable passing, both from opposite directions and for users who are traveling faster than people in front of them. Trail widths can be made continuously wide enough for comfortable passing or techniques such as bump-outs can be utilized to designate specific passing areas. Continuous trail widths are recommended on heavily-trafficked and urban frontcountry trails and paths and bump-outs are recommended in rustic settings where minimal impact to the environment is recommended. Speed is a major concern for walkers and recreational bicyclists. Some users fear that mountain bikers, fast-moving horses, cars, and road bicyclists who travel at high speeds will injure other, slower users. Speed limit signs are typically ineffective because very few people can gauge how many miles per hour they are moving without a speedometer. More effective methods include designing the trail to limit how fast a user can travel, educating users about proper trail and path etiquette, and posting signs asking users to slow down and yield at intersections and congested sections of trail. Where trails cross roads, warning signs, lights, police ticketing operations, speed radar signs, and other traffic-calming devices may serve to slow down motorists and warn them of upcoming trail crossings.
RegulationsAdopting regulations for trail use is one way to reduce conflicts. Regulations may be legally-binding and enforceable by law or “courtesy” regulations that reflect common trail etiquette. Common regulations
Virginia Department of Conservation & RecreationGreenways and Trails Toolbox • Trail Design
Land Acquisition & Trail Development • Chapter 4 -�0

include allowable users and activities, yielding/passing etiquette, speed limits, pet etiquette, and reminders about local laws.
Consider the following items when developing your trail regulations:
Clearly post regulations at all access points to ensure that all users are provided the opportunity to read and understand your message.
Signs should be universally-accessible.Make sure your regulations are fair and logical
and not weighted for or against one specific user group.
Develop your regulations in concert with all of your intended users, preferably in one group discussion. This allows each user group to air their concerns and feel involved in the process.
Avoid banning users unless they have consistently ignored regulations and cause safety concerns to other groups.
Utilize the procedure of “wheels to heels” where mountain bikers yield to pedestrian and equestrians, pedestrians yield to equestrians, and equestrians have the right-of-way.
Discussions and CooperationThis may be the most important step to managing use conflict because it affords the opportunity for
•
••
•
•
•
various trail user types to engage in dialogue and volunteerism in order to develop friendly and stable relationships. Trail users who feel that they were adequately involved in planning, developing, and managing the trail are often less likely to develop bad habits that promote conflicts and more likely to forgive etiquette mishaps by other user groups. Consider the following items when designing, developing, and managing your trail:
Engage all of your intended user groups in discussions when you begin planning your trail. Their feedback will produce a better trail design and they will feel a connection to the final product.
Bring all user groups together for at least one meeting to discuss conflict concerns prior to finalizing your trail design. Designate someone from your trail organization to act as a facilitator to ensure that useful, candid, and polite dialogue is achieved.
Create shared-use events that bring different groups together for volunteer days or for recreation activities. IMBA holds “Romp and Stomp” events where mountain bikers and equestrians convene and switch mounts for a day.
Promote trail groups that are comprised of multiple user types, such as “Friends of” organizations.
•
•
•
•
Virginia Department of Conservation & RecreationGreenways and Trails Toolbox • Trail Design
Land Acquisition & Trail Development • Chapter 4 -��
Resources:
Flink, Charles A., Kristine Olka, and Robert M. Searns. Trails for the Twenty-First Century: Planning, Design, and Management Manual for Multi-Use Trails. 2nd ed. Washington: Island Press, 2001.
Webber, Pete, ed. Managing Mountain Biking: IMBA’s Guide to Providing Great Riding. Boulder, Colorado: International Mountain Bicycling Association, 2007.
Regulatory signage used to mitigate user-conflicts. Courtesy of IMBA/Rich Edwards.

Environmental ConsiderationsTrails and paths are popular because users can experience the pleasures and challenges of traveling within the natural environment. Be it a stroll along a city sidewalk, a challenging bike ride, or a simple hike, people choose to use trails rather than highways and cars because it brings them in contact with nature. It is fitting, then, that trail managers and designers should strive to plan and construct trails in the most environmentally-friendly and non-invasive manner possible to protect settings and qualities that trail users enjoy. The ultimate goal for a well-designed trail is to minimize impact on the landscape while meeting the needs of trail users.This section provides an overview of environmental issues to consider when you are planning your trail route, selecting trail materials and surface types, or working with consultants. Topics such as preserving vegetation; avoiding wetlands and invasive species; understanding the basics of soils and topography; and other items will help you understand the complexities of trail construction and environmental sensitivity. The information provided here is a brief glance at environmental issues. For more detailed information, which will be required when planning and design move forward, you must contact and work with the appropriate agency representatives.
Preserving VegetationTrees, shrubs, wildflowers, and other plants are key elements to the success of a trail. Vegetation provides, among other things, shade, wildlife habitat, color and visual interest, protection from wind, and erosion control. Well-designed trails work with existing vegetation patterns to limit the loss of plants. Three important concepts when discussing vegetation preservation are: understanding riparian buffers, thinning versus clearing vegetation, and protecting vegetation during construction.
Riparian Buffers“Riparian” is defined as related to, living on, or located on the edge of a natural watercourse such as a stream or river. Riparian buffer is the term given to ecosystems that grow along these watercourses.
Riparian buffers are important because they provide wildlife habitat, create shade, remove pollutants from run-off before it enters the waterway, and provide bank stabilization through root mass. Many trails are located along or within riparian buffers to take advantage of views, proximity to wildflowers, and shade. It is important, then, that trail design acknowledges sensitivity of these buffers.
In Virginia, riparian buffers along waterways within the portion of the watershed of the Chesapeake Bay defined as Tidewater Virginia are protected by the Chesapeake Bay Preservation Act. Language in this act requires that a riparian buffer of at least 100 feet be located “adjacent to and landward of all tidal shores, tidal wetlands, certain associated non-tidal wetlands, and along both sides of all water bodies with perennial flow.” These features—including the 100-foot buffer—are called a Resource Protection Area (RPA). The RPA buffer area must be maintained in its natural condition although removal of some vegetation for sight lines, vistas, and construction of trails is permissible. Tidewater Virginia includes 84 local governments and approximately one-third of Virginia. While watercourses outside of Tidewater Virginia are exempt from the 100-foot RPA buffer requirement, maintaining such a buffer is considered good practice as it preserves and enhances the health of the waterway and experience of recreational users. Virginia’s Department of Conservation and Recreation Chesapeake Bay Local Assistance Division offers guidance for designing trails adjacent to and within riparian buffers. Refer to
Virginia Department of Conservation & RecreationGreenways and Trails Toolbox • Trail Design
Land Acquisition & Trail Development • Chapter 4 -��
Riparian buffer along the Smith River. Courtesy of DCR.

their Riparian Buffers Modification & Mitigation Manual for detailed information. In general, the manual suggests minimizing impacts to the buffer by limiting the length of trail located within the buffer; keeping trail slopes to less than 5% grade to limit erosion; and limiting clearing of vegetation.
Thinning vs. Clearing VegetationTrail managers and designers often want to route trails through or adjacent to wooded areas to take advantage of scenic and natural environments. This will almost always result in removal of vegetation. The level of removal defines the difference between thinning and clearing vegetation. Thinning is described as selective removal of individual plants. Clearing is described as removal of numerous plants or areas of plants in a single or multiple events. Both activities are useful in trail construction.Thinning is typically done in order to create space for a narrow trail or to create or enlarge views. Singletrack mountain bike trails through woods may require only the removal of trees and understory growth one plant at a time in order to carve out an enjoyable trail. Removing just a few select trees may open up a spectacular view that was previously overgrown. The key concept to remember about thinning is that removing only a few plants may make a big impact on your trail. Clearing is typically done when a wider, more level trail or path is planned and whole sections of vegetation must be removed to achieve an open corridor for construction. In general, the wider the trail and the more grading that is necessary, the more clearing must be done. When clearing is required, it should be done as sensitively as possible by using the smallest equipment feasible for the project, ensuring that vegetation to remain is clearly marked, and erosion and sediment controls are in place. If you are using a professional contractor, consider adding a clause to the contract that states
what type of equipment or vehicles are allowable within the limits of construction. The important points to keep in mind are to avoid removing existing vegetation unless necessary and to use thinning and clearing in appropriate situations.
Protecting Vegetation During ConstructionTrail and path construction sometime requires heavy equipment to clear trees, excavate soil, compact stone, or lay asphalt. When construction occurs near vegetation that is intended to remain in place, certain protections must be put in place. Vegetation to remain should be clearly marked with surveyor’s tape, surveyor’s flags, spray paint, or some other highly-visible method. The vegetation should also be set apart from construction areas using tree protection fence. The limits of vegetation
Virginia Department of Conservation & RecreationGreenways and Trails Toolbox • Trail Design
Land Acquisition & Trail Development • Chapter 4 -��
Resources:
Chesapeake Bay Local Assistance “Riparian Buffers Modification & Mitigation Manual”
http://www.dcr.virginia.gov/chesapeake_bay_local_assistance/ripbuffmanual.shtml•
Selectively thinning vegetation to make room for a trail. Courtesy of IMBA/Rich Edwards.
Clearing vegetation to widen a trail corridor. Courtesy of Roanoke Valley Greenways.

to be protected should be clearly marked on plans or construction drawings. Finally—and most importantly—your contractor, volunteers, or others performing trail construction must be informed about vegetation that is to remain versus vegetation that is to be thinned or cleared.
Invasive Alien PlantsThe Virginia Department of Conservation and Recreation defines alien, exotic, and non-native plants as “species [that were] intentionally or accidentally introduced by human activity into a region in which they did not evolve.” Despite their non-native status, alien plants can be beneficial and not affect the natural environment. When alien plants become invasive, however, they have the ability to out-compete and eradicate native species which may result in loss of wildlife habitat, alteration of ecosystem processes, and infestation of lawns and crop fields.
In regard to trail design and construction, most invasive alien plant problems deal with managing what exists and avoiding introduction of new alien plants into the trail corridor. Most invasive alien plant species thrive on disturbed soils and will utilize new and existing trails as a means to expand into new, previously uninfected areas. If an invasive alien plant infestation is particularly bad, the plants may overtake the trail corridor faster than maintenance efforts can keep up resulting in reduced vertical and horizontal clearances and increased maintenance costs. Another example would be if a trail were planned to take advantage of native wildflower blooms, yet the wildflowers were out-competed within a few years by invasive alien plants thus reducing the quality of the natural setting and reducing the aesthetics for trail users.The proliferation of Japanese Stiltgrass (Microstegium vimineum) upon disturbed earth provides an excellent case study. Japanese Stiltgrass is an annual grass that spreads quickly by depositing seeds in disturbed earth and rooting where stem nodes touch the ground. It thrives in numerous conditions and forms extensive patches that outcompete native plants. Stiltgrass seeds are viable for five or more years and germinate quickly. Once an area of disturbed earth is infested with Stiltgrass, the plant then spreads outward into surrounding areas. This is just one example of how invasive plants can quickly colonize an area of disturbed earth and beyond. Trail managers and designers should consider these steps when addressing invasive alien plant issues:
Undertake an inventory of invasive alien plants throughout the proposed trail corridor during the trail planning stages to identify what problem plants exist and the extent of infestation. Develop an invasive alien plant management plan if the site and problems are complex.
Discuss whether the invasive alien plants must be removed from the trail corridor prior to construction and who will undertake removal. Both volunteers and general contractors are able to remove invasive alien plants.
Determine appropriate removal methods based on extent of infestation, proximity to vegetation that will remain, proximity of water, estimated cost, and time of year. Methods may include chemical
•
•
•
Virginia Department of Conservation & RecreationGreenways and Trails Toolbox • Trail Design
Land Acquisition & Trail Development • Chapter 4 -�4
TOOLBOX TIP:The Virginia Erosion and Sediment Control Handbook (VESCH) offers guidance related to tree protection techniques that protect both vegetation and surrounding environment. Refer to Chapter 3.38 titled “Tree Preservation and Protection.”
http://www.dcr.virginia.gov/stormwater_management/e_and_s-ftp.shtml•
Proliferation of Japanese Stilt Grass within a trail corridor. Courtesy of DCR Natural Heritage.

applications (herbicides), mechanical methods (power tools and hand-pulling), or a combination of the two.
Consider proximity to waterways and wetlands when applying herbicides. Use manual removal methods or herbicides that biodegrade in water.
During the design phase, avoid using invasive alien plants. Many professional consultants are aware of the benefits of native plants and are knowledgeable about which species are considered invasive aliens.
Take time to learn which invasive alien species may already be present in your areas in order to identify problems early and then address issues rapidly. Addressing invasive alien species as soon as possible will save significant time and money over the lifetime of the trail and is the best way to protect native species in your area.
Take measures during the construction phase to avoid introducing weeds into the construction site and limit soil disturbance. Invasive alien seeds and unwanted weeds can be tracked into a site on muddy tires, horse hooves, inside straw bales, through the application of grass seed that has not been certified to be weed-free by State standards, and other methods. Proper cleaning of construction equipment and boots, use of clean straw and mulches, and use of certified grass seed are among the measures that can limit introduction of invasive alien plants. Seeds quickly germinate and take hold in disturbed soil, therefore limiting disturbance can prevent growth of unwanted plants.
•
•
•
•
Erosion & Sediment Control/Stormwater Management During Construction or RehabilitationEarlier in this chapter, permits and reviews for erosion and sediment control and stormwater management were discussed. It is also helpful to understand the types of controls exist to limit erosion, prevent sediment from entering waterways, and manage the quantity and quality of stormwater moving through your trail project. Note that this section refers to techniques placed around or adjacent to the trail tread. Refer to the section on Trail Design for methods of planning and construction trail tread to limit erosion and damage from run-off. Whenever soil is disturbed, it loses its ability to withstand wind and water erosion. Vegetation, roots, and native compaction are lost when construction calls for land-disturbing clearing or excavation. Erosion and sediment controls—typically referred to as “E&S controls”—are put into place to both limit land disturbance at the outset and to limit and contain stormwater run-off when soil is exposed during construction. Stormwater management methods help contain stormwater run-off from rain events in order to limit erosion and improve the quality of water entering natural waterways. One concern voiced repeatedly by trail planners and managers is that E&S and stormwater controls required by localities and based on State standards often disturb more soil than the actual trail construction itself. Although all state and local
Virginia Department of Conservation & RecreationGreenways and Trails Toolbox • Trail Design
Land Acquisition & Trail Development • Chapter 4 -��
Resources:
Mid-Atlantic Exotic Pest Plant Councilhttp://www.ma-eppc.org/
Virginia DCR “Managing Invasive Plants in Natural Areas, Parks, and Small Woodlands”
http://www.dcr.virginia.gov/natural_heritage/documents/mnginv.pdfVirginia DCR Natural Heritage “Invasive Alien Plant Species of Virginia”
http://www.dcr.virginia.gov/natural_heritage/invspinfo.shtml
•
•
•
Virginia DCR Natural Heritage Invasive Plant List
http://www.dcr.virginia.gov/natural_heritage/invsppdflist.shtmlVirginia DCR Natural Heritage Native Plants For Conservation, Restoration, and Landscaping
http://www.dcr.virginia.gov/natural_heritage/nativeplants.shtmlVirginia Native Plant Society
http://www.vnps.orgWeeds Gone Wild: Alien Plant Invaders of Natural Areas (National Park Service)
http://www.nps.gov/plants/ALIEN/
•
•
•
•

standards must be followed, alternative techniques exist and are being developed that address the need for controls but acknowledge that instances of land disturbance vary greatly in scale. In other words, a linear trail project may not require as extensive controls as a multi-acre townhome development. Solutions are available by speaking with your plan reviewing authority about available alternatives and by researching what other communities have accomplished with alternative best management practices. Best management practices (BMPs) are structures or facilities that reduce the impacts of development or land disturbance on water quality and aquatic habitats. BMPs include detention and retention ponds; vegetated filter strips; bioretention ponds and rain gardens; grassed swales; and manufactured systems such as Americast’s Filterra curb inlets. Most BMPs have been utilized for many years given their reliability and widespread acceptance. Alternative BMPs, however, are unconventional techniques that tend to accomplish the same goals but in a way that is more suited to a specific site or project; alternative BMPs may not be immediately accepted by a plan reviewing agency. If you are interested in applying alternative BMPs to your project, begin discussions with your plan reviewing agencies early in the process and be prepared to use examples, case studies, and research to make your case.
Soils, Soil Surveys, and TopographyExisting soil types and topography are key factors in the way a trail is planned and designed. The qualities of soils and steepness of the topography directly impact the proposed alignment of a trail, how it is constructed, and how long the trail will hold up to weather and wear-and-tear. Trail managers and designers must consider both elements when planning a trail.
Overview of SoilsIMBA’s Trail Solutions guide states, “there are three basic types of [soil] particles: sand, silt, and clay. Each differ in size and shape, and therefore affect different physical properties of the soil, such as its ability to drain.” Sandy soil drains well but is very loose and unstable. If you pick up a handful of dry sandy soil, you can see the grains of sand and it will easily slip through your hands. When the soil is wet, it will form a ball that crumbles easily. Sandy soil will not puddle or pond very easily, but does not make a stable underlayment for paved trails.
Silty soil retains more water than sand because it has smaller particles. These smaller particles also make silty soil more susceptible to erosion. Silty soil feels smooth and powdery when dry. When wet, it feels smooth—although not sticky—and crumbles apart. Clay soil has the smallest particles; these particles are shaped like flakes. Clay soil holds a great deal of water and therefore drains very poorly. When dry, however, clay soils are very hard and durable. Clay soils are identifiable by clods of dirt that are hard to break apart when dry. When wet, clay soils easily form into a ball and may stain your fingers.
Virginia Department of Conservation & RecreationGreenways and Trails Toolbox • Trail Design
Land Acquisition & Trail Development • Chapter 4 -��
TOOLBOX TIP:The International Mountain Biking Association (IMBA) developed a quick, on-site soil test that provides a general idea of soil type. While not a substitute for soil surveys or chemical soil analysis, IMBA’s test will give you a first impression of what soil-related issues and remedies you may need to address. Refer to Appendix 4-I for basic field soil tests from IMBA and the NRCS.
Resources:
Best Management Practices for Erosion Control During Trail Maintenance and Construction
http://www.novaregion.org/DocumentView.aspx?DID=1676Guidelines for the Innovative Use of BMPs in Fairfax County, VA
http://www.fairfaxcounty.gov/dpwes/publications/bmp_guide.pdfVirginia Erosion and Sediment Control Handbook (VESCH)
http://www.dcr.virginia.gov/stormwater_management/e_and_s-ftp.shtmlVirginia Stormwater Management Handbook
http://www.dcr.virginia.gov/stormwater_management/stormwat.shtml#vswmhnbk
•
•
•
•

Loamy soil is the most suitable for construction activities such as trail building. This is because loamy soils contain a mixture of sand, silt, and clay particles thereby mitigating the worst properties of all three. Loamy soil tends to drain well, compact well, and be relatively easy to work with. When dry, loamy soil clods are moderately difficult to break apart and can be gritty to the touch. When wet, it is neither very gritty nor sticky and forms a firm ball when squeezed.
How to Obtain Soil InformationMost designers and plan-reviewing entities will want to know the soil types upon which the trail or path will be constructed. This information helps designers understand how to grade and construct the trail and helps plan-reviewers—such as erosion and sediment control reviewers and VDOT—ensure that trails will not pose a risk to the health, safety, and welfare of users. Soil information can be obtained in two ways: through a soil survey and through soil samples.
Soil SurveysMost plan reviewing agencies will accept soil survey information as proof that the trail is being designed on appropriate soil types. At one time, soil surveys were only available in book form either in your public
library or from an agricultural extension office. Now, the USDA Natural Resources Conservation Service makes soil information for most of the United States available on-line through their Web Soil Survey website. This website allows the public to define their project area using an interactive map and then retrieve soil maps and associated soil data. The website offers in-depth information on the qualities, constraints, and possible uses for the soil types located within your project boundary. The website also allows users to print reports tailored to their project boundaries that include an aerial-view soil map, legend, and listing of site-specific soil types.One element of a soil survey that designers, trail builders, and plan reviewers may look at is the K factor. The K factor indicates the susceptibility of a soil to sheet and rill erosion by water. K factors range from 0.02 to 0.69; higher ranges are more susceptible to erosion. The K Factor, however, is more relevant to large areas of denuded soil such as farming and higher-acreage building sites rather than linear trail corridors. Therefore K Factors aren’t necessarily good indicators of erodibility on a trail built using sustainable practices within a narrow corridor. It should also be noted that trails and paths give value to lands that are deemed undevelopable by traditional standards based on the existing soil condition.
Soil TestingSoil testing provides an in-depth chemical analysis of the organic and mineral composition of a particular soil sample. Soil testing is primarily used during construction to evaluate the existing soil’s potential to support plant life and what additional additives and fertilizers might be needed to improve the soil’s performance. Soil testing is not necessary to plan and design the trail. If a general contractor is building your trail, they will likely be obtaining soil samples and soil test results as part of their contract. If volunteers or other entities are building your trail, you can obtain soil tests through your local Virginia Cooperative Extension office. The Extension office will provide you with small cardboard boxes and instructions for obtaining the soil samples. You will send the boxes directly to the
Virginia Department of Conservation & RecreationGreenways and Trails Toolbox • Trail Design
Land Acquisition & Trail Development • Chapter 4 -��
Soil Textural Triangle showing percentages of clay, silt, and sand for each soil type. Courtesy of USDA Natural Resources Conservation Service.

Virginia Tech Soil Lab for analysis. The tests cost $10 and $17 depending on the amount of information you wish to receive. The Soil Lab will provide your results through the mail or via your local Extension office.
Working With A Geotechnical EngineerA geotechnical engineer—or “geotech”—is concerned with sub-surface conditions of the ground. They are specially trained to understand soil and rock conditions and address issues that might arise from problematic soils. Geotechnical engineers are most often used on paved path projects that require a stone sub-base. They may, however, be called upon for any type of trail project where the soil is too wet, unstable, rocky, or otherwise unsuitable and the trail or path simply cannot be routed in any other location. For paved paths, the primary task of a geotechnical engineer is to perform tests on the soil and sub-base material to ensure that both have been compacted enough so that the trail will remain firm and stable for the foreseeable future. In cases where unsuitable soils are uncovered before or during construction, the geotechnical engineer can make recommendations for mitigating poor soils.The requirement for a geotechnical engineer is typically stated in the construction documents. Either the trail manager (also referred to as the Owner) or the contractor can hire the geotechnical engineer, although both options have drawbacks. If the Owner hires the geotech, then the Owner must pay for these services. The Owner, however, can then feel comfortable that the results and findings reflect the best interests of the project. If the contractor is asked to hire the geotechnical engineer, the Owner may not be liable for this cost yet the geotechnical engineer is then in the employ and under the
direction of the contractor. The decision regarding who hires a geotechnical engineer should be based on the amount of money available for the project, the likelihood that problematic sub-surface conditions will exist, and your comfort level with local and regional contractors.
Understanding Topography, Slopes, and GradesTopography can be described as the shape and slope of the land. Topography can be either “existing,” referring to the current shape of the landscape or “proposed,” referring to the desired shape of the landscape after construction is complete. Topography is expressed on drawings and plans as contours. Contours are lines that connect points of same elevation. For example, if you see a contour line on a plan marked with the number 680, the entire length of that contour line represents an elevation of 680 feet above mean sea level. On plans, existing contours are shown as dashed lines and proposed contours are shown as solid lines. Existing contours identify the current shape and slope of the topography while proposed contours show how the topography should be altered in order to build the trail or path.
Designers use the horizontal distance and vertical elevation difference between adjacent existing contours to determine the slope or grade of a trail corridor. They can then determine how to draw the proposed contours to either increase or decrease the slope. The formula for determining the slope of the ground is slope equals rise over run times 100. Slope is the grade of the ground expressed as a percentage, rise is the vertical distance (or elevation) between two contours, and run is the horizontal distance between two contours.
Virginia Department of Conservation & RecreationGreenways and Trails Toolbox • Trail Design
Land Acquisition & Trail Development • Chapter 4 -��
Resources:
USDA Natural Resources Conservation Service Web Soil Survey
http://websoilsurvey.nrcs.usda.gov/app/HomePage.htmVirginia Cooperative Extension/Virginia Tech Soil Testing Lab
http://www.soiltest.vt.edu/
•
•
TOOLBOX TIP:Refer to Appendix 4-J for the slope equation and handy tips and tricks for understanding slope and grade.

Designing With TopographyThe best way to design a trail or path in order to limit damage to the environment is work with the existing topography instead of against it. In other words, trail designers aim to use the existing grade as much as possible and limit the amount of soil they have to disturb in order to achieve their design intent. Trails that are designed in concert with existing topography are often less expensive, less damaging to native habitats, less susceptible to erosion, and more apt to be universally accessible. IMBA has developed numerous guidelines for designing with topography in order to create the most sustainable trails possible. Below are three rules-of-thumb for working in concert with existing contours. Note that these rules should be used in conjunction with universal accessibility regulations where applicable. While these rules are mainly intended for natural-surface trails, they also provide a good starting point to begin laying out paved trails and paths.
Half RuleThe grade of a trail or path should not exceed half the grade of the hillside or sideslope that the trail traverses.For example, if you would like to build your trail on a hill that has an existing grade of 20%, the trail’s running slope should not exceed 10%. On very steep grades, even trails that follow the half rule will erode. In these locations, use additional precautions such as armoring and constructed drainage features to reduce water velocity and erosion.
Ten Percent Average GuidelineIn general, an average trail grade of 10% or less is most sustainable. An average trail grade is the slope of the trail from one end to the other, regardless of topographical variations in between. Some trail sections may be steeper or gentler than 10%.Average grade is calculated by dividing the total elevation gain by the total trail length then multiplying by 100 to convert to a percentage. This is the same standard slope calculation described earlier but done for the entire trail route at once. This rule is most applicable to trails or paths that
climb or downgrade consistently. Where only a short section of trail is steep and the rest is routed upon gentle slopes, address only the steep section to avoid determining an average that is misleadingly low.
Virginia Department of Conservation & RecreationGreenways and Trails Toolbox • Trail Design
Land Acquisition & Trail Development • Chapter 4 -��
The Half Rule. Courtesy of IMBA.
Illustration of the Ten Percent Average Guideline. Courtesy of IMBA.

Maximum Sustainable GradeIMBA defines “maximum grade” as the steepest section of trail that is more than 10 feet in length. Maximum sustainable grade is the steepest grade that your trail can maintain before erosion and use causes damage to the tread and shoulders. Maximum sustainable grades typically range from 15% to 20%, but are very site-specific. Actual maximum sustainable grades vary depending on type and number of trail users, soil types, climate, and difficulty level. Design trails with conservative grades until you feel comfortable working with your local site characteristics.
Designing In Concert with Environmentally-Sensitive AreasEnvironmentally-sensitive areas such as wetlands, wildlife habitat, and cultural sites can provide one of the biggest draws for your trail or path. Yet trails can bring harmful impacts to these areas if not properly planned. In earlier sections, you’ve read about background research and permitting necessary to build your trail. This section provides an overview of how to use the opportunities and constraints of environmentally-sensitive areas located within your trail corridor as an advantage and how to limit potentially damaging construction and trail use impacts.
Adjusting the AlignmentAdjusting the alignment of the trail to avoid sensitive areas provides the surest form of protection for resources that may be damaged during construction or trail use. Sensitive areas that legally must be avoided or should be avoided based on principles of stewardship should have been identified during the permitting and planning stages of your trail. Based on this research, your design consultant will route the trail to avoid certain locations such as endangered species habitat or archaeological resources. Routing the trail away from resources, however, removes some potential for first-person educational experiences.
MitigationIn some instances, a trail or path can be constructed
to interact with sensitive resources yet not cause irreversible damage. For example, a trail might continue through a wetland as a boardwalk on pilings rather than an at-grade paved surface. As a general rule, pilings cause less impact because they require only individual footings of limited circumference rather than continuous excavation. Another example would be routing a trail close to a Civil War earthwork but not so close that trail users are tempted to leave the trail to touch the earthwork. In these cases, signage, fencing, and/or rope barricades allow trail users to see and understand cultural resources but make it clear that they are not to leave the trail.
No rules or standards exist for mitigating trails near environmentally-sensitive areas. General common sense, a good understanding of the types of users you expect on your trail, and respect for the resource in question must prevail when deciding how to locate a trail or path in or near these areas. In addition, the significance and fragility of the resources must be taken into consideration.
Considerations: Mitigation allows trail or path users to see sensitive areas and gain a better understanding of the resources. The potential, however, for trail or path users to attempt to interact with the resources is higher and therefore the potential for damage to the resources is higher.
•
Virginia Department of Conservation & RecreationGreenways and Trails Toolbox • Trail Design
Land Acquisition & Trail Development • Chapter 4 -40
Adjusting trail alignment to avoid sensitive resources. Courtesy of LPDA, Inc.

InterpretationWhile having environmentally-sensitive areas within your trail corridor requires additional thought and paperwork, it can be truly exciting to have such resources. The opportunity to incorporate educational moments into recreation provides a well-rounded trail experience. Interpretation can be accomplished in many ways. Signs, kiosks, hands-on exhibits, and camouflaged wildlife viewing blinds are just a few of the creative ways to engage trail users in the surrounding environment. As with trail mitigation, any built interpretive element must be sited and installed in a careful manner to avoid harming sensitive resources. Sign and panel footings must be as small as structurally possible, grading for platforms or bump-outs must be kept to a minimum, and elements must be kept out of wildlife habitat. Interpretation in environmentally-sensitive areas should be about understanding, not interacting, with the resources.
Considerations: Interpretive elements engage trail users and expand the trail experience in a positive manner. Without careful planning and installation, however, interpretive elements may encourage interaction with or damage sensitive resources. Refer to the section of the Toolbox entitled “Trail and Path Amenities” for more information about educational and interpretive signage.
Standard Trail Types and SurfacesNumerous types of trails and paths exist and selecting the right one to best meet the needs of your expected trail users will ensure that your trail will be well-used and enjoyed for years to come. Selecting an appropriate trail or path type means identifying and understanding potential trail users, existing environmental conditions, funding source standards, and cost limitations. Selecting a surface—the actual material that users will walk, hike, or ride upon—goes hand-in-hand with choosing a trail type. Often, but not always, selecting a trail type will help narrow surfacing options. The information in this section is intended to help you understand the basics of typical trail types and guide you in making an informed choice about what trail type is best for you. Matrices and field
•
guides provide assistance as you work toward your decision. The field guides are designed to be copied and or removed from the toolbox and taken along on site visits.
Choosing A Trail TypeChoosing a trail type depends almost exclusively on the location of your trail or path and the potential users you identified during the master planning stage. For example, mountain bikers prefer the challenging topography and natural settings of mountain bike trails and suburban walkers and joggers often prefer paved paths. The difficulty in choosing a trail occurs when you expect multiple users with differing needs on the same trail. These trails are often called “shared use.” In these cases, you must select and design a trail that will meet the needs of the most complex user. You will also want to avoid labeling a trail for a single use if multiple user types are expected. For example, a single backcountry trail might be utilized by hikers, mountain bikers, and equestrians. In this instance, the trail must accommodate all three user types and should be named something to the effect of “Nature Trail,” “Oak Trail,” or “Activity Trail” in order to avoid excluding any uses. Refer to the Trail Type Decision Matrix in Appendix 4-K for assistance selecting a trail type.
Choosing a Trail SurfaceTrail surfaces—also called “tread” or “wearing course”—are often determined by the type of trail selected. It is rare to find a concrete hiking trail or an aggregate/crushed stone mountain bike trail. This is because the selected surface must meet the needs of the intended trail user as well as the environment in which it will be placed.The Rails-To-Trails Conservancy recommends that trail managers consider the following factors when selecting a surface:
User acceptance and satisfactionWill the intended user feel comfortable using this surface? Does the surface type match the likely activities that trail users will engage in?
•
Virginia Department of Conservation & RecreationGreenways and Trails Toolbox • Trail Design
Land Acquisition & Trail Development • Chapter 4 -4�

AccessibilityWill a firm and stable surface be provided to accommodate people with physical impairments?
Cost to purchase and install materialsHow does the cost to purchase and install a material compare with other surface types?
Cost of maintaining the surfaceHow much will it cost to maintain this surface type over its typical lifespan?
Life expectancyHow long can the surface type be expected to last before complete replacement or major repairs are required?
Availability of materialHow easy is it to obtain the surface material type in a particular location? Will shipping or hauling costs be prohibitive? Refer to the Trail Surface Decision Matrix in Appendix 4-L for additional assistance. This matrix takes into account the factors listed above as well as additional categories useful for selecting appropriate surface types. Trail surfaces can be broken down into two categories: hard surfaces and soft surfaces. Hard surfaces tend to be used more often in frontcountry situations, although some hard surfaces can be used in wooded or rustic areas. Soft surfaces are almost exclusively used in rustic settings where trail builders desire minimal environmental and visual impact.The Rails-To-Trails Conservancy advises considering the following pros and cons of hard surfaces and soft surfaces.Hard Surface:
More accommodating for shared-use trails More expensive but requires less maintenance
and can withstand frequent useSoft Surface:
Less expensiveOften does not hold up well under heavy use or
varying weather conditions
•
•
•
•
•
••
••
Hard Surfaces:Asphalt – Works well for bicycle commuters or inline skaters but typically cannot be used by equestrians; requires minor maintenance such as crack patching, yet has a life expectancy of 7 to 15 years; possible environmental contamination during construction. Often used in developed areas and near trailheads and access points.
Chip and Seal –Also called prime and double seal; a technique where layers of liquid asphalt and stone chips are applied to base material. Chip and seal is a lower-cost alternative to asphalt paving and requires minimal maintenance. The surface may be too rough for in-line skaters. Concrete – Hardest, most expensive, and longest lasting (up to 25 years or more); appropriate for urban areas with severe climate swings and susceptibility to flooding.
Virginia Department of Conservation & RecreationGreenways and Trails Toolbox • Trail Design
Land Acquisition & Trail Development • Chapter 4 -4�
Asphalt trail at Mason Neck State Park. Courtesy of DCR.
Chip and seal trail; Ivy Creek Park, Lynchburg, VA. Courtesy of LPDA, Inc.

Pervious Concrete – Pervious concrete is made of carefully controlled amounts of water and cementitious materials, and no sand, that are combined to create a paste. When the paste is
added to aggregates, it forms a coating that binds the aggregates together. Because the paste helps the aggregate stick together but does not fill the spaces between, voids are created that allow water to pass through. The final material is as hard as concrete but the surface is much rougher. Pervious concrete is more expensive than regular concrete. Due to the rough surface, it is not suitable for use by equestrians or inline skaters but is considered universally-accessible. It is ideal for areas with surface drainage issues.
Compacted Aggregate/Crushed Stone – Can hold up well under heavy use; complements natural landscape; can accommodate nearly every trail user if compacted properly (except inline skaters). This treatment may not be appropriate for areas that flood on a regular basis as the material may wash away. Finer grades of aggregate/crushed stone (VDOT #10) are prone to rilling and erosion on grades steeper
Virginia Department of Conservation & RecreationGreenways and Trails Toolbox • Trail Design
Land Acquisition & Trail Development • Chapter 4 -4�
TOOLBOX TIP:Asphalt, chip and seal, concrete, crushed stone, and soil cement trails all require a multi-layer pavement system in order to meet their full life expectancy. These layers are generally referred to as the wearing course, base course, sub-base course, and sub-grade. Not every trail or path will use all four courses. The definitions below are listed in order of installation. Sub-grade: Sub-grade is the final excavated elevation of soil that provides the ultimate foundation for the trail or path. Sub-grade soil must be compactable in order to prevent the trail or path from buckling or shifting. Sub-Base Course: Sub-base is installed on top of the sub-grade. The purpose of the sub-base is to transfer and distribute the weight from the trail surface to the sub-grade. Sub-base typically consists of 4 to 8 inches of stone which provides bearing strength and improves drainage.Base Course: A layer of stone placed on top of the sub-base to provide a base for the wearing course. Wearing Course: The uppermost and only visible part of a trail that is used as the traveling surface. Sometimes called the tread.
Pervious concrete sidewalk. Courtesy of National Ready-Mix Concrete Association at www.perviouspavement.org.
Concrete trail; Cherry Creek Trail, Denver, CO. Courtesy of National Transportation Enhancements Clearinghouse.
Compacted aggregate trail at Hanging Rock Battlefield Trail in Salem, VA. Courtesy of Roanoke Valley Greenways.

than 5%. Use VDOT #21A or #21B stone for most base, sub-base, and tread conditions. Use VDOT #10 stone over #21A or #21B where an impact-resistant surface is desired, typically for trails frequently used by equestrians. Soil Cement – Mixture of pulverized native soil and Portland cement, rolled and compacted into very dense surface; cheaper than asphalt; drainage is very important to prevent erosion. Heavy bicycle and equestrian use will reduce life expectancy of tread. This treatment may be appropriate where both the appearance of natural soil and a hardened surface are desirable; locations include historic sites and rustic settings. Resin-based Stabilized Material – Resin is a tree product that binds aggregate or soil particles together. It has less environmental impact than asphalt, can be cheaper depending on the length of the trail or path, and blends well with the landscape. Because this product is relatively new, local suppliers may be difficult to locate. This treatment may be appropriate where the both the appearance of natural soil and a hardened surface are desirable; locations include historic sites and rustic settings.
Boardwalk – Includes both natural wood or recycled wood and plastic materials used to form lumber-sized pieces. Used for environmentally-sensitive areas such as wetlands, boardwalk is the most expensive surface to purchase and install. Designs must meet load-bearing standards and should be installed by skilled workers.
Soft Surfaces:Natural Soil Surface – Uses the existing soil as the tread. Maintenance includes fixing drainage problems, repairing eroded areas, removing new vegetation; can be built by volunteers.
Mown Grass – Blends well with rustic surroundings and has minimal impact on environment. May be difficult for people with mobility problems if ground surface is rough or bumpy. Must be mown periodically to maintain a navigable height. Wood Chips – Blends well with the natural environment but decomposes rapidly. Wood chips do not accommodate wheelchair use and require constant maintenance to keep width and surface consistent. The entire surface needs replacement every two years and after major storm events. Can be built by volunteers. Not well-suited for recreational bicyclists.
Virginia Department of Conservation & RecreationGreenways and Trails Toolbox • Trail Design
Land Acquisition & Trail Development • Chapter 4 -44
Resin-based stabilized material trail; Glorieta Pass Trail, New Mexico. Courtesy of Soil Stabilization Products Company, Inc.
Boardwalk bridge on Government Center Trail in Chesterfield County, VA. Courtesy of DCR.
Natural soil surface. Courtesy of U.S. Forest Service.

Stabilized Engineered Wood Surface – Consists of specially-engineered wood chips typically used as fall protection in playgrounds but mixed with a binding agent to create a firm and stable surface. Blends well with rustic surroundings but does not
hold up in high traffic areas or for equestrian use. Good for beach trails and universal accessibility. Sand – Typically found near water and beaches. Sand only provides a firm and stable surface when wet and must therefore be stabilized to provide a universally-accessible route.
Motorized Trails for Off-Highway VehiclesThis section provides an overview of typical motorized trail users, trail types, and tips for creating interesting trail systems.Motorized trails used by off-highway vehicles (OHV) already exist in Virginia. They are located on both public land (within the George Washington and Jefferson National Forests) and private lands. Traditional types of OHVs include 3- and 4-wheel all terrain vehicles (ATVs); dirt bikes; 4-wheel-drive vehicles; and snowmobiles. Newer forms of motorized vehicles include electric-powered dirt bikes and mountain bikes which respond to the desire of the user to be environmentally-conscious yet maintain a certain intensity of recreational
Virginia Department of Conservation & RecreationGreenways and Trails Toolbox • Trail Design
Land Acquisition & Trail Development • Chapter 4 -4�
Resources:
“Choosing Horse-Friendly Surface Materials” in U.S. Forest Service “Equestrian Design Guidebook for Trails, Trailheads, and Campgrounds”
http://www.fhwa.dot.gov/environment/fspubs/07232816/index.htm
Flink, Chuck, Kristine Olka, and Ronert M. Searns. Trails for the Twenty-First Century: Planning, Design, and Management Manual for Multi-Use Trails. 2nd ed. Washington: Island Press, 2001.
National Ready Mixed Concrete Associationhttp://www.perviouspavement.org/index.html
Rails-To-Trails Conservancy Toolbox: Trail Surfaces
http://www.railstotrails.org/ourWork/trailBuilding/toolbox/informationSummaries/trail_surfaces.html
U.S. Forest Service Soil Stabilizers on Universally-Accessible Trails
http://www.fhwa.dot.gov/environment/fspubs/00231202/index.htm
•
•
•
•
Stabilized engineered wood fibers. Courtesy of U.S. Access Board.
Wood chip trail. Courtesy of AmericanTrails.org/Stuart Macdonald.
Mown grass trail in Mint Springs Park, Albemarle County, VA. Courtesy of LPDA, Inc.

activity. The trail types they use depend greatly upon the size of the vehicle and the challenges desired. Motorized multiple-use trails are also of two types: those intended for vehicles designed for off-highway use, such as dirt bikes and ATVs and those intended for vehicles licensed for highway use. Trails for highway-licensed vehicles, such as four wheel drive trucks and jeeps (sometimes called high clearance vehicle trails), often are also used by hikers and mountain bikers. Trails intended for the smaller off-road vehicles can be managed as non-motorized trails through day of week or time of day restrictions. Due to the associated noise, motorized multi-use trails should be located in areas away from non-motorized trails.
OHV parks provide an alternative to trails on public land or trails used by agreement with a private landowner. The book Park Guidelines for OHVs defines an OHV park as “a developed and managed
recreational and educational facility that provides for a variety of riding and driving experiences for off-highway motorcycles, all-terrain vehicles, and four-wheel drive vehicles.” OHV parks range in size from a few acres to thousands of acres depending on the number and type of OHVs the park wishes to serve. OHV parks are typically privately owned either by a sole proprietor or OHV club; both usually charge an entrance fee to cover maintenance, insurance and other costs. The most developed parks have multiple trail loops and difficulty levels, as well as training and event areas, campgrounds, restroom and shower facilities, and parking lots. Given the need for intensive trail development, OHV parks are best located in previously-disturbed sites such as mining areas, gravel pits, and abandoned logging sites.
The biggest sources of concern regarding OHV use are the potential safety hazards to other trail users and potential damage to the environment. Responsible OHV riders, however, follow trail rules and regulations and respect other user groups and the landscape. User conflicts are best managed by creating entirely separate trail systems or by designating time restrictions, as noted above. The benefit of separate trail systems lies in the management of the trail: user conflicts are mitigated, maintenance concerns are reduced, and enforcing time restrictions is not an issue. However, separate trails systems represent a greater cost to build. The benefit of time restrictions—assigning certain days of the week or times of day to each user group—is that a single trail system can be
Virginia Department of Conservation & RecreationGreenways and Trails Toolbox
Land Acquisition & Trail Development • Chapter 4 -4�
ATVs on a motorized trail. Courtesy of NOHVCC.
Off-road motorcycles on a motorized trail. Courtesy of NOHVCC.
Off-highway vehicle performing a rock crawl. Courtesy of NOHVCC.

constructed and maintained. Refer to the section of this chapter entitled “Managing User Conflicts” for more information. When you begin planning your OHV trail, consider incorporating the following characteristics, adapted from Minnesota DNR’s Trail Planning, Design, & Development Guidelines, in order to create an enjoyable and interesting experience:
Trails that have a destination or special interest, such as lakes, rivers, towns, and links to other riding areas.
Primitive roads with narrower tracks for challenging rides.
Easy trails through scenic areas to appeal to touring riders.
Series of escalating challenges spaced out along the trail or within interlinked challenge loops.
Naturally-shaped and engaging trails that enhance the sense of place and offer interesting sequences of events while limiting impacts to surrounding ecological systems.
A variety of trail types and transition zones that intersperse relatively easy segments with tighter technical segments. Not only does this variety present desirable challenges, but helps control speed.
Sequences of events through the use of anchors, edges, gateways, and destinations to make the trail more exciting and riders less apt to leave the trail.
Trails that maintain a compact development footprint by using S-curves, small climbs, smaller obstacles, and limited sight distances. A narrower, slower-speed trail will seem longer and more eventful while limiting impacts on the land.
Frequent, short grades of varying length, height, and spacing to add interest.
Short vertical curves combined with a direction change of 45 degrees or less and a sufficient sight line to create smaller, maintainable challenges.
Narrow tread that is only as wide as needed for the widest permitted use.
Wider tread where easier trails are desired and where intersections or blind curves occur.
Sideslope trail alignments to create a sense of
•
•
•
•
•
•
•
•
•
•
•
•
•
exposure and drama while maximizing drainage to improve sustainability.
Virginia Department of Conservation & RecreationGreenways and Trails Toolbox
Land Acquisition & Trail Development • Chapter 4 -4�
Resources:
Fogg, George E. Park Guidelines for Off-Highway Vehicles.
available for purchase on-line at: http://www.nohvcc.org/Materials/ParkGuide.aspx“Management Guidelines for OHV Recreation” prepared by NOHVCC
available for purchase on-line at: http://www.nohvcc.org/Materials/ManageGuide.aspxNational Off-Highway Vehicle Conservation Council
http://www.nohvcc.org/
National Trails Training Partnership: Motorized Trail Recreation
http://www.americantrails.org/resources/motors/index.htmlTrail Planning, Design & Development Guidelines prepared by the Minnesota Department of Natural Resources, Trails and Waterways Division
available for purchase on-line at: http://www.americantrailsstore.org/items/MNguide.htmlVirginia 4-Wheel Drive Association
http://www.va4wda.org/index.htmWernex, Joe, Off-Highway Motorcycle & ATV Trails: Guidelines for Design, Construction, Maintenance, and User Satisfaction. 2nd ed., American Motorcyclist Association, 1994.
•
•
•
•
•
•
Off-highway vehicle trailhead. Courtesy of NOHVCC.

Trailhead GuidanceTrailheads are considered the main access points to any trail or path. Trailheads are most often the beginning point of any trail where users can convene, rest, and gather information about the trail from signs and maps. They can be parking lots or small seating areas; big or small, trailheads are designed to be unique places along a trail that are visually and physically “different” from the trail alignment itself.
General ConsiderationsPlan your trailhead with your intended users
in mind. If you anticipate equestrian use, make at least one trailhead large enough to accommodate horse trailer parking and/or groups of riders. For single-purpose mountain bike trails, ensure that enough bike racks are available. If you anticipate a large number of elderly or disabled users, provide adequate amounts of seating and seating that is universally accessible.
Some trailhead facilities located along State-maintained rights-of-way require entrance permits from VDOT to connect to the road. Contact VDOT and your local planning authorities to check regulations before you create an access route to a public road.
Select the proper parking lot surface for your intended user group. If you anticipate high volumes of vehicle traffic, especially horse trailers and trucks, consider paving the parking lot with aggregate surfacing. Avoid asphalt surfaces where horses will be loading or unloading due to potential slipping hazards. In backcountry areas, aggregate surfacing, soil cement, or compacted earth are appropriate.
Talk to local emergency and first-responder personnel to let them know where your trailhead will be located. This is particularly helpful if the trailhead is not in a heavily-trafficked or well-known area. Providing the police, fire departments, and other agencies with a map of your trailheads could save time in case of emergency.
LocationMost trailheads should be located with easy
access to developed areas, whether it be a
•
•
•
•
•
subdivision or a campground. This makes reaching the trailhead by car, mass transit, or in large groups easier. This also allows emergency services to easily locate and access the trail.
In frontcountry or highly-developed areas, consider locating your trailhead in conjunction with a park, school, or community center. These public use areas are likely already known by local trail users and facilities, such as parking and restrooms, can be shared.
Trailheads with parking are best located near public roads or private roads that have access agreements.
Locate your trailhead with universal accessibility in mind. This is a requirement for most state or federally-funded trail projects.
Locate your trailhead in an area that has relatively level topography, will not impact sensitive environmental or cultural resources, and is not likely to flood on a regular basis.
AmenitiesPlace safety, informational, directional, and
regulatory signage at your trailhead. Since the majority of trail users will enter the trail at this point, they are more likely to see and read your message at a trailhead.
Consider locating benches, drinking fountains, jug fillers, bike racks, hitching posts, mounting blocks, and other site furnishings at the trailhead. This makes organizing gear, meet-ups, and resting easier both before and after trail use.
•
•
•
•
•
•
Virginia Department of Conservation & RecreationGreenways and Trails Toolbox • Trail Design
Land Acquisition & Trail Development • Chapter 4 -4�
Trailhead at Virginia Blue Ridge Rail Trail. Courtesy of LPDA, Inc.

Locate safety amenities, such as emergency phones and lifesaving equipment, at a trailhead.
Restroom facilities are best located at trailheads since most trail users will utilize these facilities before or after their trip and the facility will not be a visual intrusion along the trail itself.
Road CrossingsGetting trail users safely across roads is one of the most difficult problems that trail planners face. Road crossing solutions can be expensive and, often, regulatory agencies will not approve certain types of crossings. The three primary types of road crossings are listed below, along with certain considerations.
CrosswalksCrosswalks allow trail users to pass directly on top of the road surface to reach the opposite side.Pros
InexpensiveCan be creative and colorfulGood for smaller and less-busy roads and streetsNew technology such as in-pavement lighting
makes them easy to seeCons
Not appropriate for busy and multi-lane roads and highways
•
•
••••
•
Require maintenance to ensure pavement markings remain visible
Tunnels & UnderpassesTunnels and underpasses allow people to pass below the grade of a road, embankment, or other feature in order to reach the opposite side. New tunnels are most often used under busy highways or railroads and consist of box culverts, poured-in-place walls, or sections of pipe large enough to allow clear passage. Existing tunnels are often abandoned railroad tunnels—which may be historically-significant and require reviews and permitting—and have similar opportunities and constraints as new structures.
•
Virginia Department of Conservation & RecreationGreenways and Trails Toolbox • Trail Design
Land Acquisition & Trail Development • Chapter 4 -4�
Resources:
2010 Draft “AASHTO Guide for the Planning, Design, and Operation of Bicycle Facilities.”
http://design.transportation.org/Documents/DraftBikeGuideFeb2010.pdf
Rails-to-Trails Conservancy Toolbox: Plan, Design, Build: Crossings
http://www.railstotrails.org/ourWork/trailBuilding/toolbox/informationSummaries/crossings.html
U.S. Dept. of Transportation. Designing Sidewalks and Trails for Access, Part 2 of 2: Best Practices Design Guide, by Beneficial Designs, Inc. September 2001.
•
•
Resources:
Birchard, William Jr. and Robert Proudman. Appalachian Trail Design, Construction, and Maintenance. Harpers Ferry, WV: Appalachian Trail Conference, 2000. Flink, Chuck, Kristine Olka, and Robert M. Searns. Trails for the Twenty-First Century: Planning, Design, and Management Manual for Multi-Use Trails. 2nd ed. Washington: Island Press, 2001. Hancock, Jan, Kim Jones Vander Hoek, Sunni Bradshaw, James D. Coffman, and Jeffrey Engelmann. “Equestrian Design Guidebook for Trails, Trailheads, and Campgrounds.” Missoula, MT: USDA Forest Service Technology and Development Program, 2007.
Typical road crossing and crosswalk on Lick Run Greenway. Courtesy of LPDA, Inc.

Underpasses route the trail below existing bridges, railroad trestles, and other overhead elements.Pros
Provides easy access around major obstaclesProvides a unique trail experienceBox culverts work well for equestrians
ConsExpensive
May be denied by regulatory agencies or railroadsLong tunnels pose safety issues and may require
lightingRequires proper drainage to avoid flooding or
pondingRequire periodic structural inspection by
qualified engineers to ensure stability
•••
••
•
•BridgesBridges and overpasses allow trail users to pass over obstacles such as waterways, roads, and railroads. Bridges can be small footbridges for pedestrian use only, they can be wide enough to accommodate equestrian traffic, and they can span long distances to cross over rivers and multi-lane highways. Bridges can be either new construction or rehabilitated structures. New bridges may be built on-site if their span is short enough or they may be hauled in on a tractor trailer and set in place. Rehabilitated bridges are most often reclaimed railroad bridges that are left in-place on an abandoned railroad alignment or vehicular bridges that were abandoned and hauled to the trail site. Existing bridges may have historical significance and require reviews and permitting; they should therefore be identified early in the planning stages and addressed through contact with DHR and/or other relevant agencies. Trail managers must take into consideration the costs for new versus rehabilitated bridges as many factors will ultimately decide which option is more cost-effective for each project.
Virginia Department of Conservation & RecreationGreenways and Trails Toolbox • Trail Design
Land Acquisition & Trail Development • Chapter 4 -�0
Resources:
Rails-to-Trails Conservancy Toolbox: Plan, Design, Build: Tunnels
http://www.railstotrails.org/ourWork/trailBuilding/toolbox/informationSummaries/tunnels.htmlRails-to-Trails Conservancy “Tunnels on Trails”
http://www.railstotrails.org/resources/documents/resource_docs/tunnels.pdfU.S. Dept. of Transportation. Rails-with-Trails: Lessons Learned, by Alta Planning & Design. Washington, D.C., 2004. Available on-line at:
http://www.fhwa.dot.gov/environment/rectrails/rwt/
•
•
•
TOOLBOX TIP:Contact your local VDOT representative to get a list of decommissioned vehicular bridges that might be re-purposed for your trail or path project.
Tunnel on the New Market Trail. Courtesy of DCR.
Path on underpass below bridge on Luray Hawksbill Trail. Courtesy of DCR.

ProsProvides easy access around major obstaclesProvides a unique trail experienceCreates a local landmarkPossibilities for adaptive re-use of historic or
abandoned bridgesCons
ExpensiveMay be denied by regulatory agenciesRequire periodic structural inspection by
qualified engineers to ensure stabilityRequired railing height increases for equestrian use
••••
•••
•
Trail and Path AmenitiesTrail and path amenities make the trail experience more enjoyable, increase comfort, and mitigate potential hazards. Amenities include benches, signs, guardrails, restrooms, hitching posts and any other feature that complements the trail. Trail amenities vary widely in cost, design, ease of installation, and quality. This section provides an overview of common trail amenities and their characteristics, but you and your organization must choose the amenities that make the most sense for your intended users, trail type, budget, and capacity for installation and maintenance.
SignageSigns are intended to warn, help, and instruct trail users as they enter, utilize, and leave your trail. The four most common categories of signs are: regulatory, warning, informational, and educational. Some signs are required by your locality, funding agency, or other entities while other forms of signage are intended to convey information and educational experiences. The best signs are easy to read, have succinct messages, and are efficient in their use of space and size.
Regulatory SignsRegulatory signs convey rules and operational requirements. They regulate speed, stop and yield locations, limitations, usage rules, and other primarily safety-related messages. Regulatory signs may be required by local, state, and federal governments for risk management. Where signs are required by law, your local planning entity, reviewing agency, and design consultants should be able to identify proper sign types and locations. The most common type of universally-required regulatory signage is found in the Manual on Uniform Traffic Control Devices (MUTCD) and is authored by the Federal Highway Administration. The MUTCD contains national signage regulations for highways, streets, crosswalks, bicycle lanes and paths, and any other type of traffic-related facility. While 4-lane highways and trails have little in common, federal and state trail funding agencies such as VDOT and the FHWA defer to the MUTCD for sign guidance. Part 9 of the MUTCD focuses
Virginia Department of Conservation & RecreationGreenways and Trails Toolbox • Trail Design
Land Acquisition & Trail Development • Chapter 4 -��
Resources:
Chapter 7 of FHWA’s Flexibility in Highway Design: “Bridges and Other Major Structures”
http://www.fhwa.dot.gov/ENVIRONMENT/flex/ch07.htmNational Trails Training Partnership: Bridges and Structures for Trails “Choosing the Right Bridge”
http://www.americantrails.org/resources/structures/ChooseBridgeBuild.htmlU.S. Forest Service Trail Bridge Catalog
http://www.fs.fed.us/eng/bridges/index.htm
•
•
•
Rehabilitated bridge at Staunton River Battlefield State Park. Courtesy of LPDA, Inc.
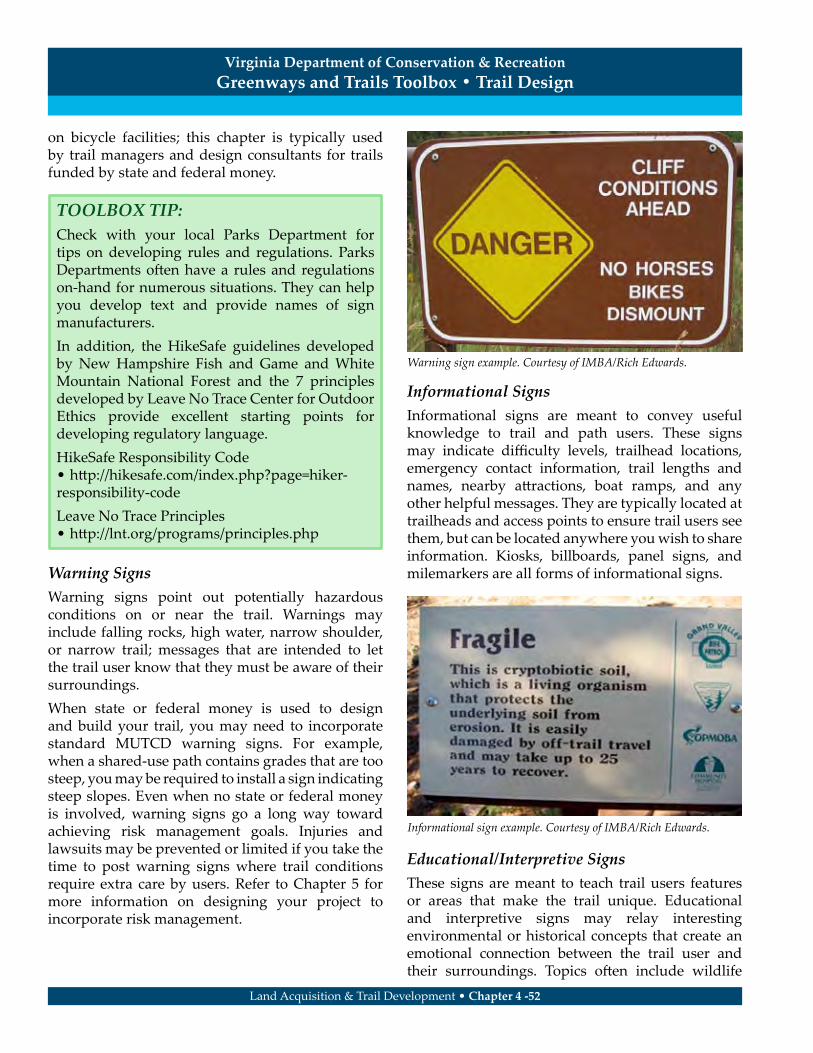
on bicycle facilities; this chapter is typically used by trail managers and design consultants for trails funded by state and federal money.
Warning SignsWarning signs point out potentially hazardous conditions on or near the trail. Warnings may include falling rocks, high water, narrow shoulder, or narrow trail; messages that are intended to let the trail user know that they must be aware of their surroundings. When state or federal money is used to design and build your trail, you may need to incorporate standard MUTCD warning signs. For example, when a shared-use path contains grades that are too steep, you may be required to install a sign indicating steep slopes. Even when no state or federal money is involved, warning signs go a long way toward achieving risk management goals. Injuries and lawsuits may be prevented or limited if you take the time to post warning signs where trail conditions require extra care by users. Refer to Chapter 5 for more information on designing your project to incorporate risk management.
Informational SignsInformational signs are meant to convey useful knowledge to trail and path users. These signs may indicate difficulty levels, trailhead locations, emergency contact information, trail lengths and names, nearby attractions, boat ramps, and any other helpful messages. They are typically located at trailheads and access points to ensure trail users see them, but can be located anywhere you wish to share information. Kiosks, billboards, panel signs, and milemarkers are all forms of informational signs.
Educational/Interpretive SignsThese signs are meant to teach trail users features or areas that make the trail unique. Educational and interpretive signs may relay interesting environmental or historical concepts that create an emotional connection between the trail user and their surroundings. Topics often include wildlife
Virginia Department of Conservation & RecreationGreenways and Trails Toolbox • Trail Design
Land Acquisition & Trail Development • Chapter 4 -��
TOOLBOX TIP:Check with your local Parks Department for tips on developing rules and regulations. Parks Departments often have a rules and regulations on-hand for numerous situations. They can help you develop text and provide names of sign manufacturers. In addition, the HikeSafe guidelines developed by New Hampshire Fish and Game and White Mountain National Forest and the 7 principles developed by Leave No Trace Center for Outdoor Ethics provide excellent starting points for developing regulatory language. HikeSafe Responsibility Code
http://hikesafe.com/index.php?page=hiker-responsibility-codeLeave No Trace Principles
http://lnt.org/programs/principles.php
•
•
Warning sign example. Courtesy of IMBA/Rich Edwards.
Informational sign example. Courtesy of IMBA/Rich Edwards.
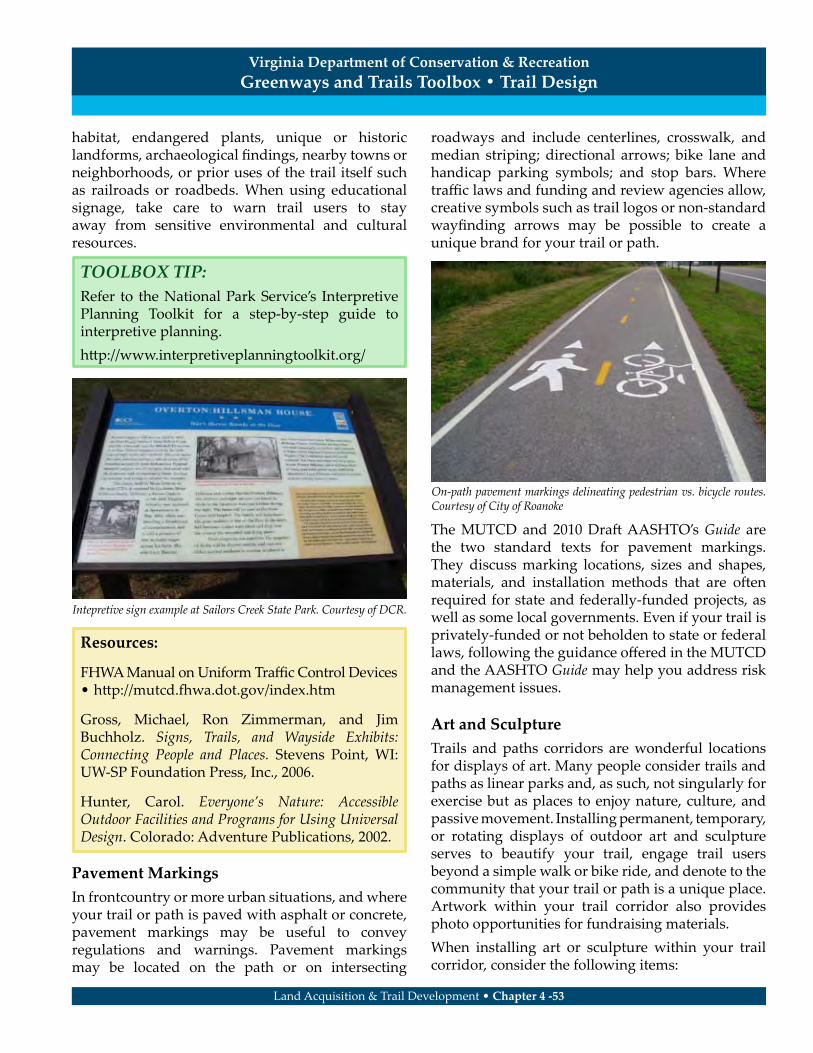
habitat, endangered plants, unique or historic landforms, archaeological findings, nearby towns or neighborhoods, or prior uses of the trail itself such as railroads or roadbeds. When using educational signage, take care to warn trail users to stay away from sensitive environmental and cultural resources.
Pavement MarkingsIn frontcountry or more urban situations, and where your trail or path is paved with asphalt or concrete, pavement markings may be useful to convey regulations and warnings. Pavement markings may be located on the path or on intersecting
roadways and include centerlines, crosswalk, and median striping; directional arrows; bike lane and handicap parking symbols; and stop bars. Where traffic laws and funding and review agencies allow, creative symbols such as trail logos or non-standard wayfinding arrows may be possible to create a unique brand for your trail or path.
The MUTCD and 2010 Draft AASHTO’s Guide are the two standard texts for pavement markings. They discuss marking locations, sizes and shapes, materials, and installation methods that are often required for state and federally-funded projects, as well as some local governments. Even if your trail is privately-funded or not beholden to state or federal laws, following the guidance offered in the MUTCD and the AASHTO Guide may help you address risk management issues.
Art and SculptureTrails and paths corridors are wonderful locations for displays of art. Many people consider trails and paths as linear parks and, as such, not singularly for exercise but as places to enjoy nature, culture, and passive movement. Installing permanent, temporary, or rotating displays of outdoor art and sculpture serves to beautify your trail, engage trail users beyond a simple walk or bike ride, and denote to the community that your trail or path is a unique place. Artwork within your trail corridor also provides photo opportunities for fundraising materials. When installing art or sculpture within your trail corridor, consider the following items:
Virginia Department of Conservation & RecreationGreenways and Trails Toolbox • Trail Design
Land Acquisition & Trail Development • Chapter 4 -��
Intepretive sign example at Sailors Creek State Park. Courtesy of DCR.
Resources:
FHWA Manual on Uniform Traffic Control Deviceshttp://mutcd.fhwa.dot.gov/index.htm
Gross, Michael, Ron Zimmerman, and Jim Buchholz. Signs, Trails, and Wayside Exhibits: Connecting People and Places. Stevens Point, WI: UW-SP Foundation Press, Inc., 2006.
Hunter, Carol. Everyone’s Nature: Accessible Outdoor Facilities and Programs for Using Universal Design. Colorado: Adventure Publications, 2002.
•
TOOLBOX TIP:Refer to the National Park Service’s Interpretive Planning Toolkit for a step-by-step guide to interpretive planning.http://www.interpretiveplanningtoolkit.org/
On-path pavement markings delineating pedestrian vs. bicycle routes. Courtesy of City of Roanoke

During the design and planning phases, identify potential locations for art and sculpture even if you don’t have pieces available yet.
Work with local or regional artists to make the trail a true community endeavor.
Consider installing art or sculpture that reflects the environmental or historic character of the trail or surrounding area. For example, artwork may recall agricultural heritage, railroading history, unique birds or plants, or community spirit.
Ensure that you locate your piece(s) according to all trail standards and regulations. Respect sight distances and vertical and horizontal clearances. In addition, consider whether the piece in question might entice people to climb, whether it has potentially hazardous edges, moving parts, or sharp edges, and if the piece will stand up to inclement weather such as wind, snow, and ice.
LightingTwo schools of thought exist in regard to lighting. Some people feel that lighting a trail extends its usability and provides safety. Others feel that lighting provides a false sense of security for people who choose to use the trail at night or when few or no other people are around. You and your trail
•
•
•
•
organization must make this decision based on your intended trail users; case studies from other nearby parks and trails; whether you choose to have safety patrols, emergency phones, or police surveillance; and the location and desired character of the trail.Often, lighting the entire length of a trail is not practical due to costs and the effects of light pollution. Lighting a portion of the trail, trailheads and parking lots, or other access points, however, may offer a compromise. Another option is to have lights set on timers to extend trail usage into dawn and dusk, yet not throughout the night. If a trail will not be lighted and is not intended to be used during dark hours, signage must clearly convey the operating hours of the trail and that the trail is closed to all users between set hours. Consider the following questions before you make a decision about lighting on your trail:
Who are my intended users? Will the majority of my trail users benefit from
trail lighting during the early morning or late evening hours?
Are my users mostly commuters who may use the trail to reach work or school during dark hours?
Will many of the intended users utilize head lamps or bicycle headlights which would reduce the need for extensive overhead lighting?
Will lighting during the morning, evening, and/or night be bothersome to people living adjacent to the trail corridor?
Does my locality have dark-sky ordinances or other light pollution regulations?
Can my organization afford to install, maintain, and pay the bills for lights?
Will early-morning and evening safety patrols or police surveillance be available?
Do I want to maintain a rustic or rural character for my trail or an urban or suburban feel?
Where may potential security problems arise on my trail? Certain trailheads or access points? Certain sections of trail?
Is there a potential for lighting to indirectly impact cultural resources such as nearby residential historic districts?
••
•
•
•
•
•
•
•
•
•
Virginia Department of Conservation & RecreationGreenways and Trails Toolbox • Trail Design
Land Acquisition & Trail Development • Chapter 4 -�4
Resources:
National Trails Training Partnership: “Art for Trails and Greenways”
http://www.americantrails.org/resources/art/index.html•
Art along trails. Courtesy of Roanoke Valley Greenways.

Amenity GuidesThe following pages contain guidance relating to selecting, placing, and maintaining various types of site amenities.Site amenities—such as benches, trash receptacles, and equestrian amenities—should be considered during the design process. Identifying details such as locations, material types, and colors prior to installation ensures that physical clearances are met, a consistent appearance is created, and completion of the project is not held up by ordering problems.As part of a design contract or discussions with organization volunteers, consider including design guidelines that compile a list of manufacturers, desired colors and materials, and typical layouts that can be applied to future sections of the trail or path. Design guidelines will enable new sections of trail or path to integrate cohesively into alignments that have already been built with a minimum of backtracking and research into what has already been done. The following photos, illustrations, and notes are examples intended to inspire discussion and ideas. Use the guides to begin your own research into amenities that are appropriate for your specific project and location. Talk to other trail-building agencies and organizations about what amenities have and have not worked for them and share ideas. Remember that amenities can often be customized to solve particular problems such as access, topography, and drainage, although custom products tend to be more expensive than stock items. Finally, remember to enjoy the site amenity selection process as this is where your organization can put your own creative, unique touch on the project.
Virginia Department of Conservation & RecreationGreenways and Trails Toolbox • Trail Design
Land Acquisition & Trail Development • Chapter 4 -��
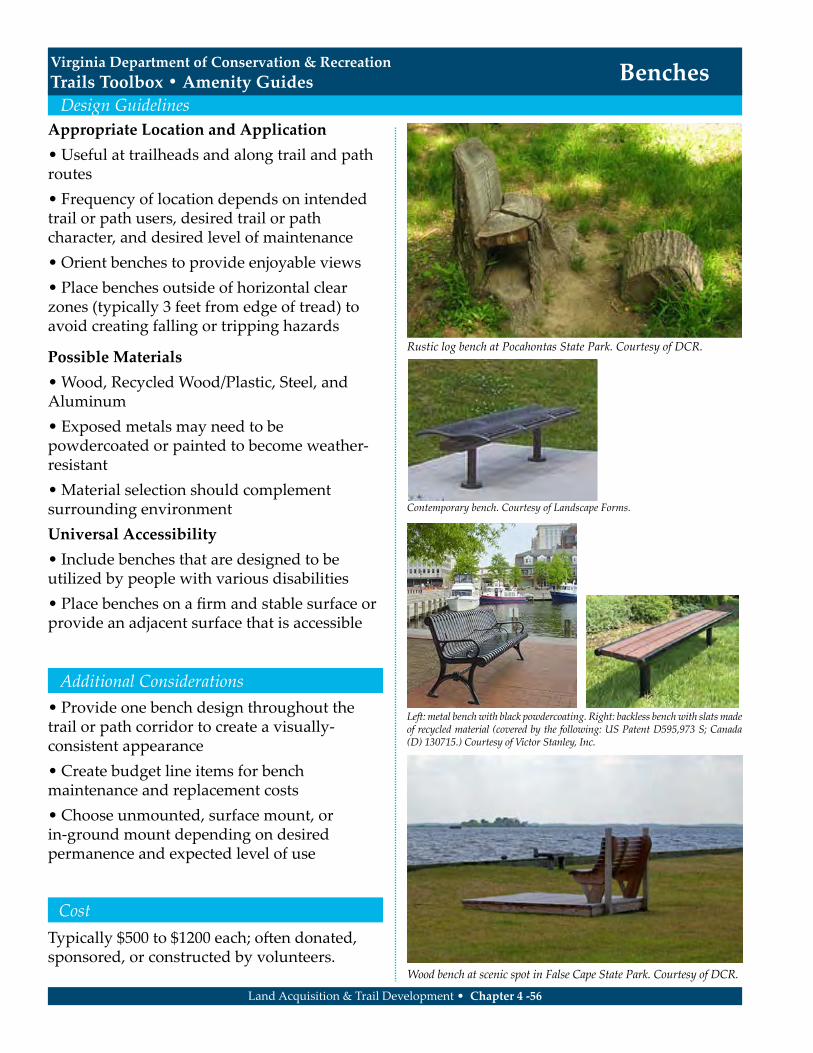
Typically $500 to $1200 each; often donated, sponsored, or constructed by volunteers.
Appropriate Location and ApplicationUseful at trailheads and along trail and path
routesFrequency of location depends on intended
trail or path users, desired trail or path character, and desired level of maintenance
Orient benches to provide enjoyable viewsPlace benches outside of horizontal clear
zones (typically 3 feet from edge of tread) to avoid creating falling or tripping hazards
Possible MaterialsWood, Recycled Wood/Plastic, Steel, and
AluminumExposed metals may need to be
powdercoated or painted to become weather-resistant
Material selection should complement surrounding environmentUniversal Accessibility
Include benches that are designed to be utilized by people with various disabilities
Place benches on a firm and stable surface or provide an adjacent surface that is accessible
•
•
••
•
•
•
•
•
Provide one bench design throughout the trail or path corridor to create a visually-consistent appearance
Create budget line items for bench maintenance and replacement costs
Choose unmounted, surface mount, or in-ground mount depending on desired permanence and expected level of use
•
•
•
BenchesVirginia Department of Conservation & RecreationTrails Toolbox • Amenity Guides
Land Acquisition & Trail Development • Chapter 4 -56
Rustic log bench at Pocahontas State Park. Courtesy of DCR.
Wood bench at scenic spot in False Cape State Park. Courtesy of DCR.
Left: metal bench with black powdercoating. Right: backless bench with slats made of recycled material (covered by the following: US Patent D595,973 S; Canada (D) 130715.) Courtesy of Victor Stanley, Inc.
Contemporary bench. Courtesy of Landscape Forms.
Design Guidelines
Additional Considerations
Cost
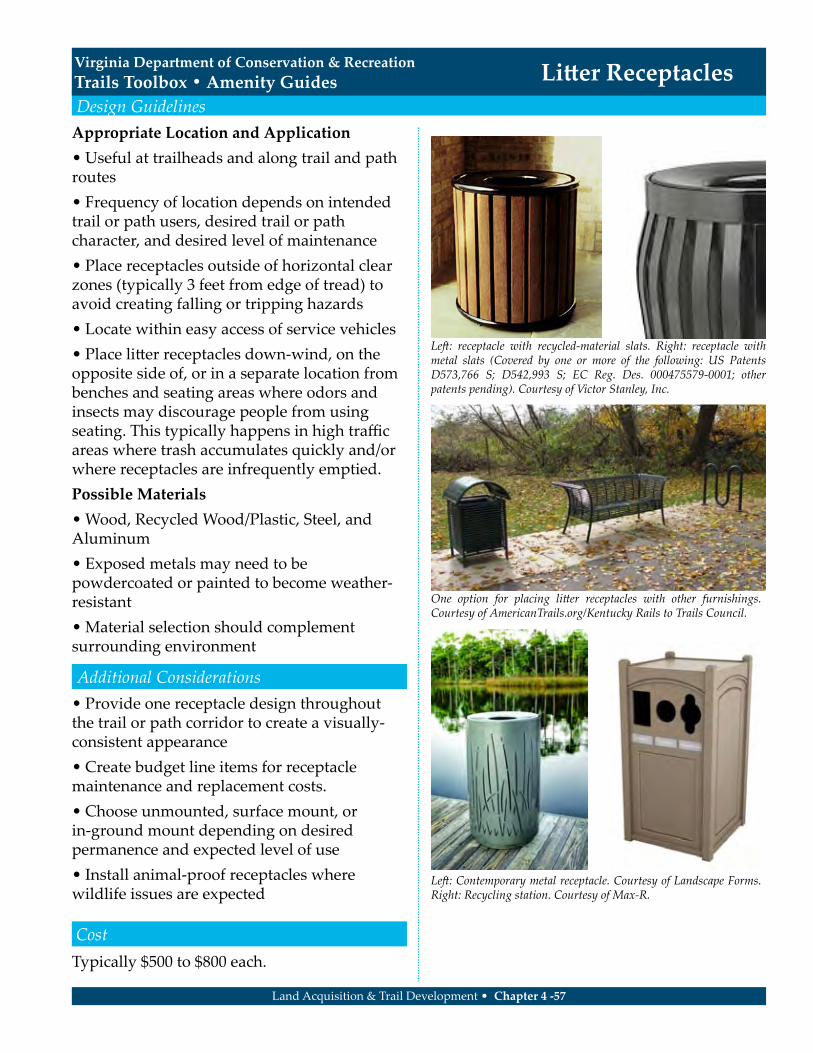
Typically $500 to $800 each.
Appropriate Location and ApplicationUseful at trailheads and along trail and path
routesFrequency of location depends on intended
trail or path users, desired trail or path character, and desired level of maintenance
Place receptacles outside of horizontal clear zones (typically 3 feet from edge of tread) to avoid creating falling or tripping hazards
Locate within easy access of service vehiclesPlace litter receptacles down-wind, on the
opposite side of, or in a separate location from benches and seating areas where odors and insects may discourage people from using seating. This typically happens in high traffic areas where trash accumulates quickly and/or where receptacles are infrequently emptied. Possible Materials
Wood, Recycled Wood/Plastic, Steel, and Aluminum
Exposed metals may need to be powdercoated or painted to become weather-resistant
Material selection should complement surrounding environment
•
•
•
••
•
•
•
Provide one receptacle design throughout the trail or path corridor to create a visually-consistent appearance
Create budget line items for receptacle maintenance and replacement costs.
Choose unmounted, surface mount, or in-ground mount depending on desired permanence and expected level of use
Install animal-proof receptacles where wildlife issues are expected
•
•
•
•
Litter ReceptaclesVirginia Department of Conservation & RecreationTrails Toolbox • Amenity Guides
Land Acquisition & Trail Development • Chapter 4 -57
Left: receptacle with recycled-material slats. Right: receptacle with metal slats (Covered by one or more of the following: US Patents D573,766 S; D542,993 S; EC Reg. Des. 000475579-0001; other patents pending). Courtesy of Victor Stanley, Inc.
One option for placing litter receptacles with other furnishings. Courtesy of AmericanTrails.org/Kentucky Rails to Trails Council.
Left: Contemporary metal receptacle. Courtesy of Landscape Forms. Right: Recycling station. Courtesy of Max-R.
Design Guidelines
Additional Considerations
Cost

Appropriate Location and ApplicationUseful at trailheads and access pointsLocate in highly-visible and surveilled areasInstall max. 50 feet away to encourage usePlace racks so that leading edge of tire is at
least 3 feet away from the trail tread in order to avoid falling or tripping hazards. This may mean locating racks 9 feet away from trail tread, depending on average bike length.
Select a rack that accommodates a bike that is at least 5’-6” long and 42” high
Install rack with enough surrounding space for easy maneuverability and so that tires do not protrude onto trailPossible Materials
Steel and AluminumExposed metals may need to be
powdercoated or painted to become weather-resistantUniversal Accessibility
Install racks on firm and stable surfaces
••••
•
•
••
•
Typically $300 to $800 each.
Consider bike lockers where bike commuting is popular
Select a rack that supports the full frame of the bicycle, not just one wheel
Provide one design to create a visually-consistent appearance
Create budget line items for maintenance and replacement costs.
Choose unmounted, surface mount, or in-ground mount depending on desired permanence
•
•
•
•
•
Additional Considerations
Cost
Bike RacksVirginia Department of Conservation & RecreationTrails Toolbox • Amenity Guides
Land Acquisition & Trail Development • Chapter 4 -58
Well-used bike rack at a trailhead. Courtesy of AmericanTrails.org.
Various types of steel bike racks. Courtesy of Victor Stanley, Inc.
Contemporary bike racks. Courtesy of Landscape Forms.
Design Guidelines

Appropriate Location and ApplicationUseful at trailheads and access pointsLocate in highly-visible and surveilled areasPlace racks outside of horizontal clear zones
(typically 3 feet from edge of tread) to avoid creating fall or tripping hazards
Do not place near benches and gathering areas
Locate within easy access of service vehiclesPossible Materials
Steel and AluminumExposed metals may need to be
powdercoated or painted for weather-resistanceUniversal Accessibility
Install containers on firm and stable surfacesInstall bag and waste repositories within
reaching distance of a seated person (max. 48” forward reach and max. 54” side reach)
•••
•
•
••
••
$200-350 each plus cost of bags ($15 per box, check for wholesale pricing).
Install only where pets are allowed on the trail or path
Where only bags are provided (no receptacle), include signage stating that trail/path users must place bags in an appropriate trash container
Provide one design to create a visually-consistent appearance
Create budget line items for maintenance and replacement costs as well as frequent bag replacement
•
•
•
•
Additional Considerations
Cost
Pet Waste ContainersVirginia Department of Conservation & RecreationTrails Toolbox • Amenity Guides
Land Acquisition & Trail Development • Chapter 4 -59
Pole-mounted pet waste receptacle. Courtesy of Mutt Mitt.
Alternative pet waste container. Courtesy of DogiPot.
Design Guidelines

Appropriate Location and ApplicationUseful at designated 1/2 mile and mile pointsPlace outside of horizontal clear zones
(typically 3 feet from edge of tread) to avoid creating fall or tripping hazards
Install milemarkers in conjunction with emergency phones and gates to quickly provide locations along the trail or pathPossible Materials
Pressure-treated wood, occasionally plastic or aluminumLifecycle and Longevity
Routed numbers last longer than painted or affixed numbers
Repaint and straighten at least once a yearUniversal Accessibility
Design marker numbers, colors, and other information to be highly legible from a distance
••
•
•
•
•
•
$50-$200 each. May be constructed and/or installed by volunteers.
Provide one design to create a visually-consistent appearance
Create budget line items for maintenance and replacement costs
Install in a stone or concrete base to reduce shifting. Use concrete where vandalism is an issue
Number mileage only on one side to enable easy location in case of emergencies (avoid duplicate mile numbers)
•
•
•
•
Additional Considerations
Cost
MilemarkersVirginia Department of Conservation & RecreationTrails Toolbox • Amenity Guides
Land Acquisition & Trail Development • Chapter 4 -60
Left: Recycled plastic mile marker. Right: Milemarker displaying metric and standard units. Courtesy of AmericanTrails.org.
Left: Metal milemarker. Courtesy of AmericanTrails.org/Kentucky Rails to Trails Council. Right: Wood milemarker on the Tobacco Heritage Trail near Lawrenceville, VA. Courtesy of LPDA, Inc.
Design Guidelines
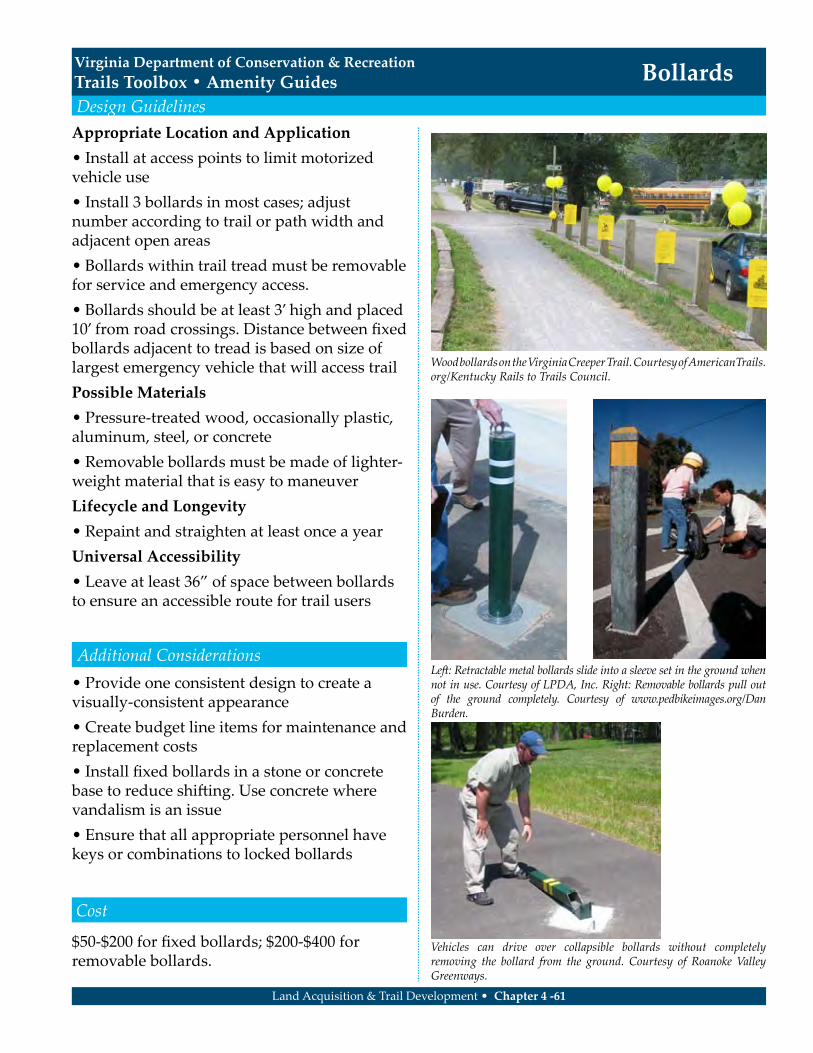
Appropriate Location and ApplicationInstall at access points to limit motorized
vehicle useInstall 3 bollards in most cases; adjust
number according to trail or path width and adjacent open areas
Bollards within trail tread must be removable for service and emergency access.
Bollards should be at least 3’ high and placed 10’ from road crossings. Distance between fixed bollards adjacent to tread is based on size of largest emergency vehicle that will access trailPossible Materials
Pressure-treated wood, occasionally plastic, aluminum, steel, or concrete
Removable bollards must be made of lighter-weight material that is easy to maneuverLifecycle and Longevity
Repaint and straighten at least once a yearUniversal Accessibility
Leave at least 36” of space between bollards to ensure an accessible route for trail users
•
•
•
•
•
•
•
•
$50-$200 for fixed bollards; $200-$400 for removable bollards.
Provide one consistent design to create a visually-consistent appearance
Create budget line items for maintenance and replacement costs
Install fixed bollards in a stone or concrete base to reduce shifting. Use concrete where vandalism is an issue
Ensure that all appropriate personnel have keys or combinations to locked bollards
•
•
•
•
Additional Considerations
Cost
BollardsVirginia Department of Conservation & RecreationTrails Toolbox • Amenity Guides
Land Acquisition & Trail Development • Chapter 4 -61
Wood bollards on the Virginia Creeper Trail. Courtesy of AmericanTrails.org/Kentucky Rails to Trails Council.
Left: Retractable metal bollards slide into a sleeve set in the ground when not in use. Courtesy of LPDA, Inc. Right: Removable bollards pull out of the ground completely. Courtesy of www.pedbikeimages.org/Dan Burden.
Vehicles can drive over collapsible bollards without completely removing the bollard from the ground. Courtesy of Roanoke Valley Greenways.
Design Guidelines

Appropriate Location and ApplicationInstall at access points where the trail or path
will be closed to all use at certain timesOther locations include access points to
private property and maintenance areasPossible Materials
Pressure-treated wood and aluminumExposed metals may need to be powder-
coated or painted to for weather-resistanceLifecycle and Longevity
Repaint and adjust swing and stabilization mechanisms at least once a year
Set posts in concrete to reduce shiftingUniversal Accessibility
Install gate designs that are easily maneuvered by people with disabilities. Consider double swing, instead of single swing, gates and aluminum materials
Refer to the U.S. Forest Service publication “Accessible Gates for Trails and Roads” available at: http://www.fs.fed.us/recreation/programs/accessibility/pubs/htmlpubs/htm06232340/index.htm
•
•
••
•
•
•
•
$1,000-$2,000 or more depending on materials and design.
Provide one consistent design to create a visually-consistent appearance
Create budget line items for maintenance and replacement costs
Locked gates must be opened and closed during operating hours by staff or local authorities
Ensure that all appropriate personnel have keys or combinations to locked gates
•
•
•
•
Additional Considerations
Cost
GatesVirginia Department of Conservation & RecreationTrails Toolbox • Amenity Guides
Land Acquisition & Trail Development • Chapter 4 -62
Gates with vertical handles allow equestrians to open and close the gate without dismounting. Courtesy of Virginia Horse Council.
Double gate to allow independent use by both motorized and non-motorized trail users. Courtesy of AmericanTrails.org/Kentucky Rails to Trails Council.
Creative gate designs accommodate many types of trail users. This dual gate system allows equestrians and mobility-impaired users, but not vehicles, to pass. Courtesy of U.S. Forest Service.
Gates can be simple chain barriers. Courtesy of Virginia Horse Council
Design Guidelines

Appropriate Location and ApplicationInstall at trailheadsLocate in highly-visible and well-traveled
areasLocate with easy access to service vehicles,
including maintenance and waste removal vehicles
Include shower facilities if they will be well-used by trail users
Visually-buffer restrooms from adjacent properties with walls and/or vegetationPossible Materials
Materials should complement the surrounding environmentLifecycle and Longevity
Clean frequently, inspect and repair periodically and as neededUniversal Accessibility
Follow all applicable State and Federal requirements to create an accessible route and structure
••
•
•
•
•
•
•
Bathrooms/Changing AreasVirginia Department of Conservation & RecreationTrails Toolbox • Amenity Guides
Land Acquisition & Trail Development • Chapter 4 -63
A small restroom facility along the High Bridge Trail near Rice, VA. Courtesy of DCR.
Waterless facilities are useful in rural areas or where water connections are not feasible. Courtesy of Biological Mediation Systems, Inc./Custom Builders.
Large restroom facility. Courtesy of Virginia Horse Council.
Typical range $25,000 to $250,000; varies greatly depending on size and complexity
Determine whether structure will be locked during off-hours or off-season and who will be responsible for opening/closing facility.
Create budget line items for maintenance and replacement costs
Type of facility will depend on access to utilities such as sewer and water
•
•
•
Additional Considerations
Cost
Design Guidelines

Appropriate Location and ApplicationInstall at trailheads; at the perimeter of
parking areas, in landscape islands, or along the outside edge of loop roads
Locate with easy access to vehicles, including horse trailers and maintenance vehicles
Visually-buffer wash racks from adjacent properties with walls and/or vegetationPossible Materials
Must be placed on a wearing surface, such as concrete or crushed stone, that provides firm footing for horses and reduces mud
May be purchased pre-fabricated or custom-built on-siteLifecycle and Longevity
Clean frequently, inspect and repair periodically and as neededUniversal Accessibility
Follow all applicable State and Federal requirements to create an accessible route to the wash rack and firm and stable surface within the rack use area
•
•
•
•
•
•
•
Typically $500 to $2,000; varies depending on size and complexity.
Store hoses in secure location if they are frequently stolen, or require that users bring their own hoses
Create budget line items for maintenance and replacement costs
Ensure proper drainage from the wash rack and handling of run-off to avoid flooding, erosion, and damage to adjacent landscape
•
•
•
Additional Considerations
Cost
Wash FacilitiesVirginia Department of Conservation & RecreationTrails Toolbox • Amenity Guides
Land Acquisition & Trail Development • Chapter 4 -64
Simple concrete slab wash area with a yard hydrant. Courtesy of Virginia Horse Council.
Diagram of multiple-horse wash rack with central hydrant. Adapted from the U.S. Forest Service “Equestrian Design Guidebook.”
Design Guidelines
Pipe Rail
Hydrant & Hose
Concrete Slab

Appropriate Location and ApplicationInstall hydrants and mounting blocks at
trailheads, access points, and rest areas along trail or path
Provide at least one hydrant at each restroom and at all access points
Locate amenities at the outside edges of loop roads, at intersections, and perimeters of parking areas to prevent users from cutting through campsites or developed areasPossible Materials
Concrete, aluminum, steel, and plasticMaterials should complement the
surrounding environment whenever possibleLifecycle and Longevity
Winterize hydrant systems as neededUniversal Accessibility
Provide accessible hand-crank hydrants on firm and stable surfaces
Avoid placing amenities on asphalt or concrete surfaces to prevent horses from slipping
•
•
•
••
•
•
•
Hydrants: $200-$400; ADA Hand-crank Pump System: $2,500; Mounting blocks: Up to $130 for portable block to $2,000 for permanent structure, can be built be volunteers.
Install hardened water crossings such as bridges or stones to limit damage to streambeds
Install trash cans specifically for manureInstall benches, tables, and other human-
size furnishings to allow for picnicking and/or camping
Create budget line items for maintenance and replacement costs
•
••
•
Additional Considerations
Cost
Equestrian AmenitiesVirginia Department of Conservation & RecreationTrails Toolbox • Amenity Guides
Land Acquisition & Trail Development • Chapter 4 -65
Hitching posts vary from rustic to ornate. Courtesy of Virginia Horse Council.
Signs can be made of almost any material. Courtesy of Virginia Horse Council.
Hardened surfaces and bridges enable water crossings without damage to the stream bed. Courtesy of Virginia Horse Council.
Mounting blocks assist riders in mounting their horse. Courtesy of Virginia Horse Council.
Design Guidelines

Trail Standards Field GuidesThe Field Guides provided on the following pages are intended to provide overview-level guidance for trail organizations or interested parties who are not intimately familiar with trail planning and construction. The guides offer typical standards for each type of trail and general rules-of-thumb. They are designed to be removed from the toolbox or printed and taken on site visits or to meetings. Because the guides offer generalized standards, and knowing that each potential trail alignment is unique, you should continue to work with your funding agency, design professionals, and/or skilled volunteers to ensure all site and legal requirements are met. One key concept to remember is that practicality and flexibility must always be part of selecting trail or path types and surfaces. Backcountry trails tend to rely on fewer stringent rules given the nature of the landscape, while frontcountry trails must often be held to higher standards due to their proximity to developed areas. Do your best to apply common sense to your risk management strategies and design standards. In doing so, you will ultimately achieve a trail or path that best meets the actual needs of users and the environment.
Virginia Department of Conservation & RecreationTrails Toolbox • Trail Standards Field Guides
Land Acquisition & Trail Design • Chapter 4 -��

Hiking trails are typically unpaved, improved earthen surface, pedestrian-only trails located in backcountry areas. They tend to take advantage of attractive scenery and variable terrain in order to provide a “natural” trail experience. Hiking trails can be made universally-accessible although accessible routes may not extend for the entirety of the trail. Hiking trails often require little improvement to the natural condition of the ground. Trail maintenance is key to limit erosion, wash-outs, and to maintain a passable route.
Opportunities Offer rustic experiences away from urban and
suburban situations. Offer beautiful scenery, wildlife viewing,
cardiovascular exercise, and other desirable challenges unique to unpaved trails. Often inexpensive to build and maintain and numerous volunteer groups are often available for these tasks.
ConstraintsMay pose greater safety risks due to their
tendency to be routed away from developed areas. Emergency and rescue services may take longer
to reach someone in need on a hiking trail. Pose potential risks to environmentally-sensitive
resources. Often difficult to make a hiking trail entirely
universally-accessible due to the presence of steep slopes and other environmental limitations.
•
•
•
•
•
•
Suitable LocationsHiking trails are best located away from highly-developed areas and in places with natural and scenic beauty and variable topography such as woodlands, bluffs, foothills and mountains, and lakes.
General Layout & SitingTrail layout should follow both the Half Rule and Ten Percent Average Rule described in Chapter 4 of the Toolbox. Follow existing topography as closely as possible. Create single or multiple “stacked” loops to increase interest and limit primary access points. Stacked loops allow for multiple hike distances and difficulty levels. Determine whether the trail will be limited to day-use or will contain overnight camping facilities and plan routes accordingly.
Land Acquisition & Trail Development • Chapter 4 -67
Hiking TrailsVirginia Department of Conservation & RecreationTrails Toolbox • Trail Standards Field Guides
Examples of trail layout systems. Adapted from U.S. Forest Service.
Hiking trail at Pocahontas State Park. Courtesy of DCR.

decrease as the slope steepness increases. Cross-slopes should generally be between 1% and 5% to allow water to sheet off the trail yet minimize erosion. Universally-accessible trails must have cross-slopes at or less than 5%.
Trail Tread WidthHiking trail widths are highly variable depending on location. In general, hiking trails should utilize the minimum width possible in order to avoid unnecessary impact on the environment. A typical rule of thumb is to construct a trail that is 2 feet wide in more rustic areas and 5 feet wide in heavily-trafficked areas. For universally-accessible hiking trails, a minimum width of 36 inches is required. Passing spaces at least 5 feet wide are required every 200 feet or less for trails that are less than 5 feet in width.
Vertical & Horizontal ClearancesVertical clearance should be a minimum of 8 feet from the trail surface to the nearest overhanging obstacle. Horizontal clearance should be 2 feet beyond the edge of the trail tread. This creates a trail corridor of between 6 and 9 feet that is free of obstructions.
Drainage ConsiderationsHiking trails are typically designed with the existing terrain in order to minimize grading and limit erosion. Some locations along the trail may require additional features such as grade reversals, culverts, and swales to contain and direct water run-off.
Suitable Trail SurfacesHiking trail surfaces should be made of materials that are similar to the existing condition of the trail corridor, require minimal impact upon the ground, and are comfortable for walking. Suitable surfaces include:
Native soilNative stone/rockStabilized soilMown grassWood chips and VDOT #21A stone in areas with
heavy traffic and/or drainage problems. Crusher fines/VDOT #10 is susceptible to erosion on slopes over 5% and should not be used in areas with frequent flooding. Universally-accessible hiking trails must have surfaces that are both firm and stable to support people with mobility impairments or who use wheelchairs or other mobility devices.
Trail GradesHiking trail grades and slopes will be highly variable due to the existing terrain. The maximum recommended sustained running grade is between 8% and 10%; trail grades should not exceed 15% except for short runs. Universal accessibility standards for hiking trails vary by land manager (i.e. U.S. Forest Service versus local government). A good rule of thumb is to keep running slopes at or less than 5%. Steeper slopes are allowable for short distances; runs lengths should
•••••
Land Acquisition & Trail Development • Chapter 4 -68
Hiking TrailsVirginia Department of Conservation & RecreationTrails Toolbox • Trail Standards Field Guides
Hiking trail graded to shed water downslope. Courtesy of City of Roanoke.
Hiking trails can follow almost any terrain, including rock outcroppings. Courtesy of City of Roanoke.

Suitable Materials & AmenitiesBecause of their rustic character, hiking trails benefit from simple, organic materials that blend with the existing setting. Suitable materials for items such as signs, benches, and other amenities include natural wood, composite wood materials, stone, and weathering steel (trademarked as Cor-Ten steel).Amenities include benches, litter receptacles, signs, restrooms, and trailheads.
Difficulty RatingsNo standardized system of hiking trail difficulty ratings exists at present. Different trails, groups, and agencies use different methods to let potential hikers know how strenuous a hiking trail will be. Unless your trail organization has their own difficulty rating system, consider using the terminology such as Easy, Moderate, and Difficult. With any system, it is imperative to provide definitions of what each term or class means in order to avoid confusion and potential injury. Below are examples of difficulty ratings and definitions:
Very Easy: smooth path over level groundEasy: uneven ground but fairly levelModerate: some steep grades, some level stretchesStrenuous: steep grades, many steady climbs
Additional ConsiderationsRefer to Chapters 4 and 5 of the Toolbox for
additional information regarding management and maintenance of trails.
Plan for periodic trail maintenance and maintenance after every major storm event
Route the trail away from sensitive environmental or cultural resources or post signs discouraging hikers from accessing these spots.
Design hiking trails to take advantage of natural grades and avoid the need for drainage structures such as culverts.
Use volunteers when feasible to build and maintain hiking trails
••••
•
•
•
•
•
Land Acquisition & Trail Development • Chapter 4 -69
Hiking TrailsVirginia Department of Conservation & RecreationTrails Toolbox • Trail Standards Field Guides
Grade reversal to prevent standing water. Courtesy of IMBA/Rich Edwards.
Signage may be used to indicate distances. Courtesy Roanoke Valley Greenways.
Trailhead restroom facilities can enhance user comfort before and after their hike. Courtesy of the Virginia Horse Council.
Examples of trail difficulty. Left: “Easy” trail; Right: “Strenuous” trail. Courtesy of City of Roanoke.

Summary of Guidelines
Trail SurfacesNatural soil, stabilized soil, and mown grassWood chips and VDOT #21A or larger crushed
stone in areas with heavy traffic and/or drainage problemsTrail Grades
Running grade: 8-10%, not to exceed 15%Minimum running grade: 1%Cross-slope: min. 1% and max. 5%Accessible running grade: max. 5%Accessible cross-slopes: max. 5%
Trail Tread Width2 feet wide in rustic settings
5 feet wide in heavily-trafficked areas
Vertical Clearance8 feet from trail surface
Horizontal Clearance2-foot shoulders on each side of tread
••
•••••
•
•
•
•
Check with the Access Board’s “Draft Final Accessibility Guidelines for Outdoor Developed Areas” for universal accessibility guidelines and exemptions
Resources
Access Board’s “Draft Final Accessibility Guidelines for Outdoor Developed Areas”
http://www.access-board.gov/outdoor/draft-final.htm
American Trails and the National Trails Training Partnership
http://www.americantrails.org/
Birchard, William Jr.. and Robert Proudman. Appalachian Trail Design, Construction, and Maintenance. Harpers Ferry, WV: Appalachian Trail Conference, 2000.
FHWA Recreational Trails Programhttp://www.fhwa.dot.gov/environment/rectrails/
FHWA and U.S. Forest Service On-line Manuals for Trails
http://www.fhwa.dot.gov/environment/rectrails/manuals.htm
Hunter, Carol. Everyone’s Nature: Accessible Outdoor Facilities and Programs Using Universal Design. Cambridge, MN: Adventure Publications, Inc.,2002.
U.S. Forest Service Trail Accessibility Guidelines (FSTAG)
http://www.fs.fed.us/recreation/programs/accessibility/FSORAG.pdf
•
•
•
•
•
•
Land Acquisition & Trail Development • Chapter 4 -70
Hiking TrailsVirginia Department of Conservation & RecreationTrails Toolbox • Trail Standards Field Guides

Mountain biking trails are typically unpaved dirt trails located in rustic settings. The most sought-after trails offer connections to nature, escape from developed areas, and a variety of fun and challenging terrain and technical trail features. Most mountain biking trails are “singletrack,” or narrow trails that require riders to travel single-file.
Opportunities Offer rustic experiences away from urban and
suburban situations. Offer beautiful scenery, wildlife viewing,
cardiovascular exercise, and other desirable challenges unique to unpaved trails.
Often inexpensive to build and maintain and numerous volunteer groups are often available for these tasks.
ConstraintsMay pose greater safety risks due to their
tendency to be routed away from developed areas. Emergency and rescue services may take longer
to reach someone in need on a mountain bike trail. Pose potential risks to environmentally-sensitive
resources.May introduce user conflict to a shared-use trail May require increased maintenance on shared-
use trails
Suitable LocationsMountain biking trails are best located on land with variable topography and land cover, scenic views, and enough property to accommodate one or more
•
•
•
•
•
•
••
trail loops of varying levels of difficulty. Woodlands, bluffs, foothills and mountains, and lakes are all appropriate for mountain biking trails.
General Layout & SitingIdentify positive and negative control points to determine where you want, and don’t want, users to go. Positive control points include scenic views, trailheads, and sustainable singletrack. Negative control points include sensitive wildlife habitat, private property, and fall line slopes. When possible, configure your trail as a loop system that starts and ends in the same location. Stacked loop systems combine multiple loop trails with the same single access point.
Plan your route by locating all of your control points on a topographic map and connecting the dots. Connect points by paralleling existing contour lines whenever possible. Take the map into the field to finalize the actual route. Determine whether you want your trail flow to be open and gentle; tight and technical; or a hybrid. Focus on the type of users you expect and what they would like to see. Remember to plan for sight distances that allow trail users to see and react to upcoming and incoming traffic. Tight turns and switchbacks have reduced sight distances compared to straight runs and broad turns.
Land Acquisition & Trail Development • Chapter 4 -71
Mountain Biking TrailsVirginia Department of Conservation & RecreationTrails Toolbox • Trail Standards Field Guides
Singletrack mountain bike trail. Courtesy IMBA/Rich Edwards.
Stacked loop trails. Courtesy of IMBA/Rich Edwards.

Suitable Trail SurfacesProvide unpaved, natural-soil trail surfaces of varying roughness. Smooth surfaces free of rocks and roots provides a faster experience while surfaces that are rougher provide a greater—and often more desirable challenge—to riders seeking a technical experience. Provide information about varying surfaces and difficulty levels at each access point. Trail design must take into account existing soil types and their suitability for bike trails. Avoid soils that are highly erosive and that flood in wet weather. Loamy soil is ideal for trailbuilding purposes. Remember the difficulty level of natural-surface trails may change in different weather conditions.
Trail GradesThe Half-Rule states that a trail’s grade should not exceed half the grade of the hillside or sideslope that the trail traverses. For example, if you build your trail on a hillside with a 20% grade, your trail grade should not exceed 10%.
The Ten Percent Average Guideline states that average grades (or the overall grade of your entire trail) should not exceed 10% in order to be most sustainable. Grades should not exceed 15-20%, although the maximum sustainable grade will depend on soil types, number of users, climate, and other conditions. Guidelines for universally-accessible, shared-use trails are located in Chapter 4.
Trail Tread WidthTrail tread width varies according to site conditions and level of difficulty. Single-purpose singletrack trails may be anywhere from 3 inches to 4 feet wide.General rule-of-thumb for trail tread width for single-purpose, singletrack trails:
Beginner Trails: 3’-4’ wideIntermediate Trails: 2’-3’ wideExpert Trails: May be inches wide or any width
the suits the desired challenge
Vertical & Horizontal ClearancesIMBA recommends an inverted triangle, or ice-cream cone, shaped clear zone for trail corridors. This shape recognizes that most users need greater clearance above ground level rather than at ground level. Vertical clearance should be 8 feet high for single-purpose single track trails. Horizontal clearance will vary depending on difficulty levels, but should be at least 2 feet wider that your trail tread.
Drainage ConsiderationsMountain biking trails utilize a host of drainage techniques in order to create and maintain sustainable trails. Trails must be designed and constructed properly at the outset to ensure that water is diverted off the trail and does not pond. Soil types must also be considered, as they play a role in trail drainage. Common drainage techniques include:
Grade Reversals: spot where a trail briefly but gently dips before rising again; the grade change forces water at the low point.
Outslope: constructing the trail tread so that the outer edge is lower than the inner edge; the slope
•••
•
•
Land Acquisition & Trail Development • Chapter 4 -72
Mountain Biking TrailsVirginia Department of Conservation & RecreationTrails Toolbox • Trail Standards Field Guides
Green, horizontal arrows indicate adequate sight lines that allow riders to see oncoming traffic. Courtesy IMBA/Rich Edwards.
Grade variations by soil type. Courtesy IMBA/Rich Edwards.

sheets water off the tread rather than collecting it.Deberming: scraping mounded dirt off the
outside edge of the tread to allow water to sheet of the tread; used to mitigate ponding
Knicks: semi-circular, shaved-down section of tread that is canted to the outer edge of tread to allow water to sheet; used to mitigate ponding on gently-sloped areas.
Rolling Grade Dips: combines a knick with a long, gentle dirt ramp; used to drain high volumes of slow-moving water on steeper slopes.
Armoring: uses rock, soil binders, geosynthetics, or other materials to harden the tread surface where other drainage methods fail.
•
•
•
•
Suitable Materials & AmenitiesBecause of their rustic character, mountain biking trails benefit from simple, organic materials that blend with the existing setting. Suitable materials for items such as signs, benches, and other amenities include natural wood, composite wood materials, stone, and weathering steel (trademarked as Cor-Ten steel).Helpful amenities include informational, warn-ing, and regulatory signs; bike racks, changing rooms, drinking fountains; trash cans; and bike wash facilities.
Difficulty RatingsIMBA uses tread width, tread surface, trail grade, and natural and technical obstacles to assign levels of difficulty. IMBA’s graphic designations are:
Easiest
Easy
More Difficult
Very Difficult
Extremely Difficult
Land Acquisition & Trail Development • Chapter 4 -73
Mountain Biking TrailsVirginia Department of Conservation & RecreationTrails Toolbox • Trail Standards Field Guides
Outslope drainage on a trail. Courtesy IMBA/Rich Edwards.
Armoring a trail. Courtesy IMBA/Rich Edwards.
Typical signage on a mountain bike trail. Courtesy IMBA/Rich Edwards.

Summary of Guidelines
Trail SurfacesUnpaved, natural soil surfaces of varying
roughness
Trail GradesVary greatly by location, difficulty level, and
other factorsDo not exceed half the grade of the sideslope
your trail will traverse
Average trail grades should not exceed 10% for maximum sustainability
Typical maximum sustainable grades are between 15% and 20%
Trail Tread WidthVaries greatly by location, level of difficulty,
and other factors
Beginner trails: 3’-4’ wide
Intermediate trails: 2’-3’ wide
Expert trails: any width
Vertical & Horizontal ClearancesVertical: 8’ above trail tread for single-purpose,
single trackHorizontal: 2’ wider than trail tread (1’ each
side)
•
•
•
•
•
•
•
•
•
•
•
Additional Considerations“Technical trail features” are elements included or added to a trail to increase challenge and variety. Typically made of rock or wood, technical trail features may be existing natural features, enhanced natural features, or completely human-made structures. Examples include drop-offs, bridges, ladders, and rock chokes and slabs. Key things to remember:
Contact the land manager or property owner before building anything
Plan out your feature before building itFollow standard drainage and construction
practices to promote trail and feature sustainabilityDo not damage any environmental or cultural
resources to build the featurePost warning and regulations signs that detail
who is allowed to use the features, who assumes risk for using the features, and levels of difficulty
Inspect and maintain the features and surrounding trail corridor
•
••
•
•
•
Land Acquisition & Trail Development • Chapter 4 -74
Mountain Biking TrailsVirginia Department of Conservation & RecreationTrails Toolbox • Trail Standards Field Guides
Example of a technical trail feature. Courtesy IMBA/Rich Edwards.

Single-use equestrian trails have similar designs and user experiences to hiking and mountain biking trails: they are typically unpaved, improved earth trails located in backcountry or low-development areas. Equestrian trails, however, pose several issues that are unique to the needs, physiology, and habits of horses, mules, and other stock. This field guide refers to mounted riders only and does not address issues with stock-drawn vehicles. Shared-use trails used by equestrians, pedestrians, and/or bicyclists must be designed accordingly in order to mitigate potential user conflicts.
OpportunitiesAllows both rider and stock to enjoy beautiful
outdoor scenery, wildlife-watching, and exerciseOffers rustic experiences away from urban and
suburban environmentsOffers interaction with groups of ridersProvides access to trails for individuals with
mobility impairmentsPreserves Virginia’s equestrian heritage and
traditions
ConstraintsMay require specialized emergency and rescue
servicesPoses potential risks to environmentally-sensitive
resources where riders wander off-trailMay introduce user conflict to a shared-use trail May require increased maintenance where trails
are well-used and frequent events are held
•
•
••
•
•
•
••
Suitable LocationsEquestrian trails may be located almost anywhere including woodlands, riparian corridors, beaches, open fields, orchards, and rail-trails. Most equestrians prefer backcountry settings or frontcountry areas set apart from intense development. These settings provide attractive scenery and reduce potential horse and motorized vehicle conflicts.
General Siting & LayoutPlan your trail to include scenic variety, varying lengths, and multiple challenge levels. When possible, configure your trail as a loop system that starts and ends in the same location. Stacked loop systems combine multiple loop trails with the same single access point.
Trails should be no shorter than 5 miles and up to 25 miles for day use, where possible. Create routes that allow rides of 2-3 hours, half days, and full days.
Land Acquisition & Trail Development • Chapter 4 -75
Equestrian TrailsVirginia Department of Conservation & RecreationTrails Toolbox • Trail Standards Field Guides
Linear, loop, spur, and cross trails. Courtesy of USDA Equestrian Design Guidebook.
Equestrian trail in Virginia. Courtesy of the Virginia Horse Council.
Equestrians riding along a beach. Courtesy of the Virginia Horse Council.

Adequate sight lines, or how far a person can see along an unobstructed line of sight, help prevent user conflicts, collisions, and assist with passing. A good rule of thumb is to provide a minimum unobstructed sight line of 100 feet in front of and behind the rider. Site trails over or near natural, flowing drinking water whenever possible. This reduces the need to haul water on longer trips and avoids having to use water troughs where standing water can spread diseases. Hardened crossings, such as bridges, puncheons, and fords may be installed to reduce streambed impacts.
Suitable Trail SurfacesPaved surfaces provide little traction for horseshoes and are rarely suitable for trail rides. Any surface should compact to a firm, slip-resistant tread that can withstand the impact of horseshoes. Ideally, the surface produces a minimal amount of dust. Consider:
Native soilsWood chipsVDOT #21A crushed aggregate (stone) topped
with 1” of VDOT #10 finesNative soil with soil hardeners
Trail GradesIn backcountry and areas of low development, grades should be less than or equal to 12%. Steep grades of 20% or more should be kept to no more than 200 feet in length.In moderately developed areas, grades should be less than or equal to 10%. Steep grades of 15% or
•••
•
more should be kept to no more than 200 feet in length.In highly-developed areas, grades should be less than or equal to 5%. Steep grades of 5-8% should be no longer than 800 to 1,500 feet in length. Grades of 8-10% should be no longer than 500 to 800 feet in length. Grades of 10% or more should be no longer than 500 feet in length. On running grades steeper than 5%, add 6-12 inches of extra tread width as a safety margin to help stock regain footing if it steps off the downhill side of the tread.
Trail Tread WidthTo accommodate the natural stride of stock, trail tread must be at least 1.5 to 2 feet wide.Single-track tread, where riders must remain single-file, should be 1.5-2 feet wide in sparsely-developed areas; 3-4 feet wide in areas of moderate development, and 6-8 feet wide in highly-developed locations. Double-track tread, which allows riders to travel side-by-side, should be 5-6 feet wide in moderately developed areas and 8-12 feet wide in highly-developed locations. Where there is little or no development, double-track trails tend to be made from converted vehicle trails.
Vertical and Horizontal ClearancesVertical clearance for riders atop stock should be at least 10 feet from the surface of the trail to the next closest overhead object. 12 feet of vertical clearance is recommended where possible. Horizontal clearance varies by trail use and setting. No standard exists, but a general guideline is to create a clear zone free of vegetation, debris, and built elements 2-3 feet on either side of the trail tread. On a trail in a moderately-developed area, for example, this would create a trail corridor of 9-12 feet wide.
Land Acquisition & Trail Development • Chapter 4 -76
Equestrian TrailsVirginia Department of Conservation & RecreationTrails Toolbox • Trail Standards Field Guides
Suggested equestrian trail widths. Courtesy of USDA Equestrian Design Guidebook.
Aggregate (stone) trail in a Virginia State Park. Courtesy of DCR.
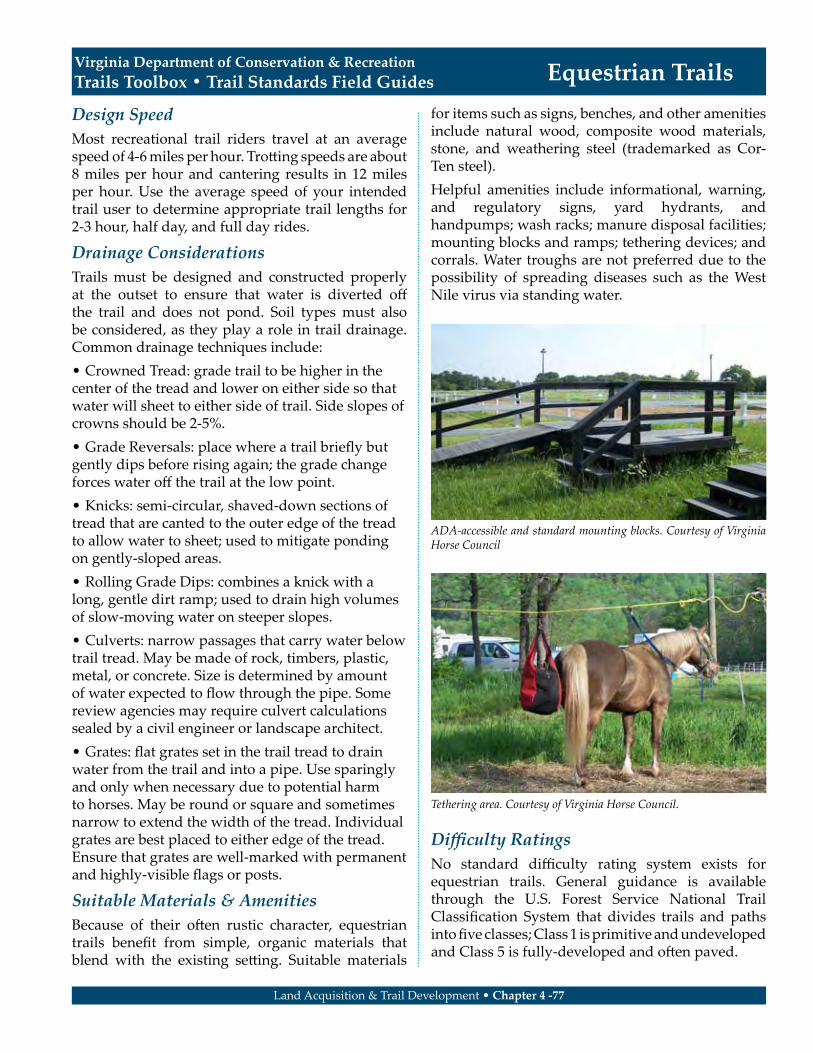
Design SpeedMost recreational trail riders travel at an average speed of 4-6 miles per hour. Trotting speeds are about 8 miles per hour and cantering results in 12 miles per hour. Use the average speed of your intended trail user to determine appropriate trail lengths for 2-3 hour, half day, and full day rides.
Drainage ConsiderationsTrails must be designed and constructed properly at the outset to ensure that water is diverted off the trail and does not pond. Soil types must also be considered, as they play a role in trail drainage. Common drainage techniques include:
Crowned Tread: grade trail to be higher in the center of the tread and lower on either side so that water will sheet to either side of trail. Side slopes of crowns should be 2-5%.
Grade Reversals: place where a trail briefly but gently dips before rising again; the grade change forces water off the trail at the low point.
Knicks: semi-circular, shaved-down sections of tread that are canted to the outer edge of the tread to allow water to sheet; used to mitigate ponding on gently-sloped areas.
Rolling Grade Dips: combines a knick with a long, gentle dirt ramp; used to drain high volumes of slow-moving water on steeper slopes.
Culverts: narrow passages that carry water below trail tread. May be made of rock, timbers, plastic, metal, or concrete. Size is determined by amount of water expected to flow through the pipe. Some review agencies may require culvert calculations sealed by a civil engineer or landscape architect.
Grates: flat grates set in the trail tread to drain water from the trail and into a pipe. Use sparingly and only when necessary due to potential harm to horses. May be round or square and sometimes narrow to extend the width of the tread. Individual grates are best placed to either edge of the tread. Ensure that grates are well-marked with permanent and highly-visible flags or posts.
Suitable Materials & AmenitiesBecause of their often rustic character, equestrian trails benefit from simple, organic materials that blend with the existing setting. Suitable materials
•
•
•
•
•
•
for items such as signs, benches, and other amenities include natural wood, composite wood materials, stone, and weathering steel (trademarked as Cor-Ten steel).Helpful amenities include informational, warning, and regulatory signs, yard hydrants, and handpumps; wash racks; manure disposal facilities; mounting blocks and ramps; tethering devices; and corrals. Water troughs are not preferred due to the possibility of spreading diseases such as the West Nile virus via standing water.
Difficulty RatingsNo standard difficulty rating system exists for equestrian trails. General guidance is available through the U.S. Forest Service National Trail Classification System that divides trails and paths into five classes; Class 1 is primitive and undeveloped and Class 5 is fully-developed and often paved.
Land Acquisition & Trail Development • Chapter 4 -77
Equestrian TrailsVirginia Department of Conservation & RecreationTrails Toolbox • Trail Standards Field Guides
ADA-accessible and standard mounting blocks. Courtesy of Virginia Horse Council
Tethering area. Courtesy of Virginia Horse Council.
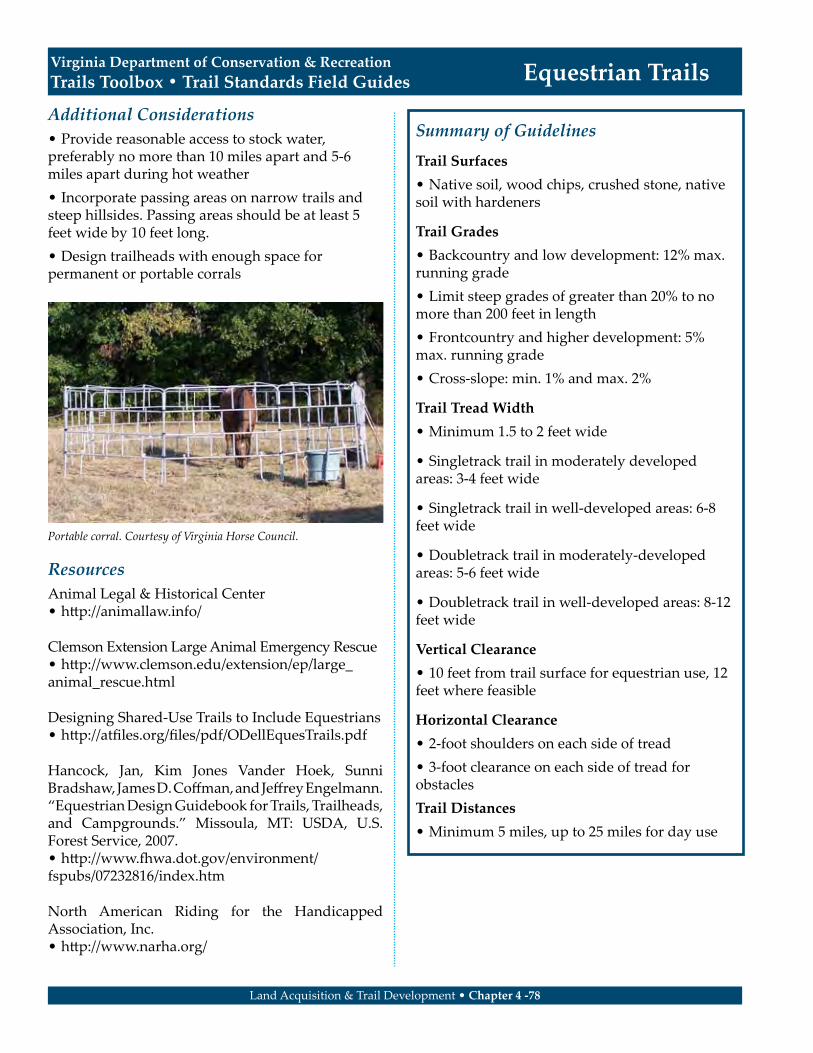
Additional ConsiderationsProvide reasonable access to stock water,
preferably no more than 10 miles apart and 5-6 miles apart during hot weather
Incorporate passing areas on narrow trails and steep hillsides. Passing areas should be at least 5 feet wide by 10 feet long.
Design trailheads with enough space for permanent or portable corrals
ResourcesAnimal Legal & Historical Center
http://animallaw.info/
Clemson Extension Large Animal Emergency Rescuehttp://www.clemson.edu/extension/ep/large_
animal_rescue.html
Designing Shared-Use Trails to Include Equestrianshttp://atfiles.org/files/pdf/ODellEquesTrails.pdf
Hancock, Jan, Kim Jones Vander Hoek, Sunni Bradshaw, James D. Coffman, and Jeffrey Engelmann. “Equestrian Design Guidebook for Trails, Trailheads, and Campgrounds.” Missoula, MT: USDA, U.S. Forest Service, 2007.
http://www.fhwa.dot.gov/environment/fspubs/07232816/index.htm
North American Riding for the Handicapped Association, Inc.
http://www.narha.org/
•
•
•
•
•
•
•
•
Land Acquisition & Trail Development • Chapter 4 -78
Equestrian TrailsVirginia Department of Conservation & RecreationTrails Toolbox • Trail Standards Field Guides
Portable corral. Courtesy of Virginia Horse Council.
Summary of Guidelines
Trail SurfacesNative soil, wood chips, crushed stone, native
soil with hardeners
Trail GradesBackcountry and low development: 12% max.
running gradeLimit steep grades of greater than 20% to no
more than 200 feet in lengthFrontcountry and higher development: 5%
max. running gradeCross-slope: min. 1% and max. 2%
Trail Tread WidthMinimum 1.5 to 2 feet wide
Singletrack trail in moderately developed areas: 3-4 feet wide
Singletrack trail in well-developed areas: 6-8 feet wide
Doubletrack trail in moderately-developed areas: 5-6 feet wide
Doubletrack trail in well-developed areas: 8-12 feet wide
Vertical Clearance10 feet from trail surface for equestrian use, 12
feet where feasible
Horizontal Clearance2-foot shoulders on each side of tread3-foot clearance on each side of tread for
obstaclesTrail Distances
Minimum 5 miles, up to 25 miles for day use
•
•
•
•
•
•
•
•
•
•
•
••
•

Paved shared-use paths differ from trails because paths are typically paved with asphalt, concrete, or crushed stone. Paved paths are generally located in frontcountry situations within or very near to developed areas and within their own right-of-way. They are almost exclusively designed for shared uses and are most often used by pedestrians, recreational bicyclists, and other visitors seeking a smooth traveling surface. Paved paths are frequently built using federally-funded Transportation Enhancement Act (TEA) grants which provide money for transportation-related improvements including sidewalks, roads, and trails. Future funding may also come from the Federal Highway Administration’s Livability Program.
OpportunitiesProvides a smooth and gently-sloped travel
surfaceProvides exercise, commuting, and outdoor
enjoyment for suburban and urban residentsProvides a wide array of opportunities for
universal accessibilityNumerous grants available
ConstraintsPhysical challenges are limitedPath routes and slopes are not easily altered after
constructionMore expensive to design and construct than
natural surface trails
•
•
•
•
••
•
Suitable LocationsDue to their potential for heavy use, typically wider tread and corridor section, and intended users, paved shared-use paths are best located in and around developed areas. Developed areas include suburban residential developments, urban parks, river edges within cities, and overland routes that connect two municipalities. Paved shared-use paths are not suitable for backcountry or wilderness settings.
General Layout & SitingPaved shared-use paths should seek, to the extent possible, to meet standards and guidelines for universal accessibility. This means gentle slopes, limited obstacles, clear distances, and other principles discussed earlier in this chapter and throughout this field guide. Paths can be any length and are often built in phases as funding becomes available. When paths are phased, a master plan should indicate the desired beginning and end point even when only a short section of trail will be constructed. This prevents “trails to nowhere” and inspires confidence in community members and potential funders that an overarching plan has been completed. Locate trailheads where they are easily accessed by cars and local pedestrians and bicyclists. Schools, parks, and boat ramps make useful trailhead locations. Trailheads may also be newly-constructed as part of the trail project. New trailheads should provide automobile and bike parking.
Site the path alignment along contours using the guidance offered within Chapter 4 of the Toolbox
Land Acquisition & Trail Development • Chapter 4 -79
Paved Shared-Use PathsVirginia Department of Conservation & RecreationTrails Toolbox • Trail Standards Field Guides
A paved, shared-use path on Garst Mill Greenway, Roanoke, VA. Courtesy of Roanoke Valley Greenways.
Side-by-side trails are one way to mitigate user conflicts. Courtesy of Northern Virginia Regional Park Authority.

including the Half Rule and the 10% Rule. Avoid steep slopes, wet soils, and private property wherever possible. If feasible, route the path through varying scenery and landcover—such as woodlands and stream corridors—for visual interest. Incorporate boardwalks and bridges to cross sensitive resources.In heavily-trafficked areas, mitigate use conflicts by providing pull-offs for passing or side-by-side trails that accommodate multiple user-types.
Suitable Path SurfacesThe ideal path surface is smooth, free of tripping hazards, and low-maintenance. Consider:
Asphalt (new or recycled)Prime and Double SealCrushed Aggregate/Stone (VDOT #21A stone)Concrete
Path GradesThe optimal running grade for a path is between 1% (1:100) and 3% (1:33) to ensure water will flow off the pavement but the path remains universally-accessible. Running grades should not exceed 5% (1:20) whenever possible although up to 10% (1:10) slope is acceptable. Based on guidance from the Access Board’s Accessibility Guidelines for Outdoor Developed Areas, running grades may exceed 5% under the following conditions:
Over 5% (1:20) up to 8.33% (1:12) for up to 50 feet maximum length of trail/path
Over 8.33% (1:12) up to 10% (1:10) for up to 30 feet maximum length of trail/pathNote that a resting interval of at least 5 feet in length, at least as wide as the trail or path, and not exceeding 5% grade must be provided at the end of each length listed above that exceeds 5% (1:20) grade. Path cross-slopes on asphalt, concrete, or boards must not exceed 2% (1:48) in order to be universally-accessible. Other surfaces may have cross-slopes of up to 3% (1:33). The cross-slope should be a minimum of 1% to ensure water will run off. Refer to the Access Board’s Outdoor Developed Area Guidelines and AASHTO’s 2010 Draft Guide for the Planning, Design, and Operation of Bicycle Facilities for additional information, variations, and exceptions.
••••
•
•
Note that funding agency requirements for maximum grades may vary from those listed in the Outdoor Developed Areas text.
Path Tread WidthThe current recommended tread width for most two-way paved paths is 10 feet, which reflects FHWA and VDOT guidance. In some cases, tread widths may be reduced to 8 feet where 10 feet is not feasible. The minimum width for a one-way path is 6 feet.
Vertical & Horizontal ClearanceBased on guidance from the 2010 Draft AASHTO Guide, vertical clearance on shared-use paths should be a minimum of 8 feet from the surface of the path to the nearest overhanging object. Paths with equestrians users should increase this distance to 10 feet to accommodate a mounted rider. A minimum graded area, or shoulder, should be constructed at least 2 feet from the edge of the path on both sides. A minimum of 3 feet of clearance is recommended between the edge of the path tread and trees, posts, guardrails and other lateral obstructions.With horizontal clearances of 2 feet, a typical clear zone for a paved shared-use path will be 14 feet (10-foot path tread plus 2-foot shoulders on each side).
Design SpeedFor a paved shared-use path, design speed refers to designing the physical alignment of the path to accommodate typical bicycle speeds. For example, turns in the path must be wide enough so that a bicyclist does not skid and fall while attempting to make the turn at a reasonable speed.
Land Acquisition & Trail Development • Chapter 4 -80
Paved Shared-Use PathsVirginia Department of Conservation & RecreationTrails Toolbox • Trail Standards Field Guides
Cross section of AASHTO-preferred, two-way shared use path on separated right-of-way. Adapted from 2010 Draft AASHTO Guide.

For most paths in relatively flat areas, design speeds between 14 and 18 mph should be used. In hilly areas and for sustained steep grades, the maximum design speed should be 30 mph.For a design speed of 18 mph, curves in the path should have radii of at least 60 feet. Where 60-foot radii cannot be achieved, warning signs should be posted. For more information, refer to Chapter 5 of AASHTO’s 2010 Draft Guide for the Planning, Design, and Operation of Bicycle Facilities.
Drainage ConsiderationsThe path tread should be graded to shed water in an efficient manner. Paths may be crowned or cross-sloped. Crowned paths are graded to be higher in the center and lower at the edges so that water falling on the path is shed to both sides. Crowned paths typically have a swale—or ditch—on one or both sides to channel the water to a particular location. Cross-sloped paths are tilted to one side so that water runs off the trail in one direction. Cross-sloped paths typically have a swale only on the uphill side to catch fast-moving water before it enters the path tread.The side slopes of crowns and cross-slopes should be 2% (1:48) maximum to remain universally-accessible. Culverts, or drainage pipes, are typical drainage features along most paths. Culverts carry concentrated flows of water underneath the trail. These flows may be existing, in the case of streams, or designed, where swales collect water and drain into culverts. Culverts are made of HDPE plastic, corrugated metal, and concrete; material types depend on how deeply the culvert is buried, how much water must be carried, how fast the water is moving, and cost.
Suitable Materials & AmenitiesMaterial types, styles, and colors are highly variable for paths and are determined by the amount of available funding, desired level of maintenance, and creativity of path managers and designers. Most path managers and designers opt for prefabricated signs and site furnishings that arrive ready to install. In some instances, local service organizations, such as the Boy Scouts or Rotary Club,
offer to build benches, signs, and other amenities. Styles may range from urban and sophisticated to rustic. Consistency, however, is a must. Utilizing consistent materials, colors, and amenities throughout the path corridor not only creates a visuallly-appealing setting, but helps “brand” your path and make it easily identifiable. In addition, ordering site furnishings in bulk may result in price breaks. Helpful amenities include informational, warning, and regulatory signs; benches; bike racks; restrooms; drinking fountains; bollards; emergency phones; and trash cans. Locate signs as needed to indicate direction, rules, and information. FHWA and VDOT-funded paths require conformance with FHWA’s Manual on Uniform Traffic Control Devices (MUTCD). The MUTCD is a good resource for any path design, regardless of funding source.
Difficulty RatingsNo standardized difficulty rating exists for paved shared-use paths, primarily because paved paths are not intended to present extreme physical challenges.
Railing Design Railings along paths and bridges must meet specific design requirements. Based on the 2010 Draft AASHTO Guide, the following standards apply to all TEA-funded paths and serve as guidance for other path projects:
AASHTO states that railings on paths and stand-alone structures should be a minimum of 42 inches in height. Provide a height of 48 inches on bridges and locations where bicyclists and other users may fall over lower-height railings. In some situations, VDOT desires a 54-inch railing height.
VDOT prefers vertical railing pickets over horizontal to avoid creating a ladder-effect whereby someone can climb over the railing.
Depending on the approving agency, vertical pickets should be spaced so that either a 4- or 6-inch sphere cannot pass through the rails.
Additional ConsiderationsBollards can prevent motorized vehicles from
accessing the path (typically in a single line of 3
•
•
•
•
Land Acquisition & Trail Development • Chapter 4 -81
Paved Shared-Use PathsVirginia Department of Conservation & RecreationTrails Toolbox • Trail Standards Field Guides

bollards). Center bollards should be removable to allow service/emergency vehicles to enter the path.
Design the path with appropriate sight distance to allow users to see and react to upcoming events. Refer to Chapter 5 of the 2010 AASHTO Draft Guide for more information.
Install appropriate pavement markings on the path and at roadway crossings to give path users and drivers warning of the upcoming intersection. Use stop bars, centerlines, “XING,” bike symbols, and other markings as indicated by Chapter 5 of the 2010 Draft AASHTO Guide and the MUTCD.
Resources
American Association of State Highway and Transportation Officials (AASHTO). Guide for the Planning, Design, and Operation of Bicycle Facilities. Washington, D.C.:AASHTO, DRAFT 2010.
http://design.transportation.org/Documents/DraftBikeGuideFeb2010.pdf
•
•
•
Beneficial Designs, Inc. “Designing Sidewalks and Trails for Access, Part II of II: Best Practices Design Guide.” Washington, D.C.: U.S. Dept. of Transportation, FHWA, 2001.
http://www.fhwa.dot.gov/environment/sidewalk2/
FHWA’s Manual on Uniform Traffic Control De-vices (MUTCD)
http://mutcd.fhwa.dot.gov/
Virginia Dept. of Transportation. “Road Design Manual: Section A-5 Bicycle and Pedestrian Facility Guidelines.” Richmond, VA: Virginia Dept. of Transportation, 2007.
http://www.virginiadot.org/business/locdes/rdmanual-index.asp
•
•
•
Land Acquisition & Trail Development • Chapter 4 -82
Paved Shared-Use PathsVirginia Department of Conservation & RecreationTrails Toolbox • Trail Standards Field Guides
Railing height and location variations. Adapted from 2010 Draft AASHTO Guide.
Summary of Guidelines
Path SurfacesAsphalt, Prime and Double Seal, Aggregate/
Crushed Stone (VDOT #21A), Concrete
Path GradesIdeal running grade: 2-3%Ideal Minimum running grade: 1%Ideal Maximum running grade: 5%Cross-slope: min. 1% and max. 2% on asphalt,
concrete, and boards; 3% max. on other surfaces
Path Tread Width10 feet wide, 8 feet wide in exceptional cases
Vertical Clearance8 feet from trail surface10 feet from trail surface for equestrian use
Horizontal Clearance2-foot shoulders on each side of tread3-foot clearance on each side of tread for
obstaclesStandard path corridor is 14 feet
Design Speed14-18 mph; max 30 mph in hilly areas
•
••••
•
••
••
•
•

Rails-with-trails (RWT) consist of any path or trail adjacent to or within an active railroad corridor. The FHWA report “Rails-with-Trails: Lessons Learned” notes that no national standards or guidelines dictate RWT facility design and that guidance must be pieced together from available standards and current practices.
At present, RWTs may be difficult to implement in Virginia given that both of the major railroads (Norfolk Southern and CSX), as well as Virginia’s shortline railroads, have stated that they are opposed to the construction of rails-with-trails and at grade pedestrian crossings within their active rights-of-way. The railroad companies are willing to address requests set forth through the process outlined in Appendix 4-C on a case-by-case basis. This process establishes two opportunities for incorporating trails or pedestrian crossings. The first is through a trail peoposal submitted to DCR who will then coordinate with the host railroad. The second is through identifying proposed Rail Enhancement Fund projects and cross-referencing with existing trail proposals, as identified by DCR. This guide is therefore included as a reference for organizations that are considering planning an RWT to outline opportunities and constraints involved with this type of trail system.Key risk management considerations are:
Providing adequate distance between track and trail;Providing safe fencing, barriers or grade
separation between track and trail where necessary;Designing safe rail crossings;Installing adequate trail-user warning signs.
••
••
OpportunitiesUtilize land in railroad corridors that is otherwise
empty and neglectedCreate a unique trail or path experienceIncrease the amount of usable trails and paths
and mitigate conflicts that would otherwise halt trail construction
ConstraintsAdditional risk management issues must be
addressedSome users might perceive the trail as unsafeRailroad companies may be unwilling to give
permission to build a trail in their right-of-way.
Suitable LocationsRails-with-trail locations are limited only by permission from railroad companies and appropriate topography, soils, and other design standards. The majority of existing RWTs run along Class I (the largest operating freight companies) mainline or other freight tracks. The remainder are split between short lines and public transit lines. The limiting factor is the availability of enough space to create a suitable setback from the centerline of the closest active railroad track.
General Layout & SitingSetback and separation are the primary layout considerations with RWTs. Other principles of design are similar to those for paved shared-use paths. Setback refers to the distance between the edge of an RWT and the centerline of the closest active railroad track. Separation refers to the method of separating the active rail line from the trail or path. Setback is determined by the following factors:
Type, speed, and frequency of trainsSeparation techniqueTopographySight distanceMaintenance requirementsHistorical problems
Setbacks on existing RWTs vary from 7 feet to 100 feet, but average about 33 feet. Where setback width is less than desirable (typically less than 25 feet),
•
••
•
••
••••••
Land Acquisition & Trail Development • Chapter 4 -83
Rails with TrailVirginia Department of Conservation & RecreationTrails Toolbox • Trail Standards Field Guides
Rail-with-trail. Courtesy of AmericanTrails.org/Stuart Macdonald.

enhanced separation methods should be employed.Separation methods vary by situation but may include:
Fencing (typ. 3-4 feet high, sometimes 6 feet)VegetationVertical grade separationDrainage ditches
Fencing is often used where the setback is less than desired. Vegetation, vertical grade, and ditches are commonly used where the setbacks are at least 25 feet and vertical separation is at least 10 feet. Separation techniques may be combined to achieve acceptable results.
Suitable Path SurfacesThe ideal trail or path surface is smooth, free of
••••
tripping hazards, and low-maintenance. Consider:Asphalt (new or recycled)Prime & Double Seal/Chip & SealCrushed StoneConcrete
Path GradesThe optimal running grade for a path is between 1% and 3% to ensure water will flow off the pavement but the path remains universally-accessible. Running grades should not exceed 5%. Where running grades exceed 5%, the path is considered a ramp; handrails and landings must be provided. Refer to the Access Board’s Outdoor Developed Area Guidelines and AASHTO’s 2010 Draft Guide for the Planning, Design, and Operation of Bicycle Facilities for exceptions to this standard.
Path cross-slopes should not exceed 2% in order to be universally-accessible. The cross-slope should be a minimum of 1% to ensure water will run off.
Path Tread WidthThe current recommended tread width for most two-way paved paths is 10 feet, which reflects FHWA and VDOT guidance. In some cases, tread widths may be reduced to 8 feet where 10 feet is not feasible. The minimum width for a one-way path is 6 feet.
Vertical & Horizontal ClearanceRefer to the section above for overarching setback requirements. Clearances discussed below refer only to clearances directly adjacent to the path tread surface. Vertical clearance should be a minimum of 8 feet from the surface of the path to the nearest overhanging object. Paths with equestrians users should increase
••••
Land Acquisition & Trail Development • Chapter 4 -84
Rails with TrailVirginia Department of Conservation & RecreationTrails Toolbox • Trail Standards Field Guides
Definition of Setback Distance. Courtesy of U.S. DOT/FHWA, “Rails with Trails: Lessons Learned.”
Setback Ranges. Courtesy of U.S. DOT/FHWA, “Rails with Trails: Lessons Learned.”
Approach grade at at-grade crossings. Courtesy of U.S. DOT/FHWA, “Rails with Trails: Lessons Learned.”

this distance to 10 feet to accommodate a mounted rider. A minimum graded area, or shoulder, should be constructed at least 2 feet from the edge of the path on both sides. 3 feet of clearance is recommended between the edge of the path tread and trees, posts, guardrails and other lateral obstructions.With horizontal clearances of 2 feet, a typical clear zone for a paved shared-use path will be 14 feet (10-foot path tread plus 2-foot shoulders on each side).
Design SpeedFor a paved shared-use path, design speed refers to designing the physical alignment of the path to accommodate typical bicycle speeds. For example, turns in the path must be wide enough so that a bicyclist does not skid and fall while attempting to make the turn at a reasonable speed. In general, a minimum design speed of 20 mph should be used. When a path slope exceeds 4% or where strong tailwinds exist, increase the design speed to 30 mph. For a design speed of 20 mph, paths should have radii of at least 100 feet. Where 100-foot radii cannot be achieved, warning signs should be posted. For more information, refer to Chapter 5 of the AASHTO’s 2010 Draft Guide.
Drainage ConsiderationsRWTs must be designed and constructed with existing railroad bed drainage in mind and must not impair existing drainage. Any paved RWT will increase the amount of drainage run-off in the existing system because the path surface is impervious and can no longer accept stormwater. The existing drainage system may need to be enhanced to accept the increased run-off or a separate system may need to be designed that does not allow path run-off to enter the system. Contact a civil engineer or landscape architect, and work with the railroad’s engineering department, to assess the existing system and make recommendations for necessary swales, culverts, and other drainage features.
Suitable Materials & AmenitiesMaterial types, styles, and colors are highly variable for paths and are determined by the amount of
available funding, desired level of maintenance, and creativity of path managers and designers. Most path managers and designers opt for prefabricated signs and site furnishings that arrive ready to install. In some instances, local service organizations, such as the Boy Scouts or Rotary Club, offer to build benches, signs, and other amenities. Styles may range from urban and sophisticated to rustic. Consistency, however, is a must. Utilizing consistent materials, colors, and amenities throughout the path corridor not only creates a visually-appealing setting, but helps “brand” your path and make it easily identifiable. In addition, ordering site furnishings in bulk may result in price breaks. Helpful amenities include informational, warning, and regulatory signs; benches; bike racks; restrooms; drinking fountains; bollards; emergency phones; and trash cans. These amenities must be located in a manner that does not impair railroad maintenance activities or sight distances.
Locate signs as needed to indicate direction, rules, and information. FHWA and VDOT-funded paths require conformance with FHWA’s Manual on Uniform Traffic Control Devices (MUTCD). The MUTCD is a good resource for any path design, regardless of funding source. The railroad company may also require certain types of signage in specific locations.
Difficulty RatingsNo standardized difficulty rating exists for paved shared-use paths, primarily because paved paths are not intended to present extreme physical challenges.
Land Acquisition & Trail Development • Chapter 4 -85
Rails with TrailVirginia Department of Conservation & RecreationTrails Toolbox • Trail Standards Field Guides
Examples of MUTCD signage for rails-with-trails. Courtesy of U.S. DOT, “Rails with Trails: Lessons Learned.”

Additional ConsiderationsRailroad track crossings are the greatest concern
for railroads, planners, and users. Refer to the resources below and consult with railroad and design professionals to determine the best way to incorporate track crossings
Railroad trestles and bridges can be incorporated into your design and need not stop a project from moving forth
Equestrian use can be incorporated where sight distances, visibility, and trail width are appropriate.
Use proper design and layout when trailheads are incorporated into the project. Refer to Section V of “Rails-with-Trails: Lessons Learned.”
ResourcesFHWA “Rails-with-Trails: Lessons Learned.”
http://www.fhwa.dot.gov/environment/rectrails/rwt/
Rails-to-Trails Conservancy Toolbox: Rail-with-Trailhttp://www.railstotrails.org/ourWork/
trailBuilding/toolbox/informationSummaries/rails-with-trails.html
“Rails-with-Trails: Design, Management, and Operating Characteristics of 61 Trails Along Active Rail Lines”
http://www.railstotrails.org/resources/documents/resource_docs/Rails-with-Trails%20Report%20reprint_1-06_lr.pdf
•
•
•
•
•
•
•
Land Acquisition & Trail Development • Chapter 4 -86
Rails with TrailVirginia Department of Conservation & RecreationTrails Toolbox • Trail Standards Field Guides
Trail with rail trestle option. Courtesy of U.S. DOT/FHWA, “Rails with Trails: Lessons Learned.”
Summary of Guidelines (Same as those for Paved Shared-Use Paths)
Trail SurfacesAsphalt, Prime and Double Seal, Aggregate/
Crushed Stone (VDOT #21A), Concrete
Trail GradesIdeal running grade: 2-3%Minimum running grade: 1%Maximum running grade: 5%Cross-slope: min. 1% and max. 2%
Trail Tread Width10 feet wide, 8 feet wide in some cases
Vertical Clearance8 feet from trail surface10 feet from trail surface for equestrian use
Horizontal Clearance2-foot shoulders on each side of tread3-foot clearance on each side of tread for
obstaclesStandard path corridor is 14 feet
Design Speed14-18 mph; max 30 mph in hilly areas
•
••••
•
••
••
•
•

The Virginia Department of Transportation (VDOT) defines a bike lane as “that portion of a roadway designated by signs and/or pavement markings for the preferential use of bicycles, electric power-assisted bicycles, and mopeds.”Bicycle commuting is gaining popularity in the Unites States and is perpetuated in part by the presence of well-designed bike lanes. Bike lanes provide for more predictable movements for both bicyclists and motor vehicles and increase the carrying capacity of roads and highways.
OpportunitiesReduce risk for bicyclists and moped ridersIncrease the carrying capacity of roads and
highwaysProvide a commuting option that reduces the
number of cars on the roadIncreases recreation options and available trail
and path linkages
ConstraintsPlaces bikes and mopeds in close proximity to
motor vehiclesAdds an extra expense to widen road pavement
and add signage and markings
Suitable LocationsBike lanes can be installed along most roads or highways in either rural or highly-developed locations.
••
•
•
•
•
Within the roadway, bike lanes may be created between motor vehicle lanes or adjacent to road shoulders. Bike lanes should never be created within a required shoulder area, as shoulders are used by motor vehicles.
General Layout & SitingBike lanes should be one-way facilities that carry bike traffic in the same direction as adjacent motor vehicle traffic. Bike lanes are always located on both sides of the road on two-way streets. Bike lanes should not be separated from other motor vehicle lanes by curbs, parking, or other obstructions. On one-way streets, bike lanes should generally be located on the right-hand side of the street. Refer to the AASHTO 2010 Draft Guide for the Planning, Design, and Operation of Bicycle Facilities for in-depth information about bike lanes and intersections.
Suitable Bike Lane SurfacesBike lanes are typically made of the same material as the road they share: asphalt. In some cases where bike lanes are added to an existing road, they may be constructed of pervious asphalt or pervious concrete. Some localities have begun to implement colored asphalt surfaces to better delineate bike lanes from motor vehicle lanes.
Bike Lane GradesBike lane grades will match the grade of the road it shares. Post signage to identify steep grades.
Bike Lane Tread WidthBike lane widths vary by location. They typically vary from 4-5 feet in width. Below are standard bike lane widths based on roadway design. Refer to the diagrams on the next sheet for additional guidance.
Roadway with no curb and gutter: 4’ min. widthRoadway with parking: 5’ min. width; place lane
between motor vehicle travel lane and parkingRoadway with parking but no designated
distinction or pavement markings: 11’ min. width with no curb and 12’ min. width from the face of a curb
••
•
A bike lane integrated into the street. Courtesy of www.pedbikeimages.org/Jennifer Campos.
Land Acquisition & Trail Development • Chapter 4 -87
Bike LanesVirginia Department of Conservation & RecreationTrails Toolbox • Trail Standards Field Guides

Land Acquisition & Trail Development • Chapter 4 -88
Bike LanesVirginia Department of Conservation & RecreationTrails Toolbox • Trail Standards Field Guides
Bike Lanes in Outlying Areas. Courtesy of VDOT Road Design Manual.
Bike Lanes on streets with no parking. Courtesy of VDOT Road Design Manual.
Bike Lanes on streets with parking not designated with striping. Courtesy of VDOT Road Design Manual.
Bike Lanes on streets with striped on-street parking. Courtesy of VDOT Road Design Manual.

Vertical & Horizontal ClearanceThere are no standards for clearances on bike lanes. A good guideline is to maintain a minimum of 8 feet from the surface of the road to the nearest overhanging object. In addition, maintain a minimum of 3 feet clear from the nearest horizontally-adjacent obstacle.
Drainage ConsiderationsBike lanes must be sloped to ensure good drainage. Slopes should shed water toward the outside of the lane to avoid running water back onto the roadway. Cross-slopes should not exceed 2% in order to maintain comfortable riding conditions. Where drain inlets are located within a bike lane or turning path, select grates that are bicycle-friendly and will not trap wheels. Contact the following manufacturers for bike-safe grates:
Neenah Foundry http://www.nfco.com/content/Home/
East Jordan Iron Workshttp://www.ejiw.com/
Suitable Materials & AmenitiesMaterials and amenities for bike lanes are minimal because they are typically used solely for commuting or as links to other trails or paths. In some instances, benches are useful for bicyclists who use bike lanes as longer-distance recreation routes or bike to specific locations such as bus stops. Amenities include MUTCD signs and wayfinding signs; pavement markings; and bike racks.
•
•
Additional ConsiderationsTwo-way bike traffic is not recommended. It may
be useful, however, for short sections of bike lane where two-way travel will eliminate the need for a double crossing.
Where possible, avoid continuous right-turn lanes as this forces bicyclists to turn in front of motor vehicle traffic. Instead, consolidate driveway access points and create well-defined intersections.
Locate drain inlets and utility covers outside of the bike lane. If this is not possible, select grates and covers that are flush with the pavement and will not trap bike wheels.
Use standard MUTCD bike lane symbols to stay consistent with other parts of the state.
•
•
•
•
Land Acquisition & Trail Development • Chapter 4 -89
Bike LanesVirginia Department of Conservation & RecreationTrails Toolbox • Trail Standards Field Guides
An ADA-approved trench grate. Courtesy of East Jordan Iron Works.
Standard MUTCD bike lane signage. Courtesy of USDOT.
Bike lane with on-street parking. Courtesy of www.pedbikeimages.org/Elaine Nelson.
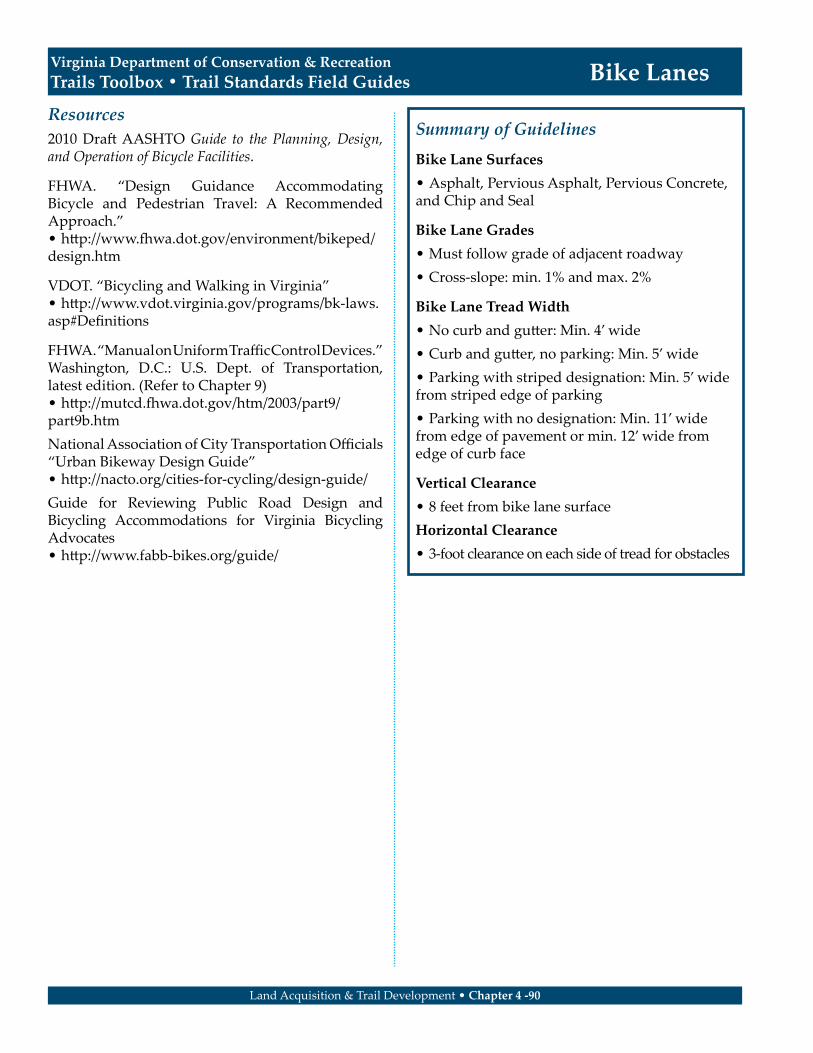
Resources2010 Draft AASHTO Guide to the Planning, Design, and Operation of Bicycle Facilities.
FHWA. “Design Guidance Accommodating Bicycle and Pedestrian Travel: A Recommended Approach.”
http://www.fhwa.dot.gov/environment/bikeped/design.htm
VDOT. “Bicycling and Walking in Virginia”http://www.vdot.virginia.gov/programs/bk-laws.
asp#Definitions
FHWA. “Manual on Uniform Traffic Control Devices.” Washington, D.C.: U.S. Dept. of Transportation, latest edition. (Refer to Chapter 9)
http://mutcd.fhwa.dot.gov/htm/2003/part9/part9b.htmNational Association of City Transportation Officials “Urban Bikeway Design Guide”
http://nacto.org/cities-for-cycling/design-guide/Guide for Reviewing Public Road Design and Bicycling Accommodations for Virginia Bicycling Advocates
http://www.fabb-bikes.org/guide/
•
•
•
•
•
Land Acquisition & Trail Development • Chapter 4 -90
Bike LanesVirginia Department of Conservation & RecreationTrails Toolbox • Trail Standards Field Guides
Summary of Guidelines
Bike Lane SurfacesAsphalt, Pervious Asphalt, Pervious Concrete,
and Chip and Seal
Bike Lane GradesMust follow grade of adjacent roadwayCross-slope: min. 1% and max. 2%
Bike Lane Tread WidthNo curb and gutter: Min. 4’ wideCurb and gutter, no parking: Min. 5’ wideParking with striped designation: Min. 5’ wide
from striped edge of parkingParking with no designation: Min. 11’ wide
from edge of pavement or min. 12’ wide from edge of curb face
Vertical Clearance8 feet from bike lane surface
Horizontal Clearance3-foot clearance on each side of tread for obstacles
•
••
•••
•
•
•

Blueways and water trails are valuable recreational, educational and economic assets. In Virginia, “water trails” and “blueways” are used synonymously to reference linear river and stream corridors. Water trails and blueways are managed systems of access points with support facilities to allow trail users opportunities for multi-day trips. Because much of Virginia’s shoreline is privately owned, partnerships between private and public landowners are a necessity to meet the growing demands on water resources Planners of water access need to consider the needs of recreational motorized and non-motorized traffic and river traffic patterns when planning facilities. Also, when riparian lands are suitable and accessible for outdoor recreation, there will likely be opportunities to link resources along the river or stream with a water trail. Natural river hazards such as dams and underwater obstructions need to be identified and accommodations made for safe portages. In planning boating facilities, tidal changes must be accommodated in the facility design. The presence of winds and tides varies across the Commonwealth and should always be considered during design and water trail trip planning. Whenever possible, water access facilities should be made accessible in compliance with the American Disabilities Act (ADA). This field guide offers an overview of blueways and water trails planning considerations. Refer to the Virginia Outdoors Plan and the references provided therein for additional information.
Blueways & Water Trails Guiding PrinciplesThe National Park Service outlines three guiding principles for water trails:
Environmental Enhancement: includes natural resource conservation, preservation and restoration; volunteer resource stewardship by the users of the resource; and sensitive sustainable, and no-impact use by individuals and businesses.
Community Livability: includes the citizens’ rights of access to public waterways and the enjoyment of the resource; scientific, historical and cultural interpretation and local and community involvement.
Personal Wholeness: relates to health and wellness through outdoor exertion, building confidence and self reliance through outdoor skills and spiritual growth through outdoor observation and experiential activities.
•
•
•
Land Acquisition & Trail Development • Chapter 4 -91
Blueways & Water TrailsVirginia Department of Conservation & RecreationTrails Toolbox • Trail Standards Field Guides
Kayaker on the James River as it flows through Richmond, VA. Courtesy of DCR.
All types of watercraft make use of blueways. Courtesy of DCR.
Wayfinding sign for the James River Heritage Trail blueway. Courtesy of DCR.

FacilitiesEstablish access points only on publicly owned lands or on properties where a legal agreement for access has been negotiated. River and water conditions will vary widely across Virginia’s coastal, piedmont and mountain regions. The distance between water access points is based on time it takes to travel the water segment. This will vary based on the geographic area of the state, recent precipitation, seasonal variations, tidal influences and the skill level of the paddler. In general, a rest stop should be located every 2-3 hours along a water trail.
Considerations for water access may include day-use and/or overnight camping. Day-use facilities may have restroom and picnic accommodations. Camping facilities provide overnight accommodations which may include tent platforms, potable water and shower facilities. Non-motorized (or hand-carry) boat ramps should
have a grade between 5% and 15%. Ramps should be located in areas protected from wind and currents. These launches should lack underwater obstructions and be located in waters deep enough to be navigable by the boats for which the launch is designed.
Trail Length and RouteDepending on the water conditions and weather, the optimal length for water trails varies. In Virginia, the coastal, piedmont and mountain regions will have water bodies with varying flow depending on the weather patterns, season and tides. The length of water trail should be based on the individual conditions along each water body. Paddler skills vary; therefore, hazards should be noted in developing water trail route alternatives to allow individuals to make decisions related to trip length based on ability and experience.
Suitable Materials & AmenitiesBlueway amenities are both land-based and water-based. On land, consider parking, signage, canoe and kayak storage (lockers and/or racks); clothing lockers; restrooms; showers; picnic table and interpretive signs. In the water, consider buoy markers for water trail designation, submerged hazards and floating interpretive signage. Materials used along the water trail should be rust resistant, glass free and should be inspected periodically for maintenance. Enameled aluminum, marine plywood and cedar may offer excellent options for water trail signage.
Land Acquisition & Trail Development • Chapter 4 -92
Blueways & Water TrailsVirginia Department of Conservation & RecreationTrails Toolbox • Trail Standards Field Guides
Inappropriate and difficult access to waterway. Courtesy of DCR.
ADA-accessible boat dock. Courtesy of City of Roanoke.
Boat launch at Robious Landing Park in Midlothian, VA. Courtesy of DCR.

Water trail signs should extend 6 feet above the water and should be installed on one side of the waterway. Signage should be placed as close to the shoreline as possible to avoid creating a hazard for motorized boats.
Buoys used as trail markers should extend at least 36 inches above the mean high water mark. Buoys may range from 5 inches to 6 inches in diameter.
Risk Management ConsiderationsBlueways and water trails planners must assess the risks associated with the trail. Proper planning, management and maintenance are key concepts for water trail risk management. All water trails should be planned to avoid known hazards and impacts to private property. Areas with submerged items, strong currents, high winds or heavy water traffic should be identified. Accommodations for these hazards should be noted on water trail signage, in brochures and on web sites. These hazards should be avoided during route planning. Trail use may be managed by addressing user conflicts and observing how the trail and associated facilities are used. Accommodations may be made by changing operating times, working with user groups, limiting access in key areas and identifying other means to promote an enjoyable trail environment.Water trail facilities should be assessed regularly by local trail representatives and paddlers. Maintenance may include put-in and take out sites, repainting signage, providing and servicing trash disposal at appropriate locations, and pruning overhanging or unstable vegetation.
Additional ConsiderationsConsider water quality. In addition to coordination with local
governments, check with state agencies before building any type of structure in or near the water. State agencies may include the Department of Game and Inland Fisheries, Virginia Marine Resources Commission, Department of Environmental Quality, and Department of Conservation and Recreation
The Coastal Geospatial and Educational Mapping System (Coastal GEMS) program may help identify resources and create water trail maps
The National Oceanic and Atmospheric Administration (NOAA) Chesapeake Bay Interpretive Buoy System (CBIBS) project collects real-time data and emits historical data to aid in marking and utilizing water trails. See <http://www.buoybay.org/site/public/>
User conflicts between non-motorized and motorized water trail users must be addressed during trail planning
Portage areas should be designated on public land or on land where an agreement has been made with the property owner to allow safe passage for water craft
Maps and other media should identify points of interest along water trails. Websites may best convey the details of important trail information. Interpretive signage may provide on site education for trail users
Resources:American Canoe Association
http://www.americancanoe.org/Chesapeake Bay Gateways Network Water Trail Toolbox
http://www.baygateways.net/trail_planning.cfmFlorida Fish and Wildlife Conservation Commission “Guidelines for Paddling Trail Development”
http://myfwc.com/boating/waterway/paddling-trails/Getchell, David. North American Water Trails: A Guide to Establishing and Maintaining Recreational Waterways on Fresh and Saltwater. Washington, D.C.: North American Water Trails, Inc., 2000.
••
•
•
•
•
•
•
•
•
Land Acquisition & Trail Development • Chapter 4 -93
Blueways & Water TrailsVirginia Department of Conservation & RecreationTrails Toolbox • Trail Standards Field Guides
Plan for trailers and staging at public access points. Courtesy of DCR.

Moore, Roger L. and Thomas D. Ross. “Trails and Recreational Greenways: Corridors of Benefits Parks & Recreation.”Parks & Recreation 33, no. 1 (January 1998): 68-79.National Park Service Rivers, Trails, and Conservation Assistance Program “Logical Lasting Launches”
http://www.nps.gov/ncrc/programs/rtca/helpfultools/ht_launch_guide.htmlNational Trails Training Partnership: Water and Boating Trails
http://www.americantrails.org/resources/water/index.htmlVirginia Outdoors Plan, Chapter VII-B: Water Access and Blueways
http://www.dcr.virginia.gov/recreational_planning/documents/vopchapt07b.pdf
Resource Agencies for Water AccessVirginia Department of Conservation and Recreation Division of Planning and Recreation Resources203 Governor Street, Suite 326Richmond, Virginia 23219www.dcr.virginia.gov
Virginia Department of Environmental Quality629 East Main StreetP.O. Box 1105Richmond, VA 23218http://www.deq.state.va.us/
Virginia Department of Game and Inland Fisheries4010 West Broad StreetRichmond, Virginia 23230www.dgif.virginia.gov
Virginia Marine Resources Commission2600 Washington Avenue, 3rd FloorNewport News, VA 23607http://www.mrc.state.va.us/
•
•
•
Summary of GuidelinesNon-Motorized Boat Ramps
Provide 5-15% slope at shoreline to facilitate launching
Check water depth at shorelineMinimize underwater hazardsMaintain water quality standards for paddling
and secondary contact sports
Facility TypesAccess-only (limited support facilities)
Day-Use (daytime facilities including restrooms and picnic areas)
Campsite (overnight facilities including tent platforms, showers and canoe/kayak lockers)
Trail Length and RouteProvide either a loop route (in lakes and the
Bay) or a point to point route (in streams and rivers)
Determine appropriate stretches of paddling length based on the condition of the water resource. Materials
Use water and salt resistant materials for construction. This may include marine plywood, cedar, enameled aluminum or plastic. Signage
Locate signage on posts 6 feet above the water and on one side of the waterway.
Install water-based buoy markers 36 inches above mean high water.
•
•••
•
•
•
•
•
•
•
•
Land Acquisition & Trail Development • Chapter 4 -94
Blueways & Water TrailsVirginia Department of Conservation & RecreationTrails Toolbox • Trail Standards Field Guides

Beach access routes are considered non-motorized routes developed on or adjacent to beaches in order to take advantage of the unique waterfront setting. Beach trails are built on sand or highly-sandy soils. These trails typically consist of imported surfaces such as concrete or boardwalk placed on top of the sand in order to create a firm and stable surface. Trail design characteristics are similar to those for shared-use paths. Challenges arise when taking into consideration the relative instability of sand as a sub-base material and the potential for flooding and wave damage.
OpportunitiesAllows users to enjoy a unique water-side trail
experienceProvides water access to people with physical
disabilities
ConstraintsDifficult to maintain due to potential for flooding
and wind and water erosionOften introduces a “built” element into a natural
setting
Suitable LocationsBeach access routes are located on or near lake, ocean, bay, or river beaches and atop sand or sandy soils.
General Layout & SitingBeach trails should be located above high tide lines, as well as above normal flood elevations if possible. Avoid locating beach trails in environmentally-sensitive areas. Take care when siting trails over
•
•
•
•
sand dunes or near inlets, tidal pools, or other water bodies. Work with local, State, and Federal permitting agencies to identify the routes that avoid sensitive areas.
Suitable Trail SurfacesBeach trail surfaces may be built of any firm and stable surface that is smooth, free of tripping hazards, and relatively low-maintenance. Consider:
ConcreteStabilized Engineered Wood Fiber (w/ Vitri-Turf)Wood (Boardwalk, Puncheons, Planks, and
CorduroySynthetics (plastic mats, roll-out mats, etc.)
Trail GradesThe optimal running grade is between 1% and 5% to ensure water will flow off the trail but the trail will remain universally-accessible. Cross-slopes should not exceed 2% in order to be universally-accessible.
•••
•
Land Acquisition & Trail Development • Chapter 4 -95
Beach Access RoutesVirginia Department of Conservation & RecreationTrails Toolbox • Trail Standards Field Guides
Stabilized engineered wood fiber surface. Courtesy of USFS.
Beach access route at Lake Anna State Park. Courtesy of DCR.
Wide access route at Douthat State Park. Courtesy of DCR.
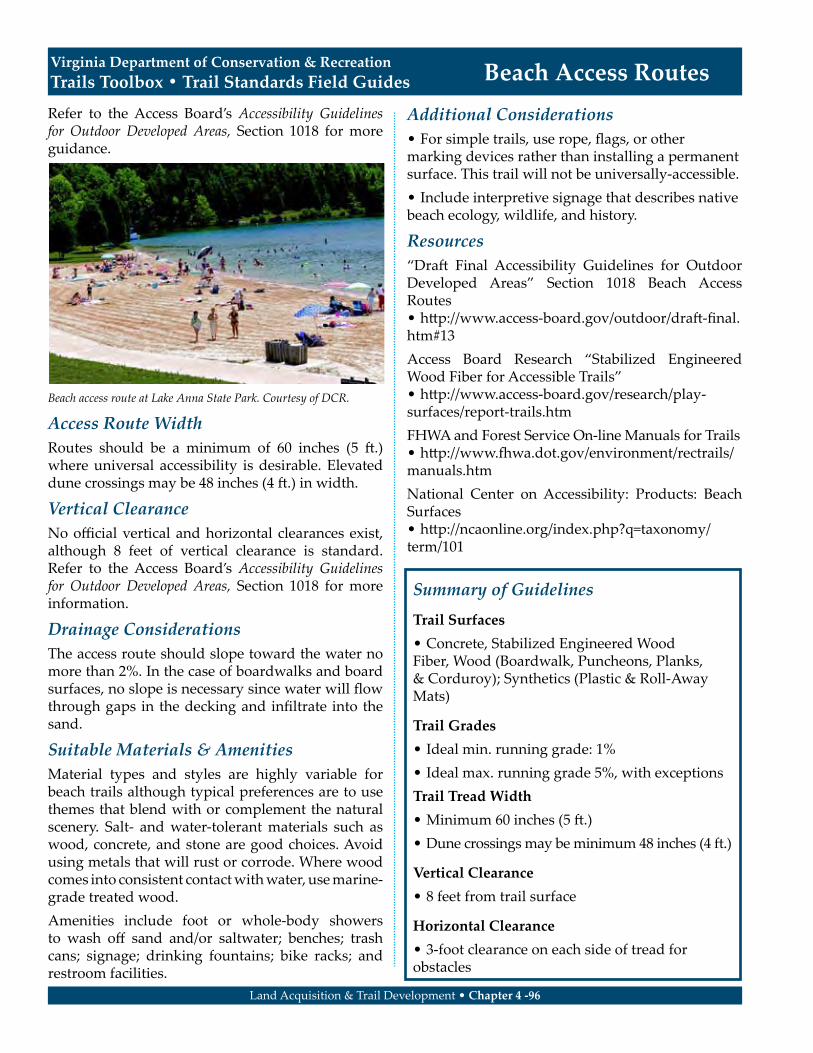
Refer to the Access Board’s Accessibility Guidelines for Outdoor Developed Areas, Section 1018 for more guidance.
Access Route WidthRoutes should be a minimum of 60 inches (5 ft.) where universal accessibility is desirable. Elevated dune crossings may be 48 inches (4 ft.) in width.
Vertical ClearanceNo official vertical and horizontal clearances exist, although 8 feet of vertical clearance is standard. Refer to the Access Board’s Accessibility Guidelines for Outdoor Developed Areas, Section 1018 for more information.
Drainage ConsiderationsThe access route should slope toward the water no more than 2%. In the case of boardwalks and board surfaces, no slope is necessary since water will flow through gaps in the decking and infiltrate into the sand.
Suitable Materials & AmenitiesMaterial types and styles are highly variable for beach trails although typical preferences are to use themes that blend with or complement the natural scenery. Salt- and water-tolerant materials such as wood, concrete, and stone are good choices. Avoid using metals that will rust or corrode. Where wood comes into consistent contact with water, use marine-grade treated wood. Amenities include foot or whole-body showers to wash off sand and/or saltwater; benches; trash cans; signage; drinking fountains; bike racks; and restroom facilities.
Additional ConsiderationsFor simple trails, use rope, flags, or other
marking devices rather than installing a permanent surface. This trail will not be universally-accessible.
Include interpretive signage that describes native beach ecology, wildlife, and history.
Resources“Draft Final Accessibility Guidelines for Outdoor Developed Areas” Section 1018 Beach Access Routes
http://www.access-board.gov/outdoor/draft-final.htm#13Access Board Research “Stabilized Engineered Wood Fiber for Accessible Trails”
http://www.access-board.gov/research/play-surfaces/report-trails.htmFHWA and Forest Service On-line Manuals for Trails
http://www.fhwa.dot.gov/environment/rectrails/manuals.htmNational Center on Accessibility: Products: Beach Surfaces
http://ncaonline.org/index.php?q=taxonomy/term/101
•
•
•
•
•
•
Land Acquisition & Trail Development • Chapter 4 -96
Beach Access RoutesVirginia Department of Conservation & RecreationTrails Toolbox • Trail Standards Field Guides
Beach access route at Lake Anna State Park. Courtesy of DCR.
Summary of Guidelines
Trail SurfacesConcrete, Stabilized Engineered Wood
Fiber, Wood (Boardwalk, Puncheons, Planks, & Corduroy); Synthetics (Plastic & Roll-Away Mats)
Trail GradesIdeal min. running grade: 1%Ideal max. running grade 5%, with exceptions
Trail Tread WidthMinimum 60 inches (5 ft.)Dune crossings may be minimum 48 inches (4 ft.)
Vertical Clearance8 feet from trail surface
Horizontal Clearance3-foot clearance on each side of tread for
obstacles
•
••
••
•
•

Off-highway vehicle (OHV) trails are popular outlets for trail users who enjoy operating ATVs, dirt bikes, four-wheel drive vehicles, and other off-highway vehicles. The Minnesota Department of Natural Resources classifies motorized vehicles in the following manner:
Off-Highway Motorcycles (OHM): dirt bikes and other two-wheeled vehicles not licensed for use on public, paved roads and highways
All-Terrain Vehicles (ATVs): three- or four-wheeled vehicles that are 50” or less in width and intended for off-highway use.
4-Wheel Drives and Sport Utility Vehicles (SUVs): four-wheeled passenger vehicles wider than 50” that may or may not be licensed to drive on public, paved roads and highways. Includes Jeeps, light trucks, and dune buggies. OHV trails can be simple, modified logging trails or highly-technical routes that require additional skills and equipment. With proper planning and maintenance, motorized trails can be fun, challenging, and environmentally sustainable.
OpportunitiesOffer rustic experiences and scenery not typically
available from an on-road vehicleProvide accessibility to people with physical
disabilitiesProvide challenges to machines and driver/rider
operating skillsOffer recreational use of remediated lands
including former mining sites and landfills.
•
•
•
•
•
•
•
ConstraintsCareless drivers/riders create poor public image
and may cause harm to other trail users or the environment
Noise and air pollution may become issues on heavily-trafficked trails
Incompatible with non-motorized users without proper mitigation efforts
Suitable LocationsSuitable locations vary depending upon the desired experience. Some trail users prefer natural scenery while others want technical features to test their skills and are not as concerned about the setting. The majority of OHV trails are located away from highly-developed areas and in settings with variable topography. Most OHV trails are found in the western portion of Virginia on public lands, such as national forests.The Virginia Department of Conservation and Recreation notes that designated OHV parks are needed in the more densely populated parts of Virginia. These parks are typically provided by the private sector and require fees. Some OHV trails are offered within the George Washington and Jefferson National Forests; they include both free and fee-for-permit riding.
General Layout & SitingSafety, challenge, diversity, and scenery are all key design criteria when planning a motorized trail facility. Areas should be designated for different skill levels and types of vehicles. Below are the three main types of OHV layouts:Forest Access Routes & RoadsThese routes are typically informal access through public forests that are allowed by land managers but not considered part of an official trail system. The routes follow fire and/or logging roads.Designated Off-Highway Vehicle Recreation SiteEssentially an OHV trail park, these sites contain a single access point or trailhead entrance that leads to a series of stacked loop trails, practice areas, competition areas, and other activity and event spaces. Stacked loops should be of varying difficulty and may be designated for specific types of vehicles to prevent user conflicts and degradation of the trail.
•
•
•
Off-Highway Vehicle TrailsVirginia Department of Conservation & RecreationTrails Toolbox • Trail Standards Field Guides
Land Acquisition & Trail Development • Chapter 4 -97
ATV rider enjoying the scenery. Courtesy of NOHVCC.

Parking lots, restrooms, and other amenities are typically available at the trailhead. Designated Off-Highway Vehicle TrailThese officially recognized trails are often located on public lands. They typically accommodate recreational drivers/riders and long-distance tourers who enjoy riding in natural settings with varying levels of difficulty. While the trails start at designated trailheads, they may have multiple access points. Usually, there is one primary trail that is either a loop or out-and-back. Stacked loops may occur off of the main trail.
Suitable Trail SurfacesGiven that motorized vehicles are designed to handle difficult terrain and many drivers and riders elect to test their skills on multiple trail types, suitable surfaces vary greatly. In general, OHV operators prefer primitive trails that are not paved with hard surfaces. Surfacing discussions should include erosion and deterioration control since these issues occur much quicker with motorized vehicles than human-powered devices. Proper planning should take place before ground is broken to correctly place drainage features, bridges, and other run-off or wet soil mitigation devices. Install compacted crushed stone where drainage or wet soils are unavoidable. Surface the trail with non-erodable materials such as compacted stone, expanded metal mats, soil stabilizers, or porous paving systems such as gravel pave or grass rings. Tire mats are strongly discouraged as natural wear causes mat deterioration, which can then catch motorcycle foot pegs or riders’ boots. Off-Highway Motorcycles and ATVsSurfaces should be resistant to soil erosion although small mudholes are acceptable. Natural conditions such as ruts, bumps, and small logs are desirable. 4-Wheel Drives and SUVsSurfaces may require gravel on some segments to slow deterioration and minimize dust. Side or feeder trails should be much less smooth ad include natural obstacles.
Trail GradesTrail grades vary greatly because of the ability for
OHVs to tackle steep grades and the desire for operators to challenge themselves. Note that the guidance below is based on general difficulty levels for all types of OHVs. Individual vehicle types may be able to handle steeper grades for short distances. The following guidelines were taken from the Minnesota Department of Natural Resources “Trail Planning Design and Development Guidelines.”Easy TrailsMaximum sustained grade should be no more than 8% although 15-25% grades can be included for short distances of 25 feet or less. More DifficultMaximum sustainable grade should be no more than 12% although 25-35% grades can be included for short distances of 15 feet or less.Most DifficultMaximum sustainable grade should be no more than 15% although 35-50% grades can be included for short distances of 12 feet or less.
Trail Tread WidthTrail tread width depends greatly on the type of user, type of vehicle, difficulty level, and whether the trail will be shared-use or single-use.Off-Highway MotorcyclesTreads should be between 18” and 30” in width. Trails designated as “most difficult” may have treads only 12”-24” wide. ATVsTreads should be a minimum of 5 feet wide and include periodic wider areas for passing. Trails designated as “most difficult” may have treads only 56”-72” wide. 4-Wheel Drives and SUVsTreads on the main or primary trail should be a minimum of 8 feet wide. Treads on secondary trails should be a minimum of 6 feet wide. Trails designated as “most difficult” may have treads only 80”-102” wide.
Vertical & Horizontal ClearancesClear distances depend on vehicle type, difficulty level, and tread width.
Virginia Department of Conservation & RecreationTrails Toolbox • Trail Standards Field Guides Off-Highway Vehicle Trails
Land Acquisition & Trail Development • Chapter 4 -98

Off-Highway MotorcyclesHorizontal clearances should be at least 1 foot on each side of the tread. Vertical clearances should be at least 8 feet above the trail surface.ATVsHorizontal clearances should be at least 2 feet on each side of the tread. Vertical clearances should be at least 8 feet above the trail surface. 4-Wheel Drives and SUVsHorizontal clearances on both primary and secondary routes should be at least 2 feet on either side of the trail tread. On secondary routes, clearances can be reduced to increase difficulty. Vertical clearances should be at least 8 feet above the trail surface. For both routes, leave sufficient obstacles, including rocks, logs, and stumps, to create technical challenges.
Drainage ConsiderationsOHV trails present unique drainage challenges because, in some cases, muddy or wet soil is desirable as a technical trail feature. However, drainage must be controlled along the majority of trails in order to create a comfortable and enjoyable experience. Much like non-motorized trails, trails for off-highway vehicles should be designed in harmony with the existing topography to limit erosion. This can be difficult where steep slopes are desirable in order to create challenging routes. In these cases, ensure that steep slopes are present only for short distances and are interspersed with gentler runs. Investigate synthetic materials, such as SolGrid or PVC mats, that help hold soil in place even on slopes.Plan trails to avoid known areas of wet and/or easily-erodable soils and flooding.
Suitable Materials & AmenitiesThe majority of amenities are found at dedicated OHV recreation sites since they are more formal, tend to attract more and diverse types of users, and require more features to address risk management and comfort. Parking, signage, restrooms, loading ramps, picnic areas, RV and camping sites, showers, and playgrounds are often found at recreation sites. Other amenities might include a rider training course, motocross practice and competition area,
administrative offices, and maintenance yard. Designated OHV trails are much less formal and may require only parking, signage, gates, and simple restrooms.
Signage is an important component of any OHV trail facility. Warning, directional, regulatory, and intepretive signs reduce liability, reduce user conflicts, create a more comfortable riding/driving environment, and educate users about their surroundings.
Difficulty RatingsTrail difficulty rating symbols are similar to those used for ski areas. See below for a graphic depiction. Easiest
More Difficult
Most Difficult
Easiest trails include grades that may range between 8% -15%; tread widths that range between 18 inches and 12 feet (depending on vehicle size); easy, flowing curves; relatively smooth tread surfaces; and mud bogs that are easily bypassed on dry tread.More difficult trails include grades that may range between 12% and 25%; tread widths that range between 18 inches and 10 feet; minimal turning radii; relatively rough trail surfaces that may include rock outcrops, loose sand or gravel, and water crossings; and muddy areas that may or may not be bypassed by dry tread depending on complexity of the feature.
Virginia Department of Conservation & RecreationTrails Toolbox • Trail Standards Field Guides Off-Highway Vehicle Trails
Land Acquisition & Trail Development • Chapter 4 -99
Provide designated overnight camp facilities where interest is high and space is available. Courtesy of NOHVCC.
Most difficult trails include grades that may range between 15% and 35%; tread widths that range between 12 inches and 8.5 feet; curves that have less-than-minimal turning radii and require extensive maneuvering; relatively rough trail surfaces with short sections that are very rough, very rocky, and have numerous water crossings; and contain some muddy areas that cannot be bypassed on dry tread.
Additional ConsiderationsOHV trails benefit from interpretive signs and
educational waysidesOHV trails benefit from association with unique
destinations such as towns, lakes, rivers, and linkages to other riding areas.
Site easiest OHV trails through scenic areas so riders/drivers can reduce their speed and focus on scenery.
Include trails and practice areas for all ability levels and ages. Many families with children enjoy using OHV trails and sites.
Create or promote rider/driver safety and responsibility courses in association with your trail.
Know that all OHV trail users don’t utilize top speeds; some users enjoy slower-speed touring as a way to enjoy natural scenery.
Trailheads and trails should be planned with universal accessibility in mind, particularly to accommodate people new to OHV trails or that may have difficulty mounting and dismounting vehicles. Incorporate accessibility into restrooms, parking lots, and staging areas.
ResourcesVirginia Department of Conservation & Recreation Motorized Trails
http://www.dcr.virginia.gov/recreational_planning/trails.shtml#Motorized
National Off-Highway Vehicle Conservation Councilhttp://www.nohvcc.org/
Fogg, George E. Park Guidelines for OHVs. National Off-Highway Vehicle Conservation Council, 2002.
Available for purchase through NOHVCC at 800-348-6487 or [email protected]
•
•
•
•
•
•
•
•
•
•
Trail Planning, Design, and Development Guidelines. St. Paul, MN: Minnesota Dept. of Natural Resources, 2006.
Available at http://www.americantrailsstore.org/items/MNguide.html
U.S. Forest Service Off-Highway Vehicle Trail and Road Grading Equipment
http://www.fhwa.dot.gov/environment/fspubs/98232837/index.htm
U.S. Forest Service Managing Degraded Off-Highway Vehicle Trails in Wet, Unstable, and Sensitive Environments
http://www.fhwa.dot.gov/environment/fspubs/02232821/index.htm
•
•
•
Virginia Department of Conservation & RecreationTrails Toolbox • Trail Standards Field Guides Off-Highway Vehicle Trails
Land Acquisition & Trail Development • Chapter 4 -100
Summary of Guidelines
Trail SurfacesVaries based on difficulty level
Design and maintain to limit erosion and deterioration
Trail Grades (Maximums)Easy: 8% - 15%More Difficult: 12% - 25%
Most Difficult: 15% - 35%
Trail Tread Width (Vehicle-Dependent)Easy: 18 inches - 12 feet
More Difficult: 18 inches - 10 feet
Most Difficult: 12 inches - 8.5 feet
Avg. Outing Time & DistanceATV: 4-5 hours; 18-26 miles4-Wheel Drive/SUV: 5-6 hours; 12-20 milesOHM: 6-7 hours; 18-35 miles
Vertical & Horizontal ClearancesATV: 1 ft. each side of tread; 8 ft. verticalOHM: 2 ft. each side of tread; 8 ft. vertical4-Wheel Drive/SUV: 2 ft. each side of tread
(reduce for more difficult trails); 8 ft. vertical
•
•
••
•
•
•
•
•••
•••

Trail Construction GuidelinesOnce your trail has been planned, designed, reviewed, and approved, construction can begin. This section addresses the most common construction concepts and activities related to trail development. For more in-depth information, you should consult the many trail construction handbooks, guides, and organizations currently available. Refer to Appendix 4-M for sample construction details for a number of typical trail featurs.
Common Trail Construction EquipmentHaving proper construction equipment makes building and repairing trails that much easier. This section will familiarize you with names and uses of common trail construction equipment in order to facilitate tool selection, volunteer organization, and discussions with professional trail builders. Refer to the equipment matrix in Appendix 4-N for a visual glossary of equipment. It is important to note that motorized construction equipment should be sized appropriately for the type of trail being built. Contractors and skilled trail builders familiar with trail and path construction will know how to select the proper equipment to ensure that construction is completed in the least invasive manner possible. For instance, a skid steer may be all that is required to perform work within a narrow trail corridor rather than a track loader that is more suited to large earthwork projects. If possible, insert language into your construction contract that requires motorized equipment to be sized according to the trail or path requirements, not simply what the contractor has on hand. During pre-construction meetings, discuss construction methods and equipment types with the contractor or trail builder to ensure reasonable actions are taken to limit disturbance due to equipment size and usage. Most organizations building their own trails will use hand-held or walk-behind tools. These tools are most appropriate for natural surface trails used by hikers, equestrians, and mountain bikers. The book Appalachian Trail Design, Construction, and Maintenance offers the following tips for working with hand-held or small, powered equipment:
Before starting, assess which tools will make your jobs easiest and fastest. For a crew, consider selecting •
a combination of tools that meets the needs of all crew members thereby keeping everyone productive.
Purchase high-quality tools that will last a long time and eliminate breakages during field work.
Make sure all crew members are familiar with proper use and handling of tools before heading into the field. This will prevent injuries, broken tools, and lost time.
Between work sessions, clean and repair all tools. Store tools in a dry place to prevent rust and rot.
Mark each tool with bright orange paint and set tools down on the trail tread or in a designated central location to avoid losing them.
Brand tools with the name of your organization to reduce theft.
Make each crew member responsible for packing out the tools they carried in and counting tools before and after each work session.
Always check with land managers to make sure using power tools is allowable.
Make sure you and your volunteers are familiar with proper handling and safety for any power tools used during the work session. Make sure each person has proper clothing and safety equipment.
•
•
•
•
•
•
•
•
Virginia Department of Conservation & RecreationGreenways and Trails Toolbox • Trail Construction Guidelines
Land Acquisition & Trail Development • Chapter 4 -�0�
Resources:
Birchard, William Jr. and Robert Proudman. Appalachian Trail Design, Construction, and Maintenance. Harpers Ferry, WV: Appalachian Trail Conference, 2000. U.S. Forest Service Mechanized Trail Building Equipment
http://www.fhwa.dot.gov/environment/rectrails/equip/equip/index.cfmU.S. Forest Service Mountain Bike Accessories for Trail Work
http://www.fhwa.dot.gov/environment/fspubs/98232812/toc.htmU.S. Forest Service Off-Highway Vehicle Trail and Road Grading Equipment
http://www.fhwa.dot.gov/environment/fspubs/98232837/index.htmWashington Trails Association Guide to Trail Work
http://old.wta.org/cgi-bin.dev/wtaweb.pl?6+tw+index
•
•
•
•

Dealing With Wet SoilsEven with the most careful siting and planning, designers often encounter areas that are prone to flooding, have wet soils, or impact wetlands. In these cases, non-standard construction techniques must be utilized in order to ensure the structural stability of the trail. The selected technique must take into consideration potential cost, time constraints, fragility of the affected environment and habitats, and ultimate stability of the trail. A geotechnical engineer should be consulted when wet areas are known, suspected, or discovered during construction. These specialized engineers are trained to identify the source of the problem and make recommendations that will both stabilize the trail and protect natural habitats. One final concept to remember is that no matter how well you and your consultants deal with wet areas on your trail or path, you may have to re-route or close the trail during particularly rainy seasons or thunderstorms to protect both the trail and trail user. Below are a few common techniques to address wet areas.
Boardwalks, Turnpikes, Puncheons, and FootbridgesBecause boardwalks tend to deal with wetlands and larger water sources, they often require permits from water-related agencies such as the ACOE and the Virginia Marine Resources Commission (VMRC). Refer to earlier sections of the Toolbox for permitting discussions. They can be expensive but, in return, boardwalks offer wonderful views and educational experiences.
Turnpikes are used to elevate the trail above wet ground. The technique uses fill material from parallel side ditches to build up the trail base higher than the surrounding water table. Turnpike construction is used to provide a stable trail base in areas of high water table and fair to well-drained soils.
Puncheons are wooden walkways used to cross bogs, to bridge boulder fields, or to cross small streams. They can be used where uneven terrain or lack of tread material makes turnpike construction impractical. Puncheons are also preferred over turnpikes where firm, mineral soil cannot be easily reached; puncheons can be supported on muddy surfaces better than turnpikes, which require effective drainage.
Virginia Department of Conservation & RecreationGreenways and Trails Toolbox • Trail Construction Guidelines
Land Acquisition & Trail Development • Chapter 4 -�0�
Puncheon example. Courtesy of U.S. Forest Service.
Turnpike example. Courtesy of U.S. Forest Service.
Boardwalk in Pocahontas State Park. Courtesy of DCR.

Footbridges vary greatly in design, cost, and construction. They may be pre-fabricated wood-and-metal structures or hand-built rustic log features. Footbridges that require abutments may require calculations performed by a structural or civil engineer to ensure that the abutments will support the weight of the bridge and that the force of moving water will not damage the abutment footings. Smaller footbridges may be built by volunteers. In cases where footbridges will be placed over or directly in permanent streams or water bodies, check with your local planning entity and a representative from the ACOE or VMRC to ensure that no permits are required for your footbridge. Refer to Appendix 4-G for contact information for these agencies.
Soil BridgingSoil bridging is a technique that creates a stable surface under the trail so that the trail components (sub-base, base, and wearing course as applicable) may be placed upon it. Soil bridging contains and protects unstable soils that may be impractical to modify or remove. Soil bridging methods include placing gravel pads, drainage mats, rock, drain pipes, and other non-erodible materials on the wet soils to improve stability and control drainage. The trail is then built upon these materials. The appropriate method depends on the type of soil, the type of trail, cost, and location. A geotechnical engineer should be consulted if you feel the soil bridging might be required on your trail.
Over-excavationOver-excavation deals with wet soils by removing them entirely. Rather than excavate earth to a typical depth for sub-base—usually 6 to 8 inches—wet soils are dug out until firm and compactable ground is reached. This may mean removing an extra few inches of soil or additional feet. Soil borings usually bring the need for over-excavation to light prior to construction. However, over-excavation can be implemented if unsuitably wet soils are discovered during construction. A geotechnical engineer should be consulted to determine the correct depth for over-excavation and what type of backfill material should be returned to the excavated area to return the ground to the correct grade. Over-excavation can be expensive, particularly if it is introduced after construction has begun. It can also be damaging to sub-surface habitats and buried cultural resources. If you suspect that you have wet soils, budgeting for soil borings during the design phase may save you money and time in the long run.
GeosyntheticsGeosynthetics are used during soil bridging activities. They are a class of inorganic (typically plastic) materials that do not biodegrade and are used to provide separation, drainage, and strength to trails. Unstable trail surfaces are usually caused by saturation from subsurface moisture and precipitation. According to the U.S. Forest Service, geosynthetics assist in obtaining stable surfaces by providing:
Separation- geotextiles, geonets, and sheet drains keep saturated, weak native soils from contaminating stronger, load-bearing trail surface materials. They allow water, but not soil, to pass through.
Drainage-geotextiles, geonets, and sheet drains improve subsurface drainage to avoid saturation and weakening of the trail tread.
Reinforcement and Load Distribution- most geosynthetics provide some degree of tread reinforcement and load distribution. This decreases the amount of imported fill material required.
•
•
•
Virginia Department of Conservation & RecreationGreenways and Trails Toolbox • Trail Construction Guidelines
Land Acquisition & Trail Development • Chapter 4 -�0�
Footbridge example. Courtesy of City of Roanoke.

Rehabilitating Older and Damaged Trails and PathsTrail rehabilitation involves returning a trail or path that currently jeopardizes the health, safety, and welfare of trail users to a state that minimizes hazards and maximizes user enjoyment. Trails and paths are constructed with the intention that they will exist for many years. Because trails and paths are subject to erosion, weather, and other environmental influences over time, they may require rehabilitation. This is particularly true for trails that are extremely well-used, used very little, or where maintenance practices are lax. Rehabilitating trails involves tasks similar to those utilized for construction and maintenance. For this reason, refer to Chapter 5 of this Toolbox for standard construction and maintenance practices. Rehabilitation may mean tasks as simple as importing more stone to fix potholes or as complicated as fixing washouts. The items below offer a general process for initiating and implementing trail rehabilitation work.
Confirm Ownership and Right to RehabilitateThe first step is to confirm that you have the right to rehabilitate the trail. If your organization owns the trail or has accepted responsibility for maintenance work with permission from the trail owner, you can proceed with rehabilitation. If you or your organization does not own the trail property, have rights to the easement, or been formally tasked with rehabilitation responsibilities, you must seek permission to move forward. The latter case may happen in circumstances where trail volunteer
organizations wish to rehabilitate a trail owned by a local, state, or federal entity or another non-profit. Without permission, your efforts might be considered trespassing. It is also useful to confirm who is responsible for trail maintenance and rehabilitation. Some public entities or non-profits already have maintenance agreements in place but have simply not followed through with these tasks. If you do not own or manage the trail, check with the entity in charge to confirm that they are not financially and legally responsible for rehabilitating the trail.
Inventory and Assess ProblemsOnce you have confirmed that you have the right to begin rehabilitation efforts, the first step is to walk, bike, or ride the trail corridor to do an inventory and assessment of all the issues. Take a camera, paper, pens, and maps or aerial photography to make notes about each problem you see and locate it on the map or aerial. Work in pairs or groups for safety and efficiency. If time allows, visit the trail in different seasons and different weather conditions.
Prioritize IssuesOnce you have a list of problems, you and your group must prioritize the list based on issues that a) pose safety risks to users, b) affect the integrity of the trail, and finally c) issues that are simply aesthetic in nature.
Virginia Department of Conservation & RecreationGreenways and Trails Toolbox • Trail Construction Guidelines
Land Acquisition & Trail Development • Chapter 4 -�04
Resources:
U.S. Forest Service. “Geosynthetics for Trails in Wet Areas”
http://www.fhwa.dot.gov/environment/fspubs/00232838/toc.htmU.S. Forest Service. “Trail Construction and Maintenance Notebook:” Trails in Wet Areas
http://www.fhwa.dot.gov/environment/fspubs/00232839/page08.htm
•
•
TOOLBOX TIP:Free aerial photography and USGS maps are available on-line through sources such as Google, Seamless, and the University of Virginia Scholar’s Lab. Use these resources to review and download maps to take with you in the field. USGS Seamless Data Warehouse (aerial photos and GIS data)
http://seamless.usgs.gov/University of Virginia Scholar’s Lab (visit the Virginia Gazetteer Database for USGS maps)
http://www.lib.virginia.edu/scholarslab/resources/index.html
•
•

Prioritization must also take into consideration potential costs, time of year, length of time to complete, and available labor. Use your prioritization list to begin planning your rehabilitation efforts, including fundraising and organizing staff/volunteer labor.
Temporary Trail Closures Due to Rehabilitation WorkWhen you are ready to begin rehabilitation work, you must decide whether to close the trail completely or to create a detour around work areas. Refer to Chapter 5 for information regarding permanent trail closures.
If the trail is not currently active, you may be able to post signs stating the trail is closed for rehabilitation. Although the trail is not in use, signs of activity may attract visitors before you are ready to re-open the trail. If the trail is currently active, you must consider the extent of the rehabilitation work to be done. Closure is appropriate when work will be done for the full extent of the trail or when particular projects may endanger the safety of trail users. The latter case may include projects involving heavy machinery and bridge removal or where no other route is available. Detours may be useful where rehabilitation work is simple, can be accomplished in a short-time-frame, and only affects a short section of trail. If a detour is used, you must provide a route that follows standard risk management practices and will not endanger sensitive wildlife or plant habitat.
Common Rehabilitation TasksWhile not all-inclusive, the following list contains some common rehabilitation tasks that stem from lack of trail maintenance and over-use.
Repair and Add Drainage Features Drainage features installed on older trails may become silted, crushed, or overgrown. Drainage issues become evident where trails are washed out, eroded, or flooded. Check for crushed culverts, culverts or other drainage features that are plugged with soil and debris, and ensure that the trail was designed to shed water properly when first constructed.Work may include cleaning or replacing culverts and drainage features, installing new drainage features, and re-grading the trail to achieve positive drainage.
Repair Tread or Wearing CourseThe trail tread may become washed out, silted over, or contain potholes or rotted-out tree stump holes. Trail tread issues are often related to poor drainage or improperly installed sub-base material. Another issue may be that vegetation is growing on the trail surface. When you identify trail tread issues, check the land adjacent to the trail to determine if improper drainage might also require rehabilitation. Work may include repairing the surface by importing fill soil, importing aggregate, or applying asphalt or concrete patch products. Larger wash-outs will require reconstruction, rather than simple patching. For silted sections, remove the silt and soil where the tread has been covered, address the source of the silt, and repair the trail surface. If the trail has settled, has numerous potholes, or appears caved-in, the sub-base or native soil may have been improperly compacted during construction. In these instances, you must excavate the problem area and reinstall the trail using proper compaction standards. Where vegetation is growing on or through the trail surface, you must determine the extent of the problem. For small weeds and groundcovers, consider using a biodegradable herbicide (glyphosate
Virginia Department of Conservation & RecreationGreenways and Trails Toolbox • Trail Construction Guidelines
Land Acquisition & Trail Development • Chapter 4 -�0�
Temporary trail closure sign. Courtesy of IMBA/Rich Edwards.

is an option). Where the problem is extensive and involves shrubs, saplings, and heavy growth, you may need to cut the trunks and dig or grind stumps and roots. In this case, the trail has probably been abandoned for a number of years and may require extensive reconstruction.
Prune, Thin, and Clear VegetationTrees, understory growth, and other vegetation may be encroaching upon your trail, thereby reducing vertical and horizontal clearances, eliminating views, and altering drainage characteristics. Work may include pruning tree limbs, clearing understory brush, selectively removing trees to restore views, and removing vegetation to restore proper drainage.
Changing the Width of the TrailIn rare cases, you may wish to alter the width of your trail in order to accommodate additional or new trail users. For example, a single-track mountain bike trail could be converted to equestrian use. Another example might be that a funding agency will only award your grant if you make a narrow path universally-accessible. The trail may also be narrowed, too, if a more intimate and rustic characteristic is desired. Trail widening includes clearing adjacent vegetation, extending the width of the tread by matching the existing design, enhancing existing drainage features or adding new features where necessary, and changing signage to identify new rules and regulations. Check with regulatory agencies to ensure that no permits are required before you begin work. Narrowing the trail includes removing any trail material that will exceed your desired width and hauling it to another location. Extra soil, stone, and asphalt must be relocated to a site approved by the property owner. Some trail organizations or public works departments have maintenance yards where excess materials can be stockpiled for future use. Work will also include planting new vegetation and/or seeding trail or path shoulders to stabilize disturbed soil. Signs must be changed to reflect the new use.
Construction Cost EstimatesTrail and path construction costs vary widely depending on location, complexity of site, length and width of trail, current material and labor costs, permitting and regulatory requirements, choice of contractor versus skilled volunteers, and time constraints. Therefore, no two trail projects—even those that use the same design specifications—will cost the same. There are, however, general costs that can be applied to estimate line items in order to achieve an overview of what your trail or path project may cost. Refer to Appendix 4-O for typical trail and path construction costs. It is a good idea to prepare a cost estimate when you have selected a final alignment yet before final plans are in place. This will help you adjust the scope of your trail or path project to meet your budget. For instance, you may find that the length of trail you have shown on the plan requires more money than currently in your budget. Finalize your cost estimate once plans are complete and more details are known, such as how many culvert pipes are required, how much earthwork must be done, and how many benches you would like to install. Use this final cost estimate to gauge fundraising needs and as a check against contractor bids or pricing.
Virginia Department of Conservation & RecreationGreenways and Trails Toolbox • Trail Construction Guidelines
Land Acquisition & Trail Development • Chapter 4 -�0�
TOOLBOX TIP:Know the difference between materials-only costs and costs that include materials, labor, overhead, and profit. Materials costs include prices only for what you purchase directly from a manufacturer or supplier. This pricing does not include additional costs for shipping, installation, and installer profit. For example, asphalt may cost only $60 a ton directly from the plant. However, when you include costs for hauling, installation, overhead, and profit, you’ll find that the actual price may be closer to $100 a ton. When preparing an estimate, use numbers that include materials, labor, overhead, and profit in order to get the most accurate idea of how much it will take to build your trail or path.

Virginia Department of Conservation & RecreationGreenways and Trails Toolbox • Trail Construction Guidelines
Land Acquisition & Trail Development • Chapter 4 -�0�

![Verifying Information with Multimedia Content on Twittersem03/mtap-2017.pdf · This study is based on the Verifying Multimedia Use (VMU) task [4] that was organized as part of the](https://static.fdocuments.net/doc/165x107/5f36ae2c8609ff1b096a5470/verifying-information-with-multimedia-content-on-twitter-sem03mtap-2017pdf-this.jpg)


![Verifying Information with Multimedia Content on TwitterThis study is based on the Verifying Multimedia Use (VMU) task [4] that was organized as part of the 2015 and 2016 editions](https://static.fdocuments.net/doc/165x107/5facc37e03f34945655459dc/verifying-information-with-multimedia-content-on-twitter-this-study-is-based-on.jpg)