How to submit Unit 2C: Proposal for a commissioning brief ... · How to submit Unit 2C: Proposal...
14
How to submit Unit 2C: Proposal for a commissioning brief (L/507/6467) This document contains information and step-by-step instructions for centres on how to submit learner’s work for Level 3 Cambridge Technicals in Performing Arts unit 2C (Proposal for a commissioning brief) to OCR for assessment. Introduction Files of completed learner work are uploaded by centres into a web-based Surpass project. Surpass is the software used by OCR for on-screen assessment, and a project is a type of file repository. Any references to a ‘test’ in Surpass also relate to a ‘project’. OCR will schedule a project for each learner, linked to a valid unit test entry for a specific examination series, which is only available within the timetabled window. The centre administrator (centre Exams Officer or class teacher) will be required to upload their learner’s completed work to the project. The project is not a workspace; work in progress should be undertaken and saved outside of Surpass. Files of learner work must be uploaded during or immediately following the published window for the examination series in question. Therefore to allow you time to resolve any issues that may be preventing you from uploading files it is recommended that: • Each learner’s project is opened, using the keycode, at the earliest possible opportunity in the timetabled window to check it can be accessed without any issue. • Completed files of learner’s work are uploaded to the project throughout the timetabled window rather than at the last minute. The timetabled window for uploading completed learner’s work runs for 14 consecutive calendar days for each examination series. It starts at 00:00 hours on the timetabled day 1 and ends at 23:59 hours on the timetabled day 14. Projects cannot be worked on outside this window but we have allowed two days immediately after the timetabled window for you to finalise the upload of the learner’s completed work (finished proposals). Our Customer Technical Support Team ([email protected] and 02476 851509) can help with any queries about Surpass. System requirements The system requirements for the computer(s) you will be using to upload the files of completed learner work in to Surpass are: • A web browser; recent versions of Internet Explorer, Google Chrome and Mozilla Firefox are supported. • An active and constant internet connection. • A recent version of Adobe Flash Player. Further details can be found in this Surpass knowledgebase article. V4 Page 1 of 14 © OCR 2018
Transcript of How to submit Unit 2C: Proposal for a commissioning brief ... · How to submit Unit 2C: Proposal...

How to submit Unit 2C: Proposal for a commissioning brief (L/507/6467)
This document contains information and step-by-step instructions for centres on how to submit learner’s work for Level 3 Cambridge Technicals in Performing Arts unit 2C (Proposal for a commissioning brief) to OCR for assessment.
Introduction
Files of completed learner work are uploaded by centres into a web-based Surpass project. Surpass is the software used by OCR for on-screen assessment, and a project is a type of file repository. Any references to a ‘test’ in Surpass also relate to a ‘project’.
OCR will schedule a project for each learner, linked to a valid unit test entry for a specific examination series, which is only available within the timetabled window.
The centre administrator (centre Exams Officer or class teacher) will be required to upload their learner’s completed work to the project. The project is not a workspace; work in progress should be undertaken and saved outside of Surpass.
Files of learner work must be uploaded during or immediately following the published window for the examination series in question. Therefore to allow you time to resolve any issues that may be preventing you from uploading files it is recommended that:
• Each learner’s project is opened, using the keycode, at the earliest possible opportunity in the timetabled window to check it can be accessed without any issue.
• Completed files of learner’s work are uploaded to the project throughout the timetabled window rather than at the last minute.
The timetabled window for uploading completed learner’s work runs for 14 consecutive calendar days for each examination series. It starts at 00:00 hours on the timetabled day 1 and ends at 23:59 hours on the timetabled day 14. Projects cannot be worked on outside this window but we have allowed two days immediately after the timetabled window for you to finalise the upload of the learner’s completed work (finished proposals).
Our Customer Technical Support Team ([email protected] and 02476 851509) can help with any queries about Surpass.
System requirements
The system requirements for the computer(s) you will be using to upload the files of completed learner work in to Surpass are:
• A web browser; recent versions of Internet Explorer, Google Chrome and Mozilla Firefox are supported.
• An active and constant internet connection. • A recent version of Adobe Flash Player.
Further details can be found in this Surpass knowledgebase article.
V4 Page 1 of 14 © OCR 2018

File upload information
Formats
The following file types are permitted. Word processing file: .doc, .docx, .odt Portable document format: .pdf Other file types are not permitted and cannot be uploaded into projects; this includes .zip files.
Names
File names should only contain letters, numbers and underscores. Although it may be possible to save files with special characters in the name, these should not be used because Surpass functions in a different way to other commonly used software packages. Although it is possible to upload a file with a name 100 characters in length, we recommend that file names are meaningful and as short as possible. File names do not have to include information to identify the learner. A suggested format is: <Centre Number>_<Unit Number>_<Candidate Number>_< <Surname_ Initials> Eg. 12345_1_0126_Jackson_B However information to identify the candidate should be evident when the file is opened.
Size The maximum individual file size permitted is 5MB.
Amendments
It is not possible to save amendments to the content of files once they have been uploaded; only completed work should be uploaded. It is possible to remove and replace files within any given project as many times as required within the timetabled window prior to the project being submitted, or the end of the timetabled window.
Upload
A file must be closed in order for an upload to be successful. It is not possible to upload the same file more than once, ie a file of the same name and type. Note: it is possible to upload files with the same name provided they are different types.
V4 Page 2 of 14 © OCR 2018

Process
1. The centre administrator logs in to Surpass (https://ocr.surpass.com/) to obtain keycodes for each learner. These keycodes will be available in the Invigilate screen in Surpass 24 hours before the start of the 14 day timetabled window. If this is the first time your centre is using Surpass, your centre administrator will receive login details in advance of the timetabled window. If your centre has used Surpass in a previous examination series, you will need to recover your details by following the steps below: • Click on the ‘Can’t access your account?’ link on the login screen. • Enter either the user name or email address associated with your account. You
will receive an email with an account recovery link. • Click this link and enter a new password and security details. These will be used
to identify you if you need to reset your password in the future. • Click the change password button and you will be logged into Surpass.
The centre administrator can print the keycodes for the class teacher if they are intending to upload the learner’s completed work instead of the administrator.
2. Launch a browser and navigate to following address to display the Surpass Deliver Test screen. https://ocr.surpass.com/LaunchTest
V4 Page 3 of 14 © OCR 2018
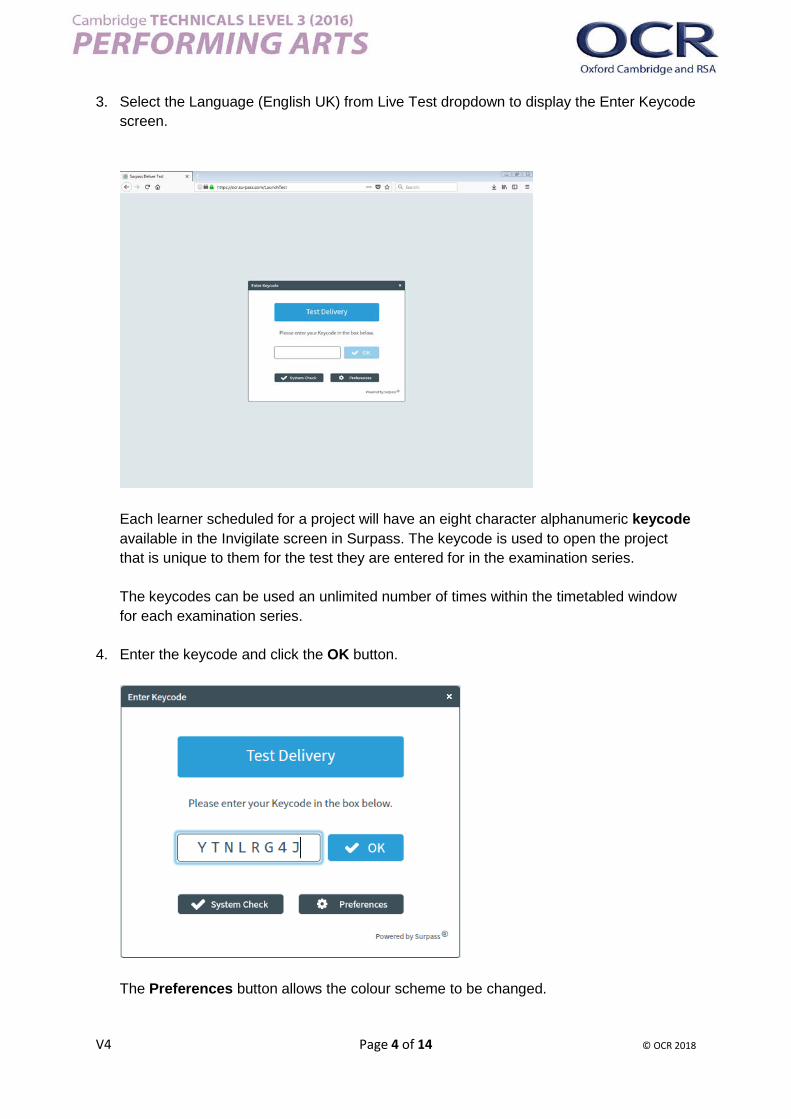
3. Select the Language (English UK) from Live Test dropdown to display the Enter Keycode screen.
Each learner scheduled for a project will have an eight character alphanumeric keycode available in the Invigilate screen in Surpass. The keycode is used to open the project that is unique to them for the test they are entered for in the examination series. The keycodes can be used an unlimited number of times within the timetabled window for each examination series.
4. Enter the keycode and click the OK button.
The Preferences button allows the colour scheme to be changed.
V4 Page 4 of 14 © OCR 2018

5. The Confirm Details screen will be displayed showing the learner the project relates to.
Check the learner’s details are correct and click the Confirm button to continue.
6. The Introduction page is displayed and includes information about the assessment. It will only be displayed when the project is opened for the first time but can be returned to if needed.
Click the Start Test button to continue.
V4 Page 5 of 14 © OCR 2018

7. The project moves to question 1 which is where the learner’s completed work is uploaded.
Click the symbol to return to the Introduction page. Click the symbol to open the Preferences screen. It is possible to open and close a learner’s project as many times as required during the timetabled window. The project will automatically open at the point that it was closed.
8. Files of completed learner work are attached to the project via the Upload Manager. Click the Upload button to open the Upload Manager.
The Upload Manager displays information about the maximum file size, the minimum/maximum number of files that can be uploaded, the fact that special characters cannot be used in file names and the file types that can be uploaded.
V4 Page 6 of 14 © OCR 2018

9. Click the Upload File button to access the computer’s directory and navigate to the folder containing the completed learner work.
Note that only files of the selected file type will be displayed.
It is necessary to change the file type to that of the file being uploaded to see the file in the Open file dialogue.
Click the Open button to upload the selected file.
V4 Page 7 of 14 © OCR 2018

10. The uploaded file is displayed in the Upload Manager.
Once a file has been uploaded it is possible to add additional files by repeating the steps in section 9.
It is also possible to rename, replace, download or delete a file that has been uploaded using the controls to the right of the file name in the Upload Manager.
11. When all of the completed learner work has been uploaded click the Close button on the Upload Manager. The Upload Manager closes.
V4 Page 8 of 14 © OCR 2018

12. When at least one file has been uploaded the progress indicator shows as 100% and the colour of question 1 in the left hand navigation changes. Both indicate that the uploaded file has been saved.
13. Click the Next button to move to the final information page. The File Attachments Summary opens and displays the files that have been uploaded.
Click the Return button to remain on question 1 and make any changes required. Click the Continue button to move to the final information page.
14. The upload process follows the same principles regardless of the browser being used. After navigating to the required folder on the computer or network there are subtle differences between the browsers in their behaviour when locating the files to be uploaded.
V4 Page 9 of 14 © OCR 2018

a. Internet Explorer The dialogue will only display files of the type selected in the Files of type list.
Click the Files of type list to see the permitted file types and to select the type to be displayed in the dialogue.
b. Google Chrome The dialogue will default to displaying Custom Files but only the permitted file types will be displayed.
The All Files view will display all of the files in the folder but it will only be possible to upload those saved in the permitted file formats.
V4 Page 10 of 14 © OCR 2018

c. Mozilla Firefox The dialogue will only display files of the type selected.
Click the files type list to see the permitted file types and to select the type to be displayed in the dialogue.
15. The final information page is displayed.
16. If the completed learner work has been uploaded click the Close button to exit the project.
V4 Page 11 of 14 © OCR 2018

17. The Close screen is displayed giving the option to close and finish later, finish and submit or cancel.
Choose the Close test and finish later button to close the project with the option to open it again within the timetabled window. Choose the Finish test and Submit answers button when all of the completed learner work has been uploaded and is ready to be submitted. The project is completed and ready for assessment. The project cannot be opened again even if there is time remaining in the timetabled window. Choose the Cancel button to remain in the project.
18. Click on the required button to confirm the close option.
a. Close test and finish later The Confirm Close dialogue is displayed. Click the Yes button to close or the No button to remain in the project.
V4 Page 12 of 14 © OCR 2018
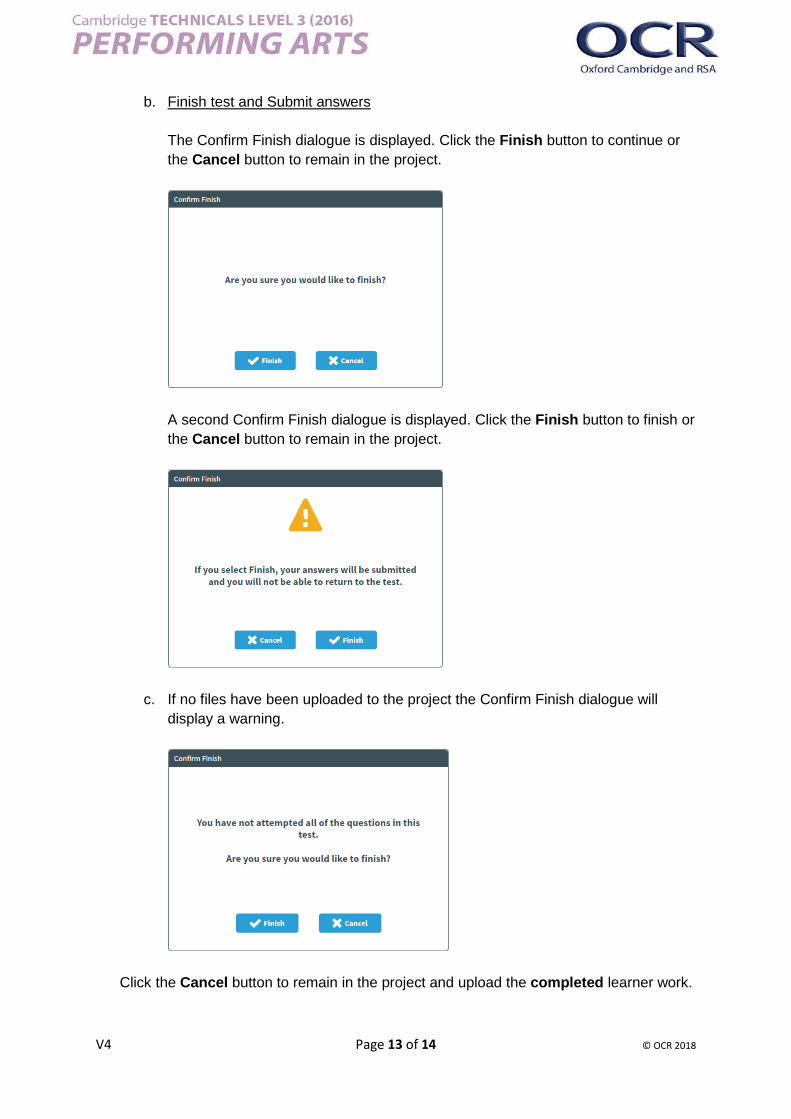
b. Finish test and Submit answers The Confirm Finish dialogue is displayed. Click the Finish button to continue or the Cancel button to remain in the project.
A second Confirm Finish dialogue is displayed. Click the Finish button to finish or the Cancel button to remain in the project.
c. If no files have been uploaded to the project the Confirm Finish dialogue will display a warning.
Click the Cancel button to remain in the project and upload the completed learner work.
V4 Page 13 of 14 © OCR 2018

19. The browser may request permission to close or may close automatically. It will need to be launched again, or the browser refreshed, in order to display the Surpass Delivery Test screen again.
20. Any projects that have not been submitted by the time the timetabled window has ended will be automatically submitted by Surpass. Only files uploaded to the project at the point of the timetabled window ending will be available to the examiner for assessment.
21. The centre administrator can monitor the status of each project in the Invigilate screen in Surpass using the State column. Surpass Invigilate Screen
Note the use of a PIN is not required.
Symbol Definition
The project (or test) has finished and been submitted for assessment
The project (or test) has been voided
The project (or test) is currently in use
The project (or test) has been started but is not currently in use
The project (or test) is ready for use but has not been started
The project (or test) has been paused
V4 Page 14 of 14 © OCR 2018