
How to setup a serial Bluetooth adapter - · PDF fileHow to setup a serial Bluetooth adapter...
50
Nordfield.com Copyrights © Nordfield Electronics 1 How to setup a serial Bluetooth adapter Master Guide Our serial Bluetooth adapters part UCBT232B and UCBT232EXA can be setup and paired using a Bluetooth management software called BlueSoleil (for Windows XP) or by using Windows Vista/7/8’s built-in Bluetooth management software. Pairing with built-in Bluetooth or external USB Bluetooth dongle using BlueSoleil (for Windows XP or older) ............................................................................................. 2 Pairing with built-in Bluetooth or external USB Bluetooth dongle using Windows default Bluetooth management software (for Windows Vista, 7, 8) ……….…………….......…10 Pairing with another Serial Bluetooth Adapter ……………………………..……..23 Enabling the DIP switches …………………………………………...……….27 Changing the COM port number ……………………………..……………….….…28 Making a loop-back test ……………………………...…………………… 31 Configuring the parameters ……………………………………………...…… 34 Configuring the parameters through the serial interface .………………………….. 34 Configuring the parameters over Bluetooth ………………………………………….. 38 Setting the Data Mode and Command Mode using <<< and >>> …………………...41 Resetting the serial Bluetooth adapter …………………………………………..….…..47 Questions and Answers ………………………..……………………….…48
Transcript of How to setup a serial Bluetooth adapter - · PDF fileHow to setup a serial Bluetooth adapter...

Nordfield.com
Copyrights © Nordfield Electronics 1
How to setup a serial Bluetooth adapter Master Guide
Our serial Bluetooth adapters part UCBT232B and UCBT232EXA can be setup and paired using a Bluetooth management software called BlueSoleil (for Windows XP) or by
using Windows Vista/7/8’s built-in Bluetooth management software.
Pairing with built-in Bluetooth or external USB Bluetooth dongle using BlueSoleil (for Windows XP or older) ............................................................................................. 2 Pairing with built-in Bluetooth or external USB Bluetooth dongle using Windows default Bluetooth management software (for Windows Vista, 7, 8) ……….…………….......…10 Pairing with another Serial Bluetooth Adapter ……………………………..……..23 Enabling the DIP switches …………………………………………...……….27 Changing the COM port number ……………………………..……………….….…28 Making a loop-back test ……………………………...…………………… 31 Configuring the parameters ……………………………………………...…… 34 Configuring the parameters through the serial interface .………………………….. 34 Configuring the parameters over Bluetooth ………………………………………….. 38 Setting the Data Mode and Command Mode using <<< and >>> …………………...41 Resetting the serial Bluetooth adapter …………………………………………..….…..47 Questions and Answers ………………………..……………………….…48

Nordfield.com
Copyrights © Nordfield Electronics 2
Pairing with built-in Bluetooth or external USB Bluetooth
dongle using BlueSoleil (for Windows XP or older)
1. Download Bluesoleil from www.nordfield.com 2. Install Bluesoleil 3. Start Bluesoleil 4. Insert a USB Bluetooth dongle into your computer’s USB port.
If you computer has built-in Bluetooth skip this step.
5. Connect the UCBT232B/EXA to the power supply, either by a USB power cable or a 110/5V power adapter, and turn it ON. The red LED light on the UCBT232B/EXA should be steady ‘ON’ and the blue light should be flashing.
The setup should look similar to this

Nordfield.com
Copyrights © Nordfield Electronics 3
6. To search for devices click on the orange circle in Bluesoleil and the
UCBT232B/EXA will be discovered. The lower status line must say “Searching for devices…” when a device search is in progress.
If BlueSoleil cannot find or detect the Serial Adapter when you click the orange search button a simple solution can be to use a different USB port for the external USB Bluetooth dongle if you are using this. If this does not help try resetting the UCBT232B/EXA (hold down the reset button for 10 sec with a paper clip while you apply power).

Nordfield.com
Copyrights © Nordfield Electronics 4
If you are getting a “USB Device Not Recognized” error from Windows when you turn on the UCBT232B/EXA you can simply just ignore this error. The adapter only gets its power from the USB port, no data is transmitted.
7. Right-click on the Serial Adapter icon in Bluesoleil and click ‘Pair Device’

Nordfield.com
Copyrights © Nordfield Electronics 5
8. Enter the default Pin code which is ‘1234’
9. Right-click on the Serial Adapter icon and click “Refresh”
Nordfield.com
Copyrights © Nordfield Electronics 6
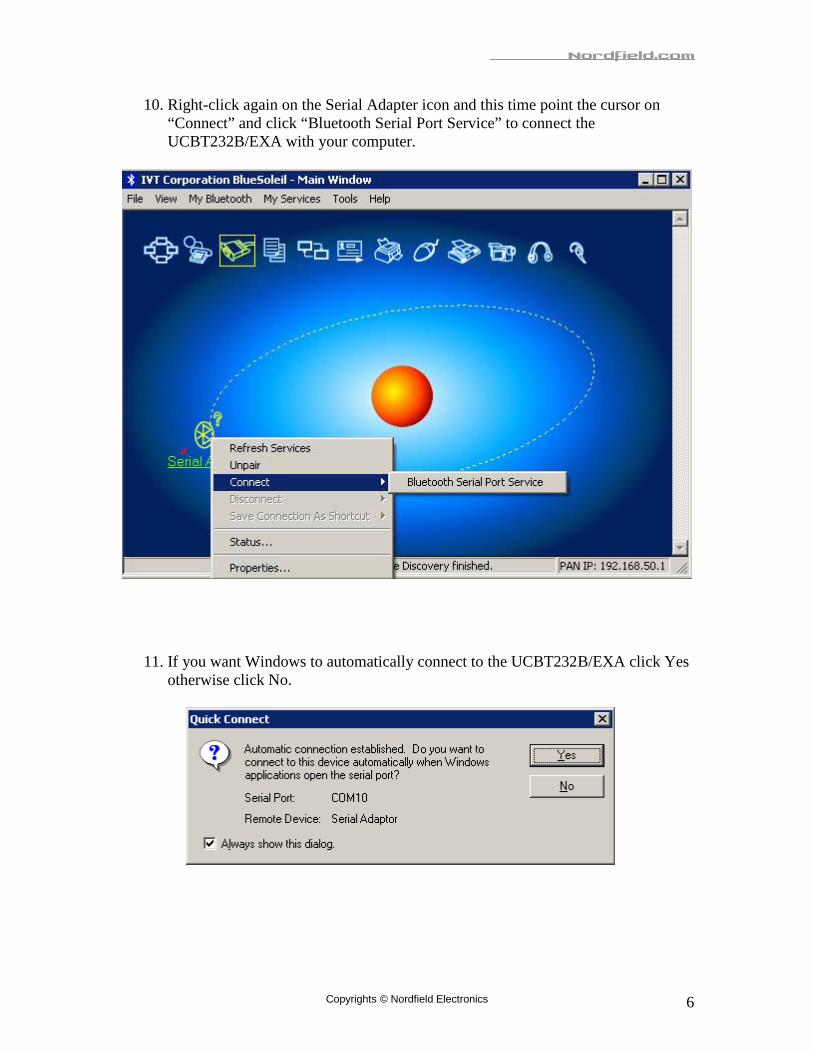
10. Right-click again on the Serial Adapter icon and this time point the cursor on “Connect” and click “Bluetooth Serial Port Service” to connect the UCBT232B/EXA with your computer.
11. If you want Windows to automatically connect to the UCBT232B/EXA click Yes otherwise click No.

Nordfield.com
Copyrights © Nordfield Electronics 7
12. The UCBT232B/EXA is now paired and connected to your computer. When its
successfully connected the blue LED light on the UCBT232B/EXA should be steady blue; and in BlueSoleil a green dotted line with a red arrow going from the serial adapter icon towards the orange circle should be visible.

Nordfield.com
Copyrights © Nordfield Electronics 8
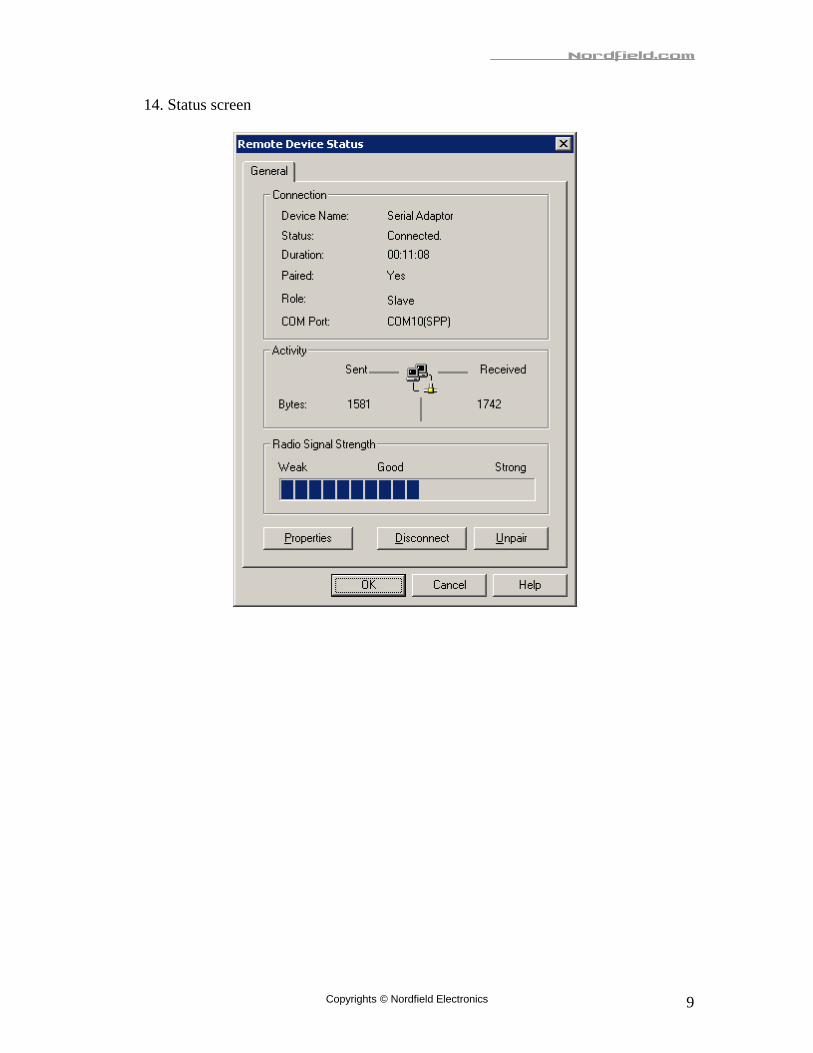
13. To see the COM port number, status and signal strength, right-click on the Serial Adapter icon and click ‘Status’
Nordfield.com
Copyrights © Nordfield Electronics 9
14. Status screen

Nordfield.com
Copyrights © Nordfield Electronics 10
Pairing with built-in Bluetooth or external USB Bluetooth dongle using Windows default Bluetooth management
software (for Windows Vista, 7, 8)
This user guide is based on Windows 7 and the UCBT232B/EXA Serial Bluetooth adapter. First we identify the products: Serial Bluetooth adapter USB Bluetooth adapter USB Bluetooth dongle (UCBR232B/EXA) (BLDONG) (BLDONG2)
The setup looks like this:

Nordfield.com
Copyrights © Nordfield Electronics 11
Getting Started If your computer does not already have built-in Bluetooth, you can instead use a USB Bluetooth dongle (part number BLDONG or BLDONG2). Plug-in the dongle to your computer’s USB port. Windows should now search for the drivers for the USB Bluetooth dongle, (you may need to be connected to the internet).
Windows automatically installing the drivers.
After the installation has finished successfully (there might be some failed control items as shown in the image above, you do not need to worry about this) you will be able to see two COM ports in Windows Device Manager. One is an outgoing port and the other is an incoming port. Both are virtual COM ports created by the Bluetooth drivers and the dongle.

Nordfield.com
Copyrights © Nordfield Electronics 12

Nordfield.com
Copyrights © Nordfield Electronics 13
Now enter the word “Bluetooth” in the start menu and click the Bluetooth link that shows up. This will start Windows default Bluetooth management software (if this has successfully been installed on your computer).
A Bluetooth icon should now appear in the task bar:

Nordfield.com
Copyrights © Nordfield Electronics 14
Click the Bluetooth icon and click “Open Setting”s in the menu:

Nordfield.com
Copyrights © Nordfield Electronics 15
The Bluetooth settings window will open. Use the settings as shown below:

Nordfield.com
Copyrights © Nordfield Electronics 16
Under the COM ports tab you will see the USB Bluetooth dongle’s virtual COM port, in this case COM16 port has been assigned by the system (as you also could see in Device Manager). Only one of the virtual COM ports is shown.
Nordfield.com
Copyrights © Nordfield Electronics 17
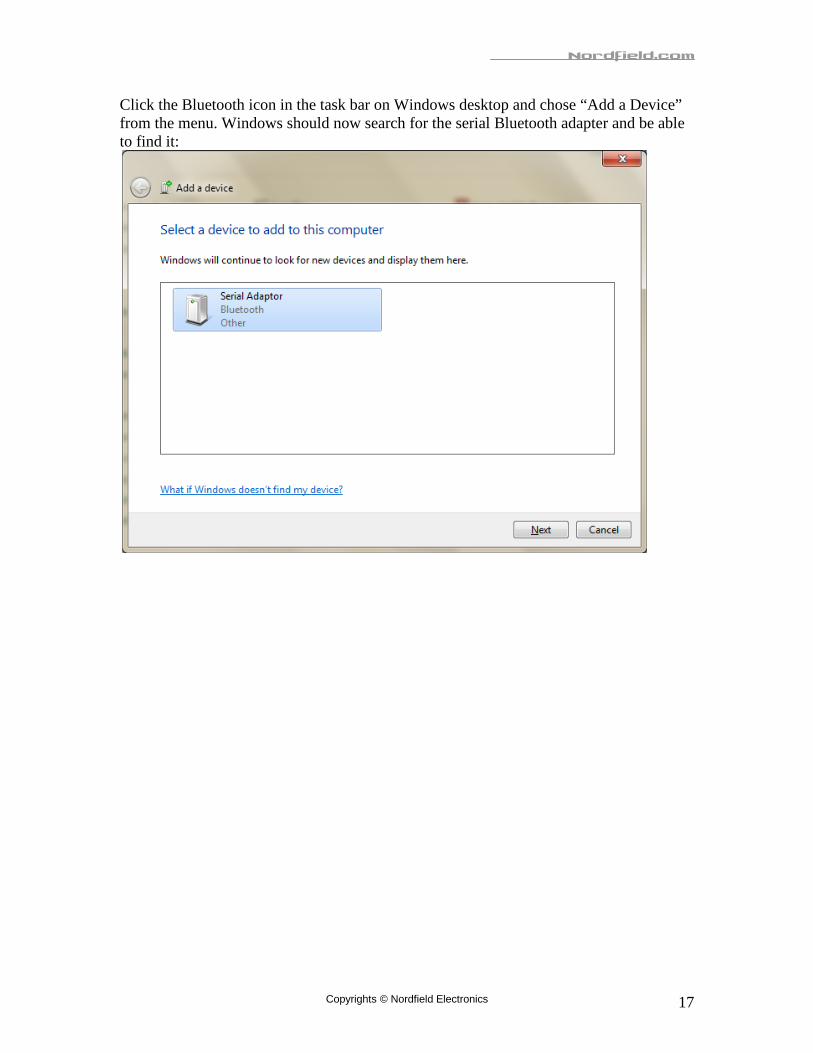
Click the Bluetooth icon in the task bar on Windows desktop and chose “Add a Device” from the menu. Windows should now search for the serial Bluetooth adapter and be able to find it:

Nordfield.com
Copyrights © Nordfield Electronics 18
After windows have found the adapter, click “Enter the device pairing code”:

Nordfield.com
Copyrights © Nordfield Electronics 19
The pairing code is “1234”:
Click Next

Nordfield.com
Copyrights © Nordfield Electronics 20
The serial Bluetooth adapter is now successfully installed and paired:

Nordfield.com
Copyrights © Nordfield Electronics 21
If Windows do NOT find the serial Bluetooth adapter
it might be because it has already been found earlier, and already exists in the system. In that case you may need to first remove the serial Bluetooth adapter from the system. Click the Bluetooth icon in Windows task bar and chose “Show Bluetooth devices” from the menu:
In the above picture the right icon called (Serial Adaptor) is the serial Bluetooth adapter, the left-side icon is the serial Bluetooth dongle. Remove only the serial Bluetooth adapter (the right-side icon). Right-click the icon and chose “Remove Device” to remove it. Now you can again try to add the serial Bluetooth adapter by clicking the Bluetooth icon in the task bar and chose “Add Device” from the menu.
Nordfield.com
Copyrights © Nordfield Electronics 22
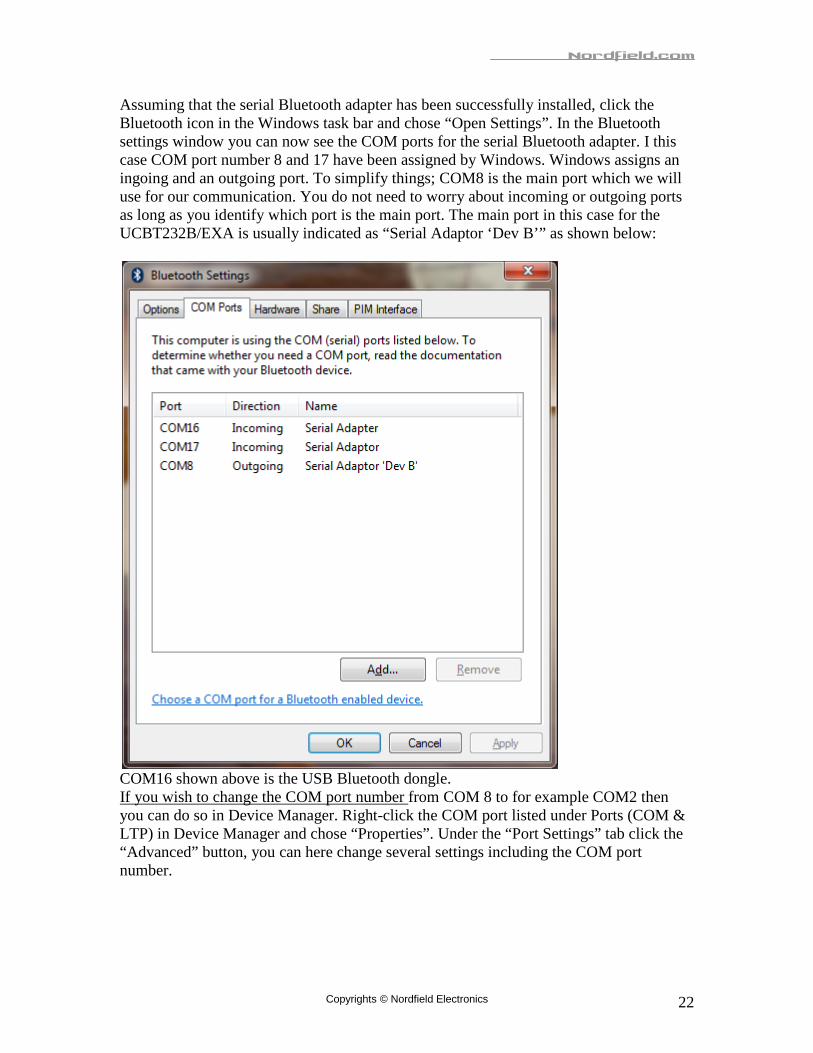
Assuming that the serial Bluetooth adapter has been successfully installed, click the Bluetooth icon in the Windows task bar and chose “Open Settings”. In the Bluetooth settings window you can now see the COM ports for the serial Bluetooth adapter. I this case COM port number 8 and 17 have been assigned by Windows. Windows assigns an ingoing and an outgoing port. To simplify things; COM8 is the main port which we will use for our communication. You do not need to worry about incoming or outgoing ports as long as you identify which port is the main port. The main port in this case for the UCBT232B/EXA is usually indicated as “Serial Adaptor ‘Dev B’” as shown below:
COM16 shown above is the USB Bluetooth dongle. If you wish to change the COM port number
from COM 8 to for example COM2 then you can do so in Device Manager. Right-click the COM port listed under Ports (COM & LTP) in Device Manager and chose “Properties”. Under the “Port Settings” tab click the “Advanced” button, you can here change several settings including the COM port number.
Nordfield.com
Copyrights © Nordfield Electronics 23
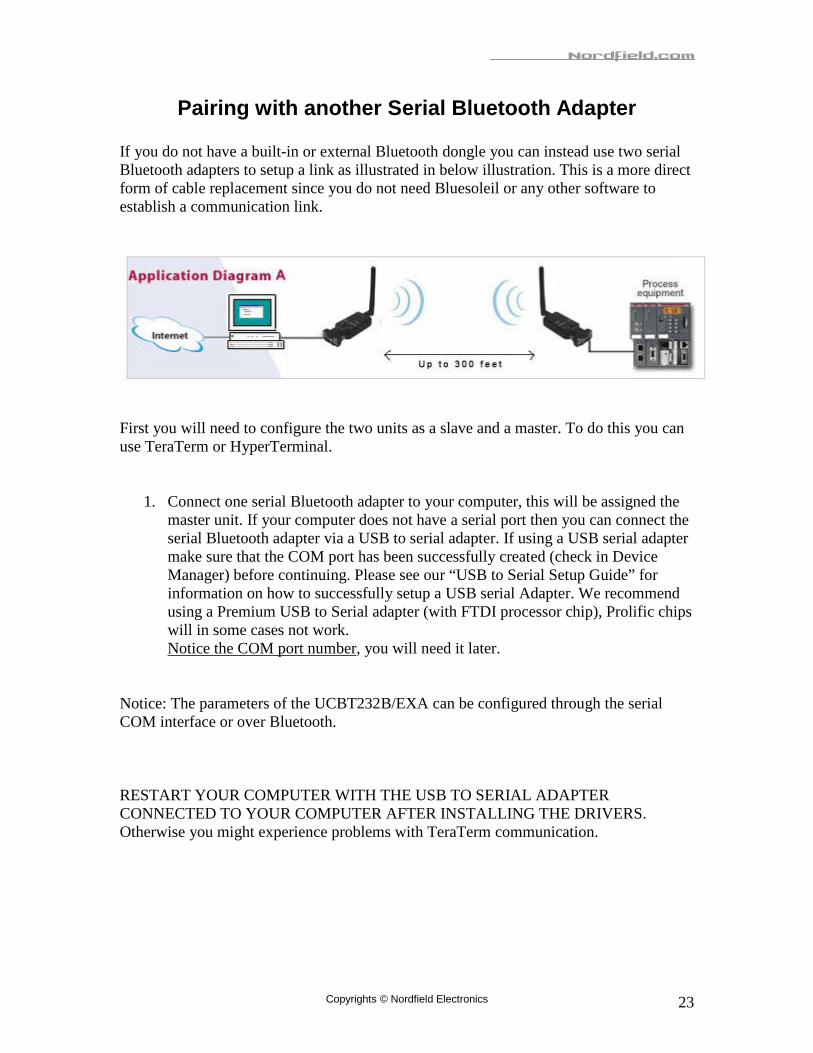
Pairing with another Serial Bluetooth Adapter If you do not have a built-in or external Bluetooth dongle you can instead use two serial Bluetooth adapters to setup a link as illustrated in below illustration. This is a more direct form of cable replacement since you do not need Bluesoleil or any other software to establish a communication link.
First you will need to configure the two units as a slave and a master. To do this you can use TeraTerm or HyperTerminal.
1. Connect one serial Bluetooth adapter to your computer, this will be assigned the master unit. If your computer does not have a serial port then you can connect the serial Bluetooth adapter via a USB to serial adapter. If using a USB serial adapter make sure that the COM port has been successfully created (check in Device Manager) before continuing. Please see our “USB to Serial Setup Guide” for information on how to successfully setup a USB serial Adapter. We recommend using a Premium USB to Serial adapter (with FTDI processor chip), Prolific chips will in some cases not work. Notice the COM port number
, you will need it later.
Notice: The parameters of the UCBT232B/EXA can be configured through the serial COM interface or over Bluetooth. RESTART YOUR COMPUTER WITH THE USB TO SERIAL ADAPTER CONNECTED TO YOUR COMPUTER AFTER INSTALLING THE DRIVERS. Otherwise you might experience problems with TeraTerm communication.

Nordfield.com
Copyrights © Nordfield Electronics 24
In this example the COM port created by the USB serial adapter is COM5
2. Download TeraTerm from www.nordfield.com. 3. Install and start TeraTerm. At the startup screen choose the virtual COM port
number which the USB adapter has created.

Nordfield.com
Copyrights © Nordfield Electronics 25
4. Click OK and click Setup > Serial Port and set the baud rate to 19200 baud which is the default baud rate of the adapter:
5. Click OK. If there is a Flow switch on your Serial Bluetooth adapter it should be in
position DCE (towards the DB9 connector on the UCBT232B/EXA).
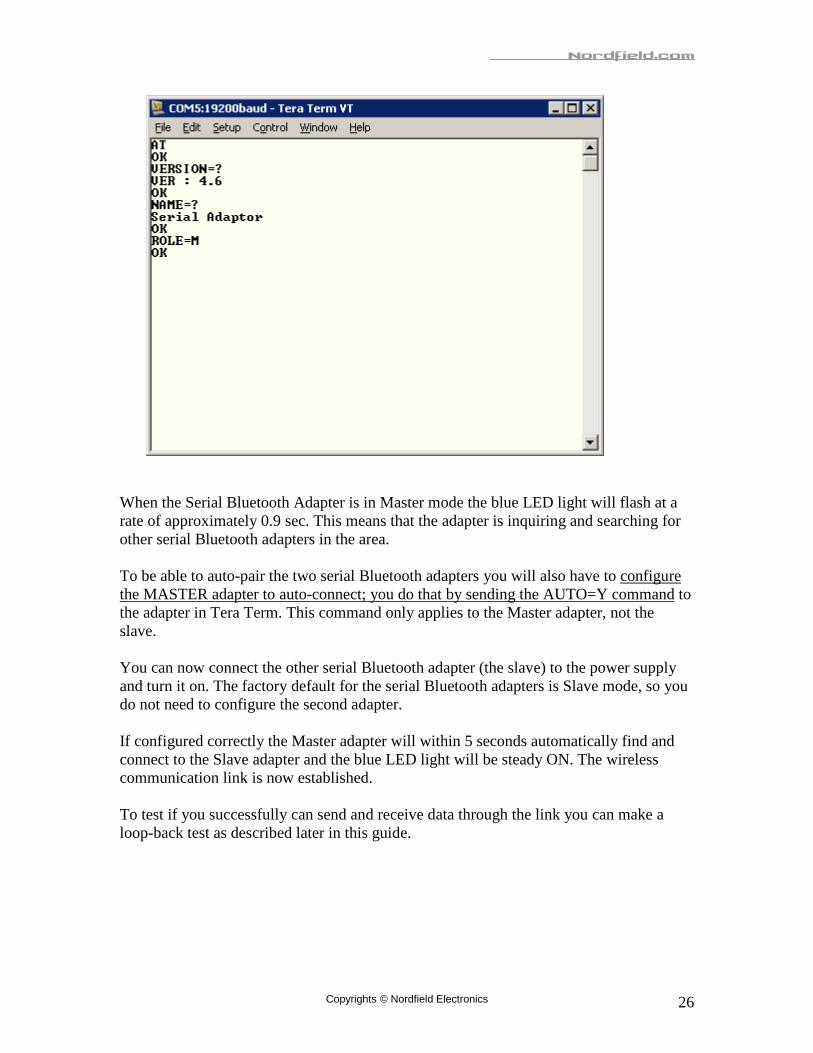
Example: Entering the command VERSION=? gives you the UCBT232B/EXA’s version number.
You are now ready to send commands to the UCBT232B/EXA. If you enter the command AT you should get an ‘OK’ back from the UCBT232B/EXA.
To be able to setup a link between the two serial Bluetooth adapters, one unit has to be configured as a Master and the other has to be configured as a Slave (this is the default setting). To change the adapter from Slave mode (default mode) to Master mode enter the following command: ROLE=M This will put the adapter in Master mode, (for a list of all commands please refer to the serial Bluetooth adapters user’s manual).
Nordfield.com
Copyrights © Nordfield Electronics 26
When the Serial Bluetooth Adapter is in Master mode the blue LED light will flash at a rate of approximately 0.9 sec. This means that the adapter is inquiring and searching for other serial Bluetooth adapters in the area. To be able to auto-pair the two serial Bluetooth adapters you will also have to configure the MASTER adapter to auto-connect; you do that by sending the AUTO=Y command
to the adapter in Tera Term. This command only applies to the Master adapter, not the slave.
You can now connect the other serial Bluetooth adapter (the slave) to the power supply and turn it on. The factory default for the serial Bluetooth adapters is Slave mode, so you do not need to configure the second adapter. If configured correctly the Master adapter will within 5 seconds automatically find and connect to the Slave adapter and the blue LED light will be steady ON. The wireless communication link is now established. To test if you successfully can send and receive data through the link you can make a loop-back test as described later in this guide.
Nordfield.com
Copyrights © Nordfield Electronics 27
Enabling the DIP switches
If you want to use the DIP switches on top of the adapter then you need to first enable these. You do that by sending the command DIP=Y in Tera Term; this
will enable the two DIP switches. The DIP switches can be a convenient way of switching between Master and Slave mode.

Nordfield.com
Copyrights © Nordfield Electronics 28
Changing the COM port number If you need to change the COM port number the UCBT232B/EXA is using, this can be done as following: Go to Windows Device Manager, right-click on the COM port which Bluesoleil has created, in this case COM 10. If there are multiple COM ports listed in Device Manager you can determine which port to click by right-clicking the Serial Adapter icon in BlueSoleil and click ‘Status’, as described in section 1 of this guide.

Nordfield.com
Copyrights © Nordfield Electronics 29
Under the ‘Port Settings” tab click the “Advanced” button
Nordfield.com
Copyrights © Nordfield Electronics 30
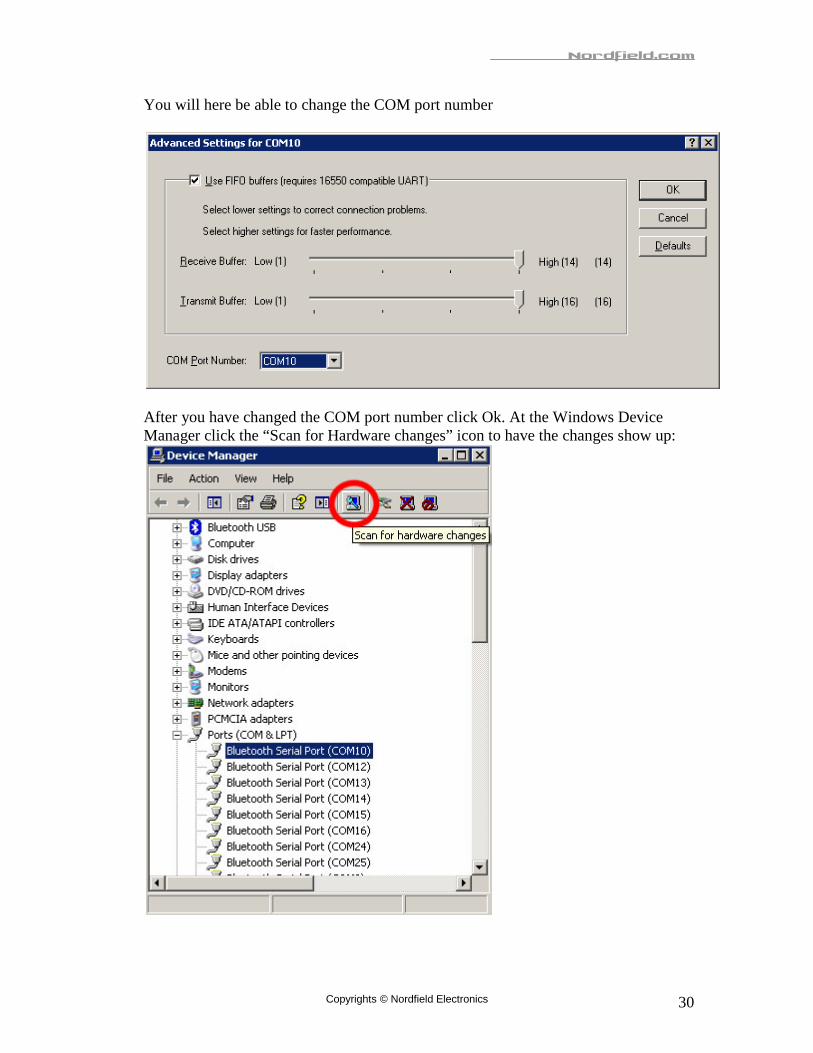
You will here be able to change the COM port number
After you have changed the COM port number click Ok. At the Windows Device Manager click the “Scan for Hardware changes” icon to have the changes show up:
Nordfield.com
Copyrights © Nordfield Electronics 31
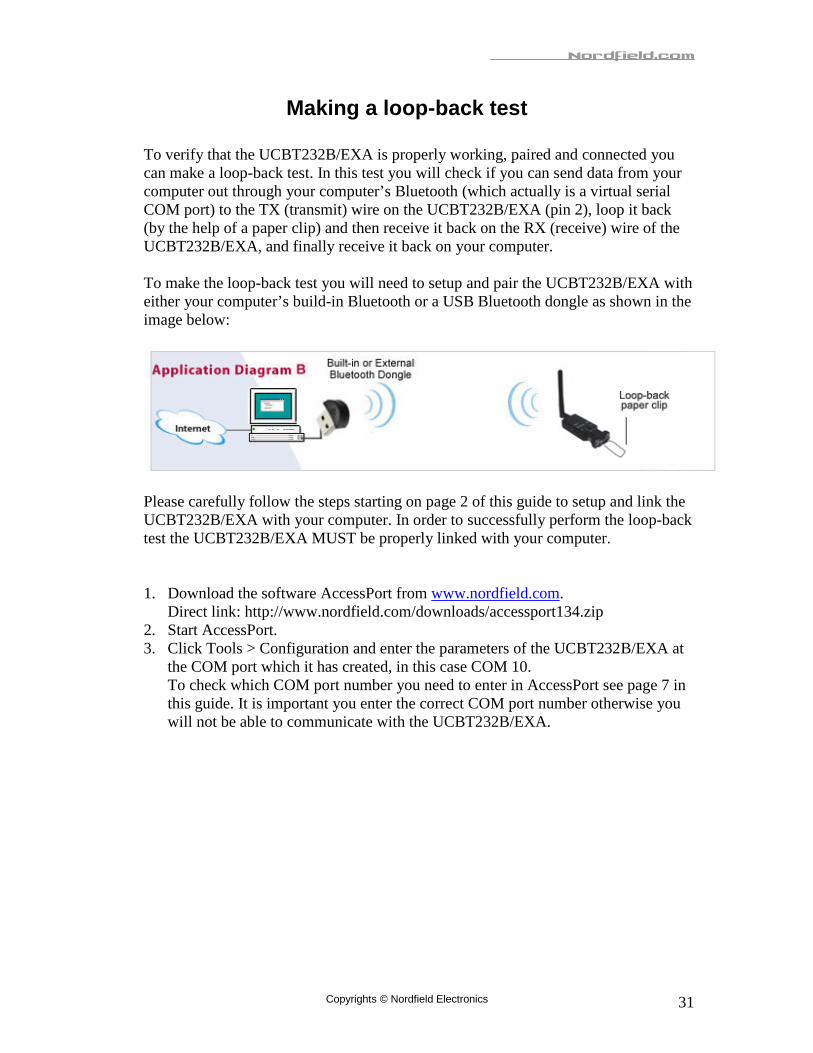
Making a loop-back test
To verify that the UCBT232B/EXA is properly working, paired and connected you can make a loop-back test. In this test you will check if you can send data from your computer out through your computer’s Bluetooth (which actually is a virtual serial COM port) to the TX (transmit) wire on the UCBT232B/EXA (pin 2), loop it back (by the help of a paper clip) and then receive it back on the RX (receive) wire of the UCBT232B/EXA, and finally receive it back on your computer. To make the loop-back test you will need to setup and pair the UCBT232B/EXA with either your computer’s build-in Bluetooth or a USB Bluetooth dongle as shown in the image below:
Please carefully follow the steps starting on page 2 of this guide to setup and link the UCBT232B/EXA with your computer. In order to successfully perform the loop-back test the UCBT232B/EXA MUST be properly linked with your computer. 1. Download the software AccessPort from www.nordfield.com.
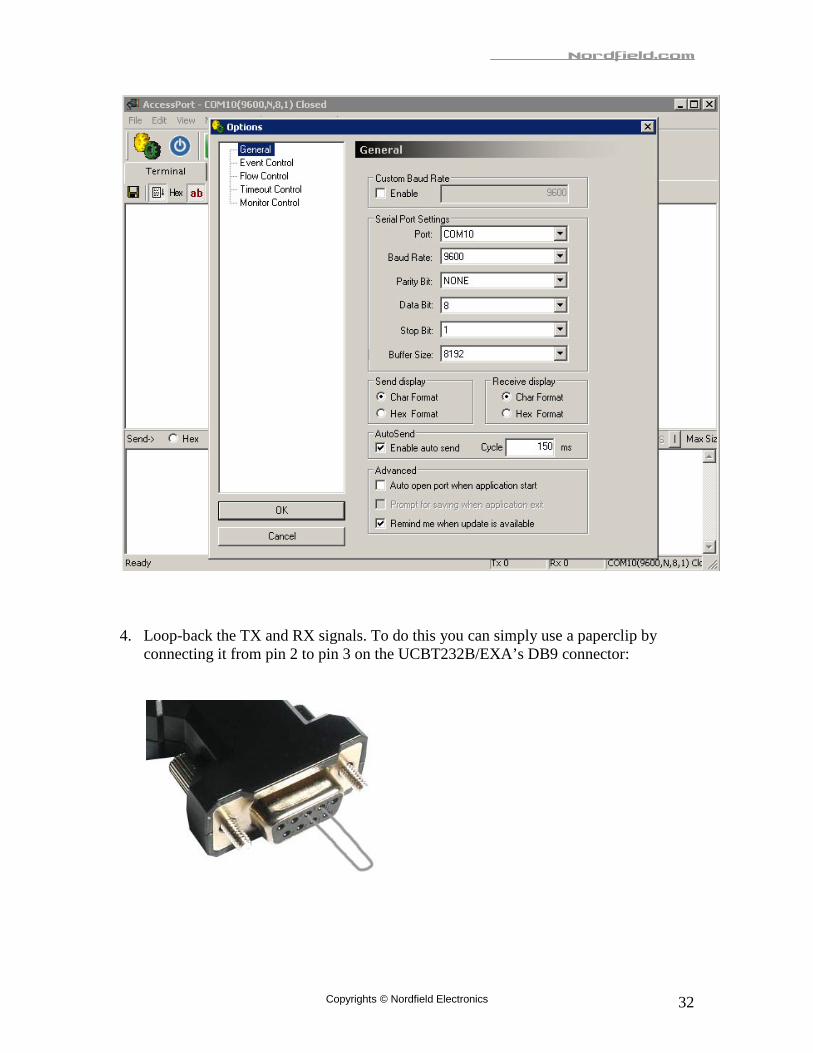
Direct link: http://www.nordfield.com/downloads/accessport134.zip 2. Start AccessPort. 3. Click Tools > Configuration and enter the parameters of the UCBT232B/EXA at
the COM port which it has created, in this case COM 10. To check which COM port number you need to enter in AccessPort see page 7 in this guide. It is important you enter the correct COM port number otherwise you will not be able to communicate with the UCBT232B/EXA.
Nordfield.com
Copyrights © Nordfield Electronics 32
4. Loop-back the TX and RX signals. To do this you can simply use a paperclip by
connecting it from pin 2 to pin 3 on the UCBT232B/EXA’s DB9 connector:

Nordfield.com
Copyrights © Nordfield Electronics 33
The UCBT232B/EXA obviously cannot and should not be connected to your serial device when you do this test. It only needs to have the loop-back paper clip and power connected and turned ON. 5. In AccessPort open COM 10 by clicking Tools > Port Switch. Make sure the
COM port is properly opened. If AccessPort cannot open the port this is an indication that the UCBT232B/EXA in not properly connected, it has a defect or the port for some other reason has not successfully been created, perhaps you entered the wrong COM port number in AccssPort Configurations. Enter a text string in the lower window and click send. With the UCBT232B/EXA properly connected and linked you should now be able to receive the same characters in the upper window which you send in the lower window.

Nordfield.com
Copyrights © Nordfield Electronics 34
Configuring the parameters Configuring the UCBT232B/EXA with your own custom settings such a baud rate, data settings, flow control etc. Please refer to the Serial Adapter’s datasheet for all available parameters. The parameters of the adapter can be configured by one of the following ways:
1. Through the serial RS232 interface 2. Over Bluetooth
Configuring the parameters through the serial interface Configuring the parameters through the serial interface is the easiest way. If you do not have a built-in serial COM port available in your computer we recommend using our USB to Serial adapter model XS880 (with FTDI processor chip), which is fully compatible with the adapter. We cannot guarantee compatibility with other adapters.
1. Connect the UCBT232B/EXA to your computer either directly to a COM port, or if you computer does not have a COM port use a USB to Serial RS232 adapter.
2. If you are using a USB to Serial adapter first install the required drivers for the
adapter and make sure that a virtual COM port has been successfully created. 3. Connect the UCBT232B/EXA to the power supply and connect the
UCBT232B/EXA’s COM port to the USB serial adapter (or your computer’s COM port).
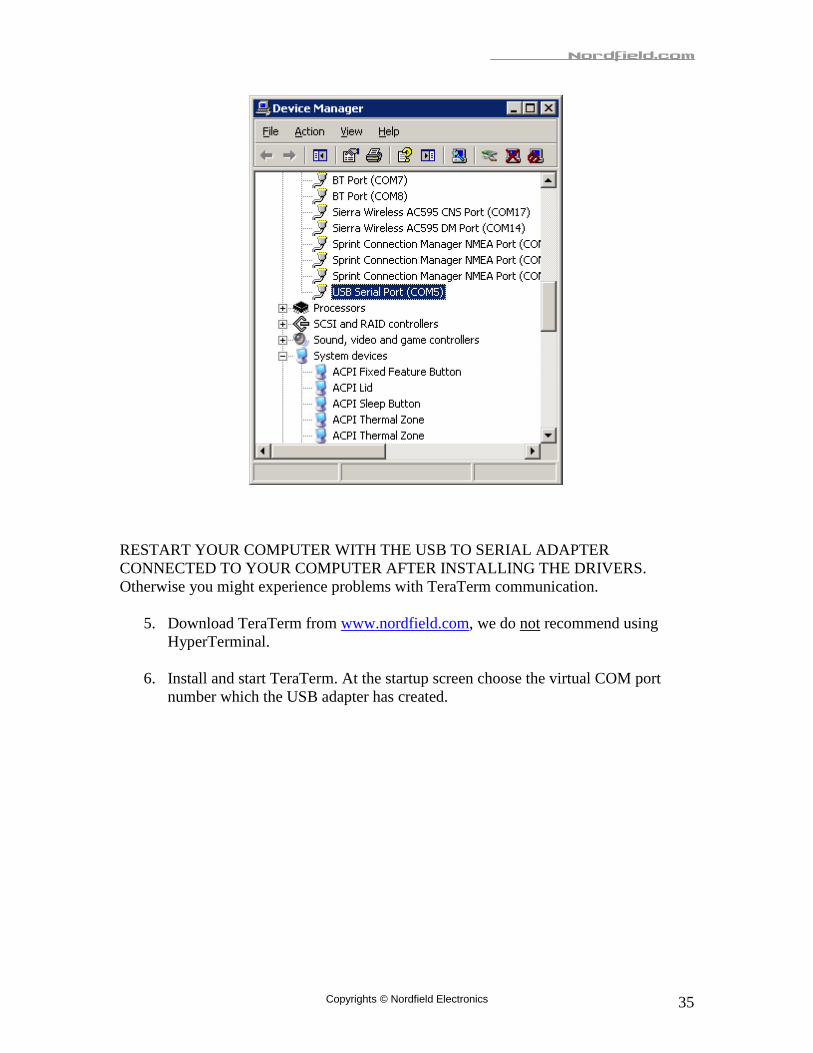
4. If you are using a USB serial adapter check in Windows Device Manager which
COM port has been assigned to your adapter, in this case COM port 5.
Nordfield.com
Copyrights © Nordfield Electronics 35
RESTART YOUR COMPUTER WITH THE USB TO SERIAL ADAPTER CONNECTED TO YOUR COMPUTER AFTER INSTALLING THE DRIVERS. Otherwise you might experience problems with TeraTerm communication.
5. Download TeraTerm from www.nordfield.com, we do not
recommend using HyperTerminal.
6. Install and start TeraTerm. At the startup screen choose the virtual COM port number which the USB adapter has created.

Nordfield.com
Copyrights © Nordfield Electronics 36
7. Click OK and click Setup > Serial Port and set the baud rate to 19200 baud:
8. Click OK. If there is a Flow switch on your Serial Bluetooth adapter it should be in
position DCE (towards the DB9 connector on the UCBT232B/EXA). You are now ready to send commands to the UCBT232B/EXA. If you enter the command AT you should get an ‘OK’ back from the UCBT232B/EXA. Example: Entering the command VERSION=? gives you the UCBT232B/EXA’s version number.

Nordfield.com
Copyrights © Nordfield Electronics 37
Notice that if you change the baud rate of the UCBT232B/EXA to for example 9600 you will no longer be able to communicate with the UCBT232B/EXA through TeraTerm until you also change the baud rate in TeraTerm to 9600.

Nordfield.com
Copyrights © Nordfield Electronics 38
Configuring the parameters over Bluetooth Instead of configuring the parameters through the serial port they can instead be configured over Bluetooth. First pair the adapter with your computer as described earlier in this guide. Open AccessPort with the following settings. Do however change the COM port number to the number your computer has created:

Nordfield.com
Copyrights © Nordfield Electronics 39
Open the port and enter a “>” sign in the lower window. Click the Send button 3 times. You should get “OK” back from the adapter when it is in Command mode.

Nordfield.com
Copyrights © Nordfield Electronics 40
Enter for example the command “at” in the lower window and click the Send button and you should get “OK” back from the adapter.
Once you close the port in AccessPort the adapter will automatically go back to Data mode.

Nordfield.com
Copyrights © Nordfield Electronics 41
Setting the Data Mode and Command Mode using <<< and >>>
Pair and connect two adapters referring to the procedure described earlier in this guide,
or connect the adapter via built-in Bluetooth or an external USB Bluetooth dongle.
You can use Windows 7’s built-in Bluetooth management software for pairing the adapter with your computer. Please see the section earlier described in this guide for how to pair the serial Bluetooth adapter with your computer using Windows built-in Bluetooth management software.
Nordfield.com
Copyrights © Nordfield Electronics 42
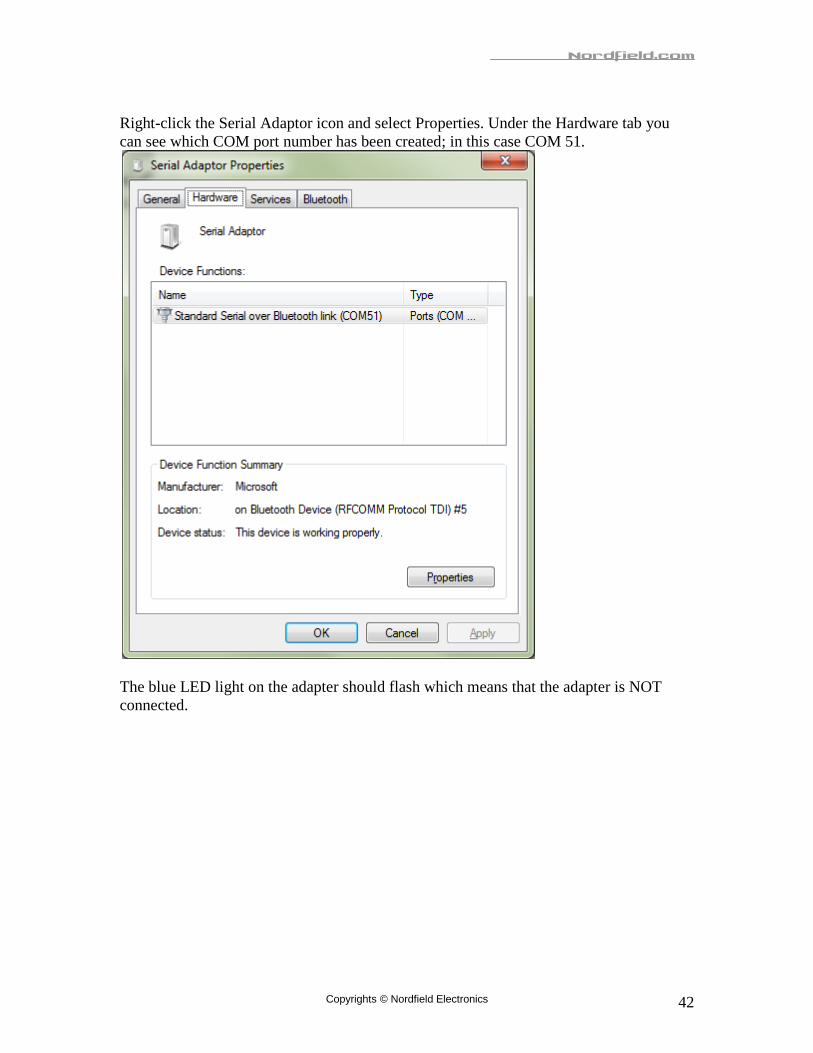
Right-click the Serial Adaptor icon and select Properties. Under the Hardware tab you can see which COM port number has been created; in this case COM 51.
The blue LED light on the adapter should flash which means that the adapter is NOT connected.

Nordfield.com
Copyrights © Nordfield Electronics 43
Open AccessPort and open the COM port with the following settings (change the COM port to the COM port number your system has created):
Click the OK button and the adapter will open the COM port. The blue LED light on the adapter should be steady ON. Instead of AccessPort you can also use TeraTerm.

Nordfield.com
Copyrights © Nordfield Electronics 44
Enter a < sign in the lower window and click the Send button 3 times with less than 500ms between the clicks. You should now receive an OK in the upper window. It may take a few tries to get the OK to appear. The OK means that the serial adapter is now in Command Mode.

Nordfield.com
Copyrights © Nordfield Electronics 45
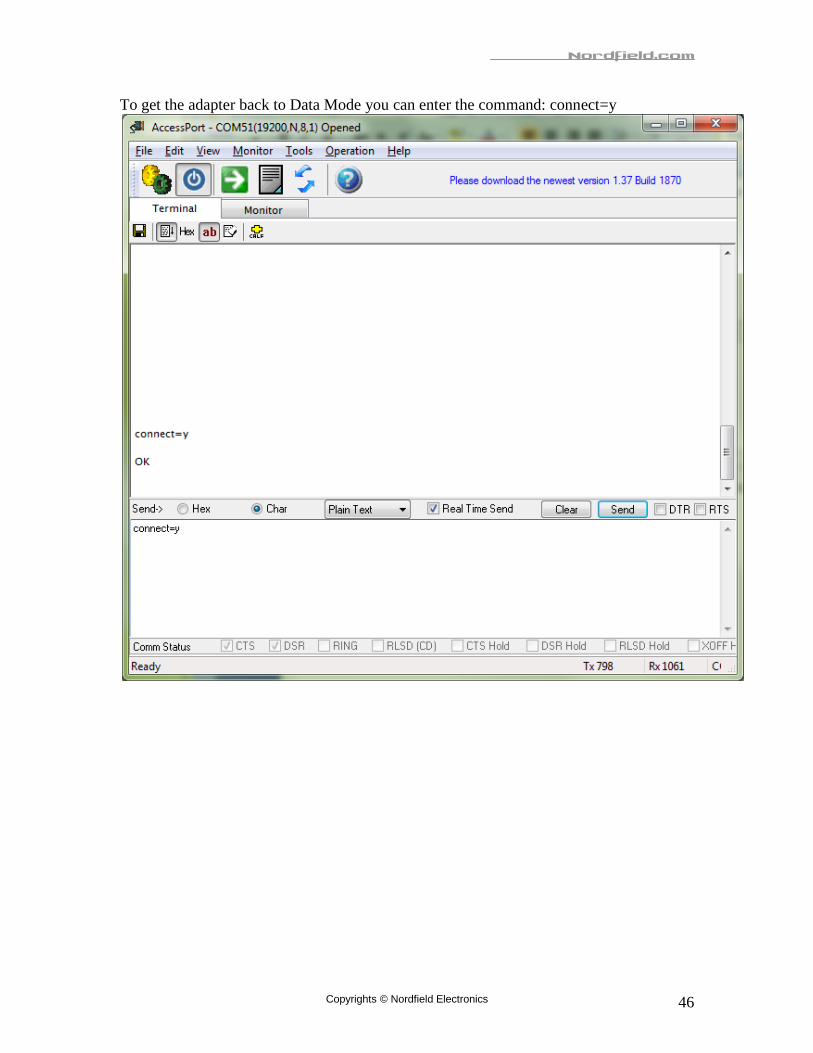
You can now enter any AT command which will be sent to the serial adapter over Bluetooth. Enter the AT command in the lower window and then click the Send button to send the command to the adapter.
Nordfield.com
Copyrights © Nordfield Electronics 46
To get the adapter back to Data Mode you can enter the command: connect=y
Nordfield.com
Copyrights © Nordfield Electronics 47
Resetting the serial Bluetooth adapter To reset the adapter to factory settings simply press and hold the reset button located on the top of the adapter. Use a paper clip and carefully press AND HOLD the micro button through the hole in the housing for approx 2 – 5 seconds. The adapter will then reset and restart. Resetting the adapter by pressing the reset button will erase all settings you have entered and reset them to factory default settings. Removing the power supply to the adapter will however NOT erase your entered settings.
Nordfield.com
Copyrights © Nordfield Electronics 48
Questions & Answers
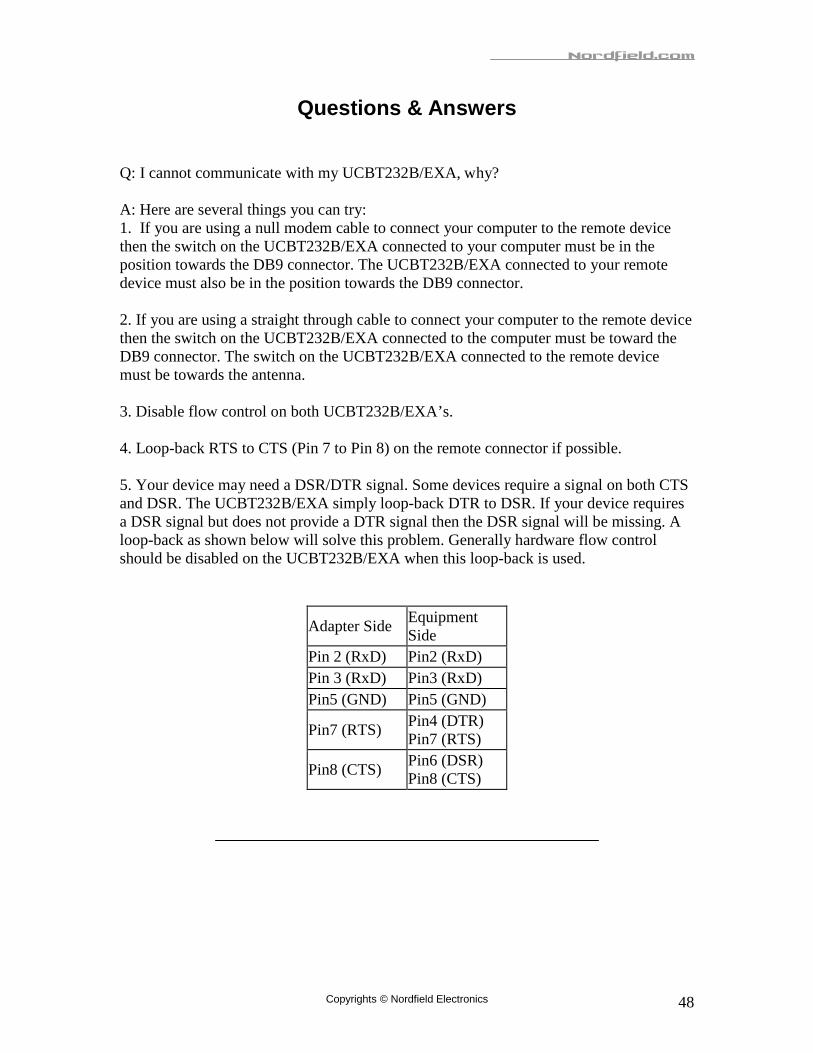
Q: I cannot communicate with my UCBT232B/EXA, why? A: Here are several things you can try: 1. If you are using a null modem cable to connect your computer to the remote device then the switch on the UCBT232B/EXA connected to your computer must be in the position towards the DB9 connector. The UCBT232B/EXA connected to your remote device must also be in the position towards the DB9 connector. 2. If you are using a straight through cable to connect your computer to the remote device then the switch on the UCBT232B/EXA connected to the computer must be toward the DB9 connector. The switch on the UCBT232B/EXA connected to the remote device must be towards the antenna. 3. Disable flow control on both UCBT232B/EXA’s. 4. Loop-back RTS to CTS (Pin 7 to Pin 8) on the remote connector if possible. 5. Your device may need a DSR/DTR signal. Some devices require a signal on both CTS and DSR. The UCBT232B/EXA simply loop-back DTR to DSR. If your device requires a DSR signal but does not provide a DTR signal then the DSR signal will be missing. A loop-back as shown below will solve this problem. Generally hardware flow control should be disabled on the UCBT232B/EXA when this loop-back is used.
Adapter Side Equipment Side
Pin 2 (RxD) Pin2 (RxD) Pin 3 (RxD) Pin3 (RxD) Pin5 (GND) Pin5 (GND)
Pin7 (RTS) Pin4 (DTR) Pin7 (RTS)
Pin8 (CTS) Pin6 (DSR) Pin8 (CTS)

Nordfield.com
Copyrights © Nordfield Electronics 49
Q: When entering the command ATF? it returns an error when trying to search for Bluetooth devices in range. A: In order to have the UCBT232B/EXA display Bluetooth devices in range it must be in Master mode, and must not be in auto-connect mode. Q: How do I configure the UCBT232B/EXA for 7 data bits, 1 stop bit and even parity? A: The adapter itself cannot be set to 7 data bits however it can still transmit 7 data bits through the air, so if you configure your computer/software and the device you remotely connect to the adapter to 7 data bits then the adapter will automatically transmit this configuration. Regardless of which number of data bits, parity and stop bits you need, you should always set the UCBT232B/EXA to 8 data bits, no parity and one stop bit. This is because the UCBT232B/EXA is simply a conduit of bits, it only cares of the number of bits and not of meaning of those.
Q: How is DTR/DSR signals (pins 4 & 6) handled by the UCBT232B/EXA? A: The DTR signal is rarely used in most serial devices and even if it is used it is often not actually required by the application. This is why the UCBT232B/EXA has looped back the DTR / DSR signal, pin 4 looped to pin 6. By doing this, if the device asserts DTR indicating it will read an asserting DSR. For devices that require an asserting DSR but are not asserting DTR the DSR signal (pin 6) can be shorted to RTS (pin 7). Q: How can I keep the COM port open at all times? I have created a link using a USB Bluetooth dongle and a UCBT232B and it appears as the COM port does not open until my application software tries to connect to my serial device.

Nordfield.com
Copyrights © Nordfield Electronics 50
A: When creating a link with a USB Bluetooth dongle or built-in Bluetooth the UCBT232B/EXA will be the Slave and the USB Bluetooth dongle (or built-in Bluetooth) in the PC will be the Master. The Master or the application at the Master will control the Slave. This is cannot be changed since this is how the Bluetooth SPP works. To keep a port open at all times you can instead create a link using two UCBT232B/EXA’s, this will create a Master and a Slave UCBT232B/EXA which will work independent from the PC thereby keeping the port open at all times. Q: I found that the UCBT232B/EXA generates a connect and disconnect string upon changes in Bluetooth state as following: CONNECT : C485 08 177441 DISCONNECT : C485 08 177441. This string causes my serial device (a telescope) to enter into a bad state which requires a power cycle to recover from. Would it be possible to avoid generating the character string? A: Yes, please refer to the 'PROMPT=N' command. This parameter is by default set to “Y”, if you change it to “N” then the character strings will no longer be present and no longer cause problems with your serial device. Q: Does the UCBT232B/EXA work with iPhone/iPad/iPods? Q: The iPhone/iPad/iPods does not support the SPP (Serial Port Profile) so currently the UCBT232B/EXA does not work with iPhone/iPad/iPods. Update December 2012: We are working on a new version of the UCBT232B/EXA which will be compatible with iOS for iPhone/iPad/iPods, unfortunately we currently do not have a release date. Bluetooth V4.0 has support for newer versions of smart phones with iOS. Older versions of iOS is not compatible with Bluetooth V4.0.


