How to program your Barrett 550 HF Radio to Program the Barrett 550 HF Ra… · Application –...
30
1 | Page How to program your Barrett 550 HF Radio Version 1.0 27 November 2013 VK1VIC
Transcript of How to program your Barrett 550 HF Radio to Program the Barrett 550 HF Ra… · Application –...
1 | P a g e
How to program
your
Barrett 550 HF Radio
Version 1.0
27 November 2013
VK1VIC

2 | P a g e
Table of Contents Introduction ............................................................................................................................................ 3
Objective: ................................................................................................................................................ 3
What you need:....................................................................................................................................... 3
Installing and configuring the DOSBox application: ................................................................................ 4
Setting up the folder on your computer ................................................................................................. 8
Running the DOSBox and installing the Barrett 550 Programming Software ...................................... 10
Creating your first Barrett 550 configuration file ................................................................................. 18
Loading the configuration file into the Barrett 550 radio ..................................................................... 25
Automating the Barrett Programming Software Start up .................................................................... 30
Additional Information: ........................................................................................................................ 30
Conclusion ............................................................................................................................................. 30
3 | P a g e
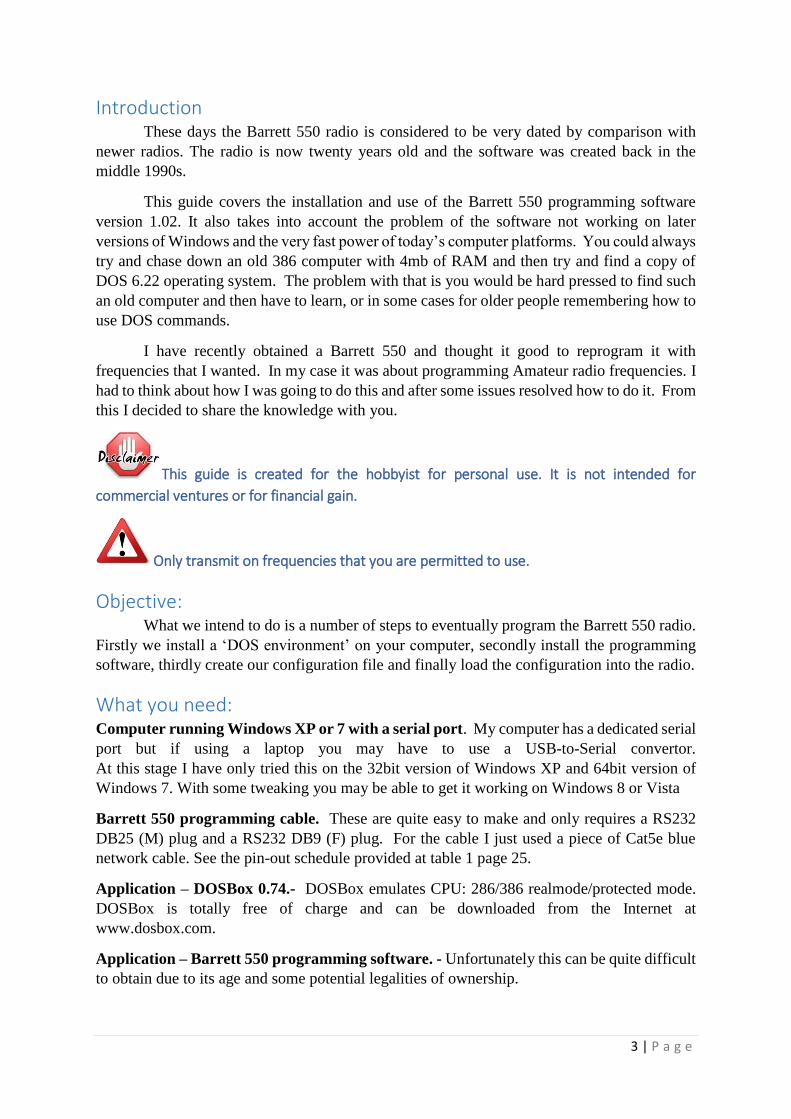
Introduction These days the Barrett 550 radio is considered to be very dated by comparison with
newer radios. The radio is now twenty years old and the software was created back in the
middle 1990s.
This guide covers the installation and use of the Barrett 550 programming software
version 1.02. It also takes into account the problem of the software not working on later
versions of Windows and the very fast power of today’s computer platforms. You could always
try and chase down an old 386 computer with 4mb of RAM and then try and find a copy of
DOS 6.22 operating system. The problem with that is you would be hard pressed to find such
an old computer and then have to learn, or in some cases for older people remembering how to
use DOS commands.
I have recently obtained a Barrett 550 and thought it good to reprogram it with
frequencies that I wanted. In my case it was about programming Amateur radio frequencies. I
had to think about how I was going to do this and after some issues resolved how to do it. From
this I decided to share the knowledge with you.
This guide is created for the hobbyist for personal use. It is not intended for
commercial ventures or for financial gain.
Only transmit on frequencies that you are permitted to use.
Objective: What we intend to do is a number of steps to eventually program the Barrett 550 radio.
Firstly we install a ‘DOS environment’ on your computer, secondly install the programming
software, thirdly create our configuration file and finally load the configuration into the radio.
What you need: Computer running Windows XP or 7 with a serial port. My computer has a dedicated serial
port but if using a laptop you may have to use a USB-to-Serial convertor.
At this stage I have only tried this on the 32bit version of Windows XP and 64bit version of
Windows 7. With some tweaking you may be able to get it working on Windows 8 or Vista
Barrett 550 programming cable. These are quite easy to make and only requires a RS232
DB25 (M) plug and a RS232 DB9 (F) plug. For the cable I just used a piece of Cat5e blue
network cable. See the pin-out schedule provided at table 1 page 25.
Application – DOSBox 0.74.- DOSBox emulates CPU: 286/386 realmode/protected mode.
DOSBox is totally free of charge and can be downloaded from the Internet at
www.dosbox.com.
Application – Barrett 550 programming software. - Unfortunately this can be quite difficult
to obtain due to its age and some potential legalities of ownership.
4 | P a g e
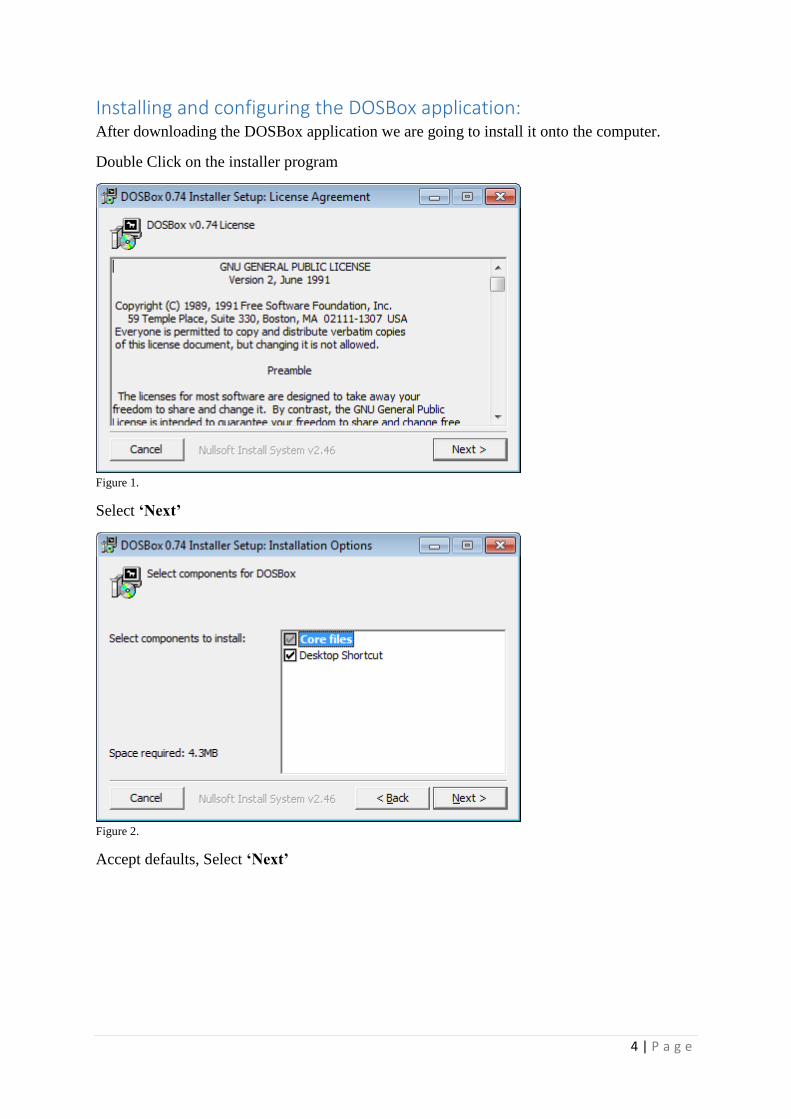
Installing and configuring the DOSBox application: After downloading the DOSBox application we are going to install it onto the computer.
Double Click on the installer program
Figure 1.
Select ‘Next’
Figure 2.
Accept defaults, Select ‘Next’

5 | P a g e
Figure 3.
Accept default folder location.
You can select elsewhere but that is up to you. Select ‘Install’
Figure 4.
Once completed the installation. Select ‘Close’
6 | P a g e
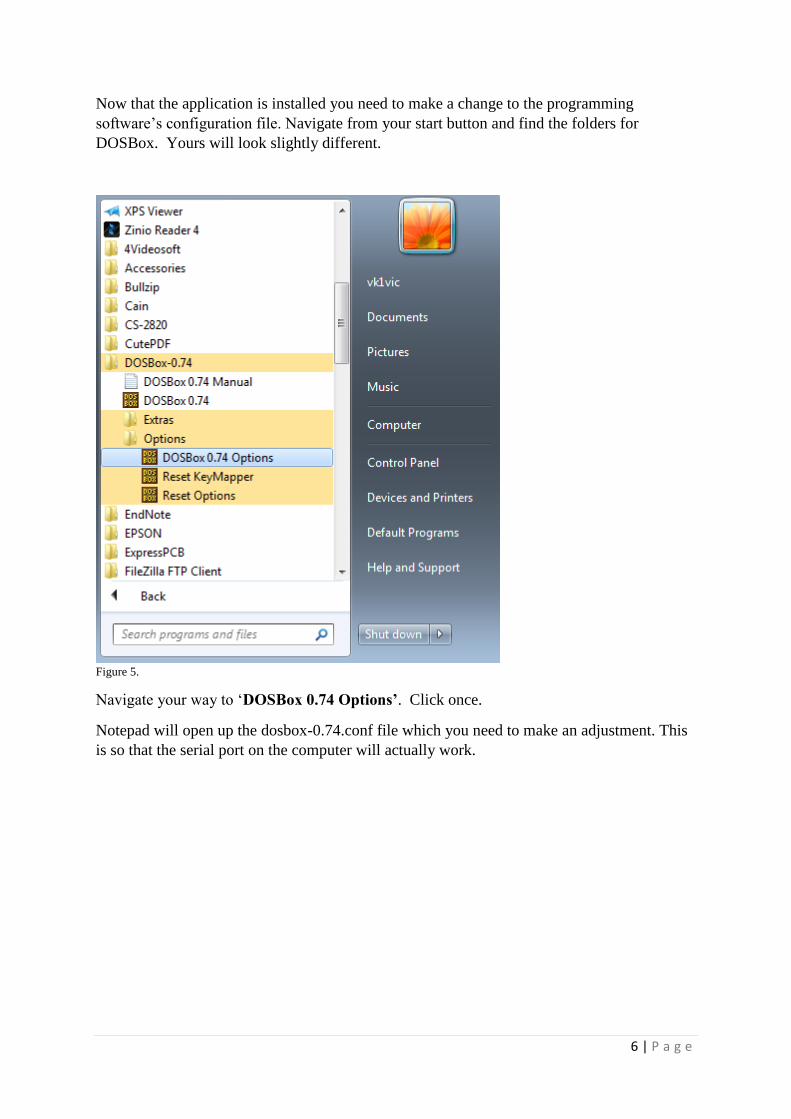
Now that the application is installed you need to make a change to the programming
software’s configuration file. Navigate from your start button and find the folders for
DOSBox. Yours will look slightly different.
Figure 5.
Navigate your way to ‘DOSBox 0.74 Options’. Click once.
Notepad will open up the dosbox-0.74.conf file which you need to make an adjustment. This
is so that the serial port on the computer will actually work.

7 | P a g e
Scroll down to where you see the lines of text in the screenshot below.
Figure 6.
You need to change it to the following screen shot below. Note the altered line
serial1=directserial realport:com1
Figure 7.
Click ‘file’ and ‘save’ then close notepad.

8 | P a g e
Now just keep in the back of your mind about this file as we will come back to this
to create the autoexec.bat lines so that when you start up DOSBox it will automatically boot
and run the Barrett 550 programming software.
Setting up the folder on your computer We are now going to get everything ready on the computer so that when we start up the
DOSBox application we can navigate to the Barrett 550 programming software and run it.
Now on your computer navigate to your C drive.
click on ‘Start’ and then ‘Computer’ will get your there. I will have to assume that
you are comfortable with driving around the windows application.
In the C drive create a folder called Barrett
The Barrett 550 application I used for this guide was in a compressed form by WinRAR.
Your copy maybe not compressed or maybe in Winzip format. I will have to leave that bit up
to you but you need to have the application copied into the folder Barrett that you created
before.
Figure 8.
Hang in there as it may seem convoluted but it will all be ok in the end.

9 | P a g e
Your folder structure with the Barrett 550 software installed should look like the screen shot
below.
Figure 9.
If you want to back up your configuration files at a later date you would copy the
‘Files’ directory to a safe place. For example a thumb drive or external hard drive.

10 | P a g e
Running the DOSBox and installing the Barrett 550 Programming
Software
Figure 10.
Navigate and click on ‘DOSBox 0.74. Click once.
Now you will see two screens pop up. Keep them both open as they work together.
11 | P a g e
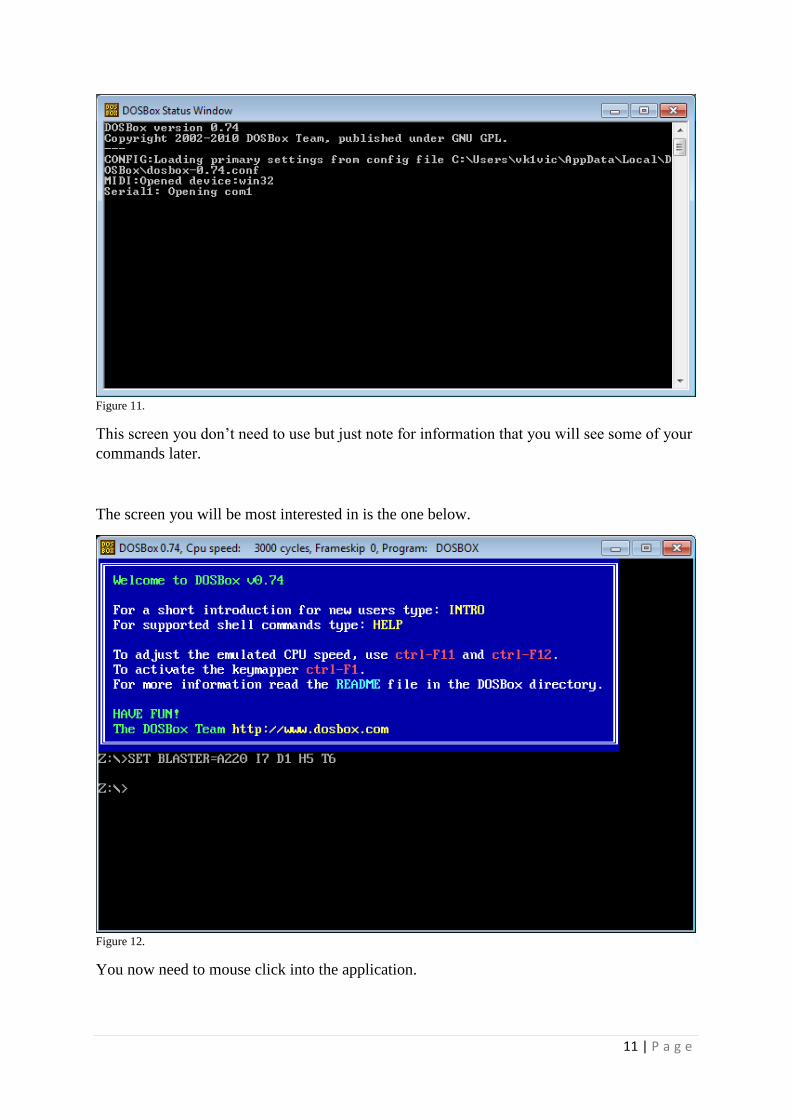
Figure 11.
This screen you don’t need to use but just note for information that you will see some of your
commands later.
The screen you will be most interested in is the one below.
Figure 12.
You now need to mouse click into the application.

12 | P a g e
When you try to do anything else on your computer it will feel that you are unable
to really do anything. Just remember that keystrokes to fix are “Cntl” and “Esc” This will get
you back to normal Windows operation.
There really is some good documentation on what the features of DOSBox are and I do
suggest that you might like to familiarise yourself but by following this guide you should
have enough knowledge so as to run the Barrett 550 software.
At the Z prompt type in the following MOUNT C C:\Barrett then press ‘enter’. You should
see the response in the screen shot below.
Figure 13

13 | P a g e
At the Z prompt now type in the following C: then press ‘enter’. You should see the
response in the screen shot below.
Figure 14.
At the C prompt type in INSTALL and then press ‘enter’

14 | P a g e
Figure 15.
Accept the default path to install to and then select Y and press ‘enter’
Figure 16.

15 | P a g e
The application just looks a little crappy in the window afterwards. Just type in ‘cls’ and the
screen will become clean again.
Figure 17.
This might sound a little confusing but when you use your computer normally you have the
folder directory called Barrett. This was the folder that you created earlier on. Now not to get confused
but when you are in the DOSBox application it only sees the folders inside the mounted drive. You can
think of C:\Barrett as a physical drive to DOSBox. Remember you mounted the folder as a new drive.
In this instance it was the C drive. We then installed the Barrett 550 Programming software into its
own directory incidently called Barrett also.
At the C prompt type cd BARRETT an press ‘enter’
You will now notice that you have navigated down the folder structure to the directory called
Barrett.
At the C:\BARRETT prompt type in radcfg and press ‘enter’. This causes the programming
software to start up.

16 | P a g e
Figure 18.
Press ‘OK’
The first time you start the Barrett 550 Programming software you need to create a new
database.
Figure 19.
17 | P a g e
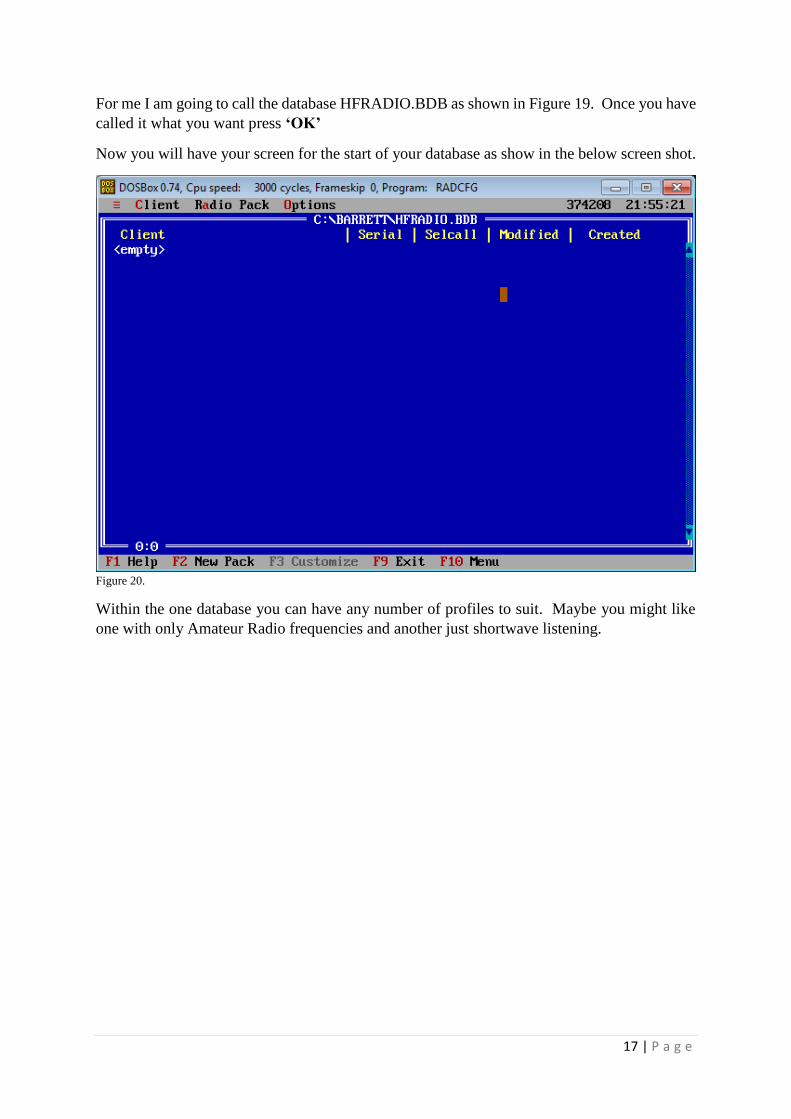
For me I am going to call the database HFRADIO.BDB as shown in Figure 19. Once you have
called it what you want press ‘OK’
Now you will have your screen for the start of your database as show in the below screen shot.
Figure 20.
Within the one database you can have any number of profiles to suit. Maybe you might like
one with only Amateur Radio frequencies and another just shortwave listening.

18 | P a g e
Creating your first Barrett 550 configuration file
From the list of commands along the bottom of the screen you what to select F2 New Pack
Figure 21.
Barrett refers to the configuration file within the database as a Client. You can call your
configuration file anything you like. I have decided to call mine TONY1. Accept the
defaults and press ‘OK’
You will note that the Serial No. is set as 1 in figure 21 for this example. Every time
you make a new configuration file you will have to have a unique number for it.

19 | P a g e
With the configuration file highlighted select F3 Customize
Figure 22.
You are now presented with the general part of the configuration. I will leave it up to you to
set the parameters.
Figure 23.

20 | P a g e
Once completed select F9 Save & Exit
Once you have saved and exit you need to press F3 Customize again. You can’t access the
channel programming unless you do.
Then select F6 Channel You will then see the screen below.
Figure 24.

21 | P a g e
For the purpose of brevity I am only going to put in two frequencies. One will be an amateur
radio frequency and the other will be Australian coastal marine frequency that issues weather
warnings. But before we do this we are going to configure some labels so once you have loaded
the configuration into the Barrett 550 radio you can have the little description appear below the
frequency something like below.
Figure 25.
Select F7 Labels and you will then see the screen below. Now to be able to actually enter in
labels you have to use the ‘Insert’ key on your keyboard. Type in the label that will suit your
frequencies.
Figure 26.
Once you have typed in your first label, press ‘OK’
22 | P a g e
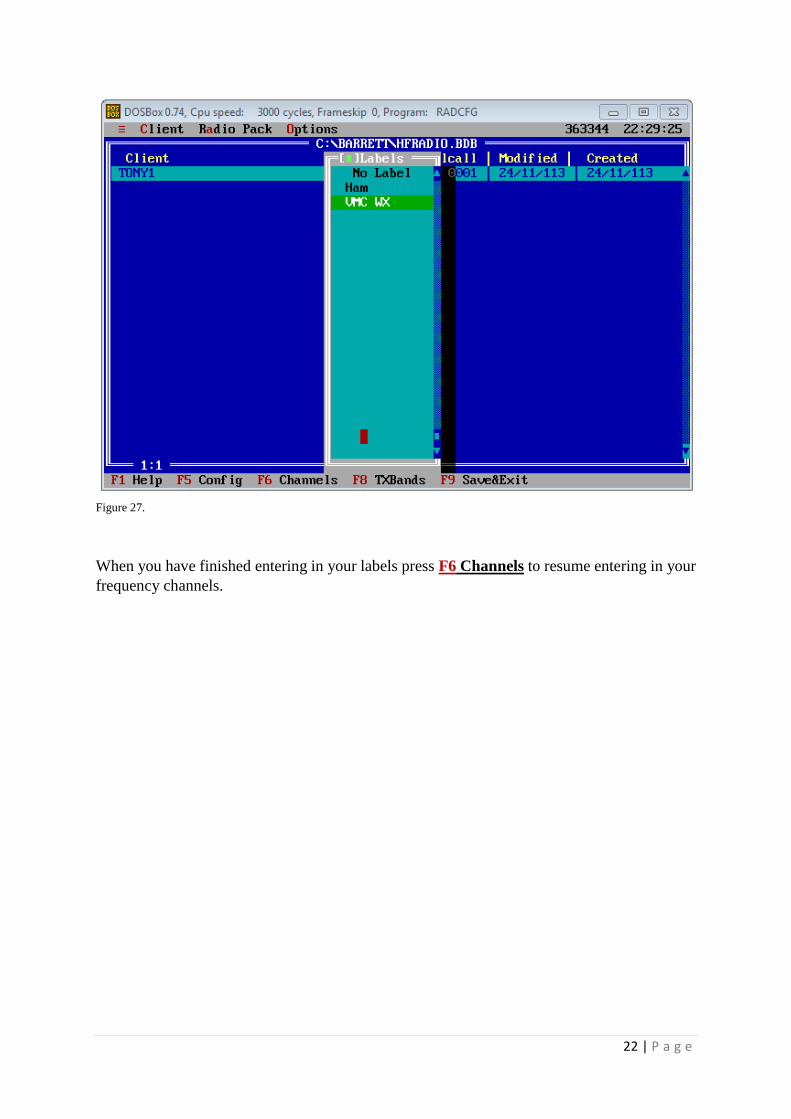
Figure 27.
When you have finished entering in your labels press F6 Channels to resume entering in your
frequency channels.

23 | P a g e
Now we will enter the first frequency.
Press ‘Insert’ on your keyboard and you will then be able to configure the first channel. There
are a number of features that you can selection. For example Upper Side band USB
Figure 28.
Repeat the same steps for the second channel. Once you have completed your configuration it
should look like the following screen shot. In this example we only put in two frequencies.

24 | P a g e
Figure 29.
Ok so that’s all the frequencies we are going to put in for now. You can continue to put as
many as 400 into the Barrett 550 radio.
Select F9 Save&Exit

25 | P a g e
Loading the configuration file into the Barrett 550 radio Here is the part that you have been waiting for and hopefully you have already made the
programming cable in accordance with the pin-out schedule provided in table 1.
Make sure you have connected the cable to the DB25 female socket located on the rear of the
Barrett 550 radio. The other end of your newly made programming cable should connect to a
serial port. If you need to make your programming cable see Table 1.
DB-25 (Male) Function
DB-9 (Female) Function
2 RX data 3 Tx data
3 Tx data 2 Rx data
4 RTS 7 RTS
5 CTS 8 CTS
7 Gnd 5 Gnd
Table 1 – Pin out schedule for Barrett 550 Programming Cable
If you have a physical serial port on your computer then it should be designated as
‘serial 1’. If your computer doesn’t have the physical serial port and you have had to use a
USB-to-Serial convertor I will leave this to you to resolve. Unfortunately this can be very
difficult for me to write about as each computer can see the USB-to-Serial convertors as
different serial ports in Windows. The advice I can give you is that you check in the ‘control
panel’ and look at ‘hardware’.
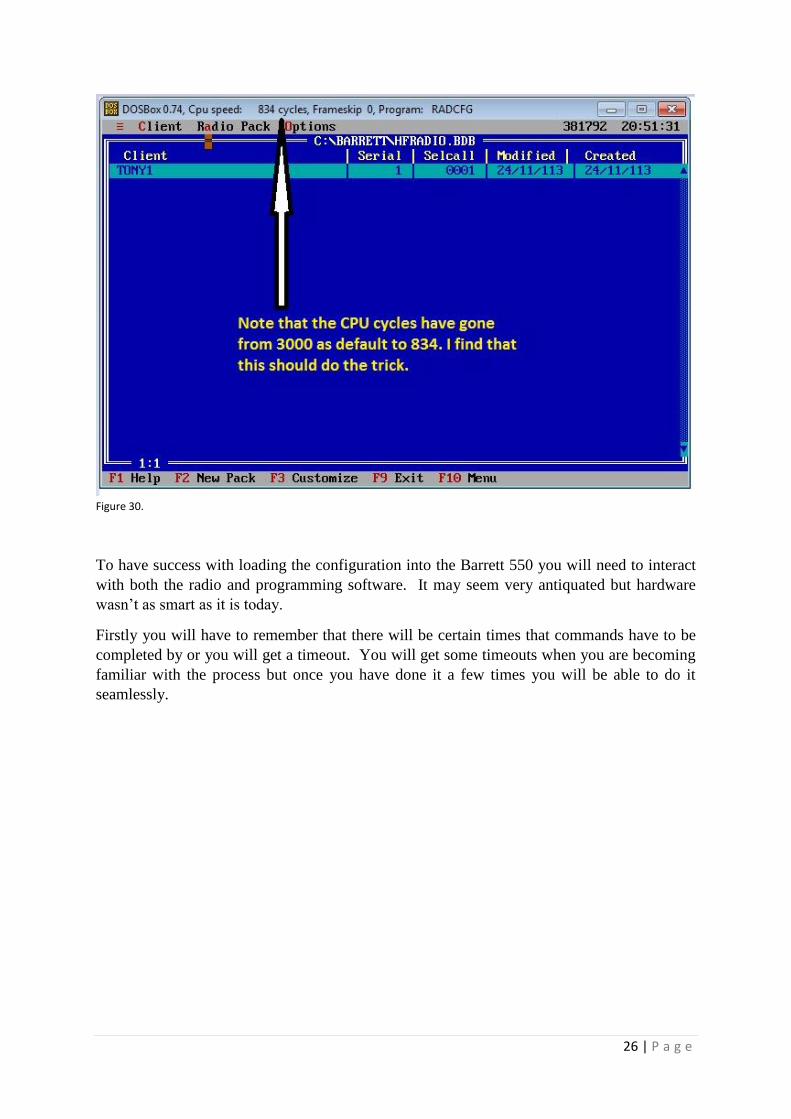
One last point that I need to mention is about slowing down the CPU cycles in the
DOSBox application as if it is too fast it can create read errors in the radio. I found that it
wasn’t serious but still annoying in the early stages of my working out how and why I was
getting some channels changing from USB to LSB and also the additional number in the
frequency. In my instance I would configure 3550Khz and when I checked it in the radio it
would be 23550Khz. If you reduce the CPU cycles it should remove this issue.
To reduce the cycles you will need to be inside the DOSBox. Hold down the Cntl and then
press F11. If you wish to increase the CPU cycles hold down the cntl and then press F12
26 | P a g e
Figure 30.
To have success with loading the configuration into the Barrett 550 you will need to interact
with both the radio and programming software. It may seem very antiquated but hardware
wasn’t as smart as it is today.
Firstly you will have to remember that there will be certain times that commands have to be
completed by or you will get a timeout. You will get some timeouts when you are becoming
familiar with the process but once you have done it a few times you will be able to do it
seamlessly.

27 | P a g e
With your Barrett 550 programming software running and all the configuration files completed,
along with the programming cable connected, turn on the radio.
Remember that not only can you upload the configuration into the radio you can also download
from the radio back into the programming software for modification.
At the top of the screen you will see a command line. Click on Radio Pack and you will then
be presented with a drop down menu. In this menu select Send Alt-S.
Figure 31.
Your will now see the following screen. Wait – don’t do anything further at this stage. You
now have to set the radio to receive the configuration file.
The software is now in a state of waiting to start sending the configuration file to the radio.
Remember you only have a fairly short time to now do the button sequence of presses on the
radio to tell it to start receiving.

28 | P a g e
Figure 32.
Now on the radio you need to do the following button presses to navigate through the
selections.
Press RESET once and you should get the prompt below.
Figure 33.
Press CHN 1 button twice and you should get the prompt below.
Figure 34.

29 | P a g e
Press CHN 1 twice and you should get the prompt below.
Figure 35.
Press RESET once more and you should get the prompt below.
Figure 36.
Quickly jump back to the DOSBox running the application and that you should still see the
screen as previously with the command that says, ESC to abort. Any other key starts. Just
press a key such as K
You should now see a progress bar showing that the configuration is loading. Also you will in
the radio screen that it is accepting the configuration file.
Figure 37.
One the configuration file has finished loading into the radio you will see all the lights and
screen flash a few times and got through an initialisation phase.
Figure 38.
Once completed the radio with revert to normal operation with the new configuration loaded.
The feedback in the programming software should be that it was successful.
The radio will then flash all the lights on the radio and go through and initialisation phase and
you are then ready to check your new configuration.
So there you have it. You have a new configuration in your Barrett 550 radio.

30 | P a g e
Automating the Barrett Programming Software Start up This last little bit is purely optionally but I find it helps with making the Barrett 550
programming software appear to start up like a normal Windows application.
Think back to earlier in the guide when you had to modify the dosbox-0.74.conf file to make
the software see the physical serial port. If you go back and follow the steps from Figure 5
through to figure 7 (pages 4-5) then all you have to do is appended the following lines one after
the other at the bottom.
Mount c c:\Barrett
C:
cd barrett
radcfg
Save the file and then give it a try.
Additional Information: There doesn’t appear to be a whole lot of information regarding the Barrett 550 available on
the Internet but with some searching you should be able to find some still.
In my searching to get me going I came across some information which you may like to look
at.
www.hf-radio.com.au – Very good site and professional. You can obtain a copy of the
Barrett 550 user manual in pdf. The owner of the site also provides some accessories for
various radios along with antennas. I would certainly encourage you to visit this website.
http://groups.yahoo.com/neo/groups/barrettqmac/info - A Yahoo group focused on Barrett
and Qmac radios. This is where I started.
http://www.mods.dk/manual.php?brand=barrett – Barrett radio manuals and schematics
www.vkclassifieds.com.au – Great website where you are likely at some stage or other to
pick up Barrett 550 radio.
www.ebay.com.au – Online auction site where you are likely to find yourself a Barrett 550
radio.
https://groups.google.com/forum/#!forum/aus.radio.amateur.misc - A Google group but more
general in its nature but does have some posts regarding the Barrett 550 radio.
Conclusion If you have any suggestions for this document please let me know and I can then improve it
for subsequent use. Look me up on qrz.com
I would also appreciate and welcome your feedback if you found the document useful.
Thank you
Tony