How to Extend a Fiori Application: Purchase Order Approval to Extend a...Extend a Fiori Application:...
40
SAP Web IDE How-To Guide Provided by Customer Experience Group How to Extend a Fiori Application: Purchase Order Approval Applicable Releases: SAP Web IDE 1.4 Version 2.0 - October 2014
Transcript of How to Extend a Fiori Application: Purchase Order Approval to Extend a...Extend a Fiori Application:...

SAP Web IDE How-To Guide
Provided by Customer Experience Group
How to Extend a Fiori Application: Purchase Order Approval Applicable Releases: SAP Web IDE 1.4 Version 2.0 - October 2014

Extend a Fiori Application: Purchase Order Approval
2
Document History
Document Version Authored By Description
1.0 Customer Experience
Group
First release of this guide
2.0 Customer Experience
Group
Update for SAP Web IDE release 1.4

Extend a Fiori Application: Purchase Order Approval
3
TABLE OF CONTENTS
1. Business Scenario .................................................................................................................. 4
2. Background Information ........................................................................................................ 4
3. Prerequisites ......................................................................................................................... 4
4. Step-by-Step Procedure ......................................................................................................... 5 4.1 Start creating a new EXTENSION Project .............................................................................. 5 4.2 Select Purchase Order Approval app from SAP Gateway ..................................................... 6 4.3 Extend the app by hiding an existing control ...................................................................... 11 4.4 Extend the app by adding a new UI field to an extension point ......................................... 13 4.5 Extend the app by replacing a view .................................................................................... 18 4.6 Extend the existing OData service in Gateway Service Builder ........................................... 23 4.7 Replace the OData Service by an extended OData Service ................................................. 23 4.8 Extend the data model using the EDMX editor, then add a reference to the new data
property in the UI logic ....................................................................................................... 28 4.9 Deploy the application to SAP Gateway ............................................................................. 33 4.10 Verify successful deployment of the app ............................................................................ 36

Extend a Fiori Application: Purchase Order Approval
4
1. BUSINESS SCENARIO
SAP Web IDE is a next-generation cloud-based meeting space where multiple project stakeholders can work together from a common web interface -- connecting to the same shared repository with virtually no setup required. It includes multiple interactive features that allow you to collaborate with your colleagues and accelerate the development of your HTML5/UI5 applications. 2. BACKGROUND INFORMATION
In this How-To Guide, we will show you how to extend a standard SAP Fiori application using a SAP Web IDE. The different possibilities of extending a Fiori app view are shown (hide a control, extend by implementing an extension point, replace a view, replace a service. 3. PREREQUISITES
To connect to your SAP Web IDE system, open the browser and enter the URL of your system.

Extend a Fiori Application: Purchase Order Approval
5
4. STEP-BY-STEP PROCEDURE
The following major steps will be described in detail step-by-step with screenshots for every step.
1. Start creating a new extension project 2. Select Purchase Order Approval app from SAP Gateway (GM0) 3. Extend the app by hiding an existing control 4. Extend the app by adding a new UI field to an extension point 5. Extend the app by replacing a view 6. OPTIONAL - Go into the Gateway Service Builder and show how to extend the existing OData
service (separate document by Andre Fischer) 7. OPTIONAL - Replace the OData Service by an extended OData Service (assuming the existing
OData Service has been modified by adding a new field) 8. OPTIONAL - (if OData Service replacement is not shown) - For demo purposes, extend the
data model using the EDMX editor, then add a reference to the new data property in the UI logic
9. Run the application with mock data 10. Deploy the application back to SAPUI5 ABAP Repository 11. Verify that the app is deployed by importing the app from SAP Gateway to SAP Web IDE
4.1 Start creating a new EXTENSION Project
Explanation Screenshot
1. Start SAP Web IDE from your browser.
2. Click on Local folder and start by creating a new extension project (File > New > Extension Project)

Extend a Fiori Application: Purchase Order Approval
6
4.2 Select Purchase Order Approval app from SAP Gateway
Explanation Screenshot
1. From step 1 in the wizard, click Remote..., and select SAPUI5 ABAP Repository to access the remote SAP Gateway system which has the standard SAP Fiori PO Approval application deployed.
2. In the Select Application from SAPUI5 ABAP Repository dialog, select the SAP Gateway System GM0 (GM0 Client 200).
3. All available applications on GM0 are shown.

Extend a Fiori Application: Purchase Order Approval
7
4. Search for "purchase" to show search and filter capabilities
5. Select MM_PO_APV Approve Purchase Orders and click OK.

Extend a Fiori Application: Purchase Order Approval
8
6. You may change the proposed project name to e.g. POApprovalExtended or leave it as proposed by SAP Web IDE ‘MM_PO_APVExtension’ Then click Next.
7. Click Finish. An extension project is created in your workspace.
8. If authentication is required, enter User Name and PW for the SAP Gateway system.

Extend a Fiori Application: Purchase Order Approval
9
9. The application Preview Pane automatically opens in Preview Mode. Once the application is loaded and the data has been fetched from the backend, you can see that the application is fully running.
10. Explore the features of the preview.
a. Display the app in the different screen sizes
b. When in Small size, change the orientation
c. At the end, go back to Large or Medium size

Extend a Fiori Application: Purchase Order Approval
10
11. In the application Outline, select the Show property Extensible Elements in the drop down list
12. Toggle to Extensibility Mode by clicking Preview Mode down arrow. Notice that the app gets a shadow. Hover the mouse of the controls in the app. Notice how views are highlighted and the scrolling occurs automatically.

Extend a Fiori Application: Purchase Order Approval
11
4.3 Extend the app by hiding an existing control
Explanation Screenshot
1. In the app, navigate to the view S4 by scrolling down in the detail view until you see the Items table, click on an item. Note: You may need to toggle off Extensibility Mode, because in Extensibility Mode you cannot navigate to other views.
2. We are going to hide the Pricing Conditions in the view S4. Make sure you are in Extensibility Mode. Select the Pricing Condition at the bottom of the view. To highlight the control you need to point the mouse pointer to the right or left side of the table. Alternatively, you may select in the Outline the PricingCondTable under S4.
3. Select Hide Control in the drop-down of Possible Extensions and click OK to hide it - busy indicator appears, followed by a popup message saying the extension was added successfully.
Alternatively, you can right-click on PricingCondTable in the Outline and select Hide Control

Extend a Fiori Application: Purchase Order Approval
12
4. A pop-up window appears to indicate that the control is successfully hidden. Click Yes to refresh the application.
5. Navigate to S4 view and show the control was hidden
6. In Outline section, under Show field, drop down to select Extended Elements. Now, you can see that under S4 element PricingCondTable is listed as Hidden.
7. Close the Extensibility Pane by clicking on the X on the top right

Extend a Fiori Application: Purchase Order Approval
13
4.4 Extend the app by adding a new UI field to an extension point
Explanation Screenshot
1. Highlight the application folder and start the Extensibility Pane (Tools > Extensibility Pane or Ctrl-Shift-E) if not done yet.
2. In the application Outline section, select the Show property Extensible Elements in the drop down list

Extend a Fiori Application: Purchase Order Approval
14
3. Expand S2 view in the Outline and select the extension point extListItemInfo
4. Check that the possible extension at the bottom of the Application Outline shows Extend View and click OK.

Extend a Fiori Application: Purchase Order Approval
15
5. Show that the extension point was successfully extended and click Yes to refresh the application
6. Check to see that the element extListItemInfo displays (Extended). Select it and click Go to Code, Extension Code at the bottom.

Extend a Fiori Application: Purchase Order Approval
16
7. You are redirected back to the Code Editor and the generated extension fragment file is opened
8. Paste the following code: <ObjectAttribute text="{i18n>view.PurchaseOrder.purchaseOrderLabel}: {PoNumber}"/>
9. The filename has a prefixed * to indicate that the file has been edited and not saved. Click Save.
10. Run the app in the Extensibility Pane (Tools > Extensibility Pane)
11. You can now see the added purchase order number and the label in English. The value of the purchase order has been fetched from the backend. Check the detail view to verify the same purchase order number.

Extend a Fiori Application: Purchase Order Approval
17
12. In the top bar, click on the down arrow next to the language English. Select another language, e.g. French.
13. Show that the language of the label has changed according to the language selected
14. Repeat for other languages. At the end, you may go back to English.

Extend a Fiori Application: Purchase Order Approval
18
4.5 Extend the app by replacing a view
Explanation Screenshot
1. Select S3 view (detail view) in the Outline. Notice the icon tab bar and remember the number of icons you can see. In the case of the screenshot, there are 2 icons (information and notes). Other POs may have other icons shown, depending on the PO data.
2. Select Replace with a copy of the parent view in the drop-down of Possible Extensions. Click OK.
Extend a Fiori Application: Purchase Order Approval
19
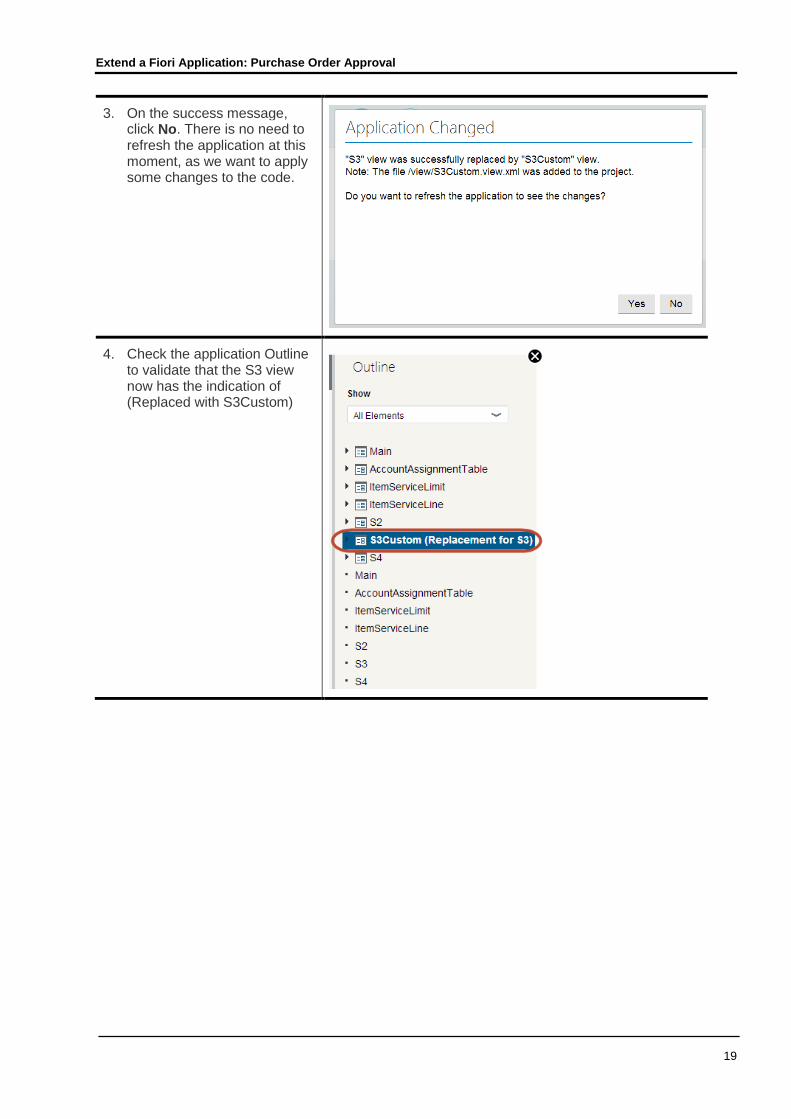
3. On the success message, click No. There is no need to refresh the application at this moment, as we want to apply some changes to the code.
4. Check the application Outline to validate that the S3 view now has the indication of (Replaced with S3Custom)

Extend a Fiori Application: Purchase Order Approval
20
5. Select S3 view in the Outline (if not already selected) and click Go to Code at the bottom.
You are redirected back to the Code Editor and the copied view file opens.
6. You are redirected back to the Code Editor and the copied view file opens.
7. We will be adding more icon tabs to the tab bar. The file on the right contains the extension we want to apply. Open the file and copy the code.
ViewReplacementCode.xml.txt

Extend a Fiori Application: Purchase Order Approval
21
8. Paste the code to the S3Custom.view.xml file as follow: At line 31, you can find multiple <IconTabFilter items. Paste all the code before the <IconTabFilter items.
9. Click Save to save the file.
10. Select index.html, click Run to run the app.
Extend a Fiori Application: Purchase Order Approval
22
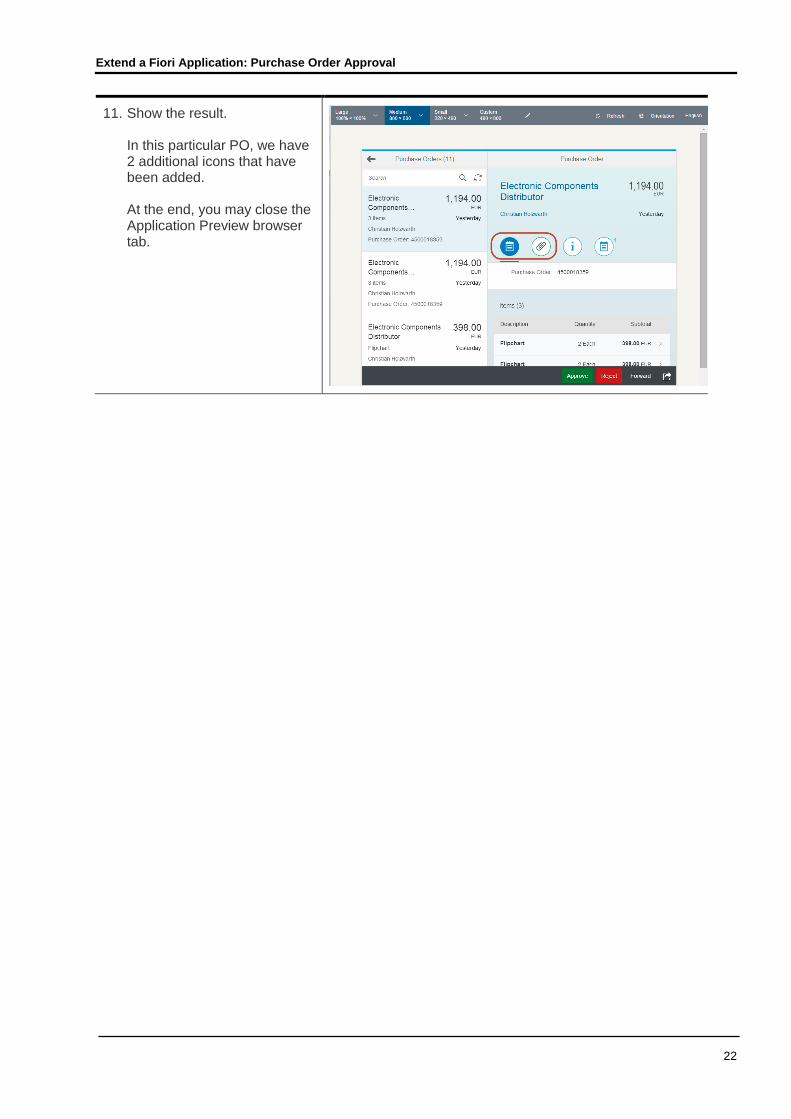
11. Show the result. In this particular PO, we have 2 additional icons that have been added. At the end, you may close the Application Preview browser tab.

Extend a Fiori Application: Purchase Order Approval
23
4.6 Extend the existing OData service in Gateway Service Builder (These steps are described in the guide “Creating a ‘Fiori Like’ Application - SO Tracking”)
4.7 Replace the OData Service by an extended OData Service
Explanation Screenshot
1. Select your project folder and start a new wizard to replace the service (File > New > Extension)
2. Make sure the right project name is displayed in the text field. Click Next.

Extend a Fiori Application: Purchase Order Approval
24
3. Click on Replace Service to select the OData Service replacing wizard, and then click Next.
4. At wizard step 3 (Data Connection), click on Service Catalog to get all available OData Services on the SAP Gateway system.
Click the drop down list and select the Gateway system (GM0). The list of OData Services is being fetched. Scroll down the list to display all OData Services available on the Gateway system selected.
Extend a Fiori Application: Purchase Order Approval
25
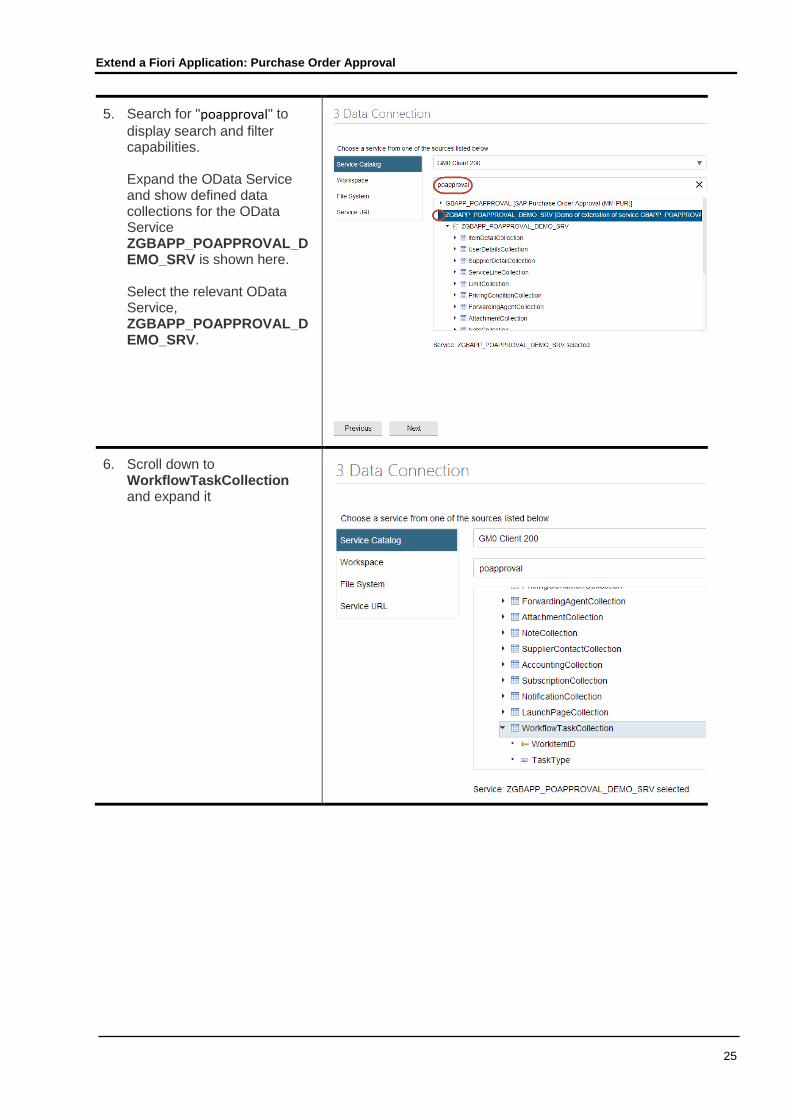
5. Search for "poapproval" to
display search and filter capabilities. Expand the OData Service and show defined data collections for the OData Service ZGBAPP_POAPPROVAL_DEMO_SRV is shown here. Select the relevant OData Service, ZGBAPP_POAPPROVAL_DEMO_SRV.
6. Scroll down to WorkflowTaskCollection and expand it

Extend a Fiori Application: Purchase Order Approval
26
7. Scroll down to the end of the WorkflowTaskCollection and show that the new field DemoExtension has been added
8. Go back up to the list, select ZGBAPP_POAPPROVAL_DEMO_SRV and click Next.
9. At wizard step 4, click Finish to confirm adding the extension.

Extend a Fiori Application: Purchase Order Approval
27
16. We will now add a text field to the UI to display the extended OData field. Double-click the file extListInfoCustom.fragment.xml in the view folder.
17. Paste the following code:
<ObjectAttribute text="OData Extension: {DemoExtension}"/>
18. The filename has a prefixed * indicating the file has been edited and not saved. Save the file.
19. Select the index.html file and Run the application.
20. You can now see the new OData field.

Extend a Fiori Application: Purchase Order Approval
28
4.8 Extend the data model using the EDMX editor, then add a reference to the new data property in the UI logic
Explanation Screenshot
1. Navigate to the project > model folder. You may want to close all other tabs.
2. Double-click on the file metadata.xml to open the file in the editor
3. Locate the EntityType with Name="HeaderDetail" You may use the search with Ctrl-f and enter the workflowtask in the search field.

Extend a Fiori Application: Purchase Order Approval
29
4. Add a new property to this EntityType:
<Property Name="NewField" Type="Edm.String" Nullable="false" MaxLength="10" sap:label="New Field"/>
5. Save the metadata.xml file.
6. Now, we will be adding a UI text field in the detail view to display the added New Field. Open the file with the extension fragment in the view folder: S3Custom.view.xml
Search for NewField by pressing Ctrl-f and enter ‘newfield’

Extend a Fiori Application: Purchase Order Approval
30
7. Uncomment the block that contains the New Field definition by selecting the commented block
8. Edit > Comment > Toggle Block Comment
9. Save the file.

Extend a Fiori Application: Purchase Order Approval
31
10. Now we will run the app with Mockdata to demonstrate that the new field is displayed by using the extended metadata.xml file. Select the file index.html of the application. Run the app (Run > Run with Mockdata).
11. Ensure that the URI is /sap/opu/odata/ZGBAPP_POAPPROVAL_DEMO_SRV and Mock Data Source is ‘Random data’:
Select project name, right mouse click, select Project Settings.
Click on Mock Data, verify Mock Data Source.
This will allow the system to generate data for the different data fields.

Extend a Fiori Application: Purchase Order Approval
32
12. Verify that data has been generated.

Extend a Fiori Application: Purchase Order Approval
33
4.9 Deploy the application to SAP Gateway (Note: It could also be deployed to HANA Cloud Platform)
Explanation Screenshot
1. Go back to SAP Web IDE. You may want to close other open tabs and windows.
2. Select the project, right-click and select Deploy > Deploy to SAPUI5 ABAP Repository.
3. For the Deployment Options, select the system GM0

Extend a Fiori Application: Purchase Order Approval
34
4. If authentication is required, enter User Name and PW for the SAP Gateway system.
5. Keep Deploy a new application selected and click Next.
6. Enter a name, e.g. Z_POAPP00 (the name needs to start with Z), enter any description and click Browse. Note: In Package field, $TMP is defaulted by the system if your system only support local object creation. Click Next.
7. Click Finish to deploy your application to the SAPUI5 ABAP Repository.

Extend a Fiori Application: Purchase Order Approval
35
8. Wait for the successful feedback. Click on OK

Extend a Fiori Application: Purchase Order Approval
36
4.10 Verify successful deployment of the app (by importing the app from SAP Gateway to SAP Web IDE)
Explanation Screenshot
1. Select the Local Folder at the very top of the project list and create a new folder (right-click Local New > Folder)
2. Provide a name, e.g. POApprovalExtendedImported, and click Create.
3. Right-click the new folder and select Import > Application from SAPUI5 ABAP Repository

Extend a Fiori Application: Purchase Order Approval
37
4. Select the system where the app had been deployed to (GM0)
5. Search for the app, e.g. Z_POAPP00

Extend a Fiori Application: Purchase Order Approval
38
6. Select the app and click OK.
7. A pop-up window message indicates the import has finished. Click OK.
8. Run the application and verify the application is running
1. Select the file index.html of the application
2. Click on the Run
9. If authentication is required, enter User Name and PW for the SAP Gateway system.

Extend a Fiori Application: Purchase Order Approval
39
10. The Application Preview is started, the application is loading and data is fetched from the OData Service.

© 2014 SAP SE. All rights reserved.
SAP, R/3, SAP NetWeaver, Duet, PartnerEdge, ByDesign, SAPBusinessObjects Explorer, StreamWork, SAP HANA, and other SAPproducts and services mentioned herein as well as their respectivelogos are trademarks or registered trademarks of SAP SE in Germanyand other countries.
Business Objects and the Business Objects logo, BusinessObjects,Crystal Reports, Crystal Decisions, Web Intelligence, Xcelsius, andother Business Objects products and services mentioned herein aswell as their respective logos are trademarks or registered trademarksof Business Objects Software Ltd. Business Objects is an SAPcompany.
Sybase and Adaptive Server, iAnywhere, Sybase 365, SQLAnywhere, and other Sybase products and services mentioned hereinas well as their respective logos are trademarks or registeredtrademarks of Sybase Inc. Sybase is an SAP company.
Crossgate, m@gic EDDY, B2B 360°, and B2B 360° Services areregistered trademarks of Crossgate AG in Germany and othercountries. Crossgate is an SAP company.
All other product and service names mentioned are the trademarks oftheir respective companies. Data contained in this document servesinformational purposes only. National product specifications may vary.
These materials are subject to change without notice. These materialsare provided by SAP SE and its affiliated companies ("SAP Group")for informational purposes only, without representation or warranty ofany kind, and SAP Group shall not be liable for errors or omissionswith respect to the materials. The only warranties for SAP Groupproducts and services are those that are set forth in the expresswarranty statements accompanying such products and services, ifany. Nothing herein should be construed as constituting an additionalwarranty.
www.sap.com