How to draft a corset pattern - Foundations Revealed · we assume that any old corset pattern will...
35
~ The ~ Corsetmaking Revolution Your doorway to beautiful corsets The New Corset Pattern Drafting Masterclass that enables EVERY corsetmaker to create the most unique, beautifully fitting corsets you’ve ever produced Why ignoring it will cost you years of effort Why using it will advance your skills faster than you ever thought possible, and… How to harness it, NOW!
Transcript of How to draft a corset pattern - Foundations Revealed · we assume that any old corset pattern will...

~ The ~
Corsetmaking
Revolution
Your doorway to beautiful corsets
The New Corset Pattern Drafting Masterclass that enables EVERY corsetmaker
to create the most unique, beautifully fitting corsets you’ve ever produced
Why ignoring it will cost you years of effort
Why using it will advance your skills faster
than you ever thought possible, and…
How to harness it, NOW!

The Corsetmaking Revolution by Cathy Hay
www.FoundationsRevealed.com 2 © Harman Hay Publications. All rights reserved.
Photographs of museum corsets © Leicestershire County Council Museums Service
About the author Meet Cathy Hay
You would not expect a mathematician to
be known for the design and careful
construction of fine clothing and costume,
but having this unusual background allows
Cathy Hay to approach the subject from a
new perspective.
Not only can her unique method of fitting
allow her to construct breathtaking
bespoke corsets for clients worldwide: her
training as a teacher of Mathematics
allows her to share her knowledge and her
discoveries clearly and simply both on her
websites and at costume makers’ events
around the world.
Working in this way has enabled Cathy to
identify the problems faced by those who
wish to make fine corsetry.
Importantly, she discovered that it may not be the makers themselves that cause
their creations to fail, but rather a lack of communication: experienced makers
believe they must guard their "secrets" in order to stay in business, and new
makers start out believing that they must learn everything alone by trial and
error, wasting valuable time, money and effort.
By sharing knowledge and re-kindling the culture of apprenticeship in a modern,
technological age, we can return to a world in which true craftsmanship is once again
loved, appreciated and shared successfully for the greatest advantage to everyone.
Cathy began sewing at the age of fourteen and became professional ten years later, in
1996. She completed work for private clients in Britain and then spent a considerable
period doing so in New England and around New York before returning to the UK in
2003 to continue bespoke work and set up her educational websites for other
corsetmakers and costume makers.
Cathy lives with partner Demi and cats close to Nottingham, England.

The Corsetmaking Revolution by Cathy Hay
www.FoundationsRevealed.com 3 © Harman Hay Publications. All rights reserved.
Photographs of museum corsets © Leicestershire County Council Museums Service
Inside this report
Introduction:
Corsets are boring!
Page 4
The fitting dilemma
The style dilemma
The corsets we *could* be making
Taking corsetmaking to the next level
The New Corset Drafting
Masterclass
Page 9
1 Choose a pattern
2 Take measurements
3 Some important (but easy) calculations
4 Mark the existing pattern
5 Draw your own pattern framework
6 How to transfer the pattern
7 Measure the original pattern
8 Convert into percentages
9 Draft the new pattern
10 Measure out the new pattern
11 Draw in the edges
12 Top and bottom edges
13 Always use a mock-up
My Big Secret
Page 28

The Corsetmaking Revolution by Cathy Hay
www.FoundationsRevealed.com 4 © Harman Hay Publications. All rights reserved.
Photographs of museum corsets © Leicestershire County Council Museums Service
Introduction:
Corsets are boring!
Since corsetmaking became fashionable again around the turn of the new millenium,
dedicated artists, seamstresses and engineers have been striving to fathom out these
fascinating garments and recreate them anew for the twenty-first century.
Materials and patterns have gradually become more available, but we still struggle
with a very small pool of very plain patterns.
I know this is going to sound controversial, and I’ll probably have a lot of people
disagreeing with me, but let’s face it: when you’ve seen one modern corset, you’ve
pretty much seen them all. Corsets, in their present incarnation, are positively
boring.
The fitting dilemma
Meanwhile, consumer demand is
growing. Clients, friends and
corsetmakers themselves all want to be
laced up in a beautiful, flattering, sexy
shape… BUT unless you are a regular
build, moderately busted and small in
size, achieving a good fit is difficult at
best.
A few commercial patterns can be
found; a few real historical styles have
been simplified, genericised, and made
generally useable by small specialist
pattern companies. But they DON’T
WORK.
Ok, ok, I’ll admit it – they work some
of the time. They work if you’re small.
They work if you’re regularly sized.
They work if you’re small busted.

The Corsetmaking Revolution by Cathy Hay
www.FoundationsRevealed.com 5 © Harman Hay Publications. All rights reserved.
Photographs of museum corsets © Leicestershire County Council Museums Service
But what about the rest of us? Can we really say that these one-style-fits-all patterns
really work if they only work for some of us? If you don’t believe me, I’ve got two
words for you. Custom overbust. If you felt the slightest frisson of dread, you know
exactly what I’m talking about.
Here’s the rub: corsetmakers are trying to make BESPOKE corsets from GENERIC
patterns. No wonder they find it hard to shoe-horn unique figures into these
generalised styles!
The style dilemma
There’s another side to these boring, generic corsets too – there are so very few styles
to choose from. It’s like bra shopping: if you find five bra styles you like in the size
you need, you still try them on, right? You head for the fitting room because you
know that some just won't work on you, regardless of the size on the label. So why do
we assume that any old corset pattern will suit us and feel right?
For our more unique friends, bra buying is a nightmare. I’m a generic 34B, but I’ll
never forget the first time I went bra shopping with my plus sized partner Demi.
See this, here? (I’m pointing at my left shoulder right now.) This is the shoulder she
cried on in the fitting room of Britain’s biggest underwear retailer because neither of
the TWO bras available in her size fit her properly… not because they were the wrong
size, but because the shape, the cut, the style was wrong for her.
We know that one size does not fit all, but here’s the truth, for bras, for every garment
we wear, and ESPECIALLY for corsets:
One STYLE does not fit all.
Above: image from a 1907 corset advertisement. Women were not all wearing the same style!

The Corsetmaking Revolution by Cathy Hay
www.FoundationsRevealed.com 6 © Harman Hay Publications. All rights reserved.
Photographs of museum corsets © Leicestershire County Council Museums Service
So let me ask you this…
When we want an 1880s corset and we pick up the generic 1880s commercial
pattern we know and love… why are we making fiddly adjustments to a
generic pattern and expecting an easy, well-fitting, flattering result?
When a client asks for a bespoke corset… why are we dusting off our generic
corset drafting instructions and drafting the same thing with different
measurements… and then settling for a mediocre result?
The corsets we could be making
Just take a look at the corset on this page. Right now, it’s sitting in a box, wrapped in
tissue, on a shelf at Leicestershire County Council Museums Service. Why?
Question: When was the last time any of us made corsets that looked this
good?
Answer: We HAVEN’T made any
that look this good….. yet.
There is a vast sea of knowledge in our
museums around the world, and we’re not
using it.
Just let this sink in for a minute: every
respectable Victorian woman wore corsets
every day. Corsets for daytime; corsets for
evening; corsets for riding; corsets for
every activity and eventuality.
Corsets were a part of everyday life. They
didn't just have to be "good enough" to be
endurable for a night out or a weekend
event; they had to last all day, every day,
through every movement a woman made,
from the finest ladies' silken flossed confection to the hardworking "Pretty
Housemaid" corset that was a bestseller amongst ladies’ maids.

The Corsetmaking Revolution by Cathy Hay
www.FoundationsRevealed.com 7 © Harman Hay Publications. All rights reserved.
Photographs of museum corsets © Leicestershire County Council Museums Service
For those who could afford it, there were different types of corset for different
activities – for riding, for visiting, for evening, for summer… those corsetmakers back
then really knew what they were doing - they had to, to stay in business!
It makes obvious sense to go back to the source and really study in detail how those
corsets worked back in the nineteenth century. By re-scaling their work to fit
ourselves and others, we can begin to uncover the secrets of these gorgeous garments
- and I believe it's essential to share this exciting opportunity with all of you so that
we can work together to gain a real understanding of how to make beautiful, sturdy,
"glove-fitting" corsets that are suitable for everyone, today.
And that's also the only way we're going to be able to start making corsets that
don't all look the same. It’s time to stop being boring and start standing out from
the crowd!
Taking corsetmaking to the next level
Some professional corsetmakers have already begun to discover this - you can't build
a corsetmaking business on a single pattern; you need variety that provides something
for everyone. And I don’t just mean an overbust and an underbust. One style does not
fit all, any more than one size does.
This is somewhere we need to go as corsetmakers and costumiers. This is the next step
in corsetmaking for the 21st century.
We need a wider range of styles to choose from, both for aesthetic purposes and to
provide something that's suitable for everyone. In fact, we need to get the blinkers off
and work out how to make any style. Excuse me ranting, but does that make sense?
There are so many drop dead
gorgeous corsets in museums,
so different from what we've
got from major pattern
companies, and we're not
using them!!
But what if we could?
I think we've all been doing
the corsetry equivalent of
trying to make virtually the
same style of bra in all our
different sizes, imagining that

The Corsetmaking Revolution by Cathy Hay
www.FoundationsRevealed.com 8 © Harman Hay Publications. All rights reserved.
Photographs of museum corsets © Leicestershire County Council Museums Service
all women in a particular era wore exactly the same design, and we're getting spotty
results at best. Are we all wearing the same style of bra right now? Then why do we
think they all wore the same corset?
If we could choose from all the styles out there in the
museum collections and draft any of them to size, we
could create the most exciting breakthrough in the study
of corsetry since we rediscovered corsets at all.
Am I making sense? That’s what this masterclass is about. It’s about freeing
ourselves. It’s about making every extant corset in the world available for you to
study, grapple with and reproduce.
It’s about raising the bar and making YOU a better corsetmaker. Let me show you
how, with… (turn the page!)

The Corsetmaking Revolution by Cathy Hay
www.FoundationsRevealed.com 9 © Harman Hay Publications. All rights reserved.
Photographs of museum corsets © Leicestershire County Council Museums Service
The New Corset Drafting Masterclass I’ve ranted long enough: let’s get stuck right in!
1 Choose a pattern
There are all sorts of wonderful places where you can find extant drawings and
patterns of historic corsets.
Books such as Norah Waugh’s Corsets and Crinolines and Jill Salen’s Corsets
have the hard work done for you. These provide the patterns of many styles of
extant corset.
Google Patents is a surprisingly rich source of wild and wonderful ideas.
… and of course, at www.FoundationsRevealed.com we’re pulling together as
many historic corsets as we can from around the world and patterning them for
you month by month… and by using these, you’re tapping into a resource
that’s subscription-based – not available to everyone – to allow you to really
develop ideas that’ll make your work stand out.
Of course, you can also visit museums yourself and take patterns from the real
thing. At Foundations Revealed you can find an article written for us by Jill
Salen giving all the secrets of how she does this.
I invite you to experiment with many different styles and learn all you can as you
begin to use this masterclass regularly, but for now, select a reasonably simple style
with which to try the method out. I’ve chosen this one from Corsets and Crinolines to
use as an example.

The Corsetmaking Revolution by Cathy Hay
www.FoundationsRevealed.com 10 © Harman Hay Publications. All rights reserved.
Photographs of museum corsets © Leicestershire County Council Museums Service
2 Take measurements
Taking measurements is a vital element in the creation of a perfectly fitting garment,
and it’s imperative that you get it right – extra care at this stage can save you an
extraordinary amount of time, effort and cost later.
I need you to make me a few promises:
1. Have these measurements taken by a professional and trusted tailor or
seamstress. Measuring yourself is unlikely to give an accurate result. This is
the best way to get it right. However, I have given full instructions below for a
friend to measure you, in a worst case scenario.
2. You will be honest about your measurements. Telling little white lies will only
result in a garment that does not fit. I can guarantee that you will not be
satisfied with the resulting garment if you have not given your true
measurements.
3. The measurements have been taken whilst you’ve been wearing what you
normally plan to wear under the corset, as much as possible (a slip or thin,
close-fitting t-shirt is fine but there’s no point measuring yourself whilst
wearing a sweater.)
4. However, you will need to wear a well-fitting bra (unpadded) whilst you
measure, since your assets will then be in a position that’s more reasonably
similar to the finished, corsetted position!

The Corsetmaking Revolution by Cathy Hay
www.FoundationsRevealed.com 11 © Harman Hay Publications. All rights reserved.
Photographs of museum corsets © Leicestershire County Council Museums Service
Tie a string or ribbon around your waist, where you bend naturally – not too tightly,
just snug, and horizontal. Remember to stand up straight (but not overly so) with your
weight evenly distributed. Measure in centimetres if you can – they’re smaller and
more accurate and they don’t carry such heavy meaning for most people.
Additionally, they’re easier to work with when making small adjustments.
………… Bust (1) – measure horizontally around the fullest part of your bust along
the nipple line, and straight across your back. It helps if you stand with your back to a
mirror, with the person measuring you in front of you, so that they can see in the
mirror that it’s straight across your back. Remember to lower your arms.
You may wish to be somewhat “squished” in order to give yourself extra cleavage. If
so, squish your breasts with your hands as much as desired. Measure as best you can
underneath your hands and straight around your back. Try it a couple of times to
make sure you’ve got it right!
………… Front bust – Just the portion of your bust measurement from side seam to
side seam, around the front. This will help you get the cup size/back size right.
Obviously, “back bust” will be the whole bust measurement minus front bust.
………… Underbust to nipple (for discussion of bust gussets, later) (2) – Whilst
still squished, measure vertically from your nipple to bra band, following the curve of
your breast.
………… Nipple to nipple (3) – this is not used directly during the drafting process
described below, but will be useful as a check.
………… Bust to waist (11)– measure at one side from the waist ribbon straight up
to the level where you measured your bust.
………… Squished waist – Suck it in as far as you
want the corset to suck you in. Measure your waist in
this position. Alternatively, measure your natural
waist and subtract the reduction you want to achieve –
but don’t overdo it, there’s no point making a corset
you’ll never wear!
………… Front waist – Just the portion of your
waist measurement from side seam to side seam,
around the front. Obviously, “back waist” will be the
whole waist measurement minus front waist.
………… Upper hip (7) – measure horizontally
around your hips, 3” below the ribbon.

The Corsetmaking Revolution by Cathy Hay
www.FoundationsRevealed.com 12 © Harman Hay Publications. All rights reserved.
Photographs of museum corsets © Leicestershire County Council Museums Service
………… Front upper hip – Similar to front waist, at upper hip level.
………… Lower hip (8) – Same again, 6” below the ribbon.
………… Front lower hip – Similar to front waist, at lower hip level.
………… Lap (9) – Sit up straight on a dining chair or similar. Measure from the top
of your thigh straight up to the ribbon. When the draft is complete, ensure you check
this length, so that the wearer can sit down in the finished corset!
………… Waist to base (10) – Measure vertically from the middle of the ribbon in
front down to the point where you want the front point of the corset to end. You may
also want to measure waist to base at the side and back, as well as waist to top, to help
you get the top and bottom edges right.
Now check all the measurements again – I find this helpful when measuring clients,
just to be sure!

The Corsetmaking Revolution by Cathy Hay
www.FoundationsRevealed.com 13 © Harman Hay Publications. All rights reserved.
Photographs of museum corsets © Leicestershire County Council Museums Service
3 Some important (but easy) calculations
It will help enormously to do these now, and have them ready when you look at the
original pattern so that you can compare the two.
Since the pattern represents half of the body, from centre front to centre back, these
half measurements will be very useful.
If you want the corset to meet at the back
Half front bust Half back bust
Half front waist Half back waist
Half front upper hip Half back upper hip
Half front lower hip Half back lower hip
If you want the corset to have the usual 2” gap at the back
Half front bust Half back bust, minus 2.5cm (1”)
Half front waist Half back waist, minus 2.5cm (1”)
Half front upper hip Half back upper hip, minus 2.5cm (1”)
Half front lower hip Half back lower hip, minus 2.5cm (1”)
For the three back measurements on the right, halve them THEN take away the inch.
4 Mark the existing pattern
Make a copy of your original pattern, one that you can scribble on. I’ll refer to this
working copy as the “original” pattern throughout these instructions in order to
distinguish it from the “new” pattern you’re drafting.
Enlarge it to full size for best results, but if you’re very precise and careful, this whole
process can be done with a small scale pattern like those in Corsets and Crinolines.
Keep in mind that a tiny mistake on a small pattern will enlarge into a very big
mistake on your pattern, so be anally retentive in your precision when using these
small scale drawings!
Mark out the major landmarks:
Centre front
Centre back (back edge of the corset – forget about the gap, you’ve taken account of
that in the sums you just did). This should be parallel to the centre front.
Side – also a straight line parallel to the centre front and centre back, this is the point
where the side seam lies. Your corset may not have a side seam (five piece patterns,

The Corsetmaking Revolution by Cathy Hay
www.FoundationsRevealed.com 14 © Harman Hay Publications. All rights reserved.
Photographs of museum corsets © Leicestershire County Council Museums Service
for example, will not), but you’ll still need to know where the side is in order to
measure from it. You won’t necessarily be able to “find” the exact point where the
side was intended to be – but you can decide, within reason, where you want your side
to fall on the finished corset. Decide this now and mark the side line.
Waist – the narrowest part, at a right angle to centre front and centre back. On some
historical corsets this may be a little challenging to mark exactly, but some detective
work might help – on the diagram above there are two telltale eyelets close together at
the centre back. Make a “best guess” if it’s not quite clear – between adjusting it to
your measurements and fitting the mock-up, the exact point you choose will naturally
become the waist.
Bust – parallel to the waist line, and at right angles to centre front and centre back.
Look for the fullest point, and notice that the pattern edge may sink below the bust
line at the side. This is fine.
Upper hip – parallel to the waist, and 7.5cm (3”) below it. Not necessarily the fullest
point.
Lower hip – parallel to the upper hip, and 7.5cm (3”) below it. Not necessarily the
fullest point. This will only be necessary on long line patterns – if the corset pattern is
short enough that most or all of the pattern ends above the lower hip level, don’t
bother with it.

The Corsetmaking Revolution by Cathy Hay
www.FoundationsRevealed.com 15 © Harman Hay Publications. All rights reserved.
Photographs of museum corsets © Leicestershire County Council Museums Service
Now look at the individual pieces of the pattern. When you draw the centre front and
centre back pieces, you’ll be able to measure out from those nice straight lines at the
centre front and centre back; the other pieces are more fluid at the edges, and could
easily come out skewed. So it would be useful to rule a straight line down the middle
of each pattern piece, which you can use as an anchor to keep the whole piece aligned
correctly.
It doesn’t matter where these anchor lines are on the pattern piece, as long as they’re
exactly vertical, parallel to the centre front and centre back and perpendicular (at right
angles) to the bust, waist and hip lines.

The Corsetmaking Revolution by Cathy Hay
www.FoundationsRevealed.com 16 © Harman Hay Publications. All rights reserved.
Photographs of museum corsets © Leicestershire County Council Museums Service
You may already have one anchor line drawn in, where the Side line rules through
one of the pieces. Meanwhile, some pattern pieces may already have a straight vertical
edge of their own, like the centre front and centre back pieces have – these are
helpful, use them instead of drawing your own anchor line, as long as they’re vertical!
In my diagram, you’ll notice that there are some helpful straight vertical boning
channels, so I’ve used those as anchor lines. On the side back piece, I’ve ruled
approxiamately down the middle.
The Corsetmaking Revolution by Cathy Hay
www.FoundationsRevealed.com 17 © Harman Hay Publications. All rights reserved.
Photographs of museum corsets © Leicestershire County Council Museums Service
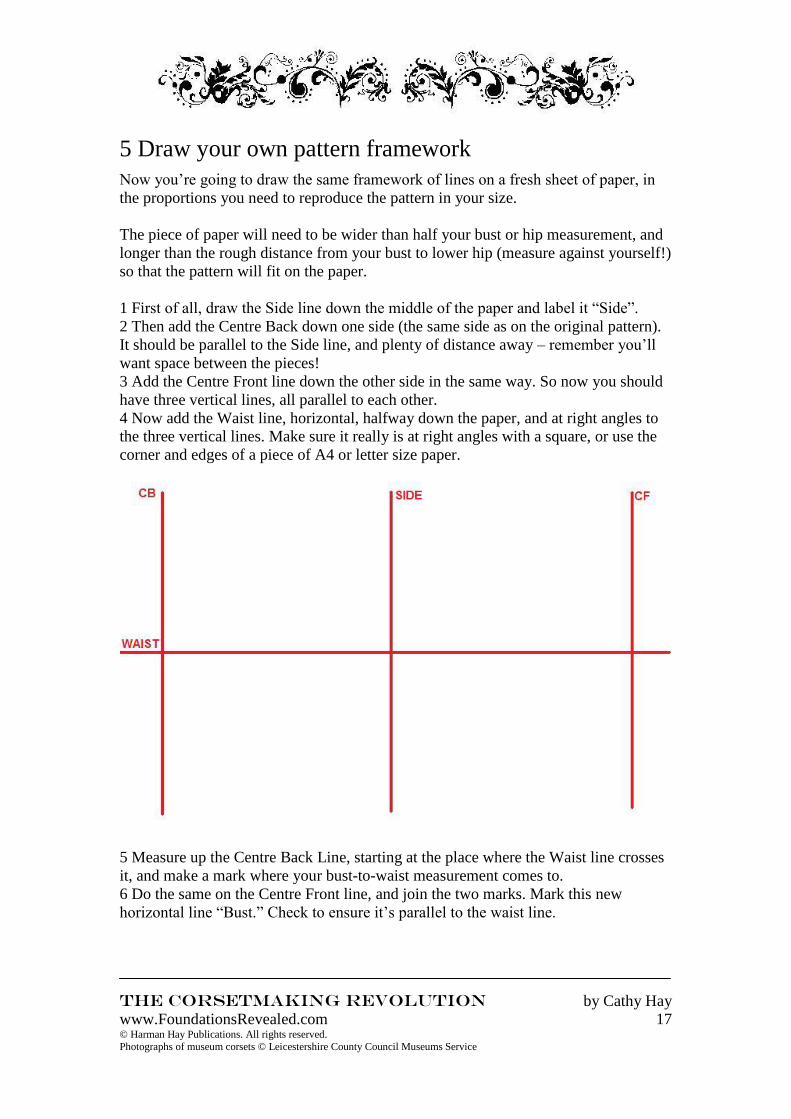
5 Draw your own pattern framework
Now you’re going to draw the same framework of lines on a fresh sheet of paper, in
the proportions you need to reproduce the pattern in your size.
The piece of paper will need to be wider than half your bust or hip measurement, and
longer than the rough distance from your bust to lower hip (measure against yourself!)
so that the pattern will fit on the paper.
1 First of all, draw the Side line down the middle of the paper and label it “Side”.
2 Then add the Centre Back down one side (the same side as on the original pattern).
It should be parallel to the Side line, and plenty of distance away – remember you’ll
want space between the pieces!
3 Add the Centre Front line down the other side in the same way. So now you should
have three vertical lines, all parallel to each other.
4 Now add the Waist line, horizontal, halfway down the paper, and at right angles to
the three vertical lines. Make sure it really is at right angles with a square, or use the
corner and edges of a piece of A4 or letter size paper.
5 Measure up the Centre Back Line, starting at the place where the Waist line crosses
it, and make a mark where your bust-to-waist measurement comes to.
6 Do the same on the Centre Front line, and join the two marks. Mark this new
horizontal line “Bust.” Check to ensure it’s parallel to the waist line.

The Corsetmaking Revolution by Cathy Hay
www.FoundationsRevealed.com 18 © Harman Hay Publications. All rights reserved.
Photographs of museum corsets © Leicestershire County Council Museums Service
7 Now measure down the Centre Back line 7.5cm (3”) from the place where the Waist
line crosses it, and make a mark.
8 Do the same on the Centre Front line, and join the two marks to produce the Upper
Hip line.
9. Did you need the Lower Hip line on the original pattern? If you did, add this now,
7.5cm (3”) below the Upper Hip line. If you don’t need it, skip this step.
Notice how the distances between the lines you’ve drawn on the new paper may be
differently distributed from the lines forming the framework on the original diagram –
that’s fine, it’s part of the changes you’re making.
10. Finally, add the anchor lines – judge roughly by eye where these will need to be.

The Corsetmaking Revolution by Cathy Hay
www.FoundationsRevealed.com 19 © Harman Hay Publications. All rights reserved.
Photographs of museum corsets © Leicestershire County Council Museums Service

The Corsetmaking Revolution by Cathy Hay
www.FoundationsRevealed.com 20 © Harman Hay Publications. All rights reserved.
Photographs of museum corsets © Leicestershire County Council Museums Service
6 How to transfer the pattern
Let’s look at that original corset pattern once more, particularly the front waist
section.
If we highlight the bits of the waist line that fall on the pattern pieces, can you see
how the highlighted areas would add up to the HALF FRONT WAIST measurement
of the original wearer?
Meanwhile, you took your front waist measurement, and you halved it in step 3,
giving you the distance from the centre front to the side around your front, at the
waist. So you need to distribute your front waist measurement on the new pattern in
the same proportions as on these original pattern pieces.
If we can do this for all six measurements you worked out in step 3 - half front bust,
half back bust, half front waist, half back waist, half front hip and half back hip -
you’ll have the complete framework for your own version of the pattern.
7 Measure the original pattern
So let’s begin with the half front waist we’ve been looking at. Take the original
pattern and measure the width of each piece along the front of the waist (ie from
centre front to side along the waist line.) Mark these measurements in pencil on the

The Corsetmaking Revolution by Cathy Hay
www.FoundationsRevealed.com 21 © Harman Hay Publications. All rights reserved.
Photographs of museum corsets © Leicestershire County Council Museums Service
original pattern, just below the waist line on each piece. Notice how I’ve measured
each side of the anchor lines separately: you’ll need to do the same.
If you’re using a tiny sized pattern, this will still work even though the pieces will
only be millimetres wide. The proportions are the same whatever the size of the copy,
but remember, be VERY precise if you’re using a tiny pattern, as small errors will
enlarge into big ones!
Now add up all the widths of the pieces that you just found, and write down the total
at the end of the waist line as shown. Put a box around it so it’s clear that this is the
total front waist measurement of the pattern.
8 Convert into percentages
Now you’re going to write the width of each piece as a percentage just above the
waist line on each piece. Why? If you know, for example, that the width of the front
piece is 10% of the half front waist measurement, you can work out 10% of YOUR
front waist measurement too, and transfer that to your own new pattern!
Here’s how to work out the percentages for each measurement:
Measurement ÷ Total written in the box x100 = Percentage
Round the answer to a whole number and write it above the line on the relevant
pattern piece – include the “%” sign and write in pen so you don’t get your numbers
mixed up.

The Corsetmaking Revolution by Cathy Hay
www.FoundationsRevealed.com 22 © Harman Hay Publications. All rights reserved.
Photographs of museum corsets © Leicestershire County Council Museums Service
Check that you’ve got it right by making sure all the percentages add up to 100%.
(You may have to fiddle it by one or two percent to make up for discrepancies where
you rounded up or down.)
Now go back to step 7 and repeat this process for the half front bust, half back bust,
half back waist, half front hip and half back hip. If you take each separately, you’ll
find the process fairly simple.
Some pattern pieces don’t extend quite to the bust and hip lines – extend them (shown
below in green) so that you can work out the percentages for them too. This isn’t an
absolutely precise method to deal with this, but it’ll help you get it right enough to get
you to the mock-up stage, when you’ll be able to tweak things to fit perfectly.

The Corsetmaking Revolution by Cathy Hay
www.FoundationsRevealed.com 23 © Harman Hay Publications. All rights reserved.
Photographs of museum corsets © Leicestershire County Council Museums Service
9 Draft the new pattern
Copy the percentages to the same places on the new pattern, above the horizontal
lines, in pencil.
At the end of each line, put a total in a box, in pen – this time, the total will be your
own half measurements as found in step 3, eg the half front waist in my example
below.
Now you just need to fill in the measurements below the lines. If your first piece is
10% and your total is 60cm, then you’re looking for ten per cent of 60cm:
Percentage* ÷ 100 x total in box = Measurement
* Don’t use the percentage button on your calculator.
If your percentage is 10%, just type 10.
Fill all of these measurements in, over the whole new pattern, in pen. Check your
working by adding up the measurements and ensuring that for each front and back
section of each line, you get the total in the box at the end of the line.

The Corsetmaking Revolution by Cathy Hay
www.FoundationsRevealed.com 24 © Harman Hay Publications. All rights reserved.
Photographs of museum corsets © Leicestershire County Council Museums Service
In order to get the exact total at the end of the line, you may have to adjust by a
millimetre or two to compensate in places where you’ve rounded things up or down.
10 Measure out the new pattern
Now measure out these distances. For the front and back pieces, measure from the
centre front and centre back lines and make a mark; for the other pieces, use your
anchor lines as starting points to measure out each distance – now you’ll see why you
needed them, and why you needed to measure each side of them separately.
Use whatever notation works for you to make sure you remember where the marks
overlap each other and end up swapping places.
11 Draw in the edges
Referring to the original pattern, begin to draw in the curves that form the edges of the
pieces. Be patient and remember how these pieces will have to fit together, one to the
next.

The Corsetmaking Revolution by Cathy Hay
www.FoundationsRevealed.com 25 © Harman Hay Publications. All rights reserved.
Photographs of museum corsets © Leicestershire County Council Museums Service
You may find that the different proportions of your body have altered the shapes of
the pieces significantly. If you’re coming out with ugly shaped pieces, consider
“robbing Peter to pay Paul”: you can always take a little away from one piece at the
front bust and add to another piece at the front bust, or vice versa. One caveat – only
give and take within one section, say front bust, or back waist. Robbing from the back
hip and giving to the front bust will destroy your perfectly measured proportions!
Doing so between, say, front and back waist will skew the side seam and cause more
problems than it solves. So stay within sections when begging and borrowing.
Aim to make the pieces closest to the centre front and centre back the most pleasing
shape – these will be more on display than the pieces hidden under your arms.
Plus size patterns may come out with big, blocky pieces – since your draft doesn’t
have any seam allowances yet, you can simply split pieces into two if you want to,
perhaps down anchor lines, and beg and borrow as above to create curves. This may
help in fact, giving you more seams where you can adjust the mock-up and accentuate
your most beautiful curves!
There are other uses for the begging and borrowing technique too: some historic
corsets have a very narrow centre front section, just big enough for the busk. Use this
method to adjust the pattern to accommodate your busk perfectly, or to switch
between a straight and spoon busk, perhaps.

The Corsetmaking Revolution by Cathy Hay
www.FoundationsRevealed.com 26 © Harman Hay Publications. All rights reserved.
Photographs of museum corsets © Leicestershire County Council Museums Service
12 Top and bottom edges
Again, refer to the original in order to help with the top and bottom edges, and use the
waist-to-top and waist-to-bottom measurements and lap measurement as your guides.
When making the mock-up later, I recommend making the pieces too long, both top
and bottom; draw in an idea of the top and bottom curve on the pattern and pieces by
all means, but keep in mind that these will be much easier to make into a perfectly
pleasing, undulating edge with a marker pen on the mock-up! You can then transfer
those markings back to the pattern, and because the pattern only represents one side of
the corset, the edge will come out looking symmetrical on the final garment.
If you’re making corsets for money, doing this with clients may seem unprofessional
when you first consider it, but keep in mind that letting them tell you exactly how
high or low the edge should be will be “all part of the service” to them, and a way of
demonstrating the value of bespoke clothing!
13 Always use a mock-up
However clever one’s pattern drafting is, drawing curves based on a handful of
measurements can only ever provide a reasonable approximation of the correct fit.

The Corsetmaking Revolution by Cathy Hay
www.FoundationsRevealed.com 27 © Harman Hay Publications. All rights reserved.
Photographs of museum corsets © Leicestershire County Council Museums Service
Making a mock-up of the final corset in sturdy yet inexpensive fabric such as cotton
drill, and boning it as in the finished article, is ALWAYS ESSENTIAL in order to
provide an opportunity to tweak a little here and a little there.
In no other way can you check the fit of your pattern completely, both around its
circumference and up and down the torso.
Don’t forget to secure the bones tightly in the channels, both lengthwise and
widthwise, to minimise wrinkling. I think you may be surprised at the resulting fit!

The Corsetmaking Revolution by Cathy Hay
www.FoundationsRevealed.com 28 © Harman Hay Publications. All rights reserved.
Photographs of museum corsets © Leicestershire County Council Museums Service
My Big Secret
Right from the time I started seriously making corsets, bridalwear and costume back
in 1996, I’ve been a stand-out designer and seamstress.
I’ve made clothes that continue to attract compliments and jealous jibes for
their quality, inside and out…
I’ve built a successful business based on being able to make my clients look
and feel outstanding, not just “unique”…
I’ve stood out at every event I’ve attended as a peerless costume artist…
I’ve built a reputation based on always being relied upon to think differently,
to innovate, and to take things a step further than the people around me.
Don’t get me wrong: I’m not telling you this to brag or try to impress you. I’m telling
you this to stretch you and impress upon you that this is available to you too.
I don’t have any special powers; my artistic skills were considered below average at
school; I didn’t even study fashion or costume at college – I was just another Maths
teacher-to-be!
But I do have a big secret: a whole sewing box full of secrets, in fact. And hundreds
of seamstresses, corsetmakers and costume makers whom I’ve taught and whom I
now call my friends and colleagues are, even now, using these secrets to lift
themselves and their abilities above the shoulders of the thousands of seamstresses
around the world whom they compete with each day.
Even now, they’re realising their creative and artistic dreams – and for some, their
dreams of owning and running their own successful businesses.
In this Masterclass I’ve tried to share some sense of the sheer creative momentum that
our Big Secret is bringing us right now, today.
I’ve shown you…
Why you can’t just stand still, making the same tired, plain corsets as everyone
else is doing…
Why a revolution in design is required in the world of corsetmaking…
Where the resources are to help you do that…
How to use those resources to make extraordinary corsets that will separate
you from the pack and make you feel special and proud.

The Corsetmaking Revolution by Cathy Hay
www.FoundationsRevealed.com 29 © Harman Hay Publications. All rights reserved.
Photographs of museum corsets © Leicestershire County Council Museums Service
But making that leap from also-ran to outstanding is not easy – if it was, everyone
would be doing it!
But here are three ways to make that jump:
For me it’s no contest. The first option is way too much to ask – corsets are just
corsets, and life and family are just too precious to sacrifice for that. The second
wastes your money and your time and leaves you with little more than a piece of
paper and some fierce internal I-must-fit-in programming that you don’t want.
It was when I decided to go with the third option – to develop my own network of
unique, outstanding tools and advisors to help me tear through the fog of information
and find the pivotal things I really needed to concentrate on – that everything changed
for me. The same will undoubtedly be true for you.
As you may remember, it was in 2003 that I started blogging and sharing my sewing
methods on the Internet. Now there are hundreds of thousands of seamstresses,
corsetmakers and costumers sharing pictures and details of things they’ve made in
forums and on blogs all over the Web. But there are so very many of them; it’s hard to
cut through the overwhelming white noise of semi-useful information and find the
people who really know what they’re doing and really have something of quality to
teach the rest of us.
1 You could commit your life totally to the art of corsetmaking, sacrificing
time with family and friends to spend 12 or even 18 hours a day scouring the Web and buying every book you can find on corsetmaking, trying to assemble the skills that will make you stand out.
2 You can shell out big bucks to go on college courses – and still spend most of
your time being groomed to become a little minnow in a big corporate fashion industry, where the sewing itself is considered to be a pesky manual labour, fit only to be farmed out to Third World factories.
3 Or you can get involved with a small but determined group of people who
are totally committed to becoming better corsetmakers, lifting you head and shoulders above the hordes of seamstresses around the world who’ve jumped onto the corsetry bandwagon over the last few years.

The Corsetmaking Revolution by Cathy Hay
www.FoundationsRevealed.com 30 © Harman Hay Publications. All rights reserved.
Photographs of museum corsets © Leicestershire County Council Museums Service
That was why, in November 2007, I opened a very special website called Your
Wardrobe Unlock’dTM
. Through this site I’ve been able to share my own friends list –
introducing readers to all the people I really admire and have learnt huge lessons
from. Each month, we produce six new articles, Masterclasses and in-depth, step-by-
step how-tos about all aspects of fine historical sewing.
Over the last two years, we’ve covered how you can…
Bind your corset edges expertly to give a perfect result (especially early
corsets with tabbed waistlines)
Select the right fabric for the right project
Create beautiful extras, like needlelace cuffs and miniature portrait
jewellery
Draft your very first corset pattern, baby step by baby step (this one’s
enormously popular with Math-phobics!)
Transform bargain basement second hand shoes into gorgeous
Cinderella-like silk slippers
Immediately identify projects and customers you should avoid like the
plague, and why (clue: family members can be the worst!)
Realise your creative dreams by learning how to tackle those really
ambitious projects you aspire to
Members of the site have gone on to create extraordinary corsets, dresses, and even
tailored suits that they never thought they had in them; some have gained the
knowledge and confidence to start that business they’ve dreamt of or make an existing
one into a successful venture that makes a real income (and most of all, makes them
proud.)
Put simply, it is my burning mission to raise as many creative
seamstresses as I can, as high as I can, and make you see what
you’re capable of.
As I approach a major milestone birthday, I’ve realised that I can’t change the world
alone. I can’t make the world beautiful and raise the value of craftsmanship back to
where it should be on my own.

The Corsetmaking Revolution by Cathy Hay
www.FoundationsRevealed.com 31 © Harman Hay Publications. All rights reserved.
Photographs of museum corsets © Leicestershire County Council Museums Service
If we’re going to change the world we have to do it together. That means I have to
share what I’ve got, spread it out and build a worldwide team who’ll make quality and
craftsmanship really valued and important once again.
I am here to pass these skills on to you, and all I ask is that one day, you pass those
skills on too. I don’t think I need to explain to you why, in a world full of plastic and
mass production, we - you and I - must keep fine craftsmanship alive. And we can do
that by re-kindling the spirit of old-fashioned apprenticeship with some very modern
technology. So guess what…
My team and I have spent the last six months
researching what you need to know, analysing
what makes Your Wardrobe Unlock’d special and
recreating a new site just for corsetmakers – and it’s
ready to start revolutionising your sewing NOW!
And not only do you get to learn every secret… every insight… every trick of the
trade…
You’ll ALSO get the chance to ask questions of our writers and contributors… get the
answers you need… participate in competitions and challenges… be part of a
community dedicated to excellence.
I’ve got a lot more to tell you about Foundations Revealed. But for now, all you need
to know is this…
Foundations Revealed:
the Corsetmaker’s Companion
Launch Date October 15th
, 2009

The Corsetmaking Revolution by Cathy Hay
www.FoundationsRevealed.com 32 © Harman Hay Publications. All rights reserved.
Photographs of museum corsets © Leicestershire County Council Museums Service
Hi Cathy
Well I have just shown my customer out the door. Tonight I did the final fitting on a longline underbust corset - my first commission. And we both cried!
But they were good tears. She is a lovely lady who has had a tough time and is finally focusing on herself. She tried the corset on and burst into tears! She said it was the first time she had felt like a proper woman in years. Which then set me off - I was already close to tears having spent all week panicking that she would try it on and it wouldn't fit and look awful :0)
I should have had more faith because it looked really good, my best so far. Not surprisingly, it was constructed using a wealth of your top tips and tricks. The darts for "mum tums" worked a treat…
So thanks (again)! The odd thing is I am grinning like a cheshire cat, not because the corset was correct, but the effect it had. Something I made did that. Really wasn't expecting it, I had only focused on scenarios where it went wrong. If ever you needed proof of the dramatic impact your website (and wisdom) has on amatuer stitchers taking their first steps to becoming a pro then here it is. Because I have stopped pigeon stepping and am taking huge leaps and bounds and am loving every minute of it. I feel like there really aren't any limits anymore, all I have to do is keep pushing myself each day. I made a corset, it was well fitting and professionally made - no errors, no shortcuts or crappy "that will do" solutions. I would be happy for anyone to look it over with a microscope, because I made it right.
Just got to floss the boning channels, attach the lining, eyelets and binding and "ta da" my first professional commission is complete.
Hope I'm not pestering you - just really felt I owed it to you to share.
Laura :0)

The Corsetmaking Revolution by Cathy Hay
www.FoundationsRevealed.com 33 © Harman Hay Publications. All rights reserved.
Photographs of museum corsets © Leicestershire County Council Museums Service
On October 15th
I will open the doors of a sewing school of which I’m enormously
proud.
Look, there are plenty of people out there teaching you how to sew, how to cobble
together your first corset, what spiral wires are for… I’ll leave that stuff to them.
We’re going to teach you the things that no-one else will: we’re going to break the
advanced techniques down and show you
Methods and patterns that are so beautiful and practical and so little used that
they could change your work (and the world’s reaction to it) overnight.
How to make a whole sampler of Victorian flossing patterns, recreating them
as a reference guide for your work
How to take corset patterns from real historical examples (we’ve got the best -
Jill Salen, whose recent book Corsets has taken the corsetmaking world by
storm – to show you how)
Professional TV and film costume maker Jema Hewitt shares historical corsets
from her personal collection – plus their patterns and the construction
techniques to recreate them
Find out once and for all what to charge for your work (I’ll share exactly how
I charge for mine and why)
Challenge yourself to think and grow by taking on our Pattern Challenges
And of course, much, much more…
I aim for this to be the apprenticeship you always wanted, the education you wish you
could have from the Victorian masters themselves. That’s a big mission, and I’d like
to humbly ask you if you’ll help me to
make it happen.
I don’t for a minute expect the writers
coming up with all these killer classes,
articles and tutorials to do it for free:
they’re giving away their time and
their trade secrets and it simply
wouldn’t be fair to leave them empty-
handed in return. In fact, the project
would fail – they simply wouldn’t
agree to be involved if there was no
reward.
But I also want to make these tools as
widely available as possible to people
who are just starting out, who are
“Maybe I should send you some pictures of my old work - from the dark days before Your Wardrobe Unlock'd - and my work now. You could do a before and after selection, with the tag "We can help anyone!" as an ad for the site. I very nearly didn't sign up because I thought everyone would be so far above me and I wouldn't understand what you were going on about, lol!”
The Corsetmaking Revolution by Cathy Hay
www.FoundationsRevealed.com 34 © Harman Hay Publications. All rights reserved.
Photographs of museum corsets © Leicestershire County Council Museums Service
doing this for a fulfilling hobby, or who are only dreaming of business success at this
stage.
On October 15th
the door will open a crack to let those who are really committed to
their corsetmaking to join Foundations Revealed and take the chance to become one
of the best of the best. I want to keep these tools exclusive and keep the class small
and friendly, but to encourage you to step through that door and be one of the select
few, I’m going to make a very generous offer.
Membership of the site will be
only US$9.97 per month for a
limited time only, to allow those
who really need to be a part of this
project to take advantage of the
opportunity, even if they are
working with a limited income.
They will also be able to get an
even more discounted rate when
signing up for six or twelve
months.
And for those of you who are
really serious and have an interest
in more than just corsetmaking,
there will also be a limited time
opportunity to sign up to
Foundations Revealed AND Your
Wardrobe Unlock’d as a
Combined Subscription, also at
specially discounted rates.
If you’re lucky enough to become a member of this very special community, this
will be one of the defining moments of your creative life.
So get to the site and sign up now, mark the date in your diary, and be ready to join
the Corsetmaking Revolution at www.FoundationsRevealed.com at 10am EST on
October 15th
, 2009.
I look forward to sharing this wonderful, exciting, rewarding artistic journey with
you!
I'm *loving* the look of the new site! Since there is *always* more to learn about any craft (and especially corsetry) I feel almost giddy at the prospect of FR coming to life. The flossing tutorial teaser already has me salivating and it really seems as though there will be an emphasis upon the pursuit of quality throughout. Quality processes, materials, tools... even the simple message of "use the appropriate piece of kit for the appropriate job" is a valuable one that's so often bypassed by those new to the craft. Yup, I'm looking forward to it :-) - Jenni, Sparklewren Bespoke Corsetry

The Corsetmaking Revolution by Cathy Hay
www.FoundationsRevealed.com 35 © Harman Hay Publications. All rights reserved.
Photographs of museum corsets © Leicestershire County Council Museums Service
Be part of the Revolution!
So tell me, what do you think of the Corsetmaking Revolution? I hope you’ll agree
that this document was worth your time, was worth trying out, and that you got some
value out of it.
But obviously, part of making this Revolution happen is sharing it, and enjoying the
buzz of being part of something bigger.
So I hope you’ll do two things right now that’ll help spread the word and bring a little
more fine craftsmanship into people’s lives.
111 Our recommend-a-friend tool makes it really easy for you to tell your friends
and spread the word. If you do so, I’ll send you a Special Bonus… the Next
Step in your drafting journey, where I share details on how to expand
what I’ve shown you here and incorporate bust gussets, hip gores or
corded panels into your work.
222 Visit the blog and tell me what you think – and tell me what else you’d like
me to share with you in the next couple of weeks to help revolutionise your
corsetmaking.
Will you do that for me right now? Thank you!
And keep an eye on the blog over the next two weeks for more details about what
we’ve got in store on the new site, and more valuable tips and tricks to help
revolutionise your corsetmaking!
Best wishes to you, and may all your creative dreams come true!
Cathy Hay
Nottingham, UK
September 2009