How-To · (1) Choose the set-up language and click OK.This will start the Wizard. (2) When the...
12
How-To Set Up Your Classes Web Space Windows and Mac Go to https://classes.lt.unt.edu/ (1) In the menu bar – Click Register (2) Use your regular EUID (abc1234 format) and password. (3) Choose your role and click sub- mit It may take up to 24 hours before your registration takes effect. If you have already registered the system will tell you so: “is user is already registered”. UNIVERSITY OF NORTH TEXAS | DEPARTMENT OF LEARNING TECHNOLOGIES | SUMMER 2013. v2
Transcript of How-To · (1) Choose the set-up language and click OK.This will start the Wizard. (2) When the...

How-ToSet Up Your Classes Web Space
Windows and Mac
Go to https://classes.lt.unt.edu/
(1) In the menu bar – Click Register
(2) Use your regular EUID (abc1234 format) and password.
(3) Choose your role and click sub-mit
It may take up to 24 hours before your registration takes effect.
If you have already registered the system will tell you so: “This user is already registered”.
UNIVERSITY OF NORTH TEXAS | DEPARTMENT OF LEARNING TECHNOLOGIES | SUMMER 2013. v2

(1) In the menu bar – Click Login
(2) Use your regular EUID and password and then click the LogIn button.
(1) In the menu bar – Click Course List.
(2) Click on the semester you need to set up course space for.
Next select the course you want to create space for. Select and click create space.
Next click on Course List in the menu bar. From the list of ourses that you see, choose the one you created Web space in. Expand to see the names of students that are in the course by clicking the + sign. Please refer to the image to the right.
- 2 -
UNIVERSITY OF NORTH TEXAS | DEPARTMENT OF LEARNING TECHNOLOGIES | SUMMER 2013. v2
Your name will be visible here. When you click your name the files in your personal webfolder will become visible. Initially there is only one file - your index.html. Next we will set up the FTP file transfer.

Next you will need to set up your FTP client for file transfer to the server. There are a number of different FTP clients that can be used. WinSCP for Windows machines and Fugu for Mac will be explained here.
Setting up your WINSCP Client
For WINSCP - go to http://winscp.net/eng/download.php
Click on Download WinSCP - Installa-tion Package. See arrow above. Do not click the advertisement!
The next screen will automatically start the download for you and you will be prompted as to how you want to pro-ceed on a yellow bar at the bottom of your screen (Explorer). This example shows you how to save to disk.
Click the arrow nex to the Save button and choose Save to disk. Make a note of where you save your file and once downloaded, open the file from there.
Page 2
- 3 -
UNIVERSITY OF NORTH TEXAS | DEPARTMENT OF LEARNING TECHNOLOGIES | SUMMER 2013. v2

(1) Choose the set-up language and click OK. This will start the Wizard.
(2) When the wizard opens up, click Next.
(3) Accept the agreement by clicking the radio button. Then click Next.
(4) Choose the kind of install you wish to make. Typical is explained in this example. Click Next.
(5) Choose preferred interface style. Commander interface will be used in this example. Click Next.
- 4 -UNIVERSITY OF NORTH TEXAS | DEPARTMENT OF LEARNING TECHNOLOGIES | SUMMER 2013. v2

(6) Click Install to initialize the process.
(7) The install process starts.
(8) Choose to Launch WINSCP. It is not necessary to open the website - the “Open Getting started page check mark may thus be unchecked.
Click Finish to complete the install.
(9) An icon will be installed on your desktop (see arrow in the image below for reference). WINSCP will launch.
- 5 -UNIVERSITY OF NORTH TEXAS | DEPARTMENT OF LEARNING TECHNOLOGIES | SUMMER 2013. v2

(10) Check the option Advanced options (1) and make sure that SCP Fallback is checked (2).
Then click on Session in the left panel.
(11) Make sure the File Protocol is SFTP. Then enter the fol-lowing information very precisely:
Host name:classes.lt.unt.edu
User name:STUDENTS\abc1234
(Students must to be capitalized. abc1234 refers to your EUID which is consists of three letters and four numbers. For exam-ple, John Eric Doe could have an EUID such as jed1234)
Password: Your password is the one you usually use together with t your EUID. Click Login
(12) The WINSCP panel opens. You will see your local files to the left and a list of user EUIDs on the right hand side. Find your EUID in the column to the right and double-click the folder. You may need to scroll to find yourself in the list.
(13) You will now see the semester folder in the right hand panel that you earlier registered space for. Double-click this folder.
- 6 - UNIVERSITY OF NORTH TEXAS | DEPARTMENT OF LEARNING TECHNOLOGIES | SUMMER 2013. v2

(14) Choose the course that you are enrolled in and want to trans-fer files to by double-clicking. This example shows CECS_5120_020.
(15) In this example there are already files saved inside the course folder. These are in sub-folders created by the student. There is one folder for each project the student has created and submitted. Make sure to organize your work within folders in the way your instructor suggests.
As a new user, there will only be one file here to start with. This is your index. html file. If you are required by your instructor to have a different index.html file (one that you have created) you need to de-lete this file and upload your own.
Should you delete your default index.html file within your course by accident, you can restore it from the my_courses tab (https://classes.lt.unt.edu/my_courses.html). Note that if you have replaced the default index.html file and try to restore it, the process will overwrite your current index.html file.
Transferring files To transfer files, create a folder on your computer with the same name as your course. Save all your files that you will need to transfer within this folder. In the image (15) example the folder was created on the desktop (1).
Open the folder within the local files in the left hand panel of the SCP client (2).
To upload files from your local computer to the server use drag and drop between the panels. In this example the file willowjoomla.jpg is
transferred from the local computer to the server. Refer to the image below.
- 7 - UNIVERSITY OF NORTH TEXAS | DEPARTMENT OF LEARNING TECHNOLOGIES | SUMMER 2013. v2
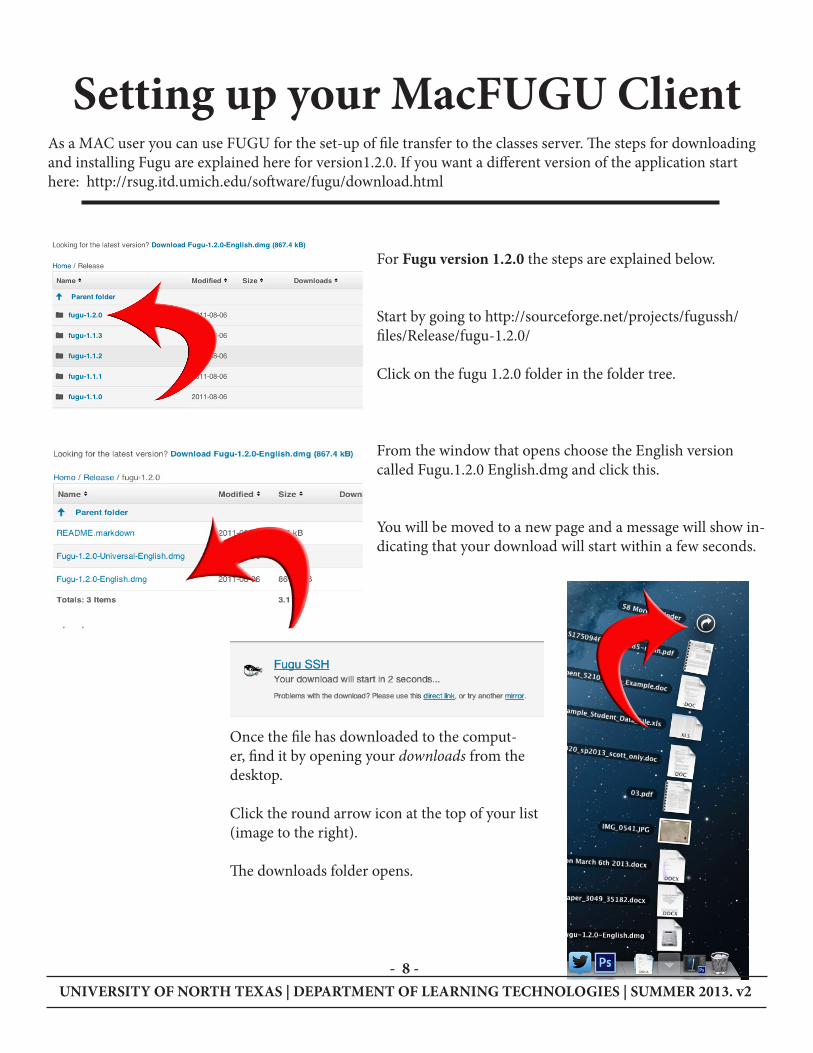
Setting up your MacFUGU ClientAs a MAC user you can use FUGU for the set-up of file transfer to the classes server. The steps for downloading and installing Fugu are explained here for version1.2.0. If you want a different version of the application start here: http://rsug.itd.umich.edu/software/fugu/download.html
For Fugu version 1.2.0 the steps are explained below.
Start by going to http://sourceforge.net/projects/fugussh/files/Release/fugu-1.2.0/
Click on the fugu 1.2.0 folder in the folder tree.
From the window that opens choose the English version called Fugu.1.2.0 English.dmg and click this.
You will be moved to a new page and a message will show in-dicating that your download will start within a few seconds.
Once the file has downloaded to the comput-er, find it by opening your downloads from the desktop.
Click the round arrow icon at the top of your list (image to the right).
The downloads folder opens.
- 8 -UNIVERSITY OF NORTH TEXAS | DEPARTMENT OF LEARNING TECHNOLOGIES | SUMMER 2013. v2

1) Look for your downloads in the left panel of the window. Click this to open the files you have downloaded. They will display in the right panel.
2) Locate the Fugu-1.2.0-English.dmg file you just downloaded, in the right panel.
Right-click the Fugu file and choose Open.
You may see the following message. Click Open.
Agree to the terms and conditions by clicking Agree.
Page 2
- 9 - UNIVERSITY OF NORTH TEXAS | DEPARTMENT OF LEARNING TECHNOLOGIES | SUMMER 2013. v2

The FTP login screen opens. Fill in the necessary infor-mation:
1) Connect to:classes.lt.unt.edu
2) Username:STUDENTS\abc1234
Observe that STUDENTS must be capitalized followed by a backslash \ and your EUID. John E. Doe’s EUID would thus be in the format jed1234, to give an example.
3) Click Connect.
4) Enter your password. This is the same password you use together with your EUID.
5. Click Authenticate.
6) You may be getting a pop-up message similar to the one here. Click Continue.
- 10 - UNIVERSITY OF NORTH TEXAS | DEPARTMENT OF LEARNING TECHNOLOGIES | SUMMER 2013. v2

The file transfer window opens.
Please refer to page 6, step 12 of this guide for further in-structions on how to transfer files between the hard drive and the server.
How to save FUGU to the Application LauncherOpen the Downloads folder again. Drag the FUGU application icon from the Down-loads folder into the Applications situated in the left panel.
You will now be able to access Fugu (2)though the Launcher (1) next time you need to transfer files.
- 11 - UNIVERSITY OF NORTH TEXAS | DEPARTMENT OF LEARNING TECHNOLOGIES | SUMMER 2013. v2

Johanna Doe’s files on the server. Johanna Doe’s files on the classes website.
The below two images show a comparision of what you will see in your FTP Client and what you will see on the classes.lt.unt.edu website. The next step explains how you will be able to see your files on the Web.
To find a file on the Web, that you have uploaded, go to classes.lt.unt.edu and access the files list (image to the right above)
To get to this, start by clicking Course List in the menu bar.
Then click the semester in which your course is run-ning (refer to page 2 of this tutorial for visuals). For example, Spring 2013.
Next click on the course you want to look at the files for.
The file listing will show. We will use the listing in the image to the right above as an example.
Let’s say you want to view the image willowjoomla.jpg on the Web and get the URL to where this image is lo-cated, simply double-click the file in the classes weblis-ting (image to the right above). A browser window will open. See image below.
The URL that you see in the URL field of the browser window is the address to the willowjoomla.jpg image file. Copy to bookmark as needed.
How to find your file on the Web