DESIGN OF A WIND TURBINE SYSTEM FOR ELECTRICITY GENERATION.pdf
Upload
ettypasewangCategory
view
215download
0
How I home-built an electricityproducing Wind turbine
It was easy. You can do it too
Several yearsago I boughtsome remoteproperty inArizona. I aman astronomerand wanted aplace topractice myhobby far awayfrom thesky-wreckinglight pollutionfound nearcities of any
real size. I found a great piece of property. The problem is, it's soremote that there is no electric service available. That's not really aproblem. No electricity equals no light pollution. However, it would benice to have at least a little electricity, since so much of life in the 21stcentury is dependent on it.
One thing I noticed right away about my property is that most of thetime, the wind is blowing. Almost from the moment I bought it, I had theidea of being energy independent by putting up a wind turbine andmaking some electricity, and later adding some solar panels and awood gasifier. This is the story of how I did it. Not with an expensive,store-bought turbine, but with a home-built one that cost hardlyanything. If you have some fabricating skills and some electronicknow-how, you can build one too.
Let me state up front that I probably won't be able to help you outmuch if you decide to build your own wind turbine. This web site hasbecome insanely popular, often taxing the bandwidth limits of theserver. I get dozens of requests for help each day. I simply don'thave time to answer the majority of them. Most of the questions andrequests I get are the same ones over and over again. I havecreated a FAQ to handle these repetitive questions. Please read it
1kShareShare
How I built an electricity producing wind turbine http://www.mdpub.com/Wind_Turbine/index.html
1 dari 40 4/7/2014 7:53 AM

before emailing me. Simple questions, not covered by the FAQ,which only require a quick and simple answer may get replies if timepermits. However, there is no way I can help you out with complexissues, teach you electronics theory, help you locate parts, build acharge controller for you, or custom design a system for you. Therejust aren't enough hours in the day. Sorry.
Since no one seems to be reading the FAQ, I will answer the No. 1question I get many, many times a day right here up front. Why didn'tI just use an automotive alternator on my wind turbine? Automotivealternators need to spin at very high speed to produce usefulamounts of power. Most wind turbines don't spin fast enough forthem to work.
Update: Here is a video of the wind turbine in operation.
Click on a ladyto learn how to
meet her.
How I built an electricity producing wind turbine http://www.mdpub.com/Wind_Turbine/index.html
2 dari 40 4/7/2014 7:53 AM

Update: Here is a video of me assembling and setting up thewind turbine on my remote off-grid property.
I started the process of designing my wind turbine by Googling forinformation on home-built wind turbines. There are a lot of them outthere in an amazing variety of designs and complexities. All of themhad five things in common though:
A generator1.Blades2.A mounting that keeps it turned into the wind3.A tower to get it up into the wind4.Batteries and an electronic control system5.
I reduced the project to just five little systems. If attacked one at atime, the project didn't seem too terribly difficult. I decided to start withthe generator. My online research showed that a lot of people werebuilding their own generators. That seemed a bit too complicated, atleast for a first effort. Others were using surplus permanent magnet DCmotors as generators in their projects. This looked like a simpler wayto go. So I began looking into what motors were best for the job.
A lot of people seemed to like to use old computer tape drive motors(surplus relics from the days when computers had big reel to reel tapedrives). The best apparently are a couple of models of motor made by
Situs tidak bisa diakses
How I built an electricity producing wind turbine http://www.mdpub.com/Wind_Turbine/index.html
3 dari 40 4/7/2014 7:53 AM

Ametek. The best motor made by Ametek is a 99 volt DC motor thatworks great as a generator. Unfortunately, they are almost impossibleto locate these days. There are a lot of other Ametek motors aroundthough. A couple of their other models make decent generators andcan still be found on places like Ebay. This web site talks about thevirtues and vices of various Ametek motors when used as generators.
http://www.tlgwindpower.com/ametek.htm
There are probably lots of other brands and models of permanentmagnet DC motors available that will work well as generators.Permanent magnet DC motors work as generators, but they weren'tdesigned to be generators. So they aren't great generators. Sometypes of motor are a lot worse than others. When used as generators,motors generally have to be driven far faster than their rated speed toproduce anything near their rated voltage. So what you are looking foris a motor that is rated for high DC voltage, low rpms and high current.Steer away from low voltage and/or high rpm motors. You want a motorthat will put out over 12 Volts at a fairly low rpm, and a useful level ofcurrent. So a motor rated for say 325 rpm at 30 Volts when used as agenerator, could be expected to produce 12+ volts at some reasonablylow rpm. On the other hand, a motor rated at 7200 rpm at 24 voltsprobably won't produce 12+ volts as a generator until it is spinningmany thousands of rpm, which is way too fast for a wind turbine. Soshop for motors accordingly.
I managed toscore one of thegood 30 voltAmetek motorsoff of Ebay foronly $26. Theydon't go thatcheap thesedays. Peopleare catching onto the fact thatthey make greatwindgenerators.Other brands
will work, so don't fret about the price Ameteks are going for. Shopwisely. Anyway, The motor I got was in good shape and worked great.Even just giving the shaft a quick turn with my fingers would light a 12
How I built an electricity producing wind turbine http://www.mdpub.com/Wind_Turbine/index.html
4 dari 40 4/7/2014 7:53 AM

volt bulb quite brightly. I gave it a real test by chucking it up in my drillpress and connecting it to a dummy load. It works great as agenerator, putting out easily a couple hundred Watts with this setup. Iknew then that if I could make a decent set of blades to drive it, itwould produce plenty of power.
So Blades and a hub to connect them to were the next order ofbusiness. More online research ensued. A lot of people made their ownblades by carving them out of wood. That looked like an outrageousamount of work to me. I found that other people were making blades bycutting sections out of PVC pipe and shaping them into airfoils. Thatlooked a lot more promising to me. This web site tells you how to makea set of blades for a small wind turbine using PVC pipe.
http://www.yourgreendream.com/diy_pvc_blades.php
I followed theirgeneral recipe. Idid things a littledifferentlythough. I usedblack ABS pipesince my localhomecenterstore justhappened tohave pre-cutlengths of it. Iused 6 inchpipe instead of4 inch and 24
inches long instead of 19 5/8. I started by quartering a 24 inch longpiece of pipe around its circumference and cutting it lengthwise intofour pieces. Then I cut out one blade, and used it as a template forcutting out the others. That left me with 4 blades (3 plus one spare).
I then did a littleextra smoothingand shapingusing my beltsander andpalm sander onthe cut edges totry to make
How I built an electricity producing wind turbine http://www.mdpub.com/Wind_Turbine/index.html
5 dari 40 4/7/2014 7:53 AM

them into betterairfoils. I don'tknow if it'sreally much ofanimprovement,but it didn't
seem to hurt, and the blades look really good (if I do say so myself).
Now I needed ahub to bolt theblades to andattach to themotor.Rummagingaround in myworkshop, Ifound a toothedpulley that fit onthe motor shaft,but was a littletoo small indiameter to boltthe blades onto.
I also found a scrap disk of Aluminum 5 inches in diameter and ¼ inchthick that I could bolt the blades onto, but wouldn't attach to the motorshaft. The simple solution of course was to bolt these two piecestogether to make the hub.
Much drilling,tapping andbolting later, Ihad a hub.
How I built an electricity producing wind turbine http://www.mdpub.com/Wind_Turbine/index.html
6 dari 40 4/7/2014 7:53 AM

Here it isassembled andwith the bladesattached (afterdrilling mountingholes in them ofcourse).
Here is anotherview of the hubwith bladesattached.
How I built an electricity producing wind turbine http://www.mdpub.com/Wind_Turbine/index.html
7 dari 40 4/7/2014 7:53 AM

On a trip to thehomecenterstore for somePVC doo-dad orother foranother project,I found thesedome shapedvent caps.
I immediatelythought ofadding aspinner to thehub. Wow, withthat on there, itreally looks likea professionallymade unit. I'dnever be able toconvinceanyone I built itmyself out ofjunk from myworkshop and
plumbing parts. They'd all look at me when I said I built it myself andgo "Yeah, right." Then I found a web site that claimed such spinnersdisrupt the airflow and hurt the efficiency of the blades. I'm not sure Ibelieve the reasoning behind the claim, but I left the spinner off, atleast initially.
Next I needed amounting for theturbine.Keeping itsimple, I optedto just strap the
How I built an electricity producing wind turbine http://www.mdpub.com/Wind_Turbine/index.html
8 dari 40 4/7/2014 7:53 AM

motor to a pieceof 2 X 4 wood.The correctlength of thewood wascomputed bythe highlyscientificmethod of
picking the best looking piece of scrap 2 X 4 off my scrap wood pileand going with however long it was. I also cut a piece of 4 inchdiameter PVC pipe to make a shield to go over the motor and protect itfrom the weather. For a tail to keep it turned into the wind, I again justused a piece of heavy sheet Aluminum I happened to have layingaround. I was worried that it wouldn't be a big enough tail, but it seemsto work just fine. The turbine snaps right around into the wind everytime it changes direction. For those of you always clamoring for me toprovide plans, blueprints, schematics, etc., for my projects, I haveadded a few dimensions to the picture. I doubt any of thesemeasurements is critical though.
Here is anotherview of thecompleted headof the unit withthe motor andtail attached.
Next I had tobegin thinkingabout some sortof tower andsome sort ofbearing thatwould allow the
How I built an electricity producing wind turbine http://www.mdpub.com/Wind_Turbine/index.html
9 dari 40 4/7/2014 7:53 AM

head to freelyturn into thewind. I spent alot of time in mylocalhomecenterstores (Lowesand Home
Depot) brainstorming. Finally, I came up with a solution that seems towork well. While brainstorming, I noticed that 1 inch diameter iron pipeis a good slip-fit inside 1 1/4 inch diameter steel EMT electrical conduit.I could use a long piece of 1 1/4 inch conduit as my tower and 1 inchpipe fittings at either end. For the head unit I attached a 1 inch ironfloor flange centered 7 1/2 inches back from the generator end of the2X4, and screwed a 10 inch long iron pipe nipple into it. The nipplewould slip into the top of the piece of conduit I'd use as a tower andform a nice bearing. Wires from the generator would pass through ahole drilled in the 2X4 down the center of the pipe/conduit unit and exitat the base of the tower. Brilliant! (if I do say so myself)
For the towerbase, I startedby cutting a 2foot diameterdisk out ofplywood. Imade a Ushapedassembly out of1 inch pipefittings. In themiddle of thatassembly I puta 1 1/4 inchTee. The Tee is
free to turn around the 1 inch pipe and forms a hinge that allows me toraise and lower the tower. I then added a close nipple, a 1 1/4 to 1reducing fitting, and a 12 inch nipple. Later I added a 1 inch Teebetween the reducer and the 12 inch nipple so there would be a placefor the wires to exit the pipe. This is shown in a photo further down thepage. I also later drilled holes in the wooden disk to allow me to usesteel stakes to lock it in place on the ground.
How I built an electricity producing wind turbine http://www.mdpub.com/Wind_Turbine/index.html
10 dari 40 4/7/2014 7:53 AM

This photoshows the headand basetogether. Youcan begin tosee how it willgo together.Imagine a 10foot long pieceof steel conduitconnecting thetwo pieces.Since I wasbuilding thisthing in Florida,
but was going to use it in Arizona, I decided to hold off on purchasingthe 10 foot piece of conduit until I got to Arizona. That meant the windturbine would never be fully assembled and not get a proper test until Iwas ready to put it up in the field. That was a little scary because Iwouldn't know if the thing actually worked until I tried it in Arizona.
Next, I paintedall the woodenparts with acouple of coatsof white latexpaint I hadleftover fromanother project.I wanted toprotect thewood from theweather. Thisphoto alsoshows the leadcounterweight I
added to the left side of the 2X4 under the tail to balance the head.
This photoshows thefinished headunit with theblades
How I built an electricity producing wind turbine http://www.mdpub.com/Wind_Turbine/index.html
11 dari 40 4/7/2014 7:53 AM

attached. Is thata thing ofbeauty or what?It almost lookslike I know whatI'm doing.
I never got achance toproperly test the
unit before heading to Arizona. One windy day though, I did take thehead outside and hold it high up in the air above my head into the windjust to see if the blades would spin it as well as I had hoped. Spin itthey did. In a matter of a few seconds it spun up to a truly scary speed(no load on the generator), and I found myself holding onto a giant,spinning, whirligig of death, with no idea how to put it down withoutgetting myself chopped to bits. Fortunately, I did eventually manage toturn it out of the wind and slow it down to a non-lethal speed. I won'tmake that mistake again.
Now That I had all the mechanical parts sorted out, it was time to turntoward the electronic end of the project. A wind power system consistsof the wind turbine, one or more batteries to store power produced bythe turbine, a blocking diode to prevent power from the batteries beingwasted spinning the motor/generator, a secondary load to dump powerfrom the turbine into when the batteries are fully charged, and a chargecontroller to run everything.
There are lots of controllers for solar and wind power systems.Anyplace that sells alternative energy stuff will have them. There arealso always lots of them for sale on Ebay . I decided to try building myown though. So it was back to Googling for information on wind turbinecharge controllers. I found a lot of information, including somecomplete schematics, which was quite nice, and made building my ownunit very easy. I based my unit on the schematic of the one found onthis web site:
http://www.fieldlines.com/story/2004/9/20/0406/27488
That web site goes into a lot of detail about the controller, so I'm onlygoing to talk about it in fairly general terms here. Again, while I followedtheir general recipe, I did do some things differently. Being an avidelectronics tinkerer from an early age, I have a huge stock of electroniccomponents already on hand, so I had to buy very little to complete the
How I built an electricity producing wind turbine http://www.mdpub.com/Wind_Turbine/index.html
12 dari 40 4/7/2014 7:53 AM
controller. I substituted different components for some parts andreworked the circuit a little just so I could use parts I already had onhand. That way I had to buy almost nothing to build the controller. Theonly part I had to buy was the relay.
Whether you build your own, or buy one, you will need some sort ofcontroller for your wind turbine. The general principal behind thecontroller is that it monitors the voltage of the battery(s) in your systemand either sends power from the turbine into the batteries to rechargethem, or dumps the power from the turbine into a secondary load if thebatteries are fully charged (to prevent over-charging and destroying thebatteries). The schematic and write-up on the above web page does agood job of explaining it.
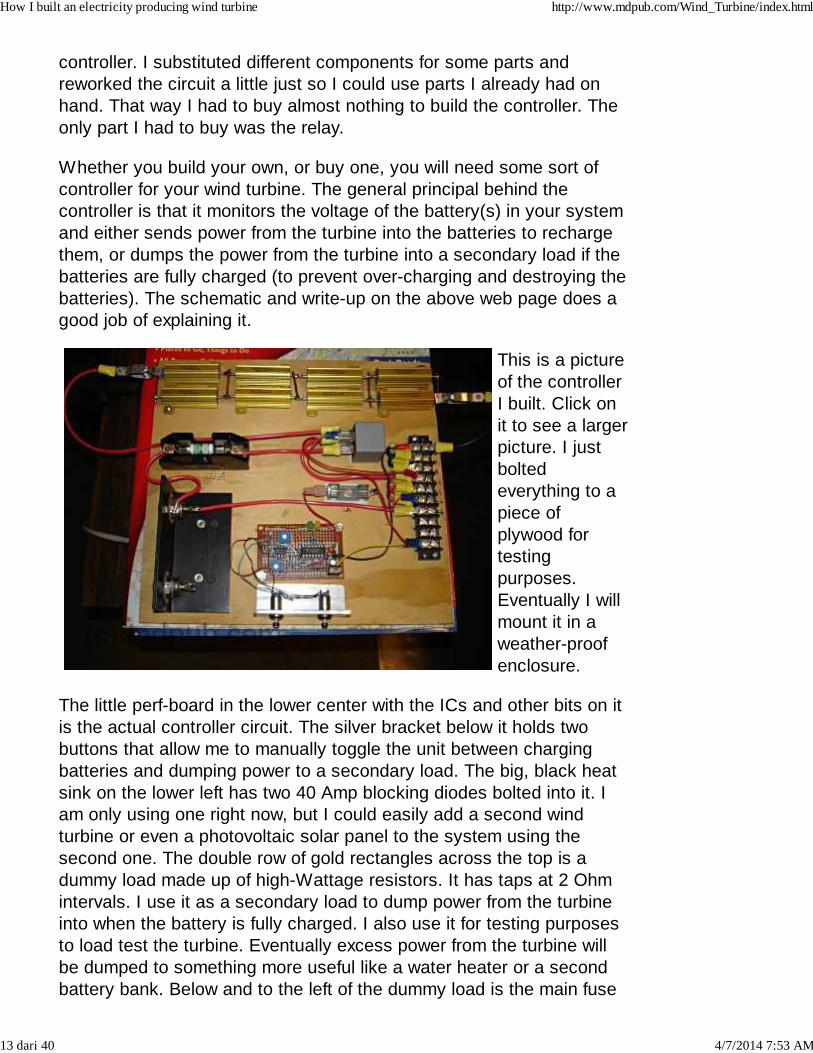
This is a pictureof the controllerI built. Click onit to see a largerpicture. I justboltedeverything to apiece ofplywood fortestingpurposes.Eventually I willmount it in aweather-proofenclosure.
The little perf-board in the lower center with the ICs and other bits on itis the actual controller circuit. The silver bracket below it holds twobuttons that allow me to manually toggle the unit between chargingbatteries and dumping power to a secondary load. The big, black heatsink on the lower left has two 40 Amp blocking diodes bolted into it. Iam only using one right now, but I could easily add a second windturbine or even a photovoltaic solar panel to the system using thesecond one. The double row of gold rectangles across the top is adummy load made up of high-Wattage resistors. It has taps at 2 Ohmintervals. I use it as a secondary load to dump power from the turbineinto when the battery is fully charged. I also use it for testing purposesto load test the turbine. Eventually excess power from the turbine willbe dumped to something more useful like a water heater or a secondbattery bank. Below and to the left of the dummy load is the main fuse
How I built an electricity producing wind turbine http://www.mdpub.com/Wind_Turbine/index.html
13 dari 40 4/7/2014 7:53 AM

for the wind turbine. The small gray cube is a 40 Amp SPDTautomotive relay (the only part I had to purchase) which sends theturbine power either to the batteries or to the dummy load. Along theright side is the terminal block which allows me to connect everythingtogether.
In operation, the wind turbine is connected to the controller. Lines thenrun from the controller to the battery. All loads are taken directly fromthe battery. If the battery voltage drops below 11.9 volts, the controllerswitches the turbine power to charging the battery. If the batteryvoltage rises to 14 volts, the controller switches to dumping the turbinepower into the dummy load. There are trimpots to adjust the voltagelevels at which the controller toggles back and forth between the twostates. I chose 11.9V for the discharge point and 14V for the fullycharged point based on advice from lots of different web sites on thesubject of properly charging lead acid batteries. The sites allrecommended slightly different voltages. I sort of averaged them andcame up with my numbers. When the battery voltage is between 11.9Vand 14V, the system can be switched between either charging ordumping. A pair of push buttons allow me to switch between statesanytime, for testing purposes. Normally the system runs automatically.When charging the battery, the yellow LED is lit. When the battery ischarged and power is being dumped to the the dummy load, the greenLED is lit. This gives me some minimal feedback on what is going onwith the system. I also use my multimeter to measure both batteryvoltage, and turbine output voltage. I will probably eventually add eitherpanel meters, or automotive-style voltage and charge/discharge metersto the system. I'll do that once I have it in some sort of enclosure.
I used my variable voltage bench power supply to simulate a battery invarious states of charge and discharge to test and tune the controller. Icould set the voltage of the power supply to 11.9V and set the trimpotfor the low voltage trip point. Then I could crank the voltage up to 14Vand set the trimpot for the high voltage trimpot. I had to get it setbefore I took it into the field because I'd have no way to tune it up outthere.
Update: I am now using 14.8V for the full charge point after furtherresearching the proper charging of lead-acid batteries. I have alsoswitched to sealed lead-acid batteries because I got a bunch of themfree from my brother. I am contemplating switching to deep-cyclebatteries when the ones I have now begin to fail.
Update: I have found out the hard way that it is important with
How I built an electricity producing wind turbine http://www.mdpub.com/Wind_Turbine/index.html
14 dari 40 4/7/2014 7:53 AM

this controller design to connect the battery first, then connectthe wind turbine and/or solar panels. If you connect the windturbine first, the wild voltage swings coming from the turbine won't besmoothed out by the load of the battery, the controller will behaveerratically, the relay will click away wildly, and voltage spikes coulddestroy the ICs. So always connect to the battery(s) first, then connectthe wind turbine. Also, make sure you disconnect the wind turbine firstwhen taking the system apart. Disconnect the battery(s) last.
Update:Finally, by verypopulardemand, I havea schematic ofmy chargecontroller. Clickon it for the fullsize schematic.It only varies alittle bit fromthe one at theabove link. Isubstituted afew parts I hadon hand for
ones in the original design. That way I only had to buy a few things tobuild the controller. You could do the same. It is not critical to exactlyduplicate this design. I used a different op-amp chip and a differentMOSFET than the original design. Most of the resistor values are notcritical. If you have the knowledge to do so, feel free to substitute.Also, feel free to experiment. I'd be interested in hearing from anyonewho feels they have improved on the design in any way.
At last, all parts of the project were complete. It was all done only aweek before my vacation arrived. That was cutting it close. Idisassembled the turbine and carefully packed the parts and the toolsI'd need to assemble it for their trip across the country. Then I onceagain I drove out to my remote property in Arizona for a week of off-gridrelaxation, but this time with hopes of having some actual electricity onthe site.
The first orderof business wassetting up and
How I built an electricity producing wind turbine http://www.mdpub.com/Wind_Turbine/index.html
15 dari 40 4/7/2014 7:53 AM

bracing thetower. Afterarriving at myproperty andunloading myvan, I drove tothe nearestHome Depot(about 60 milesone way) andbought the 10foot long piece
of 1 1/4 inch conduit I needed for the tower. Once I had it, assemblywent quickly. I used nylon rope to anchor the pole to four big woodenstakes driven in the ground. Turnbuckles on the lower ends of eachguy-line allowed my to plumb up the tower. By releasing the line fromeither stake in line with the hinge at the base, I could raise and lowerthe tower easily. Eventually the nylon line and wooden stakes will bereplaced with steel stakes and steel cables. For testing though, thisarrangement worked fine.
This photoshows acloseup of howthe guy-linesattach near thetop of the tower.I usedchain-link fencebrackets as tiepoints for myguy-lines. Thefence bracketsdon't quiteclamp downtightly on the
conduit which is smaller in diameter than the fence posts they arenormally used with. So there is a steel hose clamp at either end of thestack of brackets to keep them in place.
This photoshows the baseof the tower,
How I built an electricity producing wind turbine http://www.mdpub.com/Wind_Turbine/index.html
16 dari 40 4/7/2014 7:53 AM

staked to theground, andwith the wirefrom the windturbine exitingfrom the Teebelow theconduit tower. Iused an oldorangeextension cord
with a broken plug to connect between the turbine and the controller. Isimply cut both ends off and put on spade lugs. Threading the wirethrough the tower turned out to be easy. It was a cold morning and thecord was very stiff. I was able to just push it through the length of theconduit tower. on a warmer day I probably would have had to use afishtape or string line to pull the cord through the conduit. I got lucky.
This photoshows theturbine headinstalled on topof the tower. Igreased up thepipe on thebottom of thehead and slid itinto the top ofthe conduit. Itmade a greatbearing, just asI'd planned.Sometimes I
even amaze myself.
Too bad there was nobody around to get an Iwo Jima Flag Raising typepicture of me raising the tower up with the head installed.
Now I'm just waiting for the wind to blow. Wouldn't you know it, it wasdead calm that morning. It was the first calm day I had ever seen outthere. The wind had always been blowing every other time I had beenthere. Well, nothing to do but wait.
Finally! The
How I built an electricity producing wind turbine http://www.mdpub.com/Wind_Turbine/index.html
17 dari 40 4/7/2014 7:53 AM
wind was upand the turbinewas spinning.The winds wereactuallyunusually lightthe whole time Iwas on myproperty thistime. The windturbine stillmade goodamounts ofpower though,
even with winds that at best made it to only a little over 20 mph attimes.
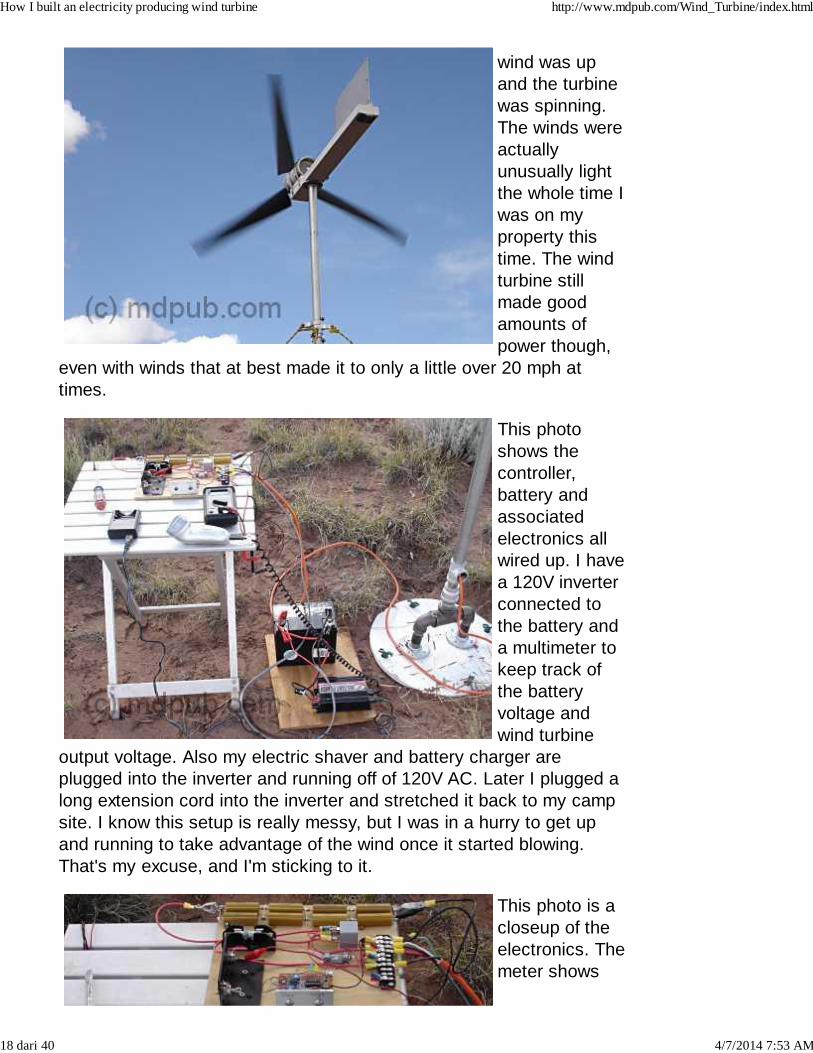
This photoshows thecontroller,battery andassociatedelectronics allwired up. I havea 120V inverterconnected tothe battery anda multimeter tokeep track ofthe batteryvoltage andwind turbine
output voltage. Also my electric shaver and battery charger areplugged into the inverter and running off of 120V AC. Later I plugged along extension cord into the inverter and stretched it back to my campsite. I know this setup is really messy, but I was in a hurry to get upand running to take advantage of the wind once it started blowing.That's my excuse, and I'm sticking to it.
This photo is acloseup of theelectronics. Themeter shows
How I built an electricity producing wind turbine http://www.mdpub.com/Wind_Turbine/index.html
18 dari 40 4/7/2014 7:53 AM

that the windturbine isproducing 13.32Volts. Myelectric shaverand batterycharger areproviding loadson the systemthrough the AC
inverter.
Here the metershows theturbineproducing 13.49volts. Thevoltage from theturbine goes uponly a little asthe wind speedincreases onceit has a load topower. Oncethe wind startsblowing, theturbine head
snaps around into it and begins spinning up. It spins up quickly untilthe output voltage exceeds the battery voltage plus the blocking diodedrop (around 13.2 volts, depending on the state of the battery charge).it is really running without a load until that point. Once the that voltageis exceeded, the turbine suddenly has a load as it begins dumpingpower into the battery. Once under load, the rpms only slightlyincrease as the wind speed increases. More wind means more currentinto the battery which means more load on the generator. So thesystem is pretty much self-governing. I saw no signs of over-reving. Ofcourse in storm-force winds, all bets are off. Switching the controller todump power into the dummy load did a good job of braking the turbineand slowing it way down even in stronger gusts. Actually shorting theturbine output is an even better brake. It brings the turbine to a haltright now, even in strong winds. Shorting the output is how I made theturbine safe to raise and lower, so I wouldn't get sliced and diced bythe spinning blades. Warning though, the whole head assembly can
How I built an electricity producing wind turbine http://www.mdpub.com/Wind_Turbine/index.html
19 dari 40 4/7/2014 7:53 AM
still swing around and crack you hard on the noggin if the windchanges direction while you are working on these things. So be carefulout there.
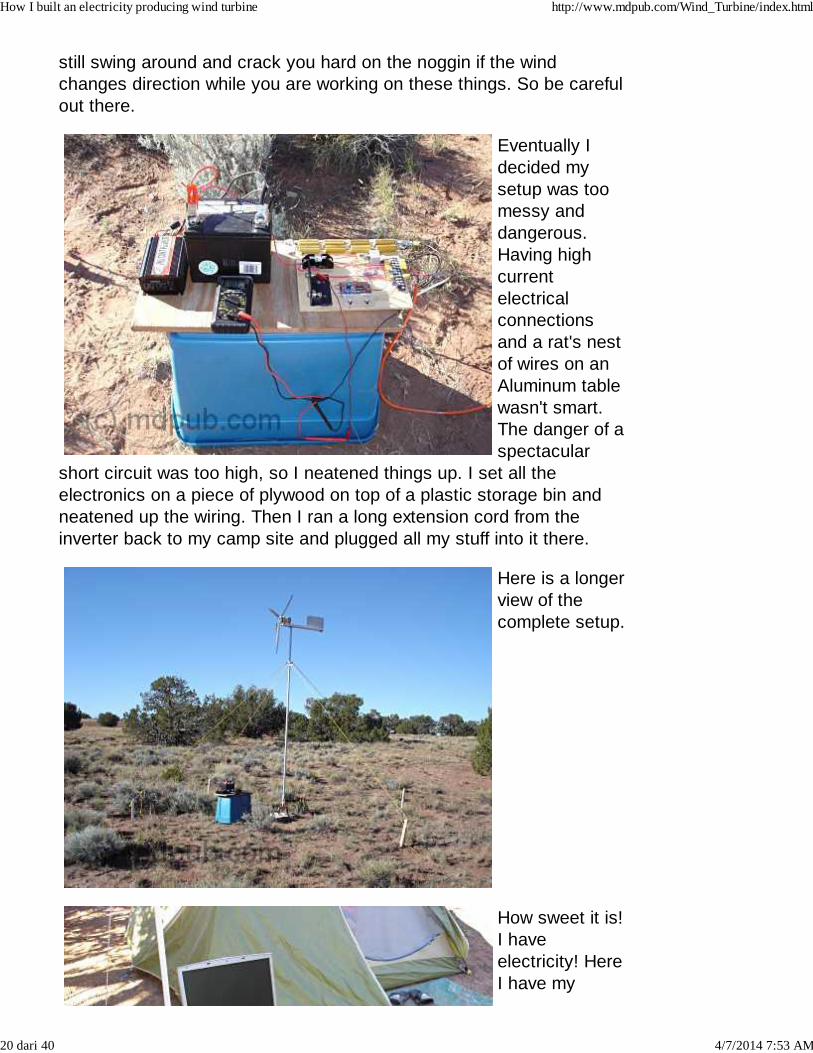
Eventually Idecided mysetup was toomessy anddangerous.Having highcurrentelectricalconnectionsand a rat's nestof wires on anAluminum tablewasn't smart.The danger of aspectacular
short circuit was too high, so I neatened things up. I set all theelectronics on a piece of plywood on top of a plastic storage bin andneatened up the wiring. Then I ran a long extension cord from theinverter back to my camp site and plugged all my stuff into it there.
Here is a longerview of thecomplete setup.
How sweet it is!I haveelectricity! HereI have my
How I built an electricity producing wind turbine http://www.mdpub.com/Wind_Turbine/index.html
20 dari 40 4/7/2014 7:53 AM

laptop computerset up andplugged into thepower providedby the inverter,which in turn ispowered by thewind turbine. Inormally onlyhave about twohours of battery
life on my laptop. So I don't get to use it much while I'm camping. Itcomes in handy though for downloading photos out of my camera whenits memory card gets full, making notes on projects like this one,working on the next great American novel, or just watching DVDmovies. Now I have no battery life problems, at least as long as thewind blows. Besides the laptop, I can also now recharge all my otherbattery powered equipment like my cell phone, my camera, my electricshaver, my air mattress pump, etc. Life used to get real primitive onprevious camping trips when the batteries in all my electronic stuff randown.
So how much did all this cost to build? Well, I saved all the receipts foreverything I bought related to this project.
Part Origin Cost
Motor/Generator Ebay $26.00Misc. pipe fittings Homecenter Store $41.49Pipe for blades Homecenter Store $12.84Misc hardware Homecenter Store $8.00Conduit Homecenter Store $19.95Wood & Aluminum Scrap Pile $0.00Power Cable Old extension cord $0.00Rope & Turnbuckles Homecenter Store $18.47Electronic Parts Already on hand $0.00Relay Auto Parts Store $13.87Battery Borrowed from my UPS $0.00Inverter Already on hand $0.00Paint Already on hand $0.00
Total $140.62
How I built an electricity producing wind turbine http://www.mdpub.com/Wind_Turbine/index.html
21 dari 40 4/7/2014 7:53 AM

Not too bad. I doubt I could buy a commercially made turbine with acomparable power output, plus a commercially made charge controller,plus a commercially made tower for less than $750-$1000.
Future modifications and enhancements I would like to make to thesystem include:
Mount the electronics in a weather-proof enclosure.Add meters to monitor battery voltage and charge/dischargecurrent.Add a tachometer so I know how fast it is spinning.Add more batteries to increase reserve storage capacity.Add a second wind turbine or solar panels to increase powerproduction.Get a higher Wattage inverter.Some method to automatically furl or brake the unit in high winds.A concrete foundation for the tower.A taller tower with steel stakes and steel guy wires.
Most of these modifications won't be made until I am living on the sitepermanently, or semi-permanently. One modification I am going to workon completing in the next few months before my next trip out there isthe weather-proof enclosure and probably adding the meters.
As the project evolves in the future, I'll post updates here.
UPDATE 03/19/07
This web site has become very popular. Thank you all for your interestand encouragement. I am getting tons of email questions from peopleabout all sorts wind power related (and not so related) issues. Manyare the same few questions asked over and over again. Unfortunately Isimply don't have the time to answer them all. I do try to read them all,but my busy schedule simply doesn't allow enough time to respond tomost of them. So don't take it personally if you don't get a response. I'llinstead post responses to the most commonly asked questions hereas time allows.
Question #1: How do you prevent the power cable coming down theinside of the tower from winding up over time?
Answer: This is by far the most asked question I get from people. Theshort answer is I don't do anything to prevent it. The cable really
How I built an electricity producing wind turbine http://www.mdpub.com/Wind_Turbine/index.html
22 dari 40 4/7/2014 7:53 AM

doesn't wind up all that badly. The wind is as liable to spin the turbinehead around one way as it is the other. So there is no real tendency forthe cable to wind up badly. If it does wind up over time, it is no big dealto simply disconnect the wires at the bottom and manually unwind it. Ihave an idea for a fairly easy to build slip-ring system that wouldprevent any possibility of winding up the cable. At present though,there is little need to actually try implementing it. Maybe I'll try it out ona future turbine.
Update: Here is a video explaining the wire twisting issue.
Question #2: Can you help me design/build a wind power system thatwill power my whole home/farm so I can get out from under the thumbof my evil electric utility company?
Answer: The short answer is no. Not just due to time constraints, butalso because my system isn't designed to produce enough electricityto power an entire home or farm. My system was just designed toprovide a couple of hundred Watts tops in an area where no otherelectric options were available. I am working on design andconstruction of other wind turbines and even solar panels to increasemy power production beyond the current minimal level. However, evenif successful, these new additions would still not power a typical homeor farm. My ultimate goal is to have enough power from wind and solarsources to power a small cabin and observatory on my remote propertythat will only be occupied occasionally and won't have much need for
How I built an electricity producing wind turbine http://www.mdpub.com/Wind_Turbine/index.html
23 dari 40 4/7/2014 7:53 AM

electricity. If you need a bigger system, then you need someone withexperience with bigger systems to help you out.
Question #3: What are you working on now?
Answer: As time permits I am reworking the charge controller. It isgoing to be mounted in a weather-proof case with automotive-stylevoltage and amp meters installed on it. I have all the parts I need, buttime to work on it is lacking. I am also working on a new design for theturbine head that will automatically turn out of the wind if it gets toostrong so as to prevent over-speed damage. I have also started workon building a solar panel out of cheaply acquired solar cell seconds(from Ebay ) and commonly available construction materials. Oncethere is any progress on that project, I'll post it to the web site, butprobably in its own section, rather than here on the wind turbine page.
UPDATE 05/17/07
Here is a photoof me setting upthe wind turbineon my remoteproperty duringour May 2007trip to Arizona. Ihad left most ofthe equipmenton-site inArizona. I onlybrought theturbine headand chargecontroller back
home with me. Everything weathered the winter ok. Just some slightsurface rust on parts of the tower base. Everything went back togetherquickly and worked great.
I used the windturbine to powermy new popuptrailer on myspring vacation.The strong
How I built an electricity producing wind turbine http://www.mdpub.com/Wind_Turbine/index.html
24 dari 40 4/7/2014 7:53 AM

spring windskept the windturbine spinningall day everyday and most ofthe nights toowhile I was inArizona. Theturbine provided
enough power for the interior 12V lighting and enough 120V AC at thepower outlets to keep my battery charger, electric shaver, and minivacuum cleaner (camping is messy) all charged up and running. Mygirlfriend complained about it not having enough power to run herblow-dryer though.
Here my voltmeter isshowing theturbineproducing 14.5volts in a stiffwind. Althoughthe wind turbinepowered thepopup fairlywell, I thinkthere is roomforimprovement. Iwas powering
the popup with 120 Volts AC via my inverter. The popup has its own120V AC to 12V DC power supply for powering the interior lighting andother 12V accessories. The losses involved in converting power to120V AC and then back to 12V DC probably heavily contributed to thebattery running down fairly quickly a couple of times during periods oflight wind. Powering the 12V systems directly from the battery wouldprobably work better. The only downside I see is that the DC voltagewon't be regulated and could swing a couple of volts up or down withchanges in wind speed. That wouldn't bother most kinds of lighting toomuch. Other devices could have a problem with it though.
This photoshows the
How I built an electricity producing wind turbine http://www.mdpub.com/Wind_Turbine/index.html
25 dari 40 4/7/2014 7:53 AM

turbine spinningaway andcranking out thepower. I haven'thad the time tocomplete therebuild of thechargecontroller in aweather-proofenclosure. Sothis time I just
put all the electronics in a plastic bin to protect them from theelements. Good thing too, since it rained several times while we werethere this time. The jug of lamp oil is on top of the bin to prevent thewind from ripping the lid off.
UPDATE 01/3/08
I have completed my first home-built solar panel. It will be used inaddition to the wind turbine to produce more power on my remoteArizona land.
UPDATE 05/20/08
I havecompleted therebuild of thechargecontroller. It isnow in a
semi-weatherproof enclosure and I have added a built in voltage meter.I have also added a few new features. The unit now has provisions for
How I built an electricity producing wind turbine http://www.mdpub.com/Wind_Turbine/index.html
26 dari 40 4/7/2014 7:53 AM

power inputs from multiple sources. It also has built-in fused 12V powerdistribution for three external loads.
This photoshows theinputs to thechargecontroller. Ithas provisionsfor 3 inputs.One for mywind turbineand two forsolar panels,though I onlyhave one solarpanel completeat this time.
This photoshows theoutputs fromthe chargecontroller.There areconnections tothe batterybank(s),dummy load,and three fusedexternal 12Vloads.
This photoshows theinside of thechargecontroller. Ibasically justtransferredeverything thatI originally had
How I built an electricity producing wind turbine http://www.mdpub.com/Wind_Turbine/index.html
27 dari 40 4/7/2014 7:53 AM

bolted onto theplywood boardin the prototypeinto this box. Iadded anautomotive
illuminated voltage gage and fuses for 3 external 12V loads. I usedheavy gage wire to try to reduce losses due to wire resistance. Everywatt counts when you are living off-grid.
This is theschematic forthe new chargecontroller. It ispretty much thesame as theold one above,except for theaddition of theVolt meter andextra fuseblocks for theexternal loads.Click on it for alarger version.
JasonMarkham hascreated aprinted circuitboard for thechargecontroller. Clickthe image formoreinformation.
This is a blockdiagram of the
How I built an electricity producing wind turbine http://www.mdpub.com/Wind_Turbine/index.html
28 dari 40 4/7/2014 7:53 AM
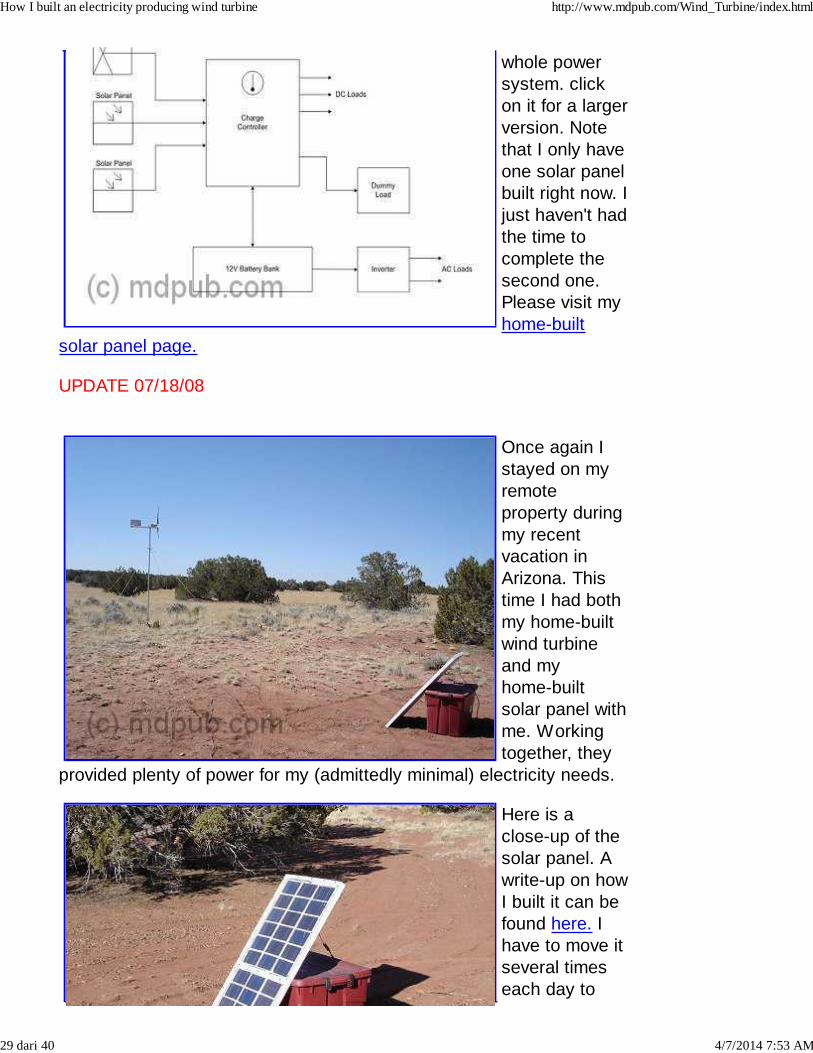
whole powersystem. clickon it for a largerversion. Notethat I only haveone solar panelbuilt right now. Ijust haven't hadthe time tocomplete thesecond one.Please visit myhome-built
solar panel page.
UPDATE 07/18/08
Once again Istayed on myremoteproperty duringmy recentvacation inArizona. Thistime I had bothmy home-builtwind turbineand myhome-builtsolar panel withme. Workingtogether, they
provided plenty of power for my (admittedly minimal) electricity needs.
Here is aclose-up of thesolar panel. Awrite-up on howI built it can befound here. Ihave to move itseveral timeseach day to
How I built an electricity producing wind turbine http://www.mdpub.com/Wind_Turbine/index.html
29 dari 40 4/7/2014 7:53 AM

keep it pointedat the sun, butthat isn't reallya big hardship.Maybesomeday I will
build a tracking system to automatically keep it aimed at the sun.
I have finallycompleted mysecondhome-builtsolar panel.This is asmaller 15 Wattpanel. It foldsup for easierstorage andtransportation.Click the phototo learn moreabout it.
Here is a photoof the newchargecontroller unit.The wires onthe left side arecoming fromthe windturbine andsolar panel.The wires onthe right sideare going to thebattery bankand dummy
load. I cut up an old heavy-duty 100 ft. extension cord to make cablesto connect wind turbine and solar panel to the charge controller. Thecable to the wind turbine is about 75 feet long and the cable to thesolar panel is about 25 feet long. The battery bank I am currently usingconsists of 11 sealed lead-acid 12V batteries of 8 Amp-Hour capacity
How I built an electricity producing wind turbine http://www.mdpub.com/Wind_Turbine/index.html
30 dari 40 4/7/2014 7:53 AM

connected in parallel. That gives me 88 Amp-Hours of storagecapacity, which is plenty for camping. As long as it is sunny and windy,(nearly every day is sunny and windy on my property), the wind turbineand solar panel keep the batteries well charged.
Disaster! Iwent into townto pick upsome supplies.While I wasgone, a windstorm came up.Winds well inexcess of 50MPH blewthrough myarea. When Ireturned Ifound theturbine in this
condition. Two blades had snapped off, and the third was cracked, butstill attached. The blades broke where the mounting tab met the bodyof the blade. I knew this was a weak spot and always expected theywould break there eventually. I don't know for sure if it was over-speed,or just fatigue from repeated flexing that caused them to break. Isuspect fatigue though. I could see the blades flexing in strong windsbefore they broke. Interestingly though, I found that the battery bankwas fully charged. The wind turbine must have generated some seriouspower in those high winds before it failed.
I knew I could get the wind turbine up and running again if I could justdrill new mounting holes in the blades. I had no drill or drill bits with methough. I had to think about it for a while before I figured out how to doit. Then, the spirit of MacGyver came over me, and I knew just how todo it.
I figured outthat if I heatedmy largestPhillipsscrewdriverover a fire, itwould melt ahole in the PVC
How I built an electricity producing wind turbine http://www.mdpub.com/Wind_Turbine/index.html
31 dari 40 4/7/2014 7:53 AM

blades just theright size forthe mountingbolts. So I gotsome charcoalgoing andstarted making
holes. It's a terrible abuse of a perfectly good screwdriver, but it was anemergency situation after all.
I used one ofthe brokenmounting tabsas a templateto locate whereto make theholes in thebases of theblades. Then itwasstraightforwardto just meltthrough theblades with thescrewdriver. It
was very quick and easy, and the holes were very clean.
I thenre-mounted theblades on thehub of theturbine. I usedthe brokenmounting tabsas spacersunder theblades toprevent themfrom fouling theheads of thebolts that holdthe hub
together. The tabless blades are much stronger and less likely to flex in
How I built an electricity producing wind turbine http://www.mdpub.com/Wind_Turbine/index.html
32 dari 40 4/7/2014 7:53 AM

strong winds. I should have done it this way in the beginning. Live andlearn.
Here is theturbine allre-assembledand ready to goback up on thetower.
Here is thewind turbine upand flyingagain. The lossof two inches ofblade lengthdoesn't seemto haveadverselyimpacted theperformance ofthe turbine. Itstill worksgreat. Not badfor an
improvised repair job.
UPDATE 03/20/11
I havere-designed thebattery chargecontrollercircuit. It is now
How I built an electricity producing wind turbine http://www.mdpub.com/Wind_Turbine/index.html
33 dari 40 4/7/2014 7:53 AM

much lesscomplex, anduses only easyto find parts, soit is mucheasier to build.Click the photofor moreinformation.
UPDATE 06/06/11
I have madesomemodifications tothe wind turbine.I have installednew blades that Ibought on theinternet. Theseblades are soldas replacementsfor the Air-Xseriescommerciallymade windturbines. Theyare moreefficient than myhome-madeblades, and startup in lower windspeeds. I havealso increasedthe tail area ofthe turbine sincethese newblades are bothheavier and havemore surfacearea than thanmy home-made
How I built an electricity producing wind turbine http://www.mdpub.com/Wind_Turbine/index.html
34 dari 40 4/7/2014 7:53 AM

blades. Checkout the video formore informationon themodifications.
The new andimproved windturbine reallyworks great. It isnow producingmuch morepower, andworking in lighterwinds thanbefore.
UPDATE 03/31/12
This web page hasreceived an extensivewrite-up in a new book onhow to Build Your OwnSmall Wind PowerSystem. The authorcontacted me months agoasking permission toinclude some of myphotos and informationfrom my wind turbine website in an upcoming book.I get this sort of request alot. Usually they will justpublish a photo or two andwrite a short blurb aboutmy system. I just receiveda complementary reviewcopy of the finished book.This time the author
devoted about four pages to describing what I am doing, and madeseveral other mentions of me in the book, with nice links back to myweb site. It is a great book too, and not just because I am in it. It ischock full of useful information for anyone who is thinking about getting
How I built an electricity producing wind turbine http://www.mdpub.com/Wind_Turbine/index.html
35 dari 40 4/7/2014 7:53 AM

into wind power.
Click the photo for more information.
UPDATE 05/24/12
I have madeanothermodification tomy home-builtwind turbine. Ihave added aprofessional-looking nosecone to it.Below is how Idid it.
Click the photofor a largerimage.
If you scrollback up to nearthe beginningof this project,you will seewhere I foundthisdome-shaped,PVC vent capin the plumbingsection of ahome-centerstore. I thoughtit would make agreat nose
cone for the turbine. Here is a photo from above with the vent capsitting next to the hub with the original (now broken) blades. I never gotaround to installing the cap on the hub. The turbine worked greatwithout it. Eventually I pretty much forgot about it. The cap bangedaround in a box of spare parts for the turbine for years. One day, Ifound it again in the bottom of the box, and decided out of boredom to
How I built an electricity producing wind turbine http://www.mdpub.com/Wind_Turbine/index.html
36 dari 40 4/7/2014 7:53 AM

just go ahead and mount it on the turbine.
I started bycutting threenotches in thecap so it wouldfit over theroots of thenew blades.Then I used JBWeld epoxy toattach threemounting boltsto the cap. Thehub that camewith the newblades is drilled
for mounting up to six blades, but I am only using three, so there areextra holes in the hub that can be used for mounting the nose cone. Iactually put the bolts through three of the extra holes, then put theepoxy on the heads of the bolts, then set the cap in place with itsmounting tabs aligned over the epoxy-covered tops of the bolts. Oncethe epoxy had hardened, I removed the nose cone, (now with boltsattached), and slathered on some more epoxy to get a goodconnection between the cap and the bolts. This photo shows the nosecone after the second application of epoxy.
Click the photo for a larger image.
Then it was justa matter ofputting thenose coneback in placeon the hub andusing somenuts andlock-washers tohold it in place.I must havedone a good
How I built an electricity producing wind turbine http://www.mdpub.com/Wind_Turbine/index.html
37 dari 40 4/7/2014 7:53 AM

job of centeringthe cap
because the rotational balance of the turbine was perfect after theinstallation. I should add a little more weight to the tail of the turbine tobalance it front to back. Still, it wasn't too far out of balance, so Idecided to erect it and try it out as is.
Click the photo for a larger image.
Boy, that looksnice on there. Itreally gives theturbine apolishedappearance.The whole jobonly took aboutan hour ofactual work. Itprobably wouldhave goneeven quicker if Ihad done it inthe workshop,
instead of in the field. I did have to wait several hours for the epoxy toproperly cure though before actually bolting the nose cone on andtrying it out.
Click the photo for a larger image.
How I built an electricity producing wind turbine http://www.mdpub.com/Wind_Turbine/index.html
38 dari 40 4/7/2014 7:53 AM

Here is a briefvideo of the windturbine inoperation with thenew nose coneinstalled. It reallylooks good onthere, if I do sayso myself. It alsoseems to actuallymake the turbinework better. Itseems to start upin even lighterwinds thanbefore. I wasfrankly amazed tosee it spinningaway in winds Icould barely evenfeel. I think thenose cone mustbe smoothlydeflecting airaround itself ontothe blades.Without thecone, air hittingthe flat hub mustbecome turbulentand notcontributesignificantly todriving theturbine. That'smy operatingtheory anyway.Mounting thething was worththe effort just forhow good itlooks. If it works
How I built an electricity producing wind turbine http://www.mdpub.com/Wind_Turbine/index.html
39 dari 40 4/7/2014 7:53 AM

better too, that'sjust a bonus.
[Back to Mike's Homepage] [Email me]
Other places to visit:
[Mike's telescope workshop] [Mike's home-built jet engine page]
[Mike's gold prospecting page] [Mike's Home-Built Solar Panel page]
© Copyright 2006-2014 Michael Davis, All rights reserved.
How I built an electricity producing wind turbine http://www.mdpub.com/Wind_Turbine/index.html
40 dari 40 4/7/2014 7:53 AM