
Honeycomb/Pleated...Honeycomb & Pleated Shades meticulously made by hand in our 8251 Preston Ct.,...
2
Honeycomb & Pleated Shades meticulously made by hand in our Great Windows factory 8251 Preston Ct., Jessup, MD 20794 www.greatwindows.com 1-800-556-6632 At Great Windows ™ child safety is first. All of our products are fitted with the highest quality components that provide the most complete safety measures in the industry. Our Honeycomb Shades for example, have a cord stop that holds together the multiple cords inside the stop mechanism. This allows for a single nylon cord to protrude from the bottom of the cord stop. This prevents loops from forming which could be hazardous. Cord cleats are also available upon request. Child Safety In order to keep your window treatments looking new, follow the recommended methods for care and maintenance. Regular care will result in better appearance and performance from your window coverings. HONEYCOMB: Light Filtering = X / Light Blocking = Z PLEATED: Sunset = O / Milano Crinkle = Y Cleaning and Care INSTALLATION INSTRUCTIONS G Installing Extension Brackets (optional) Extension brackets can project the installation brackets up to 2 1/2” from the mounting surface. Connect the installation brackets with the machine screw and speed nut which are included with each extension bracket. Be sure to use the same hole on all the extension brackets, so that each installation bracket projects the same distance from the mounting surface. Make sure the tops of the extension brackets are perfectly horizontal and aligned at the same height and use two screws to attach to wall. Please refer back to Section D for details. I Operating Honeycomb or Pleated Shades Keep the cord close to the plane of the fabric when operating the shade; for best results, do not pull the cord away from the shade more than 15°. To disengage the locking mechanism, move the cord toward the center of the shade approximately 30° from the vertical position. Raise or lower the shade while holding the cord at this angle. To engage the locking mechanism, return the cord to the vertical position. 1 2 1 2 3 1 2 3 H Installing the Valance Standard Brackets Make sure tab screw is loose, and tab is hanging freely (Fig. 1). Tilt and slip the inside lip of the headrail over the installation brackets’ front ledges as shown (Fig. 2). Raise back of headrail so that it fits completely inside the notches in the back of brackets (Fig. 3). To secure headrail to brackets tighten tab screws (Fig. 4). J Installing Hold Down Bracket (optional) If mounting to a door; your shade should include hold down brackets. With the shade at its full drop, place the pins on the hold down brackets into the holes in the bottom rail end caps and mark where to drill the mounting holes. Attach the hold down brackets with one screw through the side hole or two screws through the end holes. Be sure both bracket pins are aligned and level. 1 2 Dusting Hand-Held Vacuum Compressed Air Hair Dryer Spot Cleaning Water Immersion Ultrasonic Cleaning X Z X Z X Z X O Y O Y O Y O Y Y Hold Down Bracket Bottom Rail 4 1 2 3 Swivel Brackets To open brackets turn brackets’ arms as shown (Fig. 2). To secure headrail turn swivel brackets’ arms as shown (Fig. 3). Slip brackets’ tabs to fit under headrail’s inside lip. Push arm tight against front of headrail (Fig. 4). Turn Phillips Head Screwdriver CCW. FIGURE 1 FIGURE 2 FIGURE 3 FIGURE 4 FIGURE 1 FIGURE 2 FIGURE 3 FIGURE 4 Honeycomb Shades all sizes. Pleated Shades 1” pleat size.
Transcript of Honeycomb/Pleated...Honeycomb & Pleated Shades meticulously made by hand in our 8251 Preston Ct.,...
Honeycomb &Pleated Shades
meticulously made
by hand in our
Great Windows factory8251 Preston Ct., Jessup, MD 20794www.greatwindows.com
1-800-556-6632
At Great Windows™ child safety is first. All of our products are fittedwith the highest quality components that provide the most completesafety measures in the industry. Our Honeycomb Shades for example,have a cord stop that holds together the multiple cords inside thestop mechanism. This allows for a single nylon cord to protrude fromthe bottom of the cord stop. This prevents loops from forming whichcould be hazardous. Cord cleats are also available upon request.
Child Safety
In order to keep your window treatments looking new, follow therecommended methods for care and maintenance. Regular care willresult in better appearance and performance from your window coverings.
HONEYCOMB: Light Filtering = X / Light Blocking = Z PLEATED: Sunset = O / Milano Crinkle = Y
Cleaning and Care
INSTALLAT ION INSTRUCT IONS
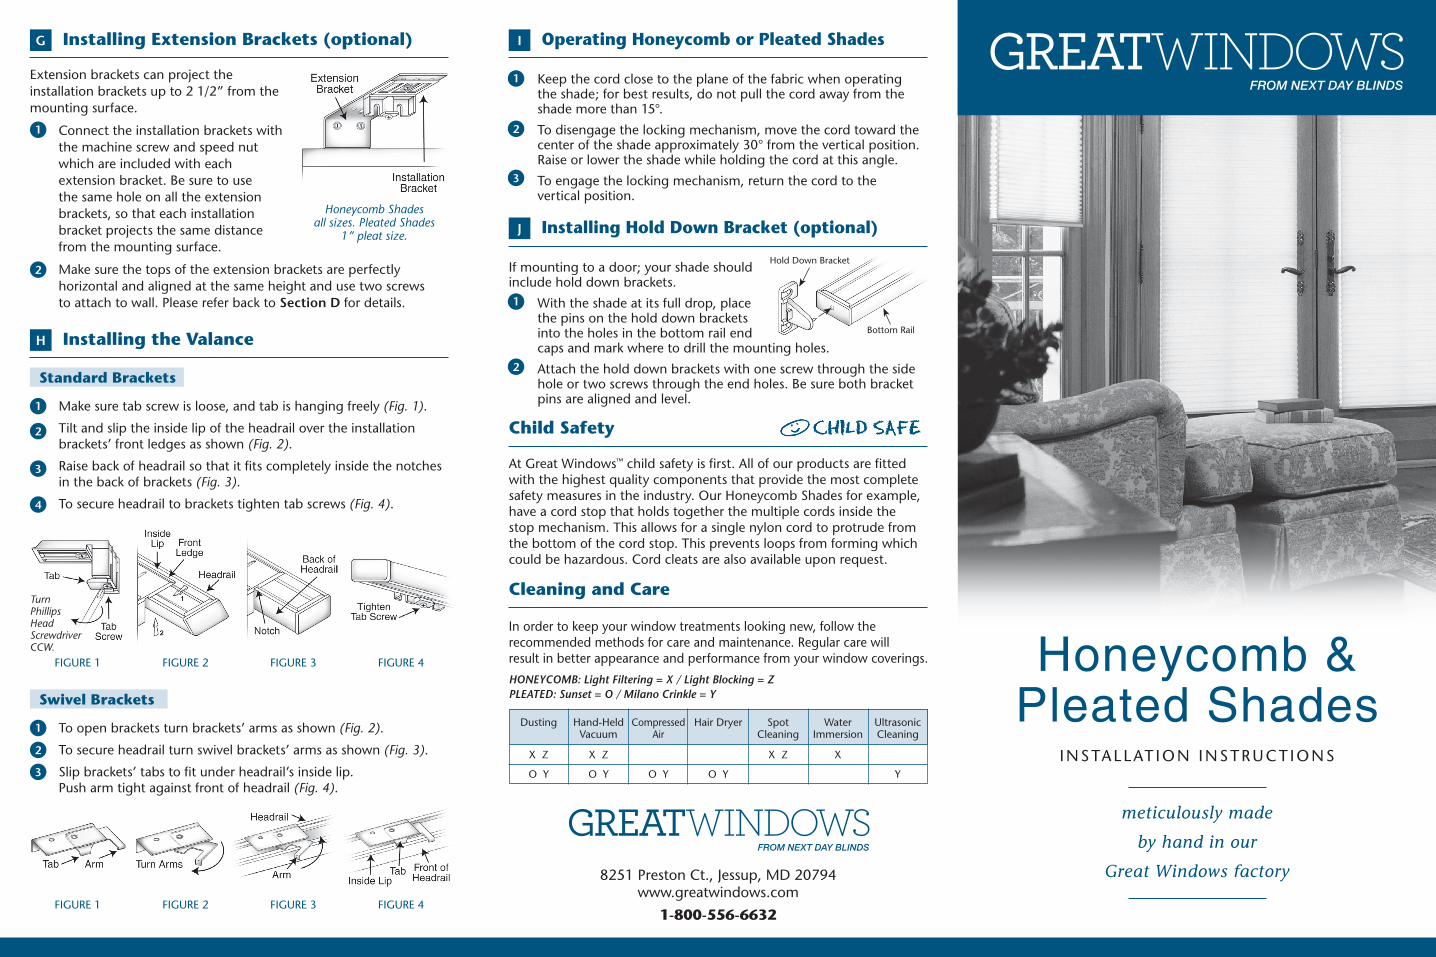
G Installing Extension Brackets (optional)
Extension brackets can project the installation brackets up to 2 1/2” from the mounting surface.
Connect the installation brackets with the machine screw and speed nut which are included with each extension bracket. Be sure to use the same hole on all the extension brackets, so that each installation bracket projects the same distance from the mounting surface.
Make sure the tops of the extension brackets are perfectly horizontal and aligned at the same height and use two screws to attach to wall. Please refer back to Section D for details.
I Operating Honeycomb or Pleated Shades
Keep the cord close to the plane of the fabric when operating the shade; for best results, do not pull the cord away from the shade more than 15°.
To disengage the locking mechanism, move the cord toward the center of the shade approximately 30° from the vertical position. Raise or lower the shade while holding the cord at this angle.
To engage the locking mechanism, return the cord to the vertical position.
1
2
1
2
3
1
2
3
H Installing the Valance
Standard Brackets
Make sure tab screw is loose, and tab is hanging freely (Fig. 1).
Tilt and slip the inside lip of the headrail over the installation brackets’ front ledges as shown (Fig. 2).
Raise back of headrail so that it fits completely inside the notches in the back of brackets (Fig. 3).
To secure headrail to brackets tighten tab screws (Fig. 4).
J Installing Hold Down Bracket (optional)
If mounting to a door; your shade should include hold down brackets.
With the shade at its full drop, place the pins on the hold down brackets into the holes in the bottom rail end caps and mark where to drill the mounting holes.
Attach the hold down brackets with one screw through the side hole or two screws through the end holes. Be sure both bracket pins are aligned and level.
1
2
Dusting Hand-Held Vacuum
Compressed Air
Hair Dryer Spot Cleaning
Water Immersion
Ultrasonic Cleaning
X Z X Z X Z X
O Y O Y O Y O Y Y
Hold Down Bracket
Bottom Rail
4
1
2
3
Swivel Brackets
To open brackets turn brackets’ arms as shown (Fig. 2).
To secure headrail turn swivel brackets’ arms as shown (Fig. 3).
Slip brackets’ tabs to fit under headrail’s inside lip. Push arm tight against front of headrail (Fig. 4).
Turn Phillips Head Screwdriver CCW.
FIGURE 1 FIGURE 2 FIGURE 3 FIGURE 4
FIGURE 1 FIGURE 2 FIGURE 3 FIGURE 4
Honeycomb Shadesall sizes. Pleated Shades
1” pleat size.
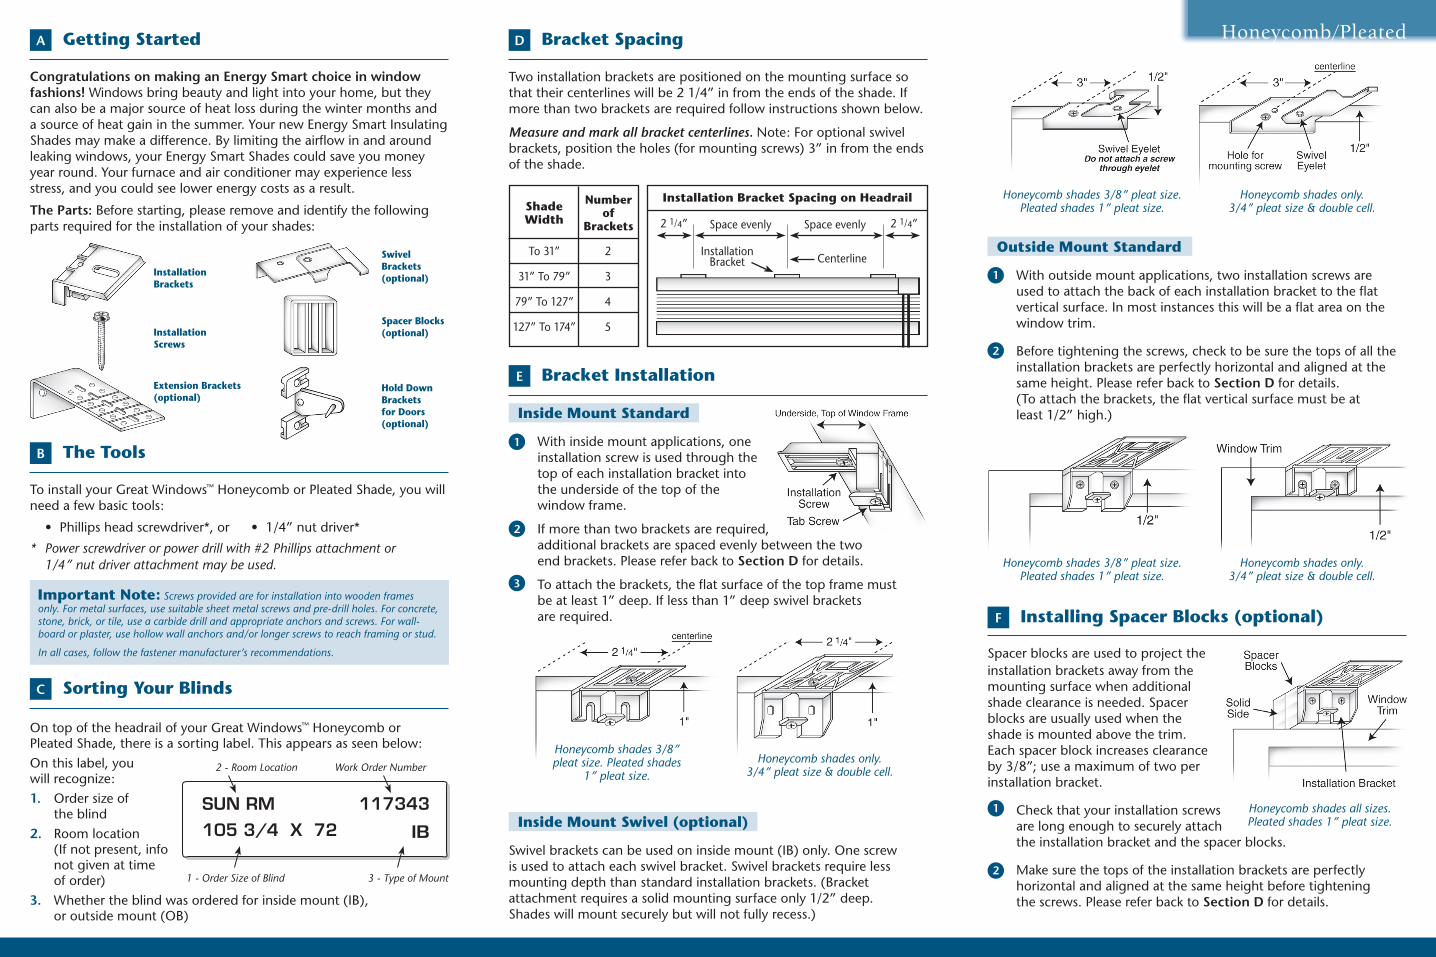
Two installation brackets are positioned on the mounting surface so that their centerlines will be 2 1/4” in from the ends of the shade. If more than two brackets are required follow instructions shown below.
Measure and mark all bracket centerlines. Note: For optional swivel brackets, position the holes (for mounting screws) 3” in from the ends of the shade.
Honeycomb/Pleated
Important Note: Screws provided are for installation into wooden frames only. For metal surfaces, use suitable sheet metal screws and pre-drill holes. For concrete, stone, brick, or tile, use a carbide drill and appropriate anchors and screws. For wall-board or plaster, use hollow wall anchors and/or longer screws to reach framing or stud.
In all cases, follow the fastener manufacturer’s recommendations.
C Sorting Your Blinds
On top of the headrail of your Great Windows™ Honeycomb or Pleated Shade, there is a sorting label. This appears as seen below:On this label, you will recognize:1. Order size of
the blind2. Room location
(If not present, info not given at time of order)
3. Whether the blind was ordered for inside mount (IB), or outside mount (OB)
A Getting Started
Congratulations on making an Energy Smart choice in window fashions! Windows bring beauty and light into your home, but they can also be a major source of heat loss during the winter months and a source of heat gain in the summer. Your new Energy Smart Insulating Shades may make a difference. By limiting the airflow in and around leaking windows, your Energy Smart Shades could save you money year round. Your furnace and air conditioner may experience less stress, and you could see lower energy costs as a result.
The Parts: Before starting, please remove and identify the following parts required for the installation of your shades:
B The Tools
To install your Great Windows™ Honeycomb or Pleated Shade, you will need a few basic tools:
D Bracket Spacing
* Power screwdriver or power drill with #2 Phillips attachment or 1/4” nut driver attachment may be used.
• Phillipsheadscrewdriver*,or • 1/4”nutdriver*
Inside Mount Standard
With inside mount applications, one installation screw is used through the top of each installation bracket into the underside of the top of the window frame.
If more than two brackets are required, additional brackets are spaced evenly between the two end brackets. Please refer back to Section D for details.
To attach the brackets, the flat surface of the top frame must be at least 1” deep. If less than 1” deep swivel brackets are required.
E Bracket Installation
1
2
3
2 - Room Location Work Order Number
1 - Order Size of Blind 3 - Type of Mount
Honeycomb shades 3/8” pleat size.Pleated shades 1” pleat size.
Honeycomb shades only.3/4” pleat size & double cell.
Outside Mount Standard
With outside mount applications, two installation screws are used to attach the back of each installation bracket to the flat vertical surface. In most instances this will be a flat area on the window trim.
Before tightening the screws, check to be sure the tops of all the installation brackets are perfectly horizontal and aligned at the same height. Please refer back to Section D for details. (To attach the brackets, the flat vertical surface must be at least 1/2” high.)
Honeycomb shades 3/8” pleat size.Pleated shades 1” pleat size.
Honeycomb shades only.3/4” pleat size & double cell.
F Installing Spacer Blocks (optional)
Spacer blocks are used to project the installation brackets away from the mounting surface when additional shade clearance is needed. Spacer blocks are usually used when the shade is mounted above the trim. Each spacer block increases clearance by 3/8”; use a maximum of two per installation bracket.
Check that your installation screws are long enough to securely attach the installation bracket and the spacer blocks.
Make sure the tops of the installation brackets are perfectly horizontal and aligned at the same height before tightening the screws. Please refer back to Section D for details.
1
2
Honeycomb shades all sizes.Pleated shades 1” pleat size.
Honeycomb shades 3/8” pleat size. Pleated shades
1” pleat size.Honeycomb shades only.
3/4” pleat size & double cell.
Inside Mount Swivel (optional)
Swivel brackets can be used on inside mount (IB) only. One screw is used to attach each swivel bracket. Swivel brackets require less mounting depth than standard installation brackets. (Bracket attachment requires a solid mounting surface only 1/2” deep. Shades will mount securely but will not fully recess.)
ShadeWidth
Number of
Brackets
To 31”
31” To 79”
79” To 127”
127” To 174”
2
3
4
5
Installation Bracket Spacing on Headrail
2 1/4” 2 1/4”Space evenlySpace evenly
InstallationBracket Centerline
1
2
Installation Brackets
Installation Screws
Extension Brackets(optional)
SwivelBrackets(optional)
Spacer Blocks(optional)
Hold DownBrackets for Doors(optional)