Home, Hearth & Health
13
Home, Hearth & Health
Transcript of Home, Hearth & Health

Home, Hearth & Health

Table of ContentsHome, Hearth & Health
Calcified Ruins Wall Finish ................................................3Find Inspiration in Italian Marble Floors.............................3Use Candles to Turn Events into Special Occasions ........4How to Bring Indoor Decor Outside ...................................5Great Tips from Minwax.....................................................6Understanding the New Safety Standards for Roman Shades ......................................................................7Tropical Combo .................................................................8Tall Vase Tricks ..................................................................9Custom Cornices ...............................................................10Diabetes and Obesity ........................................................11The Art of Perfumery .........................................................11Picture Hanging Tips .........................................................12Guests ...............................................................................13
2
3
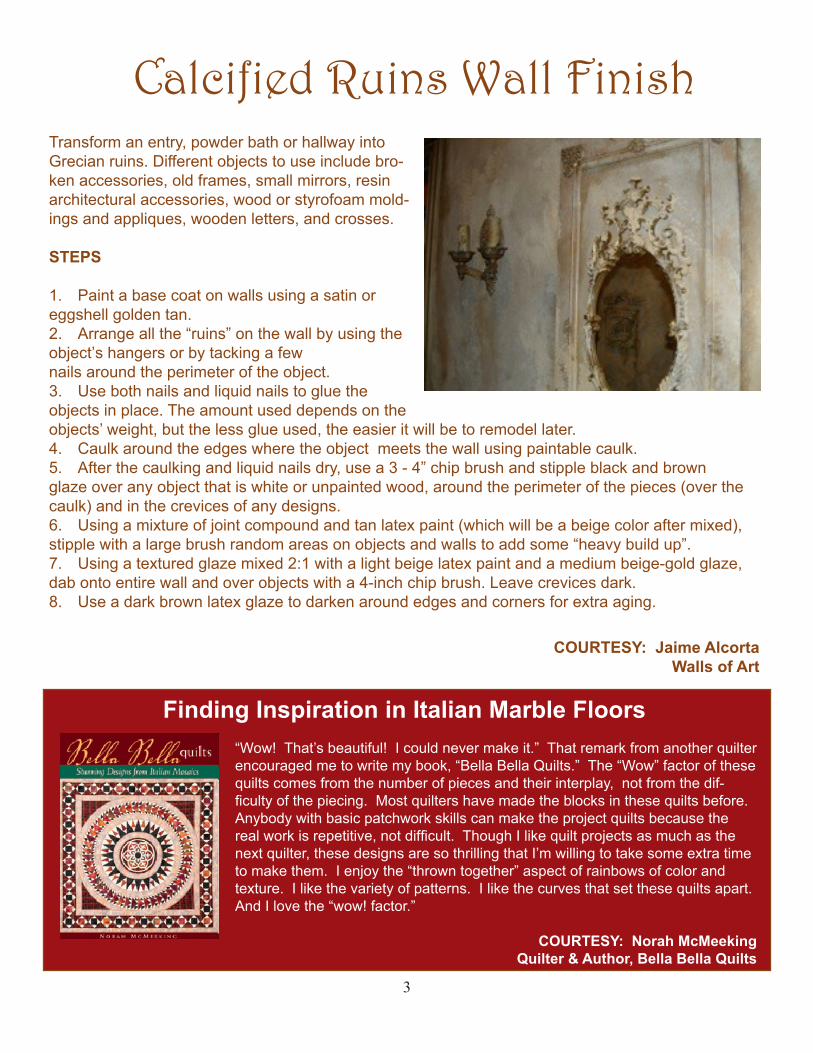
COURTESY: Jaime AlcortaWalls of Art
Calcified Ruins Wall Finish Transform an entry, powder bath or hallway into Grecian ruins. Different objects to use include bro-ken accessories, old frames, small mirrors, resin architectural accessories, wood or styrofoam mold-ings and appliques, wooden letters, and crosses.
STEPS
1. Paint a base coat on walls using a satin or eggshell golden tan.2. Arrange all the “ruins” on the wall by using the objectʼs hangers or by tacking a fewnails around the perimeter of the object.3. Use both nails and liquid nails to glue the objects in place. The amount used depends on the objects’ weight, but the less glue used, the easier it will be to remodel later.4. Caulk around the edges where the object meets the wall using paintable caulk.5. After the caulking and liquid nails dry, use a 3 - 4” chip brush and stipple black and brownglaze over any object that is white or unpainted wood, around the perimeter of the pieces (over the caulk) and in the crevices of any designs.6. Using a mixture of joint compound and tan latex paint (which will be a beige color after mixed), stipple with a large brush random areas on objects and walls to add some “heavy build up”.7. Using a textured glaze mixed 2:1 with a light beige latex paint and a medium beige-gold glaze, dab onto entire wall and over objects with a 4-inch chip brush. Leave crevices dark.8. Use a dark brown latex glaze to darken around edges and corners for extra aging.
Finding Inspiration in Italian Marble Floors“Wow! That’s beautiful! I could never make it.” That remark from another quilter encouraged me to write my book, “Bella Bella Quilts.” The “Wow” factor of these quilts comes from the number of pieces and their interplay, not from the dif-ficulty of the piecing. Most quilters have made the blocks in these quilts before. Anybody with basic patchwork skills can make the project quilts because the real work is repetitive, not difficult. Though I like quilt projects as much as the next quilter, these designs are so thrilling that I’m willing to take some extra time to make them. I enjoy the “thrown together” aspect of rainbows of color and texture. I like the variety of patterns. I like the curves that set these quilts apart. And I love the “wow! factor.”
COURTESY: Norah McMeekingQuilter & Author, Bella Bella Quilts

4
Use Candles to Turn Events Into Special Occasions
Candles make every special occasion feel warm and invit-ing. Be sure to take this into consideration when deco-rating with candles.
One way to create a “WOW” effect at any event is to start with a mag-nificent base piece and change the
candle or candles with the season. For Halloween, Fall, Christmas, or even Valentine’s Day, you can use the same accessory, just change what’s inside. The GloLite by PartyLite is considered “The brightest candle in the world” and lends itself to lots of themes.
The moment one is lit, the beauti-fully textured wax radiates soft light from top to bottom creating a magical, mesmerizing effect. You’ll experience a glimmer in the daytime; even more enchanting at dusk, and absolutely stunning in the dark!
Another idea is to make a gift basket as a gift and include a jar candle, add wine and wine glasses - you’ll definitely get lots of thanks yous from this gift.
Candles make great gifts for teenage girls, girl friends and even for your male friends and
acquaintances. You can use boxed candles or gift sets, which often come with the appropriate candle holder in-cluded. Be sure to include plenty of tealight and votives for a longer-lasting gift.
Pictured above: A. Clearly Creative Pillar Garden Holder is really two holders in one! The glass tray with metal rim sits in a glass bowl. $45.00B. Bubble Glass Hurricane features hand blown glass $70.00C. Estate Hurricane offers more than good looks - the design allows for increased air flow around the pillar for the best candle burn possible - $95.00D. Ginkgo Pillar Holder Set is polished cast aluminum - $60.00/set of 3.
COURTESY: Melanie ThaynPartyLite

How to Bring Indoor Decor Outside
The best thing about candles and some candle holders is they can be used both inside the home and also outside on your patio or deck. This weathered zinc lantern (right) is made of textured metal frame, prism tempered glass and is weather-resistant. You could use a tealight tree inside, or a round pillar candle or even a 3-wick candle. A jar candle would also work well. ($100.00.)
The GloLite pillar candle shown inside the zinc lantern provides a soft flicker that highlights the beauty of the clear and patterned glass. The GloLites (3-piece pillar garden in honeydew is $45.00) are also used in these three small
clear pillar hold-ers ($8.00 each) as well as in the large thumbprint pillar hurricane, which is made of hand-blown glass so no two are every alike! This hurricane candle holder includes leveling beads to sta-bilize the pillar. ($50.00)
Another great idea is to use hurricane candle holders as ice buckets or to hold fresh flowers (see right). This rustic scroll floor stand is the perfect way to showcase your PartyLite hurricanes. Crafted with simple curved lines and a classic bronze fin-ish, it complements every decorating style. Try a different hurricane each season for a quick and easy room update.
The floor stand is made of bronze-finished metal and is $85.00. The lower tray also shows off some of your accent pieces.
COURTESY: Christine AltPartyLite
5

6
Great TIPS FROm minwax
Repurpose Your Garage and Utilize a Great New Space
Many folks are looking for more room in their own homes, but are unable to find room in their budget for a huge home renovation. Bruce Johnson suggests that we look in our own garages as a creative solution for finding more living space.
Since the foundation and walls already exist, a few of the huge renovation expenses of remodeling are eliminated. After the garage space is converted into living space, you’ll want to add warm elements to bring a cozy, family feel to the room. Johnson suggests using wainscoting on the walls and crown modling at the ceiling to add depth and character to the room.
In the segment he taped on this topic, Bruce showed before and after pieces of wood to demonstrate what should and should not be done when preparing to stain wood. After conditioning the wood, he demonstrated easy tips for staining using Water Based Wood sheen in a rich wood tone.
Since lack of storage space is always an issue, Johnson also shared some great ideas on how wood cubes, a typical and inexpensive flea market find, can be easily cleaned up with Minwax Wood Cleaner and brought back to life with Fast-Drying Polyurethane to create the look of built-in storage.
Preparing Furniture to be Sold on Craigslist
Selling furniture on Craigslist, especially during trying economic times, has become extremely popular. Johnson showed how to turn attic treasures into cash by sprucing up furniture and following some of his “golden rules” for bringing furniture back to life. He recommends:
1. Clean it up, but avoid homespun recipes, such as homemade concoctions involving soap, detergent, vinegar and ammonia.2. Repairs 101. He suggests using simple household items, such as
a rope, bungee cord and a stack of books, for an easy way to tighten a wobbly chair or reglue a loose drawer without fancy or expensive woodworking tools.3. Make nicks and scratches disappear. Nothing brings down the price on a quality piece of furniture more than a surface fillled with unsightly nicks and scratches. He has a convenient quick fix that will give new life to marred furniture.4. Bring on the shine. Years of attic or basement dwelling may have taken a toll on the furniture you want to photograph and sell. He has a simple remedy for bringing back the luster to make a furniture finish look brand new.
COURTESY: Bruce JohnsonMinwax

7
Understanding the New Safety Standards for
Roman Shades
The WCMA (Window Covering Manufacturers Association), which represents both large and small workrooms, has been working through the ANSI (American National Standards Institute) since 1996 as well as the CPSC (Consumer Prod-ucts Safety Commission) to improve the safety of all corded window treatments. Standards have been in place since 1996 and were revised in 2002, 2007, February 2009 and most recently September 2010 (2nd Provisional Standard). You can read and purchase the standards on the WCMA web site.
I have been making Roman shades for 33 years and as a full-time business for the last 17 years. I’ve always delivered my shades with Cleaning and Safety instructions that stated the shade was “safe” when lowered, but the operating cords formed a loop when the shade was raised. The latest safety standards have changed the way I make shades.
The industry continually monitors accidents and decided they had to do something about the cords on the back of the shade. The major changes in the latest Revision of the Standards pertaining to Roman-style shades are:• Accessible cords are now considered to be on the sides and back of a shade, not just the front• A hazardous (combined with fabric) loop is defined• The Standards tell how to test, not how to make a shade• Testing involves identifying all potential hazardous loops and then testing to see if any pose a potential for strangulation.• The Product Origin must be permanently marked on the shade
Who should be concerned with these new standards? • Anyone who wants to make a safe shade, Because of the new standards, there are lots of products available that didn’t exist even 6 months ago• Anyone who makes shades and sells them, even if they work alone in their home• Anyone who makes shades for friends and family
How is a Shade determined to be Safe? First a standard test is conducted to see if there are acces-sible cords, then any accessible cords are tested to see if they form a hazardous loop. There are separate tests for the Operating Cords and the Lifting Cords. In addition, there are requirements for Warning Labels and Product Origin labeling.
At first glance, the new Standards are daunt-ing. However, the only real change when making a Roman shade is that the back cords have to be shrouded and that shroud must be attached to the shade at intervals that are spaced close enough to prevent the insertion of a small child’s head. I made a shade and submitted it to an independent Consumer Products testing laboratory. It passed all tests required for a simple Roman shade. I have complete direc-tions on how to make this type of shade on my web site.
Standards for the Operating Cords (what you pull on): There cannot be a hazardous loop when the shade is in the fully lowered position. If a cord connector is used (this can simply be a knot) the lift cords must be braided or completely separate. If no cord connector is used, the cords must be completely separate. If a loop cord is used it must be attached to the wall using an approved break-away tension device.
Lifting Cords (those that raise the shade): All accessible lift cords must be shrouded.
Labeling: The required warning tags and a permanent label stating the product origin must be on the shade.
Courtesy: Terrell SundermannTerrell Designs

8
l o we r d u
e tfTropical Combo
COURTESY: Casey SchwartzFlower Duet
GINGER & ANTHIRIUM: Look to make sure there are no brown or black spots on the flowers and try to avoid a brown tip.
Long Term Care For Your Cut Orchids & AnthuriumMost cut orchids and Anthurium will last longer as stems than as single blooms; a cut orchid arrangement will last longer than a bou-tonniere.
Flowers should be as fresh as possible. If they appear a little wilted, they can be submerged in warm water for a few minutes. After stems are purchased and brought home, 1/2 inch (approximately 2 cm) should be cut from the base of the stem with a sharp knife - if pos-sible while the stem is submerged in water - then place the stems in a vase.
Step 1: Use a deep container and floral foam.Step 2: Start with your two Gingers and place in the back of the foam, then add the larger heliconia in front.Step 3: Place your Anthirium in front a d accent with orchids, fill in with Ti Leaves or Palm Fronds.
Flower Types used in this floral design:
This is a set to purchase Ginger Anthurium Bird of Paradise
Ginger is thought to have supernatural values in chasing away evil spirits.Although more popularly known as a spice, the gingers’ flower is one of the more widely used tropical plants. Many gingers have me-dicinal uses from helping asthma to
The gift of Anthuriumconfesses a man’s intense attraction. Also known as the tail flower and the flamingo flower, the An-thurium manages some-how to be both comic and impressive. Native to South America, these flowers in northern latitudes will survive in a heated green-house.
The bird of paradise sug-gests something strange and wonderful is about to occur. Native to southern Africa, this flower attracts a particular species of bird that shares its colors, orange with a touch of dark blue. In Asia it is also known as the crane lily for its shape, which resembles a folded paper crane.
This combo is sold at Trader Joes. It con-tains 2 Heliconia, 2 gingers, & some tropi-cal leaves. We added some other greenery and the A nthirium, native to the tropi-cal Americas and the Pacific Ocean islands west to Indonesia. Heliconias are an im-portant food source for forest hummingbirds.

9
l o we r d u
e tf
COURTESY: Casey SchwartzFlower Duet
Tall Vase TricksAbout Color: The Color Explosion: Nineteenth Century AmericanLithography from the Jay T. Last Collection. Much like how ourinkjet printers of today made color copies affordable to the masses, the lithographs of the late nineteenth century brought color to the masses. From the Huntington site: “In the 19th century, color lithog-raphy created a communication revolution and brought art, literature, and music to the masses. The process had a dramatic impact on consumer culture, too, as colorful and appealing product labels began to influence advertising, branding, and customer choices. Everything from cigar boxes to children’s games suddenly exploded with color.”
Vase: We are using a tall glass vase with a slightly flared top. Weare adding tape to the top of the vase in a grid pattern.First: Fill the vase with water and floral food. Dry the top of the mouth of the vase and add the grid of floral tape. Use a water-friendly tape.Second: Clean the flowers. Keep some of the greenery on thestems of the roses – everything that will be above the water linein the vase should stay on the rose. This helps fill out the design.Finally: Place blooms in the vase starting in the middle, making sure the large blooms are at the base of the vase and the smaller blooms and tallest blooms are at the top of the design. Just remember: large = low and tall = small in floral design.
Flower Types used in this floral design:
Rose Spider Mums Snapdragons Carnations
Roses have been part of floral design for centu-ries and continue to be extremely popular in the floral trade. Condition roses for many hoursbefore designing with them if you purchased them from a wholesale vendor.
Chrysanthemums last a longtime as a cut flower and spi-der mums are a great option to add color and a fun texture to any design. Often these come in little netted covers. Be very careful when remov-ing these covers so you don’t pull off any petals.
Known as a line flower, theseflowers are sensitive to lightand heat. They will turn to-ward the light. If you wantyour snaps to stand tall, putthem in a dark, cool room (like the garage or a closet) to get them to “snap to atten-tion.”
Also known as Dianthus, these are the most popu-lar cut flower in Britain. Although not as popular here in the U.S., these flowers are one of fewthat still hold a magical scent. Most flowers in the cut floral trade have lost their scents due to hybrid techniques.

10
COURTESY: Rebecca PeckThe Upholstery Studio
We currently offer 2 Cornice Board Collections. The first collection includes the step-by-step instructions, full size patterns and the DVD to create 7 different cornice board styles. Kits are available and are custom made to order. Collection 2 includes 4 styles that attach with hook and loop, a very fun sewing project. Collection 2 does not include a DVD.
Custom Cornices
Cornice Board Collection 1 gives you 7 different styles of hard cornice boards to fit any size window.
Cornice Board Collection 2 allows you the flexibility of changing your look. Mostly a sewing project you get 4 differ-ent styles to sew up and each style attaches to the 2" X 6" board with hook and loop.

11
DIABETES & OBESITYUsing natural product screening, chemists have discovered the only block-buster diabetes drug. It successfully lowers blood sugar, triglycerides, and A1C levels while increasing insulin sensitivity - and without a single nega-tive side effect. This drug is commonly known as cinnamon! Cinnamon is positioned to save modern society from the type 2 diabetes epidemic.
Cinnamon doesn’t simply mask the insulin-resistant symptoms of high blood sugar. It is powerfully effective at overcoming bad blood because it activates the essential reaction known as phosphorylation. In other words, cinnamon increases insulin sensitivity by mimicking all the positive effects of insulin. When consumed, cinnamon rushes to muscle cells, attaches to them and does what insulin cannot: it triggers the uptake of glucose and other lifesaving nutrients from the blood by eliciting phosphorylation. It brings numb, insulin-resistant cells back to life and maximizes hormonal intelligence.
The easiest to way to harness the benefits of cinnamon is to buy it organically and use it before meals three times per day. Cinnamon’s positive effect on health is a stark reminder that nutrient logic is man’s best bet for optimal health.
COURTESY: Shane EllisonAuthor & Chemist, The People’s Chemist
The word perfume is a Latin derivative of "per fu-men" meaning "through smoke". The ancients used perfume as medicine and specifically for sexual attraction as we have in the 20th Century. This fas-cinating course will start with a history of fragrance from Cleopatra to Chanel, and move on into natural perfumery using rare and precious essential oils, resins, fixatives and heady floral absolutes. We will review fragrance notes and introduce perfume fixa-tives and perfume components. These subtle nuanc-es are important elements which will be reviewed in depth to concoct a synergy of essential oils that is rich in character. We will then use the elements so you can personally create a unique aromatic cocktail based on your olfactory preferences, and have a personal perfume to bring home.
This is an advanced level course that is a follow-up to The Art of Aromatic Blending and Introduction to Aro-matherapy, which should be taken prior to this class, or previous blending experience.
Participants will also learn:* How to further define top, middle, and base notes and incorporate them into your blend.* Review perfume components of wood, floral, fruit, and spice, and introduce green and balsamic notes.* Experimentation of blending nuances, and how a small amount (even 1 drop) can change the character of your blend.
THE ART OF PERFUMERY
COURTESY: Kris WredeKismet Potions
Picture Hanging Tips
A lot of people are still unaware of all the gadgets available for hanging pictures or mirrors. There is no need to find a stud when you use the proper tool. Hanging pictures at eye level is
confusing since people are all different heights. A standard measure-ment for an “average eye level” is where the center of the piece of art (or mirror) to be hung is 57” off the floor. When this standard is used, harmony is created among all the pictures in your home, and they will always hang in relationship from one to another from their centers - not their sides. This stand takes the guess work out of the question of whether the pictures should be hung higher or lower.
Hanging a group of pictures using butcher paper:• Roll out your paper to the measurement of the space you want the pictures to consume.• Use a chalkline to mark the center of the picture grouping at eye level - 57”.• Lay out your pictures to get the exact spacing that you want. Generally 2-3” apart.• Now, trace around the frames.• Use the same method with the tape attached to the back side of the frame.• Mark the nail hole.• Then remove the tape and attach it to the matching frame on the butcher paper.• Repeat for all frames.• Now attach the butcher paper to the wall, making sure the center of the grouping is at 57”.• Hammer all nails in “straight.”• Remove paper. Attach picture to wall. You’re done!
Hanging frames with 2 hooks:Hanging frames on your wall can either be a “walk in the park” or your worst nightmare! Use the follow-ing instructions to hang frames with the dreaded “two hook” back easily and on the first try.
• When you have decided where to place the picture on the wall, find the center of the picture just like I stated above. Place your mark at 57”.• Take your tape and attach it to the top of the frame. Add another piece of tape, if necessry, so that you can mark the exact spot where the nails or screws need to go.• Remove the tape.• Measure from the center of the picture to the nail hole and mark the spot. Place your tape on the wall. Use your level for accuracy. Note: I also use my tape measure one more time to see if I’m the same distrance from the floor on both nail holes.• As you hammer the nail into the wall, make sure that you are nailing it straight into the wall (not at an angle.)• Repeat for second nail.• Remove your tape. Attach your picture onto the nails. You’re done!
COURTESY: Latriece BrooksBrooks Interiors
12

Home, Hearth & Health Guests
13
Jaime AlcortaWalls of Art15619 CR 1870Lubbock, TX [email protected]
Christine AltPartyLite Independent Consultant59 Armstrong Rd.Plymouth, MA [email protected]
Latriece BrooksBrooks Interiors125 Colonial Estates ParkwayClovis, NM 88101 [email protected]
Shane EllisonThe People’s Chemist5482 Wilshire Blvd. 210Los Angeles, CA [email protected]
Bruce Johnson Minwax10 Mountainview Rd., Suite AUpper Saddle River, NJ [email protected]
Norah McMeekingAuthor & Designer2047 Cielito LaneSanta Barbara, CA 93105805-962-8511FAX: [email protected]
Rebecca PeckThe Upholstery Studio151 Second Ave.Phoenixville, PA [email protected]
Terrell SundermannTerrell Designs85 Crestone WayCastle Rock, CO [email protected]
Casey SchwartzFlower DuetP O Box 7000Redondo Beach, CA [email protected]
Melanie ThaynPartyLite Independent Consultant59 Armstrong Rd.Plymouth, MA [email protected]
Kris WredeKismet Potions10700 Academy Rd. NE, Ste. 721Albuquerque, NM 87111505-275-6508505-231-5257 (cell)[email protected]