HOME HEALTH BILLING CENTER MANUAL
21
1 HOME HEALTH BILLING CENTER MANUAL July 2021
Transcript of HOME HEALTH BILLING CENTER MANUAL
1
HOME HEALTH BILLING CENTER MANUAL
July 2021
2
Table of Contents BILLING CENTER ................................................................................................ 3
Verify a RAP ...................................................................................................... 4
Generating Claims ............................................................................................. 6
Quick Links ........................................................................................................ 6
PENDING CLAIMS ............................................................................................... 7
Aging Metrics ..................................................................................................... 7
Edit .................................................................................................................... 8
CLAIMS HISTORY ................................................................................................ 9
Posting Payments and Adjustments ................................................................ 10
VERIFYING FINAL CLAIMS ............................................................................... 11
1. Demographics ........................................................................................... 12
2. Verify Visits ............................................................................................... 13
3. Verify Supplies .......................................................................................... 13
4. Summary ................................................................................................... 15
Electronic Submissions.................................................................................... 15
Manual Submissions ....................................................................................... 16
CLAIM SUBMISSION HISTORY - MEDICARE .................................................. 16
CLAIM SUBMISSION HISTORY - OTHER ......................................................... 17
BILLING/REMITTANCE ADVICE........................................................................ 18
HELP CENTER ................................................................................................... 21
3
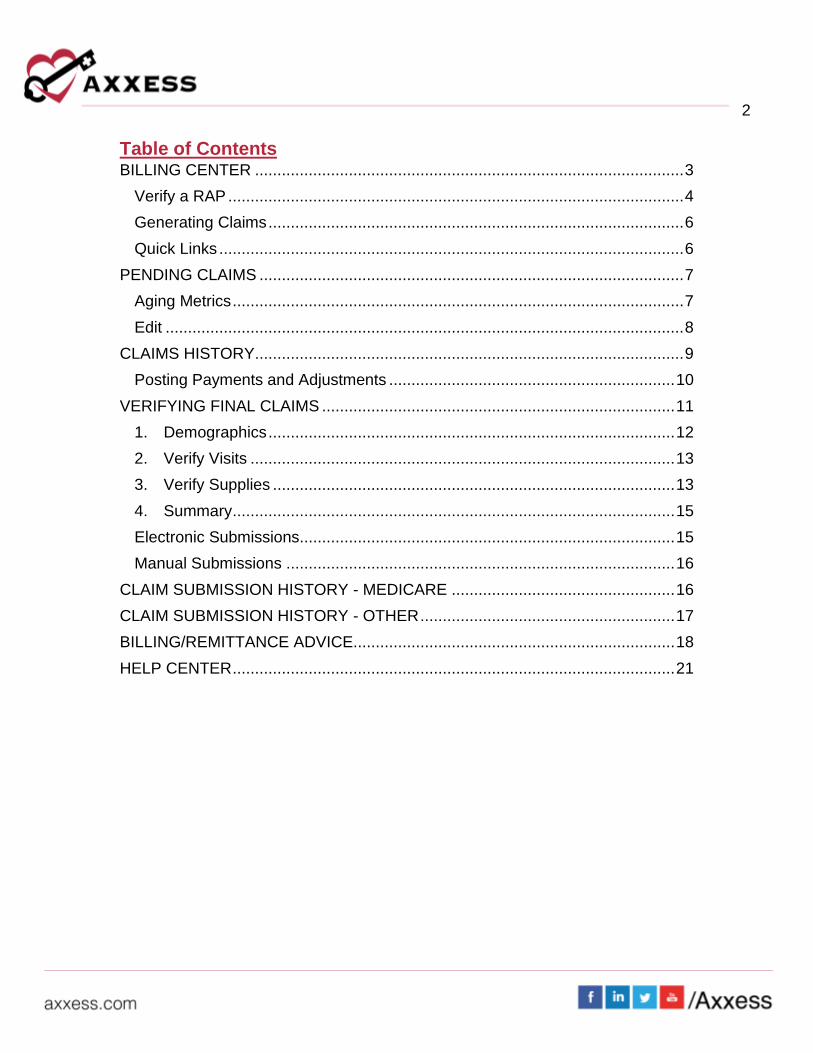
BILLING CENTER Billing/Billing Center The Billing Center enables users to manage all billing processes in a central location and streamline operations to ensure timely claim submissions. To access the Billing Center, users must have the Access Billing Center permission enabled, found by following Admin/Lists/Users/Edit/Permissions.
Billers can manage all claims in one central location, rather than navigating between several windows to manage different payers. The Billing Center enables users to view the Create PPS RAP, Create Finals and Create Claims sub-menus under one window.
Users can filter by:
• Branch – Choose a branch if the agency has more than one branch.
• From/Through Date – Select date range compared to billing period of the
claim.
• Status – Choose between Created, Rejected or Denied claims.
• Type – Choose between RAP, Final or Managed Care claims.
• Payer – Choose insurance used to pay the claim.
• Search – By Patient Name or Medical Record Number.
• Patient Status – Sort the list between Active/Discharged, Non-Admit or All.
• RAP Aging Tool - tracks the elapsed time between the start date for each
billing period to the current date, to submit RAPs for acceptance to the
Common Working File (CWF).
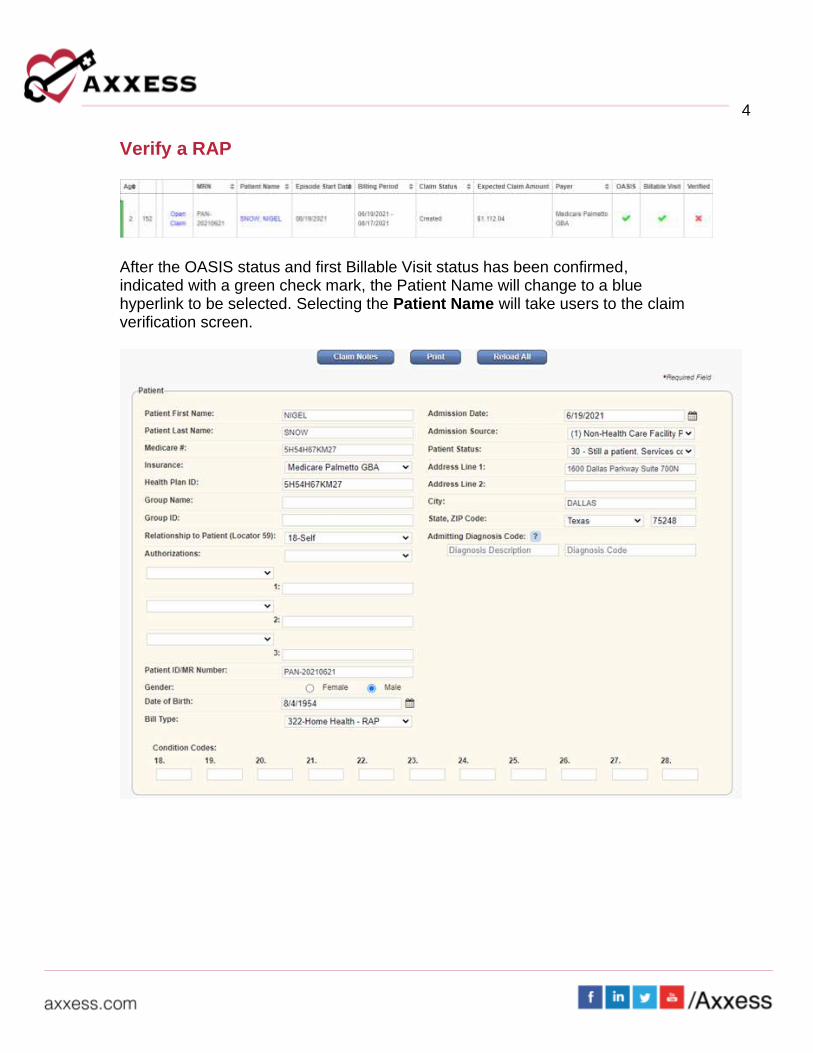
Once the specific claim is found, the following columns are shown when filtered for a RAP: Age, Patient Name, MRN, Episode Start Date, Billing Period, Claim Status, Expected Claim Amount, Payer, OASIS status, first Billable Visit status, Verified claim status and Notes. Select the Export to Excel button to create an Excel spreadsheet that lists all the claims shown within the filtered parameters.
4
Verify a RAP
After the OASIS status and first Billable Visit status has been confirmed, indicated with a green check mark, the Patient Name will change to a blue hyperlink to be selected. Selecting the Patient Name will take users to the claim verification screen.
5
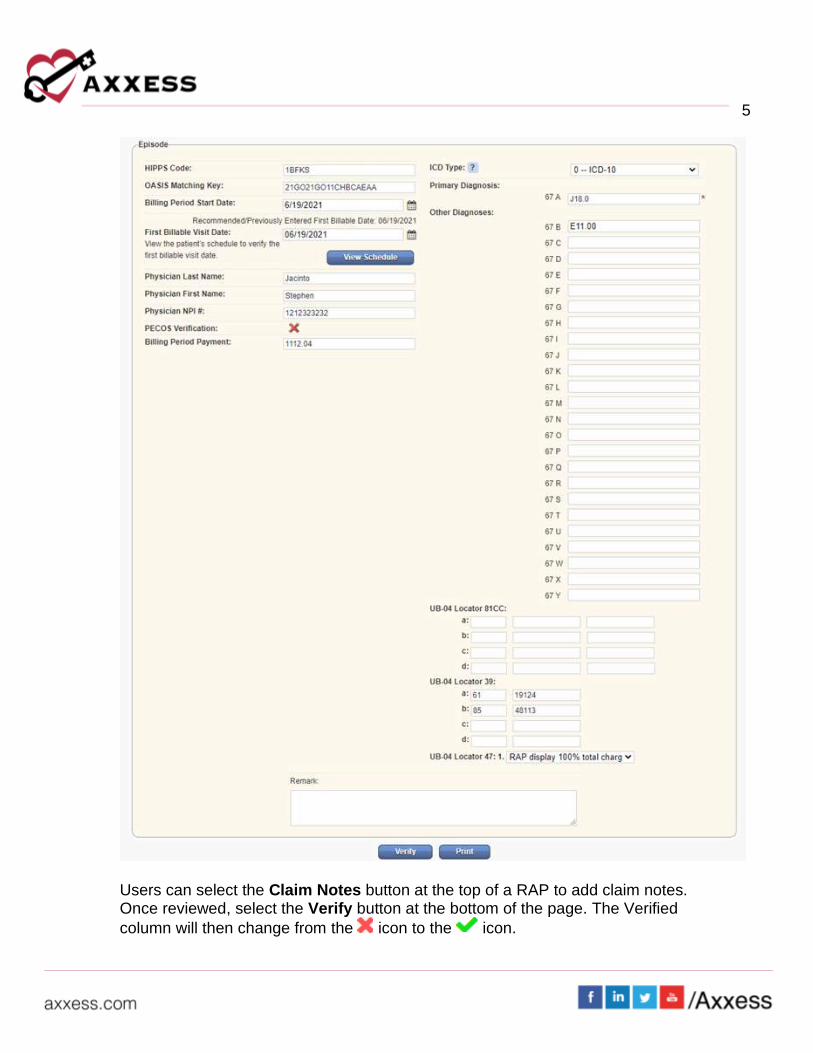
Users can select the Claim Notes button at the top of a RAP to add claim notes. Once reviewed, select the Verify button at the bottom of the page. The Verified
column will then change from the icon to the icon.
6
Generating Claims
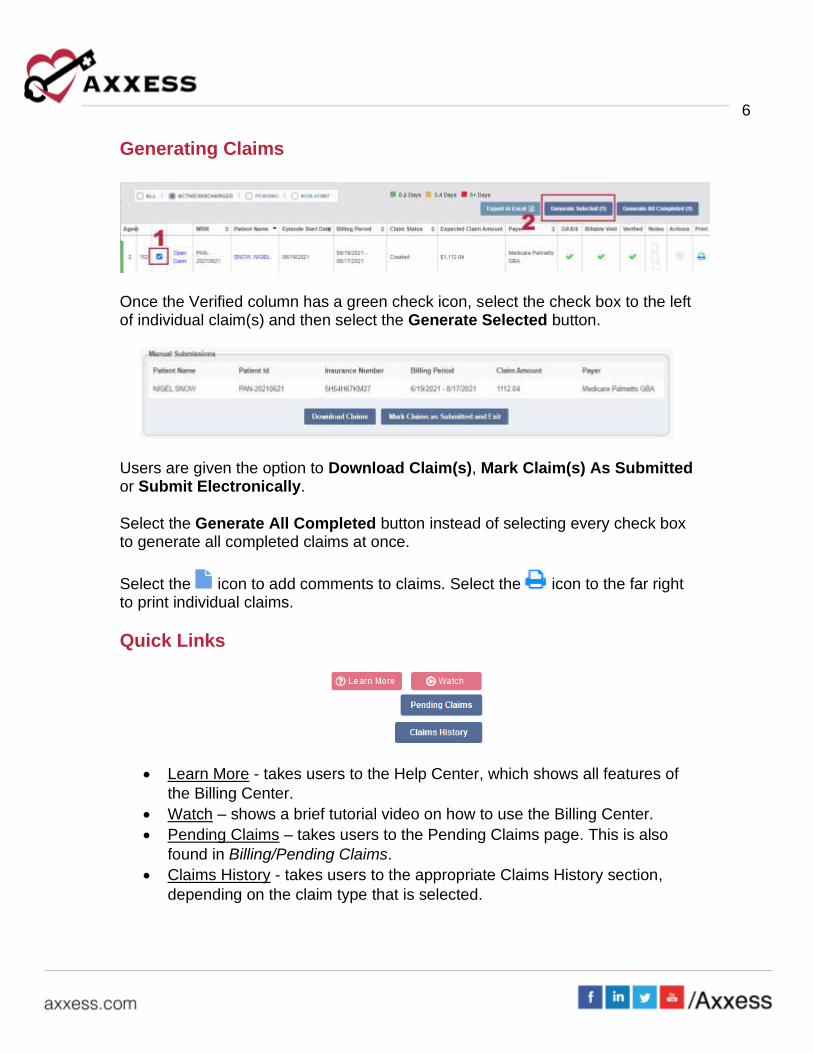
Once the Verified column has a green check icon, select the check box to the left of individual claim(s) and then select the Generate Selected button.
Users are given the option to Download Claim(s), Mark Claim(s) As Submitted or Submit Electronically.
Select the Generate All Completed button instead of selecting every check box to generate all completed claims at once.
Select the icon to add comments to claims. Select the icon to the far right to print individual claims.
Quick Links
• Learn More - takes users to the Help Center, which shows all features of
the Billing Center.
• Watch – shows a brief tutorial video on how to use the Billing Center.
• Pending Claims – takes users to the Pending Claims page. This is also
found in Billing/Pending Claims.
• Claims History - takes users to the appropriate Claims History section,
depending on the claim type that is selected.

7
PENDING CLAIMS Billing/Pending Claims The Pending Claims page provides a centralized location for managing all Medicare and Managed Care claims that have outstanding balances. To access the Billing Center, users must have the Access Billing Center permission enabled, found by following Admin/Lists/Users/Edit/Permissions.
Users can filter by:
• Branch – Choose a branch if the agency has more than one branch.
• From/Through Date – Select date range compared to billing period of the
claim.
• Status – Choose between Created, Rejected or Denied claims.
• Type – Choose between RAP, Final or Managed Care claims.
• Payer – Choose insurance used to pay the claim.
• Search – By Patient Name or Medical Record Number.
• Patient Status – Sort the list between Active/Discharged, Non-Admit or All.
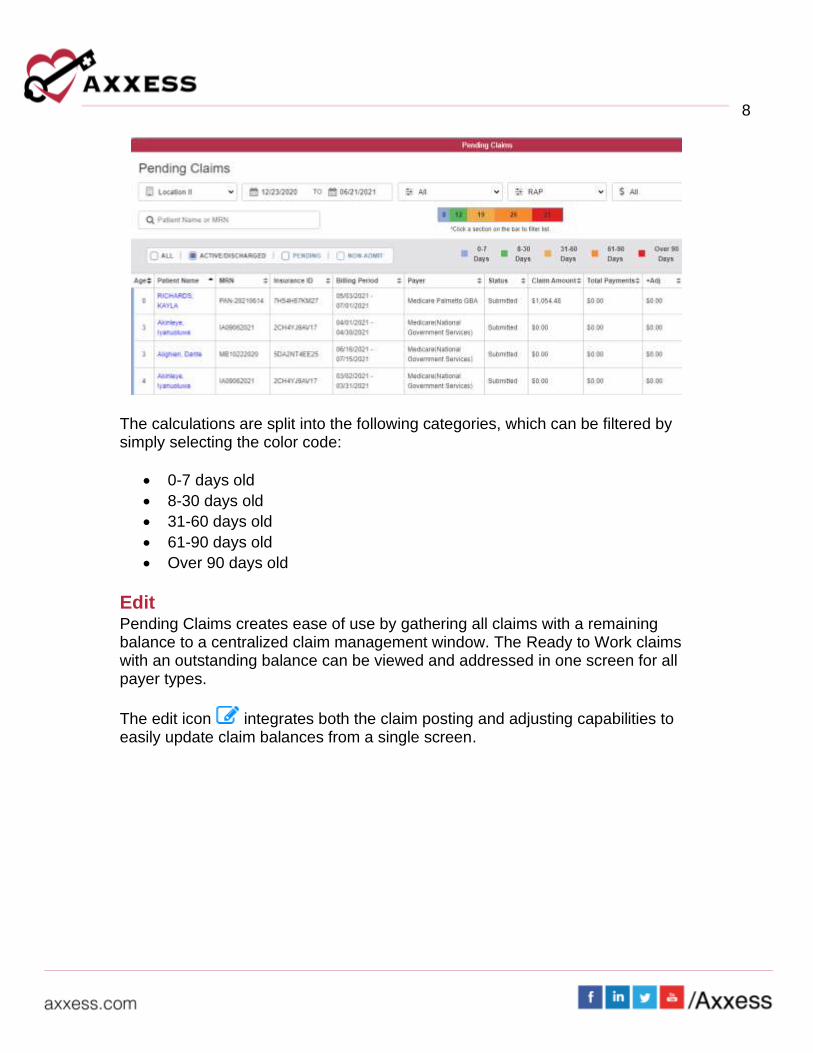
Once the specific claim is found, the following columns are shown: Age, Patient Name, MRN, Insurance ID, Billing Period, Payer, Status, Claim Amount, Total Payments, +Adj, -Adj, Balance and Notes. Select the Export to Excel button to create an Excel spreadsheet that lists all the claims shown within the filtered parameters.
Aging Metrics
The Aging Metrics feature enables filtering and gives users an at-a-glance view of aging claim buckets. The metrics are calculated from the claim’s bill date to the current date. Users can select a specific bucket to filter down the list and view only claims within that corresponding age range.
8
The calculations are split into the following categories, which can be filtered by simply selecting the color code:
• 0-7 days old
• 8-30 days old
• 31-60 days old
• 61-90 days old
• Over 90 days old
Edit Pending Claims creates ease of use by gathering all claims with a remaining balance to a centralized claim management window. The Ready to Work claims with an outstanding balance can be viewed and addressed in one screen for all payer types.
The edit icon integrates both the claim posting and adjusting capabilities to easily update claim balances from a single screen.
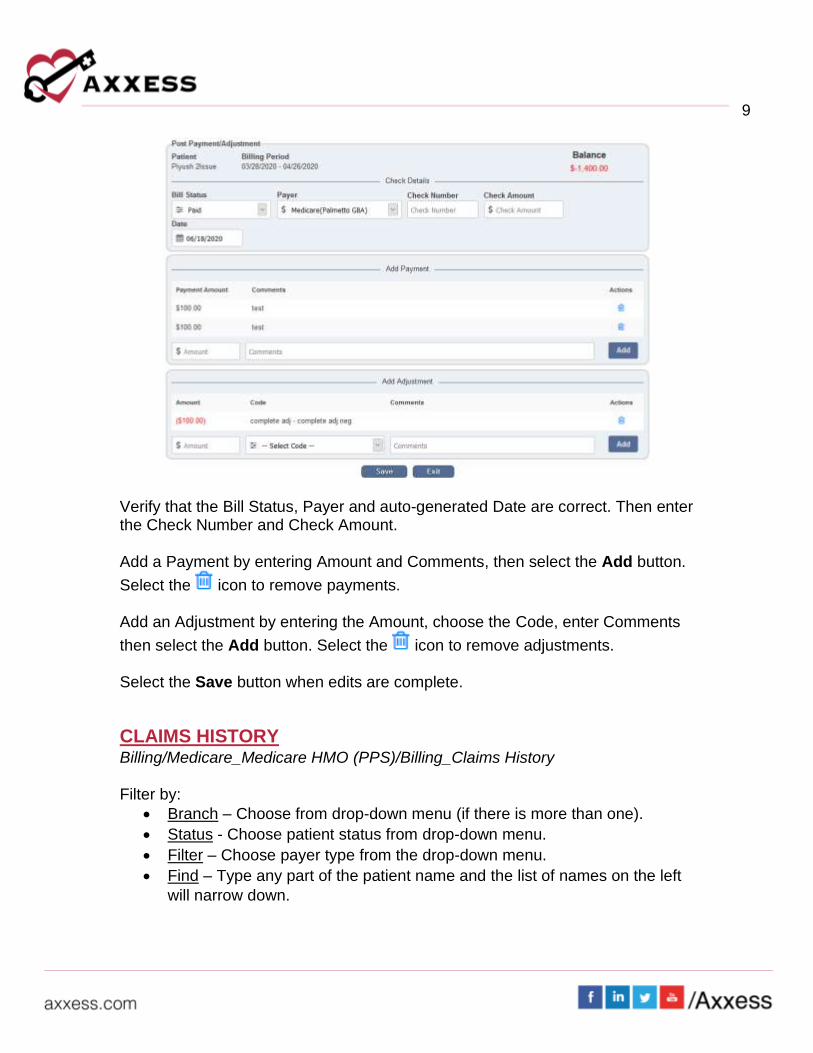
9
Verify that the Bill Status, Payer and auto-generated Date are correct. Then enter the Check Number and Check Amount. Add a Payment by entering Amount and Comments, then select the Add button.
Select the icon to remove payments. Add an Adjustment by entering the Amount, choose the Code, enter Comments
then select the Add button. Select the icon to remove adjustments. Select the Save button when edits are complete.
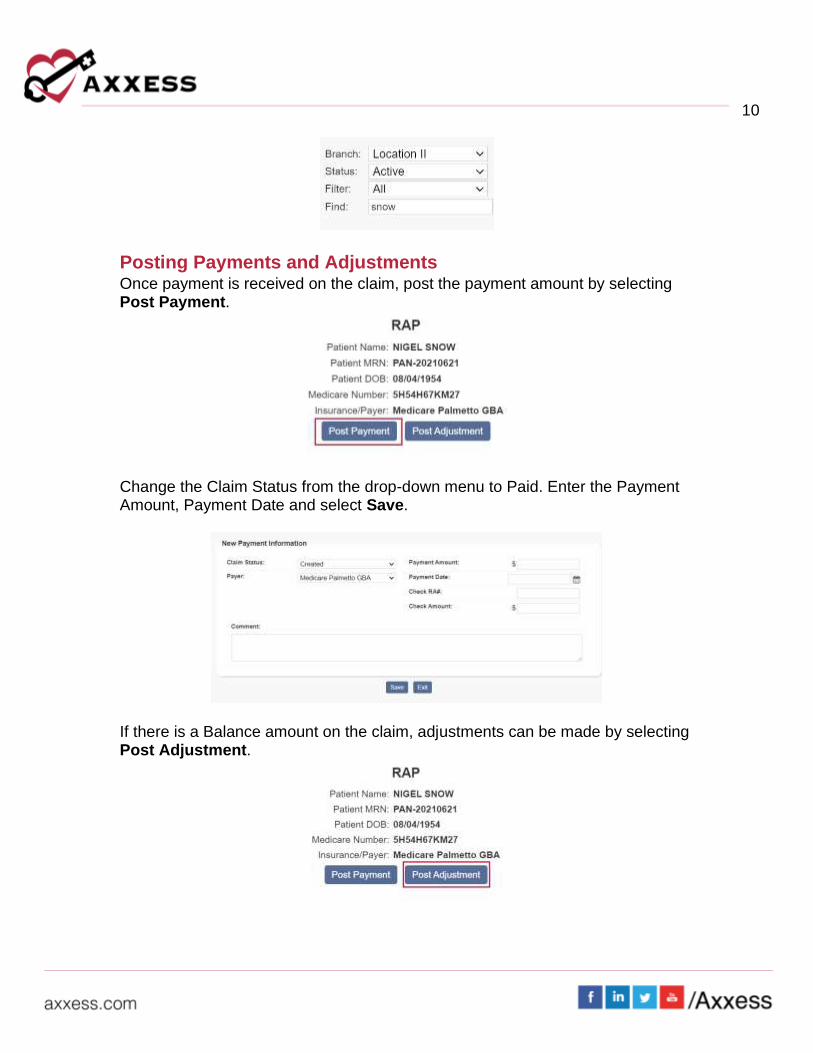
CLAIMS HISTORY Billing/Medicare_Medicare HMO (PPS)/Billing_Claims History Filter by:
• Branch – Choose from drop-down menu (if there is more than one).
• Status - Choose patient status from drop-down menu.
• Filter – Choose payer type from the drop-down menu.
• Find – Type any part of the patient name and the list of names on the left
will narrow down.
10
Posting Payments and Adjustments Once payment is received on the claim, post the payment amount by selecting Post Payment.
Change the Claim Status from the drop-down menu to Paid. Enter the Payment Amount, Payment Date and select Save.
If there is a Balance amount on the claim, adjustments can be made by selecting Post Adjustment.
11
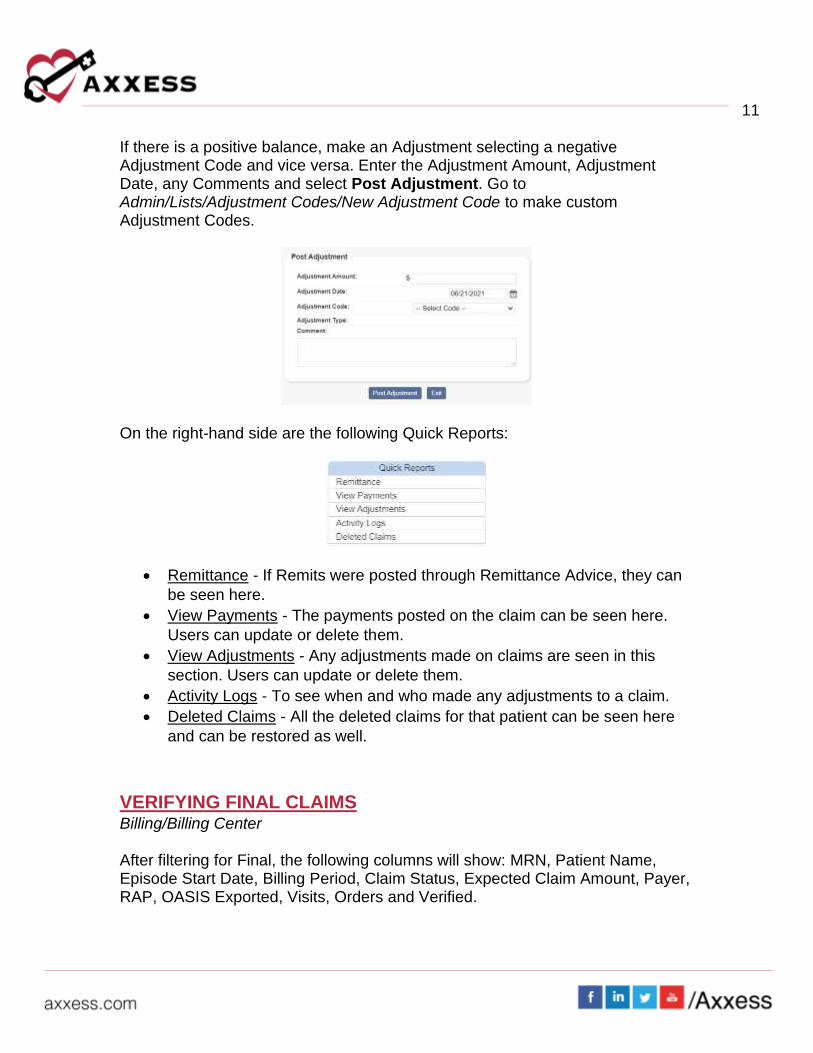
If there is a positive balance, make an Adjustment selecting a negative Adjustment Code and vice versa. Enter the Adjustment Amount, Adjustment Date, any Comments and select Post Adjustment. Go to Admin/Lists/Adjustment Codes/New Adjustment Code to make custom Adjustment Codes.
On the right-hand side are the following Quick Reports:
• Remittance - If Remits were posted through Remittance Advice, they can
be seen here.
• View Payments - The payments posted on the claim can be seen here.
Users can update or delete them.
• View Adjustments - Any adjustments made on claims are seen in this
section. Users can update or delete them.
• Activity Logs - To see when and who made any adjustments to a claim.
• Deleted Claims - All the deleted claims for that patient can be seen here
and can be restored as well.
VERIFYING FINAL CLAIMS Billing/Billing Center After filtering for Final, the following columns will show: MRN, Patient Name, Episode Start Date, Billing Period, Claim Status, Expected Claim Amount, Payer, RAP, OASIS Exported, Visits, Orders and Verified.

12
Select any red X in the Orders column to view outstanding orders. The Episode Orders screen will open and list the order number, type, status, assigned user and physician. For orders in Saved or Returned for Review status, users should rectify the issue with the clinician in the Assigned To column. For orders in Submitted (Pending QA Review) status, users should resolve the issue with the QA team. For orders in Sent to Physician status, users should reconcile the issue with the Orders Management team.
Select any red X or green check mark in the Visits column to populate a Billable Visits window. The window lists all billable visits within the billing period sorted by discipline. The visit type, scheduled date, actual visit date, assigned user and status are listed for each billable visit.
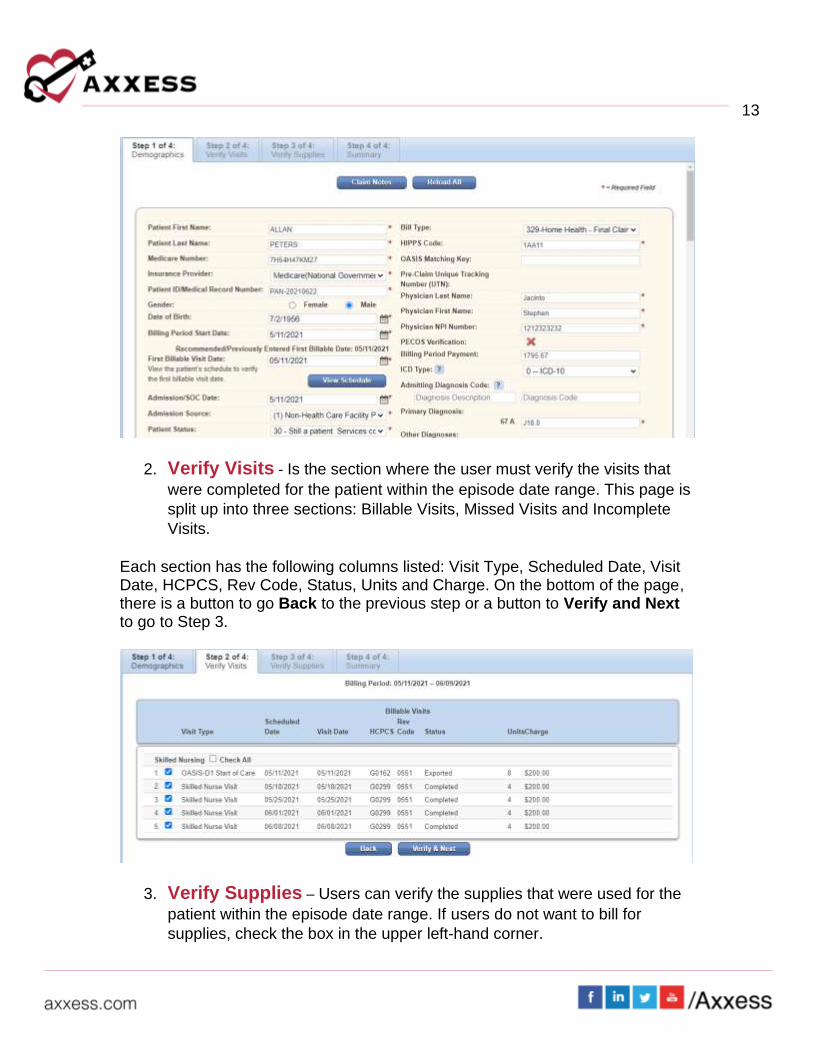
Select the Open Claim hyperlink to begin the verification process. There are four steps to verifying a Final:
1. Demographics - The patient’s information in which the user will verify
the sections with a * red asterisk are correct. These sections are typically
generated from the patient’s demographics and OASIS. Users can select
the Claim Notes button at the top of the screen to document a claim note.
At the bottom of the page, there is a Verify and Next button to go to Step
2.
13
2. Verify Visits - Is the section where the user must verify the visits that
were completed for the patient within the episode date range. This page is
split up into three sections: Billable Visits, Missed Visits and Incomplete
Visits.
Each section has the following columns listed: Visit Type, Scheduled Date, Visit Date, HCPCS, Rev Code, Status, Units and Charge. On the bottom of the page, there is a button to go Back to the previous step or a button to Verify and Next to go to Step 3.
3. Verify Supplies – Users can verify the supplies that were used for the
patient within the episode date range. If users do not want to bill for
supplies, check the box in the upper left-hand corner.
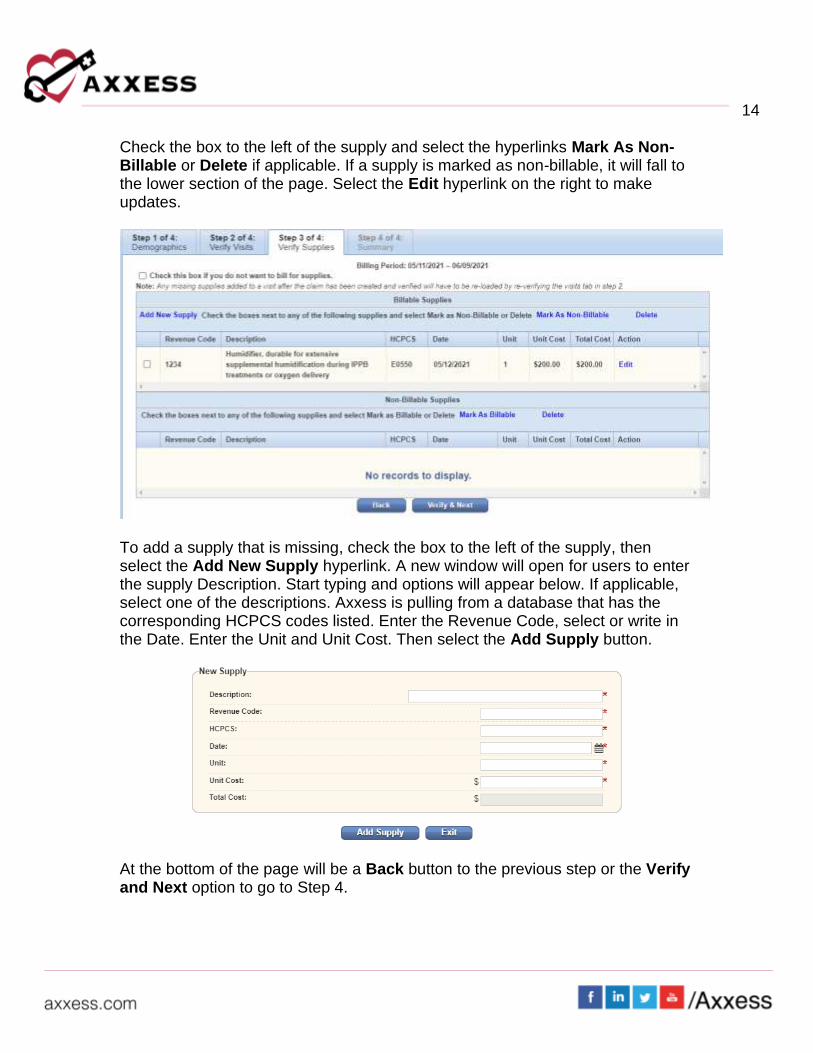
14
Check the box to the left of the supply and select the hyperlinks Mark As Non-Billable or Delete if applicable. If a supply is marked as non-billable, it will fall to the lower section of the page. Select the Edit hyperlink on the right to make updates.
To add a supply that is missing, check the box to the left of the supply, then select the Add New Supply hyperlink. A new window will open for users to enter the supply Description. Start typing and options will appear below. If applicable, select one of the descriptions. Axxess is pulling from a database that has the corresponding HCPCS codes listed. Enter the Revenue Code, select or write in the Date. Enter the Unit and Unit Cost. Then select the Add Supply button.
At the bottom of the page will be a Back button to the previous step or the Verify and Next option to go to Step 4.
15
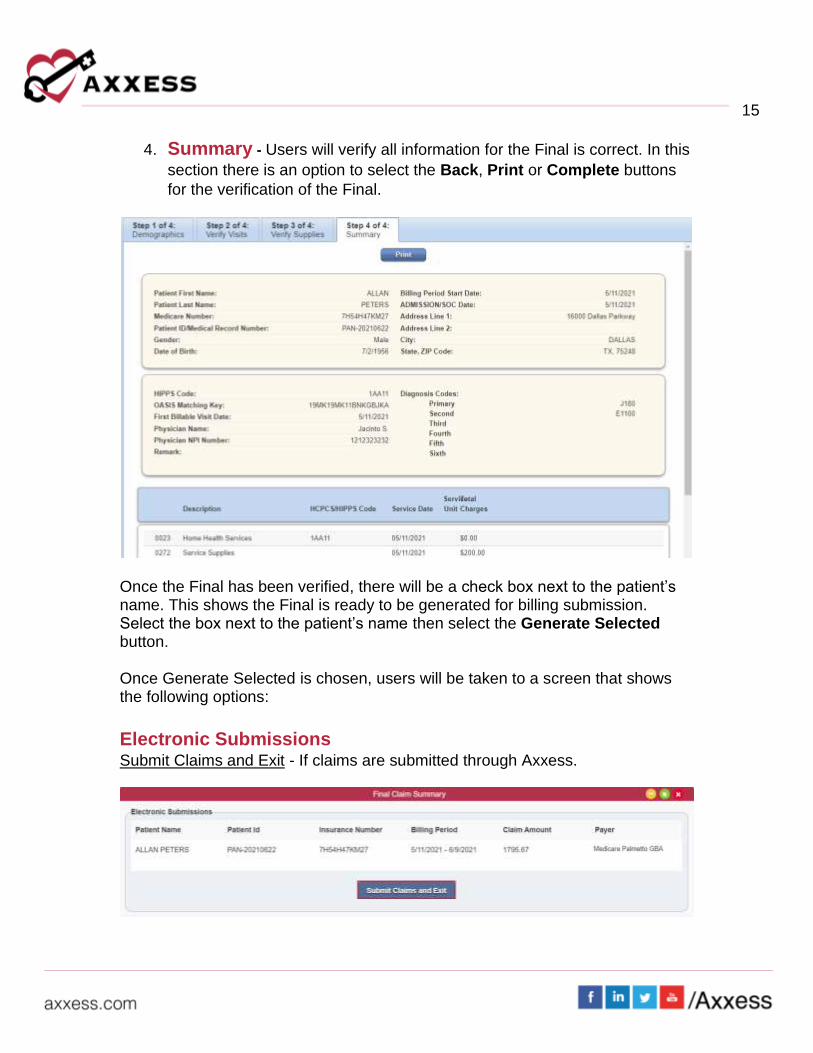
4. Summary - Users will verify all information for the Final is correct. In this
section there is an option to select the Back, Print or Complete buttons
for the verification of the Final.
Once the Final has been verified, there will be a check box next to the patient’s name. This shows the Final is ready to be generated for billing submission. Select the box next to the patient’s name then select the Generate Selected button. Once Generate Selected is chosen, users will be taken to a screen that shows the following options:
Electronic Submissions Submit Claims and Exit - If claims are submitted through Axxess.
16
Once the claim has been submitted, an alert will appear on the top right-hand side corner stating, “The claim(s) were processed successfully.” Then the Final will be removed from the list automatically and will show in the Claims History section.
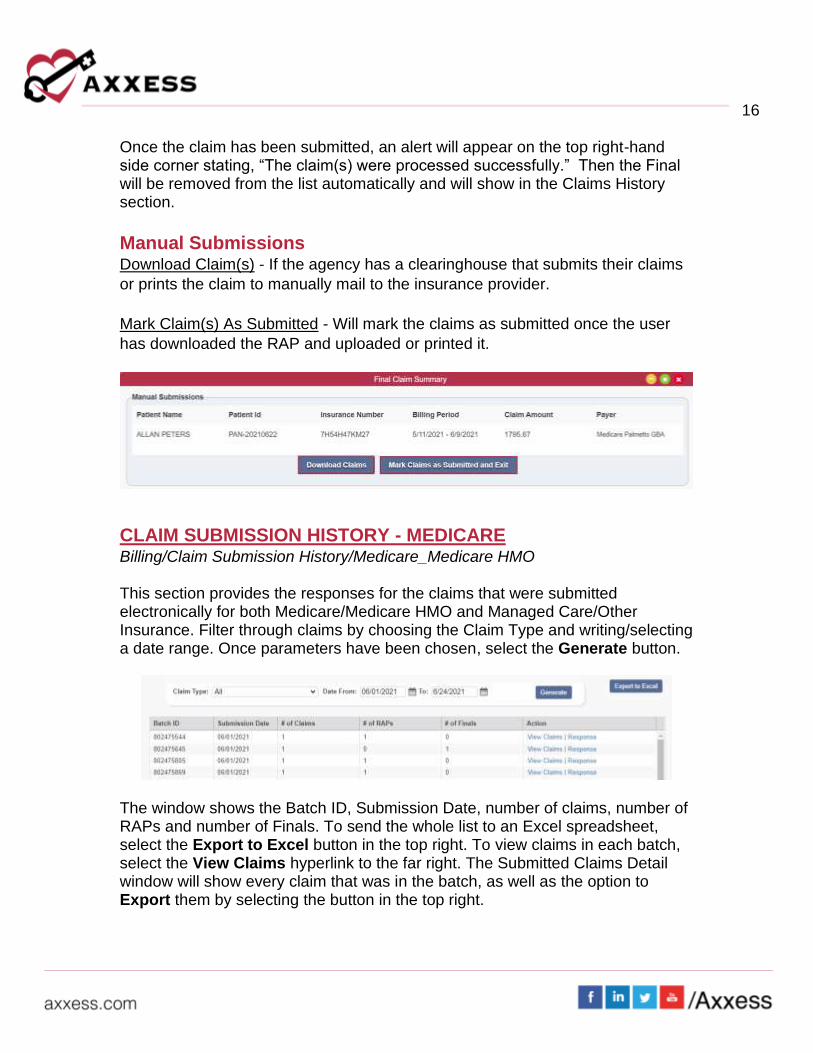
Manual Submissions Download Claim(s) - If the agency has a clearinghouse that submits their claims
or prints the claim to manually mail to the insurance provider.
Mark Claim(s) As Submitted - Will mark the claims as submitted once the user
has downloaded the RAP and uploaded or printed it.
CLAIM SUBMISSION HISTORY - MEDICARE Billing/Claim Submission History/Medicare_Medicare HMO This section provides the responses for the claims that were submitted electronically for both Medicare/Medicare HMO and Managed Care/Other Insurance. Filter through claims by choosing the Claim Type and writing/selecting a date range. Once parameters have been chosen, select the Generate button.
The window shows the Batch ID, Submission Date, number of claims, number of RAPs and number of Finals. To send the whole list to an Excel spreadsheet, select the Export to Excel button in the top right. To view claims in each batch, select the View Claims hyperlink to the far right. The Submitted Claims Detail window will show every claim that was in the batch, as well as the option to Export them by selecting the button in the top right.
17
Back at the Claim Submission History window, select the Response (in the Action column) hyperlink to see the electronic response.
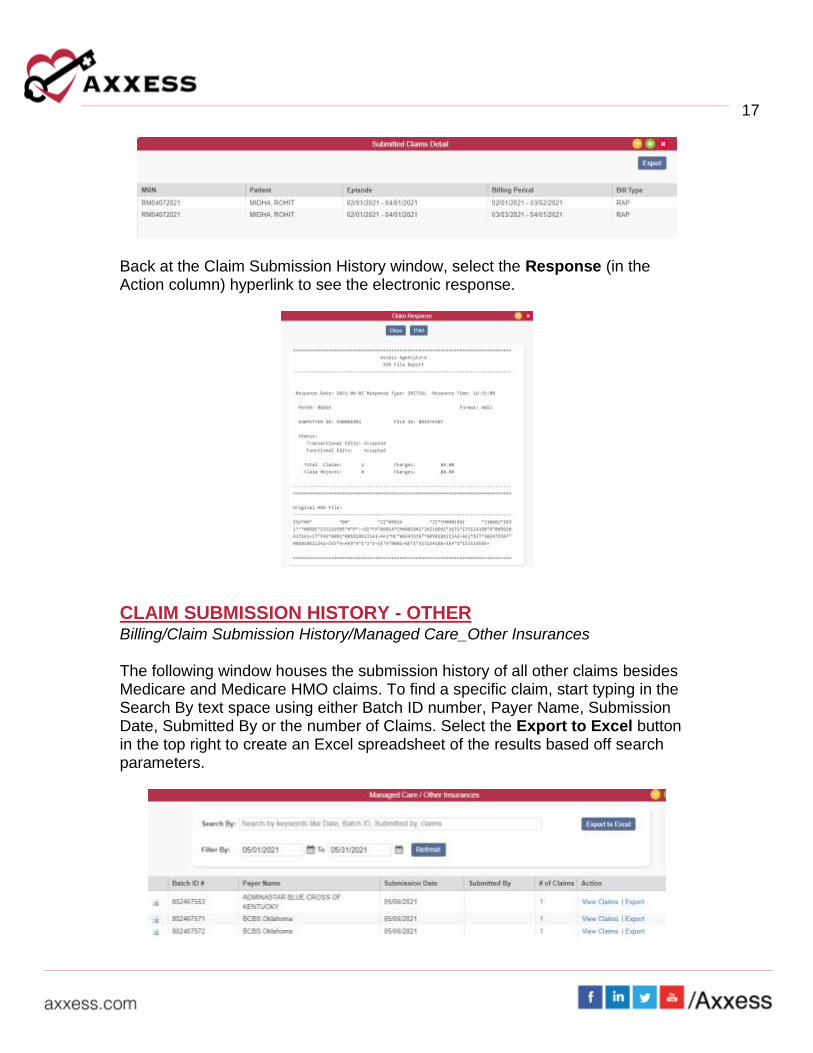
CLAIM SUBMISSION HISTORY - OTHER Billing/Claim Submission History/Managed Care_Other Insurances The following window houses the submission history of all other claims besides Medicare and Medicare HMO claims. To find a specific claim, start typing in the Search By text space using either Batch ID number, Payer Name, Submission Date, Submitted By or the number of Claims. Select the Export to Excel button in the top right to create an Excel spreadsheet of the results based off search parameters.
18
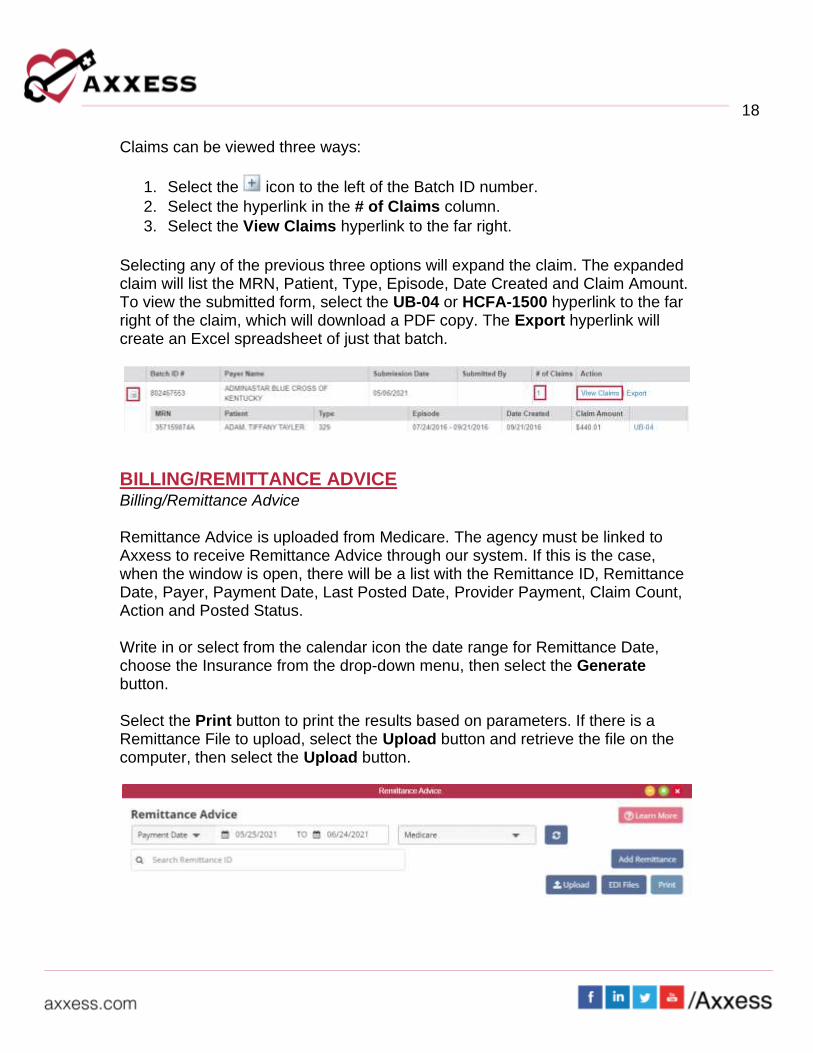
Claims can be viewed three ways:
1. Select the icon to the left of the Batch ID number.
2. Select the hyperlink in the # of Claims column.
3. Select the View Claims hyperlink to the far right.
Selecting any of the previous three options will expand the claim. The expanded claim will list the MRN, Patient, Type, Episode, Date Created and Claim Amount. To view the submitted form, select the UB-04 or HCFA-1500 hyperlink to the far right of the claim, which will download a PDF copy. The Export hyperlink will create an Excel spreadsheet of just that batch.
BILLING/REMITTANCE ADVICE Billing/Remittance Advice
Remittance Advice is uploaded from Medicare. The agency must be linked to Axxess to receive Remittance Advice through our system. If this is the case, when the window is open, there will be a list with the Remittance ID, Remittance Date, Payer, Payment Date, Last Posted Date, Provider Payment, Claim Count, Action and Posted Status. Write in or select from the calendar icon the date range for Remittance Date, choose the Insurance from the drop-down menu, then select the Generate button. Select the Print button to print the results based on parameters. If there is a Remittance File to upload, select the Upload button and retrieve the file on the computer, then select the Upload button.
19
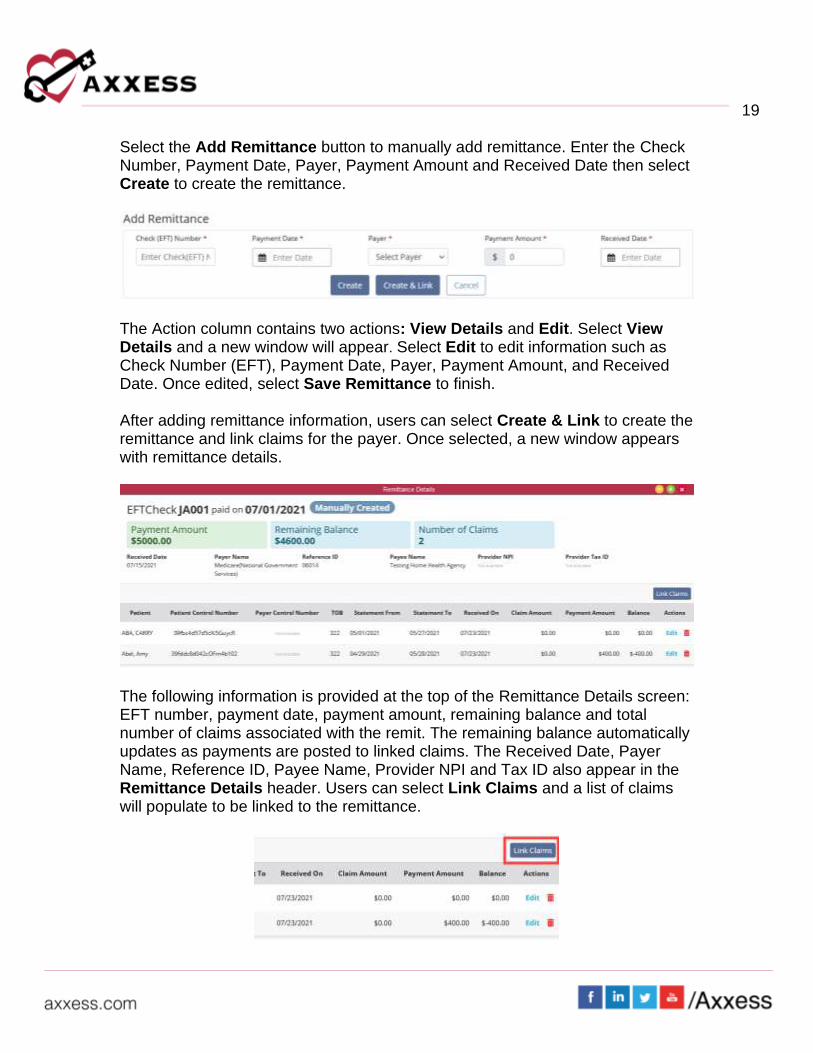
Select the Add Remittance button to manually add remittance. Enter the Check Number, Payment Date, Payer, Payment Amount and Received Date then select Create to create the remittance.
The Action column contains two actions: View Details and Edit. Select View Details and a new window will appear. Select Edit to edit information such as Check Number (EFT), Payment Date, Payer, Payment Amount, and Received Date. Once edited, select Save Remittance to finish. After adding remittance information, users can select Create & Link to create the remittance and link claims for the payer. Once selected, a new window appears with remittance details.
The following information is provided at the top of the Remittance Details screen: EFT number, payment date, payment amount, remaining balance and total number of claims associated with the remit. The remaining balance automatically updates as payments are posted to linked claims. The Received Date, Payer Name, Reference ID, Payee Name, Provider NPI and Tax ID also appear in the Remittance Details header. Users can select Link Claims and a list of claims will populate to be linked to the remittance.
20
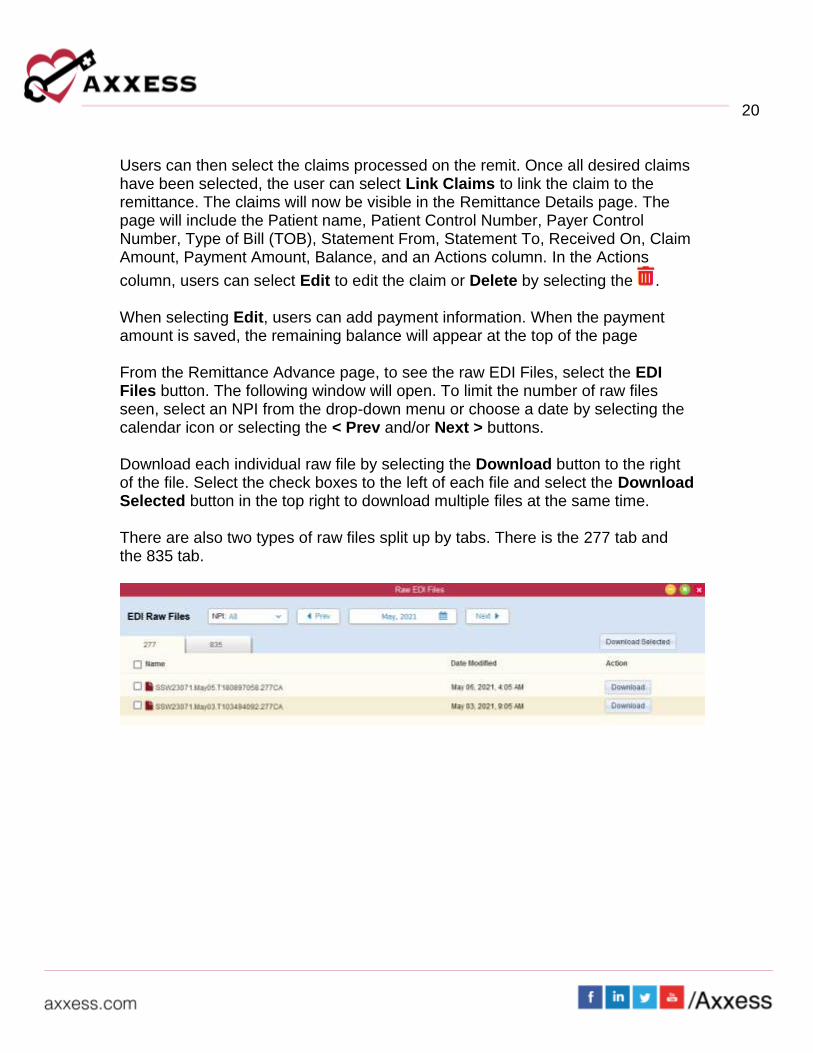
Users can then select the claims processed on the remit. Once all desired claims have been selected, the user can select Link Claims to link the claim to the remittance. The claims will now be visible in the Remittance Details page. The page will include the Patient name, Patient Control Number, Payer Control Number, Type of Bill (TOB), Statement From, Statement To, Received On, Claim Amount, Payment Amount, Balance, and an Actions column. In the Actions
column, users can select Edit to edit the claim or Delete by selecting the . When selecting Edit, users can add payment information. When the payment amount is saved, the remaining balance will appear at the top of the page From the Remittance Advance page, to see the raw EDI Files, select the EDI Files button. The following window will open. To limit the number of raw files seen, select an NPI from the drop-down menu or choose a date by selecting the calendar icon or selecting the < Prev and/or Next > buttons. Download each individual raw file by selecting the Download button to the right of the file. Select the check boxes to the left of each file and select the Download Selected button in the top right to download multiple files at the same time. There are also two types of raw files split up by tabs. There is the 277 tab and the 835 tab.
21
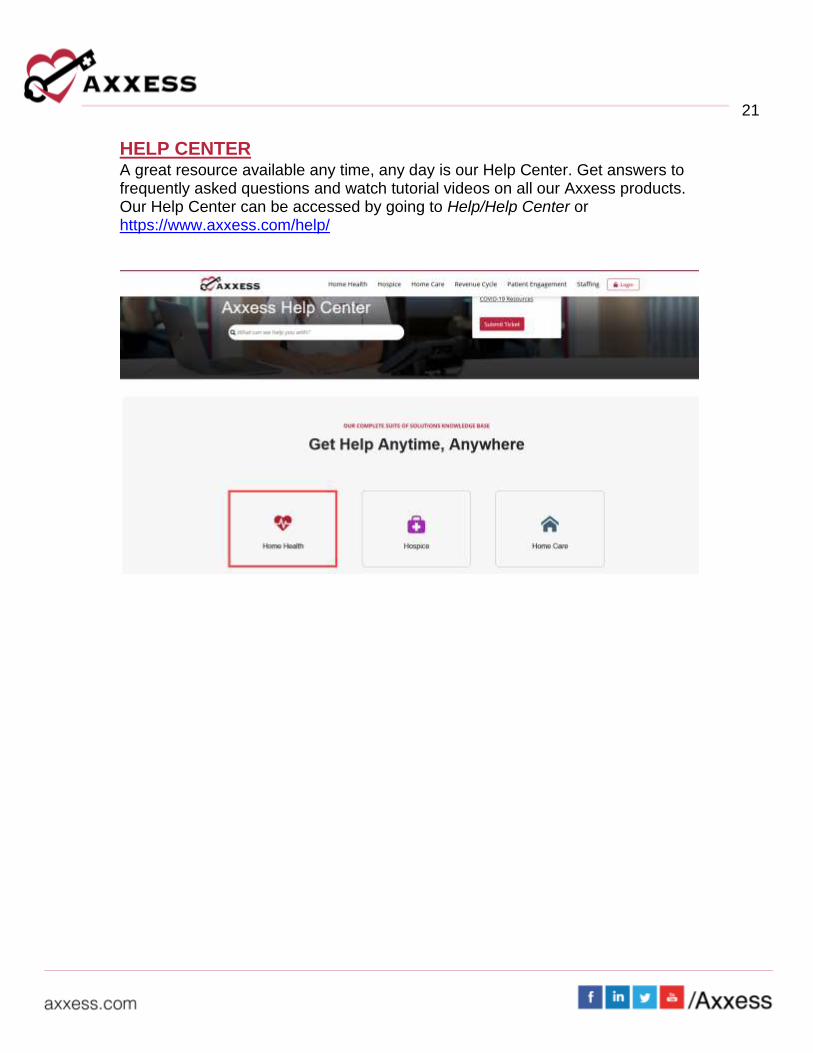
HELP CENTER A great resource available any time, any day is our Help Center. Get answers to frequently asked questions and watch tutorial videos on all our Axxess products. Our Help Center can be accessed by going to Help/Help Center or https://www.axxess.com/help/