Hitachi Content Platform using AvePoint DocAve 6 · 2014-10-31 · 1 1 Hitachi Content Platform...
23
November 8, 2012 By Implementation Guide Hitachi Content Platform using AvePoint DocAve 6 Federick Brillantes
Transcript of Hitachi Content Platform using AvePoint DocAve 6 · 2014-10-31 · 1 1 Hitachi Content Platform...

November 8, 2012
By
Implementation Guide
Hitachi Content Platform using AvePoint DocAve 6
Federick Brillantes

FeedbackHitachi Data Systems welcomes your feedback. Please share your thoughts by sending an email message to [email protected]. To assist the routing of this message, use the paper number in the subject and the title of this white paper in the text.

Table of ContentsTested Solution Components ........................................................................... 2
Hardware Components ........................................................................... 2Software Components ............................................................................ 4
Solution Implementation ................................................................................... 6
Configure the SAN .................................................................................. 6Configure Storage ................................................................................... 6Deploy DocAve Server ........................................................................... 9Deploy Hitachi Content Platform ........................................................... 13Configure AvePoint DocAve ................................................................. 14
Bibliography ..................................................................................................... 18

1
1
Hitachi Content Platform using AvePoint DocAve 6Implementation Guide
Hitachi Content Platform using AvePoint DocAve 6.0 combines intelligent object storage with business-aware content management and data protection to enhance Microsoft SharePoint-enabled business solutions.
After storing content in SharePoint databases, DocAve uses customizable storage policies in Content Platform to reduce the burden on the SQL databases used by SharePoint. Use DocAve to store or archive your SharePoint infrastructure and content without any interruptions or disturbances to the end users.
The implementation uses Hitachi Content Platform as target storage device for DocAve backup and archiving. Hitachi Adaptable Modular Storage 2500 runs DocAve Manager Server.
This implementation guide describes the installation, configuration, and the execution and integration of AvePoint DocAve to store backup or archived data on Hitachi Content Platform. Use the guide if you have any of the following:
Responsibility for storage administration
DocAve system administration and implementation
This implementation guide requires you to have the following:
Knowledge of SAN concepts
Skills with DocAve administration
Note—These procedures were developed in a lab environment. Many things affect production environments beyond prediction or duplication in a lab environment. Follow recommended practice by conducting proof-of-concept testing for acceptable results before implementing this solution in your production environment. Test the implementation in a non-production, isolated test environment that otherwise matches your production environment.

2
2
Tested Solution ComponentsThese are the components needed to implement this solution in your data center.
Hardware and operating system requirements are in “DocAve Manager System Requirements” and “DocAve Agent System Requirements” in DocAve 6 Installation Guide (AvePoint, Inc., 2012) available from the Resources web page of the AvePoint website.
Hardware ComponentsThese are the hardware components to implement an environment using Hitachi Content Platform and AvePoint DocAve.
Table 1 lists the hardware for a deployment in a single site environment. Table 2 on page 3 lists the hardware for deployment in a disaster recovery environment using a primary and secondary site.
Table 1. Hardware for Deployment in a Single Site Environment
Hardware Quantity Configuration Role
Hitachi Adaptable Modular Storage 2500
1 8 Fibre Channel ports
16 GB cache
AvePoint DocAve storage
Hitachi Compute Rack 220
1 2 × 4-core Intel Xeon E5620 CPU, 2.4 GHz
8 GB of RAM
One Compute Rack for each of the following roles:
Microsoft SQL Server 2008 Enterprise
Microsoft SharePoint 2010 server and AvePoint DocAve 6.0 server
ESX server 5.0
AvePoint DocAve client
Hitachi Content Platform 300
4 1 × 4-core Intel Xeon E5504 CPU, 2.00 GHz
12 GB of RAM
4-node
Hitachi Content Platform storage nodes

3
3
Table 2. Hardware for Deployment in a Disaster Recovery Environment (Primary Site and Secondary Site)
Hardware Quantity Configuration Role
Hitachi Adaptable Modular Storage 2500
1 8 Fibre Channel ports
16 GB cache
AvePoint DocAve storage
Hitachi Compute Rack 220 [primary site]
4 2 × 4-core Intel Xeon E5620 CPU, 2.4 GHz
8 GB of RAM
One Compute Rack for each of the following roles:
Microsoft SQL Server 2008 Enterprise
Microsoft SharePoint 2010 server and AvePoint DocAve 6.0 server
ESX server 5.0
AvePoint DocAve client
Hitachi Compute Rack 220 [secondary site]
3 2 × 4-core Intel Xeon E5620 CPU, 2.4 GHz
8 GB of RAM
One Compute Rack for each of the following roles:
Microsoft SQL Server 2008 Enterprise
Microsoft SharePoint 2010 server and AvePoint DocAve 6.0 server
Microsoft SQL Server 2008 Enterprise (witness)
Hitachi Content Platform 300 [primary site]
4 1 × 4-core Intel Xeon E5504 CPU, 2.00 GHz
12 GB of RAM
4-node
Hitachi Content Platform storage nodes
Hitachi Content Platform 300 [secondary site]
4 1 × 4-core Intel Xeon E5504 CPU, 2.00 GHz
12 GB of RAM
4-node
6 × 500 GB HDD
Hitachi Content Platform storage nodes

4
4
Hitachi Content PlatformHitachi Content Platform is a distributed object store that provides advanced storage and data management capabilities. This helps you address challenges posed by ever-growing volumes of unstructured data. Divide a single Content Platform into multiple virtual object stores, secure access to each store, and uniquely configure each store for a particular workload.
Eliminate storage silos using Content Platform with a single object storage infrastructure that supports a wide range of data types, applications, and users with different service level needs in enterprise and cloud environments.
Software ComponentsTable 3 lists the software for deployment in a single site environment or a disaster recovery environment.
AvePoint DocAveAvePoint DocAve 6 simplifies the deployment, monitoring, and enforcement of Microsoft SharePoint 2010 governance policies. As a fully integrated platform, DocAve 6 enables centralized or delegated management of SharePoint farms.
This solution uses the following DocAve components:
Granular Backup and Restore—Provides full backup and recovery
Storage Manager—Off-loads BLOBs to file-based storage
Archiver—Manages data growth and long term retention
Storage Manager—Reduces accumulating storage costs and optimize platform performance
Table 3. Software for Deployment in a Single Site Environment or Disaster Recovery Environment
Software Version
Microsoft Windows Server 2008 R2 Enterprise (64-Bit)
Microsoft SQL Server 2008 Enterprise (64-Bit)
Microsoft SharePoint 5.5 Build 44586
AvePoint DocAve Manager 6.0
Hitachi Content Platform 4.1.1.56
AvePoint DocAve Client 6.0
AvePoint DocAve Manager Patch (Hot fix) 6.0.0.600106_20120319
ESX Server 5.0

5
5
For more information about AvePoint DocAve, see the following documents from the User Guide area of the Resources page on the AvePoint web site:
DocAve 6 Archiver
DocAve 6 Storage Manager
DocAve 6 Backup and Restore
6
6
Solution ImplementationTo deploy this solution, follow these steps:
1. “Configure the SAN” on page 6
2. “Configure Storage” on page 6
3. “Deploy DocAve Server” on page 9
4. “Deploy Hitachi Content Platform” on page 13
5. “Configure AvePoint DocAve” on page 14
Create your installation checklist, based on the needs of your environment.
Configure the SANConnect all servers using two HBAs on each physical server to the Brocade 5000 Fibre Channel switches.
Recommended practice is to configure each port to use a different switch for redundancy. However, your organization’s guidelines for might vary. Check with your IT department.
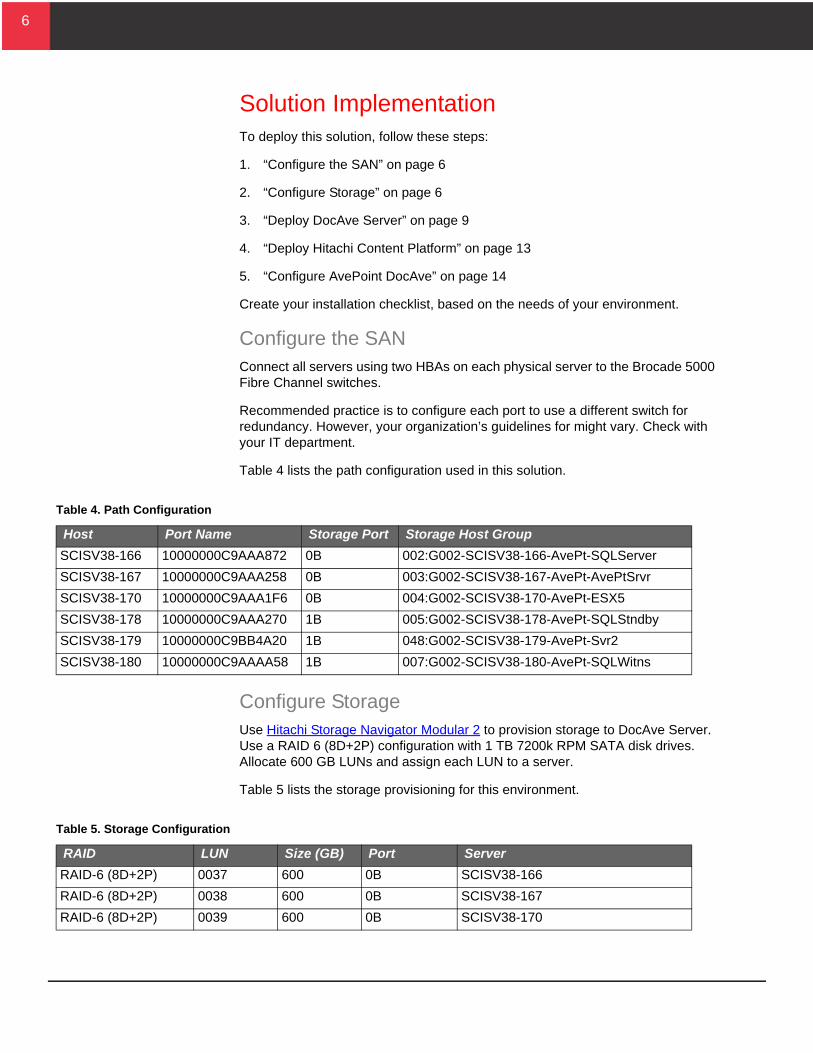
Table 4 lists the path configuration used in this solution.
Configure StorageUse Hitachi Storage Navigator Modular 2 to provision storage to DocAve Server. Use a RAID 6 (8D+2P) configuration with 1 TB 7200k RPM SATA disk drives. Allocate 600 GB LUNs and assign each LUN to a server.
Table 5 lists the storage provisioning for this environment.
Table 4. Path Configuration
Host Port Name Storage Port Storage Host Group
SCISV38-166 10000000C9AAA872 0B 002:G002-SCISV38-166-AvePt-SQLServer
SCISV38-167 10000000C9AAA258 0B 003:G002-SCISV38-167-AvePt-AvePtSrvr
SCISV38-170 10000000C9AAA1F6 0B 004:G002-SCISV38-170-AvePt-ESX5
SCISV38-178 10000000C9AAA270 1B 005:G002-SCISV38-178-AvePt-SQLStndby
SCISV38-179 10000000C9BB4A20 1B 048:G002-SCISV38-179-AvePt-Svr2
SCISV38-180 10000000C9AAAA58 1B 007:G002-SCISV38-180-AvePt-SQLWitns
Table 5. Storage Configuration
RAID LUN Size (GB) Port Server
RAID-6 (8D+2P) 0037 600 0B SCISV38-166
RAID-6 (8D+2P) 0038 600 0B SCISV38-167
RAID-6 (8D+2P) 0039 600 0B SCISV38-170

7
7
Configure RAID Groups on Hitachi Adaptable Modular Storage 2500Repeat this process for every RAID group in Table 5 on page 6.
To create and configure a RAID group on Hitachi Adaptable Modular Storage 2500, do the following.
1. Open the Logical Units pane.
(1) In the Explorer pane of Hitachi Storage Navigator Modular 2, expand the resource tree and then click the Subsystems link.
The Subsystems pane displays.
(2) Expand the storage system and groups in the navigation tree.
(3) Click the Logical Units link.
The Logical Units pane displays.
2. Configure a RAID group.
(1) On the RAID Groups tab, click Create RG.
The Create RAID Group dialog box opens.
(2) In RAID Group, type a unique numeric value.
Use any value to identify this new RAID group.
(3) From the RAID Level list, click RAID 6.
(4) From the Combination list, click 8D+2P.
(5) In Number of Parity Groups, type the following: 1
Increasing the number of parity groups above the default of value of 1 allows the creation of large LUs across multiple RAID groups. However, Hitachi Data Systems recommends against the creation of LUs that span across multiple RAID groups.
Instead, use Hitachi Dynamic Provisioning to create LUs that automatically span a greater number of hard drives.
RAID-6 (8D+2P) 0047 600 1B SCISV38-178
RAID-6 (8D+2P) 0048 600 1B SCISV38-179
RAID-6 (8D+2P) 0049 600 1B SCISV38-180
Table 5. Storage Configuration (Continued)
RAID LUN Size (GB) Port Server

8
8
(6) For Drives, do the following:
Click the Automatic Selection option.
From the Drive Type list, click SATA.
From the Drive Capacity list, click 1 TB.
3. Create the RAID group.
Click OK.
A message says the RAID group is created.
Configure Logical Units on Hitachi Adaptable Modular Storage 2500Repeat this process for every logical unit (LUN) in Table 5 on page 6.
To create and configure a LUN on Hitachi Adaptable Modular Storage 2500, do the following.
1. Open the Logical Units pane.
(1) In the Explorer pane of Hitachi Storage Navigator Modular 2, expand the resource tree and then click the Subsystems link.
The Subsystems pane displays.
(2) Expand the storage system and groups in the navigation tree.
(3) Click the Logical Units link.
The Logical Units pane displays.
2. Configure a LUN.
(1) Click the RAID Groups tab.
(2) Click the ID number for a RAID group.
The RAID Group <ID> pane displays details about this RAID group.
(3) Click Create LU.
The Create Logical Unit dialog box opens.
(4) Type the ID in LUN. See Table 5 on page 6 for example naming.
(5) From the Capacity list, click RG ALL.
(6) Do not select a Provisioning Attribute.
3. Create the LUN.
Click OK.
There is a message that says the LUN is created.

9
9
Create Host GroupsTo create host groups, do the following.
1. From Hitachi Storage Navigator Modular 2, from the Actions menu, point to Ports/Host Groups, and then click Create Host Groups.
The Create Host Groups window opens.
2. In Host Group Name, type a name.
3. From the Host Mode list, click 00 [Standard].
4. Add hosts and ports to the host group.
(1) In the Available Hosts pane, select one or more hosts.
(2) In the Available Ports pane, select one or more ports.
5. Click Add.
The Selected Host Groups pane populates.
6. Click Finish.
The Create Host Groups dialog box opens.
7. Click Apply.
Deploy DocAve ServerInstall AvePoint DocAve 6 in each server listed in Table 5 on page 6. There are two different server names used when typing configuration information during installation wizard.
The server name, as it is found in Table 5 on page 6
The SQL server name, which is the server name from Table 5 on page 6,a backslash, and “AVEP1SQLSERVER”
For example, for the server SCISV38-166, the SQL server name is SCISV38-166\AVEP1SQLSERVER
Before installing AvePoint DocAve 6, the following must be installed on the server:
Microsoft SQL Server 2008 Enterprise
Microsoft Windows server 2008
To install DocAve Server, do the following.
1. Start the AvePoint DocAve installation.
(1) Start the DocAve installer by running the Setup file.
The DocAve 6 Installation Wizard opens.
(2) Click Next.

10
10
2. Prepare the installation using the installation wizard.
(1) Type the following in the Customer Information pane, and then click Next:
Name
Organization
(2) In the DocAve License Agreement pane, select the license agreement acceptance check box and then click Next.
(3) In the Installation Location pane, set the application installation folder and then click Next.
Use the default location displayed in the text box, or click Browse to select a different location.
(4) In the Services Installation pane, click the Complete option and then click Next.
The installation wizard then checks to verify the installation prerequisites. The progress of the checking displays in the Installation Rule Scanning pane.
If any check does not pass, fix the problem and then rescan.
(5) After the setup prerequisite checks finish, in the Installation Rule Scanning pane, click Next.
(6) In the first Control Service Configuration pane, supply the information and then click Next.
In the Control Service Address area, type the Control Service Host. See the Server column in Table 5 on page 6.
In the IIS Web Site Settings area, click the Create a new IIS web site option, type DocAve6 in text box beside the option button, and type 14000 in Web Site Port.
In the Application Pool Settings area, click the Create a new application pool option, type DocAve6 in text box beside the option button, and type an administrator user credential in Username, and the password for that credential in Password.
(7) In the second Control Service Configuration pane, supply the information and then click Next.
In the Database Settings area, click MS SQL from the Database Type list, and type Doc_Ave6_ControlDB in Control Service Database Name.
In the Database Credentials area, click the Windows Authentication option.
In the Advanced Database Settings area, do not select Failover Database Server or type a name in the text box.

11
11
After clicking Next, DocAve validates the database name, Doc_Ave6_ControlDB.
If the database name DocAve6_ControlDB does not exist, the installation wizard opens a dialog box asking if you want to create a new database with the name DocAve6_ControlDB. Click OK to proceed.
(8) In the Media Service Configuration pane, supply the information and then click Next.
In the Media Service Settings area, type the server name from Table 5 on page 6 in Media Service Host, and the port numbers in Media Service Post and Media Service Data Port.
In the Control Service Address area, type the server name from Table 5 on page 6 in Control Service Host and the port number in Control Service Port.
(9) In the first Report Service Configuration pane, supply the Information and then click Next.
In the Report Service Settings area, type the server name from Table 5 on page 6 in Report Service Host and the port number in Report Service Port.
In the Control Service Address area, type the server name from Table 5 on page 6 in Control Service Host and the port number in Control Service Port.
(10)In the second Report Service Configuration pane, supply the Information and then click Next.
In the Database Settings area, type the SQL server name based on the server name from Table 5 on page 6 in Report Service Host and DocAve6_ReportDB in Report Service Port.
In the Database Credentials area, click the Windows Authentication option, and type the Username and Password credentials.
In the Advanced Database Settings area, do not select the Failover Database Server check box or type a name in the text box.
After clicking Next, DocAve validates the database name, Doc_Ave6_ReportDB.
If the database name DocAve6_ReportDB does not exist, the installation wizard opens a dialog box asking if you want to create a new database with the name DocAve6_ReportDB. Click OK to proceed.

12
12
(11)In the third Report Service Configuration pane, supply the Information and then click Next.
In the Auditor Settings area, type the SQL server name based on the server name from Table 5 on page 6 in Report Service Host and DocAve6_AuditorDB in Report Service Port.
In the Database Credentials area, click the Windows Authentication option, and type the Username and Password credentials.
In the Advanced Database Settings area, do not select the Failover Database Server check box or type a name in the text box.
After clicking Next, DocAve validates the database name, Doc_Ave6_AuditorDB.
If the database name DocAve6_AuditorDB does not exist, the installation wizard opens a dialog box asking if you want to create a new database with the name DocAve6_AuditorDB. Click OK to proceed.
(12)In the Advanced Configuration pane, click the Built-in Certificate option and then click Next.
The Ready to install DocAve Manager pane summarizes the entries made in this wizard for your review.
3. Install DocAve 6.
(1) Click Install.
The DocAve installer proceeds with the installation. When completed, the Install Completed pane displays the Passphrase for this installation. Every agent that joins this manager requires using this passphrase. See Figure 1.
Figure 1

13
13
(2) Record and save the Passphrase for use when joining an agent to this manager.
(3) Click Finish to complete installation.
4. After finishing the installation, open a DocAve server instance by typing the following in the Address bar of a browser:
https://<server name>:14000
Use the default user credentials:
Login ID: admin
Password: admin
Deploy Hitachi Content PlatformDeploy Hitachi Content Platform with four data nodes in a SAIN configuration.
For more information, see Hitachi Content Platform: Installing an HCP System (Hitachi Data Systems, 2012), which accompanies Hitachi Content Platform.
To deploy Hitachi Content Platform, do the following.
1. Set up the tenant in Hitachi Content Platform by completing the following information:
Tenant Name—Use a descriptive name
Hard Quota—100.00 GB
Soft Quota—85%
Namespace Quota—5
Description—Describe the purpose of the tenant, such as “DocAve Granular Backup/Restore”
2. Set up the namespace in Hitachi Content Platform by completing the following information:
Namespace Name—Use a descriptive name
Description—Describe the purpose of the namespace, such as “DocAve Primary Namespace”
DPL—Dynamic (1)
Hash Algorithm—SHA-256
Hard Quota—100 GB
Soft Quota—85%
Reference this namespace during mapping and defining the DocAve physical device.

14
14
Configure AvePoint DocAveThis is how you configure AvePoint DocAve.
Set Up AvePoint DocAve Physical DeviceThe physical device is the direct mapping of the Hitachi Content Platform namespace with AvePoint DocAve.
To map the physical device in DocAve, open the Control Panel window in DocAve and define the following:
1. Physical Device Name—Use a descriptive name to identify the physical device
2. Physical Device Description—Describe the purpose of the physical device, such as “Human Resources department”
3. Storage Type—HDS Hitachi Content Platform
4. Primary Namespace Address—Path to the namespace
5. Secondary Namespace Address—Do not change
6. Root Folder—The folder name where objects will be written on Content Platform, such as docave
7. Username and Password—The credentials with permissions to access the primary namespace used in step 4
After completing all the entries, click Validation Test to test the connection.
Test Successful—The configuration passes the test (Figure 2)
Figure 2
Error message—Correct the problem before continuing

15
15
Set Up AvePoint DocAve Logical DeviceAvePoint DocAve can treat multiple storage drives as a single logical unit when saving backup data. With very large backup plans, you can combine many smaller drives. Define a logical device before creating a backup plan.
To define logical device, define the following:
1. Logical Device Name—Use a descriptive a name to identify the logical device
2. Physical DocAve Description—Describe the purpose of the physical device, such as “Payroll Section”
3. Storage Type—HDS Hitachi Content Platform
4. Physical Device—Click a device from the Physical Device list and then click Add
For each physical device added, select the Storage Data check box and/or the Storage Index check box
To save the configuration and return to the Logical Device Details page, click OK. After saving the logical device, it is on the Logical Device Details page, as shown in Figure 3.
To return to the Logical Device Details page without saving any changes, click Cancel.
Figure 3

16
16
Set Up AvePoint DocAve Storage PolicyCreating a storage policy allows you to do the following:
Specify which logical device to use when saving backup data
Establish the retention policy for the data in logical device
For information about storage policy, see DocAve 6 Service Pack 1 Control Panel Reference Guide (AvePoint, Inc., 2012). This document is in the User Guides area on the Resources page on the AvePoint website.
To create a storage policy, define the following:
1. Storage Policy Name—Use a descriptive name to identify storage policy
Recommended practice is to add “_bkp” to the end of the storage policy name, such as dappolicy01_bkp.
2. Storage Policy Description—Describe the storage policy
3. Media Service—Click a service from Media Service list and then click Add
For each media service added, click Test. A successful test message displays if it passes. Otherwise, solve the problem before proceeding.
4. Logical Device—Use a defined logical device
To save the configuration and return to the Storage Policy page, click OK. After saving the storage policy, it is on the Storage Policy page.
To return to the Storage Policy page without saving any changes, click Cancel.

17
17
Set Up AvePoint DocAve Advanced OptionsUse the AvePoint DocAve advanced options to specify the following extended parameters, if necessary.
RetryInterval—Specify the time interval of the Retry operation when the connection with the Hitachi Content Platform server is not available.
The format is RetryInterval=100
The unit for this parameter is millisecond
Default value is 200
RetryCount—Specify the count of the Retry operation when the connection with the Hitachi Content Platform server is not available.
The format is RetryCount=6
The unit for this parameter is millisecond
Default value is 6
FlushDNS—Specify whether to flush the DNS before connecting to the specified secondary namespace address.
The format is FlushDN=true
Parameter default value is true
FailOverMode—Specify when to use the configured secondary namespace address if the primary namespace address is not accessible.
The format is FailOverMode=ReadWrite
Parameter default value is ReadWrite
Use Read for FailOverMode to use the secondary namespace address when DocAve fails to perform the Read operation using the primary namespace address.
Use Off for FailOverMode to not use the secondary namespace address when DocAve fails to perform any operation using the primary namespace address
Click Validation Test to verify the correct entry of one or more parameters.
Click OK to save the configuration or click Back to cancel it.
After saving the physical device, it displays on the Physical Device page.

18
18
BibliographyAvePoint, Inc. 2012. DocAve® 6 Service Pack 1: Control Panel Reference Guide. September 2012. Jersey City: AvePoint, Inc., 2012. Revision C.
-. 2012. DocAve® 6 Service Pack 1: Installation Guide. September 2012. Jersey City: AvePoint, Inc., 2012. Revision C.
Hitachi Data Systems. 2012. Installing an HCP System. Santa Clara: Hitachi Data Systems, 2012. HDS Document No. MK-99ARC026-07.

For More InformationHitachi Data Systems Global Services offers experienced storage consultants, proven methodologies and a comprehensive services portfolio to assist you in implementing Hitachi products and solutions in your environment. For more information, see the Hitachi Data Systems Global Services website.
Live and recorded product demonstrations are available for many Hitachi products. To schedule a live demonstration, contact a sales representative. To view a recorded demonstration, see the Hitachi Data Systems Corporate Resources website. Click the Product Demos tab for a list of available recorded demonstrations.
Hitachi Data Systems Academy provides best-in-class training on Hitachi products, technology, solutions and certifications. Hitachi Data Systems Academy delivers on-demand web-based training (WBT), classroom-based instructor-led training (ILT) and virtual instructor-led training (vILT) courses. For more information, see the Hitachi Data Systems Services Education website.
For more information about Hitachi products and services, contact your sales representative or channel partner or visit the Hitachi Data Systems website.

Corporate Headquarters2845 Lafayette Street, Santa Clara, California 95050-2627 USAwww.HDS.com
Regional Contact InformationAmericas: +1 408 970 1000 or [email protected], Middle East and Africa: +44 (0) 1753 618000 or [email protected] Asia-Pacific: +852 3189 7900 or [email protected] is a registered trademark of Hitachi, Ltd., in the United States and other countries. Hitachi Data Systems is a registered trademark and service mark of Hitachi, Ltd., in the United States and other countries. All other trademarks, service marks, and company names in this document or website are properties of their respective owners.
Notice: This document is for informational purposes only, and does not set forth any warranty, expressed or implied, concerning any equipment or service offered or to be offered by Hitachi Data Systems Corporation.
© Hitachi Data Systems Corporation 2012. All Rights Reserved. AS-182-00, November 2012