HireOnline Instructions (Hiring Manager) - UC San Diego … · · 2018-02-27UCSD HireOnline...
21
UCSD HireOnline Instructions (Hiring Manager): 1. Enter UCSD HireOnline a. Click on the link provided in the e-mail supplied by the Recruiter or Department HR (Approvals/Committee Members). b. Sign on using your Single Sign On (System Sign-In through Blink) login and password. NOTE: Managers/Committee Members must have a Login and Password to use this system. 1
Transcript of HireOnline Instructions (Hiring Manager) - UC San Diego … · · 2018-02-27UCSD HireOnline...
UCSD HireOnline Instructions (Hiring Manager):
1. Enter UCSD HireOnline a. Click on the link provided in the e-mail supplied by the Recruiter or Department
HR (Approvals/Committee Members). b. Sign on using your Single Sign On (System Sign-In through Blink) login and
password. NOTE: Managers/Committee Members must have a Login and Password to use this system.
1
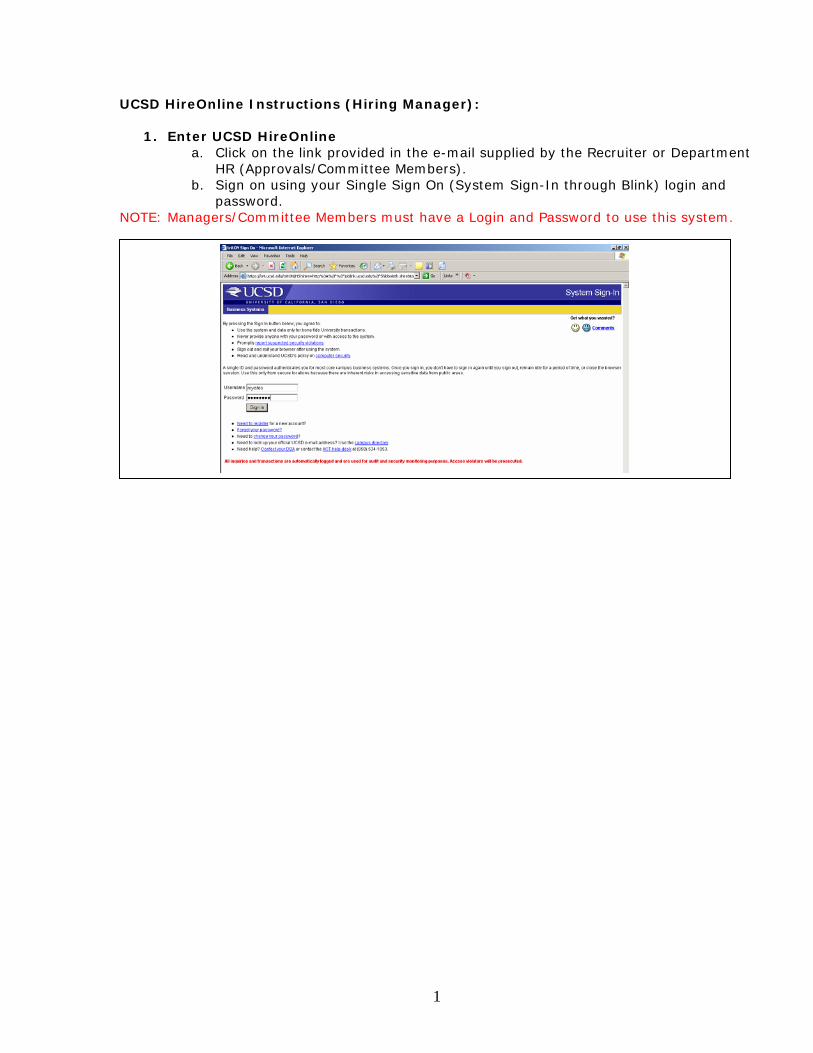
2. UCSD HireOnline Control Panel Page a. Provides access to positions if user is set up as the Preparer, Hiring Manager,
HR Contact or Endorser (occurs when the Online Requisition is created by the department and submitted to Campus Human Resources.
b. UCSD HireOnline Control Panel Page Options:
MY REQ SUMMARY Open Reqs Click on the number to view open positions Pending Reqs Click on the number to view positions pending posting Filled Reqs Click on the number to view positions filled Waiting Approval Reqs Click on the number to view positions awaiting approval
to hire
MY OPEN REQS BY # DAYS OPEN Reqs Open >90 Days Reqs Open 60 – 90 Days Reqs Open 30 – 60 Days Reqs Open <30 Days
Click on the number to view open positions by number of days open
OTHER TOOLS
Employment Policy/Procedure updates Link to recent or past Policy/Procedure updates for Employment & Staffing
Create a Job Description Link to Job Description system Create an Online Requisition Link to Online Requisition system Temporary Employment Services (TES) Link to access the TES ordering system
2
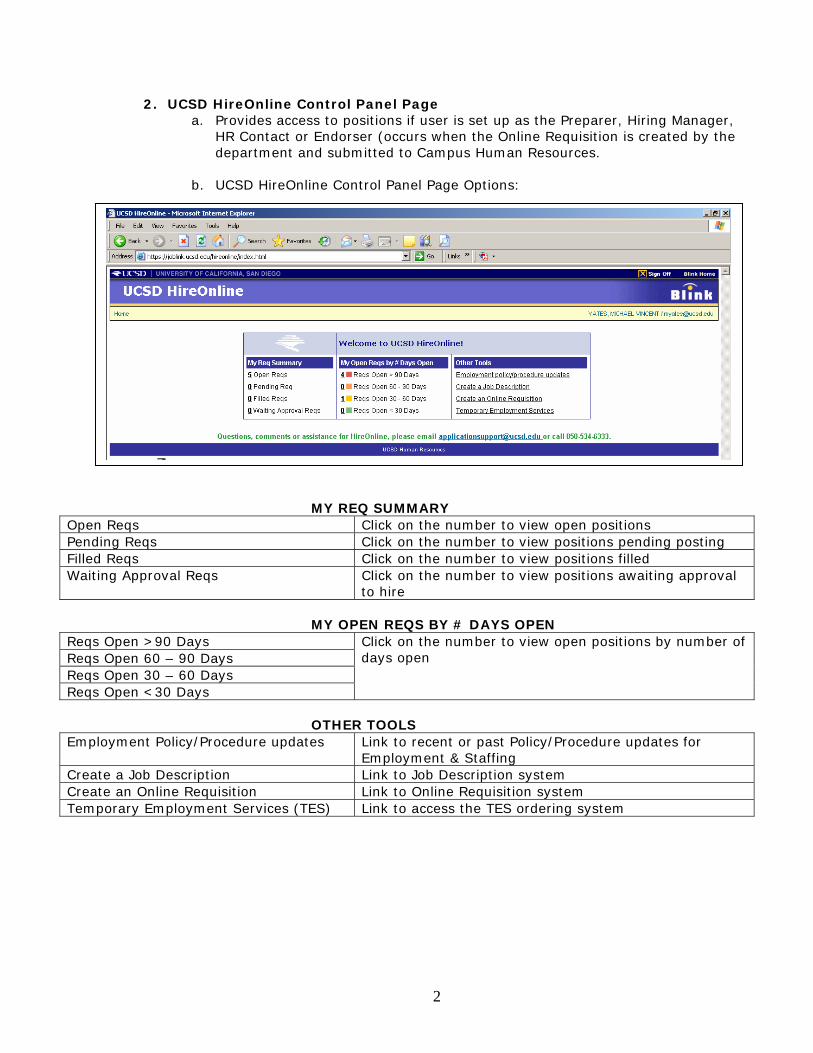
3. ENTER A SPECIFIC JOB REQUISITION a. Click on Open Reqs/Pending Reqs/Filled Reqs, then click on the number to enter
a specific job requisition. Steps are included to guide you through the process to fill a specific job requisition. There are 5 steps to this process, HOWEVER, This is not a linear process and you may exit the system and return to where you left off once you are ready to move forward.
3
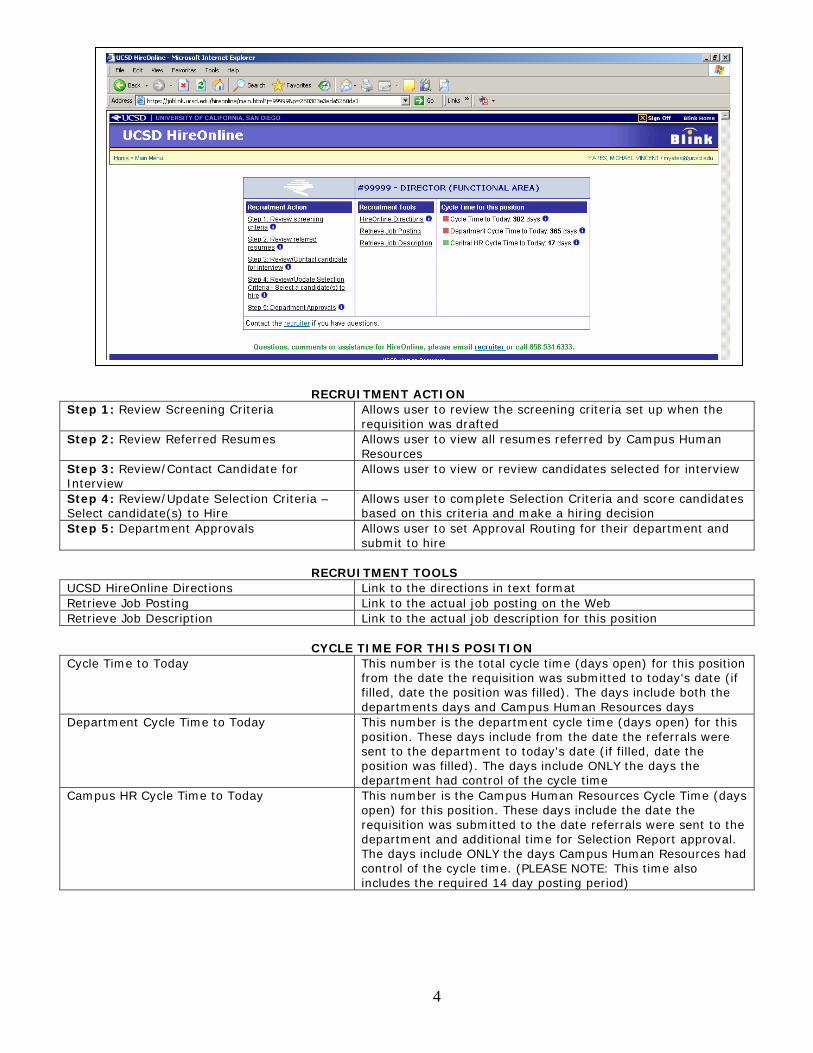
RECRUITMENT ACTION Step 1: Review Screening Criteria Allows user to review the screening criteria set up when the
requisition was drafted Step 2: Review Referred Resumes Allows user to view all resumes referred by Campus Human
Resources Step 3: Review/Contact Candidate for Interview
Allows user to view or review candidates selected for interview
Step 4: Review/Update Selection Criteria – Select candidate(s) to Hire
Allows user to complete Selection Criteria and score candidates based on this criteria and make a hiring decision
Step 5: Department Approvals Allows user to set Approval Routing for their department and submit to hire
RECRUITMENT TOOLS
UCSD HireOnline Directions Link to the directions in text format Retrieve Job Posting Link to the actual job posting on the Web Retrieve Job Description Link to the actual job description for this position
CYCLE TIME FOR THIS POSITION
Cycle Time to Today This number is the total cycle time (days open) for this position from the date the requisition was submitted to today's date (if filled, date the position was filled). The days include both the departments days and Campus Human Resources days
Department Cycle Time to Today This number is the department cycle time (days open) for this position. These days include from the date the referrals were sent to the department to today's date (if filled, date the position was filled). The days include ONLY the days the department had control of the cycle time
Campus HR Cycle Time to Today This number is the Campus Human Resources Cycle Time (days open) for this position. These days include the date the requisition was submitted to the date referrals were sent to the department and additional time for Selection Report approval. The days include ONLY the days Campus Human Resources had control of the cycle time. (PLEASE NOTE: This time also includes the required 14 day posting period)
4

4. RECRUITMENT ACTIONS TO HIRE: a. Step 1: Review screening criteria: In this step, user will review the screening
criteria created when the requisition was submitted to Campus Human Resources. User will use these screening criteria to determine who will be selected for an interview. If this screening criteria needs to be changed, contact the Recruiter.
ACTIONS – TOOLS – LINKS AVAILABLE AT THIS STEP
RECRUITMENT ACTION Step 2: Review Referred Resumes Move forward to view all resumes referred by Campus
Human Resources Back Button Return to previous page (or use Browser back button)
RECRUITMENT TOOLS Retrieve Job Posting Link to actual job posting for this position on the Web Retrieve Job Description Link to actual job description for this position
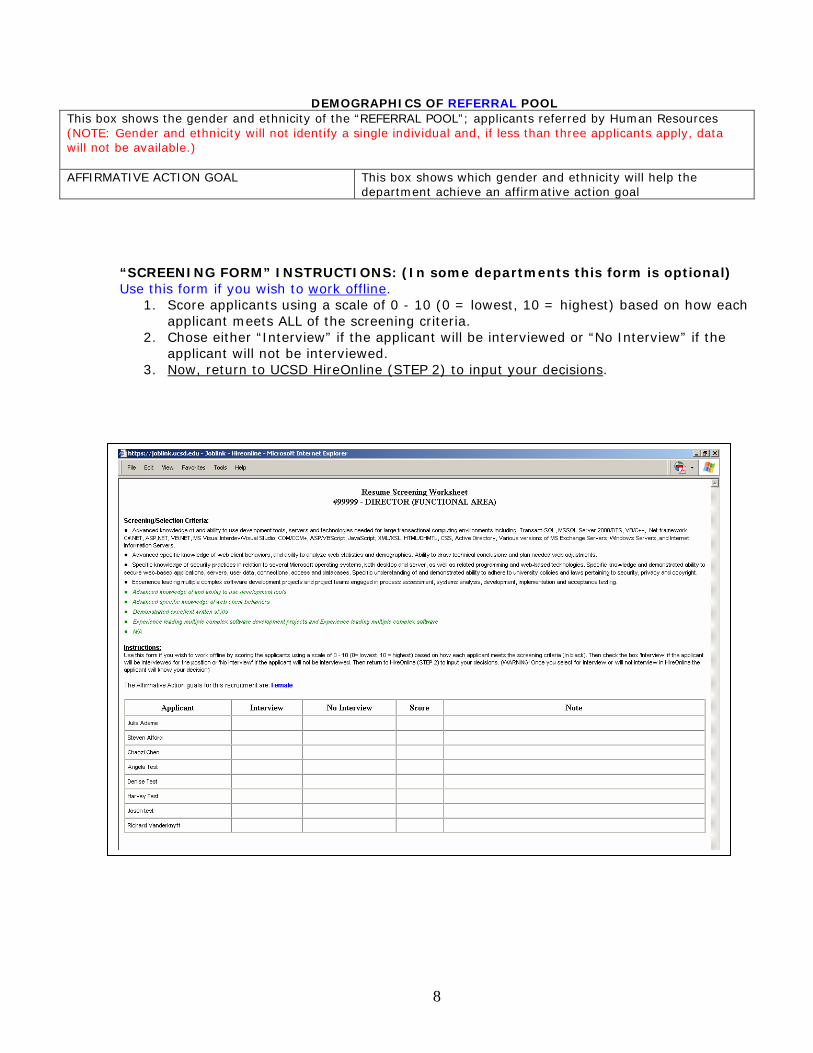
DEMOGRAPHICS OF REFERRAL POOL This box shows the Gender and Ethnicity of the “REFERRAL POOL”; applicants referred by Campus Human Resources (NOTE: Gender and ethnicity will not identify a single individual and if less than three applicants apply, data will not be shown.) AFFIRMATIVE ACTION GOAL This box shows which gender and ethnicity will help the
department achieve an affirmative action goal
5
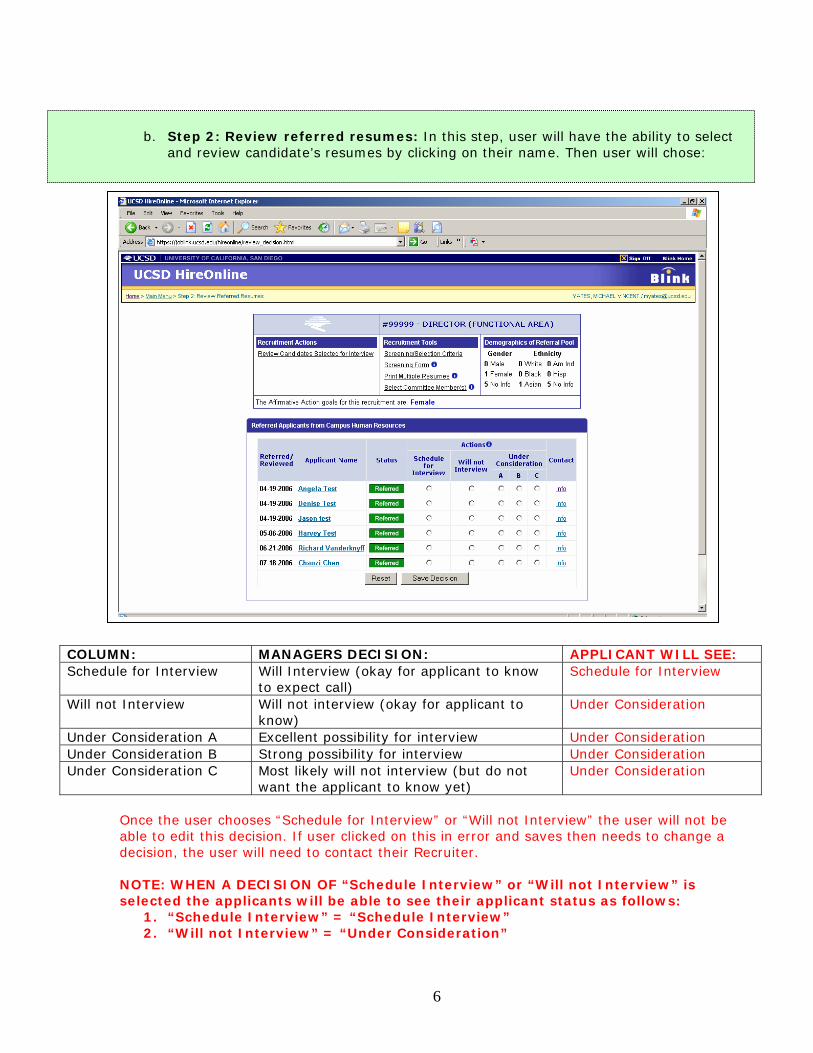
b. Step 2: Review referred resumes: In this step, user will have the ability to select and review candidate’s resumes by clicking on their name. Then user will chose:
COLUMN: MANAGERS DECISION: APPLICANT WILL SEE: Schedule for Interview Will Interview (okay for applicant to know
to expect call) Schedule for Interview
Will not Interview Will not interview (okay for applicant to know)
Under Consideration
Under Consideration A Excellent possibility for interview Under Consideration Under Consideration B Strong possibility for interview Under Consideration Under Consideration C Most likely will not interview (but do not
want the applicant to know yet) Under Consideration
Once the user chooses “Schedule for Interview” or “Will not Interview” the user will not be able to edit this decision. If user clicked on this in error and saves then needs to change a decision, the user will need to contact their Recruiter. NOTE: WHEN A DECISION OF “Schedule Interview” or “Will not Interview” is selected the applicants will be able to see their applicant status as follows:
1. “Schedule Interview” = “Schedule Interview” 2. “Will not Interview” = “Under Consideration”
6
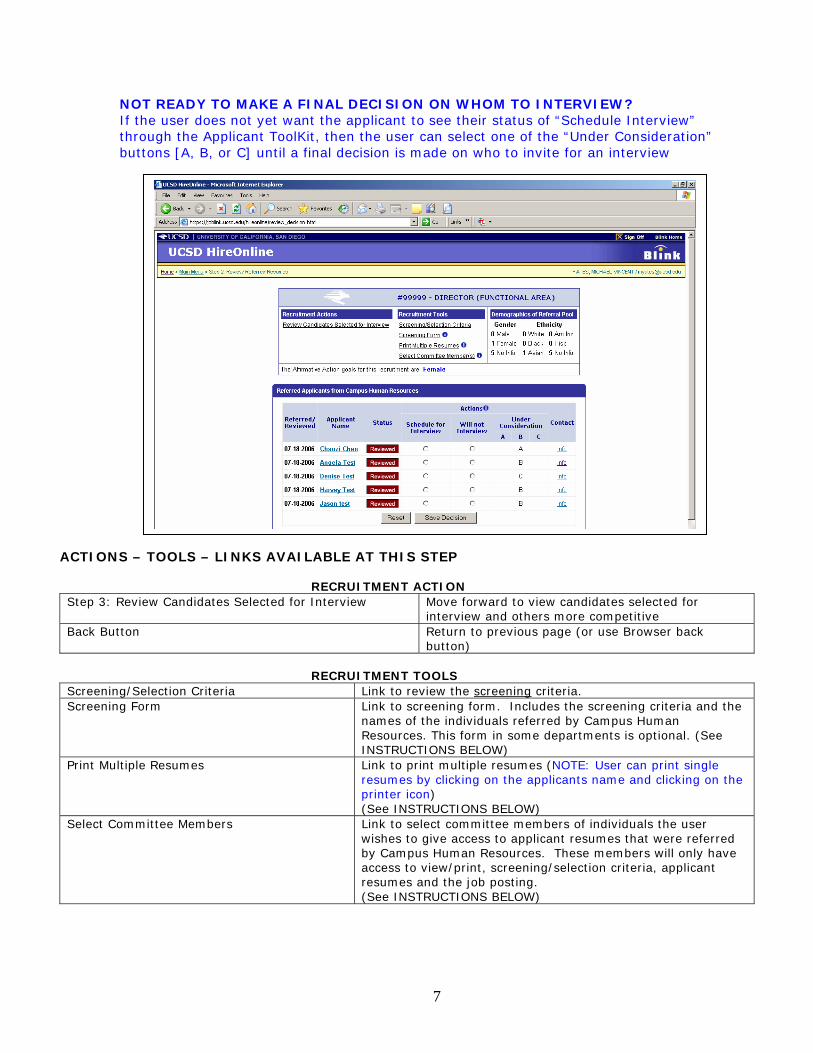
NOT READY TO MAKE A FINAL DECISION ON WHOM TO INTERVIEW? If the user does not yet want the applicant to see their status of “Schedule Interview” through the Applicant ToolKit, then the user can select one of the “Under Consideration” buttons [A, B, or C] until a final decision is made on who to invite for an interview
ACTIONS – TOOLS – LINKS AVAILABLE AT THIS STEP
RECRUITMENT ACTION Step 3: Review Candidates Selected for Interview Move forward to view candidates selected for
interview and others more competitive Back Button Return to previous page (or use Browser back
button)
RECRUITMENT TOOLS Screening/Selection Criteria Link to review the screening criteria. Screening Form Link to screening form. Includes the screening criteria and the
names of the individuals referred by Campus Human Resources. This form in some departments is optional. (See INSTRUCTIONS BELOW)
Print Multiple Resumes Link to print multiple resumes (NOTE: User can print single resumes by clicking on the applicants name and clicking on the printer icon) (See INSTRUCTIONS BELOW)
Select Committee Members Link to select committee members of individuals the user wishes to give access to applicant resumes that were referred by Campus Human Resources. These members will only have access to view/print, screening/selection criteria, applicant resumes and the job posting. (See INSTRUCTIONS BELOW)
7
DEMOGRAPHICS OF REFERRAL POOL This box shows the gender and ethnicity of the “REFERRAL POOL”; applicants referred by Human Resources (NOTE: Gender and ethnicity will not identify a single individual and, if less than three applicants apply, data will not be available.) AFFIRMATIVE ACTION GOAL This box shows which gender and ethnicity will help the
department achieve an affirmative action goal “SCREENING FORM” INSTRUCTIONS: (In some departments this form is optional) Use this form if you wish to work offline.
1. Score applicants using a scale of 0 - 10 (0 = lowest, 10 = highest) based on how each applicant meets ALL of the screening criteria.
2. Chose either “Interview” if the applicant will be interviewed or “No Interview” if the applicant will not be interviewed.
3. Now, return to UCSD HireOnline (STEP 2) to input your decisions.
8
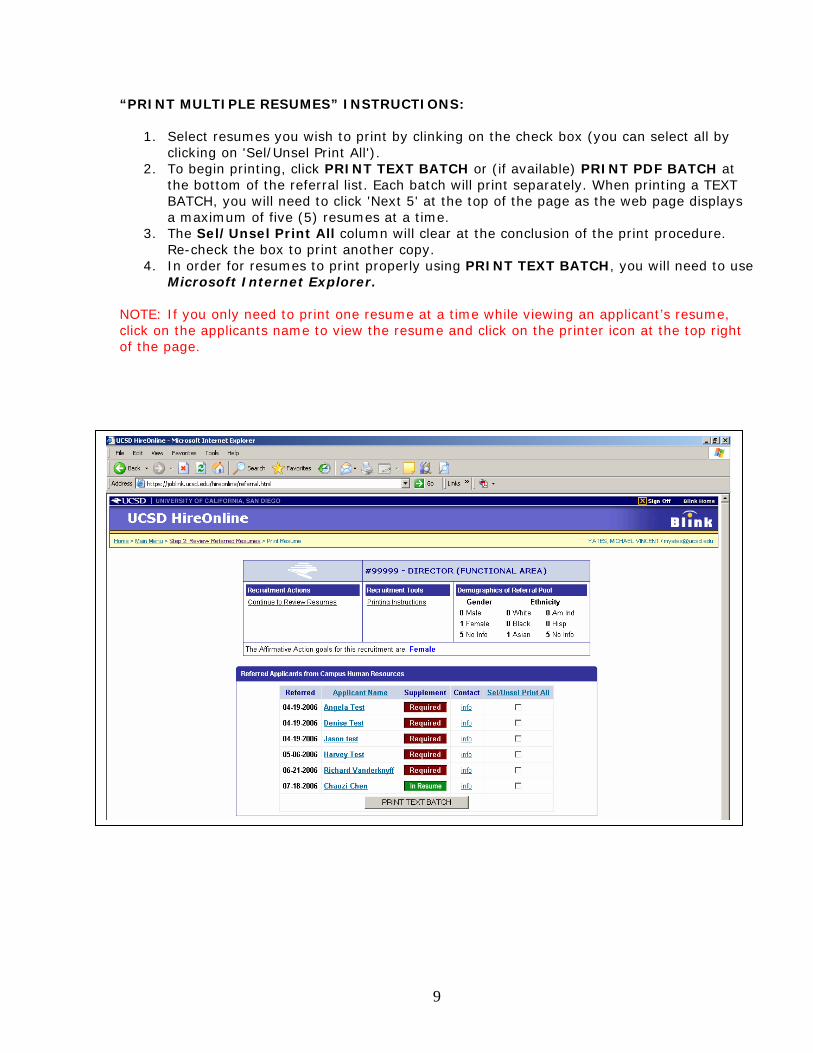
“PRINT MULTIPLE RESUMES” INSTRUCTIONS:
1. Select resumes you wish to print by clinking on the check box (you can select all by clicking on 'Sel/Unsel Print All').
2. To begin printing, click PRINT TEXT BATCH or (if available) PRINT PDF BATCH at the bottom of the referral list. Each batch will print separately. When printing a TEXT BATCH, you will need to click 'Next 5' at the top of the page as the web page displays a maximum of five (5) resumes at a time.
3. The Sel/Unsel Print All column will clear at the conclusion of the print procedure. Re-check the box to print another copy.
4. In order for resumes to print properly using PRINT TEXT BATCH, you will need to use Microsoft Internet Explorer.
NOTE: If you only need to print one resume at a time while viewing an applicant’s resume, click on the applicants name to view the resume and click on the printer icon at the top right of the page.
9
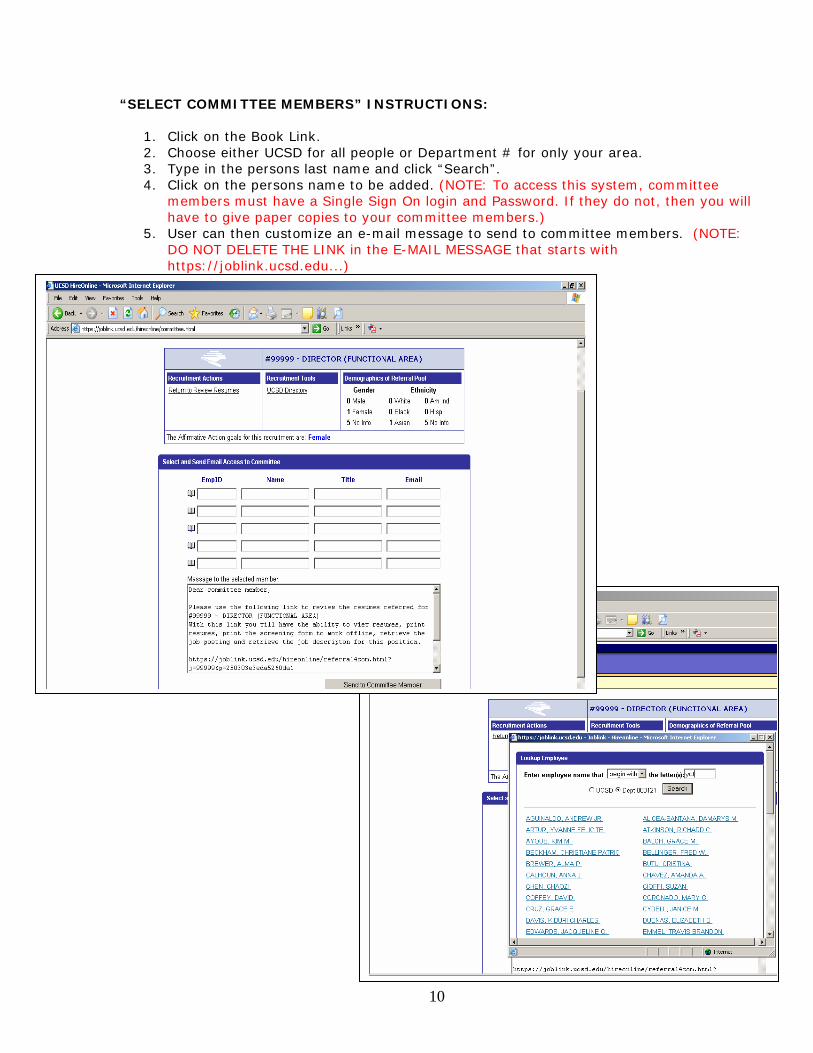
“SELECT COMMITTEE MEMBERS” INSTRUCTIONS:
1. Click on the Book Link. 2. Choose either UCSD for all people or Department # for only your area. 3. Type in the persons last name and click “Search”. 4. Click on the persons name to be added. (NOTE: To access this system, committee
members must have a Single Sign On login and Password. If they do not, then you will have to give paper copies to your committee members.)
5. User can then customize an e-mail message to send to committee members. (NOTE: DO NOT DELETE THE LINK in the E-MAIL MESSAGE that starts with https://joblink.ucsd.edu...)
10
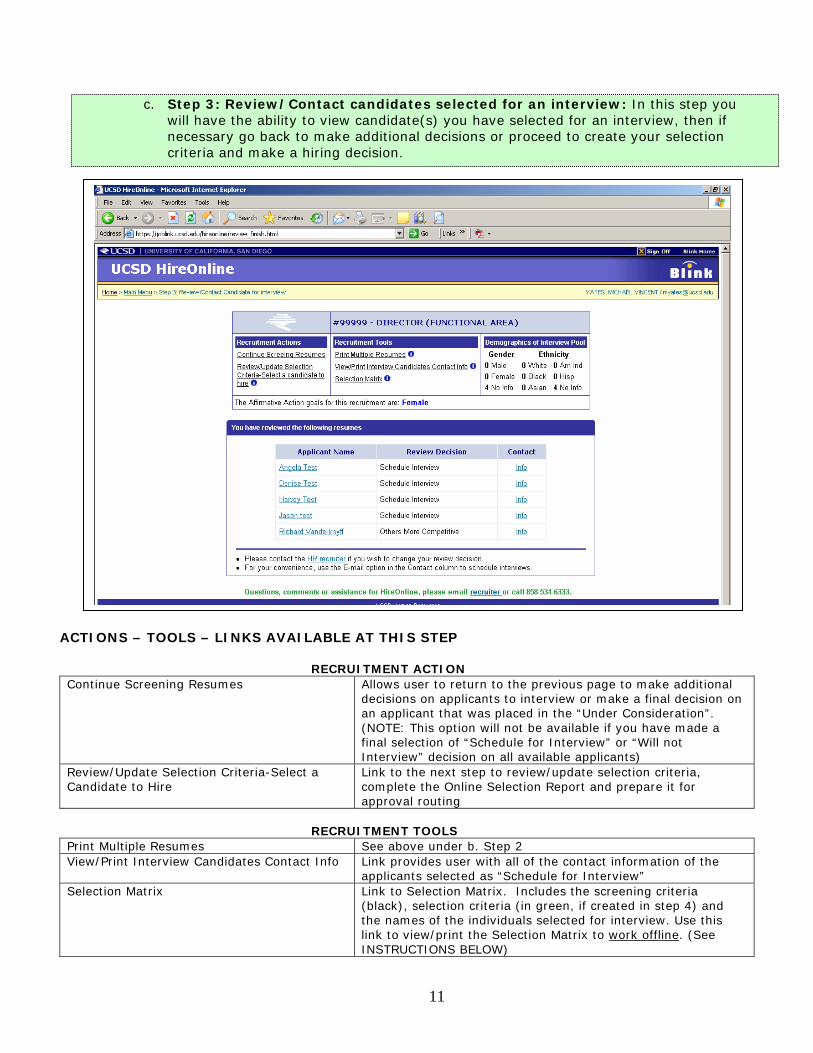
c. Step 3: Review/Contact candidates selected for an interview: In this step you will have the ability to view candidate(s) you have selected for an interview, then if necessary go back to make additional decisions or proceed to create your selection criteria and make a hiring decision.
ACTIONS – TOOLS – LINKS AVAILABLE AT THIS STEP
RECRUITMENT ACTION Continue Screening Resumes Allows user to return to the previous page to make additional
decisions on applicants to interview or make a final decision on an applicant that was placed in the “Under Consideration”. (NOTE: This option will not be available if you have made a final selection of “Schedule for Interview” or “Will not Interview” decision on all available applicants)
Review/Update Selection Criteria-Select a Candidate to Hire
Link to the next step to review/update selection criteria, complete the Online Selection Report and prepare it for approval routing
RECRUITMENT TOOLS
Print Multiple Resumes See above under b. Step 2 View/Print Interview Candidates Contact Info Link provides user with all of the contact information of the
applicants selected as “Schedule for Interview” Selection Matrix Link to Selection Matrix. Includes the screening criteria
(black), selection criteria (in green, if created in step 4) and the names of the individuals selected for interview. Use this link to view/print the Selection Matrix to work offline. (See INSTRUCTIONS BELOW)
11
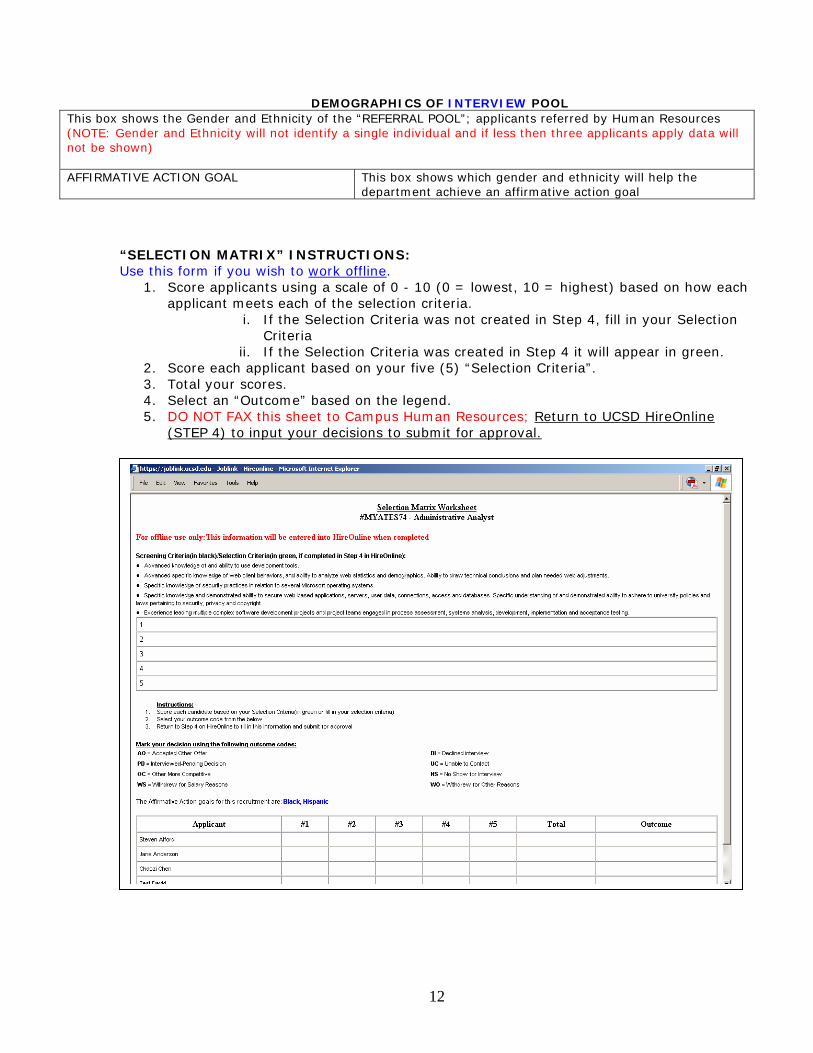
DEMOGRAPHICS OF INTERVIEW POOL This box shows the Gender and Ethnicity of the “REFERRAL POOL”; applicants referred by Human Resources (NOTE: Gender and Ethnicity will not identify a single individual and if less then three applicants apply data will not be shown) AFFIRMATIVE ACTION GOAL This box shows which gender and ethnicity will help the
department achieve an affirmative action goal
“SELECTION MATRIX” INSTRUCTIONS: Use this form if you wish to work offline.
1. Score applicants using a scale of 0 - 10 (0 = lowest, 10 = highest) based on how each applicant meets each of the selection criteria.
i. If the Selection Criteria was not created in Step 4, fill in your Selection Criteria
ii. If the Selection Criteria was created in Step 4 it will appear in green. 2. Score each applicant based on your five (5) “Selection Criteria”. 3. Total your scores. 4. Select an “Outcome” based on the legend. 5. DO NOT FAX this sheet to Campus Human Resources; Return to UCSD HireOnline
(STEP 4) to input your decisions to submit for approval.
12

d. Step 4: Review/Update selection criteria-Select a candidate to hire: In this step you will do the following.
1. Review/update your selection criteria. 2. Select a candidate to hire: Complete the Online Selection Report. 3. Confirm for approval routing.
1. Review/Update Your Selection Criteria
Establish your “Selection Criteria.” Five boxes are provided for identifying these criteria. User may use the same criteria used for the “Screening Criteria.” User may highlight them and drag them into each box separately. (NOTE: These five boxes are REQUIRED FIELDS.) If using less than five “Selection Criteria” type in “N/A” in the box. Criteria from the job posting and/or job description may also be highlighted and dragged it into one of the fields. Once the “Selection Criteria” is created, click on the “Submit” button.
13
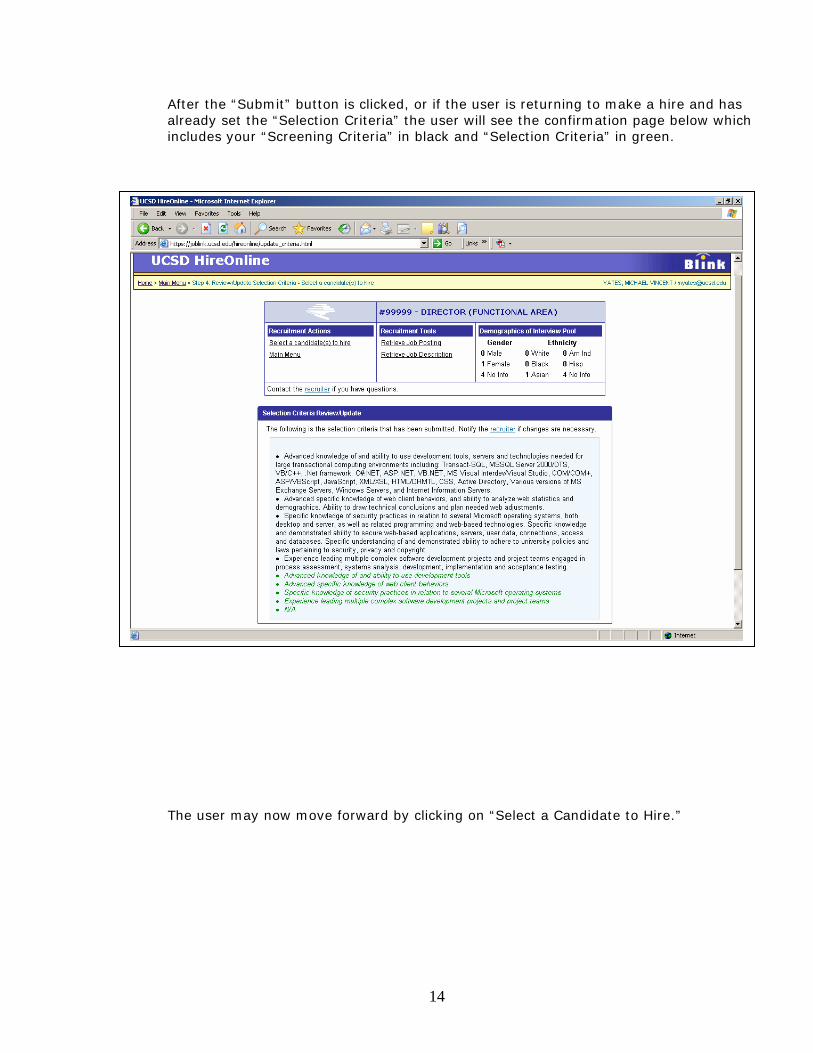
After the “Submit” button is clicked, or if the user is returning to make a hire and has already set the “Selection Criteria” the user will see the confirmation page below which includes your “Screening Criteria” in black and “Selection Criteria” in green. The user may now move forward by clicking on “Select a Candidate to Hire.”
14
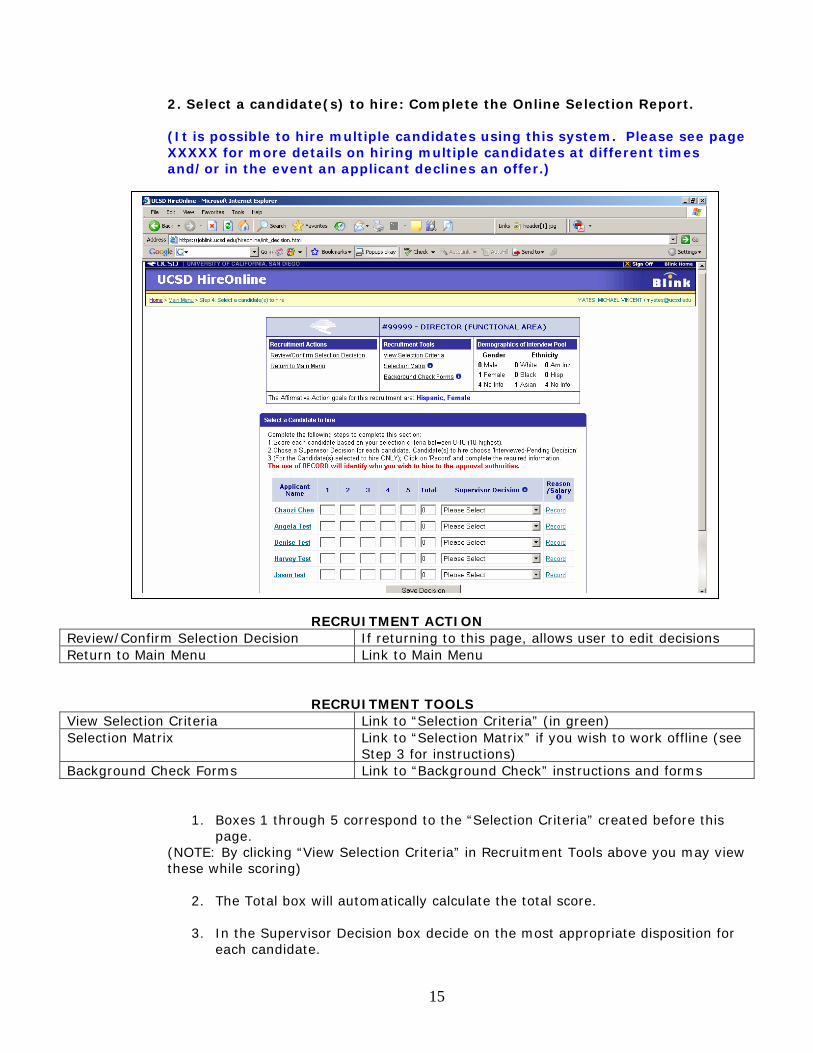
2. Select a candidate(s) to hire: Complete the Online Selection Report. (It is possible to hire multiple candidates using this system. Please see page XXXXX for more details on hiring multiple candidates at different times and/or in the event an applicant declines an offer.)
RECRUITMENT ACTION Review/Confirm Selection Decision If returning to this page, allows user to edit decisions Return to Main Menu Link to Main Menu
RECRUITMENT TOOLS View Selection Criteria Link to “Selection Criteria” (in green) Selection Matrix Link to “Selection Matrix” if you wish to work offline (see
Step 3 for instructions) Background Check Forms Link to “Background Check” instructions and forms
1. Boxes 1 through 5 correspond to the “Selection Criteria” created before this page.
(NOTE: By clicking “View Selection Criteria” in Recruitment Tools above you may view these while scoring)
2. The Total box will automatically calculate the total score. 3. In the Supervisor Decision box decide on the most appropriate disposition for
each candidate.
15
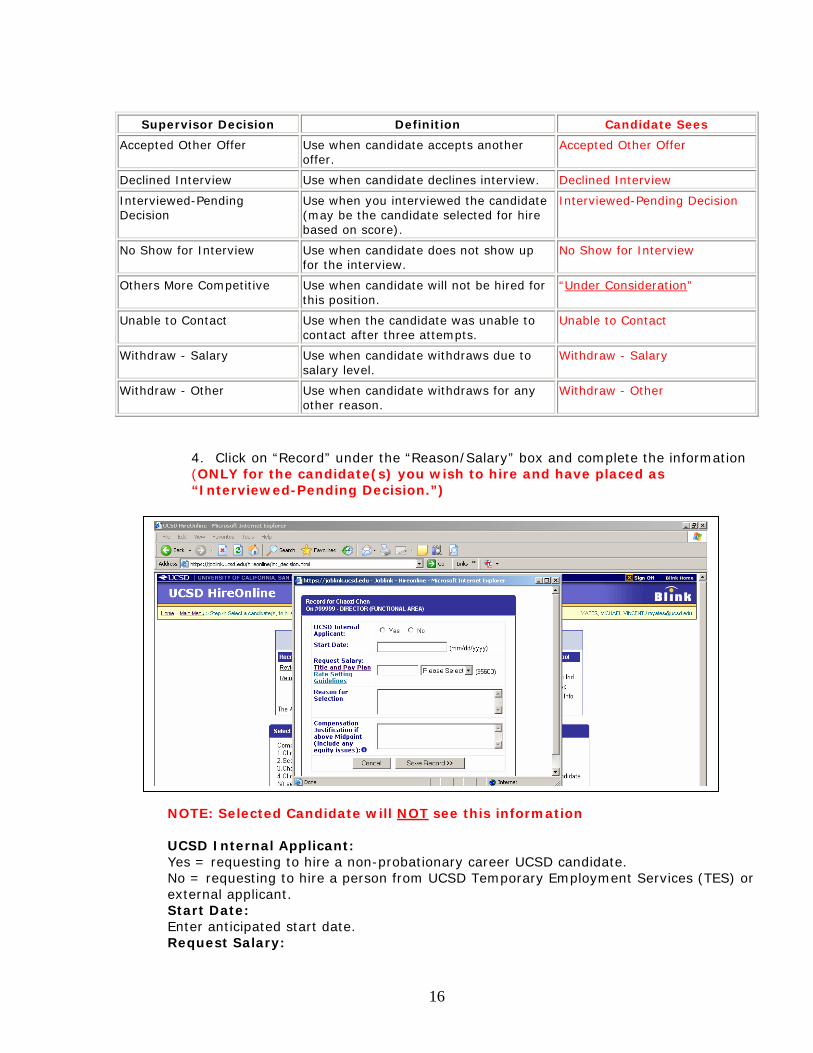
Supervisor Decision Definition Candidate Sees
Accepted Other Offer Use when candidate accepts another offer.
Accepted Other Offer
Declined Interview Use when candidate declines interview. Declined Interview
Interviewed-Pending Decision
Use when you interviewed the candidate (may be the candidate selected for hire based on score).
Interviewed-Pending Decision
No Show for Interview Use when candidate does not show up for the interview.
No Show for Interview
Others More Competitive Use when candidate will not be hired for this position.
“Under Consideration”
Unable to Contact Use when the candidate was unable to contact after three attempts.
Unable to Contact
Withdraw - Salary Use when candidate withdraws due to salary level.
Withdraw - Salary
Withdraw - Other Use when candidate withdraws for any other reason.
Withdraw - Other
4. Click on “Record” under the “Reason/Salary” box and complete the information (ONLY for the candidate(s) you wish to hire and have placed as “Interviewed-Pending Decision.”)
NOTE: Selected Candidate will NOT see this information UCSD Internal Applicant: Yes = requesting to hire a non-probationary career UCSD candidate. No = requesting to hire a person from UCSD Temporary Employment Services (TES) or external applicant. Start Date: Enter anticipated start date. Request Salary:
16
Enter salary you wish to offer. Remember you must stay within the Title and Pay Plan and Rate Setting Guidelines. Reason for Selection: Explain why you chose this person. (Most qualified applicant is acceptable.) Compensation Justification if above Midpoint (include any equity issues): If you want to go above the midpoint you will need to request approval from compensation. The following should be included:
• State that the Business Office concurs with the request and has considered the following issues. (Don't just forward the supervisor's request without comment.)
• Does the applicant’s experience warrant above a midpoint salary and is the experience relevant to the work to be performed?
• Will it cause an internal equity? If so, how do you plan on either defending it or resolving it?
• Does the salary history support it? Was the previous position similar to this position or did it have more responsibility? We won't match the salary if the previous position was of a higher level of responsibility. (Ex: you wouldn't match the salary of a Programmer Analyst II if they were previously an Operations Manager.)
• Have you gone over the Compensation Calculator to show what the actual compensation would be once the person is career?
• Does the Department Head/Business Officer or MSO concur? (Approvers will see this information.)
After you complete this information, click on “Save Record.”
Now you may click on “Save Decision.”
17
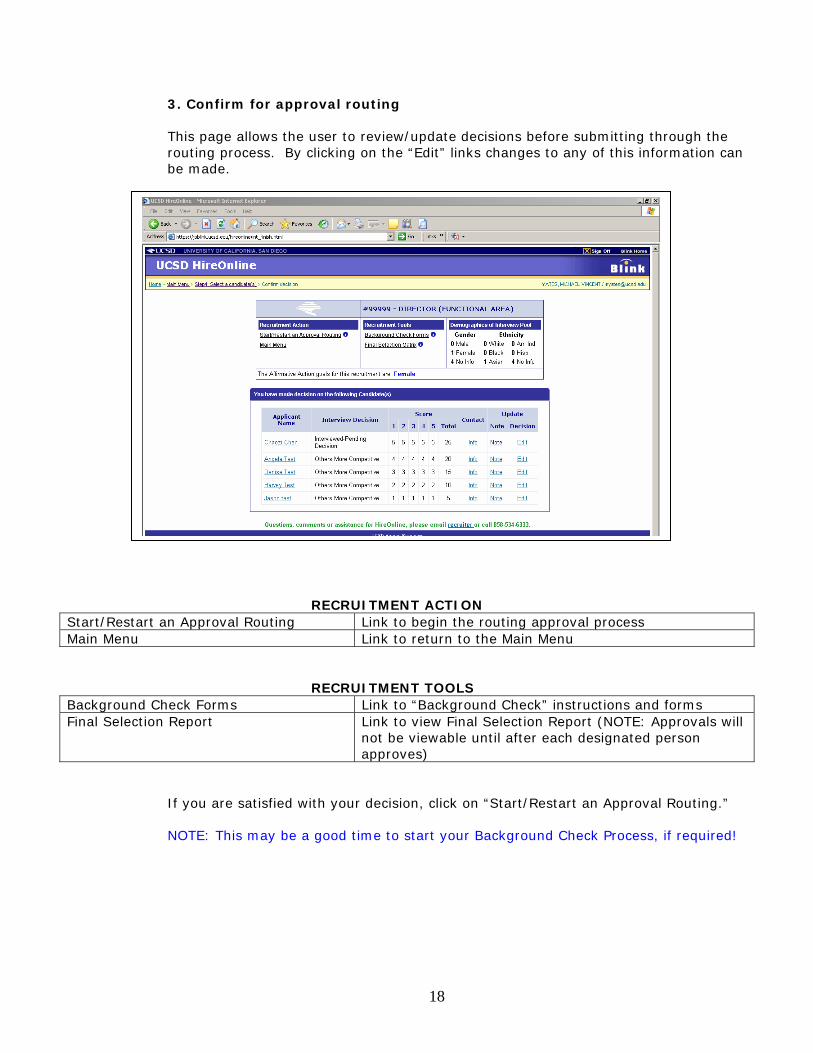
3. Confirm for approval routing
This page allows the user to review/update decisions before submitting through the routing process. By clicking on the “Edit” links changes to any of this information can be made.
RECRUITMENT ACTION Start/Restart an Approval Routing Link to begin the routing approval process Main Menu Link to return to the Main Menu
RECRUITMENT TOOLS Background Check Forms Link to “Background Check” instructions and forms Final Selection Report Link to view Final Selection Report (NOTE: Approvals will
not be viewable until after each designated person approves)
If you are satisfied with your decision, click on “Start/Restart an Approval Routing.” NOTE: This may be a good time to start your Background Check Process, if required!
18
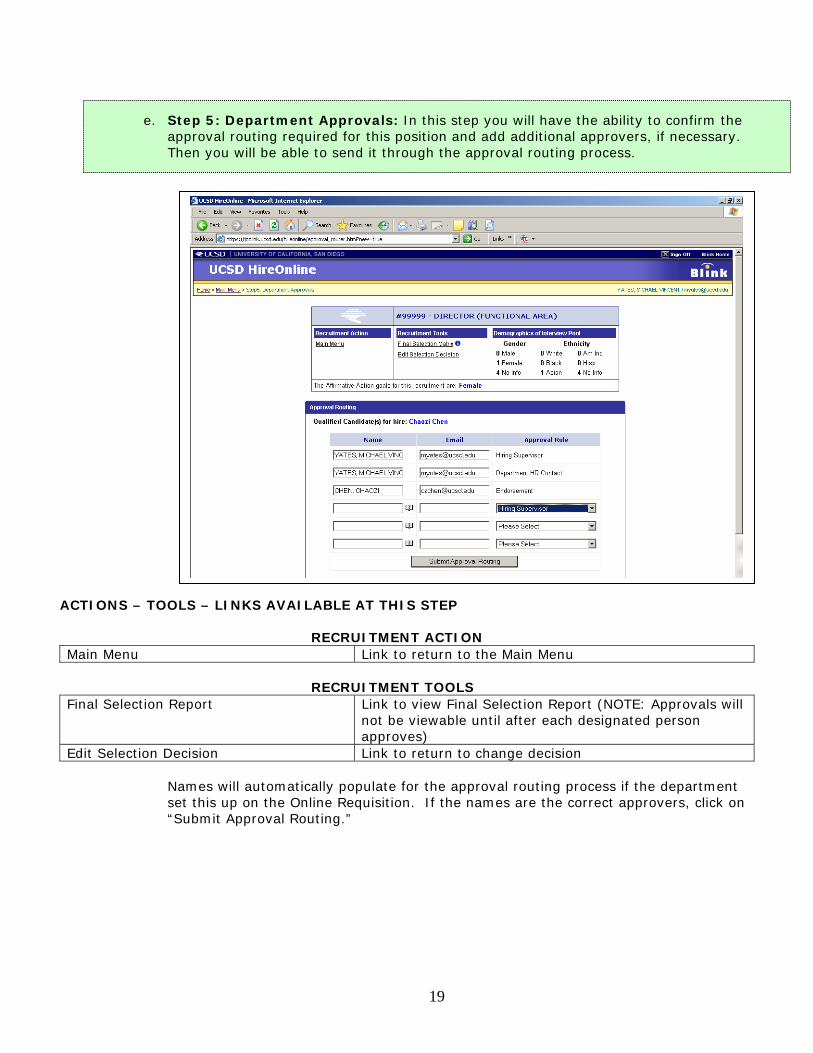
e. Step 5: Department Approvals: In this step you will have the ability to confirm the
approval routing required for this position and add additional approvers, if necessary. Then you will be able to send it through the approval routing process.
ACTIONS – TOOLS – LINKS AVAILABLE AT THIS STEP
RECRUITMENT ACTION Main Menu Link to return to the Main Menu
RECRUITMENT TOOLS
Final Selection Report Link to view Final Selection Report (NOTE: Approvals will not be viewable until after each designated person approves)
Edit Selection Decision Link to return to change decision Names will automatically populate for the approval routing process if the department set this up on the Online Requisition. If the names are the correct approvers, click on “Submit Approval Routing.”
19

ADDING AN APPROVAL AUTHORITY ORR BACK-UP APPROVER To add an Approval Authority: 1. Click on the book icon. 2. Locate the individual who will need to approve this hire. 3. Click on their name to add to the list. 4. Click on the down arrow in the “Approval Role” column and select Endorsement 2.
(Choose Endorsement or 3 if you have an Endorsement 2). To add a Back-up Approver: 1. Click on the book icon 2. Located the individual who has approval authority and will serve as serve as a
back-up in the event the primary approval authority is unavailable. 3. Click on their name to add to the list. 4. Click on the down arrow in the Approval Role column and select the EXACT SAME
ROLE as the primary approval authority has (i.e. John Manager Role = “Hiring Supervisor”, Joe Backup Role = “Hiring Supervisor”).
If/When a back-up approver approves a hire then it will log the date and time of approval.
20
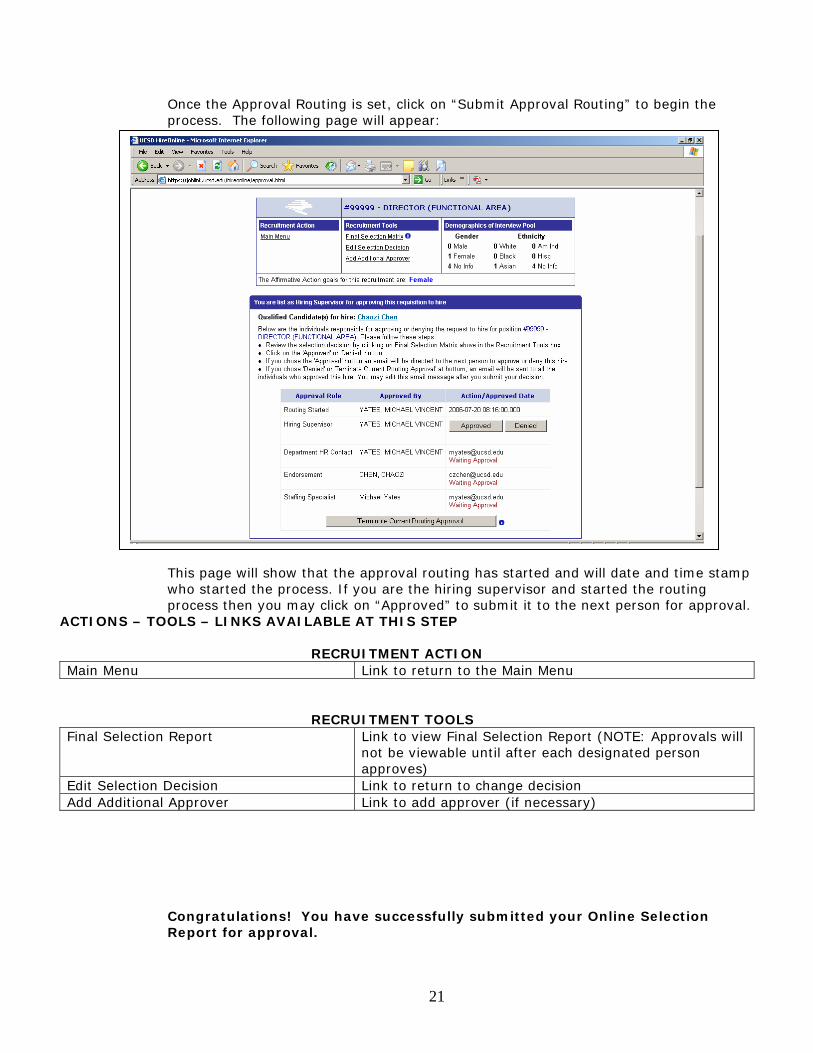
Once the Approval Routing is set, click on “Submit Approval Routing” to begin the process. The following page will appear:
This page will show that the approval routing has started and will date and time stamp who started the process. If you are the hiring supervisor and started the routing process then you may click on “Approved” to submit it to the next person for approval.
ACTIONS – TOOLS – LINKS AVAILABLE AT THIS STEP
RECRUITMENT ACTION Main Menu Link to return to the Main Menu
RECRUITMENT TOOLS Final Selection Report Link to view Final Selection Report (NOTE: Approvals will
not be viewable until after each designated person approves)
Edit Selection Decision Link to return to change decision Add Additional Approver Link to add approver (if necessary)
Congratulations! You have successfully submitted your Online Selection Report for approval.
21