High Current Design • Sound Optimization - … · Architect Model 110 Model 210 Model 210ES Two...
28
Architect Model 110 Model 210 Model 210ES Two Channel Power Amplifier High Current Design • Sound Optimization Superior Energy Efficiency Professional Installer’s Consciousness Guide 22410 70th Avenue West Seattle, WA 98043 USA 425-775-8461 • Fax 425-778-3166 www.audiocontrol.com ® For Those Who Consider Perfection Possible ® ©2011. All rights reserved. ™
Transcript of High Current Design • Sound Optimization - … · Architect Model 110 Model 210 Model 210ES Two...

Architect Model 110 Model 210 Model 210ESTwo Channel Power Amplifier
High Current Design • Sound Optimization
Superior Energy Efficiency
Professional Installer’s Consciousness Guide
22410 70th Avenue West Seattle, WA 98043 USA 425-775-8461 • Fax 425-778-3166 www.audiocontrol.com
®
For Those Who Consider Perfection Possible®
©2011. All rights reserved.
™

®
Important InformationDealer Name _____________________________________
Date Installed __________________________________
Serial Number ___________________________________

ArchitectModel 110-Model 210-Model 210ES
Installer’s Guide
™
Table of Contents
Architect Model 110 / 210 / 210ES
Architect Product Highlights . . . . . . . . . . . . . . . . . . . . . . . . . . 2
Experienced Installer’s Quick Hook-Up Guide . . . . . . . . . . . 4
A Guided Tour Of the Architect Model 210/110 . . . . . . . . . . . 5
Hooking Up Your System . . . . . . . . . . . . . . . . . . . . . . . . . . . . . 8
Installation: The Long Version . . . . . . . . . . . . . . . . . . . . . . . . 8
Remote Power Control . . . . . . . . . . . . . . . . . . . . . . . . . . . . 9
Audio Hook-Up . . . . . . . . . . . . . . . . . . . . . . . . . . . . . . . . 10
Speaker Wire Hook-Up . . . . . . . . . . . . . . . . . . . . . . . . . . 11
Equalizing The System . . . . . . . . . . . . . . . . . . . . . . . . . . . . . . 12
A Short Introduction To Equalizers And Acoustics . . . . . . . 13
Audio Analysis Using Pink Noise . . . . . . . . . . . . . . . . . . . . . 14
Equalization Controls . . . . . . . . . . . . . . . . . . . . . . . . . . . . . . . 15
Troubleshooting . . . . . . . . . . . . . . . . . . . . . . . . . . . . . . . . . . . . 17
Appendix A - Bridging the Architect . . . . . . . . . . . . . . . . . . . 18
Appendix B - Understanding the Front Panel LEDs . . . . . . 19
A Brazen Plug For Other AudioControl Products . . . . . . . . 20
The Warranty . . . . . . . . . . . . . . . . . . . . . . . . . . . . . . . . . . . . . . 21
Block Diagram . . . . . . . . . . . . . . . . . . . . . . . . . . . . . . . . . . . . . 22
Specifications . . . . . . . . . . . . . . . . . . . . . . . . . . . . . . . . . . . . . . 23
Table of Contents

®
Architect Model 210
Architect Model 110
Architect Model 210ES Model 210 Model 110
™
Architect Model 210ES

ArchitectModel 110-Model 210-Model 210ES
Installer’s Guide
™
Introduction
1
Introduction
Congratulations!
You are now installing an AudioControl Architect ampli-fier, a component that will dramatically improve the perfor-mance of any distributed audio system, especially those uti-lizing in-wall speakers. The Architect Model 110, Model 210 and Model 210ES are American-designed and manufactured, “set and forget” components which will provide a lifetime of trouble-free service for your multi-room audio system. Ad-ditionally this amplifier is highly efficient meaning that it draws very little wall current making it ideal for projects that require “GREEN” audio components.
The Architect Model 110, Model 210 and Model 210ES are designed and manufactured in the USA by AudioControl. A company whose professional sound division designed and sold the most popular one-third octave real time analyzer in the world, the SA-3050. AudioControl’s passion for high quality, meticulous attention to detail and pro sound heri-tage shows itself in the dozens of awards we have won for our designs, products and service. Now, as when we began, our greatest satisfaction is our reputation for sonic excellence and reliability among people just like you throughout the world.
This manual is designed to help you get everything you can out of your new amplifier. So, even though you’re dying to see it in action, please take a few minutes to slog through our not-so-weighty prose and learn how to get the most from the Architect power amplifier. Anything as capable as this amp deserves all the explanation it can get.
AudioControl SA-3052 with CEDIA Hall of Fame award.

®
Great Features
2
Great Features of the Architect Amplifiers
HigH Current Design to Drive Multiple speakers Distributed audio systems can place terrific demands on power amplifiers. Lots of speakers and volume controls add up to extremely complex loads that can drive most amps to the point of smoking. The high current drive capabilities of this Architect amplifier allows it to play into very low imped-ances (2 ohms) meaning it can play eight pairs of speakers simultaneously. This amp loves lots of speakers so go ahead and put a small quarry of stereo rocks by the patio. Then sit back and enjoy the sound.
superior energy effiCienCy AudioControl Architect am-plifiers are designed to provide audio enthusiasts with lots of power and great sound quality. Architect amplifiers are also great for those of us who want to “save the environment” and “go GREEN” as they very energy efficient. The literally sip electrical power making them ideal for any distributed audio application.
speCially-DesigneD frequenCy Controls The Architect Model 210 and Model 210ES are intended to provide a dra-matic sound improvement for “small” speakers, such as those with 6-inch and 8-inch woofers. The Architect’s equalization band centers were chosen to optimize in-wall and 2-way book-shelf speakers at critical frequencies, where adjustment is most advantageous. The bandwidths (or ‘Q’ as our engineer-ing types call it) have also been optimized for the difficulties that in-wall speakers present. This allows the Architect Model 210 and Model 210ES to improve the sound of these smaller speakers better than any other equalizer.
proteCtion WHen you neeD it Most The Architect Model 110, Model 210 and Model 210ES have been de-signed and manufactured with durability in mind. The AudioControl Lightdrive protection circuitry defends the Architect and your speakers against clipping, distortion, dam-age, and even teenage parties. Even if the party lasts all week-end. Each channel is independently protected so a problem in one channel will not affect the rest of the system.
Typical Amplifier
AudioControl Architect Amplifier

ArchitectModel 110-Model 210-Model 210ES
Installer’s Guide
™
3
arCHiteCt MoDel 210es – energy star CertifieD AudioControl factories are located in the rainforests of the Pacific Northwest, so we have long been know for designing “green” amplifiers that are stingy on power consumption. For clients that are looking for extremely low power consump-tion, when their distributed audio systems are not in use, AudioControl offers the Architect Model 210ES. This unique model includes a patent pending circuit that allows the Mod-el 210ES to meet the stringent Energy Star 2 requirements. If no audio signal is present for a brief period of time, the Architect Model 210ES goes into a sleep mode where it draws less than 1 watt of wall current. When the audio system starts playing , the Architect Model 210ES powers back up .
pfM subsoniC filter The Architect Model 110, Model 210 and Model 210ES’s Programmable Frequency Match (PFM) circuitry is a bass-blocking filter which protects small speakers and improves their overall sound. The smaller woofers found in most in-wall or bookshelf speakers cannot repro-duce the bass of a larger speaker (the laws of physics intervene). If called upon to reproduce a bass note that would cause the speaker to move PAST it’s maximum cone travel, damage can result - and even if the speaker isn’t damaged, severe audible distortion does occur.
bulletproof reliability The Architect Model 110, Model 210 and Model 210ES began their existence at the AudioControl factory in Mountlake Terrace, Washington, a few miles north of Seattle, USA. Here, we also build precision test instruments, equalizers and analyzers and a totally awe-some line of car stereo components. AudioControl started in 1977 and has won so many audio industry awards for design and engineering excellence that our reception room wall is starting to sag. But enough about us. Let’s start getting the most from the audio system!
Great Features
Your Friends at AudioControl

®
4
Quick Hook-up Guide Experienced Installer’s Quick
Hook-Up Guide
What follows are “Express” hook-up diagrams for profes-sionals and experienced audio buffs.
1. Connect the Speaker and Audio Inputs. (Page 10) The Architect is designed to drive multiple speakers down to 2 ohm loads. To simplify connection, there are two sets of speaker terminals in parallel. Remember to figure in both sets of connections when calculating the total system speaker impedance.
2. Connect the AC power. (Page 9) Start with the GROUND LIFT switch in the GROUND position. If you have a ground loop hum, try the other two positions. This switch only isolates the audio ground from the earth ground. The chassis is always connected to earth ground.
3. Signal Sense and Remote Turn-On. This Architect amplifier is equipped with a Signal Sensing circuit on the inputs that will turn the unit on as soon as it sees an audio signal. We have also equipped this unit with an optional 12V-trigger input that can be used to remotely turn the Architect On and Off, should this function be needed.
4. Set the Equalization (Model 210, Model 210ES). (Page 15) While it can be set by ear, adjustment of the Ar-chitect Model 210’s speaker optimizer controls is best done with a one-third octave real time analyzer and pink noise test signal.
5. Register Your Warranty To acti-vate your warranty, go on-line to
www.audiocontrolregistration.com and fill out the requested information. Also, save your invoice or sales slip as proof of purchase. Not only is this neces-sary for warranty purposes, it’s also important if the unforeseen disappearance of your Architect amplifier occurs.Four Zone System with
Volume Controls
Architect Model 210ES

ArchitectModel 110-Model 210-Model 210ES
Installer’s Guide
™
5
A Guided Tour Of Architect Model 210ES, Model 210 and Model 110
Front Panel Power LED - Nothing too tricky here...when
you have the Master Power switch on the back panel turned on, this LED will initially turn Red and then Blue, indicating that all systems are go. If the light stays Red, the Architect is in a sleep mode
Protection LED - This LED has three faces. In normal operation it glows Blue when mu-sic is playing. If the Protection LED turns Red, then one of the internal protection circuits have come into use. No LED means the unit is off or in a sleep mode.
Channel Status LED - This dual-color LED serves two purposes. It illuminates Blue when the corresponding channel is active and everything is operating correctly. The second function of the status LED is to turn Red if something has caused the amplifier to
go into protection or it is operting at a very high temperature.
Speaker Equalization controls
Model 210 and Model 210ES - This array of knobs provide up to 12dB cut or boost at 45Hz, 150Hz, 300Hz, 700Hz, 2500Hz and 12KHz. After initial adjustment the only time you would change the control settings are 1) if you connect different speakers into the system, 2) if you physically move them significantly, or if 3) your room acoustics change through addition or rearrangement of furniture, wall or floor coverings, large hairy dogs, etc.
Guided Tour
For more information on the LED functions, see Appendix B on page 19.

®
6
Guided Tour
Rear Panel
Remote Power Control – This mono 1/8” jack allows you to remotely turn the Ar-chitect ON and OFF by applying a 12-volt trigger, should your system design require this. Do not plug head-phones in this jack!! You do not have to normally use this trigger since the Architect is equipped with Signal Sensing inputs. The amplifier will turn on once an audio signal is pres-ent on the RCA inputs and the LED will turn on.
Main Inputs – These RCA inputs connect to your preamplifier’s outputs. Any stan-dard line level audio signal can be con-nected to these inputs.
Main Outputs – These unbalanced RCA outputs send a buffered audio output to daisy-chain multiple Architect amplifiers together.
Auxiliary Input – This input allows you to feed a secondary audio source into your Architect amplifier like the signals from a bedroom TV, portable audio player, or such. This input is triggered On by ap-plying 12-volts to the 1/8” Auxiliary Input Trigger.
Auxiliary Input Trigger – Hopefully you read the previous sentence to know what this 1/8” connector does.
Auxiliary Input Active LED – This LED turns Red when you apply +12 volts to the Aux 12V Trigger Input.
Signal Present – When an audio signal is present on the Main or Auxiliary inputs, this LED will light.
Input Level Controls – This screwdriver adjustment controls the input sensitivity of the Architect amplifier. The sensitivity is variable from 0 -1 volt. A safe setting is with the slot at 12 o’clock.
Mono/Stereo – Pushing in this button will sum the left and right audio stereo inputs into a Mono signal. This is particularly useful when bridging the Architect. See page 19 for more information. The Red LED indicator above the switch will light when this active.
Speaker Outputs – These terminal blocks are designed to make an installer smile. You can unplug the blocks and connect all of the speaker wires to them without bal-ancing the Architect on your lap. This also
Architect Model 110 / 210ES Rear Panel

ArchitectModel 110-Model 210-Model 210ES
Installer’s Guide
™
Guided Tour
16
7
makes it very simple to pre-wire a system without ever taking the Architect out to the installation site. The two output blocks are paralleled to simplify connection to multiple speakers. The speaker connector blocks will accept up to 12 AWG wire.
Optional 5-way Binding Posts – Available as an option for installers that prefer this type of speaker connection (The Architect Model 115 and Model 215).
Ground Lift Switch – This switch selects the level of isolation between the audio signal ground and your AC earth ground. In normal operation this switch should be in the Ground position, but if you run into trouble with an AC ground hum, try the other two settings for the best operation. For your safety, the chassis is always con-nected to the earth ground regardless of the switch setting.
AC Power Fuse – The Architect is de-signed with several layers of protection circuitry. This power fuse is here just in case something really awful goes wrong.
Master Power Switch – This switch shuts off the main AC power. Normally the only time you need to turn the master power switch off is if the system is going to be shut down for an extended period of time.
Power Cord – The Architect draws ap-proximately 550 watts at full power. Make certain that it is plugged directly into the wall outlet or a power strip with sufficient power rating. Since the Architect has remote power switching, you can plug the unit into an outlet that is always active.
Signal Present LEDs – These ultra-con-venient LED’s light up when there is an audio signal present at the outputs of your Architect amplifier. If there is still no mu-sic playing than you need to troubleshoot the wiring that comes after the Architect.
PFM Highpass Filter (Internal Setting) This Architect amplifier is internally equipped with AudioControl’s unique PFM subsonic filter circuit. This bass blocking filter sets the low frequency cut-off point of the Architect. The PFM features an 18dB per octave slope at 35Hz that can be bypassed internally. Contact us for details as this is done internally.
15
14
13
12
11
1512
11 14 13
Architect Model 110 / 210ES Rear Panel16
Optional

®
Hooking Up Your System
8
Hooking Up Your Architect Amplifier
What you’ll need:
1. The Architect Model 110, Model 210 or Model 210ES.
2. RCA audio hook-up cables.
3. Plenty of speaker wire to reach all of your speakers.
4. Source unit(s) such as multi-zone controller, receiver, or preamplifier.
5. Although you can set the speaker optimization controls by ear, a real-time audio analyzer such as the AudioControl Industrial SA-3052 is very helpful.
6. (Optional) A balanced line driver if you are going to mount the Architect more than 20 feet from the pre-amp.
Installation: The Long Version
What follows is a step-by-step guide to integrating the Architect Model 110/210/210ES into your multi-zone system. If it seems overly detailed, please forgive us. We would rather tell you too much than too little.
First, check your new Architect for any shipping damage. We pack ‘em pretty securely, but it’s a vicious world out there and anything can happen twixt Mountlake Terrace, Washing-ton and your installation.
Placement
The Architect Model 110/210/210ES is a very efficient amplifier, but it does need some breathing room to operate properly. Make certain that the air vents on the top of the Architect are not blocked and have at least 1/2” of air space. Also make certain that heat sensitive components such as DVD players, media servers, or cable boxes are not placed di-rectly on top of the Architect. Just as a reminder, you should avoid putting any leaky potted plants or sticks of butter on the audio equipment stack.
AudioControl Maestro M4 Processor with 2nd and 3rd zone audio outputs

ArchitectModel 110-Model 210-Model 210ES
Installer’s Guide
™
Warning - Always connect the safety earth
ground. If you have an AC hum problem, use the ground lift switch
Installation: The Long Version
9
A benefit of having remote power control on the Architect is that you can install it in another area of the house (such as a basement or utility room) away from the main component stack. Make certain that you use a good quality audio line driver (such as ones from AudioControl) to extend the RCA cables if you choose this type of in-stallation.
Power
Under normal operating conditions, the Architect Model 110/210/210ES can draw up to 550 watts of AC power. Don’t plug it into a switched outlet on your system unless you are certain that it can handle the power rating. Also, don’t cut off the ground pin on the power connector. It is an important safety feature. If you need to plug it into a two-prong outlet, use a ground adapter (and connect the ground on it).
Remote Power Control
The Architect has three levels of power control:
1. Main AC Power Switch - This is the master control and must be turned ON for the Architect to function. When the main power switch is On, the blue Power LED on the front panel lights up. Normally the only time that you would need to turn the AC power switch off is when the system is going to be unused for an extended period.
2. Signal Sensing Inputs - This Architect amplifier is equipped with a very responsive Signal Sensing circuit on the inputs that will turn the unit on as soon as it sees an audio signal on the RCA inputs. Please note that this circuit is by-passed when using the 12-volt trigger.
3. Remote Power Control - Should your system design require it, this mono 1/8” jack allows you to remotely turn the Architect ON and OFF by applying a 12-volt trigger. If you are using a 12-volt trigger to turn the Architect ON, then it will ignore the Signal Sensing Inputs.
AudioControl BLD-10 / BLR-10

®
Installation: The Long Version
10
Connecting the Audio
If you’re an installation veteran, this may seem repetitive, but some things can never be repeated too many times (just ask our Customer Support Department).
1. Turn ALL components OFF before making any connec-tions.
2. When making connections, designate RED RCA plugs as RIGHT and WHITE, BLACK, or GREY plugs as LEFT. In fact, this is a good idea for ALL signal connections made in your audio system. The key is consistency. Stick with the same color-coding and you’ll reduce possible problems.
3. Whenever possible, keep power cords away from signal cables to prevent induced hum. This is especially impor-tant if you bundle the cables to keep the installation neat looking.
4. Use quality interconnect cables.
5. If you need to run the RCA audio cables more than 20 feet you should use a balanced line driver for the signals. This will provide noise rejection against nasty things like hum, spikes, local talk radio, etc. The AudioControl balanced line driver components are an excellent way to send audio over long distances with standard Cat-5 type wiring. Check them out at www.audiocontrol.com.
ArchitectModel 110-Model 210-Model 210ES
Installer’s Guide
™
Installation: The Long Version
11
Speaker Hook-up
The same rule applies to the speaker wires as the RCA con-nections. Establish a standard connection color code and stick with it. One conductor of the speaker wire is normally marked by a different color (silver versus copper) or there is a ribbing on one side. Typically this marked conductor is used for the positive (+) speaker leads. Of course the really good wire has Positive and Negative printed right onto the wire jacket.
The Architect Model 110, Model 210 and Model 210SE are designed with lots of speakers in mind. To make this type of speaker connection simpler, there are two separate output connector blocks. These outputs are paralleled internally so remember to calculate your speaker impedances accordingly.
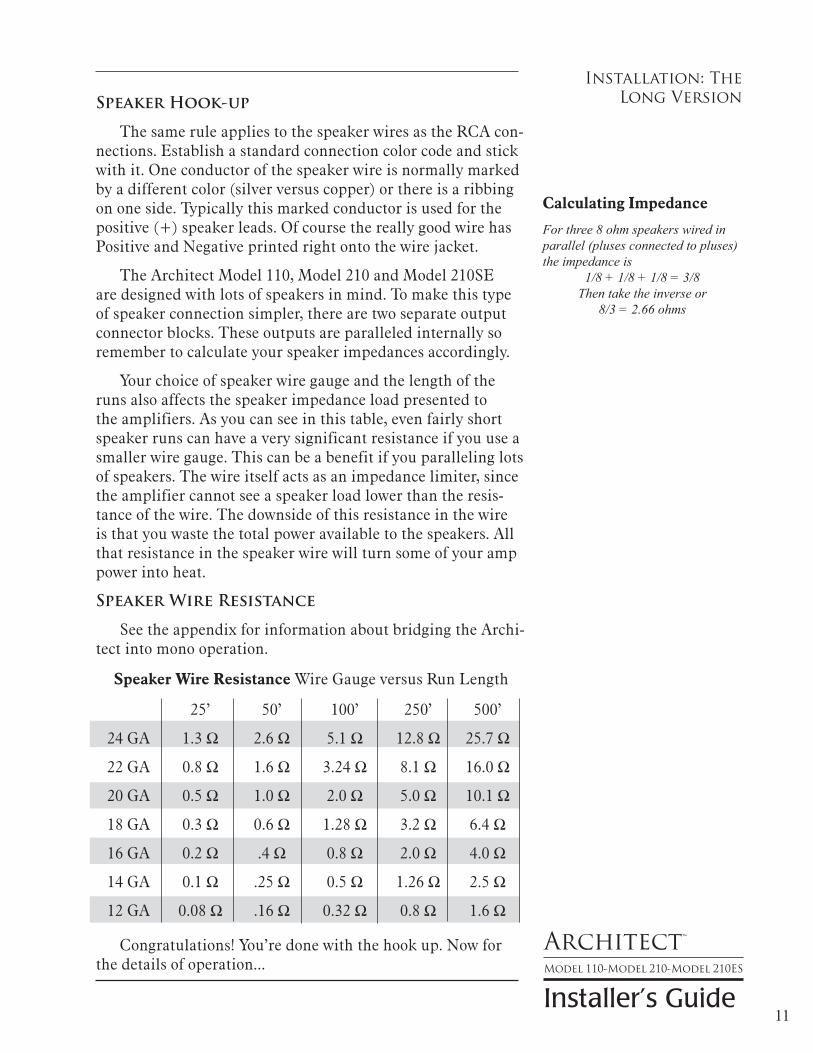
Your choice of speaker wire gauge and the length of the runs also affects the speaker impedance load presented to the amplifiers. As you can see in this table, even fairly short speaker runs can have a very significant resistance if you use a smaller wire gauge. This can be a benefit if you paralleling lots of speakers. The wire itself acts as an impedance limiter, since the amplifier cannot see a speaker load lower than the resis-tance of the wire. The downside of this resistance in the wire is that you waste the total power available to the speakers. All that resistance in the speaker wire will turn some of your amp power into heat.
Speaker Wire Resistance
See the appendix for information about bridging the Archi-tect into mono operation.
25’ 50’ 100’ 250’ 500’
24 GA 1.3 Ω 2.6 Ω 5.1 Ω 12.8 Ω 25.7 Ω
22 GA 0.8 Ω 1.6 Ω 3.24 Ω 8.1 Ω 16.0 Ω
20 GA 0.5 Ω 1.0 Ω 2.0 Ω 5.0 Ω 10.1 Ω
18 GA 0.3 Ω 0.6 Ω 1.28 Ω 3.2 Ω 6.4 Ω
16 GA 0.2 Ω .4 Ω 0.8 Ω 2.0 Ω 4.0 Ω
14 GA 0.1 Ω .25 Ω 0.5 Ω 1.26 Ω 2.5 Ω
12 GA 0.08 Ω .16 Ω 0.32 Ω 0.8 Ω 1.6 Ω
Speaker Wire Resistance Wire Gauge versus Run Length
Congratulations! You’re done with the hook up. Now for the details of operation...
Calculating Impedance
For three 8 ohm speakers wired in parallel (pluses connected to pluses) the impedance is
1/8 + 1/8 + 1/8 = 3/8Then take the inverse or
8/3 = 2.66 ohms

®
Doing The Deed
12
Doing The Deed
Before proceeding on to setting up the Speaker Optimiza-tion controls on the Architect, it’s a good idea to make sure that you have everything connected and working properly.
1. Double-check all connections. Make certain that all of the audio and speaker connections are firmly seated and tight-ened down.
2. Turn on your audio system. The Power LED on the Archi-tect should be BLUE, the Protection LED should be BLUE and (unless you have defeated the Signal-Sense) the Chan-nel Status LED’s should be BLUE, with audio present.
3. Start the audio source playing and send that signal to the Architect (how you do this depends on your particular multi-room system). The zone status LED should illumi-nate RED then BLUE approximately one second after the music begins.
4. Check each speaker output zone to ensure that each one plays properly.
5. With all the speaker loads turned on, turn up the volume and make certain that the channel status LEDs on the Architect stay BLUE. If they slowly toggle between BLUE and RED, then there is either a short in the speaker wir-ing, or the combined speaker load is below 2 ohms.
6. Congratulations! You’re ready to go on to setting the Speaker Optimization controls.

ArchitectModel 110-Model 210-Model 210ES
Installer’s Guide
™
Introduction to Equalizers and
Acoustics
13
A Short Introduction to Equalizers and Acoustics
Magazine reviewers and audio system owners spend much time critically appraising speaker and other stereo compo-nents. Unfortunately, a phenomenon that has a very large effect upon sound is not is easily judged or changed. That effect is the ACOUSTICS of the environment in which you are listening.
Room acoustics is a complicated subject about which entire textbooks have been written. We simply want you to be aware of a few basics that have a direct effect on real time audio analysis.
Sounds is waves, as you probably learned in junior high school. In a stereo system, these waves are created by the speakers. Like waves in a pond created by a splash, sound waves emanate from the transducers (drivers) in your speak-ers and spread out into the room. If your room were infinitely big, that’s all there would be to it. But just as waves in a pond reach the bank and reflect back, sound waves bounce off walls, ceilings, and floors, reflecting, rein-forcing and canceling each other as shown in the figure above. Since sound is energy, the way it reflects depends upon the angle of the sur-face, the type of material and the frequency of the sound wave. Because your listen-ing position is likely to be towards the back of the Free Field waves shown in the diagram, you also get part of the reflected Reverberant Field as well.
Now we add the next set of complications: Different fre-quencies of sound have different wave-lengths (a function of frequency and the speed of sound). Each frequency’s wave-length contributes differently to the Free and Reverberant Fields because they are different sizes. For example, a 32Hz bass note has a wavelength of 35 FEET, while a 16,000Hz note has a wavelength just under a tenth of an inch. Tiny treble
Room interaction

®
Audio Analysis Using Pink Noise
14
waves can be caught and neutralized by draperies, carpeting, upholstered furniture and gangs of indolent Persian cats...while gigantic bass waves simply slosh back and forth in the room.
Another set of variables is the shape and volume of your listening room. Large rooms require more bass energy to excite waves within them. Small rooms need less energy, but reflect it differently. And then there’s the fact that most rooms don’t have four walls anymore, but open into dining rooms, lofts, cathedral ceilings, etc. All of this means that predicting sound interaction patterns is very difficult due to the irregu-larities of the room shape.
As you can see, room acoustics is an important but com-plicated subject To learn more about room acoustics, get a copy of AudioControl’s Technical Paper 107, “Small Room Acoustics De-Mythologized”. You can download this paper from www.audiocontrol.com. The overall point that we’re try-ing to make is that the various rooms in your home function as gigantic mechanical equalizers, boosting or cutting certain frequencies depending on size, shape, volume, acoustic treat-ment and the position of the speakers.
Audio Analysis Using Pink Noise
It may take several series of adjustments since there is some interaction between each control. We have included some sample settings and general descriptions of each con-trol’s function further in this manual.
After initial adjustment the only time you would change the control settings are 1) if you connect different speakers into the system, 2) if (assuming the speakers aren’t built-in) you move them significantly, such as from a bookshelf to floor stands, or 3) if your room acoustics change through rear-rangement of furniture, wall or floor coverings, large hairy dogs, etc.
The following are examples of typical settings along with short descriptions of each Architect Model 210 Speaker Optimizer control. Naturally, the results of adjustments will vary depending on the individual acoustic environment, the type of speakers, and the personal preferences of the listener. These recommendations are not concrete, they are simply good starting points.
Example Settings

ArchitectModel 110-Model 210-Model 210ES
Installer’s Guide
™
15
Equalization SettingsMore About AudioControl’s
Equalization Settings
Here is a brief introduction to each of the Speaker Opti-mization control frequencies and what their affect on your music is.
45Hz — Low bass. This is about the lowest frequency which in-wall, extension and small book-shelf speakers can achieve. Boosting it too far might cause problems, even though the Architect Model 210’s PFM filter cuts frequencies under 35Hz. But if your speakers can take it, a mild boost will enhance bass instruments such as Fender bass, kick drum, floor toms, timpani and double bass violas.
150Hz — High bass. There’s a lot of bass information at this frequency. In fact, most modern music is mixed to en-hance this area of the frequency spectrum. 150Hz also de-termines the depth of male vocals and contains reverberant information which contributes to the spaciousness of sound. Boosting 150Hz can add “POW!” and impact to bass or it can make the sound “bonky” and “boomy”. This is a critical ad-justment with small or in-wall speakers. Experiment with it.
300Hz and 700Hz — High and low midrange. These controls directly affect the sound of instruments and vocals. These bands also determine the speaker’s presence (whether the music sounds far away or close in). Small speakers often produce too much midrange, so these controls are candidates for being turned down slightly during your initial experimen-tation. Definitely consider reducing 700Hz if you are only using your extension speakers for background music.
2500Hz — Treble. Female vocals and the “edge” of in-struments such as guitars, snare drums, saxes, violins, etc. are found in this range. If accentuated too much (by boosting this control) sounds in the 2500Hz range can seem harsh and fatiguing to the ear due to excessive output by the speaker or because of live, reflective room acoustics.
12kHz — High treble. The fine detail, texture and sheen of music is found here. The breathiness of vocals, the “sheen” of cymbals, the high overtones of piano and strings. Actually, there’s audible music information up to 20,000Hz on some CD’s and most adult’s hearing is still pretty good at 15,000Hz. But we’ve chosen 12,000Hz because it provides more useful control to compensate for room acoustics and common small-speaker deficiencies.

®
16
Programmable Frequency Match Filter The Truth about Bass and The
Programmable Frequency Match Filter
Now that digital audio is the favorite musical source, there’s more low bass running around in a typical system. Low bass injects large amounts of power into ANY kind of speaker — up to 60% of your amplifier’s output is being used to reproduce frequencies under 110Hz. That can really tax a system, which is driving multiple speakers from a single amplifier channel. The second problem is that bass produces heat in the speaker. If more heat is built-up than the speaker can dissipate, the driver coil can literally go into meltdown (or worse).
In addition, ultra-low bass and small speakers don’t always get along, ESPECIALLY when you DO have ample power. The low bass music content can cause over-excursion: The speaker cone attempts to travel farther than its physical limits, potentially causing damage (in some cases you can actually hear a clacking sound!). Even before destruction sets in, there are other problems with feeding super-low bass to small speakers. Most bookshelf and in-wall loudspeakers are 2-way systems. That means that the woofer also handles a large part of the critical midrange area. When the woofer is bashing around trying to reproduce unrealistically low bass, its ability to produce midrange is compromised due to inter-modulation distortion. So not only don’t you get low bass, you get lousy vocal and instrumental reproduction.
Pragmatically, it boils down to this: If you want ultra-low, foundation-shaking bass from an in-wall speaker, you should add in a separate subwoofer, a somewhat expensive ap-proach. A more economic approach is to equalize the speaker for maximum low bass output WITHIN IT’S PRACTICAL RANGE and eliminate lower frequencies which either can’t be reproduced or which incite excessive cone travel.
The equalization part is handled by the Architect Model 210’s 45Hz control. The prevention part is handled by the Architect’s Programmable Frequency Match (PFM) filter circuitry. While it may seem surprising, actually cutting off some of the lowest bass, will make the bass sound cleaner, punchier and even louder.

ArchitectModel 110-Model 210-Model 210ES
Installer’s Guide
™
17
TroubleShooting
Troubleshooting the Architect Amplifier
Almost all problems can be eliminated by re-checking the wiring and settings of the Architect amplifier. If a problem cannot be solved using the guide below, please call the AudioControl factory for further assistance.
1. No Sound:
• Verify Source unit is operating.
• Verify the Power LED in BLUE
• Verify Protection LED is BLUE.
• Verify Channel Status LED is BLUE.
• Verify Signal Present LED’s on rear panel are RED
• Check the Speaker Connector plug on the rear panel
• Check the AC Power Fuse on the rear panel.
See Appendix B for more detail on LED indicators
2. Audio Is Cutting In & Out:
• Using a DMM (Digital Multi Meter), confirm impedance on speaker wires is 2 ohms or higher
• Check speaker leads for short.
• If using speaker level volume controls, bypass and see if problem persists
• Verify Source unit is not clipping
• Adjust the pre-amp volume higher and/or Input Sensitivity controls on amplifier
3. Architect is excessively hot (you cannot hold your hand on the top):
• Turn down the volume and allow it to cool off.
• Verify that the ventilation holes on the top have not become blocked.
• Confirm speaker impedance is not too low.
4. Power and/or Protection LED is RED:
• Turn off Main Power on rear panel for 2 minutes to reset.
5. Speaker Buzzing or Cracking at high volume:
• Reduce the equalizer boost at 45Hz and 150Hz.

®
Appendix A – Bridging The Architect
18
Appendix A - Bridging The Architect Amplifier
To increase the output power of the Architect, you can join (bridge) the two channels of the Architect into a single channel of over 400 watts. To accomplish this just engage the MONO/STEREO switch on the rear panel and make sure the input level controls on each channel are adjusted the same. Then connect the speaker terminals as shown in the diagram below.
Caution - When bridging the Architect, the minimum speaker load impedance on that
bridged output is 4 ohms. In a bridged system, each channel of the bridged pair “sees” one half of the speaker load. This
means that a bridged amp driving a 4-ohm speaker load is operating into a 2-ohm load.
Bridged connection speaker hookup

ArchitectModel 110-Model 210-Model 210ES
Installer’s Guide
™
19
Appendix B – Understanding the Front Pandel LEDsAppendix B – Understanding The
Front Panel LEDs
The AudioControl Architect Model 110/210/210ES is not only a great sounding amplifier but it is also an intelligent audio component. Just by looking at the LED’s on the front panel, you will know how your Architect is functioning and, should the need arise, it will you assist in troubleshooting your system.
You will be happy to note that while there are a number of modes that the Architect may be operating in, you will gener-ally not have to pay any attention to this. The AudioControl Architect series of amplifiers is designed to play continuously, even under unusual circumstances. Should a situation arose where your system is not playing, please look at the LED lights on the front panel and refer to the chart below for guid-ance.
Architect Model 110/210/210ES LED Status Indicators
LED IndicatorPower Protection Status Operations
OFF OFF OFF Amplifier Main Power is OFFBLUE OFF OFF Amplifier is On, no audio signal is presentRED OFF OFF Amplifier is ON but in sleep mode; Rear panel 12-volt
trigger is being usedBLUE BLUE BLUE Amplifier is On, signal is present, all systems are Go!
BLUE BLUE RED Short circuit on speaker outputs and/or unit is operating at high temperature/low impedance
RED RED OFF Offset protection mode has been triggered; Reset unit by switching off master power for 2 minutes
Please note that when the Architect first powers up, the LEDs will initially turn RED before settling into their BLUE state.Architect Model 210ES Sleep Mode - The Architect Model 210ES will go into a “sleep mode” 10 minutes after an audio signal is removed. In this mode it will draw less than 1 watt of current.

®
A Brazen Plug For Other AudioControl Products
AudioControl started out making graphic equalizers in 1977. Our heritage and design experience grew from a back-ground in professional audio, so we were never quite satis-fied with what was available for the consumer audio market. Since that time, we have continued to expand our product offerings to become a key part of great home audio and video systems. We supply the audio components that can make a more substantial improvement in the sound of your system than almost any other addition or upgrade. You get more bass, better sound, less harshness and the ability to hear music the way you want it.
AudioControl designs and manufactures at its United States facilities a full suite of components for Home Theater needs including surround sound processors with truly excep-tional audio and video performance. Some reviewers say there is none better.
AudioControl also has five, and seven channel power amplifiers to round out this theater system. The audiophile sound quality of these amplifiers, cool running Class H design and exclusive LightDrive protection systems say these ampli-fiers mean serious business. To-gether these AudioControl home theater components provide ulti-mate performance for the ultimate home theater. Some reviewers say there are none better, and that this AudioControl is the standard.
Okay, enough commercials.
Once again, we thank you for choosing an AudioControl components in your system and hope you enjoy a lifetime of performance and reliability.
Brazen Plug
20
“I haven’t heard an amplifier at any price I’d rather listen to than this amplifier.”
–Doug Blackburn Widescreen Review
AudioControl Savoy G3 Amplifier

ArchitectModel 110-Model 210-Model 210ES
Installer’s Guide
™
CONDITIONAL FIVE YEAR WARRANTY
Custom electronics installations are an invisible element of many modern homes. You don’t appreciate what they do for you unless something goes wrong.
AudioControl recognizes this fact and engineers the most bul-letproof components we know how. We stand behind that quality, with full FIVE-YEAR parts and labor factory warranty when our components are installed by an authorized AudioControl dealer in the United States. Otherwise your warranty is one year. You will be happy to know that our warranty returns are rigorously tracked and very few of the units we build ever need to be repaired.
Conditional doesn’t mean anything ominous. The Federal Trade Commission tells all manufacturers to use the term to indicate that certain conditions have to be met before they’ll honor the warranty. If you meet all of these conditions, we will warrant all materials and workmanship on your AudioControl Amplifier product for FIVE YEARS from the date you bought it, and we will fix or replace it, at our option, during that time.
Here are the conditional conditions:1. You need to register your purchase of this AudioControl compo-
nent by going to the AudioControl web site (www.audiocontrolreg-istration.com), click on the “Distributed Audio” tab, and then go to the “Warranty Registration” department by clicking on the appropri-ate text. Follow the directions and complete all of the information.
2. A sales receipt is required for proof of purchase showing when and from whom the unit was bought. We’re not the only ones who require this, so it’s a good habit to get into with any major purchase of consumer electronics.
3. Your AudioControl product must have originally been purchased from or installed by an authorized AudioControl professional. This warranty is transferable. You do not have to be the original owner, but you do need a copy of the original sales slip.
4. You cannot let anybody (A) who isn’t: the AudioControl fac-tory or (B) somebody authorized in writing by AudioControl, ser-vice your product. If anyone other than (A) or (B) messes with your AudioControl product, that voids your warranty.
5. The warranty is also void if the serial number is altered or re-moved, or if the unit has been used improperly. Now that sounds like a big loophole, but here is all we mean by it:
Unwarranted abuse is: (A) physical damage (don’t use your AudioControl product level your kitchen table, jack up your car or keep the rain off your head); (B) improper connections (120 volts into the power jack can fry the poor thing); (C) sadistic things. This is the best product we know how to build, but if you mount it to the filter pump of a hot tub, something will probably go wrong.
Assuming you conform to 1 through 5, and it really isn’t all that hard to do, we get the option of fixing your old unit or replacing it with a new one.
Legalese Section
This is the only warranty given by AudioControl. This warranty gives you specific legal rights that vary from state to state. Promises of how well your ARCHITECT AMPLIFIER will perform are not implied by this warranty. Other than what we have covered in this warranty, we have no obliga-tion, express or implied. Also, we will not be obligated for direct or indirect consequential damage to your system caused by hooking up the AudioControl ARCHITECT AMPLIFIER.
Failure to go on-line could negate any service claims.
21
Warranty

®
©AudioControl 2011, All Rights Reserved.
This manual was written, de-signed, printed, folded and stuffed into the box in the U.S.A. Probably on a really soggy day considering where we live.
22
Block Diagram
Block Diagrams
Architect Model 210
Architect Model 210ES
Important Note: All 12v Triggers are tip +12 volts.

ArchitectModel 110-Model 210-Model 210ES
Installer’s Guide
™
SPECIFICATIONS Architect Model 110/210/210ES Series Specifications
Power Output (All Channels Driven) 2 ohm (Less than .9% THD). . . . . . . . . . . . . . . . . . . . . . . . .240 Watts
4 ohm (Less than .9% THD). . . . . . . . . . . . . . . . . . . . . . . . .120 Watts
8 ohm (Less than .9% THD). . . . . . . . . . . . . . . . . . . . . . . . . .60 Watts
8 ohm (Bridged Mono) . . . . . . . . . . . . . . . . . . . . . . . . . . . . .410 Watts
Minimum Speaker Load . . . . . . . . . . . . . . . . . . . . . . . . . . . . . . 2 ohms
Damping Factor . . . . . . . . . . . . . . . . . . . . . . . . . . . . .Greater than 200
Signal to Noise . . . . . . . . . . . . . . . .>105dB, A-wtd, Ref, Full Output
Input Signal (maximum). . . . . . . . . . . . . . . . . . . . . . . . . . . . . . 8 Volts
Input Impedance . . . . . . . . . . . . . . . . . . . . . . . . . . . . . . . 15 kilo ohms
Crosstalk . . . . . . . . . . . . . . . . . . . . . . . . .Greater than 80dB @ 1kHz
Equalizer Center Frequencies . . 45, 150, 300, 700, 2500 and 12KHz
PFM Highpass Filter (Defeatable). . . . . . . . . . . . . . . . . . . . . . . 35Hz
Remote Power Trigger . . . . . . . . . . . . . . . . . . . . . . . . . . . . . +12 VDC
Options . . . . . . . . . . 5-way Binding Posts - Model 115 & Model 215
AC Main Fuse Rating . . . . . . . . . . . . . . . . . . . . . . . . . 10 amp Slo-Blo
AC Main Operational Voltage. . . . . . . . . . . . . . . . . . . . . . . . . 95-130v
Protection . . . clipping, short circuit, thermal, ultrasonic, DC offset . . . . . . . . . . . . . . . . . . . Stable into reactive or mismatched loads
Clipping Eliminator . . . . . . . . Wideband, intelligent, soft response
Signal Sense Trigger. . . . . . . . . . . . . . . . . . . . . 0.001 volt (Very Low!)
Weight . . . . . . . . . . . . . . . . . . . . . . . . . . . . . . . . . . .16 pounds (35 kg)
Dimensions. . . . . . . . . . . . . . . . . . . . . . . . . . . . .17”W x 12”D x 3.5”H
In Rush Current . . . . . . . . . . . . . . . . . . . . . . . active limited, soft start
Current Consumption (All Channels Driven)
Standby (210ES automatically selects) . . . . . . . . . . . . . . . . .<1 Watt
Idle. . . . . . . . . . . . . . . . . . . . . . . . . . . . . . . . . . . . . . . . . . . . . . . .8 Watts
1/8th Power (loud listening level) . . . . . . . . . . . . . . . . . . . . .30 Watts
Full Power . . . . . . . . . . . . . . . . . . . . . . . . . . . . . . . . . . . . . . . .550 Watts
Heat Dissipation (All Channels Driven)
Idle. . . . . . . . . . . . . . . . . . . . . . . . . . . . . . . . . . . . . . . . . 25 BTU/ Hour
1/8 Power (loud listening level) . . . . . . . . . . . . . . . . . 20 BTU/ Hour
Full Power (worst case) . . . . . . . . . . . . . . . . . . . . . . . 490 BTU/ Hour
Country of Origin. . . . . . . . . . . . . . . . . . . . . . . . . . . . . . . . . . . . . . USA
Specifications
23

P/N 913-110-0Rev. 11/11
22410 70th Avenue West Seattle, WA 98043 USA 425-775-8461 • Fax 425-778-3166 e-mail: [email protected]
Visit us on the web at www.audiocontrol.com
®For Those Who Consider Perfection Possible®