HICS IDM Access Guide
14
HICS IDM Access Guide Prepared by: Cognosante LLC 3110 Fairview Park Dr, Suite 800 | Falls Church, VA 22042 Version 0.1 July 28, 2021
Transcript of HICS IDM Access Guide

HICS IDM Access Guide
Prepared by:
Cognosante LLC 3110 Fairview Park Dr, Suite 800 | Falls Church, VA 22042
Version 0.1
July 28, 2021

HICS IDM Access Guide Version 0.1 July 28, 2021
Proprietary and Confidential – Rev 5.0 ©Cognosante LLC, 2021 – All Rights Reserved
Page i
Revision History Version Date Revision Owner Description of Changes
0.1 07/28/2021 Cognosante Baseline

HICS IDM Access Guide Version 0.1 July 28, 2021
Proprietary and Confidential – Rev 5.0 ©Cognosante LLC, 2021 – All Rights Reserved
Page ii
Table of Contents 1.0 Introduction ....................................................................................................................................... 1
2.0 Creating an IDM Account ................................................................................................................ 2 2.1 Completing New User Registration ......................................................................................... 2 2.2 Updating the MFA Device ...................................................................................................... 4
3.0 Requesting Access to HICS .............................................................................................................. 7 3.1 Requesting the HICS Role ....................................................................................................... 7 3.2 Completing RIDP .................................................................................................................... 9
List of Exhibits
Exhibit 1: IDM Registration Button.............................................................................................................. 2 Exhibit 2: Terms and Conditions Checkbox and Next Button ...................................................................... 3 Exhibit 3: Contact Screen Next Button ......................................................................................................... 3 Exhibit 4: Credentials Screen Submit Button ............................................................................................... 4 Exhibit 5: Confirmation Message ................................................................................................................. 4 Exhibit 6: My Profile Option ........................................................................................................................ 5 Exhibit 7: Manage MFA and Recovery Devices Option .............................................................................. 5 Exhibit 8: Add Another Device Menu .......................................................................................................... 6 Exhibit 9: Role Request Button .................................................................................................................... 7 Exhibit 10: Select an Application Menu – HICS Option .............................................................................. 7 Exhibit 11: Select a Role Menu – HICS End User Role Options ................................................................. 8 Exhibit 12: Reason for Request Field and Submit Role Request Option...................................................... 9 Exhibit 13: Terms and Conditions and Next Button ................................................................................... 10 Exhibit 14: Default Address Selection and Next Button ............................................................................ 10 Exhibit 15: Example RIDP Questions and Verify Button .......................................................................... 11 Exhibit 16: RIDP Completion Message ...................................................................................................... 11

HICS IDM Access Guide Version 0.1 July 28, 2021
Proprietary and Confidential – Rev 5.0 ©Cognosante LLC, 2021 – All Rights Reserved
Page 1
1.0 Introduction This document provides guidance for existing Health Insurance Casework System (HICS) users regarding how to establish a HICS account in the new Identity Management (IDM) platform. HICS provides access to cases that originate from the Health Insurance Marketplace Call Center and other sources. The application enables users to add, edit, search, and resolve cases, and download case files and reports. CMS established IDM to provide users with a means to securely access CMS applications. Because HICS is now hosted through IDM, each user must create an IDM account in order to continue to access the application.

HICS IDM Access Guide Version 0.1 July 28, 2021
Proprietary and Confidential – Rev 5.0 ©Cognosante LLC, 2021 – All Rights Reserved
Page 2
2.0 Creating an IDM Account To complete new user registration, a user must enter the necessary profile information, choose a user ID and password, and establish a challenge question and answer for security purposes. Each user must also register an MFA device. Registering an MFA device provides another layer of security for the account by requiring the entry of a security code, in addition to the user ID and password, at each login. The following sections outline the steps for completing new user registration and registering an MFA device in IDM. NOTE: Users with an existing IDM account and registered MFA device should proceed to Section 3.0, Requesting Access to HICS.
2.1 Completing New User Registration 1. Go to the IDM website at https://home.idm.cms.gov/. 2. Click Registration (Exhibit 1). Exhibit 1: IDM Registration Button
3. Provide the required information on the Personal screen.
NOTE: All fields must be completed unless marked optional. 4. Click the View Terms & Conditions button to review the terms and conditions (Exhibit 13).

HICS IDM Access Guide Version 0.1 July 28, 2021
Proprietary and Confidential – Rev 5.0 ©Cognosante LLC, 2021 – All Rights Reserved
Page 3
5. Click the I agree to the terms and conditions checkbox. 6. Click Next (Exhibit 2). Exhibit 2: Terms and Conditions Checkbox and Next Button
7. Provide the required information on the Contact screen.
NOTE: All fields must be completed unless marked optional. 8. After entering the required information, click Next to continue (Exhibit 3Exhibit 3). Exhibit 3: Contact Screen Next Button
9. On the Credentials screen, create a user ID, password, and security question.
a. Create a user ID in accordance with the following: i. Use the format FirstName.LastName (e.g., Jane.Doe). ii. There cannot be any spaces before or after the user ID. iii. The user ID may contain uppercase letters, lowercase letters, and numbers. iv. The user ID may contain the at symbol (@) in a valid email address format (e.g.,
[email protected]). v. The user ID must be more than six and fewer than 74 characters.
NOTE: If the FirstName.LastName format exceeds the character limit or is not an available user ID, make adjustments as needed.
vi. The user ID cannot begin or end with a special character. b. Create a password. The password must:
i. Be a minimum of eight characters. ii. Contain at least one uppercase letter. iii. Contain at least one lowercase letter.

HICS IDM Access Guide Version 0.1 July 28, 2021
Proprietary and Confidential – Rev 5.0 ©Cognosante LLC, 2021 – All Rights Reserved
Page 4
iv. Contain at least one number. v. Contain at least one special character (not including ?, <, >, (, ), /, \, or &)
c. Set up the security question as follows: i. From the Security Questions drop-down menu, choose a security question. ii. In the corresponding Answer field, enter the answer to the question selected.
NOTE: Be sure to memorize or make note of the security question answer, as this is necessary for login information recovery.
10. Click Submit (Exhibit 4) to continue. Exhibit 4: Credentials Screen Submit Button
11. On the Registration Summary screen, review the information entered and make any necessary
changes. NOTE: Verify that the email address has been entered correctly, as this will be the primary contact method for CMS and IDM to provide information and notifications regarding the account.
12. Click Submit. A confirmation message (Exhibit 5) will display acknowledging the successful registration, and a confirmation email containing the user ID will be sent from [email protected] to the email address associated with the account.
Exhibit 5: Confirmation Message
13. Upon receiving the confirmation message, continue to Section 2.2, Updating the MFA Device.
NOTE: If the confirmation message does not appear, contact the Marketplace Service Desk (MSD) at 1 (855) 267-1515 or [email protected] for assistance.
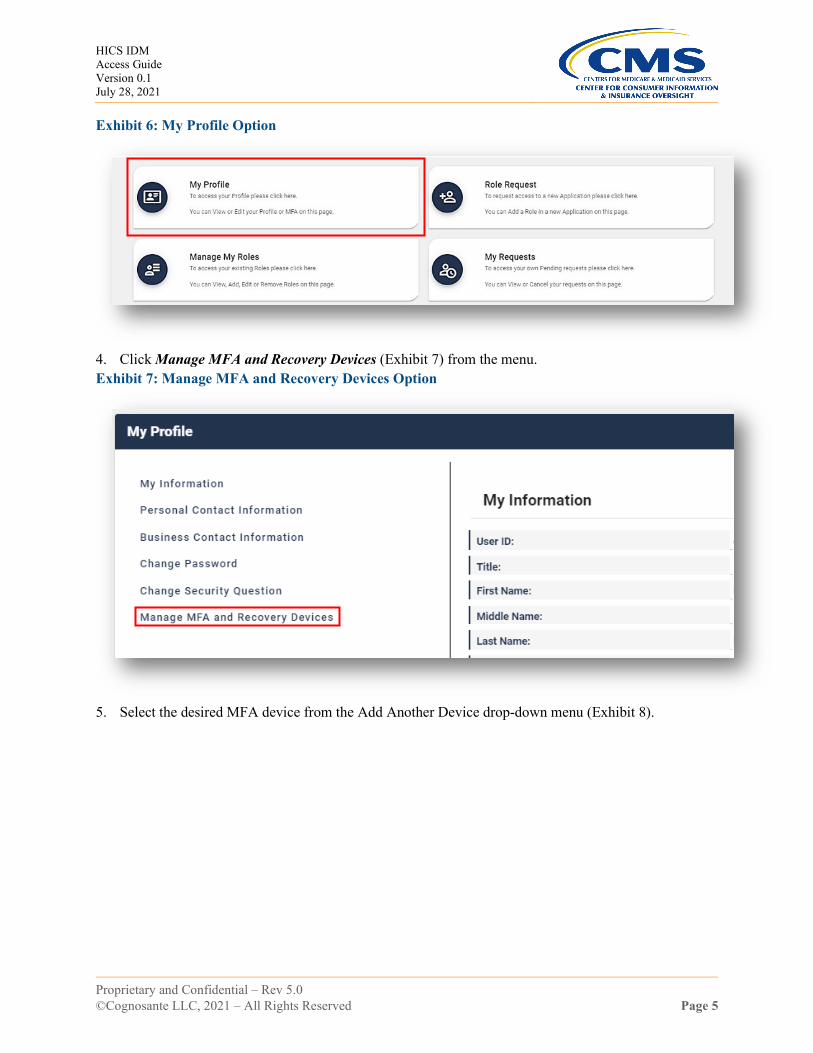
2.2 Updating the MFA Device 1. Go to the IDM website at https://home.idm.cms.gov. 2. Log in using the appropriate IDM user ID and password. 3. Click My Profile (Exhibit 6).
HICS IDM Access Guide Version 0.1 July 28, 2021
Proprietary and Confidential – Rev 5.0 ©Cognosante LLC, 2021 – All Rights Reserved
Page 5
Exhibit 6: My Profile Option
4. Click Manage MFA and Recovery Devices (Exhibit 7) from the menu. Exhibit 7: Manage MFA and Recovery Devices Option
5. Select the desired MFA device from the Add Another Device drop-down menu (Exhibit 8).

HICS IDM Access Guide Version 0.1 July 28, 2021
Proprietary and Confidential – Rev 5.0 ©Cognosante LLC, 2021 – All Rights Reserved
Page 6
Exhibit 8: Add Another Device Menu
6. Enter the appropriate information based on the MFA device selected. 7. Click Submit. A confirmation message will indicate that the MFA device was successfully registered.
NOTE: An email notification from [email protected] will also be sent to the email address associated with the account.

HICS IDM Access Guide Version 0.1 July 28, 2021
Proprietary and Confidential – Rev 5.0 ©Cognosante LLC, 2021 – All Rights Reserved
Page 7
3.0 Requesting Access to HICS To access HICS, each user must request the applicable HICS end user role within IDM and complete Identity Verification. Identity Proofing is a secure process that aims to protect each user’s privacy and prevent fraudulent activity from being conducted in the user’s name. During this process, the user answers several multiple-choice questions involving personal information. The following sections provide instructions for completing the role request and verification process.
3.1 Requesting the HICS Role 1. Go to the IDM website at https://home.idm.cms.gov. 2. Log in using the appropriate IDM user ID and password. 3. On the IDM Self Service screen, click the Role Request button (Exhibit 9) in the top right of the
screen. Exhibit 9: Role Request Button
4. From the Select an Application drop-down menu, select HICS (Exhibit 10). Exhibit 10: Select an Application Menu – HICS Option

HICS IDM Access Guide Version 0.1 July 28, 2021
Proprietary and Confidential – Rev 5.0 ©Cognosante LLC, 2021 – All Rights Reserved
Page 8
5. Select the applicable HICS end user role from the Select a Role drop-down menu (Exhibit 11). For more information regarding which role to select, refer to HICS End User Role Quick Reference Guide. NOTE: Users who have not completed Remote Identity Proofing (RIDP) will be prompted to complete the steps outlined in Section 3.2, Completing RIDP, at this time.
Exhibit 11: Select a Role Menu – HICS End User Role Options
6. Type Requesting HICS access due to IDM cutover. EUA ID – [EUA ID] in the Reason for Request
field (Exhibit 12). 7. Click Submit Role Request (Exhibit 12).

HICS IDM Access Guide Version 0.1 July 28, 2021
Proprietary and Confidential – Rev 5.0 ©Cognosante LLC, 2021 – All Rights Reserved
Page 9
Exhibit 12: Reason for Request Field and Submit Role Request Option
8. Make note of the Request Tracking Number, which will be emailed to the address associated with the
IDM account after the HICS access request is successfully submitted. The role request approval will also be emailed to the email address associated with the IDM account. NOTE: If the approval email is not sent within seven business days, contact the Marketplace Service Desk (MSD) at 1 (855) 267-1515 or [email protected] for assistance, identifying the related Request Tracking Number. Check Spam, Junk, and Clutter folders prior to contacting the help desk.
3.2 Completing RIDP NOTE: If RIDP fails at any point in this process, follow the instructions on the screen to contact the appropriate support desk for further assistance. 1. Review the identity verification description statement. 2. Click the View Terms & Conditions link to review the terms and conditions (Exhibit 13). 3. Click the I agree to the terms and conditions checkbox (Exhibit 13). 4. Click Next (Exhibit 13).

HICS IDM Access Guide Version 0.1 July 28, 2021
Proprietary and Confidential – Rev 5.0 ©Cognosante LLC, 2021 – All Rights Reserved
Page 10
Exhibit 13: Terms and Conditions and Next Button
5. Provide the required information in the respective fields.
NOTE: All fields must be completed unless marked optional. 6. Keep the default US Address selection (Exhibit 14), as the address entered must be in the United
States. 7. Click Next (Exhibit 14). Exhibit 14: Default Address Selection and Next Button

HICS IDM Access Guide Version 0.1 July 28, 2021
Proprietary and Confidential – Rev 5.0 ©Cognosante LLC, 2021 – All Rights Reserved
Page 11
8. Carefully read each question and click the radio button next to the correct response. Exhibit 15 shows example Remote Identify Proofing questions.
9. Click the Verify button (Exhibit 15). Exhibit 15: Example RIDP Questions and Verify Button
10. Click the green OK button (Exhibit 16) to close the completion message. Exhibit 16: RIDP Completion Message
11. Resume the process outlined in Section 3.1, Requesting the HICS Role, from Step 6.