Here’s to You · 2 8G 4¼ µ 6¼ 3D 4¼ µ 3 7D 3 µ 4¼ 4D 6D 5E 2E 8I Getting Started: •...
13
1 Workshop Here’s to You | 1 single page & 7 cards © 2018 CTMH CO. UC Additional Materials Needed: Z2841 Glacier Exclusive Inks ™ Stamp Pad Z2895 Lagoon Exclusive Inks ™ Stamp Pad Z2892 Pacifica Exclusive Inks ™ Stamp Pad Y1006 3" µ 3" My Acrylix ® Block Y1009 2" µ 3½" My Acrylix ® Block Y1012 4" µ 5" My Acrylix ® Block Z3372 Adhesive Runner Z2089 Micro Dots Glue Dots ® Z2060 Thin 3-D Foam Tape Z3167 Cricut ® Artistry Collection Cricut ® Machine Embossing Machine This workshop uses the Cricut ® Artistry Collection, which features designs in a wide variety of themes that can be used for any and every occasion. The necessary Cricut ® shapes to complete this workshop are available as a project file in Cricut Design Space ™ , Here’s to You Workshop (https://design.cricut.com/#/design/95920516). If you are not using a digital machine, see page 5 for specific Cricut ® cut information. Exclusive Stamps:
Transcript of Here’s to You · 2 8G 4¼ µ 6¼ 3D 4¼ µ 3 7D 3 µ 4¼ 4D 6D 5E 2E 8I Getting Started: •...

1
Workshop
Here’s to You | 1 single page & 7 cards
© 2018 CTMH CO. UC
Additional Materials Needed:Z2841 Glacier Exclusive Inks™ Stamp PadZ2895 Lagoon Exclusive Inks™ Stamp PadZ2892 Pacifica Exclusive Inks™ Stamp PadY1006 3" µ 3" My Acrylix® BlockY1009 2" µ 3½" My Acrylix® BlockY1012 4" µ 5" My Acrylix® BlockZ3372 Adhesive RunnerZ2089 Micro Dots Glue Dots®
Z2060 Thin 3-D Foam TapeZ3167 Cricut® Artistry CollectionCricut® MachineEmbossing Machine
This workshop uses the Cricut® Artistry Collection, which features designs in a wide variety of themes that can be used for any and every occasion. The necessary Cricut® shapes to complete this workshop are available as a project file in Cricut Design Space™, Here’s to You Workshop (https://design.cricut.com/#/design/95920516).
If you are not using a digital machine, see page 5 for specific Cricut® cut information.
Exclusive Stamps:

2
8G4¼ µ 6¼
3D4¼ µ 3
7D3 µ 4¼
4D
6D
5E
2E
8I
Getting Started:
• Gather all additional materials needed.• Light grey pieces on your cutting guide are scrapbooking project pieces. Dark grey pieces on your cutting guide are cardmaking project
pieces. White pieces are left over paper.• As you cut the paper, sort the pieces as indicated in the cutting guide, creating a stack for each project.
© 2018 CTMH CO. UC
Key:
= first cut | * = use back of paper = suggested stamp arrangement | = suggested Thin Cuts arrangement | = suggested Cricut® cut arrangement
(See project instructions for ink color and other details)
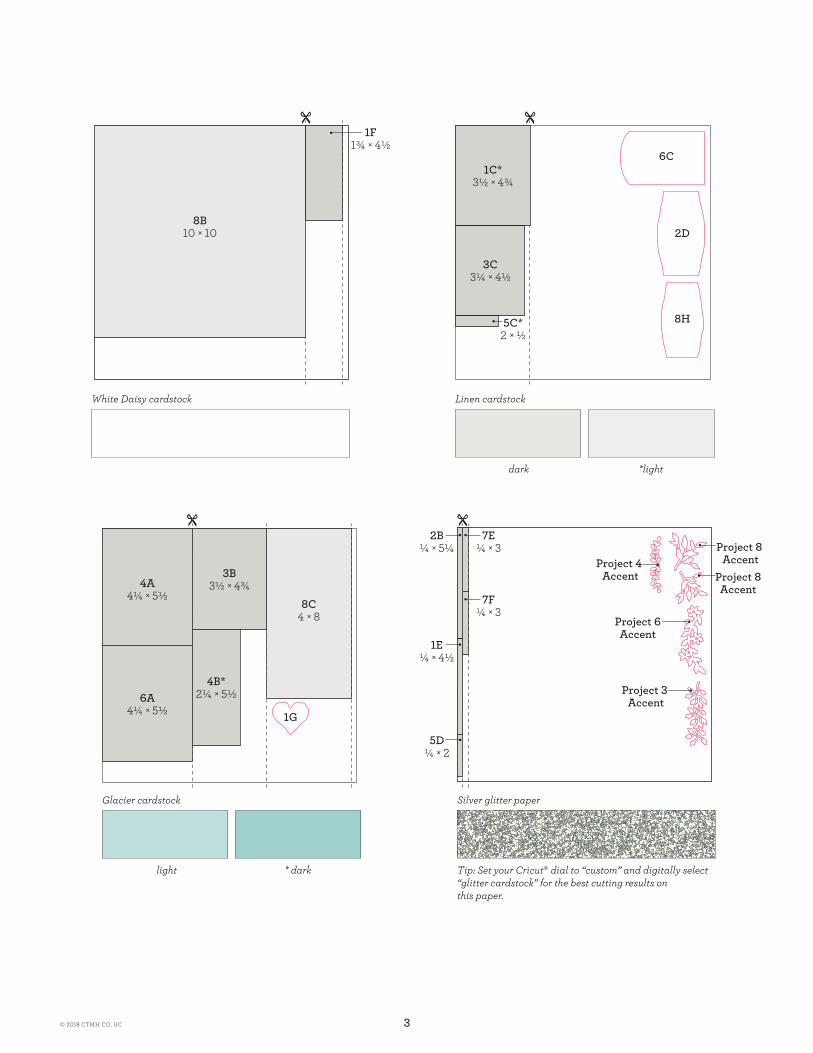
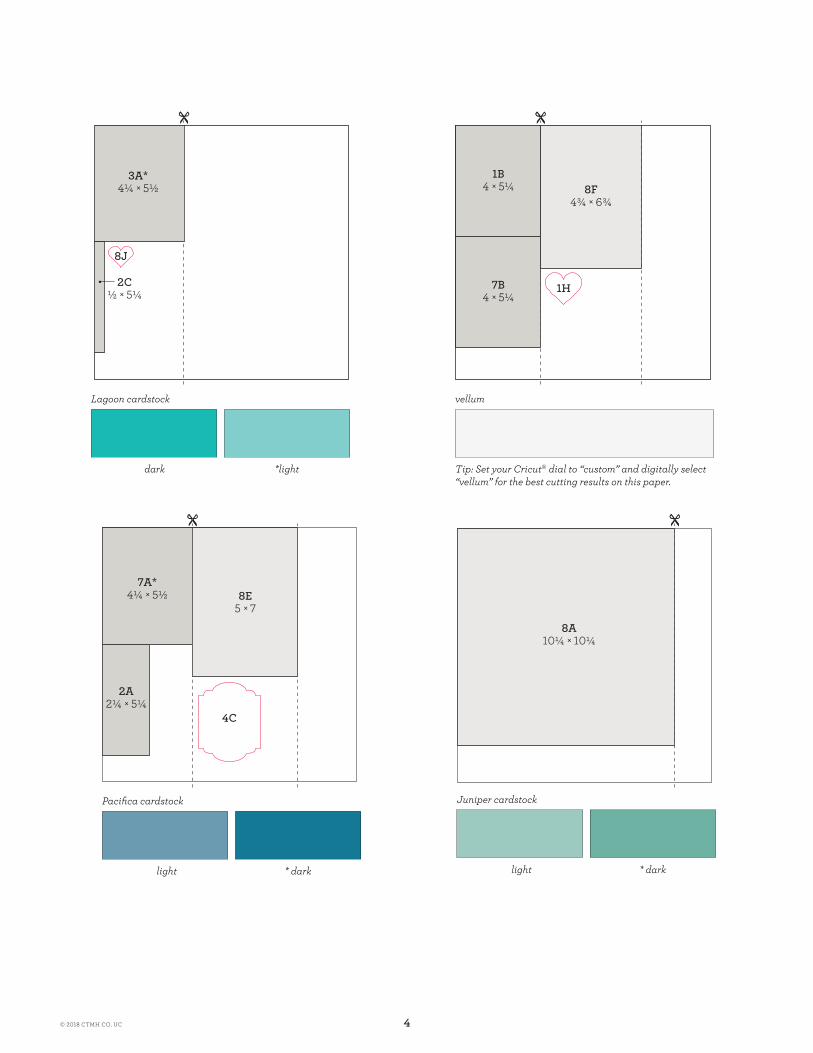
Cutting Diagrams:
Important instructions for Cricut® cuts: Where there are Cricut® shapes in the cutting diagram, start by cutting all straight pattern pieces first (except on the first sheet of White Daisy cardstock, the Linen cardstock, and the silver glitter paper). Use the remaining paper to cut pattern pieces requiring a Cricut® shape. On the first sheet of White Daisy cardstock, the Linen cardstock, and the silver glitter paper, cut the Cricut® shapes first and then make the straight cuts.
White Daisy cardstock
White Daisy cardstock
Linen cardstock
Vellum paper
Lagoon cardstock
Glacier cardstock
Pacifica cardstock
Silver glitter paper
Cricut Design Space™ color key
3© 2018 CTMH CO. UC
cut diagonal = angle in trimmer
4A4¼ µ 5½
6A4¼ µ 5½
3B3½ µ 4¾
4B*2¼ µ 5½
8C4 µ 8
1G
2B¼ µ 5¼
Project 4 Accent
Project 8 Accent
1E¼ µ 4½
5D¼ µ 2
7E¼ µ 3
7F¼ µ 3
Project 6Accent
Project 3 Accent
Project 8Accent
1C*3½ µ 4¾
5C*2 µ ½
3C3¼ µ 4½
2D
8H
6C
8B10 µ 10
1F1¾ µ 4½
light * dark
Glacier cardstock
dark *light
Linen cardstockWhite Daisy cardstock
Tip: Set your Cricut® dial to “custom” and digitally select “glitter cardstock” for the best cutting results on this paper.
Silver glitter paper
4© 2018 CTMH CO. UC
7A*4¼ µ 5½
2A2¼ µ 5¼
8E5 µ 7
4C
8A10¼ µ 10¼
1B4 µ 5¼
7B4 µ 5¼
8F4¾ µ 6¾
1H
3A*4¼ µ 5½
2C½ µ 5¼
8J
dark *light
Lagoon cardstock
light * dark
Juniper cardstock
light * dark
Pacifica cardstock
vellum
Tip: Set your Cricut® dial to “custom” and digitally select “vellum” for the best cutting results on this paper.

5© 2018 CTMH CO. UC
1A*4¼ µ 5½
5B2 µ 5
6B3¾ µ 5
8D*4¾ µ 6¼
5A*4¼ µ 5½
7C3¼ µ 4½
1D1¼ µ 4½
light * dark
Juniper cardstock
light * dark
Bashful cardstock
Cricut® Shapes: Artistry Collection
White Daisy cardstock 2E: 3½" Shape <q> (p. 11)
Tip: Rotate 90 degrees, then size. 4D: 3½" Shape <Christms> (p. 48) 5E: 2½" Banner <Spring> (p. 38) 6D: 3½" Shape <k> (p. 28) 8I: 2" Shift + Shape <Q> (p. 11)
Linen cardstock 2D: 4" Shape <q> (p. 11)
Tip: Rotate 90 degrees, then size. 6C: 4" Shape <k> (p. 28) 8H: 2" Shape <q> (p. 11)
Glacier cardstock 1G: 1½" Icon-1 <k> (p. 28)
Silver glitter paper Project 3 Accent: 1" Shift + Background <J> (p. 27) Project 4 Accent: ½" Shift + Background <Mother> (p. 39) Project 6 Accent: 1¼" Shift + Background <A> (p. 21) Project 8 Accent: 1½" Icon-1 <z> (p. 31)
Tip: Flip horizontally. Project 8 Accent: 1¾" Icon-1 <z> (p. 31)
Lagoon cardstock 8J: 1" Icon-1 <k> (p. 28)
Vellum 1H: 1½" Icon-1 <k> (p. 28)
Pacifica cardstock 4C: 3¾" Shape <Christms> (p. 48)
When using a Cricut® machine older than the Cricut Explore Air™, size the following pieces as noted below. 2D: 2¼" Shape <q> (p.11) 2E: 2" Shape <q> (p.11)
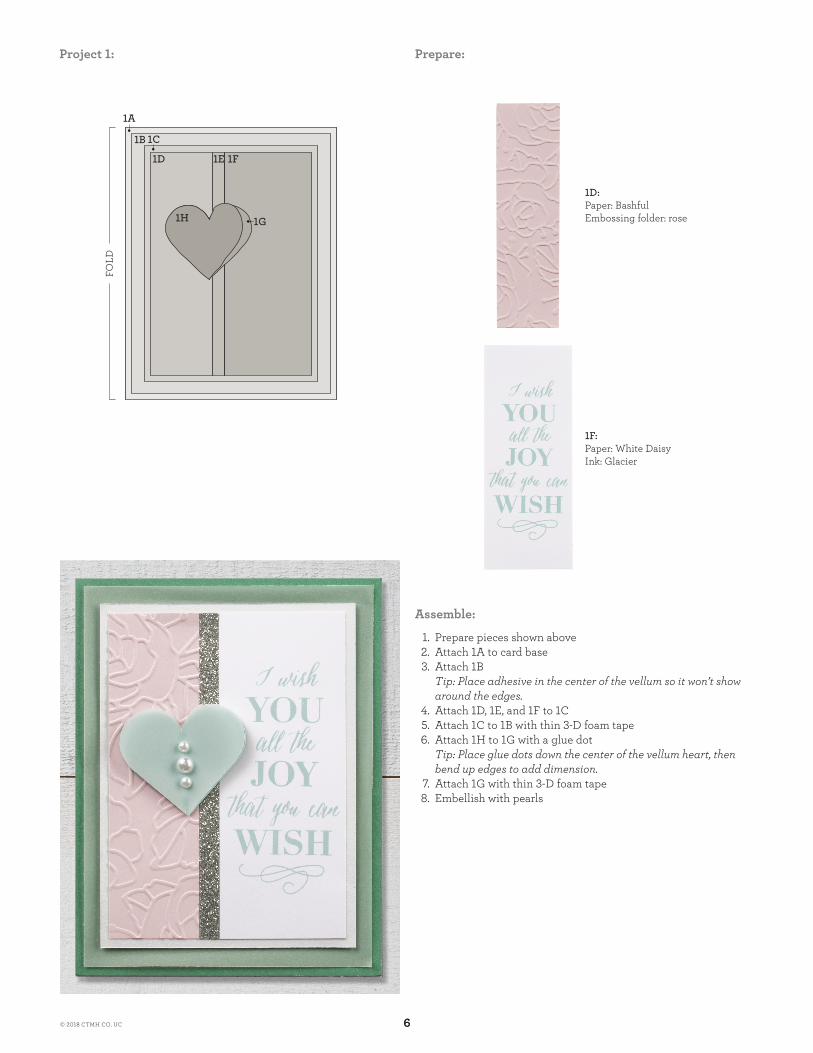
6
FOLD
1A
1B 1C
1G1H
1D 1E 1F
6© 2018 CTMH CO. UC
Project 1: Prepare:
Assemble:
1D:Paper: BashfulEmbossing folder: rose
1. Prepare pieces shown above2. Attach 1A to card base3. Attach 1B
Tip: Place adhesive in the center of the vellum so it won’t show around the edges.
4. Attach 1D, 1E, and 1F to 1C5. Attach 1C to 1B with thin 3-D foam tape6. Attach 1H to 1G with a glue dot
Tip: Place glue dots down the center of the vellum heart, then bend up edges to add dimension.
7. Attach 1G with thin 3-D foam tape8. Embellish with pearls
1F:Paper: White DaisyInk: Glacier

7
FOLD
¾
W
2A 2B
2D2E
2C
7© 2018 CTMH CO. UC
Project 2: Prepare:
Assemble:
1. Prepare pieces shown above2. Attach 2A, 2B, and 2C to card base3. Attach 2E to 2D4. Attach 2D with thin 3-D foam tape5. Embellish with pearls
2A:Paper: light PacificaEmbossing folder: rose
2E:Paper: White DaisyInk: Lagoon

8
FOLD
W
W3A
3D
3B 3C
© 2018 CTMH CO. UC
Project 3: Prepare:
Assemble:
1. Prepare pieces shown above2. Attach 3A to card base3. Attach 3D to 3C4. Attach 3C to 3B5. Attach 3B to 3A with thin 3-D foam tape6. Attach accent7. Embellish with pearls
3A:Paper: light LagoonEmbossing folder: rose
3D:Paper: White DaisyInk: PacificaTip: Stamp sentiment off-center, to the right.

9
FOLD
1 Y
X
4A 4B
4C 4D
9© 2018 CTMH CO. UC
Project 4: Prepare:
Assemble:
1. Prepare pieces shown above2. Attach 4A to card base3. Attach 4B4. Attach 4D to 4C5. Attach 4C with thin 3-D foam tape6. Attach accent7. Embellish with pearls
4B:Paper: GlacierEmbossing folder: rose
4D:Paper: White DaisyInk: Pacifica

10
FOLD
1V
1¾
5A
5B
5E
5C
5D
10© 2018 CTMH CO. UC
Project 5: Prepare:
Assemble:
1. Prepare pieces shown above2. Attach 5A to card base3. Dovetail 5B and attach4. Attach 5C5. Attach 5D6. Attach 5E with thin 3-D foam tape7. Embellish with pearls
5A:Paper: BashfulEmbossing folder: rose
5E:Paper: White DaisyInk: Pacifica

11
FOLD
X
½6A
6B
6C6D
11© 2018 CTMH CO. UC
Project 6: Prepare:
Assemble:
1. Prepare pieces shown above2. Attach 6A to card base3. Attach 6B4. Attach 6D to 6C5. Attach 6C with thin 3-D foam tape6. Attach accent7. Embellish with pearls
6B:Paper: light JuniperEmbossing folder: rose
6D:Paper: White DaisyInk: Lagoon

12
FOLD
7A
W
W
7C
7D7E
7F
7B
12© 2018 CTMH CO. UC
Project 7: Prepare:
Assemble:
1. Prepare piece shown above2. Attach 7A to card base3. Attach 7B
Tip: Place adhesive in the center of the vellum so it won’t show around the edges.
4. Attach 7D to 7C5. Attach 7E and 7F to 7D6. Attach 7C with thin 3-D foam tape7. Embellish with pearls
7D:Paper: White DaisyInk: Pacifica

13
Project 8
© 2018 CTMH CO. UC
1. Use Linen cardstock as base page2. Attach 8A to base3. Attach 8B4. Attach 8C5. Attach 8D6. Attach 8E7. Attach 8F
Assemble:
1¼
1¼ ¾
¾
¾
2
Y
Y
4
½
½
¼
8A8B
8C8D
8E8F
8H
8J
8I
8G
Photo4 × 6
Prepare:
8C:Paper: light GlacierInk: GlacierTip: Stamp image 1¼" from top
8D:Paper: BashfulEmbossing folder: rose
8. Attach photo to 8G9. Attach 8G with thin 3-D foam tape
10. Attach 8I to 8H11. Attach 8H with thin 3-D foam tape
Tip: Do not use foam tape where it overlaps mounted photo.12. Attach 8J13. Attach accents14. Embellish with pearls


![1. Excel. µ file- µ « . µ µ µ µ µ µ µ µ ; µµ ; µµ µ Excel Word; µ µ µµ ;[ ] µ , µ µ µ](https://static.fdocuments.net/doc/165x107/5e1c0fbb3625a8105f7711f5/1-excel-excel-word-.jpg)