Herb Spiral design - Permaculture Association · Permaculture Diploma Jan 2011 Lusi Alderslowe Herb...
9
Permaculture Diploma Jan 2011 Lusi Alderslowe Herb Spiral HERB SPIRAL IN CASTLEMILK STABLES CONTENTS 1. INTRODUCTION ................................................................................................................................ 1 2. OBSERVATION .................................................................................................................................. 1 3. BOUNDARIES ..................................................................................................................................... 2 4. RESOURCES ....................................................................................................................................... 2 5. EVALUATE ......................................................................................................................................... 3 6. DESIGN ................................................................................................................................................ 3 6.2 ETHICS & PRINCIPLES IN DESIGN ........................................................................................................... 4 7. IMPLEMENTING AND TWEAKING ............................................................................................. 5 8. MAINTENANCE ................................................................................................................................ 6 9. EVALUATION ..................................................................................................................................... 6 10. REFLECTIONS ................................................................................................................................. 7 10.1 WHAT WENT WELL? ........................................................................................................................... 7 10.2 WHAT WAS CHALLENGING? ................................................................................................................. 7 10.3 EVEN BETTER IF… ........................................................................................................................... 7 10.4 WHAT I WOULD DO DIFFERENTLY? ....................................................................................................... 7 10. APPENDICES .................................................................................................................................... 8 Acknowledgements Thanks to Roz for helping me design the structure of the herb spiral; to Wullie for doing an amazing job building it; thanks to Sally Wilkin and all the students at Kilmartin PDC for helping to place the herbs; to Plants with Purpose; and to all the children and staff at the nurseries, schools and after school clubs who helped to pile in soil and plant the herbs. 1. Introduction The Herb Spiral design is a detailed look at one area of the Castlemilk Stables design. Having decided where to locate it overall on this site (see diagram 1), I then set about designing the details of the herb spiral, and implementing this. I used OBREDIMET in order to ensure that careful observation was complete before designing. 2. Observation As well as observing the whole site, as detailed in design 8 – Castlemilk Stables, I observed the area around the lump of soil which I was to transform into a herb spiral. I checked out how much sun it was receiving, and noticed that although there was much creeping buttercup (indicating dampness), there was no moss (unlike other areas of the garden), it is raised within garden, hence not bad drainage. Thus I considered this an appropriate place for a herb spiral. 1
Transcript of Herb Spiral design - Permaculture Association · Permaculture Diploma Jan 2011 Lusi Alderslowe Herb...

Permaculture Diploma Jan 2011 Lusi AldersloweHerb Spiral
HERB SPIRAL IN CASTLEMILK STABLES
CONTENTS1. INTRODUCTION ................................................................................................................................ 1
2. OBSERVATION .................................................................................................................................. 1
3. BOUNDARIES ..................................................................................................................................... 2
4. RESOURCES ....................................................................................................................................... 2
5. EVALUATE ......................................................................................................................................... 3
6. DESIGN ................................................................................................................................................ 3
6.2 ETHICS & PRINCIPLES IN DESIGN ........................................................................................................... 4
7. IMPLEMENTING AND TWEAKING ............................................................................................. 5
8. MAINTENANCE ................................................................................................................................ 6
9. EVALUATION ..................................................................................................................................... 6
10. REFLECTIONS ................................................................................................................................. 7
10.1 WHAT WENT WELL? ........................................................................................................................... 7 10.2 WHAT WAS CHALLENGING? ................................................................................................................. 7 10.3 EVEN BETTER IF… ........................................................................................................................... 7 10.4 WHAT I WOULD DO DIFFERENTLY? ....................................................................................................... 7
10. APPENDICES .................................................................................................................................... 8
AcknowledgementsThanks to Roz for helping me design the structure of the herb spiral; to Wullie for doing an amazing job building it; thanks to Sally Wilkin and all the students at Kilmartin PDC for helping to place the herbs; to Plants with Purpose; and to all the children and staff at the nurseries, schools and after school clubs who helped to pile in soil and plant the herbs.
1. IntroductionThe Herb Spiral design is a detailed look at one area of the Castlemilk Stables design. Having decided where to locate it overall on this site (see diagram 1), I then set about designing the details of the herb spiral, and implementing this. I used OBREDIMET in order to ensure that careful observation was complete before designing.
2. ObservationAs well as observing the whole site, as detailed in design 8 – Castlemilk Stables, I observed the area around the lump of soil which I was to transform into a herb spiral. I checked out how much sun it was receiving, and noticed that although there was much creeping buttercup (indicating dampness), there was no moss (unlike other areas of the garden), it is raised within garden, hence not bad drainage. Thus I considered this an appropriate place for a herb spiral.
1
Permaculture Diploma Jan 2011 Lusi AldersloweHerb Spiral
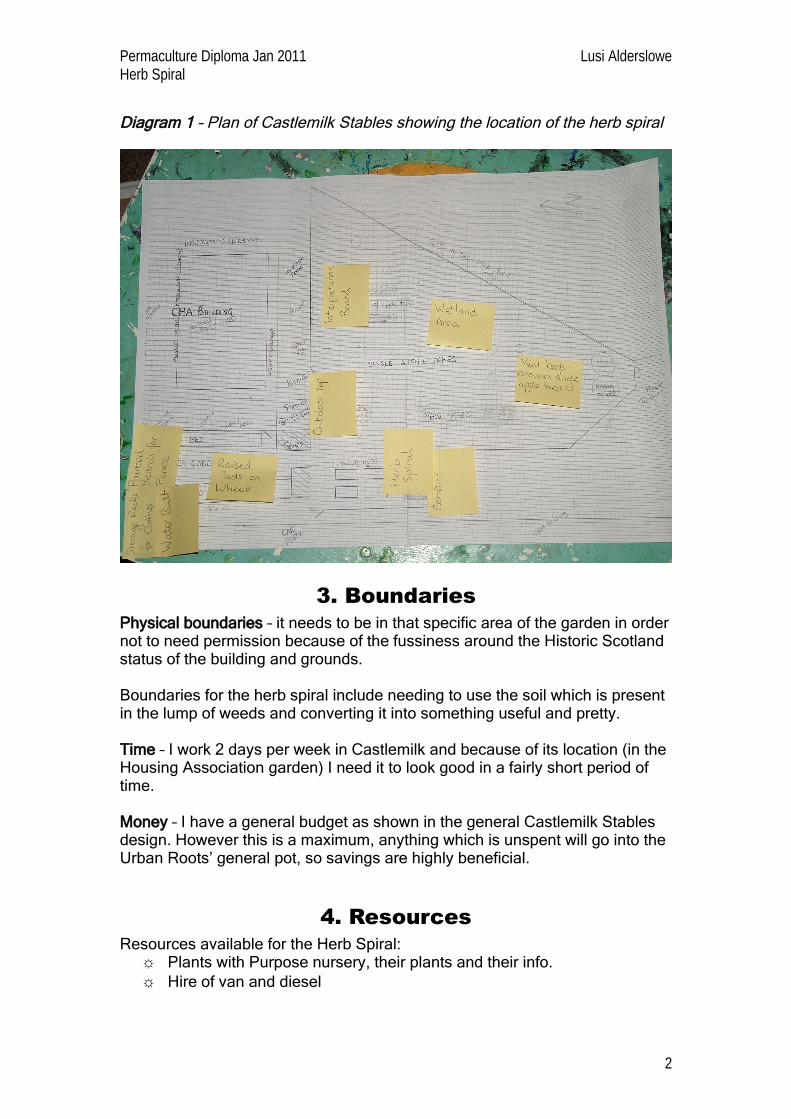
Diagram 1 – Plan of Castlemilk Stables showing the location of the herb spiral
3. BoundariesPhysical boundaries – it needs to be in that specific area of the garden in order not to need permission because of the fussiness around the Historic Scotland status of the building and grounds.
Boundaries for the herb spiral include needing to use the soil which is present in the lump of weeds and converting it into something useful and pretty.
Time – I work 2 days per week in Castlemilk and because of its location (in the Housing Association garden) I need it to look good in a fairly short period of time.
Money – I have a general budget as shown in the general Castlemilk Stables design. However this is a maximum, anything which is unspent will go into the Urban Roots’ general pot, so savings are highly beneficial.
4. ResourcesResources available for the Herb Spiral:
☼ Plants with Purpose nursery, their plants and their info. ☼ Hire of van and diesel
2
Permaculture Diploma Jan 2011 Lusi AldersloweHerb Spiral
☼ Other Urban Roots colleagues to travel with (to Perth) to make it a worthwhile journey.
☼ Urban roots volunteer to help collect roof tiles (Wullie who it turned out has landscaping experience), and Ariana later.
☼ Roz to help design the structure☼ Roof tiles found dumped in Govanhill☼ Subsoil dumped in a pile. ☼ Topsoil delivered. ☼ Compost ☼ Cut grass dumped nearby ☼ Tools: spades, trowels, measuring tapes, string, pegs, ☼ Information: web resources; Permaculture Works (Vol III Issue 1:
Spring 10) article on herbaculture spiral by Dan Wheals. ☼ Mulch: nearby dumped grass cuttings and woodchip from Southside
Studios☼ Children from the Jeely Piece Club (Go Play) who helped fill the
structure with soil.☼ Children helped planting (e.g. St Bartholomew’s Primary School;
Castlemilk Family Learning Centre; Miller Primary). ☼ Permaculture Design Course in Kilmartin Students helped place the
plants as a designing exercise.
Other resources including structures and people are listed in resources for general Castlemilk Stables design.
5. EvaluateI researched how other people have constructed herb spirals (using the internet as well as my own and Roz’s experience.
I analysed the resources available, for example through measuring the roof tiles I had found in an unsightly dump near my home. I used these measurements to work out the width of the herb spiral. From this I was able to calculate the circumference, hence the total number of roof tiles required.
I also considered what other soil/compost we would require. The soil in the lump appeared to be largely subsoil with lots of rubble, which would be good for the lower layers of the spiral. I decided to get smallest possible amount of topsoil delivered and to share this between herb spiral and mini forest garden beds (car/van tyres around single apple trees).
6. DesignThe design for the structure is shown in appendix 1.
The plan was to: 1. Design structure
3
Permaculture Diploma Jan 2011 Lusi AldersloweHerb Spiral
2. Order plants from Plants with Purpose3. Schedule children to help with construction4. Build the structure as designed (with the help of bigger kids)5. Fill the spiral with soil; 6. Go to Plant Nursery to purchase plants; 7. Decide where to put plants; 8. Plant plants; and9. Mulch.
Once the structure was constructed, I designed the plants’ location, this is shown in appendix 3.
6.2 Ethics & Principles in DesignThe permaculture ethics are in embedded in this design:Earth care: Organic plants from organic nursery; Recycling, using discarded roof tiles; Education about organic plants, using patterns from nature and other permaculture principles of different children of schools, nurseries, after school care as well as adults.
People Care: The spiral design is large, it includes stepping stones for children and adults to stand on as they go around and look after centrally located herbs; education (as above);
Fair share: Recycling, using discarded roof tiles; ensuring that education is for all, not just those children with interested parents, by involving schools and nurseries in a ‘deprived’ area.
The Principles embedded in the Herb Spiral Design include:
1. The Problem is the Solution: The brief moved from “use the huge pile of subsoil filled with dock and dandelion”, into “design and implement a herb spiral”.2. Use and Value Diversity: More than 30 different plant species. Ages of helpers (includes Urban Roots staff, Roz, volunteer, Wullie, as well as children from 3-15 years). Diverse microclimates used. 3. Stacking: Height of herb spiral as well as diameter. Education as well as designing (e.g on pdc), education as well as implementation. 4. Design from Patterns to Details: Designed the pattern of the herb spiral before the detail (what plant goes where). 5. Use Edges and Value the Marginal – herb spirals have lots of edge! Castlemilk and its residents are a marginal community. 6. Work with Nature: using the spiral pattern. Going with the nature of the different children and what they like to do, e.g. Melissa loved planting the herbs and managed to do it without any help from me after her second plant but other children in same group only managed to plant one plant altogether. 7. Minimum Effort Maximum Effect: especially apparent with the design for making the signs, very little input from me on this one (initial visit to school one afternoon discussed it and then one visit from children, the rest done by children in their schools with help from their teachers).
4

Permaculture Diploma Jan 2011 Lusi AldersloweHerb Spiral
8. Produce no Waste: we didn’t and we recycled some waste I found. 9. Creatively use and respond to change: I did have to keep tweaking the details of the design as the roof tiles were slightly different to the initial one I measured. Also, I didn’t know exactly when I would decide which plant to go where, however as it happened that I needed to get it done over the weekend in which I was attending a pdc, it worked out as perfect stacking to show them microclimates on this scale.10. Obtain a Yield: Yields already obtained include education, fun, learning, beauty, admiration. Let alone when we crop the plants!11. Catch and Store Energy: Use of plants which catch and store solar energy. Human energy stored in the placement of the roof tiles, soils, plants; and the mulch is a way of catching energy (heat and water).
7. Implementing and TweakingThis section has a photo diary to go with it, see appendix 2.
Stage 1: Collected roof tiles in van and drove them to Stables with Wullie. He stayed to help. Dug out big pile of soil. Measured and marked out the first half with roof tiles, string and pegs (as the roof tiles were of 2 types hence has slightly different measurements to the plan). Dug ditch for each tile to go in. Put cardboard on top of grass. Children from the Jeely helped to fill the herb spiral with subsoil whilst Wullie and I continued to put the tiles in place.
Stage 2: Another volunteer – Ariana - and I measured and constructed 2nd half of spiral. Different children (from family learning centre) came to help fill the herb spiral with soil. Also laid out laminated sheets of herbs to show the children how the plants would look in the completed herb spiral.
Stage 3: Drive to Perthshire to Plants with Purpose (interesting project we wanted to visit anyway) 3 of us in van all buying plants for our different gardening projects. We delivered them to Stables where I made an itinerary of all the herbs.
Stage 4: At Kilmartin Permaculture Design Course for the weekend I wrote the names (common and Latin name) of each herb onto a piece of paper together with how much sun it needed, how high it would grow, it’s uses and its function as a companion plant (the latter with the aid of Sally Wilkin). I cut out the pieces of paper and prepared a flipchart with a picture of a spiral on it – about correct proportions. I asked the teachers (Angus and Jane) if there was an appropriate time to slot this into the programme and they found one. At appropriate time I described the project briefly to the students and then gave each person one plant to place. Each person considered their plant and decided where to place it on the herb spiral. Elizabeth (an experienced gardener) gave me some extra tips on the plants being used. On the feedback for the weekend at least one person mentioned this exercise as a highlight of the weekend.
Stage 5: I laid the stepping stones on top of the soil. Planted out the herbs with the nursery (family learning centre) Miller Primary, and St Bartholomew’s
5
Permaculture Diploma Jan 2011 Lusi AldersloweHerb Spiral
Primary. At first each child had to pick a plant, look it up on the map with me, figure out where it would go, and then plant in correct place. Later I placed the remaining plants (in their pots) onto herb spiral to show children where to plant them.
Stage 6: Mulched with St Bartholomew’s school children with grass dumped nearby (using wheelbarrows), will mulch with woodchip too, for appearances (as it’s prettier than dried cut grass) and function of not retaining water in wet winter months.
Stage 7: Make signs for each herb – collaboration project within Castlemilk High School of Biology Dept and Technical dept, as part of their Curriculum for Excellence. Involves just one visit of the children into the garden to pick 2 herbs each and spend time with it, guess what it might be used for. Back in class the next week they research their plant then write something short about it (e.g. folklore or medicinal use). In technical class they design a sign to fit their passage/plant, make it, and get the writing onto the sign (e.g. paint or laminate sheet onto it), later return to Stables to place their signs.
8. Maintenance Maintenance is expected to be:
minimal weeding due to mulch; re-mulching repairing any damage caused by rampaging children(!) possible need to reinforce the structure (e.g. dry stone dyke outer wall); possible need to plant more climbing/dropping plants to make more use
of vertical space, possible need to replace some plants, and/or make more or replace signs.
9. EvaluationEvaluation was done throughout implementation before tweaking (as described in section 7). In addition, it would be useful if the full design was re-considered in mid-late summer 2011. This should be sufficient time to know how much of it has been successful. The evaluation should include answering the following questions:
1) How has the structure survived? If anything, what has damaged it and why?
2) How have the plants survived? Make an itinerary of which plants survived and how they are doing (Did they survive the winter?). Is there a trend to which ones survived (e.g. did all the ‘full sun’ ones perish).
3) Were the signs completed? Successful? Have they survived?
Once information on the above items is collected I will tweak the design, record and implement as required.
6
Permaculture Diploma Jan 2011 Lusi AldersloweHerb Spiral
10. Reflections
10.1 What went well?☼ Good photo report☼ Children involvement☼ Designing and number crunching (measurements of tiles in structure)☼ Implemented (not fallen over yet, touch wood!)☼ Kids love walking on spiral ☼ Written it up☼ Looks nice☼ Clients (both Urban Roots and Cassiltoun Housing Association) are
happy.
10.2 What was challenging?☼ Change of dimensions/size of roof tiles☼ Time taken (took much longer than expected)☼ Over-stacking (showing staff around garden whilst Wullie attacking
weed/soil pile)☼ To design as if it’s to be so, but really design constantly changing and
developing with more info etc (e.g. plants bought from nursery)☼ Concern it might fall down!☼ Concern for sun-loving plants (as not as sunny in autumn as it was mid-
summer).
10.3 Even Better If…☼ Put the roof tiles around a different way as they are designed to fit
snugly together to stop moving; ☼ more observation before siting as the site gets less than 6 hours a day
direct sunlight from October (which is what is meant by ‘full sun’ which a few on the top require) – I really learnt why they say observe for a full year! However I’m not sure on this site if it would have made any difference as the brief was to do something on this specific site.
☼ Consider using the vertical space more☼ Read Bill Mollison’s description/instructions for constructing a herb
spiral (I have heard it is written in a book which I have ordered). ☼ I had photos of people on the spiral to give a clearer idea of scale. ☼ Who is the client? Could have identified this earlier in design. ☼ Element/function analysis might have helped?☼ Had written up more during designing stage – but could I have? As I
kept tweaking the design. Also timeframe – I am paid to work not to write up the designs I’m implementing!
10.4 What I would do differently?☼ Put the roof tiles around a different way ☼ more observation before siting ☼ Consider using the vertical space more
7
Permaculture Diploma Jan 2011 Lusi AldersloweHerb Spiral
☼ Read Bill Mollison’s description/instructions for constructing a herb spiral
☼ Write it up sooner after designing☼ Consider using other designing tools such as element/function analysis
or client interview
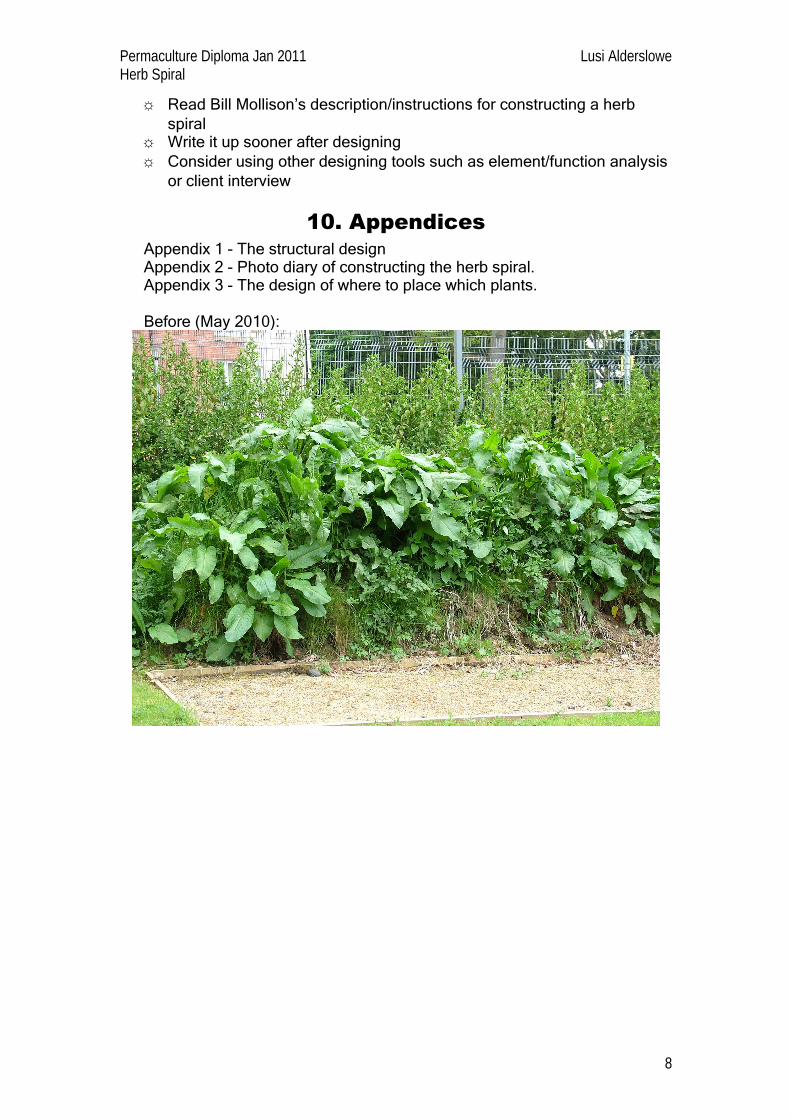
10. AppendicesAppendix 1 - The structural designAppendix 2 - Photo diary of constructing the herb spiral. Appendix 3 - The design of where to place which plants.
Before (May 2010):
8
Permaculture Diploma Jan 2011 Lusi AldersloweHerb Spiral
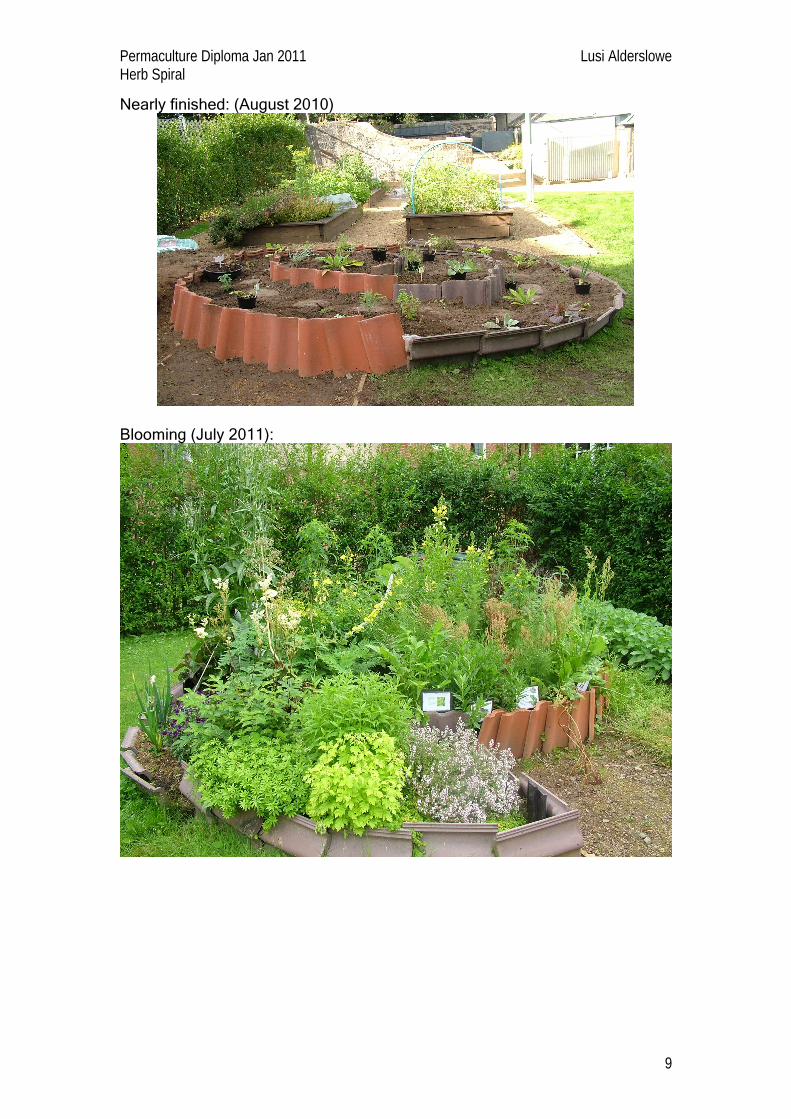
Nearly finished: (August 2010)
Blooming (July 2011):
9