Hendricks 9pc Counter Height Dining Set (Chair) · Check that all bolts and screws are tight at...
16
THIS INSTRUCTION BOOKLET CONTAINS IMPORTANT SAFETY INFORMATION. PLEASE READ AND KEEP FOR FUTURE REFERENCE. Date 2016-07-30 Rev. 0001-A Factory: HOAJOI Hendricks 9pc Counter Height Dining Set (Chair) Stock # HEN9PCH ADULT ASSEMBLY REQUIRED If you have any questions regarding assembly or if parts are missing, DO NOT return this item to the store where it was purchased. Please call our customer service number and have your instructions and parts list ready to provide the model name, part name or factory number: 866-942-5362 Pacific Standard Time: 8:30 a.m. - 4:30 p.m., Monday - Friday Or visit our web site 24 hours a day, 7 days a week for product assistance at www.whalenstyle.com Or e-mail your request to [email protected] LOT NUMBER: DATE PURCHASED: / /
Transcript of Hendricks 9pc Counter Height Dining Set (Chair) · Check that all bolts and screws are tight at...

THIS INSTRUCTION BOOKLET CONTAINS IMPORTANT SAFETY INFORMATION. PLEASE READ AND KEEP FOR FUTURE REFERENCE.
Date 2016-07-30 Rev. 0001-A Factory: HOAJOI
Hendricks 9pc Counter Height Dining Set (Chair) Stock # HEN9PCH
ADULT ASSEMBLY REQUIRED
If you have any questions regarding assembly or if parts are missing, DO NOT return this item to the store where it was purchased. Please call our customer service number and have your instructions and parts list ready to provide the model name, part name or factory number:
866-942-5362 Pacific Standard Time: 8:30 a.m. - 4:30 p.m., Monday - Friday
Or visit our web site 24 hours a day, 7 days a week for product assistance at www.whalenstyle.com
Or e-mail your request to [email protected]
LOT NUMBER: DATE PURCHASED: / /
2
1. Maximum load weight on chair is 136 kg (300 pounds).
1. Please read the Assembly Instructions prior to assembling the unit.
2. To avoid damage, assemble the unit on a sturdy, level and non-abrasive surface.
3. Keep all hardware and parts out of the reach of children.
4. Please wait until all steps are completed before fully tightening bolts.
5. Make sure all bolts and screws are tightly fastened before the unit is used.
6. Check that all bolts and screws are tight at least every 3 months or as needed.
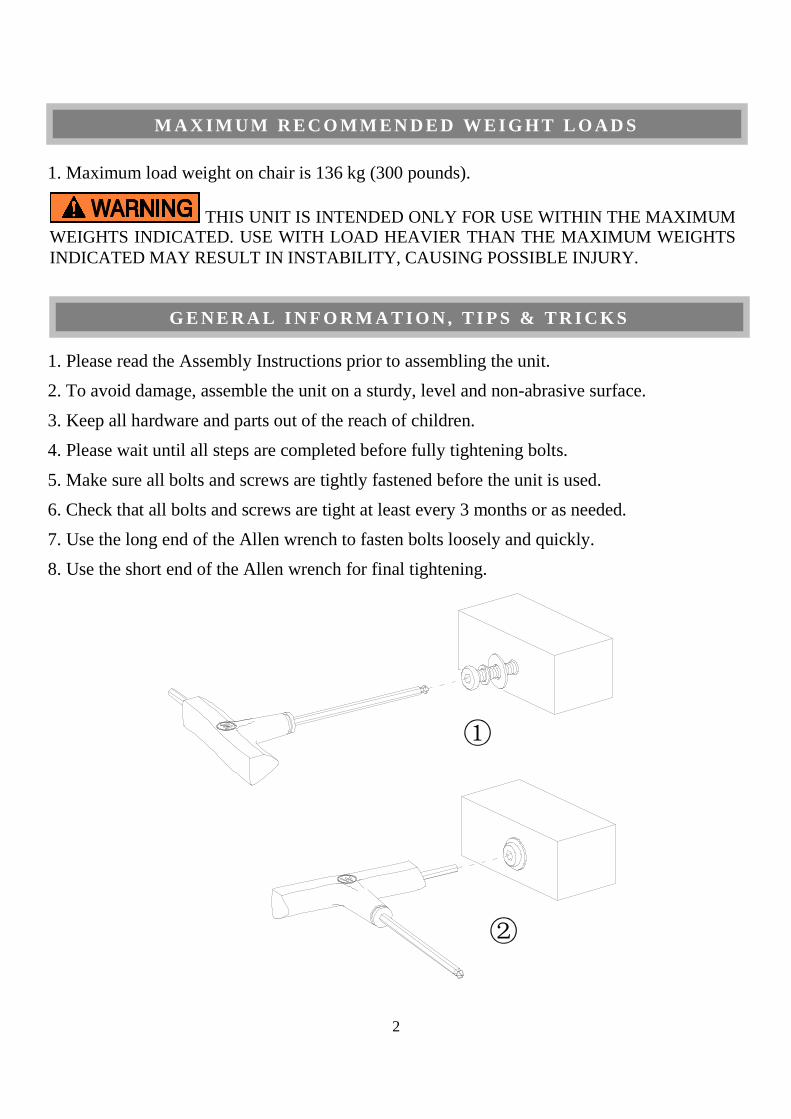
7. Use the long end of the Allen wrench to fasten bolts loosely and quickly.
8. Use the short end of the Allen wrench for final tightening.
G E N E R A L I N F O R M A T I O N , T I P S & T R I C K S
M A X I M U M R E C O M M E N D E D W E I G H T L O A D S
THIS UNIT IS INTENDED ONLY FOR USE WITHIN THE MAXIMUM WEIGHTS INDICATED. USE WITH LOAD HEAVIER THAN THE MAXIMUM WEIGHTS INDICATED MAY RESULT IN INSTABILITY, CAUSING POSSIBLE INJURY.
②
①

3
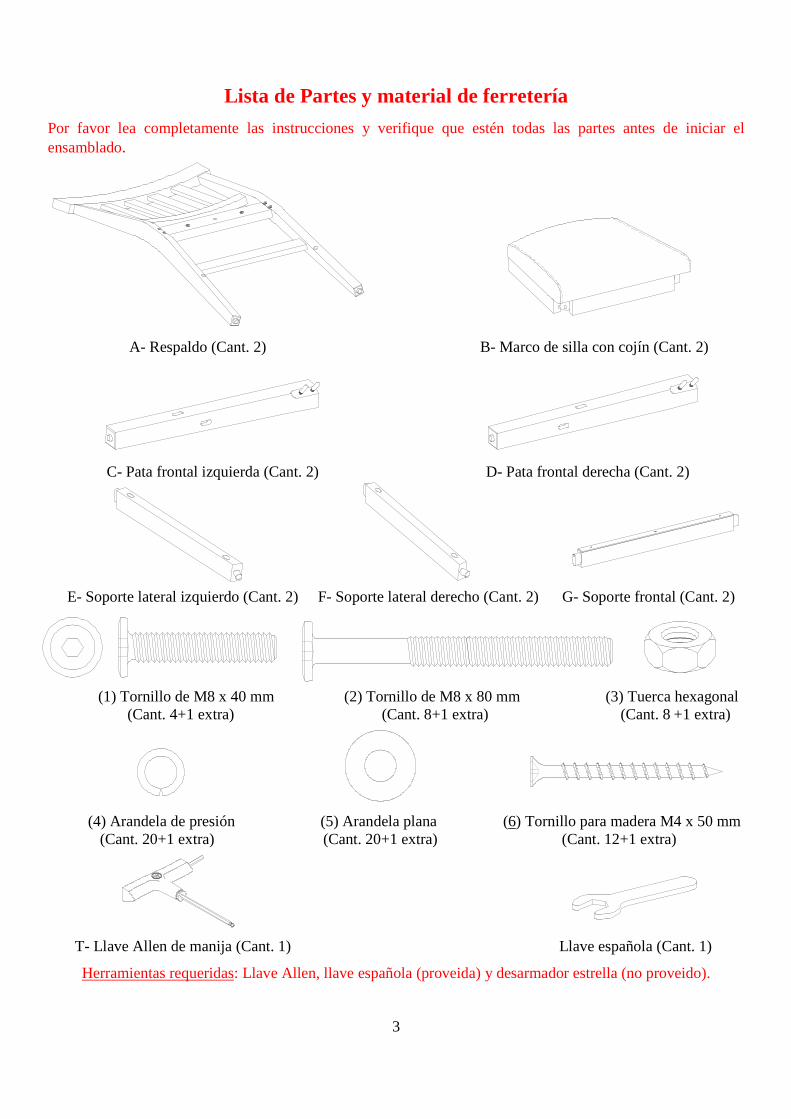
Parts and Hardware List
Please read completely through the instructions and verify that all listed parts and hardware are present before beginning assembly.
A- Chair Backrest (Qty. 2) B- Seat Frame with Cushion (Qty. 2)
C- Left Front Leg (Qty. 2) D- Right Front Leg (Qty. 2)
E - Left Side Stretcher (Qty. 2) F - Right Side Stretcher (Qty. 2) G- Front Stretcher (Qty. 2)
(1) M8 x 40 mm Bolt (2) M8 x 80 mm Bolt (3) Hex Nut
(Qty. 4+1 extra) (Qty. 8+1 extra) (Qty. 8 +1 extra)
(4) Lock Washer (5) Flat Washer (6) M4 x 50 mm Wood Screw (Qty. 20+1 extra) (Qty. 20+1 extra) (Qty. 12+1 extra)
T-handle Allen Wrench (Qty. 1) Open Wrench (Qty. 1)
Tools required: Allen wrench and open wrench (provided) and Phillips screwdriver (not provided).

4
Assembly Instructions
1. Unpack the unit and confirm that you have all the hardware and required parts.
2. Remove the plastic caps from the hanger bolts of the Front Legs (C and D) for the following steps.
3. Attach one Left Front Leg (C) to the Left front corner block of one Seat Frame (B) by inserting the hanger bolts on the leg through the drilled holes on the corner block and fit the Flat Washer (5), Lock Washer (4) and Hex Nut (3) onto each hanger bolt. Securely tighten the nuts with the provided open wrench.
NOTE: DO NOT fully tighten all the nuts until the chair has been adjust and level all the legs so that they do not wobble. Once adjusted, go back and tighten while making sure that the unit remains level.
4. Insert the tenon of one Front Stretcher (G) into the mortise of the Left Front Leg (C). Make sure that the slant holes on the stretcher will face the floor when the unit is turned upright.
5. Repeat the same procedure to attach one Right Front Leg (D) to the right front corner block of the Seat Frame (B). Be sure the mortise on Right Front Leg (D) fit onto the tenon of the Front Stretcher (G) properly.
DO NOT fully tighten the bolts or nuts initially until all the bolts or nuts are ready to assemble. To avoid causing damage to the thread, DO NOT over-tighten the nuts or bolts.
Hex Nut (4 used in this step)
③
Lock Washer (4 used in this step)
④
Flat Washer (4 used in this step)
⑤

5
Assembly Instructions
6. Lay one Backrest (A) on a smooth and protective surface with the threaded inserts facing up.
7. Insert the tenon of Left and Right Side Stretchers (E and F) into the mortises of the Backrest (A). Make sure the slant holes on the Side Stretchers will face the floor when the unit is turned upright.
8. Attach the assembled Seat Frame (B) to the middle rail of the Backrest (A) and insert both Side Stretchers (E and F) into the Front Legs (C and D) respectively. Insert the 80 mm Bolts (2) with the Washers (4 and 5) through the drilled holes on the Seat Frame (B) at rear corner blocks and loosely tighten into the threaded inserts on the Backrest (A). As shown.
9. Secure the Seat Frame (B) to the Backrest (A) by inserting two 40 mm Bolts (1) with the Washers (4 and 5) into the drilled holes on the rear rail of the Seat Frame.
NOTE: DO NOT fully tighten the bolts.
Lock Washer (6 used in this step)
④
Flat Washer (6 used in this step)
⑤
M8 x 40 mm Bolt (2 used in this step)
①
M8 x 80 mm Bolt (4 used in this step) ②

6
Assembly Instructions
10. Position the assembled unit upside down on the carton or other support surface, as shown.
NOTE: Place a protective cover (like the bubble wrap packing material) over the carton or other support surface to prevent from scratching.
11. Insert and screw six 50 mm Wood Screws (6) into the slant holes on the Stretchers (E, F and G). Tighten the screws with a Phillips screwdriver.
12. Stand the assembled unit upright on a flat surface. Press down the Seat Cushion (B) to even all legs. Now, tightly fasten all bolts with the provided Allen wrench and open wrench.
13. Repeat the same process to assemble the other chairs.
M4 x 50 mm Wood Screw (6 used in this step)
⑥

7
Care and Maintenance
� From time to time please ensure there are no loose nuts on the product.
� Use a soft, clean cloth that will not scratch the surface when dusting.
� Use of furniture polish is not necessary. Should you choose to use polish, test first in an inconspicuous area.
� Using solvents of any kind on your furniture may damage the finish.
� Never use water to clean your furniture as it may cause damage to the finish.
� Liquid spills should be removed immediately. Using a soft clean cloth, blot the spill gently. Avoid rubbing.
� Always use protective pads under hot dishes and plates. Heat can cause chemical changes that may create
spotting within the furniture finish.
� In the event that your furniture is stained or otherwise damaged during use, we recommend that you call a
professional to repair your furniture.
� Check bolts/screws periodically and tighten them if necessary.
Further advice about wood furniture care It is best to keep your furniture in a climate-controlled environment. Extreme temperature and humidity changes can cause fading, warping, shrinking and splitting of wood. It is advised to keep furniture away from direct sunlight as sun may damage the finish.
Proper care and cleaning at home will extend the life of your purchase. Following these important and helpful tips will enhance your furniture as it ages.
We hope you enjoy your purchase for many years. Thank you for your purchase!
QUALITY GUARANTEE
We are confident that you will be delighted with your Whalen Furniture purchase.
Should this product be defective in workmanship or materials or fail under normal use, we will repair or replace it for up to one (1) year from date of purchase. Every Whalen Furniture product is designed to meet your highest expectations. We guarantee that you will immediately see the value of our fine furniture.
This warranty gives you specific legal rights and you may also have other rights which vary from State to State.
Customer Service: 866-942-5362 8:30 a.m. - 4:30 p.m., PST, Monday to Friday
www.whalenstyle.com


ESTE INSTRUCTIVO CONTIENE INFORMACION IMPORTANTE DE SEGURIDAD. POR FAVOR LEA Y MANTENGA PARA USO FUTURO.
Fecha 2016-07-30 Rev. 0001-A Fábrica: HOAJOI
Juego de comedor Hendricks 9pzas altura de barra (Silla) Serie # HEN9PCH
ENSAMBLE REQUERIDO POR ADULTO
Si tienen alguna pregunta acerca del ensamble o si alguna parte está faltante, no retorne este producto a la tienda donde lo compró. Por favor llame a nuestro departamento de ayuda al cliente teniendo su instructivo y lista de partes para proveer el modelo, nombre de parte o el número de fábrica:
866-942-5362 Hora Estandar del Pacífico: 8:30 am - 4:30 pm de Lunes a Viernes
O visite nuestra página de Internet 24 horas al dia, 7 días a la semana para asistencia www.whalenstyle.com
O mande un correo electrónico a [email protected]
LOTE NÚMBERO: FECHA DE COMPRA: / /

2
1. Máxima carga recomendada en la silla es de 136 kg (300 libras).
1. Por favor lea el instructivo antes de comenzar el ensamble. 2. Para evitar daños, ensamble la unidad en una area nivelada y libre de abrazivos. 3. Mantener el herraje fuera de las manos de los niños. 4. Por favor espere a terminar de instalar todas las partes antes de apretar completamente todos los
tornillos. 5. Asegurese que todos los tornillos esten bien apretados antes de utilizar al unidad. 6. Compruebe que todos los pernos, tornillos y tuercas estan apretados por lo menos cada 3 meses o
según sea necesario. 7. Use la parte larga de la llave Allen para apretar los tornillos flojamente y rápidamente. 8. Use la parte corta de la llave Allen para el apretón final.
IN F O RM A C IÓN G E NE R AL , R E C O ME N D A C IO N ES Y T R U C O S
M Á X IM OS P E SO S R E C OME ND A D O S
ESTA UNIDAD DEBE UTILIZARSE CON LOS PESOS MÁXIMOS INDICADOS. SI SE EXCEDE EL PESO MÁXIMO, PODRIA RESULTAR EN UNA INESTABILIDAD DE LA UNIDAD CAUSANDO POSIBLES LESIONES.
②
①
3
Lista de Partes y material de ferretería
Por favor lea completamente las instrucciones y verifique que estén todas las partes antes de iniciar el ensamblado.
A- Respaldo (Cant. 2) B- Marco de silla con cojín (Cant. 2)
C- Pata frontal izquierda (Cant. 2) D- Pata frontal derecha (Cant. 2)
E- Soporte lateral izquierdo (Cant. 2) F- Soporte lateral derecho (Cant. 2) G- Soporte frontal (Cant. 2)
(1) Tornillo de M8 x 40 mm (2) Tornillo de M8 x 80 mm (3) Tuerca hexagonal
(Cant. 4+1 extra) (Cant. 8+1 extra) (Cant. 8 +1 extra)
(4) Arandela de presión (5) Arandela plana (6) Tornillo para madera M4 x 50 mm (Cant. 20+1 extra) (Cant. 20+1 extra) (Cant. 12+1 extra)
T- Llave Allen de manija (Cant. 1) Llave española (Cant. 1)
Herramientas requeridas: Llave Allen, llave española (proveida) y desarmador estrella (no proveido).

4
Instrucciones de ensamble
1. Desempacar la unidad y confirmar que se tiene todo el herraje y partes requeridas.
2. Remover las tapas de plástico de los tornillos especiales de las patas frontales (C y D) para los siguientes pasos.
3. Adjuntar una pata frontal izquierda (C) a la esquina frontal izquierda de un marco de silla (B) insertando los tornillos especiales de la pata a través de los agujeros perforados en la esquina y poner la arandela plana (5), la arandela de presión (4) y la tuerca hexagonal (3) a cada tornillo. Apretar las tuercas con la llave española.
NOTE: NO apriete completamente la tuercas hasta que la silla halla sido ajustada y nivelar las patas para que no se tambaleen. Una vez ajustada, apriete mientras se asegura que la unidad esta nivelada.
4. Insertar la espiga de un soporte frontal (G) en la entrada de la pata frontal izquierda (C). Asegurar de que los agujeros rasgados en el soporte apunten al piso cuando la unidad esté en posición vertical.
5. Repetir el mismo procedimiento para adjuntar una pata frontal derecha (D) a la esquina frontal derecha del marco de silla (B). Asegurar de que la caja de la pata (D) entre en la espiga del soporte frontal (G).
NO APRIETE completamente los tornillos o tuercas hasta que todas las partes esten ensambladas. Para evitar daños a la rosca, NO apriete de más los tornillos o tuercas.
Tuerca hexagonal (4 usados en este paso)
③
Arandela de presión (4 usados en este paso)
④
Arandela plana (4 usados en este paso)
⑤

5
Instrucciones de ensamble
6. Poner un respaldo (A) en una superficie suave y protegida con los insertos roscados apuntando hacia arriba.
7. Insertar la espiga de los soportes laterales derecho e izquierdo (E y F) en los cortes del respaldo (A). Asegurar de que los agujeros rasgados en los soportes laterales apunten al piso cuando la unidad esté en posición vertical.
8. Adjuntar el marco de silla ensamblada (B) al riel medio del respaldo (A) e insertar los dos soportes laterales (E y F) en las patas frontales (C y D). Insertar los tornillos de 80 mm (2) con las arandelas (4 y 5) a través de los agujeros perforados en el marco (B) en las esquinas posteriors y apretar flojamente en los insertos roscados en el respaldo (A). Como se muestra.
9. Asegurar el marco de silla (B) al respaldo (A) insertando dos tornillos de 40 mm (1) con las arandelas (4 y 5) en los agujeros perforados en el riel posterior del marco.
NOTA: NO apriete completamente los tornillos.
Arandela de presión (6 usados en este paso)
④
Arandela plana (6 usados en este paso)
⑤
Tornillo de M8 x 40 mm (2 usados en este paso)
①
Tornillo de M8 x 80 mm (4 usados en este paso) ②

6
Instrucciones de ensamble
10. Posicionar la unidad ensamblada boca arriba sobre el cartón u otra superficie de soporte, como se muestra.
NOTA : Poner una covertura protectiva (como el plástico de burbujas) sobre el carton u otra superficie de soporte para prevenir rasguños.
11. Insertar y fijar seis tornillos para madera de 50 mm (6) en los agujeros rasgados de los soportes (E, F y G). Apretar los tornillos con el desarmador estrella.
12. Parar la unidad ensamblada en una superficie plana. Empujar hacia abajo el cojín (B) para nivelar las patas. Ahora, apriete los tornillos con la llave Allen y la llave española.
13. Repetir el mismo proceso para ensamblar las otras sillas.
Tornillo para madera M4 x 50 mm (6 usados en este paso)
⑥

7
Mantenimiento y Cuidados
� Por favor regrese de vez en cuando a checar que las tuercas se encuentren completamente apretadas. � Use una toalla suave y limpia para evitar daños y rayaduras. � Uso de cera para pulir muebles no es necesario. Si desea usar cera revisar en una área que no sea visible para
revisar su funcionamiento. � Usar solventes de cualquier tipo puede dañar el acabado del mueble. � Nunca use agua para limpiar la unidad, ya que le puede dañar el acabado. � Líquidos derramados deben limpiarse inmediatamente, con una toalla suave evitando tallar. � Siempre utilizar protectores en caso de poner cosas calientes. El calor puede provocar una reacción química
en el acabado y dañarlo. � En caso que su unidad sea manchada durante el uso le recomendamos hablar a un profesional para que le
ayude. � Revisar los pernos y tornillos periódicamente y apriételos si es necesario..
Más recomendaciones para el cuidado de su Mueble Es mejor mantener la unidad en una área de clima controlado. Temperatura extrema y cambios de humedad pueden causar cambios como partes pandas, molduras que se contraigan o que la madera se raje. Es recommendable mantener la unidad lejos del sol directo ya que puede dañar el terminado.
Cuidados adecuados y limpieza pueden extender la vida útil de su unidad. Siga estas recomendaciones y mantendra su mueble en buenas condiciones de uso por muchos años
Esperamos que disfrute su mueble por muchos años. ¡Gracias por su compra!
GARANTIA DE CALIDAD
Nosotros estamos seguros que Usted se encontrará feliz con la compra de esté producto de Whalen Furniture.
Si esté producto tiene algun defecto de ensamblado o material o si tiene alguna falla en uso normal, Nosotros lo repararemos o lo re-emplazaremos hasta por un año a partir de la fecha de compra. Todo producto de Whalen Furniture es diseñado para alcanzar sus espectativas más altas. Nosotros le garantizamos que inmediatamente podrá ver el valor de nuestra mercancia de la más alta calidad.s
Está garantia le proporciona derechos legales especificos y talvez tenga otros derechos que varian de Estado a Estado.
Servicio al Cliente: 866-942-5362 8:30 a.m. - 4:30 p.m., PST, Lunes a Viernes
www.whalenstyle.com