

HEADSHOTS – 101€¦ · with the glasses) would be a headshot. Example number one would be an...
37
HEADSHOTS – 101 Written by Kent DuFault Photzy Timothy Marsee https://www.flickr.com/photos/tmarsee530/4713026208
Transcript of HEADSHOTS – 101€¦ · with the glasses) would be a headshot. Example number one would be an...

HEADSHOTS – 101
Written by Kent DuFault
Photzy
Timothy Marseehttps://www.flickr.com/photos/tmarsee530/4713026208

Almost every photographer (at some point) is asked (or hired) to create a headshot.
While on the surface a headshot seems like it would be pretty easy to do, there are a number of factors that will determine whether your headshot is great, good, okay, or terrible.
Let’s begin the discussion by determining exactly what a headshot is…
HEADSHOTS – 101 // © PHOTZY.COM 2

Which of the following photographs is a headshot?
The answer is any of them. By definition, example number three (the man with the glasses) would be a headshot. Example number one would be an extended head and shoulders shot (almost ½ length). Example number two would be a head and shoulders shot.
rpavichhttps://www.flickr.com/photos/rpavich/15404471337
Boudewijn Berendshttps://www.flickr.com/photos/boudewijnberends/15206079686
Texas A&M Universityhttps://www.flickr.com/photos/tamuc/15278983215/in/photostream/
HEADSHOTS – 101 // © PHOTZY.COM 3

But, it is important to realize that with most folks there is no clear definition as to what the headshot might include.
A businessperson who wants a ‘headshot’ for a newsletter article would probably prefer the framing of the image on the far left.
That same businessperson who wants a headshot for a business card would be better suited with the headshot on the far right.
A model or actress would probably want an image similar to examples two or three.
Now, you’re probably saying to yourself…
“Couldn’t I shoot it like example one and then crop it, or let them crop it, to fit examples two or three?”
Sure, you could. But that’s not the type of photographer that you want to be; is it? You want to create the best possible image to meet your subject’s needs.
Now, you might be thinking…
“Why don’t I just shoot all three examples?” You could, and that might not be a bad idea depending on the situation.
But what happens if the best expression isn’t on the right frame? What if you have limited time? What if the subject is busy and they’ll only give you a couple of shots, and then they announce that they’re done?
All these things can happen. They’ve all happened to me.
The Number One Rule in headshots 101 is to determine the subject’s expectation for the final photograph, and get that shot immediately.
There is no clear definition as to what the headshot
might include...
HEADSHOTS – 101 // © PHOTZY.COM 4

What if the client has no preconceived notion of what they want? Or, maybe the final use of the image will be strictly creative?
There are still some considerations-
• Should the subject be looking at the camera, or not?
• Is it okay to crop off part of the head?
• What kind of background will be needed?
• What kind of lighting?
• What should the POV for the camera be? Can the camera look down on the subject? How about looking up at the subject? Or, should it be even with the subject’s face?
• Should there be any props?
Robhttps://www.flickr.com/photos/23362579@N02/6378801309
HEADSHOTS – 101 // © PHOTZY.COM 5

SHOULD A HEADSHOT BE VERTICAL OR HORIZONTAL?
Traditionally (and for most paying customers), a headshot should definitely be vertical.
Think about it. Headshots are used to showcase a person’s face, as if we the viewer were standing right in front of that person. Our heads are mounted vertically on our bodies.
It’s how we expect to see someone’s face.
Is there a time where you might shoot a headshot horizontally? Sure! That’s another reason why you must interview your subject and find out what it is that they need. Perhaps a businessperson (such as the photo above) wants to drop some advertising copy into the photograph. Perhaps they like the head cut-off because it adds tension, creates interest, or is unusual.
Ryan Meili NDP 2013https://www.flickr.com/photos/ryanmeili/7979896409
HEADSHOTS – 101 // © PHOTZY.COM 6

This headshot was composed similar to the one above. But, in this case it’s clearly framed inappropriately. It’s common for beginning photographers to make this mistake - it’s just easier to hold the camera horizontally.
But, look at this photograph of the young woman. Does the horizontal format add to image? Is there a purpose for it? No. In fact, the tree is quite distracting. What if this woman wanted a horizontal photograph so that she could drop advertising copy into this image? It still doesn’t work. The texture and coloring of the tree are too busy for copy to effectively stand out.
Remember-
1. Most headshots will be vertical (unless there is a reason to shoot horizontally).
2. Find out the needs of your subject, and format your picture appropriately.
LeeLee/Lisahttps://www.flickr.com/photos/leelee0123pics/6204123276
HEADSHOTS – 101 // © PHOTZY.COM 7

Lighting a headshot is much like lighting any portrait- with one exception.
You must pay particular attention to how the light is affecting the subject’s face and head.
If you light a full-length portrait and there is an unsightly shadow across the subject’s eye, it will be less noticeable on a wider shot than on a headshot. Poor lighting on a headshot will be large and quite noticeable.
rawartistsmediahttps://www.flickr.com/photos/rawartists/15222395227/in/photostream/
rawartistsmediahttps://www.flickr.com/photos/rawartists/15222394607/in/photostream/
HEADSHOTS – 101 // © PHOTZY.COM 8

Take a look at these professionally produced actor/actress headshots. What do you notice about the lighting?
Nick Greganhttps://www.flickr.com/photos/39055373@N06/3859564410/
HEADSHOTS – 101 // © PHOTZY.COM 9

The lighting is soft and fairly even across the face, hair, and background. But, beware of going too flat with your lighting. There should be some contour to the face.
A general rule when lighting headshots-
• The lighting on a woman should be as soft and flat as possible to minimize wrinkles and skin texture. Don’t mistake trying to use ‘skin softening software’ instead of proper lighting.
• It’s generally considered acceptable to have a more dense shadow on a man’s face. This helps accentuate the jawline, which adds to the sense of masculinity.
• The background should have lighting that creates dimension without becoming distracting.
Nick Greganhttps://www.flickr.com/photos/39055373@N06/3859541980/
Nick Greganhttps://www.flickr.com/photos/39055373@N06/3588101233/
HEADSHOTS – 101 // © PHOTZY.COM 10

LIGHTING A HEADSHOT
During the years that I owned a commercial photography studio, there were basically three common headshot assignments.
1. A businessperson, or a business, that wants headshots of the employees for advertising and/or public relations purposes.
2. Models, actors, or actresses that wanted headshots for their portfolio.
3. A headshot that was part of a larger body of work, such as a wedding or a portrait session.
I generally used three lighting schemes to cover these assignments.
I’m going to describe each one in detail, and this will give you the information that you need to develop your own methods for lighting headshots.
I generally used three lighting schemes to cover
these assignments.
HEADSHOTS – 101 // © PHOTZY.COM 11

THE HEADSHOT BOOTH
The headshot booth is an excellent tool for a number of reasons.
• You can accomplish this lighting scheme with one light.
• It works equally well for men and women.
• It works well for people with glasses and men that are balding.
• It’s easy to transport.
• It doesn’t take a lot of room to set up.
• It works very well for photographing a large number of people quickly.
What’s the downside? The lighting lacks creativity or character. My primary use for the headshot booth was when I was called in to photograph a number of people at a business, or a large group such as a theater company, and the final product needed high detail and even lighting for reproduction.
This image is a fine example of the lighting produced by a headshot booth lighting scheme. The light is broad, even, and soft. The details of the face, hair, and clothing are well lit, and are without harsh shadows or highlights that are outside the range of reproduction. Yet, there is still shadow and contour in the face.
The headshot booth will give you the best light for a wide variety of subjects.
rawartistsmediahttps://www.flickr.com/photos/rawartists/16034696081/in/photostream/
HEADSHOTS – 101 // © PHOTZY.COM 12

Here is how to set up a headshot booth.
If you’re shooting multiple subjects, keep the background panel separate from the rest of the box so that you can move it for people to get in and out of the booth.
HEADSHOTS – 101 // © PHOTZY.COM 13

Here is another angle.
This lighting scheme creates a white box that surrounds the subject. The result is soft even lighting from all sides.
Quick Tip: If your subject has glasses and you’re getting reflections from the light source by the camera, do one of the following:
• Have them slightly lower their chin (watch out for a double chin, though!).
• Have them slightly angle their face away from the light source. If the light is camera right, have them angle away to camera left.
• Raise the light slightly on the light stand.
CUSTOM HEADSHOT LIGHTING SCHEME (FOR BUSINESS OR PORTRAITURE)
In the heading for this section, I have put in the caveat, for business or portraiture. I added this caveat because if you’re producing the headshot for strictly artistic purposes, you can light it any way that you want to.
But you don’t need me to help you with that!
HEADSHOTS – 101 // © PHOTZY.COM 14

When producing a headshot for creative purposes you can literally do anything you want in terms of lighting, angle, expression, etc. Just make sure that if you’re producing the image for anyone other than yourself, the end-user is onboard with your creative decisions.
The second lighting scheme that I’m going to discuss (headshot lighting) works much like the headshot booth in that it was quick.
The differences are as follows:
• It requires more lights and gear
• It requires more space
• It provides more options for contour lighting of the face and hair
• It allows some variance in the pose of the subject(s)
Indintify mediahttps://www.flickr.com/photos/thinspread/9330841604
HEADSHOTS – 101 // © PHOTZY.COM 15

Here is a basic diagram of the headshot lighting scheme:
The beauty of this lighting scheme is that you can make changes quickly and easily without major maneuvering of the equipment.
This is extremely useful if you’re shooting in a small space, or you’re photographing a number of people and you want to give them each a unique look without too much fuss.
HEADSHOTS – 101 // © PHOTZY.COM 16

There are some important things I want you to learn from this diagram.
1. Unless you are being creative for your own use, the lighting ratio between lights should be 3:1 or less. In a moment we will talk about how to measure the lighting ratio.
2. Softboxes produce the best light when they are positioned perpendicular to and slightly in front of the subject. If you point a softbox directly at the subject the light is harsher, more direct, and more difficult to control.
3. The reflectors positioned at the camera are optional and their only real purpose is to add catch-lights to the eyes.
4. The lighting in this scenario is easily changed by moving the two softboxes (on either side of the subject) forward or backward, or in or out. The softbox that is further back (closer to the subject) is the main light. The other one is the fill light.
5. The hair light is optional. It adds dimension if it’s available.
6. The background light is essential if you’re using a black or a dark grey (colored) background. It’s optional for a mid-tone to light grey, or a white background (although, I highly suggest it anyway). If you can control the ambient lighting in the area that you’re shooting (such as a room where you can turn the lights off), you can put a gel on the background light if you want to add some color (be sure that your other lights don’t spill onto the background or they will wash the color away! White light washes out the color on a gelled light).
Let’s look at some examples of this lighting scenario.
Some important things I want you to learn from this
diagram.
HEADSHOTS – 101 // © PHOTZY.COM 17

This is a 2:1 lighting ratio (one f/stop difference between the light side and the dark side of the face). For example, when you meter the light side of the face your meter indicates f/8.0. When you meter the shadow side of the face, the meter indicates f/5.6. That’s a one stop difference, or also known as a 2:1 lighting ratio. This photograph has a background light and a hair light (the purpose of these two lights is to separate the subject from the background).
Texas A&M Universityhttps://www.flickr.com/photos/tamuc/15268820775/in/photostream/
HEADSHOTS – 101 // © PHOTZY.COM 18

In this example, the hair light has been removed. If you’re doing headshots of a group of people, you may have to adjust the hair light as needed. Balding people, or people with very blonde hair, often look best with no hair light. Also, be alert to subjects that have flyaway hair such as this woman. These folks will also generally look best without a hair light, and sometimes the background light will need adjustment. This image has a 3:1 lighting ratio. Did you notice that the shadows were a bit darker than in the previous example? A 3:1 lighting ratio means there is a 1-½ stop difference from the highlight to shadow side.
When using lighting ratios, how do you meter the image and set your camera if you don’t have a handheld incident light meter?
After setting the lighting ratio, hold a grey card at the position of the face and take a meter reading from the direction of the camera. Fill the viewfinder of the camera with the card. Use this exposure combination as your starting point. If you don’t have a grey card, you can take the reading off of your hand. Depending on your skin tone you would increase the exposure ½ to 1 stop from the reading that you got from your hand.
Texas A&M Universityhttps://www.flickr.com/photos/tamuc/15265721451/in/photostream/
HEADSHOTS – 101 // © PHOTZY.COM 19

Just to show how versatile this lighting setup is- you could go from the previous examples to this example by simply turning off all of the lights except for the main softbox.
Jay DeFehrhttps://www.flickr.com/photos/jay_defehr/15852112191
HEADSHOTS – 101 // © PHOTZY.COM 20
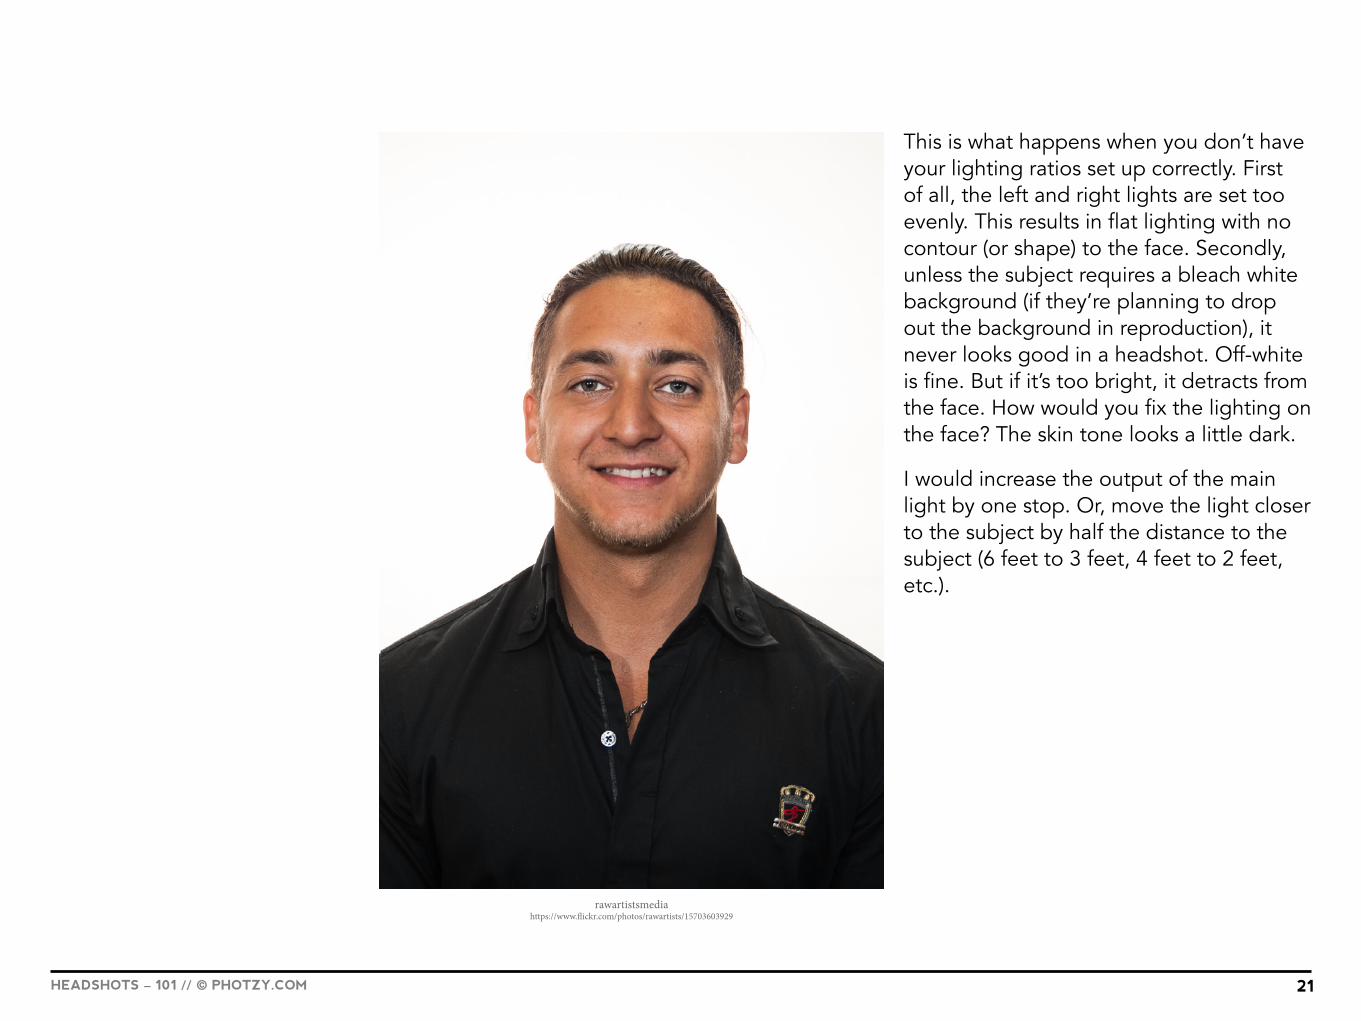
This is what happens when you don’t have your lighting ratios set up correctly. First of all, the left and right lights are set too evenly. This results in flat lighting with no contour (or shape) to the face. Secondly, unless the subject requires a bleach white background (if they’re planning to drop out the background in reproduction), it never looks good in a headshot. Off-white is fine. But if it’s too bright, it detracts from the face. How would you fix the lighting on the face? The skin tone looks a little dark.
I would increase the output of the main light by one stop. Or, move the light closer to the subject by half the distance to the subject (6 feet to 3 feet, 4 feet to 2 feet, etc.).
rawartistsmediahttps://www.flickr.com/photos/rawartists/15703603929
HEADSHOTS – 101 // © PHOTZY.COM 21

AVAILABLE AMBIENT LIGHT SOURCE
The third lighting option that I often used for headshots was an available ambient light source. I often used this option when shooting a wedding or a portrait session on location (outdoors).
The key to this option is training your mind to find (and see) good options for the light source.
One that’s commonly used is a window. But is using a window always the right answer?
If the sun is shining directly through a window, it’s not a good choice for portrait lighting. The light will be too harsh. Also, be aware of obstructions to the light, such as window shades or tree branches; they create shadows that may not look good.
Ryan and Sarah Deedshttps://www.flickr.com/photos/deedsfam/15229703487
HEADSHOTS – 101 // © PHOTZY.COM 22

This example has beautiful headshot lighting via the use of a window. What’s the problem here? Background… If you’re producing headshots using available light, you must remain aware of the background. Perhaps the subject wants an environmental background such as in this image. Great! Just be mindful of bright objects that attract attention away from the subject.
In this case, the bright white objects to camera right are very distracting. If your subject wants a plain background, carry a 30”x40” white Foamcore board and paint one side of it a mid-tone grey. You can then easily have someone hold the card behind the subject, or attach it to a light stand. The white side and grey side will give you options for background contrast depending on the lighting, hair, and clothing color. Simply slide the card in behind the subject’s head.
Alright… so windows are a pretty obvious option. Where else might you find great light for a headshot?
Aaron Stidwellhttps://www.flickr.com/photos/rankingfuuta/15794365567
HEADSHOTS – 101 // © PHOTZY.COM 23

How about in a doorway? In a barn? Under a patio? Under a tree? Next to a building?
Take a look at the lighting in this awesome headshot.
The lighting here was nothing more than a bright overcast sky. The photographer utilized two tricks. He put a small reflector below the subject’s face to bounce light back up into it. This opened up the eyes and kept the image from looking too lit from above. The second thing he did was place her next to a dark wall. The wall absorbed the overhead light and created shadowing on her face. This gave the subject a 4:1 ratio lighting scheme.
Peter McConnochiehttps://www.flickr.com/photos/dougliz/9553559887
HEADSHOTS – 101 // © PHOTZY.COM 24

So, outdoors headshots- what kind of light are we looking for?
• Indirect Light
- Shade with a bright open area nearby. Don’t use deep shade with no directional light.
- Direct sunlight that has been blocked or diffused. Make sure that the sunlight is completely blocked or diffused. You don’t want dappled light that creates uneven lighting on the face.
- Structures that provide a doorway, arch, pillar or overhang- anything that helps break up strong directional sunlight.
• Natural Reflectors
- Look for light colored walls (or other objects) that can help reflect light back onto the face of your subject.
- Look for dark colored walls that can subtract light and provide contouring to the subject’s face.
• Bring Stuff With You
- White Foamcore boards are easy to transport and work really well as reflectors. The downside to outdoor use is that they can be difficult to handle in wind.
- Bring a portable flash unit (more on that in a moment).
What kind of light are we looking for?
HEADSHOTS – 101 // © PHOTZY.COM 25
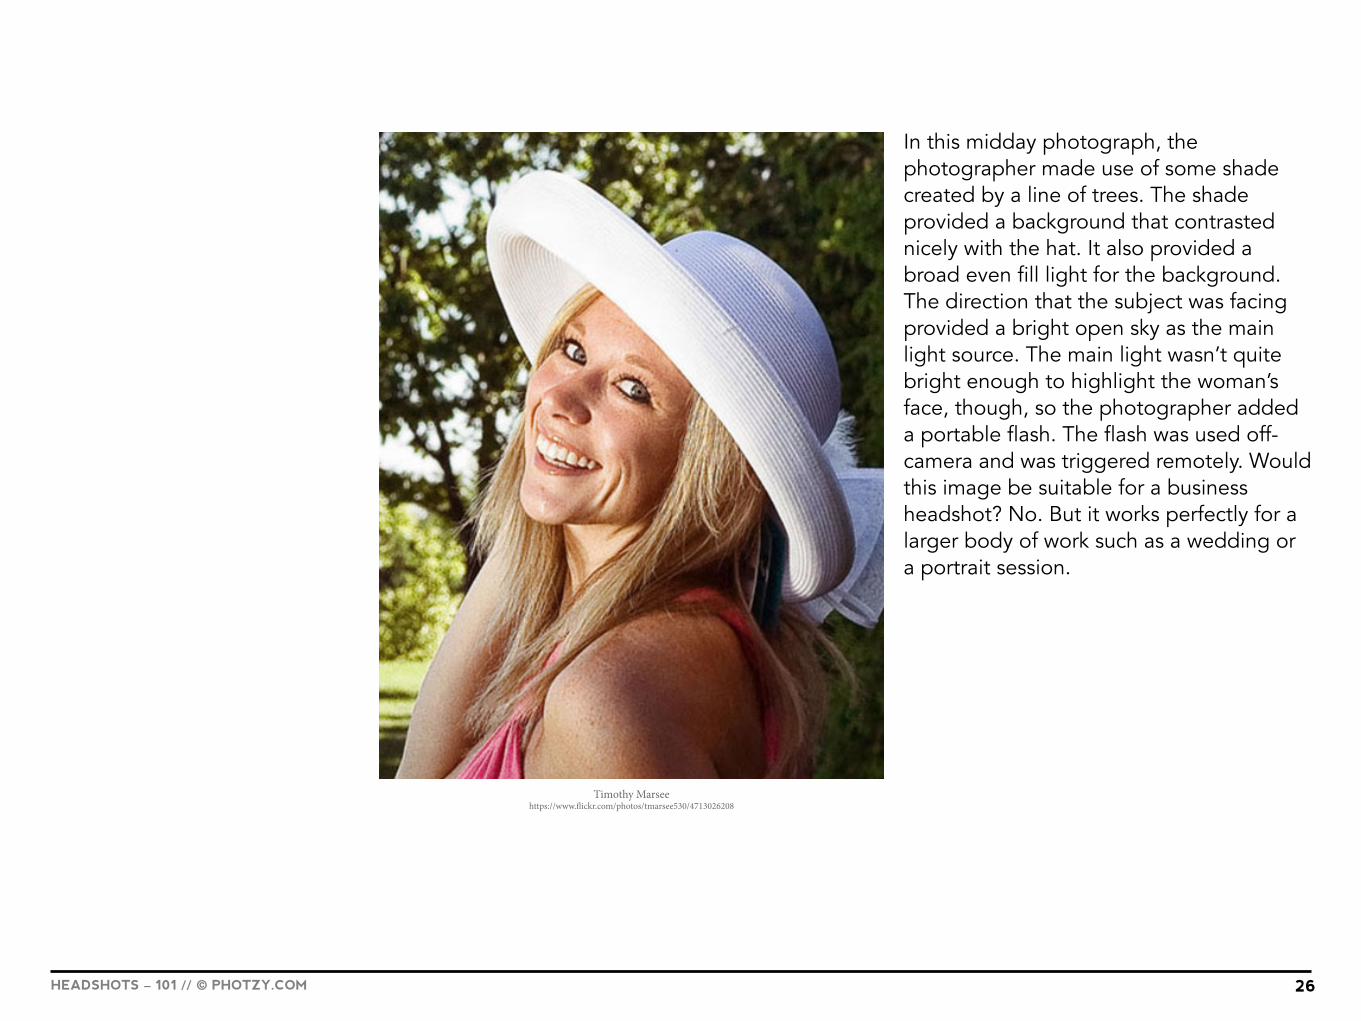
In this midday photograph, the photographer made use of some shade created by a line of trees. The shade provided a background that contrasted nicely with the hat. It also provided a broad even fill light for the background. The direction that the subject was facing provided a bright open sky as the main light source. The main light wasn’t quite bright enough to highlight the woman’s face, though, so the photographer added a portable flash. The flash was used off-camera and was triggered remotely. Would this image be suitable for a business headshot? No. But it works perfectly for a larger body of work such as a wedding or a portrait session.
Timothy Marseehttps://www.flickr.com/photos/tmarsee530/4713026208
HEADSHOTS – 101 // © PHOTZY.COM 26

This photographer made some serious mistakes in setting up this headshot. They attempted to use shade to soften the sunlight. But, their choice of angle created an imbalance between the light falling on the subject and the light falling on the background.
amateur photography by michelhttps://www.flickr.com/photos/119886413@N05/14533399138
HEADSHOTS – 101 // © PHOTZY.COM 27

The vastly overexposed background draws attention away from the woman’s face. Secondly, heavy shade (by itself) doesn’t generally provide pleasant lighting for a headshot- it’s too flat. You need to bump up the light on one side of the face via subject placement, a reflector, or a strobe. What if your only option is deep shade and all you have is a reflector? A white reflector will help very little. It doesn’t have much light to reflect. You need, what I call, a ‘shiny board’. A shiny board will create better lighting when there is very little light to work with.
I suggest that you purchase two 30”x40” white Foamcore boards. Leave one side white on each board. On the other side of one board paint it flat black. This side can be used to subtract light. On the other side of the second board, glue down tin foil that you have crunched up and then flattened out. This will give you a shiny board. By crunching up the tinfoil it helps reflect a more even light than if you kept it like a mirror. In shade, you also want to be conscious of your white balance. Shaded light shifts toward the blue end of the spectrum.
Did you notice the blue tint of the woman’s face above? It’s true that you could correct the colorcast in post, but why not get it right in-camera?
That’s enough on lighting.
You need to bump up the light on one side of the face
via subject placement.
HEADSHOTS – 101 // © PHOTZY.COM 28

LET’S TALK EQUIPMENT
With a headshot assignment, you want to use a medium length telephoto lens. The lenses that I like are the 85mm, 105mm, and 135mm.
I typically create a headshot using an aperture of f/5.6 to f/8.5. You want enough depth-of-field to keep the face sharp, but let the background go soft.
Important Tip: Always focus on the eyes when doing a headshot. Use manual focus, or set your focus pattern to a single crosshair that is placed on the eyes. A headshot with soft focus on the eyes never looks good!
I always use a tripod and so should you. Headshots are very tightly composed. It doesn’t take much of a wiggle to throw off your composition and focus point.
Without a tripod, headshots can easily be thrown out of balance. You may even include background elements that you don’t want (such as the chair).
Billy Metcalf Photographyhttps://www.flickr.com/photos/23122254@N07/15245210873
HEADSHOTS – 101 // © PHOTZY.COM 29

FRAMING
I touched upon this earlier, but it’s worth repeating. Unless there is some creative reason, or use in reproduction, that requires a horizontal format, you are best off shooting headshots in a vertical format.
This image was professionally produced. When you’re creating headshots and you choose an unusual format or crop, make sure that there is a reason for it.
Aurimashttps://www.flickr.com/photos/needoptic/14478562599/in/photostream/
HEADSHOTS – 101 // © PHOTZY.COM 30

CAMERA POV
Again, reference your client’s needs. A headshot created for a businessperson or a model, for example, should be shot looking directly into the face. The positioning of the head would be centered left to right (within the camera’s frame), and the camera elevation is generally between the bridge of the nose and the lips.
Can you vary from this formula? Sure. A businessperson might need a shot for a magazine and they want to look “in control” or “more approachable”. A model, actress, or actor may want different elevations and angles to display different facial features and expressions.
Quick Tip- A camera POV that looks down on a person (even slightly) makes them appear more approachable and submissive. You get the opposite effect when the camera is lower and looking up at your subject. That camera POV tends to make the subject look more commanding and in control. A general rule-of-thumb is… women tend to look better from straight on to a slightly elevated POV. Men tend to look better from straight on to a slightly lower POV.
The first example above would be for some creative purpose. The second example is an excellent business headshot.
Photos by: https://www.flickr.com/photos/kjcs/15891488338 https://www.flickr.com/photos/boudewijnberends/15206079686/in/photostream/
HEADSHOTS – 101 // © PHOTZY.COM 31

Notice how the camera POV is slightly lower (so that the viewer is looking up at the subject). The elevation is now centered closer to the subject’s bottom lip. The key message here is- only a matter of inches can make a huge difference in the POV.
Steve Jurvetsonhttps://www.flickr.com/photos/jurvetson/14731860273/in/photostream/
HEADSHOTS – 101 // © PHOTZY.COM 32

YOUR CHOICE OF BACKGROUND
We touched upon backgrounds earlier, but I wanted to give you a clear understanding of how important the choice of a background is for a headshot. In the following photographs, the lighting scheme is exactly the same. The only difference is the background.
As you can see, the choice of background plays a huge impact on how the final photograph will look.
Quick Tip- If you’re shooting headshots of numerous people, and you will have no idea what color clothing they’ll be wearing, use a light-medium grey backdrop. The light grey tone will work best with a variety of colors and contrasts.
Steve JurvetsonPhotos by https://www.flickr.com/photos/jurvetson/14711700622
HEADSHOTS – 101 // © PHOTZY.COM 33

SKIN RETOUCHING AND PROPS
Skin retouching is a subject that takes more time than we have for this particular guide. But, let me make an important point…
When you retouch skin, you SHOULD NOT remove all skin texture. This is especially important on a headshot.
We are all used to looking at people up-close. Skin texture looks normal. Wrinkles look normal. Yes, it’s important to make your subject look their best. But if you remove all skin texture and wrinkles, your subject will begin to take on the look of a plastic doll.
Props with headshots should be eliminated or used minimally.
Headshots have a particular purpose, and that purpose is to showcase a subject’s face.
Check out this photograph-
The Brain’shttps://www.flickr.com/photos/manuthebrain/14902747986
HEADSHOTS – 101 // © PHOTZY.COM 34

In my opinion, both the skin retouching and the use of props are on the edge of acceptability. You must judge for yourself. The fact that the model is a beautiful young woman allows me to ‘accept’ the retouching more than if say… the model was middle-aged. As far as props… I find the round earring very distracting. My eyes want to travel to the bright round shape rather than this woman’s face. The earrings may have worked better if the hair had been pulled forward of the ear to cover some of the earring. And speaking of the hair- always be mindful of what the hair is doing in your headshot photography. Gaps in the hair (such as in this picture) draw attention away from the face.
Quick Tip- I have created portraits for people of all ages for 30 years. This IS the truism of all truisms… Your subject(s) will be more critical about their hair than just about any other aspect of their portrait, headshot or otherwise. Always check the hair before proceeding.
That’s it for this guide.
If you have a greater interest in portraiture, or producing outstanding portraits at a wedding or for business applications, you should check out our Premium Portrait Guide.
Here’s the LINK- The Complete Portrait Photography Guide
Keep shooting!
Kent DuFault
Your subject(s) will be more critical about
their hair than just about any other aspect of their portrait, headshot or
otherwise.
HEADSHOTS – 101 // © PHOTZY.COM 35
37
IF YOU’D LIKE TO CONTINUE LEARNING AND IMPROVING YOUR
PHOTOGRAPHY PLEASE VISIT PHOTZY.COM
ABOUT THE AUTHOR
Kent DuFault is a professional photographer and author.
LinkedIn: http://www.linkedin.com/in/kentdufault/Flickr: https://www.flickr.com/people/35449761@N04/Redbubble: http://www.redbubble.com/people/
bellakentuky?ref=account-nav-dropdownClippings: https://www.clippings.me/kentdufault