HDR Seal Replacement v0.2 - Mud Buddy Seal Replacement v0.2.pdfMicrosoft Word - HDR Seal Replacement...
3
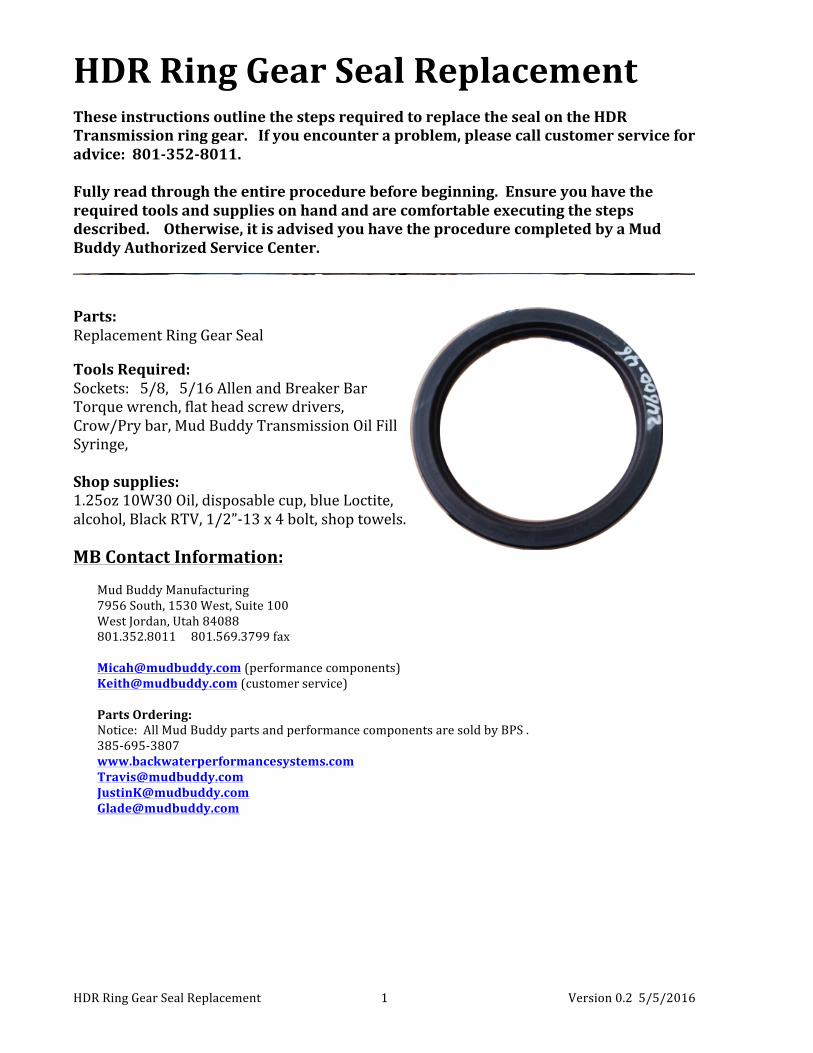
HDR Ring Gear Seal Replacement 1 Version 0.2 5/5/2016 HDR Ring Gear Seal Replacement These instructions outline the steps required to replace the seal on the HDR Transmission ring gear. If you encounter a problem, please call customer service for advice: 8013528011. Fully read through the entire procedure before beginning. Ensure you have the required tools and supplies on hand and are comfortable executing the steps described. Otherwise, it is advised you have the procedure completed by a Mud Buddy Authorized Service Center. Parts: Replacement Ring Gear Seal Tools Required: Sockets: 5/8, 5/16 Allen and Breaker Bar Torque wrench, flat head screw drivers, Crow/Pry bar, Mud Buddy Transmission Oil Fill Syringe, Shop supplies: 1.25oz 10W30 Oil, disposable cup, blue Loctite, alcohol, Black RTV, 1/2”13 x 4 bolt, shop towels. MB Contact Information: Mud Buddy Manufacturing 7956 South, 1530 West, Suite 100 West Jordan, Utah 84088 801.352.8011 801.569.3799 fax [email protected] (performance components) [email protected] (customer service) Parts Ordering: Notice: All Mud Buddy parts and performance components are sold by BPS . 3856953807 www.backwaterperformancesystems.com [email protected] [email protected] [email protected]
Transcript of HDR Seal Replacement v0.2 - Mud Buddy Seal Replacement v0.2.pdfMicrosoft Word - HDR Seal Replacement...
HDR Ring Gear Seal Replacement 1 Version 0.2 5/5/2016
HDR Ring Gear Seal Replacement These instructions outline the steps required to replace the seal on the HDR Transmission ring gear. If you encounter a problem, please call customer service for advice: 801-‐352-‐8011. Fully read through the entire procedure before beginning. Ensure you have the required tools and supplies on hand and are comfortable executing the steps described. Otherwise, it is advised you have the procedure completed by a Mud Buddy Authorized Service Center.
Parts: Replacement Ring Gear Seal Tools Required: Sockets: 5/8, 5/16 Allen and Breaker Bar Torque wrench, flat head screw drivers, Crow/Pry bar, Mud Buddy Transmission Oil Fill Syringe, Shop supplies: 1.25oz 10W30 Oil, disposable cup, blue Loctite, alcohol, Black RTV, 1/2”-‐13 x 4 bolt, shop towels. MB Contact Information:
Mud Buddy Manufacturing 7956 South, 1530 West, Suite 100 West Jordan, Utah 84088 801.352.8011 801.569.3799 fax [email protected] (performance components) [email protected] (customer service) Parts Ordering: Notice: All Mud Buddy parts and performance components are sold by BPS . 385-‐695-‐3807 www.backwaterperformancesystems.com [email protected] [email protected] [email protected]
HDR Ring Gear Seal Replacement 2 Version 0.2 5/5/2016
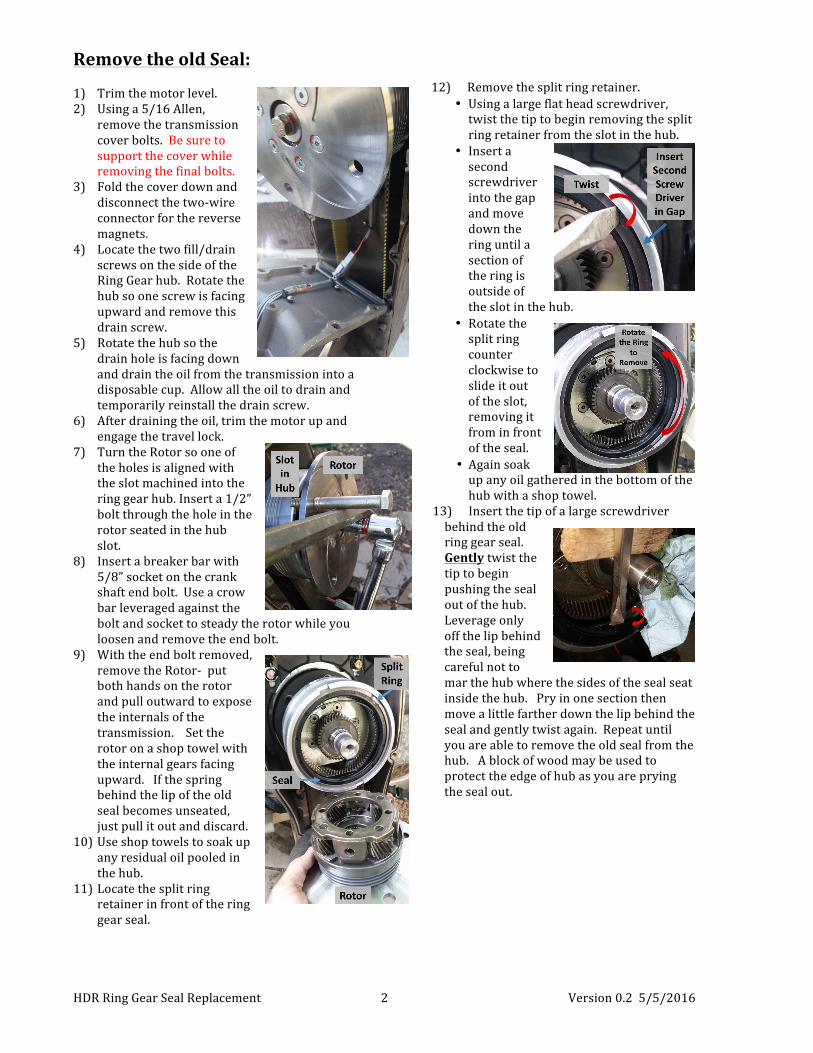
Remove the old Seal: 1) Trim the motor level. 2) Using a 5/16 Allen,
remove the transmission cover bolts. Be sure to support the cover while removing the final bolts.
3) Fold the cover down and disconnect the two-‐wire connector for the reverse magnets.
4) Locate the two fill/drain screws on the side of the Ring Gear hub. Rotate the hub so one screw is facing upward and remove this drain screw.
5) Rotate the hub so the drain hole is facing down and drain the oil from the transmission into a disposable cup. Allow all the oil to drain and temporarily reinstall the drain screw.
6) After draining the oil, trim the motor up and engage the travel lock.
7) Turn the Rotor so one of the holes is aligned with the slot machined into the ring gear hub. Insert a 1/2” bolt through the hole in the rotor seated in the hub slot.
8) Insert a breaker bar with 5/8” socket on the crank shaft end bolt. Use a crow bar leveraged against the bolt and socket to steady the rotor while you loosen and remove the end bolt.
9) With the end bolt removed, remove the Rotor-‐ put both hands on the rotor and pull outward to expose the internals of the transmission. Set the rotor on a shop towel with the internal gears facing upward. If the spring behind the lip of the old seal becomes unseated, just pull it out and discard.
10) Use shop towels to soak up any residual oil pooled in the hub.
11) Locate the split ring retainer in front of the ring gear seal.
12) Remove the split ring retainer. • Using a large flat head screwdriver, twist the tip to begin removing the split ring retainer from the slot in the hub.
• Insert a second screwdriver into the gap and move down the ring until a section of the ring is outside of the slot in the hub.
• Rotate the split ring counter clockwise to slide it out of the slot, removing it from in front of the seal.
• Again soak up any oil gathered in the bottom of the hub with a shop towel.
13) Insert the tip of a large screwdriver behind the old ring gear seal. Gently twist the tip to begin pushing the seal out of the hub. Leverage only off the lip behind the seal, being careful not to mar the hub where the sides of the seal seat inside the hub. Pry in one section then move a little farther down the lip behind the seal and gently twist again. Repeat until you are able to remove the old seal from the hub. A block of wood may be used to protect the edge of hub as you are prying the seal out.
HDR Ring Gear Seal Replacement 3 Version 0.2 5/5/2016
Install Seal and Reassembly: 1) Clean the inside of the
hub where the new seal will be installed with alcohol.
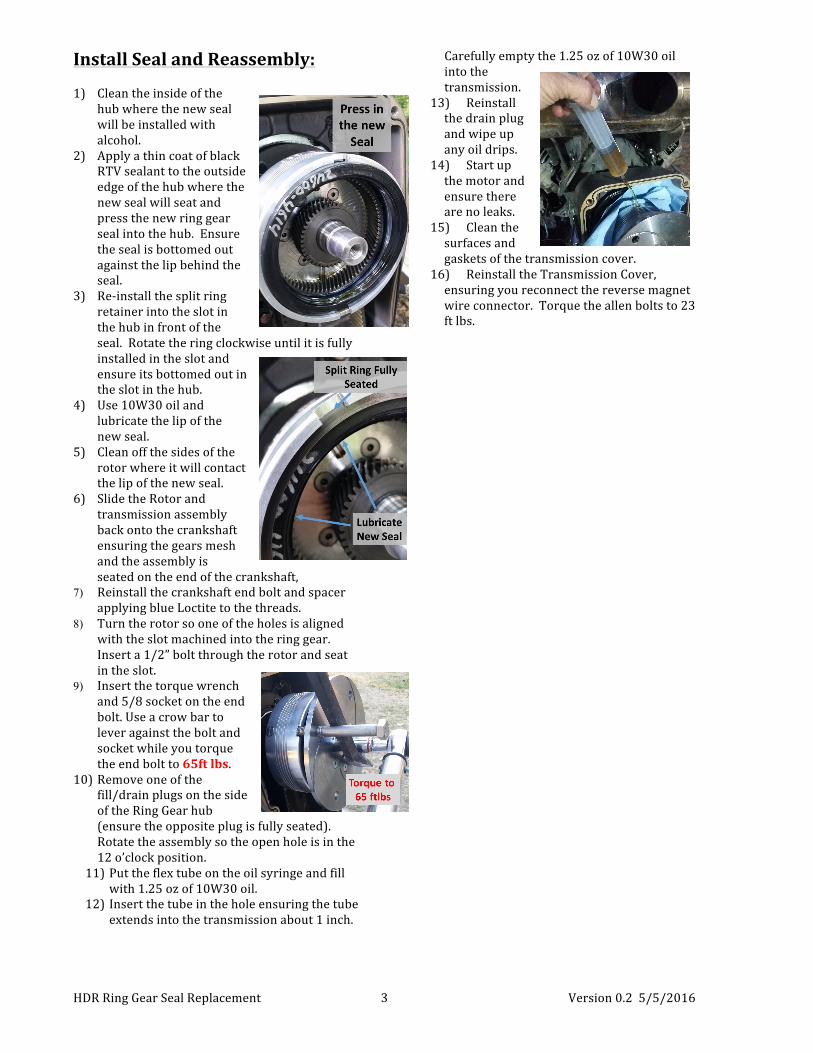
2) Apply a thin coat of black RTV sealant to the outside edge of the hub where the new seal will seat and press the new ring gear seal into the hub. Ensure the seal is bottomed out against the lip behind the seal.
3) Re-‐install the split ring retainer into the slot in the hub in front of the seal. Rotate the ring clockwise until it is fully installed in the slot and ensure its bottomed out in the slot in the hub.
4) Use 10W30 oil and lubricate the lip of the new seal.
5) Clean off the sides of the rotor where it will contact the lip of the new seal.
6) Slide the Rotor and transmission assembly back onto the crankshaft ensuring the gears mesh and the assembly is seated on the end of the crankshaft,
7) Reinstall the crankshaft end bolt and spacer applying blue Loctite to the threads.
8) Turn the rotor so one of the holes is aligned with the slot machined into the ring gear. Insert a 1/2” bolt through the rotor and seat in the slot.
9) Insert the torque wrench and 5/8 socket on the end bolt. Use a crow bar to lever against the bolt and socket while you torque the end bolt to 65ft lbs.
10) Remove one of the fill/drain plugs on the side of the Ring Gear hub (ensure the opposite plug is fully seated). Rotate the assembly so the open hole is in the 12 o’clock position.
11) Put the flex tube on the oil syringe and fill with 1.25 oz of 10W30 oil.
12) Insert the tube in the hole ensuring the tube extends into the transmission about 1 inch.
Carefully empty the 1.25 oz of 10W30 oil into the transmission.
13) Reinstall the drain plug and wipe up any oil drips.
14) Start up the motor and ensure there are no leaks.
15) Clean the surfaces and gaskets of the transmission cover.
16) Reinstall the Transmission Cover, ensuring you reconnect the reverse magnet wire connector. Torque the allen bolts to 23 ft lbs.