HD Native Thunderbolt Installation Guide -...
54
HD Native Thunderbolt ™ Interface Installation Guide
-
Upload
duongquynh -
Category
Documents
-
view
240 -
download
0
Transcript of HD Native Thunderbolt Installation Guide -...
HD Native Thunderbolt™ InterfaceInstallation Guide
Legal NoticesThis guide is copyrighted ©2012 by Avid Technology, Inc., (hereafter “Avid”), with all rights reserved. Under copyright laws, this guide may not be duplicated in whole or in part without the written consent of Avid.
003, 96 I/O, 96i I/O, 192 Digital I/O, 192 I/O, 888|24 I/O, 882|20 I/O, 1622 I/O, 24-Bit ADAT Bridge I/O, AudioSuite, Avid, Avid DNA, Avid Mojo, Avid Unity, Avid Unity ISIS, Avid Xpress, AVoption, Axiom, Beat Detective, Bomb Factory, Bruno, C|24, Command|8, Control|24, D-Command, D-Control, D-Fi, D-fx, D-Show, D-Verb, DAE, Digi 002, DigiBase, DigiDelivery, Digidesign, Digidesign Audio Engine, Digidesign Intelligent Noise Reduction, Digidesign TDM Bus, DigiDrive, DigiRack, DigiTest, DigiTranslator, DINR, DV Toolkit, EditPack, Eleven, EUCON, HD Core, HD I/O, HD MADI, HD OMNI, HD Process, Hybrid, Impact, Interplay, LoFi, M-Audio, MachineControl, Maxim, Mbox, MediaComposer, MIDI I/O, MIX, MultiShell, Nitris, OMF, OMF Interchange, PRE, ProControl, Pro Tools, Pro Tools|HD, Pro Tools LE, Pro Tools M-Powered, Pro Tools MP, QuickPunch, Recti-Fi, Reel Tape, Reso, Reverb One, ReVibe, RTAS, Sibelius, Smack!, SoundReplacer, Sound Designer II, Strike, Structure, SYNC HD, SYNC I/O, Synchronic, TL Aggro, TL AutoPan, TL Drum Rehab, TL Everyphase, TL Fauxlder, TL In Tune, TL MasterMeter, TL Metro, TL Space, TL Utilities, Transfuser, Trillium Lane Labs, Vari-Fi, Velvet, X-Form, Xpand! and XMON are trademarks or registered trademarks of Avid Technology, Inc. All other trademarks are the property of their respective owners.
Product features, specifications, system requirements, and availability are subject to change without notice.
Guide Part Number 9320-65115-00 REV B 08/12
Documentation FeedbackAt Avid, we are always looking for ways to improve our documentation. If you have comments, corrections, or suggestions regarding our documentation, email us at [email protected].
Contents iii
Chapter 1. Welcome to HD Native Thunderbolt . . . . . . . . . . . . . . . . . . . . . . . . . . . . . . . . . . . . . . 1
HD Native Thunderbolt Package . . . . . . . . . . . . . . . . . . . . . . . . . . . . . . . . . . . . . . . . . . . . . . . 1
HD Native Thunderbolt Systems . . . . . . . . . . . . . . . . . . . . . . . . . . . . . . . . . . . . . . . . . . . . . . . 2
Registration. . . . . . . . . . . . . . . . . . . . . . . . . . . . . . . . . . . . . . . . . . . . . . . . . . . . . . . . . . . . . . . 2
System Requirements and Compatibility . . . . . . . . . . . . . . . . . . . . . . . . . . . . . . . . . . . . . . . . . 2
Conventions Used in This Guide . . . . . . . . . . . . . . . . . . . . . . . . . . . . . . . . . . . . . . . . . . . . . . . 3
About www.avid.com. . . . . . . . . . . . . . . . . . . . . . . . . . . . . . . . . . . . . . . . . . . . . . . . . . . . . . . . 3
Chapter 2. HD Native Thunderbolt Hardware Overview. . . . . . . . . . . . . . . . . . . . . . . . . . . . . . . . 5
HD Native Thunderbolt . . . . . . . . . . . . . . . . . . . . . . . . . . . . . . . . . . . . . . . . . . . . . . . . . . . . . . 5
DigiLink Mini Cables . . . . . . . . . . . . . . . . . . . . . . . . . . . . . . . . . . . . . . . . . . . . . . . . . . . . . . . . 7
Avid HD Audio Interfaces . . . . . . . . . . . . . . . . . . . . . . . . . . . . . . . . . . . . . . . . . . . . . . . . . . . . 8
Chapter 3. Connecting and Configuring HD Native Thunderbolt . . . . . . . . . . . . . . . . . . . . . . . 11
Connecting HD Native Thunderbolt to your Computer . . . . . . . . . . . . . . . . . . . . . . . . . . . . . . 11
Connecting Audio Interfaces . . . . . . . . . . . . . . . . . . . . . . . . . . . . . . . . . . . . . . . . . . . . . . . . . 11
Installing and Authorizing Pro Tools Software . . . . . . . . . . . . . . . . . . . . . . . . . . . . . . . . . . . . 13
Installing HD Native Thunderbolt Hardware Drivers. . . . . . . . . . . . . . . . . . . . . . . . . . . . . . . . 13
Chapter 4. Configuring CoreAudio . . . . . . . . . . . . . . . . . . . . . . . . . . . . . . . . . . . . . . . . . . . . . . . 15
Avid CoreAudio Driver Capabilities . . . . . . . . . . . . . . . . . . . . . . . . . . . . . . . . . . . . . . . . . . . . 15
Installing the CoreAudio Driver . . . . . . . . . . . . . . . . . . . . . . . . . . . . . . . . . . . . . . . . . . . . . . . 15
Avid CoreAudio Manager . . . . . . . . . . . . . . . . . . . . . . . . . . . . . . . . . . . . . . . . . . . . . . . . . . . 16
Configuring Avid HD Audio Interfaces for Third-Party Applications . . . . . . . . . . . . . . . . . . . . 19
Configuring the Apple Sound Preferences or Apple Audio MIDI Setup . . . . . . . . . . . . . . . . . 19
Chapter 5. Low Latency Monitoring with Pro Tools . . . . . . . . . . . . . . . . . . . . . . . . . . . . . . . . . . 21
Using Low Latency Monitoring . . . . . . . . . . . . . . . . . . . . . . . . . . . . . . . . . . . . . . . . . . . . . . . 21
Configuring Low Latency Monitoring in the I/O Setup . . . . . . . . . . . . . . . . . . . . . . . . . . . . . . 21
Low Latency Monitoring and Bounce To Disk . . . . . . . . . . . . . . . . . . . . . . . . . . . . . . . . . . . . 22
Contents
HD Native Thunderboltインターフェイス・インストール・ガイドiv
Chapter 6. HD Native Thunderboltについて. . . . . . . . . . . . . . . . . . . . . . . . . . . . . . . . . . 23
HD Native Thunderboltのパッケージ . . . . . . . . . . . . . . . . . . . . . . . . . . . . . . . . . . . . . . . . . . . . . . . . . . . . . . . 23
HD Native Thunderboltシステム . . . . . . . . . . . . . . . . . . . . . . . . . . . . . . . . . . . . . . 23
登録 . . . . . . . . . . . . . . . . . . . . . . . . . . . . . . . . . . . . . . . . . . . . . . . . . . . . . . . . . . . . . . . . . . . . 24
システム要件と互換性 . . . . . . . . . . . . . . . . . . . . . . . . . . . . . . . . . . . . . . . . . . . . . . . . . . . . . . 24
本ガイドで使用する表記法. . . . . . . . . . . . . . . . . . . . . . . . . . . . . . . . . . . . . . . . . . . . . . . . . . . 24
www.avid.comについて . . . . . . . . . . . . . . . . . . . . . . . . . . . . . . . . . . . . . . . . . . . . . . . 25
Chapter 7. HD Native Thunderboltハードウェアの概要 . . . . . . . . . . . . . . . . . . . . . . . . 27
HD Native Thunderbolt. . . . . . . . . . . . . . . . . . . . . . . . . . . . . . . . . . . . . . . . . . . . . . 27
DigiLink Miniケーブル . . . . . . . . . . . . . . . . . . . . . . . . . . . . . . . . . . . . . . . . . . . . . . . . . 29
Avid HDオーディオ・インターフェイス. . . . . . . . . . . . . . . . . . . . . . . . . . . . . . . . . . . . . . 29
Chapter 8. HD Native Thunderboltを接続・設定する . . . . . . . . . . . . . . . . . . . . . . . . . . 33
HD Native Thunderboltをコンピューターに接続する . . . . . . . . . . . . . . . . . . . . . . . . . . . . . . . . . . . . . . . . . . . 33
オーディオ・インターフェイスを接続する . . . . . . . . . . . . . . . . . . . . . . . . . . . . . . . . . . . . . . 33
Pro Toolsソフトウェアをインストールしオーソライズする . . . . . . . . . . . . . . . . . . . . . . 35
HD Native Thunderboltハードウェアのドライバーをインストールする . . . . . . . . 35
Chapter 9. CoreAudioを設定する . . . . . . . . . . . . . . . . . . . . . . . . . . . . . . . . . . . . . . . . . . . . . . . 37
Avid CoreAudio Driverの性能 . . . . . . . . . . . . . . . . . . . . . . . . . . . . . . . . . . . . . . . . . 37
CoreAudioドライバーをインストールする . . . . . . . . . . . . . . . . . . . . . . . . . . . . . . . . . . . 37
Avid CoreAudio Manager . . . . . . . . . . . . . . . . . . . . . . . . . . . . . . . . . . . . . . . . . . . 38
サードパーティー製アプリケーション用にAvid HDオーディオ・インターフェイスを設定する . . . . . . . . . . . . . . . . . . . . . . . . . . . . . . . . . . . . . . . . . . . . . . . . . . . . . . . . . . . . . . 41
Appleの[サウンド]環境設定または[Audio MIDI設定]を設定する. . . . . . . . . . . . 41
Chapter 10. Pro Toolsを使用した低レイテンシー・モニタリング . . . . . . . . . . . . . . . . . . . . . 43
低レイテンシー・モニタリングを使用する . . . . . . . . . . . . . . . . . . . . . . . . . . . . . . . . . . . . . . 43
[I/O設定]で低レイテンシー・モニタリングを設定する . . . . . . . . . . . . . . . . . . . . . . . . . . . 43
低レイテンシー・モニタリングとバウンス . . . . . . . . . . . . . . . . . . . . . . . . . . . . . . . . . . . . . . 44
Appendix A. Compliance Information . . . . . . . . . . . . . . . . . . . . . . . . . . . . . . . . . . . . . . . . . . . . . . 45
Environmental Compliance . . . . . . . . . . . . . . . . . . . . . . . . . . . . . . . . . . . . . . . . . . . . . . . . . . . 45
EMC (Electromagnetic Compliance) . . . . . . . . . . . . . . . . . . . . . . . . . . . . . . . . . . . . . . . . . . . . 46
Safety Compliance . . . . . . . . . . . . . . . . . . . . . . . . . . . . . . . . . . . . . . . . . . . . . . . . . . . . . . . . . 47
Chapter 1: Welcome to HD Native Thunderbolt 1
Chapter 1: Welcome to HD Native Thunderbolt
The HD Native Thunderbolt™ interface provides connectivity for high-definition digital audio re-cording, editing, signal processing, mixing, and I/O capabilities with Avid Pro Tools® software, and Avid HD audio interfaces and synchronization peripherals. HD Native Thunderbolt also provides a high-quality headphone jack and volume/mute control.
HD Native Thunderbolt with HD audio interfaces can also be used with CoreAudio–compatible digital audio software with support for up to 64 channels of I/O.
This guide covers the installation of HD Native Thunderbolt with Avid-qualified computers.
HD Native Thunderbolt PackageThe HD Native Thunderbolt package includes the following:
• HD Native Thunderbolt interface
• 6.5 ft. (2m) Thunderbolt cable
• 12 ft. (3.6m) DigiLink Mini cable for connecting HD Native Thunderbolt to an audio interface
• Registration Information Card
• This HD Native Thunderbolt Guide, covering installation and configuration of HD Native Thunderbolt hardware
• Health and Safety GuideFor information about installing and au-thorizing Pro Tools software, see the Pro Tools Installation Guide that came with your Pro Tools software.
HD Native Thunderbolt Interface Installation Guide2
HD Native Thunderbolt SystemsAll HD Native Thunderbolt systems consist of the following:
• One of the following software packages (sold separately):
• Pro Tools HD software
• Third-party CoreAudio–compatible software
• HD Native Thunderbolt interface
• Up to four of the following Avid HD audio interfaces (sold separately):
• HD OMNI
• HD I/O
• HD MADI
RegistrationReview the enclosed Registration Information Card and follow the instructions on it to quickly register your purchase online. This is one of the most important steps you can take as a new user. Registering your purchase is the only way you can be eligible to receive:
• Information regarding technical support
• Future upgrade offers
• Limited warranty on hardware
Hardware Warranty
Your warranty can be found on the Registration Information Card.
System Requirements and CompatibilityHD Native Thunderbolt hardware can be used with a Avid-qualified computer running Pro Tools HD software or third-party CoreAudio–compatible software.
Avid can only assure compatibility and provide support for hardware and software it has tested and approved.
For complete system requirements and a list of qualified computers, operating systems, hard drives, and third-party devices, visit:
www.avid.com/compatibility
Only one HD OMNI can be used in an HD Native Thunderbolt system.
You can test your HD Native Thunderbolt hardware using Avid DigiTest. For more in-formation, see the Avid DigiTest Guide.pdf (available online and also installed with Pro Tools).
Chapter 1: Welcome to HD Native Thunderbolt 3
Conventions Used in This GuideAll Pro Tools guides use the following conven-tions to indicate menu choices and key commands:
The names of Commands, Options, and Settings that appear on-screen are in a different font.
The following symbols are used to highlight important information:
About www.avid.comThe Avid website (www.avid.com) is your best online source for information to help you get the most out of your Pro Tools system. The following are just a few of the services and features available.
Product Registration Register your purchase online.
Support and Downloads Contact Avid Customer Success (technical support); download software updates and the latest online manuals; browse the Compatibility documents for system requirements; search the online Knowledge Base or join the worldwide Pro Tools community on the User Conference.
Training and Education Study on your own using courses available online or find out how you can learn in a classroom setting at a certified Pro Tools training center.
Products and Developers Learn about Avid prod-ucts; download demo software or learn about our Development Partners and their plug-ins, applica-tions, and hardware.
News and Events Get the latest news from Avid or sign up for a Pro Tools demo.
Convention Action
File > Save Choose Save from the File menu
Control+N Hold down the Control key and press the N key
Control-click Hold down the Control key and click the mouse button
Right-click Click with the right mouse button
User Tips are helpful hints for getting the most from your Pro Tools system.
Important Notices include information that could affect your data or the performance of your system.
Shortcuts show you useful keyboard or mouse shortcuts.
Cross References point to related sections in this guide and other Pro Tools guides.

HD Native Thunderbolt Interface Installation Guide4
Chapter 2: HD Native Thunderbolt Hardware Overview 5
Chapter 2: HD Native Thunderbolt Hardware Overview
HD Native ThunderboltHD Native Thunderbolt supports up to 64 channels of I/O for direct-to-disk recording and playback, and supports up to 24-bit and up to 192 kHz audio streams. Additionally, the on-board FPGA (field-program-mable gate array) provides dedicated signal routing for headphone monitoring.
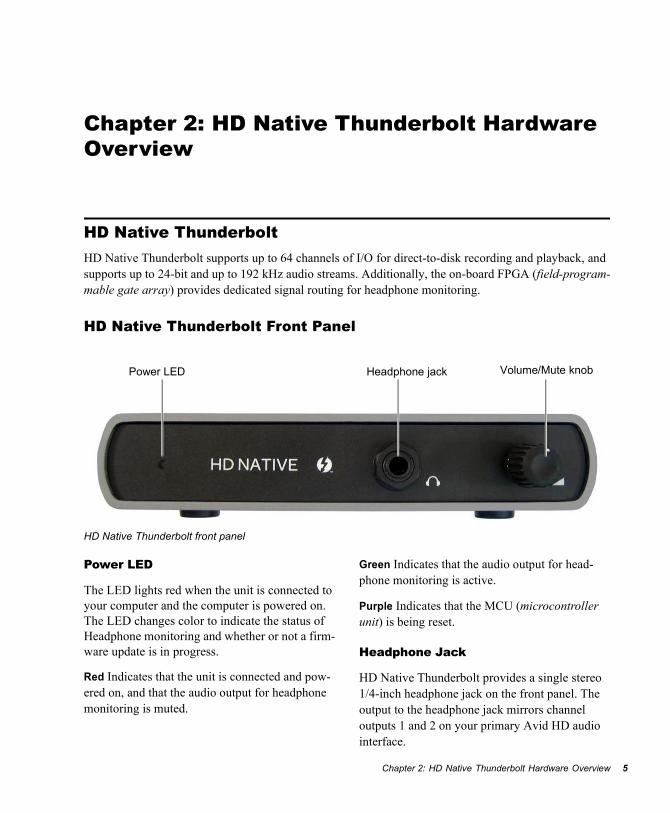
HD Native Thunderbolt Front Panel
Power LED
The LED lights red when the unit is connected to your computer and the computer is powered on. The LED changes color to indicate the status of Headphone monitoring and whether or not a firm-ware update is in progress.
Red Indicates that the unit is connected and pow-ered on, and that the audio output for headphone monitoring is muted.
Green Indicates that the audio output for head-phone monitoring is active.
Purple Indicates that the MCU (microcontroller unit) is being reset.
Headphone Jack
HD Native Thunderbolt provides a single stereo 1/4-inch headphone jack on the front panel. The output to the headphone jack mirrors channel outputs 1 and 2 on your primary Avid HD audio interface.
HD Native Thunderbolt front panel
Power LED Headphone jack Volume/Mute knob
HD Native Thunderbolt Interface Installation Guide6
Volume/Mute Knob
HD Native Thunderbolt lets you adjust the head-phone volume using the Volume/Mute knob on the front panel. Turn the knob counter-clockwise to lower and clockwise to raise the headphone vol-ume. You can also press the Volume/Mute knob to mute and unmute headphone monitoring, as well as to reset the MCU (microcontroller unit).
Muting and Unmuting Headphone Monitoring
To mute headphone monitoring:
Press and momentarily hold the Volume/Mute knob so the Power LED turns red.
To unmute headphone monitoring:
Press and momentarily hold the Volume/Mute knob so the Power LED turns green.
Resetting the MCU
If the Volume control stops working, reset the MCU. Note that resetting the MCU may take a few seconds.
To reset the MCU:
1 Make sure the Thunderbolt cable connecting HD Native Thunderbolt to your computer is dis-connected, and that the computer is powered on.
2 Press and hold the Volume/Mute knob.
3 Connect the Thunderbolt cable. HD Native Thunderbolt powers on with the LED showing purple.
4 Release the Volume/Mute knob.
5 Disconnect and reconnect the Thunderbolt cable to power cycle the unit. HD Native Thun-derbolt powers on with the LED showing red.
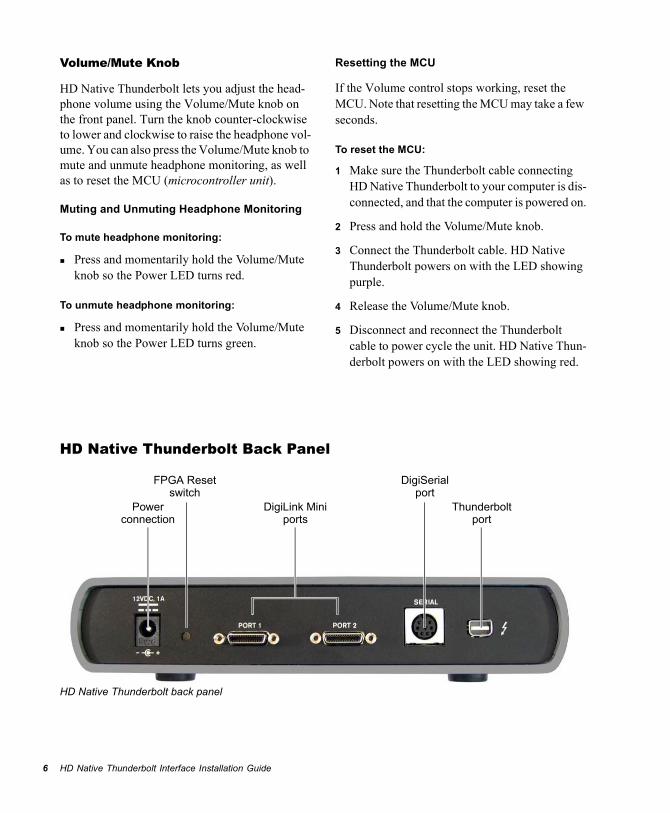
HD Native Thunderbolt Back Panel
HD Native Thunderbolt back panel
Thunderbolt
DigiSerial
DigiLink Mini
FPGA Resetport
port
switch
portsPower
connection
Chapter 2: HD Native Thunderbolt Hardware Overview 7
Thunderbolt Port
Use the Thunderbolt port to connect HD Native Thunderbolt directly to any available Thunderbolt port on your Avid-qualified computer using the included Thunderbolt cable. Be sure that your computer is powered down when making the con-nection. Once you have made the connection, you can then power on your computer and use HD Native Thunderbolt.
DigiLink Mini Ports
HD Native Thunderbolt includes two DigiLink Mini ports for connecting to Avid HD audio inter-faces. Each port provides up to 32 channels of au-dio input and output.
DigiSerial Port
You can connect a SYNC peripheral to the DigiSe-rial port on HD Native Thunderbolt. This connec-tor is an 8-pin mini-DIN.
FPGA Reset Switch
HD Native Thunderbolt provides an FPGA Reset switch to load a backup FPGA image in the un-likely event that an upgrade fails or the FPGA im-age is corrupted.
To reset the FPGA:
1 Make sure the Thunderbolt cable connecting HD Native Thunderbolt to your computer is dis-connected, and that the computer is powered on.
2 Use a paper clip (or similar tool) to press and hold the FPGA Reset switch.
3 Connect the Thunderbolt cable.
4 Release the FPGA Reset switch.
5 Launch Pro Tools and follow the on-screen instructions to update the Firmware.
Power Connection
HD Native Thunderbolt is powered over the Thun-derbolt bus. However, you can also connect a stan-dard AC adapter (sold separately) to power the unit independently.
DigiLink Mini CablesUse DigiLink Mini cables to connect HD I/O, HD OMNI, and HD MADI audio interfaces to HD Native Thunderbolt. There are five different lengths of DigiLink Mini cables:
• 18” (0.46m) (included with HD I/O, HD OMNI, and HD MADI audio interfaces)
• 12’ (3.6m) (one included with HD Native Thunderbolt)
• 25’ (7.62m) (sold separately)
• 50’ (15.25m), the maximum length supported for 176.4 kHz and 192 kHz sessions (sold separately)
• 100’ (30.5m), the maximum length supported by 88.2 kHz and 96 kHz sessions (sold separately)
The DigiSerial port on HD Native Thunderbolt does not support MachineControl connections.
HD Native Thunderbolt Interface Installation Guide8
Avid HD Audio InterfacesTo record and play audio with Pro Tools, or with qualified third-party CoreAudio-compatible appli-cations, you must have at least one Avid HD audio interface connected to the first port of HD Native Thunderbolt.
HD Native Thunderbolt supports up to 4 Avid HD audio interfaces for up to 64 simultaneous chan-nels of audio input and output.
HD OMNI Audio InterfaceHD OMNI is a professional digital audio interface designed for use with HD Native systems. HD OMNI provides a compact preamp, monitoring, and I/O solution for music production and record-ing, and post production studios.
HD OMNI Features
HD OMNI provides up to 8 discrete channels of Pro Tools input and output, with 4-segment LED meters for input or output (selectable).
Analog I/O
• 24-bit analog-to-digital (A/D) and digital-to-an-alog (D/A) converters, with support for sample rates up to 192 kHz
• 2 high-quality Mic/DI preamps (Channels 1–2)
• 2 combined XLR and 1/4-inch TRS front panel inputs for microphone and instrument level in-put
• 2 XLR back panel microphone inputs
• 2 1/4-inch TRS Send and 2 1/4-inch TRS Return back panel jacks for hardware inserts on channels 1 and 2
• 4 analog TRS line level back panel inputs (Channels 1–4)
• Soft Clip and Curv limiting circuits to protect against clipping on analog input
• 8 channels of analog back panel output using a DB-25 breakout cable (sold separately) with variable output gain
• 2 channels of analog back panel output using TRS (Mirrors channels 1–2 or 7–8 on DB-25 connector)
• Front panel stereo 1/4” headphone jack
Digital I/O
• 8 channels of AES/EBU output (up to 192 kHz Single Wire) using a DB-25 breakout cable (sold separately)
• 2 channels of AES/EBU XLR input (up to 192 kHz Single Wire)
• 2 channels of S/PDIF RCA input and output (up to 192 kHz)
• 8 channels of ADAT TOSLINK input and output
• Support for ADAT S/MUX Optical for sample rates of 88.2 kHz, 96 kHz, 176.4 kHz, and 192 kHz
• Support for two channels of S/PDIF Optical with sample rates of up to 96 kHz
• Real-time sample rate conversion (SRC) on Dig-ital Inputs 1–2 of either AES/EBU, S/PDIF, or Optical (S/PDIF)
For more information, see the HD OMNI Guide.
Only one HD OMNI can be used in an HD Native Thunderbolt system.
HD OMNI provides multiple analog input connections, but only provides up to four channels of simultaneous analog input.
SRC is not supported with ADAT S/MUX.
Chapter 2: HD Native Thunderbolt Hardware Overview 9
Monitoring
• An additional stereo “CUE” output path in Pro Tools for headphone monitoring from the front panel headphone jack
• Front panel Control Room (MAIN/ALT) and Headphone monitoring volume control
• Flexible monitoring with fold-down from all ste-reo and surround formats (up to 7.1 surround)
• Input mixer for low latency direct monitoring of a variety of incoming signals (configured in the Pro Tools Hardware Setup)
Synchronization
• Loop Sync input and output for connecting addi-tional Avid HD audio interfaces and peripherals
• External Clock input and output for synchroniz-ing HD OMNI with external Word Clock devices
HD I/O Audio InterfaceHD I/O is a multichannel digital audio interface designed for use with HD Native systems. HD I/O features extremely high quality 24-bit analog-to-digital (A/D) and digital-to-analog (D/A) convert-ers, and supports sample rates of up to 192 kHz.
HD I/O comes in three standard configurations:
• 8 x 8 x 8 (8 analog in, 8 analog out, and 8 digital in and out)
• 16 x 16 analog in and out
• 16 x 16 digital in and out
You can also add or remove HD I/O Analog Ex-pansion cards (ADC and DAC) and HD I/O Digital Expansion cards for custom configurations.
HD I/O Features
HD I/O provides up to 16 discrete channels of Pro Tools input and output, with 4-segment LED meters for input and output.
Analog I/O
• Up to 16 channels of 24-bit D/A and A/D con-verters for superior analog input and output at sample rates of 44.1 kHz, 48 kHz, 88.2 kHz, 96 kHz, 176.4 kHz, and 192 kHz with Analog In and Analog Out HD I/O cards
• Soft Clip and Curv limiting circuits to protect against clipping on analog input
Digital I/O
• Up to 16 channels of 24-bit digital I/O, using AES/EBU, TDIF DB-25, or Optical at sample rates of 44.1 kHz, 48 kHz, 88.2 kHz, 96 kHz, 176.4 kHz, and 192 kHz with a Digital HD I/O card
• Real-time sample rate conversion on digital in-puts with a Digital I/O card (up to 16 channels of AES/EBU, Optical, or TDIF)
• Support for S/MUX Optical for sample rates of 88.2 kHz and higher
• Support for 2 channels of S/PDIF Optical (enclosed) with sample rates of up to 96 kHz
• 2 channels of AES/EBU I/O (enclosed) with support for sample rates up to 192 kHz
• 2 channels of 24-bit-capable S/PDIF I/O (enclosed) with support for sample rates up to 192 kHz
Synchronization
• Loop Sync input and output for connecting addi-tional Avid HD audio interfaces and peripherals
• External Clock input and output for synchroniz-ing HD I/O with external Word Clock devices
See the HD I/O Guide for more information.
HD Native Thunderbolt Interface Installation Guide10
Expandability
• Optional addition of I/O cards to expand analog or digital I/O
• Simultaneous use of multiple Avid HD audio in-terfaces to further expand system input and out-put (for more information, see the Expanded Systems Guide)
HD MADI Digital Audio InterfaceHD MADI is a 64-channel, digital audio interface designed for use with HD Native systems. HD MADI supports the Multichannel Audio Digital Interface (MADI) format and sample rates of up to 192 kHz. HD MADI provides simplified connec-tivity between your HD Native system and MADI-compatible audio equipment, such as routers, digi-tal mixing consoles, and converters.`
HD MADI Features• 2 MADI Optical and Coaxial inputs and 2
MADI Optical and Coaxial outputs for up to 64 discrete channels of digital input and output (32 channels per DigiLink Mini port)
• Supports sample rates of 44.1 kHz, 48 kHz, 88.2 kHz, 96 kHz, 176.4 kHz, and 192 kHz
• 24- or 16-bit resolution
• Sample Rate Conversion (SRC) on input or output
• Front panel clock and SRC indicators
• Front panel signal present LEDs for input and output
• BNC Word Clock I/O for synchronizing HD MADI with external 1x Word Clock
• BNC Loop Sync I/O for synchronizing HD MADI with additional Avid HD audio interfaces and peripherals (such as HD I/O, HD OMNI, or SYNC HD)
• Dedicated BNC Word Clock input and XLR AES/EBU input (clock input only) for external MADI synchronization (when using SRC on output)
• Clock support for the following formats: Inter-nal, Loop Sync, Word Clock, AES/EBU, and MADI
• Varispeed modes (supports both 64- and 56-channel standards)
For more information about HD MADI, see the HD MADI Guide.
To use the full channel capacity of HD MADI, only a single HD MADI can be connected to HD Native Thunderbolt using two DigiLink Mini cables. No additional I/O may be used with this configuration.
Chapter 3: Connecting and Configuring HD Native Thunderbolt 11
Chapter 3: Connecting and Configuring HD Native Thunderbolt
This chapter provides information on connecting HD Native Thunderbolt to your computer, and connecting Avid HD audio interfaces to HD Native Thunderbolt.
Connecting HD Native Thunderbolt to your ComputerTo connect HD Native Thunderbolt to your computer:
1 Make sure that your computer is shut down.
2 With the included Thunderbolt cable, connect one end to the Thunderbolt port on your com-puter.
3 Connect the other end of the Thunderbolt cable to the Thunderbolt port on the back of HD Native Thunderbolt.
4 Start your computer.
HD Native Thunderbolt is powered by the Thun-derbolt bus, so no additional power is required. However, in certain situations, you may want to power HD Native Thunderbolt separately. If this is the case, you can connect a DC power adapter (sold separately) to HD Native Thunderbolt.
Connecting Audio InterfacesEach Avid HD audio interface provides several different input and output options. For example, HD OMNI supplies up to 8 channels of input and output to your Pro Tools system, HD I/O supplies up to 16 channels of input and output, and HD MADI provides up to 64 channels. Audio inter-faces can be connected directly to HD Native Thunderbolt, or through the Expansion ports on other HD audio interfaces.
HD Native Thunderbolt supports up to 64 channels of audio input and output. To get a full 64 channels of I/O, you can connect up to 4 HD I/O to HD Na-tive Thunderbolt. Two of the interfaces connect di-rectly to DigiLink Mini Ports 1 and 2, and the other 2 interfaces connect to the Expansion ports on those audio interfaces.
You can also get a full 64 channels of I/O with HD MADI connected to HD Native Thunderbolt using 2 DigiLink Mini cables. However, HD MADI will be the only audio interface in the system.
Refer to the HD OMNI Guide, HD I/O Guide, or HD MADI Guide for specific details regarding:
Front and back panel connectors and indicators
Installation of optional expansion I/O cards (HD I/O only)
Press the volume/mute knob to toggle the mute status of the headphone output.
HD Native Thunderbolt Interface Installation Guide12
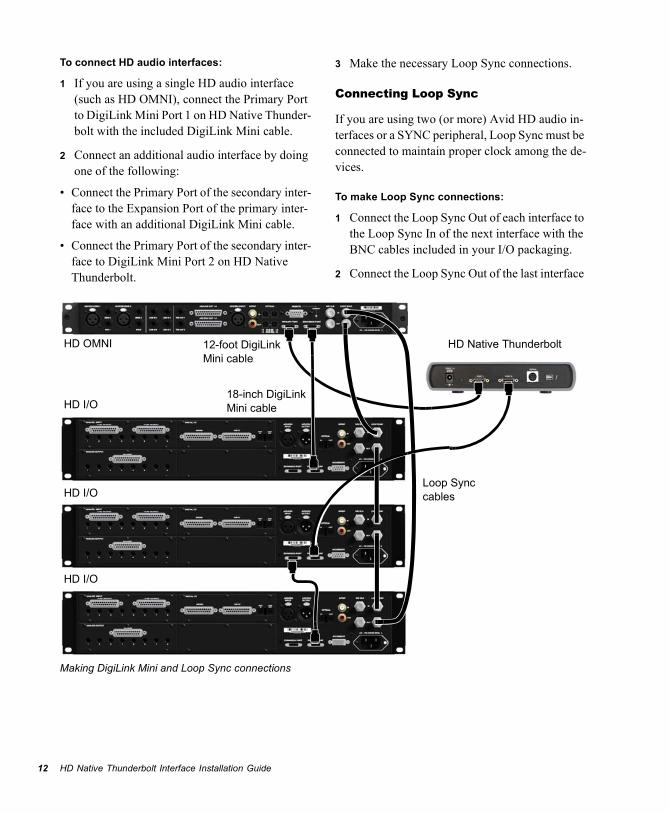
To connect HD audio interfaces:
1 If you are using a single HD audio interface (such as HD OMNI), connect the Primary Port to DigiLink Mini Port 1 on HD Native Thunder-bolt with the included DigiLink Mini cable.
2 Connect an additional audio interface by doing one of the following:
• Connect the Primary Port of the secondary inter-face to the Expansion Port of the primary inter-face with an additional DigiLink Mini cable.
• Connect the Primary Port of the secondary inter-face to DigiLink Mini Port 2 on HD Native Thunderbolt.
3 Make the necessary Loop Sync connections.
Connecting Loop Sync
If you are using two (or more) Avid HD audio in-terfaces or a SYNC peripheral, Loop Sync must be connected to maintain proper clock among the de-vices.
To make Loop Sync connections:
1 Connect the Loop Sync Out of each interface to the Loop Sync In of the next interface with the BNC cables included in your I/O packaging.
2 Connect the Loop Sync Out of the last interface
Making DigiLink Mini and Loop Sync connections
HD Native ThunderboltHD OMNI
HD I/O
HD I/O
HD I/O
12-foot DigiLink Mini cable
18-inch DigiLink Mini cable
Loop Sync cables
Chapter 3: Connecting and Configuring HD Native Thunderbolt 13
Maximum I/O ConfigurationHD Native Thunderbolt supports up to a maximum combination of up to four total of the following au-dio interfaces:
• HD OMNI (only one HD OMNI is supported in a single HD Native system)
• HD I/O (up to four HD I/O can be used simultaneously)
• HD MADI (full connectivity with one HD MADI is possible when both DigiLink Mini ports of the HD MADI are connected to both Di-giLink Mini ports on HD Native Thunderbolt)
For an example of connecting multiple Avid HD audio interfaces, see “Connecting Loop Sync” on page 12.
Installing and Authorizing Pro Tools SoftwareOnce you have connected your HD Native Thun-derbolt hardware to your computer, you can install and authorize Pro Tools HD software.
Installing HD Native Thunderbolt Hardware DriversHD Native Thunderbolt hardware drivers are re-quired for your HD Native Thunderbolt system to support digital audio software, such as Pro Tools or CoreAudio (Mac) compatible digital audio soft-ware (such as Logic, Live, or Cubase). If you in-stall Pro Tools software, these drivers are installed automatically. If you are not installing Pro Tools, you can download the driver installers from the Avid website (www.avid.com)
HD audio interfaces need room at their sides to maintain proper air flow for cooling. Do not block the sides of the unit or disconnect the internal fan. If the units are rack-mounted in a case, remove the case lids or doors before operating the system. Failure to do so can re-sult in the units overheating very quickly, which can permanently damage sensitive components.
For complete installation and authorization instructions, see the Pro Tools Installation Guide that came with your Pro Tools software.
For instructions on installing the CoreAudio driver, see “Installing the CoreAudio Driver” on page 15.

HD Native Thunderbolt Interface Installation Guide14
Chapter 4: Configuring CoreAudio 15
Chapter 4: Configuring CoreAudio
Avid CoreAudio Driver CapabilitiesThe Avid CoreAudio Driver is a multi-client, mul-tichannel sound driver that lets CoreAudio–com-patible applications record and play back through HD Native Thunderbolt hardware.
Full-duplex recording and playback of 24-bit au-dio is supported at sample rates up to 96 kHz, de-pending on your hardware and CoreAudio client application.
The Avid CoreAudio Driver provides up to 64 channels of I/O with HD Native Thunderbolt.
Limitations of the CoreAudio Driver
The Avid CoreAudio Driver has the following limitations:
The Avid CoreAudio Driver cannot be used to preview sound files from the Mac Finder. When a sound file is located in the Mac OS X navigation window, a QuickTime transport bar is displayed next to it. The QuickTime transport bar lets you au-dition the sound file. The sound will always play back though the Mac’s built-in audio controller (through the Mac speaker or headphone jack). However, if you double-click a sound file, the QuickTime application will launch, and can use the Avid CoreAudio Driver for playback.
The Avid CoreAudio Driver cannot be used for playback of Mac System Sounds.
Low Latency Monitoring is not available with CoreAudio software on HD Native Thunderbolt hardware.
Installing the CoreAudio DriverThe Avid CoreAudio Driver is installed by default when you install Pro Tools.
The Avid CoreAudio Driver can also be installed as a standalone driver on Mac systems that do not have Pro Tools software installed. The installer for the standalone Avid CoreAudio Driver is available from our website at www.avid.com/drivers.
Visit www.avid.com for the latest Avid CoreAudio drivers for HD Native Thunderbolt hardware, as well as current known issues. If you uninstall Pro Tools, the Avid
CoreAudio Driver is automatically uninstalled at that time.
HD Native Thunderbolt Interface Installation Guide16
To install the standalone Avid CoreAudio Driver:
1 Ensure that your HD Native Thunderbolthardware is correctly installed.
2 Download the standalone Avid CoreAudio driver installer from our website at www.avid.com/drivers.
3 Locate and double-click the Install HD Family
Driver.mpkg.
4 Follow the on-screen instructions to complete the installation.
5 When the installation is complete, click Restart.
Avid CoreAudio ManagerYou can configure the Avid CoreAudio Driver us-ing CoreAudio Manager, or from within most third-party CoreAudio-compatible client applica-tions (such as BIAS Peak or Logic). Refer to the manufacturer’s documentation for more informa-tion.
Some applications (such as Apple’s iTunes or QuickTime Player), also require that you configure either the Apple Sound Preferences or Apple Au-dio MIDI Setup (AMS) to use the Avid CoreAudio Driver.
The Avid CoreAudio Manager is configured to auto-hide when first launched. To bring it to the foreground, click on its icon in the dock.
The Avid CoreAudio Manager is not used by Pro Tools. It is only used by other CoreAudio ap-plications.
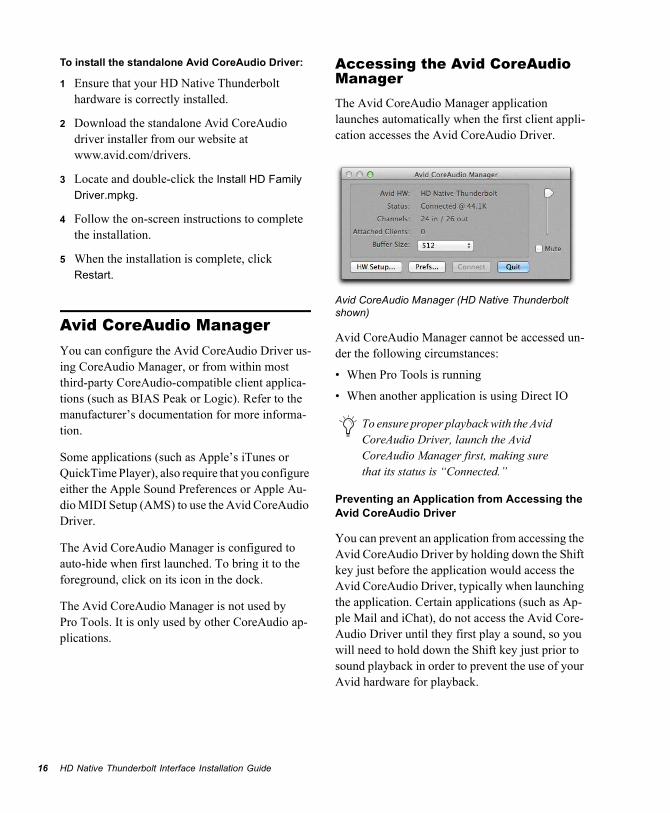
Accessing the Avid CoreAudio ManagerThe Avid CoreAudio Manager application launches automatically when the first client appli-cation accesses the Avid CoreAudio Driver.
Avid CoreAudio Manager cannot be accessed un-der the following circumstances:
• When Pro Tools is running
• When another application is using Direct IO
Preventing an Application from Accessing the Avid CoreAudio Driver
You can prevent an application from accessing the Avid CoreAudio Driver by holding down the Shift key just before the application would access the Avid CoreAudio Driver, typically when launching the application. Certain applications (such as Ap-ple Mail and iChat), do not access the Avid Core-Audio Driver until they first play a sound, so you will need to hold down the Shift key just prior to sound playback in order to prevent the use of your Avid hardware for playback.
Avid CoreAudio Manager (HD Native Thunderbolt shown)
To ensure proper playback with the Avid CoreAudio Driver, launch the Avid CoreAudio Manager first, making sure that its status is “Connected.”
Chapter 4: Configuring CoreAudio 17
Using the Avid CoreAudio ManagerUse the Avid CoreAudio Manager to change the CoreAudio Buffer Size setting, access the Hard-ware Setup dialog for your Avid hardware and control volume and mute for the Avid CoreAudio Driver. The Avid CoreAudio Manager also identi-fies your Avid hardware, the supported number of Input and Output Channels and the number of at-tached clients (applications).
Buffer Size
You can select from the following buffer sizes (de-pending on your Avid hardware):
• 64 samples
• 128 samples
• 256 samples
• 512 samples
• 1024 samples
• 2048 samples
Changing the Buffer Size for the Avid CoreAudio Driver does not affect the H/W Buffer Size setting in the Pro Tools Playback Engine dialog.
To configure Avid CoreAudio Hardware Buffer Size:
1 Double-click the Avid CoreAudio Manager file (located in /Applications/Avid/).
2 From the Buffer Size pop-up menu, select the desired CoreAudio buffer size (in samples). Generally, smaller buffer sizes are preferable. However, if you experience any problems with performance (such as clicks and pops during re-cording or playback), try increasing the Core-Audio Buffer Size setting.
3 You can also change the buffer size from within the client application if it is the only client at-tached to the CoreAudio Driver. Once two or more clients are active, you will not be able to change the sample rate or the buffer size.
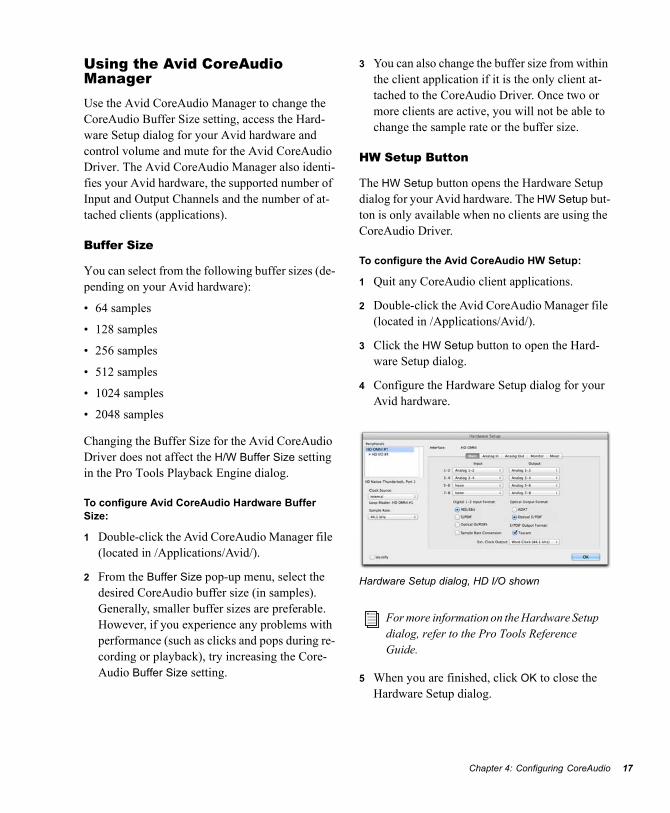
HW Setup Button
The HW Setup button opens the Hardware Setup dialog for your Avid hardware. The HW Setup but-ton is only available when no clients are using the CoreAudio Driver.
To configure the Avid CoreAudio HW Setup:
1 Quit any CoreAudio client applications.
2 Double-click the Avid CoreAudio Manager file (located in /Applications/Avid/).
3 Click the HW Setup button to open the Hard-ware Setup dialog.
4 Configure the Hardware Setup dialog for your Avid hardware.
5 When you are finished, click OK to close the Hardware Setup dialog.
Hardware Setup dialog, HD I/O shown
For more information on the Hardware Setup dialog, refer to the Pro Tools Reference Guide.
HD Native Thunderbolt Interface Installation Guide18
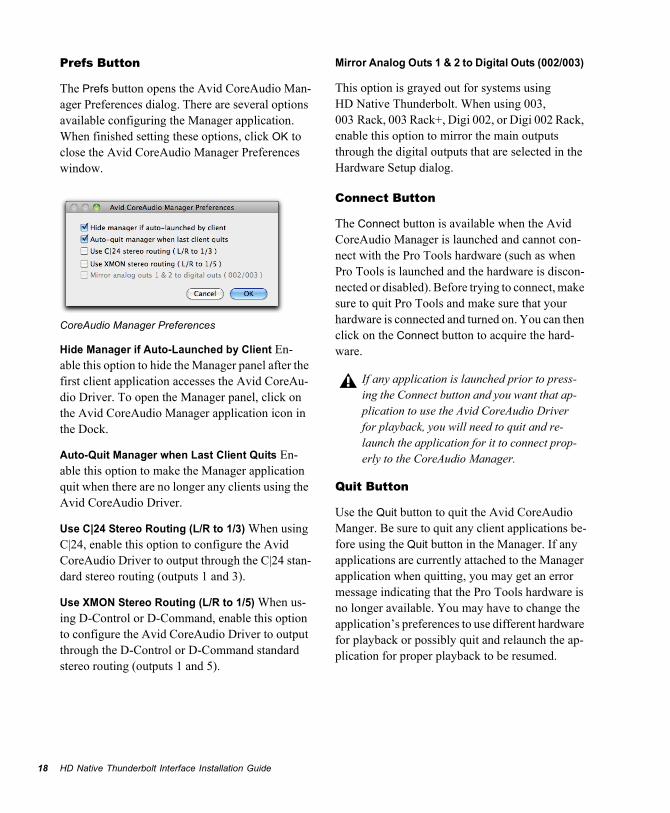
Prefs Button
The Prefs button opens the Avid CoreAudio Man-ager Preferences dialog. There are several options available configuring the Manager application. When finished setting these options, click OK to close the Avid CoreAudio Manager Preferences window.
Hide Manager if Auto-Launched by Client En-able this option to hide the Manager panel after the first client application accesses the Avid CoreAu-dio Driver. To open the Manager panel, click on the Avid CoreAudio Manager application icon in the Dock.
Auto-Quit Manager when Last Client Quits En-able this option to make the Manager application quit when there are no longer any clients using the Avid CoreAudio Driver.
Use C|24 Stereo Routing (L/R to 1/3) When using C|24, enable this option to configure the Avid CoreAudio Driver to output through the C|24 stan-dard stereo routing (outputs 1 and 3).
Use XMON Stereo Routing (L/R to 1/5) When us-ing D-Control or D-Command, enable this option to configure the Avid CoreAudio Driver to output through the D-Control or D-Command standard stereo routing (outputs 1 and 5).
Mirror Analog Outs 1 & 2 to Digital Outs (002/003)
This option is grayed out for systems using HD Native Thunderbolt. When using 003, 003 Rack, 003 Rack+, Digi 002, or Digi 002 Rack, enable this option to mirror the main outputs through the digital outputs that are selected in the Hardware Setup dialog.
Connect Button
The Connect button is available when the Avid CoreAudio Manager is launched and cannot con-nect with the Pro Tools hardware (such as when Pro Tools is launched and the hardware is discon-nected or disabled). Before trying to connect, make sure to quit Pro Tools and make sure that your hardware is connected and turned on. You can then click on the Connect button to acquire the hard-ware.
Quit Button
Use the Quit button to quit the Avid CoreAudio Manger. Be sure to quit any client applications be-fore using the Quit button in the Manager. If any applications are currently attached to the Manager application when quitting, you may get an error message indicating that the Pro Tools hardware is no longer available. You may have to change the application’s preferences to use different hardware for playback or possibly quit and relaunch the ap-plication for proper playback to be resumed.
CoreAudio Manager Preferences
If any application is launched prior to press-ing the Connect button and you want that ap-plication to use the Avid CoreAudio Driver for playback, you will need to quit and re-launch the application for it to connect prop-erly to the CoreAudio Manager.
Chapter 4: Configuring CoreAudio 19
Configuring Avid HD Audio Interfaces for Third-Party ApplicationsWhen using HD Native Thunderbolt with an appli-cation other than Pro Tools (such as Apple Garage-Band), you can configure hardware settings using the audio preference settings available in that ap-plication.
To configure hardware settings through a CoreAudio application (such as Apple GarageBand):
1 Select HD Native Thunderbolt for Audio Output and Audio Input.
2 Select a buffer size for your system from one of the following options:
• Maximum/Large buffer size
• Minimum/Small buffer size
Configuring the Apple Sound Preferences or Apple Audio MIDI Setup(Required for Using Avid Audio Interfaces with Apple iTunes or QuickTime Player)
To use your Avid audio interface with certain CoreAudio–compatible playback applications (such as Apple iTunes or QuickTime Player), you will need to configure either Sound Preferences or Audio MIDI Setup in addition to Avid CoreAudio Manager. However, for most CoreAudio–compat-ible client applications (such as BIAS Peak or Ableton Live) this is unnecessary since you can configure the CoreAudio Buffer Size setting and audio input and output channels from within the client application.
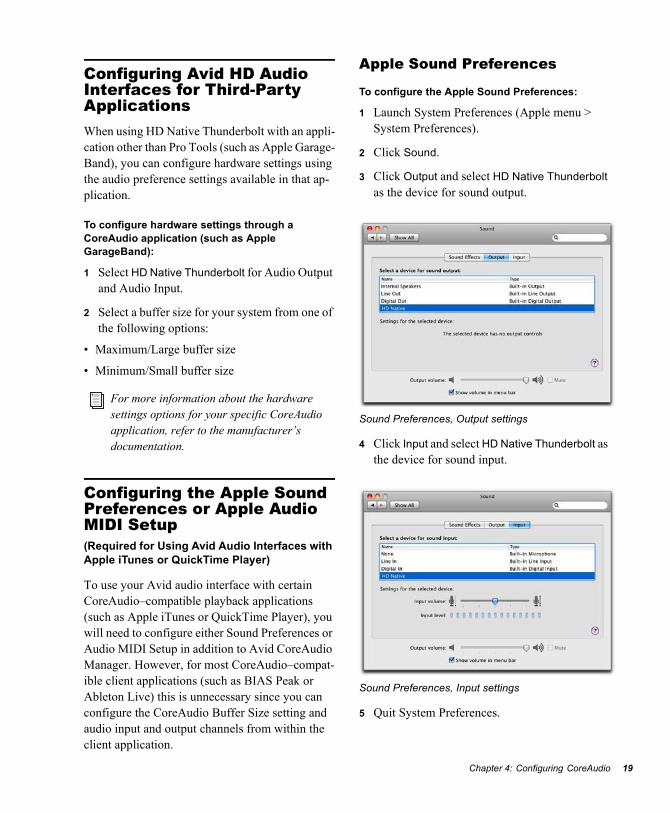
Apple Sound Preferences
To configure the Apple Sound Preferences:
1 Launch System Preferences (Apple menu > System Preferences).
2 Click Sound.
3 Click Output and select HD Native Thunderbolt
as the device for sound output.
4 Click Input and select HD Native Thunderbolt as the device for sound input.
5 Quit System Preferences.
For more information about the hardware settings options for your specific CoreAudio application, refer to the manufacturer’s documentation.
Sound Preferences, Output settings
Sound Preferences, Input settings
HD Native Thunderbolt Interface Installation Guide20
Apple Audio MIDI Setup
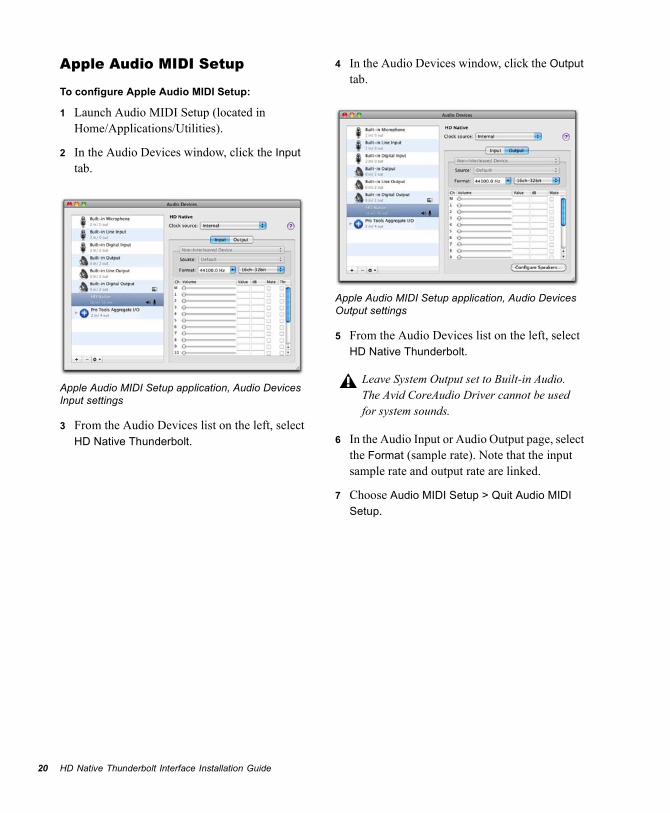
To configure Apple Audio MIDI Setup:
1 Launch Audio MIDI Setup (located in Home/Applications/Utilities).
2 In the Audio Devices window, click the Input tab.
3 From the Audio Devices list on the left, select HD Native Thunderbolt.
4 In the Audio Devices window, click the Output tab.
5 From the Audio Devices list on the left, select HD Native Thunderbolt.
6 In the Audio Input or Audio Output page, select the Format (sample rate). Note that the input sample rate and output rate are linked.
7 Choose Audio MIDI Setup > Quit Audio MIDI
Setup.
Apple Audio MIDI Setup application, Audio Devices Input settings
Apple Audio MIDI Setup application, Audio Devices Output settings
Leave System Output set to Built-in Audio. The Avid CoreAudio Driver cannot be used for system sounds.
Chapter 5: Low Latency Monitoring with Pro Tools 21
Chapter 5: Low Latency Monitoring with Pro Tools
Using Low Latency MonitoringHD Native Thunderbolt systems with Pro Tools can use the Low Latency Monitoring option to re-cord with an extremely small amount of monitor-ing latency, to as many tracks as the system sup-ports. Only tracks with input from an audio interface (not an internal mix bus) use Low La-tency Monitoring.
To use Low Latency Monitoring:
1 From the Output Path selector, assign each track to the selected Low Latency Monitoring Path (as set in the I/O Setup Output page). Only tracks assigned to these outputs use Low La-tency Monitoring.
2 Record enable audio tracks by clicking their Re-cord Enable buttons.
3 Select Options > Low Latency Monitoring.
When Low Latency Monitoring is enabled, any plug-ins and sends assigned to record-enabled tracks (routed to the selected Low Latency Moni-toring Path) are automatically bypassed, and must remain bypassed. Also, these tracks do not register on meters for Master Faders.
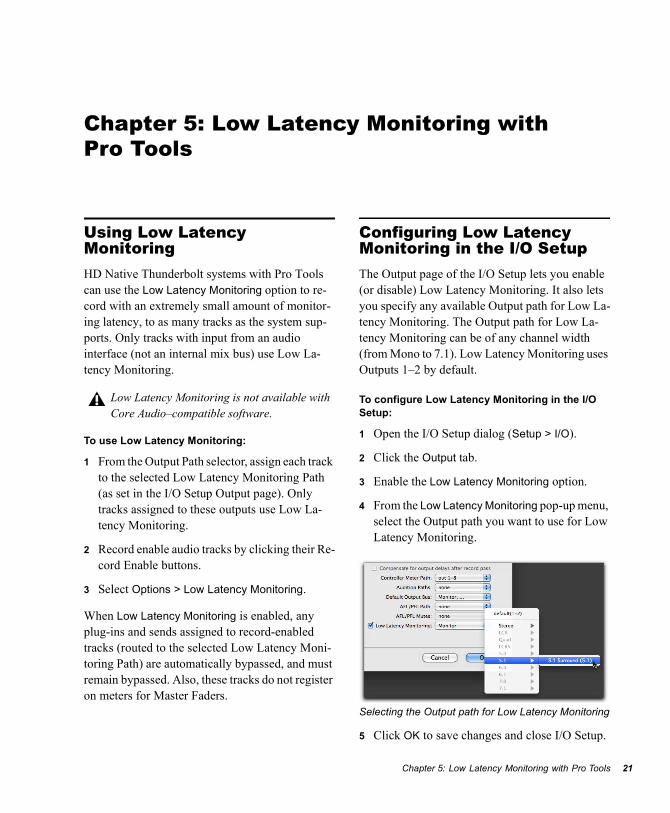
Configuring Low Latency Monitoring in the I/O SetupThe Output page of the I/O Setup lets you enable (or disable) Low Latency Monitoring. It also lets you specify any available Output path for Low La-tency Monitoring. The Output path for Low La-tency Monitoring can be of any channel width (from Mono to 7.1). Low Latency Monitoring uses Outputs 1–2 by default.
To configure Low Latency Monitoring in the I/O Setup:
1 Open the I/O Setup dialog (Setup > I/O).
2 Click the Output tab.
3 Enable the Low Latency Monitoring option.
4 From the Low Latency Monitoring pop-up menu, select the Output path you want to use for Low Latency Monitoring.
5 Click OK to save changes and close I/O Setup.
Low Latency Monitoring is not available with Core Audio–compatible software.
Selecting the Output path for Low Latency Monitoring
HD Native Thunderbolt Interface Installation Guide22
Low Latency Monitoring and Bounce To DiskWith Low Latency Monitoring enabled, only audio tracks are included with the Bounce to Disk com-mand—Auxiliary Input and Instrument tracks are ignored. To include Auxiliary Input and Instru-ment tracks, disable Low Latency Monitoring be-fore using Bounce to Disk.
External input cannot be recorded during a Bounce to Disk. To include external input in your bounce, it must be recorded to new au-dio tracks before using Bounce to Disk.
第1章: HD Native Thunderboltについて 23
第1章: HD Native Thunderboltについて
HD Native Thunderbolt™ インターフェイスは、高精度デジタル・オーディオのレコーディング、編集、
信号処理、ミキシング、入出力に対する接続性を提
供し、Avid Pro Tools® ソフトウェアおよびAvid HDオーディオ・インターフェイス、同期周辺機器に使
用できます。HD Native Thunderboltは、高品位ヘッドフォン・ジャックとボリューム・コントロールも
提供します。
またHDオーディオ・インターフェイスを使用したHD Native Thunderboltは Core Audio互換デジタル・オーディオ・ソフトウェアと共に使用す
ることもでき、最大 64チャンネルの I/Oに対応します。
このガイドでは、Avidの要件を満たすコンピューターへのHD Native Thunderbolt へのインストレーションについて説明します。
HD Native Thunderboltのパッケージ
HD Native Thunderboltのパッケージの内容は以下のとおりです。
• HD Native Thunderboltインターフェイス• 2メートル(6.5フィート)Thunderboltケーブル
• 3.6メートル(12フィート)DigiLink Miniケーブル(HD Native Thunderbolt をオーディオ・インターフェイスに接続するのに必
要です)
• オンライン登録カード
• 本HD Native Thunderboltインストール・ガイド(HD Native Thunderboltハードウェアのインストールと設定について説明してい
ます)
• 安全にお使いいただくためのガイド
HD Native ThunderboltシステムHD Native Thunderboltシステムは以下によって構成されます。
• 以下のオーディオ・インターフェイスのいずれか(別売)
• Pro Tools HDソフトウェア
または
• サードパーティー製 CoreAudio 互換ソフトウェア
• HD Native Thunderboltインターフェイス• 以下のAvid HDオーディオ・インターフェイス(別売)のうち少なくとも 1台(最大 4台)
• HD OMNI• HD I/O• HD MADI
Pro Tools ソフトウェアのインストールとオーソライズについて詳しくは、Pro Toolsソフトウェア付属の『Pro Toolsインストール・ガイド』をご参照ください。
1 つのHD Native Thunderboltシステムにつき、1台のHD OMNIのみ使用できます。
HD Native Thunderboltインターフェイス・インストール・ガイド24
登録
同梱のオンライン登録カードの説明に従って、購
入した製品をオンラインでご登録ください。これ
は、新規ユーザーとしての大切な手続きです。製
品をご登録いただきますと、以下のサービスが受
けられます。
• テクニカルサポートに関する情報• 今後のアップグレードの案内• ハードウェアの限定保証
ハードウェアの保証
ご使用のハードウェアの保証は、オンライン登録
情報カードに記載されています。
システム要件と互換性
H D N a t i v e T h u n d e r b o l t ハードウェアは、Pro Tools HD ソフトウェアまたはサードパーティー製 CoreAudio互換ソフトウェアを実行する、Avidの要件を満たすコンピューターで使用できます。
Avidは、動作確認が行われたハードウェアとソフトウェアに対してのみ互換性を保証し、サポート
を提供します。
完全なシステム要件および要件を満たしたコン
ピューター、オペレーティング・システム、ハー
ド・ドライブ、サードパーティー製機器のリスト
については以下のサイトをご覧ください。
www.avid.com/compatibility
本ガイドで使用する表記法
すべての Pro Toolsガイドでは、メニューの選択とキー・コマンドを、以下のような方法で表記し
ています。
画面に表示されるコマンド、オプション、設定の名前
は、フォントが異なります。
以下の記号は、重要な情報を示すのに使用されます。
ご使用のHD Native Thunderboltハードウェアは、Avid DigiTestを使用してテストすることができます。詳しくは、Avid DigiTest Guide.pdfをご参照ください(ダウンロードして、または
Pro Toolsインストールの付属文書としてご覧いただけます)。
表記法 アクション
[ファイル](File) > [保存](Save)
[ファイル]メニューから
[保存]を選択
Control+N Controlキーを押しながらNキーを押す
Control-クリック Controlキーを押しながらクリックする
右クリック マウスの右ボタンをクリック
Pro Toolsシステムを活用するために役立つアドバイス。
データやシステムの処理能力に作用する重
要な情報。
便利なキーボードやマウスのショートカット。
このガイドまたは他のPro Toolsガイドの関連セクション。
第1章: HD Native Thunderboltについて 25
www.avid.comについてAvidのウェブサイト(www.avid.com)は、Pro Toolsシステムを最大限に活用するための最良のオンライン
情報源です。以下はそのサービスと機能の一例です。
製品登録 購入した製品をオンラインで登録できます。
サポートとダウンロード Avidカスタマー・サクセス(テクニカル・サポート)にアクセスすると、
ソフトウェアのアップデートや最新版のオンライ
ン・マニュアルのダウンロード、システム要件の
互換性ガイドの参照、オンライン・ナレッジベー
スの検索、ユーザー・カンファレンスから世界に
広がる Pro Toolsユーザー・コミュニティへの参加が可能です。
トレーニングと教育 オンライン・コースを活用した学習、Avid公認のトレーニング・センターで実施される授業について検索することができます。
製品と開発者 Avid製品に関する情報、ソフトウェアのデモ版のダウンロード、開発パートナーとそ
のプラグイン、アプリケーション、ハードウェア
に関する情報をご覧いただけます。
ニュースとイベント Avid最新ニュースの入手や、Pro Toolsデモンストレーションへの登録が行えます。

HD Native Thunderboltインターフェイス・インストール・ガイド26
第2章: HD Native Thunderboltハードウェアの概要 27
第2章: HD Native Thunderboltハードウェアの概要
HD Native ThunderboltHD Native Thunderboltは、ダイレクト・ディスク・レコーディングとプレイバックに最大 64チャンネルの I/Oを提供し、最高 24ビット /192kHzのオーディオ・ストリームに対応しています。さらに、内蔵FPGAにより、ヘッドフォン・モニタリング専用のシグナル・ルーティングを提供します。
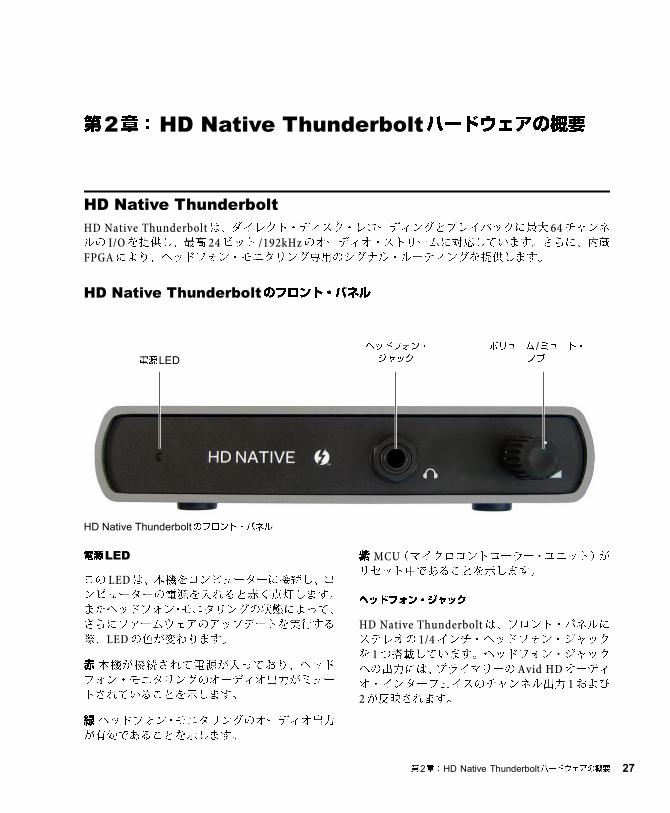
HD Native Thunderboltのフロント・パネル
電源LED
この LEDは、本機をコンピューターに接続し、コンピューターの電源を入れると赤く点灯します。
またヘッドフォン・モニタリングの状態によって、
さらにファームウェアのアップデートを実行する
際、LEDの色が変わります。
赤 本機が接続されて電源が入っており、ヘッドフォン・モニタリングのオーディオ出力がミュー
トされていることを示します。
緑 ヘッドフォン・モニタリングのオーディオ出力が有効であることを示します。
紫 MCU(マイクロコントローラー・ユニット)がリセット中であることを示します。
ヘッドフォン・ジャック
HD Native Thunderboltは、フロント・パネルにステレオの 1/4インチ・ヘッドフォン・ジャックを 1つ搭載しています。ヘッドフォン・ジャックへの出力には、プライマリーの Avid HDオーディオ・インターフェイスのチャンネル出力 1および2が反映されます。
HD Native Thunderboltのフロント・パネル
ヘッドフォン・
ジャック電源LEDボリューム /ミュート・
ノブ
HD Native Thunderboltインターフェイス・インストール・ガイド28
ボリューム /ミュート・ノブ
HD Native Thunderboltでは、フロントパネルのボリューム /ミュート・ノブでヘッドフォンの音量を調整できます。ノブを左に回すと音量が下が
り、右に回すと上がります。またボリューム /ミュート・ノブを押すことでヘッドフォン出力を
ミュート /ミュート解除できるほか、MCU(マイクロコントローラー)のリセットも行えます。
ヘッドフォン・モニタリングのミュート /ミュート解除
ヘッドフォン・モニタリングをミュートするには:
電源 LED が赤く点灯するまで、ボリューム /ミュート・ノブを⻑押しします。
ヘッドフォン・モニタリングのミュートを解除するに
は:
電源LEDが緑色に戻るまで、ボリューム・ミュート・ノブを⻑押しします。
MCUのリセット
もしボリュームを操作できなくなった場合、MCUをリセットしてください。MCUのリセットには数秒かかります。
MCUをリセットするには:
1 HD Native Thunderboltとコンピューターをつなぐ Thunderboltケーブルを外します。またコンピューターの電源が入っていることを確認しま
す。
2 ボリューム /ミュート・ノブを⻑押しします。
3 Thunderbolt ケーブルを再接続します。HDNative Thunderboltの LEDは紫色に点灯します。
4 ボリューム /ミュート・ノブを放します。
5 Thunderboltケーブルを外してから再度つなぎます(パワーサイクル)。HD Native Thunderboltの電源が入ると、LEDは赤く点灯します。
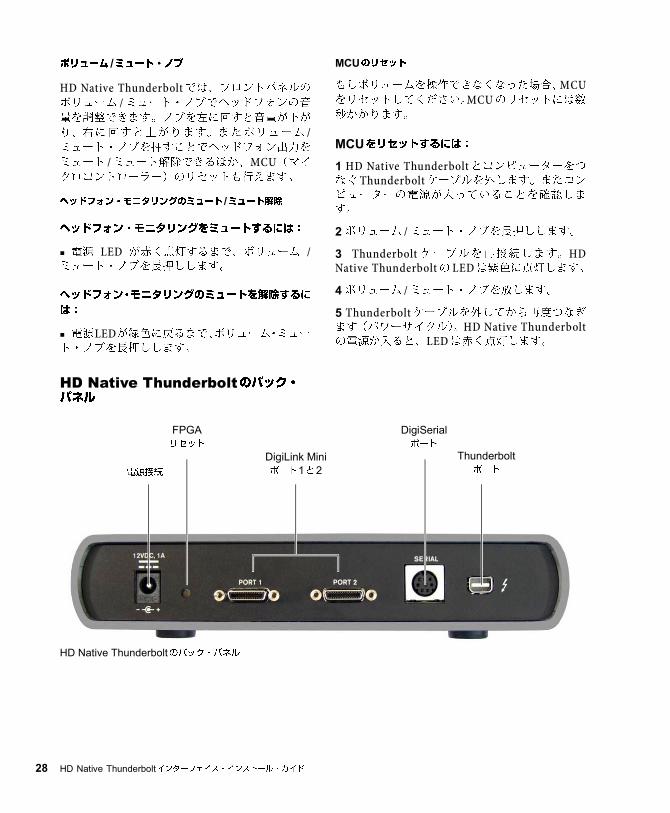
HD Native Thunderboltのバック・ パネル
HD Native Thunderboltのバック・パネル
Thunderboltポート
DigiLink Miniポート1と2
DigiSerialポート
電源接続
FPGAリセット
第2章: HD Native Thunderboltハードウェアの概要 29
Thunderboltポート
Thunderboltケーブルを使用して、Avid要件を満たすコンピューターの空いている ThunderboltポートにHD Native Thunderboltを接続します。接続を行う際は、ご使用のコンピューターの電源
がオフになっていることをご確認ください。接続
できたら、コンピューターの電源を入れ、HDNative Thunderboltを使用することができます。
DigiLink Miniポート
HD Native Thunderboltには、Avid HDオーディオ・インターフェイス接続用のDigiLink Miniポート 2基が搭載されています。ポートごとに最大 32チャンネルのオーディオ入出力を提供します。
DigiSerialポート
SYNC 周辺機器は、HD Native Thunderbolt のDigiSerial ポートに接続できます。 このコネクターは 8ピンのミニDINです。
FPGAリセット・スイッチ
万が一アップグレードに失敗したり FPGAイメージが破損したときにために、H D N a t i v eThunderboltにはバックアップの FPGAイメージを読み込ませる FPGAリセット・スイッチが備わっています。
FPGAをリセットするには:
1 HD Native Thunderboltとコンピューターをつなぐ Thunderboltケーブルを外します。またコンピューターの電源が入っていることを確認しま
す。
2 ペーパークリップなどで、FPGAリセット・スイッチを⻑押しします。
3 Thunderboltケーブルを接続します。
4 FPGAリセット・スイッチを放します。
5 Pro Toolsを起動し、画面の指示に従ってファームウェアをアップデートします。
電源の接続
HD Native Thunderboltは、Thunderboltバスにより電力供給されます。また、ACアダプター(別売)を使用してユニットに電源を供給することも
できます。
DigiLink MiniケーブルHD I/O、HD OMNI、HD MADIオーディオ・インターフェイスをHD Native Thunderboltに接続する場合、DigiLink Miniケーブルを使用してください。DigiLink Miniケーブルには以下の 5種類の⻑さがあります。
• 0.46メートル(18インチ)(HD I/O、HD OMNI、HD MADIオーディオ・インターフェイスに付属)
• 3.6メートル(12フィート)(HD Nativeカードに 1本付属)
• 7.62メートル(25フィート)(別売)• 15.25メートル(50フィート)、176.4kHzと
192kHzのセッションに対する最大⻑(別売)• 30.5メートル(100フィート)、88.2kHzと
96kHzのセッションに対する最大⻑(別売)
Avid HDオーディオ・インターフェイスPro Toolsまたは要件を満たすサードパーティー製 CoreAudio互換アプリケーションを使用してオーディオをレコーディングまたはプレイバック
するには、少なくとも 1台のAvid HDオーディオ・インターフェイスがHD Native Thunderboltの 1番目のポートに接続されていなければなりませ
ん。
HD Native Thunderboltは、最大 4台の Avid HDオーディオ・インターフェイスに対応しており、
最大 64チャンネルのオーディオ同時入出力が可能です。
HD Native Thunderbolt のDigiSerial ポートは、MachineControlの接続には対応していません。
HD Native Thunderboltインターフェイス・インストール・ガイド30
HD OMNIオーディオ・インターフェイスHD OMNIは、HD Nativeシステムと共に使用するために設計された業務用デジタル・オーディオ・イ
ンターフェイスです。HD OMNIは、音楽制作、レコーディング、ポストプロダクションの各スタジ
オにおいて、コンパクトなプリアンプ、モニタリ
ング、I/Oソリューションを提供します。
HD OMNIの機能
HD OMNIは、Pro Toolsの入出力の最大 8のディスクリート・チャンネルを提供し、入力または出
力(選択可能)用の LEDメーターを搭載しています。
アナログ I/O
• 24 ビットの AD/DA コンバーター、サンプル
レートは最大 192kHzまで対応
• 高品質Mic/Diプリアンプ x 2(チャンネル 1-2)
• マイクとインストゥルメント・レベル入力用のXLRと 1/4インチ TRSのフロントパネル・インプット x 2
• XLRバックパネル・マイク・インプット x 2• チャンネル 1 と 2 のハードウェア・インサート用のバックパネルの 1/4 インチ TRS センド・ジャック x 2と 1/4インチTRSリターン・ジャック x 2
• アナログ TRSライン・レベル・バックパネル・インプット x 4(チャンネル 1-4)
• アナログ入力のクリッピングを防ぐ 2 種類のリミッター、「ソフトクリップ」と「カーブ」
• バックパネルにDB-25ブレイクアウト・ケーブル(別売)使用を使用した可変アウトプット・
ゲイン付き 8チャンネルのアナログ・アウトプット
• バックパネルに TRSを使用した 2チャンネルのアナログ・アウトプット(DB-25コネクターのチャンネル 1-2または 7-8を反映)
• フロントパネル・ステレオ 1/4 インチ・ヘッドフォン・ジャック
デジタル I/O
• DB-25ブレイクアウト・ケーブル(別売)を使用した、8チャンネルの AES/EBUアウトプット(最大 192kHzのシングル・ワイヤー)
• 2チャンネルのAES/EBU XLRインプット(最大192kHzのシングル・ワイヤー)
• 2チャンネルの S/PDIF RCAのインプットとアウトプット(最大 192kHz)
• 8チャンネルのADAT TOSLINKのインプットとアウトプット
• サンプルレート 88.2kHz、96kHz、176.4kHz、192kHzの ADAT S/MUX Opticalに対応
• サンプルレート最大 96kHz の 2 チャンネルのS/PDIF Opticalに対応
• AES/EBU、S/PDIF、またはOptical(S/PDIF)のデジタル・インプット 1-2のリアルタイム・サンプルレート変換(SRC)
詳しくは、『HD OMNIガイド』をご参照ください。
1つのHD Native Thunderboltシステムにつき、1台のHD OMNIのみ使用できます。
HD OMNIでは複数のアナログ入力接続が行えますが、同時に行えるアナログ入力は最大
4チャンネルです。
SRCは ADAT S/MUXに対応していません。
第2章: HD Native Thunderboltハードウェアの概要 31
モニタリング
• ヘッドフォン・モニタリング(フロントパネルのヘッドフォン・ジャック)用の Pro Toolsの「キュー」ステレオ・アウトプット・パス
• フロントパネルのコントロール・ルーム(MAIN/ALT)とヘッドフォンのモニタリング・ボリューム・コントロール
• ステレオ・フォーマットとサラウンド・フォーマット(最大 7.1サラウンド)すべてのフォールドダウン機能を搭載した柔軟なモニタリング
• さまざまな入力信号の低レイテンシー・ダイレクト・モニタリング用インプット・ミキサー
(Pro Toolsの[ハードウェア設定]で設定)
同期
• 追加のAvid HDオーディオ・インターフェイスや周辺機器を接続するための Loop Sync入出力
• HD OMNI と外部ワードクロック機器を同期させるための外部クロック入出力
HD I/Oオーディオ・インターフェイスHD I/Oは、HD Nativeシステムと共に使用するために設計されたマルチチャンネル・デジタル・オー
ディオ・インターフェイスです。HD I/Oは、極めて高品質の 24ビットのAD/DAコンバーターを搭載し、サンプルレートは最大 192kHzまで対応しています。
HD I/Oは、以下の 3種類の標準構成で提供されます。
• 8 x 8 x 8(アナログ・イン x 8、アナログ・アウト x 8、デジタル・インおよびアウト x 8)
• アナログ・インおよびアウト 16 x 16• デジタル・インおよびアウト 16 x 16
HD I/Oアナログ拡張カード(ADCとDAC)とHDI/Oデジタル拡張カードを追加または取り外し、独自に構成にすることも可能です。
HD I/Oの機能
HD I/Oは、Pro Tools入出力の最大 16のディスクリート・チャンネルを提供し、入力および出力用
の LEDメーターを搭載しています。
アナログ I/O
• 優れた24ビットD/AコンバーターとA/Dコンバーターを使用した、最大16チャンネルのアナログI/O。Analog In HD I/OカードとAnalog Out HD I/Oカードを使用し、対応サンプルレートは、44.1kHz、48kHz、88.2kHz、96khz、176.4kHz、192kHz。
• アナログ入力のクリッピングを防ぐ 2 種類のリミッター、「ソフトクリップ」と「カーブ」
デジタル I/O
• AES/EBU、TDIFdB-25または Opticalを使用した、最大 16チャンネルの 24ビット・デジタルI/O。Digital HD I/O カードを使用し、対応サンプルレートは、44.1kHz、48kHz、88.2kHz、96khz、176.4kHz、192kHz。
• Digital I/Oカードを使用した、デジタル入力のリアルタイム・サンプルレート変換(最大 16チャンネルの AES/EBU、Optical、または TDIF)
• サンプルレート 88.2kHz以上の S/MUX Opticalに対応
• サンプルレート最大 96kHz の 2 チャンネルのS/PDIF Optical(内蔵)に対応
• サンプルレート最大 192kHz の 2 チャンネルのAES/EBU I/O(内蔵)
• サンプルレート最大 192kHz の 2 チャンネルの24ビット対応 S/PDIF I/O(内蔵)
同期
• 追加のAvid HDオーディオ・インターフェイスや周辺機器を接続するための Loop Sync入出力
• HD I/Oを外部ワードクロック機器と同期するための外部クロック入出力
詳しくは、『HD I/Oガイド』をご参照ください。
HD Native Thunderboltインターフェイス・インストール・ガイド32
拡張性
• オプションの追加 I/O カードでアナログ I/O またはデジタル I/Oを拡張できます。
• 複数のAvid HDオーディオ・インターフェイスを同時に使用し、さらにシステムの入出力を拡
張できます(詳しくは『拡張システム・ガイド』
をご覧ください)。
HD MADIデジタル・オーディオ・インターフェイス
HD MADIは、HD Nativeシステムと共に使用するよう設計された 64チャンネルのデジタル・オーディオ・インターフェイスです。HD MADIは、MADI(Multichannel Audio Digital Interface)フォーマットと最大 192kHzのサンプルレートに対応しています。HD MADIにより、ルーター、デジタル・ミキシング・コンソール、コンバーター
などのMADI対応オーディオ機器とHD Nativeシステムとの接続が簡単になります。`
HD MADIの機能
• 最大 64のディスクリート・チャンネルのデジタル入出力(DigiLink Miniポートごとに 32チャンネル)に対応する、MADIオプティカル・インプットと同軸インプット x 2およびMADIオプティカル・アウトプットと同軸アウトプットx 2
• サンプルレート44.1kHz、48kHz、88.2kHz、96kHz、176.4kHz、192kHzに対応
• 分解能 24ビットまたは 16ビット
• インプットまたはアウトプット上でのサンプルレート変換(SRC)
• フロントパネルにクロックとSRCのインジケーター
• フロントパネルにインプットとアウトプット用の信号 LED
• HD MADIを外部 1xワードクロックと同期させる BNCワードクロック I/O
• HD MADIを追加のAvid HDオーディオ・インターフェイスや周辺機器(HD I/O、HD OMNI、SYNC HDなど)と同期させる BNC Loop SyncI/O
• 外部MADI同期(アウトプットに SRCを使用する場合)のための専用 BNCワードクロック・インプットと XLR AES/EBUインプット(クロック入力のみ)
• 以下のフォーマットに対するクロック対応:内部、Loop Sync、ワードクロック、 AES/EBU、MADI
• バリスピード・モード(64チャンネルと 56チャンネルの両方の規格に対応)
HD MADIについて、詳しくは『HD MADIガイド』をご参照ください。
HD MADIのチャンネルを最大に利用するためには、1台のHD MADIを1つのHD NativeThunderboltに2本のDigiLink Miniケーブルで接続します。この構成では追加の I/Oは使用できません。
第3章: HD Native Thunderboltを接続・設定する 33
第3章: HD Native Thunderboltを接続・設定する
この章では、H D N a t i ve T h u n d e r b ol t をコンピューターに接続し、Avid HDオーディオ・インターフェイスをHD Native Thunderboltに接続する方法について説明します。
HD Native Thunderboltをコンピューターに接続する
HD Native Thunderboltをコンピューターに接続するには:
1 コンピューターの電源がオフになっていることを確認します。
2 付属の Thunderboltケーブルの一端を、コンピューターの Thunderboltポートに接続します。
3 ケーブルのもう一端をHD Native Thunderbolt背面の Thunderboltポートに接続します。
4 コンピューターを起動します。
HD Native Thunderboltは Thunderboltバスにより駆動するため、追加電源は必要ありません。し
かし、状況によっては、HD Native Thunderboltに直接電源を供給する必要がある場合もありま
す。そのような場合、DC電源アダプター(別売)をHD Native Thunderboltに接続することができます。
オーディオ・インターフェイスを接続する
各Avid HDオーディオ・インターフェイスは、さまざまな入出力オプションを提供します。たとえ
ば、HD OMNIは Pro Toolsシステムに最大 8チャンネルの入出力を、HD I/Oは最大 16チャンネルの入出力を、HD MADIは最大 64チャンネルを提供します。オーディオ・インターフェイスは、直
接HD Native Thunderboltに接続するか、別のHDオーディオ・インターフェイスの拡張ポートに接
続します。
HD Thunderbolt は、最大 64 チャンネルのオーディオ入出力に対応しています。64チャンネルのI/Oをすべて使用する場合、4台のHD I/OをHDNative Thunderbolt に接続します。2 台のインターフェイスは直接DigiLink Miniポート1と2に接続し、他の 2台のインターフェイスはHDオーディオ・インターフェイスの拡張ポートに接続し
ます。
2本のDigiLink Miniケーブルを使ってHD NativeThunderbolt に接続したHD MADI では、全 64チャンネルの I/Oが使用できます。ただしこの場合、HD MADIがシステム唯一のオーディオ・インターフェイスになります。
以下について詳しくは、『HD OMNIガイド』、『HDI/Oガイド』、『HD MADIガイド』をご参照ください。
• フロント・パネルとバック・パネルのコネクターとインジケーター
• オプションの拡張 I/Oカードのインストレーション(HD I/Oのみ)
HD Native Thunderboltインターフェイス・インストール・ガイド34
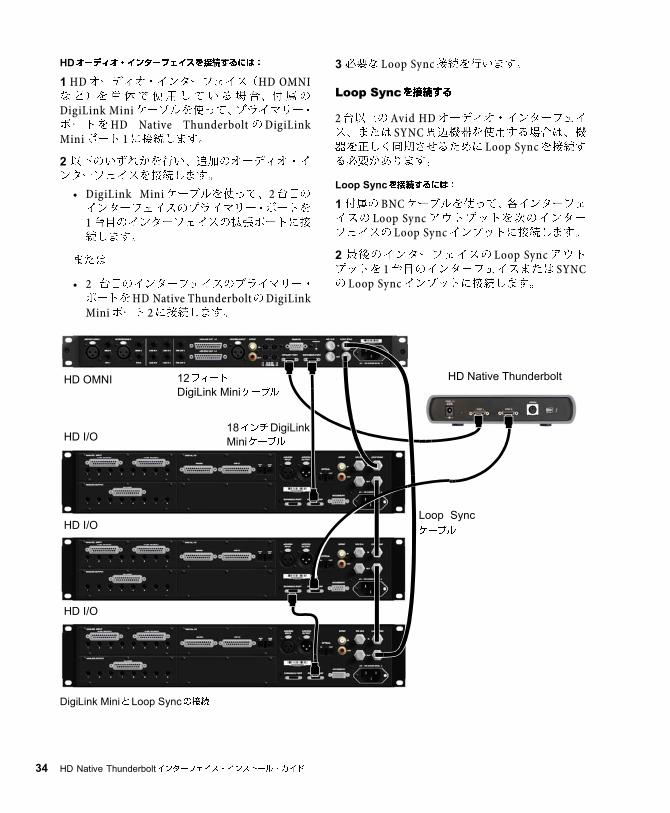
HDオーディオ・インターフェイスを接続するには:
1 HDオーディオ・インターフェイス(HD OMNIなど)を単体で使用している場合、付属の
DigiLink Miniケーブルを使って、プライマリー・ポートをHD Native Thunderbolt のDigiLinkMiniポート 1に接続します。
2 以下のいずれかを行い、追加のオーディオ・インターフェイスを接続します。
• DigiLink Miniケーブルを使って、2台目のインターフェイスのプライマリー・ポートを
1台目のインターフェイスの拡張ポートに接続します。
または
• 2 台目のインターフェイスのプライマリー・ポートをHD Native ThunderboltのDigiLinkMiniポート 2に接続します。
3 必要な Loop Sync接続を行います。
Loop Syncを接続する
2台以上のAvid HDオーディオ・インターフェイス、または SYNC周辺機器を使用する場合は、機器を正しく同期させるために Loop Syncを接続する必要があります。
Loop Syncを接続するには:
1 付属の BNCケーブルを使って、各インターフェイスの Loop Syncアウトプットを次のインターフェイスの Loop Syncインプットに接続します。
2 最後のインターフェイスの Loop Syncアウトプットを 1台目のインタ−フェイスまたは SYNCの Loop Syncインプットに接続します。
DigiLink MiniとLoop Syncの接続
HD Native ThunderboltHD OMNI
HD I/O
HD I/O
HD I/O
12フィートDigiLink Miniケーブル
18インチDigiLinkMiniケーブル
Loop Syncケーブル
第3章: HD Native Thunderboltを接続・設定する 35
最大 I/O構成HD Native Thunderboltは、以下のオーディオ・インターフェイスの最大 4台までの組み合わせに対応します。
• HD OMNI(1つのHD Nativeシステムで 1台のHD OMNIにのみ対応)
• HD I/O(最大 4台のHD I/Oを同時使用可)• HD MADI(HD MADIの両方のDigiLinkポートがHD Native Thunderboltの両方のDigiLinkポートに接続されている場合、1台のHD MADIでフル接続が可能)
複数のAvid HDオーディオ・インターフェイス接続の例については、34 ページの「Loop Syncを接続する」をご参照ください。
Pro Toolsソフトウェアをインストールしオーソライズする
Pro Tools HD Native Thunderboltハードウェアをコンピューターに接続できたら、Pro Tools HDソフトウェアをインストールしてオーソライズし
ます。
HD Native Thunderboltハードウェアのドライバーをインストールする
HD Native Thunderbolt ハードウェアのドライバーは、ご使用のHD Native Thunderboltシステムを Pro Toolsまたは CoreAudio(Mac)互換のデジタル・オーディオ・ソフトウェア(Logic、Live、Cubaseなど)に対応させるのに必要となります。Pro Toolsソフトウェアをインストールする場合、これらのドライバーは自動的にインス
トールされます。Pro Toolsをインストールしない場合、Avidウェブ・サイト(www.avid.com)からドライバー・インストーラーをダウンロード
できます。
HDオーディオ・インターフェイスは、本体の両側に通気(冷却)用の空間を必要としま
す。本体の両側を塞いだり、内蔵のファンを
取り外したりしないでください。本体をケー
スにラックマウントしている場合は、システ
ムを起動する前にケースの蓋や扉を取り外
してください。さもないと、本体が急激に加
熱され、コンポーネントが破損する場合があ
ります。
インストールとオーソライズについて詳し
くは、Pro Toolsソフトウェア・パッケージに付属の『Pro Toolsインストール・ガイド』をご参照ください。
CoreAudioドライバーのインストール方法については、37 ページの「CoreAudioドライバーをインストールする」をご参照くだ
さい。

HD Native Thunderboltインターフェイス・インストール・ガイド36
第4章: CoreAudioを設定する 37
第4章: CoreAudioを設定する
Avid CoreAudio Driverの性能Avid CoreAudio Driverは、Core Audio互換アプリケーションでHD Native Thunderbolt ハードウェアを使用してレコーディングとプレイバック
を行うための、マルチクライアントでマルチチャ
ンネルのサウンド・ドライバーです。
使用するハードウェアと CoreAudioクライアント・アプリケーションに応じて、最大 96kHzのサンプルレートで、24ビット・オーディオのフル・デュプレックス・レコーディングとプレイバック
が可能です。
A v i d C o r e A u d i o D r i v e r は、H D N a t i v eThunderboltで最大 64チャンネルの I/Oを提供します。
CoreAudio Driverの制限
Avid CoreAudio Driverには、以下の制限があります。
Mac Finderでのサウンド・ファイルの試聴にAvid CoreAudio Driverを使用することはできません。サウンド・ファイルがMac OS Xのナビゲーション・ウィンドウにある場合、ファイルの隣に
QuickTimeのトランスポート・バーが表示されます。QuickTimeトランスポート・バーを使用してサウンド・ファイルを試聴できます。サウンドは、
常にMac内蔵のオーディオ・コントローラー(Macのスピーカーやヘッドフォン・ジャック)を通じ
て再生されます。ただし、サウンド・ファイルを
ダブルクリックすると、QuickTime が起動し、Avid CoreAudio Driverを使用して再生できます。
Avid CoreAudio Driverは、Macのシステム・サウンドの再生には使用できません。
HD Native Thunderboltハードウェア上でのCoreAudioソフトウェアでは、低レイテンシー・モニタリングは使用できません。
CoreAudioドライバーをインストールする
A vi d C or e A ud io D ri ve r は、デフォルトではPro Toolsのインストール時にインストールされます。
Avid CoreAudio Driverは、Pro ToolsソフトウェアがインストールされていないMacシステムにスタンドアロンのドライバーとしてインストールする
こともできます。スタンドアロンのAvid CoreAudioドライバーのインストーラーは、Avidウェブサイト(www.avid.com)からご入手いただけます。
HD Native Thunderboltハードウェア用の最新の Core Audio Driverおよび既知の問題について詳しくは、www.avid.comをご覧ください。 Pro Toolsをアンインストールすると、Avid
CoreAudio Driver も自動的にアンインストールされます。
HD Native Thunderboltインターフェイス・インストール・ガイド38
スタンドアロンのAvid CoreAudio Driverをインストールするには:
1 HD Native Thunderboltハードウェアが正しく取り付けられていることを確認します。
2 スタンドアロンの Avid CoreAudio DriverインストーラーをAvidウェブサイト(www.avid.com)からダウンロードします。
3 Install HD Family Driver.mpkgをダブルクリックします。
4 画面上の指示に従って、インストールを完了します。
5 インストールが完了したら、[再起動]をクリックします。
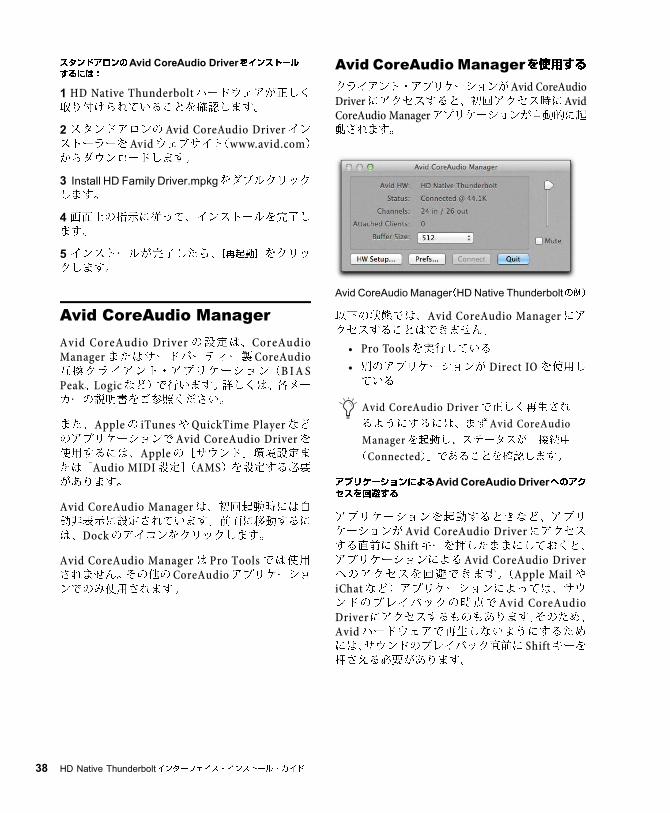
Avid CoreAudio ManagerAvid CoreAudio Driver の設定は、CoreAudioManagerまたはサードパーティー製 CoreAudio互換クライアント・アプリケーション(B I A SPeak、Logicなど)で行います。詳しくは、各メーカーの説明書をご参照ください。
また、Appleの iTunesや QuickTime Playerなどのアプリケーションで Avid CoreAudio Driverを使用するには、Appleの[サウンド]環境設定または[Audio MIDI設定](AMS)を設定する必要があります。
Avid CoreAudio Managerは、初回起動時には自動非表示に設定されています。前面に移動するに
は、Dockのアイコンをクリックします。
Avid CoreAudio Manager は Pro Toolsでは使用されません。その他の CoreAudioアプリケーションでのみ使用されます。
Avid CoreAudio Managerを使用するクライアント・アプリケーションがAvid CoreAudioDriverにアクセスすると、初回アクセス時にAvidCoreAudio Managerアプリケーションが自動的に起動されます。
以下の状態では、Avid CoreAudio Managerにアクセスすることはできません。
• Pro Toolsを実行している• 別のアプリケーションが Direct IO を使用している
アプリケーションによるAvid CoreAudio Driverへのアクセスを回避する
アプリケーションを起動するときなど、アプリ
ケーションがAvid CoreAudio Driverにアクセスする直前に Shiftキーを押したままにしておくと、アプリケーションによるAvid CoreAudio Driverへのアクセスを回避できます。(Apple Mail やiChatなど)アプリケーションによっては、サウンドのプレイバックの時点でAvid CoreAudioDriverにアクセスするものもあります。そのため、Avidハードウェアで再生しないようにするためには、サウンドのプレイバック直前に Shiftキーを押さえる必要があります。
Avid CoreAudio Manager(HD Native Thunderboltの例)
Avid CoreAudio Driverで正しく再生されるようにするには、まず Avid CoreAudioManagerを起動し、ステータスが「接続中(Connected)」であることを確認します。
第4章: CoreAudioを設定する 39
Avid CoreAudio Managerを使用するCoreAudioのバッファー・サイズの設定の変更、ご使用のAvidハードウェアの[ハードウェア設定]ダイアログへのアクセス、Avid CoreAudioDriverに対するボリュームの操作とミュートは、Avid CoreAudio Managerを使って行います。また、Avid CoreAudio Managerには、Avidハードウェアの機種、サポートされている I/Oチャンネル数、および接続されているクライアント(アプ
リケーション)数を認識する機能が搭載されてい
ます。
バッファー・サイズ
(使用している Avidハードウェアに応じて)以下のバッファー・サイズから選択できます。
• 64サンプル• 128サンプル• 256サンプル• 512サンプル• 1024サンプル• 2048サンプル
Avid CoreAudio Driverのバッファー・サイズを変更しても、Pro Toolsの[プレイバック エンジン]ダイアログの[H/Wバッファーサイズ]の設定には影響しません。
Avid CoreAudioハードウェアのバッファー・サイズを設定するには:
1 Avid CoreAudio Managerのファイルをダブルクリックします(ファイルは /アプリケーション/Avid/にあります)。
2 バッファー・サイズ・ポップアップメニューで、CoreAudioバッファー・サイズをサンプル数で選択します。一般的には、バッファーはできるだけ
小さめのサイズに設定するのが適切です。ただし、
パフォーマンスに問題が発生する(レコーディン
グやプレイバック中にクリックやポップなどのノ
イズが出る)場合は、CoreAudioのバッファー・サイズ設定を大きめにしてみてください。
3 クライアント・アプリケーションが CoreAudioドライバーに接続されている唯一のクライアント
である場合、アプリケーション側からバッファー・
サイズを変更することもできます。複数のクライ
アントがアクティブになっている場合、サンプル・
レートやバッファー・サイズを変更することはで
きません。
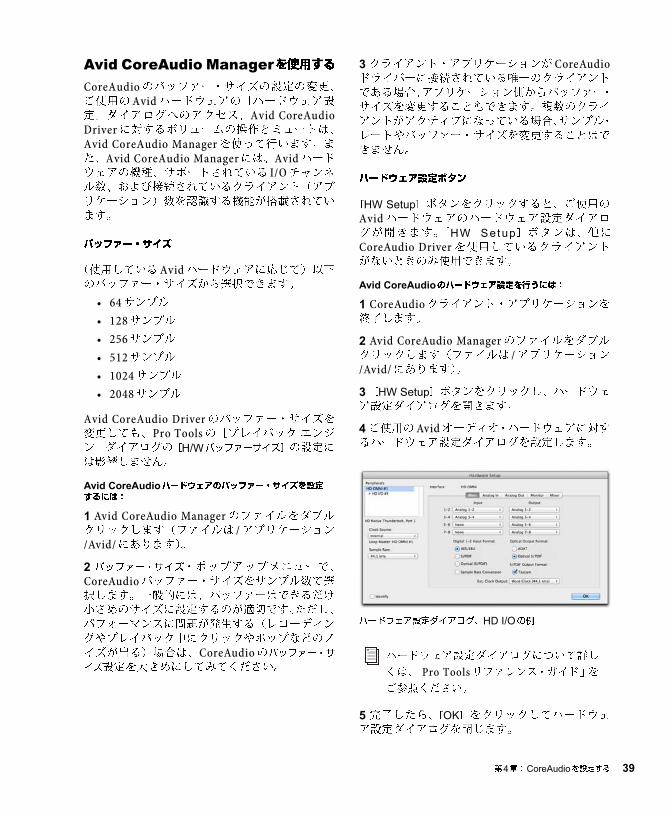
ハードウェア設定ボタン
[HW Setup]ボタンをクリックすると、ご使用のAvidハードウェアのハードウェア設定ダイアログが開きます。[HW Setup]ボタンは、他にCoreAudio Driverを使用しているクライアントがないときのみ使用できます。
Avid CoreAudioのハードウェア設定を行うには:
1 CoreAudioクライアント・アプリケーションを終了します。
2 Avid CoreAudio Managerのファイルをダブルクリックします(ファイルは /アプリケーション/Avid/にあります)。
3 [HW Setup]ボタンをクリックし、ハードウェア設定ダイアログを開きます。
4 ご使用のAvidオーディオ・ハードウェアに対するハードウェア設定ダイアログを設定します。
5 完了したら、[OK]をクリックしてハードウェア設定ダイアログを閉じます。
ハードウェア設定ダイアログ、HD I/Oの例
ハードウェア設定ダイアログについて詳し
くは、『Pro Toolsリファレンス・ガイド』をご参照ください。
HD Native Thunderboltインターフェイス・インストール・ガイド40
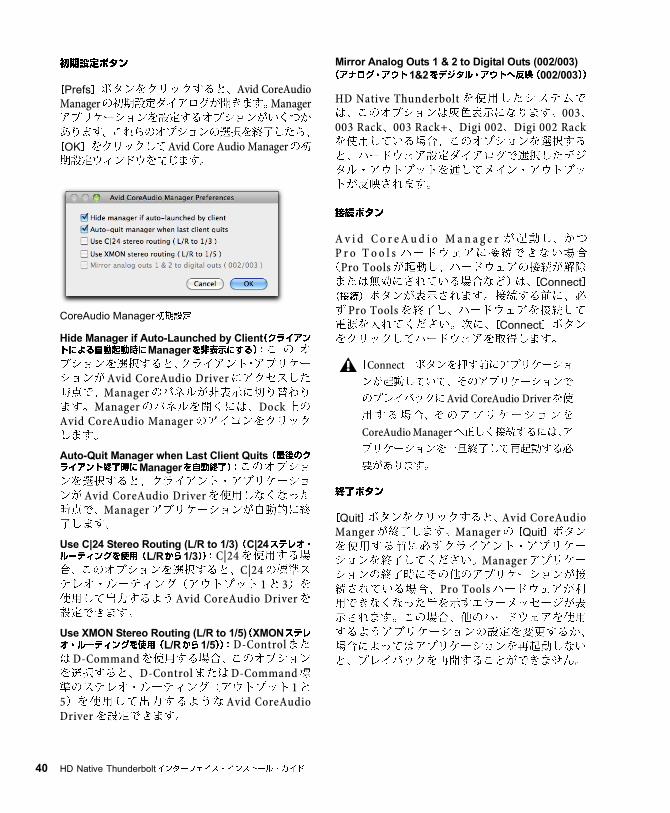
初期設定ボタン
[Prefs]ボタンをクリックすると、Avid CoreAudioManagerの初期設定ダイアログが開きます。Managerアプリケーションを設定するオプションがいくつか
あります。これらのオプションの選択を終了したら、
[OK]をクリックしてAvid Core Audio Managerの初期設定ウィンドウを閉じます。
Hide Manager if Auto-Launched by Client(クライアントによる自動起動時にManagerを非表⺬にする): こ の オ
プションを選択すると、クライアント・アプリケー
ションがAvid CoreAudio Driverにアクセスした時点で、Managerのパネルが非表示に切り替わります。Managerのパネルを開くには、Dock上のAvid CoreAudio Managerのアイコンをクリックします。
Auto-Quit Manager when Last Client Quits(最後のクライアント終了時にManagerを自動終了): このオプションを選択すると、クライアント・アプリケーショ
ンが Avid CoreAudio Driverを使用しなくなった時点で、Managerアプリケーションが自動的に終了します。
Use C|24 Stereo Routing (L/R to 1/3)(C|24ステレオ・ルーティングを使用(L/Rから1/3)): C|24を使用する場合、このオプションを選択すると、C|24の標準ステレオ・ルーティング(アウトプット 1と 3)を使用して出力するよう Avid CoreAudio Driverを設定できます。
Use XMON Stereo Routing (L/R to 1/5)(XMONステレオ・ルーティングを使用(L/Rから1/5)): D-ControlまたはD-Commandを使用する場合、このオプションを選択すると、D-ControlまたはD-Command標準のステレオ・ルーティング(アウトプット 1と5)を使用して出力するような Avid CoreAudioDriverを設定できます。
Mirror Analog Outs 1 & 2 to Digital Outs (002/003)(アナログ・アウト1&2をデジタル・アウトへ反映(002/003))
HD Native Thunderbolt を使用したシステムでは、このオプションは灰色表示になります。003、003 Rack、003 Rack+、Digi 002、Digi 002 Rackを使用している場合、このオプションを選択する
と、ハードウェア設定ダイアログで選択したデジ
タル・アウトプットを通してメイン・アウトプッ
トが反映されます。
接続ボタン
A v i d C o r e A u d i o M a n a g e r が起動し、かつP r o T o o l s ハードウェアに接続できない場合(Pro Toolsが起動し、ハードウェアの接続が解除または無効にされている場合など)は、[Connect](接続)ボタンが表示されます。接続する前に、必
ず Pro Toolsを終了し、ハードウェアを接続して電源を入れてください。次に、[Connect]ボタンをクリックしてハードウェアを取得します。
終了ボタン
[Quit]ボタンをクリックすると、Avid CoreAudioMangerが終了します。Managerの[Quit]ボタンを使用する前に必ずクライアント・アプリケー
ションを終了してください。Managerアプリケーションの終了時にその他のアプリケーションが接
続されている場合、Pro Toolsハードウェアが利用できなくなった旨を示すエラーメッセージが表
示されます。この場合、他のハードウェアを使用
するようアプリケーションの設定を変更するか、
場合によってはアプリケーションを再起動しない
と、プレイバックを再開することができません。
CoreAudio Manager初期設定
[Connect]ボタンを押す前にアプリケーションが起動していて、そのアプリケーションで
のプレイバックにAvid CoreAudio Driverを使用する場合、そのアプリケーションを
CoreAudio Managerへ正しく接続するには、アプリケーションを一旦終了して再起動する必
要があります。
第4章: CoreAudioを設定する 41
サードパーティー製アプリケーション用に
Avid HDオーディオ・インターフェイスを設定する
HD Native Thunderboltを Pro Tools以外のアプリケーション(Apple GarageBandなど)と共に使用するときは、そのアプリケーションのオー
ディオの環境設定からハードウェアの設定が行え
ます。
CoreAudioアプリケーション(Apple GarageBandなど)からハードウェアの設定を行うには:
1 オーディオ入力とオーディオ出力に[Avid NativeThunderbolt]を選択します。
2 以下のオプションからご使用のシステムのバッファー・サイズを選択します。
•[Maximum/Large]バッファー・サイズ
または
•[Minimum/Small]バッファー・サイズ
Apple の[サウンド]環境設定または[Audio MIDI設定]を設定する(Apple iTunesまたはQuickTime PlayerでAvid Audioインターフェイスを使用する場合に必要)
特定の CoreAudio 互換再生アプリケーション(Apple iTunesやQuickTime Playerなど)でAvidオーディオ・インターフェイスを使用するには、
Avid CoreAudio Managerに加え、[サウンド]環境設定または[Audio MIDI設定]を設定する必要があります。ただし、CoreAudio互換クライアント・アプリケーションの多く(BIAS Peak やAbleton Liveなど)は、クライアント・アプリケーション内から CoreAudioのバッファー・サイズとオーディオの入出力チャンネルを設定できるた
め、これは不要です。
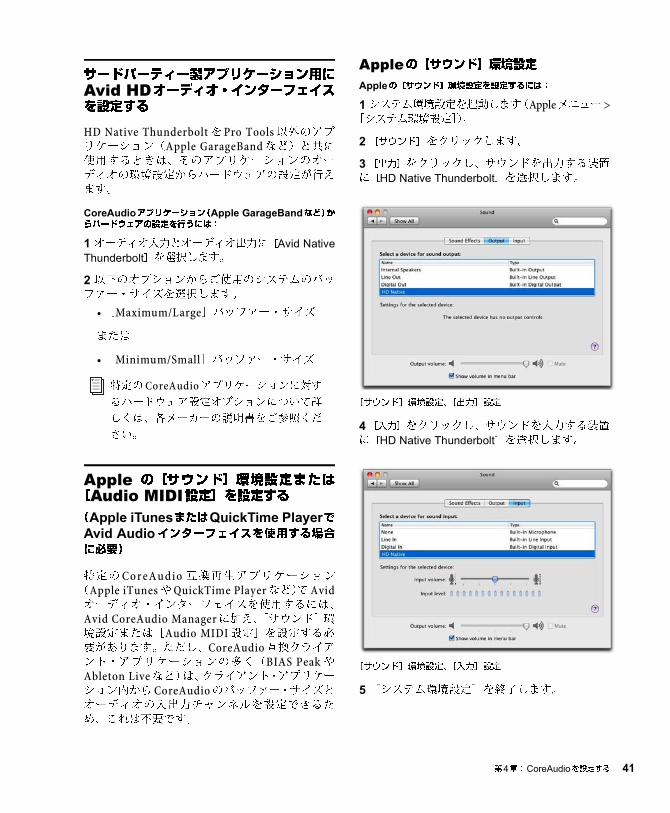
Appleの[サウンド]環境設定Appleの[サウンド]環境設定を設定するには:
1 システム環境設定を起動します(Appleメニュー >[システム環境設定])。
2 [サウンド]をクリックします。
3 [出力]をクリックし、サウンドを出力する装置に[HD Native Thunderbolt]を選択します。
4 [入力]をクリックし、サウンドを入力する装置に[HD Native Thunderbolt]を選択します。
5 [システム環境設定]を終了します。
特定の CoreAudioアプリケーションに対するハードウェア設定オプションについて詳
しくは、各メーカーの説明書をご参照くだ
さい。
[サウンド]環境設定、[出力]設定
[サウンド]環境設定、[入力]設定
HD Native Thunderboltインターフェイス・インストール・ガイド42
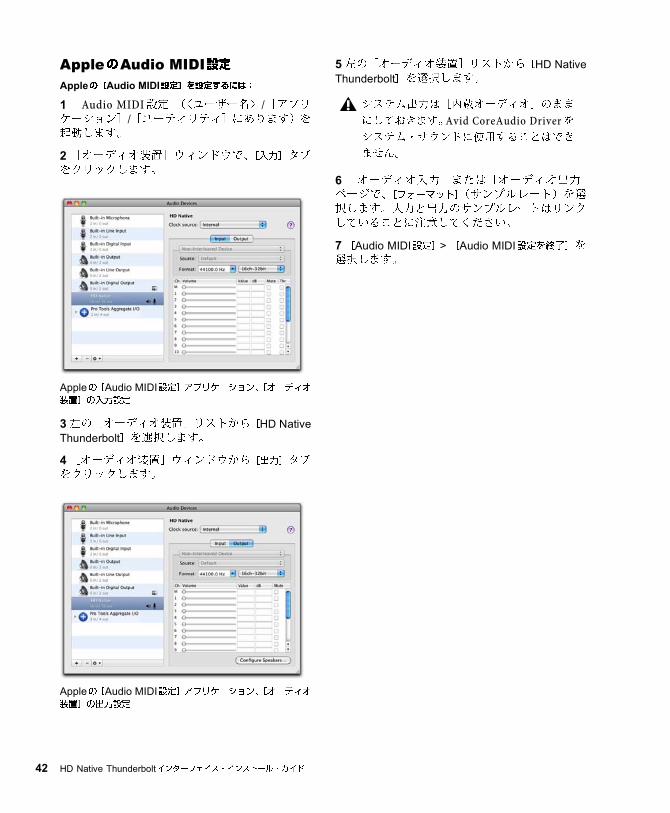
AppleのAudio MIDI設定Appleの[Audio MIDI設定]を設定するには:
1 [Audio MIDI設定](〈ユーザー名〉/[アプリケーション]/[ユーティリティ]にあります)を起動します。
2 [オーディオ装置]ウィンドウで、[入力]タブをクリックします。
3 左の[オーディオ装置]リストから[HD NativeThunderbolt]を選択します。
4 [オーディオ装置]ウィンドウから[出力]タブをクリックします。
5 左の[オーディオ装置]リストから[HD NativeThunderbolt]を選択します。
6 [オーディオ入力]または[オーディオ出力]ページで、[フォーマット](サンプルレート)を選
択します。入力と出力のサンプルレートはリンク
していることに注意してください。
7 [Audio MIDI設定] > [Audio MIDI設定を終了]を選択します。
Appleの[Audio MIDI設定]アプリケーション、[オーディオ装置]の入力設定
Appleの[Audio MIDI設定]アプリケーション、[オーディオ装置]の出力設定
システム出力は[内蔵オーディオ]のまま
にしておきます。Avid CoreAudio Driverをシステム・サウンドに使用することはでき
ません。
第5章: Pro Toolsを使用した低レイテンシー・モニタリング 43
第5章: Pro Toolsを使用した低レイテンシー・モニタリング
低レイテンシー・モニタリングを使用する
Pro Toolsを使用したHD Native Thunderboltシステムには、低レイテンシー・モニタリング・オプショ
ンが用意されており、モニター時のレイテンシー
を最小限に抑えることができます。インプットを
オーディオ・インターフェイス(内部ミックス・
バスではなく)に設定しているトラックのみ低レ
イテンシー・モニタリングが行えます。
低レイテンシー・モニタリングを使用するには:
1 [アウトプット パス](Output Path)セレクターから、選択した[低レイテンシー モニタリング パス](Low Latency Monitoring Path)([I/O設定]の[アウトプット]ページで設定)へ各ト
ラックをアサインします。これらのアウトプット
へアサインしたトラックのみ、低レイテンシー・
モニタリングを使用できます。
2 レコード・ボタンをクリックし、オーディオ・トラックをレコーディング可能にします。
3 [オプション](Options) > [低レイテンシー モニタリング](Low-Latency Monitoring)を選択します。
[低レイテンシー モニタリング]をオンにすると、レコーディング可能なトラック(選択した低レイテ
ンシー・モニタリング・パスへルーティングされ
たトラック)へアサインされたプラグインとセン
ドは自動的にバイパスされ、またバイパスされた
ままでなければなりません。また、これらのトラッ
クはマスター・フェーダーのメーターには反映さ
れません。
[I/O設定]で低レイテンシー・モニタリングを設定する
[I/O設定]の[アウトプット]ページでは、低レイテンシー・モニタリングをオン(またはオフ)
にできます。また低レイテンシー・モニタリング
用のアウトプット・パスを指定することもできま
す。低レイテンシー用のアウトプット・パスのチャ
ンネル幅は任意(モノから 7.1まで)です。低レイテンシー・モニタリングは、デフォルトではア
ウトプット 1-2を使用します。
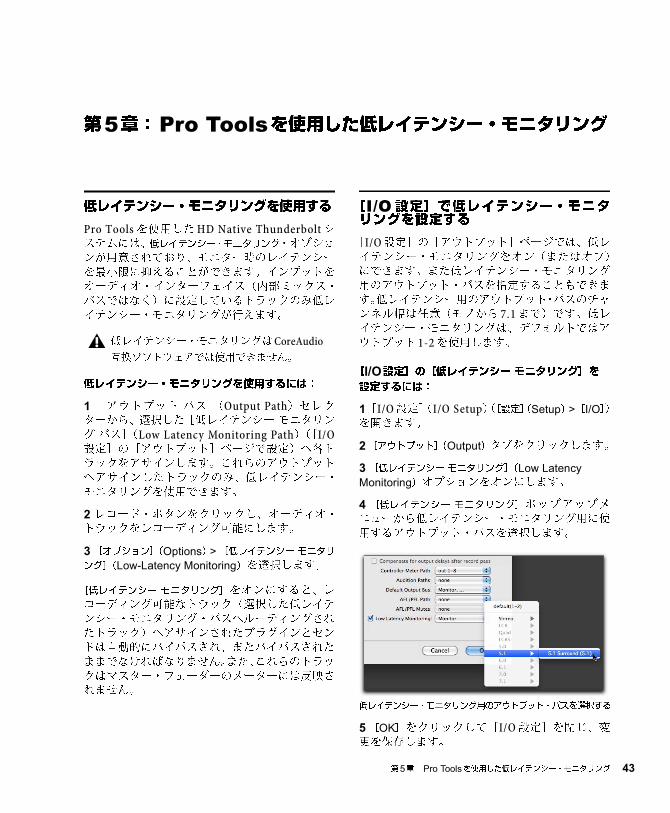
[I/O設定]の[低レイテンシー モニタリング]を設定するには:
1 [I/O設定](I/O Setup)([設定](Setup) > [I/O])を開きます。
2 [アウトプット](Output)タブをクリックします。
3 [低レイテンシー モニタリング](Low LatencyMonitoring)オプションをオンにします。
4 [低レイテンシー モニタリング]ポップアップメニューから低レイテンシー・モニタリング用に使
用するアウトプット・パスを選択します。
5 [OK]をクリックして[I/O設定]を閉じ、変更を保存します。
低レイテンシー・モニタリングはCoreAudio互換ソフトウェアでは使用できません。
低レイテンシー・モニタリング用のアウトプット・パスを選択する
HD Native Thunderboltインターフェイス・インストール・ガイド44
低レイテンシー・モニタリングとバウンス
低レイテンシー・モニタリングがオンの場合、オーディ
オ・トラックのみが[ディスクへバウンス]コマンド
の対象となります。AUXインプット・トラックとインストゥルメント・トラックは無視されます。
AUXインプット・トラックとインストゥルメント・トラックを含めるには、[ディスクへバウンス]コ
マンドを使用する前に低レイテンシー・モニタリング
をオフにします。
[ディスクへバウンス]の実行中は外部入力
へはレコーディングできません。バウンス
に外部入力を含めるには、[ディスクへバウ
ンス]コマンドを使用する前に新規オー
ディオ・トラックに録音しておく必要があ
ります。

Appendix A: Compliance Information 45
Appendix A: Compliance Information
Environmental Compliance
Disposal of Waste Equipment by Users in the European Union
This symbol on the product or its packaging indicates that this product must not be disposed of with other waste. Instead, it is your responsibility to dispose of your waste equipment by handing it over to a designated collection point for the recycling of waste electrical and electronic equipment. The separate collection and recycling of your waste equipment at the time of disposal will help conserve natural res+ources and ensure that it is recycled in a manner that protects human health and the environment. For more information about where you can drop off your waste equipment for recycling, please contact your local city recycling office or the dealer from whom you purchased the product.
Proposition 65 Warning
Perchlorate NoticeThis product may contain a lithium coin battery. The State of California requires the following disclosure statement: “Perchlorate Material – special handling may apply, See www.dtsc.ca.gov/hazardouswaste/perchlorate.”
Recycling Notice
This product contains chemicals, including lead, known to the State of California to cause cancer and birth defects or other reproductive harm. Wash hands after handling.
HD Native Thunderbolt Interface Installation Guide46
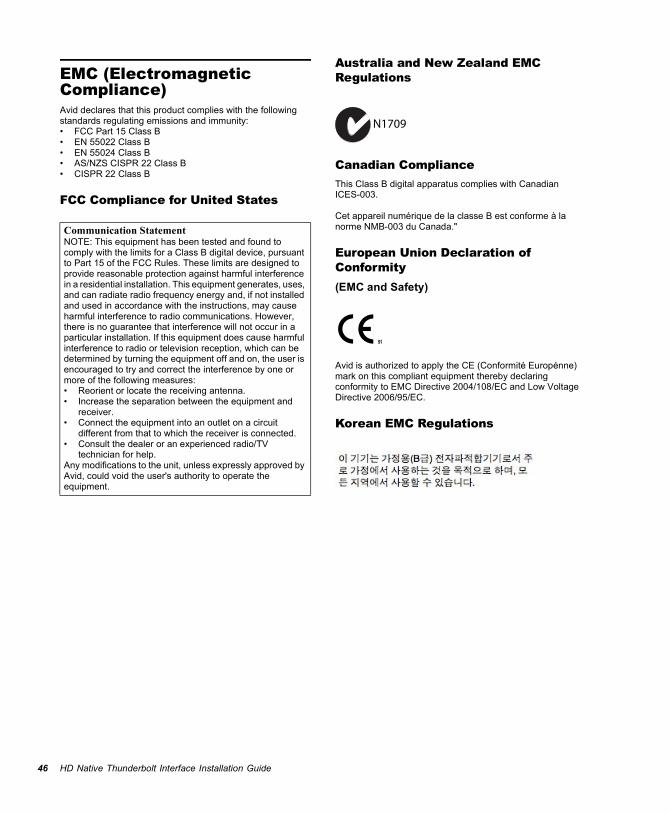
EMC (Electromagnetic Compliance)Avid declares that this product complies with the following standards regulating emissions and immunity:• FCC Part 15 Class B• EN 55022 Class B• EN 55024 Class B• AS/NZS CISPR 22 Class B• CISPR 22 Class B
FCC Compliance for United States
Australia and New Zealand EMC Regulations
Canadian ComplianceThis Class B digital apparatus complies with Canadian ICES-003.
Cet appareil numérique de la classe B est conforme à la norme NMB-003 du Canada."
European Union Declaration of Conformity(EMC and Safety)
Avid is authorized to apply the CE (Conformité Europénne) mark on this compliant equipment thereby declaring conformity to EMC Directive 2004/108/EC and Low Voltage Directive 2006/95/EC.
Korean EMC Regulations
Communication StatementNOTE: This equipment has been tested and found to comply with the limits for a Class B digital device, pursuant to Part 15 of the FCC Rules. These limits are designed to provide reasonable protection against harmful interference in a residential installation. This equipment generates, uses, and can radiate radio frequency energy and, if not installed and used in accordance with the instructions, may cause harmful interference to radio communications. However, there is no guarantee that interference will not occur in a particular installation. If this equipment does cause harmful interference to radio or television reception, which can be determined by turning the equipment off and on, the user is encouraged to try and correct the interference by one or more of the following measures:• Reorient or locate the receiving antenna.• Increase the separation between the equipment and
receiver.• Connect the equipment into an outlet on a circuit
different from that to which the receiver is connected.• Consult the dealer or an experienced radio/TV
technician for help.Any modifications to the unit, unless expressly approved by Avid, could void the user's authority to operate the equipment.
N1709
Appendix A: Compliance Information 47
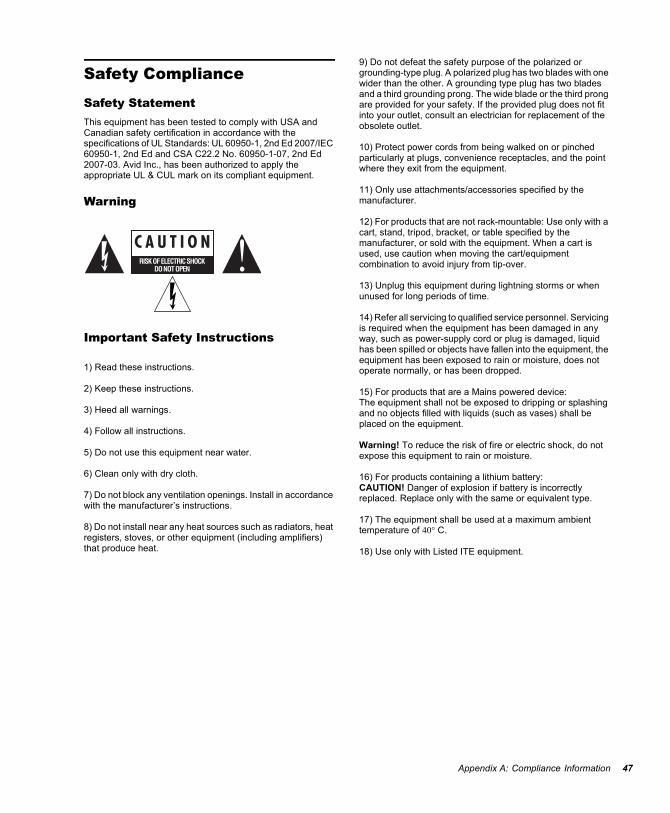
Safety Compliance
Safety StatementThis equipment has been tested to comply with USA and Canadian safety certification in accordance with the specifications of UL Standards: UL 60950-1, 2nd Ed 2007/IEC 60950-1, 2nd Ed and CSA C22.2 No. 60950-1-07, 2nd Ed 2007-03. Avid Inc., has been authorized to apply the appropriate UL & CUL mark on its compliant equipment.
Warning
Important Safety Instructions
1) Read these instructions.
2) Keep these instructions.
3) Heed all warnings.
4) Follow all instructions.
5) Do not use this equipment near water.
6) Clean only with dry cloth.
7) Do not block any ventilation openings. Install in accordance with the manufacturer’s instructions.
8) Do not install near any heat sources such as radiators, heat registers, stoves, or other equipment (including amplifiers) that produce heat.
9) Do not defeat the safety purpose of the polarized or grounding-type plug. A polarized plug has two blades with one wider than the other. A grounding type plug has two blades and a third grounding prong. The wide blade or the third prong are provided for your safety. If the provided plug does not fit into your outlet, consult an electrician for replacement of the obsolete outlet.
10) Protect power cords from being walked on or pinched particularly at plugs, convenience receptacles, and the point where they exit from the equipment.
11) Only use attachments/accessories specified by the manufacturer.
12) For products that are not rack-mountable: Use only with a cart, stand, tripod, bracket, or table specified by the manufacturer, or sold with the equipment. When a cart is used, use caution when moving the cart/equipment combination to avoid injury from tip-over.
13) Unplug this equipment during lightning storms or when unused for long periods of time.
14) Refer all servicing to qualified service personnel. Servicing is required when the equipment has been damaged in any way, such as power-supply cord or plug is damaged, liquid has been spilled or objects have fallen into the equipment, the equipment has been exposed to rain or moisture, does not operate normally, or has been dropped.
15) For products that are a Mains powered device: The equipment shall not be exposed to dripping or splashing and no objects filled with liquids (such as vases) shall be placed on the equipment.
Warning! To reduce the risk of fire or electric shock, do not expose this equipment to rain or moisture.
16) For products containing a lithium battery: CAUTION! Danger of explosion if battery is incorrectly replaced. Replace only with the same or equivalent type.
17) The equipment shall be used at a maximum ambient temperature of 40° C.
18) Use only with Listed ITE equipment.

HD Native Thunderbolt Interface Installation Guide48

Avid2001 Junipero Serra Boulevard Daly City, CA 94014-3886 USA
Technical Support (USA)Visit the Online Support Center at www.avid.com/support
Product InformationFor company and product information, visit us on the web at www.avid.com