Harris County On-Line Offense Reporting System OLO … · Harris County On-Line Offense Reporting...
111
Harris County On-Line Offense Reporting System OLO Report Entry Manual Justice Information Management System 406 Caroline, 2 nd Floor Houston, Texas 77002 http://www.jims.hctx.net/jimshome/ July 2005
Transcript of Harris County On-Line Offense Reporting System OLO … · Harris County On-Line Offense Reporting...

Harris County On-Line Offense Reporting System
OLO
Report Entry Manual
Justice Information Management System 406 Caroline, 2nd Floor Houston, Texas 77002
http://www.jims.hctx.net/jimshome/July 2005

Table of Contents
Overview..........................................................................................................................................1
Entry/Update ....................................................................................................................................2
Display/Inquiry ................................................................................................................................3
Connecting to the Unisys Mainframe ..............................................................................................4
Signing on to OLO...........................................................................................................................6
Signing off and Disconnecting from the Mainframe .......................................................................8
CAD Call For Service Transfers to OLO ........................................................................................9
New Case Number Entry Screen ...................................................................................................10
Address Validation.........................................................................................................................12 Preview Option Screen ............................................................................................................12 Multiple Hit Address Screen....................................................................................................13 Soundex Suggestion Screen.....................................................................................................14 Out of Range Screen ................................................................................................................15
Automated Offense Reporting - Main Menu.................................................................................17
Offense Entry Screen - Page 1 .......................................................................................................19
On-screen Code Look Up ..............................................................................................................23
Case Detail Menu Screen...............................................................................................................26 Persons Involved Entry Screen ................................................................................................28 Suspects Involved Entry Screen 1............................................................................................33 Suspects Involved Entry Screen 2............................................................................................38 Synopsis Entry Screen .............................................................................................................41 Narrative Entry Screen.............................................................................................................43 Property Menu .........................................................................................................................47
Article Entry Screen...........................................................................................................49 Vehicle Entry Screen .........................................................................................................53 Gun Entry Screen...............................................................................................................56 Boat Entry Screen ..............................................................................................................58 Parts Entry Screen..............................................................................................................61 Securities/Currencies Entry Screen....................................................................................63
Property Recovery/Intake Screen ............................................................................................65 Property Transmittal Screen ....................................................................................................67 Property Disposition Screen ....................................................................................................69
Supplement Processing Menu........................................................................................................71 SUPPLEMENT ENTRY SCREEN .........................................................................................73

DISPLAY SUPPLEMENT SCREEN......................................................................................75 UPDATE SUPPLEMENT SCREEN.......................................................................................78
Case Status/Approval Screen.........................................................................................................80
Case Summary Screen ...................................................................................................................83
Report Print Menu..........................................................................................................................85
Codes Inquiry.................................................................................................................................87
Appendix A — Security.................................................................................................................92
Appendix B — Navigation Tips ....................................................................................................93
Appendix C — Sending and Receiving Messages ........................................................................94
Appendix D — Sex Offender Verification Screen ........................................................................95
Appendix E — CAD Nature Codes ...............................................................................................97
Appendix F — TCIC/NCIC Entry Report .....................................................................................99
Appendix G — Current Working Accidents ...............................................................................100
Appendix H — Vehicle Stops......................................................................................................102
Appendix I — JIMS Project Analysts .........................................................................................105
Appendix J — OLO Glossary of Terms ......................................................................................106
Index ..........................................................................................................................................107

1
Overview CAD/OLO The Harris County Law Enforcement Computer System, which was implemented by the Sheriff’s Department in 1987, maintains incident-based information from 1990 to the present. The system is comprised of a large mainframe computer, a communications network, and two major software applications. The first is the Computer Aided Dispatch system (CAD) and the second is the On-line Offense Reporting system (OLO). These systems run on a UNISYS mainframe in a MAPPER programming environment. MAPPER stands for Maintaining, Preparing and Producing Executive Reports. The two applications operate independently of each other, but are related in that the CAD system passes incident-based information to the OLO system. The two systems reside in different partitions of the same mainframe computer. The OLO system consolidates all incident-based information from Harris County law enforcement agencies into a central repository. This allows all authorized users to retrieve information as needed. At the same time, the system includes a considerable number of safeguards to protect against unauthorized access, printing or report modification. OLO Main Menu The OLO system allows access in three modes: Entry, Update and Display. Use the OLO Main Menu screen to select the appropriate mode. Code Tables The OLO system is comprised of sequential screens which build the offense report. The process is the same as filling out a paper report, except the automated system is code-table driven. For example: offense code 5021= burglary/residence day/forced entry, and type code CHEV = Chevrolet. Instructions for accessing the online code tables are included in this manual. One very important entry is the offense nature code. The Uniform Crime Reporting (UCR) statistics code is derived from the nature code entered into OLO on Page 1 of the report. This code is used for the UCR reporting required by the state. Case Numbers OLO case numbers contain 10 digits beginning with the two-digit year, month and day followed by a four-digit, sequentially issued event number that contains one alpha character followed by three numeric characters. For example, the first case number issued on January 1, 2005 was 050101A001. Prior to January 1, 2005 the four-digit event number was entirely numeric. Approving Reports When you are finished entering all information in your OLO report, you must mark it COMPLETE on the Case Status/Approval screen. Reports marked COMPLETE are then approved by supervisors designated within an agency and assigned this responsibility.

2
Entry/Update Cursor Placement Your cursor must be in the correct field on the screen in order for you to complete certain functions. On an Entry screen, apply data to the report by positioning your cursor in the XMIT field before you press Enter. On an Update screen, save data to the report by placing the cursor in the UPDATE field before you press Enter. IMPORTANT: If you select the ENTER field from an Update screen, all changes you have made will be lost. The ENTER field causes a blank Entry screen to display. The Home Position and the Command Line To access a specific screen, your cursor must display in the top left corner of the screen. This is called the home position on the command line. On most screens, the cursor defaults to this position. To return your cursor to this position, press the Home key on your keyboard. To access an OLO program, type a code called a run name on the Command Line. NOTE: Do not press Enter when a character displays under the cursor on the command line. If
there is a character under the cursor, erase it by pressing the space bar, then move the cursor back to the blank space before pressing Enter.
To create an offense report you will typically use the following screens: 1. Initial Offense Screen (Page 1) — This screen identifies the offense type and the location of
the offense as well as specific geographic jurisdiction and time parameters. 2. Case Detail Menu Screen — Use this screen to select the various entry screens. 3. Persons Involved Screen — Enter all information available about the complainants,
witnesses, reportees, owners and tenants. Include personal identifiers, addresses and contact information.
4. Property Involved Menu Screen — For each type of property listed below, there is a recovery/intake screen, a transmittal screen and a disposition screen. a. Articles — Anything that does not fall into another property type category. b. Vehicles — All vehicle types, including trailers. c. Guns — All guns. Anything included under the NCIC definition of a gun. d. Boats — All boats. Anything included under the NCIC definition of a boat. e. Parts — Boat or vehicle parts. f. Securities — Money, stocks, bonds, etc.
5. Synopsis — A brief summary of the incident. Similar to a press release. 6. Narrative — A detailed summary of the incident. 7. Suspects involved — Enter all juvenile, defendant, suspect or missing person information. 8. Case status — This screen displays the current status of the report and the number of
supplements. It also identifies the person who approved these items. 9. Supplements — Additional information added to the report. Entry Code Table Access Code-table look-up is available for any field beginning with the > symbol. From most entry screens, you may access a code table by placing the cursor after the > symbol, then press Enter.

3
Display/Inquiry Confidential Access Flag Access to a report may be limited or denied based on the confidentiality assigned by the responsible division or agency. This restriction is called the confidential flag and is placed on the report by an individual with a rank of sergeant or higher using the Case Status/Approval screen. Only individuals with an equal or higher rank can view the report, and the division code of the person accessing the report must be the same as the division code of the person who entered it or the same as the responsible division as specified in the report. Even if the confidential flag has been set, access to the Case Summary screen is still permitted. Case Summary Even if the confidential access flag is set, any OLO user can access the Case Summary screen. The Case Summary screen includes the name of the person who last updated the report or supplement. Report Print Menu The Report Print Menu allows users to print various reports including the Detailed Offense Report, which can be routed directly to the District Attorney's Intake Division (printer ID 200). If the confidential access flag is set, security authorization is required to print a Detailed Offense Report. See the section titled Report Print Menu for more information. Inquiry Code Table Access You may obtain lists of valid codes by entering the run name CODES on the command line. This transaction provides instant access to code values for all parts of the report entry process. See the section titled Code Inquiry for more information about code tables. Search Menu Provides access to the Harris County Law Enforcement Offense-Reporting Search Menu and other investigative reports. See the OLO Search manual for more information.

4
Connecting to the Unisys Mainframe Emulation software called QTerm allows your personal computer (PC) to connect to the UNISYS mainframe where the CAD and OLO systems reside. This software should already be installed on your PC, and you should see an icon on your desktop. Double click on the icon to run QTerm. The following screen should display. NOTE: For OLO sign-on problems, call or send a message to the Sheriff’s Office Network Help Desk at 713-755-8130. If you forget your OLO password, call the CAD/OLO Coordinator at 713-755-6911. For help with QTerm software set up, contact your department’s network administrator.

5
Setting up your screen display You may change the font type and size used for the display. On the sample screen above, the Courier font, 6 point size is displayed on the toolbar. Bigger monitors allow bigger fonts to be used. Use the pull-down menus to change these settings and find the one that works best for you. Your PC should be assigned one to three terminal IDs The terminal IDs appear on a toolbar at the top of the screen. You may use these terminal IDs to open active sessions. When signed on to OLO, it is often necessary to have access to more than one session. On the sample screen above, the terminals are designated as 1141 and 1142 on the toolbar. You can switch back and forth between the two sessions by clicking on the box where the desired terminal ID is displayed. You can also toggle between the two terminals by pressing the ESC key on your keyboard. The session you are currently using will be highlighted. In the example below terminal 1141 is highlighted.
NOTE: After your terminal is connected, the icon to the left of the terminal ID displays in
green. If this icon is red, a message is waiting. See Appendix C. If the terminal IDs do not display on the toolbar, Click on View at the top of the screen, then click on Terminals Bar. Connect each terminal session separately 1. Click on the terminal you wish to connect. This will highlight that terminal. 2. Click on the telephone icon on the left of the toolbar towards the top of the screen. (This
step may happen automatically when you open the QTerm software.) A connection window will display. 3. Click on Connect to connect your terminal. The following status message displays on your
screen once you are connected: ***** UNISYS 2200/500 SYSTEM **** * * HCLE PRODUCTION MAPPER * * UNIT: 1142 USER: <IDLE> * *********** LEVEL 39R1B ********* * NOTE: The word IDLE displays in the USER field on the example above. This indicates that
no sign-on action has been taken. See the section titled Signing on to OLO on the next page.
4. Repeat steps 1 - 3 to connect another session. Once the sessions are connected, complete
the sign-on procedures on the following page to sign-on to each session.

6
Signing on to OLO To access the OLO system, a user will need a user ID, department number and password. The user ID consists of the individual’s initials followed by a five-digit personnel ID number (PID). The department number determines the user’s level of security. The user creates his or her own password when signing on for the first time. Choosing a Password The password you choose must be one to six characters: letters, numbers or a combination of
letters and numbers with no punctuation or spaces. Signing on the First Time When your departmental security officer sets up your PID, he or she may set it up with or
without a temporary password. If your PID is set up without a temporary password, follow step 3a below. If your PID is set up with a password, follow step 3b below. The first time you log-on, you must enter a new password.
If you try to log on without a password the following message will display: PASSWORD ENTRY REQUIRED. ENTER USERID,DEPT_NO,/PASSWORD Once you are connected to the UNISYS mainframe, the cursor defaults to the top left corner
of the screen. To log on the first time:
1. Type ] (the close bracket symbol). The entry will display as an asterisk (*). 2. Press Enter. At the top of the screen a highlighted line appears. This is the command
line. 3. On the highlighted line, type ], followed by your user ID, department number and
password. You will need to make up a password. Complete step a if you were not given a temporary password. Complete step b if you were given a temporary password.
Example using department 14: a. ]TJ19096,14,/PASSWORD OR b. ]TJ19096,14,TEMPORARYPASSWORD/PASSWORD NOTE: The slash ( / ) indicates that you are entering a new password. Remember to
type a password that is one to six characters in length. 4. Press Enter. The sign-on response screen will display indicating that you are now
logged on with your new password. ***** UNISYS 2200/500 SYSTEM **** * * HCLE PRODUCTION MAPPER * * UNIT: 1141 USER: TJ19096 * ******* MODE 0 DATA BASE ***** * NOTE: Once sign-on is successful, the USER field displays the user ID of the person
who is currently signed-on.

7
Signing on Thereafter 1. Complete steps 1 and 2 on the previous page. 2. At the highlighted line, type a ] followed by your user ID, department number and
password. For example, a user assigned to department 14, would type: ]JD19000,14,PASSWORD
3. Press Enter.
4. The sign-on response screen will display as follows:
***** UNISYS 2200/500 SYSTEM **** * * HCLE PRODUCTION MAPPER * * UNIT: 1141 USER: TJ19096 * ******* MODE 0 DATA BASE ***** * Signing on When Your Password Expires Every 30 days your password will expire and the following message will display after you
attempt to logon: PASSWORD EXPIRED. ENTER USERID,DEPT_NO,OLD PASSWORD/NEW PASSWORD Follow the steps below to erase the message and log on with a new password: 1. Press the Home key to return your cursor to the home position. 2. Hold down the Alt key and press 9 at the same time to erase the message from the
message line. 3. Type a ] followed by your user ID, department number, expired password and new
password as follows: ]TJ19096,DEPARTMENT,EXPIRED PASSWORD/NEW PASSWORD NOTE: The slash ( / ) indicates that you are entering a new password. Do not press
Enter when a character displays under the cursor on the command line. If there is a character under the cursor, erase it by pressing the space bar, then move the cursor back to the blank space before pressing Enter.
Sign-on Failed Messages If you typed something incorrectly, one of the following messages will display on the red
highlighted line: INVALID USER-ID INVALID DEPARTMENT NUMBER INVALID USER PASSWORD

8
If an error message displays, attempt to log on again as follows:
1. Type: ]USER ID,DEPARTMENT,PASSWORD 2. Press Enter.
NOTE: Don’t forget to type the close bracket before your user ID. Example: ]TJ19096,14,TEST User-ID Disabled You are allowed five attempts to enter your password correctly. If you enter your password
incorrectly more than five times, the following message will display:
SECURITY VIOLATION. THAT USER-ID IS NOW DISABLED. CONTACT THE COORDINATOR.
If you receive this message, contact your sergeant, your project analyst, HCSO Communications or the ITC Help Desk at 713-755-6624. Authorized personnel can reset your user ID, so you can create a new password. See Appendix H in this manual for a list of project analysts.
Signing off and Disconnecting from the Mainframe To sign off:
1. Press the Home key to return your cursor to the Home position if it is somewhere else on the screen.
2. Type the letter X (for exit). 3. Press Enter. The following message will display:
MAPPER disconnected--enter transaction name To disconnect from the mainframe: 1. Click on the telephone icon on the left of the toolbar towards the top of the screen. A
connection window will display. 2. Click on Disconnect to disconnect your terminal. The following status message displays
once you are disconnected: Session Path Closed NOTES: You must sign off and disconnect from each terminal session separately. The
automatic log-off after 60 minutes of inactivity is currently disabled. Be sure to log off when you are finished.
When running QTerm, the number pad to the right of your PC keyboard is disabled.

9
CAD Call For Service Transfers to OLO Calls for service that are entered into the Computer Aided Dispatch (CAD) system are referred to as call slips. Once the call slip is cleared from CAD as a true alarm, report or arrest, the information is transferred to OLO automatically. Sometimes it is necessary to manually force a transfer, and occasionally it is necessary to generate a new case because the incident was never entered into CAD. OLO reports cannot be written for CAD events that have been cleared with the status of cancelled or miscellaneous. Computer Aided Dispatch (CAD) Automatic Transfer Information from CAD is transferred to OLO automatically when a call slip is cleared from CAD as a:
• true alarm • report or • arrest
When the transfer to CAD is automatic, some fields on the Page 1, Persons Involved (reportee) and Case Status screens are automatically filled in with data transferred from CAD. Transferring a Case to OLO when the CAD Transfer is Not Automatic If a case is not cleared from the CAD system in one of the three ways listed above, then information is not transferred automatically to OLO. If an entry, update or query is attempted, the following message displays, “CASE DOES NOT EXIST IN OLO—USE RETCASE, CASE #--THEN TRY AGAIN.” If a report should be written, transfer the case manually by running one of the transactions below. To recall a case within 24 hours use the run name RETCALL 1. Type RETCALL,case number at the command line. 2. Press Enter. To recall a case after 24 hours use the run name RETCASE 1. Type RETCASE,case number at the command line. 2. Press Enter. Creating a New Case when No CAD Call for Service was Generated If no call for service was created in CAD, the officer must generate the case. This happens, for example, when an officer witnesses a crime in progress and no call for service has been made. The run name NEWCASE creates a call for service with a case number in CAD, clears the case by changing the disposition to REP (meaning a CAD report will be written) and transfers the case to OLO. See the next page for more detail.

10
New Case Number Entry Screen Use this screen only when no call for service was created in the Harris County CAD system and you need to generate a case number in order to enter an OLO report. This procedure is required for all cases not dispatched and cleared through the CAD system.
ACCESS METHOD 1. Type NEWCASE at the command line. 2. Press Enter. The following screen will display. ***************************************************************************** 12B400 NEW CASE NUMBER [1] [2] [3] [4] [5] [6] AREA: GRID: KYMP: BEAT: JUR: SUBD: [7] [8] [9] UNIT NO: CAD NATURE CODE: AGENCY/NAME: [10] [11] [12] LOCATION - STREET NUMBER: STREET NAME: ALI: [13] COMMENTS: [14] [15] [16] E3 CONTINUE:* EXIT:* ***************************************************************************** To generate a new case: 1. Fill in fields 7, 8, 9, 10, and 11. Fields 12 and 13 are optional. 2. Tab to field 15 (CONTINUE). 3. Press Enter.
a. If the message SUBSTITUTE INFORMATION USED - PLS CONTINUE displays, continue with step 4 below.
OR b. If the message NO DATA FOUND IN GEO FILE SEARCH displays, see the GEO File
Validation instructions beginning on page 12. OR
c. If a GEO File validation screen displays, see the GEO File Validation instructions beginning on page 12.
4. Tab to the CONTINUE field and press Enter again. The following message will display: a. YOUR NEW CASE NUMBER IS : YYMMDD 0001 OR
b. If the event has still not transferred from CAD to OLO within two seconds, the following warning message is displayed:
YOUR NEW CASE NUMBER IS : YYMMDD 0001 THE CASE MAY NOT HAVE BEEN TRANSFERED YET... PLEASE WAIT MOMENTARILY AND THEN ENTER YOUR CASE THRU OLO
MENU

11
EXPLANATION OF FIELDS 1. AREA: Communication area. Displays automatically based on
address entered in fields 10 and 11. 2. GRID: Key Map GRID location. Displays automatically based on
address entered in fields 10 and 11. 3. KYMP: Key Map page and cell location. Displays automatically
based on address entered in field 10 and 11. 4. BEAT: Beat code. Displays automatically based on address
entered in fields 10 and 11. 5. JUR: Jurisdiction. Displays automatically based on address
entered in fields 10 and 11. 6. SUBD: Subdivision code. Displays automatically based on address
entered in fields 10 and 11. 7. UNIT NO: Required. Unit number of officer entering call. 8. CAD NATURE CODE: Required. Nature code of original call. See Appendix E
for an explanation of CAD nature codes. 9. AGENCY/NAME: Required. Name of originating agency. 10. STREET NUMBER: Required. Street number. 11. STREET NAME: Required. Street name. 12. ALI: Additional location information or apartment number. 13. COMMENTS: Optional. Comments about the call. 14. E3: The two-character code at the bottom of the screen tracks
the user's selections during the Geo search. The code is logged on the Call For Service record and allows JIMS to monitor the GEO validation.
15. CONTINUE: Place cursor here and press Enter to generate a CAD case
number and an OLO report. 16. EXIT: Place cursor here and press Enter to exit this screen
without generating a CAD case number.

12
Address Validation The address entered on the NEWCASE screen is validated against the CAD GEO file. Once an address is validated, the AREA, GRID, KYMP, BEAT, JUR and SUBD fields are filled in automatically. If an address does not match an address on file, one or more of the following validation screens will display. Follow the instructions below to validate an address. Preview Option Screen This screen displays when equivalent street names are found in the address database. Use this screen to continue your search for a validated address. See the explanation of the three options below. *****************************************************************************
**PREVIEW OPTION ** - INPUT OF: 1128 ASHLAND WILL SEARCH THESE EQUIVALENT NAMES FOR ADDRESS NUMBER OPTION:1 TO ROLL THIS LIST -- XMIT FROM HERE NOW OPTION:2 SELECT A MORE CORRECT NAME WITH THE CURSOR THEN XMIT ...STREET NAME............. LOW... HIGH............................... ASHLAND 700 4499 ASHLAND FOREST DR 6600 7199 OPTION:3 USE ORIGINAL INPUT XMIT HERE (OR F#7) U R SEEING LINE 1 THRU 2 OUT OF 2
*****************************************************************************
EXPLANATION OF OPTIONS
OPTION: 1: To page through more address suggestions, tab next to this option and press Enter.
OPTION: 2: Select the correct street from this screen by tabbing to the
listing to be used, then press Enter. a. The NEWCASE screen will reappear with the following
message: SUBSTITUTE INFORMATION USED - PLS CONTINUE.
OR b. One of the other address validation screens will display.
See explanations below. OPTION: 3: To return to the NEWCASE screen without making a
change, tab next to this option and press Enter.

13
Multiple Hit Address Screen If a range of possibilities exists for the street name selected from the Preview Option, the following screen will display. See the explanation of the three options below. ***************************************************************************** **MULTIPLE HIT** NUMBER 419 ON PARK IS VALID **ADDRESS** BUT THERE ARE SEVERAL POSSIBLITIES OPTION:1 TO ROLL THIS LIST XMIT FROM HERE NOW OPTION:2 SELECT THE CORRECT LINE WITH CURSOR THEN XMIT (NOT F#1) . .STREETNAME. . . . . . . LO-NUM. . . HI-NUM.JURIS.KYMP.ZIPCD GRID PARK 101 THRU 699 HA 459Z 77562 459Z PARK 401 THRU 499 BT 501U 77520 501U PARK 401 THRU 499 PA 536H 77506 S715 OPTION:3 FORCE ORIGINAL INPUT XMIT HERE TO MAKE NO SELECTION (F#7) U R SEEING LINE 1 THRU 2 OUT OF 2
*****************************************************************************
EXPLANATION OF OPTIONS
OPTION: 1: To page through more address suggestions, tab next to this option and press Enter.
OPTION: 2: Select the correct address range from this screen by tabbing
to the address listing to be used, then press Enter. Note about the Jurisdiction field: HO is for a Houston address and HA is for an address in Harris County but outside the city limits of Houston.
OPTION: 3: To return to the NEWCASE screen without making a
change, tab next to this option and press Enter.

14
Soundex Suggestion Screen When similar sounding street names are found, the sample screen below displays. Use one of the three options listed on the screen. ***************************************************************************** ** SOUNDEX ** INPUT NAME WESTHEIMER RD IS SIMILAR TO THESE **SUGGESTIONS** OPTION:1 TO ROLL THIS LIST XMIT FROM HERE NOW OPTION:2 SELECT REPLACEMENT NAME WITH CURSOR AND XMIT (NOT F#1) OPTION:3 TRY THIS NEW NAME INSTEAD--> NOW XMIT . . . . .LINE. .SUGGESTED NAME. . . . . . . . .02356. . .0018-B-237 2 WESTHEIMER PL BLDG 811 WESTHIEMER BLDG 5959 WESTHEIMER BLDG 3733 WESTHEIMER BLDG 5050 WESTHEIMER BLDG WESTMERE CT WESTHEIMER BLDG OPTION:4 USE ORIGINAL INPUT XMIT HERE TO RETURN TO C1 (OR F#7) U R SEEING LINE 1 THRU 12 OUT OF 29 *****************************************************************************
EXPLANATION OF OPTIONS
OPTION: 1: To page through more address suggestions, tab to this option and press Enter.
OPTION: 2: To select another address listed on this screen, tab to the
listing you want to use and press Enter. OPTION: 3: To enter another street name,
1. Tab next to this option and type in another street name. 2. Press Enter. The NEWCASE screen will display with
the message REPLACEMENT MUST BE VALIDATED – XMIT.
3. Press Enter. a. If the name is valid, the following message will
display SUBSTITUTE INFORMATION USED - PLS CONTINUE.
b. If the name is not valid, one of the address validation screens will display.
OPTION: 4: Tab next to this option and press enter to return to the
NEWCASE screen without making a change.

15
Out of Range Screen If the street number entered is out of range, the following screen will display. This screen lists four options which are explained below. ***************************************************************************** **OUT OF RANGE** STREETNAME WESTHEIMER RD IS VALID BUT 18 INPUT NUMBER 99 IS OUT-OF-RANGE FOR ALL ENTRIES OPTION:1 TO ROLL THIS LIST XMIT FROM HERE NOW OPTION:2 KEEP INPUT NUMBER BUT USE KYMP-JURIS FROM A SELECTED LINE BELOW OPTION:3 CHANGE INPUT NUMBER TO THIS NEW NUMBER--> XMIT . .STREETNAME. . SELECT. . LO-NUM. . . HI-NUM.JURIS.ZIPCD.KYMP. . . . . . WESTHEIMER RD 101 THRU 199 HO 77006 493T WESTHEIMER RD 201 THRU 299 HO 77006 493T WESTHEIMER RD 301 THRU 399 HO 77006 493S WESTHEIMER RD 401 THRU 499 HO 77006 493S WESTHEIMER RD 501 THRU 599 HO 77006 493S WESTHEIMER RD 601 THRU 799 HO 77006 493S WESTHEIMER RD 801 THRU 899 HO 77006 493S WESTHEIMER RD 901 THRU 999 HO 77006 493S OPTION:4 USE ORIGINAL INPUT XMIT HERE-FORCE OUT-OF-RANGE NUMBER (F#7) U R SEEING LINE 1 THRU 08 OUT OF 164 *****************************************************************************
EXPLANATION OF OPTIONS
OPTION: 1: To page through more address suggestions, tab next to this option and press Enter.
OPTION: 2: To keep input number, but select a valid jurisdiction and
KeyMap, tab to the listing to be used and press Enter. OPTION: 3: To try another street number, tab to this option and type
another street number and press Enter. The NEWCASE screen will display with the message SUBSTITUTE INFORMATION USED - PLS CONTINUE.
OPTION: 4: To return to the NEWCASE screen without making a
change, tab next to this option and press Enter.

16
No match for address: When no possible matches are found in the address database, the following message displays: NO DATA FOUND IN GEOFILE SEARCH. 1. With the cursor in the CONTINUE field on the NEWCASE screen, press Enter. 2. a. One of the address validation screens will display.
OR b. The message NO DATA FOUND IN GENERIC SEARCH will display. This means the
address you entered cannot be validated. 3. Add, change or delete information on the NEWCASE screen as needed. 4. Tab to the CONTINUE field and press Enter. To maintain the address entered on the NEWCASE screen: 1. From any validation screen, press F7. The NEWCASE screen will reappear. 2. Tab to the CONTINUE field and press Enter. 3. If a validation screen displays, press F7 again to return to NEWCASE. 4. The message NO DATA FOUND IN GENERIC SEARCH will display. 5. Fill in required fields on the NEWCASE screen. 6. Tab to the CONTINUE field and press Enter. 7. Your new case number will display. NOTE: If you generate a case without a verified address, the AREA, GRID, KYMP, BEAT, JUR, and SUBD fields all fill in with 999 or 998. Avoid using the default whenever possible so that accurate and complete records can be maintained and used for crime analysis.

17
Automated Offense Reporting - Main Menu Use the OLO Main Menu to access a report in entry, update or display mode, to access the Supplement Processing Menu or Case Summary screen for a particular case or to access the OLO Report Print Menu or Search Menu.
ACCESS METHOD Type OLO in the home position and press Enter. The following screen will display. *****************************************************************************
AUTOMATED OFFENSE REPORTING
MAIN MENU enter case number then xmit
[1] [2] [3] (E) ENTER REPORT > 050101A120< (D) DISPLAY REPORT > <
[4]
(U) UPDATE REPORT > <
[5]
[6] (S) SUPPLEMENT PROCESSING > < (C) CASE SUMMARY > <
[7]
[8] (option) OLO,option,case#,type fast access [9] REPORT PRINT MENU > < xmit only [10] SEARCH MENU > <
*****************************************************************************
EXPLANATION OF FIELDS 1. (E) thru (C): Fast-access abbreviation for each of the options on the
OLO Main Menu. To bypass this menu and go directly to Page 1 of the offense report, type one of the following formats in the home position:
To access Page 1 in Entry mode: OLO,E,case number To access Page 1 in Update mode: OLO,U,case number To access Page 1 in Display mode: OLO,D,case number Press Enter. To access the Supplement Processing Menu type the
following in the home position:

18
OLO,S,case number Press Enter.
To access the Case Summary screen (in display mode only), type the following in the home position:
OLO,C,case number Press Enter.
2. ENTER REPORT: To enter a new offense report, type a case number in the
selection field next to this option and press Enter. 3. >050101A120<: Selection field. Type a case number in the selection field
for the desired option and press Enter. 4. DISPLAY REPORT: To display a previously entered offense report, type a case
number in the selection field next to this option and press Enter.
5. UPDATE REPORT: To update a previously entered offense report, type a case
number in the selection field next to this option and press Enter.
6. SUPPLEMENT To enter, update or display supplement information for a PROCESSING: previously transferred offense report, type a case number in
the selection field next to this option and press Enter. The Supplement Processing Menu will display. See page 71 for a detailed explanation of the Supplement Processing Menu.
7. CASE SUMMARY: To display the case summary for a previously entered
offense report, type a case number in the selection field next to this option and press Enter. Anyone with a valid sign-on code and case number may access a current summary of the report even if the confidential access flag has been set.
8. (option) thru fast access: This is the fast access format for accessing the various
selections or options listed on this menu. Valid options are: E, D, U, S, C. Valid types are PER, PRO, SYN, NAR,SUS, CAS and SUP.
9. REPORT PRINT MENU: To access the menu from which a selected report may be
printed, move the cursor to the selection field next to this option and press Enter. See page 85 for a detailed explanation of the OLO Report Print Menu.
10. SEARCH MENU: To access the search menu, move the cursor to the selection
field next to this option and press Enter. This provides access to HCLE Offense-Reporting Search Menu. See the OLO Search Manual for more information.

19
Offense Entry Screen - Page 1 This screen identifies the offense type, number of victims, and offense location, as well as the specific geographic jurisdiction and time parameters. When Page 1 of the report displays, it will always be in Update mode. This is because when the call for service is transferred from CAD, some information will already exist on Page 1.
ACCESS METHOD 1. From the OLO Main Menu, tab to the ENTER REPORT field. 2. Type case number. 3. Press Enter. The following screen will display.
FAST ACCESS To go directly to Page 1 of the report and bypass the OLO Main Menu: 1. Type the following in the home position (the top left corner of the screen): OLO,E,case number (use the ten-digit OLO case number) 2. Press Enter. The following screen will display. NOTE: For an explanation of OLO terminology such as home position and command line,
see Appendix I, Glossary of Terms, in this manual.
***************************************************************************** UPDATE HARRIS COUNTY OFFENSE REPORT CASE # 050101A120 [1] [2] OFFENSE AS REPORTED: CRIME FOCUS:> [3] [4] [5] OFFENSE TYPE:> # OF VIC: DESCRIPTION [6] [7] [8] [9] [10] ORIGINATING DIV:> KEY MAP: BEAT:> DISTRICT: D4 Jurs: JIMS TESTING [11] [12] [13] LOCATION- STREET NO: 16715 STREET NAME: Ali:1 [14] [15] INTERSECTION: City: [16] [17] Premises:> Weather:> [18] [19] DATE OF OFFENSE/BEGIN DATE: / / BEGIN TIME: [20] [21] End Date: / / End Time: : [22] [23] [24] [25] REPORTING DEPUTY: JIMS,TEST PID: 19096 DATE: 02/01/00 TIME: [26] [27] [28] ENTERED BY NAME: HORST,JULIANE DATE: 02/15/00 TIME: 09:54 [29] [30] [31] UPDATE > OLO MASTER MENU > DETAIL MENU > Apply Data or Fast Access *****************************************************************************

20
Points to Remember When Entering an OLO Report:
• On most screens, fields displayed in capital letters are required. Fields displayed in lowercase letters are optional.
• Code table look up is available for any field containing the > symbol. Place the
cursor after the > and press Enter to access a list of valid codes for the field. See page 23 for more detailed information about on-screen code look up.
When the code table displays, page through it by pressing Enter. To select a particular code, tab to it and press Enter. The entry screen will reappear with the selected code filled in. For more detail, see the section titled “On-Screen Code Look Up” in this manual.
• There can be up to four offense types per report. (At least one type must be entered.) • If the nature code for sex offender verification (6830) is used on Page 1, the Sex
Offender Verification screen will display. See an explanation of the screen in Appendix D of this manual.
EXPLANATION OF FIELDS 1. OFFENSE AS REPORTED: Offense code associated with original nature code entered
on CAD call for service by the call taker (not the updated nature code entered by the dispatcher). Display only.
2. CRIME FOCUS:> Required. To access a list of valid codes, move the cursor
to this field and press Enter. 3. OFFENSE TYPE:> Required. A maximum of four offense types per report
may be entered. To access a list of valid codes, move the cursor to this field and press Enter. Whenever possible, select a code for which the UC field on the code table is marked Y (for yes). The Y designates a uniform crime reporting code.
4. # OF VIC: Required. The number of victims for each offense must be
entered. 5. DESCRIPTION: Description of offense displays automatically after Enter is
pressed. This is the literal description of the offense-type code entered in field 3.
6. ORIGINATING DIVISION:> Required. The original division assigned to the call for
service based on the user ID of the primary unit. This data transfers automatically from CAD.

21
7. KEY MAP: Required. Key Map page and cell location where offense occurred. This data transfers automatically from CAD.*
8. BEAT: Required. To access a list of valid codes, move the cursor
to this field and press Enter. 9. DISTRICT: Required. This data transfers automatically from CAD.* Valid district codes are: D1, D2, D3 and D4 = Sheriff's districts. C1, C2, C3, C4, C5, C6, C7, C8 and C9 = Constable
precincts. A1 = Fire Marshal. 10. Jurs: Jurisdiction code. This data transfers automatically from
CAD.* 11. LOCATION Dispatch location transfers automatically from CAD.* STREET NO: If the location where the offense occurred is the same, then
no OLO entry is required. 12. STREET NAME: Required. Street name where offense occurred.* Not
validated against the CAD Geo Address File. 13. Ali: Additional location information or apartment number. This
data transfers automatically from CAD. 14. INTERSECTION: Street names of closest intersection. Required only if street
number and name are not entered. Not validated against the CAD Geo Address File.
15. City: City where offense occurred. 16. Premises>: Type of premises. To access a list of valid codes, move
the cursor to this field and press Enter. 17. Weather>: Weather conditions at the time of the offense. To access a
list of valid codes, move the cursor to this field and press Enter.
18. DATE OF OFFENSE/ BEGIN DATE: Required. Approximate date offense began. Enter date in
MM/DD/YY format. 19. BEGIN TIME: Required. Time offense began. Use military time. 20. End Date: Date offense ended. Enter date in MM/DD/YY format.

22
21. End Time: Time offense ended. Use military format. 22. REPORTING DEPUTY: Name associated with the user ID from the primary unit
This data transfers automatically from CAD. Display only. 23. PID: Personnel ID number from primary unit. This data
transfers automatically from CAD. Display only. 24. DATE: Date report was transferred from CAD. Display only. 25. TIME: Time report was transferred from CAD. Display only. 26. ENTERED BY: Name of deputy who initially entered Page 1, taken from
the user ID logged on to the terminal. Display only. 27. DATE: Date Page 1 was initially entered. Display only. 28. TIME: Time Page 1 was initially entered. Display only. 29. UPDATE> Apply data: Move the cursor to the UPDATE field and press Enter to
apply data entered on this screen. 30. OLO MASTER MENU> Move the cursor to this field and press Enter to return to the
OLO Master Menu. 31. DETAIL MENU> or Fast access: With the cursor in this field, press Enter to access the Case
Detail menu. OR Bypass the Case Detail Menu by typing a fast-access code
in this field. Then press Enter. The fast-access codes are: PER, PRO, SYN, NAR, SUS, CAS and SUP.
* The Detail Report displays the dispatch location and the reported location. The dispatch
location is the location specified in CAD. The reported location reflects any changes applied to Page 1.

23
On-screen Code Look Up Access an online code table for any entry field that begins with the > symbol.
ACCESS METHOD 1. On any entry screen, move the cursor after the > symbol in a field. 2. Press Enter. A list of valid codes for that field will display. The sample screen below is the code table for OLO offense codes. It was accessed by moving the cursor to the OFFENSE TYPE field on Page 1 of the offense report and pressing Enter. NOTE: On the Code Look Up screen, items are listed in alphabetic order by description. On the Codes Inquiry screen, on the other hand, items are listed in sequential order based on the code. ***************************************************************************** LINE# 6 OLO UCR OFFENSE CODE TABLE TAB TO LINE AND < XMIT > [1] [2] [3] [4] 693 LINES OPTIONS: BLANK,'-',LINE #,DESCRIPTION <5 PAGE > RETURN > to reload original list do return then come back [8] [9] [10] [11] [12] *[5] [6] [7] U.NM .RESPON.SCCCCCCCCCFM. .P *CODE .CODE DESCRIPTION . EXT DESCRIPTION .C.CODE. DIV .O123456789ME. .U *==========.==================.==================.=.====.======.============.=.= 9110 911 HANG UP CALL CAD NATURE CODE N NONE NNNNYNNNNNNN Y 0434 AAPO UNIFORM 1/MU BODILY FORCE Y 0442 HOM NNNNYNNNNNNN Y 0431 AAPO UNIFORM 1/MU BY FIREARMS Y 0412 HOM NNNNYNNNNNNN Y 0432 AAPO UNIFORM 1/MU KNIFE/CUTTING INST Y 0422 HOM NNNNYNNNNNNN Y 0433 AAPO UNIFORM 1/MU OTHER WEAPON/MEANS Y 0432 HOM NNNNYNNNNNNN Y 0435 AAPO UNIFORM 1/MU UNCLASSIFIED Y 0450 HOM NNNNYNNNNNNN Y 0421 AAPO UNIFORM 2/MU BODILY FORCE Y 0442 HOM NNNNYNNNNNNN Y 0419 AAPO UNIFORM 2/MU BY FIREARMS Y 0412 HOM NNNNYNNNNNNN Y 0422 AAPO UNIFORM 2/MU KNIFE/CUTTING INST Y 0422 HOM NNNNYNNNNNNN Y 0420 AAPO UNIFORM 2/MU OTHER WEAPON/MEANS Y 0432 HOM NNNNYNNNNNNN Y 0470 ABANDONING A CHILD CAD NATURE CODE N CAU NNNNYNNNNNNN Y 4210 ABDUCT/KIDNAPPING CAD NATURE CODE N HOM NNNNYNNNNNNN Y 8020 ACCI/FSRA/FELONY CAD NATURE CODE N TED NNNNYNNNNNNN Y 8010 ACCI/FSRA/MISD CAD NATURE CODE N TED NNNNYNNNNNNN Y 8190 ACCIDENT MINOR CAD NATURE CODE N TED NNNNYNNNNNNN Y 8270 ACCIDENT/AIRCRAFT CAD NATURE CODE N TED NNNNYNNNNNNN Y 8200 ACCIDENT/FLEET CAD NATURE CODE N TED NNNNNNNNNNNN Y ***************************************************************************** To page forward through the code table: The cursor displays in the page field (field 3). Page forward by pressing Enter while the
cursor is in the page field. To page backward through the code table: 1. Type a minus sign (-) in field 3. 2. Press Enter. The previous page of codes will display.

24
To access a particular section of the code table: 1. Type one to six letters in field 3. (The system will search for the letters occurring
anywhere in both the description fields 6 or 7) For example, you can search for any offense description containing the letters THE or
THEF by typing the letters in field 3. 2. Press Enter. 3. A list of choices matching your inquiry will display. 4. To return to the full list, tab to the RETURN> field (field 4) and press Enter. On the
resulting entry screen press Enter again to return to the complete code table listing. To select a code:
1. Press the Tab key until the cursor displays to the left of the code you wish to select (field 5).
2. Press Enter. (XMIT is a Unisys term meaning transmit instructions to computer. 3. The entry screen will reappear with the selected code filled in.
To return to the entry screen without selecting a code: 1. Tab to the RETURN> field (field 4). 2. Press Enter.
EXPLANATION OF FIELDS 1. 693 LINES: Total number of lines in this code table. 2. OPTIONS: Lists the ways the PAGE field (field 3) can be used: BLANK Leave the PAGE field blank and press
Enter to access the next page. '-' Type a - (minus sign) in the PAGE field
and press Enter to access the preceding page.
LINE # Type a number in the PAGE field and press Enter to advance the display by the specified number of lines.
DESCRIPTION Type up to four letters of the alphabet in the PAGE field to access the specified part of the list.
3. PAGE>: Cursor defaults to this field. With the cursor in this field,
press Enter to page forward. See the explanation of field 2 for other options.
4. RETURN>: To return to the preceding option without selecting a code,
move the cursor to this field and press Enter. The screen that was displayed before you accessed the code table will reappear.

25
5. CODE: Numeric code. 6. CODE DESCRIPOTION: Literal description of code. 7. EXT DESCRIPTION: Extra description of code. 8. UC: Uniform crime reporting (UCR) flag. If flag is Y then case
is included on monthly UCR report to the state. 9. NM CODE: National model code used to categorize cases for UCR
reporting to the state. 10. RESPON DIV: Responsible division for displayed offense code. 11. SCCCCCCCCCFM O123 45 6 7 89ME: Read theses codes vertically. For example, SO = Sheriff ,
C1 – C9 = Constable precincts, FM = Fire Marshal, and ME = Medical Examiner. If a Y appears beneath the agency code, then the responsible division of the user entering the report overrides the responsible division field listed in field 10.
12. PU: Page 1 usage indicator. If a Y displays here, the nature
code on Page 1 is valid.

26
Case Detail Menu Screen
ACCESS METHOD 1. After completing Page 1, press Enter. The cursor will display in the DETAIL MENU field. 2. Press Enter again. The following screen will display. The preferred order for report entry is:
1. Page 1 (Initial Offense Screen) 2. Persons 3. Suspects 4. Synopsis 5. Narrative 6. Property* 7. Supplements 8. Case Status (and Approval mode for supervisors only) * A property record has to be associated with a particular person or suspect involved in the
case; therefore, create the Person and Suspect records before entering property. ***************************************************************************** UPDATE CASE DETAIL MENU [1] [2] [3] [4] PERSONS INVOLVED (PER) > Look-up PROPERTY INVOLVED (PRO) > Look-up SYNOPSIS (SYN) > NARRATIVE (NAR) > SUSPECTS INVOLVED (SUS) > Look-up CASE STATUS (CAS) > SUPPLEMENT PROCESSING (SUP) > RETURN TO PAGE 1 > Look-up (TYPE) Fast Access
[5] RETURN TO OLO MASTER MENU > *****************************************************************************

27
To access a specific entry screen: 1. Move the cursor to the appropriate selection field (field 3). 2. Press Enter. NOTE: If the report status is approved (APP), then access to the Narrative and Synopsis
options is not allowed in Update mode.
EXPLANATION OF FIELDS 1. PERSONS INVOLVED thru RETURN TO PAGE 1: A list of screens that can be accessed from this menu.
Move the cursor to the selection field (field 3) to the right of the option and press Enter.
2. (PER) thru (SUP) (TYPE) Fast Access: Fast-access codes. You may use these codes to bypass this
menu and access the screen you need. See page 28 for a detailed explanation of the fast access methods.
3. >: Selection field. Place cursor in this column on the line with
the listing you wish to access, then press Enter. 4. Look-up: When “Look up” displays beside an option, code-table look
up is available from the entry and update screens. 5. RETURN TO OLO MASTER MENU >: Move the cursor to this field and press Enter to return to the
OLO Master Menu.

28
Persons Involved Entry Screen Use this screen to enter all pertinent information about all persons involved in an incident except suspects and defendants. (Use the Suspect screens to enter suspects and defendants.)
ACCESS METHOD On the Case Detail menu, tab to the PERSONS INVOLVED field and press Enter.
FAST ACCESS METHODS Method 1 From Page 1 of the offense report, type PER in the DETAIL MENU field and press Enter. (PER is the fast-access code for the Persons screen.) Method 2 From any screen with a NEXT TYPE field, type PER in that field and press Enter. Method 3 At the home position of any screen type: OLO,U,case number,PER Press Enter. Page 1 of the offense report will display briefly for verification, then the following screen will display. ***************************************************************************** UPDATE PERSONS INVOLVED CASE # 050101A120 [1] [2] PERSON TYPE/NUM:>R01 NAME(L F M/BUS): BROWN JERRY REPORTEE [3] [4] [5] Address: Street No: 11238 Street Name: WESTHEIMER Ali: [6] [7] [8] City: HOUSTON State:>TX Zip: 77015 [9] [10] [11] Home Phone: (713)-999-9987 Work Phone: (713)-882-8828 Ext: [12] [13] [14] [15] [16] [17] Race: Hispanic: Sex: Age: Juvenile: N Dob: A,B,I,U,W Y,N,U M,F,U Y,N,U MMDDYY [18] [19] [20] Drivers License #: Dl State:> Ss#: [21] Employment Address: Street No: Street Name: City: State:> Zip: [22] Relationship [23] [24] To Suspect:> Condition:> Taken To:> [25] [26] Transported By:> Victim Assistance: N Y,N [27] [28] [29] [30] [31] PAGE > UPDATE > NEXT TYPE > ENTER > DETAIL MENU > Next Person or Fast Access Apply Data Blank Entry Screen *****************************************************************************

29
NOTE: If you are entering a person record for the first time, the code R01 always displays in the field labeled PERSON TYPE/NUM. This code is automatically transferred from CAD or is automatically generated when you create a new case. Therefore, the first page of the Persons screen is always in Update mode when you access it. Move the cursor to the UPDATE field to apply data.
To create a person record: 1. Fill in all required and available information. 2. Move your cursor to the field labeled UPDATE and press Enter. 3. Upon completion of the screen, the message NO MORE DATA TO DISPLAY will
display at the message line 4. To transfer to another screen, position the cursor in the NEXT TYPE field (to access the
PROPERTY Menu), the ENTER field (to access a blank PERSONS entry screen) or the DETAIL MENU field (to access the DETAIL Menu) and press Enter.
To enter an additional person record: 1. Access the Update Persons Involved screen. 2. A previously entered record will display. 3. Move the cursor to the ENTER field and press Enter. A blank Enter Persons Involved
screen will display. 4. Fill in all required and available information. 5. Move your cursor to the field labeled XMIT> to apply data entered. 6. Press Enter. To proceed to the next entry screen for the offense report:
1. On the Update Persons Involved screen, move your cursor to the field labeled NEXT TYPE.
2. Type SUS in the NEXT TYPE field and press Enter. The Suspects Involved screen will display.
NOTE: If you leave the NEXT TYPE field blank and press Enter, the next screen listed on the Case Detail Menu will display. This screen is the Property Menu. It is recommended that you enter the suspect records before you enter the property records.

30
EXPLANATION OF FIELDS 1. PERSON TYPE/NUM: Required. Move the cursor to this field and press Enter to
view a list of valid codes. Examples are: C = Complainant W = Witness R = Reportee OWN = Owner TEN = Tenant Enter a sequential number for each person. Within each
category, begin with 01 and count forward. For example, when entering the first complainant, type C01. A two-digit number is required, so include a leading zero for numbers 1 through 9. The system will group all similar types together in numerical order regardless of the order in which they were entered.
NOTES: A complainant must be entered for every case. The code R01 is automatically transferred from CAD or is automatically
generated when you create a new case. When the reportee and the complainant are the same person, change the code to
C01 for complainant. In many cases the reportee is not the same person as the complainant.
In victimless crimes (examples include: DWI, DWLS, possession), the state of
Texas is the complainant. 2. NAME(L F M/BUS): Required. Name of person or company. When entering the
name of an individual, type: last name first name middle initial (if applicable). Separate names by one space only. Do not use commas or special characters.*
3. Street Number: Street number of person’s address. 4. Street Name: Street name of person's address.* 5. Ali: Additional location information such as apartment number. 6. City: Address city. 7. State:> Two-letter state code. To access a list of valid codes, move
the cursor to this field and press Enter. 8. Zip: Person's ZIP code. 9. Home Phone: Person's home phone number including area code.*

31
10. Work Phone: Person's work phone number including area code. 11. Ext: Work phone extension if applicable. 12. Race: Valid codes are: A = Asian, B = Black, I = Indian, U = Unknown, W =
White 13. Hispanic: Valid codes are: Y = Yes, N = No, U = Unknown 14. Sex: Valid codes are: M= male, F = female, U = unknown 15. Age: Age. Valid entries are 01 - 99, NB for newborns, and BB
for babies less than 1 year old. 16. Juvenile: Is the person a juvenile? Valid codes are: Y = Yes, N = No, U = Unknown 17. Dob: Person's date of birth in MMDDYY format. 18. Drivers License#: Person's driver's license number. 19. Dl State:> Person's driver's license state. To access a list of valid
codes, move the cursor to this field and press Enter. 20. Ss#: Person's Social Security number. 21. Employment Address: Address of person's employer including street number,
street name, city, state and ZIP code. 22. Relationship To Suspect:> The relationship of the person to the suspect. To access a
list of valid codes, move the cursor to this field and press Enter. See the section titled On-Screen Code Look Up for explanation of codes tables.
23. Condition:> Physical condition of person being entered. To access a list
of valid codes, move the cursor to this field and press Enter. 24. Taken To:> If the person was transported from the scene, specify where
the person was taken. To access a list of valid codes, move the cursor to this field and press Enter.
25. Transported By:> If the person was transported from the scene, type the
appropriate code for transport service. To access a list of valid codes, move the cursor to this field and press Enter.

32
26. Victim Assistance: Is the person eligible for Victim’s Assistance? Valid codes are Y = Yes or N = No.
27. PAGE>: If more than one person record exists for this case, page
through the records by placing the cursor in this field and pressing Enter.
28. UPDATE> Apply Data: Place cursor in this field and press Enter to apply or save
data. Once you save a person record, a blank entry screen will automatically display in the Entry mode.
29. NEXT TYPE> or Fast Access: Place cursor in this field and press Enter to access the next
screen listed on the Case Detail Menu. From the Persons screen, the next screen is the Property Menu. For fast access, type the three-character, fast-access code, such as SUS, in this field and press Enter.
30 ENTER> Blank Entry Screen: Place cursor in this field and press Enter to access a blank
Persons screen. 31. DETAIL MENU>: Place cursor in this field and press Enter to return to the
Case Detail Menu. * If the person type displayed as R (for reportee) when the screen was first accessed, then the
data transferred automatically from CAD.

33
Suspects Involved Entry Screen 1 Use this screen to identify the suspects in the case. Include the person’s address, alias names and main ID numbers.
ACCESS METHOD From the Case Detail Menu, tab to the SUSPECTS INVOLVED field and press Enter. The following screen will display if no suspects have been previously entered.
FAST ACCESS METHOD The fast-access code for the Suspects screen is SUS. See page 28 for a detailed explanation. ***************************************************************************** ENTER SUSPECTS INVOLVED CASE # 050101A120 [1] [2] [3] SUSPECT TYPE/NUM:> DISP:> NAME(L F M):
[4] [5] [6] Address: Street No: Street Name: Ali: [7] [8] [9]
City: State:> Zip: [10] Alias #1: [11] Alias #2 [12] [13] [14] [15] [16] Age: To Age: Dob: HEIGHT: To Weight: To [17] [18] [19] [20] RACE: HISPANIC: SEX: JUVENILE: N A,B,I,U,W Y,N,U M,F,U Y,N,U [21] [22] [23] Identifiers: Jims Spn#: So Id#: Ssan: [24] [25]
Dl#: Dl State:> [26] [27]
Court#: Cause#: [28] [29]
Charge: Desc: [30] [31] [32] Place of Birth:> Doe: Date of Last Contact: MMDDYY MMDDYY [33] [34]
XMIT> DETAIL MENU> Apply Data
*****************************************************************************

34
To create a suspect record: 1. Fill in all required and available information. 2. Place your cursor in the field labeled XMIT to apply data entered.
3. Press Enter. 4. The Enter Suspects Involved page 2 screen will display. All the data on page 2 is
optional, but include ALL available information. See page 38 for a detailed explanation of page 2 of the Suspects screen.
NOTE: If a suspect was the subject of a Sex Offender Verification visit, the person data entered
on the Sex Offender Verification screen displays. To enter an additional suspect record: 1. Access an Update Suspects Involved screen. A previously entered record will display. 2. Place cursor in the ENTER field and press Enter. A blank Enter Suspects Involved
screen will display. 3. Complete steps 1 – 4 in the section titled “To create a suspect record” above. To update a previously entered record:
1. Access an update screen. 2. Add, change or delete information as needed.
3. Move cursor to the field labeled UPDATE. 4. Press Enter to apply data. To proceed to the next type of screen for the offense report:
1. From the Update Suspects Involved page 1 screen, move your cursor to the NEXT SCREEN field.
2. Type SYN, for the Synopsis screen, in the NEXT TYPE field and press Enter. NOTE: If you leave the NEXT TYPE field blank and press Enter, the next screen listed on the Case Detail Menu will display. This screen is the Case Status screen. It is recommended that you follow the preferred report-entry order by accessing the Synopsis screen instead.
EXPLANATION OF FIELDS 1. SUSPECT TYPE/NUM: The first character designates the person-type: S = Suspect D = Defendant M = Missing person (generates TCIC/NCIC Entry report) J = Juvenile (generates TCIC/NCIC Entry report) Enter a sequential number for each person. Within each
category, begin with 01 and count forward. For example, when entering the first suspect, type S01. When entering the second suspect, type S02. A two-digit number is required, so include the leading zero before the numbers 1 through 9. The system will group all like types together in numerical order regardless of the order in which they were entered.

35
2. DISP:> Required. Identify the person’s status or disposition. To access a list of valid codes, move the cursor to this field and press Enter. The code X (cancelled) can only be entered for missing persons and juveniles. A cancelled disposition generates a TCIC message.
3. NAME (L F M): Required. Type: last name first name middle initial (if
applicable). Separate names by one space only. Do not use commas or special characters. If name is not available, type UNKNOWN.
4. Street No: Street number of suspect's address. 5. Street Name: Street name of suspect’s address. 6. Ali: Additional location information or apartment number. 7. City: Address city. 8. State:> Address state (two-character code). To access a list of
valid codes, move the cursor to this field and press Enter. 9. Zip: Address ZIP code. 10. Alias #1: Suspect's alias name if applicable. Enter name in last name
first name middle initial format. Use one space between names. Do not use commas or special characters.
11. Alias #2: Second alias name if applicable. 12. Age: Blank or numeric. Valid entries are 01 – 99, NB for
newborn and BB for babies less than one year old. 13. To Age: If actual age is unknown, enter an age range. Type a
beginning amount in field 12 and an upper limit in this field.
14. Dob: Suspect's date of birth in numeric MMDDYY format. 15. HEIGHT: Suspect’s height in three-digit format. For example, for 5
feet 9 inches, type 509. If specific height is unknown, enter a height range (example: 507 To 510.)
16. Weight: Blank or numeric. If specific weight is unknown, enter a
weight range (example: 130 To 145). 17. RACE: Valid codes are: A = Asian, B = Black, I = Indian, U =
Unknown , W = White.

36
18. HISPANIC: Valid codes are: Y = yes, N = no, U = unknown. 19. SEX: Valid codes are: M = male, F = female, U = unknown. 20. JUVENILE: Is the person a juvenile? Y = yes, N = no, U = unknown.
Defaults to N if left blank. If J for juvenile is entered in field 1 (SUSPECT TYPE), then this field must be Y.
21. Jims Spn#: Harris County system person number, if known. 22. So Id#: Harris County Sheriff's Office number, if known. 23. Ssan: Suspect's Social Security number, if known. 24. Dl#: Suspect's driver's license number. 25. Dl State:> Driver's license state (two-character code). For a list of
valid codes, move the cursor to this field and press Enter. 26. Court#: Harris County court to which suspect has been assigned, if
applicable. 27. Cause#: Harris County cause number if known. 28. Charge: TCIC/NCIC code for offense for which suspect has been
formally charged. 29. Desc: Literal description of TCIC/NCIC code for offense. 30. Place of Birth:> Suspect's place of birth. 31. Doe: Date this record was entered in numeric MMDDYY
format. 32. Date of Last Contact: Date of last contact with suspect in numeric MMDDYY
format. 33. XMIT> Place cursor in this field and press Enter to apply data Apply Data: entered on this screen. 34. DETAIL MENU>: Place cursor in this field and press Enter to return to the
Case Detail Menu.

37
Cursor Placement Options on OLO Update Screen The options below are available when the screen is in the Update or Display mode. Different options are available in the Entry mode. PAGE>: Place cursor in this field and press Enter to access the next Nxt SUS suspect. UPDATE>: Place cursor in this field and press Enter to apply updates. Apply Data NEXT SCREEN>: Place cursor in this field and press Enter to access Suspect Pg2 the second page of a suspect record, if applicable. NEXT TYPE>: Place cursor in this field and press Enter to access the next
or Fast Access option on the Case Detail Menu. The next option is the Case Status screen. To skip the Case Status screen and follow the preferred
report-entry order, type SYN in the NEXT TYPE field and press Enter. SYN is the fast-access code for the Synopsis screen.
For fast access, type any three-character fast access code in
this field and press Enter. ENTER>: Place cursor in this field and press Enter to access a blank
Blank Entry suspect entry screen. DETAIL MENU>: Place cursor in this field and press Enter to access the Case
Detail Menu.

38
Suspects Involved Entry Screen 2 Use this screen to enter additional information about each suspect. For example, enter the suspect’s location, physical descriptors and vehicle information.
ACCESS METHOD After completing Page 1 of the Suspect screen, place cursor in the UPDATE field and press Enter. ***************************************************************************** ENTER SUSPECTS INVOLVED (PAGE 2) CASE # 050101A120 [1] [2] SUSPECT TYPE/NUM: D01 NAME: BROWN TOM DEFENDENT [3] [4] [5] [6] Condition:> Taken To:> Taken By:> Caution: N Y,N [7] [8] [9] [10] Hair: Color:> Type:> Length:> Facial Hair:> [11] [12] Eye: Color:> Eye Condition :> [13] [14] Skin:> Build:> [15] [16] Speech:> Teeth Code:> [17] [18]
Smdt:> Desc: [19] Suspect Vehicle/Comment: [20] Mo Codes:> :> :> :> [21] Weapon Involved:> [22] [23] [24] XMIT> NEXT TYPE> DETAIL MENU> Apply data ***************************************************************************** To enter a record: 1. Enter all available information. 2. Place the cursor in the field labeled XMIT to apply data entered.
3. Press Enter. 4. A blank Suspects Involved page 1 screen will display and another suspect may be
entered.

39
NOTE: If the suspect was entered as a juvenile or a missing person, a TCIC and a NIC# field will display. Enter the appropriate number from the TCIC/NCIC Entry Report.
EXPLANATION OF FIELDS Code tables are available for all fields ending with the symbol >. To access a list of valid codes, move the cursor after the > and press Enter. 1. SUSPECT TYPE/NUM: Suspect code and number from page 1 of the Suspect Entry
screen. Display only. 2. NAME: Suspect's name from page 1 of the Suspect Entry screen. 3. Condition:> Condition of suspect if taken to hospital. 4. Taken To:> Hospital to which suspect was taken. 5. Taken By:> Service by which suspect was transported to hospital. 6. Caution: Should caution be used with suspect? Y = yes. N = no. 7. Color:> Suspect's hair color. 8 Type:> Suspect's hair type. 9 Length:> Suspect's hair length. 10. Facial Hair:> Suspect's facial hair descriptor. 11. Color:> Suspect's eye color. 12. Eye Condition:> Suspect's eye condition. 13. Skin:> Suspect's skin tone. 14. Build:> Suspects build. 15. Speech:> Suspect's speech descriptor. 16. Teeth Code:> Suspect's teeth description. 17. Smdt:> Suspect's scars, marks or tattoos. 18. Desc:> Description of suspect's scars marks or tattoos. 19. Suspect Vehicle/Comment: Free-form field for description of suspect's vehicle.

40
20. Mo Codes:> Modus operandi. 21. Weapon Involved:> Type of weapon used by suspect in the commission of an
offense. NOTE: The following two fields display if the person-type code entered on screen 1 is J
(juvenile) or M (missing). TCIC: Indicates whether or not person was entered into TCIC. Y = yes. N = no. NIC#: If person was entered into NCIC, enter NIC number. 22. XMIT>
Apply Data: To apply data entered on this screen, move cursor to this field and press Enter. A blank Suspects screen will display and another suspect record can be entered.
23. NEXT TYPE>: Place cursor in this field and press Enter to access the next
listing on the Case Detail Menu. The next listing is the Case Status screen. To skip the Case Status screen and follow the preferred
report-entry order, type SYN in the NEXT TYPE field and press Enter. SYN is the fast-access code for the Synopsis screen.
For fast access, type any three-character fast access code in
this field and press Enter. 24. DETAIL MENU>: Place cursor in this field and press Enter to access the Case
Detail Menu.

41
Synopsis Entry Screen Use this screen to enter a brief description of the incident. Include no more or less information than necessary for a press release. Do not use proper names. Note: This screen always displays in Update mode even when you access it for the first time. Access to the Update Synopsis screen is not allowed if the report status is APP – approved.
ACCESS METHOD
From the Case Detail Menu, tab to the SYNOPSIS field and press Enter.
FAST ACCESS METHODS
The fast-access code for the SYNOPSIS screen is SYN. See page 28 for a detailed explanation of fast access. ***************************************************************************** UPDATE SYNOPSIS CASE # 050101A120 [1] [2] METHOD OF ENTRY: POINT OF ENTRY: [3] [4] POINT OF EXIT: INSTRUMENT/TOOL USED: [5] [6] LATENT PRINTS (Y/N): SCENE PHOTOS (Y/N): [7] CAUSE OF FIRE CODE: [8] PUBLIC RELEASE SYNOPSIS: [9] [10] [11] UPDATE> NEXT TYPE > DETAIL MENU > Apply Data or Fast Access ***************************************************************************** To enter a synopsis: 1. Fill in all available information in fields 1 through 7. 2. Type synopsis information in field 8. 3. Place cursor in the field labeled UPDATE. 4. Press Enter to apply data.

42
NOTE: This screen does not work like a word processor. Words are cut off at the end of a line. To move your cursor to the next line, press Tab. The only way to insert characters is to press the insert key before every character you wish to insert. Also, pages will remain in the order in which they are entered. You cannot insert a new page between existing pages.
EXPLANATION OF FIELDS 1. METHOD OF ENTRY through 7. CAUSE OF FIRE CODE: Fields 1 through 7 are not required even though the
field names display in capital letters. There is no code table look-up from this screen. To
view valid codes, 1. Access and sign on to your second terminal session. 2. Type CODES in the home position. 3. Select the listing titled Synopsis. 4. A sub-menu will display. Choose the code table
you need. See page 87 for an explanation of the CODES inquiry.
8. PUBLIC RELEASE SYNOPSIS: Required. 9. UPDATE> Place cursor in this field and press Enter to apply data. Apply data: 10. NEXT TYPE> Move the cursor to this field and press Enter to transfer or Fast Access: to the next screen listed on the Case Detail Menu. The
next listing is the Narrative screen. That is also the next screen in the recommended report-entry order.
For fast access, enter a three-character fast-access code
and press Enter. 11. DETAIL MENU>: Place cursor in this field and press Enter to transfer to
the Case Detail Menu for the displayed offense report.

43
Narrative Entry Screen The narrative consists of two parts: the scene summary and the narrative. You will type detailed information about the scene and the events, including the names of all persons and suspects involved. Do not refer to individuals by their person/type number. For example if John Doe is the first complainant, refer to him by name and not as C01.
ACCESS METHOD From the Case Detail Menu, tab to the NARRATIVE field and press Enter.
FAST ACCESS METHOD The fast-access code for the Narrative screen is NAR. See page 28 for a detailed explanation of fast access. ***************************************************************************** ENTER NARRATIVE CASE # 050101A120 [1] [2] [3] NAME: SMITH,JOE DATE: 02/17/00 TIME: 18:31 [4] SCENE SUMMARY [5] [6] [7] XMIT> NEXT TYPE> DETAIL MENU> ***************************************************************************** To enter a narrative:
1. Place cursor under the SCENE SUMMARY reminder (field 4) and type SCENE SUMMARY.
2. Enter all scene summary information. 3. After the scene summary, type the heading NARRATIVE. 4. Enter all narrative information. 5. When page is complete or full, move cursor to the XMIT field (field 5) and press Enter
to apply data. A blank page will display. 6. Repeat step 5 as necessary and enter additional pages of information.

44
NOTE: This screen does not work like a word processor. Words are cut off at the end of the line. To move to the next line, press Tab. The only way to insert characters is to press the insert key before every character you wish to insert. Pages will remain in the order in which they are entered. You cannot insert a new page between existing pages.
To proceed to the next type of screen for the offense report:
1. Move your cursor to the NEXT TYPE field. 2. Type PRO, for the Property Menu, in the NEXT TYPE field and press Enter. NOTE: If you leave the NEXT TYPE field blank and press Enter, the next screen listed
on the Case Detail Menu will display. This screen is the Suspects Involved screen. It is recommended that you follow the preferred report-entry order by accessing the Property screen instead.
EXPLANATION OF FIELDS 1. NAME: The name of the user entering the report displays
automatically. The name is associated with the user ID used to sign on to the terminal.
2. DATE: The date the narrative was initially entered. Display only. 3. TIME: The time the narrative was initially entered. Display only. 4. SCENE SUMMARY: Description of field. To make this heading appear within
the text of the report, type SCENE SUMMARY. Under the heading type a detailed description of the scene. After that, type the heading NARRATIVE, then type details about the incident. Name all persons and suspects involved.
5. XMIT >: Place cursor in this field and press Enter to apply data
entered on this screen. 6. NEXT TYPE>: Place cursor in this field and press Enter to go to the next
screen listed on the Case Detail Menu. The next listing is the Suspects Involved screen. It is recommended that you follow the preferred report-entry order by typing PRO in this field and pressing Enter. The Property Detail Menu will display.
For fast access, type a three-character fast-access code in
this field and press Enter. 7. DETAIL MENU > Place cursor in this field and press Enter to access the Case
Detail Menu.

45
Narrative Update Screen Access to the Narrative Update screen is not allowed if the report status is APP – approved. ***************************************************************************** UPDATE NARRATIVE CASE # 050101A120 [1] [2] [3] [4] EMP#: 000000096 NAME: JIMS,TEST DATE: 04/05/00 TIME: 15:56 [5] [6] [7] [8] [9] [10] PAGE > BACK > Apply UPDATE > NEXT TYPE > Blank ENTER > DETAIL MENU > ***************************************************************************** To enter an additional narrative: 1. Access an Update Narrative screen. A previously entered record will display. 2. Place cursor in the ENTER field and press Enter. A blank Enter Narrative screen will
display. 3. Fill in all required and available information. 4. Move cursor to the field labeled XMIT. 5. Press Enter to apply data.
To update a previously entered narrative:
1. Access an Update Narrative screen. a. Access the OLO menu by typing OLO on the command line, then press Enter. b. Tab to the UPDATE REPORT field, type the OLO case number, then press Enter. c. Tab to the NARRATIVE listing, then press Enter.
2. Add, change or delete information as needed. 3. Move cursor to the field labeled UPDATE. 4. Press Enter to apply data.
EXPLANATION OF FIELDS 1. EMP#: Social Security number of the user who last updated the
narrative. 2. NAME: The name of the user who last updated the report will
display automatically. 3. DATE: Date the narrative was last updated.

46
4. TIME: Time the narrative was last updated. 5. PAGE>: Place cursor in this field and press Enter to access the next
page of the narrative. 6. BACK>: Place cursor in this field and press Enter to access the
previous page of the narrative. 7. Apply UPDATE>: Place cursor in this field and press Enter to apply data. 8. NEXT TYPE>: Place cursor in this field and press Enter to go to the next
screen listed on the Case Detail Menu. The next OPTION is the Suspects Involved screen. It is recommended that you follow the preferred report-entry order by typing PRO in this field and pressing Enter. The Property Detail Menu will display.
For fast access, enter a three-character fast-access code and
press Enter. 9. Blank ENTER>: Place cursor in this field and press Enter to access a blank
entry screen. 10. DETAIL MENU>: Place cursor in this field and press Enter to access the Case
Detail Menu.

47
Property Menu
Use this screen to access an entry/update screen for a particular type of property. The property screens were originally designed as an independent subsystem. NOTE: A property record has to be associated with a particular person or suspect involved in the case; therefore, create the Person and Suspect records before entering property.
ACCESS METHOD From the Case Detail Menu, tab to the PROPERTY field and press Enter.
FAST ACCESS METHODS The fast-access code for the Property menu is PRO. See page 28 for information about fast access. The fast-access item codes in column 5 below (such as ART, VEH and BOA), can only be used within the property screens. The fast-access codes that are listed on the Case Detail Menu (such as PER, NAR and SUS) will not work on the property screens. ***************************************************************************** [1] [2] [3] ENTER ITEM MENU RPN# 00007241 HIGH ITEM# 000 CASE# 050101A120 [4] [5] [6] [7] [8] Look-up (ART) ARTICLES > 000 Look-up (VEH) VEHICLES > 000 Look-up (GUN) GUNS > 000 Look-up (BOA) BOATS > 000 (PAR) PARTS > 000 (SEC) SECURITIES/CURRENCIES > 000 [9] [10] GO TO PROPERTY MASTER MENU > GO TO CASE DETAIL MENU > Fast Access (ITEM) ***************************************************************************** To access a property entry screen:
1. Move cursor to the appropriate selection field (field 7). 2. Press Enter.

48
EXPLANATION OF FIELDS 1. RPN #: Property report number. Because Property was a separate
computer system, all property reports entered are issued a unique report number.
2. HIGH ITEM #: Total number of items entered so far on this report. 3. CASE NUMBER: OLO case number consisting of the date plus an event
number in numeric YYMMDD#### format. 4. Look-up: When “look-up” displays beside an option, it means code
tables are available from the entry screen. 5. (ART) thru (SEC) Fast Access (ITEM): Fast-access codes for the property screens. On any
property screen with a NEXT ITEM field, type the three-character item code in that field and press Enter.
6. ARTICLES thru CURRENCIES: Name of each property item screen. 7. > (selection field): Place cursor in this column beside the menu item you wish
to access and press Enter. 8. 000: The number of items of each type displays in this column. 9. GO TO PROPERTY MASTER
MENU: Connection to the Property Master Menu is disabled. If this field is used, the Case Detail Menu will display instead.
10. GO TO CASE DETAIL MENU>: Place cursor in this field and press Enter to return to the
Case Detail Menu.

49
Article Entry Screen Property that does not fit into any of the other item categories should be entered as an article. The other property categories are: vehicle, gun, boat, parts and securities.
ACCESS METHOD From the Property Menu, tab to the ARTICLES field and press Enter.
FAST ACCESS METHODS The fast-access code for Property is PRO. This code causes the Property Menu to display. From the Property Menu, select ARTICLES. See page 28 for a detailed explanation of Fast Access. To use fast-access from one property screen to another, type ART (the three-character fast-access code for articles) in the NEXT ITEM field and press Enter. The fast-access codes for property (ART, VEH, GUN, BOA, PAR and SEC) are explained on the Property Menu. ***************************************************************************** [1] [2] ENTER ARTICLE DESCRIPTION ITEM# 001 CASE# 050101A120 [3] [4] [5] STATUS CODE : ART #: PERSON TYPE/NUM: [6] [7] [8] [9] TYPE:> Ser#: BRAND:> Model: [10] [11] Oan: Misc: [12] [13] [14] QUANTITY: Arson Prop Class:> VALUE: [15] [16] [17] [18] [19] XMIT: NEXT SCREEN: NEXT ITEM: ITEM MENU: DETAIL MENU: Apply Data or Fast Access Recovery/Intake [20] STATUS CODES: B Recovered (Local) Damaged Evidence Found Lost Recovered (Outside) Stolen (Local) *****************************************************************************

50
To enter an article: 1. Fill in all required and available information. 2. Move cursor to the XMIT field.
3. Press Enter to apply data.
NOTE: If the status code L (lost) or S (stolen) was entered, a blank Article entry screen will display.
OR If a status code of B, D, E, F or R was entered, a blank Recovery/Intake screen will
display. To enter an additional article: 1. Access an Update Article screen and a previously entered record will display. 2. Move cursor to the ENTER field and press Enter. A blank Article entry screen will
display. 3. Fill in all required and available information. 4. Move cursor to the XMIT: field. 5. Press Enter to apply data. To update a previously entered record: 1. Access an Update Article screen. 2. Add, change or delete information as needed.
3. Move cursor to the UPDATE: field. 1. Press Enter to apply data.
To proceed to the next item of property:
1. On the Update Article screen, move cursor to the NEXT ITEM field. 2. Press Enter. 3. The next screen listed on the Property Menu will display. This screen is the Vehicle
screen.
EXPLANATION OF FIELDS 1. ITEM#: Item number for the property currently being entered.
Display only. Counts each property record in the report. 2. CASE#: OLO case number. Case number is the six-digit year,
month and day followed by the computer-generated event number.
3. STATUS CODE: Required. Status of the property. Valid codes are listed at
the bottom of the screen. If B, R or S is entered, then the nature code on Page 1 of the offense report must be UCR reportable.
4. ART #: Number for this article in this report.

51
5. PERSON TYPE/NUM: Required. Identifies the person associated with the article. NOTE: Property must be associated with a person, so
enter all parties on the Person or Suspect entry screens before entering property.
6. TYPE:> Required. TCIC/NCIC code identifying the type of article.
This code is seven (7) characters long and consists of letters only. To access a code table, move your cursor to this field and press Enter.
7. Ser#: Serial number found on the article. This is a twenty (20)-
character field permitting letters and numbers. 8. BRAND:> Required. Brand name of article if applicable. To access a
list of valid codes, move the cursor to this field and press Enter.
9. Model: Free-form field for model of article if applicable. Field
allows up to 11 alpha and/or numeric characters. 10. Oan: Owner-applied number if applicable. 11. Misc: Free-form field of up to 42 characters of miscellaneous
information. 12. QUANTITY: Required. Number of articles if there are multiple articles
of the same type. 13. Arson Prop Class>: The Arson Property Class field is used only by the Fire
Marshal's Office. For a list of valid codes, move the cursor to this field and press Enter.
14. VALUE: Required. Estimated monetary value of property being
entered. This field MUST be WHOLE DOLLARS ONLY. DO NOT USE dollar signs, decimal points, or any other symbols. If the item is worth 45 dollars, enter the number 45.
NOTE: The following two fields display on the Update Article screen. TCIC: Indicates whether or not article was entered into TCIC. Y = yes. N = no. NIC#: If an article was entered into NCIC, enter NIC number.

52
15. XMIT Place cursor in this field and press Enter to apply data Apply Data: entered. If you entered an article with the status code of B,
D, E, F or R the Recovery/Intake screen will display automatically when you press Enter.
16. NEXT SCREEN Recovery/Intake: Disabled. If selected, the Property Menu displays instead. 17. NEXT ITEM: Disabled. If selected, the Property Menu displays instead. 18. ITEM MENU: Place cursor in this field and press Enter to transfer to the
Property Menu. 19. DETAIL MENU: Place cursor in this field and press Enter to transfer to the
Case Detail Menu. 20. STATUS CODE: List of status codes to be used in field 3.
Cursor Placement Options on Property Update Screen The options below are available when the screen is in the Update or Display mode. Different options are available in the Entry mode. PAGE: Place cursor in this field and press Enter to access the next Next Article article record. UPDATE: Place cursor in this field and press Enter to apply updates. Apply Data NEXT SCRN: Place cursor in this field and press Enter to access Recovery/Intake the Recovery/Intake screen, if applicable. NEXT ITEM: Place cursor in this field and press Enter to access the next
or Fast Access listing on the Property Menu. The next listing is the Vehicle screen.
For fast-access, enter the three-character code for an item
of property (example: GUN, BOA, SEC) and press Enter. ENTER: Place cursor in this field and press Enter to access a blank
Blank Entry entry screen. ITEM MENU: Place cursor in this field and press Enter to access the
Property Menu. DETL MENU: Place cursor in this field and press Enter to access the Case
Detail Menu.

53
Vehicle Entry Screen
ACCESS METHOD From the Property Menu, tab to the VEHICLES field and press Enter.
FAST ACCESS METHODS The fast-access code for Property is PRO. This code causes the Property Menu to display. From the Property Menu, select VEHICLES. See page 28 for a detailed explanation of Fast Access. To use fast-access from one property screen to another, type VEH (the three-character fast-access code for vehicles) in the NEXT ITEM field and press Enter. The fast-access codes for property (ART, VEH, GUN, BOA, PAR and SEC) are explained on the Property Menu. ***************************************************************************** [1] [2] ENTER VEHICLE DESCRIPTION ITEM# 007 CASE# 050101A120 [3] [4] [5] STATUS CODE: VEH #:001 PERS TYPE/NUM: [6] [7] [8] [9] [10] Lic #: Lic St:>TX Lic Yr: Lic Type:>PC Vin: [11] [12] [13] [14] [15] [16] Plate Only:N Veh Yr: Model:> MAKE:> Style:> Color:> > Y,N [17] [18] Misc: Oca #: (Outside Agency Only) [19] [20] [21] VEH VALUE:0 Caution:N Arson Prop Class:> Y,N [22] [23] [24] [25] [26] XMIT: NEXT SCREEN: NEXT ITEM: ITEM MENU: DETAIL MENU: Apply Data Recovery/Intake [27] STATUS CODE -- ABANDONED B RECOVERED (LOCAL) DAMAGED EVIDENCE FELONY RECOVERED (OUTSIDE) STOLEN (LOCAL) TOWED WANTED ***************************************************************************** To enter a vehicle: Follow the procedures explained in the Article Entry section on page 49. Also see the Explanation of Fields below for help with specific fields.
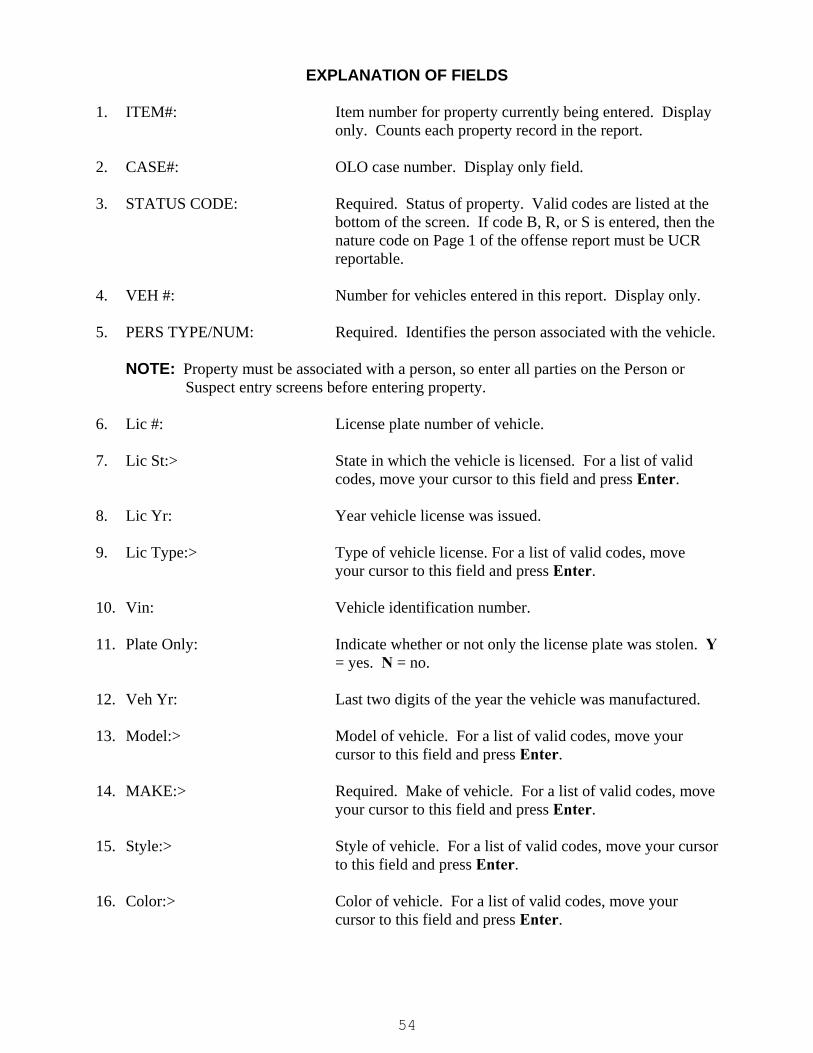
54
EXPLANATION OF FIELDS 1. ITEM#: Item number for property currently being entered. Display
only. Counts each property record in the report. 2. CASE#: OLO case number. Display only field. 3. STATUS CODE: Required. Status of property. Valid codes are listed at the
bottom of the screen. If code B, R, or S is entered, then the nature code on Page 1 of the offense report must be UCR reportable.
4. VEH #: Number for vehicles entered in this report. Display only. 5. PERS TYPE/NUM: Required. Identifies the person associated with the vehicle. NOTE: Property must be associated with a person, so enter all parties on the Person or
Suspect entry screens before entering property. 6. Lic #: License plate number of vehicle. 7. Lic St:> State in which the vehicle is licensed. For a list of valid
codes, move your cursor to this field and press Enter. 8. Lic Yr: Year vehicle license was issued. 9. Lic Type:> Type of vehicle license. For a list of valid codes, move
your cursor to this field and press Enter. 10. Vin: Vehicle identification number. 11. Plate Only: Indicate whether or not only the license plate was stolen. Y
= yes. N = no. 12. Veh Yr: Last two digits of the year the vehicle was manufactured. 13. Model:> Model of vehicle. For a list of valid codes, move your
cursor to this field and press Enter. 14. MAKE:> Required. Make of vehicle. For a list of valid codes, move
your cursor to this field and press Enter. 15. Style:> Style of vehicle. For a list of valid codes, move your cursor
to this field and press Enter. 16. Color:> Color of vehicle. For a list of valid codes, move your
cursor to this field and press Enter.

55
17. Misc: Free-form field that can be used to enter additional description of vehicle or caution information.
18. Oca #: Originating agency’s case number. 19. VEH VALUE: Estimated value of vehicle. 20. Caution: Caution indicator. Type a Y if caution text was entered in
field 17; otherwise type a N. NOTE: The following two fields display when the screen is accessed in Update mode. TCIC: Indicates whether or not vehicle was entered into TCIC. Y = yes. N = no. NIC#: If vehicle was entered into NCIC, enter NCIC NIC#. For an explanation of the ARSON PROP CLASS through STATUS CODE fields, see pages 52. NOTE: If you access a screen in Update mode, the cursor placement options at the bottom of
the screen will change. See page 52 for an explanation of the cursor placement options available in Update mode.

56
Gun Entry Screen
ACCESS METHOD From the Property Menu, tab to the GUNS field and press Enter.
FAST ACCESS METHODS The fast-access code for Property is PRO, but fast access will only take you as far as the Property Menu. From the Property Menu, select GUNS. See page 28 for a detailed explanation of Fast Access. To use fast-access from one property screen to another, type GUN (the three-character fast-access code for guns) in the NEXT ITEM field and press Enter. The fast-access codes for property (ART, VEH, GUN, BOA, PAR and SEC) are explained on the Property Menu. ***************************************************************************** [1] [2] ENTER GUN DESCRIPTION ITEM# 007 CASE# 050101A120 [3] [4] [5] STATUS CODE: GUN #:002 PERS TYPE/NUM: [6] [7] [8] [9] Ser #: MAKE:> Model: Caliber: [10] [11] [12] TYPE:> Misc: VALUE:0 [13] [14] [15] [16] [17] XMIT: NEXT SCREEN: NEXT ITEM: ITEM MENU: DETAIL MENU: Apply Data Recovery/Intake [18] STATUS CODE -- B DAMAGED EVIDENCE FOUND LOST RECOVERED (LOCAL) RECOVERED (OUTSIDE) STOLEN (LOCAL) *****************************************************************************
To enter a gun: Follow the procedures explained in the Article Entry section on page 49. Also see the Explanation of Fields below for help with specific fields.

57
EXPLANATION OF FIELDS 1. ITEM#: Item number for property currently being entered. Display
only. Counts each property record in the report. 2. CASE#: OLO case number. 3. STATUS CODE: Status of gun being entered. Status codes are listed at the
bottom of the screen. 4. GUN #: Number for this gun in this offense report. 5. PERS TYPE/NUM: Identifies the person associated with the article. NOTE: Property must be associated with a person, so you must enter all parties on the
Person or Suspect entry screens before entering property. 6. Ser #: Serial number on gun. 7. MAKE:> Make of gun. For a list of valid codes, move your cursor to
this field and press Enter. 8. Model: Model of gun. 9. Caliber: Caliber of gun. 10. TYPE:> Gun type code. For a list of valid codes, move your cursor
to this field and press Enter. 11. Misc: Free-form field for miscellaneous information about the
gun. 12. VALUE: Estimated value of gun. NOTE: The following two fields display when the screen is accessed in Update mode. TCIC: Indicates whether or not the gun was entered into TCIC. Y = yes. N = no. NIC#: If gun was entered into NCIC, enter NCIC NIC#. For an explanation of the XMIT through STATUS CODE fields, see page 52. NOTE: If you access a screen in Update mode, the cursor placement options at the bottom of
the screen will change. See page 52 for an explanation of the cursor placement options available in Update mode.

58
Boat Entry Screen
ACCESS METHOD From the property menu, tab to the BOATS field and press Enter.
FAST ACCESS METHODS The fast-access code for Property is PRO. This code causes the Property Menu to display. From the property menu, select BOATS. See page 28 for a detailed explanation of Fast Access. To use fast-access from one property screen to another, type BOA (the three-character fast-access code for boats) in the NEXT ITEM field and press Enter. The fast-access codes for property (ART, VEH, GUN, BOA, PAR and SEC) are explained on the Property Menu. ***************************************************************************** [1] [2] ENTER BOAT DESCRIPTION ITEM# 007 CASE# 050101A120 [3] [4] [5] STATUS CODE: BOAT #:001 PERS TYPE/NUM: [6] [7] [8] [9] [10] Reg #: Rst:>TX Ryr: Hull Mat:> Hull #: [11] [12] [13] [14] [15] [16] Propulsion:> Mf Yr: MAKE:> Type:> LENGTH:0 Color:> > [17] [18] Misc: Oan: [19] [20] [21] VALUE:0 Oca #: Caution:N (OUTSIDE AGENCY ONLY) Y,N [22] Arson Prop Class:> [23] [24] [25] [26] [27] XMIT: NEXT SCREEN: NEXT ITEM: ITEM MENU: DETAIL MENU: Apply Data Recovery/Intake [28] STATUS CODE -- ABANDONED B RECOVERED (LOCAL) DAMAGED EVIDENCE RECOVERED (OUTSIDE) STOLEN (LOCAL) TOWED WANTED *****************************************************************************

59
To enter a boat: Follow the procedures in the Article Entry section on page 49. Also see the Explanation of Fields below for help with specific fields.
EXPLANATION OF FIELDS 1. ITEM#: Item number for property currently being entered. Display
only. Counts each property record in the report. 2. CASE#: OLO case number. 3. STATUS CODE: Status of boat. Status codes are listed at the bottom of the
screen. 4. BOAT #: Number for this boat in this report. 5. PERS TYPE/NUM: Identifies the person associated with the boat. NOTE: Property must be associated with a person, so you must enter all persons on the
Person or Suspect entry screens before entering property. 6. Reg #: Boat registration number. 7. Rst:> State in which boat is registered. To access a list of valid
codes, move the cursor to this field and press Enter. 8. Ryr: Year of boat registration. 9. Hull Mat:> Boat hull material. To access a list of valid codes, move
the cursor to this field and press Enter. 10. Hull #: Boat hull number. 11. Propulsion:> Boat propulsion method code. To access a list of valid
codes, move the cursor to this field and press Enter. 12. Mf Yr: Year of manufacture. 13. MAKE:> Make code. To access a list of valid codes, move the
cursor to this field and press Enter. 14. Type:> Boat type code. To access a list of valid codes, move the
cursor to this field and press Enter. 15. LENGTH: Length of boat in feet. 16. Color:> Color code. To access a list of valid codes, move the

60
cursor to this field and press Enter. 17. Misc: Free-form field for miscellaneous information about the
boat, including caution text. 18. Oan: Owner-applied number if applicable. 19. VALUE: Estimated value of boat. Enter whole dollar amounts. 20. Oca #: Originating agency’s case number. Entered when a boat
reported stolen to HPD is recovered by the Sheriff’s Department and vice versa.
21. Caution: Indicates if there is caution information associated with the
boat. Y = yes. N = no. 22. Arson Prop Class:> Arson class code used by the Fire Marshal’s Office only.
For a list of valid codes, move the cursor to this field and press Enter.
For an explanation of the XMIT through STATUS CODE fields, see page 52. NOTES: If you access a screen in Update mode the cursor placement options at the bottom of
the screen will change. See page 52 for an explanation of the cursor placement options available in Update mode.
The following two fields display when the screen is accessed in Update mode. TCIC: Indicates whether or not the boat was entered into TCIC. Y = yes. N = no. NIC#: If boat was entered into NCIC, enter NCIC NIC#.

61
Parts Entry Screen
ACCESS METHOD From the Property Menu, tab to the PARTS field and press Enter.
FAST ACCESS METHODS
The fast-access code for Property is PRO. This code causes the Property Menu to display. From the Property Menu, select PARTS. See page 28 for a detailed explanation of Fast Access. To use fast-access from one property screen to another, type PAR (the three-character fast-access code for parts) in the NEXT ITEM field and press Enter. The fast-access codes for property (ART, VEH, GUN, BOA, PAR and SEC) are explained on the Property Menu. ***************************************************************************** [1] [2] ENTER PART DESCRIPTION ITEM# 007 CASE# 050101A120 [3] [4] [5] STATUS CODE: PART #:001 PERS TYPE/NUM: [6] [7] TYPE - VEHICLE, BOAT OR OTHER: VEH TYPE: SERIAL #: [8] [9] [10] [11] [12] OAN: BRAND: CATEGORY: ENG DSP: UOM: [13] [14] MISC: VALUE:0 [15] OCA #: (OUTSIDE AGENCY ONLY) [16] [17] [18] [19] [20] XMIT: NEXT SCREEN: NEXT ITEM: ITEM MENU: DETAIL MENU: Apply Data Recovery/Intake [21] STATUS CODE -- B D EVIDENCE FOUND RECOVERED (LOCAL) AMAGED RECOVERED (OUTSIDE) STOLEN (LOCAL) TOWED ***************************************************************************** To enter a part: Follow the procedures in the Article Entry section on page 49. Also, see the Explanation of Fields below for help with specific fields.

62
NOTE: On the Parts Entry screen, all field labels display in capital letters, but not all fields are required for entry. See the explanation of fields below for a list of required fields. Also, code table look-up is not available on this screen. For a list of valid codes, use the Codes Inquiry screen explained on page 87.
EXPLANATION OF FIELDS 1. ITEM#: Item number for the property currently being entered.
Display only. Counts each property record in the report. 2. CASE#: OLO case number. 3. STATUS CODE: Status of property. See the bottom of the screen for a list of
valid codes. 4. PART #: Part number for this item in this report. 5. PERS TYPE/NUM: Identifies the person associated with the boat. NOTE: Property must be associated with a person, so enter all parties on the Person or
Suspect entry screens before entering property. 6. VEH TYPE: Type of vehicle part came from. 7. SERIAL #: Serial number on part if applicable. 8. OAN: Owner-applied number if applicable 9. BRAND: Brand of part. 10. CATEGORY: Category of part. For a list of valid category codes use the
Codes Inquiry screen explained on page 87. 11. ENG DSP: Engine displacement (liter capacity or cubic size). 12. UOM: Unit of measurement of engine displacement (ex. c=cubic). 13. MISC: Free-form description of part. 14. VALUE: Estimated value of part. 15. OCA #: Originating agency's case number. For an explanation of the XMIT through STATUS CODE fields, see page 52. NOTE: If you access a screen in Update mode the cursor placement options at the bottom of the
screen will change. See page 52 for an explanation of the cursor placement options.

63
Securities/Currencies Entry Screen
ACCESS METHOD From the Property Menu, tab to the SECURITIES/CURRENCIES field and press Enter.
FAST ACCESS METHODS
The fast-access code for Property is PRO. This code causes the Property Menu to display. From the Property Menu, select SECURITIES/CURRENCIES. See page 28 for a detailed explanation of Fast Access. To use fast-access from one property screen to another, type SEC (the three-character fast-access code for securities) in the NEXT ITEM field and press Enter. The fast-access codes for property (ART, VEH, GUN, BOA, PAR and SEC) are explained on the Property Menu. ***************************************************************************** [1] [2] ENTER SECURITY/CURRENCY DESCRIPTION ITEM# 007 CASE# 050101A120 [3] [4] [5] STATUS CODE: SEC #:001 PERS TYPE/NUM: [6] [7] [8] [9] DENOMINATION: TYPE: VALUE:0.00 ISSUER: [10] [11] SECURITY SERIAL #: DATE: / / [12] [13] OWNER: SSAN: - - [14] MISC: [15] [16] [17] [18] [19] XMIT: NEXT SCREEN: NEXT ITEM: ITEM MENU: DETAIL MENU: Apply Data Recovery/Intake [20] STATUS CODE -- B RECOVERED (LOCAL) DAMAGED EVIDENCE FOUND LOST RECOVERED (OUTSIDE) STOLEN (LOCAL) ***************************************************************************** To enter a security/currency: Follow the procedures in the Article Entry section on page 49. Also, see the Explanation of Fields below for help with specific fields.

64
EXPLANATION OF FIELDS 1. ITEM#: Item number for property currently being entered. Display
only. Counts each property record in the report. 2. CASE#: OLO case number. 3. STATUS CODE: Status of displayed property. See the bottom of the screen
for a list of valid status codes. 4. SEC #: Number for the item in this report. 5. PERS TYPE/NUM: Identifies the person associated with this property item. NOTE: Property must be associated with a person, so enter all parties on the Person or
Suspect entry screens before entering property. 6. DENOMINATION: Value of currency. Type of bills. 7. TYPE: Type of security/currency. 8. VALUE: Total value of property. 9. ISSUER: Bank or institution from which currency/security was
issued. 10. SECURITY SERIAL #: Serial number on currency or ID# on security. 11. DATE: Date issued. 12. OWNER: Owner of security/currency. 13. SSAN: Social Security number of owner. 14. MISC: Miscellaneous information. For an explanation of the XMIT through STATUS CODE fields, see page 52. NOTE: If you access a screen in Update mode the cursor placement options at the bottom of the
screen will change. See page 52 for an explanation of the cursor placement options available in Update mode.

65
Property Recovery/Intake Screen This screen is available from each property entry screen (Articles, Guns, Boats, etc.). Use this screen to identify property that has been recovered, towed or impounded by an agency. Use the Enter Mode to add new data. This screen is the same for all property types.
ACCESS METHOD From any Property Entry/Update screen where the property status code is B, D, E, F, R or T (for towed vehicles or boats), position the cursor in the NEXT SCREEN field and press Enter. ***************************************************************************** [1] [2] ENTER ARTICLE RECOVERY/INTAKE ITEM # CASE # 050101A120 [3] [4] Recovered By Emp#: DATE: / / MM/DD/YY [5] [6] [7] VALUE:0 Outside Agency: Condition:> [8] [9] [10] Recovered From: Towed By:> Reason:> [11] [12] Storage Loc:> / Phone #: - - [13] [14] [15] Notified Date: / / Person: By Emp#: MM/DD/YY [16 [17] [18] [19] [20] [21] XMIT: RETURN: NEXT SCRN: NEXT ITEM: ITEM MENU: DETAIL MENU: Apply Data Transmittal Description or Fast Access *****************************************************************************
EXPLANATION OF FIELDS 1. Item #: Item number for property currently being entered. 2. Case #: OLO case number. 3. Recovered by Emp#: Social Security number of the employee recovering,
impounding or towing the property. 4. DATE: The date the property was recovered, impounded or towed.

66
5. VALUE: Estimated value of property in whole dollar amount. 6. Outside Agency: If property was recovered by an outside agency, type the
name of the agency. This is required if the RECOVERED BY EMP# field is not used.
7. Condition: Code for the condition of the property at the time of
recovery. To access a list of valid codes, move the cursor to this field and press Enter.
8. Recovered From: Free-form description of or the address from which the
property was recovered or towed. 9. Towed By:> Code for person or agency towing or removing item. To
access a list of valid codes, move the cursor to this field and press Enter.
10. Reason:> Code for reason why property was removed or recovered. 11. Storage Loc:> Code for storage location. To access a list of valid codes,
move the cursor to this field and press Enter. 12. Phone: Phone number for storage location. 13. Notified Date: Date property owner was notified. 14. Person: Name of person receiving notification. 15. By Emp#: Social Security number of person making notification. 16. XMIT: Place cursor in this field and press Enter to save
information entered on this screen. You MUST transmit from this field in order to save any data entered.
17. RETURN: Place cursor in this field and press Enter to return to the
Property Entry/Update screen. 18. NEXT SCRN: Place cursor in this field and press Enter to access the
Transmittal screen, used for changing the property storage location or custody responsibility.
19. NEXT ITEM: Place cursor in this field and press Enter to access the next
listing on the Property Menu. 20. ITEM MENU: Place here and press Enter to access the Property Menu. 21. DETAIL MENU: Place cursor here and press Enter to access the Case Detail
Menu.

67
Property Transmittal Screen Use the Property Transmittal screen to show when property is moved from one location to another.
ACCESS METHOD 1. From the Recovery/Intake screen, place cursor in the NEXT SCRN field. 2. Press Enter.
Or 1. At the home position type OLO,U,casenumber,PRO. 2. Press Enter. Page 1 of the offense report will display briefly so you can verify that you
accessed the right case; then the Property Menu will display in Update mode. 3. Select the type of property you wish to access by tabbing until your cursor is positioned to
the right of the selected option. 4. Press Enter. 5. Modify the status code to an R for recovered. 6. Place cursor in the UPDATE field. 7. Press Enter. 8. The Recovery/Intake screen will display. 9. Place cursor in the NXT SCRN> field. 10. Press Enter. The following screen will display: ***************************************************************************** [1] [2] ENTER ARTICLE TRANSMITTAL ITEM# 001 CASE# 050101A120 [3] [4] TRANSMITTAL DATE: / / TIME: : MM/DD/YY HH:MM [5] [6] FROM: TO: [7] REASON: [8] TRANSMITTED BY EMP#: [9] [10] [11] [12] [13] [14] XMIT: RETURN: NEXT SCRN: NEXT ITEM: ITEM MENU: DETAIL MENU: Description or Fast Access
Apply Data Disposition
*****************************************************************************

68
EXPLANATION OF FIELDS 1. ITEM #: Item number for displayed record. 2. CASE #: OLO case number. 3. TRANSMITTAL DATE: Date property was moved. 4. TIME: Time property was transported. 5. FROM: Location from which article was transferred. 6. TO: Location to which article was transferred. 7. REASON: Reason article was transported. 8. TRANSMITTED BY EMPLOYEE#: Social Security number of employee transporting item. For an explanation of the XMIT – DETAIL MENU fields, see page 52.

69
[9] [10] [11]
Property Disposition Screen Use this screen for all property types. Enter the final disposition of property involved in the report. This includes disposal or seizure of property for County Purchasing.
ACCESS METHOD From the Transmittal screen of any property type, place cursor in the NEXT SCRN field and press Enter. The following screen will display: ***************************************************************************** [1] [2] ENTER ARTICLE DISPOSITION ITEM# CASE# 050101A120 [3] DISPOSITION DATE: MM/DD/YY [4] [5] [6] RELEASE CODE:> AUTHORITY: Cause #: description....... [7] [8] RELEASED TO ID TYPE/#:> NAME: description.......
RELEASED BY EMP#: Destroyed: Seized: (name.........) Y,N Y,N [12] [13] [14] [15] [16] XMIT: RETURN: NEXT ITEM: ITEM MENU: DETAIL MENU: Apply Data or Fast Access Description ***************************************************************************** To enter a disposition for a property item: 1. Type appropriate information in fields 3 - 9. Fields 10 and 11 are optional. 2. Place cursor in the XMIT field. 3. Press Enter.
EXPLANATION OF FIELDS 1. ITEM#: Item number for the displayed property record. 2. CASE#: OLO case number. 3. DISPOSITION DATE: Date (DD/MM/YY) of property item disposal.

70
4. RELEASE CODE: Release disposition code from table in Mode 402, 40B. To access a list of valid codes, move the cursor to this field
and press Enter. 5. AUTHORITY: Free-form field for releasing authority. 6. CAUSE#: Free-form field for court, cause number, etc. 7. RELEASED TO ID TYPE/#: The first field is for the code identifying the type of ID used
by the person receiving released property. The second field is for the number from the ID.
8. NAME: Name of employee. 9. RELEASED BY EMP#: Social Security number of employee releasing property. 10. Destroyed: Indicate whether or not property was destroyed. Y = yes.
N = no. 11. Seized: Indicate whether or not property was seized. Y = yes. N =
no. For an explanation of the XMIT through DETAIL MENU fields, see page 52.

71
Supplement Processing Menu After a report is approved, the entering agency cannot change the narrative or synopsis. Entering a supplement, however, is one way to add information to an approved report. Also use the supplement screen when you need to add information that cannot be entered on the normal sequence of screens, when you want to add information to a report entered by another agency, or if the original report is changed, enter a supplement to explain the reason for the change.
ACCESS METHOD 1. Access the OLO Main Menu. 2. Tab to the SUPPLEMENT PROCESSING field. 3. Type the appropriate case number. 4. Press Enter. The Following menu will display. ***************************************************************************** *SUPMENU* SUPPLEMENT PROCESSING [1] case 050101A120 currently has 0 supplements [2] ENTRY OF SUPPLEMENT NUMBER> 1 XMIT [3] DISPLAY OF SUPPLEMENT NUMBER> XMIT [4] UPDATING OF SUPPLEMENT NUMBER> XMIT [5] SHOW STATUS OF SUPPLEMENTS > [6] RENUMBER SUPPLEMENTS > (restricted) [7] RETURN TO PAGE 1 -DISPLAY > [8] RETURN TO PAGE 1 -UPDATE >
[9] RETURN TO OLO MASTER MENU > *****************************************************************************
EXPLANATION OF FIELDS 1. case 050101A120 currently has 0 supplements: OLO case number and total number of
supplements entered for this case. 2. ENTRY OF SUPPLEMENT NUMBER> To access a blank supplement entry screen,
place cursor to the right of this listing and press Enter. See page 73 for a sample Supplement Entry screen.

72
3. DISPLAY OF SUPPLEMENT NUMBER> To display an existing supplement, place cursor to the right of this listing, type a supplement number and press Enter. See the Supplement Display section in this manual.
4. UPDATING OF SUPPLEMENT NUMBER> To access an existing supplement in Update
mode, place cursor to the right of this listing, type a supplement number and press Enter. See the Supplement Update section in this manual.
5. SHOW STATUS OF SUPPLEMENTS To view the status of all supplements
entered on this report (example: draft, complete or approved), place cursor to the right of this listing and press Enter.
6. RENUMBER SUPPLEMENTS> This option is restricted. 7. RETURN TO PAGE 1 -DISPLAY> To return to page 1 of the offense report in
Display mode, place cursor to the right of this listing and press Enter.
8. RETURN TO PAGE 1 -UPDATE> To return to page 1 of the offense report in
Update mode, place cursor to the right of this listing and press Enter.
9. RETURN TO OLO MASTER MENU> To return to the OLO Master Menu, place
cursor to the right of this listing and press Enter.

73
SUPPLEMENT ENTRY SCREEN
ACCESS METHOD 1. Tab to ENTRY OF SUPPLEMENT on the Supplement Processing Menu. (See page 71 for a
more detailed explanation.) 2. Press Enter. The following screen will display. ***************************************************************************** [1] [2] [3] ENTER SUPP # 5 STATUS: DRA CASE # 050101A120 [4] LOCATION: 16715 CLAY RD [5] [6] OFFENSE TYPE: SPECIAL OLO TEST COMPLAINANT: BROWN JERRY [7] [8] ENTERED BY: JIMS,TEST DATE: 03/09/00 [9] REPORTING DEPUTY: [10] [11] [12] ENTER> SUPMENU> OLOMENU> ***************************************************************************** To enter a supplement: 1. Tab to field 9 and type supplement information. 2. When you finish typing supplement information or when you reach the end of the page,
place cursor in the ENTER field. 3. Press Enter. A blank page will display. This is page two of the current supplement.
4. a. If you have more data to enter, begin again with step 1. OR
b. Return to the Supplement Processing Menu by placing your cursor in field 11 and pressing Enter. Or return to the OLO Main Menu by placing your cursor in field 12 and pressing Enter.
c. For individuals assigned to approve supplements, press F3 after pressing Enter in step 3 above. The Supplement Approval screen will display.

74
EXPLANATION OF FIELDS 1. ENTER SUPP #: Number of displayed supplement. 2. STATUS: Status of supplement. Valid codes are DRA = Draft, COM
= Complete, APP = Approved. 3. CASE #: OLO case number. 4. LOCATION: Physical location of deputy entering supplement. 5. OFFENSE TYPE: Literal offense displayed. 6. COMPLAINANT: Complainant in the case. 7. ENTERED BY: Name of user who entered supplement. 8. DATE: Date supplement was entered. 9. REPORTING DEPUTY: Name of deputy who entered report. 10. ENTER>: Place cursor in this field and press Enter to save
information entered on this screen. 11. SUPMENU>: Place cursor in this field and press Enter to return to the
Supplement Processing Menu. 12. OLOMENU>: Place cursor in this field and press Enter to return to the
OLO Main Menu.

75
DISPLAY SUPPLEMENT SCREEN
ACCESS METHOD 1. Tab to DISPLAY OF SUPPLEMENT on the Supplement Processing Menu. (See page 71
for a more detailed explanation.) 2. Type the number of the supplement. 3. Press Enter. The following screen will display. ***************************************************************************** [1] [2] [3] [4] DISPLAY SUPP # 4 STATUS: DRA HIGH SUPP: 5 CASE # 050101A120 [5] LOCATION: 16715 CLAYRD [6] [7] OFFENSE TYPE: SPECIAL OLO TEST COMPLAINANT: BROWN JERRY [8] [9] [10] [11] ENTERED BY: JIMS,TEST DATE: 000309 APPROVED BY: DATE: [12] REPORTING DEPUTY: [13] [14] [15] [16] [17] [18] PAGE> BACK> PRINT-ID> NEXTSUPP> SUPMENU> OLOMENU> ***************************************************************************** To page forward through a displayed supplement: 1. Tab to field 13. 2. Press Enter. To page backward through a displayed supplement: 1. Tab to field 14. 2. Press Enter. To display the next supplement: 1. Tab to field 16. 2. Press Enter. To page to a specific supplement: 1. Tab to field 16. 2. Type the specific number of the supplement you wish to access. 3. Press Enter.

76
EXPLANATION OF FIELDS 1. DISPLAY SUPP #: Number of currently displayed supplement. 2. STATUS: Status of supplement . Valid codes are DRA = Draft,
COM = Complete, APP = Approved. 3. HIGH SUPP: Total number of supplements entered for this report. 4. CASE #: OLO case number. 5. LOCATION: Physical address of deputy entering supplement. 6. OFFENSE TYPE: Literal name of offense. 7. COMPLAINANT: Name of complainant. 8. ENTERED BY: Name of individual who entered supplement. 9. DATE: Date supplement was entered. 10. APPROVED BY: Name of person who approved supplement. 11. DATE: Date supplement was approved. 12. REPORTING DEPUTY: Name of deputy entering supplement. 13. PAGE>: Place cursor in this field and press Enter to page forward
through existing supplements. 14. BACK>: Place cursor in this field and press Enter to page backward
through existing supplements. 15. PRINT-ID>: Place cursor in this field, type a valid printer ID and press
Enter to print a copy of the displayed supplement. 16. NEXTSUPP>: Place cursor in this field and press Enter to access the next
supplement entered on this case. 17. SUPMENU>: Place cursor in this field and press Enter to return to the
Supplement Processing Menu. 18. OLOMENU> Place cursor in this field and press Enter to return to the
OLO Master Menu.

77
To print a supplement: 1. Place cursor in the PRINT-ID> field (field 15). 2. Type a valid printer ID. 3. Press Enter. The following screen will display, then the program will return to the
Supplement Processing Menu: ***************************************************************************** AN ENTRY IN THE PRINTER LOG HAS BEEN MADE FOR THE FOLLOWING REPORT CASE NUMBER: 050101A120 USER: TJ19096 SMITH,JOHN J4 000000096 DATE AND TIME: 040700 - 19:36:16 REPORT SENT TO PRINTER: 482 REPORT NAME: DSUPP *****************************************************************************

78
UPDATE SUPPLEMENT SCREEN
ACCESS METHOD 1. Tab to UPDATING OF SUPPLEMENT from the Supplement Processing Menu. (See page
71 for a more detailed explanation.) 2. Type the number of a supplement. 3. Press Enter. The following screen will display. ***************************************************************************** [1] [2] [3] [4] UPDATE SUPP # STATUS: HIGH SUPP: CASE # [5] LOCATION: [6] [7] OFFENSE TYPE: COMPLAINANT: [8] [9] [10] [11] ENTERED BY: DATE: APPROVED BY: DATE: [12] REPORTING DEPUTY: [13] [14] [15] [16] [17] [18] [19] [20] PAGE> BACK> UPDATE> PRINT-ID> ENTER> NEXTSUPP> SUPMENU> OLOMENU> ***************************************************************************** To update a supplement: 1. Tab to field 12 and change information as needed. 2. Tab to field 15, the UPDATE field. 3. Press Enter. The message RECORD UPDATED will display at the top of the screen.
EXPLANATION OF FIELDS 1. UPDATE SUPP #: Number of currently displayed supplement. 2. STATUS: Status of supplement. Valid codes are DRA = Draft, COM
= Complete, APP = Approved. 3. HIGH SUPP: Total number of supplements entered for this report. 4. CASE #: OLO case number. 5. LOCATION: Physical address of deputy entering supplement.

79
6. OFFENSE TYPE: Literal name of offense. 7. COMPLAINANT: Name of complainant. 8. ENTERED BY: Name of individual who entered supplement. 9. DATE: Date supplement was entered. 10. APPROVED BY: Name of person who approved supplement. 11. DATE: Date supplement was approved. 12. REPORTING DEPUTY: Supplement page heading. Begin typing supplement
information after this heading. 13. PAGE> Place cursor in this field and press Enter to page forward
through existing supplements. 14. BACK> Place cursor in this field and press Enter to page backward
through existing supplements. 15. UPDATE> Place cursor in this field and press Enter to apply or save
changes made. 16. PRINT-ID> Place cursor in this field, type a valid printer ID and press
Enter to print a copy of the displayed supplement. 17. ENTER> Place cursor in this field and press Enter to access a blank
Supplement Entry screen. 18. NEXTSUPP> Place cursor in this field and press Enter to access the next
supplement entered for this case. 19. SUPMENU>: Place cursor in this field and press Enter to return to the
Supplement Processing Menu. 20. OLOMENU> Place cursor in this field and press Enter to return to the
OLO Master Menu.

80
Case Status/Approval Screen Use this screen to mark a report Complete. Supervisors use this screen to mark completed reports Approved and set the confidential flag when necessary. When a report is approved, the system logs who, where and when the report was approved. If a report is later unapproved then re-approved, a supplement must be written stating why the report was unapproved.
ACCESS METHOD Select CASE STATUS from the Case Detail Menu.
FAST ACCESS METHOD 1. Type OLO,U,case number,CAS at the command line. 2. Press Enter. ***************************************************************************** [1] UPDATE CASE STATUS/APPROVAL CASE # 050101A120 [2] [3] [4] HIGH SUPPLEMENT NUM REPORT STATUS: DRA REPORTING DEPUTY: JIM1 [5] RELATED CASES: [6] [7] [8] REPORT APPROVAL EMP#: NAME: DATE: / / ----------------------------------------------------------------------------- [9] [10] RESPONSIBLE DIV: JIM ASSIGNED TO (PID#): [11] [12] CONFIDENTIAL ACCESS FLAG: CONFIDENTIAL ACCESS CODE: [13] DISPOSITION OF THE CASE: OPN (UCR CODE) [14] [15] [16] CASE UPDATED BY : NAME: DATE: / / [17] EMPLOYEE NUM [18] [19] [20] [21] UPDATE > NEXT TYPE > MASTER MENU > DETAIL MENU > [22] [23] PRINT (D = DETAIL P = PUBLIC RELEASE) > PRINTER NUM > ***************************************************************************** To change the status of a report:
1. When a report is complete, change the status code in field 3 from DRA for draft to COM for complete.
2. To approve a report, change the status code in field 3 from COM to APP for approved.

81
EXPLANATION OF FIELDS 1. CASE #: Current case number. 2. HIGH SUPPLEMENT NUM: Total number of supplements entered for this case. 3. REPORT STATUS: Valid report status codes are: APP = APPROVED COM = COMPLETE DRA = DRAFT RET = RETURN REPORT 4. REPORTING DEPUTY: Deputy who entered report. 5. RELATED CASES: Case numbers of related cases. 6. REPORT APPROVAL EMP#: Social Security number of individual who approved
report. 7. NAME: Name of individual who approved report. 8. DATE: Date report was approved. 9. RESPONSIBLE DIV: Division to which case was assigned. 10. ASSIGNED TO (PID#): Personnel ID number of detective to whom the
report was assigned. 11. CONFIDENTIAL ACCESS FLAG: Used by supervisors approving reports. 12. CONFIDENTIAL ACCESS CODE: Code for individual setting confidential access code. 13. DISPOSITION OF THE CASE: Overall disposition of case. 14. CASE UPDATED BY NAME: Name of individual updating case status. 15. DATE: Date individual updated case status. 17. EMPLOYEE NUM: Social Security number of employee updating case
status. 18. UPDATE >: Place cursor in this field and press Enter to update
information entered. 19. NEXT TYPE>: Place cursor in this field and press Enter to access
the next type of screen listed on the Case Detail Menu.

82
20. MASTER MENU >: Place cursor in this field and press Enter to access the OLO Master Menu.
21. DETAIL MENU >: Place cursor in this field and press Enter to access
the Case Detail Menu. 22. PRINT (D = DETAIL P = PUBLIC RELEASE) >: Type a D in this field and press Enter to print a
detailed offense report. Type a P in this field and press Enter to print a copy of the public release synopsis.
23. PRINTER NUM >: Type a valid printer ID. For a list of valid printer
IDs, access the Codes Inquiry screen, select CASE STATUS, RESPONSIBLE DIVISION. The printer ID will display in the DIV PRT # column.

83
Case Summary Screen Use this screen to display a current summary of the OLO report including offense nature code, report status, number of property items and number of supplements entered. The Case Summary screen may be accessed for any report by any user with a valid user ID, even if the confidential access code is set.
ACCESS METHOD Select CASE SUMMARY from the OLO Main Menu.
FAST ACCESS METHOD 1. Type OLO,C,case number at the command line. 2. Press Enter. ***************************************************************************** CASE SUMMARY [1] [2] [3] CASE NUMBER: 050101A120 STATUS: DRAFT ORIGINATING DIVISION: J4 [4] [5] OFFENSE NATURE: 0040 SPECIAL OLO TEST ASSIGNED TO: [6] [7] [8] APPROVED: BY: RESPONSIBLE DIV: JIM CONFIDENTIAL: NO [9] [10] [11] DATE/TIME ENTERED: 050101 0954 ENTERED BY: HORST,JULIANE CLEARANCE CD: OPN [12] [13] LAST ACCESSED: 050101 1622 ACCESS BY: SMITH,JOHN [14] [15] NUMBER OF SUPPLEMENTS: 2 RELATED CASES: [16] PROPERTY INFORMATION: TOTAL PROPERTY FOR THIS CASE = 003 [17] [18] [19] [20] [21] [22] #ARTICLES #VEHICLES #GUNS #BOATS #PARTS #SECURITIES 002 000 001 000 000 000 [23] RETURN TO OLO MENU > * *****************************************************************************
EXPLANATION OF FIELDS 1. CASE NUMBER: OLO case number.

84
2. STATUS: Report status. 3. ORIGINATING DIVISION: Original division to which case was assigned. 4. OFFENSE NATURE: Nature code of offense. 5. ASSIGNED TO: Division to which case is assigned. 6. APPROVED BY: Name of employee who approved the report. 7. RESPONSIBLE DIV: Responsible division of employee who approved report. 8. CONFIDENTIAL: Was the confidential indicator set for the case? Y= yes. N = no. 9. DATE/TIME ENTERED: Date and time report was entered. 10. ENTERED BY: Name of user who entered report. 11. CLEARANCE CD: Clearance code of individual who entered report. 12. LAST ACCESSED: Year, month and day report was last accessed in update or
entry mode. 13. ACCESS BY: Name of individual who last accessed the report in update
or entry mode. 14. NUMBER OF SUPPLEMENTS: Total number of supplements entered for the report. 15. RELATED CASES: Case number of related OLO cases. 16. PROPERTY INFORMATION: Total number of items entered. 17. #ARTICLES: Total number of articles entered for this case. 18. #VEHICLES: Total number of vehicles entered for this case. 19. #GUNS: Total number of guns entered for this case. 20. #BOATS: Total number of boats entered for this case. 21. #PARTS: Total number of parts entered for this case. 22. #SECURITIES: Total number of securities entered for this case. 23. RETURN TO OLO MENU>: Place cursor in this field and press Enter to return to the
OLO Main Menu.

85
Report Print Menu Use this screen to print a detailed offense report for the District Attorney's Office and to print and view various other reports.
ACCESS METHOD 1. On the OLO Main Menu, tab to the REPORT PRINT MENU field. 2. Press Enter. The following screen will display. ***************************************************************************** OLO REPORTS MENU [1] [2] ENTER CASE NUMBER: ENTER PRINTER ID: ( 'PR', AUX DEV #, OR BLANK) [3] PUBLIC RELEASE REPORT XMIT > [4] DETAIL OFFENSE REPORT XMIT > [5] REPORTS BY STATUS XMIT > [6] CALL SLIP XMIT > [7] PROPERTY REPORT XMIT > [8] RETURN TO MASTER MENU XMIT > ****** SOME SELECTIONS REQUIRE A VALID CASE NUMBER AND PRINTER NUMBER ****** ***************************************************************************** To print a Detail Offense Report: 1. Type the case number in field 1. 2. Type the appropriate printer ID in field 2. 3. Tab to the XMIT field to the right of the DETAIL OFFENSE REPORT listing (field 4). 4. Press Enter. NOTE: If you do not know the printer ID, use the CODES look-up, select CASE STATUS,
then select RESPONSIBLE DIV to display valid printer IDs. The printer ID for the District Attorney's Intake Division is 200.
EXPLANATION OF FIELDS 1. ENTER CASE NUMBER: Type case number of report to be displayed or printed.

86
2. ENTER PRINTER ID: Type the valid OLO printer ID for the device where the report should be printed.
3. PUBLIC RELEASE REPORT: Requires entry of printer ID in field 2. 4. DETAIL OFFENSE REPORT: Requires entry of printer ID in field 2. NOTE: To print the reports listed in fields 3 and 4 above, a valid printer ID must be entered in
field 2. In contrast, the following reports can be viewed on the screen instead of being printed.
5. REPORTS BY STATUS: Tab to the XMIT field to the right of this listing and
press Enter. The Reports By Status inquiry screen will display.
6. CALL SLIP: Type the case number in field 1, tab to the XMIT
field to the right of this listing and press Enter. The original call slip entered for this case will display. If you wish to print the call slip without displaying it first, type the case number in field 1, type the printer ID in field 2, then press Enter with cursor in field 6.
7. PROPERTY REPORT: Type the case number in field 1, tab to the XMIT
field to the right of this listing and press Enter. The property report for this case will display. If you wish to print the property report without displaying it first, type the case number in field 1, type the printer ID in field 2, then press Enter with the cursor in field 7.
8. RETURN TO MASTER MENU: Place cursor in this field and press Enter to return to
the OLO Main Menu. Alternative print method for fields 5 - 7. For menu options 5, 6 and 7 explained above, a results screen displays after you run an inquiry. To print the results listed on a displayed screen: 1. At the command line of the results screen, type: COP Printer ID For example to print to printer ID 482, type: COP 482 2. Make sure the space under the cursor is blank before proceeding with step 3. If the space
is not blank, delete the character by pressing the space bar, then use the left arrow key to move the cursor back one space.
3. Press Enter. 4. The following message should display: Your Report Has Been Queued to Station ___
(printer ID).

87
Codes Inquiry There are two ways to access An OLO offense code table on-line. One way is to access the code table from a field on an entry screen; the other way is to use the inquiry called Codes.
ACCESS METHOD 1. Type CODES in the home position at the command line of any screen. 2. Press Enter. The following menu will display. ***************************************************************************** OLO CODE TABLE SELECTION MENU SCREEN NAME TRANCODE DESCRIPTION PAGE1 (PG1) ENTER OFFENSE DESCRIPTION XMIT > PERSONS (PER) PERSONS INVOLVED XMIT > ARTICLES (ART) ARTICLES INVOLVED XMIT > VEHICLES (VEH) VEHICLES INVOLVED XMIT > GUNS (GUN) GUNS INVOLVED XMIT > BOATS (BOA) BOATS INVOLVED XMIT > PARTS (PAR) PARTS INVOLVED XMIT > SECURITIES (SEC) SECURITIES/CURRENCY INVOLVED XMIT > RECOVER/INTAKE (INT) RECOVERY/INTAKE/DISPOSITION XMIT > SYNOPSIS (SYN) OFFENSE SUMMARY XMIT > SUSPECT PAGE1 (SUS1) SUSPECTS INVOLVED PAGE 1 XMIT > SUSPECT PAGE2 (SUS2) SUSPECTS INVOLVED PAGE 2 XMIT > CASE STATUS (APPR) CASE STATUS/APPROVAL XMIT > *** TAB TO DESIRED SCREEN SELECTION FOR CODE TABLES AND XMIT *** *****************************************************************************

88
To access a code table: 1. Place cursor in XMIT field to the right of appropriate code table. 2. Press Enter. For example, if you select PAGE 1, the following menu will display: ***************************************************************************** ######################## PAGE 1 CODE TABLES ################################# # CODE TABLE CODE DESCRIPTION # # OFFENSE TYPE (NAT) ____ ___________ XMIT > (SEE NOTE) # ORIGINATING DIV ____ ___________ XMIT > # BEAT/FIRE DEPARTMENT ____ ___________ XMIT > # PREMISE TYPE ____ ___________ XMIT > # WEATHER CONDITION ____ ___________ XMIT > # CRIME FOCUS ____ ___________ XMIT > # # NOTE: OFFENSE TYPE DISPLAYS NATURE CODES ALLOWED FOR PAGE1 USAGE ONLY. # # ** ENTER CODE OR DESCRIPTION OR LEAVE FIELDS BLANK TO DISPLAY ALL CODES ** # ***************************************************************************** To narrow search to a specific type of code: 1. Type a full or partial description in the DESCRIPTION field of a code table. 2. Press Enter. Only the codes with matching words or letters in the description will display. To produce a complete list of codes for a specified table: 1. Move cursor to XMIT field to the right of the appropriate code table. 2. Press Enter. To return to a previous menu, press F1.

89
Sample Code Table Result Screen NOTE: The Code Inquiry Result screen is different from a codes look-up response accessed
from an entry screen. See the sample below for a Results screen. ***************************************************************************** [1] [2] [3] [4] [5] [6] [7] line► 1 fmt► . rl►. shft►. hld chrs►. hld ln►. . RESULT ► .DATE .BACKUP 1015C300 UPDATED 990428 BAS OLO UCR OFFENSE CODE TABLE I00554
• . [11][12][13] [14] [15] [8] [9] [10] U. NM RESPON.SCCCCCCCCCFM. P *CODE .CODE DESCRIPTION .EXT DESCRIPTION . C. CODE.DIV . O123456789ME. U *==========.==================.==================.=.====.======.============. 0001 MURDER/MANSLAUGHTR UNCLASSIFIED Y 0111 HOM NNNNNNNNNNNN Y 0011 MURDER/MANSLAUGHTR BY FIREARMS Y 0111 HOM NNNNNNNNNNNN Y 0012 MURDER/MANSLAUGHTR BY KNIFE Y 0111 HOM NNNNNNNNNNNN Y 0013 MURDER/MANSLAUGHTR BY OTHER MEANS/WPN Y 0111 HOM NNNNNNNNNNNN Y 0014 MURDER/MANSLAUGHTR BY BODILY FORCE Y 0111 HOM NNNNNNNNNNNN Y 0015 CHILD HOMICIDE/MUR BY FIREARM Y 0111 HOM NNNNNNNNNNNN Y 0016 CHILD HOMICIDE/MUR BY KNIFE Y 0111 HOM NNNNNNNNNNNN Y 0017 CHILD HOMICIDE/MUR OTHER MEANS/WEAPON Y 0111 HOM NNNNNNNNNNNN Y 0018 CHILD HOMICIDE/MUR BY BODILY FORCE Y 0111 HOM NNNNNNNNNNNN Y 0019 CHILD HOMICIDE/MUR UNCLASSIFIED Y 0111 HOM NNNNNNNNNNNN Y 0021 CAPITAL MURDER BY FIREARMS Y 0111 HOM NNNNNNNNNNNN Y 0022 CAPITAL MURDER KNIFE/CUTTING INST Y 0111 HOM NNNNNNNNNNNN Y 0023 CAPITAL MURDER OTHER MEANS/WEAPON Y 0111 HOM NNNNNNNNNNNN Y 0024 CAPITAL MURDER BY BODILY FORCE Y 0111 HOM NNNNNNNNNNNN Y 0030 CAD TEST CAD NATURE CODE N OPS NNNNNNNNNNNN Y 0031 JUSTIFIABLE HOMICD BY FIREARMS Y 0111 HOM NNNNNNNNNNNN Y 0032 JUSTIFIABLE HOMICD KNIFE/CUTTING INST Y 0111 HOM NNNNNNNNNNNN Y 0033 JUSTIFIABLE HOMICD OTHER MEANS/WEAPON Y 0111 HOM NNNNNNNNNNNN Y ***************************************************************************** To return to the previous menu, press F1. To page forward: 1. Press Enter. The cursor always defaults to the rl ►field when a Results screen is first
displayed. The rl► stands for roll and pressing Enter with the cursor in this position causes the screen to roll forward 23 lines (one page) at a time.
OR 2. If the cursor has been moved, tab to the rl► field and type a + (plus sign). 3. Press Enter. To page backward: 1. Type a – (minus sign or hyphen) in the rl► field. 2. Press Enter.

90
To print the displayed code table: 1. Type COP,printer ID number in the command line of the displayed code table. Example: COP,200 NOTE: If you do not know the printer ID, use the CODES look-up, select CASE STATUS,
then select RESPONSIBLE DIV to display valid printer IDs. 2. Press Enter. The entire code table will print to the designated printer. NOTE: The cursor must be in a blank space before you press Enter. If it is blinking over a
character, erase the character and then return the cursor to the blank spot before pressing Enter.
EXPLANATION OF FIELDS
Fields 1-7 display in the heading of every Result screen. 1. line: Place cursor in this field, type a specific line number to
advance to that line of data and press Enter. 2. fmt: Type a format number in this field and press Enter to
change the display. 3. rl: Place cursor in this field and press Enter to page forward.
The cursor defaults to this field. To access the previous page, type a – (minus sign) in this field and press Enter.
4. shft: Place cursor in this field, type a number and press Enter To
shift the display to the right. To shift the display to the left, type a – (minus), a number and press Enter.
5. hld chrs: Place cursor in this field, type a number and press Enter to
hold a specific number of characters. Then, shift the display by placing the cursor in shft ► field and pressing Enter.
6. hld ln: Place cursor in this field, type a number and press Enter to
hold a specific number of lines. Then, page through the codes by placing the cursor in the rl ►field and pressing Enter.
7. RESULT: Indicates that the displayed screen is a Result screen. 8. CODE: OLO offense code. 9. CODE DESCRIPTION: Literal description of OLO offense code.

91
10. EXT DESCRIPTION: Extra description of code. 11. UC: Uniform crime reporting (UCR) flag. If flag is Y then case
is included on monthly UCR report to the state. 12. NM CODE: National model code used to categorize cases for UCR
reporting to the state. 13. RESPON DIV: Responsible division for displayed offense code. 14. SCCCCCCCCCFM O123 45 6 7 89ME: Read theses codes vertically. For example, SO = Sheriff ,
C1 – C9 = Constable precincts, FM = Fire Marshal, and ME = Medical Examiner. If a Y appears beneath the agency code, then the responsible division of the user entering the report overrides the responsible division field listed in field 10.
15. PU: Page 1 usage indicator. If a Y displays here, the nature
code on Page 1 is valid. To sort displayed codes: Type SORT on the command line of the displayed code table and press Enter. The following screen will display: ***************************************************************************** SORT BACKUP 1015C300 UPDATED 990428 BAS OLO UCR OFFENSE CODE TABLE I00554 * U.NM.RESPON.SCCCCCCCCCFM. .P *CODE .CODE DESCRIPTION . EXT DESCRIPTION C.CODE. DIV.O123456789ME. .U ==========.=================.=================.=.====.======.============.=.********* ****************** ****************** * **** ****** ************ * * [1] [2] [3] [4] [5][ [6] ***************************************************************************** To sort: 1. Type a 1 in any of fields above, 1 - 6. 2. Press Enter. 3. The code table will redisplay sorted by your choice.

92
Appendix A — Security
Report Security Access to a report may be limited or denied based on the confidentiality assigned by the responsible division or agency. This restriction is called the confidential flag and is placed on the report by an individual with a rank of sergeant or higher using the Case Status/Approval screen. Only individuals with an equal or higher rank can view the report and the division code of the person accessing the report must be the same as the division code of the person who entered it or the same as the responsible division as specified in the report. Even if the confidential flag has been set, access to the Case Summary screen is still permitted. System Security Access to the various screens is determined by the department to which a user is assigned. Each department is assigned a security level with access to specific screens and run names. Responsible Division If the current responsible division is different from the division of the user entering the report, then the following message is routed to the responsible division: New report updated - responsible division assigned. Changes to the offense type may change the responsibility assignment. The following message will be routed to the former responsible division notifying its personnel that the responsibility was reassigned: New report updated - responsible division [current] reassigned from [prior division]. The responsible division displays on the Case Status screen and can be updated in three ways: 1. During the CAD transfer to OLO based on the CAD nature code. 2. From Page 1 of the OLO report using the OFFENSE TYPE field. 3. By updating the Case Status screen. Security Violators Offense reports are confidential and should not be disseminated to the public. Personnel who violate security policies are subject to administrative and/or criminal sanctions including: reprimand, transfer, demotion, suspension, prosecution. Transaction logs are updated every time a user accesses a report. The logs contain the date and time a report was accessed and the mode of access (entry, update or display). These logs are used when a discrepancy arises about the content of a report.

93
Appendix B — Navigation Tips To clear your screen: 1. Press the Home key. 2. Type ^ (Shift + 6). 3. Press Enter. To erase an error message from the command line: 1. Press the Home key. 2. Type Alt + 9. 3. Press Enter. Paging through the Report Once an offense report is displayed, you may use three methods to select the desired screen within the report.
Method 1 Type the screen type/item identifier in the field marked NEXT SCREEN. The screen identifiers are the same for Entry, Update and Display mode. Method 2 Move the cursor to the NEXT SCREEN field and press Enter. The next screen will display.
NOTE: The Property transactions have multiple screens within the same screen type.
To access the next type of screen from a Property screen, move the cursor to the NEXT ITEM field and press Enter. If you use the NEXT SCREEN field, you will page through the screens used to track a particular item (the Recovery/Intake, Transmittal and Disposition screens).
Method 3 Access the Case Detail Menu Screen and select the appropriate screen from the list.
NOTE: The Case Detail Menu Screen will display automatically after applying data to
Page 1 or the Narrative screen. To toggle between your two active sessions or terminals: Press the Esc key. To return to a previous menu from most screens: Press PF1.

94
Appendix C — Sending and Receiving Messages Very Important: Never receive a message while in OLO entry mode. Clicking on the
receive-message icon while you are entering a report will result in the loss of data.
To send a message: 1. Return cursor to the home position on the command line. 2. Type MSGG, terminal ID. Example: MSGG, 1142 3. Press Enter. 4. Type message. 5. Press Enter. To receive message: 1. Click on the Message Icon located on the toolbar.
2. Read message. 3. Move the cursor to the home position and type OK. 4. Press Enter. To reply to a message: 1. Follow steps 1 and 2 above to receive the message. 2. Type OK, press the space bar, then type the message you wish to send. Example: OK message received. 3. Press Enter. NOTES: Do not enter anything in the last eight characters of the response line. The last eight
characters are dead space. The cursor must be over a blank space to send the reply. To Turn Off Sound Indicating You Have a Message: 1. Click on the View menu on your toolbar. 2. Click on Status Bar to unselect it. The sound indicating you have a message waiting will
cease. Search Results: When a search is performed from the OLO Search Menu (explained in a separate manual), sometimes the response is sent back in the form of a message. Retrieve the response by following the receive message steps above.

95
Appendix D — Sex Offender Verification Screen The Sex Offender Verification screen is also referred to as the Suspect III screen because it is almost identical to the existing suspect screens used for a typical offense report. The Sex Offender Verification screen displays automatically when the operator completes Page 1 of the offense report using the offense code 6830.
Access Method This screen will only display when the nature code entered on Page 1 was a sex offender nature code of 6830. ***************************************************************************** UPDATE SUSPECTS INVOLVED CASE # 050101A120 [1] [2] [3] SUSPECT TYPE/NUM: SO1 DISP: >V NAME(L F M): SIMPSON CARL SUSPECT VERIFIED [4] [5] ADDRESS: STREET NO: 1511 STREET NAME: ROANWOOD DR Ali: 11A [6] CITY: HOUSTON
[7] [8] [9] DOB: 081244 Jims Spn: 01158611 So Id#:
[10] PUBLIC RELEASE SYNOPSIS: THIS DATE AND TIME THIS DEPUTY, CONDUCTED A VERIFICATION VISIT ON AN INDIVIDUAL CONVICTED OF A SEXUAL OFFENSE. [11] [12] UPDATE: OLO MASTER MENU: Apply Data ***************************************************************************** Fields displayed in all capital letters are required fields. The required information includes disposition code, subject's name, date of birth, complete address, JIMS SPN or Sheriff’s ID number (SON). Additionally, the following statement is automatically written into the synopsis, "This date and time, this deputy, conducted a verification visit on an individual convicted of a sexual offense." To enter additional comments about the conditions, create a supplement to the report. See the Supplement Processing Menu on page 71.

96
EXPLANATION OF FIELDS 1. SUSPECT TYPE/NUM: This is the same suspect number that will be used on
the standard suspect screen. 2. DISP: Disposition of case at time of report. For a list of valid
disposition codes, place cursor in this field and press Enter.
3. NAME: Name of suspect. Format is last name first name
middle name. Do not use any commas or special characters.
4. ADDRESS: Address of suspect. In the case of sex offenders, this
should be the same address that appears on the registration.
5. Ali: Additional location information. 6. CITY: Address city. 7. DOB: Suspect’s date of birth. 8. Jims Spn: Harris County System Person Number if available. 9. So Id#: Sheriff's Office number if applicable. 10. PUBLIC RELEASE SYNOPSIS: This message displays automatically with the offense
code 6830. 11. UPDATE: Place cursor in this field and press Enter to save the
data. 12. OLO MASTER MENU: Place cursor in this field and press Enter to return to the
OLO Main Menu.

97
Appendix E — CAD Nature Codes Use the CADNAT code table to look up the nature codes used on the NEWCASE screen.
ACCESS METHOD 1. Type CADNAT in the home position at the command line of any screen. 2. Press Enter. The following menu will display. ***************************************************************************** [1] [2] [3] [4] [5] [6] [7] line► 1 fmt► . rl►. shft►. hld chrs►. hld ln►. . RESULT ► . DATE 03 JAN 01 15:41:35 RID 2B 19 MAY 00 BS19030 NATURE CODE TABLE BACKUP 1002C300 UPDATED 960419 BS . [10] [11] [12] [8] [9] P. AC. L. R. HD. DS.EN. AR. RESPON.SCCCCCCCCCFM. F.O NAT. DESCRIPTION .C. TY. H. R. TM. TM.TM. TM. DIV .O123456789ME. N.T ===.==================.=. ==. =.=. ==. ==.==. ==. ======.============.===========.=.= 001 IN PROGRESS 1 Y N UPDATE NNNNNNNNNNNN Y N 002 IN PROGRESS 2 Y N UPDATE NNNNNNNNNNNN Y N 003 CAD TEST 4 N N OPS NNNNNNNNNNNN Y N 004 SPECIAL OLO TEST 4 N N J4 NNNNNNNNNNNN Y Y 011 MURDER/MANSLAUGTER 1 Y N HOM NNNNNNNNNNNN Y Y 012 INTOX MANSL TRAFF 1 Y N TED NNNNNNNNNNNN Y Y 013 CRIM NEGL HOM TRAF 1 Y N TED NNNNNNNNNNNN Y Y 101 BURGLARY/BUSINESS 3 N N BTR NNNNNNNNNNNN Y Y 102 BURGLARY/RES 3 N N BTR NNNNNNNNNNNN Y Y 109 BURG/OTHER 3 N N BTR NNNNNNNNNNNN Y Y 110 BURGLARY/MOTVEH 3 N N BTR NNNNNNNNNNNN Y Y 120 OPEN DOOR/WINDOW 2 N N NONE NNNNNNNNNNNN Y N 171 MENTAL CASE 2 Y N UPDATE NNNNNNNNNNNN Y N 201 ROBBERY/BUSINESS 2 N N BTR NNNNNNNNNNNN Y Y 203 ROBBERY/INDIVIDUAL 2 N N BTR NNNNNNNNNNNN Y Y 205 HOME INVASION 2 Y Y BTR NNNNNNNNNNNN Y Y 206 CAR-JACKING 2 Y Y BTR NNNNNNNNNNNN Y Y 20 7 ROBBERY/AGG 2 N N BTR NNNNNNNNNNNN Y Y
*****************************************************************************
EXPLANATION OF FIELDS
The following fields display in the heading of every Result screen. 1. line: Place cursor in this field, type a specific line number to
advance to that line of data and press Enter. 2. fmt: Type a format number in this field and press Enter to
change the display.

98
3. rl: Place cursor in this field and press Enter to page forward. The cursor defaults to this field. To access the previous page, type a – (minus sign) in this field and press Enter.
4. shft: Place cursor in this field, type a number and press Enter To
shift the display to the right. To shift the display to the left, type a – (minus), a number and press Enter.
5. hld chrs: Place cursor in this field, type a number and press Enter to
hold a specific number of characters. Then, shift the display by placing the cursor in shft ► field and pressing Enter.
6. hld ln: Place cursor in this field, type a number and press Enter to
hold a specific number of lines. Then, page through the codes by placing the cursor in the rl ►field and pressing Enter.
7. RESULT: Indicates that the displayed screen is a Result screen. 8. NAT: CAD nature code. 9. DESCRIPTION: Literal description of CAD nature code. 10. PC: Priority code. Calls are prioritized from 1 to 4. The most
urgent calls are labeled 1and the least urgent calls are labeled 4.
11. RESPON DIV: Responsible division for displayed offense code. 12. SCCCCCCCCCFM O123 45 6 7 89ME: Read theses codes vertically. For example, SO = Sheriff ,
C1 – C9 = Constable precincts, FM = Fire Marshal, and ME = Medical Examiner. If a Y appears beneath the agency code, then the responsible division of the user entering the report overrides the responsible division listed in field 11.

99
Appendix F — TCIC/NCIC Entry Report Person Screen – Suspects Involved If a person-type code of J (juvenile) or M (missing) is entered, a TCIC/NCIC Entry report will print on the user’s default printer. The user must submit this form to the appropriate personnel for entry into TCIC and/or NCIC. An entry into NCIC will generate a NIC number. After entry, retrieve the form and add the TCIC entry indicator and/or the NIC number to the second page of the Suspect screen. If a juvenile or missing person designation is cancelled (DISP= X), a TCIC/NCIC Cancellation form is generated. Submit this form to the appropriate personnel to update the TCIC and/or NCIC files. Property Screens If a status code of A (abandoned), B (recovered local), R (recovered outside), F (felony or found), L (lost), or S (stolen) is entered on a property screen, a TCIC/NCIC Entry report will print on the user’s default printer. The user must submit this form to the appropriate personnel for entry into TCIC and/or NCIC. An entry into NCIC will generate a NIC number. After entry, retrieve the form and add the TCIC entry indicator and/or the NIC number to the appropriate property screen.

100
Appendix G — Current Working Accidents Use this screen to view a list of all accidents currently open or working in the Computer-Aided Dispatch (CAD) system.
ACCESS METHOD 1. Type the run name ACCI in the home position at the command line. 2. Press Enter. The following screen will display. 3. Press F1 to update the list periodically. ***************************************************************************** [1] [2] [3] [4] [5] [6] [7] line- 1 fmt- rl- - shft- hld chrs- hld ln- -RESULT- [8] [9] .DATE 05 JAN 05 19:37:14 REPORT GENERATION TJ19096 * * * * * * * * * * * * * * * * * * * * ACCIDENTS FOR MEDIA * * [10] HARRIS COUNTY * * 17 FEB 00 * * [20] * [11][12][13] [14] [15] [16] [17] [18] [19] KEY P TIME AR UNIT ST NAT ZON LOCATION EVT# MAP * * =.=====.==. =====.==. ===. ===. ===============. ====. ====.* 1 19:29 S1 4150 AR 818 N95 THREE L/TOMBALL A459 328D 1 19:12 S1 4587 DP 818 N20 VETERAN/SPEARS A469 371F 1 19:05 S1 4163 OV 818 N95 THREE L/TOMBALL A459 328D 1 19:17 S4 446 AR 818 W90 TOMBALL/BOUDREA A458 288Z 1 19:11 S4 4453 AR 818 W90 TOMBALL/BOUDREA A458 288Z 2 19:34 S1 HD 819 N50 1423W MT HOUST A577 412K 2 18:45 S2 4656 AR 819 SGP NORTH F/RANKIN A354 372G 2 19:23 C1 8118 OV 819 OTH 1800PARKER A530 492H 2 19:29 C1 1T14 AR 819 OTH 1800PARKER A530 492H 2 19:32 C1 1D31 AR 819 OTH 1800PARKER A530 492H 2 07:50 C7 HD 819 7C3 S BELTW/CULLEN A648 9996 2 18:52 S4 4033 AR 819 W40 PARK RO/N FRY R A369 446Y 2 17:37 A1 HD 819 1C1 TOMBALL/W BELTW A877 250S ..... END REPORT ..... *****************************************************************************
EXPLANATION OF FIELDS Fields 1 - 7 are explained on page 90. 8. DATE 17 FEB 00 19:37:14: Current date and time of report. 9. TJ19096: PID ID of logged on user.
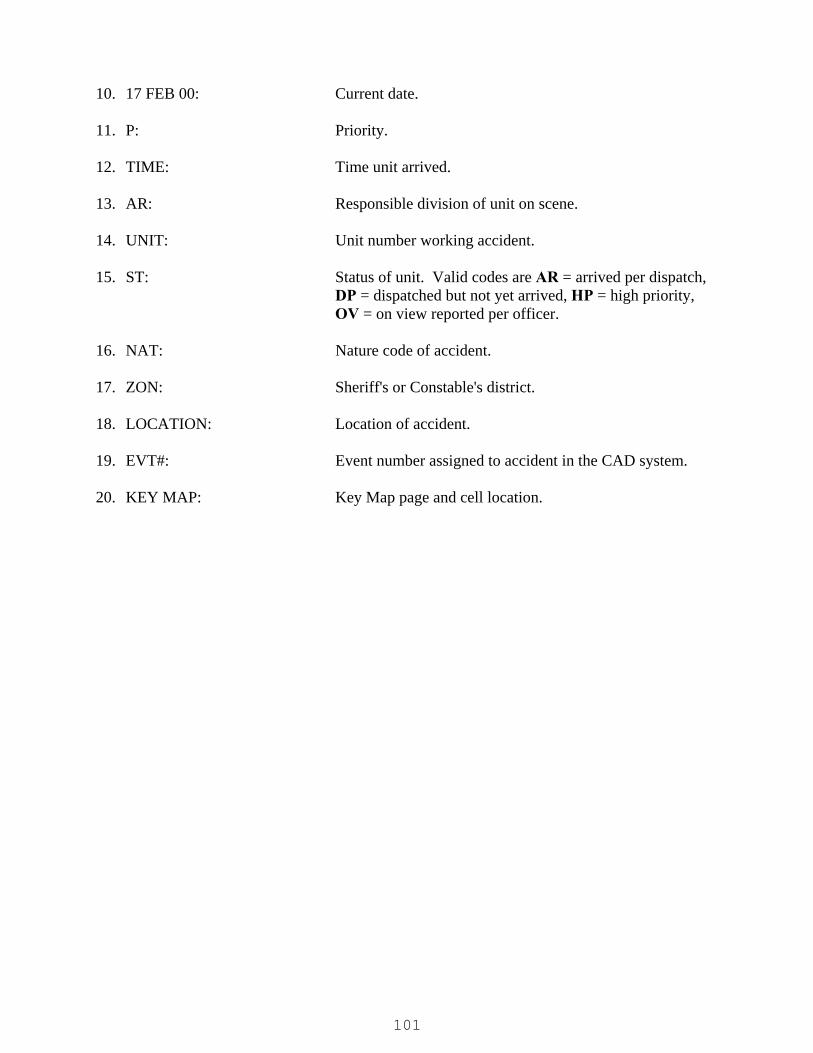
101
10. 17 FEB 00: Current date. 11. P: Priority. 12. TIME: Time unit arrived. 13. AR: Responsible division of unit on scene. 14. UNIT: Unit number working accident. 15. ST: Status of unit. Valid codes are AR = arrived per dispatch,
DP = dispatched but not yet arrived, HP = high priority, OV = on view reported per officer.
16. NAT: Nature code of accident. 17. ZON: Sheriff's or Constable's district. 18. LOCATION: Location of accident. 19. EVT#: Event number assigned to accident in the CAD system. 20. KEY MAP: Key Map page and cell location.

102
Appendix H — Vehicle Stops Use CAD command CTAG to inquire with a license plate number, or STAG to inquire with a partial license plate number, and access a list of vehicle stops reported for that vehicle. NOTE: The information contained in the vehicle stop database is only as good as the
information that was entered by the dispatcher or deputy who documented the incident. Operators are encouraged to enter correct and complete tag numbers when making a vehicle stop entry.
Use CTAG to Inquire on a Specific Vehicle Tag number To view a list of all traffic stops connected to a specific vehicle tag number:
1. Type CTAG on the command line. 2. Press Enter. The following screen will display. 3. Field 1, the state code, defaults to TX. Type over the TX with the appropriate state code
if applicable. 4. Type the plate number in field 2. 5. Tab to field 3 (designated by the third •) and press Enter. See the next page for possible
results screens. ***************************************************************************** PLEASE ENTER STATE N PLATE...... [1] [2] [3]
STATE • TX PLATE • • ***************************************************************************** Use STAG to Inquire on a Partial Vehicle Tag number To view a list of all traffic stops connected to a partial vehicle number:
1. Type STAG on the command line. 2. Press Enter. The following screen will display. 3. In fields 1 through 8, fill in the known plate digits in the appropriate position/positions. 4. Tab to field 9, the XMIT field. 5. Press Enter. See the next page for possible results screens.
***************************************************************************** ENTER THE KNOWN DIGITS INTO THE PROPER POSITIONS: [1] [2] [3] [4] [5] [6] FIRST SECOND THIRD FOURTH FIFTH SIXTH
[7] [8] [9] SEVENTH EIGHTH XMIT *****************************************************************************

103
If there have been no stops on the vehicle the following screen will display: *****************************************************************************
NO STOPS FOR TX - PRL45N IN THE FILE NO STOPS FOR TX - PRL45N IN THE FILE (1517) STATE • TX TAG PRL45N • ***************************************************************************** If there have been stops on the vehicle the following screen will display: ***************************************************************************** .DATE 10 JAN 05 09:36:18 RID 78I 12 JAN 05 KB19021
.LICENSE PLATE (TAG) DATA BY • BOING I003100 [1] [2] [3] [4] [5] [6] [7] [8][9] [10] [11] * TAG *ST NUMBER DATE EVNT UNIT ADDRESS ONE ADDRESS TWO CA ORI TIME DSP *==.========.======.====.====.============.====================.==.===.=====.=== TX K51MLT 020112 A010 4279 5400 ALDINE MAIL RD S2 KRF 00:03 CIT TX K51MLT 020201 A037 4290 13700 TERLIN S2 KLY 16:49 ARR TX K51MLT 020202 A800 4298 HOMESTEAD RD HAMILL RD S2 RDC 16:55 ARR ..... END REPORT ..... *****************************************************************************
EXPLANATION OF FIELDS 1. ST: State where vehicle is licensed. 2. TAG NUMBER: Vehicle plate number. 3. DATE: Date vehicle was stopped. 4. EVNT: Event number on date stopped. (NOTE: The date and the event
number combine to make the case number.) 5. UNIT: Unit number of deputy who made stop. 6. ADDRESS ONE: Street number or first cross street where stop occurred. 7. ADDRESS TWO: Street name or second cross street where stop occurred. 8. CA: Agency and division code of deputy who made stop. 9. ORI: Agency code of deputy who made stop. 10. TIME: Time of stop. 11. DSP: Disposition of stop as entered by the dispatcher. The following is a
list of valid disposition codes: ADV Advised ARP Accident report ARR Cleared by arrest CAN Cancelled CBU Clear back up

104
CIF Citizen information form CIT Traffic citation DPS Referred to Texas Department of Public Safety FAL False alarm FCI False alarm citation issued FHE False alarm human error FIC Filed interrogation card GOA Gone on arrival HPD Houston Police Department report HSO Referred to Harris County Sheriff’s Office INF Information INT In transit JPR J. P. REPORT NIF Non-investigative form NSE No sign of entry REF Referred REP Incident report RTS Return to service SCL Self cleared SPL Supplement report SUP Supervisor cleared TRU True alarm UNF Unfounded UTL Unable to locate WAR Verbal warning WEA Weather

105
Appendix I — JIMS Project Analysts Administrative Offices of the Court Clay Bowman 713-755-6859 Community Supervision and Corrections Glenda Stair 713-755-2725 Scheduling: Vicki Adams 713-755-2726 Civil District Courts Steve Stuchlik 713-755-7592 Constables' Offices Bob Hilsher 713-755-5200 County Criminal Courts at Law Wayne Bowling 713-755-5394 District Attorney's Office Kermit Kurtz 713-755-8816 District Clerk, Civil Division Loretta Houpt 713-755-7251 Charlie Workman 713-755-5724 District Clerk, Criminal Division Mindy Hamrick 713-755-7857 Assistant: Becky Ramirez 713-755-7834 Justices of the Peace Jennifer Juel 713-755-0999 Juvenile Probation Department Pam Boveland 713-512-4912 Pretrial Services Mara Porper 713-755-2935 Sheriff's Department Brian Jones 713-755-6041 Systems Division 713-755-6040 HPD Agency Liaison Mike Williamson 281-230-2403

106
Appendix J — OLO Glossary of Terms CAD Acronym for Harris County’s Computer-Aided Dispatch system used to
enter calls for service generated through 911 calls and officers on view. Command line Top line of all OLO screens. Typing the appropriate commands on this
line will activate the programs in OLO. Fast Access Indicates the direct access method for a particular screen. Fast-access
methods are typed on the command line with the cursor in the home position in the following format:
OLO,U,050101A120,three-character screen-type code Example: OlO,U,050101A120,PER OR The NEXT TYPE and NEXT ITEM fields can be used for fast access:
Type the three-character type or item code in these fields. Home position Top left corner of the screen. Typing the appropriate commands or run
names on this line will activate the programs in OLO. Mapper Programming environment used for CAD and OLO. Run name Commands typed at the home position to activate programs. For example,
typing OLO at the home position will access the OLO Main Menu. UNISYS Type of mainframe computer used for the OLO, CAD, Towed Vehicle and
Alarm Permit systems and the Harris County Geo File.

107
Index Article Entry Screen...................................................................................................................... 52 Automated Offense Reporting - Main Menu ................................................................................ 20 Boat Entry Screen ......................................................................................................................... 61 CAD Call For Service Transfers to OLO ..................................................................................... 12 CAD Nature Codes — Appendix E ............................................................................................ 100 Case Detail Menu Screen.............................................................................................................. 29 Case Status/Approval Screen........................................................................................................ 83 Case Summary Screen .................................................................................................................. 86 Codes Inquiry................................................................................................................................ 90 Connecting to the Unisys Mainframe ............................................................................................. 7 Current Working Accidents — Appendix G .............................................................................. 103 Cursor Placement options on OLO Update Screen....................................................................... 40 Display/Inquiry ............................................................................................................................... 6 Entry/Update ................................................................................................................................... 5 Geo File Validation....................................................................................................................... 15 Geo Validation Equivalent Names Screen.................................................................................... 15 Geo Validation Multiple Hit Address Screen ............................................................................... 16 Geo Validation Out of Range Screen............................................................................................ 18 Geo Validation Soundex Suggestion Screen ................................................................................ 17 Gun Entry Screen.......................................................................................................................... 59 JIMS Project Analysts — Appendix H....................................................................................... 108 Narrative Entry Screen.................................................................................................................. 46 Narrative Update Screen ............................................................................................................... 48 Navigation Tips — Appendix B ................................................................................................... 96 New Case Number Entry Screen .................................................................................................. 13 Offense Entry Screen - Page 1 ...................................................................................................... 22 OLO Glossary of Terms — Appendix I ..................................................................................... 109 On-screen Code Look Up ............................................................................................................. 26 Overview......................................................................................................................................... 4 Parts Entry Screen......................................................................................................................... 64 Persons Involved Entry Screen ..................................................................................................... 31 Property Disposition Screen ......................................................................................................... 72 Property Menu .............................................................................................................................. 50 Property Recovery/Intake Screen ................................................................................................. 68 Property Transmittal Screen ......................................................................................................... 70 Report Print Menu......................................................................................................................... 88 Securities/Currencies Entry Screen............................................................................................... 66 Security — Appendix A................................................................................................................ 95 Sending and Receiving Messages — Appendix C ....................................................................... 97 Sex Offender Verification Screen — Appendix D ....................................................................... 98 Signing off and Disconnecting from the Mainframe .................................................................... 11 Signing on to OLO.......................................................................................................................... 9 Supplement Display Screen .......................................................................................................... 78 Supplement Entry Screen.............................................................................................................. 76 Supplement Processing Menu....................................................................................................... 74 Supplement Update Screen ........................................................................................................... 81

108
Suspects Involved Entry Screen 1................................................................................................. 36 Suspects Involved Entry Screen 2................................................................................................. 41 Synopsis Entry Screen .................................................................................................................. 44 TCIC/NCIC Entry Report — Appendix F .................................................................................. 102 Vehicle Entry Screen .................................................................................................................... 56 Vehicle Stops — Appendix H..................................................................................................... 105