Happy Holidays
30
E C H O P A R K P A P E R C O . Happy Holidays
-
Upload
elizabeth-gonzalez-ramos -
Category
Documents
-
view
4 -
download
0
description
MANUALIDAD
Transcript of Happy Holidays
1
ECHO
PARK PAPER CO.
Happy Holidays
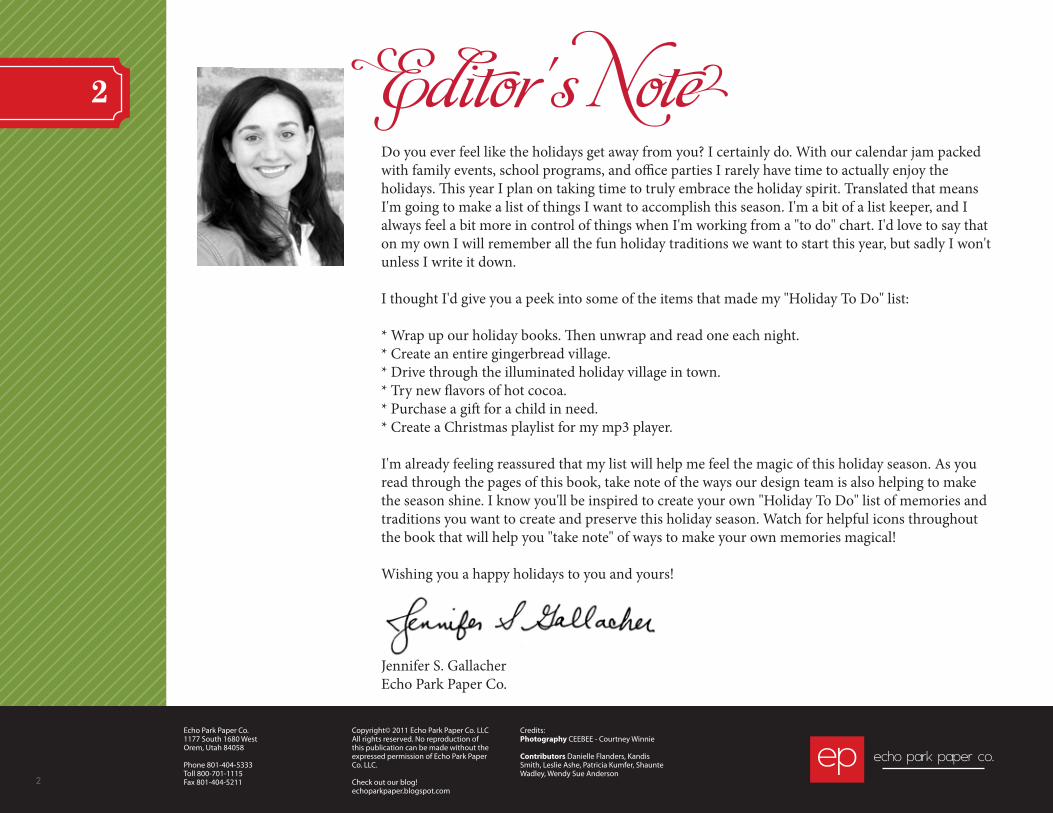
Editor's NoteDo you ever feel like the holidays get away from you? I certainly do. With our calendar jam packed with family events, school programs, and office parties I rarely have time to actually enjoy the holidays. This year I plan on taking time to truly embrace the holiday spirit. Translated that means I'm going to make a list of things I want to accomplish this season. I'm a bit of a list keeper, and I always feel a bit more in control of things when I'm working from a "to do" chart. I'd love to say that on my own I will remember all the fun holiday traditions we want to start this year, but sadly I won't unless I write it down.
I thought I'd give you a peek into some of the items that made my "Holiday To Do" list:
* Wrap up our holiday books. Then unwrap and read one each night.* Create an entire gingerbread village.* Drive through the illuminated holiday village in town.* Try new flavors of hot cocoa.* Purchase a gift for a child in need.* Create a Christmas playlist for my mp3 player.
I'm already feeling reassured that my list will help me feel the magic of this holiday season. As you read through the pages of this book, take note of the ways our design team is also helping to make the season shine. I know you'll be inspired to create your own "Holiday To Do" list of memories and traditions you want to create and preserve this holiday season. Watch for helpful icons throughout the book that will help you "take note" of ways to make your own memories magical!
Wishing you a happy holidays to you and yours!
Jennifer S. GallacherEcho Park Paper Co.
Echo Park Paper Co.1177 South 1680 WestOrem, Utah 84058
Phone 801-404-5333 Toll 800-701-1115Fax 801-404-5211
Copyright© 2011 Echo Park Paper Co. LLCAll rights reserved. No reproduction of this publication can be made without the expressed permission of Echo Park Paper Co. LLC.
Check out our blog! echoparkpaper.blogspot.com
Credits: Photography CEEBEE - Courtney Winnie
Contributors Danielle Flanders, Kandis Smith, Leslie Ashe, Patricia Kumfer, Shaunte Wadley, Wendy Sue Anderson
2
2
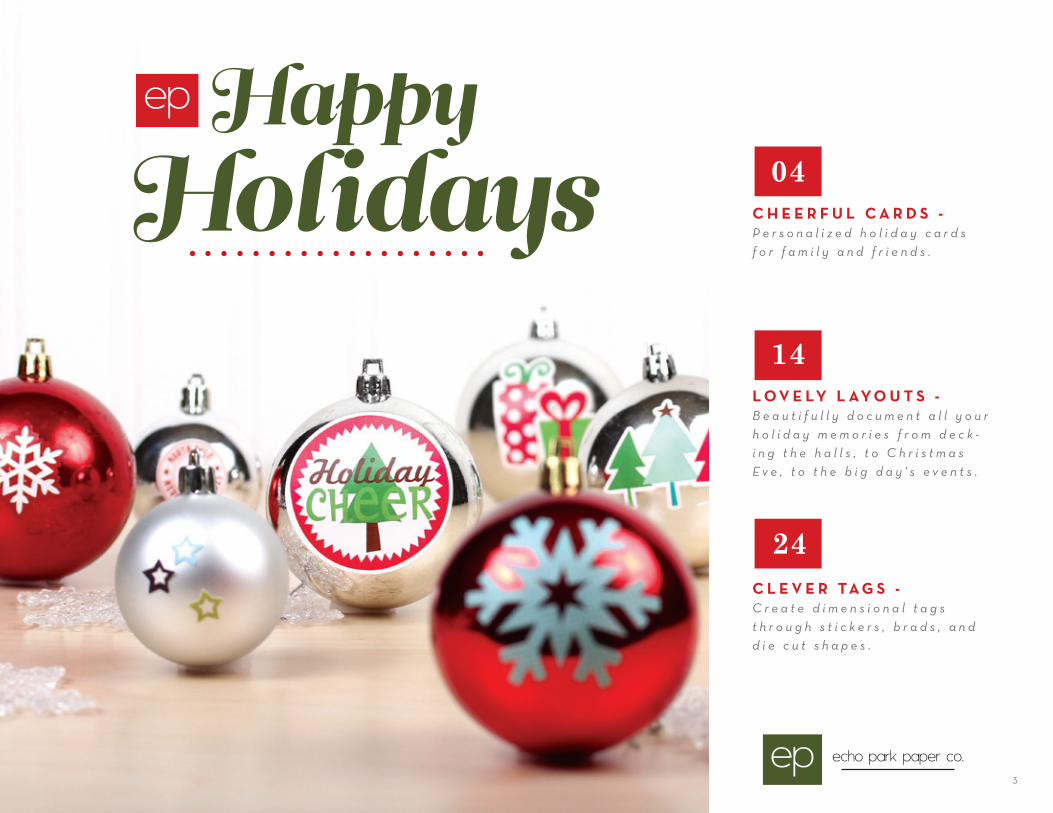
C H E E R F U L C A R D S - P e r s o n a l i z e d h o l i d a y c a r d s f o r f a m i l y a n d f r i e n d s .
L O V E LY L AY O U T S - B e a u t i f u l l y d o c u m e n t a l l y o u r h o l i d a y m e m o r i e s f r o m d e c k -i n g t h e h a l l s , t o C h r i s t m a s E v e , t o t h e b i g d a y ' s e v e n t s .
C L E V E R TA G S - C r e a t e d i m e n s i o n a l t a g s t h r o u g h s t i c k e r s , b r a d s , a n d d i e c u t s h a p e s .
04
14
24
3
HappyHolidays
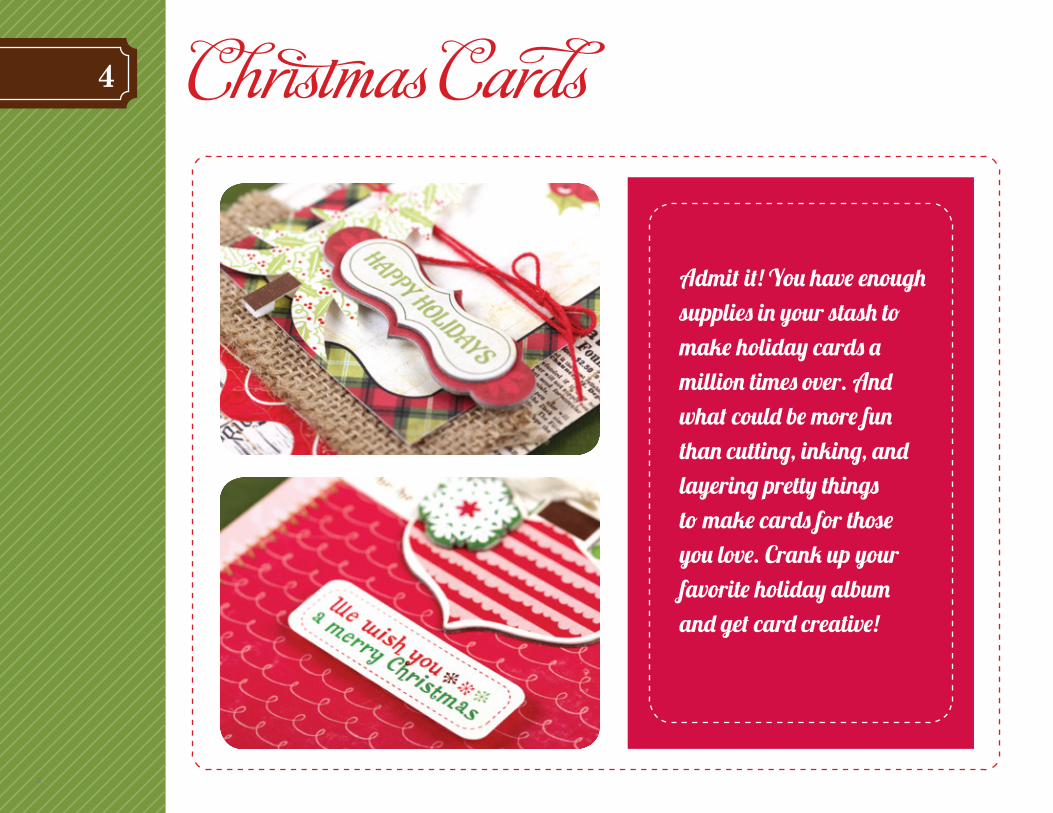
4 C¬ristmas CardsAdmit it! You have enough supplies in your stash to make holiday cards a million times over. And what could be more fun than cutting, inking, and layering pretty things to make cards for those you love. Crank up your favorite holiday album and get card creative!
4
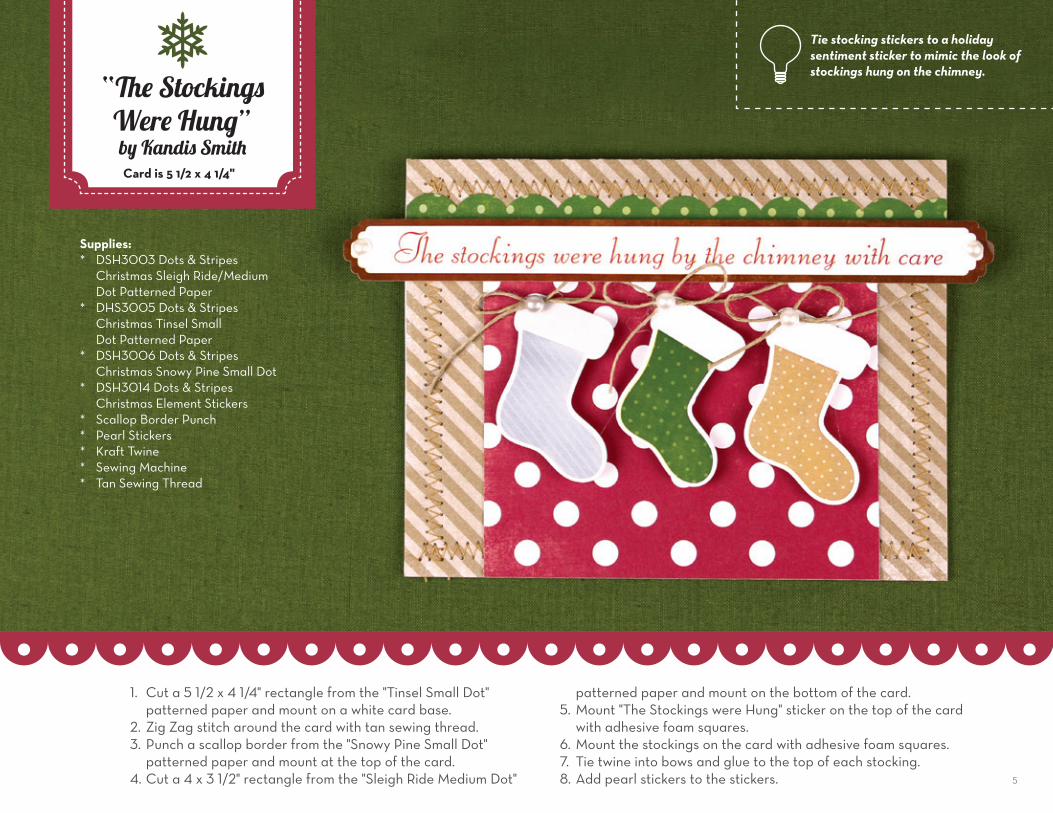
“The Stockings Were Hung”by Kandis Smith
Supplies:* DSH3003 Dots & Stripes
Christmas Sleigh Ride/Medium Dot Patterned Paper
* DHS3005 Dots & Stripes Christmas Tinsel Small Dot Patterned Paper
* DSH3006 Dots & Stripes Christmas Snowy Pine Small Dot
* DSH3014 Dots & Stripes Christmas Element Stickers
* Scallop Border Punch* Pearl Stickers* Kraft Twine* Sewing Machine* Tan Sewing Thread
Tie stocking stickers to a holiday sentiment sticker to mimic the look of stockings hung on the chimney.
1. Cut a 5 1/2 x 4 1/4" rectangle from the "Tinsel Small Dot" patterned paper and mount on a white card base.
2. Zig Zag stitch around the card with tan sewing thread.3. Punch a scallop border from the "Snowy Pine Small Dot"
patterned paper and mount at the top of the card.4. Cut a 4 x 3 1/2" rectangle from the "Sleigh Ride Medium Dot"
patterned paper and mount on the bottom of the card.5. Mount "The Stockings were Hung" sticker on the top of the card
with adhesive foam squares.6. Mount the stockings on the card with adhesive foam squares.7. Tie twine into bows and glue to the top of each stocking.8. Add pearl stickers to the stickers.
Card is 5 1/2 x 4 1/4"
5
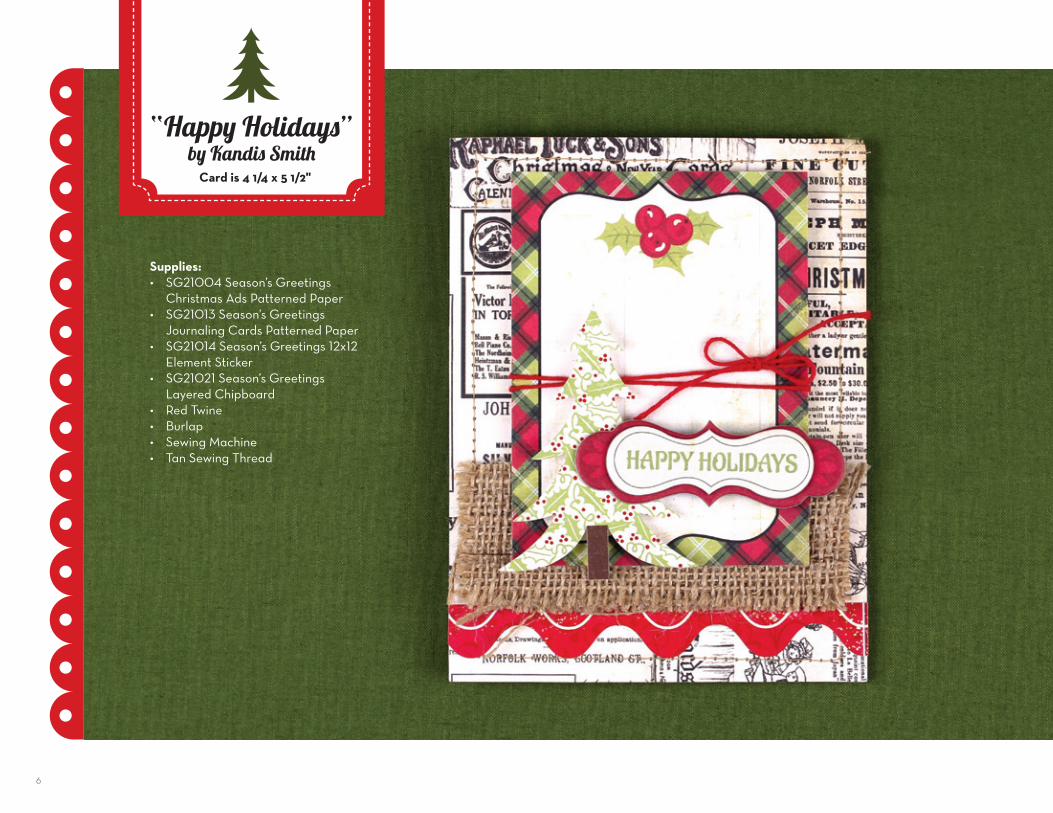
“Happy Holidays”by Kandis Smith
Supplies:• SG21004Season’sGreetings
Christmas Ads Patterned Paper• SG21013Season’sGreetings
Journaling Cards Patterned Paper• SG21014Season’sGreetings12x12
Element Sticker• SG21021Season’sGreetings
Layered Chipboard• RedTwine• Burlap• SewingMachine• TanSewingThread
Card is 4 1/4 x 5 1/2"
6

Welcome to the crafting crossover revolution! Fabric, sewing, beading, and many other crafts are making the jump to scrapbooking. If you have a second or third hobby, find a way to incorporate your supplies and skills into your scrapbook pages and paper crafting projects. It’s all part of the process for helping your design reflect your personal style.
1. Cut a 4 1/4 x 5 1/2" rectangle from the "Christmas Ads" patterned paper and machine stitch to the front of a card base with tan sewing thread.
2. Mount the scallop border on the bottom of the card and trim off excess.
3. Cut a 4 x 1" strip from burlap fabric and mount on the bottom of the card.
4. Cut the holly berries journaling card from the "Journaling Cards" patterned paper and wrap red
twine around the center of the card several times before tying into a bow.
5. Mount the journaling card on the card with adhesive foam squares.
6. Mount the tree sticker from the "Element Stickers" sheet on the card with adhesive foam squares.
7. Mount the "Happy Holidays" sticker from the "Layered Chipboard" sheet on the card.
Check out the nubby texture of the border strip on this card created by the burlap fabric glued to the bottom of the card.
7
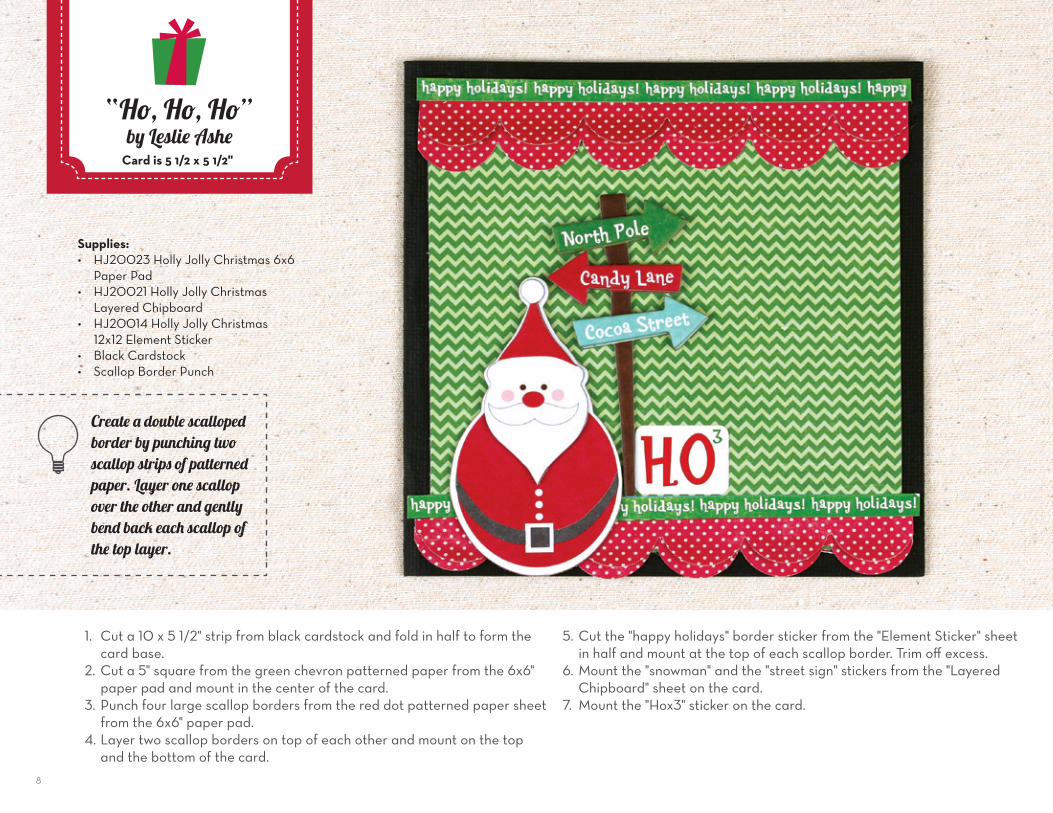
“Ho, Ho, Ho”by Leslie Ashe
Supplies:• HJ20023HollyJollyChristmas6x6
Paper Pad• HJ20021HollyJollyChristmas
Layered Chipboard• HJ20014HollyJollyChristmas
12x12 Element Sticker• BlackCardstock• ScallopBorderPunch
1. Cut a 10 x 5 1/2" strip from black cardstock and fold in half to form the card base.
2. Cut a 5" square from the green chevron patterned paper from the 6x6" paper pad and mount in the center of the card.
3. Punch four large scallop borders from the red dot patterned paper sheet from the 6x6" paper pad.
4. Layer two scallop borders on top of each other and mount on the top and the bottom of the card.
5. Cut the "happy holidays" border sticker from the "Element Sticker" sheet in half and mount at the top of each scallop border. Trim off excess.
6. Mount the "snowman" and the "street sign" stickers from the "Layered Chipboard" sheet on the card.
7. Mount the "Hox3" sticker on the card.
Create a double scalloped border by punching two scallop strips of patterned paper. Layer one scallop over the other and gently bend back each scallop of the top layer.
Card is 5 1/2 x 5 1/2"
8
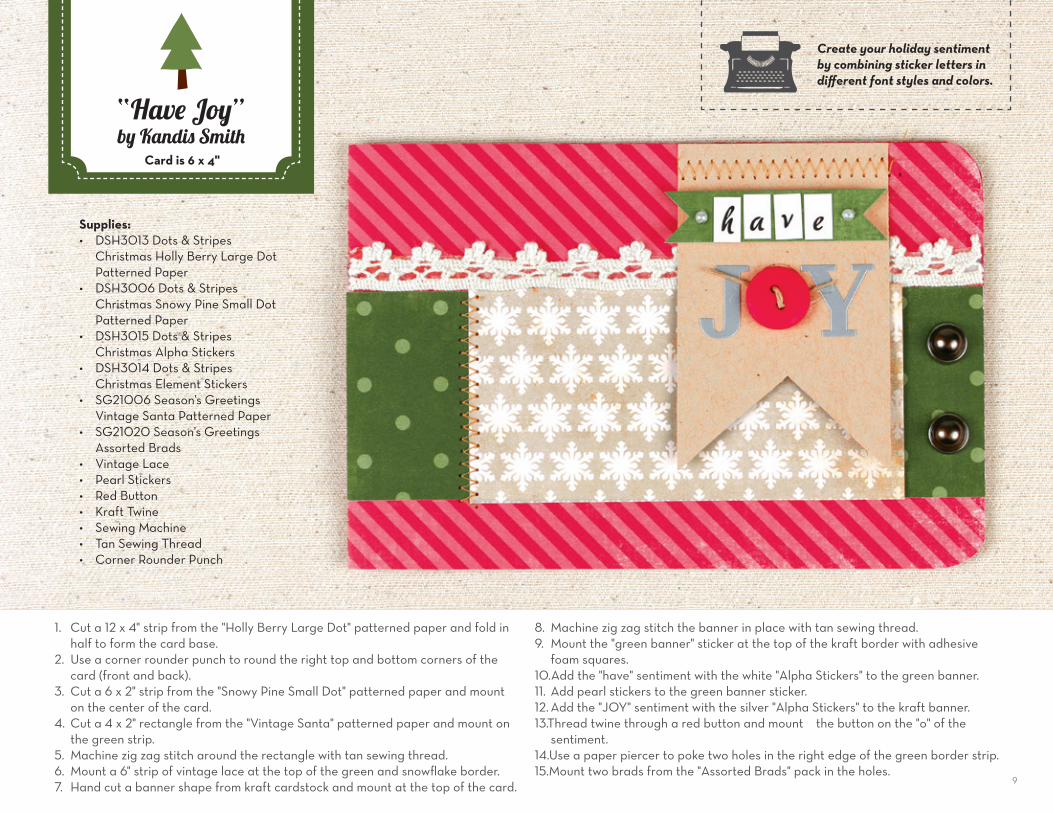
“Have Joy”by Kandis Smith
Supplies:• DSH3013Dots&Stripes
Christmas Holly Berry Large Dot Patterned Paper
• DSH3006Dots&StripesChristmas Snowy Pine Small Dot Patterned Paper
• DSH3015Dots&StripesChristmas Alpha Stickers
• DSH3014Dots&StripesChristmas Element Stickers
• SG21006Season’sGreetingsVintage Santa Patterned Paper
• SG21020Season’sGreetingsAssorted Brads
• VintageLace• PearlStickers• RedButton• KraftTwine• SewingMachine• TanSewingThread• CornerRounderPunch
1. Cut a 12 x 4" strip from the "Holly Berry Large Dot" patterned paper and fold in half to form the card base.
2. Use a corner rounder punch to round the right top and bottom corners of the card (front and back).
3. Cut a 6 x 2" strip from the "Snowy Pine Small Dot" patterned paper and mount on the center of the card.
4. Cut a 4 x 2" rectangle from the "Vintage Santa" patterned paper and mount on the green strip.
5. Machine zig zag stitch around the rectangle with tan sewing thread.6. Mount a 6" strip of vintage lace at the top of the green and snowflake border.7. Hand cut a banner shape from kraft cardstock and mount at the top of the card.
8. Machine zig zag stitch the banner in place with tan sewing thread.9. Mount the "green banner" sticker at the top of the kraft border with adhesive
foam squares.10.Add the "have" sentiment with the white "Alpha Stickers" to the green banner.11. Add pearl stickers to the green banner sticker.12. Add the "JOY" sentiment with the silver "Alpha Stickers" to the kraft banner.13.Thread twine through a red button and mount the button on the "o" of the
sentiment.14.Use a paper piercer to poke two holes in the right edge of the green border strip.15.Mount two brads from the "Assorted Brads" pack in the holes.
Card is 6 x 4"
Create your holiday sentiment by combining sticker letters in different font styles and colors.
9
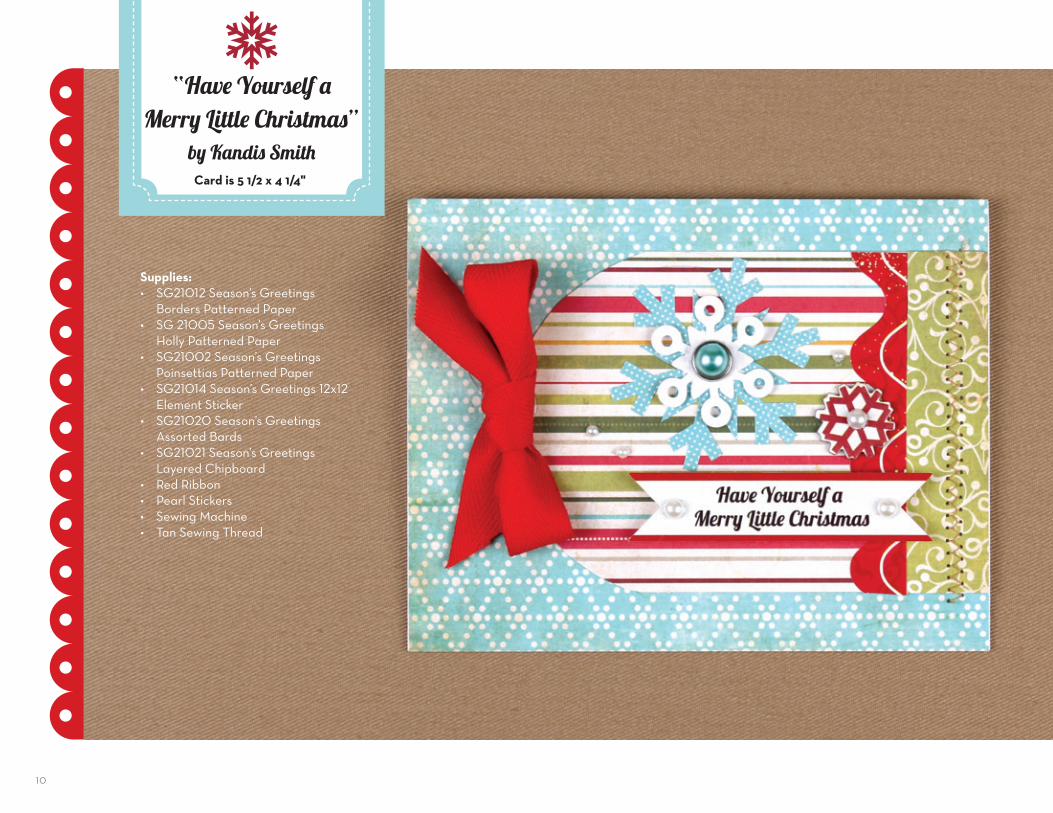
“Have Yourself a Merry Little Christmas”
by Kandis Smith
Supplies:• SG21012Season’sGreetings
Borders Patterned Paper• SG21005Season’sGreetings
Holly Patterned Paper• SG21002Season’sGreetings
Poinsettias Patterned Paper• SG21014Season’sGreetings12x12
Element Sticker• SG21020Season’sGreetings
Assorted Bards• SG21021Season’sGreetings
Layered Chipboard• RedRibbon• PearlStickers• SewingMachine• TanSewingThread
Card is 5 1/2 x 4 1/4"
10

Everyone has their favorite go-to adhesive. Use a wet, clear adhesive for adhering small items that need a strong hold. Use glue dots for a strong hold with a dry fix. Use a tape runner for holding thinner, lighter materials. Experiment with different types to find your preference.
1. Cut a 5 1/2 x 4 1/4" rectangle from the "Borders" patterned paper and mount on a white card base.
2. Hand cut a 4 1/2 x 3" tag from the "Holly" patterned paper and mount horizontally on the card front.
3. Cut a 3/4 x 3" strip from the "Poinsettias" patterned paper and mount on the right side of the tag.
4. Machine stitch the strip in place by zig zag stitching the right edge with tan sewing thread.
5. Mount the scallop border sticker from the "Element Sticker" sheet on the tag. Trim off excess.
6. Mount the "blue snowflake sticker" on the tag.7. Use a paper piercer to poke a hole through the
card front and mount the snowflake brad onto the blue snowflake sticker.
8. Mount the red chipboard snowflake sticker from the "Layered Chipboard" sheet on the tag.
9. Mount the "Have Yourself a Merry Little Christmas" banner on the card with adhesive foam squares.
10.Add pearl stickers to the card.11. Tie a red ribbon into a bow and attach it to the left
side of the tag.
Create shadow and dimension by layering a metal and paper snowflake brad on top of a snowflake sticker.
11
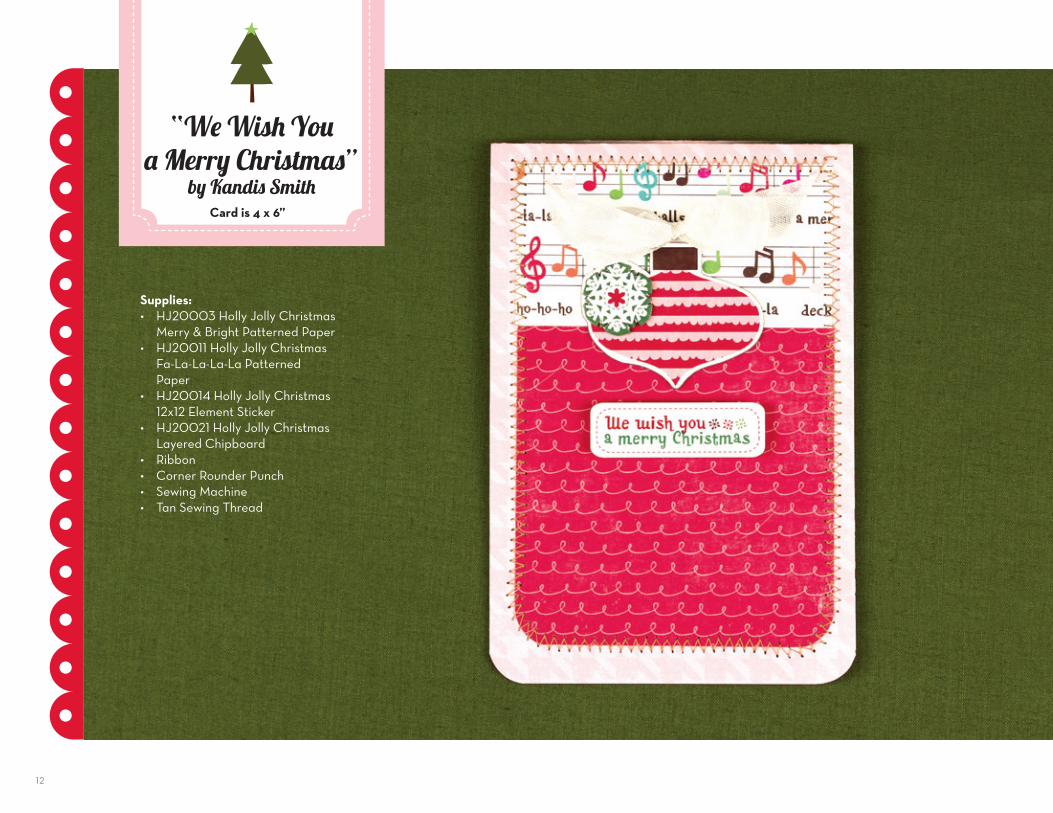
“We Wish You a Merry Christmas”
by Kandis Smith
Supplies:• HJ20003HollyJollyChristmas
Merry & Bright Patterned Paper• HJ20011HollyJollyChristmas
Fa-La-La-La-La Patterned Paper
• HJ20014HollyJollyChristmas12x12 Element Sticker
• HJ20021HollyJollyChristmasLayered Chipboard
• Ribbon• CornerRounderPunch• SewingMachine• TanSewingThread
Card is 4 x 6”
12
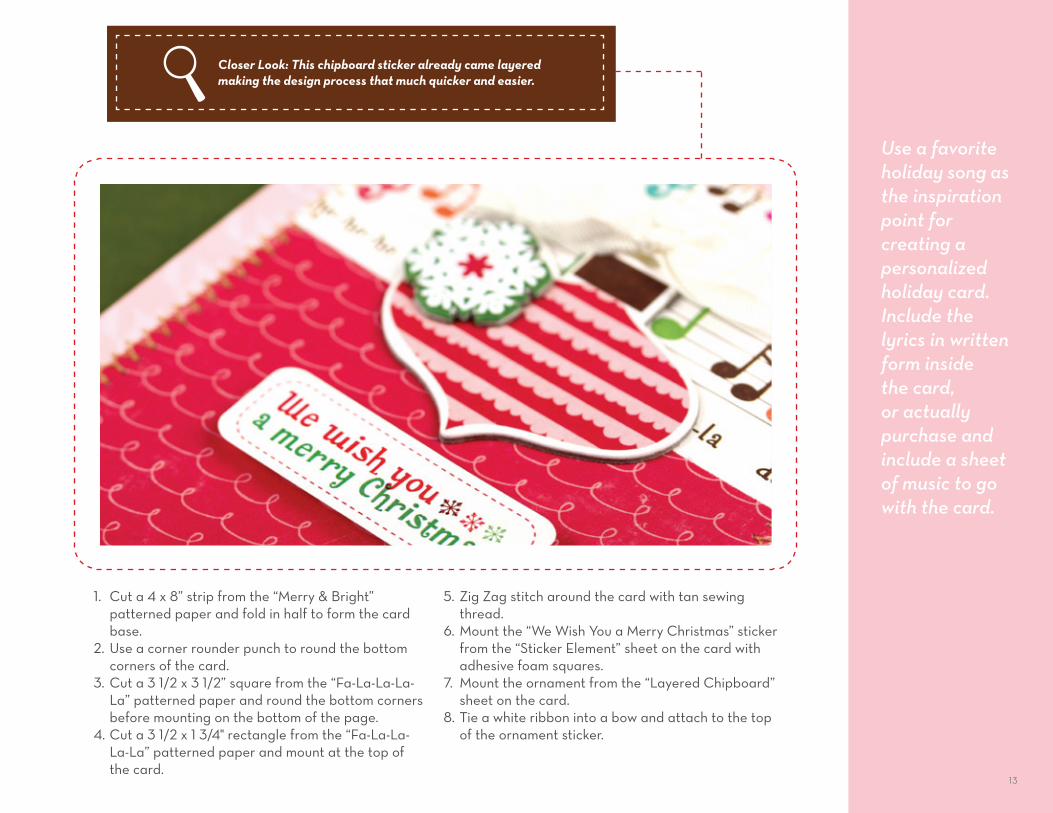
1. Cut a 4 x 8” strip from the “Merry & Bright” patterned paper and fold in half to form the card base.
2. Use a corner rounder punch to round the bottom corners of the card.
3. Cut a 3 1/2 x 3 1/2” square from the “Fa-La-La-La-La” patterned paper and round the bottom corners before mounting on the bottom of the page.
4. Cut a 3 1/2 x 1 3/4" rectangle from the “Fa-La-La-La-La” patterned paper and mount at the top of the card.
5. Zig Zag stitch around the card with tan sewing thread.
6. Mount the “We Wish You a Merry Christmas” sticker from the “Sticker Element” sheet on the card with adhesive foam squares.
7. Mount the ornament from the “Layered Chipboard” sheet on the card.
8. Tie a white ribbon into a bow and attach to the top of the ornament sticker.
Closer Look: This chipboard sticker already came layered making the design process that much quicker and easier.
Use a favorite holiday song as the inspiration point for creating a personalized holiday card. Include the lyrics in written form inside the card, or actually purchase and include a sheet of music to go with the card.
13
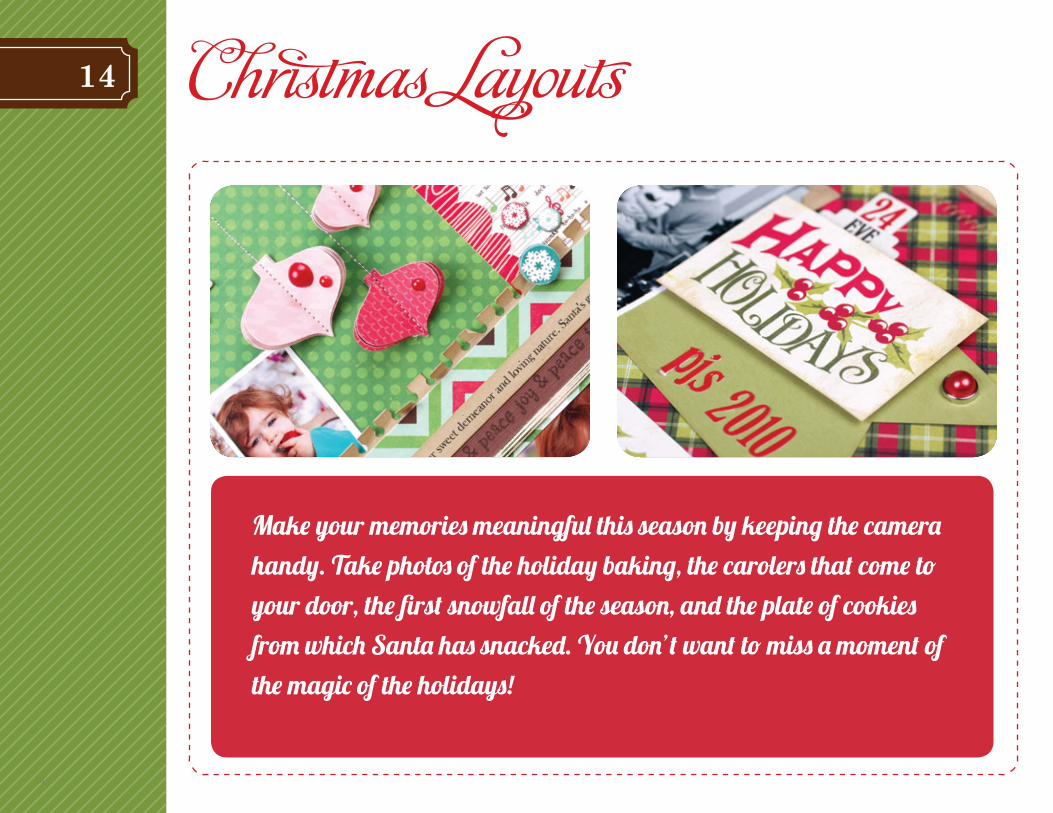
14 C¬ristmas Layouts
Make your memories meaningful this season by keeping the camera handy. Take photos of the holiday baking, the carolers that come to your door, the first snowfall of the season, and the plate of cookies from which Santa has snacked. You don’t want to miss a moment of the magic of the holidays!
14
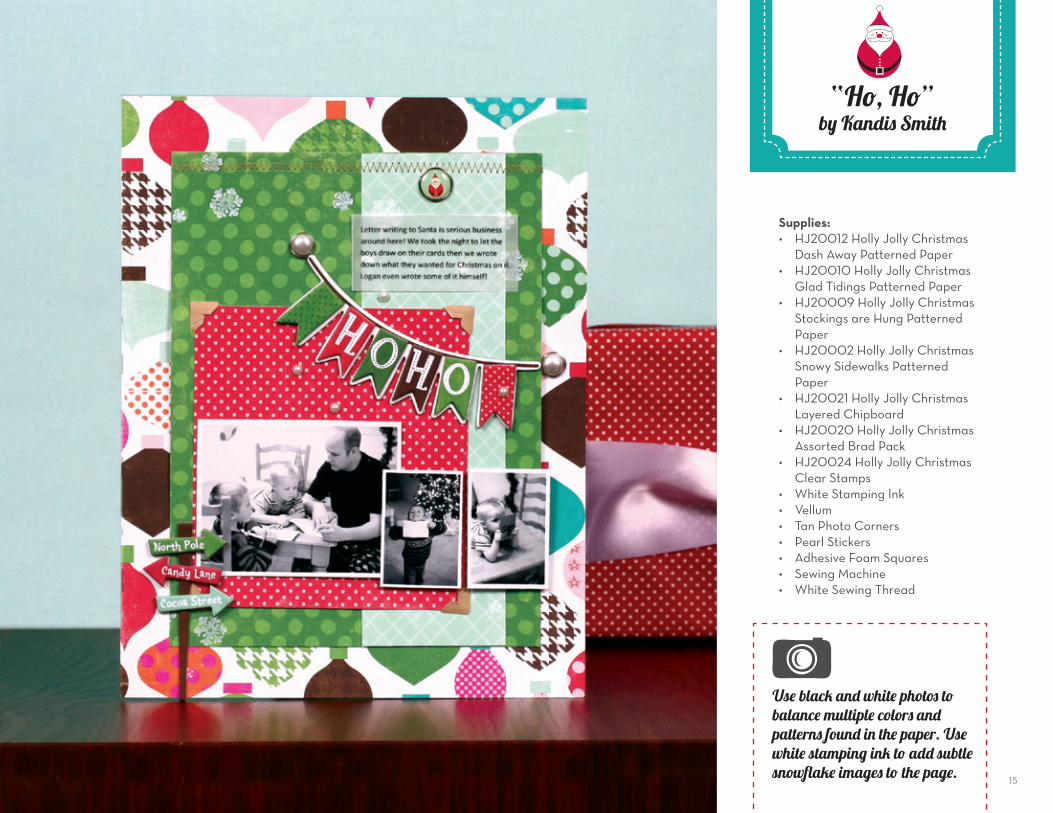
Use black and white photos to balance multiple colors and patterns found in the paper. Use white stamping ink to add subtle snowflake images to the page.
Supplies:• HJ20012HollyJollyChristmas
Dash Away Patterned Paper• HJ20010HollyJollyChristmas
GladTidingsPatternedPaper• HJ20009HollyJollyChristmas
Stockings are Hung Patterned Paper
• HJ20002HollyJollyChristmasSnowy Sidewalks Patterned Paper
• HJ20021HollyJollyChristmasLayered Chipboard
• HJ20020HollyJollyChristmasAssorted Brad Pack
• HJ20024HollyJollyChristmasClear Stamps
• WhiteStampingInk• Vellum• TanPhotoCorners• PearlStickers• AdhesiveFoamSquares• SewingMachine• WhiteSewingThread
“Ho, Ho”by Kandis Smith
15
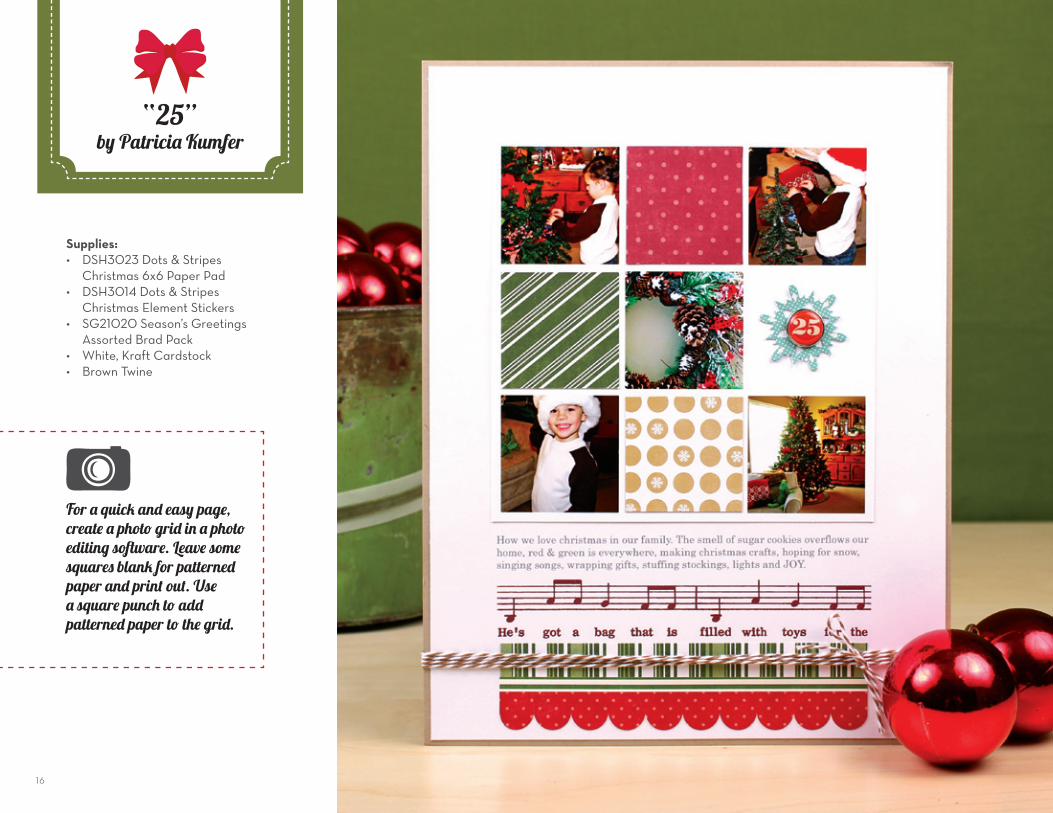
For a quick and easy page, create a photo grid in a photo editing software. Leave some squares blank for patterned paper and print out. Use a square punch to add patterned paper to the grid.
Supplies:• DSH3023Dots&Stripes
Christmas 6x6 Paper Pad• DSH3014Dots&Stripes
Christmas Element Stickers• SG21020Season’sGreetings
Assorted Brad Pack• White,KraftCardstock• BrownTwine
“25”by Patricia Kumfer
16
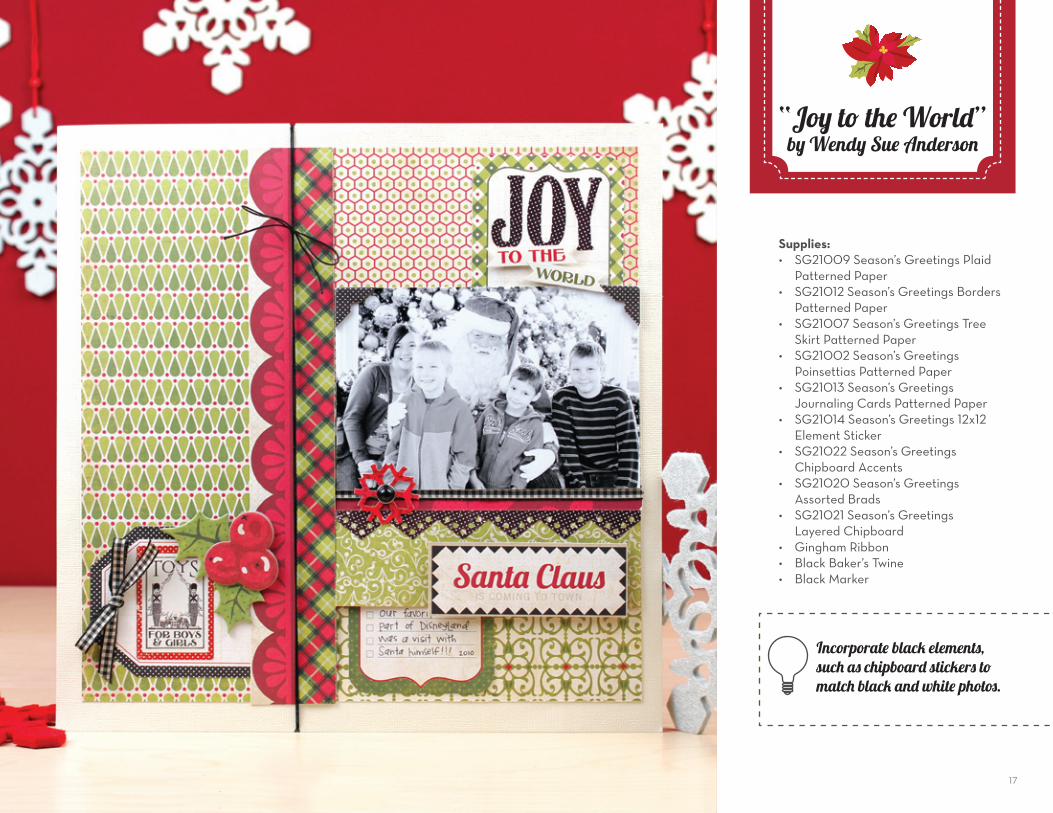
Incorporate black elements, such as chipboard stickers to match black and white photos.
Supplies:• SG21009Season’sGreetingsPlaid
Patterned Paper• SG21012Season’sGreetingsBorders
Patterned Paper• SG21007Season’sGreetingsTree
Skirt Patterned Paper• SG21002Season’sGreetings
Poinsettias Patterned Paper• SG21013Season’sGreetings
Journaling Cards Patterned Paper• SG21014Season’sGreetings12x12
Element Sticker• SG21022Season’sGreetings
Chipboard Accents• SG21020Season’sGreetings
Assorted Brads• SG21021Season’sGreetings
Layered Chipboard• GinghamRibbon• BlackBaker’sTwine• BlackMarker
“Joy to the World”by Wendy Sue Anderson
17
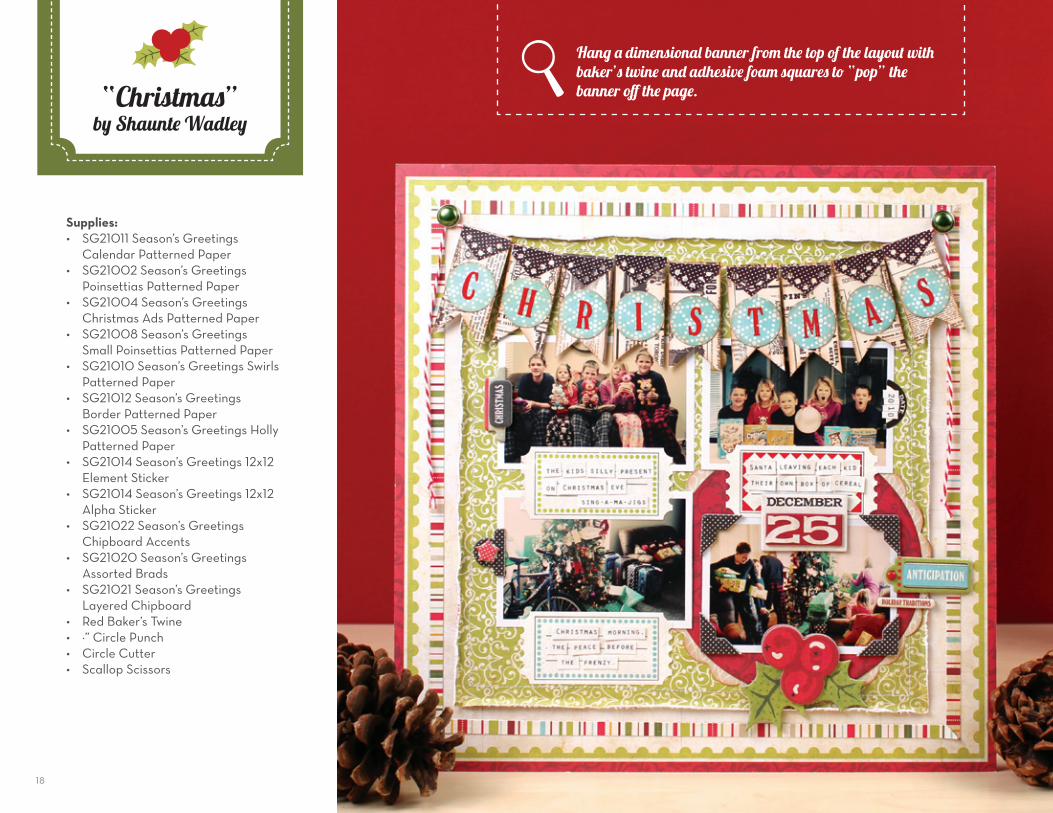
Hang a dimensional banner from the top of the layout with baker’s twine and adhesive foam squares to “pop” the banner off the page.
Supplies:• SG21011Season’sGreetings
Calendar Patterned Paper• SG21002Season’sGreetings
Poinsettias Patterned Paper• SG21004Season’sGreetings
Christmas Ads Patterned Paper• SG21008Season’sGreetings
Small Poinsettias Patterned Paper• SG21010Season’sGreetingsSwirls
Patterned Paper• SG21012Season’sGreetings
Border Patterned Paper• SG21005Season’sGreetingsHolly
Patterned Paper• SG21014Season’sGreetings12x12
Element Sticker• SG21014Season’sGreetings12x12
Alpha Sticker• SG21022Season’sGreetings
Chipboard Accents• SG21020Season’sGreetings
Assorted Brads• SG21021Season’sGreetings
Layered Chipboard• RedBaker’sTwine• ¾”CirclePunch• CircleCutter• ScallopScissors
“Christmas”by Shaunte Wadley
18
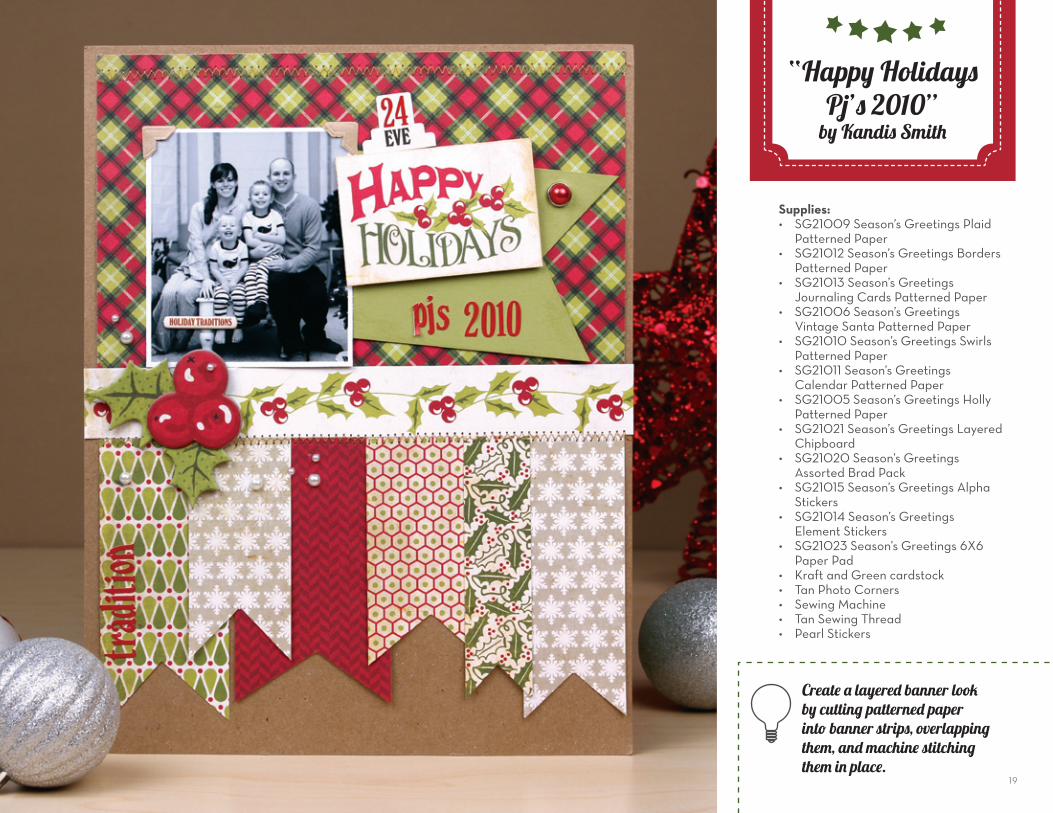
Create a layered banner look by cutting patterned paper into banner strips, overlapping them, and machine stitching them in place.
Supplies:• SG21009Season’sGreetingsPlaid
Patterned Paper• SG21012Season’sGreetingsBorders
Patterned Paper• SG21013Season’sGreetings
Journaling Cards Patterned Paper• SG21006Season’sGreetings
Vintage Santa Patterned Paper• SG21010Season’sGreetingsSwirls
Patterned Paper• SG21011Season’sGreetings
Calendar Patterned Paper• SG21005Season’sGreetingsHolly
Patterned Paper• SG21021Season’sGreetingsLayered
Chipboard• SG21020Season’sGreetings
Assorted Brad Pack• SG21015Season’sGreetingsAlpha
Stickers• SG21014Season’sGreetings
Element Stickers• SG21023Season’sGreetings6X6
Paper Pad• KraftandGreencardstock• TanPhotoCorners• SewingMachine• TanSewingThread• PearlStickers
“Happy Holidays Pj’s 2010”
by Kandis Smith
19
Supplies:• HJ20006HollyJollyChristmas
Holiday Wrap Patterned Paper• HJ20003HollyJollyChristmas
Merry & Bright Patterned Paper• HJ20014HollyJollyChristmas
Element Stickers• HJ20021HollyJollyChristmas
Layered Chipboard• HJ20023HollyJollyChristmas
6x6 Paper Pad• HJ20024HollyJollyChristmas
Clear Stamps• Kraft,WhiteCardstock• TanPhotoCorners• BorderPunch• BrownStampingInk• RedandWhitePearlStickers• EchoParkOrnamentand
Snowflake Die Cut Shapes• SilhouetteDieCuttingMachine• SewingMachine• WhiteSewingThread• TanTwine
“Ho, Ho”by Jennifer Gallacher
20
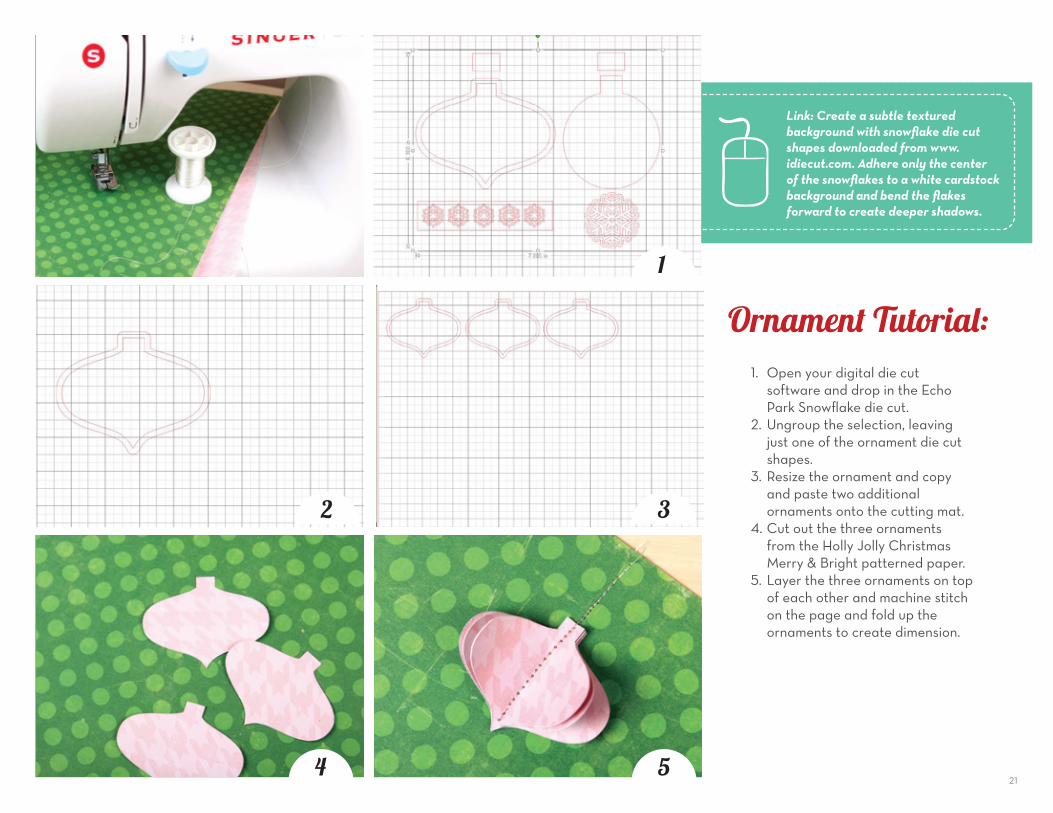
Link: Create a subtle textured background with snowflake die cut shapes downloaded from www.idiecut.com. Adhere only the center of the snowflakes to a white cardstock background and bend the flakes forward to create deeper shadows.
1. Open your digital die cut software and drop in the Echo Park Snowflake die cut.
2.Ungrouptheselection,leavingjust one of the ornament die cut shapes.
3. Resize the ornament and copy and paste two additional ornaments onto the cutting mat.
4. Cut out the three ornaments from the Holly Jolly Christmas Merry & Bright patterned paper.
5. Layer the three ornaments on top of each other and machine stitch on the page and fold up the ornaments to create dimension.
Ornament Tutorial:
1
2 3
4 521
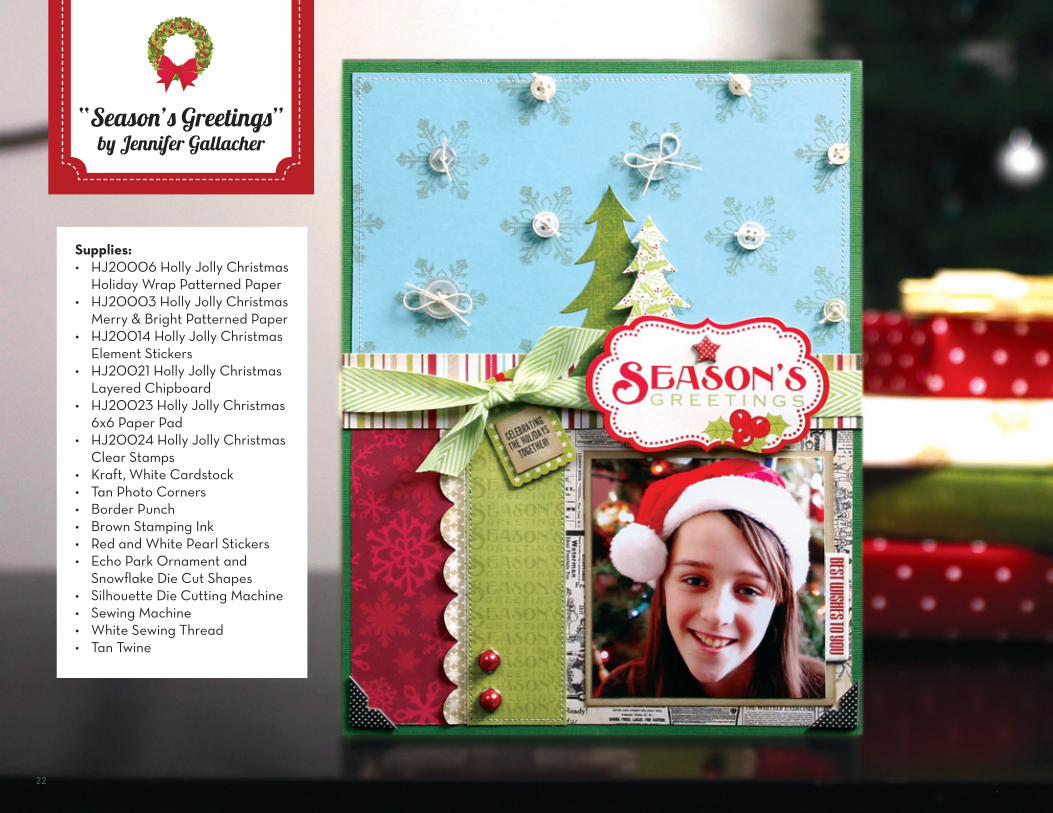
“Season’s Greetings”by Jennifer Gallacher
Supplies:• HJ20006HollyJollyChristmas
Holiday Wrap Patterned Paper• HJ20003HollyJollyChristmas
Merry & Bright Patterned Paper• HJ20014HollyJollyChristmas
Element Stickers• HJ20021HollyJollyChristmas
Layered Chipboard• HJ20023HollyJollyChristmas
6x6 Paper Pad• HJ20024HollyJollyChristmas
Clear Stamps• Kraft,WhiteCardstock• TanPhotoCorners• BorderPunch• BrownStampingInk• RedandWhitePearlStickers• EchoParkOrnamentand
Snowflake Die Cut Shapes• SilhouetteDieCuttingMachine• SewingMachine• WhiteSewingThread• TanTwine
22
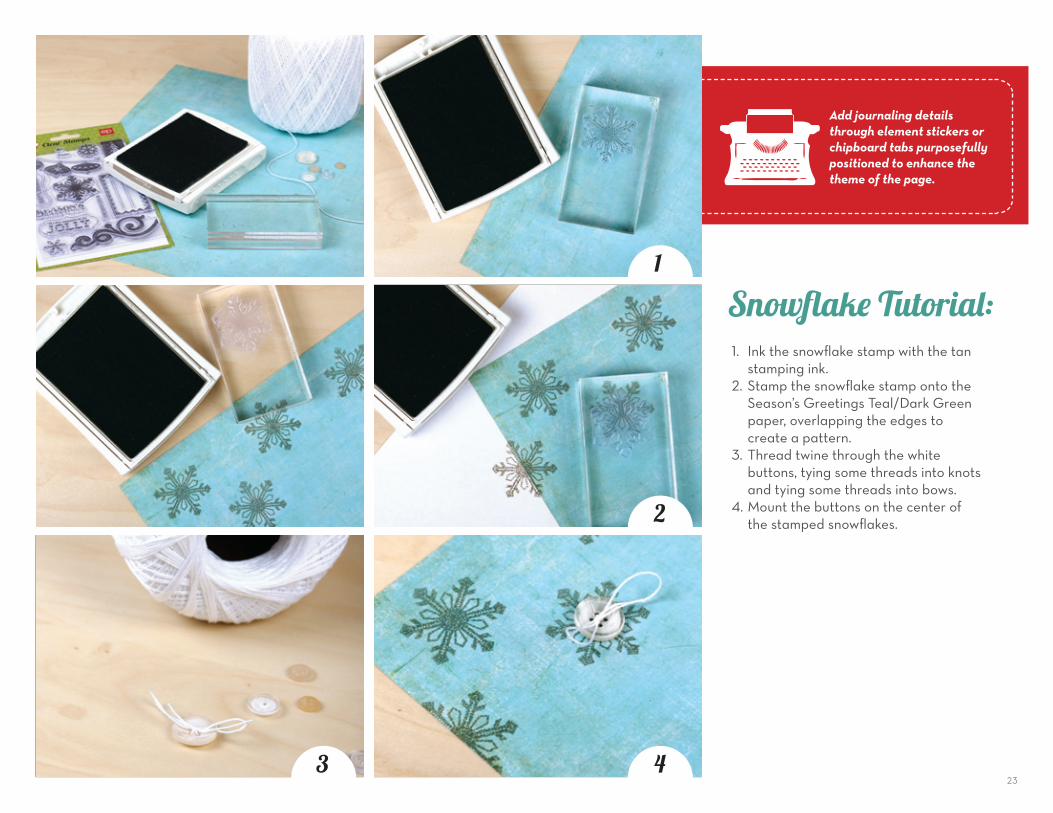
1. Inkthesnowflakestampwiththetanstamping ink.
2. Stamp the snowflake stamp onto the Season’sGreetingsTeal/DarkGreenpaper,overlappingtheedgestocreate a pattern.
3. Thread twine through the white buttons,tyingsomethreadsintoknotsand tying some threads into bows.
4. Mount the buttons on the center of the stamped snowflakes.
Add journaling details through element stickers or chipboard tabs purposefully positioned to enhance the theme of the page.
Snowflake Tutorial:
2
3 4
1
23
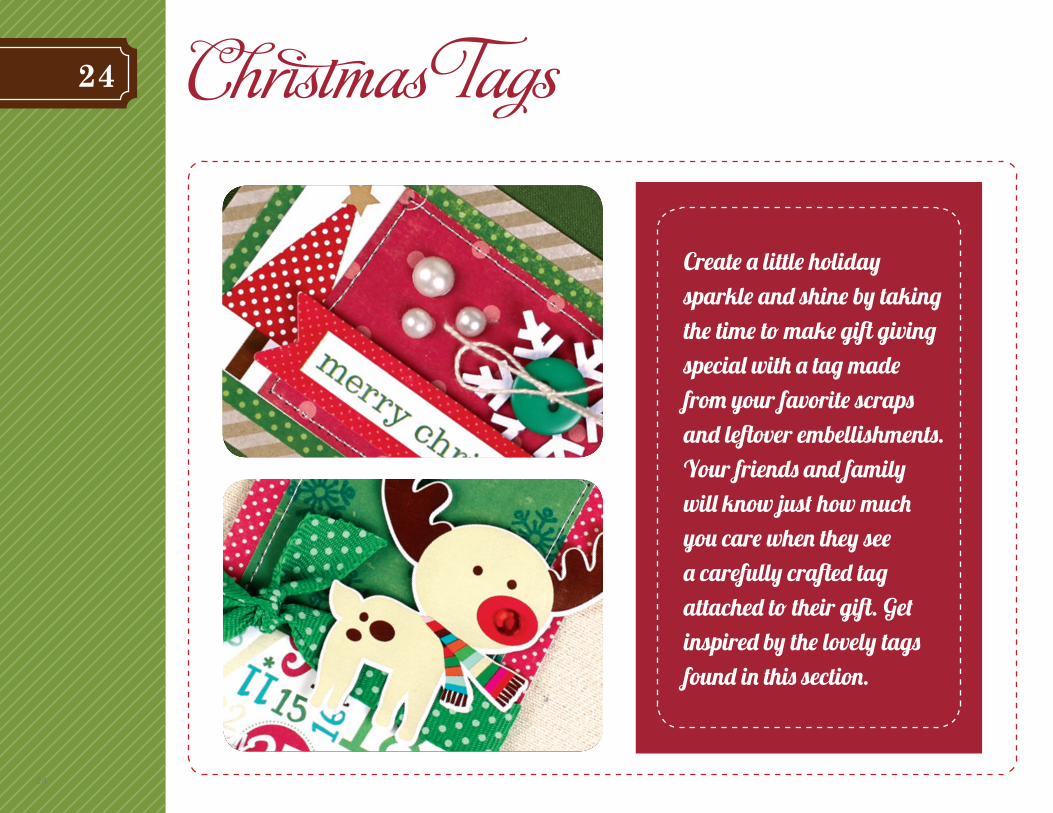
24 C¬ristmas TagsCreate a little holiday sparkle and shine by taking the time to make gift giving special with a tag made from your favorite scraps and leftover embellishments. Your friends and family will know just how much you care when they see a carefully crafted tag attached to their gift. Get inspired by the lovely tags found in this section.
24
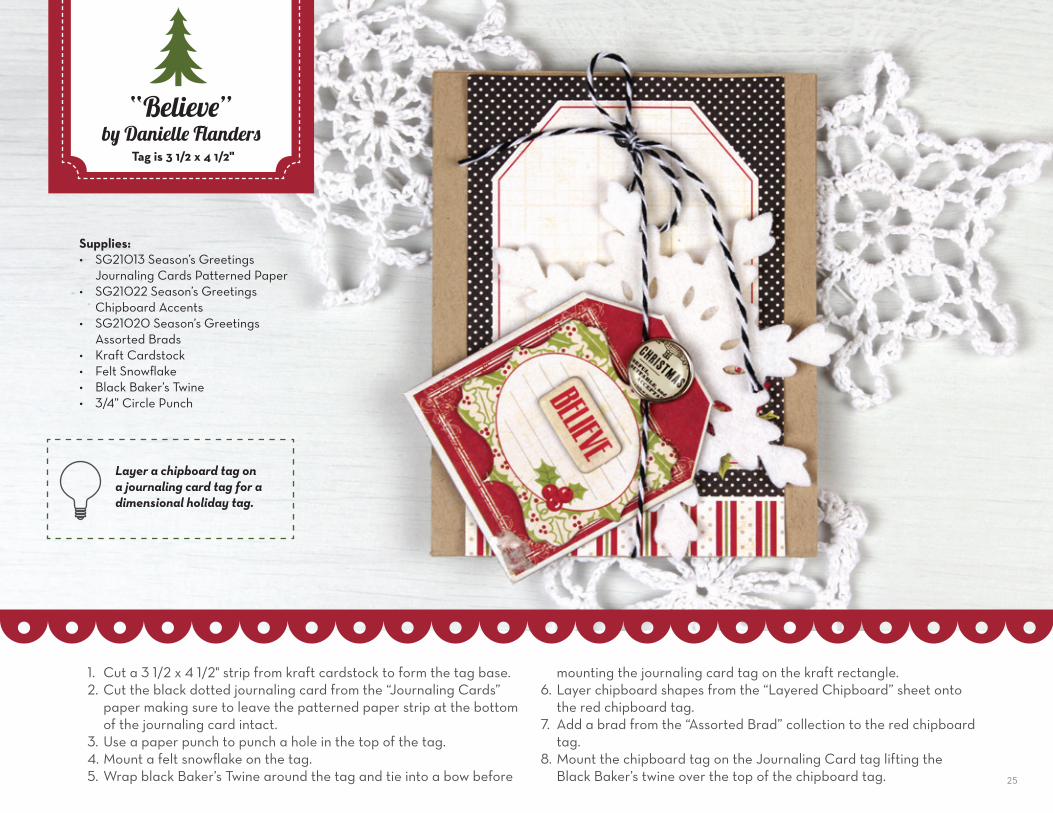
“Believe”by Danielle Flanders
Supplies:• SG21013Season’sGreetings
Journaling Cards Patterned Paper• SG21022Season’sGreetings
Chipboard Accents• SG21020Season’sGreetings
Assorted Brads• KraftCardstock• FeltSnowflake• BlackBaker’sTwine• 3/4”CirclePunch
1. Cut a 3 1/2 x 4 1/2" strip from kraft cardstock to form the tag base.2. Cut the black dotted journaling card from the “Journaling Cards”
paper making sure to leave the patterned paper strip at the bottom of the journaling card intact.
3. Use a paper punch to punch a hole in the top of the tag.4. Mount a felt snowflake on the tag.5.WrapblackBaker’sTwinearoundthetagandtieintoabowbefore
mounting the journaling card tag on the kraft rectangle.6. Layer chipboard shapes from the “Layered Chipboard” sheet onto
the red chipboard tag.7. Add a brad from the “Assorted Brad” collection to the red chipboard
tag.8. Mount the chipboard tag on the Journaling Card tag lifting the
BlackBaker’stwineoverthetopofthechipboardtag.
Tag is 3 1/2 x 4 1/2"
Layer a chipboard tag on a journaling card tag for a dimensional holiday tag.
25
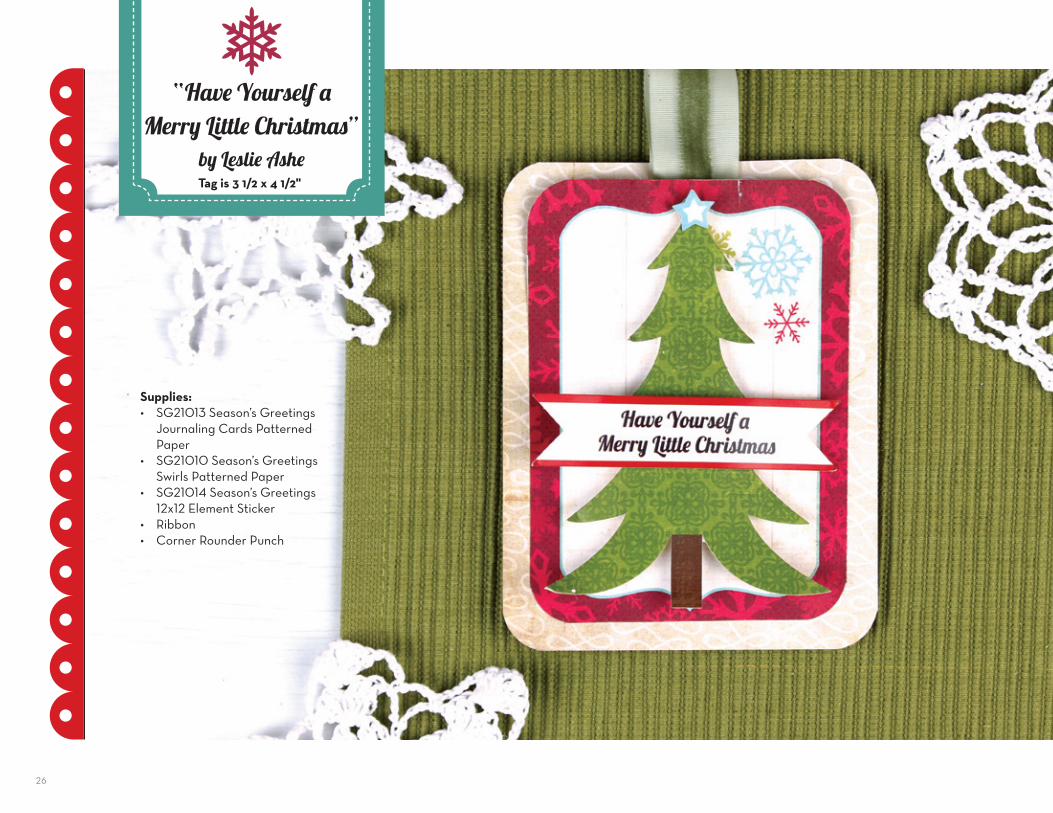
“Have Yourself a Merry Little Christmas”
by Leslie Ashe
Supplies:• SG21013Season’sGreetings
Journaling Cards Patterned Paper
• SG21010Season’sGreetingsSwirls Patterned Paper
• SG21014Season’sGreetings12x12 Element Sticker
• Ribbon• CornerRounderPunch
Tag is 3 1/2 x 4 1/2"
26
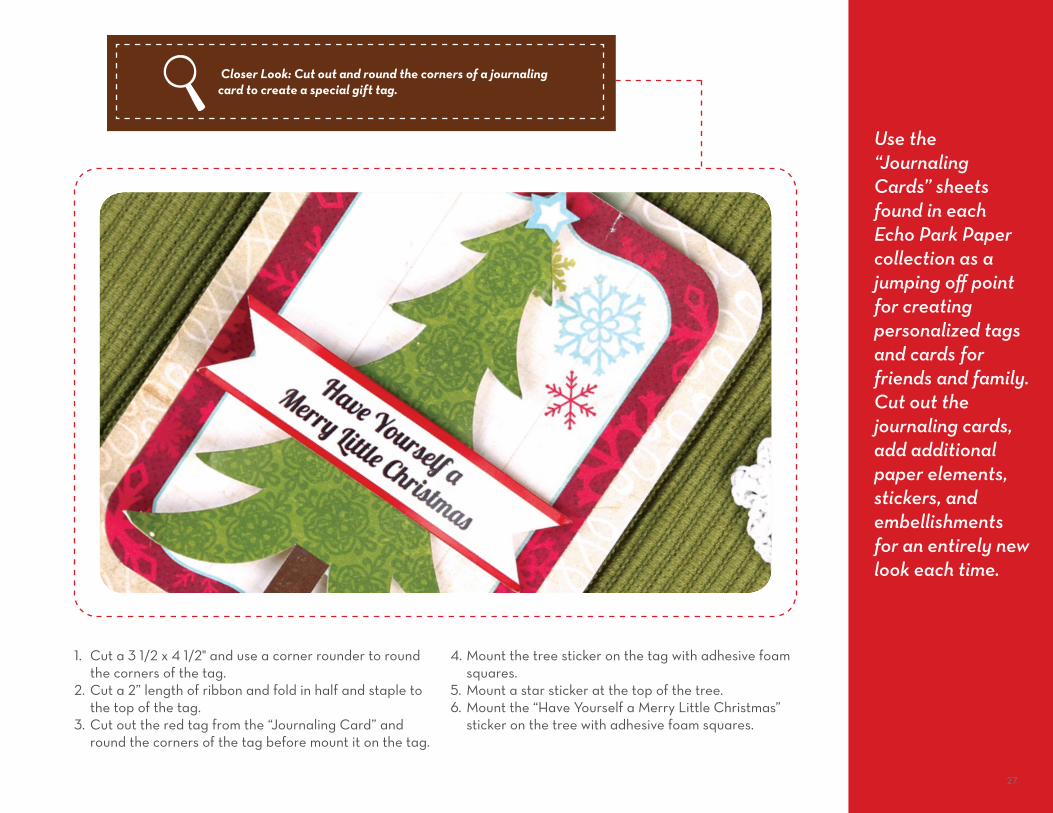
1. Cut a 3 1/2 x 4 1/2" and use a corner rounder to round the corners of the tag.
2. Cut a 2” length of ribbon and fold in half and staple to the top of the tag.
3. Cut out the red tag from the “Journaling Card” and round the corners of the tag before mount it on the tag.
4. Mount the tree sticker on the tag with adhesive foam squares.
5. Mount a star sticker at the top of the tree.6. Mount the “Have Yourself a Merry Little Christmas”
sticker on the tree with adhesive foam squares.
Closer Look: Cut out and round the corners of a journaling card to create a special gift tag.
Use the “Journaling Cards” sheets found in each Echo Park Paper collection as a jumping off point for creating personalized tags and cards for friends and family. Cut out the journaling cards, add additional paper elements, stickers, and embellishments for an entirely new look each time.
27

“Merry Christmas”by Jennifer Gallacher
1. Cut a 4 1/2 x 2 3/4" rectangle from the “Tinsel Small Dot” patterned paper and cut the ends into the shape of a tag.
2. Mount the Christmas tree tag sticker on the tag.3. Cut a 2 3/4 x 2” rectangle from the “Sleigh Ride Small Dot” patterned
paper and mount on the tag sticker.4. Machine stitch the red patterned paper in place.5.Puncha11/2"circlefromthe“GingerbreadSmallDot”andcutinhalf
and mount at the top of the tag.6. Punch a 1/4" through the half circle and the tag.
7. Thread the ribbon through the hole.8. Download and cut a digital snowflake shape from white cardstock and
mount on the card.9. Thread twine through a green button and mount on the snowflake die
cut shape.10. Add pearl stickers to the tag.11. Mount the “Merry Christmas” sticker from the “Element Sticker” sheet
on the tag with adhesive foam squares.
Supplies:• DSH3002Dots&Stripes
Christmas Sleigh Ride/Small Dot Patterned Paper
• DSH3005Dots&StripesChristmas Tinsel Small Dot Patterned Paper
• DSH3010Dots&StripesChristmasGingerbreadSmallDot Patterned Paper
• DSH3014Dots&StripesChristmas Element Stickers
• EchoParkSnowflakeDieCut• WhiteCardstock• GreenButton• TanTwine• BrownRibbon• 11/2”CirclePunch• 1/4”CirclePunch• SewingMachine• WhiteSewingThread
Tag is 4 1/2 x 2 3/4"
Download the Echo Park Paper snowflake shape from www.idiecut.com to finish completing this tag.
28
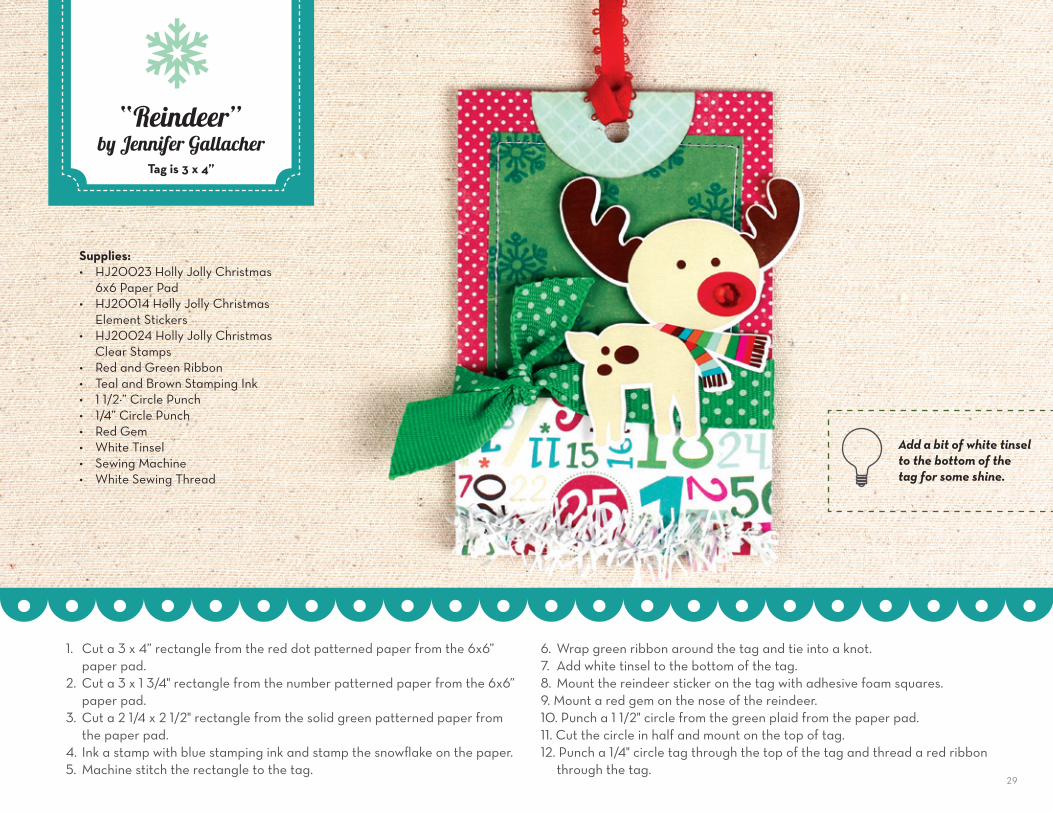
“Reindeer”by Jennifer Gallacher
Supplies:• HJ20023HollyJollyChristmas
6x6 Paper Pad• HJ20014HollyJollyChristmas
Element Stickers• HJ20024HollyJollyChristmas
Clear Stamps• RedandGreenRibbon• TealandBrownStampingInk• 11/2½”CirclePunch• 1/4”CirclePunch• RedGem• WhiteTinsel• SewingMachine• WhiteSewingThread
1. Cut a 3 x 4” rectangle from the red dot patterned paper from the 6x6” paper pad.
2. Cut a 3 x 1 3/4" rectangle from the number patterned paper from the 6x6” paper pad.
3. Cut a 2 1/4 x 2 1/2" rectangle from the solid green patterned paper from the paper pad.
4.Inkastampwithbluestampinginkandstampthesnowflakeonthepaper.5. Machine stitch the rectangle to the tag.
6. Wrap green ribbon around the tag and tie into a knot.7. Add white tinsel to the bottom of the tag.8. Mount the reindeer sticker on the tag with adhesive foam squares.9. Mount a red gem on the nose of the reindeer.10. Punch a 1 1/2" circle from the green plaid from the paper pad.11. Cut the circle in half and mount on the top of tag.12. Punch a 1/4" circle tag through the top of the tag and thread a red ribbon
through the tag.
Tag is 3 x 4”
Add a bit of white tinsel to the bottom of the tag for some shine.
29
echo park paper co.
© 201 1 Echo Park Paper Co. LLC | www . e c h o p a r k p a p e r . c o m
For more information regarding our current releases visit our website or find us on facebook at facebook.com/echoparkpaper.
1 177 South 1680 West Orem, Utah 84058 | 800.701. 1 1 1 5