Hand welding device HW35-3 Generator RL35 Manual English Ultrasonic welding device for plastics...
62
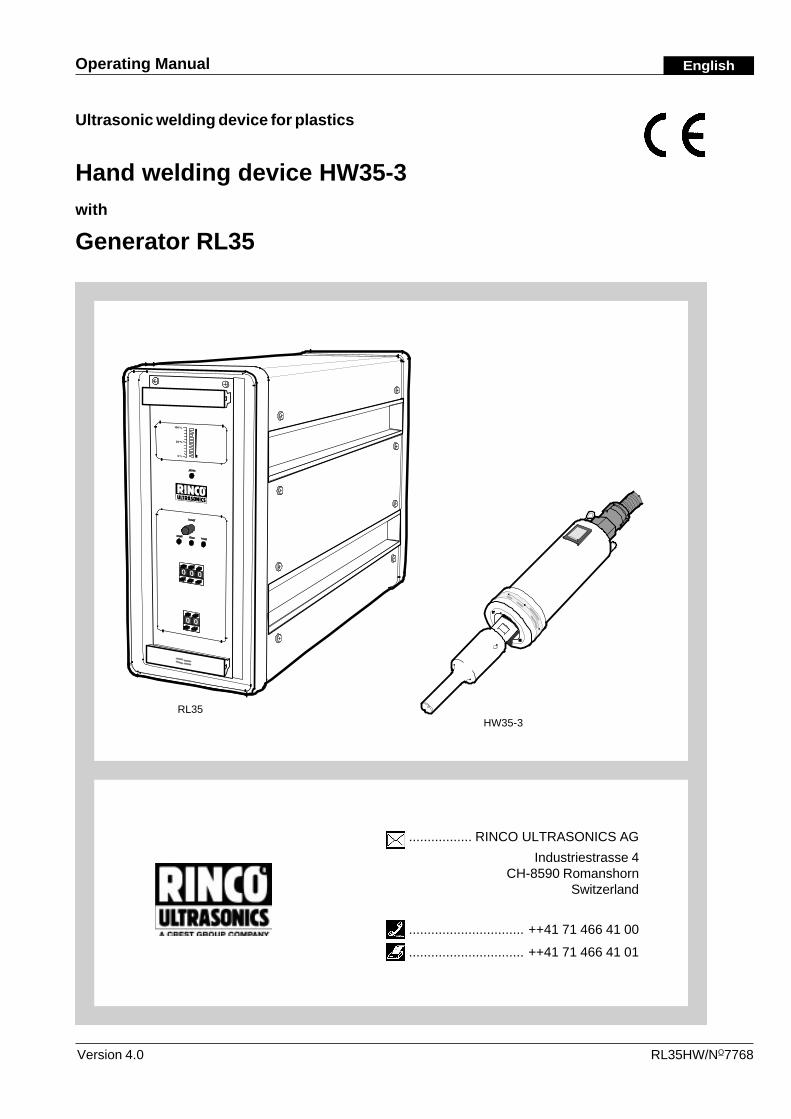
Operating Manual English Ultrasonic welding device for plastics ................. RINCO ULTRASONICS AG Industriestrasse 4 CH-8590 Romanshorn Switzerland ............................... ++41 71 466 41 00 ............................... ++41 71 466 41 01 Hand welding device HW35-3 with Generator RL35 Version 4.0 RL35HW/N O 7768 RL35 HW35-3
Transcript of Hand welding device HW35-3 Generator RL35 Manual English Ultrasonic welding device for plastics...
Operating Manual English
Ultrasonic welding device for plastics
................. RINCO ULTRASONICS AG
Industriestrasse 4CH-8590 Romanshorn
Switzerland
............................... ++41 71 466 41 00
............................... ++41 71 466 41 01
Hand welding device HW35-3with
Generator RL35
Version 4.0 RL35HW/NO7768
RL35HW35-3

RL35HWV40/GB/NO7768/16279Copyright by RINCO ULTRASONICS AG, Switzerland
Note
Device specification
Note
Read this operating manual and study itcarefully before unpacking and puttingthe device into operation.
The device may only be used, maintai-ned and repaired by persons who arefamiliar with the operating manual andthe applicable regulations concerningworking safety and accident prevention.
Sticke
r
Device
Representative
Sticke
r
Generator

RL35HWV40/GB/NO7768/16279 I
Table of contents
1 Explanation of symbols and signs....................................................................... 1-1
2 Safety information ................................................................................................. 2-12.1 General ....................................................................................................................................2-12.2 Intended purpose .....................................................................................................................2-12.3 Special points to note ...............................................................................................................2-12.4 Choosing staff ..........................................................................................................................2-12.5 Installing the device ..................................................................................................................2-22.6 Operation .................................................................................................................................2-2
3 Product information .............................................................................................. 3-13.1 Product overview ......................................................................................................................3-1
3.1.1 Hand held cutting device ..............................................................................................3-13.1.2 Ultrasonic generator RL35 ...........................................................................................3-13.1.3 Cooling (optional) .........................................................................................................3-2
3.2 Warranty statement ..................................................................................................................3-33.3 Technical data device HW35-3 .................................................................................................3-4
3.3.1 Concept ........................................................................................................................3-53.3.2 Compressed air ............................................................................................................3-53.3.3 Dimensions ..................................................................................................................3-53.3.4 Weight ..........................................................................................................................3-53.3.5 Connecting cables ........................................................................................................3-5
3.4 Technical data of the Ultrasonic Generator RL35 .....................................................................3-63.4.1 Concept ........................................................................................................................3-73.4.2 Available generator modules ........................................................................................3-73.4.3 Connected loads ..........................................................................................................3-73.4.4 Dimensions ..................................................................................................................3-73.4.5 Weight ..........................................................................................................................3-7
4 Transportation ....................................................................................................... 4-14.1 Unpacking/receiving inspection ................................................................................................4-14.2 Damage during transit ..............................................................................................................4-14.3 Positioning the device ...............................................................................................................4-1
5 Controls and indicators ........................................................................................ 5-15.1 Hand held welding device .........................................................................................................5-15.2 Ultrasonic Generator RL35 .......................................................................................................5-2
6 Initial start-up ......................................................................................................... 6-16.1 Choice of location .....................................................................................................................6-16.2 Assembling and connecting up the devices ..............................................................................6-1
7 Elements................................................................................................................. 7-17.1 Converter .................................................................................................................................7-17.3 Horn .........................................................................................................................................7-2
7.3.1 Horn materials ..............................................................................................................7-2
8 Retooling ................................................................................................................ 8-18.1 Changing horn ..........................................................................................................................8-18.2 Detailed description of functions from the program selector switch ..........................................8-2
8.2.1 Before changing a program ..........................................................................................8-28.2.2 Afterpulse (shake-off impulse) .....................................................................................8-48.2.3 Soft Start ......................................................................................................................8-4
RL35HWV40/GB/NO7768/16279
9 Cleaning and maintenance ................................................................................... 9-19.1 General maintenance jobs ....................................................................................................... 9-19.2 Hand held welding device .........................................................................................................9-19.3 Generator .................................................................................................................................9-19.4 Vibration system .......................................................................................................................9-29.5 Threaded coupling ....................................................................................................................9-2
10 Error messages and trouble shooting ............................................................... 10-110.1 Error messages / corrective action: switching on.................................................................... 10-110.2 Generator error messages during operation ........................................................................... 10-1
11 Electrical diagrams ............................................................................................. 11-111.1 Wiring diagram for housing .................................................................................................... 11-1
11.1.1 Start ST02 automatic (standard) ................................................................................ 11-111.1.2 Start ST02 manual (optional) ...................................................................................... 11-211.1.3 Start ST02 manual (optional) ...................................................................................... 11-211.1.4 Interface ST03 ........................................................................................................... 11-311.1.5 Generator module UGF.............................................................................................. 11-4
11.2 Fuses Generator RL35 ........................................................................................................... 11-511.3 List of fuses Generator RL35 ................................................................................................. 11-6
11.3.1 Fuses 230 volt / 200 volt ............................................................................................ 11-611.3.2 Fuses 110 volt ............................................................................................................ 11-6
11.4 RL 35 Generator rear panel .................................................................................................... 11-711.5 List of device sockets and connection plugs ........................................................................... 11-7
12 Technical drawings and values .......................................................................... 12-112.1 Amplitude values of the generator RL..................................................................................... 12-112.2 Amplitudes of 35 kHz RL generators ...................................................................................... 12-1
12.2.1 Amplitudes with amplified converter ........................................................................... 12-112.3 Stud length of the vibration components; 35 kHz .................................................................... 12-2
13 Service center addresses ................................................................................... 13-1
II
Table of contents

RL35HWV40/GB/NO7768/16279 III
Chapter Safety informationContains notes and warningsconcerning the operation of thewelding system.
Chapter Product informationContains all the general informati-on concerning:- function, design and mode of operation- technical data- warranty
Chapter TransportationContains necessary information onthe transportation and receipt ofthe device.
Chapter Operating and display elementsDescribes the operating elements.
Chapter Initial start-upProvides important notes andinstructions concerning the instal-lation, connection and start-up ofthe device. Includes all the infor-mation and procedures necessaryfor the safe and efficient handlingof the device.
Chapter ElementsDescribes the various exchangea-ble elements.
Chapter RetoolingDescribes how to change a hornor booster.
Chapter Cleaning and maintenanceContains instructions and notesconcerning the care and upkeep ofthe device.
Chapter Error messages and correctiveactionDescribes possible errors, theirlikely sources and suggestions forcorrective action.
Other chapters Diagrams and drawings
PrefaceCongratulations on having purchased the device.
This manual is designed to provide buyers and userswith all the information they will need to handle, install,operate and maintain the device.
To ensure that the system is always ready for opera-tion, it is necessary to follow the notes and instructionsin this manual.
The manual is broken down into the following chap-ters:
Preface

RL35HWV40/GB/NO7768/16279IV
Important!
Please quote the exact type designation andthe device serial numbers in all enquiriesconcering your device.
You will find this data on the rating plate (A) atthe back of the device, as well as on the insidecover flap of this operating manual.
The design and circuitry of this device aresubject to continuous further developmentand improvement, and represent the lateststate of the art.
RINCO ULTRASONICS AG
Romanshorn, Switzerland
Important
RL35HWV40/GB/NO7768/16279 V
Notes
___________________________________________________________________________________________________________________________________________________________________________________________________________________________________________________________________________________________________________________________________________________________________________________________________________________________________________________________________________________________________________________________________________________________________________________________________________________________

RL35HWV40/GB/NO7768/16279
Notizen
___________________________________________________________________________________________________________________________________________________________________________________________________________________________________________________________________________________________________________________________________________________________________________________________________________________________________________________________________________________________________________________________________________________________________________________________________________________________
VI
RL35HWV40/GB/NO7768/16279 1-1
Explanation of symbols and signs
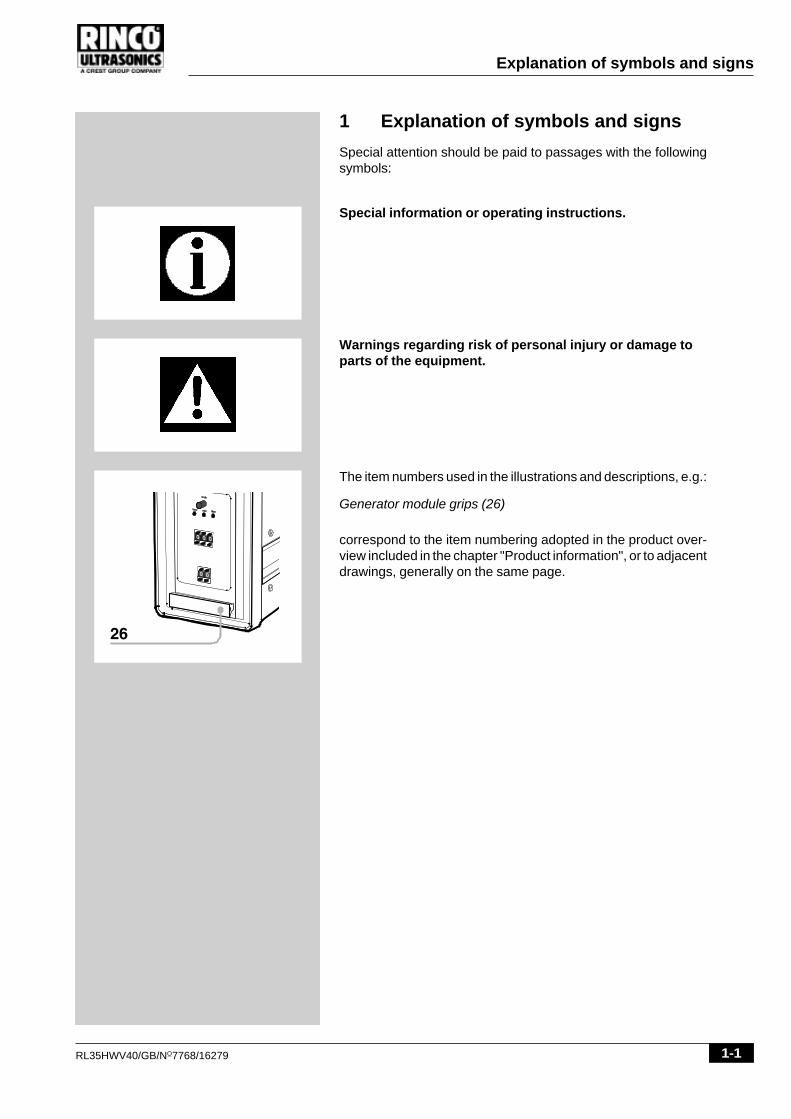
1 Explanation of symbols and signs
Special attention should be paid to passages with the followingsymbols:
Special information or operating instructions.
Warnings regarding risk of personal injury or damage toparts of the equipment.
The item numbers used in the illustrations and descriptions, e.g.:
Generator module grips (26)
correspond to the item numbering adopted in the product over-view included in the chapter "Product information", or to adjacentdrawings, generally on the same page.

1-2 RL35HWV40/GB/NO7768/16279
Explanation of symbols and signs
___________________________________________________________________________________________________________________________________________________________________________________________________________________________________________________________________________________________________________________________________________________________________________________________________________________________________________________________________________________________________________________________________________________________________________________________________________________________

RL35HWV40/GB/NO7768/16279 2-1
Safety information
2 Safety information
2.1 General
The design of this device conforms to the current state ofengineering and is safe to operate.
The individual modules and the completedevice are subject tocontinual inspection by our quality assurance department.
2.2 Intended purpose
This device is intended exclusively for the ultrasonic welding ofsuitable plastics. Any other use is regarded as inconsistent withthe intended purpose, and is undertaken at the user's own risk.The manufacturer is not liable for any resultant damage.
Intended for industrial use.
2.3 Special points to note
Before you start up the device for the first time, read this operationmanual carefully.
Being badly informed about how to operate and look after thedevice can result in damage.Always keep the operating manual handy at the site of the device.
Do not perform any modifications, extensions or conversions onthe device which might endanger safety without the supplier'sconsent.
Do not alter the programming (software) of programmable controlsystems.
2.4 Choosing staff
Work on the electrical installations of the device may only beperformed by an electrical specialist or instructed staff under themanagement and supervision of an electrical specialist, accor-ding to electrical engineering standards.
2-2 RL35HWV40/GB/NO7768/16279
Safety information
2.5 Installing the device
Always unplug the power cable before making anyconnections to peripheral devices.
Be sure to fit the power supply with a grounding connector!
Observe any statutory safety regulations in force inyour country!
Failure to observe these regulations will exempt themanufacturer from all liability for injury to persons ordamage to materials!
Before starting up the device, always make sure it is in a closedand safe condition.
2.6 Operation
Never open the generator or converter housing whilethe device is in operation.
There is a high voltage inside the device - risk ofinjury!
Avoid any potentially unsafe working practices.
Correct operation and careful handling of the devices and theirassociated tools during operation will
- keep the system ready for service,- prolong its useful life, and- reduce stoppage times to a minimum.
RL35HWV40/GB/NO7768/16279 2-3
Safety information
___________________________________________________________________________________________________________________________________________________________________________________________________________________________________________________________________________________________________________________________________________________________________________________________________________________________________________________________________________________________________________________________________________________________________________________________________________________________

2-4 RL35HWV40/GB/NO7768/16279
Safety information
___________________________________________________________________________________________________________________________________________________________________________________________________________________________________________________________________________________________________________________________________________________________________________________________________________________________________________________________________________________________________________________________________________________________________________________________________________________________
RL35HWV40/GB/NO7768/16279 3-1
Product information
3 Product information
3.1 Product overview
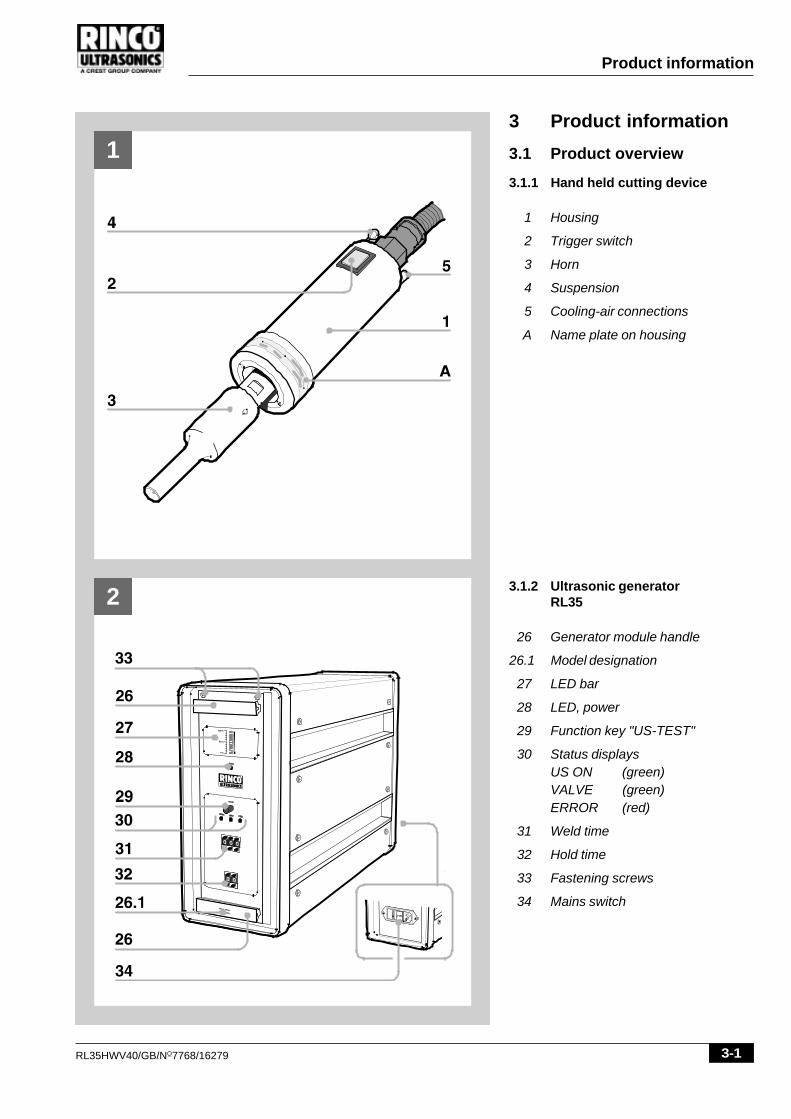
3.1.1 Hand held cutting device
1 Housing
2 Trigger switch
3 Horn
4 Suspension
5 Cooling-air connections
A Name plate on housing
1
2 3.1.2 Ultrasonic generatorRL35
26 Generator module handle
26.1 Model designation
27 LED bar
28 LED, power
29 Function key "US-TEST"
30 Status displaysUS ON (green)VALVE (green)ERROR (red)
31 Weld time
32 Hold time
33 Fastening screws
34 Mains switch
3-2 RL35HWV40/GB/NO7768/16279
Product information
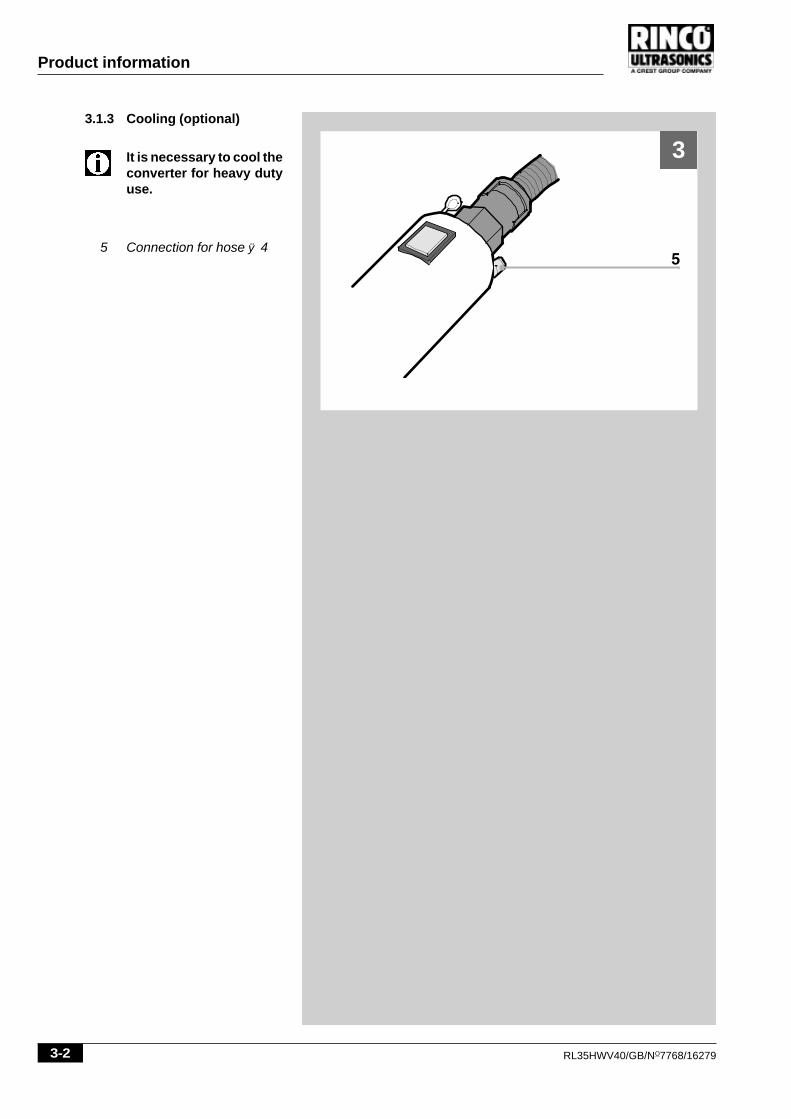
33.1.3 Cooling (optional)
It is necessary to cool theconverter for heavy dutyuse.
5 Connection for hose ÿ 4
RL35HWV40/GB/NO7768/16279 3-3
Product information
3.2 Warranty statement
With the delivery of this system RINCO ULTRASONICS AGacknowledges its warranty obligation in accordance with VSM(Association of Swiss Machine Builders).
Fulfilment of the terms of this warranty by RINCO ULTRASO-NICS AG shall be conditional, however, on a number of require-ments, for example:
The user must be familiar with the contents of thisOperating Manual.
The instructions and warnings contained in this Ope-rating Manual must be observed.
Unauthorized conversions or modifications to partsof the device and generator are prohibited.
RINCO ULTRASONICS AG shall be glad to clarify any unlcearpoints on the phone or to provide instruction by capable specia-lists.
3-4 RL35HWV40/GB/NO7768/16279
Product information
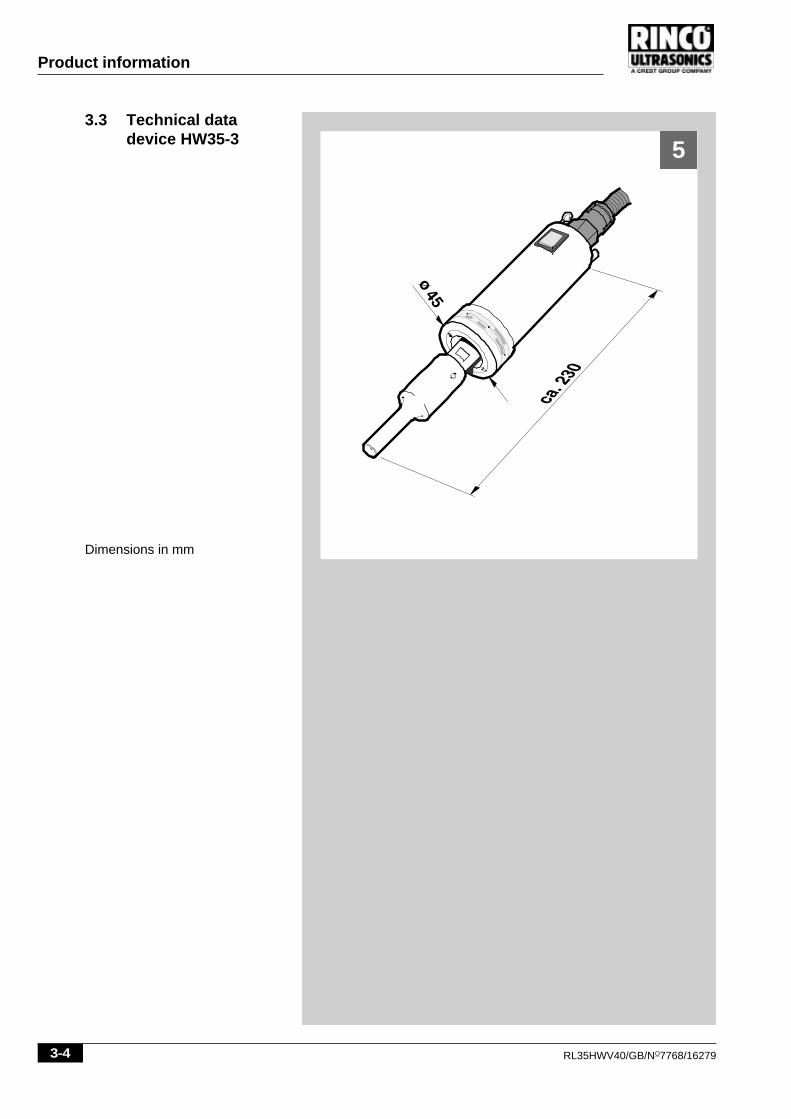
3.3 Technical datadevice HW35-3
Dimensions in mm
5
RL35HWV40/GB/NO7768/16279 3-5
Product information
3.3.1 Concept
- Robust handy housing
- Ergonomic trigger switch
- Piezoelectric converter
- Connecting screw thread for horn: ................................... M8
3.3.2 Compressed air
- Dry compressed air, maximum: .................... 7 bar (105 PSI)
3.3.3 Dimensions
- Dimensions:................................................ see fig. page 3-4
3.3.4 Weight
- Weight ................................................................... ca. 0.7 kg
3.3.5 Connecting cables
- Standard length: .............................................................. 3m
- Other lengths: ........................................................... to order
3-6 RL35HWV40/GB/NO7768/16279
Product information
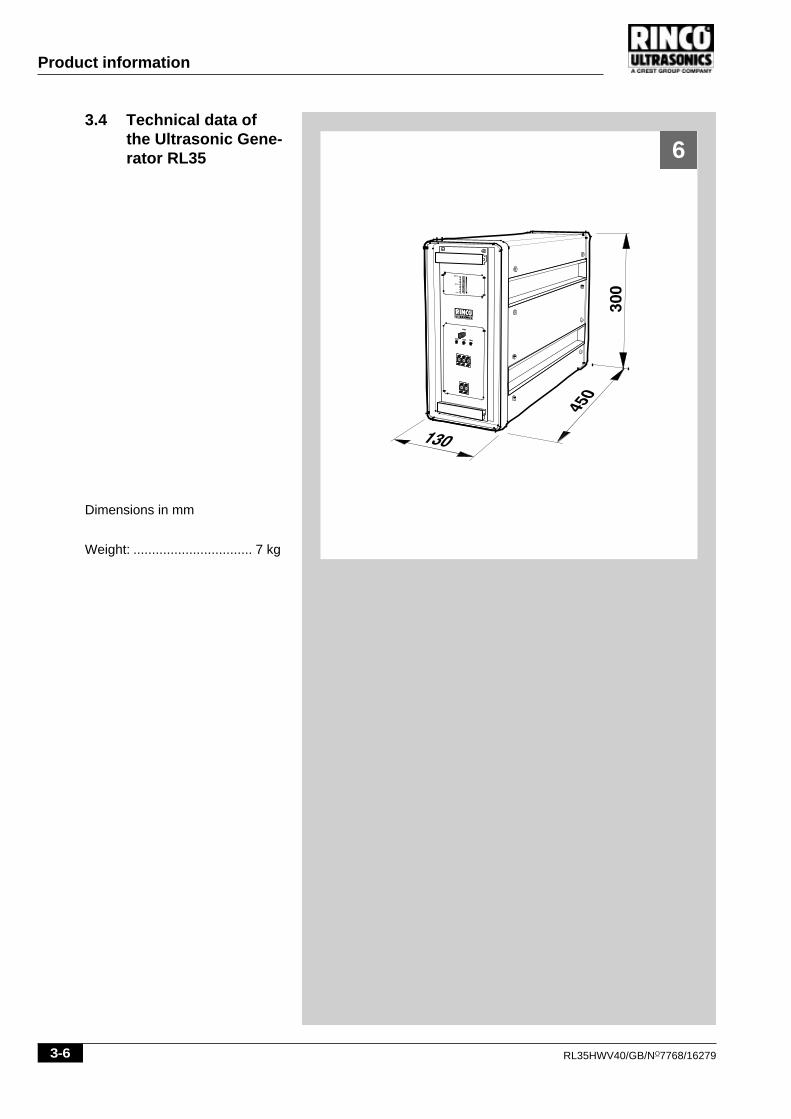
3.4 Technical data ofthe Ultrasonic Gene-rator RL35
Dimensions in mm
Weight: ................................ 7 kg
6
RL35HWV40/GB/NO7768/16279 3-7
Product information
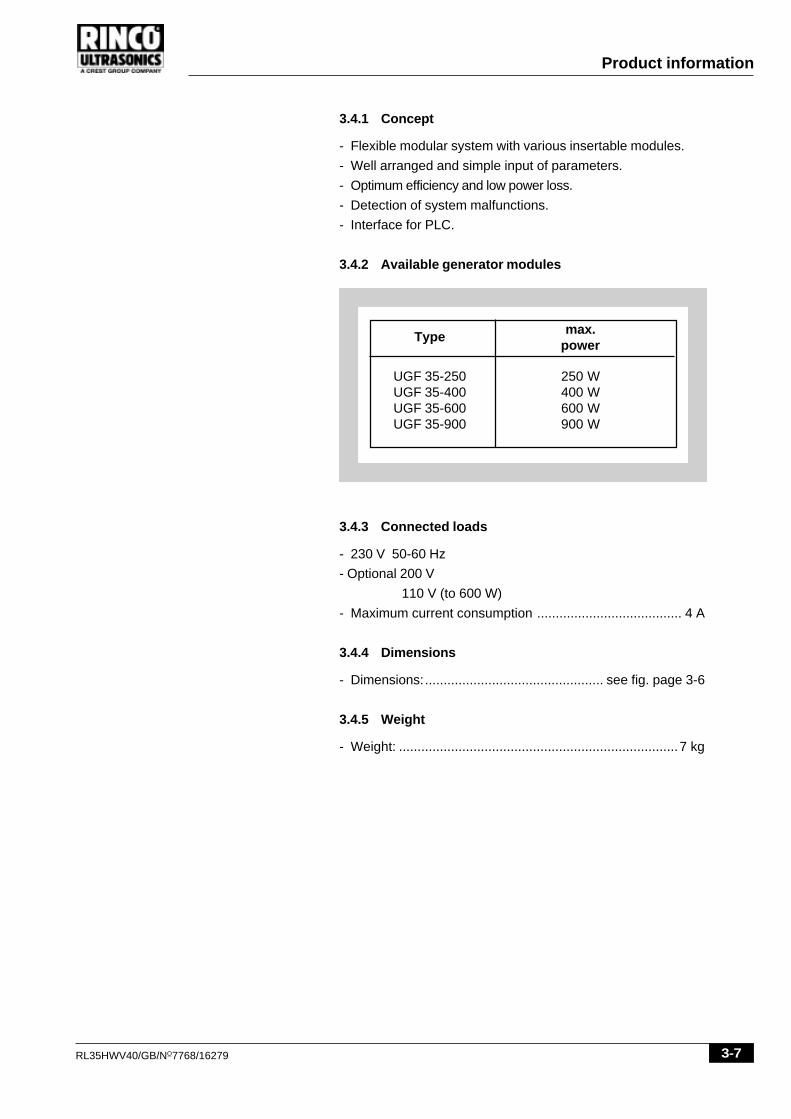
3.4.1 Concept
- Flexible modular system with various insertable modules.
- Well arranged and simple input of parameters.
- Optimum efficiency and low power loss.
- Detection of system malfunctions.
- Interface for PLC.
3.4.2 Available generator modules
Type max.power
UGF 35-250 250 WUGF 35-400 400 WUGF 35-600 600 WUGF 35-900 900 W
3.4.3 Connected loads
- 230 V 50-60 Hz
- Optional 200 V
110 V (to 600 W)
- Maximum current consumption ....................................... 4 A
3.4.4 Dimensions
- Dimensions:................................................ see fig. page 3-6
3.4.5 Weight
- Weight: ...........................................................................7 kg
3-8 RL35HWV40/GB/NO7768/16279
Product information
___________________________________________________________________________________________________________________________________________________________________________________________________________________________________________________________________________________________________________________________________________________________________________________________________________________________________________________________________________________________________________________________________________________________________________________________________________________________

RL35HWV40/GB/NO7768/16279 4-1
Transportation
4 Transportation
Transportation instructions on the packaging mustbe observed.
4.1 Unpacking/receiving inspection
The shipping container used for our devices withstands thenormal wear and tear of road, rail and air transportation.
After receiving the consignment, check whether all the partsconform to the packing list and look for any visible signs ofdamage. If you discover any damage, notify the carrier immedia-tely and keep the packaging as evidence.
4.2 Damage during transit
The carrier is responsible for any damage incurred during transit.A complete report containing an exact description of the damagemust be submitted to the carrier as the basis for the damagesclaim.
Incidents of damage or loss involving goods delivered by us mustbe reported to us immediately and they must be confirmed with acopy of the above mentioned report.
If the delivery is arranged carriage paid or CIF by RINCOULTRASONICS AG, the damaged consignment will be replacedif necessary and claims will be levelled against the relevant transitinsurance.
4.3 Positioning the device
The location of the device is important. In order to guarantee along service life, the device should be installed in clean surroun-dings. Make sure that the electronic equipment is mounted in avibration-free environment.
The factory settings are performed at 20°C. The ambient tempe-rature can range between 10° and 45° during operation.

4-2 RL35HWV40/GB/NO7768/16279
Transportation
___________________________________________________________________________________________________________________________________________________________________________________________________________________________________________________________________________________________________________________________________________________________________________________________________________________________________________________________________________________________________________________________________________________________________________________________________________________________
RL35HWV40/GB/NO7768/16279 5-1
Controls and indicators
5 Controls and indicators
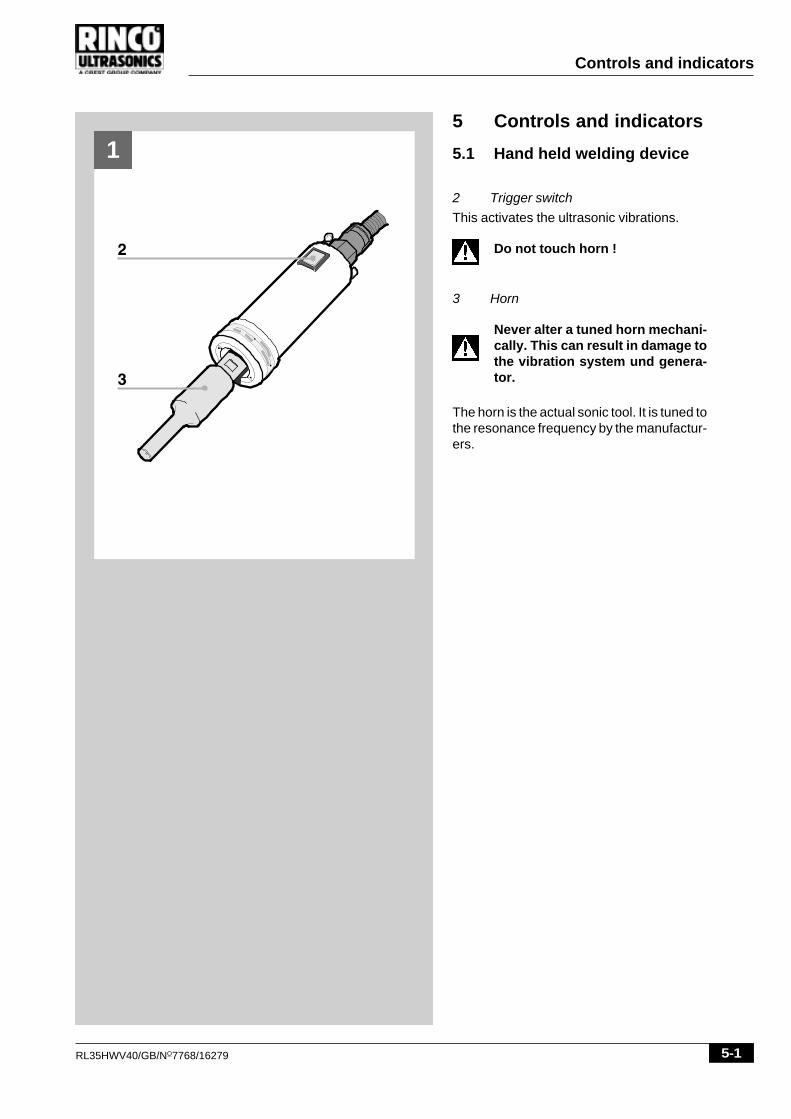
5.1 Hand held welding device
2 Trigger switch
This activates the ultrasonic vibrations.
Do not touch horn !
3 Horn
Never alter a tuned horn mechani-cally. This can result in damage tothe vibration system und genera-tor.
The horn is the actual sonic tool. It is tuned tothe resonance frequency by the manufactur-ers.
1
5-2 RL35HWV40/GB/NO7768/16279
Controls and indicators
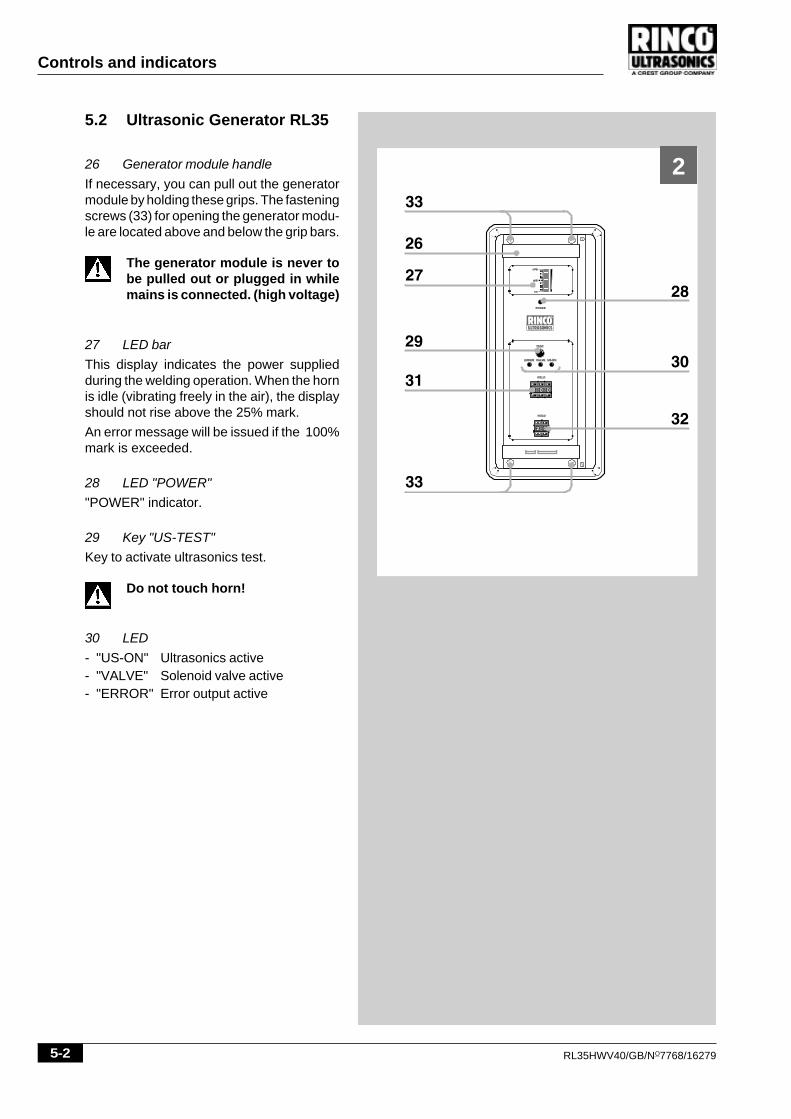
5.2 Ultrasonic Generator RL35
26 Generator module handle
If necessary, you can pull out the generatormodule by holding these grips. The fasteningscrews (33) for opening the generator modu-le are located above and below the grip bars.
The generator module is never tobe pulled out or plugged in whilemains is connected. (high voltage)
27 LED bar
This display indicates the power suppliedduring the welding operation. When the hornis idle (vibrating freely in the air), the displayshould not rise above the 25% mark.
An error message will be issued if the 100%mark is exceeded.
28 LED "POWER"
"POWER" indicator.
29 Key "US-TEST"
Key to activate ultrasonics test.
Do not touch horn!
30 LED
- "US-ON" Ultrasonics active- "VALVE" Solenoid valve active- "ERROR" Error output active
2

RL35HWV40/GB/NO7768/16279 5-3
Controls and indicators
31 Weld time
Using this keypad you can
- change the weld time.a) increase numeralb) decrease numeral
With the initialisation on the inter-nal program selection switch (level9) following section 8 „Resetting“,the welding time is increased by afactor of ten (99.9 sec.)
32 Hold time
This setting does not apply to handheld device.
33 Fastening screws
Must be locked in operation !
3
3a
3a
3a
5-4 RL35HWV40/GB/NO7768/16279
Controls and indicators
___________________________________________________________________________________________________________________________________________________________________________________________________________________________________________________________________________________________________________________________________________________________________________________________________________________________________________________________________________________________________________________________________________________________________________________________________________________________
RL35HWV40/GB/NO7768/16279 6-1
Initial start-up
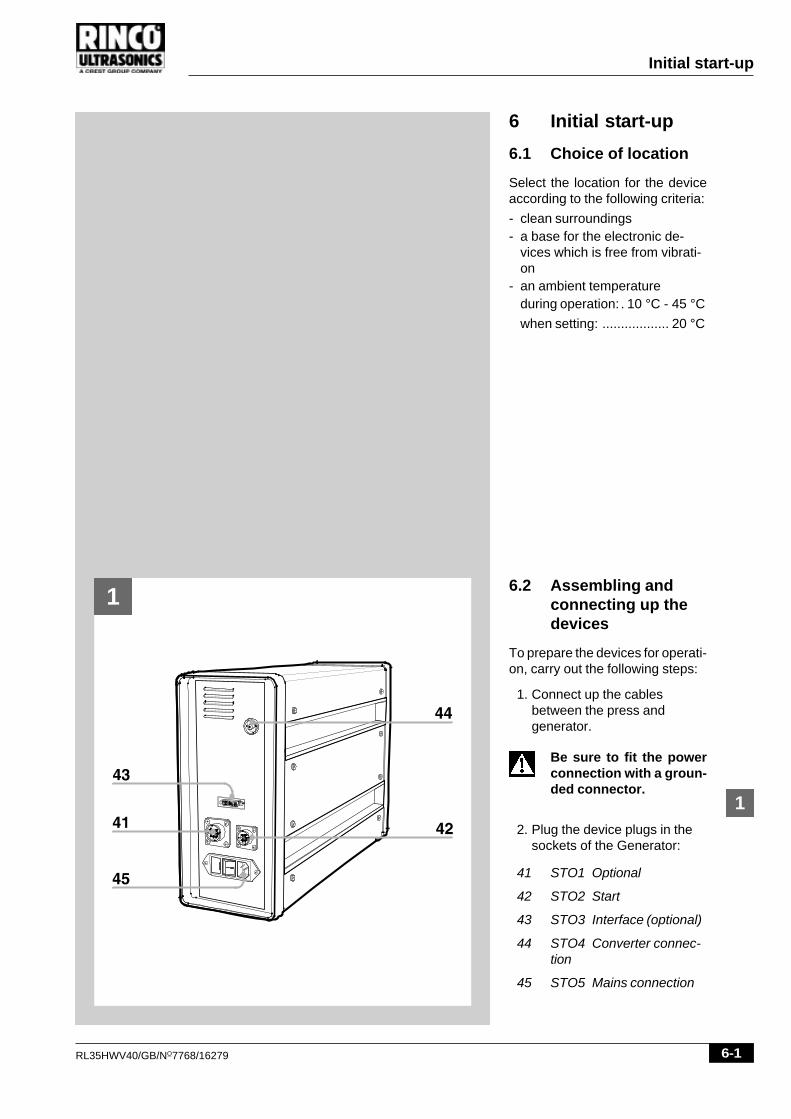
6 Initial start-up
6.1 Choice of location
Select the location for the deviceaccording to the following criteria:
- clean surroundings- a base for the electronic de-
vices which is free from vibrati-on
- an ambient temperatureduring operation: . 10 °C - 45 °C
when setting: .................. 20 °C
6.2 Assembling andconnecting up thedevices
To prepare the devices for operati-on, carry out the following steps:
1. Connect up the cablesbetween the press andgenerator.
Be sure to fit the powerconnection with a groun-ded connector.
2. Plug the device plugs in thesockets of the Generator:
41 STO1 Optional
42 STO2 Start
43 STO3 Interface (optional)
44 STO4 Converter connec-tion
45 STO5 Mains connection
1
1
6-2 RL35HWV40/GB/NO7768/16279
Initial start-up
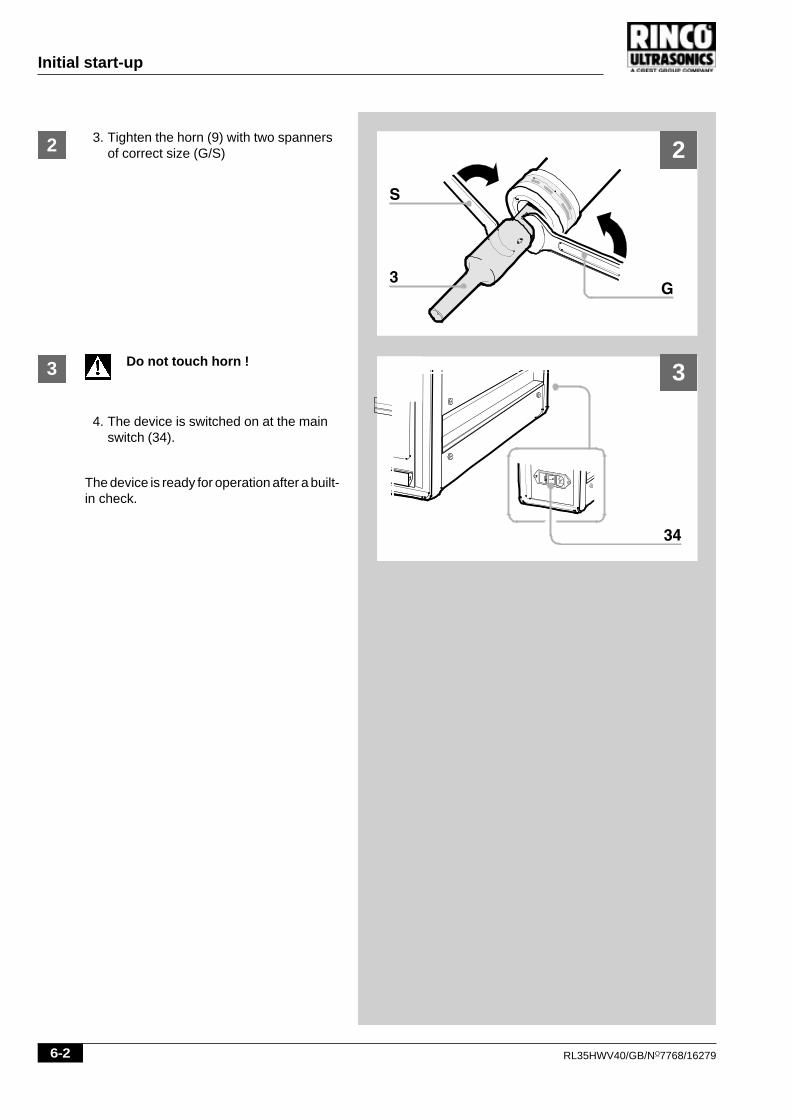
3. Tighten the horn (9) with two spannersof correct size (G/S)2
3 Do not touch horn !
4. The device is switched on at the mainswitch (34).
The device is ready for operation after a built-in check.
2
3
RL35HWV40/GB/NO7768/16279 6-3
Initial start-up
___________________________________________________________________________________________________________________________________________________________________________________________________________________________________________________________________________________________________________________________________________________________________________________________________________________________________________________________________________________________________________________________________________________________________________________________________________________________

6-4 RL35HWV40/GB/NO7768/16279
Initial start-up
___________________________________________________________________________________________________________________________________________________________________________________________________________________________________________________________________________________________________________________________________________________________________________________________________________________________________________________________________________________________________________________________________________________________________________________________________________________________
RL35HWV40/GB/NO7768/16279 7-1
Elements
7 Elements
7.1 Converter
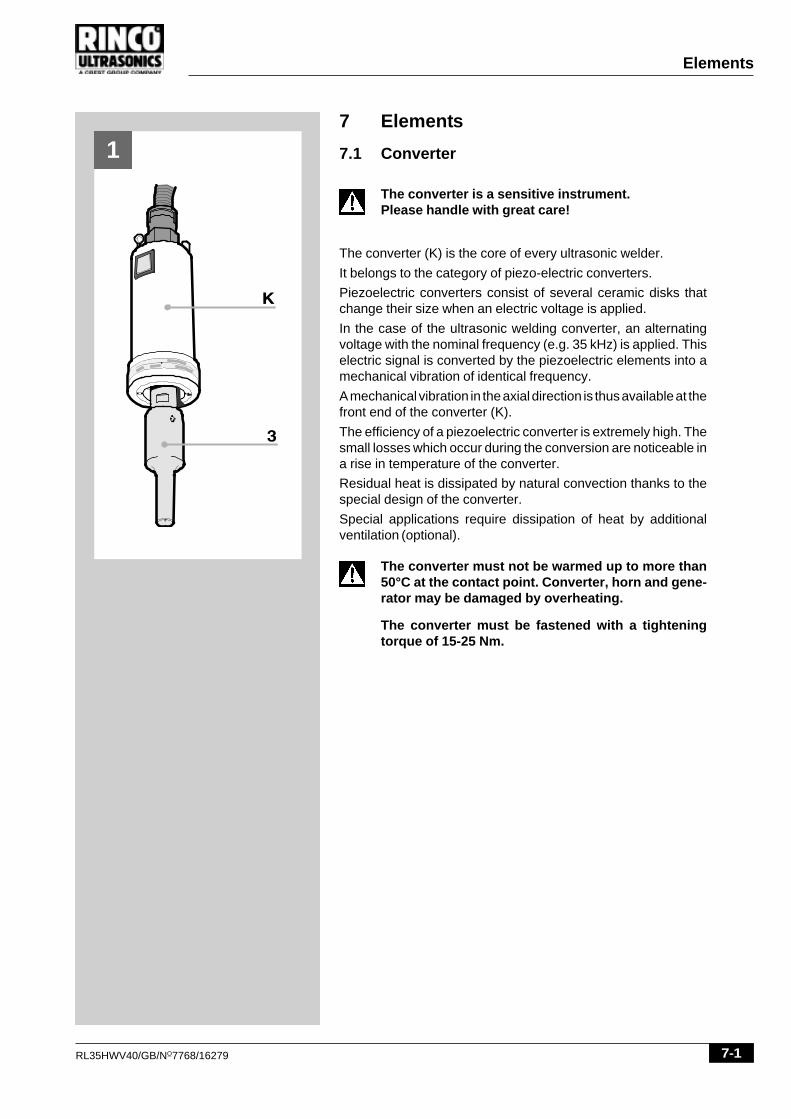
The converter is a sensitive instrument.Please handle with great care!
The converter (K) is the core of every ultrasonic welder.
It belongs to the category of piezo-electric converters.
Piezoelectric converters consist of several ceramic disks thatchange their size when an electric voltage is applied.
In the case of the ultrasonic welding converter, an alternatingvoltage with the nominal frequency (e.g. 35 kHz) is applied. Thiselectric signal is converted by the piezoelectric elements into amechanical vibration of identical frequency.
A mechanical vibration in the axial direction is thus available at thefront end of the converter (K).
The efficiency of a piezoelectric converter is extremely high. Thesmall losses which occur during the conversion are noticeable ina rise in temperature of the converter.
Residual heat is dissipated by natural convection thanks to thespecial design of the converter.
Special applications require dissipation of heat by additionalventilation (optional).
The converter must not be warmed up to more than50°C at the contact point. Converter, horn and gene-rator may be damaged by overheating.
The converter must be fastened with a tighteningtorque of 15-25 Nm.
1
7-2 RL35HWV40/GB/NO7768/16279
Elements
7.3 Horn
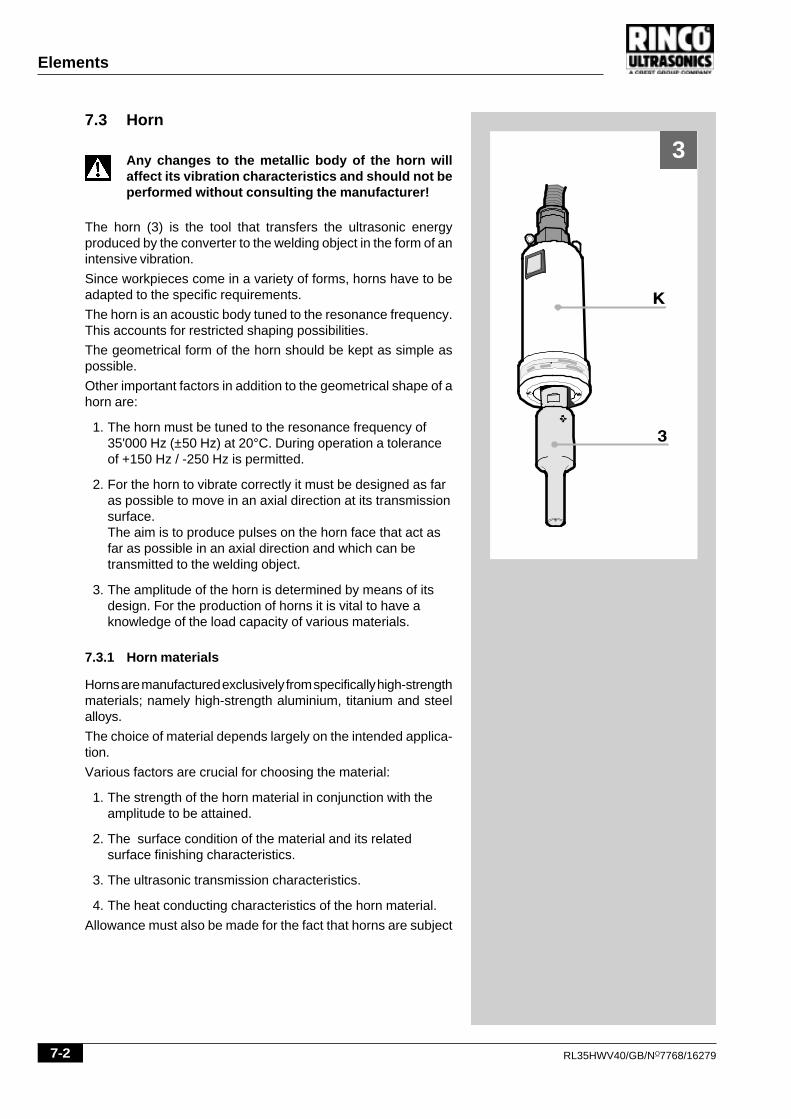
Any changes to the metallic body of the horn willaffect its vibration characteristics and should not beperformed without consulting the manufacturer!
The horn (3) is the tool that transfers the ultrasonic energyproduced by the converter to the welding object in the form of anintensive vibration.
Since workpieces come in a variety of forms, horns have to beadapted to the specific requirements.
The horn is an acoustic body tuned to the resonance frequency.This accounts for restricted shaping possibilities.
The geometrical form of the horn should be kept as simple aspossible.
Other important factors in addition to the geometrical shape of ahorn are:
1. The horn must be tuned to the resonance frequency of35'000 Hz (±50 Hz) at 20°C. During operation a toleranceof +150 Hz / -250 Hz is permitted.
2. For the horn to vibrate correctly it must be designed as faras possible to move in an axial direction at its transmissionsurface.The aim is to produce pulses on the horn face that act asfar as possible in an axial direction and which can betransmitted to the welding object.
3. The amplitude of the horn is determined by means of itsdesign. For the production of horns it is vital to have aknowledge of the load capacity of various materials.
7.3.1 Horn materials
Horns are manufactured exclusively from specifically high-strengthmaterials; namely high-strength aluminium, titanium and steelalloys.
The choice of material depends largely on the intended applica-tion.
Various factors are crucial for choosing the material:
1. The strength of the horn material in conjunction with theamplitude to be attained.
2. The surface condition of the material and its relatedsurface finishing characteristics.
3. The ultrasonic transmission characteristics.
4. The heat conducting characteristics of the horn material.
Allowance must also be made for the fact that horns are subject
3
RL35HWV40/GB/NO7768/16279 7-3
Elements
to immense mechanical loads.
It is extremely important, therefore, to design the horn in such away as to enable the plastic part to be joined under optimalconditions.
The horn surface may have a coating for abrasive plastics forlonger service life.
RINCO has a long record and a lot of experience in hornmanufacture.
Horns that are manufactured without the necessary theoreticaland practical experience are bound to lead to unsatisfactory andpoor welding results and hence to inferior product quality.
In some cases the vibration system and generatormay be damaged.
The horn must be fastened with a tightening torque of15 - 25 Nm.

7-4 RL35HWV40/GB/NO7768/16279
Elements
___________________________________________________________________________________________________________________________________________________________________________________________________________________________________________________________________________________________________________________________________________________________________________________________________________________________________________________________________________________________________________________________________________________________________________________________________________________________
RL35HWV40/GB/NO7768/16279 8-1
Retooling
11
8 Retooling
8.1 Changing horn
It is important to ensure that themains switch on the generator hasbeen switched off before unplug-ging the HF cable!
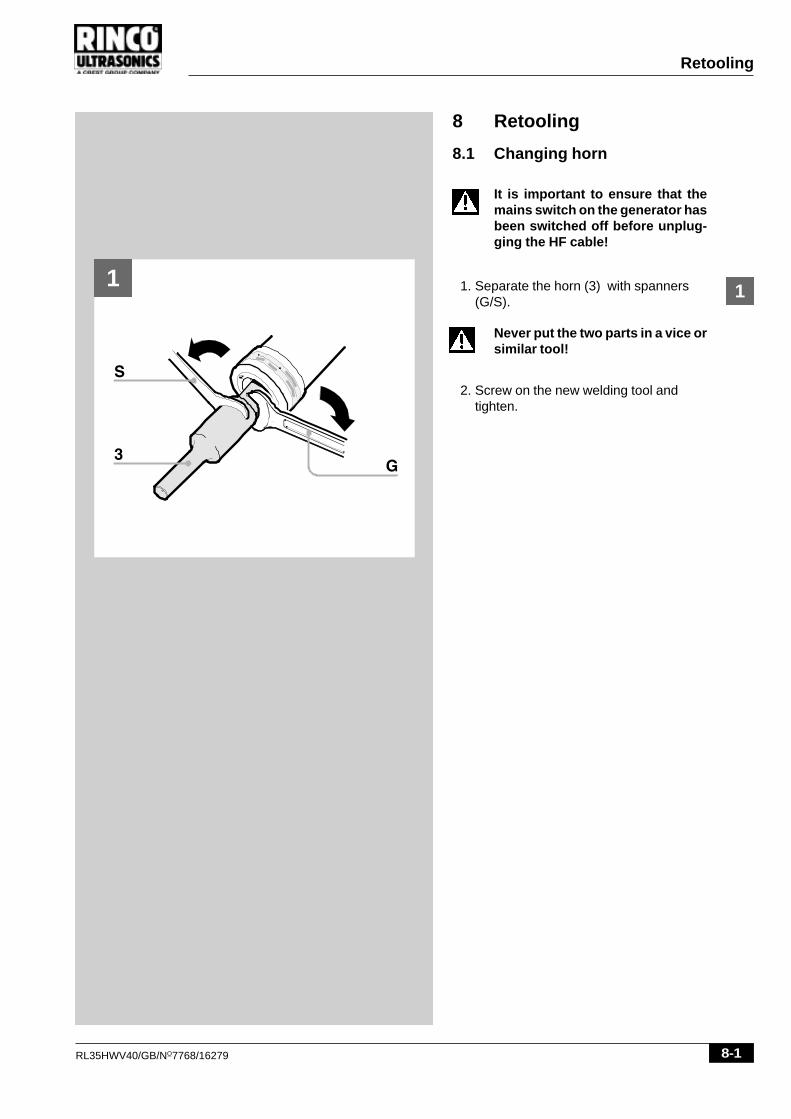
1. Separate the horn (3) with spanners(G/S).
Never put the two parts in a vice orsimilar tool!
2. Screw on the new welding tool andtighten.
8-2 RL35HWV40/GB/NO7768/16279
Retooling
2
3
4
8.2 Detailed description offunctions from the programselector switch
Ultrasonic devices are used in a wide rangeof fields today, so that users have a variety ofdifferent control requirements. A welding in-stallation needs to be able to be connected tothe available peripheral devices.
For this reason, a number of programmeshave been created to suit the most commonperipheral requirements. These programmesare permanently installed in an integratedcomputer and can be preselected via rotaryswitches.
The program selector switch is deliberatelylocated on the card module (see fig. 4a)inside the housing in order to prevent un-authorised changes to the program.
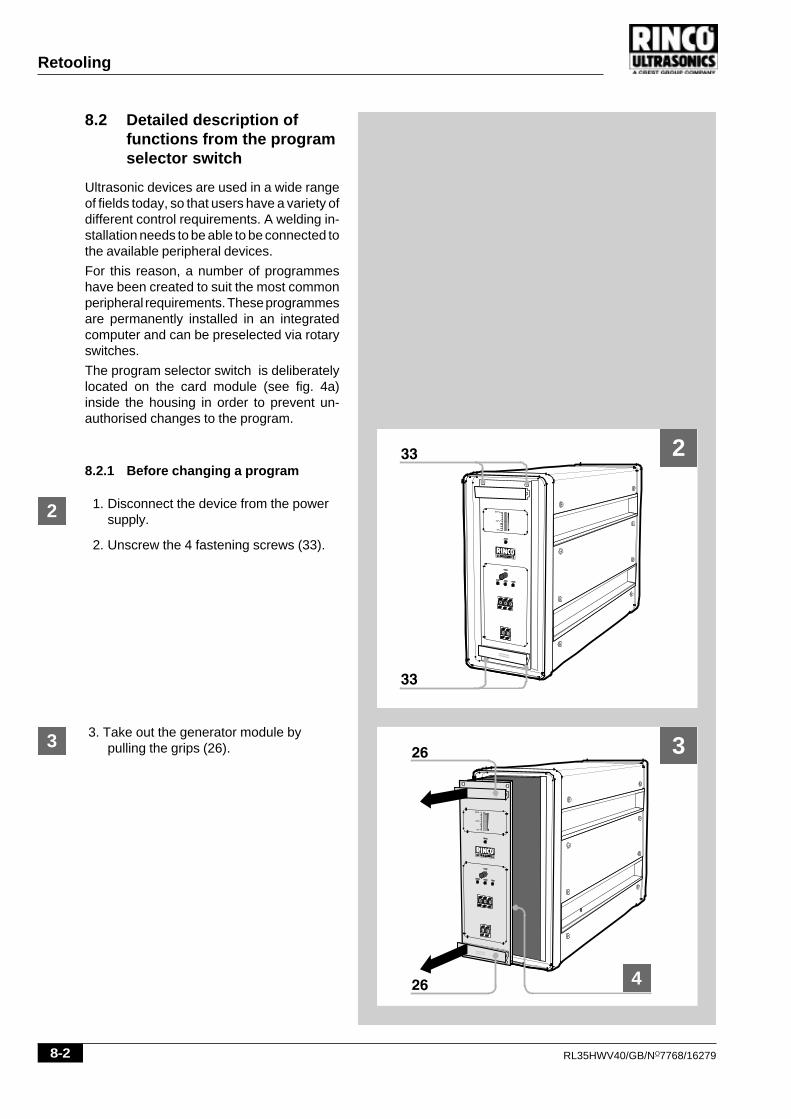
8.2.1 Before changing a program
1. Disconnect the device from the powersupply.
2. Unscrew the 4 fastening screws (33).
3. Take out the generator module bypulling the grips (26).
2
3

RL35HWV40/GB/NO7768/16279 8-3
Retooling
4
4a
The program selection switch has 10 set-tings.
For US-operations without pneumatictool advance.
The standard setting for hand helddevices is '0'.
Mode Adjustment
0 external welding time
1 internal welding time
9 Pulse with settable welding time;max. 99.9s
With setting level ”9”:
Toggle switch:
Ultra sound operates automati-cally according to the pre-settime without holding "start 1".
Re-activating "start 1":The ultra sound is stopped.
If the time has been set at ”00.0”the ultra sound is maintainedwith "start 1".
4a
8-4 RL35HWV40/GB/NO7768/16279
Retooling
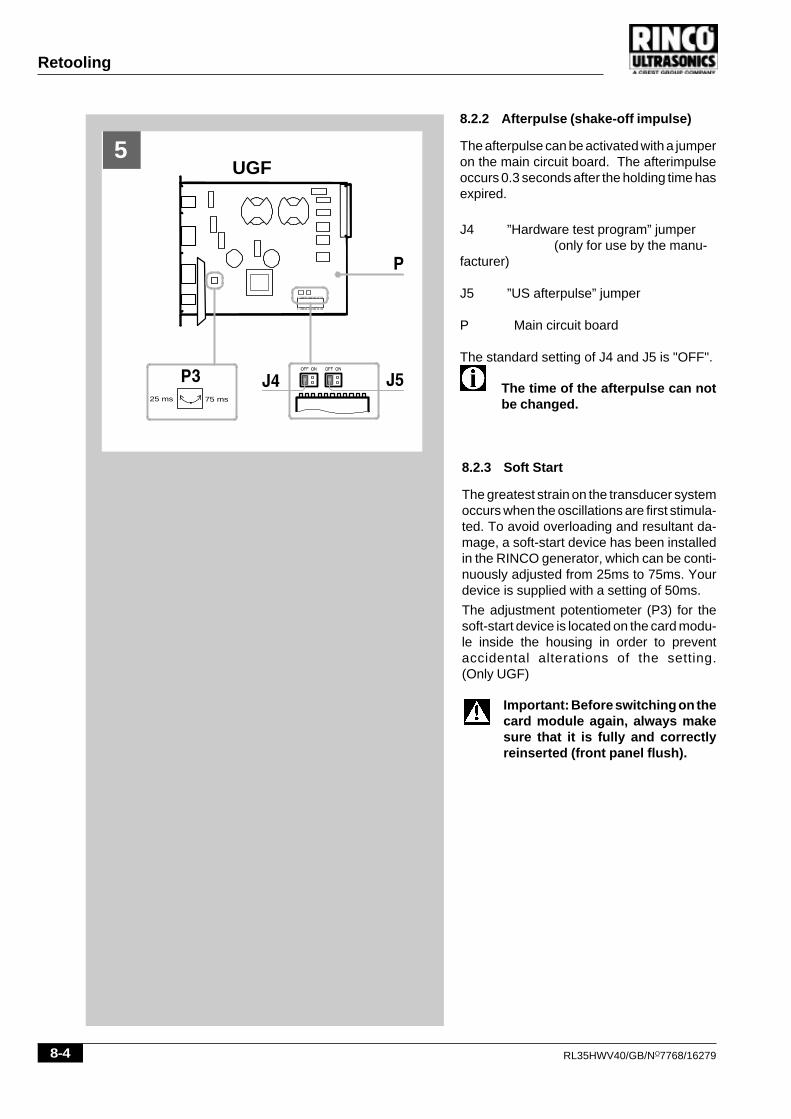
8.2.2 Afterpulse (shake-off impulse)
The afterpulse can be activated with a jumperon the main circuit board. The afterimpulseoccurs 0.3 seconds after the holding time hasexpired.
J4 ”Hardware test program” jumper(only for use by the manu-
facturer)
J5 ”US afterpulse” jumper
P Main circuit board
The standard setting of J4 and J5 is "OFF".
The time of the afterpulse can notbe changed.25 ms 75 ms
UGF5
8.2.3 Soft Start
The greatest strain on the transducer systemoccurs when the oscillations are first stimula-ted. To avoid overloading and resultant da-mage, a soft-start device has been installedin the RINCO generator, which can be conti-nuously adjusted from 25ms to 75ms. Yourdevice is supplied with a setting of 50ms.
The adjustment potentiometer (P3) for thesoft-start device is located on the card modu-le inside the housing in order to preventaccidental alterations of the setting.(Only UGF)
Important: Before switching on thecard module again, always makesure that it is fully and correctlyreinserted (front panel flush).

RL35HWV40/GB/NO7768/16279 8-5
Retooling
___________________________________________________________________________________________________________________________________________________________________________________________________________________________________________________________________________________________________________________________________________________________________________________________________________________________________________________________________________________________________________________________________________________________________________________________________________________________
8-6 RL35HWV40/GB/NO7768/16279
Retooling
___________________________________________________________________________________________________________________________________________________________________________________________________________________________________________________________________________________________________________________________________________________________________________________________________________________________________________________________________________________________________________________________________________________________________________________________________________________________
RL35HWV40/GB/NO7768/16279 9-1
Cleaning and maintenance
9 Cleaning and maintenance
9.1 General maintenance jobs
Cleaning and maintenance jobs may only be carriedout by specially trained staff.
Before beginning maintenance jobs, make sure thatall energy sources such as the power and compres-sed air supply are disconnected.
Attention: Never clean the keypad or plastic sheetingof the generator with caustic agents.
1
1
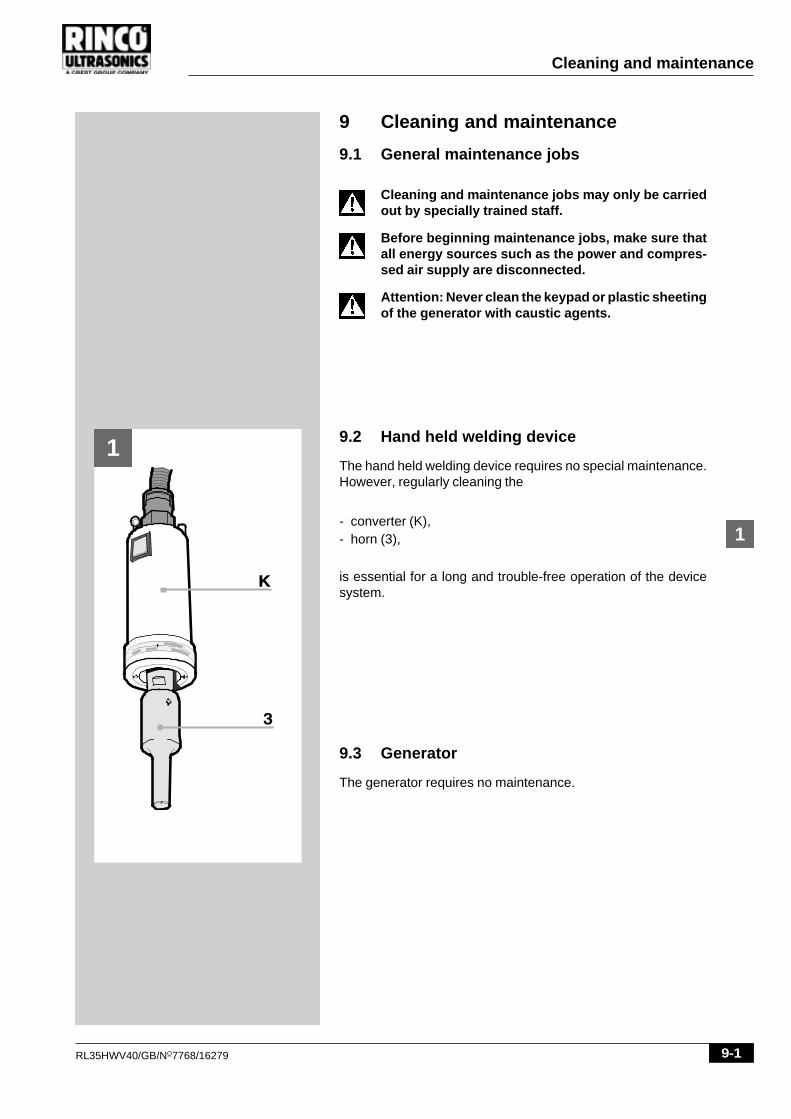
9.3 Generator
The generator requires no maintenance.
9.2 Hand held welding device
The hand held welding device requires no special maintenance.However, regularly cleaning the
- converter (K),- horn (3),
is essential for a long and trouble-free operation of the devicesystem.

9-2 RL35HWV40/GB/NO7768/16279
Cleaning and maintenance
9.4 Vibration system
Work may only be carried out onthe vibration system and converterhousing when the mains voltage isswitched off! High voltage!
Avoid contact with the RF socketof the converter.
Never connect any measuring in-struments to the RF socket of theconverter!
The converter is electrically char-ged even after switching off thegenerator.
9.5 Threaded coupling
The converter (K) and horn (3) are joinedtogether by threading couplings.
Tightening torque: 15 - 25 Nm
Black marks on the surface of the horn (3) areeasy to remove.
1. Lay out a polishing cloth on a levelsurface.
2. Draw the blackened area over thepolishing cloth.
3
2
2
3
RL35HWV40/GB/NO7768/16279 9-3
Cleaning and maintenance
___________________________________________________________________________________________________________________________________________________________________________________________________________________________________________________________________________________________________________________________________________________________________________________________________________________________________________________________________________________________________________________________________________________________________________________________________________________________
9-4 RL35HWV40/GB/NO7768/16279
Cleaning and maintenance
___________________________________________________________________________________________________________________________________________________________________________________________________________________________________________________________________________________________________________________________________________________________________________________________________________________________________________________________________________________________________________________________________________________________________________________________________________________________
RL35HWV40/GB/NO7768/16279 10-1
Error messages and corrective action
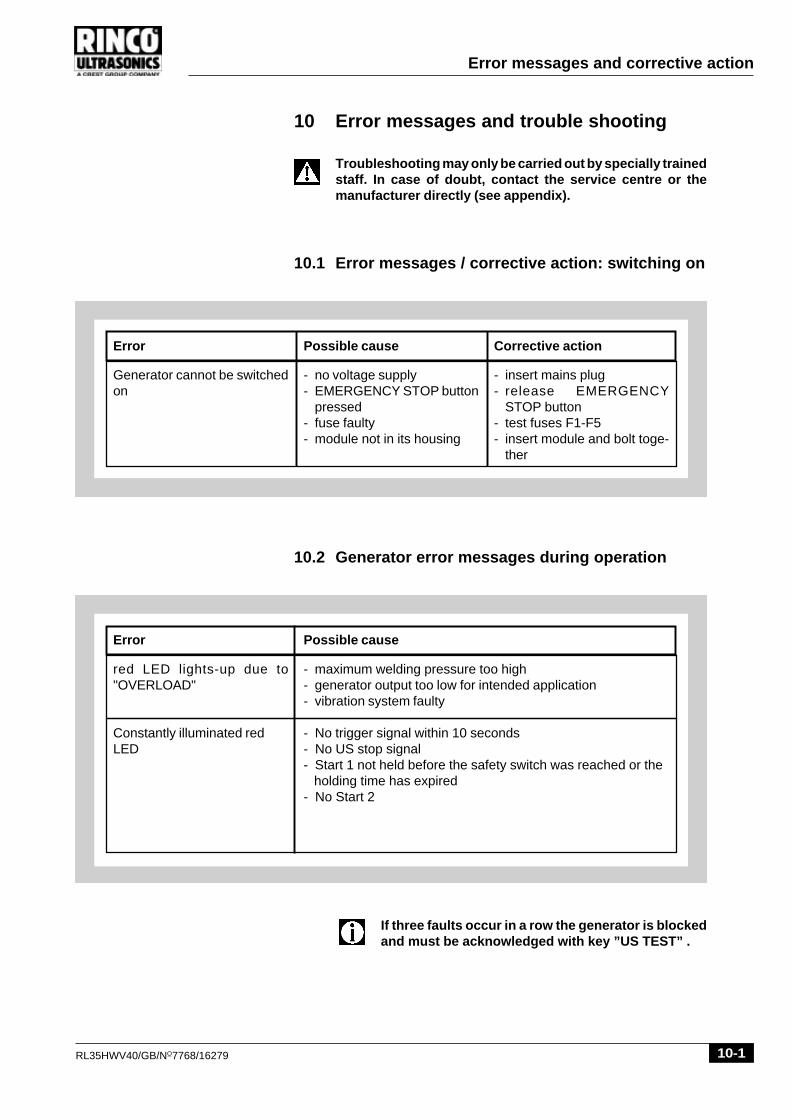
10.2 Generator error messages during operation
10.1 Error messages / corrective action: switching on
Possible cause
- no voltage supply- EMERGENCY STOP button
pressed- fuse faulty- module not in its housing
Corrective action
- insert mains plug- release EMERGENCY
STOP button- test fuses F1-F5- insert module and bolt toge-
ther
Error
Generator cannot be switchedon
10 Error messages and trouble shooting
Troubleshooting may only be carried out by specially trainedstaff. In case of doubt, contact the service centre or themanufacturer directly (see appendix).
Error
red LED lights-up due to"OVERLOAD"
Constantly illuminated redLED
Possible cause
- maximum welding pressure too high- generator output too low for intended application- vibration system faulty
- No trigger signal within 10 seconds- No US stop signal- Start 1 not held before the safety switch was reached or the holding time has expired- No Start 2
If three faults occur in a row the generator is blockedand must be acknowledged with key ”US TEST” .
10-2 RL35HWV40/GB/NO7768/16279
Error messages and corrective action
___________________________________________________________________________________________________________________________________________________________________________________________________________________________________________________________________________________________________________________________________________________________________________________________________________________________________________________________________________________________________________________________________________________________________________________________________________________________
RL35HWV40/GB/NO7768/16279 11-1
Electrical diagrams
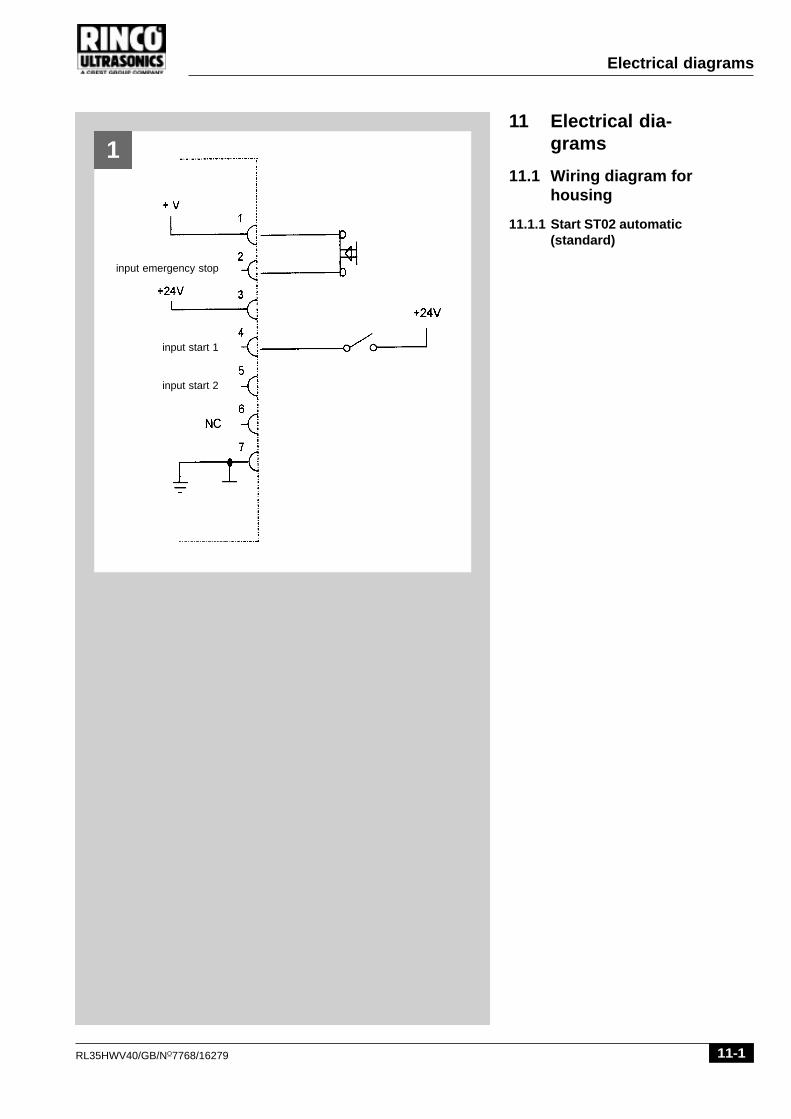
11 Electrical dia-grams
11.1 Wiring diagram forhousing
11.1.1 Start ST02 automatic(standard)
input start 1
input start 2
input emergency stop
1
11-2 RL35HWV40/GB/NO7768/16279
Electrical diagrams
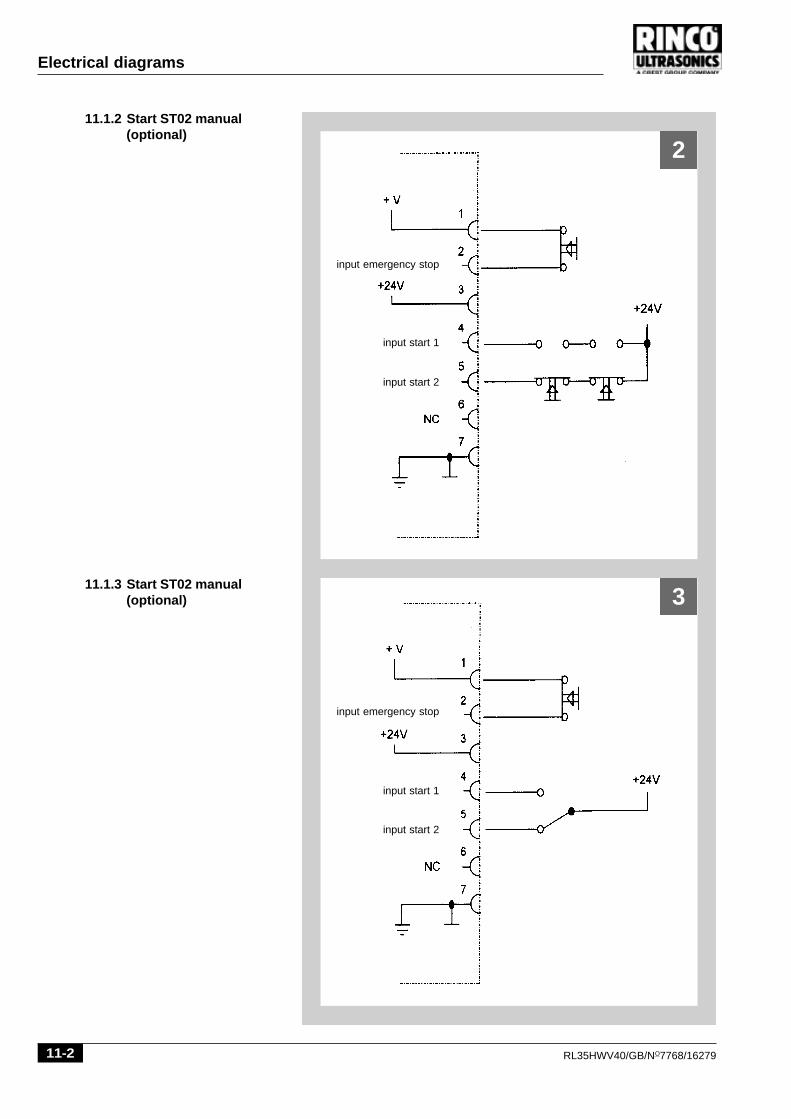
11.1.2 Start ST02 manual(optional)
11.1.3 Start ST02 manual(optional)
input start 1
input start 2
input emergency stop
input start 1
input start 2
input emergency stop
2
3

RL35HWV40/GB/NO7768/16279 11-3
Electrical diagrams
output piece counter
output piece counter
input US-Stop 1
input US-Stop 2
US-Stop option A US-Stop option B
Error- max. 24V / 0.5A- open, if error
11.1.4 Interface ST03
4

11-4 RL35HWV40/GB/NO7768/16279
Electrical diagrams
output converter
not used
not used
not used
mains ground
mains ground
mains P
mains P
mains N
mains N
not used
GND24V
+24V
output piece counter (optional):ouput power 0-5V
output magnetic valve
input start 2
input start 1
input Trigger
input US-Stop 2
input US-Stop 1
Error- max. 24V / 0.5A- open, if error
US - Stop option A US - Stop option A
11.1.5 Generator module UGF
Detail of printed circuit board
1 Connection '1'
22 Connection '22'
P Main board
5
5a
RL35HWV40/GB/NO7768/16279 11-5
Electrical diagrams
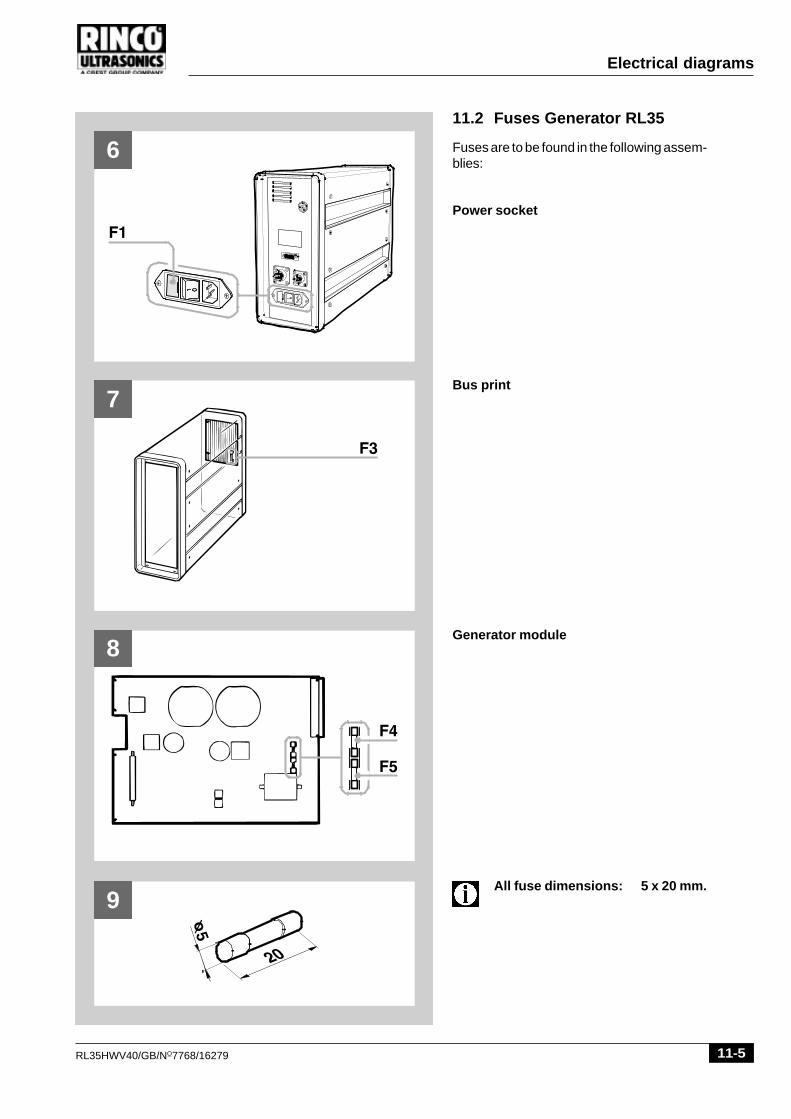
11.2 Fuses Generator RL35
Fuses are to be found in the following assem-blies:
Generator module
All fuse dimensions: 5 x 20 mm.
Bus print
Power socket
6
7
8
9

11-6 RL35HWV40/GB/NO7768/16279
Electrical diagrams
11.3.2 Fuses 110 volt
11.3 List of fuses Generator RL35
11.3.1 Fuses 230 volt / 200 volt
Generator Power socket Bus print Generator module
F1 F2 F3 F4 F5
UGF35-250 3.15 A/T 400 mA/T 3.15 A/T 100 mA/T
UGF35-400 4 A/T 400 mA/T 4 A/T 100 mA/T
UGF35-600 4 A/T 400 mA/T 4 A/T 100 mA/T
UGF35-900 6.3 A/T 400 mA/T 6.3 A/T 100 mA/T
Generator Power socket Bus print Generator moduleF1 F2 F3 F4 F5
UGF35-250-110 6.3 A/T 400 mA/T 6.3 A/T 160 mA/T
UGF35-400-110 8 A/T 400 mA/T 8 A/T 160 mA/T
UGF35-600-110 8 A/T 400 mA/T 8 A/T 160 mA/T

11-7RL35HW/V40/GB/N°7768/16279
Electrical diagrams
11.4 RL 35 Generator rear panel
1 STO1
2 STO2
3 STO3
4 STO4
5 STO5
11.5 List of device sockets andconnection plugs
List of device socket RINCO order-No.
STO1 Appliance socket 14 pol. AMP 5445STO2 Appliance socket 7 pol. AMP 5442STO3 Appliance socket SUB-D 15 pol. 5469STO4 Appliance socket Lemo 1 7254STO5 Appliance socket 250V/8A 5053
Liste der Anschluss-Stecker RINCO order-No.
ST1 Plug 14 pol. AMP 5443ST2 Plug 7 pol. AMP 5440ST3 Plug SUB-D 15 pol. 5446ST4 Plug Lemo 1 2646ST5 Power cable 250V depending on country
10
11-8 RL35HWV40/GB/NO7768/16279
Electrical diagrams
___________________________________________________________________________________________________________________________________________________________________________________________________________________________________________________________________________________________________________________________________________________________________________________________________________________________________________________________________________________________________________________________________________________________________________________________________________________________
RL35HWV40/GB/NO7768/16279 12-1
Technical drawings and values
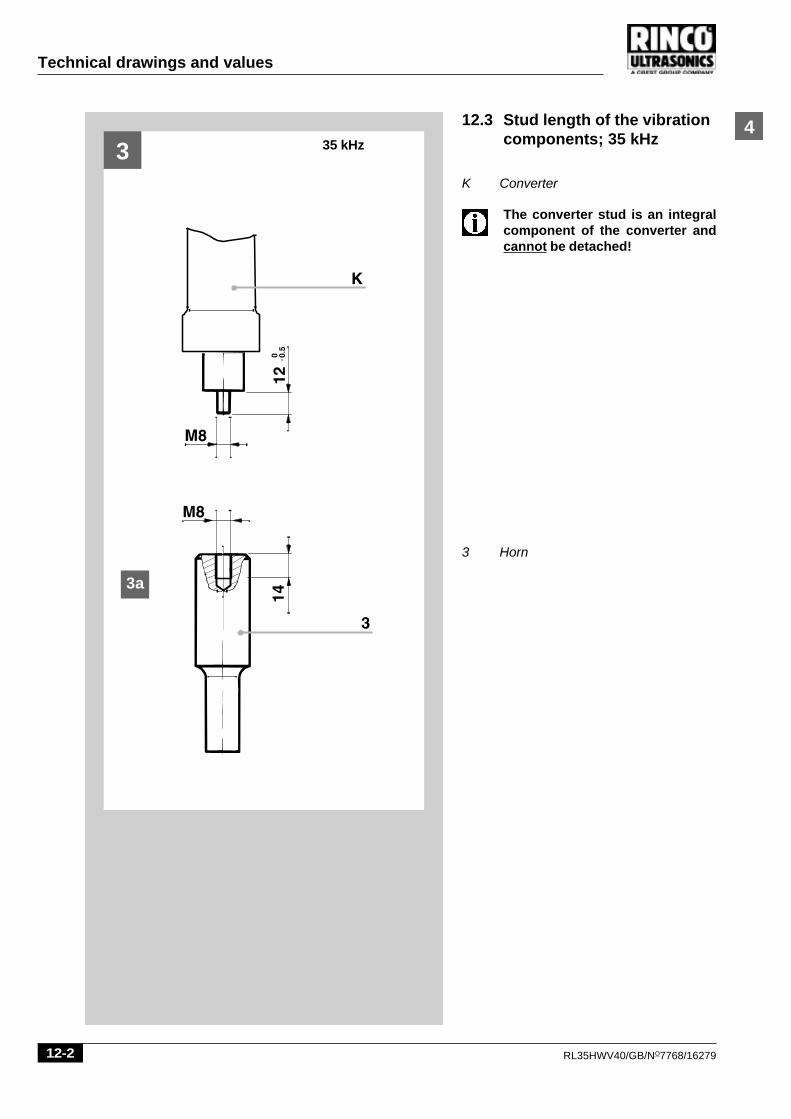
12.2 Amplitudes of 35 kHz RL generators
12.2.1 Amplitudes with amplified converter
1
2
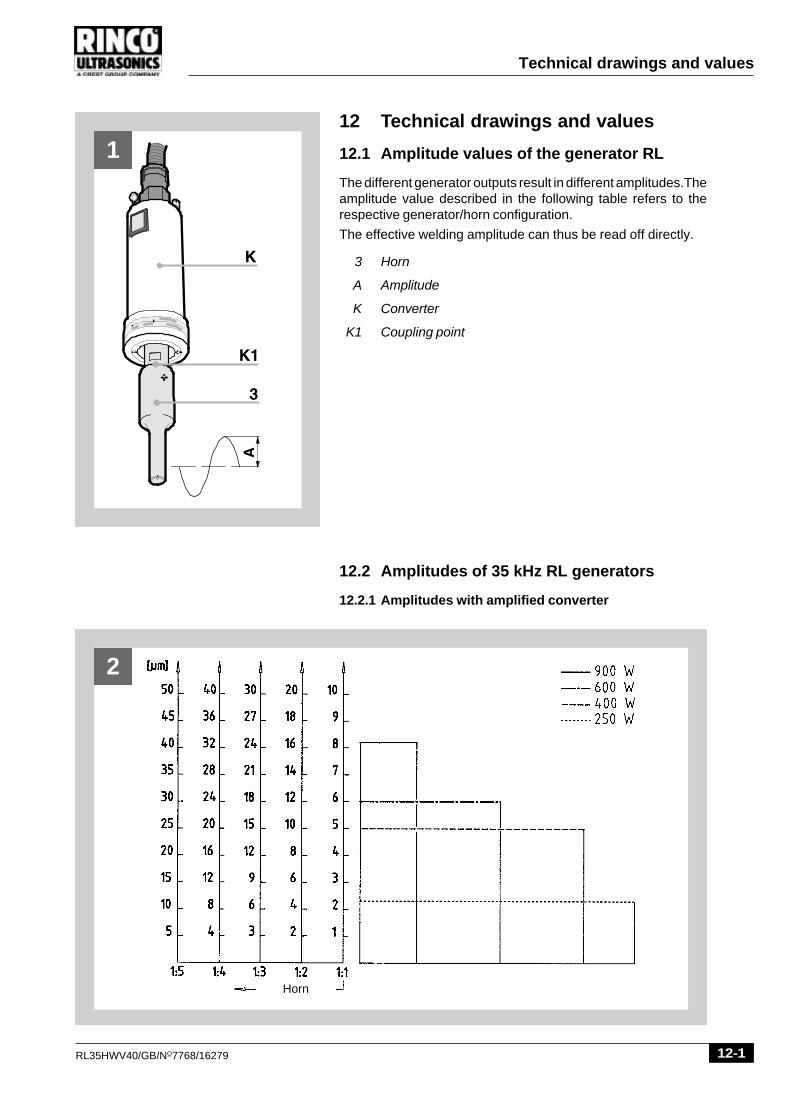
12 Technical drawings and values
12.1 Amplitude values of the generator RL
The different generator outputs result in different amplitudes.Theamplitude value described in the following table refers to therespective generator/horn configuration.
The effective welding amplitude can thus be read off directly.
3 Horn
A Amplitude
K Converter
K1 Coupling point
Horn
12-2 RL35HWV40/GB/NO7768/16279
Technical drawings and values
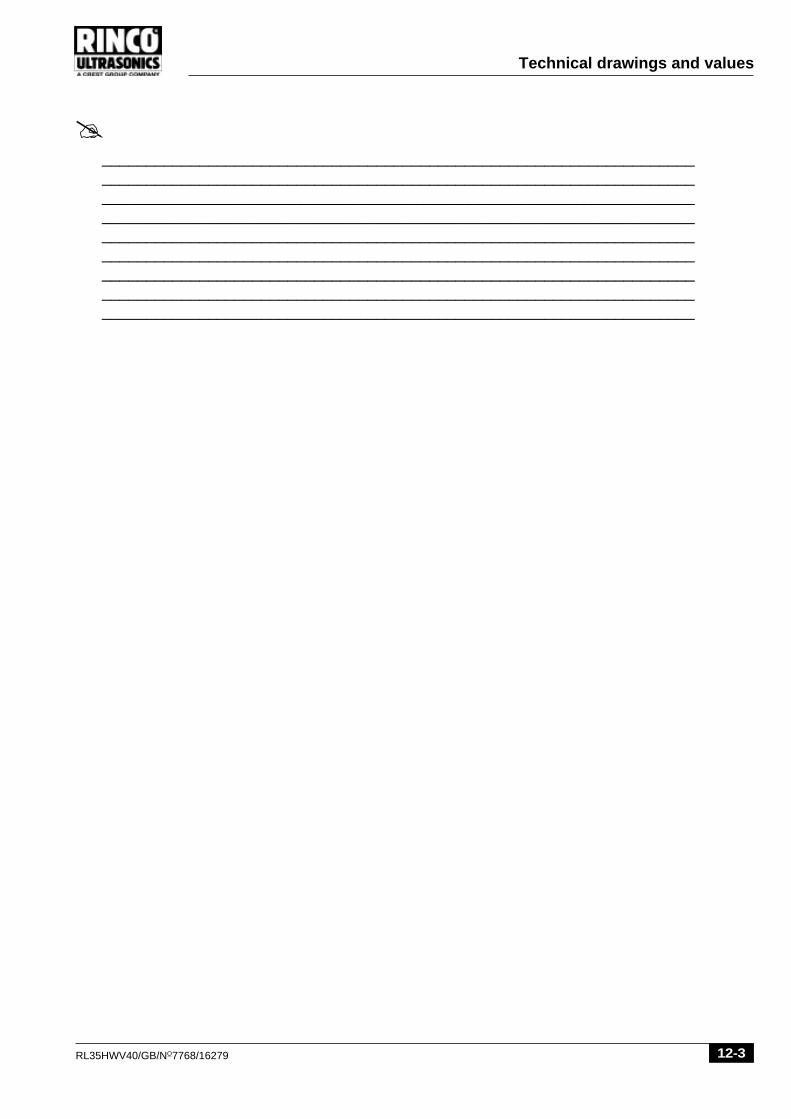
412.3 Stud length of the vibrationcomponents; 35 kHz
K Converter
The converter stud is an integralcomponent of the converter andcannot be detached!
3 Horn
4 35 kHz3
3a
RL35HWV40/GB/NO7768/16279 12-3
Technical drawings and values
___________________________________________________________________________________________________________________________________________________________________________________________________________________________________________________________________________________________________________________________________________________________________________________________________________________________________________________________________________________________________________________________________________________________________________________________________________________________
12-4 RL35HWV40/GB/NO7768/16279
Technical drawings and values
___________________________________________________________________________________________________________________________________________________________________________________________________________________________________________________________________________________________________________________________________________________________________________________________________________________________________________________________________________________________________________________________________________________________________________________________________________________________
RL35HWV40/GB/NO7768/16279 13-1
Service center addresses
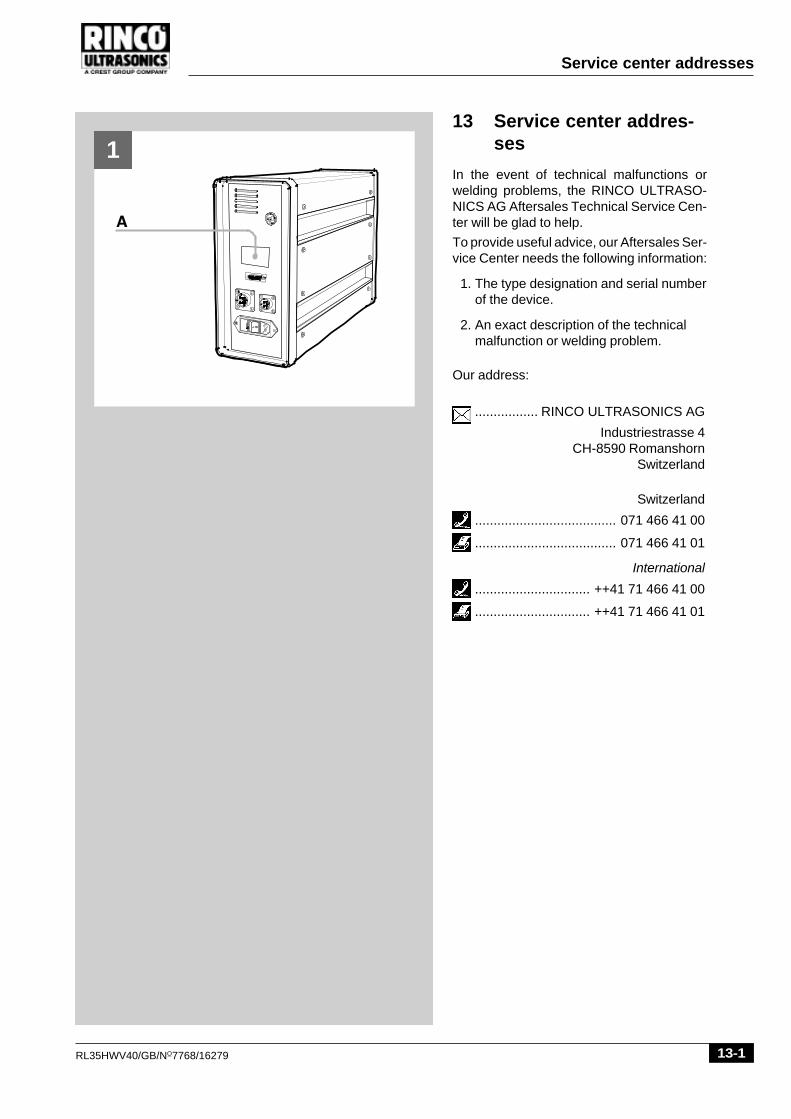
13 Service center addres-ses
In the event of technical malfunctions orwelding problems, the RINCO ULTRASO-NICS AG Aftersales Technical Service Cen-ter will be glad to help.
To provide useful advice, our Aftersales Ser-vice Center needs the following information:
1. The type designation and serial numberof the device.
2. An exact description of the technicalmalfunction or welding problem.
Our address:
................. RINCO ULTRASONICS AG
Industriestrasse 4CH-8590 Romanshorn
Switzerland
Switzerland
...................................... 071 466 41 00
...................................... 071 466 41 01
International
............................... ++41 71 466 41 00
............................... ++41 71 466 41 01
1

13-2 RL35HWV40/GB/NO7768/16279
Service center addresses
___________________________________________________________________________________________________________________________________________________________________________________________________________________________________________________________________________________________________________________________________________________________________________________________________________________________________________________________________________________________________________________________________________________________________________________________________________________________