hamburg
8
Instructions of installation and usage Instructions of Installation and Use MT-NR1601 Massage Bathtub Cleaning&Maintenance 1. During the transportation or installation, do not pull the pipe or hold to avoid the water leakage. , 2. After long time use, if there are some dirt on product s surface, wipe it off gently by a soft towel stained with mild detergent; for the metal parts, polish it with some car wax by a towel, which brings out a refreshing appearance. 3. Scale deposit can be wiped off with warm citric acid or vinegar by a soft cloth. , 4. Don t clean the tub and with hard or coarse material to avoid any scratches. , 5. Don t clean the tub and with gasoline to avoid any damages. 6. It is not recommended to leave water in the tub for a long time or use this tub for washing purpose. Pls drain off the water after the bath and dissconnect the power supply. 7. There should be sufficient power supply and wires should be safely grounded. 8. For your safty, a professional technician is necessary to ensure earthing wire be well grounded and a RCCB fitted during installation. accessories accessories accessories
description
http://www.sansan.ee/juhend/hamburg.pdf
Transcript of hamburg

Instructions of installation and usageInstructions of Installation and Use
MT-NR1601
Massage BathtubCleaning&Maintenance
1. During the transportation or installation, do not pull the pipe or hold to avoid the
water leakage. ,
2. After long time use, if there are some dirt on product s surface, wipe it off gently by a soft
towel stained with mild detergent; for the metal parts, polish it with some car wax by a towel,
which brings out a refreshing appearance.
3. Scale deposit can be wiped off with warm citric acid or vinegar by a soft cloth.,
4. Don t clean the tub and with hard or coarse material to avoid any scratches.,
5. Don t clean the tub and with gasoline to avoid any damages.
6. It is not recommended to leave water in the tub for a long time or use this tub for washing
purpose. Pls drain off the water after the bath and dissconnect the power supply.
7. There should be sufficient power supply and wires should be safely grounded.
8. For your safty, a professional technician is necessary to ensure earthing wire be well grounded
and a RCCB fitted during installation.
accessories
accessories
accessories
Villu
Typewriter
HAMBURG
Villu
Typewriter
www.schonberg-bathrooms.com

Thread sealing tape
Tape measure
Accessory box 2: Shower head 1pcsDrain cover 1pcs
Please make sure all accessories are in the package(Bathtub 1set Accessory box 2pcs Pillow 2pcs)
Accessory box 1:Faucet 1 pcs
Open spanner
Gradient
Installation Tools:(no included)
Pillow
Adjustable spanner
CONTENTS:
Page2
Page4
Page9
Page1 Page2
Preparations
Instruction of Using Our Products
Dear Customer,Thank you for choosing our product. For your safe concern, please take a few minutes to read this manual before installation and use.
WARNING
1. For a person who has heart trouble, high blood pressure & sugar diabetes should
not take a steam shower or bath when feeling sick. (The kid is suggested to be
accompanied by an adult when taking a bath),
2. Don t take a bath alone after drinking wine with alcohol or excess sports.
3. The water temeperature should be below 45 during shower and the
recommended temperature is 30 -38 . ,
4. Don t take a bath for a long time. Recommended time: 15-21 .
5. All the information in this instruction are subject to change without prior notice.
6. Settings, configurations and details of the products are subject to be changed
or upgraded without prior notice.
7. For the maintenance, please contact the technicians appointed by the dealer ,
and don t disassemble and fix by yourself, or the supplier will be free from any
conquences that may occur.
minutes
Page3 Page4
MODEL: MT-NR1601SIZE: 1630mmX1630mmX680mm
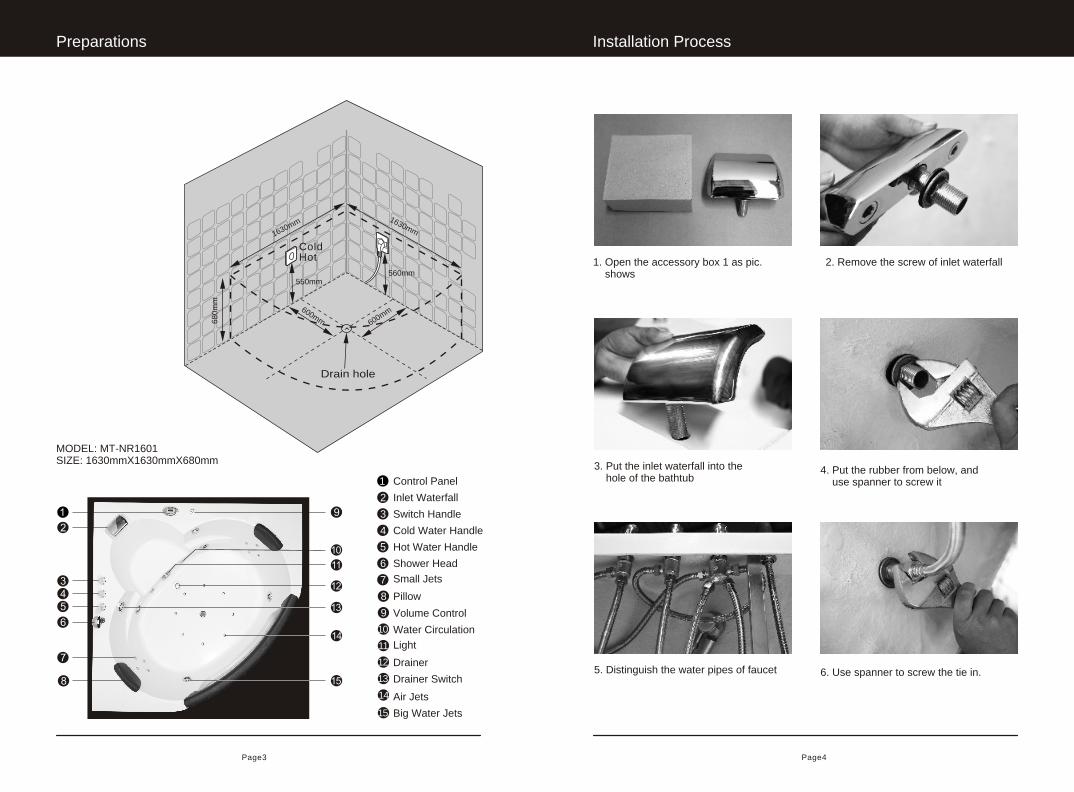
1. Open the accessory box 1 as pic. shows
2. Remove the screw of inlet waterfall
3. Put the inlet waterfall into the hole of the bathtub
4. Put the rubber from below, and use spanner to screw it
5. Distinguish the water pipes of faucet 6. Use spanner to screw the tie in.
Installation ProcessPreparations
68
0m
m
1630mm1630mm
1 Control Panel
2 Inlet Waterfall
3 Switch Handle
4 Cold Water Handle
5 Hot Water Handle
6 Shower Head
7 Small Jets
8 Pillow
9 Volume Control
Water Circulation
Light
Drainer
Drainer Switch
11
12
13
14
10
15
Air Jets
Big Water Jets
600mm600mm
560mm
Drain hole
550mm
Cold Hot

Page5 Page6
1. Open the accessory box 2 as pic. shows
2. Put the shower head into the bathtub in right position as pic. shows
3. Distinguish water inlet pipe 4. Screw it
5. Side up the bathtub, then install downcomer
6. Use thread sealing tape to wrap around the drain hole
7. Make the thread sealing tape smooth 8. Fasten the drain tube
9. Put downcomer into the drain hole on the ground
11. Put plugs into the drain hole
10. Drain sewage of the tube, then connect the cold and hot water pipe separately
12. Install pillow
Installation ProcessInstallation Process

1. The creepage protector will automatically cut off the circuit if the current is too high.
2. Volume control
3. Waste water free piping system
Page7 Page8
Unique Point:
Installation ProcessInstallation Process
13. Seal the barthtub edge by silicon glue as follows

Page9 Page10
Instruction of Using Our ProductsInstruction of Using Our Products
. CONNECTION DIAGRAM
. SYSTEM INSTALLATION SKETCH
POWER INPUT(AC220V/16A)
SPEAKER10W
CONTROL BOX
AC 12V/10W
O3
COMPUTER CONTROL BOX
ANTLIGHT
12V/20W
WATER PUMP1HP
AIR PUMP1HP HEAT
220V/1.5kW
MASSAGE BATHTUB
. EXTERIOR DESCRIPTION: (CONTROL PANEL)
. DESCRIPTION OF FUNCTION INDICATE LIGHT:
1. Heater Indicator: Heater starts to work if it is on. (Remarks:during the operation, the
indicator turns off automatically if there is no sufficient water; when the water level
reaches the standard, the indicator is on and the heater starts to work again)
2. Water Indicator: If it is on, the massage function is effective; if it flashes, it shows that
there is no sufficient water so the massage function is of no effect.
3. Bubble Bath Indicator: if it is on, the bubble bath function is effective, if it is off, this
function is off.
4. O3 Indicator: if it is on, the underwater light is on, if it flashes, the ozonation function is
effective. (Remarks: when the underwater light is on and ozonation function is effective,
this indicator will flash 5 times and pauses once then continue to flash!)
Power Switch
Heat Switch
MEMORY/TAKE Programs Switch
Water Light Switch
CD/RADIO Switch
Function Indicate Light
Water Pump Switch
LED Display Screen
Volume Increasing Channel Switch Temperature Increasing
Volume Decreasing Channel Switch Temperature Decreasing
Air Pump Switch
Channel Selecting Switch
Ozonizer Switch
POWER INPUT
AC220V/16A
E
E
L N
LIG
SPK
AC220V
E NL
ANT
CD
INP
UT
WATER PUMPAC220V/1HP
AC220V0.5A
MM
EE
E EN NL L
MM
EE
AIR BUBBLE PUMPAC220V/1HP
WATERCONTROL
LIGHTAC12V/20W
SPEAKER8 /10W
NNLL NNLL
FUSE3A
EN
L
O3
OZONIZERAC12V/20WHEATER
220V/1.5kW
1. LED-display screen: the display shows different when pressing ( )key/( )key
continuously. The display shows alternately (Measure Temperature/Setting
Temperature/FM Radio Frequency) when heating and radio are both working.
. NOTES FOR DIGITAL DISPLAY:
2. When the RADIO:
FM
MHzFM RADIO FREQUENCY
AC7.5V
AC12V

Page11 Page12
Instruction of Using Our ProductsInstruction of Using Our Products
(3). : Bubble Bath
Press this button ( ) on the panel to switch
on/off bubble bath function and the indicator
related will be on/off accordingly.
(3). ( )
Bubble Bath Please Press Key
(5). ( )
Underwater Light Please Press Key
(4). Ozonation Please Press ( )Key
(4). :
Ozonation
Press ( ) to turn on/off this function and the
indicator related will be on/off accordingly.
(Remarks: each time the ozonator works for 10
minutes, after10 minutes,the system shut it off
automatically.)
Press ( ) to turn on/off the light and the
indicator will be on/off accordingly.
(5). Underwater Light:
Press the ( VOL) button to set the water
temperature in the tub, the setting ranges: (20 -
50 ). Press (VOL+) to increase the preset
temperature, press (VOL-) to decrease the
temperature and the screen shows accordingly.
(Remarks: For this function, FM & DC should be
turned off first, otherwise, it is for volume
adjustment) Preset Temperature by factory: 45
(6).Temperature Setting:
(6). Temperature Setting VOL Please Press The ( ) Key
. TECHNICAL DATA
1. Voltage: AC220V 10%, 50Hz
AC110V 10%, 60Hz
2. Power: 3500W
3. Dielectric Strength: 1500V, 1min
4. Lighting Load:AC12V, 20W
5. Music Power: 15W
6. Frequency Range: FM88-108MHz
7. S/N Radio: 45dB
8. AIR PUMP: AC220V50Hz 1kW
9. HEAT POWER: AC220V50Hz 1.5kW
10. : AC12V 20W
11. WATER PUMP: POWER 1kW
Ozone
. OPERATION MANUAL
Surfing Operation: Connect the creepage protector,
press ( ), the system starts to work, LCD screen
shows the actual temperature. At this moment, you
can select the functions desired; Press ( ) to turn
off the system.
1. Power:
Press ( ), the pump is turned on, and the LED
indicator is on correspondingly; press again ( )
to turn off the pump; (Notice: When there is not
sufficient water in the tub, the system will shut off
the pump and the indicator will flash until the water
level reaches the standard)
(1). Water Pump
Please Press Key( )
(2). Heater
Please Press ( )Key
(1). Water Pump:
The water pump has to be activated before using
the heater. The computer establishes(45 ). Press
again( )key, heat function to OFF.
(2). Heater:
Power on/off Please Press Key( )

Page13 Page14
Instruction of Using Our ProductsInstruction of Using Our Products
2. FM Function:(1). Pull out the antenna and set it as Y type, press ( ), the screen shows FM frequence,
the volume indicating as DB increases to 00dB from 08dB .
(2). Press( )key to upward tuning, interval press is for manual selecting. If the key is held
for over 2 seconds, the frequency will stop at the channel the digital founds.(Notice: You
can press( )key for upward and press( )key for downward. In the case of the weak
signal, manual selecting is suggested.) Press( )key when a channel is selected, the
screen will show P----* , and the channel will be memorized.(Notice: The * of the
P----* is positioned memory number, the capacity of memory is 10.) If the received
signal is weak, unfold the antenna and readjust. Press( )key to select the channel you
like after setting.
(3). Volume Control: Press the volume( )or( )to adjust the volume, the correspondent
DB will be indicated in the screen.
Connect the CD audio wire with the external socket of the main control box, press
CD/RADIAO for CD function, then choose the desired volume by pressing (VOL+) or
(VOL-).
3. External CD:
.PRECAUTIONS:
4. Key Description:(1). It is the store function after pressing ( ) or after station selection; and direct pressing
of the( )key is selecting the channels that have been memorized.
(2). (VOL+) and (VOL-) Function: it is for temperature adjustment when the radio and CD
functions are ineffective, while the radio or CD functions is effective, it is for volume
adjustment; when the radio function is effective, press( ), it is for station selection.
(3).It is for tuning upward function, and also the station searching function by pressing
(VOL+) or (VOL-).
1. The installation should be carried out by a qualified technician and creepage protector
should be installed in the place easily to be controlled.
2. The electronic parts should be well grounded, otherwise, the manufacturer will not be
liable for any loss or consequences occurred.
3. The load capability of the power supply should be considered during installation, or it
affects the normal operation of the product or may lead to accident!
4. For any functions can not be activated through the ways mentioned above, please
contact a certified technicians or local dealer.
5. If you don't use the product for a long time, please disconnect the main power supply.