Guided Tour for LSM 510 and META - bio.umass.edu · Confocal microscopy Zeiss LSM 510 and Zeiss LSM...
66
Carl Zeiss - Training Application and Support Center Zeiss LSM 510 META - Guided Tour 1 Confocal microscopy Zeiss LSM 510 and Zeiss LSM 510 META Visualisation of biological structures in 3D
-
Upload
trinhtuong -
Category
Documents
-
view
248 -
download
0
Transcript of Guided Tour for LSM 510 and META - bio.umass.edu · Confocal microscopy Zeiss LSM 510 and Zeiss LSM...

Carl Zeiss - Training Application and Support Center
Zeiss LSM 510 META - Guided Tour
1
Confocal microscopyZeiss LSM 510 and Zeiss LSM 510 META
Visualisation of biological structures in 3D

Carl Zeiss - Training Application and Support Center
Zeiss LSM 510 META - Guided Tour
2
Confocal Principle
Signals from aboveand below the planeof focus fall outsidethe pinhole and areblocked
Only signals fromplane of focus passthe pinhole and aredetected - producinga “optical section”

Carl Zeiss - Training Application and Support Center
Zeiss LSM 510 META - Guided Tour
3
Upright Zeiss LSM 510 confocal microscope
LSM 510 scan head
Axioplan 2 imaging

Carl Zeiss - Training Application and Support Center
Zeiss LSM 510 META - Guided Tour
4
Inverted Zeiss LSM 510 confocal microscope
LSM 510 scan headin base port position
Axiovert 100M

Carl Zeiss - Training Application and Support Center
Zeiss LSM 510 META - Guided Tour
5
Upright Zeiss LSM 510 META confocal microscope
Axioplan 2 imaging
LSM 510 METAscan head

Carl Zeiss - Training Application and Support Center
Zeiss LSM 510 META - Guided Tour
6
Inverted Zeiss LSM 510 META confocal microscope
Axiovert 200MLSM 510 METAscan head

Carl Zeiss - Training Application and Support Center
Zeiss LSM 510 META - Guided Tour
7
• Starting the Zeiss LSM 510 microscope, software and laserSelecting an objective and focusing the microscope
• Selecting an objective and focusing the microscope
• Configuring the laser scanning and detection for confocal imageacquisition
• Acquiring a Z- and Time - Series
• Data storage
Descriptions also include the LSM 510 META
Contents

Carl Zeiss - Training Application and Support Center
Zeiss LSM 510 META - Guided Tour
8
• Starting the Zeiss LSM 510 microscope, software and laserSelecting an objective and focusing the microscope
• Selecting an objective and focusing the microscope
• Configuring the laser scanning and detection for confocal imageacquisition
• Acquiring a Z- and Time - Series
• Data storage
Descriptions also include the LSM 510 META
Contents

Carl Zeiss - Training Application and Support Center
Zeiss LSM 510 META - Guided Tour
9
1) First switch on the mercury lamp
2) Turn on the remote control switch
3) Wait for the computer to boot upand Login by simultaneouslypressing the Ctrl, Alt and Deletekeys
Start the Zeiss LSM 510 Confocal Microscope

Carl Zeiss - Training Application and Support Center
Zeiss LSM 510 META - Guided Tour
10
1) Double click theLSM 510 icon
2) Select “Scan NewImages”
3) Select “StartExpert Mode”
Starting the LSM 510 software

Carl Zeiss - Training Application and Support Center
Zeiss LSM 510 META - Guided Tour
11
1) In the main menu File select New database
Creating a database for acquired images
2) Select drive C or D: from pull down menu3) Create a new directory if needed

Carl Zeiss - Training Application and Support Center
Zeiss LSM 510 META - Guided Tour
12
1) Select Acquire Turning on the lasers
2) Select Laser
3) Switch requiredlaser/s to Standby
4) When status isReady, click On
5) Set Output [%] so thatthe tube current isbetween 5.5 and 6.5 A

Carl Zeiss - Training Application and Support Center
Zeiss LSM 510 META - Guided Tour
13
For laser scanning imageacquisition:
Set slider to “LSM”(pull slider out)
Change between direct observation and laser scanning
Upright Microscopes: Axioplan2 imaging and Axioskop 2 FS
For direct observation oftransmitted light andfluorescence:
Set slider to “VIS” (push it in)

Carl Zeiss - Training Application and Support Center
Zeiss LSM 510 META - Guided Tour
14
Toggle between Vis and LSM button in main menu, automatic switchingbetween direct observation and laser scanning (no slider)
Change between direct observation and laser scanning
Inverted Microscope: Axiovert 200 M

Carl Zeiss - Training Application and Support Center
Zeiss LSM 510 META - Guided Tour
15
• Starting the Zeiss LSM 510 microscope, software and laserSelecting an objective and focusing the microscope
• Selecting an objective and focusing the microscope
• Configuring the laser scanning and detection for confocal imageacquisition
• Acquiring a Z- and Time - Series
• Data storage
Descriptions also include the LSM 510 META
Contents

Carl Zeiss - Training Application and Support Center
Zeiss LSM 510 META - Guided Tour
16
1) Select Micro (Main menu: Acquire)(For Axioskop 2 FS these settings have tobe adjusted manually)
Selecting an objective and focusing the microscope
3) Objective lens can be selected froma pull down menu by clicking onto theObjective button
2) Microscope settings can be storedand up to 8 buttons assigned for fastretrieval and adjustment

Carl Zeiss - Training Application and Support Center
Zeiss LSM 510 META - Guided Tour
17
Focusing the microscope in fluorescence mode
Fluorescence is observed byselecting the appropriate filter setin the pull down menu of Reflector
Click onto Reflected Light to openthe shutter of the HBO lamp

Carl Zeiss - Training Application and Support Center
Zeiss LSM 510 META - Guided Tour
18
Focusing the microscope in transmitted mode
Use no reflector cube in thereflector turret, chose None
Click onto Transmitted Lightand move the slider to setthe intensity of the HALillumination

Carl Zeiss - Training Application and Support Center
Zeiss LSM 510 META - Guided Tour
19
• Starting the Zeiss LSM 510 microscope, software and laserSelecting an objective and focusing the microscope
• Selecting an objective and focusing the microscope
• Configuring the laser scanning and detection for confocal imageacquisition
• Acquiring a Z- and Time - Series
• Data storage
Descriptions also include the LSM 510 META
Contents

Carl Zeiss - Training Application and Support Center
Zeiss LSM 510 META - Guided Tour
20
Choosing the configuration
MULTI TRACK
Use for double ortriple labelling
Sequential scanning, line byline or frame by frame
When one track is active, onlyone detector and one laser isswitched on. This dramatically
reduces crosstalk.
ADVANTAGES
DISADVANTAGESSlower image acquisition
SINGLE TRACK
Use for single, double andtriple labelling
Simultaneous scanningonly
Faster imageacquisition
ADVANTAGES
DISADVANTAGESCross talk between
channels

Carl Zeiss - Training Application and Support Center
Zeiss LSM 510 META - Guided Tour
21
1) Select Config in theAcquire menu
SINGLE TRACK - lasers scan simultaneously
Configuration of the filters and storage of the track configurations
4b) The Config buttonopens the pull down menuto load/store Trackconfigurations
3) Click Excitation to selectthe laser and attenuation
4c) Transmitted light imagecan also be generated.Transmission channel isusually set to white colour.
2) Select Single Track
4a) Select theappropriate filters andactivate the Channels

Carl Zeiss - Training Application and Support Center
Zeiss LSM 510 META - Guided Tour
22
5) Chose a configuration in theTrack Configuration menu.Select Apply
If you select Store by mistake, softwarewill ask you, if you want to overwrite theconfiguration. ANSWER NO!
Each new login loads a predefined set ofcorrect configurations.
Applying a stored configuration and checking the settings
The Spectra buttonopens a window todisplay the activatedlaser lines for excitation(colored vertical lines)and channels (coloredhorizontal bars)
6) To check for correctsettings, click the Spectrabutton

Carl Zeiss - Training Application and Support Center
Zeiss LSM 510 META - Guided Tour
23
Multi Track Configuration
2) Select Config
1) Select Multi Track forsequential scanning
3) Select a stored track from thepull down menu, click on Apply
This button stores only thehighlighted single track or appliesa single track.

Carl Zeiss - Training Application and Support Center
Zeiss LSM 510 META - Guided Tour
24
Cy5-Cy3-FITC Multi TrackThree laser lines and channels activated sequentially
Excitation Detection
633 nm, usingthe METAdetector inChannel mode
543 nm
488 nm

Carl Zeiss - Training Application and Support Center
Zeiss LSM 510 META - Guided Tour
25
1) Select Scan
Setting the parameters for scanning
2) Select Mode3) Select the Frame Size as predefinednumber of pixels or enter your ownvalues (e.g 300 x 600). Use Optimal forcalculation of appropriate number ofpixels depending on N.A. and λ.
The number of pixels influences theimage resolution!

Carl Zeiss - Training Application and Support Center
Zeiss LSM 510 META - Guided Tour
26
Setting the parameters for scanning
Note: When using aAxioskop 2 FS, indicatethe Objective that is inuse in the Scan Controlwindow. This ensurescorrect calculation ofpinhole, z-stackoptimization etc.

Carl Zeiss - Training Application and Support Center
Zeiss LSM 510 META - Guided Tour
27
Adjust the scan speed - ahigher speed with averagingresults in the best signal tonoise ratio. Scan speed 8usually produces good results.Use 6 or 7 for superior images.
Adjusting the scan speed

Carl Zeiss - Training Application and Support Center
Zeiss LSM 510 META - Guided Tour
28
Select the dynamic range - 8bit will give 256 gray levels,12 Bit will give 4096 levels.Photoshop 5 will import 12and 16 Bit images.
Publication quality imagesshould be acquired using12 Bit.
12 Bit is also recommendedwhen doing quantitativemeasurements or whenimaging low fluorescenceintensities.
Choosing the Dynamic Range (8/12 Bit per pixel)

Carl Zeiss - Training Application and Support Center
Zeiss LSM 510 META - Guided Tour
29
Channel Settings - Adjusting the Pinhole
Set pinhole size to 1 Airy unit for best compromise between depth discrimination and efficiency.
Pinhole adjustment changes the “Optical slice”.
When collecting multi channel images, adjust the pinholes so that each channel has the same“Optical Slice”.
This is important for colocalization studies.
Pinhole size= 1 Airy unit

Carl Zeiss - Training Application and Support Center
Zeiss LSM 510 META - Guided Tour
30
2) Select Fast XY for continuousfast scanning - useful forfinding and changing the focus
Image Acquisition
1) Find opens new imagewindow and automatically pre-adjusts detector sensitivity
4) Stop blanks the laser beamand stops the scanning mirrors
3) Single records a single image
5) Select Cont. for continuousscanning with selected scan speed

Carl Zeiss - Training Application and Support Center
Zeiss LSM 510 META - Guided Tour
31
Minimal Pixel Size determined by Nyquist Sampling
Adjusting the field size (“XY”) to 56 µm withthe 63× lens, would produce a pixel size of0.1 µm
Field size can be adjusted by changing the objective magnification, or by optical zooming. Changingfrom 63 × to 100 × will reduce the field size, but will also reduce the amount of light available.
Brightness of image = Magnification2/NA2
Values are for scan zoom = 1.0
NA
5
10
20
40
63
100
0.15
0.3
0.5
1.3 (oil)1.4 (oil)
1.4 (oil)
1.03 µm
0.51 µm
0.31 µm
0.12 µm
0.11 µm
0.11 µm
Pixel sizeMagnification

Carl Zeiss - Training Application and Support Center
Zeiss LSM 510 META - Guided Tour
32
Optical ZoomingThe level of zoom can bechanged either by using theZoom, Rotation & Offsetcontrol in Mode menu of theScan Control, or by selectingCrop in the image menu.
The image can also berotated by selecting anddragging the bars

Carl Zeiss - Training Application and Support Center
Zeiss LSM 510 META - Guided Tour
33
Selecting gain and offset – Choosing a lookup table
1) Select Palette
2) Select Range Indicator
Red = Saturation (maximum)
Blue = Zero (minimum)

Carl Zeiss - Training Application and Support Center
Zeiss LSM 510 META - Guided Tour
34
Detector gain determines thesensitivity of the detector bysetting the maximum limit
Amplifier Offset determines theminimum intensity limit
Amplifier Gain determinessignal amplification
Scan Control – Setting Gain and Offset
Saturation at the maximum→ reduce Detector Gain
Saturation at the minimum→ increase Amplifier Offset
Gain set correctly
Offset set correctly
Gain
Offset
Amplifier Gain increases thewhole signal, and the AmplifierOffset will need to be decreased.

Carl Zeiss - Training Application and Support Center
Zeiss LSM 510 META - Guided Tour
35
Laser transmission should not be set higher than the saturation level.
• Fluorophore saturatesat 6% lasertransmission
• Photobleaching islinear
Saturation of Signal Intensity with Laser Power
2% 4% 6% 8%Argon laser 488 nm % transmission
Sign
al In
tens
ityPhotobleaching is linear!

Carl Zeiss - Training Application and Support Center
Zeiss LSM 510 META - Guided Tour
36
Adjusting the Laser Intensity
1) Set Pinhole to 1 Airy unit
2) Set Detector Gain high
3) When the image is saturated, reduceAOTF transmission in the Excitationpanel to reduce the intensity of the laserlight at the specimen
image withsaturatedpixels

Carl Zeiss - Training Application and Support Center
Zeiss LSM 510 META - Guided Tour
37
Adjusting Gain and Offset
1) Increase the Amplifier Offsetuntil all blue pixels disappear, andthen make it slightly positive.
2) Reduce the Detector Gain untilthe red pixels only just disappear.
Both Detector Gain and AmplifierOffset saturated
gain andoffset notcorrect
gain andoffsetcorrect
no blueno red

Carl Zeiss - Training Application and Support Center
Zeiss LSM 510 META - Guided Tour
38
Adjusting the Laser, Gain and Offset using a Multi Track Configuration
Each channel is selected independently byclicking on the colour button indicating thechannel i.e. Ch2-T1 (Channel 2, Track 1).The laser power and all other parametersare optimised as described in the previousslides for each selected channel.
For accurate colocalisation, adjusteach Pinhole so that each channelhas the same Optical Slice
To adjust laser, gain or offset for a single track in a multi-trackconfiguration it is possible to temporarily deactivate the othertracks in the Configuration control

Carl Zeiss - Training Application and Support Center
Zeiss LSM 510 META - Guided Tour
39
Setting up Gain and Offset - Multi Track1) Select Split XY in the Image window
2) In Palette, select Range indicator
3) Select each channel separately under Channels in the Scan controlwindow and adjust the Laser intensity, Detector Gain, and Amplifier Offsetas described previously.

Carl Zeiss - Training Application and Support Center
Zeiss LSM 510 META - Guided Tour
40
Line Averaging
2) Select Number for averaging. Themore the better for the signal to noiseratio (max 16) in this case, each line willbe scanned 4 times. But: Averagingincreases the exposure time of thesample!!
Averaging improves the image byincreasing the signal : noise ratio
Averaging can be achieved line by line,or frame by frame
1) Select Line or Frame under Mode inScan Average within the Mode panel ofthe Scan Control window

Carl Zeiss - Training Application and Support Center
Zeiss LSM 510 META - Guided Tour
41
Frame Averaging1) Select Frame
Frame averaging helps reducephotobleaching, but does not give quitesuch a smooth image. There is also alonger delay between each track whenusing “Multi Track”.
Continuous averaging has a Finish buttonwhich allows the scan currently in progress tobe completed before stopping
2) Select the Number for averaging - The more thebetter for signal to noise ratio (max 16).Continuous averaging is possible in this mode.

Carl Zeiss - Training Application and Support Center
Zeiss LSM 510 META - Guided Tour
42
Collecting an Averaged Image
1) Under Scan Average selectthe Number for the average.
In the Channels panel of theScan Control window selectSingle. An averaged image willbe collected.
Range indicator setto No Palette

Carl Zeiss - Training Application and Support Center
Zeiss LSM 510 META - Guided Tour
43
• Starting the Zeiss LSM 510 microscope, software and laserSelecting an objective and focusing the microscope
• Selecting an objective and focusing the microscope
• Configuring the laser scanning and detection for confocal imageacquisition
• Acquiring a Z- and Time - Series
• Data storage
Descriptions also include the LSM 510 META
Contents

Carl Zeiss - Training Application and Support Center
Zeiss LSM 510 META - Guided Tour
44
Scanning a Z-Series using Mark First/Last
1) Select Z Stack
2) Start scanning using Fast XY or XY cont
3) Keep your eye on the image and move thefocus to the beginning of the Z-Series, thenselect Mark First
4) Move the focus back in the opposite directionto the end of the Z-Series, then select Mark Last
5) X:Y:Z = 1:1:1 sets the Z-interval so that thevoxel has identical dimensions in X, Y, and Z.
6) Start will initiate the acquisition of the Z-Stack. The acquisition can be stopped at anytime.
NOTEFocusing can be achieved manually (preferred),or using Stage in the LSM menu if there is amotorized scanning table.
Focus
Increment

Carl Zeiss - Training Application and Support Center
Zeiss LSM 510 META - Guided Tour
45
Using Auto Z Brightness Correction
Auto Z provides an automatic gradual adjustment of DetectorGain, Amplifier Offset, Amplifier Gain, and Laser intensitysetting between the first and last optical slice of a Z Stack.
1) After defining the Z position of the first and last optical sliceactivate Auto Z.
2) Move to the First Slice and adjust the parameter for theimage acquisition in the Channels panel for each usedchannel as described in the previous slides. Then click onSet A to store the values.
3) Repeat the procedure after moving to the Last Slice. Clickon Set B to store the parameters for the last slice.
Note: Positions A and B do not have to be the first and lastslice of a stack and can also be defined simply by focussingto the appropriate positions, adjusting the parameters andpressing Set A or Set B.
4) The parameters for image acquisition will be gradually andlinearly adjusted between the first and last slice of the ZStack. Thus signal intensity and image quality is comparablethroughout the Z Stack.

Carl Zeiss - Training Application and Support Center
Zeiss LSM 510 META - Guided Tour
46
Confocal Z SectioningNumber of Sections for correct sampling
Optical thickness d depends on:• Wavelength λ• Objective lens, N.A.• Refractive index n• Pinhole diameter P
For Z-sectioning it is optimal to have:no missing information @ minimal number of sections
Slices overlap by the half of their thickness
„Nyquist-“ or Sampling- Theorem
d ~ P n λ / (N.A)2
~ 0.5 µm @ 63x1.4
The optical slicethickness is displayedin the Scan Control

Carl Zeiss - Training Application and Support Center
Zeiss LSM 510 META - Guided Tour
47
Z Stack – Number of Slices and Increment
1) Select Z slice - the windowOptical Slice will appear
For more or less sections -adjust Num Slices
2) Select Optimal interval thecomputer will calculate theoptimum number of sections
3) Select Start toacquire thecompletestack

Carl Zeiss - Training Application and Support Center
Zeiss LSM 510 META - Guided Tour
48
Z - Series using Z Sectioning
1) Select Z Stack
2) Select Z Sectioning
3) Select Line Sel
4) Select the large arrowbutton and position theXZ cut line
XZ cutline will bedisplayed as diagramwithin the XY image

Carl Zeiss - Training Application and Support Center
Zeiss LSM 510 META - Guided Tour
49
1) Decide whether to Keep Interval(number of slices will change) or KeepSlice (Interval between slices will beadjusted)
2) Select Range and position bars todecide where the Z - Series begins andends
3) Select Start for image acquisition
Z Sectioning – Setting Range
Pull redlines toset limitsfor Z-Series
Pressing Range produces an XZ image ofselected Z-range, plus 50% above and belowthe selected stack.
Draggreen lineto changefocusposition

Carl Zeiss - Training Application and Support Center
Zeiss LSM 510 META - Guided Tour
50
Viewing a Z - Series
In the image window
1) Select xy
2) Select Slice
3) Use scroll bar toview individualsections

Carl Zeiss - Training Application and Support Center
Zeiss LSM 510 META - Guided Tour
51
Viewing a Z - Series using Gallery
1) Select Gallery
2) Select Data forscale
Use Subset toextract sections

Carl Zeiss - Training Application and Support Center
Zeiss LSM 510 META - Guided Tour
52
Viewing a Z- Series using Orthogonal Sections
1) Select Ortho
2) Select mouse(Select)
3) Using the mouse,position the cut lines.
To save orthogonalsections, selectExport and save ascontents of imagewindow.

Carl Zeiss - Training Application and Support Center
Zeiss LSM 510 META - Guided Tour
53
Selecting and Saving a Region of Interest (ROI)
1) SelectOverlay anddefine shapeof ROI
2) Extractregioncreates a Z-Stack fromthe ROI
3) Save data
Carl Zeiss - Training Application and Support Center
Zeiss LSM 510 META - Guided Tour
54
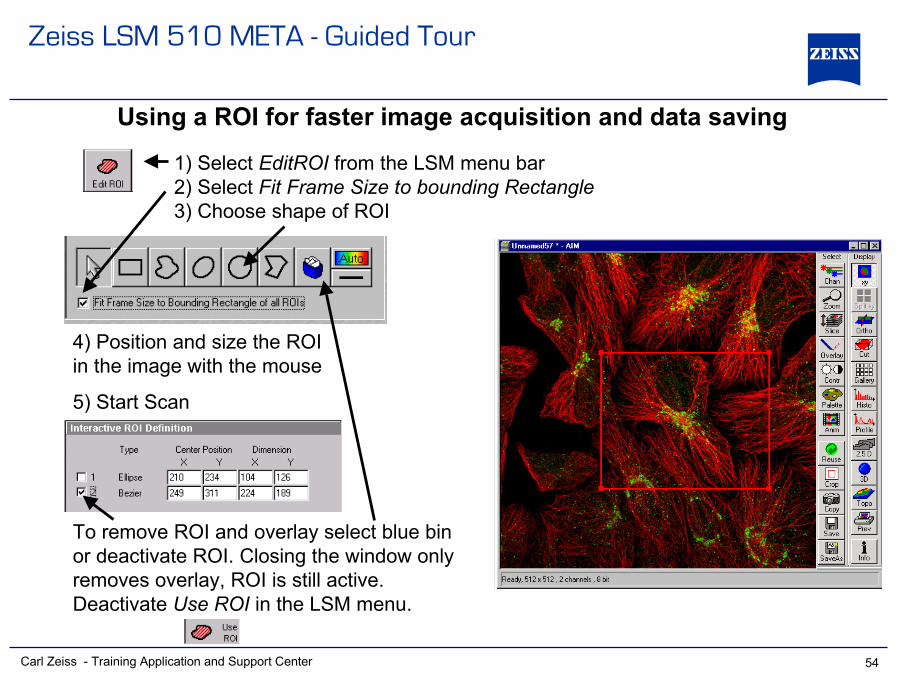
Using a ROI for faster image acquisition and data saving
1) Select EditROI from the LSM menu bar2) Select Fit Frame Size to bounding Rectangle3) Choose shape of ROI
4) Position and size the ROIin the image with the mouse
5) Start Scan
To remove ROI and overlay select blue binor deactivate ROI. Closing the window onlyremoves overlay, ROI is still active.Deactivate Use ROI in the LSM menu.

Carl Zeiss - Training Application and Support Center
Zeiss LSM 510 META - Guided Tour
55
Multiple Regions of Interest1) Un-select Fit Frame Size to bounding Rectangle, Choose shapes of ROIs
4) Position and size the ROIs with mouse
5) Start ScanTo remove ROIs and overlay select blue bin or deactivate ROIs. Closing the windowonly removes overlay, ROIs are still active. Deactivate Use ROI in the LSM menu.

Carl Zeiss - Training Application and Support Center
Zeiss LSM 510 META - Guided Tour
56
Time Series• Set up scanning parameters
for image acquisition asdescribed in previous slides
• Select TimeSeries from theLSM menu
• Enter the Number of cycles
• For a Time Delay betweenimage acquisition select min,sec or ms and set time withthe slider
• Select Start T to start imageacquisition
• Instead of using Manual youcan select Time to start andstop the series at a certainsystem time!

Carl Zeiss - Training Application and Support Center
Zeiss LSM 510 META - Guided Tour
57
Viewing a Time Series of a Z StackZ Sectionsfor any time
Time points forany Z Section
Both Z sectionsand time series

Carl Zeiss - Training Application and Support Center
Zeiss LSM 510 META - Guided Tour
58
Time Series – Physiology Experiments
1) If required, usemultiple regions ofinterest
2) Set up Time Seriesas before
3) Instead of usingStartT selectMeanROI to startscanning
View and savedata byselectingMean in theimage window

Carl Zeiss - Training Application and Support Center
Zeiss LSM 510 META - Guided Tour
59
Imaging a large area using Tile Scan
This function is onlyavailable with amotorized stage
1) Select Stage on LSMmenu
2) Enter the Tile Numbers
3) Select Start
The maximum size is4096 x4096 pixels

Carl Zeiss - Training Application and Support Center
Zeiss LSM 510 META - Guided Tour
60
Tiled ImageAny position can thenbe marked and asingle image acquiredby selecting Move toand then single

Carl Zeiss - Training Application and Support Center
Zeiss LSM 510 META - Guided Tour
61
• Starting the Zeiss LSM 510 microscope, software and laserSelecting an objective and focusing the microscope
• Selecting an objective and focusing the microscope
• Configuring the laser scanning and detection for confocal imageacquisition
• Acquiring a Z- and Time - Series
• Data storage
Descriptions also include the LSM 510 META
Contents

Carl Zeiss - Training Application and Support Center
Zeiss LSM 510 META - Guided Tour
62
Saving Data - Using Database
1) Select Save or Save as on image window or LSM menubar
2) Enter file name and notes if required
3) Select OK

Carl Zeiss - Training Application and Support Center
Zeiss LSM 510 META - Guided Tour
63
Saving Data – Using Export
1) Select File from LSM menu
2) Select Export
3) Select Image type
4) Select Single image with raw data(No overlay or Look up table etc.is saved), Series with raw data, orContents of the image window(Saves the image as shown onthe screen)
5) Select Save as type
Tif - Tagged image File” is OK for8 bit - use “Tiff -16 bit” for 12 bitacquired images(Most other software will notrecognize 12 bit)

Carl Zeiss - Training Application and Support Center
Zeiss LSM 510 META - Guided Tour
64
Shut Down Procedure
1. Go to: Acquire in the LSM menu - Laser – and deactivate HeNe Lasers byclicking Off to switch off Lasers
2. Go to File - Exit to leave LSM 510 program3. Shut down the computer4. Wait until fan of Argon laser has switched off.5. Turn off the remote control box6. Switch off the mercury vapour lamp.
Note: To turn off the Argon laser,first click on Standby, then reduceoutput power to 25%. Select Off.

Carl Zeiss - Training Application and Support Center
Zeiss LSM 510 META - Guided Tour
65
Please note:This guided tour is intended merelyas a quick introduction into theZeiss LSM 510 software and doesnot cover all aspects of the system.
Please consult the manualfor detailed instructions!

Carl Zeiss - Training Application and Support Center
Zeiss LSM 510 META - Guided Tour
66
This guided tour is based onwork done by
Peter JordanICRF
LondonUnited Kingdom
edited and complemented byEva Simbürger, Solveig Hehl and René Hessling
Carl Zeiss Jena GmbH