Guide for Configuring SNMPc and SNMPc OnLine for any … SNMPc to manage any SNMP ena… ·...
13
Advanced Guide for Configuring SNMPc to Manage Any SNMP Enabled Device SNMPc supports many devices ‘straight out of the box’. Its generic support for device classes such as Switches, Routers and Servers means that for many customers no further configuration is required. One of SNMPc’s great strengths however is its ability to manage ‘any SNMP device from any vendor’. Some of the stages listed in this guide will only be relevant to people creating private label versions of SNMPc. It is highly recommended therefore that you read through this guide in its entirety prior to configuring SNMPc. You can then decide which parts are relevant to your requirements. This guide also assumes that you have some familiarity with the basic operation of SNMPc (adding an icon to the map for example) and SNMP in general. The example device used in this guide is a Sensatronics EM1 Environmental Monitor device. It is an SNMP enabled temperature and humidity sensor that also supports a web enabled front end. Stage 1 – Compile in the manufacturers MIB The manufacturers private ‘MIB’ contains information on the variables that the device is likely to support as well as the alerts that it can generate. Typically you can download the relevant MIB’s from the manufacturers websites or online repositories such as www.mibdepot.com . There are existing SNMPc Knowledge Base articles which detail how to compile in a new MIB for SNMPc. In summary though the manufacturer MIB should be saved to the SNMPc mibfiles subdirectory. The files should have a ‘.mib’ extension and you compile in the new MIB’s via the Config MIB Database menu. The screenshot below shows the Sensatronic MIB’s successfully compiled into SNMPc.
Transcript of Guide for Configuring SNMPc and SNMPc OnLine for any … SNMPc to manage any SNMP ena… ·...

Advanced Guide for Configuring SNMPc to Manage Any SNMP Enabled Device SNMPc supports many devices ‘straight out of the box’. Its generic support for device classes such as Switches, Routers and Servers means that for many customers no further configuration is required. One of SNMPc’s great strengths however is its ability to manage ‘any SNMP device from any vendor’. Some of the stages listed in this guide will only be relevant to people creating private label versions of SNMPc. It is highly recommended therefore that you read through this guide in its entirety prior to configuring SNMPc. You can then decide which parts are relevant to your requirements. This guide also assumes that you have some familiarity with the basic operation of SNMPc (adding an icon to the map for example) and SNMP in general. The example device used in this guide is a Sensatronics EM1 Environmental Monitor device. It is an SNMP enabled temperature and humidity sensor that also supports a web enabled front end. Stage 1 – Compile in the manufacturers MIB The manufacturers private ‘MIB’ contains information on the variables that the device is likely to support as well as the alerts that it can generate. Typically you can download the relevant MIB’s from the manufacturers websites or online repositories such as www.mibdepot.com. There are existing SNMPc Knowledge Base articles which detail how to compile in a new MIB for SNMPc. In summary though the manufacturer MIB should be saved to the SNMPc mibfiles subdirectory. The files should have a ‘.mib’ extension and you compile in the new MIB’s via the Config MIB Database menu. The screenshot below shows the Sensatronic MIB’s successfully compiled into SNMPc.

Stage 2 – Configuring SNMPc to automatically use the correct icon. You should either use the SNMPc auto-discovery feature to create an icon for your device or manually add it to the map via the Insert Map Object Device… menu. Typically when you first add your icon to the map it will be displayed as a PC with ‘SNMP’ stamped on it. As a minimum this means that SNMPc recognizes the device as SNMP enabled.
If SNMPc displays a PC icon with ‘ICMP’ on it this means that SNMPc can not communicate using SNMP with the device. You should check to ensure that SNMP is enabled on the device. The SNMP community strings are configured correctly in the icon Properties Access tab and that any relevant firewalls are configured to allow SNMP to pass. In this example as the Sensatronics EM1 is an environmental unit we are going to configure SNMPc to ‘recognize’ the device and use a thermometer style icon on the map.
Thermom.ico SNMPc icons are 32x32 windows standard .ico files and should be saved in the bitmaps sub-directory. Prior to SNMPc 7.0.13 icons had to be 16 colors but in later editions this restriction was removed. SNMP devices feature a ‘System Object ID’ that is common to that type of device. i.e. every Sensatronics EM1 will respond with the same Object ID. To check the devices Object ID right click on the icon and select Tools Poll Object…
The Object ID will be displayed after the MIB name. So in the above example the Object ID for the Sensatronics unit is ‘productEM1’. If your display shows enterprises.xx.x.x.x.x then this typically means that you do not have the correct SNMP MIB’s compiled in for your device. In the mibfiles subdirectory of the SNMPc installation is a file Autoico.txt which maps the Object ID to the desired icon. The first part of the file is listed below…

Autoico.txt -- This file is used to automatically select an icon -- for a node when auto.ico is set as the node icon. -- -- To add an entry: -- 1. Select an icon from the bitmaps directory -- 2. Display the SystemInfo table and the the -- node identifier from the sysObjectID.0 variable -- 3. Make a single line entry in this file with the -- identifier in the left column and the icon name -- in the right column (seperated by spaces or tabs). -- linkBuilder10BTi-mib 3com.ico linkBuilderECS ecs.ico linkBuilderFMS* 3com.ico brouter.12.3.6.2 bridge.ico
For the Sensatronics unit we will therefore add…. productEM1 thermom.ico It is worth noting that you can use wildcards in the system Object ID field of the autoico.txt file. Therefore productEM* would match productEM1, productEMz, productEMmulti, … To force SNMPc to recheck the ObjectID (and therefore update the icon) you can either restart SNMPc, add the icon again or edit an icon attribute such as the polling interval.
Using the autoico.txt file you can also specify which program to launch when the icon is double-clicked. As this device has a web enabled front end it would be useful to launch Internet Explorer and browse to the IP address of the device. The string for doing this is ‘iexplore 0 $a’ ($a = IP address of the device). Therefore the full entry in the autoico.txt file is: productEM1 thermom.ico iexplore.exe 0 $a More information on launching applications from within SNMPc is contained in the SNMPc Knowledge Base Article; “How to change the action when an icon is double clicked”.

Stage 3 – What information is the device capable of reporting? This is one of the biggest issues with managing a new device. You typically know the metrics that you would like to monitor (in this case temperature and humidity) but which SNMP variable to use can be difficult to decipher. To discover a comprehensive list of which variables the device is capable of supporting right click on the icon and select the SNMPc Tools MIB Browser menu. Highlight the mgmt folder and select Next. You should see a display showing the sysDescr (system description) for the device:
To have the tool ‘walk’ the rest of the MIB select the MIB Repeat… menu. Accept the default options and select Ok. The MIB browser will then scan the device and list all available SNMP variables. It is worth noting that this process can generate a large number of SNMP requests which can place a load on the device. For this reason we would recommend running the MIB Walk out of hours or increasing the Delay setting to slow down the number of requests.

One of the useful features of the browser is that it can also display the complete MIB ‘path’ and description of the SNMP variable that you are interested in. Simply expand the mgmt and private folders and highlight the required variable (in this example group1TempDataInt.0)
SNMPc will then show the path to the variable/mib group. In this case the variables are stored under Private sensatronics consumerProducts productEM1 SensorInfo group1. It is useful to know the full path as it makes it easier to reference the table again when setting up Menu’s, Trend Reports or Custom Tables. Once SNMPc has completed the MIB Walk you can optionally save the variable listing by using File Export menu.

4) Stage 4 – Creating Custom Tables and Custom Expressions An abbreviated list of Private/Public variables gathered via the MIB browser is listed below: MIB II – SystemInfo Table
sysDescr.0 DisplayString RO Sensatronics EM1 sysObjectID.0 ObjectID RO 1.3.6.1.4.1.16174.1.1.3 sysUpTime.0 TimeTicks RO 71912398 sysContact.0 DisplayString RW Unknown sysName.0 DisplayString RW EM1 sysLocation.0 DisplayString RW Lab sysServices.0 Integer RO 72
Sensatronics Private MIB – group1 Table
group1Name.0 DisplayString RW Group 1 group1TempName.0 DisplayString RW Temperature group1TempDataStr.0 DisplayString RW 75.4 group1TempDataInt.0 Integer RW 75 group1HumidName.0 DisplayString RW Humidity group1HumidDataStr.0 DisplayString RW 26.4 group1HumidDataInt.0 Integer RW 26 group1WetName.0 DisplayString RW Wetness group1WetDataStr.0 DisplayString RW -999.9 group1WetDataInt.0 Integer RW -1000
Often it is useful to create custom tables which combine variables from several MIB tables so to succinctly display the desired information. In this scenario we will create a table to display the current status of the environmental monitor with the following variables:
sysName.0 (name of the device) sysLocation.0 (Location) group1TempName.0 (Sensor Description) group1TempDataInt.0 (Temperature value as integer) group1HumidName.0 (Sensor Description) group1HumidDataInt.0 (Humidity percentage as integer) group1WetName.0 (Sensor Description) group1WetDataInt.0 (Wetness Indicator as integer)
To create the new custom table select the MIB Selection Window in SNMPc and under Custom-Tables right click to ‘Insert Table…’
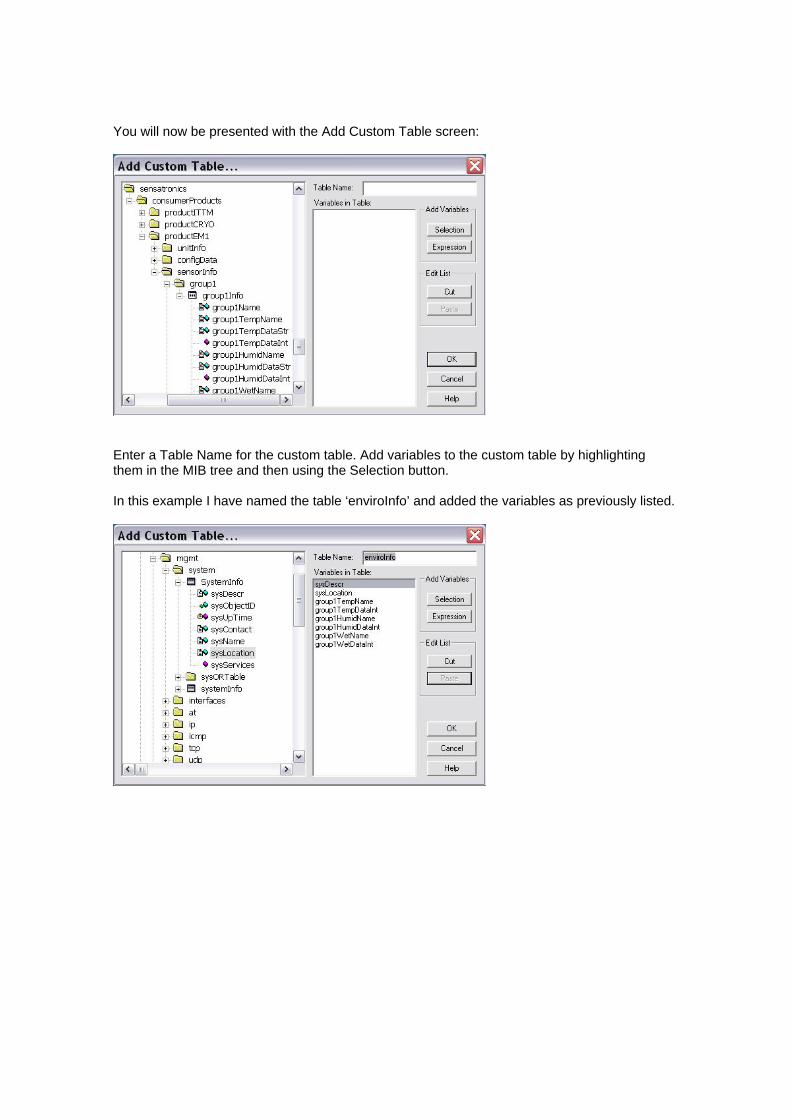
You will now be presented with the Add Custom Table screen:
Enter a Table Name for the custom table. Add variables to the custom table by highlighting them in the MIB tree and then using the Selection button. In this example I have named the table ‘enviroInfo’ and added the variables as previously listed.

You can optionally use the Expression button to create derived MIB variables. The MIB Expressions feature operates like a calculator and is useful for creating derived variables such as bandwidth utilization.
Another useful feature of the Custom Expression is that the output of the expression is always a number. Therefore you can use this to covert numeric DisplayString variables into ‘numbers’ that SNMPc is capable of charting, trending etc, It is worth noting that when creating a custom table all SNMP variable index’s must match. Therefore the example ‘enviroInfo’ custom table would be valid as all SNMP variables are .0 (i.e. system wide). You can not create a custom table though which mixed port specific variables and system wide variables. The custom table feature in SNMPc will check to ensure that selected variables are compatible and will generate an error if a problem is detected. Once you have created the table you can view it by right clicking on the Custom-Table name and selecting View table…

Stage 5 – Customizing the Menu In this example we will create a menu entry called ‘Environmental Monitor’ that will link to the previously created custom table. To create a new menu entry first select the Menu Selection Window. Then right-click on the Manage heading and select Insert Menu…..
To create the menu title set the Type field to Popup (popup = menu heading) and enter the required text in the Menu Name field:
Select OK to add the menu heading.

To add a link to the previously created custom table click on the + sign beside the new Environmental Monitor menu heading and right-click on <no children> to Insert Menu…
In the Add Custom Menu window change the Type to Table and after entering a suitable Menu Name (for example Current Status) click the >> to browse to the previously created Custom MIB Table. A simple MIB Browser (displayed below) allows you to choose the required table.
The completed menu entry should look similar to:
For reference another popular Type is RUN. This allows you to call an application, batch file or SNMP Macro via a menu heading. In the Arguments field you can pass additional parameters such as an IP Address. Appendix A of the Getting Started Guide has a full list of available parameters.

The example menu is shown in action below

Stage 6 – Adding a Trend Report to the default Trend Report Listings The Knowledge Base Article ‘How to create a Trend Report and generate alerts on thresholds’ covers the creation of trend reports in some detail. As with the previous menu entry we can use the >> option to browse to and select the custom table.
If you are creating a version of SNMPc that is to be used as an install for multiple machines though it is useful to be able to define which trend reports are included in the MIB Table pull down list. The default trend reports can be configured by editing the [Report Profiles] section of the SNMPc.ini file. This file is located in the root SNMPc installation directory (typically c:\Program Files\SNMPc Network Manager) [ReportProfiles] RPT0=OnLine Availability,CRATR-MIB|CRAvailEntry RPT1=OnLine BPS Interface,CRATR-MIB|CRIfBPSEntry RPT2=OnLine Util(%) Interface,CRATR-MIB|CRIfEntry . . . RPT15=RMON Ethernet Bytes,RMON-CRC|EtherStatsBytes RPT16=RMON Ethernet Packs,RMON-CRC|EtherStatsPacks RPT17=RMON Ethernet Pack Sizes,RMON-CRC|EtherStatsPackSizes As you can see from the above listing the format for defining the report is ‘Report Title,MIBNAME|table name’. As this is a custom table the MIBNAME is $custom. Therefore the entry for the example custom table could be: RPT18=Environmental Stats,$custom|enviroInfo

An example pull down listing is shown below:
The next level of customization would be to generate a GUI for the device using the SNMPc Bitview application. You can also access a lot of the SNMPc functionality from your own applications by utilizing the SNMPc API. More information on both these features can be found in the SDK/DOCS directory of the SNMPc installation. An example bitview is shown below.
Once you have configured SNMPc to manage your devices you can easily use the private label version of SNMPc to incorporate these changes into a ‘default build’ of SNMPc. For more information on this version please email [email protected]