Guidance for Submitting a VS 17-129 Permit Application
22
APHIS eFile Guidance for Submitting a VS 17-129 Permit Application Application for 17-135 permit to import or transit live animals, including germplasm and hatching eggs Version 1.0 September 2021
Transcript of Guidance for Submitting a VS 17-129 Permit Application

APHIS eFileGuidance for Submitting a VS 17-129 Permit ApplicationApplication for 17-135 permit to import or transit live animals, including germplasm and hatching eggs
Version 1.0September 2021

WELCOME! USDA APHIS Veterinary Services has a new online website to request Live Animal
permits. This user guide will take you through the process of creating and submitting a
17-129 Live Animals permit application.
For more APHIS eFile VS 17-129 support materials:
Check out our "How to" playlist on the APHIS YouTube Channel
Review this and other User Guides online on the APHIS eFile Training Page

3
I AM AN APPLICANT
I want to apply for a Live Animals import/transit permit
Before you apply for your Live Animal permits it is important to note that if your application results in a permit, you will see two
different numbers associated with the permit.
Permit Numbers:
1. Ref # - System Generated Permit Record Number (P-00001234)
• This number is the Record ID number that is autogenerated when a permit has been created. This is not a smart
number, and does not represent the year, permit type, or any additional information.
2. Permit # - APHIS Permit Number (6##-21-201-00015)
• This is the number on your permit and the number that VS will reference.
• The format of this number is: Program Prefix-Calendar Year-Ordinal Day-Sequential Number
• The Program Prefix indicates the type of permit.

4
TABLE OF CONTENTS
Use the VS Permitting Assistant (VSPA) to create your requestPage 5
Complete and submit your application(s)Page 11
Amend eFile PermitsPage 20
Withdraw an application (When applicable)Page 21

5
Step 1: Sign in to eFile
Navigate to https://efile.aphis.usda.gov/s/ in Google Chrome (eFile is not
supported by Internet Explorer).
• Sign in to eFile using your eAuthentication credentials.
• If you are not eAuthenticated, select Create an Account and
follow the steps to become eAuthenticated. You must be
eAuthenticated to apply in APHIS eFile.
• Under the Ready to Apply section, choose the VS 17-129 application
and then select Get Started.
• The VS 17-129: Application to import or transit live animals,
including germplasm (semen, ova, embryos, cloning tissue) and
hatching eggs.
• In the pop-up window, read the Application Process and select
Proceed to VS Permitting Assistant.
A
A
B
B
C

Complete the Permitting Assistant to begin the application process.
• Enter your commodity’s details into the appropriate search fields.
• Select the Search button to search for your material.
Note: Repeat steps A-B for all live animals you wish to import/transit. The VSPA will organize them into the appropriate applications.
6
Select the “i” icons to reveal tool tips
A
A
B
Use the “See List” hyperlinks to view lists of your options
B
Step 2: Complete the Permitting Assistant SEARCH PAGE

7
Step 2: Complete the Permitting Assistant SEARCH PAGE
• Select the Attribute Filters to refine your material search results.
Note: For best results complete ALL attribute filters from top to bottom order until there is only ONE result. Some of
the filters are selection-order dependent, meaning that your first selection may limit which filters you can select next.
A
A
Select the “i” icons to reveal tool tips
• Once you’ve completed all the attributes and only one Step 3 card remains, select Add Commodity.B
B

8
Step 2: Complete the Permitting Assistant SEARCH PAGE
To remove a commodity, select the Remove
Commodity button.
To add additional commodities, edit any of the
search fields and repeat the process.
Note: If you are moving several animals that can
be described by the same Step 3 card, you will
only add the commodity once in the VSPA and you
will be able to provide the individual animal
identification information as part of the application.
• Once you’ve added all your commodities,
proceed to your Application Summary by
selecting the Shopping Cart icon or the View
Summary button.
A
A
A

9
Step 2: Complete the Permitting Assistant SUMMARY PAGE
The materials you have added have been sorted into categories:
Permit Applications – Commodities listed in this section require
Permit applications. The materials have been sorted onto the
appropriate number of applications.
No Permit Required but Conditions Apply – Commodities
listed in this section do not require a permit application but may
have additional conditions (i.e., a required certificate).
Inadmissible – Commodities listed in this section are not
allowed for import or transit.
Select each tab to view the results in that category.

10
Step 2: Complete the Permitting Assistant SUMMARY PAGE
• To add more commodities, select Go Back
and Add More Materials.
• To delete a commodity from your summary
request, select the trashcan icon.
• When applicable, review required
documentation or download all letters by
selecting the View Letter button associated
with each material.
• To send yourself a copy of this request
summary, enter your email into the field and
select Send.
• Once you have reviewed all your results, select
Proceed to Applications to continue to submit
your application(s). If you are not already
logged in, the button will be called Proceed to
Log In and you will be prompted to log in.
A
B
C
D
DC
A
B
E
E

11
Step 3: Proceed to Application(s) from VSPA
If your Application Summary resulted in more than one application, you will see the Split Application Notice that lists each resulting
application and its associated commodities.
• If you are in more than one organization account in APHIS eFile, use the drop-down to select your Sharing Organization.
• Select I Understand & Continue to proceed to application.
• You will be sent to the My Activity page. Your most recent application(s) will be at the top of the list. To go to your application
select Go to Draft.
B
A
B
A
C
C

12
Step 4: Identify Responsible Parties Importer
Applicant Details
• Confirm that your information on the Contact Card
is correct. To have your Company name display on
the permit, edit your contact and add your
Company name in the Organization field.
• Answer the required questions to indicate whether
you will be the importer and the delivery recipient.
• If you select no to either section, you will need to add importer and/or delivery recipient contact information in additional
sections of the page.
Emergency Contact Details
• Use the Contact Cards to select your Emergency Contact(s).
• To find a contact you have previously used, enter the
contact’s name, company, or email into the search bar or use the
page arrows to manually search.
B
A
A
B
C
C

13
Step 5: Identify Shipper Shipper
Shipper Details
• Use the Contact Cards to select your Shipper.
• To find a contact you have previously used, enter the contact’s name, company, or email into the search bar or use the
page arrows to manually search.
• To create a new contact, select the Create New Contact button.
A
A

14
Step 6: Enter Transportation Information Transportation
Travel Plan Details
• Select your Mode(s) of Transport.
• Depending on your selections, you may
be required to enter additional
Incoming Airline or Vessel
information.
• Enter your Proposed Dates.
A
B
Route of Travel Details
• Use the Route of Travel tables to detail your route of travel. You must
include each stop in order, starting with Origin and ending with Final
destination. Be sure to list all stops and countries enroute.
• Use the Pencil icons to edit the existing stops.
• Use the Add Additional buttons to add new stops.
• Use the arrows to reorder your stops.
C
A
B
C
If this is a transit application, there will be an additional table called
Within the U.S.

15
Step 7: Enter Commodity Details
Commodities Details
• Enter all details about your live animals.
• Select Add Another Commodity to go back and add more live
animals to your application.
• Enter the quantity.
• Enter the Individual Animal ID.
• You may enter this in the table OR use the provided Excel
template. If you use the Excel template, make sure to select
the “I will provide...” checkbox and upload the file in the
Documentation section.
• Add any supporting documentation.
• Add any additional information.
• Use the tabs on the left to switch between each of your live
animals. You will need to complete all the above sections for each
of your animals.• If you need to go back to the VSPA and add another animal, use the Add Another Commodity button. This button is not how
you would indicate the quantity of an animal.
A A
Commodities
Select VS Permitting Assistant Selections to view additional information about your commodity

16
Step 8: Enter Quarantine Information Quarantine
Quarantine Facility Details
Note: Based on your selections in the VSPA, the Quarantine section will display when applicable. Proceed to the
Documents section if you do not see the Quarantine section.
• Use the Quarantine Facilities table to detail the facilities you will using to quarantine your commodities. The facilities
must be in the U.S. and have a physical address.
• Use the Pencil icon to edit the existing facilities and add details. The type of pre-populated facility will vary depending
on your specific application.
• Follow the prompts in the pop-up windows to enter all the details of your quarantine facility.
A
1
2
1
2

17
Step 9: Upload Documents Documents
Supporting Documentation
• Select Add New File to upload any supporting
documentation you believe would be beneficial for
your application.
• If you have no files to upload, select the “I
don’t have any files to upload” checkbox.
Additional Information
A
• Enter any additional information you believe
would be helpful in the review of your application in
the Additional Information field.
B
A
B

18
Step 10: Review, Certify, and Proceed to Payment Review and Submit
Review Application Sections
• Review your data in each of the sections.
• To edit your data, select the Edit button associated with that section. You will be taken back to that page of the application.
Confirm Information & Submit
• Once you are ready to submit your application,
read the certification statement and select the
“I certify…” checkbox.
• If you would like to add additional recipients,
other than yourself, to receive a copy of the
issued permit, select the checkbox and use the
contact cards to indicate the additional
recipients.
• Note: These contacts will not display on
the permit.
C
A
C
BB
C

19
Step 11: Pay the Processing Fee Payment
Payment
• Select your payment method and pay the application processing fee.
• You will receive a receipt of payment once VS initiates the application review process.
A
A

20
I want to amend an eFile permit
I AM AN APPLICANT
Navigate to https://efile.aphis.usda.gov/ in Google Chrome (eFile is not supported by Internet Explorer).
• Log in to eFile using your eAuthentication credentials.
• Select the My Activity tab and use the search bar or filters to find the permit you want to amend.
• Select the More Actions drop-down and choose Amend Permit.
• All issued and active permits are eligible to be amended.
A
B
B
C
C
B
Note: If approved, your amended permit will keep the same APHIS permit number (6##-20-205-1234).
21
I AM AN APPLICANT
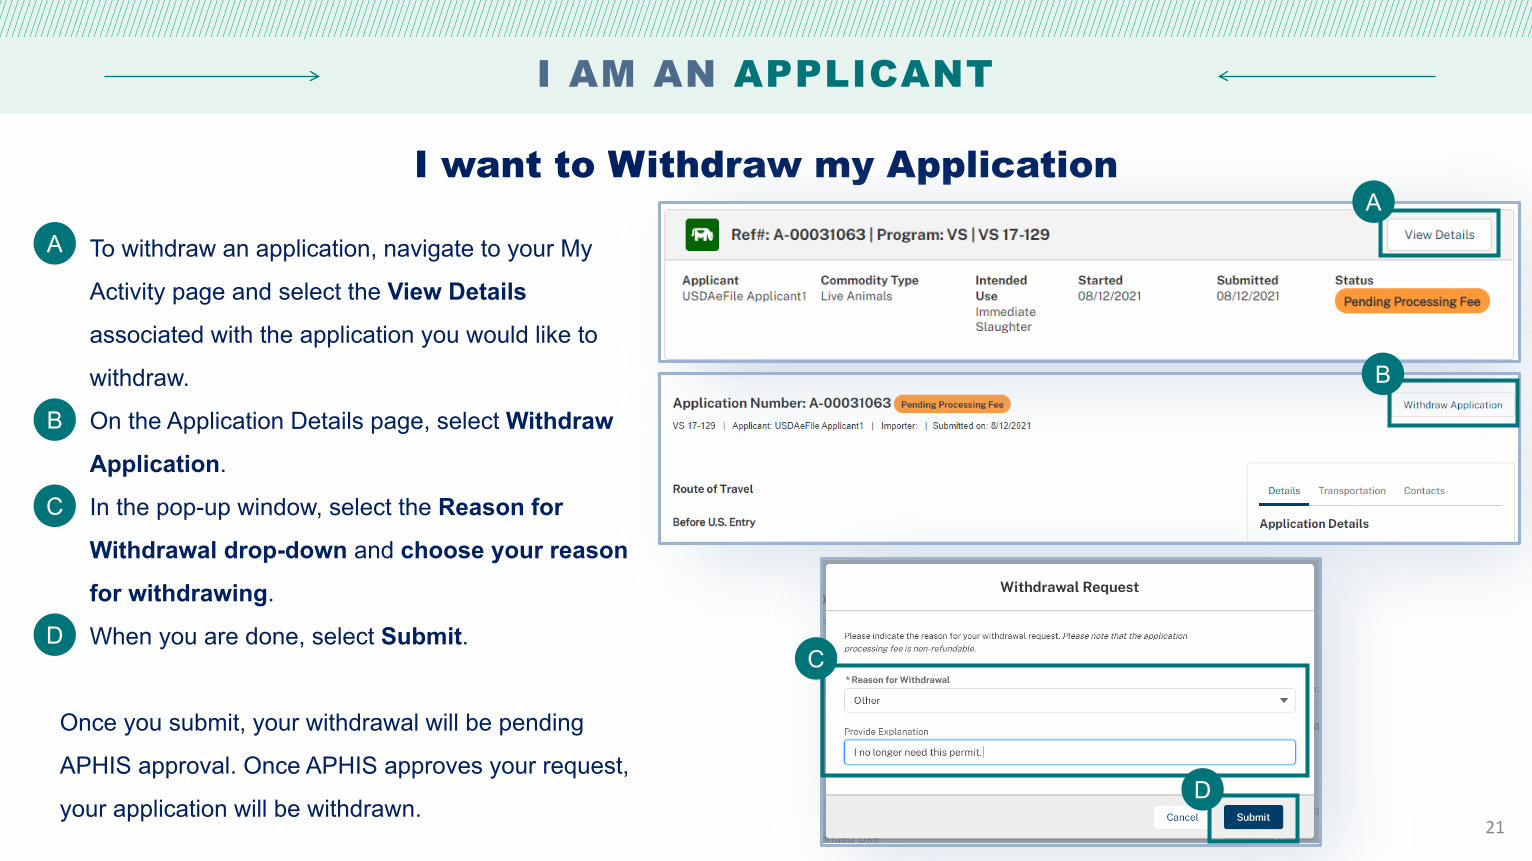
I want to Withdraw my Application
• To withdraw an application, navigate to your My
Activity page and select the View Details
associated with the application you would like to
withdraw.
• On the Application Details page, select Withdraw
Application.
• In the pop-up window, select the Reason for
Withdrawal drop-down and choose your reason
for withdrawing.
• When you are done, select Submit.
Once you submit, your withdrawal will be pending
APHIS approval. Once APHIS approves your request,
your application will be withdrawn.
A
A
B
C
D
B
C
D

22
APPENDIX
System Setup
• Compatible browser – For the best user experience, please use
Google Chrome. Other available browsers include Firefox, Safari, and
Edge. eFile is NOT supported by Internet Explorer.
• Emails – Add the APHIS eFile email at [email protected] and
[email protected] to your address book so that any automatic
emails are not sent to junk
• Zoom –100%
Contact
If you require assistance with your applications, please contact:Veterinary Services(301) 851 [email protected]
If you require technical assistance, please contact:Help [email protected]