
GSM Gateway - Operator Interfaces, Industrial I/O … 10 1.1 Purpose of this manual Thank you for...
46
USER MANUAL GSM Gateway Installation and configuration of the GSM Gateway on a FlexiSoft ® Software
-
Upload
vuongxuyen -
Category
Documents
-
view
215 -
download
0
Transcript of GSM Gateway - Operator Interfaces, Industrial I/O … 10 1.1 Purpose of this manual Thank you for...

USER MANUAL
GSM Gateway
Installation and configuration of the GSM Gateway
on a FlexiSoft® Software


REVISION HISTORY:
A manual revision code appears to the bottom of this manual and on the front cover of themanual./i
Doc. No.: UM-GWY-900-0811Ver.: 1.00D
The following table outlines the changes made to the manual during each revision.
/iRevision code Date Revised content
1.00 08/2011 First Draft
1.00A 11/2011 Sample application context revised.
1.00B 07/04/12 ASCII format for mobile number is described as well example ofcreating slave application is described. Also Registration mark isadded.
1.00C 22/02/13 GWY-901 is added.
1.00D 07/01/16 GWY-901 removed and GWY-910 added.

iv
ContentsPRECAUTIONS............................................................................................... 5
1. Intended Audience ................................................................................................ 62. Purpose and scope of this Manual ........................................................................ 63. General Precautions ............................................................................................. 64. Safety Precautions ................................................................................................ 75. Caution ................................................................................................................. 7
INTRODUCTION ............................................................................................. 91.1 Purpose of this manual ........................................................................................ 101.1.1 GSM Gateway Basics ......................................................................................... 101.1.2 Hardware Requirements ...................................................................................... 101.1.3 GWY-9xx Applications .......................................................................................... 111.2 Overview ................................................................................................................. 121.2.1 SMS Messaging .................................................................................................. 121.2.2 Configuration ....................................................................................................... 121.3 Specifications ......................................................................................................... 13
INSTALLATION AND CONNECTION..........................................................143.1 Installation Instruction ........................................................................................... 153.1.1 Panel Mounting ................................................................................................... 153.2 Removing module from the mounting module ...................................................... 173.3 Power Connection .............................................................................................. 183.4 Communication Port ........................................................................................... 183.5 USB Device ........................................................................................................ 193.6 Antenna Connection ............................................................................................ 193.7 SIM Card Installation ........................................................................................... 203.8 LED Indicators .................................................................................................... 21
SAMPLE APPLICATION ..............................................................................224.1 Creating sample application ............................................................................... 234.1.1 GWY-9xx system tag information: ...................................................................................264.1.2 GWY-9xx System Coil Tag Information: ...........................................................................264.2 Ladder Logic ...................................................................................................... 314.3 Steps to create slave application for GWY-9xx ..................................................... 33
MISCELLANEOUS .......................................................................................345.1 SMS Sending Operation ..................................................................................... 355.2 SMS Sending Operation to multiple mobile numbers: .......................................... 365.3 SMS Receiving Operation: .................................................................................. 375.4 Online Ladder Monitoring .................................................................................... 38
APPENDIX.....................................................................................................41I] Force Download Mode ....................................................................................... 42II] Appendix A: Default Settings ............................................................................... 43III] Appendix B: Communication cable ..................................................................... 45

Safety Precautions
5
PRECAUTIONS
This section provides general precautions for using the GSM gateway series units viz.: GWY-900 and GWY-910.
The information contained in this section is important for the safe and reliable application of the Unit. You mustread this section and understand the information contained before attempting to set up or operate a unit.
1. Intended Audience
2. Purpose and Scope of this Manual
3. General Precautions
4. Safety Precautions
5. Caution

Safety Precautions
6
1. Intended Audience
A Qualified Person is one that has the skills and knowledge relating to the construction,installation, operation, and maintenance of the electrical equipment and has received safetytraining on the hazards involved.Qualified Personnel shall:
• Have carefully read the entire operation manual.
• Be trained and authorized to safely energize, de-energize, ground, lockout and tag circuitsand equipment, and clear faults in accordance with established safety practices.
• Be trained in the proper care and use of protective equipment such as safety shoes, rubbergloves, hard hats, safety glasses, face shields, flash clothing, etc., in accordance withestablished safety practices.
• Be trained in rendering first aid.
2. Purpose and scope of this Manual
Thank you for purchasing the GSM gateway product from Renu Electronics Pvt. Ltd. GWY-900and GWY-910 products are configured with Microsoft Windows based software “FlexiSoft®”.This manual provides information on how to safely install, operate, and maintain your product.Read the manual completely before installing, operating, or performing maintenance on thisequipment.This manual and the accompanying drawings should be considered a permanent part of theequipment and should be readily available for reference and review.REPL reserves the right, without prior notice, to update information, make product changes, or todiscontinue any product or service identified in this publication.
3. General Precautions
The user must operate the product according to the performance specifications described in theoperational manual.
• The GSM Gateway model is a general-purpose product. It is a system component and isused in conjunction with other items of industrial equipment such as PLCs, Loop Controllers,Adjustable Speed Drives, etc.
• A detailed system analysis and job safety analysis should be performed by thesystems designer or systems integrator before including the unit in any new orexisting system. Contact REPL for options availability and for application-specific systemintegration information if required.
• Control through serial communications can fail or can also override local controls, which cancreate an unsafe condition. System safety features should be employed and designed intothe integrated system in a manner such that system operation, even in the event of systemfailure, will not cause harm or result in personnel injury or system damage. Use of the built-insystem protective features and interlocks of the equipment being controlled is highlyrecommended (i.e., emergency-off, overload protection, etc.)
• The GWY-900/GWY-910 communication module allows a user &/or system to communicateusing the Global System for Mobile communication (GSM) network. This wireless network isthe same network that supports cellular telephones, providing communication access fromvirtually anywhere.
• Changes or modifications to the GSM unit program should not be made without the approvalof the system designer or systems integrator. Minor changes or modifications could causethe defeat of safety interlocks and permissive. Any changes or modifications should benoted and included with the system documentation

Safety Precautions
7
WARNING It is extremely important that the unit and other peripherals be used for the specifiedpurpose and under the specified conditions, especially in applications that candirectly or indirectly affect human beings.
WARNING Do not use input functions as PT touch switches for applications where danger tohuman life or serious damage is possible, or for emergency switch applications.
4. Safety Precautions
Please observe the following precautions when installing the unit. Failure to comply with theserestrictions could result in loss of life, serious personal injury, or equipment damage.
WARNING Do not operate the unit in areas subject to explosion due to flammable gases, vaporsor dusts.
WARNING Do not connect the unit to an AC power source. You will cause permanent damageto the unit.
WARNING Do not attempt to use a DC power supply that does not meet unit powerrequirements. You may cause malfunction or permanent damage to unit.
WARNING Do not power the unit with a DC power supply used for inductive loads or for inputcircuitry to the programmable logic controller. Severe voltage spikes caused bythese devices may damage the unit.
5. Caution• Upon receipt of the equipment inspect the packaging and equipment for shipping damage.
• Carefully unpack the equipment and check for parts that were damaged from shipping,missing parts, or concealed damage. If any discrepancies are discovered, it should be notedwith the carrier prior to accepting the shipment, if possible. File a claim with the carrier ifnecessary and immediately notify your REPL representative.
• DO NOT install or energize equipment that has been damaged. Damaged equipment mayfail during operation resulting in further equipment damage or personal injury.
• Check to see that the model number specified on the nameplate conforms to the orderspecifications.
• Modification of this equipment is dangerous and must not be performed except by factorytrained representatives. When modifications are required contact your REPLrepresentative.
• Inspections may be required before and after moving installed equipment.
• Keep the equipment in an upright position as indicated on the shipping carton.
• Contact your REPL representative for assistance if required.
Handling and Storage:• Use proper lifting techniques when moving the product; including properly sizing up the load,
and getting assistance if required.
• Store in a well-ventilated covered location and preferably in the original carton if theequipment will not be used upon receipt.
Safety Precautions
8
• Store in a cool, clean, and dry location. Avoid storage locations with extreme temperatures,rapid temperature changes, high humidity, moisture, dust, corrosive gases, or metal particles.
• Do not store the unit in places that are exposed to outside weather conditions (i.e., wind,rain, snow, etc.).
Disposal:• Never dispose of electrical components via incineration. Contact your state environmental
agency for details on disposal of electrical components and packaging in your area.
Installation Precautions:• Location and Ambient Requirements
a) Adequate personnel working space and adequate illumination must be provided foradjustment, inspection, and maintenance of the equipment.
b) Avoid installation in areas where vibration, heat, humidity, dust, fibers, steel particles,explosive/corrosive mists or gases, or sources of electrical noise are present.
c) The installation location shall not be exposed to direct sunlight.
d) Allow proper clearance spaces for installation. Do not obstruct the ventilationopenings. Refer to the recommended minimum installation dimensions as shown onthe enclosure outline drawings.
e) The ambient operating temperature shall be between 0° and 50° C (32° and 122° F).
• Mounting Requirements
a) Only Qualified Personnel should install this equipment.
b) Install the unit in a secure upright position in a well-ventilated area.
c) A noncombustible insulating floor or mat should be provided in the area immediatelysurrounding the electrical system at the place where maintenance operations are tobe performed.
• Conductor Routing and Grounding
a) Use separate metal conduits for routing the input power, and control circuits.
b) A separate ground cable should be run inside the conduit with the input power, andcontrol circuits.
c) DO NOT connect control terminal strip return marked CC to earth ground.
d) Always ground the unit to prevent electrical shock and to help reduce electricalnoise.
The Metal Of Conduit Is Not An Acceptable Ground.

Introduction
9
INTRODUCTION
In this chapter. . . .
♦ Purpose of this manualGSM BasicsHardware Configuration
♦ Product OverviewSMS MessagingConfiguration
♦ Product Specifications

Introduction
10
1.1 Purpose of this manual
Thank you for purchasing GSM Gateway Product. The intention of this Operation Manual is to provide a guidefor Safe installation, Configuration and operation of Gateway. This manual is applicable for GSM Module(GSM-900 and GSM-910) Gateway.
Read this operation manual thoroughly before installing and operating Gateway.
This document is based on information available at the time of its publication. While efforts have been madeto be accurate, the information in this document may not cover all the details or variations in hardware orsoftware. Features described herein may not be present in all hardwares. Renu Electronics reserves the rightto update information in this publication without prior notice.
1.1.1 GSM Gateway Basics
GWY-900 / GSM-910 is a Data sharer/Protocol Converter for devices like PLCs, Inverters, and Controllers etc.GSM Gateway has a serial port, which connects to a serial device and a GSM port that connects to GSMnetwork. Gateway communicates with a device to send the information required by the other device, or to getthe information from other device using Short Message Service (SMS).Communication Ports: The unit has communication port PLC1 / COM1 that supports RS232 / RS422 / RS485levels. User can use this port to download application & firmware. Communication port COM2 is internallyconnected to GSM Module.The unit also have USB port for download, upload and online monitor.TM Configuration Software: FlexiSoft® is a compact; Windows® based software to configure the GSM gatewayunits
What is a GSM?
GSM, which stands for Global System for Mobile communications, reigns as the world’s most widely used cellphone technology. Cell phones use a cell phone service carrier’s GSM network by searching for cell phonetowers in the nearby area. GSM uses digital technology and is a second-generation (2G) cell phone system
What is a Project?
A project is an user created application in FlexiSoft® Configuration Software. A project contains informationsuch as model, Network Configuration, Task information etc.
1.1.2 Hardware Requirements
The following basic PC hardware configuration is needed to configure and operate your FlexiSoft® Configura-tion Software. Minimal PC configuration for Windows2000 / XP:
DEVICE RECOMMENDED
Processor 800MHz Pentium processor OR equivalent processor
Operating System Microsoft Windows 2000 with SP4Microsoft Windows XP Professional / Home Edition with SP2
RAM 256MB
Hard Disk Space 800MB (including 200MB for the .NET Framework Redistributive)
Display 1024 x 768 High Color 16-bit
Mouse/Keyboard Required

Introduction
11
1.1.3 GWY-9xx Applications
(I) PLC to midpoints Communication:
(ii) PLC to PLC communication
(iii) Add IO to PLC:

Introduction
12
1.2 Overview
The GWY-9xx module communicate using the Global System for Mobile Communication (GSM) network. Thiswireless network is the same network that supports cellular telephones, providing communication access fromvirtually anywhere.
Note:Not all areas have the GSM infrastructure in place. REPL is not responsible and cannot be held liable forproviding / supporting the network infrastructure. Access to this network must be authorized by a serviceprovider that supports the GSM network in the area where the GWY-9xx will be installed and where themessage(s) will be received.
A set of LEDs on the front face of the unit GSM-9xx module provide an overview of operational status.
1.2.1 SMS Messaging
The module supports the Short Message Service (SMS) protocol utilized by many cellular telephones andsome other wireless devices. SMS allows text-based messages up to 160 characters. Using SMS, theunit can send and accept messages.
1.2.2 Configuration
FlexiSoft® programming software is used to configure the module. Up to 16-digit telephone numbers can beentered in nonvolatile system register memory. These numbers are then transferred to the SIM card installedin the GWY-9xx module. The multiple telephone numbers can be configured to monitor control messages,faults and warnings, or to permit control messages to be received by the unit, via SMS messages.

Introduction
13
1.3 Specifications
Power: +24V DC 10%, 10 W max in case of Send / Receive SMS4 W in case of normal mode
LED's: 4 LED's for status indication
Communication Ports:COM1 (RJ45): RS232 / 4 wire RS485
Connects to PC for setup download or connects to PLC1 at runtime.COM2: GSM Port (Internally connected to GSM Module)
USB: For download, upload and online monitoring.(Only available with GWY-910 unit)
Operating Temperature: 0OC to +60OC
Storage Temperature: -20O to +80OC
Humidity: 10% to 90% (Non condensing)
Mounting: DIN rail or back panel mounting
Dimensions (mm): For GWY-900: 100mm(H) X 36mm(W) X 70mm(D)For GWY-910: 100mm(H) X 26mm(W) X 70mm(D)
Weight: 150 gm approx.
Certifications: CE, UL, RoHS compliant
Salient Features:
Allows data monitoring / sharing for PLCs, Inverters, Controllers and other network devices using ShortMessage Service (SMS)
Common model for connecting different devices. Several PLC and Inverters can be supported.
It has USB device port to download firmware, application and ladder to upload application and ladder and foronline ladder monitoring. (*USB device port is available with GWY-910 model).
Configurable for multiple Destination Number (SIM) through software
Connects PLC / Drive on GSM Network
Supports GSM Quad Band frequencies 850/900/1800/1900 MHz.
Installation and connection
14
INSTALLATION AND CONNECTION
In this chapter. . . .
♦ Installing module on the mounting rail
♦ Removing module from the mounting module
♦ Power Connection

Installation and connection
15
3.1 Installation Instruction
The GWY-9xx should be mounted on a din rail plate. A din rail sliders and locking connectors are provided witheach unit for proper installation.
Environmental Considerations:Make sure that the unit is installed correctly and that the operating limits are followed (see Specifications forreference). Do not operate the unit in areas subject to explosion hazards due to flammable gases, vapors ordusts. A unit should not be installed where fast temperature variations are present. Highly humid areas are alsoto be avoided. High humidity causes condensation of water in the unit.
Location Considerations:Care should be taken when locating equipment behind the GWY-9xx to ensure that AC power wiring, PLCoutput modules, contactors, starters, relays and any other source of electrical interference are located awayfrom the unit. Particular care should be taken to locate variable speed drives and switching power suppliesaway from the unit.
3.1.1 Panel Mounting
This section presents the dimensional sketches and din rail sliding for GWY-xxx models.(All dimensions are in mm and drawing are not to scale.)
For GWY-900: For GWY-910:
100mm
26mm
70m
m

Installation and connection
16
GWY-900 unit with DIN rail sliderFront View Rear View
GWY-910 unit with DIN rail sliderFront View Rear View

Installation and connection
17
Steps to mount the unit on DIN rail plate
FIG-1 FIG-2 FIG-3
FIG-1 Pull up the sliders provided with the GWY-9xx towards outward direction.
FIG-2 Rest the unit on the DIN rail plate
FIG-3 Pull down the slider again so that unit can fix up with the DIN rail plate
3.2 Removing module from the mounting module
To remove the unit from the mounting module, follow the below given steps:1. Disconnect power to the GWY-9xx unit at the power source.2. Disconnect the power supply wires from the unit.3. Pull up the sliders provided with the GWY-9xx towards outward direction.4. Remove away the unit from the mounting slider.

Installation and connection
18
3.3 Power Connection
If wiring is to be exposed to lightening or surges, use appropriate surge suppression devices. Keep AC, highenergy and rapidly switching DC wiring separate from signal wires.
Connecting high voltages or AC power mains to the DC input will make unit unusable and may create anelectrical shock hazard to personnel. Such a failure or shock could result in serious personal injury, loss of lifeand/or equipment damage. DC voltage sources should provide proper isolation from main AC power andsimilar hazards.
Pin description of the power connector for GWY-9xx model is as follows:
3.4 Communication Port
The unit has COM1 communication Port which is multi-signal port. Multi-Signal means COM1 port has RS232,RS422, and RS485 signal levels.
Different cables are required to connect the GWY-9xx unit to a specific PLC. The pin description of the com-munication port for GWY-9xx model is as given below:
DC+ DC- Earth24Vdc
1 2 3

Installation and connection
19
3.5 USB Device
1. USB Device, compliant with USB 2.0 specification, self powered device.2. Connector used: Standard USB Type B Female connector.
Pin number Name Description
1 VBUS +5V
2 D- Data -
3 D+ Data+
4 GND Circuit ground
shell shield
Note: This port is available on with GWY-910 product.
12
43
3.6 Antenna Connection
To access the GSM network, an antenna must be connected to the GWY-900 unit. Antenna will be providedwith each unit in the packing box.
Attach the antenna to the end of the module. The antenna should be mounted in a clear area where limitedinterference will occur.A good cell phone signal will likely result in a good modem signal.

Installation and connection
20
3.7 SIM Card Installation
Each GWY-9xx unit requires a SIM card.
Note: The SIM card must be obtained locally and be compatible with a local service provider’s towers. Addition-ally, the plan purchased from the service provider must include SMS messaging (texting). Not all serviceproviders utilize a GSM network for texting.
Orient the SIM card so the beveled corner is toward the middle and is inserted first. Push the card in until itclicks and stays seated. The slot is spring-loaded and will push the card out if not fully inserted in the slot. Asmall portion of the SIM card will stick out of the module when properly seated. In case of GWY-910 model,whole card will sit inside the module jack. Hence user need screw driver &/or any similar alternate object, to fitor remove card from the module.
To remove a card, push the card into the slot and then release. The spring mechanism will eject the card fromthe slot.
Note: Please do not REMOVE and / or INSERT card while unit is in Power ON condition.

Installation and connection
21
3.8 LED Indicators
LEDs on the GWY-9xx module, indicate the following:
LED LED Status Indication
OK Steady ON Gateway ON (CPU ON)OFF Gateway OFF (CPU OFF)
If other LEDs are seen ON or Blinking, then OK LED isdamaged.
COM1 Blinking slow (ON-OFF) Communication error at COM1at every 250 msSteady ON Communicating with Com 1 driver
*COM2 Blinking slow (ON-OFF) **Communication error at COM2at every 250msSteady ON Communicating with Com 2 driver
Signal Status Blnking fast Data exchange over GSM network (Transmission burst)(ON at every 575usand OFF at every4.025msOFF If other LEDs are either ON or blinking, no data exchange
over GSM network. (No transmission burst).If COM2 LED is steady ON and SMS is being sent, thensignal status LED is damaged.
*COM2: Power on the unit. COM2 LED will blink for 30 seconds. This indicates thatunit is searching for GSM network. If GSM network found, then it will be steady and ifnot it will remain blinking.
**Communication error at COM2: There are two reasons to occure this error.viz.: (i) There is no network to SIM and (ii) In-sufficient balance on SIM for SMS operation.

Application Development in Flexisoft®
22
SAMPLE APPLICATION
In this chapter. . . .
♦ Creating sample application
♦ Ladder Logic
♦ Slave application for GWY-9xx

Application Development in Flexisoft®
23
4.1 Creating sample application
There are default settings in FlexiSoft® for creating application. Please refer section Appendix - A.Also in FlexiSoft®, two sample applications are provided which clears the operation of sending SMS. Theapplication describes here is shown with GWY-900 unit. Here GWY-900 sends the data of FP5043TN-E (HMI)to user’s mobile. viz.: “FP5043TN-E.pzm” and “ModbusRTUMaster_GWY-900.pzm”Consider user wants to monitor the data of PLC placed at remote place (Consider example PLC with protocolModbus RTU Master), on his/her mobile.Below explained example clear the points as:a) GWY-900 monitors the data of PLC which is placed at remote locationb) From received SMS, Turn on Outputc) Send SMS to fixed mobile number as well as mobile number which is entered at run time from userd) Send same SMS to different mobile number
1) Open Flexisoft® Software, Make new project, Select product Gateway & model GWY-900. Refer belowImage:

Application Development in Flexisoft®
24
2) Go to COM1 from Node Configuration window, add nodes with protocol (example: Modbus Master RTU) &configuration settings on COM1. User can add multiple nodes one by one. Refer below image:

Application Development in Flexisoft®
25
3) Go to COM2 from Node Configuration window. On creation of new project of GWY-900, GSM Driver will beautomatically added here. Configuration settings are fixed for COM2. Hence only single node is supported.Refer below given image:
4) Once COM1 and COM2 are defined, you can see the default tags in taglist.Please refer the image given below, where mobile number configuration related registers are highlighted.

Application Development in Flexisoft®
26
4.1.1 GWY-9xx system tag information:
Tag Number High Byte Low Byte
SW0049 Mobile Number 2nd ASCII Digit Mobile Number 1st ASCII Digit
SW0050 Mobile Number 4th ASCII Digit Mobile Number 3rd ASCII Digit
SW0051 Mobile Number 6th ASCII Digit Mobile Number 5th ASCII Digit
SW0052 Mobile Number 8th ASCII Digit Mobile Number 7th ASCII Digit
SW0053 Mobile Number 10th ASCII Digit Mobile Number 9th ASCII Digit
SW0054 Mobile Number 12th ASCII Digit Mobile Number 11th ASCII Digit
SW0055 Mobile Number 14th ASCII Digit Mobile Number 13th ASCII Digit
SW0056 Mobile Number 16th ASCII Digit Mobile Number 15th ASCII Digit
SW0057 Mobile Number Length in decimal including ‘+’ sign & country code. **At power on, default
length will be 13 digits.
SW0058 Message Sending Progress Status. Value Details:1= Message sending is in progress2= Message sent3= Message Sending Fail4= Wrong Mobile number digit format0= Default value.User can write in this System register to clear it or it will be clear after switching to anotherscreen.
4.1.2 GWY-9xx System Coil Tag Information:
Tag NumberS00055 Network Coverage
0-SIM is not registered to network1- SIM is registered to network
S00056 Received Message Ready Flag. It will become 1 when message received. It will be clear afterone main loop cycle.
Add tags of respective node of serial driver (Modbus RTU Master), of which information you want send toremote place. Refer below given image:

Application Development in Flexisoft®
27
5) User can add tasks to update PLC tags information. Tasks supported for GWY-9xx are as follows:
Task Name SMS Screen Tasks Main loop TasksBefore While After Power Global TaskShowing Showing Hiding On TaskScreen Screen Screen
Goto Screen YES NO YES YES NOPrevious Screen YES NO YES NO NONext Screen YES NO YES NO NOSwitch Screen from Tag YES NO YES YES YESWrite value to Tag YES YES YES YES YESAdd a constant value to Tag YES YES YES YES YESSubtract a constant value form TagYES YES YES YES YESAdd Tag B to Tag A YES YES YES YES YESSubtract Tag B to Tag A YES YES YES YES YESTurn Bit On YES YES YES YES YESTurn Bit Off YES YES YES YES YESToggle Bit YES YES YES YES YESCopy Tag B to Tag A YES YES YES YES YESSwap Tag A and Tag B YES YES YES YES YESCopy HMI block to HMI/PLC block YES YES YES YES YESCopy HMI/PLC block to HMI block YES YES YES YES YESCopy Tag to LED NO NO NO NO NOWait While NO YES NO NO NODelay NO YES NO NO NOKey Specific Tasks NO NO NO NO NOUSB Data Log Upload NO NO NO NO NO
6) Go to SMS screen.
User supposed to write message/s on SMS Screens. Using Objects like Text, Numerical data display, Mes-sage data display & Bit data display, user can form maximum 160 character single message on SMS Screen.Similarly, user can add different messages on different screens for different parameters.
To send the SMS keep default option “Print once and Display Screen option” to the right, as shown below:

Application Development in Flexisoft®
28
Note: Please do not use the other two options, viz.: “Display Screen” and “Print Screen”. These opions won’tsend the message to destination mobile.
In the above shown image, a SMS is written using Text and Display Data Entry Objects. When STR (ScreenTrigger Register: SW0005) value will be same as the screen number, the screen information will be sent touser defined number.

Application Development in Flexisoft®
29
7) Enter an ASCII phone number to screen. Follow below said steps:a) Select the screen which is to be sent.b) Go to task and select “Before showing Screen” task.c) Add task for entering mobile number to which the SMS is to be sent.
d) Write mobile number is ASCII format to mobile number default tag registers.
ASCII to HEX conversion table is as below:Character Name Character Binary Hex
Pound/Number Sign # 100011 23
Asterisk * 101010 2A
Plus Sign + 101011 2B
Zero Digit 0 110000 30
One Digit 1 110001 31
Two Digit 2 110010 32
Three Digit 3 110011 33
Four Digit 4 110100 34
Five Digit 5 110101 35
Six Digit 6 110110 36
Seven Digit 7 110111 37
Eight Digit 8 111000 38
Nine Digit 9 111001 39

Application Development in Flexisoft®
30
Hence +919850898116 need to write in following way:
Tag Number High Byte (ASCII) Low Byte (ASCII) High Byte (Hex) Low Byte (Hex) Equivalent Hex
value
SW0049 9 + 39 2B 392BH
SW0050 9 1 39 31 3931H
SW0051 5 8 35 38 3538H
SW0052 8 0 38 30 3830H
SW0053 8 9 38 39 3839H
SW0054 1 1 31 31 3131H
SW0055 No need to care 6 XX 36 36H
SW0056 No need to care No need to care XX XX 0
8) For sending SMS to fixed mobile number:Add tasks in Before showing screen task are as follows for entering mobile no +919850898116 to screen 2. 1) Write 392BH value to a tag SW0049 (Mobile Number Tag1) 2) Write 3931H value to a tag SW0050 (Mobile Number Tag2) 3) Write 3538H value to a tag SW0051 (Mobile Number Tag3) 4) Write 3830H value to a tag SW0052 (Mobile Number Tag4) 5) Write 3839 H value to a tag SW0053 (Mobile Number Tag5) 6) Write 3131H value to a tag SW0054 (Mobile Number Tag6) 7) Write 36H value to a tag SW0055 (Mobile Number Tag7)
9) Add tasks in Before showing screen task are as follows for entering mobile no +917350017544 to screen 3(For Sending message to Fixed mobile Number):- 1) Write 392BH value to a tag SW0049 (Mobile Number Tag1) 2) Write 3731H value to a tag SW0050 (Mobile Number Tag2) 3) Write 3533H value to a tag SW0051 (Mobile Number Tag3) 4) Write 3030H value to a tag SW0052 (Mobile Number Tag4) 5) Write 3731H value to a tag SW0053 (Mobile Number Tag5) 6) Write 3435H value to a tag SW0054 (Mobile Number Tag6) 7) Write 34H value to a tag SW0055 (Mobile Number Tag7
10) Set “Display Screen” property to SMS screen no 1 & 4
11) At screen no.4 while showing screen task add tasks for entering mobile number at run time. Followingtasks are added:- 1) Copy tag 450200 tag to a tag SW0049 (Mobile Number Tag1) 2) Copy tag 450201 tag to a tag SW0049 (Mobile Number Tag2) 3) Copy tag 450202 tag to a tag SW0049 (Mobile Number Tag3) 4) Copy tag 450203 tag to a tag SW0049 (Mobile Number Tag4) 5) Copy tag 450204 tag to a tag SW0049 (Mobile Number Tag5) 6) Copy tag 450205 tag to a tag SW0049 (Mobile Number Tag6) 7) Copy tag 450206 tag to a tag SW0049 (Mobile Number Tag7) If needed, add following task. 8) Copy tag 450207 tag to a tag SW0049 (Mobile Number Tag8)
12) Set SMS screen no. 5 property to “Print Once & Display Screen”
i.e. One screen is assigned mobile number +919850898116 to their Before Showing screen task & one screenis assigned mobile number +917350017544 to their Before Showing screen task.

Application Development in Flexisoft®
31
Note: Mobile number can be added to Before Showing task for sending SMS to various mobile numbers byentering different mobile number to different screens. Or can be added to Global task for sending SMS to onlyone mobile number.For sending same SMS to different mobile number, same screens with different mobile numbers can bemoved to Screen trigger register.
13) Built Application, save Application, download Firmware, Application & Ladder from Flexisoft® using down-loading cable.
4.2 Ladder Logic
Above given example can be carried out through ladder logic.Write the following logic to main ladder.

Application Development in Flexisoft®
32
Here if B00000 is ON then screen 2 is moved to Screen Trigger Register i.e. Screen 2 is sent to+919850898116.Here if B00010 is ON then screen 3 is moved to Screen Trigger Register i.e. Screen 3 is sent to+917350017544.
SW0058 is Message Sending Progress Status tag.If SW0058 = 2 then message sending should be in progress, Bit B00006 is getting ON.If SW0058 = 3 then message should be sent, Bit B00007 is getting ON.If SW0058 = 4 then mobile number should be wrong format, Bit B00008 is getting ON.
If any of B00006, B00007 or B00008 is getting ON while above conditions, then screen 1 with Display Onceproperty is moved to Screen Trigger Register.If bit B00012 will get ON then Screen 4 is moved to Screen Trigger Register .Screen no. 4 has tasks whichcopies mobile entered at run time copied to default mobile number tags.When bit B00013 will get ON then screen 5 will send to mobile number which is copied from screen number 4.
At Global Task of GWY-9xx application,Following tasks are added:-At power on Task:-1) Go to screen 1. i.e. at power on GWY-9xx go to screen1At Global Task:
a) Copy tag 30001 tag of Modbus master to B00000 for sending SMS 1b) Copy tag 30002 tag of Modbus master to B00000 for sending SMS 2c) Copy tag Network Coverage tag (S00055) to 30005 coil tagd) Copy Message Sending Progress Status SW0058 Tag to 400015 Holding Register tag.e) Copy tag Received Message Ready Flag tag (S00056) to 30015 coil tagf) Copy HMI block to HMI/PLC block -> Copy HMI block where Received message is to be stored (from D04015) is copied to PLC block (From 450050)g) Copy PLC tag (30050) tag to B00012 tag from which screen number 4 is moved to Screen Trigger Registerh) Copy PLC tag (30051) tag to B00013 tag from which screen number 5 is moved to Screen TriggerRegister. This screen has “Print once & Display screen” property. So screen number 5 will send tomobile number which is entered from screen number 4.

Application Development in Flexisoft®
33
4.3 Steps to create slave application for GWY-9xx
Refer application “FP5043TN-E_GWY-900.pzm”.1) Create new project for FP5043TN-E
2) Add node of Modbus RTU (Unit as a Slave) with same setting as a Modbus RTU (Unit as a Master).
3) At Screen no.1, SMS sending logic, define data entry (Pressure, Temperature, volume tags which aremapped) which is to be sent to the SMS.
4) Take Advanced Bit Button buttons for sending SMS, Add task of Turn bit ON B00000, B00001 at Press Task& Turn bit Off at Released task. If this button is pressed, SMS has to be sent.
5) Define Message Sending Progress Status (T00012) & Network Coverage (B00004) at screen.
6) At Screen no. 2, mobile number to which SMS is to be sent, user should enter at run time. User can add mobile number in ASCII format or in HEX format
7) Define advanced bit button with Add task of Turn bit ON B00049 at Press Task & Turn bit Off B00049 atReleased task. After pressing it, mobile number entered is copied to GWY default mobile number tags.
8) Define advanced bit button with Add task of Turn bit ON B00050 at Press Task & Turn bit Off B00050 atReleased task. After pressing it, Screen number 5 will send to mobile number which is entered at run time..
9) Add another screen for Receiving SMS Operation
10) Define Received message (D000049) in ASCII format.
11) Define Received Message Sending Status (B00014) & Network Coverage (B00004) at screen
12) Write logic for ON of output by received message data at main ladderReceived message tag (D00049) is converted from ASCII to HEX format (D00100). 1234 value is written atD00105 & 4321 value is written to register D00106 to their while showing screen task.Hex value which is received by SMS is compared to value (e.g. 1234 and 4321).If received SMS has value 1234 then only output B00002 gets ON.If received SMS has value 4321 then only output B00003 gets ON.If received SMS has other than 1234 or 4321 value, then output B00002 or B00003 doesn’t get ON.

Miscellaneous
34
MISCELLANEOUS
In this chapter. . . .
♦ SMS Sending Operation
♦ SMS Receiving Operation
♦ Online Ladder Monitoring

Miscellaneous
35
5.1 SMS Sending Operation
To send SMS, follow below given steps.1) Write mobile number in ASCII digit format into Mobile number tags (SW0049 to SW0056). Mobile numbershould conatain ‘+’ sign at start, with country code & actual mobile number. User can write fix destinationmobile number digits into it or can update these Mobile number tags (SW0049 to SW0056) using external PLCtags.
e.g. +919850898116 need to write in following way:
Tag Number High Byte (ASCII) Low Byte (ASCII)SW0049 9 +SW0050 9 1SW0051 5 8SW0052 8 0SW0053 8 9SW0054 1 1SW0055 No need to care 6SW0056 No need to care No need to care
2) Write Mobile Number Length into SW0057 as per digits written into Mobile number tags (SW0049 toSW0056).E.g. for +919850898116, Mobile Number Length into SW0057 is 13.
3) SMS sending event is based on SMS screen switching. When user will write SMS Screen number intoScreen Trigger Register (SW0005), data on particular screen will be sent to destination using mobile numberwritten in Mobile number tags (SW0049 to SW0056) & Mobile Number Length into SW0057.User can switch to particular SMS Screen number using Tasks, Ladder Logic or using external PLC tag.Screen information SMS sending event purely based on Screen switching logic. Based on screen switchinglogic user can send different SMS Screens to multiple mobile numbers.After writing SMS Screen number into Screen Trigger Register (SW0005), acknowledgement of sent messagewill be written into tag Message Sending Progress Status (SW0058).
User needs to take care that Mobile number tags (SW0049 to SW0056) should be in ASCII format & MobileNumber Length should be properly mentioned into SW0057. It should be equivalent to count of Mobile numbertag digits. ‘+’ sign is necessary at start. Otherwise 4 (Wrong Mobile number digit format) will be written into tagMessage Sending Progress Status (SW0058).

Miscellaneous
36
5.2 SMS Sending Operation to multiple mobile numbers:
To send a SMS to multiple mobile number, user needs to add one SMS Screen with Display Screen option atright as shown here:
To send SMS user needs to follow below steps.a) Write mobile number in ASCII digits into Mobile number tags (SW0049 to SW0056).b) Write mobile number length into SW0057 as per digits written into Mobile number tags (SW0049 toSW0056).c) Write SMS Screen number into Screen Trigger Register (SW0005). The screen Print property of this screenshould be “Print once and Display” as shown here.
d) Wait for value 2 (Message Sent) in Message Sending Progress Status (SW0058).e) Build an application in such a way that after sending message, the screen should be switched over to thescreen with Display Screen. This will prevent to send any message.e) Write new mobile number ASCII digits into Mobile number tags (SW0049 to SW0056) & follow same stepsexplain above.
Thus user can send a SMS to multiple mobile numbers.

Miscellaneous
37
5.3 SMS Receiving Operation:
Tag memory is given to Store received SMS from external GSM device. User can copy it, can take action on it.Received Message information will be written in following Data Register Tags.S00056 (Coil) - Received Message Ready Flag. It will become 1 when message received. It will be clear afterone main loop cycle.
D04005:-Received Mobile number length
D04006 to D04013:- Sender’s Mobile number digits in ASCII.E.g. SMS received from mobile number +919850898116, will be strored in following tags as follow, Tag Number High Byte (ASCII) Low Byte (ASCII)D04006 9 +D04007 9 1D04008 5 8D04009 8 0D04010 8 9D04011 1 1D04012 No need to care 6D04013 No need to care No need to care
D04014:-Received Message length.D04015 to D04095:- Actual Received Message in ASCII.E.g. if received message is ‘Level Low’, it will be written as follow:
Tag Number High Byte (ASCII) Low Byte (ASCII)D04015 e LD04016 e vD04017 lD04018 o LD04019 No need to care wD04020 No need to care No need to careD04021 No need to care No need to careUp to D04095 No need to care No need to care

Miscellaneous
38
5.4 Online Ladder Monitoring
On line ladder monitoring is used to monitor ladder logic blocks running in device. It can also be used as adebug tool for debugging the ladder logic diagram. This functionality is available only with GWY-910 model.Flexisoft software operates in three modes:
(i) Offline Mode(ii) Online mode(iii) Online edit mode
(i) Offline mode: This is default mode of Flexosoft software. User can create ladder diagram in offline mode. In this mode, nocommunication exists between device and PC software.
(ii) Online mode: In this mode user can view and monitor ladder blocks running in device. User can monitor / modify operandvalues. Double clicking on instruction opens window to modify operand values. In this mode communicationexists between device and PC software. There are two ways user can monitor ladder: a) Monitor with upload: Go online with uploading project from device. Select "With Upload" option from menu.Mode -> Online -> With UploadIn this mode, PC software uploads logic blocks running in device and start monitoring.

Miscellaneous
39
b) Monitor without upload: Go online with offline project. Select "Without Upload" option from Mode menu.Mode -> Online -> Without Upload.In this mode, PC software starts monitoring Logic blocks from current active project. Project must have logicblocks defined in order to start monitoring.
(iii) Online edit mode: User can edit the ladder in online mode. In this mode, communication exists between device and software inthe background. This mode is applicable for on line with upload only. User can go online and modify ladder.Edit options must be selected in order to activate ladder block editing. Modified ladder must be downloaded todevice before start monitoring for modified ladder.
Online ladder and data monitor are supported through USB and Serial port. Communication media is decidedby user through global settingsTools -> Preferences -> Online Communication
User can select either USB or Serial as shown in below:
Miscellaneous
40
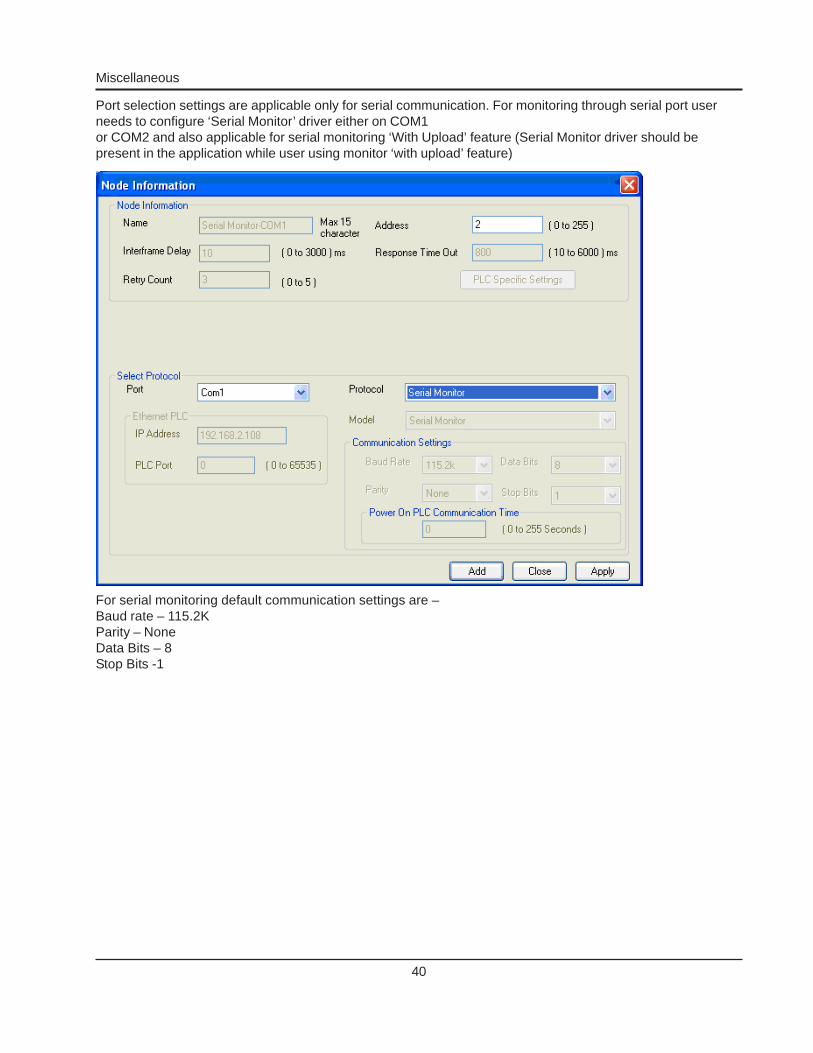
Port selection settings are applicable only for serial communication. For monitoring through serial port userneeds to configure ‘Serial Monitor’ driver either on COM1or COM2 and also applicable for serial monitoring ‘With Upload’ feature (Serial Monitor driver should bepresent in the application while user using monitor ‘with upload’ feature)
For serial monitoring default communication settings are –Baud rate – 115.2KParity – NoneData Bits – 8Stop Bits -1

Miscellaneous
41
APPENDIX
In this chapter. . . .
♦ Force Download Mode
♦ Default Settings
♦ Communication Cable

Miscellaneous
42
I] Force Download Mode
In case the GWY-9xx is not responding for the firmware download command and when it does not allow thefurther download in the unit, unit can be driven in the Force download mode. Follow the following step to enterthe force download mode.1. Power off the unit2. Remove all communication cables.3. Short the pin 2 and 8 of Com1 (RJ45). (Prepare the special RJ cable for this).4. Power on the unit.5. Wait for 10 Seconds.6. Unit enters the Force download mode.7. Remove the short of pin 2 and 8 of com1 RJ45 keeping unit turn ON as it is.8. Download the firmware first, using Com1 RS232 downloading cable.
Note: User need to use this force download mode for following drivers on COM1:1. Modbus RTU (Unit as Slave)2. Universal Serial Driver (ASCII)

Miscellaneous
43
II] Appendix A: Default Settings
While creating application for GWY-9xx in FlexiSoft®, keep the deafult settings as given below:Default “Upload from device” Properties if user selects port “Serial”:
Mode: Serial
Project: Application + Ladder
Device settings: Unit in HALT ModeUnit in RUN Mode
Default “Download to device” Properties if user selects port “Serial”:
Mode: Serial
Download Options: Firmware
Project: ApplicationLadder

Miscellaneous
44
While creating application for GWY-9xx in FlexiSoft®, keep the deafult settings as given below:Default “Upload from device” Properties if user selects port “USB”:
Mode: USB
Project: Application + Ladder
Device settings: Unit in HALT ModeUnit in RUN Mode
Default “Download to device” Properties if user selects port “Serial”:
Mode: USB
Download Options: Firmware
Project: ApplicationLadder

Miscellaneous
45
III] Appendix B: Communication cable
Programming cable for GWY-9xx unit (IBM-H-005-00):
FlexiLogics® SIDEPC SIDE
2 mtr.
9 6
5 1
PC
En
d
Pin 1(Leftside)
Pin 8(Right side)
FRONT VIEWR.H.S. VIEW
8 PIN MODULAR CONNECTORPINOUTS
DB9 FEMALE PINOUTS
Pin# Signals
1 TXD 2 RXD 3 SG & Shield 4 5 6 7 8 9
Signals Pin#
1 RXD 2 TXD 3
4 SG & Shield 5
6 7 8 9

Please contact factory for more information
Specifications subject to change without prior notice.
FACTORY:Gat No. 1163, Village - Ghotawade,Tal - Mulshi, Pune 412115, India.Tel: +91 20 6687 2900Website: www.renuelectronics.com
An ISO 9001 : 2008 and ISO 14001 : 2004 certified company
HEAD OFFICE:Survey No. 2/6, Baner Road, Pune - 411045, India.Tel : +91 20 2729 2840 Fax : +91 20 2729 2839Email : [email protected]: www.renuelectronics.com


