GSG MP40P - American Tactical Imports MP40_9x19_America.… · The GSG-MP40P firearm in calibre...
20
GSG MP40P Handling & Safety Manual USA 3 4 5 6 7 8 1 2 3 4 5 6 7 8 9 7 6 5 4 3 2 1 6 7 3 4 5
Transcript of GSG MP40P - American Tactical Imports MP40_9x19_America.… · The GSG-MP40P firearm in calibre...
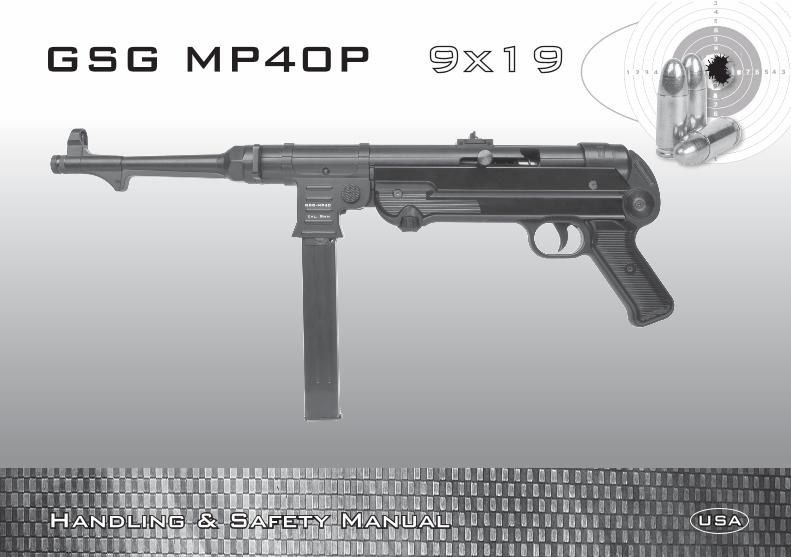
GSG MP40P
Handling & Safety Manual USA
345678
1 2 3 4 5 6 7 8 9
7654321
67 3 4 5

02

03
User Manual GSG MP40P
a) Product Description
b) Scope of Supply
c) Safety Instructions
d) Warranty
e) Safety Mechanism
f) Loading the Magazine
g) Loading the Firearm
h) Firing
i) Unloading the Firearm
j) Disassembly
k) Cleaning
l) Reassembly
m) Maintenance / Repair
n) Sight Adjustment
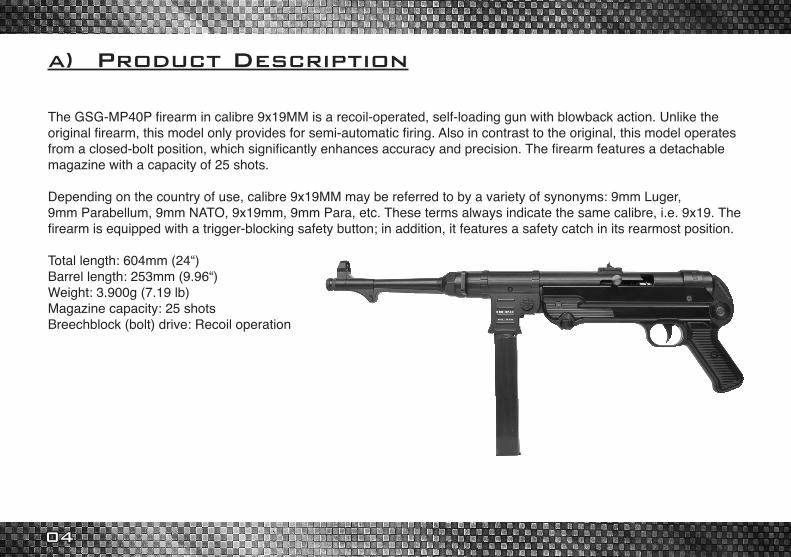
a) Product Description
The GSG-MP40P firearm in calibre 9x19MM is a recoil-operated, self-loading gun with blowback action. Unlike the original firearm, this model only provides for semi-automatic firing. Also in contrast to the original, this model operates from a closed-bolt position, which significantly enhances accuracy and precision. The firearm features a detachable magazine with a capacity of 25 shots.
Depending on the country of use, calibre 9x19MM may be referred to by a variety of synonyms: 9mm Luger, 9mm Parabellum, 9mm NATO, 9x19mm, 9mm Para, etc. These terms always indicate the same calibre, i.e. 9x19. The firearm is equipped with a trigger-blocking safety button; in addition, it features a safety catch in its rearmost position.
Total length: 604mm (24“)Barrel length: 253mm (9.96“)Weight: 3.900g (7.19 lb)Magazine capacity: 25 shots Breechblock (bolt) drive: Recoil operation
04

05
GSG MP40P
Bedienungs- und Sicherheitshinweise D
345678
1 2 3 4 5 6 7 8 9
7654321
67 2 3 4 5
b) Scope of Supply
1 Magazine1 User Manual1 Loading Aid1 Muzzle Nut Wrench4 Replacement Front Sights
Please check the kit for completeness upon purchase.
06
c) Safety Instructions
Always treat the gun as loaded. Always keep the gun pointed in a safe direction. Always keep your finger straight and off the trigger until you are ready to shoot. Always keep the gun unloaded until you are ready to use it. Never point the gun at anything you don't intend to destroy. Be sure of your target and what is beyond it. Learn the mechanical and handling characteristics of the gun you are using. Always use proper Ammunition. Be sure the barrel is clear of obstructions before loading and shooting. If your gun fails to fire when the trigger is pulled, hold your shooting position for several seconds; then with the muzzlepointed in a safe direction, carefully unload the gun. Don't rely on the gun's safety to keep it from firing. Be aware of your surroundings when handling guns so you don't trip or lose your balance and accidentally point and/or fire the gun at anyone or anything
d) Warranty
American Tactical’s LIMITED LIFETIME WARRANTY is in effect for any GSG firearms purchased in the United States and registered for warranty beginning January 1, 2015. This warranty extends to any and all parts of the firearm as originally sold by American Tactical, but does not extend to firearms altered after their original purchase, firearms damaged through abuse, misuse or lack of proper care and maintenance or firearms used other than for their legal intended purposes.
For more information on American Tactical’s Limited Lifetime Warranty and to register your warranty, please visit www.americantactical.us/warranty. You can also contact American Tactical at 1-800-290-0065, then press 3 when prompted by the message menu, to register by phone with our customer service department.

07
„F“ „S“
c) Safety Instructions
Always treat the gun as loaded. Always keep the gun pointed in a safe direction. Always keep your finger straight and off the trigger until you are ready to shoot. Always keep the gun unloaded until you are ready to use it. Never point the gun at anything you don't intend to destroy. Be sure of your target and what is beyond it. Learn the mechanical and handling characteristics of the gun you are using. Always use proper Ammunition. Be sure the barrel is clear of obstructions before loading and shooting. If your gun fails to fire when the trigger is pulled, hold your shooting position for several seconds; then with the muzzlepointed in a safe direction, carefully unload the gun. Don't rely on the gun's safety to keep it from firing. Be aware of your surroundings when handling guns so you don't trip or lose your balance and accidentally point and/or fire the gun at anyone or anything
e) Safety Mechanism
The firearm is equipped with a rotatable safety button that is located on the receiver bottom behind the magazine port. The safety button is marked with an arrow. When the button is turned so that the arrow points in the direction of the barrel (i.e. along the longitudinal axis of the firearm), the gun is now in safety-off condition. When the button is turned by 90° to the left or right so that the arrow is located at a right angle to the longitudinal axis of the firearm, the gun is in safety-on condition. With each 90° turn of the button, the safety condition of the firearm is shifted to on or off, respectively. The breech (bolt) is also equipped with a safety catch in which it can be manually arrested. In this way, closing of the breech (bolt) and release of the striker are mechanically blocked.

08
1 2 3 4 5 6 7 8
f) Loading the Magazine
The magazine can be conveniently loaded by means of the loading aid included in the kit. The procedure is as follows:
1) Place the magazine on a hard, solid surface, e.g. on a table.2) Position the loading aid in such a way that you can insert a cartridge into the magazine lips from the front.3) Press the loading aid down to the stop.4) Place the cartridge bottom on the magazine follower and push the cartridge (round) rearward to under the magazine lips until the cartridge bottom hits the “nose” of the loading aid.5) Release the loading aid and lift it slightly.6) Push the cartridge approx. 6 mm further in towards the rearward magazine wall. 7) Press the loading aid down to the stop.8) Proceed likewise with the next cartridge by placing it on the cartridge already located in the magazine; push rearward until the cartridge bottom hits the “nose” of the loading aid.9) Repeat the steps from 5) onward until the 25-rounds magazine (26 rounds cannot be loaded) is full.

09
„F“
g) Loading the Firearm
Before loading a firearm, a variety of precautions must be taken to ensure the safety of both the shooter and his/her environment. Therefore, all loading operations must be consistently performed in such a way that the barrel/muzzle always points in a safe direction (e.g. that it is directed at a backstop) and that it will never cross other persons or objects.The firearm can be prepared for firing in a variety of ways:
Variant A (with closed breech/bolt & firearm in safe condition): - Open the breech (bolt) by pulling the locking lever towards the rear end position. - Swivel the bolt handle until it comes to rest in the catch on the frame, then release your hand from the handle. The breech (bolt) is now locked in place in its rearmost position (safety catch). - Insert the loaded magazine into the magazine port until it locks in place (you will hear a click).- Check the correct position of the magazine by performing a short pulling operation – the magazine should remain firmly seated in the firearm.- Use the bolt handle to pull the breech (bolt) back into its rear end position, then release your hand from the handle: The bolt catch is deactivated, and the spring will push the bolt forward; the bolt will then slide the cartridge into the cartridge chamber so that the firearm is in loaded condition.- Put the firearm in safety-off mode by moving the safety button into the “Fire” position – the gun is now ready for firing!

10
g) Loading the Firearm
Variant B (with closed breech/bolt & firearm in safe condition):
- Insert the loaded magazine into the magazine port until it locks in place (you will hear a click).- Check the correct position of the magazine by performing a short pulling operation – the magazine should remain firmly seated in the firearm.- Use the bolt handle to pull the breech (bolt) back into its rear end position, then release your hand from the handle: The spring will push the bolt forward, and the bolt will slide the cartridge into the cartridge chamber so that the firearm is in loaded condition.- Put the firearm in safety-off mode by moving the safety button into the “Fire” position – the gun is now ready for firing!

11
g) Loading the Firearm
Variant C (the breech/bolt is open after the last shot, or the breech/bolt was retracted while an empty magazine was located in the firearm):
- Put the firearm in safety-on mode.- Remove the empty magazine and reload it, or replace the empty magazine with a loaded one. - Insert the loaded magazine into the magazine port until it locks in place (you will hear a click).- Check the correct position of the magazine by performing a short pulling operation – the magazine should remain firmly seated in the firearm.- Use the bolt handle to pull the breech (bolt) back into its rear end position, then release your hand from the handle: The spring will push the bolt forward, and the bolt will slide the cartridge into the cartridge chamber so that the firearm is in loaded condition.- Put the firearm in safety-off mode by moving the safety button into the “Fire” position – the gun is now ready for firing!
12
h) Firing
Please make sure that you are familiar with the terrain in front of and behind the target [ surrounding the target]!Remember to provide for a backstop! Please be aware at all times that you are personally responsible and liable for each shot you fire! Never put your finger on the trigger unless you are really ready to shoot. Loaded and safety-off firearms always pose a danger to life and health. Never leave a loaded firearm unattended, and do not hand it to another person. Also, never use the firearm while you are under the influence of alcohol or drugs. Always wear eye and ear protection when shooting. Load the magazine and the firearm as described above. Take aim at your target with the front sight and rear sight in proper alignment. Release the safety and fire the required number of shots. Then immediately after shooting, activate the safety mechanism and unload the firearm!

13
i) Unloading the Firearm
Before unloading a firearm, a variety of precautions must be taken to ensure the safety of both the shooter and his/her environment. Therefore, all loading and unloading operations must be consistently performed in such a way that the barrel/muzzle always points in a safe direction (e.g. that it is directed at a backstop) and that it will never cross or sweep at, past or over other persons or objects.
To unload the firearm after shooting, release the finger from the trigger and the trigger guard, then put the firearm in a safe condition. In the next step, remove the magazine by pressing the magazine release button. Since the GSG MP40P firearm is a self-loading model, a cartridge will already be present in the cartridge chamber before each shot. By pulling back the breech (bolt) and locking it in its rearmost position (safety catch), the cartridge will be ejected. Always perform a visual check on the cartridge chamber to ensure that no cartridge is present in it.
Any further cartridges that may be present in the magazine must also be removed by means of the loading aid. The rear of the loading aid is designed with a semicircular bar whose flat front surface can be passed through the magazine lips from the rear so that it will strip the respective top cartridge from the magazine.
14
j) Disassembly
For maintenance and cleaning purposes, the GSG MP40P firearm can be easily dismantled into its main parts. Please ask your specialist supplier to demonstrate the procedure to you.
Before dismantling the firearm, please always perform the following safety operations to make sure that the firearm is not loaded:- Activate the safety mechanism.- Remove the magazine and unload it (if applicable).- Pull back the bolt handle and swivel it toward the safety catch until the handle engages with the catch.- Check the cartridge chamber and make sure that it is empty.
The take-down pin can now be pressed out on one side of the firearm with a suitable 4 mm diameter tool. Please be sure to keep this pin in a safe place for subsequent reassembly! Once the pin has been removed so that it no longer performs its connecting function, the frame and the receiver can be separated from each other. To do so, remove the frame from the receiver by pulling it forward in firing direction. The receiver should not be dismantled any further whereas the frame with the barrel and breech (bolt) can be further disassembled. To do so, release the breech (bolt) from the safety catch and move it back to the front position. Then slightly push in the spring guide bushing (located in the rear portion of the frame) against the pressure of the spring. This will cause the retaining pin to fall out from the foot of the frame. You can now slowly pull out the bushing rearward from the frame along with the recoil spring. To remove the breech (bolt) from the frame, take out the bolt handle from the frame by applying a sharp jerk to the side. The bolt can now also be removed from the frame for cleaning. After this step, please do not dismantle the frame any further.

15
k) Cleaning
If you want to clean the firearm, please first dismantle it (cf. section j) of this User Manual). Use a lint-free cloth and a little oil to remove shot residues from the bolt. Stubborn deposits built up underneath the extractor can best be removed with a toothpick or a nylon brush. The firing pin hole should be never be oiled because the oil might “resinify”, thus promoting malfunctions such as firing failure.Clean the bore carefully using a little oil and a brush, then pass a dry patch/cloth/rod through the barrel after cleaning. Presence of too much oil can cause irreparable damage to the barrel during firing.

16
l) Reassembly
Reassembly is performed in the reverse order of the dismantling procedure (cf. Section j) of this User Manual).After reassembling the firearm, please be sure to perform a functional check on the firearm.
m) Maintenance/Repair
Regular maintenance and any repair work that may be needed should be performed by a certified dealer or gunsmith. The warranty will be forfeited if unauthorised persons interfere or tamper with the structural design of the firearm or if they modify the firearm in any way.

17
n) Sight Adjustment
To ensure proper “zeroing in” of the firearm, GSG GmbH supplies four extra front sights of different heights in additi-on to the front sight already installed on the firearm. These front sights are laterally marked. One point: smallest front sight; five points: largest front sight. By exchanging the front sight, you can vertically adjust the position of the sight picture in relation to the point of impact/target. If the shots are too high, a higher front sight must be installed – and vice versa.
If you wish to exchange the front sight, unscrew the muzzle nut by using the wrench included in the kit. The nut is secured in place with a spring-loaded pin. Pushing the pin in completely will cause the nut to be released so that it can be unscrewed and removed from the barrel. You can now also remove the front sight protective cover forward from the barrel. This again will release the front sight so that you can remove it laterally from its dovetail guide. A different front sight can be inserted in the same way; assembly is performed in the reverse order of the disassembly procedure. After tightening the nut, please make sure that it is again properly secured in its position by means of the spring-loaded pin. In order to properly align the horizontal position of the sight picture in relation to the point of impact/target, the flip-up rear sight can be laterally adjusted. If the impact point/target is right of the sight picture, shift the rear sight to the right – and vice versa.

18

19
Pos. Description Pos. Description Pos. Description1 Receiver 36 Ball yellow 70 Grip left2 ASM Barrel MP40 9x19 37 Front sight 2 71 Hammer return spring3 Cover 38 Front sight 3 72 DIN7985/7500 M3x8 bolt cover screw4 Blind rivet A DIN73 39 Front sight 4 73 Screw for bolt stop5 Ejector metal 40 Front sight 5 74 Charging handle6 Spring for magazine catch 41 Front sight cover 75 Buffer7 Bolt catch lever 42 Muzzle nut 76 Countersunk screw M4x358 DIN 934 M5 nut 43 Mutte nut retaining pin 77 Take-down pin9 Magazine catch 44 Grip right 78 Cover left10 Magazine release button 45 Trigger Pin DIN 7 3 m6x18 79 Cover right11 Spring for magazine button 46 Disconnector 80 ø2,5x12 ISO 8748/DIN 734412 Magazine catch screw Torx M2,5x10 47 Spring for trigger guard 81 Washer DIN 125 ø5,1/ø10/0,513 DIN7985/7500 Torx M3x20 48 Pin DIN 6325 - 2 m6x10 82 Lock washer DIN 679914 Breech block 49 Sear 83 Steel ball ø7,9315 Firing pin 50 Sear spring 84 Spring for front sight adjustment16 Spring rod 51 DIN 6325 2,5 m6x10 85 Pin 3x617 Extractor trigger bar & firing pin retainer pin 86 Muzzle nut key18 Coiled spring pin 2x20 52 Trigger lever 87 Magazine body19 DIN6325 ø3x20 53 Trigger housing 88 Follower20 Distance spring for spring rod 54 Grip cover right 89 Spring plate21 Spring for firing pin 55 Muzzle washer 90 Magazine spring22 Bolt axis 56 Hammer Strut 91 Magazine base pad23 Countersunk screw M4 x 16 DIN 7991.elt 57 Hammer spring (mainspring) 92 Plastic grip left24 Spring for safety plunger 58 Hammer strut washer (small) 93 Plastic grip right25 Rear Sight 59 Hammer strut washer (large) 94 Grip cover26 Grooved pin DIN 1472 - 2 x 20 -St 60 Trigger 95 Countersunk screw M4 x 8 DIN 7991.elt27 Grubscrew M3x5 DIN913 61 Pin 3 m6 x 12 DIN 6325 96 DIN6325 ø4x2828 Rear sight foldable 62 DIN EN ISO 8748 2,5 x14 97 Grubscrew M5x12 DIN91329 DIN 5401-1.3505 ø2mm chromesteel ball 63 Spring for trigger 98 DIN6325 ø4x830 Spring for safety lever 64 Carrier 99 Allen head screw DIN 7984 M4x1431 Pressure spring D-217A 65 Safety lever 100 Slotted nut DIN 546 black32 Spring housing 66 DIN 921 M3x8 Stock bolt screw 101 Hammer33 Coiled spring pin 3x18 67 DIN 6325/ISO 8734 ø4x20 hammer pivot pin 102 Spacer34 Foresight holder 68 Notch plunger 35 Front sight 1 69 Bolt stop spring

Hersteller / Manufacturer
German Sport Guns GmbHOesterweg 2159469 Ense-HöingenGermany
Tel.: +49 (0) 2938 97839-0Fax: +49 (0) 2938 97890-31
All rights reservedArt. Nr.: 940.70.02.0 01/17
US Distributor
American Tactical231 Deming WaySummerville, SC 29483United States
Phone: 1-800-290-0065Fax: 843-851-2897