Growing Table Grapes - TownNewsbloximages.chicago2.vip.townnews.com/heraldandnews.com/conten… ·...
32
Bernadine C. Strik Growing Table Grapes EC 1639 • May 2011 Grapes are a popular choice for the home garden. You can use the fruit in many ways, and properly managed grapevines are great additions to the home landscape. hough grapes can be grown throughout Oregon, they are considered temperate zone plants, requiring a cool winter to meet chilling requirements and a warm growing season (150 to 180 frost-free days) to develop and mature a crop. Not all cultivars (varieties) are suited to a speciic region. If the growing season is too short for a particular cultivar, the fruit may be of poor quality and low in sugar content at harvest. Also, the vines may not mature properly in the fall, leading to possible winter injury. In the cooler climate of the coast and the Willamette Valley, avoid choosing late-ripening cultivars. In eastern Oregon, choose only cold hardy cultivars and manage vines to reduce risk of winter cold injury (see “Choosing a cultivar,” page 4). Along with choosing a site and cultivar, you should also consider site preparation, planting, general planting management, pruning and training, harvesting, and pest management. In many ways, grapevines are easy to grow, but you need to give the vines very good care to produce high- quality fruit. he hardest parts of grape production are pruning and training. To prune well and properly, you must have an understanding of grape growth. Contents How grape plants grow .................... 2 Establishing the planting .................. 3 Choosing a site ................................ 3 Choosing plants ............................... 3 Propagation ................................... 3 Choosing a cultivar............................. 4 Spacing ........................................ 6 Preparing the soil .............................. 6 Planting ....................................... 6 Fertilizing and irrigating ........................ 7 Training the young vine ........................ 7 Maintaining the planting .................. 8 Fertilizing and irrigating ....................... 8 Pruning ....................................... 8 Cane pruning .................................. 9 Spur pruning ................................. 11 Training. . . . . . . . . . . . . . . . . . . . . . . . . . . . . . . . . . . . . . . 13 Trellis ......................................... 18 Summer pruning .............................. 19 Pruning an old, neglected vine ........... 21 Harvest ................................. 21 Pests and problems ..................... 22 Environment .................................. 22 Pests.......................................... 22 Disease ....................................... 23 For further reading ...................... 24 Appendix A Characteristics of table grape cultivars grown in Oregon ........................... 25 Appendix B Photographs of cultivars, by color ............. 30 This publication is for the home gardener or small- scale grower. For information on establishing a larger vineyard, refer to commercial production guides for wine grape growers (see “For further reading,” page 24). Bernadine C. Strik, Extension berry crops professor, Department of Horticulture, Oregon State University
Transcript of Growing Table Grapes - TownNewsbloximages.chicago2.vip.townnews.com/heraldandnews.com/conten… ·...

Bernadine C. Strik
Growing Table Grapes
EC 1639 • May 2011
Grapes are a popular choice for the home garden. You can use the fruit in many ways, and properly managed grapevines are great additions to the home landscape. hough grapes can be grown throughout Oregon, they are considered temperate zone plants, requiring a cool winter to meet chilling requirements and a warm growing season (150 to 180 frost-free days) to develop and mature a crop.
Not all cultivars (varieties) are suited to a speciic region. If the growing season is too short for a particular cultivar, the fruit may be of poor quality and low in sugar content at harvest. Also, the vines may not mature properly in the fall, leading to possible winter injury. In the cooler climate of the coast and the Willamette Valley, avoid choosing late-ripening cultivars. In eastern Oregon, choose only cold hardy cultivars and manage vines to reduce risk of winter cold injury (see “Choosing a cultivar,” page 4).
Along with choosing a site and cultivar, you should also consider site preparation, planting, general planting management, pruning and training, harvesting, and pest management.
In many ways, grapevines are easy to grow, but you need to give the vines very good care to produce high-quality fruit. he hardest parts of grape production are pruning and training. To prune well and properly, you must have an understanding of grape growth.
Contents
How grape plants grow . . . . . . . . . . . . . . . . . . . .2Establishing the planting . . . . . . . . . . . . . . . . . .3
Choosing a site . . . . . . . . . . . . . . . . . . . . . . . . . . . . . . . . 3Choosing plants . . . . . . . . . . . . . . . . . . . . . . . . . . . . . . . 3Propagation . . . . . . . . . . . . . . . . . . . . . . . . . . . . . . . . . . . 3Choosing a cultivar . . . . . . . . . . . . . . . . . . . . . . . . . . . . . 4Spacing . . . . . . . . . . . . . . . . . . . . . . . . . . . . . . . . . . . . . . . . 6Preparing the soil . . . . . . . . . . . . . . . . . . . . . . . . . . . . . . 6Planting . . . . . . . . . . . . . . . . . . . . . . . . . . . . . . . . . . . . . . . 6Fertilizing and irrigating . . . . . . . . . . . . . . . . . . . . . . . . 7Training the young vine . . . . . . . . . . . . . . . . . . . . . . . . 7
Maintaining the planting . . . . . . . . . . . . . . . . . .8
Fertilizing and irrigating . . . . . . . . . . . . . . . . . . . . . . . 8Pruning . . . . . . . . . . . . . . . . . . . . . . . . . . . . . . . . . . . . . . . 8Cane pruning . . . . . . . . . . . . . . . . . . . . . . . . . . . . . . . . . . 9Spur pruning . . . . . . . . . . . . . . . . . . . . . . . . . . . . . . . . .11Training. . . . . . . . . . . . . . . . . . . . . . . . . . . . . . . . . . . . . . .13Trellis . . . . . . . . . . . . . . . . . . . . . . . . . . . . . . . . . . . . . . . . .18Summer pruning . . . . . . . . . . . . . . . . . . . . . . . . . . . . . .19
Pruning an old, neglected vine . . . . . . . . . . . 21Harvest . . . . . . . . . . . . . . . . . . . . . . . . . . . . . . . . . 21Pests and problems . . . . . . . . . . . . . . . . . . . . . 22
Environment . . . . . . . . . . . . . . . . . . . . . . . . . . . . . . . . . .22Pests . . . . . . . . . . . . . . . . . . . . . . . . . . . . . . . . . . . . . . . . . .22Disease . . . . . . . . . . . . . . . . . . . . . . . . . . . . . . . . . . . . . . .23
For further reading . . . . . . . . . . . . . . . . . . . . . . 24Appendix A
Characteristics of table grape cultivars grown in Oregon . . . . . . . . . . . . . . . . . . . . . . . . . . .25
Appendix BPhotographs of cultivars, by color . . . . . . . . . . . . .30
This publication is for the home gardener or small-
scale grower. For information on establishing a larger
vineyard, refer to commercial production guides for
wine grape growers (see “For further reading,” page 24).
Bernadine C. Strik, Extension berry crops professor, Department
of Horticulture, Oregon State University

2Growing Table Grapes
How grape plants growHere is an explanation of terms used
to describe parts of the grape plant or its growth.Cane. A mature shoot ater harvest and
leaf fall; a shoot becomes a cane ater the growing season.
Cordon. An extension of the trunk, usually trained along a wire, from which spurs grow.
Fruiting zone. he section of a shoot where fruit clusters appear.
Head. he top of the trunk where it transitions to cordon, spurs, or canes.
Internode. Portion of the shoot or cane between two nodes.
Lateral. A branch of a shoot or cane.
Node. (1) hickened portion of the shoot where the leaf and lateral bud appear; (2) the place on a cane or spur where a bud appears.
Shoot. New green growth with leaves, tendrils, and oten lower clusters, developing from a bud on a cane or spur.
Spur. A cane pruned back to one to ive buds. A spur is on a cordon or at the head of the vine.
Sucker. Also called a “water sprout”; a shoot growing from old wood, oten at the trunk base or at the head of the vine.
Veraison. he start of grape ripening, when color change begins. Green berries start changing to red or blue in a colored grape cultivar, or a green grape becomes more translucent. In the Willamette Valley, this change occurs in about mid-August.
A dormant grapevine is illustrated in igure 1a. In the spring, shoots grow from buds on canes, renewal spurs (if present), and sometimes the trunk. Each bud on a cane or spur may produce from one to three shoots. As the shoot grows, it can produce leaves, lower clusters, buds, and lateral branches (igure 1b and igure 2). Fruit is produced on the current season’s growth.
When the vine is dormant once again (generally from December through March), you must prune it. he buds that produce next year’s fruit are on the 1-year-old canes (last year’s growth). To prevent the vine from producing too much fruit (overbearing), you must prune to keep only some of the 1-year-old wood or canes and remove the rest. Overbearing delays fruit ripening, reduces fruit quality, and weakens the vine.
Figure 1A. Dormant grapevine after pruning.
Arm
Renewal spur
Trunk
Fruiting cane
Figure 1B. Shoot.
Fruiting cane
Figure 2. Early grape shoot growth.

3Growing Table Grapes
Establishing the plantingGrapevines require several years from time of
planting to irst harvested crop, and they normally do not reach full production until the ith or sixth year. Grape plants live for 50 to 100 years, if you care for them properly. It’s relatively easy to propagate a favorite vine (see “Propagation,” this page) but well-established plants cannot be transplanted. hus, it’s important to consider carefully both where you will plant and how you will prepare the site before you plant.
Choosing a sitehe irst step toward consistent production of
high-quality grapes is to choose a sunny place to plant. While some ornamental grapevine species perform adequately in partial shade, full sunlight is required to get good production of table grapes. If you plant a row that runs north–south, the fruit and leaves will be better exposed to sunlight than in east–west rows; this way, you’ll produce better quality fruit.
Grapes can be grown on a wide range of soil types and soil nutrient status (for example, soil acidity or pH). European grapes may grow better than American types on soils with a pH greater than 7 (see “Choosing a cultivar,” page 4). Grapevines may have nutritional problems when grown on soils with a pH greater than 8.
Grape plants grow best in well-drained soils. Heavy clay soils with poor drainage or soils with an impervious subsoil clay pan are not ideal. Building up raised beds may improve growth on these soils.
When selecting a site, avoid areas prone to early spring frosts. New shoot growth in April and May is very susceptible to frost injury (see “Pests and problems,” page 22). Home surroundings or other sites that are sheltered from colder temperatures and wind are best. If possible, choose a sloping area, especially a south or southwest slope, because it generally has higher temperatures and is less likely to get frost.
Vines that are stressed due to drought or shade are more prone to diseases such as powdery
mildew or botrytis fruit rot (see “Pests and problems,” page 23).
Choosing plantsPurchase dormant bare-root vines or young, well-
rooted, potted plants (generally grown in 1-gallon containers). here is no need to buy older plants. In retail nurseries, nongrated vines (also called “self-rooted”) are most commonly available. Nurseries may sell grated plants of some cultivars. European wine grapes are oten grated onto a rootstock resistant to the root-feeding insect phylloxera (see “Pests and problems,” page 22). Many table grapes are tolerant or resistant to phylloxera.
When choosing a bare-root or container plant, pick one that will be easy to prune back to a few buds or to a vigorous basal shoot, to encourage development of a straight trunk (see “Training the young vine,” page 7).
PropagationOten, home gardeners want to propagate
an older vine that is in the wrong spot or has become too old to rejuvenate (see “Pruning an old, neglected vine,” page 21) or a wonderful variety a friend successfully grows. You must propagate grapes from cuttings rather than seeds, because seedlings don’t have the same characteristics as the parent plant. Propagating by dormant, hardwood cuttings is simple.
It’s easiest to take hardwood cuttings late in the dormant period. his ensures that the grapevine has had enough winter cold (chilling) to give buds a chance to grow normally in spring. Ideally, take cuttings right before pruning in February. Select 1-year-old dormant canes (those that were new shoots the previous summer). Choose healthy canes that look like they grew in full sunlight. Canes growing in partial shade may be spindly and may not have enough stored food to support the cutting until it has developed leaves and roots.
Select canes that are at least pencil-size in diameter. Avoid choosing canes that are too big or have very long internodes (longer than 6 inches between buds on a cane). Make each cutting long enough to include three buds. Take cuttings by
4Growing Table Grapes
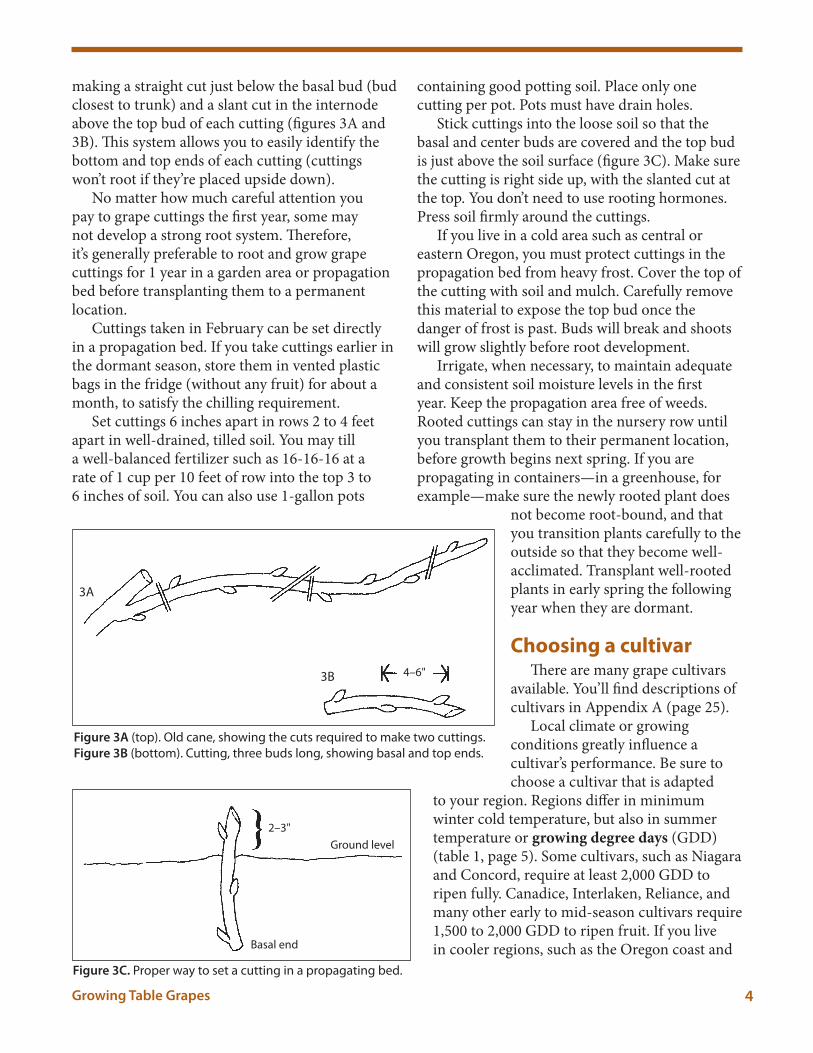
making a straight cut just below the basal bud (bud closest to trunk) and a slant cut in the internode above the top bud of each cutting (igures 3A and 3B). his system allows you to easily identify the bottom and top ends of each cutting (cuttings won’t root if they’re placed upside down).
No matter how much careful attention you pay to grape cuttings the irst year, some may not develop a strong root system. herefore, it’s generally preferable to root and grow grape cuttings for 1 year in a garden area or propagation bed before transplanting them to a permanent location.
Cuttings taken in February can be set directly in a propagation bed. If you take cuttings earlier in the dormant season, store them in vented plastic bags in the fridge (without any fruit) for about a month, to satisfy the chilling requirement.
Set cuttings 6 inches apart in rows 2 to 4 feet apart in well-drained, tilled soil. You may till a well-balanced fertilizer such as 16-16-16 at a rate of 1 cup per 10 feet of row into the top 3 to 6 inches of soil. You can also use 1-gallon pots
containing good potting soil. Place only one cutting per pot. Pots must have drain holes.
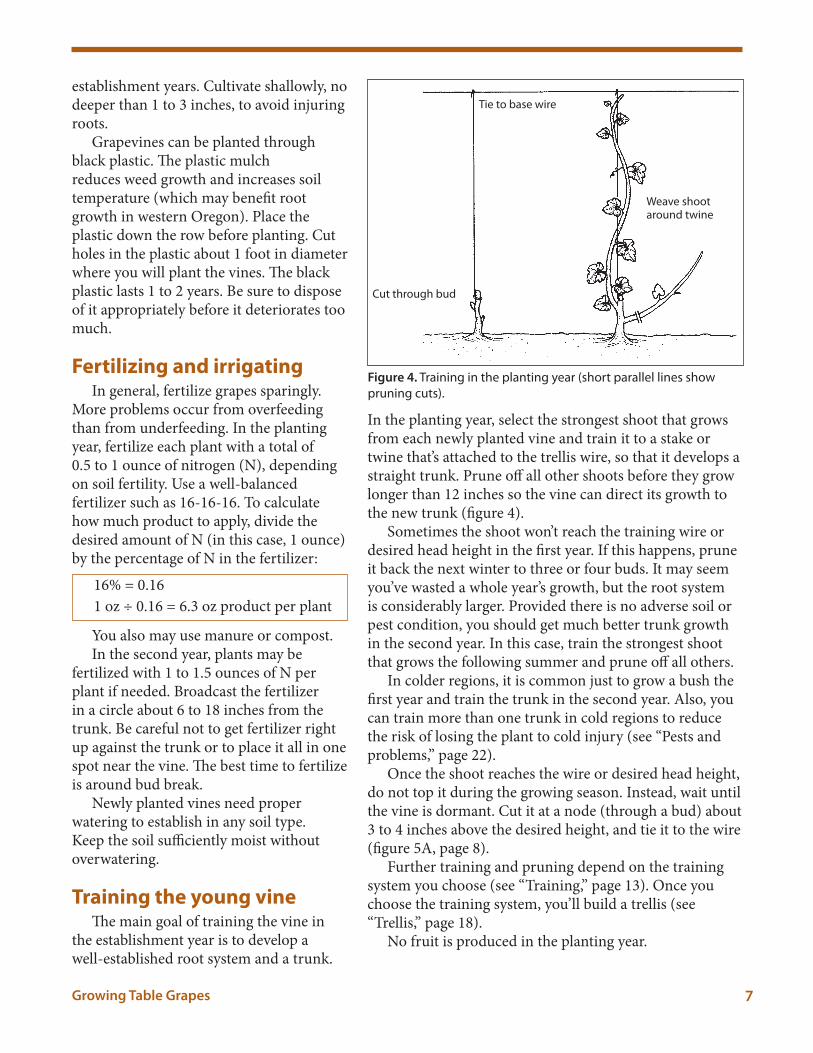
Stick cuttings into the loose soil so that the basal and center buds are covered and the top bud is just above the soil surface (igure 3C). Make sure the cutting is right side up, with the slanted cut at the top. You don’t need to use rooting hormones. Press soil irmly around the cuttings.
If you live in a cold area such as central or eastern Oregon, you must protect cuttings in the propagation bed from heavy frost. Cover the top of the cutting with soil and mulch. Carefully remove this material to expose the top bud once the danger of frost is past. Buds will break and shoots will grow slightly before root development.
Irrigate, when necessary, to maintain adequate and consistent soil moisture levels in the irst year. Keep the propagation area free of weeds. Rooted cuttings can stay in the nursery row until you transplant them to their permanent location, before growth begins next spring. If you are propagating in containers—in a greenhouse, for example—make sure the newly rooted plant does
not become root-bound, and that you transition plants carefully to the outside so that they become well-acclimated. Transplant well-rooted plants in early spring the following year when they are dormant.
Choosing a cultivarhere are many grape cultivars
available. You’ll ind descriptions of cultivars in Appendix A (page 25).
Local climate or growing conditions greatly inluence a cultivar’s performance. Be sure to choose a cultivar that is adapted
to your region. Regions difer in minimum winter cold temperature, but also in summer temperature or growing degree days (GDD) (table 1, page 5). Some cultivars, such as Niagara and Concord, require at least 2,000 GDD to ripen fully. Canadice, Interlaken, Reliance, and many other early to mid-season cultivars require 1,500 to 2,000 GDD to ripen fruit. If you live in cooler regions, such as the Oregon coast and
Figure 3A (top). Old cane, showing the cuts required to make two cuttings.
Figure 3B (bottom). Cutting, three buds long, showing basal and top ends.
3A
3B 4–6"
Figure 3C. Proper way to set a cutting in a propagating bed.
2–3"
Ground level
Basal end

5Growing Table Grapes
parts of the Willamette Valley, choose only early to mid-season cultivars. Late-season cultivars may not fully ripen their fruit every year in these regions, though this can be inluenced by pruning (see “Pruning,” page 8).
It’s important to consider a cultivar’s disease and cold tolerance (see “Pests and problems,” page 22). Tolerance to winter cold temperatures involves the health of the vine, yield the previous season, how well the vine became dormant, how quickly the temperature gets cold and how long it stays cold, and other factors. Dormant buds may be damaged at one temperature and trunks at another temperature. See Appendix A (page 25) for comments on cold hardiness of cultivars.
Because grapes are self-fertile, you need only one cultivar for fruit production. But, for variety
and to extend the fruiting season, you may choose to grow several very early, mid-, or late-season ripening cultivars (depending on your climate).
Each cultivar’s fruit is unique in its aroma, lavor, and other qualities. When choosing a cultivar, try to determine which ones have a lavor you like. You can oten ind unique cultivars to taste at U-pick farms, farmers markets, or through your county’s OSU Master Gardener Program.
Depending on the cultivar, fruit may be suited for fresh eating, juice, raisins, jellies, or wine. Some cultivars suit more than one purpose. Generally, sweet seedless grapes with tender skins are best for raisins.
hree types of grapes are grown in the Paciic Northwest: American, European, and European-American hybrids. Each has speciic qualities.• American cultivars (Vitis labrusca) have a
strong “foxy” lavor and aroma (characteristic of Concord, the most common cultivar used for purple grape juice). Fruit generally have a slip-skin (pulp separates from the skin when you pop the berry in your mouth). American cultivars that have a slip-skin are noted in Appendix A (page 25). he cluster can vary from tight to loose and berries from small to large, depending on cultivar.
Plants tend to be more tolerant of pests and more vigorous than the European type. his type of grape is tolerant or resistant to phylloxera, and it is more disease-resistant and cold hardy than the other types. hese cultivars are used mostly for juice, jellies, pies, and fresh eating.
• European cultivars (Vitis vinifera) difer from American cultivars in fruit characteristics, vine growth habit, and climate adaptation. hey have tight clusters, berries with thin skins that do not “slip,” and a more subtle aroma and lavor. Some cultivars have berries with a “crunchy” texture. In general, European grape cultivars are more sensitive to pests (such as phylloxera) and diseases (such as powdery mildew and botrytis bunch rot) and are less cold hardy than American types. For these reasons, European-type table grapes are not as commonly grown in home gardens in Oregon.
Table 1. Average growing degree days (GDD)
(base 50°F, from Jan. 1–Dec. 31) in cities
throughout Oregon.
Average of approximately 70 years
City GDD
Ashland 2,355
Roseburg 2,760
Corvallis 2,121
McMinnville 2,157
Portland 2,455
Brookings 1,736
Newport 1,181
Astoria 1,409
Hermiston 2,981
Baker 1,693
Ontario 3,031
Bend 1,478
Source: Oregon Climate Summaries http://www.wrcc.dri.edu/summary/climsmor.html
Growing-degree-day units are computed as the difer-ence between the daily average temperature and the base temperature. (Daily Avg. Temp. - Base Temp.)
One unit is accumulated for each degree Fahrenheit the average temperature is above the base temperature. Negative numbers are discarded.
Example: If the day’s high temperature was 95°F and the low was 51°F, the base 50 heating degree-day units are
This is done for each day of the month and summed.
95 + 51 - 50 = 23
2

6Growing Table Grapes
• European-American hybrids have some characteristics of both American and European types, depending on parentage.
Cultivars in Appendix A (page 25) are designated as European (E) or American (A). Hybrids are indicated as “A” with lavor and other attributes noted. See Appendix B (page 30) for photos of some cultivars.
Cultivars difer in ripening time, characterized by season as “very early“ to “late.” Note that cultural practices (such as pruning) and weather can inluence harvest time. In the Willamette Valley, very early season cultivars would be ready for fruit harvest in early September. Late-season cultivars, such as Concord, may not be ripe until mid-October when pruned well.
Yield per vine varies tremendously with vine age, site (climate, depth of soil, soil fertility), management (pruning, irrigation, plant fertility, pest management), and cultivar. Yield per plant, for a mature, well-managed vine, may be from 15 to 35 pounds.
SpacingSpacing within the row depends on the cultivar
you plant, the depth or fertility of your soil, and the training system you use (see “Training,” page 13). Plant European cultivars (Vitis vinifera) 6 feet apart in the row. You can set American cultivars (V. labrusca) and hybrids 6 to 8 feet apart in the row, because they are more vigorous (produce longer shoots). If your soil is shallow or of low fertility, you can space vines closer together in the row to “ill” the trellis.
he spacing between rows depends, in part, on the training and trellis system you choose. In backyard plantings, 9 to 10 feet between rows is common for single canopy training systems (head trained, single downward hanging canopy, vertical hedgerow or VSP, and Scott Henry). If you plan to train to a Geneva Double Curtain (GDC) and will have more than one row of vines, use a between-row spacing of 11 to 12 feet.
Preparing the soilBe sure soil is free of perennial weeds and
well tilled before you plant. You can improve
the organic matter content of heavy soil by incorporating well-aged sawdust, manure, or compost.
Don’t place manure or compost directly in the planting hole. Instead, incorporate it into soil in the whole planting area. Apply organic matter the summer or fall before you plant. Manure applied at 2 to 3 cubic yards per 100 square feet is a good source. Use only materials that you believe are free from insects and weed seeds. Dig, plow, or till the material into the soil to ensure that it will be well decomposed by planting time.
If you incorporate large amounts of non-decomposed material into the soil, add calcium nitrate (16 percent nitrogen) or equivalent fertilizer at 2 pounds of product per 100 square feet to aid in decomposition. If you also use manure to improve soil structure, decrease the rate of fertilizer by half.
PlantingPlant grapes in early spring, as soon as you
can work the soil. If you buy dormant, bare-root plants, make sure roots don’t dry out before planting. If you’re transplanting from a propagation bed or nursery, dig plants carefully to avoid breaking roots.
At planting, prune of all broken roots and trim very long roots. Set plants in a hole large enough to spread roots without bending them. For plants growing in a pot, remove the pot (whether it’s iber or plastic) and place the rootball into a suiciently large hole. Plant all bare-root or potted plants at the same depth that they were growing in the nursery.
Firm the soil well around roots to remove air pockets, and water thoroughly. Continue to irrigate plants as required to keep soil adequately moist without saturating it.
Right ater planting, prune of all but one vigorous 1-year-old cane from nursery-bought plants. Prune the cane back to two buds. On plants that are already growing, remove all but the most vigorously growing shoot near the base of the plant. his will become the new trunk.
Young grapevines can’t compete with weeds or established lawn grass for water and nutrients. Keep the planting free of all weeds in the
7Growing Table Grapes
establishment years. Cultivate shallowly, no deeper than 1 to 3 inches, to avoid injuring roots.
Grapevines can be planted through black plastic. he plastic mulch reduces weed growth and increases soil temperature (which may beneit root growth in western Oregon). Place the plastic down the row before planting. Cut holes in the plastic about 1 foot in diameter where you will plant the vines. he black plastic lasts 1 to 2 years. Be sure to dispose of it appropriately before it deteriorates too much.
Fertilizing and irrigatingIn general, fertilize grapes sparingly.
More problems occur from overfeeding than from underfeeding. In the planting year, fertilize each plant with a total of 0.5 to 1 ounce of nitrogen (N), depending on soil fertility. Use a well-balanced fertilizer such as 16-16-16. To calculate how much product to apply, divide the desired amount of N (in this case, 1 ounce) by the percentage of N in the fertilizer:
16% = 0.16
1 oz ÷ 0.16 = 6.3 oz product per plant
You also may use manure or compost. In the second year, plants may be
fertilized with 1 to 1.5 ounces of N per plant if needed. Broadcast the fertilizer in a circle about 6 to 18 inches from the trunk. Be careful not to get fertilizer right up against the trunk or to place it all in one spot near the vine. he best time to fertilize is around bud break.
Newly planted vines need proper watering to establish in any soil type. Keep the soil suiciently moist without overwatering.
Training the young vinehe main goal of training the vine in
the establishment year is to develop a well-established root system and a trunk.
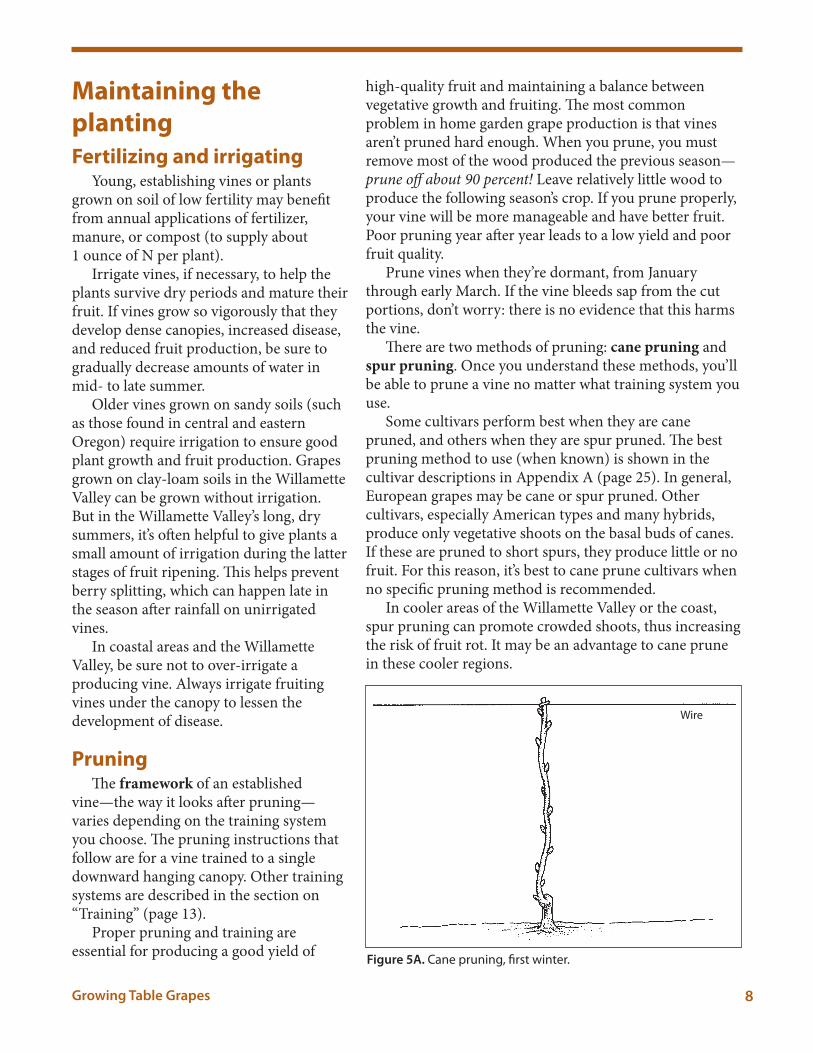
In the planting year, select the strongest shoot that grows from each newly planted vine and train it to a stake or twine that’s attached to the trellis wire, so that it develops a straight trunk. Prune of all other shoots before they grow longer than 12 inches so the vine can direct its growth to the new trunk (igure 4).
Sometimes the shoot won’t reach the training wire or desired head height in the irst year. If this happens, prune it back the next winter to three or four buds. It may seem you’ve wasted a whole year’s growth, but the root system is considerably larger. Provided there is no adverse soil or pest condition, you should get much better trunk growth in the second year. In this case, train the strongest shoot that grows the following summer and prune of all others.
In colder regions, it is common just to grow a bush the irst year and train the trunk in the second year. Also, you can train more than one trunk in cold regions to reduce the risk of losing the plant to cold injury (see “Pests and problems,” page 22).
Once the shoot reaches the wire or desired head height, do not top it during the growing season. Instead, wait until the vine is dormant. Cut it at a node (through a bud) about 3 to 4 inches above the desired height, and tie it to the wire (igure 5A, page 8).
Further training and pruning depend on the training system you choose (see “Training,” page 13). Once you choose the training system, you’ll build a trellis (see “Trellis,” page 18).
No fruit is produced in the planting year.
Figure 4. Training in the planting year (short parallel lines show
pruning cuts).
Tie to base wire
Weave shoot around twine
Cut through bud
8Growing Table Grapes
Maintaining the
planting
Fertilizing and irrigating Young, establishing vines or plants
grown on soil of low fertility may beneit from annual applications of fertilizer, manure, or compost (to supply about 1 ounce of N per plant).
Irrigate vines, if necessary, to help the plants survive dry periods and mature their fruit. If vines grow so vigorously that they develop dense canopies, increased disease, and reduced fruit production, be sure to gradually decrease amounts of water in mid- to late summer.
Older vines grown on sandy soils (such as those found in central and eastern Oregon) require irrigation to ensure good plant growth and fruit production. Grapes grown on clay-loam soils in the Willamette Valley can be grown without irrigation. But in the Willamette Valley’s long, dry summers, it’s oten helpful to give plants a small amount of irrigation during the latter stages of fruit ripening. his helps prevent berry splitting, which can happen late in the season ater rainfall on unirrigated vines.
In coastal areas and the Willamette Valley, be sure not to over-irrigate a producing vine. Always irrigate fruiting vines under the canopy to lessen the development of disease.
Pruning he framework of an established
vine—the way it looks ater pruning—varies depending on the training system you choose. he pruning instructions that follow are for a vine trained to a single downward hanging canopy. Other training systems are described in the section on “Training” (page 13).
Proper pruning and training are essential for producing a good yield of
high-quality fruit and maintaining a balance between vegetative growth and fruiting. he most common problem in home garden grape production is that vines aren’t pruned hard enough. When you prune, you must remove most of the wood produced the previous season—prune of about 90 percent! Leave relatively little wood to produce the following season’s crop. If you prune properly, your vine will be more manageable and have better fruit. Poor pruning year ater year leads to a low yield and poor fruit quality.
Prune vines when they’re dormant, from January through early March. If the vine bleeds sap from the cut portions, don’t worry: there is no evidence that this harms the vine.
here are two methods of pruning: cane pruning and spur pruning. Once you understand these methods, you’ll be able to prune a vine no matter what training system you use.
Some cultivars perform best when they are cane pruned, and others when they are spur pruned. he best pruning method to use (when known) is shown in the cultivar descriptions in Appendix A (page 25). In general, European grapes may be cane or spur pruned. Other cultivars, especially American types and many hybrids, produce only vegetative shoots on the basal buds of canes. If these are pruned to short spurs, they produce little or no fruit. For this reason, it’s best to cane prune cultivars when no speciic pruning method is recommended.
In cooler areas of the Willamette Valley or the coast, spur pruning can promote crowded shoots, thus increasing the risk of fruit rot. It may be an advantage to cane prune in these cooler regions.
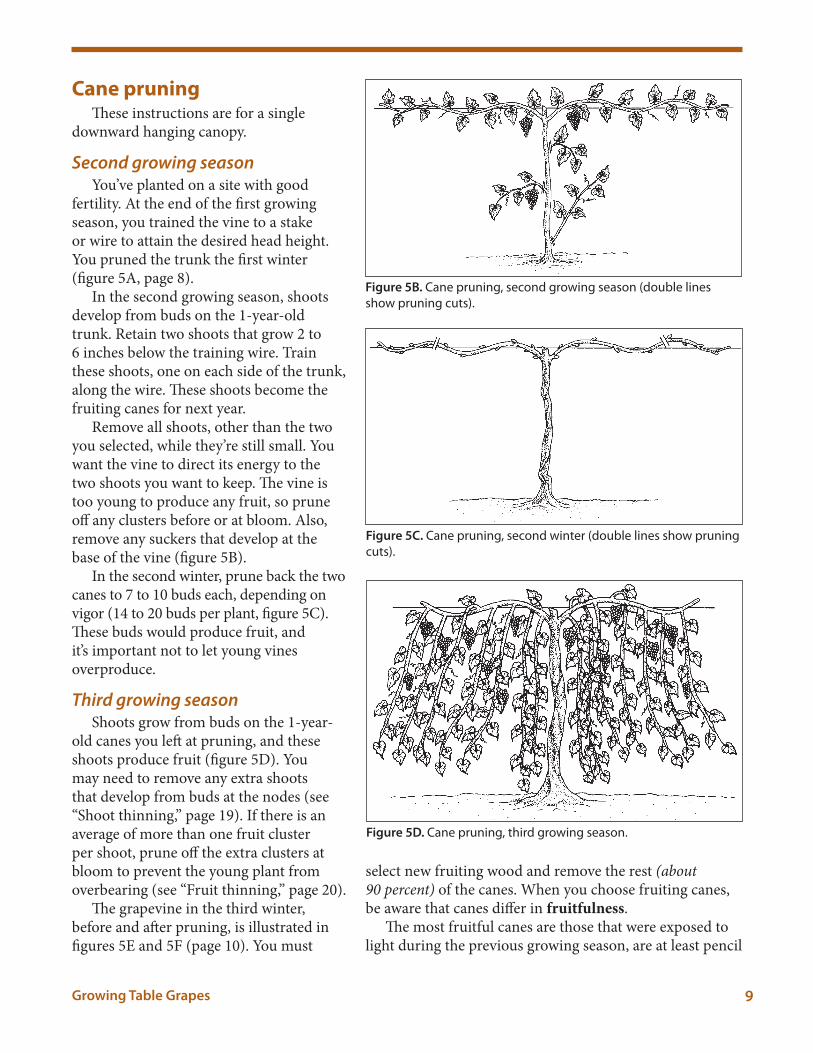
Figure 5A. Cane pruning, irst winter.
Wire
9Growing Table Grapes
Cane pruninghese instructions are for a single
downward hanging canopy.
Second growing season You’ve planted on a site with good
fertility. At the end of the irst growing season, you trained the vine to a stake or wire to attain the desired head height. You pruned the trunk the irst winter (igure 5A, page 8).
In the second growing season, shoots develop from buds on the 1-year-old trunk. Retain two shoots that grow 2 to 6 inches below the training wire. Train these shoots, one on each side of the trunk, along the wire. hese shoots become the fruiting canes for next year.
Remove all shoots, other than the two you selected, while they’re still small. You want the vine to direct its energy to the two shoots you want to keep. he vine is too young to produce any fruit, so prune of any clusters before or at bloom. Also, remove any suckers that develop at the base of the vine (igure 5B).
In the second winter, prune back the two canes to 7 to 10 buds each, depending on vigor (14 to 20 buds per plant, igure 5C). hese buds would produce fruit, and it’s important not to let young vines overproduce.
Third growing season Shoots grow from buds on the 1-year-
old canes you let at pruning, and these shoots produce fruit (igure 5D). You may need to remove any extra shoots that develop from buds at the nodes (see “Shoot thinning,” page 19). If there is an average of more than one fruit cluster per shoot, prune of the extra clusters at bloom to prevent the young plant from overbearing (see “Fruit thinning,” page 20).
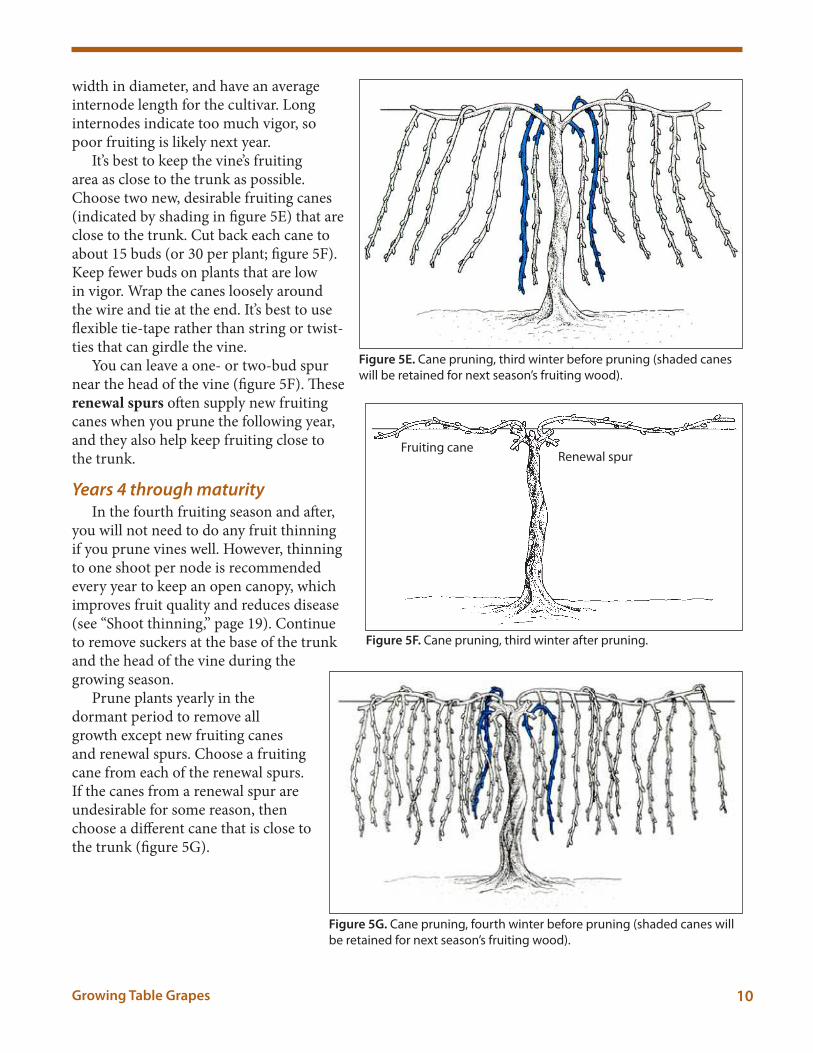
he grapevine in the third winter, before and ater pruning, is illustrated in igures 5E and 5F (page 10). You must
select new fruiting wood and remove the rest (about 90 percent) of the canes. When you choose fruiting canes, be aware that canes difer in fruitfulness.
he most fruitful canes are those that were exposed to light during the previous growing season, are at least pencil
Figure 5B. Cane pruning, second growing season (double lines
show pruning cuts).
Figure 5C. Cane pruning, second winter (double lines show pruning
cuts).
Figure 5D. Cane pruning, third growing season.
10Growing Table Grapes
width in diameter, and have an average internode length for the cultivar. Long internodes indicate too much vigor, so poor fruiting is likely next year.
It’s best to keep the vine’s fruiting area as close to the trunk as possible. Choose two new, desirable fruiting canes (indicated by shading in igure 5E) that are close to the trunk. Cut back each cane to about 15 buds (or 30 per plant; igure 5F). Keep fewer buds on plants that are low in vigor. Wrap the canes loosely around the wire and tie at the end. It’s best to use lexible tie-tape rather than string or twist-ties that can girdle the vine.
You can leave a one- or two-bud spur near the head of the vine (igure 5F). hese renewal spurs oten supply new fruiting canes when you prune the following year, and they also help keep fruiting close to the trunk.
Years 4 through maturity In the fourth fruiting season and ater,
you will not need to do any fruit thinning if you prune vines well. However, thinning to one shoot per node is recommended every year to keep an open canopy, which improves fruit quality and reduces disease (see “Shoot thinning,” page 19). Continue to remove suckers at the base of the trunk and the head of the vine during the growing season.
Prune plants yearly in the dormant period to remove all growth except new fruiting canes and renewal spurs. Choose a fruiting cane from each of the renewal spurs. If the canes from a renewal spur are undesirable for some reason, then choose a diferent cane that is close to the trunk (igure 5G).
Figure 5F. Cane pruning, third winter after pruning.
Renewal spurFruiting cane
Figure 5G. Cane pruning, fourth winter before pruning (shaded canes will
be retained for next season’s fruiting wood).
Figure 5E. Cane pruning, third winter before pruning (shaded canes
will be retained for next season’s fruiting wood).

11Growing Table Grapes
Cut back each fruiting cane to control the number of buds per vine. he number of buds to leave depends on: • Climate. Vines in cooler climates
ripen less fruit and need fewer buds, particularly on late-season cultivars.
• Soil. Fertile soil increases vine vigor and the number of buds let at pruning.
• Vine age. Vines in years 4 and 5 can support fewer buds than those that are mature.
• Cultivar. American types can support more buds than European types.
In general, leave 20 to 60 buds per plant (or 10 to 25 buds per cane in this training example, igure 5H). Prune younger vines, in years 4 and 5, to the lower end of the range. You can adjust bud number at pruning up or down, with experience. If the vine is growing well and ripens its crop well, you can maintain or try slightly increasing bud number the following year.
When vines are grown in rows, mature vines are usually pruned without counting buds. heir cane is pruned to meet the cane from the adjacent vine with no overlap.
Spur pruningEstablishing a vine for spur
pruning is the same as for cane pruning in the early years. Until the third winter, prune the young vine as illustrated in igures 5A through 5D for a vine trained to a single downward hanging canopy.
Third growing season (Figure 5D) Remove any extra shoots that develop
from buds at the nodes (see “Shoot thinning,” page 19). If there is an average of more than one fruit cluster per shoot, prune of the extra clusters at bloom to prevent the young plant from overbearing (see “Fruit thinning,” page 20).
In the third winter, cut back the selected canes (indicated by shading in igure 6A) along the older wood to two- or three-bud spurs. Spurs should be 4 to 6 inches apart. he 2-year-old cane that was trained to the wire the previous winter now becomes a “permanent” part of the vine, called the cordon. If more than one shoot grew from a node on the cordon (if you missed some when shoot thinning), choose the strongest one and cut of the others (igure 6B, page 12). Leave no more than about 30 buds per plant. If plants are low in vigor, leave fewer buds. Buds on spurs will produce fruit in cultivars that are adapted to this method of pruning.
Figure 5H. Cane pruning, fourth winter after pruning.
Figure 6A. Spur pruning, third winter before pruning (shading indicates
fruiting spurs that will be retained for next season).

12Growing Table Grapes
Figure 6B. Spur pruning, third winter after pruning.
Years 4 through maturity In the fourth fruiting season and ater,
you will not need to do any fruit thinning if you prune vines well. However, thinning to one shoot per node is recommended every year to keep an open canopy, which improves fruit quality and reduces disease. Continue to remove suckers at the base of the trunk and the head of the vine during the growing season.
To prune mature plants, select new spurs (ideally those nearest the cordon), cut them back to two to six buds, depending on cultivar, and remove all other canes (igures 6C and 6D). In general, leave 20 to 60 buds per plant. However, the number of buds per plant depends on the same factors as for cane-pruned vines (climate, soil, vine age, and cultivar).
If you’re not sure whether a cultivar’s basal buds are fruitful and it’s suited for spur pruning, it’s best to cane prune the vine. It’s easy to convert from one system of pruning to the other, though. So, if you’re interested in spur pruning, try both methods on a particular cultivar and compare results.
Figure 6D. Spur pruning, fourth winter after pruning.
Spur
Cordon
Figure 6C. Spur pruning, fourth winter before pruning (shading indicates
fruiting spurs that will be retained for next season).
13Growing Table Grapes
TrainingYou can train grapevines in
many ways. he training systems described below are well suited to all production regions in Oregon, unless otherwise noted.
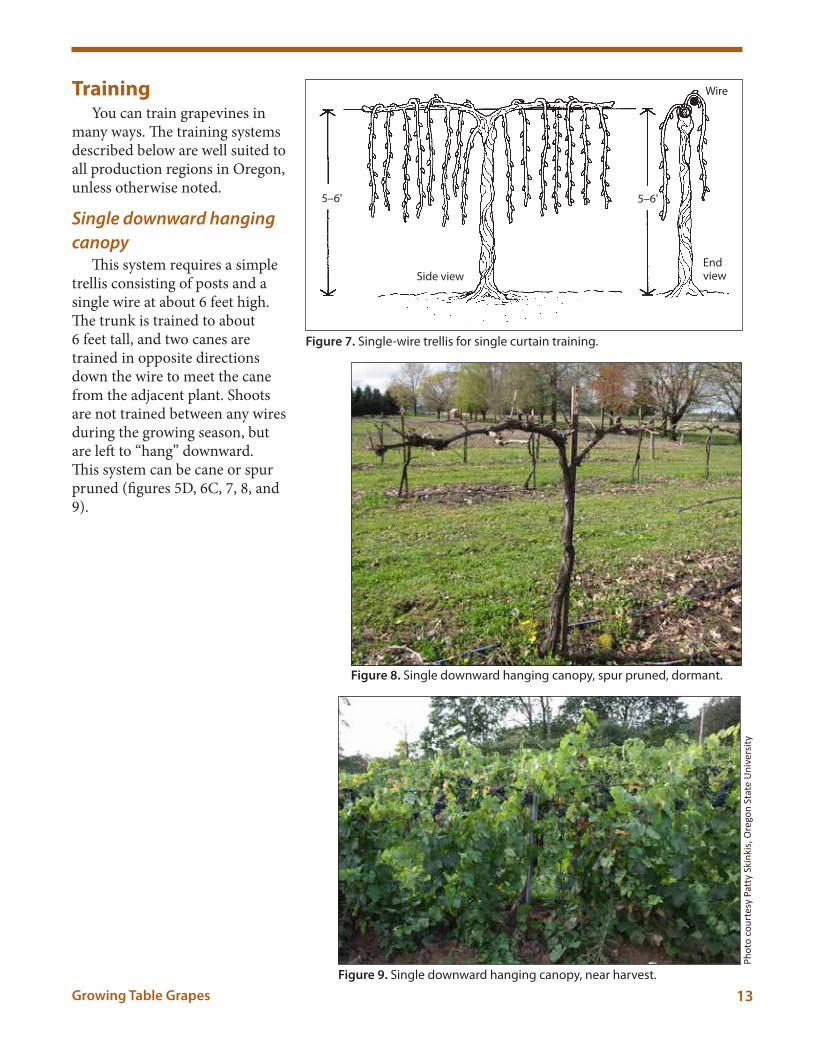
Single downward hanging
canopy his system requires a simple
trellis consisting of posts and a single wire at about 6 feet high. he trunk is trained to about 6 feet tall, and two canes are trained in opposite directions down the wire to meet the cane from the adjacent plant. Shoots are not trained between any wires during the growing season, but are let to “hang” downward. his system can be cane or spur pruned (igures 5D, 6C, 7, 8, and 9).
5–6'
Side view
5–6'
End view
Wire
Figure 7. Single-wire trellis for single curtain training.
Figure 8. Single downward hanging canopy, spur pruned, dormant.
Figure 9. Single downward hanging canopy, near harvest.
Ph
oto
co
urt
esy
Pa
tty
Sk
ink
is,
Ore
go
n S
tate
Un
ive
rsit
y

14Growing Table Grapes
Geneva Double Curtain (GDC) his system, developed in Geneva,
New York, is well suited to vigorous American-type grapes that can be pruned to a relatively high number of buds. Vines are pruned to four fruiting canes or four cordons. It is generally best to use this training system on vigorous sites.
he trellis must be of sturdy construction to support the weight of vine growth and fruit production. he trunk must be trained to a high head height, about 5½ feet tall. A center wire at this height serves as the trunk’s training wire. he GDC requires cross-arms about 3 to 4 feet wide. Run a wire down the row on each side of the cross-arm or “T.” hese become the cane training wires (igures 10 and 11).
Train the shoot (the future trunk) to head height in the irst growing season. If growth is vigorous, train the shoot toward one side of the “T” and down a wire if needed. For these instructions, we will assume only a trunk, to head height, grew the irst year.
In the second growing season, choose two shoots, one per side, to grow toward the cane training wires of the “T.” hese become the arms, or permanent part of the vine that extends from the trunk to the cane training wires. Train these shoots down the wire as they grow (for example, toward the south). Remove all other shoots early in development.
In the third growing season, prune the existing canes (one per side on the south end of the vine) to limit fruit production. Choose one shoot on each cane, near the arm, to train down the wire toward the north. he following winter, select a new 1-year-old cane from the south side to become that side’s new fruiting cane. Prune it back to limit fruit production. On the north side, prune back the 1-year-old cane to limit the crop. Repeat this on the other side of the trellis.
he next winter, choose a new fruiting cane on each of the four sections of the vine (on each side of the arm). Ater pruning, the vine will have four fruiting canes (igure 10). his training system can also be spur pruned to four cordons.
During the growing and fruiting season, thin shoots to one shoot per node, if necessary (see “Shoot thinning,” page 19). Look at your vine frequently to make sure that shoots are hanging down in distinct curtains on each side of the trunk. It’s important for light to reach both sides of the curtain. If you do not manage shoots well, they intertwine, creating a 4-foot thick canopy. Fruit will not get enough light, which delays ripening and increases risk of disease.
Figure 10. Dormant GDC-trained vine, cane pruned.
Figure 11. GDC-trained vine, spring, center of row view.

15Growing Table Grapes
Vertical hedgerow (also called
2-cane Guyot, VSP, or two-
cane Knifen)In this system, the head height of
the trunk varies from very short in cooler areas (1½ to 2 feet) to 3 feet in warmer regions. Vines are pruned to two canes or cordons (igure 12). he trellis requires a training wire at head height and two to three sets of training wires above head height to about 6 feet. Shoots produced from canes or spurs are trained upward between the sets of training wires on the trellis (igures 13 and 14). Keeping the shoots upright in a narrow canopy improves the fruit’s exposure to light. Many wine grapes are grown in Oregon using this method. Table grapes are more oten grown using downward hanging systems.
Figure 13. Two-cane Knifen.
Side view End view
Wires
5–6'
Figure 12. Vertical hedgerow training, cane pruned, dormant.
Figure 14. Vertical hedgerow, cane pruned, growing season.
Ph
oto
co
urt
esy
Pa
tty
Sk
ink
is,
Ore
go
n S
tate
Un
ive
rsit
y

16Growing Table Grapes
Head trainingIn areas with limited space, it’s possible to train vines to
a self-supporting trunk with no trellis. Young vine trunks are tied to a stake and become self-supporting as they grow (igures 15 and 16). Prune vines to long spurs that originate at the head of the vine (igure 17A). his method is inexpensive and requires less space, but yields are lower. A common mistake made in the home garden is to “hedge prune” these head-trained vines (igure 17B). his produces too many spurs, which leaves too many buds and—in American types—many spurs that are too short for good fruit production.
Figure 15. A head-trained vine.
3'
Figure 16. Head-trained vine. Figure 17B. Incorrectly “hedged” vine.
Figure 17A. Correctly pruned, head-trained
vineyard.

17Growing Table Grapes
ArborsGrapes are well suited to training on an
arbor. he plants make attractive ornamentals and provide shade (igure 18). Depending on how the arbor is constructed, fruit hangs down through the arbor to see and harvest underneath.
You can choose a red-, blue-, and green-fruited grape to grow on each side of a large, three-sided arbor. If you grow one vine per side, plant each in the center of its arbor “wall” and train each trunk to grow up the side and along the top to the middle of the arbor. It may take more than 2 years to grow a trunk to that length.
Ater the irst growing season (when the goal is to grow the trunk as tall as possible), select shoots along each trunk to distribute fruiting canes along the trunk’s length. If a trunk is not tall enough yet, use the topmost shoot to extend the trunk in the current season. Repeat this process until the framework of the vine has been established (each vine’s trunk goes up the side and along the top to the middle of the arbor). Have short fruiting canes alternate on the let and right sides of each trunk, so that shoots (leaves and shade) and fruit are well distributed along the trunk and arbor.
Scott Henry his system of pruning vines to four canes
and dividing the canopy was invented by Scott Henry, owner of a vineyard and winery near Roseburg, Oregon. he system is suited to European table grapes grown on a vigorous soil and can be spur pruned.
he trellis should have two cane-training wires, one at about 2½ feet from the ground and another at 3½ feet (igure 19). Train the trunk to a 2½-foot head height. Prune the vine to four canes. Allow the shoots from the two lower canes to grow downward; they are not “trained.” Train the shoots from the two upper canes upward and between catch wires (see “Vertical hedgerow,” page 15; igure 20). Train four shoots near the head of the vine upward. hese become the fruiting canes for next year.
It’s important not to let the upper shoots shade the lower ones, or quality will be relatively poor.
Figure 18. Grapes trained to an arbor.
Ph
oto
co
urt
esy
Ne
il B
ell
, O
reg
on
Sta
te U
niv
ers
ity
Figure 19. Scott-Henry training system, after cane-pruning.
(Left side of vine)
Figure 20. Scott Henry training system, during fruiting season,
showing gap between upward- and downward-trained shoots.
Ph
oto
co
urt
esy
Pa
tty
Sk
ink
is,
Ore
go
n S
tate
Un
ive
rsit
y

18Growing Table Grapes
Four-cane KnifenHome garden grape books oten refer to
this system. It is similar to the Scott Henry, but shoots are not trained. he top shoots are allowed to shade the lower ones (igure 21). his system is not generally recommended for cool regions in Oregon. Also, it is best not to spur prune this system in western Oregon to avoid too much shading.
TrellisA trellis is required for most training
systems. Building a trellis is like building a fence: take care to make the trellis strong and brace it well. It needs to bear the weight of vigorously growing vines and a heavy crop.
It’s best to build the trellis in the irst growing season, so that you can start training vines to the trellis early (rather than to a stake).
he type of trellis you need varies with the training system you use (see “Training,” page 13). However, all trellises have certain characteristics in common.
End posts should be strong, about 8 to 9 feet long, and have a diameter of at least 6 inches. Treated wooden posts are best, though you can use concrete or large steel posts. Set end posts about 2 to 3 feet deep and leaning slightly away from the center of the row. For most training systems, 6 feet of post should be above ground. To brace the end posts, use large screw anchors or an “H” brace (igures 22 and 23).
Line posts are those in the row between the end posts. Space them 18 to 21 feet apart (or every three plants) and set them 2 feet deep. Wooden line posts should have a minimum diameter of 3 inches. An option for some training systems (like the single downward hanging canopy) is to place a steel fence post at each plant.
Use high-tensile, 12-gauge or heavier wire. Insert a wire tightener (e.g., igure 24, page 19) in each head- or cane-training wire. Wires must be tightened each winter ater pruning.
To make moveable training wires, add chain-link to the end of wires at the row ends (igure 23) and put nails or hooks in the post.
Figure 21. Four-cane Knifen, early spring.
Figure 22. Trellis for GDC.
Figure 23. Trellis for VSP-trained vineyard.
Ph
oto
co
urt
esy
Pa
tty
Sk
ink
is,
Ore
go
n S
tate
Un
ive
rsit
y

19Growing Table Grapes
his allows you to move wires as you train the shoots. he number of wires you need depends on the training system you use.
Summer pruninghere are several pruning techniques you can
use in spring and summer to manage the vine for good fruit quality.
Shoot thinningIn spring, a grapevine can produce up to
three shoots per bud at a node. When you prune to a certain number of buds per vine, you are estimating yield by assuming there will be only one fruitful shoot per node. Shoot thinning is removing extra shoots to leave just one shoot per node. hin shoots once in spring when the main shoot is about 6 inches long. You can usually determine the shoot to keep because it’s longer than the secondary or tertiary shoots (shorter shoots at the same node). Remove the extra shoot(s) by carefully snapping them of (igure 25 A–D). Avoid shoot thinning when shoots are too long, so you won’t accidentally remove the main (primary) shoot.
Figure 25. Shoot thinning process.
25A. Two shoots
per node, before
thinning.
25B. Ready
to remove
the least
productive
shoot.
25C. Snapping
of the shoot.
25D. One shoot
is left per node.
Figure 24. Example of a wire tightener.
20Growing Table Grapes
Fruit thinningIt’s best to limit young vines to one cluster per
shoot (see “Pruning,” page 8). his is called fruit thinning. hin fruit right before bloom to improve fruit set on the remaining clusters.
Fruit thinning can also be done later in the season, if you feel you haven’t pruned the vine severely enough and there’s too much fruit for the crop to ripen well. If you remove fruit clusters before veraison, berry size increases, yield is less afected, and the grape clusters ripen sooner. If you thin fruit soon ater veraison, there is little efect on berry size, but yield is reduced, and the remaining fruit ripens sooner.
In general, shoots need to be at least 3 feet long to support a fruit crop. Remove clusters from shorter shoots.
HedgingUsually, 3 to 4 feet of growth per shoot is
enough to ripen a crop. If plants become too vigorous, you can top or trim shoots. Be sure not to shorten too much the shoots that are to become next year’s new fruiting canes. Hedged or tipped shoots produce lateral branches. Trim these also to prevent too much shading of the fruiting zone.
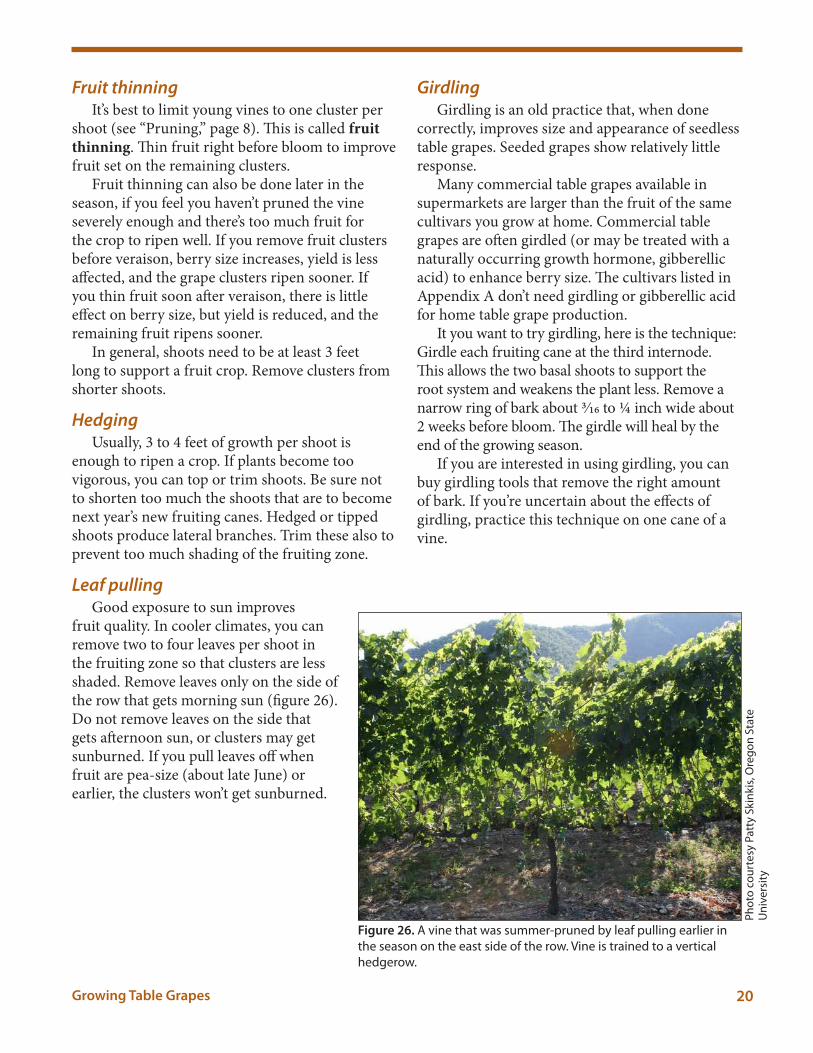
Leaf pullingGood exposure to sun improves
fruit quality. In cooler climates, you can remove two to four leaves per shoot in the fruiting zone so that clusters are less shaded. Remove leaves only on the side of the row that gets morning sun (igure 26). Do not remove leaves on the side that gets aternoon sun, or clusters may get sunburned. If you pull leaves of when fruit are pea-size (about late June) or earlier, the clusters won’t get sunburned.
GirdlingGirdling is an old practice that, when done
correctly, improves size and appearance of seedless table grapes. Seeded grapes show relatively little response.
Many commercial table grapes available in supermarkets are larger than the fruit of the same cultivars you grow at home. Commercial table grapes are oten girdled (or may be treated with a naturally occurring growth hormone, gibberellic acid) to enhance berry size. he cultivars listed in Appendix A don’t need girdling or gibberellic acid for home table grape production.
It you want to try girdling, here is the technique: Girdle each fruiting cane at the third internode. his allows the two basal shoots to support the root system and weakens the plant less. Remove a narrow ring of bark about 3⁄16 to ¼ inch wide about 2 weeks before bloom. he girdle will heal by the end of the growing season.
If you are interested in using girdling, you can buy girdling tools that remove the right amount of bark. If you’re uncertain about the efects of girdling, practice this technique on one cane of a vine.
Figure 26. A vine that was summer-pruned by leaf pulling earlier in
the season on the east side of the row. Vine is trained to a vertical
hedgerow.
Ph
oto
co
urt
esy
Pa
tty
Sk
ink
is, O
reg
on
Sta
te
Un
ive
rsit
y

21Growing Table Grapes
Pruning an old, neglected
vineA common question home gardeners ask is
whether they can “save” an old, neglected vine. Usually, they refer to a vine that wasn’t pruned or trained well to begin with, or one that hasn’t been pruned for many years. First of all, if the vine has sentimental value or you really like the variety and want to “save” it, it’s best to take some cuttings just in case the pruning methods described here don’t work (see “Propagation,” page 3).
A vine that hasn’t been managed well will have many small (short and thin) shoots. Oten, these are at the growing ends of the plant—perhaps high up in a tree or on the roof of an old shed! his growth produces low-quality fruit, isn’t good material for cane or spur pruning, and isn’t in a place where you can harvest the fruit easily.
If the vine has a decent trunk and looks like it had a good framework in the past, you might be able to save it. Prune it heavily by removing most of the wood, leaving only about 40 buds on 1-year-old wood. his wood might still be high up in a tree, but it’s needed to support new shoot growth.
With such a severe pruning, the vine may produce new suckers at the head of the vine or at the base of the trunk. If this happens, you will have new shoots that will become your fruiting canes next winter. You can use a sucker to replace the trunk. In that case, you would remove the older wood (up in the tree, in this example) the winter following the severe pruning.
For a vine that has too many trunks to count and you don’t know where to begin pruning, try cutting the vine back to near ground level. Oten, the vine will produce new suckers. (his method doesn’t work on grated vines, but grated vines are rare in table grapes.) Choose one of the new suckers to be your new trunk, and train it. he following winter, pile soil around this new trunk so that it will form its own roots (the old stump will rot out).
Remember: to be safe, be sure to take cuttings to propagate the vine in case the severe pruning doesn’t work.
Harvesthere are several signs that can help you judge
the ripeness of your grapes. • hecolorofripegrapesvarieswithcultivar.
Once you become familiar with a particular variety, color can help you judge when the grapes are getting close to maturity.
• hestemthatsupportstheclusterchangesfrom green to brown as the cluster reaches maturity.
• heseedsofseededgrapesdarkenastheberrymatures.
he best way to judge whether table grapes are ripe is to taste them. Taste berries at the tip of the cluster. hese are the last to ripen.
Grapes become sweeter and less acid as they mature. he characteristic aroma and lavor of a cultivar develops relatively late in the ripening process, with intensity increasing as the grapes “hang.” But, grapes also start to soten if they are let to hang too long, which decreases storage life. Also, the longer you let fruit hang on the vine in the fall, the greater the risk of damage from birds, bees, and fruit rot.
If you are an avid grower, you might buy a hand-held refractometer, a device that measures the percentage of soluble solids or sugar content (also known as “Brix”). hese cost a little over $150.
As you decide when to harvest, you must consider the weather and its potential efects on fruit. Rain on mature fruit may cause shattering (falling from the cluster), cracking or splitting, and an increase in fruit rot.
he average temperature must be above 50°F for grapes to continue to mature on the vine. Grapes do not ripen further ater they’ve been picked.
Use pruning shears to harvest clusters. Store clusters in the refrigerator in vented plastic bags.

22Growing Table Grapes
Pests and problems
EnvironmentWinter cold injury
American grapes are the most cold hardy, while European grapes are the least. In the Willamette Valley and coastal areas of Oregon, cold damage to buds and canes of European grapes occurs rarely, and then only on the coolest sites (such as at high elevation). Cold injury to European table grapes and hybrids is more common in eastern-Oregon growing regions. here, these types of grapes may be grown using certain methods to train vines or protect them with soil or mulch during cold winter months. Refer to the publication Protecting Grapevines from Winter Injury (“For further reading,” page 24).
FrostAter bud break in spring, grapevine shoots are
sensitive to frost damage. If frost injury occurs, there may be a less developed shoot or bud at that node that will grow and produce a partial crop.
To reduce risk of frost injury on cooler sites: • Growvinesnearcompactedbaresoilrather
than near weeds or grass.
• Leavelongcaneswhenpruning,whichdelaysbud break on the more basal part of the canes. Remove the extra cane length ater risk of frost has passed.
• Keepothercanesas“spareparts”todelaybudbreak. Remove the extra canes or buds ater risk of frost has passed.
• Traintoahighheadheight.Higherfromthe ground tends to be warmer during frost season.
Risk of frost injury varies a great deal among sites and even among locations on the same property. Cultivars may also difer in timing of bud break, which can make some cultivars more susceptible to frost.
Stunted spring growthIn spring, afected shoots have zig-zag
internodes and are generally stunted. his can be caused by nutrient deiciencies (particularly zinc and boron), herbicide injury, spring frost damage, or mites. Refer to the publication Grapevine Growth Distortions (“For further reading,” page 24) for more information and suggested control measures.
Herbicide injuryGrapes are very sensitive to herbicide injury.
Distorted leaves (igure 27) and shoot tips are common symptoms in areas where herbicide drit (particularly of a 2,4-D product) has occurred. Avoid using these herbicide products near grapes or on days when drit may occur (hot or windy conditions).
PestsPhylloxera
his aphid-like insect feeds on roots, weakening the plant. Many American or hybrid table grape cultivars are tolerant of this pest, but European cultivars are susceptible. European wine grapes are available from nurseries as vines grated to a resistant rootstock, but most European table grapes available in the Paciic Northwest are not grated.
Phylloxera can kill a susceptible grapevine. here are no control measures for this pest if susceptible, non-grated vines become infested.
Figure 27. Symptoms of 2,4-D injury on a grape leaf.
23Growing Table Grapes
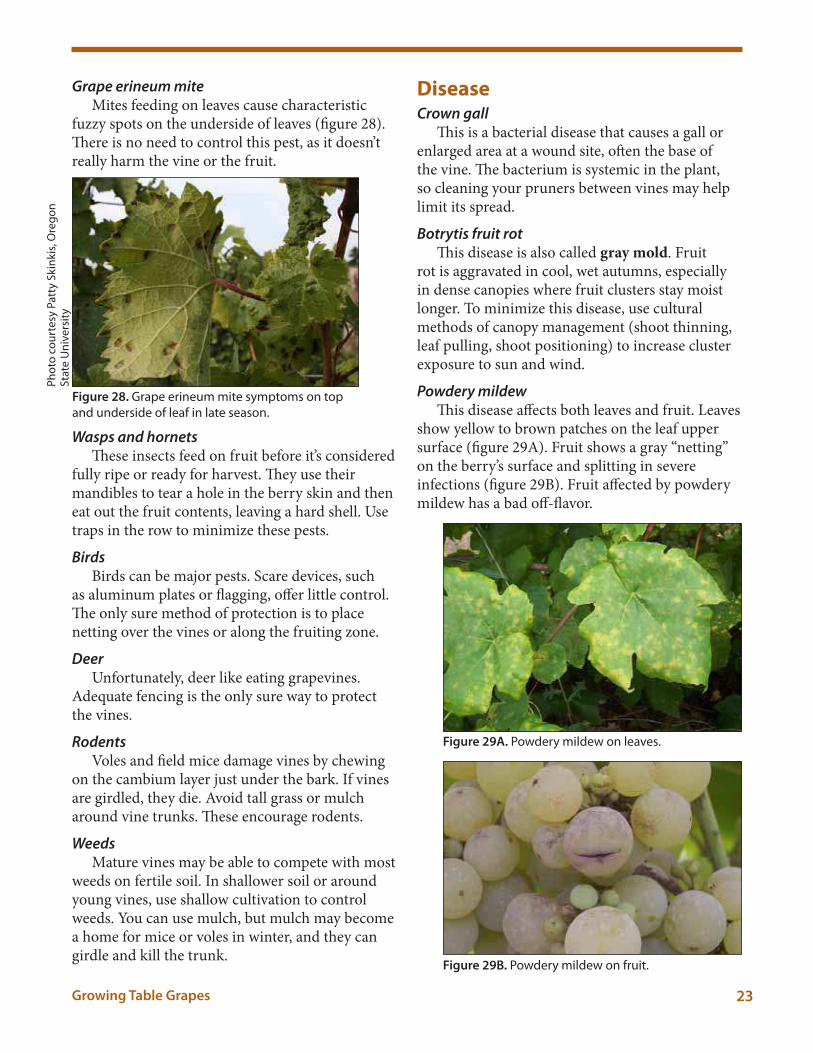
Grape erineum miteMites feeding on leaves cause characteristic
fuzzy spots on the underside of leaves (igure 28). here is no need to control this pest, as it doesn’t really harm the vine or the fruit.
Wasps and hornetshese insects feed on fruit before it’s considered
fully ripe or ready for harvest. hey use their mandibles to tear a hole in the berry skin and then eat out the fruit contents, leaving a hard shell. Use traps in the row to minimize these pests.
BirdsBirds can be major pests. Scare devices, such
as aluminum plates or lagging, ofer little control. he only sure method of protection is to place netting over the vines or along the fruiting zone.
DeerUnfortunately, deer like eating grapevines.
Adequate fencing is the only sure way to protect the vines.
RodentsVoles and ield mice damage vines by chewing
on the cambium layer just under the bark. If vines are girdled, they die. Avoid tall grass or mulch around vine trunks. hese encourage rodents.
WeedsMature vines may be able to compete with most
weeds on fertile soil. In shallower soil or around young vines, use shallow cultivation to control weeds. You can use mulch, but mulch may become a home for mice or voles in winter, and they can girdle and kill the trunk.
DiseaseCrown gall
his is a bacterial disease that causes a gall or enlarged area at a wound site, oten the base of the vine. he bacterium is systemic in the plant, so cleaning your pruners between vines may help limit its spread.
Botrytis fruit rothis disease is also called gray mold. Fruit
rot is aggravated in cool, wet autumns, especially in dense canopies where fruit clusters stay moist longer. To minimize this disease, use cultural methods of canopy management (shoot thinning, leaf pulling, shoot positioning) to increase cluster exposure to sun and wind.
Powdery mildewhis disease afects both leaves and fruit. Leaves
show yellow to brown patches on the leaf upper surface (igure 29A). Fruit shows a gray “netting” on the berry’s surface and splitting in severe infections (igure 29B). Fruit afected by powdery mildew has a bad of-lavor.
Figure 28. Grape erineum mite symptoms on top
and underside of leaf in late season.
Ph
oto
co
urt
esy
Pa
tty
Sk
ink
is, O
reg
on
S
tate
Un
ive
rsit
y
Figure 29A. Powdery mildew on leaves.
Figure 29B. Powdery mildew on fruit.

24Growing Table Grapes
Cultivars difer considerably in their sensitivity to powdery mildew. In general, European cultivars are most susceptible and may require several applications of sulfur or other fungicides for control. Good canopy exposure and air circulation also help manage this disease.
For more information on pests, see the following publications (in “For further reading,” below). • PestManagementGuideforWineGrapesin
Oregon
• PaciicNorthwestInsectManagementHandbook
• PaciicNorthwestPlantDiseaseManagementHandbook
• PaciicNorthwestWeedManagementHandbook
Also, check with your local OSU Extension Service oice for management recommendations.
For further readingEstablishing a Vineyard in Oregon—A Quick Start
Resource Guide (EM 8973-E). 2009. Oregon State University Extension Service. http://ir.library.oregonstate.edu/xmlui/bitstream/handle/1957/20551/
em8973-e.pdf
Grape Phylloxera—Biology and Management in the Paciic Northwest (EC 1463-E). 2009. Oregon State University Extension Service. http://ir.library.oregonstate.edu/xmlui/bitstream/
handle/1957/19539/ec1463-e.pdf
Grapevine Growth Distortions—A Guide to Identifying Symptoms (EM 8975-E). 2009. Oregon State University Extension Service. http://ir.library.oregonstate.edu/xmlui/bitstream/
handle/1957/20598/em8975-e.pdf
Paciic Northwest Pest Management Handbooks Insect Management Handbook. Plant Disease Management Handbook. Weed Management Handbook. Oregon State University Extension Service. http://pnwhandbooks.org/
Pest Management Guide for Wine Grapes In Oregon (EM 8413). 2011. Oregon State University Extension Service. http://ir.library.oregonstate.edu/xmlui/bitstream/handle/1957/20097/
em8413-2011.pdf
Preventing Herbicide Drit and Injury to Grapevines (EM 8860). 2004. Oregon State University Extension Service. http://ir.library.oregonstate.edu/xmlui/bitstream/handle/1957/20353/
em8860.pdf
Preventing Phenoxy Herbicide Damage to Grape Vineyards (EM 8737). 1999. Oregon State University Extension Service. http://ir.library.oregonstate.edu/xmlui/bitstream/handle/1957/20090/
em8737-e.pdf
Protecting Grapevines from Winter Injury (PNW 603-E). 2008. Oregon State University Extension Service. http://ir.library.oregonstate.edu/xmlui/bitstream/handle/1957/20803/pnw603-e.pdf
he Grape Grower—A Guide to Organic Viticulture. 2002. Chelsea Green Pub. Co., White River Junction, VT. 289 pp.

25Growing Table Grapes
Appendix A
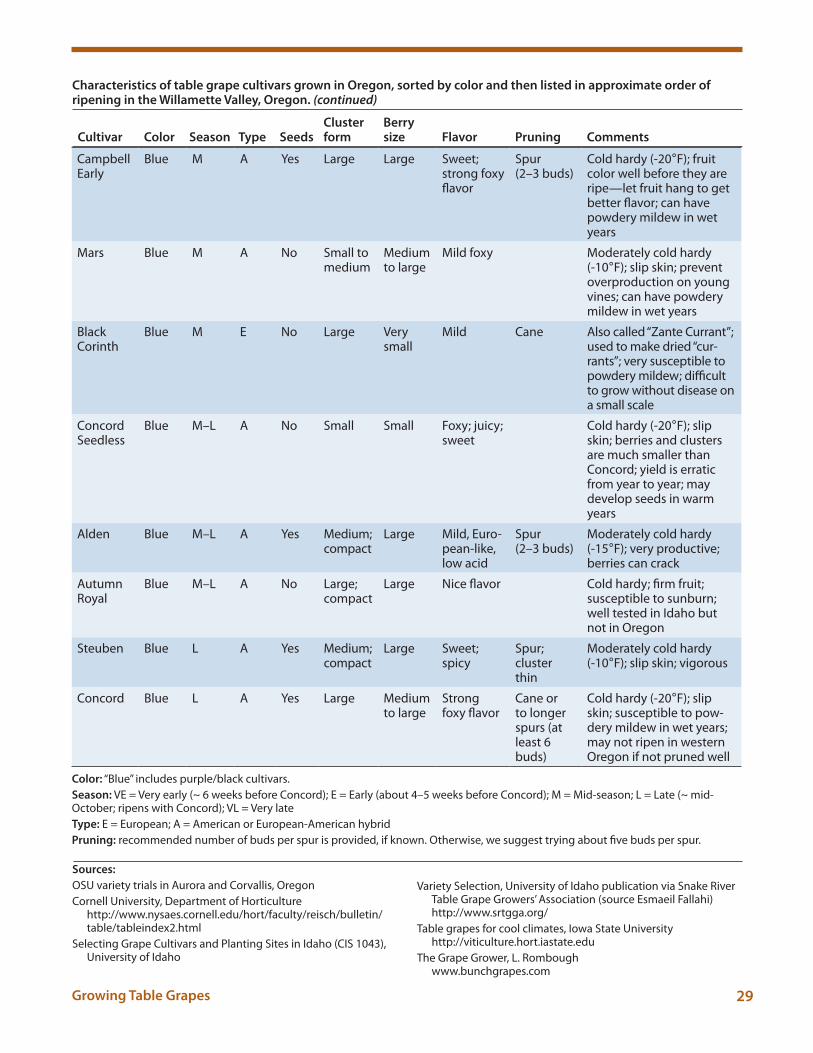
Characteristics of table grape cultivars grown in Oregon, sorted by color and then listed in approximate
order of ripening in the Willamette Valley, Oregon.
Cluster Berry
Cultivar Color Season Type Seeds form size Flavor Pruning Comments
Interlaken Green VE E No Small; compact
Small Excellent; foxy lavor; sweet; aromatic
Cane Moderate cold hardiness (some injury at -5°F); tender skin; berries crisp texture; good for raisins; fruit hangs well on vine to sweeten further; reliable high yields; also adapted to cooler coastal areas
Spartan Green E A No Large; compact
Small Mild Spur Moderately cold hardy to -10°F; irm fruit
Himrod Green E A No Long; loose
Small Good, honey-like
Cane; cluster-thin to improve compact-ness of remaining clusters
Moderately cold hardy (-10°F); tender skin; good for raisins; brittle cluster and berry stems; berries fall of cluster when stored; medium yield on very vigorous vines
Ontario Green E A Yes Medium; compact
Medium to large
Mild foxy lavor
Cold hardy (-20°F); slip skin; productive on lighter, fertile soil
Seneca Green E A Yes Medium; loose
Small; oval
Sweet, spicy, aromatic
Moderately cold hardy (-5 to -10°F); not suited for coldest regions; irm-textured berries; suscep-tible to powdery mildew; vigorous
Edelweiss Green E A Yes Medium; loose
Medium to large
Mild foxy lavor that intensiies as fruit hangs on vine
Cane Cold hardy (-30°F); slip skin; nice alternative to Niagara (more disease resistant)
Lakemont Green M A No Very large; compact
Small to medium
Mild and acid
Cane; cluster-thin
Moderate cold hardiness (-10°F); susceptible to botrytis; high yield
Remaily Seedless
Green M–L A No Very large
Large; oval
Sweet when ripe; mildly fruity
Cane; cluster-thin
Vigorous plants; suscep-tible to powdery mildew; fruit may “bronze” in sun; needs warm fall to develop sweet fruit
Continued next page
Color: “Green” includes yellow-green cultivars.
Season: VE = Very early (~ 6 weeks before Concord); E = Early (about 4–5 weeks before Concord); M = Mid-season; L = Late (~ mid-October; ripens with Concord); VL = Very late
Type: E = European; A = American or European-American hybrid
Pruning: Recommended number of buds per spur is provided, if known. Otherwise, we suggest trying about ive buds per spur.

26Growing Table Grapes
Emerald Green M–L A No Very large
Medium to large
Mild Spur; cluster-thin
Cold hardy; well tested in Idaho but not in Oregon; extremely susceptible to powdery mildew and sun-burn
Italia Green M–L A Yes Large Large; oval
Great sweet lavor
Spur Cold hardy; fruit turns yellow in sun; berries hang well on vine; fruit stores well; well-tested in Idaho but not in Oregon
Niagara Green M–L A Yes Large; compact
Large Strong foxy lavor; not very sweet
Cold hardy (-15 to -20°F); slip skin; for fresh or wine; does not consis-tently ripen in Willamette Valley unless pruned well; susceptible to powdery mildew in wet years; very vigorous
Neptune Green L A No Large; compact
Large; oval
Mild and fruity
Spur Cold hardy; irm berries with thick skin; milder European-type lavor; low yield; resistant to cracking
Golden Muscat
Green VL A Yes Large Medium to large; oval
Muscat type; sweet; aromatic
Moderately cold hardy (-10 to -15°F); slip skin is slightly tough; juicy, soft berries; will not ripen in most locations in Oregon; rain near harvest will cause berries to crack
Flame Seedless
Red E E No Large Medium Mild, sweet Cane or spur
Not cold hardy enough for eastern Oregon (injury at 0 to 10°F); crisp texture; vine susceptible to pow-dery mildew
Reliance Red E A No Medium to large
Medium Sweet, foxy, fruity
Spur Cold hardy (-20°F); slip skin; fruit may not develop good red color in some years and may crack in wet fall; tender skin; good for raisins, fresh, jellies, and juice
Characteristics of table grape cultivars grown in Oregon, sorted by color and then listed in approximate order of ripening in the Willamette Valley, Oregon. (continued)
Cluster Berry
Cultivar Color Season Type Seeds form size Flavor Pruning Comments
Continued next page
Color: “Green” includes yellow-green cultivars.
Season: VE = Very early (~ 6 weeks before Concord); E = Early (about 4–5 weeks before Concord); M = Mid-season; L = Late (~ mid-October; ripens with Concord); VL = Very late
Type: E = European; A = American or European-American hybrid
Pruning: Recommended number of buds per spur is provided, if known. Otherwise, we suggest trying about ive buds per spur.

27Growing Table Grapes
Canadice Red E A No Medium; very compact
Small Medium foxy lavor; sweet
Spur (2–3 buds per spur); cluster-thin if needed to limit yield
Cold hardy (-25°F; only in well-pruned vine); adapted to cooler coastal climates as well as other regions; high yield; tender skin; slip skin; good for raisins
Vanessa Red E A No Medium; compact
Medium Mild; fruity Cane prune if high vigor; spur if low vigor
Cold hardy (-20°F); may have remnants of undeveloped seeds; stores well; irm berries; a favorite variety of many; a good alternative to Flame Seedless in cool climates
Einset Seedless
Red E A No Medium; mod-erately loose
Medium; oval
Flavor mild foxy, fruity, straw-berry-like
Cane Moderately cold hardy (-10°F); skin is slightly tough; small, undeveloped seeds may be noticeable; irm fruit stores fresh very well; overly fertilized or vigorous vines set little fruit
Delaware Red M A Yes Small Small Almost no foxy lavor; sweet
Cane Susceptible to powdery mildew; fruit better for juice than fresh eating
Swenson Red
Red M A Yes Medium; compact
Medium to large
Nice foxy lavor; sweet; aromatic
Cold hardy (to -30°F); berries have irm texture; vine has low vigor when young; not well adapted to coast, as set is reduced in fog
Saturn Red M A No Medium to large
Large Nice, sweet Cane or spur
Moderate cold hardiness (-15°F); texture and lavor similar to European types; can have small berries in cool season; traces of seed remnants found in warm seasons; well tested in Idaho
Sufolk Red
Red M A No Medium; loose
Medium Mild foxy lavor; sweet
Cane or spur
Moderate cold hardiness (to zone 5); berries may be more pink than red; fruit set (berries/cluster) can be poor in some years; low yield
Alborz Red M A No Large Medium Nice, crispy fruit
Spur Cold hardy; well tested in Idaho but not in Oregon
Continued next page
Characteristics of table grape cultivars grown in Oregon, sorted by color and then listed in approximate order of ripening in the Willamette Valley, Oregon. (continued)
Cluster Berry
Cultivar Color Season Type Seeds form size Flavor Pruning Comments
Season: VE = Very early (~ 6 weeks before Concord); E = Early (about 4–5 weeks before Concord); M = Mid-season; L = Late (~ mid-October; ripens with Concord); VL = Very late
Type: E = European; A = American or European-American hybrid
Pruning: Recommended number of buds per spur is provided, if known. Otherwise, we suggest trying about ive buds per spur.

28Growing Table Grapes
Van Buren Blue VE A Yes Medium Medium Foxy; juicy; sweet; low acid
Cold hardy; slip skin; juice similar to Concord; berries prone to splitting; fresh fruit doesn’t store well; not ideal for juice; vine does best in light, fertile soil
Elizabeth Blue VE A Yes Medium Medium Foxy Cold hardy; thought by some to be the same cultivar as Van Buren
Price Blue VE A Yes Small; compact
Large Nice foxy lavor; very sweet
Cold hardy (-25°F); good disease resistance; slip skin is tender; thinner skin than Concord; makes great juice; most adapted to cool coastal regions as well as warmer areas
Valiant Blue E A Yes Small; compact
Medium Nice foxy lavor; sweet
Spur (3–4 buds)
Cold hardy (-35°F); excel-lent for juice or jelly; do not let vines produce too much fruit when young
Bufalo Blue E–M A Yes Medium; loose
Medium Pleasant, sweet lavor
Cane or spur
Moderate hardiness (-10°F); slip skin; tough, astringent skin; pulp can be stringy; best for juice
Venus Blue M A No Medium; compact
Medium to large
Slight foxy lavor
Cane Moderate cold hardiness (-15°F); slip skin; skin may be tough and astringent; remnants of undeveloped seeds can be quite notice-able
Jupiter Blue M A No Large Large; oval
Mild Muscat lavor
Spur (3–4 buds)
Cold hardy (-20°F); irm reddish-blue fruit; resistant to cracking; sweet, late fruit makes good raisins
Glenora Blue M A No Large Medium to large
Slight foxy lavor
Cane Moderate cold hardiness (-15°F); tip berries may not ripen well; berries do not store well
NY Muscat
Blue M A Yes Medium Medium Fruity; rich Muscat lavor
Spur Cold hardy (-15°F); slip skin; susceptible to pow-dery mildew; fruit are red-dish blue
Characteristics of table grape cultivars grown in Oregon, sorted by color and then listed in approximate order of ripening in the Willamette Valley, Oregon. (continued)
Cluster Berry
Cultivar Color Season Type Seeds form size Flavor Pruning Comments
Continued next page
Color: “Blue” includes purple/black cultivars.
Season: VE = Very early (~ 6 weeks before Concord); E = Early (about 4–5 weeks before Concord); M = Mid-season; L = Late (~ mid-October; ripens with Concord); VL = Very late
Type: E= European; A=American or European-American hybrid
Pruning: recommended number of buds per spur is provided, if known. Otherwise, we suggest trying about ive buds per spur.
29Growing Table Grapes
Campbell Early
Blue M A Yes Large Large Sweet; strong foxy lavor
Spur (2–3 buds)
Cold hardy (-20°F); fruit color well before they are ripe—let fruit hang to get better lavor; can have powdery mildew in wet years
Mars Blue M A No Small to medium
Medium to large
Mild foxy Moderately cold hardy (-10°F); slip skin; prevent overproduction on young vines; can have powdery mildew in wet years
Black Corinth
Blue M E No Large Very small
Mild Cane Also called “Zante Currant”; used to make dried “cur-rants”; very susceptible to powdery mildew; diicult to grow without disease on a small scale
Concord Seedless
Blue M–L A No Small Small Foxy; juicy; sweet
Cold hardy (-20°F); slip skin; berries and clusters are much smaller than Concord; yield is erratic from year to year; may develop seeds in warm years
Alden Blue M–L A Yes Medium; compact
Large Mild, Euro-pean-like, low acid
Spur (2–3 buds)
Moderately cold hardy (-15°F); very productive; berries can crack
Autumn Royal
Blue M–L A No Large; compact
Large Nice lavor Cold hardy; irm fruit; susceptible to sunburn; well tested in Idaho but not in Oregon
Steuben Blue L A Yes Medium; compact
Large Sweet; spicy
Spur; cluster thin
Moderately cold hardy (-10°F); slip skin; vigorous
Concord Blue L A Yes Large Medium to large
Strong foxy lavor
Cane or to longer spurs (at least 6 buds)
Cold hardy (-20°F); slip skin; susceptible to pow-dery mildew in wet years; may not ripen in western Oregon if not pruned well
Characteristics of table grape cultivars grown in Oregon, sorted by color and then listed in approximate order of ripening in the Willamette Valley, Oregon. (continued)
Cluster Berry
Cultivar Color Season Type Seeds form size Flavor Pruning Comments
Sources: OSU variety trials in Aurora and Corvallis, Oregon
Cornell University, Department of Horticulture http://www.nysaes.cornell.edu/hort/faculty/reisch/bulletin/table/tableindex2.html
Selecting Grape Cultivars and Planting Sites in Idaho (CIS 1043), University of Idaho
Color: “Blue” includes purple/black cultivars.
Season: VE = Very early (~ 6 weeks before Concord); E = Early (about 4–5 weeks before Concord); M = Mid-season; L = Late (~ mid-October; ripens with Concord); VL = Very late
Type: E = European; A = American or European-American hybrid
Pruning: recommended number of buds per spur is provided, if known. Otherwise, we suggest trying about ive buds per spur.
Variety Selection, University of Idaho publication via Snake River Table Grape Growers’ Association (source Esmaeil Fallahi) http://www.srtgga.org/
Table grapes for cool climates, Iowa State University http://viticulture.hort.iastate.edu
The Grape Grower, L. Rombough www.bunchgrapes.com

30Growing Table Grapes
Appendix B
Photographs of cultivars, by color
Green
Edelweiss
Interlaken
Golden Muscat
Himrod
Lakemont
Niagara
Neptune
Remaily Seedless

31Growing Table Grapes
Blue
Black Corinth
Campbell Early (good fruit set)
ConcordMars
New York Muscat
Glenora
Jupiter
Canadice
Campbell Early (poor fruit set)

32Growing Table Grapes
Saturn
Venus
Blue (continued) Red
Einsett Seedless
RelianceSufolk Red
Flame Seedless
VanessaSwenson Red
© 2011 Oregon State University. his publication was produced and distributed in furtherance of the Acts of Congress of May 8 and June 30, 1914. Extension work is a cooperative program of Oregon State University, the U.S. Department of Agriculture, and Oregon counties.
Oregon State University Extension Service ofers educational programs, activities, and materials without discrimination based on age, color, disability, gender identity or expression, marital status, national origin, race, religion, sex, sexual orientation, or veteran’s status. Oregon State University Extension Service is an Equal Opportunity Employer.
Published May 2011.
Price