GROMACSIMUM USER GUIDE Version 5.0.4 is a ... - diagrid · PDF fileGROMACSIMUM USER GUIDE...
23
Page | 1 GROMACSIMUM USER GUIDE Version 5.0.4 Gromacsimum is a graphical front-end for Gromacs. Ian Campbell Feng (Kevin) Chen
Transcript of GROMACSIMUM USER GUIDE Version 5.0.4 is a ... - diagrid · PDF fileGROMACSIMUM USER GUIDE...
Page | 1
GROMACSIMUM USER GUIDE
Version 5.0.4
Gromacsimum is a graphical front-end for Gromacs.
Ian Campbell
Feng (Kevin) Chen
Page | 2
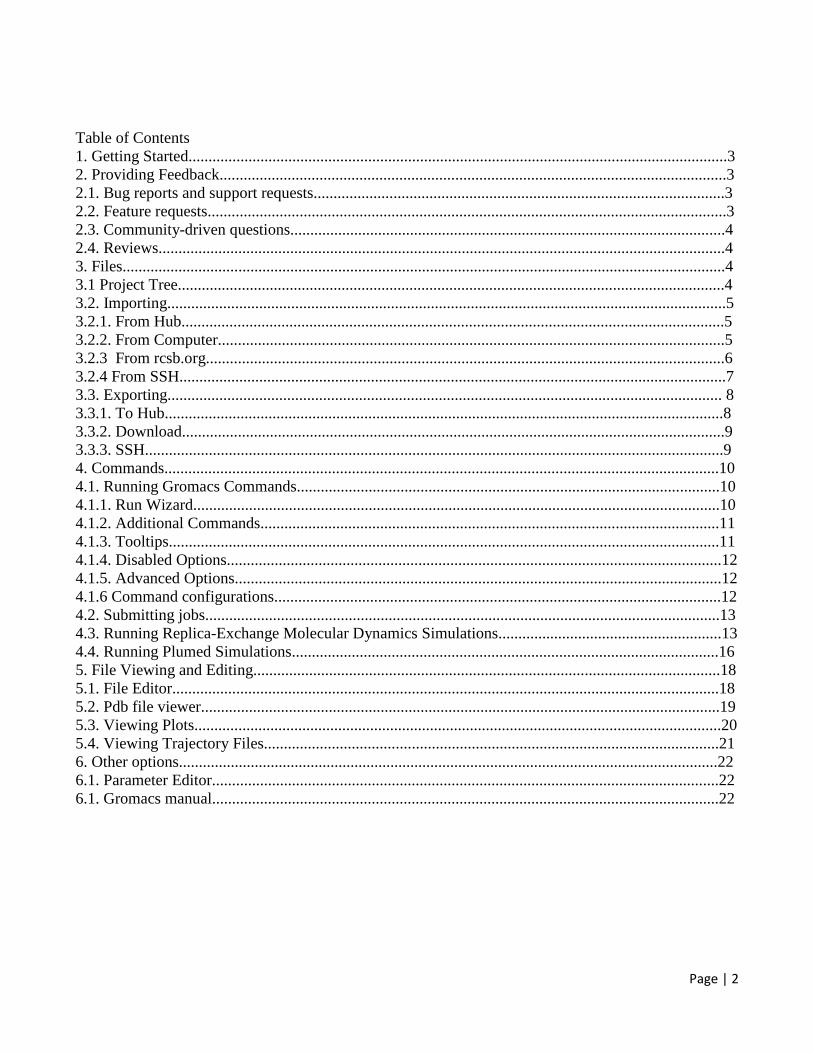
Table of Contents
1. Getting Started.......................................................................................................................................3
2. Providing Feedback...............................................................................................................................3
2.1. Bug reports and support requests.......................................................................................................3
2.2. Feature requests..................................................................................................................................3
2.3. Community-driven questions.............................................................................................................4
2.4. Reviews..............................................................................................................................................4
3. Files.......................................................................................................................................................4
3.1 Project Tree.........................................................................................................................................4
3.2. Importing............................................................................................................................................5
3.2.1. From Hub........................................................................................................................................5
3.2.2. From Computer...............................................................................................................................5
3.2.3 From rcsb.org..................................................................................................................................6
3.2.4 From SSH.........................................................................................................................................7
3.3. Exporting........................................................................................................................................... 8
3.3.1. To Hub............................................................................................................................................8
3.3.2. Download........................................................................................................................................9
3.3.3. SSH.................................................................................................................................................9
4. Commands...........................................................................................................................................10
4.1. Running Gromacs Commands..........................................................................................................10
4.1.1. Run Wizard....................................................................................................................................10
4.1.2. Additional Commands...................................................................................................................11
4.1.3. Tooltips..........................................................................................................................................11
4.1.4. Disabled Options............................................................................................................................12
4.1.5. Advanced Options..........................................................................................................................12
4.1.6 Command configurations................................................................................................................12
4.2. Submitting jobs.................................................................................................................................13
4.3. Running Replica-Exchange Molecular Dynamics Simulations........................................................13
4.4. Running Plumed Simulations...........................................................................................................16
5. File Viewing and Editing.....................................................................................................................18
5.1. File Editor.........................................................................................................................................18
5.2. Pdb file viewer..................................................................................................................................19
5.3. Viewing Plots....................................................................................................................................20
5.4. Viewing Trajectory Files..................................................................................................................21
6. Other options.......................................................................................................................................22
6.1. Parameter Editor...............................................................................................................................22
6.1. Gromacs manual...............................................................................................................................22
Page | 3
1. Getting Started
In order to use Gromacsimum, you must first have an account on the DiaGrid hub. To register for a free account, go to http://diagrid.org and click the “Register” button. After filling in the required form fields, click “Create Account”. You will receive an confirmation email at the account you specified. Click the link in the confirmation email to finalize your account. Users affiliated with Purdue University may choose to log in with their Purdue Career Account instead of creating a separate DiaGrid hub account. This grants access to the hub's Workspace feature, whichincludes a full desktop environment and the Rapid APPlication infrastrucTURE (RAPPTURE) toolkit. Once you have a DiaGrid hub account, log in with the user name and password you created. Click on“All Tools” under the “My Tools” menu on the right side of the screen. Click the tool you would like to launch. If you want to add the Gromacsimum tool to the “Favorites” tab, click the heart icon. Clicking on the Gromacsimum link will take you to the Gromacsimum home page. From this page, you can click the “Launch Tool” button to begin using the tool or explore more content like support documentation and historic usage data. Note: Java plugin required In order to use DiaGrid applications, your browser must have a Java plugin installed. To check the status of the your plugin or to download Java, visit java.com.
2. Providing Feedback User feedback is critical to making tools that will benefit science communities. The DiaGrid hub has several tools available to provide feedback to developers through the hub website.
2.1. Bug reports and support requests To report a bug or submit a support requests, click “Need Help?” button found in the upper-right corner of all hub web pages. This brings up a form that will generate a support ticket with the developers.
2.2. Feature requests To request new features be added to Gromacsimum, click the “Wish List” tab. Vote on existing wishes using the "thumb up" and "thumb down" buttons or add a new wish by clicking the “Add a new wish” button. Provide as much detail as possible so that the developers can most quickly implement the new feature.
Page | 4
2.3. Community-driven questions From the Gromacsimum tool page, users can ask and answer questions about the tool or the science. To view questions, click the “Questions” tab. To ask a new question, click the “Ask a question about this tool” button. Existing questions can be viewed by clicking the title. To answer a question, click “Answer this question”.
2.4. Reviews Reviews of Gromacsimum can be published under the “Reviews” tab. To write a new review, click the “Write a review” button. Select a star rating (where one star is "poor" and five stars represents "excellent") and enter supporting text. If anonymity is desired, select the “Anonymous (check if you do not want your name shown on reviews)” check box. When the review is complete, click the “Submit” button.
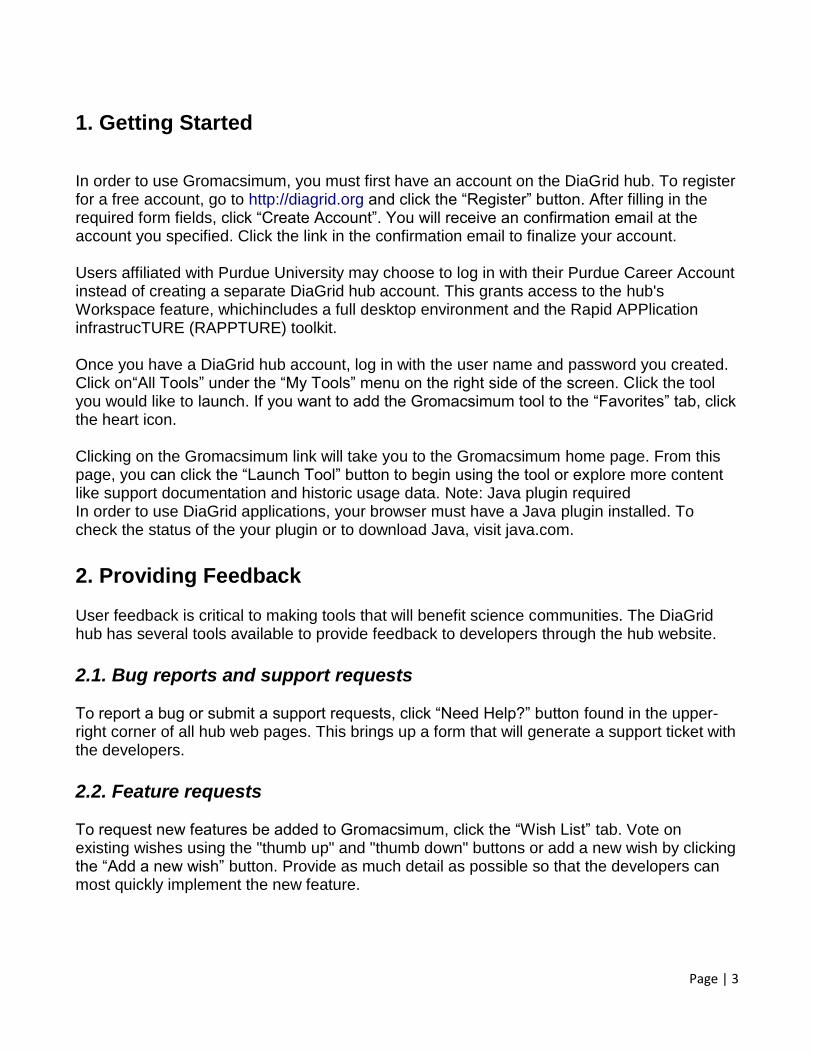
3. Files 3.1 Project Tree This is the default view in Gromacsimum:
Files are shown in the project tree to the right. New folders and empty files can be created by
right clicking on the parent directory and selecting “New Folder” or “New File” respectively.
Select files by single-clicking on them. Multiple files can be selected at once using the ctrl or
shift modifiers. Existing files can be deleted or renamed by right-clicking on them and
selecting “Delete” or “Rename.” “Delete Backup Files” will delete files from a directory or a
selection of files that begin and end with #.Compressed files (ending with .zip, .tar.gz, etc.)
Page | 5
can be unzipped by right-clicking on them andselecting “Extract archives,” and can be created
by selecting multiple files or directories and selecting “Compress.”
Files in gromacsimum are arranged in projects. Each project is stored as a folder in the ~/.gromacsimum directory. The “Refresh” item in the File menu will refresh the project tree from that directory. The default project name is “Project”, and is created on startup if it doesn't exist already. Gromacsimum will only display one project at a time. Projects can be created, deleted, and changed to in the Project menu.
3.2. Importing
The import file dialog can be brought up using the “Import” item in the File menu, or by right-clicking on the directory that files will be imported into and selecting “Import.” If the File menu is used, the files will be imported into the root directory of the project folder. Importing multiple files is easier if those files are compressed into an archive (.zip, .tar.gz, etc.) and then unzipped through gromacsimum.
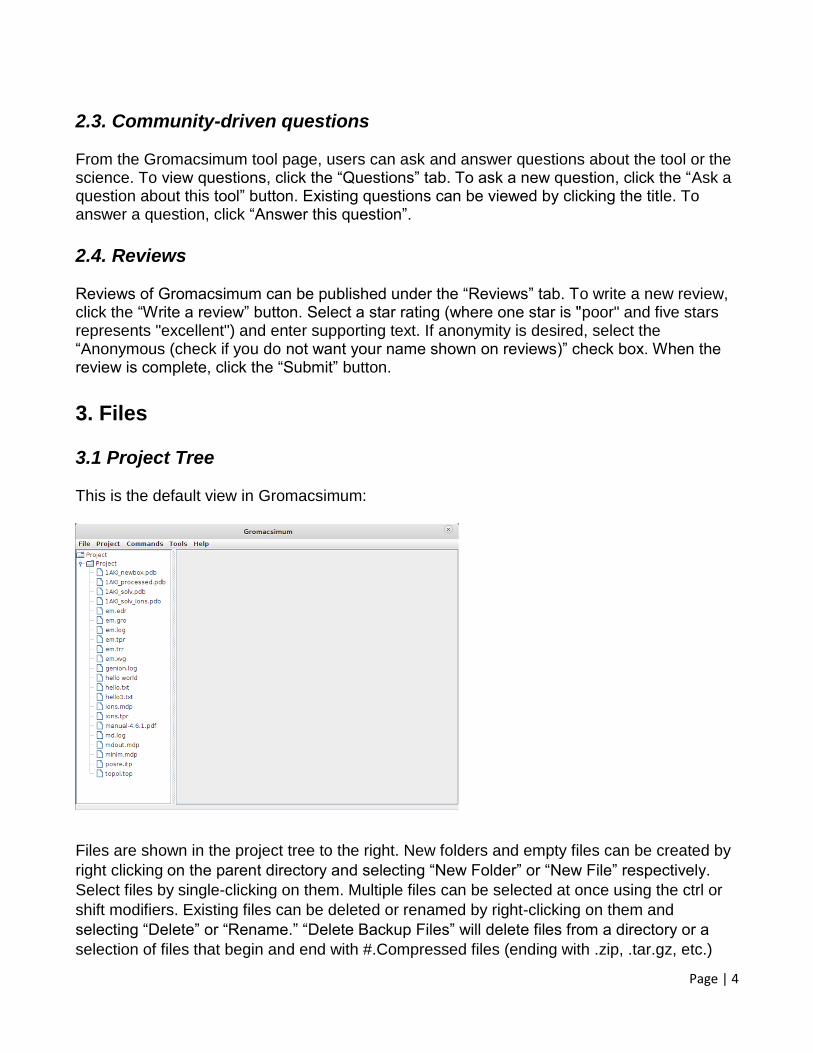
3.2.1. From Hub Currently, there are 4 options for importing files. The first option is to import files from the diagrid hub. Files can be selected from a generic file browser. These files will be copied on the hub into the selected directory.
3.2.2. From Computer

Page | 6
The second option is to import files from the local computer through the web browser. Clicking the “Import File” button will bring up a file selection dialog in the web browser.
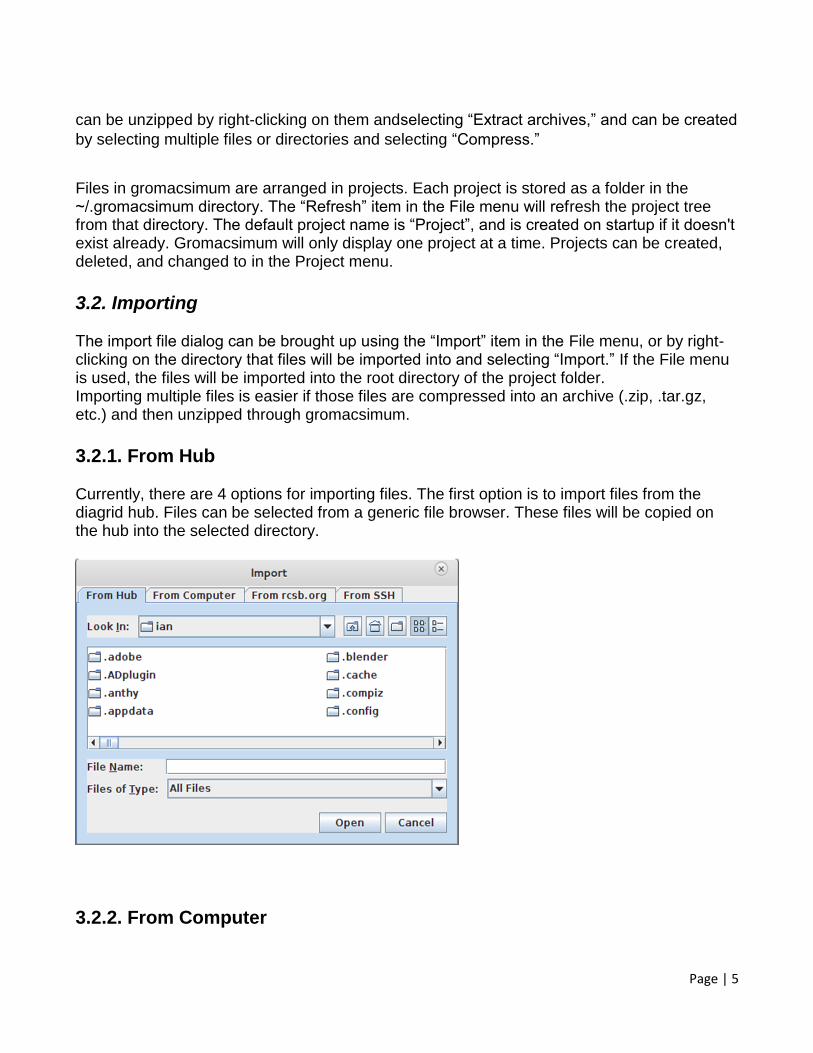
3.2.3 From rcsb.org
The third option is to import a .pdb file from rcsb.org. Each pdb file has a 4 character identifier which can be found to the right of the page here (in red):
Page | 7
By typing in this identifier into the text box (in uppercase or lowercase) and clicking the “Import File” button, Gromacsimum will download the file into the selected directory.
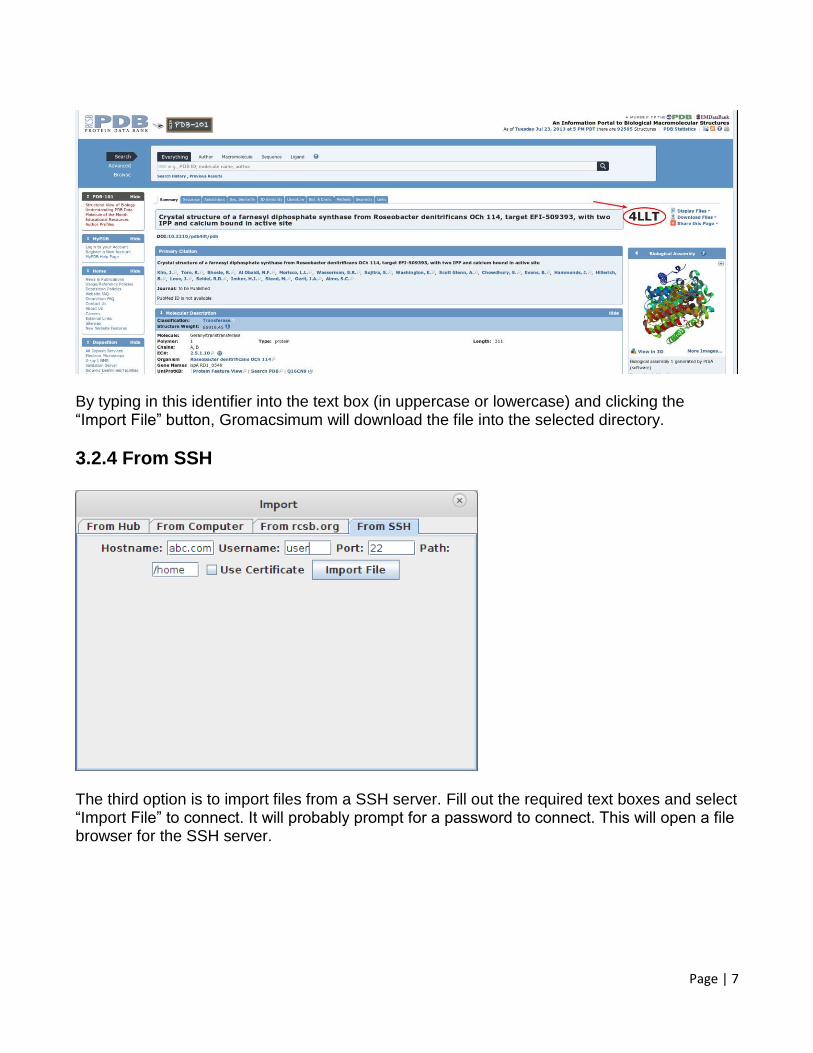
3.2.4 From SSH
The third option is to import files from a SSH server. Fill out the required text boxes and select “Import File” to connect. It will probably prompt for a password to connect. This will open a file browser for the SSH server.

Page | 8
A file can be imported by selecting the file and by pressing “open.”
3.3. Exporting Files can be downloaded from the project by selecting one or more files and selecting “Save To” from the right-click menu.
3.3.1. To Hub
Currently, there are 3 options to export files. The first option is to save the files to a different directory on the hub. Select a directory for the files to be saved into through the file browser to use this option.
Page | 9
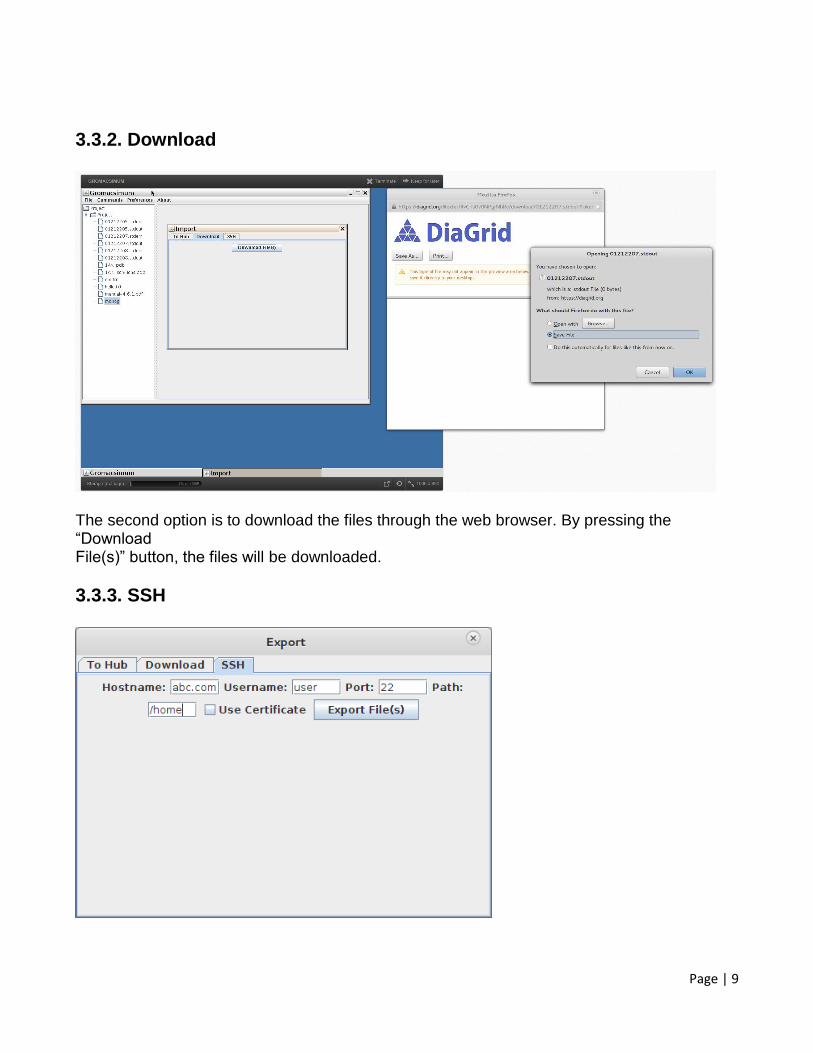
3.3.2. Download
The second option is to download the files through the web browser. By pressing the “Download File(s)” button, the files will be downloaded.
3.3.3. SSH
Page | 10
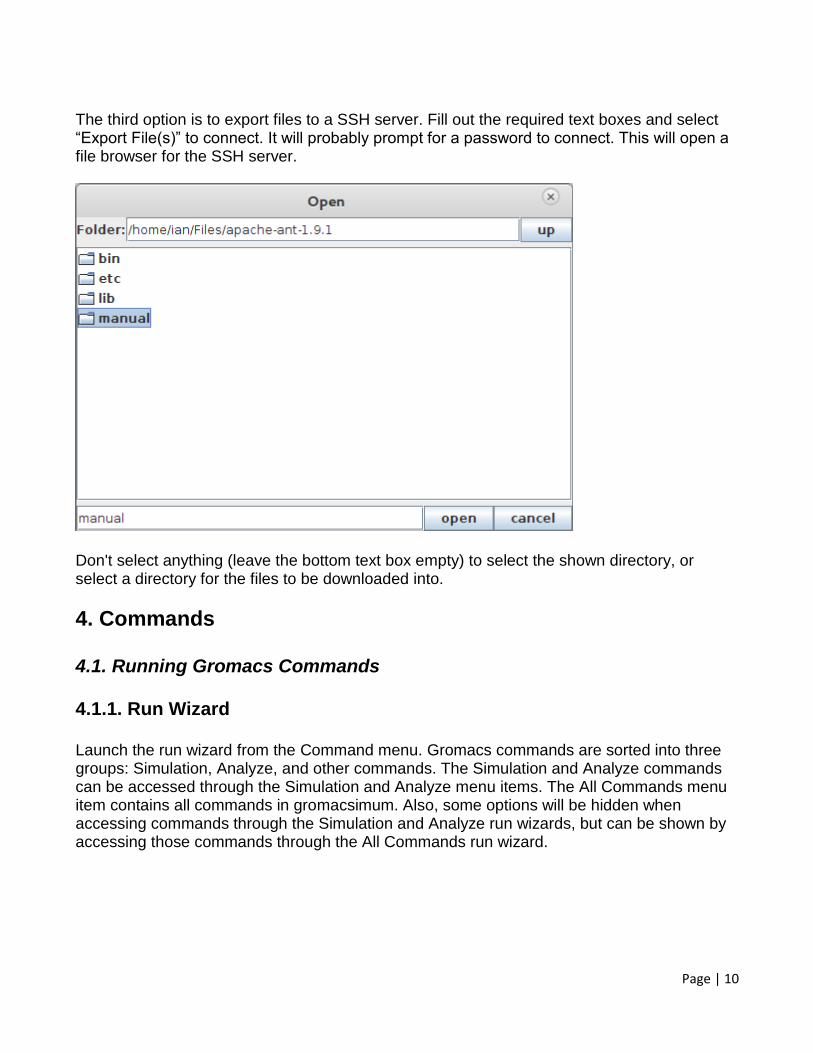
The third option is to export files to a SSH server. Fill out the required text boxes and select “Export File(s)” to connect. It will probably prompt for a password to connect. This will open a file browser for the SSH server.
Don't select anything (leave the bottom text box empty) to select the shown directory, or select a directory for the files to be downloaded into.
4. Commands 4.1. Running Gromacs Commands 4.1.1. Run Wizard Launch the run wizard from the Command menu. Gromacs commands are sorted into three groups: Simulation, Analyze, and other commands. The Simulation and Analyze commands can be accessed through the Simulation and Analyze menu items. The All Commands menu item contains all commands in gromacsimum. Also, some options will be hidden when accessing commands through the Simulation and Analyze run wizards, but can be shown by accessing those commands through the All Commands run wizard.
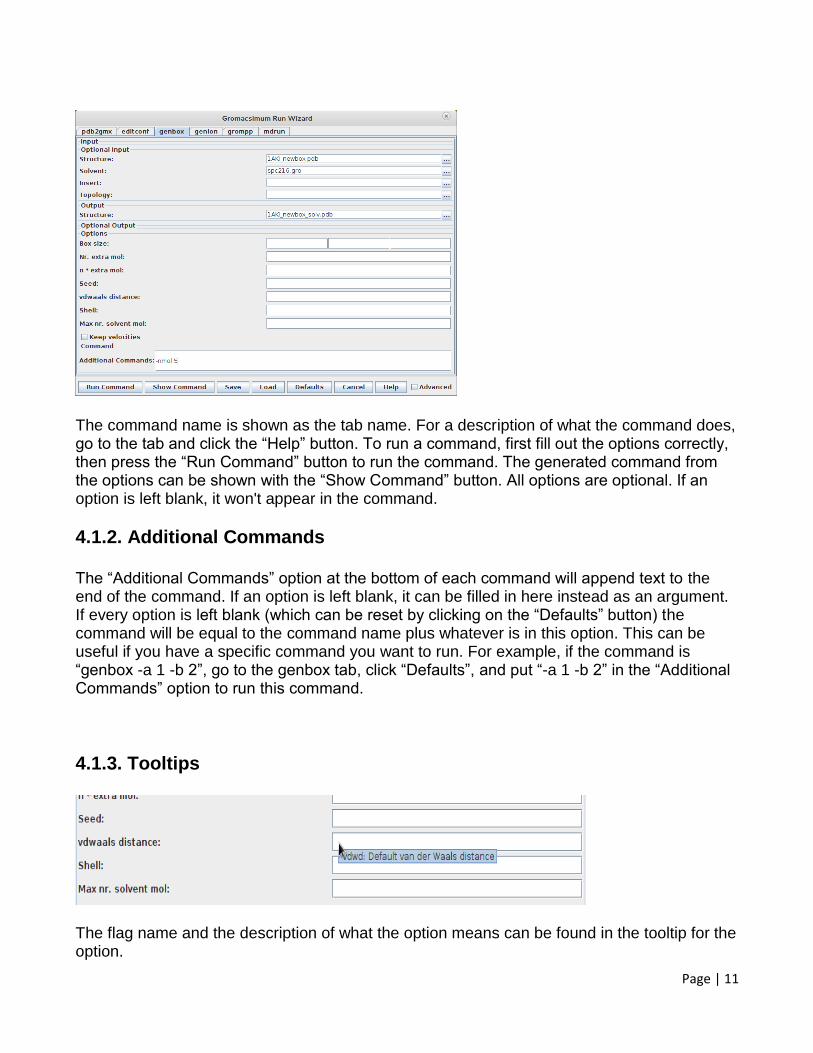
Page | 11
The command name is shown as the tab name. For a description of what the command does, go to the tab and click the “Help” button. To run a command, first fill out the options correctly, then press the “Run Command” button to run the command. The generated command from the options can be shown with the “Show Command” button. All options are optional. If an option is left blank, it won't appear in the command.
4.1.2. Additional Commands The “Additional Commands” option at the bottom of each command will append text to the end of the command. If an option is left blank, it can be filled in here instead as an argument. If every option is left blank (which can be reset by clicking on the “Defaults” button) the command will be equal to the command name plus whatever is in this option. This can be useful if you have a specific command you want to run. For example, if the command is “genbox -a 1 -b 2”, go to the genbox tab, click “Defaults”, and put “-a 1 -b 2” in the “Additional Commands” option to run this command.
4.1.3. Tooltips
The flag name and the description of what the option means can be found in the tooltip for the option.

Page | 12
4.1.4. Disabled Options
Some options can only be accessed if other options are set properly.
4.1.5. Advanced Options
In the “All Commands” run wizard, some advanced options are disabled by default to separate them from more commonly-used options. They can be enabled using the “Advanced” checkbox in the bottom-right.
4.1.6. Command Configurations The values of all of the options in all tabs can be saved to a file using the “Save” button. This

Page | 13
configuration can be loaded later using the “Load” button. The configuration can be reset to the default using the “Defaults” button.
4.2. Running and Submitting jobs
When clicking the submit/run command button, a window will pop up showing the full command and giving options to run the command. Clicking “Run” will run the program. The “mail completion email” option will email the user (at their purdue or diagrid account) when a job is finished running. When running the mdrun command, the option to submit the job will be available using the “Where to run” option. The “Number of CPUs” and “Maximum Time for Job (minutes)” options must be filled out to use this option. The option “Protien-only trajectory” can be used with the “Run on clusters” command to make the trajectory file smaller. This option will save the trajectory of only the protien in the trajectory file, as opposed to all atoms. The protien has to be defined in the index file as a group and the group name has to be supplied in the “Protien Group” option for this option to work. The trajectory will be saved under the name from the “Protien-only trajectory” option instead of the “Output” option.
4.3. Running Replica-Exchange Molecular Dynamics (REMD) Simulations As for V5.0.1, Gromacsimum provides support for Replica-Exchange Molecular Dynamics
(REMD) simulations. Replica-Exchange Molecular Dynamics (REMD) is a technique used to
enhance sampling relative to a standard molecular dynamics simulations by allowing systems
Page | 14
of similar potential energies to sample conformations at different temperatures. By doing so,
energy barriers on the potential energy surface might be overcome, allowing for the
exploration of new conformational space.
There is good evidence to suggest that the period between exchange attempts for
peptide/protein systems should not be under 1 ps. This will determine the average length of
time a replica will spend exploring conformation space between exchanges, and this is more
important than the actual exchange probability. In the GROMACS implementation, an
exchange attempt of a particular pair will only happen at every second attempt, as the odd
and even pairs attempt exchange on alternating occasions. Information about REMD with
GROMACS can be found at http://www.gromacs.org/Documentation/How-tos/REMD
The setup of a REMD simulation is actually quite straightforward.
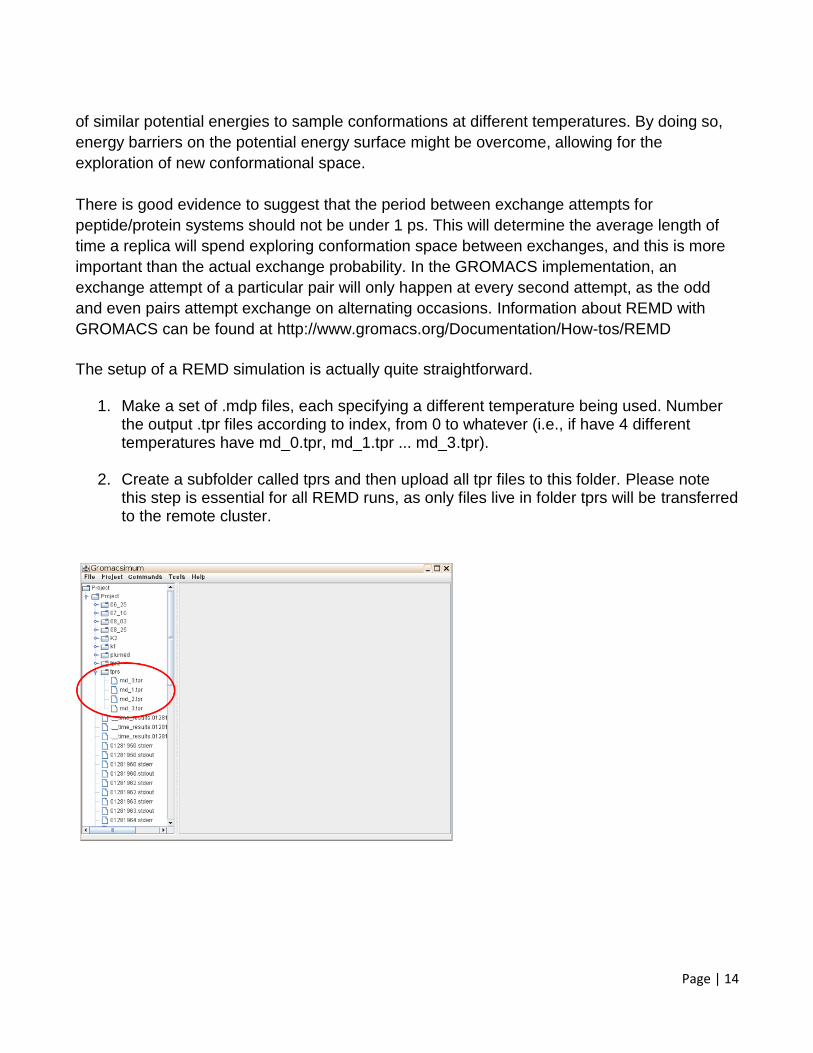
1. Make a set of .mdp files, each specifying a different temperature being used. Number the output .tpr files according to index, from 0 to whatever (i.e., if have 4 different temperatures have md_0.tpr, md_1.tpr ... md_3.tpr).
2. Create a subfolder called tprs and then upload all tpr files to this folder. Please note this step is essential for all REMD runs, as only files live in folder tprs will be transferred to the remote cluster.

Page | 15
3. Go to the mdrun wizard, then put tprs/md_.tpr in the “Run input” option. The interval for
replica exchange is given by the mdrun flag -replex. This is can be done by adding “-
multi 4 -replex 500” in the “Additional Commands” box.
4. After clicking the submit/run command button, a window will pop up showing the full
command and giving options to run. Please make sure the “REMD Simulation” option is
checked, as is necessary for REMD simulations. One should see a window like the
following. The number of cores must be a multiple of the number of replicas (given with
-multi, which must equal to the number of .tpr files i.e., 4 for this example using
md_0.tpr through prefix_3.tpr). In this example, 12 cores (3 cores/replica) will be used
for the calculation.

Page | 16
5. Clicking “Run” button to run the simulation on a remote cluster.
4.4. Running Plumed Simulations
PLUMED is a plugin that works with Gromacs molecular dynamics code. It can be used to analyse features of the dynamics on-the-fly or to perform a wide variety of free energy methods. To run Gromacsimum with PLUMED support, user need to provide one input file called plumed.dat. Typically this this file will involve calculating one or more collective variables, perhaps calculating a function of these CVs and then doing some analysis of values of your collective variables/functions or running some free energy method. This file has to be uploaded through the file uploading wizard in Gromacsimum.

Page | 17
In the next step go to the mdrun tab and put “-plumed plumed.dat” in the “Additional Commands” box. Then chose the appropriate run time parameters by clicking the submit/run command button and submit it to clusters.

Page | 18
5. File Viewing and Editing 5.1. File Editor

Page | 19
The file editor can be launched by double-clicking on any file in the project tree. Gromacsimum has a built-in text editor. The text editor is in the “Editor View” tab. Certain file types will show the “Design View” tab which can be used to view those files. The “External Editor” tab will show the file using the system's default viewer for that file type. (For example, pdf files will be shown using the default pdf viewer, xpdf).
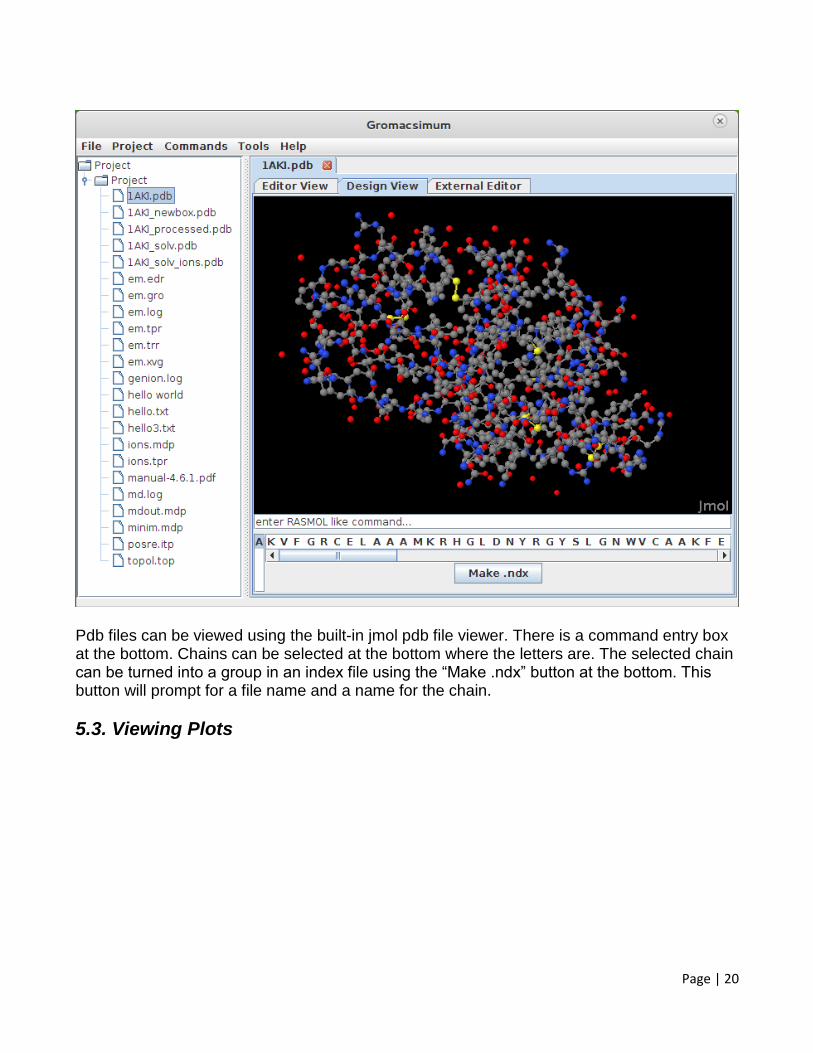
5.2. Pdb file viewer
Page | 20
Pdb files can be viewed using the built-in jmol pdb file viewer. There is a command entry box at the bottom. Chains can be selected at the bottom where the letters are. The selected chain can be turned into a group in an index file using the “Make .ndx” button at the bottom. This button will prompt for a file name and a name for the chain.
5.3. Viewing Plots

Page | 21
Plot files ending with .xvg can be viewed and edited in the Design View.
5.4. Viewing Trajectory Files

Page | 22
Plots can be viewed with ngmx or vmd through the Design View. Ngmx requires a topology file, and vmd requires a pdb file to view the trajectory.
6. Other options 6.1. Parameter Editor

Page | 23
The parameter editor can be launched from the Tools menu using the “Parameter Editor” option. It can create .mdp files from scratch.
6.2. Gromacs manual The gromacs user manual can be accessed in the Help menu by pressing the “Gromacs Manual” option. This will copy the manual into the project folder and then open it using the pdf viewer.